Embed Size (px)
Citation preview

HP Photosmart A610 series
User Guide
User Guide

Copyrights and trademarks© 2006 Hewlett-Packard DevelopmentCompany, L.P.
Hewlett-Packard CompanynoticesThe information contained in thisdocument is subject to change withoutnotice.All rights reserved. Reproduction,adaptation, or translation of thismaterial is prohibited without priorwritten permission of Hewlett-Packard,except as allowed under copyrightlaws.The only warranties for HP productsand services are set forth in the expresswarranty statements accompanyingsuch products and services. Nothingherein should be construed asconstituting an additional warranty. HPshall not be liable for technical oreditorial errors or omissions containedherein.
TrademarksHP, the HP logo, and Photosmart areproperty of Hewlett-PackardDevelopment Company, L.P.The Secure Digital logo is a trademarkof the SD Association.Microsoft and Windows are registeredtrademarks of Microsoft Corporation.CompactFlash, CF, and the CF logo aretrademarks of the CompactFlashAssociation (CFA).Memory Stick, Memory Stick Duo,Memory Stick PRO, and Memory StickPRO Duo are trademarks or registeredtrademarks of Sony Corporation.Microdrive is a trademark of HitachiGlobal Storage Technologies.MultiMediaCard is a trademark ofInfineon Technologies AG of Germany,and is licensed to the MMCA(MultiMediaCard Association).xD-Picture Card is a trademark of FujiPhoto Film Co., Ltd., ToshibaCorporation, and Olympus Optical Co.,Ltd.Mac, the Mac logo, and Macintosh areregistered trademarks of AppleComputer, Inc.The Bluetooth word mark and logos areowned by the Bluetooth SIG, Inc. andany use of such marks by Hewlett-Packard Company is under license.PictBridge and the PictBridge logo aretrademarks of the Camera & ImagingProducts Association (CIPA).
Other brands and their products aretrademarks or registered trademarks oftheir respective holders.
Regulatory modelidentification numberVCVRA-0608/VCVRA-0601For regulatory identification purposes,the product is assigned a RegulatoryModel Number. The Regulatory ModelNumber for the product isVCVRA-0608/VCVRA-0601. Thisregulatory number should not beconfused with the marketing name(HP Photosmart A610 series) orproduct number (Q7110A).
Environmental statementsFor Environmental Stewardshipinformation, see the electronic Help.
Contents
1 Welcome.................................................................................................................3Find more information .............................................................................................4Printer parts ............................................................................................................4Optional accessories ..............................................................................................9Use the printer menus ..........................................................................................10
2 Photo printing overview......................................................................................11Start-to-finish printing ...........................................................................................11
3 Paper basics........................................................................................................13Choose and load paper ........................................................................................13
Choose the right paper ..................................................................................13Load your paper ............................................................................................13
4 Print from a memory card...................................................................................15Get photos from a memory card ...........................................................................15
Insert a memory card ....................................................................................15Remove a memory card ................................................................................17
Navigate through and view your photos ...............................................................17Select multiple photos ..........................................................................................18Choose a photo layout .........................................................................................18Print your photos ..................................................................................................19
5 Creative projects.................................................................................................21Print panoramic photos ........................................................................................21Print photo stickers ...............................................................................................22Print passport photos ...........................................................................................23Print CD/DVD labels .............................................................................................23Print frames from a video clip ...............................................................................23Improve the quality of your photos .......................................................................24
Perfect photos automatically using Photo Fix ...............................................24Improve the quality of your video clips ..........................................................24
Crop a photo .........................................................................................................25Add frames to your photos ...................................................................................25Apply color effects to your photos ........................................................................25Add the date and time to your photos ..................................................................26Set print quality .....................................................................................................26E-mail or upload photos using HP Photosmart Share ..........................................26View a slide show .................................................................................................27
6 Print from other devices.....................................................................................29Print photos from a digital camera ........................................................................29Print photos from a Bluetooth device ...................................................................30Print photos from a computer ...............................................................................30Print photos from an iPod .....................................................................................31
7 Maintain and transport the printer.....................................................................33Replace the print cartridge ...................................................................................33Clean and maintain the printer .............................................................................35
Clean the outside of the printer .....................................................................35Automatically clean the print cartridge ..........................................................35
HP Photosmart A610 series User Guide 1

Manually clean the print cartridge contacts ...................................................36Print a test page ............................................................................................36Align the print cartridge .................................................................................37
Store the printer and print cartridge ......................................................................38Store the printer .............................................................................................38Store the print cartridge .................................................................................39
Maintain the quality of photo paper ......................................................................39Transport the printer .............................................................................................39
8 Troubleshooting..................................................................................................41Printer hardware problems ...................................................................................41Printing problems ..................................................................................................44Bluetooth printing problems ..................................................................................47Error messages ....................................................................................................48
9 Specifications .....................................................................................................51System requirements ............................................................................................51Printer specifications ............................................................................................52
10 HP support ..........................................................................................................55Support process ...................................................................................................55HP support by phone ............................................................................................55
Phone support period ....................................................................................55Placing a call .................................................................................................55After the phone support period ......................................................................56
Additional warranty options ..................................................................................56HP Warranty .........................................................................................................57
A Install the software..............................................................................................59B Printer menus......................................................................................................61
Printer menu .........................................................................................................61Index............................................................................................................................65
2 HP Photosmart A610 series

1 WelcomeThank you for purchasing an HP Photosmart A610 series printer! This printer makeshome photo printing simple, convenient, and fun, and it produces high-quality color printsyou will be pleased to share with family and friends. With your printer, you can:
Apply Photo Fix techniques
See Perfect photos automatically using Photo Fix.
Add a decorative frame
See Add frames to yourphotos. Frames are onlyavailable on theHP Photosmart A612, A614,A616, A617, and A618models.
Print passport photos
See Print passport photos.
Print panoramas
See Print panoramic photos.
Print CD/DVD labels
See Print CD/DVD labels
Print different photo sizes
See Choose the right paper.
Print photo stickers
Print borderless photos
HP Photosmart A610 series User Guide 3

See Print photo stickers.
Find more informationThe printer comes with the following documentation:● Setup Guide: Read this guide first! It explains how to set up the printer and print
your first photo.● User Guide: This is the book you are reading. This book describes the basic features
of the printer, explains how to use the printer without connecting it to a computer,and contains hardware troubleshooting information. Appendix A containsinformation on installing the printer software.
● Printer Help Menu: The Help menu on the printer lets you read helpful printing tipsand information about basic printer features right on the printer screen. Forinformation on viewing the Help menu, see Use the printer menus.
● Electronic Help: The electronic Help describes how to use the printer with acomputer and contains software troubleshooting information.
After you have installed the printer software on your computer, you can view theelectronic Help:● Windows: From the Windows Start menu, click Programs or All Programs, point
to HP, HP Photosmart A610 series, and then click Photosmart Help.● Mac: Choose Help, Mac Help in the Finder, and then choose Library, HP
Photosmart Printer Help.
Printer partsThis section gives an overview of the parts of your printer, and provides references tosections where the parts and functions are described in more detail. Your model mayvary slightly from the model shown in the illustrations.
Chapter 1(continued)
4 HP Photosmart A610 series

Front of printer1 Control panel: Control the basic functions of the printer from here.2 Printer screen: View photos and menus here. The printer screen pops up automatically when
you open the output tray. Tilt the screen up to adjust the viewing angle. Fold the screen flatto store or transport the printer.
3 Printer handle: Make sure the printer screen is in the flat (closed) position, and then pull upthe printer handle from the back to carry the printer upright.
4 Output tray (closed): Open this to print, insert a memory card, connect a compatible digitalcamera, connect an iPod, or open the print cartridge area. When you open the output tray,the input tray opens automatically, and the screen pops up.
Rear of printer1 USB port: Use this port to connect the printer to a computer or to an HP direct-printing digital
camera using a USB cable.2 Power cord connection: Connect the power cord here.
HP Photosmart A610 series User Guide 5

Input tray and inside front of printer1 Input tray: Load paper here. The input tray opens automatically when you open the output
tray.2 Input tray extension: Pull out to support paper.3 Paper-width guide: Move to the width of the current paper to position the paper properly.4 Camera port: Connect a digital camera, the optional HP Bluetooth wireless printer adapter,
or an iPod here.5 Memory card slots: Insert memory cards into these slots. See Get photos from a memory
card.6 Print cartridge door: Open to insert or remove a print cartridge. See Replace the print
cartridge.7 Output tray (open): The printer deposits printed photos here.
Chapter 1
6 HP Photosmart A610 series

Indicator lights1 On light: This light, surrounding the Power button, is solid green when the printer is on. It is
green and flashing when the printer is busy, and it is red and flashing when the printer requiresattention.
2 Bluetooth light (HP Photosmart A618 models only): This light indicates wireless activitybetween the printer and a Bluetooth-enabled device. If your printer does not have integratedBluetooth, you can purchase the optional Bluetooth wireless printer adapter. The adapterplugs into the camera port on the front of the printer and has its own activity light. For moreinformation on Bluetooth wireless connectivity, see Print photos from a Bluetooth device.
3 Battery light: This light indicates the battery state: charging or fully charged. For moreinformation about the optional battery, refer to the instructions that came with the battery.
4 Attention light : This light flashes red when an error occurs or the printer needs attention.5 Photo Fix light: This light is on when the Photo Fix feature is on and working.6 Memory card light: This light turns solid green after a memory card is correctly inserted. It
flashes green when the memory card is being accessed. See Get photos from a memorycard.
HP Photosmart A610 series User Guide 7

Control panel1 On: Press this button to turn the printer on or off.2 Layout: Press this button to select a print layout. Use the 4-way arrow button to scroll through
layout selections. Press OK to select a layout.3 Printer screen: View photos and menus here. The screen pops up automatically when you
open the output tray. Tilt the screen up to adjust the viewing angle. Fold the screen flat tostore or transport the printer using the handle.
4 Zoom: Press the Zoom + or Zoom - buttons repeatedly to increase or decrease the zoomlevel, to change to 9-up view, or from 9-up back to 1-up view.
5 Delete: Press this button to delete the displayed photo or all selected photos from a memorycard. For more information on selecting and deleting photos, see Select multiple photos.
6 Photo Fix: Press this button to toggle the Photo Fix feature off and on. Photo Fixautomatically improves your photos by adjusting the focus, lighting, brightening, and byremoving red-eye. This feature is on by default. See Perfect photos automatically using PhotoFix.
7 Menu: Press this button to open the printer menu.8 Print: Press this button to print highlighted or selected photos from a memory card. See Print
your photos.9 Cancel: Press this button to deselect photos, exit a menu, or stop an action.10 4–way arrow button: Use the arrows to scroll through photos on a memory card, navigate
menus, or scroll through layout selections. Press OK to select a photo, menu, menu option,print layout.
Chapter 1
8 HP Photosmart A610 series
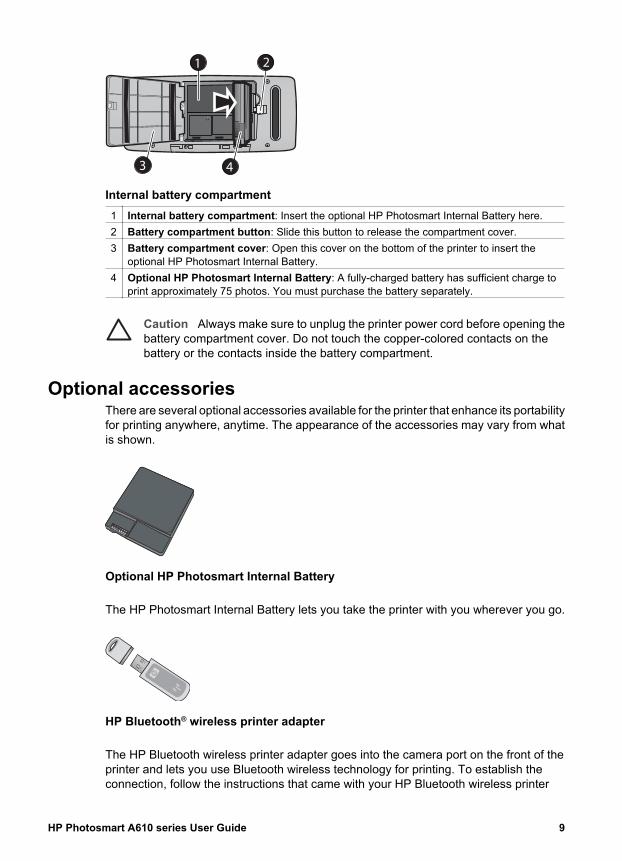
Internal battery compartment1 Internal battery compartment: Insert the optional HP Photosmart Internal Battery here.2 Battery compartment button: Slide this button to release the compartment cover.3 Battery compartment cover: Open this cover on the bottom of the printer to insert the
optional HP Photosmart Internal Battery.4 Optional HP Photosmart Internal Battery: A fully-charged battery has sufficient charge to
print approximately 75 photos. You must purchase the battery separately.
Caution Always make sure to unplug the printer power cord before opening thebattery compartment cover. Do not touch the copper-colored contacts on thebattery or the contacts inside the battery compartment.
Optional accessoriesThere are several optional accessories available for the printer that enhance its portabilityfor printing anywhere, anytime. The appearance of the accessories may vary from whatis shown.
Optional HP Photosmart Internal Battery
The HP Photosmart Internal Battery lets you take the printer with you wherever you go.
HP Bluetooth® wireless printer adapter
The HP Bluetooth wireless printer adapter goes into the camera port on the front of theprinter and lets you use Bluetooth wireless technology for printing. To establish theconnection, follow the instructions that came with your HP Bluetooth wireless printer
HP Photosmart A610 series User Guide 9
adapter. This optional adapter is only used with the HP Photosmart A610, A612, A614,A616, and A617 models.
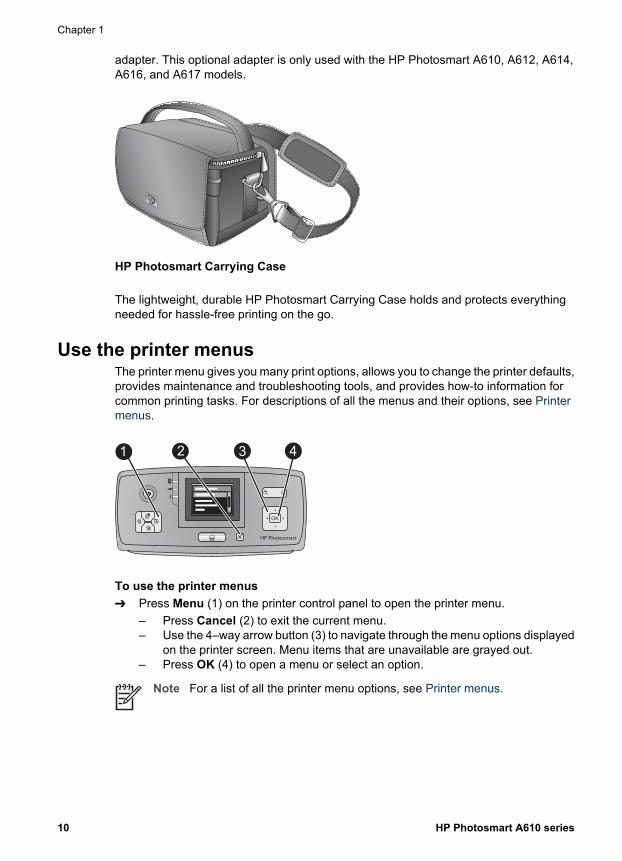
HP Photosmart Carrying Case
The lightweight, durable HP Photosmart Carrying Case holds and protects everythingneeded for hassle-free printing on the go.
Use the printer menusThe printer menu gives you many print options, allows you to change the printer defaults,provides maintenance and troubleshooting tools, and provides how-to information forcommon printing tasks. For descriptions of all the menus and their options, see Printermenus.
HP Photosmart
To use the printer menus➔ Press Menu (1) on the printer control panel to open the printer menu.
– Press Cancel (2) to exit the current menu.– Use the 4–way arrow button (3) to navigate through the menu options displayed
on the printer screen. Menu items that are unavailable are grayed out.– Press OK (4) to open a menu or select an option.
Note For a list of all the printer menu options, see Printer menus.
Chapter 1
10 HP Photosmart A610 series
2 Photo printing overview
Start-to-finish printingThis sections gives you a high-level overview of the steps involved in printing your photos.Subsequent sections describe each step in more detail.
Step 1Choose and load paperSee Choose and load paper.
Step 2Get photosYou can connect the printer tovarious devices from which youcan print. See Get photos froma memory card and Print fromother devices.
HP Photosmart A610 series User Guide 11

Step 3Navigate through and viewyour photosSee Navigate through andview your photos.
Index page
Step 4Select photos to printSee Select multiple photos.
Step 5Choose a photo layoutSee Choose a photo layout.
Step 6Print photosSee Print your photos.
Chapter 2(continued)
12 HP Photosmart A610 series

3 Paper basics
Choose and load paperLearn how to choose the right paper for your print job and how to load it into the inputtray for printing.
Choose the right paperUse HP Advanced Photo Paper. It is especially designed to work with the inks in yourprinter to create beautiful photos. Other photo papers will produce inferior results.For a list of available HP-designed photo paper, or to purchase supplies, go to:● www.hpshopping.com (U.S.)● www.hp.com/eur/hpoptions (Europe)● www.hp.com/jp/supply_inkjet (Japan)● www.hp.com/paper (Asia/Pacific)The printer is set by default to print the best quality photos on HP Advanced Photo Paper.If you print on a different type of paper, be sure to change the paper type from the printermenu. See To change the paper type.
Load your paper
Some supported paper sizes:● 10 x 15 cm (4 x 6 inch) photo paper● 13 x 18 cm (5 x 7 inch) photo paper● Index cards● L-size cards● Hagaki cards
HP Photosmart A610 series User Guide 13

For a full list of supported paper sizes, see Specifications.
To load paper1. Open the output and input trays, and pull out the input tray extension.2. Load up to 20 sheets of paper with the print side or glossy side facing the front of
the printer. When loading, slide the paper to the left side of the input tray and pushthe paper down firmly until it stops.
Note If you are using panorama photo paper, only load up to 10 sheets. Ifyou are using photo sticker paper, only load a single sheet at a time.
3. Move the paper-width guide to the left to fit close to the edge of the paper withoutbending the paper.
To change the paper type1. Press Menu.2. Press to select Preferences, and then press OK.3. Press to select Paper type, and then press OK.4. Press to select one of the following paper types:
– HP Advanced Photo Paper (default)– HP Premium Photo Paper– Other Photo– Other Plain
5. Press OK.
Chapter 3
14 HP Photosmart A610 series
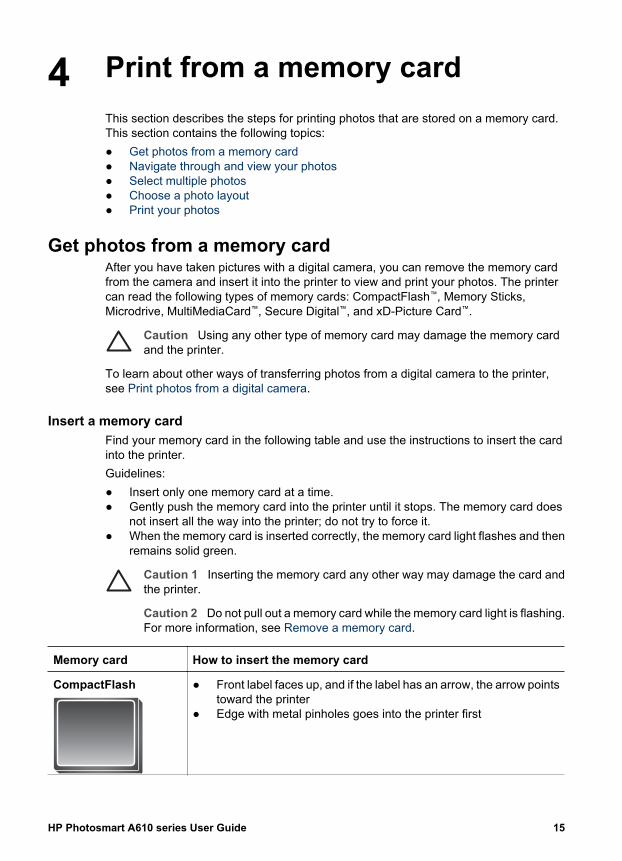
4 Print from a memory cardThis section describes the steps for printing photos that are stored on a memory card.This section contains the following topics:● Get photos from a memory card● Navigate through and view your photos● Select multiple photos● Choose a photo layout● Print your photos
Get photos from a memory cardAfter you have taken pictures with a digital camera, you can remove the memory cardfrom the camera and insert it into the printer to view and print your photos. The printercan read the following types of memory cards: CompactFlash™, Memory Sticks,Microdrive, MultiMediaCard™, Secure Digital™, and xD-Picture Card™.
Caution Using any other type of memory card may damage the memory cardand the printer.
To learn about other ways of transferring photos from a digital camera to the printer,see Print photos from a digital camera.
Insert a memory cardFind your memory card in the following table and use the instructions to insert the cardinto the printer.Guidelines:● Insert only one memory card at a time.● Gently push the memory card into the printer until it stops. The memory card does
not insert all the way into the printer; do not try to force it.● When the memory card is inserted correctly, the memory card light flashes and then
remains solid green.
Caution 1 Inserting the memory card any other way may damage the card andthe printer.
Caution 2 Do not pull out a memory card while the memory card light is flashing.For more information, see Remove a memory card.
Memory card How to insert the memory card
CompactFlash ● Front label faces up, and if the label has an arrow, the arrow pointstoward the printer
● Edge with metal pinholes goes into the printer first
HP Photosmart A610 series User Guide 15

Memory card How to insert the memory card
Microdrive ● Front label faces up, and if the label has an arrow, the arrow pointstoward the printer
● Edge with metal pinholes goes into the printer first
MultiMediaCard ● Angled corner is on the right● Metal contacts face down
Secure Digital ● Angled corner is on the right● Metal contacts face down● If you are using a miniSD card, attach the adapter that came with
the card before you insert the card into the printer
Chapter 4(continued)
16 HP Photosmart A610 series
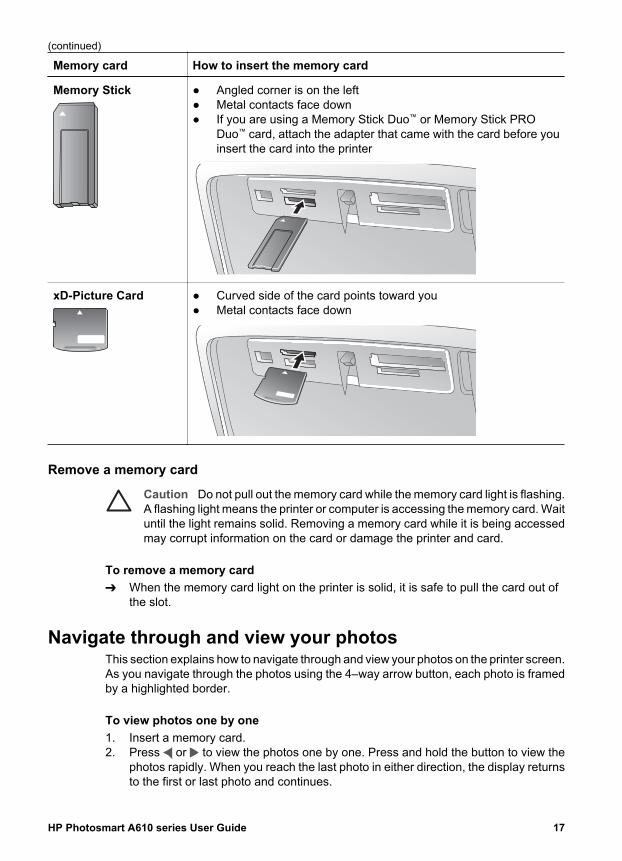
Memory card How to insert the memory card
Memory Stick ● Angled corner is on the left● Metal contacts face down● If you are using a Memory Stick Duo™ or Memory Stick PRO
Duo™ card, attach the adapter that came with the card before youinsert the card into the printer
xD-Picture Card ● Curved side of the card points toward you● Metal contacts face down
Remove a memory card
Caution Do not pull out the memory card while the memory card light is flashing.A flashing light means the printer or computer is accessing the memory card. Waituntil the light remains solid. Removing a memory card while it is being accessedmay corrupt information on the card or damage the printer and card.
To remove a memory card➔ When the memory card light on the printer is solid, it is safe to pull the card out of
the slot.
Navigate through and view your photosThis section explains how to navigate through and view your photos on the printer screen.As you navigate through the photos using the 4–way arrow button, each photo is framedby a highlighted border.
To view photos one by one1. Insert a memory card.2. Press or to view the photos one by one. Press and hold the button to view the
photos rapidly. When you reach the last photo in either direction, the display returnsto the first or last photo and continues.
(continued)
HP Photosmart A610 series User Guide 17

To view photos nine at a time1. Insert a memory card.2. Press to view nine photos at a time.3. Press or to highlight one of the nine photos.4. Press to change back to viewing one by one.
Select multiple photosIf you want to print more than one photo, or delete a group of photos all at once, youneed to select the photos. When you select a photo, a check mark appears in the lowerleft corner of the photo on the screen.
To select several photos1. Insert a memory card and view photos.2. Press OK to select each photo you want to print.
To deselect photos➔ Highlight the photo you want to deselect, and then press Cancel. The check mark
disappears from the lower left corner of the photo.
To select a continuous range of photos1. Insert a memory card.2. Press Menu.3. Select Print Options, and then press OK.4. Select Print Range, and then press OK.5. Press or until the first photo you want to print appears, and then press OK.6. Press or until the last photo you want to print appears, and then press OK.
To select more than one copy of a photo1. Insert a memory card and view photos.2. Press OK once for each copy of the current photo you want to print. Press Cancel
to decrease the number of copies by one.
Choose a photo layoutYou can choose from several print layouts by pressing Layout after you insert a memorycard. By default the printer prints one photo per page.
To choose a photo layout1. Insert a memory card.2. Press Layout.
Chapter 4
18 HP Photosmart A610 series

3. Use the 4–way arrow button to select a layout:– Print one photo per sheet– Print two photos per sheet– Print four photos per sheet
4. Press OK.The printer may rotate your photos to fit the layout.
Note Borderless printing is the default. If you want a narrow white border arounda photo, you can turn the borderless setting off. To turn off borderless printing,see Printer menu.
Print your photosThis section explains how to print digital photos that are stored on a memory card. Youcan select photos while the memory card is in the camera (Digital Print Order Format, orDPOF) or while the memory card is in the printer. Printing from a memory card requiresno computer and does not drain your digital camera's batteries. See Get photos from amemory card.Your photos are instantly dry, and can be handled immediately after they are printed.However, HP recommends that you leave the printed surface of your photos exposed tothe air for 5-10 minutes, to allow the colors to fully develop before you stack them withother photos or place them in albums.
To print a single photo1. Navigate through the photos on the inserted memory card.2. Display the photo you want to print.3. Press Print.
After you press Print, the estimated time until print completion appears, and willcount down during printing.
To print a group of selected photos1. Navigate through the photos on the inserted memory card.2. Select the photos you want to print. See Select multiple photos.3. Press Print.
After you press Print, the estimated time until print completion appears, and willcount down during printing.
To print a photo index1. Press Menu.2. Select Print Options, and then press OK.3. Select Print Index Page, and then press OK.A photo index shows thumbnail views and index numbers for up to 2000 photos on amemory card. You can use the index numbers to print specific photos or a range ofphotos. Use an index card instead of photo paper to cut costs when printing index pages.
HP Photosmart A610 series User Guide 19
To print camera-selected photos1. Insert a memory card that contains camera-selected (DPOF) photos.2. Select Yes when the printer asks you whether you want to print the camera-selected
photos, and then press OK.
Chapter 4
20 HP Photosmart A610 series

5 Creative projectsOnce you have mastered basic photo printing, experiment with some of the other greatfeatures the printer has to offer. This section contains the following topics:● Print panoramic photos● Print photo stickers● Print passport photos● Print CD/DVD labels● Print frames from a video clip● Improve the quality of your photos● Crop a photo● Add frames to your photos● Apply color effects to your photos● Add the date and time to your photos● Set print quality● E-mail or upload photos using HP Photosmart Share● View a slide show
Print panoramic photosNote 1 Panoramic mode is not supported when printing from a digital cameraconnected to the camera port on the front of the printer with a USB cable.
Note 2 If you have installed the HP Photosmart Premier software on yourWindows 2000 or XP computer, you can create stitched panoramic photos.HP Photosmart Premier is only available on some models. For more informationabout the software options available with the printer, see Install the software.
To create panoramic photosStitch several photos together➔ Use image editing software, such as HP Photosmart Premier, to stitch
overlapping photos together to form a 10 x 30 cm (4 x 12 inch) photo.(Alternatively, some digital cameras can stitch several shots together into onephoto before saving the photo to a memory card.) Then save the photo to amemory card and use the steps below to turn on panoramic mode, or printdirectly from the computer. Panoramic mode prints the selected photo with a3:1 aspect ratio. For more information about printing from the computer, seethe electronic Help.
HP Photosmart A610 series User Guide 21

Select any photo➔ Select one or more photos on a memory card and use the steps below to turn
on panoramic mode. Panoramic mode prints the selected photos with a 3:1aspect ratio.
To print panoramic photos1. Insert a memory card.2. Press Menu to open the printer menu.3. Select Print options, and then press OK.4. Select Panoramic photos, and then press OK.5. Select On, and then press OK.6. Load 10 x 30 cm (4 x 12 inch) paper.7. Select one or more photos to print.
A crop box appears on the printer screen to show the portion of the displayed phototo be printed (3:1 aspect ratio). The higher the original resolution of the displayedphoto, the better it will look when printed in panoramic mode.
8. Press Print.9. When you have finished printing panoramic photos, turn off panoramic mode to
continue printing with a normal 3:2 aspect ratio. To turn off panoramic mode, repeatsteps 1 through 4, and then select Off and press OK.
Print photo stickersTo print 16–up photo stickers, use photo sticker media and the Photo stickers feature onthe printer. Follow these steps:1. Insert a memory card and display the photo you want to print.2. Press Menu to open the printer menu.3. Select Print options, and then press OK.4. Select Photo stickers, and then press OK.5. Select On, and then press OK.6. Load photo sticker media.7. Select one or more photos.8. Press Print.
Each printed sheet contains 16 copies of a single photo.9. When you have finished printing stickers, turn off Photo stickers mode. To turn
off Photo stickers mode, repeat steps 1 through 4, select Off, and then pressOK.
Chapter 5
22 HP Photosmart A610 series

Note You can also print 10 x 15 cm (4 x 6 inch) photo stickers using HP Self-Adhesive Photo Paper. For this project, use the basic printing instructions as ifyou were printing standard 10 x 15 cm (4 x 6 inch) photos.
Print passport photos
To print passport photos1. Insert a memory card.2. Press Menu.3. Select Print options, and then press OK.4. Select Passport photo mode, and then press OK.5. Select On, and then press OK.6. Select a passport photo size, and then press OK.7. Load photo paper.8. Select one or more photos.9. Press Print. Each printed sheet contains as many copies of a photo as will fit on the
page, depending on the passport photo size selected.
Print CD/DVD labels
To print CD/DVD labels1. Insert a memory card.2. Press Menu.3. Select Print options, and then press OK.4. Select Print CD Tattoo, and then press OK.5. Select On, and then press OK.6. Load CD/DVD label media.7. Select a photo.8. Press Print.
One photo prints on each sheet of CD/DVD label paper.
Print frames from a video clip
To print one selected frame from a video clip1. Insert a memory card that contains a video clip.2. Press or to scroll to the video clip. The first frame in the clip appears. The video
clip icon appears at the bottom of the printer screen.3. Press OK to select the video clip. The video will load slowly, frame by frame, to allow
you to pick a frame to print.4. When the frame you want to print appears, press OK, and then press Print.
Note 1 The image resolution in video clips is typically lower than that of digitalphotos; therefore, you may notice that the print quality of your video clip framesis lower than the print quality of your photos.
Note 2 This printer does not support all video file formats. For a list of supportedvideo file formats, see Printer specifications.
HP Photosmart A610 series User Guide 23

To print nine frames from a video clip1. Insert a memory card that contains a video clip.2. Press Menu, select Print Options, and then select Video action prints. A preview
of all video clips on the memory card appears.3. Use the 4–way arrow button to scroll to the video clip you want to print, and then
press OK to select it.4. Press Print. The printout contains one page of nine frames automatically selected
from the video clip.
Note 1 The image resolution in video clips is typically lower than that of digitalphotos; therefore, you may notice that the print quality of your video clip framesis lower than the print quality of your photos.
Note 2 This printer does not support all video file formats. For a list of supportedvideo file formats, see Printer specifications.
Improve the quality of your photosThe printer provides a variety of preferences and effects that can improve the quality ofyour printed photos. The settings do not change your original photo. They only affectprinting.
Perfect photos automatically using Photo FixPhoto Fix automatically enhances your photos using the following HP Real LifeTechnologies:● Sharpen blurred photos.● Improve dark areas of an image without affecting the light areas of an image.● Reduce red-eye that can occur in photos taken with a flash.● Improve the overall brightness, color, and contrast of photos.Photo Fix is on by default when you turn on the printer. The Photo Fix light on the printercontrol panel is on when Photo Fix is on.HP recommends leaving Photo Fix on, but if your photos do not print correctly, or if youwant to print a photo without using the Photo Fix improvements, turn off Photo Fix.
To turn off Photo Fix➔ Press Photo Fix.
A message on the printer screen tells you, Photo Fix has been turned Off. Allimages will be printed without any changes.
Photo Fix remains off until you press the Photo Fix button again, or turn the printer offand on again. If you have turned on Photo Fix, a message on the printer screen tellsyou, Photo Fix has been turned On. All images will be printed withimprovements.
Improve the quality of your video clips
To improve the quality of your video clips1. Press Menu.2. Select Preferences, and then press OK.
Chapter 5
24 HP Photosmart A610 series

3. Select Video Enhancement, and then press OK.4. Use the 4–way arrow button to highlight On, and then press OK.
Note When you improve the quality of printed video clips using this preference,print times may be slower than when this preference is turned off.
Crop a photoTo print only a portion of a photo, you can crop out unwanted detail. Cropping does notchange your original photo. It only affects printing.
To crop a photo1. Navigate to the photo you want to change, and then press OK to select it.2. Press to zoom in on the current photo.3. Press again to see the four white arrows.4. Use the 4–way arrow button to move the crop box.5. Press OK when the portion of the photo you want to print is in the crop box.6. Press Print to begin printing.
Add frames to your photosChoose from a palette of various patterns and colors to make the frame stand out. Theframe does not change your original photo. It only affects printing.
Note Frames are only available on the HP Photosmart A612, A614, A616, A617,and A618 models.
To add a decorative frame1. Navigate to the photo you want to change, and then press OK to select it.2. Press Menu.3. Select Edit, and then press OK.4. Select Add Frame, and then press OK.5. Use the 4–way arrow button to highlight the frame pattern you want to use, and then
press OK.6. Use the 4–way arrow button to highlight the frame color you want to use, and then
press OK.The photo appears on the printer screen with the frame.
Apply color effects to your photosSet the printer to change the color effect of your prints to Black and White, Sepia,Antique, or None (default).
To add a color effect1. Navigate to the photo you want to change, and then press OK to select it.2. Press Menu.3. Select Edit, and then press OK.
HP Photosmart A610 series User Guide 25
4. Select Add Color Effect, and then press OK.5. Use the 4–way arrow button to highlight the color effect you want to use, and then
press OK.The photo appears on the printer screen with the selected color effect applied. Theeffect does not change your original photo. It only affects printing.
Add the date and time to your photosYou can print a stamp on the front of your photos that shows when the photo was taken.This preference affects all prints.
To add the date and time1. Press Menu.2. Select Preferences, and then press OK.3. Select Date/time, and then press OK.4. Use the 4–way arrow button to highlight a date/time stamp option:
– Date/time– Date only– Off
5. Press OK.
Set print qualityYou can set the printer to print photos at a higher or lower level of quality. For the bestquality photos, choose Best. This mode produces the highest quality photos, but is alsoa slightly slower print mode. If you want to print a photo quickly, and are not concernedwith obtaining the highest quality, choose a lower quality setting.
To change the print quality1. Press Menu.2. Select Tools, and then press OK.3. Select Print Quality, and then press OK.
The current print quality setting has a check mark next to it.4. Select a print quality, and then press OK.
E-mail or upload photos using HP Photosmart ShareUse HP Photosmart Share to share photos with friends and relatives using e-mail, onlinealbums, or an online photo finishing service. The printer must be connected through aUSB cable to a computer with Internet access and have all the HP software installed. Ifyou try to use HP Photosmart Share and do not have all the required software installedor configured, a message prompts you through the required steps. See Install thesoftware.
To use HP Photosmart Share to send photos1. Insert a memory card that contains the photos you want to share.2. Follow the prompts on your computer to save the photos to the computer.3. Use the HP Photosmart Share features of the HP Photosmart Premier or HP
Photosmart Studio software to share your photos with others.
Chapter 5
26 HP Photosmart A610 series

For information about using HP Photosmart Share, see the electronic Help inHP Photosmart Premier, HP Photosmart Essential, or HP Photosmart Studio.
View a slide show
To view photos in a continuous slide show1. Press Menu.2. Select Tools, and then press OK.3. Select Slide Show, and then press OK.
Press OK to pause or resume a slide show. Press Cancel to stop the slide show.
HP Photosmart A610 series User Guide 27

Chapter 5
28 HP Photosmart A610 series

6 Print from other devicesThis printer can print photos stored on several types of devices including computers,digital cameras, and iPods. Each connection type lets you do different things.● Print photos from a digital camera● Print photos from a Bluetooth device● Print photos from a computer● Print photos from an iPod
Print photos from a digital cameraPrint beautiful photos from a PictBridge or HP direct-printing digital camera without usinga computer.When you print directly from a digital camera, the printer uses the settings that youselected on the camera. For more information on using camera-selected photos, see thedocumentation that came with the camera.
Before you beginTo print from a digital camera, you will need the following:● A PictBridge-compatible digital camera or an HP direct-printing digital camera.● A USB cable to connect the camera and printer.● (Optional) A memory card.
To print from a PictBridge camera1. Turn on the PictBridge digital camera and select the photos you want to print.2. Make sure the camera is in PictBridge mode, and then connect it to the camera port
on the front of the printer using the USB cable that came with the camera.Once the printer recognizes the PictBridge camera, the selected photos print.
To print from an HP direct-printing camera1. Turn on the HP direct-printing digital camera and select the photos you want to print.2. Connect the camera to the USB port on the back of the printer using the USB cable
that came with the camera.3. Follow the instructions on the camera screen.
HP Photosmart A610 series User Guide 29

Print photos from a Bluetooth devicePrint from any device with Bluetooth wireless technology to the printer.
Before you beginTo print from a Bluetooth-enabled device, you will need the following:● To print from a Bluetooth-enabled device to the HP Photosmart A610, A612, A616,
or A617 model, you need the HP Bluetooth wireless printer adapter, sold separately.The HP Photosmart A618 has integrated Bluetooth.
● A Bluetooth-enabled deviceBefore connecting to the printer with your Bluetooth device, be sure to set the Bluetoothprinter menu options as needed. See Printer menu.
To print photos from a Bluetooth device➔ For more information on Bluetooth wireless technology and HP, go to
www.hp.com/go/bluetooth.
Print photos from a computerYou need to transfer your photos to the computer before you can use them with theHP Photosmart software that lets you print from a computer. For more information,see To save photos from a memory card to the computer.For information on installing the HP Photosmart software, see Install the software. TheHP Photosmart software includes the interface that is displayed whenever you print froma computer.
Note The electronic Help provides more information on the many print settingsavailable when you print from a computer. To learn how to access the electronicHelp, see Find more information.
Before you beginTo print from a computer, you will need the following:● A Universal Serial Bus (USB) 2.0 full speed compliant cable 3 meters (10 feet) or
less in length. For instructions about connecting the printer with a USB cable, seethe electronic Help.
● A computer with Internet access (to use HP Photosmart Share).
To save photos from a memory card to the computer1. Connect the printer to the computer using the USB cable.2. Launch the HP Photosmart Premier, HP Photosmart Essential, or HP Photosmart
Studio software.
Chapter 6
30 HP Photosmart A610 series

3. Insert a memory card and select photos to transfer. For information on viewing andselecting photos, see Select multiple photos.
4. In the HP Photosmart screen, click Start Using the Device.5. Select the drive for the HP Photosmart A610 series printer, and the select the
location to save photos.6. Click Transfer.
To print photos from a computer (Windows)1. On the File menu in your software program, click Print.2. Select the HP Photosmart A610 series as the printer. If you set the HP Photosmart
A610 series as the default printer, you can skip this step. The HP Photosmart A610series will already be selected.
3. Click Print or OK to begin printing.
To print photos from a computer (Mac)1. On the File menu in your software program, click Page Setup.2. Select the HP Photosmart A610 series as the printer. If you set the HP Photosmart
A610 series as the default printer, you can skip this step. The HP Photosmart A610series will already be selected.
3. On the File menu in your software program, click Print.4. Click Print to begin printing.
Print photos from an iPodIf you have an iPod that can store photos, you can connect your iPod to the printer andprint the photos.
Before you beginCheck that the images you copy to the iPod are in JPEG format.
Note iPods might not be available in your country/region.
To import photos to an iPod1. Copy photos from a memory card to your iPod using the Belkin Media Reader for
iPod.2. Verify that photos are on your iPod by selecting Photo Import on the iPod menu.
Photos appear as Rolls.
To print photos from an iPod1. Connect the iPod to the camera port on the front of the printer using the USB cable
that came with the iPod. The printer screen displays Reading Device for severalminutes while the photos are read. Then the photos appear on the printer screen.
2. Select the photo(s) you want to print and press Print. For more information onselecting and printing photos, see Select multiple photos.
HP Photosmart A610 series User Guide 31

Chapter 6
32 HP Photosmart A610 series

7 Maintain and transport the printerThe printer requires very little maintenance. Follow the guidelines in this section to extendthe life span of the printer and printing supplies, and to ensure that the photos you printare always of the highest quality.● Replace the print cartridge● Clean and maintain the printer● Store the printer and print cartridge● Maintain the quality of photo paper● Transport the printer
Replace the print cartridgeUse the HP 110 Tri-color Inkjet print cartridge to print black-and-white and color photos.HP Vivera Inks deliver true-to-life photo quality and exceptional fade resistance, resultingin vivid colors that last. HP Vivera Inks are specially formulated and scientifically testedfor quality, purity, and fade resistance.For optimal printing results, HP recommends using only HP print cartridges. Inserting anincorrect cartridge may invalidate the printer warranty.
Caution Check that you are using the correct print cartridges. Also, note thatHP does not recommend modifying or refilling HP cartridges. Damage that resultsfrom modifying or refilling HP cartridges is not covered by the HP warranty.
HP Photosmart A610 series User Guide 33

For best print quality, HP recommends that you install all retail print cartridges before thedate stamped on the box.
To prepare the printer and cartridge1. Make sure the printer is on.2. Open the print cartridge door of the printer.3. Remove the bright pink tape from the cartridge.
Remove the pink tape
Do not touch here
To insert the cartridge1. Remove the old cartridge from the cradle by pushing down and pulling outward on
the cartridge.
Warning Do not touch the copper-colored contacts inside the print cartridgecompartment or on the print cartridge.
2. Hold the replacement cartridge with the label on top. Slide the cartridge at a slightupward angle into the cradle so the copper-colored contacts go in first. Push thecartridge until it snaps into place.
3. Close the print cartridge door.The idle screen of the printer displays an icon showing the approximate ink level for theinstalled cartridge (100%, 75%, 50%, 25%, and nearly empty). No ink-level icon appearsif the cartridge is not a genuine HP cartridge.
Chapter 7
34 HP Photosmart A610 series

Each time you install or replace a print cartridge, a message appears on the printerscreen asking you to load paper so the printer can align the cartridge. This ensures high-quality prints.Load photo paper in the input tray, press OK, and then follow the onscreen instructionsto align the cartridge.
Clean and maintain the printerKeep the printer and print cartridge clean and well maintained using the simpleprocedures in this section.
Clean the outside of the printer
To clean the outside of the printer1. Turn off the printer, and then disconnect the power cord from the back of the printer.2. If you installed the optional HP Photosmart Internal Battery in the printer, remove it,
and then replace the battery compartment cover.3. Wipe the outside of the printer with a soft cloth that has been lightly moistened with
water.
Caution 1 Do not use any type of cleaning solution. Household cleaners anddetergents may damage the printer finish.
Caution 2 Do not clean the interior of the printer. Keep all fluids away from theinterior.
Automatically clean the print cartridgeIf you notice white lines or single-color streaks on the photos you print, the print cartridgemay need to be cleaned. Do not clean the cartridge more often than necessary, sincecleaning uses up ink.
To automatically clean the print cartridge1. Press Menu.2. Select Tools, and then press OK.3. Select Clean cartridge, and then press OK.4. Following the directions on the printer screen, load paper so the printer can print a
test page after cleaning the cartridge. Use plain paper or index cards to conservephoto paper.
5. Press OK to begin cleaning the print cartridge.6. When the printer finishes cleaning the cartridge and prints a test page, it asks
whether you want to Continue to second level cleaning. Check the test page andselect from the following options:– If the test page has white streaks or missing colors, the print cartridge needs to
be cleaned again. Select Yes, and then press OK.– If the print quality of the test page looks good, select No, and then press OK.You can clean the cartridge up to three times. Each successive cleaning is morethorough and uses more ink.
If you complete all three levels of cleaning using this procedure and you still notice whitestreaks or missing colors on the test page, you may need to replace the cartridge.
HP Photosmart A610 series User Guide 35

Note If the cartridge or printer has been recently dropped, you may also seewhite streaks or missing colors in your prints. This problem is temporary andclears up within 24 hours.
Manually clean the print cartridge contactsIf you use the printer in a dusty environment, debris may accumulate on the copper-colored contacts and cause printing problems.
To clean the print cartridge contacts1. Gather the following items to clean the contacts:
– Distilled water (tap water may contain contaminants that can damage the printcartridge)
– Cotton swabs or other soft, lint-free material that will not stick to the printcartridge
2. Open the print cartridge door.3. Remove the print cartridge and place it on a piece of paper with the ink nozzle plate
facing up. Be careful not to touch the copper-colored contacts or the ink nozzle platewith your fingers.
Caution Do not leave the print cartridge outside the printer for more than30 minutes. Ink nozzles exposed to the air longer than this may dry out andcause printing problems.
4. Lightly moisten a cotton swab with distilled water and squeeze any excess waterfrom the swab.
5. Gently wipe the copper-colored contacts with the cotton swab.
Caution Do not touch the ink nozzle plate. Touching the ink nozzle platewill result in clogs, ink failure, and bad electrical connections.
6. Repeat steps 4 and 5 until no ink residue or dust appears on a clean swab.7. Insert the print cartridge in the printer, and then close the print cartridge door.
Print a test pagePrint a test page before contacting HP support. The test page contains diagnosticinformation you can use when working with HP support to solve printing problems. Lookat the ink nozzle pattern on the test page to check the ink level and condition of the printcartridge. If any line or color is missing from the pattern, try cleaning the print cartridge.For more information, see Automatically clean the print cartridge.
To print a test page1. Press Menu.2. Select Tools, and then press OK.3. Select Print test page, and then press OK.4. Following the directions on the printer screen, load paper so the printer can print a
test page. Use plain paper or index cards to conserve photo paper.5. Press OK to begin printing the test page.The test page contains the following information:
Chapter 7
36 HP Photosmart A610 series
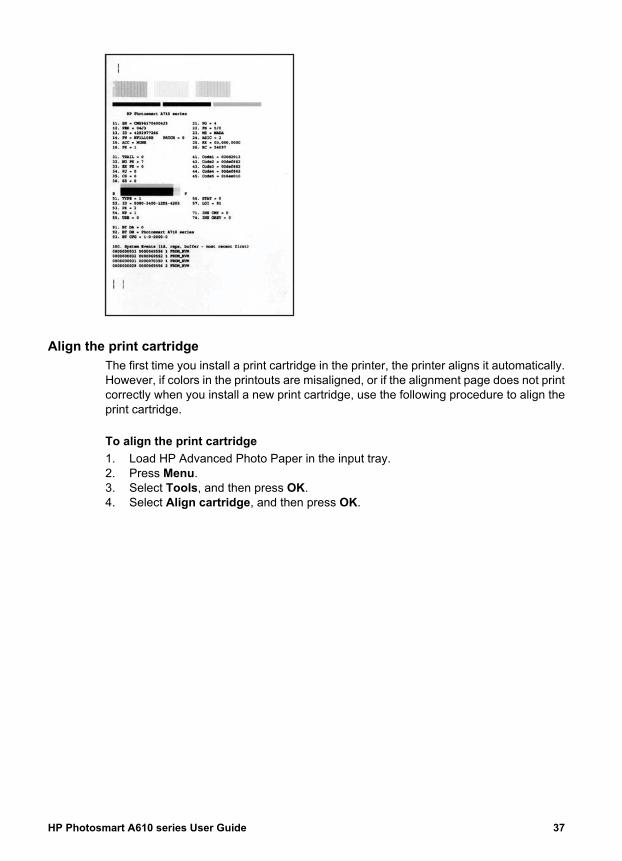
Align the print cartridgeThe first time you install a print cartridge in the printer, the printer aligns it automatically.However, if colors in the printouts are misaligned, or if the alignment page does not printcorrectly when you install a new print cartridge, use the following procedure to align theprint cartridge.
To align the print cartridge1. Load HP Advanced Photo Paper in the input tray.2. Press Menu.3. Select Tools, and then press OK.4. Select Align cartridge, and then press OK.
HP Photosmart A610 series User Guide 37

5. A message appears on the printer screen reminding you to load plain paper. LoadHP Advanced Photo Paper so the printer can print an alignment page.
6. Press OK to begin aligning the print cartridge.When the printer finishes aligning the cartridge, it prints an alignment page to confirmthat the alignment was successful.
– The check marks verify that the print cartridge is installed correctly andfunctioning properly.
– If an “x” appears to the left of any of the bars, align the print cartridge again. Ifthe “x” still appears, replace the print cartridge.
Store the printer and print cartridgeProtect the printer and print cartridges by storing them properly when you are not usingthem.
Store the printerThe printer is built to withstand long or short periods of inactivity.● Close the input and output trays and push the printer screen down into the flat
position when the printer is not in use.● Store the printer indoors out of direct sunlight in a place without temperature
extremes.● If the printer and print cartridge have not been used for one month or more, clean
the print cartridge before printing. For more information, see Automatically clean theprint cartridge.
● If you are storing the printer for a long period of time and the optional HP PhotosmartInternal Battery is installed, remove the battery from the printer.
Chapter 7
38 HP Photosmart A610 series
Store the print cartridgeWhen you store or transport the printer, always leave the active print cartridge inside theprinter. The printer stores the print cartridge in a protective cap during the power-downcycle.
Caution Make sure the printer completes its power-down cycle before youunplug the power cord or remove the internal battery. This allows the printer tostore the print cartridge properly.
Follow these tips to help maintain HP print cartridges and ensure consistent print quality:● Keep all unused print cartridges in their original sealed packages until they are
needed. Store print cartridges at room temperature (15–35° C or 59–95° F).● Do not remove the plastic tape covering the ink nozzles until you are ready to install
the print cartridge in the printer. If the plastic tape has been removed from the printcartridge, do not attempt to reattach it. Reattaching the tape damages the printcartridge.
Maintain the quality of photo paperFor best results with photo paper, follow the guidelines in this section.
To store photo paper● Store the photo paper in its original packaging or in a resealable plastic bag.● Store the packaged photo paper on a flat, cool, and dry surface.● Return unused photo paper to the plastic bag. Paper left in the printer or exposed
to the elements may curl.
To handle photo paper● Always hold photo paper by the edges to avoid fingerprints.● If the photo paper has curled edges, place it in its plastic storage bag and gently
bend it in the opposite direction of the curl until the paper lies flat.
Transport the printerIt is easy to transport and set up the printer almost anywhere. Take it with you onvacations and to family gatherings and social events to instantly print and share photoswith family and friends.To make it even easier to print on the go, you can purchase these accessories:● Optional HP Photosmart Internal Battery: Power the printer with a rechargeable
optional HP Photosmart Internal Battery so you can print anywhere.● Carrying Case: Carry the printer and printing supplies together in this convenient
HP Photosmart Carrying Case.
To transport the printer1. Turn off the printer.2. Remove the memory card from the memory card slot.
Note Do not remove the print cartridge when transporting the printer.
HP Photosmart A610 series User Guide 39
3. Remove all paper from the input and output trays, then close the input and outputtrays.
4. Push the printer screen down into the flat position.
Note Make sure the printer completes its power-down cycle before youunplug the power cord. This allows the printer to store the print cartridgeproperly.
5. Unplug the power cord.6. If the printer is connected to a computer, disconnect the USB cable from the
computer.7. Always carry the printer upright.
Tip The printer has a convenient built-in handle to make it easy to carry. Besure to push the printer screen down flat before raising the handle. Do notshake or swing the printer while carrying it by the handle.
Make sure to bring the following items with you:● Paper● Power cord● Digital camera or a memory card containing photos● Extra HP 110 Tri-color Inkjet print cartridges if you plan to print a lot of photos● Optional printer accessories you plan to use, such as the battery or HP Bluetooth
wireless printer adapter● If you are going to connect the printer to a computer, bring the USB cable and
HP Photosmart printer software CD● Printer User Guide (the book you are reading)
Note If you do not take the printer User Guide with you, be sure to writedown the correct print cartridge number, or purchase enough HP 110 Tri-color Inkjet print cartridges before you go.
Chapter 7
40 HP Photosmart A610 series

8 TroubleshootingThe HP Photosmart printer is designed to be reliable and easy to use. This chapteranswers frequently asked questions about using the printer and printing without acomputer. It contains information about the following topics:● Printer hardware problems● Printing problems● Bluetooth printing problems● Error messagesFor troubleshooting information about using the printer software and printing from acomputer, see the electronic Help. For information about viewing the electronic Help,see Find more information.
Printer hardware problemsBefore contacting HP support, read this section for troubleshooting tips or go to the onlinesupport services at www.hp.com/support.
Note If you want to connect the printer to a computer with a USB cable, HPrecommends using a 2.0 high-speed compliant cable 3 meters (10 feet) or lessin length.
The On light is flashing green but the printer is not printing.
Solution● If the printer is turned on, it is initializing. Wait for it to finish.● If the printer is turned off, and the optional HP Photosmart Internal Battery is
installed, the battery is charging.
The Attention light is flashing red.Cause The printer requires attention. Try the following solutions.
HP Photosmart A610 series User Guide 41

Solution● Check the printer screen for instructions. If you have a digital camera connected
to the printer, check the camera screen for instructions. If the printer isconnected to a computer, check the computer monitor for instructions.
● Turn off the printer.If the optional HP Photosmart Internal Battery is not installed in the printer,unplug the printer power cord. Wait about 10 seconds, and then plug the powercord back in. Turn on the printer.If the optional HP Photosmart Internal Battery is installed in the printer, unplugthe printer power cord if it is plugged in. Open the battery compartment coverand remove the battery. Be careful not to touch the contacts inside the printeror on the battery. Wait about 10 seconds, and then reinstall the battery. Plug inthe power cord (optional). Turn on the printer.
● If the Attention light continues to flash red, go to www.hp.com/support or contactHP support.
The buttons on the control panel do not respond.Cause A printer error has occurred. Wait for about a minute to see if the printerresets. If it does not, try the following solutions.
Solution● Turn off the printer.
If the optional HP Photosmart Internal Battery is not installed in the printer,unplug the printer power cord. Wait about 10 seconds, and then plug the powercord back in. Turn on the printer.If the optional HP Photosmart Internal Battery is installed in the printer, unplugthe printer power cord if it is plugged in. Open the battery compartment coverand remove the battery. Be careful not to touch the contacts inside the printeror on the battery. Wait about 10 seconds, and then reinstall the battery. Plug inthe power cord (optional). Turn on the printer.
● If the printer does not reset and the control panel buttons still do not respond,go to www.hp.com/support or contact HP support.
The printer does not find and display the photos on my memory card.
SolutionThe memory card may contain file types the printer cannot read directly from thememory card.– Save the photos to a computer, and then print them from the computer. For
more information, see the camera documentation or the electronic Help.– The next time you take photos, set the digital camera to save them in a file
format the printer can read directly from the memory card. For a list of supportedfile formats, see Specifications. For instructions on setting the digital camera tosave photos in specific file formats, see the documentation that came with thecamera.
Chapter 8
42 HP Photosmart A610 series
The printer is plugged in, but it will not turn on.
Solution● The printer may have drawn too much power.
If the optional HP Photosmart Internal Battery is not installed in the printer,unplug the printer power cord. Wait about 10 seconds, and then plug the powercord back in. Turn on the printer.If the optional HP Photosmart Internal Battery is installed in the printer, unplugthe printer power cord if it is plugged in. Open the battery compartment coverand remove the battery. Be careful not to touch the contacts inside the printeror on the battery. Wait about 10 seconds, and then reinstall the battery. Plug inthe power cord (optional). Turn on the printer.
● Make sure the printer is plugged into a working electrical outlet.
The optional HP Photosmart Internal Battery is installed in the printer, but theprinter will not turn on using battery power.
Cause The battery may need to be charged.
Solution● Plug in the printer power cord to charge the battery. The On light flashes green
to indicate that the battery is charging.● If the battery is charged, try removing and reinstalling the battery.
The optional use variable in en_ww Internal Battery is installed in the printer, butit will not charge.
Solution● Turn off and unplug the printer. Open the battery compartment cover. Remove
the battery and reinstall it. Be careful not to touch the contacts on the inside ofthe battery compartment or on the battery. For more information on how to installthe battery, see the documentation that came with the battery.
● Check that the printer power cord is securely connected to both the printer andthe power source. When the printer is turned off, the On light flashes green toindicate that the battery is charging.
● Turn on the printer. The battery charging icon, a lightning bolt, flashes abovethe battery icon on the printer screen to indicate that the battery is charging.
● An empty battery should fully charge in approximately four hours when theprinter is not in use. If the battery still does not charge, replace it.
The printer makes noises when I turn it on, or starts making noises after sittingunused for a while.
Solution The printer may make noises after long periods of inactivity(approximately 2 weeks) or when its power supply has been interrupted and thenrestored. This is normal operation. The printer is performing an automaticmaintenance procedure to ensure it produces the best quality output.
HP Photosmart A610 series User Guide 43

Printing problemsBefore contacting HP support, read this section for troubleshooting tips or go to the onlinesupport services at www.hp.com/support.
The printer does not print borderless photos when I print from the control panel.Cause The borderless printing option may be turned off.Solution To turn on borderless printing, follow these steps:1. Press Menu.2. Select Preferences, and then press OK.3. Select Borderless, and then press OK.4. Select On, and then press OK.
Paper does not feed into the printer correctly.
Solution● Make sure that the paper-width guide fits close to the edge of the paper without
bending the paper.● There may be too much paper loaded in the input tray. Remove some paper
and try printing again.● If sheets of photo paper stick together, try loading one sheet at a time.● If you are using the printer in an extremely high or low humidity environment,
insert the paper as far as it will go into the input tray, and load one sheet ofphoto paper at a time.
● If you are using photo paper that is curled, place the paper in a plastic bag andgently bend it in the opposite direction of the curl until the paper lies flat. If theproblem persists, use paper that is not curled. For information about properstorage and handling of photo paper, see Maintain the quality of photo paper.
● The paper may be too thin or too thick. Try using HP-designed photo paper. Formore information, see Choose the right paper.
The photo printed at an angle or is off-center.
Solution● The paper may not be loaded correctly. Reload the paper, making sure that the
paper is correctly oriented in the input tray and that the paper-width guide fitsclose to the edge of the paper. For paper-loading instructions, see Choose andload paper.
● The print cartridge may need to be aligned. For more information, see Align theprint cartridge.
Chapter 8
44 HP Photosmart A610 series

No page came out of the printer.
Solution● The printer may need attention. Read the printer screen for instructions.● The power may be off or there may be a loose connection. Make sure that the
power is on and the power cord is securely connected. If you are using batterypower, make sure the battery is correctly installed.
● You may not have any paper in the input tray. Check that paper is loadedcorrectly in the input tray. For paper-loading instructions, see Choose and loadpaper.
● The paper may have jammed while printing. See the following section forinstructions on clearing a paper jam.
The paper jammed while printing.Solution Check the printer screen for instructions. To clear a paper jam, try thefollowing solutions.● If the paper came part way through the front of the printer, gently pull the paper
towards you to remove it.● If the paper did not come part way through the front of the printer, try removing
it from the back of the printer:– Remove the paper from the input tray, and then pull down on the input tray
to open it fully to a horizontal position.– Gently pull the jammed paper to remove it from the back of the printer.– Lift the input tray up until it snaps back into paper-loading position.
● If you cannot grasp the edge of the jammed paper to remove it, try the following:– Turn off the printer.– If the optional HP Photosmart Internal Battery is not installed in the printer,
unplug the printer power cord. Wait about 10 seconds, and then plug thepower cord back in.
– If the optional HP Photosmart Internal Battery is installed in the printer,unplug the printer power cord, if it is plugged in. Open the batterycompartment cover and remove the battery. Be careful not to touch thecontacts inside the printer or on the battery. Wait about 10 seconds, andthen reinstall the battery. Plug in the power cord (optional).
– Turn on the printer. The printer checks for paper in the paper path and willautomatically eject the jammed paper.
● Press OK to continue.
Tip If you experience paper jams while printing, try loading one sheet ofphoto paper at a time. Insert the paper as far as it will go into the input tray.
HP Photosmart A610 series User Guide 45

A blank page came out of the printer.
Solution● Check the ink-level icon on the printer screen. If the print cartridge is out of ink,
replace it. For more information, see Replace the print cartridge.● You may have begun printing and then cancelled the process. If you cancelled
the process before the photo started printing, the printer may have alreadyloaded paper in preparation for printing. The next time you print, the printer willeject the blank page before starting the new printing project.
The photo did not print using the printer's default print settings.Solution You may have changed the print settings for the selected photo. Printsettings you apply to an individual photo override the printer's default print settings.Discard all print settings that have been applied to an individual photo by deselectingthe photo. For more information, see Select multiple photos.
The printer ejected the paper when preparing to print.Cause The printer might be in direct sunlight, which affects the operation of theautomatic paper sensor.Solution Move the printer out of direct sunlight.
Print quality is poor.
Solution● Make sure you have selected the correct paper type. See To change the paper
type.● Make sure the print quality setting is set to Best quality. See Set print quality.● Turn the Photo Fix feature on or off. See Perfect photos automatically using
Photo Fix.● The print cartridge may be running out of ink. Check the ink-level icon on the
printer screen, and replace the cartridge if necessary. For more information,see Replace the print cartridge.
● You may have selected a low-resolution setting on the digital camera when youtook the photo. For better results in the future, set the digital camera to a higherresolution.
● Make sure you are using the right type of photo paper for the project. Use HPAdvanced Photo Paper for best results. For more information, see Choose theright paper.
● You may be printing on the wrong side of the paper. Make sure the paper isloaded with the side to be printed facing toward the front of the printer.
● The print cartridge may need to be cleaned. For more information, seeAutomatically clean the print cartridge.
Chapter 8
46 HP Photosmart A610 series
● The print cartridge may need to be aligned. For more information, see Align theprint cartridge.
● Photos may be stacked in the output tray. The printed surface of your photosneeds to be left exposed to the air for up to 5 minutes after printing. Do not placephotos in an album until they have fully developed.
The photos I selected for printing in the digital camera do not print.Solution Some digital cameras let you mark photos for printing both in thecamera's internal memory and on the memory card. If you mark photos in the internalmemory, and then move photos from the camera's internal memory to the memorycard, the marks do not transfer. Mark photos for printing after you transfer them fromthe digital camera's internal memory to the memory card.
Photos will not print from an iPod.Cause You may have saved your photos to the iPod in low resolution.Solution Photos must be stored in high resolution for the printer to recognize them.Check your iPod documentation for information on changing the resolution setting.
Bluetooth printing problemsBefore contacting HP support, read this section for troubleshooting tips, or go to theonline support services at www.hp.com/support. Be sure to also read the documentationthat came with your HP Bluetooth wireless printer adapter (if you are using one) and yourdevice with Bluetooth wireless technology.
My Bluetooth device cannot find the printer.
Solution● If you are using the optional HP Bluetooth wireless printer adapter, make sure
the adapter is plugged into the camera port on the front of the printer. The lighton the adapter flashes when the adapter is ready to receive data.If the printer has integrated Bluetooth wireless technology, check the Bluetoothlight on the printer. The light flashes when the printer is ready to receive data.
● Bluetooth Visibility may be set to Not visible. Change this setting to Visibleto all as follows:– Press Menu.– Select Bluetooth, and then press OK.– Select Visibility, and then press OK.– Select Visible to all, and then press OK.
● Bluetooth Security level may be set to High. Change this setting to Low asfollows:– Press Menu.– Select Bluetooth, and then press OK.– Select Security level, and then press OK.– Select Low, and then press OK.
HP Photosmart A610 series User Guide 47

● The passkey (PIN) that the device with Bluetooth wireless technology is usingfor the printer may be incorrect. Make sure the correct passkey for the printeris entered in the device with Bluetooth wireless technology.
● You may be too far from the printer. Move the device with Bluetooth wirelesstechnology closer to the printer. The maximum recommended distance betweenthe device with Bluetooth wireless technology and the printer is 10 meters(30 feet).
No page came out of the printer.Solution The printer may not recognize the type of file sent by the device withBluetooth wireless technology. For a list of the file formats that the printer supports,see Specifications.
Print quality is poor.Solution The photo you printed may be low resolution. For better results, set thedigital camera to a higher resolution. Photos taken with VGA-resolution cameras,such as those found in wireless phones, may not have high enough resolution toproduce a high-quality print.
The photo printed with borders.Solution The printing program installed on your device with Bluetooth wirelesstechnology may not support borderless printing. Contact the vendor of the device,or go to their support Web site to obtain the latest updates for the printing program.
My computer cannot set the device name using the Bluetooth wireless connection.Solution Use a USB cable to connect your computer to the printer in order to setthe printer Bluetooth device name using the printer Toolbox. The printer softwaremust already be installed on the computer. See Install the software and the electronicHelp.Use the following instructions to get to the printer Toolbox.Windows users only: Right-click the small monitor icon on the far right of theWindows taskbar and select either Launch/Show HP Solution Center or Launch/Show Director, whichever appears. Click Settings, Print Settings, and thenPrinter Toolbox. Click the Configure Bluetooth Settings tab and enter theBluetooth device name in the Device Name box
Error messagesBefore contacting HP support, read this section for troubleshooting tips or go to the onlinesupport services at www.hp.com/support.The following error messages may appear on the printer screen. Follow the instructionsto resolve the problem.
Chapter 8
48 HP Photosmart A610 series

Error message: Paper jam. Clear jam then press OK.Solution Try the following steps to clear the paper jam:● If the paper came part way through the front of the printer, gently pull the paper
towards you to remove it.● If the paper did not come part way through the front of the printer, try removing
it from the back of the printer:– Remove the paper from the input tray, and then pull down on the input tray
to open it fully to a horizontal position.– Gently pull the jammed paper to remove it from the back of the printer.– Lift the input tray up until it snaps back into paper-loading position.
● If you cannot grasp the edge of the jammed paper to remove it, try the following:– Turn off the printer.– If the optional HP Photosmart Internal Battery is not installed in the printer,
unplug the printer power cord. Wait about 10 seconds, and then plug thepower cord back in.
– If the optional HP Photosmart Internal Battery is installed in the printer,unplug the printer power cord, if it is plugged in. Open the batterycompartment cover and remove the battery. Wait about 10 seconds, andthen reinstall the battery. Plug in the power cord.
– Turn on the printer. The printer checks for jammed paper and automaticallyejects any jammed paper it finds.
● Press OK to continue.
Error message: Automatic paper sensor failed.Solution The automatic paper sensor is obstructed or damaged. Try moving theprinter out of direct sunlight, and then press OK and try printing again. If this doesnot work, go to www.hp.com/support or contact HP support.
Error message: Cartridge is not compatible. Use appropriate HP cartridge.Solution Replace the print cartridge with one that is compatible with the printer.For more information, see Replace the print cartridge.
Warning Do not touch the copper-colored contacts inside the print cartridgecompartment or on the print cartridge.
Error message: Print cartridge cradle is stuck. Clear jam then press OK.Solution Follow these steps to clear any obstruction in the path of the printcartridge cradle:1. Remove any jammed paper from the input or output trays.2. Turn the printer off and then on again.
HP Photosmart A610 series User Guide 49
Error message: Cartridge service station is stuck.Solution The print cartridge service station is the component located beneath theprint cartridge cradle that wipes and caps the print cartridge for storage. Follow thesesteps to clear the obstruction blocking the print cartridge service station:1. Remove any jammed paper from the input and output trays.2. Turn the printer off and then on again.
Error message: Photo is corruptedCause While the printer was printing from a memory card, either another memorycard was inserted or a USB device was connected to the front camera port.Solution Insert only one memory card at a time. Do not insert a USB device whilethe printer is printing from a memory card. Your photo is not corrupted.
Cause The indicated photo is corrupted on the inserted memory card.Solution Select and print a different photo, or insert a different memory card.
Error message: Card access error. See user manual.Cause A card access error may indicate that an xD-Picture Card memory card isin a write-protected condition. xD-Picture Card memory cards have a specialprotection feature to ensure that your pictures are kept safe.
Note During this condition, you can still use the printer for printing andsaving photos from the xD-Picture Card to a secure location, such as thecomputer hard drive.
Solution● Reinsert the xD-Picture Card memory card into your camera and turn on the
camera. In most cases, the camera automatically makes the necessarychanges.
● Reformat the xD-Picture Card memory card. See the documentation that camewith your camera for instructions on reformatting the memory card. Note thatthis process erases the pictures currently saved to your memory card. To savethese pictures, transfer them to the computer before reformatting the memorycard. Once you reformat the memory card, transfer those photos back to thememory card using the computer.
● Turn off the printer, insert the xD-Picture Card memory card into the printer, andthen turn on the printer again.
Chapter 8
50 HP Photosmart A610 series
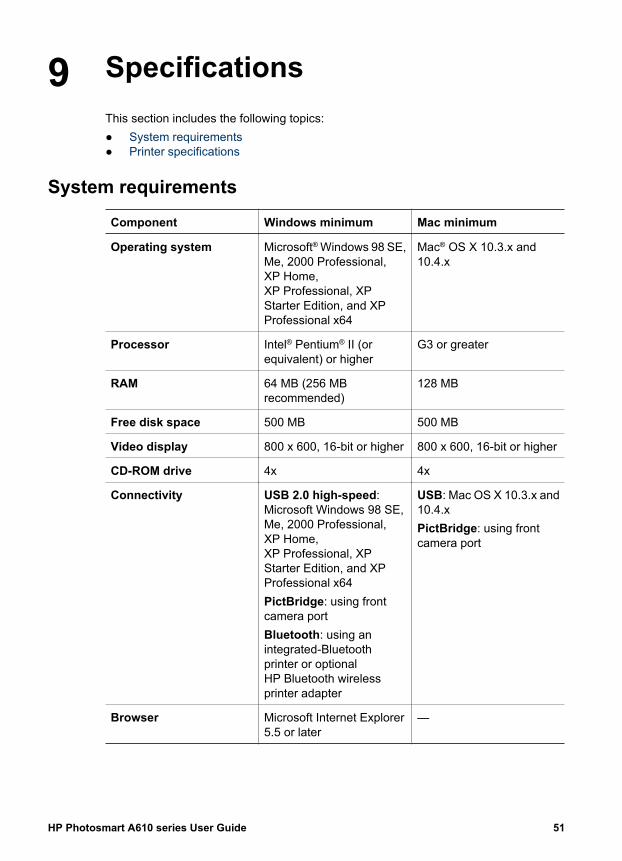
9 SpecificationsThis section includes the following topics:● System requirements● Printer specifications
System requirements
Component Windows minimum Mac minimum
Operating system Microsoft® Windows 98 SE,Me, 2000 Professional,XP Home,XP Professional, XPStarter Edition, and XPProfessional x64
Mac® OS X 10.3.x and10.4.x
Processor Intel® Pentium® II (orequivalent) or higher
G3 or greater
RAM 64 MB (256 MBrecommended)
128 MB
Free disk space 500 MB 500 MB
Video display 800 x 600, 16-bit or higher 800 x 600, 16-bit or higher
CD-ROM drive 4x 4x
Connectivity USB 2.0 high-speed:Microsoft Windows 98 SE,Me, 2000 Professional,XP Home,XP Professional, XPStarter Edition, and XPProfessional x64PictBridge: using frontcamera portBluetooth: using anintegrated-Bluetoothprinter or optionalHP Bluetooth wirelessprinter adapter
USB: Mac OS X 10.3.x and10.4.xPictBridge: using frontcamera port
Browser Microsoft Internet Explorer5.5 or later
—
HP Photosmart A610 series User Guide 51

Printer specifications
Category Specifications
Connectivity USB 2.0 high-speed: Microsoft Windows 98 SE,Me, 2000 Professional, XP Home, XP Professional,XP Starter Edition, and XP Professional x64;Mac OS X 10.3.x and 10.4.xPictBridge: Microsoft Windows 98 SE, Me, 2000Professional, XP Home, XP Professional, XP StarterEdition, and XP Professional x64; Mac OS X 10.3.xand 10.4.xBluetooth: Microsoft Windows 98 SE, Me, 2000Professional, XP Home, XP Professional, XP StarterEdition, and XP Professional x64
Environmentalspecifications
Maximum during operation: 5–40° C (41–104° F),5–90% RHRecommended during operation: 15–35° C (59–95° F), 20–80% RH
Image file formats JPEG BaselineTIFF 24-bit RGB uncompressed interleavedTIFF 24-bit YCbCr uncompressed interleavedTIFF 24-bit RGB packbits interleavedTIFF 8-bit gray uncompressed/packbitsTIFF 8-bit palette color uncompressed/packbitsTIFF 1-bit uncompressed/packbits/1D Huffman
Margins Borderless printing: Top 0.0 mm (0.0 inch); Bottom12.5 mm (0.50 inch); Left/right 0.0 mm (0.0 inch)Bordered printing: Top 3 mm (0.12 inch); Bottom12.5 mm (0.50 inch); Left/right 3 mm (0.12 inch)
Media sizes Photo paper 10 x 15 cm (4 x 6 inches) or 13 x 18 cm(5 x 7 inches)Photo paper with tab 10 x 15 cm with 1.25 cm tab(4 x 6 inches with 0.5 inch tab)Photo sticker paper 10 x 15 cm (4 x 6 inches), 16rectangular or oval stickers per pagePanorama photo paper (for pre-stitched images)10 x 30 cm (4 x 12 inches)Index cards 10 x 15 cm (4 x 6 inches)Hagaki cards 100 x 148 mm (3.9 x 5.8 inches)A6 cards 105 x 148 mm (4.1 x 5.8 inches)L-size cards 90 x 127 mm (3.5 x 5 inches)
Chapter 9
52 HP Photosmart A610 series

Category SpecificationsL-size cards with tab 90 x 127 mm with 12.5 mm tab(3.5 x 5 inches with 0.5 inch tab)
Media types HP Advanced Photo PaperCards: index, Hagaki, A6, L-size, 2L-sizePhoto sticker paperHP CD/DVD Label tattooHP Self-Adhesive Photo Paper
Memory cards CompactFlash Type I and IIMultiMediaCardSecure DigitalMemory SticksMicrodrivexD-Picture Card
Memory card-supported fileformats
Printing: All supported image and video file formatsSaving: All file formats
Paper tray One 13 x 18 cm (5 x 7 inches) photo paper tray
Paper tray capacity 20 sheets of photo paper, maximum thickness 292µm (11.5 mil) per sheet
Power consumption U.S.Printing: 15.14 WIdle: 8.61 WOff: 6.66 WInternationalPrinting: 14.04 WIdle: 8.58 WOff: 7.06 W
Power supply model number HP Part # 0957–2121 (North America), 100-240V AC (± 10%) 50/60 Hz (±3 Hz)HP Part # 0957–2120 (Rest of world), 100-240 V AC(± 10%) 50/60 Hz (± 3 Hz)
Print cartridge HP 110 Tri-color Inkjet print cartridge
(continued)
HP Photosmart A610 series User Guide 53

Category Specifications
USB 2.0 high-speed support Microsoft Windows 98 SE, Me, 2000 Professional,XP Home, XP Professional, XP Starter Edition, andXP Professional x64Mac OS X 10.3.x and 10.4.xHP recommends that the USB cable be less than3 meters (10 feet) in length
Video file formats Motion JPEG AVIMotion-JPEG QuickTimeMPEG-1
Chapter 9(continued)
54 HP Photosmart A610 series

10 HP support● Support process● HP support by phone● Additional warranty options● HP Warranty
Support process
If you have a problem, follow these steps:1. Check the documentation that came with the HP Photosmart printer.2. Visit the HP online support Web site at www.hp.com/support. HP online support is
available to all HP customers. It is the fastest source for up-to-date deviceinformation and expert assistance and includes the following features:– Fast access to qualified online support specialists– Software and driver updates for the HP Photosmart printer– Valuable HP Photosmart printer and troubleshooting information for common
problems– Proactive device updates, support alerts, and HP newsgrams that are available
when you register the HP Photosmart printer3. For Europe only: Contact your local point of purchase. If the HP Photosmart printer
has a hardware failure, you will be asked to bring it back to your local point ofpurchase. (Service is provided at no charge during the device limited warrantyperiod. After the warranty period, you will be quoted a service charge.)
4. Call HP support. Support options and availability vary by device, country/region, andlanguage.
HP support by phoneFor a list of support phone numbers, see the phone number list on the inside of the frontcover.
Phone support periodOne year of phone support is available in North America, Asia Pacific, and Latin America(including Mexico). To determine the duration of phone support in Europe, the MiddleEast, and Africa, go to www.hp.com/support. Standard phone company charges apply.
Placing a callCall HP support while you are in front of the computer and the HP Photosmart printer.Be prepared to provide the following information:● Device model number (located on the label on the front of the device)● Device serial number (located on the back or bottom of the device)
HP Photosmart A610 series User Guide 55

● Messages that appear when the situation occurs● Answers to these questions:
– Has this situation happened before?– Can you re-create it?– Did you add any new hardware or software to your computer at about the time
that this situation began?– Did anything else occur prior to this situation (such as a thunderstorm, device
was moved, etc.)?
After the phone support periodAfter the phone support period, help is available from HP at an additional cost. Help mayalso be available at the HP online support Web site: www.hp.com/support. Contact yourHP dealer or call the support phone number for your country/region to learn more aboutsupport options.
Additional warranty optionsExtended service plans are available for the printer at additional costs. Go towww.hp.com/support, select your country/region and language, then explore theservices and warranty area for information about the extended service plans.
Chapter 10
56 HP Photosmart A610 series

HP Warranty
A. Extent of limited warranty 1. Hewlett-Packard (HP) warrants to the end-user customer that the HP products specified above will be free from defects
in materials and workmanship for the duration specified above, which duration begins on the date of purchase by the customer.
2. For software products, HP’s limited warranty applies only to a failure to execute programming instructions. HP does not warrant that the operation of any product will be interrupted or error free.
3. HP's limited warranty covers only those defects that arise as a result of normal use of the product, and does not cover any other problems, including those that arise as a result of:
a. Improper maintenance or modification; b. Software, media, parts, or supplies not provided or supported by HP; c. Operation outside the product's specifications; d. Unauthorized modification or misuse. 4. For HP printer products, the use of a non-HP cartridge or a refilled cartridge does not affect either the warranty to the
customer or any HP support contract with the customer. However, if printer failure or damage is attributable to the use of a non-HP or refilled cartridge or an expired ink cartridge, HP will charge its standard time and materials charges to service the printer for the particular failure or damage.
5. If HP receives, during the applicable warranty period, notice of a defect in any product which is covered by HP's warranty, HP shall either repair or replace the product, at HP's option.
6. If HP is unable to repair or replace, as applicable, a defective product which is covered by HP's warranty, HP shall, within a reasonable time after being notified of the defect, refund the purchase price for the product.
7. HP shall have no obligation to repair, replace, or refund until the customer returns the defective product to HP. 8. Any replacement product may be either new or like-new, provided that it has functionality at least equal to that of the
product being replaced. 9. HP products may contain remanufactured parts, components, or materials equivalent to new in performance. 10. HP's Limited Warranty Statement is valid in any country where the covered HP product is distributed by HP. Contracts
for additional warranty services, such as on-site service, may be available from any authorized HP service facility in countries where the product is distributed by HP or by an authorized importer.
B. Limitations of warrantyTO THE EXTENT ALLOWED BY LOCAL LAW, NEITHER HP NOR ITS THIRD PARTY SUPPLIERS MAKES ANY OTHER WARRANTY OR CONDITION OF ANY KIND, WHETHER EXPRESS OR IMPLIED WARRANTIES OR CONDITIONS OF MERCHANTABILITY, SATISFACTORY QUALITY, AND FITNESS FOR A PARTICULAR PURPOSE.
C. Limitations of liability 1. To the extent allowed by local law, the remedies provided in this Warranty Statement are the customer's sole and
exclusive remedies. 2. TO THE EXTENT ALLOWED BY LOCAL LAW, EXCEPT FOR THE OBLIGATIONS SPECIFICALLY SET FORTH IN
THIS WARRANTY STATEMENT, IN NO EVENT SHALL HP OR ITS THIRD PARTY SUPPLIERS BE LIABLE FOR DIRECT, INDIRECT, SPECIAL, INCIDENTAL, OR CONSEQUENTIAL DAMAGES, WHETHER BASED ON CONTRACT, TORT, OR ANY OTHER LEGAL THEORY AND WHETHER ADVISED OF THE POSSIBILITY OF
SUCH DAMAGES.D. Local law 1. This Warranty Statement gives the customer specific legal rights. The customer may also have other rights which vary
from state to state in the United States, from province to province in Canada, and from country to country elsewhere in the world.
2. To the extent that this Warranty Statement is inconsistent with local law, this Warranty Statement shall be deemed modified to be consistent with such local law. Under such local law, certain disclaimers and limitations of this Warranty Statement may not apply to the customer. For example, some states in the United States, as well as some governments outside the United States (including provinces in Canada), may:
a. Preclude the disclaimers and limitations in this Warranty Statement from limiting the statutory rights of a consumer (e.g., the United Kingdom); b. Otherwise restrict the ability of a manufacturer to enforce such disclaimers or limitations; or c. Grant the customer additional warranty rights, specify the duration of implied warranties which the manufacturer
cannot disclaim, or allow limitations on the duration of implied warranties. 3. THE TERMS IN THIS WARRANTY STATEMENT, EXCEPT TO THE EXTENT LAWFULLY PERMITTED, DO NOT
EXCLUDE, RESTRICT, OR MODIFY, AND ARE IN ADDITION TO, THE MANDATORY STATUTORY RIGHTS APPLICABLE TO THE SALE OF THE HP PRODUCTS TO SUCH CUSTOMERS.
HP Limited WarrantyDear Customer,You will find below the name and address of the HP entity responsible for the performance of the HP Limited Warranty in your country. You may have additional statutory rights against the seller based on your purchase agreement. Those rights are not in any way affected by this HP Limited Warranty.Ireland: Hewlett-Packard Ireland Ltd. 30 Herbert Street IRL-Dublin 2United Kingdom: Hewlett-Packard Ltd, Cain Road, Bracknell, GB-Berks RG12 1HN
HP product Duration of limited warrantySoftware Media 90 daysPrinter 1 yearPrint or Ink cartridges Until the HP ink is depleted or the “end of warranty” date printed on the cartridge has been reached, whichever occurs first. This
warranty does not cover HP ink products that have been refilled, remanufactured, refurbished, misused, or tampered with.
Accessories 1 year unless otherwise stated
HP Photosmart A610 series User Guide 57

Chapter 10
58 HP Photosmart A610 series

A Install the softwareThe printer comes with optional software you can install on a computer.After using the setup instructions that came in the box with the printer to set up the printer hardware,use the instructions in this section to install the software.
Windows users Mac users
Important: Do not connect the USB cable untilyou are prompted.1. Insert the HP Photosmart CD into your
computer's CD-ROM drive. If the InstallWizard does not appear, locate theSetup.exe file on the CD-ROM drive anddouble-click it. It takes less than a minutefor the files to load.
2. Click Next and follow the onscreeninstructions.
3. When prompted, either accept theRecommended option or select theCustom option. If you select Custom,deselect the software programs you don'twant to install. If you are not sure, you canhighlight the name of each program listedto read a brief description of the program.
4. When prompted, connect one end of theUSB cable to the USB port on the back ofthe printer, and connect the other end tothe USB port on your computer.
5. Follow the onscreen instructions until theinstallation is finished. If you are promptedto restart your computer, go ahead and doso.
1. Connect one end of the USB cable to theUSB port on the back of the printer, andconnect the other end to the USB port onyour computer.
2. Insert the HP Photosmart CD into yourcomputer's CD-ROM drive.
3. On your desktop, double-click theHP Photosmart CD icon.
4. Double-click the HP Installer icon, andfollow the instructions on each installationscreen to install the printer software.
5. When the Congratulations screenappears, click OK.
Note Windows users: The HP Photosmart Essential software is included in theRecommended install option. If you use Windows 2000 or XP, you can selectHP Photosmart Premier as a Custom install option. HP Photosmart Premier is not availableon the HP Photosmart A610 model.
HP Photosmart A610 series User Guide 59

Appendix A
60 HP Photosmart A610 series

B Printer menusThe printer menus contain many features for viewing and printing photos, obtaining help, and more.
Printer menuPrinter menu structure● Print Options
– Print all: Select to print all the photos on the memory card inserted in the printer.– Video action prints: Select to print nine frames from a video clip. For instructions on how
to print from a video clip, see Select multiple photos.– Print range: Select to print a range of photos. The current print settings, including number
of copies, apply to all photos in the range.– Print index page: Select to print an index of all photos on the memory card inserted in
the printer.– Panoramic photos: Select to turn panoramic printing On or Off (default). Select On to
print all selected photos with a 3:1 aspect ratio; load 10 x 30 cm (4 x 12 inch) paper beforeprinting. When a photo is selected, a green crop box shows the area to be printed. OtherPrint Options menu choices are disabled when this option is turned on. Select Off to printwith a normal 3:2 aspect ratio. Panoramic printing is not supported when printing directlyfrom a digital camera with a USB cable.
– Photo stickers: Select to turn sticker printing On or Off (default). Select On to print 16photos per page, and load special sticker media. Other Print Options menu choices willbe disabled when this option is turned on. Select Off to print using one of the normallayout options.
– CD/DVD tattoo: Select to turn CD/DVD label printing On or Off (default).– Passport photos: Select to turn passport printing On or Off (default). Passport printing
tells the printer to print all selected photos in the selected passport photo size. A separatepage is printed for each selected photo. Each printed page contains the number of photosof the selected size that will fit on the page. Other Print Options menu choices will bedisabled when this option is turned on.
● Edit– Rotate photo: Press to rotate the photo 90° clockwise. Press to rotate the photo
90° counterclockwise.– Add frame: Choose from the Select pattern and Select color choices.– Add color effect: Choose from the following color effects: Black & white, Sepia,
Antique, or No effect (default).
HP Photosmart A610 series User Guide 61

● Tools– Photosmart Share (Instant Share): Select to share photos on an inserted memory card
with family and friends. The printer must be connected to a computer, the computer mustbe connected to the Internet, and the printer software must be installed on the computer.
– View 9-up: Select to view photos on the inserted memory card nine at a time.– Slide show: Select to view photos on the inserted memory card in a slide show. Press
Cancel to stop the slide show.– Print sample page: Select to print a sample page, which is useful for checking the print
quality of the printer.– Print test page: Select to print a test page containing information about the printer that
can help in troubleshooting problems.– Clean cartridge: Select to clean the print cartridge. After cleaning, you'll be asked if you
want to continue to a second-level cleaning (choose Yes or No). If you choose Yes,another cleaning cycle will be completed. Next you'll be asked if you want to continue toa third-level cleaning (choose Yes or No).
– Align cartridge: Select to align the print cartridge.● Bluetooth
– Device address: Some devices with Bluetooth wireless technology require you to enterthe address of the device they are trying to locate. This menu option shows the printeraddress.
– Device name: You can select a name for the printer that appears on other devices withBluetooth wireless technology when they locate the printer.
– Passkey: When the Bluetooth Security level of the printer is set to High, you must entera passkey to make the printer available to other Bluetooth devices. The default passkeyis 0000.
– Visibility: Select Visible to all (default) or Not visible. When Visibility is set to Notvisible, only devices that know the printer address can print to it.
– Security level: Select Low (default) or High. The Low setting does not require users ofother devices with Bluetooth wireless technology to enter the printer passkey. Highrequires users of other devices with Bluetooth wireless technology to enter the printerpasskey.
– Reset Bluetooth options: Select to reset all items in the Bluetooth menu to their defaultvalues.
Appendix B
62 HP Photosmart A610 series

● Help– Printing Tips I: Select to read about the auto image enhancement features of the printer.– Printing Tips II: Select to read tips that can help you obtain the best possible prints.– Panoramic photos: Select to read about printing panoramic photos.– Photo stickers: Select to read about printing photo stickers.– Memory cards: Select to read about using memory cards.– Cartridges: Select to read about using print cartridges.– Loading paper: Select to read about loading paper.– Paper jams: Select to read about removing a paper jam.– Camera connect: Select to read about connecting PictBridge cameras to the printer.– Traveling with the printer: Select to read tips about taking the printer on the road.– Getting assistance: Select to read how to obtain help with the printer.
● Preferences– Print quality: Select to change the print quality. Choose between Best (default) which
produces the highest quality, Normal, which uses less ink than Best and prints faster,and Fast Normal which produces faster prints with medium print quality.
– Paper type: Select to change the type of paper on which to print. Choose betweenHP Advanced or HP Premium photo paper. HP recommends HP Advanced Photo Paperfor best results.
– Date/time: Select to show a date/time stamp on your printed photos. Select Date/time,Date only, or Off (default).
– Colorspace: Select to choose a colorspace, which is a three-dimensional mathematicalmodel for organizing color. Choose between Adobe RGB, sRGB, or Auto-select(default). The Auto-select default tells the printer to use the Adobe RGB colorspace, ifavailable. The printer defaults to sRGB if Adobe RGB is not available.
– Borderless: Select to turn borderless printing On (default) or Off. When borderlessprinting is turned off, all pages print with a narrow white border around the outside edgesof the paper.
– After printing: Select to change whether selected photos are deselected after printing:Always (default), Never, or Ask.
– Preview animation: Select to turn preview animation On (default) or Off. Select Off tobypass printer screen animations.
– Video enhancement: Select to turn video enhancement On or Off (default).– Restore defaults: Select to restore printer defaults: Yes or No. Selecting Yes restores
the original factory preferences.– Language: Select to change the language or country/region setting. Choose from Select
language and Select country/region.
HP Photosmart A610 series User Guide 63

Appendix B
64 HP Photosmart A610 series

Index
Aaccessories 9, 39adaptive lighting 24after the support period 56aligning print cartridges 37alignment page 37antique coloration 21automobile adapter 39
Bbatteries
charge indicator 67compartment 9model 9
Bluetoothtroubleshooting 47wireless printer adapter 9
buttons 8
Ccalling HP support 55camera types 29cameras
photos do not print 47ports 4
carrying casemodel 10transporting printer 39
cartridges. See print cartridgesCD/DVD labels 23cleaning
print cartridges 35printer 35
CompactFlash 15computer
installing software 59system requirements 51
control panel 8cropping photos 21
Ddate and time stamps 21digital cameras. See camerasdocumentation, printer 3
Ee-mailing photos 26
error messages 48
Ffile formats, supported 52framing photos 21Frequently asked questions
41
GGetting help 41
HHelp 41Hewlett-Packard Company
notices 4HP Photosmart Share 26HP support 55
Iink cartridges. See print
cartridgesink level, checking 36, 67inserting memory cards 15
Llayout and photo size 18loading paper 13
MMemory card icon 17Memory cards
Removing 17memory cards
inserting 15supported types 15
Memory Sticks 15menu, printer 10, 61Microdrive 15MultiMediaCard 15
Ppanoramic mode 21paper
buying and choosing 13jams 45loading 13maintaining 13, 39
specifications 52trays 4troubleshooting 44
passport photos 23phone support 55phone support period
period for support 55photo fix 24photo stickers 22photos
antique coloration 21cropping 21date and time stamp 21e-mailing 26framing 21improving quality 24index 17printing 19red-eye removal 24selecting for print 18sepia tones 21viewing 17zooming 21
placing a call 55preferences 63print cartridges
aligning 37cleaning 35cleaning contacts 36storing 39testing 36
printeraccessories 9, 39cleaning 35documentation 3error messages 48menu 10, 61parts 4specifications 52storing 38transporting 39
printingCD/DVD tattoo 61help 63in panoramic mode 21index page 17multiple copies 18
HP Photosmart A610 series User Guide 65
multiple photos 18panoramic mode 18panoramic photos 61passport photos 23, 61photo stickers 22, 61photos 19test page 36thumbnails 17without computer 15
Qquality
photo paper 39photos 24print 26print test page 36troubleshooting 46
Questions and Answers 41
Rred-eye removal 24Removing a memory card 17
SSecure Digital 15sepia tones 21SmartFocus 24software, installing 59Sony Memory Sticks. See
Memory Sticksspecifications 51storing
photo paper 39print cartridges 39printer 38
support process 55system requirements 51
Ttest page 36thumbnails, printing 17transporting printer 9, 39trays, paper 4Troubleshooting 41troubleshooting
Bluetooth 47error messages 48flashing lights 41HP support 55paper problems 44quality problems 46
UUSB
ports 4specifications 52
Vvideo camera
icon on printer screen67
video clipprint a single frame from
23print nine frames from 23,
24supported file formats 54
viewing photos 17
Wwarranty 57
XxD-Picture Card 15
Zzooming and cropping 21
66 HP Photosmart A610 series
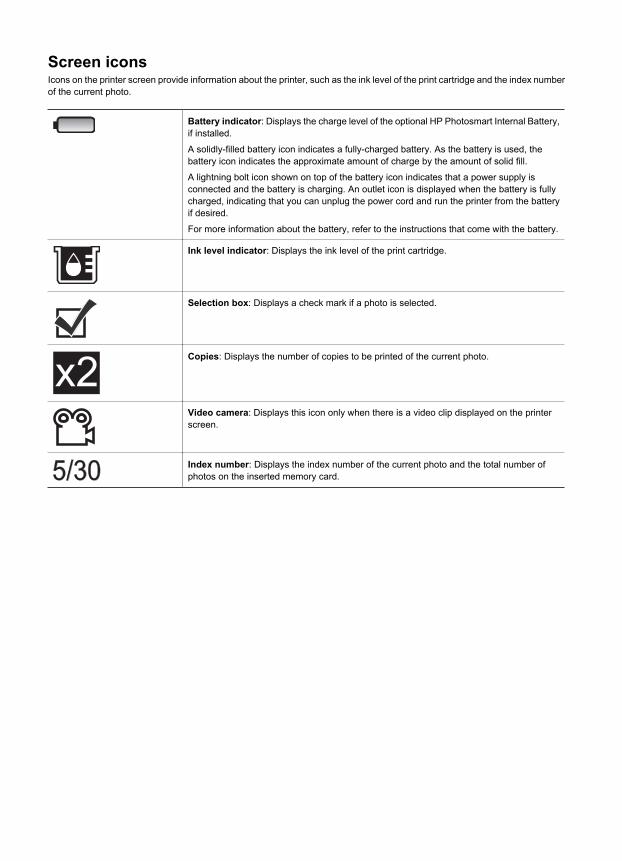
Screen iconsIcons on the printer screen provide information about the printer, such as the ink level of the print cartridge and the index numberof the current photo.
Battery indicator: Displays the charge level of the optional HP Photosmart Internal Battery,if installed.
A solidly-filled battery icon indicates a fully-charged battery. As the battery is used, thebattery icon indicates the approximate amount of charge by the amount of solid fill.
A lightning bolt icon shown on top of the battery icon indicates that a power supply isconnected and the battery is charging. An outlet icon is displayed when the battery is fullycharged, indicating that you can unplug the power cord and run the printer from the batteryif desired.
For more information about the battery, refer to the instructions that come with the battery.
Ink level indicator: Displays the ink level of the print cartridge.
Selection box: Displays a check mark if a photo is selected.
Copies: Displays the number of copies to be printed of the current photo.
Video camera: Displays this icon only when there is a video clip displayed on the printerscreen.
Index number: Displays the index number of the current photo and the total number ofphotos on the inserted memory card.