Embed Size (px)
Citation preview

hp officejet4100 seriesall-in-one
reference guide
copy Copyright Hewlett-Packard Company 2003All rights are reserved No part of the document may be photocopied reproduced or translated to another language without the prior written consent of Hewlett-Packard CompanyThis product incorporates Adobersquos PDF technology which contains an implementation of LZW licensed under US Patent 4558302
Portions Copyright copy 1989-2003 Palomar Software Inc The HP Officejet 4100 Series includes printer driver technology licensed from Palomar Software Inc wwwpalomarcom Copyright copy 1999-2003 Apple Computer IncApple the Apple logo Mac Mac logo Macintosh and Mac OS are trademarks of Apple Computer Inc registered in the US and other countriesPublication number Q1608-90163First edition June 2003Printed in USA Mexico Germany Singapore or China
Windowsreg Windows NTreg Windows MEreg Windows XPreg and Windows 2000reg are US-registered trademarks of Microsoft Corporation
Intelreg and Pentiumreg are registered trademarks of Intel Corporation
noticeThe information contained in this document is subject to change without notice and should not be construed as a commitment by the Hewlett-Packard Company
Hewlett-Packard assumes no responsibility for any errors that may appear in this document nor does it make expressed or implied warranty of any kind with regard to this material including but not limited to the implied warranties of merchantability and fitness for a particular purpose The Hewlett-Packard Company shall not be liable for incidental or consequential damages in connection with or arising out of the furnishing performance or use of this document and the program material which it describesNote Regulatory information can be found in the ldquoTechnical informationrdquo section of this guide
It is not lawful in many places to make copies of the following items When in doubt check with a legal representative firstbull Governmental paper or
documents- Passports- Immigration papers- Selective service papers- Identification badges cards or
insigniasbull Governmental stamps
- Postage stamps- Food stamps
bull Checks or drafts drawn on Governmental agencies
bull Paper currency travelerrsquos checks or money orders
bull Certificates of depositbull Copyrighted works
safety information
Warning To prevent fire or shock hazard do not expose this product to rain or any type of moisture
Always follow basic safety precautions when using this product to reduce risk of injury from fire or electric shock
Warning Potential shock hazard
1 Read and understand all instructions in the setup poster
2 Use only a grounded electrical outlet when connecting the unit to a power source If you do not know whether the outlet is grounded check with a qualified electrician
3 Observe all warnings and instructions marked on the product
4 Unplug this product from wall outlets before cleaning
5 Do not install or use this product near water or when you are wet
6 Install the product securely on a stable surface
7 Install the product in a protected location where no one can step on or trip over the line cord and where the line cord will not be damaged
8 If the product does not operate normally see the online Troubleshooting help
9 No operator-serviceable parts inside Refer servicing to qualified service personnel
10 Use in a well-ventilated area
Adobe and the Acrobat logo are either registered trademarks or trademarks of Adobe Systems Incorporated in the United States andor other countries
iii
contents
1 get help 1
2 quick start 3use your hp officejet with a computer 4
3 load originals and load paper 7load originals 7load paper 7load envelopes 9load 4 x 6 inch photo paper 10load postcards 10tips for loading other types of paper in the paper tray 11set the paper type 12set the paper size 12
4 use the copy features 13make copies 13perform special copy jobs 15copy options 16
5 use the scan features 17scan an original 17stop scanning 18
6 use the fax features 19send a fax 19receive a fax 21print reports 22control resolution and contrast 22change other fax settings 23set up speed dialing 26set basic fax settings using the front panel 27fax job menu 29setup menu for fax commands 29
7 maintain your hp officejet 31clean the glass 31clean the white strip 32clean the exterior 32work with print cartridges 32restore factory defaults 35set scroll speed 36set the prompt delay time 36self-maintenance sounds 36setup menu options 37
contents
hp officejet 4100 seriesiv
8 additional setup information 39possible installation problems 39remove and reinstall your hp officejet software 40connect your hp officejet to a phone modem or answering machine 41additional troubleshooting help 42
9 technical information 43physical specifications 43power specifications 43regulatory information 43
10 hp support 45get support and other information from the internet 45hp customer support 45prepare your unit for shipment 47hp distribution center 49
11 warranty information 51warranty service 51warranty upgrades 51returning your hp officejet for service 51hewlett-packard limited global warranty statement 51
index 55
1
1
get help
This Reference Guide contains information on using your HP Officejet and provides additional troubleshooting assistance for the installation process The Reference Guide also contains information on how to order supplies and accessories technical specifications support and warranty information
The table below lists additional sources of information for your HP Officejet
help description
Setup Poster The Setup Poster provides instructions for setting up and configuring your HP Officejet Make sure you use the correct poster for your operating system (Windows or Macintosh)
HP Photo amp Imaging Help
The HP Photo amp Imaging Help provides detailed information on using the software for your HP Officejet For Windows users Go to the HP Director and click HelpFor Macintosh users Go to the HP Director and click Help then click hp photo and imaging help
Troubleshooting help To access troubleshooting informationFor Windows users In the HP Director click Help Open the Troubleshooting book in the HP Photo amp Imaging Help then follow the links to general troubleshooting as well as links to Troubleshooting help that is specific to your HP Officejet Troubleshooting is also available from the Help button that appears on some error messagesFor Macintosh users Open the Apple Help Viewer click hp photo and imaging troubleshooting then click hp officejet 4100 series
Internet help and technical support
If you have Internet access you can get help from the HP website atwwwhpcomsupport
The website also provides answers to frequently-asked questions
Readme file After you install your software you can access the Readme file from either the HP Officejet 4100 Series CD-ROM or the HP Officejet 4100 Series program folder The Readme file contains late-breaking information that does not appear in the Reference Guide or the online help To access the Readme file do the followingFor Windows go to the Windows taskbar click Start point to Programs or All Programs (XP) point to Hewlett-Packard point to HP Officejet 4100 Series and then choose View the Readme FileFor Macintosh go to the HDApplicationsHP Officejet Software folder
Dialog-box help For Windows Clicking Help in a dialog box displays information about options and settings within the dialog box
hp officejet 4100 series
chapter 1
2
2
3
quick start
You can perform many functions using either the front panel or the HP Officejet software
Even if you do not connect your HP Officejet to a computer you can use the front panel to copy documents or photos and send a fax You can change a wide variety of settings using the front-panel buttons and menu system
front panel featuresReview the illustrations below and identify the location of the buttons on the front panel
1
2
3
4
5
678
9
10 11 12 13 14 15
button purpose
1 On turn the HP Officejet on or off
2 Left Arrow scroll through settings or to delete one character at a time from a text entry
3 Right Arrow scroll through settings
4 Enter select or save the displayed setting
5 Cancel stop a job exit a menu or exit settings
6 Start Color use to start a color copy scan or fax job
7 Start Black start a black and white copy scan or fax job
8 Keypad enter fax numbers names values or text
9 RedialPause start a fax redial or insert a hyphen when entering a phone number
hp officejet 4100 series
chapter 2
4
use your hp officejet with a computerIf you installed the HP Officejet software on your computer according to the Setup Poster you can access all the features of the HP Officejet using the HP Director
review the hp photo amp imaging directorThe HP Director is available through the desktop shortcut
for windows users
1 Do one of the followingndash Double-click the hp director icon on the desktopndash In the Windows taskbar click Start point to Programs or All Programs
(XP) point to Hewlett-Packard point to hp officejet 4100 series then choose hp photo amp imaging director
2 In the Select Device box click to see a list of installed HP devices
3 Select hp officejet 4100 seriesThe Director displays only the buttons that are appropriate for the selected device
the hp photo amp imaging director
10 Speed Dial access programmed speed dial entries
11 Setup access the menu system for reports fax settings and maintenance
12 Fax select the fax function
13 Scan select the scan function
14 Copy select the copy function
15 Photo Fit to Page enlarge a photo to fit a full-size sheet of paper
button purpose
1 2 3
4 5 6 7 8 9 10
reference guide
quick start
5
for macintosh users
Do one for the followingndash For OS 9 double-click the HP Photo and Imaging Director icon on the
desktopndash For OS X double-click the HP Photo and Imaging Director icon on the
dock
The following figure shows some of the features available through the HP Photo and Imaging Director for Macintosh Consult the legend for a brief explanation of a specific feature
feature purpose
1 Select Device Use this feature to select the product you want to use from the list of installed HP products
2 Settings Use this feature to view or change various settings for your HP device such as print scan or copy
3 Status Displays the status window for all-in-one devices only
4 Send a Fax Use this feature to send a fax and access fax settings
5 Scan Picture Scans an image and displays it in the HP Photo amp Imaging Gallery
6 Scan Document Scans text and displays it in the selected destination text editing software program
7 Make Copies Displays the Copy dialog box where you can select the copy quality the number of copies the color the size and can start a copy
8 View amp Print Displays the HP Photo amp Imaging Gallery where you can view and edit images use HP Photo Prints make and print a photo album e-mail an image unload an image to the Web or copy an image to another application
9 Help Provides access to HP Photo amp Imaging Help which provides software help a product tour and troubleshooting information
10 Click this arrow to access tool tips which explain each of the Director options
hp officejet 4100 series
chapter 2
6
the hp photo and imaging director for macintosh OS X
feature purpose
1 Select Device Use this feature to select the product you want to use from the list of installed HP products
2 Settings Use this feature to view or change various settings for your HP device such as print scan or copy
3 Scan Picture Scans an image and displays it in the HP Photo and Imaging Gallery
4 Scan Document Scans text and displays it in a text editing software program
5 Make Copies Displays the Copy dialog box where you can select the copy quality the number of copies the color the size and can start a copy
6 Send Fax Use this feature to send a fax
7 Maintain Printer Accesses the HP Inkjet Utility where you can clean and align the print cartridges check print cartridge ink levels print a test or sample page register your printer or access information on product support
8 View and Print Displays the HP Photo and Imaging Gallery where you can view and edit images
1 2
3 4 5 6 7 8
3
7
load originals and load paper
You can make copies from originals loaded on the automatic document feeder (ADF) You can also print and copy onto a variety of paper types weights sizes and transparency films It is important however that you choose the right paper and make sure that it is loaded correctly and not damaged
load originalsYou can copy or scan any original by placing it in the automatic document feeder
1 Load your original in the automatic document feeder
Note Do not feed photos smaller than 35-by-5 inches through the automatic document feeder
2 Slide the right and left paper guides in until they stop at the edges of the paper
load paperFollowing is the basic procedure for loading paper There are specific considerations for loading certain types of paper transparency film postcards and envelopes After you review this procedure see tips for loading other types of paper in the paper tray on page 11 load 4 x 6 inch photo paper on page 10 load envelopes on page 9 and load postcards on page 10
For best results adjust the paper settings each time you change paper types or paper sizes For more information see set the paper type on page 12
to load the paper tray
1 Lower the paper tray and extend the paper-tray extender
2 Slide the paper-width guide on the left to its outermost position
automatic document feeder (ADF)
hp officejet 4100 series
chapter 3
8
3 Tap the stack on a flat surface to align the edges of the paper and then check the paper for the followingndash Make sure it is free of rips dust wrinkles and curled or bent edgesndash Make sure all the paper in the stack is the same size and type unless
you are working with photo paper
4 Insert paper into the paper tray print-side down until it stops To avoid bending the paper make sure you do not push the paper in too far or push too hard If you are using letterhead insert the top of the page firstBe careful not to use too much or too little paper Check that the stack of paper contains several sheets but is no higher than the top of the paper-width guide
5 Slide the paper-width guide in until it stops at the edge of the paper Make sure that the paper stack lies flat in the paper tray and fits under the tab of the paper-width guide
6 Extend the output-tray
reference guide
load originals and load paper
9
load envelopesUse the print feature of your software to print to envelopes with your HP Officejet Do not use shiny or embossed envelopes or envelopes that have clasps or windows You can load the paper tray with one or multiple envelopes
1 Remove all paper from the paper tray
2 Slide an envelope into the tray with the envelope flap up and to the left (print-side down) until it stops
3 Adjust the paper-width guide against the envelope until it stopsBe careful not to bend the envelope If you are loading multiple envelopes make sure the envelopes fit within the tray (do not overload it)Consult the help files in your word processing software for details on how to format text for printing on envelopes
hp officejet 4100 series
chapter 3
10
load 4 x 6 inch photo paperFollowing is the procedure for loading 4-by-6 inch photo paper into your HP Officejet
1 Remove all paper from the paper tray and then slide a stack of photo paper into the tray until it stopsMake sure the print-side faces downIf the photo paper you are using has perforated tabs load the photo paper so that the tabs are closest to you
2 Adjust the paper-width guide against the stack of photo paper until it stopsMake sure the photo paper fits within the tray (do not overload it)
Note Make sure you set the paper type and paper size before printing See set the paper type on page 12 and set the paper size on page 12
load postcardsFollowing is the procedure for loading postcards
1 Remove all paper from the paper tray and then slide a stack of cards into the tray until they stopMake sure the print-side faces down
reference guide
load originals and load paper
11
2 Adjust the paper-width guide against the cards until it stops Make sure the cards fit within the tray (do not overload it)
tips for loading other types of paper in the paper trayThe following table provides guidelines for loading certain types of paper and transparency film For best results adjust the paper settings each time you change paper types and paper sizes For more information see set the paper type on page 12
Note HP Photo Paper and HP Photo Paper Glossy 4-by-6 are not recommended for printing with your HP Officejet To print photos use HP Everyday Photo Paper For your best photo printing needs use HP Premium Plus Photo Paper
paper tips
HP papers bull HP Premium Inkjet Paper Locate the gray arrow on the nonprinting side of the paper and then insert paper with the arrow side facing up
bull HP Premium or Premium Plus Photo Paper Load the glossy (print) side down (To prevent curling keep photo paper sealed in the original package until you are ready to use it) Always load at least five sheets of regular paper in the paper tray first and then place the photo paper on top of the regular paper
bull HP Premium Inkjet Transparency Film Insert the film so that the white transparency strip (with arrows and the HP logo) is on top and is going into the tray first
bull HP Inkjet T-shirt Transfer Iron-On Flatten the transfer sheet completely before using it do not load curled sheets (To prevent curling keep transfer sheets sealed in the original package until you are ready to use them) Manually feed one sheet at a time with the unprinted side facing down (the blue stripe faces up)
bull HP Matte Greeting Cards HP Glossy Greeting Cards or HP Felt-Textured Greeting Cards Insert a small stack of HP greeting-card paper with the print-side down into the paper tray until it stops
hp officejet 4100 series
chapter 3
12
set the paper typeIf you want to use a different type of paper such as photo paper transparency film Iron-On T-shirt transfers or brochures simply load that paper in the paper tray You must then change the paper type settings to ensure the best print quality
HP recommends paper type settings according to the type of paper you are using
This setting refers to copy options only If you want to set the paper type for printing from a computer set the properties in the Print dialog box of the software
1 Press the Copy button until Paper Type appears
2 Press until the appropriate paper type appears
3 Press Enter to choose the displayed paper type
set the paper sizeThe HP Officejet can use Letter Legal or A4 paper Use the following procedure to set the paper size for copy options
1 Press the Copy button until Copy Paper Size appears
2 Press until the appropriate paper size appears
3 Press Enter to choose the displayed paper size
To avoid jams remove papers from the output tray frequently The output tray capacity is affected by the type of paper and the amount of ink you are using For more information about output-tray capacity see technical information in the HP Photo amp Imaging Help
Labels(works only with printing)
bull Always use letter-size or A4-size label sheets designed for use with HP inkjet products (like Avery Inkjet Labels) and make sure that the labels are not over two years old
bull Fan the stack of labels to make sure none of the pages are sticking together
bull Place a stack of label sheets on top of standard paper in the paper tray print-side down Do not insert labels one sheet at a time
Postcards (works only with printing)
Insert a stack of postcards or hagaki cards with the print-side down into the paper tray until it stops Line the postcards up on the right side of the paper tray slide the paper-width guide up against the left side of the cards until it stops
4-by-6 inch photo paper (works only with printing)
Insert the photo paper with the print-side down into the paper tray until it stops Place the long edge of the photo paper against the right side of the paper tray and slide the paper-width guide up against the long edge of the photo paper until it stops If the photo paper you are using has perforated tabs load the photo paper so that the tabs are closest to you
paper tips
4
13
use the copy features
The copy features let you do the following
bull Produce high-quality color and black-and-white copiesbull Reduce or enlarge the size of the copies you make from 25 to 200 or
50 to 200 (depending on your model) of the copyrsquos original sizebull Make the copy lighter or darker select the number of copies and specify
the quality of the copies you makebull Use special copying features to make high-quality copies of photos using
special photo paper or to create transparencies
make copiesYou can make copies using the front panel of your HP Officejet or by using the HP Officejet software on your computer Many copy features are available using either method However you may find that the software offers easier access to special copy features
All copy settings that you select on the front panel are reset two minutes after the HP Officejet completes the copy unless you save the settings as the default settings as described in change settings for all copy tasks on page 15
make a copy1 Load the paper tray with the appropriate paper
2 Load your original
3 Press the Copy button
4 Use the keypad or press the or to enter the number of copies
5 Press Start Black or Start Color
Tip To make a single copy press the Copy button and then press Start Black or Start Color
Note Make sure that the color print cartridge is installed in your HP Officejet Both print cartridges must be installed when making a copy
increase copy speed or qualityThe HP Officejet provides three options that affect copy speed and quality
bull Best produces the highest quality for all paper types Best copies more slowly than the other quality settings
bull Normal delivers high-quality output and is the recommended setting for most of your copying Normal copies faster than Best
bull Fast copies faster than the Normal setting The text is of comparable quality to the Normal setting but the graphics may be of lower quality Using Fast also reduces the frequency of replacing your print cartridges because it uses less ink
hp officejet 4100 series
chapter 4
14
1 Load your original
2 Press Copy until Copy Quality appears
3 Press until the desired quality setting appears and then press Enter to select it
4 Press Start Black or Start Color
set the number of copies You can set the number of copies using the front panel
1 Press the Copy button
2 Use the keypad or press the or to enter the number of copies
3 Press Enter
4 Press Start Black or Start Color
Tip If you hold down the right arrow button then after reaching 10 the number of copies changes by increments of five to make it easier to set a large number of copies
reduce or enlarge a copyYou can reduce or enlarge a copy of an original using ReduceEnlarge
For more information about additional copy options such as Fit to Page see perform special copy jobs on page 15
1 Press Copy until ReduceEnlarge appears
2 Press until the appropriate ReduceEnlarge option appears and then press Enter to select it
3 If you select Custom 100 Set Custom Size appears Use the arrow keys or type a percentage on the keypad
4 Press Enter when the desired percentage is displayed
5 Press Start Black or Start Color
make copies lighter or darkerUse LighterDarker to adjust the lightness and darkness of the copies you make
1 Press Copy until LighterDarker appearsThe range of LighterDarker values are represented as circles on a scale on the front-panel display
2 Press to lighten the copy or to darken it The circle moves to the left or right depending on the arrow button you press
3 Press Enter to select the setting
4 Press Start Black or Start Color
enhance text sharpness and photo colorsYou can use Text to sharpen edges of black text Photo to enhance light colors in your photographs or Mixed if your original contains a photograph and text You can also select None to turn off all enhancements
reference guide
use the copy features
15
Text enhancement is the default option You can turn off Text enhancement by selecting Photo Mixed or None if the following occur
bull Stray dots of color surround some text on your copiesbull Large black typefaces look splotchy (not smooth)bull Thin colored objects or lines contain black sectionsbull Horizontal grainy or white bands appear in light- to medium-gray areas
1 Press Copy until Enhancements appears
2 Press until the desired enhancement (Text Photo Mixed or None) appears
3 Press Enter to select the setting
4 Press Start Black or Start Color
change settings for all copy tasksSave the copy settings you use most often by setting them as the default This includes changes to Copy options such as Paper Type and Paper Size as well as other Copy settings on the front panel such as Number of Copies and Copy Quality
1 Make any desired changes to the copy options
2 Press Copy until Set New Defaults appears
3 Press until Yes appears
4 Press Enter to set the options as a defaultYour settings are saved
perform special copy jobsIn addition to supporting standard copying your HP Officejet can also copy a photo or fit a copy to the page
copy a photoWhen copying a photo you should select options for the correct paper type and photo enhancement
1 Load the photo in the automatic document feeder (ADF)For more information see load originals
2 If you are using photo paper load it in the paper tray
3 Press Copy until Paper Type appears
4 Press until Premium Photo appears and then press Enter to select it
5 Press Copy until Enhancements appears
6 Press until Photo appears and then press Enter to select it
7 Press Start Black or Start Color
Tip To enlarge a photo automatically to a full page use the Photo Fit to Page button
hp officejet 4100 series
chapter 4
16
fit a copy to the pageUse the Photo Fit to Page button when you want to automatically enlarge or reduce your original to fit Letter or A4 size paper You can enlarge a small photo to fit a full-size page as shown below Using Photo Fit to Page may prevent unwanted cropping of text or images around the margins
1 Load the original in the ADFFor more information see load originals on page 7
2 Press the Photo Fit to Page button
Note Do not press the Fax Copy or Scan buttons on the front panel once you have pressed the Photo Fit to Page button
3 Press until the appropriate paper type appears and then press Enter to select it
4 Press Start Black or Start Color
copy optionsThe following diagram shows the options that are available when you press Copy
Original Fit to Page
Plain PaperPhoto PaperTransparency
Actual sizeCustom 100Full Page 91Legal gt Ltr 72
ReduceEnlarge Paper Type
NoYes
TextPhotoMixedNone
Enhancements Set New Defaults
LetterLegalA4
Copy Paper Size
The sizes vary by countryregion
LighterDarker
NormalFastBest
Copy Quality
To cycle through the copy options press Copy repeatedly
Press and to move to the setting you want within one of the copy optionsPress Enter to select the displayed setting
5
17
use the scan features
Scanning is the process of converting pictures and text into an electronic format for your computer You can scan photos and text documents
Because the scanned image or text is in an electronic format you can bring it into your word processor or graphics program and modify it to suit your needs You can do the following
bull Scan photos of your kids and e-mail them to relatives create a photographic inventory of your house or office or create an electronic scrapbook
bull Scan text from an article into your word processor and quote it in a report saving you a lot of retyping
Tip To use the scan features your HP Officejet and computer must be connected and turned on The HP Officejet software must also be installed and running on your computer prior to scanning To verify that the HP Officejet software is running on Windows look for a status icon in the system tray On a Macintosh the HP Officejet software is always running
Note High resolution scanning (600 dpi or higher) requires a large amount hard disk space If there is not enough hard disk space available your system may stall
scan an originalYou can start a scan from your HP Officejet or from the HP Officejet software on your computer
For more information about scanning your pictures or documents from the HP Officejet software see scan pictures and documents in the HP Photo amp Imaging Help
to scan an original from your hp officejet
1 Load your original in the automatic document feeder (ADF)For more information see load originals on page 7
2 Press Scan
3 Select the Scan to destination by pressing or or by pressing the Scan button repeatedlyThe default destination is the HP Photo amp Imaging Gallery Any applications on your computer that are supported by the HP Officejet also appear in the Scan to list
4 Press Start Black or Start ColorThe original is scanned and the image is sent to selected destinationFor more information about using the HP Photo amp Imaging Gallery see manage images in how to use the software
hp officejet 4100 series
chapter 5
18
stop scanningYou can stop a scan by pressing the Cancel button located on the front panel
6
19
use the fax features
Using your HP Officejet you can
bull Send and receive paper faxesbull Send computer faxes (reference the HP Photo amp Imaging Help)bull Send and receive color faxes
Fax features are available only on some HP Officejets
send a faxYou can send a fax in a variety of configurations These include the following
bull send a paper fax (using the front panel or computer)bull send a paper fax with a PC-generated cover page (using the computer)bull send a file with or without a cover page (using the computer)bull send a PC-generated cover page as a single-page fax (using the
computer)
Note For information on sending a fax using the computer reference the HP Photo amp Imaging Help
Note By default your HP Officejet prints a report only if there is a problem with sending or receiving a fax A confirmation message indicating whether an item was successfully sent appears briefly on the front-panel display after each transaction If you need printed confirmation that your faxes are successfully sent see print reports on page 22 for information about report options
Note If you have not done so set the date and time See set the date and time on page 27
send a fax from your hp officejet1 Load your originals in the ADF
For more information see load originals on page 7
2 Enter the fax number using the keypad or press Speed Dial until the desired speed-dial entry appearsFor more information on speed dialing see set up speed dialing in the HP Photo amp Imaging Help
3 Press Start Black or Start Color
change settings and use speed dials before sending a fax1 Load your originals in the ADF
For more information see load originals on page 7
2 Enter the fax number using the keypad or press Speed Dial until the desired speed-dial entry appears
hp officejet 4100 series
chapter 6
20
For more information on speed dialing see set up speed dialing in the HP Photo amp Imaging Help
3 Press Enter
4 Press Fax to scroll through the fax options
5 When you reach the option whose setting you wish to change press to scroll through the setting options
6 When you reach the setting you want to change press Enter to accept the setting
7 Press Start Black or Start Color
send a color faxYou can send and receive color faxes to and from other color fax machines If you are faxing from the front panel and your HP Officejet determines that the recipient has a black-and-white fax unit it sends the fax in black and white If you are faxing from the software and your HP Officejet determines that the recipient has a black-and-white fax unit the HP Officejet prompts you to try sending the fax in black and white
We recommend that you use only color originals for color faxing The color originals must be loaded in the ADF you cannot send a color fax from memory using the scan and fax features To fax in color to multiple recipients send the fax from the Director or your software program
to send a color fax from the front panel
1 Load your originals in the ADF For more information see load originals on page 7
2 Enter the fax number using the keypad or press Speed Dial until the desired speed-dial entry appearsFor more information on creating speed-dial entries see set up speed dialing in the HP Photo amp Imaging Help
3 Press Start Color
schedule a faxYou can schedule a black and white fax to be sent later during the same day (for example when telephone lines are not as busy) If you use the front panel you can select a single recipient
When the specified time is reached your fax is automatically sent as soon as a connection can be made
1 Load your originals in the ADF
2 Enter the fax number using the keypad or press Speed Dial until the desired speed-dial entry appears
3 Press Enter
4 Press Fax to scroll through the fax options
5 Stop scrolling when you reach the How to Fax menu
6 Press to scroll through the setting options
7 Stop scrolling when you reach the Send Fax Later option
reference guide
use the fax features
21
8 Press Enter
9 Enter the Send Time using the numeric keypad
10 At the prompt press 1 for AM or 2 for PM
11 When Store Fax Now appears press 1 for Yes or 2 for NoIf 1 is selected the document is scanned to memory and is sent at the selected time If 2 is selected and you havenrsquot loaded your originals a message appears reminding you to load the original before the send time
12 Press Start Black
cancel a scheduled faxYou can cancel a fax stored in memory or one that is currently in progress
bull Press Cancel to cancel the scheduled fax
receive a faxYour HP Officejet is set to print received faxes automatically If you receive a legal-size fax and your HP Officejet is not currently configured to use legal-sized paper the unit automatically reduces the fax so that it fits on the paper that is loaded For more information see set automatic reduction on page 25
If you have an answering machine connected to the same line as your HP Officejet you may need to set the number of rings required before the HP Officejet begins receiving the fax The default number of rings before the HP Officejet receives a fax is 5
set the number of rings before answeringYou can specify how many rings should occur before your HP Officejet automatically answers the phone When you run the Fax Setup Wizard this is set automatically
If you do not want your HP Officejet to answer the phone Rings to Answer should be set to No Answer
1 Press Setup
2 Press 3 then press 3 againThis selects the Basic Fax Setup menu then the Rings to Answer option
3 Use the arrow keys to choose the number of rings and then press Enter
receive a fax manuallyBefore manually receiving a fax we recommend that you remove any originals from your HP Officejet so that they are not accidentally processed
Verify that Rings to Answer is set to No Answer
1 When your HP Officejet rings pick up the handset of a telephone that is on the same telephone line as your HP Officejet
2 If you hear fax tones press Start Black or Start Color or if you are receiving from an extension phone (on the same telephone line as your HP Officejet but not connected directly to it) press 1 2 3 on your phone
3 After you are finished hang up the telephone
hp officejet 4100 series
chapter 6
22
print reportsYou can set up your HP Officejet to print error reports and confirmation reports for each fax you send and receive You can also manually print reports as you need them
generate reports automaticallyThis setting lets you configure your HP Officejet so that it automatically prints error and confirmation reports
1 Press Setup
2 Press 1 then press 5This selects Print Report then selects Automatic Reports Setup
3 Press to scroll through the following report typesndash Every Error which prints whenever there is any kind of fax error
(default)ndash Send Error which prints whenever there is a transmission errorndash Receive Error which prints whenever there is a receiving errorndash Every Fax which confirms every time a fax is sent or receivedndash Send Only which prints every time a fax is sentndash Off which does not print fax reports
4 When you reach the report that you want press Enter
generate reports manuallyThis setting lets you print reports manually From the computer you can only print the Speed-Dial List and the Fax Log
to print reports from the front panel
1 Press Setup then press 1This selects the Print Report menu
2 Press to scroll through the following report typesndash Last Transaction which prints details of the last fax transactionndash Fax Log which prints a log of the last 30 fax transactionsndash Speed Dial List which prints a list of programmed speed dialsndash Self-Test Report which prints a report to assist you in diagnosing print
and alignment problems For more information see print a self-test report on page 32
ndash Automatic Reports Setup which is the automatic reports setting described in generate reports automatically on page 22
3 When you reach the report that you want press Enter
control resolution and contrastYour HP Officejet lets you change the resolution and contrast of documents that you are sending
change resolutionResolution affects the transmission speed and quality of faxed documents
reference guide
use the fax features
23
to change the resolution from the front panel
1 Load your originals in the ADF
2 Enter the fax number using the keypad or press Speed Dial until the desired speed-dial entry appears
3 Press Enter
4 Press Fax to scroll through the fax options
5 Stop scrolling when you reach the Resolution menu
6 Press until the desired resolution quality appears (Standard Photo Fine Very Fine)
7 Press EnterYour HP Officejet only faxes at the highest resolution supported by the receiving faxIf you choose Photo be aware that the faxing process takes longer to complete When faxing photographs we recommend that you choose Photo
change contrastChange this setting if you want a black-and-white fax to be darker or lighter than the original
to change the fax contrast from the front panel
1 Load your originals in the ADF
2 Enter the fax number using the keypad or press Speed Dial until the desired speed-dial entry appears
3 Press Enter
4 Press Fax to scroll through the fax options
5 Stop scrolling when you reach the LighterDarker menuThe range of values appears as a circle on a scale on the display
6 Press to lighten the fax or to darken itThe circle moves left or right as you press a button
7 Press Enter to accept the setting you selected
change other fax settings
redial a number automaticallyYou can set your HP Officejet to redial a busy and an unanswered number automatically If you initiated a fax from the computer the computer must be left on for the redialing process to work correctly
1 Press Setup
2 Press 4This selects the Advanced Fax Setup menu
3 Choose one of the following optionsndash Press 3
hp officejet 4100 series
chapter 6
24
This selects the Busy Redial option The default setting for Busy Redial is Redial
ndash Press 4This selects the No Answer Redial option The default setting for No Answer Redial is No Redial
4 Press Enter
5 Press to select Redial or No Redial as desired
6 Press Enter
forward faxes to another numberWith fax forwarding you can send a fax that you receive to another fax number during the next 24-hour period
to forward faxes from the front panel
1 Press Setup
2 Press 3 then press 7This selects the Basic Fax Setup menu then selects the Fax Forwarding Black Only option
3 At the prompt enter the Fax Number to which you wish to send the fax
4 Press Enter
5 Enter the Start Date using the numeric keypad
6 Enter the Start Time using the numeric keypad
7 At the prompt press 1 for AM or 2 for PM
8 Enter the Stop Date using the numeric keypadFax Forwarding On appears on the display
edit or cancel fax forwardingOnce fax forwarding is enabled you may find that you need to change the number you are faxing to or the start and stop times you entered You may wish to cancel your fax forwarding setup altogether Follow the steps below to edit or turn off fax forwarding
to edit fax forwarding from the front panel
1 Press Setup
2 Press 3 then press 7This selects the Basic Fax Setup menu then selects the Fax Forwarding Black Only option
3 Forwarding is ON 1=Edit 2=Cancel appears on the display after a moment Press 1 to edit the number you wish to fax to or to change the start and stop times Follow the messages on the display
to cancel fax forwarding from the front panelbull Press Cancel
OR
reference guide
use the fax features
25
Follow the steps in edit or cancel fax forwarding on page 24 When Forwarding is ON 1=Edit 2=Cancel appears on the display press 2 to cancel fax forwarding
use error correction modeError Correction Mode (ECM) eliminates data lost due to poor phone lines by detecting errors that occur during transmission and automatically requesting retransmission of the erroneous portion Phone charges are unaffected or may even be reduced on good phone lines On poor phone lines ECM increases sending time and phone charges but sends the data much more reliably Turn ECM off (the default setting is on) only if it increases phone charges substantially and you can accept poorer quality in exchange for reduced charges
to change the ECM setting from the front panel
1 Press Setup
2 Press 4 then press 7This selects the Advanced Fax Setup menu then selects the Error Correction Mode option
3 Press to switch between On and Off
4 Press Enter to accept the setting you selected
set automatic reductionThis setting determines what your HP Officejet does if it receives a fax that is too large for the default paper size With this setting on (the default) the image is reduced so that it fits on one page With this feature off information that doesnrsquot fit on the first page is printed on a second page
1 Press Setup
2 Press 4 then press 5This selects the Advanced Fax Setup menu then selects the Automatic Reduction option
3 Press to switch between On and Off
4 Press Enter to accept the setting you selected
adjust the volumeYour HP Officejet provides three levels for adjusting the ring and speaker volume The ring volume is the volume of the phone ringer The speaker volume is the volume of everything else such as the dial and fax tones The default setting is Soft
1 Press Setup
2 Press 3 then press 6This selects the Basic Fax Setup menu then selects the Ring and Beep Volume option
3 Press to select one of the options Soft Loud or Off
4 Press Enter to accept the setting you selected
hp officejet 4100 series
chapter 6
26
change the answer ring pattern (distinctive ringing)Distinctive ringing is a feature offered by phone companies that allows several phone numbers to share the same line Each number has a specific ring pattern If you do not have this service use the default ring pattern which is All Rings
If you connect your HP Officejet to a line with distinctive ringing have your telephone company assign one ring pattern to voice calls and another to fax calls (double or triple rings are best for a fax number)
1 Press Setup
2 Press 4 then press 2This selects the Advanced Fax Setup menu then selects the Answer Ring Pattern option
3 Press to scroll through these options All Rings Single Rings Double Rings Triple Rings and Double amp Triple
4 When the ring pattern that the phone company established for this number appears press Enter
Tip We recommend that you use Double Rings or Triple Rings for fax
set up speed dialingThrough your HP Officejet or your computer you can assign entries to fax numbers you use often This lets you dial those numbers quickly using the front panelrsquos Speed Dial button and a one- or two-digit entry You can create up to 100 individual speed-dial entries (the maximum for some models is 70)
We recommend that you use the software to set up speed-dial settings
Note A speed-dial entry can only be associated with one phone number speed-dial groups are not supported
For more information see set up speed dialing in the hp photo amp imaging help
create individual speed-dial settingsYou can enter fax numbers that you will reuse frequently
1 Press Setup
2 Press 2 then press 1This selects the Speed Dial Setup menu then selects the Individual Speed Dial option
3 Press EnterThe first unassigned speed-dial entry appears on the display
4 Press Enter to select the displayed speed-dial entry
5 Enter the Fax Number to assign to that entry then press EnterThe fax number can be up to 50 digits in length
Tip To enter a three-second pause within a number sequence press Symbols to display a dash
6 Enter the personrsquos or companyrsquos name then press Enter
reference guide
use the fax features
27
The name is limited to 13 characters in lengthFor more information see enter text on page 28
7 After Enter Another appears press 1 (Yes) if you want to set up another number or press 2 (No) to exit
delete speed-dial settingsFollow these steps to delete an individual speed-dial entry
1 Press Setup
2 Press 2 then press 2 againThis selects Speed Dial Setup then selects Delete Speed Dial
3 Press until the individual entry that you want to delete appears then press Enter
set basic fax settings using the front panelWe recommend that you use the Fax Setup Wizard in the HP Officejet software to configure all your basic fax settings however you can also access these settings from the front panel
Note In the US regulations require that your name and phone number appear on every fax The minimum settings that we recommend are described in the following topics
set the date and timeFollow these steps to set the date and time manually
1 Press Setup
2 Press 3 then press 1This selects the Basic Fax Setup menu then selects the Date and Time option
3 Follow the prompts on the display to enter the date and time using the keypad
Tip Use only the last two digits for the year
Tip When you enter a single-digit date or time type a leading zero before the single digit for example 0345 or 08-03-02
After you are done the date and time appear on the display
Warning Cutting off power to the HP Officejet causes the selected date and time to be lost However name and fax number information is not lost
set the fax headerFollow these steps to enter your name and fax number in the header
Note In Hungary the subscriber identification code (fax header) can be set or changed only by authorized personnel For more information contact your authorized HP dealer
1 Press Setup
2 Press 3 then press 2
hp officejet 4100 series
chapter 6
28
This selects the Basic Fax Setup menu then selects the Fax Header option
3 Enter your personal or company name at the prompt Use the guidelines provided in the next section under enter text
4 Press Enter
5 Enter your fax number using the numeric keypad
6 Press Enter
enter textThe following list provides tips for entering text using the front-panel keypad
bull Press the keypad numbers that correspond to the letters of a name
bull Press a button multiple times to see a letter first in uppercase and then in lowercase
bull After the correct letter appears press and then press the number that corresponds to the next letter in the name Again press multiple times until the correct letter appears
bull To insert a space press Space ()bull To enter a symbol such as press Symbols () to scroll through the list of
available symbolsbull If you make a mistake press to clear it and then make the correct
entrybull After you are done entering text press Enter to store your entries
check for dial toneBefore using the fax features verify that the connections are correctly established
1 Press Fax
2 Listen for a dial tone
3 If you do not hear a dial tone check the connections
4 Press Cancel to hang up
ABC These letters correspond to this number and so on
2
JKL To get this character J j K k L l 5
5 Press 5 this many times 1 2 3 4 5 6 7
reference guide
use the fax features
29
fax job menuThe following options become available when the Fax button is pressed
setup menu for fax commandsThe following fax settings are available in the Setup menu
Enter Fax or Speed Dial
FineVery FinePhotoStandard
Fax Number Resolution LighterDarker
Enter a fax number or speed dialWhen the Fax button is pressed
Press and to move to the option you wantPress Enter to select the displayed setting
NoYes
Set New Defaults
Send Fax NowFax from MemorySend Fax LaterPoll to Receive
How to Fax
1Automatic Reports Setup
2Answer Ring Pattern
3Busy Redial
4No Answer Redial
5Automatic Reduction
6Backup Fax Reception
7Error Correction Mode
3Basic Fax Setup 4Advanced Fax Setup
Press Setup to display the menu options
Press and to move to the setting you wantPress Enter to select the displayed setting
1Date and Time
2Fax Header
3Rings to Answer
4Paper Size
5Tone or Pulse Dialing
6Ring and Beep Volume
7Fax Forwarding Black Only
2Speed Dial Setup
1Individual Speed Dial
2Delete Speed Dial
3Print Speed Dial List
hp officejet 4100 series
chapter 6
30
7
31
maintain your hp officejet
This section provides instructions for keeping your HP Officejet in top working condition Perform these maintenance procedures as necessary
clean the glassDirty glass from dust smudges hair and so on slows down performance and affects the accuracy of features such as Fit to Page and Copy
1 Turn off the unit unplug the power cord and raise the scanner lid
2 Clean the glass with a soft cloth or sponge slightly moistened with a nonabrasive glass cleaner
Caution Do not use abrasives acetone benzene or carbon tetrachloride on the glass these can damage it Do not place liquids directly on the glass They may seep under it and damage the unit
3 Dry the glass with a chamois or cellulose sponge to prevent spotting
hp officejet 4100 series
chapter 7
32
clean the white stripMinor debris can accumulate on the white strip located underneath the scannerrsquos lid
1 Turn off the unit unplug the power cord and raise the scanner lid
2 Clean the white strip with a soft cloth or sponge slightly moistened with a mild soap and warm water
3 Wash the strip gently to loosen debris do not scrub the strip
4 Dry the strip with a chamois or soft cloth
Caution Do not use paper-based wipes as these may scratch the strip
5 If this does not clean the strip well enough repeat the previous steps using isopropyl (rubbing) alcohol and wipe the strip thoroughly with a damp cloth to remove any residual alcohol
clean the exterior Use a soft damp lint-free cloth to wipe dust smudges and stains off the case The interior of the unit does not require cleaning Keep fluids away from the interior of the unit as well as the front panel
work with print cartridgesTo ensure the best print quality from your HP Officejet you will need to perform some simple maintenance procedures and when prompted by a front-panel message replace the print cartridges
print a self-test reportIf you are experiencing problems with printing before cleaning or replacing the print cartridges you should print a Self-Test Report This report provides useful information about your print cartridges including status information
1 Press Setup
2 Press 1 then press 4This selects Print Report and then selects Self-Test Report
3 Press Start Black or Start ColorA Self-Test Report is printed for your HP Officejet
handle print cartridgesBefore you replace or clean a print cartridge you should know the part names and how to handle the print cartridge
reference guide
maintain your hp officejet
33
replace the print cartridgesFront-panel messages appear to let you know that you should replace your print cartridges
See order print cartridges on the back cover for information on ordering replacement print cartridges
1 Turn on the unit then lift open the print cartridge access doorThe print carriage moves into view
2 After the carriage stops moving push down on the print cartridge down to release it and then pull it toward you out of its slot
Plastic tape with pink tab(must be removed)
Copper contactsInk nozzles under tape
Do not touch the copper contacts or the ink nozzles
print cartridge access door
hp officejet 4100 series
chapter 7
34
Note It is normal to see ink build-up in the print cartridge slots
3 Remove the new print cartridge from its packaging and being careful to touch only the bright pink plastic tab gently remove the plastic tape to uncover the ink nozzles
Caution Do not touch the copper contacts or ink nozzles
Once you have removed the plastic tape install the print cartridge immediately to prevent the ink from drying in the nozzles
4 Push the new print cartridge into the appropriate slot at a slight angle until it clicks into place
Caution Do not attempt to push the cartridge straight into the slot It must slide in at a slight angle
The tri-color print cartridge goes on the left and the black cartridge goes on the right
5 Close the print cartridge access door
reference guide
maintain your hp officejet
35
align the print cartridgesThe HP Officejet prompts you to align cartridges every time you install or replace a print cartridge Aligning the cartridges ensures high-quality output
To align the print cartridges when prompted
1 Press Enter on the front panelAn align cartridges (test pattern) page prints
2 Load the align cartridges page face down in the ADF between the paper-width guides and press the Enter button again
3 Recycle or discard the page
To align the cartridges at any other time
1 Press Setup
2 Press 5 then press 2This selects the Maintenance menu and then selects the Align Print Cartridge option
3 Press EnterAn align cartridges (test pattern) page prints
4 Load the align cartridges page face down in the ADF between the paper-width guides and press the Enter button again
5 Recycle or discard the page
clean the print cartridgesUse this feature when the Self-Test Report shows streaking or white lines through any of the colored bars Do not clean print cartridges unnecessarily This wastes ink and shortens the life of the ink nozzles
1 Press Setup
2 Press 5 then press 1This selects the Maintenance menu and then selects the Clean Print Cartridge optionA page of patterns is printed The cartridges are cleaned Recycle or discard the pageIf copy or print quality still seem poor after you clean the print cartridges replace the print cartridge that is affected
restore factory defaultsYou can restore the original factory settings to what they were when you purchased your HP Officejet Choosing to restore your factory defaults restores all settings except date information and any scan settings you may have set
You can perform this process from the front panel only
1 Press Setup
2 Press 5 then press 3This selects Maintenance and then selects Restore Factory DefaultsThe factory default settings are restored
hp officejet 4100 series
chapter 7
36
set scroll speedThe Scroll Speed option lets you control the rate that text messages appear in the front-panel display You can choose Normal Fast or Slow The default is Normal
1 Press Setup
2 Press 5 then press 6This selects Maintenance and then selects Set Scroll Speed
3 Press until the desired speed appears then press Enter
set the prompt delay timeThe Prompt Delay option lets you control the amount of time before a message is displayed in the front-panel display You can choose Normal Fast or Slow The default is Normal
1 Press Setup
2 Press 5 then press 7This selects Maintenance and then selects Set Prompt Delay Time
3 Press until the delay time appears then press Enter
self-maintenance sounds During the life of your product you may hear various mechanical sounds This is a normal part of your unitrsquos self-maintenance
reference guide
maintain your hp officejet
37
setup menu optionsThe following options are available from the Setup button
1Last Transaction
2Fax Log
3Speed Dial List
4Self-Test Report
5Automatic Reports Setup
1Print Report
Use Setup to display the Print Report Speed Dial Setup Basic Fax Setup Advanced Fax Setup and Maintenance options
Press and to move to the setting you wantPress Enter to select the displayed setting
1Clean Print Cartridges
2Align Print Cartridges
3Restore Factory Defaults
4Reprint Faxes in Memory
5Set Language amp CountryRegion
6Set Scroll Speed
7Set Prompt Delay Time
5Maintenance2Speed Dial Setup
3Basic Fax Setup
4Advanced Fax Setup
1Individual Speed Dial
2Delete Speed Dial
3Print Speed Dial List
1Date and Time
2Fax Header
3Rings to Answer
4 Paper Size
5Tone or Pulse Dialing
6Ring and Beep Volume
7Fax Forwarding Black Only
1Automatic Reports Setup
2Answer Ring Pattern
3Busy Redial
4No Answer Redail
5Automatic Reduction
6Backup Fax Reception
7Error Correction Mode
hp officejet 4100 series
chapter 7
38
8
39
additional setup information
During the installation of the HP Officejet software a number of windows are displayed You should see the following
bull Installingbull Copying files bull A request to plug in the HP Officejetbull Green OK and check markbull Request to restart your computer (may not occur in all cases)bull Registration
If you did not see all of these windows there may be a problem with the installation Verify the following
bull The HP Director contains six icons (double-click the HP Director icon on the desktop)
bull The HP Officejet is listed in the Printers dialog boxbull There is an icon for the HP Officejet in the System Tray that indicates the
HP Officejet is ready
If the HP Director does not show six icons you may need to wait a few minutes for the HP Officejet to connect to your computer
possible installation problemsIf nothing appears on your computer screen after you insert the HP Officejet 4100 Series CD-ROM into your computerrsquos CD-ROM drive
1 From the Start menu choose Run
2 In the Run dialog box enter dsetupexe (if your CD-ROM drive is not assigned to drive letter d use the appropriate drive letter) then click OK
If the HP Director does not contain six icons do the following
bull Verify that the front-panel cover is attached then unplug the HP Officejet and plug it in again
bull Verify that the USB and power cables are plugged inndash Unplug the USB cable and plug it in againndash Do not attach the USB cable to a keyboard or nonpowered hubndash Verify that the USB cable is 3 meters or less in lengthndash If you have several USB devices attached to your computer you may
want to unplug the others during the installation
Note AppleTalk is not supported
bull Unplug the HP Officejet from the wall and plug it in againbull Restart your computer
hp officejet 4100 series
chapter 8
40
On Windows check the System Tray for applications that are running in the background and close them before restarting your computer
remove and reinstall your hp officejet softwareIf six icons do not appear in the Director you may need to uninstall and re-install the software Do not simply delete the HP Officejet program files from your hard drive Be sure to remove them properly using the uninstall utility provided in the HP Officejet program group
to uninstall from a Windows computer
1 Disconnect your HP Officejet from your computer
2 On the Windows taskbar click Start choose Programs or All Programs (XP) choose Hewlett-Packard choose hp officejet 4100 series then choose uninstall software
3 Follow the directions on the screenBe sure to disconnect your HP Officejet
4 If you are asked whether you would like to remove shared files click NoOther programs that use these files may not work properly if the files are deleted
5 After the program finishes removing the software disconnect your HP Officejet and restart your computer
Note It is important that you disconnect your HP Officejet before restarting your computer
6 To reinstall the software insert the HP Officejet 4100 Series CD-ROM into your computerrsquos CD-ROM drive and follow the instructions that appear
7 After the software is installed connect and turn on your HP Officejet following the onscreen instructions and the instructions in your Setup PosterAfter connecting and turning on your HP Officejet you may have to wait several minutes for all of the Plug and Play events to completeWhen the software installation is complete you will see a Status Monitor icon in the System Tray
8 To verify that the software is properly installed double-click on the HP Director icon on the desktop If the HP Director shows six icons the software has been properly installed
to uninstall from a Macintosh computer
1 Disconnect your HP Officejet from your computer
2 Double-click on ApplicationsHP All-in-One Software folder
reference guide
additional setup information
41
3 Double-click on HP Uninstaller
4 Follow the directions that appear on the screen
5 After the program finishes removing the software disconnect your HP Officejet and restart your computer
6 To reinstall the software insert the HP Officejet 4100 Series CD-ROM into your computerrsquos CD-ROM drive
Note When re-installing the software follow the instructions on the Setup Poster Do not connect the HP Officejet to your computer until after you have completed the software installation
7 On the desktop open the CD-ROM double-click on hp all-in-one installer and follow the instructions that appear
connect your hp officejet to a phone modem or answering machine
The HP Officejet can share a phone line with a phone a modem or an aswering machine When sharing a phone line with an answering machine the HP Officejet will answer fax calls and direct voice calls to the answering machine
Note For information on connecting your HP Officejet to your computer and phone line refer to the Setup Poster that came with your unit
to connect your hp officejet to a phone modem or answering machine
1 Remove the white plastic stopper from connector 2 on the back of the HP Officejet
To connect more than one device to connector 2 on the HP Officejet you must purchase a Y-splitter and plug it into connector 2
2 Connect the phone cord from the phone modem or answering machine to connector 2 (or Y-splitter)
Caution Do not use the phone cord that came with the HP Officejet for this purpose That phone cord must connect connector 1 on the HP Officejet to the wall jack for your phone system See the Setup Poster for details
3 If you are connecting an answering machine see set the number of rings before answering on page 21 for instructions on setting the number of rings correctly or change the answer ring pattern (distinctive ringing) on page 26 for information on incoming ring patterns
4 If you are connecting a modem turn off its fax-receive feature
connector 2 on the HP Officejet
connector 1 on the HP Officejet
hp officejet 4100 series
chapter 8
42
additional troubleshooting helpYou may want to refer to the readme file for more information on possible installation problems On Windows you can access the readme file from the Start button on the taskbar select Programs Hewlett-Packard hp officejet 4100 series View the Readme File On Macintosh you can access the readme file by double-clicking on the icon located in the top-level folder of the HP Officejet software CD-ROM
The readme file provides more information including
bull Using the Re-install utility after a failed installation to return your PC to a state that will allow the HP Officejet to be re-installed
bull Using the Re-install utility on Windows 98 to recover from a Composite USB System Driver missing errorThis error may occur if the hardware is installed prior to installing the software After running the Re-install utility reboot your PC and install the HP Officejet software before connecting the HP Officejet to your computer
You can also find more information on this website
wwwhpcomsupport
9
43
technical information
Additional specifications information can be found in the HP Photo amp Imaging Help in the hp officejet 4100 series section
physical specifications
power specificationsbull Power consumption 75W maximumbull Source (Input Voltage) 100 to 240 VAC groundedbull Input Frequency 50 to 60 Hzbull Current 1A maximum
regulatory informationAdditional regulatory information can be found in the HP Photo amp Imaging Help The information in this section supercedes information in the HP Photo amp Imaging Help
doc statement deacuteclaration de conformiteacute (Canada)Le preacutesent appareil numeacuterique neacutemet pas de bruit radioeacutelectrique deacutepassant les limites applicables aux appareils numeacuteriques de la classe B prescrites dans le Regraveglement sur le brouillage radioeacutelectrique eacutedicteacute par le ministegravere des Communications du CanadaThis digital apparatus does not exceed the Class B limits for radio noise emissions from digital apparatus set out in the Radio Interference Regulations of the Canadian Department of Communications
notice to users of the Canadian telephone networkThis equipment meets the applicable Industry Canada Terminal Equipment Technical Specifications This is confirmed by the registration number The abbreviation IC before the registration number signifies that registration was performed based on a Declaration of Conformity indicating that Industry Canada technical specifications were met It does not imply that Industry Canada approved the equipment
Note The Ringer Equivalence Number (REN) assigned to each terminal device provides an indication of the maximum number of terminals allowed to be connected to a telephone interface The termination on an interface may consist of any combination of devices subject only to the requirement that the sum of the Ringer Equivalence Numbers of all the devices does not exceed 5
The REN for this product is 03B based on FCC Part 68 test results
height width depth weight (without print cartridges)
with paper trays and ADF closed
718 in (1824 cm) 1676 in (4258 cm) 825 in (2096 cm) 75 lbs (34 kg)
with ADF and paper tray extended
1030 in (2615 cm) 1676 in (4258 cm) 1854 in (4709 cm) 75 lbs (34 kg)
hp officejet 4100 series
chapter 9
44
notice to all users of the European Economic Area (EEA)
This product is designed to interwork with the analogue telephone networks in the following countriesregions
Network compatibility depends on customer selected settings which must be reset to use the equipment on a telephone network in a countryregion other than where the product was purchased Contact the vendor or Hewlett-Packard Company if addition product support is necessaryThis equipment has been certified by the manufacturer in accordance with Directive 19995EC (annex II) for Pan-European single-terminal connection to the public switched telephone network (PSTN) However due to differences between the individual PSTNs provided in different countriesregions the approval does not of itself give an unconditional assurance of successful operation on every PSTN network termination pointIn the event of problems you should contact your equipment supplier in the first instance
geraumluschemissionLpA lt 70 dBam Arbeitsplatzim Normalbetriebnach DIN 45635 T 19
notice to Korean customers
Germany UK Netherlands
France Spain Italy
Belgium Luxembourg Sweden
Austria Denmark Ireland
Norway Finland Switzerland
Greece Portugal
10
45
hp support
This section explains the support services information provided by Hewlett-Packard If you are unable to find the answer you need in the printed or onscreen documentation supplied with your product you can contact one of the HP support services listed in the following pages Some support services are available only in the US and Canada while others are available in many countriesregions worldwide If a support service number is not listed for your countryregion contact your nearest authorized HP dealer for help
get support and other information from the internetIf you have Internet access you can get help from the following HP website
wwwhpcomsupportThe Web site offers technical support drivers supplies and ordering information
hp customer supportSoftware programs from other companies may be included with your HP Officejet If you experience problems with any of those programs you will receive the best technical assistance by calling the experts at that companyIf you need to contact HP Customer Support do the following before you call
1 Make sure thata Your unit is plugged in and turned onb The specified print cartridges are installed correctlyc The recommended paper is properly loaded in the input tray
2 Reset your unita Turn off the unit using the On button located on the unitrsquos front panelb Unplug the power cord from the back of the unitc Plug the power cord back into the unitd Turn on the unit using the On button
3 For more information check the HP website at wwwhpcomsupport
4 If you are still experiencing problems and need to speak with an HP Customer Support Representativendash Have your service ID and serial number ready To display your service ID and
serial number on the front panel do the following Press Enter and Start Color at the same time until the service ID appears in the front-panel display From this display press the right arrow until the serial number displays
ndash Print a Self-Test Report See print a self-test report on page 32 for information on printing this report
ndash Make a color copyndash Be prepared to describe your problem in detail
5 Call HP Customer Support Be near your unit when you call
call in the US during warrantyCall (208) 323-2551 This service is free during the warranty period however your standard long-distance phone charges still apply A fee may apply outside the warranty period
hp officejet 4100 series
chapter 10
46
US phone support is available in both English and Spanish languages 24 hours a day 7 days a week (days and hours of support may change without notice)
call elsewhere in the worldThe numbers listed below are current as of the printing date of this guide For a list of current international HP Support Service numbers visit this address and choose your own countryregion or language
wwwhpcomsupportFor Korea you can also visit this address
httpwwwhpcokrYou can call the HP support center in the following countriesregions If your countryregion is not listed contact your local dealer or nearest HP Sales and Support Office to find out how to obtain servicesSupport service is free during the warranty period however your standard long-distance phone charges will apply In some cases a flat fee per single incident will also applyFor phone support in Europe please check for the details and conditions of phone support in your countryregion by consulting the following Web site
wwwhpcomsupportAlternatively you can ask your dealer or call HP at the phone number indicated in this booklet As part of our constant efforts to improve our phone support service we advise you to check our website on a regular basis for new information regarding service features and delivery
countryregion hp technical support countryregion hp technical support
Algeria1 +213 (0) 61564 543 Malaysia 1-800-805405
Argentina 0810-555-5520 Mexico 01-800-472-6684
Australia +61 3 8877 80001902 910 910
Mexico (Mexico City) 5258-9922
Austria +43 (0) 810 00 6080 Morocco1 +212 22404 747
Bahrain (Dubai) 800 728 Netherlands +31 (0) 20 606 8751
Belgium (Dutch) +32 (0) 2 626 8806 New Zealand 0800 441 147
Belgium (French) +32 (0) 2 626 8807 Norway +47 22 11 6299
Brazil (Grande Sao Paulo) (11) 3747 7799 Oman +971 4 883 8454
Brazil (Demais Localidades) 0800 157751 Palestine +971 4 883 8454
Canada during warranty (905) 206 4663 Panama 001-800-7112884
Canada post-warranty(per-call charge)
1-877-621-4722 Peru 0-800-10111
Caribbean amp Central America
1-800-711-2884 Philippines 632-867-3551
Chile 800-360-999 Poland +48 22 865 98 00
China 86 10 6868 7980 Portugal +351 21 3176333
Colombia 9-800-114-726 Puerto Rico 1-877-2320-589
Costa Rica 0-800-011-0524 Qatar +971 4 883 8454
Czech Republic +420 (0) 261307310 Romania +40 1 315 44 42or local 01 3154442
reference guide
hp support
47
call in Australia post-warrantyIf your product is not under warranty you can call 03 8877 8000 A per-incident out-of-warranty support fee of $2750 (inc GST) will be charged to your credit card You can also call 1902 910 910 ($2750 charged to your phone account) from 900 AM to 500 PM Monday through Friday (Charges and support hours are subject to change without notice)
prepare your unit for shipmentIf after contacting HP Customer Support or returning to the point of purchase you are requested to send your unit in for service please follow the power off and rebox steps below to avoid further damage to the HP product
Denmark +45 39 29 4099 Russian Federation Moscow +7 095 797 3520
Ecuador 1800-711-2884 Russian Federation St Petersburg
+7 812 346 7997
Europe (English) +44 (0) 207 512 5202 Saudi Arabia +800 897 14440
Egypt 02 532 5222 Singapore 65 6272 5300
Finland +358 (0) 203 47 288 Slovakia +421 (0) 2 682 08080
France (034 Euromin) +0892 69 60 22 South Africa (inside RSA) 086 000 1030
Germany (012 Euromin) +49 (0) 180 52 58 143 South Africa (inside RSA) +27-11 258 9301
Greece +30 1060 73 603 Spain +34 902 321 123
Hong Kong (SAR) +85 (2) 3002 8555 Sweden +46 (0)8 619 2170
Guatemala 1800-995-5105 Switzerland 2 +41 (0) 84 880 1111
Hungary +36 (0) 1 382 1111 Taiwan +886-2-2717-00550800 010 055
India 1-600-11226791 11 682 6035
Thailand +66 (2) 661 4000
Indonesia 62-21-350-3408 Tunisia1 +216 1891 222
Ireland +353 (0) 1 662 5525 Turkey +90 216 579 7171
Israel +972 (0) 9 8304848 Ukraine +7 (380-44) 490-3520
Italy +39 (0) 226410350 United Arab Emirates +971 4 883 8454
Japan 0570 000 511+81 3 3335 9800
United Kingdom +44 (0) 207 512 52 02
Jordan +971 4 883 8454 Venezuela 0800-47468368 or800-477-7777
Korea (Seoul) +82 (2) 3270 0700 Venezuela (Caracas) (502) 207-8488
Korea (outside Seoul) 080 999 0700 Vietnam 84 (0) 8 823 4530
Kuwait +971 4 883 8454 Yemen +971 4 883 8454
Lebanon +971 4 883 8454
1 This Call Center supports French speaking customers from the following countriesregions Morocco Tunisia and Algeria
2 This Call Center supports German French and Italian speaking customers in Switzerland
countryregion hp technical support countryregion hp technical support
hp officejet 4100 series
chapter 10
48
Note When transporting your HP Officejet make sure that the pens have been removed the HP Officejet has been properly shut down by pressing the power button and you have allowed time for the carriage to return to the service station and for the scanner to return to its parked position
1 Turn on the unitDisregard steps 1 through 6 if your unit will not turn on and the print carriage is in the home position You will not be able to remove the print cartridges Proceed to step 7
2 Open the print cartridge access doorThe print carriage moves into view
3 See replace the print cartridges on page 33 for information on removing the print cartridges
Caution Remove both print cartridges Failure to do so may damage your unit
4 Place the print cartridges in an airtight bag so they will not dry out and put them aside (do not send them with the unit unless instructed to by the HP customer support call agent)
5 Turn off the unit
6 Close the print cartridge access door
7 Remove the front panel cover as followsa Grasp the front of the front panel cover with two hands as shownb Firmly lift the front panel cover to unsnap it from the unit
8 Retain the front panel cover Do not return the front panel cover with the unit
9 If available pack the unit for shipment using the original packing materials or the packaging materials that come with your exchange unit
If you do not have the original packaging materials please use other adequate packaging materials Shipping damage caused by improper packaging andor improper transportation is not covered under the warranty
reference guide
hp support
49
10 Place the return shipping label on the outside of the box
11 Include the following items in the boxndash A complete description of symptoms for service personnel (samples of print
quality problems are helpful)ndash A copy of the sales slip or other proof of purchase to establish the warranty
coverage periodndash Your name address and a phone number where you can be reached during
the day
hp distribution centerTo order HP Officejet software a copy of the printed Reference Guide a setup poster or other customer-replaceable parts do one of the following bull In the US or Canada call (208) 323 2551bull Visit this website
httpwwwhpcomcposupportsoftwarehtml
hp officejet 4100 series
chapter 10
50
11
51
warranty information
HP Officejet 4100 seriesDuration of Limited Warranty (hardware and labor) 1 YearDuration of Limited Warranty (CD media) 90 DaysDuration of Limited Warranty (print cartridges) Until the HP ink is depleted or the ldquoend of warrantyrdquo date printed on the cartridge has been reached whichever occurs first
warranty service
express serviceTo obtain HP express repair service the customer must contact an HP service office or an HP Customer Support Center for basic troubleshooting first See hp customer support on page 45 for steps to take before calling Customer SupportIf a customer unit needs a minor part replacement and these parts can normally be replaced by the customer the customer-replaceable components may be serviced through expedited part shipment In this event HP will prepay shipping charges duty and taxes provide telephone assistance on replacement of the component and pay shipping charges duty and taxes for any part that HP asks to be returnedThe HP Customer Support Center may direct customers to designated authorized service providers who are certified by HP to service the HP product
warranty upgradesUpgrade your standard factory warranty to a total of three years with the HP SUPPORTPACK Service coverage begins on product purchase date and the pack must be purchased within the first 180 days of product purchase This program offers phone support from 600 AM to 1000 PM Mountain Standard Time (MST) Monday through Friday and 900 AM to 400 PM (MST) on Saturdays If during your technical support call it is determined that you need a replacement product then HP will ship you this product next business day free of charge Available in US onlyFor more information please call 1-888-999-4747 or visit the following HP Web site
httpwwwhpcomgohpsupportpack
Outside the US please call your local HP Customer Support office See call elsewhere in the world on page 46 for a list of international Customer Support numbers
returning your hp officejet for serviceBefore returning your HP Officejet for service you must call HP Customer Support See hp customer support on page 45 for steps to take before calling Customer Support
hewlett-packard limited global warranty statement
extent of limited warrantyHewlett-Packard (ldquoHPrdquo) warrants to the end-user customer (ldquoCustomerrdquo) that each HP Officejet 4100 Series product (ldquoProductrdquo) including related software accessories media and supplies shall be free from defects in material and workmanship for the duration which begins on the date of purchase by the Customer
hp officejet 4100 series
chapter 11
52
For each software Product HPrsquos limited warranty applies only to a failure to execute programming instructions HP does not warrant that the operation of any Product shall be uninterrupted or error freeHPrsquos limited warranty covers only those defects which arise as a result of normal use of a Product and does not cover any other problems including those which arise as a result of (a) improper maintenance or modification (b) software accessories media or supplies not provided or supported by HP or (c) operation outside the Productrsquos specificationsFor any hardware Product the use of a non-HP print cartridge or a refilled print cartridge does not affect either the warranty to the Customer or any HP support contract with the Customer However if Product failure or damage is attributable to the use of a non-HP or refilled print cartridge HP shall charge its standard labor and materials charges to service the Product for the failure or damageIf HP receives during the applicable warranty period notice of a defect in any Product HP shall either repair or replace the defective Product at HPrsquos option Where labor charges are not covered by HPrsquos limited warranty repairs shall be at HPrsquos standard charges for laborIf HP is unable to repair or replace as applicable a defective Product which is covered by HPrsquos warranty HP shall within a reasonable time after being notified of the defect refund the purchase price for the ProductHP shall have no obligation to repair replace or refund until the Customer returns the defective Product to HPAny replacement product may be either new or like-new provided that it has functionality at least equal to that of the Product being replacedHP products including each Product may contain remanufactured parts components or materials equivalent to new in performanceHPs limited warranty for each Product is valid in any countryregion or locality where HP has a support presence for the Product and where HP has marketed the Product The level of warranty service may vary according to local standards HP shall have no obligation to alter the form fit or function of the Product in order to make it operate in a countryregion or locality for which the Product was never intended to operate
limitations of warrantyTO THE EXTENT ALLOWED BY LOCAL LAW NEITHER HP NOR ITS THIRD PARTY SUPPLIERS MAKE ANY OTHER WARRANTY OR CONDITION OF ANY KIND WHETHER EXPRESS OR IMPLIED WITH RESPECT TO THE COVERED HP PRODUCTS AND SPECIFICALLY DISCLAIM THE IMPLIED WARRANTIES OR CONDITIONS OF MERCHANTABILITY SATISFACTORY QUALITY AND FITNESS FOR A PARTICULAR PURPOSE
limitations of liabilityTo the extent allowed by local law the remedies provided in this Limited Warranty Statement are the Customerrsquos sole and exclusive remediesTO THE EXTENT ALLOWED BY LOCAL LAW EXCEPT FOR THE OBLIGATIONS SPECIFICALLY SET FORTH IN THIS LIMITED WARRANTY STATEMENT IN NO EVENT SHALL HP OR ITS THIRD PARTY SUPPLIERS BE LIABLE FOR DIRECT INDIRECT SPECIAL INCIDENTAL OR CONSEQUENTIAL DAMAGES WHETHER BASED ON CONTRACT TORT OR ANY OTHER LEGAL THEORY AND WHETHER ADVISED OF THE POSSIBILITY OF SUCH DAMAGES
local lawThis Limited Warranty Statement gives the Customer specific legal rights The Customer may also have other rights which vary from state to state in the United States from province to province in Canada and from countryregion to countryregion elsewhere in the world
reference guide
warranty information
53
To the extent this Limited Warranty Statement is inconsistent with local law this Statement shall be deemed modified to be consistent with such local law Under such local law certain disclaimers and limitations of this Statement may not apply to the Customer For example some states in the United States as well as some governments outside the United States (including provinces in Canada) mayPreclude the disclaimers and limitations in this Statement from limiting the statutory rights of a consumer (eg the United Kingdom)Otherwise restrict the ability of a manufacturer to enforce such disclaimers or limitations orGrant the Customer additional warranty rights specify the duration of implied warranties which the manufacturer cannot disclaim or not allow limitations on the duration of implied warrantiesFOR CONSUMER TRANSACTIONS IN AUSTRALIA AND NEW ZEALAND THE TERMS IN THIS LIMITED WARRANTY STATEMENT EXCEPT TO THE EXTENT LAWFULLY PERMITTED DO NOT EXCLUDE RESTRICT OR MODIFY AND ARE IN ADDITION TO THE MANDATORY STATUTORY RIGHTS APPLICABLE TO THE SALE OF THE COVERED HP PRODUCTS TO SUCH CUSTOMERS
hp officejet 4100 series
chapter 11
54
55
index
Numerics4-by-6 inch photo paper
load 10 12
AADF 7adjust
volume for fax 25align print cartridges 35Answer Ring Pattern 26automatic document feeder 7automatic reduction
fax 25
Bbest copy quality 13busy number
redial automatically 23
Ccancel
scan 18scheduled fax 21
cartridgesalign 35replace 33
cleanprint cartridges 35the exterior 32the glass 31white strip 32
colorenhance 14fax 20fax from front panel 20
contrastchange for fax 23photo color 14
copy 13 16change default settings 15enhance 14fit to page 16lighten or darken 14menu options 16number of copies 14photo 15quality 13reduce or enlarge 14settings 13 15
speed 13tutorial 4
Customer Support 45web site 45
Ddarken a copy 14date
setting 27default settings
restore 35director review 4distinctive ringing 26
Eenhance copies 14enlarge copy 14 16envelopes
load 9Error Correction Mode
(ECM) 25
Ffactory defaults
restore 35fast copy quality 13fax 28
adjust volume 25automated reports 22cancel fax forward 24cancel scheduled 21change Answer Ring
Pattern 26change contrast 23change resolution 22change settings 19control appearance 22create individual speed-dial
settings 26delete speed-dial
settings 27distinctive ringing 26Error Correction Mode
(ECM) 25forward faxes 24header 27in color 20in color from front panel 20manual reports 22
menu 29print reports 22receive 21receive manually 21redial busy or unanswered
number 23schedule 20send from front panel 19set automatic reduction 25set date and time 27set the number of rings 21settings 27 28setup menu options 29speed dials 19test 28
fit to page 16forward faxes 24
cancel 24front panel
display scroll speed 36enter text 28send a fax 19setting prompt delay 36tutorial 3
Gglass
cleaning 31greeting cards
load 11
Hhelp 1HP Customer Support 45
calling 45HP Director 4HP distribution center 49HP Officjet
preparing to ship 47HP papers
tips on loading 11
Iindividual speed-dial settings
create 26ink cartridges see print
cartridgesinkjet paper
load 11
index
hp officejet 4100 series56
Kkeypad
enter text 28
Llabels
load 12lighten copies 14load
change the paper type 12envelopes 9original in ADF 7paper 7photo paper 10 12postcards 10 12print cartridges 33set the paper size 12tips 11
Mmaintenance
align print cartridges 35clean print cartridges 35clean the exterior 32clean the glass 31clean the white strip 32normal sounds 36replace print cartridges 33restore factory defaults 35self-maintenance
sounds 36self-test report 32
menuscopy options 16fax 29fax setup 29maintenance 37print reports 37
Nnormal copy quality 13number of copies
set 14number of rings
set 21
Oorder print cartridges 60originals
load in ADF 7output tray 8
Ppaper
change default size for copy 12
change the type 12load 7recommended 7set the size 12tips on loading 11
paper size change for copy 12
paper trayload 7
phone numbers support services 45
photo paperload 10 12
photoscopy 15enhance copy 14
physical specifications 43postcards
load 10 12power
specifications 43print
envelopes 9fax reports 22self-test report 32
print cartridgesalign 35clean 35handling 32replace 33
prompt delaysetting 36
Qquick start
review the director 4use with a computer 4
Rreceive
fax 21redial
busy or unanswered number 23
reduce copy 14 16regulatory information 43reinstall software 40reports
generate automatically for fax 22
generate manually for fax 22
print 22self-test 32
resolution
change for fax 22restore factory settings 35returning your HP Officejet for
service 51
Sscan
from front panel 17stop 18
schedule a fax 20scroll speed
setting 36self-test report 32send
cancel forward faxes 24color fax 20color fax from front
panel 20forward faxes 24
settingscopy 13 15fax 27 28prompt delay 36scroll speed 36
setupadditional information 39menu 29
shippingyour HP Officejet 47
softwareremove and reinstall 40
soundsself-maintenance 36
specificationsphysical 43power 43
speed dials 19create individual
settings 26delete settings 27
stopscan 18scheduled fax 21
subscriber identification code 27
support services 45
Ttelephone line
multiple numbers 26telephone numbers 45text
enhance 14enter from front panel 28
time
index
reference guide 57
setting 27transparency film
recommended 7tips on loading 11
troubleshootingremove and reinstall
software 40T-shirt Transfer Iron-On
load 11tutorial
front panel 3make a copy 4
Uunanswered number
redial automatically 23
Vvolume
adjust 25
Wwarranty 45
service 51statement 51upgrades 51
white stripcleaning 32
hp officejet 4100 series
chapter 12
58
declaration of conformityAccording to ISOIEC Guide 22 and EN 45014
Manufacturerrsquos Name and Address
Hewlett-Packard Company 16399 West Bernardo Drive San Diego CA 92127-1899 USA
declares that the product
Product Name hp officejet 4100 series (Q1608A)
Model Number(s) officejet 4110 (Q1609A) officejet 4110xi (Q1610A) officejet 4110v (Q1611A) officejet 4105 (Q1612A) officejet 4105z (Q1613A) officejet 4115 (Q1614A)
Product Options All
conforms to the following Product Specifications
Safety EN609501992 +A1 A2 A3 A4 amp A11
IEC609501991 +A1 A2 A3 amp A4
UL1950CSA 222 No 950 3rd Edn 1995
NOM-019-SCFI-1993
EMC CISPR221993 +A1 amp A2 EN550221994 +A1 amp A2 -Class B
CISPR241997EN550241998
IEC 61000-3-21995 EN61000-3-21995
IEC 61000-3-31994 EN61000-3-31995
ASNZS 3548 1992
CNS13438 1997
FCC Part 15-Class B ICES-003 Issue 2 VCCI-2
GB 9254-1998
Telecom TBR21 1998
Supplementary Information
The Product herewith complies with the requirements of the Low Voltage Directive 7323EEC the EMC Directive 89336EEC and the RampTTE Directive 19995EC (ANNEX II) carries the CE marking accordingly
European Contact for regulatory topics only Your local Hewlett-Packard Sales and Service Office orHewlett-Packard GmbH
Department HQ-TRE Herrenberger Strasse 140 D-71034 Boumlblingen Germany (FAX + 49-7031-14-3143)
order mediaTo order media such as HP Premium Inkjet Paper HP Premium Inkjet Transparency Film HP Iron-On T-shirt Transfer paper or HP Greeting Cards go to
wwwhpshoppingcom
For orders in countries other than the US and Canada select other countries then click Yes to leave hpshoppingcom From this website you can access hpshoppingcom for your specific language or countryregion
order print cartridges
If you have Internet access you can get more information from the HP website at
wwwhpcomsupport
print cartridges hp reorder number
HP black print cartridge 56 19 ml black print cartridge
HP color print cartridgeHP tri-color print cartridge
57 17 ml color print cartridge28 8 ml color print cartridge
Visit the hp officejet information centerIt has everything you need to get the most value from your HP Officejet
bull Technical Supportbull Supplies and Ordering Informationbull Project Tipsbull Ways to Enhance Your Product
wwwhpcomsupport
copy 2003 Hewlett-Packard Company
Printed in the USA Mexico Germany Singapore or China
Q1608-90163Q1608-90163
Q1608-90163

1
1
get help
This Reference Guide contains information on using your HP Officejet and provides additional troubleshooting assistance for the installation process The Reference Guide also contains information on how to order supplies and accessories technical specifications support and warranty information
The table below lists additional sources of information for your HP Officejet
help description
Setup Poster The Setup Poster provides instructions for setting up and configuring your HP Officejet Make sure you use the correct poster for your operating system (Windows or Macintosh)
HP Photo amp Imaging Help
The HP Photo amp Imaging Help provides detailed information on using the software for your HP Officejet For Windows users Go to the HP Director and click HelpFor Macintosh users Go to the HP Director and click Help then click hp photo and imaging help
Troubleshooting help To access troubleshooting informationFor Windows users In the HP Director click Help Open the Troubleshooting book in the HP Photo amp Imaging Help then follow the links to general troubleshooting as well as links to Troubleshooting help that is specific to your HP Officejet Troubleshooting is also available from the Help button that appears on some error messagesFor Macintosh users Open the Apple Help Viewer click hp photo and imaging troubleshooting then click hp officejet 4100 series
Internet help and technical support
If you have Internet access you can get help from the HP website atwwwhpcomsupport
The website also provides answers to frequently-asked questions
Readme file After you install your software you can access the Readme file from either the HP Officejet 4100 Series CD-ROM or the HP Officejet 4100 Series program folder The Readme file contains late-breaking information that does not appear in the Reference Guide or the online help To access the Readme file do the followingFor Windows go to the Windows taskbar click Start point to Programs or All Programs (XP) point to Hewlett-Packard point to HP Officejet 4100 Series and then choose View the Readme FileFor Macintosh go to the HDApplicationsHP Officejet Software folder
Dialog-box help For Windows Clicking Help in a dialog box displays information about options and settings within the dialog box
hp officejet 4100 series
chapter 1
2
2
3
quick start
You can perform many functions using either the front panel or the HP Officejet software
Even if you do not connect your HP Officejet to a computer you can use the front panel to copy documents or photos and send a fax You can change a wide variety of settings using the front-panel buttons and menu system
front panel featuresReview the illustrations below and identify the location of the buttons on the front panel
1
2
3
4
5
678
9
10 11 12 13 14 15
button purpose
1 On turn the HP Officejet on or off
2 Left Arrow scroll through settings or to delete one character at a time from a text entry
3 Right Arrow scroll through settings
4 Enter select or save the displayed setting
5 Cancel stop a job exit a menu or exit settings
6 Start Color use to start a color copy scan or fax job
7 Start Black start a black and white copy scan or fax job
8 Keypad enter fax numbers names values or text
9 RedialPause start a fax redial or insert a hyphen when entering a phone number
hp officejet 4100 series
chapter 2
4
use your hp officejet with a computerIf you installed the HP Officejet software on your computer according to the Setup Poster you can access all the features of the HP Officejet using the HP Director
review the hp photo amp imaging directorThe HP Director is available through the desktop shortcut
for windows users
1 Do one of the followingndash Double-click the hp director icon on the desktopndash In the Windows taskbar click Start point to Programs or All Programs
(XP) point to Hewlett-Packard point to hp officejet 4100 series then choose hp photo amp imaging director
2 In the Select Device box click to see a list of installed HP devices
3 Select hp officejet 4100 seriesThe Director displays only the buttons that are appropriate for the selected device
the hp photo amp imaging director
10 Speed Dial access programmed speed dial entries
11 Setup access the menu system for reports fax settings and maintenance
12 Fax select the fax function
13 Scan select the scan function
14 Copy select the copy function
15 Photo Fit to Page enlarge a photo to fit a full-size sheet of paper
button purpose
1 2 3
4 5 6 7 8 9 10
reference guide
quick start
5
for macintosh users
Do one for the followingndash For OS 9 double-click the HP Photo and Imaging Director icon on the
desktopndash For OS X double-click the HP Photo and Imaging Director icon on the
dock
The following figure shows some of the features available through the HP Photo and Imaging Director for Macintosh Consult the legend for a brief explanation of a specific feature
feature purpose
1 Select Device Use this feature to select the product you want to use from the list of installed HP products
2 Settings Use this feature to view or change various settings for your HP device such as print scan or copy
3 Status Displays the status window for all-in-one devices only
4 Send a Fax Use this feature to send a fax and access fax settings
5 Scan Picture Scans an image and displays it in the HP Photo amp Imaging Gallery
6 Scan Document Scans text and displays it in the selected destination text editing software program
7 Make Copies Displays the Copy dialog box where you can select the copy quality the number of copies the color the size and can start a copy
8 View amp Print Displays the HP Photo amp Imaging Gallery where you can view and edit images use HP Photo Prints make and print a photo album e-mail an image unload an image to the Web or copy an image to another application
9 Help Provides access to HP Photo amp Imaging Help which provides software help a product tour and troubleshooting information
10 Click this arrow to access tool tips which explain each of the Director options
hp officejet 4100 series
chapter 2
6
the hp photo and imaging director for macintosh OS X
feature purpose
1 Select Device Use this feature to select the product you want to use from the list of installed HP products
2 Settings Use this feature to view or change various settings for your HP device such as print scan or copy
3 Scan Picture Scans an image and displays it in the HP Photo and Imaging Gallery
4 Scan Document Scans text and displays it in a text editing software program
5 Make Copies Displays the Copy dialog box where you can select the copy quality the number of copies the color the size and can start a copy
6 Send Fax Use this feature to send a fax
7 Maintain Printer Accesses the HP Inkjet Utility where you can clean and align the print cartridges check print cartridge ink levels print a test or sample page register your printer or access information on product support
8 View and Print Displays the HP Photo and Imaging Gallery where you can view and edit images
1 2
3 4 5 6 7 8
3
7
load originals and load paper
You can make copies from originals loaded on the automatic document feeder (ADF) You can also print and copy onto a variety of paper types weights sizes and transparency films It is important however that you choose the right paper and make sure that it is loaded correctly and not damaged
load originalsYou can copy or scan any original by placing it in the automatic document feeder
1 Load your original in the automatic document feeder
Note Do not feed photos smaller than 35-by-5 inches through the automatic document feeder
2 Slide the right and left paper guides in until they stop at the edges of the paper
load paperFollowing is the basic procedure for loading paper There are specific considerations for loading certain types of paper transparency film postcards and envelopes After you review this procedure see tips for loading other types of paper in the paper tray on page 11 load 4 x 6 inch photo paper on page 10 load envelopes on page 9 and load postcards on page 10
For best results adjust the paper settings each time you change paper types or paper sizes For more information see set the paper type on page 12
to load the paper tray
1 Lower the paper tray and extend the paper-tray extender
2 Slide the paper-width guide on the left to its outermost position
automatic document feeder (ADF)
hp officejet 4100 series
chapter 3
8
3 Tap the stack on a flat surface to align the edges of the paper and then check the paper for the followingndash Make sure it is free of rips dust wrinkles and curled or bent edgesndash Make sure all the paper in the stack is the same size and type unless
you are working with photo paper
4 Insert paper into the paper tray print-side down until it stops To avoid bending the paper make sure you do not push the paper in too far or push too hard If you are using letterhead insert the top of the page firstBe careful not to use too much or too little paper Check that the stack of paper contains several sheets but is no higher than the top of the paper-width guide
5 Slide the paper-width guide in until it stops at the edge of the paper Make sure that the paper stack lies flat in the paper tray and fits under the tab of the paper-width guide
6 Extend the output-tray
reference guide
load originals and load paper
9
load envelopesUse the print feature of your software to print to envelopes with your HP Officejet Do not use shiny or embossed envelopes or envelopes that have clasps or windows You can load the paper tray with one or multiple envelopes
1 Remove all paper from the paper tray
2 Slide an envelope into the tray with the envelope flap up and to the left (print-side down) until it stops
3 Adjust the paper-width guide against the envelope until it stopsBe careful not to bend the envelope If you are loading multiple envelopes make sure the envelopes fit within the tray (do not overload it)Consult the help files in your word processing software for details on how to format text for printing on envelopes
hp officejet 4100 series
chapter 3
10
load 4 x 6 inch photo paperFollowing is the procedure for loading 4-by-6 inch photo paper into your HP Officejet
1 Remove all paper from the paper tray and then slide a stack of photo paper into the tray until it stopsMake sure the print-side faces downIf the photo paper you are using has perforated tabs load the photo paper so that the tabs are closest to you
2 Adjust the paper-width guide against the stack of photo paper until it stopsMake sure the photo paper fits within the tray (do not overload it)
Note Make sure you set the paper type and paper size before printing See set the paper type on page 12 and set the paper size on page 12
load postcardsFollowing is the procedure for loading postcards
1 Remove all paper from the paper tray and then slide a stack of cards into the tray until they stopMake sure the print-side faces down
reference guide
load originals and load paper
11
2 Adjust the paper-width guide against the cards until it stops Make sure the cards fit within the tray (do not overload it)
tips for loading other types of paper in the paper trayThe following table provides guidelines for loading certain types of paper and transparency film For best results adjust the paper settings each time you change paper types and paper sizes For more information see set the paper type on page 12
Note HP Photo Paper and HP Photo Paper Glossy 4-by-6 are not recommended for printing with your HP Officejet To print photos use HP Everyday Photo Paper For your best photo printing needs use HP Premium Plus Photo Paper
paper tips
HP papers bull HP Premium Inkjet Paper Locate the gray arrow on the nonprinting side of the paper and then insert paper with the arrow side facing up
bull HP Premium or Premium Plus Photo Paper Load the glossy (print) side down (To prevent curling keep photo paper sealed in the original package until you are ready to use it) Always load at least five sheets of regular paper in the paper tray first and then place the photo paper on top of the regular paper
bull HP Premium Inkjet Transparency Film Insert the film so that the white transparency strip (with arrows and the HP logo) is on top and is going into the tray first
bull HP Inkjet T-shirt Transfer Iron-On Flatten the transfer sheet completely before using it do not load curled sheets (To prevent curling keep transfer sheets sealed in the original package until you are ready to use them) Manually feed one sheet at a time with the unprinted side facing down (the blue stripe faces up)
bull HP Matte Greeting Cards HP Glossy Greeting Cards or HP Felt-Textured Greeting Cards Insert a small stack of HP greeting-card paper with the print-side down into the paper tray until it stops
hp officejet 4100 series
chapter 3
12
set the paper typeIf you want to use a different type of paper such as photo paper transparency film Iron-On T-shirt transfers or brochures simply load that paper in the paper tray You must then change the paper type settings to ensure the best print quality
HP recommends paper type settings according to the type of paper you are using
This setting refers to copy options only If you want to set the paper type for printing from a computer set the properties in the Print dialog box of the software
1 Press the Copy button until Paper Type appears
2 Press until the appropriate paper type appears
3 Press Enter to choose the displayed paper type
set the paper sizeThe HP Officejet can use Letter Legal or A4 paper Use the following procedure to set the paper size for copy options
1 Press the Copy button until Copy Paper Size appears
2 Press until the appropriate paper size appears
3 Press Enter to choose the displayed paper size
To avoid jams remove papers from the output tray frequently The output tray capacity is affected by the type of paper and the amount of ink you are using For more information about output-tray capacity see technical information in the HP Photo amp Imaging Help
Labels(works only with printing)
bull Always use letter-size or A4-size label sheets designed for use with HP inkjet products (like Avery Inkjet Labels) and make sure that the labels are not over two years old
bull Fan the stack of labels to make sure none of the pages are sticking together
bull Place a stack of label sheets on top of standard paper in the paper tray print-side down Do not insert labels one sheet at a time
Postcards (works only with printing)
Insert a stack of postcards or hagaki cards with the print-side down into the paper tray until it stops Line the postcards up on the right side of the paper tray slide the paper-width guide up against the left side of the cards until it stops
4-by-6 inch photo paper (works only with printing)
Insert the photo paper with the print-side down into the paper tray until it stops Place the long edge of the photo paper against the right side of the paper tray and slide the paper-width guide up against the long edge of the photo paper until it stops If the photo paper you are using has perforated tabs load the photo paper so that the tabs are closest to you
paper tips
4
13
use the copy features
The copy features let you do the following
bull Produce high-quality color and black-and-white copiesbull Reduce or enlarge the size of the copies you make from 25 to 200 or
50 to 200 (depending on your model) of the copyrsquos original sizebull Make the copy lighter or darker select the number of copies and specify
the quality of the copies you makebull Use special copying features to make high-quality copies of photos using
special photo paper or to create transparencies
make copiesYou can make copies using the front panel of your HP Officejet or by using the HP Officejet software on your computer Many copy features are available using either method However you may find that the software offers easier access to special copy features
All copy settings that you select on the front panel are reset two minutes after the HP Officejet completes the copy unless you save the settings as the default settings as described in change settings for all copy tasks on page 15
make a copy1 Load the paper tray with the appropriate paper
2 Load your original
3 Press the Copy button
4 Use the keypad or press the or to enter the number of copies
5 Press Start Black or Start Color
Tip To make a single copy press the Copy button and then press Start Black or Start Color
Note Make sure that the color print cartridge is installed in your HP Officejet Both print cartridges must be installed when making a copy
increase copy speed or qualityThe HP Officejet provides three options that affect copy speed and quality
bull Best produces the highest quality for all paper types Best copies more slowly than the other quality settings
bull Normal delivers high-quality output and is the recommended setting for most of your copying Normal copies faster than Best
bull Fast copies faster than the Normal setting The text is of comparable quality to the Normal setting but the graphics may be of lower quality Using Fast also reduces the frequency of replacing your print cartridges because it uses less ink
hp officejet 4100 series
chapter 4
14
1 Load your original
2 Press Copy until Copy Quality appears
3 Press until the desired quality setting appears and then press Enter to select it
4 Press Start Black or Start Color
set the number of copies You can set the number of copies using the front panel
1 Press the Copy button
2 Use the keypad or press the or to enter the number of copies
3 Press Enter
4 Press Start Black or Start Color
Tip If you hold down the right arrow button then after reaching 10 the number of copies changes by increments of five to make it easier to set a large number of copies
reduce or enlarge a copyYou can reduce or enlarge a copy of an original using ReduceEnlarge
For more information about additional copy options such as Fit to Page see perform special copy jobs on page 15
1 Press Copy until ReduceEnlarge appears
2 Press until the appropriate ReduceEnlarge option appears and then press Enter to select it
3 If you select Custom 100 Set Custom Size appears Use the arrow keys or type a percentage on the keypad
4 Press Enter when the desired percentage is displayed
5 Press Start Black or Start Color
make copies lighter or darkerUse LighterDarker to adjust the lightness and darkness of the copies you make
1 Press Copy until LighterDarker appearsThe range of LighterDarker values are represented as circles on a scale on the front-panel display
2 Press to lighten the copy or to darken it The circle moves to the left or right depending on the arrow button you press
3 Press Enter to select the setting
4 Press Start Black or Start Color
enhance text sharpness and photo colorsYou can use Text to sharpen edges of black text Photo to enhance light colors in your photographs or Mixed if your original contains a photograph and text You can also select None to turn off all enhancements
reference guide
use the copy features
15
Text enhancement is the default option You can turn off Text enhancement by selecting Photo Mixed or None if the following occur
bull Stray dots of color surround some text on your copiesbull Large black typefaces look splotchy (not smooth)bull Thin colored objects or lines contain black sectionsbull Horizontal grainy or white bands appear in light- to medium-gray areas
1 Press Copy until Enhancements appears
2 Press until the desired enhancement (Text Photo Mixed or None) appears
3 Press Enter to select the setting
4 Press Start Black or Start Color
change settings for all copy tasksSave the copy settings you use most often by setting them as the default This includes changes to Copy options such as Paper Type and Paper Size as well as other Copy settings on the front panel such as Number of Copies and Copy Quality
1 Make any desired changes to the copy options
2 Press Copy until Set New Defaults appears
3 Press until Yes appears
4 Press Enter to set the options as a defaultYour settings are saved
perform special copy jobsIn addition to supporting standard copying your HP Officejet can also copy a photo or fit a copy to the page
copy a photoWhen copying a photo you should select options for the correct paper type and photo enhancement
1 Load the photo in the automatic document feeder (ADF)For more information see load originals
2 If you are using photo paper load it in the paper tray
3 Press Copy until Paper Type appears
4 Press until Premium Photo appears and then press Enter to select it
5 Press Copy until Enhancements appears
6 Press until Photo appears and then press Enter to select it
7 Press Start Black or Start Color
Tip To enlarge a photo automatically to a full page use the Photo Fit to Page button
hp officejet 4100 series
chapter 4
16
fit a copy to the pageUse the Photo Fit to Page button when you want to automatically enlarge or reduce your original to fit Letter or A4 size paper You can enlarge a small photo to fit a full-size page as shown below Using Photo Fit to Page may prevent unwanted cropping of text or images around the margins
1 Load the original in the ADFFor more information see load originals on page 7
2 Press the Photo Fit to Page button
Note Do not press the Fax Copy or Scan buttons on the front panel once you have pressed the Photo Fit to Page button
3 Press until the appropriate paper type appears and then press Enter to select it
4 Press Start Black or Start Color
copy optionsThe following diagram shows the options that are available when you press Copy
Original Fit to Page
Plain PaperPhoto PaperTransparency
Actual sizeCustom 100Full Page 91Legal gt Ltr 72
ReduceEnlarge Paper Type
NoYes
TextPhotoMixedNone
Enhancements Set New Defaults
LetterLegalA4
Copy Paper Size
The sizes vary by countryregion
LighterDarker
NormalFastBest
Copy Quality
To cycle through the copy options press Copy repeatedly
Press and to move to the setting you want within one of the copy optionsPress Enter to select the displayed setting
5
17
use the scan features
Scanning is the process of converting pictures and text into an electronic format for your computer You can scan photos and text documents
Because the scanned image or text is in an electronic format you can bring it into your word processor or graphics program and modify it to suit your needs You can do the following
bull Scan photos of your kids and e-mail them to relatives create a photographic inventory of your house or office or create an electronic scrapbook
bull Scan text from an article into your word processor and quote it in a report saving you a lot of retyping
Tip To use the scan features your HP Officejet and computer must be connected and turned on The HP Officejet software must also be installed and running on your computer prior to scanning To verify that the HP Officejet software is running on Windows look for a status icon in the system tray On a Macintosh the HP Officejet software is always running
Note High resolution scanning (600 dpi or higher) requires a large amount hard disk space If there is not enough hard disk space available your system may stall
scan an originalYou can start a scan from your HP Officejet or from the HP Officejet software on your computer
For more information about scanning your pictures or documents from the HP Officejet software see scan pictures and documents in the HP Photo amp Imaging Help
to scan an original from your hp officejet
1 Load your original in the automatic document feeder (ADF)For more information see load originals on page 7
2 Press Scan
3 Select the Scan to destination by pressing or or by pressing the Scan button repeatedlyThe default destination is the HP Photo amp Imaging Gallery Any applications on your computer that are supported by the HP Officejet also appear in the Scan to list
4 Press Start Black or Start ColorThe original is scanned and the image is sent to selected destinationFor more information about using the HP Photo amp Imaging Gallery see manage images in how to use the software
hp officejet 4100 series
chapter 5
18
stop scanningYou can stop a scan by pressing the Cancel button located on the front panel
6
19
use the fax features
Using your HP Officejet you can
bull Send and receive paper faxesbull Send computer faxes (reference the HP Photo amp Imaging Help)bull Send and receive color faxes
Fax features are available only on some HP Officejets
send a faxYou can send a fax in a variety of configurations These include the following
bull send a paper fax (using the front panel or computer)bull send a paper fax with a PC-generated cover page (using the computer)bull send a file with or without a cover page (using the computer)bull send a PC-generated cover page as a single-page fax (using the
computer)
Note For information on sending a fax using the computer reference the HP Photo amp Imaging Help
Note By default your HP Officejet prints a report only if there is a problem with sending or receiving a fax A confirmation message indicating whether an item was successfully sent appears briefly on the front-panel display after each transaction If you need printed confirmation that your faxes are successfully sent see print reports on page 22 for information about report options
Note If you have not done so set the date and time See set the date and time on page 27
send a fax from your hp officejet1 Load your originals in the ADF
For more information see load originals on page 7
2 Enter the fax number using the keypad or press Speed Dial until the desired speed-dial entry appearsFor more information on speed dialing see set up speed dialing in the HP Photo amp Imaging Help
3 Press Start Black or Start Color
change settings and use speed dials before sending a fax1 Load your originals in the ADF
For more information see load originals on page 7
2 Enter the fax number using the keypad or press Speed Dial until the desired speed-dial entry appears
hp officejet 4100 series
chapter 6
20
For more information on speed dialing see set up speed dialing in the HP Photo amp Imaging Help
3 Press Enter
4 Press Fax to scroll through the fax options
5 When you reach the option whose setting you wish to change press to scroll through the setting options
6 When you reach the setting you want to change press Enter to accept the setting
7 Press Start Black or Start Color
send a color faxYou can send and receive color faxes to and from other color fax machines If you are faxing from the front panel and your HP Officejet determines that the recipient has a black-and-white fax unit it sends the fax in black and white If you are faxing from the software and your HP Officejet determines that the recipient has a black-and-white fax unit the HP Officejet prompts you to try sending the fax in black and white
We recommend that you use only color originals for color faxing The color originals must be loaded in the ADF you cannot send a color fax from memory using the scan and fax features To fax in color to multiple recipients send the fax from the Director or your software program
to send a color fax from the front panel
1 Load your originals in the ADF For more information see load originals on page 7
2 Enter the fax number using the keypad or press Speed Dial until the desired speed-dial entry appearsFor more information on creating speed-dial entries see set up speed dialing in the HP Photo amp Imaging Help
3 Press Start Color
schedule a faxYou can schedule a black and white fax to be sent later during the same day (for example when telephone lines are not as busy) If you use the front panel you can select a single recipient
When the specified time is reached your fax is automatically sent as soon as a connection can be made
1 Load your originals in the ADF
2 Enter the fax number using the keypad or press Speed Dial until the desired speed-dial entry appears
3 Press Enter
4 Press Fax to scroll through the fax options
5 Stop scrolling when you reach the How to Fax menu
6 Press to scroll through the setting options
7 Stop scrolling when you reach the Send Fax Later option
reference guide
use the fax features
21
8 Press Enter
9 Enter the Send Time using the numeric keypad
10 At the prompt press 1 for AM or 2 for PM
11 When Store Fax Now appears press 1 for Yes or 2 for NoIf 1 is selected the document is scanned to memory and is sent at the selected time If 2 is selected and you havenrsquot loaded your originals a message appears reminding you to load the original before the send time
12 Press Start Black
cancel a scheduled faxYou can cancel a fax stored in memory or one that is currently in progress
bull Press Cancel to cancel the scheduled fax
receive a faxYour HP Officejet is set to print received faxes automatically If you receive a legal-size fax and your HP Officejet is not currently configured to use legal-sized paper the unit automatically reduces the fax so that it fits on the paper that is loaded For more information see set automatic reduction on page 25
If you have an answering machine connected to the same line as your HP Officejet you may need to set the number of rings required before the HP Officejet begins receiving the fax The default number of rings before the HP Officejet receives a fax is 5
set the number of rings before answeringYou can specify how many rings should occur before your HP Officejet automatically answers the phone When you run the Fax Setup Wizard this is set automatically
If you do not want your HP Officejet to answer the phone Rings to Answer should be set to No Answer
1 Press Setup
2 Press 3 then press 3 againThis selects the Basic Fax Setup menu then the Rings to Answer option
3 Use the arrow keys to choose the number of rings and then press Enter
receive a fax manuallyBefore manually receiving a fax we recommend that you remove any originals from your HP Officejet so that they are not accidentally processed
Verify that Rings to Answer is set to No Answer
1 When your HP Officejet rings pick up the handset of a telephone that is on the same telephone line as your HP Officejet
2 If you hear fax tones press Start Black or Start Color or if you are receiving from an extension phone (on the same telephone line as your HP Officejet but not connected directly to it) press 1 2 3 on your phone
3 After you are finished hang up the telephone
hp officejet 4100 series
chapter 6
22
print reportsYou can set up your HP Officejet to print error reports and confirmation reports for each fax you send and receive You can also manually print reports as you need them
generate reports automaticallyThis setting lets you configure your HP Officejet so that it automatically prints error and confirmation reports
1 Press Setup
2 Press 1 then press 5This selects Print Report then selects Automatic Reports Setup
3 Press to scroll through the following report typesndash Every Error which prints whenever there is any kind of fax error
(default)ndash Send Error which prints whenever there is a transmission errorndash Receive Error which prints whenever there is a receiving errorndash Every Fax which confirms every time a fax is sent or receivedndash Send Only which prints every time a fax is sentndash Off which does not print fax reports
4 When you reach the report that you want press Enter
generate reports manuallyThis setting lets you print reports manually From the computer you can only print the Speed-Dial List and the Fax Log
to print reports from the front panel
1 Press Setup then press 1This selects the Print Report menu
2 Press to scroll through the following report typesndash Last Transaction which prints details of the last fax transactionndash Fax Log which prints a log of the last 30 fax transactionsndash Speed Dial List which prints a list of programmed speed dialsndash Self-Test Report which prints a report to assist you in diagnosing print
and alignment problems For more information see print a self-test report on page 32
ndash Automatic Reports Setup which is the automatic reports setting described in generate reports automatically on page 22
3 When you reach the report that you want press Enter
control resolution and contrastYour HP Officejet lets you change the resolution and contrast of documents that you are sending
change resolutionResolution affects the transmission speed and quality of faxed documents
reference guide
use the fax features
23
to change the resolution from the front panel
1 Load your originals in the ADF
2 Enter the fax number using the keypad or press Speed Dial until the desired speed-dial entry appears
3 Press Enter
4 Press Fax to scroll through the fax options
5 Stop scrolling when you reach the Resolution menu
6 Press until the desired resolution quality appears (Standard Photo Fine Very Fine)
7 Press EnterYour HP Officejet only faxes at the highest resolution supported by the receiving faxIf you choose Photo be aware that the faxing process takes longer to complete When faxing photographs we recommend that you choose Photo
change contrastChange this setting if you want a black-and-white fax to be darker or lighter than the original
to change the fax contrast from the front panel
1 Load your originals in the ADF
2 Enter the fax number using the keypad or press Speed Dial until the desired speed-dial entry appears
3 Press Enter
4 Press Fax to scroll through the fax options
5 Stop scrolling when you reach the LighterDarker menuThe range of values appears as a circle on a scale on the display
6 Press to lighten the fax or to darken itThe circle moves left or right as you press a button
7 Press Enter to accept the setting you selected
change other fax settings
redial a number automaticallyYou can set your HP Officejet to redial a busy and an unanswered number automatically If you initiated a fax from the computer the computer must be left on for the redialing process to work correctly
1 Press Setup
2 Press 4This selects the Advanced Fax Setup menu
3 Choose one of the following optionsndash Press 3
hp officejet 4100 series
chapter 6
24
This selects the Busy Redial option The default setting for Busy Redial is Redial
ndash Press 4This selects the No Answer Redial option The default setting for No Answer Redial is No Redial
4 Press Enter
5 Press to select Redial or No Redial as desired
6 Press Enter
forward faxes to another numberWith fax forwarding you can send a fax that you receive to another fax number during the next 24-hour period
to forward faxes from the front panel
1 Press Setup
2 Press 3 then press 7This selects the Basic Fax Setup menu then selects the Fax Forwarding Black Only option
3 At the prompt enter the Fax Number to which you wish to send the fax
4 Press Enter
5 Enter the Start Date using the numeric keypad
6 Enter the Start Time using the numeric keypad
7 At the prompt press 1 for AM or 2 for PM
8 Enter the Stop Date using the numeric keypadFax Forwarding On appears on the display
edit or cancel fax forwardingOnce fax forwarding is enabled you may find that you need to change the number you are faxing to or the start and stop times you entered You may wish to cancel your fax forwarding setup altogether Follow the steps below to edit or turn off fax forwarding
to edit fax forwarding from the front panel
1 Press Setup
2 Press 3 then press 7This selects the Basic Fax Setup menu then selects the Fax Forwarding Black Only option
3 Forwarding is ON 1=Edit 2=Cancel appears on the display after a moment Press 1 to edit the number you wish to fax to or to change the start and stop times Follow the messages on the display
to cancel fax forwarding from the front panelbull Press Cancel
OR
reference guide
use the fax features
25
Follow the steps in edit or cancel fax forwarding on page 24 When Forwarding is ON 1=Edit 2=Cancel appears on the display press 2 to cancel fax forwarding
use error correction modeError Correction Mode (ECM) eliminates data lost due to poor phone lines by detecting errors that occur during transmission and automatically requesting retransmission of the erroneous portion Phone charges are unaffected or may even be reduced on good phone lines On poor phone lines ECM increases sending time and phone charges but sends the data much more reliably Turn ECM off (the default setting is on) only if it increases phone charges substantially and you can accept poorer quality in exchange for reduced charges
to change the ECM setting from the front panel
1 Press Setup
2 Press 4 then press 7This selects the Advanced Fax Setup menu then selects the Error Correction Mode option
3 Press to switch between On and Off
4 Press Enter to accept the setting you selected
set automatic reductionThis setting determines what your HP Officejet does if it receives a fax that is too large for the default paper size With this setting on (the default) the image is reduced so that it fits on one page With this feature off information that doesnrsquot fit on the first page is printed on a second page
1 Press Setup
2 Press 4 then press 5This selects the Advanced Fax Setup menu then selects the Automatic Reduction option
3 Press to switch between On and Off
4 Press Enter to accept the setting you selected
adjust the volumeYour HP Officejet provides three levels for adjusting the ring and speaker volume The ring volume is the volume of the phone ringer The speaker volume is the volume of everything else such as the dial and fax tones The default setting is Soft
1 Press Setup
2 Press 3 then press 6This selects the Basic Fax Setup menu then selects the Ring and Beep Volume option
3 Press to select one of the options Soft Loud or Off
4 Press Enter to accept the setting you selected
hp officejet 4100 series
chapter 6
26
change the answer ring pattern (distinctive ringing)Distinctive ringing is a feature offered by phone companies that allows several phone numbers to share the same line Each number has a specific ring pattern If you do not have this service use the default ring pattern which is All Rings
If you connect your HP Officejet to a line with distinctive ringing have your telephone company assign one ring pattern to voice calls and another to fax calls (double or triple rings are best for a fax number)
1 Press Setup
2 Press 4 then press 2This selects the Advanced Fax Setup menu then selects the Answer Ring Pattern option
3 Press to scroll through these options All Rings Single Rings Double Rings Triple Rings and Double amp Triple
4 When the ring pattern that the phone company established for this number appears press Enter
Tip We recommend that you use Double Rings or Triple Rings for fax
set up speed dialingThrough your HP Officejet or your computer you can assign entries to fax numbers you use often This lets you dial those numbers quickly using the front panelrsquos Speed Dial button and a one- or two-digit entry You can create up to 100 individual speed-dial entries (the maximum for some models is 70)
We recommend that you use the software to set up speed-dial settings
Note A speed-dial entry can only be associated with one phone number speed-dial groups are not supported
For more information see set up speed dialing in the hp photo amp imaging help
create individual speed-dial settingsYou can enter fax numbers that you will reuse frequently
1 Press Setup
2 Press 2 then press 1This selects the Speed Dial Setup menu then selects the Individual Speed Dial option
3 Press EnterThe first unassigned speed-dial entry appears on the display
4 Press Enter to select the displayed speed-dial entry
5 Enter the Fax Number to assign to that entry then press EnterThe fax number can be up to 50 digits in length
Tip To enter a three-second pause within a number sequence press Symbols to display a dash
6 Enter the personrsquos or companyrsquos name then press Enter
reference guide
use the fax features
27
The name is limited to 13 characters in lengthFor more information see enter text on page 28
7 After Enter Another appears press 1 (Yes) if you want to set up another number or press 2 (No) to exit
delete speed-dial settingsFollow these steps to delete an individual speed-dial entry
1 Press Setup
2 Press 2 then press 2 againThis selects Speed Dial Setup then selects Delete Speed Dial
3 Press until the individual entry that you want to delete appears then press Enter
set basic fax settings using the front panelWe recommend that you use the Fax Setup Wizard in the HP Officejet software to configure all your basic fax settings however you can also access these settings from the front panel
Note In the US regulations require that your name and phone number appear on every fax The minimum settings that we recommend are described in the following topics
set the date and timeFollow these steps to set the date and time manually
1 Press Setup
2 Press 3 then press 1This selects the Basic Fax Setup menu then selects the Date and Time option
3 Follow the prompts on the display to enter the date and time using the keypad
Tip Use only the last two digits for the year
Tip When you enter a single-digit date or time type a leading zero before the single digit for example 0345 or 08-03-02
After you are done the date and time appear on the display
Warning Cutting off power to the HP Officejet causes the selected date and time to be lost However name and fax number information is not lost
set the fax headerFollow these steps to enter your name and fax number in the header
Note In Hungary the subscriber identification code (fax header) can be set or changed only by authorized personnel For more information contact your authorized HP dealer
1 Press Setup
2 Press 3 then press 2
hp officejet 4100 series
chapter 6
28
This selects the Basic Fax Setup menu then selects the Fax Header option
3 Enter your personal or company name at the prompt Use the guidelines provided in the next section under enter text
4 Press Enter
5 Enter your fax number using the numeric keypad
6 Press Enter
enter textThe following list provides tips for entering text using the front-panel keypad
bull Press the keypad numbers that correspond to the letters of a name
bull Press a button multiple times to see a letter first in uppercase and then in lowercase
bull After the correct letter appears press and then press the number that corresponds to the next letter in the name Again press multiple times until the correct letter appears
bull To insert a space press Space ()bull To enter a symbol such as press Symbols () to scroll through the list of
available symbolsbull If you make a mistake press to clear it and then make the correct
entrybull After you are done entering text press Enter to store your entries
check for dial toneBefore using the fax features verify that the connections are correctly established
1 Press Fax
2 Listen for a dial tone
3 If you do not hear a dial tone check the connections
4 Press Cancel to hang up
ABC These letters correspond to this number and so on
2
JKL To get this character J j K k L l 5
5 Press 5 this many times 1 2 3 4 5 6 7
reference guide
use the fax features
29
fax job menuThe following options become available when the Fax button is pressed
setup menu for fax commandsThe following fax settings are available in the Setup menu
Enter Fax or Speed Dial
FineVery FinePhotoStandard
Fax Number Resolution LighterDarker
Enter a fax number or speed dialWhen the Fax button is pressed
Press and to move to the option you wantPress Enter to select the displayed setting
NoYes
Set New Defaults
Send Fax NowFax from MemorySend Fax LaterPoll to Receive
How to Fax
1Automatic Reports Setup
2Answer Ring Pattern
3Busy Redial
4No Answer Redial
5Automatic Reduction
6Backup Fax Reception
7Error Correction Mode
3Basic Fax Setup 4Advanced Fax Setup
Press Setup to display the menu options
Press and to move to the setting you wantPress Enter to select the displayed setting
1Date and Time
2Fax Header
3Rings to Answer
4Paper Size
5Tone or Pulse Dialing
6Ring and Beep Volume
7Fax Forwarding Black Only
2Speed Dial Setup
1Individual Speed Dial
2Delete Speed Dial
3Print Speed Dial List
hp officejet 4100 series
chapter 6
30
7
31
maintain your hp officejet
This section provides instructions for keeping your HP Officejet in top working condition Perform these maintenance procedures as necessary
clean the glassDirty glass from dust smudges hair and so on slows down performance and affects the accuracy of features such as Fit to Page and Copy
1 Turn off the unit unplug the power cord and raise the scanner lid
2 Clean the glass with a soft cloth or sponge slightly moistened with a nonabrasive glass cleaner
Caution Do not use abrasives acetone benzene or carbon tetrachloride on the glass these can damage it Do not place liquids directly on the glass They may seep under it and damage the unit
3 Dry the glass with a chamois or cellulose sponge to prevent spotting
hp officejet 4100 series
chapter 7
32
clean the white stripMinor debris can accumulate on the white strip located underneath the scannerrsquos lid
1 Turn off the unit unplug the power cord and raise the scanner lid
2 Clean the white strip with a soft cloth or sponge slightly moistened with a mild soap and warm water
3 Wash the strip gently to loosen debris do not scrub the strip
4 Dry the strip with a chamois or soft cloth
Caution Do not use paper-based wipes as these may scratch the strip
5 If this does not clean the strip well enough repeat the previous steps using isopropyl (rubbing) alcohol and wipe the strip thoroughly with a damp cloth to remove any residual alcohol
clean the exterior Use a soft damp lint-free cloth to wipe dust smudges and stains off the case The interior of the unit does not require cleaning Keep fluids away from the interior of the unit as well as the front panel
work with print cartridgesTo ensure the best print quality from your HP Officejet you will need to perform some simple maintenance procedures and when prompted by a front-panel message replace the print cartridges
print a self-test reportIf you are experiencing problems with printing before cleaning or replacing the print cartridges you should print a Self-Test Report This report provides useful information about your print cartridges including status information
1 Press Setup
2 Press 1 then press 4This selects Print Report and then selects Self-Test Report
3 Press Start Black or Start ColorA Self-Test Report is printed for your HP Officejet
handle print cartridgesBefore you replace or clean a print cartridge you should know the part names and how to handle the print cartridge
reference guide
maintain your hp officejet
33
replace the print cartridgesFront-panel messages appear to let you know that you should replace your print cartridges
See order print cartridges on the back cover for information on ordering replacement print cartridges
1 Turn on the unit then lift open the print cartridge access doorThe print carriage moves into view
2 After the carriage stops moving push down on the print cartridge down to release it and then pull it toward you out of its slot
Plastic tape with pink tab(must be removed)
Copper contactsInk nozzles under tape
Do not touch the copper contacts or the ink nozzles
print cartridge access door
hp officejet 4100 series
chapter 7
34
Note It is normal to see ink build-up in the print cartridge slots
3 Remove the new print cartridge from its packaging and being careful to touch only the bright pink plastic tab gently remove the plastic tape to uncover the ink nozzles
Caution Do not touch the copper contacts or ink nozzles
Once you have removed the plastic tape install the print cartridge immediately to prevent the ink from drying in the nozzles
4 Push the new print cartridge into the appropriate slot at a slight angle until it clicks into place
Caution Do not attempt to push the cartridge straight into the slot It must slide in at a slight angle
The tri-color print cartridge goes on the left and the black cartridge goes on the right
5 Close the print cartridge access door
reference guide
maintain your hp officejet
35
align the print cartridgesThe HP Officejet prompts you to align cartridges every time you install or replace a print cartridge Aligning the cartridges ensures high-quality output
To align the print cartridges when prompted
1 Press Enter on the front panelAn align cartridges (test pattern) page prints
2 Load the align cartridges page face down in the ADF between the paper-width guides and press the Enter button again
3 Recycle or discard the page
To align the cartridges at any other time
1 Press Setup
2 Press 5 then press 2This selects the Maintenance menu and then selects the Align Print Cartridge option
3 Press EnterAn align cartridges (test pattern) page prints
4 Load the align cartridges page face down in the ADF between the paper-width guides and press the Enter button again
5 Recycle or discard the page
clean the print cartridgesUse this feature when the Self-Test Report shows streaking or white lines through any of the colored bars Do not clean print cartridges unnecessarily This wastes ink and shortens the life of the ink nozzles
1 Press Setup
2 Press 5 then press 1This selects the Maintenance menu and then selects the Clean Print Cartridge optionA page of patterns is printed The cartridges are cleaned Recycle or discard the pageIf copy or print quality still seem poor after you clean the print cartridges replace the print cartridge that is affected
restore factory defaultsYou can restore the original factory settings to what they were when you purchased your HP Officejet Choosing to restore your factory defaults restores all settings except date information and any scan settings you may have set
You can perform this process from the front panel only
1 Press Setup
2 Press 5 then press 3This selects Maintenance and then selects Restore Factory DefaultsThe factory default settings are restored
hp officejet 4100 series
chapter 7
36
set scroll speedThe Scroll Speed option lets you control the rate that text messages appear in the front-panel display You can choose Normal Fast or Slow The default is Normal
1 Press Setup
2 Press 5 then press 6This selects Maintenance and then selects Set Scroll Speed
3 Press until the desired speed appears then press Enter
set the prompt delay timeThe Prompt Delay option lets you control the amount of time before a message is displayed in the front-panel display You can choose Normal Fast or Slow The default is Normal
1 Press Setup
2 Press 5 then press 7This selects Maintenance and then selects Set Prompt Delay Time
3 Press until the delay time appears then press Enter
self-maintenance sounds During the life of your product you may hear various mechanical sounds This is a normal part of your unitrsquos self-maintenance
reference guide
maintain your hp officejet
37
setup menu optionsThe following options are available from the Setup button
1Last Transaction
2Fax Log
3Speed Dial List
4Self-Test Report
5Automatic Reports Setup
1Print Report
Use Setup to display the Print Report Speed Dial Setup Basic Fax Setup Advanced Fax Setup and Maintenance options
Press and to move to the setting you wantPress Enter to select the displayed setting
1Clean Print Cartridges
2Align Print Cartridges
3Restore Factory Defaults
4Reprint Faxes in Memory
5Set Language amp CountryRegion
6Set Scroll Speed
7Set Prompt Delay Time
5Maintenance2Speed Dial Setup
3Basic Fax Setup
4Advanced Fax Setup
1Individual Speed Dial
2Delete Speed Dial
3Print Speed Dial List
1Date and Time
2Fax Header
3Rings to Answer
4 Paper Size
5Tone or Pulse Dialing
6Ring and Beep Volume
7Fax Forwarding Black Only
1Automatic Reports Setup
2Answer Ring Pattern
3Busy Redial
4No Answer Redail
5Automatic Reduction
6Backup Fax Reception
7Error Correction Mode
hp officejet 4100 series
chapter 7
38
8
39
additional setup information
During the installation of the HP Officejet software a number of windows are displayed You should see the following
bull Installingbull Copying files bull A request to plug in the HP Officejetbull Green OK and check markbull Request to restart your computer (may not occur in all cases)bull Registration
If you did not see all of these windows there may be a problem with the installation Verify the following
bull The HP Director contains six icons (double-click the HP Director icon on the desktop)
bull The HP Officejet is listed in the Printers dialog boxbull There is an icon for the HP Officejet in the System Tray that indicates the
HP Officejet is ready
If the HP Director does not show six icons you may need to wait a few minutes for the HP Officejet to connect to your computer
possible installation problemsIf nothing appears on your computer screen after you insert the HP Officejet 4100 Series CD-ROM into your computerrsquos CD-ROM drive
1 From the Start menu choose Run
2 In the Run dialog box enter dsetupexe (if your CD-ROM drive is not assigned to drive letter d use the appropriate drive letter) then click OK
If the HP Director does not contain six icons do the following
bull Verify that the front-panel cover is attached then unplug the HP Officejet and plug it in again
bull Verify that the USB and power cables are plugged inndash Unplug the USB cable and plug it in againndash Do not attach the USB cable to a keyboard or nonpowered hubndash Verify that the USB cable is 3 meters or less in lengthndash If you have several USB devices attached to your computer you may
want to unplug the others during the installation
Note AppleTalk is not supported
bull Unplug the HP Officejet from the wall and plug it in againbull Restart your computer
hp officejet 4100 series
chapter 8
40
On Windows check the System Tray for applications that are running in the background and close them before restarting your computer
remove and reinstall your hp officejet softwareIf six icons do not appear in the Director you may need to uninstall and re-install the software Do not simply delete the HP Officejet program files from your hard drive Be sure to remove them properly using the uninstall utility provided in the HP Officejet program group
to uninstall from a Windows computer
1 Disconnect your HP Officejet from your computer
2 On the Windows taskbar click Start choose Programs or All Programs (XP) choose Hewlett-Packard choose hp officejet 4100 series then choose uninstall software
3 Follow the directions on the screenBe sure to disconnect your HP Officejet
4 If you are asked whether you would like to remove shared files click NoOther programs that use these files may not work properly if the files are deleted
5 After the program finishes removing the software disconnect your HP Officejet and restart your computer
Note It is important that you disconnect your HP Officejet before restarting your computer
6 To reinstall the software insert the HP Officejet 4100 Series CD-ROM into your computerrsquos CD-ROM drive and follow the instructions that appear
7 After the software is installed connect and turn on your HP Officejet following the onscreen instructions and the instructions in your Setup PosterAfter connecting and turning on your HP Officejet you may have to wait several minutes for all of the Plug and Play events to completeWhen the software installation is complete you will see a Status Monitor icon in the System Tray
8 To verify that the software is properly installed double-click on the HP Director icon on the desktop If the HP Director shows six icons the software has been properly installed
to uninstall from a Macintosh computer
1 Disconnect your HP Officejet from your computer
2 Double-click on ApplicationsHP All-in-One Software folder
reference guide
additional setup information
41
3 Double-click on HP Uninstaller
4 Follow the directions that appear on the screen
5 After the program finishes removing the software disconnect your HP Officejet and restart your computer
6 To reinstall the software insert the HP Officejet 4100 Series CD-ROM into your computerrsquos CD-ROM drive
Note When re-installing the software follow the instructions on the Setup Poster Do not connect the HP Officejet to your computer until after you have completed the software installation
7 On the desktop open the CD-ROM double-click on hp all-in-one installer and follow the instructions that appear
connect your hp officejet to a phone modem or answering machine
The HP Officejet can share a phone line with a phone a modem or an aswering machine When sharing a phone line with an answering machine the HP Officejet will answer fax calls and direct voice calls to the answering machine
Note For information on connecting your HP Officejet to your computer and phone line refer to the Setup Poster that came with your unit
to connect your hp officejet to a phone modem or answering machine
1 Remove the white plastic stopper from connector 2 on the back of the HP Officejet
To connect more than one device to connector 2 on the HP Officejet you must purchase a Y-splitter and plug it into connector 2
2 Connect the phone cord from the phone modem or answering machine to connector 2 (or Y-splitter)
Caution Do not use the phone cord that came with the HP Officejet for this purpose That phone cord must connect connector 1 on the HP Officejet to the wall jack for your phone system See the Setup Poster for details
3 If you are connecting an answering machine see set the number of rings before answering on page 21 for instructions on setting the number of rings correctly or change the answer ring pattern (distinctive ringing) on page 26 for information on incoming ring patterns
4 If you are connecting a modem turn off its fax-receive feature
connector 2 on the HP Officejet
connector 1 on the HP Officejet
hp officejet 4100 series
chapter 8
42
additional troubleshooting helpYou may want to refer to the readme file for more information on possible installation problems On Windows you can access the readme file from the Start button on the taskbar select Programs Hewlett-Packard hp officejet 4100 series View the Readme File On Macintosh you can access the readme file by double-clicking on the icon located in the top-level folder of the HP Officejet software CD-ROM
The readme file provides more information including
bull Using the Re-install utility after a failed installation to return your PC to a state that will allow the HP Officejet to be re-installed
bull Using the Re-install utility on Windows 98 to recover from a Composite USB System Driver missing errorThis error may occur if the hardware is installed prior to installing the software After running the Re-install utility reboot your PC and install the HP Officejet software before connecting the HP Officejet to your computer
You can also find more information on this website
wwwhpcomsupport
9
43
technical information
Additional specifications information can be found in the HP Photo amp Imaging Help in the hp officejet 4100 series section
physical specifications
power specificationsbull Power consumption 75W maximumbull Source (Input Voltage) 100 to 240 VAC groundedbull Input Frequency 50 to 60 Hzbull Current 1A maximum
regulatory informationAdditional regulatory information can be found in the HP Photo amp Imaging Help The information in this section supercedes information in the HP Photo amp Imaging Help
doc statement deacuteclaration de conformiteacute (Canada)Le preacutesent appareil numeacuterique neacutemet pas de bruit radioeacutelectrique deacutepassant les limites applicables aux appareils numeacuteriques de la classe B prescrites dans le Regraveglement sur le brouillage radioeacutelectrique eacutedicteacute par le ministegravere des Communications du CanadaThis digital apparatus does not exceed the Class B limits for radio noise emissions from digital apparatus set out in the Radio Interference Regulations of the Canadian Department of Communications
notice to users of the Canadian telephone networkThis equipment meets the applicable Industry Canada Terminal Equipment Technical Specifications This is confirmed by the registration number The abbreviation IC before the registration number signifies that registration was performed based on a Declaration of Conformity indicating that Industry Canada technical specifications were met It does not imply that Industry Canada approved the equipment
Note The Ringer Equivalence Number (REN) assigned to each terminal device provides an indication of the maximum number of terminals allowed to be connected to a telephone interface The termination on an interface may consist of any combination of devices subject only to the requirement that the sum of the Ringer Equivalence Numbers of all the devices does not exceed 5
The REN for this product is 03B based on FCC Part 68 test results
height width depth weight (without print cartridges)
with paper trays and ADF closed
718 in (1824 cm) 1676 in (4258 cm) 825 in (2096 cm) 75 lbs (34 kg)
with ADF and paper tray extended
1030 in (2615 cm) 1676 in (4258 cm) 1854 in (4709 cm) 75 lbs (34 kg)
hp officejet 4100 series
chapter 9
44
notice to all users of the European Economic Area (EEA)
This product is designed to interwork with the analogue telephone networks in the following countriesregions
Network compatibility depends on customer selected settings which must be reset to use the equipment on a telephone network in a countryregion other than where the product was purchased Contact the vendor or Hewlett-Packard Company if addition product support is necessaryThis equipment has been certified by the manufacturer in accordance with Directive 19995EC (annex II) for Pan-European single-terminal connection to the public switched telephone network (PSTN) However due to differences between the individual PSTNs provided in different countriesregions the approval does not of itself give an unconditional assurance of successful operation on every PSTN network termination pointIn the event of problems you should contact your equipment supplier in the first instance
geraumluschemissionLpA lt 70 dBam Arbeitsplatzim Normalbetriebnach DIN 45635 T 19
notice to Korean customers
Germany UK Netherlands
France Spain Italy
Belgium Luxembourg Sweden
Austria Denmark Ireland
Norway Finland Switzerland
Greece Portugal
10
45
hp support
This section explains the support services information provided by Hewlett-Packard If you are unable to find the answer you need in the printed or onscreen documentation supplied with your product you can contact one of the HP support services listed in the following pages Some support services are available only in the US and Canada while others are available in many countriesregions worldwide If a support service number is not listed for your countryregion contact your nearest authorized HP dealer for help
get support and other information from the internetIf you have Internet access you can get help from the following HP website
wwwhpcomsupportThe Web site offers technical support drivers supplies and ordering information
hp customer supportSoftware programs from other companies may be included with your HP Officejet If you experience problems with any of those programs you will receive the best technical assistance by calling the experts at that companyIf you need to contact HP Customer Support do the following before you call
1 Make sure thata Your unit is plugged in and turned onb The specified print cartridges are installed correctlyc The recommended paper is properly loaded in the input tray
2 Reset your unita Turn off the unit using the On button located on the unitrsquos front panelb Unplug the power cord from the back of the unitc Plug the power cord back into the unitd Turn on the unit using the On button
3 For more information check the HP website at wwwhpcomsupport
4 If you are still experiencing problems and need to speak with an HP Customer Support Representativendash Have your service ID and serial number ready To display your service ID and
serial number on the front panel do the following Press Enter and Start Color at the same time until the service ID appears in the front-panel display From this display press the right arrow until the serial number displays
ndash Print a Self-Test Report See print a self-test report on page 32 for information on printing this report
ndash Make a color copyndash Be prepared to describe your problem in detail
5 Call HP Customer Support Be near your unit when you call
call in the US during warrantyCall (208) 323-2551 This service is free during the warranty period however your standard long-distance phone charges still apply A fee may apply outside the warranty period
hp officejet 4100 series
chapter 10
46
US phone support is available in both English and Spanish languages 24 hours a day 7 days a week (days and hours of support may change without notice)
call elsewhere in the worldThe numbers listed below are current as of the printing date of this guide For a list of current international HP Support Service numbers visit this address and choose your own countryregion or language
wwwhpcomsupportFor Korea you can also visit this address
httpwwwhpcokrYou can call the HP support center in the following countriesregions If your countryregion is not listed contact your local dealer or nearest HP Sales and Support Office to find out how to obtain servicesSupport service is free during the warranty period however your standard long-distance phone charges will apply In some cases a flat fee per single incident will also applyFor phone support in Europe please check for the details and conditions of phone support in your countryregion by consulting the following Web site
wwwhpcomsupportAlternatively you can ask your dealer or call HP at the phone number indicated in this booklet As part of our constant efforts to improve our phone support service we advise you to check our website on a regular basis for new information regarding service features and delivery
countryregion hp technical support countryregion hp technical support
Algeria1 +213 (0) 61564 543 Malaysia 1-800-805405
Argentina 0810-555-5520 Mexico 01-800-472-6684
Australia +61 3 8877 80001902 910 910
Mexico (Mexico City) 5258-9922
Austria +43 (0) 810 00 6080 Morocco1 +212 22404 747
Bahrain (Dubai) 800 728 Netherlands +31 (0) 20 606 8751
Belgium (Dutch) +32 (0) 2 626 8806 New Zealand 0800 441 147
Belgium (French) +32 (0) 2 626 8807 Norway +47 22 11 6299
Brazil (Grande Sao Paulo) (11) 3747 7799 Oman +971 4 883 8454
Brazil (Demais Localidades) 0800 157751 Palestine +971 4 883 8454
Canada during warranty (905) 206 4663 Panama 001-800-7112884
Canada post-warranty(per-call charge)
1-877-621-4722 Peru 0-800-10111
Caribbean amp Central America
1-800-711-2884 Philippines 632-867-3551
Chile 800-360-999 Poland +48 22 865 98 00
China 86 10 6868 7980 Portugal +351 21 3176333
Colombia 9-800-114-726 Puerto Rico 1-877-2320-589
Costa Rica 0-800-011-0524 Qatar +971 4 883 8454
Czech Republic +420 (0) 261307310 Romania +40 1 315 44 42or local 01 3154442
reference guide
hp support
47
call in Australia post-warrantyIf your product is not under warranty you can call 03 8877 8000 A per-incident out-of-warranty support fee of $2750 (inc GST) will be charged to your credit card You can also call 1902 910 910 ($2750 charged to your phone account) from 900 AM to 500 PM Monday through Friday (Charges and support hours are subject to change without notice)
prepare your unit for shipmentIf after contacting HP Customer Support or returning to the point of purchase you are requested to send your unit in for service please follow the power off and rebox steps below to avoid further damage to the HP product
Denmark +45 39 29 4099 Russian Federation Moscow +7 095 797 3520
Ecuador 1800-711-2884 Russian Federation St Petersburg
+7 812 346 7997
Europe (English) +44 (0) 207 512 5202 Saudi Arabia +800 897 14440
Egypt 02 532 5222 Singapore 65 6272 5300
Finland +358 (0) 203 47 288 Slovakia +421 (0) 2 682 08080
France (034 Euromin) +0892 69 60 22 South Africa (inside RSA) 086 000 1030
Germany (012 Euromin) +49 (0) 180 52 58 143 South Africa (inside RSA) +27-11 258 9301
Greece +30 1060 73 603 Spain +34 902 321 123
Hong Kong (SAR) +85 (2) 3002 8555 Sweden +46 (0)8 619 2170
Guatemala 1800-995-5105 Switzerland 2 +41 (0) 84 880 1111
Hungary +36 (0) 1 382 1111 Taiwan +886-2-2717-00550800 010 055
India 1-600-11226791 11 682 6035
Thailand +66 (2) 661 4000
Indonesia 62-21-350-3408 Tunisia1 +216 1891 222
Ireland +353 (0) 1 662 5525 Turkey +90 216 579 7171
Israel +972 (0) 9 8304848 Ukraine +7 (380-44) 490-3520
Italy +39 (0) 226410350 United Arab Emirates +971 4 883 8454
Japan 0570 000 511+81 3 3335 9800
United Kingdom +44 (0) 207 512 52 02
Jordan +971 4 883 8454 Venezuela 0800-47468368 or800-477-7777
Korea (Seoul) +82 (2) 3270 0700 Venezuela (Caracas) (502) 207-8488
Korea (outside Seoul) 080 999 0700 Vietnam 84 (0) 8 823 4530
Kuwait +971 4 883 8454 Yemen +971 4 883 8454
Lebanon +971 4 883 8454
1 This Call Center supports French speaking customers from the following countriesregions Morocco Tunisia and Algeria
2 This Call Center supports German French and Italian speaking customers in Switzerland
countryregion hp technical support countryregion hp technical support
hp officejet 4100 series
chapter 10
48
Note When transporting your HP Officejet make sure that the pens have been removed the HP Officejet has been properly shut down by pressing the power button and you have allowed time for the carriage to return to the service station and for the scanner to return to its parked position
1 Turn on the unitDisregard steps 1 through 6 if your unit will not turn on and the print carriage is in the home position You will not be able to remove the print cartridges Proceed to step 7
2 Open the print cartridge access doorThe print carriage moves into view
3 See replace the print cartridges on page 33 for information on removing the print cartridges
Caution Remove both print cartridges Failure to do so may damage your unit
4 Place the print cartridges in an airtight bag so they will not dry out and put them aside (do not send them with the unit unless instructed to by the HP customer support call agent)
5 Turn off the unit
6 Close the print cartridge access door
7 Remove the front panel cover as followsa Grasp the front of the front panel cover with two hands as shownb Firmly lift the front panel cover to unsnap it from the unit
8 Retain the front panel cover Do not return the front panel cover with the unit
9 If available pack the unit for shipment using the original packing materials or the packaging materials that come with your exchange unit
If you do not have the original packaging materials please use other adequate packaging materials Shipping damage caused by improper packaging andor improper transportation is not covered under the warranty
reference guide
hp support
49
10 Place the return shipping label on the outside of the box
11 Include the following items in the boxndash A complete description of symptoms for service personnel (samples of print
quality problems are helpful)ndash A copy of the sales slip or other proof of purchase to establish the warranty
coverage periodndash Your name address and a phone number where you can be reached during
the day
hp distribution centerTo order HP Officejet software a copy of the printed Reference Guide a setup poster or other customer-replaceable parts do one of the following bull In the US or Canada call (208) 323 2551bull Visit this website
httpwwwhpcomcposupportsoftwarehtml
hp officejet 4100 series
chapter 10
50
11
51
warranty information
HP Officejet 4100 seriesDuration of Limited Warranty (hardware and labor) 1 YearDuration of Limited Warranty (CD media) 90 DaysDuration of Limited Warranty (print cartridges) Until the HP ink is depleted or the ldquoend of warrantyrdquo date printed on the cartridge has been reached whichever occurs first
warranty service
express serviceTo obtain HP express repair service the customer must contact an HP service office or an HP Customer Support Center for basic troubleshooting first See hp customer support on page 45 for steps to take before calling Customer SupportIf a customer unit needs a minor part replacement and these parts can normally be replaced by the customer the customer-replaceable components may be serviced through expedited part shipment In this event HP will prepay shipping charges duty and taxes provide telephone assistance on replacement of the component and pay shipping charges duty and taxes for any part that HP asks to be returnedThe HP Customer Support Center may direct customers to designated authorized service providers who are certified by HP to service the HP product
warranty upgradesUpgrade your standard factory warranty to a total of three years with the HP SUPPORTPACK Service coverage begins on product purchase date and the pack must be purchased within the first 180 days of product purchase This program offers phone support from 600 AM to 1000 PM Mountain Standard Time (MST) Monday through Friday and 900 AM to 400 PM (MST) on Saturdays If during your technical support call it is determined that you need a replacement product then HP will ship you this product next business day free of charge Available in US onlyFor more information please call 1-888-999-4747 or visit the following HP Web site
httpwwwhpcomgohpsupportpack
Outside the US please call your local HP Customer Support office See call elsewhere in the world on page 46 for a list of international Customer Support numbers
returning your hp officejet for serviceBefore returning your HP Officejet for service you must call HP Customer Support See hp customer support on page 45 for steps to take before calling Customer Support
hewlett-packard limited global warranty statement
extent of limited warrantyHewlett-Packard (ldquoHPrdquo) warrants to the end-user customer (ldquoCustomerrdquo) that each HP Officejet 4100 Series product (ldquoProductrdquo) including related software accessories media and supplies shall be free from defects in material and workmanship for the duration which begins on the date of purchase by the Customer
hp officejet 4100 series
chapter 11
52
For each software Product HPrsquos limited warranty applies only to a failure to execute programming instructions HP does not warrant that the operation of any Product shall be uninterrupted or error freeHPrsquos limited warranty covers only those defects which arise as a result of normal use of a Product and does not cover any other problems including those which arise as a result of (a) improper maintenance or modification (b) software accessories media or supplies not provided or supported by HP or (c) operation outside the Productrsquos specificationsFor any hardware Product the use of a non-HP print cartridge or a refilled print cartridge does not affect either the warranty to the Customer or any HP support contract with the Customer However if Product failure or damage is attributable to the use of a non-HP or refilled print cartridge HP shall charge its standard labor and materials charges to service the Product for the failure or damageIf HP receives during the applicable warranty period notice of a defect in any Product HP shall either repair or replace the defective Product at HPrsquos option Where labor charges are not covered by HPrsquos limited warranty repairs shall be at HPrsquos standard charges for laborIf HP is unable to repair or replace as applicable a defective Product which is covered by HPrsquos warranty HP shall within a reasonable time after being notified of the defect refund the purchase price for the ProductHP shall have no obligation to repair replace or refund until the Customer returns the defective Product to HPAny replacement product may be either new or like-new provided that it has functionality at least equal to that of the Product being replacedHP products including each Product may contain remanufactured parts components or materials equivalent to new in performanceHPs limited warranty for each Product is valid in any countryregion or locality where HP has a support presence for the Product and where HP has marketed the Product The level of warranty service may vary according to local standards HP shall have no obligation to alter the form fit or function of the Product in order to make it operate in a countryregion or locality for which the Product was never intended to operate
limitations of warrantyTO THE EXTENT ALLOWED BY LOCAL LAW NEITHER HP NOR ITS THIRD PARTY SUPPLIERS MAKE ANY OTHER WARRANTY OR CONDITION OF ANY KIND WHETHER EXPRESS OR IMPLIED WITH RESPECT TO THE COVERED HP PRODUCTS AND SPECIFICALLY DISCLAIM THE IMPLIED WARRANTIES OR CONDITIONS OF MERCHANTABILITY SATISFACTORY QUALITY AND FITNESS FOR A PARTICULAR PURPOSE
limitations of liabilityTo the extent allowed by local law the remedies provided in this Limited Warranty Statement are the Customerrsquos sole and exclusive remediesTO THE EXTENT ALLOWED BY LOCAL LAW EXCEPT FOR THE OBLIGATIONS SPECIFICALLY SET FORTH IN THIS LIMITED WARRANTY STATEMENT IN NO EVENT SHALL HP OR ITS THIRD PARTY SUPPLIERS BE LIABLE FOR DIRECT INDIRECT SPECIAL INCIDENTAL OR CONSEQUENTIAL DAMAGES WHETHER BASED ON CONTRACT TORT OR ANY OTHER LEGAL THEORY AND WHETHER ADVISED OF THE POSSIBILITY OF SUCH DAMAGES
local lawThis Limited Warranty Statement gives the Customer specific legal rights The Customer may also have other rights which vary from state to state in the United States from province to province in Canada and from countryregion to countryregion elsewhere in the world
reference guide
warranty information
53
To the extent this Limited Warranty Statement is inconsistent with local law this Statement shall be deemed modified to be consistent with such local law Under such local law certain disclaimers and limitations of this Statement may not apply to the Customer For example some states in the United States as well as some governments outside the United States (including provinces in Canada) mayPreclude the disclaimers and limitations in this Statement from limiting the statutory rights of a consumer (eg the United Kingdom)Otherwise restrict the ability of a manufacturer to enforce such disclaimers or limitations orGrant the Customer additional warranty rights specify the duration of implied warranties which the manufacturer cannot disclaim or not allow limitations on the duration of implied warrantiesFOR CONSUMER TRANSACTIONS IN AUSTRALIA AND NEW ZEALAND THE TERMS IN THIS LIMITED WARRANTY STATEMENT EXCEPT TO THE EXTENT LAWFULLY PERMITTED DO NOT EXCLUDE RESTRICT OR MODIFY AND ARE IN ADDITION TO THE MANDATORY STATUTORY RIGHTS APPLICABLE TO THE SALE OF THE COVERED HP PRODUCTS TO SUCH CUSTOMERS
hp officejet 4100 series
chapter 11
54
55
index
Numerics4-by-6 inch photo paper
load 10 12
AADF 7adjust
volume for fax 25align print cartridges 35Answer Ring Pattern 26automatic document feeder 7automatic reduction
fax 25
Bbest copy quality 13busy number
redial automatically 23
Ccancel
scan 18scheduled fax 21
cartridgesalign 35replace 33
cleanprint cartridges 35the exterior 32the glass 31white strip 32
colorenhance 14fax 20fax from front panel 20
contrastchange for fax 23photo color 14
copy 13 16change default settings 15enhance 14fit to page 16lighten or darken 14menu options 16number of copies 14photo 15quality 13reduce or enlarge 14settings 13 15
speed 13tutorial 4
Customer Support 45web site 45
Ddarken a copy 14date
setting 27default settings
restore 35director review 4distinctive ringing 26
Eenhance copies 14enlarge copy 14 16envelopes
load 9Error Correction Mode
(ECM) 25
Ffactory defaults
restore 35fast copy quality 13fax 28
adjust volume 25automated reports 22cancel fax forward 24cancel scheduled 21change Answer Ring
Pattern 26change contrast 23change resolution 22change settings 19control appearance 22create individual speed-dial
settings 26delete speed-dial
settings 27distinctive ringing 26Error Correction Mode
(ECM) 25forward faxes 24header 27in color 20in color from front panel 20manual reports 22
menu 29print reports 22receive 21receive manually 21redial busy or unanswered
number 23schedule 20send from front panel 19set automatic reduction 25set date and time 27set the number of rings 21settings 27 28setup menu options 29speed dials 19test 28
fit to page 16forward faxes 24
cancel 24front panel
display scroll speed 36enter text 28send a fax 19setting prompt delay 36tutorial 3
Gglass
cleaning 31greeting cards
load 11
Hhelp 1HP Customer Support 45
calling 45HP Director 4HP distribution center 49HP Officjet
preparing to ship 47HP papers
tips on loading 11
Iindividual speed-dial settings
create 26ink cartridges see print
cartridgesinkjet paper
load 11
index
hp officejet 4100 series56
Kkeypad
enter text 28
Llabels
load 12lighten copies 14load
change the paper type 12envelopes 9original in ADF 7paper 7photo paper 10 12postcards 10 12print cartridges 33set the paper size 12tips 11
Mmaintenance
align print cartridges 35clean print cartridges 35clean the exterior 32clean the glass 31clean the white strip 32normal sounds 36replace print cartridges 33restore factory defaults 35self-maintenance
sounds 36self-test report 32
menuscopy options 16fax 29fax setup 29maintenance 37print reports 37
Nnormal copy quality 13number of copies
set 14number of rings
set 21
Oorder print cartridges 60originals
load in ADF 7output tray 8
Ppaper
change default size for copy 12
change the type 12load 7recommended 7set the size 12tips on loading 11
paper size change for copy 12
paper trayload 7
phone numbers support services 45
photo paperload 10 12
photoscopy 15enhance copy 14
physical specifications 43postcards
load 10 12power
specifications 43print
envelopes 9fax reports 22self-test report 32
print cartridgesalign 35clean 35handling 32replace 33
prompt delaysetting 36
Qquick start
review the director 4use with a computer 4
Rreceive
fax 21redial
busy or unanswered number 23
reduce copy 14 16regulatory information 43reinstall software 40reports
generate automatically for fax 22
generate manually for fax 22
print 22self-test 32
resolution
change for fax 22restore factory settings 35returning your HP Officejet for
service 51
Sscan
from front panel 17stop 18
schedule a fax 20scroll speed
setting 36self-test report 32send
cancel forward faxes 24color fax 20color fax from front
panel 20forward faxes 24
settingscopy 13 15fax 27 28prompt delay 36scroll speed 36
setupadditional information 39menu 29
shippingyour HP Officejet 47
softwareremove and reinstall 40
soundsself-maintenance 36
specificationsphysical 43power 43
speed dials 19create individual
settings 26delete settings 27
stopscan 18scheduled fax 21
subscriber identification code 27
support services 45
Ttelephone line
multiple numbers 26telephone numbers 45text
enhance 14enter from front panel 28
time
index
reference guide 57
setting 27transparency film
recommended 7tips on loading 11
troubleshootingremove and reinstall
software 40T-shirt Transfer Iron-On
load 11tutorial
front panel 3make a copy 4
Uunanswered number
redial automatically 23
Vvolume
adjust 25
Wwarranty 45
service 51statement 51upgrades 51
white stripcleaning 32
hp officejet 4100 series
chapter 12
58
declaration of conformityAccording to ISOIEC Guide 22 and EN 45014
Manufacturerrsquos Name and Address
Hewlett-Packard Company 16399 West Bernardo Drive San Diego CA 92127-1899 USA
declares that the product
Product Name hp officejet 4100 series (Q1608A)
Model Number(s) officejet 4110 (Q1609A) officejet 4110xi (Q1610A) officejet 4110v (Q1611A) officejet 4105 (Q1612A) officejet 4105z (Q1613A) officejet 4115 (Q1614A)
Product Options All
conforms to the following Product Specifications
Safety EN609501992 +A1 A2 A3 A4 amp A11
IEC609501991 +A1 A2 A3 amp A4
UL1950CSA 222 No 950 3rd Edn 1995
NOM-019-SCFI-1993
EMC CISPR221993 +A1 amp A2 EN550221994 +A1 amp A2 -Class B
CISPR241997EN550241998
IEC 61000-3-21995 EN61000-3-21995
IEC 61000-3-31994 EN61000-3-31995
ASNZS 3548 1992
CNS13438 1997
FCC Part 15-Class B ICES-003 Issue 2 VCCI-2
GB 9254-1998
Telecom TBR21 1998
Supplementary Information
The Product herewith complies with the requirements of the Low Voltage Directive 7323EEC the EMC Directive 89336EEC and the RampTTE Directive 19995EC (ANNEX II) carries the CE marking accordingly
European Contact for regulatory topics only Your local Hewlett-Packard Sales and Service Office orHewlett-Packard GmbH
Department HQ-TRE Herrenberger Strasse 140 D-71034 Boumlblingen Germany (FAX + 49-7031-14-3143)
order mediaTo order media such as HP Premium Inkjet Paper HP Premium Inkjet Transparency Film HP Iron-On T-shirt Transfer paper or HP Greeting Cards go to
wwwhpshoppingcom
For orders in countries other than the US and Canada select other countries then click Yes to leave hpshoppingcom From this website you can access hpshoppingcom for your specific language or countryregion
order print cartridges
If you have Internet access you can get more information from the HP website at
wwwhpcomsupport
print cartridges hp reorder number
HP black print cartridge 56 19 ml black print cartridge
HP color print cartridgeHP tri-color print cartridge
57 17 ml color print cartridge28 8 ml color print cartridge
Visit the hp officejet information centerIt has everything you need to get the most value from your HP Officejet
bull Technical Supportbull Supplies and Ordering Informationbull Project Tipsbull Ways to Enhance Your Product
wwwhpcomsupport
copy 2003 Hewlett-Packard Company
Printed in the USA Mexico Germany Singapore or China
Q1608-90163Q1608-90163
Q1608-90163

hp officejet 4100 series
chapter 1
2
2
3
quick start
You can perform many functions using either the front panel or the HP Officejet software
Even if you do not connect your HP Officejet to a computer you can use the front panel to copy documents or photos and send a fax You can change a wide variety of settings using the front-panel buttons and menu system
front panel featuresReview the illustrations below and identify the location of the buttons on the front panel
1
2
3
4
5
678
9
10 11 12 13 14 15
button purpose
1 On turn the HP Officejet on or off
2 Left Arrow scroll through settings or to delete one character at a time from a text entry
3 Right Arrow scroll through settings
4 Enter select or save the displayed setting
5 Cancel stop a job exit a menu or exit settings
6 Start Color use to start a color copy scan or fax job
7 Start Black start a black and white copy scan or fax job
8 Keypad enter fax numbers names values or text
9 RedialPause start a fax redial or insert a hyphen when entering a phone number
hp officejet 4100 series
chapter 2
4
use your hp officejet with a computerIf you installed the HP Officejet software on your computer according to the Setup Poster you can access all the features of the HP Officejet using the HP Director
review the hp photo amp imaging directorThe HP Director is available through the desktop shortcut
for windows users
1 Do one of the followingndash Double-click the hp director icon on the desktopndash In the Windows taskbar click Start point to Programs or All Programs
(XP) point to Hewlett-Packard point to hp officejet 4100 series then choose hp photo amp imaging director
2 In the Select Device box click to see a list of installed HP devices
3 Select hp officejet 4100 seriesThe Director displays only the buttons that are appropriate for the selected device
the hp photo amp imaging director
10 Speed Dial access programmed speed dial entries
11 Setup access the menu system for reports fax settings and maintenance
12 Fax select the fax function
13 Scan select the scan function
14 Copy select the copy function
15 Photo Fit to Page enlarge a photo to fit a full-size sheet of paper
button purpose
1 2 3
4 5 6 7 8 9 10
reference guide
quick start
5
for macintosh users
Do one for the followingndash For OS 9 double-click the HP Photo and Imaging Director icon on the
desktopndash For OS X double-click the HP Photo and Imaging Director icon on the
dock
The following figure shows some of the features available through the HP Photo and Imaging Director for Macintosh Consult the legend for a brief explanation of a specific feature
feature purpose
1 Select Device Use this feature to select the product you want to use from the list of installed HP products
2 Settings Use this feature to view or change various settings for your HP device such as print scan or copy
3 Status Displays the status window for all-in-one devices only
4 Send a Fax Use this feature to send a fax and access fax settings
5 Scan Picture Scans an image and displays it in the HP Photo amp Imaging Gallery
6 Scan Document Scans text and displays it in the selected destination text editing software program
7 Make Copies Displays the Copy dialog box where you can select the copy quality the number of copies the color the size and can start a copy
8 View amp Print Displays the HP Photo amp Imaging Gallery where you can view and edit images use HP Photo Prints make and print a photo album e-mail an image unload an image to the Web or copy an image to another application
9 Help Provides access to HP Photo amp Imaging Help which provides software help a product tour and troubleshooting information
10 Click this arrow to access tool tips which explain each of the Director options
hp officejet 4100 series
chapter 2
6
the hp photo and imaging director for macintosh OS X
feature purpose
1 Select Device Use this feature to select the product you want to use from the list of installed HP products
2 Settings Use this feature to view or change various settings for your HP device such as print scan or copy
3 Scan Picture Scans an image and displays it in the HP Photo and Imaging Gallery
4 Scan Document Scans text and displays it in a text editing software program
5 Make Copies Displays the Copy dialog box where you can select the copy quality the number of copies the color the size and can start a copy
6 Send Fax Use this feature to send a fax
7 Maintain Printer Accesses the HP Inkjet Utility where you can clean and align the print cartridges check print cartridge ink levels print a test or sample page register your printer or access information on product support
8 View and Print Displays the HP Photo and Imaging Gallery where you can view and edit images
1 2
3 4 5 6 7 8
3
7
load originals and load paper
You can make copies from originals loaded on the automatic document feeder (ADF) You can also print and copy onto a variety of paper types weights sizes and transparency films It is important however that you choose the right paper and make sure that it is loaded correctly and not damaged
load originalsYou can copy or scan any original by placing it in the automatic document feeder
1 Load your original in the automatic document feeder
Note Do not feed photos smaller than 35-by-5 inches through the automatic document feeder
2 Slide the right and left paper guides in until they stop at the edges of the paper
load paperFollowing is the basic procedure for loading paper There are specific considerations for loading certain types of paper transparency film postcards and envelopes After you review this procedure see tips for loading other types of paper in the paper tray on page 11 load 4 x 6 inch photo paper on page 10 load envelopes on page 9 and load postcards on page 10
For best results adjust the paper settings each time you change paper types or paper sizes For more information see set the paper type on page 12
to load the paper tray
1 Lower the paper tray and extend the paper-tray extender
2 Slide the paper-width guide on the left to its outermost position
automatic document feeder (ADF)
hp officejet 4100 series
chapter 3
8
3 Tap the stack on a flat surface to align the edges of the paper and then check the paper for the followingndash Make sure it is free of rips dust wrinkles and curled or bent edgesndash Make sure all the paper in the stack is the same size and type unless
you are working with photo paper
4 Insert paper into the paper tray print-side down until it stops To avoid bending the paper make sure you do not push the paper in too far or push too hard If you are using letterhead insert the top of the page firstBe careful not to use too much or too little paper Check that the stack of paper contains several sheets but is no higher than the top of the paper-width guide
5 Slide the paper-width guide in until it stops at the edge of the paper Make sure that the paper stack lies flat in the paper tray and fits under the tab of the paper-width guide
6 Extend the output-tray
reference guide
load originals and load paper
9
load envelopesUse the print feature of your software to print to envelopes with your HP Officejet Do not use shiny or embossed envelopes or envelopes that have clasps or windows You can load the paper tray with one or multiple envelopes
1 Remove all paper from the paper tray
2 Slide an envelope into the tray with the envelope flap up and to the left (print-side down) until it stops
3 Adjust the paper-width guide against the envelope until it stopsBe careful not to bend the envelope If you are loading multiple envelopes make sure the envelopes fit within the tray (do not overload it)Consult the help files in your word processing software for details on how to format text for printing on envelopes
hp officejet 4100 series
chapter 3
10
load 4 x 6 inch photo paperFollowing is the procedure for loading 4-by-6 inch photo paper into your HP Officejet
1 Remove all paper from the paper tray and then slide a stack of photo paper into the tray until it stopsMake sure the print-side faces downIf the photo paper you are using has perforated tabs load the photo paper so that the tabs are closest to you
2 Adjust the paper-width guide against the stack of photo paper until it stopsMake sure the photo paper fits within the tray (do not overload it)
Note Make sure you set the paper type and paper size before printing See set the paper type on page 12 and set the paper size on page 12
load postcardsFollowing is the procedure for loading postcards
1 Remove all paper from the paper tray and then slide a stack of cards into the tray until they stopMake sure the print-side faces down
reference guide
load originals and load paper
11
2 Adjust the paper-width guide against the cards until it stops Make sure the cards fit within the tray (do not overload it)
tips for loading other types of paper in the paper trayThe following table provides guidelines for loading certain types of paper and transparency film For best results adjust the paper settings each time you change paper types and paper sizes For more information see set the paper type on page 12
Note HP Photo Paper and HP Photo Paper Glossy 4-by-6 are not recommended for printing with your HP Officejet To print photos use HP Everyday Photo Paper For your best photo printing needs use HP Premium Plus Photo Paper
paper tips
HP papers bull HP Premium Inkjet Paper Locate the gray arrow on the nonprinting side of the paper and then insert paper with the arrow side facing up
bull HP Premium or Premium Plus Photo Paper Load the glossy (print) side down (To prevent curling keep photo paper sealed in the original package until you are ready to use it) Always load at least five sheets of regular paper in the paper tray first and then place the photo paper on top of the regular paper
bull HP Premium Inkjet Transparency Film Insert the film so that the white transparency strip (with arrows and the HP logo) is on top and is going into the tray first
bull HP Inkjet T-shirt Transfer Iron-On Flatten the transfer sheet completely before using it do not load curled sheets (To prevent curling keep transfer sheets sealed in the original package until you are ready to use them) Manually feed one sheet at a time with the unprinted side facing down (the blue stripe faces up)
bull HP Matte Greeting Cards HP Glossy Greeting Cards or HP Felt-Textured Greeting Cards Insert a small stack of HP greeting-card paper with the print-side down into the paper tray until it stops
hp officejet 4100 series
chapter 3
12
set the paper typeIf you want to use a different type of paper such as photo paper transparency film Iron-On T-shirt transfers or brochures simply load that paper in the paper tray You must then change the paper type settings to ensure the best print quality
HP recommends paper type settings according to the type of paper you are using
This setting refers to copy options only If you want to set the paper type for printing from a computer set the properties in the Print dialog box of the software
1 Press the Copy button until Paper Type appears
2 Press until the appropriate paper type appears
3 Press Enter to choose the displayed paper type
set the paper sizeThe HP Officejet can use Letter Legal or A4 paper Use the following procedure to set the paper size for copy options
1 Press the Copy button until Copy Paper Size appears
2 Press until the appropriate paper size appears
3 Press Enter to choose the displayed paper size
To avoid jams remove papers from the output tray frequently The output tray capacity is affected by the type of paper and the amount of ink you are using For more information about output-tray capacity see technical information in the HP Photo amp Imaging Help
Labels(works only with printing)
bull Always use letter-size or A4-size label sheets designed for use with HP inkjet products (like Avery Inkjet Labels) and make sure that the labels are not over two years old
bull Fan the stack of labels to make sure none of the pages are sticking together
bull Place a stack of label sheets on top of standard paper in the paper tray print-side down Do not insert labels one sheet at a time
Postcards (works only with printing)
Insert a stack of postcards or hagaki cards with the print-side down into the paper tray until it stops Line the postcards up on the right side of the paper tray slide the paper-width guide up against the left side of the cards until it stops
4-by-6 inch photo paper (works only with printing)
Insert the photo paper with the print-side down into the paper tray until it stops Place the long edge of the photo paper against the right side of the paper tray and slide the paper-width guide up against the long edge of the photo paper until it stops If the photo paper you are using has perforated tabs load the photo paper so that the tabs are closest to you
paper tips
4
13
use the copy features
The copy features let you do the following
bull Produce high-quality color and black-and-white copiesbull Reduce or enlarge the size of the copies you make from 25 to 200 or
50 to 200 (depending on your model) of the copyrsquos original sizebull Make the copy lighter or darker select the number of copies and specify
the quality of the copies you makebull Use special copying features to make high-quality copies of photos using
special photo paper or to create transparencies
make copiesYou can make copies using the front panel of your HP Officejet or by using the HP Officejet software on your computer Many copy features are available using either method However you may find that the software offers easier access to special copy features
All copy settings that you select on the front panel are reset two minutes after the HP Officejet completes the copy unless you save the settings as the default settings as described in change settings for all copy tasks on page 15
make a copy1 Load the paper tray with the appropriate paper
2 Load your original
3 Press the Copy button
4 Use the keypad or press the or to enter the number of copies
5 Press Start Black or Start Color
Tip To make a single copy press the Copy button and then press Start Black or Start Color
Note Make sure that the color print cartridge is installed in your HP Officejet Both print cartridges must be installed when making a copy
increase copy speed or qualityThe HP Officejet provides three options that affect copy speed and quality
bull Best produces the highest quality for all paper types Best copies more slowly than the other quality settings
bull Normal delivers high-quality output and is the recommended setting for most of your copying Normal copies faster than Best
bull Fast copies faster than the Normal setting The text is of comparable quality to the Normal setting but the graphics may be of lower quality Using Fast also reduces the frequency of replacing your print cartridges because it uses less ink
hp officejet 4100 series
chapter 4
14
1 Load your original
2 Press Copy until Copy Quality appears
3 Press until the desired quality setting appears and then press Enter to select it
4 Press Start Black or Start Color
set the number of copies You can set the number of copies using the front panel
1 Press the Copy button
2 Use the keypad or press the or to enter the number of copies
3 Press Enter
4 Press Start Black or Start Color
Tip If you hold down the right arrow button then after reaching 10 the number of copies changes by increments of five to make it easier to set a large number of copies
reduce or enlarge a copyYou can reduce or enlarge a copy of an original using ReduceEnlarge
For more information about additional copy options such as Fit to Page see perform special copy jobs on page 15
1 Press Copy until ReduceEnlarge appears
2 Press until the appropriate ReduceEnlarge option appears and then press Enter to select it
3 If you select Custom 100 Set Custom Size appears Use the arrow keys or type a percentage on the keypad
4 Press Enter when the desired percentage is displayed
5 Press Start Black or Start Color
make copies lighter or darkerUse LighterDarker to adjust the lightness and darkness of the copies you make
1 Press Copy until LighterDarker appearsThe range of LighterDarker values are represented as circles on a scale on the front-panel display
2 Press to lighten the copy or to darken it The circle moves to the left or right depending on the arrow button you press
3 Press Enter to select the setting
4 Press Start Black or Start Color
enhance text sharpness and photo colorsYou can use Text to sharpen edges of black text Photo to enhance light colors in your photographs or Mixed if your original contains a photograph and text You can also select None to turn off all enhancements
reference guide
use the copy features
15
Text enhancement is the default option You can turn off Text enhancement by selecting Photo Mixed or None if the following occur
bull Stray dots of color surround some text on your copiesbull Large black typefaces look splotchy (not smooth)bull Thin colored objects or lines contain black sectionsbull Horizontal grainy or white bands appear in light- to medium-gray areas
1 Press Copy until Enhancements appears
2 Press until the desired enhancement (Text Photo Mixed or None) appears
3 Press Enter to select the setting
4 Press Start Black or Start Color
change settings for all copy tasksSave the copy settings you use most often by setting them as the default This includes changes to Copy options such as Paper Type and Paper Size as well as other Copy settings on the front panel such as Number of Copies and Copy Quality
1 Make any desired changes to the copy options
2 Press Copy until Set New Defaults appears
3 Press until Yes appears
4 Press Enter to set the options as a defaultYour settings are saved
perform special copy jobsIn addition to supporting standard copying your HP Officejet can also copy a photo or fit a copy to the page
copy a photoWhen copying a photo you should select options for the correct paper type and photo enhancement
1 Load the photo in the automatic document feeder (ADF)For more information see load originals
2 If you are using photo paper load it in the paper tray
3 Press Copy until Paper Type appears
4 Press until Premium Photo appears and then press Enter to select it
5 Press Copy until Enhancements appears
6 Press until Photo appears and then press Enter to select it
7 Press Start Black or Start Color
Tip To enlarge a photo automatically to a full page use the Photo Fit to Page button
hp officejet 4100 series
chapter 4
16
fit a copy to the pageUse the Photo Fit to Page button when you want to automatically enlarge or reduce your original to fit Letter or A4 size paper You can enlarge a small photo to fit a full-size page as shown below Using Photo Fit to Page may prevent unwanted cropping of text or images around the margins
1 Load the original in the ADFFor more information see load originals on page 7
2 Press the Photo Fit to Page button
Note Do not press the Fax Copy or Scan buttons on the front panel once you have pressed the Photo Fit to Page button
3 Press until the appropriate paper type appears and then press Enter to select it
4 Press Start Black or Start Color
copy optionsThe following diagram shows the options that are available when you press Copy
Original Fit to Page
Plain PaperPhoto PaperTransparency
Actual sizeCustom 100Full Page 91Legal gt Ltr 72
ReduceEnlarge Paper Type
NoYes
TextPhotoMixedNone
Enhancements Set New Defaults
LetterLegalA4
Copy Paper Size
The sizes vary by countryregion
LighterDarker
NormalFastBest
Copy Quality
To cycle through the copy options press Copy repeatedly
Press and to move to the setting you want within one of the copy optionsPress Enter to select the displayed setting
5
17
use the scan features
Scanning is the process of converting pictures and text into an electronic format for your computer You can scan photos and text documents
Because the scanned image or text is in an electronic format you can bring it into your word processor or graphics program and modify it to suit your needs You can do the following
bull Scan photos of your kids and e-mail them to relatives create a photographic inventory of your house or office or create an electronic scrapbook
bull Scan text from an article into your word processor and quote it in a report saving you a lot of retyping
Tip To use the scan features your HP Officejet and computer must be connected and turned on The HP Officejet software must also be installed and running on your computer prior to scanning To verify that the HP Officejet software is running on Windows look for a status icon in the system tray On a Macintosh the HP Officejet software is always running
Note High resolution scanning (600 dpi or higher) requires a large amount hard disk space If there is not enough hard disk space available your system may stall
scan an originalYou can start a scan from your HP Officejet or from the HP Officejet software on your computer
For more information about scanning your pictures or documents from the HP Officejet software see scan pictures and documents in the HP Photo amp Imaging Help
to scan an original from your hp officejet
1 Load your original in the automatic document feeder (ADF)For more information see load originals on page 7
2 Press Scan
3 Select the Scan to destination by pressing or or by pressing the Scan button repeatedlyThe default destination is the HP Photo amp Imaging Gallery Any applications on your computer that are supported by the HP Officejet also appear in the Scan to list
4 Press Start Black or Start ColorThe original is scanned and the image is sent to selected destinationFor more information about using the HP Photo amp Imaging Gallery see manage images in how to use the software
hp officejet 4100 series
chapter 5
18
stop scanningYou can stop a scan by pressing the Cancel button located on the front panel
6
19
use the fax features
Using your HP Officejet you can
bull Send and receive paper faxesbull Send computer faxes (reference the HP Photo amp Imaging Help)bull Send and receive color faxes
Fax features are available only on some HP Officejets
send a faxYou can send a fax in a variety of configurations These include the following
bull send a paper fax (using the front panel or computer)bull send a paper fax with a PC-generated cover page (using the computer)bull send a file with or without a cover page (using the computer)bull send a PC-generated cover page as a single-page fax (using the
computer)
Note For information on sending a fax using the computer reference the HP Photo amp Imaging Help
Note By default your HP Officejet prints a report only if there is a problem with sending or receiving a fax A confirmation message indicating whether an item was successfully sent appears briefly on the front-panel display after each transaction If you need printed confirmation that your faxes are successfully sent see print reports on page 22 for information about report options
Note If you have not done so set the date and time See set the date and time on page 27
send a fax from your hp officejet1 Load your originals in the ADF
For more information see load originals on page 7
2 Enter the fax number using the keypad or press Speed Dial until the desired speed-dial entry appearsFor more information on speed dialing see set up speed dialing in the HP Photo amp Imaging Help
3 Press Start Black or Start Color
change settings and use speed dials before sending a fax1 Load your originals in the ADF
For more information see load originals on page 7
2 Enter the fax number using the keypad or press Speed Dial until the desired speed-dial entry appears
hp officejet 4100 series
chapter 6
20
For more information on speed dialing see set up speed dialing in the HP Photo amp Imaging Help
3 Press Enter
4 Press Fax to scroll through the fax options
5 When you reach the option whose setting you wish to change press to scroll through the setting options
6 When you reach the setting you want to change press Enter to accept the setting
7 Press Start Black or Start Color
send a color faxYou can send and receive color faxes to and from other color fax machines If you are faxing from the front panel and your HP Officejet determines that the recipient has a black-and-white fax unit it sends the fax in black and white If you are faxing from the software and your HP Officejet determines that the recipient has a black-and-white fax unit the HP Officejet prompts you to try sending the fax in black and white
We recommend that you use only color originals for color faxing The color originals must be loaded in the ADF you cannot send a color fax from memory using the scan and fax features To fax in color to multiple recipients send the fax from the Director or your software program
to send a color fax from the front panel
1 Load your originals in the ADF For more information see load originals on page 7
2 Enter the fax number using the keypad or press Speed Dial until the desired speed-dial entry appearsFor more information on creating speed-dial entries see set up speed dialing in the HP Photo amp Imaging Help
3 Press Start Color
schedule a faxYou can schedule a black and white fax to be sent later during the same day (for example when telephone lines are not as busy) If you use the front panel you can select a single recipient
When the specified time is reached your fax is automatically sent as soon as a connection can be made
1 Load your originals in the ADF
2 Enter the fax number using the keypad or press Speed Dial until the desired speed-dial entry appears
3 Press Enter
4 Press Fax to scroll through the fax options
5 Stop scrolling when you reach the How to Fax menu
6 Press to scroll through the setting options
7 Stop scrolling when you reach the Send Fax Later option
reference guide
use the fax features
21
8 Press Enter
9 Enter the Send Time using the numeric keypad
10 At the prompt press 1 for AM or 2 for PM
11 When Store Fax Now appears press 1 for Yes or 2 for NoIf 1 is selected the document is scanned to memory and is sent at the selected time If 2 is selected and you havenrsquot loaded your originals a message appears reminding you to load the original before the send time
12 Press Start Black
cancel a scheduled faxYou can cancel a fax stored in memory or one that is currently in progress
bull Press Cancel to cancel the scheduled fax
receive a faxYour HP Officejet is set to print received faxes automatically If you receive a legal-size fax and your HP Officejet is not currently configured to use legal-sized paper the unit automatically reduces the fax so that it fits on the paper that is loaded For more information see set automatic reduction on page 25
If you have an answering machine connected to the same line as your HP Officejet you may need to set the number of rings required before the HP Officejet begins receiving the fax The default number of rings before the HP Officejet receives a fax is 5
set the number of rings before answeringYou can specify how many rings should occur before your HP Officejet automatically answers the phone When you run the Fax Setup Wizard this is set automatically
If you do not want your HP Officejet to answer the phone Rings to Answer should be set to No Answer
1 Press Setup
2 Press 3 then press 3 againThis selects the Basic Fax Setup menu then the Rings to Answer option
3 Use the arrow keys to choose the number of rings and then press Enter
receive a fax manuallyBefore manually receiving a fax we recommend that you remove any originals from your HP Officejet so that they are not accidentally processed
Verify that Rings to Answer is set to No Answer
1 When your HP Officejet rings pick up the handset of a telephone that is on the same telephone line as your HP Officejet
2 If you hear fax tones press Start Black or Start Color or if you are receiving from an extension phone (on the same telephone line as your HP Officejet but not connected directly to it) press 1 2 3 on your phone
3 After you are finished hang up the telephone
hp officejet 4100 series
chapter 6
22
print reportsYou can set up your HP Officejet to print error reports and confirmation reports for each fax you send and receive You can also manually print reports as you need them
generate reports automaticallyThis setting lets you configure your HP Officejet so that it automatically prints error and confirmation reports
1 Press Setup
2 Press 1 then press 5This selects Print Report then selects Automatic Reports Setup
3 Press to scroll through the following report typesndash Every Error which prints whenever there is any kind of fax error
(default)ndash Send Error which prints whenever there is a transmission errorndash Receive Error which prints whenever there is a receiving errorndash Every Fax which confirms every time a fax is sent or receivedndash Send Only which prints every time a fax is sentndash Off which does not print fax reports
4 When you reach the report that you want press Enter
generate reports manuallyThis setting lets you print reports manually From the computer you can only print the Speed-Dial List and the Fax Log
to print reports from the front panel
1 Press Setup then press 1This selects the Print Report menu
2 Press to scroll through the following report typesndash Last Transaction which prints details of the last fax transactionndash Fax Log which prints a log of the last 30 fax transactionsndash Speed Dial List which prints a list of programmed speed dialsndash Self-Test Report which prints a report to assist you in diagnosing print
and alignment problems For more information see print a self-test report on page 32
ndash Automatic Reports Setup which is the automatic reports setting described in generate reports automatically on page 22
3 When you reach the report that you want press Enter
control resolution and contrastYour HP Officejet lets you change the resolution and contrast of documents that you are sending
change resolutionResolution affects the transmission speed and quality of faxed documents
reference guide
use the fax features
23
to change the resolution from the front panel
1 Load your originals in the ADF
2 Enter the fax number using the keypad or press Speed Dial until the desired speed-dial entry appears
3 Press Enter
4 Press Fax to scroll through the fax options
5 Stop scrolling when you reach the Resolution menu
6 Press until the desired resolution quality appears (Standard Photo Fine Very Fine)
7 Press EnterYour HP Officejet only faxes at the highest resolution supported by the receiving faxIf you choose Photo be aware that the faxing process takes longer to complete When faxing photographs we recommend that you choose Photo
change contrastChange this setting if you want a black-and-white fax to be darker or lighter than the original
to change the fax contrast from the front panel
1 Load your originals in the ADF
2 Enter the fax number using the keypad or press Speed Dial until the desired speed-dial entry appears
3 Press Enter
4 Press Fax to scroll through the fax options
5 Stop scrolling when you reach the LighterDarker menuThe range of values appears as a circle on a scale on the display
6 Press to lighten the fax or to darken itThe circle moves left or right as you press a button
7 Press Enter to accept the setting you selected
change other fax settings
redial a number automaticallyYou can set your HP Officejet to redial a busy and an unanswered number automatically If you initiated a fax from the computer the computer must be left on for the redialing process to work correctly
1 Press Setup
2 Press 4This selects the Advanced Fax Setup menu
3 Choose one of the following optionsndash Press 3
hp officejet 4100 series
chapter 6
24
This selects the Busy Redial option The default setting for Busy Redial is Redial
ndash Press 4This selects the No Answer Redial option The default setting for No Answer Redial is No Redial
4 Press Enter
5 Press to select Redial or No Redial as desired
6 Press Enter
forward faxes to another numberWith fax forwarding you can send a fax that you receive to another fax number during the next 24-hour period
to forward faxes from the front panel
1 Press Setup
2 Press 3 then press 7This selects the Basic Fax Setup menu then selects the Fax Forwarding Black Only option
3 At the prompt enter the Fax Number to which you wish to send the fax
4 Press Enter
5 Enter the Start Date using the numeric keypad
6 Enter the Start Time using the numeric keypad
7 At the prompt press 1 for AM or 2 for PM
8 Enter the Stop Date using the numeric keypadFax Forwarding On appears on the display
edit or cancel fax forwardingOnce fax forwarding is enabled you may find that you need to change the number you are faxing to or the start and stop times you entered You may wish to cancel your fax forwarding setup altogether Follow the steps below to edit or turn off fax forwarding
to edit fax forwarding from the front panel
1 Press Setup
2 Press 3 then press 7This selects the Basic Fax Setup menu then selects the Fax Forwarding Black Only option
3 Forwarding is ON 1=Edit 2=Cancel appears on the display after a moment Press 1 to edit the number you wish to fax to or to change the start and stop times Follow the messages on the display
to cancel fax forwarding from the front panelbull Press Cancel
OR
reference guide
use the fax features
25
Follow the steps in edit or cancel fax forwarding on page 24 When Forwarding is ON 1=Edit 2=Cancel appears on the display press 2 to cancel fax forwarding
use error correction modeError Correction Mode (ECM) eliminates data lost due to poor phone lines by detecting errors that occur during transmission and automatically requesting retransmission of the erroneous portion Phone charges are unaffected or may even be reduced on good phone lines On poor phone lines ECM increases sending time and phone charges but sends the data much more reliably Turn ECM off (the default setting is on) only if it increases phone charges substantially and you can accept poorer quality in exchange for reduced charges
to change the ECM setting from the front panel
1 Press Setup
2 Press 4 then press 7This selects the Advanced Fax Setup menu then selects the Error Correction Mode option
3 Press to switch between On and Off
4 Press Enter to accept the setting you selected
set automatic reductionThis setting determines what your HP Officejet does if it receives a fax that is too large for the default paper size With this setting on (the default) the image is reduced so that it fits on one page With this feature off information that doesnrsquot fit on the first page is printed on a second page
1 Press Setup
2 Press 4 then press 5This selects the Advanced Fax Setup menu then selects the Automatic Reduction option
3 Press to switch between On and Off
4 Press Enter to accept the setting you selected
adjust the volumeYour HP Officejet provides three levels for adjusting the ring and speaker volume The ring volume is the volume of the phone ringer The speaker volume is the volume of everything else such as the dial and fax tones The default setting is Soft
1 Press Setup
2 Press 3 then press 6This selects the Basic Fax Setup menu then selects the Ring and Beep Volume option
3 Press to select one of the options Soft Loud or Off
4 Press Enter to accept the setting you selected
hp officejet 4100 series
chapter 6
26
change the answer ring pattern (distinctive ringing)Distinctive ringing is a feature offered by phone companies that allows several phone numbers to share the same line Each number has a specific ring pattern If you do not have this service use the default ring pattern which is All Rings
If you connect your HP Officejet to a line with distinctive ringing have your telephone company assign one ring pattern to voice calls and another to fax calls (double or triple rings are best for a fax number)
1 Press Setup
2 Press 4 then press 2This selects the Advanced Fax Setup menu then selects the Answer Ring Pattern option
3 Press to scroll through these options All Rings Single Rings Double Rings Triple Rings and Double amp Triple
4 When the ring pattern that the phone company established for this number appears press Enter
Tip We recommend that you use Double Rings or Triple Rings for fax
set up speed dialingThrough your HP Officejet or your computer you can assign entries to fax numbers you use often This lets you dial those numbers quickly using the front panelrsquos Speed Dial button and a one- or two-digit entry You can create up to 100 individual speed-dial entries (the maximum for some models is 70)
We recommend that you use the software to set up speed-dial settings
Note A speed-dial entry can only be associated with one phone number speed-dial groups are not supported
For more information see set up speed dialing in the hp photo amp imaging help
create individual speed-dial settingsYou can enter fax numbers that you will reuse frequently
1 Press Setup
2 Press 2 then press 1This selects the Speed Dial Setup menu then selects the Individual Speed Dial option
3 Press EnterThe first unassigned speed-dial entry appears on the display
4 Press Enter to select the displayed speed-dial entry
5 Enter the Fax Number to assign to that entry then press EnterThe fax number can be up to 50 digits in length
Tip To enter a three-second pause within a number sequence press Symbols to display a dash
6 Enter the personrsquos or companyrsquos name then press Enter
reference guide
use the fax features
27
The name is limited to 13 characters in lengthFor more information see enter text on page 28
7 After Enter Another appears press 1 (Yes) if you want to set up another number or press 2 (No) to exit
delete speed-dial settingsFollow these steps to delete an individual speed-dial entry
1 Press Setup
2 Press 2 then press 2 againThis selects Speed Dial Setup then selects Delete Speed Dial
3 Press until the individual entry that you want to delete appears then press Enter
set basic fax settings using the front panelWe recommend that you use the Fax Setup Wizard in the HP Officejet software to configure all your basic fax settings however you can also access these settings from the front panel
Note In the US regulations require that your name and phone number appear on every fax The minimum settings that we recommend are described in the following topics
set the date and timeFollow these steps to set the date and time manually
1 Press Setup
2 Press 3 then press 1This selects the Basic Fax Setup menu then selects the Date and Time option
3 Follow the prompts on the display to enter the date and time using the keypad
Tip Use only the last two digits for the year
Tip When you enter a single-digit date or time type a leading zero before the single digit for example 0345 or 08-03-02
After you are done the date and time appear on the display
Warning Cutting off power to the HP Officejet causes the selected date and time to be lost However name and fax number information is not lost
set the fax headerFollow these steps to enter your name and fax number in the header
Note In Hungary the subscriber identification code (fax header) can be set or changed only by authorized personnel For more information contact your authorized HP dealer
1 Press Setup
2 Press 3 then press 2
hp officejet 4100 series
chapter 6
28
This selects the Basic Fax Setup menu then selects the Fax Header option
3 Enter your personal or company name at the prompt Use the guidelines provided in the next section under enter text
4 Press Enter
5 Enter your fax number using the numeric keypad
6 Press Enter
enter textThe following list provides tips for entering text using the front-panel keypad
bull Press the keypad numbers that correspond to the letters of a name
bull Press a button multiple times to see a letter first in uppercase and then in lowercase
bull After the correct letter appears press and then press the number that corresponds to the next letter in the name Again press multiple times until the correct letter appears
bull To insert a space press Space ()bull To enter a symbol such as press Symbols () to scroll through the list of
available symbolsbull If you make a mistake press to clear it and then make the correct
entrybull After you are done entering text press Enter to store your entries
check for dial toneBefore using the fax features verify that the connections are correctly established
1 Press Fax
2 Listen for a dial tone
3 If you do not hear a dial tone check the connections
4 Press Cancel to hang up
ABC These letters correspond to this number and so on
2
JKL To get this character J j K k L l 5
5 Press 5 this many times 1 2 3 4 5 6 7
reference guide
use the fax features
29
fax job menuThe following options become available when the Fax button is pressed
setup menu for fax commandsThe following fax settings are available in the Setup menu
Enter Fax or Speed Dial
FineVery FinePhotoStandard
Fax Number Resolution LighterDarker
Enter a fax number or speed dialWhen the Fax button is pressed
Press and to move to the option you wantPress Enter to select the displayed setting
NoYes
Set New Defaults
Send Fax NowFax from MemorySend Fax LaterPoll to Receive
How to Fax
1Automatic Reports Setup
2Answer Ring Pattern
3Busy Redial
4No Answer Redial
5Automatic Reduction
6Backup Fax Reception
7Error Correction Mode
3Basic Fax Setup 4Advanced Fax Setup
Press Setup to display the menu options
Press and to move to the setting you wantPress Enter to select the displayed setting
1Date and Time
2Fax Header
3Rings to Answer
4Paper Size
5Tone or Pulse Dialing
6Ring and Beep Volume
7Fax Forwarding Black Only
2Speed Dial Setup
1Individual Speed Dial
2Delete Speed Dial
3Print Speed Dial List
hp officejet 4100 series
chapter 6
30
7
31
maintain your hp officejet
This section provides instructions for keeping your HP Officejet in top working condition Perform these maintenance procedures as necessary
clean the glassDirty glass from dust smudges hair and so on slows down performance and affects the accuracy of features such as Fit to Page and Copy
1 Turn off the unit unplug the power cord and raise the scanner lid
2 Clean the glass with a soft cloth or sponge slightly moistened with a nonabrasive glass cleaner
Caution Do not use abrasives acetone benzene or carbon tetrachloride on the glass these can damage it Do not place liquids directly on the glass They may seep under it and damage the unit
3 Dry the glass with a chamois or cellulose sponge to prevent spotting
hp officejet 4100 series
chapter 7
32
clean the white stripMinor debris can accumulate on the white strip located underneath the scannerrsquos lid
1 Turn off the unit unplug the power cord and raise the scanner lid
2 Clean the white strip with a soft cloth or sponge slightly moistened with a mild soap and warm water
3 Wash the strip gently to loosen debris do not scrub the strip
4 Dry the strip with a chamois or soft cloth
Caution Do not use paper-based wipes as these may scratch the strip
5 If this does not clean the strip well enough repeat the previous steps using isopropyl (rubbing) alcohol and wipe the strip thoroughly with a damp cloth to remove any residual alcohol
clean the exterior Use a soft damp lint-free cloth to wipe dust smudges and stains off the case The interior of the unit does not require cleaning Keep fluids away from the interior of the unit as well as the front panel
work with print cartridgesTo ensure the best print quality from your HP Officejet you will need to perform some simple maintenance procedures and when prompted by a front-panel message replace the print cartridges
print a self-test reportIf you are experiencing problems with printing before cleaning or replacing the print cartridges you should print a Self-Test Report This report provides useful information about your print cartridges including status information
1 Press Setup
2 Press 1 then press 4This selects Print Report and then selects Self-Test Report
3 Press Start Black or Start ColorA Self-Test Report is printed for your HP Officejet
handle print cartridgesBefore you replace or clean a print cartridge you should know the part names and how to handle the print cartridge
reference guide
maintain your hp officejet
33
replace the print cartridgesFront-panel messages appear to let you know that you should replace your print cartridges
See order print cartridges on the back cover for information on ordering replacement print cartridges
1 Turn on the unit then lift open the print cartridge access doorThe print carriage moves into view
2 After the carriage stops moving push down on the print cartridge down to release it and then pull it toward you out of its slot
Plastic tape with pink tab(must be removed)
Copper contactsInk nozzles under tape
Do not touch the copper contacts or the ink nozzles
print cartridge access door
hp officejet 4100 series
chapter 7
34
Note It is normal to see ink build-up in the print cartridge slots
3 Remove the new print cartridge from its packaging and being careful to touch only the bright pink plastic tab gently remove the plastic tape to uncover the ink nozzles
Caution Do not touch the copper contacts or ink nozzles
Once you have removed the plastic tape install the print cartridge immediately to prevent the ink from drying in the nozzles
4 Push the new print cartridge into the appropriate slot at a slight angle until it clicks into place
Caution Do not attempt to push the cartridge straight into the slot It must slide in at a slight angle
The tri-color print cartridge goes on the left and the black cartridge goes on the right
5 Close the print cartridge access door
reference guide
maintain your hp officejet
35
align the print cartridgesThe HP Officejet prompts you to align cartridges every time you install or replace a print cartridge Aligning the cartridges ensures high-quality output
To align the print cartridges when prompted
1 Press Enter on the front panelAn align cartridges (test pattern) page prints
2 Load the align cartridges page face down in the ADF between the paper-width guides and press the Enter button again
3 Recycle or discard the page
To align the cartridges at any other time
1 Press Setup
2 Press 5 then press 2This selects the Maintenance menu and then selects the Align Print Cartridge option
3 Press EnterAn align cartridges (test pattern) page prints
4 Load the align cartridges page face down in the ADF between the paper-width guides and press the Enter button again
5 Recycle or discard the page
clean the print cartridgesUse this feature when the Self-Test Report shows streaking or white lines through any of the colored bars Do not clean print cartridges unnecessarily This wastes ink and shortens the life of the ink nozzles
1 Press Setup
2 Press 5 then press 1This selects the Maintenance menu and then selects the Clean Print Cartridge optionA page of patterns is printed The cartridges are cleaned Recycle or discard the pageIf copy or print quality still seem poor after you clean the print cartridges replace the print cartridge that is affected
restore factory defaultsYou can restore the original factory settings to what they were when you purchased your HP Officejet Choosing to restore your factory defaults restores all settings except date information and any scan settings you may have set
You can perform this process from the front panel only
1 Press Setup
2 Press 5 then press 3This selects Maintenance and then selects Restore Factory DefaultsThe factory default settings are restored
hp officejet 4100 series
chapter 7
36
set scroll speedThe Scroll Speed option lets you control the rate that text messages appear in the front-panel display You can choose Normal Fast or Slow The default is Normal
1 Press Setup
2 Press 5 then press 6This selects Maintenance and then selects Set Scroll Speed
3 Press until the desired speed appears then press Enter
set the prompt delay timeThe Prompt Delay option lets you control the amount of time before a message is displayed in the front-panel display You can choose Normal Fast or Slow The default is Normal
1 Press Setup
2 Press 5 then press 7This selects Maintenance and then selects Set Prompt Delay Time
3 Press until the delay time appears then press Enter
self-maintenance sounds During the life of your product you may hear various mechanical sounds This is a normal part of your unitrsquos self-maintenance
reference guide
maintain your hp officejet
37
setup menu optionsThe following options are available from the Setup button
1Last Transaction
2Fax Log
3Speed Dial List
4Self-Test Report
5Automatic Reports Setup
1Print Report
Use Setup to display the Print Report Speed Dial Setup Basic Fax Setup Advanced Fax Setup and Maintenance options
Press and to move to the setting you wantPress Enter to select the displayed setting
1Clean Print Cartridges
2Align Print Cartridges
3Restore Factory Defaults
4Reprint Faxes in Memory
5Set Language amp CountryRegion
6Set Scroll Speed
7Set Prompt Delay Time
5Maintenance2Speed Dial Setup
3Basic Fax Setup
4Advanced Fax Setup
1Individual Speed Dial
2Delete Speed Dial
3Print Speed Dial List
1Date and Time
2Fax Header
3Rings to Answer
4 Paper Size
5Tone or Pulse Dialing
6Ring and Beep Volume
7Fax Forwarding Black Only
1Automatic Reports Setup
2Answer Ring Pattern
3Busy Redial
4No Answer Redail
5Automatic Reduction
6Backup Fax Reception
7Error Correction Mode
hp officejet 4100 series
chapter 7
38
8
39
additional setup information
During the installation of the HP Officejet software a number of windows are displayed You should see the following
bull Installingbull Copying files bull A request to plug in the HP Officejetbull Green OK and check markbull Request to restart your computer (may not occur in all cases)bull Registration
If you did not see all of these windows there may be a problem with the installation Verify the following
bull The HP Director contains six icons (double-click the HP Director icon on the desktop)
bull The HP Officejet is listed in the Printers dialog boxbull There is an icon for the HP Officejet in the System Tray that indicates the
HP Officejet is ready
If the HP Director does not show six icons you may need to wait a few minutes for the HP Officejet to connect to your computer
possible installation problemsIf nothing appears on your computer screen after you insert the HP Officejet 4100 Series CD-ROM into your computerrsquos CD-ROM drive
1 From the Start menu choose Run
2 In the Run dialog box enter dsetupexe (if your CD-ROM drive is not assigned to drive letter d use the appropriate drive letter) then click OK
If the HP Director does not contain six icons do the following
bull Verify that the front-panel cover is attached then unplug the HP Officejet and plug it in again
bull Verify that the USB and power cables are plugged inndash Unplug the USB cable and plug it in againndash Do not attach the USB cable to a keyboard or nonpowered hubndash Verify that the USB cable is 3 meters or less in lengthndash If you have several USB devices attached to your computer you may
want to unplug the others during the installation
Note AppleTalk is not supported
bull Unplug the HP Officejet from the wall and plug it in againbull Restart your computer
hp officejet 4100 series
chapter 8
40
On Windows check the System Tray for applications that are running in the background and close them before restarting your computer
remove and reinstall your hp officejet softwareIf six icons do not appear in the Director you may need to uninstall and re-install the software Do not simply delete the HP Officejet program files from your hard drive Be sure to remove them properly using the uninstall utility provided in the HP Officejet program group
to uninstall from a Windows computer
1 Disconnect your HP Officejet from your computer
2 On the Windows taskbar click Start choose Programs or All Programs (XP) choose Hewlett-Packard choose hp officejet 4100 series then choose uninstall software
3 Follow the directions on the screenBe sure to disconnect your HP Officejet
4 If you are asked whether you would like to remove shared files click NoOther programs that use these files may not work properly if the files are deleted
5 After the program finishes removing the software disconnect your HP Officejet and restart your computer
Note It is important that you disconnect your HP Officejet before restarting your computer
6 To reinstall the software insert the HP Officejet 4100 Series CD-ROM into your computerrsquos CD-ROM drive and follow the instructions that appear
7 After the software is installed connect and turn on your HP Officejet following the onscreen instructions and the instructions in your Setup PosterAfter connecting and turning on your HP Officejet you may have to wait several minutes for all of the Plug and Play events to completeWhen the software installation is complete you will see a Status Monitor icon in the System Tray
8 To verify that the software is properly installed double-click on the HP Director icon on the desktop If the HP Director shows six icons the software has been properly installed
to uninstall from a Macintosh computer
1 Disconnect your HP Officejet from your computer
2 Double-click on ApplicationsHP All-in-One Software folder
reference guide
additional setup information
41
3 Double-click on HP Uninstaller
4 Follow the directions that appear on the screen
5 After the program finishes removing the software disconnect your HP Officejet and restart your computer
6 To reinstall the software insert the HP Officejet 4100 Series CD-ROM into your computerrsquos CD-ROM drive
Note When re-installing the software follow the instructions on the Setup Poster Do not connect the HP Officejet to your computer until after you have completed the software installation
7 On the desktop open the CD-ROM double-click on hp all-in-one installer and follow the instructions that appear
connect your hp officejet to a phone modem or answering machine
The HP Officejet can share a phone line with a phone a modem or an aswering machine When sharing a phone line with an answering machine the HP Officejet will answer fax calls and direct voice calls to the answering machine
Note For information on connecting your HP Officejet to your computer and phone line refer to the Setup Poster that came with your unit
to connect your hp officejet to a phone modem or answering machine
1 Remove the white plastic stopper from connector 2 on the back of the HP Officejet
To connect more than one device to connector 2 on the HP Officejet you must purchase a Y-splitter and plug it into connector 2
2 Connect the phone cord from the phone modem or answering machine to connector 2 (or Y-splitter)
Caution Do not use the phone cord that came with the HP Officejet for this purpose That phone cord must connect connector 1 on the HP Officejet to the wall jack for your phone system See the Setup Poster for details
3 If you are connecting an answering machine see set the number of rings before answering on page 21 for instructions on setting the number of rings correctly or change the answer ring pattern (distinctive ringing) on page 26 for information on incoming ring patterns
4 If you are connecting a modem turn off its fax-receive feature
connector 2 on the HP Officejet
connector 1 on the HP Officejet
hp officejet 4100 series
chapter 8
42
additional troubleshooting helpYou may want to refer to the readme file for more information on possible installation problems On Windows you can access the readme file from the Start button on the taskbar select Programs Hewlett-Packard hp officejet 4100 series View the Readme File On Macintosh you can access the readme file by double-clicking on the icon located in the top-level folder of the HP Officejet software CD-ROM
The readme file provides more information including
bull Using the Re-install utility after a failed installation to return your PC to a state that will allow the HP Officejet to be re-installed
bull Using the Re-install utility on Windows 98 to recover from a Composite USB System Driver missing errorThis error may occur if the hardware is installed prior to installing the software After running the Re-install utility reboot your PC and install the HP Officejet software before connecting the HP Officejet to your computer
You can also find more information on this website
wwwhpcomsupport
9
43
technical information
Additional specifications information can be found in the HP Photo amp Imaging Help in the hp officejet 4100 series section
physical specifications
power specificationsbull Power consumption 75W maximumbull Source (Input Voltage) 100 to 240 VAC groundedbull Input Frequency 50 to 60 Hzbull Current 1A maximum
regulatory informationAdditional regulatory information can be found in the HP Photo amp Imaging Help The information in this section supercedes information in the HP Photo amp Imaging Help
doc statement deacuteclaration de conformiteacute (Canada)Le preacutesent appareil numeacuterique neacutemet pas de bruit radioeacutelectrique deacutepassant les limites applicables aux appareils numeacuteriques de la classe B prescrites dans le Regraveglement sur le brouillage radioeacutelectrique eacutedicteacute par le ministegravere des Communications du CanadaThis digital apparatus does not exceed the Class B limits for radio noise emissions from digital apparatus set out in the Radio Interference Regulations of the Canadian Department of Communications
notice to users of the Canadian telephone networkThis equipment meets the applicable Industry Canada Terminal Equipment Technical Specifications This is confirmed by the registration number The abbreviation IC before the registration number signifies that registration was performed based on a Declaration of Conformity indicating that Industry Canada technical specifications were met It does not imply that Industry Canada approved the equipment
Note The Ringer Equivalence Number (REN) assigned to each terminal device provides an indication of the maximum number of terminals allowed to be connected to a telephone interface The termination on an interface may consist of any combination of devices subject only to the requirement that the sum of the Ringer Equivalence Numbers of all the devices does not exceed 5
The REN for this product is 03B based on FCC Part 68 test results
height width depth weight (without print cartridges)
with paper trays and ADF closed
718 in (1824 cm) 1676 in (4258 cm) 825 in (2096 cm) 75 lbs (34 kg)
with ADF and paper tray extended
1030 in (2615 cm) 1676 in (4258 cm) 1854 in (4709 cm) 75 lbs (34 kg)
hp officejet 4100 series
chapter 9
44
notice to all users of the European Economic Area (EEA)
This product is designed to interwork with the analogue telephone networks in the following countriesregions
Network compatibility depends on customer selected settings which must be reset to use the equipment on a telephone network in a countryregion other than where the product was purchased Contact the vendor or Hewlett-Packard Company if addition product support is necessaryThis equipment has been certified by the manufacturer in accordance with Directive 19995EC (annex II) for Pan-European single-terminal connection to the public switched telephone network (PSTN) However due to differences between the individual PSTNs provided in different countriesregions the approval does not of itself give an unconditional assurance of successful operation on every PSTN network termination pointIn the event of problems you should contact your equipment supplier in the first instance
geraumluschemissionLpA lt 70 dBam Arbeitsplatzim Normalbetriebnach DIN 45635 T 19
notice to Korean customers
Germany UK Netherlands
France Spain Italy
Belgium Luxembourg Sweden
Austria Denmark Ireland
Norway Finland Switzerland
Greece Portugal
10
45
hp support
This section explains the support services information provided by Hewlett-Packard If you are unable to find the answer you need in the printed or onscreen documentation supplied with your product you can contact one of the HP support services listed in the following pages Some support services are available only in the US and Canada while others are available in many countriesregions worldwide If a support service number is not listed for your countryregion contact your nearest authorized HP dealer for help
get support and other information from the internetIf you have Internet access you can get help from the following HP website
wwwhpcomsupportThe Web site offers technical support drivers supplies and ordering information
hp customer supportSoftware programs from other companies may be included with your HP Officejet If you experience problems with any of those programs you will receive the best technical assistance by calling the experts at that companyIf you need to contact HP Customer Support do the following before you call
1 Make sure thata Your unit is plugged in and turned onb The specified print cartridges are installed correctlyc The recommended paper is properly loaded in the input tray
2 Reset your unita Turn off the unit using the On button located on the unitrsquos front panelb Unplug the power cord from the back of the unitc Plug the power cord back into the unitd Turn on the unit using the On button
3 For more information check the HP website at wwwhpcomsupport
4 If you are still experiencing problems and need to speak with an HP Customer Support Representativendash Have your service ID and serial number ready To display your service ID and
serial number on the front panel do the following Press Enter and Start Color at the same time until the service ID appears in the front-panel display From this display press the right arrow until the serial number displays
ndash Print a Self-Test Report See print a self-test report on page 32 for information on printing this report
ndash Make a color copyndash Be prepared to describe your problem in detail
5 Call HP Customer Support Be near your unit when you call
call in the US during warrantyCall (208) 323-2551 This service is free during the warranty period however your standard long-distance phone charges still apply A fee may apply outside the warranty period
hp officejet 4100 series
chapter 10
46
US phone support is available in both English and Spanish languages 24 hours a day 7 days a week (days and hours of support may change without notice)
call elsewhere in the worldThe numbers listed below are current as of the printing date of this guide For a list of current international HP Support Service numbers visit this address and choose your own countryregion or language
wwwhpcomsupportFor Korea you can also visit this address
httpwwwhpcokrYou can call the HP support center in the following countriesregions If your countryregion is not listed contact your local dealer or nearest HP Sales and Support Office to find out how to obtain servicesSupport service is free during the warranty period however your standard long-distance phone charges will apply In some cases a flat fee per single incident will also applyFor phone support in Europe please check for the details and conditions of phone support in your countryregion by consulting the following Web site
wwwhpcomsupportAlternatively you can ask your dealer or call HP at the phone number indicated in this booklet As part of our constant efforts to improve our phone support service we advise you to check our website on a regular basis for new information regarding service features and delivery
countryregion hp technical support countryregion hp technical support
Algeria1 +213 (0) 61564 543 Malaysia 1-800-805405
Argentina 0810-555-5520 Mexico 01-800-472-6684
Australia +61 3 8877 80001902 910 910
Mexico (Mexico City) 5258-9922
Austria +43 (0) 810 00 6080 Morocco1 +212 22404 747
Bahrain (Dubai) 800 728 Netherlands +31 (0) 20 606 8751
Belgium (Dutch) +32 (0) 2 626 8806 New Zealand 0800 441 147
Belgium (French) +32 (0) 2 626 8807 Norway +47 22 11 6299
Brazil (Grande Sao Paulo) (11) 3747 7799 Oman +971 4 883 8454
Brazil (Demais Localidades) 0800 157751 Palestine +971 4 883 8454
Canada during warranty (905) 206 4663 Panama 001-800-7112884
Canada post-warranty(per-call charge)
1-877-621-4722 Peru 0-800-10111
Caribbean amp Central America
1-800-711-2884 Philippines 632-867-3551
Chile 800-360-999 Poland +48 22 865 98 00
China 86 10 6868 7980 Portugal +351 21 3176333
Colombia 9-800-114-726 Puerto Rico 1-877-2320-589
Costa Rica 0-800-011-0524 Qatar +971 4 883 8454
Czech Republic +420 (0) 261307310 Romania +40 1 315 44 42or local 01 3154442
reference guide
hp support
47
call in Australia post-warrantyIf your product is not under warranty you can call 03 8877 8000 A per-incident out-of-warranty support fee of $2750 (inc GST) will be charged to your credit card You can also call 1902 910 910 ($2750 charged to your phone account) from 900 AM to 500 PM Monday through Friday (Charges and support hours are subject to change without notice)
prepare your unit for shipmentIf after contacting HP Customer Support or returning to the point of purchase you are requested to send your unit in for service please follow the power off and rebox steps below to avoid further damage to the HP product
Denmark +45 39 29 4099 Russian Federation Moscow +7 095 797 3520
Ecuador 1800-711-2884 Russian Federation St Petersburg
+7 812 346 7997
Europe (English) +44 (0) 207 512 5202 Saudi Arabia +800 897 14440
Egypt 02 532 5222 Singapore 65 6272 5300
Finland +358 (0) 203 47 288 Slovakia +421 (0) 2 682 08080
France (034 Euromin) +0892 69 60 22 South Africa (inside RSA) 086 000 1030
Germany (012 Euromin) +49 (0) 180 52 58 143 South Africa (inside RSA) +27-11 258 9301
Greece +30 1060 73 603 Spain +34 902 321 123
Hong Kong (SAR) +85 (2) 3002 8555 Sweden +46 (0)8 619 2170
Guatemala 1800-995-5105 Switzerland 2 +41 (0) 84 880 1111
Hungary +36 (0) 1 382 1111 Taiwan +886-2-2717-00550800 010 055
India 1-600-11226791 11 682 6035
Thailand +66 (2) 661 4000
Indonesia 62-21-350-3408 Tunisia1 +216 1891 222
Ireland +353 (0) 1 662 5525 Turkey +90 216 579 7171
Israel +972 (0) 9 8304848 Ukraine +7 (380-44) 490-3520
Italy +39 (0) 226410350 United Arab Emirates +971 4 883 8454
Japan 0570 000 511+81 3 3335 9800
United Kingdom +44 (0) 207 512 52 02
Jordan +971 4 883 8454 Venezuela 0800-47468368 or800-477-7777
Korea (Seoul) +82 (2) 3270 0700 Venezuela (Caracas) (502) 207-8488
Korea (outside Seoul) 080 999 0700 Vietnam 84 (0) 8 823 4530
Kuwait +971 4 883 8454 Yemen +971 4 883 8454
Lebanon +971 4 883 8454
1 This Call Center supports French speaking customers from the following countriesregions Morocco Tunisia and Algeria
2 This Call Center supports German French and Italian speaking customers in Switzerland
countryregion hp technical support countryregion hp technical support
hp officejet 4100 series
chapter 10
48
Note When transporting your HP Officejet make sure that the pens have been removed the HP Officejet has been properly shut down by pressing the power button and you have allowed time for the carriage to return to the service station and for the scanner to return to its parked position
1 Turn on the unitDisregard steps 1 through 6 if your unit will not turn on and the print carriage is in the home position You will not be able to remove the print cartridges Proceed to step 7
2 Open the print cartridge access doorThe print carriage moves into view
3 See replace the print cartridges on page 33 for information on removing the print cartridges
Caution Remove both print cartridges Failure to do so may damage your unit
4 Place the print cartridges in an airtight bag so they will not dry out and put them aside (do not send them with the unit unless instructed to by the HP customer support call agent)
5 Turn off the unit
6 Close the print cartridge access door
7 Remove the front panel cover as followsa Grasp the front of the front panel cover with two hands as shownb Firmly lift the front panel cover to unsnap it from the unit
8 Retain the front panel cover Do not return the front panel cover with the unit
9 If available pack the unit for shipment using the original packing materials or the packaging materials that come with your exchange unit
If you do not have the original packaging materials please use other adequate packaging materials Shipping damage caused by improper packaging andor improper transportation is not covered under the warranty
reference guide
hp support
49
10 Place the return shipping label on the outside of the box
11 Include the following items in the boxndash A complete description of symptoms for service personnel (samples of print
quality problems are helpful)ndash A copy of the sales slip or other proof of purchase to establish the warranty
coverage periodndash Your name address and a phone number where you can be reached during
the day
hp distribution centerTo order HP Officejet software a copy of the printed Reference Guide a setup poster or other customer-replaceable parts do one of the following bull In the US or Canada call (208) 323 2551bull Visit this website
httpwwwhpcomcposupportsoftwarehtml
hp officejet 4100 series
chapter 10
50
11
51
warranty information
HP Officejet 4100 seriesDuration of Limited Warranty (hardware and labor) 1 YearDuration of Limited Warranty (CD media) 90 DaysDuration of Limited Warranty (print cartridges) Until the HP ink is depleted or the ldquoend of warrantyrdquo date printed on the cartridge has been reached whichever occurs first
warranty service
express serviceTo obtain HP express repair service the customer must contact an HP service office or an HP Customer Support Center for basic troubleshooting first See hp customer support on page 45 for steps to take before calling Customer SupportIf a customer unit needs a minor part replacement and these parts can normally be replaced by the customer the customer-replaceable components may be serviced through expedited part shipment In this event HP will prepay shipping charges duty and taxes provide telephone assistance on replacement of the component and pay shipping charges duty and taxes for any part that HP asks to be returnedThe HP Customer Support Center may direct customers to designated authorized service providers who are certified by HP to service the HP product
warranty upgradesUpgrade your standard factory warranty to a total of three years with the HP SUPPORTPACK Service coverage begins on product purchase date and the pack must be purchased within the first 180 days of product purchase This program offers phone support from 600 AM to 1000 PM Mountain Standard Time (MST) Monday through Friday and 900 AM to 400 PM (MST) on Saturdays If during your technical support call it is determined that you need a replacement product then HP will ship you this product next business day free of charge Available in US onlyFor more information please call 1-888-999-4747 or visit the following HP Web site
httpwwwhpcomgohpsupportpack
Outside the US please call your local HP Customer Support office See call elsewhere in the world on page 46 for a list of international Customer Support numbers
returning your hp officejet for serviceBefore returning your HP Officejet for service you must call HP Customer Support See hp customer support on page 45 for steps to take before calling Customer Support
hewlett-packard limited global warranty statement
extent of limited warrantyHewlett-Packard (ldquoHPrdquo) warrants to the end-user customer (ldquoCustomerrdquo) that each HP Officejet 4100 Series product (ldquoProductrdquo) including related software accessories media and supplies shall be free from defects in material and workmanship for the duration which begins on the date of purchase by the Customer
hp officejet 4100 series
chapter 11
52
For each software Product HPrsquos limited warranty applies only to a failure to execute programming instructions HP does not warrant that the operation of any Product shall be uninterrupted or error freeHPrsquos limited warranty covers only those defects which arise as a result of normal use of a Product and does not cover any other problems including those which arise as a result of (a) improper maintenance or modification (b) software accessories media or supplies not provided or supported by HP or (c) operation outside the Productrsquos specificationsFor any hardware Product the use of a non-HP print cartridge or a refilled print cartridge does not affect either the warranty to the Customer or any HP support contract with the Customer However if Product failure or damage is attributable to the use of a non-HP or refilled print cartridge HP shall charge its standard labor and materials charges to service the Product for the failure or damageIf HP receives during the applicable warranty period notice of a defect in any Product HP shall either repair or replace the defective Product at HPrsquos option Where labor charges are not covered by HPrsquos limited warranty repairs shall be at HPrsquos standard charges for laborIf HP is unable to repair or replace as applicable a defective Product which is covered by HPrsquos warranty HP shall within a reasonable time after being notified of the defect refund the purchase price for the ProductHP shall have no obligation to repair replace or refund until the Customer returns the defective Product to HPAny replacement product may be either new or like-new provided that it has functionality at least equal to that of the Product being replacedHP products including each Product may contain remanufactured parts components or materials equivalent to new in performanceHPs limited warranty for each Product is valid in any countryregion or locality where HP has a support presence for the Product and where HP has marketed the Product The level of warranty service may vary according to local standards HP shall have no obligation to alter the form fit or function of the Product in order to make it operate in a countryregion or locality for which the Product was never intended to operate
limitations of warrantyTO THE EXTENT ALLOWED BY LOCAL LAW NEITHER HP NOR ITS THIRD PARTY SUPPLIERS MAKE ANY OTHER WARRANTY OR CONDITION OF ANY KIND WHETHER EXPRESS OR IMPLIED WITH RESPECT TO THE COVERED HP PRODUCTS AND SPECIFICALLY DISCLAIM THE IMPLIED WARRANTIES OR CONDITIONS OF MERCHANTABILITY SATISFACTORY QUALITY AND FITNESS FOR A PARTICULAR PURPOSE
limitations of liabilityTo the extent allowed by local law the remedies provided in this Limited Warranty Statement are the Customerrsquos sole and exclusive remediesTO THE EXTENT ALLOWED BY LOCAL LAW EXCEPT FOR THE OBLIGATIONS SPECIFICALLY SET FORTH IN THIS LIMITED WARRANTY STATEMENT IN NO EVENT SHALL HP OR ITS THIRD PARTY SUPPLIERS BE LIABLE FOR DIRECT INDIRECT SPECIAL INCIDENTAL OR CONSEQUENTIAL DAMAGES WHETHER BASED ON CONTRACT TORT OR ANY OTHER LEGAL THEORY AND WHETHER ADVISED OF THE POSSIBILITY OF SUCH DAMAGES
local lawThis Limited Warranty Statement gives the Customer specific legal rights The Customer may also have other rights which vary from state to state in the United States from province to province in Canada and from countryregion to countryregion elsewhere in the world
reference guide
warranty information
53
To the extent this Limited Warranty Statement is inconsistent with local law this Statement shall be deemed modified to be consistent with such local law Under such local law certain disclaimers and limitations of this Statement may not apply to the Customer For example some states in the United States as well as some governments outside the United States (including provinces in Canada) mayPreclude the disclaimers and limitations in this Statement from limiting the statutory rights of a consumer (eg the United Kingdom)Otherwise restrict the ability of a manufacturer to enforce such disclaimers or limitations orGrant the Customer additional warranty rights specify the duration of implied warranties which the manufacturer cannot disclaim or not allow limitations on the duration of implied warrantiesFOR CONSUMER TRANSACTIONS IN AUSTRALIA AND NEW ZEALAND THE TERMS IN THIS LIMITED WARRANTY STATEMENT EXCEPT TO THE EXTENT LAWFULLY PERMITTED DO NOT EXCLUDE RESTRICT OR MODIFY AND ARE IN ADDITION TO THE MANDATORY STATUTORY RIGHTS APPLICABLE TO THE SALE OF THE COVERED HP PRODUCTS TO SUCH CUSTOMERS
hp officejet 4100 series
chapter 11
54
55
index
Numerics4-by-6 inch photo paper
load 10 12
AADF 7adjust
volume for fax 25align print cartridges 35Answer Ring Pattern 26automatic document feeder 7automatic reduction
fax 25
Bbest copy quality 13busy number
redial automatically 23
Ccancel
scan 18scheduled fax 21
cartridgesalign 35replace 33
cleanprint cartridges 35the exterior 32the glass 31white strip 32
colorenhance 14fax 20fax from front panel 20
contrastchange for fax 23photo color 14
copy 13 16change default settings 15enhance 14fit to page 16lighten or darken 14menu options 16number of copies 14photo 15quality 13reduce or enlarge 14settings 13 15
speed 13tutorial 4
Customer Support 45web site 45
Ddarken a copy 14date
setting 27default settings
restore 35director review 4distinctive ringing 26
Eenhance copies 14enlarge copy 14 16envelopes
load 9Error Correction Mode
(ECM) 25
Ffactory defaults
restore 35fast copy quality 13fax 28
adjust volume 25automated reports 22cancel fax forward 24cancel scheduled 21change Answer Ring
Pattern 26change contrast 23change resolution 22change settings 19control appearance 22create individual speed-dial
settings 26delete speed-dial
settings 27distinctive ringing 26Error Correction Mode
(ECM) 25forward faxes 24header 27in color 20in color from front panel 20manual reports 22
menu 29print reports 22receive 21receive manually 21redial busy or unanswered
number 23schedule 20send from front panel 19set automatic reduction 25set date and time 27set the number of rings 21settings 27 28setup menu options 29speed dials 19test 28
fit to page 16forward faxes 24
cancel 24front panel
display scroll speed 36enter text 28send a fax 19setting prompt delay 36tutorial 3
Gglass
cleaning 31greeting cards
load 11
Hhelp 1HP Customer Support 45
calling 45HP Director 4HP distribution center 49HP Officjet
preparing to ship 47HP papers
tips on loading 11
Iindividual speed-dial settings
create 26ink cartridges see print
cartridgesinkjet paper
load 11
index
hp officejet 4100 series56
Kkeypad
enter text 28
Llabels
load 12lighten copies 14load
change the paper type 12envelopes 9original in ADF 7paper 7photo paper 10 12postcards 10 12print cartridges 33set the paper size 12tips 11
Mmaintenance
align print cartridges 35clean print cartridges 35clean the exterior 32clean the glass 31clean the white strip 32normal sounds 36replace print cartridges 33restore factory defaults 35self-maintenance
sounds 36self-test report 32
menuscopy options 16fax 29fax setup 29maintenance 37print reports 37
Nnormal copy quality 13number of copies
set 14number of rings
set 21
Oorder print cartridges 60originals
load in ADF 7output tray 8
Ppaper
change default size for copy 12
change the type 12load 7recommended 7set the size 12tips on loading 11
paper size change for copy 12
paper trayload 7
phone numbers support services 45
photo paperload 10 12
photoscopy 15enhance copy 14
physical specifications 43postcards
load 10 12power
specifications 43print
envelopes 9fax reports 22self-test report 32
print cartridgesalign 35clean 35handling 32replace 33
prompt delaysetting 36
Qquick start
review the director 4use with a computer 4
Rreceive
fax 21redial
busy or unanswered number 23
reduce copy 14 16regulatory information 43reinstall software 40reports
generate automatically for fax 22
generate manually for fax 22
print 22self-test 32
resolution
change for fax 22restore factory settings 35returning your HP Officejet for
service 51
Sscan
from front panel 17stop 18
schedule a fax 20scroll speed
setting 36self-test report 32send
cancel forward faxes 24color fax 20color fax from front
panel 20forward faxes 24
settingscopy 13 15fax 27 28prompt delay 36scroll speed 36
setupadditional information 39menu 29
shippingyour HP Officejet 47
softwareremove and reinstall 40
soundsself-maintenance 36
specificationsphysical 43power 43
speed dials 19create individual
settings 26delete settings 27
stopscan 18scheduled fax 21
subscriber identification code 27
support services 45
Ttelephone line
multiple numbers 26telephone numbers 45text
enhance 14enter from front panel 28
time
index
reference guide 57
setting 27transparency film
recommended 7tips on loading 11
troubleshootingremove and reinstall
software 40T-shirt Transfer Iron-On
load 11tutorial
front panel 3make a copy 4
Uunanswered number
redial automatically 23
Vvolume
adjust 25
Wwarranty 45
service 51statement 51upgrades 51
white stripcleaning 32
hp officejet 4100 series
chapter 12
58
declaration of conformityAccording to ISOIEC Guide 22 and EN 45014
Manufacturerrsquos Name and Address
Hewlett-Packard Company 16399 West Bernardo Drive San Diego CA 92127-1899 USA
declares that the product
Product Name hp officejet 4100 series (Q1608A)
Model Number(s) officejet 4110 (Q1609A) officejet 4110xi (Q1610A) officejet 4110v (Q1611A) officejet 4105 (Q1612A) officejet 4105z (Q1613A) officejet 4115 (Q1614A)
Product Options All
conforms to the following Product Specifications
Safety EN609501992 +A1 A2 A3 A4 amp A11
IEC609501991 +A1 A2 A3 amp A4
UL1950CSA 222 No 950 3rd Edn 1995
NOM-019-SCFI-1993
EMC CISPR221993 +A1 amp A2 EN550221994 +A1 amp A2 -Class B
CISPR241997EN550241998
IEC 61000-3-21995 EN61000-3-21995
IEC 61000-3-31994 EN61000-3-31995
ASNZS 3548 1992
CNS13438 1997
FCC Part 15-Class B ICES-003 Issue 2 VCCI-2
GB 9254-1998
Telecom TBR21 1998
Supplementary Information
The Product herewith complies with the requirements of the Low Voltage Directive 7323EEC the EMC Directive 89336EEC and the RampTTE Directive 19995EC (ANNEX II) carries the CE marking accordingly
European Contact for regulatory topics only Your local Hewlett-Packard Sales and Service Office orHewlett-Packard GmbH
Department HQ-TRE Herrenberger Strasse 140 D-71034 Boumlblingen Germany (FAX + 49-7031-14-3143)
order mediaTo order media such as HP Premium Inkjet Paper HP Premium Inkjet Transparency Film HP Iron-On T-shirt Transfer paper or HP Greeting Cards go to
wwwhpshoppingcom
For orders in countries other than the US and Canada select other countries then click Yes to leave hpshoppingcom From this website you can access hpshoppingcom for your specific language or countryregion
order print cartridges
If you have Internet access you can get more information from the HP website at
wwwhpcomsupport
print cartridges hp reorder number
HP black print cartridge 56 19 ml black print cartridge
HP color print cartridgeHP tri-color print cartridge
57 17 ml color print cartridge28 8 ml color print cartridge
Visit the hp officejet information centerIt has everything you need to get the most value from your HP Officejet
bull Technical Supportbull Supplies and Ordering Informationbull Project Tipsbull Ways to Enhance Your Product
wwwhpcomsupport
copy 2003 Hewlett-Packard Company
Printed in the USA Mexico Germany Singapore or China
Q1608-90163Q1608-90163
Q1608-90163

2
3
quick start
You can perform many functions using either the front panel or the HP Officejet software
Even if you do not connect your HP Officejet to a computer you can use the front panel to copy documents or photos and send a fax You can change a wide variety of settings using the front-panel buttons and menu system
front panel featuresReview the illustrations below and identify the location of the buttons on the front panel
1
2
3
4
5
678
9
10 11 12 13 14 15
button purpose
1 On turn the HP Officejet on or off
2 Left Arrow scroll through settings or to delete one character at a time from a text entry
3 Right Arrow scroll through settings
4 Enter select or save the displayed setting
5 Cancel stop a job exit a menu or exit settings
6 Start Color use to start a color copy scan or fax job
7 Start Black start a black and white copy scan or fax job
8 Keypad enter fax numbers names values or text
9 RedialPause start a fax redial or insert a hyphen when entering a phone number
hp officejet 4100 series
chapter 2
4
use your hp officejet with a computerIf you installed the HP Officejet software on your computer according to the Setup Poster you can access all the features of the HP Officejet using the HP Director
review the hp photo amp imaging directorThe HP Director is available through the desktop shortcut
for windows users
1 Do one of the followingndash Double-click the hp director icon on the desktopndash In the Windows taskbar click Start point to Programs or All Programs
(XP) point to Hewlett-Packard point to hp officejet 4100 series then choose hp photo amp imaging director
2 In the Select Device box click to see a list of installed HP devices
3 Select hp officejet 4100 seriesThe Director displays only the buttons that are appropriate for the selected device
the hp photo amp imaging director
10 Speed Dial access programmed speed dial entries
11 Setup access the menu system for reports fax settings and maintenance
12 Fax select the fax function
13 Scan select the scan function
14 Copy select the copy function
15 Photo Fit to Page enlarge a photo to fit a full-size sheet of paper
button purpose
1 2 3
4 5 6 7 8 9 10
reference guide
quick start
5
for macintosh users
Do one for the followingndash For OS 9 double-click the HP Photo and Imaging Director icon on the
desktopndash For OS X double-click the HP Photo and Imaging Director icon on the
dock
The following figure shows some of the features available through the HP Photo and Imaging Director for Macintosh Consult the legend for a brief explanation of a specific feature
feature purpose
1 Select Device Use this feature to select the product you want to use from the list of installed HP products
2 Settings Use this feature to view or change various settings for your HP device such as print scan or copy
3 Status Displays the status window for all-in-one devices only
4 Send a Fax Use this feature to send a fax and access fax settings
5 Scan Picture Scans an image and displays it in the HP Photo amp Imaging Gallery
6 Scan Document Scans text and displays it in the selected destination text editing software program
7 Make Copies Displays the Copy dialog box where you can select the copy quality the number of copies the color the size and can start a copy
8 View amp Print Displays the HP Photo amp Imaging Gallery where you can view and edit images use HP Photo Prints make and print a photo album e-mail an image unload an image to the Web or copy an image to another application
9 Help Provides access to HP Photo amp Imaging Help which provides software help a product tour and troubleshooting information
10 Click this arrow to access tool tips which explain each of the Director options
hp officejet 4100 series
chapter 2
6
the hp photo and imaging director for macintosh OS X
feature purpose
1 Select Device Use this feature to select the product you want to use from the list of installed HP products
2 Settings Use this feature to view or change various settings for your HP device such as print scan or copy
3 Scan Picture Scans an image and displays it in the HP Photo and Imaging Gallery
4 Scan Document Scans text and displays it in a text editing software program
5 Make Copies Displays the Copy dialog box where you can select the copy quality the number of copies the color the size and can start a copy
6 Send Fax Use this feature to send a fax
7 Maintain Printer Accesses the HP Inkjet Utility where you can clean and align the print cartridges check print cartridge ink levels print a test or sample page register your printer or access information on product support
8 View and Print Displays the HP Photo and Imaging Gallery where you can view and edit images
1 2
3 4 5 6 7 8
3
7
load originals and load paper
You can make copies from originals loaded on the automatic document feeder (ADF) You can also print and copy onto a variety of paper types weights sizes and transparency films It is important however that you choose the right paper and make sure that it is loaded correctly and not damaged
load originalsYou can copy or scan any original by placing it in the automatic document feeder
1 Load your original in the automatic document feeder
Note Do not feed photos smaller than 35-by-5 inches through the automatic document feeder
2 Slide the right and left paper guides in until they stop at the edges of the paper
load paperFollowing is the basic procedure for loading paper There are specific considerations for loading certain types of paper transparency film postcards and envelopes After you review this procedure see tips for loading other types of paper in the paper tray on page 11 load 4 x 6 inch photo paper on page 10 load envelopes on page 9 and load postcards on page 10
For best results adjust the paper settings each time you change paper types or paper sizes For more information see set the paper type on page 12
to load the paper tray
1 Lower the paper tray and extend the paper-tray extender
2 Slide the paper-width guide on the left to its outermost position
automatic document feeder (ADF)
hp officejet 4100 series
chapter 3
8
3 Tap the stack on a flat surface to align the edges of the paper and then check the paper for the followingndash Make sure it is free of rips dust wrinkles and curled or bent edgesndash Make sure all the paper in the stack is the same size and type unless
you are working with photo paper
4 Insert paper into the paper tray print-side down until it stops To avoid bending the paper make sure you do not push the paper in too far or push too hard If you are using letterhead insert the top of the page firstBe careful not to use too much or too little paper Check that the stack of paper contains several sheets but is no higher than the top of the paper-width guide
5 Slide the paper-width guide in until it stops at the edge of the paper Make sure that the paper stack lies flat in the paper tray and fits under the tab of the paper-width guide
6 Extend the output-tray
reference guide
load originals and load paper
9
load envelopesUse the print feature of your software to print to envelopes with your HP Officejet Do not use shiny or embossed envelopes or envelopes that have clasps or windows You can load the paper tray with one or multiple envelopes
1 Remove all paper from the paper tray
2 Slide an envelope into the tray with the envelope flap up and to the left (print-side down) until it stops
3 Adjust the paper-width guide against the envelope until it stopsBe careful not to bend the envelope If you are loading multiple envelopes make sure the envelopes fit within the tray (do not overload it)Consult the help files in your word processing software for details on how to format text for printing on envelopes
hp officejet 4100 series
chapter 3
10
load 4 x 6 inch photo paperFollowing is the procedure for loading 4-by-6 inch photo paper into your HP Officejet
1 Remove all paper from the paper tray and then slide a stack of photo paper into the tray until it stopsMake sure the print-side faces downIf the photo paper you are using has perforated tabs load the photo paper so that the tabs are closest to you
2 Adjust the paper-width guide against the stack of photo paper until it stopsMake sure the photo paper fits within the tray (do not overload it)
Note Make sure you set the paper type and paper size before printing See set the paper type on page 12 and set the paper size on page 12
load postcardsFollowing is the procedure for loading postcards
1 Remove all paper from the paper tray and then slide a stack of cards into the tray until they stopMake sure the print-side faces down
reference guide
load originals and load paper
11
2 Adjust the paper-width guide against the cards until it stops Make sure the cards fit within the tray (do not overload it)
tips for loading other types of paper in the paper trayThe following table provides guidelines for loading certain types of paper and transparency film For best results adjust the paper settings each time you change paper types and paper sizes For more information see set the paper type on page 12
Note HP Photo Paper and HP Photo Paper Glossy 4-by-6 are not recommended for printing with your HP Officejet To print photos use HP Everyday Photo Paper For your best photo printing needs use HP Premium Plus Photo Paper
paper tips
HP papers bull HP Premium Inkjet Paper Locate the gray arrow on the nonprinting side of the paper and then insert paper with the arrow side facing up
bull HP Premium or Premium Plus Photo Paper Load the glossy (print) side down (To prevent curling keep photo paper sealed in the original package until you are ready to use it) Always load at least five sheets of regular paper in the paper tray first and then place the photo paper on top of the regular paper
bull HP Premium Inkjet Transparency Film Insert the film so that the white transparency strip (with arrows and the HP logo) is on top and is going into the tray first
bull HP Inkjet T-shirt Transfer Iron-On Flatten the transfer sheet completely before using it do not load curled sheets (To prevent curling keep transfer sheets sealed in the original package until you are ready to use them) Manually feed one sheet at a time with the unprinted side facing down (the blue stripe faces up)
bull HP Matte Greeting Cards HP Glossy Greeting Cards or HP Felt-Textured Greeting Cards Insert a small stack of HP greeting-card paper with the print-side down into the paper tray until it stops
hp officejet 4100 series
chapter 3
12
set the paper typeIf you want to use a different type of paper such as photo paper transparency film Iron-On T-shirt transfers or brochures simply load that paper in the paper tray You must then change the paper type settings to ensure the best print quality
HP recommends paper type settings according to the type of paper you are using
This setting refers to copy options only If you want to set the paper type for printing from a computer set the properties in the Print dialog box of the software
1 Press the Copy button until Paper Type appears
2 Press until the appropriate paper type appears
3 Press Enter to choose the displayed paper type
set the paper sizeThe HP Officejet can use Letter Legal or A4 paper Use the following procedure to set the paper size for copy options
1 Press the Copy button until Copy Paper Size appears
2 Press until the appropriate paper size appears
3 Press Enter to choose the displayed paper size
To avoid jams remove papers from the output tray frequently The output tray capacity is affected by the type of paper and the amount of ink you are using For more information about output-tray capacity see technical information in the HP Photo amp Imaging Help
Labels(works only with printing)
bull Always use letter-size or A4-size label sheets designed for use with HP inkjet products (like Avery Inkjet Labels) and make sure that the labels are not over two years old
bull Fan the stack of labels to make sure none of the pages are sticking together
bull Place a stack of label sheets on top of standard paper in the paper tray print-side down Do not insert labels one sheet at a time
Postcards (works only with printing)
Insert a stack of postcards or hagaki cards with the print-side down into the paper tray until it stops Line the postcards up on the right side of the paper tray slide the paper-width guide up against the left side of the cards until it stops
4-by-6 inch photo paper (works only with printing)
Insert the photo paper with the print-side down into the paper tray until it stops Place the long edge of the photo paper against the right side of the paper tray and slide the paper-width guide up against the long edge of the photo paper until it stops If the photo paper you are using has perforated tabs load the photo paper so that the tabs are closest to you
paper tips
4
13
use the copy features
The copy features let you do the following
bull Produce high-quality color and black-and-white copiesbull Reduce or enlarge the size of the copies you make from 25 to 200 or
50 to 200 (depending on your model) of the copyrsquos original sizebull Make the copy lighter or darker select the number of copies and specify
the quality of the copies you makebull Use special copying features to make high-quality copies of photos using
special photo paper or to create transparencies
make copiesYou can make copies using the front panel of your HP Officejet or by using the HP Officejet software on your computer Many copy features are available using either method However you may find that the software offers easier access to special copy features
All copy settings that you select on the front panel are reset two minutes after the HP Officejet completes the copy unless you save the settings as the default settings as described in change settings for all copy tasks on page 15
make a copy1 Load the paper tray with the appropriate paper
2 Load your original
3 Press the Copy button
4 Use the keypad or press the or to enter the number of copies
5 Press Start Black or Start Color
Tip To make a single copy press the Copy button and then press Start Black or Start Color
Note Make sure that the color print cartridge is installed in your HP Officejet Both print cartridges must be installed when making a copy
increase copy speed or qualityThe HP Officejet provides three options that affect copy speed and quality
bull Best produces the highest quality for all paper types Best copies more slowly than the other quality settings
bull Normal delivers high-quality output and is the recommended setting for most of your copying Normal copies faster than Best
bull Fast copies faster than the Normal setting The text is of comparable quality to the Normal setting but the graphics may be of lower quality Using Fast also reduces the frequency of replacing your print cartridges because it uses less ink
hp officejet 4100 series
chapter 4
14
1 Load your original
2 Press Copy until Copy Quality appears
3 Press until the desired quality setting appears and then press Enter to select it
4 Press Start Black or Start Color
set the number of copies You can set the number of copies using the front panel
1 Press the Copy button
2 Use the keypad or press the or to enter the number of copies
3 Press Enter
4 Press Start Black or Start Color
Tip If you hold down the right arrow button then after reaching 10 the number of copies changes by increments of five to make it easier to set a large number of copies
reduce or enlarge a copyYou can reduce or enlarge a copy of an original using ReduceEnlarge
For more information about additional copy options such as Fit to Page see perform special copy jobs on page 15
1 Press Copy until ReduceEnlarge appears
2 Press until the appropriate ReduceEnlarge option appears and then press Enter to select it
3 If you select Custom 100 Set Custom Size appears Use the arrow keys or type a percentage on the keypad
4 Press Enter when the desired percentage is displayed
5 Press Start Black or Start Color
make copies lighter or darkerUse LighterDarker to adjust the lightness and darkness of the copies you make
1 Press Copy until LighterDarker appearsThe range of LighterDarker values are represented as circles on a scale on the front-panel display
2 Press to lighten the copy or to darken it The circle moves to the left or right depending on the arrow button you press
3 Press Enter to select the setting
4 Press Start Black or Start Color
enhance text sharpness and photo colorsYou can use Text to sharpen edges of black text Photo to enhance light colors in your photographs or Mixed if your original contains a photograph and text You can also select None to turn off all enhancements
reference guide
use the copy features
15
Text enhancement is the default option You can turn off Text enhancement by selecting Photo Mixed or None if the following occur
bull Stray dots of color surround some text on your copiesbull Large black typefaces look splotchy (not smooth)bull Thin colored objects or lines contain black sectionsbull Horizontal grainy or white bands appear in light- to medium-gray areas
1 Press Copy until Enhancements appears
2 Press until the desired enhancement (Text Photo Mixed or None) appears
3 Press Enter to select the setting
4 Press Start Black or Start Color
change settings for all copy tasksSave the copy settings you use most often by setting them as the default This includes changes to Copy options such as Paper Type and Paper Size as well as other Copy settings on the front panel such as Number of Copies and Copy Quality
1 Make any desired changes to the copy options
2 Press Copy until Set New Defaults appears
3 Press until Yes appears
4 Press Enter to set the options as a defaultYour settings are saved
perform special copy jobsIn addition to supporting standard copying your HP Officejet can also copy a photo or fit a copy to the page
copy a photoWhen copying a photo you should select options for the correct paper type and photo enhancement
1 Load the photo in the automatic document feeder (ADF)For more information see load originals
2 If you are using photo paper load it in the paper tray
3 Press Copy until Paper Type appears
4 Press until Premium Photo appears and then press Enter to select it
5 Press Copy until Enhancements appears
6 Press until Photo appears and then press Enter to select it
7 Press Start Black or Start Color
Tip To enlarge a photo automatically to a full page use the Photo Fit to Page button
hp officejet 4100 series
chapter 4
16
fit a copy to the pageUse the Photo Fit to Page button when you want to automatically enlarge or reduce your original to fit Letter or A4 size paper You can enlarge a small photo to fit a full-size page as shown below Using Photo Fit to Page may prevent unwanted cropping of text or images around the margins
1 Load the original in the ADFFor more information see load originals on page 7
2 Press the Photo Fit to Page button
Note Do not press the Fax Copy or Scan buttons on the front panel once you have pressed the Photo Fit to Page button
3 Press until the appropriate paper type appears and then press Enter to select it
4 Press Start Black or Start Color
copy optionsThe following diagram shows the options that are available when you press Copy
Original Fit to Page
Plain PaperPhoto PaperTransparency
Actual sizeCustom 100Full Page 91Legal gt Ltr 72
ReduceEnlarge Paper Type
NoYes
TextPhotoMixedNone
Enhancements Set New Defaults
LetterLegalA4
Copy Paper Size
The sizes vary by countryregion
LighterDarker
NormalFastBest
Copy Quality
To cycle through the copy options press Copy repeatedly
Press and to move to the setting you want within one of the copy optionsPress Enter to select the displayed setting
5
17
use the scan features
Scanning is the process of converting pictures and text into an electronic format for your computer You can scan photos and text documents
Because the scanned image or text is in an electronic format you can bring it into your word processor or graphics program and modify it to suit your needs You can do the following
bull Scan photos of your kids and e-mail them to relatives create a photographic inventory of your house or office or create an electronic scrapbook
bull Scan text from an article into your word processor and quote it in a report saving you a lot of retyping
Tip To use the scan features your HP Officejet and computer must be connected and turned on The HP Officejet software must also be installed and running on your computer prior to scanning To verify that the HP Officejet software is running on Windows look for a status icon in the system tray On a Macintosh the HP Officejet software is always running
Note High resolution scanning (600 dpi or higher) requires a large amount hard disk space If there is not enough hard disk space available your system may stall
scan an originalYou can start a scan from your HP Officejet or from the HP Officejet software on your computer
For more information about scanning your pictures or documents from the HP Officejet software see scan pictures and documents in the HP Photo amp Imaging Help
to scan an original from your hp officejet
1 Load your original in the automatic document feeder (ADF)For more information see load originals on page 7
2 Press Scan
3 Select the Scan to destination by pressing or or by pressing the Scan button repeatedlyThe default destination is the HP Photo amp Imaging Gallery Any applications on your computer that are supported by the HP Officejet also appear in the Scan to list
4 Press Start Black or Start ColorThe original is scanned and the image is sent to selected destinationFor more information about using the HP Photo amp Imaging Gallery see manage images in how to use the software
hp officejet 4100 series
chapter 5
18
stop scanningYou can stop a scan by pressing the Cancel button located on the front panel
6
19
use the fax features
Using your HP Officejet you can
bull Send and receive paper faxesbull Send computer faxes (reference the HP Photo amp Imaging Help)bull Send and receive color faxes
Fax features are available only on some HP Officejets
send a faxYou can send a fax in a variety of configurations These include the following
bull send a paper fax (using the front panel or computer)bull send a paper fax with a PC-generated cover page (using the computer)bull send a file with or without a cover page (using the computer)bull send a PC-generated cover page as a single-page fax (using the
computer)
Note For information on sending a fax using the computer reference the HP Photo amp Imaging Help
Note By default your HP Officejet prints a report only if there is a problem with sending or receiving a fax A confirmation message indicating whether an item was successfully sent appears briefly on the front-panel display after each transaction If you need printed confirmation that your faxes are successfully sent see print reports on page 22 for information about report options
Note If you have not done so set the date and time See set the date and time on page 27
send a fax from your hp officejet1 Load your originals in the ADF
For more information see load originals on page 7
2 Enter the fax number using the keypad or press Speed Dial until the desired speed-dial entry appearsFor more information on speed dialing see set up speed dialing in the HP Photo amp Imaging Help
3 Press Start Black or Start Color
change settings and use speed dials before sending a fax1 Load your originals in the ADF
For more information see load originals on page 7
2 Enter the fax number using the keypad or press Speed Dial until the desired speed-dial entry appears
hp officejet 4100 series
chapter 6
20
For more information on speed dialing see set up speed dialing in the HP Photo amp Imaging Help
3 Press Enter
4 Press Fax to scroll through the fax options
5 When you reach the option whose setting you wish to change press to scroll through the setting options
6 When you reach the setting you want to change press Enter to accept the setting
7 Press Start Black or Start Color
send a color faxYou can send and receive color faxes to and from other color fax machines If you are faxing from the front panel and your HP Officejet determines that the recipient has a black-and-white fax unit it sends the fax in black and white If you are faxing from the software and your HP Officejet determines that the recipient has a black-and-white fax unit the HP Officejet prompts you to try sending the fax in black and white
We recommend that you use only color originals for color faxing The color originals must be loaded in the ADF you cannot send a color fax from memory using the scan and fax features To fax in color to multiple recipients send the fax from the Director or your software program
to send a color fax from the front panel
1 Load your originals in the ADF For more information see load originals on page 7
2 Enter the fax number using the keypad or press Speed Dial until the desired speed-dial entry appearsFor more information on creating speed-dial entries see set up speed dialing in the HP Photo amp Imaging Help
3 Press Start Color
schedule a faxYou can schedule a black and white fax to be sent later during the same day (for example when telephone lines are not as busy) If you use the front panel you can select a single recipient
When the specified time is reached your fax is automatically sent as soon as a connection can be made
1 Load your originals in the ADF
2 Enter the fax number using the keypad or press Speed Dial until the desired speed-dial entry appears
3 Press Enter
4 Press Fax to scroll through the fax options
5 Stop scrolling when you reach the How to Fax menu
6 Press to scroll through the setting options
7 Stop scrolling when you reach the Send Fax Later option
reference guide
use the fax features
21
8 Press Enter
9 Enter the Send Time using the numeric keypad
10 At the prompt press 1 for AM or 2 for PM
11 When Store Fax Now appears press 1 for Yes or 2 for NoIf 1 is selected the document is scanned to memory and is sent at the selected time If 2 is selected and you havenrsquot loaded your originals a message appears reminding you to load the original before the send time
12 Press Start Black
cancel a scheduled faxYou can cancel a fax stored in memory or one that is currently in progress
bull Press Cancel to cancel the scheduled fax
receive a faxYour HP Officejet is set to print received faxes automatically If you receive a legal-size fax and your HP Officejet is not currently configured to use legal-sized paper the unit automatically reduces the fax so that it fits on the paper that is loaded For more information see set automatic reduction on page 25
If you have an answering machine connected to the same line as your HP Officejet you may need to set the number of rings required before the HP Officejet begins receiving the fax The default number of rings before the HP Officejet receives a fax is 5
set the number of rings before answeringYou can specify how many rings should occur before your HP Officejet automatically answers the phone When you run the Fax Setup Wizard this is set automatically
If you do not want your HP Officejet to answer the phone Rings to Answer should be set to No Answer
1 Press Setup
2 Press 3 then press 3 againThis selects the Basic Fax Setup menu then the Rings to Answer option
3 Use the arrow keys to choose the number of rings and then press Enter
receive a fax manuallyBefore manually receiving a fax we recommend that you remove any originals from your HP Officejet so that they are not accidentally processed
Verify that Rings to Answer is set to No Answer
1 When your HP Officejet rings pick up the handset of a telephone that is on the same telephone line as your HP Officejet
2 If you hear fax tones press Start Black or Start Color or if you are receiving from an extension phone (on the same telephone line as your HP Officejet but not connected directly to it) press 1 2 3 on your phone
3 After you are finished hang up the telephone
hp officejet 4100 series
chapter 6
22
print reportsYou can set up your HP Officejet to print error reports and confirmation reports for each fax you send and receive You can also manually print reports as you need them
generate reports automaticallyThis setting lets you configure your HP Officejet so that it automatically prints error and confirmation reports
1 Press Setup
2 Press 1 then press 5This selects Print Report then selects Automatic Reports Setup
3 Press to scroll through the following report typesndash Every Error which prints whenever there is any kind of fax error
(default)ndash Send Error which prints whenever there is a transmission errorndash Receive Error which prints whenever there is a receiving errorndash Every Fax which confirms every time a fax is sent or receivedndash Send Only which prints every time a fax is sentndash Off which does not print fax reports
4 When you reach the report that you want press Enter
generate reports manuallyThis setting lets you print reports manually From the computer you can only print the Speed-Dial List and the Fax Log
to print reports from the front panel
1 Press Setup then press 1This selects the Print Report menu
2 Press to scroll through the following report typesndash Last Transaction which prints details of the last fax transactionndash Fax Log which prints a log of the last 30 fax transactionsndash Speed Dial List which prints a list of programmed speed dialsndash Self-Test Report which prints a report to assist you in diagnosing print
and alignment problems For more information see print a self-test report on page 32
ndash Automatic Reports Setup which is the automatic reports setting described in generate reports automatically on page 22
3 When you reach the report that you want press Enter
control resolution and contrastYour HP Officejet lets you change the resolution and contrast of documents that you are sending
change resolutionResolution affects the transmission speed and quality of faxed documents
reference guide
use the fax features
23
to change the resolution from the front panel
1 Load your originals in the ADF
2 Enter the fax number using the keypad or press Speed Dial until the desired speed-dial entry appears
3 Press Enter
4 Press Fax to scroll through the fax options
5 Stop scrolling when you reach the Resolution menu
6 Press until the desired resolution quality appears (Standard Photo Fine Very Fine)
7 Press EnterYour HP Officejet only faxes at the highest resolution supported by the receiving faxIf you choose Photo be aware that the faxing process takes longer to complete When faxing photographs we recommend that you choose Photo
change contrastChange this setting if you want a black-and-white fax to be darker or lighter than the original
to change the fax contrast from the front panel
1 Load your originals in the ADF
2 Enter the fax number using the keypad or press Speed Dial until the desired speed-dial entry appears
3 Press Enter
4 Press Fax to scroll through the fax options
5 Stop scrolling when you reach the LighterDarker menuThe range of values appears as a circle on a scale on the display
6 Press to lighten the fax or to darken itThe circle moves left or right as you press a button
7 Press Enter to accept the setting you selected
change other fax settings
redial a number automaticallyYou can set your HP Officejet to redial a busy and an unanswered number automatically If you initiated a fax from the computer the computer must be left on for the redialing process to work correctly
1 Press Setup
2 Press 4This selects the Advanced Fax Setup menu
3 Choose one of the following optionsndash Press 3
hp officejet 4100 series
chapter 6
24
This selects the Busy Redial option The default setting for Busy Redial is Redial
ndash Press 4This selects the No Answer Redial option The default setting for No Answer Redial is No Redial
4 Press Enter
5 Press to select Redial or No Redial as desired
6 Press Enter
forward faxes to another numberWith fax forwarding you can send a fax that you receive to another fax number during the next 24-hour period
to forward faxes from the front panel
1 Press Setup
2 Press 3 then press 7This selects the Basic Fax Setup menu then selects the Fax Forwarding Black Only option
3 At the prompt enter the Fax Number to which you wish to send the fax
4 Press Enter
5 Enter the Start Date using the numeric keypad
6 Enter the Start Time using the numeric keypad
7 At the prompt press 1 for AM or 2 for PM
8 Enter the Stop Date using the numeric keypadFax Forwarding On appears on the display
edit or cancel fax forwardingOnce fax forwarding is enabled you may find that you need to change the number you are faxing to or the start and stop times you entered You may wish to cancel your fax forwarding setup altogether Follow the steps below to edit or turn off fax forwarding
to edit fax forwarding from the front panel
1 Press Setup
2 Press 3 then press 7This selects the Basic Fax Setup menu then selects the Fax Forwarding Black Only option
3 Forwarding is ON 1=Edit 2=Cancel appears on the display after a moment Press 1 to edit the number you wish to fax to or to change the start and stop times Follow the messages on the display
to cancel fax forwarding from the front panelbull Press Cancel
OR
reference guide
use the fax features
25
Follow the steps in edit or cancel fax forwarding on page 24 When Forwarding is ON 1=Edit 2=Cancel appears on the display press 2 to cancel fax forwarding
use error correction modeError Correction Mode (ECM) eliminates data lost due to poor phone lines by detecting errors that occur during transmission and automatically requesting retransmission of the erroneous portion Phone charges are unaffected or may even be reduced on good phone lines On poor phone lines ECM increases sending time and phone charges but sends the data much more reliably Turn ECM off (the default setting is on) only if it increases phone charges substantially and you can accept poorer quality in exchange for reduced charges
to change the ECM setting from the front panel
1 Press Setup
2 Press 4 then press 7This selects the Advanced Fax Setup menu then selects the Error Correction Mode option
3 Press to switch between On and Off
4 Press Enter to accept the setting you selected
set automatic reductionThis setting determines what your HP Officejet does if it receives a fax that is too large for the default paper size With this setting on (the default) the image is reduced so that it fits on one page With this feature off information that doesnrsquot fit on the first page is printed on a second page
1 Press Setup
2 Press 4 then press 5This selects the Advanced Fax Setup menu then selects the Automatic Reduction option
3 Press to switch between On and Off
4 Press Enter to accept the setting you selected
adjust the volumeYour HP Officejet provides three levels for adjusting the ring and speaker volume The ring volume is the volume of the phone ringer The speaker volume is the volume of everything else such as the dial and fax tones The default setting is Soft
1 Press Setup
2 Press 3 then press 6This selects the Basic Fax Setup menu then selects the Ring and Beep Volume option
3 Press to select one of the options Soft Loud or Off
4 Press Enter to accept the setting you selected
hp officejet 4100 series
chapter 6
26
change the answer ring pattern (distinctive ringing)Distinctive ringing is a feature offered by phone companies that allows several phone numbers to share the same line Each number has a specific ring pattern If you do not have this service use the default ring pattern which is All Rings
If you connect your HP Officejet to a line with distinctive ringing have your telephone company assign one ring pattern to voice calls and another to fax calls (double or triple rings are best for a fax number)
1 Press Setup
2 Press 4 then press 2This selects the Advanced Fax Setup menu then selects the Answer Ring Pattern option
3 Press to scroll through these options All Rings Single Rings Double Rings Triple Rings and Double amp Triple
4 When the ring pattern that the phone company established for this number appears press Enter
Tip We recommend that you use Double Rings or Triple Rings for fax
set up speed dialingThrough your HP Officejet or your computer you can assign entries to fax numbers you use often This lets you dial those numbers quickly using the front panelrsquos Speed Dial button and a one- or two-digit entry You can create up to 100 individual speed-dial entries (the maximum for some models is 70)
We recommend that you use the software to set up speed-dial settings
Note A speed-dial entry can only be associated with one phone number speed-dial groups are not supported
For more information see set up speed dialing in the hp photo amp imaging help
create individual speed-dial settingsYou can enter fax numbers that you will reuse frequently
1 Press Setup
2 Press 2 then press 1This selects the Speed Dial Setup menu then selects the Individual Speed Dial option
3 Press EnterThe first unassigned speed-dial entry appears on the display
4 Press Enter to select the displayed speed-dial entry
5 Enter the Fax Number to assign to that entry then press EnterThe fax number can be up to 50 digits in length
Tip To enter a three-second pause within a number sequence press Symbols to display a dash
6 Enter the personrsquos or companyrsquos name then press Enter
reference guide
use the fax features
27
The name is limited to 13 characters in lengthFor more information see enter text on page 28
7 After Enter Another appears press 1 (Yes) if you want to set up another number or press 2 (No) to exit
delete speed-dial settingsFollow these steps to delete an individual speed-dial entry
1 Press Setup
2 Press 2 then press 2 againThis selects Speed Dial Setup then selects Delete Speed Dial
3 Press until the individual entry that you want to delete appears then press Enter
set basic fax settings using the front panelWe recommend that you use the Fax Setup Wizard in the HP Officejet software to configure all your basic fax settings however you can also access these settings from the front panel
Note In the US regulations require that your name and phone number appear on every fax The minimum settings that we recommend are described in the following topics
set the date and timeFollow these steps to set the date and time manually
1 Press Setup
2 Press 3 then press 1This selects the Basic Fax Setup menu then selects the Date and Time option
3 Follow the prompts on the display to enter the date and time using the keypad
Tip Use only the last two digits for the year
Tip When you enter a single-digit date or time type a leading zero before the single digit for example 0345 or 08-03-02
After you are done the date and time appear on the display
Warning Cutting off power to the HP Officejet causes the selected date and time to be lost However name and fax number information is not lost
set the fax headerFollow these steps to enter your name and fax number in the header
Note In Hungary the subscriber identification code (fax header) can be set or changed only by authorized personnel For more information contact your authorized HP dealer
1 Press Setup
2 Press 3 then press 2
hp officejet 4100 series
chapter 6
28
This selects the Basic Fax Setup menu then selects the Fax Header option
3 Enter your personal or company name at the prompt Use the guidelines provided in the next section under enter text
4 Press Enter
5 Enter your fax number using the numeric keypad
6 Press Enter
enter textThe following list provides tips for entering text using the front-panel keypad
bull Press the keypad numbers that correspond to the letters of a name
bull Press a button multiple times to see a letter first in uppercase and then in lowercase
bull After the correct letter appears press and then press the number that corresponds to the next letter in the name Again press multiple times until the correct letter appears
bull To insert a space press Space ()bull To enter a symbol such as press Symbols () to scroll through the list of
available symbolsbull If you make a mistake press to clear it and then make the correct
entrybull After you are done entering text press Enter to store your entries
check for dial toneBefore using the fax features verify that the connections are correctly established
1 Press Fax
2 Listen for a dial tone
3 If you do not hear a dial tone check the connections
4 Press Cancel to hang up
ABC These letters correspond to this number and so on
2
JKL To get this character J j K k L l 5
5 Press 5 this many times 1 2 3 4 5 6 7
reference guide
use the fax features
29
fax job menuThe following options become available when the Fax button is pressed
setup menu for fax commandsThe following fax settings are available in the Setup menu
Enter Fax or Speed Dial
FineVery FinePhotoStandard
Fax Number Resolution LighterDarker
Enter a fax number or speed dialWhen the Fax button is pressed
Press and to move to the option you wantPress Enter to select the displayed setting
NoYes
Set New Defaults
Send Fax NowFax from MemorySend Fax LaterPoll to Receive
How to Fax
1Automatic Reports Setup
2Answer Ring Pattern
3Busy Redial
4No Answer Redial
5Automatic Reduction
6Backup Fax Reception
7Error Correction Mode
3Basic Fax Setup 4Advanced Fax Setup
Press Setup to display the menu options
Press and to move to the setting you wantPress Enter to select the displayed setting
1Date and Time
2Fax Header
3Rings to Answer
4Paper Size
5Tone or Pulse Dialing
6Ring and Beep Volume
7Fax Forwarding Black Only
2Speed Dial Setup
1Individual Speed Dial
2Delete Speed Dial
3Print Speed Dial List
hp officejet 4100 series
chapter 6
30
7
31
maintain your hp officejet
This section provides instructions for keeping your HP Officejet in top working condition Perform these maintenance procedures as necessary
clean the glassDirty glass from dust smudges hair and so on slows down performance and affects the accuracy of features such as Fit to Page and Copy
1 Turn off the unit unplug the power cord and raise the scanner lid
2 Clean the glass with a soft cloth or sponge slightly moistened with a nonabrasive glass cleaner
Caution Do not use abrasives acetone benzene or carbon tetrachloride on the glass these can damage it Do not place liquids directly on the glass They may seep under it and damage the unit
3 Dry the glass with a chamois or cellulose sponge to prevent spotting
hp officejet 4100 series
chapter 7
32
clean the white stripMinor debris can accumulate on the white strip located underneath the scannerrsquos lid
1 Turn off the unit unplug the power cord and raise the scanner lid
2 Clean the white strip with a soft cloth or sponge slightly moistened with a mild soap and warm water
3 Wash the strip gently to loosen debris do not scrub the strip
4 Dry the strip with a chamois or soft cloth
Caution Do not use paper-based wipes as these may scratch the strip
5 If this does not clean the strip well enough repeat the previous steps using isopropyl (rubbing) alcohol and wipe the strip thoroughly with a damp cloth to remove any residual alcohol
clean the exterior Use a soft damp lint-free cloth to wipe dust smudges and stains off the case The interior of the unit does not require cleaning Keep fluids away from the interior of the unit as well as the front panel
work with print cartridgesTo ensure the best print quality from your HP Officejet you will need to perform some simple maintenance procedures and when prompted by a front-panel message replace the print cartridges
print a self-test reportIf you are experiencing problems with printing before cleaning or replacing the print cartridges you should print a Self-Test Report This report provides useful information about your print cartridges including status information
1 Press Setup
2 Press 1 then press 4This selects Print Report and then selects Self-Test Report
3 Press Start Black or Start ColorA Self-Test Report is printed for your HP Officejet
handle print cartridgesBefore you replace or clean a print cartridge you should know the part names and how to handle the print cartridge
reference guide
maintain your hp officejet
33
replace the print cartridgesFront-panel messages appear to let you know that you should replace your print cartridges
See order print cartridges on the back cover for information on ordering replacement print cartridges
1 Turn on the unit then lift open the print cartridge access doorThe print carriage moves into view
2 After the carriage stops moving push down on the print cartridge down to release it and then pull it toward you out of its slot
Plastic tape with pink tab(must be removed)
Copper contactsInk nozzles under tape
Do not touch the copper contacts or the ink nozzles
print cartridge access door
hp officejet 4100 series
chapter 7
34
Note It is normal to see ink build-up in the print cartridge slots
3 Remove the new print cartridge from its packaging and being careful to touch only the bright pink plastic tab gently remove the plastic tape to uncover the ink nozzles
Caution Do not touch the copper contacts or ink nozzles
Once you have removed the plastic tape install the print cartridge immediately to prevent the ink from drying in the nozzles
4 Push the new print cartridge into the appropriate slot at a slight angle until it clicks into place
Caution Do not attempt to push the cartridge straight into the slot It must slide in at a slight angle
The tri-color print cartridge goes on the left and the black cartridge goes on the right
5 Close the print cartridge access door
reference guide
maintain your hp officejet
35
align the print cartridgesThe HP Officejet prompts you to align cartridges every time you install or replace a print cartridge Aligning the cartridges ensures high-quality output
To align the print cartridges when prompted
1 Press Enter on the front panelAn align cartridges (test pattern) page prints
2 Load the align cartridges page face down in the ADF between the paper-width guides and press the Enter button again
3 Recycle or discard the page
To align the cartridges at any other time
1 Press Setup
2 Press 5 then press 2This selects the Maintenance menu and then selects the Align Print Cartridge option
3 Press EnterAn align cartridges (test pattern) page prints
4 Load the align cartridges page face down in the ADF between the paper-width guides and press the Enter button again
5 Recycle or discard the page
clean the print cartridgesUse this feature when the Self-Test Report shows streaking or white lines through any of the colored bars Do not clean print cartridges unnecessarily This wastes ink and shortens the life of the ink nozzles
1 Press Setup
2 Press 5 then press 1This selects the Maintenance menu and then selects the Clean Print Cartridge optionA page of patterns is printed The cartridges are cleaned Recycle or discard the pageIf copy or print quality still seem poor after you clean the print cartridges replace the print cartridge that is affected
restore factory defaultsYou can restore the original factory settings to what they were when you purchased your HP Officejet Choosing to restore your factory defaults restores all settings except date information and any scan settings you may have set
You can perform this process from the front panel only
1 Press Setup
2 Press 5 then press 3This selects Maintenance and then selects Restore Factory DefaultsThe factory default settings are restored
hp officejet 4100 series
chapter 7
36
set scroll speedThe Scroll Speed option lets you control the rate that text messages appear in the front-panel display You can choose Normal Fast or Slow The default is Normal
1 Press Setup
2 Press 5 then press 6This selects Maintenance and then selects Set Scroll Speed
3 Press until the desired speed appears then press Enter
set the prompt delay timeThe Prompt Delay option lets you control the amount of time before a message is displayed in the front-panel display You can choose Normal Fast or Slow The default is Normal
1 Press Setup
2 Press 5 then press 7This selects Maintenance and then selects Set Prompt Delay Time
3 Press until the delay time appears then press Enter
self-maintenance sounds During the life of your product you may hear various mechanical sounds This is a normal part of your unitrsquos self-maintenance
reference guide
maintain your hp officejet
37
setup menu optionsThe following options are available from the Setup button
1Last Transaction
2Fax Log
3Speed Dial List
4Self-Test Report
5Automatic Reports Setup
1Print Report
Use Setup to display the Print Report Speed Dial Setup Basic Fax Setup Advanced Fax Setup and Maintenance options
Press and to move to the setting you wantPress Enter to select the displayed setting
1Clean Print Cartridges
2Align Print Cartridges
3Restore Factory Defaults
4Reprint Faxes in Memory
5Set Language amp CountryRegion
6Set Scroll Speed
7Set Prompt Delay Time
5Maintenance2Speed Dial Setup
3Basic Fax Setup
4Advanced Fax Setup
1Individual Speed Dial
2Delete Speed Dial
3Print Speed Dial List
1Date and Time
2Fax Header
3Rings to Answer
4 Paper Size
5Tone or Pulse Dialing
6Ring and Beep Volume
7Fax Forwarding Black Only
1Automatic Reports Setup
2Answer Ring Pattern
3Busy Redial
4No Answer Redail
5Automatic Reduction
6Backup Fax Reception
7Error Correction Mode
hp officejet 4100 series
chapter 7
38
8
39
additional setup information
During the installation of the HP Officejet software a number of windows are displayed You should see the following
bull Installingbull Copying files bull A request to plug in the HP Officejetbull Green OK and check markbull Request to restart your computer (may not occur in all cases)bull Registration
If you did not see all of these windows there may be a problem with the installation Verify the following
bull The HP Director contains six icons (double-click the HP Director icon on the desktop)
bull The HP Officejet is listed in the Printers dialog boxbull There is an icon for the HP Officejet in the System Tray that indicates the
HP Officejet is ready
If the HP Director does not show six icons you may need to wait a few minutes for the HP Officejet to connect to your computer
possible installation problemsIf nothing appears on your computer screen after you insert the HP Officejet 4100 Series CD-ROM into your computerrsquos CD-ROM drive
1 From the Start menu choose Run
2 In the Run dialog box enter dsetupexe (if your CD-ROM drive is not assigned to drive letter d use the appropriate drive letter) then click OK
If the HP Director does not contain six icons do the following
bull Verify that the front-panel cover is attached then unplug the HP Officejet and plug it in again
bull Verify that the USB and power cables are plugged inndash Unplug the USB cable and plug it in againndash Do not attach the USB cable to a keyboard or nonpowered hubndash Verify that the USB cable is 3 meters or less in lengthndash If you have several USB devices attached to your computer you may
want to unplug the others during the installation
Note AppleTalk is not supported
bull Unplug the HP Officejet from the wall and plug it in againbull Restart your computer
hp officejet 4100 series
chapter 8
40
On Windows check the System Tray for applications that are running in the background and close them before restarting your computer
remove and reinstall your hp officejet softwareIf six icons do not appear in the Director you may need to uninstall and re-install the software Do not simply delete the HP Officejet program files from your hard drive Be sure to remove them properly using the uninstall utility provided in the HP Officejet program group
to uninstall from a Windows computer
1 Disconnect your HP Officejet from your computer
2 On the Windows taskbar click Start choose Programs or All Programs (XP) choose Hewlett-Packard choose hp officejet 4100 series then choose uninstall software
3 Follow the directions on the screenBe sure to disconnect your HP Officejet
4 If you are asked whether you would like to remove shared files click NoOther programs that use these files may not work properly if the files are deleted
5 After the program finishes removing the software disconnect your HP Officejet and restart your computer
Note It is important that you disconnect your HP Officejet before restarting your computer
6 To reinstall the software insert the HP Officejet 4100 Series CD-ROM into your computerrsquos CD-ROM drive and follow the instructions that appear
7 After the software is installed connect and turn on your HP Officejet following the onscreen instructions and the instructions in your Setup PosterAfter connecting and turning on your HP Officejet you may have to wait several minutes for all of the Plug and Play events to completeWhen the software installation is complete you will see a Status Monitor icon in the System Tray
8 To verify that the software is properly installed double-click on the HP Director icon on the desktop If the HP Director shows six icons the software has been properly installed
to uninstall from a Macintosh computer
1 Disconnect your HP Officejet from your computer
2 Double-click on ApplicationsHP All-in-One Software folder
reference guide
additional setup information
41
3 Double-click on HP Uninstaller
4 Follow the directions that appear on the screen
5 After the program finishes removing the software disconnect your HP Officejet and restart your computer
6 To reinstall the software insert the HP Officejet 4100 Series CD-ROM into your computerrsquos CD-ROM drive
Note When re-installing the software follow the instructions on the Setup Poster Do not connect the HP Officejet to your computer until after you have completed the software installation
7 On the desktop open the CD-ROM double-click on hp all-in-one installer and follow the instructions that appear
connect your hp officejet to a phone modem or answering machine
The HP Officejet can share a phone line with a phone a modem or an aswering machine When sharing a phone line with an answering machine the HP Officejet will answer fax calls and direct voice calls to the answering machine
Note For information on connecting your HP Officejet to your computer and phone line refer to the Setup Poster that came with your unit
to connect your hp officejet to a phone modem or answering machine
1 Remove the white plastic stopper from connector 2 on the back of the HP Officejet
To connect more than one device to connector 2 on the HP Officejet you must purchase a Y-splitter and plug it into connector 2
2 Connect the phone cord from the phone modem or answering machine to connector 2 (or Y-splitter)
Caution Do not use the phone cord that came with the HP Officejet for this purpose That phone cord must connect connector 1 on the HP Officejet to the wall jack for your phone system See the Setup Poster for details
3 If you are connecting an answering machine see set the number of rings before answering on page 21 for instructions on setting the number of rings correctly or change the answer ring pattern (distinctive ringing) on page 26 for information on incoming ring patterns
4 If you are connecting a modem turn off its fax-receive feature
connector 2 on the HP Officejet
connector 1 on the HP Officejet
hp officejet 4100 series
chapter 8
42
additional troubleshooting helpYou may want to refer to the readme file for more information on possible installation problems On Windows you can access the readme file from the Start button on the taskbar select Programs Hewlett-Packard hp officejet 4100 series View the Readme File On Macintosh you can access the readme file by double-clicking on the icon located in the top-level folder of the HP Officejet software CD-ROM
The readme file provides more information including
bull Using the Re-install utility after a failed installation to return your PC to a state that will allow the HP Officejet to be re-installed
bull Using the Re-install utility on Windows 98 to recover from a Composite USB System Driver missing errorThis error may occur if the hardware is installed prior to installing the software After running the Re-install utility reboot your PC and install the HP Officejet software before connecting the HP Officejet to your computer
You can also find more information on this website
wwwhpcomsupport
9
43
technical information
Additional specifications information can be found in the HP Photo amp Imaging Help in the hp officejet 4100 series section
physical specifications
power specificationsbull Power consumption 75W maximumbull Source (Input Voltage) 100 to 240 VAC groundedbull Input Frequency 50 to 60 Hzbull Current 1A maximum
regulatory informationAdditional regulatory information can be found in the HP Photo amp Imaging Help The information in this section supercedes information in the HP Photo amp Imaging Help
doc statement deacuteclaration de conformiteacute (Canada)Le preacutesent appareil numeacuterique neacutemet pas de bruit radioeacutelectrique deacutepassant les limites applicables aux appareils numeacuteriques de la classe B prescrites dans le Regraveglement sur le brouillage radioeacutelectrique eacutedicteacute par le ministegravere des Communications du CanadaThis digital apparatus does not exceed the Class B limits for radio noise emissions from digital apparatus set out in the Radio Interference Regulations of the Canadian Department of Communications
notice to users of the Canadian telephone networkThis equipment meets the applicable Industry Canada Terminal Equipment Technical Specifications This is confirmed by the registration number The abbreviation IC before the registration number signifies that registration was performed based on a Declaration of Conformity indicating that Industry Canada technical specifications were met It does not imply that Industry Canada approved the equipment
Note The Ringer Equivalence Number (REN) assigned to each terminal device provides an indication of the maximum number of terminals allowed to be connected to a telephone interface The termination on an interface may consist of any combination of devices subject only to the requirement that the sum of the Ringer Equivalence Numbers of all the devices does not exceed 5
The REN for this product is 03B based on FCC Part 68 test results
height width depth weight (without print cartridges)
with paper trays and ADF closed
718 in (1824 cm) 1676 in (4258 cm) 825 in (2096 cm) 75 lbs (34 kg)
with ADF and paper tray extended
1030 in (2615 cm) 1676 in (4258 cm) 1854 in (4709 cm) 75 lbs (34 kg)
hp officejet 4100 series
chapter 9
44
notice to all users of the European Economic Area (EEA)
This product is designed to interwork with the analogue telephone networks in the following countriesregions
Network compatibility depends on customer selected settings which must be reset to use the equipment on a telephone network in a countryregion other than where the product was purchased Contact the vendor or Hewlett-Packard Company if addition product support is necessaryThis equipment has been certified by the manufacturer in accordance with Directive 19995EC (annex II) for Pan-European single-terminal connection to the public switched telephone network (PSTN) However due to differences between the individual PSTNs provided in different countriesregions the approval does not of itself give an unconditional assurance of successful operation on every PSTN network termination pointIn the event of problems you should contact your equipment supplier in the first instance
geraumluschemissionLpA lt 70 dBam Arbeitsplatzim Normalbetriebnach DIN 45635 T 19
notice to Korean customers
Germany UK Netherlands
France Spain Italy
Belgium Luxembourg Sweden
Austria Denmark Ireland
Norway Finland Switzerland
Greece Portugal
10
45
hp support
This section explains the support services information provided by Hewlett-Packard If you are unable to find the answer you need in the printed or onscreen documentation supplied with your product you can contact one of the HP support services listed in the following pages Some support services are available only in the US and Canada while others are available in many countriesregions worldwide If a support service number is not listed for your countryregion contact your nearest authorized HP dealer for help
get support and other information from the internetIf you have Internet access you can get help from the following HP website
wwwhpcomsupportThe Web site offers technical support drivers supplies and ordering information
hp customer supportSoftware programs from other companies may be included with your HP Officejet If you experience problems with any of those programs you will receive the best technical assistance by calling the experts at that companyIf you need to contact HP Customer Support do the following before you call
1 Make sure thata Your unit is plugged in and turned onb The specified print cartridges are installed correctlyc The recommended paper is properly loaded in the input tray
2 Reset your unita Turn off the unit using the On button located on the unitrsquos front panelb Unplug the power cord from the back of the unitc Plug the power cord back into the unitd Turn on the unit using the On button
3 For more information check the HP website at wwwhpcomsupport
4 If you are still experiencing problems and need to speak with an HP Customer Support Representativendash Have your service ID and serial number ready To display your service ID and
serial number on the front panel do the following Press Enter and Start Color at the same time until the service ID appears in the front-panel display From this display press the right arrow until the serial number displays
ndash Print a Self-Test Report See print a self-test report on page 32 for information on printing this report
ndash Make a color copyndash Be prepared to describe your problem in detail
5 Call HP Customer Support Be near your unit when you call
call in the US during warrantyCall (208) 323-2551 This service is free during the warranty period however your standard long-distance phone charges still apply A fee may apply outside the warranty period
hp officejet 4100 series
chapter 10
46
US phone support is available in both English and Spanish languages 24 hours a day 7 days a week (days and hours of support may change without notice)
call elsewhere in the worldThe numbers listed below are current as of the printing date of this guide For a list of current international HP Support Service numbers visit this address and choose your own countryregion or language
wwwhpcomsupportFor Korea you can also visit this address
httpwwwhpcokrYou can call the HP support center in the following countriesregions If your countryregion is not listed contact your local dealer or nearest HP Sales and Support Office to find out how to obtain servicesSupport service is free during the warranty period however your standard long-distance phone charges will apply In some cases a flat fee per single incident will also applyFor phone support in Europe please check for the details and conditions of phone support in your countryregion by consulting the following Web site
wwwhpcomsupportAlternatively you can ask your dealer or call HP at the phone number indicated in this booklet As part of our constant efforts to improve our phone support service we advise you to check our website on a regular basis for new information regarding service features and delivery
countryregion hp technical support countryregion hp technical support
Algeria1 +213 (0) 61564 543 Malaysia 1-800-805405
Argentina 0810-555-5520 Mexico 01-800-472-6684
Australia +61 3 8877 80001902 910 910
Mexico (Mexico City) 5258-9922
Austria +43 (0) 810 00 6080 Morocco1 +212 22404 747
Bahrain (Dubai) 800 728 Netherlands +31 (0) 20 606 8751
Belgium (Dutch) +32 (0) 2 626 8806 New Zealand 0800 441 147
Belgium (French) +32 (0) 2 626 8807 Norway +47 22 11 6299
Brazil (Grande Sao Paulo) (11) 3747 7799 Oman +971 4 883 8454
Brazil (Demais Localidades) 0800 157751 Palestine +971 4 883 8454
Canada during warranty (905) 206 4663 Panama 001-800-7112884
Canada post-warranty(per-call charge)
1-877-621-4722 Peru 0-800-10111
Caribbean amp Central America
1-800-711-2884 Philippines 632-867-3551
Chile 800-360-999 Poland +48 22 865 98 00
China 86 10 6868 7980 Portugal +351 21 3176333
Colombia 9-800-114-726 Puerto Rico 1-877-2320-589
Costa Rica 0-800-011-0524 Qatar +971 4 883 8454
Czech Republic +420 (0) 261307310 Romania +40 1 315 44 42or local 01 3154442
reference guide
hp support
47
call in Australia post-warrantyIf your product is not under warranty you can call 03 8877 8000 A per-incident out-of-warranty support fee of $2750 (inc GST) will be charged to your credit card You can also call 1902 910 910 ($2750 charged to your phone account) from 900 AM to 500 PM Monday through Friday (Charges and support hours are subject to change without notice)
prepare your unit for shipmentIf after contacting HP Customer Support or returning to the point of purchase you are requested to send your unit in for service please follow the power off and rebox steps below to avoid further damage to the HP product
Denmark +45 39 29 4099 Russian Federation Moscow +7 095 797 3520
Ecuador 1800-711-2884 Russian Federation St Petersburg
+7 812 346 7997
Europe (English) +44 (0) 207 512 5202 Saudi Arabia +800 897 14440
Egypt 02 532 5222 Singapore 65 6272 5300
Finland +358 (0) 203 47 288 Slovakia +421 (0) 2 682 08080
France (034 Euromin) +0892 69 60 22 South Africa (inside RSA) 086 000 1030
Germany (012 Euromin) +49 (0) 180 52 58 143 South Africa (inside RSA) +27-11 258 9301
Greece +30 1060 73 603 Spain +34 902 321 123
Hong Kong (SAR) +85 (2) 3002 8555 Sweden +46 (0)8 619 2170
Guatemala 1800-995-5105 Switzerland 2 +41 (0) 84 880 1111
Hungary +36 (0) 1 382 1111 Taiwan +886-2-2717-00550800 010 055
India 1-600-11226791 11 682 6035
Thailand +66 (2) 661 4000
Indonesia 62-21-350-3408 Tunisia1 +216 1891 222
Ireland +353 (0) 1 662 5525 Turkey +90 216 579 7171
Israel +972 (0) 9 8304848 Ukraine +7 (380-44) 490-3520
Italy +39 (0) 226410350 United Arab Emirates +971 4 883 8454
Japan 0570 000 511+81 3 3335 9800
United Kingdom +44 (0) 207 512 52 02
Jordan +971 4 883 8454 Venezuela 0800-47468368 or800-477-7777
Korea (Seoul) +82 (2) 3270 0700 Venezuela (Caracas) (502) 207-8488
Korea (outside Seoul) 080 999 0700 Vietnam 84 (0) 8 823 4530
Kuwait +971 4 883 8454 Yemen +971 4 883 8454
Lebanon +971 4 883 8454
1 This Call Center supports French speaking customers from the following countriesregions Morocco Tunisia and Algeria
2 This Call Center supports German French and Italian speaking customers in Switzerland
countryregion hp technical support countryregion hp technical support
hp officejet 4100 series
chapter 10
48
Note When transporting your HP Officejet make sure that the pens have been removed the HP Officejet has been properly shut down by pressing the power button and you have allowed time for the carriage to return to the service station and for the scanner to return to its parked position
1 Turn on the unitDisregard steps 1 through 6 if your unit will not turn on and the print carriage is in the home position You will not be able to remove the print cartridges Proceed to step 7
2 Open the print cartridge access doorThe print carriage moves into view
3 See replace the print cartridges on page 33 for information on removing the print cartridges
Caution Remove both print cartridges Failure to do so may damage your unit
4 Place the print cartridges in an airtight bag so they will not dry out and put them aside (do not send them with the unit unless instructed to by the HP customer support call agent)
5 Turn off the unit
6 Close the print cartridge access door
7 Remove the front panel cover as followsa Grasp the front of the front panel cover with two hands as shownb Firmly lift the front panel cover to unsnap it from the unit
8 Retain the front panel cover Do not return the front panel cover with the unit
9 If available pack the unit for shipment using the original packing materials or the packaging materials that come with your exchange unit
If you do not have the original packaging materials please use other adequate packaging materials Shipping damage caused by improper packaging andor improper transportation is not covered under the warranty
reference guide
hp support
49
10 Place the return shipping label on the outside of the box
11 Include the following items in the boxndash A complete description of symptoms for service personnel (samples of print
quality problems are helpful)ndash A copy of the sales slip or other proof of purchase to establish the warranty
coverage periodndash Your name address and a phone number where you can be reached during
the day
hp distribution centerTo order HP Officejet software a copy of the printed Reference Guide a setup poster or other customer-replaceable parts do one of the following bull In the US or Canada call (208) 323 2551bull Visit this website
httpwwwhpcomcposupportsoftwarehtml
hp officejet 4100 series
chapter 10
50
11
51
warranty information
HP Officejet 4100 seriesDuration of Limited Warranty (hardware and labor) 1 YearDuration of Limited Warranty (CD media) 90 DaysDuration of Limited Warranty (print cartridges) Until the HP ink is depleted or the ldquoend of warrantyrdquo date printed on the cartridge has been reached whichever occurs first
warranty service
express serviceTo obtain HP express repair service the customer must contact an HP service office or an HP Customer Support Center for basic troubleshooting first See hp customer support on page 45 for steps to take before calling Customer SupportIf a customer unit needs a minor part replacement and these parts can normally be replaced by the customer the customer-replaceable components may be serviced through expedited part shipment In this event HP will prepay shipping charges duty and taxes provide telephone assistance on replacement of the component and pay shipping charges duty and taxes for any part that HP asks to be returnedThe HP Customer Support Center may direct customers to designated authorized service providers who are certified by HP to service the HP product
warranty upgradesUpgrade your standard factory warranty to a total of three years with the HP SUPPORTPACK Service coverage begins on product purchase date and the pack must be purchased within the first 180 days of product purchase This program offers phone support from 600 AM to 1000 PM Mountain Standard Time (MST) Monday through Friday and 900 AM to 400 PM (MST) on Saturdays If during your technical support call it is determined that you need a replacement product then HP will ship you this product next business day free of charge Available in US onlyFor more information please call 1-888-999-4747 or visit the following HP Web site
httpwwwhpcomgohpsupportpack
Outside the US please call your local HP Customer Support office See call elsewhere in the world on page 46 for a list of international Customer Support numbers
returning your hp officejet for serviceBefore returning your HP Officejet for service you must call HP Customer Support See hp customer support on page 45 for steps to take before calling Customer Support
hewlett-packard limited global warranty statement
extent of limited warrantyHewlett-Packard (ldquoHPrdquo) warrants to the end-user customer (ldquoCustomerrdquo) that each HP Officejet 4100 Series product (ldquoProductrdquo) including related software accessories media and supplies shall be free from defects in material and workmanship for the duration which begins on the date of purchase by the Customer
hp officejet 4100 series
chapter 11
52
For each software Product HPrsquos limited warranty applies only to a failure to execute programming instructions HP does not warrant that the operation of any Product shall be uninterrupted or error freeHPrsquos limited warranty covers only those defects which arise as a result of normal use of a Product and does not cover any other problems including those which arise as a result of (a) improper maintenance or modification (b) software accessories media or supplies not provided or supported by HP or (c) operation outside the Productrsquos specificationsFor any hardware Product the use of a non-HP print cartridge or a refilled print cartridge does not affect either the warranty to the Customer or any HP support contract with the Customer However if Product failure or damage is attributable to the use of a non-HP or refilled print cartridge HP shall charge its standard labor and materials charges to service the Product for the failure or damageIf HP receives during the applicable warranty period notice of a defect in any Product HP shall either repair or replace the defective Product at HPrsquos option Where labor charges are not covered by HPrsquos limited warranty repairs shall be at HPrsquos standard charges for laborIf HP is unable to repair or replace as applicable a defective Product which is covered by HPrsquos warranty HP shall within a reasonable time after being notified of the defect refund the purchase price for the ProductHP shall have no obligation to repair replace or refund until the Customer returns the defective Product to HPAny replacement product may be either new or like-new provided that it has functionality at least equal to that of the Product being replacedHP products including each Product may contain remanufactured parts components or materials equivalent to new in performanceHPs limited warranty for each Product is valid in any countryregion or locality where HP has a support presence for the Product and where HP has marketed the Product The level of warranty service may vary according to local standards HP shall have no obligation to alter the form fit or function of the Product in order to make it operate in a countryregion or locality for which the Product was never intended to operate
limitations of warrantyTO THE EXTENT ALLOWED BY LOCAL LAW NEITHER HP NOR ITS THIRD PARTY SUPPLIERS MAKE ANY OTHER WARRANTY OR CONDITION OF ANY KIND WHETHER EXPRESS OR IMPLIED WITH RESPECT TO THE COVERED HP PRODUCTS AND SPECIFICALLY DISCLAIM THE IMPLIED WARRANTIES OR CONDITIONS OF MERCHANTABILITY SATISFACTORY QUALITY AND FITNESS FOR A PARTICULAR PURPOSE
limitations of liabilityTo the extent allowed by local law the remedies provided in this Limited Warranty Statement are the Customerrsquos sole and exclusive remediesTO THE EXTENT ALLOWED BY LOCAL LAW EXCEPT FOR THE OBLIGATIONS SPECIFICALLY SET FORTH IN THIS LIMITED WARRANTY STATEMENT IN NO EVENT SHALL HP OR ITS THIRD PARTY SUPPLIERS BE LIABLE FOR DIRECT INDIRECT SPECIAL INCIDENTAL OR CONSEQUENTIAL DAMAGES WHETHER BASED ON CONTRACT TORT OR ANY OTHER LEGAL THEORY AND WHETHER ADVISED OF THE POSSIBILITY OF SUCH DAMAGES
local lawThis Limited Warranty Statement gives the Customer specific legal rights The Customer may also have other rights which vary from state to state in the United States from province to province in Canada and from countryregion to countryregion elsewhere in the world
reference guide
warranty information
53
To the extent this Limited Warranty Statement is inconsistent with local law this Statement shall be deemed modified to be consistent with such local law Under such local law certain disclaimers and limitations of this Statement may not apply to the Customer For example some states in the United States as well as some governments outside the United States (including provinces in Canada) mayPreclude the disclaimers and limitations in this Statement from limiting the statutory rights of a consumer (eg the United Kingdom)Otherwise restrict the ability of a manufacturer to enforce such disclaimers or limitations orGrant the Customer additional warranty rights specify the duration of implied warranties which the manufacturer cannot disclaim or not allow limitations on the duration of implied warrantiesFOR CONSUMER TRANSACTIONS IN AUSTRALIA AND NEW ZEALAND THE TERMS IN THIS LIMITED WARRANTY STATEMENT EXCEPT TO THE EXTENT LAWFULLY PERMITTED DO NOT EXCLUDE RESTRICT OR MODIFY AND ARE IN ADDITION TO THE MANDATORY STATUTORY RIGHTS APPLICABLE TO THE SALE OF THE COVERED HP PRODUCTS TO SUCH CUSTOMERS
hp officejet 4100 series
chapter 11
54
55
index
Numerics4-by-6 inch photo paper
load 10 12
AADF 7adjust
volume for fax 25align print cartridges 35Answer Ring Pattern 26automatic document feeder 7automatic reduction
fax 25
Bbest copy quality 13busy number
redial automatically 23
Ccancel
scan 18scheduled fax 21
cartridgesalign 35replace 33
cleanprint cartridges 35the exterior 32the glass 31white strip 32
colorenhance 14fax 20fax from front panel 20
contrastchange for fax 23photo color 14
copy 13 16change default settings 15enhance 14fit to page 16lighten or darken 14menu options 16number of copies 14photo 15quality 13reduce or enlarge 14settings 13 15
speed 13tutorial 4
Customer Support 45web site 45
Ddarken a copy 14date
setting 27default settings
restore 35director review 4distinctive ringing 26
Eenhance copies 14enlarge copy 14 16envelopes
load 9Error Correction Mode
(ECM) 25
Ffactory defaults
restore 35fast copy quality 13fax 28
adjust volume 25automated reports 22cancel fax forward 24cancel scheduled 21change Answer Ring
Pattern 26change contrast 23change resolution 22change settings 19control appearance 22create individual speed-dial
settings 26delete speed-dial
settings 27distinctive ringing 26Error Correction Mode
(ECM) 25forward faxes 24header 27in color 20in color from front panel 20manual reports 22
menu 29print reports 22receive 21receive manually 21redial busy or unanswered
number 23schedule 20send from front panel 19set automatic reduction 25set date and time 27set the number of rings 21settings 27 28setup menu options 29speed dials 19test 28
fit to page 16forward faxes 24
cancel 24front panel
display scroll speed 36enter text 28send a fax 19setting prompt delay 36tutorial 3
Gglass
cleaning 31greeting cards
load 11
Hhelp 1HP Customer Support 45
calling 45HP Director 4HP distribution center 49HP Officjet
preparing to ship 47HP papers
tips on loading 11
Iindividual speed-dial settings
create 26ink cartridges see print
cartridgesinkjet paper
load 11
index
hp officejet 4100 series56
Kkeypad
enter text 28
Llabels
load 12lighten copies 14load
change the paper type 12envelopes 9original in ADF 7paper 7photo paper 10 12postcards 10 12print cartridges 33set the paper size 12tips 11
Mmaintenance
align print cartridges 35clean print cartridges 35clean the exterior 32clean the glass 31clean the white strip 32normal sounds 36replace print cartridges 33restore factory defaults 35self-maintenance
sounds 36self-test report 32
menuscopy options 16fax 29fax setup 29maintenance 37print reports 37
Nnormal copy quality 13number of copies
set 14number of rings
set 21
Oorder print cartridges 60originals
load in ADF 7output tray 8
Ppaper
change default size for copy 12
change the type 12load 7recommended 7set the size 12tips on loading 11
paper size change for copy 12
paper trayload 7
phone numbers support services 45
photo paperload 10 12
photoscopy 15enhance copy 14
physical specifications 43postcards
load 10 12power
specifications 43print
envelopes 9fax reports 22self-test report 32
print cartridgesalign 35clean 35handling 32replace 33
prompt delaysetting 36
Qquick start
review the director 4use with a computer 4
Rreceive
fax 21redial
busy or unanswered number 23
reduce copy 14 16regulatory information 43reinstall software 40reports
generate automatically for fax 22
generate manually for fax 22
print 22self-test 32
resolution
change for fax 22restore factory settings 35returning your HP Officejet for
service 51
Sscan
from front panel 17stop 18
schedule a fax 20scroll speed
setting 36self-test report 32send
cancel forward faxes 24color fax 20color fax from front
panel 20forward faxes 24
settingscopy 13 15fax 27 28prompt delay 36scroll speed 36
setupadditional information 39menu 29
shippingyour HP Officejet 47
softwareremove and reinstall 40
soundsself-maintenance 36
specificationsphysical 43power 43
speed dials 19create individual
settings 26delete settings 27
stopscan 18scheduled fax 21
subscriber identification code 27
support services 45
Ttelephone line
multiple numbers 26telephone numbers 45text
enhance 14enter from front panel 28
time
index
reference guide 57
setting 27transparency film
recommended 7tips on loading 11
troubleshootingremove and reinstall
software 40T-shirt Transfer Iron-On
load 11tutorial
front panel 3make a copy 4
Uunanswered number
redial automatically 23
Vvolume
adjust 25
Wwarranty 45
service 51statement 51upgrades 51
white stripcleaning 32
hp officejet 4100 series
chapter 12
58
declaration of conformityAccording to ISOIEC Guide 22 and EN 45014
Manufacturerrsquos Name and Address
Hewlett-Packard Company 16399 West Bernardo Drive San Diego CA 92127-1899 USA
declares that the product
Product Name hp officejet 4100 series (Q1608A)
Model Number(s) officejet 4110 (Q1609A) officejet 4110xi (Q1610A) officejet 4110v (Q1611A) officejet 4105 (Q1612A) officejet 4105z (Q1613A) officejet 4115 (Q1614A)
Product Options All
conforms to the following Product Specifications
Safety EN609501992 +A1 A2 A3 A4 amp A11
IEC609501991 +A1 A2 A3 amp A4
UL1950CSA 222 No 950 3rd Edn 1995
NOM-019-SCFI-1993
EMC CISPR221993 +A1 amp A2 EN550221994 +A1 amp A2 -Class B
CISPR241997EN550241998
IEC 61000-3-21995 EN61000-3-21995
IEC 61000-3-31994 EN61000-3-31995
ASNZS 3548 1992
CNS13438 1997
FCC Part 15-Class B ICES-003 Issue 2 VCCI-2
GB 9254-1998
Telecom TBR21 1998
Supplementary Information
The Product herewith complies with the requirements of the Low Voltage Directive 7323EEC the EMC Directive 89336EEC and the RampTTE Directive 19995EC (ANNEX II) carries the CE marking accordingly
European Contact for regulatory topics only Your local Hewlett-Packard Sales and Service Office orHewlett-Packard GmbH
Department HQ-TRE Herrenberger Strasse 140 D-71034 Boumlblingen Germany (FAX + 49-7031-14-3143)
order mediaTo order media such as HP Premium Inkjet Paper HP Premium Inkjet Transparency Film HP Iron-On T-shirt Transfer paper or HP Greeting Cards go to
wwwhpshoppingcom
For orders in countries other than the US and Canada select other countries then click Yes to leave hpshoppingcom From this website you can access hpshoppingcom for your specific language or countryregion
order print cartridges
If you have Internet access you can get more information from the HP website at
wwwhpcomsupport
print cartridges hp reorder number
HP black print cartridge 56 19 ml black print cartridge
HP color print cartridgeHP tri-color print cartridge
57 17 ml color print cartridge28 8 ml color print cartridge
Visit the hp officejet information centerIt has everything you need to get the most value from your HP Officejet
bull Technical Supportbull Supplies and Ordering Informationbull Project Tipsbull Ways to Enhance Your Product
wwwhpcomsupport
copy 2003 Hewlett-Packard Company
Printed in the USA Mexico Germany Singapore or China
Q1608-90163Q1608-90163
Q1608-90163

hp officejet 4100 series
chapter 2
4
use your hp officejet with a computerIf you installed the HP Officejet software on your computer according to the Setup Poster you can access all the features of the HP Officejet using the HP Director
review the hp photo amp imaging directorThe HP Director is available through the desktop shortcut
for windows users
1 Do one of the followingndash Double-click the hp director icon on the desktopndash In the Windows taskbar click Start point to Programs or All Programs
(XP) point to Hewlett-Packard point to hp officejet 4100 series then choose hp photo amp imaging director
2 In the Select Device box click to see a list of installed HP devices
3 Select hp officejet 4100 seriesThe Director displays only the buttons that are appropriate for the selected device
the hp photo amp imaging director
10 Speed Dial access programmed speed dial entries
11 Setup access the menu system for reports fax settings and maintenance
12 Fax select the fax function
13 Scan select the scan function
14 Copy select the copy function
15 Photo Fit to Page enlarge a photo to fit a full-size sheet of paper
button purpose
1 2 3
4 5 6 7 8 9 10
reference guide
quick start
5
for macintosh users
Do one for the followingndash For OS 9 double-click the HP Photo and Imaging Director icon on the
desktopndash For OS X double-click the HP Photo and Imaging Director icon on the
dock
The following figure shows some of the features available through the HP Photo and Imaging Director for Macintosh Consult the legend for a brief explanation of a specific feature
feature purpose
1 Select Device Use this feature to select the product you want to use from the list of installed HP products
2 Settings Use this feature to view or change various settings for your HP device such as print scan or copy
3 Status Displays the status window for all-in-one devices only
4 Send a Fax Use this feature to send a fax and access fax settings
5 Scan Picture Scans an image and displays it in the HP Photo amp Imaging Gallery
6 Scan Document Scans text and displays it in the selected destination text editing software program
7 Make Copies Displays the Copy dialog box where you can select the copy quality the number of copies the color the size and can start a copy
8 View amp Print Displays the HP Photo amp Imaging Gallery where you can view and edit images use HP Photo Prints make and print a photo album e-mail an image unload an image to the Web or copy an image to another application
9 Help Provides access to HP Photo amp Imaging Help which provides software help a product tour and troubleshooting information
10 Click this arrow to access tool tips which explain each of the Director options
hp officejet 4100 series
chapter 2
6
the hp photo and imaging director for macintosh OS X
feature purpose
1 Select Device Use this feature to select the product you want to use from the list of installed HP products
2 Settings Use this feature to view or change various settings for your HP device such as print scan or copy
3 Scan Picture Scans an image and displays it in the HP Photo and Imaging Gallery
4 Scan Document Scans text and displays it in a text editing software program
5 Make Copies Displays the Copy dialog box where you can select the copy quality the number of copies the color the size and can start a copy
6 Send Fax Use this feature to send a fax
7 Maintain Printer Accesses the HP Inkjet Utility where you can clean and align the print cartridges check print cartridge ink levels print a test or sample page register your printer or access information on product support
8 View and Print Displays the HP Photo and Imaging Gallery where you can view and edit images
1 2
3 4 5 6 7 8
3
7
load originals and load paper
You can make copies from originals loaded on the automatic document feeder (ADF) You can also print and copy onto a variety of paper types weights sizes and transparency films It is important however that you choose the right paper and make sure that it is loaded correctly and not damaged
load originalsYou can copy or scan any original by placing it in the automatic document feeder
1 Load your original in the automatic document feeder
Note Do not feed photos smaller than 35-by-5 inches through the automatic document feeder
2 Slide the right and left paper guides in until they stop at the edges of the paper
load paperFollowing is the basic procedure for loading paper There are specific considerations for loading certain types of paper transparency film postcards and envelopes After you review this procedure see tips for loading other types of paper in the paper tray on page 11 load 4 x 6 inch photo paper on page 10 load envelopes on page 9 and load postcards on page 10
For best results adjust the paper settings each time you change paper types or paper sizes For more information see set the paper type on page 12
to load the paper tray
1 Lower the paper tray and extend the paper-tray extender
2 Slide the paper-width guide on the left to its outermost position
automatic document feeder (ADF)
hp officejet 4100 series
chapter 3
8
3 Tap the stack on a flat surface to align the edges of the paper and then check the paper for the followingndash Make sure it is free of rips dust wrinkles and curled or bent edgesndash Make sure all the paper in the stack is the same size and type unless
you are working with photo paper
4 Insert paper into the paper tray print-side down until it stops To avoid bending the paper make sure you do not push the paper in too far or push too hard If you are using letterhead insert the top of the page firstBe careful not to use too much or too little paper Check that the stack of paper contains several sheets but is no higher than the top of the paper-width guide
5 Slide the paper-width guide in until it stops at the edge of the paper Make sure that the paper stack lies flat in the paper tray and fits under the tab of the paper-width guide
6 Extend the output-tray
reference guide
load originals and load paper
9
load envelopesUse the print feature of your software to print to envelopes with your HP Officejet Do not use shiny or embossed envelopes or envelopes that have clasps or windows You can load the paper tray with one or multiple envelopes
1 Remove all paper from the paper tray
2 Slide an envelope into the tray with the envelope flap up and to the left (print-side down) until it stops
3 Adjust the paper-width guide against the envelope until it stopsBe careful not to bend the envelope If you are loading multiple envelopes make sure the envelopes fit within the tray (do not overload it)Consult the help files in your word processing software for details on how to format text for printing on envelopes
hp officejet 4100 series
chapter 3
10
load 4 x 6 inch photo paperFollowing is the procedure for loading 4-by-6 inch photo paper into your HP Officejet
1 Remove all paper from the paper tray and then slide a stack of photo paper into the tray until it stopsMake sure the print-side faces downIf the photo paper you are using has perforated tabs load the photo paper so that the tabs are closest to you
2 Adjust the paper-width guide against the stack of photo paper until it stopsMake sure the photo paper fits within the tray (do not overload it)
Note Make sure you set the paper type and paper size before printing See set the paper type on page 12 and set the paper size on page 12
load postcardsFollowing is the procedure for loading postcards
1 Remove all paper from the paper tray and then slide a stack of cards into the tray until they stopMake sure the print-side faces down
reference guide
load originals and load paper
11
2 Adjust the paper-width guide against the cards until it stops Make sure the cards fit within the tray (do not overload it)
tips for loading other types of paper in the paper trayThe following table provides guidelines for loading certain types of paper and transparency film For best results adjust the paper settings each time you change paper types and paper sizes For more information see set the paper type on page 12
Note HP Photo Paper and HP Photo Paper Glossy 4-by-6 are not recommended for printing with your HP Officejet To print photos use HP Everyday Photo Paper For your best photo printing needs use HP Premium Plus Photo Paper
paper tips
HP papers bull HP Premium Inkjet Paper Locate the gray arrow on the nonprinting side of the paper and then insert paper with the arrow side facing up
bull HP Premium or Premium Plus Photo Paper Load the glossy (print) side down (To prevent curling keep photo paper sealed in the original package until you are ready to use it) Always load at least five sheets of regular paper in the paper tray first and then place the photo paper on top of the regular paper
bull HP Premium Inkjet Transparency Film Insert the film so that the white transparency strip (with arrows and the HP logo) is on top and is going into the tray first
bull HP Inkjet T-shirt Transfer Iron-On Flatten the transfer sheet completely before using it do not load curled sheets (To prevent curling keep transfer sheets sealed in the original package until you are ready to use them) Manually feed one sheet at a time with the unprinted side facing down (the blue stripe faces up)
bull HP Matte Greeting Cards HP Glossy Greeting Cards or HP Felt-Textured Greeting Cards Insert a small stack of HP greeting-card paper with the print-side down into the paper tray until it stops
hp officejet 4100 series
chapter 3
12
set the paper typeIf you want to use a different type of paper such as photo paper transparency film Iron-On T-shirt transfers or brochures simply load that paper in the paper tray You must then change the paper type settings to ensure the best print quality
HP recommends paper type settings according to the type of paper you are using
This setting refers to copy options only If you want to set the paper type for printing from a computer set the properties in the Print dialog box of the software
1 Press the Copy button until Paper Type appears
2 Press until the appropriate paper type appears
3 Press Enter to choose the displayed paper type
set the paper sizeThe HP Officejet can use Letter Legal or A4 paper Use the following procedure to set the paper size for copy options
1 Press the Copy button until Copy Paper Size appears
2 Press until the appropriate paper size appears
3 Press Enter to choose the displayed paper size
To avoid jams remove papers from the output tray frequently The output tray capacity is affected by the type of paper and the amount of ink you are using For more information about output-tray capacity see technical information in the HP Photo amp Imaging Help
Labels(works only with printing)
bull Always use letter-size or A4-size label sheets designed for use with HP inkjet products (like Avery Inkjet Labels) and make sure that the labels are not over two years old
bull Fan the stack of labels to make sure none of the pages are sticking together
bull Place a stack of label sheets on top of standard paper in the paper tray print-side down Do not insert labels one sheet at a time
Postcards (works only with printing)
Insert a stack of postcards or hagaki cards with the print-side down into the paper tray until it stops Line the postcards up on the right side of the paper tray slide the paper-width guide up against the left side of the cards until it stops
4-by-6 inch photo paper (works only with printing)
Insert the photo paper with the print-side down into the paper tray until it stops Place the long edge of the photo paper against the right side of the paper tray and slide the paper-width guide up against the long edge of the photo paper until it stops If the photo paper you are using has perforated tabs load the photo paper so that the tabs are closest to you
paper tips
4
13
use the copy features
The copy features let you do the following
bull Produce high-quality color and black-and-white copiesbull Reduce or enlarge the size of the copies you make from 25 to 200 or
50 to 200 (depending on your model) of the copyrsquos original sizebull Make the copy lighter or darker select the number of copies and specify
the quality of the copies you makebull Use special copying features to make high-quality copies of photos using
special photo paper or to create transparencies
make copiesYou can make copies using the front panel of your HP Officejet or by using the HP Officejet software on your computer Many copy features are available using either method However you may find that the software offers easier access to special copy features
All copy settings that you select on the front panel are reset two minutes after the HP Officejet completes the copy unless you save the settings as the default settings as described in change settings for all copy tasks on page 15
make a copy1 Load the paper tray with the appropriate paper
2 Load your original
3 Press the Copy button
4 Use the keypad or press the or to enter the number of copies
5 Press Start Black or Start Color
Tip To make a single copy press the Copy button and then press Start Black or Start Color
Note Make sure that the color print cartridge is installed in your HP Officejet Both print cartridges must be installed when making a copy
increase copy speed or qualityThe HP Officejet provides three options that affect copy speed and quality
bull Best produces the highest quality for all paper types Best copies more slowly than the other quality settings
bull Normal delivers high-quality output and is the recommended setting for most of your copying Normal copies faster than Best
bull Fast copies faster than the Normal setting The text is of comparable quality to the Normal setting but the graphics may be of lower quality Using Fast also reduces the frequency of replacing your print cartridges because it uses less ink
hp officejet 4100 series
chapter 4
14
1 Load your original
2 Press Copy until Copy Quality appears
3 Press until the desired quality setting appears and then press Enter to select it
4 Press Start Black or Start Color
set the number of copies You can set the number of copies using the front panel
1 Press the Copy button
2 Use the keypad or press the or to enter the number of copies
3 Press Enter
4 Press Start Black or Start Color
Tip If you hold down the right arrow button then after reaching 10 the number of copies changes by increments of five to make it easier to set a large number of copies
reduce or enlarge a copyYou can reduce or enlarge a copy of an original using ReduceEnlarge
For more information about additional copy options such as Fit to Page see perform special copy jobs on page 15
1 Press Copy until ReduceEnlarge appears
2 Press until the appropriate ReduceEnlarge option appears and then press Enter to select it
3 If you select Custom 100 Set Custom Size appears Use the arrow keys or type a percentage on the keypad
4 Press Enter when the desired percentage is displayed
5 Press Start Black or Start Color
make copies lighter or darkerUse LighterDarker to adjust the lightness and darkness of the copies you make
1 Press Copy until LighterDarker appearsThe range of LighterDarker values are represented as circles on a scale on the front-panel display
2 Press to lighten the copy or to darken it The circle moves to the left or right depending on the arrow button you press
3 Press Enter to select the setting
4 Press Start Black or Start Color
enhance text sharpness and photo colorsYou can use Text to sharpen edges of black text Photo to enhance light colors in your photographs or Mixed if your original contains a photograph and text You can also select None to turn off all enhancements
reference guide
use the copy features
15
Text enhancement is the default option You can turn off Text enhancement by selecting Photo Mixed or None if the following occur
bull Stray dots of color surround some text on your copiesbull Large black typefaces look splotchy (not smooth)bull Thin colored objects or lines contain black sectionsbull Horizontal grainy or white bands appear in light- to medium-gray areas
1 Press Copy until Enhancements appears
2 Press until the desired enhancement (Text Photo Mixed or None) appears
3 Press Enter to select the setting
4 Press Start Black or Start Color
change settings for all copy tasksSave the copy settings you use most often by setting them as the default This includes changes to Copy options such as Paper Type and Paper Size as well as other Copy settings on the front panel such as Number of Copies and Copy Quality
1 Make any desired changes to the copy options
2 Press Copy until Set New Defaults appears
3 Press until Yes appears
4 Press Enter to set the options as a defaultYour settings are saved
perform special copy jobsIn addition to supporting standard copying your HP Officejet can also copy a photo or fit a copy to the page
copy a photoWhen copying a photo you should select options for the correct paper type and photo enhancement
1 Load the photo in the automatic document feeder (ADF)For more information see load originals
2 If you are using photo paper load it in the paper tray
3 Press Copy until Paper Type appears
4 Press until Premium Photo appears and then press Enter to select it
5 Press Copy until Enhancements appears
6 Press until Photo appears and then press Enter to select it
7 Press Start Black or Start Color
Tip To enlarge a photo automatically to a full page use the Photo Fit to Page button
hp officejet 4100 series
chapter 4
16
fit a copy to the pageUse the Photo Fit to Page button when you want to automatically enlarge or reduce your original to fit Letter or A4 size paper You can enlarge a small photo to fit a full-size page as shown below Using Photo Fit to Page may prevent unwanted cropping of text or images around the margins
1 Load the original in the ADFFor more information see load originals on page 7
2 Press the Photo Fit to Page button
Note Do not press the Fax Copy or Scan buttons on the front panel once you have pressed the Photo Fit to Page button
3 Press until the appropriate paper type appears and then press Enter to select it
4 Press Start Black or Start Color
copy optionsThe following diagram shows the options that are available when you press Copy
Original Fit to Page
Plain PaperPhoto PaperTransparency
Actual sizeCustom 100Full Page 91Legal gt Ltr 72
ReduceEnlarge Paper Type
NoYes
TextPhotoMixedNone
Enhancements Set New Defaults
LetterLegalA4
Copy Paper Size
The sizes vary by countryregion
LighterDarker
NormalFastBest
Copy Quality
To cycle through the copy options press Copy repeatedly
Press and to move to the setting you want within one of the copy optionsPress Enter to select the displayed setting
5
17
use the scan features
Scanning is the process of converting pictures and text into an electronic format for your computer You can scan photos and text documents
Because the scanned image or text is in an electronic format you can bring it into your word processor or graphics program and modify it to suit your needs You can do the following
bull Scan photos of your kids and e-mail them to relatives create a photographic inventory of your house or office or create an electronic scrapbook
bull Scan text from an article into your word processor and quote it in a report saving you a lot of retyping
Tip To use the scan features your HP Officejet and computer must be connected and turned on The HP Officejet software must also be installed and running on your computer prior to scanning To verify that the HP Officejet software is running on Windows look for a status icon in the system tray On a Macintosh the HP Officejet software is always running
Note High resolution scanning (600 dpi or higher) requires a large amount hard disk space If there is not enough hard disk space available your system may stall
scan an originalYou can start a scan from your HP Officejet or from the HP Officejet software on your computer
For more information about scanning your pictures or documents from the HP Officejet software see scan pictures and documents in the HP Photo amp Imaging Help
to scan an original from your hp officejet
1 Load your original in the automatic document feeder (ADF)For more information see load originals on page 7
2 Press Scan
3 Select the Scan to destination by pressing or or by pressing the Scan button repeatedlyThe default destination is the HP Photo amp Imaging Gallery Any applications on your computer that are supported by the HP Officejet also appear in the Scan to list
4 Press Start Black or Start ColorThe original is scanned and the image is sent to selected destinationFor more information about using the HP Photo amp Imaging Gallery see manage images in how to use the software
hp officejet 4100 series
chapter 5
18
stop scanningYou can stop a scan by pressing the Cancel button located on the front panel
6
19
use the fax features
Using your HP Officejet you can
bull Send and receive paper faxesbull Send computer faxes (reference the HP Photo amp Imaging Help)bull Send and receive color faxes
Fax features are available only on some HP Officejets
send a faxYou can send a fax in a variety of configurations These include the following
bull send a paper fax (using the front panel or computer)bull send a paper fax with a PC-generated cover page (using the computer)bull send a file with or without a cover page (using the computer)bull send a PC-generated cover page as a single-page fax (using the
computer)
Note For information on sending a fax using the computer reference the HP Photo amp Imaging Help
Note By default your HP Officejet prints a report only if there is a problem with sending or receiving a fax A confirmation message indicating whether an item was successfully sent appears briefly on the front-panel display after each transaction If you need printed confirmation that your faxes are successfully sent see print reports on page 22 for information about report options
Note If you have not done so set the date and time See set the date and time on page 27
send a fax from your hp officejet1 Load your originals in the ADF
For more information see load originals on page 7
2 Enter the fax number using the keypad or press Speed Dial until the desired speed-dial entry appearsFor more information on speed dialing see set up speed dialing in the HP Photo amp Imaging Help
3 Press Start Black or Start Color
change settings and use speed dials before sending a fax1 Load your originals in the ADF
For more information see load originals on page 7
2 Enter the fax number using the keypad or press Speed Dial until the desired speed-dial entry appears
hp officejet 4100 series
chapter 6
20
For more information on speed dialing see set up speed dialing in the HP Photo amp Imaging Help
3 Press Enter
4 Press Fax to scroll through the fax options
5 When you reach the option whose setting you wish to change press to scroll through the setting options
6 When you reach the setting you want to change press Enter to accept the setting
7 Press Start Black or Start Color
send a color faxYou can send and receive color faxes to and from other color fax machines If you are faxing from the front panel and your HP Officejet determines that the recipient has a black-and-white fax unit it sends the fax in black and white If you are faxing from the software and your HP Officejet determines that the recipient has a black-and-white fax unit the HP Officejet prompts you to try sending the fax in black and white
We recommend that you use only color originals for color faxing The color originals must be loaded in the ADF you cannot send a color fax from memory using the scan and fax features To fax in color to multiple recipients send the fax from the Director or your software program
to send a color fax from the front panel
1 Load your originals in the ADF For more information see load originals on page 7
2 Enter the fax number using the keypad or press Speed Dial until the desired speed-dial entry appearsFor more information on creating speed-dial entries see set up speed dialing in the HP Photo amp Imaging Help
3 Press Start Color
schedule a faxYou can schedule a black and white fax to be sent later during the same day (for example when telephone lines are not as busy) If you use the front panel you can select a single recipient
When the specified time is reached your fax is automatically sent as soon as a connection can be made
1 Load your originals in the ADF
2 Enter the fax number using the keypad or press Speed Dial until the desired speed-dial entry appears
3 Press Enter
4 Press Fax to scroll through the fax options
5 Stop scrolling when you reach the How to Fax menu
6 Press to scroll through the setting options
7 Stop scrolling when you reach the Send Fax Later option
reference guide
use the fax features
21
8 Press Enter
9 Enter the Send Time using the numeric keypad
10 At the prompt press 1 for AM or 2 for PM
11 When Store Fax Now appears press 1 for Yes or 2 for NoIf 1 is selected the document is scanned to memory and is sent at the selected time If 2 is selected and you havenrsquot loaded your originals a message appears reminding you to load the original before the send time
12 Press Start Black
cancel a scheduled faxYou can cancel a fax stored in memory or one that is currently in progress
bull Press Cancel to cancel the scheduled fax
receive a faxYour HP Officejet is set to print received faxes automatically If you receive a legal-size fax and your HP Officejet is not currently configured to use legal-sized paper the unit automatically reduces the fax so that it fits on the paper that is loaded For more information see set automatic reduction on page 25
If you have an answering machine connected to the same line as your HP Officejet you may need to set the number of rings required before the HP Officejet begins receiving the fax The default number of rings before the HP Officejet receives a fax is 5
set the number of rings before answeringYou can specify how many rings should occur before your HP Officejet automatically answers the phone When you run the Fax Setup Wizard this is set automatically
If you do not want your HP Officejet to answer the phone Rings to Answer should be set to No Answer
1 Press Setup
2 Press 3 then press 3 againThis selects the Basic Fax Setup menu then the Rings to Answer option
3 Use the arrow keys to choose the number of rings and then press Enter
receive a fax manuallyBefore manually receiving a fax we recommend that you remove any originals from your HP Officejet so that they are not accidentally processed
Verify that Rings to Answer is set to No Answer
1 When your HP Officejet rings pick up the handset of a telephone that is on the same telephone line as your HP Officejet
2 If you hear fax tones press Start Black or Start Color or if you are receiving from an extension phone (on the same telephone line as your HP Officejet but not connected directly to it) press 1 2 3 on your phone
3 After you are finished hang up the telephone
hp officejet 4100 series
chapter 6
22
print reportsYou can set up your HP Officejet to print error reports and confirmation reports for each fax you send and receive You can also manually print reports as you need them
generate reports automaticallyThis setting lets you configure your HP Officejet so that it automatically prints error and confirmation reports
1 Press Setup
2 Press 1 then press 5This selects Print Report then selects Automatic Reports Setup
3 Press to scroll through the following report typesndash Every Error which prints whenever there is any kind of fax error
(default)ndash Send Error which prints whenever there is a transmission errorndash Receive Error which prints whenever there is a receiving errorndash Every Fax which confirms every time a fax is sent or receivedndash Send Only which prints every time a fax is sentndash Off which does not print fax reports
4 When you reach the report that you want press Enter
generate reports manuallyThis setting lets you print reports manually From the computer you can only print the Speed-Dial List and the Fax Log
to print reports from the front panel
1 Press Setup then press 1This selects the Print Report menu
2 Press to scroll through the following report typesndash Last Transaction which prints details of the last fax transactionndash Fax Log which prints a log of the last 30 fax transactionsndash Speed Dial List which prints a list of programmed speed dialsndash Self-Test Report which prints a report to assist you in diagnosing print
and alignment problems For more information see print a self-test report on page 32
ndash Automatic Reports Setup which is the automatic reports setting described in generate reports automatically on page 22
3 When you reach the report that you want press Enter
control resolution and contrastYour HP Officejet lets you change the resolution and contrast of documents that you are sending
change resolutionResolution affects the transmission speed and quality of faxed documents
reference guide
use the fax features
23
to change the resolution from the front panel
1 Load your originals in the ADF
2 Enter the fax number using the keypad or press Speed Dial until the desired speed-dial entry appears
3 Press Enter
4 Press Fax to scroll through the fax options
5 Stop scrolling when you reach the Resolution menu
6 Press until the desired resolution quality appears (Standard Photo Fine Very Fine)
7 Press EnterYour HP Officejet only faxes at the highest resolution supported by the receiving faxIf you choose Photo be aware that the faxing process takes longer to complete When faxing photographs we recommend that you choose Photo
change contrastChange this setting if you want a black-and-white fax to be darker or lighter than the original
to change the fax contrast from the front panel
1 Load your originals in the ADF
2 Enter the fax number using the keypad or press Speed Dial until the desired speed-dial entry appears
3 Press Enter
4 Press Fax to scroll through the fax options
5 Stop scrolling when you reach the LighterDarker menuThe range of values appears as a circle on a scale on the display
6 Press to lighten the fax or to darken itThe circle moves left or right as you press a button
7 Press Enter to accept the setting you selected
change other fax settings
redial a number automaticallyYou can set your HP Officejet to redial a busy and an unanswered number automatically If you initiated a fax from the computer the computer must be left on for the redialing process to work correctly
1 Press Setup
2 Press 4This selects the Advanced Fax Setup menu
3 Choose one of the following optionsndash Press 3
hp officejet 4100 series
chapter 6
24
This selects the Busy Redial option The default setting for Busy Redial is Redial
ndash Press 4This selects the No Answer Redial option The default setting for No Answer Redial is No Redial
4 Press Enter
5 Press to select Redial or No Redial as desired
6 Press Enter
forward faxes to another numberWith fax forwarding you can send a fax that you receive to another fax number during the next 24-hour period
to forward faxes from the front panel
1 Press Setup
2 Press 3 then press 7This selects the Basic Fax Setup menu then selects the Fax Forwarding Black Only option
3 At the prompt enter the Fax Number to which you wish to send the fax
4 Press Enter
5 Enter the Start Date using the numeric keypad
6 Enter the Start Time using the numeric keypad
7 At the prompt press 1 for AM or 2 for PM
8 Enter the Stop Date using the numeric keypadFax Forwarding On appears on the display
edit or cancel fax forwardingOnce fax forwarding is enabled you may find that you need to change the number you are faxing to or the start and stop times you entered You may wish to cancel your fax forwarding setup altogether Follow the steps below to edit or turn off fax forwarding
to edit fax forwarding from the front panel
1 Press Setup
2 Press 3 then press 7This selects the Basic Fax Setup menu then selects the Fax Forwarding Black Only option
3 Forwarding is ON 1=Edit 2=Cancel appears on the display after a moment Press 1 to edit the number you wish to fax to or to change the start and stop times Follow the messages on the display
to cancel fax forwarding from the front panelbull Press Cancel
OR
reference guide
use the fax features
25
Follow the steps in edit or cancel fax forwarding on page 24 When Forwarding is ON 1=Edit 2=Cancel appears on the display press 2 to cancel fax forwarding
use error correction modeError Correction Mode (ECM) eliminates data lost due to poor phone lines by detecting errors that occur during transmission and automatically requesting retransmission of the erroneous portion Phone charges are unaffected or may even be reduced on good phone lines On poor phone lines ECM increases sending time and phone charges but sends the data much more reliably Turn ECM off (the default setting is on) only if it increases phone charges substantially and you can accept poorer quality in exchange for reduced charges
to change the ECM setting from the front panel
1 Press Setup
2 Press 4 then press 7This selects the Advanced Fax Setup menu then selects the Error Correction Mode option
3 Press to switch between On and Off
4 Press Enter to accept the setting you selected
set automatic reductionThis setting determines what your HP Officejet does if it receives a fax that is too large for the default paper size With this setting on (the default) the image is reduced so that it fits on one page With this feature off information that doesnrsquot fit on the first page is printed on a second page
1 Press Setup
2 Press 4 then press 5This selects the Advanced Fax Setup menu then selects the Automatic Reduction option
3 Press to switch between On and Off
4 Press Enter to accept the setting you selected
adjust the volumeYour HP Officejet provides three levels for adjusting the ring and speaker volume The ring volume is the volume of the phone ringer The speaker volume is the volume of everything else such as the dial and fax tones The default setting is Soft
1 Press Setup
2 Press 3 then press 6This selects the Basic Fax Setup menu then selects the Ring and Beep Volume option
3 Press to select one of the options Soft Loud or Off
4 Press Enter to accept the setting you selected
hp officejet 4100 series
chapter 6
26
change the answer ring pattern (distinctive ringing)Distinctive ringing is a feature offered by phone companies that allows several phone numbers to share the same line Each number has a specific ring pattern If you do not have this service use the default ring pattern which is All Rings
If you connect your HP Officejet to a line with distinctive ringing have your telephone company assign one ring pattern to voice calls and another to fax calls (double or triple rings are best for a fax number)
1 Press Setup
2 Press 4 then press 2This selects the Advanced Fax Setup menu then selects the Answer Ring Pattern option
3 Press to scroll through these options All Rings Single Rings Double Rings Triple Rings and Double amp Triple
4 When the ring pattern that the phone company established for this number appears press Enter
Tip We recommend that you use Double Rings or Triple Rings for fax
set up speed dialingThrough your HP Officejet or your computer you can assign entries to fax numbers you use often This lets you dial those numbers quickly using the front panelrsquos Speed Dial button and a one- or two-digit entry You can create up to 100 individual speed-dial entries (the maximum for some models is 70)
We recommend that you use the software to set up speed-dial settings
Note A speed-dial entry can only be associated with one phone number speed-dial groups are not supported
For more information see set up speed dialing in the hp photo amp imaging help
create individual speed-dial settingsYou can enter fax numbers that you will reuse frequently
1 Press Setup
2 Press 2 then press 1This selects the Speed Dial Setup menu then selects the Individual Speed Dial option
3 Press EnterThe first unassigned speed-dial entry appears on the display
4 Press Enter to select the displayed speed-dial entry
5 Enter the Fax Number to assign to that entry then press EnterThe fax number can be up to 50 digits in length
Tip To enter a three-second pause within a number sequence press Symbols to display a dash
6 Enter the personrsquos or companyrsquos name then press Enter
reference guide
use the fax features
27
The name is limited to 13 characters in lengthFor more information see enter text on page 28
7 After Enter Another appears press 1 (Yes) if you want to set up another number or press 2 (No) to exit
delete speed-dial settingsFollow these steps to delete an individual speed-dial entry
1 Press Setup
2 Press 2 then press 2 againThis selects Speed Dial Setup then selects Delete Speed Dial
3 Press until the individual entry that you want to delete appears then press Enter
set basic fax settings using the front panelWe recommend that you use the Fax Setup Wizard in the HP Officejet software to configure all your basic fax settings however you can also access these settings from the front panel
Note In the US regulations require that your name and phone number appear on every fax The minimum settings that we recommend are described in the following topics
set the date and timeFollow these steps to set the date and time manually
1 Press Setup
2 Press 3 then press 1This selects the Basic Fax Setup menu then selects the Date and Time option
3 Follow the prompts on the display to enter the date and time using the keypad
Tip Use only the last two digits for the year
Tip When you enter a single-digit date or time type a leading zero before the single digit for example 0345 or 08-03-02
After you are done the date and time appear on the display
Warning Cutting off power to the HP Officejet causes the selected date and time to be lost However name and fax number information is not lost
set the fax headerFollow these steps to enter your name and fax number in the header
Note In Hungary the subscriber identification code (fax header) can be set or changed only by authorized personnel For more information contact your authorized HP dealer
1 Press Setup
2 Press 3 then press 2
hp officejet 4100 series
chapter 6
28
This selects the Basic Fax Setup menu then selects the Fax Header option
3 Enter your personal or company name at the prompt Use the guidelines provided in the next section under enter text
4 Press Enter
5 Enter your fax number using the numeric keypad
6 Press Enter
enter textThe following list provides tips for entering text using the front-panel keypad
bull Press the keypad numbers that correspond to the letters of a name
bull Press a button multiple times to see a letter first in uppercase and then in lowercase
bull After the correct letter appears press and then press the number that corresponds to the next letter in the name Again press multiple times until the correct letter appears
bull To insert a space press Space ()bull To enter a symbol such as press Symbols () to scroll through the list of
available symbolsbull If you make a mistake press to clear it and then make the correct
entrybull After you are done entering text press Enter to store your entries
check for dial toneBefore using the fax features verify that the connections are correctly established
1 Press Fax
2 Listen for a dial tone
3 If you do not hear a dial tone check the connections
4 Press Cancel to hang up
ABC These letters correspond to this number and so on
2
JKL To get this character J j K k L l 5
5 Press 5 this many times 1 2 3 4 5 6 7
reference guide
use the fax features
29
fax job menuThe following options become available when the Fax button is pressed
setup menu for fax commandsThe following fax settings are available in the Setup menu
Enter Fax or Speed Dial
FineVery FinePhotoStandard
Fax Number Resolution LighterDarker
Enter a fax number or speed dialWhen the Fax button is pressed
Press and to move to the option you wantPress Enter to select the displayed setting
NoYes
Set New Defaults
Send Fax NowFax from MemorySend Fax LaterPoll to Receive
How to Fax
1Automatic Reports Setup
2Answer Ring Pattern
3Busy Redial
4No Answer Redial
5Automatic Reduction
6Backup Fax Reception
7Error Correction Mode
3Basic Fax Setup 4Advanced Fax Setup
Press Setup to display the menu options
Press and to move to the setting you wantPress Enter to select the displayed setting
1Date and Time
2Fax Header
3Rings to Answer
4Paper Size
5Tone or Pulse Dialing
6Ring and Beep Volume
7Fax Forwarding Black Only
2Speed Dial Setup
1Individual Speed Dial
2Delete Speed Dial
3Print Speed Dial List
hp officejet 4100 series
chapter 6
30
7
31
maintain your hp officejet
This section provides instructions for keeping your HP Officejet in top working condition Perform these maintenance procedures as necessary
clean the glassDirty glass from dust smudges hair and so on slows down performance and affects the accuracy of features such as Fit to Page and Copy
1 Turn off the unit unplug the power cord and raise the scanner lid
2 Clean the glass with a soft cloth or sponge slightly moistened with a nonabrasive glass cleaner
Caution Do not use abrasives acetone benzene or carbon tetrachloride on the glass these can damage it Do not place liquids directly on the glass They may seep under it and damage the unit
3 Dry the glass with a chamois or cellulose sponge to prevent spotting
hp officejet 4100 series
chapter 7
32
clean the white stripMinor debris can accumulate on the white strip located underneath the scannerrsquos lid
1 Turn off the unit unplug the power cord and raise the scanner lid
2 Clean the white strip with a soft cloth or sponge slightly moistened with a mild soap and warm water
3 Wash the strip gently to loosen debris do not scrub the strip
4 Dry the strip with a chamois or soft cloth
Caution Do not use paper-based wipes as these may scratch the strip
5 If this does not clean the strip well enough repeat the previous steps using isopropyl (rubbing) alcohol and wipe the strip thoroughly with a damp cloth to remove any residual alcohol
clean the exterior Use a soft damp lint-free cloth to wipe dust smudges and stains off the case The interior of the unit does not require cleaning Keep fluids away from the interior of the unit as well as the front panel
work with print cartridgesTo ensure the best print quality from your HP Officejet you will need to perform some simple maintenance procedures and when prompted by a front-panel message replace the print cartridges
print a self-test reportIf you are experiencing problems with printing before cleaning or replacing the print cartridges you should print a Self-Test Report This report provides useful information about your print cartridges including status information
1 Press Setup
2 Press 1 then press 4This selects Print Report and then selects Self-Test Report
3 Press Start Black or Start ColorA Self-Test Report is printed for your HP Officejet
handle print cartridgesBefore you replace or clean a print cartridge you should know the part names and how to handle the print cartridge
reference guide
maintain your hp officejet
33
replace the print cartridgesFront-panel messages appear to let you know that you should replace your print cartridges
See order print cartridges on the back cover for information on ordering replacement print cartridges
1 Turn on the unit then lift open the print cartridge access doorThe print carriage moves into view
2 After the carriage stops moving push down on the print cartridge down to release it and then pull it toward you out of its slot
Plastic tape with pink tab(must be removed)
Copper contactsInk nozzles under tape
Do not touch the copper contacts or the ink nozzles
print cartridge access door
hp officejet 4100 series
chapter 7
34
Note It is normal to see ink build-up in the print cartridge slots
3 Remove the new print cartridge from its packaging and being careful to touch only the bright pink plastic tab gently remove the plastic tape to uncover the ink nozzles
Caution Do not touch the copper contacts or ink nozzles
Once you have removed the plastic tape install the print cartridge immediately to prevent the ink from drying in the nozzles
4 Push the new print cartridge into the appropriate slot at a slight angle until it clicks into place
Caution Do not attempt to push the cartridge straight into the slot It must slide in at a slight angle
The tri-color print cartridge goes on the left and the black cartridge goes on the right
5 Close the print cartridge access door
reference guide
maintain your hp officejet
35
align the print cartridgesThe HP Officejet prompts you to align cartridges every time you install or replace a print cartridge Aligning the cartridges ensures high-quality output
To align the print cartridges when prompted
1 Press Enter on the front panelAn align cartridges (test pattern) page prints
2 Load the align cartridges page face down in the ADF between the paper-width guides and press the Enter button again
3 Recycle or discard the page
To align the cartridges at any other time
1 Press Setup
2 Press 5 then press 2This selects the Maintenance menu and then selects the Align Print Cartridge option
3 Press EnterAn align cartridges (test pattern) page prints
4 Load the align cartridges page face down in the ADF between the paper-width guides and press the Enter button again
5 Recycle or discard the page
clean the print cartridgesUse this feature when the Self-Test Report shows streaking or white lines through any of the colored bars Do not clean print cartridges unnecessarily This wastes ink and shortens the life of the ink nozzles
1 Press Setup
2 Press 5 then press 1This selects the Maintenance menu and then selects the Clean Print Cartridge optionA page of patterns is printed The cartridges are cleaned Recycle or discard the pageIf copy or print quality still seem poor after you clean the print cartridges replace the print cartridge that is affected
restore factory defaultsYou can restore the original factory settings to what they were when you purchased your HP Officejet Choosing to restore your factory defaults restores all settings except date information and any scan settings you may have set
You can perform this process from the front panel only
1 Press Setup
2 Press 5 then press 3This selects Maintenance and then selects Restore Factory DefaultsThe factory default settings are restored
hp officejet 4100 series
chapter 7
36
set scroll speedThe Scroll Speed option lets you control the rate that text messages appear in the front-panel display You can choose Normal Fast or Slow The default is Normal
1 Press Setup
2 Press 5 then press 6This selects Maintenance and then selects Set Scroll Speed
3 Press until the desired speed appears then press Enter
set the prompt delay timeThe Prompt Delay option lets you control the amount of time before a message is displayed in the front-panel display You can choose Normal Fast or Slow The default is Normal
1 Press Setup
2 Press 5 then press 7This selects Maintenance and then selects Set Prompt Delay Time
3 Press until the delay time appears then press Enter
self-maintenance sounds During the life of your product you may hear various mechanical sounds This is a normal part of your unitrsquos self-maintenance
reference guide
maintain your hp officejet
37
setup menu optionsThe following options are available from the Setup button
1Last Transaction
2Fax Log
3Speed Dial List
4Self-Test Report
5Automatic Reports Setup
1Print Report
Use Setup to display the Print Report Speed Dial Setup Basic Fax Setup Advanced Fax Setup and Maintenance options
Press and to move to the setting you wantPress Enter to select the displayed setting
1Clean Print Cartridges
2Align Print Cartridges
3Restore Factory Defaults
4Reprint Faxes in Memory
5Set Language amp CountryRegion
6Set Scroll Speed
7Set Prompt Delay Time
5Maintenance2Speed Dial Setup
3Basic Fax Setup
4Advanced Fax Setup
1Individual Speed Dial
2Delete Speed Dial
3Print Speed Dial List
1Date and Time
2Fax Header
3Rings to Answer
4 Paper Size
5Tone or Pulse Dialing
6Ring and Beep Volume
7Fax Forwarding Black Only
1Automatic Reports Setup
2Answer Ring Pattern
3Busy Redial
4No Answer Redail
5Automatic Reduction
6Backup Fax Reception
7Error Correction Mode
hp officejet 4100 series
chapter 7
38
8
39
additional setup information
During the installation of the HP Officejet software a number of windows are displayed You should see the following
bull Installingbull Copying files bull A request to plug in the HP Officejetbull Green OK and check markbull Request to restart your computer (may not occur in all cases)bull Registration
If you did not see all of these windows there may be a problem with the installation Verify the following
bull The HP Director contains six icons (double-click the HP Director icon on the desktop)
bull The HP Officejet is listed in the Printers dialog boxbull There is an icon for the HP Officejet in the System Tray that indicates the
HP Officejet is ready
If the HP Director does not show six icons you may need to wait a few minutes for the HP Officejet to connect to your computer
possible installation problemsIf nothing appears on your computer screen after you insert the HP Officejet 4100 Series CD-ROM into your computerrsquos CD-ROM drive
1 From the Start menu choose Run
2 In the Run dialog box enter dsetupexe (if your CD-ROM drive is not assigned to drive letter d use the appropriate drive letter) then click OK
If the HP Director does not contain six icons do the following
bull Verify that the front-panel cover is attached then unplug the HP Officejet and plug it in again
bull Verify that the USB and power cables are plugged inndash Unplug the USB cable and plug it in againndash Do not attach the USB cable to a keyboard or nonpowered hubndash Verify that the USB cable is 3 meters or less in lengthndash If you have several USB devices attached to your computer you may
want to unplug the others during the installation
Note AppleTalk is not supported
bull Unplug the HP Officejet from the wall and plug it in againbull Restart your computer
hp officejet 4100 series
chapter 8
40
On Windows check the System Tray for applications that are running in the background and close them before restarting your computer
remove and reinstall your hp officejet softwareIf six icons do not appear in the Director you may need to uninstall and re-install the software Do not simply delete the HP Officejet program files from your hard drive Be sure to remove them properly using the uninstall utility provided in the HP Officejet program group
to uninstall from a Windows computer
1 Disconnect your HP Officejet from your computer
2 On the Windows taskbar click Start choose Programs or All Programs (XP) choose Hewlett-Packard choose hp officejet 4100 series then choose uninstall software
3 Follow the directions on the screenBe sure to disconnect your HP Officejet
4 If you are asked whether you would like to remove shared files click NoOther programs that use these files may not work properly if the files are deleted
5 After the program finishes removing the software disconnect your HP Officejet and restart your computer
Note It is important that you disconnect your HP Officejet before restarting your computer
6 To reinstall the software insert the HP Officejet 4100 Series CD-ROM into your computerrsquos CD-ROM drive and follow the instructions that appear
7 After the software is installed connect and turn on your HP Officejet following the onscreen instructions and the instructions in your Setup PosterAfter connecting and turning on your HP Officejet you may have to wait several minutes for all of the Plug and Play events to completeWhen the software installation is complete you will see a Status Monitor icon in the System Tray
8 To verify that the software is properly installed double-click on the HP Director icon on the desktop If the HP Director shows six icons the software has been properly installed
to uninstall from a Macintosh computer
1 Disconnect your HP Officejet from your computer
2 Double-click on ApplicationsHP All-in-One Software folder
reference guide
additional setup information
41
3 Double-click on HP Uninstaller
4 Follow the directions that appear on the screen
5 After the program finishes removing the software disconnect your HP Officejet and restart your computer
6 To reinstall the software insert the HP Officejet 4100 Series CD-ROM into your computerrsquos CD-ROM drive
Note When re-installing the software follow the instructions on the Setup Poster Do not connect the HP Officejet to your computer until after you have completed the software installation
7 On the desktop open the CD-ROM double-click on hp all-in-one installer and follow the instructions that appear
connect your hp officejet to a phone modem or answering machine
The HP Officejet can share a phone line with a phone a modem or an aswering machine When sharing a phone line with an answering machine the HP Officejet will answer fax calls and direct voice calls to the answering machine
Note For information on connecting your HP Officejet to your computer and phone line refer to the Setup Poster that came with your unit
to connect your hp officejet to a phone modem or answering machine
1 Remove the white plastic stopper from connector 2 on the back of the HP Officejet
To connect more than one device to connector 2 on the HP Officejet you must purchase a Y-splitter and plug it into connector 2
2 Connect the phone cord from the phone modem or answering machine to connector 2 (or Y-splitter)
Caution Do not use the phone cord that came with the HP Officejet for this purpose That phone cord must connect connector 1 on the HP Officejet to the wall jack for your phone system See the Setup Poster for details
3 If you are connecting an answering machine see set the number of rings before answering on page 21 for instructions on setting the number of rings correctly or change the answer ring pattern (distinctive ringing) on page 26 for information on incoming ring patterns
4 If you are connecting a modem turn off its fax-receive feature
connector 2 on the HP Officejet
connector 1 on the HP Officejet
hp officejet 4100 series
chapter 8
42
additional troubleshooting helpYou may want to refer to the readme file for more information on possible installation problems On Windows you can access the readme file from the Start button on the taskbar select Programs Hewlett-Packard hp officejet 4100 series View the Readme File On Macintosh you can access the readme file by double-clicking on the icon located in the top-level folder of the HP Officejet software CD-ROM
The readme file provides more information including
bull Using the Re-install utility after a failed installation to return your PC to a state that will allow the HP Officejet to be re-installed
bull Using the Re-install utility on Windows 98 to recover from a Composite USB System Driver missing errorThis error may occur if the hardware is installed prior to installing the software After running the Re-install utility reboot your PC and install the HP Officejet software before connecting the HP Officejet to your computer
You can also find more information on this website
wwwhpcomsupport
9
43
technical information
Additional specifications information can be found in the HP Photo amp Imaging Help in the hp officejet 4100 series section
physical specifications
power specificationsbull Power consumption 75W maximumbull Source (Input Voltage) 100 to 240 VAC groundedbull Input Frequency 50 to 60 Hzbull Current 1A maximum
regulatory informationAdditional regulatory information can be found in the HP Photo amp Imaging Help The information in this section supercedes information in the HP Photo amp Imaging Help
doc statement deacuteclaration de conformiteacute (Canada)Le preacutesent appareil numeacuterique neacutemet pas de bruit radioeacutelectrique deacutepassant les limites applicables aux appareils numeacuteriques de la classe B prescrites dans le Regraveglement sur le brouillage radioeacutelectrique eacutedicteacute par le ministegravere des Communications du CanadaThis digital apparatus does not exceed the Class B limits for radio noise emissions from digital apparatus set out in the Radio Interference Regulations of the Canadian Department of Communications
notice to users of the Canadian telephone networkThis equipment meets the applicable Industry Canada Terminal Equipment Technical Specifications This is confirmed by the registration number The abbreviation IC before the registration number signifies that registration was performed based on a Declaration of Conformity indicating that Industry Canada technical specifications were met It does not imply that Industry Canada approved the equipment
Note The Ringer Equivalence Number (REN) assigned to each terminal device provides an indication of the maximum number of terminals allowed to be connected to a telephone interface The termination on an interface may consist of any combination of devices subject only to the requirement that the sum of the Ringer Equivalence Numbers of all the devices does not exceed 5
The REN for this product is 03B based on FCC Part 68 test results
height width depth weight (without print cartridges)
with paper trays and ADF closed
718 in (1824 cm) 1676 in (4258 cm) 825 in (2096 cm) 75 lbs (34 kg)
with ADF and paper tray extended
1030 in (2615 cm) 1676 in (4258 cm) 1854 in (4709 cm) 75 lbs (34 kg)
hp officejet 4100 series
chapter 9
44
notice to all users of the European Economic Area (EEA)
This product is designed to interwork with the analogue telephone networks in the following countriesregions
Network compatibility depends on customer selected settings which must be reset to use the equipment on a telephone network in a countryregion other than where the product was purchased Contact the vendor or Hewlett-Packard Company if addition product support is necessaryThis equipment has been certified by the manufacturer in accordance with Directive 19995EC (annex II) for Pan-European single-terminal connection to the public switched telephone network (PSTN) However due to differences between the individual PSTNs provided in different countriesregions the approval does not of itself give an unconditional assurance of successful operation on every PSTN network termination pointIn the event of problems you should contact your equipment supplier in the first instance
geraumluschemissionLpA lt 70 dBam Arbeitsplatzim Normalbetriebnach DIN 45635 T 19
notice to Korean customers
Germany UK Netherlands
France Spain Italy
Belgium Luxembourg Sweden
Austria Denmark Ireland
Norway Finland Switzerland
Greece Portugal
10
45
hp support
This section explains the support services information provided by Hewlett-Packard If you are unable to find the answer you need in the printed or onscreen documentation supplied with your product you can contact one of the HP support services listed in the following pages Some support services are available only in the US and Canada while others are available in many countriesregions worldwide If a support service number is not listed for your countryregion contact your nearest authorized HP dealer for help
get support and other information from the internetIf you have Internet access you can get help from the following HP website
wwwhpcomsupportThe Web site offers technical support drivers supplies and ordering information
hp customer supportSoftware programs from other companies may be included with your HP Officejet If you experience problems with any of those programs you will receive the best technical assistance by calling the experts at that companyIf you need to contact HP Customer Support do the following before you call
1 Make sure thata Your unit is plugged in and turned onb The specified print cartridges are installed correctlyc The recommended paper is properly loaded in the input tray
2 Reset your unita Turn off the unit using the On button located on the unitrsquos front panelb Unplug the power cord from the back of the unitc Plug the power cord back into the unitd Turn on the unit using the On button
3 For more information check the HP website at wwwhpcomsupport
4 If you are still experiencing problems and need to speak with an HP Customer Support Representativendash Have your service ID and serial number ready To display your service ID and
serial number on the front panel do the following Press Enter and Start Color at the same time until the service ID appears in the front-panel display From this display press the right arrow until the serial number displays
ndash Print a Self-Test Report See print a self-test report on page 32 for information on printing this report
ndash Make a color copyndash Be prepared to describe your problem in detail
5 Call HP Customer Support Be near your unit when you call
call in the US during warrantyCall (208) 323-2551 This service is free during the warranty period however your standard long-distance phone charges still apply A fee may apply outside the warranty period
hp officejet 4100 series
chapter 10
46
US phone support is available in both English and Spanish languages 24 hours a day 7 days a week (days and hours of support may change without notice)
call elsewhere in the worldThe numbers listed below are current as of the printing date of this guide For a list of current international HP Support Service numbers visit this address and choose your own countryregion or language
wwwhpcomsupportFor Korea you can also visit this address
httpwwwhpcokrYou can call the HP support center in the following countriesregions If your countryregion is not listed contact your local dealer or nearest HP Sales and Support Office to find out how to obtain servicesSupport service is free during the warranty period however your standard long-distance phone charges will apply In some cases a flat fee per single incident will also applyFor phone support in Europe please check for the details and conditions of phone support in your countryregion by consulting the following Web site
wwwhpcomsupportAlternatively you can ask your dealer or call HP at the phone number indicated in this booklet As part of our constant efforts to improve our phone support service we advise you to check our website on a regular basis for new information regarding service features and delivery
countryregion hp technical support countryregion hp technical support
Algeria1 +213 (0) 61564 543 Malaysia 1-800-805405
Argentina 0810-555-5520 Mexico 01-800-472-6684
Australia +61 3 8877 80001902 910 910
Mexico (Mexico City) 5258-9922
Austria +43 (0) 810 00 6080 Morocco1 +212 22404 747
Bahrain (Dubai) 800 728 Netherlands +31 (0) 20 606 8751
Belgium (Dutch) +32 (0) 2 626 8806 New Zealand 0800 441 147
Belgium (French) +32 (0) 2 626 8807 Norway +47 22 11 6299
Brazil (Grande Sao Paulo) (11) 3747 7799 Oman +971 4 883 8454
Brazil (Demais Localidades) 0800 157751 Palestine +971 4 883 8454
Canada during warranty (905) 206 4663 Panama 001-800-7112884
Canada post-warranty(per-call charge)
1-877-621-4722 Peru 0-800-10111
Caribbean amp Central America
1-800-711-2884 Philippines 632-867-3551
Chile 800-360-999 Poland +48 22 865 98 00
China 86 10 6868 7980 Portugal +351 21 3176333
Colombia 9-800-114-726 Puerto Rico 1-877-2320-589
Costa Rica 0-800-011-0524 Qatar +971 4 883 8454
Czech Republic +420 (0) 261307310 Romania +40 1 315 44 42or local 01 3154442
reference guide
hp support
47
call in Australia post-warrantyIf your product is not under warranty you can call 03 8877 8000 A per-incident out-of-warranty support fee of $2750 (inc GST) will be charged to your credit card You can also call 1902 910 910 ($2750 charged to your phone account) from 900 AM to 500 PM Monday through Friday (Charges and support hours are subject to change without notice)
prepare your unit for shipmentIf after contacting HP Customer Support or returning to the point of purchase you are requested to send your unit in for service please follow the power off and rebox steps below to avoid further damage to the HP product
Denmark +45 39 29 4099 Russian Federation Moscow +7 095 797 3520
Ecuador 1800-711-2884 Russian Federation St Petersburg
+7 812 346 7997
Europe (English) +44 (0) 207 512 5202 Saudi Arabia +800 897 14440
Egypt 02 532 5222 Singapore 65 6272 5300
Finland +358 (0) 203 47 288 Slovakia +421 (0) 2 682 08080
France (034 Euromin) +0892 69 60 22 South Africa (inside RSA) 086 000 1030
Germany (012 Euromin) +49 (0) 180 52 58 143 South Africa (inside RSA) +27-11 258 9301
Greece +30 1060 73 603 Spain +34 902 321 123
Hong Kong (SAR) +85 (2) 3002 8555 Sweden +46 (0)8 619 2170
Guatemala 1800-995-5105 Switzerland 2 +41 (0) 84 880 1111
Hungary +36 (0) 1 382 1111 Taiwan +886-2-2717-00550800 010 055
India 1-600-11226791 11 682 6035
Thailand +66 (2) 661 4000
Indonesia 62-21-350-3408 Tunisia1 +216 1891 222
Ireland +353 (0) 1 662 5525 Turkey +90 216 579 7171
Israel +972 (0) 9 8304848 Ukraine +7 (380-44) 490-3520
Italy +39 (0) 226410350 United Arab Emirates +971 4 883 8454
Japan 0570 000 511+81 3 3335 9800
United Kingdom +44 (0) 207 512 52 02
Jordan +971 4 883 8454 Venezuela 0800-47468368 or800-477-7777
Korea (Seoul) +82 (2) 3270 0700 Venezuela (Caracas) (502) 207-8488
Korea (outside Seoul) 080 999 0700 Vietnam 84 (0) 8 823 4530
Kuwait +971 4 883 8454 Yemen +971 4 883 8454
Lebanon +971 4 883 8454
1 This Call Center supports French speaking customers from the following countriesregions Morocco Tunisia and Algeria
2 This Call Center supports German French and Italian speaking customers in Switzerland
countryregion hp technical support countryregion hp technical support
hp officejet 4100 series
chapter 10
48
Note When transporting your HP Officejet make sure that the pens have been removed the HP Officejet has been properly shut down by pressing the power button and you have allowed time for the carriage to return to the service station and for the scanner to return to its parked position
1 Turn on the unitDisregard steps 1 through 6 if your unit will not turn on and the print carriage is in the home position You will not be able to remove the print cartridges Proceed to step 7
2 Open the print cartridge access doorThe print carriage moves into view
3 See replace the print cartridges on page 33 for information on removing the print cartridges
Caution Remove both print cartridges Failure to do so may damage your unit
4 Place the print cartridges in an airtight bag so they will not dry out and put them aside (do not send them with the unit unless instructed to by the HP customer support call agent)
5 Turn off the unit
6 Close the print cartridge access door
7 Remove the front panel cover as followsa Grasp the front of the front panel cover with two hands as shownb Firmly lift the front panel cover to unsnap it from the unit
8 Retain the front panel cover Do not return the front panel cover with the unit
9 If available pack the unit for shipment using the original packing materials or the packaging materials that come with your exchange unit
If you do not have the original packaging materials please use other adequate packaging materials Shipping damage caused by improper packaging andor improper transportation is not covered under the warranty
reference guide
hp support
49
10 Place the return shipping label on the outside of the box
11 Include the following items in the boxndash A complete description of symptoms for service personnel (samples of print
quality problems are helpful)ndash A copy of the sales slip or other proof of purchase to establish the warranty
coverage periodndash Your name address and a phone number where you can be reached during
the day
hp distribution centerTo order HP Officejet software a copy of the printed Reference Guide a setup poster or other customer-replaceable parts do one of the following bull In the US or Canada call (208) 323 2551bull Visit this website
httpwwwhpcomcposupportsoftwarehtml
hp officejet 4100 series
chapter 10
50
11
51
warranty information
HP Officejet 4100 seriesDuration of Limited Warranty (hardware and labor) 1 YearDuration of Limited Warranty (CD media) 90 DaysDuration of Limited Warranty (print cartridges) Until the HP ink is depleted or the ldquoend of warrantyrdquo date printed on the cartridge has been reached whichever occurs first
warranty service
express serviceTo obtain HP express repair service the customer must contact an HP service office or an HP Customer Support Center for basic troubleshooting first See hp customer support on page 45 for steps to take before calling Customer SupportIf a customer unit needs a minor part replacement and these parts can normally be replaced by the customer the customer-replaceable components may be serviced through expedited part shipment In this event HP will prepay shipping charges duty and taxes provide telephone assistance on replacement of the component and pay shipping charges duty and taxes for any part that HP asks to be returnedThe HP Customer Support Center may direct customers to designated authorized service providers who are certified by HP to service the HP product
warranty upgradesUpgrade your standard factory warranty to a total of three years with the HP SUPPORTPACK Service coverage begins on product purchase date and the pack must be purchased within the first 180 days of product purchase This program offers phone support from 600 AM to 1000 PM Mountain Standard Time (MST) Monday through Friday and 900 AM to 400 PM (MST) on Saturdays If during your technical support call it is determined that you need a replacement product then HP will ship you this product next business day free of charge Available in US onlyFor more information please call 1-888-999-4747 or visit the following HP Web site
httpwwwhpcomgohpsupportpack
Outside the US please call your local HP Customer Support office See call elsewhere in the world on page 46 for a list of international Customer Support numbers
returning your hp officejet for serviceBefore returning your HP Officejet for service you must call HP Customer Support See hp customer support on page 45 for steps to take before calling Customer Support
hewlett-packard limited global warranty statement
extent of limited warrantyHewlett-Packard (ldquoHPrdquo) warrants to the end-user customer (ldquoCustomerrdquo) that each HP Officejet 4100 Series product (ldquoProductrdquo) including related software accessories media and supplies shall be free from defects in material and workmanship for the duration which begins on the date of purchase by the Customer
hp officejet 4100 series
chapter 11
52
For each software Product HPrsquos limited warranty applies only to a failure to execute programming instructions HP does not warrant that the operation of any Product shall be uninterrupted or error freeHPrsquos limited warranty covers only those defects which arise as a result of normal use of a Product and does not cover any other problems including those which arise as a result of (a) improper maintenance or modification (b) software accessories media or supplies not provided or supported by HP or (c) operation outside the Productrsquos specificationsFor any hardware Product the use of a non-HP print cartridge or a refilled print cartridge does not affect either the warranty to the Customer or any HP support contract with the Customer However if Product failure or damage is attributable to the use of a non-HP or refilled print cartridge HP shall charge its standard labor and materials charges to service the Product for the failure or damageIf HP receives during the applicable warranty period notice of a defect in any Product HP shall either repair or replace the defective Product at HPrsquos option Where labor charges are not covered by HPrsquos limited warranty repairs shall be at HPrsquos standard charges for laborIf HP is unable to repair or replace as applicable a defective Product which is covered by HPrsquos warranty HP shall within a reasonable time after being notified of the defect refund the purchase price for the ProductHP shall have no obligation to repair replace or refund until the Customer returns the defective Product to HPAny replacement product may be either new or like-new provided that it has functionality at least equal to that of the Product being replacedHP products including each Product may contain remanufactured parts components or materials equivalent to new in performanceHPs limited warranty for each Product is valid in any countryregion or locality where HP has a support presence for the Product and where HP has marketed the Product The level of warranty service may vary according to local standards HP shall have no obligation to alter the form fit or function of the Product in order to make it operate in a countryregion or locality for which the Product was never intended to operate
limitations of warrantyTO THE EXTENT ALLOWED BY LOCAL LAW NEITHER HP NOR ITS THIRD PARTY SUPPLIERS MAKE ANY OTHER WARRANTY OR CONDITION OF ANY KIND WHETHER EXPRESS OR IMPLIED WITH RESPECT TO THE COVERED HP PRODUCTS AND SPECIFICALLY DISCLAIM THE IMPLIED WARRANTIES OR CONDITIONS OF MERCHANTABILITY SATISFACTORY QUALITY AND FITNESS FOR A PARTICULAR PURPOSE
limitations of liabilityTo the extent allowed by local law the remedies provided in this Limited Warranty Statement are the Customerrsquos sole and exclusive remediesTO THE EXTENT ALLOWED BY LOCAL LAW EXCEPT FOR THE OBLIGATIONS SPECIFICALLY SET FORTH IN THIS LIMITED WARRANTY STATEMENT IN NO EVENT SHALL HP OR ITS THIRD PARTY SUPPLIERS BE LIABLE FOR DIRECT INDIRECT SPECIAL INCIDENTAL OR CONSEQUENTIAL DAMAGES WHETHER BASED ON CONTRACT TORT OR ANY OTHER LEGAL THEORY AND WHETHER ADVISED OF THE POSSIBILITY OF SUCH DAMAGES
local lawThis Limited Warranty Statement gives the Customer specific legal rights The Customer may also have other rights which vary from state to state in the United States from province to province in Canada and from countryregion to countryregion elsewhere in the world
reference guide
warranty information
53
To the extent this Limited Warranty Statement is inconsistent with local law this Statement shall be deemed modified to be consistent with such local law Under such local law certain disclaimers and limitations of this Statement may not apply to the Customer For example some states in the United States as well as some governments outside the United States (including provinces in Canada) mayPreclude the disclaimers and limitations in this Statement from limiting the statutory rights of a consumer (eg the United Kingdom)Otherwise restrict the ability of a manufacturer to enforce such disclaimers or limitations orGrant the Customer additional warranty rights specify the duration of implied warranties which the manufacturer cannot disclaim or not allow limitations on the duration of implied warrantiesFOR CONSUMER TRANSACTIONS IN AUSTRALIA AND NEW ZEALAND THE TERMS IN THIS LIMITED WARRANTY STATEMENT EXCEPT TO THE EXTENT LAWFULLY PERMITTED DO NOT EXCLUDE RESTRICT OR MODIFY AND ARE IN ADDITION TO THE MANDATORY STATUTORY RIGHTS APPLICABLE TO THE SALE OF THE COVERED HP PRODUCTS TO SUCH CUSTOMERS
hp officejet 4100 series
chapter 11
54
55
index
Numerics4-by-6 inch photo paper
load 10 12
AADF 7adjust
volume for fax 25align print cartridges 35Answer Ring Pattern 26automatic document feeder 7automatic reduction
fax 25
Bbest copy quality 13busy number
redial automatically 23
Ccancel
scan 18scheduled fax 21
cartridgesalign 35replace 33
cleanprint cartridges 35the exterior 32the glass 31white strip 32
colorenhance 14fax 20fax from front panel 20
contrastchange for fax 23photo color 14
copy 13 16change default settings 15enhance 14fit to page 16lighten or darken 14menu options 16number of copies 14photo 15quality 13reduce or enlarge 14settings 13 15
speed 13tutorial 4
Customer Support 45web site 45
Ddarken a copy 14date
setting 27default settings
restore 35director review 4distinctive ringing 26
Eenhance copies 14enlarge copy 14 16envelopes
load 9Error Correction Mode
(ECM) 25
Ffactory defaults
restore 35fast copy quality 13fax 28
adjust volume 25automated reports 22cancel fax forward 24cancel scheduled 21change Answer Ring
Pattern 26change contrast 23change resolution 22change settings 19control appearance 22create individual speed-dial
settings 26delete speed-dial
settings 27distinctive ringing 26Error Correction Mode
(ECM) 25forward faxes 24header 27in color 20in color from front panel 20manual reports 22
menu 29print reports 22receive 21receive manually 21redial busy or unanswered
number 23schedule 20send from front panel 19set automatic reduction 25set date and time 27set the number of rings 21settings 27 28setup menu options 29speed dials 19test 28
fit to page 16forward faxes 24
cancel 24front panel
display scroll speed 36enter text 28send a fax 19setting prompt delay 36tutorial 3
Gglass
cleaning 31greeting cards
load 11
Hhelp 1HP Customer Support 45
calling 45HP Director 4HP distribution center 49HP Officjet
preparing to ship 47HP papers
tips on loading 11
Iindividual speed-dial settings
create 26ink cartridges see print
cartridgesinkjet paper
load 11
index
hp officejet 4100 series56
Kkeypad
enter text 28
Llabels
load 12lighten copies 14load
change the paper type 12envelopes 9original in ADF 7paper 7photo paper 10 12postcards 10 12print cartridges 33set the paper size 12tips 11
Mmaintenance
align print cartridges 35clean print cartridges 35clean the exterior 32clean the glass 31clean the white strip 32normal sounds 36replace print cartridges 33restore factory defaults 35self-maintenance
sounds 36self-test report 32
menuscopy options 16fax 29fax setup 29maintenance 37print reports 37
Nnormal copy quality 13number of copies
set 14number of rings
set 21
Oorder print cartridges 60originals
load in ADF 7output tray 8
Ppaper
change default size for copy 12
change the type 12load 7recommended 7set the size 12tips on loading 11
paper size change for copy 12
paper trayload 7
phone numbers support services 45
photo paperload 10 12
photoscopy 15enhance copy 14
physical specifications 43postcards
load 10 12power
specifications 43print
envelopes 9fax reports 22self-test report 32
print cartridgesalign 35clean 35handling 32replace 33
prompt delaysetting 36
Qquick start
review the director 4use with a computer 4
Rreceive
fax 21redial
busy or unanswered number 23
reduce copy 14 16regulatory information 43reinstall software 40reports
generate automatically for fax 22
generate manually for fax 22
print 22self-test 32
resolution
change for fax 22restore factory settings 35returning your HP Officejet for
service 51
Sscan
from front panel 17stop 18
schedule a fax 20scroll speed
setting 36self-test report 32send
cancel forward faxes 24color fax 20color fax from front
panel 20forward faxes 24
settingscopy 13 15fax 27 28prompt delay 36scroll speed 36
setupadditional information 39menu 29
shippingyour HP Officejet 47
softwareremove and reinstall 40
soundsself-maintenance 36
specificationsphysical 43power 43
speed dials 19create individual
settings 26delete settings 27
stopscan 18scheduled fax 21
subscriber identification code 27
support services 45
Ttelephone line
multiple numbers 26telephone numbers 45text
enhance 14enter from front panel 28
time
index
reference guide 57
setting 27transparency film
recommended 7tips on loading 11
troubleshootingremove and reinstall
software 40T-shirt Transfer Iron-On
load 11tutorial
front panel 3make a copy 4
Uunanswered number
redial automatically 23
Vvolume
adjust 25
Wwarranty 45
service 51statement 51upgrades 51
white stripcleaning 32
hp officejet 4100 series
chapter 12
58
declaration of conformityAccording to ISOIEC Guide 22 and EN 45014
Manufacturerrsquos Name and Address
Hewlett-Packard Company 16399 West Bernardo Drive San Diego CA 92127-1899 USA
declares that the product
Product Name hp officejet 4100 series (Q1608A)
Model Number(s) officejet 4110 (Q1609A) officejet 4110xi (Q1610A) officejet 4110v (Q1611A) officejet 4105 (Q1612A) officejet 4105z (Q1613A) officejet 4115 (Q1614A)
Product Options All
conforms to the following Product Specifications
Safety EN609501992 +A1 A2 A3 A4 amp A11
IEC609501991 +A1 A2 A3 amp A4
UL1950CSA 222 No 950 3rd Edn 1995
NOM-019-SCFI-1993
EMC CISPR221993 +A1 amp A2 EN550221994 +A1 amp A2 -Class B
CISPR241997EN550241998
IEC 61000-3-21995 EN61000-3-21995
IEC 61000-3-31994 EN61000-3-31995
ASNZS 3548 1992
CNS13438 1997
FCC Part 15-Class B ICES-003 Issue 2 VCCI-2
GB 9254-1998
Telecom TBR21 1998
Supplementary Information
The Product herewith complies with the requirements of the Low Voltage Directive 7323EEC the EMC Directive 89336EEC and the RampTTE Directive 19995EC (ANNEX II) carries the CE marking accordingly
European Contact for regulatory topics only Your local Hewlett-Packard Sales and Service Office orHewlett-Packard GmbH
Department HQ-TRE Herrenberger Strasse 140 D-71034 Boumlblingen Germany (FAX + 49-7031-14-3143)
order mediaTo order media such as HP Premium Inkjet Paper HP Premium Inkjet Transparency Film HP Iron-On T-shirt Transfer paper or HP Greeting Cards go to
wwwhpshoppingcom
For orders in countries other than the US and Canada select other countries then click Yes to leave hpshoppingcom From this website you can access hpshoppingcom for your specific language or countryregion
order print cartridges
If you have Internet access you can get more information from the HP website at
wwwhpcomsupport
print cartridges hp reorder number
HP black print cartridge 56 19 ml black print cartridge
HP color print cartridgeHP tri-color print cartridge
57 17 ml color print cartridge28 8 ml color print cartridge
Visit the hp officejet information centerIt has everything you need to get the most value from your HP Officejet
bull Technical Supportbull Supplies and Ordering Informationbull Project Tipsbull Ways to Enhance Your Product
wwwhpcomsupport
copy 2003 Hewlett-Packard Company
Printed in the USA Mexico Germany Singapore or China
Q1608-90163Q1608-90163
Q1608-90163

reference guide
quick start
5
for macintosh users
Do one for the followingndash For OS 9 double-click the HP Photo and Imaging Director icon on the
desktopndash For OS X double-click the HP Photo and Imaging Director icon on the
dock
The following figure shows some of the features available through the HP Photo and Imaging Director for Macintosh Consult the legend for a brief explanation of a specific feature
feature purpose
1 Select Device Use this feature to select the product you want to use from the list of installed HP products
2 Settings Use this feature to view or change various settings for your HP device such as print scan or copy
3 Status Displays the status window for all-in-one devices only
4 Send a Fax Use this feature to send a fax and access fax settings
5 Scan Picture Scans an image and displays it in the HP Photo amp Imaging Gallery
6 Scan Document Scans text and displays it in the selected destination text editing software program
7 Make Copies Displays the Copy dialog box where you can select the copy quality the number of copies the color the size and can start a copy
8 View amp Print Displays the HP Photo amp Imaging Gallery where you can view and edit images use HP Photo Prints make and print a photo album e-mail an image unload an image to the Web or copy an image to another application
9 Help Provides access to HP Photo amp Imaging Help which provides software help a product tour and troubleshooting information
10 Click this arrow to access tool tips which explain each of the Director options
hp officejet 4100 series
chapter 2
6
the hp photo and imaging director for macintosh OS X
feature purpose
1 Select Device Use this feature to select the product you want to use from the list of installed HP products
2 Settings Use this feature to view or change various settings for your HP device such as print scan or copy
3 Scan Picture Scans an image and displays it in the HP Photo and Imaging Gallery
4 Scan Document Scans text and displays it in a text editing software program
5 Make Copies Displays the Copy dialog box where you can select the copy quality the number of copies the color the size and can start a copy
6 Send Fax Use this feature to send a fax
7 Maintain Printer Accesses the HP Inkjet Utility where you can clean and align the print cartridges check print cartridge ink levels print a test or sample page register your printer or access information on product support
8 View and Print Displays the HP Photo and Imaging Gallery where you can view and edit images
1 2
3 4 5 6 7 8
3
7
load originals and load paper
You can make copies from originals loaded on the automatic document feeder (ADF) You can also print and copy onto a variety of paper types weights sizes and transparency films It is important however that you choose the right paper and make sure that it is loaded correctly and not damaged
load originalsYou can copy or scan any original by placing it in the automatic document feeder
1 Load your original in the automatic document feeder
Note Do not feed photos smaller than 35-by-5 inches through the automatic document feeder
2 Slide the right and left paper guides in until they stop at the edges of the paper
load paperFollowing is the basic procedure for loading paper There are specific considerations for loading certain types of paper transparency film postcards and envelopes After you review this procedure see tips for loading other types of paper in the paper tray on page 11 load 4 x 6 inch photo paper on page 10 load envelopes on page 9 and load postcards on page 10
For best results adjust the paper settings each time you change paper types or paper sizes For more information see set the paper type on page 12
to load the paper tray
1 Lower the paper tray and extend the paper-tray extender
2 Slide the paper-width guide on the left to its outermost position
automatic document feeder (ADF)
hp officejet 4100 series
chapter 3
8
3 Tap the stack on a flat surface to align the edges of the paper and then check the paper for the followingndash Make sure it is free of rips dust wrinkles and curled or bent edgesndash Make sure all the paper in the stack is the same size and type unless
you are working with photo paper
4 Insert paper into the paper tray print-side down until it stops To avoid bending the paper make sure you do not push the paper in too far or push too hard If you are using letterhead insert the top of the page firstBe careful not to use too much or too little paper Check that the stack of paper contains several sheets but is no higher than the top of the paper-width guide
5 Slide the paper-width guide in until it stops at the edge of the paper Make sure that the paper stack lies flat in the paper tray and fits under the tab of the paper-width guide
6 Extend the output-tray
reference guide
load originals and load paper
9
load envelopesUse the print feature of your software to print to envelopes with your HP Officejet Do not use shiny or embossed envelopes or envelopes that have clasps or windows You can load the paper tray with one or multiple envelopes
1 Remove all paper from the paper tray
2 Slide an envelope into the tray with the envelope flap up and to the left (print-side down) until it stops
3 Adjust the paper-width guide against the envelope until it stopsBe careful not to bend the envelope If you are loading multiple envelopes make sure the envelopes fit within the tray (do not overload it)Consult the help files in your word processing software for details on how to format text for printing on envelopes
hp officejet 4100 series
chapter 3
10
load 4 x 6 inch photo paperFollowing is the procedure for loading 4-by-6 inch photo paper into your HP Officejet
1 Remove all paper from the paper tray and then slide a stack of photo paper into the tray until it stopsMake sure the print-side faces downIf the photo paper you are using has perforated tabs load the photo paper so that the tabs are closest to you
2 Adjust the paper-width guide against the stack of photo paper until it stopsMake sure the photo paper fits within the tray (do not overload it)
Note Make sure you set the paper type and paper size before printing See set the paper type on page 12 and set the paper size on page 12
load postcardsFollowing is the procedure for loading postcards
1 Remove all paper from the paper tray and then slide a stack of cards into the tray until they stopMake sure the print-side faces down
reference guide
load originals and load paper
11
2 Adjust the paper-width guide against the cards until it stops Make sure the cards fit within the tray (do not overload it)
tips for loading other types of paper in the paper trayThe following table provides guidelines for loading certain types of paper and transparency film For best results adjust the paper settings each time you change paper types and paper sizes For more information see set the paper type on page 12
Note HP Photo Paper and HP Photo Paper Glossy 4-by-6 are not recommended for printing with your HP Officejet To print photos use HP Everyday Photo Paper For your best photo printing needs use HP Premium Plus Photo Paper
paper tips
HP papers bull HP Premium Inkjet Paper Locate the gray arrow on the nonprinting side of the paper and then insert paper with the arrow side facing up
bull HP Premium or Premium Plus Photo Paper Load the glossy (print) side down (To prevent curling keep photo paper sealed in the original package until you are ready to use it) Always load at least five sheets of regular paper in the paper tray first and then place the photo paper on top of the regular paper
bull HP Premium Inkjet Transparency Film Insert the film so that the white transparency strip (with arrows and the HP logo) is on top and is going into the tray first
bull HP Inkjet T-shirt Transfer Iron-On Flatten the transfer sheet completely before using it do not load curled sheets (To prevent curling keep transfer sheets sealed in the original package until you are ready to use them) Manually feed one sheet at a time with the unprinted side facing down (the blue stripe faces up)
bull HP Matte Greeting Cards HP Glossy Greeting Cards or HP Felt-Textured Greeting Cards Insert a small stack of HP greeting-card paper with the print-side down into the paper tray until it stops
hp officejet 4100 series
chapter 3
12
set the paper typeIf you want to use a different type of paper such as photo paper transparency film Iron-On T-shirt transfers or brochures simply load that paper in the paper tray You must then change the paper type settings to ensure the best print quality
HP recommends paper type settings according to the type of paper you are using
This setting refers to copy options only If you want to set the paper type for printing from a computer set the properties in the Print dialog box of the software
1 Press the Copy button until Paper Type appears
2 Press until the appropriate paper type appears
3 Press Enter to choose the displayed paper type
set the paper sizeThe HP Officejet can use Letter Legal or A4 paper Use the following procedure to set the paper size for copy options
1 Press the Copy button until Copy Paper Size appears
2 Press until the appropriate paper size appears
3 Press Enter to choose the displayed paper size
To avoid jams remove papers from the output tray frequently The output tray capacity is affected by the type of paper and the amount of ink you are using For more information about output-tray capacity see technical information in the HP Photo amp Imaging Help
Labels(works only with printing)
bull Always use letter-size or A4-size label sheets designed for use with HP inkjet products (like Avery Inkjet Labels) and make sure that the labels are not over two years old
bull Fan the stack of labels to make sure none of the pages are sticking together
bull Place a stack of label sheets on top of standard paper in the paper tray print-side down Do not insert labels one sheet at a time
Postcards (works only with printing)
Insert a stack of postcards or hagaki cards with the print-side down into the paper tray until it stops Line the postcards up on the right side of the paper tray slide the paper-width guide up against the left side of the cards until it stops
4-by-6 inch photo paper (works only with printing)
Insert the photo paper with the print-side down into the paper tray until it stops Place the long edge of the photo paper against the right side of the paper tray and slide the paper-width guide up against the long edge of the photo paper until it stops If the photo paper you are using has perforated tabs load the photo paper so that the tabs are closest to you
paper tips
4
13
use the copy features
The copy features let you do the following
bull Produce high-quality color and black-and-white copiesbull Reduce or enlarge the size of the copies you make from 25 to 200 or
50 to 200 (depending on your model) of the copyrsquos original sizebull Make the copy lighter or darker select the number of copies and specify
the quality of the copies you makebull Use special copying features to make high-quality copies of photos using
special photo paper or to create transparencies
make copiesYou can make copies using the front panel of your HP Officejet or by using the HP Officejet software on your computer Many copy features are available using either method However you may find that the software offers easier access to special copy features
All copy settings that you select on the front panel are reset two minutes after the HP Officejet completes the copy unless you save the settings as the default settings as described in change settings for all copy tasks on page 15
make a copy1 Load the paper tray with the appropriate paper
2 Load your original
3 Press the Copy button
4 Use the keypad or press the or to enter the number of copies
5 Press Start Black or Start Color
Tip To make a single copy press the Copy button and then press Start Black or Start Color
Note Make sure that the color print cartridge is installed in your HP Officejet Both print cartridges must be installed when making a copy
increase copy speed or qualityThe HP Officejet provides three options that affect copy speed and quality
bull Best produces the highest quality for all paper types Best copies more slowly than the other quality settings
bull Normal delivers high-quality output and is the recommended setting for most of your copying Normal copies faster than Best
bull Fast copies faster than the Normal setting The text is of comparable quality to the Normal setting but the graphics may be of lower quality Using Fast also reduces the frequency of replacing your print cartridges because it uses less ink
hp officejet 4100 series
chapter 4
14
1 Load your original
2 Press Copy until Copy Quality appears
3 Press until the desired quality setting appears and then press Enter to select it
4 Press Start Black or Start Color
set the number of copies You can set the number of copies using the front panel
1 Press the Copy button
2 Use the keypad or press the or to enter the number of copies
3 Press Enter
4 Press Start Black or Start Color
Tip If you hold down the right arrow button then after reaching 10 the number of copies changes by increments of five to make it easier to set a large number of copies
reduce or enlarge a copyYou can reduce or enlarge a copy of an original using ReduceEnlarge
For more information about additional copy options such as Fit to Page see perform special copy jobs on page 15
1 Press Copy until ReduceEnlarge appears
2 Press until the appropriate ReduceEnlarge option appears and then press Enter to select it
3 If you select Custom 100 Set Custom Size appears Use the arrow keys or type a percentage on the keypad
4 Press Enter when the desired percentage is displayed
5 Press Start Black or Start Color
make copies lighter or darkerUse LighterDarker to adjust the lightness and darkness of the copies you make
1 Press Copy until LighterDarker appearsThe range of LighterDarker values are represented as circles on a scale on the front-panel display
2 Press to lighten the copy or to darken it The circle moves to the left or right depending on the arrow button you press
3 Press Enter to select the setting
4 Press Start Black or Start Color
enhance text sharpness and photo colorsYou can use Text to sharpen edges of black text Photo to enhance light colors in your photographs or Mixed if your original contains a photograph and text You can also select None to turn off all enhancements
reference guide
use the copy features
15
Text enhancement is the default option You can turn off Text enhancement by selecting Photo Mixed or None if the following occur
bull Stray dots of color surround some text on your copiesbull Large black typefaces look splotchy (not smooth)bull Thin colored objects or lines contain black sectionsbull Horizontal grainy or white bands appear in light- to medium-gray areas
1 Press Copy until Enhancements appears
2 Press until the desired enhancement (Text Photo Mixed or None) appears
3 Press Enter to select the setting
4 Press Start Black or Start Color
change settings for all copy tasksSave the copy settings you use most often by setting them as the default This includes changes to Copy options such as Paper Type and Paper Size as well as other Copy settings on the front panel such as Number of Copies and Copy Quality
1 Make any desired changes to the copy options
2 Press Copy until Set New Defaults appears
3 Press until Yes appears
4 Press Enter to set the options as a defaultYour settings are saved
perform special copy jobsIn addition to supporting standard copying your HP Officejet can also copy a photo or fit a copy to the page
copy a photoWhen copying a photo you should select options for the correct paper type and photo enhancement
1 Load the photo in the automatic document feeder (ADF)For more information see load originals
2 If you are using photo paper load it in the paper tray
3 Press Copy until Paper Type appears
4 Press until Premium Photo appears and then press Enter to select it
5 Press Copy until Enhancements appears
6 Press until Photo appears and then press Enter to select it
7 Press Start Black or Start Color
Tip To enlarge a photo automatically to a full page use the Photo Fit to Page button
hp officejet 4100 series
chapter 4
16
fit a copy to the pageUse the Photo Fit to Page button when you want to automatically enlarge or reduce your original to fit Letter or A4 size paper You can enlarge a small photo to fit a full-size page as shown below Using Photo Fit to Page may prevent unwanted cropping of text or images around the margins
1 Load the original in the ADFFor more information see load originals on page 7
2 Press the Photo Fit to Page button
Note Do not press the Fax Copy or Scan buttons on the front panel once you have pressed the Photo Fit to Page button
3 Press until the appropriate paper type appears and then press Enter to select it
4 Press Start Black or Start Color
copy optionsThe following diagram shows the options that are available when you press Copy
Original Fit to Page
Plain PaperPhoto PaperTransparency
Actual sizeCustom 100Full Page 91Legal gt Ltr 72
ReduceEnlarge Paper Type
NoYes
TextPhotoMixedNone
Enhancements Set New Defaults
LetterLegalA4
Copy Paper Size
The sizes vary by countryregion
LighterDarker
NormalFastBest
Copy Quality
To cycle through the copy options press Copy repeatedly
Press and to move to the setting you want within one of the copy optionsPress Enter to select the displayed setting
5
17
use the scan features
Scanning is the process of converting pictures and text into an electronic format for your computer You can scan photos and text documents
Because the scanned image or text is in an electronic format you can bring it into your word processor or graphics program and modify it to suit your needs You can do the following
bull Scan photos of your kids and e-mail them to relatives create a photographic inventory of your house or office or create an electronic scrapbook
bull Scan text from an article into your word processor and quote it in a report saving you a lot of retyping
Tip To use the scan features your HP Officejet and computer must be connected and turned on The HP Officejet software must also be installed and running on your computer prior to scanning To verify that the HP Officejet software is running on Windows look for a status icon in the system tray On a Macintosh the HP Officejet software is always running
Note High resolution scanning (600 dpi or higher) requires a large amount hard disk space If there is not enough hard disk space available your system may stall
scan an originalYou can start a scan from your HP Officejet or from the HP Officejet software on your computer
For more information about scanning your pictures or documents from the HP Officejet software see scan pictures and documents in the HP Photo amp Imaging Help
to scan an original from your hp officejet
1 Load your original in the automatic document feeder (ADF)For more information see load originals on page 7
2 Press Scan
3 Select the Scan to destination by pressing or or by pressing the Scan button repeatedlyThe default destination is the HP Photo amp Imaging Gallery Any applications on your computer that are supported by the HP Officejet also appear in the Scan to list
4 Press Start Black or Start ColorThe original is scanned and the image is sent to selected destinationFor more information about using the HP Photo amp Imaging Gallery see manage images in how to use the software
hp officejet 4100 series
chapter 5
18
stop scanningYou can stop a scan by pressing the Cancel button located on the front panel
6
19
use the fax features
Using your HP Officejet you can
bull Send and receive paper faxesbull Send computer faxes (reference the HP Photo amp Imaging Help)bull Send and receive color faxes
Fax features are available only on some HP Officejets
send a faxYou can send a fax in a variety of configurations These include the following
bull send a paper fax (using the front panel or computer)bull send a paper fax with a PC-generated cover page (using the computer)bull send a file with or without a cover page (using the computer)bull send a PC-generated cover page as a single-page fax (using the
computer)
Note For information on sending a fax using the computer reference the HP Photo amp Imaging Help
Note By default your HP Officejet prints a report only if there is a problem with sending or receiving a fax A confirmation message indicating whether an item was successfully sent appears briefly on the front-panel display after each transaction If you need printed confirmation that your faxes are successfully sent see print reports on page 22 for information about report options
Note If you have not done so set the date and time See set the date and time on page 27
send a fax from your hp officejet1 Load your originals in the ADF
For more information see load originals on page 7
2 Enter the fax number using the keypad or press Speed Dial until the desired speed-dial entry appearsFor more information on speed dialing see set up speed dialing in the HP Photo amp Imaging Help
3 Press Start Black or Start Color
change settings and use speed dials before sending a fax1 Load your originals in the ADF
For more information see load originals on page 7
2 Enter the fax number using the keypad or press Speed Dial until the desired speed-dial entry appears
hp officejet 4100 series
chapter 6
20
For more information on speed dialing see set up speed dialing in the HP Photo amp Imaging Help
3 Press Enter
4 Press Fax to scroll through the fax options
5 When you reach the option whose setting you wish to change press to scroll through the setting options
6 When you reach the setting you want to change press Enter to accept the setting
7 Press Start Black or Start Color
send a color faxYou can send and receive color faxes to and from other color fax machines If you are faxing from the front panel and your HP Officejet determines that the recipient has a black-and-white fax unit it sends the fax in black and white If you are faxing from the software and your HP Officejet determines that the recipient has a black-and-white fax unit the HP Officejet prompts you to try sending the fax in black and white
We recommend that you use only color originals for color faxing The color originals must be loaded in the ADF you cannot send a color fax from memory using the scan and fax features To fax in color to multiple recipients send the fax from the Director or your software program
to send a color fax from the front panel
1 Load your originals in the ADF For more information see load originals on page 7
2 Enter the fax number using the keypad or press Speed Dial until the desired speed-dial entry appearsFor more information on creating speed-dial entries see set up speed dialing in the HP Photo amp Imaging Help
3 Press Start Color
schedule a faxYou can schedule a black and white fax to be sent later during the same day (for example when telephone lines are not as busy) If you use the front panel you can select a single recipient
When the specified time is reached your fax is automatically sent as soon as a connection can be made
1 Load your originals in the ADF
2 Enter the fax number using the keypad or press Speed Dial until the desired speed-dial entry appears
3 Press Enter
4 Press Fax to scroll through the fax options
5 Stop scrolling when you reach the How to Fax menu
6 Press to scroll through the setting options
7 Stop scrolling when you reach the Send Fax Later option
reference guide
use the fax features
21
8 Press Enter
9 Enter the Send Time using the numeric keypad
10 At the prompt press 1 for AM or 2 for PM
11 When Store Fax Now appears press 1 for Yes or 2 for NoIf 1 is selected the document is scanned to memory and is sent at the selected time If 2 is selected and you havenrsquot loaded your originals a message appears reminding you to load the original before the send time
12 Press Start Black
cancel a scheduled faxYou can cancel a fax stored in memory or one that is currently in progress
bull Press Cancel to cancel the scheduled fax
receive a faxYour HP Officejet is set to print received faxes automatically If you receive a legal-size fax and your HP Officejet is not currently configured to use legal-sized paper the unit automatically reduces the fax so that it fits on the paper that is loaded For more information see set automatic reduction on page 25
If you have an answering machine connected to the same line as your HP Officejet you may need to set the number of rings required before the HP Officejet begins receiving the fax The default number of rings before the HP Officejet receives a fax is 5
set the number of rings before answeringYou can specify how many rings should occur before your HP Officejet automatically answers the phone When you run the Fax Setup Wizard this is set automatically
If you do not want your HP Officejet to answer the phone Rings to Answer should be set to No Answer
1 Press Setup
2 Press 3 then press 3 againThis selects the Basic Fax Setup menu then the Rings to Answer option
3 Use the arrow keys to choose the number of rings and then press Enter
receive a fax manuallyBefore manually receiving a fax we recommend that you remove any originals from your HP Officejet so that they are not accidentally processed
Verify that Rings to Answer is set to No Answer
1 When your HP Officejet rings pick up the handset of a telephone that is on the same telephone line as your HP Officejet
2 If you hear fax tones press Start Black or Start Color or if you are receiving from an extension phone (on the same telephone line as your HP Officejet but not connected directly to it) press 1 2 3 on your phone
3 After you are finished hang up the telephone
hp officejet 4100 series
chapter 6
22
print reportsYou can set up your HP Officejet to print error reports and confirmation reports for each fax you send and receive You can also manually print reports as you need them
generate reports automaticallyThis setting lets you configure your HP Officejet so that it automatically prints error and confirmation reports
1 Press Setup
2 Press 1 then press 5This selects Print Report then selects Automatic Reports Setup
3 Press to scroll through the following report typesndash Every Error which prints whenever there is any kind of fax error
(default)ndash Send Error which prints whenever there is a transmission errorndash Receive Error which prints whenever there is a receiving errorndash Every Fax which confirms every time a fax is sent or receivedndash Send Only which prints every time a fax is sentndash Off which does not print fax reports
4 When you reach the report that you want press Enter
generate reports manuallyThis setting lets you print reports manually From the computer you can only print the Speed-Dial List and the Fax Log
to print reports from the front panel
1 Press Setup then press 1This selects the Print Report menu
2 Press to scroll through the following report typesndash Last Transaction which prints details of the last fax transactionndash Fax Log which prints a log of the last 30 fax transactionsndash Speed Dial List which prints a list of programmed speed dialsndash Self-Test Report which prints a report to assist you in diagnosing print
and alignment problems For more information see print a self-test report on page 32
ndash Automatic Reports Setup which is the automatic reports setting described in generate reports automatically on page 22
3 When you reach the report that you want press Enter
control resolution and contrastYour HP Officejet lets you change the resolution and contrast of documents that you are sending
change resolutionResolution affects the transmission speed and quality of faxed documents
reference guide
use the fax features
23
to change the resolution from the front panel
1 Load your originals in the ADF
2 Enter the fax number using the keypad or press Speed Dial until the desired speed-dial entry appears
3 Press Enter
4 Press Fax to scroll through the fax options
5 Stop scrolling when you reach the Resolution menu
6 Press until the desired resolution quality appears (Standard Photo Fine Very Fine)
7 Press EnterYour HP Officejet only faxes at the highest resolution supported by the receiving faxIf you choose Photo be aware that the faxing process takes longer to complete When faxing photographs we recommend that you choose Photo
change contrastChange this setting if you want a black-and-white fax to be darker or lighter than the original
to change the fax contrast from the front panel
1 Load your originals in the ADF
2 Enter the fax number using the keypad or press Speed Dial until the desired speed-dial entry appears
3 Press Enter
4 Press Fax to scroll through the fax options
5 Stop scrolling when you reach the LighterDarker menuThe range of values appears as a circle on a scale on the display
6 Press to lighten the fax or to darken itThe circle moves left or right as you press a button
7 Press Enter to accept the setting you selected
change other fax settings
redial a number automaticallyYou can set your HP Officejet to redial a busy and an unanswered number automatically If you initiated a fax from the computer the computer must be left on for the redialing process to work correctly
1 Press Setup
2 Press 4This selects the Advanced Fax Setup menu
3 Choose one of the following optionsndash Press 3
hp officejet 4100 series
chapter 6
24
This selects the Busy Redial option The default setting for Busy Redial is Redial
ndash Press 4This selects the No Answer Redial option The default setting for No Answer Redial is No Redial
4 Press Enter
5 Press to select Redial or No Redial as desired
6 Press Enter
forward faxes to another numberWith fax forwarding you can send a fax that you receive to another fax number during the next 24-hour period
to forward faxes from the front panel
1 Press Setup
2 Press 3 then press 7This selects the Basic Fax Setup menu then selects the Fax Forwarding Black Only option
3 At the prompt enter the Fax Number to which you wish to send the fax
4 Press Enter
5 Enter the Start Date using the numeric keypad
6 Enter the Start Time using the numeric keypad
7 At the prompt press 1 for AM or 2 for PM
8 Enter the Stop Date using the numeric keypadFax Forwarding On appears on the display
edit or cancel fax forwardingOnce fax forwarding is enabled you may find that you need to change the number you are faxing to or the start and stop times you entered You may wish to cancel your fax forwarding setup altogether Follow the steps below to edit or turn off fax forwarding
to edit fax forwarding from the front panel
1 Press Setup
2 Press 3 then press 7This selects the Basic Fax Setup menu then selects the Fax Forwarding Black Only option
3 Forwarding is ON 1=Edit 2=Cancel appears on the display after a moment Press 1 to edit the number you wish to fax to or to change the start and stop times Follow the messages on the display
to cancel fax forwarding from the front panelbull Press Cancel
OR
reference guide
use the fax features
25
Follow the steps in edit or cancel fax forwarding on page 24 When Forwarding is ON 1=Edit 2=Cancel appears on the display press 2 to cancel fax forwarding
use error correction modeError Correction Mode (ECM) eliminates data lost due to poor phone lines by detecting errors that occur during transmission and automatically requesting retransmission of the erroneous portion Phone charges are unaffected or may even be reduced on good phone lines On poor phone lines ECM increases sending time and phone charges but sends the data much more reliably Turn ECM off (the default setting is on) only if it increases phone charges substantially and you can accept poorer quality in exchange for reduced charges
to change the ECM setting from the front panel
1 Press Setup
2 Press 4 then press 7This selects the Advanced Fax Setup menu then selects the Error Correction Mode option
3 Press to switch between On and Off
4 Press Enter to accept the setting you selected
set automatic reductionThis setting determines what your HP Officejet does if it receives a fax that is too large for the default paper size With this setting on (the default) the image is reduced so that it fits on one page With this feature off information that doesnrsquot fit on the first page is printed on a second page
1 Press Setup
2 Press 4 then press 5This selects the Advanced Fax Setup menu then selects the Automatic Reduction option
3 Press to switch between On and Off
4 Press Enter to accept the setting you selected
adjust the volumeYour HP Officejet provides three levels for adjusting the ring and speaker volume The ring volume is the volume of the phone ringer The speaker volume is the volume of everything else such as the dial and fax tones The default setting is Soft
1 Press Setup
2 Press 3 then press 6This selects the Basic Fax Setup menu then selects the Ring and Beep Volume option
3 Press to select one of the options Soft Loud or Off
4 Press Enter to accept the setting you selected
hp officejet 4100 series
chapter 6
26
change the answer ring pattern (distinctive ringing)Distinctive ringing is a feature offered by phone companies that allows several phone numbers to share the same line Each number has a specific ring pattern If you do not have this service use the default ring pattern which is All Rings
If you connect your HP Officejet to a line with distinctive ringing have your telephone company assign one ring pattern to voice calls and another to fax calls (double or triple rings are best for a fax number)
1 Press Setup
2 Press 4 then press 2This selects the Advanced Fax Setup menu then selects the Answer Ring Pattern option
3 Press to scroll through these options All Rings Single Rings Double Rings Triple Rings and Double amp Triple
4 When the ring pattern that the phone company established for this number appears press Enter
Tip We recommend that you use Double Rings or Triple Rings for fax
set up speed dialingThrough your HP Officejet or your computer you can assign entries to fax numbers you use often This lets you dial those numbers quickly using the front panelrsquos Speed Dial button and a one- or two-digit entry You can create up to 100 individual speed-dial entries (the maximum for some models is 70)
We recommend that you use the software to set up speed-dial settings
Note A speed-dial entry can only be associated with one phone number speed-dial groups are not supported
For more information see set up speed dialing in the hp photo amp imaging help
create individual speed-dial settingsYou can enter fax numbers that you will reuse frequently
1 Press Setup
2 Press 2 then press 1This selects the Speed Dial Setup menu then selects the Individual Speed Dial option
3 Press EnterThe first unassigned speed-dial entry appears on the display
4 Press Enter to select the displayed speed-dial entry
5 Enter the Fax Number to assign to that entry then press EnterThe fax number can be up to 50 digits in length
Tip To enter a three-second pause within a number sequence press Symbols to display a dash
6 Enter the personrsquos or companyrsquos name then press Enter
reference guide
use the fax features
27
The name is limited to 13 characters in lengthFor more information see enter text on page 28
7 After Enter Another appears press 1 (Yes) if you want to set up another number or press 2 (No) to exit
delete speed-dial settingsFollow these steps to delete an individual speed-dial entry
1 Press Setup
2 Press 2 then press 2 againThis selects Speed Dial Setup then selects Delete Speed Dial
3 Press until the individual entry that you want to delete appears then press Enter
set basic fax settings using the front panelWe recommend that you use the Fax Setup Wizard in the HP Officejet software to configure all your basic fax settings however you can also access these settings from the front panel
Note In the US regulations require that your name and phone number appear on every fax The minimum settings that we recommend are described in the following topics
set the date and timeFollow these steps to set the date and time manually
1 Press Setup
2 Press 3 then press 1This selects the Basic Fax Setup menu then selects the Date and Time option
3 Follow the prompts on the display to enter the date and time using the keypad
Tip Use only the last two digits for the year
Tip When you enter a single-digit date or time type a leading zero before the single digit for example 0345 or 08-03-02
After you are done the date and time appear on the display
Warning Cutting off power to the HP Officejet causes the selected date and time to be lost However name and fax number information is not lost
set the fax headerFollow these steps to enter your name and fax number in the header
Note In Hungary the subscriber identification code (fax header) can be set or changed only by authorized personnel For more information contact your authorized HP dealer
1 Press Setup
2 Press 3 then press 2
hp officejet 4100 series
chapter 6
28
This selects the Basic Fax Setup menu then selects the Fax Header option
3 Enter your personal or company name at the prompt Use the guidelines provided in the next section under enter text
4 Press Enter
5 Enter your fax number using the numeric keypad
6 Press Enter
enter textThe following list provides tips for entering text using the front-panel keypad
bull Press the keypad numbers that correspond to the letters of a name
bull Press a button multiple times to see a letter first in uppercase and then in lowercase
bull After the correct letter appears press and then press the number that corresponds to the next letter in the name Again press multiple times until the correct letter appears
bull To insert a space press Space ()bull To enter a symbol such as press Symbols () to scroll through the list of
available symbolsbull If you make a mistake press to clear it and then make the correct
entrybull After you are done entering text press Enter to store your entries
check for dial toneBefore using the fax features verify that the connections are correctly established
1 Press Fax
2 Listen for a dial tone
3 If you do not hear a dial tone check the connections
4 Press Cancel to hang up
ABC These letters correspond to this number and so on
2
JKL To get this character J j K k L l 5
5 Press 5 this many times 1 2 3 4 5 6 7
reference guide
use the fax features
29
fax job menuThe following options become available when the Fax button is pressed
setup menu for fax commandsThe following fax settings are available in the Setup menu
Enter Fax or Speed Dial
FineVery FinePhotoStandard
Fax Number Resolution LighterDarker
Enter a fax number or speed dialWhen the Fax button is pressed
Press and to move to the option you wantPress Enter to select the displayed setting
NoYes
Set New Defaults
Send Fax NowFax from MemorySend Fax LaterPoll to Receive
How to Fax
1Automatic Reports Setup
2Answer Ring Pattern
3Busy Redial
4No Answer Redial
5Automatic Reduction
6Backup Fax Reception
7Error Correction Mode
3Basic Fax Setup 4Advanced Fax Setup
Press Setup to display the menu options
Press and to move to the setting you wantPress Enter to select the displayed setting
1Date and Time
2Fax Header
3Rings to Answer
4Paper Size
5Tone or Pulse Dialing
6Ring and Beep Volume
7Fax Forwarding Black Only
2Speed Dial Setup
1Individual Speed Dial
2Delete Speed Dial
3Print Speed Dial List
hp officejet 4100 series
chapter 6
30
7
31
maintain your hp officejet
This section provides instructions for keeping your HP Officejet in top working condition Perform these maintenance procedures as necessary
clean the glassDirty glass from dust smudges hair and so on slows down performance and affects the accuracy of features such as Fit to Page and Copy
1 Turn off the unit unplug the power cord and raise the scanner lid
2 Clean the glass with a soft cloth or sponge slightly moistened with a nonabrasive glass cleaner
Caution Do not use abrasives acetone benzene or carbon tetrachloride on the glass these can damage it Do not place liquids directly on the glass They may seep under it and damage the unit
3 Dry the glass with a chamois or cellulose sponge to prevent spotting
hp officejet 4100 series
chapter 7
32
clean the white stripMinor debris can accumulate on the white strip located underneath the scannerrsquos lid
1 Turn off the unit unplug the power cord and raise the scanner lid
2 Clean the white strip with a soft cloth or sponge slightly moistened with a mild soap and warm water
3 Wash the strip gently to loosen debris do not scrub the strip
4 Dry the strip with a chamois or soft cloth
Caution Do not use paper-based wipes as these may scratch the strip
5 If this does not clean the strip well enough repeat the previous steps using isopropyl (rubbing) alcohol and wipe the strip thoroughly with a damp cloth to remove any residual alcohol
clean the exterior Use a soft damp lint-free cloth to wipe dust smudges and stains off the case The interior of the unit does not require cleaning Keep fluids away from the interior of the unit as well as the front panel
work with print cartridgesTo ensure the best print quality from your HP Officejet you will need to perform some simple maintenance procedures and when prompted by a front-panel message replace the print cartridges
print a self-test reportIf you are experiencing problems with printing before cleaning or replacing the print cartridges you should print a Self-Test Report This report provides useful information about your print cartridges including status information
1 Press Setup
2 Press 1 then press 4This selects Print Report and then selects Self-Test Report
3 Press Start Black or Start ColorA Self-Test Report is printed for your HP Officejet
handle print cartridgesBefore you replace or clean a print cartridge you should know the part names and how to handle the print cartridge
reference guide
maintain your hp officejet
33
replace the print cartridgesFront-panel messages appear to let you know that you should replace your print cartridges
See order print cartridges on the back cover for information on ordering replacement print cartridges
1 Turn on the unit then lift open the print cartridge access doorThe print carriage moves into view
2 After the carriage stops moving push down on the print cartridge down to release it and then pull it toward you out of its slot
Plastic tape with pink tab(must be removed)
Copper contactsInk nozzles under tape
Do not touch the copper contacts or the ink nozzles
print cartridge access door
hp officejet 4100 series
chapter 7
34
Note It is normal to see ink build-up in the print cartridge slots
3 Remove the new print cartridge from its packaging and being careful to touch only the bright pink plastic tab gently remove the plastic tape to uncover the ink nozzles
Caution Do not touch the copper contacts or ink nozzles
Once you have removed the plastic tape install the print cartridge immediately to prevent the ink from drying in the nozzles
4 Push the new print cartridge into the appropriate slot at a slight angle until it clicks into place
Caution Do not attempt to push the cartridge straight into the slot It must slide in at a slight angle
The tri-color print cartridge goes on the left and the black cartridge goes on the right
5 Close the print cartridge access door
reference guide
maintain your hp officejet
35
align the print cartridgesThe HP Officejet prompts you to align cartridges every time you install or replace a print cartridge Aligning the cartridges ensures high-quality output
To align the print cartridges when prompted
1 Press Enter on the front panelAn align cartridges (test pattern) page prints
2 Load the align cartridges page face down in the ADF between the paper-width guides and press the Enter button again
3 Recycle or discard the page
To align the cartridges at any other time
1 Press Setup
2 Press 5 then press 2This selects the Maintenance menu and then selects the Align Print Cartridge option
3 Press EnterAn align cartridges (test pattern) page prints
4 Load the align cartridges page face down in the ADF between the paper-width guides and press the Enter button again
5 Recycle or discard the page
clean the print cartridgesUse this feature when the Self-Test Report shows streaking or white lines through any of the colored bars Do not clean print cartridges unnecessarily This wastes ink and shortens the life of the ink nozzles
1 Press Setup
2 Press 5 then press 1This selects the Maintenance menu and then selects the Clean Print Cartridge optionA page of patterns is printed The cartridges are cleaned Recycle or discard the pageIf copy or print quality still seem poor after you clean the print cartridges replace the print cartridge that is affected
restore factory defaultsYou can restore the original factory settings to what they were when you purchased your HP Officejet Choosing to restore your factory defaults restores all settings except date information and any scan settings you may have set
You can perform this process from the front panel only
1 Press Setup
2 Press 5 then press 3This selects Maintenance and then selects Restore Factory DefaultsThe factory default settings are restored
hp officejet 4100 series
chapter 7
36
set scroll speedThe Scroll Speed option lets you control the rate that text messages appear in the front-panel display You can choose Normal Fast or Slow The default is Normal
1 Press Setup
2 Press 5 then press 6This selects Maintenance and then selects Set Scroll Speed
3 Press until the desired speed appears then press Enter
set the prompt delay timeThe Prompt Delay option lets you control the amount of time before a message is displayed in the front-panel display You can choose Normal Fast or Slow The default is Normal
1 Press Setup
2 Press 5 then press 7This selects Maintenance and then selects Set Prompt Delay Time
3 Press until the delay time appears then press Enter
self-maintenance sounds During the life of your product you may hear various mechanical sounds This is a normal part of your unitrsquos self-maintenance
reference guide
maintain your hp officejet
37
setup menu optionsThe following options are available from the Setup button
1Last Transaction
2Fax Log
3Speed Dial List
4Self-Test Report
5Automatic Reports Setup
1Print Report
Use Setup to display the Print Report Speed Dial Setup Basic Fax Setup Advanced Fax Setup and Maintenance options
Press and to move to the setting you wantPress Enter to select the displayed setting
1Clean Print Cartridges
2Align Print Cartridges
3Restore Factory Defaults
4Reprint Faxes in Memory
5Set Language amp CountryRegion
6Set Scroll Speed
7Set Prompt Delay Time
5Maintenance2Speed Dial Setup
3Basic Fax Setup
4Advanced Fax Setup
1Individual Speed Dial
2Delete Speed Dial
3Print Speed Dial List
1Date and Time
2Fax Header
3Rings to Answer
4 Paper Size
5Tone or Pulse Dialing
6Ring and Beep Volume
7Fax Forwarding Black Only
1Automatic Reports Setup
2Answer Ring Pattern
3Busy Redial
4No Answer Redail
5Automatic Reduction
6Backup Fax Reception
7Error Correction Mode
hp officejet 4100 series
chapter 7
38
8
39
additional setup information
During the installation of the HP Officejet software a number of windows are displayed You should see the following
bull Installingbull Copying files bull A request to plug in the HP Officejetbull Green OK and check markbull Request to restart your computer (may not occur in all cases)bull Registration
If you did not see all of these windows there may be a problem with the installation Verify the following
bull The HP Director contains six icons (double-click the HP Director icon on the desktop)
bull The HP Officejet is listed in the Printers dialog boxbull There is an icon for the HP Officejet in the System Tray that indicates the
HP Officejet is ready
If the HP Director does not show six icons you may need to wait a few minutes for the HP Officejet to connect to your computer
possible installation problemsIf nothing appears on your computer screen after you insert the HP Officejet 4100 Series CD-ROM into your computerrsquos CD-ROM drive
1 From the Start menu choose Run
2 In the Run dialog box enter dsetupexe (if your CD-ROM drive is not assigned to drive letter d use the appropriate drive letter) then click OK
If the HP Director does not contain six icons do the following
bull Verify that the front-panel cover is attached then unplug the HP Officejet and plug it in again
bull Verify that the USB and power cables are plugged inndash Unplug the USB cable and plug it in againndash Do not attach the USB cable to a keyboard or nonpowered hubndash Verify that the USB cable is 3 meters or less in lengthndash If you have several USB devices attached to your computer you may
want to unplug the others during the installation
Note AppleTalk is not supported
bull Unplug the HP Officejet from the wall and plug it in againbull Restart your computer
hp officejet 4100 series
chapter 8
40
On Windows check the System Tray for applications that are running in the background and close them before restarting your computer
remove and reinstall your hp officejet softwareIf six icons do not appear in the Director you may need to uninstall and re-install the software Do not simply delete the HP Officejet program files from your hard drive Be sure to remove them properly using the uninstall utility provided in the HP Officejet program group
to uninstall from a Windows computer
1 Disconnect your HP Officejet from your computer
2 On the Windows taskbar click Start choose Programs or All Programs (XP) choose Hewlett-Packard choose hp officejet 4100 series then choose uninstall software
3 Follow the directions on the screenBe sure to disconnect your HP Officejet
4 If you are asked whether you would like to remove shared files click NoOther programs that use these files may not work properly if the files are deleted
5 After the program finishes removing the software disconnect your HP Officejet and restart your computer
Note It is important that you disconnect your HP Officejet before restarting your computer
6 To reinstall the software insert the HP Officejet 4100 Series CD-ROM into your computerrsquos CD-ROM drive and follow the instructions that appear
7 After the software is installed connect and turn on your HP Officejet following the onscreen instructions and the instructions in your Setup PosterAfter connecting and turning on your HP Officejet you may have to wait several minutes for all of the Plug and Play events to completeWhen the software installation is complete you will see a Status Monitor icon in the System Tray
8 To verify that the software is properly installed double-click on the HP Director icon on the desktop If the HP Director shows six icons the software has been properly installed
to uninstall from a Macintosh computer
1 Disconnect your HP Officejet from your computer
2 Double-click on ApplicationsHP All-in-One Software folder
reference guide
additional setup information
41
3 Double-click on HP Uninstaller
4 Follow the directions that appear on the screen
5 After the program finishes removing the software disconnect your HP Officejet and restart your computer
6 To reinstall the software insert the HP Officejet 4100 Series CD-ROM into your computerrsquos CD-ROM drive
Note When re-installing the software follow the instructions on the Setup Poster Do not connect the HP Officejet to your computer until after you have completed the software installation
7 On the desktop open the CD-ROM double-click on hp all-in-one installer and follow the instructions that appear
connect your hp officejet to a phone modem or answering machine
The HP Officejet can share a phone line with a phone a modem or an aswering machine When sharing a phone line with an answering machine the HP Officejet will answer fax calls and direct voice calls to the answering machine
Note For information on connecting your HP Officejet to your computer and phone line refer to the Setup Poster that came with your unit
to connect your hp officejet to a phone modem or answering machine
1 Remove the white plastic stopper from connector 2 on the back of the HP Officejet
To connect more than one device to connector 2 on the HP Officejet you must purchase a Y-splitter and plug it into connector 2
2 Connect the phone cord from the phone modem or answering machine to connector 2 (or Y-splitter)
Caution Do not use the phone cord that came with the HP Officejet for this purpose That phone cord must connect connector 1 on the HP Officejet to the wall jack for your phone system See the Setup Poster for details
3 If you are connecting an answering machine see set the number of rings before answering on page 21 for instructions on setting the number of rings correctly or change the answer ring pattern (distinctive ringing) on page 26 for information on incoming ring patterns
4 If you are connecting a modem turn off its fax-receive feature
connector 2 on the HP Officejet
connector 1 on the HP Officejet
hp officejet 4100 series
chapter 8
42
additional troubleshooting helpYou may want to refer to the readme file for more information on possible installation problems On Windows you can access the readme file from the Start button on the taskbar select Programs Hewlett-Packard hp officejet 4100 series View the Readme File On Macintosh you can access the readme file by double-clicking on the icon located in the top-level folder of the HP Officejet software CD-ROM
The readme file provides more information including
bull Using the Re-install utility after a failed installation to return your PC to a state that will allow the HP Officejet to be re-installed
bull Using the Re-install utility on Windows 98 to recover from a Composite USB System Driver missing errorThis error may occur if the hardware is installed prior to installing the software After running the Re-install utility reboot your PC and install the HP Officejet software before connecting the HP Officejet to your computer
You can also find more information on this website
wwwhpcomsupport
9
43
technical information
Additional specifications information can be found in the HP Photo amp Imaging Help in the hp officejet 4100 series section
physical specifications
power specificationsbull Power consumption 75W maximumbull Source (Input Voltage) 100 to 240 VAC groundedbull Input Frequency 50 to 60 Hzbull Current 1A maximum
regulatory informationAdditional regulatory information can be found in the HP Photo amp Imaging Help The information in this section supercedes information in the HP Photo amp Imaging Help
doc statement deacuteclaration de conformiteacute (Canada)Le preacutesent appareil numeacuterique neacutemet pas de bruit radioeacutelectrique deacutepassant les limites applicables aux appareils numeacuteriques de la classe B prescrites dans le Regraveglement sur le brouillage radioeacutelectrique eacutedicteacute par le ministegravere des Communications du CanadaThis digital apparatus does not exceed the Class B limits for radio noise emissions from digital apparatus set out in the Radio Interference Regulations of the Canadian Department of Communications
notice to users of the Canadian telephone networkThis equipment meets the applicable Industry Canada Terminal Equipment Technical Specifications This is confirmed by the registration number The abbreviation IC before the registration number signifies that registration was performed based on a Declaration of Conformity indicating that Industry Canada technical specifications were met It does not imply that Industry Canada approved the equipment
Note The Ringer Equivalence Number (REN) assigned to each terminal device provides an indication of the maximum number of terminals allowed to be connected to a telephone interface The termination on an interface may consist of any combination of devices subject only to the requirement that the sum of the Ringer Equivalence Numbers of all the devices does not exceed 5
The REN for this product is 03B based on FCC Part 68 test results
height width depth weight (without print cartridges)
with paper trays and ADF closed
718 in (1824 cm) 1676 in (4258 cm) 825 in (2096 cm) 75 lbs (34 kg)
with ADF and paper tray extended
1030 in (2615 cm) 1676 in (4258 cm) 1854 in (4709 cm) 75 lbs (34 kg)
hp officejet 4100 series
chapter 9
44
notice to all users of the European Economic Area (EEA)
This product is designed to interwork with the analogue telephone networks in the following countriesregions
Network compatibility depends on customer selected settings which must be reset to use the equipment on a telephone network in a countryregion other than where the product was purchased Contact the vendor or Hewlett-Packard Company if addition product support is necessaryThis equipment has been certified by the manufacturer in accordance with Directive 19995EC (annex II) for Pan-European single-terminal connection to the public switched telephone network (PSTN) However due to differences between the individual PSTNs provided in different countriesregions the approval does not of itself give an unconditional assurance of successful operation on every PSTN network termination pointIn the event of problems you should contact your equipment supplier in the first instance
geraumluschemissionLpA lt 70 dBam Arbeitsplatzim Normalbetriebnach DIN 45635 T 19
notice to Korean customers
Germany UK Netherlands
France Spain Italy
Belgium Luxembourg Sweden
Austria Denmark Ireland
Norway Finland Switzerland
Greece Portugal
10
45
hp support
This section explains the support services information provided by Hewlett-Packard If you are unable to find the answer you need in the printed or onscreen documentation supplied with your product you can contact one of the HP support services listed in the following pages Some support services are available only in the US and Canada while others are available in many countriesregions worldwide If a support service number is not listed for your countryregion contact your nearest authorized HP dealer for help
get support and other information from the internetIf you have Internet access you can get help from the following HP website
wwwhpcomsupportThe Web site offers technical support drivers supplies and ordering information
hp customer supportSoftware programs from other companies may be included with your HP Officejet If you experience problems with any of those programs you will receive the best technical assistance by calling the experts at that companyIf you need to contact HP Customer Support do the following before you call
1 Make sure thata Your unit is plugged in and turned onb The specified print cartridges are installed correctlyc The recommended paper is properly loaded in the input tray
2 Reset your unita Turn off the unit using the On button located on the unitrsquos front panelb Unplug the power cord from the back of the unitc Plug the power cord back into the unitd Turn on the unit using the On button
3 For more information check the HP website at wwwhpcomsupport
4 If you are still experiencing problems and need to speak with an HP Customer Support Representativendash Have your service ID and serial number ready To display your service ID and
serial number on the front panel do the following Press Enter and Start Color at the same time until the service ID appears in the front-panel display From this display press the right arrow until the serial number displays
ndash Print a Self-Test Report See print a self-test report on page 32 for information on printing this report
ndash Make a color copyndash Be prepared to describe your problem in detail
5 Call HP Customer Support Be near your unit when you call
call in the US during warrantyCall (208) 323-2551 This service is free during the warranty period however your standard long-distance phone charges still apply A fee may apply outside the warranty period
hp officejet 4100 series
chapter 10
46
US phone support is available in both English and Spanish languages 24 hours a day 7 days a week (days and hours of support may change without notice)
call elsewhere in the worldThe numbers listed below are current as of the printing date of this guide For a list of current international HP Support Service numbers visit this address and choose your own countryregion or language
wwwhpcomsupportFor Korea you can also visit this address
httpwwwhpcokrYou can call the HP support center in the following countriesregions If your countryregion is not listed contact your local dealer or nearest HP Sales and Support Office to find out how to obtain servicesSupport service is free during the warranty period however your standard long-distance phone charges will apply In some cases a flat fee per single incident will also applyFor phone support in Europe please check for the details and conditions of phone support in your countryregion by consulting the following Web site
wwwhpcomsupportAlternatively you can ask your dealer or call HP at the phone number indicated in this booklet As part of our constant efforts to improve our phone support service we advise you to check our website on a regular basis for new information regarding service features and delivery
countryregion hp technical support countryregion hp technical support
Algeria1 +213 (0) 61564 543 Malaysia 1-800-805405
Argentina 0810-555-5520 Mexico 01-800-472-6684
Australia +61 3 8877 80001902 910 910
Mexico (Mexico City) 5258-9922
Austria +43 (0) 810 00 6080 Morocco1 +212 22404 747
Bahrain (Dubai) 800 728 Netherlands +31 (0) 20 606 8751
Belgium (Dutch) +32 (0) 2 626 8806 New Zealand 0800 441 147
Belgium (French) +32 (0) 2 626 8807 Norway +47 22 11 6299
Brazil (Grande Sao Paulo) (11) 3747 7799 Oman +971 4 883 8454
Brazil (Demais Localidades) 0800 157751 Palestine +971 4 883 8454
Canada during warranty (905) 206 4663 Panama 001-800-7112884
Canada post-warranty(per-call charge)
1-877-621-4722 Peru 0-800-10111
Caribbean amp Central America
1-800-711-2884 Philippines 632-867-3551
Chile 800-360-999 Poland +48 22 865 98 00
China 86 10 6868 7980 Portugal +351 21 3176333
Colombia 9-800-114-726 Puerto Rico 1-877-2320-589
Costa Rica 0-800-011-0524 Qatar +971 4 883 8454
Czech Republic +420 (0) 261307310 Romania +40 1 315 44 42or local 01 3154442
reference guide
hp support
47
call in Australia post-warrantyIf your product is not under warranty you can call 03 8877 8000 A per-incident out-of-warranty support fee of $2750 (inc GST) will be charged to your credit card You can also call 1902 910 910 ($2750 charged to your phone account) from 900 AM to 500 PM Monday through Friday (Charges and support hours are subject to change without notice)
prepare your unit for shipmentIf after contacting HP Customer Support or returning to the point of purchase you are requested to send your unit in for service please follow the power off and rebox steps below to avoid further damage to the HP product
Denmark +45 39 29 4099 Russian Federation Moscow +7 095 797 3520
Ecuador 1800-711-2884 Russian Federation St Petersburg
+7 812 346 7997
Europe (English) +44 (0) 207 512 5202 Saudi Arabia +800 897 14440
Egypt 02 532 5222 Singapore 65 6272 5300
Finland +358 (0) 203 47 288 Slovakia +421 (0) 2 682 08080
France (034 Euromin) +0892 69 60 22 South Africa (inside RSA) 086 000 1030
Germany (012 Euromin) +49 (0) 180 52 58 143 South Africa (inside RSA) +27-11 258 9301
Greece +30 1060 73 603 Spain +34 902 321 123
Hong Kong (SAR) +85 (2) 3002 8555 Sweden +46 (0)8 619 2170
Guatemala 1800-995-5105 Switzerland 2 +41 (0) 84 880 1111
Hungary +36 (0) 1 382 1111 Taiwan +886-2-2717-00550800 010 055
India 1-600-11226791 11 682 6035
Thailand +66 (2) 661 4000
Indonesia 62-21-350-3408 Tunisia1 +216 1891 222
Ireland +353 (0) 1 662 5525 Turkey +90 216 579 7171
Israel +972 (0) 9 8304848 Ukraine +7 (380-44) 490-3520
Italy +39 (0) 226410350 United Arab Emirates +971 4 883 8454
Japan 0570 000 511+81 3 3335 9800
United Kingdom +44 (0) 207 512 52 02
Jordan +971 4 883 8454 Venezuela 0800-47468368 or800-477-7777
Korea (Seoul) +82 (2) 3270 0700 Venezuela (Caracas) (502) 207-8488
Korea (outside Seoul) 080 999 0700 Vietnam 84 (0) 8 823 4530
Kuwait +971 4 883 8454 Yemen +971 4 883 8454
Lebanon +971 4 883 8454
1 This Call Center supports French speaking customers from the following countriesregions Morocco Tunisia and Algeria
2 This Call Center supports German French and Italian speaking customers in Switzerland
countryregion hp technical support countryregion hp technical support
hp officejet 4100 series
chapter 10
48
Note When transporting your HP Officejet make sure that the pens have been removed the HP Officejet has been properly shut down by pressing the power button and you have allowed time for the carriage to return to the service station and for the scanner to return to its parked position
1 Turn on the unitDisregard steps 1 through 6 if your unit will not turn on and the print carriage is in the home position You will not be able to remove the print cartridges Proceed to step 7
2 Open the print cartridge access doorThe print carriage moves into view
3 See replace the print cartridges on page 33 for information on removing the print cartridges
Caution Remove both print cartridges Failure to do so may damage your unit
4 Place the print cartridges in an airtight bag so they will not dry out and put them aside (do not send them with the unit unless instructed to by the HP customer support call agent)
5 Turn off the unit
6 Close the print cartridge access door
7 Remove the front panel cover as followsa Grasp the front of the front panel cover with two hands as shownb Firmly lift the front panel cover to unsnap it from the unit
8 Retain the front panel cover Do not return the front panel cover with the unit
9 If available pack the unit for shipment using the original packing materials or the packaging materials that come with your exchange unit
If you do not have the original packaging materials please use other adequate packaging materials Shipping damage caused by improper packaging andor improper transportation is not covered under the warranty
reference guide
hp support
49
10 Place the return shipping label on the outside of the box
11 Include the following items in the boxndash A complete description of symptoms for service personnel (samples of print
quality problems are helpful)ndash A copy of the sales slip or other proof of purchase to establish the warranty
coverage periodndash Your name address and a phone number where you can be reached during
the day
hp distribution centerTo order HP Officejet software a copy of the printed Reference Guide a setup poster or other customer-replaceable parts do one of the following bull In the US or Canada call (208) 323 2551bull Visit this website
httpwwwhpcomcposupportsoftwarehtml
hp officejet 4100 series
chapter 10
50
11
51
warranty information
HP Officejet 4100 seriesDuration of Limited Warranty (hardware and labor) 1 YearDuration of Limited Warranty (CD media) 90 DaysDuration of Limited Warranty (print cartridges) Until the HP ink is depleted or the ldquoend of warrantyrdquo date printed on the cartridge has been reached whichever occurs first
warranty service
express serviceTo obtain HP express repair service the customer must contact an HP service office or an HP Customer Support Center for basic troubleshooting first See hp customer support on page 45 for steps to take before calling Customer SupportIf a customer unit needs a minor part replacement and these parts can normally be replaced by the customer the customer-replaceable components may be serviced through expedited part shipment In this event HP will prepay shipping charges duty and taxes provide telephone assistance on replacement of the component and pay shipping charges duty and taxes for any part that HP asks to be returnedThe HP Customer Support Center may direct customers to designated authorized service providers who are certified by HP to service the HP product
warranty upgradesUpgrade your standard factory warranty to a total of three years with the HP SUPPORTPACK Service coverage begins on product purchase date and the pack must be purchased within the first 180 days of product purchase This program offers phone support from 600 AM to 1000 PM Mountain Standard Time (MST) Monday through Friday and 900 AM to 400 PM (MST) on Saturdays If during your technical support call it is determined that you need a replacement product then HP will ship you this product next business day free of charge Available in US onlyFor more information please call 1-888-999-4747 or visit the following HP Web site
httpwwwhpcomgohpsupportpack
Outside the US please call your local HP Customer Support office See call elsewhere in the world on page 46 for a list of international Customer Support numbers
returning your hp officejet for serviceBefore returning your HP Officejet for service you must call HP Customer Support See hp customer support on page 45 for steps to take before calling Customer Support
hewlett-packard limited global warranty statement
extent of limited warrantyHewlett-Packard (ldquoHPrdquo) warrants to the end-user customer (ldquoCustomerrdquo) that each HP Officejet 4100 Series product (ldquoProductrdquo) including related software accessories media and supplies shall be free from defects in material and workmanship for the duration which begins on the date of purchase by the Customer
hp officejet 4100 series
chapter 11
52
For each software Product HPrsquos limited warranty applies only to a failure to execute programming instructions HP does not warrant that the operation of any Product shall be uninterrupted or error freeHPrsquos limited warranty covers only those defects which arise as a result of normal use of a Product and does not cover any other problems including those which arise as a result of (a) improper maintenance or modification (b) software accessories media or supplies not provided or supported by HP or (c) operation outside the Productrsquos specificationsFor any hardware Product the use of a non-HP print cartridge or a refilled print cartridge does not affect either the warranty to the Customer or any HP support contract with the Customer However if Product failure or damage is attributable to the use of a non-HP or refilled print cartridge HP shall charge its standard labor and materials charges to service the Product for the failure or damageIf HP receives during the applicable warranty period notice of a defect in any Product HP shall either repair or replace the defective Product at HPrsquos option Where labor charges are not covered by HPrsquos limited warranty repairs shall be at HPrsquos standard charges for laborIf HP is unable to repair or replace as applicable a defective Product which is covered by HPrsquos warranty HP shall within a reasonable time after being notified of the defect refund the purchase price for the ProductHP shall have no obligation to repair replace or refund until the Customer returns the defective Product to HPAny replacement product may be either new or like-new provided that it has functionality at least equal to that of the Product being replacedHP products including each Product may contain remanufactured parts components or materials equivalent to new in performanceHPs limited warranty for each Product is valid in any countryregion or locality where HP has a support presence for the Product and where HP has marketed the Product The level of warranty service may vary according to local standards HP shall have no obligation to alter the form fit or function of the Product in order to make it operate in a countryregion or locality for which the Product was never intended to operate
limitations of warrantyTO THE EXTENT ALLOWED BY LOCAL LAW NEITHER HP NOR ITS THIRD PARTY SUPPLIERS MAKE ANY OTHER WARRANTY OR CONDITION OF ANY KIND WHETHER EXPRESS OR IMPLIED WITH RESPECT TO THE COVERED HP PRODUCTS AND SPECIFICALLY DISCLAIM THE IMPLIED WARRANTIES OR CONDITIONS OF MERCHANTABILITY SATISFACTORY QUALITY AND FITNESS FOR A PARTICULAR PURPOSE
limitations of liabilityTo the extent allowed by local law the remedies provided in this Limited Warranty Statement are the Customerrsquos sole and exclusive remediesTO THE EXTENT ALLOWED BY LOCAL LAW EXCEPT FOR THE OBLIGATIONS SPECIFICALLY SET FORTH IN THIS LIMITED WARRANTY STATEMENT IN NO EVENT SHALL HP OR ITS THIRD PARTY SUPPLIERS BE LIABLE FOR DIRECT INDIRECT SPECIAL INCIDENTAL OR CONSEQUENTIAL DAMAGES WHETHER BASED ON CONTRACT TORT OR ANY OTHER LEGAL THEORY AND WHETHER ADVISED OF THE POSSIBILITY OF SUCH DAMAGES
local lawThis Limited Warranty Statement gives the Customer specific legal rights The Customer may also have other rights which vary from state to state in the United States from province to province in Canada and from countryregion to countryregion elsewhere in the world
reference guide
warranty information
53
To the extent this Limited Warranty Statement is inconsistent with local law this Statement shall be deemed modified to be consistent with such local law Under such local law certain disclaimers and limitations of this Statement may not apply to the Customer For example some states in the United States as well as some governments outside the United States (including provinces in Canada) mayPreclude the disclaimers and limitations in this Statement from limiting the statutory rights of a consumer (eg the United Kingdom)Otherwise restrict the ability of a manufacturer to enforce such disclaimers or limitations orGrant the Customer additional warranty rights specify the duration of implied warranties which the manufacturer cannot disclaim or not allow limitations on the duration of implied warrantiesFOR CONSUMER TRANSACTIONS IN AUSTRALIA AND NEW ZEALAND THE TERMS IN THIS LIMITED WARRANTY STATEMENT EXCEPT TO THE EXTENT LAWFULLY PERMITTED DO NOT EXCLUDE RESTRICT OR MODIFY AND ARE IN ADDITION TO THE MANDATORY STATUTORY RIGHTS APPLICABLE TO THE SALE OF THE COVERED HP PRODUCTS TO SUCH CUSTOMERS
hp officejet 4100 series
chapter 11
54
55
index
Numerics4-by-6 inch photo paper
load 10 12
AADF 7adjust
volume for fax 25align print cartridges 35Answer Ring Pattern 26automatic document feeder 7automatic reduction
fax 25
Bbest copy quality 13busy number
redial automatically 23
Ccancel
scan 18scheduled fax 21
cartridgesalign 35replace 33
cleanprint cartridges 35the exterior 32the glass 31white strip 32
colorenhance 14fax 20fax from front panel 20
contrastchange for fax 23photo color 14
copy 13 16change default settings 15enhance 14fit to page 16lighten or darken 14menu options 16number of copies 14photo 15quality 13reduce or enlarge 14settings 13 15
speed 13tutorial 4
Customer Support 45web site 45
Ddarken a copy 14date
setting 27default settings
restore 35director review 4distinctive ringing 26
Eenhance copies 14enlarge copy 14 16envelopes
load 9Error Correction Mode
(ECM) 25
Ffactory defaults
restore 35fast copy quality 13fax 28
adjust volume 25automated reports 22cancel fax forward 24cancel scheduled 21change Answer Ring
Pattern 26change contrast 23change resolution 22change settings 19control appearance 22create individual speed-dial
settings 26delete speed-dial
settings 27distinctive ringing 26Error Correction Mode
(ECM) 25forward faxes 24header 27in color 20in color from front panel 20manual reports 22
menu 29print reports 22receive 21receive manually 21redial busy or unanswered
number 23schedule 20send from front panel 19set automatic reduction 25set date and time 27set the number of rings 21settings 27 28setup menu options 29speed dials 19test 28
fit to page 16forward faxes 24
cancel 24front panel
display scroll speed 36enter text 28send a fax 19setting prompt delay 36tutorial 3
Gglass
cleaning 31greeting cards
load 11
Hhelp 1HP Customer Support 45
calling 45HP Director 4HP distribution center 49HP Officjet
preparing to ship 47HP papers
tips on loading 11
Iindividual speed-dial settings
create 26ink cartridges see print
cartridgesinkjet paper
load 11
index
hp officejet 4100 series56
Kkeypad
enter text 28
Llabels
load 12lighten copies 14load
change the paper type 12envelopes 9original in ADF 7paper 7photo paper 10 12postcards 10 12print cartridges 33set the paper size 12tips 11
Mmaintenance
align print cartridges 35clean print cartridges 35clean the exterior 32clean the glass 31clean the white strip 32normal sounds 36replace print cartridges 33restore factory defaults 35self-maintenance
sounds 36self-test report 32
menuscopy options 16fax 29fax setup 29maintenance 37print reports 37
Nnormal copy quality 13number of copies
set 14number of rings
set 21
Oorder print cartridges 60originals
load in ADF 7output tray 8
Ppaper
change default size for copy 12
change the type 12load 7recommended 7set the size 12tips on loading 11
paper size change for copy 12
paper trayload 7
phone numbers support services 45
photo paperload 10 12
photoscopy 15enhance copy 14
physical specifications 43postcards
load 10 12power
specifications 43print
envelopes 9fax reports 22self-test report 32
print cartridgesalign 35clean 35handling 32replace 33
prompt delaysetting 36
Qquick start
review the director 4use with a computer 4
Rreceive
fax 21redial
busy or unanswered number 23
reduce copy 14 16regulatory information 43reinstall software 40reports
generate automatically for fax 22
generate manually for fax 22
print 22self-test 32
resolution
change for fax 22restore factory settings 35returning your HP Officejet for
service 51
Sscan
from front panel 17stop 18
schedule a fax 20scroll speed
setting 36self-test report 32send
cancel forward faxes 24color fax 20color fax from front
panel 20forward faxes 24
settingscopy 13 15fax 27 28prompt delay 36scroll speed 36
setupadditional information 39menu 29
shippingyour HP Officejet 47
softwareremove and reinstall 40
soundsself-maintenance 36
specificationsphysical 43power 43
speed dials 19create individual
settings 26delete settings 27
stopscan 18scheduled fax 21
subscriber identification code 27
support services 45
Ttelephone line
multiple numbers 26telephone numbers 45text
enhance 14enter from front panel 28
time
index
reference guide 57
setting 27transparency film
recommended 7tips on loading 11
troubleshootingremove and reinstall
software 40T-shirt Transfer Iron-On
load 11tutorial
front panel 3make a copy 4
Uunanswered number
redial automatically 23
Vvolume
adjust 25
Wwarranty 45
service 51statement 51upgrades 51
white stripcleaning 32
hp officejet 4100 series
chapter 12
58
declaration of conformityAccording to ISOIEC Guide 22 and EN 45014
Manufacturerrsquos Name and Address
Hewlett-Packard Company 16399 West Bernardo Drive San Diego CA 92127-1899 USA
declares that the product
Product Name hp officejet 4100 series (Q1608A)
Model Number(s) officejet 4110 (Q1609A) officejet 4110xi (Q1610A) officejet 4110v (Q1611A) officejet 4105 (Q1612A) officejet 4105z (Q1613A) officejet 4115 (Q1614A)
Product Options All
conforms to the following Product Specifications
Safety EN609501992 +A1 A2 A3 A4 amp A11
IEC609501991 +A1 A2 A3 amp A4
UL1950CSA 222 No 950 3rd Edn 1995
NOM-019-SCFI-1993
EMC CISPR221993 +A1 amp A2 EN550221994 +A1 amp A2 -Class B
CISPR241997EN550241998
IEC 61000-3-21995 EN61000-3-21995
IEC 61000-3-31994 EN61000-3-31995
ASNZS 3548 1992
CNS13438 1997
FCC Part 15-Class B ICES-003 Issue 2 VCCI-2
GB 9254-1998
Telecom TBR21 1998
Supplementary Information
The Product herewith complies with the requirements of the Low Voltage Directive 7323EEC the EMC Directive 89336EEC and the RampTTE Directive 19995EC (ANNEX II) carries the CE marking accordingly
European Contact for regulatory topics only Your local Hewlett-Packard Sales and Service Office orHewlett-Packard GmbH
Department HQ-TRE Herrenberger Strasse 140 D-71034 Boumlblingen Germany (FAX + 49-7031-14-3143)
order mediaTo order media such as HP Premium Inkjet Paper HP Premium Inkjet Transparency Film HP Iron-On T-shirt Transfer paper or HP Greeting Cards go to
wwwhpshoppingcom
For orders in countries other than the US and Canada select other countries then click Yes to leave hpshoppingcom From this website you can access hpshoppingcom for your specific language or countryregion
order print cartridges
If you have Internet access you can get more information from the HP website at
wwwhpcomsupport
print cartridges hp reorder number
HP black print cartridge 56 19 ml black print cartridge
HP color print cartridgeHP tri-color print cartridge
57 17 ml color print cartridge28 8 ml color print cartridge
Visit the hp officejet information centerIt has everything you need to get the most value from your HP Officejet
bull Technical Supportbull Supplies and Ordering Informationbull Project Tipsbull Ways to Enhance Your Product
wwwhpcomsupport
copy 2003 Hewlett-Packard Company
Printed in the USA Mexico Germany Singapore or China
Q1608-90163Q1608-90163
Q1608-90163

hp officejet 4100 series
chapter 2
6
the hp photo and imaging director for macintosh OS X
feature purpose
1 Select Device Use this feature to select the product you want to use from the list of installed HP products
2 Settings Use this feature to view or change various settings for your HP device such as print scan or copy
3 Scan Picture Scans an image and displays it in the HP Photo and Imaging Gallery
4 Scan Document Scans text and displays it in a text editing software program
5 Make Copies Displays the Copy dialog box where you can select the copy quality the number of copies the color the size and can start a copy
6 Send Fax Use this feature to send a fax
7 Maintain Printer Accesses the HP Inkjet Utility where you can clean and align the print cartridges check print cartridge ink levels print a test or sample page register your printer or access information on product support
8 View and Print Displays the HP Photo and Imaging Gallery where you can view and edit images
1 2
3 4 5 6 7 8
3
7
load originals and load paper
You can make copies from originals loaded on the automatic document feeder (ADF) You can also print and copy onto a variety of paper types weights sizes and transparency films It is important however that you choose the right paper and make sure that it is loaded correctly and not damaged
load originalsYou can copy or scan any original by placing it in the automatic document feeder
1 Load your original in the automatic document feeder
Note Do not feed photos smaller than 35-by-5 inches through the automatic document feeder
2 Slide the right and left paper guides in until they stop at the edges of the paper
load paperFollowing is the basic procedure for loading paper There are specific considerations for loading certain types of paper transparency film postcards and envelopes After you review this procedure see tips for loading other types of paper in the paper tray on page 11 load 4 x 6 inch photo paper on page 10 load envelopes on page 9 and load postcards on page 10
For best results adjust the paper settings each time you change paper types or paper sizes For more information see set the paper type on page 12
to load the paper tray
1 Lower the paper tray and extend the paper-tray extender
2 Slide the paper-width guide on the left to its outermost position
automatic document feeder (ADF)
hp officejet 4100 series
chapter 3
8
3 Tap the stack on a flat surface to align the edges of the paper and then check the paper for the followingndash Make sure it is free of rips dust wrinkles and curled or bent edgesndash Make sure all the paper in the stack is the same size and type unless
you are working with photo paper
4 Insert paper into the paper tray print-side down until it stops To avoid bending the paper make sure you do not push the paper in too far or push too hard If you are using letterhead insert the top of the page firstBe careful not to use too much or too little paper Check that the stack of paper contains several sheets but is no higher than the top of the paper-width guide
5 Slide the paper-width guide in until it stops at the edge of the paper Make sure that the paper stack lies flat in the paper tray and fits under the tab of the paper-width guide
6 Extend the output-tray
reference guide
load originals and load paper
9
load envelopesUse the print feature of your software to print to envelopes with your HP Officejet Do not use shiny or embossed envelopes or envelopes that have clasps or windows You can load the paper tray with one or multiple envelopes
1 Remove all paper from the paper tray
2 Slide an envelope into the tray with the envelope flap up and to the left (print-side down) until it stops
3 Adjust the paper-width guide against the envelope until it stopsBe careful not to bend the envelope If you are loading multiple envelopes make sure the envelopes fit within the tray (do not overload it)Consult the help files in your word processing software for details on how to format text for printing on envelopes
hp officejet 4100 series
chapter 3
10
load 4 x 6 inch photo paperFollowing is the procedure for loading 4-by-6 inch photo paper into your HP Officejet
1 Remove all paper from the paper tray and then slide a stack of photo paper into the tray until it stopsMake sure the print-side faces downIf the photo paper you are using has perforated tabs load the photo paper so that the tabs are closest to you
2 Adjust the paper-width guide against the stack of photo paper until it stopsMake sure the photo paper fits within the tray (do not overload it)
Note Make sure you set the paper type and paper size before printing See set the paper type on page 12 and set the paper size on page 12
load postcardsFollowing is the procedure for loading postcards
1 Remove all paper from the paper tray and then slide a stack of cards into the tray until they stopMake sure the print-side faces down
reference guide
load originals and load paper
11
2 Adjust the paper-width guide against the cards until it stops Make sure the cards fit within the tray (do not overload it)
tips for loading other types of paper in the paper trayThe following table provides guidelines for loading certain types of paper and transparency film For best results adjust the paper settings each time you change paper types and paper sizes For more information see set the paper type on page 12
Note HP Photo Paper and HP Photo Paper Glossy 4-by-6 are not recommended for printing with your HP Officejet To print photos use HP Everyday Photo Paper For your best photo printing needs use HP Premium Plus Photo Paper
paper tips
HP papers bull HP Premium Inkjet Paper Locate the gray arrow on the nonprinting side of the paper and then insert paper with the arrow side facing up
bull HP Premium or Premium Plus Photo Paper Load the glossy (print) side down (To prevent curling keep photo paper sealed in the original package until you are ready to use it) Always load at least five sheets of regular paper in the paper tray first and then place the photo paper on top of the regular paper
bull HP Premium Inkjet Transparency Film Insert the film so that the white transparency strip (with arrows and the HP logo) is on top and is going into the tray first
bull HP Inkjet T-shirt Transfer Iron-On Flatten the transfer sheet completely before using it do not load curled sheets (To prevent curling keep transfer sheets sealed in the original package until you are ready to use them) Manually feed one sheet at a time with the unprinted side facing down (the blue stripe faces up)
bull HP Matte Greeting Cards HP Glossy Greeting Cards or HP Felt-Textured Greeting Cards Insert a small stack of HP greeting-card paper with the print-side down into the paper tray until it stops
hp officejet 4100 series
chapter 3
12
set the paper typeIf you want to use a different type of paper such as photo paper transparency film Iron-On T-shirt transfers or brochures simply load that paper in the paper tray You must then change the paper type settings to ensure the best print quality
HP recommends paper type settings according to the type of paper you are using
This setting refers to copy options only If you want to set the paper type for printing from a computer set the properties in the Print dialog box of the software
1 Press the Copy button until Paper Type appears
2 Press until the appropriate paper type appears
3 Press Enter to choose the displayed paper type
set the paper sizeThe HP Officejet can use Letter Legal or A4 paper Use the following procedure to set the paper size for copy options
1 Press the Copy button until Copy Paper Size appears
2 Press until the appropriate paper size appears
3 Press Enter to choose the displayed paper size
To avoid jams remove papers from the output tray frequently The output tray capacity is affected by the type of paper and the amount of ink you are using For more information about output-tray capacity see technical information in the HP Photo amp Imaging Help
Labels(works only with printing)
bull Always use letter-size or A4-size label sheets designed for use with HP inkjet products (like Avery Inkjet Labels) and make sure that the labels are not over two years old
bull Fan the stack of labels to make sure none of the pages are sticking together
bull Place a stack of label sheets on top of standard paper in the paper tray print-side down Do not insert labels one sheet at a time
Postcards (works only with printing)
Insert a stack of postcards or hagaki cards with the print-side down into the paper tray until it stops Line the postcards up on the right side of the paper tray slide the paper-width guide up against the left side of the cards until it stops
4-by-6 inch photo paper (works only with printing)
Insert the photo paper with the print-side down into the paper tray until it stops Place the long edge of the photo paper against the right side of the paper tray and slide the paper-width guide up against the long edge of the photo paper until it stops If the photo paper you are using has perforated tabs load the photo paper so that the tabs are closest to you
paper tips
4
13
use the copy features
The copy features let you do the following
bull Produce high-quality color and black-and-white copiesbull Reduce or enlarge the size of the copies you make from 25 to 200 or
50 to 200 (depending on your model) of the copyrsquos original sizebull Make the copy lighter or darker select the number of copies and specify
the quality of the copies you makebull Use special copying features to make high-quality copies of photos using
special photo paper or to create transparencies
make copiesYou can make copies using the front panel of your HP Officejet or by using the HP Officejet software on your computer Many copy features are available using either method However you may find that the software offers easier access to special copy features
All copy settings that you select on the front panel are reset two minutes after the HP Officejet completes the copy unless you save the settings as the default settings as described in change settings for all copy tasks on page 15
make a copy1 Load the paper tray with the appropriate paper
2 Load your original
3 Press the Copy button
4 Use the keypad or press the or to enter the number of copies
5 Press Start Black or Start Color
Tip To make a single copy press the Copy button and then press Start Black or Start Color
Note Make sure that the color print cartridge is installed in your HP Officejet Both print cartridges must be installed when making a copy
increase copy speed or qualityThe HP Officejet provides three options that affect copy speed and quality
bull Best produces the highest quality for all paper types Best copies more slowly than the other quality settings
bull Normal delivers high-quality output and is the recommended setting for most of your copying Normal copies faster than Best
bull Fast copies faster than the Normal setting The text is of comparable quality to the Normal setting but the graphics may be of lower quality Using Fast also reduces the frequency of replacing your print cartridges because it uses less ink
hp officejet 4100 series
chapter 4
14
1 Load your original
2 Press Copy until Copy Quality appears
3 Press until the desired quality setting appears and then press Enter to select it
4 Press Start Black or Start Color
set the number of copies You can set the number of copies using the front panel
1 Press the Copy button
2 Use the keypad or press the or to enter the number of copies
3 Press Enter
4 Press Start Black or Start Color
Tip If you hold down the right arrow button then after reaching 10 the number of copies changes by increments of five to make it easier to set a large number of copies
reduce or enlarge a copyYou can reduce or enlarge a copy of an original using ReduceEnlarge
For more information about additional copy options such as Fit to Page see perform special copy jobs on page 15
1 Press Copy until ReduceEnlarge appears
2 Press until the appropriate ReduceEnlarge option appears and then press Enter to select it
3 If you select Custom 100 Set Custom Size appears Use the arrow keys or type a percentage on the keypad
4 Press Enter when the desired percentage is displayed
5 Press Start Black or Start Color
make copies lighter or darkerUse LighterDarker to adjust the lightness and darkness of the copies you make
1 Press Copy until LighterDarker appearsThe range of LighterDarker values are represented as circles on a scale on the front-panel display
2 Press to lighten the copy or to darken it The circle moves to the left or right depending on the arrow button you press
3 Press Enter to select the setting
4 Press Start Black or Start Color
enhance text sharpness and photo colorsYou can use Text to sharpen edges of black text Photo to enhance light colors in your photographs or Mixed if your original contains a photograph and text You can also select None to turn off all enhancements
reference guide
use the copy features
15
Text enhancement is the default option You can turn off Text enhancement by selecting Photo Mixed or None if the following occur
bull Stray dots of color surround some text on your copiesbull Large black typefaces look splotchy (not smooth)bull Thin colored objects or lines contain black sectionsbull Horizontal grainy or white bands appear in light- to medium-gray areas
1 Press Copy until Enhancements appears
2 Press until the desired enhancement (Text Photo Mixed or None) appears
3 Press Enter to select the setting
4 Press Start Black or Start Color
change settings for all copy tasksSave the copy settings you use most often by setting them as the default This includes changes to Copy options such as Paper Type and Paper Size as well as other Copy settings on the front panel such as Number of Copies and Copy Quality
1 Make any desired changes to the copy options
2 Press Copy until Set New Defaults appears
3 Press until Yes appears
4 Press Enter to set the options as a defaultYour settings are saved
perform special copy jobsIn addition to supporting standard copying your HP Officejet can also copy a photo or fit a copy to the page
copy a photoWhen copying a photo you should select options for the correct paper type and photo enhancement
1 Load the photo in the automatic document feeder (ADF)For more information see load originals
2 If you are using photo paper load it in the paper tray
3 Press Copy until Paper Type appears
4 Press until Premium Photo appears and then press Enter to select it
5 Press Copy until Enhancements appears
6 Press until Photo appears and then press Enter to select it
7 Press Start Black or Start Color
Tip To enlarge a photo automatically to a full page use the Photo Fit to Page button
hp officejet 4100 series
chapter 4
16
fit a copy to the pageUse the Photo Fit to Page button when you want to automatically enlarge or reduce your original to fit Letter or A4 size paper You can enlarge a small photo to fit a full-size page as shown below Using Photo Fit to Page may prevent unwanted cropping of text or images around the margins
1 Load the original in the ADFFor more information see load originals on page 7
2 Press the Photo Fit to Page button
Note Do not press the Fax Copy or Scan buttons on the front panel once you have pressed the Photo Fit to Page button
3 Press until the appropriate paper type appears and then press Enter to select it
4 Press Start Black or Start Color
copy optionsThe following diagram shows the options that are available when you press Copy
Original Fit to Page
Plain PaperPhoto PaperTransparency
Actual sizeCustom 100Full Page 91Legal gt Ltr 72
ReduceEnlarge Paper Type
NoYes
TextPhotoMixedNone
Enhancements Set New Defaults
LetterLegalA4
Copy Paper Size
The sizes vary by countryregion
LighterDarker
NormalFastBest
Copy Quality
To cycle through the copy options press Copy repeatedly
Press and to move to the setting you want within one of the copy optionsPress Enter to select the displayed setting
5
17
use the scan features
Scanning is the process of converting pictures and text into an electronic format for your computer You can scan photos and text documents
Because the scanned image or text is in an electronic format you can bring it into your word processor or graphics program and modify it to suit your needs You can do the following
bull Scan photos of your kids and e-mail them to relatives create a photographic inventory of your house or office or create an electronic scrapbook
bull Scan text from an article into your word processor and quote it in a report saving you a lot of retyping
Tip To use the scan features your HP Officejet and computer must be connected and turned on The HP Officejet software must also be installed and running on your computer prior to scanning To verify that the HP Officejet software is running on Windows look for a status icon in the system tray On a Macintosh the HP Officejet software is always running
Note High resolution scanning (600 dpi or higher) requires a large amount hard disk space If there is not enough hard disk space available your system may stall
scan an originalYou can start a scan from your HP Officejet or from the HP Officejet software on your computer
For more information about scanning your pictures or documents from the HP Officejet software see scan pictures and documents in the HP Photo amp Imaging Help
to scan an original from your hp officejet
1 Load your original in the automatic document feeder (ADF)For more information see load originals on page 7
2 Press Scan
3 Select the Scan to destination by pressing or or by pressing the Scan button repeatedlyThe default destination is the HP Photo amp Imaging Gallery Any applications on your computer that are supported by the HP Officejet also appear in the Scan to list
4 Press Start Black or Start ColorThe original is scanned and the image is sent to selected destinationFor more information about using the HP Photo amp Imaging Gallery see manage images in how to use the software
hp officejet 4100 series
chapter 5
18
stop scanningYou can stop a scan by pressing the Cancel button located on the front panel
6
19
use the fax features
Using your HP Officejet you can
bull Send and receive paper faxesbull Send computer faxes (reference the HP Photo amp Imaging Help)bull Send and receive color faxes
Fax features are available only on some HP Officejets
send a faxYou can send a fax in a variety of configurations These include the following
bull send a paper fax (using the front panel or computer)bull send a paper fax with a PC-generated cover page (using the computer)bull send a file with or without a cover page (using the computer)bull send a PC-generated cover page as a single-page fax (using the
computer)
Note For information on sending a fax using the computer reference the HP Photo amp Imaging Help
Note By default your HP Officejet prints a report only if there is a problem with sending or receiving a fax A confirmation message indicating whether an item was successfully sent appears briefly on the front-panel display after each transaction If you need printed confirmation that your faxes are successfully sent see print reports on page 22 for information about report options
Note If you have not done so set the date and time See set the date and time on page 27
send a fax from your hp officejet1 Load your originals in the ADF
For more information see load originals on page 7
2 Enter the fax number using the keypad or press Speed Dial until the desired speed-dial entry appearsFor more information on speed dialing see set up speed dialing in the HP Photo amp Imaging Help
3 Press Start Black or Start Color
change settings and use speed dials before sending a fax1 Load your originals in the ADF
For more information see load originals on page 7
2 Enter the fax number using the keypad or press Speed Dial until the desired speed-dial entry appears
hp officejet 4100 series
chapter 6
20
For more information on speed dialing see set up speed dialing in the HP Photo amp Imaging Help
3 Press Enter
4 Press Fax to scroll through the fax options
5 When you reach the option whose setting you wish to change press to scroll through the setting options
6 When you reach the setting you want to change press Enter to accept the setting
7 Press Start Black or Start Color
send a color faxYou can send and receive color faxes to and from other color fax machines If you are faxing from the front panel and your HP Officejet determines that the recipient has a black-and-white fax unit it sends the fax in black and white If you are faxing from the software and your HP Officejet determines that the recipient has a black-and-white fax unit the HP Officejet prompts you to try sending the fax in black and white
We recommend that you use only color originals for color faxing The color originals must be loaded in the ADF you cannot send a color fax from memory using the scan and fax features To fax in color to multiple recipients send the fax from the Director or your software program
to send a color fax from the front panel
1 Load your originals in the ADF For more information see load originals on page 7
2 Enter the fax number using the keypad or press Speed Dial until the desired speed-dial entry appearsFor more information on creating speed-dial entries see set up speed dialing in the HP Photo amp Imaging Help
3 Press Start Color
schedule a faxYou can schedule a black and white fax to be sent later during the same day (for example when telephone lines are not as busy) If you use the front panel you can select a single recipient
When the specified time is reached your fax is automatically sent as soon as a connection can be made
1 Load your originals in the ADF
2 Enter the fax number using the keypad or press Speed Dial until the desired speed-dial entry appears
3 Press Enter
4 Press Fax to scroll through the fax options
5 Stop scrolling when you reach the How to Fax menu
6 Press to scroll through the setting options
7 Stop scrolling when you reach the Send Fax Later option
reference guide
use the fax features
21
8 Press Enter
9 Enter the Send Time using the numeric keypad
10 At the prompt press 1 for AM or 2 for PM
11 When Store Fax Now appears press 1 for Yes or 2 for NoIf 1 is selected the document is scanned to memory and is sent at the selected time If 2 is selected and you havenrsquot loaded your originals a message appears reminding you to load the original before the send time
12 Press Start Black
cancel a scheduled faxYou can cancel a fax stored in memory or one that is currently in progress
bull Press Cancel to cancel the scheduled fax
receive a faxYour HP Officejet is set to print received faxes automatically If you receive a legal-size fax and your HP Officejet is not currently configured to use legal-sized paper the unit automatically reduces the fax so that it fits on the paper that is loaded For more information see set automatic reduction on page 25
If you have an answering machine connected to the same line as your HP Officejet you may need to set the number of rings required before the HP Officejet begins receiving the fax The default number of rings before the HP Officejet receives a fax is 5
set the number of rings before answeringYou can specify how many rings should occur before your HP Officejet automatically answers the phone When you run the Fax Setup Wizard this is set automatically
If you do not want your HP Officejet to answer the phone Rings to Answer should be set to No Answer
1 Press Setup
2 Press 3 then press 3 againThis selects the Basic Fax Setup menu then the Rings to Answer option
3 Use the arrow keys to choose the number of rings and then press Enter
receive a fax manuallyBefore manually receiving a fax we recommend that you remove any originals from your HP Officejet so that they are not accidentally processed
Verify that Rings to Answer is set to No Answer
1 When your HP Officejet rings pick up the handset of a telephone that is on the same telephone line as your HP Officejet
2 If you hear fax tones press Start Black or Start Color or if you are receiving from an extension phone (on the same telephone line as your HP Officejet but not connected directly to it) press 1 2 3 on your phone
3 After you are finished hang up the telephone
hp officejet 4100 series
chapter 6
22
print reportsYou can set up your HP Officejet to print error reports and confirmation reports for each fax you send and receive You can also manually print reports as you need them
generate reports automaticallyThis setting lets you configure your HP Officejet so that it automatically prints error and confirmation reports
1 Press Setup
2 Press 1 then press 5This selects Print Report then selects Automatic Reports Setup
3 Press to scroll through the following report typesndash Every Error which prints whenever there is any kind of fax error
(default)ndash Send Error which prints whenever there is a transmission errorndash Receive Error which prints whenever there is a receiving errorndash Every Fax which confirms every time a fax is sent or receivedndash Send Only which prints every time a fax is sentndash Off which does not print fax reports
4 When you reach the report that you want press Enter
generate reports manuallyThis setting lets you print reports manually From the computer you can only print the Speed-Dial List and the Fax Log
to print reports from the front panel
1 Press Setup then press 1This selects the Print Report menu
2 Press to scroll through the following report typesndash Last Transaction which prints details of the last fax transactionndash Fax Log which prints a log of the last 30 fax transactionsndash Speed Dial List which prints a list of programmed speed dialsndash Self-Test Report which prints a report to assist you in diagnosing print
and alignment problems For more information see print a self-test report on page 32
ndash Automatic Reports Setup which is the automatic reports setting described in generate reports automatically on page 22
3 When you reach the report that you want press Enter
control resolution and contrastYour HP Officejet lets you change the resolution and contrast of documents that you are sending
change resolutionResolution affects the transmission speed and quality of faxed documents
reference guide
use the fax features
23
to change the resolution from the front panel
1 Load your originals in the ADF
2 Enter the fax number using the keypad or press Speed Dial until the desired speed-dial entry appears
3 Press Enter
4 Press Fax to scroll through the fax options
5 Stop scrolling when you reach the Resolution menu
6 Press until the desired resolution quality appears (Standard Photo Fine Very Fine)
7 Press EnterYour HP Officejet only faxes at the highest resolution supported by the receiving faxIf you choose Photo be aware that the faxing process takes longer to complete When faxing photographs we recommend that you choose Photo
change contrastChange this setting if you want a black-and-white fax to be darker or lighter than the original
to change the fax contrast from the front panel
1 Load your originals in the ADF
2 Enter the fax number using the keypad or press Speed Dial until the desired speed-dial entry appears
3 Press Enter
4 Press Fax to scroll through the fax options
5 Stop scrolling when you reach the LighterDarker menuThe range of values appears as a circle on a scale on the display
6 Press to lighten the fax or to darken itThe circle moves left or right as you press a button
7 Press Enter to accept the setting you selected
change other fax settings
redial a number automaticallyYou can set your HP Officejet to redial a busy and an unanswered number automatically If you initiated a fax from the computer the computer must be left on for the redialing process to work correctly
1 Press Setup
2 Press 4This selects the Advanced Fax Setup menu
3 Choose one of the following optionsndash Press 3
hp officejet 4100 series
chapter 6
24
This selects the Busy Redial option The default setting for Busy Redial is Redial
ndash Press 4This selects the No Answer Redial option The default setting for No Answer Redial is No Redial
4 Press Enter
5 Press to select Redial or No Redial as desired
6 Press Enter
forward faxes to another numberWith fax forwarding you can send a fax that you receive to another fax number during the next 24-hour period
to forward faxes from the front panel
1 Press Setup
2 Press 3 then press 7This selects the Basic Fax Setup menu then selects the Fax Forwarding Black Only option
3 At the prompt enter the Fax Number to which you wish to send the fax
4 Press Enter
5 Enter the Start Date using the numeric keypad
6 Enter the Start Time using the numeric keypad
7 At the prompt press 1 for AM or 2 for PM
8 Enter the Stop Date using the numeric keypadFax Forwarding On appears on the display
edit or cancel fax forwardingOnce fax forwarding is enabled you may find that you need to change the number you are faxing to or the start and stop times you entered You may wish to cancel your fax forwarding setup altogether Follow the steps below to edit or turn off fax forwarding
to edit fax forwarding from the front panel
1 Press Setup
2 Press 3 then press 7This selects the Basic Fax Setup menu then selects the Fax Forwarding Black Only option
3 Forwarding is ON 1=Edit 2=Cancel appears on the display after a moment Press 1 to edit the number you wish to fax to or to change the start and stop times Follow the messages on the display
to cancel fax forwarding from the front panelbull Press Cancel
OR
reference guide
use the fax features
25
Follow the steps in edit or cancel fax forwarding on page 24 When Forwarding is ON 1=Edit 2=Cancel appears on the display press 2 to cancel fax forwarding
use error correction modeError Correction Mode (ECM) eliminates data lost due to poor phone lines by detecting errors that occur during transmission and automatically requesting retransmission of the erroneous portion Phone charges are unaffected or may even be reduced on good phone lines On poor phone lines ECM increases sending time and phone charges but sends the data much more reliably Turn ECM off (the default setting is on) only if it increases phone charges substantially and you can accept poorer quality in exchange for reduced charges
to change the ECM setting from the front panel
1 Press Setup
2 Press 4 then press 7This selects the Advanced Fax Setup menu then selects the Error Correction Mode option
3 Press to switch between On and Off
4 Press Enter to accept the setting you selected
set automatic reductionThis setting determines what your HP Officejet does if it receives a fax that is too large for the default paper size With this setting on (the default) the image is reduced so that it fits on one page With this feature off information that doesnrsquot fit on the first page is printed on a second page
1 Press Setup
2 Press 4 then press 5This selects the Advanced Fax Setup menu then selects the Automatic Reduction option
3 Press to switch between On and Off
4 Press Enter to accept the setting you selected
adjust the volumeYour HP Officejet provides three levels for adjusting the ring and speaker volume The ring volume is the volume of the phone ringer The speaker volume is the volume of everything else such as the dial and fax tones The default setting is Soft
1 Press Setup
2 Press 3 then press 6This selects the Basic Fax Setup menu then selects the Ring and Beep Volume option
3 Press to select one of the options Soft Loud or Off
4 Press Enter to accept the setting you selected
hp officejet 4100 series
chapter 6
26
change the answer ring pattern (distinctive ringing)Distinctive ringing is a feature offered by phone companies that allows several phone numbers to share the same line Each number has a specific ring pattern If you do not have this service use the default ring pattern which is All Rings
If you connect your HP Officejet to a line with distinctive ringing have your telephone company assign one ring pattern to voice calls and another to fax calls (double or triple rings are best for a fax number)
1 Press Setup
2 Press 4 then press 2This selects the Advanced Fax Setup menu then selects the Answer Ring Pattern option
3 Press to scroll through these options All Rings Single Rings Double Rings Triple Rings and Double amp Triple
4 When the ring pattern that the phone company established for this number appears press Enter
Tip We recommend that you use Double Rings or Triple Rings for fax
set up speed dialingThrough your HP Officejet or your computer you can assign entries to fax numbers you use often This lets you dial those numbers quickly using the front panelrsquos Speed Dial button and a one- or two-digit entry You can create up to 100 individual speed-dial entries (the maximum for some models is 70)
We recommend that you use the software to set up speed-dial settings
Note A speed-dial entry can only be associated with one phone number speed-dial groups are not supported
For more information see set up speed dialing in the hp photo amp imaging help
create individual speed-dial settingsYou can enter fax numbers that you will reuse frequently
1 Press Setup
2 Press 2 then press 1This selects the Speed Dial Setup menu then selects the Individual Speed Dial option
3 Press EnterThe first unassigned speed-dial entry appears on the display
4 Press Enter to select the displayed speed-dial entry
5 Enter the Fax Number to assign to that entry then press EnterThe fax number can be up to 50 digits in length
Tip To enter a three-second pause within a number sequence press Symbols to display a dash
6 Enter the personrsquos or companyrsquos name then press Enter
reference guide
use the fax features
27
The name is limited to 13 characters in lengthFor more information see enter text on page 28
7 After Enter Another appears press 1 (Yes) if you want to set up another number or press 2 (No) to exit
delete speed-dial settingsFollow these steps to delete an individual speed-dial entry
1 Press Setup
2 Press 2 then press 2 againThis selects Speed Dial Setup then selects Delete Speed Dial
3 Press until the individual entry that you want to delete appears then press Enter
set basic fax settings using the front panelWe recommend that you use the Fax Setup Wizard in the HP Officejet software to configure all your basic fax settings however you can also access these settings from the front panel
Note In the US regulations require that your name and phone number appear on every fax The minimum settings that we recommend are described in the following topics
set the date and timeFollow these steps to set the date and time manually
1 Press Setup
2 Press 3 then press 1This selects the Basic Fax Setup menu then selects the Date and Time option
3 Follow the prompts on the display to enter the date and time using the keypad
Tip Use only the last two digits for the year
Tip When you enter a single-digit date or time type a leading zero before the single digit for example 0345 or 08-03-02
After you are done the date and time appear on the display
Warning Cutting off power to the HP Officejet causes the selected date and time to be lost However name and fax number information is not lost
set the fax headerFollow these steps to enter your name and fax number in the header
Note In Hungary the subscriber identification code (fax header) can be set or changed only by authorized personnel For more information contact your authorized HP dealer
1 Press Setup
2 Press 3 then press 2
hp officejet 4100 series
chapter 6
28
This selects the Basic Fax Setup menu then selects the Fax Header option
3 Enter your personal or company name at the prompt Use the guidelines provided in the next section under enter text
4 Press Enter
5 Enter your fax number using the numeric keypad
6 Press Enter
enter textThe following list provides tips for entering text using the front-panel keypad
bull Press the keypad numbers that correspond to the letters of a name
bull Press a button multiple times to see a letter first in uppercase and then in lowercase
bull After the correct letter appears press and then press the number that corresponds to the next letter in the name Again press multiple times until the correct letter appears
bull To insert a space press Space ()bull To enter a symbol such as press Symbols () to scroll through the list of
available symbolsbull If you make a mistake press to clear it and then make the correct
entrybull After you are done entering text press Enter to store your entries
check for dial toneBefore using the fax features verify that the connections are correctly established
1 Press Fax
2 Listen for a dial tone
3 If you do not hear a dial tone check the connections
4 Press Cancel to hang up
ABC These letters correspond to this number and so on
2
JKL To get this character J j K k L l 5
5 Press 5 this many times 1 2 3 4 5 6 7
reference guide
use the fax features
29
fax job menuThe following options become available when the Fax button is pressed
setup menu for fax commandsThe following fax settings are available in the Setup menu
Enter Fax or Speed Dial
FineVery FinePhotoStandard
Fax Number Resolution LighterDarker
Enter a fax number or speed dialWhen the Fax button is pressed
Press and to move to the option you wantPress Enter to select the displayed setting
NoYes
Set New Defaults
Send Fax NowFax from MemorySend Fax LaterPoll to Receive
How to Fax
1Automatic Reports Setup
2Answer Ring Pattern
3Busy Redial
4No Answer Redial
5Automatic Reduction
6Backup Fax Reception
7Error Correction Mode
3Basic Fax Setup 4Advanced Fax Setup
Press Setup to display the menu options
Press and to move to the setting you wantPress Enter to select the displayed setting
1Date and Time
2Fax Header
3Rings to Answer
4Paper Size
5Tone or Pulse Dialing
6Ring and Beep Volume
7Fax Forwarding Black Only
2Speed Dial Setup
1Individual Speed Dial
2Delete Speed Dial
3Print Speed Dial List
hp officejet 4100 series
chapter 6
30
7
31
maintain your hp officejet
This section provides instructions for keeping your HP Officejet in top working condition Perform these maintenance procedures as necessary
clean the glassDirty glass from dust smudges hair and so on slows down performance and affects the accuracy of features such as Fit to Page and Copy
1 Turn off the unit unplug the power cord and raise the scanner lid
2 Clean the glass with a soft cloth or sponge slightly moistened with a nonabrasive glass cleaner
Caution Do not use abrasives acetone benzene or carbon tetrachloride on the glass these can damage it Do not place liquids directly on the glass They may seep under it and damage the unit
3 Dry the glass with a chamois or cellulose sponge to prevent spotting
hp officejet 4100 series
chapter 7
32
clean the white stripMinor debris can accumulate on the white strip located underneath the scannerrsquos lid
1 Turn off the unit unplug the power cord and raise the scanner lid
2 Clean the white strip with a soft cloth or sponge slightly moistened with a mild soap and warm water
3 Wash the strip gently to loosen debris do not scrub the strip
4 Dry the strip with a chamois or soft cloth
Caution Do not use paper-based wipes as these may scratch the strip
5 If this does not clean the strip well enough repeat the previous steps using isopropyl (rubbing) alcohol and wipe the strip thoroughly with a damp cloth to remove any residual alcohol
clean the exterior Use a soft damp lint-free cloth to wipe dust smudges and stains off the case The interior of the unit does not require cleaning Keep fluids away from the interior of the unit as well as the front panel
work with print cartridgesTo ensure the best print quality from your HP Officejet you will need to perform some simple maintenance procedures and when prompted by a front-panel message replace the print cartridges
print a self-test reportIf you are experiencing problems with printing before cleaning or replacing the print cartridges you should print a Self-Test Report This report provides useful information about your print cartridges including status information
1 Press Setup
2 Press 1 then press 4This selects Print Report and then selects Self-Test Report
3 Press Start Black or Start ColorA Self-Test Report is printed for your HP Officejet
handle print cartridgesBefore you replace or clean a print cartridge you should know the part names and how to handle the print cartridge
reference guide
maintain your hp officejet
33
replace the print cartridgesFront-panel messages appear to let you know that you should replace your print cartridges
See order print cartridges on the back cover for information on ordering replacement print cartridges
1 Turn on the unit then lift open the print cartridge access doorThe print carriage moves into view
2 After the carriage stops moving push down on the print cartridge down to release it and then pull it toward you out of its slot
Plastic tape with pink tab(must be removed)
Copper contactsInk nozzles under tape
Do not touch the copper contacts or the ink nozzles
print cartridge access door
hp officejet 4100 series
chapter 7
34
Note It is normal to see ink build-up in the print cartridge slots
3 Remove the new print cartridge from its packaging and being careful to touch only the bright pink plastic tab gently remove the plastic tape to uncover the ink nozzles
Caution Do not touch the copper contacts or ink nozzles
Once you have removed the plastic tape install the print cartridge immediately to prevent the ink from drying in the nozzles
4 Push the new print cartridge into the appropriate slot at a slight angle until it clicks into place
Caution Do not attempt to push the cartridge straight into the slot It must slide in at a slight angle
The tri-color print cartridge goes on the left and the black cartridge goes on the right
5 Close the print cartridge access door
reference guide
maintain your hp officejet
35
align the print cartridgesThe HP Officejet prompts you to align cartridges every time you install or replace a print cartridge Aligning the cartridges ensures high-quality output
To align the print cartridges when prompted
1 Press Enter on the front panelAn align cartridges (test pattern) page prints
2 Load the align cartridges page face down in the ADF between the paper-width guides and press the Enter button again
3 Recycle or discard the page
To align the cartridges at any other time
1 Press Setup
2 Press 5 then press 2This selects the Maintenance menu and then selects the Align Print Cartridge option
3 Press EnterAn align cartridges (test pattern) page prints
4 Load the align cartridges page face down in the ADF between the paper-width guides and press the Enter button again
5 Recycle or discard the page
clean the print cartridgesUse this feature when the Self-Test Report shows streaking or white lines through any of the colored bars Do not clean print cartridges unnecessarily This wastes ink and shortens the life of the ink nozzles
1 Press Setup
2 Press 5 then press 1This selects the Maintenance menu and then selects the Clean Print Cartridge optionA page of patterns is printed The cartridges are cleaned Recycle or discard the pageIf copy or print quality still seem poor after you clean the print cartridges replace the print cartridge that is affected
restore factory defaultsYou can restore the original factory settings to what they were when you purchased your HP Officejet Choosing to restore your factory defaults restores all settings except date information and any scan settings you may have set
You can perform this process from the front panel only
1 Press Setup
2 Press 5 then press 3This selects Maintenance and then selects Restore Factory DefaultsThe factory default settings are restored
hp officejet 4100 series
chapter 7
36
set scroll speedThe Scroll Speed option lets you control the rate that text messages appear in the front-panel display You can choose Normal Fast or Slow The default is Normal
1 Press Setup
2 Press 5 then press 6This selects Maintenance and then selects Set Scroll Speed
3 Press until the desired speed appears then press Enter
set the prompt delay timeThe Prompt Delay option lets you control the amount of time before a message is displayed in the front-panel display You can choose Normal Fast or Slow The default is Normal
1 Press Setup
2 Press 5 then press 7This selects Maintenance and then selects Set Prompt Delay Time
3 Press until the delay time appears then press Enter
self-maintenance sounds During the life of your product you may hear various mechanical sounds This is a normal part of your unitrsquos self-maintenance
reference guide
maintain your hp officejet
37
setup menu optionsThe following options are available from the Setup button
1Last Transaction
2Fax Log
3Speed Dial List
4Self-Test Report
5Automatic Reports Setup
1Print Report
Use Setup to display the Print Report Speed Dial Setup Basic Fax Setup Advanced Fax Setup and Maintenance options
Press and to move to the setting you wantPress Enter to select the displayed setting
1Clean Print Cartridges
2Align Print Cartridges
3Restore Factory Defaults
4Reprint Faxes in Memory
5Set Language amp CountryRegion
6Set Scroll Speed
7Set Prompt Delay Time
5Maintenance2Speed Dial Setup
3Basic Fax Setup
4Advanced Fax Setup
1Individual Speed Dial
2Delete Speed Dial
3Print Speed Dial List
1Date and Time
2Fax Header
3Rings to Answer
4 Paper Size
5Tone or Pulse Dialing
6Ring and Beep Volume
7Fax Forwarding Black Only
1Automatic Reports Setup
2Answer Ring Pattern
3Busy Redial
4No Answer Redail
5Automatic Reduction
6Backup Fax Reception
7Error Correction Mode
hp officejet 4100 series
chapter 7
38
8
39
additional setup information
During the installation of the HP Officejet software a number of windows are displayed You should see the following
bull Installingbull Copying files bull A request to plug in the HP Officejetbull Green OK and check markbull Request to restart your computer (may not occur in all cases)bull Registration
If you did not see all of these windows there may be a problem with the installation Verify the following
bull The HP Director contains six icons (double-click the HP Director icon on the desktop)
bull The HP Officejet is listed in the Printers dialog boxbull There is an icon for the HP Officejet in the System Tray that indicates the
HP Officejet is ready
If the HP Director does not show six icons you may need to wait a few minutes for the HP Officejet to connect to your computer
possible installation problemsIf nothing appears on your computer screen after you insert the HP Officejet 4100 Series CD-ROM into your computerrsquos CD-ROM drive
1 From the Start menu choose Run
2 In the Run dialog box enter dsetupexe (if your CD-ROM drive is not assigned to drive letter d use the appropriate drive letter) then click OK
If the HP Director does not contain six icons do the following
bull Verify that the front-panel cover is attached then unplug the HP Officejet and plug it in again
bull Verify that the USB and power cables are plugged inndash Unplug the USB cable and plug it in againndash Do not attach the USB cable to a keyboard or nonpowered hubndash Verify that the USB cable is 3 meters or less in lengthndash If you have several USB devices attached to your computer you may
want to unplug the others during the installation
Note AppleTalk is not supported
bull Unplug the HP Officejet from the wall and plug it in againbull Restart your computer
hp officejet 4100 series
chapter 8
40
On Windows check the System Tray for applications that are running in the background and close them before restarting your computer
remove and reinstall your hp officejet softwareIf six icons do not appear in the Director you may need to uninstall and re-install the software Do not simply delete the HP Officejet program files from your hard drive Be sure to remove them properly using the uninstall utility provided in the HP Officejet program group
to uninstall from a Windows computer
1 Disconnect your HP Officejet from your computer
2 On the Windows taskbar click Start choose Programs or All Programs (XP) choose Hewlett-Packard choose hp officejet 4100 series then choose uninstall software
3 Follow the directions on the screenBe sure to disconnect your HP Officejet
4 If you are asked whether you would like to remove shared files click NoOther programs that use these files may not work properly if the files are deleted
5 After the program finishes removing the software disconnect your HP Officejet and restart your computer
Note It is important that you disconnect your HP Officejet before restarting your computer
6 To reinstall the software insert the HP Officejet 4100 Series CD-ROM into your computerrsquos CD-ROM drive and follow the instructions that appear
7 After the software is installed connect and turn on your HP Officejet following the onscreen instructions and the instructions in your Setup PosterAfter connecting and turning on your HP Officejet you may have to wait several minutes for all of the Plug and Play events to completeWhen the software installation is complete you will see a Status Monitor icon in the System Tray
8 To verify that the software is properly installed double-click on the HP Director icon on the desktop If the HP Director shows six icons the software has been properly installed
to uninstall from a Macintosh computer
1 Disconnect your HP Officejet from your computer
2 Double-click on ApplicationsHP All-in-One Software folder
reference guide
additional setup information
41
3 Double-click on HP Uninstaller
4 Follow the directions that appear on the screen
5 After the program finishes removing the software disconnect your HP Officejet and restart your computer
6 To reinstall the software insert the HP Officejet 4100 Series CD-ROM into your computerrsquos CD-ROM drive
Note When re-installing the software follow the instructions on the Setup Poster Do not connect the HP Officejet to your computer until after you have completed the software installation
7 On the desktop open the CD-ROM double-click on hp all-in-one installer and follow the instructions that appear
connect your hp officejet to a phone modem or answering machine
The HP Officejet can share a phone line with a phone a modem or an aswering machine When sharing a phone line with an answering machine the HP Officejet will answer fax calls and direct voice calls to the answering machine
Note For information on connecting your HP Officejet to your computer and phone line refer to the Setup Poster that came with your unit
to connect your hp officejet to a phone modem or answering machine
1 Remove the white plastic stopper from connector 2 on the back of the HP Officejet
To connect more than one device to connector 2 on the HP Officejet you must purchase a Y-splitter and plug it into connector 2
2 Connect the phone cord from the phone modem or answering machine to connector 2 (or Y-splitter)
Caution Do not use the phone cord that came with the HP Officejet for this purpose That phone cord must connect connector 1 on the HP Officejet to the wall jack for your phone system See the Setup Poster for details
3 If you are connecting an answering machine see set the number of rings before answering on page 21 for instructions on setting the number of rings correctly or change the answer ring pattern (distinctive ringing) on page 26 for information on incoming ring patterns
4 If you are connecting a modem turn off its fax-receive feature
connector 2 on the HP Officejet
connector 1 on the HP Officejet
hp officejet 4100 series
chapter 8
42
additional troubleshooting helpYou may want to refer to the readme file for more information on possible installation problems On Windows you can access the readme file from the Start button on the taskbar select Programs Hewlett-Packard hp officejet 4100 series View the Readme File On Macintosh you can access the readme file by double-clicking on the icon located in the top-level folder of the HP Officejet software CD-ROM
The readme file provides more information including
bull Using the Re-install utility after a failed installation to return your PC to a state that will allow the HP Officejet to be re-installed
bull Using the Re-install utility on Windows 98 to recover from a Composite USB System Driver missing errorThis error may occur if the hardware is installed prior to installing the software After running the Re-install utility reboot your PC and install the HP Officejet software before connecting the HP Officejet to your computer
You can also find more information on this website
wwwhpcomsupport
9
43
technical information
Additional specifications information can be found in the HP Photo amp Imaging Help in the hp officejet 4100 series section
physical specifications
power specificationsbull Power consumption 75W maximumbull Source (Input Voltage) 100 to 240 VAC groundedbull Input Frequency 50 to 60 Hzbull Current 1A maximum
regulatory informationAdditional regulatory information can be found in the HP Photo amp Imaging Help The information in this section supercedes information in the HP Photo amp Imaging Help
doc statement deacuteclaration de conformiteacute (Canada)Le preacutesent appareil numeacuterique neacutemet pas de bruit radioeacutelectrique deacutepassant les limites applicables aux appareils numeacuteriques de la classe B prescrites dans le Regraveglement sur le brouillage radioeacutelectrique eacutedicteacute par le ministegravere des Communications du CanadaThis digital apparatus does not exceed the Class B limits for radio noise emissions from digital apparatus set out in the Radio Interference Regulations of the Canadian Department of Communications
notice to users of the Canadian telephone networkThis equipment meets the applicable Industry Canada Terminal Equipment Technical Specifications This is confirmed by the registration number The abbreviation IC before the registration number signifies that registration was performed based on a Declaration of Conformity indicating that Industry Canada technical specifications were met It does not imply that Industry Canada approved the equipment
Note The Ringer Equivalence Number (REN) assigned to each terminal device provides an indication of the maximum number of terminals allowed to be connected to a telephone interface The termination on an interface may consist of any combination of devices subject only to the requirement that the sum of the Ringer Equivalence Numbers of all the devices does not exceed 5
The REN for this product is 03B based on FCC Part 68 test results
height width depth weight (without print cartridges)
with paper trays and ADF closed
718 in (1824 cm) 1676 in (4258 cm) 825 in (2096 cm) 75 lbs (34 kg)
with ADF and paper tray extended
1030 in (2615 cm) 1676 in (4258 cm) 1854 in (4709 cm) 75 lbs (34 kg)
hp officejet 4100 series
chapter 9
44
notice to all users of the European Economic Area (EEA)
This product is designed to interwork with the analogue telephone networks in the following countriesregions
Network compatibility depends on customer selected settings which must be reset to use the equipment on a telephone network in a countryregion other than where the product was purchased Contact the vendor or Hewlett-Packard Company if addition product support is necessaryThis equipment has been certified by the manufacturer in accordance with Directive 19995EC (annex II) for Pan-European single-terminal connection to the public switched telephone network (PSTN) However due to differences between the individual PSTNs provided in different countriesregions the approval does not of itself give an unconditional assurance of successful operation on every PSTN network termination pointIn the event of problems you should contact your equipment supplier in the first instance
geraumluschemissionLpA lt 70 dBam Arbeitsplatzim Normalbetriebnach DIN 45635 T 19
notice to Korean customers
Germany UK Netherlands
France Spain Italy
Belgium Luxembourg Sweden
Austria Denmark Ireland
Norway Finland Switzerland
Greece Portugal
10
45
hp support
This section explains the support services information provided by Hewlett-Packard If you are unable to find the answer you need in the printed or onscreen documentation supplied with your product you can contact one of the HP support services listed in the following pages Some support services are available only in the US and Canada while others are available in many countriesregions worldwide If a support service number is not listed for your countryregion contact your nearest authorized HP dealer for help
get support and other information from the internetIf you have Internet access you can get help from the following HP website
wwwhpcomsupportThe Web site offers technical support drivers supplies and ordering information
hp customer supportSoftware programs from other companies may be included with your HP Officejet If you experience problems with any of those programs you will receive the best technical assistance by calling the experts at that companyIf you need to contact HP Customer Support do the following before you call
1 Make sure thata Your unit is plugged in and turned onb The specified print cartridges are installed correctlyc The recommended paper is properly loaded in the input tray
2 Reset your unita Turn off the unit using the On button located on the unitrsquos front panelb Unplug the power cord from the back of the unitc Plug the power cord back into the unitd Turn on the unit using the On button
3 For more information check the HP website at wwwhpcomsupport
4 If you are still experiencing problems and need to speak with an HP Customer Support Representativendash Have your service ID and serial number ready To display your service ID and
serial number on the front panel do the following Press Enter and Start Color at the same time until the service ID appears in the front-panel display From this display press the right arrow until the serial number displays
ndash Print a Self-Test Report See print a self-test report on page 32 for information on printing this report
ndash Make a color copyndash Be prepared to describe your problem in detail
5 Call HP Customer Support Be near your unit when you call
call in the US during warrantyCall (208) 323-2551 This service is free during the warranty period however your standard long-distance phone charges still apply A fee may apply outside the warranty period
hp officejet 4100 series
chapter 10
46
US phone support is available in both English and Spanish languages 24 hours a day 7 days a week (days and hours of support may change without notice)
call elsewhere in the worldThe numbers listed below are current as of the printing date of this guide For a list of current international HP Support Service numbers visit this address and choose your own countryregion or language
wwwhpcomsupportFor Korea you can also visit this address
httpwwwhpcokrYou can call the HP support center in the following countriesregions If your countryregion is not listed contact your local dealer or nearest HP Sales and Support Office to find out how to obtain servicesSupport service is free during the warranty period however your standard long-distance phone charges will apply In some cases a flat fee per single incident will also applyFor phone support in Europe please check for the details and conditions of phone support in your countryregion by consulting the following Web site
wwwhpcomsupportAlternatively you can ask your dealer or call HP at the phone number indicated in this booklet As part of our constant efforts to improve our phone support service we advise you to check our website on a regular basis for new information regarding service features and delivery
countryregion hp technical support countryregion hp technical support
Algeria1 +213 (0) 61564 543 Malaysia 1-800-805405
Argentina 0810-555-5520 Mexico 01-800-472-6684
Australia +61 3 8877 80001902 910 910
Mexico (Mexico City) 5258-9922
Austria +43 (0) 810 00 6080 Morocco1 +212 22404 747
Bahrain (Dubai) 800 728 Netherlands +31 (0) 20 606 8751
Belgium (Dutch) +32 (0) 2 626 8806 New Zealand 0800 441 147
Belgium (French) +32 (0) 2 626 8807 Norway +47 22 11 6299
Brazil (Grande Sao Paulo) (11) 3747 7799 Oman +971 4 883 8454
Brazil (Demais Localidades) 0800 157751 Palestine +971 4 883 8454
Canada during warranty (905) 206 4663 Panama 001-800-7112884
Canada post-warranty(per-call charge)
1-877-621-4722 Peru 0-800-10111
Caribbean amp Central America
1-800-711-2884 Philippines 632-867-3551
Chile 800-360-999 Poland +48 22 865 98 00
China 86 10 6868 7980 Portugal +351 21 3176333
Colombia 9-800-114-726 Puerto Rico 1-877-2320-589
Costa Rica 0-800-011-0524 Qatar +971 4 883 8454
Czech Republic +420 (0) 261307310 Romania +40 1 315 44 42or local 01 3154442
reference guide
hp support
47
call in Australia post-warrantyIf your product is not under warranty you can call 03 8877 8000 A per-incident out-of-warranty support fee of $2750 (inc GST) will be charged to your credit card You can also call 1902 910 910 ($2750 charged to your phone account) from 900 AM to 500 PM Monday through Friday (Charges and support hours are subject to change without notice)
prepare your unit for shipmentIf after contacting HP Customer Support or returning to the point of purchase you are requested to send your unit in for service please follow the power off and rebox steps below to avoid further damage to the HP product
Denmark +45 39 29 4099 Russian Federation Moscow +7 095 797 3520
Ecuador 1800-711-2884 Russian Federation St Petersburg
+7 812 346 7997
Europe (English) +44 (0) 207 512 5202 Saudi Arabia +800 897 14440
Egypt 02 532 5222 Singapore 65 6272 5300
Finland +358 (0) 203 47 288 Slovakia +421 (0) 2 682 08080
France (034 Euromin) +0892 69 60 22 South Africa (inside RSA) 086 000 1030
Germany (012 Euromin) +49 (0) 180 52 58 143 South Africa (inside RSA) +27-11 258 9301
Greece +30 1060 73 603 Spain +34 902 321 123
Hong Kong (SAR) +85 (2) 3002 8555 Sweden +46 (0)8 619 2170
Guatemala 1800-995-5105 Switzerland 2 +41 (0) 84 880 1111
Hungary +36 (0) 1 382 1111 Taiwan +886-2-2717-00550800 010 055
India 1-600-11226791 11 682 6035
Thailand +66 (2) 661 4000
Indonesia 62-21-350-3408 Tunisia1 +216 1891 222
Ireland +353 (0) 1 662 5525 Turkey +90 216 579 7171
Israel +972 (0) 9 8304848 Ukraine +7 (380-44) 490-3520
Italy +39 (0) 226410350 United Arab Emirates +971 4 883 8454
Japan 0570 000 511+81 3 3335 9800
United Kingdom +44 (0) 207 512 52 02
Jordan +971 4 883 8454 Venezuela 0800-47468368 or800-477-7777
Korea (Seoul) +82 (2) 3270 0700 Venezuela (Caracas) (502) 207-8488
Korea (outside Seoul) 080 999 0700 Vietnam 84 (0) 8 823 4530
Kuwait +971 4 883 8454 Yemen +971 4 883 8454
Lebanon +971 4 883 8454
1 This Call Center supports French speaking customers from the following countriesregions Morocco Tunisia and Algeria
2 This Call Center supports German French and Italian speaking customers in Switzerland
countryregion hp technical support countryregion hp technical support
hp officejet 4100 series
chapter 10
48
Note When transporting your HP Officejet make sure that the pens have been removed the HP Officejet has been properly shut down by pressing the power button and you have allowed time for the carriage to return to the service station and for the scanner to return to its parked position
1 Turn on the unitDisregard steps 1 through 6 if your unit will not turn on and the print carriage is in the home position You will not be able to remove the print cartridges Proceed to step 7
2 Open the print cartridge access doorThe print carriage moves into view
3 See replace the print cartridges on page 33 for information on removing the print cartridges
Caution Remove both print cartridges Failure to do so may damage your unit
4 Place the print cartridges in an airtight bag so they will not dry out and put them aside (do not send them with the unit unless instructed to by the HP customer support call agent)
5 Turn off the unit
6 Close the print cartridge access door
7 Remove the front panel cover as followsa Grasp the front of the front panel cover with two hands as shownb Firmly lift the front panel cover to unsnap it from the unit
8 Retain the front panel cover Do not return the front panel cover with the unit
9 If available pack the unit for shipment using the original packing materials or the packaging materials that come with your exchange unit
If you do not have the original packaging materials please use other adequate packaging materials Shipping damage caused by improper packaging andor improper transportation is not covered under the warranty
reference guide
hp support
49
10 Place the return shipping label on the outside of the box
11 Include the following items in the boxndash A complete description of symptoms for service personnel (samples of print
quality problems are helpful)ndash A copy of the sales slip or other proof of purchase to establish the warranty
coverage periodndash Your name address and a phone number where you can be reached during
the day
hp distribution centerTo order HP Officejet software a copy of the printed Reference Guide a setup poster or other customer-replaceable parts do one of the following bull In the US or Canada call (208) 323 2551bull Visit this website
httpwwwhpcomcposupportsoftwarehtml
hp officejet 4100 series
chapter 10
50
11
51
warranty information
HP Officejet 4100 seriesDuration of Limited Warranty (hardware and labor) 1 YearDuration of Limited Warranty (CD media) 90 DaysDuration of Limited Warranty (print cartridges) Until the HP ink is depleted or the ldquoend of warrantyrdquo date printed on the cartridge has been reached whichever occurs first
warranty service
express serviceTo obtain HP express repair service the customer must contact an HP service office or an HP Customer Support Center for basic troubleshooting first See hp customer support on page 45 for steps to take before calling Customer SupportIf a customer unit needs a minor part replacement and these parts can normally be replaced by the customer the customer-replaceable components may be serviced through expedited part shipment In this event HP will prepay shipping charges duty and taxes provide telephone assistance on replacement of the component and pay shipping charges duty and taxes for any part that HP asks to be returnedThe HP Customer Support Center may direct customers to designated authorized service providers who are certified by HP to service the HP product
warranty upgradesUpgrade your standard factory warranty to a total of three years with the HP SUPPORTPACK Service coverage begins on product purchase date and the pack must be purchased within the first 180 days of product purchase This program offers phone support from 600 AM to 1000 PM Mountain Standard Time (MST) Monday through Friday and 900 AM to 400 PM (MST) on Saturdays If during your technical support call it is determined that you need a replacement product then HP will ship you this product next business day free of charge Available in US onlyFor more information please call 1-888-999-4747 or visit the following HP Web site
httpwwwhpcomgohpsupportpack
Outside the US please call your local HP Customer Support office See call elsewhere in the world on page 46 for a list of international Customer Support numbers
returning your hp officejet for serviceBefore returning your HP Officejet for service you must call HP Customer Support See hp customer support on page 45 for steps to take before calling Customer Support
hewlett-packard limited global warranty statement
extent of limited warrantyHewlett-Packard (ldquoHPrdquo) warrants to the end-user customer (ldquoCustomerrdquo) that each HP Officejet 4100 Series product (ldquoProductrdquo) including related software accessories media and supplies shall be free from defects in material and workmanship for the duration which begins on the date of purchase by the Customer
hp officejet 4100 series
chapter 11
52
For each software Product HPrsquos limited warranty applies only to a failure to execute programming instructions HP does not warrant that the operation of any Product shall be uninterrupted or error freeHPrsquos limited warranty covers only those defects which arise as a result of normal use of a Product and does not cover any other problems including those which arise as a result of (a) improper maintenance or modification (b) software accessories media or supplies not provided or supported by HP or (c) operation outside the Productrsquos specificationsFor any hardware Product the use of a non-HP print cartridge or a refilled print cartridge does not affect either the warranty to the Customer or any HP support contract with the Customer However if Product failure or damage is attributable to the use of a non-HP or refilled print cartridge HP shall charge its standard labor and materials charges to service the Product for the failure or damageIf HP receives during the applicable warranty period notice of a defect in any Product HP shall either repair or replace the defective Product at HPrsquos option Where labor charges are not covered by HPrsquos limited warranty repairs shall be at HPrsquos standard charges for laborIf HP is unable to repair or replace as applicable a defective Product which is covered by HPrsquos warranty HP shall within a reasonable time after being notified of the defect refund the purchase price for the ProductHP shall have no obligation to repair replace or refund until the Customer returns the defective Product to HPAny replacement product may be either new or like-new provided that it has functionality at least equal to that of the Product being replacedHP products including each Product may contain remanufactured parts components or materials equivalent to new in performanceHPs limited warranty for each Product is valid in any countryregion or locality where HP has a support presence for the Product and where HP has marketed the Product The level of warranty service may vary according to local standards HP shall have no obligation to alter the form fit or function of the Product in order to make it operate in a countryregion or locality for which the Product was never intended to operate
limitations of warrantyTO THE EXTENT ALLOWED BY LOCAL LAW NEITHER HP NOR ITS THIRD PARTY SUPPLIERS MAKE ANY OTHER WARRANTY OR CONDITION OF ANY KIND WHETHER EXPRESS OR IMPLIED WITH RESPECT TO THE COVERED HP PRODUCTS AND SPECIFICALLY DISCLAIM THE IMPLIED WARRANTIES OR CONDITIONS OF MERCHANTABILITY SATISFACTORY QUALITY AND FITNESS FOR A PARTICULAR PURPOSE
limitations of liabilityTo the extent allowed by local law the remedies provided in this Limited Warranty Statement are the Customerrsquos sole and exclusive remediesTO THE EXTENT ALLOWED BY LOCAL LAW EXCEPT FOR THE OBLIGATIONS SPECIFICALLY SET FORTH IN THIS LIMITED WARRANTY STATEMENT IN NO EVENT SHALL HP OR ITS THIRD PARTY SUPPLIERS BE LIABLE FOR DIRECT INDIRECT SPECIAL INCIDENTAL OR CONSEQUENTIAL DAMAGES WHETHER BASED ON CONTRACT TORT OR ANY OTHER LEGAL THEORY AND WHETHER ADVISED OF THE POSSIBILITY OF SUCH DAMAGES
local lawThis Limited Warranty Statement gives the Customer specific legal rights The Customer may also have other rights which vary from state to state in the United States from province to province in Canada and from countryregion to countryregion elsewhere in the world
reference guide
warranty information
53
To the extent this Limited Warranty Statement is inconsistent with local law this Statement shall be deemed modified to be consistent with such local law Under such local law certain disclaimers and limitations of this Statement may not apply to the Customer For example some states in the United States as well as some governments outside the United States (including provinces in Canada) mayPreclude the disclaimers and limitations in this Statement from limiting the statutory rights of a consumer (eg the United Kingdom)Otherwise restrict the ability of a manufacturer to enforce such disclaimers or limitations orGrant the Customer additional warranty rights specify the duration of implied warranties which the manufacturer cannot disclaim or not allow limitations on the duration of implied warrantiesFOR CONSUMER TRANSACTIONS IN AUSTRALIA AND NEW ZEALAND THE TERMS IN THIS LIMITED WARRANTY STATEMENT EXCEPT TO THE EXTENT LAWFULLY PERMITTED DO NOT EXCLUDE RESTRICT OR MODIFY AND ARE IN ADDITION TO THE MANDATORY STATUTORY RIGHTS APPLICABLE TO THE SALE OF THE COVERED HP PRODUCTS TO SUCH CUSTOMERS
hp officejet 4100 series
chapter 11
54
55
index
Numerics4-by-6 inch photo paper
load 10 12
AADF 7adjust
volume for fax 25align print cartridges 35Answer Ring Pattern 26automatic document feeder 7automatic reduction
fax 25
Bbest copy quality 13busy number
redial automatically 23
Ccancel
scan 18scheduled fax 21
cartridgesalign 35replace 33
cleanprint cartridges 35the exterior 32the glass 31white strip 32
colorenhance 14fax 20fax from front panel 20
contrastchange for fax 23photo color 14
copy 13 16change default settings 15enhance 14fit to page 16lighten or darken 14menu options 16number of copies 14photo 15quality 13reduce or enlarge 14settings 13 15
speed 13tutorial 4
Customer Support 45web site 45
Ddarken a copy 14date
setting 27default settings
restore 35director review 4distinctive ringing 26
Eenhance copies 14enlarge copy 14 16envelopes
load 9Error Correction Mode
(ECM) 25
Ffactory defaults
restore 35fast copy quality 13fax 28
adjust volume 25automated reports 22cancel fax forward 24cancel scheduled 21change Answer Ring
Pattern 26change contrast 23change resolution 22change settings 19control appearance 22create individual speed-dial
settings 26delete speed-dial
settings 27distinctive ringing 26Error Correction Mode
(ECM) 25forward faxes 24header 27in color 20in color from front panel 20manual reports 22
menu 29print reports 22receive 21receive manually 21redial busy or unanswered
number 23schedule 20send from front panel 19set automatic reduction 25set date and time 27set the number of rings 21settings 27 28setup menu options 29speed dials 19test 28
fit to page 16forward faxes 24
cancel 24front panel
display scroll speed 36enter text 28send a fax 19setting prompt delay 36tutorial 3
Gglass
cleaning 31greeting cards
load 11
Hhelp 1HP Customer Support 45
calling 45HP Director 4HP distribution center 49HP Officjet
preparing to ship 47HP papers
tips on loading 11
Iindividual speed-dial settings
create 26ink cartridges see print
cartridgesinkjet paper
load 11
index
hp officejet 4100 series56
Kkeypad
enter text 28
Llabels
load 12lighten copies 14load
change the paper type 12envelopes 9original in ADF 7paper 7photo paper 10 12postcards 10 12print cartridges 33set the paper size 12tips 11
Mmaintenance
align print cartridges 35clean print cartridges 35clean the exterior 32clean the glass 31clean the white strip 32normal sounds 36replace print cartridges 33restore factory defaults 35self-maintenance
sounds 36self-test report 32
menuscopy options 16fax 29fax setup 29maintenance 37print reports 37
Nnormal copy quality 13number of copies
set 14number of rings
set 21
Oorder print cartridges 60originals
load in ADF 7output tray 8
Ppaper
change default size for copy 12
change the type 12load 7recommended 7set the size 12tips on loading 11
paper size change for copy 12
paper trayload 7
phone numbers support services 45
photo paperload 10 12
photoscopy 15enhance copy 14
physical specifications 43postcards
load 10 12power
specifications 43print
envelopes 9fax reports 22self-test report 32
print cartridgesalign 35clean 35handling 32replace 33
prompt delaysetting 36
Qquick start
review the director 4use with a computer 4
Rreceive
fax 21redial
busy or unanswered number 23
reduce copy 14 16regulatory information 43reinstall software 40reports
generate automatically for fax 22
generate manually for fax 22
print 22self-test 32
resolution
change for fax 22restore factory settings 35returning your HP Officejet for
service 51
Sscan
from front panel 17stop 18
schedule a fax 20scroll speed
setting 36self-test report 32send
cancel forward faxes 24color fax 20color fax from front
panel 20forward faxes 24
settingscopy 13 15fax 27 28prompt delay 36scroll speed 36
setupadditional information 39menu 29
shippingyour HP Officejet 47
softwareremove and reinstall 40
soundsself-maintenance 36
specificationsphysical 43power 43
speed dials 19create individual
settings 26delete settings 27
stopscan 18scheduled fax 21
subscriber identification code 27
support services 45
Ttelephone line
multiple numbers 26telephone numbers 45text
enhance 14enter from front panel 28
time
index
reference guide 57
setting 27transparency film
recommended 7tips on loading 11
troubleshootingremove and reinstall
software 40T-shirt Transfer Iron-On
load 11tutorial
front panel 3make a copy 4
Uunanswered number
redial automatically 23
Vvolume
adjust 25
Wwarranty 45
service 51statement 51upgrades 51
white stripcleaning 32
hp officejet 4100 series
chapter 12
58
declaration of conformityAccording to ISOIEC Guide 22 and EN 45014
Manufacturerrsquos Name and Address
Hewlett-Packard Company 16399 West Bernardo Drive San Diego CA 92127-1899 USA
declares that the product
Product Name hp officejet 4100 series (Q1608A)
Model Number(s) officejet 4110 (Q1609A) officejet 4110xi (Q1610A) officejet 4110v (Q1611A) officejet 4105 (Q1612A) officejet 4105z (Q1613A) officejet 4115 (Q1614A)
Product Options All
conforms to the following Product Specifications
Safety EN609501992 +A1 A2 A3 A4 amp A11
IEC609501991 +A1 A2 A3 amp A4
UL1950CSA 222 No 950 3rd Edn 1995
NOM-019-SCFI-1993
EMC CISPR221993 +A1 amp A2 EN550221994 +A1 amp A2 -Class B
CISPR241997EN550241998
IEC 61000-3-21995 EN61000-3-21995
IEC 61000-3-31994 EN61000-3-31995
ASNZS 3548 1992
CNS13438 1997
FCC Part 15-Class B ICES-003 Issue 2 VCCI-2
GB 9254-1998
Telecom TBR21 1998
Supplementary Information
The Product herewith complies with the requirements of the Low Voltage Directive 7323EEC the EMC Directive 89336EEC and the RampTTE Directive 19995EC (ANNEX II) carries the CE marking accordingly
European Contact for regulatory topics only Your local Hewlett-Packard Sales and Service Office orHewlett-Packard GmbH
Department HQ-TRE Herrenberger Strasse 140 D-71034 Boumlblingen Germany (FAX + 49-7031-14-3143)
order mediaTo order media such as HP Premium Inkjet Paper HP Premium Inkjet Transparency Film HP Iron-On T-shirt Transfer paper or HP Greeting Cards go to
wwwhpshoppingcom
For orders in countries other than the US and Canada select other countries then click Yes to leave hpshoppingcom From this website you can access hpshoppingcom for your specific language or countryregion
order print cartridges
If you have Internet access you can get more information from the HP website at
wwwhpcomsupport
print cartridges hp reorder number
HP black print cartridge 56 19 ml black print cartridge
HP color print cartridgeHP tri-color print cartridge
57 17 ml color print cartridge28 8 ml color print cartridge
Visit the hp officejet information centerIt has everything you need to get the most value from your HP Officejet
bull Technical Supportbull Supplies and Ordering Informationbull Project Tipsbull Ways to Enhance Your Product
wwwhpcomsupport
copy 2003 Hewlett-Packard Company
Printed in the USA Mexico Germany Singapore or China
Q1608-90163Q1608-90163
Q1608-90163

hp officejet 4100 series
chapter 3
8
3 Tap the stack on a flat surface to align the edges of the paper and then check the paper for the followingndash Make sure it is free of rips dust wrinkles and curled or bent edgesndash Make sure all the paper in the stack is the same size and type unless
you are working with photo paper
4 Insert paper into the paper tray print-side down until it stops To avoid bending the paper make sure you do not push the paper in too far or push too hard If you are using letterhead insert the top of the page firstBe careful not to use too much or too little paper Check that the stack of paper contains several sheets but is no higher than the top of the paper-width guide
5 Slide the paper-width guide in until it stops at the edge of the paper Make sure that the paper stack lies flat in the paper tray and fits under the tab of the paper-width guide
6 Extend the output-tray
reference guide
load originals and load paper
9
load envelopesUse the print feature of your software to print to envelopes with your HP Officejet Do not use shiny or embossed envelopes or envelopes that have clasps or windows You can load the paper tray with one or multiple envelopes
1 Remove all paper from the paper tray
2 Slide an envelope into the tray with the envelope flap up and to the left (print-side down) until it stops
3 Adjust the paper-width guide against the envelope until it stopsBe careful not to bend the envelope If you are loading multiple envelopes make sure the envelopes fit within the tray (do not overload it)Consult the help files in your word processing software for details on how to format text for printing on envelopes
hp officejet 4100 series
chapter 3
10
load 4 x 6 inch photo paperFollowing is the procedure for loading 4-by-6 inch photo paper into your HP Officejet
1 Remove all paper from the paper tray and then slide a stack of photo paper into the tray until it stopsMake sure the print-side faces downIf the photo paper you are using has perforated tabs load the photo paper so that the tabs are closest to you
2 Adjust the paper-width guide against the stack of photo paper until it stopsMake sure the photo paper fits within the tray (do not overload it)
Note Make sure you set the paper type and paper size before printing See set the paper type on page 12 and set the paper size on page 12
load postcardsFollowing is the procedure for loading postcards
1 Remove all paper from the paper tray and then slide a stack of cards into the tray until they stopMake sure the print-side faces down
reference guide
load originals and load paper
11
2 Adjust the paper-width guide against the cards until it stops Make sure the cards fit within the tray (do not overload it)
tips for loading other types of paper in the paper trayThe following table provides guidelines for loading certain types of paper and transparency film For best results adjust the paper settings each time you change paper types and paper sizes For more information see set the paper type on page 12
Note HP Photo Paper and HP Photo Paper Glossy 4-by-6 are not recommended for printing with your HP Officejet To print photos use HP Everyday Photo Paper For your best photo printing needs use HP Premium Plus Photo Paper
paper tips
HP papers bull HP Premium Inkjet Paper Locate the gray arrow on the nonprinting side of the paper and then insert paper with the arrow side facing up
bull HP Premium or Premium Plus Photo Paper Load the glossy (print) side down (To prevent curling keep photo paper sealed in the original package until you are ready to use it) Always load at least five sheets of regular paper in the paper tray first and then place the photo paper on top of the regular paper
bull HP Premium Inkjet Transparency Film Insert the film so that the white transparency strip (with arrows and the HP logo) is on top and is going into the tray first
bull HP Inkjet T-shirt Transfer Iron-On Flatten the transfer sheet completely before using it do not load curled sheets (To prevent curling keep transfer sheets sealed in the original package until you are ready to use them) Manually feed one sheet at a time with the unprinted side facing down (the blue stripe faces up)
bull HP Matte Greeting Cards HP Glossy Greeting Cards or HP Felt-Textured Greeting Cards Insert a small stack of HP greeting-card paper with the print-side down into the paper tray until it stops
hp officejet 4100 series
chapter 3
12
set the paper typeIf you want to use a different type of paper such as photo paper transparency film Iron-On T-shirt transfers or brochures simply load that paper in the paper tray You must then change the paper type settings to ensure the best print quality
HP recommends paper type settings according to the type of paper you are using
This setting refers to copy options only If you want to set the paper type for printing from a computer set the properties in the Print dialog box of the software
1 Press the Copy button until Paper Type appears
2 Press until the appropriate paper type appears
3 Press Enter to choose the displayed paper type
set the paper sizeThe HP Officejet can use Letter Legal or A4 paper Use the following procedure to set the paper size for copy options
1 Press the Copy button until Copy Paper Size appears
2 Press until the appropriate paper size appears
3 Press Enter to choose the displayed paper size
To avoid jams remove papers from the output tray frequently The output tray capacity is affected by the type of paper and the amount of ink you are using For more information about output-tray capacity see technical information in the HP Photo amp Imaging Help
Labels(works only with printing)
bull Always use letter-size or A4-size label sheets designed for use with HP inkjet products (like Avery Inkjet Labels) and make sure that the labels are not over two years old
bull Fan the stack of labels to make sure none of the pages are sticking together
bull Place a stack of label sheets on top of standard paper in the paper tray print-side down Do not insert labels one sheet at a time
Postcards (works only with printing)
Insert a stack of postcards or hagaki cards with the print-side down into the paper tray until it stops Line the postcards up on the right side of the paper tray slide the paper-width guide up against the left side of the cards until it stops
4-by-6 inch photo paper (works only with printing)
Insert the photo paper with the print-side down into the paper tray until it stops Place the long edge of the photo paper against the right side of the paper tray and slide the paper-width guide up against the long edge of the photo paper until it stops If the photo paper you are using has perforated tabs load the photo paper so that the tabs are closest to you
paper tips
4
13
use the copy features
The copy features let you do the following
bull Produce high-quality color and black-and-white copiesbull Reduce or enlarge the size of the copies you make from 25 to 200 or
50 to 200 (depending on your model) of the copyrsquos original sizebull Make the copy lighter or darker select the number of copies and specify
the quality of the copies you makebull Use special copying features to make high-quality copies of photos using
special photo paper or to create transparencies
make copiesYou can make copies using the front panel of your HP Officejet or by using the HP Officejet software on your computer Many copy features are available using either method However you may find that the software offers easier access to special copy features
All copy settings that you select on the front panel are reset two minutes after the HP Officejet completes the copy unless you save the settings as the default settings as described in change settings for all copy tasks on page 15
make a copy1 Load the paper tray with the appropriate paper
2 Load your original
3 Press the Copy button
4 Use the keypad or press the or to enter the number of copies
5 Press Start Black or Start Color
Tip To make a single copy press the Copy button and then press Start Black or Start Color
Note Make sure that the color print cartridge is installed in your HP Officejet Both print cartridges must be installed when making a copy
increase copy speed or qualityThe HP Officejet provides three options that affect copy speed and quality
bull Best produces the highest quality for all paper types Best copies more slowly than the other quality settings
bull Normal delivers high-quality output and is the recommended setting for most of your copying Normal copies faster than Best
bull Fast copies faster than the Normal setting The text is of comparable quality to the Normal setting but the graphics may be of lower quality Using Fast also reduces the frequency of replacing your print cartridges because it uses less ink
hp officejet 4100 series
chapter 4
14
1 Load your original
2 Press Copy until Copy Quality appears
3 Press until the desired quality setting appears and then press Enter to select it
4 Press Start Black or Start Color
set the number of copies You can set the number of copies using the front panel
1 Press the Copy button
2 Use the keypad or press the or to enter the number of copies
3 Press Enter
4 Press Start Black or Start Color
Tip If you hold down the right arrow button then after reaching 10 the number of copies changes by increments of five to make it easier to set a large number of copies
reduce or enlarge a copyYou can reduce or enlarge a copy of an original using ReduceEnlarge
For more information about additional copy options such as Fit to Page see perform special copy jobs on page 15
1 Press Copy until ReduceEnlarge appears
2 Press until the appropriate ReduceEnlarge option appears and then press Enter to select it
3 If you select Custom 100 Set Custom Size appears Use the arrow keys or type a percentage on the keypad
4 Press Enter when the desired percentage is displayed
5 Press Start Black or Start Color
make copies lighter or darkerUse LighterDarker to adjust the lightness and darkness of the copies you make
1 Press Copy until LighterDarker appearsThe range of LighterDarker values are represented as circles on a scale on the front-panel display
2 Press to lighten the copy or to darken it The circle moves to the left or right depending on the arrow button you press
3 Press Enter to select the setting
4 Press Start Black or Start Color
enhance text sharpness and photo colorsYou can use Text to sharpen edges of black text Photo to enhance light colors in your photographs or Mixed if your original contains a photograph and text You can also select None to turn off all enhancements
reference guide
use the copy features
15
Text enhancement is the default option You can turn off Text enhancement by selecting Photo Mixed or None if the following occur
bull Stray dots of color surround some text on your copiesbull Large black typefaces look splotchy (not smooth)bull Thin colored objects or lines contain black sectionsbull Horizontal grainy or white bands appear in light- to medium-gray areas
1 Press Copy until Enhancements appears
2 Press until the desired enhancement (Text Photo Mixed or None) appears
3 Press Enter to select the setting
4 Press Start Black or Start Color
change settings for all copy tasksSave the copy settings you use most often by setting them as the default This includes changes to Copy options such as Paper Type and Paper Size as well as other Copy settings on the front panel such as Number of Copies and Copy Quality
1 Make any desired changes to the copy options
2 Press Copy until Set New Defaults appears
3 Press until Yes appears
4 Press Enter to set the options as a defaultYour settings are saved
perform special copy jobsIn addition to supporting standard copying your HP Officejet can also copy a photo or fit a copy to the page
copy a photoWhen copying a photo you should select options for the correct paper type and photo enhancement
1 Load the photo in the automatic document feeder (ADF)For more information see load originals
2 If you are using photo paper load it in the paper tray
3 Press Copy until Paper Type appears
4 Press until Premium Photo appears and then press Enter to select it
5 Press Copy until Enhancements appears
6 Press until Photo appears and then press Enter to select it
7 Press Start Black or Start Color
Tip To enlarge a photo automatically to a full page use the Photo Fit to Page button
hp officejet 4100 series
chapter 4
16
fit a copy to the pageUse the Photo Fit to Page button when you want to automatically enlarge or reduce your original to fit Letter or A4 size paper You can enlarge a small photo to fit a full-size page as shown below Using Photo Fit to Page may prevent unwanted cropping of text or images around the margins
1 Load the original in the ADFFor more information see load originals on page 7
2 Press the Photo Fit to Page button
Note Do not press the Fax Copy or Scan buttons on the front panel once you have pressed the Photo Fit to Page button
3 Press until the appropriate paper type appears and then press Enter to select it
4 Press Start Black or Start Color
copy optionsThe following diagram shows the options that are available when you press Copy
Original Fit to Page
Plain PaperPhoto PaperTransparency
Actual sizeCustom 100Full Page 91Legal gt Ltr 72
ReduceEnlarge Paper Type
NoYes
TextPhotoMixedNone
Enhancements Set New Defaults
LetterLegalA4
Copy Paper Size
The sizes vary by countryregion
LighterDarker
NormalFastBest
Copy Quality
To cycle through the copy options press Copy repeatedly
Press and to move to the setting you want within one of the copy optionsPress Enter to select the displayed setting
5
17
use the scan features
Scanning is the process of converting pictures and text into an electronic format for your computer You can scan photos and text documents
Because the scanned image or text is in an electronic format you can bring it into your word processor or graphics program and modify it to suit your needs You can do the following
bull Scan photos of your kids and e-mail them to relatives create a photographic inventory of your house or office or create an electronic scrapbook
bull Scan text from an article into your word processor and quote it in a report saving you a lot of retyping
Tip To use the scan features your HP Officejet and computer must be connected and turned on The HP Officejet software must also be installed and running on your computer prior to scanning To verify that the HP Officejet software is running on Windows look for a status icon in the system tray On a Macintosh the HP Officejet software is always running
Note High resolution scanning (600 dpi or higher) requires a large amount hard disk space If there is not enough hard disk space available your system may stall
scan an originalYou can start a scan from your HP Officejet or from the HP Officejet software on your computer
For more information about scanning your pictures or documents from the HP Officejet software see scan pictures and documents in the HP Photo amp Imaging Help
to scan an original from your hp officejet
1 Load your original in the automatic document feeder (ADF)For more information see load originals on page 7
2 Press Scan
3 Select the Scan to destination by pressing or or by pressing the Scan button repeatedlyThe default destination is the HP Photo amp Imaging Gallery Any applications on your computer that are supported by the HP Officejet also appear in the Scan to list
4 Press Start Black or Start ColorThe original is scanned and the image is sent to selected destinationFor more information about using the HP Photo amp Imaging Gallery see manage images in how to use the software
hp officejet 4100 series
chapter 5
18
stop scanningYou can stop a scan by pressing the Cancel button located on the front panel
6
19
use the fax features
Using your HP Officejet you can
bull Send and receive paper faxesbull Send computer faxes (reference the HP Photo amp Imaging Help)bull Send and receive color faxes
Fax features are available only on some HP Officejets
send a faxYou can send a fax in a variety of configurations These include the following
bull send a paper fax (using the front panel or computer)bull send a paper fax with a PC-generated cover page (using the computer)bull send a file with or without a cover page (using the computer)bull send a PC-generated cover page as a single-page fax (using the
computer)
Note For information on sending a fax using the computer reference the HP Photo amp Imaging Help
Note By default your HP Officejet prints a report only if there is a problem with sending or receiving a fax A confirmation message indicating whether an item was successfully sent appears briefly on the front-panel display after each transaction If you need printed confirmation that your faxes are successfully sent see print reports on page 22 for information about report options
Note If you have not done so set the date and time See set the date and time on page 27
send a fax from your hp officejet1 Load your originals in the ADF
For more information see load originals on page 7
2 Enter the fax number using the keypad or press Speed Dial until the desired speed-dial entry appearsFor more information on speed dialing see set up speed dialing in the HP Photo amp Imaging Help
3 Press Start Black or Start Color
change settings and use speed dials before sending a fax1 Load your originals in the ADF
For more information see load originals on page 7
2 Enter the fax number using the keypad or press Speed Dial until the desired speed-dial entry appears
hp officejet 4100 series
chapter 6
20
For more information on speed dialing see set up speed dialing in the HP Photo amp Imaging Help
3 Press Enter
4 Press Fax to scroll through the fax options
5 When you reach the option whose setting you wish to change press to scroll through the setting options
6 When you reach the setting you want to change press Enter to accept the setting
7 Press Start Black or Start Color
send a color faxYou can send and receive color faxes to and from other color fax machines If you are faxing from the front panel and your HP Officejet determines that the recipient has a black-and-white fax unit it sends the fax in black and white If you are faxing from the software and your HP Officejet determines that the recipient has a black-and-white fax unit the HP Officejet prompts you to try sending the fax in black and white
We recommend that you use only color originals for color faxing The color originals must be loaded in the ADF you cannot send a color fax from memory using the scan and fax features To fax in color to multiple recipients send the fax from the Director or your software program
to send a color fax from the front panel
1 Load your originals in the ADF For more information see load originals on page 7
2 Enter the fax number using the keypad or press Speed Dial until the desired speed-dial entry appearsFor more information on creating speed-dial entries see set up speed dialing in the HP Photo amp Imaging Help
3 Press Start Color
schedule a faxYou can schedule a black and white fax to be sent later during the same day (for example when telephone lines are not as busy) If you use the front panel you can select a single recipient
When the specified time is reached your fax is automatically sent as soon as a connection can be made
1 Load your originals in the ADF
2 Enter the fax number using the keypad or press Speed Dial until the desired speed-dial entry appears
3 Press Enter
4 Press Fax to scroll through the fax options
5 Stop scrolling when you reach the How to Fax menu
6 Press to scroll through the setting options
7 Stop scrolling when you reach the Send Fax Later option
reference guide
use the fax features
21
8 Press Enter
9 Enter the Send Time using the numeric keypad
10 At the prompt press 1 for AM or 2 for PM
11 When Store Fax Now appears press 1 for Yes or 2 for NoIf 1 is selected the document is scanned to memory and is sent at the selected time If 2 is selected and you havenrsquot loaded your originals a message appears reminding you to load the original before the send time
12 Press Start Black
cancel a scheduled faxYou can cancel a fax stored in memory or one that is currently in progress
bull Press Cancel to cancel the scheduled fax
receive a faxYour HP Officejet is set to print received faxes automatically If you receive a legal-size fax and your HP Officejet is not currently configured to use legal-sized paper the unit automatically reduces the fax so that it fits on the paper that is loaded For more information see set automatic reduction on page 25
If you have an answering machine connected to the same line as your HP Officejet you may need to set the number of rings required before the HP Officejet begins receiving the fax The default number of rings before the HP Officejet receives a fax is 5
set the number of rings before answeringYou can specify how many rings should occur before your HP Officejet automatically answers the phone When you run the Fax Setup Wizard this is set automatically
If you do not want your HP Officejet to answer the phone Rings to Answer should be set to No Answer
1 Press Setup
2 Press 3 then press 3 againThis selects the Basic Fax Setup menu then the Rings to Answer option
3 Use the arrow keys to choose the number of rings and then press Enter
receive a fax manuallyBefore manually receiving a fax we recommend that you remove any originals from your HP Officejet so that they are not accidentally processed
Verify that Rings to Answer is set to No Answer
1 When your HP Officejet rings pick up the handset of a telephone that is on the same telephone line as your HP Officejet
2 If you hear fax tones press Start Black or Start Color or if you are receiving from an extension phone (on the same telephone line as your HP Officejet but not connected directly to it) press 1 2 3 on your phone
3 After you are finished hang up the telephone
hp officejet 4100 series
chapter 6
22
print reportsYou can set up your HP Officejet to print error reports and confirmation reports for each fax you send and receive You can also manually print reports as you need them
generate reports automaticallyThis setting lets you configure your HP Officejet so that it automatically prints error and confirmation reports
1 Press Setup
2 Press 1 then press 5This selects Print Report then selects Automatic Reports Setup
3 Press to scroll through the following report typesndash Every Error which prints whenever there is any kind of fax error
(default)ndash Send Error which prints whenever there is a transmission errorndash Receive Error which prints whenever there is a receiving errorndash Every Fax which confirms every time a fax is sent or receivedndash Send Only which prints every time a fax is sentndash Off which does not print fax reports
4 When you reach the report that you want press Enter
generate reports manuallyThis setting lets you print reports manually From the computer you can only print the Speed-Dial List and the Fax Log
to print reports from the front panel
1 Press Setup then press 1This selects the Print Report menu
2 Press to scroll through the following report typesndash Last Transaction which prints details of the last fax transactionndash Fax Log which prints a log of the last 30 fax transactionsndash Speed Dial List which prints a list of programmed speed dialsndash Self-Test Report which prints a report to assist you in diagnosing print
and alignment problems For more information see print a self-test report on page 32
ndash Automatic Reports Setup which is the automatic reports setting described in generate reports automatically on page 22
3 When you reach the report that you want press Enter
control resolution and contrastYour HP Officejet lets you change the resolution and contrast of documents that you are sending
change resolutionResolution affects the transmission speed and quality of faxed documents
reference guide
use the fax features
23
to change the resolution from the front panel
1 Load your originals in the ADF
2 Enter the fax number using the keypad or press Speed Dial until the desired speed-dial entry appears
3 Press Enter
4 Press Fax to scroll through the fax options
5 Stop scrolling when you reach the Resolution menu
6 Press until the desired resolution quality appears (Standard Photo Fine Very Fine)
7 Press EnterYour HP Officejet only faxes at the highest resolution supported by the receiving faxIf you choose Photo be aware that the faxing process takes longer to complete When faxing photographs we recommend that you choose Photo
change contrastChange this setting if you want a black-and-white fax to be darker or lighter than the original
to change the fax contrast from the front panel
1 Load your originals in the ADF
2 Enter the fax number using the keypad or press Speed Dial until the desired speed-dial entry appears
3 Press Enter
4 Press Fax to scroll through the fax options
5 Stop scrolling when you reach the LighterDarker menuThe range of values appears as a circle on a scale on the display
6 Press to lighten the fax or to darken itThe circle moves left or right as you press a button
7 Press Enter to accept the setting you selected
change other fax settings
redial a number automaticallyYou can set your HP Officejet to redial a busy and an unanswered number automatically If you initiated a fax from the computer the computer must be left on for the redialing process to work correctly
1 Press Setup
2 Press 4This selects the Advanced Fax Setup menu
3 Choose one of the following optionsndash Press 3
hp officejet 4100 series
chapter 6
24
This selects the Busy Redial option The default setting for Busy Redial is Redial
ndash Press 4This selects the No Answer Redial option The default setting for No Answer Redial is No Redial
4 Press Enter
5 Press to select Redial or No Redial as desired
6 Press Enter
forward faxes to another numberWith fax forwarding you can send a fax that you receive to another fax number during the next 24-hour period
to forward faxes from the front panel
1 Press Setup
2 Press 3 then press 7This selects the Basic Fax Setup menu then selects the Fax Forwarding Black Only option
3 At the prompt enter the Fax Number to which you wish to send the fax
4 Press Enter
5 Enter the Start Date using the numeric keypad
6 Enter the Start Time using the numeric keypad
7 At the prompt press 1 for AM or 2 for PM
8 Enter the Stop Date using the numeric keypadFax Forwarding On appears on the display
edit or cancel fax forwardingOnce fax forwarding is enabled you may find that you need to change the number you are faxing to or the start and stop times you entered You may wish to cancel your fax forwarding setup altogether Follow the steps below to edit or turn off fax forwarding
to edit fax forwarding from the front panel
1 Press Setup
2 Press 3 then press 7This selects the Basic Fax Setup menu then selects the Fax Forwarding Black Only option
3 Forwarding is ON 1=Edit 2=Cancel appears on the display after a moment Press 1 to edit the number you wish to fax to or to change the start and stop times Follow the messages on the display
to cancel fax forwarding from the front panelbull Press Cancel
OR
reference guide
use the fax features
25
Follow the steps in edit or cancel fax forwarding on page 24 When Forwarding is ON 1=Edit 2=Cancel appears on the display press 2 to cancel fax forwarding
use error correction modeError Correction Mode (ECM) eliminates data lost due to poor phone lines by detecting errors that occur during transmission and automatically requesting retransmission of the erroneous portion Phone charges are unaffected or may even be reduced on good phone lines On poor phone lines ECM increases sending time and phone charges but sends the data much more reliably Turn ECM off (the default setting is on) only if it increases phone charges substantially and you can accept poorer quality in exchange for reduced charges
to change the ECM setting from the front panel
1 Press Setup
2 Press 4 then press 7This selects the Advanced Fax Setup menu then selects the Error Correction Mode option
3 Press to switch between On and Off
4 Press Enter to accept the setting you selected
set automatic reductionThis setting determines what your HP Officejet does if it receives a fax that is too large for the default paper size With this setting on (the default) the image is reduced so that it fits on one page With this feature off information that doesnrsquot fit on the first page is printed on a second page
1 Press Setup
2 Press 4 then press 5This selects the Advanced Fax Setup menu then selects the Automatic Reduction option
3 Press to switch between On and Off
4 Press Enter to accept the setting you selected
adjust the volumeYour HP Officejet provides three levels for adjusting the ring and speaker volume The ring volume is the volume of the phone ringer The speaker volume is the volume of everything else such as the dial and fax tones The default setting is Soft
1 Press Setup
2 Press 3 then press 6This selects the Basic Fax Setup menu then selects the Ring and Beep Volume option
3 Press to select one of the options Soft Loud or Off
4 Press Enter to accept the setting you selected
hp officejet 4100 series
chapter 6
26
change the answer ring pattern (distinctive ringing)Distinctive ringing is a feature offered by phone companies that allows several phone numbers to share the same line Each number has a specific ring pattern If you do not have this service use the default ring pattern which is All Rings
If you connect your HP Officejet to a line with distinctive ringing have your telephone company assign one ring pattern to voice calls and another to fax calls (double or triple rings are best for a fax number)
1 Press Setup
2 Press 4 then press 2This selects the Advanced Fax Setup menu then selects the Answer Ring Pattern option
3 Press to scroll through these options All Rings Single Rings Double Rings Triple Rings and Double amp Triple
4 When the ring pattern that the phone company established for this number appears press Enter
Tip We recommend that you use Double Rings or Triple Rings for fax
set up speed dialingThrough your HP Officejet or your computer you can assign entries to fax numbers you use often This lets you dial those numbers quickly using the front panelrsquos Speed Dial button and a one- or two-digit entry You can create up to 100 individual speed-dial entries (the maximum for some models is 70)
We recommend that you use the software to set up speed-dial settings
Note A speed-dial entry can only be associated with one phone number speed-dial groups are not supported
For more information see set up speed dialing in the hp photo amp imaging help
create individual speed-dial settingsYou can enter fax numbers that you will reuse frequently
1 Press Setup
2 Press 2 then press 1This selects the Speed Dial Setup menu then selects the Individual Speed Dial option
3 Press EnterThe first unassigned speed-dial entry appears on the display
4 Press Enter to select the displayed speed-dial entry
5 Enter the Fax Number to assign to that entry then press EnterThe fax number can be up to 50 digits in length
Tip To enter a three-second pause within a number sequence press Symbols to display a dash
6 Enter the personrsquos or companyrsquos name then press Enter
reference guide
use the fax features
27
The name is limited to 13 characters in lengthFor more information see enter text on page 28
7 After Enter Another appears press 1 (Yes) if you want to set up another number or press 2 (No) to exit
delete speed-dial settingsFollow these steps to delete an individual speed-dial entry
1 Press Setup
2 Press 2 then press 2 againThis selects Speed Dial Setup then selects Delete Speed Dial
3 Press until the individual entry that you want to delete appears then press Enter
set basic fax settings using the front panelWe recommend that you use the Fax Setup Wizard in the HP Officejet software to configure all your basic fax settings however you can also access these settings from the front panel
Note In the US regulations require that your name and phone number appear on every fax The minimum settings that we recommend are described in the following topics
set the date and timeFollow these steps to set the date and time manually
1 Press Setup
2 Press 3 then press 1This selects the Basic Fax Setup menu then selects the Date and Time option
3 Follow the prompts on the display to enter the date and time using the keypad
Tip Use only the last two digits for the year
Tip When you enter a single-digit date or time type a leading zero before the single digit for example 0345 or 08-03-02
After you are done the date and time appear on the display
Warning Cutting off power to the HP Officejet causes the selected date and time to be lost However name and fax number information is not lost
set the fax headerFollow these steps to enter your name and fax number in the header
Note In Hungary the subscriber identification code (fax header) can be set or changed only by authorized personnel For more information contact your authorized HP dealer
1 Press Setup
2 Press 3 then press 2
hp officejet 4100 series
chapter 6
28
This selects the Basic Fax Setup menu then selects the Fax Header option
3 Enter your personal or company name at the prompt Use the guidelines provided in the next section under enter text
4 Press Enter
5 Enter your fax number using the numeric keypad
6 Press Enter
enter textThe following list provides tips for entering text using the front-panel keypad
bull Press the keypad numbers that correspond to the letters of a name
bull Press a button multiple times to see a letter first in uppercase and then in lowercase
bull After the correct letter appears press and then press the number that corresponds to the next letter in the name Again press multiple times until the correct letter appears
bull To insert a space press Space ()bull To enter a symbol such as press Symbols () to scroll through the list of
available symbolsbull If you make a mistake press to clear it and then make the correct
entrybull After you are done entering text press Enter to store your entries
check for dial toneBefore using the fax features verify that the connections are correctly established
1 Press Fax
2 Listen for a dial tone
3 If you do not hear a dial tone check the connections
4 Press Cancel to hang up
ABC These letters correspond to this number and so on
2
JKL To get this character J j K k L l 5
5 Press 5 this many times 1 2 3 4 5 6 7
reference guide
use the fax features
29
fax job menuThe following options become available when the Fax button is pressed
setup menu for fax commandsThe following fax settings are available in the Setup menu
Enter Fax or Speed Dial
FineVery FinePhotoStandard
Fax Number Resolution LighterDarker
Enter a fax number or speed dialWhen the Fax button is pressed
Press and to move to the option you wantPress Enter to select the displayed setting
NoYes
Set New Defaults
Send Fax NowFax from MemorySend Fax LaterPoll to Receive
How to Fax
1Automatic Reports Setup
2Answer Ring Pattern
3Busy Redial
4No Answer Redial
5Automatic Reduction
6Backup Fax Reception
7Error Correction Mode
3Basic Fax Setup 4Advanced Fax Setup
Press Setup to display the menu options
Press and to move to the setting you wantPress Enter to select the displayed setting
1Date and Time
2Fax Header
3Rings to Answer
4Paper Size
5Tone or Pulse Dialing
6Ring and Beep Volume
7Fax Forwarding Black Only
2Speed Dial Setup
1Individual Speed Dial
2Delete Speed Dial
3Print Speed Dial List
hp officejet 4100 series
chapter 6
30
7
31
maintain your hp officejet
This section provides instructions for keeping your HP Officejet in top working condition Perform these maintenance procedures as necessary
clean the glassDirty glass from dust smudges hair and so on slows down performance and affects the accuracy of features such as Fit to Page and Copy
1 Turn off the unit unplug the power cord and raise the scanner lid
2 Clean the glass with a soft cloth or sponge slightly moistened with a nonabrasive glass cleaner
Caution Do not use abrasives acetone benzene or carbon tetrachloride on the glass these can damage it Do not place liquids directly on the glass They may seep under it and damage the unit
3 Dry the glass with a chamois or cellulose sponge to prevent spotting
hp officejet 4100 series
chapter 7
32
clean the white stripMinor debris can accumulate on the white strip located underneath the scannerrsquos lid
1 Turn off the unit unplug the power cord and raise the scanner lid
2 Clean the white strip with a soft cloth or sponge slightly moistened with a mild soap and warm water
3 Wash the strip gently to loosen debris do not scrub the strip
4 Dry the strip with a chamois or soft cloth
Caution Do not use paper-based wipes as these may scratch the strip
5 If this does not clean the strip well enough repeat the previous steps using isopropyl (rubbing) alcohol and wipe the strip thoroughly with a damp cloth to remove any residual alcohol
clean the exterior Use a soft damp lint-free cloth to wipe dust smudges and stains off the case The interior of the unit does not require cleaning Keep fluids away from the interior of the unit as well as the front panel
work with print cartridgesTo ensure the best print quality from your HP Officejet you will need to perform some simple maintenance procedures and when prompted by a front-panel message replace the print cartridges
print a self-test reportIf you are experiencing problems with printing before cleaning or replacing the print cartridges you should print a Self-Test Report This report provides useful information about your print cartridges including status information
1 Press Setup
2 Press 1 then press 4This selects Print Report and then selects Self-Test Report
3 Press Start Black or Start ColorA Self-Test Report is printed for your HP Officejet
handle print cartridgesBefore you replace or clean a print cartridge you should know the part names and how to handle the print cartridge
reference guide
maintain your hp officejet
33
replace the print cartridgesFront-panel messages appear to let you know that you should replace your print cartridges
See order print cartridges on the back cover for information on ordering replacement print cartridges
1 Turn on the unit then lift open the print cartridge access doorThe print carriage moves into view
2 After the carriage stops moving push down on the print cartridge down to release it and then pull it toward you out of its slot
Plastic tape with pink tab(must be removed)
Copper contactsInk nozzles under tape
Do not touch the copper contacts or the ink nozzles
print cartridge access door
hp officejet 4100 series
chapter 7
34
Note It is normal to see ink build-up in the print cartridge slots
3 Remove the new print cartridge from its packaging and being careful to touch only the bright pink plastic tab gently remove the plastic tape to uncover the ink nozzles
Caution Do not touch the copper contacts or ink nozzles
Once you have removed the plastic tape install the print cartridge immediately to prevent the ink from drying in the nozzles
4 Push the new print cartridge into the appropriate slot at a slight angle until it clicks into place
Caution Do not attempt to push the cartridge straight into the slot It must slide in at a slight angle
The tri-color print cartridge goes on the left and the black cartridge goes on the right
5 Close the print cartridge access door
reference guide
maintain your hp officejet
35
align the print cartridgesThe HP Officejet prompts you to align cartridges every time you install or replace a print cartridge Aligning the cartridges ensures high-quality output
To align the print cartridges when prompted
1 Press Enter on the front panelAn align cartridges (test pattern) page prints
2 Load the align cartridges page face down in the ADF between the paper-width guides and press the Enter button again
3 Recycle or discard the page
To align the cartridges at any other time
1 Press Setup
2 Press 5 then press 2This selects the Maintenance menu and then selects the Align Print Cartridge option
3 Press EnterAn align cartridges (test pattern) page prints
4 Load the align cartridges page face down in the ADF between the paper-width guides and press the Enter button again
5 Recycle or discard the page
clean the print cartridgesUse this feature when the Self-Test Report shows streaking or white lines through any of the colored bars Do not clean print cartridges unnecessarily This wastes ink and shortens the life of the ink nozzles
1 Press Setup
2 Press 5 then press 1This selects the Maintenance menu and then selects the Clean Print Cartridge optionA page of patterns is printed The cartridges are cleaned Recycle or discard the pageIf copy or print quality still seem poor after you clean the print cartridges replace the print cartridge that is affected
restore factory defaultsYou can restore the original factory settings to what they were when you purchased your HP Officejet Choosing to restore your factory defaults restores all settings except date information and any scan settings you may have set
You can perform this process from the front panel only
1 Press Setup
2 Press 5 then press 3This selects Maintenance and then selects Restore Factory DefaultsThe factory default settings are restored
hp officejet 4100 series
chapter 7
36
set scroll speedThe Scroll Speed option lets you control the rate that text messages appear in the front-panel display You can choose Normal Fast or Slow The default is Normal
1 Press Setup
2 Press 5 then press 6This selects Maintenance and then selects Set Scroll Speed
3 Press until the desired speed appears then press Enter
set the prompt delay timeThe Prompt Delay option lets you control the amount of time before a message is displayed in the front-panel display You can choose Normal Fast or Slow The default is Normal
1 Press Setup
2 Press 5 then press 7This selects Maintenance and then selects Set Prompt Delay Time
3 Press until the delay time appears then press Enter
self-maintenance sounds During the life of your product you may hear various mechanical sounds This is a normal part of your unitrsquos self-maintenance
reference guide
maintain your hp officejet
37
setup menu optionsThe following options are available from the Setup button
1Last Transaction
2Fax Log
3Speed Dial List
4Self-Test Report
5Automatic Reports Setup
1Print Report
Use Setup to display the Print Report Speed Dial Setup Basic Fax Setup Advanced Fax Setup and Maintenance options
Press and to move to the setting you wantPress Enter to select the displayed setting
1Clean Print Cartridges
2Align Print Cartridges
3Restore Factory Defaults
4Reprint Faxes in Memory
5Set Language amp CountryRegion
6Set Scroll Speed
7Set Prompt Delay Time
5Maintenance2Speed Dial Setup
3Basic Fax Setup
4Advanced Fax Setup
1Individual Speed Dial
2Delete Speed Dial
3Print Speed Dial List
1Date and Time
2Fax Header
3Rings to Answer
4 Paper Size
5Tone or Pulse Dialing
6Ring and Beep Volume
7Fax Forwarding Black Only
1Automatic Reports Setup
2Answer Ring Pattern
3Busy Redial
4No Answer Redail
5Automatic Reduction
6Backup Fax Reception
7Error Correction Mode
hp officejet 4100 series
chapter 7
38
8
39
additional setup information
During the installation of the HP Officejet software a number of windows are displayed You should see the following
bull Installingbull Copying files bull A request to plug in the HP Officejetbull Green OK and check markbull Request to restart your computer (may not occur in all cases)bull Registration
If you did not see all of these windows there may be a problem with the installation Verify the following
bull The HP Director contains six icons (double-click the HP Director icon on the desktop)
bull The HP Officejet is listed in the Printers dialog boxbull There is an icon for the HP Officejet in the System Tray that indicates the
HP Officejet is ready
If the HP Director does not show six icons you may need to wait a few minutes for the HP Officejet to connect to your computer
possible installation problemsIf nothing appears on your computer screen after you insert the HP Officejet 4100 Series CD-ROM into your computerrsquos CD-ROM drive
1 From the Start menu choose Run
2 In the Run dialog box enter dsetupexe (if your CD-ROM drive is not assigned to drive letter d use the appropriate drive letter) then click OK
If the HP Director does not contain six icons do the following
bull Verify that the front-panel cover is attached then unplug the HP Officejet and plug it in again
bull Verify that the USB and power cables are plugged inndash Unplug the USB cable and plug it in againndash Do not attach the USB cable to a keyboard or nonpowered hubndash Verify that the USB cable is 3 meters or less in lengthndash If you have several USB devices attached to your computer you may
want to unplug the others during the installation
Note AppleTalk is not supported
bull Unplug the HP Officejet from the wall and plug it in againbull Restart your computer
hp officejet 4100 series
chapter 8
40
On Windows check the System Tray for applications that are running in the background and close them before restarting your computer
remove and reinstall your hp officejet softwareIf six icons do not appear in the Director you may need to uninstall and re-install the software Do not simply delete the HP Officejet program files from your hard drive Be sure to remove them properly using the uninstall utility provided in the HP Officejet program group
to uninstall from a Windows computer
1 Disconnect your HP Officejet from your computer
2 On the Windows taskbar click Start choose Programs or All Programs (XP) choose Hewlett-Packard choose hp officejet 4100 series then choose uninstall software
3 Follow the directions on the screenBe sure to disconnect your HP Officejet
4 If you are asked whether you would like to remove shared files click NoOther programs that use these files may not work properly if the files are deleted
5 After the program finishes removing the software disconnect your HP Officejet and restart your computer
Note It is important that you disconnect your HP Officejet before restarting your computer
6 To reinstall the software insert the HP Officejet 4100 Series CD-ROM into your computerrsquos CD-ROM drive and follow the instructions that appear
7 After the software is installed connect and turn on your HP Officejet following the onscreen instructions and the instructions in your Setup PosterAfter connecting and turning on your HP Officejet you may have to wait several minutes for all of the Plug and Play events to completeWhen the software installation is complete you will see a Status Monitor icon in the System Tray
8 To verify that the software is properly installed double-click on the HP Director icon on the desktop If the HP Director shows six icons the software has been properly installed
to uninstall from a Macintosh computer
1 Disconnect your HP Officejet from your computer
2 Double-click on ApplicationsHP All-in-One Software folder
reference guide
additional setup information
41
3 Double-click on HP Uninstaller
4 Follow the directions that appear on the screen
5 After the program finishes removing the software disconnect your HP Officejet and restart your computer
6 To reinstall the software insert the HP Officejet 4100 Series CD-ROM into your computerrsquos CD-ROM drive
Note When re-installing the software follow the instructions on the Setup Poster Do not connect the HP Officejet to your computer until after you have completed the software installation
7 On the desktop open the CD-ROM double-click on hp all-in-one installer and follow the instructions that appear
connect your hp officejet to a phone modem or answering machine
The HP Officejet can share a phone line with a phone a modem or an aswering machine When sharing a phone line with an answering machine the HP Officejet will answer fax calls and direct voice calls to the answering machine
Note For information on connecting your HP Officejet to your computer and phone line refer to the Setup Poster that came with your unit
to connect your hp officejet to a phone modem or answering machine
1 Remove the white plastic stopper from connector 2 on the back of the HP Officejet
To connect more than one device to connector 2 on the HP Officejet you must purchase a Y-splitter and plug it into connector 2
2 Connect the phone cord from the phone modem or answering machine to connector 2 (or Y-splitter)
Caution Do not use the phone cord that came with the HP Officejet for this purpose That phone cord must connect connector 1 on the HP Officejet to the wall jack for your phone system See the Setup Poster for details
3 If you are connecting an answering machine see set the number of rings before answering on page 21 for instructions on setting the number of rings correctly or change the answer ring pattern (distinctive ringing) on page 26 for information on incoming ring patterns
4 If you are connecting a modem turn off its fax-receive feature
connector 2 on the HP Officejet
connector 1 on the HP Officejet
hp officejet 4100 series
chapter 8
42
additional troubleshooting helpYou may want to refer to the readme file for more information on possible installation problems On Windows you can access the readme file from the Start button on the taskbar select Programs Hewlett-Packard hp officejet 4100 series View the Readme File On Macintosh you can access the readme file by double-clicking on the icon located in the top-level folder of the HP Officejet software CD-ROM
The readme file provides more information including
bull Using the Re-install utility after a failed installation to return your PC to a state that will allow the HP Officejet to be re-installed
bull Using the Re-install utility on Windows 98 to recover from a Composite USB System Driver missing errorThis error may occur if the hardware is installed prior to installing the software After running the Re-install utility reboot your PC and install the HP Officejet software before connecting the HP Officejet to your computer
You can also find more information on this website
wwwhpcomsupport
9
43
technical information
Additional specifications information can be found in the HP Photo amp Imaging Help in the hp officejet 4100 series section
physical specifications
power specificationsbull Power consumption 75W maximumbull Source (Input Voltage) 100 to 240 VAC groundedbull Input Frequency 50 to 60 Hzbull Current 1A maximum
regulatory informationAdditional regulatory information can be found in the HP Photo amp Imaging Help The information in this section supercedes information in the HP Photo amp Imaging Help
doc statement deacuteclaration de conformiteacute (Canada)Le preacutesent appareil numeacuterique neacutemet pas de bruit radioeacutelectrique deacutepassant les limites applicables aux appareils numeacuteriques de la classe B prescrites dans le Regraveglement sur le brouillage radioeacutelectrique eacutedicteacute par le ministegravere des Communications du CanadaThis digital apparatus does not exceed the Class B limits for radio noise emissions from digital apparatus set out in the Radio Interference Regulations of the Canadian Department of Communications
notice to users of the Canadian telephone networkThis equipment meets the applicable Industry Canada Terminal Equipment Technical Specifications This is confirmed by the registration number The abbreviation IC before the registration number signifies that registration was performed based on a Declaration of Conformity indicating that Industry Canada technical specifications were met It does not imply that Industry Canada approved the equipment
Note The Ringer Equivalence Number (REN) assigned to each terminal device provides an indication of the maximum number of terminals allowed to be connected to a telephone interface The termination on an interface may consist of any combination of devices subject only to the requirement that the sum of the Ringer Equivalence Numbers of all the devices does not exceed 5
The REN for this product is 03B based on FCC Part 68 test results
height width depth weight (without print cartridges)
with paper trays and ADF closed
718 in (1824 cm) 1676 in (4258 cm) 825 in (2096 cm) 75 lbs (34 kg)
with ADF and paper tray extended
1030 in (2615 cm) 1676 in (4258 cm) 1854 in (4709 cm) 75 lbs (34 kg)
hp officejet 4100 series
chapter 9
44
notice to all users of the European Economic Area (EEA)
This product is designed to interwork with the analogue telephone networks in the following countriesregions
Network compatibility depends on customer selected settings which must be reset to use the equipment on a telephone network in a countryregion other than where the product was purchased Contact the vendor or Hewlett-Packard Company if addition product support is necessaryThis equipment has been certified by the manufacturer in accordance with Directive 19995EC (annex II) for Pan-European single-terminal connection to the public switched telephone network (PSTN) However due to differences between the individual PSTNs provided in different countriesregions the approval does not of itself give an unconditional assurance of successful operation on every PSTN network termination pointIn the event of problems you should contact your equipment supplier in the first instance
geraumluschemissionLpA lt 70 dBam Arbeitsplatzim Normalbetriebnach DIN 45635 T 19
notice to Korean customers
Germany UK Netherlands
France Spain Italy
Belgium Luxembourg Sweden
Austria Denmark Ireland
Norway Finland Switzerland
Greece Portugal
10
45
hp support
This section explains the support services information provided by Hewlett-Packard If you are unable to find the answer you need in the printed or onscreen documentation supplied with your product you can contact one of the HP support services listed in the following pages Some support services are available only in the US and Canada while others are available in many countriesregions worldwide If a support service number is not listed for your countryregion contact your nearest authorized HP dealer for help
get support and other information from the internetIf you have Internet access you can get help from the following HP website
wwwhpcomsupportThe Web site offers technical support drivers supplies and ordering information
hp customer supportSoftware programs from other companies may be included with your HP Officejet If you experience problems with any of those programs you will receive the best technical assistance by calling the experts at that companyIf you need to contact HP Customer Support do the following before you call
1 Make sure thata Your unit is plugged in and turned onb The specified print cartridges are installed correctlyc The recommended paper is properly loaded in the input tray
2 Reset your unita Turn off the unit using the On button located on the unitrsquos front panelb Unplug the power cord from the back of the unitc Plug the power cord back into the unitd Turn on the unit using the On button
3 For more information check the HP website at wwwhpcomsupport
4 If you are still experiencing problems and need to speak with an HP Customer Support Representativendash Have your service ID and serial number ready To display your service ID and
serial number on the front panel do the following Press Enter and Start Color at the same time until the service ID appears in the front-panel display From this display press the right arrow until the serial number displays
ndash Print a Self-Test Report See print a self-test report on page 32 for information on printing this report
ndash Make a color copyndash Be prepared to describe your problem in detail
5 Call HP Customer Support Be near your unit when you call
call in the US during warrantyCall (208) 323-2551 This service is free during the warranty period however your standard long-distance phone charges still apply A fee may apply outside the warranty period
hp officejet 4100 series
chapter 10
46
US phone support is available in both English and Spanish languages 24 hours a day 7 days a week (days and hours of support may change without notice)
call elsewhere in the worldThe numbers listed below are current as of the printing date of this guide For a list of current international HP Support Service numbers visit this address and choose your own countryregion or language
wwwhpcomsupportFor Korea you can also visit this address
httpwwwhpcokrYou can call the HP support center in the following countriesregions If your countryregion is not listed contact your local dealer or nearest HP Sales and Support Office to find out how to obtain servicesSupport service is free during the warranty period however your standard long-distance phone charges will apply In some cases a flat fee per single incident will also applyFor phone support in Europe please check for the details and conditions of phone support in your countryregion by consulting the following Web site
wwwhpcomsupportAlternatively you can ask your dealer or call HP at the phone number indicated in this booklet As part of our constant efforts to improve our phone support service we advise you to check our website on a regular basis for new information regarding service features and delivery
countryregion hp technical support countryregion hp technical support
Algeria1 +213 (0) 61564 543 Malaysia 1-800-805405
Argentina 0810-555-5520 Mexico 01-800-472-6684
Australia +61 3 8877 80001902 910 910
Mexico (Mexico City) 5258-9922
Austria +43 (0) 810 00 6080 Morocco1 +212 22404 747
Bahrain (Dubai) 800 728 Netherlands +31 (0) 20 606 8751
Belgium (Dutch) +32 (0) 2 626 8806 New Zealand 0800 441 147
Belgium (French) +32 (0) 2 626 8807 Norway +47 22 11 6299
Brazil (Grande Sao Paulo) (11) 3747 7799 Oman +971 4 883 8454
Brazil (Demais Localidades) 0800 157751 Palestine +971 4 883 8454
Canada during warranty (905) 206 4663 Panama 001-800-7112884
Canada post-warranty(per-call charge)
1-877-621-4722 Peru 0-800-10111
Caribbean amp Central America
1-800-711-2884 Philippines 632-867-3551
Chile 800-360-999 Poland +48 22 865 98 00
China 86 10 6868 7980 Portugal +351 21 3176333
Colombia 9-800-114-726 Puerto Rico 1-877-2320-589
Costa Rica 0-800-011-0524 Qatar +971 4 883 8454
Czech Republic +420 (0) 261307310 Romania +40 1 315 44 42or local 01 3154442
reference guide
hp support
47
call in Australia post-warrantyIf your product is not under warranty you can call 03 8877 8000 A per-incident out-of-warranty support fee of $2750 (inc GST) will be charged to your credit card You can also call 1902 910 910 ($2750 charged to your phone account) from 900 AM to 500 PM Monday through Friday (Charges and support hours are subject to change without notice)
prepare your unit for shipmentIf after contacting HP Customer Support or returning to the point of purchase you are requested to send your unit in for service please follow the power off and rebox steps below to avoid further damage to the HP product
Denmark +45 39 29 4099 Russian Federation Moscow +7 095 797 3520
Ecuador 1800-711-2884 Russian Federation St Petersburg
+7 812 346 7997
Europe (English) +44 (0) 207 512 5202 Saudi Arabia +800 897 14440
Egypt 02 532 5222 Singapore 65 6272 5300
Finland +358 (0) 203 47 288 Slovakia +421 (0) 2 682 08080
France (034 Euromin) +0892 69 60 22 South Africa (inside RSA) 086 000 1030
Germany (012 Euromin) +49 (0) 180 52 58 143 South Africa (inside RSA) +27-11 258 9301
Greece +30 1060 73 603 Spain +34 902 321 123
Hong Kong (SAR) +85 (2) 3002 8555 Sweden +46 (0)8 619 2170
Guatemala 1800-995-5105 Switzerland 2 +41 (0) 84 880 1111
Hungary +36 (0) 1 382 1111 Taiwan +886-2-2717-00550800 010 055
India 1-600-11226791 11 682 6035
Thailand +66 (2) 661 4000
Indonesia 62-21-350-3408 Tunisia1 +216 1891 222
Ireland +353 (0) 1 662 5525 Turkey +90 216 579 7171
Israel +972 (0) 9 8304848 Ukraine +7 (380-44) 490-3520
Italy +39 (0) 226410350 United Arab Emirates +971 4 883 8454
Japan 0570 000 511+81 3 3335 9800
United Kingdom +44 (0) 207 512 52 02
Jordan +971 4 883 8454 Venezuela 0800-47468368 or800-477-7777
Korea (Seoul) +82 (2) 3270 0700 Venezuela (Caracas) (502) 207-8488
Korea (outside Seoul) 080 999 0700 Vietnam 84 (0) 8 823 4530
Kuwait +971 4 883 8454 Yemen +971 4 883 8454
Lebanon +971 4 883 8454
1 This Call Center supports French speaking customers from the following countriesregions Morocco Tunisia and Algeria
2 This Call Center supports German French and Italian speaking customers in Switzerland
countryregion hp technical support countryregion hp technical support
hp officejet 4100 series
chapter 10
48
Note When transporting your HP Officejet make sure that the pens have been removed the HP Officejet has been properly shut down by pressing the power button and you have allowed time for the carriage to return to the service station and for the scanner to return to its parked position
1 Turn on the unitDisregard steps 1 through 6 if your unit will not turn on and the print carriage is in the home position You will not be able to remove the print cartridges Proceed to step 7
2 Open the print cartridge access doorThe print carriage moves into view
3 See replace the print cartridges on page 33 for information on removing the print cartridges
Caution Remove both print cartridges Failure to do so may damage your unit
4 Place the print cartridges in an airtight bag so they will not dry out and put them aside (do not send them with the unit unless instructed to by the HP customer support call agent)
5 Turn off the unit
6 Close the print cartridge access door
7 Remove the front panel cover as followsa Grasp the front of the front panel cover with two hands as shownb Firmly lift the front panel cover to unsnap it from the unit
8 Retain the front panel cover Do not return the front panel cover with the unit
9 If available pack the unit for shipment using the original packing materials or the packaging materials that come with your exchange unit
If you do not have the original packaging materials please use other adequate packaging materials Shipping damage caused by improper packaging andor improper transportation is not covered under the warranty
reference guide
hp support
49
10 Place the return shipping label on the outside of the box
11 Include the following items in the boxndash A complete description of symptoms for service personnel (samples of print
quality problems are helpful)ndash A copy of the sales slip or other proof of purchase to establish the warranty
coverage periodndash Your name address and a phone number where you can be reached during
the day
hp distribution centerTo order HP Officejet software a copy of the printed Reference Guide a setup poster or other customer-replaceable parts do one of the following bull In the US or Canada call (208) 323 2551bull Visit this website
httpwwwhpcomcposupportsoftwarehtml
hp officejet 4100 series
chapter 10
50
11
51
warranty information
HP Officejet 4100 seriesDuration of Limited Warranty (hardware and labor) 1 YearDuration of Limited Warranty (CD media) 90 DaysDuration of Limited Warranty (print cartridges) Until the HP ink is depleted or the ldquoend of warrantyrdquo date printed on the cartridge has been reached whichever occurs first
warranty service
express serviceTo obtain HP express repair service the customer must contact an HP service office or an HP Customer Support Center for basic troubleshooting first See hp customer support on page 45 for steps to take before calling Customer SupportIf a customer unit needs a minor part replacement and these parts can normally be replaced by the customer the customer-replaceable components may be serviced through expedited part shipment In this event HP will prepay shipping charges duty and taxes provide telephone assistance on replacement of the component and pay shipping charges duty and taxes for any part that HP asks to be returnedThe HP Customer Support Center may direct customers to designated authorized service providers who are certified by HP to service the HP product
warranty upgradesUpgrade your standard factory warranty to a total of three years with the HP SUPPORTPACK Service coverage begins on product purchase date and the pack must be purchased within the first 180 days of product purchase This program offers phone support from 600 AM to 1000 PM Mountain Standard Time (MST) Monday through Friday and 900 AM to 400 PM (MST) on Saturdays If during your technical support call it is determined that you need a replacement product then HP will ship you this product next business day free of charge Available in US onlyFor more information please call 1-888-999-4747 or visit the following HP Web site
httpwwwhpcomgohpsupportpack
Outside the US please call your local HP Customer Support office See call elsewhere in the world on page 46 for a list of international Customer Support numbers
returning your hp officejet for serviceBefore returning your HP Officejet for service you must call HP Customer Support See hp customer support on page 45 for steps to take before calling Customer Support
hewlett-packard limited global warranty statement
extent of limited warrantyHewlett-Packard (ldquoHPrdquo) warrants to the end-user customer (ldquoCustomerrdquo) that each HP Officejet 4100 Series product (ldquoProductrdquo) including related software accessories media and supplies shall be free from defects in material and workmanship for the duration which begins on the date of purchase by the Customer
hp officejet 4100 series
chapter 11
52
For each software Product HPrsquos limited warranty applies only to a failure to execute programming instructions HP does not warrant that the operation of any Product shall be uninterrupted or error freeHPrsquos limited warranty covers only those defects which arise as a result of normal use of a Product and does not cover any other problems including those which arise as a result of (a) improper maintenance or modification (b) software accessories media or supplies not provided or supported by HP or (c) operation outside the Productrsquos specificationsFor any hardware Product the use of a non-HP print cartridge or a refilled print cartridge does not affect either the warranty to the Customer or any HP support contract with the Customer However if Product failure or damage is attributable to the use of a non-HP or refilled print cartridge HP shall charge its standard labor and materials charges to service the Product for the failure or damageIf HP receives during the applicable warranty period notice of a defect in any Product HP shall either repair or replace the defective Product at HPrsquos option Where labor charges are not covered by HPrsquos limited warranty repairs shall be at HPrsquos standard charges for laborIf HP is unable to repair or replace as applicable a defective Product which is covered by HPrsquos warranty HP shall within a reasonable time after being notified of the defect refund the purchase price for the ProductHP shall have no obligation to repair replace or refund until the Customer returns the defective Product to HPAny replacement product may be either new or like-new provided that it has functionality at least equal to that of the Product being replacedHP products including each Product may contain remanufactured parts components or materials equivalent to new in performanceHPs limited warranty for each Product is valid in any countryregion or locality where HP has a support presence for the Product and where HP has marketed the Product The level of warranty service may vary according to local standards HP shall have no obligation to alter the form fit or function of the Product in order to make it operate in a countryregion or locality for which the Product was never intended to operate
limitations of warrantyTO THE EXTENT ALLOWED BY LOCAL LAW NEITHER HP NOR ITS THIRD PARTY SUPPLIERS MAKE ANY OTHER WARRANTY OR CONDITION OF ANY KIND WHETHER EXPRESS OR IMPLIED WITH RESPECT TO THE COVERED HP PRODUCTS AND SPECIFICALLY DISCLAIM THE IMPLIED WARRANTIES OR CONDITIONS OF MERCHANTABILITY SATISFACTORY QUALITY AND FITNESS FOR A PARTICULAR PURPOSE
limitations of liabilityTo the extent allowed by local law the remedies provided in this Limited Warranty Statement are the Customerrsquos sole and exclusive remediesTO THE EXTENT ALLOWED BY LOCAL LAW EXCEPT FOR THE OBLIGATIONS SPECIFICALLY SET FORTH IN THIS LIMITED WARRANTY STATEMENT IN NO EVENT SHALL HP OR ITS THIRD PARTY SUPPLIERS BE LIABLE FOR DIRECT INDIRECT SPECIAL INCIDENTAL OR CONSEQUENTIAL DAMAGES WHETHER BASED ON CONTRACT TORT OR ANY OTHER LEGAL THEORY AND WHETHER ADVISED OF THE POSSIBILITY OF SUCH DAMAGES
local lawThis Limited Warranty Statement gives the Customer specific legal rights The Customer may also have other rights which vary from state to state in the United States from province to province in Canada and from countryregion to countryregion elsewhere in the world
reference guide
warranty information
53
To the extent this Limited Warranty Statement is inconsistent with local law this Statement shall be deemed modified to be consistent with such local law Under such local law certain disclaimers and limitations of this Statement may not apply to the Customer For example some states in the United States as well as some governments outside the United States (including provinces in Canada) mayPreclude the disclaimers and limitations in this Statement from limiting the statutory rights of a consumer (eg the United Kingdom)Otherwise restrict the ability of a manufacturer to enforce such disclaimers or limitations orGrant the Customer additional warranty rights specify the duration of implied warranties which the manufacturer cannot disclaim or not allow limitations on the duration of implied warrantiesFOR CONSUMER TRANSACTIONS IN AUSTRALIA AND NEW ZEALAND THE TERMS IN THIS LIMITED WARRANTY STATEMENT EXCEPT TO THE EXTENT LAWFULLY PERMITTED DO NOT EXCLUDE RESTRICT OR MODIFY AND ARE IN ADDITION TO THE MANDATORY STATUTORY RIGHTS APPLICABLE TO THE SALE OF THE COVERED HP PRODUCTS TO SUCH CUSTOMERS
hp officejet 4100 series
chapter 11
54
55
index
Numerics4-by-6 inch photo paper
load 10 12
AADF 7adjust
volume for fax 25align print cartridges 35Answer Ring Pattern 26automatic document feeder 7automatic reduction
fax 25
Bbest copy quality 13busy number
redial automatically 23
Ccancel
scan 18scheduled fax 21
cartridgesalign 35replace 33
cleanprint cartridges 35the exterior 32the glass 31white strip 32
colorenhance 14fax 20fax from front panel 20
contrastchange for fax 23photo color 14
copy 13 16change default settings 15enhance 14fit to page 16lighten or darken 14menu options 16number of copies 14photo 15quality 13reduce or enlarge 14settings 13 15
speed 13tutorial 4
Customer Support 45web site 45
Ddarken a copy 14date
setting 27default settings
restore 35director review 4distinctive ringing 26
Eenhance copies 14enlarge copy 14 16envelopes
load 9Error Correction Mode
(ECM) 25
Ffactory defaults
restore 35fast copy quality 13fax 28
adjust volume 25automated reports 22cancel fax forward 24cancel scheduled 21change Answer Ring
Pattern 26change contrast 23change resolution 22change settings 19control appearance 22create individual speed-dial
settings 26delete speed-dial
settings 27distinctive ringing 26Error Correction Mode
(ECM) 25forward faxes 24header 27in color 20in color from front panel 20manual reports 22
menu 29print reports 22receive 21receive manually 21redial busy or unanswered
number 23schedule 20send from front panel 19set automatic reduction 25set date and time 27set the number of rings 21settings 27 28setup menu options 29speed dials 19test 28
fit to page 16forward faxes 24
cancel 24front panel
display scroll speed 36enter text 28send a fax 19setting prompt delay 36tutorial 3
Gglass
cleaning 31greeting cards
load 11
Hhelp 1HP Customer Support 45
calling 45HP Director 4HP distribution center 49HP Officjet
preparing to ship 47HP papers
tips on loading 11
Iindividual speed-dial settings
create 26ink cartridges see print
cartridgesinkjet paper
load 11
index
hp officejet 4100 series56
Kkeypad
enter text 28
Llabels
load 12lighten copies 14load
change the paper type 12envelopes 9original in ADF 7paper 7photo paper 10 12postcards 10 12print cartridges 33set the paper size 12tips 11
Mmaintenance
align print cartridges 35clean print cartridges 35clean the exterior 32clean the glass 31clean the white strip 32normal sounds 36replace print cartridges 33restore factory defaults 35self-maintenance
sounds 36self-test report 32
menuscopy options 16fax 29fax setup 29maintenance 37print reports 37
Nnormal copy quality 13number of copies
set 14number of rings
set 21
Oorder print cartridges 60originals
load in ADF 7output tray 8
Ppaper
change default size for copy 12
change the type 12load 7recommended 7set the size 12tips on loading 11
paper size change for copy 12
paper trayload 7
phone numbers support services 45
photo paperload 10 12
photoscopy 15enhance copy 14
physical specifications 43postcards
load 10 12power
specifications 43print
envelopes 9fax reports 22self-test report 32
print cartridgesalign 35clean 35handling 32replace 33
prompt delaysetting 36
Qquick start
review the director 4use with a computer 4
Rreceive
fax 21redial
busy or unanswered number 23
reduce copy 14 16regulatory information 43reinstall software 40reports
generate automatically for fax 22
generate manually for fax 22
print 22self-test 32
resolution
change for fax 22restore factory settings 35returning your HP Officejet for
service 51
Sscan
from front panel 17stop 18
schedule a fax 20scroll speed
setting 36self-test report 32send
cancel forward faxes 24color fax 20color fax from front
panel 20forward faxes 24
settingscopy 13 15fax 27 28prompt delay 36scroll speed 36
setupadditional information 39menu 29
shippingyour HP Officejet 47
softwareremove and reinstall 40
soundsself-maintenance 36
specificationsphysical 43power 43
speed dials 19create individual
settings 26delete settings 27
stopscan 18scheduled fax 21
subscriber identification code 27
support services 45
Ttelephone line
multiple numbers 26telephone numbers 45text
enhance 14enter from front panel 28
time
index
reference guide 57
setting 27transparency film
recommended 7tips on loading 11
troubleshootingremove and reinstall
software 40T-shirt Transfer Iron-On
load 11tutorial
front panel 3make a copy 4
Uunanswered number
redial automatically 23
Vvolume
adjust 25
Wwarranty 45
service 51statement 51upgrades 51
white stripcleaning 32
hp officejet 4100 series
chapter 12
58
declaration of conformityAccording to ISOIEC Guide 22 and EN 45014
Manufacturerrsquos Name and Address
Hewlett-Packard Company 16399 West Bernardo Drive San Diego CA 92127-1899 USA
declares that the product
Product Name hp officejet 4100 series (Q1608A)
Model Number(s) officejet 4110 (Q1609A) officejet 4110xi (Q1610A) officejet 4110v (Q1611A) officejet 4105 (Q1612A) officejet 4105z (Q1613A) officejet 4115 (Q1614A)
Product Options All
conforms to the following Product Specifications
Safety EN609501992 +A1 A2 A3 A4 amp A11
IEC609501991 +A1 A2 A3 amp A4
UL1950CSA 222 No 950 3rd Edn 1995
NOM-019-SCFI-1993
EMC CISPR221993 +A1 amp A2 EN550221994 +A1 amp A2 -Class B
CISPR241997EN550241998
IEC 61000-3-21995 EN61000-3-21995
IEC 61000-3-31994 EN61000-3-31995
ASNZS 3548 1992
CNS13438 1997
FCC Part 15-Class B ICES-003 Issue 2 VCCI-2
GB 9254-1998
Telecom TBR21 1998
Supplementary Information
The Product herewith complies with the requirements of the Low Voltage Directive 7323EEC the EMC Directive 89336EEC and the RampTTE Directive 19995EC (ANNEX II) carries the CE marking accordingly
European Contact for regulatory topics only Your local Hewlett-Packard Sales and Service Office orHewlett-Packard GmbH
Department HQ-TRE Herrenberger Strasse 140 D-71034 Boumlblingen Germany (FAX + 49-7031-14-3143)
order mediaTo order media such as HP Premium Inkjet Paper HP Premium Inkjet Transparency Film HP Iron-On T-shirt Transfer paper or HP Greeting Cards go to
wwwhpshoppingcom
For orders in countries other than the US and Canada select other countries then click Yes to leave hpshoppingcom From this website you can access hpshoppingcom for your specific language or countryregion
order print cartridges
If you have Internet access you can get more information from the HP website at
wwwhpcomsupport
print cartridges hp reorder number
HP black print cartridge 56 19 ml black print cartridge
HP color print cartridgeHP tri-color print cartridge
57 17 ml color print cartridge28 8 ml color print cartridge
Visit the hp officejet information centerIt has everything you need to get the most value from your HP Officejet
bull Technical Supportbull Supplies and Ordering Informationbull Project Tipsbull Ways to Enhance Your Product
wwwhpcomsupport
copy 2003 Hewlett-Packard Company
Printed in the USA Mexico Germany Singapore or China
Q1608-90163Q1608-90163
Q1608-90163

reference guide
load originals and load paper
9
load envelopesUse the print feature of your software to print to envelopes with your HP Officejet Do not use shiny or embossed envelopes or envelopes that have clasps or windows You can load the paper tray with one or multiple envelopes
1 Remove all paper from the paper tray
2 Slide an envelope into the tray with the envelope flap up and to the left (print-side down) until it stops
3 Adjust the paper-width guide against the envelope until it stopsBe careful not to bend the envelope If you are loading multiple envelopes make sure the envelopes fit within the tray (do not overload it)Consult the help files in your word processing software for details on how to format text for printing on envelopes
hp officejet 4100 series
chapter 3
10
load 4 x 6 inch photo paperFollowing is the procedure for loading 4-by-6 inch photo paper into your HP Officejet
1 Remove all paper from the paper tray and then slide a stack of photo paper into the tray until it stopsMake sure the print-side faces downIf the photo paper you are using has perforated tabs load the photo paper so that the tabs are closest to you
2 Adjust the paper-width guide against the stack of photo paper until it stopsMake sure the photo paper fits within the tray (do not overload it)
Note Make sure you set the paper type and paper size before printing See set the paper type on page 12 and set the paper size on page 12
load postcardsFollowing is the procedure for loading postcards
1 Remove all paper from the paper tray and then slide a stack of cards into the tray until they stopMake sure the print-side faces down
reference guide
load originals and load paper
11
2 Adjust the paper-width guide against the cards until it stops Make sure the cards fit within the tray (do not overload it)
tips for loading other types of paper in the paper trayThe following table provides guidelines for loading certain types of paper and transparency film For best results adjust the paper settings each time you change paper types and paper sizes For more information see set the paper type on page 12
Note HP Photo Paper and HP Photo Paper Glossy 4-by-6 are not recommended for printing with your HP Officejet To print photos use HP Everyday Photo Paper For your best photo printing needs use HP Premium Plus Photo Paper
paper tips
HP papers bull HP Premium Inkjet Paper Locate the gray arrow on the nonprinting side of the paper and then insert paper with the arrow side facing up
bull HP Premium or Premium Plus Photo Paper Load the glossy (print) side down (To prevent curling keep photo paper sealed in the original package until you are ready to use it) Always load at least five sheets of regular paper in the paper tray first and then place the photo paper on top of the regular paper
bull HP Premium Inkjet Transparency Film Insert the film so that the white transparency strip (with arrows and the HP logo) is on top and is going into the tray first
bull HP Inkjet T-shirt Transfer Iron-On Flatten the transfer sheet completely before using it do not load curled sheets (To prevent curling keep transfer sheets sealed in the original package until you are ready to use them) Manually feed one sheet at a time with the unprinted side facing down (the blue stripe faces up)
bull HP Matte Greeting Cards HP Glossy Greeting Cards or HP Felt-Textured Greeting Cards Insert a small stack of HP greeting-card paper with the print-side down into the paper tray until it stops
hp officejet 4100 series
chapter 3
12
set the paper typeIf you want to use a different type of paper such as photo paper transparency film Iron-On T-shirt transfers or brochures simply load that paper in the paper tray You must then change the paper type settings to ensure the best print quality
HP recommends paper type settings according to the type of paper you are using
This setting refers to copy options only If you want to set the paper type for printing from a computer set the properties in the Print dialog box of the software
1 Press the Copy button until Paper Type appears
2 Press until the appropriate paper type appears
3 Press Enter to choose the displayed paper type
set the paper sizeThe HP Officejet can use Letter Legal or A4 paper Use the following procedure to set the paper size for copy options
1 Press the Copy button until Copy Paper Size appears
2 Press until the appropriate paper size appears
3 Press Enter to choose the displayed paper size
To avoid jams remove papers from the output tray frequently The output tray capacity is affected by the type of paper and the amount of ink you are using For more information about output-tray capacity see technical information in the HP Photo amp Imaging Help
Labels(works only with printing)
bull Always use letter-size or A4-size label sheets designed for use with HP inkjet products (like Avery Inkjet Labels) and make sure that the labels are not over two years old
bull Fan the stack of labels to make sure none of the pages are sticking together
bull Place a stack of label sheets on top of standard paper in the paper tray print-side down Do not insert labels one sheet at a time
Postcards (works only with printing)
Insert a stack of postcards or hagaki cards with the print-side down into the paper tray until it stops Line the postcards up on the right side of the paper tray slide the paper-width guide up against the left side of the cards until it stops
4-by-6 inch photo paper (works only with printing)
Insert the photo paper with the print-side down into the paper tray until it stops Place the long edge of the photo paper against the right side of the paper tray and slide the paper-width guide up against the long edge of the photo paper until it stops If the photo paper you are using has perforated tabs load the photo paper so that the tabs are closest to you
paper tips
4
13
use the copy features
The copy features let you do the following
bull Produce high-quality color and black-and-white copiesbull Reduce or enlarge the size of the copies you make from 25 to 200 or
50 to 200 (depending on your model) of the copyrsquos original sizebull Make the copy lighter or darker select the number of copies and specify
the quality of the copies you makebull Use special copying features to make high-quality copies of photos using
special photo paper or to create transparencies
make copiesYou can make copies using the front panel of your HP Officejet or by using the HP Officejet software on your computer Many copy features are available using either method However you may find that the software offers easier access to special copy features
All copy settings that you select on the front panel are reset two minutes after the HP Officejet completes the copy unless you save the settings as the default settings as described in change settings for all copy tasks on page 15
make a copy1 Load the paper tray with the appropriate paper
2 Load your original
3 Press the Copy button
4 Use the keypad or press the or to enter the number of copies
5 Press Start Black or Start Color
Tip To make a single copy press the Copy button and then press Start Black or Start Color
Note Make sure that the color print cartridge is installed in your HP Officejet Both print cartridges must be installed when making a copy
increase copy speed or qualityThe HP Officejet provides three options that affect copy speed and quality
bull Best produces the highest quality for all paper types Best copies more slowly than the other quality settings
bull Normal delivers high-quality output and is the recommended setting for most of your copying Normal copies faster than Best
bull Fast copies faster than the Normal setting The text is of comparable quality to the Normal setting but the graphics may be of lower quality Using Fast also reduces the frequency of replacing your print cartridges because it uses less ink
hp officejet 4100 series
chapter 4
14
1 Load your original
2 Press Copy until Copy Quality appears
3 Press until the desired quality setting appears and then press Enter to select it
4 Press Start Black or Start Color
set the number of copies You can set the number of copies using the front panel
1 Press the Copy button
2 Use the keypad or press the or to enter the number of copies
3 Press Enter
4 Press Start Black or Start Color
Tip If you hold down the right arrow button then after reaching 10 the number of copies changes by increments of five to make it easier to set a large number of copies
reduce or enlarge a copyYou can reduce or enlarge a copy of an original using ReduceEnlarge
For more information about additional copy options such as Fit to Page see perform special copy jobs on page 15
1 Press Copy until ReduceEnlarge appears
2 Press until the appropriate ReduceEnlarge option appears and then press Enter to select it
3 If you select Custom 100 Set Custom Size appears Use the arrow keys or type a percentage on the keypad
4 Press Enter when the desired percentage is displayed
5 Press Start Black or Start Color
make copies lighter or darkerUse LighterDarker to adjust the lightness and darkness of the copies you make
1 Press Copy until LighterDarker appearsThe range of LighterDarker values are represented as circles on a scale on the front-panel display
2 Press to lighten the copy or to darken it The circle moves to the left or right depending on the arrow button you press
3 Press Enter to select the setting
4 Press Start Black or Start Color
enhance text sharpness and photo colorsYou can use Text to sharpen edges of black text Photo to enhance light colors in your photographs or Mixed if your original contains a photograph and text You can also select None to turn off all enhancements
reference guide
use the copy features
15
Text enhancement is the default option You can turn off Text enhancement by selecting Photo Mixed or None if the following occur
bull Stray dots of color surround some text on your copiesbull Large black typefaces look splotchy (not smooth)bull Thin colored objects or lines contain black sectionsbull Horizontal grainy or white bands appear in light- to medium-gray areas
1 Press Copy until Enhancements appears
2 Press until the desired enhancement (Text Photo Mixed or None) appears
3 Press Enter to select the setting
4 Press Start Black or Start Color
change settings for all copy tasksSave the copy settings you use most often by setting them as the default This includes changes to Copy options such as Paper Type and Paper Size as well as other Copy settings on the front panel such as Number of Copies and Copy Quality
1 Make any desired changes to the copy options
2 Press Copy until Set New Defaults appears
3 Press until Yes appears
4 Press Enter to set the options as a defaultYour settings are saved
perform special copy jobsIn addition to supporting standard copying your HP Officejet can also copy a photo or fit a copy to the page
copy a photoWhen copying a photo you should select options for the correct paper type and photo enhancement
1 Load the photo in the automatic document feeder (ADF)For more information see load originals
2 If you are using photo paper load it in the paper tray
3 Press Copy until Paper Type appears
4 Press until Premium Photo appears and then press Enter to select it
5 Press Copy until Enhancements appears
6 Press until Photo appears and then press Enter to select it
7 Press Start Black or Start Color
Tip To enlarge a photo automatically to a full page use the Photo Fit to Page button
hp officejet 4100 series
chapter 4
16
fit a copy to the pageUse the Photo Fit to Page button when you want to automatically enlarge or reduce your original to fit Letter or A4 size paper You can enlarge a small photo to fit a full-size page as shown below Using Photo Fit to Page may prevent unwanted cropping of text or images around the margins
1 Load the original in the ADFFor more information see load originals on page 7
2 Press the Photo Fit to Page button
Note Do not press the Fax Copy or Scan buttons on the front panel once you have pressed the Photo Fit to Page button
3 Press until the appropriate paper type appears and then press Enter to select it
4 Press Start Black or Start Color
copy optionsThe following diagram shows the options that are available when you press Copy
Original Fit to Page
Plain PaperPhoto PaperTransparency
Actual sizeCustom 100Full Page 91Legal gt Ltr 72
ReduceEnlarge Paper Type
NoYes
TextPhotoMixedNone
Enhancements Set New Defaults
LetterLegalA4
Copy Paper Size
The sizes vary by countryregion
LighterDarker
NormalFastBest
Copy Quality
To cycle through the copy options press Copy repeatedly
Press and to move to the setting you want within one of the copy optionsPress Enter to select the displayed setting
5
17
use the scan features
Scanning is the process of converting pictures and text into an electronic format for your computer You can scan photos and text documents
Because the scanned image or text is in an electronic format you can bring it into your word processor or graphics program and modify it to suit your needs You can do the following
bull Scan photos of your kids and e-mail them to relatives create a photographic inventory of your house or office or create an electronic scrapbook
bull Scan text from an article into your word processor and quote it in a report saving you a lot of retyping
Tip To use the scan features your HP Officejet and computer must be connected and turned on The HP Officejet software must also be installed and running on your computer prior to scanning To verify that the HP Officejet software is running on Windows look for a status icon in the system tray On a Macintosh the HP Officejet software is always running
Note High resolution scanning (600 dpi or higher) requires a large amount hard disk space If there is not enough hard disk space available your system may stall
scan an originalYou can start a scan from your HP Officejet or from the HP Officejet software on your computer
For more information about scanning your pictures or documents from the HP Officejet software see scan pictures and documents in the HP Photo amp Imaging Help
to scan an original from your hp officejet
1 Load your original in the automatic document feeder (ADF)For more information see load originals on page 7
2 Press Scan
3 Select the Scan to destination by pressing or or by pressing the Scan button repeatedlyThe default destination is the HP Photo amp Imaging Gallery Any applications on your computer that are supported by the HP Officejet also appear in the Scan to list
4 Press Start Black or Start ColorThe original is scanned and the image is sent to selected destinationFor more information about using the HP Photo amp Imaging Gallery see manage images in how to use the software
hp officejet 4100 series
chapter 5
18
stop scanningYou can stop a scan by pressing the Cancel button located on the front panel
6
19
use the fax features
Using your HP Officejet you can
bull Send and receive paper faxesbull Send computer faxes (reference the HP Photo amp Imaging Help)bull Send and receive color faxes
Fax features are available only on some HP Officejets
send a faxYou can send a fax in a variety of configurations These include the following
bull send a paper fax (using the front panel or computer)bull send a paper fax with a PC-generated cover page (using the computer)bull send a file with or without a cover page (using the computer)bull send a PC-generated cover page as a single-page fax (using the
computer)
Note For information on sending a fax using the computer reference the HP Photo amp Imaging Help
Note By default your HP Officejet prints a report only if there is a problem with sending or receiving a fax A confirmation message indicating whether an item was successfully sent appears briefly on the front-panel display after each transaction If you need printed confirmation that your faxes are successfully sent see print reports on page 22 for information about report options
Note If you have not done so set the date and time See set the date and time on page 27
send a fax from your hp officejet1 Load your originals in the ADF
For more information see load originals on page 7
2 Enter the fax number using the keypad or press Speed Dial until the desired speed-dial entry appearsFor more information on speed dialing see set up speed dialing in the HP Photo amp Imaging Help
3 Press Start Black or Start Color
change settings and use speed dials before sending a fax1 Load your originals in the ADF
For more information see load originals on page 7
2 Enter the fax number using the keypad or press Speed Dial until the desired speed-dial entry appears
hp officejet 4100 series
chapter 6
20
For more information on speed dialing see set up speed dialing in the HP Photo amp Imaging Help
3 Press Enter
4 Press Fax to scroll through the fax options
5 When you reach the option whose setting you wish to change press to scroll through the setting options
6 When you reach the setting you want to change press Enter to accept the setting
7 Press Start Black or Start Color
send a color faxYou can send and receive color faxes to and from other color fax machines If you are faxing from the front panel and your HP Officejet determines that the recipient has a black-and-white fax unit it sends the fax in black and white If you are faxing from the software and your HP Officejet determines that the recipient has a black-and-white fax unit the HP Officejet prompts you to try sending the fax in black and white
We recommend that you use only color originals for color faxing The color originals must be loaded in the ADF you cannot send a color fax from memory using the scan and fax features To fax in color to multiple recipients send the fax from the Director or your software program
to send a color fax from the front panel
1 Load your originals in the ADF For more information see load originals on page 7
2 Enter the fax number using the keypad or press Speed Dial until the desired speed-dial entry appearsFor more information on creating speed-dial entries see set up speed dialing in the HP Photo amp Imaging Help
3 Press Start Color
schedule a faxYou can schedule a black and white fax to be sent later during the same day (for example when telephone lines are not as busy) If you use the front panel you can select a single recipient
When the specified time is reached your fax is automatically sent as soon as a connection can be made
1 Load your originals in the ADF
2 Enter the fax number using the keypad or press Speed Dial until the desired speed-dial entry appears
3 Press Enter
4 Press Fax to scroll through the fax options
5 Stop scrolling when you reach the How to Fax menu
6 Press to scroll through the setting options
7 Stop scrolling when you reach the Send Fax Later option
reference guide
use the fax features
21
8 Press Enter
9 Enter the Send Time using the numeric keypad
10 At the prompt press 1 for AM or 2 for PM
11 When Store Fax Now appears press 1 for Yes or 2 for NoIf 1 is selected the document is scanned to memory and is sent at the selected time If 2 is selected and you havenrsquot loaded your originals a message appears reminding you to load the original before the send time
12 Press Start Black
cancel a scheduled faxYou can cancel a fax stored in memory or one that is currently in progress
bull Press Cancel to cancel the scheduled fax
receive a faxYour HP Officejet is set to print received faxes automatically If you receive a legal-size fax and your HP Officejet is not currently configured to use legal-sized paper the unit automatically reduces the fax so that it fits on the paper that is loaded For more information see set automatic reduction on page 25
If you have an answering machine connected to the same line as your HP Officejet you may need to set the number of rings required before the HP Officejet begins receiving the fax The default number of rings before the HP Officejet receives a fax is 5
set the number of rings before answeringYou can specify how many rings should occur before your HP Officejet automatically answers the phone When you run the Fax Setup Wizard this is set automatically
If you do not want your HP Officejet to answer the phone Rings to Answer should be set to No Answer
1 Press Setup
2 Press 3 then press 3 againThis selects the Basic Fax Setup menu then the Rings to Answer option
3 Use the arrow keys to choose the number of rings and then press Enter
receive a fax manuallyBefore manually receiving a fax we recommend that you remove any originals from your HP Officejet so that they are not accidentally processed
Verify that Rings to Answer is set to No Answer
1 When your HP Officejet rings pick up the handset of a telephone that is on the same telephone line as your HP Officejet
2 If you hear fax tones press Start Black or Start Color or if you are receiving from an extension phone (on the same telephone line as your HP Officejet but not connected directly to it) press 1 2 3 on your phone
3 After you are finished hang up the telephone
hp officejet 4100 series
chapter 6
22
print reportsYou can set up your HP Officejet to print error reports and confirmation reports for each fax you send and receive You can also manually print reports as you need them
generate reports automaticallyThis setting lets you configure your HP Officejet so that it automatically prints error and confirmation reports
1 Press Setup
2 Press 1 then press 5This selects Print Report then selects Automatic Reports Setup
3 Press to scroll through the following report typesndash Every Error which prints whenever there is any kind of fax error
(default)ndash Send Error which prints whenever there is a transmission errorndash Receive Error which prints whenever there is a receiving errorndash Every Fax which confirms every time a fax is sent or receivedndash Send Only which prints every time a fax is sentndash Off which does not print fax reports
4 When you reach the report that you want press Enter
generate reports manuallyThis setting lets you print reports manually From the computer you can only print the Speed-Dial List and the Fax Log
to print reports from the front panel
1 Press Setup then press 1This selects the Print Report menu
2 Press to scroll through the following report typesndash Last Transaction which prints details of the last fax transactionndash Fax Log which prints a log of the last 30 fax transactionsndash Speed Dial List which prints a list of programmed speed dialsndash Self-Test Report which prints a report to assist you in diagnosing print
and alignment problems For more information see print a self-test report on page 32
ndash Automatic Reports Setup which is the automatic reports setting described in generate reports automatically on page 22
3 When you reach the report that you want press Enter
control resolution and contrastYour HP Officejet lets you change the resolution and contrast of documents that you are sending
change resolutionResolution affects the transmission speed and quality of faxed documents
reference guide
use the fax features
23
to change the resolution from the front panel
1 Load your originals in the ADF
2 Enter the fax number using the keypad or press Speed Dial until the desired speed-dial entry appears
3 Press Enter
4 Press Fax to scroll through the fax options
5 Stop scrolling when you reach the Resolution menu
6 Press until the desired resolution quality appears (Standard Photo Fine Very Fine)
7 Press EnterYour HP Officejet only faxes at the highest resolution supported by the receiving faxIf you choose Photo be aware that the faxing process takes longer to complete When faxing photographs we recommend that you choose Photo
change contrastChange this setting if you want a black-and-white fax to be darker or lighter than the original
to change the fax contrast from the front panel
1 Load your originals in the ADF
2 Enter the fax number using the keypad or press Speed Dial until the desired speed-dial entry appears
3 Press Enter
4 Press Fax to scroll through the fax options
5 Stop scrolling when you reach the LighterDarker menuThe range of values appears as a circle on a scale on the display
6 Press to lighten the fax or to darken itThe circle moves left or right as you press a button
7 Press Enter to accept the setting you selected
change other fax settings
redial a number automaticallyYou can set your HP Officejet to redial a busy and an unanswered number automatically If you initiated a fax from the computer the computer must be left on for the redialing process to work correctly
1 Press Setup
2 Press 4This selects the Advanced Fax Setup menu
3 Choose one of the following optionsndash Press 3
hp officejet 4100 series
chapter 6
24
This selects the Busy Redial option The default setting for Busy Redial is Redial
ndash Press 4This selects the No Answer Redial option The default setting for No Answer Redial is No Redial
4 Press Enter
5 Press to select Redial or No Redial as desired
6 Press Enter
forward faxes to another numberWith fax forwarding you can send a fax that you receive to another fax number during the next 24-hour period
to forward faxes from the front panel
1 Press Setup
2 Press 3 then press 7This selects the Basic Fax Setup menu then selects the Fax Forwarding Black Only option
3 At the prompt enter the Fax Number to which you wish to send the fax
4 Press Enter
5 Enter the Start Date using the numeric keypad
6 Enter the Start Time using the numeric keypad
7 At the prompt press 1 for AM or 2 for PM
8 Enter the Stop Date using the numeric keypadFax Forwarding On appears on the display
edit or cancel fax forwardingOnce fax forwarding is enabled you may find that you need to change the number you are faxing to or the start and stop times you entered You may wish to cancel your fax forwarding setup altogether Follow the steps below to edit or turn off fax forwarding
to edit fax forwarding from the front panel
1 Press Setup
2 Press 3 then press 7This selects the Basic Fax Setup menu then selects the Fax Forwarding Black Only option
3 Forwarding is ON 1=Edit 2=Cancel appears on the display after a moment Press 1 to edit the number you wish to fax to or to change the start and stop times Follow the messages on the display
to cancel fax forwarding from the front panelbull Press Cancel
OR
reference guide
use the fax features
25
Follow the steps in edit or cancel fax forwarding on page 24 When Forwarding is ON 1=Edit 2=Cancel appears on the display press 2 to cancel fax forwarding
use error correction modeError Correction Mode (ECM) eliminates data lost due to poor phone lines by detecting errors that occur during transmission and automatically requesting retransmission of the erroneous portion Phone charges are unaffected or may even be reduced on good phone lines On poor phone lines ECM increases sending time and phone charges but sends the data much more reliably Turn ECM off (the default setting is on) only if it increases phone charges substantially and you can accept poorer quality in exchange for reduced charges
to change the ECM setting from the front panel
1 Press Setup
2 Press 4 then press 7This selects the Advanced Fax Setup menu then selects the Error Correction Mode option
3 Press to switch between On and Off
4 Press Enter to accept the setting you selected
set automatic reductionThis setting determines what your HP Officejet does if it receives a fax that is too large for the default paper size With this setting on (the default) the image is reduced so that it fits on one page With this feature off information that doesnrsquot fit on the first page is printed on a second page
1 Press Setup
2 Press 4 then press 5This selects the Advanced Fax Setup menu then selects the Automatic Reduction option
3 Press to switch between On and Off
4 Press Enter to accept the setting you selected
adjust the volumeYour HP Officejet provides three levels for adjusting the ring and speaker volume The ring volume is the volume of the phone ringer The speaker volume is the volume of everything else such as the dial and fax tones The default setting is Soft
1 Press Setup
2 Press 3 then press 6This selects the Basic Fax Setup menu then selects the Ring and Beep Volume option
3 Press to select one of the options Soft Loud or Off
4 Press Enter to accept the setting you selected
hp officejet 4100 series
chapter 6
26
change the answer ring pattern (distinctive ringing)Distinctive ringing is a feature offered by phone companies that allows several phone numbers to share the same line Each number has a specific ring pattern If you do not have this service use the default ring pattern which is All Rings
If you connect your HP Officejet to a line with distinctive ringing have your telephone company assign one ring pattern to voice calls and another to fax calls (double or triple rings are best for a fax number)
1 Press Setup
2 Press 4 then press 2This selects the Advanced Fax Setup menu then selects the Answer Ring Pattern option
3 Press to scroll through these options All Rings Single Rings Double Rings Triple Rings and Double amp Triple
4 When the ring pattern that the phone company established for this number appears press Enter
Tip We recommend that you use Double Rings or Triple Rings for fax
set up speed dialingThrough your HP Officejet or your computer you can assign entries to fax numbers you use often This lets you dial those numbers quickly using the front panelrsquos Speed Dial button and a one- or two-digit entry You can create up to 100 individual speed-dial entries (the maximum for some models is 70)
We recommend that you use the software to set up speed-dial settings
Note A speed-dial entry can only be associated with one phone number speed-dial groups are not supported
For more information see set up speed dialing in the hp photo amp imaging help
create individual speed-dial settingsYou can enter fax numbers that you will reuse frequently
1 Press Setup
2 Press 2 then press 1This selects the Speed Dial Setup menu then selects the Individual Speed Dial option
3 Press EnterThe first unassigned speed-dial entry appears on the display
4 Press Enter to select the displayed speed-dial entry
5 Enter the Fax Number to assign to that entry then press EnterThe fax number can be up to 50 digits in length
Tip To enter a three-second pause within a number sequence press Symbols to display a dash
6 Enter the personrsquos or companyrsquos name then press Enter
reference guide
use the fax features
27
The name is limited to 13 characters in lengthFor more information see enter text on page 28
7 After Enter Another appears press 1 (Yes) if you want to set up another number or press 2 (No) to exit
delete speed-dial settingsFollow these steps to delete an individual speed-dial entry
1 Press Setup
2 Press 2 then press 2 againThis selects Speed Dial Setup then selects Delete Speed Dial
3 Press until the individual entry that you want to delete appears then press Enter
set basic fax settings using the front panelWe recommend that you use the Fax Setup Wizard in the HP Officejet software to configure all your basic fax settings however you can also access these settings from the front panel
Note In the US regulations require that your name and phone number appear on every fax The minimum settings that we recommend are described in the following topics
set the date and timeFollow these steps to set the date and time manually
1 Press Setup
2 Press 3 then press 1This selects the Basic Fax Setup menu then selects the Date and Time option
3 Follow the prompts on the display to enter the date and time using the keypad
Tip Use only the last two digits for the year
Tip When you enter a single-digit date or time type a leading zero before the single digit for example 0345 or 08-03-02
After you are done the date and time appear on the display
Warning Cutting off power to the HP Officejet causes the selected date and time to be lost However name and fax number information is not lost
set the fax headerFollow these steps to enter your name and fax number in the header
Note In Hungary the subscriber identification code (fax header) can be set or changed only by authorized personnel For more information contact your authorized HP dealer
1 Press Setup
2 Press 3 then press 2
hp officejet 4100 series
chapter 6
28
This selects the Basic Fax Setup menu then selects the Fax Header option
3 Enter your personal or company name at the prompt Use the guidelines provided in the next section under enter text
4 Press Enter
5 Enter your fax number using the numeric keypad
6 Press Enter
enter textThe following list provides tips for entering text using the front-panel keypad
bull Press the keypad numbers that correspond to the letters of a name
bull Press a button multiple times to see a letter first in uppercase and then in lowercase
bull After the correct letter appears press and then press the number that corresponds to the next letter in the name Again press multiple times until the correct letter appears
bull To insert a space press Space ()bull To enter a symbol such as press Symbols () to scroll through the list of
available symbolsbull If you make a mistake press to clear it and then make the correct
entrybull After you are done entering text press Enter to store your entries
check for dial toneBefore using the fax features verify that the connections are correctly established
1 Press Fax
2 Listen for a dial tone
3 If you do not hear a dial tone check the connections
4 Press Cancel to hang up
ABC These letters correspond to this number and so on
2
JKL To get this character J j K k L l 5
5 Press 5 this many times 1 2 3 4 5 6 7
reference guide
use the fax features
29
fax job menuThe following options become available when the Fax button is pressed
setup menu for fax commandsThe following fax settings are available in the Setup menu
Enter Fax or Speed Dial
FineVery FinePhotoStandard
Fax Number Resolution LighterDarker
Enter a fax number or speed dialWhen the Fax button is pressed
Press and to move to the option you wantPress Enter to select the displayed setting
NoYes
Set New Defaults
Send Fax NowFax from MemorySend Fax LaterPoll to Receive
How to Fax
1Automatic Reports Setup
2Answer Ring Pattern
3Busy Redial
4No Answer Redial
5Automatic Reduction
6Backup Fax Reception
7Error Correction Mode
3Basic Fax Setup 4Advanced Fax Setup
Press Setup to display the menu options
Press and to move to the setting you wantPress Enter to select the displayed setting
1Date and Time
2Fax Header
3Rings to Answer
4Paper Size
5Tone or Pulse Dialing
6Ring and Beep Volume
7Fax Forwarding Black Only
2Speed Dial Setup
1Individual Speed Dial
2Delete Speed Dial
3Print Speed Dial List
hp officejet 4100 series
chapter 6
30
7
31
maintain your hp officejet
This section provides instructions for keeping your HP Officejet in top working condition Perform these maintenance procedures as necessary
clean the glassDirty glass from dust smudges hair and so on slows down performance and affects the accuracy of features such as Fit to Page and Copy
1 Turn off the unit unplug the power cord and raise the scanner lid
2 Clean the glass with a soft cloth or sponge slightly moistened with a nonabrasive glass cleaner
Caution Do not use abrasives acetone benzene or carbon tetrachloride on the glass these can damage it Do not place liquids directly on the glass They may seep under it and damage the unit
3 Dry the glass with a chamois or cellulose sponge to prevent spotting
hp officejet 4100 series
chapter 7
32
clean the white stripMinor debris can accumulate on the white strip located underneath the scannerrsquos lid
1 Turn off the unit unplug the power cord and raise the scanner lid
2 Clean the white strip with a soft cloth or sponge slightly moistened with a mild soap and warm water
3 Wash the strip gently to loosen debris do not scrub the strip
4 Dry the strip with a chamois or soft cloth
Caution Do not use paper-based wipes as these may scratch the strip
5 If this does not clean the strip well enough repeat the previous steps using isopropyl (rubbing) alcohol and wipe the strip thoroughly with a damp cloth to remove any residual alcohol
clean the exterior Use a soft damp lint-free cloth to wipe dust smudges and stains off the case The interior of the unit does not require cleaning Keep fluids away from the interior of the unit as well as the front panel
work with print cartridgesTo ensure the best print quality from your HP Officejet you will need to perform some simple maintenance procedures and when prompted by a front-panel message replace the print cartridges
print a self-test reportIf you are experiencing problems with printing before cleaning or replacing the print cartridges you should print a Self-Test Report This report provides useful information about your print cartridges including status information
1 Press Setup
2 Press 1 then press 4This selects Print Report and then selects Self-Test Report
3 Press Start Black or Start ColorA Self-Test Report is printed for your HP Officejet
handle print cartridgesBefore you replace or clean a print cartridge you should know the part names and how to handle the print cartridge
reference guide
maintain your hp officejet
33
replace the print cartridgesFront-panel messages appear to let you know that you should replace your print cartridges
See order print cartridges on the back cover for information on ordering replacement print cartridges
1 Turn on the unit then lift open the print cartridge access doorThe print carriage moves into view
2 After the carriage stops moving push down on the print cartridge down to release it and then pull it toward you out of its slot
Plastic tape with pink tab(must be removed)
Copper contactsInk nozzles under tape
Do not touch the copper contacts or the ink nozzles
print cartridge access door
hp officejet 4100 series
chapter 7
34
Note It is normal to see ink build-up in the print cartridge slots
3 Remove the new print cartridge from its packaging and being careful to touch only the bright pink plastic tab gently remove the plastic tape to uncover the ink nozzles
Caution Do not touch the copper contacts or ink nozzles
Once you have removed the plastic tape install the print cartridge immediately to prevent the ink from drying in the nozzles
4 Push the new print cartridge into the appropriate slot at a slight angle until it clicks into place
Caution Do not attempt to push the cartridge straight into the slot It must slide in at a slight angle
The tri-color print cartridge goes on the left and the black cartridge goes on the right
5 Close the print cartridge access door
reference guide
maintain your hp officejet
35
align the print cartridgesThe HP Officejet prompts you to align cartridges every time you install or replace a print cartridge Aligning the cartridges ensures high-quality output
To align the print cartridges when prompted
1 Press Enter on the front panelAn align cartridges (test pattern) page prints
2 Load the align cartridges page face down in the ADF between the paper-width guides and press the Enter button again
3 Recycle or discard the page
To align the cartridges at any other time
1 Press Setup
2 Press 5 then press 2This selects the Maintenance menu and then selects the Align Print Cartridge option
3 Press EnterAn align cartridges (test pattern) page prints
4 Load the align cartridges page face down in the ADF between the paper-width guides and press the Enter button again
5 Recycle or discard the page
clean the print cartridgesUse this feature when the Self-Test Report shows streaking or white lines through any of the colored bars Do not clean print cartridges unnecessarily This wastes ink and shortens the life of the ink nozzles
1 Press Setup
2 Press 5 then press 1This selects the Maintenance menu and then selects the Clean Print Cartridge optionA page of patterns is printed The cartridges are cleaned Recycle or discard the pageIf copy or print quality still seem poor after you clean the print cartridges replace the print cartridge that is affected
restore factory defaultsYou can restore the original factory settings to what they were when you purchased your HP Officejet Choosing to restore your factory defaults restores all settings except date information and any scan settings you may have set
You can perform this process from the front panel only
1 Press Setup
2 Press 5 then press 3This selects Maintenance and then selects Restore Factory DefaultsThe factory default settings are restored
hp officejet 4100 series
chapter 7
36
set scroll speedThe Scroll Speed option lets you control the rate that text messages appear in the front-panel display You can choose Normal Fast or Slow The default is Normal
1 Press Setup
2 Press 5 then press 6This selects Maintenance and then selects Set Scroll Speed
3 Press until the desired speed appears then press Enter
set the prompt delay timeThe Prompt Delay option lets you control the amount of time before a message is displayed in the front-panel display You can choose Normal Fast or Slow The default is Normal
1 Press Setup
2 Press 5 then press 7This selects Maintenance and then selects Set Prompt Delay Time
3 Press until the delay time appears then press Enter
self-maintenance sounds During the life of your product you may hear various mechanical sounds This is a normal part of your unitrsquos self-maintenance
reference guide
maintain your hp officejet
37
setup menu optionsThe following options are available from the Setup button
1Last Transaction
2Fax Log
3Speed Dial List
4Self-Test Report
5Automatic Reports Setup
1Print Report
Use Setup to display the Print Report Speed Dial Setup Basic Fax Setup Advanced Fax Setup and Maintenance options
Press and to move to the setting you wantPress Enter to select the displayed setting
1Clean Print Cartridges
2Align Print Cartridges
3Restore Factory Defaults
4Reprint Faxes in Memory
5Set Language amp CountryRegion
6Set Scroll Speed
7Set Prompt Delay Time
5Maintenance2Speed Dial Setup
3Basic Fax Setup
4Advanced Fax Setup
1Individual Speed Dial
2Delete Speed Dial
3Print Speed Dial List
1Date and Time
2Fax Header
3Rings to Answer
4 Paper Size
5Tone or Pulse Dialing
6Ring and Beep Volume
7Fax Forwarding Black Only
1Automatic Reports Setup
2Answer Ring Pattern
3Busy Redial
4No Answer Redail
5Automatic Reduction
6Backup Fax Reception
7Error Correction Mode
hp officejet 4100 series
chapter 7
38
8
39
additional setup information
During the installation of the HP Officejet software a number of windows are displayed You should see the following
bull Installingbull Copying files bull A request to plug in the HP Officejetbull Green OK and check markbull Request to restart your computer (may not occur in all cases)bull Registration
If you did not see all of these windows there may be a problem with the installation Verify the following
bull The HP Director contains six icons (double-click the HP Director icon on the desktop)
bull The HP Officejet is listed in the Printers dialog boxbull There is an icon for the HP Officejet in the System Tray that indicates the
HP Officejet is ready
If the HP Director does not show six icons you may need to wait a few minutes for the HP Officejet to connect to your computer
possible installation problemsIf nothing appears on your computer screen after you insert the HP Officejet 4100 Series CD-ROM into your computerrsquos CD-ROM drive
1 From the Start menu choose Run
2 In the Run dialog box enter dsetupexe (if your CD-ROM drive is not assigned to drive letter d use the appropriate drive letter) then click OK
If the HP Director does not contain six icons do the following
bull Verify that the front-panel cover is attached then unplug the HP Officejet and plug it in again
bull Verify that the USB and power cables are plugged inndash Unplug the USB cable and plug it in againndash Do not attach the USB cable to a keyboard or nonpowered hubndash Verify that the USB cable is 3 meters or less in lengthndash If you have several USB devices attached to your computer you may
want to unplug the others during the installation
Note AppleTalk is not supported
bull Unplug the HP Officejet from the wall and plug it in againbull Restart your computer
hp officejet 4100 series
chapter 8
40
On Windows check the System Tray for applications that are running in the background and close them before restarting your computer
remove and reinstall your hp officejet softwareIf six icons do not appear in the Director you may need to uninstall and re-install the software Do not simply delete the HP Officejet program files from your hard drive Be sure to remove them properly using the uninstall utility provided in the HP Officejet program group
to uninstall from a Windows computer
1 Disconnect your HP Officejet from your computer
2 On the Windows taskbar click Start choose Programs or All Programs (XP) choose Hewlett-Packard choose hp officejet 4100 series then choose uninstall software
3 Follow the directions on the screenBe sure to disconnect your HP Officejet
4 If you are asked whether you would like to remove shared files click NoOther programs that use these files may not work properly if the files are deleted
5 After the program finishes removing the software disconnect your HP Officejet and restart your computer
Note It is important that you disconnect your HP Officejet before restarting your computer
6 To reinstall the software insert the HP Officejet 4100 Series CD-ROM into your computerrsquos CD-ROM drive and follow the instructions that appear
7 After the software is installed connect and turn on your HP Officejet following the onscreen instructions and the instructions in your Setup PosterAfter connecting and turning on your HP Officejet you may have to wait several minutes for all of the Plug and Play events to completeWhen the software installation is complete you will see a Status Monitor icon in the System Tray
8 To verify that the software is properly installed double-click on the HP Director icon on the desktop If the HP Director shows six icons the software has been properly installed
to uninstall from a Macintosh computer
1 Disconnect your HP Officejet from your computer
2 Double-click on ApplicationsHP All-in-One Software folder
reference guide
additional setup information
41
3 Double-click on HP Uninstaller
4 Follow the directions that appear on the screen
5 After the program finishes removing the software disconnect your HP Officejet and restart your computer
6 To reinstall the software insert the HP Officejet 4100 Series CD-ROM into your computerrsquos CD-ROM drive
Note When re-installing the software follow the instructions on the Setup Poster Do not connect the HP Officejet to your computer until after you have completed the software installation
7 On the desktop open the CD-ROM double-click on hp all-in-one installer and follow the instructions that appear
connect your hp officejet to a phone modem or answering machine
The HP Officejet can share a phone line with a phone a modem or an aswering machine When sharing a phone line with an answering machine the HP Officejet will answer fax calls and direct voice calls to the answering machine
Note For information on connecting your HP Officejet to your computer and phone line refer to the Setup Poster that came with your unit
to connect your hp officejet to a phone modem or answering machine
1 Remove the white plastic stopper from connector 2 on the back of the HP Officejet
To connect more than one device to connector 2 on the HP Officejet you must purchase a Y-splitter and plug it into connector 2
2 Connect the phone cord from the phone modem or answering machine to connector 2 (or Y-splitter)
Caution Do not use the phone cord that came with the HP Officejet for this purpose That phone cord must connect connector 1 on the HP Officejet to the wall jack for your phone system See the Setup Poster for details
3 If you are connecting an answering machine see set the number of rings before answering on page 21 for instructions on setting the number of rings correctly or change the answer ring pattern (distinctive ringing) on page 26 for information on incoming ring patterns
4 If you are connecting a modem turn off its fax-receive feature
connector 2 on the HP Officejet
connector 1 on the HP Officejet
hp officejet 4100 series
chapter 8
42
additional troubleshooting helpYou may want to refer to the readme file for more information on possible installation problems On Windows you can access the readme file from the Start button on the taskbar select Programs Hewlett-Packard hp officejet 4100 series View the Readme File On Macintosh you can access the readme file by double-clicking on the icon located in the top-level folder of the HP Officejet software CD-ROM
The readme file provides more information including
bull Using the Re-install utility after a failed installation to return your PC to a state that will allow the HP Officejet to be re-installed
bull Using the Re-install utility on Windows 98 to recover from a Composite USB System Driver missing errorThis error may occur if the hardware is installed prior to installing the software After running the Re-install utility reboot your PC and install the HP Officejet software before connecting the HP Officejet to your computer
You can also find more information on this website
wwwhpcomsupport
9
43
technical information
Additional specifications information can be found in the HP Photo amp Imaging Help in the hp officejet 4100 series section
physical specifications
power specificationsbull Power consumption 75W maximumbull Source (Input Voltage) 100 to 240 VAC groundedbull Input Frequency 50 to 60 Hzbull Current 1A maximum
regulatory informationAdditional regulatory information can be found in the HP Photo amp Imaging Help The information in this section supercedes information in the HP Photo amp Imaging Help
doc statement deacuteclaration de conformiteacute (Canada)Le preacutesent appareil numeacuterique neacutemet pas de bruit radioeacutelectrique deacutepassant les limites applicables aux appareils numeacuteriques de la classe B prescrites dans le Regraveglement sur le brouillage radioeacutelectrique eacutedicteacute par le ministegravere des Communications du CanadaThis digital apparatus does not exceed the Class B limits for radio noise emissions from digital apparatus set out in the Radio Interference Regulations of the Canadian Department of Communications
notice to users of the Canadian telephone networkThis equipment meets the applicable Industry Canada Terminal Equipment Technical Specifications This is confirmed by the registration number The abbreviation IC before the registration number signifies that registration was performed based on a Declaration of Conformity indicating that Industry Canada technical specifications were met It does not imply that Industry Canada approved the equipment
Note The Ringer Equivalence Number (REN) assigned to each terminal device provides an indication of the maximum number of terminals allowed to be connected to a telephone interface The termination on an interface may consist of any combination of devices subject only to the requirement that the sum of the Ringer Equivalence Numbers of all the devices does not exceed 5
The REN for this product is 03B based on FCC Part 68 test results
height width depth weight (without print cartridges)
with paper trays and ADF closed
718 in (1824 cm) 1676 in (4258 cm) 825 in (2096 cm) 75 lbs (34 kg)
with ADF and paper tray extended
1030 in (2615 cm) 1676 in (4258 cm) 1854 in (4709 cm) 75 lbs (34 kg)
hp officejet 4100 series
chapter 9
44
notice to all users of the European Economic Area (EEA)
This product is designed to interwork with the analogue telephone networks in the following countriesregions
Network compatibility depends on customer selected settings which must be reset to use the equipment on a telephone network in a countryregion other than where the product was purchased Contact the vendor or Hewlett-Packard Company if addition product support is necessaryThis equipment has been certified by the manufacturer in accordance with Directive 19995EC (annex II) for Pan-European single-terminal connection to the public switched telephone network (PSTN) However due to differences between the individual PSTNs provided in different countriesregions the approval does not of itself give an unconditional assurance of successful operation on every PSTN network termination pointIn the event of problems you should contact your equipment supplier in the first instance
geraumluschemissionLpA lt 70 dBam Arbeitsplatzim Normalbetriebnach DIN 45635 T 19
notice to Korean customers
Germany UK Netherlands
France Spain Italy
Belgium Luxembourg Sweden
Austria Denmark Ireland
Norway Finland Switzerland
Greece Portugal
10
45
hp support
This section explains the support services information provided by Hewlett-Packard If you are unable to find the answer you need in the printed or onscreen documentation supplied with your product you can contact one of the HP support services listed in the following pages Some support services are available only in the US and Canada while others are available in many countriesregions worldwide If a support service number is not listed for your countryregion contact your nearest authorized HP dealer for help
get support and other information from the internetIf you have Internet access you can get help from the following HP website
wwwhpcomsupportThe Web site offers technical support drivers supplies and ordering information
hp customer supportSoftware programs from other companies may be included with your HP Officejet If you experience problems with any of those programs you will receive the best technical assistance by calling the experts at that companyIf you need to contact HP Customer Support do the following before you call
1 Make sure thata Your unit is plugged in and turned onb The specified print cartridges are installed correctlyc The recommended paper is properly loaded in the input tray
2 Reset your unita Turn off the unit using the On button located on the unitrsquos front panelb Unplug the power cord from the back of the unitc Plug the power cord back into the unitd Turn on the unit using the On button
3 For more information check the HP website at wwwhpcomsupport
4 If you are still experiencing problems and need to speak with an HP Customer Support Representativendash Have your service ID and serial number ready To display your service ID and
serial number on the front panel do the following Press Enter and Start Color at the same time until the service ID appears in the front-panel display From this display press the right arrow until the serial number displays
ndash Print a Self-Test Report See print a self-test report on page 32 for information on printing this report
ndash Make a color copyndash Be prepared to describe your problem in detail
5 Call HP Customer Support Be near your unit when you call
call in the US during warrantyCall (208) 323-2551 This service is free during the warranty period however your standard long-distance phone charges still apply A fee may apply outside the warranty period
hp officejet 4100 series
chapter 10
46
US phone support is available in both English and Spanish languages 24 hours a day 7 days a week (days and hours of support may change without notice)
call elsewhere in the worldThe numbers listed below are current as of the printing date of this guide For a list of current international HP Support Service numbers visit this address and choose your own countryregion or language
wwwhpcomsupportFor Korea you can also visit this address
httpwwwhpcokrYou can call the HP support center in the following countriesregions If your countryregion is not listed contact your local dealer or nearest HP Sales and Support Office to find out how to obtain servicesSupport service is free during the warranty period however your standard long-distance phone charges will apply In some cases a flat fee per single incident will also applyFor phone support in Europe please check for the details and conditions of phone support in your countryregion by consulting the following Web site
wwwhpcomsupportAlternatively you can ask your dealer or call HP at the phone number indicated in this booklet As part of our constant efforts to improve our phone support service we advise you to check our website on a regular basis for new information regarding service features and delivery
countryregion hp technical support countryregion hp technical support
Algeria1 +213 (0) 61564 543 Malaysia 1-800-805405
Argentina 0810-555-5520 Mexico 01-800-472-6684
Australia +61 3 8877 80001902 910 910
Mexico (Mexico City) 5258-9922
Austria +43 (0) 810 00 6080 Morocco1 +212 22404 747
Bahrain (Dubai) 800 728 Netherlands +31 (0) 20 606 8751
Belgium (Dutch) +32 (0) 2 626 8806 New Zealand 0800 441 147
Belgium (French) +32 (0) 2 626 8807 Norway +47 22 11 6299
Brazil (Grande Sao Paulo) (11) 3747 7799 Oman +971 4 883 8454
Brazil (Demais Localidades) 0800 157751 Palestine +971 4 883 8454
Canada during warranty (905) 206 4663 Panama 001-800-7112884
Canada post-warranty(per-call charge)
1-877-621-4722 Peru 0-800-10111
Caribbean amp Central America
1-800-711-2884 Philippines 632-867-3551
Chile 800-360-999 Poland +48 22 865 98 00
China 86 10 6868 7980 Portugal +351 21 3176333
Colombia 9-800-114-726 Puerto Rico 1-877-2320-589
Costa Rica 0-800-011-0524 Qatar +971 4 883 8454
Czech Republic +420 (0) 261307310 Romania +40 1 315 44 42or local 01 3154442
reference guide
hp support
47
call in Australia post-warrantyIf your product is not under warranty you can call 03 8877 8000 A per-incident out-of-warranty support fee of $2750 (inc GST) will be charged to your credit card You can also call 1902 910 910 ($2750 charged to your phone account) from 900 AM to 500 PM Monday through Friday (Charges and support hours are subject to change without notice)
prepare your unit for shipmentIf after contacting HP Customer Support or returning to the point of purchase you are requested to send your unit in for service please follow the power off and rebox steps below to avoid further damage to the HP product
Denmark +45 39 29 4099 Russian Federation Moscow +7 095 797 3520
Ecuador 1800-711-2884 Russian Federation St Petersburg
+7 812 346 7997
Europe (English) +44 (0) 207 512 5202 Saudi Arabia +800 897 14440
Egypt 02 532 5222 Singapore 65 6272 5300
Finland +358 (0) 203 47 288 Slovakia +421 (0) 2 682 08080
France (034 Euromin) +0892 69 60 22 South Africa (inside RSA) 086 000 1030
Germany (012 Euromin) +49 (0) 180 52 58 143 South Africa (inside RSA) +27-11 258 9301
Greece +30 1060 73 603 Spain +34 902 321 123
Hong Kong (SAR) +85 (2) 3002 8555 Sweden +46 (0)8 619 2170
Guatemala 1800-995-5105 Switzerland 2 +41 (0) 84 880 1111
Hungary +36 (0) 1 382 1111 Taiwan +886-2-2717-00550800 010 055
India 1-600-11226791 11 682 6035
Thailand +66 (2) 661 4000
Indonesia 62-21-350-3408 Tunisia1 +216 1891 222
Ireland +353 (0) 1 662 5525 Turkey +90 216 579 7171
Israel +972 (0) 9 8304848 Ukraine +7 (380-44) 490-3520
Italy +39 (0) 226410350 United Arab Emirates +971 4 883 8454
Japan 0570 000 511+81 3 3335 9800
United Kingdom +44 (0) 207 512 52 02
Jordan +971 4 883 8454 Venezuela 0800-47468368 or800-477-7777
Korea (Seoul) +82 (2) 3270 0700 Venezuela (Caracas) (502) 207-8488
Korea (outside Seoul) 080 999 0700 Vietnam 84 (0) 8 823 4530
Kuwait +971 4 883 8454 Yemen +971 4 883 8454
Lebanon +971 4 883 8454
1 This Call Center supports French speaking customers from the following countriesregions Morocco Tunisia and Algeria
2 This Call Center supports German French and Italian speaking customers in Switzerland
countryregion hp technical support countryregion hp technical support
hp officejet 4100 series
chapter 10
48
Note When transporting your HP Officejet make sure that the pens have been removed the HP Officejet has been properly shut down by pressing the power button and you have allowed time for the carriage to return to the service station and for the scanner to return to its parked position
1 Turn on the unitDisregard steps 1 through 6 if your unit will not turn on and the print carriage is in the home position You will not be able to remove the print cartridges Proceed to step 7
2 Open the print cartridge access doorThe print carriage moves into view
3 See replace the print cartridges on page 33 for information on removing the print cartridges
Caution Remove both print cartridges Failure to do so may damage your unit
4 Place the print cartridges in an airtight bag so they will not dry out and put them aside (do not send them with the unit unless instructed to by the HP customer support call agent)
5 Turn off the unit
6 Close the print cartridge access door
7 Remove the front panel cover as followsa Grasp the front of the front panel cover with two hands as shownb Firmly lift the front panel cover to unsnap it from the unit
8 Retain the front panel cover Do not return the front panel cover with the unit
9 If available pack the unit for shipment using the original packing materials or the packaging materials that come with your exchange unit
If you do not have the original packaging materials please use other adequate packaging materials Shipping damage caused by improper packaging andor improper transportation is not covered under the warranty
reference guide
hp support
49
10 Place the return shipping label on the outside of the box
11 Include the following items in the boxndash A complete description of symptoms for service personnel (samples of print
quality problems are helpful)ndash A copy of the sales slip or other proof of purchase to establish the warranty
coverage periodndash Your name address and a phone number where you can be reached during
the day
hp distribution centerTo order HP Officejet software a copy of the printed Reference Guide a setup poster or other customer-replaceable parts do one of the following bull In the US or Canada call (208) 323 2551bull Visit this website
httpwwwhpcomcposupportsoftwarehtml
hp officejet 4100 series
chapter 10
50
11
51
warranty information
HP Officejet 4100 seriesDuration of Limited Warranty (hardware and labor) 1 YearDuration of Limited Warranty (CD media) 90 DaysDuration of Limited Warranty (print cartridges) Until the HP ink is depleted or the ldquoend of warrantyrdquo date printed on the cartridge has been reached whichever occurs first
warranty service
express serviceTo obtain HP express repair service the customer must contact an HP service office or an HP Customer Support Center for basic troubleshooting first See hp customer support on page 45 for steps to take before calling Customer SupportIf a customer unit needs a minor part replacement and these parts can normally be replaced by the customer the customer-replaceable components may be serviced through expedited part shipment In this event HP will prepay shipping charges duty and taxes provide telephone assistance on replacement of the component and pay shipping charges duty and taxes for any part that HP asks to be returnedThe HP Customer Support Center may direct customers to designated authorized service providers who are certified by HP to service the HP product
warranty upgradesUpgrade your standard factory warranty to a total of three years with the HP SUPPORTPACK Service coverage begins on product purchase date and the pack must be purchased within the first 180 days of product purchase This program offers phone support from 600 AM to 1000 PM Mountain Standard Time (MST) Monday through Friday and 900 AM to 400 PM (MST) on Saturdays If during your technical support call it is determined that you need a replacement product then HP will ship you this product next business day free of charge Available in US onlyFor more information please call 1-888-999-4747 or visit the following HP Web site
httpwwwhpcomgohpsupportpack
Outside the US please call your local HP Customer Support office See call elsewhere in the world on page 46 for a list of international Customer Support numbers
returning your hp officejet for serviceBefore returning your HP Officejet for service you must call HP Customer Support See hp customer support on page 45 for steps to take before calling Customer Support
hewlett-packard limited global warranty statement
extent of limited warrantyHewlett-Packard (ldquoHPrdquo) warrants to the end-user customer (ldquoCustomerrdquo) that each HP Officejet 4100 Series product (ldquoProductrdquo) including related software accessories media and supplies shall be free from defects in material and workmanship for the duration which begins on the date of purchase by the Customer
hp officejet 4100 series
chapter 11
52
For each software Product HPrsquos limited warranty applies only to a failure to execute programming instructions HP does not warrant that the operation of any Product shall be uninterrupted or error freeHPrsquos limited warranty covers only those defects which arise as a result of normal use of a Product and does not cover any other problems including those which arise as a result of (a) improper maintenance or modification (b) software accessories media or supplies not provided or supported by HP or (c) operation outside the Productrsquos specificationsFor any hardware Product the use of a non-HP print cartridge or a refilled print cartridge does not affect either the warranty to the Customer or any HP support contract with the Customer However if Product failure or damage is attributable to the use of a non-HP or refilled print cartridge HP shall charge its standard labor and materials charges to service the Product for the failure or damageIf HP receives during the applicable warranty period notice of a defect in any Product HP shall either repair or replace the defective Product at HPrsquos option Where labor charges are not covered by HPrsquos limited warranty repairs shall be at HPrsquos standard charges for laborIf HP is unable to repair or replace as applicable a defective Product which is covered by HPrsquos warranty HP shall within a reasonable time after being notified of the defect refund the purchase price for the ProductHP shall have no obligation to repair replace or refund until the Customer returns the defective Product to HPAny replacement product may be either new or like-new provided that it has functionality at least equal to that of the Product being replacedHP products including each Product may contain remanufactured parts components or materials equivalent to new in performanceHPs limited warranty for each Product is valid in any countryregion or locality where HP has a support presence for the Product and where HP has marketed the Product The level of warranty service may vary according to local standards HP shall have no obligation to alter the form fit or function of the Product in order to make it operate in a countryregion or locality for which the Product was never intended to operate
limitations of warrantyTO THE EXTENT ALLOWED BY LOCAL LAW NEITHER HP NOR ITS THIRD PARTY SUPPLIERS MAKE ANY OTHER WARRANTY OR CONDITION OF ANY KIND WHETHER EXPRESS OR IMPLIED WITH RESPECT TO THE COVERED HP PRODUCTS AND SPECIFICALLY DISCLAIM THE IMPLIED WARRANTIES OR CONDITIONS OF MERCHANTABILITY SATISFACTORY QUALITY AND FITNESS FOR A PARTICULAR PURPOSE
limitations of liabilityTo the extent allowed by local law the remedies provided in this Limited Warranty Statement are the Customerrsquos sole and exclusive remediesTO THE EXTENT ALLOWED BY LOCAL LAW EXCEPT FOR THE OBLIGATIONS SPECIFICALLY SET FORTH IN THIS LIMITED WARRANTY STATEMENT IN NO EVENT SHALL HP OR ITS THIRD PARTY SUPPLIERS BE LIABLE FOR DIRECT INDIRECT SPECIAL INCIDENTAL OR CONSEQUENTIAL DAMAGES WHETHER BASED ON CONTRACT TORT OR ANY OTHER LEGAL THEORY AND WHETHER ADVISED OF THE POSSIBILITY OF SUCH DAMAGES
local lawThis Limited Warranty Statement gives the Customer specific legal rights The Customer may also have other rights which vary from state to state in the United States from province to province in Canada and from countryregion to countryregion elsewhere in the world
reference guide
warranty information
53
To the extent this Limited Warranty Statement is inconsistent with local law this Statement shall be deemed modified to be consistent with such local law Under such local law certain disclaimers and limitations of this Statement may not apply to the Customer For example some states in the United States as well as some governments outside the United States (including provinces in Canada) mayPreclude the disclaimers and limitations in this Statement from limiting the statutory rights of a consumer (eg the United Kingdom)Otherwise restrict the ability of a manufacturer to enforce such disclaimers or limitations orGrant the Customer additional warranty rights specify the duration of implied warranties which the manufacturer cannot disclaim or not allow limitations on the duration of implied warrantiesFOR CONSUMER TRANSACTIONS IN AUSTRALIA AND NEW ZEALAND THE TERMS IN THIS LIMITED WARRANTY STATEMENT EXCEPT TO THE EXTENT LAWFULLY PERMITTED DO NOT EXCLUDE RESTRICT OR MODIFY AND ARE IN ADDITION TO THE MANDATORY STATUTORY RIGHTS APPLICABLE TO THE SALE OF THE COVERED HP PRODUCTS TO SUCH CUSTOMERS
hp officejet 4100 series
chapter 11
54
55
index
Numerics4-by-6 inch photo paper
load 10 12
AADF 7adjust
volume for fax 25align print cartridges 35Answer Ring Pattern 26automatic document feeder 7automatic reduction
fax 25
Bbest copy quality 13busy number
redial automatically 23
Ccancel
scan 18scheduled fax 21
cartridgesalign 35replace 33
cleanprint cartridges 35the exterior 32the glass 31white strip 32
colorenhance 14fax 20fax from front panel 20
contrastchange for fax 23photo color 14
copy 13 16change default settings 15enhance 14fit to page 16lighten or darken 14menu options 16number of copies 14photo 15quality 13reduce or enlarge 14settings 13 15
speed 13tutorial 4
Customer Support 45web site 45
Ddarken a copy 14date
setting 27default settings
restore 35director review 4distinctive ringing 26
Eenhance copies 14enlarge copy 14 16envelopes
load 9Error Correction Mode
(ECM) 25
Ffactory defaults
restore 35fast copy quality 13fax 28
adjust volume 25automated reports 22cancel fax forward 24cancel scheduled 21change Answer Ring
Pattern 26change contrast 23change resolution 22change settings 19control appearance 22create individual speed-dial
settings 26delete speed-dial
settings 27distinctive ringing 26Error Correction Mode
(ECM) 25forward faxes 24header 27in color 20in color from front panel 20manual reports 22
menu 29print reports 22receive 21receive manually 21redial busy or unanswered
number 23schedule 20send from front panel 19set automatic reduction 25set date and time 27set the number of rings 21settings 27 28setup menu options 29speed dials 19test 28
fit to page 16forward faxes 24
cancel 24front panel
display scroll speed 36enter text 28send a fax 19setting prompt delay 36tutorial 3
Gglass
cleaning 31greeting cards
load 11
Hhelp 1HP Customer Support 45
calling 45HP Director 4HP distribution center 49HP Officjet
preparing to ship 47HP papers
tips on loading 11
Iindividual speed-dial settings
create 26ink cartridges see print
cartridgesinkjet paper
load 11
index
hp officejet 4100 series56
Kkeypad
enter text 28
Llabels
load 12lighten copies 14load
change the paper type 12envelopes 9original in ADF 7paper 7photo paper 10 12postcards 10 12print cartridges 33set the paper size 12tips 11
Mmaintenance
align print cartridges 35clean print cartridges 35clean the exterior 32clean the glass 31clean the white strip 32normal sounds 36replace print cartridges 33restore factory defaults 35self-maintenance
sounds 36self-test report 32
menuscopy options 16fax 29fax setup 29maintenance 37print reports 37
Nnormal copy quality 13number of copies
set 14number of rings
set 21
Oorder print cartridges 60originals
load in ADF 7output tray 8
Ppaper
change default size for copy 12
change the type 12load 7recommended 7set the size 12tips on loading 11
paper size change for copy 12
paper trayload 7
phone numbers support services 45
photo paperload 10 12
photoscopy 15enhance copy 14
physical specifications 43postcards
load 10 12power
specifications 43print
envelopes 9fax reports 22self-test report 32
print cartridgesalign 35clean 35handling 32replace 33
prompt delaysetting 36
Qquick start
review the director 4use with a computer 4
Rreceive
fax 21redial
busy or unanswered number 23
reduce copy 14 16regulatory information 43reinstall software 40reports
generate automatically for fax 22
generate manually for fax 22
print 22self-test 32
resolution
change for fax 22restore factory settings 35returning your HP Officejet for
service 51
Sscan
from front panel 17stop 18
schedule a fax 20scroll speed
setting 36self-test report 32send
cancel forward faxes 24color fax 20color fax from front
panel 20forward faxes 24
settingscopy 13 15fax 27 28prompt delay 36scroll speed 36
setupadditional information 39menu 29
shippingyour HP Officejet 47
softwareremove and reinstall 40
soundsself-maintenance 36
specificationsphysical 43power 43
speed dials 19create individual
settings 26delete settings 27
stopscan 18scheduled fax 21
subscriber identification code 27
support services 45
Ttelephone line
multiple numbers 26telephone numbers 45text
enhance 14enter from front panel 28
time
index
reference guide 57
setting 27transparency film
recommended 7tips on loading 11
troubleshootingremove and reinstall
software 40T-shirt Transfer Iron-On
load 11tutorial
front panel 3make a copy 4
Uunanswered number
redial automatically 23
Vvolume
adjust 25
Wwarranty 45
service 51statement 51upgrades 51
white stripcleaning 32
hp officejet 4100 series
chapter 12
58
declaration of conformityAccording to ISOIEC Guide 22 and EN 45014
Manufacturerrsquos Name and Address
Hewlett-Packard Company 16399 West Bernardo Drive San Diego CA 92127-1899 USA
declares that the product
Product Name hp officejet 4100 series (Q1608A)
Model Number(s) officejet 4110 (Q1609A) officejet 4110xi (Q1610A) officejet 4110v (Q1611A) officejet 4105 (Q1612A) officejet 4105z (Q1613A) officejet 4115 (Q1614A)
Product Options All
conforms to the following Product Specifications
Safety EN609501992 +A1 A2 A3 A4 amp A11
IEC609501991 +A1 A2 A3 amp A4
UL1950CSA 222 No 950 3rd Edn 1995
NOM-019-SCFI-1993
EMC CISPR221993 +A1 amp A2 EN550221994 +A1 amp A2 -Class B
CISPR241997EN550241998
IEC 61000-3-21995 EN61000-3-21995
IEC 61000-3-31994 EN61000-3-31995
ASNZS 3548 1992
CNS13438 1997
FCC Part 15-Class B ICES-003 Issue 2 VCCI-2
GB 9254-1998
Telecom TBR21 1998
Supplementary Information
The Product herewith complies with the requirements of the Low Voltage Directive 7323EEC the EMC Directive 89336EEC and the RampTTE Directive 19995EC (ANNEX II) carries the CE marking accordingly
European Contact for regulatory topics only Your local Hewlett-Packard Sales and Service Office orHewlett-Packard GmbH
Department HQ-TRE Herrenberger Strasse 140 D-71034 Boumlblingen Germany (FAX + 49-7031-14-3143)
order mediaTo order media such as HP Premium Inkjet Paper HP Premium Inkjet Transparency Film HP Iron-On T-shirt Transfer paper or HP Greeting Cards go to
wwwhpshoppingcom
For orders in countries other than the US and Canada select other countries then click Yes to leave hpshoppingcom From this website you can access hpshoppingcom for your specific language or countryregion
order print cartridges
If you have Internet access you can get more information from the HP website at
wwwhpcomsupport
print cartridges hp reorder number
HP black print cartridge 56 19 ml black print cartridge
HP color print cartridgeHP tri-color print cartridge
57 17 ml color print cartridge28 8 ml color print cartridge
Visit the hp officejet information centerIt has everything you need to get the most value from your HP Officejet
bull Technical Supportbull Supplies and Ordering Informationbull Project Tipsbull Ways to Enhance Your Product
wwwhpcomsupport
copy 2003 Hewlett-Packard Company
Printed in the USA Mexico Germany Singapore or China
Q1608-90163Q1608-90163
Q1608-90163

hp officejet 4100 series
chapter 3
10
load 4 x 6 inch photo paperFollowing is the procedure for loading 4-by-6 inch photo paper into your HP Officejet
1 Remove all paper from the paper tray and then slide a stack of photo paper into the tray until it stopsMake sure the print-side faces downIf the photo paper you are using has perforated tabs load the photo paper so that the tabs are closest to you
2 Adjust the paper-width guide against the stack of photo paper until it stopsMake sure the photo paper fits within the tray (do not overload it)
Note Make sure you set the paper type and paper size before printing See set the paper type on page 12 and set the paper size on page 12
load postcardsFollowing is the procedure for loading postcards
1 Remove all paper from the paper tray and then slide a stack of cards into the tray until they stopMake sure the print-side faces down
reference guide
load originals and load paper
11
2 Adjust the paper-width guide against the cards until it stops Make sure the cards fit within the tray (do not overload it)
tips for loading other types of paper in the paper trayThe following table provides guidelines for loading certain types of paper and transparency film For best results adjust the paper settings each time you change paper types and paper sizes For more information see set the paper type on page 12
Note HP Photo Paper and HP Photo Paper Glossy 4-by-6 are not recommended for printing with your HP Officejet To print photos use HP Everyday Photo Paper For your best photo printing needs use HP Premium Plus Photo Paper
paper tips
HP papers bull HP Premium Inkjet Paper Locate the gray arrow on the nonprinting side of the paper and then insert paper with the arrow side facing up
bull HP Premium or Premium Plus Photo Paper Load the glossy (print) side down (To prevent curling keep photo paper sealed in the original package until you are ready to use it) Always load at least five sheets of regular paper in the paper tray first and then place the photo paper on top of the regular paper
bull HP Premium Inkjet Transparency Film Insert the film so that the white transparency strip (with arrows and the HP logo) is on top and is going into the tray first
bull HP Inkjet T-shirt Transfer Iron-On Flatten the transfer sheet completely before using it do not load curled sheets (To prevent curling keep transfer sheets sealed in the original package until you are ready to use them) Manually feed one sheet at a time with the unprinted side facing down (the blue stripe faces up)
bull HP Matte Greeting Cards HP Glossy Greeting Cards or HP Felt-Textured Greeting Cards Insert a small stack of HP greeting-card paper with the print-side down into the paper tray until it stops
hp officejet 4100 series
chapter 3
12
set the paper typeIf you want to use a different type of paper such as photo paper transparency film Iron-On T-shirt transfers or brochures simply load that paper in the paper tray You must then change the paper type settings to ensure the best print quality
HP recommends paper type settings according to the type of paper you are using
This setting refers to copy options only If you want to set the paper type for printing from a computer set the properties in the Print dialog box of the software
1 Press the Copy button until Paper Type appears
2 Press until the appropriate paper type appears
3 Press Enter to choose the displayed paper type
set the paper sizeThe HP Officejet can use Letter Legal or A4 paper Use the following procedure to set the paper size for copy options
1 Press the Copy button until Copy Paper Size appears
2 Press until the appropriate paper size appears
3 Press Enter to choose the displayed paper size
To avoid jams remove papers from the output tray frequently The output tray capacity is affected by the type of paper and the amount of ink you are using For more information about output-tray capacity see technical information in the HP Photo amp Imaging Help
Labels(works only with printing)
bull Always use letter-size or A4-size label sheets designed for use with HP inkjet products (like Avery Inkjet Labels) and make sure that the labels are not over two years old
bull Fan the stack of labels to make sure none of the pages are sticking together
bull Place a stack of label sheets on top of standard paper in the paper tray print-side down Do not insert labels one sheet at a time
Postcards (works only with printing)
Insert a stack of postcards or hagaki cards with the print-side down into the paper tray until it stops Line the postcards up on the right side of the paper tray slide the paper-width guide up against the left side of the cards until it stops
4-by-6 inch photo paper (works only with printing)
Insert the photo paper with the print-side down into the paper tray until it stops Place the long edge of the photo paper against the right side of the paper tray and slide the paper-width guide up against the long edge of the photo paper until it stops If the photo paper you are using has perforated tabs load the photo paper so that the tabs are closest to you
paper tips
4
13
use the copy features
The copy features let you do the following
bull Produce high-quality color and black-and-white copiesbull Reduce or enlarge the size of the copies you make from 25 to 200 or
50 to 200 (depending on your model) of the copyrsquos original sizebull Make the copy lighter or darker select the number of copies and specify
the quality of the copies you makebull Use special copying features to make high-quality copies of photos using
special photo paper or to create transparencies
make copiesYou can make copies using the front panel of your HP Officejet or by using the HP Officejet software on your computer Many copy features are available using either method However you may find that the software offers easier access to special copy features
All copy settings that you select on the front panel are reset two minutes after the HP Officejet completes the copy unless you save the settings as the default settings as described in change settings for all copy tasks on page 15
make a copy1 Load the paper tray with the appropriate paper
2 Load your original
3 Press the Copy button
4 Use the keypad or press the or to enter the number of copies
5 Press Start Black or Start Color
Tip To make a single copy press the Copy button and then press Start Black or Start Color
Note Make sure that the color print cartridge is installed in your HP Officejet Both print cartridges must be installed when making a copy
increase copy speed or qualityThe HP Officejet provides three options that affect copy speed and quality
bull Best produces the highest quality for all paper types Best copies more slowly than the other quality settings
bull Normal delivers high-quality output and is the recommended setting for most of your copying Normal copies faster than Best
bull Fast copies faster than the Normal setting The text is of comparable quality to the Normal setting but the graphics may be of lower quality Using Fast also reduces the frequency of replacing your print cartridges because it uses less ink
hp officejet 4100 series
chapter 4
14
1 Load your original
2 Press Copy until Copy Quality appears
3 Press until the desired quality setting appears and then press Enter to select it
4 Press Start Black or Start Color
set the number of copies You can set the number of copies using the front panel
1 Press the Copy button
2 Use the keypad or press the or to enter the number of copies
3 Press Enter
4 Press Start Black or Start Color
Tip If you hold down the right arrow button then after reaching 10 the number of copies changes by increments of five to make it easier to set a large number of copies
reduce or enlarge a copyYou can reduce or enlarge a copy of an original using ReduceEnlarge
For more information about additional copy options such as Fit to Page see perform special copy jobs on page 15
1 Press Copy until ReduceEnlarge appears
2 Press until the appropriate ReduceEnlarge option appears and then press Enter to select it
3 If you select Custom 100 Set Custom Size appears Use the arrow keys or type a percentage on the keypad
4 Press Enter when the desired percentage is displayed
5 Press Start Black or Start Color
make copies lighter or darkerUse LighterDarker to adjust the lightness and darkness of the copies you make
1 Press Copy until LighterDarker appearsThe range of LighterDarker values are represented as circles on a scale on the front-panel display
2 Press to lighten the copy or to darken it The circle moves to the left or right depending on the arrow button you press
3 Press Enter to select the setting
4 Press Start Black or Start Color
enhance text sharpness and photo colorsYou can use Text to sharpen edges of black text Photo to enhance light colors in your photographs or Mixed if your original contains a photograph and text You can also select None to turn off all enhancements
reference guide
use the copy features
15
Text enhancement is the default option You can turn off Text enhancement by selecting Photo Mixed or None if the following occur
bull Stray dots of color surround some text on your copiesbull Large black typefaces look splotchy (not smooth)bull Thin colored objects or lines contain black sectionsbull Horizontal grainy or white bands appear in light- to medium-gray areas
1 Press Copy until Enhancements appears
2 Press until the desired enhancement (Text Photo Mixed or None) appears
3 Press Enter to select the setting
4 Press Start Black or Start Color
change settings for all copy tasksSave the copy settings you use most often by setting them as the default This includes changes to Copy options such as Paper Type and Paper Size as well as other Copy settings on the front panel such as Number of Copies and Copy Quality
1 Make any desired changes to the copy options
2 Press Copy until Set New Defaults appears
3 Press until Yes appears
4 Press Enter to set the options as a defaultYour settings are saved
perform special copy jobsIn addition to supporting standard copying your HP Officejet can also copy a photo or fit a copy to the page
copy a photoWhen copying a photo you should select options for the correct paper type and photo enhancement
1 Load the photo in the automatic document feeder (ADF)For more information see load originals
2 If you are using photo paper load it in the paper tray
3 Press Copy until Paper Type appears
4 Press until Premium Photo appears and then press Enter to select it
5 Press Copy until Enhancements appears
6 Press until Photo appears and then press Enter to select it
7 Press Start Black or Start Color
Tip To enlarge a photo automatically to a full page use the Photo Fit to Page button
hp officejet 4100 series
chapter 4
16
fit a copy to the pageUse the Photo Fit to Page button when you want to automatically enlarge or reduce your original to fit Letter or A4 size paper You can enlarge a small photo to fit a full-size page as shown below Using Photo Fit to Page may prevent unwanted cropping of text or images around the margins
1 Load the original in the ADFFor more information see load originals on page 7
2 Press the Photo Fit to Page button
Note Do not press the Fax Copy or Scan buttons on the front panel once you have pressed the Photo Fit to Page button
3 Press until the appropriate paper type appears and then press Enter to select it
4 Press Start Black or Start Color
copy optionsThe following diagram shows the options that are available when you press Copy
Original Fit to Page
Plain PaperPhoto PaperTransparency
Actual sizeCustom 100Full Page 91Legal gt Ltr 72
ReduceEnlarge Paper Type
NoYes
TextPhotoMixedNone
Enhancements Set New Defaults
LetterLegalA4
Copy Paper Size
The sizes vary by countryregion
LighterDarker
NormalFastBest
Copy Quality
To cycle through the copy options press Copy repeatedly
Press and to move to the setting you want within one of the copy optionsPress Enter to select the displayed setting
5
17
use the scan features
Scanning is the process of converting pictures and text into an electronic format for your computer You can scan photos and text documents
Because the scanned image or text is in an electronic format you can bring it into your word processor or graphics program and modify it to suit your needs You can do the following
bull Scan photos of your kids and e-mail them to relatives create a photographic inventory of your house or office or create an electronic scrapbook
bull Scan text from an article into your word processor and quote it in a report saving you a lot of retyping
Tip To use the scan features your HP Officejet and computer must be connected and turned on The HP Officejet software must also be installed and running on your computer prior to scanning To verify that the HP Officejet software is running on Windows look for a status icon in the system tray On a Macintosh the HP Officejet software is always running
Note High resolution scanning (600 dpi or higher) requires a large amount hard disk space If there is not enough hard disk space available your system may stall
scan an originalYou can start a scan from your HP Officejet or from the HP Officejet software on your computer
For more information about scanning your pictures or documents from the HP Officejet software see scan pictures and documents in the HP Photo amp Imaging Help
to scan an original from your hp officejet
1 Load your original in the automatic document feeder (ADF)For more information see load originals on page 7
2 Press Scan
3 Select the Scan to destination by pressing or or by pressing the Scan button repeatedlyThe default destination is the HP Photo amp Imaging Gallery Any applications on your computer that are supported by the HP Officejet also appear in the Scan to list
4 Press Start Black or Start ColorThe original is scanned and the image is sent to selected destinationFor more information about using the HP Photo amp Imaging Gallery see manage images in how to use the software
hp officejet 4100 series
chapter 5
18
stop scanningYou can stop a scan by pressing the Cancel button located on the front panel
6
19
use the fax features
Using your HP Officejet you can
bull Send and receive paper faxesbull Send computer faxes (reference the HP Photo amp Imaging Help)bull Send and receive color faxes
Fax features are available only on some HP Officejets
send a faxYou can send a fax in a variety of configurations These include the following
bull send a paper fax (using the front panel or computer)bull send a paper fax with a PC-generated cover page (using the computer)bull send a file with or without a cover page (using the computer)bull send a PC-generated cover page as a single-page fax (using the
computer)
Note For information on sending a fax using the computer reference the HP Photo amp Imaging Help
Note By default your HP Officejet prints a report only if there is a problem with sending or receiving a fax A confirmation message indicating whether an item was successfully sent appears briefly on the front-panel display after each transaction If you need printed confirmation that your faxes are successfully sent see print reports on page 22 for information about report options
Note If you have not done so set the date and time See set the date and time on page 27
send a fax from your hp officejet1 Load your originals in the ADF
For more information see load originals on page 7
2 Enter the fax number using the keypad or press Speed Dial until the desired speed-dial entry appearsFor more information on speed dialing see set up speed dialing in the HP Photo amp Imaging Help
3 Press Start Black or Start Color
change settings and use speed dials before sending a fax1 Load your originals in the ADF
For more information see load originals on page 7
2 Enter the fax number using the keypad or press Speed Dial until the desired speed-dial entry appears
hp officejet 4100 series
chapter 6
20
For more information on speed dialing see set up speed dialing in the HP Photo amp Imaging Help
3 Press Enter
4 Press Fax to scroll through the fax options
5 When you reach the option whose setting you wish to change press to scroll through the setting options
6 When you reach the setting you want to change press Enter to accept the setting
7 Press Start Black or Start Color
send a color faxYou can send and receive color faxes to and from other color fax machines If you are faxing from the front panel and your HP Officejet determines that the recipient has a black-and-white fax unit it sends the fax in black and white If you are faxing from the software and your HP Officejet determines that the recipient has a black-and-white fax unit the HP Officejet prompts you to try sending the fax in black and white
We recommend that you use only color originals for color faxing The color originals must be loaded in the ADF you cannot send a color fax from memory using the scan and fax features To fax in color to multiple recipients send the fax from the Director or your software program
to send a color fax from the front panel
1 Load your originals in the ADF For more information see load originals on page 7
2 Enter the fax number using the keypad or press Speed Dial until the desired speed-dial entry appearsFor more information on creating speed-dial entries see set up speed dialing in the HP Photo amp Imaging Help
3 Press Start Color
schedule a faxYou can schedule a black and white fax to be sent later during the same day (for example when telephone lines are not as busy) If you use the front panel you can select a single recipient
When the specified time is reached your fax is automatically sent as soon as a connection can be made
1 Load your originals in the ADF
2 Enter the fax number using the keypad or press Speed Dial until the desired speed-dial entry appears
3 Press Enter
4 Press Fax to scroll through the fax options
5 Stop scrolling when you reach the How to Fax menu
6 Press to scroll through the setting options
7 Stop scrolling when you reach the Send Fax Later option
reference guide
use the fax features
21
8 Press Enter
9 Enter the Send Time using the numeric keypad
10 At the prompt press 1 for AM or 2 for PM
11 When Store Fax Now appears press 1 for Yes or 2 for NoIf 1 is selected the document is scanned to memory and is sent at the selected time If 2 is selected and you havenrsquot loaded your originals a message appears reminding you to load the original before the send time
12 Press Start Black
cancel a scheduled faxYou can cancel a fax stored in memory or one that is currently in progress
bull Press Cancel to cancel the scheduled fax
receive a faxYour HP Officejet is set to print received faxes automatically If you receive a legal-size fax and your HP Officejet is not currently configured to use legal-sized paper the unit automatically reduces the fax so that it fits on the paper that is loaded For more information see set automatic reduction on page 25
If you have an answering machine connected to the same line as your HP Officejet you may need to set the number of rings required before the HP Officejet begins receiving the fax The default number of rings before the HP Officejet receives a fax is 5
set the number of rings before answeringYou can specify how many rings should occur before your HP Officejet automatically answers the phone When you run the Fax Setup Wizard this is set automatically
If you do not want your HP Officejet to answer the phone Rings to Answer should be set to No Answer
1 Press Setup
2 Press 3 then press 3 againThis selects the Basic Fax Setup menu then the Rings to Answer option
3 Use the arrow keys to choose the number of rings and then press Enter
receive a fax manuallyBefore manually receiving a fax we recommend that you remove any originals from your HP Officejet so that they are not accidentally processed
Verify that Rings to Answer is set to No Answer
1 When your HP Officejet rings pick up the handset of a telephone that is on the same telephone line as your HP Officejet
2 If you hear fax tones press Start Black or Start Color or if you are receiving from an extension phone (on the same telephone line as your HP Officejet but not connected directly to it) press 1 2 3 on your phone
3 After you are finished hang up the telephone
hp officejet 4100 series
chapter 6
22
print reportsYou can set up your HP Officejet to print error reports and confirmation reports for each fax you send and receive You can also manually print reports as you need them
generate reports automaticallyThis setting lets you configure your HP Officejet so that it automatically prints error and confirmation reports
1 Press Setup
2 Press 1 then press 5This selects Print Report then selects Automatic Reports Setup
3 Press to scroll through the following report typesndash Every Error which prints whenever there is any kind of fax error
(default)ndash Send Error which prints whenever there is a transmission errorndash Receive Error which prints whenever there is a receiving errorndash Every Fax which confirms every time a fax is sent or receivedndash Send Only which prints every time a fax is sentndash Off which does not print fax reports
4 When you reach the report that you want press Enter
generate reports manuallyThis setting lets you print reports manually From the computer you can only print the Speed-Dial List and the Fax Log
to print reports from the front panel
1 Press Setup then press 1This selects the Print Report menu
2 Press to scroll through the following report typesndash Last Transaction which prints details of the last fax transactionndash Fax Log which prints a log of the last 30 fax transactionsndash Speed Dial List which prints a list of programmed speed dialsndash Self-Test Report which prints a report to assist you in diagnosing print
and alignment problems For more information see print a self-test report on page 32
ndash Automatic Reports Setup which is the automatic reports setting described in generate reports automatically on page 22
3 When you reach the report that you want press Enter
control resolution and contrastYour HP Officejet lets you change the resolution and contrast of documents that you are sending
change resolutionResolution affects the transmission speed and quality of faxed documents
reference guide
use the fax features
23
to change the resolution from the front panel
1 Load your originals in the ADF
2 Enter the fax number using the keypad or press Speed Dial until the desired speed-dial entry appears
3 Press Enter
4 Press Fax to scroll through the fax options
5 Stop scrolling when you reach the Resolution menu
6 Press until the desired resolution quality appears (Standard Photo Fine Very Fine)
7 Press EnterYour HP Officejet only faxes at the highest resolution supported by the receiving faxIf you choose Photo be aware that the faxing process takes longer to complete When faxing photographs we recommend that you choose Photo
change contrastChange this setting if you want a black-and-white fax to be darker or lighter than the original
to change the fax contrast from the front panel
1 Load your originals in the ADF
2 Enter the fax number using the keypad or press Speed Dial until the desired speed-dial entry appears
3 Press Enter
4 Press Fax to scroll through the fax options
5 Stop scrolling when you reach the LighterDarker menuThe range of values appears as a circle on a scale on the display
6 Press to lighten the fax or to darken itThe circle moves left or right as you press a button
7 Press Enter to accept the setting you selected
change other fax settings
redial a number automaticallyYou can set your HP Officejet to redial a busy and an unanswered number automatically If you initiated a fax from the computer the computer must be left on for the redialing process to work correctly
1 Press Setup
2 Press 4This selects the Advanced Fax Setup menu
3 Choose one of the following optionsndash Press 3
hp officejet 4100 series
chapter 6
24
This selects the Busy Redial option The default setting for Busy Redial is Redial
ndash Press 4This selects the No Answer Redial option The default setting for No Answer Redial is No Redial
4 Press Enter
5 Press to select Redial or No Redial as desired
6 Press Enter
forward faxes to another numberWith fax forwarding you can send a fax that you receive to another fax number during the next 24-hour period
to forward faxes from the front panel
1 Press Setup
2 Press 3 then press 7This selects the Basic Fax Setup menu then selects the Fax Forwarding Black Only option
3 At the prompt enter the Fax Number to which you wish to send the fax
4 Press Enter
5 Enter the Start Date using the numeric keypad
6 Enter the Start Time using the numeric keypad
7 At the prompt press 1 for AM or 2 for PM
8 Enter the Stop Date using the numeric keypadFax Forwarding On appears on the display
edit or cancel fax forwardingOnce fax forwarding is enabled you may find that you need to change the number you are faxing to or the start and stop times you entered You may wish to cancel your fax forwarding setup altogether Follow the steps below to edit or turn off fax forwarding
to edit fax forwarding from the front panel
1 Press Setup
2 Press 3 then press 7This selects the Basic Fax Setup menu then selects the Fax Forwarding Black Only option
3 Forwarding is ON 1=Edit 2=Cancel appears on the display after a moment Press 1 to edit the number you wish to fax to or to change the start and stop times Follow the messages on the display
to cancel fax forwarding from the front panelbull Press Cancel
OR
reference guide
use the fax features
25
Follow the steps in edit or cancel fax forwarding on page 24 When Forwarding is ON 1=Edit 2=Cancel appears on the display press 2 to cancel fax forwarding
use error correction modeError Correction Mode (ECM) eliminates data lost due to poor phone lines by detecting errors that occur during transmission and automatically requesting retransmission of the erroneous portion Phone charges are unaffected or may even be reduced on good phone lines On poor phone lines ECM increases sending time and phone charges but sends the data much more reliably Turn ECM off (the default setting is on) only if it increases phone charges substantially and you can accept poorer quality in exchange for reduced charges
to change the ECM setting from the front panel
1 Press Setup
2 Press 4 then press 7This selects the Advanced Fax Setup menu then selects the Error Correction Mode option
3 Press to switch between On and Off
4 Press Enter to accept the setting you selected
set automatic reductionThis setting determines what your HP Officejet does if it receives a fax that is too large for the default paper size With this setting on (the default) the image is reduced so that it fits on one page With this feature off information that doesnrsquot fit on the first page is printed on a second page
1 Press Setup
2 Press 4 then press 5This selects the Advanced Fax Setup menu then selects the Automatic Reduction option
3 Press to switch between On and Off
4 Press Enter to accept the setting you selected
adjust the volumeYour HP Officejet provides three levels for adjusting the ring and speaker volume The ring volume is the volume of the phone ringer The speaker volume is the volume of everything else such as the dial and fax tones The default setting is Soft
1 Press Setup
2 Press 3 then press 6This selects the Basic Fax Setup menu then selects the Ring and Beep Volume option
3 Press to select one of the options Soft Loud or Off
4 Press Enter to accept the setting you selected
hp officejet 4100 series
chapter 6
26
change the answer ring pattern (distinctive ringing)Distinctive ringing is a feature offered by phone companies that allows several phone numbers to share the same line Each number has a specific ring pattern If you do not have this service use the default ring pattern which is All Rings
If you connect your HP Officejet to a line with distinctive ringing have your telephone company assign one ring pattern to voice calls and another to fax calls (double or triple rings are best for a fax number)
1 Press Setup
2 Press 4 then press 2This selects the Advanced Fax Setup menu then selects the Answer Ring Pattern option
3 Press to scroll through these options All Rings Single Rings Double Rings Triple Rings and Double amp Triple
4 When the ring pattern that the phone company established for this number appears press Enter
Tip We recommend that you use Double Rings or Triple Rings for fax
set up speed dialingThrough your HP Officejet or your computer you can assign entries to fax numbers you use often This lets you dial those numbers quickly using the front panelrsquos Speed Dial button and a one- or two-digit entry You can create up to 100 individual speed-dial entries (the maximum for some models is 70)
We recommend that you use the software to set up speed-dial settings
Note A speed-dial entry can only be associated with one phone number speed-dial groups are not supported
For more information see set up speed dialing in the hp photo amp imaging help
create individual speed-dial settingsYou can enter fax numbers that you will reuse frequently
1 Press Setup
2 Press 2 then press 1This selects the Speed Dial Setup menu then selects the Individual Speed Dial option
3 Press EnterThe first unassigned speed-dial entry appears on the display
4 Press Enter to select the displayed speed-dial entry
5 Enter the Fax Number to assign to that entry then press EnterThe fax number can be up to 50 digits in length
Tip To enter a three-second pause within a number sequence press Symbols to display a dash
6 Enter the personrsquos or companyrsquos name then press Enter
reference guide
use the fax features
27
The name is limited to 13 characters in lengthFor more information see enter text on page 28
7 After Enter Another appears press 1 (Yes) if you want to set up another number or press 2 (No) to exit
delete speed-dial settingsFollow these steps to delete an individual speed-dial entry
1 Press Setup
2 Press 2 then press 2 againThis selects Speed Dial Setup then selects Delete Speed Dial
3 Press until the individual entry that you want to delete appears then press Enter
set basic fax settings using the front panelWe recommend that you use the Fax Setup Wizard in the HP Officejet software to configure all your basic fax settings however you can also access these settings from the front panel
Note In the US regulations require that your name and phone number appear on every fax The minimum settings that we recommend are described in the following topics
set the date and timeFollow these steps to set the date and time manually
1 Press Setup
2 Press 3 then press 1This selects the Basic Fax Setup menu then selects the Date and Time option
3 Follow the prompts on the display to enter the date and time using the keypad
Tip Use only the last two digits for the year
Tip When you enter a single-digit date or time type a leading zero before the single digit for example 0345 or 08-03-02
After you are done the date and time appear on the display
Warning Cutting off power to the HP Officejet causes the selected date and time to be lost However name and fax number information is not lost
set the fax headerFollow these steps to enter your name and fax number in the header
Note In Hungary the subscriber identification code (fax header) can be set or changed only by authorized personnel For more information contact your authorized HP dealer
1 Press Setup
2 Press 3 then press 2
hp officejet 4100 series
chapter 6
28
This selects the Basic Fax Setup menu then selects the Fax Header option
3 Enter your personal or company name at the prompt Use the guidelines provided in the next section under enter text
4 Press Enter
5 Enter your fax number using the numeric keypad
6 Press Enter
enter textThe following list provides tips for entering text using the front-panel keypad
bull Press the keypad numbers that correspond to the letters of a name
bull Press a button multiple times to see a letter first in uppercase and then in lowercase
bull After the correct letter appears press and then press the number that corresponds to the next letter in the name Again press multiple times until the correct letter appears
bull To insert a space press Space ()bull To enter a symbol such as press Symbols () to scroll through the list of
available symbolsbull If you make a mistake press to clear it and then make the correct
entrybull After you are done entering text press Enter to store your entries
check for dial toneBefore using the fax features verify that the connections are correctly established
1 Press Fax
2 Listen for a dial tone
3 If you do not hear a dial tone check the connections
4 Press Cancel to hang up
ABC These letters correspond to this number and so on
2
JKL To get this character J j K k L l 5
5 Press 5 this many times 1 2 3 4 5 6 7
reference guide
use the fax features
29
fax job menuThe following options become available when the Fax button is pressed
setup menu for fax commandsThe following fax settings are available in the Setup menu
Enter Fax or Speed Dial
FineVery FinePhotoStandard
Fax Number Resolution LighterDarker
Enter a fax number or speed dialWhen the Fax button is pressed
Press and to move to the option you wantPress Enter to select the displayed setting
NoYes
Set New Defaults
Send Fax NowFax from MemorySend Fax LaterPoll to Receive
How to Fax
1Automatic Reports Setup
2Answer Ring Pattern
3Busy Redial
4No Answer Redial
5Automatic Reduction
6Backup Fax Reception
7Error Correction Mode
3Basic Fax Setup 4Advanced Fax Setup
Press Setup to display the menu options
Press and to move to the setting you wantPress Enter to select the displayed setting
1Date and Time
2Fax Header
3Rings to Answer
4Paper Size
5Tone or Pulse Dialing
6Ring and Beep Volume
7Fax Forwarding Black Only
2Speed Dial Setup
1Individual Speed Dial
2Delete Speed Dial
3Print Speed Dial List
hp officejet 4100 series
chapter 6
30
7
31
maintain your hp officejet
This section provides instructions for keeping your HP Officejet in top working condition Perform these maintenance procedures as necessary
clean the glassDirty glass from dust smudges hair and so on slows down performance and affects the accuracy of features such as Fit to Page and Copy
1 Turn off the unit unplug the power cord and raise the scanner lid
2 Clean the glass with a soft cloth or sponge slightly moistened with a nonabrasive glass cleaner
Caution Do not use abrasives acetone benzene or carbon tetrachloride on the glass these can damage it Do not place liquids directly on the glass They may seep under it and damage the unit
3 Dry the glass with a chamois or cellulose sponge to prevent spotting
hp officejet 4100 series
chapter 7
32
clean the white stripMinor debris can accumulate on the white strip located underneath the scannerrsquos lid
1 Turn off the unit unplug the power cord and raise the scanner lid
2 Clean the white strip with a soft cloth or sponge slightly moistened with a mild soap and warm water
3 Wash the strip gently to loosen debris do not scrub the strip
4 Dry the strip with a chamois or soft cloth
Caution Do not use paper-based wipes as these may scratch the strip
5 If this does not clean the strip well enough repeat the previous steps using isopropyl (rubbing) alcohol and wipe the strip thoroughly with a damp cloth to remove any residual alcohol
clean the exterior Use a soft damp lint-free cloth to wipe dust smudges and stains off the case The interior of the unit does not require cleaning Keep fluids away from the interior of the unit as well as the front panel
work with print cartridgesTo ensure the best print quality from your HP Officejet you will need to perform some simple maintenance procedures and when prompted by a front-panel message replace the print cartridges
print a self-test reportIf you are experiencing problems with printing before cleaning or replacing the print cartridges you should print a Self-Test Report This report provides useful information about your print cartridges including status information
1 Press Setup
2 Press 1 then press 4This selects Print Report and then selects Self-Test Report
3 Press Start Black or Start ColorA Self-Test Report is printed for your HP Officejet
handle print cartridgesBefore you replace or clean a print cartridge you should know the part names and how to handle the print cartridge
reference guide
maintain your hp officejet
33
replace the print cartridgesFront-panel messages appear to let you know that you should replace your print cartridges
See order print cartridges on the back cover for information on ordering replacement print cartridges
1 Turn on the unit then lift open the print cartridge access doorThe print carriage moves into view
2 After the carriage stops moving push down on the print cartridge down to release it and then pull it toward you out of its slot
Plastic tape with pink tab(must be removed)
Copper contactsInk nozzles under tape
Do not touch the copper contacts or the ink nozzles
print cartridge access door
hp officejet 4100 series
chapter 7
34
Note It is normal to see ink build-up in the print cartridge slots
3 Remove the new print cartridge from its packaging and being careful to touch only the bright pink plastic tab gently remove the plastic tape to uncover the ink nozzles
Caution Do not touch the copper contacts or ink nozzles
Once you have removed the plastic tape install the print cartridge immediately to prevent the ink from drying in the nozzles
4 Push the new print cartridge into the appropriate slot at a slight angle until it clicks into place
Caution Do not attempt to push the cartridge straight into the slot It must slide in at a slight angle
The tri-color print cartridge goes on the left and the black cartridge goes on the right
5 Close the print cartridge access door
reference guide
maintain your hp officejet
35
align the print cartridgesThe HP Officejet prompts you to align cartridges every time you install or replace a print cartridge Aligning the cartridges ensures high-quality output
To align the print cartridges when prompted
1 Press Enter on the front panelAn align cartridges (test pattern) page prints
2 Load the align cartridges page face down in the ADF between the paper-width guides and press the Enter button again
3 Recycle or discard the page
To align the cartridges at any other time
1 Press Setup
2 Press 5 then press 2This selects the Maintenance menu and then selects the Align Print Cartridge option
3 Press EnterAn align cartridges (test pattern) page prints
4 Load the align cartridges page face down in the ADF between the paper-width guides and press the Enter button again
5 Recycle or discard the page
clean the print cartridgesUse this feature when the Self-Test Report shows streaking or white lines through any of the colored bars Do not clean print cartridges unnecessarily This wastes ink and shortens the life of the ink nozzles
1 Press Setup
2 Press 5 then press 1This selects the Maintenance menu and then selects the Clean Print Cartridge optionA page of patterns is printed The cartridges are cleaned Recycle or discard the pageIf copy or print quality still seem poor after you clean the print cartridges replace the print cartridge that is affected
restore factory defaultsYou can restore the original factory settings to what they were when you purchased your HP Officejet Choosing to restore your factory defaults restores all settings except date information and any scan settings you may have set
You can perform this process from the front panel only
1 Press Setup
2 Press 5 then press 3This selects Maintenance and then selects Restore Factory DefaultsThe factory default settings are restored
hp officejet 4100 series
chapter 7
36
set scroll speedThe Scroll Speed option lets you control the rate that text messages appear in the front-panel display You can choose Normal Fast or Slow The default is Normal
1 Press Setup
2 Press 5 then press 6This selects Maintenance and then selects Set Scroll Speed
3 Press until the desired speed appears then press Enter
set the prompt delay timeThe Prompt Delay option lets you control the amount of time before a message is displayed in the front-panel display You can choose Normal Fast or Slow The default is Normal
1 Press Setup
2 Press 5 then press 7This selects Maintenance and then selects Set Prompt Delay Time
3 Press until the delay time appears then press Enter
self-maintenance sounds During the life of your product you may hear various mechanical sounds This is a normal part of your unitrsquos self-maintenance
reference guide
maintain your hp officejet
37
setup menu optionsThe following options are available from the Setup button
1Last Transaction
2Fax Log
3Speed Dial List
4Self-Test Report
5Automatic Reports Setup
1Print Report
Use Setup to display the Print Report Speed Dial Setup Basic Fax Setup Advanced Fax Setup and Maintenance options
Press and to move to the setting you wantPress Enter to select the displayed setting
1Clean Print Cartridges
2Align Print Cartridges
3Restore Factory Defaults
4Reprint Faxes in Memory
5Set Language amp CountryRegion
6Set Scroll Speed
7Set Prompt Delay Time
5Maintenance2Speed Dial Setup
3Basic Fax Setup
4Advanced Fax Setup
1Individual Speed Dial
2Delete Speed Dial
3Print Speed Dial List
1Date and Time
2Fax Header
3Rings to Answer
4 Paper Size
5Tone or Pulse Dialing
6Ring and Beep Volume
7Fax Forwarding Black Only
1Automatic Reports Setup
2Answer Ring Pattern
3Busy Redial
4No Answer Redail
5Automatic Reduction
6Backup Fax Reception
7Error Correction Mode
hp officejet 4100 series
chapter 7
38
8
39
additional setup information
During the installation of the HP Officejet software a number of windows are displayed You should see the following
bull Installingbull Copying files bull A request to plug in the HP Officejetbull Green OK and check markbull Request to restart your computer (may not occur in all cases)bull Registration
If you did not see all of these windows there may be a problem with the installation Verify the following
bull The HP Director contains six icons (double-click the HP Director icon on the desktop)
bull The HP Officejet is listed in the Printers dialog boxbull There is an icon for the HP Officejet in the System Tray that indicates the
HP Officejet is ready
If the HP Director does not show six icons you may need to wait a few minutes for the HP Officejet to connect to your computer
possible installation problemsIf nothing appears on your computer screen after you insert the HP Officejet 4100 Series CD-ROM into your computerrsquos CD-ROM drive
1 From the Start menu choose Run
2 In the Run dialog box enter dsetupexe (if your CD-ROM drive is not assigned to drive letter d use the appropriate drive letter) then click OK
If the HP Director does not contain six icons do the following
bull Verify that the front-panel cover is attached then unplug the HP Officejet and plug it in again
bull Verify that the USB and power cables are plugged inndash Unplug the USB cable and plug it in againndash Do not attach the USB cable to a keyboard or nonpowered hubndash Verify that the USB cable is 3 meters or less in lengthndash If you have several USB devices attached to your computer you may
want to unplug the others during the installation
Note AppleTalk is not supported
bull Unplug the HP Officejet from the wall and plug it in againbull Restart your computer
hp officejet 4100 series
chapter 8
40
On Windows check the System Tray for applications that are running in the background and close them before restarting your computer
remove and reinstall your hp officejet softwareIf six icons do not appear in the Director you may need to uninstall and re-install the software Do not simply delete the HP Officejet program files from your hard drive Be sure to remove them properly using the uninstall utility provided in the HP Officejet program group
to uninstall from a Windows computer
1 Disconnect your HP Officejet from your computer
2 On the Windows taskbar click Start choose Programs or All Programs (XP) choose Hewlett-Packard choose hp officejet 4100 series then choose uninstall software
3 Follow the directions on the screenBe sure to disconnect your HP Officejet
4 If you are asked whether you would like to remove shared files click NoOther programs that use these files may not work properly if the files are deleted
5 After the program finishes removing the software disconnect your HP Officejet and restart your computer
Note It is important that you disconnect your HP Officejet before restarting your computer
6 To reinstall the software insert the HP Officejet 4100 Series CD-ROM into your computerrsquos CD-ROM drive and follow the instructions that appear
7 After the software is installed connect and turn on your HP Officejet following the onscreen instructions and the instructions in your Setup PosterAfter connecting and turning on your HP Officejet you may have to wait several minutes for all of the Plug and Play events to completeWhen the software installation is complete you will see a Status Monitor icon in the System Tray
8 To verify that the software is properly installed double-click on the HP Director icon on the desktop If the HP Director shows six icons the software has been properly installed
to uninstall from a Macintosh computer
1 Disconnect your HP Officejet from your computer
2 Double-click on ApplicationsHP All-in-One Software folder
reference guide
additional setup information
41
3 Double-click on HP Uninstaller
4 Follow the directions that appear on the screen
5 After the program finishes removing the software disconnect your HP Officejet and restart your computer
6 To reinstall the software insert the HP Officejet 4100 Series CD-ROM into your computerrsquos CD-ROM drive
Note When re-installing the software follow the instructions on the Setup Poster Do not connect the HP Officejet to your computer until after you have completed the software installation
7 On the desktop open the CD-ROM double-click on hp all-in-one installer and follow the instructions that appear
connect your hp officejet to a phone modem or answering machine
The HP Officejet can share a phone line with a phone a modem or an aswering machine When sharing a phone line with an answering machine the HP Officejet will answer fax calls and direct voice calls to the answering machine
Note For information on connecting your HP Officejet to your computer and phone line refer to the Setup Poster that came with your unit
to connect your hp officejet to a phone modem or answering machine
1 Remove the white plastic stopper from connector 2 on the back of the HP Officejet
To connect more than one device to connector 2 on the HP Officejet you must purchase a Y-splitter and plug it into connector 2
2 Connect the phone cord from the phone modem or answering machine to connector 2 (or Y-splitter)
Caution Do not use the phone cord that came with the HP Officejet for this purpose That phone cord must connect connector 1 on the HP Officejet to the wall jack for your phone system See the Setup Poster for details
3 If you are connecting an answering machine see set the number of rings before answering on page 21 for instructions on setting the number of rings correctly or change the answer ring pattern (distinctive ringing) on page 26 for information on incoming ring patterns
4 If you are connecting a modem turn off its fax-receive feature
connector 2 on the HP Officejet
connector 1 on the HP Officejet
hp officejet 4100 series
chapter 8
42
additional troubleshooting helpYou may want to refer to the readme file for more information on possible installation problems On Windows you can access the readme file from the Start button on the taskbar select Programs Hewlett-Packard hp officejet 4100 series View the Readme File On Macintosh you can access the readme file by double-clicking on the icon located in the top-level folder of the HP Officejet software CD-ROM
The readme file provides more information including
bull Using the Re-install utility after a failed installation to return your PC to a state that will allow the HP Officejet to be re-installed
bull Using the Re-install utility on Windows 98 to recover from a Composite USB System Driver missing errorThis error may occur if the hardware is installed prior to installing the software After running the Re-install utility reboot your PC and install the HP Officejet software before connecting the HP Officejet to your computer
You can also find more information on this website
wwwhpcomsupport
9
43
technical information
Additional specifications information can be found in the HP Photo amp Imaging Help in the hp officejet 4100 series section
physical specifications
power specificationsbull Power consumption 75W maximumbull Source (Input Voltage) 100 to 240 VAC groundedbull Input Frequency 50 to 60 Hzbull Current 1A maximum
regulatory informationAdditional regulatory information can be found in the HP Photo amp Imaging Help The information in this section supercedes information in the HP Photo amp Imaging Help
doc statement deacuteclaration de conformiteacute (Canada)Le preacutesent appareil numeacuterique neacutemet pas de bruit radioeacutelectrique deacutepassant les limites applicables aux appareils numeacuteriques de la classe B prescrites dans le Regraveglement sur le brouillage radioeacutelectrique eacutedicteacute par le ministegravere des Communications du CanadaThis digital apparatus does not exceed the Class B limits for radio noise emissions from digital apparatus set out in the Radio Interference Regulations of the Canadian Department of Communications
notice to users of the Canadian telephone networkThis equipment meets the applicable Industry Canada Terminal Equipment Technical Specifications This is confirmed by the registration number The abbreviation IC before the registration number signifies that registration was performed based on a Declaration of Conformity indicating that Industry Canada technical specifications were met It does not imply that Industry Canada approved the equipment
Note The Ringer Equivalence Number (REN) assigned to each terminal device provides an indication of the maximum number of terminals allowed to be connected to a telephone interface The termination on an interface may consist of any combination of devices subject only to the requirement that the sum of the Ringer Equivalence Numbers of all the devices does not exceed 5
The REN for this product is 03B based on FCC Part 68 test results
height width depth weight (without print cartridges)
with paper trays and ADF closed
718 in (1824 cm) 1676 in (4258 cm) 825 in (2096 cm) 75 lbs (34 kg)
with ADF and paper tray extended
1030 in (2615 cm) 1676 in (4258 cm) 1854 in (4709 cm) 75 lbs (34 kg)
hp officejet 4100 series
chapter 9
44
notice to all users of the European Economic Area (EEA)
This product is designed to interwork with the analogue telephone networks in the following countriesregions
Network compatibility depends on customer selected settings which must be reset to use the equipment on a telephone network in a countryregion other than where the product was purchased Contact the vendor or Hewlett-Packard Company if addition product support is necessaryThis equipment has been certified by the manufacturer in accordance with Directive 19995EC (annex II) for Pan-European single-terminal connection to the public switched telephone network (PSTN) However due to differences between the individual PSTNs provided in different countriesregions the approval does not of itself give an unconditional assurance of successful operation on every PSTN network termination pointIn the event of problems you should contact your equipment supplier in the first instance
geraumluschemissionLpA lt 70 dBam Arbeitsplatzim Normalbetriebnach DIN 45635 T 19
notice to Korean customers
Germany UK Netherlands
France Spain Italy
Belgium Luxembourg Sweden
Austria Denmark Ireland
Norway Finland Switzerland
Greece Portugal
10
45
hp support
This section explains the support services information provided by Hewlett-Packard If you are unable to find the answer you need in the printed or onscreen documentation supplied with your product you can contact one of the HP support services listed in the following pages Some support services are available only in the US and Canada while others are available in many countriesregions worldwide If a support service number is not listed for your countryregion contact your nearest authorized HP dealer for help
get support and other information from the internetIf you have Internet access you can get help from the following HP website
wwwhpcomsupportThe Web site offers technical support drivers supplies and ordering information
hp customer supportSoftware programs from other companies may be included with your HP Officejet If you experience problems with any of those programs you will receive the best technical assistance by calling the experts at that companyIf you need to contact HP Customer Support do the following before you call
1 Make sure thata Your unit is plugged in and turned onb The specified print cartridges are installed correctlyc The recommended paper is properly loaded in the input tray
2 Reset your unita Turn off the unit using the On button located on the unitrsquos front panelb Unplug the power cord from the back of the unitc Plug the power cord back into the unitd Turn on the unit using the On button
3 For more information check the HP website at wwwhpcomsupport
4 If you are still experiencing problems and need to speak with an HP Customer Support Representativendash Have your service ID and serial number ready To display your service ID and
serial number on the front panel do the following Press Enter and Start Color at the same time until the service ID appears in the front-panel display From this display press the right arrow until the serial number displays
ndash Print a Self-Test Report See print a self-test report on page 32 for information on printing this report
ndash Make a color copyndash Be prepared to describe your problem in detail
5 Call HP Customer Support Be near your unit when you call
call in the US during warrantyCall (208) 323-2551 This service is free during the warranty period however your standard long-distance phone charges still apply A fee may apply outside the warranty period
hp officejet 4100 series
chapter 10
46
US phone support is available in both English and Spanish languages 24 hours a day 7 days a week (days and hours of support may change without notice)
call elsewhere in the worldThe numbers listed below are current as of the printing date of this guide For a list of current international HP Support Service numbers visit this address and choose your own countryregion or language
wwwhpcomsupportFor Korea you can also visit this address
httpwwwhpcokrYou can call the HP support center in the following countriesregions If your countryregion is not listed contact your local dealer or nearest HP Sales and Support Office to find out how to obtain servicesSupport service is free during the warranty period however your standard long-distance phone charges will apply In some cases a flat fee per single incident will also applyFor phone support in Europe please check for the details and conditions of phone support in your countryregion by consulting the following Web site
wwwhpcomsupportAlternatively you can ask your dealer or call HP at the phone number indicated in this booklet As part of our constant efforts to improve our phone support service we advise you to check our website on a regular basis for new information regarding service features and delivery
countryregion hp technical support countryregion hp technical support
Algeria1 +213 (0) 61564 543 Malaysia 1-800-805405
Argentina 0810-555-5520 Mexico 01-800-472-6684
Australia +61 3 8877 80001902 910 910
Mexico (Mexico City) 5258-9922
Austria +43 (0) 810 00 6080 Morocco1 +212 22404 747
Bahrain (Dubai) 800 728 Netherlands +31 (0) 20 606 8751
Belgium (Dutch) +32 (0) 2 626 8806 New Zealand 0800 441 147
Belgium (French) +32 (0) 2 626 8807 Norway +47 22 11 6299
Brazil (Grande Sao Paulo) (11) 3747 7799 Oman +971 4 883 8454
Brazil (Demais Localidades) 0800 157751 Palestine +971 4 883 8454
Canada during warranty (905) 206 4663 Panama 001-800-7112884
Canada post-warranty(per-call charge)
1-877-621-4722 Peru 0-800-10111
Caribbean amp Central America
1-800-711-2884 Philippines 632-867-3551
Chile 800-360-999 Poland +48 22 865 98 00
China 86 10 6868 7980 Portugal +351 21 3176333
Colombia 9-800-114-726 Puerto Rico 1-877-2320-589
Costa Rica 0-800-011-0524 Qatar +971 4 883 8454
Czech Republic +420 (0) 261307310 Romania +40 1 315 44 42or local 01 3154442
reference guide
hp support
47
call in Australia post-warrantyIf your product is not under warranty you can call 03 8877 8000 A per-incident out-of-warranty support fee of $2750 (inc GST) will be charged to your credit card You can also call 1902 910 910 ($2750 charged to your phone account) from 900 AM to 500 PM Monday through Friday (Charges and support hours are subject to change without notice)
prepare your unit for shipmentIf after contacting HP Customer Support or returning to the point of purchase you are requested to send your unit in for service please follow the power off and rebox steps below to avoid further damage to the HP product
Denmark +45 39 29 4099 Russian Federation Moscow +7 095 797 3520
Ecuador 1800-711-2884 Russian Federation St Petersburg
+7 812 346 7997
Europe (English) +44 (0) 207 512 5202 Saudi Arabia +800 897 14440
Egypt 02 532 5222 Singapore 65 6272 5300
Finland +358 (0) 203 47 288 Slovakia +421 (0) 2 682 08080
France (034 Euromin) +0892 69 60 22 South Africa (inside RSA) 086 000 1030
Germany (012 Euromin) +49 (0) 180 52 58 143 South Africa (inside RSA) +27-11 258 9301
Greece +30 1060 73 603 Spain +34 902 321 123
Hong Kong (SAR) +85 (2) 3002 8555 Sweden +46 (0)8 619 2170
Guatemala 1800-995-5105 Switzerland 2 +41 (0) 84 880 1111
Hungary +36 (0) 1 382 1111 Taiwan +886-2-2717-00550800 010 055
India 1-600-11226791 11 682 6035
Thailand +66 (2) 661 4000
Indonesia 62-21-350-3408 Tunisia1 +216 1891 222
Ireland +353 (0) 1 662 5525 Turkey +90 216 579 7171
Israel +972 (0) 9 8304848 Ukraine +7 (380-44) 490-3520
Italy +39 (0) 226410350 United Arab Emirates +971 4 883 8454
Japan 0570 000 511+81 3 3335 9800
United Kingdom +44 (0) 207 512 52 02
Jordan +971 4 883 8454 Venezuela 0800-47468368 or800-477-7777
Korea (Seoul) +82 (2) 3270 0700 Venezuela (Caracas) (502) 207-8488
Korea (outside Seoul) 080 999 0700 Vietnam 84 (0) 8 823 4530
Kuwait +971 4 883 8454 Yemen +971 4 883 8454
Lebanon +971 4 883 8454
1 This Call Center supports French speaking customers from the following countriesregions Morocco Tunisia and Algeria
2 This Call Center supports German French and Italian speaking customers in Switzerland
countryregion hp technical support countryregion hp technical support
hp officejet 4100 series
chapter 10
48
Note When transporting your HP Officejet make sure that the pens have been removed the HP Officejet has been properly shut down by pressing the power button and you have allowed time for the carriage to return to the service station and for the scanner to return to its parked position
1 Turn on the unitDisregard steps 1 through 6 if your unit will not turn on and the print carriage is in the home position You will not be able to remove the print cartridges Proceed to step 7
2 Open the print cartridge access doorThe print carriage moves into view
3 See replace the print cartridges on page 33 for information on removing the print cartridges
Caution Remove both print cartridges Failure to do so may damage your unit
4 Place the print cartridges in an airtight bag so they will not dry out and put them aside (do not send them with the unit unless instructed to by the HP customer support call agent)
5 Turn off the unit
6 Close the print cartridge access door
7 Remove the front panel cover as followsa Grasp the front of the front panel cover with two hands as shownb Firmly lift the front panel cover to unsnap it from the unit
8 Retain the front panel cover Do not return the front panel cover with the unit
9 If available pack the unit for shipment using the original packing materials or the packaging materials that come with your exchange unit
If you do not have the original packaging materials please use other adequate packaging materials Shipping damage caused by improper packaging andor improper transportation is not covered under the warranty
reference guide
hp support
49
10 Place the return shipping label on the outside of the box
11 Include the following items in the boxndash A complete description of symptoms for service personnel (samples of print
quality problems are helpful)ndash A copy of the sales slip or other proof of purchase to establish the warranty
coverage periodndash Your name address and a phone number where you can be reached during
the day
hp distribution centerTo order HP Officejet software a copy of the printed Reference Guide a setup poster or other customer-replaceable parts do one of the following bull In the US or Canada call (208) 323 2551bull Visit this website
httpwwwhpcomcposupportsoftwarehtml
hp officejet 4100 series
chapter 10
50
11
51
warranty information
HP Officejet 4100 seriesDuration of Limited Warranty (hardware and labor) 1 YearDuration of Limited Warranty (CD media) 90 DaysDuration of Limited Warranty (print cartridges) Until the HP ink is depleted or the ldquoend of warrantyrdquo date printed on the cartridge has been reached whichever occurs first
warranty service
express serviceTo obtain HP express repair service the customer must contact an HP service office or an HP Customer Support Center for basic troubleshooting first See hp customer support on page 45 for steps to take before calling Customer SupportIf a customer unit needs a minor part replacement and these parts can normally be replaced by the customer the customer-replaceable components may be serviced through expedited part shipment In this event HP will prepay shipping charges duty and taxes provide telephone assistance on replacement of the component and pay shipping charges duty and taxes for any part that HP asks to be returnedThe HP Customer Support Center may direct customers to designated authorized service providers who are certified by HP to service the HP product
warranty upgradesUpgrade your standard factory warranty to a total of three years with the HP SUPPORTPACK Service coverage begins on product purchase date and the pack must be purchased within the first 180 days of product purchase This program offers phone support from 600 AM to 1000 PM Mountain Standard Time (MST) Monday through Friday and 900 AM to 400 PM (MST) on Saturdays If during your technical support call it is determined that you need a replacement product then HP will ship you this product next business day free of charge Available in US onlyFor more information please call 1-888-999-4747 or visit the following HP Web site
httpwwwhpcomgohpsupportpack
Outside the US please call your local HP Customer Support office See call elsewhere in the world on page 46 for a list of international Customer Support numbers
returning your hp officejet for serviceBefore returning your HP Officejet for service you must call HP Customer Support See hp customer support on page 45 for steps to take before calling Customer Support
hewlett-packard limited global warranty statement
extent of limited warrantyHewlett-Packard (ldquoHPrdquo) warrants to the end-user customer (ldquoCustomerrdquo) that each HP Officejet 4100 Series product (ldquoProductrdquo) including related software accessories media and supplies shall be free from defects in material and workmanship for the duration which begins on the date of purchase by the Customer
hp officejet 4100 series
chapter 11
52
For each software Product HPrsquos limited warranty applies only to a failure to execute programming instructions HP does not warrant that the operation of any Product shall be uninterrupted or error freeHPrsquos limited warranty covers only those defects which arise as a result of normal use of a Product and does not cover any other problems including those which arise as a result of (a) improper maintenance or modification (b) software accessories media or supplies not provided or supported by HP or (c) operation outside the Productrsquos specificationsFor any hardware Product the use of a non-HP print cartridge or a refilled print cartridge does not affect either the warranty to the Customer or any HP support contract with the Customer However if Product failure or damage is attributable to the use of a non-HP or refilled print cartridge HP shall charge its standard labor and materials charges to service the Product for the failure or damageIf HP receives during the applicable warranty period notice of a defect in any Product HP shall either repair or replace the defective Product at HPrsquos option Where labor charges are not covered by HPrsquos limited warranty repairs shall be at HPrsquos standard charges for laborIf HP is unable to repair or replace as applicable a defective Product which is covered by HPrsquos warranty HP shall within a reasonable time after being notified of the defect refund the purchase price for the ProductHP shall have no obligation to repair replace or refund until the Customer returns the defective Product to HPAny replacement product may be either new or like-new provided that it has functionality at least equal to that of the Product being replacedHP products including each Product may contain remanufactured parts components or materials equivalent to new in performanceHPs limited warranty for each Product is valid in any countryregion or locality where HP has a support presence for the Product and where HP has marketed the Product The level of warranty service may vary according to local standards HP shall have no obligation to alter the form fit or function of the Product in order to make it operate in a countryregion or locality for which the Product was never intended to operate
limitations of warrantyTO THE EXTENT ALLOWED BY LOCAL LAW NEITHER HP NOR ITS THIRD PARTY SUPPLIERS MAKE ANY OTHER WARRANTY OR CONDITION OF ANY KIND WHETHER EXPRESS OR IMPLIED WITH RESPECT TO THE COVERED HP PRODUCTS AND SPECIFICALLY DISCLAIM THE IMPLIED WARRANTIES OR CONDITIONS OF MERCHANTABILITY SATISFACTORY QUALITY AND FITNESS FOR A PARTICULAR PURPOSE
limitations of liabilityTo the extent allowed by local law the remedies provided in this Limited Warranty Statement are the Customerrsquos sole and exclusive remediesTO THE EXTENT ALLOWED BY LOCAL LAW EXCEPT FOR THE OBLIGATIONS SPECIFICALLY SET FORTH IN THIS LIMITED WARRANTY STATEMENT IN NO EVENT SHALL HP OR ITS THIRD PARTY SUPPLIERS BE LIABLE FOR DIRECT INDIRECT SPECIAL INCIDENTAL OR CONSEQUENTIAL DAMAGES WHETHER BASED ON CONTRACT TORT OR ANY OTHER LEGAL THEORY AND WHETHER ADVISED OF THE POSSIBILITY OF SUCH DAMAGES
local lawThis Limited Warranty Statement gives the Customer specific legal rights The Customer may also have other rights which vary from state to state in the United States from province to province in Canada and from countryregion to countryregion elsewhere in the world
reference guide
warranty information
53
To the extent this Limited Warranty Statement is inconsistent with local law this Statement shall be deemed modified to be consistent with such local law Under such local law certain disclaimers and limitations of this Statement may not apply to the Customer For example some states in the United States as well as some governments outside the United States (including provinces in Canada) mayPreclude the disclaimers and limitations in this Statement from limiting the statutory rights of a consumer (eg the United Kingdom)Otherwise restrict the ability of a manufacturer to enforce such disclaimers or limitations orGrant the Customer additional warranty rights specify the duration of implied warranties which the manufacturer cannot disclaim or not allow limitations on the duration of implied warrantiesFOR CONSUMER TRANSACTIONS IN AUSTRALIA AND NEW ZEALAND THE TERMS IN THIS LIMITED WARRANTY STATEMENT EXCEPT TO THE EXTENT LAWFULLY PERMITTED DO NOT EXCLUDE RESTRICT OR MODIFY AND ARE IN ADDITION TO THE MANDATORY STATUTORY RIGHTS APPLICABLE TO THE SALE OF THE COVERED HP PRODUCTS TO SUCH CUSTOMERS
hp officejet 4100 series
chapter 11
54
55
index
Numerics4-by-6 inch photo paper
load 10 12
AADF 7adjust
volume for fax 25align print cartridges 35Answer Ring Pattern 26automatic document feeder 7automatic reduction
fax 25
Bbest copy quality 13busy number
redial automatically 23
Ccancel
scan 18scheduled fax 21
cartridgesalign 35replace 33
cleanprint cartridges 35the exterior 32the glass 31white strip 32
colorenhance 14fax 20fax from front panel 20
contrastchange for fax 23photo color 14
copy 13 16change default settings 15enhance 14fit to page 16lighten or darken 14menu options 16number of copies 14photo 15quality 13reduce or enlarge 14settings 13 15
speed 13tutorial 4
Customer Support 45web site 45
Ddarken a copy 14date
setting 27default settings
restore 35director review 4distinctive ringing 26
Eenhance copies 14enlarge copy 14 16envelopes
load 9Error Correction Mode
(ECM) 25
Ffactory defaults
restore 35fast copy quality 13fax 28
adjust volume 25automated reports 22cancel fax forward 24cancel scheduled 21change Answer Ring
Pattern 26change contrast 23change resolution 22change settings 19control appearance 22create individual speed-dial
settings 26delete speed-dial
settings 27distinctive ringing 26Error Correction Mode
(ECM) 25forward faxes 24header 27in color 20in color from front panel 20manual reports 22
menu 29print reports 22receive 21receive manually 21redial busy or unanswered
number 23schedule 20send from front panel 19set automatic reduction 25set date and time 27set the number of rings 21settings 27 28setup menu options 29speed dials 19test 28
fit to page 16forward faxes 24
cancel 24front panel
display scroll speed 36enter text 28send a fax 19setting prompt delay 36tutorial 3
Gglass
cleaning 31greeting cards
load 11
Hhelp 1HP Customer Support 45
calling 45HP Director 4HP distribution center 49HP Officjet
preparing to ship 47HP papers
tips on loading 11
Iindividual speed-dial settings
create 26ink cartridges see print
cartridgesinkjet paper
load 11
index
hp officejet 4100 series56
Kkeypad
enter text 28
Llabels
load 12lighten copies 14load
change the paper type 12envelopes 9original in ADF 7paper 7photo paper 10 12postcards 10 12print cartridges 33set the paper size 12tips 11
Mmaintenance
align print cartridges 35clean print cartridges 35clean the exterior 32clean the glass 31clean the white strip 32normal sounds 36replace print cartridges 33restore factory defaults 35self-maintenance
sounds 36self-test report 32
menuscopy options 16fax 29fax setup 29maintenance 37print reports 37
Nnormal copy quality 13number of copies
set 14number of rings
set 21
Oorder print cartridges 60originals
load in ADF 7output tray 8
Ppaper
change default size for copy 12
change the type 12load 7recommended 7set the size 12tips on loading 11
paper size change for copy 12
paper trayload 7
phone numbers support services 45
photo paperload 10 12
photoscopy 15enhance copy 14
physical specifications 43postcards
load 10 12power
specifications 43print
envelopes 9fax reports 22self-test report 32
print cartridgesalign 35clean 35handling 32replace 33
prompt delaysetting 36
Qquick start
review the director 4use with a computer 4
Rreceive
fax 21redial
busy or unanswered number 23
reduce copy 14 16regulatory information 43reinstall software 40reports
generate automatically for fax 22
generate manually for fax 22
print 22self-test 32
resolution
change for fax 22restore factory settings 35returning your HP Officejet for
service 51
Sscan
from front panel 17stop 18
schedule a fax 20scroll speed
setting 36self-test report 32send
cancel forward faxes 24color fax 20color fax from front
panel 20forward faxes 24
settingscopy 13 15fax 27 28prompt delay 36scroll speed 36
setupadditional information 39menu 29
shippingyour HP Officejet 47
softwareremove and reinstall 40
soundsself-maintenance 36
specificationsphysical 43power 43
speed dials 19create individual
settings 26delete settings 27
stopscan 18scheduled fax 21
subscriber identification code 27
support services 45
Ttelephone line
multiple numbers 26telephone numbers 45text
enhance 14enter from front panel 28
time
index
reference guide 57
setting 27transparency film
recommended 7tips on loading 11
troubleshootingremove and reinstall
software 40T-shirt Transfer Iron-On
load 11tutorial
front panel 3make a copy 4
Uunanswered number
redial automatically 23
Vvolume
adjust 25
Wwarranty 45
service 51statement 51upgrades 51
white stripcleaning 32
hp officejet 4100 series
chapter 12
58
declaration of conformityAccording to ISOIEC Guide 22 and EN 45014
Manufacturerrsquos Name and Address
Hewlett-Packard Company 16399 West Bernardo Drive San Diego CA 92127-1899 USA
declares that the product
Product Name hp officejet 4100 series (Q1608A)
Model Number(s) officejet 4110 (Q1609A) officejet 4110xi (Q1610A) officejet 4110v (Q1611A) officejet 4105 (Q1612A) officejet 4105z (Q1613A) officejet 4115 (Q1614A)
Product Options All
conforms to the following Product Specifications
Safety EN609501992 +A1 A2 A3 A4 amp A11
IEC609501991 +A1 A2 A3 amp A4
UL1950CSA 222 No 950 3rd Edn 1995
NOM-019-SCFI-1993
EMC CISPR221993 +A1 amp A2 EN550221994 +A1 amp A2 -Class B
CISPR241997EN550241998
IEC 61000-3-21995 EN61000-3-21995
IEC 61000-3-31994 EN61000-3-31995
ASNZS 3548 1992
CNS13438 1997
FCC Part 15-Class B ICES-003 Issue 2 VCCI-2
GB 9254-1998
Telecom TBR21 1998
Supplementary Information
The Product herewith complies with the requirements of the Low Voltage Directive 7323EEC the EMC Directive 89336EEC and the RampTTE Directive 19995EC (ANNEX II) carries the CE marking accordingly
European Contact for regulatory topics only Your local Hewlett-Packard Sales and Service Office orHewlett-Packard GmbH
Department HQ-TRE Herrenberger Strasse 140 D-71034 Boumlblingen Germany (FAX + 49-7031-14-3143)
order mediaTo order media such as HP Premium Inkjet Paper HP Premium Inkjet Transparency Film HP Iron-On T-shirt Transfer paper or HP Greeting Cards go to
wwwhpshoppingcom
For orders in countries other than the US and Canada select other countries then click Yes to leave hpshoppingcom From this website you can access hpshoppingcom for your specific language or countryregion
order print cartridges
If you have Internet access you can get more information from the HP website at
wwwhpcomsupport
print cartridges hp reorder number
HP black print cartridge 56 19 ml black print cartridge
HP color print cartridgeHP tri-color print cartridge
57 17 ml color print cartridge28 8 ml color print cartridge
Visit the hp officejet information centerIt has everything you need to get the most value from your HP Officejet
bull Technical Supportbull Supplies and Ordering Informationbull Project Tipsbull Ways to Enhance Your Product
wwwhpcomsupport
copy 2003 Hewlett-Packard Company
Printed in the USA Mexico Germany Singapore or China
Q1608-90163Q1608-90163
Q1608-90163
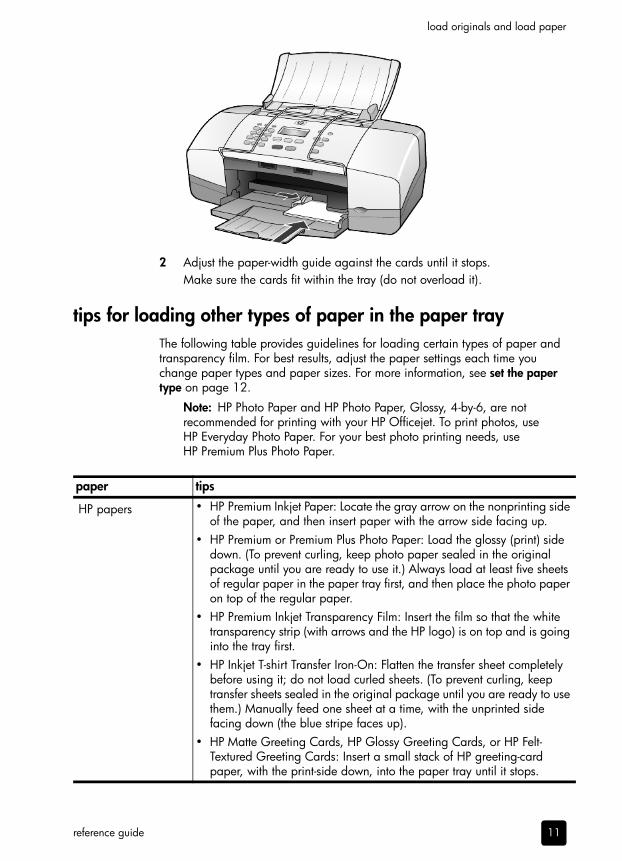
reference guide
load originals and load paper
11
2 Adjust the paper-width guide against the cards until it stops Make sure the cards fit within the tray (do not overload it)
tips for loading other types of paper in the paper trayThe following table provides guidelines for loading certain types of paper and transparency film For best results adjust the paper settings each time you change paper types and paper sizes For more information see set the paper type on page 12
Note HP Photo Paper and HP Photo Paper Glossy 4-by-6 are not recommended for printing with your HP Officejet To print photos use HP Everyday Photo Paper For your best photo printing needs use HP Premium Plus Photo Paper
paper tips
HP papers bull HP Premium Inkjet Paper Locate the gray arrow on the nonprinting side of the paper and then insert paper with the arrow side facing up
bull HP Premium or Premium Plus Photo Paper Load the glossy (print) side down (To prevent curling keep photo paper sealed in the original package until you are ready to use it) Always load at least five sheets of regular paper in the paper tray first and then place the photo paper on top of the regular paper
bull HP Premium Inkjet Transparency Film Insert the film so that the white transparency strip (with arrows and the HP logo) is on top and is going into the tray first
bull HP Inkjet T-shirt Transfer Iron-On Flatten the transfer sheet completely before using it do not load curled sheets (To prevent curling keep transfer sheets sealed in the original package until you are ready to use them) Manually feed one sheet at a time with the unprinted side facing down (the blue stripe faces up)
bull HP Matte Greeting Cards HP Glossy Greeting Cards or HP Felt-Textured Greeting Cards Insert a small stack of HP greeting-card paper with the print-side down into the paper tray until it stops
hp officejet 4100 series
chapter 3
12
set the paper typeIf you want to use a different type of paper such as photo paper transparency film Iron-On T-shirt transfers or brochures simply load that paper in the paper tray You must then change the paper type settings to ensure the best print quality
HP recommends paper type settings according to the type of paper you are using
This setting refers to copy options only If you want to set the paper type for printing from a computer set the properties in the Print dialog box of the software
1 Press the Copy button until Paper Type appears
2 Press until the appropriate paper type appears
3 Press Enter to choose the displayed paper type
set the paper sizeThe HP Officejet can use Letter Legal or A4 paper Use the following procedure to set the paper size for copy options
1 Press the Copy button until Copy Paper Size appears
2 Press until the appropriate paper size appears
3 Press Enter to choose the displayed paper size
To avoid jams remove papers from the output tray frequently The output tray capacity is affected by the type of paper and the amount of ink you are using For more information about output-tray capacity see technical information in the HP Photo amp Imaging Help
Labels(works only with printing)
bull Always use letter-size or A4-size label sheets designed for use with HP inkjet products (like Avery Inkjet Labels) and make sure that the labels are not over two years old
bull Fan the stack of labels to make sure none of the pages are sticking together
bull Place a stack of label sheets on top of standard paper in the paper tray print-side down Do not insert labels one sheet at a time
Postcards (works only with printing)
Insert a stack of postcards or hagaki cards with the print-side down into the paper tray until it stops Line the postcards up on the right side of the paper tray slide the paper-width guide up against the left side of the cards until it stops
4-by-6 inch photo paper (works only with printing)
Insert the photo paper with the print-side down into the paper tray until it stops Place the long edge of the photo paper against the right side of the paper tray and slide the paper-width guide up against the long edge of the photo paper until it stops If the photo paper you are using has perforated tabs load the photo paper so that the tabs are closest to you
paper tips
4
13
use the copy features
The copy features let you do the following
bull Produce high-quality color and black-and-white copiesbull Reduce or enlarge the size of the copies you make from 25 to 200 or
50 to 200 (depending on your model) of the copyrsquos original sizebull Make the copy lighter or darker select the number of copies and specify
the quality of the copies you makebull Use special copying features to make high-quality copies of photos using
special photo paper or to create transparencies
make copiesYou can make copies using the front panel of your HP Officejet or by using the HP Officejet software on your computer Many copy features are available using either method However you may find that the software offers easier access to special copy features
All copy settings that you select on the front panel are reset two minutes after the HP Officejet completes the copy unless you save the settings as the default settings as described in change settings for all copy tasks on page 15
make a copy1 Load the paper tray with the appropriate paper
2 Load your original
3 Press the Copy button
4 Use the keypad or press the or to enter the number of copies
5 Press Start Black or Start Color
Tip To make a single copy press the Copy button and then press Start Black or Start Color
Note Make sure that the color print cartridge is installed in your HP Officejet Both print cartridges must be installed when making a copy
increase copy speed or qualityThe HP Officejet provides three options that affect copy speed and quality
bull Best produces the highest quality for all paper types Best copies more slowly than the other quality settings
bull Normal delivers high-quality output and is the recommended setting for most of your copying Normal copies faster than Best
bull Fast copies faster than the Normal setting The text is of comparable quality to the Normal setting but the graphics may be of lower quality Using Fast also reduces the frequency of replacing your print cartridges because it uses less ink
hp officejet 4100 series
chapter 4
14
1 Load your original
2 Press Copy until Copy Quality appears
3 Press until the desired quality setting appears and then press Enter to select it
4 Press Start Black or Start Color
set the number of copies You can set the number of copies using the front panel
1 Press the Copy button
2 Use the keypad or press the or to enter the number of copies
3 Press Enter
4 Press Start Black or Start Color
Tip If you hold down the right arrow button then after reaching 10 the number of copies changes by increments of five to make it easier to set a large number of copies
reduce or enlarge a copyYou can reduce or enlarge a copy of an original using ReduceEnlarge
For more information about additional copy options such as Fit to Page see perform special copy jobs on page 15
1 Press Copy until ReduceEnlarge appears
2 Press until the appropriate ReduceEnlarge option appears and then press Enter to select it
3 If you select Custom 100 Set Custom Size appears Use the arrow keys or type a percentage on the keypad
4 Press Enter when the desired percentage is displayed
5 Press Start Black or Start Color
make copies lighter or darkerUse LighterDarker to adjust the lightness and darkness of the copies you make
1 Press Copy until LighterDarker appearsThe range of LighterDarker values are represented as circles on a scale on the front-panel display
2 Press to lighten the copy or to darken it The circle moves to the left or right depending on the arrow button you press
3 Press Enter to select the setting
4 Press Start Black or Start Color
enhance text sharpness and photo colorsYou can use Text to sharpen edges of black text Photo to enhance light colors in your photographs or Mixed if your original contains a photograph and text You can also select None to turn off all enhancements
reference guide
use the copy features
15
Text enhancement is the default option You can turn off Text enhancement by selecting Photo Mixed or None if the following occur
bull Stray dots of color surround some text on your copiesbull Large black typefaces look splotchy (not smooth)bull Thin colored objects or lines contain black sectionsbull Horizontal grainy or white bands appear in light- to medium-gray areas
1 Press Copy until Enhancements appears
2 Press until the desired enhancement (Text Photo Mixed or None) appears
3 Press Enter to select the setting
4 Press Start Black or Start Color
change settings for all copy tasksSave the copy settings you use most often by setting them as the default This includes changes to Copy options such as Paper Type and Paper Size as well as other Copy settings on the front panel such as Number of Copies and Copy Quality
1 Make any desired changes to the copy options
2 Press Copy until Set New Defaults appears
3 Press until Yes appears
4 Press Enter to set the options as a defaultYour settings are saved
perform special copy jobsIn addition to supporting standard copying your HP Officejet can also copy a photo or fit a copy to the page
copy a photoWhen copying a photo you should select options for the correct paper type and photo enhancement
1 Load the photo in the automatic document feeder (ADF)For more information see load originals
2 If you are using photo paper load it in the paper tray
3 Press Copy until Paper Type appears
4 Press until Premium Photo appears and then press Enter to select it
5 Press Copy until Enhancements appears
6 Press until Photo appears and then press Enter to select it
7 Press Start Black or Start Color
Tip To enlarge a photo automatically to a full page use the Photo Fit to Page button
hp officejet 4100 series
chapter 4
16
fit a copy to the pageUse the Photo Fit to Page button when you want to automatically enlarge or reduce your original to fit Letter or A4 size paper You can enlarge a small photo to fit a full-size page as shown below Using Photo Fit to Page may prevent unwanted cropping of text or images around the margins
1 Load the original in the ADFFor more information see load originals on page 7
2 Press the Photo Fit to Page button
Note Do not press the Fax Copy or Scan buttons on the front panel once you have pressed the Photo Fit to Page button
3 Press until the appropriate paper type appears and then press Enter to select it
4 Press Start Black or Start Color
copy optionsThe following diagram shows the options that are available when you press Copy
Original Fit to Page
Plain PaperPhoto PaperTransparency
Actual sizeCustom 100Full Page 91Legal gt Ltr 72
ReduceEnlarge Paper Type
NoYes
TextPhotoMixedNone
Enhancements Set New Defaults
LetterLegalA4
Copy Paper Size
The sizes vary by countryregion
LighterDarker
NormalFastBest
Copy Quality
To cycle through the copy options press Copy repeatedly
Press and to move to the setting you want within one of the copy optionsPress Enter to select the displayed setting
5
17
use the scan features
Scanning is the process of converting pictures and text into an electronic format for your computer You can scan photos and text documents
Because the scanned image or text is in an electronic format you can bring it into your word processor or graphics program and modify it to suit your needs You can do the following
bull Scan photos of your kids and e-mail them to relatives create a photographic inventory of your house or office or create an electronic scrapbook
bull Scan text from an article into your word processor and quote it in a report saving you a lot of retyping
Tip To use the scan features your HP Officejet and computer must be connected and turned on The HP Officejet software must also be installed and running on your computer prior to scanning To verify that the HP Officejet software is running on Windows look for a status icon in the system tray On a Macintosh the HP Officejet software is always running
Note High resolution scanning (600 dpi or higher) requires a large amount hard disk space If there is not enough hard disk space available your system may stall
scan an originalYou can start a scan from your HP Officejet or from the HP Officejet software on your computer
For more information about scanning your pictures or documents from the HP Officejet software see scan pictures and documents in the HP Photo amp Imaging Help
to scan an original from your hp officejet
1 Load your original in the automatic document feeder (ADF)For more information see load originals on page 7
2 Press Scan
3 Select the Scan to destination by pressing or or by pressing the Scan button repeatedlyThe default destination is the HP Photo amp Imaging Gallery Any applications on your computer that are supported by the HP Officejet also appear in the Scan to list
4 Press Start Black or Start ColorThe original is scanned and the image is sent to selected destinationFor more information about using the HP Photo amp Imaging Gallery see manage images in how to use the software
hp officejet 4100 series
chapter 5
18
stop scanningYou can stop a scan by pressing the Cancel button located on the front panel
6
19
use the fax features
Using your HP Officejet you can
bull Send and receive paper faxesbull Send computer faxes (reference the HP Photo amp Imaging Help)bull Send and receive color faxes
Fax features are available only on some HP Officejets
send a faxYou can send a fax in a variety of configurations These include the following
bull send a paper fax (using the front panel or computer)bull send a paper fax with a PC-generated cover page (using the computer)bull send a file with or without a cover page (using the computer)bull send a PC-generated cover page as a single-page fax (using the
computer)
Note For information on sending a fax using the computer reference the HP Photo amp Imaging Help
Note By default your HP Officejet prints a report only if there is a problem with sending or receiving a fax A confirmation message indicating whether an item was successfully sent appears briefly on the front-panel display after each transaction If you need printed confirmation that your faxes are successfully sent see print reports on page 22 for information about report options
Note If you have not done so set the date and time See set the date and time on page 27
send a fax from your hp officejet1 Load your originals in the ADF
For more information see load originals on page 7
2 Enter the fax number using the keypad or press Speed Dial until the desired speed-dial entry appearsFor more information on speed dialing see set up speed dialing in the HP Photo amp Imaging Help
3 Press Start Black or Start Color
change settings and use speed dials before sending a fax1 Load your originals in the ADF
For more information see load originals on page 7
2 Enter the fax number using the keypad or press Speed Dial until the desired speed-dial entry appears
hp officejet 4100 series
chapter 6
20
For more information on speed dialing see set up speed dialing in the HP Photo amp Imaging Help
3 Press Enter
4 Press Fax to scroll through the fax options
5 When you reach the option whose setting you wish to change press to scroll through the setting options
6 When you reach the setting you want to change press Enter to accept the setting
7 Press Start Black or Start Color
send a color faxYou can send and receive color faxes to and from other color fax machines If you are faxing from the front panel and your HP Officejet determines that the recipient has a black-and-white fax unit it sends the fax in black and white If you are faxing from the software and your HP Officejet determines that the recipient has a black-and-white fax unit the HP Officejet prompts you to try sending the fax in black and white
We recommend that you use only color originals for color faxing The color originals must be loaded in the ADF you cannot send a color fax from memory using the scan and fax features To fax in color to multiple recipients send the fax from the Director or your software program
to send a color fax from the front panel
1 Load your originals in the ADF For more information see load originals on page 7
2 Enter the fax number using the keypad or press Speed Dial until the desired speed-dial entry appearsFor more information on creating speed-dial entries see set up speed dialing in the HP Photo amp Imaging Help
3 Press Start Color
schedule a faxYou can schedule a black and white fax to be sent later during the same day (for example when telephone lines are not as busy) If you use the front panel you can select a single recipient
When the specified time is reached your fax is automatically sent as soon as a connection can be made
1 Load your originals in the ADF
2 Enter the fax number using the keypad or press Speed Dial until the desired speed-dial entry appears
3 Press Enter
4 Press Fax to scroll through the fax options
5 Stop scrolling when you reach the How to Fax menu
6 Press to scroll through the setting options
7 Stop scrolling when you reach the Send Fax Later option
reference guide
use the fax features
21
8 Press Enter
9 Enter the Send Time using the numeric keypad
10 At the prompt press 1 for AM or 2 for PM
11 When Store Fax Now appears press 1 for Yes or 2 for NoIf 1 is selected the document is scanned to memory and is sent at the selected time If 2 is selected and you havenrsquot loaded your originals a message appears reminding you to load the original before the send time
12 Press Start Black
cancel a scheduled faxYou can cancel a fax stored in memory or one that is currently in progress
bull Press Cancel to cancel the scheduled fax
receive a faxYour HP Officejet is set to print received faxes automatically If you receive a legal-size fax and your HP Officejet is not currently configured to use legal-sized paper the unit automatically reduces the fax so that it fits on the paper that is loaded For more information see set automatic reduction on page 25
If you have an answering machine connected to the same line as your HP Officejet you may need to set the number of rings required before the HP Officejet begins receiving the fax The default number of rings before the HP Officejet receives a fax is 5
set the number of rings before answeringYou can specify how many rings should occur before your HP Officejet automatically answers the phone When you run the Fax Setup Wizard this is set automatically
If you do not want your HP Officejet to answer the phone Rings to Answer should be set to No Answer
1 Press Setup
2 Press 3 then press 3 againThis selects the Basic Fax Setup menu then the Rings to Answer option
3 Use the arrow keys to choose the number of rings and then press Enter
receive a fax manuallyBefore manually receiving a fax we recommend that you remove any originals from your HP Officejet so that they are not accidentally processed
Verify that Rings to Answer is set to No Answer
1 When your HP Officejet rings pick up the handset of a telephone that is on the same telephone line as your HP Officejet
2 If you hear fax tones press Start Black or Start Color or if you are receiving from an extension phone (on the same telephone line as your HP Officejet but not connected directly to it) press 1 2 3 on your phone
3 After you are finished hang up the telephone
hp officejet 4100 series
chapter 6
22
print reportsYou can set up your HP Officejet to print error reports and confirmation reports for each fax you send and receive You can also manually print reports as you need them
generate reports automaticallyThis setting lets you configure your HP Officejet so that it automatically prints error and confirmation reports
1 Press Setup
2 Press 1 then press 5This selects Print Report then selects Automatic Reports Setup
3 Press to scroll through the following report typesndash Every Error which prints whenever there is any kind of fax error
(default)ndash Send Error which prints whenever there is a transmission errorndash Receive Error which prints whenever there is a receiving errorndash Every Fax which confirms every time a fax is sent or receivedndash Send Only which prints every time a fax is sentndash Off which does not print fax reports
4 When you reach the report that you want press Enter
generate reports manuallyThis setting lets you print reports manually From the computer you can only print the Speed-Dial List and the Fax Log
to print reports from the front panel
1 Press Setup then press 1This selects the Print Report menu
2 Press to scroll through the following report typesndash Last Transaction which prints details of the last fax transactionndash Fax Log which prints a log of the last 30 fax transactionsndash Speed Dial List which prints a list of programmed speed dialsndash Self-Test Report which prints a report to assist you in diagnosing print
and alignment problems For more information see print a self-test report on page 32
ndash Automatic Reports Setup which is the automatic reports setting described in generate reports automatically on page 22
3 When you reach the report that you want press Enter
control resolution and contrastYour HP Officejet lets you change the resolution and contrast of documents that you are sending
change resolutionResolution affects the transmission speed and quality of faxed documents
reference guide
use the fax features
23
to change the resolution from the front panel
1 Load your originals in the ADF
2 Enter the fax number using the keypad or press Speed Dial until the desired speed-dial entry appears
3 Press Enter
4 Press Fax to scroll through the fax options
5 Stop scrolling when you reach the Resolution menu
6 Press until the desired resolution quality appears (Standard Photo Fine Very Fine)
7 Press EnterYour HP Officejet only faxes at the highest resolution supported by the receiving faxIf you choose Photo be aware that the faxing process takes longer to complete When faxing photographs we recommend that you choose Photo
change contrastChange this setting if you want a black-and-white fax to be darker or lighter than the original
to change the fax contrast from the front panel
1 Load your originals in the ADF
2 Enter the fax number using the keypad or press Speed Dial until the desired speed-dial entry appears
3 Press Enter
4 Press Fax to scroll through the fax options
5 Stop scrolling when you reach the LighterDarker menuThe range of values appears as a circle on a scale on the display
6 Press to lighten the fax or to darken itThe circle moves left or right as you press a button
7 Press Enter to accept the setting you selected
change other fax settings
redial a number automaticallyYou can set your HP Officejet to redial a busy and an unanswered number automatically If you initiated a fax from the computer the computer must be left on for the redialing process to work correctly
1 Press Setup
2 Press 4This selects the Advanced Fax Setup menu
3 Choose one of the following optionsndash Press 3
hp officejet 4100 series
chapter 6
24
This selects the Busy Redial option The default setting for Busy Redial is Redial
ndash Press 4This selects the No Answer Redial option The default setting for No Answer Redial is No Redial
4 Press Enter
5 Press to select Redial or No Redial as desired
6 Press Enter
forward faxes to another numberWith fax forwarding you can send a fax that you receive to another fax number during the next 24-hour period
to forward faxes from the front panel
1 Press Setup
2 Press 3 then press 7This selects the Basic Fax Setup menu then selects the Fax Forwarding Black Only option
3 At the prompt enter the Fax Number to which you wish to send the fax
4 Press Enter
5 Enter the Start Date using the numeric keypad
6 Enter the Start Time using the numeric keypad
7 At the prompt press 1 for AM or 2 for PM
8 Enter the Stop Date using the numeric keypadFax Forwarding On appears on the display
edit or cancel fax forwardingOnce fax forwarding is enabled you may find that you need to change the number you are faxing to or the start and stop times you entered You may wish to cancel your fax forwarding setup altogether Follow the steps below to edit or turn off fax forwarding
to edit fax forwarding from the front panel
1 Press Setup
2 Press 3 then press 7This selects the Basic Fax Setup menu then selects the Fax Forwarding Black Only option
3 Forwarding is ON 1=Edit 2=Cancel appears on the display after a moment Press 1 to edit the number you wish to fax to or to change the start and stop times Follow the messages on the display
to cancel fax forwarding from the front panelbull Press Cancel
OR
reference guide
use the fax features
25
Follow the steps in edit or cancel fax forwarding on page 24 When Forwarding is ON 1=Edit 2=Cancel appears on the display press 2 to cancel fax forwarding
use error correction modeError Correction Mode (ECM) eliminates data lost due to poor phone lines by detecting errors that occur during transmission and automatically requesting retransmission of the erroneous portion Phone charges are unaffected or may even be reduced on good phone lines On poor phone lines ECM increases sending time and phone charges but sends the data much more reliably Turn ECM off (the default setting is on) only if it increases phone charges substantially and you can accept poorer quality in exchange for reduced charges
to change the ECM setting from the front panel
1 Press Setup
2 Press 4 then press 7This selects the Advanced Fax Setup menu then selects the Error Correction Mode option
3 Press to switch between On and Off
4 Press Enter to accept the setting you selected
set automatic reductionThis setting determines what your HP Officejet does if it receives a fax that is too large for the default paper size With this setting on (the default) the image is reduced so that it fits on one page With this feature off information that doesnrsquot fit on the first page is printed on a second page
1 Press Setup
2 Press 4 then press 5This selects the Advanced Fax Setup menu then selects the Automatic Reduction option
3 Press to switch between On and Off
4 Press Enter to accept the setting you selected
adjust the volumeYour HP Officejet provides three levels for adjusting the ring and speaker volume The ring volume is the volume of the phone ringer The speaker volume is the volume of everything else such as the dial and fax tones The default setting is Soft
1 Press Setup
2 Press 3 then press 6This selects the Basic Fax Setup menu then selects the Ring and Beep Volume option
3 Press to select one of the options Soft Loud or Off
4 Press Enter to accept the setting you selected
hp officejet 4100 series
chapter 6
26
change the answer ring pattern (distinctive ringing)Distinctive ringing is a feature offered by phone companies that allows several phone numbers to share the same line Each number has a specific ring pattern If you do not have this service use the default ring pattern which is All Rings
If you connect your HP Officejet to a line with distinctive ringing have your telephone company assign one ring pattern to voice calls and another to fax calls (double or triple rings are best for a fax number)
1 Press Setup
2 Press 4 then press 2This selects the Advanced Fax Setup menu then selects the Answer Ring Pattern option
3 Press to scroll through these options All Rings Single Rings Double Rings Triple Rings and Double amp Triple
4 When the ring pattern that the phone company established for this number appears press Enter
Tip We recommend that you use Double Rings or Triple Rings for fax
set up speed dialingThrough your HP Officejet or your computer you can assign entries to fax numbers you use often This lets you dial those numbers quickly using the front panelrsquos Speed Dial button and a one- or two-digit entry You can create up to 100 individual speed-dial entries (the maximum for some models is 70)
We recommend that you use the software to set up speed-dial settings
Note A speed-dial entry can only be associated with one phone number speed-dial groups are not supported
For more information see set up speed dialing in the hp photo amp imaging help
create individual speed-dial settingsYou can enter fax numbers that you will reuse frequently
1 Press Setup
2 Press 2 then press 1This selects the Speed Dial Setup menu then selects the Individual Speed Dial option
3 Press EnterThe first unassigned speed-dial entry appears on the display
4 Press Enter to select the displayed speed-dial entry
5 Enter the Fax Number to assign to that entry then press EnterThe fax number can be up to 50 digits in length
Tip To enter a three-second pause within a number sequence press Symbols to display a dash
6 Enter the personrsquos or companyrsquos name then press Enter
reference guide
use the fax features
27
The name is limited to 13 characters in lengthFor more information see enter text on page 28
7 After Enter Another appears press 1 (Yes) if you want to set up another number or press 2 (No) to exit
delete speed-dial settingsFollow these steps to delete an individual speed-dial entry
1 Press Setup
2 Press 2 then press 2 againThis selects Speed Dial Setup then selects Delete Speed Dial
3 Press until the individual entry that you want to delete appears then press Enter
set basic fax settings using the front panelWe recommend that you use the Fax Setup Wizard in the HP Officejet software to configure all your basic fax settings however you can also access these settings from the front panel
Note In the US regulations require that your name and phone number appear on every fax The minimum settings that we recommend are described in the following topics
set the date and timeFollow these steps to set the date and time manually
1 Press Setup
2 Press 3 then press 1This selects the Basic Fax Setup menu then selects the Date and Time option
3 Follow the prompts on the display to enter the date and time using the keypad
Tip Use only the last two digits for the year
Tip When you enter a single-digit date or time type a leading zero before the single digit for example 0345 or 08-03-02
After you are done the date and time appear on the display
Warning Cutting off power to the HP Officejet causes the selected date and time to be lost However name and fax number information is not lost
set the fax headerFollow these steps to enter your name and fax number in the header
Note In Hungary the subscriber identification code (fax header) can be set or changed only by authorized personnel For more information contact your authorized HP dealer
1 Press Setup
2 Press 3 then press 2
hp officejet 4100 series
chapter 6
28
This selects the Basic Fax Setup menu then selects the Fax Header option
3 Enter your personal or company name at the prompt Use the guidelines provided in the next section under enter text
4 Press Enter
5 Enter your fax number using the numeric keypad
6 Press Enter
enter textThe following list provides tips for entering text using the front-panel keypad
bull Press the keypad numbers that correspond to the letters of a name
bull Press a button multiple times to see a letter first in uppercase and then in lowercase
bull After the correct letter appears press and then press the number that corresponds to the next letter in the name Again press multiple times until the correct letter appears
bull To insert a space press Space ()bull To enter a symbol such as press Symbols () to scroll through the list of
available symbolsbull If you make a mistake press to clear it and then make the correct
entrybull After you are done entering text press Enter to store your entries
check for dial toneBefore using the fax features verify that the connections are correctly established
1 Press Fax
2 Listen for a dial tone
3 If you do not hear a dial tone check the connections
4 Press Cancel to hang up
ABC These letters correspond to this number and so on
2
JKL To get this character J j K k L l 5
5 Press 5 this many times 1 2 3 4 5 6 7
reference guide
use the fax features
29
fax job menuThe following options become available when the Fax button is pressed
setup menu for fax commandsThe following fax settings are available in the Setup menu
Enter Fax or Speed Dial
FineVery FinePhotoStandard
Fax Number Resolution LighterDarker
Enter a fax number or speed dialWhen the Fax button is pressed
Press and to move to the option you wantPress Enter to select the displayed setting
NoYes
Set New Defaults
Send Fax NowFax from MemorySend Fax LaterPoll to Receive
How to Fax
1Automatic Reports Setup
2Answer Ring Pattern
3Busy Redial
4No Answer Redial
5Automatic Reduction
6Backup Fax Reception
7Error Correction Mode
3Basic Fax Setup 4Advanced Fax Setup
Press Setup to display the menu options
Press and to move to the setting you wantPress Enter to select the displayed setting
1Date and Time
2Fax Header
3Rings to Answer
4Paper Size
5Tone or Pulse Dialing
6Ring and Beep Volume
7Fax Forwarding Black Only
2Speed Dial Setup
1Individual Speed Dial
2Delete Speed Dial
3Print Speed Dial List
hp officejet 4100 series
chapter 6
30
7
31
maintain your hp officejet
This section provides instructions for keeping your HP Officejet in top working condition Perform these maintenance procedures as necessary
clean the glassDirty glass from dust smudges hair and so on slows down performance and affects the accuracy of features such as Fit to Page and Copy
1 Turn off the unit unplug the power cord and raise the scanner lid
2 Clean the glass with a soft cloth or sponge slightly moistened with a nonabrasive glass cleaner
Caution Do not use abrasives acetone benzene or carbon tetrachloride on the glass these can damage it Do not place liquids directly on the glass They may seep under it and damage the unit
3 Dry the glass with a chamois or cellulose sponge to prevent spotting
hp officejet 4100 series
chapter 7
32
clean the white stripMinor debris can accumulate on the white strip located underneath the scannerrsquos lid
1 Turn off the unit unplug the power cord and raise the scanner lid
2 Clean the white strip with a soft cloth or sponge slightly moistened with a mild soap and warm water
3 Wash the strip gently to loosen debris do not scrub the strip
4 Dry the strip with a chamois or soft cloth
Caution Do not use paper-based wipes as these may scratch the strip
5 If this does not clean the strip well enough repeat the previous steps using isopropyl (rubbing) alcohol and wipe the strip thoroughly with a damp cloth to remove any residual alcohol
clean the exterior Use a soft damp lint-free cloth to wipe dust smudges and stains off the case The interior of the unit does not require cleaning Keep fluids away from the interior of the unit as well as the front panel
work with print cartridgesTo ensure the best print quality from your HP Officejet you will need to perform some simple maintenance procedures and when prompted by a front-panel message replace the print cartridges
print a self-test reportIf you are experiencing problems with printing before cleaning or replacing the print cartridges you should print a Self-Test Report This report provides useful information about your print cartridges including status information
1 Press Setup
2 Press 1 then press 4This selects Print Report and then selects Self-Test Report
3 Press Start Black or Start ColorA Self-Test Report is printed for your HP Officejet
handle print cartridgesBefore you replace or clean a print cartridge you should know the part names and how to handle the print cartridge
reference guide
maintain your hp officejet
33
replace the print cartridgesFront-panel messages appear to let you know that you should replace your print cartridges
See order print cartridges on the back cover for information on ordering replacement print cartridges
1 Turn on the unit then lift open the print cartridge access doorThe print carriage moves into view
2 After the carriage stops moving push down on the print cartridge down to release it and then pull it toward you out of its slot
Plastic tape with pink tab(must be removed)
Copper contactsInk nozzles under tape
Do not touch the copper contacts or the ink nozzles
print cartridge access door
hp officejet 4100 series
chapter 7
34
Note It is normal to see ink build-up in the print cartridge slots
3 Remove the new print cartridge from its packaging and being careful to touch only the bright pink plastic tab gently remove the plastic tape to uncover the ink nozzles
Caution Do not touch the copper contacts or ink nozzles
Once you have removed the plastic tape install the print cartridge immediately to prevent the ink from drying in the nozzles
4 Push the new print cartridge into the appropriate slot at a slight angle until it clicks into place
Caution Do not attempt to push the cartridge straight into the slot It must slide in at a slight angle
The tri-color print cartridge goes on the left and the black cartridge goes on the right
5 Close the print cartridge access door
reference guide
maintain your hp officejet
35
align the print cartridgesThe HP Officejet prompts you to align cartridges every time you install or replace a print cartridge Aligning the cartridges ensures high-quality output
To align the print cartridges when prompted
1 Press Enter on the front panelAn align cartridges (test pattern) page prints
2 Load the align cartridges page face down in the ADF between the paper-width guides and press the Enter button again
3 Recycle or discard the page
To align the cartridges at any other time
1 Press Setup
2 Press 5 then press 2This selects the Maintenance menu and then selects the Align Print Cartridge option
3 Press EnterAn align cartridges (test pattern) page prints
4 Load the align cartridges page face down in the ADF between the paper-width guides and press the Enter button again
5 Recycle or discard the page
clean the print cartridgesUse this feature when the Self-Test Report shows streaking or white lines through any of the colored bars Do not clean print cartridges unnecessarily This wastes ink and shortens the life of the ink nozzles
1 Press Setup
2 Press 5 then press 1This selects the Maintenance menu and then selects the Clean Print Cartridge optionA page of patterns is printed The cartridges are cleaned Recycle or discard the pageIf copy or print quality still seem poor after you clean the print cartridges replace the print cartridge that is affected
restore factory defaultsYou can restore the original factory settings to what they were when you purchased your HP Officejet Choosing to restore your factory defaults restores all settings except date information and any scan settings you may have set
You can perform this process from the front panel only
1 Press Setup
2 Press 5 then press 3This selects Maintenance and then selects Restore Factory DefaultsThe factory default settings are restored
hp officejet 4100 series
chapter 7
36
set scroll speedThe Scroll Speed option lets you control the rate that text messages appear in the front-panel display You can choose Normal Fast or Slow The default is Normal
1 Press Setup
2 Press 5 then press 6This selects Maintenance and then selects Set Scroll Speed
3 Press until the desired speed appears then press Enter
set the prompt delay timeThe Prompt Delay option lets you control the amount of time before a message is displayed in the front-panel display You can choose Normal Fast or Slow The default is Normal
1 Press Setup
2 Press 5 then press 7This selects Maintenance and then selects Set Prompt Delay Time
3 Press until the delay time appears then press Enter
self-maintenance sounds During the life of your product you may hear various mechanical sounds This is a normal part of your unitrsquos self-maintenance
reference guide
maintain your hp officejet
37
setup menu optionsThe following options are available from the Setup button
1Last Transaction
2Fax Log
3Speed Dial List
4Self-Test Report
5Automatic Reports Setup
1Print Report
Use Setup to display the Print Report Speed Dial Setup Basic Fax Setup Advanced Fax Setup and Maintenance options
Press and to move to the setting you wantPress Enter to select the displayed setting
1Clean Print Cartridges
2Align Print Cartridges
3Restore Factory Defaults
4Reprint Faxes in Memory
5Set Language amp CountryRegion
6Set Scroll Speed
7Set Prompt Delay Time
5Maintenance2Speed Dial Setup
3Basic Fax Setup
4Advanced Fax Setup
1Individual Speed Dial
2Delete Speed Dial
3Print Speed Dial List
1Date and Time
2Fax Header
3Rings to Answer
4 Paper Size
5Tone or Pulse Dialing
6Ring and Beep Volume
7Fax Forwarding Black Only
1Automatic Reports Setup
2Answer Ring Pattern
3Busy Redial
4No Answer Redail
5Automatic Reduction
6Backup Fax Reception
7Error Correction Mode
hp officejet 4100 series
chapter 7
38
8
39
additional setup information
During the installation of the HP Officejet software a number of windows are displayed You should see the following
bull Installingbull Copying files bull A request to plug in the HP Officejetbull Green OK and check markbull Request to restart your computer (may not occur in all cases)bull Registration
If you did not see all of these windows there may be a problem with the installation Verify the following
bull The HP Director contains six icons (double-click the HP Director icon on the desktop)
bull The HP Officejet is listed in the Printers dialog boxbull There is an icon for the HP Officejet in the System Tray that indicates the
HP Officejet is ready
If the HP Director does not show six icons you may need to wait a few minutes for the HP Officejet to connect to your computer
possible installation problemsIf nothing appears on your computer screen after you insert the HP Officejet 4100 Series CD-ROM into your computerrsquos CD-ROM drive
1 From the Start menu choose Run
2 In the Run dialog box enter dsetupexe (if your CD-ROM drive is not assigned to drive letter d use the appropriate drive letter) then click OK
If the HP Director does not contain six icons do the following
bull Verify that the front-panel cover is attached then unplug the HP Officejet and plug it in again
bull Verify that the USB and power cables are plugged inndash Unplug the USB cable and plug it in againndash Do not attach the USB cable to a keyboard or nonpowered hubndash Verify that the USB cable is 3 meters or less in lengthndash If you have several USB devices attached to your computer you may
want to unplug the others during the installation
Note AppleTalk is not supported
bull Unplug the HP Officejet from the wall and plug it in againbull Restart your computer
hp officejet 4100 series
chapter 8
40
On Windows check the System Tray for applications that are running in the background and close them before restarting your computer
remove and reinstall your hp officejet softwareIf six icons do not appear in the Director you may need to uninstall and re-install the software Do not simply delete the HP Officejet program files from your hard drive Be sure to remove them properly using the uninstall utility provided in the HP Officejet program group
to uninstall from a Windows computer
1 Disconnect your HP Officejet from your computer
2 On the Windows taskbar click Start choose Programs or All Programs (XP) choose Hewlett-Packard choose hp officejet 4100 series then choose uninstall software
3 Follow the directions on the screenBe sure to disconnect your HP Officejet
4 If you are asked whether you would like to remove shared files click NoOther programs that use these files may not work properly if the files are deleted
5 After the program finishes removing the software disconnect your HP Officejet and restart your computer
Note It is important that you disconnect your HP Officejet before restarting your computer
6 To reinstall the software insert the HP Officejet 4100 Series CD-ROM into your computerrsquos CD-ROM drive and follow the instructions that appear
7 After the software is installed connect and turn on your HP Officejet following the onscreen instructions and the instructions in your Setup PosterAfter connecting and turning on your HP Officejet you may have to wait several minutes for all of the Plug and Play events to completeWhen the software installation is complete you will see a Status Monitor icon in the System Tray
8 To verify that the software is properly installed double-click on the HP Director icon on the desktop If the HP Director shows six icons the software has been properly installed
to uninstall from a Macintosh computer
1 Disconnect your HP Officejet from your computer
2 Double-click on ApplicationsHP All-in-One Software folder
reference guide
additional setup information
41
3 Double-click on HP Uninstaller
4 Follow the directions that appear on the screen
5 After the program finishes removing the software disconnect your HP Officejet and restart your computer
6 To reinstall the software insert the HP Officejet 4100 Series CD-ROM into your computerrsquos CD-ROM drive
Note When re-installing the software follow the instructions on the Setup Poster Do not connect the HP Officejet to your computer until after you have completed the software installation
7 On the desktop open the CD-ROM double-click on hp all-in-one installer and follow the instructions that appear
connect your hp officejet to a phone modem or answering machine
The HP Officejet can share a phone line with a phone a modem or an aswering machine When sharing a phone line with an answering machine the HP Officejet will answer fax calls and direct voice calls to the answering machine
Note For information on connecting your HP Officejet to your computer and phone line refer to the Setup Poster that came with your unit
to connect your hp officejet to a phone modem or answering machine
1 Remove the white plastic stopper from connector 2 on the back of the HP Officejet
To connect more than one device to connector 2 on the HP Officejet you must purchase a Y-splitter and plug it into connector 2
2 Connect the phone cord from the phone modem or answering machine to connector 2 (or Y-splitter)
Caution Do not use the phone cord that came with the HP Officejet for this purpose That phone cord must connect connector 1 on the HP Officejet to the wall jack for your phone system See the Setup Poster for details
3 If you are connecting an answering machine see set the number of rings before answering on page 21 for instructions on setting the number of rings correctly or change the answer ring pattern (distinctive ringing) on page 26 for information on incoming ring patterns
4 If you are connecting a modem turn off its fax-receive feature
connector 2 on the HP Officejet
connector 1 on the HP Officejet
hp officejet 4100 series
chapter 8
42
additional troubleshooting helpYou may want to refer to the readme file for more information on possible installation problems On Windows you can access the readme file from the Start button on the taskbar select Programs Hewlett-Packard hp officejet 4100 series View the Readme File On Macintosh you can access the readme file by double-clicking on the icon located in the top-level folder of the HP Officejet software CD-ROM
The readme file provides more information including
bull Using the Re-install utility after a failed installation to return your PC to a state that will allow the HP Officejet to be re-installed
bull Using the Re-install utility on Windows 98 to recover from a Composite USB System Driver missing errorThis error may occur if the hardware is installed prior to installing the software After running the Re-install utility reboot your PC and install the HP Officejet software before connecting the HP Officejet to your computer
You can also find more information on this website
wwwhpcomsupport
9
43
technical information
Additional specifications information can be found in the HP Photo amp Imaging Help in the hp officejet 4100 series section
physical specifications
power specificationsbull Power consumption 75W maximumbull Source (Input Voltage) 100 to 240 VAC groundedbull Input Frequency 50 to 60 Hzbull Current 1A maximum
regulatory informationAdditional regulatory information can be found in the HP Photo amp Imaging Help The information in this section supercedes information in the HP Photo amp Imaging Help
doc statement deacuteclaration de conformiteacute (Canada)Le preacutesent appareil numeacuterique neacutemet pas de bruit radioeacutelectrique deacutepassant les limites applicables aux appareils numeacuteriques de la classe B prescrites dans le Regraveglement sur le brouillage radioeacutelectrique eacutedicteacute par le ministegravere des Communications du CanadaThis digital apparatus does not exceed the Class B limits for radio noise emissions from digital apparatus set out in the Radio Interference Regulations of the Canadian Department of Communications
notice to users of the Canadian telephone networkThis equipment meets the applicable Industry Canada Terminal Equipment Technical Specifications This is confirmed by the registration number The abbreviation IC before the registration number signifies that registration was performed based on a Declaration of Conformity indicating that Industry Canada technical specifications were met It does not imply that Industry Canada approved the equipment
Note The Ringer Equivalence Number (REN) assigned to each terminal device provides an indication of the maximum number of terminals allowed to be connected to a telephone interface The termination on an interface may consist of any combination of devices subject only to the requirement that the sum of the Ringer Equivalence Numbers of all the devices does not exceed 5
The REN for this product is 03B based on FCC Part 68 test results
height width depth weight (without print cartridges)
with paper trays and ADF closed
718 in (1824 cm) 1676 in (4258 cm) 825 in (2096 cm) 75 lbs (34 kg)
with ADF and paper tray extended
1030 in (2615 cm) 1676 in (4258 cm) 1854 in (4709 cm) 75 lbs (34 kg)
hp officejet 4100 series
chapter 9
44
notice to all users of the European Economic Area (EEA)
This product is designed to interwork with the analogue telephone networks in the following countriesregions
Network compatibility depends on customer selected settings which must be reset to use the equipment on a telephone network in a countryregion other than where the product was purchased Contact the vendor or Hewlett-Packard Company if addition product support is necessaryThis equipment has been certified by the manufacturer in accordance with Directive 19995EC (annex II) for Pan-European single-terminal connection to the public switched telephone network (PSTN) However due to differences between the individual PSTNs provided in different countriesregions the approval does not of itself give an unconditional assurance of successful operation on every PSTN network termination pointIn the event of problems you should contact your equipment supplier in the first instance
geraumluschemissionLpA lt 70 dBam Arbeitsplatzim Normalbetriebnach DIN 45635 T 19
notice to Korean customers
Germany UK Netherlands
France Spain Italy
Belgium Luxembourg Sweden
Austria Denmark Ireland
Norway Finland Switzerland
Greece Portugal
10
45
hp support
This section explains the support services information provided by Hewlett-Packard If you are unable to find the answer you need in the printed or onscreen documentation supplied with your product you can contact one of the HP support services listed in the following pages Some support services are available only in the US and Canada while others are available in many countriesregions worldwide If a support service number is not listed for your countryregion contact your nearest authorized HP dealer for help
get support and other information from the internetIf you have Internet access you can get help from the following HP website
wwwhpcomsupportThe Web site offers technical support drivers supplies and ordering information
hp customer supportSoftware programs from other companies may be included with your HP Officejet If you experience problems with any of those programs you will receive the best technical assistance by calling the experts at that companyIf you need to contact HP Customer Support do the following before you call
1 Make sure thata Your unit is plugged in and turned onb The specified print cartridges are installed correctlyc The recommended paper is properly loaded in the input tray
2 Reset your unita Turn off the unit using the On button located on the unitrsquos front panelb Unplug the power cord from the back of the unitc Plug the power cord back into the unitd Turn on the unit using the On button
3 For more information check the HP website at wwwhpcomsupport
4 If you are still experiencing problems and need to speak with an HP Customer Support Representativendash Have your service ID and serial number ready To display your service ID and
serial number on the front panel do the following Press Enter and Start Color at the same time until the service ID appears in the front-panel display From this display press the right arrow until the serial number displays
ndash Print a Self-Test Report See print a self-test report on page 32 for information on printing this report
ndash Make a color copyndash Be prepared to describe your problem in detail
5 Call HP Customer Support Be near your unit when you call
call in the US during warrantyCall (208) 323-2551 This service is free during the warranty period however your standard long-distance phone charges still apply A fee may apply outside the warranty period
hp officejet 4100 series
chapter 10
46
US phone support is available in both English and Spanish languages 24 hours a day 7 days a week (days and hours of support may change without notice)
call elsewhere in the worldThe numbers listed below are current as of the printing date of this guide For a list of current international HP Support Service numbers visit this address and choose your own countryregion or language
wwwhpcomsupportFor Korea you can also visit this address
httpwwwhpcokrYou can call the HP support center in the following countriesregions If your countryregion is not listed contact your local dealer or nearest HP Sales and Support Office to find out how to obtain servicesSupport service is free during the warranty period however your standard long-distance phone charges will apply In some cases a flat fee per single incident will also applyFor phone support in Europe please check for the details and conditions of phone support in your countryregion by consulting the following Web site
wwwhpcomsupportAlternatively you can ask your dealer or call HP at the phone number indicated in this booklet As part of our constant efforts to improve our phone support service we advise you to check our website on a regular basis for new information regarding service features and delivery
countryregion hp technical support countryregion hp technical support
Algeria1 +213 (0) 61564 543 Malaysia 1-800-805405
Argentina 0810-555-5520 Mexico 01-800-472-6684
Australia +61 3 8877 80001902 910 910
Mexico (Mexico City) 5258-9922
Austria +43 (0) 810 00 6080 Morocco1 +212 22404 747
Bahrain (Dubai) 800 728 Netherlands +31 (0) 20 606 8751
Belgium (Dutch) +32 (0) 2 626 8806 New Zealand 0800 441 147
Belgium (French) +32 (0) 2 626 8807 Norway +47 22 11 6299
Brazil (Grande Sao Paulo) (11) 3747 7799 Oman +971 4 883 8454
Brazil (Demais Localidades) 0800 157751 Palestine +971 4 883 8454
Canada during warranty (905) 206 4663 Panama 001-800-7112884
Canada post-warranty(per-call charge)
1-877-621-4722 Peru 0-800-10111
Caribbean amp Central America
1-800-711-2884 Philippines 632-867-3551
Chile 800-360-999 Poland +48 22 865 98 00
China 86 10 6868 7980 Portugal +351 21 3176333
Colombia 9-800-114-726 Puerto Rico 1-877-2320-589
Costa Rica 0-800-011-0524 Qatar +971 4 883 8454
Czech Republic +420 (0) 261307310 Romania +40 1 315 44 42or local 01 3154442
reference guide
hp support
47
call in Australia post-warrantyIf your product is not under warranty you can call 03 8877 8000 A per-incident out-of-warranty support fee of $2750 (inc GST) will be charged to your credit card You can also call 1902 910 910 ($2750 charged to your phone account) from 900 AM to 500 PM Monday through Friday (Charges and support hours are subject to change without notice)
prepare your unit for shipmentIf after contacting HP Customer Support or returning to the point of purchase you are requested to send your unit in for service please follow the power off and rebox steps below to avoid further damage to the HP product
Denmark +45 39 29 4099 Russian Federation Moscow +7 095 797 3520
Ecuador 1800-711-2884 Russian Federation St Petersburg
+7 812 346 7997
Europe (English) +44 (0) 207 512 5202 Saudi Arabia +800 897 14440
Egypt 02 532 5222 Singapore 65 6272 5300
Finland +358 (0) 203 47 288 Slovakia +421 (0) 2 682 08080
France (034 Euromin) +0892 69 60 22 South Africa (inside RSA) 086 000 1030
Germany (012 Euromin) +49 (0) 180 52 58 143 South Africa (inside RSA) +27-11 258 9301
Greece +30 1060 73 603 Spain +34 902 321 123
Hong Kong (SAR) +85 (2) 3002 8555 Sweden +46 (0)8 619 2170
Guatemala 1800-995-5105 Switzerland 2 +41 (0) 84 880 1111
Hungary +36 (0) 1 382 1111 Taiwan +886-2-2717-00550800 010 055
India 1-600-11226791 11 682 6035
Thailand +66 (2) 661 4000
Indonesia 62-21-350-3408 Tunisia1 +216 1891 222
Ireland +353 (0) 1 662 5525 Turkey +90 216 579 7171
Israel +972 (0) 9 8304848 Ukraine +7 (380-44) 490-3520
Italy +39 (0) 226410350 United Arab Emirates +971 4 883 8454
Japan 0570 000 511+81 3 3335 9800
United Kingdom +44 (0) 207 512 52 02
Jordan +971 4 883 8454 Venezuela 0800-47468368 or800-477-7777
Korea (Seoul) +82 (2) 3270 0700 Venezuela (Caracas) (502) 207-8488
Korea (outside Seoul) 080 999 0700 Vietnam 84 (0) 8 823 4530
Kuwait +971 4 883 8454 Yemen +971 4 883 8454
Lebanon +971 4 883 8454
1 This Call Center supports French speaking customers from the following countriesregions Morocco Tunisia and Algeria
2 This Call Center supports German French and Italian speaking customers in Switzerland
countryregion hp technical support countryregion hp technical support
hp officejet 4100 series
chapter 10
48
Note When transporting your HP Officejet make sure that the pens have been removed the HP Officejet has been properly shut down by pressing the power button and you have allowed time for the carriage to return to the service station and for the scanner to return to its parked position
1 Turn on the unitDisregard steps 1 through 6 if your unit will not turn on and the print carriage is in the home position You will not be able to remove the print cartridges Proceed to step 7
2 Open the print cartridge access doorThe print carriage moves into view
3 See replace the print cartridges on page 33 for information on removing the print cartridges
Caution Remove both print cartridges Failure to do so may damage your unit
4 Place the print cartridges in an airtight bag so they will not dry out and put them aside (do not send them with the unit unless instructed to by the HP customer support call agent)
5 Turn off the unit
6 Close the print cartridge access door
7 Remove the front panel cover as followsa Grasp the front of the front panel cover with two hands as shownb Firmly lift the front panel cover to unsnap it from the unit
8 Retain the front panel cover Do not return the front panel cover with the unit
9 If available pack the unit for shipment using the original packing materials or the packaging materials that come with your exchange unit
If you do not have the original packaging materials please use other adequate packaging materials Shipping damage caused by improper packaging andor improper transportation is not covered under the warranty
reference guide
hp support
49
10 Place the return shipping label on the outside of the box
11 Include the following items in the boxndash A complete description of symptoms for service personnel (samples of print
quality problems are helpful)ndash A copy of the sales slip or other proof of purchase to establish the warranty
coverage periodndash Your name address and a phone number where you can be reached during
the day
hp distribution centerTo order HP Officejet software a copy of the printed Reference Guide a setup poster or other customer-replaceable parts do one of the following bull In the US or Canada call (208) 323 2551bull Visit this website
httpwwwhpcomcposupportsoftwarehtml
hp officejet 4100 series
chapter 10
50
11
51
warranty information
HP Officejet 4100 seriesDuration of Limited Warranty (hardware and labor) 1 YearDuration of Limited Warranty (CD media) 90 DaysDuration of Limited Warranty (print cartridges) Until the HP ink is depleted or the ldquoend of warrantyrdquo date printed on the cartridge has been reached whichever occurs first
warranty service
express serviceTo obtain HP express repair service the customer must contact an HP service office or an HP Customer Support Center for basic troubleshooting first See hp customer support on page 45 for steps to take before calling Customer SupportIf a customer unit needs a minor part replacement and these parts can normally be replaced by the customer the customer-replaceable components may be serviced through expedited part shipment In this event HP will prepay shipping charges duty and taxes provide telephone assistance on replacement of the component and pay shipping charges duty and taxes for any part that HP asks to be returnedThe HP Customer Support Center may direct customers to designated authorized service providers who are certified by HP to service the HP product
warranty upgradesUpgrade your standard factory warranty to a total of three years with the HP SUPPORTPACK Service coverage begins on product purchase date and the pack must be purchased within the first 180 days of product purchase This program offers phone support from 600 AM to 1000 PM Mountain Standard Time (MST) Monday through Friday and 900 AM to 400 PM (MST) on Saturdays If during your technical support call it is determined that you need a replacement product then HP will ship you this product next business day free of charge Available in US onlyFor more information please call 1-888-999-4747 or visit the following HP Web site
httpwwwhpcomgohpsupportpack
Outside the US please call your local HP Customer Support office See call elsewhere in the world on page 46 for a list of international Customer Support numbers
returning your hp officejet for serviceBefore returning your HP Officejet for service you must call HP Customer Support See hp customer support on page 45 for steps to take before calling Customer Support
hewlett-packard limited global warranty statement
extent of limited warrantyHewlett-Packard (ldquoHPrdquo) warrants to the end-user customer (ldquoCustomerrdquo) that each HP Officejet 4100 Series product (ldquoProductrdquo) including related software accessories media and supplies shall be free from defects in material and workmanship for the duration which begins on the date of purchase by the Customer
hp officejet 4100 series
chapter 11
52
For each software Product HPrsquos limited warranty applies only to a failure to execute programming instructions HP does not warrant that the operation of any Product shall be uninterrupted or error freeHPrsquos limited warranty covers only those defects which arise as a result of normal use of a Product and does not cover any other problems including those which arise as a result of (a) improper maintenance or modification (b) software accessories media or supplies not provided or supported by HP or (c) operation outside the Productrsquos specificationsFor any hardware Product the use of a non-HP print cartridge or a refilled print cartridge does not affect either the warranty to the Customer or any HP support contract with the Customer However if Product failure or damage is attributable to the use of a non-HP or refilled print cartridge HP shall charge its standard labor and materials charges to service the Product for the failure or damageIf HP receives during the applicable warranty period notice of a defect in any Product HP shall either repair or replace the defective Product at HPrsquos option Where labor charges are not covered by HPrsquos limited warranty repairs shall be at HPrsquos standard charges for laborIf HP is unable to repair or replace as applicable a defective Product which is covered by HPrsquos warranty HP shall within a reasonable time after being notified of the defect refund the purchase price for the ProductHP shall have no obligation to repair replace or refund until the Customer returns the defective Product to HPAny replacement product may be either new or like-new provided that it has functionality at least equal to that of the Product being replacedHP products including each Product may contain remanufactured parts components or materials equivalent to new in performanceHPs limited warranty for each Product is valid in any countryregion or locality where HP has a support presence for the Product and where HP has marketed the Product The level of warranty service may vary according to local standards HP shall have no obligation to alter the form fit or function of the Product in order to make it operate in a countryregion or locality for which the Product was never intended to operate
limitations of warrantyTO THE EXTENT ALLOWED BY LOCAL LAW NEITHER HP NOR ITS THIRD PARTY SUPPLIERS MAKE ANY OTHER WARRANTY OR CONDITION OF ANY KIND WHETHER EXPRESS OR IMPLIED WITH RESPECT TO THE COVERED HP PRODUCTS AND SPECIFICALLY DISCLAIM THE IMPLIED WARRANTIES OR CONDITIONS OF MERCHANTABILITY SATISFACTORY QUALITY AND FITNESS FOR A PARTICULAR PURPOSE
limitations of liabilityTo the extent allowed by local law the remedies provided in this Limited Warranty Statement are the Customerrsquos sole and exclusive remediesTO THE EXTENT ALLOWED BY LOCAL LAW EXCEPT FOR THE OBLIGATIONS SPECIFICALLY SET FORTH IN THIS LIMITED WARRANTY STATEMENT IN NO EVENT SHALL HP OR ITS THIRD PARTY SUPPLIERS BE LIABLE FOR DIRECT INDIRECT SPECIAL INCIDENTAL OR CONSEQUENTIAL DAMAGES WHETHER BASED ON CONTRACT TORT OR ANY OTHER LEGAL THEORY AND WHETHER ADVISED OF THE POSSIBILITY OF SUCH DAMAGES
local lawThis Limited Warranty Statement gives the Customer specific legal rights The Customer may also have other rights which vary from state to state in the United States from province to province in Canada and from countryregion to countryregion elsewhere in the world
reference guide
warranty information
53
To the extent this Limited Warranty Statement is inconsistent with local law this Statement shall be deemed modified to be consistent with such local law Under such local law certain disclaimers and limitations of this Statement may not apply to the Customer For example some states in the United States as well as some governments outside the United States (including provinces in Canada) mayPreclude the disclaimers and limitations in this Statement from limiting the statutory rights of a consumer (eg the United Kingdom)Otherwise restrict the ability of a manufacturer to enforce such disclaimers or limitations orGrant the Customer additional warranty rights specify the duration of implied warranties which the manufacturer cannot disclaim or not allow limitations on the duration of implied warrantiesFOR CONSUMER TRANSACTIONS IN AUSTRALIA AND NEW ZEALAND THE TERMS IN THIS LIMITED WARRANTY STATEMENT EXCEPT TO THE EXTENT LAWFULLY PERMITTED DO NOT EXCLUDE RESTRICT OR MODIFY AND ARE IN ADDITION TO THE MANDATORY STATUTORY RIGHTS APPLICABLE TO THE SALE OF THE COVERED HP PRODUCTS TO SUCH CUSTOMERS
hp officejet 4100 series
chapter 11
54
55
index
Numerics4-by-6 inch photo paper
load 10 12
AADF 7adjust
volume for fax 25align print cartridges 35Answer Ring Pattern 26automatic document feeder 7automatic reduction
fax 25
Bbest copy quality 13busy number
redial automatically 23
Ccancel
scan 18scheduled fax 21
cartridgesalign 35replace 33
cleanprint cartridges 35the exterior 32the glass 31white strip 32
colorenhance 14fax 20fax from front panel 20
contrastchange for fax 23photo color 14
copy 13 16change default settings 15enhance 14fit to page 16lighten or darken 14menu options 16number of copies 14photo 15quality 13reduce or enlarge 14settings 13 15
speed 13tutorial 4
Customer Support 45web site 45
Ddarken a copy 14date
setting 27default settings
restore 35director review 4distinctive ringing 26
Eenhance copies 14enlarge copy 14 16envelopes
load 9Error Correction Mode
(ECM) 25
Ffactory defaults
restore 35fast copy quality 13fax 28
adjust volume 25automated reports 22cancel fax forward 24cancel scheduled 21change Answer Ring
Pattern 26change contrast 23change resolution 22change settings 19control appearance 22create individual speed-dial
settings 26delete speed-dial
settings 27distinctive ringing 26Error Correction Mode
(ECM) 25forward faxes 24header 27in color 20in color from front panel 20manual reports 22
menu 29print reports 22receive 21receive manually 21redial busy or unanswered
number 23schedule 20send from front panel 19set automatic reduction 25set date and time 27set the number of rings 21settings 27 28setup menu options 29speed dials 19test 28
fit to page 16forward faxes 24
cancel 24front panel
display scroll speed 36enter text 28send a fax 19setting prompt delay 36tutorial 3
Gglass
cleaning 31greeting cards
load 11
Hhelp 1HP Customer Support 45
calling 45HP Director 4HP distribution center 49HP Officjet
preparing to ship 47HP papers
tips on loading 11
Iindividual speed-dial settings
create 26ink cartridges see print
cartridgesinkjet paper
load 11
index
hp officejet 4100 series56
Kkeypad
enter text 28
Llabels
load 12lighten copies 14load
change the paper type 12envelopes 9original in ADF 7paper 7photo paper 10 12postcards 10 12print cartridges 33set the paper size 12tips 11
Mmaintenance
align print cartridges 35clean print cartridges 35clean the exterior 32clean the glass 31clean the white strip 32normal sounds 36replace print cartridges 33restore factory defaults 35self-maintenance
sounds 36self-test report 32
menuscopy options 16fax 29fax setup 29maintenance 37print reports 37
Nnormal copy quality 13number of copies
set 14number of rings
set 21
Oorder print cartridges 60originals
load in ADF 7output tray 8
Ppaper
change default size for copy 12
change the type 12load 7recommended 7set the size 12tips on loading 11
paper size change for copy 12
paper trayload 7
phone numbers support services 45
photo paperload 10 12
photoscopy 15enhance copy 14
physical specifications 43postcards
load 10 12power
specifications 43print
envelopes 9fax reports 22self-test report 32
print cartridgesalign 35clean 35handling 32replace 33
prompt delaysetting 36
Qquick start
review the director 4use with a computer 4
Rreceive
fax 21redial
busy or unanswered number 23
reduce copy 14 16regulatory information 43reinstall software 40reports
generate automatically for fax 22
generate manually for fax 22
print 22self-test 32
resolution
change for fax 22restore factory settings 35returning your HP Officejet for
service 51
Sscan
from front panel 17stop 18
schedule a fax 20scroll speed
setting 36self-test report 32send
cancel forward faxes 24color fax 20color fax from front
panel 20forward faxes 24
settingscopy 13 15fax 27 28prompt delay 36scroll speed 36
setupadditional information 39menu 29
shippingyour HP Officejet 47
softwareremove and reinstall 40
soundsself-maintenance 36
specificationsphysical 43power 43
speed dials 19create individual
settings 26delete settings 27
stopscan 18scheduled fax 21
subscriber identification code 27
support services 45
Ttelephone line
multiple numbers 26telephone numbers 45text
enhance 14enter from front panel 28
time
index
reference guide 57
setting 27transparency film
recommended 7tips on loading 11
troubleshootingremove and reinstall
software 40T-shirt Transfer Iron-On
load 11tutorial
front panel 3make a copy 4
Uunanswered number
redial automatically 23
Vvolume
adjust 25
Wwarranty 45
service 51statement 51upgrades 51
white stripcleaning 32
hp officejet 4100 series
chapter 12
58
declaration of conformityAccording to ISOIEC Guide 22 and EN 45014
Manufacturerrsquos Name and Address
Hewlett-Packard Company 16399 West Bernardo Drive San Diego CA 92127-1899 USA
declares that the product
Product Name hp officejet 4100 series (Q1608A)
Model Number(s) officejet 4110 (Q1609A) officejet 4110xi (Q1610A) officejet 4110v (Q1611A) officejet 4105 (Q1612A) officejet 4105z (Q1613A) officejet 4115 (Q1614A)
Product Options All
conforms to the following Product Specifications
Safety EN609501992 +A1 A2 A3 A4 amp A11
IEC609501991 +A1 A2 A3 amp A4
UL1950CSA 222 No 950 3rd Edn 1995
NOM-019-SCFI-1993
EMC CISPR221993 +A1 amp A2 EN550221994 +A1 amp A2 -Class B
CISPR241997EN550241998
IEC 61000-3-21995 EN61000-3-21995
IEC 61000-3-31994 EN61000-3-31995
ASNZS 3548 1992
CNS13438 1997
FCC Part 15-Class B ICES-003 Issue 2 VCCI-2
GB 9254-1998
Telecom TBR21 1998
Supplementary Information
The Product herewith complies with the requirements of the Low Voltage Directive 7323EEC the EMC Directive 89336EEC and the RampTTE Directive 19995EC (ANNEX II) carries the CE marking accordingly
European Contact for regulatory topics only Your local Hewlett-Packard Sales and Service Office orHewlett-Packard GmbH
Department HQ-TRE Herrenberger Strasse 140 D-71034 Boumlblingen Germany (FAX + 49-7031-14-3143)
order mediaTo order media such as HP Premium Inkjet Paper HP Premium Inkjet Transparency Film HP Iron-On T-shirt Transfer paper or HP Greeting Cards go to
wwwhpshoppingcom
For orders in countries other than the US and Canada select other countries then click Yes to leave hpshoppingcom From this website you can access hpshoppingcom for your specific language or countryregion
order print cartridges
If you have Internet access you can get more information from the HP website at
wwwhpcomsupport
print cartridges hp reorder number
HP black print cartridge 56 19 ml black print cartridge
HP color print cartridgeHP tri-color print cartridge
57 17 ml color print cartridge28 8 ml color print cartridge
Visit the hp officejet information centerIt has everything you need to get the most value from your HP Officejet
bull Technical Supportbull Supplies and Ordering Informationbull Project Tipsbull Ways to Enhance Your Product
wwwhpcomsupport
copy 2003 Hewlett-Packard Company
Printed in the USA Mexico Germany Singapore or China
Q1608-90163Q1608-90163
Q1608-90163

hp officejet 4100 series
chapter 3
12
set the paper typeIf you want to use a different type of paper such as photo paper transparency film Iron-On T-shirt transfers or brochures simply load that paper in the paper tray You must then change the paper type settings to ensure the best print quality
HP recommends paper type settings according to the type of paper you are using
This setting refers to copy options only If you want to set the paper type for printing from a computer set the properties in the Print dialog box of the software
1 Press the Copy button until Paper Type appears
2 Press until the appropriate paper type appears
3 Press Enter to choose the displayed paper type
set the paper sizeThe HP Officejet can use Letter Legal or A4 paper Use the following procedure to set the paper size for copy options
1 Press the Copy button until Copy Paper Size appears
2 Press until the appropriate paper size appears
3 Press Enter to choose the displayed paper size
To avoid jams remove papers from the output tray frequently The output tray capacity is affected by the type of paper and the amount of ink you are using For more information about output-tray capacity see technical information in the HP Photo amp Imaging Help
Labels(works only with printing)
bull Always use letter-size or A4-size label sheets designed for use with HP inkjet products (like Avery Inkjet Labels) and make sure that the labels are not over two years old
bull Fan the stack of labels to make sure none of the pages are sticking together
bull Place a stack of label sheets on top of standard paper in the paper tray print-side down Do not insert labels one sheet at a time
Postcards (works only with printing)
Insert a stack of postcards or hagaki cards with the print-side down into the paper tray until it stops Line the postcards up on the right side of the paper tray slide the paper-width guide up against the left side of the cards until it stops
4-by-6 inch photo paper (works only with printing)
Insert the photo paper with the print-side down into the paper tray until it stops Place the long edge of the photo paper against the right side of the paper tray and slide the paper-width guide up against the long edge of the photo paper until it stops If the photo paper you are using has perforated tabs load the photo paper so that the tabs are closest to you
paper tips
4
13
use the copy features
The copy features let you do the following
bull Produce high-quality color and black-and-white copiesbull Reduce or enlarge the size of the copies you make from 25 to 200 or
50 to 200 (depending on your model) of the copyrsquos original sizebull Make the copy lighter or darker select the number of copies and specify
the quality of the copies you makebull Use special copying features to make high-quality copies of photos using
special photo paper or to create transparencies
make copiesYou can make copies using the front panel of your HP Officejet or by using the HP Officejet software on your computer Many copy features are available using either method However you may find that the software offers easier access to special copy features
All copy settings that you select on the front panel are reset two minutes after the HP Officejet completes the copy unless you save the settings as the default settings as described in change settings for all copy tasks on page 15
make a copy1 Load the paper tray with the appropriate paper
2 Load your original
3 Press the Copy button
4 Use the keypad or press the or to enter the number of copies
5 Press Start Black or Start Color
Tip To make a single copy press the Copy button and then press Start Black or Start Color
Note Make sure that the color print cartridge is installed in your HP Officejet Both print cartridges must be installed when making a copy
increase copy speed or qualityThe HP Officejet provides three options that affect copy speed and quality
bull Best produces the highest quality for all paper types Best copies more slowly than the other quality settings
bull Normal delivers high-quality output and is the recommended setting for most of your copying Normal copies faster than Best
bull Fast copies faster than the Normal setting The text is of comparable quality to the Normal setting but the graphics may be of lower quality Using Fast also reduces the frequency of replacing your print cartridges because it uses less ink
hp officejet 4100 series
chapter 4
14
1 Load your original
2 Press Copy until Copy Quality appears
3 Press until the desired quality setting appears and then press Enter to select it
4 Press Start Black or Start Color
set the number of copies You can set the number of copies using the front panel
1 Press the Copy button
2 Use the keypad or press the or to enter the number of copies
3 Press Enter
4 Press Start Black or Start Color
Tip If you hold down the right arrow button then after reaching 10 the number of copies changes by increments of five to make it easier to set a large number of copies
reduce or enlarge a copyYou can reduce or enlarge a copy of an original using ReduceEnlarge
For more information about additional copy options such as Fit to Page see perform special copy jobs on page 15
1 Press Copy until ReduceEnlarge appears
2 Press until the appropriate ReduceEnlarge option appears and then press Enter to select it
3 If you select Custom 100 Set Custom Size appears Use the arrow keys or type a percentage on the keypad
4 Press Enter when the desired percentage is displayed
5 Press Start Black or Start Color
make copies lighter or darkerUse LighterDarker to adjust the lightness and darkness of the copies you make
1 Press Copy until LighterDarker appearsThe range of LighterDarker values are represented as circles on a scale on the front-panel display
2 Press to lighten the copy or to darken it The circle moves to the left or right depending on the arrow button you press
3 Press Enter to select the setting
4 Press Start Black or Start Color
enhance text sharpness and photo colorsYou can use Text to sharpen edges of black text Photo to enhance light colors in your photographs or Mixed if your original contains a photograph and text You can also select None to turn off all enhancements
reference guide
use the copy features
15
Text enhancement is the default option You can turn off Text enhancement by selecting Photo Mixed or None if the following occur
bull Stray dots of color surround some text on your copiesbull Large black typefaces look splotchy (not smooth)bull Thin colored objects or lines contain black sectionsbull Horizontal grainy or white bands appear in light- to medium-gray areas
1 Press Copy until Enhancements appears
2 Press until the desired enhancement (Text Photo Mixed or None) appears
3 Press Enter to select the setting
4 Press Start Black or Start Color
change settings for all copy tasksSave the copy settings you use most often by setting them as the default This includes changes to Copy options such as Paper Type and Paper Size as well as other Copy settings on the front panel such as Number of Copies and Copy Quality
1 Make any desired changes to the copy options
2 Press Copy until Set New Defaults appears
3 Press until Yes appears
4 Press Enter to set the options as a defaultYour settings are saved
perform special copy jobsIn addition to supporting standard copying your HP Officejet can also copy a photo or fit a copy to the page
copy a photoWhen copying a photo you should select options for the correct paper type and photo enhancement
1 Load the photo in the automatic document feeder (ADF)For more information see load originals
2 If you are using photo paper load it in the paper tray
3 Press Copy until Paper Type appears
4 Press until Premium Photo appears and then press Enter to select it
5 Press Copy until Enhancements appears
6 Press until Photo appears and then press Enter to select it
7 Press Start Black or Start Color
Tip To enlarge a photo automatically to a full page use the Photo Fit to Page button
hp officejet 4100 series
chapter 4
16
fit a copy to the pageUse the Photo Fit to Page button when you want to automatically enlarge or reduce your original to fit Letter or A4 size paper You can enlarge a small photo to fit a full-size page as shown below Using Photo Fit to Page may prevent unwanted cropping of text or images around the margins
1 Load the original in the ADFFor more information see load originals on page 7
2 Press the Photo Fit to Page button
Note Do not press the Fax Copy or Scan buttons on the front panel once you have pressed the Photo Fit to Page button
3 Press until the appropriate paper type appears and then press Enter to select it
4 Press Start Black or Start Color
copy optionsThe following diagram shows the options that are available when you press Copy
Original Fit to Page
Plain PaperPhoto PaperTransparency
Actual sizeCustom 100Full Page 91Legal gt Ltr 72
ReduceEnlarge Paper Type
NoYes
TextPhotoMixedNone
Enhancements Set New Defaults
LetterLegalA4
Copy Paper Size
The sizes vary by countryregion
LighterDarker
NormalFastBest
Copy Quality
To cycle through the copy options press Copy repeatedly
Press and to move to the setting you want within one of the copy optionsPress Enter to select the displayed setting
5
17
use the scan features
Scanning is the process of converting pictures and text into an electronic format for your computer You can scan photos and text documents
Because the scanned image or text is in an electronic format you can bring it into your word processor or graphics program and modify it to suit your needs You can do the following
bull Scan photos of your kids and e-mail them to relatives create a photographic inventory of your house or office or create an electronic scrapbook
bull Scan text from an article into your word processor and quote it in a report saving you a lot of retyping
Tip To use the scan features your HP Officejet and computer must be connected and turned on The HP Officejet software must also be installed and running on your computer prior to scanning To verify that the HP Officejet software is running on Windows look for a status icon in the system tray On a Macintosh the HP Officejet software is always running
Note High resolution scanning (600 dpi or higher) requires a large amount hard disk space If there is not enough hard disk space available your system may stall
scan an originalYou can start a scan from your HP Officejet or from the HP Officejet software on your computer
For more information about scanning your pictures or documents from the HP Officejet software see scan pictures and documents in the HP Photo amp Imaging Help
to scan an original from your hp officejet
1 Load your original in the automatic document feeder (ADF)For more information see load originals on page 7
2 Press Scan
3 Select the Scan to destination by pressing or or by pressing the Scan button repeatedlyThe default destination is the HP Photo amp Imaging Gallery Any applications on your computer that are supported by the HP Officejet also appear in the Scan to list
4 Press Start Black or Start ColorThe original is scanned and the image is sent to selected destinationFor more information about using the HP Photo amp Imaging Gallery see manage images in how to use the software
hp officejet 4100 series
chapter 5
18
stop scanningYou can stop a scan by pressing the Cancel button located on the front panel
6
19
use the fax features
Using your HP Officejet you can
bull Send and receive paper faxesbull Send computer faxes (reference the HP Photo amp Imaging Help)bull Send and receive color faxes
Fax features are available only on some HP Officejets
send a faxYou can send a fax in a variety of configurations These include the following
bull send a paper fax (using the front panel or computer)bull send a paper fax with a PC-generated cover page (using the computer)bull send a file with or without a cover page (using the computer)bull send a PC-generated cover page as a single-page fax (using the
computer)
Note For information on sending a fax using the computer reference the HP Photo amp Imaging Help
Note By default your HP Officejet prints a report only if there is a problem with sending or receiving a fax A confirmation message indicating whether an item was successfully sent appears briefly on the front-panel display after each transaction If you need printed confirmation that your faxes are successfully sent see print reports on page 22 for information about report options
Note If you have not done so set the date and time See set the date and time on page 27
send a fax from your hp officejet1 Load your originals in the ADF
For more information see load originals on page 7
2 Enter the fax number using the keypad or press Speed Dial until the desired speed-dial entry appearsFor more information on speed dialing see set up speed dialing in the HP Photo amp Imaging Help
3 Press Start Black or Start Color
change settings and use speed dials before sending a fax1 Load your originals in the ADF
For more information see load originals on page 7
2 Enter the fax number using the keypad or press Speed Dial until the desired speed-dial entry appears
hp officejet 4100 series
chapter 6
20
For more information on speed dialing see set up speed dialing in the HP Photo amp Imaging Help
3 Press Enter
4 Press Fax to scroll through the fax options
5 When you reach the option whose setting you wish to change press to scroll through the setting options
6 When you reach the setting you want to change press Enter to accept the setting
7 Press Start Black or Start Color
send a color faxYou can send and receive color faxes to and from other color fax machines If you are faxing from the front panel and your HP Officejet determines that the recipient has a black-and-white fax unit it sends the fax in black and white If you are faxing from the software and your HP Officejet determines that the recipient has a black-and-white fax unit the HP Officejet prompts you to try sending the fax in black and white
We recommend that you use only color originals for color faxing The color originals must be loaded in the ADF you cannot send a color fax from memory using the scan and fax features To fax in color to multiple recipients send the fax from the Director or your software program
to send a color fax from the front panel
1 Load your originals in the ADF For more information see load originals on page 7
2 Enter the fax number using the keypad or press Speed Dial until the desired speed-dial entry appearsFor more information on creating speed-dial entries see set up speed dialing in the HP Photo amp Imaging Help
3 Press Start Color
schedule a faxYou can schedule a black and white fax to be sent later during the same day (for example when telephone lines are not as busy) If you use the front panel you can select a single recipient
When the specified time is reached your fax is automatically sent as soon as a connection can be made
1 Load your originals in the ADF
2 Enter the fax number using the keypad or press Speed Dial until the desired speed-dial entry appears
3 Press Enter
4 Press Fax to scroll through the fax options
5 Stop scrolling when you reach the How to Fax menu
6 Press to scroll through the setting options
7 Stop scrolling when you reach the Send Fax Later option
reference guide
use the fax features
21
8 Press Enter
9 Enter the Send Time using the numeric keypad
10 At the prompt press 1 for AM or 2 for PM
11 When Store Fax Now appears press 1 for Yes or 2 for NoIf 1 is selected the document is scanned to memory and is sent at the selected time If 2 is selected and you havenrsquot loaded your originals a message appears reminding you to load the original before the send time
12 Press Start Black
cancel a scheduled faxYou can cancel a fax stored in memory or one that is currently in progress
bull Press Cancel to cancel the scheduled fax
receive a faxYour HP Officejet is set to print received faxes automatically If you receive a legal-size fax and your HP Officejet is not currently configured to use legal-sized paper the unit automatically reduces the fax so that it fits on the paper that is loaded For more information see set automatic reduction on page 25
If you have an answering machine connected to the same line as your HP Officejet you may need to set the number of rings required before the HP Officejet begins receiving the fax The default number of rings before the HP Officejet receives a fax is 5
set the number of rings before answeringYou can specify how many rings should occur before your HP Officejet automatically answers the phone When you run the Fax Setup Wizard this is set automatically
If you do not want your HP Officejet to answer the phone Rings to Answer should be set to No Answer
1 Press Setup
2 Press 3 then press 3 againThis selects the Basic Fax Setup menu then the Rings to Answer option
3 Use the arrow keys to choose the number of rings and then press Enter
receive a fax manuallyBefore manually receiving a fax we recommend that you remove any originals from your HP Officejet so that they are not accidentally processed
Verify that Rings to Answer is set to No Answer
1 When your HP Officejet rings pick up the handset of a telephone that is on the same telephone line as your HP Officejet
2 If you hear fax tones press Start Black or Start Color or if you are receiving from an extension phone (on the same telephone line as your HP Officejet but not connected directly to it) press 1 2 3 on your phone
3 After you are finished hang up the telephone
hp officejet 4100 series
chapter 6
22
print reportsYou can set up your HP Officejet to print error reports and confirmation reports for each fax you send and receive You can also manually print reports as you need them
generate reports automaticallyThis setting lets you configure your HP Officejet so that it automatically prints error and confirmation reports
1 Press Setup
2 Press 1 then press 5This selects Print Report then selects Automatic Reports Setup
3 Press to scroll through the following report typesndash Every Error which prints whenever there is any kind of fax error
(default)ndash Send Error which prints whenever there is a transmission errorndash Receive Error which prints whenever there is a receiving errorndash Every Fax which confirms every time a fax is sent or receivedndash Send Only which prints every time a fax is sentndash Off which does not print fax reports
4 When you reach the report that you want press Enter
generate reports manuallyThis setting lets you print reports manually From the computer you can only print the Speed-Dial List and the Fax Log
to print reports from the front panel
1 Press Setup then press 1This selects the Print Report menu
2 Press to scroll through the following report typesndash Last Transaction which prints details of the last fax transactionndash Fax Log which prints a log of the last 30 fax transactionsndash Speed Dial List which prints a list of programmed speed dialsndash Self-Test Report which prints a report to assist you in diagnosing print
and alignment problems For more information see print a self-test report on page 32
ndash Automatic Reports Setup which is the automatic reports setting described in generate reports automatically on page 22
3 When you reach the report that you want press Enter
control resolution and contrastYour HP Officejet lets you change the resolution and contrast of documents that you are sending
change resolutionResolution affects the transmission speed and quality of faxed documents
reference guide
use the fax features
23
to change the resolution from the front panel
1 Load your originals in the ADF
2 Enter the fax number using the keypad or press Speed Dial until the desired speed-dial entry appears
3 Press Enter
4 Press Fax to scroll through the fax options
5 Stop scrolling when you reach the Resolution menu
6 Press until the desired resolution quality appears (Standard Photo Fine Very Fine)
7 Press EnterYour HP Officejet only faxes at the highest resolution supported by the receiving faxIf you choose Photo be aware that the faxing process takes longer to complete When faxing photographs we recommend that you choose Photo
change contrastChange this setting if you want a black-and-white fax to be darker or lighter than the original
to change the fax contrast from the front panel
1 Load your originals in the ADF
2 Enter the fax number using the keypad or press Speed Dial until the desired speed-dial entry appears
3 Press Enter
4 Press Fax to scroll through the fax options
5 Stop scrolling when you reach the LighterDarker menuThe range of values appears as a circle on a scale on the display
6 Press to lighten the fax or to darken itThe circle moves left or right as you press a button
7 Press Enter to accept the setting you selected
change other fax settings
redial a number automaticallyYou can set your HP Officejet to redial a busy and an unanswered number automatically If you initiated a fax from the computer the computer must be left on for the redialing process to work correctly
1 Press Setup
2 Press 4This selects the Advanced Fax Setup menu
3 Choose one of the following optionsndash Press 3
hp officejet 4100 series
chapter 6
24
This selects the Busy Redial option The default setting for Busy Redial is Redial
ndash Press 4This selects the No Answer Redial option The default setting for No Answer Redial is No Redial
4 Press Enter
5 Press to select Redial or No Redial as desired
6 Press Enter
forward faxes to another numberWith fax forwarding you can send a fax that you receive to another fax number during the next 24-hour period
to forward faxes from the front panel
1 Press Setup
2 Press 3 then press 7This selects the Basic Fax Setup menu then selects the Fax Forwarding Black Only option
3 At the prompt enter the Fax Number to which you wish to send the fax
4 Press Enter
5 Enter the Start Date using the numeric keypad
6 Enter the Start Time using the numeric keypad
7 At the prompt press 1 for AM or 2 for PM
8 Enter the Stop Date using the numeric keypadFax Forwarding On appears on the display
edit or cancel fax forwardingOnce fax forwarding is enabled you may find that you need to change the number you are faxing to or the start and stop times you entered You may wish to cancel your fax forwarding setup altogether Follow the steps below to edit or turn off fax forwarding
to edit fax forwarding from the front panel
1 Press Setup
2 Press 3 then press 7This selects the Basic Fax Setup menu then selects the Fax Forwarding Black Only option
3 Forwarding is ON 1=Edit 2=Cancel appears on the display after a moment Press 1 to edit the number you wish to fax to or to change the start and stop times Follow the messages on the display
to cancel fax forwarding from the front panelbull Press Cancel
OR
reference guide
use the fax features
25
Follow the steps in edit or cancel fax forwarding on page 24 When Forwarding is ON 1=Edit 2=Cancel appears on the display press 2 to cancel fax forwarding
use error correction modeError Correction Mode (ECM) eliminates data lost due to poor phone lines by detecting errors that occur during transmission and automatically requesting retransmission of the erroneous portion Phone charges are unaffected or may even be reduced on good phone lines On poor phone lines ECM increases sending time and phone charges but sends the data much more reliably Turn ECM off (the default setting is on) only if it increases phone charges substantially and you can accept poorer quality in exchange for reduced charges
to change the ECM setting from the front panel
1 Press Setup
2 Press 4 then press 7This selects the Advanced Fax Setup menu then selects the Error Correction Mode option
3 Press to switch between On and Off
4 Press Enter to accept the setting you selected
set automatic reductionThis setting determines what your HP Officejet does if it receives a fax that is too large for the default paper size With this setting on (the default) the image is reduced so that it fits on one page With this feature off information that doesnrsquot fit on the first page is printed on a second page
1 Press Setup
2 Press 4 then press 5This selects the Advanced Fax Setup menu then selects the Automatic Reduction option
3 Press to switch between On and Off
4 Press Enter to accept the setting you selected
adjust the volumeYour HP Officejet provides three levels for adjusting the ring and speaker volume The ring volume is the volume of the phone ringer The speaker volume is the volume of everything else such as the dial and fax tones The default setting is Soft
1 Press Setup
2 Press 3 then press 6This selects the Basic Fax Setup menu then selects the Ring and Beep Volume option
3 Press to select one of the options Soft Loud or Off
4 Press Enter to accept the setting you selected
hp officejet 4100 series
chapter 6
26
change the answer ring pattern (distinctive ringing)Distinctive ringing is a feature offered by phone companies that allows several phone numbers to share the same line Each number has a specific ring pattern If you do not have this service use the default ring pattern which is All Rings
If you connect your HP Officejet to a line with distinctive ringing have your telephone company assign one ring pattern to voice calls and another to fax calls (double or triple rings are best for a fax number)
1 Press Setup
2 Press 4 then press 2This selects the Advanced Fax Setup menu then selects the Answer Ring Pattern option
3 Press to scroll through these options All Rings Single Rings Double Rings Triple Rings and Double amp Triple
4 When the ring pattern that the phone company established for this number appears press Enter
Tip We recommend that you use Double Rings or Triple Rings for fax
set up speed dialingThrough your HP Officejet or your computer you can assign entries to fax numbers you use often This lets you dial those numbers quickly using the front panelrsquos Speed Dial button and a one- or two-digit entry You can create up to 100 individual speed-dial entries (the maximum for some models is 70)
We recommend that you use the software to set up speed-dial settings
Note A speed-dial entry can only be associated with one phone number speed-dial groups are not supported
For more information see set up speed dialing in the hp photo amp imaging help
create individual speed-dial settingsYou can enter fax numbers that you will reuse frequently
1 Press Setup
2 Press 2 then press 1This selects the Speed Dial Setup menu then selects the Individual Speed Dial option
3 Press EnterThe first unassigned speed-dial entry appears on the display
4 Press Enter to select the displayed speed-dial entry
5 Enter the Fax Number to assign to that entry then press EnterThe fax number can be up to 50 digits in length
Tip To enter a three-second pause within a number sequence press Symbols to display a dash
6 Enter the personrsquos or companyrsquos name then press Enter
reference guide
use the fax features
27
The name is limited to 13 characters in lengthFor more information see enter text on page 28
7 After Enter Another appears press 1 (Yes) if you want to set up another number or press 2 (No) to exit
delete speed-dial settingsFollow these steps to delete an individual speed-dial entry
1 Press Setup
2 Press 2 then press 2 againThis selects Speed Dial Setup then selects Delete Speed Dial
3 Press until the individual entry that you want to delete appears then press Enter
set basic fax settings using the front panelWe recommend that you use the Fax Setup Wizard in the HP Officejet software to configure all your basic fax settings however you can also access these settings from the front panel
Note In the US regulations require that your name and phone number appear on every fax The minimum settings that we recommend are described in the following topics
set the date and timeFollow these steps to set the date and time manually
1 Press Setup
2 Press 3 then press 1This selects the Basic Fax Setup menu then selects the Date and Time option
3 Follow the prompts on the display to enter the date and time using the keypad
Tip Use only the last two digits for the year
Tip When you enter a single-digit date or time type a leading zero before the single digit for example 0345 or 08-03-02
After you are done the date and time appear on the display
Warning Cutting off power to the HP Officejet causes the selected date and time to be lost However name and fax number information is not lost
set the fax headerFollow these steps to enter your name and fax number in the header
Note In Hungary the subscriber identification code (fax header) can be set or changed only by authorized personnel For more information contact your authorized HP dealer
1 Press Setup
2 Press 3 then press 2
hp officejet 4100 series
chapter 6
28
This selects the Basic Fax Setup menu then selects the Fax Header option
3 Enter your personal or company name at the prompt Use the guidelines provided in the next section under enter text
4 Press Enter
5 Enter your fax number using the numeric keypad
6 Press Enter
enter textThe following list provides tips for entering text using the front-panel keypad
bull Press the keypad numbers that correspond to the letters of a name
bull Press a button multiple times to see a letter first in uppercase and then in lowercase
bull After the correct letter appears press and then press the number that corresponds to the next letter in the name Again press multiple times until the correct letter appears
bull To insert a space press Space ()bull To enter a symbol such as press Symbols () to scroll through the list of
available symbolsbull If you make a mistake press to clear it and then make the correct
entrybull After you are done entering text press Enter to store your entries
check for dial toneBefore using the fax features verify that the connections are correctly established
1 Press Fax
2 Listen for a dial tone
3 If you do not hear a dial tone check the connections
4 Press Cancel to hang up
ABC These letters correspond to this number and so on
2
JKL To get this character J j K k L l 5
5 Press 5 this many times 1 2 3 4 5 6 7
reference guide
use the fax features
29
fax job menuThe following options become available when the Fax button is pressed
setup menu for fax commandsThe following fax settings are available in the Setup menu
Enter Fax or Speed Dial
FineVery FinePhotoStandard
Fax Number Resolution LighterDarker
Enter a fax number or speed dialWhen the Fax button is pressed
Press and to move to the option you wantPress Enter to select the displayed setting
NoYes
Set New Defaults
Send Fax NowFax from MemorySend Fax LaterPoll to Receive
How to Fax
1Automatic Reports Setup
2Answer Ring Pattern
3Busy Redial
4No Answer Redial
5Automatic Reduction
6Backup Fax Reception
7Error Correction Mode
3Basic Fax Setup 4Advanced Fax Setup
Press Setup to display the menu options
Press and to move to the setting you wantPress Enter to select the displayed setting
1Date and Time
2Fax Header
3Rings to Answer
4Paper Size
5Tone or Pulse Dialing
6Ring and Beep Volume
7Fax Forwarding Black Only
2Speed Dial Setup
1Individual Speed Dial
2Delete Speed Dial
3Print Speed Dial List
hp officejet 4100 series
chapter 6
30
7
31
maintain your hp officejet
This section provides instructions for keeping your HP Officejet in top working condition Perform these maintenance procedures as necessary
clean the glassDirty glass from dust smudges hair and so on slows down performance and affects the accuracy of features such as Fit to Page and Copy
1 Turn off the unit unplug the power cord and raise the scanner lid
2 Clean the glass with a soft cloth or sponge slightly moistened with a nonabrasive glass cleaner
Caution Do not use abrasives acetone benzene or carbon tetrachloride on the glass these can damage it Do not place liquids directly on the glass They may seep under it and damage the unit
3 Dry the glass with a chamois or cellulose sponge to prevent spotting
hp officejet 4100 series
chapter 7
32
clean the white stripMinor debris can accumulate on the white strip located underneath the scannerrsquos lid
1 Turn off the unit unplug the power cord and raise the scanner lid
2 Clean the white strip with a soft cloth or sponge slightly moistened with a mild soap and warm water
3 Wash the strip gently to loosen debris do not scrub the strip
4 Dry the strip with a chamois or soft cloth
Caution Do not use paper-based wipes as these may scratch the strip
5 If this does not clean the strip well enough repeat the previous steps using isopropyl (rubbing) alcohol and wipe the strip thoroughly with a damp cloth to remove any residual alcohol
clean the exterior Use a soft damp lint-free cloth to wipe dust smudges and stains off the case The interior of the unit does not require cleaning Keep fluids away from the interior of the unit as well as the front panel
work with print cartridgesTo ensure the best print quality from your HP Officejet you will need to perform some simple maintenance procedures and when prompted by a front-panel message replace the print cartridges
print a self-test reportIf you are experiencing problems with printing before cleaning or replacing the print cartridges you should print a Self-Test Report This report provides useful information about your print cartridges including status information
1 Press Setup
2 Press 1 then press 4This selects Print Report and then selects Self-Test Report
3 Press Start Black or Start ColorA Self-Test Report is printed for your HP Officejet
handle print cartridgesBefore you replace or clean a print cartridge you should know the part names and how to handle the print cartridge
reference guide
maintain your hp officejet
33
replace the print cartridgesFront-panel messages appear to let you know that you should replace your print cartridges
See order print cartridges on the back cover for information on ordering replacement print cartridges
1 Turn on the unit then lift open the print cartridge access doorThe print carriage moves into view
2 After the carriage stops moving push down on the print cartridge down to release it and then pull it toward you out of its slot
Plastic tape with pink tab(must be removed)
Copper contactsInk nozzles under tape
Do not touch the copper contacts or the ink nozzles
print cartridge access door
hp officejet 4100 series
chapter 7
34
Note It is normal to see ink build-up in the print cartridge slots
3 Remove the new print cartridge from its packaging and being careful to touch only the bright pink plastic tab gently remove the plastic tape to uncover the ink nozzles
Caution Do not touch the copper contacts or ink nozzles
Once you have removed the plastic tape install the print cartridge immediately to prevent the ink from drying in the nozzles
4 Push the new print cartridge into the appropriate slot at a slight angle until it clicks into place
Caution Do not attempt to push the cartridge straight into the slot It must slide in at a slight angle
The tri-color print cartridge goes on the left and the black cartridge goes on the right
5 Close the print cartridge access door
reference guide
maintain your hp officejet
35
align the print cartridgesThe HP Officejet prompts you to align cartridges every time you install or replace a print cartridge Aligning the cartridges ensures high-quality output
To align the print cartridges when prompted
1 Press Enter on the front panelAn align cartridges (test pattern) page prints
2 Load the align cartridges page face down in the ADF between the paper-width guides and press the Enter button again
3 Recycle or discard the page
To align the cartridges at any other time
1 Press Setup
2 Press 5 then press 2This selects the Maintenance menu and then selects the Align Print Cartridge option
3 Press EnterAn align cartridges (test pattern) page prints
4 Load the align cartridges page face down in the ADF between the paper-width guides and press the Enter button again
5 Recycle or discard the page
clean the print cartridgesUse this feature when the Self-Test Report shows streaking or white lines through any of the colored bars Do not clean print cartridges unnecessarily This wastes ink and shortens the life of the ink nozzles
1 Press Setup
2 Press 5 then press 1This selects the Maintenance menu and then selects the Clean Print Cartridge optionA page of patterns is printed The cartridges are cleaned Recycle or discard the pageIf copy or print quality still seem poor after you clean the print cartridges replace the print cartridge that is affected
restore factory defaultsYou can restore the original factory settings to what they were when you purchased your HP Officejet Choosing to restore your factory defaults restores all settings except date information and any scan settings you may have set
You can perform this process from the front panel only
1 Press Setup
2 Press 5 then press 3This selects Maintenance and then selects Restore Factory DefaultsThe factory default settings are restored
hp officejet 4100 series
chapter 7
36
set scroll speedThe Scroll Speed option lets you control the rate that text messages appear in the front-panel display You can choose Normal Fast or Slow The default is Normal
1 Press Setup
2 Press 5 then press 6This selects Maintenance and then selects Set Scroll Speed
3 Press until the desired speed appears then press Enter
set the prompt delay timeThe Prompt Delay option lets you control the amount of time before a message is displayed in the front-panel display You can choose Normal Fast or Slow The default is Normal
1 Press Setup
2 Press 5 then press 7This selects Maintenance and then selects Set Prompt Delay Time
3 Press until the delay time appears then press Enter
self-maintenance sounds During the life of your product you may hear various mechanical sounds This is a normal part of your unitrsquos self-maintenance
reference guide
maintain your hp officejet
37
setup menu optionsThe following options are available from the Setup button
1Last Transaction
2Fax Log
3Speed Dial List
4Self-Test Report
5Automatic Reports Setup
1Print Report
Use Setup to display the Print Report Speed Dial Setup Basic Fax Setup Advanced Fax Setup and Maintenance options
Press and to move to the setting you wantPress Enter to select the displayed setting
1Clean Print Cartridges
2Align Print Cartridges
3Restore Factory Defaults
4Reprint Faxes in Memory
5Set Language amp CountryRegion
6Set Scroll Speed
7Set Prompt Delay Time
5Maintenance2Speed Dial Setup
3Basic Fax Setup
4Advanced Fax Setup
1Individual Speed Dial
2Delete Speed Dial
3Print Speed Dial List
1Date and Time
2Fax Header
3Rings to Answer
4 Paper Size
5Tone or Pulse Dialing
6Ring and Beep Volume
7Fax Forwarding Black Only
1Automatic Reports Setup
2Answer Ring Pattern
3Busy Redial
4No Answer Redail
5Automatic Reduction
6Backup Fax Reception
7Error Correction Mode
hp officejet 4100 series
chapter 7
38
8
39
additional setup information
During the installation of the HP Officejet software a number of windows are displayed You should see the following
bull Installingbull Copying files bull A request to plug in the HP Officejetbull Green OK and check markbull Request to restart your computer (may not occur in all cases)bull Registration
If you did not see all of these windows there may be a problem with the installation Verify the following
bull The HP Director contains six icons (double-click the HP Director icon on the desktop)
bull The HP Officejet is listed in the Printers dialog boxbull There is an icon for the HP Officejet in the System Tray that indicates the
HP Officejet is ready
If the HP Director does not show six icons you may need to wait a few minutes for the HP Officejet to connect to your computer
possible installation problemsIf nothing appears on your computer screen after you insert the HP Officejet 4100 Series CD-ROM into your computerrsquos CD-ROM drive
1 From the Start menu choose Run
2 In the Run dialog box enter dsetupexe (if your CD-ROM drive is not assigned to drive letter d use the appropriate drive letter) then click OK
If the HP Director does not contain six icons do the following
bull Verify that the front-panel cover is attached then unplug the HP Officejet and plug it in again
bull Verify that the USB and power cables are plugged inndash Unplug the USB cable and plug it in againndash Do not attach the USB cable to a keyboard or nonpowered hubndash Verify that the USB cable is 3 meters or less in lengthndash If you have several USB devices attached to your computer you may
want to unplug the others during the installation
Note AppleTalk is not supported
bull Unplug the HP Officejet from the wall and plug it in againbull Restart your computer
hp officejet 4100 series
chapter 8
40
On Windows check the System Tray for applications that are running in the background and close them before restarting your computer
remove and reinstall your hp officejet softwareIf six icons do not appear in the Director you may need to uninstall and re-install the software Do not simply delete the HP Officejet program files from your hard drive Be sure to remove them properly using the uninstall utility provided in the HP Officejet program group
to uninstall from a Windows computer
1 Disconnect your HP Officejet from your computer
2 On the Windows taskbar click Start choose Programs or All Programs (XP) choose Hewlett-Packard choose hp officejet 4100 series then choose uninstall software
3 Follow the directions on the screenBe sure to disconnect your HP Officejet
4 If you are asked whether you would like to remove shared files click NoOther programs that use these files may not work properly if the files are deleted
5 After the program finishes removing the software disconnect your HP Officejet and restart your computer
Note It is important that you disconnect your HP Officejet before restarting your computer
6 To reinstall the software insert the HP Officejet 4100 Series CD-ROM into your computerrsquos CD-ROM drive and follow the instructions that appear
7 After the software is installed connect and turn on your HP Officejet following the onscreen instructions and the instructions in your Setup PosterAfter connecting and turning on your HP Officejet you may have to wait several minutes for all of the Plug and Play events to completeWhen the software installation is complete you will see a Status Monitor icon in the System Tray
8 To verify that the software is properly installed double-click on the HP Director icon on the desktop If the HP Director shows six icons the software has been properly installed
to uninstall from a Macintosh computer
1 Disconnect your HP Officejet from your computer
2 Double-click on ApplicationsHP All-in-One Software folder
reference guide
additional setup information
41
3 Double-click on HP Uninstaller
4 Follow the directions that appear on the screen
5 After the program finishes removing the software disconnect your HP Officejet and restart your computer
6 To reinstall the software insert the HP Officejet 4100 Series CD-ROM into your computerrsquos CD-ROM drive
Note When re-installing the software follow the instructions on the Setup Poster Do not connect the HP Officejet to your computer until after you have completed the software installation
7 On the desktop open the CD-ROM double-click on hp all-in-one installer and follow the instructions that appear
connect your hp officejet to a phone modem or answering machine
The HP Officejet can share a phone line with a phone a modem or an aswering machine When sharing a phone line with an answering machine the HP Officejet will answer fax calls and direct voice calls to the answering machine
Note For information on connecting your HP Officejet to your computer and phone line refer to the Setup Poster that came with your unit
to connect your hp officejet to a phone modem or answering machine
1 Remove the white plastic stopper from connector 2 on the back of the HP Officejet
To connect more than one device to connector 2 on the HP Officejet you must purchase a Y-splitter and plug it into connector 2
2 Connect the phone cord from the phone modem or answering machine to connector 2 (or Y-splitter)
Caution Do not use the phone cord that came with the HP Officejet for this purpose That phone cord must connect connector 1 on the HP Officejet to the wall jack for your phone system See the Setup Poster for details
3 If you are connecting an answering machine see set the number of rings before answering on page 21 for instructions on setting the number of rings correctly or change the answer ring pattern (distinctive ringing) on page 26 for information on incoming ring patterns
4 If you are connecting a modem turn off its fax-receive feature
connector 2 on the HP Officejet
connector 1 on the HP Officejet
hp officejet 4100 series
chapter 8
42
additional troubleshooting helpYou may want to refer to the readme file for more information on possible installation problems On Windows you can access the readme file from the Start button on the taskbar select Programs Hewlett-Packard hp officejet 4100 series View the Readme File On Macintosh you can access the readme file by double-clicking on the icon located in the top-level folder of the HP Officejet software CD-ROM
The readme file provides more information including
bull Using the Re-install utility after a failed installation to return your PC to a state that will allow the HP Officejet to be re-installed
bull Using the Re-install utility on Windows 98 to recover from a Composite USB System Driver missing errorThis error may occur if the hardware is installed prior to installing the software After running the Re-install utility reboot your PC and install the HP Officejet software before connecting the HP Officejet to your computer
You can also find more information on this website
wwwhpcomsupport
9
43
technical information
Additional specifications information can be found in the HP Photo amp Imaging Help in the hp officejet 4100 series section
physical specifications
power specificationsbull Power consumption 75W maximumbull Source (Input Voltage) 100 to 240 VAC groundedbull Input Frequency 50 to 60 Hzbull Current 1A maximum
regulatory informationAdditional regulatory information can be found in the HP Photo amp Imaging Help The information in this section supercedes information in the HP Photo amp Imaging Help
doc statement deacuteclaration de conformiteacute (Canada)Le preacutesent appareil numeacuterique neacutemet pas de bruit radioeacutelectrique deacutepassant les limites applicables aux appareils numeacuteriques de la classe B prescrites dans le Regraveglement sur le brouillage radioeacutelectrique eacutedicteacute par le ministegravere des Communications du CanadaThis digital apparatus does not exceed the Class B limits for radio noise emissions from digital apparatus set out in the Radio Interference Regulations of the Canadian Department of Communications
notice to users of the Canadian telephone networkThis equipment meets the applicable Industry Canada Terminal Equipment Technical Specifications This is confirmed by the registration number The abbreviation IC before the registration number signifies that registration was performed based on a Declaration of Conformity indicating that Industry Canada technical specifications were met It does not imply that Industry Canada approved the equipment
Note The Ringer Equivalence Number (REN) assigned to each terminal device provides an indication of the maximum number of terminals allowed to be connected to a telephone interface The termination on an interface may consist of any combination of devices subject only to the requirement that the sum of the Ringer Equivalence Numbers of all the devices does not exceed 5
The REN for this product is 03B based on FCC Part 68 test results
height width depth weight (without print cartridges)
with paper trays and ADF closed
718 in (1824 cm) 1676 in (4258 cm) 825 in (2096 cm) 75 lbs (34 kg)
with ADF and paper tray extended
1030 in (2615 cm) 1676 in (4258 cm) 1854 in (4709 cm) 75 lbs (34 kg)
hp officejet 4100 series
chapter 9
44
notice to all users of the European Economic Area (EEA)
This product is designed to interwork with the analogue telephone networks in the following countriesregions
Network compatibility depends on customer selected settings which must be reset to use the equipment on a telephone network in a countryregion other than where the product was purchased Contact the vendor or Hewlett-Packard Company if addition product support is necessaryThis equipment has been certified by the manufacturer in accordance with Directive 19995EC (annex II) for Pan-European single-terminal connection to the public switched telephone network (PSTN) However due to differences between the individual PSTNs provided in different countriesregions the approval does not of itself give an unconditional assurance of successful operation on every PSTN network termination pointIn the event of problems you should contact your equipment supplier in the first instance
geraumluschemissionLpA lt 70 dBam Arbeitsplatzim Normalbetriebnach DIN 45635 T 19
notice to Korean customers
Germany UK Netherlands
France Spain Italy
Belgium Luxembourg Sweden
Austria Denmark Ireland
Norway Finland Switzerland
Greece Portugal
10
45
hp support
This section explains the support services information provided by Hewlett-Packard If you are unable to find the answer you need in the printed or onscreen documentation supplied with your product you can contact one of the HP support services listed in the following pages Some support services are available only in the US and Canada while others are available in many countriesregions worldwide If a support service number is not listed for your countryregion contact your nearest authorized HP dealer for help
get support and other information from the internetIf you have Internet access you can get help from the following HP website
wwwhpcomsupportThe Web site offers technical support drivers supplies and ordering information
hp customer supportSoftware programs from other companies may be included with your HP Officejet If you experience problems with any of those programs you will receive the best technical assistance by calling the experts at that companyIf you need to contact HP Customer Support do the following before you call
1 Make sure thata Your unit is plugged in and turned onb The specified print cartridges are installed correctlyc The recommended paper is properly loaded in the input tray
2 Reset your unita Turn off the unit using the On button located on the unitrsquos front panelb Unplug the power cord from the back of the unitc Plug the power cord back into the unitd Turn on the unit using the On button
3 For more information check the HP website at wwwhpcomsupport
4 If you are still experiencing problems and need to speak with an HP Customer Support Representativendash Have your service ID and serial number ready To display your service ID and
serial number on the front panel do the following Press Enter and Start Color at the same time until the service ID appears in the front-panel display From this display press the right arrow until the serial number displays
ndash Print a Self-Test Report See print a self-test report on page 32 for information on printing this report
ndash Make a color copyndash Be prepared to describe your problem in detail
5 Call HP Customer Support Be near your unit when you call
call in the US during warrantyCall (208) 323-2551 This service is free during the warranty period however your standard long-distance phone charges still apply A fee may apply outside the warranty period
hp officejet 4100 series
chapter 10
46
US phone support is available in both English and Spanish languages 24 hours a day 7 days a week (days and hours of support may change without notice)
call elsewhere in the worldThe numbers listed below are current as of the printing date of this guide For a list of current international HP Support Service numbers visit this address and choose your own countryregion or language
wwwhpcomsupportFor Korea you can also visit this address
httpwwwhpcokrYou can call the HP support center in the following countriesregions If your countryregion is not listed contact your local dealer or nearest HP Sales and Support Office to find out how to obtain servicesSupport service is free during the warranty period however your standard long-distance phone charges will apply In some cases a flat fee per single incident will also applyFor phone support in Europe please check for the details and conditions of phone support in your countryregion by consulting the following Web site
wwwhpcomsupportAlternatively you can ask your dealer or call HP at the phone number indicated in this booklet As part of our constant efforts to improve our phone support service we advise you to check our website on a regular basis for new information regarding service features and delivery
countryregion hp technical support countryregion hp technical support
Algeria1 +213 (0) 61564 543 Malaysia 1-800-805405
Argentina 0810-555-5520 Mexico 01-800-472-6684
Australia +61 3 8877 80001902 910 910
Mexico (Mexico City) 5258-9922
Austria +43 (0) 810 00 6080 Morocco1 +212 22404 747
Bahrain (Dubai) 800 728 Netherlands +31 (0) 20 606 8751
Belgium (Dutch) +32 (0) 2 626 8806 New Zealand 0800 441 147
Belgium (French) +32 (0) 2 626 8807 Norway +47 22 11 6299
Brazil (Grande Sao Paulo) (11) 3747 7799 Oman +971 4 883 8454
Brazil (Demais Localidades) 0800 157751 Palestine +971 4 883 8454
Canada during warranty (905) 206 4663 Panama 001-800-7112884
Canada post-warranty(per-call charge)
1-877-621-4722 Peru 0-800-10111
Caribbean amp Central America
1-800-711-2884 Philippines 632-867-3551
Chile 800-360-999 Poland +48 22 865 98 00
China 86 10 6868 7980 Portugal +351 21 3176333
Colombia 9-800-114-726 Puerto Rico 1-877-2320-589
Costa Rica 0-800-011-0524 Qatar +971 4 883 8454
Czech Republic +420 (0) 261307310 Romania +40 1 315 44 42or local 01 3154442
reference guide
hp support
47
call in Australia post-warrantyIf your product is not under warranty you can call 03 8877 8000 A per-incident out-of-warranty support fee of $2750 (inc GST) will be charged to your credit card You can also call 1902 910 910 ($2750 charged to your phone account) from 900 AM to 500 PM Monday through Friday (Charges and support hours are subject to change without notice)
prepare your unit for shipmentIf after contacting HP Customer Support or returning to the point of purchase you are requested to send your unit in for service please follow the power off and rebox steps below to avoid further damage to the HP product
Denmark +45 39 29 4099 Russian Federation Moscow +7 095 797 3520
Ecuador 1800-711-2884 Russian Federation St Petersburg
+7 812 346 7997
Europe (English) +44 (0) 207 512 5202 Saudi Arabia +800 897 14440
Egypt 02 532 5222 Singapore 65 6272 5300
Finland +358 (0) 203 47 288 Slovakia +421 (0) 2 682 08080
France (034 Euromin) +0892 69 60 22 South Africa (inside RSA) 086 000 1030
Germany (012 Euromin) +49 (0) 180 52 58 143 South Africa (inside RSA) +27-11 258 9301
Greece +30 1060 73 603 Spain +34 902 321 123
Hong Kong (SAR) +85 (2) 3002 8555 Sweden +46 (0)8 619 2170
Guatemala 1800-995-5105 Switzerland 2 +41 (0) 84 880 1111
Hungary +36 (0) 1 382 1111 Taiwan +886-2-2717-00550800 010 055
India 1-600-11226791 11 682 6035
Thailand +66 (2) 661 4000
Indonesia 62-21-350-3408 Tunisia1 +216 1891 222
Ireland +353 (0) 1 662 5525 Turkey +90 216 579 7171
Israel +972 (0) 9 8304848 Ukraine +7 (380-44) 490-3520
Italy +39 (0) 226410350 United Arab Emirates +971 4 883 8454
Japan 0570 000 511+81 3 3335 9800
United Kingdom +44 (0) 207 512 52 02
Jordan +971 4 883 8454 Venezuela 0800-47468368 or800-477-7777
Korea (Seoul) +82 (2) 3270 0700 Venezuela (Caracas) (502) 207-8488
Korea (outside Seoul) 080 999 0700 Vietnam 84 (0) 8 823 4530
Kuwait +971 4 883 8454 Yemen +971 4 883 8454
Lebanon +971 4 883 8454
1 This Call Center supports French speaking customers from the following countriesregions Morocco Tunisia and Algeria
2 This Call Center supports German French and Italian speaking customers in Switzerland
countryregion hp technical support countryregion hp technical support
hp officejet 4100 series
chapter 10
48
Note When transporting your HP Officejet make sure that the pens have been removed the HP Officejet has been properly shut down by pressing the power button and you have allowed time for the carriage to return to the service station and for the scanner to return to its parked position
1 Turn on the unitDisregard steps 1 through 6 if your unit will not turn on and the print carriage is in the home position You will not be able to remove the print cartridges Proceed to step 7
2 Open the print cartridge access doorThe print carriage moves into view
3 See replace the print cartridges on page 33 for information on removing the print cartridges
Caution Remove both print cartridges Failure to do so may damage your unit
4 Place the print cartridges in an airtight bag so they will not dry out and put them aside (do not send them with the unit unless instructed to by the HP customer support call agent)
5 Turn off the unit
6 Close the print cartridge access door
7 Remove the front panel cover as followsa Grasp the front of the front panel cover with two hands as shownb Firmly lift the front panel cover to unsnap it from the unit
8 Retain the front panel cover Do not return the front panel cover with the unit
9 If available pack the unit for shipment using the original packing materials or the packaging materials that come with your exchange unit
If you do not have the original packaging materials please use other adequate packaging materials Shipping damage caused by improper packaging andor improper transportation is not covered under the warranty
reference guide
hp support
49
10 Place the return shipping label on the outside of the box
11 Include the following items in the boxndash A complete description of symptoms for service personnel (samples of print
quality problems are helpful)ndash A copy of the sales slip or other proof of purchase to establish the warranty
coverage periodndash Your name address and a phone number where you can be reached during
the day
hp distribution centerTo order HP Officejet software a copy of the printed Reference Guide a setup poster or other customer-replaceable parts do one of the following bull In the US or Canada call (208) 323 2551bull Visit this website
httpwwwhpcomcposupportsoftwarehtml
hp officejet 4100 series
chapter 10
50
11
51
warranty information
HP Officejet 4100 seriesDuration of Limited Warranty (hardware and labor) 1 YearDuration of Limited Warranty (CD media) 90 DaysDuration of Limited Warranty (print cartridges) Until the HP ink is depleted or the ldquoend of warrantyrdquo date printed on the cartridge has been reached whichever occurs first
warranty service
express serviceTo obtain HP express repair service the customer must contact an HP service office or an HP Customer Support Center for basic troubleshooting first See hp customer support on page 45 for steps to take before calling Customer SupportIf a customer unit needs a minor part replacement and these parts can normally be replaced by the customer the customer-replaceable components may be serviced through expedited part shipment In this event HP will prepay shipping charges duty and taxes provide telephone assistance on replacement of the component and pay shipping charges duty and taxes for any part that HP asks to be returnedThe HP Customer Support Center may direct customers to designated authorized service providers who are certified by HP to service the HP product
warranty upgradesUpgrade your standard factory warranty to a total of three years with the HP SUPPORTPACK Service coverage begins on product purchase date and the pack must be purchased within the first 180 days of product purchase This program offers phone support from 600 AM to 1000 PM Mountain Standard Time (MST) Monday through Friday and 900 AM to 400 PM (MST) on Saturdays If during your technical support call it is determined that you need a replacement product then HP will ship you this product next business day free of charge Available in US onlyFor more information please call 1-888-999-4747 or visit the following HP Web site
httpwwwhpcomgohpsupportpack
Outside the US please call your local HP Customer Support office See call elsewhere in the world on page 46 for a list of international Customer Support numbers
returning your hp officejet for serviceBefore returning your HP Officejet for service you must call HP Customer Support See hp customer support on page 45 for steps to take before calling Customer Support
hewlett-packard limited global warranty statement
extent of limited warrantyHewlett-Packard (ldquoHPrdquo) warrants to the end-user customer (ldquoCustomerrdquo) that each HP Officejet 4100 Series product (ldquoProductrdquo) including related software accessories media and supplies shall be free from defects in material and workmanship for the duration which begins on the date of purchase by the Customer
hp officejet 4100 series
chapter 11
52
For each software Product HPrsquos limited warranty applies only to a failure to execute programming instructions HP does not warrant that the operation of any Product shall be uninterrupted or error freeHPrsquos limited warranty covers only those defects which arise as a result of normal use of a Product and does not cover any other problems including those which arise as a result of (a) improper maintenance or modification (b) software accessories media or supplies not provided or supported by HP or (c) operation outside the Productrsquos specificationsFor any hardware Product the use of a non-HP print cartridge or a refilled print cartridge does not affect either the warranty to the Customer or any HP support contract with the Customer However if Product failure or damage is attributable to the use of a non-HP or refilled print cartridge HP shall charge its standard labor and materials charges to service the Product for the failure or damageIf HP receives during the applicable warranty period notice of a defect in any Product HP shall either repair or replace the defective Product at HPrsquos option Where labor charges are not covered by HPrsquos limited warranty repairs shall be at HPrsquos standard charges for laborIf HP is unable to repair or replace as applicable a defective Product which is covered by HPrsquos warranty HP shall within a reasonable time after being notified of the defect refund the purchase price for the ProductHP shall have no obligation to repair replace or refund until the Customer returns the defective Product to HPAny replacement product may be either new or like-new provided that it has functionality at least equal to that of the Product being replacedHP products including each Product may contain remanufactured parts components or materials equivalent to new in performanceHPs limited warranty for each Product is valid in any countryregion or locality where HP has a support presence for the Product and where HP has marketed the Product The level of warranty service may vary according to local standards HP shall have no obligation to alter the form fit or function of the Product in order to make it operate in a countryregion or locality for which the Product was never intended to operate
limitations of warrantyTO THE EXTENT ALLOWED BY LOCAL LAW NEITHER HP NOR ITS THIRD PARTY SUPPLIERS MAKE ANY OTHER WARRANTY OR CONDITION OF ANY KIND WHETHER EXPRESS OR IMPLIED WITH RESPECT TO THE COVERED HP PRODUCTS AND SPECIFICALLY DISCLAIM THE IMPLIED WARRANTIES OR CONDITIONS OF MERCHANTABILITY SATISFACTORY QUALITY AND FITNESS FOR A PARTICULAR PURPOSE
limitations of liabilityTo the extent allowed by local law the remedies provided in this Limited Warranty Statement are the Customerrsquos sole and exclusive remediesTO THE EXTENT ALLOWED BY LOCAL LAW EXCEPT FOR THE OBLIGATIONS SPECIFICALLY SET FORTH IN THIS LIMITED WARRANTY STATEMENT IN NO EVENT SHALL HP OR ITS THIRD PARTY SUPPLIERS BE LIABLE FOR DIRECT INDIRECT SPECIAL INCIDENTAL OR CONSEQUENTIAL DAMAGES WHETHER BASED ON CONTRACT TORT OR ANY OTHER LEGAL THEORY AND WHETHER ADVISED OF THE POSSIBILITY OF SUCH DAMAGES
local lawThis Limited Warranty Statement gives the Customer specific legal rights The Customer may also have other rights which vary from state to state in the United States from province to province in Canada and from countryregion to countryregion elsewhere in the world
reference guide
warranty information
53
To the extent this Limited Warranty Statement is inconsistent with local law this Statement shall be deemed modified to be consistent with such local law Under such local law certain disclaimers and limitations of this Statement may not apply to the Customer For example some states in the United States as well as some governments outside the United States (including provinces in Canada) mayPreclude the disclaimers and limitations in this Statement from limiting the statutory rights of a consumer (eg the United Kingdom)Otherwise restrict the ability of a manufacturer to enforce such disclaimers or limitations orGrant the Customer additional warranty rights specify the duration of implied warranties which the manufacturer cannot disclaim or not allow limitations on the duration of implied warrantiesFOR CONSUMER TRANSACTIONS IN AUSTRALIA AND NEW ZEALAND THE TERMS IN THIS LIMITED WARRANTY STATEMENT EXCEPT TO THE EXTENT LAWFULLY PERMITTED DO NOT EXCLUDE RESTRICT OR MODIFY AND ARE IN ADDITION TO THE MANDATORY STATUTORY RIGHTS APPLICABLE TO THE SALE OF THE COVERED HP PRODUCTS TO SUCH CUSTOMERS
hp officejet 4100 series
chapter 11
54
55
index
Numerics4-by-6 inch photo paper
load 10 12
AADF 7adjust
volume for fax 25align print cartridges 35Answer Ring Pattern 26automatic document feeder 7automatic reduction
fax 25
Bbest copy quality 13busy number
redial automatically 23
Ccancel
scan 18scheduled fax 21
cartridgesalign 35replace 33
cleanprint cartridges 35the exterior 32the glass 31white strip 32
colorenhance 14fax 20fax from front panel 20
contrastchange for fax 23photo color 14
copy 13 16change default settings 15enhance 14fit to page 16lighten or darken 14menu options 16number of copies 14photo 15quality 13reduce or enlarge 14settings 13 15
speed 13tutorial 4
Customer Support 45web site 45
Ddarken a copy 14date
setting 27default settings
restore 35director review 4distinctive ringing 26
Eenhance copies 14enlarge copy 14 16envelopes
load 9Error Correction Mode
(ECM) 25
Ffactory defaults
restore 35fast copy quality 13fax 28
adjust volume 25automated reports 22cancel fax forward 24cancel scheduled 21change Answer Ring
Pattern 26change contrast 23change resolution 22change settings 19control appearance 22create individual speed-dial
settings 26delete speed-dial
settings 27distinctive ringing 26Error Correction Mode
(ECM) 25forward faxes 24header 27in color 20in color from front panel 20manual reports 22
menu 29print reports 22receive 21receive manually 21redial busy or unanswered
number 23schedule 20send from front panel 19set automatic reduction 25set date and time 27set the number of rings 21settings 27 28setup menu options 29speed dials 19test 28
fit to page 16forward faxes 24
cancel 24front panel
display scroll speed 36enter text 28send a fax 19setting prompt delay 36tutorial 3
Gglass
cleaning 31greeting cards
load 11
Hhelp 1HP Customer Support 45
calling 45HP Director 4HP distribution center 49HP Officjet
preparing to ship 47HP papers
tips on loading 11
Iindividual speed-dial settings
create 26ink cartridges see print
cartridgesinkjet paper
load 11
index
hp officejet 4100 series56
Kkeypad
enter text 28
Llabels
load 12lighten copies 14load
change the paper type 12envelopes 9original in ADF 7paper 7photo paper 10 12postcards 10 12print cartridges 33set the paper size 12tips 11
Mmaintenance
align print cartridges 35clean print cartridges 35clean the exterior 32clean the glass 31clean the white strip 32normal sounds 36replace print cartridges 33restore factory defaults 35self-maintenance
sounds 36self-test report 32
menuscopy options 16fax 29fax setup 29maintenance 37print reports 37
Nnormal copy quality 13number of copies
set 14number of rings
set 21
Oorder print cartridges 60originals
load in ADF 7output tray 8
Ppaper
change default size for copy 12
change the type 12load 7recommended 7set the size 12tips on loading 11
paper size change for copy 12
paper trayload 7
phone numbers support services 45
photo paperload 10 12
photoscopy 15enhance copy 14
physical specifications 43postcards
load 10 12power
specifications 43print
envelopes 9fax reports 22self-test report 32
print cartridgesalign 35clean 35handling 32replace 33
prompt delaysetting 36
Qquick start
review the director 4use with a computer 4
Rreceive
fax 21redial
busy or unanswered number 23
reduce copy 14 16regulatory information 43reinstall software 40reports
generate automatically for fax 22
generate manually for fax 22
print 22self-test 32
resolution
change for fax 22restore factory settings 35returning your HP Officejet for
service 51
Sscan
from front panel 17stop 18
schedule a fax 20scroll speed
setting 36self-test report 32send
cancel forward faxes 24color fax 20color fax from front
panel 20forward faxes 24
settingscopy 13 15fax 27 28prompt delay 36scroll speed 36
setupadditional information 39menu 29
shippingyour HP Officejet 47
softwareremove and reinstall 40
soundsself-maintenance 36
specificationsphysical 43power 43
speed dials 19create individual
settings 26delete settings 27
stopscan 18scheduled fax 21
subscriber identification code 27
support services 45
Ttelephone line
multiple numbers 26telephone numbers 45text
enhance 14enter from front panel 28
time
index
reference guide 57
setting 27transparency film
recommended 7tips on loading 11
troubleshootingremove and reinstall
software 40T-shirt Transfer Iron-On
load 11tutorial
front panel 3make a copy 4
Uunanswered number
redial automatically 23
Vvolume
adjust 25
Wwarranty 45
service 51statement 51upgrades 51
white stripcleaning 32
hp officejet 4100 series
chapter 12
58
declaration of conformityAccording to ISOIEC Guide 22 and EN 45014
Manufacturerrsquos Name and Address
Hewlett-Packard Company 16399 West Bernardo Drive San Diego CA 92127-1899 USA
declares that the product
Product Name hp officejet 4100 series (Q1608A)
Model Number(s) officejet 4110 (Q1609A) officejet 4110xi (Q1610A) officejet 4110v (Q1611A) officejet 4105 (Q1612A) officejet 4105z (Q1613A) officejet 4115 (Q1614A)
Product Options All
conforms to the following Product Specifications
Safety EN609501992 +A1 A2 A3 A4 amp A11
IEC609501991 +A1 A2 A3 amp A4
UL1950CSA 222 No 950 3rd Edn 1995
NOM-019-SCFI-1993
EMC CISPR221993 +A1 amp A2 EN550221994 +A1 amp A2 -Class B
CISPR241997EN550241998
IEC 61000-3-21995 EN61000-3-21995
IEC 61000-3-31994 EN61000-3-31995
ASNZS 3548 1992
CNS13438 1997
FCC Part 15-Class B ICES-003 Issue 2 VCCI-2
GB 9254-1998
Telecom TBR21 1998
Supplementary Information
The Product herewith complies with the requirements of the Low Voltage Directive 7323EEC the EMC Directive 89336EEC and the RampTTE Directive 19995EC (ANNEX II) carries the CE marking accordingly
European Contact for regulatory topics only Your local Hewlett-Packard Sales and Service Office orHewlett-Packard GmbH
Department HQ-TRE Herrenberger Strasse 140 D-71034 Boumlblingen Germany (FAX + 49-7031-14-3143)
order mediaTo order media such as HP Premium Inkjet Paper HP Premium Inkjet Transparency Film HP Iron-On T-shirt Transfer paper or HP Greeting Cards go to
wwwhpshoppingcom
For orders in countries other than the US and Canada select other countries then click Yes to leave hpshoppingcom From this website you can access hpshoppingcom for your specific language or countryregion
order print cartridges
If you have Internet access you can get more information from the HP website at
wwwhpcomsupport
print cartridges hp reorder number
HP black print cartridge 56 19 ml black print cartridge
HP color print cartridgeHP tri-color print cartridge
57 17 ml color print cartridge28 8 ml color print cartridge
Visit the hp officejet information centerIt has everything you need to get the most value from your HP Officejet
bull Technical Supportbull Supplies and Ordering Informationbull Project Tipsbull Ways to Enhance Your Product
wwwhpcomsupport
copy 2003 Hewlett-Packard Company
Printed in the USA Mexico Germany Singapore or China
Q1608-90163Q1608-90163
Q1608-90163

hp officejet 4100 series
chapter 4
14
1 Load your original
2 Press Copy until Copy Quality appears
3 Press until the desired quality setting appears and then press Enter to select it
4 Press Start Black or Start Color
set the number of copies You can set the number of copies using the front panel
1 Press the Copy button
2 Use the keypad or press the or to enter the number of copies
3 Press Enter
4 Press Start Black or Start Color
Tip If you hold down the right arrow button then after reaching 10 the number of copies changes by increments of five to make it easier to set a large number of copies
reduce or enlarge a copyYou can reduce or enlarge a copy of an original using ReduceEnlarge
For more information about additional copy options such as Fit to Page see perform special copy jobs on page 15
1 Press Copy until ReduceEnlarge appears
2 Press until the appropriate ReduceEnlarge option appears and then press Enter to select it
3 If you select Custom 100 Set Custom Size appears Use the arrow keys or type a percentage on the keypad
4 Press Enter when the desired percentage is displayed
5 Press Start Black or Start Color
make copies lighter or darkerUse LighterDarker to adjust the lightness and darkness of the copies you make
1 Press Copy until LighterDarker appearsThe range of LighterDarker values are represented as circles on a scale on the front-panel display
2 Press to lighten the copy or to darken it The circle moves to the left or right depending on the arrow button you press
3 Press Enter to select the setting
4 Press Start Black or Start Color
enhance text sharpness and photo colorsYou can use Text to sharpen edges of black text Photo to enhance light colors in your photographs or Mixed if your original contains a photograph and text You can also select None to turn off all enhancements
reference guide
use the copy features
15
Text enhancement is the default option You can turn off Text enhancement by selecting Photo Mixed or None if the following occur
bull Stray dots of color surround some text on your copiesbull Large black typefaces look splotchy (not smooth)bull Thin colored objects or lines contain black sectionsbull Horizontal grainy or white bands appear in light- to medium-gray areas
1 Press Copy until Enhancements appears
2 Press until the desired enhancement (Text Photo Mixed or None) appears
3 Press Enter to select the setting
4 Press Start Black or Start Color
change settings for all copy tasksSave the copy settings you use most often by setting them as the default This includes changes to Copy options such as Paper Type and Paper Size as well as other Copy settings on the front panel such as Number of Copies and Copy Quality
1 Make any desired changes to the copy options
2 Press Copy until Set New Defaults appears
3 Press until Yes appears
4 Press Enter to set the options as a defaultYour settings are saved
perform special copy jobsIn addition to supporting standard copying your HP Officejet can also copy a photo or fit a copy to the page
copy a photoWhen copying a photo you should select options for the correct paper type and photo enhancement
1 Load the photo in the automatic document feeder (ADF)For more information see load originals
2 If you are using photo paper load it in the paper tray
3 Press Copy until Paper Type appears
4 Press until Premium Photo appears and then press Enter to select it
5 Press Copy until Enhancements appears
6 Press until Photo appears and then press Enter to select it
7 Press Start Black or Start Color
Tip To enlarge a photo automatically to a full page use the Photo Fit to Page button
hp officejet 4100 series
chapter 4
16
fit a copy to the pageUse the Photo Fit to Page button when you want to automatically enlarge or reduce your original to fit Letter or A4 size paper You can enlarge a small photo to fit a full-size page as shown below Using Photo Fit to Page may prevent unwanted cropping of text or images around the margins
1 Load the original in the ADFFor more information see load originals on page 7
2 Press the Photo Fit to Page button
Note Do not press the Fax Copy or Scan buttons on the front panel once you have pressed the Photo Fit to Page button
3 Press until the appropriate paper type appears and then press Enter to select it
4 Press Start Black or Start Color
copy optionsThe following diagram shows the options that are available when you press Copy
Original Fit to Page
Plain PaperPhoto PaperTransparency
Actual sizeCustom 100Full Page 91Legal gt Ltr 72
ReduceEnlarge Paper Type
NoYes
TextPhotoMixedNone
Enhancements Set New Defaults
LetterLegalA4
Copy Paper Size
The sizes vary by countryregion
LighterDarker
NormalFastBest
Copy Quality
To cycle through the copy options press Copy repeatedly
Press and to move to the setting you want within one of the copy optionsPress Enter to select the displayed setting
5
17
use the scan features
Scanning is the process of converting pictures and text into an electronic format for your computer You can scan photos and text documents
Because the scanned image or text is in an electronic format you can bring it into your word processor or graphics program and modify it to suit your needs You can do the following
bull Scan photos of your kids and e-mail them to relatives create a photographic inventory of your house or office or create an electronic scrapbook
bull Scan text from an article into your word processor and quote it in a report saving you a lot of retyping
Tip To use the scan features your HP Officejet and computer must be connected and turned on The HP Officejet software must also be installed and running on your computer prior to scanning To verify that the HP Officejet software is running on Windows look for a status icon in the system tray On a Macintosh the HP Officejet software is always running
Note High resolution scanning (600 dpi or higher) requires a large amount hard disk space If there is not enough hard disk space available your system may stall
scan an originalYou can start a scan from your HP Officejet or from the HP Officejet software on your computer
For more information about scanning your pictures or documents from the HP Officejet software see scan pictures and documents in the HP Photo amp Imaging Help
to scan an original from your hp officejet
1 Load your original in the automatic document feeder (ADF)For more information see load originals on page 7
2 Press Scan
3 Select the Scan to destination by pressing or or by pressing the Scan button repeatedlyThe default destination is the HP Photo amp Imaging Gallery Any applications on your computer that are supported by the HP Officejet also appear in the Scan to list
4 Press Start Black or Start ColorThe original is scanned and the image is sent to selected destinationFor more information about using the HP Photo amp Imaging Gallery see manage images in how to use the software
hp officejet 4100 series
chapter 5
18
stop scanningYou can stop a scan by pressing the Cancel button located on the front panel
6
19
use the fax features
Using your HP Officejet you can
bull Send and receive paper faxesbull Send computer faxes (reference the HP Photo amp Imaging Help)bull Send and receive color faxes
Fax features are available only on some HP Officejets
send a faxYou can send a fax in a variety of configurations These include the following
bull send a paper fax (using the front panel or computer)bull send a paper fax with a PC-generated cover page (using the computer)bull send a file with or without a cover page (using the computer)bull send a PC-generated cover page as a single-page fax (using the
computer)
Note For information on sending a fax using the computer reference the HP Photo amp Imaging Help
Note By default your HP Officejet prints a report only if there is a problem with sending or receiving a fax A confirmation message indicating whether an item was successfully sent appears briefly on the front-panel display after each transaction If you need printed confirmation that your faxes are successfully sent see print reports on page 22 for information about report options
Note If you have not done so set the date and time See set the date and time on page 27
send a fax from your hp officejet1 Load your originals in the ADF
For more information see load originals on page 7
2 Enter the fax number using the keypad or press Speed Dial until the desired speed-dial entry appearsFor more information on speed dialing see set up speed dialing in the HP Photo amp Imaging Help
3 Press Start Black or Start Color
change settings and use speed dials before sending a fax1 Load your originals in the ADF
For more information see load originals on page 7
2 Enter the fax number using the keypad or press Speed Dial until the desired speed-dial entry appears
hp officejet 4100 series
chapter 6
20
For more information on speed dialing see set up speed dialing in the HP Photo amp Imaging Help
3 Press Enter
4 Press Fax to scroll through the fax options
5 When you reach the option whose setting you wish to change press to scroll through the setting options
6 When you reach the setting you want to change press Enter to accept the setting
7 Press Start Black or Start Color
send a color faxYou can send and receive color faxes to and from other color fax machines If you are faxing from the front panel and your HP Officejet determines that the recipient has a black-and-white fax unit it sends the fax in black and white If you are faxing from the software and your HP Officejet determines that the recipient has a black-and-white fax unit the HP Officejet prompts you to try sending the fax in black and white
We recommend that you use only color originals for color faxing The color originals must be loaded in the ADF you cannot send a color fax from memory using the scan and fax features To fax in color to multiple recipients send the fax from the Director or your software program
to send a color fax from the front panel
1 Load your originals in the ADF For more information see load originals on page 7
2 Enter the fax number using the keypad or press Speed Dial until the desired speed-dial entry appearsFor more information on creating speed-dial entries see set up speed dialing in the HP Photo amp Imaging Help
3 Press Start Color
schedule a faxYou can schedule a black and white fax to be sent later during the same day (for example when telephone lines are not as busy) If you use the front panel you can select a single recipient
When the specified time is reached your fax is automatically sent as soon as a connection can be made
1 Load your originals in the ADF
2 Enter the fax number using the keypad or press Speed Dial until the desired speed-dial entry appears
3 Press Enter
4 Press Fax to scroll through the fax options
5 Stop scrolling when you reach the How to Fax menu
6 Press to scroll through the setting options
7 Stop scrolling when you reach the Send Fax Later option
reference guide
use the fax features
21
8 Press Enter
9 Enter the Send Time using the numeric keypad
10 At the prompt press 1 for AM or 2 for PM
11 When Store Fax Now appears press 1 for Yes or 2 for NoIf 1 is selected the document is scanned to memory and is sent at the selected time If 2 is selected and you havenrsquot loaded your originals a message appears reminding you to load the original before the send time
12 Press Start Black
cancel a scheduled faxYou can cancel a fax stored in memory or one that is currently in progress
bull Press Cancel to cancel the scheduled fax
receive a faxYour HP Officejet is set to print received faxes automatically If you receive a legal-size fax and your HP Officejet is not currently configured to use legal-sized paper the unit automatically reduces the fax so that it fits on the paper that is loaded For more information see set automatic reduction on page 25
If you have an answering machine connected to the same line as your HP Officejet you may need to set the number of rings required before the HP Officejet begins receiving the fax The default number of rings before the HP Officejet receives a fax is 5
set the number of rings before answeringYou can specify how many rings should occur before your HP Officejet automatically answers the phone When you run the Fax Setup Wizard this is set automatically
If you do not want your HP Officejet to answer the phone Rings to Answer should be set to No Answer
1 Press Setup
2 Press 3 then press 3 againThis selects the Basic Fax Setup menu then the Rings to Answer option
3 Use the arrow keys to choose the number of rings and then press Enter
receive a fax manuallyBefore manually receiving a fax we recommend that you remove any originals from your HP Officejet so that they are not accidentally processed
Verify that Rings to Answer is set to No Answer
1 When your HP Officejet rings pick up the handset of a telephone that is on the same telephone line as your HP Officejet
2 If you hear fax tones press Start Black or Start Color or if you are receiving from an extension phone (on the same telephone line as your HP Officejet but not connected directly to it) press 1 2 3 on your phone
3 After you are finished hang up the telephone
hp officejet 4100 series
chapter 6
22
print reportsYou can set up your HP Officejet to print error reports and confirmation reports for each fax you send and receive You can also manually print reports as you need them
generate reports automaticallyThis setting lets you configure your HP Officejet so that it automatically prints error and confirmation reports
1 Press Setup
2 Press 1 then press 5This selects Print Report then selects Automatic Reports Setup
3 Press to scroll through the following report typesndash Every Error which prints whenever there is any kind of fax error
(default)ndash Send Error which prints whenever there is a transmission errorndash Receive Error which prints whenever there is a receiving errorndash Every Fax which confirms every time a fax is sent or receivedndash Send Only which prints every time a fax is sentndash Off which does not print fax reports
4 When you reach the report that you want press Enter
generate reports manuallyThis setting lets you print reports manually From the computer you can only print the Speed-Dial List and the Fax Log
to print reports from the front panel
1 Press Setup then press 1This selects the Print Report menu
2 Press to scroll through the following report typesndash Last Transaction which prints details of the last fax transactionndash Fax Log which prints a log of the last 30 fax transactionsndash Speed Dial List which prints a list of programmed speed dialsndash Self-Test Report which prints a report to assist you in diagnosing print
and alignment problems For more information see print a self-test report on page 32
ndash Automatic Reports Setup which is the automatic reports setting described in generate reports automatically on page 22
3 When you reach the report that you want press Enter
control resolution and contrastYour HP Officejet lets you change the resolution and contrast of documents that you are sending
change resolutionResolution affects the transmission speed and quality of faxed documents
reference guide
use the fax features
23
to change the resolution from the front panel
1 Load your originals in the ADF
2 Enter the fax number using the keypad or press Speed Dial until the desired speed-dial entry appears
3 Press Enter
4 Press Fax to scroll through the fax options
5 Stop scrolling when you reach the Resolution menu
6 Press until the desired resolution quality appears (Standard Photo Fine Very Fine)
7 Press EnterYour HP Officejet only faxes at the highest resolution supported by the receiving faxIf you choose Photo be aware that the faxing process takes longer to complete When faxing photographs we recommend that you choose Photo
change contrastChange this setting if you want a black-and-white fax to be darker or lighter than the original
to change the fax contrast from the front panel
1 Load your originals in the ADF
2 Enter the fax number using the keypad or press Speed Dial until the desired speed-dial entry appears
3 Press Enter
4 Press Fax to scroll through the fax options
5 Stop scrolling when you reach the LighterDarker menuThe range of values appears as a circle on a scale on the display
6 Press to lighten the fax or to darken itThe circle moves left or right as you press a button
7 Press Enter to accept the setting you selected
change other fax settings
redial a number automaticallyYou can set your HP Officejet to redial a busy and an unanswered number automatically If you initiated a fax from the computer the computer must be left on for the redialing process to work correctly
1 Press Setup
2 Press 4This selects the Advanced Fax Setup menu
3 Choose one of the following optionsndash Press 3
hp officejet 4100 series
chapter 6
24
This selects the Busy Redial option The default setting for Busy Redial is Redial
ndash Press 4This selects the No Answer Redial option The default setting for No Answer Redial is No Redial
4 Press Enter
5 Press to select Redial or No Redial as desired
6 Press Enter
forward faxes to another numberWith fax forwarding you can send a fax that you receive to another fax number during the next 24-hour period
to forward faxes from the front panel
1 Press Setup
2 Press 3 then press 7This selects the Basic Fax Setup menu then selects the Fax Forwarding Black Only option
3 At the prompt enter the Fax Number to which you wish to send the fax
4 Press Enter
5 Enter the Start Date using the numeric keypad
6 Enter the Start Time using the numeric keypad
7 At the prompt press 1 for AM or 2 for PM
8 Enter the Stop Date using the numeric keypadFax Forwarding On appears on the display
edit or cancel fax forwardingOnce fax forwarding is enabled you may find that you need to change the number you are faxing to or the start and stop times you entered You may wish to cancel your fax forwarding setup altogether Follow the steps below to edit or turn off fax forwarding
to edit fax forwarding from the front panel
1 Press Setup
2 Press 3 then press 7This selects the Basic Fax Setup menu then selects the Fax Forwarding Black Only option
3 Forwarding is ON 1=Edit 2=Cancel appears on the display after a moment Press 1 to edit the number you wish to fax to or to change the start and stop times Follow the messages on the display
to cancel fax forwarding from the front panelbull Press Cancel
OR
reference guide
use the fax features
25
Follow the steps in edit or cancel fax forwarding on page 24 When Forwarding is ON 1=Edit 2=Cancel appears on the display press 2 to cancel fax forwarding
use error correction modeError Correction Mode (ECM) eliminates data lost due to poor phone lines by detecting errors that occur during transmission and automatically requesting retransmission of the erroneous portion Phone charges are unaffected or may even be reduced on good phone lines On poor phone lines ECM increases sending time and phone charges but sends the data much more reliably Turn ECM off (the default setting is on) only if it increases phone charges substantially and you can accept poorer quality in exchange for reduced charges
to change the ECM setting from the front panel
1 Press Setup
2 Press 4 then press 7This selects the Advanced Fax Setup menu then selects the Error Correction Mode option
3 Press to switch between On and Off
4 Press Enter to accept the setting you selected
set automatic reductionThis setting determines what your HP Officejet does if it receives a fax that is too large for the default paper size With this setting on (the default) the image is reduced so that it fits on one page With this feature off information that doesnrsquot fit on the first page is printed on a second page
1 Press Setup
2 Press 4 then press 5This selects the Advanced Fax Setup menu then selects the Automatic Reduction option
3 Press to switch between On and Off
4 Press Enter to accept the setting you selected
adjust the volumeYour HP Officejet provides three levels for adjusting the ring and speaker volume The ring volume is the volume of the phone ringer The speaker volume is the volume of everything else such as the dial and fax tones The default setting is Soft
1 Press Setup
2 Press 3 then press 6This selects the Basic Fax Setup menu then selects the Ring and Beep Volume option
3 Press to select one of the options Soft Loud or Off
4 Press Enter to accept the setting you selected
hp officejet 4100 series
chapter 6
26
change the answer ring pattern (distinctive ringing)Distinctive ringing is a feature offered by phone companies that allows several phone numbers to share the same line Each number has a specific ring pattern If you do not have this service use the default ring pattern which is All Rings
If you connect your HP Officejet to a line with distinctive ringing have your telephone company assign one ring pattern to voice calls and another to fax calls (double or triple rings are best for a fax number)
1 Press Setup
2 Press 4 then press 2This selects the Advanced Fax Setup menu then selects the Answer Ring Pattern option
3 Press to scroll through these options All Rings Single Rings Double Rings Triple Rings and Double amp Triple
4 When the ring pattern that the phone company established for this number appears press Enter
Tip We recommend that you use Double Rings or Triple Rings for fax
set up speed dialingThrough your HP Officejet or your computer you can assign entries to fax numbers you use often This lets you dial those numbers quickly using the front panelrsquos Speed Dial button and a one- or two-digit entry You can create up to 100 individual speed-dial entries (the maximum for some models is 70)
We recommend that you use the software to set up speed-dial settings
Note A speed-dial entry can only be associated with one phone number speed-dial groups are not supported
For more information see set up speed dialing in the hp photo amp imaging help
create individual speed-dial settingsYou can enter fax numbers that you will reuse frequently
1 Press Setup
2 Press 2 then press 1This selects the Speed Dial Setup menu then selects the Individual Speed Dial option
3 Press EnterThe first unassigned speed-dial entry appears on the display
4 Press Enter to select the displayed speed-dial entry
5 Enter the Fax Number to assign to that entry then press EnterThe fax number can be up to 50 digits in length
Tip To enter a three-second pause within a number sequence press Symbols to display a dash
6 Enter the personrsquos or companyrsquos name then press Enter
reference guide
use the fax features
27
The name is limited to 13 characters in lengthFor more information see enter text on page 28
7 After Enter Another appears press 1 (Yes) if you want to set up another number or press 2 (No) to exit
delete speed-dial settingsFollow these steps to delete an individual speed-dial entry
1 Press Setup
2 Press 2 then press 2 againThis selects Speed Dial Setup then selects Delete Speed Dial
3 Press until the individual entry that you want to delete appears then press Enter
set basic fax settings using the front panelWe recommend that you use the Fax Setup Wizard in the HP Officejet software to configure all your basic fax settings however you can also access these settings from the front panel
Note In the US regulations require that your name and phone number appear on every fax The minimum settings that we recommend are described in the following topics
set the date and timeFollow these steps to set the date and time manually
1 Press Setup
2 Press 3 then press 1This selects the Basic Fax Setup menu then selects the Date and Time option
3 Follow the prompts on the display to enter the date and time using the keypad
Tip Use only the last two digits for the year
Tip When you enter a single-digit date or time type a leading zero before the single digit for example 0345 or 08-03-02
After you are done the date and time appear on the display
Warning Cutting off power to the HP Officejet causes the selected date and time to be lost However name and fax number information is not lost
set the fax headerFollow these steps to enter your name and fax number in the header
Note In Hungary the subscriber identification code (fax header) can be set or changed only by authorized personnel For more information contact your authorized HP dealer
1 Press Setup
2 Press 3 then press 2
hp officejet 4100 series
chapter 6
28
This selects the Basic Fax Setup menu then selects the Fax Header option
3 Enter your personal or company name at the prompt Use the guidelines provided in the next section under enter text
4 Press Enter
5 Enter your fax number using the numeric keypad
6 Press Enter
enter textThe following list provides tips for entering text using the front-panel keypad
bull Press the keypad numbers that correspond to the letters of a name
bull Press a button multiple times to see a letter first in uppercase and then in lowercase
bull After the correct letter appears press and then press the number that corresponds to the next letter in the name Again press multiple times until the correct letter appears
bull To insert a space press Space ()bull To enter a symbol such as press Symbols () to scroll through the list of
available symbolsbull If you make a mistake press to clear it and then make the correct
entrybull After you are done entering text press Enter to store your entries
check for dial toneBefore using the fax features verify that the connections are correctly established
1 Press Fax
2 Listen for a dial tone
3 If you do not hear a dial tone check the connections
4 Press Cancel to hang up
ABC These letters correspond to this number and so on
2
JKL To get this character J j K k L l 5
5 Press 5 this many times 1 2 3 4 5 6 7
reference guide
use the fax features
29
fax job menuThe following options become available when the Fax button is pressed
setup menu for fax commandsThe following fax settings are available in the Setup menu
Enter Fax or Speed Dial
FineVery FinePhotoStandard
Fax Number Resolution LighterDarker
Enter a fax number or speed dialWhen the Fax button is pressed
Press and to move to the option you wantPress Enter to select the displayed setting
NoYes
Set New Defaults
Send Fax NowFax from MemorySend Fax LaterPoll to Receive
How to Fax
1Automatic Reports Setup
2Answer Ring Pattern
3Busy Redial
4No Answer Redial
5Automatic Reduction
6Backup Fax Reception
7Error Correction Mode
3Basic Fax Setup 4Advanced Fax Setup
Press Setup to display the menu options
Press and to move to the setting you wantPress Enter to select the displayed setting
1Date and Time
2Fax Header
3Rings to Answer
4Paper Size
5Tone or Pulse Dialing
6Ring and Beep Volume
7Fax Forwarding Black Only
2Speed Dial Setup
1Individual Speed Dial
2Delete Speed Dial
3Print Speed Dial List
hp officejet 4100 series
chapter 6
30
7
31
maintain your hp officejet
This section provides instructions for keeping your HP Officejet in top working condition Perform these maintenance procedures as necessary
clean the glassDirty glass from dust smudges hair and so on slows down performance and affects the accuracy of features such as Fit to Page and Copy
1 Turn off the unit unplug the power cord and raise the scanner lid
2 Clean the glass with a soft cloth or sponge slightly moistened with a nonabrasive glass cleaner
Caution Do not use abrasives acetone benzene or carbon tetrachloride on the glass these can damage it Do not place liquids directly on the glass They may seep under it and damage the unit
3 Dry the glass with a chamois or cellulose sponge to prevent spotting
hp officejet 4100 series
chapter 7
32
clean the white stripMinor debris can accumulate on the white strip located underneath the scannerrsquos lid
1 Turn off the unit unplug the power cord and raise the scanner lid
2 Clean the white strip with a soft cloth or sponge slightly moistened with a mild soap and warm water
3 Wash the strip gently to loosen debris do not scrub the strip
4 Dry the strip with a chamois or soft cloth
Caution Do not use paper-based wipes as these may scratch the strip
5 If this does not clean the strip well enough repeat the previous steps using isopropyl (rubbing) alcohol and wipe the strip thoroughly with a damp cloth to remove any residual alcohol
clean the exterior Use a soft damp lint-free cloth to wipe dust smudges and stains off the case The interior of the unit does not require cleaning Keep fluids away from the interior of the unit as well as the front panel
work with print cartridgesTo ensure the best print quality from your HP Officejet you will need to perform some simple maintenance procedures and when prompted by a front-panel message replace the print cartridges
print a self-test reportIf you are experiencing problems with printing before cleaning or replacing the print cartridges you should print a Self-Test Report This report provides useful information about your print cartridges including status information
1 Press Setup
2 Press 1 then press 4This selects Print Report and then selects Self-Test Report
3 Press Start Black or Start ColorA Self-Test Report is printed for your HP Officejet
handle print cartridgesBefore you replace or clean a print cartridge you should know the part names and how to handle the print cartridge
reference guide
maintain your hp officejet
33
replace the print cartridgesFront-panel messages appear to let you know that you should replace your print cartridges
See order print cartridges on the back cover for information on ordering replacement print cartridges
1 Turn on the unit then lift open the print cartridge access doorThe print carriage moves into view
2 After the carriage stops moving push down on the print cartridge down to release it and then pull it toward you out of its slot
Plastic tape with pink tab(must be removed)
Copper contactsInk nozzles under tape
Do not touch the copper contacts or the ink nozzles
print cartridge access door
hp officejet 4100 series
chapter 7
34
Note It is normal to see ink build-up in the print cartridge slots
3 Remove the new print cartridge from its packaging and being careful to touch only the bright pink plastic tab gently remove the plastic tape to uncover the ink nozzles
Caution Do not touch the copper contacts or ink nozzles
Once you have removed the plastic tape install the print cartridge immediately to prevent the ink from drying in the nozzles
4 Push the new print cartridge into the appropriate slot at a slight angle until it clicks into place
Caution Do not attempt to push the cartridge straight into the slot It must slide in at a slight angle
The tri-color print cartridge goes on the left and the black cartridge goes on the right
5 Close the print cartridge access door
reference guide
maintain your hp officejet
35
align the print cartridgesThe HP Officejet prompts you to align cartridges every time you install or replace a print cartridge Aligning the cartridges ensures high-quality output
To align the print cartridges when prompted
1 Press Enter on the front panelAn align cartridges (test pattern) page prints
2 Load the align cartridges page face down in the ADF between the paper-width guides and press the Enter button again
3 Recycle or discard the page
To align the cartridges at any other time
1 Press Setup
2 Press 5 then press 2This selects the Maintenance menu and then selects the Align Print Cartridge option
3 Press EnterAn align cartridges (test pattern) page prints
4 Load the align cartridges page face down in the ADF between the paper-width guides and press the Enter button again
5 Recycle or discard the page
clean the print cartridgesUse this feature when the Self-Test Report shows streaking or white lines through any of the colored bars Do not clean print cartridges unnecessarily This wastes ink and shortens the life of the ink nozzles
1 Press Setup
2 Press 5 then press 1This selects the Maintenance menu and then selects the Clean Print Cartridge optionA page of patterns is printed The cartridges are cleaned Recycle or discard the pageIf copy or print quality still seem poor after you clean the print cartridges replace the print cartridge that is affected
restore factory defaultsYou can restore the original factory settings to what they were when you purchased your HP Officejet Choosing to restore your factory defaults restores all settings except date information and any scan settings you may have set
You can perform this process from the front panel only
1 Press Setup
2 Press 5 then press 3This selects Maintenance and then selects Restore Factory DefaultsThe factory default settings are restored
hp officejet 4100 series
chapter 7
36
set scroll speedThe Scroll Speed option lets you control the rate that text messages appear in the front-panel display You can choose Normal Fast or Slow The default is Normal
1 Press Setup
2 Press 5 then press 6This selects Maintenance and then selects Set Scroll Speed
3 Press until the desired speed appears then press Enter
set the prompt delay timeThe Prompt Delay option lets you control the amount of time before a message is displayed in the front-panel display You can choose Normal Fast or Slow The default is Normal
1 Press Setup
2 Press 5 then press 7This selects Maintenance and then selects Set Prompt Delay Time
3 Press until the delay time appears then press Enter
self-maintenance sounds During the life of your product you may hear various mechanical sounds This is a normal part of your unitrsquos self-maintenance
reference guide
maintain your hp officejet
37
setup menu optionsThe following options are available from the Setup button
1Last Transaction
2Fax Log
3Speed Dial List
4Self-Test Report
5Automatic Reports Setup
1Print Report
Use Setup to display the Print Report Speed Dial Setup Basic Fax Setup Advanced Fax Setup and Maintenance options
Press and to move to the setting you wantPress Enter to select the displayed setting
1Clean Print Cartridges
2Align Print Cartridges
3Restore Factory Defaults
4Reprint Faxes in Memory
5Set Language amp CountryRegion
6Set Scroll Speed
7Set Prompt Delay Time
5Maintenance2Speed Dial Setup
3Basic Fax Setup
4Advanced Fax Setup
1Individual Speed Dial
2Delete Speed Dial
3Print Speed Dial List
1Date and Time
2Fax Header
3Rings to Answer
4 Paper Size
5Tone or Pulse Dialing
6Ring and Beep Volume
7Fax Forwarding Black Only
1Automatic Reports Setup
2Answer Ring Pattern
3Busy Redial
4No Answer Redail
5Automatic Reduction
6Backup Fax Reception
7Error Correction Mode
hp officejet 4100 series
chapter 7
38
8
39
additional setup information
During the installation of the HP Officejet software a number of windows are displayed You should see the following
bull Installingbull Copying files bull A request to plug in the HP Officejetbull Green OK and check markbull Request to restart your computer (may not occur in all cases)bull Registration
If you did not see all of these windows there may be a problem with the installation Verify the following
bull The HP Director contains six icons (double-click the HP Director icon on the desktop)
bull The HP Officejet is listed in the Printers dialog boxbull There is an icon for the HP Officejet in the System Tray that indicates the
HP Officejet is ready
If the HP Director does not show six icons you may need to wait a few minutes for the HP Officejet to connect to your computer
possible installation problemsIf nothing appears on your computer screen after you insert the HP Officejet 4100 Series CD-ROM into your computerrsquos CD-ROM drive
1 From the Start menu choose Run
2 In the Run dialog box enter dsetupexe (if your CD-ROM drive is not assigned to drive letter d use the appropriate drive letter) then click OK
If the HP Director does not contain six icons do the following
bull Verify that the front-panel cover is attached then unplug the HP Officejet and plug it in again
bull Verify that the USB and power cables are plugged inndash Unplug the USB cable and plug it in againndash Do not attach the USB cable to a keyboard or nonpowered hubndash Verify that the USB cable is 3 meters or less in lengthndash If you have several USB devices attached to your computer you may
want to unplug the others during the installation
Note AppleTalk is not supported
bull Unplug the HP Officejet from the wall and plug it in againbull Restart your computer
hp officejet 4100 series
chapter 8
40
On Windows check the System Tray for applications that are running in the background and close them before restarting your computer
remove and reinstall your hp officejet softwareIf six icons do not appear in the Director you may need to uninstall and re-install the software Do not simply delete the HP Officejet program files from your hard drive Be sure to remove them properly using the uninstall utility provided in the HP Officejet program group
to uninstall from a Windows computer
1 Disconnect your HP Officejet from your computer
2 On the Windows taskbar click Start choose Programs or All Programs (XP) choose Hewlett-Packard choose hp officejet 4100 series then choose uninstall software
3 Follow the directions on the screenBe sure to disconnect your HP Officejet
4 If you are asked whether you would like to remove shared files click NoOther programs that use these files may not work properly if the files are deleted
5 After the program finishes removing the software disconnect your HP Officejet and restart your computer
Note It is important that you disconnect your HP Officejet before restarting your computer
6 To reinstall the software insert the HP Officejet 4100 Series CD-ROM into your computerrsquos CD-ROM drive and follow the instructions that appear
7 After the software is installed connect and turn on your HP Officejet following the onscreen instructions and the instructions in your Setup PosterAfter connecting and turning on your HP Officejet you may have to wait several minutes for all of the Plug and Play events to completeWhen the software installation is complete you will see a Status Monitor icon in the System Tray
8 To verify that the software is properly installed double-click on the HP Director icon on the desktop If the HP Director shows six icons the software has been properly installed
to uninstall from a Macintosh computer
1 Disconnect your HP Officejet from your computer
2 Double-click on ApplicationsHP All-in-One Software folder
reference guide
additional setup information
41
3 Double-click on HP Uninstaller
4 Follow the directions that appear on the screen
5 After the program finishes removing the software disconnect your HP Officejet and restart your computer
6 To reinstall the software insert the HP Officejet 4100 Series CD-ROM into your computerrsquos CD-ROM drive
Note When re-installing the software follow the instructions on the Setup Poster Do not connect the HP Officejet to your computer until after you have completed the software installation
7 On the desktop open the CD-ROM double-click on hp all-in-one installer and follow the instructions that appear
connect your hp officejet to a phone modem or answering machine
The HP Officejet can share a phone line with a phone a modem or an aswering machine When sharing a phone line with an answering machine the HP Officejet will answer fax calls and direct voice calls to the answering machine
Note For information on connecting your HP Officejet to your computer and phone line refer to the Setup Poster that came with your unit
to connect your hp officejet to a phone modem or answering machine
1 Remove the white plastic stopper from connector 2 on the back of the HP Officejet
To connect more than one device to connector 2 on the HP Officejet you must purchase a Y-splitter and plug it into connector 2
2 Connect the phone cord from the phone modem or answering machine to connector 2 (or Y-splitter)
Caution Do not use the phone cord that came with the HP Officejet for this purpose That phone cord must connect connector 1 on the HP Officejet to the wall jack for your phone system See the Setup Poster for details
3 If you are connecting an answering machine see set the number of rings before answering on page 21 for instructions on setting the number of rings correctly or change the answer ring pattern (distinctive ringing) on page 26 for information on incoming ring patterns
4 If you are connecting a modem turn off its fax-receive feature
connector 2 on the HP Officejet
connector 1 on the HP Officejet
hp officejet 4100 series
chapter 8
42
additional troubleshooting helpYou may want to refer to the readme file for more information on possible installation problems On Windows you can access the readme file from the Start button on the taskbar select Programs Hewlett-Packard hp officejet 4100 series View the Readme File On Macintosh you can access the readme file by double-clicking on the icon located in the top-level folder of the HP Officejet software CD-ROM
The readme file provides more information including
bull Using the Re-install utility after a failed installation to return your PC to a state that will allow the HP Officejet to be re-installed
bull Using the Re-install utility on Windows 98 to recover from a Composite USB System Driver missing errorThis error may occur if the hardware is installed prior to installing the software After running the Re-install utility reboot your PC and install the HP Officejet software before connecting the HP Officejet to your computer
You can also find more information on this website
wwwhpcomsupport
9
43
technical information
Additional specifications information can be found in the HP Photo amp Imaging Help in the hp officejet 4100 series section
physical specifications
power specificationsbull Power consumption 75W maximumbull Source (Input Voltage) 100 to 240 VAC groundedbull Input Frequency 50 to 60 Hzbull Current 1A maximum
regulatory informationAdditional regulatory information can be found in the HP Photo amp Imaging Help The information in this section supercedes information in the HP Photo amp Imaging Help
doc statement deacuteclaration de conformiteacute (Canada)Le preacutesent appareil numeacuterique neacutemet pas de bruit radioeacutelectrique deacutepassant les limites applicables aux appareils numeacuteriques de la classe B prescrites dans le Regraveglement sur le brouillage radioeacutelectrique eacutedicteacute par le ministegravere des Communications du CanadaThis digital apparatus does not exceed the Class B limits for radio noise emissions from digital apparatus set out in the Radio Interference Regulations of the Canadian Department of Communications
notice to users of the Canadian telephone networkThis equipment meets the applicable Industry Canada Terminal Equipment Technical Specifications This is confirmed by the registration number The abbreviation IC before the registration number signifies that registration was performed based on a Declaration of Conformity indicating that Industry Canada technical specifications were met It does not imply that Industry Canada approved the equipment
Note The Ringer Equivalence Number (REN) assigned to each terminal device provides an indication of the maximum number of terminals allowed to be connected to a telephone interface The termination on an interface may consist of any combination of devices subject only to the requirement that the sum of the Ringer Equivalence Numbers of all the devices does not exceed 5
The REN for this product is 03B based on FCC Part 68 test results
height width depth weight (without print cartridges)
with paper trays and ADF closed
718 in (1824 cm) 1676 in (4258 cm) 825 in (2096 cm) 75 lbs (34 kg)
with ADF and paper tray extended
1030 in (2615 cm) 1676 in (4258 cm) 1854 in (4709 cm) 75 lbs (34 kg)
hp officejet 4100 series
chapter 9
44
notice to all users of the European Economic Area (EEA)
This product is designed to interwork with the analogue telephone networks in the following countriesregions
Network compatibility depends on customer selected settings which must be reset to use the equipment on a telephone network in a countryregion other than where the product was purchased Contact the vendor or Hewlett-Packard Company if addition product support is necessaryThis equipment has been certified by the manufacturer in accordance with Directive 19995EC (annex II) for Pan-European single-terminal connection to the public switched telephone network (PSTN) However due to differences between the individual PSTNs provided in different countriesregions the approval does not of itself give an unconditional assurance of successful operation on every PSTN network termination pointIn the event of problems you should contact your equipment supplier in the first instance
geraumluschemissionLpA lt 70 dBam Arbeitsplatzim Normalbetriebnach DIN 45635 T 19
notice to Korean customers
Germany UK Netherlands
France Spain Italy
Belgium Luxembourg Sweden
Austria Denmark Ireland
Norway Finland Switzerland
Greece Portugal
10
45
hp support
This section explains the support services information provided by Hewlett-Packard If you are unable to find the answer you need in the printed or onscreen documentation supplied with your product you can contact one of the HP support services listed in the following pages Some support services are available only in the US and Canada while others are available in many countriesregions worldwide If a support service number is not listed for your countryregion contact your nearest authorized HP dealer for help
get support and other information from the internetIf you have Internet access you can get help from the following HP website
wwwhpcomsupportThe Web site offers technical support drivers supplies and ordering information
hp customer supportSoftware programs from other companies may be included with your HP Officejet If you experience problems with any of those programs you will receive the best technical assistance by calling the experts at that companyIf you need to contact HP Customer Support do the following before you call
1 Make sure thata Your unit is plugged in and turned onb The specified print cartridges are installed correctlyc The recommended paper is properly loaded in the input tray
2 Reset your unita Turn off the unit using the On button located on the unitrsquos front panelb Unplug the power cord from the back of the unitc Plug the power cord back into the unitd Turn on the unit using the On button
3 For more information check the HP website at wwwhpcomsupport
4 If you are still experiencing problems and need to speak with an HP Customer Support Representativendash Have your service ID and serial number ready To display your service ID and
serial number on the front panel do the following Press Enter and Start Color at the same time until the service ID appears in the front-panel display From this display press the right arrow until the serial number displays
ndash Print a Self-Test Report See print a self-test report on page 32 for information on printing this report
ndash Make a color copyndash Be prepared to describe your problem in detail
5 Call HP Customer Support Be near your unit when you call
call in the US during warrantyCall (208) 323-2551 This service is free during the warranty period however your standard long-distance phone charges still apply A fee may apply outside the warranty period
hp officejet 4100 series
chapter 10
46
US phone support is available in both English and Spanish languages 24 hours a day 7 days a week (days and hours of support may change without notice)
call elsewhere in the worldThe numbers listed below are current as of the printing date of this guide For a list of current international HP Support Service numbers visit this address and choose your own countryregion or language
wwwhpcomsupportFor Korea you can also visit this address
httpwwwhpcokrYou can call the HP support center in the following countriesregions If your countryregion is not listed contact your local dealer or nearest HP Sales and Support Office to find out how to obtain servicesSupport service is free during the warranty period however your standard long-distance phone charges will apply In some cases a flat fee per single incident will also applyFor phone support in Europe please check for the details and conditions of phone support in your countryregion by consulting the following Web site
wwwhpcomsupportAlternatively you can ask your dealer or call HP at the phone number indicated in this booklet As part of our constant efforts to improve our phone support service we advise you to check our website on a regular basis for new information regarding service features and delivery
countryregion hp technical support countryregion hp technical support
Algeria1 +213 (0) 61564 543 Malaysia 1-800-805405
Argentina 0810-555-5520 Mexico 01-800-472-6684
Australia +61 3 8877 80001902 910 910
Mexico (Mexico City) 5258-9922
Austria +43 (0) 810 00 6080 Morocco1 +212 22404 747
Bahrain (Dubai) 800 728 Netherlands +31 (0) 20 606 8751
Belgium (Dutch) +32 (0) 2 626 8806 New Zealand 0800 441 147
Belgium (French) +32 (0) 2 626 8807 Norway +47 22 11 6299
Brazil (Grande Sao Paulo) (11) 3747 7799 Oman +971 4 883 8454
Brazil (Demais Localidades) 0800 157751 Palestine +971 4 883 8454
Canada during warranty (905) 206 4663 Panama 001-800-7112884
Canada post-warranty(per-call charge)
1-877-621-4722 Peru 0-800-10111
Caribbean amp Central America
1-800-711-2884 Philippines 632-867-3551
Chile 800-360-999 Poland +48 22 865 98 00
China 86 10 6868 7980 Portugal +351 21 3176333
Colombia 9-800-114-726 Puerto Rico 1-877-2320-589
Costa Rica 0-800-011-0524 Qatar +971 4 883 8454
Czech Republic +420 (0) 261307310 Romania +40 1 315 44 42or local 01 3154442
reference guide
hp support
47
call in Australia post-warrantyIf your product is not under warranty you can call 03 8877 8000 A per-incident out-of-warranty support fee of $2750 (inc GST) will be charged to your credit card You can also call 1902 910 910 ($2750 charged to your phone account) from 900 AM to 500 PM Monday through Friday (Charges and support hours are subject to change without notice)
prepare your unit for shipmentIf after contacting HP Customer Support or returning to the point of purchase you are requested to send your unit in for service please follow the power off and rebox steps below to avoid further damage to the HP product
Denmark +45 39 29 4099 Russian Federation Moscow +7 095 797 3520
Ecuador 1800-711-2884 Russian Federation St Petersburg
+7 812 346 7997
Europe (English) +44 (0) 207 512 5202 Saudi Arabia +800 897 14440
Egypt 02 532 5222 Singapore 65 6272 5300
Finland +358 (0) 203 47 288 Slovakia +421 (0) 2 682 08080
France (034 Euromin) +0892 69 60 22 South Africa (inside RSA) 086 000 1030
Germany (012 Euromin) +49 (0) 180 52 58 143 South Africa (inside RSA) +27-11 258 9301
Greece +30 1060 73 603 Spain +34 902 321 123
Hong Kong (SAR) +85 (2) 3002 8555 Sweden +46 (0)8 619 2170
Guatemala 1800-995-5105 Switzerland 2 +41 (0) 84 880 1111
Hungary +36 (0) 1 382 1111 Taiwan +886-2-2717-00550800 010 055
India 1-600-11226791 11 682 6035
Thailand +66 (2) 661 4000
Indonesia 62-21-350-3408 Tunisia1 +216 1891 222
Ireland +353 (0) 1 662 5525 Turkey +90 216 579 7171
Israel +972 (0) 9 8304848 Ukraine +7 (380-44) 490-3520
Italy +39 (0) 226410350 United Arab Emirates +971 4 883 8454
Japan 0570 000 511+81 3 3335 9800
United Kingdom +44 (0) 207 512 52 02
Jordan +971 4 883 8454 Venezuela 0800-47468368 or800-477-7777
Korea (Seoul) +82 (2) 3270 0700 Venezuela (Caracas) (502) 207-8488
Korea (outside Seoul) 080 999 0700 Vietnam 84 (0) 8 823 4530
Kuwait +971 4 883 8454 Yemen +971 4 883 8454
Lebanon +971 4 883 8454
1 This Call Center supports French speaking customers from the following countriesregions Morocco Tunisia and Algeria
2 This Call Center supports German French and Italian speaking customers in Switzerland
countryregion hp technical support countryregion hp technical support
hp officejet 4100 series
chapter 10
48
Note When transporting your HP Officejet make sure that the pens have been removed the HP Officejet has been properly shut down by pressing the power button and you have allowed time for the carriage to return to the service station and for the scanner to return to its parked position
1 Turn on the unitDisregard steps 1 through 6 if your unit will not turn on and the print carriage is in the home position You will not be able to remove the print cartridges Proceed to step 7
2 Open the print cartridge access doorThe print carriage moves into view
3 See replace the print cartridges on page 33 for information on removing the print cartridges
Caution Remove both print cartridges Failure to do so may damage your unit
4 Place the print cartridges in an airtight bag so they will not dry out and put them aside (do not send them with the unit unless instructed to by the HP customer support call agent)
5 Turn off the unit
6 Close the print cartridge access door
7 Remove the front panel cover as followsa Grasp the front of the front panel cover with two hands as shownb Firmly lift the front panel cover to unsnap it from the unit
8 Retain the front panel cover Do not return the front panel cover with the unit
9 If available pack the unit for shipment using the original packing materials or the packaging materials that come with your exchange unit
If you do not have the original packaging materials please use other adequate packaging materials Shipping damage caused by improper packaging andor improper transportation is not covered under the warranty
reference guide
hp support
49
10 Place the return shipping label on the outside of the box
11 Include the following items in the boxndash A complete description of symptoms for service personnel (samples of print
quality problems are helpful)ndash A copy of the sales slip or other proof of purchase to establish the warranty
coverage periodndash Your name address and a phone number where you can be reached during
the day
hp distribution centerTo order HP Officejet software a copy of the printed Reference Guide a setup poster or other customer-replaceable parts do one of the following bull In the US or Canada call (208) 323 2551bull Visit this website
httpwwwhpcomcposupportsoftwarehtml
hp officejet 4100 series
chapter 10
50
11
51
warranty information
HP Officejet 4100 seriesDuration of Limited Warranty (hardware and labor) 1 YearDuration of Limited Warranty (CD media) 90 DaysDuration of Limited Warranty (print cartridges) Until the HP ink is depleted or the ldquoend of warrantyrdquo date printed on the cartridge has been reached whichever occurs first
warranty service
express serviceTo obtain HP express repair service the customer must contact an HP service office or an HP Customer Support Center for basic troubleshooting first See hp customer support on page 45 for steps to take before calling Customer SupportIf a customer unit needs a minor part replacement and these parts can normally be replaced by the customer the customer-replaceable components may be serviced through expedited part shipment In this event HP will prepay shipping charges duty and taxes provide telephone assistance on replacement of the component and pay shipping charges duty and taxes for any part that HP asks to be returnedThe HP Customer Support Center may direct customers to designated authorized service providers who are certified by HP to service the HP product
warranty upgradesUpgrade your standard factory warranty to a total of three years with the HP SUPPORTPACK Service coverage begins on product purchase date and the pack must be purchased within the first 180 days of product purchase This program offers phone support from 600 AM to 1000 PM Mountain Standard Time (MST) Monday through Friday and 900 AM to 400 PM (MST) on Saturdays If during your technical support call it is determined that you need a replacement product then HP will ship you this product next business day free of charge Available in US onlyFor more information please call 1-888-999-4747 or visit the following HP Web site
httpwwwhpcomgohpsupportpack
Outside the US please call your local HP Customer Support office See call elsewhere in the world on page 46 for a list of international Customer Support numbers
returning your hp officejet for serviceBefore returning your HP Officejet for service you must call HP Customer Support See hp customer support on page 45 for steps to take before calling Customer Support
hewlett-packard limited global warranty statement
extent of limited warrantyHewlett-Packard (ldquoHPrdquo) warrants to the end-user customer (ldquoCustomerrdquo) that each HP Officejet 4100 Series product (ldquoProductrdquo) including related software accessories media and supplies shall be free from defects in material and workmanship for the duration which begins on the date of purchase by the Customer
hp officejet 4100 series
chapter 11
52
For each software Product HPrsquos limited warranty applies only to a failure to execute programming instructions HP does not warrant that the operation of any Product shall be uninterrupted or error freeHPrsquos limited warranty covers only those defects which arise as a result of normal use of a Product and does not cover any other problems including those which arise as a result of (a) improper maintenance or modification (b) software accessories media or supplies not provided or supported by HP or (c) operation outside the Productrsquos specificationsFor any hardware Product the use of a non-HP print cartridge or a refilled print cartridge does not affect either the warranty to the Customer or any HP support contract with the Customer However if Product failure or damage is attributable to the use of a non-HP or refilled print cartridge HP shall charge its standard labor and materials charges to service the Product for the failure or damageIf HP receives during the applicable warranty period notice of a defect in any Product HP shall either repair or replace the defective Product at HPrsquos option Where labor charges are not covered by HPrsquos limited warranty repairs shall be at HPrsquos standard charges for laborIf HP is unable to repair or replace as applicable a defective Product which is covered by HPrsquos warranty HP shall within a reasonable time after being notified of the defect refund the purchase price for the ProductHP shall have no obligation to repair replace or refund until the Customer returns the defective Product to HPAny replacement product may be either new or like-new provided that it has functionality at least equal to that of the Product being replacedHP products including each Product may contain remanufactured parts components or materials equivalent to new in performanceHPs limited warranty for each Product is valid in any countryregion or locality where HP has a support presence for the Product and where HP has marketed the Product The level of warranty service may vary according to local standards HP shall have no obligation to alter the form fit or function of the Product in order to make it operate in a countryregion or locality for which the Product was never intended to operate
limitations of warrantyTO THE EXTENT ALLOWED BY LOCAL LAW NEITHER HP NOR ITS THIRD PARTY SUPPLIERS MAKE ANY OTHER WARRANTY OR CONDITION OF ANY KIND WHETHER EXPRESS OR IMPLIED WITH RESPECT TO THE COVERED HP PRODUCTS AND SPECIFICALLY DISCLAIM THE IMPLIED WARRANTIES OR CONDITIONS OF MERCHANTABILITY SATISFACTORY QUALITY AND FITNESS FOR A PARTICULAR PURPOSE
limitations of liabilityTo the extent allowed by local law the remedies provided in this Limited Warranty Statement are the Customerrsquos sole and exclusive remediesTO THE EXTENT ALLOWED BY LOCAL LAW EXCEPT FOR THE OBLIGATIONS SPECIFICALLY SET FORTH IN THIS LIMITED WARRANTY STATEMENT IN NO EVENT SHALL HP OR ITS THIRD PARTY SUPPLIERS BE LIABLE FOR DIRECT INDIRECT SPECIAL INCIDENTAL OR CONSEQUENTIAL DAMAGES WHETHER BASED ON CONTRACT TORT OR ANY OTHER LEGAL THEORY AND WHETHER ADVISED OF THE POSSIBILITY OF SUCH DAMAGES
local lawThis Limited Warranty Statement gives the Customer specific legal rights The Customer may also have other rights which vary from state to state in the United States from province to province in Canada and from countryregion to countryregion elsewhere in the world
reference guide
warranty information
53
To the extent this Limited Warranty Statement is inconsistent with local law this Statement shall be deemed modified to be consistent with such local law Under such local law certain disclaimers and limitations of this Statement may not apply to the Customer For example some states in the United States as well as some governments outside the United States (including provinces in Canada) mayPreclude the disclaimers and limitations in this Statement from limiting the statutory rights of a consumer (eg the United Kingdom)Otherwise restrict the ability of a manufacturer to enforce such disclaimers or limitations orGrant the Customer additional warranty rights specify the duration of implied warranties which the manufacturer cannot disclaim or not allow limitations on the duration of implied warrantiesFOR CONSUMER TRANSACTIONS IN AUSTRALIA AND NEW ZEALAND THE TERMS IN THIS LIMITED WARRANTY STATEMENT EXCEPT TO THE EXTENT LAWFULLY PERMITTED DO NOT EXCLUDE RESTRICT OR MODIFY AND ARE IN ADDITION TO THE MANDATORY STATUTORY RIGHTS APPLICABLE TO THE SALE OF THE COVERED HP PRODUCTS TO SUCH CUSTOMERS
hp officejet 4100 series
chapter 11
54
55
index
Numerics4-by-6 inch photo paper
load 10 12
AADF 7adjust
volume for fax 25align print cartridges 35Answer Ring Pattern 26automatic document feeder 7automatic reduction
fax 25
Bbest copy quality 13busy number
redial automatically 23
Ccancel
scan 18scheduled fax 21
cartridgesalign 35replace 33
cleanprint cartridges 35the exterior 32the glass 31white strip 32
colorenhance 14fax 20fax from front panel 20
contrastchange for fax 23photo color 14
copy 13 16change default settings 15enhance 14fit to page 16lighten or darken 14menu options 16number of copies 14photo 15quality 13reduce or enlarge 14settings 13 15
speed 13tutorial 4
Customer Support 45web site 45
Ddarken a copy 14date
setting 27default settings
restore 35director review 4distinctive ringing 26
Eenhance copies 14enlarge copy 14 16envelopes
load 9Error Correction Mode
(ECM) 25
Ffactory defaults
restore 35fast copy quality 13fax 28
adjust volume 25automated reports 22cancel fax forward 24cancel scheduled 21change Answer Ring
Pattern 26change contrast 23change resolution 22change settings 19control appearance 22create individual speed-dial
settings 26delete speed-dial
settings 27distinctive ringing 26Error Correction Mode
(ECM) 25forward faxes 24header 27in color 20in color from front panel 20manual reports 22
menu 29print reports 22receive 21receive manually 21redial busy or unanswered
number 23schedule 20send from front panel 19set automatic reduction 25set date and time 27set the number of rings 21settings 27 28setup menu options 29speed dials 19test 28
fit to page 16forward faxes 24
cancel 24front panel
display scroll speed 36enter text 28send a fax 19setting prompt delay 36tutorial 3
Gglass
cleaning 31greeting cards
load 11
Hhelp 1HP Customer Support 45
calling 45HP Director 4HP distribution center 49HP Officjet
preparing to ship 47HP papers
tips on loading 11
Iindividual speed-dial settings
create 26ink cartridges see print
cartridgesinkjet paper
load 11
index
hp officejet 4100 series56
Kkeypad
enter text 28
Llabels
load 12lighten copies 14load
change the paper type 12envelopes 9original in ADF 7paper 7photo paper 10 12postcards 10 12print cartridges 33set the paper size 12tips 11
Mmaintenance
align print cartridges 35clean print cartridges 35clean the exterior 32clean the glass 31clean the white strip 32normal sounds 36replace print cartridges 33restore factory defaults 35self-maintenance
sounds 36self-test report 32
menuscopy options 16fax 29fax setup 29maintenance 37print reports 37
Nnormal copy quality 13number of copies
set 14number of rings
set 21
Oorder print cartridges 60originals
load in ADF 7output tray 8
Ppaper
change default size for copy 12
change the type 12load 7recommended 7set the size 12tips on loading 11
paper size change for copy 12
paper trayload 7
phone numbers support services 45
photo paperload 10 12
photoscopy 15enhance copy 14
physical specifications 43postcards
load 10 12power
specifications 43print
envelopes 9fax reports 22self-test report 32
print cartridgesalign 35clean 35handling 32replace 33
prompt delaysetting 36
Qquick start
review the director 4use with a computer 4
Rreceive
fax 21redial
busy or unanswered number 23
reduce copy 14 16regulatory information 43reinstall software 40reports
generate automatically for fax 22
generate manually for fax 22
print 22self-test 32
resolution
change for fax 22restore factory settings 35returning your HP Officejet for
service 51
Sscan
from front panel 17stop 18
schedule a fax 20scroll speed
setting 36self-test report 32send
cancel forward faxes 24color fax 20color fax from front
panel 20forward faxes 24
settingscopy 13 15fax 27 28prompt delay 36scroll speed 36
setupadditional information 39menu 29
shippingyour HP Officejet 47
softwareremove and reinstall 40
soundsself-maintenance 36
specificationsphysical 43power 43
speed dials 19create individual
settings 26delete settings 27
stopscan 18scheduled fax 21
subscriber identification code 27
support services 45
Ttelephone line
multiple numbers 26telephone numbers 45text
enhance 14enter from front panel 28
time
index
reference guide 57
setting 27transparency film
recommended 7tips on loading 11
troubleshootingremove and reinstall
software 40T-shirt Transfer Iron-On
load 11tutorial
front panel 3make a copy 4
Uunanswered number
redial automatically 23
Vvolume
adjust 25
Wwarranty 45
service 51statement 51upgrades 51
white stripcleaning 32
hp officejet 4100 series
chapter 12
58
declaration of conformityAccording to ISOIEC Guide 22 and EN 45014
Manufacturerrsquos Name and Address
Hewlett-Packard Company 16399 West Bernardo Drive San Diego CA 92127-1899 USA
declares that the product
Product Name hp officejet 4100 series (Q1608A)
Model Number(s) officejet 4110 (Q1609A) officejet 4110xi (Q1610A) officejet 4110v (Q1611A) officejet 4105 (Q1612A) officejet 4105z (Q1613A) officejet 4115 (Q1614A)
Product Options All
conforms to the following Product Specifications
Safety EN609501992 +A1 A2 A3 A4 amp A11
IEC609501991 +A1 A2 A3 amp A4
UL1950CSA 222 No 950 3rd Edn 1995
NOM-019-SCFI-1993
EMC CISPR221993 +A1 amp A2 EN550221994 +A1 amp A2 -Class B
CISPR241997EN550241998
IEC 61000-3-21995 EN61000-3-21995
IEC 61000-3-31994 EN61000-3-31995
ASNZS 3548 1992
CNS13438 1997
FCC Part 15-Class B ICES-003 Issue 2 VCCI-2
GB 9254-1998
Telecom TBR21 1998
Supplementary Information
The Product herewith complies with the requirements of the Low Voltage Directive 7323EEC the EMC Directive 89336EEC and the RampTTE Directive 19995EC (ANNEX II) carries the CE marking accordingly
European Contact for regulatory topics only Your local Hewlett-Packard Sales and Service Office orHewlett-Packard GmbH
Department HQ-TRE Herrenberger Strasse 140 D-71034 Boumlblingen Germany (FAX + 49-7031-14-3143)
order mediaTo order media such as HP Premium Inkjet Paper HP Premium Inkjet Transparency Film HP Iron-On T-shirt Transfer paper or HP Greeting Cards go to
wwwhpshoppingcom
For orders in countries other than the US and Canada select other countries then click Yes to leave hpshoppingcom From this website you can access hpshoppingcom for your specific language or countryregion
order print cartridges
If you have Internet access you can get more information from the HP website at
wwwhpcomsupport
print cartridges hp reorder number
HP black print cartridge 56 19 ml black print cartridge
HP color print cartridgeHP tri-color print cartridge
57 17 ml color print cartridge28 8 ml color print cartridge
Visit the hp officejet information centerIt has everything you need to get the most value from your HP Officejet
bull Technical Supportbull Supplies and Ordering Informationbull Project Tipsbull Ways to Enhance Your Product
wwwhpcomsupport
copy 2003 Hewlett-Packard Company
Printed in the USA Mexico Germany Singapore or China
Q1608-90163Q1608-90163
Q1608-90163

reference guide
use the copy features
15
Text enhancement is the default option You can turn off Text enhancement by selecting Photo Mixed or None if the following occur
bull Stray dots of color surround some text on your copiesbull Large black typefaces look splotchy (not smooth)bull Thin colored objects or lines contain black sectionsbull Horizontal grainy or white bands appear in light- to medium-gray areas
1 Press Copy until Enhancements appears
2 Press until the desired enhancement (Text Photo Mixed or None) appears
3 Press Enter to select the setting
4 Press Start Black or Start Color
change settings for all copy tasksSave the copy settings you use most often by setting them as the default This includes changes to Copy options such as Paper Type and Paper Size as well as other Copy settings on the front panel such as Number of Copies and Copy Quality
1 Make any desired changes to the copy options
2 Press Copy until Set New Defaults appears
3 Press until Yes appears
4 Press Enter to set the options as a defaultYour settings are saved
perform special copy jobsIn addition to supporting standard copying your HP Officejet can also copy a photo or fit a copy to the page
copy a photoWhen copying a photo you should select options for the correct paper type and photo enhancement
1 Load the photo in the automatic document feeder (ADF)For more information see load originals
2 If you are using photo paper load it in the paper tray
3 Press Copy until Paper Type appears
4 Press until Premium Photo appears and then press Enter to select it
5 Press Copy until Enhancements appears
6 Press until Photo appears and then press Enter to select it
7 Press Start Black or Start Color
Tip To enlarge a photo automatically to a full page use the Photo Fit to Page button
hp officejet 4100 series
chapter 4
16
fit a copy to the pageUse the Photo Fit to Page button when you want to automatically enlarge or reduce your original to fit Letter or A4 size paper You can enlarge a small photo to fit a full-size page as shown below Using Photo Fit to Page may prevent unwanted cropping of text or images around the margins
1 Load the original in the ADFFor more information see load originals on page 7
2 Press the Photo Fit to Page button
Note Do not press the Fax Copy or Scan buttons on the front panel once you have pressed the Photo Fit to Page button
3 Press until the appropriate paper type appears and then press Enter to select it
4 Press Start Black or Start Color
copy optionsThe following diagram shows the options that are available when you press Copy
Original Fit to Page
Plain PaperPhoto PaperTransparency
Actual sizeCustom 100Full Page 91Legal gt Ltr 72
ReduceEnlarge Paper Type
NoYes
TextPhotoMixedNone
Enhancements Set New Defaults
LetterLegalA4
Copy Paper Size
The sizes vary by countryregion
LighterDarker
NormalFastBest
Copy Quality
To cycle through the copy options press Copy repeatedly
Press and to move to the setting you want within one of the copy optionsPress Enter to select the displayed setting
5
17
use the scan features
Scanning is the process of converting pictures and text into an electronic format for your computer You can scan photos and text documents
Because the scanned image or text is in an electronic format you can bring it into your word processor or graphics program and modify it to suit your needs You can do the following
bull Scan photos of your kids and e-mail them to relatives create a photographic inventory of your house or office or create an electronic scrapbook
bull Scan text from an article into your word processor and quote it in a report saving you a lot of retyping
Tip To use the scan features your HP Officejet and computer must be connected and turned on The HP Officejet software must also be installed and running on your computer prior to scanning To verify that the HP Officejet software is running on Windows look for a status icon in the system tray On a Macintosh the HP Officejet software is always running
Note High resolution scanning (600 dpi or higher) requires a large amount hard disk space If there is not enough hard disk space available your system may stall
scan an originalYou can start a scan from your HP Officejet or from the HP Officejet software on your computer
For more information about scanning your pictures or documents from the HP Officejet software see scan pictures and documents in the HP Photo amp Imaging Help
to scan an original from your hp officejet
1 Load your original in the automatic document feeder (ADF)For more information see load originals on page 7
2 Press Scan
3 Select the Scan to destination by pressing or or by pressing the Scan button repeatedlyThe default destination is the HP Photo amp Imaging Gallery Any applications on your computer that are supported by the HP Officejet also appear in the Scan to list
4 Press Start Black or Start ColorThe original is scanned and the image is sent to selected destinationFor more information about using the HP Photo amp Imaging Gallery see manage images in how to use the software
hp officejet 4100 series
chapter 5
18
stop scanningYou can stop a scan by pressing the Cancel button located on the front panel
6
19
use the fax features
Using your HP Officejet you can
bull Send and receive paper faxesbull Send computer faxes (reference the HP Photo amp Imaging Help)bull Send and receive color faxes
Fax features are available only on some HP Officejets
send a faxYou can send a fax in a variety of configurations These include the following
bull send a paper fax (using the front panel or computer)bull send a paper fax with a PC-generated cover page (using the computer)bull send a file with or without a cover page (using the computer)bull send a PC-generated cover page as a single-page fax (using the
computer)
Note For information on sending a fax using the computer reference the HP Photo amp Imaging Help
Note By default your HP Officejet prints a report only if there is a problem with sending or receiving a fax A confirmation message indicating whether an item was successfully sent appears briefly on the front-panel display after each transaction If you need printed confirmation that your faxes are successfully sent see print reports on page 22 for information about report options
Note If you have not done so set the date and time See set the date and time on page 27
send a fax from your hp officejet1 Load your originals in the ADF
For more information see load originals on page 7
2 Enter the fax number using the keypad or press Speed Dial until the desired speed-dial entry appearsFor more information on speed dialing see set up speed dialing in the HP Photo amp Imaging Help
3 Press Start Black or Start Color
change settings and use speed dials before sending a fax1 Load your originals in the ADF
For more information see load originals on page 7
2 Enter the fax number using the keypad or press Speed Dial until the desired speed-dial entry appears
hp officejet 4100 series
chapter 6
20
For more information on speed dialing see set up speed dialing in the HP Photo amp Imaging Help
3 Press Enter
4 Press Fax to scroll through the fax options
5 When you reach the option whose setting you wish to change press to scroll through the setting options
6 When you reach the setting you want to change press Enter to accept the setting
7 Press Start Black or Start Color
send a color faxYou can send and receive color faxes to and from other color fax machines If you are faxing from the front panel and your HP Officejet determines that the recipient has a black-and-white fax unit it sends the fax in black and white If you are faxing from the software and your HP Officejet determines that the recipient has a black-and-white fax unit the HP Officejet prompts you to try sending the fax in black and white
We recommend that you use only color originals for color faxing The color originals must be loaded in the ADF you cannot send a color fax from memory using the scan and fax features To fax in color to multiple recipients send the fax from the Director or your software program
to send a color fax from the front panel
1 Load your originals in the ADF For more information see load originals on page 7
2 Enter the fax number using the keypad or press Speed Dial until the desired speed-dial entry appearsFor more information on creating speed-dial entries see set up speed dialing in the HP Photo amp Imaging Help
3 Press Start Color
schedule a faxYou can schedule a black and white fax to be sent later during the same day (for example when telephone lines are not as busy) If you use the front panel you can select a single recipient
When the specified time is reached your fax is automatically sent as soon as a connection can be made
1 Load your originals in the ADF
2 Enter the fax number using the keypad or press Speed Dial until the desired speed-dial entry appears
3 Press Enter
4 Press Fax to scroll through the fax options
5 Stop scrolling when you reach the How to Fax menu
6 Press to scroll through the setting options
7 Stop scrolling when you reach the Send Fax Later option
reference guide
use the fax features
21
8 Press Enter
9 Enter the Send Time using the numeric keypad
10 At the prompt press 1 for AM or 2 for PM
11 When Store Fax Now appears press 1 for Yes or 2 for NoIf 1 is selected the document is scanned to memory and is sent at the selected time If 2 is selected and you havenrsquot loaded your originals a message appears reminding you to load the original before the send time
12 Press Start Black
cancel a scheduled faxYou can cancel a fax stored in memory or one that is currently in progress
bull Press Cancel to cancel the scheduled fax
receive a faxYour HP Officejet is set to print received faxes automatically If you receive a legal-size fax and your HP Officejet is not currently configured to use legal-sized paper the unit automatically reduces the fax so that it fits on the paper that is loaded For more information see set automatic reduction on page 25
If you have an answering machine connected to the same line as your HP Officejet you may need to set the number of rings required before the HP Officejet begins receiving the fax The default number of rings before the HP Officejet receives a fax is 5
set the number of rings before answeringYou can specify how many rings should occur before your HP Officejet automatically answers the phone When you run the Fax Setup Wizard this is set automatically
If you do not want your HP Officejet to answer the phone Rings to Answer should be set to No Answer
1 Press Setup
2 Press 3 then press 3 againThis selects the Basic Fax Setup menu then the Rings to Answer option
3 Use the arrow keys to choose the number of rings and then press Enter
receive a fax manuallyBefore manually receiving a fax we recommend that you remove any originals from your HP Officejet so that they are not accidentally processed
Verify that Rings to Answer is set to No Answer
1 When your HP Officejet rings pick up the handset of a telephone that is on the same telephone line as your HP Officejet
2 If you hear fax tones press Start Black or Start Color or if you are receiving from an extension phone (on the same telephone line as your HP Officejet but not connected directly to it) press 1 2 3 on your phone
3 After you are finished hang up the telephone
hp officejet 4100 series
chapter 6
22
print reportsYou can set up your HP Officejet to print error reports and confirmation reports for each fax you send and receive You can also manually print reports as you need them
generate reports automaticallyThis setting lets you configure your HP Officejet so that it automatically prints error and confirmation reports
1 Press Setup
2 Press 1 then press 5This selects Print Report then selects Automatic Reports Setup
3 Press to scroll through the following report typesndash Every Error which prints whenever there is any kind of fax error
(default)ndash Send Error which prints whenever there is a transmission errorndash Receive Error which prints whenever there is a receiving errorndash Every Fax which confirms every time a fax is sent or receivedndash Send Only which prints every time a fax is sentndash Off which does not print fax reports
4 When you reach the report that you want press Enter
generate reports manuallyThis setting lets you print reports manually From the computer you can only print the Speed-Dial List and the Fax Log
to print reports from the front panel
1 Press Setup then press 1This selects the Print Report menu
2 Press to scroll through the following report typesndash Last Transaction which prints details of the last fax transactionndash Fax Log which prints a log of the last 30 fax transactionsndash Speed Dial List which prints a list of programmed speed dialsndash Self-Test Report which prints a report to assist you in diagnosing print
and alignment problems For more information see print a self-test report on page 32
ndash Automatic Reports Setup which is the automatic reports setting described in generate reports automatically on page 22
3 When you reach the report that you want press Enter
control resolution and contrastYour HP Officejet lets you change the resolution and contrast of documents that you are sending
change resolutionResolution affects the transmission speed and quality of faxed documents
reference guide
use the fax features
23
to change the resolution from the front panel
1 Load your originals in the ADF
2 Enter the fax number using the keypad or press Speed Dial until the desired speed-dial entry appears
3 Press Enter
4 Press Fax to scroll through the fax options
5 Stop scrolling when you reach the Resolution menu
6 Press until the desired resolution quality appears (Standard Photo Fine Very Fine)
7 Press EnterYour HP Officejet only faxes at the highest resolution supported by the receiving faxIf you choose Photo be aware that the faxing process takes longer to complete When faxing photographs we recommend that you choose Photo
change contrastChange this setting if you want a black-and-white fax to be darker or lighter than the original
to change the fax contrast from the front panel
1 Load your originals in the ADF
2 Enter the fax number using the keypad or press Speed Dial until the desired speed-dial entry appears
3 Press Enter
4 Press Fax to scroll through the fax options
5 Stop scrolling when you reach the LighterDarker menuThe range of values appears as a circle on a scale on the display
6 Press to lighten the fax or to darken itThe circle moves left or right as you press a button
7 Press Enter to accept the setting you selected
change other fax settings
redial a number automaticallyYou can set your HP Officejet to redial a busy and an unanswered number automatically If you initiated a fax from the computer the computer must be left on for the redialing process to work correctly
1 Press Setup
2 Press 4This selects the Advanced Fax Setup menu
3 Choose one of the following optionsndash Press 3
hp officejet 4100 series
chapter 6
24
This selects the Busy Redial option The default setting for Busy Redial is Redial
ndash Press 4This selects the No Answer Redial option The default setting for No Answer Redial is No Redial
4 Press Enter
5 Press to select Redial or No Redial as desired
6 Press Enter
forward faxes to another numberWith fax forwarding you can send a fax that you receive to another fax number during the next 24-hour period
to forward faxes from the front panel
1 Press Setup
2 Press 3 then press 7This selects the Basic Fax Setup menu then selects the Fax Forwarding Black Only option
3 At the prompt enter the Fax Number to which you wish to send the fax
4 Press Enter
5 Enter the Start Date using the numeric keypad
6 Enter the Start Time using the numeric keypad
7 At the prompt press 1 for AM or 2 for PM
8 Enter the Stop Date using the numeric keypadFax Forwarding On appears on the display
edit or cancel fax forwardingOnce fax forwarding is enabled you may find that you need to change the number you are faxing to or the start and stop times you entered You may wish to cancel your fax forwarding setup altogether Follow the steps below to edit or turn off fax forwarding
to edit fax forwarding from the front panel
1 Press Setup
2 Press 3 then press 7This selects the Basic Fax Setup menu then selects the Fax Forwarding Black Only option
3 Forwarding is ON 1=Edit 2=Cancel appears on the display after a moment Press 1 to edit the number you wish to fax to or to change the start and stop times Follow the messages on the display
to cancel fax forwarding from the front panelbull Press Cancel
OR
reference guide
use the fax features
25
Follow the steps in edit or cancel fax forwarding on page 24 When Forwarding is ON 1=Edit 2=Cancel appears on the display press 2 to cancel fax forwarding
use error correction modeError Correction Mode (ECM) eliminates data lost due to poor phone lines by detecting errors that occur during transmission and automatically requesting retransmission of the erroneous portion Phone charges are unaffected or may even be reduced on good phone lines On poor phone lines ECM increases sending time and phone charges but sends the data much more reliably Turn ECM off (the default setting is on) only if it increases phone charges substantially and you can accept poorer quality in exchange for reduced charges
to change the ECM setting from the front panel
1 Press Setup
2 Press 4 then press 7This selects the Advanced Fax Setup menu then selects the Error Correction Mode option
3 Press to switch between On and Off
4 Press Enter to accept the setting you selected
set automatic reductionThis setting determines what your HP Officejet does if it receives a fax that is too large for the default paper size With this setting on (the default) the image is reduced so that it fits on one page With this feature off information that doesnrsquot fit on the first page is printed on a second page
1 Press Setup
2 Press 4 then press 5This selects the Advanced Fax Setup menu then selects the Automatic Reduction option
3 Press to switch between On and Off
4 Press Enter to accept the setting you selected
adjust the volumeYour HP Officejet provides three levels for adjusting the ring and speaker volume The ring volume is the volume of the phone ringer The speaker volume is the volume of everything else such as the dial and fax tones The default setting is Soft
1 Press Setup
2 Press 3 then press 6This selects the Basic Fax Setup menu then selects the Ring and Beep Volume option
3 Press to select one of the options Soft Loud or Off
4 Press Enter to accept the setting you selected
hp officejet 4100 series
chapter 6
26
change the answer ring pattern (distinctive ringing)Distinctive ringing is a feature offered by phone companies that allows several phone numbers to share the same line Each number has a specific ring pattern If you do not have this service use the default ring pattern which is All Rings
If you connect your HP Officejet to a line with distinctive ringing have your telephone company assign one ring pattern to voice calls and another to fax calls (double or triple rings are best for a fax number)
1 Press Setup
2 Press 4 then press 2This selects the Advanced Fax Setup menu then selects the Answer Ring Pattern option
3 Press to scroll through these options All Rings Single Rings Double Rings Triple Rings and Double amp Triple
4 When the ring pattern that the phone company established for this number appears press Enter
Tip We recommend that you use Double Rings or Triple Rings for fax
set up speed dialingThrough your HP Officejet or your computer you can assign entries to fax numbers you use often This lets you dial those numbers quickly using the front panelrsquos Speed Dial button and a one- or two-digit entry You can create up to 100 individual speed-dial entries (the maximum for some models is 70)
We recommend that you use the software to set up speed-dial settings
Note A speed-dial entry can only be associated with one phone number speed-dial groups are not supported
For more information see set up speed dialing in the hp photo amp imaging help
create individual speed-dial settingsYou can enter fax numbers that you will reuse frequently
1 Press Setup
2 Press 2 then press 1This selects the Speed Dial Setup menu then selects the Individual Speed Dial option
3 Press EnterThe first unassigned speed-dial entry appears on the display
4 Press Enter to select the displayed speed-dial entry
5 Enter the Fax Number to assign to that entry then press EnterThe fax number can be up to 50 digits in length
Tip To enter a three-second pause within a number sequence press Symbols to display a dash
6 Enter the personrsquos or companyrsquos name then press Enter
reference guide
use the fax features
27
The name is limited to 13 characters in lengthFor more information see enter text on page 28
7 After Enter Another appears press 1 (Yes) if you want to set up another number or press 2 (No) to exit
delete speed-dial settingsFollow these steps to delete an individual speed-dial entry
1 Press Setup
2 Press 2 then press 2 againThis selects Speed Dial Setup then selects Delete Speed Dial
3 Press until the individual entry that you want to delete appears then press Enter
set basic fax settings using the front panelWe recommend that you use the Fax Setup Wizard in the HP Officejet software to configure all your basic fax settings however you can also access these settings from the front panel
Note In the US regulations require that your name and phone number appear on every fax The minimum settings that we recommend are described in the following topics
set the date and timeFollow these steps to set the date and time manually
1 Press Setup
2 Press 3 then press 1This selects the Basic Fax Setup menu then selects the Date and Time option
3 Follow the prompts on the display to enter the date and time using the keypad
Tip Use only the last two digits for the year
Tip When you enter a single-digit date or time type a leading zero before the single digit for example 0345 or 08-03-02
After you are done the date and time appear on the display
Warning Cutting off power to the HP Officejet causes the selected date and time to be lost However name and fax number information is not lost
set the fax headerFollow these steps to enter your name and fax number in the header
Note In Hungary the subscriber identification code (fax header) can be set or changed only by authorized personnel For more information contact your authorized HP dealer
1 Press Setup
2 Press 3 then press 2
hp officejet 4100 series
chapter 6
28
This selects the Basic Fax Setup menu then selects the Fax Header option
3 Enter your personal or company name at the prompt Use the guidelines provided in the next section under enter text
4 Press Enter
5 Enter your fax number using the numeric keypad
6 Press Enter
enter textThe following list provides tips for entering text using the front-panel keypad
bull Press the keypad numbers that correspond to the letters of a name
bull Press a button multiple times to see a letter first in uppercase and then in lowercase
bull After the correct letter appears press and then press the number that corresponds to the next letter in the name Again press multiple times until the correct letter appears
bull To insert a space press Space ()bull To enter a symbol such as press Symbols () to scroll through the list of
available symbolsbull If you make a mistake press to clear it and then make the correct
entrybull After you are done entering text press Enter to store your entries
check for dial toneBefore using the fax features verify that the connections are correctly established
1 Press Fax
2 Listen for a dial tone
3 If you do not hear a dial tone check the connections
4 Press Cancel to hang up
ABC These letters correspond to this number and so on
2
JKL To get this character J j K k L l 5
5 Press 5 this many times 1 2 3 4 5 6 7
reference guide
use the fax features
29
fax job menuThe following options become available when the Fax button is pressed
setup menu for fax commandsThe following fax settings are available in the Setup menu
Enter Fax or Speed Dial
FineVery FinePhotoStandard
Fax Number Resolution LighterDarker
Enter a fax number or speed dialWhen the Fax button is pressed
Press and to move to the option you wantPress Enter to select the displayed setting
NoYes
Set New Defaults
Send Fax NowFax from MemorySend Fax LaterPoll to Receive
How to Fax
1Automatic Reports Setup
2Answer Ring Pattern
3Busy Redial
4No Answer Redial
5Automatic Reduction
6Backup Fax Reception
7Error Correction Mode
3Basic Fax Setup 4Advanced Fax Setup
Press Setup to display the menu options
Press and to move to the setting you wantPress Enter to select the displayed setting
1Date and Time
2Fax Header
3Rings to Answer
4Paper Size
5Tone or Pulse Dialing
6Ring and Beep Volume
7Fax Forwarding Black Only
2Speed Dial Setup
1Individual Speed Dial
2Delete Speed Dial
3Print Speed Dial List
hp officejet 4100 series
chapter 6
30
7
31
maintain your hp officejet
This section provides instructions for keeping your HP Officejet in top working condition Perform these maintenance procedures as necessary
clean the glassDirty glass from dust smudges hair and so on slows down performance and affects the accuracy of features such as Fit to Page and Copy
1 Turn off the unit unplug the power cord and raise the scanner lid
2 Clean the glass with a soft cloth or sponge slightly moistened with a nonabrasive glass cleaner
Caution Do not use abrasives acetone benzene or carbon tetrachloride on the glass these can damage it Do not place liquids directly on the glass They may seep under it and damage the unit
3 Dry the glass with a chamois or cellulose sponge to prevent spotting
hp officejet 4100 series
chapter 7
32
clean the white stripMinor debris can accumulate on the white strip located underneath the scannerrsquos lid
1 Turn off the unit unplug the power cord and raise the scanner lid
2 Clean the white strip with a soft cloth or sponge slightly moistened with a mild soap and warm water
3 Wash the strip gently to loosen debris do not scrub the strip
4 Dry the strip with a chamois or soft cloth
Caution Do not use paper-based wipes as these may scratch the strip
5 If this does not clean the strip well enough repeat the previous steps using isopropyl (rubbing) alcohol and wipe the strip thoroughly with a damp cloth to remove any residual alcohol
clean the exterior Use a soft damp lint-free cloth to wipe dust smudges and stains off the case The interior of the unit does not require cleaning Keep fluids away from the interior of the unit as well as the front panel
work with print cartridgesTo ensure the best print quality from your HP Officejet you will need to perform some simple maintenance procedures and when prompted by a front-panel message replace the print cartridges
print a self-test reportIf you are experiencing problems with printing before cleaning or replacing the print cartridges you should print a Self-Test Report This report provides useful information about your print cartridges including status information
1 Press Setup
2 Press 1 then press 4This selects Print Report and then selects Self-Test Report
3 Press Start Black or Start ColorA Self-Test Report is printed for your HP Officejet
handle print cartridgesBefore you replace or clean a print cartridge you should know the part names and how to handle the print cartridge
reference guide
maintain your hp officejet
33
replace the print cartridgesFront-panel messages appear to let you know that you should replace your print cartridges
See order print cartridges on the back cover for information on ordering replacement print cartridges
1 Turn on the unit then lift open the print cartridge access doorThe print carriage moves into view
2 After the carriage stops moving push down on the print cartridge down to release it and then pull it toward you out of its slot
Plastic tape with pink tab(must be removed)
Copper contactsInk nozzles under tape
Do not touch the copper contacts or the ink nozzles
print cartridge access door
hp officejet 4100 series
chapter 7
34
Note It is normal to see ink build-up in the print cartridge slots
3 Remove the new print cartridge from its packaging and being careful to touch only the bright pink plastic tab gently remove the plastic tape to uncover the ink nozzles
Caution Do not touch the copper contacts or ink nozzles
Once you have removed the plastic tape install the print cartridge immediately to prevent the ink from drying in the nozzles
4 Push the new print cartridge into the appropriate slot at a slight angle until it clicks into place
Caution Do not attempt to push the cartridge straight into the slot It must slide in at a slight angle
The tri-color print cartridge goes on the left and the black cartridge goes on the right
5 Close the print cartridge access door
reference guide
maintain your hp officejet
35
align the print cartridgesThe HP Officejet prompts you to align cartridges every time you install or replace a print cartridge Aligning the cartridges ensures high-quality output
To align the print cartridges when prompted
1 Press Enter on the front panelAn align cartridges (test pattern) page prints
2 Load the align cartridges page face down in the ADF between the paper-width guides and press the Enter button again
3 Recycle or discard the page
To align the cartridges at any other time
1 Press Setup
2 Press 5 then press 2This selects the Maintenance menu and then selects the Align Print Cartridge option
3 Press EnterAn align cartridges (test pattern) page prints
4 Load the align cartridges page face down in the ADF between the paper-width guides and press the Enter button again
5 Recycle or discard the page
clean the print cartridgesUse this feature when the Self-Test Report shows streaking or white lines through any of the colored bars Do not clean print cartridges unnecessarily This wastes ink and shortens the life of the ink nozzles
1 Press Setup
2 Press 5 then press 1This selects the Maintenance menu and then selects the Clean Print Cartridge optionA page of patterns is printed The cartridges are cleaned Recycle or discard the pageIf copy or print quality still seem poor after you clean the print cartridges replace the print cartridge that is affected
restore factory defaultsYou can restore the original factory settings to what they were when you purchased your HP Officejet Choosing to restore your factory defaults restores all settings except date information and any scan settings you may have set
You can perform this process from the front panel only
1 Press Setup
2 Press 5 then press 3This selects Maintenance and then selects Restore Factory DefaultsThe factory default settings are restored
hp officejet 4100 series
chapter 7
36
set scroll speedThe Scroll Speed option lets you control the rate that text messages appear in the front-panel display You can choose Normal Fast or Slow The default is Normal
1 Press Setup
2 Press 5 then press 6This selects Maintenance and then selects Set Scroll Speed
3 Press until the desired speed appears then press Enter
set the prompt delay timeThe Prompt Delay option lets you control the amount of time before a message is displayed in the front-panel display You can choose Normal Fast or Slow The default is Normal
1 Press Setup
2 Press 5 then press 7This selects Maintenance and then selects Set Prompt Delay Time
3 Press until the delay time appears then press Enter
self-maintenance sounds During the life of your product you may hear various mechanical sounds This is a normal part of your unitrsquos self-maintenance
reference guide
maintain your hp officejet
37
setup menu optionsThe following options are available from the Setup button
1Last Transaction
2Fax Log
3Speed Dial List
4Self-Test Report
5Automatic Reports Setup
1Print Report
Use Setup to display the Print Report Speed Dial Setup Basic Fax Setup Advanced Fax Setup and Maintenance options
Press and to move to the setting you wantPress Enter to select the displayed setting
1Clean Print Cartridges
2Align Print Cartridges
3Restore Factory Defaults
4Reprint Faxes in Memory
5Set Language amp CountryRegion
6Set Scroll Speed
7Set Prompt Delay Time
5Maintenance2Speed Dial Setup
3Basic Fax Setup
4Advanced Fax Setup
1Individual Speed Dial
2Delete Speed Dial
3Print Speed Dial List
1Date and Time
2Fax Header
3Rings to Answer
4 Paper Size
5Tone or Pulse Dialing
6Ring and Beep Volume
7Fax Forwarding Black Only
1Automatic Reports Setup
2Answer Ring Pattern
3Busy Redial
4No Answer Redail
5Automatic Reduction
6Backup Fax Reception
7Error Correction Mode
hp officejet 4100 series
chapter 7
38
8
39
additional setup information
During the installation of the HP Officejet software a number of windows are displayed You should see the following
bull Installingbull Copying files bull A request to plug in the HP Officejetbull Green OK and check markbull Request to restart your computer (may not occur in all cases)bull Registration
If you did not see all of these windows there may be a problem with the installation Verify the following
bull The HP Director contains six icons (double-click the HP Director icon on the desktop)
bull The HP Officejet is listed in the Printers dialog boxbull There is an icon for the HP Officejet in the System Tray that indicates the
HP Officejet is ready
If the HP Director does not show six icons you may need to wait a few minutes for the HP Officejet to connect to your computer
possible installation problemsIf nothing appears on your computer screen after you insert the HP Officejet 4100 Series CD-ROM into your computerrsquos CD-ROM drive
1 From the Start menu choose Run
2 In the Run dialog box enter dsetupexe (if your CD-ROM drive is not assigned to drive letter d use the appropriate drive letter) then click OK
If the HP Director does not contain six icons do the following
bull Verify that the front-panel cover is attached then unplug the HP Officejet and plug it in again
bull Verify that the USB and power cables are plugged inndash Unplug the USB cable and plug it in againndash Do not attach the USB cable to a keyboard or nonpowered hubndash Verify that the USB cable is 3 meters or less in lengthndash If you have several USB devices attached to your computer you may
want to unplug the others during the installation
Note AppleTalk is not supported
bull Unplug the HP Officejet from the wall and plug it in againbull Restart your computer
hp officejet 4100 series
chapter 8
40
On Windows check the System Tray for applications that are running in the background and close them before restarting your computer
remove and reinstall your hp officejet softwareIf six icons do not appear in the Director you may need to uninstall and re-install the software Do not simply delete the HP Officejet program files from your hard drive Be sure to remove them properly using the uninstall utility provided in the HP Officejet program group
to uninstall from a Windows computer
1 Disconnect your HP Officejet from your computer
2 On the Windows taskbar click Start choose Programs or All Programs (XP) choose Hewlett-Packard choose hp officejet 4100 series then choose uninstall software
3 Follow the directions on the screenBe sure to disconnect your HP Officejet
4 If you are asked whether you would like to remove shared files click NoOther programs that use these files may not work properly if the files are deleted
5 After the program finishes removing the software disconnect your HP Officejet and restart your computer
Note It is important that you disconnect your HP Officejet before restarting your computer
6 To reinstall the software insert the HP Officejet 4100 Series CD-ROM into your computerrsquos CD-ROM drive and follow the instructions that appear
7 After the software is installed connect and turn on your HP Officejet following the onscreen instructions and the instructions in your Setup PosterAfter connecting and turning on your HP Officejet you may have to wait several minutes for all of the Plug and Play events to completeWhen the software installation is complete you will see a Status Monitor icon in the System Tray
8 To verify that the software is properly installed double-click on the HP Director icon on the desktop If the HP Director shows six icons the software has been properly installed
to uninstall from a Macintosh computer
1 Disconnect your HP Officejet from your computer
2 Double-click on ApplicationsHP All-in-One Software folder
reference guide
additional setup information
41
3 Double-click on HP Uninstaller
4 Follow the directions that appear on the screen
5 After the program finishes removing the software disconnect your HP Officejet and restart your computer
6 To reinstall the software insert the HP Officejet 4100 Series CD-ROM into your computerrsquos CD-ROM drive
Note When re-installing the software follow the instructions on the Setup Poster Do not connect the HP Officejet to your computer until after you have completed the software installation
7 On the desktop open the CD-ROM double-click on hp all-in-one installer and follow the instructions that appear
connect your hp officejet to a phone modem or answering machine
The HP Officejet can share a phone line with a phone a modem or an aswering machine When sharing a phone line with an answering machine the HP Officejet will answer fax calls and direct voice calls to the answering machine
Note For information on connecting your HP Officejet to your computer and phone line refer to the Setup Poster that came with your unit
to connect your hp officejet to a phone modem or answering machine
1 Remove the white plastic stopper from connector 2 on the back of the HP Officejet
To connect more than one device to connector 2 on the HP Officejet you must purchase a Y-splitter and plug it into connector 2
2 Connect the phone cord from the phone modem or answering machine to connector 2 (or Y-splitter)
Caution Do not use the phone cord that came with the HP Officejet for this purpose That phone cord must connect connector 1 on the HP Officejet to the wall jack for your phone system See the Setup Poster for details
3 If you are connecting an answering machine see set the number of rings before answering on page 21 for instructions on setting the number of rings correctly or change the answer ring pattern (distinctive ringing) on page 26 for information on incoming ring patterns
4 If you are connecting a modem turn off its fax-receive feature
connector 2 on the HP Officejet
connector 1 on the HP Officejet
hp officejet 4100 series
chapter 8
42
additional troubleshooting helpYou may want to refer to the readme file for more information on possible installation problems On Windows you can access the readme file from the Start button on the taskbar select Programs Hewlett-Packard hp officejet 4100 series View the Readme File On Macintosh you can access the readme file by double-clicking on the icon located in the top-level folder of the HP Officejet software CD-ROM
The readme file provides more information including
bull Using the Re-install utility after a failed installation to return your PC to a state that will allow the HP Officejet to be re-installed
bull Using the Re-install utility on Windows 98 to recover from a Composite USB System Driver missing errorThis error may occur if the hardware is installed prior to installing the software After running the Re-install utility reboot your PC and install the HP Officejet software before connecting the HP Officejet to your computer
You can also find more information on this website
wwwhpcomsupport
9
43
technical information
Additional specifications information can be found in the HP Photo amp Imaging Help in the hp officejet 4100 series section
physical specifications
power specificationsbull Power consumption 75W maximumbull Source (Input Voltage) 100 to 240 VAC groundedbull Input Frequency 50 to 60 Hzbull Current 1A maximum
regulatory informationAdditional regulatory information can be found in the HP Photo amp Imaging Help The information in this section supercedes information in the HP Photo amp Imaging Help
doc statement deacuteclaration de conformiteacute (Canada)Le preacutesent appareil numeacuterique neacutemet pas de bruit radioeacutelectrique deacutepassant les limites applicables aux appareils numeacuteriques de la classe B prescrites dans le Regraveglement sur le brouillage radioeacutelectrique eacutedicteacute par le ministegravere des Communications du CanadaThis digital apparatus does not exceed the Class B limits for radio noise emissions from digital apparatus set out in the Radio Interference Regulations of the Canadian Department of Communications
notice to users of the Canadian telephone networkThis equipment meets the applicable Industry Canada Terminal Equipment Technical Specifications This is confirmed by the registration number The abbreviation IC before the registration number signifies that registration was performed based on a Declaration of Conformity indicating that Industry Canada technical specifications were met It does not imply that Industry Canada approved the equipment
Note The Ringer Equivalence Number (REN) assigned to each terminal device provides an indication of the maximum number of terminals allowed to be connected to a telephone interface The termination on an interface may consist of any combination of devices subject only to the requirement that the sum of the Ringer Equivalence Numbers of all the devices does not exceed 5
The REN for this product is 03B based on FCC Part 68 test results
height width depth weight (without print cartridges)
with paper trays and ADF closed
718 in (1824 cm) 1676 in (4258 cm) 825 in (2096 cm) 75 lbs (34 kg)
with ADF and paper tray extended
1030 in (2615 cm) 1676 in (4258 cm) 1854 in (4709 cm) 75 lbs (34 kg)
hp officejet 4100 series
chapter 9
44
notice to all users of the European Economic Area (EEA)
This product is designed to interwork with the analogue telephone networks in the following countriesregions
Network compatibility depends on customer selected settings which must be reset to use the equipment on a telephone network in a countryregion other than where the product was purchased Contact the vendor or Hewlett-Packard Company if addition product support is necessaryThis equipment has been certified by the manufacturer in accordance with Directive 19995EC (annex II) for Pan-European single-terminal connection to the public switched telephone network (PSTN) However due to differences between the individual PSTNs provided in different countriesregions the approval does not of itself give an unconditional assurance of successful operation on every PSTN network termination pointIn the event of problems you should contact your equipment supplier in the first instance
geraumluschemissionLpA lt 70 dBam Arbeitsplatzim Normalbetriebnach DIN 45635 T 19
notice to Korean customers
Germany UK Netherlands
France Spain Italy
Belgium Luxembourg Sweden
Austria Denmark Ireland
Norway Finland Switzerland
Greece Portugal
10
45
hp support
This section explains the support services information provided by Hewlett-Packard If you are unable to find the answer you need in the printed or onscreen documentation supplied with your product you can contact one of the HP support services listed in the following pages Some support services are available only in the US and Canada while others are available in many countriesregions worldwide If a support service number is not listed for your countryregion contact your nearest authorized HP dealer for help
get support and other information from the internetIf you have Internet access you can get help from the following HP website
wwwhpcomsupportThe Web site offers technical support drivers supplies and ordering information
hp customer supportSoftware programs from other companies may be included with your HP Officejet If you experience problems with any of those programs you will receive the best technical assistance by calling the experts at that companyIf you need to contact HP Customer Support do the following before you call
1 Make sure thata Your unit is plugged in and turned onb The specified print cartridges are installed correctlyc The recommended paper is properly loaded in the input tray
2 Reset your unita Turn off the unit using the On button located on the unitrsquos front panelb Unplug the power cord from the back of the unitc Plug the power cord back into the unitd Turn on the unit using the On button
3 For more information check the HP website at wwwhpcomsupport
4 If you are still experiencing problems and need to speak with an HP Customer Support Representativendash Have your service ID and serial number ready To display your service ID and
serial number on the front panel do the following Press Enter and Start Color at the same time until the service ID appears in the front-panel display From this display press the right arrow until the serial number displays
ndash Print a Self-Test Report See print a self-test report on page 32 for information on printing this report
ndash Make a color copyndash Be prepared to describe your problem in detail
5 Call HP Customer Support Be near your unit when you call
call in the US during warrantyCall (208) 323-2551 This service is free during the warranty period however your standard long-distance phone charges still apply A fee may apply outside the warranty period
hp officejet 4100 series
chapter 10
46
US phone support is available in both English and Spanish languages 24 hours a day 7 days a week (days and hours of support may change without notice)
call elsewhere in the worldThe numbers listed below are current as of the printing date of this guide For a list of current international HP Support Service numbers visit this address and choose your own countryregion or language
wwwhpcomsupportFor Korea you can also visit this address
httpwwwhpcokrYou can call the HP support center in the following countriesregions If your countryregion is not listed contact your local dealer or nearest HP Sales and Support Office to find out how to obtain servicesSupport service is free during the warranty period however your standard long-distance phone charges will apply In some cases a flat fee per single incident will also applyFor phone support in Europe please check for the details and conditions of phone support in your countryregion by consulting the following Web site
wwwhpcomsupportAlternatively you can ask your dealer or call HP at the phone number indicated in this booklet As part of our constant efforts to improve our phone support service we advise you to check our website on a regular basis for new information regarding service features and delivery
countryregion hp technical support countryregion hp technical support
Algeria1 +213 (0) 61564 543 Malaysia 1-800-805405
Argentina 0810-555-5520 Mexico 01-800-472-6684
Australia +61 3 8877 80001902 910 910
Mexico (Mexico City) 5258-9922
Austria +43 (0) 810 00 6080 Morocco1 +212 22404 747
Bahrain (Dubai) 800 728 Netherlands +31 (0) 20 606 8751
Belgium (Dutch) +32 (0) 2 626 8806 New Zealand 0800 441 147
Belgium (French) +32 (0) 2 626 8807 Norway +47 22 11 6299
Brazil (Grande Sao Paulo) (11) 3747 7799 Oman +971 4 883 8454
Brazil (Demais Localidades) 0800 157751 Palestine +971 4 883 8454
Canada during warranty (905) 206 4663 Panama 001-800-7112884
Canada post-warranty(per-call charge)
1-877-621-4722 Peru 0-800-10111
Caribbean amp Central America
1-800-711-2884 Philippines 632-867-3551
Chile 800-360-999 Poland +48 22 865 98 00
China 86 10 6868 7980 Portugal +351 21 3176333
Colombia 9-800-114-726 Puerto Rico 1-877-2320-589
Costa Rica 0-800-011-0524 Qatar +971 4 883 8454
Czech Republic +420 (0) 261307310 Romania +40 1 315 44 42or local 01 3154442
reference guide
hp support
47
call in Australia post-warrantyIf your product is not under warranty you can call 03 8877 8000 A per-incident out-of-warranty support fee of $2750 (inc GST) will be charged to your credit card You can also call 1902 910 910 ($2750 charged to your phone account) from 900 AM to 500 PM Monday through Friday (Charges and support hours are subject to change without notice)
prepare your unit for shipmentIf after contacting HP Customer Support or returning to the point of purchase you are requested to send your unit in for service please follow the power off and rebox steps below to avoid further damage to the HP product
Denmark +45 39 29 4099 Russian Federation Moscow +7 095 797 3520
Ecuador 1800-711-2884 Russian Federation St Petersburg
+7 812 346 7997
Europe (English) +44 (0) 207 512 5202 Saudi Arabia +800 897 14440
Egypt 02 532 5222 Singapore 65 6272 5300
Finland +358 (0) 203 47 288 Slovakia +421 (0) 2 682 08080
France (034 Euromin) +0892 69 60 22 South Africa (inside RSA) 086 000 1030
Germany (012 Euromin) +49 (0) 180 52 58 143 South Africa (inside RSA) +27-11 258 9301
Greece +30 1060 73 603 Spain +34 902 321 123
Hong Kong (SAR) +85 (2) 3002 8555 Sweden +46 (0)8 619 2170
Guatemala 1800-995-5105 Switzerland 2 +41 (0) 84 880 1111
Hungary +36 (0) 1 382 1111 Taiwan +886-2-2717-00550800 010 055
India 1-600-11226791 11 682 6035
Thailand +66 (2) 661 4000
Indonesia 62-21-350-3408 Tunisia1 +216 1891 222
Ireland +353 (0) 1 662 5525 Turkey +90 216 579 7171
Israel +972 (0) 9 8304848 Ukraine +7 (380-44) 490-3520
Italy +39 (0) 226410350 United Arab Emirates +971 4 883 8454
Japan 0570 000 511+81 3 3335 9800
United Kingdom +44 (0) 207 512 52 02
Jordan +971 4 883 8454 Venezuela 0800-47468368 or800-477-7777
Korea (Seoul) +82 (2) 3270 0700 Venezuela (Caracas) (502) 207-8488
Korea (outside Seoul) 080 999 0700 Vietnam 84 (0) 8 823 4530
Kuwait +971 4 883 8454 Yemen +971 4 883 8454
Lebanon +971 4 883 8454
1 This Call Center supports French speaking customers from the following countriesregions Morocco Tunisia and Algeria
2 This Call Center supports German French and Italian speaking customers in Switzerland
countryregion hp technical support countryregion hp technical support
hp officejet 4100 series
chapter 10
48
Note When transporting your HP Officejet make sure that the pens have been removed the HP Officejet has been properly shut down by pressing the power button and you have allowed time for the carriage to return to the service station and for the scanner to return to its parked position
1 Turn on the unitDisregard steps 1 through 6 if your unit will not turn on and the print carriage is in the home position You will not be able to remove the print cartridges Proceed to step 7
2 Open the print cartridge access doorThe print carriage moves into view
3 See replace the print cartridges on page 33 for information on removing the print cartridges
Caution Remove both print cartridges Failure to do so may damage your unit
4 Place the print cartridges in an airtight bag so they will not dry out and put them aside (do not send them with the unit unless instructed to by the HP customer support call agent)
5 Turn off the unit
6 Close the print cartridge access door
7 Remove the front panel cover as followsa Grasp the front of the front panel cover with two hands as shownb Firmly lift the front panel cover to unsnap it from the unit
8 Retain the front panel cover Do not return the front panel cover with the unit
9 If available pack the unit for shipment using the original packing materials or the packaging materials that come with your exchange unit
If you do not have the original packaging materials please use other adequate packaging materials Shipping damage caused by improper packaging andor improper transportation is not covered under the warranty
reference guide
hp support
49
10 Place the return shipping label on the outside of the box
11 Include the following items in the boxndash A complete description of symptoms for service personnel (samples of print
quality problems are helpful)ndash A copy of the sales slip or other proof of purchase to establish the warranty
coverage periodndash Your name address and a phone number where you can be reached during
the day
hp distribution centerTo order HP Officejet software a copy of the printed Reference Guide a setup poster or other customer-replaceable parts do one of the following bull In the US or Canada call (208) 323 2551bull Visit this website
httpwwwhpcomcposupportsoftwarehtml
hp officejet 4100 series
chapter 10
50
11
51
warranty information
HP Officejet 4100 seriesDuration of Limited Warranty (hardware and labor) 1 YearDuration of Limited Warranty (CD media) 90 DaysDuration of Limited Warranty (print cartridges) Until the HP ink is depleted or the ldquoend of warrantyrdquo date printed on the cartridge has been reached whichever occurs first
warranty service
express serviceTo obtain HP express repair service the customer must contact an HP service office or an HP Customer Support Center for basic troubleshooting first See hp customer support on page 45 for steps to take before calling Customer SupportIf a customer unit needs a minor part replacement and these parts can normally be replaced by the customer the customer-replaceable components may be serviced through expedited part shipment In this event HP will prepay shipping charges duty and taxes provide telephone assistance on replacement of the component and pay shipping charges duty and taxes for any part that HP asks to be returnedThe HP Customer Support Center may direct customers to designated authorized service providers who are certified by HP to service the HP product
warranty upgradesUpgrade your standard factory warranty to a total of three years with the HP SUPPORTPACK Service coverage begins on product purchase date and the pack must be purchased within the first 180 days of product purchase This program offers phone support from 600 AM to 1000 PM Mountain Standard Time (MST) Monday through Friday and 900 AM to 400 PM (MST) on Saturdays If during your technical support call it is determined that you need a replacement product then HP will ship you this product next business day free of charge Available in US onlyFor more information please call 1-888-999-4747 or visit the following HP Web site
httpwwwhpcomgohpsupportpack
Outside the US please call your local HP Customer Support office See call elsewhere in the world on page 46 for a list of international Customer Support numbers
returning your hp officejet for serviceBefore returning your HP Officejet for service you must call HP Customer Support See hp customer support on page 45 for steps to take before calling Customer Support
hewlett-packard limited global warranty statement
extent of limited warrantyHewlett-Packard (ldquoHPrdquo) warrants to the end-user customer (ldquoCustomerrdquo) that each HP Officejet 4100 Series product (ldquoProductrdquo) including related software accessories media and supplies shall be free from defects in material and workmanship for the duration which begins on the date of purchase by the Customer
hp officejet 4100 series
chapter 11
52
For each software Product HPrsquos limited warranty applies only to a failure to execute programming instructions HP does not warrant that the operation of any Product shall be uninterrupted or error freeHPrsquos limited warranty covers only those defects which arise as a result of normal use of a Product and does not cover any other problems including those which arise as a result of (a) improper maintenance or modification (b) software accessories media or supplies not provided or supported by HP or (c) operation outside the Productrsquos specificationsFor any hardware Product the use of a non-HP print cartridge or a refilled print cartridge does not affect either the warranty to the Customer or any HP support contract with the Customer However if Product failure or damage is attributable to the use of a non-HP or refilled print cartridge HP shall charge its standard labor and materials charges to service the Product for the failure or damageIf HP receives during the applicable warranty period notice of a defect in any Product HP shall either repair or replace the defective Product at HPrsquos option Where labor charges are not covered by HPrsquos limited warranty repairs shall be at HPrsquos standard charges for laborIf HP is unable to repair or replace as applicable a defective Product which is covered by HPrsquos warranty HP shall within a reasonable time after being notified of the defect refund the purchase price for the ProductHP shall have no obligation to repair replace or refund until the Customer returns the defective Product to HPAny replacement product may be either new or like-new provided that it has functionality at least equal to that of the Product being replacedHP products including each Product may contain remanufactured parts components or materials equivalent to new in performanceHPs limited warranty for each Product is valid in any countryregion or locality where HP has a support presence for the Product and where HP has marketed the Product The level of warranty service may vary according to local standards HP shall have no obligation to alter the form fit or function of the Product in order to make it operate in a countryregion or locality for which the Product was never intended to operate
limitations of warrantyTO THE EXTENT ALLOWED BY LOCAL LAW NEITHER HP NOR ITS THIRD PARTY SUPPLIERS MAKE ANY OTHER WARRANTY OR CONDITION OF ANY KIND WHETHER EXPRESS OR IMPLIED WITH RESPECT TO THE COVERED HP PRODUCTS AND SPECIFICALLY DISCLAIM THE IMPLIED WARRANTIES OR CONDITIONS OF MERCHANTABILITY SATISFACTORY QUALITY AND FITNESS FOR A PARTICULAR PURPOSE
limitations of liabilityTo the extent allowed by local law the remedies provided in this Limited Warranty Statement are the Customerrsquos sole and exclusive remediesTO THE EXTENT ALLOWED BY LOCAL LAW EXCEPT FOR THE OBLIGATIONS SPECIFICALLY SET FORTH IN THIS LIMITED WARRANTY STATEMENT IN NO EVENT SHALL HP OR ITS THIRD PARTY SUPPLIERS BE LIABLE FOR DIRECT INDIRECT SPECIAL INCIDENTAL OR CONSEQUENTIAL DAMAGES WHETHER BASED ON CONTRACT TORT OR ANY OTHER LEGAL THEORY AND WHETHER ADVISED OF THE POSSIBILITY OF SUCH DAMAGES
local lawThis Limited Warranty Statement gives the Customer specific legal rights The Customer may also have other rights which vary from state to state in the United States from province to province in Canada and from countryregion to countryregion elsewhere in the world
reference guide
warranty information
53
To the extent this Limited Warranty Statement is inconsistent with local law this Statement shall be deemed modified to be consistent with such local law Under such local law certain disclaimers and limitations of this Statement may not apply to the Customer For example some states in the United States as well as some governments outside the United States (including provinces in Canada) mayPreclude the disclaimers and limitations in this Statement from limiting the statutory rights of a consumer (eg the United Kingdom)Otherwise restrict the ability of a manufacturer to enforce such disclaimers or limitations orGrant the Customer additional warranty rights specify the duration of implied warranties which the manufacturer cannot disclaim or not allow limitations on the duration of implied warrantiesFOR CONSUMER TRANSACTIONS IN AUSTRALIA AND NEW ZEALAND THE TERMS IN THIS LIMITED WARRANTY STATEMENT EXCEPT TO THE EXTENT LAWFULLY PERMITTED DO NOT EXCLUDE RESTRICT OR MODIFY AND ARE IN ADDITION TO THE MANDATORY STATUTORY RIGHTS APPLICABLE TO THE SALE OF THE COVERED HP PRODUCTS TO SUCH CUSTOMERS
hp officejet 4100 series
chapter 11
54
55
index
Numerics4-by-6 inch photo paper
load 10 12
AADF 7adjust
volume for fax 25align print cartridges 35Answer Ring Pattern 26automatic document feeder 7automatic reduction
fax 25
Bbest copy quality 13busy number
redial automatically 23
Ccancel
scan 18scheduled fax 21
cartridgesalign 35replace 33
cleanprint cartridges 35the exterior 32the glass 31white strip 32
colorenhance 14fax 20fax from front panel 20
contrastchange for fax 23photo color 14
copy 13 16change default settings 15enhance 14fit to page 16lighten or darken 14menu options 16number of copies 14photo 15quality 13reduce or enlarge 14settings 13 15
speed 13tutorial 4
Customer Support 45web site 45
Ddarken a copy 14date
setting 27default settings
restore 35director review 4distinctive ringing 26
Eenhance copies 14enlarge copy 14 16envelopes
load 9Error Correction Mode
(ECM) 25
Ffactory defaults
restore 35fast copy quality 13fax 28
adjust volume 25automated reports 22cancel fax forward 24cancel scheduled 21change Answer Ring
Pattern 26change contrast 23change resolution 22change settings 19control appearance 22create individual speed-dial
settings 26delete speed-dial
settings 27distinctive ringing 26Error Correction Mode
(ECM) 25forward faxes 24header 27in color 20in color from front panel 20manual reports 22
menu 29print reports 22receive 21receive manually 21redial busy or unanswered
number 23schedule 20send from front panel 19set automatic reduction 25set date and time 27set the number of rings 21settings 27 28setup menu options 29speed dials 19test 28
fit to page 16forward faxes 24
cancel 24front panel
display scroll speed 36enter text 28send a fax 19setting prompt delay 36tutorial 3
Gglass
cleaning 31greeting cards
load 11
Hhelp 1HP Customer Support 45
calling 45HP Director 4HP distribution center 49HP Officjet
preparing to ship 47HP papers
tips on loading 11
Iindividual speed-dial settings
create 26ink cartridges see print
cartridgesinkjet paper
load 11
index
hp officejet 4100 series56
Kkeypad
enter text 28
Llabels
load 12lighten copies 14load
change the paper type 12envelopes 9original in ADF 7paper 7photo paper 10 12postcards 10 12print cartridges 33set the paper size 12tips 11
Mmaintenance
align print cartridges 35clean print cartridges 35clean the exterior 32clean the glass 31clean the white strip 32normal sounds 36replace print cartridges 33restore factory defaults 35self-maintenance
sounds 36self-test report 32
menuscopy options 16fax 29fax setup 29maintenance 37print reports 37
Nnormal copy quality 13number of copies
set 14number of rings
set 21
Oorder print cartridges 60originals
load in ADF 7output tray 8
Ppaper
change default size for copy 12
change the type 12load 7recommended 7set the size 12tips on loading 11
paper size change for copy 12
paper trayload 7
phone numbers support services 45
photo paperload 10 12
photoscopy 15enhance copy 14
physical specifications 43postcards
load 10 12power
specifications 43print
envelopes 9fax reports 22self-test report 32
print cartridgesalign 35clean 35handling 32replace 33
prompt delaysetting 36
Qquick start
review the director 4use with a computer 4
Rreceive
fax 21redial
busy or unanswered number 23
reduce copy 14 16regulatory information 43reinstall software 40reports
generate automatically for fax 22
generate manually for fax 22
print 22self-test 32
resolution
change for fax 22restore factory settings 35returning your HP Officejet for
service 51
Sscan
from front panel 17stop 18
schedule a fax 20scroll speed
setting 36self-test report 32send
cancel forward faxes 24color fax 20color fax from front
panel 20forward faxes 24
settingscopy 13 15fax 27 28prompt delay 36scroll speed 36
setupadditional information 39menu 29
shippingyour HP Officejet 47
softwareremove and reinstall 40
soundsself-maintenance 36
specificationsphysical 43power 43
speed dials 19create individual
settings 26delete settings 27
stopscan 18scheduled fax 21
subscriber identification code 27
support services 45
Ttelephone line
multiple numbers 26telephone numbers 45text
enhance 14enter from front panel 28
time
index
reference guide 57
setting 27transparency film
recommended 7tips on loading 11
troubleshootingremove and reinstall
software 40T-shirt Transfer Iron-On
load 11tutorial
front panel 3make a copy 4
Uunanswered number
redial automatically 23
Vvolume
adjust 25
Wwarranty 45
service 51statement 51upgrades 51
white stripcleaning 32
hp officejet 4100 series
chapter 12
58
declaration of conformityAccording to ISOIEC Guide 22 and EN 45014
Manufacturerrsquos Name and Address
Hewlett-Packard Company 16399 West Bernardo Drive San Diego CA 92127-1899 USA
declares that the product
Product Name hp officejet 4100 series (Q1608A)
Model Number(s) officejet 4110 (Q1609A) officejet 4110xi (Q1610A) officejet 4110v (Q1611A) officejet 4105 (Q1612A) officejet 4105z (Q1613A) officejet 4115 (Q1614A)
Product Options All
conforms to the following Product Specifications
Safety EN609501992 +A1 A2 A3 A4 amp A11
IEC609501991 +A1 A2 A3 amp A4
UL1950CSA 222 No 950 3rd Edn 1995
NOM-019-SCFI-1993
EMC CISPR221993 +A1 amp A2 EN550221994 +A1 amp A2 -Class B
CISPR241997EN550241998
IEC 61000-3-21995 EN61000-3-21995
IEC 61000-3-31994 EN61000-3-31995
ASNZS 3548 1992
CNS13438 1997
FCC Part 15-Class B ICES-003 Issue 2 VCCI-2
GB 9254-1998
Telecom TBR21 1998
Supplementary Information
The Product herewith complies with the requirements of the Low Voltage Directive 7323EEC the EMC Directive 89336EEC and the RampTTE Directive 19995EC (ANNEX II) carries the CE marking accordingly
European Contact for regulatory topics only Your local Hewlett-Packard Sales and Service Office orHewlett-Packard GmbH
Department HQ-TRE Herrenberger Strasse 140 D-71034 Boumlblingen Germany (FAX + 49-7031-14-3143)
order mediaTo order media such as HP Premium Inkjet Paper HP Premium Inkjet Transparency Film HP Iron-On T-shirt Transfer paper or HP Greeting Cards go to
wwwhpshoppingcom
For orders in countries other than the US and Canada select other countries then click Yes to leave hpshoppingcom From this website you can access hpshoppingcom for your specific language or countryregion
order print cartridges
If you have Internet access you can get more information from the HP website at
wwwhpcomsupport
print cartridges hp reorder number
HP black print cartridge 56 19 ml black print cartridge
HP color print cartridgeHP tri-color print cartridge
57 17 ml color print cartridge28 8 ml color print cartridge
Visit the hp officejet information centerIt has everything you need to get the most value from your HP Officejet
bull Technical Supportbull Supplies and Ordering Informationbull Project Tipsbull Ways to Enhance Your Product
wwwhpcomsupport
copy 2003 Hewlett-Packard Company
Printed in the USA Mexico Germany Singapore or China
Q1608-90163Q1608-90163
Q1608-90163

hp officejet 4100 series
chapter 4
16
fit a copy to the pageUse the Photo Fit to Page button when you want to automatically enlarge or reduce your original to fit Letter or A4 size paper You can enlarge a small photo to fit a full-size page as shown below Using Photo Fit to Page may prevent unwanted cropping of text or images around the margins
1 Load the original in the ADFFor more information see load originals on page 7
2 Press the Photo Fit to Page button
Note Do not press the Fax Copy or Scan buttons on the front panel once you have pressed the Photo Fit to Page button
3 Press until the appropriate paper type appears and then press Enter to select it
4 Press Start Black or Start Color
copy optionsThe following diagram shows the options that are available when you press Copy
Original Fit to Page
Plain PaperPhoto PaperTransparency
Actual sizeCustom 100Full Page 91Legal gt Ltr 72
ReduceEnlarge Paper Type
NoYes
TextPhotoMixedNone
Enhancements Set New Defaults
LetterLegalA4
Copy Paper Size
The sizes vary by countryregion
LighterDarker
NormalFastBest
Copy Quality
To cycle through the copy options press Copy repeatedly
Press and to move to the setting you want within one of the copy optionsPress Enter to select the displayed setting
5
17
use the scan features
Scanning is the process of converting pictures and text into an electronic format for your computer You can scan photos and text documents
Because the scanned image or text is in an electronic format you can bring it into your word processor or graphics program and modify it to suit your needs You can do the following
bull Scan photos of your kids and e-mail them to relatives create a photographic inventory of your house or office or create an electronic scrapbook
bull Scan text from an article into your word processor and quote it in a report saving you a lot of retyping
Tip To use the scan features your HP Officejet and computer must be connected and turned on The HP Officejet software must also be installed and running on your computer prior to scanning To verify that the HP Officejet software is running on Windows look for a status icon in the system tray On a Macintosh the HP Officejet software is always running
Note High resolution scanning (600 dpi or higher) requires a large amount hard disk space If there is not enough hard disk space available your system may stall
scan an originalYou can start a scan from your HP Officejet or from the HP Officejet software on your computer
For more information about scanning your pictures or documents from the HP Officejet software see scan pictures and documents in the HP Photo amp Imaging Help
to scan an original from your hp officejet
1 Load your original in the automatic document feeder (ADF)For more information see load originals on page 7
2 Press Scan
3 Select the Scan to destination by pressing or or by pressing the Scan button repeatedlyThe default destination is the HP Photo amp Imaging Gallery Any applications on your computer that are supported by the HP Officejet also appear in the Scan to list
4 Press Start Black or Start ColorThe original is scanned and the image is sent to selected destinationFor more information about using the HP Photo amp Imaging Gallery see manage images in how to use the software
hp officejet 4100 series
chapter 5
18
stop scanningYou can stop a scan by pressing the Cancel button located on the front panel
6
19
use the fax features
Using your HP Officejet you can
bull Send and receive paper faxesbull Send computer faxes (reference the HP Photo amp Imaging Help)bull Send and receive color faxes
Fax features are available only on some HP Officejets
send a faxYou can send a fax in a variety of configurations These include the following
bull send a paper fax (using the front panel or computer)bull send a paper fax with a PC-generated cover page (using the computer)bull send a file with or without a cover page (using the computer)bull send a PC-generated cover page as a single-page fax (using the
computer)
Note For information on sending a fax using the computer reference the HP Photo amp Imaging Help
Note By default your HP Officejet prints a report only if there is a problem with sending or receiving a fax A confirmation message indicating whether an item was successfully sent appears briefly on the front-panel display after each transaction If you need printed confirmation that your faxes are successfully sent see print reports on page 22 for information about report options
Note If you have not done so set the date and time See set the date and time on page 27
send a fax from your hp officejet1 Load your originals in the ADF
For more information see load originals on page 7
2 Enter the fax number using the keypad or press Speed Dial until the desired speed-dial entry appearsFor more information on speed dialing see set up speed dialing in the HP Photo amp Imaging Help
3 Press Start Black or Start Color
change settings and use speed dials before sending a fax1 Load your originals in the ADF
For more information see load originals on page 7
2 Enter the fax number using the keypad or press Speed Dial until the desired speed-dial entry appears
hp officejet 4100 series
chapter 6
20
For more information on speed dialing see set up speed dialing in the HP Photo amp Imaging Help
3 Press Enter
4 Press Fax to scroll through the fax options
5 When you reach the option whose setting you wish to change press to scroll through the setting options
6 When you reach the setting you want to change press Enter to accept the setting
7 Press Start Black or Start Color
send a color faxYou can send and receive color faxes to and from other color fax machines If you are faxing from the front panel and your HP Officejet determines that the recipient has a black-and-white fax unit it sends the fax in black and white If you are faxing from the software and your HP Officejet determines that the recipient has a black-and-white fax unit the HP Officejet prompts you to try sending the fax in black and white
We recommend that you use only color originals for color faxing The color originals must be loaded in the ADF you cannot send a color fax from memory using the scan and fax features To fax in color to multiple recipients send the fax from the Director or your software program
to send a color fax from the front panel
1 Load your originals in the ADF For more information see load originals on page 7
2 Enter the fax number using the keypad or press Speed Dial until the desired speed-dial entry appearsFor more information on creating speed-dial entries see set up speed dialing in the HP Photo amp Imaging Help
3 Press Start Color
schedule a faxYou can schedule a black and white fax to be sent later during the same day (for example when telephone lines are not as busy) If you use the front panel you can select a single recipient
When the specified time is reached your fax is automatically sent as soon as a connection can be made
1 Load your originals in the ADF
2 Enter the fax number using the keypad or press Speed Dial until the desired speed-dial entry appears
3 Press Enter
4 Press Fax to scroll through the fax options
5 Stop scrolling when you reach the How to Fax menu
6 Press to scroll through the setting options
7 Stop scrolling when you reach the Send Fax Later option
reference guide
use the fax features
21
8 Press Enter
9 Enter the Send Time using the numeric keypad
10 At the prompt press 1 for AM or 2 for PM
11 When Store Fax Now appears press 1 for Yes or 2 for NoIf 1 is selected the document is scanned to memory and is sent at the selected time If 2 is selected and you havenrsquot loaded your originals a message appears reminding you to load the original before the send time
12 Press Start Black
cancel a scheduled faxYou can cancel a fax stored in memory or one that is currently in progress
bull Press Cancel to cancel the scheduled fax
receive a faxYour HP Officejet is set to print received faxes automatically If you receive a legal-size fax and your HP Officejet is not currently configured to use legal-sized paper the unit automatically reduces the fax so that it fits on the paper that is loaded For more information see set automatic reduction on page 25
If you have an answering machine connected to the same line as your HP Officejet you may need to set the number of rings required before the HP Officejet begins receiving the fax The default number of rings before the HP Officejet receives a fax is 5
set the number of rings before answeringYou can specify how many rings should occur before your HP Officejet automatically answers the phone When you run the Fax Setup Wizard this is set automatically
If you do not want your HP Officejet to answer the phone Rings to Answer should be set to No Answer
1 Press Setup
2 Press 3 then press 3 againThis selects the Basic Fax Setup menu then the Rings to Answer option
3 Use the arrow keys to choose the number of rings and then press Enter
receive a fax manuallyBefore manually receiving a fax we recommend that you remove any originals from your HP Officejet so that they are not accidentally processed
Verify that Rings to Answer is set to No Answer
1 When your HP Officejet rings pick up the handset of a telephone that is on the same telephone line as your HP Officejet
2 If you hear fax tones press Start Black or Start Color or if you are receiving from an extension phone (on the same telephone line as your HP Officejet but not connected directly to it) press 1 2 3 on your phone
3 After you are finished hang up the telephone
hp officejet 4100 series
chapter 6
22
print reportsYou can set up your HP Officejet to print error reports and confirmation reports for each fax you send and receive You can also manually print reports as you need them
generate reports automaticallyThis setting lets you configure your HP Officejet so that it automatically prints error and confirmation reports
1 Press Setup
2 Press 1 then press 5This selects Print Report then selects Automatic Reports Setup
3 Press to scroll through the following report typesndash Every Error which prints whenever there is any kind of fax error
(default)ndash Send Error which prints whenever there is a transmission errorndash Receive Error which prints whenever there is a receiving errorndash Every Fax which confirms every time a fax is sent or receivedndash Send Only which prints every time a fax is sentndash Off which does not print fax reports
4 When you reach the report that you want press Enter
generate reports manuallyThis setting lets you print reports manually From the computer you can only print the Speed-Dial List and the Fax Log
to print reports from the front panel
1 Press Setup then press 1This selects the Print Report menu
2 Press to scroll through the following report typesndash Last Transaction which prints details of the last fax transactionndash Fax Log which prints a log of the last 30 fax transactionsndash Speed Dial List which prints a list of programmed speed dialsndash Self-Test Report which prints a report to assist you in diagnosing print
and alignment problems For more information see print a self-test report on page 32
ndash Automatic Reports Setup which is the automatic reports setting described in generate reports automatically on page 22
3 When you reach the report that you want press Enter
control resolution and contrastYour HP Officejet lets you change the resolution and contrast of documents that you are sending
change resolutionResolution affects the transmission speed and quality of faxed documents
reference guide
use the fax features
23
to change the resolution from the front panel
1 Load your originals in the ADF
2 Enter the fax number using the keypad or press Speed Dial until the desired speed-dial entry appears
3 Press Enter
4 Press Fax to scroll through the fax options
5 Stop scrolling when you reach the Resolution menu
6 Press until the desired resolution quality appears (Standard Photo Fine Very Fine)
7 Press EnterYour HP Officejet only faxes at the highest resolution supported by the receiving faxIf you choose Photo be aware that the faxing process takes longer to complete When faxing photographs we recommend that you choose Photo
change contrastChange this setting if you want a black-and-white fax to be darker or lighter than the original
to change the fax contrast from the front panel
1 Load your originals in the ADF
2 Enter the fax number using the keypad or press Speed Dial until the desired speed-dial entry appears
3 Press Enter
4 Press Fax to scroll through the fax options
5 Stop scrolling when you reach the LighterDarker menuThe range of values appears as a circle on a scale on the display
6 Press to lighten the fax or to darken itThe circle moves left or right as you press a button
7 Press Enter to accept the setting you selected
change other fax settings
redial a number automaticallyYou can set your HP Officejet to redial a busy and an unanswered number automatically If you initiated a fax from the computer the computer must be left on for the redialing process to work correctly
1 Press Setup
2 Press 4This selects the Advanced Fax Setup menu
3 Choose one of the following optionsndash Press 3
hp officejet 4100 series
chapter 6
24
This selects the Busy Redial option The default setting for Busy Redial is Redial
ndash Press 4This selects the No Answer Redial option The default setting for No Answer Redial is No Redial
4 Press Enter
5 Press to select Redial or No Redial as desired
6 Press Enter
forward faxes to another numberWith fax forwarding you can send a fax that you receive to another fax number during the next 24-hour period
to forward faxes from the front panel
1 Press Setup
2 Press 3 then press 7This selects the Basic Fax Setup menu then selects the Fax Forwarding Black Only option
3 At the prompt enter the Fax Number to which you wish to send the fax
4 Press Enter
5 Enter the Start Date using the numeric keypad
6 Enter the Start Time using the numeric keypad
7 At the prompt press 1 for AM or 2 for PM
8 Enter the Stop Date using the numeric keypadFax Forwarding On appears on the display
edit or cancel fax forwardingOnce fax forwarding is enabled you may find that you need to change the number you are faxing to or the start and stop times you entered You may wish to cancel your fax forwarding setup altogether Follow the steps below to edit or turn off fax forwarding
to edit fax forwarding from the front panel
1 Press Setup
2 Press 3 then press 7This selects the Basic Fax Setup menu then selects the Fax Forwarding Black Only option
3 Forwarding is ON 1=Edit 2=Cancel appears on the display after a moment Press 1 to edit the number you wish to fax to or to change the start and stop times Follow the messages on the display
to cancel fax forwarding from the front panelbull Press Cancel
OR
reference guide
use the fax features
25
Follow the steps in edit or cancel fax forwarding on page 24 When Forwarding is ON 1=Edit 2=Cancel appears on the display press 2 to cancel fax forwarding
use error correction modeError Correction Mode (ECM) eliminates data lost due to poor phone lines by detecting errors that occur during transmission and automatically requesting retransmission of the erroneous portion Phone charges are unaffected or may even be reduced on good phone lines On poor phone lines ECM increases sending time and phone charges but sends the data much more reliably Turn ECM off (the default setting is on) only if it increases phone charges substantially and you can accept poorer quality in exchange for reduced charges
to change the ECM setting from the front panel
1 Press Setup
2 Press 4 then press 7This selects the Advanced Fax Setup menu then selects the Error Correction Mode option
3 Press to switch between On and Off
4 Press Enter to accept the setting you selected
set automatic reductionThis setting determines what your HP Officejet does if it receives a fax that is too large for the default paper size With this setting on (the default) the image is reduced so that it fits on one page With this feature off information that doesnrsquot fit on the first page is printed on a second page
1 Press Setup
2 Press 4 then press 5This selects the Advanced Fax Setup menu then selects the Automatic Reduction option
3 Press to switch between On and Off
4 Press Enter to accept the setting you selected
adjust the volumeYour HP Officejet provides three levels for adjusting the ring and speaker volume The ring volume is the volume of the phone ringer The speaker volume is the volume of everything else such as the dial and fax tones The default setting is Soft
1 Press Setup
2 Press 3 then press 6This selects the Basic Fax Setup menu then selects the Ring and Beep Volume option
3 Press to select one of the options Soft Loud or Off
4 Press Enter to accept the setting you selected
hp officejet 4100 series
chapter 6
26
change the answer ring pattern (distinctive ringing)Distinctive ringing is a feature offered by phone companies that allows several phone numbers to share the same line Each number has a specific ring pattern If you do not have this service use the default ring pattern which is All Rings
If you connect your HP Officejet to a line with distinctive ringing have your telephone company assign one ring pattern to voice calls and another to fax calls (double or triple rings are best for a fax number)
1 Press Setup
2 Press 4 then press 2This selects the Advanced Fax Setup menu then selects the Answer Ring Pattern option
3 Press to scroll through these options All Rings Single Rings Double Rings Triple Rings and Double amp Triple
4 When the ring pattern that the phone company established for this number appears press Enter
Tip We recommend that you use Double Rings or Triple Rings for fax
set up speed dialingThrough your HP Officejet or your computer you can assign entries to fax numbers you use often This lets you dial those numbers quickly using the front panelrsquos Speed Dial button and a one- or two-digit entry You can create up to 100 individual speed-dial entries (the maximum for some models is 70)
We recommend that you use the software to set up speed-dial settings
Note A speed-dial entry can only be associated with one phone number speed-dial groups are not supported
For more information see set up speed dialing in the hp photo amp imaging help
create individual speed-dial settingsYou can enter fax numbers that you will reuse frequently
1 Press Setup
2 Press 2 then press 1This selects the Speed Dial Setup menu then selects the Individual Speed Dial option
3 Press EnterThe first unassigned speed-dial entry appears on the display
4 Press Enter to select the displayed speed-dial entry
5 Enter the Fax Number to assign to that entry then press EnterThe fax number can be up to 50 digits in length
Tip To enter a three-second pause within a number sequence press Symbols to display a dash
6 Enter the personrsquos or companyrsquos name then press Enter
reference guide
use the fax features
27
The name is limited to 13 characters in lengthFor more information see enter text on page 28
7 After Enter Another appears press 1 (Yes) if you want to set up another number or press 2 (No) to exit
delete speed-dial settingsFollow these steps to delete an individual speed-dial entry
1 Press Setup
2 Press 2 then press 2 againThis selects Speed Dial Setup then selects Delete Speed Dial
3 Press until the individual entry that you want to delete appears then press Enter
set basic fax settings using the front panelWe recommend that you use the Fax Setup Wizard in the HP Officejet software to configure all your basic fax settings however you can also access these settings from the front panel
Note In the US regulations require that your name and phone number appear on every fax The minimum settings that we recommend are described in the following topics
set the date and timeFollow these steps to set the date and time manually
1 Press Setup
2 Press 3 then press 1This selects the Basic Fax Setup menu then selects the Date and Time option
3 Follow the prompts on the display to enter the date and time using the keypad
Tip Use only the last two digits for the year
Tip When you enter a single-digit date or time type a leading zero before the single digit for example 0345 or 08-03-02
After you are done the date and time appear on the display
Warning Cutting off power to the HP Officejet causes the selected date and time to be lost However name and fax number information is not lost
set the fax headerFollow these steps to enter your name and fax number in the header
Note In Hungary the subscriber identification code (fax header) can be set or changed only by authorized personnel For more information contact your authorized HP dealer
1 Press Setup
2 Press 3 then press 2
hp officejet 4100 series
chapter 6
28
This selects the Basic Fax Setup menu then selects the Fax Header option
3 Enter your personal or company name at the prompt Use the guidelines provided in the next section under enter text
4 Press Enter
5 Enter your fax number using the numeric keypad
6 Press Enter
enter textThe following list provides tips for entering text using the front-panel keypad
bull Press the keypad numbers that correspond to the letters of a name
bull Press a button multiple times to see a letter first in uppercase and then in lowercase
bull After the correct letter appears press and then press the number that corresponds to the next letter in the name Again press multiple times until the correct letter appears
bull To insert a space press Space ()bull To enter a symbol such as press Symbols () to scroll through the list of
available symbolsbull If you make a mistake press to clear it and then make the correct
entrybull After you are done entering text press Enter to store your entries
check for dial toneBefore using the fax features verify that the connections are correctly established
1 Press Fax
2 Listen for a dial tone
3 If you do not hear a dial tone check the connections
4 Press Cancel to hang up
ABC These letters correspond to this number and so on
2
JKL To get this character J j K k L l 5
5 Press 5 this many times 1 2 3 4 5 6 7
reference guide
use the fax features
29
fax job menuThe following options become available when the Fax button is pressed
setup menu for fax commandsThe following fax settings are available in the Setup menu
Enter Fax or Speed Dial
FineVery FinePhotoStandard
Fax Number Resolution LighterDarker
Enter a fax number or speed dialWhen the Fax button is pressed
Press and to move to the option you wantPress Enter to select the displayed setting
NoYes
Set New Defaults
Send Fax NowFax from MemorySend Fax LaterPoll to Receive
How to Fax
1Automatic Reports Setup
2Answer Ring Pattern
3Busy Redial
4No Answer Redial
5Automatic Reduction
6Backup Fax Reception
7Error Correction Mode
3Basic Fax Setup 4Advanced Fax Setup
Press Setup to display the menu options
Press and to move to the setting you wantPress Enter to select the displayed setting
1Date and Time
2Fax Header
3Rings to Answer
4Paper Size
5Tone or Pulse Dialing
6Ring and Beep Volume
7Fax Forwarding Black Only
2Speed Dial Setup
1Individual Speed Dial
2Delete Speed Dial
3Print Speed Dial List
hp officejet 4100 series
chapter 6
30
7
31
maintain your hp officejet
This section provides instructions for keeping your HP Officejet in top working condition Perform these maintenance procedures as necessary
clean the glassDirty glass from dust smudges hair and so on slows down performance and affects the accuracy of features such as Fit to Page and Copy
1 Turn off the unit unplug the power cord and raise the scanner lid
2 Clean the glass with a soft cloth or sponge slightly moistened with a nonabrasive glass cleaner
Caution Do not use abrasives acetone benzene or carbon tetrachloride on the glass these can damage it Do not place liquids directly on the glass They may seep under it and damage the unit
3 Dry the glass with a chamois or cellulose sponge to prevent spotting
hp officejet 4100 series
chapter 7
32
clean the white stripMinor debris can accumulate on the white strip located underneath the scannerrsquos lid
1 Turn off the unit unplug the power cord and raise the scanner lid
2 Clean the white strip with a soft cloth or sponge slightly moistened with a mild soap and warm water
3 Wash the strip gently to loosen debris do not scrub the strip
4 Dry the strip with a chamois or soft cloth
Caution Do not use paper-based wipes as these may scratch the strip
5 If this does not clean the strip well enough repeat the previous steps using isopropyl (rubbing) alcohol and wipe the strip thoroughly with a damp cloth to remove any residual alcohol
clean the exterior Use a soft damp lint-free cloth to wipe dust smudges and stains off the case The interior of the unit does not require cleaning Keep fluids away from the interior of the unit as well as the front panel
work with print cartridgesTo ensure the best print quality from your HP Officejet you will need to perform some simple maintenance procedures and when prompted by a front-panel message replace the print cartridges
print a self-test reportIf you are experiencing problems with printing before cleaning or replacing the print cartridges you should print a Self-Test Report This report provides useful information about your print cartridges including status information
1 Press Setup
2 Press 1 then press 4This selects Print Report and then selects Self-Test Report
3 Press Start Black or Start ColorA Self-Test Report is printed for your HP Officejet
handle print cartridgesBefore you replace or clean a print cartridge you should know the part names and how to handle the print cartridge
reference guide
maintain your hp officejet
33
replace the print cartridgesFront-panel messages appear to let you know that you should replace your print cartridges
See order print cartridges on the back cover for information on ordering replacement print cartridges
1 Turn on the unit then lift open the print cartridge access doorThe print carriage moves into view
2 After the carriage stops moving push down on the print cartridge down to release it and then pull it toward you out of its slot
Plastic tape with pink tab(must be removed)
Copper contactsInk nozzles under tape
Do not touch the copper contacts or the ink nozzles
print cartridge access door
hp officejet 4100 series
chapter 7
34
Note It is normal to see ink build-up in the print cartridge slots
3 Remove the new print cartridge from its packaging and being careful to touch only the bright pink plastic tab gently remove the plastic tape to uncover the ink nozzles
Caution Do not touch the copper contacts or ink nozzles
Once you have removed the plastic tape install the print cartridge immediately to prevent the ink from drying in the nozzles
4 Push the new print cartridge into the appropriate slot at a slight angle until it clicks into place
Caution Do not attempt to push the cartridge straight into the slot It must slide in at a slight angle
The tri-color print cartridge goes on the left and the black cartridge goes on the right
5 Close the print cartridge access door
reference guide
maintain your hp officejet
35
align the print cartridgesThe HP Officejet prompts you to align cartridges every time you install or replace a print cartridge Aligning the cartridges ensures high-quality output
To align the print cartridges when prompted
1 Press Enter on the front panelAn align cartridges (test pattern) page prints
2 Load the align cartridges page face down in the ADF between the paper-width guides and press the Enter button again
3 Recycle or discard the page
To align the cartridges at any other time
1 Press Setup
2 Press 5 then press 2This selects the Maintenance menu and then selects the Align Print Cartridge option
3 Press EnterAn align cartridges (test pattern) page prints
4 Load the align cartridges page face down in the ADF between the paper-width guides and press the Enter button again
5 Recycle or discard the page
clean the print cartridgesUse this feature when the Self-Test Report shows streaking or white lines through any of the colored bars Do not clean print cartridges unnecessarily This wastes ink and shortens the life of the ink nozzles
1 Press Setup
2 Press 5 then press 1This selects the Maintenance menu and then selects the Clean Print Cartridge optionA page of patterns is printed The cartridges are cleaned Recycle or discard the pageIf copy or print quality still seem poor after you clean the print cartridges replace the print cartridge that is affected
restore factory defaultsYou can restore the original factory settings to what they were when you purchased your HP Officejet Choosing to restore your factory defaults restores all settings except date information and any scan settings you may have set
You can perform this process from the front panel only
1 Press Setup
2 Press 5 then press 3This selects Maintenance and then selects Restore Factory DefaultsThe factory default settings are restored
hp officejet 4100 series
chapter 7
36
set scroll speedThe Scroll Speed option lets you control the rate that text messages appear in the front-panel display You can choose Normal Fast or Slow The default is Normal
1 Press Setup
2 Press 5 then press 6This selects Maintenance and then selects Set Scroll Speed
3 Press until the desired speed appears then press Enter
set the prompt delay timeThe Prompt Delay option lets you control the amount of time before a message is displayed in the front-panel display You can choose Normal Fast or Slow The default is Normal
1 Press Setup
2 Press 5 then press 7This selects Maintenance and then selects Set Prompt Delay Time
3 Press until the delay time appears then press Enter
self-maintenance sounds During the life of your product you may hear various mechanical sounds This is a normal part of your unitrsquos self-maintenance
reference guide
maintain your hp officejet
37
setup menu optionsThe following options are available from the Setup button
1Last Transaction
2Fax Log
3Speed Dial List
4Self-Test Report
5Automatic Reports Setup
1Print Report
Use Setup to display the Print Report Speed Dial Setup Basic Fax Setup Advanced Fax Setup and Maintenance options
Press and to move to the setting you wantPress Enter to select the displayed setting
1Clean Print Cartridges
2Align Print Cartridges
3Restore Factory Defaults
4Reprint Faxes in Memory
5Set Language amp CountryRegion
6Set Scroll Speed
7Set Prompt Delay Time
5Maintenance2Speed Dial Setup
3Basic Fax Setup
4Advanced Fax Setup
1Individual Speed Dial
2Delete Speed Dial
3Print Speed Dial List
1Date and Time
2Fax Header
3Rings to Answer
4 Paper Size
5Tone or Pulse Dialing
6Ring and Beep Volume
7Fax Forwarding Black Only
1Automatic Reports Setup
2Answer Ring Pattern
3Busy Redial
4No Answer Redail
5Automatic Reduction
6Backup Fax Reception
7Error Correction Mode
hp officejet 4100 series
chapter 7
38
8
39
additional setup information
During the installation of the HP Officejet software a number of windows are displayed You should see the following
bull Installingbull Copying files bull A request to plug in the HP Officejetbull Green OK and check markbull Request to restart your computer (may not occur in all cases)bull Registration
If you did not see all of these windows there may be a problem with the installation Verify the following
bull The HP Director contains six icons (double-click the HP Director icon on the desktop)
bull The HP Officejet is listed in the Printers dialog boxbull There is an icon for the HP Officejet in the System Tray that indicates the
HP Officejet is ready
If the HP Director does not show six icons you may need to wait a few minutes for the HP Officejet to connect to your computer
possible installation problemsIf nothing appears on your computer screen after you insert the HP Officejet 4100 Series CD-ROM into your computerrsquos CD-ROM drive
1 From the Start menu choose Run
2 In the Run dialog box enter dsetupexe (if your CD-ROM drive is not assigned to drive letter d use the appropriate drive letter) then click OK
If the HP Director does not contain six icons do the following
bull Verify that the front-panel cover is attached then unplug the HP Officejet and plug it in again
bull Verify that the USB and power cables are plugged inndash Unplug the USB cable and plug it in againndash Do not attach the USB cable to a keyboard or nonpowered hubndash Verify that the USB cable is 3 meters or less in lengthndash If you have several USB devices attached to your computer you may
want to unplug the others during the installation
Note AppleTalk is not supported
bull Unplug the HP Officejet from the wall and plug it in againbull Restart your computer
hp officejet 4100 series
chapter 8
40
On Windows check the System Tray for applications that are running in the background and close them before restarting your computer
remove and reinstall your hp officejet softwareIf six icons do not appear in the Director you may need to uninstall and re-install the software Do not simply delete the HP Officejet program files from your hard drive Be sure to remove them properly using the uninstall utility provided in the HP Officejet program group
to uninstall from a Windows computer
1 Disconnect your HP Officejet from your computer
2 On the Windows taskbar click Start choose Programs or All Programs (XP) choose Hewlett-Packard choose hp officejet 4100 series then choose uninstall software
3 Follow the directions on the screenBe sure to disconnect your HP Officejet
4 If you are asked whether you would like to remove shared files click NoOther programs that use these files may not work properly if the files are deleted
5 After the program finishes removing the software disconnect your HP Officejet and restart your computer
Note It is important that you disconnect your HP Officejet before restarting your computer
6 To reinstall the software insert the HP Officejet 4100 Series CD-ROM into your computerrsquos CD-ROM drive and follow the instructions that appear
7 After the software is installed connect and turn on your HP Officejet following the onscreen instructions and the instructions in your Setup PosterAfter connecting and turning on your HP Officejet you may have to wait several minutes for all of the Plug and Play events to completeWhen the software installation is complete you will see a Status Monitor icon in the System Tray
8 To verify that the software is properly installed double-click on the HP Director icon on the desktop If the HP Director shows six icons the software has been properly installed
to uninstall from a Macintosh computer
1 Disconnect your HP Officejet from your computer
2 Double-click on ApplicationsHP All-in-One Software folder
reference guide
additional setup information
41
3 Double-click on HP Uninstaller
4 Follow the directions that appear on the screen
5 After the program finishes removing the software disconnect your HP Officejet and restart your computer
6 To reinstall the software insert the HP Officejet 4100 Series CD-ROM into your computerrsquos CD-ROM drive
Note When re-installing the software follow the instructions on the Setup Poster Do not connect the HP Officejet to your computer until after you have completed the software installation
7 On the desktop open the CD-ROM double-click on hp all-in-one installer and follow the instructions that appear
connect your hp officejet to a phone modem or answering machine
The HP Officejet can share a phone line with a phone a modem or an aswering machine When sharing a phone line with an answering machine the HP Officejet will answer fax calls and direct voice calls to the answering machine
Note For information on connecting your HP Officejet to your computer and phone line refer to the Setup Poster that came with your unit
to connect your hp officejet to a phone modem or answering machine
1 Remove the white plastic stopper from connector 2 on the back of the HP Officejet
To connect more than one device to connector 2 on the HP Officejet you must purchase a Y-splitter and plug it into connector 2
2 Connect the phone cord from the phone modem or answering machine to connector 2 (or Y-splitter)
Caution Do not use the phone cord that came with the HP Officejet for this purpose That phone cord must connect connector 1 on the HP Officejet to the wall jack for your phone system See the Setup Poster for details
3 If you are connecting an answering machine see set the number of rings before answering on page 21 for instructions on setting the number of rings correctly or change the answer ring pattern (distinctive ringing) on page 26 for information on incoming ring patterns
4 If you are connecting a modem turn off its fax-receive feature
connector 2 on the HP Officejet
connector 1 on the HP Officejet
hp officejet 4100 series
chapter 8
42
additional troubleshooting helpYou may want to refer to the readme file for more information on possible installation problems On Windows you can access the readme file from the Start button on the taskbar select Programs Hewlett-Packard hp officejet 4100 series View the Readme File On Macintosh you can access the readme file by double-clicking on the icon located in the top-level folder of the HP Officejet software CD-ROM
The readme file provides more information including
bull Using the Re-install utility after a failed installation to return your PC to a state that will allow the HP Officejet to be re-installed
bull Using the Re-install utility on Windows 98 to recover from a Composite USB System Driver missing errorThis error may occur if the hardware is installed prior to installing the software After running the Re-install utility reboot your PC and install the HP Officejet software before connecting the HP Officejet to your computer
You can also find more information on this website
wwwhpcomsupport
9
43
technical information
Additional specifications information can be found in the HP Photo amp Imaging Help in the hp officejet 4100 series section
physical specifications
power specificationsbull Power consumption 75W maximumbull Source (Input Voltage) 100 to 240 VAC groundedbull Input Frequency 50 to 60 Hzbull Current 1A maximum
regulatory informationAdditional regulatory information can be found in the HP Photo amp Imaging Help The information in this section supercedes information in the HP Photo amp Imaging Help
doc statement deacuteclaration de conformiteacute (Canada)Le preacutesent appareil numeacuterique neacutemet pas de bruit radioeacutelectrique deacutepassant les limites applicables aux appareils numeacuteriques de la classe B prescrites dans le Regraveglement sur le brouillage radioeacutelectrique eacutedicteacute par le ministegravere des Communications du CanadaThis digital apparatus does not exceed the Class B limits for radio noise emissions from digital apparatus set out in the Radio Interference Regulations of the Canadian Department of Communications
notice to users of the Canadian telephone networkThis equipment meets the applicable Industry Canada Terminal Equipment Technical Specifications This is confirmed by the registration number The abbreviation IC before the registration number signifies that registration was performed based on a Declaration of Conformity indicating that Industry Canada technical specifications were met It does not imply that Industry Canada approved the equipment
Note The Ringer Equivalence Number (REN) assigned to each terminal device provides an indication of the maximum number of terminals allowed to be connected to a telephone interface The termination on an interface may consist of any combination of devices subject only to the requirement that the sum of the Ringer Equivalence Numbers of all the devices does not exceed 5
The REN for this product is 03B based on FCC Part 68 test results
height width depth weight (without print cartridges)
with paper trays and ADF closed
718 in (1824 cm) 1676 in (4258 cm) 825 in (2096 cm) 75 lbs (34 kg)
with ADF and paper tray extended
1030 in (2615 cm) 1676 in (4258 cm) 1854 in (4709 cm) 75 lbs (34 kg)
hp officejet 4100 series
chapter 9
44
notice to all users of the European Economic Area (EEA)
This product is designed to interwork with the analogue telephone networks in the following countriesregions
Network compatibility depends on customer selected settings which must be reset to use the equipment on a telephone network in a countryregion other than where the product was purchased Contact the vendor or Hewlett-Packard Company if addition product support is necessaryThis equipment has been certified by the manufacturer in accordance with Directive 19995EC (annex II) for Pan-European single-terminal connection to the public switched telephone network (PSTN) However due to differences between the individual PSTNs provided in different countriesregions the approval does not of itself give an unconditional assurance of successful operation on every PSTN network termination pointIn the event of problems you should contact your equipment supplier in the first instance
geraumluschemissionLpA lt 70 dBam Arbeitsplatzim Normalbetriebnach DIN 45635 T 19
notice to Korean customers
Germany UK Netherlands
France Spain Italy
Belgium Luxembourg Sweden
Austria Denmark Ireland
Norway Finland Switzerland
Greece Portugal
10
45
hp support
This section explains the support services information provided by Hewlett-Packard If you are unable to find the answer you need in the printed or onscreen documentation supplied with your product you can contact one of the HP support services listed in the following pages Some support services are available only in the US and Canada while others are available in many countriesregions worldwide If a support service number is not listed for your countryregion contact your nearest authorized HP dealer for help
get support and other information from the internetIf you have Internet access you can get help from the following HP website
wwwhpcomsupportThe Web site offers technical support drivers supplies and ordering information
hp customer supportSoftware programs from other companies may be included with your HP Officejet If you experience problems with any of those programs you will receive the best technical assistance by calling the experts at that companyIf you need to contact HP Customer Support do the following before you call
1 Make sure thata Your unit is plugged in and turned onb The specified print cartridges are installed correctlyc The recommended paper is properly loaded in the input tray
2 Reset your unita Turn off the unit using the On button located on the unitrsquos front panelb Unplug the power cord from the back of the unitc Plug the power cord back into the unitd Turn on the unit using the On button
3 For more information check the HP website at wwwhpcomsupport
4 If you are still experiencing problems and need to speak with an HP Customer Support Representativendash Have your service ID and serial number ready To display your service ID and
serial number on the front panel do the following Press Enter and Start Color at the same time until the service ID appears in the front-panel display From this display press the right arrow until the serial number displays
ndash Print a Self-Test Report See print a self-test report on page 32 for information on printing this report
ndash Make a color copyndash Be prepared to describe your problem in detail
5 Call HP Customer Support Be near your unit when you call
call in the US during warrantyCall (208) 323-2551 This service is free during the warranty period however your standard long-distance phone charges still apply A fee may apply outside the warranty period
hp officejet 4100 series
chapter 10
46
US phone support is available in both English and Spanish languages 24 hours a day 7 days a week (days and hours of support may change without notice)
call elsewhere in the worldThe numbers listed below are current as of the printing date of this guide For a list of current international HP Support Service numbers visit this address and choose your own countryregion or language
wwwhpcomsupportFor Korea you can also visit this address
httpwwwhpcokrYou can call the HP support center in the following countriesregions If your countryregion is not listed contact your local dealer or nearest HP Sales and Support Office to find out how to obtain servicesSupport service is free during the warranty period however your standard long-distance phone charges will apply In some cases a flat fee per single incident will also applyFor phone support in Europe please check for the details and conditions of phone support in your countryregion by consulting the following Web site
wwwhpcomsupportAlternatively you can ask your dealer or call HP at the phone number indicated in this booklet As part of our constant efforts to improve our phone support service we advise you to check our website on a regular basis for new information regarding service features and delivery
countryregion hp technical support countryregion hp technical support
Algeria1 +213 (0) 61564 543 Malaysia 1-800-805405
Argentina 0810-555-5520 Mexico 01-800-472-6684
Australia +61 3 8877 80001902 910 910
Mexico (Mexico City) 5258-9922
Austria +43 (0) 810 00 6080 Morocco1 +212 22404 747
Bahrain (Dubai) 800 728 Netherlands +31 (0) 20 606 8751
Belgium (Dutch) +32 (0) 2 626 8806 New Zealand 0800 441 147
Belgium (French) +32 (0) 2 626 8807 Norway +47 22 11 6299
Brazil (Grande Sao Paulo) (11) 3747 7799 Oman +971 4 883 8454
Brazil (Demais Localidades) 0800 157751 Palestine +971 4 883 8454
Canada during warranty (905) 206 4663 Panama 001-800-7112884
Canada post-warranty(per-call charge)
1-877-621-4722 Peru 0-800-10111
Caribbean amp Central America
1-800-711-2884 Philippines 632-867-3551
Chile 800-360-999 Poland +48 22 865 98 00
China 86 10 6868 7980 Portugal +351 21 3176333
Colombia 9-800-114-726 Puerto Rico 1-877-2320-589
Costa Rica 0-800-011-0524 Qatar +971 4 883 8454
Czech Republic +420 (0) 261307310 Romania +40 1 315 44 42or local 01 3154442
reference guide
hp support
47
call in Australia post-warrantyIf your product is not under warranty you can call 03 8877 8000 A per-incident out-of-warranty support fee of $2750 (inc GST) will be charged to your credit card You can also call 1902 910 910 ($2750 charged to your phone account) from 900 AM to 500 PM Monday through Friday (Charges and support hours are subject to change without notice)
prepare your unit for shipmentIf after contacting HP Customer Support or returning to the point of purchase you are requested to send your unit in for service please follow the power off and rebox steps below to avoid further damage to the HP product
Denmark +45 39 29 4099 Russian Federation Moscow +7 095 797 3520
Ecuador 1800-711-2884 Russian Federation St Petersburg
+7 812 346 7997
Europe (English) +44 (0) 207 512 5202 Saudi Arabia +800 897 14440
Egypt 02 532 5222 Singapore 65 6272 5300
Finland +358 (0) 203 47 288 Slovakia +421 (0) 2 682 08080
France (034 Euromin) +0892 69 60 22 South Africa (inside RSA) 086 000 1030
Germany (012 Euromin) +49 (0) 180 52 58 143 South Africa (inside RSA) +27-11 258 9301
Greece +30 1060 73 603 Spain +34 902 321 123
Hong Kong (SAR) +85 (2) 3002 8555 Sweden +46 (0)8 619 2170
Guatemala 1800-995-5105 Switzerland 2 +41 (0) 84 880 1111
Hungary +36 (0) 1 382 1111 Taiwan +886-2-2717-00550800 010 055
India 1-600-11226791 11 682 6035
Thailand +66 (2) 661 4000
Indonesia 62-21-350-3408 Tunisia1 +216 1891 222
Ireland +353 (0) 1 662 5525 Turkey +90 216 579 7171
Israel +972 (0) 9 8304848 Ukraine +7 (380-44) 490-3520
Italy +39 (0) 226410350 United Arab Emirates +971 4 883 8454
Japan 0570 000 511+81 3 3335 9800
United Kingdom +44 (0) 207 512 52 02
Jordan +971 4 883 8454 Venezuela 0800-47468368 or800-477-7777
Korea (Seoul) +82 (2) 3270 0700 Venezuela (Caracas) (502) 207-8488
Korea (outside Seoul) 080 999 0700 Vietnam 84 (0) 8 823 4530
Kuwait +971 4 883 8454 Yemen +971 4 883 8454
Lebanon +971 4 883 8454
1 This Call Center supports French speaking customers from the following countriesregions Morocco Tunisia and Algeria
2 This Call Center supports German French and Italian speaking customers in Switzerland
countryregion hp technical support countryregion hp technical support
hp officejet 4100 series
chapter 10
48
Note When transporting your HP Officejet make sure that the pens have been removed the HP Officejet has been properly shut down by pressing the power button and you have allowed time for the carriage to return to the service station and for the scanner to return to its parked position
1 Turn on the unitDisregard steps 1 through 6 if your unit will not turn on and the print carriage is in the home position You will not be able to remove the print cartridges Proceed to step 7
2 Open the print cartridge access doorThe print carriage moves into view
3 See replace the print cartridges on page 33 for information on removing the print cartridges
Caution Remove both print cartridges Failure to do so may damage your unit
4 Place the print cartridges in an airtight bag so they will not dry out and put them aside (do not send them with the unit unless instructed to by the HP customer support call agent)
5 Turn off the unit
6 Close the print cartridge access door
7 Remove the front panel cover as followsa Grasp the front of the front panel cover with two hands as shownb Firmly lift the front panel cover to unsnap it from the unit
8 Retain the front panel cover Do not return the front panel cover with the unit
9 If available pack the unit for shipment using the original packing materials or the packaging materials that come with your exchange unit
If you do not have the original packaging materials please use other adequate packaging materials Shipping damage caused by improper packaging andor improper transportation is not covered under the warranty
reference guide
hp support
49
10 Place the return shipping label on the outside of the box
11 Include the following items in the boxndash A complete description of symptoms for service personnel (samples of print
quality problems are helpful)ndash A copy of the sales slip or other proof of purchase to establish the warranty
coverage periodndash Your name address and a phone number where you can be reached during
the day
hp distribution centerTo order HP Officejet software a copy of the printed Reference Guide a setup poster or other customer-replaceable parts do one of the following bull In the US or Canada call (208) 323 2551bull Visit this website
httpwwwhpcomcposupportsoftwarehtml
hp officejet 4100 series
chapter 10
50
11
51
warranty information
HP Officejet 4100 seriesDuration of Limited Warranty (hardware and labor) 1 YearDuration of Limited Warranty (CD media) 90 DaysDuration of Limited Warranty (print cartridges) Until the HP ink is depleted or the ldquoend of warrantyrdquo date printed on the cartridge has been reached whichever occurs first
warranty service
express serviceTo obtain HP express repair service the customer must contact an HP service office or an HP Customer Support Center for basic troubleshooting first See hp customer support on page 45 for steps to take before calling Customer SupportIf a customer unit needs a minor part replacement and these parts can normally be replaced by the customer the customer-replaceable components may be serviced through expedited part shipment In this event HP will prepay shipping charges duty and taxes provide telephone assistance on replacement of the component and pay shipping charges duty and taxes for any part that HP asks to be returnedThe HP Customer Support Center may direct customers to designated authorized service providers who are certified by HP to service the HP product
warranty upgradesUpgrade your standard factory warranty to a total of three years with the HP SUPPORTPACK Service coverage begins on product purchase date and the pack must be purchased within the first 180 days of product purchase This program offers phone support from 600 AM to 1000 PM Mountain Standard Time (MST) Monday through Friday and 900 AM to 400 PM (MST) on Saturdays If during your technical support call it is determined that you need a replacement product then HP will ship you this product next business day free of charge Available in US onlyFor more information please call 1-888-999-4747 or visit the following HP Web site
httpwwwhpcomgohpsupportpack
Outside the US please call your local HP Customer Support office See call elsewhere in the world on page 46 for a list of international Customer Support numbers
returning your hp officejet for serviceBefore returning your HP Officejet for service you must call HP Customer Support See hp customer support on page 45 for steps to take before calling Customer Support
hewlett-packard limited global warranty statement
extent of limited warrantyHewlett-Packard (ldquoHPrdquo) warrants to the end-user customer (ldquoCustomerrdquo) that each HP Officejet 4100 Series product (ldquoProductrdquo) including related software accessories media and supplies shall be free from defects in material and workmanship for the duration which begins on the date of purchase by the Customer
hp officejet 4100 series
chapter 11
52
For each software Product HPrsquos limited warranty applies only to a failure to execute programming instructions HP does not warrant that the operation of any Product shall be uninterrupted or error freeHPrsquos limited warranty covers only those defects which arise as a result of normal use of a Product and does not cover any other problems including those which arise as a result of (a) improper maintenance or modification (b) software accessories media or supplies not provided or supported by HP or (c) operation outside the Productrsquos specificationsFor any hardware Product the use of a non-HP print cartridge or a refilled print cartridge does not affect either the warranty to the Customer or any HP support contract with the Customer However if Product failure or damage is attributable to the use of a non-HP or refilled print cartridge HP shall charge its standard labor and materials charges to service the Product for the failure or damageIf HP receives during the applicable warranty period notice of a defect in any Product HP shall either repair or replace the defective Product at HPrsquos option Where labor charges are not covered by HPrsquos limited warranty repairs shall be at HPrsquos standard charges for laborIf HP is unable to repair or replace as applicable a defective Product which is covered by HPrsquos warranty HP shall within a reasonable time after being notified of the defect refund the purchase price for the ProductHP shall have no obligation to repair replace or refund until the Customer returns the defective Product to HPAny replacement product may be either new or like-new provided that it has functionality at least equal to that of the Product being replacedHP products including each Product may contain remanufactured parts components or materials equivalent to new in performanceHPs limited warranty for each Product is valid in any countryregion or locality where HP has a support presence for the Product and where HP has marketed the Product The level of warranty service may vary according to local standards HP shall have no obligation to alter the form fit or function of the Product in order to make it operate in a countryregion or locality for which the Product was never intended to operate
limitations of warrantyTO THE EXTENT ALLOWED BY LOCAL LAW NEITHER HP NOR ITS THIRD PARTY SUPPLIERS MAKE ANY OTHER WARRANTY OR CONDITION OF ANY KIND WHETHER EXPRESS OR IMPLIED WITH RESPECT TO THE COVERED HP PRODUCTS AND SPECIFICALLY DISCLAIM THE IMPLIED WARRANTIES OR CONDITIONS OF MERCHANTABILITY SATISFACTORY QUALITY AND FITNESS FOR A PARTICULAR PURPOSE
limitations of liabilityTo the extent allowed by local law the remedies provided in this Limited Warranty Statement are the Customerrsquos sole and exclusive remediesTO THE EXTENT ALLOWED BY LOCAL LAW EXCEPT FOR THE OBLIGATIONS SPECIFICALLY SET FORTH IN THIS LIMITED WARRANTY STATEMENT IN NO EVENT SHALL HP OR ITS THIRD PARTY SUPPLIERS BE LIABLE FOR DIRECT INDIRECT SPECIAL INCIDENTAL OR CONSEQUENTIAL DAMAGES WHETHER BASED ON CONTRACT TORT OR ANY OTHER LEGAL THEORY AND WHETHER ADVISED OF THE POSSIBILITY OF SUCH DAMAGES
local lawThis Limited Warranty Statement gives the Customer specific legal rights The Customer may also have other rights which vary from state to state in the United States from province to province in Canada and from countryregion to countryregion elsewhere in the world
reference guide
warranty information
53
To the extent this Limited Warranty Statement is inconsistent with local law this Statement shall be deemed modified to be consistent with such local law Under such local law certain disclaimers and limitations of this Statement may not apply to the Customer For example some states in the United States as well as some governments outside the United States (including provinces in Canada) mayPreclude the disclaimers and limitations in this Statement from limiting the statutory rights of a consumer (eg the United Kingdom)Otherwise restrict the ability of a manufacturer to enforce such disclaimers or limitations orGrant the Customer additional warranty rights specify the duration of implied warranties which the manufacturer cannot disclaim or not allow limitations on the duration of implied warrantiesFOR CONSUMER TRANSACTIONS IN AUSTRALIA AND NEW ZEALAND THE TERMS IN THIS LIMITED WARRANTY STATEMENT EXCEPT TO THE EXTENT LAWFULLY PERMITTED DO NOT EXCLUDE RESTRICT OR MODIFY AND ARE IN ADDITION TO THE MANDATORY STATUTORY RIGHTS APPLICABLE TO THE SALE OF THE COVERED HP PRODUCTS TO SUCH CUSTOMERS
hp officejet 4100 series
chapter 11
54
55
index
Numerics4-by-6 inch photo paper
load 10 12
AADF 7adjust
volume for fax 25align print cartridges 35Answer Ring Pattern 26automatic document feeder 7automatic reduction
fax 25
Bbest copy quality 13busy number
redial automatically 23
Ccancel
scan 18scheduled fax 21
cartridgesalign 35replace 33
cleanprint cartridges 35the exterior 32the glass 31white strip 32
colorenhance 14fax 20fax from front panel 20
contrastchange for fax 23photo color 14
copy 13 16change default settings 15enhance 14fit to page 16lighten or darken 14menu options 16number of copies 14photo 15quality 13reduce or enlarge 14settings 13 15
speed 13tutorial 4
Customer Support 45web site 45
Ddarken a copy 14date
setting 27default settings
restore 35director review 4distinctive ringing 26
Eenhance copies 14enlarge copy 14 16envelopes
load 9Error Correction Mode
(ECM) 25
Ffactory defaults
restore 35fast copy quality 13fax 28
adjust volume 25automated reports 22cancel fax forward 24cancel scheduled 21change Answer Ring
Pattern 26change contrast 23change resolution 22change settings 19control appearance 22create individual speed-dial
settings 26delete speed-dial
settings 27distinctive ringing 26Error Correction Mode
(ECM) 25forward faxes 24header 27in color 20in color from front panel 20manual reports 22
menu 29print reports 22receive 21receive manually 21redial busy or unanswered
number 23schedule 20send from front panel 19set automatic reduction 25set date and time 27set the number of rings 21settings 27 28setup menu options 29speed dials 19test 28
fit to page 16forward faxes 24
cancel 24front panel
display scroll speed 36enter text 28send a fax 19setting prompt delay 36tutorial 3
Gglass
cleaning 31greeting cards
load 11
Hhelp 1HP Customer Support 45
calling 45HP Director 4HP distribution center 49HP Officjet
preparing to ship 47HP papers
tips on loading 11
Iindividual speed-dial settings
create 26ink cartridges see print
cartridgesinkjet paper
load 11
index
hp officejet 4100 series56
Kkeypad
enter text 28
Llabels
load 12lighten copies 14load
change the paper type 12envelopes 9original in ADF 7paper 7photo paper 10 12postcards 10 12print cartridges 33set the paper size 12tips 11
Mmaintenance
align print cartridges 35clean print cartridges 35clean the exterior 32clean the glass 31clean the white strip 32normal sounds 36replace print cartridges 33restore factory defaults 35self-maintenance
sounds 36self-test report 32
menuscopy options 16fax 29fax setup 29maintenance 37print reports 37
Nnormal copy quality 13number of copies
set 14number of rings
set 21
Oorder print cartridges 60originals
load in ADF 7output tray 8
Ppaper
change default size for copy 12
change the type 12load 7recommended 7set the size 12tips on loading 11
paper size change for copy 12
paper trayload 7
phone numbers support services 45
photo paperload 10 12
photoscopy 15enhance copy 14
physical specifications 43postcards
load 10 12power
specifications 43print
envelopes 9fax reports 22self-test report 32
print cartridgesalign 35clean 35handling 32replace 33
prompt delaysetting 36
Qquick start
review the director 4use with a computer 4
Rreceive
fax 21redial
busy or unanswered number 23
reduce copy 14 16regulatory information 43reinstall software 40reports
generate automatically for fax 22
generate manually for fax 22
print 22self-test 32
resolution
change for fax 22restore factory settings 35returning your HP Officejet for
service 51
Sscan
from front panel 17stop 18
schedule a fax 20scroll speed
setting 36self-test report 32send
cancel forward faxes 24color fax 20color fax from front
panel 20forward faxes 24
settingscopy 13 15fax 27 28prompt delay 36scroll speed 36
setupadditional information 39menu 29
shippingyour HP Officejet 47
softwareremove and reinstall 40
soundsself-maintenance 36
specificationsphysical 43power 43
speed dials 19create individual
settings 26delete settings 27
stopscan 18scheduled fax 21
subscriber identification code 27
support services 45
Ttelephone line
multiple numbers 26telephone numbers 45text
enhance 14enter from front panel 28
time
index
reference guide 57
setting 27transparency film
recommended 7tips on loading 11
troubleshootingremove and reinstall
software 40T-shirt Transfer Iron-On
load 11tutorial
front panel 3make a copy 4
Uunanswered number
redial automatically 23
Vvolume
adjust 25
Wwarranty 45
service 51statement 51upgrades 51
white stripcleaning 32
hp officejet 4100 series
chapter 12
58
declaration of conformityAccording to ISOIEC Guide 22 and EN 45014
Manufacturerrsquos Name and Address
Hewlett-Packard Company 16399 West Bernardo Drive San Diego CA 92127-1899 USA
declares that the product
Product Name hp officejet 4100 series (Q1608A)
Model Number(s) officejet 4110 (Q1609A) officejet 4110xi (Q1610A) officejet 4110v (Q1611A) officejet 4105 (Q1612A) officejet 4105z (Q1613A) officejet 4115 (Q1614A)
Product Options All
conforms to the following Product Specifications
Safety EN609501992 +A1 A2 A3 A4 amp A11
IEC609501991 +A1 A2 A3 amp A4
UL1950CSA 222 No 950 3rd Edn 1995
NOM-019-SCFI-1993
EMC CISPR221993 +A1 amp A2 EN550221994 +A1 amp A2 -Class B
CISPR241997EN550241998
IEC 61000-3-21995 EN61000-3-21995
IEC 61000-3-31994 EN61000-3-31995
ASNZS 3548 1992
CNS13438 1997
FCC Part 15-Class B ICES-003 Issue 2 VCCI-2
GB 9254-1998
Telecom TBR21 1998
Supplementary Information
The Product herewith complies with the requirements of the Low Voltage Directive 7323EEC the EMC Directive 89336EEC and the RampTTE Directive 19995EC (ANNEX II) carries the CE marking accordingly
European Contact for regulatory topics only Your local Hewlett-Packard Sales and Service Office orHewlett-Packard GmbH
Department HQ-TRE Herrenberger Strasse 140 D-71034 Boumlblingen Germany (FAX + 49-7031-14-3143)
order mediaTo order media such as HP Premium Inkjet Paper HP Premium Inkjet Transparency Film HP Iron-On T-shirt Transfer paper or HP Greeting Cards go to
wwwhpshoppingcom
For orders in countries other than the US and Canada select other countries then click Yes to leave hpshoppingcom From this website you can access hpshoppingcom for your specific language or countryregion
order print cartridges
If you have Internet access you can get more information from the HP website at
wwwhpcomsupport
print cartridges hp reorder number
HP black print cartridge 56 19 ml black print cartridge
HP color print cartridgeHP tri-color print cartridge
57 17 ml color print cartridge28 8 ml color print cartridge
Visit the hp officejet information centerIt has everything you need to get the most value from your HP Officejet
bull Technical Supportbull Supplies and Ordering Informationbull Project Tipsbull Ways to Enhance Your Product
wwwhpcomsupport
copy 2003 Hewlett-Packard Company
Printed in the USA Mexico Germany Singapore or China
Q1608-90163Q1608-90163
Q1608-90163

hp officejet 4100 series
chapter 5
18
stop scanningYou can stop a scan by pressing the Cancel button located on the front panel
6
19
use the fax features
Using your HP Officejet you can
bull Send and receive paper faxesbull Send computer faxes (reference the HP Photo amp Imaging Help)bull Send and receive color faxes
Fax features are available only on some HP Officejets
send a faxYou can send a fax in a variety of configurations These include the following
bull send a paper fax (using the front panel or computer)bull send a paper fax with a PC-generated cover page (using the computer)bull send a file with or without a cover page (using the computer)bull send a PC-generated cover page as a single-page fax (using the
computer)
Note For information on sending a fax using the computer reference the HP Photo amp Imaging Help
Note By default your HP Officejet prints a report only if there is a problem with sending or receiving a fax A confirmation message indicating whether an item was successfully sent appears briefly on the front-panel display after each transaction If you need printed confirmation that your faxes are successfully sent see print reports on page 22 for information about report options
Note If you have not done so set the date and time See set the date and time on page 27
send a fax from your hp officejet1 Load your originals in the ADF
For more information see load originals on page 7
2 Enter the fax number using the keypad or press Speed Dial until the desired speed-dial entry appearsFor more information on speed dialing see set up speed dialing in the HP Photo amp Imaging Help
3 Press Start Black or Start Color
change settings and use speed dials before sending a fax1 Load your originals in the ADF
For more information see load originals on page 7
2 Enter the fax number using the keypad or press Speed Dial until the desired speed-dial entry appears
hp officejet 4100 series
chapter 6
20
For more information on speed dialing see set up speed dialing in the HP Photo amp Imaging Help
3 Press Enter
4 Press Fax to scroll through the fax options
5 When you reach the option whose setting you wish to change press to scroll through the setting options
6 When you reach the setting you want to change press Enter to accept the setting
7 Press Start Black or Start Color
send a color faxYou can send and receive color faxes to and from other color fax machines If you are faxing from the front panel and your HP Officejet determines that the recipient has a black-and-white fax unit it sends the fax in black and white If you are faxing from the software and your HP Officejet determines that the recipient has a black-and-white fax unit the HP Officejet prompts you to try sending the fax in black and white
We recommend that you use only color originals for color faxing The color originals must be loaded in the ADF you cannot send a color fax from memory using the scan and fax features To fax in color to multiple recipients send the fax from the Director or your software program
to send a color fax from the front panel
1 Load your originals in the ADF For more information see load originals on page 7
2 Enter the fax number using the keypad or press Speed Dial until the desired speed-dial entry appearsFor more information on creating speed-dial entries see set up speed dialing in the HP Photo amp Imaging Help
3 Press Start Color
schedule a faxYou can schedule a black and white fax to be sent later during the same day (for example when telephone lines are not as busy) If you use the front panel you can select a single recipient
When the specified time is reached your fax is automatically sent as soon as a connection can be made
1 Load your originals in the ADF
2 Enter the fax number using the keypad or press Speed Dial until the desired speed-dial entry appears
3 Press Enter
4 Press Fax to scroll through the fax options
5 Stop scrolling when you reach the How to Fax menu
6 Press to scroll through the setting options
7 Stop scrolling when you reach the Send Fax Later option
reference guide
use the fax features
21
8 Press Enter
9 Enter the Send Time using the numeric keypad
10 At the prompt press 1 for AM or 2 for PM
11 When Store Fax Now appears press 1 for Yes or 2 for NoIf 1 is selected the document is scanned to memory and is sent at the selected time If 2 is selected and you havenrsquot loaded your originals a message appears reminding you to load the original before the send time
12 Press Start Black
cancel a scheduled faxYou can cancel a fax stored in memory or one that is currently in progress
bull Press Cancel to cancel the scheduled fax
receive a faxYour HP Officejet is set to print received faxes automatically If you receive a legal-size fax and your HP Officejet is not currently configured to use legal-sized paper the unit automatically reduces the fax so that it fits on the paper that is loaded For more information see set automatic reduction on page 25
If you have an answering machine connected to the same line as your HP Officejet you may need to set the number of rings required before the HP Officejet begins receiving the fax The default number of rings before the HP Officejet receives a fax is 5
set the number of rings before answeringYou can specify how many rings should occur before your HP Officejet automatically answers the phone When you run the Fax Setup Wizard this is set automatically
If you do not want your HP Officejet to answer the phone Rings to Answer should be set to No Answer
1 Press Setup
2 Press 3 then press 3 againThis selects the Basic Fax Setup menu then the Rings to Answer option
3 Use the arrow keys to choose the number of rings and then press Enter
receive a fax manuallyBefore manually receiving a fax we recommend that you remove any originals from your HP Officejet so that they are not accidentally processed
Verify that Rings to Answer is set to No Answer
1 When your HP Officejet rings pick up the handset of a telephone that is on the same telephone line as your HP Officejet
2 If you hear fax tones press Start Black or Start Color or if you are receiving from an extension phone (on the same telephone line as your HP Officejet but not connected directly to it) press 1 2 3 on your phone
3 After you are finished hang up the telephone
hp officejet 4100 series
chapter 6
22
print reportsYou can set up your HP Officejet to print error reports and confirmation reports for each fax you send and receive You can also manually print reports as you need them
generate reports automaticallyThis setting lets you configure your HP Officejet so that it automatically prints error and confirmation reports
1 Press Setup
2 Press 1 then press 5This selects Print Report then selects Automatic Reports Setup
3 Press to scroll through the following report typesndash Every Error which prints whenever there is any kind of fax error
(default)ndash Send Error which prints whenever there is a transmission errorndash Receive Error which prints whenever there is a receiving errorndash Every Fax which confirms every time a fax is sent or receivedndash Send Only which prints every time a fax is sentndash Off which does not print fax reports
4 When you reach the report that you want press Enter
generate reports manuallyThis setting lets you print reports manually From the computer you can only print the Speed-Dial List and the Fax Log
to print reports from the front panel
1 Press Setup then press 1This selects the Print Report menu
2 Press to scroll through the following report typesndash Last Transaction which prints details of the last fax transactionndash Fax Log which prints a log of the last 30 fax transactionsndash Speed Dial List which prints a list of programmed speed dialsndash Self-Test Report which prints a report to assist you in diagnosing print
and alignment problems For more information see print a self-test report on page 32
ndash Automatic Reports Setup which is the automatic reports setting described in generate reports automatically on page 22
3 When you reach the report that you want press Enter
control resolution and contrastYour HP Officejet lets you change the resolution and contrast of documents that you are sending
change resolutionResolution affects the transmission speed and quality of faxed documents
reference guide
use the fax features
23
to change the resolution from the front panel
1 Load your originals in the ADF
2 Enter the fax number using the keypad or press Speed Dial until the desired speed-dial entry appears
3 Press Enter
4 Press Fax to scroll through the fax options
5 Stop scrolling when you reach the Resolution menu
6 Press until the desired resolution quality appears (Standard Photo Fine Very Fine)
7 Press EnterYour HP Officejet only faxes at the highest resolution supported by the receiving faxIf you choose Photo be aware that the faxing process takes longer to complete When faxing photographs we recommend that you choose Photo
change contrastChange this setting if you want a black-and-white fax to be darker or lighter than the original
to change the fax contrast from the front panel
1 Load your originals in the ADF
2 Enter the fax number using the keypad or press Speed Dial until the desired speed-dial entry appears
3 Press Enter
4 Press Fax to scroll through the fax options
5 Stop scrolling when you reach the LighterDarker menuThe range of values appears as a circle on a scale on the display
6 Press to lighten the fax or to darken itThe circle moves left or right as you press a button
7 Press Enter to accept the setting you selected
change other fax settings
redial a number automaticallyYou can set your HP Officejet to redial a busy and an unanswered number automatically If you initiated a fax from the computer the computer must be left on for the redialing process to work correctly
1 Press Setup
2 Press 4This selects the Advanced Fax Setup menu
3 Choose one of the following optionsndash Press 3
hp officejet 4100 series
chapter 6
24
This selects the Busy Redial option The default setting for Busy Redial is Redial
ndash Press 4This selects the No Answer Redial option The default setting for No Answer Redial is No Redial
4 Press Enter
5 Press to select Redial or No Redial as desired
6 Press Enter
forward faxes to another numberWith fax forwarding you can send a fax that you receive to another fax number during the next 24-hour period
to forward faxes from the front panel
1 Press Setup
2 Press 3 then press 7This selects the Basic Fax Setup menu then selects the Fax Forwarding Black Only option
3 At the prompt enter the Fax Number to which you wish to send the fax
4 Press Enter
5 Enter the Start Date using the numeric keypad
6 Enter the Start Time using the numeric keypad
7 At the prompt press 1 for AM or 2 for PM
8 Enter the Stop Date using the numeric keypadFax Forwarding On appears on the display
edit or cancel fax forwardingOnce fax forwarding is enabled you may find that you need to change the number you are faxing to or the start and stop times you entered You may wish to cancel your fax forwarding setup altogether Follow the steps below to edit or turn off fax forwarding
to edit fax forwarding from the front panel
1 Press Setup
2 Press 3 then press 7This selects the Basic Fax Setup menu then selects the Fax Forwarding Black Only option
3 Forwarding is ON 1=Edit 2=Cancel appears on the display after a moment Press 1 to edit the number you wish to fax to or to change the start and stop times Follow the messages on the display
to cancel fax forwarding from the front panelbull Press Cancel
OR
reference guide
use the fax features
25
Follow the steps in edit or cancel fax forwarding on page 24 When Forwarding is ON 1=Edit 2=Cancel appears on the display press 2 to cancel fax forwarding
use error correction modeError Correction Mode (ECM) eliminates data lost due to poor phone lines by detecting errors that occur during transmission and automatically requesting retransmission of the erroneous portion Phone charges are unaffected or may even be reduced on good phone lines On poor phone lines ECM increases sending time and phone charges but sends the data much more reliably Turn ECM off (the default setting is on) only if it increases phone charges substantially and you can accept poorer quality in exchange for reduced charges
to change the ECM setting from the front panel
1 Press Setup
2 Press 4 then press 7This selects the Advanced Fax Setup menu then selects the Error Correction Mode option
3 Press to switch between On and Off
4 Press Enter to accept the setting you selected
set automatic reductionThis setting determines what your HP Officejet does if it receives a fax that is too large for the default paper size With this setting on (the default) the image is reduced so that it fits on one page With this feature off information that doesnrsquot fit on the first page is printed on a second page
1 Press Setup
2 Press 4 then press 5This selects the Advanced Fax Setup menu then selects the Automatic Reduction option
3 Press to switch between On and Off
4 Press Enter to accept the setting you selected
adjust the volumeYour HP Officejet provides three levels for adjusting the ring and speaker volume The ring volume is the volume of the phone ringer The speaker volume is the volume of everything else such as the dial and fax tones The default setting is Soft
1 Press Setup
2 Press 3 then press 6This selects the Basic Fax Setup menu then selects the Ring and Beep Volume option
3 Press to select one of the options Soft Loud or Off
4 Press Enter to accept the setting you selected
hp officejet 4100 series
chapter 6
26
change the answer ring pattern (distinctive ringing)Distinctive ringing is a feature offered by phone companies that allows several phone numbers to share the same line Each number has a specific ring pattern If you do not have this service use the default ring pattern which is All Rings
If you connect your HP Officejet to a line with distinctive ringing have your telephone company assign one ring pattern to voice calls and another to fax calls (double or triple rings are best for a fax number)
1 Press Setup
2 Press 4 then press 2This selects the Advanced Fax Setup menu then selects the Answer Ring Pattern option
3 Press to scroll through these options All Rings Single Rings Double Rings Triple Rings and Double amp Triple
4 When the ring pattern that the phone company established for this number appears press Enter
Tip We recommend that you use Double Rings or Triple Rings for fax
set up speed dialingThrough your HP Officejet or your computer you can assign entries to fax numbers you use often This lets you dial those numbers quickly using the front panelrsquos Speed Dial button and a one- or two-digit entry You can create up to 100 individual speed-dial entries (the maximum for some models is 70)
We recommend that you use the software to set up speed-dial settings
Note A speed-dial entry can only be associated with one phone number speed-dial groups are not supported
For more information see set up speed dialing in the hp photo amp imaging help
create individual speed-dial settingsYou can enter fax numbers that you will reuse frequently
1 Press Setup
2 Press 2 then press 1This selects the Speed Dial Setup menu then selects the Individual Speed Dial option
3 Press EnterThe first unassigned speed-dial entry appears on the display
4 Press Enter to select the displayed speed-dial entry
5 Enter the Fax Number to assign to that entry then press EnterThe fax number can be up to 50 digits in length
Tip To enter a three-second pause within a number sequence press Symbols to display a dash
6 Enter the personrsquos or companyrsquos name then press Enter
reference guide
use the fax features
27
The name is limited to 13 characters in lengthFor more information see enter text on page 28
7 After Enter Another appears press 1 (Yes) if you want to set up another number or press 2 (No) to exit
delete speed-dial settingsFollow these steps to delete an individual speed-dial entry
1 Press Setup
2 Press 2 then press 2 againThis selects Speed Dial Setup then selects Delete Speed Dial
3 Press until the individual entry that you want to delete appears then press Enter
set basic fax settings using the front panelWe recommend that you use the Fax Setup Wizard in the HP Officejet software to configure all your basic fax settings however you can also access these settings from the front panel
Note In the US regulations require that your name and phone number appear on every fax The minimum settings that we recommend are described in the following topics
set the date and timeFollow these steps to set the date and time manually
1 Press Setup
2 Press 3 then press 1This selects the Basic Fax Setup menu then selects the Date and Time option
3 Follow the prompts on the display to enter the date and time using the keypad
Tip Use only the last two digits for the year
Tip When you enter a single-digit date or time type a leading zero before the single digit for example 0345 or 08-03-02
After you are done the date and time appear on the display
Warning Cutting off power to the HP Officejet causes the selected date and time to be lost However name and fax number information is not lost
set the fax headerFollow these steps to enter your name and fax number in the header
Note In Hungary the subscriber identification code (fax header) can be set or changed only by authorized personnel For more information contact your authorized HP dealer
1 Press Setup
2 Press 3 then press 2
hp officejet 4100 series
chapter 6
28
This selects the Basic Fax Setup menu then selects the Fax Header option
3 Enter your personal or company name at the prompt Use the guidelines provided in the next section under enter text
4 Press Enter
5 Enter your fax number using the numeric keypad
6 Press Enter
enter textThe following list provides tips for entering text using the front-panel keypad
bull Press the keypad numbers that correspond to the letters of a name
bull Press a button multiple times to see a letter first in uppercase and then in lowercase
bull After the correct letter appears press and then press the number that corresponds to the next letter in the name Again press multiple times until the correct letter appears
bull To insert a space press Space ()bull To enter a symbol such as press Symbols () to scroll through the list of
available symbolsbull If you make a mistake press to clear it and then make the correct
entrybull After you are done entering text press Enter to store your entries
check for dial toneBefore using the fax features verify that the connections are correctly established
1 Press Fax
2 Listen for a dial tone
3 If you do not hear a dial tone check the connections
4 Press Cancel to hang up
ABC These letters correspond to this number and so on
2
JKL To get this character J j K k L l 5
5 Press 5 this many times 1 2 3 4 5 6 7
reference guide
use the fax features
29
fax job menuThe following options become available when the Fax button is pressed
setup menu for fax commandsThe following fax settings are available in the Setup menu
Enter Fax or Speed Dial
FineVery FinePhotoStandard
Fax Number Resolution LighterDarker
Enter a fax number or speed dialWhen the Fax button is pressed
Press and to move to the option you wantPress Enter to select the displayed setting
NoYes
Set New Defaults
Send Fax NowFax from MemorySend Fax LaterPoll to Receive
How to Fax
1Automatic Reports Setup
2Answer Ring Pattern
3Busy Redial
4No Answer Redial
5Automatic Reduction
6Backup Fax Reception
7Error Correction Mode
3Basic Fax Setup 4Advanced Fax Setup
Press Setup to display the menu options
Press and to move to the setting you wantPress Enter to select the displayed setting
1Date and Time
2Fax Header
3Rings to Answer
4Paper Size
5Tone or Pulse Dialing
6Ring and Beep Volume
7Fax Forwarding Black Only
2Speed Dial Setup
1Individual Speed Dial
2Delete Speed Dial
3Print Speed Dial List
hp officejet 4100 series
chapter 6
30
7
31
maintain your hp officejet
This section provides instructions for keeping your HP Officejet in top working condition Perform these maintenance procedures as necessary
clean the glassDirty glass from dust smudges hair and so on slows down performance and affects the accuracy of features such as Fit to Page and Copy
1 Turn off the unit unplug the power cord and raise the scanner lid
2 Clean the glass with a soft cloth or sponge slightly moistened with a nonabrasive glass cleaner
Caution Do not use abrasives acetone benzene or carbon tetrachloride on the glass these can damage it Do not place liquids directly on the glass They may seep under it and damage the unit
3 Dry the glass with a chamois or cellulose sponge to prevent spotting
hp officejet 4100 series
chapter 7
32
clean the white stripMinor debris can accumulate on the white strip located underneath the scannerrsquos lid
1 Turn off the unit unplug the power cord and raise the scanner lid
2 Clean the white strip with a soft cloth or sponge slightly moistened with a mild soap and warm water
3 Wash the strip gently to loosen debris do not scrub the strip
4 Dry the strip with a chamois or soft cloth
Caution Do not use paper-based wipes as these may scratch the strip
5 If this does not clean the strip well enough repeat the previous steps using isopropyl (rubbing) alcohol and wipe the strip thoroughly with a damp cloth to remove any residual alcohol
clean the exterior Use a soft damp lint-free cloth to wipe dust smudges and stains off the case The interior of the unit does not require cleaning Keep fluids away from the interior of the unit as well as the front panel
work with print cartridgesTo ensure the best print quality from your HP Officejet you will need to perform some simple maintenance procedures and when prompted by a front-panel message replace the print cartridges
print a self-test reportIf you are experiencing problems with printing before cleaning or replacing the print cartridges you should print a Self-Test Report This report provides useful information about your print cartridges including status information
1 Press Setup
2 Press 1 then press 4This selects Print Report and then selects Self-Test Report
3 Press Start Black or Start ColorA Self-Test Report is printed for your HP Officejet
handle print cartridgesBefore you replace or clean a print cartridge you should know the part names and how to handle the print cartridge
reference guide
maintain your hp officejet
33
replace the print cartridgesFront-panel messages appear to let you know that you should replace your print cartridges
See order print cartridges on the back cover for information on ordering replacement print cartridges
1 Turn on the unit then lift open the print cartridge access doorThe print carriage moves into view
2 After the carriage stops moving push down on the print cartridge down to release it and then pull it toward you out of its slot
Plastic tape with pink tab(must be removed)
Copper contactsInk nozzles under tape
Do not touch the copper contacts or the ink nozzles
print cartridge access door
hp officejet 4100 series
chapter 7
34
Note It is normal to see ink build-up in the print cartridge slots
3 Remove the new print cartridge from its packaging and being careful to touch only the bright pink plastic tab gently remove the plastic tape to uncover the ink nozzles
Caution Do not touch the copper contacts or ink nozzles
Once you have removed the plastic tape install the print cartridge immediately to prevent the ink from drying in the nozzles
4 Push the new print cartridge into the appropriate slot at a slight angle until it clicks into place
Caution Do not attempt to push the cartridge straight into the slot It must slide in at a slight angle
The tri-color print cartridge goes on the left and the black cartridge goes on the right
5 Close the print cartridge access door
reference guide
maintain your hp officejet
35
align the print cartridgesThe HP Officejet prompts you to align cartridges every time you install or replace a print cartridge Aligning the cartridges ensures high-quality output
To align the print cartridges when prompted
1 Press Enter on the front panelAn align cartridges (test pattern) page prints
2 Load the align cartridges page face down in the ADF between the paper-width guides and press the Enter button again
3 Recycle or discard the page
To align the cartridges at any other time
1 Press Setup
2 Press 5 then press 2This selects the Maintenance menu and then selects the Align Print Cartridge option
3 Press EnterAn align cartridges (test pattern) page prints
4 Load the align cartridges page face down in the ADF between the paper-width guides and press the Enter button again
5 Recycle or discard the page
clean the print cartridgesUse this feature when the Self-Test Report shows streaking or white lines through any of the colored bars Do not clean print cartridges unnecessarily This wastes ink and shortens the life of the ink nozzles
1 Press Setup
2 Press 5 then press 1This selects the Maintenance menu and then selects the Clean Print Cartridge optionA page of patterns is printed The cartridges are cleaned Recycle or discard the pageIf copy or print quality still seem poor after you clean the print cartridges replace the print cartridge that is affected
restore factory defaultsYou can restore the original factory settings to what they were when you purchased your HP Officejet Choosing to restore your factory defaults restores all settings except date information and any scan settings you may have set
You can perform this process from the front panel only
1 Press Setup
2 Press 5 then press 3This selects Maintenance and then selects Restore Factory DefaultsThe factory default settings are restored
hp officejet 4100 series
chapter 7
36
set scroll speedThe Scroll Speed option lets you control the rate that text messages appear in the front-panel display You can choose Normal Fast or Slow The default is Normal
1 Press Setup
2 Press 5 then press 6This selects Maintenance and then selects Set Scroll Speed
3 Press until the desired speed appears then press Enter
set the prompt delay timeThe Prompt Delay option lets you control the amount of time before a message is displayed in the front-panel display You can choose Normal Fast or Slow The default is Normal
1 Press Setup
2 Press 5 then press 7This selects Maintenance and then selects Set Prompt Delay Time
3 Press until the delay time appears then press Enter
self-maintenance sounds During the life of your product you may hear various mechanical sounds This is a normal part of your unitrsquos self-maintenance
reference guide
maintain your hp officejet
37
setup menu optionsThe following options are available from the Setup button
1Last Transaction
2Fax Log
3Speed Dial List
4Self-Test Report
5Automatic Reports Setup
1Print Report
Use Setup to display the Print Report Speed Dial Setup Basic Fax Setup Advanced Fax Setup and Maintenance options
Press and to move to the setting you wantPress Enter to select the displayed setting
1Clean Print Cartridges
2Align Print Cartridges
3Restore Factory Defaults
4Reprint Faxes in Memory
5Set Language amp CountryRegion
6Set Scroll Speed
7Set Prompt Delay Time
5Maintenance2Speed Dial Setup
3Basic Fax Setup
4Advanced Fax Setup
1Individual Speed Dial
2Delete Speed Dial
3Print Speed Dial List
1Date and Time
2Fax Header
3Rings to Answer
4 Paper Size
5Tone or Pulse Dialing
6Ring and Beep Volume
7Fax Forwarding Black Only
1Automatic Reports Setup
2Answer Ring Pattern
3Busy Redial
4No Answer Redail
5Automatic Reduction
6Backup Fax Reception
7Error Correction Mode
hp officejet 4100 series
chapter 7
38
8
39
additional setup information
During the installation of the HP Officejet software a number of windows are displayed You should see the following
bull Installingbull Copying files bull A request to plug in the HP Officejetbull Green OK and check markbull Request to restart your computer (may not occur in all cases)bull Registration
If you did not see all of these windows there may be a problem with the installation Verify the following
bull The HP Director contains six icons (double-click the HP Director icon on the desktop)
bull The HP Officejet is listed in the Printers dialog boxbull There is an icon for the HP Officejet in the System Tray that indicates the
HP Officejet is ready
If the HP Director does not show six icons you may need to wait a few minutes for the HP Officejet to connect to your computer
possible installation problemsIf nothing appears on your computer screen after you insert the HP Officejet 4100 Series CD-ROM into your computerrsquos CD-ROM drive
1 From the Start menu choose Run
2 In the Run dialog box enter dsetupexe (if your CD-ROM drive is not assigned to drive letter d use the appropriate drive letter) then click OK
If the HP Director does not contain six icons do the following
bull Verify that the front-panel cover is attached then unplug the HP Officejet and plug it in again
bull Verify that the USB and power cables are plugged inndash Unplug the USB cable and plug it in againndash Do not attach the USB cable to a keyboard or nonpowered hubndash Verify that the USB cable is 3 meters or less in lengthndash If you have several USB devices attached to your computer you may
want to unplug the others during the installation
Note AppleTalk is not supported
bull Unplug the HP Officejet from the wall and plug it in againbull Restart your computer
hp officejet 4100 series
chapter 8
40
On Windows check the System Tray for applications that are running in the background and close them before restarting your computer
remove and reinstall your hp officejet softwareIf six icons do not appear in the Director you may need to uninstall and re-install the software Do not simply delete the HP Officejet program files from your hard drive Be sure to remove them properly using the uninstall utility provided in the HP Officejet program group
to uninstall from a Windows computer
1 Disconnect your HP Officejet from your computer
2 On the Windows taskbar click Start choose Programs or All Programs (XP) choose Hewlett-Packard choose hp officejet 4100 series then choose uninstall software
3 Follow the directions on the screenBe sure to disconnect your HP Officejet
4 If you are asked whether you would like to remove shared files click NoOther programs that use these files may not work properly if the files are deleted
5 After the program finishes removing the software disconnect your HP Officejet and restart your computer
Note It is important that you disconnect your HP Officejet before restarting your computer
6 To reinstall the software insert the HP Officejet 4100 Series CD-ROM into your computerrsquos CD-ROM drive and follow the instructions that appear
7 After the software is installed connect and turn on your HP Officejet following the onscreen instructions and the instructions in your Setup PosterAfter connecting and turning on your HP Officejet you may have to wait several minutes for all of the Plug and Play events to completeWhen the software installation is complete you will see a Status Monitor icon in the System Tray
8 To verify that the software is properly installed double-click on the HP Director icon on the desktop If the HP Director shows six icons the software has been properly installed
to uninstall from a Macintosh computer
1 Disconnect your HP Officejet from your computer
2 Double-click on ApplicationsHP All-in-One Software folder
reference guide
additional setup information
41
3 Double-click on HP Uninstaller
4 Follow the directions that appear on the screen
5 After the program finishes removing the software disconnect your HP Officejet and restart your computer
6 To reinstall the software insert the HP Officejet 4100 Series CD-ROM into your computerrsquos CD-ROM drive
Note When re-installing the software follow the instructions on the Setup Poster Do not connect the HP Officejet to your computer until after you have completed the software installation
7 On the desktop open the CD-ROM double-click on hp all-in-one installer and follow the instructions that appear
connect your hp officejet to a phone modem or answering machine
The HP Officejet can share a phone line with a phone a modem or an aswering machine When sharing a phone line with an answering machine the HP Officejet will answer fax calls and direct voice calls to the answering machine
Note For information on connecting your HP Officejet to your computer and phone line refer to the Setup Poster that came with your unit
to connect your hp officejet to a phone modem or answering machine
1 Remove the white plastic stopper from connector 2 on the back of the HP Officejet
To connect more than one device to connector 2 on the HP Officejet you must purchase a Y-splitter and plug it into connector 2
2 Connect the phone cord from the phone modem or answering machine to connector 2 (or Y-splitter)
Caution Do not use the phone cord that came with the HP Officejet for this purpose That phone cord must connect connector 1 on the HP Officejet to the wall jack for your phone system See the Setup Poster for details
3 If you are connecting an answering machine see set the number of rings before answering on page 21 for instructions on setting the number of rings correctly or change the answer ring pattern (distinctive ringing) on page 26 for information on incoming ring patterns
4 If you are connecting a modem turn off its fax-receive feature
connector 2 on the HP Officejet
connector 1 on the HP Officejet
hp officejet 4100 series
chapter 8
42
additional troubleshooting helpYou may want to refer to the readme file for more information on possible installation problems On Windows you can access the readme file from the Start button on the taskbar select Programs Hewlett-Packard hp officejet 4100 series View the Readme File On Macintosh you can access the readme file by double-clicking on the icon located in the top-level folder of the HP Officejet software CD-ROM
The readme file provides more information including
bull Using the Re-install utility after a failed installation to return your PC to a state that will allow the HP Officejet to be re-installed
bull Using the Re-install utility on Windows 98 to recover from a Composite USB System Driver missing errorThis error may occur if the hardware is installed prior to installing the software After running the Re-install utility reboot your PC and install the HP Officejet software before connecting the HP Officejet to your computer
You can also find more information on this website
wwwhpcomsupport
9
43
technical information
Additional specifications information can be found in the HP Photo amp Imaging Help in the hp officejet 4100 series section
physical specifications
power specificationsbull Power consumption 75W maximumbull Source (Input Voltage) 100 to 240 VAC groundedbull Input Frequency 50 to 60 Hzbull Current 1A maximum
regulatory informationAdditional regulatory information can be found in the HP Photo amp Imaging Help The information in this section supercedes information in the HP Photo amp Imaging Help
doc statement deacuteclaration de conformiteacute (Canada)Le preacutesent appareil numeacuterique neacutemet pas de bruit radioeacutelectrique deacutepassant les limites applicables aux appareils numeacuteriques de la classe B prescrites dans le Regraveglement sur le brouillage radioeacutelectrique eacutedicteacute par le ministegravere des Communications du CanadaThis digital apparatus does not exceed the Class B limits for radio noise emissions from digital apparatus set out in the Radio Interference Regulations of the Canadian Department of Communications
notice to users of the Canadian telephone networkThis equipment meets the applicable Industry Canada Terminal Equipment Technical Specifications This is confirmed by the registration number The abbreviation IC before the registration number signifies that registration was performed based on a Declaration of Conformity indicating that Industry Canada technical specifications were met It does not imply that Industry Canada approved the equipment
Note The Ringer Equivalence Number (REN) assigned to each terminal device provides an indication of the maximum number of terminals allowed to be connected to a telephone interface The termination on an interface may consist of any combination of devices subject only to the requirement that the sum of the Ringer Equivalence Numbers of all the devices does not exceed 5
The REN for this product is 03B based on FCC Part 68 test results
height width depth weight (without print cartridges)
with paper trays and ADF closed
718 in (1824 cm) 1676 in (4258 cm) 825 in (2096 cm) 75 lbs (34 kg)
with ADF and paper tray extended
1030 in (2615 cm) 1676 in (4258 cm) 1854 in (4709 cm) 75 lbs (34 kg)
hp officejet 4100 series
chapter 9
44
notice to all users of the European Economic Area (EEA)
This product is designed to interwork with the analogue telephone networks in the following countriesregions
Network compatibility depends on customer selected settings which must be reset to use the equipment on a telephone network in a countryregion other than where the product was purchased Contact the vendor or Hewlett-Packard Company if addition product support is necessaryThis equipment has been certified by the manufacturer in accordance with Directive 19995EC (annex II) for Pan-European single-terminal connection to the public switched telephone network (PSTN) However due to differences between the individual PSTNs provided in different countriesregions the approval does not of itself give an unconditional assurance of successful operation on every PSTN network termination pointIn the event of problems you should contact your equipment supplier in the first instance
geraumluschemissionLpA lt 70 dBam Arbeitsplatzim Normalbetriebnach DIN 45635 T 19
notice to Korean customers
Germany UK Netherlands
France Spain Italy
Belgium Luxembourg Sweden
Austria Denmark Ireland
Norway Finland Switzerland
Greece Portugal
10
45
hp support
This section explains the support services information provided by Hewlett-Packard If you are unable to find the answer you need in the printed or onscreen documentation supplied with your product you can contact one of the HP support services listed in the following pages Some support services are available only in the US and Canada while others are available in many countriesregions worldwide If a support service number is not listed for your countryregion contact your nearest authorized HP dealer for help
get support and other information from the internetIf you have Internet access you can get help from the following HP website
wwwhpcomsupportThe Web site offers technical support drivers supplies and ordering information
hp customer supportSoftware programs from other companies may be included with your HP Officejet If you experience problems with any of those programs you will receive the best technical assistance by calling the experts at that companyIf you need to contact HP Customer Support do the following before you call
1 Make sure thata Your unit is plugged in and turned onb The specified print cartridges are installed correctlyc The recommended paper is properly loaded in the input tray
2 Reset your unita Turn off the unit using the On button located on the unitrsquos front panelb Unplug the power cord from the back of the unitc Plug the power cord back into the unitd Turn on the unit using the On button
3 For more information check the HP website at wwwhpcomsupport
4 If you are still experiencing problems and need to speak with an HP Customer Support Representativendash Have your service ID and serial number ready To display your service ID and
serial number on the front panel do the following Press Enter and Start Color at the same time until the service ID appears in the front-panel display From this display press the right arrow until the serial number displays
ndash Print a Self-Test Report See print a self-test report on page 32 for information on printing this report
ndash Make a color copyndash Be prepared to describe your problem in detail
5 Call HP Customer Support Be near your unit when you call
call in the US during warrantyCall (208) 323-2551 This service is free during the warranty period however your standard long-distance phone charges still apply A fee may apply outside the warranty period
hp officejet 4100 series
chapter 10
46
US phone support is available in both English and Spanish languages 24 hours a day 7 days a week (days and hours of support may change without notice)
call elsewhere in the worldThe numbers listed below are current as of the printing date of this guide For a list of current international HP Support Service numbers visit this address and choose your own countryregion or language
wwwhpcomsupportFor Korea you can also visit this address
httpwwwhpcokrYou can call the HP support center in the following countriesregions If your countryregion is not listed contact your local dealer or nearest HP Sales and Support Office to find out how to obtain servicesSupport service is free during the warranty period however your standard long-distance phone charges will apply In some cases a flat fee per single incident will also applyFor phone support in Europe please check for the details and conditions of phone support in your countryregion by consulting the following Web site
wwwhpcomsupportAlternatively you can ask your dealer or call HP at the phone number indicated in this booklet As part of our constant efforts to improve our phone support service we advise you to check our website on a regular basis for new information regarding service features and delivery
countryregion hp technical support countryregion hp technical support
Algeria1 +213 (0) 61564 543 Malaysia 1-800-805405
Argentina 0810-555-5520 Mexico 01-800-472-6684
Australia +61 3 8877 80001902 910 910
Mexico (Mexico City) 5258-9922
Austria +43 (0) 810 00 6080 Morocco1 +212 22404 747
Bahrain (Dubai) 800 728 Netherlands +31 (0) 20 606 8751
Belgium (Dutch) +32 (0) 2 626 8806 New Zealand 0800 441 147
Belgium (French) +32 (0) 2 626 8807 Norway +47 22 11 6299
Brazil (Grande Sao Paulo) (11) 3747 7799 Oman +971 4 883 8454
Brazil (Demais Localidades) 0800 157751 Palestine +971 4 883 8454
Canada during warranty (905) 206 4663 Panama 001-800-7112884
Canada post-warranty(per-call charge)
1-877-621-4722 Peru 0-800-10111
Caribbean amp Central America
1-800-711-2884 Philippines 632-867-3551
Chile 800-360-999 Poland +48 22 865 98 00
China 86 10 6868 7980 Portugal +351 21 3176333
Colombia 9-800-114-726 Puerto Rico 1-877-2320-589
Costa Rica 0-800-011-0524 Qatar +971 4 883 8454
Czech Republic +420 (0) 261307310 Romania +40 1 315 44 42or local 01 3154442
reference guide
hp support
47
call in Australia post-warrantyIf your product is not under warranty you can call 03 8877 8000 A per-incident out-of-warranty support fee of $2750 (inc GST) will be charged to your credit card You can also call 1902 910 910 ($2750 charged to your phone account) from 900 AM to 500 PM Monday through Friday (Charges and support hours are subject to change without notice)
prepare your unit for shipmentIf after contacting HP Customer Support or returning to the point of purchase you are requested to send your unit in for service please follow the power off and rebox steps below to avoid further damage to the HP product
Denmark +45 39 29 4099 Russian Federation Moscow +7 095 797 3520
Ecuador 1800-711-2884 Russian Federation St Petersburg
+7 812 346 7997
Europe (English) +44 (0) 207 512 5202 Saudi Arabia +800 897 14440
Egypt 02 532 5222 Singapore 65 6272 5300
Finland +358 (0) 203 47 288 Slovakia +421 (0) 2 682 08080
France (034 Euromin) +0892 69 60 22 South Africa (inside RSA) 086 000 1030
Germany (012 Euromin) +49 (0) 180 52 58 143 South Africa (inside RSA) +27-11 258 9301
Greece +30 1060 73 603 Spain +34 902 321 123
Hong Kong (SAR) +85 (2) 3002 8555 Sweden +46 (0)8 619 2170
Guatemala 1800-995-5105 Switzerland 2 +41 (0) 84 880 1111
Hungary +36 (0) 1 382 1111 Taiwan +886-2-2717-00550800 010 055
India 1-600-11226791 11 682 6035
Thailand +66 (2) 661 4000
Indonesia 62-21-350-3408 Tunisia1 +216 1891 222
Ireland +353 (0) 1 662 5525 Turkey +90 216 579 7171
Israel +972 (0) 9 8304848 Ukraine +7 (380-44) 490-3520
Italy +39 (0) 226410350 United Arab Emirates +971 4 883 8454
Japan 0570 000 511+81 3 3335 9800
United Kingdom +44 (0) 207 512 52 02
Jordan +971 4 883 8454 Venezuela 0800-47468368 or800-477-7777
Korea (Seoul) +82 (2) 3270 0700 Venezuela (Caracas) (502) 207-8488
Korea (outside Seoul) 080 999 0700 Vietnam 84 (0) 8 823 4530
Kuwait +971 4 883 8454 Yemen +971 4 883 8454
Lebanon +971 4 883 8454
1 This Call Center supports French speaking customers from the following countriesregions Morocco Tunisia and Algeria
2 This Call Center supports German French and Italian speaking customers in Switzerland
countryregion hp technical support countryregion hp technical support
hp officejet 4100 series
chapter 10
48
Note When transporting your HP Officejet make sure that the pens have been removed the HP Officejet has been properly shut down by pressing the power button and you have allowed time for the carriage to return to the service station and for the scanner to return to its parked position
1 Turn on the unitDisregard steps 1 through 6 if your unit will not turn on and the print carriage is in the home position You will not be able to remove the print cartridges Proceed to step 7
2 Open the print cartridge access doorThe print carriage moves into view
3 See replace the print cartridges on page 33 for information on removing the print cartridges
Caution Remove both print cartridges Failure to do so may damage your unit
4 Place the print cartridges in an airtight bag so they will not dry out and put them aside (do not send them with the unit unless instructed to by the HP customer support call agent)
5 Turn off the unit
6 Close the print cartridge access door
7 Remove the front panel cover as followsa Grasp the front of the front panel cover with two hands as shownb Firmly lift the front panel cover to unsnap it from the unit
8 Retain the front panel cover Do not return the front panel cover with the unit
9 If available pack the unit for shipment using the original packing materials or the packaging materials that come with your exchange unit
If you do not have the original packaging materials please use other adequate packaging materials Shipping damage caused by improper packaging andor improper transportation is not covered under the warranty
reference guide
hp support
49
10 Place the return shipping label on the outside of the box
11 Include the following items in the boxndash A complete description of symptoms for service personnel (samples of print
quality problems are helpful)ndash A copy of the sales slip or other proof of purchase to establish the warranty
coverage periodndash Your name address and a phone number where you can be reached during
the day
hp distribution centerTo order HP Officejet software a copy of the printed Reference Guide a setup poster or other customer-replaceable parts do one of the following bull In the US or Canada call (208) 323 2551bull Visit this website
httpwwwhpcomcposupportsoftwarehtml
hp officejet 4100 series
chapter 10
50
11
51
warranty information
HP Officejet 4100 seriesDuration of Limited Warranty (hardware and labor) 1 YearDuration of Limited Warranty (CD media) 90 DaysDuration of Limited Warranty (print cartridges) Until the HP ink is depleted or the ldquoend of warrantyrdquo date printed on the cartridge has been reached whichever occurs first
warranty service
express serviceTo obtain HP express repair service the customer must contact an HP service office or an HP Customer Support Center for basic troubleshooting first See hp customer support on page 45 for steps to take before calling Customer SupportIf a customer unit needs a minor part replacement and these parts can normally be replaced by the customer the customer-replaceable components may be serviced through expedited part shipment In this event HP will prepay shipping charges duty and taxes provide telephone assistance on replacement of the component and pay shipping charges duty and taxes for any part that HP asks to be returnedThe HP Customer Support Center may direct customers to designated authorized service providers who are certified by HP to service the HP product
warranty upgradesUpgrade your standard factory warranty to a total of three years with the HP SUPPORTPACK Service coverage begins on product purchase date and the pack must be purchased within the first 180 days of product purchase This program offers phone support from 600 AM to 1000 PM Mountain Standard Time (MST) Monday through Friday and 900 AM to 400 PM (MST) on Saturdays If during your technical support call it is determined that you need a replacement product then HP will ship you this product next business day free of charge Available in US onlyFor more information please call 1-888-999-4747 or visit the following HP Web site
httpwwwhpcomgohpsupportpack
Outside the US please call your local HP Customer Support office See call elsewhere in the world on page 46 for a list of international Customer Support numbers
returning your hp officejet for serviceBefore returning your HP Officejet for service you must call HP Customer Support See hp customer support on page 45 for steps to take before calling Customer Support
hewlett-packard limited global warranty statement
extent of limited warrantyHewlett-Packard (ldquoHPrdquo) warrants to the end-user customer (ldquoCustomerrdquo) that each HP Officejet 4100 Series product (ldquoProductrdquo) including related software accessories media and supplies shall be free from defects in material and workmanship for the duration which begins on the date of purchase by the Customer
hp officejet 4100 series
chapter 11
52
For each software Product HPrsquos limited warranty applies only to a failure to execute programming instructions HP does not warrant that the operation of any Product shall be uninterrupted or error freeHPrsquos limited warranty covers only those defects which arise as a result of normal use of a Product and does not cover any other problems including those which arise as a result of (a) improper maintenance or modification (b) software accessories media or supplies not provided or supported by HP or (c) operation outside the Productrsquos specificationsFor any hardware Product the use of a non-HP print cartridge or a refilled print cartridge does not affect either the warranty to the Customer or any HP support contract with the Customer However if Product failure or damage is attributable to the use of a non-HP or refilled print cartridge HP shall charge its standard labor and materials charges to service the Product for the failure or damageIf HP receives during the applicable warranty period notice of a defect in any Product HP shall either repair or replace the defective Product at HPrsquos option Where labor charges are not covered by HPrsquos limited warranty repairs shall be at HPrsquos standard charges for laborIf HP is unable to repair or replace as applicable a defective Product which is covered by HPrsquos warranty HP shall within a reasonable time after being notified of the defect refund the purchase price for the ProductHP shall have no obligation to repair replace or refund until the Customer returns the defective Product to HPAny replacement product may be either new or like-new provided that it has functionality at least equal to that of the Product being replacedHP products including each Product may contain remanufactured parts components or materials equivalent to new in performanceHPs limited warranty for each Product is valid in any countryregion or locality where HP has a support presence for the Product and where HP has marketed the Product The level of warranty service may vary according to local standards HP shall have no obligation to alter the form fit or function of the Product in order to make it operate in a countryregion or locality for which the Product was never intended to operate
limitations of warrantyTO THE EXTENT ALLOWED BY LOCAL LAW NEITHER HP NOR ITS THIRD PARTY SUPPLIERS MAKE ANY OTHER WARRANTY OR CONDITION OF ANY KIND WHETHER EXPRESS OR IMPLIED WITH RESPECT TO THE COVERED HP PRODUCTS AND SPECIFICALLY DISCLAIM THE IMPLIED WARRANTIES OR CONDITIONS OF MERCHANTABILITY SATISFACTORY QUALITY AND FITNESS FOR A PARTICULAR PURPOSE
limitations of liabilityTo the extent allowed by local law the remedies provided in this Limited Warranty Statement are the Customerrsquos sole and exclusive remediesTO THE EXTENT ALLOWED BY LOCAL LAW EXCEPT FOR THE OBLIGATIONS SPECIFICALLY SET FORTH IN THIS LIMITED WARRANTY STATEMENT IN NO EVENT SHALL HP OR ITS THIRD PARTY SUPPLIERS BE LIABLE FOR DIRECT INDIRECT SPECIAL INCIDENTAL OR CONSEQUENTIAL DAMAGES WHETHER BASED ON CONTRACT TORT OR ANY OTHER LEGAL THEORY AND WHETHER ADVISED OF THE POSSIBILITY OF SUCH DAMAGES
local lawThis Limited Warranty Statement gives the Customer specific legal rights The Customer may also have other rights which vary from state to state in the United States from province to province in Canada and from countryregion to countryregion elsewhere in the world
reference guide
warranty information
53
To the extent this Limited Warranty Statement is inconsistent with local law this Statement shall be deemed modified to be consistent with such local law Under such local law certain disclaimers and limitations of this Statement may not apply to the Customer For example some states in the United States as well as some governments outside the United States (including provinces in Canada) mayPreclude the disclaimers and limitations in this Statement from limiting the statutory rights of a consumer (eg the United Kingdom)Otherwise restrict the ability of a manufacturer to enforce such disclaimers or limitations orGrant the Customer additional warranty rights specify the duration of implied warranties which the manufacturer cannot disclaim or not allow limitations on the duration of implied warrantiesFOR CONSUMER TRANSACTIONS IN AUSTRALIA AND NEW ZEALAND THE TERMS IN THIS LIMITED WARRANTY STATEMENT EXCEPT TO THE EXTENT LAWFULLY PERMITTED DO NOT EXCLUDE RESTRICT OR MODIFY AND ARE IN ADDITION TO THE MANDATORY STATUTORY RIGHTS APPLICABLE TO THE SALE OF THE COVERED HP PRODUCTS TO SUCH CUSTOMERS
hp officejet 4100 series
chapter 11
54
55
index
Numerics4-by-6 inch photo paper
load 10 12
AADF 7adjust
volume for fax 25align print cartridges 35Answer Ring Pattern 26automatic document feeder 7automatic reduction
fax 25
Bbest copy quality 13busy number
redial automatically 23
Ccancel
scan 18scheduled fax 21
cartridgesalign 35replace 33
cleanprint cartridges 35the exterior 32the glass 31white strip 32
colorenhance 14fax 20fax from front panel 20
contrastchange for fax 23photo color 14
copy 13 16change default settings 15enhance 14fit to page 16lighten or darken 14menu options 16number of copies 14photo 15quality 13reduce or enlarge 14settings 13 15
speed 13tutorial 4
Customer Support 45web site 45
Ddarken a copy 14date
setting 27default settings
restore 35director review 4distinctive ringing 26
Eenhance copies 14enlarge copy 14 16envelopes
load 9Error Correction Mode
(ECM) 25
Ffactory defaults
restore 35fast copy quality 13fax 28
adjust volume 25automated reports 22cancel fax forward 24cancel scheduled 21change Answer Ring
Pattern 26change contrast 23change resolution 22change settings 19control appearance 22create individual speed-dial
settings 26delete speed-dial
settings 27distinctive ringing 26Error Correction Mode
(ECM) 25forward faxes 24header 27in color 20in color from front panel 20manual reports 22
menu 29print reports 22receive 21receive manually 21redial busy or unanswered
number 23schedule 20send from front panel 19set automatic reduction 25set date and time 27set the number of rings 21settings 27 28setup menu options 29speed dials 19test 28
fit to page 16forward faxes 24
cancel 24front panel
display scroll speed 36enter text 28send a fax 19setting prompt delay 36tutorial 3
Gglass
cleaning 31greeting cards
load 11
Hhelp 1HP Customer Support 45
calling 45HP Director 4HP distribution center 49HP Officjet
preparing to ship 47HP papers
tips on loading 11
Iindividual speed-dial settings
create 26ink cartridges see print
cartridgesinkjet paper
load 11
index
hp officejet 4100 series56
Kkeypad
enter text 28
Llabels
load 12lighten copies 14load
change the paper type 12envelopes 9original in ADF 7paper 7photo paper 10 12postcards 10 12print cartridges 33set the paper size 12tips 11
Mmaintenance
align print cartridges 35clean print cartridges 35clean the exterior 32clean the glass 31clean the white strip 32normal sounds 36replace print cartridges 33restore factory defaults 35self-maintenance
sounds 36self-test report 32
menuscopy options 16fax 29fax setup 29maintenance 37print reports 37
Nnormal copy quality 13number of copies
set 14number of rings
set 21
Oorder print cartridges 60originals
load in ADF 7output tray 8
Ppaper
change default size for copy 12
change the type 12load 7recommended 7set the size 12tips on loading 11
paper size change for copy 12
paper trayload 7
phone numbers support services 45
photo paperload 10 12
photoscopy 15enhance copy 14
physical specifications 43postcards
load 10 12power
specifications 43print
envelopes 9fax reports 22self-test report 32
print cartridgesalign 35clean 35handling 32replace 33
prompt delaysetting 36
Qquick start
review the director 4use with a computer 4
Rreceive
fax 21redial
busy or unanswered number 23
reduce copy 14 16regulatory information 43reinstall software 40reports
generate automatically for fax 22
generate manually for fax 22
print 22self-test 32
resolution
change for fax 22restore factory settings 35returning your HP Officejet for
service 51
Sscan
from front panel 17stop 18
schedule a fax 20scroll speed
setting 36self-test report 32send
cancel forward faxes 24color fax 20color fax from front
panel 20forward faxes 24
settingscopy 13 15fax 27 28prompt delay 36scroll speed 36
setupadditional information 39menu 29
shippingyour HP Officejet 47
softwareremove and reinstall 40
soundsself-maintenance 36
specificationsphysical 43power 43
speed dials 19create individual
settings 26delete settings 27
stopscan 18scheduled fax 21
subscriber identification code 27
support services 45
Ttelephone line
multiple numbers 26telephone numbers 45text
enhance 14enter from front panel 28
time
index
reference guide 57
setting 27transparency film
recommended 7tips on loading 11
troubleshootingremove and reinstall
software 40T-shirt Transfer Iron-On
load 11tutorial
front panel 3make a copy 4
Uunanswered number
redial automatically 23
Vvolume
adjust 25
Wwarranty 45
service 51statement 51upgrades 51
white stripcleaning 32
hp officejet 4100 series
chapter 12
58
declaration of conformityAccording to ISOIEC Guide 22 and EN 45014
Manufacturerrsquos Name and Address
Hewlett-Packard Company 16399 West Bernardo Drive San Diego CA 92127-1899 USA
declares that the product
Product Name hp officejet 4100 series (Q1608A)
Model Number(s) officejet 4110 (Q1609A) officejet 4110xi (Q1610A) officejet 4110v (Q1611A) officejet 4105 (Q1612A) officejet 4105z (Q1613A) officejet 4115 (Q1614A)
Product Options All
conforms to the following Product Specifications
Safety EN609501992 +A1 A2 A3 A4 amp A11
IEC609501991 +A1 A2 A3 amp A4
UL1950CSA 222 No 950 3rd Edn 1995
NOM-019-SCFI-1993
EMC CISPR221993 +A1 amp A2 EN550221994 +A1 amp A2 -Class B
CISPR241997EN550241998
IEC 61000-3-21995 EN61000-3-21995
IEC 61000-3-31994 EN61000-3-31995
ASNZS 3548 1992
CNS13438 1997
FCC Part 15-Class B ICES-003 Issue 2 VCCI-2
GB 9254-1998
Telecom TBR21 1998
Supplementary Information
The Product herewith complies with the requirements of the Low Voltage Directive 7323EEC the EMC Directive 89336EEC and the RampTTE Directive 19995EC (ANNEX II) carries the CE marking accordingly
European Contact for regulatory topics only Your local Hewlett-Packard Sales and Service Office orHewlett-Packard GmbH
Department HQ-TRE Herrenberger Strasse 140 D-71034 Boumlblingen Germany (FAX + 49-7031-14-3143)
order mediaTo order media such as HP Premium Inkjet Paper HP Premium Inkjet Transparency Film HP Iron-On T-shirt Transfer paper or HP Greeting Cards go to
wwwhpshoppingcom
For orders in countries other than the US and Canada select other countries then click Yes to leave hpshoppingcom From this website you can access hpshoppingcom for your specific language or countryregion
order print cartridges
If you have Internet access you can get more information from the HP website at
wwwhpcomsupport
print cartridges hp reorder number
HP black print cartridge 56 19 ml black print cartridge
HP color print cartridgeHP tri-color print cartridge
57 17 ml color print cartridge28 8 ml color print cartridge
Visit the hp officejet information centerIt has everything you need to get the most value from your HP Officejet
bull Technical Supportbull Supplies and Ordering Informationbull Project Tipsbull Ways to Enhance Your Product
wwwhpcomsupport
copy 2003 Hewlett-Packard Company
Printed in the USA Mexico Germany Singapore or China
Q1608-90163Q1608-90163
Q1608-90163

hp officejet 4100 series
chapter 6
20
For more information on speed dialing see set up speed dialing in the HP Photo amp Imaging Help
3 Press Enter
4 Press Fax to scroll through the fax options
5 When you reach the option whose setting you wish to change press to scroll through the setting options
6 When you reach the setting you want to change press Enter to accept the setting
7 Press Start Black or Start Color
send a color faxYou can send and receive color faxes to and from other color fax machines If you are faxing from the front panel and your HP Officejet determines that the recipient has a black-and-white fax unit it sends the fax in black and white If you are faxing from the software and your HP Officejet determines that the recipient has a black-and-white fax unit the HP Officejet prompts you to try sending the fax in black and white
We recommend that you use only color originals for color faxing The color originals must be loaded in the ADF you cannot send a color fax from memory using the scan and fax features To fax in color to multiple recipients send the fax from the Director or your software program
to send a color fax from the front panel
1 Load your originals in the ADF For more information see load originals on page 7
2 Enter the fax number using the keypad or press Speed Dial until the desired speed-dial entry appearsFor more information on creating speed-dial entries see set up speed dialing in the HP Photo amp Imaging Help
3 Press Start Color
schedule a faxYou can schedule a black and white fax to be sent later during the same day (for example when telephone lines are not as busy) If you use the front panel you can select a single recipient
When the specified time is reached your fax is automatically sent as soon as a connection can be made
1 Load your originals in the ADF
2 Enter the fax number using the keypad or press Speed Dial until the desired speed-dial entry appears
3 Press Enter
4 Press Fax to scroll through the fax options
5 Stop scrolling when you reach the How to Fax menu
6 Press to scroll through the setting options
7 Stop scrolling when you reach the Send Fax Later option
reference guide
use the fax features
21
8 Press Enter
9 Enter the Send Time using the numeric keypad
10 At the prompt press 1 for AM or 2 for PM
11 When Store Fax Now appears press 1 for Yes or 2 for NoIf 1 is selected the document is scanned to memory and is sent at the selected time If 2 is selected and you havenrsquot loaded your originals a message appears reminding you to load the original before the send time
12 Press Start Black
cancel a scheduled faxYou can cancel a fax stored in memory or one that is currently in progress
bull Press Cancel to cancel the scheduled fax
receive a faxYour HP Officejet is set to print received faxes automatically If you receive a legal-size fax and your HP Officejet is not currently configured to use legal-sized paper the unit automatically reduces the fax so that it fits on the paper that is loaded For more information see set automatic reduction on page 25
If you have an answering machine connected to the same line as your HP Officejet you may need to set the number of rings required before the HP Officejet begins receiving the fax The default number of rings before the HP Officejet receives a fax is 5
set the number of rings before answeringYou can specify how many rings should occur before your HP Officejet automatically answers the phone When you run the Fax Setup Wizard this is set automatically
If you do not want your HP Officejet to answer the phone Rings to Answer should be set to No Answer
1 Press Setup
2 Press 3 then press 3 againThis selects the Basic Fax Setup menu then the Rings to Answer option
3 Use the arrow keys to choose the number of rings and then press Enter
receive a fax manuallyBefore manually receiving a fax we recommend that you remove any originals from your HP Officejet so that they are not accidentally processed
Verify that Rings to Answer is set to No Answer
1 When your HP Officejet rings pick up the handset of a telephone that is on the same telephone line as your HP Officejet
2 If you hear fax tones press Start Black or Start Color or if you are receiving from an extension phone (on the same telephone line as your HP Officejet but not connected directly to it) press 1 2 3 on your phone
3 After you are finished hang up the telephone
hp officejet 4100 series
chapter 6
22
print reportsYou can set up your HP Officejet to print error reports and confirmation reports for each fax you send and receive You can also manually print reports as you need them
generate reports automaticallyThis setting lets you configure your HP Officejet so that it automatically prints error and confirmation reports
1 Press Setup
2 Press 1 then press 5This selects Print Report then selects Automatic Reports Setup
3 Press to scroll through the following report typesndash Every Error which prints whenever there is any kind of fax error
(default)ndash Send Error which prints whenever there is a transmission errorndash Receive Error which prints whenever there is a receiving errorndash Every Fax which confirms every time a fax is sent or receivedndash Send Only which prints every time a fax is sentndash Off which does not print fax reports
4 When you reach the report that you want press Enter
generate reports manuallyThis setting lets you print reports manually From the computer you can only print the Speed-Dial List and the Fax Log
to print reports from the front panel
1 Press Setup then press 1This selects the Print Report menu
2 Press to scroll through the following report typesndash Last Transaction which prints details of the last fax transactionndash Fax Log which prints a log of the last 30 fax transactionsndash Speed Dial List which prints a list of programmed speed dialsndash Self-Test Report which prints a report to assist you in diagnosing print
and alignment problems For more information see print a self-test report on page 32
ndash Automatic Reports Setup which is the automatic reports setting described in generate reports automatically on page 22
3 When you reach the report that you want press Enter
control resolution and contrastYour HP Officejet lets you change the resolution and contrast of documents that you are sending
change resolutionResolution affects the transmission speed and quality of faxed documents
reference guide
use the fax features
23
to change the resolution from the front panel
1 Load your originals in the ADF
2 Enter the fax number using the keypad or press Speed Dial until the desired speed-dial entry appears
3 Press Enter
4 Press Fax to scroll through the fax options
5 Stop scrolling when you reach the Resolution menu
6 Press until the desired resolution quality appears (Standard Photo Fine Very Fine)
7 Press EnterYour HP Officejet only faxes at the highest resolution supported by the receiving faxIf you choose Photo be aware that the faxing process takes longer to complete When faxing photographs we recommend that you choose Photo
change contrastChange this setting if you want a black-and-white fax to be darker or lighter than the original
to change the fax contrast from the front panel
1 Load your originals in the ADF
2 Enter the fax number using the keypad or press Speed Dial until the desired speed-dial entry appears
3 Press Enter
4 Press Fax to scroll through the fax options
5 Stop scrolling when you reach the LighterDarker menuThe range of values appears as a circle on a scale on the display
6 Press to lighten the fax or to darken itThe circle moves left or right as you press a button
7 Press Enter to accept the setting you selected
change other fax settings
redial a number automaticallyYou can set your HP Officejet to redial a busy and an unanswered number automatically If you initiated a fax from the computer the computer must be left on for the redialing process to work correctly
1 Press Setup
2 Press 4This selects the Advanced Fax Setup menu
3 Choose one of the following optionsndash Press 3
hp officejet 4100 series
chapter 6
24
This selects the Busy Redial option The default setting for Busy Redial is Redial
ndash Press 4This selects the No Answer Redial option The default setting for No Answer Redial is No Redial
4 Press Enter
5 Press to select Redial or No Redial as desired
6 Press Enter
forward faxes to another numberWith fax forwarding you can send a fax that you receive to another fax number during the next 24-hour period
to forward faxes from the front panel
1 Press Setup
2 Press 3 then press 7This selects the Basic Fax Setup menu then selects the Fax Forwarding Black Only option
3 At the prompt enter the Fax Number to which you wish to send the fax
4 Press Enter
5 Enter the Start Date using the numeric keypad
6 Enter the Start Time using the numeric keypad
7 At the prompt press 1 for AM or 2 for PM
8 Enter the Stop Date using the numeric keypadFax Forwarding On appears on the display
edit or cancel fax forwardingOnce fax forwarding is enabled you may find that you need to change the number you are faxing to or the start and stop times you entered You may wish to cancel your fax forwarding setup altogether Follow the steps below to edit or turn off fax forwarding
to edit fax forwarding from the front panel
1 Press Setup
2 Press 3 then press 7This selects the Basic Fax Setup menu then selects the Fax Forwarding Black Only option
3 Forwarding is ON 1=Edit 2=Cancel appears on the display after a moment Press 1 to edit the number you wish to fax to or to change the start and stop times Follow the messages on the display
to cancel fax forwarding from the front panelbull Press Cancel
OR
reference guide
use the fax features
25
Follow the steps in edit or cancel fax forwarding on page 24 When Forwarding is ON 1=Edit 2=Cancel appears on the display press 2 to cancel fax forwarding
use error correction modeError Correction Mode (ECM) eliminates data lost due to poor phone lines by detecting errors that occur during transmission and automatically requesting retransmission of the erroneous portion Phone charges are unaffected or may even be reduced on good phone lines On poor phone lines ECM increases sending time and phone charges but sends the data much more reliably Turn ECM off (the default setting is on) only if it increases phone charges substantially and you can accept poorer quality in exchange for reduced charges
to change the ECM setting from the front panel
1 Press Setup
2 Press 4 then press 7This selects the Advanced Fax Setup menu then selects the Error Correction Mode option
3 Press to switch between On and Off
4 Press Enter to accept the setting you selected
set automatic reductionThis setting determines what your HP Officejet does if it receives a fax that is too large for the default paper size With this setting on (the default) the image is reduced so that it fits on one page With this feature off information that doesnrsquot fit on the first page is printed on a second page
1 Press Setup
2 Press 4 then press 5This selects the Advanced Fax Setup menu then selects the Automatic Reduction option
3 Press to switch between On and Off
4 Press Enter to accept the setting you selected
adjust the volumeYour HP Officejet provides three levels for adjusting the ring and speaker volume The ring volume is the volume of the phone ringer The speaker volume is the volume of everything else such as the dial and fax tones The default setting is Soft
1 Press Setup
2 Press 3 then press 6This selects the Basic Fax Setup menu then selects the Ring and Beep Volume option
3 Press to select one of the options Soft Loud or Off
4 Press Enter to accept the setting you selected
hp officejet 4100 series
chapter 6
26
change the answer ring pattern (distinctive ringing)Distinctive ringing is a feature offered by phone companies that allows several phone numbers to share the same line Each number has a specific ring pattern If you do not have this service use the default ring pattern which is All Rings
If you connect your HP Officejet to a line with distinctive ringing have your telephone company assign one ring pattern to voice calls and another to fax calls (double or triple rings are best for a fax number)
1 Press Setup
2 Press 4 then press 2This selects the Advanced Fax Setup menu then selects the Answer Ring Pattern option
3 Press to scroll through these options All Rings Single Rings Double Rings Triple Rings and Double amp Triple
4 When the ring pattern that the phone company established for this number appears press Enter
Tip We recommend that you use Double Rings or Triple Rings for fax
set up speed dialingThrough your HP Officejet or your computer you can assign entries to fax numbers you use often This lets you dial those numbers quickly using the front panelrsquos Speed Dial button and a one- or two-digit entry You can create up to 100 individual speed-dial entries (the maximum for some models is 70)
We recommend that you use the software to set up speed-dial settings
Note A speed-dial entry can only be associated with one phone number speed-dial groups are not supported
For more information see set up speed dialing in the hp photo amp imaging help
create individual speed-dial settingsYou can enter fax numbers that you will reuse frequently
1 Press Setup
2 Press 2 then press 1This selects the Speed Dial Setup menu then selects the Individual Speed Dial option
3 Press EnterThe first unassigned speed-dial entry appears on the display
4 Press Enter to select the displayed speed-dial entry
5 Enter the Fax Number to assign to that entry then press EnterThe fax number can be up to 50 digits in length
Tip To enter a three-second pause within a number sequence press Symbols to display a dash
6 Enter the personrsquos or companyrsquos name then press Enter
reference guide
use the fax features
27
The name is limited to 13 characters in lengthFor more information see enter text on page 28
7 After Enter Another appears press 1 (Yes) if you want to set up another number or press 2 (No) to exit
delete speed-dial settingsFollow these steps to delete an individual speed-dial entry
1 Press Setup
2 Press 2 then press 2 againThis selects Speed Dial Setup then selects Delete Speed Dial
3 Press until the individual entry that you want to delete appears then press Enter
set basic fax settings using the front panelWe recommend that you use the Fax Setup Wizard in the HP Officejet software to configure all your basic fax settings however you can also access these settings from the front panel
Note In the US regulations require that your name and phone number appear on every fax The minimum settings that we recommend are described in the following topics
set the date and timeFollow these steps to set the date and time manually
1 Press Setup
2 Press 3 then press 1This selects the Basic Fax Setup menu then selects the Date and Time option
3 Follow the prompts on the display to enter the date and time using the keypad
Tip Use only the last two digits for the year
Tip When you enter a single-digit date or time type a leading zero before the single digit for example 0345 or 08-03-02
After you are done the date and time appear on the display
Warning Cutting off power to the HP Officejet causes the selected date and time to be lost However name and fax number information is not lost
set the fax headerFollow these steps to enter your name and fax number in the header
Note In Hungary the subscriber identification code (fax header) can be set or changed only by authorized personnel For more information contact your authorized HP dealer
1 Press Setup
2 Press 3 then press 2
hp officejet 4100 series
chapter 6
28
This selects the Basic Fax Setup menu then selects the Fax Header option
3 Enter your personal or company name at the prompt Use the guidelines provided in the next section under enter text
4 Press Enter
5 Enter your fax number using the numeric keypad
6 Press Enter
enter textThe following list provides tips for entering text using the front-panel keypad
bull Press the keypad numbers that correspond to the letters of a name
bull Press a button multiple times to see a letter first in uppercase and then in lowercase
bull After the correct letter appears press and then press the number that corresponds to the next letter in the name Again press multiple times until the correct letter appears
bull To insert a space press Space ()bull To enter a symbol such as press Symbols () to scroll through the list of
available symbolsbull If you make a mistake press to clear it and then make the correct
entrybull After you are done entering text press Enter to store your entries
check for dial toneBefore using the fax features verify that the connections are correctly established
1 Press Fax
2 Listen for a dial tone
3 If you do not hear a dial tone check the connections
4 Press Cancel to hang up
ABC These letters correspond to this number and so on
2
JKL To get this character J j K k L l 5
5 Press 5 this many times 1 2 3 4 5 6 7
reference guide
use the fax features
29
fax job menuThe following options become available when the Fax button is pressed
setup menu for fax commandsThe following fax settings are available in the Setup menu
Enter Fax or Speed Dial
FineVery FinePhotoStandard
Fax Number Resolution LighterDarker
Enter a fax number or speed dialWhen the Fax button is pressed
Press and to move to the option you wantPress Enter to select the displayed setting
NoYes
Set New Defaults
Send Fax NowFax from MemorySend Fax LaterPoll to Receive
How to Fax
1Automatic Reports Setup
2Answer Ring Pattern
3Busy Redial
4No Answer Redial
5Automatic Reduction
6Backup Fax Reception
7Error Correction Mode
3Basic Fax Setup 4Advanced Fax Setup
Press Setup to display the menu options
Press and to move to the setting you wantPress Enter to select the displayed setting
1Date and Time
2Fax Header
3Rings to Answer
4Paper Size
5Tone or Pulse Dialing
6Ring and Beep Volume
7Fax Forwarding Black Only
2Speed Dial Setup
1Individual Speed Dial
2Delete Speed Dial
3Print Speed Dial List
hp officejet 4100 series
chapter 6
30
7
31
maintain your hp officejet
This section provides instructions for keeping your HP Officejet in top working condition Perform these maintenance procedures as necessary
clean the glassDirty glass from dust smudges hair and so on slows down performance and affects the accuracy of features such as Fit to Page and Copy
1 Turn off the unit unplug the power cord and raise the scanner lid
2 Clean the glass with a soft cloth or sponge slightly moistened with a nonabrasive glass cleaner
Caution Do not use abrasives acetone benzene or carbon tetrachloride on the glass these can damage it Do not place liquids directly on the glass They may seep under it and damage the unit
3 Dry the glass with a chamois or cellulose sponge to prevent spotting
hp officejet 4100 series
chapter 7
32
clean the white stripMinor debris can accumulate on the white strip located underneath the scannerrsquos lid
1 Turn off the unit unplug the power cord and raise the scanner lid
2 Clean the white strip with a soft cloth or sponge slightly moistened with a mild soap and warm water
3 Wash the strip gently to loosen debris do not scrub the strip
4 Dry the strip with a chamois or soft cloth
Caution Do not use paper-based wipes as these may scratch the strip
5 If this does not clean the strip well enough repeat the previous steps using isopropyl (rubbing) alcohol and wipe the strip thoroughly with a damp cloth to remove any residual alcohol
clean the exterior Use a soft damp lint-free cloth to wipe dust smudges and stains off the case The interior of the unit does not require cleaning Keep fluids away from the interior of the unit as well as the front panel
work with print cartridgesTo ensure the best print quality from your HP Officejet you will need to perform some simple maintenance procedures and when prompted by a front-panel message replace the print cartridges
print a self-test reportIf you are experiencing problems with printing before cleaning or replacing the print cartridges you should print a Self-Test Report This report provides useful information about your print cartridges including status information
1 Press Setup
2 Press 1 then press 4This selects Print Report and then selects Self-Test Report
3 Press Start Black or Start ColorA Self-Test Report is printed for your HP Officejet
handle print cartridgesBefore you replace or clean a print cartridge you should know the part names and how to handle the print cartridge
reference guide
maintain your hp officejet
33
replace the print cartridgesFront-panel messages appear to let you know that you should replace your print cartridges
See order print cartridges on the back cover for information on ordering replacement print cartridges
1 Turn on the unit then lift open the print cartridge access doorThe print carriage moves into view
2 After the carriage stops moving push down on the print cartridge down to release it and then pull it toward you out of its slot
Plastic tape with pink tab(must be removed)
Copper contactsInk nozzles under tape
Do not touch the copper contacts or the ink nozzles
print cartridge access door
hp officejet 4100 series
chapter 7
34
Note It is normal to see ink build-up in the print cartridge slots
3 Remove the new print cartridge from its packaging and being careful to touch only the bright pink plastic tab gently remove the plastic tape to uncover the ink nozzles
Caution Do not touch the copper contacts or ink nozzles
Once you have removed the plastic tape install the print cartridge immediately to prevent the ink from drying in the nozzles
4 Push the new print cartridge into the appropriate slot at a slight angle until it clicks into place
Caution Do not attempt to push the cartridge straight into the slot It must slide in at a slight angle
The tri-color print cartridge goes on the left and the black cartridge goes on the right
5 Close the print cartridge access door
reference guide
maintain your hp officejet
35
align the print cartridgesThe HP Officejet prompts you to align cartridges every time you install or replace a print cartridge Aligning the cartridges ensures high-quality output
To align the print cartridges when prompted
1 Press Enter on the front panelAn align cartridges (test pattern) page prints
2 Load the align cartridges page face down in the ADF between the paper-width guides and press the Enter button again
3 Recycle or discard the page
To align the cartridges at any other time
1 Press Setup
2 Press 5 then press 2This selects the Maintenance menu and then selects the Align Print Cartridge option
3 Press EnterAn align cartridges (test pattern) page prints
4 Load the align cartridges page face down in the ADF between the paper-width guides and press the Enter button again
5 Recycle or discard the page
clean the print cartridgesUse this feature when the Self-Test Report shows streaking or white lines through any of the colored bars Do not clean print cartridges unnecessarily This wastes ink and shortens the life of the ink nozzles
1 Press Setup
2 Press 5 then press 1This selects the Maintenance menu and then selects the Clean Print Cartridge optionA page of patterns is printed The cartridges are cleaned Recycle or discard the pageIf copy or print quality still seem poor after you clean the print cartridges replace the print cartridge that is affected
restore factory defaultsYou can restore the original factory settings to what they were when you purchased your HP Officejet Choosing to restore your factory defaults restores all settings except date information and any scan settings you may have set
You can perform this process from the front panel only
1 Press Setup
2 Press 5 then press 3This selects Maintenance and then selects Restore Factory DefaultsThe factory default settings are restored
hp officejet 4100 series
chapter 7
36
set scroll speedThe Scroll Speed option lets you control the rate that text messages appear in the front-panel display You can choose Normal Fast or Slow The default is Normal
1 Press Setup
2 Press 5 then press 6This selects Maintenance and then selects Set Scroll Speed
3 Press until the desired speed appears then press Enter
set the prompt delay timeThe Prompt Delay option lets you control the amount of time before a message is displayed in the front-panel display You can choose Normal Fast or Slow The default is Normal
1 Press Setup
2 Press 5 then press 7This selects Maintenance and then selects Set Prompt Delay Time
3 Press until the delay time appears then press Enter
self-maintenance sounds During the life of your product you may hear various mechanical sounds This is a normal part of your unitrsquos self-maintenance
reference guide
maintain your hp officejet
37
setup menu optionsThe following options are available from the Setup button
1Last Transaction
2Fax Log
3Speed Dial List
4Self-Test Report
5Automatic Reports Setup
1Print Report
Use Setup to display the Print Report Speed Dial Setup Basic Fax Setup Advanced Fax Setup and Maintenance options
Press and to move to the setting you wantPress Enter to select the displayed setting
1Clean Print Cartridges
2Align Print Cartridges
3Restore Factory Defaults
4Reprint Faxes in Memory
5Set Language amp CountryRegion
6Set Scroll Speed
7Set Prompt Delay Time
5Maintenance2Speed Dial Setup
3Basic Fax Setup
4Advanced Fax Setup
1Individual Speed Dial
2Delete Speed Dial
3Print Speed Dial List
1Date and Time
2Fax Header
3Rings to Answer
4 Paper Size
5Tone or Pulse Dialing
6Ring and Beep Volume
7Fax Forwarding Black Only
1Automatic Reports Setup
2Answer Ring Pattern
3Busy Redial
4No Answer Redail
5Automatic Reduction
6Backup Fax Reception
7Error Correction Mode
hp officejet 4100 series
chapter 7
38
8
39
additional setup information
During the installation of the HP Officejet software a number of windows are displayed You should see the following
bull Installingbull Copying files bull A request to plug in the HP Officejetbull Green OK and check markbull Request to restart your computer (may not occur in all cases)bull Registration
If you did not see all of these windows there may be a problem with the installation Verify the following
bull The HP Director contains six icons (double-click the HP Director icon on the desktop)
bull The HP Officejet is listed in the Printers dialog boxbull There is an icon for the HP Officejet in the System Tray that indicates the
HP Officejet is ready
If the HP Director does not show six icons you may need to wait a few minutes for the HP Officejet to connect to your computer
possible installation problemsIf nothing appears on your computer screen after you insert the HP Officejet 4100 Series CD-ROM into your computerrsquos CD-ROM drive
1 From the Start menu choose Run
2 In the Run dialog box enter dsetupexe (if your CD-ROM drive is not assigned to drive letter d use the appropriate drive letter) then click OK
If the HP Director does not contain six icons do the following
bull Verify that the front-panel cover is attached then unplug the HP Officejet and plug it in again
bull Verify that the USB and power cables are plugged inndash Unplug the USB cable and plug it in againndash Do not attach the USB cable to a keyboard or nonpowered hubndash Verify that the USB cable is 3 meters or less in lengthndash If you have several USB devices attached to your computer you may
want to unplug the others during the installation
Note AppleTalk is not supported
bull Unplug the HP Officejet from the wall and plug it in againbull Restart your computer
hp officejet 4100 series
chapter 8
40
On Windows check the System Tray for applications that are running in the background and close them before restarting your computer
remove and reinstall your hp officejet softwareIf six icons do not appear in the Director you may need to uninstall and re-install the software Do not simply delete the HP Officejet program files from your hard drive Be sure to remove them properly using the uninstall utility provided in the HP Officejet program group
to uninstall from a Windows computer
1 Disconnect your HP Officejet from your computer
2 On the Windows taskbar click Start choose Programs or All Programs (XP) choose Hewlett-Packard choose hp officejet 4100 series then choose uninstall software
3 Follow the directions on the screenBe sure to disconnect your HP Officejet
4 If you are asked whether you would like to remove shared files click NoOther programs that use these files may not work properly if the files are deleted
5 After the program finishes removing the software disconnect your HP Officejet and restart your computer
Note It is important that you disconnect your HP Officejet before restarting your computer
6 To reinstall the software insert the HP Officejet 4100 Series CD-ROM into your computerrsquos CD-ROM drive and follow the instructions that appear
7 After the software is installed connect and turn on your HP Officejet following the onscreen instructions and the instructions in your Setup PosterAfter connecting and turning on your HP Officejet you may have to wait several minutes for all of the Plug and Play events to completeWhen the software installation is complete you will see a Status Monitor icon in the System Tray
8 To verify that the software is properly installed double-click on the HP Director icon on the desktop If the HP Director shows six icons the software has been properly installed
to uninstall from a Macintosh computer
1 Disconnect your HP Officejet from your computer
2 Double-click on ApplicationsHP All-in-One Software folder
reference guide
additional setup information
41
3 Double-click on HP Uninstaller
4 Follow the directions that appear on the screen
5 After the program finishes removing the software disconnect your HP Officejet and restart your computer
6 To reinstall the software insert the HP Officejet 4100 Series CD-ROM into your computerrsquos CD-ROM drive
Note When re-installing the software follow the instructions on the Setup Poster Do not connect the HP Officejet to your computer until after you have completed the software installation
7 On the desktop open the CD-ROM double-click on hp all-in-one installer and follow the instructions that appear
connect your hp officejet to a phone modem or answering machine
The HP Officejet can share a phone line with a phone a modem or an aswering machine When sharing a phone line with an answering machine the HP Officejet will answer fax calls and direct voice calls to the answering machine
Note For information on connecting your HP Officejet to your computer and phone line refer to the Setup Poster that came with your unit
to connect your hp officejet to a phone modem or answering machine
1 Remove the white plastic stopper from connector 2 on the back of the HP Officejet
To connect more than one device to connector 2 on the HP Officejet you must purchase a Y-splitter and plug it into connector 2
2 Connect the phone cord from the phone modem or answering machine to connector 2 (or Y-splitter)
Caution Do not use the phone cord that came with the HP Officejet for this purpose That phone cord must connect connector 1 on the HP Officejet to the wall jack for your phone system See the Setup Poster for details
3 If you are connecting an answering machine see set the number of rings before answering on page 21 for instructions on setting the number of rings correctly or change the answer ring pattern (distinctive ringing) on page 26 for information on incoming ring patterns
4 If you are connecting a modem turn off its fax-receive feature
connector 2 on the HP Officejet
connector 1 on the HP Officejet
hp officejet 4100 series
chapter 8
42
additional troubleshooting helpYou may want to refer to the readme file for more information on possible installation problems On Windows you can access the readme file from the Start button on the taskbar select Programs Hewlett-Packard hp officejet 4100 series View the Readme File On Macintosh you can access the readme file by double-clicking on the icon located in the top-level folder of the HP Officejet software CD-ROM
The readme file provides more information including
bull Using the Re-install utility after a failed installation to return your PC to a state that will allow the HP Officejet to be re-installed
bull Using the Re-install utility on Windows 98 to recover from a Composite USB System Driver missing errorThis error may occur if the hardware is installed prior to installing the software After running the Re-install utility reboot your PC and install the HP Officejet software before connecting the HP Officejet to your computer
You can also find more information on this website
wwwhpcomsupport
9
43
technical information
Additional specifications information can be found in the HP Photo amp Imaging Help in the hp officejet 4100 series section
physical specifications
power specificationsbull Power consumption 75W maximumbull Source (Input Voltage) 100 to 240 VAC groundedbull Input Frequency 50 to 60 Hzbull Current 1A maximum
regulatory informationAdditional regulatory information can be found in the HP Photo amp Imaging Help The information in this section supercedes information in the HP Photo amp Imaging Help
doc statement deacuteclaration de conformiteacute (Canada)Le preacutesent appareil numeacuterique neacutemet pas de bruit radioeacutelectrique deacutepassant les limites applicables aux appareils numeacuteriques de la classe B prescrites dans le Regraveglement sur le brouillage radioeacutelectrique eacutedicteacute par le ministegravere des Communications du CanadaThis digital apparatus does not exceed the Class B limits for radio noise emissions from digital apparatus set out in the Radio Interference Regulations of the Canadian Department of Communications
notice to users of the Canadian telephone networkThis equipment meets the applicable Industry Canada Terminal Equipment Technical Specifications This is confirmed by the registration number The abbreviation IC before the registration number signifies that registration was performed based on a Declaration of Conformity indicating that Industry Canada technical specifications were met It does not imply that Industry Canada approved the equipment
Note The Ringer Equivalence Number (REN) assigned to each terminal device provides an indication of the maximum number of terminals allowed to be connected to a telephone interface The termination on an interface may consist of any combination of devices subject only to the requirement that the sum of the Ringer Equivalence Numbers of all the devices does not exceed 5
The REN for this product is 03B based on FCC Part 68 test results
height width depth weight (without print cartridges)
with paper trays and ADF closed
718 in (1824 cm) 1676 in (4258 cm) 825 in (2096 cm) 75 lbs (34 kg)
with ADF and paper tray extended
1030 in (2615 cm) 1676 in (4258 cm) 1854 in (4709 cm) 75 lbs (34 kg)
hp officejet 4100 series
chapter 9
44
notice to all users of the European Economic Area (EEA)
This product is designed to interwork with the analogue telephone networks in the following countriesregions
Network compatibility depends on customer selected settings which must be reset to use the equipment on a telephone network in a countryregion other than where the product was purchased Contact the vendor or Hewlett-Packard Company if addition product support is necessaryThis equipment has been certified by the manufacturer in accordance with Directive 19995EC (annex II) for Pan-European single-terminal connection to the public switched telephone network (PSTN) However due to differences between the individual PSTNs provided in different countriesregions the approval does not of itself give an unconditional assurance of successful operation on every PSTN network termination pointIn the event of problems you should contact your equipment supplier in the first instance
geraumluschemissionLpA lt 70 dBam Arbeitsplatzim Normalbetriebnach DIN 45635 T 19
notice to Korean customers
Germany UK Netherlands
France Spain Italy
Belgium Luxembourg Sweden
Austria Denmark Ireland
Norway Finland Switzerland
Greece Portugal
10
45
hp support
This section explains the support services information provided by Hewlett-Packard If you are unable to find the answer you need in the printed or onscreen documentation supplied with your product you can contact one of the HP support services listed in the following pages Some support services are available only in the US and Canada while others are available in many countriesregions worldwide If a support service number is not listed for your countryregion contact your nearest authorized HP dealer for help
get support and other information from the internetIf you have Internet access you can get help from the following HP website
wwwhpcomsupportThe Web site offers technical support drivers supplies and ordering information
hp customer supportSoftware programs from other companies may be included with your HP Officejet If you experience problems with any of those programs you will receive the best technical assistance by calling the experts at that companyIf you need to contact HP Customer Support do the following before you call
1 Make sure thata Your unit is plugged in and turned onb The specified print cartridges are installed correctlyc The recommended paper is properly loaded in the input tray
2 Reset your unita Turn off the unit using the On button located on the unitrsquos front panelb Unplug the power cord from the back of the unitc Plug the power cord back into the unitd Turn on the unit using the On button
3 For more information check the HP website at wwwhpcomsupport
4 If you are still experiencing problems and need to speak with an HP Customer Support Representativendash Have your service ID and serial number ready To display your service ID and
serial number on the front panel do the following Press Enter and Start Color at the same time until the service ID appears in the front-panel display From this display press the right arrow until the serial number displays
ndash Print a Self-Test Report See print a self-test report on page 32 for information on printing this report
ndash Make a color copyndash Be prepared to describe your problem in detail
5 Call HP Customer Support Be near your unit when you call
call in the US during warrantyCall (208) 323-2551 This service is free during the warranty period however your standard long-distance phone charges still apply A fee may apply outside the warranty period
hp officejet 4100 series
chapter 10
46
US phone support is available in both English and Spanish languages 24 hours a day 7 days a week (days and hours of support may change without notice)
call elsewhere in the worldThe numbers listed below are current as of the printing date of this guide For a list of current international HP Support Service numbers visit this address and choose your own countryregion or language
wwwhpcomsupportFor Korea you can also visit this address
httpwwwhpcokrYou can call the HP support center in the following countriesregions If your countryregion is not listed contact your local dealer or nearest HP Sales and Support Office to find out how to obtain servicesSupport service is free during the warranty period however your standard long-distance phone charges will apply In some cases a flat fee per single incident will also applyFor phone support in Europe please check for the details and conditions of phone support in your countryregion by consulting the following Web site
wwwhpcomsupportAlternatively you can ask your dealer or call HP at the phone number indicated in this booklet As part of our constant efforts to improve our phone support service we advise you to check our website on a regular basis for new information regarding service features and delivery
countryregion hp technical support countryregion hp technical support
Algeria1 +213 (0) 61564 543 Malaysia 1-800-805405
Argentina 0810-555-5520 Mexico 01-800-472-6684
Australia +61 3 8877 80001902 910 910
Mexico (Mexico City) 5258-9922
Austria +43 (0) 810 00 6080 Morocco1 +212 22404 747
Bahrain (Dubai) 800 728 Netherlands +31 (0) 20 606 8751
Belgium (Dutch) +32 (0) 2 626 8806 New Zealand 0800 441 147
Belgium (French) +32 (0) 2 626 8807 Norway +47 22 11 6299
Brazil (Grande Sao Paulo) (11) 3747 7799 Oman +971 4 883 8454
Brazil (Demais Localidades) 0800 157751 Palestine +971 4 883 8454
Canada during warranty (905) 206 4663 Panama 001-800-7112884
Canada post-warranty(per-call charge)
1-877-621-4722 Peru 0-800-10111
Caribbean amp Central America
1-800-711-2884 Philippines 632-867-3551
Chile 800-360-999 Poland +48 22 865 98 00
China 86 10 6868 7980 Portugal +351 21 3176333
Colombia 9-800-114-726 Puerto Rico 1-877-2320-589
Costa Rica 0-800-011-0524 Qatar +971 4 883 8454
Czech Republic +420 (0) 261307310 Romania +40 1 315 44 42or local 01 3154442
reference guide
hp support
47
call in Australia post-warrantyIf your product is not under warranty you can call 03 8877 8000 A per-incident out-of-warranty support fee of $2750 (inc GST) will be charged to your credit card You can also call 1902 910 910 ($2750 charged to your phone account) from 900 AM to 500 PM Monday through Friday (Charges and support hours are subject to change without notice)
prepare your unit for shipmentIf after contacting HP Customer Support or returning to the point of purchase you are requested to send your unit in for service please follow the power off and rebox steps below to avoid further damage to the HP product
Denmark +45 39 29 4099 Russian Federation Moscow +7 095 797 3520
Ecuador 1800-711-2884 Russian Federation St Petersburg
+7 812 346 7997
Europe (English) +44 (0) 207 512 5202 Saudi Arabia +800 897 14440
Egypt 02 532 5222 Singapore 65 6272 5300
Finland +358 (0) 203 47 288 Slovakia +421 (0) 2 682 08080
France (034 Euromin) +0892 69 60 22 South Africa (inside RSA) 086 000 1030
Germany (012 Euromin) +49 (0) 180 52 58 143 South Africa (inside RSA) +27-11 258 9301
Greece +30 1060 73 603 Spain +34 902 321 123
Hong Kong (SAR) +85 (2) 3002 8555 Sweden +46 (0)8 619 2170
Guatemala 1800-995-5105 Switzerland 2 +41 (0) 84 880 1111
Hungary +36 (0) 1 382 1111 Taiwan +886-2-2717-00550800 010 055
India 1-600-11226791 11 682 6035
Thailand +66 (2) 661 4000
Indonesia 62-21-350-3408 Tunisia1 +216 1891 222
Ireland +353 (0) 1 662 5525 Turkey +90 216 579 7171
Israel +972 (0) 9 8304848 Ukraine +7 (380-44) 490-3520
Italy +39 (0) 226410350 United Arab Emirates +971 4 883 8454
Japan 0570 000 511+81 3 3335 9800
United Kingdom +44 (0) 207 512 52 02
Jordan +971 4 883 8454 Venezuela 0800-47468368 or800-477-7777
Korea (Seoul) +82 (2) 3270 0700 Venezuela (Caracas) (502) 207-8488
Korea (outside Seoul) 080 999 0700 Vietnam 84 (0) 8 823 4530
Kuwait +971 4 883 8454 Yemen +971 4 883 8454
Lebanon +971 4 883 8454
1 This Call Center supports French speaking customers from the following countriesregions Morocco Tunisia and Algeria
2 This Call Center supports German French and Italian speaking customers in Switzerland
countryregion hp technical support countryregion hp technical support
hp officejet 4100 series
chapter 10
48
Note When transporting your HP Officejet make sure that the pens have been removed the HP Officejet has been properly shut down by pressing the power button and you have allowed time for the carriage to return to the service station and for the scanner to return to its parked position
1 Turn on the unitDisregard steps 1 through 6 if your unit will not turn on and the print carriage is in the home position You will not be able to remove the print cartridges Proceed to step 7
2 Open the print cartridge access doorThe print carriage moves into view
3 See replace the print cartridges on page 33 for information on removing the print cartridges
Caution Remove both print cartridges Failure to do so may damage your unit
4 Place the print cartridges in an airtight bag so they will not dry out and put them aside (do not send them with the unit unless instructed to by the HP customer support call agent)
5 Turn off the unit
6 Close the print cartridge access door
7 Remove the front panel cover as followsa Grasp the front of the front panel cover with two hands as shownb Firmly lift the front panel cover to unsnap it from the unit
8 Retain the front panel cover Do not return the front panel cover with the unit
9 If available pack the unit for shipment using the original packing materials or the packaging materials that come with your exchange unit
If you do not have the original packaging materials please use other adequate packaging materials Shipping damage caused by improper packaging andor improper transportation is not covered under the warranty
reference guide
hp support
49
10 Place the return shipping label on the outside of the box
11 Include the following items in the boxndash A complete description of symptoms for service personnel (samples of print
quality problems are helpful)ndash A copy of the sales slip or other proof of purchase to establish the warranty
coverage periodndash Your name address and a phone number where you can be reached during
the day
hp distribution centerTo order HP Officejet software a copy of the printed Reference Guide a setup poster or other customer-replaceable parts do one of the following bull In the US or Canada call (208) 323 2551bull Visit this website
httpwwwhpcomcposupportsoftwarehtml
hp officejet 4100 series
chapter 10
50
11
51
warranty information
HP Officejet 4100 seriesDuration of Limited Warranty (hardware and labor) 1 YearDuration of Limited Warranty (CD media) 90 DaysDuration of Limited Warranty (print cartridges) Until the HP ink is depleted or the ldquoend of warrantyrdquo date printed on the cartridge has been reached whichever occurs first
warranty service
express serviceTo obtain HP express repair service the customer must contact an HP service office or an HP Customer Support Center for basic troubleshooting first See hp customer support on page 45 for steps to take before calling Customer SupportIf a customer unit needs a minor part replacement and these parts can normally be replaced by the customer the customer-replaceable components may be serviced through expedited part shipment In this event HP will prepay shipping charges duty and taxes provide telephone assistance on replacement of the component and pay shipping charges duty and taxes for any part that HP asks to be returnedThe HP Customer Support Center may direct customers to designated authorized service providers who are certified by HP to service the HP product
warranty upgradesUpgrade your standard factory warranty to a total of three years with the HP SUPPORTPACK Service coverage begins on product purchase date and the pack must be purchased within the first 180 days of product purchase This program offers phone support from 600 AM to 1000 PM Mountain Standard Time (MST) Monday through Friday and 900 AM to 400 PM (MST) on Saturdays If during your technical support call it is determined that you need a replacement product then HP will ship you this product next business day free of charge Available in US onlyFor more information please call 1-888-999-4747 or visit the following HP Web site
httpwwwhpcomgohpsupportpack
Outside the US please call your local HP Customer Support office See call elsewhere in the world on page 46 for a list of international Customer Support numbers
returning your hp officejet for serviceBefore returning your HP Officejet for service you must call HP Customer Support See hp customer support on page 45 for steps to take before calling Customer Support
hewlett-packard limited global warranty statement
extent of limited warrantyHewlett-Packard (ldquoHPrdquo) warrants to the end-user customer (ldquoCustomerrdquo) that each HP Officejet 4100 Series product (ldquoProductrdquo) including related software accessories media and supplies shall be free from defects in material and workmanship for the duration which begins on the date of purchase by the Customer
hp officejet 4100 series
chapter 11
52
For each software Product HPrsquos limited warranty applies only to a failure to execute programming instructions HP does not warrant that the operation of any Product shall be uninterrupted or error freeHPrsquos limited warranty covers only those defects which arise as a result of normal use of a Product and does not cover any other problems including those which arise as a result of (a) improper maintenance or modification (b) software accessories media or supplies not provided or supported by HP or (c) operation outside the Productrsquos specificationsFor any hardware Product the use of a non-HP print cartridge or a refilled print cartridge does not affect either the warranty to the Customer or any HP support contract with the Customer However if Product failure or damage is attributable to the use of a non-HP or refilled print cartridge HP shall charge its standard labor and materials charges to service the Product for the failure or damageIf HP receives during the applicable warranty period notice of a defect in any Product HP shall either repair or replace the defective Product at HPrsquos option Where labor charges are not covered by HPrsquos limited warranty repairs shall be at HPrsquos standard charges for laborIf HP is unable to repair or replace as applicable a defective Product which is covered by HPrsquos warranty HP shall within a reasonable time after being notified of the defect refund the purchase price for the ProductHP shall have no obligation to repair replace or refund until the Customer returns the defective Product to HPAny replacement product may be either new or like-new provided that it has functionality at least equal to that of the Product being replacedHP products including each Product may contain remanufactured parts components or materials equivalent to new in performanceHPs limited warranty for each Product is valid in any countryregion or locality where HP has a support presence for the Product and where HP has marketed the Product The level of warranty service may vary according to local standards HP shall have no obligation to alter the form fit or function of the Product in order to make it operate in a countryregion or locality for which the Product was never intended to operate
limitations of warrantyTO THE EXTENT ALLOWED BY LOCAL LAW NEITHER HP NOR ITS THIRD PARTY SUPPLIERS MAKE ANY OTHER WARRANTY OR CONDITION OF ANY KIND WHETHER EXPRESS OR IMPLIED WITH RESPECT TO THE COVERED HP PRODUCTS AND SPECIFICALLY DISCLAIM THE IMPLIED WARRANTIES OR CONDITIONS OF MERCHANTABILITY SATISFACTORY QUALITY AND FITNESS FOR A PARTICULAR PURPOSE
limitations of liabilityTo the extent allowed by local law the remedies provided in this Limited Warranty Statement are the Customerrsquos sole and exclusive remediesTO THE EXTENT ALLOWED BY LOCAL LAW EXCEPT FOR THE OBLIGATIONS SPECIFICALLY SET FORTH IN THIS LIMITED WARRANTY STATEMENT IN NO EVENT SHALL HP OR ITS THIRD PARTY SUPPLIERS BE LIABLE FOR DIRECT INDIRECT SPECIAL INCIDENTAL OR CONSEQUENTIAL DAMAGES WHETHER BASED ON CONTRACT TORT OR ANY OTHER LEGAL THEORY AND WHETHER ADVISED OF THE POSSIBILITY OF SUCH DAMAGES
local lawThis Limited Warranty Statement gives the Customer specific legal rights The Customer may also have other rights which vary from state to state in the United States from province to province in Canada and from countryregion to countryregion elsewhere in the world
reference guide
warranty information
53
To the extent this Limited Warranty Statement is inconsistent with local law this Statement shall be deemed modified to be consistent with such local law Under such local law certain disclaimers and limitations of this Statement may not apply to the Customer For example some states in the United States as well as some governments outside the United States (including provinces in Canada) mayPreclude the disclaimers and limitations in this Statement from limiting the statutory rights of a consumer (eg the United Kingdom)Otherwise restrict the ability of a manufacturer to enforce such disclaimers or limitations orGrant the Customer additional warranty rights specify the duration of implied warranties which the manufacturer cannot disclaim or not allow limitations on the duration of implied warrantiesFOR CONSUMER TRANSACTIONS IN AUSTRALIA AND NEW ZEALAND THE TERMS IN THIS LIMITED WARRANTY STATEMENT EXCEPT TO THE EXTENT LAWFULLY PERMITTED DO NOT EXCLUDE RESTRICT OR MODIFY AND ARE IN ADDITION TO THE MANDATORY STATUTORY RIGHTS APPLICABLE TO THE SALE OF THE COVERED HP PRODUCTS TO SUCH CUSTOMERS
hp officejet 4100 series
chapter 11
54
55
index
Numerics4-by-6 inch photo paper
load 10 12
AADF 7adjust
volume for fax 25align print cartridges 35Answer Ring Pattern 26automatic document feeder 7automatic reduction
fax 25
Bbest copy quality 13busy number
redial automatically 23
Ccancel
scan 18scheduled fax 21
cartridgesalign 35replace 33
cleanprint cartridges 35the exterior 32the glass 31white strip 32
colorenhance 14fax 20fax from front panel 20
contrastchange for fax 23photo color 14
copy 13 16change default settings 15enhance 14fit to page 16lighten or darken 14menu options 16number of copies 14photo 15quality 13reduce or enlarge 14settings 13 15
speed 13tutorial 4
Customer Support 45web site 45
Ddarken a copy 14date
setting 27default settings
restore 35director review 4distinctive ringing 26
Eenhance copies 14enlarge copy 14 16envelopes
load 9Error Correction Mode
(ECM) 25
Ffactory defaults
restore 35fast copy quality 13fax 28
adjust volume 25automated reports 22cancel fax forward 24cancel scheduled 21change Answer Ring
Pattern 26change contrast 23change resolution 22change settings 19control appearance 22create individual speed-dial
settings 26delete speed-dial
settings 27distinctive ringing 26Error Correction Mode
(ECM) 25forward faxes 24header 27in color 20in color from front panel 20manual reports 22
menu 29print reports 22receive 21receive manually 21redial busy or unanswered
number 23schedule 20send from front panel 19set automatic reduction 25set date and time 27set the number of rings 21settings 27 28setup menu options 29speed dials 19test 28
fit to page 16forward faxes 24
cancel 24front panel
display scroll speed 36enter text 28send a fax 19setting prompt delay 36tutorial 3
Gglass
cleaning 31greeting cards
load 11
Hhelp 1HP Customer Support 45
calling 45HP Director 4HP distribution center 49HP Officjet
preparing to ship 47HP papers
tips on loading 11
Iindividual speed-dial settings
create 26ink cartridges see print
cartridgesinkjet paper
load 11
index
hp officejet 4100 series56
Kkeypad
enter text 28
Llabels
load 12lighten copies 14load
change the paper type 12envelopes 9original in ADF 7paper 7photo paper 10 12postcards 10 12print cartridges 33set the paper size 12tips 11
Mmaintenance
align print cartridges 35clean print cartridges 35clean the exterior 32clean the glass 31clean the white strip 32normal sounds 36replace print cartridges 33restore factory defaults 35self-maintenance
sounds 36self-test report 32
menuscopy options 16fax 29fax setup 29maintenance 37print reports 37
Nnormal copy quality 13number of copies
set 14number of rings
set 21
Oorder print cartridges 60originals
load in ADF 7output tray 8
Ppaper
change default size for copy 12
change the type 12load 7recommended 7set the size 12tips on loading 11
paper size change for copy 12
paper trayload 7
phone numbers support services 45
photo paperload 10 12
photoscopy 15enhance copy 14
physical specifications 43postcards
load 10 12power
specifications 43print
envelopes 9fax reports 22self-test report 32
print cartridgesalign 35clean 35handling 32replace 33
prompt delaysetting 36
Qquick start
review the director 4use with a computer 4
Rreceive
fax 21redial
busy or unanswered number 23
reduce copy 14 16regulatory information 43reinstall software 40reports
generate automatically for fax 22
generate manually for fax 22
print 22self-test 32
resolution
change for fax 22restore factory settings 35returning your HP Officejet for
service 51
Sscan
from front panel 17stop 18
schedule a fax 20scroll speed
setting 36self-test report 32send
cancel forward faxes 24color fax 20color fax from front
panel 20forward faxes 24
settingscopy 13 15fax 27 28prompt delay 36scroll speed 36
setupadditional information 39menu 29
shippingyour HP Officejet 47
softwareremove and reinstall 40
soundsself-maintenance 36
specificationsphysical 43power 43
speed dials 19create individual
settings 26delete settings 27
stopscan 18scheduled fax 21
subscriber identification code 27
support services 45
Ttelephone line
multiple numbers 26telephone numbers 45text
enhance 14enter from front panel 28
time
index
reference guide 57
setting 27transparency film
recommended 7tips on loading 11
troubleshootingremove and reinstall
software 40T-shirt Transfer Iron-On
load 11tutorial
front panel 3make a copy 4
Uunanswered number
redial automatically 23
Vvolume
adjust 25
Wwarranty 45
service 51statement 51upgrades 51
white stripcleaning 32
hp officejet 4100 series
chapter 12
58
declaration of conformityAccording to ISOIEC Guide 22 and EN 45014
Manufacturerrsquos Name and Address
Hewlett-Packard Company 16399 West Bernardo Drive San Diego CA 92127-1899 USA
declares that the product
Product Name hp officejet 4100 series (Q1608A)
Model Number(s) officejet 4110 (Q1609A) officejet 4110xi (Q1610A) officejet 4110v (Q1611A) officejet 4105 (Q1612A) officejet 4105z (Q1613A) officejet 4115 (Q1614A)
Product Options All
conforms to the following Product Specifications
Safety EN609501992 +A1 A2 A3 A4 amp A11
IEC609501991 +A1 A2 A3 amp A4
UL1950CSA 222 No 950 3rd Edn 1995
NOM-019-SCFI-1993
EMC CISPR221993 +A1 amp A2 EN550221994 +A1 amp A2 -Class B
CISPR241997EN550241998
IEC 61000-3-21995 EN61000-3-21995
IEC 61000-3-31994 EN61000-3-31995
ASNZS 3548 1992
CNS13438 1997
FCC Part 15-Class B ICES-003 Issue 2 VCCI-2
GB 9254-1998
Telecom TBR21 1998
Supplementary Information
The Product herewith complies with the requirements of the Low Voltage Directive 7323EEC the EMC Directive 89336EEC and the RampTTE Directive 19995EC (ANNEX II) carries the CE marking accordingly
European Contact for regulatory topics only Your local Hewlett-Packard Sales and Service Office orHewlett-Packard GmbH
Department HQ-TRE Herrenberger Strasse 140 D-71034 Boumlblingen Germany (FAX + 49-7031-14-3143)
order mediaTo order media such as HP Premium Inkjet Paper HP Premium Inkjet Transparency Film HP Iron-On T-shirt Transfer paper or HP Greeting Cards go to
wwwhpshoppingcom
For orders in countries other than the US and Canada select other countries then click Yes to leave hpshoppingcom From this website you can access hpshoppingcom for your specific language or countryregion
order print cartridges
If you have Internet access you can get more information from the HP website at
wwwhpcomsupport
print cartridges hp reorder number
HP black print cartridge 56 19 ml black print cartridge
HP color print cartridgeHP tri-color print cartridge
57 17 ml color print cartridge28 8 ml color print cartridge
Visit the hp officejet information centerIt has everything you need to get the most value from your HP Officejet
bull Technical Supportbull Supplies and Ordering Informationbull Project Tipsbull Ways to Enhance Your Product
wwwhpcomsupport
copy 2003 Hewlett-Packard Company
Printed in the USA Mexico Germany Singapore or China
Q1608-90163Q1608-90163
Q1608-90163

reference guide
use the fax features
21
8 Press Enter
9 Enter the Send Time using the numeric keypad
10 At the prompt press 1 for AM or 2 for PM
11 When Store Fax Now appears press 1 for Yes or 2 for NoIf 1 is selected the document is scanned to memory and is sent at the selected time If 2 is selected and you havenrsquot loaded your originals a message appears reminding you to load the original before the send time
12 Press Start Black
cancel a scheduled faxYou can cancel a fax stored in memory or one that is currently in progress
bull Press Cancel to cancel the scheduled fax
receive a faxYour HP Officejet is set to print received faxes automatically If you receive a legal-size fax and your HP Officejet is not currently configured to use legal-sized paper the unit automatically reduces the fax so that it fits on the paper that is loaded For more information see set automatic reduction on page 25
If you have an answering machine connected to the same line as your HP Officejet you may need to set the number of rings required before the HP Officejet begins receiving the fax The default number of rings before the HP Officejet receives a fax is 5
set the number of rings before answeringYou can specify how many rings should occur before your HP Officejet automatically answers the phone When you run the Fax Setup Wizard this is set automatically
If you do not want your HP Officejet to answer the phone Rings to Answer should be set to No Answer
1 Press Setup
2 Press 3 then press 3 againThis selects the Basic Fax Setup menu then the Rings to Answer option
3 Use the arrow keys to choose the number of rings and then press Enter
receive a fax manuallyBefore manually receiving a fax we recommend that you remove any originals from your HP Officejet so that they are not accidentally processed
Verify that Rings to Answer is set to No Answer
1 When your HP Officejet rings pick up the handset of a telephone that is on the same telephone line as your HP Officejet
2 If you hear fax tones press Start Black or Start Color or if you are receiving from an extension phone (on the same telephone line as your HP Officejet but not connected directly to it) press 1 2 3 on your phone
3 After you are finished hang up the telephone
hp officejet 4100 series
chapter 6
22
print reportsYou can set up your HP Officejet to print error reports and confirmation reports for each fax you send and receive You can also manually print reports as you need them
generate reports automaticallyThis setting lets you configure your HP Officejet so that it automatically prints error and confirmation reports
1 Press Setup
2 Press 1 then press 5This selects Print Report then selects Automatic Reports Setup
3 Press to scroll through the following report typesndash Every Error which prints whenever there is any kind of fax error
(default)ndash Send Error which prints whenever there is a transmission errorndash Receive Error which prints whenever there is a receiving errorndash Every Fax which confirms every time a fax is sent or receivedndash Send Only which prints every time a fax is sentndash Off which does not print fax reports
4 When you reach the report that you want press Enter
generate reports manuallyThis setting lets you print reports manually From the computer you can only print the Speed-Dial List and the Fax Log
to print reports from the front panel
1 Press Setup then press 1This selects the Print Report menu
2 Press to scroll through the following report typesndash Last Transaction which prints details of the last fax transactionndash Fax Log which prints a log of the last 30 fax transactionsndash Speed Dial List which prints a list of programmed speed dialsndash Self-Test Report which prints a report to assist you in diagnosing print
and alignment problems For more information see print a self-test report on page 32
ndash Automatic Reports Setup which is the automatic reports setting described in generate reports automatically on page 22
3 When you reach the report that you want press Enter
control resolution and contrastYour HP Officejet lets you change the resolution and contrast of documents that you are sending
change resolutionResolution affects the transmission speed and quality of faxed documents
reference guide
use the fax features
23
to change the resolution from the front panel
1 Load your originals in the ADF
2 Enter the fax number using the keypad or press Speed Dial until the desired speed-dial entry appears
3 Press Enter
4 Press Fax to scroll through the fax options
5 Stop scrolling when you reach the Resolution menu
6 Press until the desired resolution quality appears (Standard Photo Fine Very Fine)
7 Press EnterYour HP Officejet only faxes at the highest resolution supported by the receiving faxIf you choose Photo be aware that the faxing process takes longer to complete When faxing photographs we recommend that you choose Photo
change contrastChange this setting if you want a black-and-white fax to be darker or lighter than the original
to change the fax contrast from the front panel
1 Load your originals in the ADF
2 Enter the fax number using the keypad or press Speed Dial until the desired speed-dial entry appears
3 Press Enter
4 Press Fax to scroll through the fax options
5 Stop scrolling when you reach the LighterDarker menuThe range of values appears as a circle on a scale on the display
6 Press to lighten the fax or to darken itThe circle moves left or right as you press a button
7 Press Enter to accept the setting you selected
change other fax settings
redial a number automaticallyYou can set your HP Officejet to redial a busy and an unanswered number automatically If you initiated a fax from the computer the computer must be left on for the redialing process to work correctly
1 Press Setup
2 Press 4This selects the Advanced Fax Setup menu
3 Choose one of the following optionsndash Press 3
hp officejet 4100 series
chapter 6
24
This selects the Busy Redial option The default setting for Busy Redial is Redial
ndash Press 4This selects the No Answer Redial option The default setting for No Answer Redial is No Redial
4 Press Enter
5 Press to select Redial or No Redial as desired
6 Press Enter
forward faxes to another numberWith fax forwarding you can send a fax that you receive to another fax number during the next 24-hour period
to forward faxes from the front panel
1 Press Setup
2 Press 3 then press 7This selects the Basic Fax Setup menu then selects the Fax Forwarding Black Only option
3 At the prompt enter the Fax Number to which you wish to send the fax
4 Press Enter
5 Enter the Start Date using the numeric keypad
6 Enter the Start Time using the numeric keypad
7 At the prompt press 1 for AM or 2 for PM
8 Enter the Stop Date using the numeric keypadFax Forwarding On appears on the display
edit or cancel fax forwardingOnce fax forwarding is enabled you may find that you need to change the number you are faxing to or the start and stop times you entered You may wish to cancel your fax forwarding setup altogether Follow the steps below to edit or turn off fax forwarding
to edit fax forwarding from the front panel
1 Press Setup
2 Press 3 then press 7This selects the Basic Fax Setup menu then selects the Fax Forwarding Black Only option
3 Forwarding is ON 1=Edit 2=Cancel appears on the display after a moment Press 1 to edit the number you wish to fax to or to change the start and stop times Follow the messages on the display
to cancel fax forwarding from the front panelbull Press Cancel
OR
reference guide
use the fax features
25
Follow the steps in edit or cancel fax forwarding on page 24 When Forwarding is ON 1=Edit 2=Cancel appears on the display press 2 to cancel fax forwarding
use error correction modeError Correction Mode (ECM) eliminates data lost due to poor phone lines by detecting errors that occur during transmission and automatically requesting retransmission of the erroneous portion Phone charges are unaffected or may even be reduced on good phone lines On poor phone lines ECM increases sending time and phone charges but sends the data much more reliably Turn ECM off (the default setting is on) only if it increases phone charges substantially and you can accept poorer quality in exchange for reduced charges
to change the ECM setting from the front panel
1 Press Setup
2 Press 4 then press 7This selects the Advanced Fax Setup menu then selects the Error Correction Mode option
3 Press to switch between On and Off
4 Press Enter to accept the setting you selected
set automatic reductionThis setting determines what your HP Officejet does if it receives a fax that is too large for the default paper size With this setting on (the default) the image is reduced so that it fits on one page With this feature off information that doesnrsquot fit on the first page is printed on a second page
1 Press Setup
2 Press 4 then press 5This selects the Advanced Fax Setup menu then selects the Automatic Reduction option
3 Press to switch between On and Off
4 Press Enter to accept the setting you selected
adjust the volumeYour HP Officejet provides three levels for adjusting the ring and speaker volume The ring volume is the volume of the phone ringer The speaker volume is the volume of everything else such as the dial and fax tones The default setting is Soft
1 Press Setup
2 Press 3 then press 6This selects the Basic Fax Setup menu then selects the Ring and Beep Volume option
3 Press to select one of the options Soft Loud or Off
4 Press Enter to accept the setting you selected
hp officejet 4100 series
chapter 6
26
change the answer ring pattern (distinctive ringing)Distinctive ringing is a feature offered by phone companies that allows several phone numbers to share the same line Each number has a specific ring pattern If you do not have this service use the default ring pattern which is All Rings
If you connect your HP Officejet to a line with distinctive ringing have your telephone company assign one ring pattern to voice calls and another to fax calls (double or triple rings are best for a fax number)
1 Press Setup
2 Press 4 then press 2This selects the Advanced Fax Setup menu then selects the Answer Ring Pattern option
3 Press to scroll through these options All Rings Single Rings Double Rings Triple Rings and Double amp Triple
4 When the ring pattern that the phone company established for this number appears press Enter
Tip We recommend that you use Double Rings or Triple Rings for fax
set up speed dialingThrough your HP Officejet or your computer you can assign entries to fax numbers you use often This lets you dial those numbers quickly using the front panelrsquos Speed Dial button and a one- or two-digit entry You can create up to 100 individual speed-dial entries (the maximum for some models is 70)
We recommend that you use the software to set up speed-dial settings
Note A speed-dial entry can only be associated with one phone number speed-dial groups are not supported
For more information see set up speed dialing in the hp photo amp imaging help
create individual speed-dial settingsYou can enter fax numbers that you will reuse frequently
1 Press Setup
2 Press 2 then press 1This selects the Speed Dial Setup menu then selects the Individual Speed Dial option
3 Press EnterThe first unassigned speed-dial entry appears on the display
4 Press Enter to select the displayed speed-dial entry
5 Enter the Fax Number to assign to that entry then press EnterThe fax number can be up to 50 digits in length
Tip To enter a three-second pause within a number sequence press Symbols to display a dash
6 Enter the personrsquos or companyrsquos name then press Enter
reference guide
use the fax features
27
The name is limited to 13 characters in lengthFor more information see enter text on page 28
7 After Enter Another appears press 1 (Yes) if you want to set up another number or press 2 (No) to exit
delete speed-dial settingsFollow these steps to delete an individual speed-dial entry
1 Press Setup
2 Press 2 then press 2 againThis selects Speed Dial Setup then selects Delete Speed Dial
3 Press until the individual entry that you want to delete appears then press Enter
set basic fax settings using the front panelWe recommend that you use the Fax Setup Wizard in the HP Officejet software to configure all your basic fax settings however you can also access these settings from the front panel
Note In the US regulations require that your name and phone number appear on every fax The minimum settings that we recommend are described in the following topics
set the date and timeFollow these steps to set the date and time manually
1 Press Setup
2 Press 3 then press 1This selects the Basic Fax Setup menu then selects the Date and Time option
3 Follow the prompts on the display to enter the date and time using the keypad
Tip Use only the last two digits for the year
Tip When you enter a single-digit date or time type a leading zero before the single digit for example 0345 or 08-03-02
After you are done the date and time appear on the display
Warning Cutting off power to the HP Officejet causes the selected date and time to be lost However name and fax number information is not lost
set the fax headerFollow these steps to enter your name and fax number in the header
Note In Hungary the subscriber identification code (fax header) can be set or changed only by authorized personnel For more information contact your authorized HP dealer
1 Press Setup
2 Press 3 then press 2
hp officejet 4100 series
chapter 6
28
This selects the Basic Fax Setup menu then selects the Fax Header option
3 Enter your personal or company name at the prompt Use the guidelines provided in the next section under enter text
4 Press Enter
5 Enter your fax number using the numeric keypad
6 Press Enter
enter textThe following list provides tips for entering text using the front-panel keypad
bull Press the keypad numbers that correspond to the letters of a name
bull Press a button multiple times to see a letter first in uppercase and then in lowercase
bull After the correct letter appears press and then press the number that corresponds to the next letter in the name Again press multiple times until the correct letter appears
bull To insert a space press Space ()bull To enter a symbol such as press Symbols () to scroll through the list of
available symbolsbull If you make a mistake press to clear it and then make the correct
entrybull After you are done entering text press Enter to store your entries
check for dial toneBefore using the fax features verify that the connections are correctly established
1 Press Fax
2 Listen for a dial tone
3 If you do not hear a dial tone check the connections
4 Press Cancel to hang up
ABC These letters correspond to this number and so on
2
JKL To get this character J j K k L l 5
5 Press 5 this many times 1 2 3 4 5 6 7
reference guide
use the fax features
29
fax job menuThe following options become available when the Fax button is pressed
setup menu for fax commandsThe following fax settings are available in the Setup menu
Enter Fax or Speed Dial
FineVery FinePhotoStandard
Fax Number Resolution LighterDarker
Enter a fax number or speed dialWhen the Fax button is pressed
Press and to move to the option you wantPress Enter to select the displayed setting
NoYes
Set New Defaults
Send Fax NowFax from MemorySend Fax LaterPoll to Receive
How to Fax
1Automatic Reports Setup
2Answer Ring Pattern
3Busy Redial
4No Answer Redial
5Automatic Reduction
6Backup Fax Reception
7Error Correction Mode
3Basic Fax Setup 4Advanced Fax Setup
Press Setup to display the menu options
Press and to move to the setting you wantPress Enter to select the displayed setting
1Date and Time
2Fax Header
3Rings to Answer
4Paper Size
5Tone or Pulse Dialing
6Ring and Beep Volume
7Fax Forwarding Black Only
2Speed Dial Setup
1Individual Speed Dial
2Delete Speed Dial
3Print Speed Dial List
hp officejet 4100 series
chapter 6
30
7
31
maintain your hp officejet
This section provides instructions for keeping your HP Officejet in top working condition Perform these maintenance procedures as necessary
clean the glassDirty glass from dust smudges hair and so on slows down performance and affects the accuracy of features such as Fit to Page and Copy
1 Turn off the unit unplug the power cord and raise the scanner lid
2 Clean the glass with a soft cloth or sponge slightly moistened with a nonabrasive glass cleaner
Caution Do not use abrasives acetone benzene or carbon tetrachloride on the glass these can damage it Do not place liquids directly on the glass They may seep under it and damage the unit
3 Dry the glass with a chamois or cellulose sponge to prevent spotting
hp officejet 4100 series
chapter 7
32
clean the white stripMinor debris can accumulate on the white strip located underneath the scannerrsquos lid
1 Turn off the unit unplug the power cord and raise the scanner lid
2 Clean the white strip with a soft cloth or sponge slightly moistened with a mild soap and warm water
3 Wash the strip gently to loosen debris do not scrub the strip
4 Dry the strip with a chamois or soft cloth
Caution Do not use paper-based wipes as these may scratch the strip
5 If this does not clean the strip well enough repeat the previous steps using isopropyl (rubbing) alcohol and wipe the strip thoroughly with a damp cloth to remove any residual alcohol
clean the exterior Use a soft damp lint-free cloth to wipe dust smudges and stains off the case The interior of the unit does not require cleaning Keep fluids away from the interior of the unit as well as the front panel
work with print cartridgesTo ensure the best print quality from your HP Officejet you will need to perform some simple maintenance procedures and when prompted by a front-panel message replace the print cartridges
print a self-test reportIf you are experiencing problems with printing before cleaning or replacing the print cartridges you should print a Self-Test Report This report provides useful information about your print cartridges including status information
1 Press Setup
2 Press 1 then press 4This selects Print Report and then selects Self-Test Report
3 Press Start Black or Start ColorA Self-Test Report is printed for your HP Officejet
handle print cartridgesBefore you replace or clean a print cartridge you should know the part names and how to handle the print cartridge
reference guide
maintain your hp officejet
33
replace the print cartridgesFront-panel messages appear to let you know that you should replace your print cartridges
See order print cartridges on the back cover for information on ordering replacement print cartridges
1 Turn on the unit then lift open the print cartridge access doorThe print carriage moves into view
2 After the carriage stops moving push down on the print cartridge down to release it and then pull it toward you out of its slot
Plastic tape with pink tab(must be removed)
Copper contactsInk nozzles under tape
Do not touch the copper contacts or the ink nozzles
print cartridge access door
hp officejet 4100 series
chapter 7
34
Note It is normal to see ink build-up in the print cartridge slots
3 Remove the new print cartridge from its packaging and being careful to touch only the bright pink plastic tab gently remove the plastic tape to uncover the ink nozzles
Caution Do not touch the copper contacts or ink nozzles
Once you have removed the plastic tape install the print cartridge immediately to prevent the ink from drying in the nozzles
4 Push the new print cartridge into the appropriate slot at a slight angle until it clicks into place
Caution Do not attempt to push the cartridge straight into the slot It must slide in at a slight angle
The tri-color print cartridge goes on the left and the black cartridge goes on the right
5 Close the print cartridge access door
reference guide
maintain your hp officejet
35
align the print cartridgesThe HP Officejet prompts you to align cartridges every time you install or replace a print cartridge Aligning the cartridges ensures high-quality output
To align the print cartridges when prompted
1 Press Enter on the front panelAn align cartridges (test pattern) page prints
2 Load the align cartridges page face down in the ADF between the paper-width guides and press the Enter button again
3 Recycle or discard the page
To align the cartridges at any other time
1 Press Setup
2 Press 5 then press 2This selects the Maintenance menu and then selects the Align Print Cartridge option
3 Press EnterAn align cartridges (test pattern) page prints
4 Load the align cartridges page face down in the ADF between the paper-width guides and press the Enter button again
5 Recycle or discard the page
clean the print cartridgesUse this feature when the Self-Test Report shows streaking or white lines through any of the colored bars Do not clean print cartridges unnecessarily This wastes ink and shortens the life of the ink nozzles
1 Press Setup
2 Press 5 then press 1This selects the Maintenance menu and then selects the Clean Print Cartridge optionA page of patterns is printed The cartridges are cleaned Recycle or discard the pageIf copy or print quality still seem poor after you clean the print cartridges replace the print cartridge that is affected
restore factory defaultsYou can restore the original factory settings to what they were when you purchased your HP Officejet Choosing to restore your factory defaults restores all settings except date information and any scan settings you may have set
You can perform this process from the front panel only
1 Press Setup
2 Press 5 then press 3This selects Maintenance and then selects Restore Factory DefaultsThe factory default settings are restored
hp officejet 4100 series
chapter 7
36
set scroll speedThe Scroll Speed option lets you control the rate that text messages appear in the front-panel display You can choose Normal Fast or Slow The default is Normal
1 Press Setup
2 Press 5 then press 6This selects Maintenance and then selects Set Scroll Speed
3 Press until the desired speed appears then press Enter
set the prompt delay timeThe Prompt Delay option lets you control the amount of time before a message is displayed in the front-panel display You can choose Normal Fast or Slow The default is Normal
1 Press Setup
2 Press 5 then press 7This selects Maintenance and then selects Set Prompt Delay Time
3 Press until the delay time appears then press Enter
self-maintenance sounds During the life of your product you may hear various mechanical sounds This is a normal part of your unitrsquos self-maintenance
reference guide
maintain your hp officejet
37
setup menu optionsThe following options are available from the Setup button
1Last Transaction
2Fax Log
3Speed Dial List
4Self-Test Report
5Automatic Reports Setup
1Print Report
Use Setup to display the Print Report Speed Dial Setup Basic Fax Setup Advanced Fax Setup and Maintenance options
Press and to move to the setting you wantPress Enter to select the displayed setting
1Clean Print Cartridges
2Align Print Cartridges
3Restore Factory Defaults
4Reprint Faxes in Memory
5Set Language amp CountryRegion
6Set Scroll Speed
7Set Prompt Delay Time
5Maintenance2Speed Dial Setup
3Basic Fax Setup
4Advanced Fax Setup
1Individual Speed Dial
2Delete Speed Dial
3Print Speed Dial List
1Date and Time
2Fax Header
3Rings to Answer
4 Paper Size
5Tone or Pulse Dialing
6Ring and Beep Volume
7Fax Forwarding Black Only
1Automatic Reports Setup
2Answer Ring Pattern
3Busy Redial
4No Answer Redail
5Automatic Reduction
6Backup Fax Reception
7Error Correction Mode
hp officejet 4100 series
chapter 7
38
8
39
additional setup information
During the installation of the HP Officejet software a number of windows are displayed You should see the following
bull Installingbull Copying files bull A request to plug in the HP Officejetbull Green OK and check markbull Request to restart your computer (may not occur in all cases)bull Registration
If you did not see all of these windows there may be a problem with the installation Verify the following
bull The HP Director contains six icons (double-click the HP Director icon on the desktop)
bull The HP Officejet is listed in the Printers dialog boxbull There is an icon for the HP Officejet in the System Tray that indicates the
HP Officejet is ready
If the HP Director does not show six icons you may need to wait a few minutes for the HP Officejet to connect to your computer
possible installation problemsIf nothing appears on your computer screen after you insert the HP Officejet 4100 Series CD-ROM into your computerrsquos CD-ROM drive
1 From the Start menu choose Run
2 In the Run dialog box enter dsetupexe (if your CD-ROM drive is not assigned to drive letter d use the appropriate drive letter) then click OK
If the HP Director does not contain six icons do the following
bull Verify that the front-panel cover is attached then unplug the HP Officejet and plug it in again
bull Verify that the USB and power cables are plugged inndash Unplug the USB cable and plug it in againndash Do not attach the USB cable to a keyboard or nonpowered hubndash Verify that the USB cable is 3 meters or less in lengthndash If you have several USB devices attached to your computer you may
want to unplug the others during the installation
Note AppleTalk is not supported
bull Unplug the HP Officejet from the wall and plug it in againbull Restart your computer
hp officejet 4100 series
chapter 8
40
On Windows check the System Tray for applications that are running in the background and close them before restarting your computer
remove and reinstall your hp officejet softwareIf six icons do not appear in the Director you may need to uninstall and re-install the software Do not simply delete the HP Officejet program files from your hard drive Be sure to remove them properly using the uninstall utility provided in the HP Officejet program group
to uninstall from a Windows computer
1 Disconnect your HP Officejet from your computer
2 On the Windows taskbar click Start choose Programs or All Programs (XP) choose Hewlett-Packard choose hp officejet 4100 series then choose uninstall software
3 Follow the directions on the screenBe sure to disconnect your HP Officejet
4 If you are asked whether you would like to remove shared files click NoOther programs that use these files may not work properly if the files are deleted
5 After the program finishes removing the software disconnect your HP Officejet and restart your computer
Note It is important that you disconnect your HP Officejet before restarting your computer
6 To reinstall the software insert the HP Officejet 4100 Series CD-ROM into your computerrsquos CD-ROM drive and follow the instructions that appear
7 After the software is installed connect and turn on your HP Officejet following the onscreen instructions and the instructions in your Setup PosterAfter connecting and turning on your HP Officejet you may have to wait several minutes for all of the Plug and Play events to completeWhen the software installation is complete you will see a Status Monitor icon in the System Tray
8 To verify that the software is properly installed double-click on the HP Director icon on the desktop If the HP Director shows six icons the software has been properly installed
to uninstall from a Macintosh computer
1 Disconnect your HP Officejet from your computer
2 Double-click on ApplicationsHP All-in-One Software folder
reference guide
additional setup information
41
3 Double-click on HP Uninstaller
4 Follow the directions that appear on the screen
5 After the program finishes removing the software disconnect your HP Officejet and restart your computer
6 To reinstall the software insert the HP Officejet 4100 Series CD-ROM into your computerrsquos CD-ROM drive
Note When re-installing the software follow the instructions on the Setup Poster Do not connect the HP Officejet to your computer until after you have completed the software installation
7 On the desktop open the CD-ROM double-click on hp all-in-one installer and follow the instructions that appear
connect your hp officejet to a phone modem or answering machine
The HP Officejet can share a phone line with a phone a modem or an aswering machine When sharing a phone line with an answering machine the HP Officejet will answer fax calls and direct voice calls to the answering machine
Note For information on connecting your HP Officejet to your computer and phone line refer to the Setup Poster that came with your unit
to connect your hp officejet to a phone modem or answering machine
1 Remove the white plastic stopper from connector 2 on the back of the HP Officejet
To connect more than one device to connector 2 on the HP Officejet you must purchase a Y-splitter and plug it into connector 2
2 Connect the phone cord from the phone modem or answering machine to connector 2 (or Y-splitter)
Caution Do not use the phone cord that came with the HP Officejet for this purpose That phone cord must connect connector 1 on the HP Officejet to the wall jack for your phone system See the Setup Poster for details
3 If you are connecting an answering machine see set the number of rings before answering on page 21 for instructions on setting the number of rings correctly or change the answer ring pattern (distinctive ringing) on page 26 for information on incoming ring patterns
4 If you are connecting a modem turn off its fax-receive feature
connector 2 on the HP Officejet
connector 1 on the HP Officejet
hp officejet 4100 series
chapter 8
42
additional troubleshooting helpYou may want to refer to the readme file for more information on possible installation problems On Windows you can access the readme file from the Start button on the taskbar select Programs Hewlett-Packard hp officejet 4100 series View the Readme File On Macintosh you can access the readme file by double-clicking on the icon located in the top-level folder of the HP Officejet software CD-ROM
The readme file provides more information including
bull Using the Re-install utility after a failed installation to return your PC to a state that will allow the HP Officejet to be re-installed
bull Using the Re-install utility on Windows 98 to recover from a Composite USB System Driver missing errorThis error may occur if the hardware is installed prior to installing the software After running the Re-install utility reboot your PC and install the HP Officejet software before connecting the HP Officejet to your computer
You can also find more information on this website
wwwhpcomsupport
9
43
technical information
Additional specifications information can be found in the HP Photo amp Imaging Help in the hp officejet 4100 series section
physical specifications
power specificationsbull Power consumption 75W maximumbull Source (Input Voltage) 100 to 240 VAC groundedbull Input Frequency 50 to 60 Hzbull Current 1A maximum
regulatory informationAdditional regulatory information can be found in the HP Photo amp Imaging Help The information in this section supercedes information in the HP Photo amp Imaging Help
doc statement deacuteclaration de conformiteacute (Canada)Le preacutesent appareil numeacuterique neacutemet pas de bruit radioeacutelectrique deacutepassant les limites applicables aux appareils numeacuteriques de la classe B prescrites dans le Regraveglement sur le brouillage radioeacutelectrique eacutedicteacute par le ministegravere des Communications du CanadaThis digital apparatus does not exceed the Class B limits for radio noise emissions from digital apparatus set out in the Radio Interference Regulations of the Canadian Department of Communications
notice to users of the Canadian telephone networkThis equipment meets the applicable Industry Canada Terminal Equipment Technical Specifications This is confirmed by the registration number The abbreviation IC before the registration number signifies that registration was performed based on a Declaration of Conformity indicating that Industry Canada technical specifications were met It does not imply that Industry Canada approved the equipment
Note The Ringer Equivalence Number (REN) assigned to each terminal device provides an indication of the maximum number of terminals allowed to be connected to a telephone interface The termination on an interface may consist of any combination of devices subject only to the requirement that the sum of the Ringer Equivalence Numbers of all the devices does not exceed 5
The REN for this product is 03B based on FCC Part 68 test results
height width depth weight (without print cartridges)
with paper trays and ADF closed
718 in (1824 cm) 1676 in (4258 cm) 825 in (2096 cm) 75 lbs (34 kg)
with ADF and paper tray extended
1030 in (2615 cm) 1676 in (4258 cm) 1854 in (4709 cm) 75 lbs (34 kg)
hp officejet 4100 series
chapter 9
44
notice to all users of the European Economic Area (EEA)
This product is designed to interwork with the analogue telephone networks in the following countriesregions
Network compatibility depends on customer selected settings which must be reset to use the equipment on a telephone network in a countryregion other than where the product was purchased Contact the vendor or Hewlett-Packard Company if addition product support is necessaryThis equipment has been certified by the manufacturer in accordance with Directive 19995EC (annex II) for Pan-European single-terminal connection to the public switched telephone network (PSTN) However due to differences between the individual PSTNs provided in different countriesregions the approval does not of itself give an unconditional assurance of successful operation on every PSTN network termination pointIn the event of problems you should contact your equipment supplier in the first instance
geraumluschemissionLpA lt 70 dBam Arbeitsplatzim Normalbetriebnach DIN 45635 T 19
notice to Korean customers
Germany UK Netherlands
France Spain Italy
Belgium Luxembourg Sweden
Austria Denmark Ireland
Norway Finland Switzerland
Greece Portugal
10
45
hp support
This section explains the support services information provided by Hewlett-Packard If you are unable to find the answer you need in the printed or onscreen documentation supplied with your product you can contact one of the HP support services listed in the following pages Some support services are available only in the US and Canada while others are available in many countriesregions worldwide If a support service number is not listed for your countryregion contact your nearest authorized HP dealer for help
get support and other information from the internetIf you have Internet access you can get help from the following HP website
wwwhpcomsupportThe Web site offers technical support drivers supplies and ordering information
hp customer supportSoftware programs from other companies may be included with your HP Officejet If you experience problems with any of those programs you will receive the best technical assistance by calling the experts at that companyIf you need to contact HP Customer Support do the following before you call
1 Make sure thata Your unit is plugged in and turned onb The specified print cartridges are installed correctlyc The recommended paper is properly loaded in the input tray
2 Reset your unita Turn off the unit using the On button located on the unitrsquos front panelb Unplug the power cord from the back of the unitc Plug the power cord back into the unitd Turn on the unit using the On button
3 For more information check the HP website at wwwhpcomsupport
4 If you are still experiencing problems and need to speak with an HP Customer Support Representativendash Have your service ID and serial number ready To display your service ID and
serial number on the front panel do the following Press Enter and Start Color at the same time until the service ID appears in the front-panel display From this display press the right arrow until the serial number displays
ndash Print a Self-Test Report See print a self-test report on page 32 for information on printing this report
ndash Make a color copyndash Be prepared to describe your problem in detail
5 Call HP Customer Support Be near your unit when you call
call in the US during warrantyCall (208) 323-2551 This service is free during the warranty period however your standard long-distance phone charges still apply A fee may apply outside the warranty period
hp officejet 4100 series
chapter 10
46
US phone support is available in both English and Spanish languages 24 hours a day 7 days a week (days and hours of support may change without notice)
call elsewhere in the worldThe numbers listed below are current as of the printing date of this guide For a list of current international HP Support Service numbers visit this address and choose your own countryregion or language
wwwhpcomsupportFor Korea you can also visit this address
httpwwwhpcokrYou can call the HP support center in the following countriesregions If your countryregion is not listed contact your local dealer or nearest HP Sales and Support Office to find out how to obtain servicesSupport service is free during the warranty period however your standard long-distance phone charges will apply In some cases a flat fee per single incident will also applyFor phone support in Europe please check for the details and conditions of phone support in your countryregion by consulting the following Web site
wwwhpcomsupportAlternatively you can ask your dealer or call HP at the phone number indicated in this booklet As part of our constant efforts to improve our phone support service we advise you to check our website on a regular basis for new information regarding service features and delivery
countryregion hp technical support countryregion hp technical support
Algeria1 +213 (0) 61564 543 Malaysia 1-800-805405
Argentina 0810-555-5520 Mexico 01-800-472-6684
Australia +61 3 8877 80001902 910 910
Mexico (Mexico City) 5258-9922
Austria +43 (0) 810 00 6080 Morocco1 +212 22404 747
Bahrain (Dubai) 800 728 Netherlands +31 (0) 20 606 8751
Belgium (Dutch) +32 (0) 2 626 8806 New Zealand 0800 441 147
Belgium (French) +32 (0) 2 626 8807 Norway +47 22 11 6299
Brazil (Grande Sao Paulo) (11) 3747 7799 Oman +971 4 883 8454
Brazil (Demais Localidades) 0800 157751 Palestine +971 4 883 8454
Canada during warranty (905) 206 4663 Panama 001-800-7112884
Canada post-warranty(per-call charge)
1-877-621-4722 Peru 0-800-10111
Caribbean amp Central America
1-800-711-2884 Philippines 632-867-3551
Chile 800-360-999 Poland +48 22 865 98 00
China 86 10 6868 7980 Portugal +351 21 3176333
Colombia 9-800-114-726 Puerto Rico 1-877-2320-589
Costa Rica 0-800-011-0524 Qatar +971 4 883 8454
Czech Republic +420 (0) 261307310 Romania +40 1 315 44 42or local 01 3154442
reference guide
hp support
47
call in Australia post-warrantyIf your product is not under warranty you can call 03 8877 8000 A per-incident out-of-warranty support fee of $2750 (inc GST) will be charged to your credit card You can also call 1902 910 910 ($2750 charged to your phone account) from 900 AM to 500 PM Monday through Friday (Charges and support hours are subject to change without notice)
prepare your unit for shipmentIf after contacting HP Customer Support or returning to the point of purchase you are requested to send your unit in for service please follow the power off and rebox steps below to avoid further damage to the HP product
Denmark +45 39 29 4099 Russian Federation Moscow +7 095 797 3520
Ecuador 1800-711-2884 Russian Federation St Petersburg
+7 812 346 7997
Europe (English) +44 (0) 207 512 5202 Saudi Arabia +800 897 14440
Egypt 02 532 5222 Singapore 65 6272 5300
Finland +358 (0) 203 47 288 Slovakia +421 (0) 2 682 08080
France (034 Euromin) +0892 69 60 22 South Africa (inside RSA) 086 000 1030
Germany (012 Euromin) +49 (0) 180 52 58 143 South Africa (inside RSA) +27-11 258 9301
Greece +30 1060 73 603 Spain +34 902 321 123
Hong Kong (SAR) +85 (2) 3002 8555 Sweden +46 (0)8 619 2170
Guatemala 1800-995-5105 Switzerland 2 +41 (0) 84 880 1111
Hungary +36 (0) 1 382 1111 Taiwan +886-2-2717-00550800 010 055
India 1-600-11226791 11 682 6035
Thailand +66 (2) 661 4000
Indonesia 62-21-350-3408 Tunisia1 +216 1891 222
Ireland +353 (0) 1 662 5525 Turkey +90 216 579 7171
Israel +972 (0) 9 8304848 Ukraine +7 (380-44) 490-3520
Italy +39 (0) 226410350 United Arab Emirates +971 4 883 8454
Japan 0570 000 511+81 3 3335 9800
United Kingdom +44 (0) 207 512 52 02
Jordan +971 4 883 8454 Venezuela 0800-47468368 or800-477-7777
Korea (Seoul) +82 (2) 3270 0700 Venezuela (Caracas) (502) 207-8488
Korea (outside Seoul) 080 999 0700 Vietnam 84 (0) 8 823 4530
Kuwait +971 4 883 8454 Yemen +971 4 883 8454
Lebanon +971 4 883 8454
1 This Call Center supports French speaking customers from the following countriesregions Morocco Tunisia and Algeria
2 This Call Center supports German French and Italian speaking customers in Switzerland
countryregion hp technical support countryregion hp technical support
hp officejet 4100 series
chapter 10
48
Note When transporting your HP Officejet make sure that the pens have been removed the HP Officejet has been properly shut down by pressing the power button and you have allowed time for the carriage to return to the service station and for the scanner to return to its parked position
1 Turn on the unitDisregard steps 1 through 6 if your unit will not turn on and the print carriage is in the home position You will not be able to remove the print cartridges Proceed to step 7
2 Open the print cartridge access doorThe print carriage moves into view
3 See replace the print cartridges on page 33 for information on removing the print cartridges
Caution Remove both print cartridges Failure to do so may damage your unit
4 Place the print cartridges in an airtight bag so they will not dry out and put them aside (do not send them with the unit unless instructed to by the HP customer support call agent)
5 Turn off the unit
6 Close the print cartridge access door
7 Remove the front panel cover as followsa Grasp the front of the front panel cover with two hands as shownb Firmly lift the front panel cover to unsnap it from the unit
8 Retain the front panel cover Do not return the front panel cover with the unit
9 If available pack the unit for shipment using the original packing materials or the packaging materials that come with your exchange unit
If you do not have the original packaging materials please use other adequate packaging materials Shipping damage caused by improper packaging andor improper transportation is not covered under the warranty
reference guide
hp support
49
10 Place the return shipping label on the outside of the box
11 Include the following items in the boxndash A complete description of symptoms for service personnel (samples of print
quality problems are helpful)ndash A copy of the sales slip or other proof of purchase to establish the warranty
coverage periodndash Your name address and a phone number where you can be reached during
the day
hp distribution centerTo order HP Officejet software a copy of the printed Reference Guide a setup poster or other customer-replaceable parts do one of the following bull In the US or Canada call (208) 323 2551bull Visit this website
httpwwwhpcomcposupportsoftwarehtml
hp officejet 4100 series
chapter 10
50
11
51
warranty information
HP Officejet 4100 seriesDuration of Limited Warranty (hardware and labor) 1 YearDuration of Limited Warranty (CD media) 90 DaysDuration of Limited Warranty (print cartridges) Until the HP ink is depleted or the ldquoend of warrantyrdquo date printed on the cartridge has been reached whichever occurs first
warranty service
express serviceTo obtain HP express repair service the customer must contact an HP service office or an HP Customer Support Center for basic troubleshooting first See hp customer support on page 45 for steps to take before calling Customer SupportIf a customer unit needs a minor part replacement and these parts can normally be replaced by the customer the customer-replaceable components may be serviced through expedited part shipment In this event HP will prepay shipping charges duty and taxes provide telephone assistance on replacement of the component and pay shipping charges duty and taxes for any part that HP asks to be returnedThe HP Customer Support Center may direct customers to designated authorized service providers who are certified by HP to service the HP product
warranty upgradesUpgrade your standard factory warranty to a total of three years with the HP SUPPORTPACK Service coverage begins on product purchase date and the pack must be purchased within the first 180 days of product purchase This program offers phone support from 600 AM to 1000 PM Mountain Standard Time (MST) Monday through Friday and 900 AM to 400 PM (MST) on Saturdays If during your technical support call it is determined that you need a replacement product then HP will ship you this product next business day free of charge Available in US onlyFor more information please call 1-888-999-4747 or visit the following HP Web site
httpwwwhpcomgohpsupportpack
Outside the US please call your local HP Customer Support office See call elsewhere in the world on page 46 for a list of international Customer Support numbers
returning your hp officejet for serviceBefore returning your HP Officejet for service you must call HP Customer Support See hp customer support on page 45 for steps to take before calling Customer Support
hewlett-packard limited global warranty statement
extent of limited warrantyHewlett-Packard (ldquoHPrdquo) warrants to the end-user customer (ldquoCustomerrdquo) that each HP Officejet 4100 Series product (ldquoProductrdquo) including related software accessories media and supplies shall be free from defects in material and workmanship for the duration which begins on the date of purchase by the Customer
hp officejet 4100 series
chapter 11
52
For each software Product HPrsquos limited warranty applies only to a failure to execute programming instructions HP does not warrant that the operation of any Product shall be uninterrupted or error freeHPrsquos limited warranty covers only those defects which arise as a result of normal use of a Product and does not cover any other problems including those which arise as a result of (a) improper maintenance or modification (b) software accessories media or supplies not provided or supported by HP or (c) operation outside the Productrsquos specificationsFor any hardware Product the use of a non-HP print cartridge or a refilled print cartridge does not affect either the warranty to the Customer or any HP support contract with the Customer However if Product failure or damage is attributable to the use of a non-HP or refilled print cartridge HP shall charge its standard labor and materials charges to service the Product for the failure or damageIf HP receives during the applicable warranty period notice of a defect in any Product HP shall either repair or replace the defective Product at HPrsquos option Where labor charges are not covered by HPrsquos limited warranty repairs shall be at HPrsquos standard charges for laborIf HP is unable to repair or replace as applicable a defective Product which is covered by HPrsquos warranty HP shall within a reasonable time after being notified of the defect refund the purchase price for the ProductHP shall have no obligation to repair replace or refund until the Customer returns the defective Product to HPAny replacement product may be either new or like-new provided that it has functionality at least equal to that of the Product being replacedHP products including each Product may contain remanufactured parts components or materials equivalent to new in performanceHPs limited warranty for each Product is valid in any countryregion or locality where HP has a support presence for the Product and where HP has marketed the Product The level of warranty service may vary according to local standards HP shall have no obligation to alter the form fit or function of the Product in order to make it operate in a countryregion or locality for which the Product was never intended to operate
limitations of warrantyTO THE EXTENT ALLOWED BY LOCAL LAW NEITHER HP NOR ITS THIRD PARTY SUPPLIERS MAKE ANY OTHER WARRANTY OR CONDITION OF ANY KIND WHETHER EXPRESS OR IMPLIED WITH RESPECT TO THE COVERED HP PRODUCTS AND SPECIFICALLY DISCLAIM THE IMPLIED WARRANTIES OR CONDITIONS OF MERCHANTABILITY SATISFACTORY QUALITY AND FITNESS FOR A PARTICULAR PURPOSE
limitations of liabilityTo the extent allowed by local law the remedies provided in this Limited Warranty Statement are the Customerrsquos sole and exclusive remediesTO THE EXTENT ALLOWED BY LOCAL LAW EXCEPT FOR THE OBLIGATIONS SPECIFICALLY SET FORTH IN THIS LIMITED WARRANTY STATEMENT IN NO EVENT SHALL HP OR ITS THIRD PARTY SUPPLIERS BE LIABLE FOR DIRECT INDIRECT SPECIAL INCIDENTAL OR CONSEQUENTIAL DAMAGES WHETHER BASED ON CONTRACT TORT OR ANY OTHER LEGAL THEORY AND WHETHER ADVISED OF THE POSSIBILITY OF SUCH DAMAGES
local lawThis Limited Warranty Statement gives the Customer specific legal rights The Customer may also have other rights which vary from state to state in the United States from province to province in Canada and from countryregion to countryregion elsewhere in the world
reference guide
warranty information
53
To the extent this Limited Warranty Statement is inconsistent with local law this Statement shall be deemed modified to be consistent with such local law Under such local law certain disclaimers and limitations of this Statement may not apply to the Customer For example some states in the United States as well as some governments outside the United States (including provinces in Canada) mayPreclude the disclaimers and limitations in this Statement from limiting the statutory rights of a consumer (eg the United Kingdom)Otherwise restrict the ability of a manufacturer to enforce such disclaimers or limitations orGrant the Customer additional warranty rights specify the duration of implied warranties which the manufacturer cannot disclaim or not allow limitations on the duration of implied warrantiesFOR CONSUMER TRANSACTIONS IN AUSTRALIA AND NEW ZEALAND THE TERMS IN THIS LIMITED WARRANTY STATEMENT EXCEPT TO THE EXTENT LAWFULLY PERMITTED DO NOT EXCLUDE RESTRICT OR MODIFY AND ARE IN ADDITION TO THE MANDATORY STATUTORY RIGHTS APPLICABLE TO THE SALE OF THE COVERED HP PRODUCTS TO SUCH CUSTOMERS
hp officejet 4100 series
chapter 11
54
55
index
Numerics4-by-6 inch photo paper
load 10 12
AADF 7adjust
volume for fax 25align print cartridges 35Answer Ring Pattern 26automatic document feeder 7automatic reduction
fax 25
Bbest copy quality 13busy number
redial automatically 23
Ccancel
scan 18scheduled fax 21
cartridgesalign 35replace 33
cleanprint cartridges 35the exterior 32the glass 31white strip 32
colorenhance 14fax 20fax from front panel 20
contrastchange for fax 23photo color 14
copy 13 16change default settings 15enhance 14fit to page 16lighten or darken 14menu options 16number of copies 14photo 15quality 13reduce or enlarge 14settings 13 15
speed 13tutorial 4
Customer Support 45web site 45
Ddarken a copy 14date
setting 27default settings
restore 35director review 4distinctive ringing 26
Eenhance copies 14enlarge copy 14 16envelopes
load 9Error Correction Mode
(ECM) 25
Ffactory defaults
restore 35fast copy quality 13fax 28
adjust volume 25automated reports 22cancel fax forward 24cancel scheduled 21change Answer Ring
Pattern 26change contrast 23change resolution 22change settings 19control appearance 22create individual speed-dial
settings 26delete speed-dial
settings 27distinctive ringing 26Error Correction Mode
(ECM) 25forward faxes 24header 27in color 20in color from front panel 20manual reports 22
menu 29print reports 22receive 21receive manually 21redial busy or unanswered
number 23schedule 20send from front panel 19set automatic reduction 25set date and time 27set the number of rings 21settings 27 28setup menu options 29speed dials 19test 28
fit to page 16forward faxes 24
cancel 24front panel
display scroll speed 36enter text 28send a fax 19setting prompt delay 36tutorial 3
Gglass
cleaning 31greeting cards
load 11
Hhelp 1HP Customer Support 45
calling 45HP Director 4HP distribution center 49HP Officjet
preparing to ship 47HP papers
tips on loading 11
Iindividual speed-dial settings
create 26ink cartridges see print
cartridgesinkjet paper
load 11
index
hp officejet 4100 series56
Kkeypad
enter text 28
Llabels
load 12lighten copies 14load
change the paper type 12envelopes 9original in ADF 7paper 7photo paper 10 12postcards 10 12print cartridges 33set the paper size 12tips 11
Mmaintenance
align print cartridges 35clean print cartridges 35clean the exterior 32clean the glass 31clean the white strip 32normal sounds 36replace print cartridges 33restore factory defaults 35self-maintenance
sounds 36self-test report 32
menuscopy options 16fax 29fax setup 29maintenance 37print reports 37
Nnormal copy quality 13number of copies
set 14number of rings
set 21
Oorder print cartridges 60originals
load in ADF 7output tray 8
Ppaper
change default size for copy 12
change the type 12load 7recommended 7set the size 12tips on loading 11
paper size change for copy 12
paper trayload 7
phone numbers support services 45
photo paperload 10 12
photoscopy 15enhance copy 14
physical specifications 43postcards
load 10 12power
specifications 43print
envelopes 9fax reports 22self-test report 32
print cartridgesalign 35clean 35handling 32replace 33
prompt delaysetting 36
Qquick start
review the director 4use with a computer 4
Rreceive
fax 21redial
busy or unanswered number 23
reduce copy 14 16regulatory information 43reinstall software 40reports
generate automatically for fax 22
generate manually for fax 22
print 22self-test 32
resolution
change for fax 22restore factory settings 35returning your HP Officejet for
service 51
Sscan
from front panel 17stop 18
schedule a fax 20scroll speed
setting 36self-test report 32send
cancel forward faxes 24color fax 20color fax from front
panel 20forward faxes 24
settingscopy 13 15fax 27 28prompt delay 36scroll speed 36
setupadditional information 39menu 29
shippingyour HP Officejet 47
softwareremove and reinstall 40
soundsself-maintenance 36
specificationsphysical 43power 43
speed dials 19create individual
settings 26delete settings 27
stopscan 18scheduled fax 21
subscriber identification code 27
support services 45
Ttelephone line
multiple numbers 26telephone numbers 45text
enhance 14enter from front panel 28
time
index
reference guide 57
setting 27transparency film
recommended 7tips on loading 11
troubleshootingremove and reinstall
software 40T-shirt Transfer Iron-On
load 11tutorial
front panel 3make a copy 4
Uunanswered number
redial automatically 23
Vvolume
adjust 25
Wwarranty 45
service 51statement 51upgrades 51
white stripcleaning 32
hp officejet 4100 series
chapter 12
58
declaration of conformityAccording to ISOIEC Guide 22 and EN 45014
Manufacturerrsquos Name and Address
Hewlett-Packard Company 16399 West Bernardo Drive San Diego CA 92127-1899 USA
declares that the product
Product Name hp officejet 4100 series (Q1608A)
Model Number(s) officejet 4110 (Q1609A) officejet 4110xi (Q1610A) officejet 4110v (Q1611A) officejet 4105 (Q1612A) officejet 4105z (Q1613A) officejet 4115 (Q1614A)
Product Options All
conforms to the following Product Specifications
Safety EN609501992 +A1 A2 A3 A4 amp A11
IEC609501991 +A1 A2 A3 amp A4
UL1950CSA 222 No 950 3rd Edn 1995
NOM-019-SCFI-1993
EMC CISPR221993 +A1 amp A2 EN550221994 +A1 amp A2 -Class B
CISPR241997EN550241998
IEC 61000-3-21995 EN61000-3-21995
IEC 61000-3-31994 EN61000-3-31995
ASNZS 3548 1992
CNS13438 1997
FCC Part 15-Class B ICES-003 Issue 2 VCCI-2
GB 9254-1998
Telecom TBR21 1998
Supplementary Information
The Product herewith complies with the requirements of the Low Voltage Directive 7323EEC the EMC Directive 89336EEC and the RampTTE Directive 19995EC (ANNEX II) carries the CE marking accordingly
European Contact for regulatory topics only Your local Hewlett-Packard Sales and Service Office orHewlett-Packard GmbH
Department HQ-TRE Herrenberger Strasse 140 D-71034 Boumlblingen Germany (FAX + 49-7031-14-3143)
order mediaTo order media such as HP Premium Inkjet Paper HP Premium Inkjet Transparency Film HP Iron-On T-shirt Transfer paper or HP Greeting Cards go to
wwwhpshoppingcom
For orders in countries other than the US and Canada select other countries then click Yes to leave hpshoppingcom From this website you can access hpshoppingcom for your specific language or countryregion
order print cartridges
If you have Internet access you can get more information from the HP website at
wwwhpcomsupport
print cartridges hp reorder number
HP black print cartridge 56 19 ml black print cartridge
HP color print cartridgeHP tri-color print cartridge
57 17 ml color print cartridge28 8 ml color print cartridge
Visit the hp officejet information centerIt has everything you need to get the most value from your HP Officejet
bull Technical Supportbull Supplies and Ordering Informationbull Project Tipsbull Ways to Enhance Your Product
wwwhpcomsupport
copy 2003 Hewlett-Packard Company
Printed in the USA Mexico Germany Singapore or China
Q1608-90163Q1608-90163
Q1608-90163

hp officejet 4100 series
chapter 6
22
print reportsYou can set up your HP Officejet to print error reports and confirmation reports for each fax you send and receive You can also manually print reports as you need them
generate reports automaticallyThis setting lets you configure your HP Officejet so that it automatically prints error and confirmation reports
1 Press Setup
2 Press 1 then press 5This selects Print Report then selects Automatic Reports Setup
3 Press to scroll through the following report typesndash Every Error which prints whenever there is any kind of fax error
(default)ndash Send Error which prints whenever there is a transmission errorndash Receive Error which prints whenever there is a receiving errorndash Every Fax which confirms every time a fax is sent or receivedndash Send Only which prints every time a fax is sentndash Off which does not print fax reports
4 When you reach the report that you want press Enter
generate reports manuallyThis setting lets you print reports manually From the computer you can only print the Speed-Dial List and the Fax Log
to print reports from the front panel
1 Press Setup then press 1This selects the Print Report menu
2 Press to scroll through the following report typesndash Last Transaction which prints details of the last fax transactionndash Fax Log which prints a log of the last 30 fax transactionsndash Speed Dial List which prints a list of programmed speed dialsndash Self-Test Report which prints a report to assist you in diagnosing print
and alignment problems For more information see print a self-test report on page 32
ndash Automatic Reports Setup which is the automatic reports setting described in generate reports automatically on page 22
3 When you reach the report that you want press Enter
control resolution and contrastYour HP Officejet lets you change the resolution and contrast of documents that you are sending
change resolutionResolution affects the transmission speed and quality of faxed documents
reference guide
use the fax features
23
to change the resolution from the front panel
1 Load your originals in the ADF
2 Enter the fax number using the keypad or press Speed Dial until the desired speed-dial entry appears
3 Press Enter
4 Press Fax to scroll through the fax options
5 Stop scrolling when you reach the Resolution menu
6 Press until the desired resolution quality appears (Standard Photo Fine Very Fine)
7 Press EnterYour HP Officejet only faxes at the highest resolution supported by the receiving faxIf you choose Photo be aware that the faxing process takes longer to complete When faxing photographs we recommend that you choose Photo
change contrastChange this setting if you want a black-and-white fax to be darker or lighter than the original
to change the fax contrast from the front panel
1 Load your originals in the ADF
2 Enter the fax number using the keypad or press Speed Dial until the desired speed-dial entry appears
3 Press Enter
4 Press Fax to scroll through the fax options
5 Stop scrolling when you reach the LighterDarker menuThe range of values appears as a circle on a scale on the display
6 Press to lighten the fax or to darken itThe circle moves left or right as you press a button
7 Press Enter to accept the setting you selected
change other fax settings
redial a number automaticallyYou can set your HP Officejet to redial a busy and an unanswered number automatically If you initiated a fax from the computer the computer must be left on for the redialing process to work correctly
1 Press Setup
2 Press 4This selects the Advanced Fax Setup menu
3 Choose one of the following optionsndash Press 3
hp officejet 4100 series
chapter 6
24
This selects the Busy Redial option The default setting for Busy Redial is Redial
ndash Press 4This selects the No Answer Redial option The default setting for No Answer Redial is No Redial
4 Press Enter
5 Press to select Redial or No Redial as desired
6 Press Enter
forward faxes to another numberWith fax forwarding you can send a fax that you receive to another fax number during the next 24-hour period
to forward faxes from the front panel
1 Press Setup
2 Press 3 then press 7This selects the Basic Fax Setup menu then selects the Fax Forwarding Black Only option
3 At the prompt enter the Fax Number to which you wish to send the fax
4 Press Enter
5 Enter the Start Date using the numeric keypad
6 Enter the Start Time using the numeric keypad
7 At the prompt press 1 for AM or 2 for PM
8 Enter the Stop Date using the numeric keypadFax Forwarding On appears on the display
edit or cancel fax forwardingOnce fax forwarding is enabled you may find that you need to change the number you are faxing to or the start and stop times you entered You may wish to cancel your fax forwarding setup altogether Follow the steps below to edit or turn off fax forwarding
to edit fax forwarding from the front panel
1 Press Setup
2 Press 3 then press 7This selects the Basic Fax Setup menu then selects the Fax Forwarding Black Only option
3 Forwarding is ON 1=Edit 2=Cancel appears on the display after a moment Press 1 to edit the number you wish to fax to or to change the start and stop times Follow the messages on the display
to cancel fax forwarding from the front panelbull Press Cancel
OR
reference guide
use the fax features
25
Follow the steps in edit or cancel fax forwarding on page 24 When Forwarding is ON 1=Edit 2=Cancel appears on the display press 2 to cancel fax forwarding
use error correction modeError Correction Mode (ECM) eliminates data lost due to poor phone lines by detecting errors that occur during transmission and automatically requesting retransmission of the erroneous portion Phone charges are unaffected or may even be reduced on good phone lines On poor phone lines ECM increases sending time and phone charges but sends the data much more reliably Turn ECM off (the default setting is on) only if it increases phone charges substantially and you can accept poorer quality in exchange for reduced charges
to change the ECM setting from the front panel
1 Press Setup
2 Press 4 then press 7This selects the Advanced Fax Setup menu then selects the Error Correction Mode option
3 Press to switch between On and Off
4 Press Enter to accept the setting you selected
set automatic reductionThis setting determines what your HP Officejet does if it receives a fax that is too large for the default paper size With this setting on (the default) the image is reduced so that it fits on one page With this feature off information that doesnrsquot fit on the first page is printed on a second page
1 Press Setup
2 Press 4 then press 5This selects the Advanced Fax Setup menu then selects the Automatic Reduction option
3 Press to switch between On and Off
4 Press Enter to accept the setting you selected
adjust the volumeYour HP Officejet provides three levels for adjusting the ring and speaker volume The ring volume is the volume of the phone ringer The speaker volume is the volume of everything else such as the dial and fax tones The default setting is Soft
1 Press Setup
2 Press 3 then press 6This selects the Basic Fax Setup menu then selects the Ring and Beep Volume option
3 Press to select one of the options Soft Loud or Off
4 Press Enter to accept the setting you selected
hp officejet 4100 series
chapter 6
26
change the answer ring pattern (distinctive ringing)Distinctive ringing is a feature offered by phone companies that allows several phone numbers to share the same line Each number has a specific ring pattern If you do not have this service use the default ring pattern which is All Rings
If you connect your HP Officejet to a line with distinctive ringing have your telephone company assign one ring pattern to voice calls and another to fax calls (double or triple rings are best for a fax number)
1 Press Setup
2 Press 4 then press 2This selects the Advanced Fax Setup menu then selects the Answer Ring Pattern option
3 Press to scroll through these options All Rings Single Rings Double Rings Triple Rings and Double amp Triple
4 When the ring pattern that the phone company established for this number appears press Enter
Tip We recommend that you use Double Rings or Triple Rings for fax
set up speed dialingThrough your HP Officejet or your computer you can assign entries to fax numbers you use often This lets you dial those numbers quickly using the front panelrsquos Speed Dial button and a one- or two-digit entry You can create up to 100 individual speed-dial entries (the maximum for some models is 70)
We recommend that you use the software to set up speed-dial settings
Note A speed-dial entry can only be associated with one phone number speed-dial groups are not supported
For more information see set up speed dialing in the hp photo amp imaging help
create individual speed-dial settingsYou can enter fax numbers that you will reuse frequently
1 Press Setup
2 Press 2 then press 1This selects the Speed Dial Setup menu then selects the Individual Speed Dial option
3 Press EnterThe first unassigned speed-dial entry appears on the display
4 Press Enter to select the displayed speed-dial entry
5 Enter the Fax Number to assign to that entry then press EnterThe fax number can be up to 50 digits in length
Tip To enter a three-second pause within a number sequence press Symbols to display a dash
6 Enter the personrsquos or companyrsquos name then press Enter
reference guide
use the fax features
27
The name is limited to 13 characters in lengthFor more information see enter text on page 28
7 After Enter Another appears press 1 (Yes) if you want to set up another number or press 2 (No) to exit
delete speed-dial settingsFollow these steps to delete an individual speed-dial entry
1 Press Setup
2 Press 2 then press 2 againThis selects Speed Dial Setup then selects Delete Speed Dial
3 Press until the individual entry that you want to delete appears then press Enter
set basic fax settings using the front panelWe recommend that you use the Fax Setup Wizard in the HP Officejet software to configure all your basic fax settings however you can also access these settings from the front panel
Note In the US regulations require that your name and phone number appear on every fax The minimum settings that we recommend are described in the following topics
set the date and timeFollow these steps to set the date and time manually
1 Press Setup
2 Press 3 then press 1This selects the Basic Fax Setup menu then selects the Date and Time option
3 Follow the prompts on the display to enter the date and time using the keypad
Tip Use only the last two digits for the year
Tip When you enter a single-digit date or time type a leading zero before the single digit for example 0345 or 08-03-02
After you are done the date and time appear on the display
Warning Cutting off power to the HP Officejet causes the selected date and time to be lost However name and fax number information is not lost
set the fax headerFollow these steps to enter your name and fax number in the header
Note In Hungary the subscriber identification code (fax header) can be set or changed only by authorized personnel For more information contact your authorized HP dealer
1 Press Setup
2 Press 3 then press 2
hp officejet 4100 series
chapter 6
28
This selects the Basic Fax Setup menu then selects the Fax Header option
3 Enter your personal or company name at the prompt Use the guidelines provided in the next section under enter text
4 Press Enter
5 Enter your fax number using the numeric keypad
6 Press Enter
enter textThe following list provides tips for entering text using the front-panel keypad
bull Press the keypad numbers that correspond to the letters of a name
bull Press a button multiple times to see a letter first in uppercase and then in lowercase
bull After the correct letter appears press and then press the number that corresponds to the next letter in the name Again press multiple times until the correct letter appears
bull To insert a space press Space ()bull To enter a symbol such as press Symbols () to scroll through the list of
available symbolsbull If you make a mistake press to clear it and then make the correct
entrybull After you are done entering text press Enter to store your entries
check for dial toneBefore using the fax features verify that the connections are correctly established
1 Press Fax
2 Listen for a dial tone
3 If you do not hear a dial tone check the connections
4 Press Cancel to hang up
ABC These letters correspond to this number and so on
2
JKL To get this character J j K k L l 5
5 Press 5 this many times 1 2 3 4 5 6 7
reference guide
use the fax features
29
fax job menuThe following options become available when the Fax button is pressed
setup menu for fax commandsThe following fax settings are available in the Setup menu
Enter Fax or Speed Dial
FineVery FinePhotoStandard
Fax Number Resolution LighterDarker
Enter a fax number or speed dialWhen the Fax button is pressed
Press and to move to the option you wantPress Enter to select the displayed setting
NoYes
Set New Defaults
Send Fax NowFax from MemorySend Fax LaterPoll to Receive
How to Fax
1Automatic Reports Setup
2Answer Ring Pattern
3Busy Redial
4No Answer Redial
5Automatic Reduction
6Backup Fax Reception
7Error Correction Mode
3Basic Fax Setup 4Advanced Fax Setup
Press Setup to display the menu options
Press and to move to the setting you wantPress Enter to select the displayed setting
1Date and Time
2Fax Header
3Rings to Answer
4Paper Size
5Tone or Pulse Dialing
6Ring and Beep Volume
7Fax Forwarding Black Only
2Speed Dial Setup
1Individual Speed Dial
2Delete Speed Dial
3Print Speed Dial List
hp officejet 4100 series
chapter 6
30
7
31
maintain your hp officejet
This section provides instructions for keeping your HP Officejet in top working condition Perform these maintenance procedures as necessary
clean the glassDirty glass from dust smudges hair and so on slows down performance and affects the accuracy of features such as Fit to Page and Copy
1 Turn off the unit unplug the power cord and raise the scanner lid
2 Clean the glass with a soft cloth or sponge slightly moistened with a nonabrasive glass cleaner
Caution Do not use abrasives acetone benzene or carbon tetrachloride on the glass these can damage it Do not place liquids directly on the glass They may seep under it and damage the unit
3 Dry the glass with a chamois or cellulose sponge to prevent spotting
hp officejet 4100 series
chapter 7
32
clean the white stripMinor debris can accumulate on the white strip located underneath the scannerrsquos lid
1 Turn off the unit unplug the power cord and raise the scanner lid
2 Clean the white strip with a soft cloth or sponge slightly moistened with a mild soap and warm water
3 Wash the strip gently to loosen debris do not scrub the strip
4 Dry the strip with a chamois or soft cloth
Caution Do not use paper-based wipes as these may scratch the strip
5 If this does not clean the strip well enough repeat the previous steps using isopropyl (rubbing) alcohol and wipe the strip thoroughly with a damp cloth to remove any residual alcohol
clean the exterior Use a soft damp lint-free cloth to wipe dust smudges and stains off the case The interior of the unit does not require cleaning Keep fluids away from the interior of the unit as well as the front panel
work with print cartridgesTo ensure the best print quality from your HP Officejet you will need to perform some simple maintenance procedures and when prompted by a front-panel message replace the print cartridges
print a self-test reportIf you are experiencing problems with printing before cleaning or replacing the print cartridges you should print a Self-Test Report This report provides useful information about your print cartridges including status information
1 Press Setup
2 Press 1 then press 4This selects Print Report and then selects Self-Test Report
3 Press Start Black or Start ColorA Self-Test Report is printed for your HP Officejet
handle print cartridgesBefore you replace or clean a print cartridge you should know the part names and how to handle the print cartridge
reference guide
maintain your hp officejet
33
replace the print cartridgesFront-panel messages appear to let you know that you should replace your print cartridges
See order print cartridges on the back cover for information on ordering replacement print cartridges
1 Turn on the unit then lift open the print cartridge access doorThe print carriage moves into view
2 After the carriage stops moving push down on the print cartridge down to release it and then pull it toward you out of its slot
Plastic tape with pink tab(must be removed)
Copper contactsInk nozzles under tape
Do not touch the copper contacts or the ink nozzles
print cartridge access door
hp officejet 4100 series
chapter 7
34
Note It is normal to see ink build-up in the print cartridge slots
3 Remove the new print cartridge from its packaging and being careful to touch only the bright pink plastic tab gently remove the plastic tape to uncover the ink nozzles
Caution Do not touch the copper contacts or ink nozzles
Once you have removed the plastic tape install the print cartridge immediately to prevent the ink from drying in the nozzles
4 Push the new print cartridge into the appropriate slot at a slight angle until it clicks into place
Caution Do not attempt to push the cartridge straight into the slot It must slide in at a slight angle
The tri-color print cartridge goes on the left and the black cartridge goes on the right
5 Close the print cartridge access door
reference guide
maintain your hp officejet
35
align the print cartridgesThe HP Officejet prompts you to align cartridges every time you install or replace a print cartridge Aligning the cartridges ensures high-quality output
To align the print cartridges when prompted
1 Press Enter on the front panelAn align cartridges (test pattern) page prints
2 Load the align cartridges page face down in the ADF between the paper-width guides and press the Enter button again
3 Recycle or discard the page
To align the cartridges at any other time
1 Press Setup
2 Press 5 then press 2This selects the Maintenance menu and then selects the Align Print Cartridge option
3 Press EnterAn align cartridges (test pattern) page prints
4 Load the align cartridges page face down in the ADF between the paper-width guides and press the Enter button again
5 Recycle or discard the page
clean the print cartridgesUse this feature when the Self-Test Report shows streaking or white lines through any of the colored bars Do not clean print cartridges unnecessarily This wastes ink and shortens the life of the ink nozzles
1 Press Setup
2 Press 5 then press 1This selects the Maintenance menu and then selects the Clean Print Cartridge optionA page of patterns is printed The cartridges are cleaned Recycle or discard the pageIf copy or print quality still seem poor after you clean the print cartridges replace the print cartridge that is affected
restore factory defaultsYou can restore the original factory settings to what they were when you purchased your HP Officejet Choosing to restore your factory defaults restores all settings except date information and any scan settings you may have set
You can perform this process from the front panel only
1 Press Setup
2 Press 5 then press 3This selects Maintenance and then selects Restore Factory DefaultsThe factory default settings are restored
hp officejet 4100 series
chapter 7
36
set scroll speedThe Scroll Speed option lets you control the rate that text messages appear in the front-panel display You can choose Normal Fast or Slow The default is Normal
1 Press Setup
2 Press 5 then press 6This selects Maintenance and then selects Set Scroll Speed
3 Press until the desired speed appears then press Enter
set the prompt delay timeThe Prompt Delay option lets you control the amount of time before a message is displayed in the front-panel display You can choose Normal Fast or Slow The default is Normal
1 Press Setup
2 Press 5 then press 7This selects Maintenance and then selects Set Prompt Delay Time
3 Press until the delay time appears then press Enter
self-maintenance sounds During the life of your product you may hear various mechanical sounds This is a normal part of your unitrsquos self-maintenance
reference guide
maintain your hp officejet
37
setup menu optionsThe following options are available from the Setup button
1Last Transaction
2Fax Log
3Speed Dial List
4Self-Test Report
5Automatic Reports Setup
1Print Report
Use Setup to display the Print Report Speed Dial Setup Basic Fax Setup Advanced Fax Setup and Maintenance options
Press and to move to the setting you wantPress Enter to select the displayed setting
1Clean Print Cartridges
2Align Print Cartridges
3Restore Factory Defaults
4Reprint Faxes in Memory
5Set Language amp CountryRegion
6Set Scroll Speed
7Set Prompt Delay Time
5Maintenance2Speed Dial Setup
3Basic Fax Setup
4Advanced Fax Setup
1Individual Speed Dial
2Delete Speed Dial
3Print Speed Dial List
1Date and Time
2Fax Header
3Rings to Answer
4 Paper Size
5Tone or Pulse Dialing
6Ring and Beep Volume
7Fax Forwarding Black Only
1Automatic Reports Setup
2Answer Ring Pattern
3Busy Redial
4No Answer Redail
5Automatic Reduction
6Backup Fax Reception
7Error Correction Mode
hp officejet 4100 series
chapter 7
38
8
39
additional setup information
During the installation of the HP Officejet software a number of windows are displayed You should see the following
bull Installingbull Copying files bull A request to plug in the HP Officejetbull Green OK and check markbull Request to restart your computer (may not occur in all cases)bull Registration
If you did not see all of these windows there may be a problem with the installation Verify the following
bull The HP Director contains six icons (double-click the HP Director icon on the desktop)
bull The HP Officejet is listed in the Printers dialog boxbull There is an icon for the HP Officejet in the System Tray that indicates the
HP Officejet is ready
If the HP Director does not show six icons you may need to wait a few minutes for the HP Officejet to connect to your computer
possible installation problemsIf nothing appears on your computer screen after you insert the HP Officejet 4100 Series CD-ROM into your computerrsquos CD-ROM drive
1 From the Start menu choose Run
2 In the Run dialog box enter dsetupexe (if your CD-ROM drive is not assigned to drive letter d use the appropriate drive letter) then click OK
If the HP Director does not contain six icons do the following
bull Verify that the front-panel cover is attached then unplug the HP Officejet and plug it in again
bull Verify that the USB and power cables are plugged inndash Unplug the USB cable and plug it in againndash Do not attach the USB cable to a keyboard or nonpowered hubndash Verify that the USB cable is 3 meters or less in lengthndash If you have several USB devices attached to your computer you may
want to unplug the others during the installation
Note AppleTalk is not supported
bull Unplug the HP Officejet from the wall and plug it in againbull Restart your computer
hp officejet 4100 series
chapter 8
40
On Windows check the System Tray for applications that are running in the background and close them before restarting your computer
remove and reinstall your hp officejet softwareIf six icons do not appear in the Director you may need to uninstall and re-install the software Do not simply delete the HP Officejet program files from your hard drive Be sure to remove them properly using the uninstall utility provided in the HP Officejet program group
to uninstall from a Windows computer
1 Disconnect your HP Officejet from your computer
2 On the Windows taskbar click Start choose Programs or All Programs (XP) choose Hewlett-Packard choose hp officejet 4100 series then choose uninstall software
3 Follow the directions on the screenBe sure to disconnect your HP Officejet
4 If you are asked whether you would like to remove shared files click NoOther programs that use these files may not work properly if the files are deleted
5 After the program finishes removing the software disconnect your HP Officejet and restart your computer
Note It is important that you disconnect your HP Officejet before restarting your computer
6 To reinstall the software insert the HP Officejet 4100 Series CD-ROM into your computerrsquos CD-ROM drive and follow the instructions that appear
7 After the software is installed connect and turn on your HP Officejet following the onscreen instructions and the instructions in your Setup PosterAfter connecting and turning on your HP Officejet you may have to wait several minutes for all of the Plug and Play events to completeWhen the software installation is complete you will see a Status Monitor icon in the System Tray
8 To verify that the software is properly installed double-click on the HP Director icon on the desktop If the HP Director shows six icons the software has been properly installed
to uninstall from a Macintosh computer
1 Disconnect your HP Officejet from your computer
2 Double-click on ApplicationsHP All-in-One Software folder
reference guide
additional setup information
41
3 Double-click on HP Uninstaller
4 Follow the directions that appear on the screen
5 After the program finishes removing the software disconnect your HP Officejet and restart your computer
6 To reinstall the software insert the HP Officejet 4100 Series CD-ROM into your computerrsquos CD-ROM drive
Note When re-installing the software follow the instructions on the Setup Poster Do not connect the HP Officejet to your computer until after you have completed the software installation
7 On the desktop open the CD-ROM double-click on hp all-in-one installer and follow the instructions that appear
connect your hp officejet to a phone modem or answering machine
The HP Officejet can share a phone line with a phone a modem or an aswering machine When sharing a phone line with an answering machine the HP Officejet will answer fax calls and direct voice calls to the answering machine
Note For information on connecting your HP Officejet to your computer and phone line refer to the Setup Poster that came with your unit
to connect your hp officejet to a phone modem or answering machine
1 Remove the white plastic stopper from connector 2 on the back of the HP Officejet
To connect more than one device to connector 2 on the HP Officejet you must purchase a Y-splitter and plug it into connector 2
2 Connect the phone cord from the phone modem or answering machine to connector 2 (or Y-splitter)
Caution Do not use the phone cord that came with the HP Officejet for this purpose That phone cord must connect connector 1 on the HP Officejet to the wall jack for your phone system See the Setup Poster for details
3 If you are connecting an answering machine see set the number of rings before answering on page 21 for instructions on setting the number of rings correctly or change the answer ring pattern (distinctive ringing) on page 26 for information on incoming ring patterns
4 If you are connecting a modem turn off its fax-receive feature
connector 2 on the HP Officejet
connector 1 on the HP Officejet
hp officejet 4100 series
chapter 8
42
additional troubleshooting helpYou may want to refer to the readme file for more information on possible installation problems On Windows you can access the readme file from the Start button on the taskbar select Programs Hewlett-Packard hp officejet 4100 series View the Readme File On Macintosh you can access the readme file by double-clicking on the icon located in the top-level folder of the HP Officejet software CD-ROM
The readme file provides more information including
bull Using the Re-install utility after a failed installation to return your PC to a state that will allow the HP Officejet to be re-installed
bull Using the Re-install utility on Windows 98 to recover from a Composite USB System Driver missing errorThis error may occur if the hardware is installed prior to installing the software After running the Re-install utility reboot your PC and install the HP Officejet software before connecting the HP Officejet to your computer
You can also find more information on this website
wwwhpcomsupport
9
43
technical information
Additional specifications information can be found in the HP Photo amp Imaging Help in the hp officejet 4100 series section
physical specifications
power specificationsbull Power consumption 75W maximumbull Source (Input Voltage) 100 to 240 VAC groundedbull Input Frequency 50 to 60 Hzbull Current 1A maximum
regulatory informationAdditional regulatory information can be found in the HP Photo amp Imaging Help The information in this section supercedes information in the HP Photo amp Imaging Help
doc statement deacuteclaration de conformiteacute (Canada)Le preacutesent appareil numeacuterique neacutemet pas de bruit radioeacutelectrique deacutepassant les limites applicables aux appareils numeacuteriques de la classe B prescrites dans le Regraveglement sur le brouillage radioeacutelectrique eacutedicteacute par le ministegravere des Communications du CanadaThis digital apparatus does not exceed the Class B limits for radio noise emissions from digital apparatus set out in the Radio Interference Regulations of the Canadian Department of Communications
notice to users of the Canadian telephone networkThis equipment meets the applicable Industry Canada Terminal Equipment Technical Specifications This is confirmed by the registration number The abbreviation IC before the registration number signifies that registration was performed based on a Declaration of Conformity indicating that Industry Canada technical specifications were met It does not imply that Industry Canada approved the equipment
Note The Ringer Equivalence Number (REN) assigned to each terminal device provides an indication of the maximum number of terminals allowed to be connected to a telephone interface The termination on an interface may consist of any combination of devices subject only to the requirement that the sum of the Ringer Equivalence Numbers of all the devices does not exceed 5
The REN for this product is 03B based on FCC Part 68 test results
height width depth weight (without print cartridges)
with paper trays and ADF closed
718 in (1824 cm) 1676 in (4258 cm) 825 in (2096 cm) 75 lbs (34 kg)
with ADF and paper tray extended
1030 in (2615 cm) 1676 in (4258 cm) 1854 in (4709 cm) 75 lbs (34 kg)
hp officejet 4100 series
chapter 9
44
notice to all users of the European Economic Area (EEA)
This product is designed to interwork with the analogue telephone networks in the following countriesregions
Network compatibility depends on customer selected settings which must be reset to use the equipment on a telephone network in a countryregion other than where the product was purchased Contact the vendor or Hewlett-Packard Company if addition product support is necessaryThis equipment has been certified by the manufacturer in accordance with Directive 19995EC (annex II) for Pan-European single-terminal connection to the public switched telephone network (PSTN) However due to differences between the individual PSTNs provided in different countriesregions the approval does not of itself give an unconditional assurance of successful operation on every PSTN network termination pointIn the event of problems you should contact your equipment supplier in the first instance
geraumluschemissionLpA lt 70 dBam Arbeitsplatzim Normalbetriebnach DIN 45635 T 19
notice to Korean customers
Germany UK Netherlands
France Spain Italy
Belgium Luxembourg Sweden
Austria Denmark Ireland
Norway Finland Switzerland
Greece Portugal
10
45
hp support
This section explains the support services information provided by Hewlett-Packard If you are unable to find the answer you need in the printed or onscreen documentation supplied with your product you can contact one of the HP support services listed in the following pages Some support services are available only in the US and Canada while others are available in many countriesregions worldwide If a support service number is not listed for your countryregion contact your nearest authorized HP dealer for help
get support and other information from the internetIf you have Internet access you can get help from the following HP website
wwwhpcomsupportThe Web site offers technical support drivers supplies and ordering information
hp customer supportSoftware programs from other companies may be included with your HP Officejet If you experience problems with any of those programs you will receive the best technical assistance by calling the experts at that companyIf you need to contact HP Customer Support do the following before you call
1 Make sure thata Your unit is plugged in and turned onb The specified print cartridges are installed correctlyc The recommended paper is properly loaded in the input tray
2 Reset your unita Turn off the unit using the On button located on the unitrsquos front panelb Unplug the power cord from the back of the unitc Plug the power cord back into the unitd Turn on the unit using the On button
3 For more information check the HP website at wwwhpcomsupport
4 If you are still experiencing problems and need to speak with an HP Customer Support Representativendash Have your service ID and serial number ready To display your service ID and
serial number on the front panel do the following Press Enter and Start Color at the same time until the service ID appears in the front-panel display From this display press the right arrow until the serial number displays
ndash Print a Self-Test Report See print a self-test report on page 32 for information on printing this report
ndash Make a color copyndash Be prepared to describe your problem in detail
5 Call HP Customer Support Be near your unit when you call
call in the US during warrantyCall (208) 323-2551 This service is free during the warranty period however your standard long-distance phone charges still apply A fee may apply outside the warranty period
hp officejet 4100 series
chapter 10
46
US phone support is available in both English and Spanish languages 24 hours a day 7 days a week (days and hours of support may change without notice)
call elsewhere in the worldThe numbers listed below are current as of the printing date of this guide For a list of current international HP Support Service numbers visit this address and choose your own countryregion or language
wwwhpcomsupportFor Korea you can also visit this address
httpwwwhpcokrYou can call the HP support center in the following countriesregions If your countryregion is not listed contact your local dealer or nearest HP Sales and Support Office to find out how to obtain servicesSupport service is free during the warranty period however your standard long-distance phone charges will apply In some cases a flat fee per single incident will also applyFor phone support in Europe please check for the details and conditions of phone support in your countryregion by consulting the following Web site
wwwhpcomsupportAlternatively you can ask your dealer or call HP at the phone number indicated in this booklet As part of our constant efforts to improve our phone support service we advise you to check our website on a regular basis for new information regarding service features and delivery
countryregion hp technical support countryregion hp technical support
Algeria1 +213 (0) 61564 543 Malaysia 1-800-805405
Argentina 0810-555-5520 Mexico 01-800-472-6684
Australia +61 3 8877 80001902 910 910
Mexico (Mexico City) 5258-9922
Austria +43 (0) 810 00 6080 Morocco1 +212 22404 747
Bahrain (Dubai) 800 728 Netherlands +31 (0) 20 606 8751
Belgium (Dutch) +32 (0) 2 626 8806 New Zealand 0800 441 147
Belgium (French) +32 (0) 2 626 8807 Norway +47 22 11 6299
Brazil (Grande Sao Paulo) (11) 3747 7799 Oman +971 4 883 8454
Brazil (Demais Localidades) 0800 157751 Palestine +971 4 883 8454
Canada during warranty (905) 206 4663 Panama 001-800-7112884
Canada post-warranty(per-call charge)
1-877-621-4722 Peru 0-800-10111
Caribbean amp Central America
1-800-711-2884 Philippines 632-867-3551
Chile 800-360-999 Poland +48 22 865 98 00
China 86 10 6868 7980 Portugal +351 21 3176333
Colombia 9-800-114-726 Puerto Rico 1-877-2320-589
Costa Rica 0-800-011-0524 Qatar +971 4 883 8454
Czech Republic +420 (0) 261307310 Romania +40 1 315 44 42or local 01 3154442
reference guide
hp support
47
call in Australia post-warrantyIf your product is not under warranty you can call 03 8877 8000 A per-incident out-of-warranty support fee of $2750 (inc GST) will be charged to your credit card You can also call 1902 910 910 ($2750 charged to your phone account) from 900 AM to 500 PM Monday through Friday (Charges and support hours are subject to change without notice)
prepare your unit for shipmentIf after contacting HP Customer Support or returning to the point of purchase you are requested to send your unit in for service please follow the power off and rebox steps below to avoid further damage to the HP product
Denmark +45 39 29 4099 Russian Federation Moscow +7 095 797 3520
Ecuador 1800-711-2884 Russian Federation St Petersburg
+7 812 346 7997
Europe (English) +44 (0) 207 512 5202 Saudi Arabia +800 897 14440
Egypt 02 532 5222 Singapore 65 6272 5300
Finland +358 (0) 203 47 288 Slovakia +421 (0) 2 682 08080
France (034 Euromin) +0892 69 60 22 South Africa (inside RSA) 086 000 1030
Germany (012 Euromin) +49 (0) 180 52 58 143 South Africa (inside RSA) +27-11 258 9301
Greece +30 1060 73 603 Spain +34 902 321 123
Hong Kong (SAR) +85 (2) 3002 8555 Sweden +46 (0)8 619 2170
Guatemala 1800-995-5105 Switzerland 2 +41 (0) 84 880 1111
Hungary +36 (0) 1 382 1111 Taiwan +886-2-2717-00550800 010 055
India 1-600-11226791 11 682 6035
Thailand +66 (2) 661 4000
Indonesia 62-21-350-3408 Tunisia1 +216 1891 222
Ireland +353 (0) 1 662 5525 Turkey +90 216 579 7171
Israel +972 (0) 9 8304848 Ukraine +7 (380-44) 490-3520
Italy +39 (0) 226410350 United Arab Emirates +971 4 883 8454
Japan 0570 000 511+81 3 3335 9800
United Kingdom +44 (0) 207 512 52 02
Jordan +971 4 883 8454 Venezuela 0800-47468368 or800-477-7777
Korea (Seoul) +82 (2) 3270 0700 Venezuela (Caracas) (502) 207-8488
Korea (outside Seoul) 080 999 0700 Vietnam 84 (0) 8 823 4530
Kuwait +971 4 883 8454 Yemen +971 4 883 8454
Lebanon +971 4 883 8454
1 This Call Center supports French speaking customers from the following countriesregions Morocco Tunisia and Algeria
2 This Call Center supports German French and Italian speaking customers in Switzerland
countryregion hp technical support countryregion hp technical support
hp officejet 4100 series
chapter 10
48
Note When transporting your HP Officejet make sure that the pens have been removed the HP Officejet has been properly shut down by pressing the power button and you have allowed time for the carriage to return to the service station and for the scanner to return to its parked position
1 Turn on the unitDisregard steps 1 through 6 if your unit will not turn on and the print carriage is in the home position You will not be able to remove the print cartridges Proceed to step 7
2 Open the print cartridge access doorThe print carriage moves into view
3 See replace the print cartridges on page 33 for information on removing the print cartridges
Caution Remove both print cartridges Failure to do so may damage your unit
4 Place the print cartridges in an airtight bag so they will not dry out and put them aside (do not send them with the unit unless instructed to by the HP customer support call agent)
5 Turn off the unit
6 Close the print cartridge access door
7 Remove the front panel cover as followsa Grasp the front of the front panel cover with two hands as shownb Firmly lift the front panel cover to unsnap it from the unit
8 Retain the front panel cover Do not return the front panel cover with the unit
9 If available pack the unit for shipment using the original packing materials or the packaging materials that come with your exchange unit
If you do not have the original packaging materials please use other adequate packaging materials Shipping damage caused by improper packaging andor improper transportation is not covered under the warranty
reference guide
hp support
49
10 Place the return shipping label on the outside of the box
11 Include the following items in the boxndash A complete description of symptoms for service personnel (samples of print
quality problems are helpful)ndash A copy of the sales slip or other proof of purchase to establish the warranty
coverage periodndash Your name address and a phone number where you can be reached during
the day
hp distribution centerTo order HP Officejet software a copy of the printed Reference Guide a setup poster or other customer-replaceable parts do one of the following bull In the US or Canada call (208) 323 2551bull Visit this website
httpwwwhpcomcposupportsoftwarehtml
hp officejet 4100 series
chapter 10
50
11
51
warranty information
HP Officejet 4100 seriesDuration of Limited Warranty (hardware and labor) 1 YearDuration of Limited Warranty (CD media) 90 DaysDuration of Limited Warranty (print cartridges) Until the HP ink is depleted or the ldquoend of warrantyrdquo date printed on the cartridge has been reached whichever occurs first
warranty service
express serviceTo obtain HP express repair service the customer must contact an HP service office or an HP Customer Support Center for basic troubleshooting first See hp customer support on page 45 for steps to take before calling Customer SupportIf a customer unit needs a minor part replacement and these parts can normally be replaced by the customer the customer-replaceable components may be serviced through expedited part shipment In this event HP will prepay shipping charges duty and taxes provide telephone assistance on replacement of the component and pay shipping charges duty and taxes for any part that HP asks to be returnedThe HP Customer Support Center may direct customers to designated authorized service providers who are certified by HP to service the HP product
warranty upgradesUpgrade your standard factory warranty to a total of three years with the HP SUPPORTPACK Service coverage begins on product purchase date and the pack must be purchased within the first 180 days of product purchase This program offers phone support from 600 AM to 1000 PM Mountain Standard Time (MST) Monday through Friday and 900 AM to 400 PM (MST) on Saturdays If during your technical support call it is determined that you need a replacement product then HP will ship you this product next business day free of charge Available in US onlyFor more information please call 1-888-999-4747 or visit the following HP Web site
httpwwwhpcomgohpsupportpack
Outside the US please call your local HP Customer Support office See call elsewhere in the world on page 46 for a list of international Customer Support numbers
returning your hp officejet for serviceBefore returning your HP Officejet for service you must call HP Customer Support See hp customer support on page 45 for steps to take before calling Customer Support
hewlett-packard limited global warranty statement
extent of limited warrantyHewlett-Packard (ldquoHPrdquo) warrants to the end-user customer (ldquoCustomerrdquo) that each HP Officejet 4100 Series product (ldquoProductrdquo) including related software accessories media and supplies shall be free from defects in material and workmanship for the duration which begins on the date of purchase by the Customer
hp officejet 4100 series
chapter 11
52
For each software Product HPrsquos limited warranty applies only to a failure to execute programming instructions HP does not warrant that the operation of any Product shall be uninterrupted or error freeHPrsquos limited warranty covers only those defects which arise as a result of normal use of a Product and does not cover any other problems including those which arise as a result of (a) improper maintenance or modification (b) software accessories media or supplies not provided or supported by HP or (c) operation outside the Productrsquos specificationsFor any hardware Product the use of a non-HP print cartridge or a refilled print cartridge does not affect either the warranty to the Customer or any HP support contract with the Customer However if Product failure or damage is attributable to the use of a non-HP or refilled print cartridge HP shall charge its standard labor and materials charges to service the Product for the failure or damageIf HP receives during the applicable warranty period notice of a defect in any Product HP shall either repair or replace the defective Product at HPrsquos option Where labor charges are not covered by HPrsquos limited warranty repairs shall be at HPrsquos standard charges for laborIf HP is unable to repair or replace as applicable a defective Product which is covered by HPrsquos warranty HP shall within a reasonable time after being notified of the defect refund the purchase price for the ProductHP shall have no obligation to repair replace or refund until the Customer returns the defective Product to HPAny replacement product may be either new or like-new provided that it has functionality at least equal to that of the Product being replacedHP products including each Product may contain remanufactured parts components or materials equivalent to new in performanceHPs limited warranty for each Product is valid in any countryregion or locality where HP has a support presence for the Product and where HP has marketed the Product The level of warranty service may vary according to local standards HP shall have no obligation to alter the form fit or function of the Product in order to make it operate in a countryregion or locality for which the Product was never intended to operate
limitations of warrantyTO THE EXTENT ALLOWED BY LOCAL LAW NEITHER HP NOR ITS THIRD PARTY SUPPLIERS MAKE ANY OTHER WARRANTY OR CONDITION OF ANY KIND WHETHER EXPRESS OR IMPLIED WITH RESPECT TO THE COVERED HP PRODUCTS AND SPECIFICALLY DISCLAIM THE IMPLIED WARRANTIES OR CONDITIONS OF MERCHANTABILITY SATISFACTORY QUALITY AND FITNESS FOR A PARTICULAR PURPOSE
limitations of liabilityTo the extent allowed by local law the remedies provided in this Limited Warranty Statement are the Customerrsquos sole and exclusive remediesTO THE EXTENT ALLOWED BY LOCAL LAW EXCEPT FOR THE OBLIGATIONS SPECIFICALLY SET FORTH IN THIS LIMITED WARRANTY STATEMENT IN NO EVENT SHALL HP OR ITS THIRD PARTY SUPPLIERS BE LIABLE FOR DIRECT INDIRECT SPECIAL INCIDENTAL OR CONSEQUENTIAL DAMAGES WHETHER BASED ON CONTRACT TORT OR ANY OTHER LEGAL THEORY AND WHETHER ADVISED OF THE POSSIBILITY OF SUCH DAMAGES
local lawThis Limited Warranty Statement gives the Customer specific legal rights The Customer may also have other rights which vary from state to state in the United States from province to province in Canada and from countryregion to countryregion elsewhere in the world
reference guide
warranty information
53
To the extent this Limited Warranty Statement is inconsistent with local law this Statement shall be deemed modified to be consistent with such local law Under such local law certain disclaimers and limitations of this Statement may not apply to the Customer For example some states in the United States as well as some governments outside the United States (including provinces in Canada) mayPreclude the disclaimers and limitations in this Statement from limiting the statutory rights of a consumer (eg the United Kingdom)Otherwise restrict the ability of a manufacturer to enforce such disclaimers or limitations orGrant the Customer additional warranty rights specify the duration of implied warranties which the manufacturer cannot disclaim or not allow limitations on the duration of implied warrantiesFOR CONSUMER TRANSACTIONS IN AUSTRALIA AND NEW ZEALAND THE TERMS IN THIS LIMITED WARRANTY STATEMENT EXCEPT TO THE EXTENT LAWFULLY PERMITTED DO NOT EXCLUDE RESTRICT OR MODIFY AND ARE IN ADDITION TO THE MANDATORY STATUTORY RIGHTS APPLICABLE TO THE SALE OF THE COVERED HP PRODUCTS TO SUCH CUSTOMERS
hp officejet 4100 series
chapter 11
54
55
index
Numerics4-by-6 inch photo paper
load 10 12
AADF 7adjust
volume for fax 25align print cartridges 35Answer Ring Pattern 26automatic document feeder 7automatic reduction
fax 25
Bbest copy quality 13busy number
redial automatically 23
Ccancel
scan 18scheduled fax 21
cartridgesalign 35replace 33
cleanprint cartridges 35the exterior 32the glass 31white strip 32
colorenhance 14fax 20fax from front panel 20
contrastchange for fax 23photo color 14
copy 13 16change default settings 15enhance 14fit to page 16lighten or darken 14menu options 16number of copies 14photo 15quality 13reduce or enlarge 14settings 13 15
speed 13tutorial 4
Customer Support 45web site 45
Ddarken a copy 14date
setting 27default settings
restore 35director review 4distinctive ringing 26
Eenhance copies 14enlarge copy 14 16envelopes
load 9Error Correction Mode
(ECM) 25
Ffactory defaults
restore 35fast copy quality 13fax 28
adjust volume 25automated reports 22cancel fax forward 24cancel scheduled 21change Answer Ring
Pattern 26change contrast 23change resolution 22change settings 19control appearance 22create individual speed-dial
settings 26delete speed-dial
settings 27distinctive ringing 26Error Correction Mode
(ECM) 25forward faxes 24header 27in color 20in color from front panel 20manual reports 22
menu 29print reports 22receive 21receive manually 21redial busy or unanswered
number 23schedule 20send from front panel 19set automatic reduction 25set date and time 27set the number of rings 21settings 27 28setup menu options 29speed dials 19test 28
fit to page 16forward faxes 24
cancel 24front panel
display scroll speed 36enter text 28send a fax 19setting prompt delay 36tutorial 3
Gglass
cleaning 31greeting cards
load 11
Hhelp 1HP Customer Support 45
calling 45HP Director 4HP distribution center 49HP Officjet
preparing to ship 47HP papers
tips on loading 11
Iindividual speed-dial settings
create 26ink cartridges see print
cartridgesinkjet paper
load 11
index
hp officejet 4100 series56
Kkeypad
enter text 28
Llabels
load 12lighten copies 14load
change the paper type 12envelopes 9original in ADF 7paper 7photo paper 10 12postcards 10 12print cartridges 33set the paper size 12tips 11
Mmaintenance
align print cartridges 35clean print cartridges 35clean the exterior 32clean the glass 31clean the white strip 32normal sounds 36replace print cartridges 33restore factory defaults 35self-maintenance
sounds 36self-test report 32
menuscopy options 16fax 29fax setup 29maintenance 37print reports 37
Nnormal copy quality 13number of copies
set 14number of rings
set 21
Oorder print cartridges 60originals
load in ADF 7output tray 8
Ppaper
change default size for copy 12
change the type 12load 7recommended 7set the size 12tips on loading 11
paper size change for copy 12
paper trayload 7
phone numbers support services 45
photo paperload 10 12
photoscopy 15enhance copy 14
physical specifications 43postcards
load 10 12power
specifications 43print
envelopes 9fax reports 22self-test report 32
print cartridgesalign 35clean 35handling 32replace 33
prompt delaysetting 36
Qquick start
review the director 4use with a computer 4
Rreceive
fax 21redial
busy or unanswered number 23
reduce copy 14 16regulatory information 43reinstall software 40reports
generate automatically for fax 22
generate manually for fax 22
print 22self-test 32
resolution
change for fax 22restore factory settings 35returning your HP Officejet for
service 51
Sscan
from front panel 17stop 18
schedule a fax 20scroll speed
setting 36self-test report 32send
cancel forward faxes 24color fax 20color fax from front
panel 20forward faxes 24
settingscopy 13 15fax 27 28prompt delay 36scroll speed 36
setupadditional information 39menu 29
shippingyour HP Officejet 47
softwareremove and reinstall 40
soundsself-maintenance 36
specificationsphysical 43power 43
speed dials 19create individual
settings 26delete settings 27
stopscan 18scheduled fax 21
subscriber identification code 27
support services 45
Ttelephone line
multiple numbers 26telephone numbers 45text
enhance 14enter from front panel 28
time
index
reference guide 57
setting 27transparency film
recommended 7tips on loading 11
troubleshootingremove and reinstall
software 40T-shirt Transfer Iron-On
load 11tutorial
front panel 3make a copy 4
Uunanswered number
redial automatically 23
Vvolume
adjust 25
Wwarranty 45
service 51statement 51upgrades 51
white stripcleaning 32
hp officejet 4100 series
chapter 12
58
declaration of conformityAccording to ISOIEC Guide 22 and EN 45014
Manufacturerrsquos Name and Address
Hewlett-Packard Company 16399 West Bernardo Drive San Diego CA 92127-1899 USA
declares that the product
Product Name hp officejet 4100 series (Q1608A)
Model Number(s) officejet 4110 (Q1609A) officejet 4110xi (Q1610A) officejet 4110v (Q1611A) officejet 4105 (Q1612A) officejet 4105z (Q1613A) officejet 4115 (Q1614A)
Product Options All
conforms to the following Product Specifications
Safety EN609501992 +A1 A2 A3 A4 amp A11
IEC609501991 +A1 A2 A3 amp A4
UL1950CSA 222 No 950 3rd Edn 1995
NOM-019-SCFI-1993
EMC CISPR221993 +A1 amp A2 EN550221994 +A1 amp A2 -Class B
CISPR241997EN550241998
IEC 61000-3-21995 EN61000-3-21995
IEC 61000-3-31994 EN61000-3-31995
ASNZS 3548 1992
CNS13438 1997
FCC Part 15-Class B ICES-003 Issue 2 VCCI-2
GB 9254-1998
Telecom TBR21 1998
Supplementary Information
The Product herewith complies with the requirements of the Low Voltage Directive 7323EEC the EMC Directive 89336EEC and the RampTTE Directive 19995EC (ANNEX II) carries the CE marking accordingly
European Contact for regulatory topics only Your local Hewlett-Packard Sales and Service Office orHewlett-Packard GmbH
Department HQ-TRE Herrenberger Strasse 140 D-71034 Boumlblingen Germany (FAX + 49-7031-14-3143)
order mediaTo order media such as HP Premium Inkjet Paper HP Premium Inkjet Transparency Film HP Iron-On T-shirt Transfer paper or HP Greeting Cards go to
wwwhpshoppingcom
For orders in countries other than the US and Canada select other countries then click Yes to leave hpshoppingcom From this website you can access hpshoppingcom for your specific language or countryregion
order print cartridges
If you have Internet access you can get more information from the HP website at
wwwhpcomsupport
print cartridges hp reorder number
HP black print cartridge 56 19 ml black print cartridge
HP color print cartridgeHP tri-color print cartridge
57 17 ml color print cartridge28 8 ml color print cartridge
Visit the hp officejet information centerIt has everything you need to get the most value from your HP Officejet
bull Technical Supportbull Supplies and Ordering Informationbull Project Tipsbull Ways to Enhance Your Product
wwwhpcomsupport
copy 2003 Hewlett-Packard Company
Printed in the USA Mexico Germany Singapore or China
Q1608-90163Q1608-90163
Q1608-90163

reference guide
use the fax features
23
to change the resolution from the front panel
1 Load your originals in the ADF
2 Enter the fax number using the keypad or press Speed Dial until the desired speed-dial entry appears
3 Press Enter
4 Press Fax to scroll through the fax options
5 Stop scrolling when you reach the Resolution menu
6 Press until the desired resolution quality appears (Standard Photo Fine Very Fine)
7 Press EnterYour HP Officejet only faxes at the highest resolution supported by the receiving faxIf you choose Photo be aware that the faxing process takes longer to complete When faxing photographs we recommend that you choose Photo
change contrastChange this setting if you want a black-and-white fax to be darker or lighter than the original
to change the fax contrast from the front panel
1 Load your originals in the ADF
2 Enter the fax number using the keypad or press Speed Dial until the desired speed-dial entry appears
3 Press Enter
4 Press Fax to scroll through the fax options
5 Stop scrolling when you reach the LighterDarker menuThe range of values appears as a circle on a scale on the display
6 Press to lighten the fax or to darken itThe circle moves left or right as you press a button
7 Press Enter to accept the setting you selected
change other fax settings
redial a number automaticallyYou can set your HP Officejet to redial a busy and an unanswered number automatically If you initiated a fax from the computer the computer must be left on for the redialing process to work correctly
1 Press Setup
2 Press 4This selects the Advanced Fax Setup menu
3 Choose one of the following optionsndash Press 3
hp officejet 4100 series
chapter 6
24
This selects the Busy Redial option The default setting for Busy Redial is Redial
ndash Press 4This selects the No Answer Redial option The default setting for No Answer Redial is No Redial
4 Press Enter
5 Press to select Redial or No Redial as desired
6 Press Enter
forward faxes to another numberWith fax forwarding you can send a fax that you receive to another fax number during the next 24-hour period
to forward faxes from the front panel
1 Press Setup
2 Press 3 then press 7This selects the Basic Fax Setup menu then selects the Fax Forwarding Black Only option
3 At the prompt enter the Fax Number to which you wish to send the fax
4 Press Enter
5 Enter the Start Date using the numeric keypad
6 Enter the Start Time using the numeric keypad
7 At the prompt press 1 for AM or 2 for PM
8 Enter the Stop Date using the numeric keypadFax Forwarding On appears on the display
edit or cancel fax forwardingOnce fax forwarding is enabled you may find that you need to change the number you are faxing to or the start and stop times you entered You may wish to cancel your fax forwarding setup altogether Follow the steps below to edit or turn off fax forwarding
to edit fax forwarding from the front panel
1 Press Setup
2 Press 3 then press 7This selects the Basic Fax Setup menu then selects the Fax Forwarding Black Only option
3 Forwarding is ON 1=Edit 2=Cancel appears on the display after a moment Press 1 to edit the number you wish to fax to or to change the start and stop times Follow the messages on the display
to cancel fax forwarding from the front panelbull Press Cancel
OR
reference guide
use the fax features
25
Follow the steps in edit or cancel fax forwarding on page 24 When Forwarding is ON 1=Edit 2=Cancel appears on the display press 2 to cancel fax forwarding
use error correction modeError Correction Mode (ECM) eliminates data lost due to poor phone lines by detecting errors that occur during transmission and automatically requesting retransmission of the erroneous portion Phone charges are unaffected or may even be reduced on good phone lines On poor phone lines ECM increases sending time and phone charges but sends the data much more reliably Turn ECM off (the default setting is on) only if it increases phone charges substantially and you can accept poorer quality in exchange for reduced charges
to change the ECM setting from the front panel
1 Press Setup
2 Press 4 then press 7This selects the Advanced Fax Setup menu then selects the Error Correction Mode option
3 Press to switch between On and Off
4 Press Enter to accept the setting you selected
set automatic reductionThis setting determines what your HP Officejet does if it receives a fax that is too large for the default paper size With this setting on (the default) the image is reduced so that it fits on one page With this feature off information that doesnrsquot fit on the first page is printed on a second page
1 Press Setup
2 Press 4 then press 5This selects the Advanced Fax Setup menu then selects the Automatic Reduction option
3 Press to switch between On and Off
4 Press Enter to accept the setting you selected
adjust the volumeYour HP Officejet provides three levels for adjusting the ring and speaker volume The ring volume is the volume of the phone ringer The speaker volume is the volume of everything else such as the dial and fax tones The default setting is Soft
1 Press Setup
2 Press 3 then press 6This selects the Basic Fax Setup menu then selects the Ring and Beep Volume option
3 Press to select one of the options Soft Loud or Off
4 Press Enter to accept the setting you selected
hp officejet 4100 series
chapter 6
26
change the answer ring pattern (distinctive ringing)Distinctive ringing is a feature offered by phone companies that allows several phone numbers to share the same line Each number has a specific ring pattern If you do not have this service use the default ring pattern which is All Rings
If you connect your HP Officejet to a line with distinctive ringing have your telephone company assign one ring pattern to voice calls and another to fax calls (double or triple rings are best for a fax number)
1 Press Setup
2 Press 4 then press 2This selects the Advanced Fax Setup menu then selects the Answer Ring Pattern option
3 Press to scroll through these options All Rings Single Rings Double Rings Triple Rings and Double amp Triple
4 When the ring pattern that the phone company established for this number appears press Enter
Tip We recommend that you use Double Rings or Triple Rings for fax
set up speed dialingThrough your HP Officejet or your computer you can assign entries to fax numbers you use often This lets you dial those numbers quickly using the front panelrsquos Speed Dial button and a one- or two-digit entry You can create up to 100 individual speed-dial entries (the maximum for some models is 70)
We recommend that you use the software to set up speed-dial settings
Note A speed-dial entry can only be associated with one phone number speed-dial groups are not supported
For more information see set up speed dialing in the hp photo amp imaging help
create individual speed-dial settingsYou can enter fax numbers that you will reuse frequently
1 Press Setup
2 Press 2 then press 1This selects the Speed Dial Setup menu then selects the Individual Speed Dial option
3 Press EnterThe first unassigned speed-dial entry appears on the display
4 Press Enter to select the displayed speed-dial entry
5 Enter the Fax Number to assign to that entry then press EnterThe fax number can be up to 50 digits in length
Tip To enter a three-second pause within a number sequence press Symbols to display a dash
6 Enter the personrsquos or companyrsquos name then press Enter
reference guide
use the fax features
27
The name is limited to 13 characters in lengthFor more information see enter text on page 28
7 After Enter Another appears press 1 (Yes) if you want to set up another number or press 2 (No) to exit
delete speed-dial settingsFollow these steps to delete an individual speed-dial entry
1 Press Setup
2 Press 2 then press 2 againThis selects Speed Dial Setup then selects Delete Speed Dial
3 Press until the individual entry that you want to delete appears then press Enter
set basic fax settings using the front panelWe recommend that you use the Fax Setup Wizard in the HP Officejet software to configure all your basic fax settings however you can also access these settings from the front panel
Note In the US regulations require that your name and phone number appear on every fax The minimum settings that we recommend are described in the following topics
set the date and timeFollow these steps to set the date and time manually
1 Press Setup
2 Press 3 then press 1This selects the Basic Fax Setup menu then selects the Date and Time option
3 Follow the prompts on the display to enter the date and time using the keypad
Tip Use only the last two digits for the year
Tip When you enter a single-digit date or time type a leading zero before the single digit for example 0345 or 08-03-02
After you are done the date and time appear on the display
Warning Cutting off power to the HP Officejet causes the selected date and time to be lost However name and fax number information is not lost
set the fax headerFollow these steps to enter your name and fax number in the header
Note In Hungary the subscriber identification code (fax header) can be set or changed only by authorized personnel For more information contact your authorized HP dealer
1 Press Setup
2 Press 3 then press 2
hp officejet 4100 series
chapter 6
28
This selects the Basic Fax Setup menu then selects the Fax Header option
3 Enter your personal or company name at the prompt Use the guidelines provided in the next section under enter text
4 Press Enter
5 Enter your fax number using the numeric keypad
6 Press Enter
enter textThe following list provides tips for entering text using the front-panel keypad
bull Press the keypad numbers that correspond to the letters of a name
bull Press a button multiple times to see a letter first in uppercase and then in lowercase
bull After the correct letter appears press and then press the number that corresponds to the next letter in the name Again press multiple times until the correct letter appears
bull To insert a space press Space ()bull To enter a symbol such as press Symbols () to scroll through the list of
available symbolsbull If you make a mistake press to clear it and then make the correct
entrybull After you are done entering text press Enter to store your entries
check for dial toneBefore using the fax features verify that the connections are correctly established
1 Press Fax
2 Listen for a dial tone
3 If you do not hear a dial tone check the connections
4 Press Cancel to hang up
ABC These letters correspond to this number and so on
2
JKL To get this character J j K k L l 5
5 Press 5 this many times 1 2 3 4 5 6 7
reference guide
use the fax features
29
fax job menuThe following options become available when the Fax button is pressed
setup menu for fax commandsThe following fax settings are available in the Setup menu
Enter Fax or Speed Dial
FineVery FinePhotoStandard
Fax Number Resolution LighterDarker
Enter a fax number or speed dialWhen the Fax button is pressed
Press and to move to the option you wantPress Enter to select the displayed setting
NoYes
Set New Defaults
Send Fax NowFax from MemorySend Fax LaterPoll to Receive
How to Fax
1Automatic Reports Setup
2Answer Ring Pattern
3Busy Redial
4No Answer Redial
5Automatic Reduction
6Backup Fax Reception
7Error Correction Mode
3Basic Fax Setup 4Advanced Fax Setup
Press Setup to display the menu options
Press and to move to the setting you wantPress Enter to select the displayed setting
1Date and Time
2Fax Header
3Rings to Answer
4Paper Size
5Tone or Pulse Dialing
6Ring and Beep Volume
7Fax Forwarding Black Only
2Speed Dial Setup
1Individual Speed Dial
2Delete Speed Dial
3Print Speed Dial List
hp officejet 4100 series
chapter 6
30
7
31
maintain your hp officejet
This section provides instructions for keeping your HP Officejet in top working condition Perform these maintenance procedures as necessary
clean the glassDirty glass from dust smudges hair and so on slows down performance and affects the accuracy of features such as Fit to Page and Copy
1 Turn off the unit unplug the power cord and raise the scanner lid
2 Clean the glass with a soft cloth or sponge slightly moistened with a nonabrasive glass cleaner
Caution Do not use abrasives acetone benzene or carbon tetrachloride on the glass these can damage it Do not place liquids directly on the glass They may seep under it and damage the unit
3 Dry the glass with a chamois or cellulose sponge to prevent spotting
hp officejet 4100 series
chapter 7
32
clean the white stripMinor debris can accumulate on the white strip located underneath the scannerrsquos lid
1 Turn off the unit unplug the power cord and raise the scanner lid
2 Clean the white strip with a soft cloth or sponge slightly moistened with a mild soap and warm water
3 Wash the strip gently to loosen debris do not scrub the strip
4 Dry the strip with a chamois or soft cloth
Caution Do not use paper-based wipes as these may scratch the strip
5 If this does not clean the strip well enough repeat the previous steps using isopropyl (rubbing) alcohol and wipe the strip thoroughly with a damp cloth to remove any residual alcohol
clean the exterior Use a soft damp lint-free cloth to wipe dust smudges and stains off the case The interior of the unit does not require cleaning Keep fluids away from the interior of the unit as well as the front panel
work with print cartridgesTo ensure the best print quality from your HP Officejet you will need to perform some simple maintenance procedures and when prompted by a front-panel message replace the print cartridges
print a self-test reportIf you are experiencing problems with printing before cleaning or replacing the print cartridges you should print a Self-Test Report This report provides useful information about your print cartridges including status information
1 Press Setup
2 Press 1 then press 4This selects Print Report and then selects Self-Test Report
3 Press Start Black or Start ColorA Self-Test Report is printed for your HP Officejet
handle print cartridgesBefore you replace or clean a print cartridge you should know the part names and how to handle the print cartridge
reference guide
maintain your hp officejet
33
replace the print cartridgesFront-panel messages appear to let you know that you should replace your print cartridges
See order print cartridges on the back cover for information on ordering replacement print cartridges
1 Turn on the unit then lift open the print cartridge access doorThe print carriage moves into view
2 After the carriage stops moving push down on the print cartridge down to release it and then pull it toward you out of its slot
Plastic tape with pink tab(must be removed)
Copper contactsInk nozzles under tape
Do not touch the copper contacts or the ink nozzles
print cartridge access door
hp officejet 4100 series
chapter 7
34
Note It is normal to see ink build-up in the print cartridge slots
3 Remove the new print cartridge from its packaging and being careful to touch only the bright pink plastic tab gently remove the plastic tape to uncover the ink nozzles
Caution Do not touch the copper contacts or ink nozzles
Once you have removed the plastic tape install the print cartridge immediately to prevent the ink from drying in the nozzles
4 Push the new print cartridge into the appropriate slot at a slight angle until it clicks into place
Caution Do not attempt to push the cartridge straight into the slot It must slide in at a slight angle
The tri-color print cartridge goes on the left and the black cartridge goes on the right
5 Close the print cartridge access door
reference guide
maintain your hp officejet
35
align the print cartridgesThe HP Officejet prompts you to align cartridges every time you install or replace a print cartridge Aligning the cartridges ensures high-quality output
To align the print cartridges when prompted
1 Press Enter on the front panelAn align cartridges (test pattern) page prints
2 Load the align cartridges page face down in the ADF between the paper-width guides and press the Enter button again
3 Recycle or discard the page
To align the cartridges at any other time
1 Press Setup
2 Press 5 then press 2This selects the Maintenance menu and then selects the Align Print Cartridge option
3 Press EnterAn align cartridges (test pattern) page prints
4 Load the align cartridges page face down in the ADF between the paper-width guides and press the Enter button again
5 Recycle or discard the page
clean the print cartridgesUse this feature when the Self-Test Report shows streaking or white lines through any of the colored bars Do not clean print cartridges unnecessarily This wastes ink and shortens the life of the ink nozzles
1 Press Setup
2 Press 5 then press 1This selects the Maintenance menu and then selects the Clean Print Cartridge optionA page of patterns is printed The cartridges are cleaned Recycle or discard the pageIf copy or print quality still seem poor after you clean the print cartridges replace the print cartridge that is affected
restore factory defaultsYou can restore the original factory settings to what they were when you purchased your HP Officejet Choosing to restore your factory defaults restores all settings except date information and any scan settings you may have set
You can perform this process from the front panel only
1 Press Setup
2 Press 5 then press 3This selects Maintenance and then selects Restore Factory DefaultsThe factory default settings are restored
hp officejet 4100 series
chapter 7
36
set scroll speedThe Scroll Speed option lets you control the rate that text messages appear in the front-panel display You can choose Normal Fast or Slow The default is Normal
1 Press Setup
2 Press 5 then press 6This selects Maintenance and then selects Set Scroll Speed
3 Press until the desired speed appears then press Enter
set the prompt delay timeThe Prompt Delay option lets you control the amount of time before a message is displayed in the front-panel display You can choose Normal Fast or Slow The default is Normal
1 Press Setup
2 Press 5 then press 7This selects Maintenance and then selects Set Prompt Delay Time
3 Press until the delay time appears then press Enter
self-maintenance sounds During the life of your product you may hear various mechanical sounds This is a normal part of your unitrsquos self-maintenance
reference guide
maintain your hp officejet
37
setup menu optionsThe following options are available from the Setup button
1Last Transaction
2Fax Log
3Speed Dial List
4Self-Test Report
5Automatic Reports Setup
1Print Report
Use Setup to display the Print Report Speed Dial Setup Basic Fax Setup Advanced Fax Setup and Maintenance options
Press and to move to the setting you wantPress Enter to select the displayed setting
1Clean Print Cartridges
2Align Print Cartridges
3Restore Factory Defaults
4Reprint Faxes in Memory
5Set Language amp CountryRegion
6Set Scroll Speed
7Set Prompt Delay Time
5Maintenance2Speed Dial Setup
3Basic Fax Setup
4Advanced Fax Setup
1Individual Speed Dial
2Delete Speed Dial
3Print Speed Dial List
1Date and Time
2Fax Header
3Rings to Answer
4 Paper Size
5Tone or Pulse Dialing
6Ring and Beep Volume
7Fax Forwarding Black Only
1Automatic Reports Setup
2Answer Ring Pattern
3Busy Redial
4No Answer Redail
5Automatic Reduction
6Backup Fax Reception
7Error Correction Mode
hp officejet 4100 series
chapter 7
38
8
39
additional setup information
During the installation of the HP Officejet software a number of windows are displayed You should see the following
bull Installingbull Copying files bull A request to plug in the HP Officejetbull Green OK and check markbull Request to restart your computer (may not occur in all cases)bull Registration
If you did not see all of these windows there may be a problem with the installation Verify the following
bull The HP Director contains six icons (double-click the HP Director icon on the desktop)
bull The HP Officejet is listed in the Printers dialog boxbull There is an icon for the HP Officejet in the System Tray that indicates the
HP Officejet is ready
If the HP Director does not show six icons you may need to wait a few minutes for the HP Officejet to connect to your computer
possible installation problemsIf nothing appears on your computer screen after you insert the HP Officejet 4100 Series CD-ROM into your computerrsquos CD-ROM drive
1 From the Start menu choose Run
2 In the Run dialog box enter dsetupexe (if your CD-ROM drive is not assigned to drive letter d use the appropriate drive letter) then click OK
If the HP Director does not contain six icons do the following
bull Verify that the front-panel cover is attached then unplug the HP Officejet and plug it in again
bull Verify that the USB and power cables are plugged inndash Unplug the USB cable and plug it in againndash Do not attach the USB cable to a keyboard or nonpowered hubndash Verify that the USB cable is 3 meters or less in lengthndash If you have several USB devices attached to your computer you may
want to unplug the others during the installation
Note AppleTalk is not supported
bull Unplug the HP Officejet from the wall and plug it in againbull Restart your computer
hp officejet 4100 series
chapter 8
40
On Windows check the System Tray for applications that are running in the background and close them before restarting your computer
remove and reinstall your hp officejet softwareIf six icons do not appear in the Director you may need to uninstall and re-install the software Do not simply delete the HP Officejet program files from your hard drive Be sure to remove them properly using the uninstall utility provided in the HP Officejet program group
to uninstall from a Windows computer
1 Disconnect your HP Officejet from your computer
2 On the Windows taskbar click Start choose Programs or All Programs (XP) choose Hewlett-Packard choose hp officejet 4100 series then choose uninstall software
3 Follow the directions on the screenBe sure to disconnect your HP Officejet
4 If you are asked whether you would like to remove shared files click NoOther programs that use these files may not work properly if the files are deleted
5 After the program finishes removing the software disconnect your HP Officejet and restart your computer
Note It is important that you disconnect your HP Officejet before restarting your computer
6 To reinstall the software insert the HP Officejet 4100 Series CD-ROM into your computerrsquos CD-ROM drive and follow the instructions that appear
7 After the software is installed connect and turn on your HP Officejet following the onscreen instructions and the instructions in your Setup PosterAfter connecting and turning on your HP Officejet you may have to wait several minutes for all of the Plug and Play events to completeWhen the software installation is complete you will see a Status Monitor icon in the System Tray
8 To verify that the software is properly installed double-click on the HP Director icon on the desktop If the HP Director shows six icons the software has been properly installed
to uninstall from a Macintosh computer
1 Disconnect your HP Officejet from your computer
2 Double-click on ApplicationsHP All-in-One Software folder
reference guide
additional setup information
41
3 Double-click on HP Uninstaller
4 Follow the directions that appear on the screen
5 After the program finishes removing the software disconnect your HP Officejet and restart your computer
6 To reinstall the software insert the HP Officejet 4100 Series CD-ROM into your computerrsquos CD-ROM drive
Note When re-installing the software follow the instructions on the Setup Poster Do not connect the HP Officejet to your computer until after you have completed the software installation
7 On the desktop open the CD-ROM double-click on hp all-in-one installer and follow the instructions that appear
connect your hp officejet to a phone modem or answering machine
The HP Officejet can share a phone line with a phone a modem or an aswering machine When sharing a phone line with an answering machine the HP Officejet will answer fax calls and direct voice calls to the answering machine
Note For information on connecting your HP Officejet to your computer and phone line refer to the Setup Poster that came with your unit
to connect your hp officejet to a phone modem or answering machine
1 Remove the white plastic stopper from connector 2 on the back of the HP Officejet
To connect more than one device to connector 2 on the HP Officejet you must purchase a Y-splitter and plug it into connector 2
2 Connect the phone cord from the phone modem or answering machine to connector 2 (or Y-splitter)
Caution Do not use the phone cord that came with the HP Officejet for this purpose That phone cord must connect connector 1 on the HP Officejet to the wall jack for your phone system See the Setup Poster for details
3 If you are connecting an answering machine see set the number of rings before answering on page 21 for instructions on setting the number of rings correctly or change the answer ring pattern (distinctive ringing) on page 26 for information on incoming ring patterns
4 If you are connecting a modem turn off its fax-receive feature
connector 2 on the HP Officejet
connector 1 on the HP Officejet
hp officejet 4100 series
chapter 8
42
additional troubleshooting helpYou may want to refer to the readme file for more information on possible installation problems On Windows you can access the readme file from the Start button on the taskbar select Programs Hewlett-Packard hp officejet 4100 series View the Readme File On Macintosh you can access the readme file by double-clicking on the icon located in the top-level folder of the HP Officejet software CD-ROM
The readme file provides more information including
bull Using the Re-install utility after a failed installation to return your PC to a state that will allow the HP Officejet to be re-installed
bull Using the Re-install utility on Windows 98 to recover from a Composite USB System Driver missing errorThis error may occur if the hardware is installed prior to installing the software After running the Re-install utility reboot your PC and install the HP Officejet software before connecting the HP Officejet to your computer
You can also find more information on this website
wwwhpcomsupport
9
43
technical information
Additional specifications information can be found in the HP Photo amp Imaging Help in the hp officejet 4100 series section
physical specifications
power specificationsbull Power consumption 75W maximumbull Source (Input Voltage) 100 to 240 VAC groundedbull Input Frequency 50 to 60 Hzbull Current 1A maximum
regulatory informationAdditional regulatory information can be found in the HP Photo amp Imaging Help The information in this section supercedes information in the HP Photo amp Imaging Help
doc statement deacuteclaration de conformiteacute (Canada)Le preacutesent appareil numeacuterique neacutemet pas de bruit radioeacutelectrique deacutepassant les limites applicables aux appareils numeacuteriques de la classe B prescrites dans le Regraveglement sur le brouillage radioeacutelectrique eacutedicteacute par le ministegravere des Communications du CanadaThis digital apparatus does not exceed the Class B limits for radio noise emissions from digital apparatus set out in the Radio Interference Regulations of the Canadian Department of Communications
notice to users of the Canadian telephone networkThis equipment meets the applicable Industry Canada Terminal Equipment Technical Specifications This is confirmed by the registration number The abbreviation IC before the registration number signifies that registration was performed based on a Declaration of Conformity indicating that Industry Canada technical specifications were met It does not imply that Industry Canada approved the equipment
Note The Ringer Equivalence Number (REN) assigned to each terminal device provides an indication of the maximum number of terminals allowed to be connected to a telephone interface The termination on an interface may consist of any combination of devices subject only to the requirement that the sum of the Ringer Equivalence Numbers of all the devices does not exceed 5
The REN for this product is 03B based on FCC Part 68 test results
height width depth weight (without print cartridges)
with paper trays and ADF closed
718 in (1824 cm) 1676 in (4258 cm) 825 in (2096 cm) 75 lbs (34 kg)
with ADF and paper tray extended
1030 in (2615 cm) 1676 in (4258 cm) 1854 in (4709 cm) 75 lbs (34 kg)
hp officejet 4100 series
chapter 9
44
notice to all users of the European Economic Area (EEA)
This product is designed to interwork with the analogue telephone networks in the following countriesregions
Network compatibility depends on customer selected settings which must be reset to use the equipment on a telephone network in a countryregion other than where the product was purchased Contact the vendor or Hewlett-Packard Company if addition product support is necessaryThis equipment has been certified by the manufacturer in accordance with Directive 19995EC (annex II) for Pan-European single-terminal connection to the public switched telephone network (PSTN) However due to differences between the individual PSTNs provided in different countriesregions the approval does not of itself give an unconditional assurance of successful operation on every PSTN network termination pointIn the event of problems you should contact your equipment supplier in the first instance
geraumluschemissionLpA lt 70 dBam Arbeitsplatzim Normalbetriebnach DIN 45635 T 19
notice to Korean customers
Germany UK Netherlands
France Spain Italy
Belgium Luxembourg Sweden
Austria Denmark Ireland
Norway Finland Switzerland
Greece Portugal
10
45
hp support
This section explains the support services information provided by Hewlett-Packard If you are unable to find the answer you need in the printed or onscreen documentation supplied with your product you can contact one of the HP support services listed in the following pages Some support services are available only in the US and Canada while others are available in many countriesregions worldwide If a support service number is not listed for your countryregion contact your nearest authorized HP dealer for help
get support and other information from the internetIf you have Internet access you can get help from the following HP website
wwwhpcomsupportThe Web site offers technical support drivers supplies and ordering information
hp customer supportSoftware programs from other companies may be included with your HP Officejet If you experience problems with any of those programs you will receive the best technical assistance by calling the experts at that companyIf you need to contact HP Customer Support do the following before you call
1 Make sure thata Your unit is plugged in and turned onb The specified print cartridges are installed correctlyc The recommended paper is properly loaded in the input tray
2 Reset your unita Turn off the unit using the On button located on the unitrsquos front panelb Unplug the power cord from the back of the unitc Plug the power cord back into the unitd Turn on the unit using the On button
3 For more information check the HP website at wwwhpcomsupport
4 If you are still experiencing problems and need to speak with an HP Customer Support Representativendash Have your service ID and serial number ready To display your service ID and
serial number on the front panel do the following Press Enter and Start Color at the same time until the service ID appears in the front-panel display From this display press the right arrow until the serial number displays
ndash Print a Self-Test Report See print a self-test report on page 32 for information on printing this report
ndash Make a color copyndash Be prepared to describe your problem in detail
5 Call HP Customer Support Be near your unit when you call
call in the US during warrantyCall (208) 323-2551 This service is free during the warranty period however your standard long-distance phone charges still apply A fee may apply outside the warranty period
hp officejet 4100 series
chapter 10
46
US phone support is available in both English and Spanish languages 24 hours a day 7 days a week (days and hours of support may change without notice)
call elsewhere in the worldThe numbers listed below are current as of the printing date of this guide For a list of current international HP Support Service numbers visit this address and choose your own countryregion or language
wwwhpcomsupportFor Korea you can also visit this address
httpwwwhpcokrYou can call the HP support center in the following countriesregions If your countryregion is not listed contact your local dealer or nearest HP Sales and Support Office to find out how to obtain servicesSupport service is free during the warranty period however your standard long-distance phone charges will apply In some cases a flat fee per single incident will also applyFor phone support in Europe please check for the details and conditions of phone support in your countryregion by consulting the following Web site
wwwhpcomsupportAlternatively you can ask your dealer or call HP at the phone number indicated in this booklet As part of our constant efforts to improve our phone support service we advise you to check our website on a regular basis for new information regarding service features and delivery
countryregion hp technical support countryregion hp technical support
Algeria1 +213 (0) 61564 543 Malaysia 1-800-805405
Argentina 0810-555-5520 Mexico 01-800-472-6684
Australia +61 3 8877 80001902 910 910
Mexico (Mexico City) 5258-9922
Austria +43 (0) 810 00 6080 Morocco1 +212 22404 747
Bahrain (Dubai) 800 728 Netherlands +31 (0) 20 606 8751
Belgium (Dutch) +32 (0) 2 626 8806 New Zealand 0800 441 147
Belgium (French) +32 (0) 2 626 8807 Norway +47 22 11 6299
Brazil (Grande Sao Paulo) (11) 3747 7799 Oman +971 4 883 8454
Brazil (Demais Localidades) 0800 157751 Palestine +971 4 883 8454
Canada during warranty (905) 206 4663 Panama 001-800-7112884
Canada post-warranty(per-call charge)
1-877-621-4722 Peru 0-800-10111
Caribbean amp Central America
1-800-711-2884 Philippines 632-867-3551
Chile 800-360-999 Poland +48 22 865 98 00
China 86 10 6868 7980 Portugal +351 21 3176333
Colombia 9-800-114-726 Puerto Rico 1-877-2320-589
Costa Rica 0-800-011-0524 Qatar +971 4 883 8454
Czech Republic +420 (0) 261307310 Romania +40 1 315 44 42or local 01 3154442
reference guide
hp support
47
call in Australia post-warrantyIf your product is not under warranty you can call 03 8877 8000 A per-incident out-of-warranty support fee of $2750 (inc GST) will be charged to your credit card You can also call 1902 910 910 ($2750 charged to your phone account) from 900 AM to 500 PM Monday through Friday (Charges and support hours are subject to change without notice)
prepare your unit for shipmentIf after contacting HP Customer Support or returning to the point of purchase you are requested to send your unit in for service please follow the power off and rebox steps below to avoid further damage to the HP product
Denmark +45 39 29 4099 Russian Federation Moscow +7 095 797 3520
Ecuador 1800-711-2884 Russian Federation St Petersburg
+7 812 346 7997
Europe (English) +44 (0) 207 512 5202 Saudi Arabia +800 897 14440
Egypt 02 532 5222 Singapore 65 6272 5300
Finland +358 (0) 203 47 288 Slovakia +421 (0) 2 682 08080
France (034 Euromin) +0892 69 60 22 South Africa (inside RSA) 086 000 1030
Germany (012 Euromin) +49 (0) 180 52 58 143 South Africa (inside RSA) +27-11 258 9301
Greece +30 1060 73 603 Spain +34 902 321 123
Hong Kong (SAR) +85 (2) 3002 8555 Sweden +46 (0)8 619 2170
Guatemala 1800-995-5105 Switzerland 2 +41 (0) 84 880 1111
Hungary +36 (0) 1 382 1111 Taiwan +886-2-2717-00550800 010 055
India 1-600-11226791 11 682 6035
Thailand +66 (2) 661 4000
Indonesia 62-21-350-3408 Tunisia1 +216 1891 222
Ireland +353 (0) 1 662 5525 Turkey +90 216 579 7171
Israel +972 (0) 9 8304848 Ukraine +7 (380-44) 490-3520
Italy +39 (0) 226410350 United Arab Emirates +971 4 883 8454
Japan 0570 000 511+81 3 3335 9800
United Kingdom +44 (0) 207 512 52 02
Jordan +971 4 883 8454 Venezuela 0800-47468368 or800-477-7777
Korea (Seoul) +82 (2) 3270 0700 Venezuela (Caracas) (502) 207-8488
Korea (outside Seoul) 080 999 0700 Vietnam 84 (0) 8 823 4530
Kuwait +971 4 883 8454 Yemen +971 4 883 8454
Lebanon +971 4 883 8454
1 This Call Center supports French speaking customers from the following countriesregions Morocco Tunisia and Algeria
2 This Call Center supports German French and Italian speaking customers in Switzerland
countryregion hp technical support countryregion hp technical support
hp officejet 4100 series
chapter 10
48
Note When transporting your HP Officejet make sure that the pens have been removed the HP Officejet has been properly shut down by pressing the power button and you have allowed time for the carriage to return to the service station and for the scanner to return to its parked position
1 Turn on the unitDisregard steps 1 through 6 if your unit will not turn on and the print carriage is in the home position You will not be able to remove the print cartridges Proceed to step 7
2 Open the print cartridge access doorThe print carriage moves into view
3 See replace the print cartridges on page 33 for information on removing the print cartridges
Caution Remove both print cartridges Failure to do so may damage your unit
4 Place the print cartridges in an airtight bag so they will not dry out and put them aside (do not send them with the unit unless instructed to by the HP customer support call agent)
5 Turn off the unit
6 Close the print cartridge access door
7 Remove the front panel cover as followsa Grasp the front of the front panel cover with two hands as shownb Firmly lift the front panel cover to unsnap it from the unit
8 Retain the front panel cover Do not return the front panel cover with the unit
9 If available pack the unit for shipment using the original packing materials or the packaging materials that come with your exchange unit
If you do not have the original packaging materials please use other adequate packaging materials Shipping damage caused by improper packaging andor improper transportation is not covered under the warranty
reference guide
hp support
49
10 Place the return shipping label on the outside of the box
11 Include the following items in the boxndash A complete description of symptoms for service personnel (samples of print
quality problems are helpful)ndash A copy of the sales slip or other proof of purchase to establish the warranty
coverage periodndash Your name address and a phone number where you can be reached during
the day
hp distribution centerTo order HP Officejet software a copy of the printed Reference Guide a setup poster or other customer-replaceable parts do one of the following bull In the US or Canada call (208) 323 2551bull Visit this website
httpwwwhpcomcposupportsoftwarehtml
hp officejet 4100 series
chapter 10
50
11
51
warranty information
HP Officejet 4100 seriesDuration of Limited Warranty (hardware and labor) 1 YearDuration of Limited Warranty (CD media) 90 DaysDuration of Limited Warranty (print cartridges) Until the HP ink is depleted or the ldquoend of warrantyrdquo date printed on the cartridge has been reached whichever occurs first
warranty service
express serviceTo obtain HP express repair service the customer must contact an HP service office or an HP Customer Support Center for basic troubleshooting first See hp customer support on page 45 for steps to take before calling Customer SupportIf a customer unit needs a minor part replacement and these parts can normally be replaced by the customer the customer-replaceable components may be serviced through expedited part shipment In this event HP will prepay shipping charges duty and taxes provide telephone assistance on replacement of the component and pay shipping charges duty and taxes for any part that HP asks to be returnedThe HP Customer Support Center may direct customers to designated authorized service providers who are certified by HP to service the HP product
warranty upgradesUpgrade your standard factory warranty to a total of three years with the HP SUPPORTPACK Service coverage begins on product purchase date and the pack must be purchased within the first 180 days of product purchase This program offers phone support from 600 AM to 1000 PM Mountain Standard Time (MST) Monday through Friday and 900 AM to 400 PM (MST) on Saturdays If during your technical support call it is determined that you need a replacement product then HP will ship you this product next business day free of charge Available in US onlyFor more information please call 1-888-999-4747 or visit the following HP Web site
httpwwwhpcomgohpsupportpack
Outside the US please call your local HP Customer Support office See call elsewhere in the world on page 46 for a list of international Customer Support numbers
returning your hp officejet for serviceBefore returning your HP Officejet for service you must call HP Customer Support See hp customer support on page 45 for steps to take before calling Customer Support
hewlett-packard limited global warranty statement
extent of limited warrantyHewlett-Packard (ldquoHPrdquo) warrants to the end-user customer (ldquoCustomerrdquo) that each HP Officejet 4100 Series product (ldquoProductrdquo) including related software accessories media and supplies shall be free from defects in material and workmanship for the duration which begins on the date of purchase by the Customer
hp officejet 4100 series
chapter 11
52
For each software Product HPrsquos limited warranty applies only to a failure to execute programming instructions HP does not warrant that the operation of any Product shall be uninterrupted or error freeHPrsquos limited warranty covers only those defects which arise as a result of normal use of a Product and does not cover any other problems including those which arise as a result of (a) improper maintenance or modification (b) software accessories media or supplies not provided or supported by HP or (c) operation outside the Productrsquos specificationsFor any hardware Product the use of a non-HP print cartridge or a refilled print cartridge does not affect either the warranty to the Customer or any HP support contract with the Customer However if Product failure or damage is attributable to the use of a non-HP or refilled print cartridge HP shall charge its standard labor and materials charges to service the Product for the failure or damageIf HP receives during the applicable warranty period notice of a defect in any Product HP shall either repair or replace the defective Product at HPrsquos option Where labor charges are not covered by HPrsquos limited warranty repairs shall be at HPrsquos standard charges for laborIf HP is unable to repair or replace as applicable a defective Product which is covered by HPrsquos warranty HP shall within a reasonable time after being notified of the defect refund the purchase price for the ProductHP shall have no obligation to repair replace or refund until the Customer returns the defective Product to HPAny replacement product may be either new or like-new provided that it has functionality at least equal to that of the Product being replacedHP products including each Product may contain remanufactured parts components or materials equivalent to new in performanceHPs limited warranty for each Product is valid in any countryregion or locality where HP has a support presence for the Product and where HP has marketed the Product The level of warranty service may vary according to local standards HP shall have no obligation to alter the form fit or function of the Product in order to make it operate in a countryregion or locality for which the Product was never intended to operate
limitations of warrantyTO THE EXTENT ALLOWED BY LOCAL LAW NEITHER HP NOR ITS THIRD PARTY SUPPLIERS MAKE ANY OTHER WARRANTY OR CONDITION OF ANY KIND WHETHER EXPRESS OR IMPLIED WITH RESPECT TO THE COVERED HP PRODUCTS AND SPECIFICALLY DISCLAIM THE IMPLIED WARRANTIES OR CONDITIONS OF MERCHANTABILITY SATISFACTORY QUALITY AND FITNESS FOR A PARTICULAR PURPOSE
limitations of liabilityTo the extent allowed by local law the remedies provided in this Limited Warranty Statement are the Customerrsquos sole and exclusive remediesTO THE EXTENT ALLOWED BY LOCAL LAW EXCEPT FOR THE OBLIGATIONS SPECIFICALLY SET FORTH IN THIS LIMITED WARRANTY STATEMENT IN NO EVENT SHALL HP OR ITS THIRD PARTY SUPPLIERS BE LIABLE FOR DIRECT INDIRECT SPECIAL INCIDENTAL OR CONSEQUENTIAL DAMAGES WHETHER BASED ON CONTRACT TORT OR ANY OTHER LEGAL THEORY AND WHETHER ADVISED OF THE POSSIBILITY OF SUCH DAMAGES
local lawThis Limited Warranty Statement gives the Customer specific legal rights The Customer may also have other rights which vary from state to state in the United States from province to province in Canada and from countryregion to countryregion elsewhere in the world
reference guide
warranty information
53
To the extent this Limited Warranty Statement is inconsistent with local law this Statement shall be deemed modified to be consistent with such local law Under such local law certain disclaimers and limitations of this Statement may not apply to the Customer For example some states in the United States as well as some governments outside the United States (including provinces in Canada) mayPreclude the disclaimers and limitations in this Statement from limiting the statutory rights of a consumer (eg the United Kingdom)Otherwise restrict the ability of a manufacturer to enforce such disclaimers or limitations orGrant the Customer additional warranty rights specify the duration of implied warranties which the manufacturer cannot disclaim or not allow limitations on the duration of implied warrantiesFOR CONSUMER TRANSACTIONS IN AUSTRALIA AND NEW ZEALAND THE TERMS IN THIS LIMITED WARRANTY STATEMENT EXCEPT TO THE EXTENT LAWFULLY PERMITTED DO NOT EXCLUDE RESTRICT OR MODIFY AND ARE IN ADDITION TO THE MANDATORY STATUTORY RIGHTS APPLICABLE TO THE SALE OF THE COVERED HP PRODUCTS TO SUCH CUSTOMERS
hp officejet 4100 series
chapter 11
54
55
index
Numerics4-by-6 inch photo paper
load 10 12
AADF 7adjust
volume for fax 25align print cartridges 35Answer Ring Pattern 26automatic document feeder 7automatic reduction
fax 25
Bbest copy quality 13busy number
redial automatically 23
Ccancel
scan 18scheduled fax 21
cartridgesalign 35replace 33
cleanprint cartridges 35the exterior 32the glass 31white strip 32
colorenhance 14fax 20fax from front panel 20
contrastchange for fax 23photo color 14
copy 13 16change default settings 15enhance 14fit to page 16lighten or darken 14menu options 16number of copies 14photo 15quality 13reduce or enlarge 14settings 13 15
speed 13tutorial 4
Customer Support 45web site 45
Ddarken a copy 14date
setting 27default settings
restore 35director review 4distinctive ringing 26
Eenhance copies 14enlarge copy 14 16envelopes
load 9Error Correction Mode
(ECM) 25
Ffactory defaults
restore 35fast copy quality 13fax 28
adjust volume 25automated reports 22cancel fax forward 24cancel scheduled 21change Answer Ring
Pattern 26change contrast 23change resolution 22change settings 19control appearance 22create individual speed-dial
settings 26delete speed-dial
settings 27distinctive ringing 26Error Correction Mode
(ECM) 25forward faxes 24header 27in color 20in color from front panel 20manual reports 22
menu 29print reports 22receive 21receive manually 21redial busy or unanswered
number 23schedule 20send from front panel 19set automatic reduction 25set date and time 27set the number of rings 21settings 27 28setup menu options 29speed dials 19test 28
fit to page 16forward faxes 24
cancel 24front panel
display scroll speed 36enter text 28send a fax 19setting prompt delay 36tutorial 3
Gglass
cleaning 31greeting cards
load 11
Hhelp 1HP Customer Support 45
calling 45HP Director 4HP distribution center 49HP Officjet
preparing to ship 47HP papers
tips on loading 11
Iindividual speed-dial settings
create 26ink cartridges see print
cartridgesinkjet paper
load 11
index
hp officejet 4100 series56
Kkeypad
enter text 28
Llabels
load 12lighten copies 14load
change the paper type 12envelopes 9original in ADF 7paper 7photo paper 10 12postcards 10 12print cartridges 33set the paper size 12tips 11
Mmaintenance
align print cartridges 35clean print cartridges 35clean the exterior 32clean the glass 31clean the white strip 32normal sounds 36replace print cartridges 33restore factory defaults 35self-maintenance
sounds 36self-test report 32
menuscopy options 16fax 29fax setup 29maintenance 37print reports 37
Nnormal copy quality 13number of copies
set 14number of rings
set 21
Oorder print cartridges 60originals
load in ADF 7output tray 8
Ppaper
change default size for copy 12
change the type 12load 7recommended 7set the size 12tips on loading 11
paper size change for copy 12
paper trayload 7
phone numbers support services 45
photo paperload 10 12
photoscopy 15enhance copy 14
physical specifications 43postcards
load 10 12power
specifications 43print
envelopes 9fax reports 22self-test report 32
print cartridgesalign 35clean 35handling 32replace 33
prompt delaysetting 36
Qquick start
review the director 4use with a computer 4
Rreceive
fax 21redial
busy or unanswered number 23
reduce copy 14 16regulatory information 43reinstall software 40reports
generate automatically for fax 22
generate manually for fax 22
print 22self-test 32
resolution
change for fax 22restore factory settings 35returning your HP Officejet for
service 51
Sscan
from front panel 17stop 18
schedule a fax 20scroll speed
setting 36self-test report 32send
cancel forward faxes 24color fax 20color fax from front
panel 20forward faxes 24
settingscopy 13 15fax 27 28prompt delay 36scroll speed 36
setupadditional information 39menu 29
shippingyour HP Officejet 47
softwareremove and reinstall 40
soundsself-maintenance 36
specificationsphysical 43power 43
speed dials 19create individual
settings 26delete settings 27
stopscan 18scheduled fax 21
subscriber identification code 27
support services 45
Ttelephone line
multiple numbers 26telephone numbers 45text
enhance 14enter from front panel 28
time
index
reference guide 57
setting 27transparency film
recommended 7tips on loading 11
troubleshootingremove and reinstall
software 40T-shirt Transfer Iron-On
load 11tutorial
front panel 3make a copy 4
Uunanswered number
redial automatically 23
Vvolume
adjust 25
Wwarranty 45
service 51statement 51upgrades 51
white stripcleaning 32
hp officejet 4100 series
chapter 12
58
declaration of conformityAccording to ISOIEC Guide 22 and EN 45014
Manufacturerrsquos Name and Address
Hewlett-Packard Company 16399 West Bernardo Drive San Diego CA 92127-1899 USA
declares that the product
Product Name hp officejet 4100 series (Q1608A)
Model Number(s) officejet 4110 (Q1609A) officejet 4110xi (Q1610A) officejet 4110v (Q1611A) officejet 4105 (Q1612A) officejet 4105z (Q1613A) officejet 4115 (Q1614A)
Product Options All
conforms to the following Product Specifications
Safety EN609501992 +A1 A2 A3 A4 amp A11
IEC609501991 +A1 A2 A3 amp A4
UL1950CSA 222 No 950 3rd Edn 1995
NOM-019-SCFI-1993
EMC CISPR221993 +A1 amp A2 EN550221994 +A1 amp A2 -Class B
CISPR241997EN550241998
IEC 61000-3-21995 EN61000-3-21995
IEC 61000-3-31994 EN61000-3-31995
ASNZS 3548 1992
CNS13438 1997
FCC Part 15-Class B ICES-003 Issue 2 VCCI-2
GB 9254-1998
Telecom TBR21 1998
Supplementary Information
The Product herewith complies with the requirements of the Low Voltage Directive 7323EEC the EMC Directive 89336EEC and the RampTTE Directive 19995EC (ANNEX II) carries the CE marking accordingly
European Contact for regulatory topics only Your local Hewlett-Packard Sales and Service Office orHewlett-Packard GmbH
Department HQ-TRE Herrenberger Strasse 140 D-71034 Boumlblingen Germany (FAX + 49-7031-14-3143)
order mediaTo order media such as HP Premium Inkjet Paper HP Premium Inkjet Transparency Film HP Iron-On T-shirt Transfer paper or HP Greeting Cards go to
wwwhpshoppingcom
For orders in countries other than the US and Canada select other countries then click Yes to leave hpshoppingcom From this website you can access hpshoppingcom for your specific language or countryregion
order print cartridges
If you have Internet access you can get more information from the HP website at
wwwhpcomsupport
print cartridges hp reorder number
HP black print cartridge 56 19 ml black print cartridge
HP color print cartridgeHP tri-color print cartridge
57 17 ml color print cartridge28 8 ml color print cartridge
Visit the hp officejet information centerIt has everything you need to get the most value from your HP Officejet
bull Technical Supportbull Supplies and Ordering Informationbull Project Tipsbull Ways to Enhance Your Product
wwwhpcomsupport
copy 2003 Hewlett-Packard Company
Printed in the USA Mexico Germany Singapore or China
Q1608-90163Q1608-90163
Q1608-90163

hp officejet 4100 series
chapter 6
24
This selects the Busy Redial option The default setting for Busy Redial is Redial
ndash Press 4This selects the No Answer Redial option The default setting for No Answer Redial is No Redial
4 Press Enter
5 Press to select Redial or No Redial as desired
6 Press Enter
forward faxes to another numberWith fax forwarding you can send a fax that you receive to another fax number during the next 24-hour period
to forward faxes from the front panel
1 Press Setup
2 Press 3 then press 7This selects the Basic Fax Setup menu then selects the Fax Forwarding Black Only option
3 At the prompt enter the Fax Number to which you wish to send the fax
4 Press Enter
5 Enter the Start Date using the numeric keypad
6 Enter the Start Time using the numeric keypad
7 At the prompt press 1 for AM or 2 for PM
8 Enter the Stop Date using the numeric keypadFax Forwarding On appears on the display
edit or cancel fax forwardingOnce fax forwarding is enabled you may find that you need to change the number you are faxing to or the start and stop times you entered You may wish to cancel your fax forwarding setup altogether Follow the steps below to edit or turn off fax forwarding
to edit fax forwarding from the front panel
1 Press Setup
2 Press 3 then press 7This selects the Basic Fax Setup menu then selects the Fax Forwarding Black Only option
3 Forwarding is ON 1=Edit 2=Cancel appears on the display after a moment Press 1 to edit the number you wish to fax to or to change the start and stop times Follow the messages on the display
to cancel fax forwarding from the front panelbull Press Cancel
OR
reference guide
use the fax features
25
Follow the steps in edit or cancel fax forwarding on page 24 When Forwarding is ON 1=Edit 2=Cancel appears on the display press 2 to cancel fax forwarding
use error correction modeError Correction Mode (ECM) eliminates data lost due to poor phone lines by detecting errors that occur during transmission and automatically requesting retransmission of the erroneous portion Phone charges are unaffected or may even be reduced on good phone lines On poor phone lines ECM increases sending time and phone charges but sends the data much more reliably Turn ECM off (the default setting is on) only if it increases phone charges substantially and you can accept poorer quality in exchange for reduced charges
to change the ECM setting from the front panel
1 Press Setup
2 Press 4 then press 7This selects the Advanced Fax Setup menu then selects the Error Correction Mode option
3 Press to switch between On and Off
4 Press Enter to accept the setting you selected
set automatic reductionThis setting determines what your HP Officejet does if it receives a fax that is too large for the default paper size With this setting on (the default) the image is reduced so that it fits on one page With this feature off information that doesnrsquot fit on the first page is printed on a second page
1 Press Setup
2 Press 4 then press 5This selects the Advanced Fax Setup menu then selects the Automatic Reduction option
3 Press to switch between On and Off
4 Press Enter to accept the setting you selected
adjust the volumeYour HP Officejet provides three levels for adjusting the ring and speaker volume The ring volume is the volume of the phone ringer The speaker volume is the volume of everything else such as the dial and fax tones The default setting is Soft
1 Press Setup
2 Press 3 then press 6This selects the Basic Fax Setup menu then selects the Ring and Beep Volume option
3 Press to select one of the options Soft Loud or Off
4 Press Enter to accept the setting you selected
hp officejet 4100 series
chapter 6
26
change the answer ring pattern (distinctive ringing)Distinctive ringing is a feature offered by phone companies that allows several phone numbers to share the same line Each number has a specific ring pattern If you do not have this service use the default ring pattern which is All Rings
If you connect your HP Officejet to a line with distinctive ringing have your telephone company assign one ring pattern to voice calls and another to fax calls (double or triple rings are best for a fax number)
1 Press Setup
2 Press 4 then press 2This selects the Advanced Fax Setup menu then selects the Answer Ring Pattern option
3 Press to scroll through these options All Rings Single Rings Double Rings Triple Rings and Double amp Triple
4 When the ring pattern that the phone company established for this number appears press Enter
Tip We recommend that you use Double Rings or Triple Rings for fax
set up speed dialingThrough your HP Officejet or your computer you can assign entries to fax numbers you use often This lets you dial those numbers quickly using the front panelrsquos Speed Dial button and a one- or two-digit entry You can create up to 100 individual speed-dial entries (the maximum for some models is 70)
We recommend that you use the software to set up speed-dial settings
Note A speed-dial entry can only be associated with one phone number speed-dial groups are not supported
For more information see set up speed dialing in the hp photo amp imaging help
create individual speed-dial settingsYou can enter fax numbers that you will reuse frequently
1 Press Setup
2 Press 2 then press 1This selects the Speed Dial Setup menu then selects the Individual Speed Dial option
3 Press EnterThe first unassigned speed-dial entry appears on the display
4 Press Enter to select the displayed speed-dial entry
5 Enter the Fax Number to assign to that entry then press EnterThe fax number can be up to 50 digits in length
Tip To enter a three-second pause within a number sequence press Symbols to display a dash
6 Enter the personrsquos or companyrsquos name then press Enter
reference guide
use the fax features
27
The name is limited to 13 characters in lengthFor more information see enter text on page 28
7 After Enter Another appears press 1 (Yes) if you want to set up another number or press 2 (No) to exit
delete speed-dial settingsFollow these steps to delete an individual speed-dial entry
1 Press Setup
2 Press 2 then press 2 againThis selects Speed Dial Setup then selects Delete Speed Dial
3 Press until the individual entry that you want to delete appears then press Enter
set basic fax settings using the front panelWe recommend that you use the Fax Setup Wizard in the HP Officejet software to configure all your basic fax settings however you can also access these settings from the front panel
Note In the US regulations require that your name and phone number appear on every fax The minimum settings that we recommend are described in the following topics
set the date and timeFollow these steps to set the date and time manually
1 Press Setup
2 Press 3 then press 1This selects the Basic Fax Setup menu then selects the Date and Time option
3 Follow the prompts on the display to enter the date and time using the keypad
Tip Use only the last two digits for the year
Tip When you enter a single-digit date or time type a leading zero before the single digit for example 0345 or 08-03-02
After you are done the date and time appear on the display
Warning Cutting off power to the HP Officejet causes the selected date and time to be lost However name and fax number information is not lost
set the fax headerFollow these steps to enter your name and fax number in the header
Note In Hungary the subscriber identification code (fax header) can be set or changed only by authorized personnel For more information contact your authorized HP dealer
1 Press Setup
2 Press 3 then press 2
hp officejet 4100 series
chapter 6
28
This selects the Basic Fax Setup menu then selects the Fax Header option
3 Enter your personal or company name at the prompt Use the guidelines provided in the next section under enter text
4 Press Enter
5 Enter your fax number using the numeric keypad
6 Press Enter
enter textThe following list provides tips for entering text using the front-panel keypad
bull Press the keypad numbers that correspond to the letters of a name
bull Press a button multiple times to see a letter first in uppercase and then in lowercase
bull After the correct letter appears press and then press the number that corresponds to the next letter in the name Again press multiple times until the correct letter appears
bull To insert a space press Space ()bull To enter a symbol such as press Symbols () to scroll through the list of
available symbolsbull If you make a mistake press to clear it and then make the correct
entrybull After you are done entering text press Enter to store your entries
check for dial toneBefore using the fax features verify that the connections are correctly established
1 Press Fax
2 Listen for a dial tone
3 If you do not hear a dial tone check the connections
4 Press Cancel to hang up
ABC These letters correspond to this number and so on
2
JKL To get this character J j K k L l 5
5 Press 5 this many times 1 2 3 4 5 6 7
reference guide
use the fax features
29
fax job menuThe following options become available when the Fax button is pressed
setup menu for fax commandsThe following fax settings are available in the Setup menu
Enter Fax or Speed Dial
FineVery FinePhotoStandard
Fax Number Resolution LighterDarker
Enter a fax number or speed dialWhen the Fax button is pressed
Press and to move to the option you wantPress Enter to select the displayed setting
NoYes
Set New Defaults
Send Fax NowFax from MemorySend Fax LaterPoll to Receive
How to Fax
1Automatic Reports Setup
2Answer Ring Pattern
3Busy Redial
4No Answer Redial
5Automatic Reduction
6Backup Fax Reception
7Error Correction Mode
3Basic Fax Setup 4Advanced Fax Setup
Press Setup to display the menu options
Press and to move to the setting you wantPress Enter to select the displayed setting
1Date and Time
2Fax Header
3Rings to Answer
4Paper Size
5Tone or Pulse Dialing
6Ring and Beep Volume
7Fax Forwarding Black Only
2Speed Dial Setup
1Individual Speed Dial
2Delete Speed Dial
3Print Speed Dial List
hp officejet 4100 series
chapter 6
30
7
31
maintain your hp officejet
This section provides instructions for keeping your HP Officejet in top working condition Perform these maintenance procedures as necessary
clean the glassDirty glass from dust smudges hair and so on slows down performance and affects the accuracy of features such as Fit to Page and Copy
1 Turn off the unit unplug the power cord and raise the scanner lid
2 Clean the glass with a soft cloth or sponge slightly moistened with a nonabrasive glass cleaner
Caution Do not use abrasives acetone benzene or carbon tetrachloride on the glass these can damage it Do not place liquids directly on the glass They may seep under it and damage the unit
3 Dry the glass with a chamois or cellulose sponge to prevent spotting
hp officejet 4100 series
chapter 7
32
clean the white stripMinor debris can accumulate on the white strip located underneath the scannerrsquos lid
1 Turn off the unit unplug the power cord and raise the scanner lid
2 Clean the white strip with a soft cloth or sponge slightly moistened with a mild soap and warm water
3 Wash the strip gently to loosen debris do not scrub the strip
4 Dry the strip with a chamois or soft cloth
Caution Do not use paper-based wipes as these may scratch the strip
5 If this does not clean the strip well enough repeat the previous steps using isopropyl (rubbing) alcohol and wipe the strip thoroughly with a damp cloth to remove any residual alcohol
clean the exterior Use a soft damp lint-free cloth to wipe dust smudges and stains off the case The interior of the unit does not require cleaning Keep fluids away from the interior of the unit as well as the front panel
work with print cartridgesTo ensure the best print quality from your HP Officejet you will need to perform some simple maintenance procedures and when prompted by a front-panel message replace the print cartridges
print a self-test reportIf you are experiencing problems with printing before cleaning or replacing the print cartridges you should print a Self-Test Report This report provides useful information about your print cartridges including status information
1 Press Setup
2 Press 1 then press 4This selects Print Report and then selects Self-Test Report
3 Press Start Black or Start ColorA Self-Test Report is printed for your HP Officejet
handle print cartridgesBefore you replace or clean a print cartridge you should know the part names and how to handle the print cartridge
reference guide
maintain your hp officejet
33
replace the print cartridgesFront-panel messages appear to let you know that you should replace your print cartridges
See order print cartridges on the back cover for information on ordering replacement print cartridges
1 Turn on the unit then lift open the print cartridge access doorThe print carriage moves into view
2 After the carriage stops moving push down on the print cartridge down to release it and then pull it toward you out of its slot
Plastic tape with pink tab(must be removed)
Copper contactsInk nozzles under tape
Do not touch the copper contacts or the ink nozzles
print cartridge access door
hp officejet 4100 series
chapter 7
34
Note It is normal to see ink build-up in the print cartridge slots
3 Remove the new print cartridge from its packaging and being careful to touch only the bright pink plastic tab gently remove the plastic tape to uncover the ink nozzles
Caution Do not touch the copper contacts or ink nozzles
Once you have removed the plastic tape install the print cartridge immediately to prevent the ink from drying in the nozzles
4 Push the new print cartridge into the appropriate slot at a slight angle until it clicks into place
Caution Do not attempt to push the cartridge straight into the slot It must slide in at a slight angle
The tri-color print cartridge goes on the left and the black cartridge goes on the right
5 Close the print cartridge access door
reference guide
maintain your hp officejet
35
align the print cartridgesThe HP Officejet prompts you to align cartridges every time you install or replace a print cartridge Aligning the cartridges ensures high-quality output
To align the print cartridges when prompted
1 Press Enter on the front panelAn align cartridges (test pattern) page prints
2 Load the align cartridges page face down in the ADF between the paper-width guides and press the Enter button again
3 Recycle or discard the page
To align the cartridges at any other time
1 Press Setup
2 Press 5 then press 2This selects the Maintenance menu and then selects the Align Print Cartridge option
3 Press EnterAn align cartridges (test pattern) page prints
4 Load the align cartridges page face down in the ADF between the paper-width guides and press the Enter button again
5 Recycle or discard the page
clean the print cartridgesUse this feature when the Self-Test Report shows streaking or white lines through any of the colored bars Do not clean print cartridges unnecessarily This wastes ink and shortens the life of the ink nozzles
1 Press Setup
2 Press 5 then press 1This selects the Maintenance menu and then selects the Clean Print Cartridge optionA page of patterns is printed The cartridges are cleaned Recycle or discard the pageIf copy or print quality still seem poor after you clean the print cartridges replace the print cartridge that is affected
restore factory defaultsYou can restore the original factory settings to what they were when you purchased your HP Officejet Choosing to restore your factory defaults restores all settings except date information and any scan settings you may have set
You can perform this process from the front panel only
1 Press Setup
2 Press 5 then press 3This selects Maintenance and then selects Restore Factory DefaultsThe factory default settings are restored
hp officejet 4100 series
chapter 7
36
set scroll speedThe Scroll Speed option lets you control the rate that text messages appear in the front-panel display You can choose Normal Fast or Slow The default is Normal
1 Press Setup
2 Press 5 then press 6This selects Maintenance and then selects Set Scroll Speed
3 Press until the desired speed appears then press Enter
set the prompt delay timeThe Prompt Delay option lets you control the amount of time before a message is displayed in the front-panel display You can choose Normal Fast or Slow The default is Normal
1 Press Setup
2 Press 5 then press 7This selects Maintenance and then selects Set Prompt Delay Time
3 Press until the delay time appears then press Enter
self-maintenance sounds During the life of your product you may hear various mechanical sounds This is a normal part of your unitrsquos self-maintenance
reference guide
maintain your hp officejet
37
setup menu optionsThe following options are available from the Setup button
1Last Transaction
2Fax Log
3Speed Dial List
4Self-Test Report
5Automatic Reports Setup
1Print Report
Use Setup to display the Print Report Speed Dial Setup Basic Fax Setup Advanced Fax Setup and Maintenance options
Press and to move to the setting you wantPress Enter to select the displayed setting
1Clean Print Cartridges
2Align Print Cartridges
3Restore Factory Defaults
4Reprint Faxes in Memory
5Set Language amp CountryRegion
6Set Scroll Speed
7Set Prompt Delay Time
5Maintenance2Speed Dial Setup
3Basic Fax Setup
4Advanced Fax Setup
1Individual Speed Dial
2Delete Speed Dial
3Print Speed Dial List
1Date and Time
2Fax Header
3Rings to Answer
4 Paper Size
5Tone or Pulse Dialing
6Ring and Beep Volume
7Fax Forwarding Black Only
1Automatic Reports Setup
2Answer Ring Pattern
3Busy Redial
4No Answer Redail
5Automatic Reduction
6Backup Fax Reception
7Error Correction Mode
hp officejet 4100 series
chapter 7
38
8
39
additional setup information
During the installation of the HP Officejet software a number of windows are displayed You should see the following
bull Installingbull Copying files bull A request to plug in the HP Officejetbull Green OK and check markbull Request to restart your computer (may not occur in all cases)bull Registration
If you did not see all of these windows there may be a problem with the installation Verify the following
bull The HP Director contains six icons (double-click the HP Director icon on the desktop)
bull The HP Officejet is listed in the Printers dialog boxbull There is an icon for the HP Officejet in the System Tray that indicates the
HP Officejet is ready
If the HP Director does not show six icons you may need to wait a few minutes for the HP Officejet to connect to your computer
possible installation problemsIf nothing appears on your computer screen after you insert the HP Officejet 4100 Series CD-ROM into your computerrsquos CD-ROM drive
1 From the Start menu choose Run
2 In the Run dialog box enter dsetupexe (if your CD-ROM drive is not assigned to drive letter d use the appropriate drive letter) then click OK
If the HP Director does not contain six icons do the following
bull Verify that the front-panel cover is attached then unplug the HP Officejet and plug it in again
bull Verify that the USB and power cables are plugged inndash Unplug the USB cable and plug it in againndash Do not attach the USB cable to a keyboard or nonpowered hubndash Verify that the USB cable is 3 meters or less in lengthndash If you have several USB devices attached to your computer you may
want to unplug the others during the installation
Note AppleTalk is not supported
bull Unplug the HP Officejet from the wall and plug it in againbull Restart your computer
hp officejet 4100 series
chapter 8
40
On Windows check the System Tray for applications that are running in the background and close them before restarting your computer
remove and reinstall your hp officejet softwareIf six icons do not appear in the Director you may need to uninstall and re-install the software Do not simply delete the HP Officejet program files from your hard drive Be sure to remove them properly using the uninstall utility provided in the HP Officejet program group
to uninstall from a Windows computer
1 Disconnect your HP Officejet from your computer
2 On the Windows taskbar click Start choose Programs or All Programs (XP) choose Hewlett-Packard choose hp officejet 4100 series then choose uninstall software
3 Follow the directions on the screenBe sure to disconnect your HP Officejet
4 If you are asked whether you would like to remove shared files click NoOther programs that use these files may not work properly if the files are deleted
5 After the program finishes removing the software disconnect your HP Officejet and restart your computer
Note It is important that you disconnect your HP Officejet before restarting your computer
6 To reinstall the software insert the HP Officejet 4100 Series CD-ROM into your computerrsquos CD-ROM drive and follow the instructions that appear
7 After the software is installed connect and turn on your HP Officejet following the onscreen instructions and the instructions in your Setup PosterAfter connecting and turning on your HP Officejet you may have to wait several minutes for all of the Plug and Play events to completeWhen the software installation is complete you will see a Status Monitor icon in the System Tray
8 To verify that the software is properly installed double-click on the HP Director icon on the desktop If the HP Director shows six icons the software has been properly installed
to uninstall from a Macintosh computer
1 Disconnect your HP Officejet from your computer
2 Double-click on ApplicationsHP All-in-One Software folder
reference guide
additional setup information
41
3 Double-click on HP Uninstaller
4 Follow the directions that appear on the screen
5 After the program finishes removing the software disconnect your HP Officejet and restart your computer
6 To reinstall the software insert the HP Officejet 4100 Series CD-ROM into your computerrsquos CD-ROM drive
Note When re-installing the software follow the instructions on the Setup Poster Do not connect the HP Officejet to your computer until after you have completed the software installation
7 On the desktop open the CD-ROM double-click on hp all-in-one installer and follow the instructions that appear
connect your hp officejet to a phone modem or answering machine
The HP Officejet can share a phone line with a phone a modem or an aswering machine When sharing a phone line with an answering machine the HP Officejet will answer fax calls and direct voice calls to the answering machine
Note For information on connecting your HP Officejet to your computer and phone line refer to the Setup Poster that came with your unit
to connect your hp officejet to a phone modem or answering machine
1 Remove the white plastic stopper from connector 2 on the back of the HP Officejet
To connect more than one device to connector 2 on the HP Officejet you must purchase a Y-splitter and plug it into connector 2
2 Connect the phone cord from the phone modem or answering machine to connector 2 (or Y-splitter)
Caution Do not use the phone cord that came with the HP Officejet for this purpose That phone cord must connect connector 1 on the HP Officejet to the wall jack for your phone system See the Setup Poster for details
3 If you are connecting an answering machine see set the number of rings before answering on page 21 for instructions on setting the number of rings correctly or change the answer ring pattern (distinctive ringing) on page 26 for information on incoming ring patterns
4 If you are connecting a modem turn off its fax-receive feature
connector 2 on the HP Officejet
connector 1 on the HP Officejet
hp officejet 4100 series
chapter 8
42
additional troubleshooting helpYou may want to refer to the readme file for more information on possible installation problems On Windows you can access the readme file from the Start button on the taskbar select Programs Hewlett-Packard hp officejet 4100 series View the Readme File On Macintosh you can access the readme file by double-clicking on the icon located in the top-level folder of the HP Officejet software CD-ROM
The readme file provides more information including
bull Using the Re-install utility after a failed installation to return your PC to a state that will allow the HP Officejet to be re-installed
bull Using the Re-install utility on Windows 98 to recover from a Composite USB System Driver missing errorThis error may occur if the hardware is installed prior to installing the software After running the Re-install utility reboot your PC and install the HP Officejet software before connecting the HP Officejet to your computer
You can also find more information on this website
wwwhpcomsupport
9
43
technical information
Additional specifications information can be found in the HP Photo amp Imaging Help in the hp officejet 4100 series section
physical specifications
power specificationsbull Power consumption 75W maximumbull Source (Input Voltage) 100 to 240 VAC groundedbull Input Frequency 50 to 60 Hzbull Current 1A maximum
regulatory informationAdditional regulatory information can be found in the HP Photo amp Imaging Help The information in this section supercedes information in the HP Photo amp Imaging Help
doc statement deacuteclaration de conformiteacute (Canada)Le preacutesent appareil numeacuterique neacutemet pas de bruit radioeacutelectrique deacutepassant les limites applicables aux appareils numeacuteriques de la classe B prescrites dans le Regraveglement sur le brouillage radioeacutelectrique eacutedicteacute par le ministegravere des Communications du CanadaThis digital apparatus does not exceed the Class B limits for radio noise emissions from digital apparatus set out in the Radio Interference Regulations of the Canadian Department of Communications
notice to users of the Canadian telephone networkThis equipment meets the applicable Industry Canada Terminal Equipment Technical Specifications This is confirmed by the registration number The abbreviation IC before the registration number signifies that registration was performed based on a Declaration of Conformity indicating that Industry Canada technical specifications were met It does not imply that Industry Canada approved the equipment
Note The Ringer Equivalence Number (REN) assigned to each terminal device provides an indication of the maximum number of terminals allowed to be connected to a telephone interface The termination on an interface may consist of any combination of devices subject only to the requirement that the sum of the Ringer Equivalence Numbers of all the devices does not exceed 5
The REN for this product is 03B based on FCC Part 68 test results
height width depth weight (without print cartridges)
with paper trays and ADF closed
718 in (1824 cm) 1676 in (4258 cm) 825 in (2096 cm) 75 lbs (34 kg)
with ADF and paper tray extended
1030 in (2615 cm) 1676 in (4258 cm) 1854 in (4709 cm) 75 lbs (34 kg)
hp officejet 4100 series
chapter 9
44
notice to all users of the European Economic Area (EEA)
This product is designed to interwork with the analogue telephone networks in the following countriesregions
Network compatibility depends on customer selected settings which must be reset to use the equipment on a telephone network in a countryregion other than where the product was purchased Contact the vendor or Hewlett-Packard Company if addition product support is necessaryThis equipment has been certified by the manufacturer in accordance with Directive 19995EC (annex II) for Pan-European single-terminal connection to the public switched telephone network (PSTN) However due to differences between the individual PSTNs provided in different countriesregions the approval does not of itself give an unconditional assurance of successful operation on every PSTN network termination pointIn the event of problems you should contact your equipment supplier in the first instance
geraumluschemissionLpA lt 70 dBam Arbeitsplatzim Normalbetriebnach DIN 45635 T 19
notice to Korean customers
Germany UK Netherlands
France Spain Italy
Belgium Luxembourg Sweden
Austria Denmark Ireland
Norway Finland Switzerland
Greece Portugal
10
45
hp support
This section explains the support services information provided by Hewlett-Packard If you are unable to find the answer you need in the printed or onscreen documentation supplied with your product you can contact one of the HP support services listed in the following pages Some support services are available only in the US and Canada while others are available in many countriesregions worldwide If a support service number is not listed for your countryregion contact your nearest authorized HP dealer for help
get support and other information from the internetIf you have Internet access you can get help from the following HP website
wwwhpcomsupportThe Web site offers technical support drivers supplies and ordering information
hp customer supportSoftware programs from other companies may be included with your HP Officejet If you experience problems with any of those programs you will receive the best technical assistance by calling the experts at that companyIf you need to contact HP Customer Support do the following before you call
1 Make sure thata Your unit is plugged in and turned onb The specified print cartridges are installed correctlyc The recommended paper is properly loaded in the input tray
2 Reset your unita Turn off the unit using the On button located on the unitrsquos front panelb Unplug the power cord from the back of the unitc Plug the power cord back into the unitd Turn on the unit using the On button
3 For more information check the HP website at wwwhpcomsupport
4 If you are still experiencing problems and need to speak with an HP Customer Support Representativendash Have your service ID and serial number ready To display your service ID and
serial number on the front panel do the following Press Enter and Start Color at the same time until the service ID appears in the front-panel display From this display press the right arrow until the serial number displays
ndash Print a Self-Test Report See print a self-test report on page 32 for information on printing this report
ndash Make a color copyndash Be prepared to describe your problem in detail
5 Call HP Customer Support Be near your unit when you call
call in the US during warrantyCall (208) 323-2551 This service is free during the warranty period however your standard long-distance phone charges still apply A fee may apply outside the warranty period
hp officejet 4100 series
chapter 10
46
US phone support is available in both English and Spanish languages 24 hours a day 7 days a week (days and hours of support may change without notice)
call elsewhere in the worldThe numbers listed below are current as of the printing date of this guide For a list of current international HP Support Service numbers visit this address and choose your own countryregion or language
wwwhpcomsupportFor Korea you can also visit this address
httpwwwhpcokrYou can call the HP support center in the following countriesregions If your countryregion is not listed contact your local dealer or nearest HP Sales and Support Office to find out how to obtain servicesSupport service is free during the warranty period however your standard long-distance phone charges will apply In some cases a flat fee per single incident will also applyFor phone support in Europe please check for the details and conditions of phone support in your countryregion by consulting the following Web site
wwwhpcomsupportAlternatively you can ask your dealer or call HP at the phone number indicated in this booklet As part of our constant efforts to improve our phone support service we advise you to check our website on a regular basis for new information regarding service features and delivery
countryregion hp technical support countryregion hp technical support
Algeria1 +213 (0) 61564 543 Malaysia 1-800-805405
Argentina 0810-555-5520 Mexico 01-800-472-6684
Australia +61 3 8877 80001902 910 910
Mexico (Mexico City) 5258-9922
Austria +43 (0) 810 00 6080 Morocco1 +212 22404 747
Bahrain (Dubai) 800 728 Netherlands +31 (0) 20 606 8751
Belgium (Dutch) +32 (0) 2 626 8806 New Zealand 0800 441 147
Belgium (French) +32 (0) 2 626 8807 Norway +47 22 11 6299
Brazil (Grande Sao Paulo) (11) 3747 7799 Oman +971 4 883 8454
Brazil (Demais Localidades) 0800 157751 Palestine +971 4 883 8454
Canada during warranty (905) 206 4663 Panama 001-800-7112884
Canada post-warranty(per-call charge)
1-877-621-4722 Peru 0-800-10111
Caribbean amp Central America
1-800-711-2884 Philippines 632-867-3551
Chile 800-360-999 Poland +48 22 865 98 00
China 86 10 6868 7980 Portugal +351 21 3176333
Colombia 9-800-114-726 Puerto Rico 1-877-2320-589
Costa Rica 0-800-011-0524 Qatar +971 4 883 8454
Czech Republic +420 (0) 261307310 Romania +40 1 315 44 42or local 01 3154442
reference guide
hp support
47
call in Australia post-warrantyIf your product is not under warranty you can call 03 8877 8000 A per-incident out-of-warranty support fee of $2750 (inc GST) will be charged to your credit card You can also call 1902 910 910 ($2750 charged to your phone account) from 900 AM to 500 PM Monday through Friday (Charges and support hours are subject to change without notice)
prepare your unit for shipmentIf after contacting HP Customer Support or returning to the point of purchase you are requested to send your unit in for service please follow the power off and rebox steps below to avoid further damage to the HP product
Denmark +45 39 29 4099 Russian Federation Moscow +7 095 797 3520
Ecuador 1800-711-2884 Russian Federation St Petersburg
+7 812 346 7997
Europe (English) +44 (0) 207 512 5202 Saudi Arabia +800 897 14440
Egypt 02 532 5222 Singapore 65 6272 5300
Finland +358 (0) 203 47 288 Slovakia +421 (0) 2 682 08080
France (034 Euromin) +0892 69 60 22 South Africa (inside RSA) 086 000 1030
Germany (012 Euromin) +49 (0) 180 52 58 143 South Africa (inside RSA) +27-11 258 9301
Greece +30 1060 73 603 Spain +34 902 321 123
Hong Kong (SAR) +85 (2) 3002 8555 Sweden +46 (0)8 619 2170
Guatemala 1800-995-5105 Switzerland 2 +41 (0) 84 880 1111
Hungary +36 (0) 1 382 1111 Taiwan +886-2-2717-00550800 010 055
India 1-600-11226791 11 682 6035
Thailand +66 (2) 661 4000
Indonesia 62-21-350-3408 Tunisia1 +216 1891 222
Ireland +353 (0) 1 662 5525 Turkey +90 216 579 7171
Israel +972 (0) 9 8304848 Ukraine +7 (380-44) 490-3520
Italy +39 (0) 226410350 United Arab Emirates +971 4 883 8454
Japan 0570 000 511+81 3 3335 9800
United Kingdom +44 (0) 207 512 52 02
Jordan +971 4 883 8454 Venezuela 0800-47468368 or800-477-7777
Korea (Seoul) +82 (2) 3270 0700 Venezuela (Caracas) (502) 207-8488
Korea (outside Seoul) 080 999 0700 Vietnam 84 (0) 8 823 4530
Kuwait +971 4 883 8454 Yemen +971 4 883 8454
Lebanon +971 4 883 8454
1 This Call Center supports French speaking customers from the following countriesregions Morocco Tunisia and Algeria
2 This Call Center supports German French and Italian speaking customers in Switzerland
countryregion hp technical support countryregion hp technical support
hp officejet 4100 series
chapter 10
48
Note When transporting your HP Officejet make sure that the pens have been removed the HP Officejet has been properly shut down by pressing the power button and you have allowed time for the carriage to return to the service station and for the scanner to return to its parked position
1 Turn on the unitDisregard steps 1 through 6 if your unit will not turn on and the print carriage is in the home position You will not be able to remove the print cartridges Proceed to step 7
2 Open the print cartridge access doorThe print carriage moves into view
3 See replace the print cartridges on page 33 for information on removing the print cartridges
Caution Remove both print cartridges Failure to do so may damage your unit
4 Place the print cartridges in an airtight bag so they will not dry out and put them aside (do not send them with the unit unless instructed to by the HP customer support call agent)
5 Turn off the unit
6 Close the print cartridge access door
7 Remove the front panel cover as followsa Grasp the front of the front panel cover with two hands as shownb Firmly lift the front panel cover to unsnap it from the unit
8 Retain the front panel cover Do not return the front panel cover with the unit
9 If available pack the unit for shipment using the original packing materials or the packaging materials that come with your exchange unit
If you do not have the original packaging materials please use other adequate packaging materials Shipping damage caused by improper packaging andor improper transportation is not covered under the warranty
reference guide
hp support
49
10 Place the return shipping label on the outside of the box
11 Include the following items in the boxndash A complete description of symptoms for service personnel (samples of print
quality problems are helpful)ndash A copy of the sales slip or other proof of purchase to establish the warranty
coverage periodndash Your name address and a phone number where you can be reached during
the day
hp distribution centerTo order HP Officejet software a copy of the printed Reference Guide a setup poster or other customer-replaceable parts do one of the following bull In the US or Canada call (208) 323 2551bull Visit this website
httpwwwhpcomcposupportsoftwarehtml
hp officejet 4100 series
chapter 10
50
11
51
warranty information
HP Officejet 4100 seriesDuration of Limited Warranty (hardware and labor) 1 YearDuration of Limited Warranty (CD media) 90 DaysDuration of Limited Warranty (print cartridges) Until the HP ink is depleted or the ldquoend of warrantyrdquo date printed on the cartridge has been reached whichever occurs first
warranty service
express serviceTo obtain HP express repair service the customer must contact an HP service office or an HP Customer Support Center for basic troubleshooting first See hp customer support on page 45 for steps to take before calling Customer SupportIf a customer unit needs a minor part replacement and these parts can normally be replaced by the customer the customer-replaceable components may be serviced through expedited part shipment In this event HP will prepay shipping charges duty and taxes provide telephone assistance on replacement of the component and pay shipping charges duty and taxes for any part that HP asks to be returnedThe HP Customer Support Center may direct customers to designated authorized service providers who are certified by HP to service the HP product
warranty upgradesUpgrade your standard factory warranty to a total of three years with the HP SUPPORTPACK Service coverage begins on product purchase date and the pack must be purchased within the first 180 days of product purchase This program offers phone support from 600 AM to 1000 PM Mountain Standard Time (MST) Monday through Friday and 900 AM to 400 PM (MST) on Saturdays If during your technical support call it is determined that you need a replacement product then HP will ship you this product next business day free of charge Available in US onlyFor more information please call 1-888-999-4747 or visit the following HP Web site
httpwwwhpcomgohpsupportpack
Outside the US please call your local HP Customer Support office See call elsewhere in the world on page 46 for a list of international Customer Support numbers
returning your hp officejet for serviceBefore returning your HP Officejet for service you must call HP Customer Support See hp customer support on page 45 for steps to take before calling Customer Support
hewlett-packard limited global warranty statement
extent of limited warrantyHewlett-Packard (ldquoHPrdquo) warrants to the end-user customer (ldquoCustomerrdquo) that each HP Officejet 4100 Series product (ldquoProductrdquo) including related software accessories media and supplies shall be free from defects in material and workmanship for the duration which begins on the date of purchase by the Customer
hp officejet 4100 series
chapter 11
52
For each software Product HPrsquos limited warranty applies only to a failure to execute programming instructions HP does not warrant that the operation of any Product shall be uninterrupted or error freeHPrsquos limited warranty covers only those defects which arise as a result of normal use of a Product and does not cover any other problems including those which arise as a result of (a) improper maintenance or modification (b) software accessories media or supplies not provided or supported by HP or (c) operation outside the Productrsquos specificationsFor any hardware Product the use of a non-HP print cartridge or a refilled print cartridge does not affect either the warranty to the Customer or any HP support contract with the Customer However if Product failure or damage is attributable to the use of a non-HP or refilled print cartridge HP shall charge its standard labor and materials charges to service the Product for the failure or damageIf HP receives during the applicable warranty period notice of a defect in any Product HP shall either repair or replace the defective Product at HPrsquos option Where labor charges are not covered by HPrsquos limited warranty repairs shall be at HPrsquos standard charges for laborIf HP is unable to repair or replace as applicable a defective Product which is covered by HPrsquos warranty HP shall within a reasonable time after being notified of the defect refund the purchase price for the ProductHP shall have no obligation to repair replace or refund until the Customer returns the defective Product to HPAny replacement product may be either new or like-new provided that it has functionality at least equal to that of the Product being replacedHP products including each Product may contain remanufactured parts components or materials equivalent to new in performanceHPs limited warranty for each Product is valid in any countryregion or locality where HP has a support presence for the Product and where HP has marketed the Product The level of warranty service may vary according to local standards HP shall have no obligation to alter the form fit or function of the Product in order to make it operate in a countryregion or locality for which the Product was never intended to operate
limitations of warrantyTO THE EXTENT ALLOWED BY LOCAL LAW NEITHER HP NOR ITS THIRD PARTY SUPPLIERS MAKE ANY OTHER WARRANTY OR CONDITION OF ANY KIND WHETHER EXPRESS OR IMPLIED WITH RESPECT TO THE COVERED HP PRODUCTS AND SPECIFICALLY DISCLAIM THE IMPLIED WARRANTIES OR CONDITIONS OF MERCHANTABILITY SATISFACTORY QUALITY AND FITNESS FOR A PARTICULAR PURPOSE
limitations of liabilityTo the extent allowed by local law the remedies provided in this Limited Warranty Statement are the Customerrsquos sole and exclusive remediesTO THE EXTENT ALLOWED BY LOCAL LAW EXCEPT FOR THE OBLIGATIONS SPECIFICALLY SET FORTH IN THIS LIMITED WARRANTY STATEMENT IN NO EVENT SHALL HP OR ITS THIRD PARTY SUPPLIERS BE LIABLE FOR DIRECT INDIRECT SPECIAL INCIDENTAL OR CONSEQUENTIAL DAMAGES WHETHER BASED ON CONTRACT TORT OR ANY OTHER LEGAL THEORY AND WHETHER ADVISED OF THE POSSIBILITY OF SUCH DAMAGES
local lawThis Limited Warranty Statement gives the Customer specific legal rights The Customer may also have other rights which vary from state to state in the United States from province to province in Canada and from countryregion to countryregion elsewhere in the world
reference guide
warranty information
53
To the extent this Limited Warranty Statement is inconsistent with local law this Statement shall be deemed modified to be consistent with such local law Under such local law certain disclaimers and limitations of this Statement may not apply to the Customer For example some states in the United States as well as some governments outside the United States (including provinces in Canada) mayPreclude the disclaimers and limitations in this Statement from limiting the statutory rights of a consumer (eg the United Kingdom)Otherwise restrict the ability of a manufacturer to enforce such disclaimers or limitations orGrant the Customer additional warranty rights specify the duration of implied warranties which the manufacturer cannot disclaim or not allow limitations on the duration of implied warrantiesFOR CONSUMER TRANSACTIONS IN AUSTRALIA AND NEW ZEALAND THE TERMS IN THIS LIMITED WARRANTY STATEMENT EXCEPT TO THE EXTENT LAWFULLY PERMITTED DO NOT EXCLUDE RESTRICT OR MODIFY AND ARE IN ADDITION TO THE MANDATORY STATUTORY RIGHTS APPLICABLE TO THE SALE OF THE COVERED HP PRODUCTS TO SUCH CUSTOMERS
hp officejet 4100 series
chapter 11
54
55
index
Numerics4-by-6 inch photo paper
load 10 12
AADF 7adjust
volume for fax 25align print cartridges 35Answer Ring Pattern 26automatic document feeder 7automatic reduction
fax 25
Bbest copy quality 13busy number
redial automatically 23
Ccancel
scan 18scheduled fax 21
cartridgesalign 35replace 33
cleanprint cartridges 35the exterior 32the glass 31white strip 32
colorenhance 14fax 20fax from front panel 20
contrastchange for fax 23photo color 14
copy 13 16change default settings 15enhance 14fit to page 16lighten or darken 14menu options 16number of copies 14photo 15quality 13reduce or enlarge 14settings 13 15
speed 13tutorial 4
Customer Support 45web site 45
Ddarken a copy 14date
setting 27default settings
restore 35director review 4distinctive ringing 26
Eenhance copies 14enlarge copy 14 16envelopes
load 9Error Correction Mode
(ECM) 25
Ffactory defaults
restore 35fast copy quality 13fax 28
adjust volume 25automated reports 22cancel fax forward 24cancel scheduled 21change Answer Ring
Pattern 26change contrast 23change resolution 22change settings 19control appearance 22create individual speed-dial
settings 26delete speed-dial
settings 27distinctive ringing 26Error Correction Mode
(ECM) 25forward faxes 24header 27in color 20in color from front panel 20manual reports 22
menu 29print reports 22receive 21receive manually 21redial busy or unanswered
number 23schedule 20send from front panel 19set automatic reduction 25set date and time 27set the number of rings 21settings 27 28setup menu options 29speed dials 19test 28
fit to page 16forward faxes 24
cancel 24front panel
display scroll speed 36enter text 28send a fax 19setting prompt delay 36tutorial 3
Gglass
cleaning 31greeting cards
load 11
Hhelp 1HP Customer Support 45
calling 45HP Director 4HP distribution center 49HP Officjet
preparing to ship 47HP papers
tips on loading 11
Iindividual speed-dial settings
create 26ink cartridges see print
cartridgesinkjet paper
load 11
index
hp officejet 4100 series56
Kkeypad
enter text 28
Llabels
load 12lighten copies 14load
change the paper type 12envelopes 9original in ADF 7paper 7photo paper 10 12postcards 10 12print cartridges 33set the paper size 12tips 11
Mmaintenance
align print cartridges 35clean print cartridges 35clean the exterior 32clean the glass 31clean the white strip 32normal sounds 36replace print cartridges 33restore factory defaults 35self-maintenance
sounds 36self-test report 32
menuscopy options 16fax 29fax setup 29maintenance 37print reports 37
Nnormal copy quality 13number of copies
set 14number of rings
set 21
Oorder print cartridges 60originals
load in ADF 7output tray 8
Ppaper
change default size for copy 12
change the type 12load 7recommended 7set the size 12tips on loading 11
paper size change for copy 12
paper trayload 7
phone numbers support services 45
photo paperload 10 12
photoscopy 15enhance copy 14
physical specifications 43postcards
load 10 12power
specifications 43print
envelopes 9fax reports 22self-test report 32
print cartridgesalign 35clean 35handling 32replace 33
prompt delaysetting 36
Qquick start
review the director 4use with a computer 4
Rreceive
fax 21redial
busy or unanswered number 23
reduce copy 14 16regulatory information 43reinstall software 40reports
generate automatically for fax 22
generate manually for fax 22
print 22self-test 32
resolution
change for fax 22restore factory settings 35returning your HP Officejet for
service 51
Sscan
from front panel 17stop 18
schedule a fax 20scroll speed
setting 36self-test report 32send
cancel forward faxes 24color fax 20color fax from front
panel 20forward faxes 24
settingscopy 13 15fax 27 28prompt delay 36scroll speed 36
setupadditional information 39menu 29
shippingyour HP Officejet 47
softwareremove and reinstall 40
soundsself-maintenance 36
specificationsphysical 43power 43
speed dials 19create individual
settings 26delete settings 27
stopscan 18scheduled fax 21
subscriber identification code 27
support services 45
Ttelephone line
multiple numbers 26telephone numbers 45text
enhance 14enter from front panel 28
time
index
reference guide 57
setting 27transparency film
recommended 7tips on loading 11
troubleshootingremove and reinstall
software 40T-shirt Transfer Iron-On
load 11tutorial
front panel 3make a copy 4
Uunanswered number
redial automatically 23
Vvolume
adjust 25
Wwarranty 45
service 51statement 51upgrades 51
white stripcleaning 32
hp officejet 4100 series
chapter 12
58
declaration of conformityAccording to ISOIEC Guide 22 and EN 45014
Manufacturerrsquos Name and Address
Hewlett-Packard Company 16399 West Bernardo Drive San Diego CA 92127-1899 USA
declares that the product
Product Name hp officejet 4100 series (Q1608A)
Model Number(s) officejet 4110 (Q1609A) officejet 4110xi (Q1610A) officejet 4110v (Q1611A) officejet 4105 (Q1612A) officejet 4105z (Q1613A) officejet 4115 (Q1614A)
Product Options All
conforms to the following Product Specifications
Safety EN609501992 +A1 A2 A3 A4 amp A11
IEC609501991 +A1 A2 A3 amp A4
UL1950CSA 222 No 950 3rd Edn 1995
NOM-019-SCFI-1993
EMC CISPR221993 +A1 amp A2 EN550221994 +A1 amp A2 -Class B
CISPR241997EN550241998
IEC 61000-3-21995 EN61000-3-21995
IEC 61000-3-31994 EN61000-3-31995
ASNZS 3548 1992
CNS13438 1997
FCC Part 15-Class B ICES-003 Issue 2 VCCI-2
GB 9254-1998
Telecom TBR21 1998
Supplementary Information
The Product herewith complies with the requirements of the Low Voltage Directive 7323EEC the EMC Directive 89336EEC and the RampTTE Directive 19995EC (ANNEX II) carries the CE marking accordingly
European Contact for regulatory topics only Your local Hewlett-Packard Sales and Service Office orHewlett-Packard GmbH
Department HQ-TRE Herrenberger Strasse 140 D-71034 Boumlblingen Germany (FAX + 49-7031-14-3143)
order mediaTo order media such as HP Premium Inkjet Paper HP Premium Inkjet Transparency Film HP Iron-On T-shirt Transfer paper or HP Greeting Cards go to
wwwhpshoppingcom
For orders in countries other than the US and Canada select other countries then click Yes to leave hpshoppingcom From this website you can access hpshoppingcom for your specific language or countryregion
order print cartridges
If you have Internet access you can get more information from the HP website at
wwwhpcomsupport
print cartridges hp reorder number
HP black print cartridge 56 19 ml black print cartridge
HP color print cartridgeHP tri-color print cartridge
57 17 ml color print cartridge28 8 ml color print cartridge
Visit the hp officejet information centerIt has everything you need to get the most value from your HP Officejet
bull Technical Supportbull Supplies and Ordering Informationbull Project Tipsbull Ways to Enhance Your Product
wwwhpcomsupport
copy 2003 Hewlett-Packard Company
Printed in the USA Mexico Germany Singapore or China
Q1608-90163Q1608-90163
Q1608-90163

reference guide
use the fax features
25
Follow the steps in edit or cancel fax forwarding on page 24 When Forwarding is ON 1=Edit 2=Cancel appears on the display press 2 to cancel fax forwarding
use error correction modeError Correction Mode (ECM) eliminates data lost due to poor phone lines by detecting errors that occur during transmission and automatically requesting retransmission of the erroneous portion Phone charges are unaffected or may even be reduced on good phone lines On poor phone lines ECM increases sending time and phone charges but sends the data much more reliably Turn ECM off (the default setting is on) only if it increases phone charges substantially and you can accept poorer quality in exchange for reduced charges
to change the ECM setting from the front panel
1 Press Setup
2 Press 4 then press 7This selects the Advanced Fax Setup menu then selects the Error Correction Mode option
3 Press to switch between On and Off
4 Press Enter to accept the setting you selected
set automatic reductionThis setting determines what your HP Officejet does if it receives a fax that is too large for the default paper size With this setting on (the default) the image is reduced so that it fits on one page With this feature off information that doesnrsquot fit on the first page is printed on a second page
1 Press Setup
2 Press 4 then press 5This selects the Advanced Fax Setup menu then selects the Automatic Reduction option
3 Press to switch between On and Off
4 Press Enter to accept the setting you selected
adjust the volumeYour HP Officejet provides three levels for adjusting the ring and speaker volume The ring volume is the volume of the phone ringer The speaker volume is the volume of everything else such as the dial and fax tones The default setting is Soft
1 Press Setup
2 Press 3 then press 6This selects the Basic Fax Setup menu then selects the Ring and Beep Volume option
3 Press to select one of the options Soft Loud or Off
4 Press Enter to accept the setting you selected
hp officejet 4100 series
chapter 6
26
change the answer ring pattern (distinctive ringing)Distinctive ringing is a feature offered by phone companies that allows several phone numbers to share the same line Each number has a specific ring pattern If you do not have this service use the default ring pattern which is All Rings
If you connect your HP Officejet to a line with distinctive ringing have your telephone company assign one ring pattern to voice calls and another to fax calls (double or triple rings are best for a fax number)
1 Press Setup
2 Press 4 then press 2This selects the Advanced Fax Setup menu then selects the Answer Ring Pattern option
3 Press to scroll through these options All Rings Single Rings Double Rings Triple Rings and Double amp Triple
4 When the ring pattern that the phone company established for this number appears press Enter
Tip We recommend that you use Double Rings or Triple Rings for fax
set up speed dialingThrough your HP Officejet or your computer you can assign entries to fax numbers you use often This lets you dial those numbers quickly using the front panelrsquos Speed Dial button and a one- or two-digit entry You can create up to 100 individual speed-dial entries (the maximum for some models is 70)
We recommend that you use the software to set up speed-dial settings
Note A speed-dial entry can only be associated with one phone number speed-dial groups are not supported
For more information see set up speed dialing in the hp photo amp imaging help
create individual speed-dial settingsYou can enter fax numbers that you will reuse frequently
1 Press Setup
2 Press 2 then press 1This selects the Speed Dial Setup menu then selects the Individual Speed Dial option
3 Press EnterThe first unassigned speed-dial entry appears on the display
4 Press Enter to select the displayed speed-dial entry
5 Enter the Fax Number to assign to that entry then press EnterThe fax number can be up to 50 digits in length
Tip To enter a three-second pause within a number sequence press Symbols to display a dash
6 Enter the personrsquos or companyrsquos name then press Enter
reference guide
use the fax features
27
The name is limited to 13 characters in lengthFor more information see enter text on page 28
7 After Enter Another appears press 1 (Yes) if you want to set up another number or press 2 (No) to exit
delete speed-dial settingsFollow these steps to delete an individual speed-dial entry
1 Press Setup
2 Press 2 then press 2 againThis selects Speed Dial Setup then selects Delete Speed Dial
3 Press until the individual entry that you want to delete appears then press Enter
set basic fax settings using the front panelWe recommend that you use the Fax Setup Wizard in the HP Officejet software to configure all your basic fax settings however you can also access these settings from the front panel
Note In the US regulations require that your name and phone number appear on every fax The minimum settings that we recommend are described in the following topics
set the date and timeFollow these steps to set the date and time manually
1 Press Setup
2 Press 3 then press 1This selects the Basic Fax Setup menu then selects the Date and Time option
3 Follow the prompts on the display to enter the date and time using the keypad
Tip Use only the last two digits for the year
Tip When you enter a single-digit date or time type a leading zero before the single digit for example 0345 or 08-03-02
After you are done the date and time appear on the display
Warning Cutting off power to the HP Officejet causes the selected date and time to be lost However name and fax number information is not lost
set the fax headerFollow these steps to enter your name and fax number in the header
Note In Hungary the subscriber identification code (fax header) can be set or changed only by authorized personnel For more information contact your authorized HP dealer
1 Press Setup
2 Press 3 then press 2
hp officejet 4100 series
chapter 6
28
This selects the Basic Fax Setup menu then selects the Fax Header option
3 Enter your personal or company name at the prompt Use the guidelines provided in the next section under enter text
4 Press Enter
5 Enter your fax number using the numeric keypad
6 Press Enter
enter textThe following list provides tips for entering text using the front-panel keypad
bull Press the keypad numbers that correspond to the letters of a name
bull Press a button multiple times to see a letter first in uppercase and then in lowercase
bull After the correct letter appears press and then press the number that corresponds to the next letter in the name Again press multiple times until the correct letter appears
bull To insert a space press Space ()bull To enter a symbol such as press Symbols () to scroll through the list of
available symbolsbull If you make a mistake press to clear it and then make the correct
entrybull After you are done entering text press Enter to store your entries
check for dial toneBefore using the fax features verify that the connections are correctly established
1 Press Fax
2 Listen for a dial tone
3 If you do not hear a dial tone check the connections
4 Press Cancel to hang up
ABC These letters correspond to this number and so on
2
JKL To get this character J j K k L l 5
5 Press 5 this many times 1 2 3 4 5 6 7
reference guide
use the fax features
29
fax job menuThe following options become available when the Fax button is pressed
setup menu for fax commandsThe following fax settings are available in the Setup menu
Enter Fax or Speed Dial
FineVery FinePhotoStandard
Fax Number Resolution LighterDarker
Enter a fax number or speed dialWhen the Fax button is pressed
Press and to move to the option you wantPress Enter to select the displayed setting
NoYes
Set New Defaults
Send Fax NowFax from MemorySend Fax LaterPoll to Receive
How to Fax
1Automatic Reports Setup
2Answer Ring Pattern
3Busy Redial
4No Answer Redial
5Automatic Reduction
6Backup Fax Reception
7Error Correction Mode
3Basic Fax Setup 4Advanced Fax Setup
Press Setup to display the menu options
Press and to move to the setting you wantPress Enter to select the displayed setting
1Date and Time
2Fax Header
3Rings to Answer
4Paper Size
5Tone or Pulse Dialing
6Ring and Beep Volume
7Fax Forwarding Black Only
2Speed Dial Setup
1Individual Speed Dial
2Delete Speed Dial
3Print Speed Dial List
hp officejet 4100 series
chapter 6
30
7
31
maintain your hp officejet
This section provides instructions for keeping your HP Officejet in top working condition Perform these maintenance procedures as necessary
clean the glassDirty glass from dust smudges hair and so on slows down performance and affects the accuracy of features such as Fit to Page and Copy
1 Turn off the unit unplug the power cord and raise the scanner lid
2 Clean the glass with a soft cloth or sponge slightly moistened with a nonabrasive glass cleaner
Caution Do not use abrasives acetone benzene or carbon tetrachloride on the glass these can damage it Do not place liquids directly on the glass They may seep under it and damage the unit
3 Dry the glass with a chamois or cellulose sponge to prevent spotting
hp officejet 4100 series
chapter 7
32
clean the white stripMinor debris can accumulate on the white strip located underneath the scannerrsquos lid
1 Turn off the unit unplug the power cord and raise the scanner lid
2 Clean the white strip with a soft cloth or sponge slightly moistened with a mild soap and warm water
3 Wash the strip gently to loosen debris do not scrub the strip
4 Dry the strip with a chamois or soft cloth
Caution Do not use paper-based wipes as these may scratch the strip
5 If this does not clean the strip well enough repeat the previous steps using isopropyl (rubbing) alcohol and wipe the strip thoroughly with a damp cloth to remove any residual alcohol
clean the exterior Use a soft damp lint-free cloth to wipe dust smudges and stains off the case The interior of the unit does not require cleaning Keep fluids away from the interior of the unit as well as the front panel
work with print cartridgesTo ensure the best print quality from your HP Officejet you will need to perform some simple maintenance procedures and when prompted by a front-panel message replace the print cartridges
print a self-test reportIf you are experiencing problems with printing before cleaning or replacing the print cartridges you should print a Self-Test Report This report provides useful information about your print cartridges including status information
1 Press Setup
2 Press 1 then press 4This selects Print Report and then selects Self-Test Report
3 Press Start Black or Start ColorA Self-Test Report is printed for your HP Officejet
handle print cartridgesBefore you replace or clean a print cartridge you should know the part names and how to handle the print cartridge
reference guide
maintain your hp officejet
33
replace the print cartridgesFront-panel messages appear to let you know that you should replace your print cartridges
See order print cartridges on the back cover for information on ordering replacement print cartridges
1 Turn on the unit then lift open the print cartridge access doorThe print carriage moves into view
2 After the carriage stops moving push down on the print cartridge down to release it and then pull it toward you out of its slot
Plastic tape with pink tab(must be removed)
Copper contactsInk nozzles under tape
Do not touch the copper contacts or the ink nozzles
print cartridge access door
hp officejet 4100 series
chapter 7
34
Note It is normal to see ink build-up in the print cartridge slots
3 Remove the new print cartridge from its packaging and being careful to touch only the bright pink plastic tab gently remove the plastic tape to uncover the ink nozzles
Caution Do not touch the copper contacts or ink nozzles
Once you have removed the plastic tape install the print cartridge immediately to prevent the ink from drying in the nozzles
4 Push the new print cartridge into the appropriate slot at a slight angle until it clicks into place
Caution Do not attempt to push the cartridge straight into the slot It must slide in at a slight angle
The tri-color print cartridge goes on the left and the black cartridge goes on the right
5 Close the print cartridge access door
reference guide
maintain your hp officejet
35
align the print cartridgesThe HP Officejet prompts you to align cartridges every time you install or replace a print cartridge Aligning the cartridges ensures high-quality output
To align the print cartridges when prompted
1 Press Enter on the front panelAn align cartridges (test pattern) page prints
2 Load the align cartridges page face down in the ADF between the paper-width guides and press the Enter button again
3 Recycle or discard the page
To align the cartridges at any other time
1 Press Setup
2 Press 5 then press 2This selects the Maintenance menu and then selects the Align Print Cartridge option
3 Press EnterAn align cartridges (test pattern) page prints
4 Load the align cartridges page face down in the ADF between the paper-width guides and press the Enter button again
5 Recycle or discard the page
clean the print cartridgesUse this feature when the Self-Test Report shows streaking or white lines through any of the colored bars Do not clean print cartridges unnecessarily This wastes ink and shortens the life of the ink nozzles
1 Press Setup
2 Press 5 then press 1This selects the Maintenance menu and then selects the Clean Print Cartridge optionA page of patterns is printed The cartridges are cleaned Recycle or discard the pageIf copy or print quality still seem poor after you clean the print cartridges replace the print cartridge that is affected
restore factory defaultsYou can restore the original factory settings to what they were when you purchased your HP Officejet Choosing to restore your factory defaults restores all settings except date information and any scan settings you may have set
You can perform this process from the front panel only
1 Press Setup
2 Press 5 then press 3This selects Maintenance and then selects Restore Factory DefaultsThe factory default settings are restored
hp officejet 4100 series
chapter 7
36
set scroll speedThe Scroll Speed option lets you control the rate that text messages appear in the front-panel display You can choose Normal Fast or Slow The default is Normal
1 Press Setup
2 Press 5 then press 6This selects Maintenance and then selects Set Scroll Speed
3 Press until the desired speed appears then press Enter
set the prompt delay timeThe Prompt Delay option lets you control the amount of time before a message is displayed in the front-panel display You can choose Normal Fast or Slow The default is Normal
1 Press Setup
2 Press 5 then press 7This selects Maintenance and then selects Set Prompt Delay Time
3 Press until the delay time appears then press Enter
self-maintenance sounds During the life of your product you may hear various mechanical sounds This is a normal part of your unitrsquos self-maintenance
reference guide
maintain your hp officejet
37
setup menu optionsThe following options are available from the Setup button
1Last Transaction
2Fax Log
3Speed Dial List
4Self-Test Report
5Automatic Reports Setup
1Print Report
Use Setup to display the Print Report Speed Dial Setup Basic Fax Setup Advanced Fax Setup and Maintenance options
Press and to move to the setting you wantPress Enter to select the displayed setting
1Clean Print Cartridges
2Align Print Cartridges
3Restore Factory Defaults
4Reprint Faxes in Memory
5Set Language amp CountryRegion
6Set Scroll Speed
7Set Prompt Delay Time
5Maintenance2Speed Dial Setup
3Basic Fax Setup
4Advanced Fax Setup
1Individual Speed Dial
2Delete Speed Dial
3Print Speed Dial List
1Date and Time
2Fax Header
3Rings to Answer
4 Paper Size
5Tone or Pulse Dialing
6Ring and Beep Volume
7Fax Forwarding Black Only
1Automatic Reports Setup
2Answer Ring Pattern
3Busy Redial
4No Answer Redail
5Automatic Reduction
6Backup Fax Reception
7Error Correction Mode
hp officejet 4100 series
chapter 7
38
8
39
additional setup information
During the installation of the HP Officejet software a number of windows are displayed You should see the following
bull Installingbull Copying files bull A request to plug in the HP Officejetbull Green OK and check markbull Request to restart your computer (may not occur in all cases)bull Registration
If you did not see all of these windows there may be a problem with the installation Verify the following
bull The HP Director contains six icons (double-click the HP Director icon on the desktop)
bull The HP Officejet is listed in the Printers dialog boxbull There is an icon for the HP Officejet in the System Tray that indicates the
HP Officejet is ready
If the HP Director does not show six icons you may need to wait a few minutes for the HP Officejet to connect to your computer
possible installation problemsIf nothing appears on your computer screen after you insert the HP Officejet 4100 Series CD-ROM into your computerrsquos CD-ROM drive
1 From the Start menu choose Run
2 In the Run dialog box enter dsetupexe (if your CD-ROM drive is not assigned to drive letter d use the appropriate drive letter) then click OK
If the HP Director does not contain six icons do the following
bull Verify that the front-panel cover is attached then unplug the HP Officejet and plug it in again
bull Verify that the USB and power cables are plugged inndash Unplug the USB cable and plug it in againndash Do not attach the USB cable to a keyboard or nonpowered hubndash Verify that the USB cable is 3 meters or less in lengthndash If you have several USB devices attached to your computer you may
want to unplug the others during the installation
Note AppleTalk is not supported
bull Unplug the HP Officejet from the wall and plug it in againbull Restart your computer
hp officejet 4100 series
chapter 8
40
On Windows check the System Tray for applications that are running in the background and close them before restarting your computer
remove and reinstall your hp officejet softwareIf six icons do not appear in the Director you may need to uninstall and re-install the software Do not simply delete the HP Officejet program files from your hard drive Be sure to remove them properly using the uninstall utility provided in the HP Officejet program group
to uninstall from a Windows computer
1 Disconnect your HP Officejet from your computer
2 On the Windows taskbar click Start choose Programs or All Programs (XP) choose Hewlett-Packard choose hp officejet 4100 series then choose uninstall software
3 Follow the directions on the screenBe sure to disconnect your HP Officejet
4 If you are asked whether you would like to remove shared files click NoOther programs that use these files may not work properly if the files are deleted
5 After the program finishes removing the software disconnect your HP Officejet and restart your computer
Note It is important that you disconnect your HP Officejet before restarting your computer
6 To reinstall the software insert the HP Officejet 4100 Series CD-ROM into your computerrsquos CD-ROM drive and follow the instructions that appear
7 After the software is installed connect and turn on your HP Officejet following the onscreen instructions and the instructions in your Setup PosterAfter connecting and turning on your HP Officejet you may have to wait several minutes for all of the Plug and Play events to completeWhen the software installation is complete you will see a Status Monitor icon in the System Tray
8 To verify that the software is properly installed double-click on the HP Director icon on the desktop If the HP Director shows six icons the software has been properly installed
to uninstall from a Macintosh computer
1 Disconnect your HP Officejet from your computer
2 Double-click on ApplicationsHP All-in-One Software folder
reference guide
additional setup information
41
3 Double-click on HP Uninstaller
4 Follow the directions that appear on the screen
5 After the program finishes removing the software disconnect your HP Officejet and restart your computer
6 To reinstall the software insert the HP Officejet 4100 Series CD-ROM into your computerrsquos CD-ROM drive
Note When re-installing the software follow the instructions on the Setup Poster Do not connect the HP Officejet to your computer until after you have completed the software installation
7 On the desktop open the CD-ROM double-click on hp all-in-one installer and follow the instructions that appear
connect your hp officejet to a phone modem or answering machine
The HP Officejet can share a phone line with a phone a modem or an aswering machine When sharing a phone line with an answering machine the HP Officejet will answer fax calls and direct voice calls to the answering machine
Note For information on connecting your HP Officejet to your computer and phone line refer to the Setup Poster that came with your unit
to connect your hp officejet to a phone modem or answering machine
1 Remove the white plastic stopper from connector 2 on the back of the HP Officejet
To connect more than one device to connector 2 on the HP Officejet you must purchase a Y-splitter and plug it into connector 2
2 Connect the phone cord from the phone modem or answering machine to connector 2 (or Y-splitter)
Caution Do not use the phone cord that came with the HP Officejet for this purpose That phone cord must connect connector 1 on the HP Officejet to the wall jack for your phone system See the Setup Poster for details
3 If you are connecting an answering machine see set the number of rings before answering on page 21 for instructions on setting the number of rings correctly or change the answer ring pattern (distinctive ringing) on page 26 for information on incoming ring patterns
4 If you are connecting a modem turn off its fax-receive feature
connector 2 on the HP Officejet
connector 1 on the HP Officejet
hp officejet 4100 series
chapter 8
42
additional troubleshooting helpYou may want to refer to the readme file for more information on possible installation problems On Windows you can access the readme file from the Start button on the taskbar select Programs Hewlett-Packard hp officejet 4100 series View the Readme File On Macintosh you can access the readme file by double-clicking on the icon located in the top-level folder of the HP Officejet software CD-ROM
The readme file provides more information including
bull Using the Re-install utility after a failed installation to return your PC to a state that will allow the HP Officejet to be re-installed
bull Using the Re-install utility on Windows 98 to recover from a Composite USB System Driver missing errorThis error may occur if the hardware is installed prior to installing the software After running the Re-install utility reboot your PC and install the HP Officejet software before connecting the HP Officejet to your computer
You can also find more information on this website
wwwhpcomsupport
9
43
technical information
Additional specifications information can be found in the HP Photo amp Imaging Help in the hp officejet 4100 series section
physical specifications
power specificationsbull Power consumption 75W maximumbull Source (Input Voltage) 100 to 240 VAC groundedbull Input Frequency 50 to 60 Hzbull Current 1A maximum
regulatory informationAdditional regulatory information can be found in the HP Photo amp Imaging Help The information in this section supercedes information in the HP Photo amp Imaging Help
doc statement deacuteclaration de conformiteacute (Canada)Le preacutesent appareil numeacuterique neacutemet pas de bruit radioeacutelectrique deacutepassant les limites applicables aux appareils numeacuteriques de la classe B prescrites dans le Regraveglement sur le brouillage radioeacutelectrique eacutedicteacute par le ministegravere des Communications du CanadaThis digital apparatus does not exceed the Class B limits for radio noise emissions from digital apparatus set out in the Radio Interference Regulations of the Canadian Department of Communications
notice to users of the Canadian telephone networkThis equipment meets the applicable Industry Canada Terminal Equipment Technical Specifications This is confirmed by the registration number The abbreviation IC before the registration number signifies that registration was performed based on a Declaration of Conformity indicating that Industry Canada technical specifications were met It does not imply that Industry Canada approved the equipment
Note The Ringer Equivalence Number (REN) assigned to each terminal device provides an indication of the maximum number of terminals allowed to be connected to a telephone interface The termination on an interface may consist of any combination of devices subject only to the requirement that the sum of the Ringer Equivalence Numbers of all the devices does not exceed 5
The REN for this product is 03B based on FCC Part 68 test results
height width depth weight (without print cartridges)
with paper trays and ADF closed
718 in (1824 cm) 1676 in (4258 cm) 825 in (2096 cm) 75 lbs (34 kg)
with ADF and paper tray extended
1030 in (2615 cm) 1676 in (4258 cm) 1854 in (4709 cm) 75 lbs (34 kg)
hp officejet 4100 series
chapter 9
44
notice to all users of the European Economic Area (EEA)
This product is designed to interwork with the analogue telephone networks in the following countriesregions
Network compatibility depends on customer selected settings which must be reset to use the equipment on a telephone network in a countryregion other than where the product was purchased Contact the vendor or Hewlett-Packard Company if addition product support is necessaryThis equipment has been certified by the manufacturer in accordance with Directive 19995EC (annex II) for Pan-European single-terminal connection to the public switched telephone network (PSTN) However due to differences between the individual PSTNs provided in different countriesregions the approval does not of itself give an unconditional assurance of successful operation on every PSTN network termination pointIn the event of problems you should contact your equipment supplier in the first instance
geraumluschemissionLpA lt 70 dBam Arbeitsplatzim Normalbetriebnach DIN 45635 T 19
notice to Korean customers
Germany UK Netherlands
France Spain Italy
Belgium Luxembourg Sweden
Austria Denmark Ireland
Norway Finland Switzerland
Greece Portugal
10
45
hp support
This section explains the support services information provided by Hewlett-Packard If you are unable to find the answer you need in the printed or onscreen documentation supplied with your product you can contact one of the HP support services listed in the following pages Some support services are available only in the US and Canada while others are available in many countriesregions worldwide If a support service number is not listed for your countryregion contact your nearest authorized HP dealer for help
get support and other information from the internetIf you have Internet access you can get help from the following HP website
wwwhpcomsupportThe Web site offers technical support drivers supplies and ordering information
hp customer supportSoftware programs from other companies may be included with your HP Officejet If you experience problems with any of those programs you will receive the best technical assistance by calling the experts at that companyIf you need to contact HP Customer Support do the following before you call
1 Make sure thata Your unit is plugged in and turned onb The specified print cartridges are installed correctlyc The recommended paper is properly loaded in the input tray
2 Reset your unita Turn off the unit using the On button located on the unitrsquos front panelb Unplug the power cord from the back of the unitc Plug the power cord back into the unitd Turn on the unit using the On button
3 For more information check the HP website at wwwhpcomsupport
4 If you are still experiencing problems and need to speak with an HP Customer Support Representativendash Have your service ID and serial number ready To display your service ID and
serial number on the front panel do the following Press Enter and Start Color at the same time until the service ID appears in the front-panel display From this display press the right arrow until the serial number displays
ndash Print a Self-Test Report See print a self-test report on page 32 for information on printing this report
ndash Make a color copyndash Be prepared to describe your problem in detail
5 Call HP Customer Support Be near your unit when you call
call in the US during warrantyCall (208) 323-2551 This service is free during the warranty period however your standard long-distance phone charges still apply A fee may apply outside the warranty period
hp officejet 4100 series
chapter 10
46
US phone support is available in both English and Spanish languages 24 hours a day 7 days a week (days and hours of support may change without notice)
call elsewhere in the worldThe numbers listed below are current as of the printing date of this guide For a list of current international HP Support Service numbers visit this address and choose your own countryregion or language
wwwhpcomsupportFor Korea you can also visit this address
httpwwwhpcokrYou can call the HP support center in the following countriesregions If your countryregion is not listed contact your local dealer or nearest HP Sales and Support Office to find out how to obtain servicesSupport service is free during the warranty period however your standard long-distance phone charges will apply In some cases a flat fee per single incident will also applyFor phone support in Europe please check for the details and conditions of phone support in your countryregion by consulting the following Web site
wwwhpcomsupportAlternatively you can ask your dealer or call HP at the phone number indicated in this booklet As part of our constant efforts to improve our phone support service we advise you to check our website on a regular basis for new information regarding service features and delivery
countryregion hp technical support countryregion hp technical support
Algeria1 +213 (0) 61564 543 Malaysia 1-800-805405
Argentina 0810-555-5520 Mexico 01-800-472-6684
Australia +61 3 8877 80001902 910 910
Mexico (Mexico City) 5258-9922
Austria +43 (0) 810 00 6080 Morocco1 +212 22404 747
Bahrain (Dubai) 800 728 Netherlands +31 (0) 20 606 8751
Belgium (Dutch) +32 (0) 2 626 8806 New Zealand 0800 441 147
Belgium (French) +32 (0) 2 626 8807 Norway +47 22 11 6299
Brazil (Grande Sao Paulo) (11) 3747 7799 Oman +971 4 883 8454
Brazil (Demais Localidades) 0800 157751 Palestine +971 4 883 8454
Canada during warranty (905) 206 4663 Panama 001-800-7112884
Canada post-warranty(per-call charge)
1-877-621-4722 Peru 0-800-10111
Caribbean amp Central America
1-800-711-2884 Philippines 632-867-3551
Chile 800-360-999 Poland +48 22 865 98 00
China 86 10 6868 7980 Portugal +351 21 3176333
Colombia 9-800-114-726 Puerto Rico 1-877-2320-589
Costa Rica 0-800-011-0524 Qatar +971 4 883 8454
Czech Republic +420 (0) 261307310 Romania +40 1 315 44 42or local 01 3154442
reference guide
hp support
47
call in Australia post-warrantyIf your product is not under warranty you can call 03 8877 8000 A per-incident out-of-warranty support fee of $2750 (inc GST) will be charged to your credit card You can also call 1902 910 910 ($2750 charged to your phone account) from 900 AM to 500 PM Monday through Friday (Charges and support hours are subject to change without notice)
prepare your unit for shipmentIf after contacting HP Customer Support or returning to the point of purchase you are requested to send your unit in for service please follow the power off and rebox steps below to avoid further damage to the HP product
Denmark +45 39 29 4099 Russian Federation Moscow +7 095 797 3520
Ecuador 1800-711-2884 Russian Federation St Petersburg
+7 812 346 7997
Europe (English) +44 (0) 207 512 5202 Saudi Arabia +800 897 14440
Egypt 02 532 5222 Singapore 65 6272 5300
Finland +358 (0) 203 47 288 Slovakia +421 (0) 2 682 08080
France (034 Euromin) +0892 69 60 22 South Africa (inside RSA) 086 000 1030
Germany (012 Euromin) +49 (0) 180 52 58 143 South Africa (inside RSA) +27-11 258 9301
Greece +30 1060 73 603 Spain +34 902 321 123
Hong Kong (SAR) +85 (2) 3002 8555 Sweden +46 (0)8 619 2170
Guatemala 1800-995-5105 Switzerland 2 +41 (0) 84 880 1111
Hungary +36 (0) 1 382 1111 Taiwan +886-2-2717-00550800 010 055
India 1-600-11226791 11 682 6035
Thailand +66 (2) 661 4000
Indonesia 62-21-350-3408 Tunisia1 +216 1891 222
Ireland +353 (0) 1 662 5525 Turkey +90 216 579 7171
Israel +972 (0) 9 8304848 Ukraine +7 (380-44) 490-3520
Italy +39 (0) 226410350 United Arab Emirates +971 4 883 8454
Japan 0570 000 511+81 3 3335 9800
United Kingdom +44 (0) 207 512 52 02
Jordan +971 4 883 8454 Venezuela 0800-47468368 or800-477-7777
Korea (Seoul) +82 (2) 3270 0700 Venezuela (Caracas) (502) 207-8488
Korea (outside Seoul) 080 999 0700 Vietnam 84 (0) 8 823 4530
Kuwait +971 4 883 8454 Yemen +971 4 883 8454
Lebanon +971 4 883 8454
1 This Call Center supports French speaking customers from the following countriesregions Morocco Tunisia and Algeria
2 This Call Center supports German French and Italian speaking customers in Switzerland
countryregion hp technical support countryregion hp technical support
hp officejet 4100 series
chapter 10
48
Note When transporting your HP Officejet make sure that the pens have been removed the HP Officejet has been properly shut down by pressing the power button and you have allowed time for the carriage to return to the service station and for the scanner to return to its parked position
1 Turn on the unitDisregard steps 1 through 6 if your unit will not turn on and the print carriage is in the home position You will not be able to remove the print cartridges Proceed to step 7
2 Open the print cartridge access doorThe print carriage moves into view
3 See replace the print cartridges on page 33 for information on removing the print cartridges
Caution Remove both print cartridges Failure to do so may damage your unit
4 Place the print cartridges in an airtight bag so they will not dry out and put them aside (do not send them with the unit unless instructed to by the HP customer support call agent)
5 Turn off the unit
6 Close the print cartridge access door
7 Remove the front panel cover as followsa Grasp the front of the front panel cover with two hands as shownb Firmly lift the front panel cover to unsnap it from the unit
8 Retain the front panel cover Do not return the front panel cover with the unit
9 If available pack the unit for shipment using the original packing materials or the packaging materials that come with your exchange unit
If you do not have the original packaging materials please use other adequate packaging materials Shipping damage caused by improper packaging andor improper transportation is not covered under the warranty
reference guide
hp support
49
10 Place the return shipping label on the outside of the box
11 Include the following items in the boxndash A complete description of symptoms for service personnel (samples of print
quality problems are helpful)ndash A copy of the sales slip or other proof of purchase to establish the warranty
coverage periodndash Your name address and a phone number where you can be reached during
the day
hp distribution centerTo order HP Officejet software a copy of the printed Reference Guide a setup poster or other customer-replaceable parts do one of the following bull In the US or Canada call (208) 323 2551bull Visit this website
httpwwwhpcomcposupportsoftwarehtml
hp officejet 4100 series
chapter 10
50
11
51
warranty information
HP Officejet 4100 seriesDuration of Limited Warranty (hardware and labor) 1 YearDuration of Limited Warranty (CD media) 90 DaysDuration of Limited Warranty (print cartridges) Until the HP ink is depleted or the ldquoend of warrantyrdquo date printed on the cartridge has been reached whichever occurs first
warranty service
express serviceTo obtain HP express repair service the customer must contact an HP service office or an HP Customer Support Center for basic troubleshooting first See hp customer support on page 45 for steps to take before calling Customer SupportIf a customer unit needs a minor part replacement and these parts can normally be replaced by the customer the customer-replaceable components may be serviced through expedited part shipment In this event HP will prepay shipping charges duty and taxes provide telephone assistance on replacement of the component and pay shipping charges duty and taxes for any part that HP asks to be returnedThe HP Customer Support Center may direct customers to designated authorized service providers who are certified by HP to service the HP product
warranty upgradesUpgrade your standard factory warranty to a total of three years with the HP SUPPORTPACK Service coverage begins on product purchase date and the pack must be purchased within the first 180 days of product purchase This program offers phone support from 600 AM to 1000 PM Mountain Standard Time (MST) Monday through Friday and 900 AM to 400 PM (MST) on Saturdays If during your technical support call it is determined that you need a replacement product then HP will ship you this product next business day free of charge Available in US onlyFor more information please call 1-888-999-4747 or visit the following HP Web site
httpwwwhpcomgohpsupportpack
Outside the US please call your local HP Customer Support office See call elsewhere in the world on page 46 for a list of international Customer Support numbers
returning your hp officejet for serviceBefore returning your HP Officejet for service you must call HP Customer Support See hp customer support on page 45 for steps to take before calling Customer Support
hewlett-packard limited global warranty statement
extent of limited warrantyHewlett-Packard (ldquoHPrdquo) warrants to the end-user customer (ldquoCustomerrdquo) that each HP Officejet 4100 Series product (ldquoProductrdquo) including related software accessories media and supplies shall be free from defects in material and workmanship for the duration which begins on the date of purchase by the Customer
hp officejet 4100 series
chapter 11
52
For each software Product HPrsquos limited warranty applies only to a failure to execute programming instructions HP does not warrant that the operation of any Product shall be uninterrupted or error freeHPrsquos limited warranty covers only those defects which arise as a result of normal use of a Product and does not cover any other problems including those which arise as a result of (a) improper maintenance or modification (b) software accessories media or supplies not provided or supported by HP or (c) operation outside the Productrsquos specificationsFor any hardware Product the use of a non-HP print cartridge or a refilled print cartridge does not affect either the warranty to the Customer or any HP support contract with the Customer However if Product failure or damage is attributable to the use of a non-HP or refilled print cartridge HP shall charge its standard labor and materials charges to service the Product for the failure or damageIf HP receives during the applicable warranty period notice of a defect in any Product HP shall either repair or replace the defective Product at HPrsquos option Where labor charges are not covered by HPrsquos limited warranty repairs shall be at HPrsquos standard charges for laborIf HP is unable to repair or replace as applicable a defective Product which is covered by HPrsquos warranty HP shall within a reasonable time after being notified of the defect refund the purchase price for the ProductHP shall have no obligation to repair replace or refund until the Customer returns the defective Product to HPAny replacement product may be either new or like-new provided that it has functionality at least equal to that of the Product being replacedHP products including each Product may contain remanufactured parts components or materials equivalent to new in performanceHPs limited warranty for each Product is valid in any countryregion or locality where HP has a support presence for the Product and where HP has marketed the Product The level of warranty service may vary according to local standards HP shall have no obligation to alter the form fit or function of the Product in order to make it operate in a countryregion or locality for which the Product was never intended to operate
limitations of warrantyTO THE EXTENT ALLOWED BY LOCAL LAW NEITHER HP NOR ITS THIRD PARTY SUPPLIERS MAKE ANY OTHER WARRANTY OR CONDITION OF ANY KIND WHETHER EXPRESS OR IMPLIED WITH RESPECT TO THE COVERED HP PRODUCTS AND SPECIFICALLY DISCLAIM THE IMPLIED WARRANTIES OR CONDITIONS OF MERCHANTABILITY SATISFACTORY QUALITY AND FITNESS FOR A PARTICULAR PURPOSE
limitations of liabilityTo the extent allowed by local law the remedies provided in this Limited Warranty Statement are the Customerrsquos sole and exclusive remediesTO THE EXTENT ALLOWED BY LOCAL LAW EXCEPT FOR THE OBLIGATIONS SPECIFICALLY SET FORTH IN THIS LIMITED WARRANTY STATEMENT IN NO EVENT SHALL HP OR ITS THIRD PARTY SUPPLIERS BE LIABLE FOR DIRECT INDIRECT SPECIAL INCIDENTAL OR CONSEQUENTIAL DAMAGES WHETHER BASED ON CONTRACT TORT OR ANY OTHER LEGAL THEORY AND WHETHER ADVISED OF THE POSSIBILITY OF SUCH DAMAGES
local lawThis Limited Warranty Statement gives the Customer specific legal rights The Customer may also have other rights which vary from state to state in the United States from province to province in Canada and from countryregion to countryregion elsewhere in the world
reference guide
warranty information
53
To the extent this Limited Warranty Statement is inconsistent with local law this Statement shall be deemed modified to be consistent with such local law Under such local law certain disclaimers and limitations of this Statement may not apply to the Customer For example some states in the United States as well as some governments outside the United States (including provinces in Canada) mayPreclude the disclaimers and limitations in this Statement from limiting the statutory rights of a consumer (eg the United Kingdom)Otherwise restrict the ability of a manufacturer to enforce such disclaimers or limitations orGrant the Customer additional warranty rights specify the duration of implied warranties which the manufacturer cannot disclaim or not allow limitations on the duration of implied warrantiesFOR CONSUMER TRANSACTIONS IN AUSTRALIA AND NEW ZEALAND THE TERMS IN THIS LIMITED WARRANTY STATEMENT EXCEPT TO THE EXTENT LAWFULLY PERMITTED DO NOT EXCLUDE RESTRICT OR MODIFY AND ARE IN ADDITION TO THE MANDATORY STATUTORY RIGHTS APPLICABLE TO THE SALE OF THE COVERED HP PRODUCTS TO SUCH CUSTOMERS
hp officejet 4100 series
chapter 11
54
55
index
Numerics4-by-6 inch photo paper
load 10 12
AADF 7adjust
volume for fax 25align print cartridges 35Answer Ring Pattern 26automatic document feeder 7automatic reduction
fax 25
Bbest copy quality 13busy number
redial automatically 23
Ccancel
scan 18scheduled fax 21
cartridgesalign 35replace 33
cleanprint cartridges 35the exterior 32the glass 31white strip 32
colorenhance 14fax 20fax from front panel 20
contrastchange for fax 23photo color 14
copy 13 16change default settings 15enhance 14fit to page 16lighten or darken 14menu options 16number of copies 14photo 15quality 13reduce or enlarge 14settings 13 15
speed 13tutorial 4
Customer Support 45web site 45
Ddarken a copy 14date
setting 27default settings
restore 35director review 4distinctive ringing 26
Eenhance copies 14enlarge copy 14 16envelopes
load 9Error Correction Mode
(ECM) 25
Ffactory defaults
restore 35fast copy quality 13fax 28
adjust volume 25automated reports 22cancel fax forward 24cancel scheduled 21change Answer Ring
Pattern 26change contrast 23change resolution 22change settings 19control appearance 22create individual speed-dial
settings 26delete speed-dial
settings 27distinctive ringing 26Error Correction Mode
(ECM) 25forward faxes 24header 27in color 20in color from front panel 20manual reports 22
menu 29print reports 22receive 21receive manually 21redial busy or unanswered
number 23schedule 20send from front panel 19set automatic reduction 25set date and time 27set the number of rings 21settings 27 28setup menu options 29speed dials 19test 28
fit to page 16forward faxes 24
cancel 24front panel
display scroll speed 36enter text 28send a fax 19setting prompt delay 36tutorial 3
Gglass
cleaning 31greeting cards
load 11
Hhelp 1HP Customer Support 45
calling 45HP Director 4HP distribution center 49HP Officjet
preparing to ship 47HP papers
tips on loading 11
Iindividual speed-dial settings
create 26ink cartridges see print
cartridgesinkjet paper
load 11
index
hp officejet 4100 series56
Kkeypad
enter text 28
Llabels
load 12lighten copies 14load
change the paper type 12envelopes 9original in ADF 7paper 7photo paper 10 12postcards 10 12print cartridges 33set the paper size 12tips 11
Mmaintenance
align print cartridges 35clean print cartridges 35clean the exterior 32clean the glass 31clean the white strip 32normal sounds 36replace print cartridges 33restore factory defaults 35self-maintenance
sounds 36self-test report 32
menuscopy options 16fax 29fax setup 29maintenance 37print reports 37
Nnormal copy quality 13number of copies
set 14number of rings
set 21
Oorder print cartridges 60originals
load in ADF 7output tray 8
Ppaper
change default size for copy 12
change the type 12load 7recommended 7set the size 12tips on loading 11
paper size change for copy 12
paper trayload 7
phone numbers support services 45
photo paperload 10 12
photoscopy 15enhance copy 14
physical specifications 43postcards
load 10 12power
specifications 43print
envelopes 9fax reports 22self-test report 32
print cartridgesalign 35clean 35handling 32replace 33
prompt delaysetting 36
Qquick start
review the director 4use with a computer 4
Rreceive
fax 21redial
busy or unanswered number 23
reduce copy 14 16regulatory information 43reinstall software 40reports
generate automatically for fax 22
generate manually for fax 22
print 22self-test 32
resolution
change for fax 22restore factory settings 35returning your HP Officejet for
service 51
Sscan
from front panel 17stop 18
schedule a fax 20scroll speed
setting 36self-test report 32send
cancel forward faxes 24color fax 20color fax from front
panel 20forward faxes 24
settingscopy 13 15fax 27 28prompt delay 36scroll speed 36
setupadditional information 39menu 29
shippingyour HP Officejet 47
softwareremove and reinstall 40
soundsself-maintenance 36
specificationsphysical 43power 43
speed dials 19create individual
settings 26delete settings 27
stopscan 18scheduled fax 21
subscriber identification code 27
support services 45
Ttelephone line
multiple numbers 26telephone numbers 45text
enhance 14enter from front panel 28
time
index
reference guide 57
setting 27transparency film
recommended 7tips on loading 11
troubleshootingremove and reinstall
software 40T-shirt Transfer Iron-On
load 11tutorial
front panel 3make a copy 4
Uunanswered number
redial automatically 23
Vvolume
adjust 25
Wwarranty 45
service 51statement 51upgrades 51
white stripcleaning 32
hp officejet 4100 series
chapter 12
58
declaration of conformityAccording to ISOIEC Guide 22 and EN 45014
Manufacturerrsquos Name and Address
Hewlett-Packard Company 16399 West Bernardo Drive San Diego CA 92127-1899 USA
declares that the product
Product Name hp officejet 4100 series (Q1608A)
Model Number(s) officejet 4110 (Q1609A) officejet 4110xi (Q1610A) officejet 4110v (Q1611A) officejet 4105 (Q1612A) officejet 4105z (Q1613A) officejet 4115 (Q1614A)
Product Options All
conforms to the following Product Specifications
Safety EN609501992 +A1 A2 A3 A4 amp A11
IEC609501991 +A1 A2 A3 amp A4
UL1950CSA 222 No 950 3rd Edn 1995
NOM-019-SCFI-1993
EMC CISPR221993 +A1 amp A2 EN550221994 +A1 amp A2 -Class B
CISPR241997EN550241998
IEC 61000-3-21995 EN61000-3-21995
IEC 61000-3-31994 EN61000-3-31995
ASNZS 3548 1992
CNS13438 1997
FCC Part 15-Class B ICES-003 Issue 2 VCCI-2
GB 9254-1998
Telecom TBR21 1998
Supplementary Information
The Product herewith complies with the requirements of the Low Voltage Directive 7323EEC the EMC Directive 89336EEC and the RampTTE Directive 19995EC (ANNEX II) carries the CE marking accordingly
European Contact for regulatory topics only Your local Hewlett-Packard Sales and Service Office orHewlett-Packard GmbH
Department HQ-TRE Herrenberger Strasse 140 D-71034 Boumlblingen Germany (FAX + 49-7031-14-3143)
order mediaTo order media such as HP Premium Inkjet Paper HP Premium Inkjet Transparency Film HP Iron-On T-shirt Transfer paper or HP Greeting Cards go to
wwwhpshoppingcom
For orders in countries other than the US and Canada select other countries then click Yes to leave hpshoppingcom From this website you can access hpshoppingcom for your specific language or countryregion
order print cartridges
If you have Internet access you can get more information from the HP website at
wwwhpcomsupport
print cartridges hp reorder number
HP black print cartridge 56 19 ml black print cartridge
HP color print cartridgeHP tri-color print cartridge
57 17 ml color print cartridge28 8 ml color print cartridge
Visit the hp officejet information centerIt has everything you need to get the most value from your HP Officejet
bull Technical Supportbull Supplies and Ordering Informationbull Project Tipsbull Ways to Enhance Your Product
wwwhpcomsupport
copy 2003 Hewlett-Packard Company
Printed in the USA Mexico Germany Singapore or China
Q1608-90163Q1608-90163
Q1608-90163
hp officejet 4100 series
chapter 6
26
change the answer ring pattern (distinctive ringing)Distinctive ringing is a feature offered by phone companies that allows several phone numbers to share the same line Each number has a specific ring pattern If you do not have this service use the default ring pattern which is All Rings
If you connect your HP Officejet to a line with distinctive ringing have your telephone company assign one ring pattern to voice calls and another to fax calls (double or triple rings are best for a fax number)
1 Press Setup
2 Press 4 then press 2This selects the Advanced Fax Setup menu then selects the Answer Ring Pattern option
3 Press to scroll through these options All Rings Single Rings Double Rings Triple Rings and Double amp Triple
4 When the ring pattern that the phone company established for this number appears press Enter
Tip We recommend that you use Double Rings or Triple Rings for fax
set up speed dialingThrough your HP Officejet or your computer you can assign entries to fax numbers you use often This lets you dial those numbers quickly using the front panelrsquos Speed Dial button and a one- or two-digit entry You can create up to 100 individual speed-dial entries (the maximum for some models is 70)
We recommend that you use the software to set up speed-dial settings
Note A speed-dial entry can only be associated with one phone number speed-dial groups are not supported
For more information see set up speed dialing in the hp photo amp imaging help
create individual speed-dial settingsYou can enter fax numbers that you will reuse frequently
1 Press Setup
2 Press 2 then press 1This selects the Speed Dial Setup menu then selects the Individual Speed Dial option
3 Press EnterThe first unassigned speed-dial entry appears on the display
4 Press Enter to select the displayed speed-dial entry
5 Enter the Fax Number to assign to that entry then press EnterThe fax number can be up to 50 digits in length
Tip To enter a three-second pause within a number sequence press Symbols to display a dash
6 Enter the personrsquos or companyrsquos name then press Enter
reference guide
use the fax features
27
The name is limited to 13 characters in lengthFor more information see enter text on page 28
7 After Enter Another appears press 1 (Yes) if you want to set up another number or press 2 (No) to exit
delete speed-dial settingsFollow these steps to delete an individual speed-dial entry
1 Press Setup
2 Press 2 then press 2 againThis selects Speed Dial Setup then selects Delete Speed Dial
3 Press until the individual entry that you want to delete appears then press Enter
set basic fax settings using the front panelWe recommend that you use the Fax Setup Wizard in the HP Officejet software to configure all your basic fax settings however you can also access these settings from the front panel
Note In the US regulations require that your name and phone number appear on every fax The minimum settings that we recommend are described in the following topics
set the date and timeFollow these steps to set the date and time manually
1 Press Setup
2 Press 3 then press 1This selects the Basic Fax Setup menu then selects the Date and Time option
3 Follow the prompts on the display to enter the date and time using the keypad
Tip Use only the last two digits for the year
Tip When you enter a single-digit date or time type a leading zero before the single digit for example 0345 or 08-03-02
After you are done the date and time appear on the display
Warning Cutting off power to the HP Officejet causes the selected date and time to be lost However name and fax number information is not lost
set the fax headerFollow these steps to enter your name and fax number in the header
Note In Hungary the subscriber identification code (fax header) can be set or changed only by authorized personnel For more information contact your authorized HP dealer
1 Press Setup
2 Press 3 then press 2
hp officejet 4100 series
chapter 6
28
This selects the Basic Fax Setup menu then selects the Fax Header option
3 Enter your personal or company name at the prompt Use the guidelines provided in the next section under enter text
4 Press Enter
5 Enter your fax number using the numeric keypad
6 Press Enter
enter textThe following list provides tips for entering text using the front-panel keypad
bull Press the keypad numbers that correspond to the letters of a name
bull Press a button multiple times to see a letter first in uppercase and then in lowercase
bull After the correct letter appears press and then press the number that corresponds to the next letter in the name Again press multiple times until the correct letter appears
bull To insert a space press Space ()bull To enter a symbol such as press Symbols () to scroll through the list of
available symbolsbull If you make a mistake press to clear it and then make the correct
entrybull After you are done entering text press Enter to store your entries
check for dial toneBefore using the fax features verify that the connections are correctly established
1 Press Fax
2 Listen for a dial tone
3 If you do not hear a dial tone check the connections
4 Press Cancel to hang up
ABC These letters correspond to this number and so on
2
JKL To get this character J j K k L l 5
5 Press 5 this many times 1 2 3 4 5 6 7
reference guide
use the fax features
29
fax job menuThe following options become available when the Fax button is pressed
setup menu for fax commandsThe following fax settings are available in the Setup menu
Enter Fax or Speed Dial
FineVery FinePhotoStandard
Fax Number Resolution LighterDarker
Enter a fax number or speed dialWhen the Fax button is pressed
Press and to move to the option you wantPress Enter to select the displayed setting
NoYes
Set New Defaults
Send Fax NowFax from MemorySend Fax LaterPoll to Receive
How to Fax
1Automatic Reports Setup
2Answer Ring Pattern
3Busy Redial
4No Answer Redial
5Automatic Reduction
6Backup Fax Reception
7Error Correction Mode
3Basic Fax Setup 4Advanced Fax Setup
Press Setup to display the menu options
Press and to move to the setting you wantPress Enter to select the displayed setting
1Date and Time
2Fax Header
3Rings to Answer
4Paper Size
5Tone or Pulse Dialing
6Ring and Beep Volume
7Fax Forwarding Black Only
2Speed Dial Setup
1Individual Speed Dial
2Delete Speed Dial
3Print Speed Dial List
hp officejet 4100 series
chapter 6
30
7
31
maintain your hp officejet
This section provides instructions for keeping your HP Officejet in top working condition Perform these maintenance procedures as necessary
clean the glassDirty glass from dust smudges hair and so on slows down performance and affects the accuracy of features such as Fit to Page and Copy
1 Turn off the unit unplug the power cord and raise the scanner lid
2 Clean the glass with a soft cloth or sponge slightly moistened with a nonabrasive glass cleaner
Caution Do not use abrasives acetone benzene or carbon tetrachloride on the glass these can damage it Do not place liquids directly on the glass They may seep under it and damage the unit
3 Dry the glass with a chamois or cellulose sponge to prevent spotting
hp officejet 4100 series
chapter 7
32
clean the white stripMinor debris can accumulate on the white strip located underneath the scannerrsquos lid
1 Turn off the unit unplug the power cord and raise the scanner lid
2 Clean the white strip with a soft cloth or sponge slightly moistened with a mild soap and warm water
3 Wash the strip gently to loosen debris do not scrub the strip
4 Dry the strip with a chamois or soft cloth
Caution Do not use paper-based wipes as these may scratch the strip
5 If this does not clean the strip well enough repeat the previous steps using isopropyl (rubbing) alcohol and wipe the strip thoroughly with a damp cloth to remove any residual alcohol
clean the exterior Use a soft damp lint-free cloth to wipe dust smudges and stains off the case The interior of the unit does not require cleaning Keep fluids away from the interior of the unit as well as the front panel
work with print cartridgesTo ensure the best print quality from your HP Officejet you will need to perform some simple maintenance procedures and when prompted by a front-panel message replace the print cartridges
print a self-test reportIf you are experiencing problems with printing before cleaning or replacing the print cartridges you should print a Self-Test Report This report provides useful information about your print cartridges including status information
1 Press Setup
2 Press 1 then press 4This selects Print Report and then selects Self-Test Report
3 Press Start Black or Start ColorA Self-Test Report is printed for your HP Officejet
handle print cartridgesBefore you replace or clean a print cartridge you should know the part names and how to handle the print cartridge
reference guide
maintain your hp officejet
33
replace the print cartridgesFront-panel messages appear to let you know that you should replace your print cartridges
See order print cartridges on the back cover for information on ordering replacement print cartridges
1 Turn on the unit then lift open the print cartridge access doorThe print carriage moves into view
2 After the carriage stops moving push down on the print cartridge down to release it and then pull it toward you out of its slot
Plastic tape with pink tab(must be removed)
Copper contactsInk nozzles under tape
Do not touch the copper contacts or the ink nozzles
print cartridge access door
hp officejet 4100 series
chapter 7
34
Note It is normal to see ink build-up in the print cartridge slots
3 Remove the new print cartridge from its packaging and being careful to touch only the bright pink plastic tab gently remove the plastic tape to uncover the ink nozzles
Caution Do not touch the copper contacts or ink nozzles
Once you have removed the plastic tape install the print cartridge immediately to prevent the ink from drying in the nozzles
4 Push the new print cartridge into the appropriate slot at a slight angle until it clicks into place
Caution Do not attempt to push the cartridge straight into the slot It must slide in at a slight angle
The tri-color print cartridge goes on the left and the black cartridge goes on the right
5 Close the print cartridge access door
reference guide
maintain your hp officejet
35
align the print cartridgesThe HP Officejet prompts you to align cartridges every time you install or replace a print cartridge Aligning the cartridges ensures high-quality output
To align the print cartridges when prompted
1 Press Enter on the front panelAn align cartridges (test pattern) page prints
2 Load the align cartridges page face down in the ADF between the paper-width guides and press the Enter button again
3 Recycle or discard the page
To align the cartridges at any other time
1 Press Setup
2 Press 5 then press 2This selects the Maintenance menu and then selects the Align Print Cartridge option
3 Press EnterAn align cartridges (test pattern) page prints
4 Load the align cartridges page face down in the ADF between the paper-width guides and press the Enter button again
5 Recycle or discard the page
clean the print cartridgesUse this feature when the Self-Test Report shows streaking or white lines through any of the colored bars Do not clean print cartridges unnecessarily This wastes ink and shortens the life of the ink nozzles
1 Press Setup
2 Press 5 then press 1This selects the Maintenance menu and then selects the Clean Print Cartridge optionA page of patterns is printed The cartridges are cleaned Recycle or discard the pageIf copy or print quality still seem poor after you clean the print cartridges replace the print cartridge that is affected
restore factory defaultsYou can restore the original factory settings to what they were when you purchased your HP Officejet Choosing to restore your factory defaults restores all settings except date information and any scan settings you may have set
You can perform this process from the front panel only
1 Press Setup
2 Press 5 then press 3This selects Maintenance and then selects Restore Factory DefaultsThe factory default settings are restored
hp officejet 4100 series
chapter 7
36
set scroll speedThe Scroll Speed option lets you control the rate that text messages appear in the front-panel display You can choose Normal Fast or Slow The default is Normal
1 Press Setup
2 Press 5 then press 6This selects Maintenance and then selects Set Scroll Speed
3 Press until the desired speed appears then press Enter
set the prompt delay timeThe Prompt Delay option lets you control the amount of time before a message is displayed in the front-panel display You can choose Normal Fast or Slow The default is Normal
1 Press Setup
2 Press 5 then press 7This selects Maintenance and then selects Set Prompt Delay Time
3 Press until the delay time appears then press Enter
self-maintenance sounds During the life of your product you may hear various mechanical sounds This is a normal part of your unitrsquos self-maintenance
reference guide
maintain your hp officejet
37
setup menu optionsThe following options are available from the Setup button
1Last Transaction
2Fax Log
3Speed Dial List
4Self-Test Report
5Automatic Reports Setup
1Print Report
Use Setup to display the Print Report Speed Dial Setup Basic Fax Setup Advanced Fax Setup and Maintenance options
Press and to move to the setting you wantPress Enter to select the displayed setting
1Clean Print Cartridges
2Align Print Cartridges
3Restore Factory Defaults
4Reprint Faxes in Memory
5Set Language amp CountryRegion
6Set Scroll Speed
7Set Prompt Delay Time
5Maintenance2Speed Dial Setup
3Basic Fax Setup
4Advanced Fax Setup
1Individual Speed Dial
2Delete Speed Dial
3Print Speed Dial List
1Date and Time
2Fax Header
3Rings to Answer
4 Paper Size
5Tone or Pulse Dialing
6Ring and Beep Volume
7Fax Forwarding Black Only
1Automatic Reports Setup
2Answer Ring Pattern
3Busy Redial
4No Answer Redail
5Automatic Reduction
6Backup Fax Reception
7Error Correction Mode
hp officejet 4100 series
chapter 7
38
8
39
additional setup information
During the installation of the HP Officejet software a number of windows are displayed You should see the following
bull Installingbull Copying files bull A request to plug in the HP Officejetbull Green OK and check markbull Request to restart your computer (may not occur in all cases)bull Registration
If you did not see all of these windows there may be a problem with the installation Verify the following
bull The HP Director contains six icons (double-click the HP Director icon on the desktop)
bull The HP Officejet is listed in the Printers dialog boxbull There is an icon for the HP Officejet in the System Tray that indicates the
HP Officejet is ready
If the HP Director does not show six icons you may need to wait a few minutes for the HP Officejet to connect to your computer
possible installation problemsIf nothing appears on your computer screen after you insert the HP Officejet 4100 Series CD-ROM into your computerrsquos CD-ROM drive
1 From the Start menu choose Run
2 In the Run dialog box enter dsetupexe (if your CD-ROM drive is not assigned to drive letter d use the appropriate drive letter) then click OK
If the HP Director does not contain six icons do the following
bull Verify that the front-panel cover is attached then unplug the HP Officejet and plug it in again
bull Verify that the USB and power cables are plugged inndash Unplug the USB cable and plug it in againndash Do not attach the USB cable to a keyboard or nonpowered hubndash Verify that the USB cable is 3 meters or less in lengthndash If you have several USB devices attached to your computer you may
want to unplug the others during the installation
Note AppleTalk is not supported
bull Unplug the HP Officejet from the wall and plug it in againbull Restart your computer
hp officejet 4100 series
chapter 8
40
On Windows check the System Tray for applications that are running in the background and close them before restarting your computer
remove and reinstall your hp officejet softwareIf six icons do not appear in the Director you may need to uninstall and re-install the software Do not simply delete the HP Officejet program files from your hard drive Be sure to remove them properly using the uninstall utility provided in the HP Officejet program group
to uninstall from a Windows computer
1 Disconnect your HP Officejet from your computer
2 On the Windows taskbar click Start choose Programs or All Programs (XP) choose Hewlett-Packard choose hp officejet 4100 series then choose uninstall software
3 Follow the directions on the screenBe sure to disconnect your HP Officejet
4 If you are asked whether you would like to remove shared files click NoOther programs that use these files may not work properly if the files are deleted
5 After the program finishes removing the software disconnect your HP Officejet and restart your computer
Note It is important that you disconnect your HP Officejet before restarting your computer
6 To reinstall the software insert the HP Officejet 4100 Series CD-ROM into your computerrsquos CD-ROM drive and follow the instructions that appear
7 After the software is installed connect and turn on your HP Officejet following the onscreen instructions and the instructions in your Setup PosterAfter connecting and turning on your HP Officejet you may have to wait several minutes for all of the Plug and Play events to completeWhen the software installation is complete you will see a Status Monitor icon in the System Tray
8 To verify that the software is properly installed double-click on the HP Director icon on the desktop If the HP Director shows six icons the software has been properly installed
to uninstall from a Macintosh computer
1 Disconnect your HP Officejet from your computer
2 Double-click on ApplicationsHP All-in-One Software folder
reference guide
additional setup information
41
3 Double-click on HP Uninstaller
4 Follow the directions that appear on the screen
5 After the program finishes removing the software disconnect your HP Officejet and restart your computer
6 To reinstall the software insert the HP Officejet 4100 Series CD-ROM into your computerrsquos CD-ROM drive
Note When re-installing the software follow the instructions on the Setup Poster Do not connect the HP Officejet to your computer until after you have completed the software installation
7 On the desktop open the CD-ROM double-click on hp all-in-one installer and follow the instructions that appear
connect your hp officejet to a phone modem or answering machine
The HP Officejet can share a phone line with a phone a modem or an aswering machine When sharing a phone line with an answering machine the HP Officejet will answer fax calls and direct voice calls to the answering machine
Note For information on connecting your HP Officejet to your computer and phone line refer to the Setup Poster that came with your unit
to connect your hp officejet to a phone modem or answering machine
1 Remove the white plastic stopper from connector 2 on the back of the HP Officejet
To connect more than one device to connector 2 on the HP Officejet you must purchase a Y-splitter and plug it into connector 2
2 Connect the phone cord from the phone modem or answering machine to connector 2 (or Y-splitter)
Caution Do not use the phone cord that came with the HP Officejet for this purpose That phone cord must connect connector 1 on the HP Officejet to the wall jack for your phone system See the Setup Poster for details
3 If you are connecting an answering machine see set the number of rings before answering on page 21 for instructions on setting the number of rings correctly or change the answer ring pattern (distinctive ringing) on page 26 for information on incoming ring patterns
4 If you are connecting a modem turn off its fax-receive feature
connector 2 on the HP Officejet
connector 1 on the HP Officejet
hp officejet 4100 series
chapter 8
42
additional troubleshooting helpYou may want to refer to the readme file for more information on possible installation problems On Windows you can access the readme file from the Start button on the taskbar select Programs Hewlett-Packard hp officejet 4100 series View the Readme File On Macintosh you can access the readme file by double-clicking on the icon located in the top-level folder of the HP Officejet software CD-ROM
The readme file provides more information including
bull Using the Re-install utility after a failed installation to return your PC to a state that will allow the HP Officejet to be re-installed
bull Using the Re-install utility on Windows 98 to recover from a Composite USB System Driver missing errorThis error may occur if the hardware is installed prior to installing the software After running the Re-install utility reboot your PC and install the HP Officejet software before connecting the HP Officejet to your computer
You can also find more information on this website
wwwhpcomsupport
9
43
technical information
Additional specifications information can be found in the HP Photo amp Imaging Help in the hp officejet 4100 series section
physical specifications
power specificationsbull Power consumption 75W maximumbull Source (Input Voltage) 100 to 240 VAC groundedbull Input Frequency 50 to 60 Hzbull Current 1A maximum
regulatory informationAdditional regulatory information can be found in the HP Photo amp Imaging Help The information in this section supercedes information in the HP Photo amp Imaging Help
doc statement deacuteclaration de conformiteacute (Canada)Le preacutesent appareil numeacuterique neacutemet pas de bruit radioeacutelectrique deacutepassant les limites applicables aux appareils numeacuteriques de la classe B prescrites dans le Regraveglement sur le brouillage radioeacutelectrique eacutedicteacute par le ministegravere des Communications du CanadaThis digital apparatus does not exceed the Class B limits for radio noise emissions from digital apparatus set out in the Radio Interference Regulations of the Canadian Department of Communications
notice to users of the Canadian telephone networkThis equipment meets the applicable Industry Canada Terminal Equipment Technical Specifications This is confirmed by the registration number The abbreviation IC before the registration number signifies that registration was performed based on a Declaration of Conformity indicating that Industry Canada technical specifications were met It does not imply that Industry Canada approved the equipment
Note The Ringer Equivalence Number (REN) assigned to each terminal device provides an indication of the maximum number of terminals allowed to be connected to a telephone interface The termination on an interface may consist of any combination of devices subject only to the requirement that the sum of the Ringer Equivalence Numbers of all the devices does not exceed 5
The REN for this product is 03B based on FCC Part 68 test results
height width depth weight (without print cartridges)
with paper trays and ADF closed
718 in (1824 cm) 1676 in (4258 cm) 825 in (2096 cm) 75 lbs (34 kg)
with ADF and paper tray extended
1030 in (2615 cm) 1676 in (4258 cm) 1854 in (4709 cm) 75 lbs (34 kg)
hp officejet 4100 series
chapter 9
44
notice to all users of the European Economic Area (EEA)
This product is designed to interwork with the analogue telephone networks in the following countriesregions
Network compatibility depends on customer selected settings which must be reset to use the equipment on a telephone network in a countryregion other than where the product was purchased Contact the vendor or Hewlett-Packard Company if addition product support is necessaryThis equipment has been certified by the manufacturer in accordance with Directive 19995EC (annex II) for Pan-European single-terminal connection to the public switched telephone network (PSTN) However due to differences between the individual PSTNs provided in different countriesregions the approval does not of itself give an unconditional assurance of successful operation on every PSTN network termination pointIn the event of problems you should contact your equipment supplier in the first instance
geraumluschemissionLpA lt 70 dBam Arbeitsplatzim Normalbetriebnach DIN 45635 T 19
notice to Korean customers
Germany UK Netherlands
France Spain Italy
Belgium Luxembourg Sweden
Austria Denmark Ireland
Norway Finland Switzerland
Greece Portugal
10
45
hp support
This section explains the support services information provided by Hewlett-Packard If you are unable to find the answer you need in the printed or onscreen documentation supplied with your product you can contact one of the HP support services listed in the following pages Some support services are available only in the US and Canada while others are available in many countriesregions worldwide If a support service number is not listed for your countryregion contact your nearest authorized HP dealer for help
get support and other information from the internetIf you have Internet access you can get help from the following HP website
wwwhpcomsupportThe Web site offers technical support drivers supplies and ordering information
hp customer supportSoftware programs from other companies may be included with your HP Officejet If you experience problems with any of those programs you will receive the best technical assistance by calling the experts at that companyIf you need to contact HP Customer Support do the following before you call
1 Make sure thata Your unit is plugged in and turned onb The specified print cartridges are installed correctlyc The recommended paper is properly loaded in the input tray
2 Reset your unita Turn off the unit using the On button located on the unitrsquos front panelb Unplug the power cord from the back of the unitc Plug the power cord back into the unitd Turn on the unit using the On button
3 For more information check the HP website at wwwhpcomsupport
4 If you are still experiencing problems and need to speak with an HP Customer Support Representativendash Have your service ID and serial number ready To display your service ID and
serial number on the front panel do the following Press Enter and Start Color at the same time until the service ID appears in the front-panel display From this display press the right arrow until the serial number displays
ndash Print a Self-Test Report See print a self-test report on page 32 for information on printing this report
ndash Make a color copyndash Be prepared to describe your problem in detail
5 Call HP Customer Support Be near your unit when you call
call in the US during warrantyCall (208) 323-2551 This service is free during the warranty period however your standard long-distance phone charges still apply A fee may apply outside the warranty period
hp officejet 4100 series
chapter 10
46
US phone support is available in both English and Spanish languages 24 hours a day 7 days a week (days and hours of support may change without notice)
call elsewhere in the worldThe numbers listed below are current as of the printing date of this guide For a list of current international HP Support Service numbers visit this address and choose your own countryregion or language
wwwhpcomsupportFor Korea you can also visit this address
httpwwwhpcokrYou can call the HP support center in the following countriesregions If your countryregion is not listed contact your local dealer or nearest HP Sales and Support Office to find out how to obtain servicesSupport service is free during the warranty period however your standard long-distance phone charges will apply In some cases a flat fee per single incident will also applyFor phone support in Europe please check for the details and conditions of phone support in your countryregion by consulting the following Web site
wwwhpcomsupportAlternatively you can ask your dealer or call HP at the phone number indicated in this booklet As part of our constant efforts to improve our phone support service we advise you to check our website on a regular basis for new information regarding service features and delivery
countryregion hp technical support countryregion hp technical support
Algeria1 +213 (0) 61564 543 Malaysia 1-800-805405
Argentina 0810-555-5520 Mexico 01-800-472-6684
Australia +61 3 8877 80001902 910 910
Mexico (Mexico City) 5258-9922
Austria +43 (0) 810 00 6080 Morocco1 +212 22404 747
Bahrain (Dubai) 800 728 Netherlands +31 (0) 20 606 8751
Belgium (Dutch) +32 (0) 2 626 8806 New Zealand 0800 441 147
Belgium (French) +32 (0) 2 626 8807 Norway +47 22 11 6299
Brazil (Grande Sao Paulo) (11) 3747 7799 Oman +971 4 883 8454
Brazil (Demais Localidades) 0800 157751 Palestine +971 4 883 8454
Canada during warranty (905) 206 4663 Panama 001-800-7112884
Canada post-warranty(per-call charge)
1-877-621-4722 Peru 0-800-10111
Caribbean amp Central America
1-800-711-2884 Philippines 632-867-3551
Chile 800-360-999 Poland +48 22 865 98 00
China 86 10 6868 7980 Portugal +351 21 3176333
Colombia 9-800-114-726 Puerto Rico 1-877-2320-589
Costa Rica 0-800-011-0524 Qatar +971 4 883 8454
Czech Republic +420 (0) 261307310 Romania +40 1 315 44 42or local 01 3154442
reference guide
hp support
47
call in Australia post-warrantyIf your product is not under warranty you can call 03 8877 8000 A per-incident out-of-warranty support fee of $2750 (inc GST) will be charged to your credit card You can also call 1902 910 910 ($2750 charged to your phone account) from 900 AM to 500 PM Monday through Friday (Charges and support hours are subject to change without notice)
prepare your unit for shipmentIf after contacting HP Customer Support or returning to the point of purchase you are requested to send your unit in for service please follow the power off and rebox steps below to avoid further damage to the HP product
Denmark +45 39 29 4099 Russian Federation Moscow +7 095 797 3520
Ecuador 1800-711-2884 Russian Federation St Petersburg
+7 812 346 7997
Europe (English) +44 (0) 207 512 5202 Saudi Arabia +800 897 14440
Egypt 02 532 5222 Singapore 65 6272 5300
Finland +358 (0) 203 47 288 Slovakia +421 (0) 2 682 08080
France (034 Euromin) +0892 69 60 22 South Africa (inside RSA) 086 000 1030
Germany (012 Euromin) +49 (0) 180 52 58 143 South Africa (inside RSA) +27-11 258 9301
Greece +30 1060 73 603 Spain +34 902 321 123
Hong Kong (SAR) +85 (2) 3002 8555 Sweden +46 (0)8 619 2170
Guatemala 1800-995-5105 Switzerland 2 +41 (0) 84 880 1111
Hungary +36 (0) 1 382 1111 Taiwan +886-2-2717-00550800 010 055
India 1-600-11226791 11 682 6035
Thailand +66 (2) 661 4000
Indonesia 62-21-350-3408 Tunisia1 +216 1891 222
Ireland +353 (0) 1 662 5525 Turkey +90 216 579 7171
Israel +972 (0) 9 8304848 Ukraine +7 (380-44) 490-3520
Italy +39 (0) 226410350 United Arab Emirates +971 4 883 8454
Japan 0570 000 511+81 3 3335 9800
United Kingdom +44 (0) 207 512 52 02
Jordan +971 4 883 8454 Venezuela 0800-47468368 or800-477-7777
Korea (Seoul) +82 (2) 3270 0700 Venezuela (Caracas) (502) 207-8488
Korea (outside Seoul) 080 999 0700 Vietnam 84 (0) 8 823 4530
Kuwait +971 4 883 8454 Yemen +971 4 883 8454
Lebanon +971 4 883 8454
1 This Call Center supports French speaking customers from the following countriesregions Morocco Tunisia and Algeria
2 This Call Center supports German French and Italian speaking customers in Switzerland
countryregion hp technical support countryregion hp technical support
hp officejet 4100 series
chapter 10
48
Note When transporting your HP Officejet make sure that the pens have been removed the HP Officejet has been properly shut down by pressing the power button and you have allowed time for the carriage to return to the service station and for the scanner to return to its parked position
1 Turn on the unitDisregard steps 1 through 6 if your unit will not turn on and the print carriage is in the home position You will not be able to remove the print cartridges Proceed to step 7
2 Open the print cartridge access doorThe print carriage moves into view
3 See replace the print cartridges on page 33 for information on removing the print cartridges
Caution Remove both print cartridges Failure to do so may damage your unit
4 Place the print cartridges in an airtight bag so they will not dry out and put them aside (do not send them with the unit unless instructed to by the HP customer support call agent)
5 Turn off the unit
6 Close the print cartridge access door
7 Remove the front panel cover as followsa Grasp the front of the front panel cover with two hands as shownb Firmly lift the front panel cover to unsnap it from the unit
8 Retain the front panel cover Do not return the front panel cover with the unit
9 If available pack the unit for shipment using the original packing materials or the packaging materials that come with your exchange unit
If you do not have the original packaging materials please use other adequate packaging materials Shipping damage caused by improper packaging andor improper transportation is not covered under the warranty
reference guide
hp support
49
10 Place the return shipping label on the outside of the box
11 Include the following items in the boxndash A complete description of symptoms for service personnel (samples of print
quality problems are helpful)ndash A copy of the sales slip or other proof of purchase to establish the warranty
coverage periodndash Your name address and a phone number where you can be reached during
the day
hp distribution centerTo order HP Officejet software a copy of the printed Reference Guide a setup poster or other customer-replaceable parts do one of the following bull In the US or Canada call (208) 323 2551bull Visit this website
httpwwwhpcomcposupportsoftwarehtml
hp officejet 4100 series
chapter 10
50
11
51
warranty information
HP Officejet 4100 seriesDuration of Limited Warranty (hardware and labor) 1 YearDuration of Limited Warranty (CD media) 90 DaysDuration of Limited Warranty (print cartridges) Until the HP ink is depleted or the ldquoend of warrantyrdquo date printed on the cartridge has been reached whichever occurs first
warranty service
express serviceTo obtain HP express repair service the customer must contact an HP service office or an HP Customer Support Center for basic troubleshooting first See hp customer support on page 45 for steps to take before calling Customer SupportIf a customer unit needs a minor part replacement and these parts can normally be replaced by the customer the customer-replaceable components may be serviced through expedited part shipment In this event HP will prepay shipping charges duty and taxes provide telephone assistance on replacement of the component and pay shipping charges duty and taxes for any part that HP asks to be returnedThe HP Customer Support Center may direct customers to designated authorized service providers who are certified by HP to service the HP product
warranty upgradesUpgrade your standard factory warranty to a total of three years with the HP SUPPORTPACK Service coverage begins on product purchase date and the pack must be purchased within the first 180 days of product purchase This program offers phone support from 600 AM to 1000 PM Mountain Standard Time (MST) Monday through Friday and 900 AM to 400 PM (MST) on Saturdays If during your technical support call it is determined that you need a replacement product then HP will ship you this product next business day free of charge Available in US onlyFor more information please call 1-888-999-4747 or visit the following HP Web site
httpwwwhpcomgohpsupportpack
Outside the US please call your local HP Customer Support office See call elsewhere in the world on page 46 for a list of international Customer Support numbers
returning your hp officejet for serviceBefore returning your HP Officejet for service you must call HP Customer Support See hp customer support on page 45 for steps to take before calling Customer Support
hewlett-packard limited global warranty statement
extent of limited warrantyHewlett-Packard (ldquoHPrdquo) warrants to the end-user customer (ldquoCustomerrdquo) that each HP Officejet 4100 Series product (ldquoProductrdquo) including related software accessories media and supplies shall be free from defects in material and workmanship for the duration which begins on the date of purchase by the Customer
hp officejet 4100 series
chapter 11
52
For each software Product HPrsquos limited warranty applies only to a failure to execute programming instructions HP does not warrant that the operation of any Product shall be uninterrupted or error freeHPrsquos limited warranty covers only those defects which arise as a result of normal use of a Product and does not cover any other problems including those which arise as a result of (a) improper maintenance or modification (b) software accessories media or supplies not provided or supported by HP or (c) operation outside the Productrsquos specificationsFor any hardware Product the use of a non-HP print cartridge or a refilled print cartridge does not affect either the warranty to the Customer or any HP support contract with the Customer However if Product failure or damage is attributable to the use of a non-HP or refilled print cartridge HP shall charge its standard labor and materials charges to service the Product for the failure or damageIf HP receives during the applicable warranty period notice of a defect in any Product HP shall either repair or replace the defective Product at HPrsquos option Where labor charges are not covered by HPrsquos limited warranty repairs shall be at HPrsquos standard charges for laborIf HP is unable to repair or replace as applicable a defective Product which is covered by HPrsquos warranty HP shall within a reasonable time after being notified of the defect refund the purchase price for the ProductHP shall have no obligation to repair replace or refund until the Customer returns the defective Product to HPAny replacement product may be either new or like-new provided that it has functionality at least equal to that of the Product being replacedHP products including each Product may contain remanufactured parts components or materials equivalent to new in performanceHPs limited warranty for each Product is valid in any countryregion or locality where HP has a support presence for the Product and where HP has marketed the Product The level of warranty service may vary according to local standards HP shall have no obligation to alter the form fit or function of the Product in order to make it operate in a countryregion or locality for which the Product was never intended to operate
limitations of warrantyTO THE EXTENT ALLOWED BY LOCAL LAW NEITHER HP NOR ITS THIRD PARTY SUPPLIERS MAKE ANY OTHER WARRANTY OR CONDITION OF ANY KIND WHETHER EXPRESS OR IMPLIED WITH RESPECT TO THE COVERED HP PRODUCTS AND SPECIFICALLY DISCLAIM THE IMPLIED WARRANTIES OR CONDITIONS OF MERCHANTABILITY SATISFACTORY QUALITY AND FITNESS FOR A PARTICULAR PURPOSE
limitations of liabilityTo the extent allowed by local law the remedies provided in this Limited Warranty Statement are the Customerrsquos sole and exclusive remediesTO THE EXTENT ALLOWED BY LOCAL LAW EXCEPT FOR THE OBLIGATIONS SPECIFICALLY SET FORTH IN THIS LIMITED WARRANTY STATEMENT IN NO EVENT SHALL HP OR ITS THIRD PARTY SUPPLIERS BE LIABLE FOR DIRECT INDIRECT SPECIAL INCIDENTAL OR CONSEQUENTIAL DAMAGES WHETHER BASED ON CONTRACT TORT OR ANY OTHER LEGAL THEORY AND WHETHER ADVISED OF THE POSSIBILITY OF SUCH DAMAGES
local lawThis Limited Warranty Statement gives the Customer specific legal rights The Customer may also have other rights which vary from state to state in the United States from province to province in Canada and from countryregion to countryregion elsewhere in the world
reference guide
warranty information
53
To the extent this Limited Warranty Statement is inconsistent with local law this Statement shall be deemed modified to be consistent with such local law Under such local law certain disclaimers and limitations of this Statement may not apply to the Customer For example some states in the United States as well as some governments outside the United States (including provinces in Canada) mayPreclude the disclaimers and limitations in this Statement from limiting the statutory rights of a consumer (eg the United Kingdom)Otherwise restrict the ability of a manufacturer to enforce such disclaimers or limitations orGrant the Customer additional warranty rights specify the duration of implied warranties which the manufacturer cannot disclaim or not allow limitations on the duration of implied warrantiesFOR CONSUMER TRANSACTIONS IN AUSTRALIA AND NEW ZEALAND THE TERMS IN THIS LIMITED WARRANTY STATEMENT EXCEPT TO THE EXTENT LAWFULLY PERMITTED DO NOT EXCLUDE RESTRICT OR MODIFY AND ARE IN ADDITION TO THE MANDATORY STATUTORY RIGHTS APPLICABLE TO THE SALE OF THE COVERED HP PRODUCTS TO SUCH CUSTOMERS
hp officejet 4100 series
chapter 11
54
55
index
Numerics4-by-6 inch photo paper
load 10 12
AADF 7adjust
volume for fax 25align print cartridges 35Answer Ring Pattern 26automatic document feeder 7automatic reduction
fax 25
Bbest copy quality 13busy number
redial automatically 23
Ccancel
scan 18scheduled fax 21
cartridgesalign 35replace 33
cleanprint cartridges 35the exterior 32the glass 31white strip 32
colorenhance 14fax 20fax from front panel 20
contrastchange for fax 23photo color 14
copy 13 16change default settings 15enhance 14fit to page 16lighten or darken 14menu options 16number of copies 14photo 15quality 13reduce or enlarge 14settings 13 15
speed 13tutorial 4
Customer Support 45web site 45
Ddarken a copy 14date
setting 27default settings
restore 35director review 4distinctive ringing 26
Eenhance copies 14enlarge copy 14 16envelopes
load 9Error Correction Mode
(ECM) 25
Ffactory defaults
restore 35fast copy quality 13fax 28
adjust volume 25automated reports 22cancel fax forward 24cancel scheduled 21change Answer Ring
Pattern 26change contrast 23change resolution 22change settings 19control appearance 22create individual speed-dial
settings 26delete speed-dial
settings 27distinctive ringing 26Error Correction Mode
(ECM) 25forward faxes 24header 27in color 20in color from front panel 20manual reports 22
menu 29print reports 22receive 21receive manually 21redial busy or unanswered
number 23schedule 20send from front panel 19set automatic reduction 25set date and time 27set the number of rings 21settings 27 28setup menu options 29speed dials 19test 28
fit to page 16forward faxes 24
cancel 24front panel
display scroll speed 36enter text 28send a fax 19setting prompt delay 36tutorial 3
Gglass
cleaning 31greeting cards
load 11
Hhelp 1HP Customer Support 45
calling 45HP Director 4HP distribution center 49HP Officjet
preparing to ship 47HP papers
tips on loading 11
Iindividual speed-dial settings
create 26ink cartridges see print
cartridgesinkjet paper
load 11
index
hp officejet 4100 series56
Kkeypad
enter text 28
Llabels
load 12lighten copies 14load
change the paper type 12envelopes 9original in ADF 7paper 7photo paper 10 12postcards 10 12print cartridges 33set the paper size 12tips 11
Mmaintenance
align print cartridges 35clean print cartridges 35clean the exterior 32clean the glass 31clean the white strip 32normal sounds 36replace print cartridges 33restore factory defaults 35self-maintenance
sounds 36self-test report 32
menuscopy options 16fax 29fax setup 29maintenance 37print reports 37
Nnormal copy quality 13number of copies
set 14number of rings
set 21
Oorder print cartridges 60originals
load in ADF 7output tray 8
Ppaper
change default size for copy 12
change the type 12load 7recommended 7set the size 12tips on loading 11
paper size change for copy 12
paper trayload 7
phone numbers support services 45
photo paperload 10 12
photoscopy 15enhance copy 14
physical specifications 43postcards
load 10 12power
specifications 43print
envelopes 9fax reports 22self-test report 32
print cartridgesalign 35clean 35handling 32replace 33
prompt delaysetting 36
Qquick start
review the director 4use with a computer 4
Rreceive
fax 21redial
busy or unanswered number 23
reduce copy 14 16regulatory information 43reinstall software 40reports
generate automatically for fax 22
generate manually for fax 22
print 22self-test 32
resolution
change for fax 22restore factory settings 35returning your HP Officejet for
service 51
Sscan
from front panel 17stop 18
schedule a fax 20scroll speed
setting 36self-test report 32send
cancel forward faxes 24color fax 20color fax from front
panel 20forward faxes 24
settingscopy 13 15fax 27 28prompt delay 36scroll speed 36
setupadditional information 39menu 29
shippingyour HP Officejet 47
softwareremove and reinstall 40
soundsself-maintenance 36
specificationsphysical 43power 43
speed dials 19create individual
settings 26delete settings 27
stopscan 18scheduled fax 21
subscriber identification code 27
support services 45
Ttelephone line
multiple numbers 26telephone numbers 45text
enhance 14enter from front panel 28
time
index
reference guide 57
setting 27transparency film
recommended 7tips on loading 11
troubleshootingremove and reinstall
software 40T-shirt Transfer Iron-On
load 11tutorial
front panel 3make a copy 4
Uunanswered number
redial automatically 23
Vvolume
adjust 25
Wwarranty 45
service 51statement 51upgrades 51
white stripcleaning 32
hp officejet 4100 series
chapter 12
58
declaration of conformityAccording to ISOIEC Guide 22 and EN 45014
Manufacturerrsquos Name and Address
Hewlett-Packard Company 16399 West Bernardo Drive San Diego CA 92127-1899 USA
declares that the product
Product Name hp officejet 4100 series (Q1608A)
Model Number(s) officejet 4110 (Q1609A) officejet 4110xi (Q1610A) officejet 4110v (Q1611A) officejet 4105 (Q1612A) officejet 4105z (Q1613A) officejet 4115 (Q1614A)
Product Options All
conforms to the following Product Specifications
Safety EN609501992 +A1 A2 A3 A4 amp A11
IEC609501991 +A1 A2 A3 amp A4
UL1950CSA 222 No 950 3rd Edn 1995
NOM-019-SCFI-1993
EMC CISPR221993 +A1 amp A2 EN550221994 +A1 amp A2 -Class B
CISPR241997EN550241998
IEC 61000-3-21995 EN61000-3-21995
IEC 61000-3-31994 EN61000-3-31995
ASNZS 3548 1992
CNS13438 1997
FCC Part 15-Class B ICES-003 Issue 2 VCCI-2
GB 9254-1998
Telecom TBR21 1998
Supplementary Information
The Product herewith complies with the requirements of the Low Voltage Directive 7323EEC the EMC Directive 89336EEC and the RampTTE Directive 19995EC (ANNEX II) carries the CE marking accordingly
European Contact for regulatory topics only Your local Hewlett-Packard Sales and Service Office orHewlett-Packard GmbH
Department HQ-TRE Herrenberger Strasse 140 D-71034 Boumlblingen Germany (FAX + 49-7031-14-3143)
order mediaTo order media such as HP Premium Inkjet Paper HP Premium Inkjet Transparency Film HP Iron-On T-shirt Transfer paper or HP Greeting Cards go to
wwwhpshoppingcom
For orders in countries other than the US and Canada select other countries then click Yes to leave hpshoppingcom From this website you can access hpshoppingcom for your specific language or countryregion
order print cartridges
If you have Internet access you can get more information from the HP website at
wwwhpcomsupport
print cartridges hp reorder number
HP black print cartridge 56 19 ml black print cartridge
HP color print cartridgeHP tri-color print cartridge
57 17 ml color print cartridge28 8 ml color print cartridge
Visit the hp officejet information centerIt has everything you need to get the most value from your HP Officejet
bull Technical Supportbull Supplies and Ordering Informationbull Project Tipsbull Ways to Enhance Your Product
wwwhpcomsupport
copy 2003 Hewlett-Packard Company
Printed in the USA Mexico Germany Singapore or China
Q1608-90163Q1608-90163
Q1608-90163

reference guide
use the fax features
27
The name is limited to 13 characters in lengthFor more information see enter text on page 28
7 After Enter Another appears press 1 (Yes) if you want to set up another number or press 2 (No) to exit
delete speed-dial settingsFollow these steps to delete an individual speed-dial entry
1 Press Setup
2 Press 2 then press 2 againThis selects Speed Dial Setup then selects Delete Speed Dial
3 Press until the individual entry that you want to delete appears then press Enter
set basic fax settings using the front panelWe recommend that you use the Fax Setup Wizard in the HP Officejet software to configure all your basic fax settings however you can also access these settings from the front panel
Note In the US regulations require that your name and phone number appear on every fax The minimum settings that we recommend are described in the following topics
set the date and timeFollow these steps to set the date and time manually
1 Press Setup
2 Press 3 then press 1This selects the Basic Fax Setup menu then selects the Date and Time option
3 Follow the prompts on the display to enter the date and time using the keypad
Tip Use only the last two digits for the year
Tip When you enter a single-digit date or time type a leading zero before the single digit for example 0345 or 08-03-02
After you are done the date and time appear on the display
Warning Cutting off power to the HP Officejet causes the selected date and time to be lost However name and fax number information is not lost
set the fax headerFollow these steps to enter your name and fax number in the header
Note In Hungary the subscriber identification code (fax header) can be set or changed only by authorized personnel For more information contact your authorized HP dealer
1 Press Setup
2 Press 3 then press 2
hp officejet 4100 series
chapter 6
28
This selects the Basic Fax Setup menu then selects the Fax Header option
3 Enter your personal or company name at the prompt Use the guidelines provided in the next section under enter text
4 Press Enter
5 Enter your fax number using the numeric keypad
6 Press Enter
enter textThe following list provides tips for entering text using the front-panel keypad
bull Press the keypad numbers that correspond to the letters of a name
bull Press a button multiple times to see a letter first in uppercase and then in lowercase
bull After the correct letter appears press and then press the number that corresponds to the next letter in the name Again press multiple times until the correct letter appears
bull To insert a space press Space ()bull To enter a symbol such as press Symbols () to scroll through the list of
available symbolsbull If you make a mistake press to clear it and then make the correct
entrybull After you are done entering text press Enter to store your entries
check for dial toneBefore using the fax features verify that the connections are correctly established
1 Press Fax
2 Listen for a dial tone
3 If you do not hear a dial tone check the connections
4 Press Cancel to hang up
ABC These letters correspond to this number and so on
2
JKL To get this character J j K k L l 5
5 Press 5 this many times 1 2 3 4 5 6 7
reference guide
use the fax features
29
fax job menuThe following options become available when the Fax button is pressed
setup menu for fax commandsThe following fax settings are available in the Setup menu
Enter Fax or Speed Dial
FineVery FinePhotoStandard
Fax Number Resolution LighterDarker
Enter a fax number or speed dialWhen the Fax button is pressed
Press and to move to the option you wantPress Enter to select the displayed setting
NoYes
Set New Defaults
Send Fax NowFax from MemorySend Fax LaterPoll to Receive
How to Fax
1Automatic Reports Setup
2Answer Ring Pattern
3Busy Redial
4No Answer Redial
5Automatic Reduction
6Backup Fax Reception
7Error Correction Mode
3Basic Fax Setup 4Advanced Fax Setup
Press Setup to display the menu options
Press and to move to the setting you wantPress Enter to select the displayed setting
1Date and Time
2Fax Header
3Rings to Answer
4Paper Size
5Tone or Pulse Dialing
6Ring and Beep Volume
7Fax Forwarding Black Only
2Speed Dial Setup
1Individual Speed Dial
2Delete Speed Dial
3Print Speed Dial List
hp officejet 4100 series
chapter 6
30
7
31
maintain your hp officejet
This section provides instructions for keeping your HP Officejet in top working condition Perform these maintenance procedures as necessary
clean the glassDirty glass from dust smudges hair and so on slows down performance and affects the accuracy of features such as Fit to Page and Copy
1 Turn off the unit unplug the power cord and raise the scanner lid
2 Clean the glass with a soft cloth or sponge slightly moistened with a nonabrasive glass cleaner
Caution Do not use abrasives acetone benzene or carbon tetrachloride on the glass these can damage it Do not place liquids directly on the glass They may seep under it and damage the unit
3 Dry the glass with a chamois or cellulose sponge to prevent spotting
hp officejet 4100 series
chapter 7
32
clean the white stripMinor debris can accumulate on the white strip located underneath the scannerrsquos lid
1 Turn off the unit unplug the power cord and raise the scanner lid
2 Clean the white strip with a soft cloth or sponge slightly moistened with a mild soap and warm water
3 Wash the strip gently to loosen debris do not scrub the strip
4 Dry the strip with a chamois or soft cloth
Caution Do not use paper-based wipes as these may scratch the strip
5 If this does not clean the strip well enough repeat the previous steps using isopropyl (rubbing) alcohol and wipe the strip thoroughly with a damp cloth to remove any residual alcohol
clean the exterior Use a soft damp lint-free cloth to wipe dust smudges and stains off the case The interior of the unit does not require cleaning Keep fluids away from the interior of the unit as well as the front panel
work with print cartridgesTo ensure the best print quality from your HP Officejet you will need to perform some simple maintenance procedures and when prompted by a front-panel message replace the print cartridges
print a self-test reportIf you are experiencing problems with printing before cleaning or replacing the print cartridges you should print a Self-Test Report This report provides useful information about your print cartridges including status information
1 Press Setup
2 Press 1 then press 4This selects Print Report and then selects Self-Test Report
3 Press Start Black or Start ColorA Self-Test Report is printed for your HP Officejet
handle print cartridgesBefore you replace or clean a print cartridge you should know the part names and how to handle the print cartridge
reference guide
maintain your hp officejet
33
replace the print cartridgesFront-panel messages appear to let you know that you should replace your print cartridges
See order print cartridges on the back cover for information on ordering replacement print cartridges
1 Turn on the unit then lift open the print cartridge access doorThe print carriage moves into view
2 After the carriage stops moving push down on the print cartridge down to release it and then pull it toward you out of its slot
Plastic tape with pink tab(must be removed)
Copper contactsInk nozzles under tape
Do not touch the copper contacts or the ink nozzles
print cartridge access door
hp officejet 4100 series
chapter 7
34
Note It is normal to see ink build-up in the print cartridge slots
3 Remove the new print cartridge from its packaging and being careful to touch only the bright pink plastic tab gently remove the plastic tape to uncover the ink nozzles
Caution Do not touch the copper contacts or ink nozzles
Once you have removed the plastic tape install the print cartridge immediately to prevent the ink from drying in the nozzles
4 Push the new print cartridge into the appropriate slot at a slight angle until it clicks into place
Caution Do not attempt to push the cartridge straight into the slot It must slide in at a slight angle
The tri-color print cartridge goes on the left and the black cartridge goes on the right
5 Close the print cartridge access door
reference guide
maintain your hp officejet
35
align the print cartridgesThe HP Officejet prompts you to align cartridges every time you install or replace a print cartridge Aligning the cartridges ensures high-quality output
To align the print cartridges when prompted
1 Press Enter on the front panelAn align cartridges (test pattern) page prints
2 Load the align cartridges page face down in the ADF between the paper-width guides and press the Enter button again
3 Recycle or discard the page
To align the cartridges at any other time
1 Press Setup
2 Press 5 then press 2This selects the Maintenance menu and then selects the Align Print Cartridge option
3 Press EnterAn align cartridges (test pattern) page prints
4 Load the align cartridges page face down in the ADF between the paper-width guides and press the Enter button again
5 Recycle or discard the page
clean the print cartridgesUse this feature when the Self-Test Report shows streaking or white lines through any of the colored bars Do not clean print cartridges unnecessarily This wastes ink and shortens the life of the ink nozzles
1 Press Setup
2 Press 5 then press 1This selects the Maintenance menu and then selects the Clean Print Cartridge optionA page of patterns is printed The cartridges are cleaned Recycle or discard the pageIf copy or print quality still seem poor after you clean the print cartridges replace the print cartridge that is affected
restore factory defaultsYou can restore the original factory settings to what they were when you purchased your HP Officejet Choosing to restore your factory defaults restores all settings except date information and any scan settings you may have set
You can perform this process from the front panel only
1 Press Setup
2 Press 5 then press 3This selects Maintenance and then selects Restore Factory DefaultsThe factory default settings are restored
hp officejet 4100 series
chapter 7
36
set scroll speedThe Scroll Speed option lets you control the rate that text messages appear in the front-panel display You can choose Normal Fast or Slow The default is Normal
1 Press Setup
2 Press 5 then press 6This selects Maintenance and then selects Set Scroll Speed
3 Press until the desired speed appears then press Enter
set the prompt delay timeThe Prompt Delay option lets you control the amount of time before a message is displayed in the front-panel display You can choose Normal Fast or Slow The default is Normal
1 Press Setup
2 Press 5 then press 7This selects Maintenance and then selects Set Prompt Delay Time
3 Press until the delay time appears then press Enter
self-maintenance sounds During the life of your product you may hear various mechanical sounds This is a normal part of your unitrsquos self-maintenance
reference guide
maintain your hp officejet
37
setup menu optionsThe following options are available from the Setup button
1Last Transaction
2Fax Log
3Speed Dial List
4Self-Test Report
5Automatic Reports Setup
1Print Report
Use Setup to display the Print Report Speed Dial Setup Basic Fax Setup Advanced Fax Setup and Maintenance options
Press and to move to the setting you wantPress Enter to select the displayed setting
1Clean Print Cartridges
2Align Print Cartridges
3Restore Factory Defaults
4Reprint Faxes in Memory
5Set Language amp CountryRegion
6Set Scroll Speed
7Set Prompt Delay Time
5Maintenance2Speed Dial Setup
3Basic Fax Setup
4Advanced Fax Setup
1Individual Speed Dial
2Delete Speed Dial
3Print Speed Dial List
1Date and Time
2Fax Header
3Rings to Answer
4 Paper Size
5Tone or Pulse Dialing
6Ring and Beep Volume
7Fax Forwarding Black Only
1Automatic Reports Setup
2Answer Ring Pattern
3Busy Redial
4No Answer Redail
5Automatic Reduction
6Backup Fax Reception
7Error Correction Mode
hp officejet 4100 series
chapter 7
38
8
39
additional setup information
During the installation of the HP Officejet software a number of windows are displayed You should see the following
bull Installingbull Copying files bull A request to plug in the HP Officejetbull Green OK and check markbull Request to restart your computer (may not occur in all cases)bull Registration
If you did not see all of these windows there may be a problem with the installation Verify the following
bull The HP Director contains six icons (double-click the HP Director icon on the desktop)
bull The HP Officejet is listed in the Printers dialog boxbull There is an icon for the HP Officejet in the System Tray that indicates the
HP Officejet is ready
If the HP Director does not show six icons you may need to wait a few minutes for the HP Officejet to connect to your computer
possible installation problemsIf nothing appears on your computer screen after you insert the HP Officejet 4100 Series CD-ROM into your computerrsquos CD-ROM drive
1 From the Start menu choose Run
2 In the Run dialog box enter dsetupexe (if your CD-ROM drive is not assigned to drive letter d use the appropriate drive letter) then click OK
If the HP Director does not contain six icons do the following
bull Verify that the front-panel cover is attached then unplug the HP Officejet and plug it in again
bull Verify that the USB and power cables are plugged inndash Unplug the USB cable and plug it in againndash Do not attach the USB cable to a keyboard or nonpowered hubndash Verify that the USB cable is 3 meters or less in lengthndash If you have several USB devices attached to your computer you may
want to unplug the others during the installation
Note AppleTalk is not supported
bull Unplug the HP Officejet from the wall and plug it in againbull Restart your computer
hp officejet 4100 series
chapter 8
40
On Windows check the System Tray for applications that are running in the background and close them before restarting your computer
remove and reinstall your hp officejet softwareIf six icons do not appear in the Director you may need to uninstall and re-install the software Do not simply delete the HP Officejet program files from your hard drive Be sure to remove them properly using the uninstall utility provided in the HP Officejet program group
to uninstall from a Windows computer
1 Disconnect your HP Officejet from your computer
2 On the Windows taskbar click Start choose Programs or All Programs (XP) choose Hewlett-Packard choose hp officejet 4100 series then choose uninstall software
3 Follow the directions on the screenBe sure to disconnect your HP Officejet
4 If you are asked whether you would like to remove shared files click NoOther programs that use these files may not work properly if the files are deleted
5 After the program finishes removing the software disconnect your HP Officejet and restart your computer
Note It is important that you disconnect your HP Officejet before restarting your computer
6 To reinstall the software insert the HP Officejet 4100 Series CD-ROM into your computerrsquos CD-ROM drive and follow the instructions that appear
7 After the software is installed connect and turn on your HP Officejet following the onscreen instructions and the instructions in your Setup PosterAfter connecting and turning on your HP Officejet you may have to wait several minutes for all of the Plug and Play events to completeWhen the software installation is complete you will see a Status Monitor icon in the System Tray
8 To verify that the software is properly installed double-click on the HP Director icon on the desktop If the HP Director shows six icons the software has been properly installed
to uninstall from a Macintosh computer
1 Disconnect your HP Officejet from your computer
2 Double-click on ApplicationsHP All-in-One Software folder
reference guide
additional setup information
41
3 Double-click on HP Uninstaller
4 Follow the directions that appear on the screen
5 After the program finishes removing the software disconnect your HP Officejet and restart your computer
6 To reinstall the software insert the HP Officejet 4100 Series CD-ROM into your computerrsquos CD-ROM drive
Note When re-installing the software follow the instructions on the Setup Poster Do not connect the HP Officejet to your computer until after you have completed the software installation
7 On the desktop open the CD-ROM double-click on hp all-in-one installer and follow the instructions that appear
connect your hp officejet to a phone modem or answering machine
The HP Officejet can share a phone line with a phone a modem or an aswering machine When sharing a phone line with an answering machine the HP Officejet will answer fax calls and direct voice calls to the answering machine
Note For information on connecting your HP Officejet to your computer and phone line refer to the Setup Poster that came with your unit
to connect your hp officejet to a phone modem or answering machine
1 Remove the white plastic stopper from connector 2 on the back of the HP Officejet
To connect more than one device to connector 2 on the HP Officejet you must purchase a Y-splitter and plug it into connector 2
2 Connect the phone cord from the phone modem or answering machine to connector 2 (or Y-splitter)
Caution Do not use the phone cord that came with the HP Officejet for this purpose That phone cord must connect connector 1 on the HP Officejet to the wall jack for your phone system See the Setup Poster for details
3 If you are connecting an answering machine see set the number of rings before answering on page 21 for instructions on setting the number of rings correctly or change the answer ring pattern (distinctive ringing) on page 26 for information on incoming ring patterns
4 If you are connecting a modem turn off its fax-receive feature
connector 2 on the HP Officejet
connector 1 on the HP Officejet
hp officejet 4100 series
chapter 8
42
additional troubleshooting helpYou may want to refer to the readme file for more information on possible installation problems On Windows you can access the readme file from the Start button on the taskbar select Programs Hewlett-Packard hp officejet 4100 series View the Readme File On Macintosh you can access the readme file by double-clicking on the icon located in the top-level folder of the HP Officejet software CD-ROM
The readme file provides more information including
bull Using the Re-install utility after a failed installation to return your PC to a state that will allow the HP Officejet to be re-installed
bull Using the Re-install utility on Windows 98 to recover from a Composite USB System Driver missing errorThis error may occur if the hardware is installed prior to installing the software After running the Re-install utility reboot your PC and install the HP Officejet software before connecting the HP Officejet to your computer
You can also find more information on this website
wwwhpcomsupport
9
43
technical information
Additional specifications information can be found in the HP Photo amp Imaging Help in the hp officejet 4100 series section
physical specifications
power specificationsbull Power consumption 75W maximumbull Source (Input Voltage) 100 to 240 VAC groundedbull Input Frequency 50 to 60 Hzbull Current 1A maximum
regulatory informationAdditional regulatory information can be found in the HP Photo amp Imaging Help The information in this section supercedes information in the HP Photo amp Imaging Help
doc statement deacuteclaration de conformiteacute (Canada)Le preacutesent appareil numeacuterique neacutemet pas de bruit radioeacutelectrique deacutepassant les limites applicables aux appareils numeacuteriques de la classe B prescrites dans le Regraveglement sur le brouillage radioeacutelectrique eacutedicteacute par le ministegravere des Communications du CanadaThis digital apparatus does not exceed the Class B limits for radio noise emissions from digital apparatus set out in the Radio Interference Regulations of the Canadian Department of Communications
notice to users of the Canadian telephone networkThis equipment meets the applicable Industry Canada Terminal Equipment Technical Specifications This is confirmed by the registration number The abbreviation IC before the registration number signifies that registration was performed based on a Declaration of Conformity indicating that Industry Canada technical specifications were met It does not imply that Industry Canada approved the equipment
Note The Ringer Equivalence Number (REN) assigned to each terminal device provides an indication of the maximum number of terminals allowed to be connected to a telephone interface The termination on an interface may consist of any combination of devices subject only to the requirement that the sum of the Ringer Equivalence Numbers of all the devices does not exceed 5
The REN for this product is 03B based on FCC Part 68 test results
height width depth weight (without print cartridges)
with paper trays and ADF closed
718 in (1824 cm) 1676 in (4258 cm) 825 in (2096 cm) 75 lbs (34 kg)
with ADF and paper tray extended
1030 in (2615 cm) 1676 in (4258 cm) 1854 in (4709 cm) 75 lbs (34 kg)
hp officejet 4100 series
chapter 9
44
notice to all users of the European Economic Area (EEA)
This product is designed to interwork with the analogue telephone networks in the following countriesregions
Network compatibility depends on customer selected settings which must be reset to use the equipment on a telephone network in a countryregion other than where the product was purchased Contact the vendor or Hewlett-Packard Company if addition product support is necessaryThis equipment has been certified by the manufacturer in accordance with Directive 19995EC (annex II) for Pan-European single-terminal connection to the public switched telephone network (PSTN) However due to differences between the individual PSTNs provided in different countriesregions the approval does not of itself give an unconditional assurance of successful operation on every PSTN network termination pointIn the event of problems you should contact your equipment supplier in the first instance
geraumluschemissionLpA lt 70 dBam Arbeitsplatzim Normalbetriebnach DIN 45635 T 19
notice to Korean customers
Germany UK Netherlands
France Spain Italy
Belgium Luxembourg Sweden
Austria Denmark Ireland
Norway Finland Switzerland
Greece Portugal
10
45
hp support
This section explains the support services information provided by Hewlett-Packard If you are unable to find the answer you need in the printed or onscreen documentation supplied with your product you can contact one of the HP support services listed in the following pages Some support services are available only in the US and Canada while others are available in many countriesregions worldwide If a support service number is not listed for your countryregion contact your nearest authorized HP dealer for help
get support and other information from the internetIf you have Internet access you can get help from the following HP website
wwwhpcomsupportThe Web site offers technical support drivers supplies and ordering information
hp customer supportSoftware programs from other companies may be included with your HP Officejet If you experience problems with any of those programs you will receive the best technical assistance by calling the experts at that companyIf you need to contact HP Customer Support do the following before you call
1 Make sure thata Your unit is plugged in and turned onb The specified print cartridges are installed correctlyc The recommended paper is properly loaded in the input tray
2 Reset your unita Turn off the unit using the On button located on the unitrsquos front panelb Unplug the power cord from the back of the unitc Plug the power cord back into the unitd Turn on the unit using the On button
3 For more information check the HP website at wwwhpcomsupport
4 If you are still experiencing problems and need to speak with an HP Customer Support Representativendash Have your service ID and serial number ready To display your service ID and
serial number on the front panel do the following Press Enter and Start Color at the same time until the service ID appears in the front-panel display From this display press the right arrow until the serial number displays
ndash Print a Self-Test Report See print a self-test report on page 32 for information on printing this report
ndash Make a color copyndash Be prepared to describe your problem in detail
5 Call HP Customer Support Be near your unit when you call
call in the US during warrantyCall (208) 323-2551 This service is free during the warranty period however your standard long-distance phone charges still apply A fee may apply outside the warranty period
hp officejet 4100 series
chapter 10
46
US phone support is available in both English and Spanish languages 24 hours a day 7 days a week (days and hours of support may change without notice)
call elsewhere in the worldThe numbers listed below are current as of the printing date of this guide For a list of current international HP Support Service numbers visit this address and choose your own countryregion or language
wwwhpcomsupportFor Korea you can also visit this address
httpwwwhpcokrYou can call the HP support center in the following countriesregions If your countryregion is not listed contact your local dealer or nearest HP Sales and Support Office to find out how to obtain servicesSupport service is free during the warranty period however your standard long-distance phone charges will apply In some cases a flat fee per single incident will also applyFor phone support in Europe please check for the details and conditions of phone support in your countryregion by consulting the following Web site
wwwhpcomsupportAlternatively you can ask your dealer or call HP at the phone number indicated in this booklet As part of our constant efforts to improve our phone support service we advise you to check our website on a regular basis for new information regarding service features and delivery
countryregion hp technical support countryregion hp technical support
Algeria1 +213 (0) 61564 543 Malaysia 1-800-805405
Argentina 0810-555-5520 Mexico 01-800-472-6684
Australia +61 3 8877 80001902 910 910
Mexico (Mexico City) 5258-9922
Austria +43 (0) 810 00 6080 Morocco1 +212 22404 747
Bahrain (Dubai) 800 728 Netherlands +31 (0) 20 606 8751
Belgium (Dutch) +32 (0) 2 626 8806 New Zealand 0800 441 147
Belgium (French) +32 (0) 2 626 8807 Norway +47 22 11 6299
Brazil (Grande Sao Paulo) (11) 3747 7799 Oman +971 4 883 8454
Brazil (Demais Localidades) 0800 157751 Palestine +971 4 883 8454
Canada during warranty (905) 206 4663 Panama 001-800-7112884
Canada post-warranty(per-call charge)
1-877-621-4722 Peru 0-800-10111
Caribbean amp Central America
1-800-711-2884 Philippines 632-867-3551
Chile 800-360-999 Poland +48 22 865 98 00
China 86 10 6868 7980 Portugal +351 21 3176333
Colombia 9-800-114-726 Puerto Rico 1-877-2320-589
Costa Rica 0-800-011-0524 Qatar +971 4 883 8454
Czech Republic +420 (0) 261307310 Romania +40 1 315 44 42or local 01 3154442
reference guide
hp support
47
call in Australia post-warrantyIf your product is not under warranty you can call 03 8877 8000 A per-incident out-of-warranty support fee of $2750 (inc GST) will be charged to your credit card You can also call 1902 910 910 ($2750 charged to your phone account) from 900 AM to 500 PM Monday through Friday (Charges and support hours are subject to change without notice)
prepare your unit for shipmentIf after contacting HP Customer Support or returning to the point of purchase you are requested to send your unit in for service please follow the power off and rebox steps below to avoid further damage to the HP product
Denmark +45 39 29 4099 Russian Federation Moscow +7 095 797 3520
Ecuador 1800-711-2884 Russian Federation St Petersburg
+7 812 346 7997
Europe (English) +44 (0) 207 512 5202 Saudi Arabia +800 897 14440
Egypt 02 532 5222 Singapore 65 6272 5300
Finland +358 (0) 203 47 288 Slovakia +421 (0) 2 682 08080
France (034 Euromin) +0892 69 60 22 South Africa (inside RSA) 086 000 1030
Germany (012 Euromin) +49 (0) 180 52 58 143 South Africa (inside RSA) +27-11 258 9301
Greece +30 1060 73 603 Spain +34 902 321 123
Hong Kong (SAR) +85 (2) 3002 8555 Sweden +46 (0)8 619 2170
Guatemala 1800-995-5105 Switzerland 2 +41 (0) 84 880 1111
Hungary +36 (0) 1 382 1111 Taiwan +886-2-2717-00550800 010 055
India 1-600-11226791 11 682 6035
Thailand +66 (2) 661 4000
Indonesia 62-21-350-3408 Tunisia1 +216 1891 222
Ireland +353 (0) 1 662 5525 Turkey +90 216 579 7171
Israel +972 (0) 9 8304848 Ukraine +7 (380-44) 490-3520
Italy +39 (0) 226410350 United Arab Emirates +971 4 883 8454
Japan 0570 000 511+81 3 3335 9800
United Kingdom +44 (0) 207 512 52 02
Jordan +971 4 883 8454 Venezuela 0800-47468368 or800-477-7777
Korea (Seoul) +82 (2) 3270 0700 Venezuela (Caracas) (502) 207-8488
Korea (outside Seoul) 080 999 0700 Vietnam 84 (0) 8 823 4530
Kuwait +971 4 883 8454 Yemen +971 4 883 8454
Lebanon +971 4 883 8454
1 This Call Center supports French speaking customers from the following countriesregions Morocco Tunisia and Algeria
2 This Call Center supports German French and Italian speaking customers in Switzerland
countryregion hp technical support countryregion hp technical support
hp officejet 4100 series
chapter 10
48
Note When transporting your HP Officejet make sure that the pens have been removed the HP Officejet has been properly shut down by pressing the power button and you have allowed time for the carriage to return to the service station and for the scanner to return to its parked position
1 Turn on the unitDisregard steps 1 through 6 if your unit will not turn on and the print carriage is in the home position You will not be able to remove the print cartridges Proceed to step 7
2 Open the print cartridge access doorThe print carriage moves into view
3 See replace the print cartridges on page 33 for information on removing the print cartridges
Caution Remove both print cartridges Failure to do so may damage your unit
4 Place the print cartridges in an airtight bag so they will not dry out and put them aside (do not send them with the unit unless instructed to by the HP customer support call agent)
5 Turn off the unit
6 Close the print cartridge access door
7 Remove the front panel cover as followsa Grasp the front of the front panel cover with two hands as shownb Firmly lift the front panel cover to unsnap it from the unit
8 Retain the front panel cover Do not return the front panel cover with the unit
9 If available pack the unit for shipment using the original packing materials or the packaging materials that come with your exchange unit
If you do not have the original packaging materials please use other adequate packaging materials Shipping damage caused by improper packaging andor improper transportation is not covered under the warranty
reference guide
hp support
49
10 Place the return shipping label on the outside of the box
11 Include the following items in the boxndash A complete description of symptoms for service personnel (samples of print
quality problems are helpful)ndash A copy of the sales slip or other proof of purchase to establish the warranty
coverage periodndash Your name address and a phone number where you can be reached during
the day
hp distribution centerTo order HP Officejet software a copy of the printed Reference Guide a setup poster or other customer-replaceable parts do one of the following bull In the US or Canada call (208) 323 2551bull Visit this website
httpwwwhpcomcposupportsoftwarehtml
hp officejet 4100 series
chapter 10
50
11
51
warranty information
HP Officejet 4100 seriesDuration of Limited Warranty (hardware and labor) 1 YearDuration of Limited Warranty (CD media) 90 DaysDuration of Limited Warranty (print cartridges) Until the HP ink is depleted or the ldquoend of warrantyrdquo date printed on the cartridge has been reached whichever occurs first
warranty service
express serviceTo obtain HP express repair service the customer must contact an HP service office or an HP Customer Support Center for basic troubleshooting first See hp customer support on page 45 for steps to take before calling Customer SupportIf a customer unit needs a minor part replacement and these parts can normally be replaced by the customer the customer-replaceable components may be serviced through expedited part shipment In this event HP will prepay shipping charges duty and taxes provide telephone assistance on replacement of the component and pay shipping charges duty and taxes for any part that HP asks to be returnedThe HP Customer Support Center may direct customers to designated authorized service providers who are certified by HP to service the HP product
warranty upgradesUpgrade your standard factory warranty to a total of three years with the HP SUPPORTPACK Service coverage begins on product purchase date and the pack must be purchased within the first 180 days of product purchase This program offers phone support from 600 AM to 1000 PM Mountain Standard Time (MST) Monday through Friday and 900 AM to 400 PM (MST) on Saturdays If during your technical support call it is determined that you need a replacement product then HP will ship you this product next business day free of charge Available in US onlyFor more information please call 1-888-999-4747 or visit the following HP Web site
httpwwwhpcomgohpsupportpack
Outside the US please call your local HP Customer Support office See call elsewhere in the world on page 46 for a list of international Customer Support numbers
returning your hp officejet for serviceBefore returning your HP Officejet for service you must call HP Customer Support See hp customer support on page 45 for steps to take before calling Customer Support
hewlett-packard limited global warranty statement
extent of limited warrantyHewlett-Packard (ldquoHPrdquo) warrants to the end-user customer (ldquoCustomerrdquo) that each HP Officejet 4100 Series product (ldquoProductrdquo) including related software accessories media and supplies shall be free from defects in material and workmanship for the duration which begins on the date of purchase by the Customer
hp officejet 4100 series
chapter 11
52
For each software Product HPrsquos limited warranty applies only to a failure to execute programming instructions HP does not warrant that the operation of any Product shall be uninterrupted or error freeHPrsquos limited warranty covers only those defects which arise as a result of normal use of a Product and does not cover any other problems including those which arise as a result of (a) improper maintenance or modification (b) software accessories media or supplies not provided or supported by HP or (c) operation outside the Productrsquos specificationsFor any hardware Product the use of a non-HP print cartridge or a refilled print cartridge does not affect either the warranty to the Customer or any HP support contract with the Customer However if Product failure or damage is attributable to the use of a non-HP or refilled print cartridge HP shall charge its standard labor and materials charges to service the Product for the failure or damageIf HP receives during the applicable warranty period notice of a defect in any Product HP shall either repair or replace the defective Product at HPrsquos option Where labor charges are not covered by HPrsquos limited warranty repairs shall be at HPrsquos standard charges for laborIf HP is unable to repair or replace as applicable a defective Product which is covered by HPrsquos warranty HP shall within a reasonable time after being notified of the defect refund the purchase price for the ProductHP shall have no obligation to repair replace or refund until the Customer returns the defective Product to HPAny replacement product may be either new or like-new provided that it has functionality at least equal to that of the Product being replacedHP products including each Product may contain remanufactured parts components or materials equivalent to new in performanceHPs limited warranty for each Product is valid in any countryregion or locality where HP has a support presence for the Product and where HP has marketed the Product The level of warranty service may vary according to local standards HP shall have no obligation to alter the form fit or function of the Product in order to make it operate in a countryregion or locality for which the Product was never intended to operate
limitations of warrantyTO THE EXTENT ALLOWED BY LOCAL LAW NEITHER HP NOR ITS THIRD PARTY SUPPLIERS MAKE ANY OTHER WARRANTY OR CONDITION OF ANY KIND WHETHER EXPRESS OR IMPLIED WITH RESPECT TO THE COVERED HP PRODUCTS AND SPECIFICALLY DISCLAIM THE IMPLIED WARRANTIES OR CONDITIONS OF MERCHANTABILITY SATISFACTORY QUALITY AND FITNESS FOR A PARTICULAR PURPOSE
limitations of liabilityTo the extent allowed by local law the remedies provided in this Limited Warranty Statement are the Customerrsquos sole and exclusive remediesTO THE EXTENT ALLOWED BY LOCAL LAW EXCEPT FOR THE OBLIGATIONS SPECIFICALLY SET FORTH IN THIS LIMITED WARRANTY STATEMENT IN NO EVENT SHALL HP OR ITS THIRD PARTY SUPPLIERS BE LIABLE FOR DIRECT INDIRECT SPECIAL INCIDENTAL OR CONSEQUENTIAL DAMAGES WHETHER BASED ON CONTRACT TORT OR ANY OTHER LEGAL THEORY AND WHETHER ADVISED OF THE POSSIBILITY OF SUCH DAMAGES
local lawThis Limited Warranty Statement gives the Customer specific legal rights The Customer may also have other rights which vary from state to state in the United States from province to province in Canada and from countryregion to countryregion elsewhere in the world
reference guide
warranty information
53
To the extent this Limited Warranty Statement is inconsistent with local law this Statement shall be deemed modified to be consistent with such local law Under such local law certain disclaimers and limitations of this Statement may not apply to the Customer For example some states in the United States as well as some governments outside the United States (including provinces in Canada) mayPreclude the disclaimers and limitations in this Statement from limiting the statutory rights of a consumer (eg the United Kingdom)Otherwise restrict the ability of a manufacturer to enforce such disclaimers or limitations orGrant the Customer additional warranty rights specify the duration of implied warranties which the manufacturer cannot disclaim or not allow limitations on the duration of implied warrantiesFOR CONSUMER TRANSACTIONS IN AUSTRALIA AND NEW ZEALAND THE TERMS IN THIS LIMITED WARRANTY STATEMENT EXCEPT TO THE EXTENT LAWFULLY PERMITTED DO NOT EXCLUDE RESTRICT OR MODIFY AND ARE IN ADDITION TO THE MANDATORY STATUTORY RIGHTS APPLICABLE TO THE SALE OF THE COVERED HP PRODUCTS TO SUCH CUSTOMERS
hp officejet 4100 series
chapter 11
54
55
index
Numerics4-by-6 inch photo paper
load 10 12
AADF 7adjust
volume for fax 25align print cartridges 35Answer Ring Pattern 26automatic document feeder 7automatic reduction
fax 25
Bbest copy quality 13busy number
redial automatically 23
Ccancel
scan 18scheduled fax 21
cartridgesalign 35replace 33
cleanprint cartridges 35the exterior 32the glass 31white strip 32
colorenhance 14fax 20fax from front panel 20
contrastchange for fax 23photo color 14
copy 13 16change default settings 15enhance 14fit to page 16lighten or darken 14menu options 16number of copies 14photo 15quality 13reduce or enlarge 14settings 13 15
speed 13tutorial 4
Customer Support 45web site 45
Ddarken a copy 14date
setting 27default settings
restore 35director review 4distinctive ringing 26
Eenhance copies 14enlarge copy 14 16envelopes
load 9Error Correction Mode
(ECM) 25
Ffactory defaults
restore 35fast copy quality 13fax 28
adjust volume 25automated reports 22cancel fax forward 24cancel scheduled 21change Answer Ring
Pattern 26change contrast 23change resolution 22change settings 19control appearance 22create individual speed-dial
settings 26delete speed-dial
settings 27distinctive ringing 26Error Correction Mode
(ECM) 25forward faxes 24header 27in color 20in color from front panel 20manual reports 22
menu 29print reports 22receive 21receive manually 21redial busy or unanswered
number 23schedule 20send from front panel 19set automatic reduction 25set date and time 27set the number of rings 21settings 27 28setup menu options 29speed dials 19test 28
fit to page 16forward faxes 24
cancel 24front panel
display scroll speed 36enter text 28send a fax 19setting prompt delay 36tutorial 3
Gglass
cleaning 31greeting cards
load 11
Hhelp 1HP Customer Support 45
calling 45HP Director 4HP distribution center 49HP Officjet
preparing to ship 47HP papers
tips on loading 11
Iindividual speed-dial settings
create 26ink cartridges see print
cartridgesinkjet paper
load 11
index
hp officejet 4100 series56
Kkeypad
enter text 28
Llabels
load 12lighten copies 14load
change the paper type 12envelopes 9original in ADF 7paper 7photo paper 10 12postcards 10 12print cartridges 33set the paper size 12tips 11
Mmaintenance
align print cartridges 35clean print cartridges 35clean the exterior 32clean the glass 31clean the white strip 32normal sounds 36replace print cartridges 33restore factory defaults 35self-maintenance
sounds 36self-test report 32
menuscopy options 16fax 29fax setup 29maintenance 37print reports 37
Nnormal copy quality 13number of copies
set 14number of rings
set 21
Oorder print cartridges 60originals
load in ADF 7output tray 8
Ppaper
change default size for copy 12
change the type 12load 7recommended 7set the size 12tips on loading 11
paper size change for copy 12
paper trayload 7
phone numbers support services 45
photo paperload 10 12
photoscopy 15enhance copy 14
physical specifications 43postcards
load 10 12power
specifications 43print
envelopes 9fax reports 22self-test report 32
print cartridgesalign 35clean 35handling 32replace 33
prompt delaysetting 36
Qquick start
review the director 4use with a computer 4
Rreceive
fax 21redial
busy or unanswered number 23
reduce copy 14 16regulatory information 43reinstall software 40reports
generate automatically for fax 22
generate manually for fax 22
print 22self-test 32
resolution
change for fax 22restore factory settings 35returning your HP Officejet for
service 51
Sscan
from front panel 17stop 18
schedule a fax 20scroll speed
setting 36self-test report 32send
cancel forward faxes 24color fax 20color fax from front
panel 20forward faxes 24
settingscopy 13 15fax 27 28prompt delay 36scroll speed 36
setupadditional information 39menu 29
shippingyour HP Officejet 47
softwareremove and reinstall 40
soundsself-maintenance 36
specificationsphysical 43power 43
speed dials 19create individual
settings 26delete settings 27
stopscan 18scheduled fax 21
subscriber identification code 27
support services 45
Ttelephone line
multiple numbers 26telephone numbers 45text
enhance 14enter from front panel 28
time
index
reference guide 57
setting 27transparency film
recommended 7tips on loading 11
troubleshootingremove and reinstall
software 40T-shirt Transfer Iron-On
load 11tutorial
front panel 3make a copy 4
Uunanswered number
redial automatically 23
Vvolume
adjust 25
Wwarranty 45
service 51statement 51upgrades 51
white stripcleaning 32
hp officejet 4100 series
chapter 12
58
declaration of conformityAccording to ISOIEC Guide 22 and EN 45014
Manufacturerrsquos Name and Address
Hewlett-Packard Company 16399 West Bernardo Drive San Diego CA 92127-1899 USA
declares that the product
Product Name hp officejet 4100 series (Q1608A)
Model Number(s) officejet 4110 (Q1609A) officejet 4110xi (Q1610A) officejet 4110v (Q1611A) officejet 4105 (Q1612A) officejet 4105z (Q1613A) officejet 4115 (Q1614A)
Product Options All
conforms to the following Product Specifications
Safety EN609501992 +A1 A2 A3 A4 amp A11
IEC609501991 +A1 A2 A3 amp A4
UL1950CSA 222 No 950 3rd Edn 1995
NOM-019-SCFI-1993
EMC CISPR221993 +A1 amp A2 EN550221994 +A1 amp A2 -Class B
CISPR241997EN550241998
IEC 61000-3-21995 EN61000-3-21995
IEC 61000-3-31994 EN61000-3-31995
ASNZS 3548 1992
CNS13438 1997
FCC Part 15-Class B ICES-003 Issue 2 VCCI-2
GB 9254-1998
Telecom TBR21 1998
Supplementary Information
The Product herewith complies with the requirements of the Low Voltage Directive 7323EEC the EMC Directive 89336EEC and the RampTTE Directive 19995EC (ANNEX II) carries the CE marking accordingly
European Contact for regulatory topics only Your local Hewlett-Packard Sales and Service Office orHewlett-Packard GmbH
Department HQ-TRE Herrenberger Strasse 140 D-71034 Boumlblingen Germany (FAX + 49-7031-14-3143)
order mediaTo order media such as HP Premium Inkjet Paper HP Premium Inkjet Transparency Film HP Iron-On T-shirt Transfer paper or HP Greeting Cards go to
wwwhpshoppingcom
For orders in countries other than the US and Canada select other countries then click Yes to leave hpshoppingcom From this website you can access hpshoppingcom for your specific language or countryregion
order print cartridges
If you have Internet access you can get more information from the HP website at
wwwhpcomsupport
print cartridges hp reorder number
HP black print cartridge 56 19 ml black print cartridge
HP color print cartridgeHP tri-color print cartridge
57 17 ml color print cartridge28 8 ml color print cartridge
Visit the hp officejet information centerIt has everything you need to get the most value from your HP Officejet
bull Technical Supportbull Supplies and Ordering Informationbull Project Tipsbull Ways to Enhance Your Product
wwwhpcomsupport
copy 2003 Hewlett-Packard Company
Printed in the USA Mexico Germany Singapore or China
Q1608-90163Q1608-90163
Q1608-90163

hp officejet 4100 series
chapter 6
28
This selects the Basic Fax Setup menu then selects the Fax Header option
3 Enter your personal or company name at the prompt Use the guidelines provided in the next section under enter text
4 Press Enter
5 Enter your fax number using the numeric keypad
6 Press Enter
enter textThe following list provides tips for entering text using the front-panel keypad
bull Press the keypad numbers that correspond to the letters of a name
bull Press a button multiple times to see a letter first in uppercase and then in lowercase
bull After the correct letter appears press and then press the number that corresponds to the next letter in the name Again press multiple times until the correct letter appears
bull To insert a space press Space ()bull To enter a symbol such as press Symbols () to scroll through the list of
available symbolsbull If you make a mistake press to clear it and then make the correct
entrybull After you are done entering text press Enter to store your entries
check for dial toneBefore using the fax features verify that the connections are correctly established
1 Press Fax
2 Listen for a dial tone
3 If you do not hear a dial tone check the connections
4 Press Cancel to hang up
ABC These letters correspond to this number and so on
2
JKL To get this character J j K k L l 5
5 Press 5 this many times 1 2 3 4 5 6 7
reference guide
use the fax features
29
fax job menuThe following options become available when the Fax button is pressed
setup menu for fax commandsThe following fax settings are available in the Setup menu
Enter Fax or Speed Dial
FineVery FinePhotoStandard
Fax Number Resolution LighterDarker
Enter a fax number or speed dialWhen the Fax button is pressed
Press and to move to the option you wantPress Enter to select the displayed setting
NoYes
Set New Defaults
Send Fax NowFax from MemorySend Fax LaterPoll to Receive
How to Fax
1Automatic Reports Setup
2Answer Ring Pattern
3Busy Redial
4No Answer Redial
5Automatic Reduction
6Backup Fax Reception
7Error Correction Mode
3Basic Fax Setup 4Advanced Fax Setup
Press Setup to display the menu options
Press and to move to the setting you wantPress Enter to select the displayed setting
1Date and Time
2Fax Header
3Rings to Answer
4Paper Size
5Tone or Pulse Dialing
6Ring and Beep Volume
7Fax Forwarding Black Only
2Speed Dial Setup
1Individual Speed Dial
2Delete Speed Dial
3Print Speed Dial List
hp officejet 4100 series
chapter 6
30
7
31
maintain your hp officejet
This section provides instructions for keeping your HP Officejet in top working condition Perform these maintenance procedures as necessary
clean the glassDirty glass from dust smudges hair and so on slows down performance and affects the accuracy of features such as Fit to Page and Copy
1 Turn off the unit unplug the power cord and raise the scanner lid
2 Clean the glass with a soft cloth or sponge slightly moistened with a nonabrasive glass cleaner
Caution Do not use abrasives acetone benzene or carbon tetrachloride on the glass these can damage it Do not place liquids directly on the glass They may seep under it and damage the unit
3 Dry the glass with a chamois or cellulose sponge to prevent spotting
hp officejet 4100 series
chapter 7
32
clean the white stripMinor debris can accumulate on the white strip located underneath the scannerrsquos lid
1 Turn off the unit unplug the power cord and raise the scanner lid
2 Clean the white strip with a soft cloth or sponge slightly moistened with a mild soap and warm water
3 Wash the strip gently to loosen debris do not scrub the strip
4 Dry the strip with a chamois or soft cloth
Caution Do not use paper-based wipes as these may scratch the strip
5 If this does not clean the strip well enough repeat the previous steps using isopropyl (rubbing) alcohol and wipe the strip thoroughly with a damp cloth to remove any residual alcohol
clean the exterior Use a soft damp lint-free cloth to wipe dust smudges and stains off the case The interior of the unit does not require cleaning Keep fluids away from the interior of the unit as well as the front panel
work with print cartridgesTo ensure the best print quality from your HP Officejet you will need to perform some simple maintenance procedures and when prompted by a front-panel message replace the print cartridges
print a self-test reportIf you are experiencing problems with printing before cleaning or replacing the print cartridges you should print a Self-Test Report This report provides useful information about your print cartridges including status information
1 Press Setup
2 Press 1 then press 4This selects Print Report and then selects Self-Test Report
3 Press Start Black or Start ColorA Self-Test Report is printed for your HP Officejet
handle print cartridgesBefore you replace or clean a print cartridge you should know the part names and how to handle the print cartridge
reference guide
maintain your hp officejet
33
replace the print cartridgesFront-panel messages appear to let you know that you should replace your print cartridges
See order print cartridges on the back cover for information on ordering replacement print cartridges
1 Turn on the unit then lift open the print cartridge access doorThe print carriage moves into view
2 After the carriage stops moving push down on the print cartridge down to release it and then pull it toward you out of its slot
Plastic tape with pink tab(must be removed)
Copper contactsInk nozzles under tape
Do not touch the copper contacts or the ink nozzles
print cartridge access door
hp officejet 4100 series
chapter 7
34
Note It is normal to see ink build-up in the print cartridge slots
3 Remove the new print cartridge from its packaging and being careful to touch only the bright pink plastic tab gently remove the plastic tape to uncover the ink nozzles
Caution Do not touch the copper contacts or ink nozzles
Once you have removed the plastic tape install the print cartridge immediately to prevent the ink from drying in the nozzles
4 Push the new print cartridge into the appropriate slot at a slight angle until it clicks into place
Caution Do not attempt to push the cartridge straight into the slot It must slide in at a slight angle
The tri-color print cartridge goes on the left and the black cartridge goes on the right
5 Close the print cartridge access door
reference guide
maintain your hp officejet
35
align the print cartridgesThe HP Officejet prompts you to align cartridges every time you install or replace a print cartridge Aligning the cartridges ensures high-quality output
To align the print cartridges when prompted
1 Press Enter on the front panelAn align cartridges (test pattern) page prints
2 Load the align cartridges page face down in the ADF between the paper-width guides and press the Enter button again
3 Recycle or discard the page
To align the cartridges at any other time
1 Press Setup
2 Press 5 then press 2This selects the Maintenance menu and then selects the Align Print Cartridge option
3 Press EnterAn align cartridges (test pattern) page prints
4 Load the align cartridges page face down in the ADF between the paper-width guides and press the Enter button again
5 Recycle or discard the page
clean the print cartridgesUse this feature when the Self-Test Report shows streaking or white lines through any of the colored bars Do not clean print cartridges unnecessarily This wastes ink and shortens the life of the ink nozzles
1 Press Setup
2 Press 5 then press 1This selects the Maintenance menu and then selects the Clean Print Cartridge optionA page of patterns is printed The cartridges are cleaned Recycle or discard the pageIf copy or print quality still seem poor after you clean the print cartridges replace the print cartridge that is affected
restore factory defaultsYou can restore the original factory settings to what they were when you purchased your HP Officejet Choosing to restore your factory defaults restores all settings except date information and any scan settings you may have set
You can perform this process from the front panel only
1 Press Setup
2 Press 5 then press 3This selects Maintenance and then selects Restore Factory DefaultsThe factory default settings are restored
hp officejet 4100 series
chapter 7
36
set scroll speedThe Scroll Speed option lets you control the rate that text messages appear in the front-panel display You can choose Normal Fast or Slow The default is Normal
1 Press Setup
2 Press 5 then press 6This selects Maintenance and then selects Set Scroll Speed
3 Press until the desired speed appears then press Enter
set the prompt delay timeThe Prompt Delay option lets you control the amount of time before a message is displayed in the front-panel display You can choose Normal Fast or Slow The default is Normal
1 Press Setup
2 Press 5 then press 7This selects Maintenance and then selects Set Prompt Delay Time
3 Press until the delay time appears then press Enter
self-maintenance sounds During the life of your product you may hear various mechanical sounds This is a normal part of your unitrsquos self-maintenance
reference guide
maintain your hp officejet
37
setup menu optionsThe following options are available from the Setup button
1Last Transaction
2Fax Log
3Speed Dial List
4Self-Test Report
5Automatic Reports Setup
1Print Report
Use Setup to display the Print Report Speed Dial Setup Basic Fax Setup Advanced Fax Setup and Maintenance options
Press and to move to the setting you wantPress Enter to select the displayed setting
1Clean Print Cartridges
2Align Print Cartridges
3Restore Factory Defaults
4Reprint Faxes in Memory
5Set Language amp CountryRegion
6Set Scroll Speed
7Set Prompt Delay Time
5Maintenance2Speed Dial Setup
3Basic Fax Setup
4Advanced Fax Setup
1Individual Speed Dial
2Delete Speed Dial
3Print Speed Dial List
1Date and Time
2Fax Header
3Rings to Answer
4 Paper Size
5Tone or Pulse Dialing
6Ring and Beep Volume
7Fax Forwarding Black Only
1Automatic Reports Setup
2Answer Ring Pattern
3Busy Redial
4No Answer Redail
5Automatic Reduction
6Backup Fax Reception
7Error Correction Mode
hp officejet 4100 series
chapter 7
38
8
39
additional setup information
During the installation of the HP Officejet software a number of windows are displayed You should see the following
bull Installingbull Copying files bull A request to plug in the HP Officejetbull Green OK and check markbull Request to restart your computer (may not occur in all cases)bull Registration
If you did not see all of these windows there may be a problem with the installation Verify the following
bull The HP Director contains six icons (double-click the HP Director icon on the desktop)
bull The HP Officejet is listed in the Printers dialog boxbull There is an icon for the HP Officejet in the System Tray that indicates the
HP Officejet is ready
If the HP Director does not show six icons you may need to wait a few minutes for the HP Officejet to connect to your computer
possible installation problemsIf nothing appears on your computer screen after you insert the HP Officejet 4100 Series CD-ROM into your computerrsquos CD-ROM drive
1 From the Start menu choose Run
2 In the Run dialog box enter dsetupexe (if your CD-ROM drive is not assigned to drive letter d use the appropriate drive letter) then click OK
If the HP Director does not contain six icons do the following
bull Verify that the front-panel cover is attached then unplug the HP Officejet and plug it in again
bull Verify that the USB and power cables are plugged inndash Unplug the USB cable and plug it in againndash Do not attach the USB cable to a keyboard or nonpowered hubndash Verify that the USB cable is 3 meters or less in lengthndash If you have several USB devices attached to your computer you may
want to unplug the others during the installation
Note AppleTalk is not supported
bull Unplug the HP Officejet from the wall and plug it in againbull Restart your computer
hp officejet 4100 series
chapter 8
40
On Windows check the System Tray for applications that are running in the background and close them before restarting your computer
remove and reinstall your hp officejet softwareIf six icons do not appear in the Director you may need to uninstall and re-install the software Do not simply delete the HP Officejet program files from your hard drive Be sure to remove them properly using the uninstall utility provided in the HP Officejet program group
to uninstall from a Windows computer
1 Disconnect your HP Officejet from your computer
2 On the Windows taskbar click Start choose Programs or All Programs (XP) choose Hewlett-Packard choose hp officejet 4100 series then choose uninstall software
3 Follow the directions on the screenBe sure to disconnect your HP Officejet
4 If you are asked whether you would like to remove shared files click NoOther programs that use these files may not work properly if the files are deleted
5 After the program finishes removing the software disconnect your HP Officejet and restart your computer
Note It is important that you disconnect your HP Officejet before restarting your computer
6 To reinstall the software insert the HP Officejet 4100 Series CD-ROM into your computerrsquos CD-ROM drive and follow the instructions that appear
7 After the software is installed connect and turn on your HP Officejet following the onscreen instructions and the instructions in your Setup PosterAfter connecting and turning on your HP Officejet you may have to wait several minutes for all of the Plug and Play events to completeWhen the software installation is complete you will see a Status Monitor icon in the System Tray
8 To verify that the software is properly installed double-click on the HP Director icon on the desktop If the HP Director shows six icons the software has been properly installed
to uninstall from a Macintosh computer
1 Disconnect your HP Officejet from your computer
2 Double-click on ApplicationsHP All-in-One Software folder
reference guide
additional setup information
41
3 Double-click on HP Uninstaller
4 Follow the directions that appear on the screen
5 After the program finishes removing the software disconnect your HP Officejet and restart your computer
6 To reinstall the software insert the HP Officejet 4100 Series CD-ROM into your computerrsquos CD-ROM drive
Note When re-installing the software follow the instructions on the Setup Poster Do not connect the HP Officejet to your computer until after you have completed the software installation
7 On the desktop open the CD-ROM double-click on hp all-in-one installer and follow the instructions that appear
connect your hp officejet to a phone modem or answering machine
The HP Officejet can share a phone line with a phone a modem or an aswering machine When sharing a phone line with an answering machine the HP Officejet will answer fax calls and direct voice calls to the answering machine
Note For information on connecting your HP Officejet to your computer and phone line refer to the Setup Poster that came with your unit
to connect your hp officejet to a phone modem or answering machine
1 Remove the white plastic stopper from connector 2 on the back of the HP Officejet
To connect more than one device to connector 2 on the HP Officejet you must purchase a Y-splitter and plug it into connector 2
2 Connect the phone cord from the phone modem or answering machine to connector 2 (or Y-splitter)
Caution Do not use the phone cord that came with the HP Officejet for this purpose That phone cord must connect connector 1 on the HP Officejet to the wall jack for your phone system See the Setup Poster for details
3 If you are connecting an answering machine see set the number of rings before answering on page 21 for instructions on setting the number of rings correctly or change the answer ring pattern (distinctive ringing) on page 26 for information on incoming ring patterns
4 If you are connecting a modem turn off its fax-receive feature
connector 2 on the HP Officejet
connector 1 on the HP Officejet
hp officejet 4100 series
chapter 8
42
additional troubleshooting helpYou may want to refer to the readme file for more information on possible installation problems On Windows you can access the readme file from the Start button on the taskbar select Programs Hewlett-Packard hp officejet 4100 series View the Readme File On Macintosh you can access the readme file by double-clicking on the icon located in the top-level folder of the HP Officejet software CD-ROM
The readme file provides more information including
bull Using the Re-install utility after a failed installation to return your PC to a state that will allow the HP Officejet to be re-installed
bull Using the Re-install utility on Windows 98 to recover from a Composite USB System Driver missing errorThis error may occur if the hardware is installed prior to installing the software After running the Re-install utility reboot your PC and install the HP Officejet software before connecting the HP Officejet to your computer
You can also find more information on this website
wwwhpcomsupport
9
43
technical information
Additional specifications information can be found in the HP Photo amp Imaging Help in the hp officejet 4100 series section
physical specifications
power specificationsbull Power consumption 75W maximumbull Source (Input Voltage) 100 to 240 VAC groundedbull Input Frequency 50 to 60 Hzbull Current 1A maximum
regulatory informationAdditional regulatory information can be found in the HP Photo amp Imaging Help The information in this section supercedes information in the HP Photo amp Imaging Help
doc statement deacuteclaration de conformiteacute (Canada)Le preacutesent appareil numeacuterique neacutemet pas de bruit radioeacutelectrique deacutepassant les limites applicables aux appareils numeacuteriques de la classe B prescrites dans le Regraveglement sur le brouillage radioeacutelectrique eacutedicteacute par le ministegravere des Communications du CanadaThis digital apparatus does not exceed the Class B limits for radio noise emissions from digital apparatus set out in the Radio Interference Regulations of the Canadian Department of Communications
notice to users of the Canadian telephone networkThis equipment meets the applicable Industry Canada Terminal Equipment Technical Specifications This is confirmed by the registration number The abbreviation IC before the registration number signifies that registration was performed based on a Declaration of Conformity indicating that Industry Canada technical specifications were met It does not imply that Industry Canada approved the equipment
Note The Ringer Equivalence Number (REN) assigned to each terminal device provides an indication of the maximum number of terminals allowed to be connected to a telephone interface The termination on an interface may consist of any combination of devices subject only to the requirement that the sum of the Ringer Equivalence Numbers of all the devices does not exceed 5
The REN for this product is 03B based on FCC Part 68 test results
height width depth weight (without print cartridges)
with paper trays and ADF closed
718 in (1824 cm) 1676 in (4258 cm) 825 in (2096 cm) 75 lbs (34 kg)
with ADF and paper tray extended
1030 in (2615 cm) 1676 in (4258 cm) 1854 in (4709 cm) 75 lbs (34 kg)
hp officejet 4100 series
chapter 9
44
notice to all users of the European Economic Area (EEA)
This product is designed to interwork with the analogue telephone networks in the following countriesregions
Network compatibility depends on customer selected settings which must be reset to use the equipment on a telephone network in a countryregion other than where the product was purchased Contact the vendor or Hewlett-Packard Company if addition product support is necessaryThis equipment has been certified by the manufacturer in accordance with Directive 19995EC (annex II) for Pan-European single-terminal connection to the public switched telephone network (PSTN) However due to differences between the individual PSTNs provided in different countriesregions the approval does not of itself give an unconditional assurance of successful operation on every PSTN network termination pointIn the event of problems you should contact your equipment supplier in the first instance
geraumluschemissionLpA lt 70 dBam Arbeitsplatzim Normalbetriebnach DIN 45635 T 19
notice to Korean customers
Germany UK Netherlands
France Spain Italy
Belgium Luxembourg Sweden
Austria Denmark Ireland
Norway Finland Switzerland
Greece Portugal
10
45
hp support
This section explains the support services information provided by Hewlett-Packard If you are unable to find the answer you need in the printed or onscreen documentation supplied with your product you can contact one of the HP support services listed in the following pages Some support services are available only in the US and Canada while others are available in many countriesregions worldwide If a support service number is not listed for your countryregion contact your nearest authorized HP dealer for help
get support and other information from the internetIf you have Internet access you can get help from the following HP website
wwwhpcomsupportThe Web site offers technical support drivers supplies and ordering information
hp customer supportSoftware programs from other companies may be included with your HP Officejet If you experience problems with any of those programs you will receive the best technical assistance by calling the experts at that companyIf you need to contact HP Customer Support do the following before you call
1 Make sure thata Your unit is plugged in and turned onb The specified print cartridges are installed correctlyc The recommended paper is properly loaded in the input tray
2 Reset your unita Turn off the unit using the On button located on the unitrsquos front panelb Unplug the power cord from the back of the unitc Plug the power cord back into the unitd Turn on the unit using the On button
3 For more information check the HP website at wwwhpcomsupport
4 If you are still experiencing problems and need to speak with an HP Customer Support Representativendash Have your service ID and serial number ready To display your service ID and
serial number on the front panel do the following Press Enter and Start Color at the same time until the service ID appears in the front-panel display From this display press the right arrow until the serial number displays
ndash Print a Self-Test Report See print a self-test report on page 32 for information on printing this report
ndash Make a color copyndash Be prepared to describe your problem in detail
5 Call HP Customer Support Be near your unit when you call
call in the US during warrantyCall (208) 323-2551 This service is free during the warranty period however your standard long-distance phone charges still apply A fee may apply outside the warranty period
hp officejet 4100 series
chapter 10
46
US phone support is available in both English and Spanish languages 24 hours a day 7 days a week (days and hours of support may change without notice)
call elsewhere in the worldThe numbers listed below are current as of the printing date of this guide For a list of current international HP Support Service numbers visit this address and choose your own countryregion or language
wwwhpcomsupportFor Korea you can also visit this address
httpwwwhpcokrYou can call the HP support center in the following countriesregions If your countryregion is not listed contact your local dealer or nearest HP Sales and Support Office to find out how to obtain servicesSupport service is free during the warranty period however your standard long-distance phone charges will apply In some cases a flat fee per single incident will also applyFor phone support in Europe please check for the details and conditions of phone support in your countryregion by consulting the following Web site
wwwhpcomsupportAlternatively you can ask your dealer or call HP at the phone number indicated in this booklet As part of our constant efforts to improve our phone support service we advise you to check our website on a regular basis for new information regarding service features and delivery
countryregion hp technical support countryregion hp technical support
Algeria1 +213 (0) 61564 543 Malaysia 1-800-805405
Argentina 0810-555-5520 Mexico 01-800-472-6684
Australia +61 3 8877 80001902 910 910
Mexico (Mexico City) 5258-9922
Austria +43 (0) 810 00 6080 Morocco1 +212 22404 747
Bahrain (Dubai) 800 728 Netherlands +31 (0) 20 606 8751
Belgium (Dutch) +32 (0) 2 626 8806 New Zealand 0800 441 147
Belgium (French) +32 (0) 2 626 8807 Norway +47 22 11 6299
Brazil (Grande Sao Paulo) (11) 3747 7799 Oman +971 4 883 8454
Brazil (Demais Localidades) 0800 157751 Palestine +971 4 883 8454
Canada during warranty (905) 206 4663 Panama 001-800-7112884
Canada post-warranty(per-call charge)
1-877-621-4722 Peru 0-800-10111
Caribbean amp Central America
1-800-711-2884 Philippines 632-867-3551
Chile 800-360-999 Poland +48 22 865 98 00
China 86 10 6868 7980 Portugal +351 21 3176333
Colombia 9-800-114-726 Puerto Rico 1-877-2320-589
Costa Rica 0-800-011-0524 Qatar +971 4 883 8454
Czech Republic +420 (0) 261307310 Romania +40 1 315 44 42or local 01 3154442
reference guide
hp support
47
call in Australia post-warrantyIf your product is not under warranty you can call 03 8877 8000 A per-incident out-of-warranty support fee of $2750 (inc GST) will be charged to your credit card You can also call 1902 910 910 ($2750 charged to your phone account) from 900 AM to 500 PM Monday through Friday (Charges and support hours are subject to change without notice)
prepare your unit for shipmentIf after contacting HP Customer Support or returning to the point of purchase you are requested to send your unit in for service please follow the power off and rebox steps below to avoid further damage to the HP product
Denmark +45 39 29 4099 Russian Federation Moscow +7 095 797 3520
Ecuador 1800-711-2884 Russian Federation St Petersburg
+7 812 346 7997
Europe (English) +44 (0) 207 512 5202 Saudi Arabia +800 897 14440
Egypt 02 532 5222 Singapore 65 6272 5300
Finland +358 (0) 203 47 288 Slovakia +421 (0) 2 682 08080
France (034 Euromin) +0892 69 60 22 South Africa (inside RSA) 086 000 1030
Germany (012 Euromin) +49 (0) 180 52 58 143 South Africa (inside RSA) +27-11 258 9301
Greece +30 1060 73 603 Spain +34 902 321 123
Hong Kong (SAR) +85 (2) 3002 8555 Sweden +46 (0)8 619 2170
Guatemala 1800-995-5105 Switzerland 2 +41 (0) 84 880 1111
Hungary +36 (0) 1 382 1111 Taiwan +886-2-2717-00550800 010 055
India 1-600-11226791 11 682 6035
Thailand +66 (2) 661 4000
Indonesia 62-21-350-3408 Tunisia1 +216 1891 222
Ireland +353 (0) 1 662 5525 Turkey +90 216 579 7171
Israel +972 (0) 9 8304848 Ukraine +7 (380-44) 490-3520
Italy +39 (0) 226410350 United Arab Emirates +971 4 883 8454
Japan 0570 000 511+81 3 3335 9800
United Kingdom +44 (0) 207 512 52 02
Jordan +971 4 883 8454 Venezuela 0800-47468368 or800-477-7777
Korea (Seoul) +82 (2) 3270 0700 Venezuela (Caracas) (502) 207-8488
Korea (outside Seoul) 080 999 0700 Vietnam 84 (0) 8 823 4530
Kuwait +971 4 883 8454 Yemen +971 4 883 8454
Lebanon +971 4 883 8454
1 This Call Center supports French speaking customers from the following countriesregions Morocco Tunisia and Algeria
2 This Call Center supports German French and Italian speaking customers in Switzerland
countryregion hp technical support countryregion hp technical support
hp officejet 4100 series
chapter 10
48
Note When transporting your HP Officejet make sure that the pens have been removed the HP Officejet has been properly shut down by pressing the power button and you have allowed time for the carriage to return to the service station and for the scanner to return to its parked position
1 Turn on the unitDisregard steps 1 through 6 if your unit will not turn on and the print carriage is in the home position You will not be able to remove the print cartridges Proceed to step 7
2 Open the print cartridge access doorThe print carriage moves into view
3 See replace the print cartridges on page 33 for information on removing the print cartridges
Caution Remove both print cartridges Failure to do so may damage your unit
4 Place the print cartridges in an airtight bag so they will not dry out and put them aside (do not send them with the unit unless instructed to by the HP customer support call agent)
5 Turn off the unit
6 Close the print cartridge access door
7 Remove the front panel cover as followsa Grasp the front of the front panel cover with two hands as shownb Firmly lift the front panel cover to unsnap it from the unit
8 Retain the front panel cover Do not return the front panel cover with the unit
9 If available pack the unit for shipment using the original packing materials or the packaging materials that come with your exchange unit
If you do not have the original packaging materials please use other adequate packaging materials Shipping damage caused by improper packaging andor improper transportation is not covered under the warranty
reference guide
hp support
49
10 Place the return shipping label on the outside of the box
11 Include the following items in the boxndash A complete description of symptoms for service personnel (samples of print
quality problems are helpful)ndash A copy of the sales slip or other proof of purchase to establish the warranty
coverage periodndash Your name address and a phone number where you can be reached during
the day
hp distribution centerTo order HP Officejet software a copy of the printed Reference Guide a setup poster or other customer-replaceable parts do one of the following bull In the US or Canada call (208) 323 2551bull Visit this website
httpwwwhpcomcposupportsoftwarehtml
hp officejet 4100 series
chapter 10
50
11
51
warranty information
HP Officejet 4100 seriesDuration of Limited Warranty (hardware and labor) 1 YearDuration of Limited Warranty (CD media) 90 DaysDuration of Limited Warranty (print cartridges) Until the HP ink is depleted or the ldquoend of warrantyrdquo date printed on the cartridge has been reached whichever occurs first
warranty service
express serviceTo obtain HP express repair service the customer must contact an HP service office or an HP Customer Support Center for basic troubleshooting first See hp customer support on page 45 for steps to take before calling Customer SupportIf a customer unit needs a minor part replacement and these parts can normally be replaced by the customer the customer-replaceable components may be serviced through expedited part shipment In this event HP will prepay shipping charges duty and taxes provide telephone assistance on replacement of the component and pay shipping charges duty and taxes for any part that HP asks to be returnedThe HP Customer Support Center may direct customers to designated authorized service providers who are certified by HP to service the HP product
warranty upgradesUpgrade your standard factory warranty to a total of three years with the HP SUPPORTPACK Service coverage begins on product purchase date and the pack must be purchased within the first 180 days of product purchase This program offers phone support from 600 AM to 1000 PM Mountain Standard Time (MST) Monday through Friday and 900 AM to 400 PM (MST) on Saturdays If during your technical support call it is determined that you need a replacement product then HP will ship you this product next business day free of charge Available in US onlyFor more information please call 1-888-999-4747 or visit the following HP Web site
httpwwwhpcomgohpsupportpack
Outside the US please call your local HP Customer Support office See call elsewhere in the world on page 46 for a list of international Customer Support numbers
returning your hp officejet for serviceBefore returning your HP Officejet for service you must call HP Customer Support See hp customer support on page 45 for steps to take before calling Customer Support
hewlett-packard limited global warranty statement
extent of limited warrantyHewlett-Packard (ldquoHPrdquo) warrants to the end-user customer (ldquoCustomerrdquo) that each HP Officejet 4100 Series product (ldquoProductrdquo) including related software accessories media and supplies shall be free from defects in material and workmanship for the duration which begins on the date of purchase by the Customer
hp officejet 4100 series
chapter 11
52
For each software Product HPrsquos limited warranty applies only to a failure to execute programming instructions HP does not warrant that the operation of any Product shall be uninterrupted or error freeHPrsquos limited warranty covers only those defects which arise as a result of normal use of a Product and does not cover any other problems including those which arise as a result of (a) improper maintenance or modification (b) software accessories media or supplies not provided or supported by HP or (c) operation outside the Productrsquos specificationsFor any hardware Product the use of a non-HP print cartridge or a refilled print cartridge does not affect either the warranty to the Customer or any HP support contract with the Customer However if Product failure or damage is attributable to the use of a non-HP or refilled print cartridge HP shall charge its standard labor and materials charges to service the Product for the failure or damageIf HP receives during the applicable warranty period notice of a defect in any Product HP shall either repair or replace the defective Product at HPrsquos option Where labor charges are not covered by HPrsquos limited warranty repairs shall be at HPrsquos standard charges for laborIf HP is unable to repair or replace as applicable a defective Product which is covered by HPrsquos warranty HP shall within a reasonable time after being notified of the defect refund the purchase price for the ProductHP shall have no obligation to repair replace or refund until the Customer returns the defective Product to HPAny replacement product may be either new or like-new provided that it has functionality at least equal to that of the Product being replacedHP products including each Product may contain remanufactured parts components or materials equivalent to new in performanceHPs limited warranty for each Product is valid in any countryregion or locality where HP has a support presence for the Product and where HP has marketed the Product The level of warranty service may vary according to local standards HP shall have no obligation to alter the form fit or function of the Product in order to make it operate in a countryregion or locality for which the Product was never intended to operate
limitations of warrantyTO THE EXTENT ALLOWED BY LOCAL LAW NEITHER HP NOR ITS THIRD PARTY SUPPLIERS MAKE ANY OTHER WARRANTY OR CONDITION OF ANY KIND WHETHER EXPRESS OR IMPLIED WITH RESPECT TO THE COVERED HP PRODUCTS AND SPECIFICALLY DISCLAIM THE IMPLIED WARRANTIES OR CONDITIONS OF MERCHANTABILITY SATISFACTORY QUALITY AND FITNESS FOR A PARTICULAR PURPOSE
limitations of liabilityTo the extent allowed by local law the remedies provided in this Limited Warranty Statement are the Customerrsquos sole and exclusive remediesTO THE EXTENT ALLOWED BY LOCAL LAW EXCEPT FOR THE OBLIGATIONS SPECIFICALLY SET FORTH IN THIS LIMITED WARRANTY STATEMENT IN NO EVENT SHALL HP OR ITS THIRD PARTY SUPPLIERS BE LIABLE FOR DIRECT INDIRECT SPECIAL INCIDENTAL OR CONSEQUENTIAL DAMAGES WHETHER BASED ON CONTRACT TORT OR ANY OTHER LEGAL THEORY AND WHETHER ADVISED OF THE POSSIBILITY OF SUCH DAMAGES
local lawThis Limited Warranty Statement gives the Customer specific legal rights The Customer may also have other rights which vary from state to state in the United States from province to province in Canada and from countryregion to countryregion elsewhere in the world
reference guide
warranty information
53
To the extent this Limited Warranty Statement is inconsistent with local law this Statement shall be deemed modified to be consistent with such local law Under such local law certain disclaimers and limitations of this Statement may not apply to the Customer For example some states in the United States as well as some governments outside the United States (including provinces in Canada) mayPreclude the disclaimers and limitations in this Statement from limiting the statutory rights of a consumer (eg the United Kingdom)Otherwise restrict the ability of a manufacturer to enforce such disclaimers or limitations orGrant the Customer additional warranty rights specify the duration of implied warranties which the manufacturer cannot disclaim or not allow limitations on the duration of implied warrantiesFOR CONSUMER TRANSACTIONS IN AUSTRALIA AND NEW ZEALAND THE TERMS IN THIS LIMITED WARRANTY STATEMENT EXCEPT TO THE EXTENT LAWFULLY PERMITTED DO NOT EXCLUDE RESTRICT OR MODIFY AND ARE IN ADDITION TO THE MANDATORY STATUTORY RIGHTS APPLICABLE TO THE SALE OF THE COVERED HP PRODUCTS TO SUCH CUSTOMERS
hp officejet 4100 series
chapter 11
54
55
index
Numerics4-by-6 inch photo paper
load 10 12
AADF 7adjust
volume for fax 25align print cartridges 35Answer Ring Pattern 26automatic document feeder 7automatic reduction
fax 25
Bbest copy quality 13busy number
redial automatically 23
Ccancel
scan 18scheduled fax 21
cartridgesalign 35replace 33
cleanprint cartridges 35the exterior 32the glass 31white strip 32
colorenhance 14fax 20fax from front panel 20
contrastchange for fax 23photo color 14
copy 13 16change default settings 15enhance 14fit to page 16lighten or darken 14menu options 16number of copies 14photo 15quality 13reduce or enlarge 14settings 13 15
speed 13tutorial 4
Customer Support 45web site 45
Ddarken a copy 14date
setting 27default settings
restore 35director review 4distinctive ringing 26
Eenhance copies 14enlarge copy 14 16envelopes
load 9Error Correction Mode
(ECM) 25
Ffactory defaults
restore 35fast copy quality 13fax 28
adjust volume 25automated reports 22cancel fax forward 24cancel scheduled 21change Answer Ring
Pattern 26change contrast 23change resolution 22change settings 19control appearance 22create individual speed-dial
settings 26delete speed-dial
settings 27distinctive ringing 26Error Correction Mode
(ECM) 25forward faxes 24header 27in color 20in color from front panel 20manual reports 22
menu 29print reports 22receive 21receive manually 21redial busy or unanswered
number 23schedule 20send from front panel 19set automatic reduction 25set date and time 27set the number of rings 21settings 27 28setup menu options 29speed dials 19test 28
fit to page 16forward faxes 24
cancel 24front panel
display scroll speed 36enter text 28send a fax 19setting prompt delay 36tutorial 3
Gglass
cleaning 31greeting cards
load 11
Hhelp 1HP Customer Support 45
calling 45HP Director 4HP distribution center 49HP Officjet
preparing to ship 47HP papers
tips on loading 11
Iindividual speed-dial settings
create 26ink cartridges see print
cartridgesinkjet paper
load 11
index
hp officejet 4100 series56
Kkeypad
enter text 28
Llabels
load 12lighten copies 14load
change the paper type 12envelopes 9original in ADF 7paper 7photo paper 10 12postcards 10 12print cartridges 33set the paper size 12tips 11
Mmaintenance
align print cartridges 35clean print cartridges 35clean the exterior 32clean the glass 31clean the white strip 32normal sounds 36replace print cartridges 33restore factory defaults 35self-maintenance
sounds 36self-test report 32
menuscopy options 16fax 29fax setup 29maintenance 37print reports 37
Nnormal copy quality 13number of copies
set 14number of rings
set 21
Oorder print cartridges 60originals
load in ADF 7output tray 8
Ppaper
change default size for copy 12
change the type 12load 7recommended 7set the size 12tips on loading 11
paper size change for copy 12
paper trayload 7
phone numbers support services 45
photo paperload 10 12
photoscopy 15enhance copy 14
physical specifications 43postcards
load 10 12power
specifications 43print
envelopes 9fax reports 22self-test report 32
print cartridgesalign 35clean 35handling 32replace 33
prompt delaysetting 36
Qquick start
review the director 4use with a computer 4
Rreceive
fax 21redial
busy or unanswered number 23
reduce copy 14 16regulatory information 43reinstall software 40reports
generate automatically for fax 22
generate manually for fax 22
print 22self-test 32
resolution
change for fax 22restore factory settings 35returning your HP Officejet for
service 51
Sscan
from front panel 17stop 18
schedule a fax 20scroll speed
setting 36self-test report 32send
cancel forward faxes 24color fax 20color fax from front
panel 20forward faxes 24
settingscopy 13 15fax 27 28prompt delay 36scroll speed 36
setupadditional information 39menu 29
shippingyour HP Officejet 47
softwareremove and reinstall 40
soundsself-maintenance 36
specificationsphysical 43power 43
speed dials 19create individual
settings 26delete settings 27
stopscan 18scheduled fax 21
subscriber identification code 27
support services 45
Ttelephone line
multiple numbers 26telephone numbers 45text
enhance 14enter from front panel 28
time
index
reference guide 57
setting 27transparency film
recommended 7tips on loading 11
troubleshootingremove and reinstall
software 40T-shirt Transfer Iron-On
load 11tutorial
front panel 3make a copy 4
Uunanswered number
redial automatically 23
Vvolume
adjust 25
Wwarranty 45
service 51statement 51upgrades 51
white stripcleaning 32
hp officejet 4100 series
chapter 12
58
declaration of conformityAccording to ISOIEC Guide 22 and EN 45014
Manufacturerrsquos Name and Address
Hewlett-Packard Company 16399 West Bernardo Drive San Diego CA 92127-1899 USA
declares that the product
Product Name hp officejet 4100 series (Q1608A)
Model Number(s) officejet 4110 (Q1609A) officejet 4110xi (Q1610A) officejet 4110v (Q1611A) officejet 4105 (Q1612A) officejet 4105z (Q1613A) officejet 4115 (Q1614A)
Product Options All
conforms to the following Product Specifications
Safety EN609501992 +A1 A2 A3 A4 amp A11
IEC609501991 +A1 A2 A3 amp A4
UL1950CSA 222 No 950 3rd Edn 1995
NOM-019-SCFI-1993
EMC CISPR221993 +A1 amp A2 EN550221994 +A1 amp A2 -Class B
CISPR241997EN550241998
IEC 61000-3-21995 EN61000-3-21995
IEC 61000-3-31994 EN61000-3-31995
ASNZS 3548 1992
CNS13438 1997
FCC Part 15-Class B ICES-003 Issue 2 VCCI-2
GB 9254-1998
Telecom TBR21 1998
Supplementary Information
The Product herewith complies with the requirements of the Low Voltage Directive 7323EEC the EMC Directive 89336EEC and the RampTTE Directive 19995EC (ANNEX II) carries the CE marking accordingly
European Contact for regulatory topics only Your local Hewlett-Packard Sales and Service Office orHewlett-Packard GmbH
Department HQ-TRE Herrenberger Strasse 140 D-71034 Boumlblingen Germany (FAX + 49-7031-14-3143)
order mediaTo order media such as HP Premium Inkjet Paper HP Premium Inkjet Transparency Film HP Iron-On T-shirt Transfer paper or HP Greeting Cards go to
wwwhpshoppingcom
For orders in countries other than the US and Canada select other countries then click Yes to leave hpshoppingcom From this website you can access hpshoppingcom for your specific language or countryregion
order print cartridges
If you have Internet access you can get more information from the HP website at
wwwhpcomsupport
print cartridges hp reorder number
HP black print cartridge 56 19 ml black print cartridge
HP color print cartridgeHP tri-color print cartridge
57 17 ml color print cartridge28 8 ml color print cartridge
Visit the hp officejet information centerIt has everything you need to get the most value from your HP Officejet
bull Technical Supportbull Supplies and Ordering Informationbull Project Tipsbull Ways to Enhance Your Product
wwwhpcomsupport
copy 2003 Hewlett-Packard Company
Printed in the USA Mexico Germany Singapore or China
Q1608-90163Q1608-90163
Q1608-90163
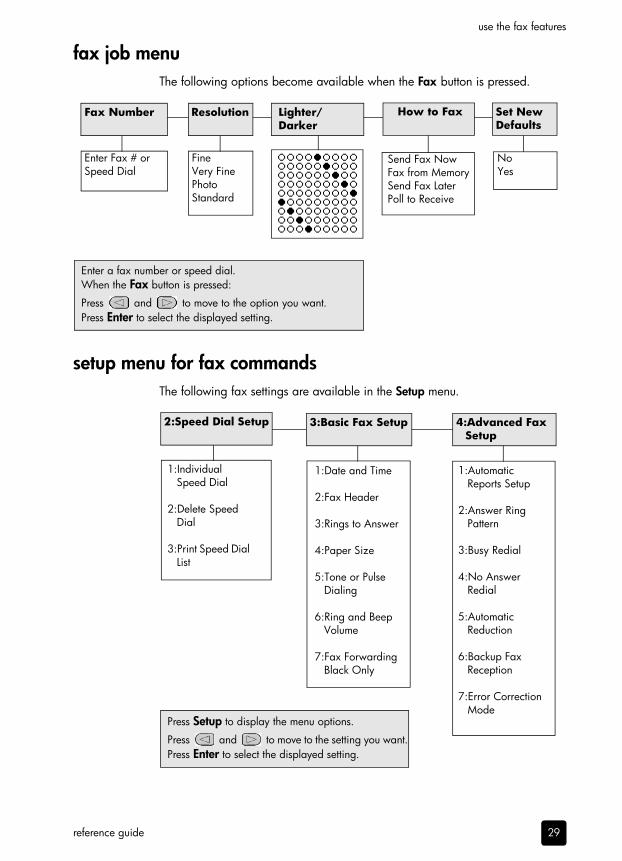
reference guide
use the fax features
29
fax job menuThe following options become available when the Fax button is pressed
setup menu for fax commandsThe following fax settings are available in the Setup menu
Enter Fax or Speed Dial
FineVery FinePhotoStandard
Fax Number Resolution LighterDarker
Enter a fax number or speed dialWhen the Fax button is pressed
Press and to move to the option you wantPress Enter to select the displayed setting
NoYes
Set New Defaults
Send Fax NowFax from MemorySend Fax LaterPoll to Receive
How to Fax
1Automatic Reports Setup
2Answer Ring Pattern
3Busy Redial
4No Answer Redial
5Automatic Reduction
6Backup Fax Reception
7Error Correction Mode
3Basic Fax Setup 4Advanced Fax Setup
Press Setup to display the menu options
Press and to move to the setting you wantPress Enter to select the displayed setting
1Date and Time
2Fax Header
3Rings to Answer
4Paper Size
5Tone or Pulse Dialing
6Ring and Beep Volume
7Fax Forwarding Black Only
2Speed Dial Setup
1Individual Speed Dial
2Delete Speed Dial
3Print Speed Dial List
hp officejet 4100 series
chapter 6
30
7
31
maintain your hp officejet
This section provides instructions for keeping your HP Officejet in top working condition Perform these maintenance procedures as necessary
clean the glassDirty glass from dust smudges hair and so on slows down performance and affects the accuracy of features such as Fit to Page and Copy
1 Turn off the unit unplug the power cord and raise the scanner lid
2 Clean the glass with a soft cloth or sponge slightly moistened with a nonabrasive glass cleaner
Caution Do not use abrasives acetone benzene or carbon tetrachloride on the glass these can damage it Do not place liquids directly on the glass They may seep under it and damage the unit
3 Dry the glass with a chamois or cellulose sponge to prevent spotting
hp officejet 4100 series
chapter 7
32
clean the white stripMinor debris can accumulate on the white strip located underneath the scannerrsquos lid
1 Turn off the unit unplug the power cord and raise the scanner lid
2 Clean the white strip with a soft cloth or sponge slightly moistened with a mild soap and warm water
3 Wash the strip gently to loosen debris do not scrub the strip
4 Dry the strip with a chamois or soft cloth
Caution Do not use paper-based wipes as these may scratch the strip
5 If this does not clean the strip well enough repeat the previous steps using isopropyl (rubbing) alcohol and wipe the strip thoroughly with a damp cloth to remove any residual alcohol
clean the exterior Use a soft damp lint-free cloth to wipe dust smudges and stains off the case The interior of the unit does not require cleaning Keep fluids away from the interior of the unit as well as the front panel
work with print cartridgesTo ensure the best print quality from your HP Officejet you will need to perform some simple maintenance procedures and when prompted by a front-panel message replace the print cartridges
print a self-test reportIf you are experiencing problems with printing before cleaning or replacing the print cartridges you should print a Self-Test Report This report provides useful information about your print cartridges including status information
1 Press Setup
2 Press 1 then press 4This selects Print Report and then selects Self-Test Report
3 Press Start Black or Start ColorA Self-Test Report is printed for your HP Officejet
handle print cartridgesBefore you replace or clean a print cartridge you should know the part names and how to handle the print cartridge
reference guide
maintain your hp officejet
33
replace the print cartridgesFront-panel messages appear to let you know that you should replace your print cartridges
See order print cartridges on the back cover for information on ordering replacement print cartridges
1 Turn on the unit then lift open the print cartridge access doorThe print carriage moves into view
2 After the carriage stops moving push down on the print cartridge down to release it and then pull it toward you out of its slot
Plastic tape with pink tab(must be removed)
Copper contactsInk nozzles under tape
Do not touch the copper contacts or the ink nozzles
print cartridge access door
hp officejet 4100 series
chapter 7
34
Note It is normal to see ink build-up in the print cartridge slots
3 Remove the new print cartridge from its packaging and being careful to touch only the bright pink plastic tab gently remove the plastic tape to uncover the ink nozzles
Caution Do not touch the copper contacts or ink nozzles
Once you have removed the plastic tape install the print cartridge immediately to prevent the ink from drying in the nozzles
4 Push the new print cartridge into the appropriate slot at a slight angle until it clicks into place
Caution Do not attempt to push the cartridge straight into the slot It must slide in at a slight angle
The tri-color print cartridge goes on the left and the black cartridge goes on the right
5 Close the print cartridge access door
reference guide
maintain your hp officejet
35
align the print cartridgesThe HP Officejet prompts you to align cartridges every time you install or replace a print cartridge Aligning the cartridges ensures high-quality output
To align the print cartridges when prompted
1 Press Enter on the front panelAn align cartridges (test pattern) page prints
2 Load the align cartridges page face down in the ADF between the paper-width guides and press the Enter button again
3 Recycle or discard the page
To align the cartridges at any other time
1 Press Setup
2 Press 5 then press 2This selects the Maintenance menu and then selects the Align Print Cartridge option
3 Press EnterAn align cartridges (test pattern) page prints
4 Load the align cartridges page face down in the ADF between the paper-width guides and press the Enter button again
5 Recycle or discard the page
clean the print cartridgesUse this feature when the Self-Test Report shows streaking or white lines through any of the colored bars Do not clean print cartridges unnecessarily This wastes ink and shortens the life of the ink nozzles
1 Press Setup
2 Press 5 then press 1This selects the Maintenance menu and then selects the Clean Print Cartridge optionA page of patterns is printed The cartridges are cleaned Recycle or discard the pageIf copy or print quality still seem poor after you clean the print cartridges replace the print cartridge that is affected
restore factory defaultsYou can restore the original factory settings to what they were when you purchased your HP Officejet Choosing to restore your factory defaults restores all settings except date information and any scan settings you may have set
You can perform this process from the front panel only
1 Press Setup
2 Press 5 then press 3This selects Maintenance and then selects Restore Factory DefaultsThe factory default settings are restored
hp officejet 4100 series
chapter 7
36
set scroll speedThe Scroll Speed option lets you control the rate that text messages appear in the front-panel display You can choose Normal Fast or Slow The default is Normal
1 Press Setup
2 Press 5 then press 6This selects Maintenance and then selects Set Scroll Speed
3 Press until the desired speed appears then press Enter
set the prompt delay timeThe Prompt Delay option lets you control the amount of time before a message is displayed in the front-panel display You can choose Normal Fast or Slow The default is Normal
1 Press Setup
2 Press 5 then press 7This selects Maintenance and then selects Set Prompt Delay Time
3 Press until the delay time appears then press Enter
self-maintenance sounds During the life of your product you may hear various mechanical sounds This is a normal part of your unitrsquos self-maintenance
reference guide
maintain your hp officejet
37
setup menu optionsThe following options are available from the Setup button
1Last Transaction
2Fax Log
3Speed Dial List
4Self-Test Report
5Automatic Reports Setup
1Print Report
Use Setup to display the Print Report Speed Dial Setup Basic Fax Setup Advanced Fax Setup and Maintenance options
Press and to move to the setting you wantPress Enter to select the displayed setting
1Clean Print Cartridges
2Align Print Cartridges
3Restore Factory Defaults
4Reprint Faxes in Memory
5Set Language amp CountryRegion
6Set Scroll Speed
7Set Prompt Delay Time
5Maintenance2Speed Dial Setup
3Basic Fax Setup
4Advanced Fax Setup
1Individual Speed Dial
2Delete Speed Dial
3Print Speed Dial List
1Date and Time
2Fax Header
3Rings to Answer
4 Paper Size
5Tone or Pulse Dialing
6Ring and Beep Volume
7Fax Forwarding Black Only
1Automatic Reports Setup
2Answer Ring Pattern
3Busy Redial
4No Answer Redail
5Automatic Reduction
6Backup Fax Reception
7Error Correction Mode
hp officejet 4100 series
chapter 7
38
8
39
additional setup information
During the installation of the HP Officejet software a number of windows are displayed You should see the following
bull Installingbull Copying files bull A request to plug in the HP Officejetbull Green OK and check markbull Request to restart your computer (may not occur in all cases)bull Registration
If you did not see all of these windows there may be a problem with the installation Verify the following
bull The HP Director contains six icons (double-click the HP Director icon on the desktop)
bull The HP Officejet is listed in the Printers dialog boxbull There is an icon for the HP Officejet in the System Tray that indicates the
HP Officejet is ready
If the HP Director does not show six icons you may need to wait a few minutes for the HP Officejet to connect to your computer
possible installation problemsIf nothing appears on your computer screen after you insert the HP Officejet 4100 Series CD-ROM into your computerrsquos CD-ROM drive
1 From the Start menu choose Run
2 In the Run dialog box enter dsetupexe (if your CD-ROM drive is not assigned to drive letter d use the appropriate drive letter) then click OK
If the HP Director does not contain six icons do the following
bull Verify that the front-panel cover is attached then unplug the HP Officejet and plug it in again
bull Verify that the USB and power cables are plugged inndash Unplug the USB cable and plug it in againndash Do not attach the USB cable to a keyboard or nonpowered hubndash Verify that the USB cable is 3 meters or less in lengthndash If you have several USB devices attached to your computer you may
want to unplug the others during the installation
Note AppleTalk is not supported
bull Unplug the HP Officejet from the wall and plug it in againbull Restart your computer
hp officejet 4100 series
chapter 8
40
On Windows check the System Tray for applications that are running in the background and close them before restarting your computer
remove and reinstall your hp officejet softwareIf six icons do not appear in the Director you may need to uninstall and re-install the software Do not simply delete the HP Officejet program files from your hard drive Be sure to remove them properly using the uninstall utility provided in the HP Officejet program group
to uninstall from a Windows computer
1 Disconnect your HP Officejet from your computer
2 On the Windows taskbar click Start choose Programs or All Programs (XP) choose Hewlett-Packard choose hp officejet 4100 series then choose uninstall software
3 Follow the directions on the screenBe sure to disconnect your HP Officejet
4 If you are asked whether you would like to remove shared files click NoOther programs that use these files may not work properly if the files are deleted
5 After the program finishes removing the software disconnect your HP Officejet and restart your computer
Note It is important that you disconnect your HP Officejet before restarting your computer
6 To reinstall the software insert the HP Officejet 4100 Series CD-ROM into your computerrsquos CD-ROM drive and follow the instructions that appear
7 After the software is installed connect and turn on your HP Officejet following the onscreen instructions and the instructions in your Setup PosterAfter connecting and turning on your HP Officejet you may have to wait several minutes for all of the Plug and Play events to completeWhen the software installation is complete you will see a Status Monitor icon in the System Tray
8 To verify that the software is properly installed double-click on the HP Director icon on the desktop If the HP Director shows six icons the software has been properly installed
to uninstall from a Macintosh computer
1 Disconnect your HP Officejet from your computer
2 Double-click on ApplicationsHP All-in-One Software folder
reference guide
additional setup information
41
3 Double-click on HP Uninstaller
4 Follow the directions that appear on the screen
5 After the program finishes removing the software disconnect your HP Officejet and restart your computer
6 To reinstall the software insert the HP Officejet 4100 Series CD-ROM into your computerrsquos CD-ROM drive
Note When re-installing the software follow the instructions on the Setup Poster Do not connect the HP Officejet to your computer until after you have completed the software installation
7 On the desktop open the CD-ROM double-click on hp all-in-one installer and follow the instructions that appear
connect your hp officejet to a phone modem or answering machine
The HP Officejet can share a phone line with a phone a modem or an aswering machine When sharing a phone line with an answering machine the HP Officejet will answer fax calls and direct voice calls to the answering machine
Note For information on connecting your HP Officejet to your computer and phone line refer to the Setup Poster that came with your unit
to connect your hp officejet to a phone modem or answering machine
1 Remove the white plastic stopper from connector 2 on the back of the HP Officejet
To connect more than one device to connector 2 on the HP Officejet you must purchase a Y-splitter and plug it into connector 2
2 Connect the phone cord from the phone modem or answering machine to connector 2 (or Y-splitter)
Caution Do not use the phone cord that came with the HP Officejet for this purpose That phone cord must connect connector 1 on the HP Officejet to the wall jack for your phone system See the Setup Poster for details
3 If you are connecting an answering machine see set the number of rings before answering on page 21 for instructions on setting the number of rings correctly or change the answer ring pattern (distinctive ringing) on page 26 for information on incoming ring patterns
4 If you are connecting a modem turn off its fax-receive feature
connector 2 on the HP Officejet
connector 1 on the HP Officejet
hp officejet 4100 series
chapter 8
42
additional troubleshooting helpYou may want to refer to the readme file for more information on possible installation problems On Windows you can access the readme file from the Start button on the taskbar select Programs Hewlett-Packard hp officejet 4100 series View the Readme File On Macintosh you can access the readme file by double-clicking on the icon located in the top-level folder of the HP Officejet software CD-ROM
The readme file provides more information including
bull Using the Re-install utility after a failed installation to return your PC to a state that will allow the HP Officejet to be re-installed
bull Using the Re-install utility on Windows 98 to recover from a Composite USB System Driver missing errorThis error may occur if the hardware is installed prior to installing the software After running the Re-install utility reboot your PC and install the HP Officejet software before connecting the HP Officejet to your computer
You can also find more information on this website
wwwhpcomsupport
9
43
technical information
Additional specifications information can be found in the HP Photo amp Imaging Help in the hp officejet 4100 series section
physical specifications
power specificationsbull Power consumption 75W maximumbull Source (Input Voltage) 100 to 240 VAC groundedbull Input Frequency 50 to 60 Hzbull Current 1A maximum
regulatory informationAdditional regulatory information can be found in the HP Photo amp Imaging Help The information in this section supercedes information in the HP Photo amp Imaging Help
doc statement deacuteclaration de conformiteacute (Canada)Le preacutesent appareil numeacuterique neacutemet pas de bruit radioeacutelectrique deacutepassant les limites applicables aux appareils numeacuteriques de la classe B prescrites dans le Regraveglement sur le brouillage radioeacutelectrique eacutedicteacute par le ministegravere des Communications du CanadaThis digital apparatus does not exceed the Class B limits for radio noise emissions from digital apparatus set out in the Radio Interference Regulations of the Canadian Department of Communications
notice to users of the Canadian telephone networkThis equipment meets the applicable Industry Canada Terminal Equipment Technical Specifications This is confirmed by the registration number The abbreviation IC before the registration number signifies that registration was performed based on a Declaration of Conformity indicating that Industry Canada technical specifications were met It does not imply that Industry Canada approved the equipment
Note The Ringer Equivalence Number (REN) assigned to each terminal device provides an indication of the maximum number of terminals allowed to be connected to a telephone interface The termination on an interface may consist of any combination of devices subject only to the requirement that the sum of the Ringer Equivalence Numbers of all the devices does not exceed 5
The REN for this product is 03B based on FCC Part 68 test results
height width depth weight (without print cartridges)
with paper trays and ADF closed
718 in (1824 cm) 1676 in (4258 cm) 825 in (2096 cm) 75 lbs (34 kg)
with ADF and paper tray extended
1030 in (2615 cm) 1676 in (4258 cm) 1854 in (4709 cm) 75 lbs (34 kg)
hp officejet 4100 series
chapter 9
44
notice to all users of the European Economic Area (EEA)
This product is designed to interwork with the analogue telephone networks in the following countriesregions
Network compatibility depends on customer selected settings which must be reset to use the equipment on a telephone network in a countryregion other than where the product was purchased Contact the vendor or Hewlett-Packard Company if addition product support is necessaryThis equipment has been certified by the manufacturer in accordance with Directive 19995EC (annex II) for Pan-European single-terminal connection to the public switched telephone network (PSTN) However due to differences between the individual PSTNs provided in different countriesregions the approval does not of itself give an unconditional assurance of successful operation on every PSTN network termination pointIn the event of problems you should contact your equipment supplier in the first instance
geraumluschemissionLpA lt 70 dBam Arbeitsplatzim Normalbetriebnach DIN 45635 T 19
notice to Korean customers
Germany UK Netherlands
France Spain Italy
Belgium Luxembourg Sweden
Austria Denmark Ireland
Norway Finland Switzerland
Greece Portugal
10
45
hp support
This section explains the support services information provided by Hewlett-Packard If you are unable to find the answer you need in the printed or onscreen documentation supplied with your product you can contact one of the HP support services listed in the following pages Some support services are available only in the US and Canada while others are available in many countriesregions worldwide If a support service number is not listed for your countryregion contact your nearest authorized HP dealer for help
get support and other information from the internetIf you have Internet access you can get help from the following HP website
wwwhpcomsupportThe Web site offers technical support drivers supplies and ordering information
hp customer supportSoftware programs from other companies may be included with your HP Officejet If you experience problems with any of those programs you will receive the best technical assistance by calling the experts at that companyIf you need to contact HP Customer Support do the following before you call
1 Make sure thata Your unit is plugged in and turned onb The specified print cartridges are installed correctlyc The recommended paper is properly loaded in the input tray
2 Reset your unita Turn off the unit using the On button located on the unitrsquos front panelb Unplug the power cord from the back of the unitc Plug the power cord back into the unitd Turn on the unit using the On button
3 For more information check the HP website at wwwhpcomsupport
4 If you are still experiencing problems and need to speak with an HP Customer Support Representativendash Have your service ID and serial number ready To display your service ID and
serial number on the front panel do the following Press Enter and Start Color at the same time until the service ID appears in the front-panel display From this display press the right arrow until the serial number displays
ndash Print a Self-Test Report See print a self-test report on page 32 for information on printing this report
ndash Make a color copyndash Be prepared to describe your problem in detail
5 Call HP Customer Support Be near your unit when you call
call in the US during warrantyCall (208) 323-2551 This service is free during the warranty period however your standard long-distance phone charges still apply A fee may apply outside the warranty period
hp officejet 4100 series
chapter 10
46
US phone support is available in both English and Spanish languages 24 hours a day 7 days a week (days and hours of support may change without notice)
call elsewhere in the worldThe numbers listed below are current as of the printing date of this guide For a list of current international HP Support Service numbers visit this address and choose your own countryregion or language
wwwhpcomsupportFor Korea you can also visit this address
httpwwwhpcokrYou can call the HP support center in the following countriesregions If your countryregion is not listed contact your local dealer or nearest HP Sales and Support Office to find out how to obtain servicesSupport service is free during the warranty period however your standard long-distance phone charges will apply In some cases a flat fee per single incident will also applyFor phone support in Europe please check for the details and conditions of phone support in your countryregion by consulting the following Web site
wwwhpcomsupportAlternatively you can ask your dealer or call HP at the phone number indicated in this booklet As part of our constant efforts to improve our phone support service we advise you to check our website on a regular basis for new information regarding service features and delivery
countryregion hp technical support countryregion hp technical support
Algeria1 +213 (0) 61564 543 Malaysia 1-800-805405
Argentina 0810-555-5520 Mexico 01-800-472-6684
Australia +61 3 8877 80001902 910 910
Mexico (Mexico City) 5258-9922
Austria +43 (0) 810 00 6080 Morocco1 +212 22404 747
Bahrain (Dubai) 800 728 Netherlands +31 (0) 20 606 8751
Belgium (Dutch) +32 (0) 2 626 8806 New Zealand 0800 441 147
Belgium (French) +32 (0) 2 626 8807 Norway +47 22 11 6299
Brazil (Grande Sao Paulo) (11) 3747 7799 Oman +971 4 883 8454
Brazil (Demais Localidades) 0800 157751 Palestine +971 4 883 8454
Canada during warranty (905) 206 4663 Panama 001-800-7112884
Canada post-warranty(per-call charge)
1-877-621-4722 Peru 0-800-10111
Caribbean amp Central America
1-800-711-2884 Philippines 632-867-3551
Chile 800-360-999 Poland +48 22 865 98 00
China 86 10 6868 7980 Portugal +351 21 3176333
Colombia 9-800-114-726 Puerto Rico 1-877-2320-589
Costa Rica 0-800-011-0524 Qatar +971 4 883 8454
Czech Republic +420 (0) 261307310 Romania +40 1 315 44 42or local 01 3154442
reference guide
hp support
47
call in Australia post-warrantyIf your product is not under warranty you can call 03 8877 8000 A per-incident out-of-warranty support fee of $2750 (inc GST) will be charged to your credit card You can also call 1902 910 910 ($2750 charged to your phone account) from 900 AM to 500 PM Monday through Friday (Charges and support hours are subject to change without notice)
prepare your unit for shipmentIf after contacting HP Customer Support or returning to the point of purchase you are requested to send your unit in for service please follow the power off and rebox steps below to avoid further damage to the HP product
Denmark +45 39 29 4099 Russian Federation Moscow +7 095 797 3520
Ecuador 1800-711-2884 Russian Federation St Petersburg
+7 812 346 7997
Europe (English) +44 (0) 207 512 5202 Saudi Arabia +800 897 14440
Egypt 02 532 5222 Singapore 65 6272 5300
Finland +358 (0) 203 47 288 Slovakia +421 (0) 2 682 08080
France (034 Euromin) +0892 69 60 22 South Africa (inside RSA) 086 000 1030
Germany (012 Euromin) +49 (0) 180 52 58 143 South Africa (inside RSA) +27-11 258 9301
Greece +30 1060 73 603 Spain +34 902 321 123
Hong Kong (SAR) +85 (2) 3002 8555 Sweden +46 (0)8 619 2170
Guatemala 1800-995-5105 Switzerland 2 +41 (0) 84 880 1111
Hungary +36 (0) 1 382 1111 Taiwan +886-2-2717-00550800 010 055
India 1-600-11226791 11 682 6035
Thailand +66 (2) 661 4000
Indonesia 62-21-350-3408 Tunisia1 +216 1891 222
Ireland +353 (0) 1 662 5525 Turkey +90 216 579 7171
Israel +972 (0) 9 8304848 Ukraine +7 (380-44) 490-3520
Italy +39 (0) 226410350 United Arab Emirates +971 4 883 8454
Japan 0570 000 511+81 3 3335 9800
United Kingdom +44 (0) 207 512 52 02
Jordan +971 4 883 8454 Venezuela 0800-47468368 or800-477-7777
Korea (Seoul) +82 (2) 3270 0700 Venezuela (Caracas) (502) 207-8488
Korea (outside Seoul) 080 999 0700 Vietnam 84 (0) 8 823 4530
Kuwait +971 4 883 8454 Yemen +971 4 883 8454
Lebanon +971 4 883 8454
1 This Call Center supports French speaking customers from the following countriesregions Morocco Tunisia and Algeria
2 This Call Center supports German French and Italian speaking customers in Switzerland
countryregion hp technical support countryregion hp technical support
hp officejet 4100 series
chapter 10
48
Note When transporting your HP Officejet make sure that the pens have been removed the HP Officejet has been properly shut down by pressing the power button and you have allowed time for the carriage to return to the service station and for the scanner to return to its parked position
1 Turn on the unitDisregard steps 1 through 6 if your unit will not turn on and the print carriage is in the home position You will not be able to remove the print cartridges Proceed to step 7
2 Open the print cartridge access doorThe print carriage moves into view
3 See replace the print cartridges on page 33 for information on removing the print cartridges
Caution Remove both print cartridges Failure to do so may damage your unit
4 Place the print cartridges in an airtight bag so they will not dry out and put them aside (do not send them with the unit unless instructed to by the HP customer support call agent)
5 Turn off the unit
6 Close the print cartridge access door
7 Remove the front panel cover as followsa Grasp the front of the front panel cover with two hands as shownb Firmly lift the front panel cover to unsnap it from the unit
8 Retain the front panel cover Do not return the front panel cover with the unit
9 If available pack the unit for shipment using the original packing materials or the packaging materials that come with your exchange unit
If you do not have the original packaging materials please use other adequate packaging materials Shipping damage caused by improper packaging andor improper transportation is not covered under the warranty
reference guide
hp support
49
10 Place the return shipping label on the outside of the box
11 Include the following items in the boxndash A complete description of symptoms for service personnel (samples of print
quality problems are helpful)ndash A copy of the sales slip or other proof of purchase to establish the warranty
coverage periodndash Your name address and a phone number where you can be reached during
the day
hp distribution centerTo order HP Officejet software a copy of the printed Reference Guide a setup poster or other customer-replaceable parts do one of the following bull In the US or Canada call (208) 323 2551bull Visit this website
httpwwwhpcomcposupportsoftwarehtml
hp officejet 4100 series
chapter 10
50
11
51
warranty information
HP Officejet 4100 seriesDuration of Limited Warranty (hardware and labor) 1 YearDuration of Limited Warranty (CD media) 90 DaysDuration of Limited Warranty (print cartridges) Until the HP ink is depleted or the ldquoend of warrantyrdquo date printed on the cartridge has been reached whichever occurs first
warranty service
express serviceTo obtain HP express repair service the customer must contact an HP service office or an HP Customer Support Center for basic troubleshooting first See hp customer support on page 45 for steps to take before calling Customer SupportIf a customer unit needs a minor part replacement and these parts can normally be replaced by the customer the customer-replaceable components may be serviced through expedited part shipment In this event HP will prepay shipping charges duty and taxes provide telephone assistance on replacement of the component and pay shipping charges duty and taxes for any part that HP asks to be returnedThe HP Customer Support Center may direct customers to designated authorized service providers who are certified by HP to service the HP product
warranty upgradesUpgrade your standard factory warranty to a total of three years with the HP SUPPORTPACK Service coverage begins on product purchase date and the pack must be purchased within the first 180 days of product purchase This program offers phone support from 600 AM to 1000 PM Mountain Standard Time (MST) Monday through Friday and 900 AM to 400 PM (MST) on Saturdays If during your technical support call it is determined that you need a replacement product then HP will ship you this product next business day free of charge Available in US onlyFor more information please call 1-888-999-4747 or visit the following HP Web site
httpwwwhpcomgohpsupportpack
Outside the US please call your local HP Customer Support office See call elsewhere in the world on page 46 for a list of international Customer Support numbers
returning your hp officejet for serviceBefore returning your HP Officejet for service you must call HP Customer Support See hp customer support on page 45 for steps to take before calling Customer Support
hewlett-packard limited global warranty statement
extent of limited warrantyHewlett-Packard (ldquoHPrdquo) warrants to the end-user customer (ldquoCustomerrdquo) that each HP Officejet 4100 Series product (ldquoProductrdquo) including related software accessories media and supplies shall be free from defects in material and workmanship for the duration which begins on the date of purchase by the Customer
hp officejet 4100 series
chapter 11
52
For each software Product HPrsquos limited warranty applies only to a failure to execute programming instructions HP does not warrant that the operation of any Product shall be uninterrupted or error freeHPrsquos limited warranty covers only those defects which arise as a result of normal use of a Product and does not cover any other problems including those which arise as a result of (a) improper maintenance or modification (b) software accessories media or supplies not provided or supported by HP or (c) operation outside the Productrsquos specificationsFor any hardware Product the use of a non-HP print cartridge or a refilled print cartridge does not affect either the warranty to the Customer or any HP support contract with the Customer However if Product failure or damage is attributable to the use of a non-HP or refilled print cartridge HP shall charge its standard labor and materials charges to service the Product for the failure or damageIf HP receives during the applicable warranty period notice of a defect in any Product HP shall either repair or replace the defective Product at HPrsquos option Where labor charges are not covered by HPrsquos limited warranty repairs shall be at HPrsquos standard charges for laborIf HP is unable to repair or replace as applicable a defective Product which is covered by HPrsquos warranty HP shall within a reasonable time after being notified of the defect refund the purchase price for the ProductHP shall have no obligation to repair replace or refund until the Customer returns the defective Product to HPAny replacement product may be either new or like-new provided that it has functionality at least equal to that of the Product being replacedHP products including each Product may contain remanufactured parts components or materials equivalent to new in performanceHPs limited warranty for each Product is valid in any countryregion or locality where HP has a support presence for the Product and where HP has marketed the Product The level of warranty service may vary according to local standards HP shall have no obligation to alter the form fit or function of the Product in order to make it operate in a countryregion or locality for which the Product was never intended to operate
limitations of warrantyTO THE EXTENT ALLOWED BY LOCAL LAW NEITHER HP NOR ITS THIRD PARTY SUPPLIERS MAKE ANY OTHER WARRANTY OR CONDITION OF ANY KIND WHETHER EXPRESS OR IMPLIED WITH RESPECT TO THE COVERED HP PRODUCTS AND SPECIFICALLY DISCLAIM THE IMPLIED WARRANTIES OR CONDITIONS OF MERCHANTABILITY SATISFACTORY QUALITY AND FITNESS FOR A PARTICULAR PURPOSE
limitations of liabilityTo the extent allowed by local law the remedies provided in this Limited Warranty Statement are the Customerrsquos sole and exclusive remediesTO THE EXTENT ALLOWED BY LOCAL LAW EXCEPT FOR THE OBLIGATIONS SPECIFICALLY SET FORTH IN THIS LIMITED WARRANTY STATEMENT IN NO EVENT SHALL HP OR ITS THIRD PARTY SUPPLIERS BE LIABLE FOR DIRECT INDIRECT SPECIAL INCIDENTAL OR CONSEQUENTIAL DAMAGES WHETHER BASED ON CONTRACT TORT OR ANY OTHER LEGAL THEORY AND WHETHER ADVISED OF THE POSSIBILITY OF SUCH DAMAGES
local lawThis Limited Warranty Statement gives the Customer specific legal rights The Customer may also have other rights which vary from state to state in the United States from province to province in Canada and from countryregion to countryregion elsewhere in the world
reference guide
warranty information
53
To the extent this Limited Warranty Statement is inconsistent with local law this Statement shall be deemed modified to be consistent with such local law Under such local law certain disclaimers and limitations of this Statement may not apply to the Customer For example some states in the United States as well as some governments outside the United States (including provinces in Canada) mayPreclude the disclaimers and limitations in this Statement from limiting the statutory rights of a consumer (eg the United Kingdom)Otherwise restrict the ability of a manufacturer to enforce such disclaimers or limitations orGrant the Customer additional warranty rights specify the duration of implied warranties which the manufacturer cannot disclaim or not allow limitations on the duration of implied warrantiesFOR CONSUMER TRANSACTIONS IN AUSTRALIA AND NEW ZEALAND THE TERMS IN THIS LIMITED WARRANTY STATEMENT EXCEPT TO THE EXTENT LAWFULLY PERMITTED DO NOT EXCLUDE RESTRICT OR MODIFY AND ARE IN ADDITION TO THE MANDATORY STATUTORY RIGHTS APPLICABLE TO THE SALE OF THE COVERED HP PRODUCTS TO SUCH CUSTOMERS
hp officejet 4100 series
chapter 11
54
55
index
Numerics4-by-6 inch photo paper
load 10 12
AADF 7adjust
volume for fax 25align print cartridges 35Answer Ring Pattern 26automatic document feeder 7automatic reduction
fax 25
Bbest copy quality 13busy number
redial automatically 23
Ccancel
scan 18scheduled fax 21
cartridgesalign 35replace 33
cleanprint cartridges 35the exterior 32the glass 31white strip 32
colorenhance 14fax 20fax from front panel 20
contrastchange for fax 23photo color 14
copy 13 16change default settings 15enhance 14fit to page 16lighten or darken 14menu options 16number of copies 14photo 15quality 13reduce or enlarge 14settings 13 15
speed 13tutorial 4
Customer Support 45web site 45
Ddarken a copy 14date
setting 27default settings
restore 35director review 4distinctive ringing 26
Eenhance copies 14enlarge copy 14 16envelopes
load 9Error Correction Mode
(ECM) 25
Ffactory defaults
restore 35fast copy quality 13fax 28
adjust volume 25automated reports 22cancel fax forward 24cancel scheduled 21change Answer Ring
Pattern 26change contrast 23change resolution 22change settings 19control appearance 22create individual speed-dial
settings 26delete speed-dial
settings 27distinctive ringing 26Error Correction Mode
(ECM) 25forward faxes 24header 27in color 20in color from front panel 20manual reports 22
menu 29print reports 22receive 21receive manually 21redial busy or unanswered
number 23schedule 20send from front panel 19set automatic reduction 25set date and time 27set the number of rings 21settings 27 28setup menu options 29speed dials 19test 28
fit to page 16forward faxes 24
cancel 24front panel
display scroll speed 36enter text 28send a fax 19setting prompt delay 36tutorial 3
Gglass
cleaning 31greeting cards
load 11
Hhelp 1HP Customer Support 45
calling 45HP Director 4HP distribution center 49HP Officjet
preparing to ship 47HP papers
tips on loading 11
Iindividual speed-dial settings
create 26ink cartridges see print
cartridgesinkjet paper
load 11
index
hp officejet 4100 series56
Kkeypad
enter text 28
Llabels
load 12lighten copies 14load
change the paper type 12envelopes 9original in ADF 7paper 7photo paper 10 12postcards 10 12print cartridges 33set the paper size 12tips 11
Mmaintenance
align print cartridges 35clean print cartridges 35clean the exterior 32clean the glass 31clean the white strip 32normal sounds 36replace print cartridges 33restore factory defaults 35self-maintenance
sounds 36self-test report 32
menuscopy options 16fax 29fax setup 29maintenance 37print reports 37
Nnormal copy quality 13number of copies
set 14number of rings
set 21
Oorder print cartridges 60originals
load in ADF 7output tray 8
Ppaper
change default size for copy 12
change the type 12load 7recommended 7set the size 12tips on loading 11
paper size change for copy 12
paper trayload 7
phone numbers support services 45
photo paperload 10 12
photoscopy 15enhance copy 14
physical specifications 43postcards
load 10 12power
specifications 43print
envelopes 9fax reports 22self-test report 32
print cartridgesalign 35clean 35handling 32replace 33
prompt delaysetting 36
Qquick start
review the director 4use with a computer 4
Rreceive
fax 21redial
busy or unanswered number 23
reduce copy 14 16regulatory information 43reinstall software 40reports
generate automatically for fax 22
generate manually for fax 22
print 22self-test 32
resolution
change for fax 22restore factory settings 35returning your HP Officejet for
service 51
Sscan
from front panel 17stop 18
schedule a fax 20scroll speed
setting 36self-test report 32send
cancel forward faxes 24color fax 20color fax from front
panel 20forward faxes 24
settingscopy 13 15fax 27 28prompt delay 36scroll speed 36
setupadditional information 39menu 29
shippingyour HP Officejet 47
softwareremove and reinstall 40
soundsself-maintenance 36
specificationsphysical 43power 43
speed dials 19create individual
settings 26delete settings 27
stopscan 18scheduled fax 21
subscriber identification code 27
support services 45
Ttelephone line
multiple numbers 26telephone numbers 45text
enhance 14enter from front panel 28
time
index
reference guide 57
setting 27transparency film
recommended 7tips on loading 11
troubleshootingremove and reinstall
software 40T-shirt Transfer Iron-On
load 11tutorial
front panel 3make a copy 4
Uunanswered number
redial automatically 23
Vvolume
adjust 25
Wwarranty 45
service 51statement 51upgrades 51
white stripcleaning 32
hp officejet 4100 series
chapter 12
58
declaration of conformityAccording to ISOIEC Guide 22 and EN 45014
Manufacturerrsquos Name and Address
Hewlett-Packard Company 16399 West Bernardo Drive San Diego CA 92127-1899 USA
declares that the product
Product Name hp officejet 4100 series (Q1608A)
Model Number(s) officejet 4110 (Q1609A) officejet 4110xi (Q1610A) officejet 4110v (Q1611A) officejet 4105 (Q1612A) officejet 4105z (Q1613A) officejet 4115 (Q1614A)
Product Options All
conforms to the following Product Specifications
Safety EN609501992 +A1 A2 A3 A4 amp A11
IEC609501991 +A1 A2 A3 amp A4
UL1950CSA 222 No 950 3rd Edn 1995
NOM-019-SCFI-1993
EMC CISPR221993 +A1 amp A2 EN550221994 +A1 amp A2 -Class B
CISPR241997EN550241998
IEC 61000-3-21995 EN61000-3-21995
IEC 61000-3-31994 EN61000-3-31995
ASNZS 3548 1992
CNS13438 1997
FCC Part 15-Class B ICES-003 Issue 2 VCCI-2
GB 9254-1998
Telecom TBR21 1998
Supplementary Information
The Product herewith complies with the requirements of the Low Voltage Directive 7323EEC the EMC Directive 89336EEC and the RampTTE Directive 19995EC (ANNEX II) carries the CE marking accordingly
European Contact for regulatory topics only Your local Hewlett-Packard Sales and Service Office orHewlett-Packard GmbH
Department HQ-TRE Herrenberger Strasse 140 D-71034 Boumlblingen Germany (FAX + 49-7031-14-3143)
order mediaTo order media such as HP Premium Inkjet Paper HP Premium Inkjet Transparency Film HP Iron-On T-shirt Transfer paper or HP Greeting Cards go to
wwwhpshoppingcom
For orders in countries other than the US and Canada select other countries then click Yes to leave hpshoppingcom From this website you can access hpshoppingcom for your specific language or countryregion
order print cartridges
If you have Internet access you can get more information from the HP website at
wwwhpcomsupport
print cartridges hp reorder number
HP black print cartridge 56 19 ml black print cartridge
HP color print cartridgeHP tri-color print cartridge
57 17 ml color print cartridge28 8 ml color print cartridge
Visit the hp officejet information centerIt has everything you need to get the most value from your HP Officejet
bull Technical Supportbull Supplies and Ordering Informationbull Project Tipsbull Ways to Enhance Your Product
wwwhpcomsupport
copy 2003 Hewlett-Packard Company
Printed in the USA Mexico Germany Singapore or China
Q1608-90163Q1608-90163
Q1608-90163

hp officejet 4100 series
chapter 6
30
7
31
maintain your hp officejet
This section provides instructions for keeping your HP Officejet in top working condition Perform these maintenance procedures as necessary
clean the glassDirty glass from dust smudges hair and so on slows down performance and affects the accuracy of features such as Fit to Page and Copy
1 Turn off the unit unplug the power cord and raise the scanner lid
2 Clean the glass with a soft cloth or sponge slightly moistened with a nonabrasive glass cleaner
Caution Do not use abrasives acetone benzene or carbon tetrachloride on the glass these can damage it Do not place liquids directly on the glass They may seep under it and damage the unit
3 Dry the glass with a chamois or cellulose sponge to prevent spotting
hp officejet 4100 series
chapter 7
32
clean the white stripMinor debris can accumulate on the white strip located underneath the scannerrsquos lid
1 Turn off the unit unplug the power cord and raise the scanner lid
2 Clean the white strip with a soft cloth or sponge slightly moistened with a mild soap and warm water
3 Wash the strip gently to loosen debris do not scrub the strip
4 Dry the strip with a chamois or soft cloth
Caution Do not use paper-based wipes as these may scratch the strip
5 If this does not clean the strip well enough repeat the previous steps using isopropyl (rubbing) alcohol and wipe the strip thoroughly with a damp cloth to remove any residual alcohol
clean the exterior Use a soft damp lint-free cloth to wipe dust smudges and stains off the case The interior of the unit does not require cleaning Keep fluids away from the interior of the unit as well as the front panel
work with print cartridgesTo ensure the best print quality from your HP Officejet you will need to perform some simple maintenance procedures and when prompted by a front-panel message replace the print cartridges
print a self-test reportIf you are experiencing problems with printing before cleaning or replacing the print cartridges you should print a Self-Test Report This report provides useful information about your print cartridges including status information
1 Press Setup
2 Press 1 then press 4This selects Print Report and then selects Self-Test Report
3 Press Start Black or Start ColorA Self-Test Report is printed for your HP Officejet
handle print cartridgesBefore you replace or clean a print cartridge you should know the part names and how to handle the print cartridge
reference guide
maintain your hp officejet
33
replace the print cartridgesFront-panel messages appear to let you know that you should replace your print cartridges
See order print cartridges on the back cover for information on ordering replacement print cartridges
1 Turn on the unit then lift open the print cartridge access doorThe print carriage moves into view
2 After the carriage stops moving push down on the print cartridge down to release it and then pull it toward you out of its slot
Plastic tape with pink tab(must be removed)
Copper contactsInk nozzles under tape
Do not touch the copper contacts or the ink nozzles
print cartridge access door
hp officejet 4100 series
chapter 7
34
Note It is normal to see ink build-up in the print cartridge slots
3 Remove the new print cartridge from its packaging and being careful to touch only the bright pink plastic tab gently remove the plastic tape to uncover the ink nozzles
Caution Do not touch the copper contacts or ink nozzles
Once you have removed the plastic tape install the print cartridge immediately to prevent the ink from drying in the nozzles
4 Push the new print cartridge into the appropriate slot at a slight angle until it clicks into place
Caution Do not attempt to push the cartridge straight into the slot It must slide in at a slight angle
The tri-color print cartridge goes on the left and the black cartridge goes on the right
5 Close the print cartridge access door
reference guide
maintain your hp officejet
35
align the print cartridgesThe HP Officejet prompts you to align cartridges every time you install or replace a print cartridge Aligning the cartridges ensures high-quality output
To align the print cartridges when prompted
1 Press Enter on the front panelAn align cartridges (test pattern) page prints
2 Load the align cartridges page face down in the ADF between the paper-width guides and press the Enter button again
3 Recycle or discard the page
To align the cartridges at any other time
1 Press Setup
2 Press 5 then press 2This selects the Maintenance menu and then selects the Align Print Cartridge option
3 Press EnterAn align cartridges (test pattern) page prints
4 Load the align cartridges page face down in the ADF between the paper-width guides and press the Enter button again
5 Recycle or discard the page
clean the print cartridgesUse this feature when the Self-Test Report shows streaking or white lines through any of the colored bars Do not clean print cartridges unnecessarily This wastes ink and shortens the life of the ink nozzles
1 Press Setup
2 Press 5 then press 1This selects the Maintenance menu and then selects the Clean Print Cartridge optionA page of patterns is printed The cartridges are cleaned Recycle or discard the pageIf copy or print quality still seem poor after you clean the print cartridges replace the print cartridge that is affected
restore factory defaultsYou can restore the original factory settings to what they were when you purchased your HP Officejet Choosing to restore your factory defaults restores all settings except date information and any scan settings you may have set
You can perform this process from the front panel only
1 Press Setup
2 Press 5 then press 3This selects Maintenance and then selects Restore Factory DefaultsThe factory default settings are restored
hp officejet 4100 series
chapter 7
36
set scroll speedThe Scroll Speed option lets you control the rate that text messages appear in the front-panel display You can choose Normal Fast or Slow The default is Normal
1 Press Setup
2 Press 5 then press 6This selects Maintenance and then selects Set Scroll Speed
3 Press until the desired speed appears then press Enter
set the prompt delay timeThe Prompt Delay option lets you control the amount of time before a message is displayed in the front-panel display You can choose Normal Fast or Slow The default is Normal
1 Press Setup
2 Press 5 then press 7This selects Maintenance and then selects Set Prompt Delay Time
3 Press until the delay time appears then press Enter
self-maintenance sounds During the life of your product you may hear various mechanical sounds This is a normal part of your unitrsquos self-maintenance
reference guide
maintain your hp officejet
37
setup menu optionsThe following options are available from the Setup button
1Last Transaction
2Fax Log
3Speed Dial List
4Self-Test Report
5Automatic Reports Setup
1Print Report
Use Setup to display the Print Report Speed Dial Setup Basic Fax Setup Advanced Fax Setup and Maintenance options
Press and to move to the setting you wantPress Enter to select the displayed setting
1Clean Print Cartridges
2Align Print Cartridges
3Restore Factory Defaults
4Reprint Faxes in Memory
5Set Language amp CountryRegion
6Set Scroll Speed
7Set Prompt Delay Time
5Maintenance2Speed Dial Setup
3Basic Fax Setup
4Advanced Fax Setup
1Individual Speed Dial
2Delete Speed Dial
3Print Speed Dial List
1Date and Time
2Fax Header
3Rings to Answer
4 Paper Size
5Tone or Pulse Dialing
6Ring and Beep Volume
7Fax Forwarding Black Only
1Automatic Reports Setup
2Answer Ring Pattern
3Busy Redial
4No Answer Redail
5Automatic Reduction
6Backup Fax Reception
7Error Correction Mode
hp officejet 4100 series
chapter 7
38
8
39
additional setup information
During the installation of the HP Officejet software a number of windows are displayed You should see the following
bull Installingbull Copying files bull A request to plug in the HP Officejetbull Green OK and check markbull Request to restart your computer (may not occur in all cases)bull Registration
If you did not see all of these windows there may be a problem with the installation Verify the following
bull The HP Director contains six icons (double-click the HP Director icon on the desktop)
bull The HP Officejet is listed in the Printers dialog boxbull There is an icon for the HP Officejet in the System Tray that indicates the
HP Officejet is ready
If the HP Director does not show six icons you may need to wait a few minutes for the HP Officejet to connect to your computer
possible installation problemsIf nothing appears on your computer screen after you insert the HP Officejet 4100 Series CD-ROM into your computerrsquos CD-ROM drive
1 From the Start menu choose Run
2 In the Run dialog box enter dsetupexe (if your CD-ROM drive is not assigned to drive letter d use the appropriate drive letter) then click OK
If the HP Director does not contain six icons do the following
bull Verify that the front-panel cover is attached then unplug the HP Officejet and plug it in again
bull Verify that the USB and power cables are plugged inndash Unplug the USB cable and plug it in againndash Do not attach the USB cable to a keyboard or nonpowered hubndash Verify that the USB cable is 3 meters or less in lengthndash If you have several USB devices attached to your computer you may
want to unplug the others during the installation
Note AppleTalk is not supported
bull Unplug the HP Officejet from the wall and plug it in againbull Restart your computer
hp officejet 4100 series
chapter 8
40
On Windows check the System Tray for applications that are running in the background and close them before restarting your computer
remove and reinstall your hp officejet softwareIf six icons do not appear in the Director you may need to uninstall and re-install the software Do not simply delete the HP Officejet program files from your hard drive Be sure to remove them properly using the uninstall utility provided in the HP Officejet program group
to uninstall from a Windows computer
1 Disconnect your HP Officejet from your computer
2 On the Windows taskbar click Start choose Programs or All Programs (XP) choose Hewlett-Packard choose hp officejet 4100 series then choose uninstall software
3 Follow the directions on the screenBe sure to disconnect your HP Officejet
4 If you are asked whether you would like to remove shared files click NoOther programs that use these files may not work properly if the files are deleted
5 After the program finishes removing the software disconnect your HP Officejet and restart your computer
Note It is important that you disconnect your HP Officejet before restarting your computer
6 To reinstall the software insert the HP Officejet 4100 Series CD-ROM into your computerrsquos CD-ROM drive and follow the instructions that appear
7 After the software is installed connect and turn on your HP Officejet following the onscreen instructions and the instructions in your Setup PosterAfter connecting and turning on your HP Officejet you may have to wait several minutes for all of the Plug and Play events to completeWhen the software installation is complete you will see a Status Monitor icon in the System Tray
8 To verify that the software is properly installed double-click on the HP Director icon on the desktop If the HP Director shows six icons the software has been properly installed
to uninstall from a Macintosh computer
1 Disconnect your HP Officejet from your computer
2 Double-click on ApplicationsHP All-in-One Software folder
reference guide
additional setup information
41
3 Double-click on HP Uninstaller
4 Follow the directions that appear on the screen
5 After the program finishes removing the software disconnect your HP Officejet and restart your computer
6 To reinstall the software insert the HP Officejet 4100 Series CD-ROM into your computerrsquos CD-ROM drive
Note When re-installing the software follow the instructions on the Setup Poster Do not connect the HP Officejet to your computer until after you have completed the software installation
7 On the desktop open the CD-ROM double-click on hp all-in-one installer and follow the instructions that appear
connect your hp officejet to a phone modem or answering machine
The HP Officejet can share a phone line with a phone a modem or an aswering machine When sharing a phone line with an answering machine the HP Officejet will answer fax calls and direct voice calls to the answering machine
Note For information on connecting your HP Officejet to your computer and phone line refer to the Setup Poster that came with your unit
to connect your hp officejet to a phone modem or answering machine
1 Remove the white plastic stopper from connector 2 on the back of the HP Officejet
To connect more than one device to connector 2 on the HP Officejet you must purchase a Y-splitter and plug it into connector 2
2 Connect the phone cord from the phone modem or answering machine to connector 2 (or Y-splitter)
Caution Do not use the phone cord that came with the HP Officejet for this purpose That phone cord must connect connector 1 on the HP Officejet to the wall jack for your phone system See the Setup Poster for details
3 If you are connecting an answering machine see set the number of rings before answering on page 21 for instructions on setting the number of rings correctly or change the answer ring pattern (distinctive ringing) on page 26 for information on incoming ring patterns
4 If you are connecting a modem turn off its fax-receive feature
connector 2 on the HP Officejet
connector 1 on the HP Officejet
hp officejet 4100 series
chapter 8
42
additional troubleshooting helpYou may want to refer to the readme file for more information on possible installation problems On Windows you can access the readme file from the Start button on the taskbar select Programs Hewlett-Packard hp officejet 4100 series View the Readme File On Macintosh you can access the readme file by double-clicking on the icon located in the top-level folder of the HP Officejet software CD-ROM
The readme file provides more information including
bull Using the Re-install utility after a failed installation to return your PC to a state that will allow the HP Officejet to be re-installed
bull Using the Re-install utility on Windows 98 to recover from a Composite USB System Driver missing errorThis error may occur if the hardware is installed prior to installing the software After running the Re-install utility reboot your PC and install the HP Officejet software before connecting the HP Officejet to your computer
You can also find more information on this website
wwwhpcomsupport
9
43
technical information
Additional specifications information can be found in the HP Photo amp Imaging Help in the hp officejet 4100 series section
physical specifications
power specificationsbull Power consumption 75W maximumbull Source (Input Voltage) 100 to 240 VAC groundedbull Input Frequency 50 to 60 Hzbull Current 1A maximum
regulatory informationAdditional regulatory information can be found in the HP Photo amp Imaging Help The information in this section supercedes information in the HP Photo amp Imaging Help
doc statement deacuteclaration de conformiteacute (Canada)Le preacutesent appareil numeacuterique neacutemet pas de bruit radioeacutelectrique deacutepassant les limites applicables aux appareils numeacuteriques de la classe B prescrites dans le Regraveglement sur le brouillage radioeacutelectrique eacutedicteacute par le ministegravere des Communications du CanadaThis digital apparatus does not exceed the Class B limits for radio noise emissions from digital apparatus set out in the Radio Interference Regulations of the Canadian Department of Communications
notice to users of the Canadian telephone networkThis equipment meets the applicable Industry Canada Terminal Equipment Technical Specifications This is confirmed by the registration number The abbreviation IC before the registration number signifies that registration was performed based on a Declaration of Conformity indicating that Industry Canada technical specifications were met It does not imply that Industry Canada approved the equipment
Note The Ringer Equivalence Number (REN) assigned to each terminal device provides an indication of the maximum number of terminals allowed to be connected to a telephone interface The termination on an interface may consist of any combination of devices subject only to the requirement that the sum of the Ringer Equivalence Numbers of all the devices does not exceed 5
The REN for this product is 03B based on FCC Part 68 test results
height width depth weight (without print cartridges)
with paper trays and ADF closed
718 in (1824 cm) 1676 in (4258 cm) 825 in (2096 cm) 75 lbs (34 kg)
with ADF and paper tray extended
1030 in (2615 cm) 1676 in (4258 cm) 1854 in (4709 cm) 75 lbs (34 kg)
hp officejet 4100 series
chapter 9
44
notice to all users of the European Economic Area (EEA)
This product is designed to interwork with the analogue telephone networks in the following countriesregions
Network compatibility depends on customer selected settings which must be reset to use the equipment on a telephone network in a countryregion other than where the product was purchased Contact the vendor or Hewlett-Packard Company if addition product support is necessaryThis equipment has been certified by the manufacturer in accordance with Directive 19995EC (annex II) for Pan-European single-terminal connection to the public switched telephone network (PSTN) However due to differences between the individual PSTNs provided in different countriesregions the approval does not of itself give an unconditional assurance of successful operation on every PSTN network termination pointIn the event of problems you should contact your equipment supplier in the first instance
geraumluschemissionLpA lt 70 dBam Arbeitsplatzim Normalbetriebnach DIN 45635 T 19
notice to Korean customers
Germany UK Netherlands
France Spain Italy
Belgium Luxembourg Sweden
Austria Denmark Ireland
Norway Finland Switzerland
Greece Portugal
10
45
hp support
This section explains the support services information provided by Hewlett-Packard If you are unable to find the answer you need in the printed or onscreen documentation supplied with your product you can contact one of the HP support services listed in the following pages Some support services are available only in the US and Canada while others are available in many countriesregions worldwide If a support service number is not listed for your countryregion contact your nearest authorized HP dealer for help
get support and other information from the internetIf you have Internet access you can get help from the following HP website
wwwhpcomsupportThe Web site offers technical support drivers supplies and ordering information
hp customer supportSoftware programs from other companies may be included with your HP Officejet If you experience problems with any of those programs you will receive the best technical assistance by calling the experts at that companyIf you need to contact HP Customer Support do the following before you call
1 Make sure thata Your unit is plugged in and turned onb The specified print cartridges are installed correctlyc The recommended paper is properly loaded in the input tray
2 Reset your unita Turn off the unit using the On button located on the unitrsquos front panelb Unplug the power cord from the back of the unitc Plug the power cord back into the unitd Turn on the unit using the On button
3 For more information check the HP website at wwwhpcomsupport
4 If you are still experiencing problems and need to speak with an HP Customer Support Representativendash Have your service ID and serial number ready To display your service ID and
serial number on the front panel do the following Press Enter and Start Color at the same time until the service ID appears in the front-panel display From this display press the right arrow until the serial number displays
ndash Print a Self-Test Report See print a self-test report on page 32 for information on printing this report
ndash Make a color copyndash Be prepared to describe your problem in detail
5 Call HP Customer Support Be near your unit when you call
call in the US during warrantyCall (208) 323-2551 This service is free during the warranty period however your standard long-distance phone charges still apply A fee may apply outside the warranty period
hp officejet 4100 series
chapter 10
46
US phone support is available in both English and Spanish languages 24 hours a day 7 days a week (days and hours of support may change without notice)
call elsewhere in the worldThe numbers listed below are current as of the printing date of this guide For a list of current international HP Support Service numbers visit this address and choose your own countryregion or language
wwwhpcomsupportFor Korea you can also visit this address
httpwwwhpcokrYou can call the HP support center in the following countriesregions If your countryregion is not listed contact your local dealer or nearest HP Sales and Support Office to find out how to obtain servicesSupport service is free during the warranty period however your standard long-distance phone charges will apply In some cases a flat fee per single incident will also applyFor phone support in Europe please check for the details and conditions of phone support in your countryregion by consulting the following Web site
wwwhpcomsupportAlternatively you can ask your dealer or call HP at the phone number indicated in this booklet As part of our constant efforts to improve our phone support service we advise you to check our website on a regular basis for new information regarding service features and delivery
countryregion hp technical support countryregion hp technical support
Algeria1 +213 (0) 61564 543 Malaysia 1-800-805405
Argentina 0810-555-5520 Mexico 01-800-472-6684
Australia +61 3 8877 80001902 910 910
Mexico (Mexico City) 5258-9922
Austria +43 (0) 810 00 6080 Morocco1 +212 22404 747
Bahrain (Dubai) 800 728 Netherlands +31 (0) 20 606 8751
Belgium (Dutch) +32 (0) 2 626 8806 New Zealand 0800 441 147
Belgium (French) +32 (0) 2 626 8807 Norway +47 22 11 6299
Brazil (Grande Sao Paulo) (11) 3747 7799 Oman +971 4 883 8454
Brazil (Demais Localidades) 0800 157751 Palestine +971 4 883 8454
Canada during warranty (905) 206 4663 Panama 001-800-7112884
Canada post-warranty(per-call charge)
1-877-621-4722 Peru 0-800-10111
Caribbean amp Central America
1-800-711-2884 Philippines 632-867-3551
Chile 800-360-999 Poland +48 22 865 98 00
China 86 10 6868 7980 Portugal +351 21 3176333
Colombia 9-800-114-726 Puerto Rico 1-877-2320-589
Costa Rica 0-800-011-0524 Qatar +971 4 883 8454
Czech Republic +420 (0) 261307310 Romania +40 1 315 44 42or local 01 3154442
reference guide
hp support
47
call in Australia post-warrantyIf your product is not under warranty you can call 03 8877 8000 A per-incident out-of-warranty support fee of $2750 (inc GST) will be charged to your credit card You can also call 1902 910 910 ($2750 charged to your phone account) from 900 AM to 500 PM Monday through Friday (Charges and support hours are subject to change without notice)
prepare your unit for shipmentIf after contacting HP Customer Support or returning to the point of purchase you are requested to send your unit in for service please follow the power off and rebox steps below to avoid further damage to the HP product
Denmark +45 39 29 4099 Russian Federation Moscow +7 095 797 3520
Ecuador 1800-711-2884 Russian Federation St Petersburg
+7 812 346 7997
Europe (English) +44 (0) 207 512 5202 Saudi Arabia +800 897 14440
Egypt 02 532 5222 Singapore 65 6272 5300
Finland +358 (0) 203 47 288 Slovakia +421 (0) 2 682 08080
France (034 Euromin) +0892 69 60 22 South Africa (inside RSA) 086 000 1030
Germany (012 Euromin) +49 (0) 180 52 58 143 South Africa (inside RSA) +27-11 258 9301
Greece +30 1060 73 603 Spain +34 902 321 123
Hong Kong (SAR) +85 (2) 3002 8555 Sweden +46 (0)8 619 2170
Guatemala 1800-995-5105 Switzerland 2 +41 (0) 84 880 1111
Hungary +36 (0) 1 382 1111 Taiwan +886-2-2717-00550800 010 055
India 1-600-11226791 11 682 6035
Thailand +66 (2) 661 4000
Indonesia 62-21-350-3408 Tunisia1 +216 1891 222
Ireland +353 (0) 1 662 5525 Turkey +90 216 579 7171
Israel +972 (0) 9 8304848 Ukraine +7 (380-44) 490-3520
Italy +39 (0) 226410350 United Arab Emirates +971 4 883 8454
Japan 0570 000 511+81 3 3335 9800
United Kingdom +44 (0) 207 512 52 02
Jordan +971 4 883 8454 Venezuela 0800-47468368 or800-477-7777
Korea (Seoul) +82 (2) 3270 0700 Venezuela (Caracas) (502) 207-8488
Korea (outside Seoul) 080 999 0700 Vietnam 84 (0) 8 823 4530
Kuwait +971 4 883 8454 Yemen +971 4 883 8454
Lebanon +971 4 883 8454
1 This Call Center supports French speaking customers from the following countriesregions Morocco Tunisia and Algeria
2 This Call Center supports German French and Italian speaking customers in Switzerland
countryregion hp technical support countryregion hp technical support
hp officejet 4100 series
chapter 10
48
Note When transporting your HP Officejet make sure that the pens have been removed the HP Officejet has been properly shut down by pressing the power button and you have allowed time for the carriage to return to the service station and for the scanner to return to its parked position
1 Turn on the unitDisregard steps 1 through 6 if your unit will not turn on and the print carriage is in the home position You will not be able to remove the print cartridges Proceed to step 7
2 Open the print cartridge access doorThe print carriage moves into view
3 See replace the print cartridges on page 33 for information on removing the print cartridges
Caution Remove both print cartridges Failure to do so may damage your unit
4 Place the print cartridges in an airtight bag so they will not dry out and put them aside (do not send them with the unit unless instructed to by the HP customer support call agent)
5 Turn off the unit
6 Close the print cartridge access door
7 Remove the front panel cover as followsa Grasp the front of the front panel cover with two hands as shownb Firmly lift the front panel cover to unsnap it from the unit
8 Retain the front panel cover Do not return the front panel cover with the unit
9 If available pack the unit for shipment using the original packing materials or the packaging materials that come with your exchange unit
If you do not have the original packaging materials please use other adequate packaging materials Shipping damage caused by improper packaging andor improper transportation is not covered under the warranty
reference guide
hp support
49
10 Place the return shipping label on the outside of the box
11 Include the following items in the boxndash A complete description of symptoms for service personnel (samples of print
quality problems are helpful)ndash A copy of the sales slip or other proof of purchase to establish the warranty
coverage periodndash Your name address and a phone number where you can be reached during
the day
hp distribution centerTo order HP Officejet software a copy of the printed Reference Guide a setup poster or other customer-replaceable parts do one of the following bull In the US or Canada call (208) 323 2551bull Visit this website
httpwwwhpcomcposupportsoftwarehtml
hp officejet 4100 series
chapter 10
50
11
51
warranty information
HP Officejet 4100 seriesDuration of Limited Warranty (hardware and labor) 1 YearDuration of Limited Warranty (CD media) 90 DaysDuration of Limited Warranty (print cartridges) Until the HP ink is depleted or the ldquoend of warrantyrdquo date printed on the cartridge has been reached whichever occurs first
warranty service
express serviceTo obtain HP express repair service the customer must contact an HP service office or an HP Customer Support Center for basic troubleshooting first See hp customer support on page 45 for steps to take before calling Customer SupportIf a customer unit needs a minor part replacement and these parts can normally be replaced by the customer the customer-replaceable components may be serviced through expedited part shipment In this event HP will prepay shipping charges duty and taxes provide telephone assistance on replacement of the component and pay shipping charges duty and taxes for any part that HP asks to be returnedThe HP Customer Support Center may direct customers to designated authorized service providers who are certified by HP to service the HP product
warranty upgradesUpgrade your standard factory warranty to a total of three years with the HP SUPPORTPACK Service coverage begins on product purchase date and the pack must be purchased within the first 180 days of product purchase This program offers phone support from 600 AM to 1000 PM Mountain Standard Time (MST) Monday through Friday and 900 AM to 400 PM (MST) on Saturdays If during your technical support call it is determined that you need a replacement product then HP will ship you this product next business day free of charge Available in US onlyFor more information please call 1-888-999-4747 or visit the following HP Web site
httpwwwhpcomgohpsupportpack
Outside the US please call your local HP Customer Support office See call elsewhere in the world on page 46 for a list of international Customer Support numbers
returning your hp officejet for serviceBefore returning your HP Officejet for service you must call HP Customer Support See hp customer support on page 45 for steps to take before calling Customer Support
hewlett-packard limited global warranty statement
extent of limited warrantyHewlett-Packard (ldquoHPrdquo) warrants to the end-user customer (ldquoCustomerrdquo) that each HP Officejet 4100 Series product (ldquoProductrdquo) including related software accessories media and supplies shall be free from defects in material and workmanship for the duration which begins on the date of purchase by the Customer
hp officejet 4100 series
chapter 11
52
For each software Product HPrsquos limited warranty applies only to a failure to execute programming instructions HP does not warrant that the operation of any Product shall be uninterrupted or error freeHPrsquos limited warranty covers only those defects which arise as a result of normal use of a Product and does not cover any other problems including those which arise as a result of (a) improper maintenance or modification (b) software accessories media or supplies not provided or supported by HP or (c) operation outside the Productrsquos specificationsFor any hardware Product the use of a non-HP print cartridge or a refilled print cartridge does not affect either the warranty to the Customer or any HP support contract with the Customer However if Product failure or damage is attributable to the use of a non-HP or refilled print cartridge HP shall charge its standard labor and materials charges to service the Product for the failure or damageIf HP receives during the applicable warranty period notice of a defect in any Product HP shall either repair or replace the defective Product at HPrsquos option Where labor charges are not covered by HPrsquos limited warranty repairs shall be at HPrsquos standard charges for laborIf HP is unable to repair or replace as applicable a defective Product which is covered by HPrsquos warranty HP shall within a reasonable time after being notified of the defect refund the purchase price for the ProductHP shall have no obligation to repair replace or refund until the Customer returns the defective Product to HPAny replacement product may be either new or like-new provided that it has functionality at least equal to that of the Product being replacedHP products including each Product may contain remanufactured parts components or materials equivalent to new in performanceHPs limited warranty for each Product is valid in any countryregion or locality where HP has a support presence for the Product and where HP has marketed the Product The level of warranty service may vary according to local standards HP shall have no obligation to alter the form fit or function of the Product in order to make it operate in a countryregion or locality for which the Product was never intended to operate
limitations of warrantyTO THE EXTENT ALLOWED BY LOCAL LAW NEITHER HP NOR ITS THIRD PARTY SUPPLIERS MAKE ANY OTHER WARRANTY OR CONDITION OF ANY KIND WHETHER EXPRESS OR IMPLIED WITH RESPECT TO THE COVERED HP PRODUCTS AND SPECIFICALLY DISCLAIM THE IMPLIED WARRANTIES OR CONDITIONS OF MERCHANTABILITY SATISFACTORY QUALITY AND FITNESS FOR A PARTICULAR PURPOSE
limitations of liabilityTo the extent allowed by local law the remedies provided in this Limited Warranty Statement are the Customerrsquos sole and exclusive remediesTO THE EXTENT ALLOWED BY LOCAL LAW EXCEPT FOR THE OBLIGATIONS SPECIFICALLY SET FORTH IN THIS LIMITED WARRANTY STATEMENT IN NO EVENT SHALL HP OR ITS THIRD PARTY SUPPLIERS BE LIABLE FOR DIRECT INDIRECT SPECIAL INCIDENTAL OR CONSEQUENTIAL DAMAGES WHETHER BASED ON CONTRACT TORT OR ANY OTHER LEGAL THEORY AND WHETHER ADVISED OF THE POSSIBILITY OF SUCH DAMAGES
local lawThis Limited Warranty Statement gives the Customer specific legal rights The Customer may also have other rights which vary from state to state in the United States from province to province in Canada and from countryregion to countryregion elsewhere in the world
reference guide
warranty information
53
To the extent this Limited Warranty Statement is inconsistent with local law this Statement shall be deemed modified to be consistent with such local law Under such local law certain disclaimers and limitations of this Statement may not apply to the Customer For example some states in the United States as well as some governments outside the United States (including provinces in Canada) mayPreclude the disclaimers and limitations in this Statement from limiting the statutory rights of a consumer (eg the United Kingdom)Otherwise restrict the ability of a manufacturer to enforce such disclaimers or limitations orGrant the Customer additional warranty rights specify the duration of implied warranties which the manufacturer cannot disclaim or not allow limitations on the duration of implied warrantiesFOR CONSUMER TRANSACTIONS IN AUSTRALIA AND NEW ZEALAND THE TERMS IN THIS LIMITED WARRANTY STATEMENT EXCEPT TO THE EXTENT LAWFULLY PERMITTED DO NOT EXCLUDE RESTRICT OR MODIFY AND ARE IN ADDITION TO THE MANDATORY STATUTORY RIGHTS APPLICABLE TO THE SALE OF THE COVERED HP PRODUCTS TO SUCH CUSTOMERS
hp officejet 4100 series
chapter 11
54
55
index
Numerics4-by-6 inch photo paper
load 10 12
AADF 7adjust
volume for fax 25align print cartridges 35Answer Ring Pattern 26automatic document feeder 7automatic reduction
fax 25
Bbest copy quality 13busy number
redial automatically 23
Ccancel
scan 18scheduled fax 21
cartridgesalign 35replace 33
cleanprint cartridges 35the exterior 32the glass 31white strip 32
colorenhance 14fax 20fax from front panel 20
contrastchange for fax 23photo color 14
copy 13 16change default settings 15enhance 14fit to page 16lighten or darken 14menu options 16number of copies 14photo 15quality 13reduce or enlarge 14settings 13 15
speed 13tutorial 4
Customer Support 45web site 45
Ddarken a copy 14date
setting 27default settings
restore 35director review 4distinctive ringing 26
Eenhance copies 14enlarge copy 14 16envelopes
load 9Error Correction Mode
(ECM) 25
Ffactory defaults
restore 35fast copy quality 13fax 28
adjust volume 25automated reports 22cancel fax forward 24cancel scheduled 21change Answer Ring
Pattern 26change contrast 23change resolution 22change settings 19control appearance 22create individual speed-dial
settings 26delete speed-dial
settings 27distinctive ringing 26Error Correction Mode
(ECM) 25forward faxes 24header 27in color 20in color from front panel 20manual reports 22
menu 29print reports 22receive 21receive manually 21redial busy or unanswered
number 23schedule 20send from front panel 19set automatic reduction 25set date and time 27set the number of rings 21settings 27 28setup menu options 29speed dials 19test 28
fit to page 16forward faxes 24
cancel 24front panel
display scroll speed 36enter text 28send a fax 19setting prompt delay 36tutorial 3
Gglass
cleaning 31greeting cards
load 11
Hhelp 1HP Customer Support 45
calling 45HP Director 4HP distribution center 49HP Officjet
preparing to ship 47HP papers
tips on loading 11
Iindividual speed-dial settings
create 26ink cartridges see print
cartridgesinkjet paper
load 11
index
hp officejet 4100 series56
Kkeypad
enter text 28
Llabels
load 12lighten copies 14load
change the paper type 12envelopes 9original in ADF 7paper 7photo paper 10 12postcards 10 12print cartridges 33set the paper size 12tips 11
Mmaintenance
align print cartridges 35clean print cartridges 35clean the exterior 32clean the glass 31clean the white strip 32normal sounds 36replace print cartridges 33restore factory defaults 35self-maintenance
sounds 36self-test report 32
menuscopy options 16fax 29fax setup 29maintenance 37print reports 37
Nnormal copy quality 13number of copies
set 14number of rings
set 21
Oorder print cartridges 60originals
load in ADF 7output tray 8
Ppaper
change default size for copy 12
change the type 12load 7recommended 7set the size 12tips on loading 11
paper size change for copy 12
paper trayload 7
phone numbers support services 45
photo paperload 10 12
photoscopy 15enhance copy 14
physical specifications 43postcards
load 10 12power
specifications 43print
envelopes 9fax reports 22self-test report 32
print cartridgesalign 35clean 35handling 32replace 33
prompt delaysetting 36
Qquick start
review the director 4use with a computer 4
Rreceive
fax 21redial
busy or unanswered number 23
reduce copy 14 16regulatory information 43reinstall software 40reports
generate automatically for fax 22
generate manually for fax 22
print 22self-test 32
resolution
change for fax 22restore factory settings 35returning your HP Officejet for
service 51
Sscan
from front panel 17stop 18
schedule a fax 20scroll speed
setting 36self-test report 32send
cancel forward faxes 24color fax 20color fax from front
panel 20forward faxes 24
settingscopy 13 15fax 27 28prompt delay 36scroll speed 36
setupadditional information 39menu 29
shippingyour HP Officejet 47
softwareremove and reinstall 40
soundsself-maintenance 36
specificationsphysical 43power 43
speed dials 19create individual
settings 26delete settings 27
stopscan 18scheduled fax 21
subscriber identification code 27
support services 45
Ttelephone line
multiple numbers 26telephone numbers 45text
enhance 14enter from front panel 28
time
index
reference guide 57
setting 27transparency film
recommended 7tips on loading 11
troubleshootingremove and reinstall
software 40T-shirt Transfer Iron-On
load 11tutorial
front panel 3make a copy 4
Uunanswered number
redial automatically 23
Vvolume
adjust 25
Wwarranty 45
service 51statement 51upgrades 51
white stripcleaning 32
hp officejet 4100 series
chapter 12
58
declaration of conformityAccording to ISOIEC Guide 22 and EN 45014
Manufacturerrsquos Name and Address
Hewlett-Packard Company 16399 West Bernardo Drive San Diego CA 92127-1899 USA
declares that the product
Product Name hp officejet 4100 series (Q1608A)
Model Number(s) officejet 4110 (Q1609A) officejet 4110xi (Q1610A) officejet 4110v (Q1611A) officejet 4105 (Q1612A) officejet 4105z (Q1613A) officejet 4115 (Q1614A)
Product Options All
conforms to the following Product Specifications
Safety EN609501992 +A1 A2 A3 A4 amp A11
IEC609501991 +A1 A2 A3 amp A4
UL1950CSA 222 No 950 3rd Edn 1995
NOM-019-SCFI-1993
EMC CISPR221993 +A1 amp A2 EN550221994 +A1 amp A2 -Class B
CISPR241997EN550241998
IEC 61000-3-21995 EN61000-3-21995
IEC 61000-3-31994 EN61000-3-31995
ASNZS 3548 1992
CNS13438 1997
FCC Part 15-Class B ICES-003 Issue 2 VCCI-2
GB 9254-1998
Telecom TBR21 1998
Supplementary Information
The Product herewith complies with the requirements of the Low Voltage Directive 7323EEC the EMC Directive 89336EEC and the RampTTE Directive 19995EC (ANNEX II) carries the CE marking accordingly
European Contact for regulatory topics only Your local Hewlett-Packard Sales and Service Office orHewlett-Packard GmbH
Department HQ-TRE Herrenberger Strasse 140 D-71034 Boumlblingen Germany (FAX + 49-7031-14-3143)
order mediaTo order media such as HP Premium Inkjet Paper HP Premium Inkjet Transparency Film HP Iron-On T-shirt Transfer paper or HP Greeting Cards go to
wwwhpshoppingcom
For orders in countries other than the US and Canada select other countries then click Yes to leave hpshoppingcom From this website you can access hpshoppingcom for your specific language or countryregion
order print cartridges
If you have Internet access you can get more information from the HP website at
wwwhpcomsupport
print cartridges hp reorder number
HP black print cartridge 56 19 ml black print cartridge
HP color print cartridgeHP tri-color print cartridge
57 17 ml color print cartridge28 8 ml color print cartridge
Visit the hp officejet information centerIt has everything you need to get the most value from your HP Officejet
bull Technical Supportbull Supplies and Ordering Informationbull Project Tipsbull Ways to Enhance Your Product
wwwhpcomsupport
copy 2003 Hewlett-Packard Company
Printed in the USA Mexico Germany Singapore or China
Q1608-90163Q1608-90163
Q1608-90163
hp officejet 4100 series
chapter 7
32
clean the white stripMinor debris can accumulate on the white strip located underneath the scannerrsquos lid
1 Turn off the unit unplug the power cord and raise the scanner lid
2 Clean the white strip with a soft cloth or sponge slightly moistened with a mild soap and warm water
3 Wash the strip gently to loosen debris do not scrub the strip
4 Dry the strip with a chamois or soft cloth
Caution Do not use paper-based wipes as these may scratch the strip
5 If this does not clean the strip well enough repeat the previous steps using isopropyl (rubbing) alcohol and wipe the strip thoroughly with a damp cloth to remove any residual alcohol
clean the exterior Use a soft damp lint-free cloth to wipe dust smudges and stains off the case The interior of the unit does not require cleaning Keep fluids away from the interior of the unit as well as the front panel
work with print cartridgesTo ensure the best print quality from your HP Officejet you will need to perform some simple maintenance procedures and when prompted by a front-panel message replace the print cartridges
print a self-test reportIf you are experiencing problems with printing before cleaning or replacing the print cartridges you should print a Self-Test Report This report provides useful information about your print cartridges including status information
1 Press Setup
2 Press 1 then press 4This selects Print Report and then selects Self-Test Report
3 Press Start Black or Start ColorA Self-Test Report is printed for your HP Officejet
handle print cartridgesBefore you replace or clean a print cartridge you should know the part names and how to handle the print cartridge
reference guide
maintain your hp officejet
33
replace the print cartridgesFront-panel messages appear to let you know that you should replace your print cartridges
See order print cartridges on the back cover for information on ordering replacement print cartridges
1 Turn on the unit then lift open the print cartridge access doorThe print carriage moves into view
2 After the carriage stops moving push down on the print cartridge down to release it and then pull it toward you out of its slot
Plastic tape with pink tab(must be removed)
Copper contactsInk nozzles under tape
Do not touch the copper contacts or the ink nozzles
print cartridge access door
hp officejet 4100 series
chapter 7
34
Note It is normal to see ink build-up in the print cartridge slots
3 Remove the new print cartridge from its packaging and being careful to touch only the bright pink plastic tab gently remove the plastic tape to uncover the ink nozzles
Caution Do not touch the copper contacts or ink nozzles
Once you have removed the plastic tape install the print cartridge immediately to prevent the ink from drying in the nozzles
4 Push the new print cartridge into the appropriate slot at a slight angle until it clicks into place
Caution Do not attempt to push the cartridge straight into the slot It must slide in at a slight angle
The tri-color print cartridge goes on the left and the black cartridge goes on the right
5 Close the print cartridge access door
reference guide
maintain your hp officejet
35
align the print cartridgesThe HP Officejet prompts you to align cartridges every time you install or replace a print cartridge Aligning the cartridges ensures high-quality output
To align the print cartridges when prompted
1 Press Enter on the front panelAn align cartridges (test pattern) page prints
2 Load the align cartridges page face down in the ADF between the paper-width guides and press the Enter button again
3 Recycle or discard the page
To align the cartridges at any other time
1 Press Setup
2 Press 5 then press 2This selects the Maintenance menu and then selects the Align Print Cartridge option
3 Press EnterAn align cartridges (test pattern) page prints
4 Load the align cartridges page face down in the ADF between the paper-width guides and press the Enter button again
5 Recycle or discard the page
clean the print cartridgesUse this feature when the Self-Test Report shows streaking or white lines through any of the colored bars Do not clean print cartridges unnecessarily This wastes ink and shortens the life of the ink nozzles
1 Press Setup
2 Press 5 then press 1This selects the Maintenance menu and then selects the Clean Print Cartridge optionA page of patterns is printed The cartridges are cleaned Recycle or discard the pageIf copy or print quality still seem poor after you clean the print cartridges replace the print cartridge that is affected
restore factory defaultsYou can restore the original factory settings to what they were when you purchased your HP Officejet Choosing to restore your factory defaults restores all settings except date information and any scan settings you may have set
You can perform this process from the front panel only
1 Press Setup
2 Press 5 then press 3This selects Maintenance and then selects Restore Factory DefaultsThe factory default settings are restored
hp officejet 4100 series
chapter 7
36
set scroll speedThe Scroll Speed option lets you control the rate that text messages appear in the front-panel display You can choose Normal Fast or Slow The default is Normal
1 Press Setup
2 Press 5 then press 6This selects Maintenance and then selects Set Scroll Speed
3 Press until the desired speed appears then press Enter
set the prompt delay timeThe Prompt Delay option lets you control the amount of time before a message is displayed in the front-panel display You can choose Normal Fast or Slow The default is Normal
1 Press Setup
2 Press 5 then press 7This selects Maintenance and then selects Set Prompt Delay Time
3 Press until the delay time appears then press Enter
self-maintenance sounds During the life of your product you may hear various mechanical sounds This is a normal part of your unitrsquos self-maintenance
reference guide
maintain your hp officejet
37
setup menu optionsThe following options are available from the Setup button
1Last Transaction
2Fax Log
3Speed Dial List
4Self-Test Report
5Automatic Reports Setup
1Print Report
Use Setup to display the Print Report Speed Dial Setup Basic Fax Setup Advanced Fax Setup and Maintenance options
Press and to move to the setting you wantPress Enter to select the displayed setting
1Clean Print Cartridges
2Align Print Cartridges
3Restore Factory Defaults
4Reprint Faxes in Memory
5Set Language amp CountryRegion
6Set Scroll Speed
7Set Prompt Delay Time
5Maintenance2Speed Dial Setup
3Basic Fax Setup
4Advanced Fax Setup
1Individual Speed Dial
2Delete Speed Dial
3Print Speed Dial List
1Date and Time
2Fax Header
3Rings to Answer
4 Paper Size
5Tone or Pulse Dialing
6Ring and Beep Volume
7Fax Forwarding Black Only
1Automatic Reports Setup
2Answer Ring Pattern
3Busy Redial
4No Answer Redail
5Automatic Reduction
6Backup Fax Reception
7Error Correction Mode
hp officejet 4100 series
chapter 7
38
8
39
additional setup information
During the installation of the HP Officejet software a number of windows are displayed You should see the following
bull Installingbull Copying files bull A request to plug in the HP Officejetbull Green OK and check markbull Request to restart your computer (may not occur in all cases)bull Registration
If you did not see all of these windows there may be a problem with the installation Verify the following
bull The HP Director contains six icons (double-click the HP Director icon on the desktop)
bull The HP Officejet is listed in the Printers dialog boxbull There is an icon for the HP Officejet in the System Tray that indicates the
HP Officejet is ready
If the HP Director does not show six icons you may need to wait a few minutes for the HP Officejet to connect to your computer
possible installation problemsIf nothing appears on your computer screen after you insert the HP Officejet 4100 Series CD-ROM into your computerrsquos CD-ROM drive
1 From the Start menu choose Run
2 In the Run dialog box enter dsetupexe (if your CD-ROM drive is not assigned to drive letter d use the appropriate drive letter) then click OK
If the HP Director does not contain six icons do the following
bull Verify that the front-panel cover is attached then unplug the HP Officejet and plug it in again
bull Verify that the USB and power cables are plugged inndash Unplug the USB cable and plug it in againndash Do not attach the USB cable to a keyboard or nonpowered hubndash Verify that the USB cable is 3 meters or less in lengthndash If you have several USB devices attached to your computer you may
want to unplug the others during the installation
Note AppleTalk is not supported
bull Unplug the HP Officejet from the wall and plug it in againbull Restart your computer
hp officejet 4100 series
chapter 8
40
On Windows check the System Tray for applications that are running in the background and close them before restarting your computer
remove and reinstall your hp officejet softwareIf six icons do not appear in the Director you may need to uninstall and re-install the software Do not simply delete the HP Officejet program files from your hard drive Be sure to remove them properly using the uninstall utility provided in the HP Officejet program group
to uninstall from a Windows computer
1 Disconnect your HP Officejet from your computer
2 On the Windows taskbar click Start choose Programs or All Programs (XP) choose Hewlett-Packard choose hp officejet 4100 series then choose uninstall software
3 Follow the directions on the screenBe sure to disconnect your HP Officejet
4 If you are asked whether you would like to remove shared files click NoOther programs that use these files may not work properly if the files are deleted
5 After the program finishes removing the software disconnect your HP Officejet and restart your computer
Note It is important that you disconnect your HP Officejet before restarting your computer
6 To reinstall the software insert the HP Officejet 4100 Series CD-ROM into your computerrsquos CD-ROM drive and follow the instructions that appear
7 After the software is installed connect and turn on your HP Officejet following the onscreen instructions and the instructions in your Setup PosterAfter connecting and turning on your HP Officejet you may have to wait several minutes for all of the Plug and Play events to completeWhen the software installation is complete you will see a Status Monitor icon in the System Tray
8 To verify that the software is properly installed double-click on the HP Director icon on the desktop If the HP Director shows six icons the software has been properly installed
to uninstall from a Macintosh computer
1 Disconnect your HP Officejet from your computer
2 Double-click on ApplicationsHP All-in-One Software folder
reference guide
additional setup information
41
3 Double-click on HP Uninstaller
4 Follow the directions that appear on the screen
5 After the program finishes removing the software disconnect your HP Officejet and restart your computer
6 To reinstall the software insert the HP Officejet 4100 Series CD-ROM into your computerrsquos CD-ROM drive
Note When re-installing the software follow the instructions on the Setup Poster Do not connect the HP Officejet to your computer until after you have completed the software installation
7 On the desktop open the CD-ROM double-click on hp all-in-one installer and follow the instructions that appear
connect your hp officejet to a phone modem or answering machine
The HP Officejet can share a phone line with a phone a modem or an aswering machine When sharing a phone line with an answering machine the HP Officejet will answer fax calls and direct voice calls to the answering machine
Note For information on connecting your HP Officejet to your computer and phone line refer to the Setup Poster that came with your unit
to connect your hp officejet to a phone modem or answering machine
1 Remove the white plastic stopper from connector 2 on the back of the HP Officejet
To connect more than one device to connector 2 on the HP Officejet you must purchase a Y-splitter and plug it into connector 2
2 Connect the phone cord from the phone modem or answering machine to connector 2 (or Y-splitter)
Caution Do not use the phone cord that came with the HP Officejet for this purpose That phone cord must connect connector 1 on the HP Officejet to the wall jack for your phone system See the Setup Poster for details
3 If you are connecting an answering machine see set the number of rings before answering on page 21 for instructions on setting the number of rings correctly or change the answer ring pattern (distinctive ringing) on page 26 for information on incoming ring patterns
4 If you are connecting a modem turn off its fax-receive feature
connector 2 on the HP Officejet
connector 1 on the HP Officejet
hp officejet 4100 series
chapter 8
42
additional troubleshooting helpYou may want to refer to the readme file for more information on possible installation problems On Windows you can access the readme file from the Start button on the taskbar select Programs Hewlett-Packard hp officejet 4100 series View the Readme File On Macintosh you can access the readme file by double-clicking on the icon located in the top-level folder of the HP Officejet software CD-ROM
The readme file provides more information including
bull Using the Re-install utility after a failed installation to return your PC to a state that will allow the HP Officejet to be re-installed
bull Using the Re-install utility on Windows 98 to recover from a Composite USB System Driver missing errorThis error may occur if the hardware is installed prior to installing the software After running the Re-install utility reboot your PC and install the HP Officejet software before connecting the HP Officejet to your computer
You can also find more information on this website
wwwhpcomsupport
9
43
technical information
Additional specifications information can be found in the HP Photo amp Imaging Help in the hp officejet 4100 series section
physical specifications
power specificationsbull Power consumption 75W maximumbull Source (Input Voltage) 100 to 240 VAC groundedbull Input Frequency 50 to 60 Hzbull Current 1A maximum
regulatory informationAdditional regulatory information can be found in the HP Photo amp Imaging Help The information in this section supercedes information in the HP Photo amp Imaging Help
doc statement deacuteclaration de conformiteacute (Canada)Le preacutesent appareil numeacuterique neacutemet pas de bruit radioeacutelectrique deacutepassant les limites applicables aux appareils numeacuteriques de la classe B prescrites dans le Regraveglement sur le brouillage radioeacutelectrique eacutedicteacute par le ministegravere des Communications du CanadaThis digital apparatus does not exceed the Class B limits for radio noise emissions from digital apparatus set out in the Radio Interference Regulations of the Canadian Department of Communications
notice to users of the Canadian telephone networkThis equipment meets the applicable Industry Canada Terminal Equipment Technical Specifications This is confirmed by the registration number The abbreviation IC before the registration number signifies that registration was performed based on a Declaration of Conformity indicating that Industry Canada technical specifications were met It does not imply that Industry Canada approved the equipment
Note The Ringer Equivalence Number (REN) assigned to each terminal device provides an indication of the maximum number of terminals allowed to be connected to a telephone interface The termination on an interface may consist of any combination of devices subject only to the requirement that the sum of the Ringer Equivalence Numbers of all the devices does not exceed 5
The REN for this product is 03B based on FCC Part 68 test results
height width depth weight (without print cartridges)
with paper trays and ADF closed
718 in (1824 cm) 1676 in (4258 cm) 825 in (2096 cm) 75 lbs (34 kg)
with ADF and paper tray extended
1030 in (2615 cm) 1676 in (4258 cm) 1854 in (4709 cm) 75 lbs (34 kg)
hp officejet 4100 series
chapter 9
44
notice to all users of the European Economic Area (EEA)
This product is designed to interwork with the analogue telephone networks in the following countriesregions
Network compatibility depends on customer selected settings which must be reset to use the equipment on a telephone network in a countryregion other than where the product was purchased Contact the vendor or Hewlett-Packard Company if addition product support is necessaryThis equipment has been certified by the manufacturer in accordance with Directive 19995EC (annex II) for Pan-European single-terminal connection to the public switched telephone network (PSTN) However due to differences between the individual PSTNs provided in different countriesregions the approval does not of itself give an unconditional assurance of successful operation on every PSTN network termination pointIn the event of problems you should contact your equipment supplier in the first instance
geraumluschemissionLpA lt 70 dBam Arbeitsplatzim Normalbetriebnach DIN 45635 T 19
notice to Korean customers
Germany UK Netherlands
France Spain Italy
Belgium Luxembourg Sweden
Austria Denmark Ireland
Norway Finland Switzerland
Greece Portugal
10
45
hp support
This section explains the support services information provided by Hewlett-Packard If you are unable to find the answer you need in the printed or onscreen documentation supplied with your product you can contact one of the HP support services listed in the following pages Some support services are available only in the US and Canada while others are available in many countriesregions worldwide If a support service number is not listed for your countryregion contact your nearest authorized HP dealer for help
get support and other information from the internetIf you have Internet access you can get help from the following HP website
wwwhpcomsupportThe Web site offers technical support drivers supplies and ordering information
hp customer supportSoftware programs from other companies may be included with your HP Officejet If you experience problems with any of those programs you will receive the best technical assistance by calling the experts at that companyIf you need to contact HP Customer Support do the following before you call
1 Make sure thata Your unit is plugged in and turned onb The specified print cartridges are installed correctlyc The recommended paper is properly loaded in the input tray
2 Reset your unita Turn off the unit using the On button located on the unitrsquos front panelb Unplug the power cord from the back of the unitc Plug the power cord back into the unitd Turn on the unit using the On button
3 For more information check the HP website at wwwhpcomsupport
4 If you are still experiencing problems and need to speak with an HP Customer Support Representativendash Have your service ID and serial number ready To display your service ID and
serial number on the front panel do the following Press Enter and Start Color at the same time until the service ID appears in the front-panel display From this display press the right arrow until the serial number displays
ndash Print a Self-Test Report See print a self-test report on page 32 for information on printing this report
ndash Make a color copyndash Be prepared to describe your problem in detail
5 Call HP Customer Support Be near your unit when you call
call in the US during warrantyCall (208) 323-2551 This service is free during the warranty period however your standard long-distance phone charges still apply A fee may apply outside the warranty period
hp officejet 4100 series
chapter 10
46
US phone support is available in both English and Spanish languages 24 hours a day 7 days a week (days and hours of support may change without notice)
call elsewhere in the worldThe numbers listed below are current as of the printing date of this guide For a list of current international HP Support Service numbers visit this address and choose your own countryregion or language
wwwhpcomsupportFor Korea you can also visit this address
httpwwwhpcokrYou can call the HP support center in the following countriesregions If your countryregion is not listed contact your local dealer or nearest HP Sales and Support Office to find out how to obtain servicesSupport service is free during the warranty period however your standard long-distance phone charges will apply In some cases a flat fee per single incident will also applyFor phone support in Europe please check for the details and conditions of phone support in your countryregion by consulting the following Web site
wwwhpcomsupportAlternatively you can ask your dealer or call HP at the phone number indicated in this booklet As part of our constant efforts to improve our phone support service we advise you to check our website on a regular basis for new information regarding service features and delivery
countryregion hp technical support countryregion hp technical support
Algeria1 +213 (0) 61564 543 Malaysia 1-800-805405
Argentina 0810-555-5520 Mexico 01-800-472-6684
Australia +61 3 8877 80001902 910 910
Mexico (Mexico City) 5258-9922
Austria +43 (0) 810 00 6080 Morocco1 +212 22404 747
Bahrain (Dubai) 800 728 Netherlands +31 (0) 20 606 8751
Belgium (Dutch) +32 (0) 2 626 8806 New Zealand 0800 441 147
Belgium (French) +32 (0) 2 626 8807 Norway +47 22 11 6299
Brazil (Grande Sao Paulo) (11) 3747 7799 Oman +971 4 883 8454
Brazil (Demais Localidades) 0800 157751 Palestine +971 4 883 8454
Canada during warranty (905) 206 4663 Panama 001-800-7112884
Canada post-warranty(per-call charge)
1-877-621-4722 Peru 0-800-10111
Caribbean amp Central America
1-800-711-2884 Philippines 632-867-3551
Chile 800-360-999 Poland +48 22 865 98 00
China 86 10 6868 7980 Portugal +351 21 3176333
Colombia 9-800-114-726 Puerto Rico 1-877-2320-589
Costa Rica 0-800-011-0524 Qatar +971 4 883 8454
Czech Republic +420 (0) 261307310 Romania +40 1 315 44 42or local 01 3154442
reference guide
hp support
47
call in Australia post-warrantyIf your product is not under warranty you can call 03 8877 8000 A per-incident out-of-warranty support fee of $2750 (inc GST) will be charged to your credit card You can also call 1902 910 910 ($2750 charged to your phone account) from 900 AM to 500 PM Monday through Friday (Charges and support hours are subject to change without notice)
prepare your unit for shipmentIf after contacting HP Customer Support or returning to the point of purchase you are requested to send your unit in for service please follow the power off and rebox steps below to avoid further damage to the HP product
Denmark +45 39 29 4099 Russian Federation Moscow +7 095 797 3520
Ecuador 1800-711-2884 Russian Federation St Petersburg
+7 812 346 7997
Europe (English) +44 (0) 207 512 5202 Saudi Arabia +800 897 14440
Egypt 02 532 5222 Singapore 65 6272 5300
Finland +358 (0) 203 47 288 Slovakia +421 (0) 2 682 08080
France (034 Euromin) +0892 69 60 22 South Africa (inside RSA) 086 000 1030
Germany (012 Euromin) +49 (0) 180 52 58 143 South Africa (inside RSA) +27-11 258 9301
Greece +30 1060 73 603 Spain +34 902 321 123
Hong Kong (SAR) +85 (2) 3002 8555 Sweden +46 (0)8 619 2170
Guatemala 1800-995-5105 Switzerland 2 +41 (0) 84 880 1111
Hungary +36 (0) 1 382 1111 Taiwan +886-2-2717-00550800 010 055
India 1-600-11226791 11 682 6035
Thailand +66 (2) 661 4000
Indonesia 62-21-350-3408 Tunisia1 +216 1891 222
Ireland +353 (0) 1 662 5525 Turkey +90 216 579 7171
Israel +972 (0) 9 8304848 Ukraine +7 (380-44) 490-3520
Italy +39 (0) 226410350 United Arab Emirates +971 4 883 8454
Japan 0570 000 511+81 3 3335 9800
United Kingdom +44 (0) 207 512 52 02
Jordan +971 4 883 8454 Venezuela 0800-47468368 or800-477-7777
Korea (Seoul) +82 (2) 3270 0700 Venezuela (Caracas) (502) 207-8488
Korea (outside Seoul) 080 999 0700 Vietnam 84 (0) 8 823 4530
Kuwait +971 4 883 8454 Yemen +971 4 883 8454
Lebanon +971 4 883 8454
1 This Call Center supports French speaking customers from the following countriesregions Morocco Tunisia and Algeria
2 This Call Center supports German French and Italian speaking customers in Switzerland
countryregion hp technical support countryregion hp technical support
hp officejet 4100 series
chapter 10
48
Note When transporting your HP Officejet make sure that the pens have been removed the HP Officejet has been properly shut down by pressing the power button and you have allowed time for the carriage to return to the service station and for the scanner to return to its parked position
1 Turn on the unitDisregard steps 1 through 6 if your unit will not turn on and the print carriage is in the home position You will not be able to remove the print cartridges Proceed to step 7
2 Open the print cartridge access doorThe print carriage moves into view
3 See replace the print cartridges on page 33 for information on removing the print cartridges
Caution Remove both print cartridges Failure to do so may damage your unit
4 Place the print cartridges in an airtight bag so they will not dry out and put them aside (do not send them with the unit unless instructed to by the HP customer support call agent)
5 Turn off the unit
6 Close the print cartridge access door
7 Remove the front panel cover as followsa Grasp the front of the front panel cover with two hands as shownb Firmly lift the front panel cover to unsnap it from the unit
8 Retain the front panel cover Do not return the front panel cover with the unit
9 If available pack the unit for shipment using the original packing materials or the packaging materials that come with your exchange unit
If you do not have the original packaging materials please use other adequate packaging materials Shipping damage caused by improper packaging andor improper transportation is not covered under the warranty
reference guide
hp support
49
10 Place the return shipping label on the outside of the box
11 Include the following items in the boxndash A complete description of symptoms for service personnel (samples of print
quality problems are helpful)ndash A copy of the sales slip or other proof of purchase to establish the warranty
coverage periodndash Your name address and a phone number where you can be reached during
the day
hp distribution centerTo order HP Officejet software a copy of the printed Reference Guide a setup poster or other customer-replaceable parts do one of the following bull In the US or Canada call (208) 323 2551bull Visit this website
httpwwwhpcomcposupportsoftwarehtml
hp officejet 4100 series
chapter 10
50
11
51
warranty information
HP Officejet 4100 seriesDuration of Limited Warranty (hardware and labor) 1 YearDuration of Limited Warranty (CD media) 90 DaysDuration of Limited Warranty (print cartridges) Until the HP ink is depleted or the ldquoend of warrantyrdquo date printed on the cartridge has been reached whichever occurs first
warranty service
express serviceTo obtain HP express repair service the customer must contact an HP service office or an HP Customer Support Center for basic troubleshooting first See hp customer support on page 45 for steps to take before calling Customer SupportIf a customer unit needs a minor part replacement and these parts can normally be replaced by the customer the customer-replaceable components may be serviced through expedited part shipment In this event HP will prepay shipping charges duty and taxes provide telephone assistance on replacement of the component and pay shipping charges duty and taxes for any part that HP asks to be returnedThe HP Customer Support Center may direct customers to designated authorized service providers who are certified by HP to service the HP product
warranty upgradesUpgrade your standard factory warranty to a total of three years with the HP SUPPORTPACK Service coverage begins on product purchase date and the pack must be purchased within the first 180 days of product purchase This program offers phone support from 600 AM to 1000 PM Mountain Standard Time (MST) Monday through Friday and 900 AM to 400 PM (MST) on Saturdays If during your technical support call it is determined that you need a replacement product then HP will ship you this product next business day free of charge Available in US onlyFor more information please call 1-888-999-4747 or visit the following HP Web site
httpwwwhpcomgohpsupportpack
Outside the US please call your local HP Customer Support office See call elsewhere in the world on page 46 for a list of international Customer Support numbers
returning your hp officejet for serviceBefore returning your HP Officejet for service you must call HP Customer Support See hp customer support on page 45 for steps to take before calling Customer Support
hewlett-packard limited global warranty statement
extent of limited warrantyHewlett-Packard (ldquoHPrdquo) warrants to the end-user customer (ldquoCustomerrdquo) that each HP Officejet 4100 Series product (ldquoProductrdquo) including related software accessories media and supplies shall be free from defects in material and workmanship for the duration which begins on the date of purchase by the Customer
hp officejet 4100 series
chapter 11
52
For each software Product HPrsquos limited warranty applies only to a failure to execute programming instructions HP does not warrant that the operation of any Product shall be uninterrupted or error freeHPrsquos limited warranty covers only those defects which arise as a result of normal use of a Product and does not cover any other problems including those which arise as a result of (a) improper maintenance or modification (b) software accessories media or supplies not provided or supported by HP or (c) operation outside the Productrsquos specificationsFor any hardware Product the use of a non-HP print cartridge or a refilled print cartridge does not affect either the warranty to the Customer or any HP support contract with the Customer However if Product failure or damage is attributable to the use of a non-HP or refilled print cartridge HP shall charge its standard labor and materials charges to service the Product for the failure or damageIf HP receives during the applicable warranty period notice of a defect in any Product HP shall either repair or replace the defective Product at HPrsquos option Where labor charges are not covered by HPrsquos limited warranty repairs shall be at HPrsquos standard charges for laborIf HP is unable to repair or replace as applicable a defective Product which is covered by HPrsquos warranty HP shall within a reasonable time after being notified of the defect refund the purchase price for the ProductHP shall have no obligation to repair replace or refund until the Customer returns the defective Product to HPAny replacement product may be either new or like-new provided that it has functionality at least equal to that of the Product being replacedHP products including each Product may contain remanufactured parts components or materials equivalent to new in performanceHPs limited warranty for each Product is valid in any countryregion or locality where HP has a support presence for the Product and where HP has marketed the Product The level of warranty service may vary according to local standards HP shall have no obligation to alter the form fit or function of the Product in order to make it operate in a countryregion or locality for which the Product was never intended to operate
limitations of warrantyTO THE EXTENT ALLOWED BY LOCAL LAW NEITHER HP NOR ITS THIRD PARTY SUPPLIERS MAKE ANY OTHER WARRANTY OR CONDITION OF ANY KIND WHETHER EXPRESS OR IMPLIED WITH RESPECT TO THE COVERED HP PRODUCTS AND SPECIFICALLY DISCLAIM THE IMPLIED WARRANTIES OR CONDITIONS OF MERCHANTABILITY SATISFACTORY QUALITY AND FITNESS FOR A PARTICULAR PURPOSE
limitations of liabilityTo the extent allowed by local law the remedies provided in this Limited Warranty Statement are the Customerrsquos sole and exclusive remediesTO THE EXTENT ALLOWED BY LOCAL LAW EXCEPT FOR THE OBLIGATIONS SPECIFICALLY SET FORTH IN THIS LIMITED WARRANTY STATEMENT IN NO EVENT SHALL HP OR ITS THIRD PARTY SUPPLIERS BE LIABLE FOR DIRECT INDIRECT SPECIAL INCIDENTAL OR CONSEQUENTIAL DAMAGES WHETHER BASED ON CONTRACT TORT OR ANY OTHER LEGAL THEORY AND WHETHER ADVISED OF THE POSSIBILITY OF SUCH DAMAGES
local lawThis Limited Warranty Statement gives the Customer specific legal rights The Customer may also have other rights which vary from state to state in the United States from province to province in Canada and from countryregion to countryregion elsewhere in the world
reference guide
warranty information
53
To the extent this Limited Warranty Statement is inconsistent with local law this Statement shall be deemed modified to be consistent with such local law Under such local law certain disclaimers and limitations of this Statement may not apply to the Customer For example some states in the United States as well as some governments outside the United States (including provinces in Canada) mayPreclude the disclaimers and limitations in this Statement from limiting the statutory rights of a consumer (eg the United Kingdom)Otherwise restrict the ability of a manufacturer to enforce such disclaimers or limitations orGrant the Customer additional warranty rights specify the duration of implied warranties which the manufacturer cannot disclaim or not allow limitations on the duration of implied warrantiesFOR CONSUMER TRANSACTIONS IN AUSTRALIA AND NEW ZEALAND THE TERMS IN THIS LIMITED WARRANTY STATEMENT EXCEPT TO THE EXTENT LAWFULLY PERMITTED DO NOT EXCLUDE RESTRICT OR MODIFY AND ARE IN ADDITION TO THE MANDATORY STATUTORY RIGHTS APPLICABLE TO THE SALE OF THE COVERED HP PRODUCTS TO SUCH CUSTOMERS
hp officejet 4100 series
chapter 11
54
55
index
Numerics4-by-6 inch photo paper
load 10 12
AADF 7adjust
volume for fax 25align print cartridges 35Answer Ring Pattern 26automatic document feeder 7automatic reduction
fax 25
Bbest copy quality 13busy number
redial automatically 23
Ccancel
scan 18scheduled fax 21
cartridgesalign 35replace 33
cleanprint cartridges 35the exterior 32the glass 31white strip 32
colorenhance 14fax 20fax from front panel 20
contrastchange for fax 23photo color 14
copy 13 16change default settings 15enhance 14fit to page 16lighten or darken 14menu options 16number of copies 14photo 15quality 13reduce or enlarge 14settings 13 15
speed 13tutorial 4
Customer Support 45web site 45
Ddarken a copy 14date
setting 27default settings
restore 35director review 4distinctive ringing 26
Eenhance copies 14enlarge copy 14 16envelopes
load 9Error Correction Mode
(ECM) 25
Ffactory defaults
restore 35fast copy quality 13fax 28
adjust volume 25automated reports 22cancel fax forward 24cancel scheduled 21change Answer Ring
Pattern 26change contrast 23change resolution 22change settings 19control appearance 22create individual speed-dial
settings 26delete speed-dial
settings 27distinctive ringing 26Error Correction Mode
(ECM) 25forward faxes 24header 27in color 20in color from front panel 20manual reports 22
menu 29print reports 22receive 21receive manually 21redial busy or unanswered
number 23schedule 20send from front panel 19set automatic reduction 25set date and time 27set the number of rings 21settings 27 28setup menu options 29speed dials 19test 28
fit to page 16forward faxes 24
cancel 24front panel
display scroll speed 36enter text 28send a fax 19setting prompt delay 36tutorial 3
Gglass
cleaning 31greeting cards
load 11
Hhelp 1HP Customer Support 45
calling 45HP Director 4HP distribution center 49HP Officjet
preparing to ship 47HP papers
tips on loading 11
Iindividual speed-dial settings
create 26ink cartridges see print
cartridgesinkjet paper
load 11
index
hp officejet 4100 series56
Kkeypad
enter text 28
Llabels
load 12lighten copies 14load
change the paper type 12envelopes 9original in ADF 7paper 7photo paper 10 12postcards 10 12print cartridges 33set the paper size 12tips 11
Mmaintenance
align print cartridges 35clean print cartridges 35clean the exterior 32clean the glass 31clean the white strip 32normal sounds 36replace print cartridges 33restore factory defaults 35self-maintenance
sounds 36self-test report 32
menuscopy options 16fax 29fax setup 29maintenance 37print reports 37
Nnormal copy quality 13number of copies
set 14number of rings
set 21
Oorder print cartridges 60originals
load in ADF 7output tray 8
Ppaper
change default size for copy 12
change the type 12load 7recommended 7set the size 12tips on loading 11
paper size change for copy 12
paper trayload 7
phone numbers support services 45
photo paperload 10 12
photoscopy 15enhance copy 14
physical specifications 43postcards
load 10 12power
specifications 43print
envelopes 9fax reports 22self-test report 32
print cartridgesalign 35clean 35handling 32replace 33
prompt delaysetting 36
Qquick start
review the director 4use with a computer 4
Rreceive
fax 21redial
busy or unanswered number 23
reduce copy 14 16regulatory information 43reinstall software 40reports
generate automatically for fax 22
generate manually for fax 22
print 22self-test 32
resolution
change for fax 22restore factory settings 35returning your HP Officejet for
service 51
Sscan
from front panel 17stop 18
schedule a fax 20scroll speed
setting 36self-test report 32send
cancel forward faxes 24color fax 20color fax from front
panel 20forward faxes 24
settingscopy 13 15fax 27 28prompt delay 36scroll speed 36
setupadditional information 39menu 29
shippingyour HP Officejet 47
softwareremove and reinstall 40
soundsself-maintenance 36
specificationsphysical 43power 43
speed dials 19create individual
settings 26delete settings 27
stopscan 18scheduled fax 21
subscriber identification code 27
support services 45
Ttelephone line
multiple numbers 26telephone numbers 45text
enhance 14enter from front panel 28
time
index
reference guide 57
setting 27transparency film
recommended 7tips on loading 11
troubleshootingremove and reinstall
software 40T-shirt Transfer Iron-On
load 11tutorial
front panel 3make a copy 4
Uunanswered number
redial automatically 23
Vvolume
adjust 25
Wwarranty 45
service 51statement 51upgrades 51
white stripcleaning 32
hp officejet 4100 series
chapter 12
58
declaration of conformityAccording to ISOIEC Guide 22 and EN 45014
Manufacturerrsquos Name and Address
Hewlett-Packard Company 16399 West Bernardo Drive San Diego CA 92127-1899 USA
declares that the product
Product Name hp officejet 4100 series (Q1608A)
Model Number(s) officejet 4110 (Q1609A) officejet 4110xi (Q1610A) officejet 4110v (Q1611A) officejet 4105 (Q1612A) officejet 4105z (Q1613A) officejet 4115 (Q1614A)
Product Options All
conforms to the following Product Specifications
Safety EN609501992 +A1 A2 A3 A4 amp A11
IEC609501991 +A1 A2 A3 amp A4
UL1950CSA 222 No 950 3rd Edn 1995
NOM-019-SCFI-1993
EMC CISPR221993 +A1 amp A2 EN550221994 +A1 amp A2 -Class B
CISPR241997EN550241998
IEC 61000-3-21995 EN61000-3-21995
IEC 61000-3-31994 EN61000-3-31995
ASNZS 3548 1992
CNS13438 1997
FCC Part 15-Class B ICES-003 Issue 2 VCCI-2
GB 9254-1998
Telecom TBR21 1998
Supplementary Information
The Product herewith complies with the requirements of the Low Voltage Directive 7323EEC the EMC Directive 89336EEC and the RampTTE Directive 19995EC (ANNEX II) carries the CE marking accordingly
European Contact for regulatory topics only Your local Hewlett-Packard Sales and Service Office orHewlett-Packard GmbH
Department HQ-TRE Herrenberger Strasse 140 D-71034 Boumlblingen Germany (FAX + 49-7031-14-3143)
order mediaTo order media such as HP Premium Inkjet Paper HP Premium Inkjet Transparency Film HP Iron-On T-shirt Transfer paper or HP Greeting Cards go to
wwwhpshoppingcom
For orders in countries other than the US and Canada select other countries then click Yes to leave hpshoppingcom From this website you can access hpshoppingcom for your specific language or countryregion
order print cartridges
If you have Internet access you can get more information from the HP website at
wwwhpcomsupport
print cartridges hp reorder number
HP black print cartridge 56 19 ml black print cartridge
HP color print cartridgeHP tri-color print cartridge
57 17 ml color print cartridge28 8 ml color print cartridge
Visit the hp officejet information centerIt has everything you need to get the most value from your HP Officejet
bull Technical Supportbull Supplies and Ordering Informationbull Project Tipsbull Ways to Enhance Your Product
wwwhpcomsupport
copy 2003 Hewlett-Packard Company
Printed in the USA Mexico Germany Singapore or China
Q1608-90163Q1608-90163
Q1608-90163

reference guide
maintain your hp officejet
33
replace the print cartridgesFront-panel messages appear to let you know that you should replace your print cartridges
See order print cartridges on the back cover for information on ordering replacement print cartridges
1 Turn on the unit then lift open the print cartridge access doorThe print carriage moves into view
2 After the carriage stops moving push down on the print cartridge down to release it and then pull it toward you out of its slot
Plastic tape with pink tab(must be removed)
Copper contactsInk nozzles under tape
Do not touch the copper contacts or the ink nozzles
print cartridge access door
hp officejet 4100 series
chapter 7
34
Note It is normal to see ink build-up in the print cartridge slots
3 Remove the new print cartridge from its packaging and being careful to touch only the bright pink plastic tab gently remove the plastic tape to uncover the ink nozzles
Caution Do not touch the copper contacts or ink nozzles
Once you have removed the plastic tape install the print cartridge immediately to prevent the ink from drying in the nozzles
4 Push the new print cartridge into the appropriate slot at a slight angle until it clicks into place
Caution Do not attempt to push the cartridge straight into the slot It must slide in at a slight angle
The tri-color print cartridge goes on the left and the black cartridge goes on the right
5 Close the print cartridge access door
reference guide
maintain your hp officejet
35
align the print cartridgesThe HP Officejet prompts you to align cartridges every time you install or replace a print cartridge Aligning the cartridges ensures high-quality output
To align the print cartridges when prompted
1 Press Enter on the front panelAn align cartridges (test pattern) page prints
2 Load the align cartridges page face down in the ADF between the paper-width guides and press the Enter button again
3 Recycle or discard the page
To align the cartridges at any other time
1 Press Setup
2 Press 5 then press 2This selects the Maintenance menu and then selects the Align Print Cartridge option
3 Press EnterAn align cartridges (test pattern) page prints
4 Load the align cartridges page face down in the ADF between the paper-width guides and press the Enter button again
5 Recycle or discard the page
clean the print cartridgesUse this feature when the Self-Test Report shows streaking or white lines through any of the colored bars Do not clean print cartridges unnecessarily This wastes ink and shortens the life of the ink nozzles
1 Press Setup
2 Press 5 then press 1This selects the Maintenance menu and then selects the Clean Print Cartridge optionA page of patterns is printed The cartridges are cleaned Recycle or discard the pageIf copy or print quality still seem poor after you clean the print cartridges replace the print cartridge that is affected
restore factory defaultsYou can restore the original factory settings to what they were when you purchased your HP Officejet Choosing to restore your factory defaults restores all settings except date information and any scan settings you may have set
You can perform this process from the front panel only
1 Press Setup
2 Press 5 then press 3This selects Maintenance and then selects Restore Factory DefaultsThe factory default settings are restored
hp officejet 4100 series
chapter 7
36
set scroll speedThe Scroll Speed option lets you control the rate that text messages appear in the front-panel display You can choose Normal Fast or Slow The default is Normal
1 Press Setup
2 Press 5 then press 6This selects Maintenance and then selects Set Scroll Speed
3 Press until the desired speed appears then press Enter
set the prompt delay timeThe Prompt Delay option lets you control the amount of time before a message is displayed in the front-panel display You can choose Normal Fast or Slow The default is Normal
1 Press Setup
2 Press 5 then press 7This selects Maintenance and then selects Set Prompt Delay Time
3 Press until the delay time appears then press Enter
self-maintenance sounds During the life of your product you may hear various mechanical sounds This is a normal part of your unitrsquos self-maintenance
reference guide
maintain your hp officejet
37
setup menu optionsThe following options are available from the Setup button
1Last Transaction
2Fax Log
3Speed Dial List
4Self-Test Report
5Automatic Reports Setup
1Print Report
Use Setup to display the Print Report Speed Dial Setup Basic Fax Setup Advanced Fax Setup and Maintenance options
Press and to move to the setting you wantPress Enter to select the displayed setting
1Clean Print Cartridges
2Align Print Cartridges
3Restore Factory Defaults
4Reprint Faxes in Memory
5Set Language amp CountryRegion
6Set Scroll Speed
7Set Prompt Delay Time
5Maintenance2Speed Dial Setup
3Basic Fax Setup
4Advanced Fax Setup
1Individual Speed Dial
2Delete Speed Dial
3Print Speed Dial List
1Date and Time
2Fax Header
3Rings to Answer
4 Paper Size
5Tone or Pulse Dialing
6Ring and Beep Volume
7Fax Forwarding Black Only
1Automatic Reports Setup
2Answer Ring Pattern
3Busy Redial
4No Answer Redail
5Automatic Reduction
6Backup Fax Reception
7Error Correction Mode
hp officejet 4100 series
chapter 7
38
8
39
additional setup information
During the installation of the HP Officejet software a number of windows are displayed You should see the following
bull Installingbull Copying files bull A request to plug in the HP Officejetbull Green OK and check markbull Request to restart your computer (may not occur in all cases)bull Registration
If you did not see all of these windows there may be a problem with the installation Verify the following
bull The HP Director contains six icons (double-click the HP Director icon on the desktop)
bull The HP Officejet is listed in the Printers dialog boxbull There is an icon for the HP Officejet in the System Tray that indicates the
HP Officejet is ready
If the HP Director does not show six icons you may need to wait a few minutes for the HP Officejet to connect to your computer
possible installation problemsIf nothing appears on your computer screen after you insert the HP Officejet 4100 Series CD-ROM into your computerrsquos CD-ROM drive
1 From the Start menu choose Run
2 In the Run dialog box enter dsetupexe (if your CD-ROM drive is not assigned to drive letter d use the appropriate drive letter) then click OK
If the HP Director does not contain six icons do the following
bull Verify that the front-panel cover is attached then unplug the HP Officejet and plug it in again
bull Verify that the USB and power cables are plugged inndash Unplug the USB cable and plug it in againndash Do not attach the USB cable to a keyboard or nonpowered hubndash Verify that the USB cable is 3 meters or less in lengthndash If you have several USB devices attached to your computer you may
want to unplug the others during the installation
Note AppleTalk is not supported
bull Unplug the HP Officejet from the wall and plug it in againbull Restart your computer
hp officejet 4100 series
chapter 8
40
On Windows check the System Tray for applications that are running in the background and close them before restarting your computer
remove and reinstall your hp officejet softwareIf six icons do not appear in the Director you may need to uninstall and re-install the software Do not simply delete the HP Officejet program files from your hard drive Be sure to remove them properly using the uninstall utility provided in the HP Officejet program group
to uninstall from a Windows computer
1 Disconnect your HP Officejet from your computer
2 On the Windows taskbar click Start choose Programs or All Programs (XP) choose Hewlett-Packard choose hp officejet 4100 series then choose uninstall software
3 Follow the directions on the screenBe sure to disconnect your HP Officejet
4 If you are asked whether you would like to remove shared files click NoOther programs that use these files may not work properly if the files are deleted
5 After the program finishes removing the software disconnect your HP Officejet and restart your computer
Note It is important that you disconnect your HP Officejet before restarting your computer
6 To reinstall the software insert the HP Officejet 4100 Series CD-ROM into your computerrsquos CD-ROM drive and follow the instructions that appear
7 After the software is installed connect and turn on your HP Officejet following the onscreen instructions and the instructions in your Setup PosterAfter connecting and turning on your HP Officejet you may have to wait several minutes for all of the Plug and Play events to completeWhen the software installation is complete you will see a Status Monitor icon in the System Tray
8 To verify that the software is properly installed double-click on the HP Director icon on the desktop If the HP Director shows six icons the software has been properly installed
to uninstall from a Macintosh computer
1 Disconnect your HP Officejet from your computer
2 Double-click on ApplicationsHP All-in-One Software folder
reference guide
additional setup information
41
3 Double-click on HP Uninstaller
4 Follow the directions that appear on the screen
5 After the program finishes removing the software disconnect your HP Officejet and restart your computer
6 To reinstall the software insert the HP Officejet 4100 Series CD-ROM into your computerrsquos CD-ROM drive
Note When re-installing the software follow the instructions on the Setup Poster Do not connect the HP Officejet to your computer until after you have completed the software installation
7 On the desktop open the CD-ROM double-click on hp all-in-one installer and follow the instructions that appear
connect your hp officejet to a phone modem or answering machine
The HP Officejet can share a phone line with a phone a modem or an aswering machine When sharing a phone line with an answering machine the HP Officejet will answer fax calls and direct voice calls to the answering machine
Note For information on connecting your HP Officejet to your computer and phone line refer to the Setup Poster that came with your unit
to connect your hp officejet to a phone modem or answering machine
1 Remove the white plastic stopper from connector 2 on the back of the HP Officejet
To connect more than one device to connector 2 on the HP Officejet you must purchase a Y-splitter and plug it into connector 2
2 Connect the phone cord from the phone modem or answering machine to connector 2 (or Y-splitter)
Caution Do not use the phone cord that came with the HP Officejet for this purpose That phone cord must connect connector 1 on the HP Officejet to the wall jack for your phone system See the Setup Poster for details
3 If you are connecting an answering machine see set the number of rings before answering on page 21 for instructions on setting the number of rings correctly or change the answer ring pattern (distinctive ringing) on page 26 for information on incoming ring patterns
4 If you are connecting a modem turn off its fax-receive feature
connector 2 on the HP Officejet
connector 1 on the HP Officejet
hp officejet 4100 series
chapter 8
42
additional troubleshooting helpYou may want to refer to the readme file for more information on possible installation problems On Windows you can access the readme file from the Start button on the taskbar select Programs Hewlett-Packard hp officejet 4100 series View the Readme File On Macintosh you can access the readme file by double-clicking on the icon located in the top-level folder of the HP Officejet software CD-ROM
The readme file provides more information including
bull Using the Re-install utility after a failed installation to return your PC to a state that will allow the HP Officejet to be re-installed
bull Using the Re-install utility on Windows 98 to recover from a Composite USB System Driver missing errorThis error may occur if the hardware is installed prior to installing the software After running the Re-install utility reboot your PC and install the HP Officejet software before connecting the HP Officejet to your computer
You can also find more information on this website
wwwhpcomsupport
9
43
technical information
Additional specifications information can be found in the HP Photo amp Imaging Help in the hp officejet 4100 series section
physical specifications
power specificationsbull Power consumption 75W maximumbull Source (Input Voltage) 100 to 240 VAC groundedbull Input Frequency 50 to 60 Hzbull Current 1A maximum
regulatory informationAdditional regulatory information can be found in the HP Photo amp Imaging Help The information in this section supercedes information in the HP Photo amp Imaging Help
doc statement deacuteclaration de conformiteacute (Canada)Le preacutesent appareil numeacuterique neacutemet pas de bruit radioeacutelectrique deacutepassant les limites applicables aux appareils numeacuteriques de la classe B prescrites dans le Regraveglement sur le brouillage radioeacutelectrique eacutedicteacute par le ministegravere des Communications du CanadaThis digital apparatus does not exceed the Class B limits for radio noise emissions from digital apparatus set out in the Radio Interference Regulations of the Canadian Department of Communications
notice to users of the Canadian telephone networkThis equipment meets the applicable Industry Canada Terminal Equipment Technical Specifications This is confirmed by the registration number The abbreviation IC before the registration number signifies that registration was performed based on a Declaration of Conformity indicating that Industry Canada technical specifications were met It does not imply that Industry Canada approved the equipment
Note The Ringer Equivalence Number (REN) assigned to each terminal device provides an indication of the maximum number of terminals allowed to be connected to a telephone interface The termination on an interface may consist of any combination of devices subject only to the requirement that the sum of the Ringer Equivalence Numbers of all the devices does not exceed 5
The REN for this product is 03B based on FCC Part 68 test results
height width depth weight (without print cartridges)
with paper trays and ADF closed
718 in (1824 cm) 1676 in (4258 cm) 825 in (2096 cm) 75 lbs (34 kg)
with ADF and paper tray extended
1030 in (2615 cm) 1676 in (4258 cm) 1854 in (4709 cm) 75 lbs (34 kg)
hp officejet 4100 series
chapter 9
44
notice to all users of the European Economic Area (EEA)
This product is designed to interwork with the analogue telephone networks in the following countriesregions
Network compatibility depends on customer selected settings which must be reset to use the equipment on a telephone network in a countryregion other than where the product was purchased Contact the vendor or Hewlett-Packard Company if addition product support is necessaryThis equipment has been certified by the manufacturer in accordance with Directive 19995EC (annex II) for Pan-European single-terminal connection to the public switched telephone network (PSTN) However due to differences between the individual PSTNs provided in different countriesregions the approval does not of itself give an unconditional assurance of successful operation on every PSTN network termination pointIn the event of problems you should contact your equipment supplier in the first instance
geraumluschemissionLpA lt 70 dBam Arbeitsplatzim Normalbetriebnach DIN 45635 T 19
notice to Korean customers
Germany UK Netherlands
France Spain Italy
Belgium Luxembourg Sweden
Austria Denmark Ireland
Norway Finland Switzerland
Greece Portugal
10
45
hp support
This section explains the support services information provided by Hewlett-Packard If you are unable to find the answer you need in the printed or onscreen documentation supplied with your product you can contact one of the HP support services listed in the following pages Some support services are available only in the US and Canada while others are available in many countriesregions worldwide If a support service number is not listed for your countryregion contact your nearest authorized HP dealer for help
get support and other information from the internetIf you have Internet access you can get help from the following HP website
wwwhpcomsupportThe Web site offers technical support drivers supplies and ordering information
hp customer supportSoftware programs from other companies may be included with your HP Officejet If you experience problems with any of those programs you will receive the best technical assistance by calling the experts at that companyIf you need to contact HP Customer Support do the following before you call
1 Make sure thata Your unit is plugged in and turned onb The specified print cartridges are installed correctlyc The recommended paper is properly loaded in the input tray
2 Reset your unita Turn off the unit using the On button located on the unitrsquos front panelb Unplug the power cord from the back of the unitc Plug the power cord back into the unitd Turn on the unit using the On button
3 For more information check the HP website at wwwhpcomsupport
4 If you are still experiencing problems and need to speak with an HP Customer Support Representativendash Have your service ID and serial number ready To display your service ID and
serial number on the front panel do the following Press Enter and Start Color at the same time until the service ID appears in the front-panel display From this display press the right arrow until the serial number displays
ndash Print a Self-Test Report See print a self-test report on page 32 for information on printing this report
ndash Make a color copyndash Be prepared to describe your problem in detail
5 Call HP Customer Support Be near your unit when you call
call in the US during warrantyCall (208) 323-2551 This service is free during the warranty period however your standard long-distance phone charges still apply A fee may apply outside the warranty period
hp officejet 4100 series
chapter 10
46
US phone support is available in both English and Spanish languages 24 hours a day 7 days a week (days and hours of support may change without notice)
call elsewhere in the worldThe numbers listed below are current as of the printing date of this guide For a list of current international HP Support Service numbers visit this address and choose your own countryregion or language
wwwhpcomsupportFor Korea you can also visit this address
httpwwwhpcokrYou can call the HP support center in the following countriesregions If your countryregion is not listed contact your local dealer or nearest HP Sales and Support Office to find out how to obtain servicesSupport service is free during the warranty period however your standard long-distance phone charges will apply In some cases a flat fee per single incident will also applyFor phone support in Europe please check for the details and conditions of phone support in your countryregion by consulting the following Web site
wwwhpcomsupportAlternatively you can ask your dealer or call HP at the phone number indicated in this booklet As part of our constant efforts to improve our phone support service we advise you to check our website on a regular basis for new information regarding service features and delivery
countryregion hp technical support countryregion hp technical support
Algeria1 +213 (0) 61564 543 Malaysia 1-800-805405
Argentina 0810-555-5520 Mexico 01-800-472-6684
Australia +61 3 8877 80001902 910 910
Mexico (Mexico City) 5258-9922
Austria +43 (0) 810 00 6080 Morocco1 +212 22404 747
Bahrain (Dubai) 800 728 Netherlands +31 (0) 20 606 8751
Belgium (Dutch) +32 (0) 2 626 8806 New Zealand 0800 441 147
Belgium (French) +32 (0) 2 626 8807 Norway +47 22 11 6299
Brazil (Grande Sao Paulo) (11) 3747 7799 Oman +971 4 883 8454
Brazil (Demais Localidades) 0800 157751 Palestine +971 4 883 8454
Canada during warranty (905) 206 4663 Panama 001-800-7112884
Canada post-warranty(per-call charge)
1-877-621-4722 Peru 0-800-10111
Caribbean amp Central America
1-800-711-2884 Philippines 632-867-3551
Chile 800-360-999 Poland +48 22 865 98 00
China 86 10 6868 7980 Portugal +351 21 3176333
Colombia 9-800-114-726 Puerto Rico 1-877-2320-589
Costa Rica 0-800-011-0524 Qatar +971 4 883 8454
Czech Republic +420 (0) 261307310 Romania +40 1 315 44 42or local 01 3154442
reference guide
hp support
47
call in Australia post-warrantyIf your product is not under warranty you can call 03 8877 8000 A per-incident out-of-warranty support fee of $2750 (inc GST) will be charged to your credit card You can also call 1902 910 910 ($2750 charged to your phone account) from 900 AM to 500 PM Monday through Friday (Charges and support hours are subject to change without notice)
prepare your unit for shipmentIf after contacting HP Customer Support or returning to the point of purchase you are requested to send your unit in for service please follow the power off and rebox steps below to avoid further damage to the HP product
Denmark +45 39 29 4099 Russian Federation Moscow +7 095 797 3520
Ecuador 1800-711-2884 Russian Federation St Petersburg
+7 812 346 7997
Europe (English) +44 (0) 207 512 5202 Saudi Arabia +800 897 14440
Egypt 02 532 5222 Singapore 65 6272 5300
Finland +358 (0) 203 47 288 Slovakia +421 (0) 2 682 08080
France (034 Euromin) +0892 69 60 22 South Africa (inside RSA) 086 000 1030
Germany (012 Euromin) +49 (0) 180 52 58 143 South Africa (inside RSA) +27-11 258 9301
Greece +30 1060 73 603 Spain +34 902 321 123
Hong Kong (SAR) +85 (2) 3002 8555 Sweden +46 (0)8 619 2170
Guatemala 1800-995-5105 Switzerland 2 +41 (0) 84 880 1111
Hungary +36 (0) 1 382 1111 Taiwan +886-2-2717-00550800 010 055
India 1-600-11226791 11 682 6035
Thailand +66 (2) 661 4000
Indonesia 62-21-350-3408 Tunisia1 +216 1891 222
Ireland +353 (0) 1 662 5525 Turkey +90 216 579 7171
Israel +972 (0) 9 8304848 Ukraine +7 (380-44) 490-3520
Italy +39 (0) 226410350 United Arab Emirates +971 4 883 8454
Japan 0570 000 511+81 3 3335 9800
United Kingdom +44 (0) 207 512 52 02
Jordan +971 4 883 8454 Venezuela 0800-47468368 or800-477-7777
Korea (Seoul) +82 (2) 3270 0700 Venezuela (Caracas) (502) 207-8488
Korea (outside Seoul) 080 999 0700 Vietnam 84 (0) 8 823 4530
Kuwait +971 4 883 8454 Yemen +971 4 883 8454
Lebanon +971 4 883 8454
1 This Call Center supports French speaking customers from the following countriesregions Morocco Tunisia and Algeria
2 This Call Center supports German French and Italian speaking customers in Switzerland
countryregion hp technical support countryregion hp technical support
hp officejet 4100 series
chapter 10
48
Note When transporting your HP Officejet make sure that the pens have been removed the HP Officejet has been properly shut down by pressing the power button and you have allowed time for the carriage to return to the service station and for the scanner to return to its parked position
1 Turn on the unitDisregard steps 1 through 6 if your unit will not turn on and the print carriage is in the home position You will not be able to remove the print cartridges Proceed to step 7
2 Open the print cartridge access doorThe print carriage moves into view
3 See replace the print cartridges on page 33 for information on removing the print cartridges
Caution Remove both print cartridges Failure to do so may damage your unit
4 Place the print cartridges in an airtight bag so they will not dry out and put them aside (do not send them with the unit unless instructed to by the HP customer support call agent)
5 Turn off the unit
6 Close the print cartridge access door
7 Remove the front panel cover as followsa Grasp the front of the front panel cover with two hands as shownb Firmly lift the front panel cover to unsnap it from the unit
8 Retain the front panel cover Do not return the front panel cover with the unit
9 If available pack the unit for shipment using the original packing materials or the packaging materials that come with your exchange unit
If you do not have the original packaging materials please use other adequate packaging materials Shipping damage caused by improper packaging andor improper transportation is not covered under the warranty
reference guide
hp support
49
10 Place the return shipping label on the outside of the box
11 Include the following items in the boxndash A complete description of symptoms for service personnel (samples of print
quality problems are helpful)ndash A copy of the sales slip or other proof of purchase to establish the warranty
coverage periodndash Your name address and a phone number where you can be reached during
the day
hp distribution centerTo order HP Officejet software a copy of the printed Reference Guide a setup poster or other customer-replaceable parts do one of the following bull In the US or Canada call (208) 323 2551bull Visit this website
httpwwwhpcomcposupportsoftwarehtml
hp officejet 4100 series
chapter 10
50
11
51
warranty information
HP Officejet 4100 seriesDuration of Limited Warranty (hardware and labor) 1 YearDuration of Limited Warranty (CD media) 90 DaysDuration of Limited Warranty (print cartridges) Until the HP ink is depleted or the ldquoend of warrantyrdquo date printed on the cartridge has been reached whichever occurs first
warranty service
express serviceTo obtain HP express repair service the customer must contact an HP service office or an HP Customer Support Center for basic troubleshooting first See hp customer support on page 45 for steps to take before calling Customer SupportIf a customer unit needs a minor part replacement and these parts can normally be replaced by the customer the customer-replaceable components may be serviced through expedited part shipment In this event HP will prepay shipping charges duty and taxes provide telephone assistance on replacement of the component and pay shipping charges duty and taxes for any part that HP asks to be returnedThe HP Customer Support Center may direct customers to designated authorized service providers who are certified by HP to service the HP product
warranty upgradesUpgrade your standard factory warranty to a total of three years with the HP SUPPORTPACK Service coverage begins on product purchase date and the pack must be purchased within the first 180 days of product purchase This program offers phone support from 600 AM to 1000 PM Mountain Standard Time (MST) Monday through Friday and 900 AM to 400 PM (MST) on Saturdays If during your technical support call it is determined that you need a replacement product then HP will ship you this product next business day free of charge Available in US onlyFor more information please call 1-888-999-4747 or visit the following HP Web site
httpwwwhpcomgohpsupportpack
Outside the US please call your local HP Customer Support office See call elsewhere in the world on page 46 for a list of international Customer Support numbers
returning your hp officejet for serviceBefore returning your HP Officejet for service you must call HP Customer Support See hp customer support on page 45 for steps to take before calling Customer Support
hewlett-packard limited global warranty statement
extent of limited warrantyHewlett-Packard (ldquoHPrdquo) warrants to the end-user customer (ldquoCustomerrdquo) that each HP Officejet 4100 Series product (ldquoProductrdquo) including related software accessories media and supplies shall be free from defects in material and workmanship for the duration which begins on the date of purchase by the Customer
hp officejet 4100 series
chapter 11
52
For each software Product HPrsquos limited warranty applies only to a failure to execute programming instructions HP does not warrant that the operation of any Product shall be uninterrupted or error freeHPrsquos limited warranty covers only those defects which arise as a result of normal use of a Product and does not cover any other problems including those which arise as a result of (a) improper maintenance or modification (b) software accessories media or supplies not provided or supported by HP or (c) operation outside the Productrsquos specificationsFor any hardware Product the use of a non-HP print cartridge or a refilled print cartridge does not affect either the warranty to the Customer or any HP support contract with the Customer However if Product failure or damage is attributable to the use of a non-HP or refilled print cartridge HP shall charge its standard labor and materials charges to service the Product for the failure or damageIf HP receives during the applicable warranty period notice of a defect in any Product HP shall either repair or replace the defective Product at HPrsquos option Where labor charges are not covered by HPrsquos limited warranty repairs shall be at HPrsquos standard charges for laborIf HP is unable to repair or replace as applicable a defective Product which is covered by HPrsquos warranty HP shall within a reasonable time after being notified of the defect refund the purchase price for the ProductHP shall have no obligation to repair replace or refund until the Customer returns the defective Product to HPAny replacement product may be either new or like-new provided that it has functionality at least equal to that of the Product being replacedHP products including each Product may contain remanufactured parts components or materials equivalent to new in performanceHPs limited warranty for each Product is valid in any countryregion or locality where HP has a support presence for the Product and where HP has marketed the Product The level of warranty service may vary according to local standards HP shall have no obligation to alter the form fit or function of the Product in order to make it operate in a countryregion or locality for which the Product was never intended to operate
limitations of warrantyTO THE EXTENT ALLOWED BY LOCAL LAW NEITHER HP NOR ITS THIRD PARTY SUPPLIERS MAKE ANY OTHER WARRANTY OR CONDITION OF ANY KIND WHETHER EXPRESS OR IMPLIED WITH RESPECT TO THE COVERED HP PRODUCTS AND SPECIFICALLY DISCLAIM THE IMPLIED WARRANTIES OR CONDITIONS OF MERCHANTABILITY SATISFACTORY QUALITY AND FITNESS FOR A PARTICULAR PURPOSE
limitations of liabilityTo the extent allowed by local law the remedies provided in this Limited Warranty Statement are the Customerrsquos sole and exclusive remediesTO THE EXTENT ALLOWED BY LOCAL LAW EXCEPT FOR THE OBLIGATIONS SPECIFICALLY SET FORTH IN THIS LIMITED WARRANTY STATEMENT IN NO EVENT SHALL HP OR ITS THIRD PARTY SUPPLIERS BE LIABLE FOR DIRECT INDIRECT SPECIAL INCIDENTAL OR CONSEQUENTIAL DAMAGES WHETHER BASED ON CONTRACT TORT OR ANY OTHER LEGAL THEORY AND WHETHER ADVISED OF THE POSSIBILITY OF SUCH DAMAGES
local lawThis Limited Warranty Statement gives the Customer specific legal rights The Customer may also have other rights which vary from state to state in the United States from province to province in Canada and from countryregion to countryregion elsewhere in the world
reference guide
warranty information
53
To the extent this Limited Warranty Statement is inconsistent with local law this Statement shall be deemed modified to be consistent with such local law Under such local law certain disclaimers and limitations of this Statement may not apply to the Customer For example some states in the United States as well as some governments outside the United States (including provinces in Canada) mayPreclude the disclaimers and limitations in this Statement from limiting the statutory rights of a consumer (eg the United Kingdom)Otherwise restrict the ability of a manufacturer to enforce such disclaimers or limitations orGrant the Customer additional warranty rights specify the duration of implied warranties which the manufacturer cannot disclaim or not allow limitations on the duration of implied warrantiesFOR CONSUMER TRANSACTIONS IN AUSTRALIA AND NEW ZEALAND THE TERMS IN THIS LIMITED WARRANTY STATEMENT EXCEPT TO THE EXTENT LAWFULLY PERMITTED DO NOT EXCLUDE RESTRICT OR MODIFY AND ARE IN ADDITION TO THE MANDATORY STATUTORY RIGHTS APPLICABLE TO THE SALE OF THE COVERED HP PRODUCTS TO SUCH CUSTOMERS
hp officejet 4100 series
chapter 11
54
55
index
Numerics4-by-6 inch photo paper
load 10 12
AADF 7adjust
volume for fax 25align print cartridges 35Answer Ring Pattern 26automatic document feeder 7automatic reduction
fax 25
Bbest copy quality 13busy number
redial automatically 23
Ccancel
scan 18scheduled fax 21
cartridgesalign 35replace 33
cleanprint cartridges 35the exterior 32the glass 31white strip 32
colorenhance 14fax 20fax from front panel 20
contrastchange for fax 23photo color 14
copy 13 16change default settings 15enhance 14fit to page 16lighten or darken 14menu options 16number of copies 14photo 15quality 13reduce or enlarge 14settings 13 15
speed 13tutorial 4
Customer Support 45web site 45
Ddarken a copy 14date
setting 27default settings
restore 35director review 4distinctive ringing 26
Eenhance copies 14enlarge copy 14 16envelopes
load 9Error Correction Mode
(ECM) 25
Ffactory defaults
restore 35fast copy quality 13fax 28
adjust volume 25automated reports 22cancel fax forward 24cancel scheduled 21change Answer Ring
Pattern 26change contrast 23change resolution 22change settings 19control appearance 22create individual speed-dial
settings 26delete speed-dial
settings 27distinctive ringing 26Error Correction Mode
(ECM) 25forward faxes 24header 27in color 20in color from front panel 20manual reports 22
menu 29print reports 22receive 21receive manually 21redial busy or unanswered
number 23schedule 20send from front panel 19set automatic reduction 25set date and time 27set the number of rings 21settings 27 28setup menu options 29speed dials 19test 28
fit to page 16forward faxes 24
cancel 24front panel
display scroll speed 36enter text 28send a fax 19setting prompt delay 36tutorial 3
Gglass
cleaning 31greeting cards
load 11
Hhelp 1HP Customer Support 45
calling 45HP Director 4HP distribution center 49HP Officjet
preparing to ship 47HP papers
tips on loading 11
Iindividual speed-dial settings
create 26ink cartridges see print
cartridgesinkjet paper
load 11
index
hp officejet 4100 series56
Kkeypad
enter text 28
Llabels
load 12lighten copies 14load
change the paper type 12envelopes 9original in ADF 7paper 7photo paper 10 12postcards 10 12print cartridges 33set the paper size 12tips 11
Mmaintenance
align print cartridges 35clean print cartridges 35clean the exterior 32clean the glass 31clean the white strip 32normal sounds 36replace print cartridges 33restore factory defaults 35self-maintenance
sounds 36self-test report 32
menuscopy options 16fax 29fax setup 29maintenance 37print reports 37
Nnormal copy quality 13number of copies
set 14number of rings
set 21
Oorder print cartridges 60originals
load in ADF 7output tray 8
Ppaper
change default size for copy 12
change the type 12load 7recommended 7set the size 12tips on loading 11
paper size change for copy 12
paper trayload 7
phone numbers support services 45
photo paperload 10 12
photoscopy 15enhance copy 14
physical specifications 43postcards
load 10 12power
specifications 43print
envelopes 9fax reports 22self-test report 32
print cartridgesalign 35clean 35handling 32replace 33
prompt delaysetting 36
Qquick start
review the director 4use with a computer 4
Rreceive
fax 21redial
busy or unanswered number 23
reduce copy 14 16regulatory information 43reinstall software 40reports
generate automatically for fax 22
generate manually for fax 22
print 22self-test 32
resolution
change for fax 22restore factory settings 35returning your HP Officejet for
service 51
Sscan
from front panel 17stop 18
schedule a fax 20scroll speed
setting 36self-test report 32send
cancel forward faxes 24color fax 20color fax from front
panel 20forward faxes 24
settingscopy 13 15fax 27 28prompt delay 36scroll speed 36
setupadditional information 39menu 29
shippingyour HP Officejet 47
softwareremove and reinstall 40
soundsself-maintenance 36
specificationsphysical 43power 43
speed dials 19create individual
settings 26delete settings 27
stopscan 18scheduled fax 21
subscriber identification code 27
support services 45
Ttelephone line
multiple numbers 26telephone numbers 45text
enhance 14enter from front panel 28
time
index
reference guide 57
setting 27transparency film
recommended 7tips on loading 11
troubleshootingremove and reinstall
software 40T-shirt Transfer Iron-On
load 11tutorial
front panel 3make a copy 4
Uunanswered number
redial automatically 23
Vvolume
adjust 25
Wwarranty 45
service 51statement 51upgrades 51
white stripcleaning 32
hp officejet 4100 series
chapter 12
58
declaration of conformityAccording to ISOIEC Guide 22 and EN 45014
Manufacturerrsquos Name and Address
Hewlett-Packard Company 16399 West Bernardo Drive San Diego CA 92127-1899 USA
declares that the product
Product Name hp officejet 4100 series (Q1608A)
Model Number(s) officejet 4110 (Q1609A) officejet 4110xi (Q1610A) officejet 4110v (Q1611A) officejet 4105 (Q1612A) officejet 4105z (Q1613A) officejet 4115 (Q1614A)
Product Options All
conforms to the following Product Specifications
Safety EN609501992 +A1 A2 A3 A4 amp A11
IEC609501991 +A1 A2 A3 amp A4
UL1950CSA 222 No 950 3rd Edn 1995
NOM-019-SCFI-1993
EMC CISPR221993 +A1 amp A2 EN550221994 +A1 amp A2 -Class B
CISPR241997EN550241998
IEC 61000-3-21995 EN61000-3-21995
IEC 61000-3-31994 EN61000-3-31995
ASNZS 3548 1992
CNS13438 1997
FCC Part 15-Class B ICES-003 Issue 2 VCCI-2
GB 9254-1998
Telecom TBR21 1998
Supplementary Information
The Product herewith complies with the requirements of the Low Voltage Directive 7323EEC the EMC Directive 89336EEC and the RampTTE Directive 19995EC (ANNEX II) carries the CE marking accordingly
European Contact for regulatory topics only Your local Hewlett-Packard Sales and Service Office orHewlett-Packard GmbH
Department HQ-TRE Herrenberger Strasse 140 D-71034 Boumlblingen Germany (FAX + 49-7031-14-3143)
order mediaTo order media such as HP Premium Inkjet Paper HP Premium Inkjet Transparency Film HP Iron-On T-shirt Transfer paper or HP Greeting Cards go to
wwwhpshoppingcom
For orders in countries other than the US and Canada select other countries then click Yes to leave hpshoppingcom From this website you can access hpshoppingcom for your specific language or countryregion
order print cartridges
If you have Internet access you can get more information from the HP website at
wwwhpcomsupport
print cartridges hp reorder number
HP black print cartridge 56 19 ml black print cartridge
HP color print cartridgeHP tri-color print cartridge
57 17 ml color print cartridge28 8 ml color print cartridge
Visit the hp officejet information centerIt has everything you need to get the most value from your HP Officejet
bull Technical Supportbull Supplies and Ordering Informationbull Project Tipsbull Ways to Enhance Your Product
wwwhpcomsupport
copy 2003 Hewlett-Packard Company
Printed in the USA Mexico Germany Singapore or China
Q1608-90163Q1608-90163
Q1608-90163
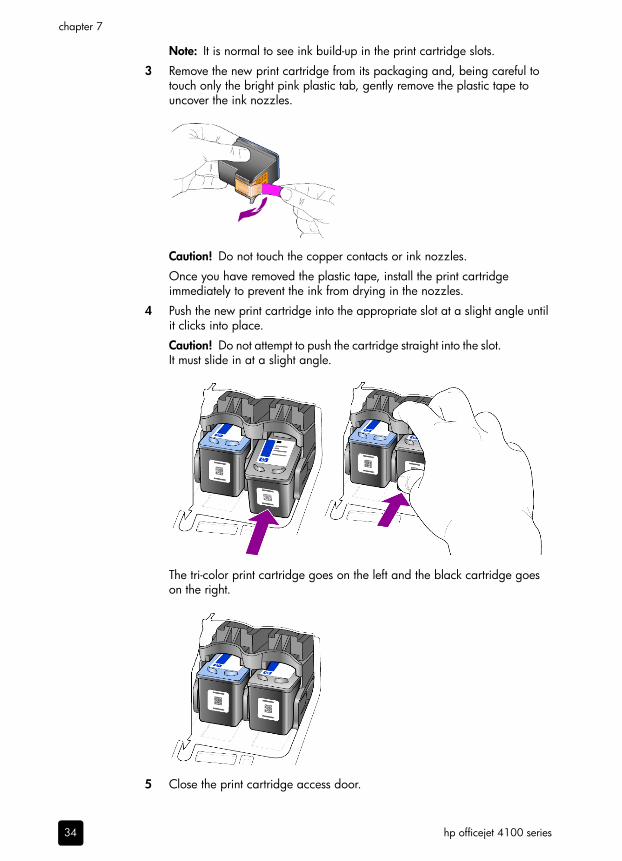
hp officejet 4100 series
chapter 7
34
Note It is normal to see ink build-up in the print cartridge slots
3 Remove the new print cartridge from its packaging and being careful to touch only the bright pink plastic tab gently remove the plastic tape to uncover the ink nozzles
Caution Do not touch the copper contacts or ink nozzles
Once you have removed the plastic tape install the print cartridge immediately to prevent the ink from drying in the nozzles
4 Push the new print cartridge into the appropriate slot at a slight angle until it clicks into place
Caution Do not attempt to push the cartridge straight into the slot It must slide in at a slight angle
The tri-color print cartridge goes on the left and the black cartridge goes on the right
5 Close the print cartridge access door
reference guide
maintain your hp officejet
35
align the print cartridgesThe HP Officejet prompts you to align cartridges every time you install or replace a print cartridge Aligning the cartridges ensures high-quality output
To align the print cartridges when prompted
1 Press Enter on the front panelAn align cartridges (test pattern) page prints
2 Load the align cartridges page face down in the ADF between the paper-width guides and press the Enter button again
3 Recycle or discard the page
To align the cartridges at any other time
1 Press Setup
2 Press 5 then press 2This selects the Maintenance menu and then selects the Align Print Cartridge option
3 Press EnterAn align cartridges (test pattern) page prints
4 Load the align cartridges page face down in the ADF between the paper-width guides and press the Enter button again
5 Recycle or discard the page
clean the print cartridgesUse this feature when the Self-Test Report shows streaking or white lines through any of the colored bars Do not clean print cartridges unnecessarily This wastes ink and shortens the life of the ink nozzles
1 Press Setup
2 Press 5 then press 1This selects the Maintenance menu and then selects the Clean Print Cartridge optionA page of patterns is printed The cartridges are cleaned Recycle or discard the pageIf copy or print quality still seem poor after you clean the print cartridges replace the print cartridge that is affected
restore factory defaultsYou can restore the original factory settings to what they were when you purchased your HP Officejet Choosing to restore your factory defaults restores all settings except date information and any scan settings you may have set
You can perform this process from the front panel only
1 Press Setup
2 Press 5 then press 3This selects Maintenance and then selects Restore Factory DefaultsThe factory default settings are restored
hp officejet 4100 series
chapter 7
36
set scroll speedThe Scroll Speed option lets you control the rate that text messages appear in the front-panel display You can choose Normal Fast or Slow The default is Normal
1 Press Setup
2 Press 5 then press 6This selects Maintenance and then selects Set Scroll Speed
3 Press until the desired speed appears then press Enter
set the prompt delay timeThe Prompt Delay option lets you control the amount of time before a message is displayed in the front-panel display You can choose Normal Fast or Slow The default is Normal
1 Press Setup
2 Press 5 then press 7This selects Maintenance and then selects Set Prompt Delay Time
3 Press until the delay time appears then press Enter
self-maintenance sounds During the life of your product you may hear various mechanical sounds This is a normal part of your unitrsquos self-maintenance
reference guide
maintain your hp officejet
37
setup menu optionsThe following options are available from the Setup button
1Last Transaction
2Fax Log
3Speed Dial List
4Self-Test Report
5Automatic Reports Setup
1Print Report
Use Setup to display the Print Report Speed Dial Setup Basic Fax Setup Advanced Fax Setup and Maintenance options
Press and to move to the setting you wantPress Enter to select the displayed setting
1Clean Print Cartridges
2Align Print Cartridges
3Restore Factory Defaults
4Reprint Faxes in Memory
5Set Language amp CountryRegion
6Set Scroll Speed
7Set Prompt Delay Time
5Maintenance2Speed Dial Setup
3Basic Fax Setup
4Advanced Fax Setup
1Individual Speed Dial
2Delete Speed Dial
3Print Speed Dial List
1Date and Time
2Fax Header
3Rings to Answer
4 Paper Size
5Tone or Pulse Dialing
6Ring and Beep Volume
7Fax Forwarding Black Only
1Automatic Reports Setup
2Answer Ring Pattern
3Busy Redial
4No Answer Redail
5Automatic Reduction
6Backup Fax Reception
7Error Correction Mode
hp officejet 4100 series
chapter 7
38
8
39
additional setup information
During the installation of the HP Officejet software a number of windows are displayed You should see the following
bull Installingbull Copying files bull A request to plug in the HP Officejetbull Green OK and check markbull Request to restart your computer (may not occur in all cases)bull Registration
If you did not see all of these windows there may be a problem with the installation Verify the following
bull The HP Director contains six icons (double-click the HP Director icon on the desktop)
bull The HP Officejet is listed in the Printers dialog boxbull There is an icon for the HP Officejet in the System Tray that indicates the
HP Officejet is ready
If the HP Director does not show six icons you may need to wait a few minutes for the HP Officejet to connect to your computer
possible installation problemsIf nothing appears on your computer screen after you insert the HP Officejet 4100 Series CD-ROM into your computerrsquos CD-ROM drive
1 From the Start menu choose Run
2 In the Run dialog box enter dsetupexe (if your CD-ROM drive is not assigned to drive letter d use the appropriate drive letter) then click OK
If the HP Director does not contain six icons do the following
bull Verify that the front-panel cover is attached then unplug the HP Officejet and plug it in again
bull Verify that the USB and power cables are plugged inndash Unplug the USB cable and plug it in againndash Do not attach the USB cable to a keyboard or nonpowered hubndash Verify that the USB cable is 3 meters or less in lengthndash If you have several USB devices attached to your computer you may
want to unplug the others during the installation
Note AppleTalk is not supported
bull Unplug the HP Officejet from the wall and plug it in againbull Restart your computer
hp officejet 4100 series
chapter 8
40
On Windows check the System Tray for applications that are running in the background and close them before restarting your computer
remove and reinstall your hp officejet softwareIf six icons do not appear in the Director you may need to uninstall and re-install the software Do not simply delete the HP Officejet program files from your hard drive Be sure to remove them properly using the uninstall utility provided in the HP Officejet program group
to uninstall from a Windows computer
1 Disconnect your HP Officejet from your computer
2 On the Windows taskbar click Start choose Programs or All Programs (XP) choose Hewlett-Packard choose hp officejet 4100 series then choose uninstall software
3 Follow the directions on the screenBe sure to disconnect your HP Officejet
4 If you are asked whether you would like to remove shared files click NoOther programs that use these files may not work properly if the files are deleted
5 After the program finishes removing the software disconnect your HP Officejet and restart your computer
Note It is important that you disconnect your HP Officejet before restarting your computer
6 To reinstall the software insert the HP Officejet 4100 Series CD-ROM into your computerrsquos CD-ROM drive and follow the instructions that appear
7 After the software is installed connect and turn on your HP Officejet following the onscreen instructions and the instructions in your Setup PosterAfter connecting and turning on your HP Officejet you may have to wait several minutes for all of the Plug and Play events to completeWhen the software installation is complete you will see a Status Monitor icon in the System Tray
8 To verify that the software is properly installed double-click on the HP Director icon on the desktop If the HP Director shows six icons the software has been properly installed
to uninstall from a Macintosh computer
1 Disconnect your HP Officejet from your computer
2 Double-click on ApplicationsHP All-in-One Software folder
reference guide
additional setup information
41
3 Double-click on HP Uninstaller
4 Follow the directions that appear on the screen
5 After the program finishes removing the software disconnect your HP Officejet and restart your computer
6 To reinstall the software insert the HP Officejet 4100 Series CD-ROM into your computerrsquos CD-ROM drive
Note When re-installing the software follow the instructions on the Setup Poster Do not connect the HP Officejet to your computer until after you have completed the software installation
7 On the desktop open the CD-ROM double-click on hp all-in-one installer and follow the instructions that appear
connect your hp officejet to a phone modem or answering machine
The HP Officejet can share a phone line with a phone a modem or an aswering machine When sharing a phone line with an answering machine the HP Officejet will answer fax calls and direct voice calls to the answering machine
Note For information on connecting your HP Officejet to your computer and phone line refer to the Setup Poster that came with your unit
to connect your hp officejet to a phone modem or answering machine
1 Remove the white plastic stopper from connector 2 on the back of the HP Officejet
To connect more than one device to connector 2 on the HP Officejet you must purchase a Y-splitter and plug it into connector 2
2 Connect the phone cord from the phone modem or answering machine to connector 2 (or Y-splitter)
Caution Do not use the phone cord that came with the HP Officejet for this purpose That phone cord must connect connector 1 on the HP Officejet to the wall jack for your phone system See the Setup Poster for details
3 If you are connecting an answering machine see set the number of rings before answering on page 21 for instructions on setting the number of rings correctly or change the answer ring pattern (distinctive ringing) on page 26 for information on incoming ring patterns
4 If you are connecting a modem turn off its fax-receive feature
connector 2 on the HP Officejet
connector 1 on the HP Officejet
hp officejet 4100 series
chapter 8
42
additional troubleshooting helpYou may want to refer to the readme file for more information on possible installation problems On Windows you can access the readme file from the Start button on the taskbar select Programs Hewlett-Packard hp officejet 4100 series View the Readme File On Macintosh you can access the readme file by double-clicking on the icon located in the top-level folder of the HP Officejet software CD-ROM
The readme file provides more information including
bull Using the Re-install utility after a failed installation to return your PC to a state that will allow the HP Officejet to be re-installed
bull Using the Re-install utility on Windows 98 to recover from a Composite USB System Driver missing errorThis error may occur if the hardware is installed prior to installing the software After running the Re-install utility reboot your PC and install the HP Officejet software before connecting the HP Officejet to your computer
You can also find more information on this website
wwwhpcomsupport
9
43
technical information
Additional specifications information can be found in the HP Photo amp Imaging Help in the hp officejet 4100 series section
physical specifications
power specificationsbull Power consumption 75W maximumbull Source (Input Voltage) 100 to 240 VAC groundedbull Input Frequency 50 to 60 Hzbull Current 1A maximum
regulatory informationAdditional regulatory information can be found in the HP Photo amp Imaging Help The information in this section supercedes information in the HP Photo amp Imaging Help
doc statement deacuteclaration de conformiteacute (Canada)Le preacutesent appareil numeacuterique neacutemet pas de bruit radioeacutelectrique deacutepassant les limites applicables aux appareils numeacuteriques de la classe B prescrites dans le Regraveglement sur le brouillage radioeacutelectrique eacutedicteacute par le ministegravere des Communications du CanadaThis digital apparatus does not exceed the Class B limits for radio noise emissions from digital apparatus set out in the Radio Interference Regulations of the Canadian Department of Communications
notice to users of the Canadian telephone networkThis equipment meets the applicable Industry Canada Terminal Equipment Technical Specifications This is confirmed by the registration number The abbreviation IC before the registration number signifies that registration was performed based on a Declaration of Conformity indicating that Industry Canada technical specifications were met It does not imply that Industry Canada approved the equipment
Note The Ringer Equivalence Number (REN) assigned to each terminal device provides an indication of the maximum number of terminals allowed to be connected to a telephone interface The termination on an interface may consist of any combination of devices subject only to the requirement that the sum of the Ringer Equivalence Numbers of all the devices does not exceed 5
The REN for this product is 03B based on FCC Part 68 test results
height width depth weight (without print cartridges)
with paper trays and ADF closed
718 in (1824 cm) 1676 in (4258 cm) 825 in (2096 cm) 75 lbs (34 kg)
with ADF and paper tray extended
1030 in (2615 cm) 1676 in (4258 cm) 1854 in (4709 cm) 75 lbs (34 kg)
hp officejet 4100 series
chapter 9
44
notice to all users of the European Economic Area (EEA)
This product is designed to interwork with the analogue telephone networks in the following countriesregions
Network compatibility depends on customer selected settings which must be reset to use the equipment on a telephone network in a countryregion other than where the product was purchased Contact the vendor or Hewlett-Packard Company if addition product support is necessaryThis equipment has been certified by the manufacturer in accordance with Directive 19995EC (annex II) for Pan-European single-terminal connection to the public switched telephone network (PSTN) However due to differences between the individual PSTNs provided in different countriesregions the approval does not of itself give an unconditional assurance of successful operation on every PSTN network termination pointIn the event of problems you should contact your equipment supplier in the first instance
geraumluschemissionLpA lt 70 dBam Arbeitsplatzim Normalbetriebnach DIN 45635 T 19
notice to Korean customers
Germany UK Netherlands
France Spain Italy
Belgium Luxembourg Sweden
Austria Denmark Ireland
Norway Finland Switzerland
Greece Portugal
10
45
hp support
This section explains the support services information provided by Hewlett-Packard If you are unable to find the answer you need in the printed or onscreen documentation supplied with your product you can contact one of the HP support services listed in the following pages Some support services are available only in the US and Canada while others are available in many countriesregions worldwide If a support service number is not listed for your countryregion contact your nearest authorized HP dealer for help
get support and other information from the internetIf you have Internet access you can get help from the following HP website
wwwhpcomsupportThe Web site offers technical support drivers supplies and ordering information
hp customer supportSoftware programs from other companies may be included with your HP Officejet If you experience problems with any of those programs you will receive the best technical assistance by calling the experts at that companyIf you need to contact HP Customer Support do the following before you call
1 Make sure thata Your unit is plugged in and turned onb The specified print cartridges are installed correctlyc The recommended paper is properly loaded in the input tray
2 Reset your unita Turn off the unit using the On button located on the unitrsquos front panelb Unplug the power cord from the back of the unitc Plug the power cord back into the unitd Turn on the unit using the On button
3 For more information check the HP website at wwwhpcomsupport
4 If you are still experiencing problems and need to speak with an HP Customer Support Representativendash Have your service ID and serial number ready To display your service ID and
serial number on the front panel do the following Press Enter and Start Color at the same time until the service ID appears in the front-panel display From this display press the right arrow until the serial number displays
ndash Print a Self-Test Report See print a self-test report on page 32 for information on printing this report
ndash Make a color copyndash Be prepared to describe your problem in detail
5 Call HP Customer Support Be near your unit when you call
call in the US during warrantyCall (208) 323-2551 This service is free during the warranty period however your standard long-distance phone charges still apply A fee may apply outside the warranty period
hp officejet 4100 series
chapter 10
46
US phone support is available in both English and Spanish languages 24 hours a day 7 days a week (days and hours of support may change without notice)
call elsewhere in the worldThe numbers listed below are current as of the printing date of this guide For a list of current international HP Support Service numbers visit this address and choose your own countryregion or language
wwwhpcomsupportFor Korea you can also visit this address
httpwwwhpcokrYou can call the HP support center in the following countriesregions If your countryregion is not listed contact your local dealer or nearest HP Sales and Support Office to find out how to obtain servicesSupport service is free during the warranty period however your standard long-distance phone charges will apply In some cases a flat fee per single incident will also applyFor phone support in Europe please check for the details and conditions of phone support in your countryregion by consulting the following Web site
wwwhpcomsupportAlternatively you can ask your dealer or call HP at the phone number indicated in this booklet As part of our constant efforts to improve our phone support service we advise you to check our website on a regular basis for new information regarding service features and delivery
countryregion hp technical support countryregion hp technical support
Algeria1 +213 (0) 61564 543 Malaysia 1-800-805405
Argentina 0810-555-5520 Mexico 01-800-472-6684
Australia +61 3 8877 80001902 910 910
Mexico (Mexico City) 5258-9922
Austria +43 (0) 810 00 6080 Morocco1 +212 22404 747
Bahrain (Dubai) 800 728 Netherlands +31 (0) 20 606 8751
Belgium (Dutch) +32 (0) 2 626 8806 New Zealand 0800 441 147
Belgium (French) +32 (0) 2 626 8807 Norway +47 22 11 6299
Brazil (Grande Sao Paulo) (11) 3747 7799 Oman +971 4 883 8454
Brazil (Demais Localidades) 0800 157751 Palestine +971 4 883 8454
Canada during warranty (905) 206 4663 Panama 001-800-7112884
Canada post-warranty(per-call charge)
1-877-621-4722 Peru 0-800-10111
Caribbean amp Central America
1-800-711-2884 Philippines 632-867-3551
Chile 800-360-999 Poland +48 22 865 98 00
China 86 10 6868 7980 Portugal +351 21 3176333
Colombia 9-800-114-726 Puerto Rico 1-877-2320-589
Costa Rica 0-800-011-0524 Qatar +971 4 883 8454
Czech Republic +420 (0) 261307310 Romania +40 1 315 44 42or local 01 3154442
reference guide
hp support
47
call in Australia post-warrantyIf your product is not under warranty you can call 03 8877 8000 A per-incident out-of-warranty support fee of $2750 (inc GST) will be charged to your credit card You can also call 1902 910 910 ($2750 charged to your phone account) from 900 AM to 500 PM Monday through Friday (Charges and support hours are subject to change without notice)
prepare your unit for shipmentIf after contacting HP Customer Support or returning to the point of purchase you are requested to send your unit in for service please follow the power off and rebox steps below to avoid further damage to the HP product
Denmark +45 39 29 4099 Russian Federation Moscow +7 095 797 3520
Ecuador 1800-711-2884 Russian Federation St Petersburg
+7 812 346 7997
Europe (English) +44 (0) 207 512 5202 Saudi Arabia +800 897 14440
Egypt 02 532 5222 Singapore 65 6272 5300
Finland +358 (0) 203 47 288 Slovakia +421 (0) 2 682 08080
France (034 Euromin) +0892 69 60 22 South Africa (inside RSA) 086 000 1030
Germany (012 Euromin) +49 (0) 180 52 58 143 South Africa (inside RSA) +27-11 258 9301
Greece +30 1060 73 603 Spain +34 902 321 123
Hong Kong (SAR) +85 (2) 3002 8555 Sweden +46 (0)8 619 2170
Guatemala 1800-995-5105 Switzerland 2 +41 (0) 84 880 1111
Hungary +36 (0) 1 382 1111 Taiwan +886-2-2717-00550800 010 055
India 1-600-11226791 11 682 6035
Thailand +66 (2) 661 4000
Indonesia 62-21-350-3408 Tunisia1 +216 1891 222
Ireland +353 (0) 1 662 5525 Turkey +90 216 579 7171
Israel +972 (0) 9 8304848 Ukraine +7 (380-44) 490-3520
Italy +39 (0) 226410350 United Arab Emirates +971 4 883 8454
Japan 0570 000 511+81 3 3335 9800
United Kingdom +44 (0) 207 512 52 02
Jordan +971 4 883 8454 Venezuela 0800-47468368 or800-477-7777
Korea (Seoul) +82 (2) 3270 0700 Venezuela (Caracas) (502) 207-8488
Korea (outside Seoul) 080 999 0700 Vietnam 84 (0) 8 823 4530
Kuwait +971 4 883 8454 Yemen +971 4 883 8454
Lebanon +971 4 883 8454
1 This Call Center supports French speaking customers from the following countriesregions Morocco Tunisia and Algeria
2 This Call Center supports German French and Italian speaking customers in Switzerland
countryregion hp technical support countryregion hp technical support
hp officejet 4100 series
chapter 10
48
Note When transporting your HP Officejet make sure that the pens have been removed the HP Officejet has been properly shut down by pressing the power button and you have allowed time for the carriage to return to the service station and for the scanner to return to its parked position
1 Turn on the unitDisregard steps 1 through 6 if your unit will not turn on and the print carriage is in the home position You will not be able to remove the print cartridges Proceed to step 7
2 Open the print cartridge access doorThe print carriage moves into view
3 See replace the print cartridges on page 33 for information on removing the print cartridges
Caution Remove both print cartridges Failure to do so may damage your unit
4 Place the print cartridges in an airtight bag so they will not dry out and put them aside (do not send them with the unit unless instructed to by the HP customer support call agent)
5 Turn off the unit
6 Close the print cartridge access door
7 Remove the front panel cover as followsa Grasp the front of the front panel cover with two hands as shownb Firmly lift the front panel cover to unsnap it from the unit
8 Retain the front panel cover Do not return the front panel cover with the unit
9 If available pack the unit for shipment using the original packing materials or the packaging materials that come with your exchange unit
If you do not have the original packaging materials please use other adequate packaging materials Shipping damage caused by improper packaging andor improper transportation is not covered under the warranty
reference guide
hp support
49
10 Place the return shipping label on the outside of the box
11 Include the following items in the boxndash A complete description of symptoms for service personnel (samples of print
quality problems are helpful)ndash A copy of the sales slip or other proof of purchase to establish the warranty
coverage periodndash Your name address and a phone number where you can be reached during
the day
hp distribution centerTo order HP Officejet software a copy of the printed Reference Guide a setup poster or other customer-replaceable parts do one of the following bull In the US or Canada call (208) 323 2551bull Visit this website
httpwwwhpcomcposupportsoftwarehtml
hp officejet 4100 series
chapter 10
50
11
51
warranty information
HP Officejet 4100 seriesDuration of Limited Warranty (hardware and labor) 1 YearDuration of Limited Warranty (CD media) 90 DaysDuration of Limited Warranty (print cartridges) Until the HP ink is depleted or the ldquoend of warrantyrdquo date printed on the cartridge has been reached whichever occurs first
warranty service
express serviceTo obtain HP express repair service the customer must contact an HP service office or an HP Customer Support Center for basic troubleshooting first See hp customer support on page 45 for steps to take before calling Customer SupportIf a customer unit needs a minor part replacement and these parts can normally be replaced by the customer the customer-replaceable components may be serviced through expedited part shipment In this event HP will prepay shipping charges duty and taxes provide telephone assistance on replacement of the component and pay shipping charges duty and taxes for any part that HP asks to be returnedThe HP Customer Support Center may direct customers to designated authorized service providers who are certified by HP to service the HP product
warranty upgradesUpgrade your standard factory warranty to a total of three years with the HP SUPPORTPACK Service coverage begins on product purchase date and the pack must be purchased within the first 180 days of product purchase This program offers phone support from 600 AM to 1000 PM Mountain Standard Time (MST) Monday through Friday and 900 AM to 400 PM (MST) on Saturdays If during your technical support call it is determined that you need a replacement product then HP will ship you this product next business day free of charge Available in US onlyFor more information please call 1-888-999-4747 or visit the following HP Web site
httpwwwhpcomgohpsupportpack
Outside the US please call your local HP Customer Support office See call elsewhere in the world on page 46 for a list of international Customer Support numbers
returning your hp officejet for serviceBefore returning your HP Officejet for service you must call HP Customer Support See hp customer support on page 45 for steps to take before calling Customer Support
hewlett-packard limited global warranty statement
extent of limited warrantyHewlett-Packard (ldquoHPrdquo) warrants to the end-user customer (ldquoCustomerrdquo) that each HP Officejet 4100 Series product (ldquoProductrdquo) including related software accessories media and supplies shall be free from defects in material and workmanship for the duration which begins on the date of purchase by the Customer
hp officejet 4100 series
chapter 11
52
For each software Product HPrsquos limited warranty applies only to a failure to execute programming instructions HP does not warrant that the operation of any Product shall be uninterrupted or error freeHPrsquos limited warranty covers only those defects which arise as a result of normal use of a Product and does not cover any other problems including those which arise as a result of (a) improper maintenance or modification (b) software accessories media or supplies not provided or supported by HP or (c) operation outside the Productrsquos specificationsFor any hardware Product the use of a non-HP print cartridge or a refilled print cartridge does not affect either the warranty to the Customer or any HP support contract with the Customer However if Product failure or damage is attributable to the use of a non-HP or refilled print cartridge HP shall charge its standard labor and materials charges to service the Product for the failure or damageIf HP receives during the applicable warranty period notice of a defect in any Product HP shall either repair or replace the defective Product at HPrsquos option Where labor charges are not covered by HPrsquos limited warranty repairs shall be at HPrsquos standard charges for laborIf HP is unable to repair or replace as applicable a defective Product which is covered by HPrsquos warranty HP shall within a reasonable time after being notified of the defect refund the purchase price for the ProductHP shall have no obligation to repair replace or refund until the Customer returns the defective Product to HPAny replacement product may be either new or like-new provided that it has functionality at least equal to that of the Product being replacedHP products including each Product may contain remanufactured parts components or materials equivalent to new in performanceHPs limited warranty for each Product is valid in any countryregion or locality where HP has a support presence for the Product and where HP has marketed the Product The level of warranty service may vary according to local standards HP shall have no obligation to alter the form fit or function of the Product in order to make it operate in a countryregion or locality for which the Product was never intended to operate
limitations of warrantyTO THE EXTENT ALLOWED BY LOCAL LAW NEITHER HP NOR ITS THIRD PARTY SUPPLIERS MAKE ANY OTHER WARRANTY OR CONDITION OF ANY KIND WHETHER EXPRESS OR IMPLIED WITH RESPECT TO THE COVERED HP PRODUCTS AND SPECIFICALLY DISCLAIM THE IMPLIED WARRANTIES OR CONDITIONS OF MERCHANTABILITY SATISFACTORY QUALITY AND FITNESS FOR A PARTICULAR PURPOSE
limitations of liabilityTo the extent allowed by local law the remedies provided in this Limited Warranty Statement are the Customerrsquos sole and exclusive remediesTO THE EXTENT ALLOWED BY LOCAL LAW EXCEPT FOR THE OBLIGATIONS SPECIFICALLY SET FORTH IN THIS LIMITED WARRANTY STATEMENT IN NO EVENT SHALL HP OR ITS THIRD PARTY SUPPLIERS BE LIABLE FOR DIRECT INDIRECT SPECIAL INCIDENTAL OR CONSEQUENTIAL DAMAGES WHETHER BASED ON CONTRACT TORT OR ANY OTHER LEGAL THEORY AND WHETHER ADVISED OF THE POSSIBILITY OF SUCH DAMAGES
local lawThis Limited Warranty Statement gives the Customer specific legal rights The Customer may also have other rights which vary from state to state in the United States from province to province in Canada and from countryregion to countryregion elsewhere in the world
reference guide
warranty information
53
To the extent this Limited Warranty Statement is inconsistent with local law this Statement shall be deemed modified to be consistent with such local law Under such local law certain disclaimers and limitations of this Statement may not apply to the Customer For example some states in the United States as well as some governments outside the United States (including provinces in Canada) mayPreclude the disclaimers and limitations in this Statement from limiting the statutory rights of a consumer (eg the United Kingdom)Otherwise restrict the ability of a manufacturer to enforce such disclaimers or limitations orGrant the Customer additional warranty rights specify the duration of implied warranties which the manufacturer cannot disclaim or not allow limitations on the duration of implied warrantiesFOR CONSUMER TRANSACTIONS IN AUSTRALIA AND NEW ZEALAND THE TERMS IN THIS LIMITED WARRANTY STATEMENT EXCEPT TO THE EXTENT LAWFULLY PERMITTED DO NOT EXCLUDE RESTRICT OR MODIFY AND ARE IN ADDITION TO THE MANDATORY STATUTORY RIGHTS APPLICABLE TO THE SALE OF THE COVERED HP PRODUCTS TO SUCH CUSTOMERS
hp officejet 4100 series
chapter 11
54
55
index
Numerics4-by-6 inch photo paper
load 10 12
AADF 7adjust
volume for fax 25align print cartridges 35Answer Ring Pattern 26automatic document feeder 7automatic reduction
fax 25
Bbest copy quality 13busy number
redial automatically 23
Ccancel
scan 18scheduled fax 21
cartridgesalign 35replace 33
cleanprint cartridges 35the exterior 32the glass 31white strip 32
colorenhance 14fax 20fax from front panel 20
contrastchange for fax 23photo color 14
copy 13 16change default settings 15enhance 14fit to page 16lighten or darken 14menu options 16number of copies 14photo 15quality 13reduce or enlarge 14settings 13 15
speed 13tutorial 4
Customer Support 45web site 45
Ddarken a copy 14date
setting 27default settings
restore 35director review 4distinctive ringing 26
Eenhance copies 14enlarge copy 14 16envelopes
load 9Error Correction Mode
(ECM) 25
Ffactory defaults
restore 35fast copy quality 13fax 28
adjust volume 25automated reports 22cancel fax forward 24cancel scheduled 21change Answer Ring
Pattern 26change contrast 23change resolution 22change settings 19control appearance 22create individual speed-dial
settings 26delete speed-dial
settings 27distinctive ringing 26Error Correction Mode
(ECM) 25forward faxes 24header 27in color 20in color from front panel 20manual reports 22
menu 29print reports 22receive 21receive manually 21redial busy or unanswered
number 23schedule 20send from front panel 19set automatic reduction 25set date and time 27set the number of rings 21settings 27 28setup menu options 29speed dials 19test 28
fit to page 16forward faxes 24
cancel 24front panel
display scroll speed 36enter text 28send a fax 19setting prompt delay 36tutorial 3
Gglass
cleaning 31greeting cards
load 11
Hhelp 1HP Customer Support 45
calling 45HP Director 4HP distribution center 49HP Officjet
preparing to ship 47HP papers
tips on loading 11
Iindividual speed-dial settings
create 26ink cartridges see print
cartridgesinkjet paper
load 11
index
hp officejet 4100 series56
Kkeypad
enter text 28
Llabels
load 12lighten copies 14load
change the paper type 12envelopes 9original in ADF 7paper 7photo paper 10 12postcards 10 12print cartridges 33set the paper size 12tips 11
Mmaintenance
align print cartridges 35clean print cartridges 35clean the exterior 32clean the glass 31clean the white strip 32normal sounds 36replace print cartridges 33restore factory defaults 35self-maintenance
sounds 36self-test report 32
menuscopy options 16fax 29fax setup 29maintenance 37print reports 37
Nnormal copy quality 13number of copies
set 14number of rings
set 21
Oorder print cartridges 60originals
load in ADF 7output tray 8
Ppaper
change default size for copy 12
change the type 12load 7recommended 7set the size 12tips on loading 11
paper size change for copy 12
paper trayload 7
phone numbers support services 45
photo paperload 10 12
photoscopy 15enhance copy 14
physical specifications 43postcards
load 10 12power
specifications 43print
envelopes 9fax reports 22self-test report 32
print cartridgesalign 35clean 35handling 32replace 33
prompt delaysetting 36
Qquick start
review the director 4use with a computer 4
Rreceive
fax 21redial
busy or unanswered number 23
reduce copy 14 16regulatory information 43reinstall software 40reports
generate automatically for fax 22
generate manually for fax 22
print 22self-test 32
resolution
change for fax 22restore factory settings 35returning your HP Officejet for
service 51
Sscan
from front panel 17stop 18
schedule a fax 20scroll speed
setting 36self-test report 32send
cancel forward faxes 24color fax 20color fax from front
panel 20forward faxes 24
settingscopy 13 15fax 27 28prompt delay 36scroll speed 36
setupadditional information 39menu 29
shippingyour HP Officejet 47
softwareremove and reinstall 40
soundsself-maintenance 36
specificationsphysical 43power 43
speed dials 19create individual
settings 26delete settings 27
stopscan 18scheduled fax 21
subscriber identification code 27
support services 45
Ttelephone line
multiple numbers 26telephone numbers 45text
enhance 14enter from front panel 28
time
index
reference guide 57
setting 27transparency film
recommended 7tips on loading 11
troubleshootingremove and reinstall
software 40T-shirt Transfer Iron-On
load 11tutorial
front panel 3make a copy 4
Uunanswered number
redial automatically 23
Vvolume
adjust 25
Wwarranty 45
service 51statement 51upgrades 51
white stripcleaning 32
hp officejet 4100 series
chapter 12
58
declaration of conformityAccording to ISOIEC Guide 22 and EN 45014
Manufacturerrsquos Name and Address
Hewlett-Packard Company 16399 West Bernardo Drive San Diego CA 92127-1899 USA
declares that the product
Product Name hp officejet 4100 series (Q1608A)
Model Number(s) officejet 4110 (Q1609A) officejet 4110xi (Q1610A) officejet 4110v (Q1611A) officejet 4105 (Q1612A) officejet 4105z (Q1613A) officejet 4115 (Q1614A)
Product Options All
conforms to the following Product Specifications
Safety EN609501992 +A1 A2 A3 A4 amp A11
IEC609501991 +A1 A2 A3 amp A4
UL1950CSA 222 No 950 3rd Edn 1995
NOM-019-SCFI-1993
EMC CISPR221993 +A1 amp A2 EN550221994 +A1 amp A2 -Class B
CISPR241997EN550241998
IEC 61000-3-21995 EN61000-3-21995
IEC 61000-3-31994 EN61000-3-31995
ASNZS 3548 1992
CNS13438 1997
FCC Part 15-Class B ICES-003 Issue 2 VCCI-2
GB 9254-1998
Telecom TBR21 1998
Supplementary Information
The Product herewith complies with the requirements of the Low Voltage Directive 7323EEC the EMC Directive 89336EEC and the RampTTE Directive 19995EC (ANNEX II) carries the CE marking accordingly
European Contact for regulatory topics only Your local Hewlett-Packard Sales and Service Office orHewlett-Packard GmbH
Department HQ-TRE Herrenberger Strasse 140 D-71034 Boumlblingen Germany (FAX + 49-7031-14-3143)
order mediaTo order media such as HP Premium Inkjet Paper HP Premium Inkjet Transparency Film HP Iron-On T-shirt Transfer paper or HP Greeting Cards go to
wwwhpshoppingcom
For orders in countries other than the US and Canada select other countries then click Yes to leave hpshoppingcom From this website you can access hpshoppingcom for your specific language or countryregion
order print cartridges
If you have Internet access you can get more information from the HP website at
wwwhpcomsupport
print cartridges hp reorder number
HP black print cartridge 56 19 ml black print cartridge
HP color print cartridgeHP tri-color print cartridge
57 17 ml color print cartridge28 8 ml color print cartridge
Visit the hp officejet information centerIt has everything you need to get the most value from your HP Officejet
bull Technical Supportbull Supplies and Ordering Informationbull Project Tipsbull Ways to Enhance Your Product
wwwhpcomsupport
copy 2003 Hewlett-Packard Company
Printed in the USA Mexico Germany Singapore or China
Q1608-90163Q1608-90163
Q1608-90163

reference guide
maintain your hp officejet
35
align the print cartridgesThe HP Officejet prompts you to align cartridges every time you install or replace a print cartridge Aligning the cartridges ensures high-quality output
To align the print cartridges when prompted
1 Press Enter on the front panelAn align cartridges (test pattern) page prints
2 Load the align cartridges page face down in the ADF between the paper-width guides and press the Enter button again
3 Recycle or discard the page
To align the cartridges at any other time
1 Press Setup
2 Press 5 then press 2This selects the Maintenance menu and then selects the Align Print Cartridge option
3 Press EnterAn align cartridges (test pattern) page prints
4 Load the align cartridges page face down in the ADF between the paper-width guides and press the Enter button again
5 Recycle or discard the page
clean the print cartridgesUse this feature when the Self-Test Report shows streaking or white lines through any of the colored bars Do not clean print cartridges unnecessarily This wastes ink and shortens the life of the ink nozzles
1 Press Setup
2 Press 5 then press 1This selects the Maintenance menu and then selects the Clean Print Cartridge optionA page of patterns is printed The cartridges are cleaned Recycle or discard the pageIf copy or print quality still seem poor after you clean the print cartridges replace the print cartridge that is affected
restore factory defaultsYou can restore the original factory settings to what they were when you purchased your HP Officejet Choosing to restore your factory defaults restores all settings except date information and any scan settings you may have set
You can perform this process from the front panel only
1 Press Setup
2 Press 5 then press 3This selects Maintenance and then selects Restore Factory DefaultsThe factory default settings are restored
hp officejet 4100 series
chapter 7
36
set scroll speedThe Scroll Speed option lets you control the rate that text messages appear in the front-panel display You can choose Normal Fast or Slow The default is Normal
1 Press Setup
2 Press 5 then press 6This selects Maintenance and then selects Set Scroll Speed
3 Press until the desired speed appears then press Enter
set the prompt delay timeThe Prompt Delay option lets you control the amount of time before a message is displayed in the front-panel display You can choose Normal Fast or Slow The default is Normal
1 Press Setup
2 Press 5 then press 7This selects Maintenance and then selects Set Prompt Delay Time
3 Press until the delay time appears then press Enter
self-maintenance sounds During the life of your product you may hear various mechanical sounds This is a normal part of your unitrsquos self-maintenance
reference guide
maintain your hp officejet
37
setup menu optionsThe following options are available from the Setup button
1Last Transaction
2Fax Log
3Speed Dial List
4Self-Test Report
5Automatic Reports Setup
1Print Report
Use Setup to display the Print Report Speed Dial Setup Basic Fax Setup Advanced Fax Setup and Maintenance options
Press and to move to the setting you wantPress Enter to select the displayed setting
1Clean Print Cartridges
2Align Print Cartridges
3Restore Factory Defaults
4Reprint Faxes in Memory
5Set Language amp CountryRegion
6Set Scroll Speed
7Set Prompt Delay Time
5Maintenance2Speed Dial Setup
3Basic Fax Setup
4Advanced Fax Setup
1Individual Speed Dial
2Delete Speed Dial
3Print Speed Dial List
1Date and Time
2Fax Header
3Rings to Answer
4 Paper Size
5Tone or Pulse Dialing
6Ring and Beep Volume
7Fax Forwarding Black Only
1Automatic Reports Setup
2Answer Ring Pattern
3Busy Redial
4No Answer Redail
5Automatic Reduction
6Backup Fax Reception
7Error Correction Mode
hp officejet 4100 series
chapter 7
38
8
39
additional setup information
During the installation of the HP Officejet software a number of windows are displayed You should see the following
bull Installingbull Copying files bull A request to plug in the HP Officejetbull Green OK and check markbull Request to restart your computer (may not occur in all cases)bull Registration
If you did not see all of these windows there may be a problem with the installation Verify the following
bull The HP Director contains six icons (double-click the HP Director icon on the desktop)
bull The HP Officejet is listed in the Printers dialog boxbull There is an icon for the HP Officejet in the System Tray that indicates the
HP Officejet is ready
If the HP Director does not show six icons you may need to wait a few minutes for the HP Officejet to connect to your computer
possible installation problemsIf nothing appears on your computer screen after you insert the HP Officejet 4100 Series CD-ROM into your computerrsquos CD-ROM drive
1 From the Start menu choose Run
2 In the Run dialog box enter dsetupexe (if your CD-ROM drive is not assigned to drive letter d use the appropriate drive letter) then click OK
If the HP Director does not contain six icons do the following
bull Verify that the front-panel cover is attached then unplug the HP Officejet and plug it in again
bull Verify that the USB and power cables are plugged inndash Unplug the USB cable and plug it in againndash Do not attach the USB cable to a keyboard or nonpowered hubndash Verify that the USB cable is 3 meters or less in lengthndash If you have several USB devices attached to your computer you may
want to unplug the others during the installation
Note AppleTalk is not supported
bull Unplug the HP Officejet from the wall and plug it in againbull Restart your computer
hp officejet 4100 series
chapter 8
40
On Windows check the System Tray for applications that are running in the background and close them before restarting your computer
remove and reinstall your hp officejet softwareIf six icons do not appear in the Director you may need to uninstall and re-install the software Do not simply delete the HP Officejet program files from your hard drive Be sure to remove them properly using the uninstall utility provided in the HP Officejet program group
to uninstall from a Windows computer
1 Disconnect your HP Officejet from your computer
2 On the Windows taskbar click Start choose Programs or All Programs (XP) choose Hewlett-Packard choose hp officejet 4100 series then choose uninstall software
3 Follow the directions on the screenBe sure to disconnect your HP Officejet
4 If you are asked whether you would like to remove shared files click NoOther programs that use these files may not work properly if the files are deleted
5 After the program finishes removing the software disconnect your HP Officejet and restart your computer
Note It is important that you disconnect your HP Officejet before restarting your computer
6 To reinstall the software insert the HP Officejet 4100 Series CD-ROM into your computerrsquos CD-ROM drive and follow the instructions that appear
7 After the software is installed connect and turn on your HP Officejet following the onscreen instructions and the instructions in your Setup PosterAfter connecting and turning on your HP Officejet you may have to wait several minutes for all of the Plug and Play events to completeWhen the software installation is complete you will see a Status Monitor icon in the System Tray
8 To verify that the software is properly installed double-click on the HP Director icon on the desktop If the HP Director shows six icons the software has been properly installed
to uninstall from a Macintosh computer
1 Disconnect your HP Officejet from your computer
2 Double-click on ApplicationsHP All-in-One Software folder
reference guide
additional setup information
41
3 Double-click on HP Uninstaller
4 Follow the directions that appear on the screen
5 After the program finishes removing the software disconnect your HP Officejet and restart your computer
6 To reinstall the software insert the HP Officejet 4100 Series CD-ROM into your computerrsquos CD-ROM drive
Note When re-installing the software follow the instructions on the Setup Poster Do not connect the HP Officejet to your computer until after you have completed the software installation
7 On the desktop open the CD-ROM double-click on hp all-in-one installer and follow the instructions that appear
connect your hp officejet to a phone modem or answering machine
The HP Officejet can share a phone line with a phone a modem or an aswering machine When sharing a phone line with an answering machine the HP Officejet will answer fax calls and direct voice calls to the answering machine
Note For information on connecting your HP Officejet to your computer and phone line refer to the Setup Poster that came with your unit
to connect your hp officejet to a phone modem or answering machine
1 Remove the white plastic stopper from connector 2 on the back of the HP Officejet
To connect more than one device to connector 2 on the HP Officejet you must purchase a Y-splitter and plug it into connector 2
2 Connect the phone cord from the phone modem or answering machine to connector 2 (or Y-splitter)
Caution Do not use the phone cord that came with the HP Officejet for this purpose That phone cord must connect connector 1 on the HP Officejet to the wall jack for your phone system See the Setup Poster for details
3 If you are connecting an answering machine see set the number of rings before answering on page 21 for instructions on setting the number of rings correctly or change the answer ring pattern (distinctive ringing) on page 26 for information on incoming ring patterns
4 If you are connecting a modem turn off its fax-receive feature
connector 2 on the HP Officejet
connector 1 on the HP Officejet
hp officejet 4100 series
chapter 8
42
additional troubleshooting helpYou may want to refer to the readme file for more information on possible installation problems On Windows you can access the readme file from the Start button on the taskbar select Programs Hewlett-Packard hp officejet 4100 series View the Readme File On Macintosh you can access the readme file by double-clicking on the icon located in the top-level folder of the HP Officejet software CD-ROM
The readme file provides more information including
bull Using the Re-install utility after a failed installation to return your PC to a state that will allow the HP Officejet to be re-installed
bull Using the Re-install utility on Windows 98 to recover from a Composite USB System Driver missing errorThis error may occur if the hardware is installed prior to installing the software After running the Re-install utility reboot your PC and install the HP Officejet software before connecting the HP Officejet to your computer
You can also find more information on this website
wwwhpcomsupport
9
43
technical information
Additional specifications information can be found in the HP Photo amp Imaging Help in the hp officejet 4100 series section
physical specifications
power specificationsbull Power consumption 75W maximumbull Source (Input Voltage) 100 to 240 VAC groundedbull Input Frequency 50 to 60 Hzbull Current 1A maximum
regulatory informationAdditional regulatory information can be found in the HP Photo amp Imaging Help The information in this section supercedes information in the HP Photo amp Imaging Help
doc statement deacuteclaration de conformiteacute (Canada)Le preacutesent appareil numeacuterique neacutemet pas de bruit radioeacutelectrique deacutepassant les limites applicables aux appareils numeacuteriques de la classe B prescrites dans le Regraveglement sur le brouillage radioeacutelectrique eacutedicteacute par le ministegravere des Communications du CanadaThis digital apparatus does not exceed the Class B limits for radio noise emissions from digital apparatus set out in the Radio Interference Regulations of the Canadian Department of Communications
notice to users of the Canadian telephone networkThis equipment meets the applicable Industry Canada Terminal Equipment Technical Specifications This is confirmed by the registration number The abbreviation IC before the registration number signifies that registration was performed based on a Declaration of Conformity indicating that Industry Canada technical specifications were met It does not imply that Industry Canada approved the equipment
Note The Ringer Equivalence Number (REN) assigned to each terminal device provides an indication of the maximum number of terminals allowed to be connected to a telephone interface The termination on an interface may consist of any combination of devices subject only to the requirement that the sum of the Ringer Equivalence Numbers of all the devices does not exceed 5
The REN for this product is 03B based on FCC Part 68 test results
height width depth weight (without print cartridges)
with paper trays and ADF closed
718 in (1824 cm) 1676 in (4258 cm) 825 in (2096 cm) 75 lbs (34 kg)
with ADF and paper tray extended
1030 in (2615 cm) 1676 in (4258 cm) 1854 in (4709 cm) 75 lbs (34 kg)
hp officejet 4100 series
chapter 9
44
notice to all users of the European Economic Area (EEA)
This product is designed to interwork with the analogue telephone networks in the following countriesregions
Network compatibility depends on customer selected settings which must be reset to use the equipment on a telephone network in a countryregion other than where the product was purchased Contact the vendor or Hewlett-Packard Company if addition product support is necessaryThis equipment has been certified by the manufacturer in accordance with Directive 19995EC (annex II) for Pan-European single-terminal connection to the public switched telephone network (PSTN) However due to differences between the individual PSTNs provided in different countriesregions the approval does not of itself give an unconditional assurance of successful operation on every PSTN network termination pointIn the event of problems you should contact your equipment supplier in the first instance
geraumluschemissionLpA lt 70 dBam Arbeitsplatzim Normalbetriebnach DIN 45635 T 19
notice to Korean customers
Germany UK Netherlands
France Spain Italy
Belgium Luxembourg Sweden
Austria Denmark Ireland
Norway Finland Switzerland
Greece Portugal
10
45
hp support
This section explains the support services information provided by Hewlett-Packard If you are unable to find the answer you need in the printed or onscreen documentation supplied with your product you can contact one of the HP support services listed in the following pages Some support services are available only in the US and Canada while others are available in many countriesregions worldwide If a support service number is not listed for your countryregion contact your nearest authorized HP dealer for help
get support and other information from the internetIf you have Internet access you can get help from the following HP website
wwwhpcomsupportThe Web site offers technical support drivers supplies and ordering information
hp customer supportSoftware programs from other companies may be included with your HP Officejet If you experience problems with any of those programs you will receive the best technical assistance by calling the experts at that companyIf you need to contact HP Customer Support do the following before you call
1 Make sure thata Your unit is plugged in and turned onb The specified print cartridges are installed correctlyc The recommended paper is properly loaded in the input tray
2 Reset your unita Turn off the unit using the On button located on the unitrsquos front panelb Unplug the power cord from the back of the unitc Plug the power cord back into the unitd Turn on the unit using the On button
3 For more information check the HP website at wwwhpcomsupport
4 If you are still experiencing problems and need to speak with an HP Customer Support Representativendash Have your service ID and serial number ready To display your service ID and
serial number on the front panel do the following Press Enter and Start Color at the same time until the service ID appears in the front-panel display From this display press the right arrow until the serial number displays
ndash Print a Self-Test Report See print a self-test report on page 32 for information on printing this report
ndash Make a color copyndash Be prepared to describe your problem in detail
5 Call HP Customer Support Be near your unit when you call
call in the US during warrantyCall (208) 323-2551 This service is free during the warranty period however your standard long-distance phone charges still apply A fee may apply outside the warranty period
hp officejet 4100 series
chapter 10
46
US phone support is available in both English and Spanish languages 24 hours a day 7 days a week (days and hours of support may change without notice)
call elsewhere in the worldThe numbers listed below are current as of the printing date of this guide For a list of current international HP Support Service numbers visit this address and choose your own countryregion or language
wwwhpcomsupportFor Korea you can also visit this address
httpwwwhpcokrYou can call the HP support center in the following countriesregions If your countryregion is not listed contact your local dealer or nearest HP Sales and Support Office to find out how to obtain servicesSupport service is free during the warranty period however your standard long-distance phone charges will apply In some cases a flat fee per single incident will also applyFor phone support in Europe please check for the details and conditions of phone support in your countryregion by consulting the following Web site
wwwhpcomsupportAlternatively you can ask your dealer or call HP at the phone number indicated in this booklet As part of our constant efforts to improve our phone support service we advise you to check our website on a regular basis for new information regarding service features and delivery
countryregion hp technical support countryregion hp technical support
Algeria1 +213 (0) 61564 543 Malaysia 1-800-805405
Argentina 0810-555-5520 Mexico 01-800-472-6684
Australia +61 3 8877 80001902 910 910
Mexico (Mexico City) 5258-9922
Austria +43 (0) 810 00 6080 Morocco1 +212 22404 747
Bahrain (Dubai) 800 728 Netherlands +31 (0) 20 606 8751
Belgium (Dutch) +32 (0) 2 626 8806 New Zealand 0800 441 147
Belgium (French) +32 (0) 2 626 8807 Norway +47 22 11 6299
Brazil (Grande Sao Paulo) (11) 3747 7799 Oman +971 4 883 8454
Brazil (Demais Localidades) 0800 157751 Palestine +971 4 883 8454
Canada during warranty (905) 206 4663 Panama 001-800-7112884
Canada post-warranty(per-call charge)
1-877-621-4722 Peru 0-800-10111
Caribbean amp Central America
1-800-711-2884 Philippines 632-867-3551
Chile 800-360-999 Poland +48 22 865 98 00
China 86 10 6868 7980 Portugal +351 21 3176333
Colombia 9-800-114-726 Puerto Rico 1-877-2320-589
Costa Rica 0-800-011-0524 Qatar +971 4 883 8454
Czech Republic +420 (0) 261307310 Romania +40 1 315 44 42or local 01 3154442
reference guide
hp support
47
call in Australia post-warrantyIf your product is not under warranty you can call 03 8877 8000 A per-incident out-of-warranty support fee of $2750 (inc GST) will be charged to your credit card You can also call 1902 910 910 ($2750 charged to your phone account) from 900 AM to 500 PM Monday through Friday (Charges and support hours are subject to change without notice)
prepare your unit for shipmentIf after contacting HP Customer Support or returning to the point of purchase you are requested to send your unit in for service please follow the power off and rebox steps below to avoid further damage to the HP product
Denmark +45 39 29 4099 Russian Federation Moscow +7 095 797 3520
Ecuador 1800-711-2884 Russian Federation St Petersburg
+7 812 346 7997
Europe (English) +44 (0) 207 512 5202 Saudi Arabia +800 897 14440
Egypt 02 532 5222 Singapore 65 6272 5300
Finland +358 (0) 203 47 288 Slovakia +421 (0) 2 682 08080
France (034 Euromin) +0892 69 60 22 South Africa (inside RSA) 086 000 1030
Germany (012 Euromin) +49 (0) 180 52 58 143 South Africa (inside RSA) +27-11 258 9301
Greece +30 1060 73 603 Spain +34 902 321 123
Hong Kong (SAR) +85 (2) 3002 8555 Sweden +46 (0)8 619 2170
Guatemala 1800-995-5105 Switzerland 2 +41 (0) 84 880 1111
Hungary +36 (0) 1 382 1111 Taiwan +886-2-2717-00550800 010 055
India 1-600-11226791 11 682 6035
Thailand +66 (2) 661 4000
Indonesia 62-21-350-3408 Tunisia1 +216 1891 222
Ireland +353 (0) 1 662 5525 Turkey +90 216 579 7171
Israel +972 (0) 9 8304848 Ukraine +7 (380-44) 490-3520
Italy +39 (0) 226410350 United Arab Emirates +971 4 883 8454
Japan 0570 000 511+81 3 3335 9800
United Kingdom +44 (0) 207 512 52 02
Jordan +971 4 883 8454 Venezuela 0800-47468368 or800-477-7777
Korea (Seoul) +82 (2) 3270 0700 Venezuela (Caracas) (502) 207-8488
Korea (outside Seoul) 080 999 0700 Vietnam 84 (0) 8 823 4530
Kuwait +971 4 883 8454 Yemen +971 4 883 8454
Lebanon +971 4 883 8454
1 This Call Center supports French speaking customers from the following countriesregions Morocco Tunisia and Algeria
2 This Call Center supports German French and Italian speaking customers in Switzerland
countryregion hp technical support countryregion hp technical support
hp officejet 4100 series
chapter 10
48
Note When transporting your HP Officejet make sure that the pens have been removed the HP Officejet has been properly shut down by pressing the power button and you have allowed time for the carriage to return to the service station and for the scanner to return to its parked position
1 Turn on the unitDisregard steps 1 through 6 if your unit will not turn on and the print carriage is in the home position You will not be able to remove the print cartridges Proceed to step 7
2 Open the print cartridge access doorThe print carriage moves into view
3 See replace the print cartridges on page 33 for information on removing the print cartridges
Caution Remove both print cartridges Failure to do so may damage your unit
4 Place the print cartridges in an airtight bag so they will not dry out and put them aside (do not send them with the unit unless instructed to by the HP customer support call agent)
5 Turn off the unit
6 Close the print cartridge access door
7 Remove the front panel cover as followsa Grasp the front of the front panel cover with two hands as shownb Firmly lift the front panel cover to unsnap it from the unit
8 Retain the front panel cover Do not return the front panel cover with the unit
9 If available pack the unit for shipment using the original packing materials or the packaging materials that come with your exchange unit
If you do not have the original packaging materials please use other adequate packaging materials Shipping damage caused by improper packaging andor improper transportation is not covered under the warranty
reference guide
hp support
49
10 Place the return shipping label on the outside of the box
11 Include the following items in the boxndash A complete description of symptoms for service personnel (samples of print
quality problems are helpful)ndash A copy of the sales slip or other proof of purchase to establish the warranty
coverage periodndash Your name address and a phone number where you can be reached during
the day
hp distribution centerTo order HP Officejet software a copy of the printed Reference Guide a setup poster or other customer-replaceable parts do one of the following bull In the US or Canada call (208) 323 2551bull Visit this website
httpwwwhpcomcposupportsoftwarehtml
hp officejet 4100 series
chapter 10
50
11
51
warranty information
HP Officejet 4100 seriesDuration of Limited Warranty (hardware and labor) 1 YearDuration of Limited Warranty (CD media) 90 DaysDuration of Limited Warranty (print cartridges) Until the HP ink is depleted or the ldquoend of warrantyrdquo date printed on the cartridge has been reached whichever occurs first
warranty service
express serviceTo obtain HP express repair service the customer must contact an HP service office or an HP Customer Support Center for basic troubleshooting first See hp customer support on page 45 for steps to take before calling Customer SupportIf a customer unit needs a minor part replacement and these parts can normally be replaced by the customer the customer-replaceable components may be serviced through expedited part shipment In this event HP will prepay shipping charges duty and taxes provide telephone assistance on replacement of the component and pay shipping charges duty and taxes for any part that HP asks to be returnedThe HP Customer Support Center may direct customers to designated authorized service providers who are certified by HP to service the HP product
warranty upgradesUpgrade your standard factory warranty to a total of three years with the HP SUPPORTPACK Service coverage begins on product purchase date and the pack must be purchased within the first 180 days of product purchase This program offers phone support from 600 AM to 1000 PM Mountain Standard Time (MST) Monday through Friday and 900 AM to 400 PM (MST) on Saturdays If during your technical support call it is determined that you need a replacement product then HP will ship you this product next business day free of charge Available in US onlyFor more information please call 1-888-999-4747 or visit the following HP Web site
httpwwwhpcomgohpsupportpack
Outside the US please call your local HP Customer Support office See call elsewhere in the world on page 46 for a list of international Customer Support numbers
returning your hp officejet for serviceBefore returning your HP Officejet for service you must call HP Customer Support See hp customer support on page 45 for steps to take before calling Customer Support
hewlett-packard limited global warranty statement
extent of limited warrantyHewlett-Packard (ldquoHPrdquo) warrants to the end-user customer (ldquoCustomerrdquo) that each HP Officejet 4100 Series product (ldquoProductrdquo) including related software accessories media and supplies shall be free from defects in material and workmanship for the duration which begins on the date of purchase by the Customer
hp officejet 4100 series
chapter 11
52
For each software Product HPrsquos limited warranty applies only to a failure to execute programming instructions HP does not warrant that the operation of any Product shall be uninterrupted or error freeHPrsquos limited warranty covers only those defects which arise as a result of normal use of a Product and does not cover any other problems including those which arise as a result of (a) improper maintenance or modification (b) software accessories media or supplies not provided or supported by HP or (c) operation outside the Productrsquos specificationsFor any hardware Product the use of a non-HP print cartridge or a refilled print cartridge does not affect either the warranty to the Customer or any HP support contract with the Customer However if Product failure or damage is attributable to the use of a non-HP or refilled print cartridge HP shall charge its standard labor and materials charges to service the Product for the failure or damageIf HP receives during the applicable warranty period notice of a defect in any Product HP shall either repair or replace the defective Product at HPrsquos option Where labor charges are not covered by HPrsquos limited warranty repairs shall be at HPrsquos standard charges for laborIf HP is unable to repair or replace as applicable a defective Product which is covered by HPrsquos warranty HP shall within a reasonable time after being notified of the defect refund the purchase price for the ProductHP shall have no obligation to repair replace or refund until the Customer returns the defective Product to HPAny replacement product may be either new or like-new provided that it has functionality at least equal to that of the Product being replacedHP products including each Product may contain remanufactured parts components or materials equivalent to new in performanceHPs limited warranty for each Product is valid in any countryregion or locality where HP has a support presence for the Product and where HP has marketed the Product The level of warranty service may vary according to local standards HP shall have no obligation to alter the form fit or function of the Product in order to make it operate in a countryregion or locality for which the Product was never intended to operate
limitations of warrantyTO THE EXTENT ALLOWED BY LOCAL LAW NEITHER HP NOR ITS THIRD PARTY SUPPLIERS MAKE ANY OTHER WARRANTY OR CONDITION OF ANY KIND WHETHER EXPRESS OR IMPLIED WITH RESPECT TO THE COVERED HP PRODUCTS AND SPECIFICALLY DISCLAIM THE IMPLIED WARRANTIES OR CONDITIONS OF MERCHANTABILITY SATISFACTORY QUALITY AND FITNESS FOR A PARTICULAR PURPOSE
limitations of liabilityTo the extent allowed by local law the remedies provided in this Limited Warranty Statement are the Customerrsquos sole and exclusive remediesTO THE EXTENT ALLOWED BY LOCAL LAW EXCEPT FOR THE OBLIGATIONS SPECIFICALLY SET FORTH IN THIS LIMITED WARRANTY STATEMENT IN NO EVENT SHALL HP OR ITS THIRD PARTY SUPPLIERS BE LIABLE FOR DIRECT INDIRECT SPECIAL INCIDENTAL OR CONSEQUENTIAL DAMAGES WHETHER BASED ON CONTRACT TORT OR ANY OTHER LEGAL THEORY AND WHETHER ADVISED OF THE POSSIBILITY OF SUCH DAMAGES
local lawThis Limited Warranty Statement gives the Customer specific legal rights The Customer may also have other rights which vary from state to state in the United States from province to province in Canada and from countryregion to countryregion elsewhere in the world
reference guide
warranty information
53
To the extent this Limited Warranty Statement is inconsistent with local law this Statement shall be deemed modified to be consistent with such local law Under such local law certain disclaimers and limitations of this Statement may not apply to the Customer For example some states in the United States as well as some governments outside the United States (including provinces in Canada) mayPreclude the disclaimers and limitations in this Statement from limiting the statutory rights of a consumer (eg the United Kingdom)Otherwise restrict the ability of a manufacturer to enforce such disclaimers or limitations orGrant the Customer additional warranty rights specify the duration of implied warranties which the manufacturer cannot disclaim or not allow limitations on the duration of implied warrantiesFOR CONSUMER TRANSACTIONS IN AUSTRALIA AND NEW ZEALAND THE TERMS IN THIS LIMITED WARRANTY STATEMENT EXCEPT TO THE EXTENT LAWFULLY PERMITTED DO NOT EXCLUDE RESTRICT OR MODIFY AND ARE IN ADDITION TO THE MANDATORY STATUTORY RIGHTS APPLICABLE TO THE SALE OF THE COVERED HP PRODUCTS TO SUCH CUSTOMERS
hp officejet 4100 series
chapter 11
54
55
index
Numerics4-by-6 inch photo paper
load 10 12
AADF 7adjust
volume for fax 25align print cartridges 35Answer Ring Pattern 26automatic document feeder 7automatic reduction
fax 25
Bbest copy quality 13busy number
redial automatically 23
Ccancel
scan 18scheduled fax 21
cartridgesalign 35replace 33
cleanprint cartridges 35the exterior 32the glass 31white strip 32
colorenhance 14fax 20fax from front panel 20
contrastchange for fax 23photo color 14
copy 13 16change default settings 15enhance 14fit to page 16lighten or darken 14menu options 16number of copies 14photo 15quality 13reduce or enlarge 14settings 13 15
speed 13tutorial 4
Customer Support 45web site 45
Ddarken a copy 14date
setting 27default settings
restore 35director review 4distinctive ringing 26
Eenhance copies 14enlarge copy 14 16envelopes
load 9Error Correction Mode
(ECM) 25
Ffactory defaults
restore 35fast copy quality 13fax 28
adjust volume 25automated reports 22cancel fax forward 24cancel scheduled 21change Answer Ring
Pattern 26change contrast 23change resolution 22change settings 19control appearance 22create individual speed-dial
settings 26delete speed-dial
settings 27distinctive ringing 26Error Correction Mode
(ECM) 25forward faxes 24header 27in color 20in color from front panel 20manual reports 22
menu 29print reports 22receive 21receive manually 21redial busy or unanswered
number 23schedule 20send from front panel 19set automatic reduction 25set date and time 27set the number of rings 21settings 27 28setup menu options 29speed dials 19test 28
fit to page 16forward faxes 24
cancel 24front panel
display scroll speed 36enter text 28send a fax 19setting prompt delay 36tutorial 3
Gglass
cleaning 31greeting cards
load 11
Hhelp 1HP Customer Support 45
calling 45HP Director 4HP distribution center 49HP Officjet
preparing to ship 47HP papers
tips on loading 11
Iindividual speed-dial settings
create 26ink cartridges see print
cartridgesinkjet paper
load 11
index
hp officejet 4100 series56
Kkeypad
enter text 28
Llabels
load 12lighten copies 14load
change the paper type 12envelopes 9original in ADF 7paper 7photo paper 10 12postcards 10 12print cartridges 33set the paper size 12tips 11
Mmaintenance
align print cartridges 35clean print cartridges 35clean the exterior 32clean the glass 31clean the white strip 32normal sounds 36replace print cartridges 33restore factory defaults 35self-maintenance
sounds 36self-test report 32
menuscopy options 16fax 29fax setup 29maintenance 37print reports 37
Nnormal copy quality 13number of copies
set 14number of rings
set 21
Oorder print cartridges 60originals
load in ADF 7output tray 8
Ppaper
change default size for copy 12
change the type 12load 7recommended 7set the size 12tips on loading 11
paper size change for copy 12
paper trayload 7
phone numbers support services 45
photo paperload 10 12
photoscopy 15enhance copy 14
physical specifications 43postcards
load 10 12power
specifications 43print
envelopes 9fax reports 22self-test report 32
print cartridgesalign 35clean 35handling 32replace 33
prompt delaysetting 36
Qquick start
review the director 4use with a computer 4
Rreceive
fax 21redial
busy or unanswered number 23
reduce copy 14 16regulatory information 43reinstall software 40reports
generate automatically for fax 22
generate manually for fax 22
print 22self-test 32
resolution
change for fax 22restore factory settings 35returning your HP Officejet for
service 51
Sscan
from front panel 17stop 18
schedule a fax 20scroll speed
setting 36self-test report 32send
cancel forward faxes 24color fax 20color fax from front
panel 20forward faxes 24
settingscopy 13 15fax 27 28prompt delay 36scroll speed 36
setupadditional information 39menu 29
shippingyour HP Officejet 47
softwareremove and reinstall 40
soundsself-maintenance 36
specificationsphysical 43power 43
speed dials 19create individual
settings 26delete settings 27
stopscan 18scheduled fax 21
subscriber identification code 27
support services 45
Ttelephone line
multiple numbers 26telephone numbers 45text
enhance 14enter from front panel 28
time
index
reference guide 57
setting 27transparency film
recommended 7tips on loading 11
troubleshootingremove and reinstall
software 40T-shirt Transfer Iron-On
load 11tutorial
front panel 3make a copy 4
Uunanswered number
redial automatically 23
Vvolume
adjust 25
Wwarranty 45
service 51statement 51upgrades 51
white stripcleaning 32
hp officejet 4100 series
chapter 12
58
declaration of conformityAccording to ISOIEC Guide 22 and EN 45014
Manufacturerrsquos Name and Address
Hewlett-Packard Company 16399 West Bernardo Drive San Diego CA 92127-1899 USA
declares that the product
Product Name hp officejet 4100 series (Q1608A)
Model Number(s) officejet 4110 (Q1609A) officejet 4110xi (Q1610A) officejet 4110v (Q1611A) officejet 4105 (Q1612A) officejet 4105z (Q1613A) officejet 4115 (Q1614A)
Product Options All
conforms to the following Product Specifications
Safety EN609501992 +A1 A2 A3 A4 amp A11
IEC609501991 +A1 A2 A3 amp A4
UL1950CSA 222 No 950 3rd Edn 1995
NOM-019-SCFI-1993
EMC CISPR221993 +A1 amp A2 EN550221994 +A1 amp A2 -Class B
CISPR241997EN550241998
IEC 61000-3-21995 EN61000-3-21995
IEC 61000-3-31994 EN61000-3-31995
ASNZS 3548 1992
CNS13438 1997
FCC Part 15-Class B ICES-003 Issue 2 VCCI-2
GB 9254-1998
Telecom TBR21 1998
Supplementary Information
The Product herewith complies with the requirements of the Low Voltage Directive 7323EEC the EMC Directive 89336EEC and the RampTTE Directive 19995EC (ANNEX II) carries the CE marking accordingly
European Contact for regulatory topics only Your local Hewlett-Packard Sales and Service Office orHewlett-Packard GmbH
Department HQ-TRE Herrenberger Strasse 140 D-71034 Boumlblingen Germany (FAX + 49-7031-14-3143)
order mediaTo order media such as HP Premium Inkjet Paper HP Premium Inkjet Transparency Film HP Iron-On T-shirt Transfer paper or HP Greeting Cards go to
wwwhpshoppingcom
For orders in countries other than the US and Canada select other countries then click Yes to leave hpshoppingcom From this website you can access hpshoppingcom for your specific language or countryregion
order print cartridges
If you have Internet access you can get more information from the HP website at
wwwhpcomsupport
print cartridges hp reorder number
HP black print cartridge 56 19 ml black print cartridge
HP color print cartridgeHP tri-color print cartridge
57 17 ml color print cartridge28 8 ml color print cartridge
Visit the hp officejet information centerIt has everything you need to get the most value from your HP Officejet
bull Technical Supportbull Supplies and Ordering Informationbull Project Tipsbull Ways to Enhance Your Product
wwwhpcomsupport
copy 2003 Hewlett-Packard Company
Printed in the USA Mexico Germany Singapore or China
Q1608-90163Q1608-90163
Q1608-90163

hp officejet 4100 series
chapter 7
36
set scroll speedThe Scroll Speed option lets you control the rate that text messages appear in the front-panel display You can choose Normal Fast or Slow The default is Normal
1 Press Setup
2 Press 5 then press 6This selects Maintenance and then selects Set Scroll Speed
3 Press until the desired speed appears then press Enter
set the prompt delay timeThe Prompt Delay option lets you control the amount of time before a message is displayed in the front-panel display You can choose Normal Fast or Slow The default is Normal
1 Press Setup
2 Press 5 then press 7This selects Maintenance and then selects Set Prompt Delay Time
3 Press until the delay time appears then press Enter
self-maintenance sounds During the life of your product you may hear various mechanical sounds This is a normal part of your unitrsquos self-maintenance
reference guide
maintain your hp officejet
37
setup menu optionsThe following options are available from the Setup button
1Last Transaction
2Fax Log
3Speed Dial List
4Self-Test Report
5Automatic Reports Setup
1Print Report
Use Setup to display the Print Report Speed Dial Setup Basic Fax Setup Advanced Fax Setup and Maintenance options
Press and to move to the setting you wantPress Enter to select the displayed setting
1Clean Print Cartridges
2Align Print Cartridges
3Restore Factory Defaults
4Reprint Faxes in Memory
5Set Language amp CountryRegion
6Set Scroll Speed
7Set Prompt Delay Time
5Maintenance2Speed Dial Setup
3Basic Fax Setup
4Advanced Fax Setup
1Individual Speed Dial
2Delete Speed Dial
3Print Speed Dial List
1Date and Time
2Fax Header
3Rings to Answer
4 Paper Size
5Tone or Pulse Dialing
6Ring and Beep Volume
7Fax Forwarding Black Only
1Automatic Reports Setup
2Answer Ring Pattern
3Busy Redial
4No Answer Redail
5Automatic Reduction
6Backup Fax Reception
7Error Correction Mode
hp officejet 4100 series
chapter 7
38
8
39
additional setup information
During the installation of the HP Officejet software a number of windows are displayed You should see the following
bull Installingbull Copying files bull A request to plug in the HP Officejetbull Green OK and check markbull Request to restart your computer (may not occur in all cases)bull Registration
If you did not see all of these windows there may be a problem with the installation Verify the following
bull The HP Director contains six icons (double-click the HP Director icon on the desktop)
bull The HP Officejet is listed in the Printers dialog boxbull There is an icon for the HP Officejet in the System Tray that indicates the
HP Officejet is ready
If the HP Director does not show six icons you may need to wait a few minutes for the HP Officejet to connect to your computer
possible installation problemsIf nothing appears on your computer screen after you insert the HP Officejet 4100 Series CD-ROM into your computerrsquos CD-ROM drive
1 From the Start menu choose Run
2 In the Run dialog box enter dsetupexe (if your CD-ROM drive is not assigned to drive letter d use the appropriate drive letter) then click OK
If the HP Director does not contain six icons do the following
bull Verify that the front-panel cover is attached then unplug the HP Officejet and plug it in again
bull Verify that the USB and power cables are plugged inndash Unplug the USB cable and plug it in againndash Do not attach the USB cable to a keyboard or nonpowered hubndash Verify that the USB cable is 3 meters or less in lengthndash If you have several USB devices attached to your computer you may
want to unplug the others during the installation
Note AppleTalk is not supported
bull Unplug the HP Officejet from the wall and plug it in againbull Restart your computer
hp officejet 4100 series
chapter 8
40
On Windows check the System Tray for applications that are running in the background and close them before restarting your computer
remove and reinstall your hp officejet softwareIf six icons do not appear in the Director you may need to uninstall and re-install the software Do not simply delete the HP Officejet program files from your hard drive Be sure to remove them properly using the uninstall utility provided in the HP Officejet program group
to uninstall from a Windows computer
1 Disconnect your HP Officejet from your computer
2 On the Windows taskbar click Start choose Programs or All Programs (XP) choose Hewlett-Packard choose hp officejet 4100 series then choose uninstall software
3 Follow the directions on the screenBe sure to disconnect your HP Officejet
4 If you are asked whether you would like to remove shared files click NoOther programs that use these files may not work properly if the files are deleted
5 After the program finishes removing the software disconnect your HP Officejet and restart your computer
Note It is important that you disconnect your HP Officejet before restarting your computer
6 To reinstall the software insert the HP Officejet 4100 Series CD-ROM into your computerrsquos CD-ROM drive and follow the instructions that appear
7 After the software is installed connect and turn on your HP Officejet following the onscreen instructions and the instructions in your Setup PosterAfter connecting and turning on your HP Officejet you may have to wait several minutes for all of the Plug and Play events to completeWhen the software installation is complete you will see a Status Monitor icon in the System Tray
8 To verify that the software is properly installed double-click on the HP Director icon on the desktop If the HP Director shows six icons the software has been properly installed
to uninstall from a Macintosh computer
1 Disconnect your HP Officejet from your computer
2 Double-click on ApplicationsHP All-in-One Software folder
reference guide
additional setup information
41
3 Double-click on HP Uninstaller
4 Follow the directions that appear on the screen
5 After the program finishes removing the software disconnect your HP Officejet and restart your computer
6 To reinstall the software insert the HP Officejet 4100 Series CD-ROM into your computerrsquos CD-ROM drive
Note When re-installing the software follow the instructions on the Setup Poster Do not connect the HP Officejet to your computer until after you have completed the software installation
7 On the desktop open the CD-ROM double-click on hp all-in-one installer and follow the instructions that appear
connect your hp officejet to a phone modem or answering machine
The HP Officejet can share a phone line with a phone a modem or an aswering machine When sharing a phone line with an answering machine the HP Officejet will answer fax calls and direct voice calls to the answering machine
Note For information on connecting your HP Officejet to your computer and phone line refer to the Setup Poster that came with your unit
to connect your hp officejet to a phone modem or answering machine
1 Remove the white plastic stopper from connector 2 on the back of the HP Officejet
To connect more than one device to connector 2 on the HP Officejet you must purchase a Y-splitter and plug it into connector 2
2 Connect the phone cord from the phone modem or answering machine to connector 2 (or Y-splitter)
Caution Do not use the phone cord that came with the HP Officejet for this purpose That phone cord must connect connector 1 on the HP Officejet to the wall jack for your phone system See the Setup Poster for details
3 If you are connecting an answering machine see set the number of rings before answering on page 21 for instructions on setting the number of rings correctly or change the answer ring pattern (distinctive ringing) on page 26 for information on incoming ring patterns
4 If you are connecting a modem turn off its fax-receive feature
connector 2 on the HP Officejet
connector 1 on the HP Officejet
hp officejet 4100 series
chapter 8
42
additional troubleshooting helpYou may want to refer to the readme file for more information on possible installation problems On Windows you can access the readme file from the Start button on the taskbar select Programs Hewlett-Packard hp officejet 4100 series View the Readme File On Macintosh you can access the readme file by double-clicking on the icon located in the top-level folder of the HP Officejet software CD-ROM
The readme file provides more information including
bull Using the Re-install utility after a failed installation to return your PC to a state that will allow the HP Officejet to be re-installed
bull Using the Re-install utility on Windows 98 to recover from a Composite USB System Driver missing errorThis error may occur if the hardware is installed prior to installing the software After running the Re-install utility reboot your PC and install the HP Officejet software before connecting the HP Officejet to your computer
You can also find more information on this website
wwwhpcomsupport
9
43
technical information
Additional specifications information can be found in the HP Photo amp Imaging Help in the hp officejet 4100 series section
physical specifications
power specificationsbull Power consumption 75W maximumbull Source (Input Voltage) 100 to 240 VAC groundedbull Input Frequency 50 to 60 Hzbull Current 1A maximum
regulatory informationAdditional regulatory information can be found in the HP Photo amp Imaging Help The information in this section supercedes information in the HP Photo amp Imaging Help
doc statement deacuteclaration de conformiteacute (Canada)Le preacutesent appareil numeacuterique neacutemet pas de bruit radioeacutelectrique deacutepassant les limites applicables aux appareils numeacuteriques de la classe B prescrites dans le Regraveglement sur le brouillage radioeacutelectrique eacutedicteacute par le ministegravere des Communications du CanadaThis digital apparatus does not exceed the Class B limits for radio noise emissions from digital apparatus set out in the Radio Interference Regulations of the Canadian Department of Communications
notice to users of the Canadian telephone networkThis equipment meets the applicable Industry Canada Terminal Equipment Technical Specifications This is confirmed by the registration number The abbreviation IC before the registration number signifies that registration was performed based on a Declaration of Conformity indicating that Industry Canada technical specifications were met It does not imply that Industry Canada approved the equipment
Note The Ringer Equivalence Number (REN) assigned to each terminal device provides an indication of the maximum number of terminals allowed to be connected to a telephone interface The termination on an interface may consist of any combination of devices subject only to the requirement that the sum of the Ringer Equivalence Numbers of all the devices does not exceed 5
The REN for this product is 03B based on FCC Part 68 test results
height width depth weight (without print cartridges)
with paper trays and ADF closed
718 in (1824 cm) 1676 in (4258 cm) 825 in (2096 cm) 75 lbs (34 kg)
with ADF and paper tray extended
1030 in (2615 cm) 1676 in (4258 cm) 1854 in (4709 cm) 75 lbs (34 kg)
hp officejet 4100 series
chapter 9
44
notice to all users of the European Economic Area (EEA)
This product is designed to interwork with the analogue telephone networks in the following countriesregions
Network compatibility depends on customer selected settings which must be reset to use the equipment on a telephone network in a countryregion other than where the product was purchased Contact the vendor or Hewlett-Packard Company if addition product support is necessaryThis equipment has been certified by the manufacturer in accordance with Directive 19995EC (annex II) for Pan-European single-terminal connection to the public switched telephone network (PSTN) However due to differences between the individual PSTNs provided in different countriesregions the approval does not of itself give an unconditional assurance of successful operation on every PSTN network termination pointIn the event of problems you should contact your equipment supplier in the first instance
geraumluschemissionLpA lt 70 dBam Arbeitsplatzim Normalbetriebnach DIN 45635 T 19
notice to Korean customers
Germany UK Netherlands
France Spain Italy
Belgium Luxembourg Sweden
Austria Denmark Ireland
Norway Finland Switzerland
Greece Portugal
10
45
hp support
This section explains the support services information provided by Hewlett-Packard If you are unable to find the answer you need in the printed or onscreen documentation supplied with your product you can contact one of the HP support services listed in the following pages Some support services are available only in the US and Canada while others are available in many countriesregions worldwide If a support service number is not listed for your countryregion contact your nearest authorized HP dealer for help
get support and other information from the internetIf you have Internet access you can get help from the following HP website
wwwhpcomsupportThe Web site offers technical support drivers supplies and ordering information
hp customer supportSoftware programs from other companies may be included with your HP Officejet If you experience problems with any of those programs you will receive the best technical assistance by calling the experts at that companyIf you need to contact HP Customer Support do the following before you call
1 Make sure thata Your unit is plugged in and turned onb The specified print cartridges are installed correctlyc The recommended paper is properly loaded in the input tray
2 Reset your unita Turn off the unit using the On button located on the unitrsquos front panelb Unplug the power cord from the back of the unitc Plug the power cord back into the unitd Turn on the unit using the On button
3 For more information check the HP website at wwwhpcomsupport
4 If you are still experiencing problems and need to speak with an HP Customer Support Representativendash Have your service ID and serial number ready To display your service ID and
serial number on the front panel do the following Press Enter and Start Color at the same time until the service ID appears in the front-panel display From this display press the right arrow until the serial number displays
ndash Print a Self-Test Report See print a self-test report on page 32 for information on printing this report
ndash Make a color copyndash Be prepared to describe your problem in detail
5 Call HP Customer Support Be near your unit when you call
call in the US during warrantyCall (208) 323-2551 This service is free during the warranty period however your standard long-distance phone charges still apply A fee may apply outside the warranty period
hp officejet 4100 series
chapter 10
46
US phone support is available in both English and Spanish languages 24 hours a day 7 days a week (days and hours of support may change without notice)
call elsewhere in the worldThe numbers listed below are current as of the printing date of this guide For a list of current international HP Support Service numbers visit this address and choose your own countryregion or language
wwwhpcomsupportFor Korea you can also visit this address
httpwwwhpcokrYou can call the HP support center in the following countriesregions If your countryregion is not listed contact your local dealer or nearest HP Sales and Support Office to find out how to obtain servicesSupport service is free during the warranty period however your standard long-distance phone charges will apply In some cases a flat fee per single incident will also applyFor phone support in Europe please check for the details and conditions of phone support in your countryregion by consulting the following Web site
wwwhpcomsupportAlternatively you can ask your dealer or call HP at the phone number indicated in this booklet As part of our constant efforts to improve our phone support service we advise you to check our website on a regular basis for new information regarding service features and delivery
countryregion hp technical support countryregion hp technical support
Algeria1 +213 (0) 61564 543 Malaysia 1-800-805405
Argentina 0810-555-5520 Mexico 01-800-472-6684
Australia +61 3 8877 80001902 910 910
Mexico (Mexico City) 5258-9922
Austria +43 (0) 810 00 6080 Morocco1 +212 22404 747
Bahrain (Dubai) 800 728 Netherlands +31 (0) 20 606 8751
Belgium (Dutch) +32 (0) 2 626 8806 New Zealand 0800 441 147
Belgium (French) +32 (0) 2 626 8807 Norway +47 22 11 6299
Brazil (Grande Sao Paulo) (11) 3747 7799 Oman +971 4 883 8454
Brazil (Demais Localidades) 0800 157751 Palestine +971 4 883 8454
Canada during warranty (905) 206 4663 Panama 001-800-7112884
Canada post-warranty(per-call charge)
1-877-621-4722 Peru 0-800-10111
Caribbean amp Central America
1-800-711-2884 Philippines 632-867-3551
Chile 800-360-999 Poland +48 22 865 98 00
China 86 10 6868 7980 Portugal +351 21 3176333
Colombia 9-800-114-726 Puerto Rico 1-877-2320-589
Costa Rica 0-800-011-0524 Qatar +971 4 883 8454
Czech Republic +420 (0) 261307310 Romania +40 1 315 44 42or local 01 3154442
reference guide
hp support
47
call in Australia post-warrantyIf your product is not under warranty you can call 03 8877 8000 A per-incident out-of-warranty support fee of $2750 (inc GST) will be charged to your credit card You can also call 1902 910 910 ($2750 charged to your phone account) from 900 AM to 500 PM Monday through Friday (Charges and support hours are subject to change without notice)
prepare your unit for shipmentIf after contacting HP Customer Support or returning to the point of purchase you are requested to send your unit in for service please follow the power off and rebox steps below to avoid further damage to the HP product
Denmark +45 39 29 4099 Russian Federation Moscow +7 095 797 3520
Ecuador 1800-711-2884 Russian Federation St Petersburg
+7 812 346 7997
Europe (English) +44 (0) 207 512 5202 Saudi Arabia +800 897 14440
Egypt 02 532 5222 Singapore 65 6272 5300
Finland +358 (0) 203 47 288 Slovakia +421 (0) 2 682 08080
France (034 Euromin) +0892 69 60 22 South Africa (inside RSA) 086 000 1030
Germany (012 Euromin) +49 (0) 180 52 58 143 South Africa (inside RSA) +27-11 258 9301
Greece +30 1060 73 603 Spain +34 902 321 123
Hong Kong (SAR) +85 (2) 3002 8555 Sweden +46 (0)8 619 2170
Guatemala 1800-995-5105 Switzerland 2 +41 (0) 84 880 1111
Hungary +36 (0) 1 382 1111 Taiwan +886-2-2717-00550800 010 055
India 1-600-11226791 11 682 6035
Thailand +66 (2) 661 4000
Indonesia 62-21-350-3408 Tunisia1 +216 1891 222
Ireland +353 (0) 1 662 5525 Turkey +90 216 579 7171
Israel +972 (0) 9 8304848 Ukraine +7 (380-44) 490-3520
Italy +39 (0) 226410350 United Arab Emirates +971 4 883 8454
Japan 0570 000 511+81 3 3335 9800
United Kingdom +44 (0) 207 512 52 02
Jordan +971 4 883 8454 Venezuela 0800-47468368 or800-477-7777
Korea (Seoul) +82 (2) 3270 0700 Venezuela (Caracas) (502) 207-8488
Korea (outside Seoul) 080 999 0700 Vietnam 84 (0) 8 823 4530
Kuwait +971 4 883 8454 Yemen +971 4 883 8454
Lebanon +971 4 883 8454
1 This Call Center supports French speaking customers from the following countriesregions Morocco Tunisia and Algeria
2 This Call Center supports German French and Italian speaking customers in Switzerland
countryregion hp technical support countryregion hp technical support
hp officejet 4100 series
chapter 10
48
Note When transporting your HP Officejet make sure that the pens have been removed the HP Officejet has been properly shut down by pressing the power button and you have allowed time for the carriage to return to the service station and for the scanner to return to its parked position
1 Turn on the unitDisregard steps 1 through 6 if your unit will not turn on and the print carriage is in the home position You will not be able to remove the print cartridges Proceed to step 7
2 Open the print cartridge access doorThe print carriage moves into view
3 See replace the print cartridges on page 33 for information on removing the print cartridges
Caution Remove both print cartridges Failure to do so may damage your unit
4 Place the print cartridges in an airtight bag so they will not dry out and put them aside (do not send them with the unit unless instructed to by the HP customer support call agent)
5 Turn off the unit
6 Close the print cartridge access door
7 Remove the front panel cover as followsa Grasp the front of the front panel cover with two hands as shownb Firmly lift the front panel cover to unsnap it from the unit
8 Retain the front panel cover Do not return the front panel cover with the unit
9 If available pack the unit for shipment using the original packing materials or the packaging materials that come with your exchange unit
If you do not have the original packaging materials please use other adequate packaging materials Shipping damage caused by improper packaging andor improper transportation is not covered under the warranty
reference guide
hp support
49
10 Place the return shipping label on the outside of the box
11 Include the following items in the boxndash A complete description of symptoms for service personnel (samples of print
quality problems are helpful)ndash A copy of the sales slip or other proof of purchase to establish the warranty
coverage periodndash Your name address and a phone number where you can be reached during
the day
hp distribution centerTo order HP Officejet software a copy of the printed Reference Guide a setup poster or other customer-replaceable parts do one of the following bull In the US or Canada call (208) 323 2551bull Visit this website
httpwwwhpcomcposupportsoftwarehtml
hp officejet 4100 series
chapter 10
50
11
51
warranty information
HP Officejet 4100 seriesDuration of Limited Warranty (hardware and labor) 1 YearDuration of Limited Warranty (CD media) 90 DaysDuration of Limited Warranty (print cartridges) Until the HP ink is depleted or the ldquoend of warrantyrdquo date printed on the cartridge has been reached whichever occurs first
warranty service
express serviceTo obtain HP express repair service the customer must contact an HP service office or an HP Customer Support Center for basic troubleshooting first See hp customer support on page 45 for steps to take before calling Customer SupportIf a customer unit needs a minor part replacement and these parts can normally be replaced by the customer the customer-replaceable components may be serviced through expedited part shipment In this event HP will prepay shipping charges duty and taxes provide telephone assistance on replacement of the component and pay shipping charges duty and taxes for any part that HP asks to be returnedThe HP Customer Support Center may direct customers to designated authorized service providers who are certified by HP to service the HP product
warranty upgradesUpgrade your standard factory warranty to a total of three years with the HP SUPPORTPACK Service coverage begins on product purchase date and the pack must be purchased within the first 180 days of product purchase This program offers phone support from 600 AM to 1000 PM Mountain Standard Time (MST) Monday through Friday and 900 AM to 400 PM (MST) on Saturdays If during your technical support call it is determined that you need a replacement product then HP will ship you this product next business day free of charge Available in US onlyFor more information please call 1-888-999-4747 or visit the following HP Web site
httpwwwhpcomgohpsupportpack
Outside the US please call your local HP Customer Support office See call elsewhere in the world on page 46 for a list of international Customer Support numbers
returning your hp officejet for serviceBefore returning your HP Officejet for service you must call HP Customer Support See hp customer support on page 45 for steps to take before calling Customer Support
hewlett-packard limited global warranty statement
extent of limited warrantyHewlett-Packard (ldquoHPrdquo) warrants to the end-user customer (ldquoCustomerrdquo) that each HP Officejet 4100 Series product (ldquoProductrdquo) including related software accessories media and supplies shall be free from defects in material and workmanship for the duration which begins on the date of purchase by the Customer
hp officejet 4100 series
chapter 11
52
For each software Product HPrsquos limited warranty applies only to a failure to execute programming instructions HP does not warrant that the operation of any Product shall be uninterrupted or error freeHPrsquos limited warranty covers only those defects which arise as a result of normal use of a Product and does not cover any other problems including those which arise as a result of (a) improper maintenance or modification (b) software accessories media or supplies not provided or supported by HP or (c) operation outside the Productrsquos specificationsFor any hardware Product the use of a non-HP print cartridge or a refilled print cartridge does not affect either the warranty to the Customer or any HP support contract with the Customer However if Product failure or damage is attributable to the use of a non-HP or refilled print cartridge HP shall charge its standard labor and materials charges to service the Product for the failure or damageIf HP receives during the applicable warranty period notice of a defect in any Product HP shall either repair or replace the defective Product at HPrsquos option Where labor charges are not covered by HPrsquos limited warranty repairs shall be at HPrsquos standard charges for laborIf HP is unable to repair or replace as applicable a defective Product which is covered by HPrsquos warranty HP shall within a reasonable time after being notified of the defect refund the purchase price for the ProductHP shall have no obligation to repair replace or refund until the Customer returns the defective Product to HPAny replacement product may be either new or like-new provided that it has functionality at least equal to that of the Product being replacedHP products including each Product may contain remanufactured parts components or materials equivalent to new in performanceHPs limited warranty for each Product is valid in any countryregion or locality where HP has a support presence for the Product and where HP has marketed the Product The level of warranty service may vary according to local standards HP shall have no obligation to alter the form fit or function of the Product in order to make it operate in a countryregion or locality for which the Product was never intended to operate
limitations of warrantyTO THE EXTENT ALLOWED BY LOCAL LAW NEITHER HP NOR ITS THIRD PARTY SUPPLIERS MAKE ANY OTHER WARRANTY OR CONDITION OF ANY KIND WHETHER EXPRESS OR IMPLIED WITH RESPECT TO THE COVERED HP PRODUCTS AND SPECIFICALLY DISCLAIM THE IMPLIED WARRANTIES OR CONDITIONS OF MERCHANTABILITY SATISFACTORY QUALITY AND FITNESS FOR A PARTICULAR PURPOSE
limitations of liabilityTo the extent allowed by local law the remedies provided in this Limited Warranty Statement are the Customerrsquos sole and exclusive remediesTO THE EXTENT ALLOWED BY LOCAL LAW EXCEPT FOR THE OBLIGATIONS SPECIFICALLY SET FORTH IN THIS LIMITED WARRANTY STATEMENT IN NO EVENT SHALL HP OR ITS THIRD PARTY SUPPLIERS BE LIABLE FOR DIRECT INDIRECT SPECIAL INCIDENTAL OR CONSEQUENTIAL DAMAGES WHETHER BASED ON CONTRACT TORT OR ANY OTHER LEGAL THEORY AND WHETHER ADVISED OF THE POSSIBILITY OF SUCH DAMAGES
local lawThis Limited Warranty Statement gives the Customer specific legal rights The Customer may also have other rights which vary from state to state in the United States from province to province in Canada and from countryregion to countryregion elsewhere in the world
reference guide
warranty information
53
To the extent this Limited Warranty Statement is inconsistent with local law this Statement shall be deemed modified to be consistent with such local law Under such local law certain disclaimers and limitations of this Statement may not apply to the Customer For example some states in the United States as well as some governments outside the United States (including provinces in Canada) mayPreclude the disclaimers and limitations in this Statement from limiting the statutory rights of a consumer (eg the United Kingdom)Otherwise restrict the ability of a manufacturer to enforce such disclaimers or limitations orGrant the Customer additional warranty rights specify the duration of implied warranties which the manufacturer cannot disclaim or not allow limitations on the duration of implied warrantiesFOR CONSUMER TRANSACTIONS IN AUSTRALIA AND NEW ZEALAND THE TERMS IN THIS LIMITED WARRANTY STATEMENT EXCEPT TO THE EXTENT LAWFULLY PERMITTED DO NOT EXCLUDE RESTRICT OR MODIFY AND ARE IN ADDITION TO THE MANDATORY STATUTORY RIGHTS APPLICABLE TO THE SALE OF THE COVERED HP PRODUCTS TO SUCH CUSTOMERS
hp officejet 4100 series
chapter 11
54
55
index
Numerics4-by-6 inch photo paper
load 10 12
AADF 7adjust
volume for fax 25align print cartridges 35Answer Ring Pattern 26automatic document feeder 7automatic reduction
fax 25
Bbest copy quality 13busy number
redial automatically 23
Ccancel
scan 18scheduled fax 21
cartridgesalign 35replace 33
cleanprint cartridges 35the exterior 32the glass 31white strip 32
colorenhance 14fax 20fax from front panel 20
contrastchange for fax 23photo color 14
copy 13 16change default settings 15enhance 14fit to page 16lighten or darken 14menu options 16number of copies 14photo 15quality 13reduce or enlarge 14settings 13 15
speed 13tutorial 4
Customer Support 45web site 45
Ddarken a copy 14date
setting 27default settings
restore 35director review 4distinctive ringing 26
Eenhance copies 14enlarge copy 14 16envelopes
load 9Error Correction Mode
(ECM) 25
Ffactory defaults
restore 35fast copy quality 13fax 28
adjust volume 25automated reports 22cancel fax forward 24cancel scheduled 21change Answer Ring
Pattern 26change contrast 23change resolution 22change settings 19control appearance 22create individual speed-dial
settings 26delete speed-dial
settings 27distinctive ringing 26Error Correction Mode
(ECM) 25forward faxes 24header 27in color 20in color from front panel 20manual reports 22
menu 29print reports 22receive 21receive manually 21redial busy or unanswered
number 23schedule 20send from front panel 19set automatic reduction 25set date and time 27set the number of rings 21settings 27 28setup menu options 29speed dials 19test 28
fit to page 16forward faxes 24
cancel 24front panel
display scroll speed 36enter text 28send a fax 19setting prompt delay 36tutorial 3
Gglass
cleaning 31greeting cards
load 11
Hhelp 1HP Customer Support 45
calling 45HP Director 4HP distribution center 49HP Officjet
preparing to ship 47HP papers
tips on loading 11
Iindividual speed-dial settings
create 26ink cartridges see print
cartridgesinkjet paper
load 11
index
hp officejet 4100 series56
Kkeypad
enter text 28
Llabels
load 12lighten copies 14load
change the paper type 12envelopes 9original in ADF 7paper 7photo paper 10 12postcards 10 12print cartridges 33set the paper size 12tips 11
Mmaintenance
align print cartridges 35clean print cartridges 35clean the exterior 32clean the glass 31clean the white strip 32normal sounds 36replace print cartridges 33restore factory defaults 35self-maintenance
sounds 36self-test report 32
menuscopy options 16fax 29fax setup 29maintenance 37print reports 37
Nnormal copy quality 13number of copies
set 14number of rings
set 21
Oorder print cartridges 60originals
load in ADF 7output tray 8
Ppaper
change default size for copy 12
change the type 12load 7recommended 7set the size 12tips on loading 11
paper size change for copy 12
paper trayload 7
phone numbers support services 45
photo paperload 10 12
photoscopy 15enhance copy 14
physical specifications 43postcards
load 10 12power
specifications 43print
envelopes 9fax reports 22self-test report 32
print cartridgesalign 35clean 35handling 32replace 33
prompt delaysetting 36
Qquick start
review the director 4use with a computer 4
Rreceive
fax 21redial
busy or unanswered number 23
reduce copy 14 16regulatory information 43reinstall software 40reports
generate automatically for fax 22
generate manually for fax 22
print 22self-test 32
resolution
change for fax 22restore factory settings 35returning your HP Officejet for
service 51
Sscan
from front panel 17stop 18
schedule a fax 20scroll speed
setting 36self-test report 32send
cancel forward faxes 24color fax 20color fax from front
panel 20forward faxes 24
settingscopy 13 15fax 27 28prompt delay 36scroll speed 36
setupadditional information 39menu 29
shippingyour HP Officejet 47
softwareremove and reinstall 40
soundsself-maintenance 36
specificationsphysical 43power 43
speed dials 19create individual
settings 26delete settings 27
stopscan 18scheduled fax 21
subscriber identification code 27
support services 45
Ttelephone line
multiple numbers 26telephone numbers 45text
enhance 14enter from front panel 28
time
index
reference guide 57
setting 27transparency film
recommended 7tips on loading 11
troubleshootingremove and reinstall
software 40T-shirt Transfer Iron-On
load 11tutorial
front panel 3make a copy 4
Uunanswered number
redial automatically 23
Vvolume
adjust 25
Wwarranty 45
service 51statement 51upgrades 51
white stripcleaning 32
hp officejet 4100 series
chapter 12
58
declaration of conformityAccording to ISOIEC Guide 22 and EN 45014
Manufacturerrsquos Name and Address
Hewlett-Packard Company 16399 West Bernardo Drive San Diego CA 92127-1899 USA
declares that the product
Product Name hp officejet 4100 series (Q1608A)
Model Number(s) officejet 4110 (Q1609A) officejet 4110xi (Q1610A) officejet 4110v (Q1611A) officejet 4105 (Q1612A) officejet 4105z (Q1613A) officejet 4115 (Q1614A)
Product Options All
conforms to the following Product Specifications
Safety EN609501992 +A1 A2 A3 A4 amp A11
IEC609501991 +A1 A2 A3 amp A4
UL1950CSA 222 No 950 3rd Edn 1995
NOM-019-SCFI-1993
EMC CISPR221993 +A1 amp A2 EN550221994 +A1 amp A2 -Class B
CISPR241997EN550241998
IEC 61000-3-21995 EN61000-3-21995
IEC 61000-3-31994 EN61000-3-31995
ASNZS 3548 1992
CNS13438 1997
FCC Part 15-Class B ICES-003 Issue 2 VCCI-2
GB 9254-1998
Telecom TBR21 1998
Supplementary Information
The Product herewith complies with the requirements of the Low Voltage Directive 7323EEC the EMC Directive 89336EEC and the RampTTE Directive 19995EC (ANNEX II) carries the CE marking accordingly
European Contact for regulatory topics only Your local Hewlett-Packard Sales and Service Office orHewlett-Packard GmbH
Department HQ-TRE Herrenberger Strasse 140 D-71034 Boumlblingen Germany (FAX + 49-7031-14-3143)
order mediaTo order media such as HP Premium Inkjet Paper HP Premium Inkjet Transparency Film HP Iron-On T-shirt Transfer paper or HP Greeting Cards go to
wwwhpshoppingcom
For orders in countries other than the US and Canada select other countries then click Yes to leave hpshoppingcom From this website you can access hpshoppingcom for your specific language or countryregion
order print cartridges
If you have Internet access you can get more information from the HP website at
wwwhpcomsupport
print cartridges hp reorder number
HP black print cartridge 56 19 ml black print cartridge
HP color print cartridgeHP tri-color print cartridge
57 17 ml color print cartridge28 8 ml color print cartridge
Visit the hp officejet information centerIt has everything you need to get the most value from your HP Officejet
bull Technical Supportbull Supplies and Ordering Informationbull Project Tipsbull Ways to Enhance Your Product
wwwhpcomsupport
copy 2003 Hewlett-Packard Company
Printed in the USA Mexico Germany Singapore or China
Q1608-90163Q1608-90163
Q1608-90163

reference guide
maintain your hp officejet
37
setup menu optionsThe following options are available from the Setup button
1Last Transaction
2Fax Log
3Speed Dial List
4Self-Test Report
5Automatic Reports Setup
1Print Report
Use Setup to display the Print Report Speed Dial Setup Basic Fax Setup Advanced Fax Setup and Maintenance options
Press and to move to the setting you wantPress Enter to select the displayed setting
1Clean Print Cartridges
2Align Print Cartridges
3Restore Factory Defaults
4Reprint Faxes in Memory
5Set Language amp CountryRegion
6Set Scroll Speed
7Set Prompt Delay Time
5Maintenance2Speed Dial Setup
3Basic Fax Setup
4Advanced Fax Setup
1Individual Speed Dial
2Delete Speed Dial
3Print Speed Dial List
1Date and Time
2Fax Header
3Rings to Answer
4 Paper Size
5Tone or Pulse Dialing
6Ring and Beep Volume
7Fax Forwarding Black Only
1Automatic Reports Setup
2Answer Ring Pattern
3Busy Redial
4No Answer Redail
5Automatic Reduction
6Backup Fax Reception
7Error Correction Mode
hp officejet 4100 series
chapter 7
38
8
39
additional setup information
During the installation of the HP Officejet software a number of windows are displayed You should see the following
bull Installingbull Copying files bull A request to plug in the HP Officejetbull Green OK and check markbull Request to restart your computer (may not occur in all cases)bull Registration
If you did not see all of these windows there may be a problem with the installation Verify the following
bull The HP Director contains six icons (double-click the HP Director icon on the desktop)
bull The HP Officejet is listed in the Printers dialog boxbull There is an icon for the HP Officejet in the System Tray that indicates the
HP Officejet is ready
If the HP Director does not show six icons you may need to wait a few minutes for the HP Officejet to connect to your computer
possible installation problemsIf nothing appears on your computer screen after you insert the HP Officejet 4100 Series CD-ROM into your computerrsquos CD-ROM drive
1 From the Start menu choose Run
2 In the Run dialog box enter dsetupexe (if your CD-ROM drive is not assigned to drive letter d use the appropriate drive letter) then click OK
If the HP Director does not contain six icons do the following
bull Verify that the front-panel cover is attached then unplug the HP Officejet and plug it in again
bull Verify that the USB and power cables are plugged inndash Unplug the USB cable and plug it in againndash Do not attach the USB cable to a keyboard or nonpowered hubndash Verify that the USB cable is 3 meters or less in lengthndash If you have several USB devices attached to your computer you may
want to unplug the others during the installation
Note AppleTalk is not supported
bull Unplug the HP Officejet from the wall and plug it in againbull Restart your computer
hp officejet 4100 series
chapter 8
40
On Windows check the System Tray for applications that are running in the background and close them before restarting your computer
remove and reinstall your hp officejet softwareIf six icons do not appear in the Director you may need to uninstall and re-install the software Do not simply delete the HP Officejet program files from your hard drive Be sure to remove them properly using the uninstall utility provided in the HP Officejet program group
to uninstall from a Windows computer
1 Disconnect your HP Officejet from your computer
2 On the Windows taskbar click Start choose Programs or All Programs (XP) choose Hewlett-Packard choose hp officejet 4100 series then choose uninstall software
3 Follow the directions on the screenBe sure to disconnect your HP Officejet
4 If you are asked whether you would like to remove shared files click NoOther programs that use these files may not work properly if the files are deleted
5 After the program finishes removing the software disconnect your HP Officejet and restart your computer
Note It is important that you disconnect your HP Officejet before restarting your computer
6 To reinstall the software insert the HP Officejet 4100 Series CD-ROM into your computerrsquos CD-ROM drive and follow the instructions that appear
7 After the software is installed connect and turn on your HP Officejet following the onscreen instructions and the instructions in your Setup PosterAfter connecting and turning on your HP Officejet you may have to wait several minutes for all of the Plug and Play events to completeWhen the software installation is complete you will see a Status Monitor icon in the System Tray
8 To verify that the software is properly installed double-click on the HP Director icon on the desktop If the HP Director shows six icons the software has been properly installed
to uninstall from a Macintosh computer
1 Disconnect your HP Officejet from your computer
2 Double-click on ApplicationsHP All-in-One Software folder
reference guide
additional setup information
41
3 Double-click on HP Uninstaller
4 Follow the directions that appear on the screen
5 After the program finishes removing the software disconnect your HP Officejet and restart your computer
6 To reinstall the software insert the HP Officejet 4100 Series CD-ROM into your computerrsquos CD-ROM drive
Note When re-installing the software follow the instructions on the Setup Poster Do not connect the HP Officejet to your computer until after you have completed the software installation
7 On the desktop open the CD-ROM double-click on hp all-in-one installer and follow the instructions that appear
connect your hp officejet to a phone modem or answering machine
The HP Officejet can share a phone line with a phone a modem or an aswering machine When sharing a phone line with an answering machine the HP Officejet will answer fax calls and direct voice calls to the answering machine
Note For information on connecting your HP Officejet to your computer and phone line refer to the Setup Poster that came with your unit
to connect your hp officejet to a phone modem or answering machine
1 Remove the white plastic stopper from connector 2 on the back of the HP Officejet
To connect more than one device to connector 2 on the HP Officejet you must purchase a Y-splitter and plug it into connector 2
2 Connect the phone cord from the phone modem or answering machine to connector 2 (or Y-splitter)
Caution Do not use the phone cord that came with the HP Officejet for this purpose That phone cord must connect connector 1 on the HP Officejet to the wall jack for your phone system See the Setup Poster for details
3 If you are connecting an answering machine see set the number of rings before answering on page 21 for instructions on setting the number of rings correctly or change the answer ring pattern (distinctive ringing) on page 26 for information on incoming ring patterns
4 If you are connecting a modem turn off its fax-receive feature
connector 2 on the HP Officejet
connector 1 on the HP Officejet
hp officejet 4100 series
chapter 8
42
additional troubleshooting helpYou may want to refer to the readme file for more information on possible installation problems On Windows you can access the readme file from the Start button on the taskbar select Programs Hewlett-Packard hp officejet 4100 series View the Readme File On Macintosh you can access the readme file by double-clicking on the icon located in the top-level folder of the HP Officejet software CD-ROM
The readme file provides more information including
bull Using the Re-install utility after a failed installation to return your PC to a state that will allow the HP Officejet to be re-installed
bull Using the Re-install utility on Windows 98 to recover from a Composite USB System Driver missing errorThis error may occur if the hardware is installed prior to installing the software After running the Re-install utility reboot your PC and install the HP Officejet software before connecting the HP Officejet to your computer
You can also find more information on this website
wwwhpcomsupport
9
43
technical information
Additional specifications information can be found in the HP Photo amp Imaging Help in the hp officejet 4100 series section
physical specifications
power specificationsbull Power consumption 75W maximumbull Source (Input Voltage) 100 to 240 VAC groundedbull Input Frequency 50 to 60 Hzbull Current 1A maximum
regulatory informationAdditional regulatory information can be found in the HP Photo amp Imaging Help The information in this section supercedes information in the HP Photo amp Imaging Help
doc statement deacuteclaration de conformiteacute (Canada)Le preacutesent appareil numeacuterique neacutemet pas de bruit radioeacutelectrique deacutepassant les limites applicables aux appareils numeacuteriques de la classe B prescrites dans le Regraveglement sur le brouillage radioeacutelectrique eacutedicteacute par le ministegravere des Communications du CanadaThis digital apparatus does not exceed the Class B limits for radio noise emissions from digital apparatus set out in the Radio Interference Regulations of the Canadian Department of Communications
notice to users of the Canadian telephone networkThis equipment meets the applicable Industry Canada Terminal Equipment Technical Specifications This is confirmed by the registration number The abbreviation IC before the registration number signifies that registration was performed based on a Declaration of Conformity indicating that Industry Canada technical specifications were met It does not imply that Industry Canada approved the equipment
Note The Ringer Equivalence Number (REN) assigned to each terminal device provides an indication of the maximum number of terminals allowed to be connected to a telephone interface The termination on an interface may consist of any combination of devices subject only to the requirement that the sum of the Ringer Equivalence Numbers of all the devices does not exceed 5
The REN for this product is 03B based on FCC Part 68 test results
height width depth weight (without print cartridges)
with paper trays and ADF closed
718 in (1824 cm) 1676 in (4258 cm) 825 in (2096 cm) 75 lbs (34 kg)
with ADF and paper tray extended
1030 in (2615 cm) 1676 in (4258 cm) 1854 in (4709 cm) 75 lbs (34 kg)
hp officejet 4100 series
chapter 9
44
notice to all users of the European Economic Area (EEA)
This product is designed to interwork with the analogue telephone networks in the following countriesregions
Network compatibility depends on customer selected settings which must be reset to use the equipment on a telephone network in a countryregion other than where the product was purchased Contact the vendor or Hewlett-Packard Company if addition product support is necessaryThis equipment has been certified by the manufacturer in accordance with Directive 19995EC (annex II) for Pan-European single-terminal connection to the public switched telephone network (PSTN) However due to differences between the individual PSTNs provided in different countriesregions the approval does not of itself give an unconditional assurance of successful operation on every PSTN network termination pointIn the event of problems you should contact your equipment supplier in the first instance
geraumluschemissionLpA lt 70 dBam Arbeitsplatzim Normalbetriebnach DIN 45635 T 19
notice to Korean customers
Germany UK Netherlands
France Spain Italy
Belgium Luxembourg Sweden
Austria Denmark Ireland
Norway Finland Switzerland
Greece Portugal
10
45
hp support
This section explains the support services information provided by Hewlett-Packard If you are unable to find the answer you need in the printed or onscreen documentation supplied with your product you can contact one of the HP support services listed in the following pages Some support services are available only in the US and Canada while others are available in many countriesregions worldwide If a support service number is not listed for your countryregion contact your nearest authorized HP dealer for help
get support and other information from the internetIf you have Internet access you can get help from the following HP website
wwwhpcomsupportThe Web site offers technical support drivers supplies and ordering information
hp customer supportSoftware programs from other companies may be included with your HP Officejet If you experience problems with any of those programs you will receive the best technical assistance by calling the experts at that companyIf you need to contact HP Customer Support do the following before you call
1 Make sure thata Your unit is plugged in and turned onb The specified print cartridges are installed correctlyc The recommended paper is properly loaded in the input tray
2 Reset your unita Turn off the unit using the On button located on the unitrsquos front panelb Unplug the power cord from the back of the unitc Plug the power cord back into the unitd Turn on the unit using the On button
3 For more information check the HP website at wwwhpcomsupport
4 If you are still experiencing problems and need to speak with an HP Customer Support Representativendash Have your service ID and serial number ready To display your service ID and
serial number on the front panel do the following Press Enter and Start Color at the same time until the service ID appears in the front-panel display From this display press the right arrow until the serial number displays
ndash Print a Self-Test Report See print a self-test report on page 32 for information on printing this report
ndash Make a color copyndash Be prepared to describe your problem in detail
5 Call HP Customer Support Be near your unit when you call
call in the US during warrantyCall (208) 323-2551 This service is free during the warranty period however your standard long-distance phone charges still apply A fee may apply outside the warranty period
hp officejet 4100 series
chapter 10
46
US phone support is available in both English and Spanish languages 24 hours a day 7 days a week (days and hours of support may change without notice)
call elsewhere in the worldThe numbers listed below are current as of the printing date of this guide For a list of current international HP Support Service numbers visit this address and choose your own countryregion or language
wwwhpcomsupportFor Korea you can also visit this address
httpwwwhpcokrYou can call the HP support center in the following countriesregions If your countryregion is not listed contact your local dealer or nearest HP Sales and Support Office to find out how to obtain servicesSupport service is free during the warranty period however your standard long-distance phone charges will apply In some cases a flat fee per single incident will also applyFor phone support in Europe please check for the details and conditions of phone support in your countryregion by consulting the following Web site
wwwhpcomsupportAlternatively you can ask your dealer or call HP at the phone number indicated in this booklet As part of our constant efforts to improve our phone support service we advise you to check our website on a regular basis for new information regarding service features and delivery
countryregion hp technical support countryregion hp technical support
Algeria1 +213 (0) 61564 543 Malaysia 1-800-805405
Argentina 0810-555-5520 Mexico 01-800-472-6684
Australia +61 3 8877 80001902 910 910
Mexico (Mexico City) 5258-9922
Austria +43 (0) 810 00 6080 Morocco1 +212 22404 747
Bahrain (Dubai) 800 728 Netherlands +31 (0) 20 606 8751
Belgium (Dutch) +32 (0) 2 626 8806 New Zealand 0800 441 147
Belgium (French) +32 (0) 2 626 8807 Norway +47 22 11 6299
Brazil (Grande Sao Paulo) (11) 3747 7799 Oman +971 4 883 8454
Brazil (Demais Localidades) 0800 157751 Palestine +971 4 883 8454
Canada during warranty (905) 206 4663 Panama 001-800-7112884
Canada post-warranty(per-call charge)
1-877-621-4722 Peru 0-800-10111
Caribbean amp Central America
1-800-711-2884 Philippines 632-867-3551
Chile 800-360-999 Poland +48 22 865 98 00
China 86 10 6868 7980 Portugal +351 21 3176333
Colombia 9-800-114-726 Puerto Rico 1-877-2320-589
Costa Rica 0-800-011-0524 Qatar +971 4 883 8454
Czech Republic +420 (0) 261307310 Romania +40 1 315 44 42or local 01 3154442
reference guide
hp support
47
call in Australia post-warrantyIf your product is not under warranty you can call 03 8877 8000 A per-incident out-of-warranty support fee of $2750 (inc GST) will be charged to your credit card You can also call 1902 910 910 ($2750 charged to your phone account) from 900 AM to 500 PM Monday through Friday (Charges and support hours are subject to change without notice)
prepare your unit for shipmentIf after contacting HP Customer Support or returning to the point of purchase you are requested to send your unit in for service please follow the power off and rebox steps below to avoid further damage to the HP product
Denmark +45 39 29 4099 Russian Federation Moscow +7 095 797 3520
Ecuador 1800-711-2884 Russian Federation St Petersburg
+7 812 346 7997
Europe (English) +44 (0) 207 512 5202 Saudi Arabia +800 897 14440
Egypt 02 532 5222 Singapore 65 6272 5300
Finland +358 (0) 203 47 288 Slovakia +421 (0) 2 682 08080
France (034 Euromin) +0892 69 60 22 South Africa (inside RSA) 086 000 1030
Germany (012 Euromin) +49 (0) 180 52 58 143 South Africa (inside RSA) +27-11 258 9301
Greece +30 1060 73 603 Spain +34 902 321 123
Hong Kong (SAR) +85 (2) 3002 8555 Sweden +46 (0)8 619 2170
Guatemala 1800-995-5105 Switzerland 2 +41 (0) 84 880 1111
Hungary +36 (0) 1 382 1111 Taiwan +886-2-2717-00550800 010 055
India 1-600-11226791 11 682 6035
Thailand +66 (2) 661 4000
Indonesia 62-21-350-3408 Tunisia1 +216 1891 222
Ireland +353 (0) 1 662 5525 Turkey +90 216 579 7171
Israel +972 (0) 9 8304848 Ukraine +7 (380-44) 490-3520
Italy +39 (0) 226410350 United Arab Emirates +971 4 883 8454
Japan 0570 000 511+81 3 3335 9800
United Kingdom +44 (0) 207 512 52 02
Jordan +971 4 883 8454 Venezuela 0800-47468368 or800-477-7777
Korea (Seoul) +82 (2) 3270 0700 Venezuela (Caracas) (502) 207-8488
Korea (outside Seoul) 080 999 0700 Vietnam 84 (0) 8 823 4530
Kuwait +971 4 883 8454 Yemen +971 4 883 8454
Lebanon +971 4 883 8454
1 This Call Center supports French speaking customers from the following countriesregions Morocco Tunisia and Algeria
2 This Call Center supports German French and Italian speaking customers in Switzerland
countryregion hp technical support countryregion hp technical support
hp officejet 4100 series
chapter 10
48
Note When transporting your HP Officejet make sure that the pens have been removed the HP Officejet has been properly shut down by pressing the power button and you have allowed time for the carriage to return to the service station and for the scanner to return to its parked position
1 Turn on the unitDisregard steps 1 through 6 if your unit will not turn on and the print carriage is in the home position You will not be able to remove the print cartridges Proceed to step 7
2 Open the print cartridge access doorThe print carriage moves into view
3 See replace the print cartridges on page 33 for information on removing the print cartridges
Caution Remove both print cartridges Failure to do so may damage your unit
4 Place the print cartridges in an airtight bag so they will not dry out and put them aside (do not send them with the unit unless instructed to by the HP customer support call agent)
5 Turn off the unit
6 Close the print cartridge access door
7 Remove the front panel cover as followsa Grasp the front of the front panel cover with two hands as shownb Firmly lift the front panel cover to unsnap it from the unit
8 Retain the front panel cover Do not return the front panel cover with the unit
9 If available pack the unit for shipment using the original packing materials or the packaging materials that come with your exchange unit
If you do not have the original packaging materials please use other adequate packaging materials Shipping damage caused by improper packaging andor improper transportation is not covered under the warranty
reference guide
hp support
49
10 Place the return shipping label on the outside of the box
11 Include the following items in the boxndash A complete description of symptoms for service personnel (samples of print
quality problems are helpful)ndash A copy of the sales slip or other proof of purchase to establish the warranty
coverage periodndash Your name address and a phone number where you can be reached during
the day
hp distribution centerTo order HP Officejet software a copy of the printed Reference Guide a setup poster or other customer-replaceable parts do one of the following bull In the US or Canada call (208) 323 2551bull Visit this website
httpwwwhpcomcposupportsoftwarehtml
hp officejet 4100 series
chapter 10
50
11
51
warranty information
HP Officejet 4100 seriesDuration of Limited Warranty (hardware and labor) 1 YearDuration of Limited Warranty (CD media) 90 DaysDuration of Limited Warranty (print cartridges) Until the HP ink is depleted or the ldquoend of warrantyrdquo date printed on the cartridge has been reached whichever occurs first
warranty service
express serviceTo obtain HP express repair service the customer must contact an HP service office or an HP Customer Support Center for basic troubleshooting first See hp customer support on page 45 for steps to take before calling Customer SupportIf a customer unit needs a minor part replacement and these parts can normally be replaced by the customer the customer-replaceable components may be serviced through expedited part shipment In this event HP will prepay shipping charges duty and taxes provide telephone assistance on replacement of the component and pay shipping charges duty and taxes for any part that HP asks to be returnedThe HP Customer Support Center may direct customers to designated authorized service providers who are certified by HP to service the HP product
warranty upgradesUpgrade your standard factory warranty to a total of three years with the HP SUPPORTPACK Service coverage begins on product purchase date and the pack must be purchased within the first 180 days of product purchase This program offers phone support from 600 AM to 1000 PM Mountain Standard Time (MST) Monday through Friday and 900 AM to 400 PM (MST) on Saturdays If during your technical support call it is determined that you need a replacement product then HP will ship you this product next business day free of charge Available in US onlyFor more information please call 1-888-999-4747 or visit the following HP Web site
httpwwwhpcomgohpsupportpack
Outside the US please call your local HP Customer Support office See call elsewhere in the world on page 46 for a list of international Customer Support numbers
returning your hp officejet for serviceBefore returning your HP Officejet for service you must call HP Customer Support See hp customer support on page 45 for steps to take before calling Customer Support
hewlett-packard limited global warranty statement
extent of limited warrantyHewlett-Packard (ldquoHPrdquo) warrants to the end-user customer (ldquoCustomerrdquo) that each HP Officejet 4100 Series product (ldquoProductrdquo) including related software accessories media and supplies shall be free from defects in material and workmanship for the duration which begins on the date of purchase by the Customer
hp officejet 4100 series
chapter 11
52
For each software Product HPrsquos limited warranty applies only to a failure to execute programming instructions HP does not warrant that the operation of any Product shall be uninterrupted or error freeHPrsquos limited warranty covers only those defects which arise as a result of normal use of a Product and does not cover any other problems including those which arise as a result of (a) improper maintenance or modification (b) software accessories media or supplies not provided or supported by HP or (c) operation outside the Productrsquos specificationsFor any hardware Product the use of a non-HP print cartridge or a refilled print cartridge does not affect either the warranty to the Customer or any HP support contract with the Customer However if Product failure or damage is attributable to the use of a non-HP or refilled print cartridge HP shall charge its standard labor and materials charges to service the Product for the failure or damageIf HP receives during the applicable warranty period notice of a defect in any Product HP shall either repair or replace the defective Product at HPrsquos option Where labor charges are not covered by HPrsquos limited warranty repairs shall be at HPrsquos standard charges for laborIf HP is unable to repair or replace as applicable a defective Product which is covered by HPrsquos warranty HP shall within a reasonable time after being notified of the defect refund the purchase price for the ProductHP shall have no obligation to repair replace or refund until the Customer returns the defective Product to HPAny replacement product may be either new or like-new provided that it has functionality at least equal to that of the Product being replacedHP products including each Product may contain remanufactured parts components or materials equivalent to new in performanceHPs limited warranty for each Product is valid in any countryregion or locality where HP has a support presence for the Product and where HP has marketed the Product The level of warranty service may vary according to local standards HP shall have no obligation to alter the form fit or function of the Product in order to make it operate in a countryregion or locality for which the Product was never intended to operate
limitations of warrantyTO THE EXTENT ALLOWED BY LOCAL LAW NEITHER HP NOR ITS THIRD PARTY SUPPLIERS MAKE ANY OTHER WARRANTY OR CONDITION OF ANY KIND WHETHER EXPRESS OR IMPLIED WITH RESPECT TO THE COVERED HP PRODUCTS AND SPECIFICALLY DISCLAIM THE IMPLIED WARRANTIES OR CONDITIONS OF MERCHANTABILITY SATISFACTORY QUALITY AND FITNESS FOR A PARTICULAR PURPOSE
limitations of liabilityTo the extent allowed by local law the remedies provided in this Limited Warranty Statement are the Customerrsquos sole and exclusive remediesTO THE EXTENT ALLOWED BY LOCAL LAW EXCEPT FOR THE OBLIGATIONS SPECIFICALLY SET FORTH IN THIS LIMITED WARRANTY STATEMENT IN NO EVENT SHALL HP OR ITS THIRD PARTY SUPPLIERS BE LIABLE FOR DIRECT INDIRECT SPECIAL INCIDENTAL OR CONSEQUENTIAL DAMAGES WHETHER BASED ON CONTRACT TORT OR ANY OTHER LEGAL THEORY AND WHETHER ADVISED OF THE POSSIBILITY OF SUCH DAMAGES
local lawThis Limited Warranty Statement gives the Customer specific legal rights The Customer may also have other rights which vary from state to state in the United States from province to province in Canada and from countryregion to countryregion elsewhere in the world
reference guide
warranty information
53
To the extent this Limited Warranty Statement is inconsistent with local law this Statement shall be deemed modified to be consistent with such local law Under such local law certain disclaimers and limitations of this Statement may not apply to the Customer For example some states in the United States as well as some governments outside the United States (including provinces in Canada) mayPreclude the disclaimers and limitations in this Statement from limiting the statutory rights of a consumer (eg the United Kingdom)Otherwise restrict the ability of a manufacturer to enforce such disclaimers or limitations orGrant the Customer additional warranty rights specify the duration of implied warranties which the manufacturer cannot disclaim or not allow limitations on the duration of implied warrantiesFOR CONSUMER TRANSACTIONS IN AUSTRALIA AND NEW ZEALAND THE TERMS IN THIS LIMITED WARRANTY STATEMENT EXCEPT TO THE EXTENT LAWFULLY PERMITTED DO NOT EXCLUDE RESTRICT OR MODIFY AND ARE IN ADDITION TO THE MANDATORY STATUTORY RIGHTS APPLICABLE TO THE SALE OF THE COVERED HP PRODUCTS TO SUCH CUSTOMERS
hp officejet 4100 series
chapter 11
54
55
index
Numerics4-by-6 inch photo paper
load 10 12
AADF 7adjust
volume for fax 25align print cartridges 35Answer Ring Pattern 26automatic document feeder 7automatic reduction
fax 25
Bbest copy quality 13busy number
redial automatically 23
Ccancel
scan 18scheduled fax 21
cartridgesalign 35replace 33
cleanprint cartridges 35the exterior 32the glass 31white strip 32
colorenhance 14fax 20fax from front panel 20
contrastchange for fax 23photo color 14
copy 13 16change default settings 15enhance 14fit to page 16lighten or darken 14menu options 16number of copies 14photo 15quality 13reduce or enlarge 14settings 13 15
speed 13tutorial 4
Customer Support 45web site 45
Ddarken a copy 14date
setting 27default settings
restore 35director review 4distinctive ringing 26
Eenhance copies 14enlarge copy 14 16envelopes
load 9Error Correction Mode
(ECM) 25
Ffactory defaults
restore 35fast copy quality 13fax 28
adjust volume 25automated reports 22cancel fax forward 24cancel scheduled 21change Answer Ring
Pattern 26change contrast 23change resolution 22change settings 19control appearance 22create individual speed-dial
settings 26delete speed-dial
settings 27distinctive ringing 26Error Correction Mode
(ECM) 25forward faxes 24header 27in color 20in color from front panel 20manual reports 22
menu 29print reports 22receive 21receive manually 21redial busy or unanswered
number 23schedule 20send from front panel 19set automatic reduction 25set date and time 27set the number of rings 21settings 27 28setup menu options 29speed dials 19test 28
fit to page 16forward faxes 24
cancel 24front panel
display scroll speed 36enter text 28send a fax 19setting prompt delay 36tutorial 3
Gglass
cleaning 31greeting cards
load 11
Hhelp 1HP Customer Support 45
calling 45HP Director 4HP distribution center 49HP Officjet
preparing to ship 47HP papers
tips on loading 11
Iindividual speed-dial settings
create 26ink cartridges see print
cartridgesinkjet paper
load 11
index
hp officejet 4100 series56
Kkeypad
enter text 28
Llabels
load 12lighten copies 14load
change the paper type 12envelopes 9original in ADF 7paper 7photo paper 10 12postcards 10 12print cartridges 33set the paper size 12tips 11
Mmaintenance
align print cartridges 35clean print cartridges 35clean the exterior 32clean the glass 31clean the white strip 32normal sounds 36replace print cartridges 33restore factory defaults 35self-maintenance
sounds 36self-test report 32
menuscopy options 16fax 29fax setup 29maintenance 37print reports 37
Nnormal copy quality 13number of copies
set 14number of rings
set 21
Oorder print cartridges 60originals
load in ADF 7output tray 8
Ppaper
change default size for copy 12
change the type 12load 7recommended 7set the size 12tips on loading 11
paper size change for copy 12
paper trayload 7
phone numbers support services 45
photo paperload 10 12
photoscopy 15enhance copy 14
physical specifications 43postcards
load 10 12power
specifications 43print
envelopes 9fax reports 22self-test report 32
print cartridgesalign 35clean 35handling 32replace 33
prompt delaysetting 36
Qquick start
review the director 4use with a computer 4
Rreceive
fax 21redial
busy or unanswered number 23
reduce copy 14 16regulatory information 43reinstall software 40reports
generate automatically for fax 22
generate manually for fax 22
print 22self-test 32
resolution
change for fax 22restore factory settings 35returning your HP Officejet for
service 51
Sscan
from front panel 17stop 18
schedule a fax 20scroll speed
setting 36self-test report 32send
cancel forward faxes 24color fax 20color fax from front
panel 20forward faxes 24
settingscopy 13 15fax 27 28prompt delay 36scroll speed 36
setupadditional information 39menu 29
shippingyour HP Officejet 47
softwareremove and reinstall 40
soundsself-maintenance 36
specificationsphysical 43power 43
speed dials 19create individual
settings 26delete settings 27
stopscan 18scheduled fax 21
subscriber identification code 27
support services 45
Ttelephone line
multiple numbers 26telephone numbers 45text
enhance 14enter from front panel 28
time
index
reference guide 57
setting 27transparency film
recommended 7tips on loading 11
troubleshootingremove and reinstall
software 40T-shirt Transfer Iron-On
load 11tutorial
front panel 3make a copy 4
Uunanswered number
redial automatically 23
Vvolume
adjust 25
Wwarranty 45
service 51statement 51upgrades 51
white stripcleaning 32
hp officejet 4100 series
chapter 12
58
declaration of conformityAccording to ISOIEC Guide 22 and EN 45014
Manufacturerrsquos Name and Address
Hewlett-Packard Company 16399 West Bernardo Drive San Diego CA 92127-1899 USA
declares that the product
Product Name hp officejet 4100 series (Q1608A)
Model Number(s) officejet 4110 (Q1609A) officejet 4110xi (Q1610A) officejet 4110v (Q1611A) officejet 4105 (Q1612A) officejet 4105z (Q1613A) officejet 4115 (Q1614A)
Product Options All
conforms to the following Product Specifications
Safety EN609501992 +A1 A2 A3 A4 amp A11
IEC609501991 +A1 A2 A3 amp A4
UL1950CSA 222 No 950 3rd Edn 1995
NOM-019-SCFI-1993
EMC CISPR221993 +A1 amp A2 EN550221994 +A1 amp A2 -Class B
CISPR241997EN550241998
IEC 61000-3-21995 EN61000-3-21995
IEC 61000-3-31994 EN61000-3-31995
ASNZS 3548 1992
CNS13438 1997
FCC Part 15-Class B ICES-003 Issue 2 VCCI-2
GB 9254-1998
Telecom TBR21 1998
Supplementary Information
The Product herewith complies with the requirements of the Low Voltage Directive 7323EEC the EMC Directive 89336EEC and the RampTTE Directive 19995EC (ANNEX II) carries the CE marking accordingly
European Contact for regulatory topics only Your local Hewlett-Packard Sales and Service Office orHewlett-Packard GmbH
Department HQ-TRE Herrenberger Strasse 140 D-71034 Boumlblingen Germany (FAX + 49-7031-14-3143)
order mediaTo order media such as HP Premium Inkjet Paper HP Premium Inkjet Transparency Film HP Iron-On T-shirt Transfer paper or HP Greeting Cards go to
wwwhpshoppingcom
For orders in countries other than the US and Canada select other countries then click Yes to leave hpshoppingcom From this website you can access hpshoppingcom for your specific language or countryregion
order print cartridges
If you have Internet access you can get more information from the HP website at
wwwhpcomsupport
print cartridges hp reorder number
HP black print cartridge 56 19 ml black print cartridge
HP color print cartridgeHP tri-color print cartridge
57 17 ml color print cartridge28 8 ml color print cartridge
Visit the hp officejet information centerIt has everything you need to get the most value from your HP Officejet
bull Technical Supportbull Supplies and Ordering Informationbull Project Tipsbull Ways to Enhance Your Product
wwwhpcomsupport
copy 2003 Hewlett-Packard Company
Printed in the USA Mexico Germany Singapore or China
Q1608-90163Q1608-90163
Q1608-90163

hp officejet 4100 series
chapter 7
38
8
39
additional setup information
During the installation of the HP Officejet software a number of windows are displayed You should see the following
bull Installingbull Copying files bull A request to plug in the HP Officejetbull Green OK and check markbull Request to restart your computer (may not occur in all cases)bull Registration
If you did not see all of these windows there may be a problem with the installation Verify the following
bull The HP Director contains six icons (double-click the HP Director icon on the desktop)
bull The HP Officejet is listed in the Printers dialog boxbull There is an icon for the HP Officejet in the System Tray that indicates the
HP Officejet is ready
If the HP Director does not show six icons you may need to wait a few minutes for the HP Officejet to connect to your computer
possible installation problemsIf nothing appears on your computer screen after you insert the HP Officejet 4100 Series CD-ROM into your computerrsquos CD-ROM drive
1 From the Start menu choose Run
2 In the Run dialog box enter dsetupexe (if your CD-ROM drive is not assigned to drive letter d use the appropriate drive letter) then click OK
If the HP Director does not contain six icons do the following
bull Verify that the front-panel cover is attached then unplug the HP Officejet and plug it in again
bull Verify that the USB and power cables are plugged inndash Unplug the USB cable and plug it in againndash Do not attach the USB cable to a keyboard or nonpowered hubndash Verify that the USB cable is 3 meters or less in lengthndash If you have several USB devices attached to your computer you may
want to unplug the others during the installation
Note AppleTalk is not supported
bull Unplug the HP Officejet from the wall and plug it in againbull Restart your computer
hp officejet 4100 series
chapter 8
40
On Windows check the System Tray for applications that are running in the background and close them before restarting your computer
remove and reinstall your hp officejet softwareIf six icons do not appear in the Director you may need to uninstall and re-install the software Do not simply delete the HP Officejet program files from your hard drive Be sure to remove them properly using the uninstall utility provided in the HP Officejet program group
to uninstall from a Windows computer
1 Disconnect your HP Officejet from your computer
2 On the Windows taskbar click Start choose Programs or All Programs (XP) choose Hewlett-Packard choose hp officejet 4100 series then choose uninstall software
3 Follow the directions on the screenBe sure to disconnect your HP Officejet
4 If you are asked whether you would like to remove shared files click NoOther programs that use these files may not work properly if the files are deleted
5 After the program finishes removing the software disconnect your HP Officejet and restart your computer
Note It is important that you disconnect your HP Officejet before restarting your computer
6 To reinstall the software insert the HP Officejet 4100 Series CD-ROM into your computerrsquos CD-ROM drive and follow the instructions that appear
7 After the software is installed connect and turn on your HP Officejet following the onscreen instructions and the instructions in your Setup PosterAfter connecting and turning on your HP Officejet you may have to wait several minutes for all of the Plug and Play events to completeWhen the software installation is complete you will see a Status Monitor icon in the System Tray
8 To verify that the software is properly installed double-click on the HP Director icon on the desktop If the HP Director shows six icons the software has been properly installed
to uninstall from a Macintosh computer
1 Disconnect your HP Officejet from your computer
2 Double-click on ApplicationsHP All-in-One Software folder
reference guide
additional setup information
41
3 Double-click on HP Uninstaller
4 Follow the directions that appear on the screen
5 After the program finishes removing the software disconnect your HP Officejet and restart your computer
6 To reinstall the software insert the HP Officejet 4100 Series CD-ROM into your computerrsquos CD-ROM drive
Note When re-installing the software follow the instructions on the Setup Poster Do not connect the HP Officejet to your computer until after you have completed the software installation
7 On the desktop open the CD-ROM double-click on hp all-in-one installer and follow the instructions that appear
connect your hp officejet to a phone modem or answering machine
The HP Officejet can share a phone line with a phone a modem or an aswering machine When sharing a phone line with an answering machine the HP Officejet will answer fax calls and direct voice calls to the answering machine
Note For information on connecting your HP Officejet to your computer and phone line refer to the Setup Poster that came with your unit
to connect your hp officejet to a phone modem or answering machine
1 Remove the white plastic stopper from connector 2 on the back of the HP Officejet
To connect more than one device to connector 2 on the HP Officejet you must purchase a Y-splitter and plug it into connector 2
2 Connect the phone cord from the phone modem or answering machine to connector 2 (or Y-splitter)
Caution Do not use the phone cord that came with the HP Officejet for this purpose That phone cord must connect connector 1 on the HP Officejet to the wall jack for your phone system See the Setup Poster for details
3 If you are connecting an answering machine see set the number of rings before answering on page 21 for instructions on setting the number of rings correctly or change the answer ring pattern (distinctive ringing) on page 26 for information on incoming ring patterns
4 If you are connecting a modem turn off its fax-receive feature
connector 2 on the HP Officejet
connector 1 on the HP Officejet
hp officejet 4100 series
chapter 8
42
additional troubleshooting helpYou may want to refer to the readme file for more information on possible installation problems On Windows you can access the readme file from the Start button on the taskbar select Programs Hewlett-Packard hp officejet 4100 series View the Readme File On Macintosh you can access the readme file by double-clicking on the icon located in the top-level folder of the HP Officejet software CD-ROM
The readme file provides more information including
bull Using the Re-install utility after a failed installation to return your PC to a state that will allow the HP Officejet to be re-installed
bull Using the Re-install utility on Windows 98 to recover from a Composite USB System Driver missing errorThis error may occur if the hardware is installed prior to installing the software After running the Re-install utility reboot your PC and install the HP Officejet software before connecting the HP Officejet to your computer
You can also find more information on this website
wwwhpcomsupport
9
43
technical information
Additional specifications information can be found in the HP Photo amp Imaging Help in the hp officejet 4100 series section
physical specifications
power specificationsbull Power consumption 75W maximumbull Source (Input Voltage) 100 to 240 VAC groundedbull Input Frequency 50 to 60 Hzbull Current 1A maximum
regulatory informationAdditional regulatory information can be found in the HP Photo amp Imaging Help The information in this section supercedes information in the HP Photo amp Imaging Help
doc statement deacuteclaration de conformiteacute (Canada)Le preacutesent appareil numeacuterique neacutemet pas de bruit radioeacutelectrique deacutepassant les limites applicables aux appareils numeacuteriques de la classe B prescrites dans le Regraveglement sur le brouillage radioeacutelectrique eacutedicteacute par le ministegravere des Communications du CanadaThis digital apparatus does not exceed the Class B limits for radio noise emissions from digital apparatus set out in the Radio Interference Regulations of the Canadian Department of Communications
notice to users of the Canadian telephone networkThis equipment meets the applicable Industry Canada Terminal Equipment Technical Specifications This is confirmed by the registration number The abbreviation IC before the registration number signifies that registration was performed based on a Declaration of Conformity indicating that Industry Canada technical specifications were met It does not imply that Industry Canada approved the equipment
Note The Ringer Equivalence Number (REN) assigned to each terminal device provides an indication of the maximum number of terminals allowed to be connected to a telephone interface The termination on an interface may consist of any combination of devices subject only to the requirement that the sum of the Ringer Equivalence Numbers of all the devices does not exceed 5
The REN for this product is 03B based on FCC Part 68 test results
height width depth weight (without print cartridges)
with paper trays and ADF closed
718 in (1824 cm) 1676 in (4258 cm) 825 in (2096 cm) 75 lbs (34 kg)
with ADF and paper tray extended
1030 in (2615 cm) 1676 in (4258 cm) 1854 in (4709 cm) 75 lbs (34 kg)
hp officejet 4100 series
chapter 9
44
notice to all users of the European Economic Area (EEA)
This product is designed to interwork with the analogue telephone networks in the following countriesregions
Network compatibility depends on customer selected settings which must be reset to use the equipment on a telephone network in a countryregion other than where the product was purchased Contact the vendor or Hewlett-Packard Company if addition product support is necessaryThis equipment has been certified by the manufacturer in accordance with Directive 19995EC (annex II) for Pan-European single-terminal connection to the public switched telephone network (PSTN) However due to differences between the individual PSTNs provided in different countriesregions the approval does not of itself give an unconditional assurance of successful operation on every PSTN network termination pointIn the event of problems you should contact your equipment supplier in the first instance
geraumluschemissionLpA lt 70 dBam Arbeitsplatzim Normalbetriebnach DIN 45635 T 19
notice to Korean customers
Germany UK Netherlands
France Spain Italy
Belgium Luxembourg Sweden
Austria Denmark Ireland
Norway Finland Switzerland
Greece Portugal
10
45
hp support
This section explains the support services information provided by Hewlett-Packard If you are unable to find the answer you need in the printed or onscreen documentation supplied with your product you can contact one of the HP support services listed in the following pages Some support services are available only in the US and Canada while others are available in many countriesregions worldwide If a support service number is not listed for your countryregion contact your nearest authorized HP dealer for help
get support and other information from the internetIf you have Internet access you can get help from the following HP website
wwwhpcomsupportThe Web site offers technical support drivers supplies and ordering information
hp customer supportSoftware programs from other companies may be included with your HP Officejet If you experience problems with any of those programs you will receive the best technical assistance by calling the experts at that companyIf you need to contact HP Customer Support do the following before you call
1 Make sure thata Your unit is plugged in and turned onb The specified print cartridges are installed correctlyc The recommended paper is properly loaded in the input tray
2 Reset your unita Turn off the unit using the On button located on the unitrsquos front panelb Unplug the power cord from the back of the unitc Plug the power cord back into the unitd Turn on the unit using the On button
3 For more information check the HP website at wwwhpcomsupport
4 If you are still experiencing problems and need to speak with an HP Customer Support Representativendash Have your service ID and serial number ready To display your service ID and
serial number on the front panel do the following Press Enter and Start Color at the same time until the service ID appears in the front-panel display From this display press the right arrow until the serial number displays
ndash Print a Self-Test Report See print a self-test report on page 32 for information on printing this report
ndash Make a color copyndash Be prepared to describe your problem in detail
5 Call HP Customer Support Be near your unit when you call
call in the US during warrantyCall (208) 323-2551 This service is free during the warranty period however your standard long-distance phone charges still apply A fee may apply outside the warranty period
hp officejet 4100 series
chapter 10
46
US phone support is available in both English and Spanish languages 24 hours a day 7 days a week (days and hours of support may change without notice)
call elsewhere in the worldThe numbers listed below are current as of the printing date of this guide For a list of current international HP Support Service numbers visit this address and choose your own countryregion or language
wwwhpcomsupportFor Korea you can also visit this address
httpwwwhpcokrYou can call the HP support center in the following countriesregions If your countryregion is not listed contact your local dealer or nearest HP Sales and Support Office to find out how to obtain servicesSupport service is free during the warranty period however your standard long-distance phone charges will apply In some cases a flat fee per single incident will also applyFor phone support in Europe please check for the details and conditions of phone support in your countryregion by consulting the following Web site
wwwhpcomsupportAlternatively you can ask your dealer or call HP at the phone number indicated in this booklet As part of our constant efforts to improve our phone support service we advise you to check our website on a regular basis for new information regarding service features and delivery
countryregion hp technical support countryregion hp technical support
Algeria1 +213 (0) 61564 543 Malaysia 1-800-805405
Argentina 0810-555-5520 Mexico 01-800-472-6684
Australia +61 3 8877 80001902 910 910
Mexico (Mexico City) 5258-9922
Austria +43 (0) 810 00 6080 Morocco1 +212 22404 747
Bahrain (Dubai) 800 728 Netherlands +31 (0) 20 606 8751
Belgium (Dutch) +32 (0) 2 626 8806 New Zealand 0800 441 147
Belgium (French) +32 (0) 2 626 8807 Norway +47 22 11 6299
Brazil (Grande Sao Paulo) (11) 3747 7799 Oman +971 4 883 8454
Brazil (Demais Localidades) 0800 157751 Palestine +971 4 883 8454
Canada during warranty (905) 206 4663 Panama 001-800-7112884
Canada post-warranty(per-call charge)
1-877-621-4722 Peru 0-800-10111
Caribbean amp Central America
1-800-711-2884 Philippines 632-867-3551
Chile 800-360-999 Poland +48 22 865 98 00
China 86 10 6868 7980 Portugal +351 21 3176333
Colombia 9-800-114-726 Puerto Rico 1-877-2320-589
Costa Rica 0-800-011-0524 Qatar +971 4 883 8454
Czech Republic +420 (0) 261307310 Romania +40 1 315 44 42or local 01 3154442
reference guide
hp support
47
call in Australia post-warrantyIf your product is not under warranty you can call 03 8877 8000 A per-incident out-of-warranty support fee of $2750 (inc GST) will be charged to your credit card You can also call 1902 910 910 ($2750 charged to your phone account) from 900 AM to 500 PM Monday through Friday (Charges and support hours are subject to change without notice)
prepare your unit for shipmentIf after contacting HP Customer Support or returning to the point of purchase you are requested to send your unit in for service please follow the power off and rebox steps below to avoid further damage to the HP product
Denmark +45 39 29 4099 Russian Federation Moscow +7 095 797 3520
Ecuador 1800-711-2884 Russian Federation St Petersburg
+7 812 346 7997
Europe (English) +44 (0) 207 512 5202 Saudi Arabia +800 897 14440
Egypt 02 532 5222 Singapore 65 6272 5300
Finland +358 (0) 203 47 288 Slovakia +421 (0) 2 682 08080
France (034 Euromin) +0892 69 60 22 South Africa (inside RSA) 086 000 1030
Germany (012 Euromin) +49 (0) 180 52 58 143 South Africa (inside RSA) +27-11 258 9301
Greece +30 1060 73 603 Spain +34 902 321 123
Hong Kong (SAR) +85 (2) 3002 8555 Sweden +46 (0)8 619 2170
Guatemala 1800-995-5105 Switzerland 2 +41 (0) 84 880 1111
Hungary +36 (0) 1 382 1111 Taiwan +886-2-2717-00550800 010 055
India 1-600-11226791 11 682 6035
Thailand +66 (2) 661 4000
Indonesia 62-21-350-3408 Tunisia1 +216 1891 222
Ireland +353 (0) 1 662 5525 Turkey +90 216 579 7171
Israel +972 (0) 9 8304848 Ukraine +7 (380-44) 490-3520
Italy +39 (0) 226410350 United Arab Emirates +971 4 883 8454
Japan 0570 000 511+81 3 3335 9800
United Kingdom +44 (0) 207 512 52 02
Jordan +971 4 883 8454 Venezuela 0800-47468368 or800-477-7777
Korea (Seoul) +82 (2) 3270 0700 Venezuela (Caracas) (502) 207-8488
Korea (outside Seoul) 080 999 0700 Vietnam 84 (0) 8 823 4530
Kuwait +971 4 883 8454 Yemen +971 4 883 8454
Lebanon +971 4 883 8454
1 This Call Center supports French speaking customers from the following countriesregions Morocco Tunisia and Algeria
2 This Call Center supports German French and Italian speaking customers in Switzerland
countryregion hp technical support countryregion hp technical support
hp officejet 4100 series
chapter 10
48
Note When transporting your HP Officejet make sure that the pens have been removed the HP Officejet has been properly shut down by pressing the power button and you have allowed time for the carriage to return to the service station and for the scanner to return to its parked position
1 Turn on the unitDisregard steps 1 through 6 if your unit will not turn on and the print carriage is in the home position You will not be able to remove the print cartridges Proceed to step 7
2 Open the print cartridge access doorThe print carriage moves into view
3 See replace the print cartridges on page 33 for information on removing the print cartridges
Caution Remove both print cartridges Failure to do so may damage your unit
4 Place the print cartridges in an airtight bag so they will not dry out and put them aside (do not send them with the unit unless instructed to by the HP customer support call agent)
5 Turn off the unit
6 Close the print cartridge access door
7 Remove the front panel cover as followsa Grasp the front of the front panel cover with two hands as shownb Firmly lift the front panel cover to unsnap it from the unit
8 Retain the front panel cover Do not return the front panel cover with the unit
9 If available pack the unit for shipment using the original packing materials or the packaging materials that come with your exchange unit
If you do not have the original packaging materials please use other adequate packaging materials Shipping damage caused by improper packaging andor improper transportation is not covered under the warranty
reference guide
hp support
49
10 Place the return shipping label on the outside of the box
11 Include the following items in the boxndash A complete description of symptoms for service personnel (samples of print
quality problems are helpful)ndash A copy of the sales slip or other proof of purchase to establish the warranty
coverage periodndash Your name address and a phone number where you can be reached during
the day
hp distribution centerTo order HP Officejet software a copy of the printed Reference Guide a setup poster or other customer-replaceable parts do one of the following bull In the US or Canada call (208) 323 2551bull Visit this website
httpwwwhpcomcposupportsoftwarehtml
hp officejet 4100 series
chapter 10
50
11
51
warranty information
HP Officejet 4100 seriesDuration of Limited Warranty (hardware and labor) 1 YearDuration of Limited Warranty (CD media) 90 DaysDuration of Limited Warranty (print cartridges) Until the HP ink is depleted or the ldquoend of warrantyrdquo date printed on the cartridge has been reached whichever occurs first
warranty service
express serviceTo obtain HP express repair service the customer must contact an HP service office or an HP Customer Support Center for basic troubleshooting first See hp customer support on page 45 for steps to take before calling Customer SupportIf a customer unit needs a minor part replacement and these parts can normally be replaced by the customer the customer-replaceable components may be serviced through expedited part shipment In this event HP will prepay shipping charges duty and taxes provide telephone assistance on replacement of the component and pay shipping charges duty and taxes for any part that HP asks to be returnedThe HP Customer Support Center may direct customers to designated authorized service providers who are certified by HP to service the HP product
warranty upgradesUpgrade your standard factory warranty to a total of three years with the HP SUPPORTPACK Service coverage begins on product purchase date and the pack must be purchased within the first 180 days of product purchase This program offers phone support from 600 AM to 1000 PM Mountain Standard Time (MST) Monday through Friday and 900 AM to 400 PM (MST) on Saturdays If during your technical support call it is determined that you need a replacement product then HP will ship you this product next business day free of charge Available in US onlyFor more information please call 1-888-999-4747 or visit the following HP Web site
httpwwwhpcomgohpsupportpack
Outside the US please call your local HP Customer Support office See call elsewhere in the world on page 46 for a list of international Customer Support numbers
returning your hp officejet for serviceBefore returning your HP Officejet for service you must call HP Customer Support See hp customer support on page 45 for steps to take before calling Customer Support
hewlett-packard limited global warranty statement
extent of limited warrantyHewlett-Packard (ldquoHPrdquo) warrants to the end-user customer (ldquoCustomerrdquo) that each HP Officejet 4100 Series product (ldquoProductrdquo) including related software accessories media and supplies shall be free from defects in material and workmanship for the duration which begins on the date of purchase by the Customer
hp officejet 4100 series
chapter 11
52
For each software Product HPrsquos limited warranty applies only to a failure to execute programming instructions HP does not warrant that the operation of any Product shall be uninterrupted or error freeHPrsquos limited warranty covers only those defects which arise as a result of normal use of a Product and does not cover any other problems including those which arise as a result of (a) improper maintenance or modification (b) software accessories media or supplies not provided or supported by HP or (c) operation outside the Productrsquos specificationsFor any hardware Product the use of a non-HP print cartridge or a refilled print cartridge does not affect either the warranty to the Customer or any HP support contract with the Customer However if Product failure or damage is attributable to the use of a non-HP or refilled print cartridge HP shall charge its standard labor and materials charges to service the Product for the failure or damageIf HP receives during the applicable warranty period notice of a defect in any Product HP shall either repair or replace the defective Product at HPrsquos option Where labor charges are not covered by HPrsquos limited warranty repairs shall be at HPrsquos standard charges for laborIf HP is unable to repair or replace as applicable a defective Product which is covered by HPrsquos warranty HP shall within a reasonable time after being notified of the defect refund the purchase price for the ProductHP shall have no obligation to repair replace or refund until the Customer returns the defective Product to HPAny replacement product may be either new or like-new provided that it has functionality at least equal to that of the Product being replacedHP products including each Product may contain remanufactured parts components or materials equivalent to new in performanceHPs limited warranty for each Product is valid in any countryregion or locality where HP has a support presence for the Product and where HP has marketed the Product The level of warranty service may vary according to local standards HP shall have no obligation to alter the form fit or function of the Product in order to make it operate in a countryregion or locality for which the Product was never intended to operate
limitations of warrantyTO THE EXTENT ALLOWED BY LOCAL LAW NEITHER HP NOR ITS THIRD PARTY SUPPLIERS MAKE ANY OTHER WARRANTY OR CONDITION OF ANY KIND WHETHER EXPRESS OR IMPLIED WITH RESPECT TO THE COVERED HP PRODUCTS AND SPECIFICALLY DISCLAIM THE IMPLIED WARRANTIES OR CONDITIONS OF MERCHANTABILITY SATISFACTORY QUALITY AND FITNESS FOR A PARTICULAR PURPOSE
limitations of liabilityTo the extent allowed by local law the remedies provided in this Limited Warranty Statement are the Customerrsquos sole and exclusive remediesTO THE EXTENT ALLOWED BY LOCAL LAW EXCEPT FOR THE OBLIGATIONS SPECIFICALLY SET FORTH IN THIS LIMITED WARRANTY STATEMENT IN NO EVENT SHALL HP OR ITS THIRD PARTY SUPPLIERS BE LIABLE FOR DIRECT INDIRECT SPECIAL INCIDENTAL OR CONSEQUENTIAL DAMAGES WHETHER BASED ON CONTRACT TORT OR ANY OTHER LEGAL THEORY AND WHETHER ADVISED OF THE POSSIBILITY OF SUCH DAMAGES
local lawThis Limited Warranty Statement gives the Customer specific legal rights The Customer may also have other rights which vary from state to state in the United States from province to province in Canada and from countryregion to countryregion elsewhere in the world
reference guide
warranty information
53
To the extent this Limited Warranty Statement is inconsistent with local law this Statement shall be deemed modified to be consistent with such local law Under such local law certain disclaimers and limitations of this Statement may not apply to the Customer For example some states in the United States as well as some governments outside the United States (including provinces in Canada) mayPreclude the disclaimers and limitations in this Statement from limiting the statutory rights of a consumer (eg the United Kingdom)Otherwise restrict the ability of a manufacturer to enforce such disclaimers or limitations orGrant the Customer additional warranty rights specify the duration of implied warranties which the manufacturer cannot disclaim or not allow limitations on the duration of implied warrantiesFOR CONSUMER TRANSACTIONS IN AUSTRALIA AND NEW ZEALAND THE TERMS IN THIS LIMITED WARRANTY STATEMENT EXCEPT TO THE EXTENT LAWFULLY PERMITTED DO NOT EXCLUDE RESTRICT OR MODIFY AND ARE IN ADDITION TO THE MANDATORY STATUTORY RIGHTS APPLICABLE TO THE SALE OF THE COVERED HP PRODUCTS TO SUCH CUSTOMERS
hp officejet 4100 series
chapter 11
54
55
index
Numerics4-by-6 inch photo paper
load 10 12
AADF 7adjust
volume for fax 25align print cartridges 35Answer Ring Pattern 26automatic document feeder 7automatic reduction
fax 25
Bbest copy quality 13busy number
redial automatically 23
Ccancel
scan 18scheduled fax 21
cartridgesalign 35replace 33
cleanprint cartridges 35the exterior 32the glass 31white strip 32
colorenhance 14fax 20fax from front panel 20
contrastchange for fax 23photo color 14
copy 13 16change default settings 15enhance 14fit to page 16lighten or darken 14menu options 16number of copies 14photo 15quality 13reduce or enlarge 14settings 13 15
speed 13tutorial 4
Customer Support 45web site 45
Ddarken a copy 14date
setting 27default settings
restore 35director review 4distinctive ringing 26
Eenhance copies 14enlarge copy 14 16envelopes
load 9Error Correction Mode
(ECM) 25
Ffactory defaults
restore 35fast copy quality 13fax 28
adjust volume 25automated reports 22cancel fax forward 24cancel scheduled 21change Answer Ring
Pattern 26change contrast 23change resolution 22change settings 19control appearance 22create individual speed-dial
settings 26delete speed-dial
settings 27distinctive ringing 26Error Correction Mode
(ECM) 25forward faxes 24header 27in color 20in color from front panel 20manual reports 22
menu 29print reports 22receive 21receive manually 21redial busy or unanswered
number 23schedule 20send from front panel 19set automatic reduction 25set date and time 27set the number of rings 21settings 27 28setup menu options 29speed dials 19test 28
fit to page 16forward faxes 24
cancel 24front panel
display scroll speed 36enter text 28send a fax 19setting prompt delay 36tutorial 3
Gglass
cleaning 31greeting cards
load 11
Hhelp 1HP Customer Support 45
calling 45HP Director 4HP distribution center 49HP Officjet
preparing to ship 47HP papers
tips on loading 11
Iindividual speed-dial settings
create 26ink cartridges see print
cartridgesinkjet paper
load 11
index
hp officejet 4100 series56
Kkeypad
enter text 28
Llabels
load 12lighten copies 14load
change the paper type 12envelopes 9original in ADF 7paper 7photo paper 10 12postcards 10 12print cartridges 33set the paper size 12tips 11
Mmaintenance
align print cartridges 35clean print cartridges 35clean the exterior 32clean the glass 31clean the white strip 32normal sounds 36replace print cartridges 33restore factory defaults 35self-maintenance
sounds 36self-test report 32
menuscopy options 16fax 29fax setup 29maintenance 37print reports 37
Nnormal copy quality 13number of copies
set 14number of rings
set 21
Oorder print cartridges 60originals
load in ADF 7output tray 8
Ppaper
change default size for copy 12
change the type 12load 7recommended 7set the size 12tips on loading 11
paper size change for copy 12
paper trayload 7
phone numbers support services 45
photo paperload 10 12
photoscopy 15enhance copy 14
physical specifications 43postcards
load 10 12power
specifications 43print
envelopes 9fax reports 22self-test report 32
print cartridgesalign 35clean 35handling 32replace 33
prompt delaysetting 36
Qquick start
review the director 4use with a computer 4
Rreceive
fax 21redial
busy or unanswered number 23
reduce copy 14 16regulatory information 43reinstall software 40reports
generate automatically for fax 22
generate manually for fax 22
print 22self-test 32
resolution
change for fax 22restore factory settings 35returning your HP Officejet for
service 51
Sscan
from front panel 17stop 18
schedule a fax 20scroll speed
setting 36self-test report 32send
cancel forward faxes 24color fax 20color fax from front
panel 20forward faxes 24
settingscopy 13 15fax 27 28prompt delay 36scroll speed 36
setupadditional information 39menu 29
shippingyour HP Officejet 47
softwareremove and reinstall 40
soundsself-maintenance 36
specificationsphysical 43power 43
speed dials 19create individual
settings 26delete settings 27
stopscan 18scheduled fax 21
subscriber identification code 27
support services 45
Ttelephone line
multiple numbers 26telephone numbers 45text
enhance 14enter from front panel 28
time
index
reference guide 57
setting 27transparency film
recommended 7tips on loading 11
troubleshootingremove and reinstall
software 40T-shirt Transfer Iron-On
load 11tutorial
front panel 3make a copy 4
Uunanswered number
redial automatically 23
Vvolume
adjust 25
Wwarranty 45
service 51statement 51upgrades 51
white stripcleaning 32
hp officejet 4100 series
chapter 12
58
declaration of conformityAccording to ISOIEC Guide 22 and EN 45014
Manufacturerrsquos Name and Address
Hewlett-Packard Company 16399 West Bernardo Drive San Diego CA 92127-1899 USA
declares that the product
Product Name hp officejet 4100 series (Q1608A)
Model Number(s) officejet 4110 (Q1609A) officejet 4110xi (Q1610A) officejet 4110v (Q1611A) officejet 4105 (Q1612A) officejet 4105z (Q1613A) officejet 4115 (Q1614A)
Product Options All
conforms to the following Product Specifications
Safety EN609501992 +A1 A2 A3 A4 amp A11
IEC609501991 +A1 A2 A3 amp A4
UL1950CSA 222 No 950 3rd Edn 1995
NOM-019-SCFI-1993
EMC CISPR221993 +A1 amp A2 EN550221994 +A1 amp A2 -Class B
CISPR241997EN550241998
IEC 61000-3-21995 EN61000-3-21995
IEC 61000-3-31994 EN61000-3-31995
ASNZS 3548 1992
CNS13438 1997
FCC Part 15-Class B ICES-003 Issue 2 VCCI-2
GB 9254-1998
Telecom TBR21 1998
Supplementary Information
The Product herewith complies with the requirements of the Low Voltage Directive 7323EEC the EMC Directive 89336EEC and the RampTTE Directive 19995EC (ANNEX II) carries the CE marking accordingly
European Contact for regulatory topics only Your local Hewlett-Packard Sales and Service Office orHewlett-Packard GmbH
Department HQ-TRE Herrenberger Strasse 140 D-71034 Boumlblingen Germany (FAX + 49-7031-14-3143)
order mediaTo order media such as HP Premium Inkjet Paper HP Premium Inkjet Transparency Film HP Iron-On T-shirt Transfer paper or HP Greeting Cards go to
wwwhpshoppingcom
For orders in countries other than the US and Canada select other countries then click Yes to leave hpshoppingcom From this website you can access hpshoppingcom for your specific language or countryregion
order print cartridges
If you have Internet access you can get more information from the HP website at
wwwhpcomsupport
print cartridges hp reorder number
HP black print cartridge 56 19 ml black print cartridge
HP color print cartridgeHP tri-color print cartridge
57 17 ml color print cartridge28 8 ml color print cartridge
Visit the hp officejet information centerIt has everything you need to get the most value from your HP Officejet
bull Technical Supportbull Supplies and Ordering Informationbull Project Tipsbull Ways to Enhance Your Product
wwwhpcomsupport
copy 2003 Hewlett-Packard Company
Printed in the USA Mexico Germany Singapore or China
Q1608-90163Q1608-90163
Q1608-90163

hp officejet 4100 series
chapter 8
40
On Windows check the System Tray for applications that are running in the background and close them before restarting your computer
remove and reinstall your hp officejet softwareIf six icons do not appear in the Director you may need to uninstall and re-install the software Do not simply delete the HP Officejet program files from your hard drive Be sure to remove them properly using the uninstall utility provided in the HP Officejet program group
to uninstall from a Windows computer
1 Disconnect your HP Officejet from your computer
2 On the Windows taskbar click Start choose Programs or All Programs (XP) choose Hewlett-Packard choose hp officejet 4100 series then choose uninstall software
3 Follow the directions on the screenBe sure to disconnect your HP Officejet
4 If you are asked whether you would like to remove shared files click NoOther programs that use these files may not work properly if the files are deleted
5 After the program finishes removing the software disconnect your HP Officejet and restart your computer
Note It is important that you disconnect your HP Officejet before restarting your computer
6 To reinstall the software insert the HP Officejet 4100 Series CD-ROM into your computerrsquos CD-ROM drive and follow the instructions that appear
7 After the software is installed connect and turn on your HP Officejet following the onscreen instructions and the instructions in your Setup PosterAfter connecting and turning on your HP Officejet you may have to wait several minutes for all of the Plug and Play events to completeWhen the software installation is complete you will see a Status Monitor icon in the System Tray
8 To verify that the software is properly installed double-click on the HP Director icon on the desktop If the HP Director shows six icons the software has been properly installed
to uninstall from a Macintosh computer
1 Disconnect your HP Officejet from your computer
2 Double-click on ApplicationsHP All-in-One Software folder
reference guide
additional setup information
41
3 Double-click on HP Uninstaller
4 Follow the directions that appear on the screen
5 After the program finishes removing the software disconnect your HP Officejet and restart your computer
6 To reinstall the software insert the HP Officejet 4100 Series CD-ROM into your computerrsquos CD-ROM drive
Note When re-installing the software follow the instructions on the Setup Poster Do not connect the HP Officejet to your computer until after you have completed the software installation
7 On the desktop open the CD-ROM double-click on hp all-in-one installer and follow the instructions that appear
connect your hp officejet to a phone modem or answering machine
The HP Officejet can share a phone line with a phone a modem or an aswering machine When sharing a phone line with an answering machine the HP Officejet will answer fax calls and direct voice calls to the answering machine
Note For information on connecting your HP Officejet to your computer and phone line refer to the Setup Poster that came with your unit
to connect your hp officejet to a phone modem or answering machine
1 Remove the white plastic stopper from connector 2 on the back of the HP Officejet
To connect more than one device to connector 2 on the HP Officejet you must purchase a Y-splitter and plug it into connector 2
2 Connect the phone cord from the phone modem or answering machine to connector 2 (or Y-splitter)
Caution Do not use the phone cord that came with the HP Officejet for this purpose That phone cord must connect connector 1 on the HP Officejet to the wall jack for your phone system See the Setup Poster for details
3 If you are connecting an answering machine see set the number of rings before answering on page 21 for instructions on setting the number of rings correctly or change the answer ring pattern (distinctive ringing) on page 26 for information on incoming ring patterns
4 If you are connecting a modem turn off its fax-receive feature
connector 2 on the HP Officejet
connector 1 on the HP Officejet
hp officejet 4100 series
chapter 8
42
additional troubleshooting helpYou may want to refer to the readme file for more information on possible installation problems On Windows you can access the readme file from the Start button on the taskbar select Programs Hewlett-Packard hp officejet 4100 series View the Readme File On Macintosh you can access the readme file by double-clicking on the icon located in the top-level folder of the HP Officejet software CD-ROM
The readme file provides more information including
bull Using the Re-install utility after a failed installation to return your PC to a state that will allow the HP Officejet to be re-installed
bull Using the Re-install utility on Windows 98 to recover from a Composite USB System Driver missing errorThis error may occur if the hardware is installed prior to installing the software After running the Re-install utility reboot your PC and install the HP Officejet software before connecting the HP Officejet to your computer
You can also find more information on this website
wwwhpcomsupport
9
43
technical information
Additional specifications information can be found in the HP Photo amp Imaging Help in the hp officejet 4100 series section
physical specifications
power specificationsbull Power consumption 75W maximumbull Source (Input Voltage) 100 to 240 VAC groundedbull Input Frequency 50 to 60 Hzbull Current 1A maximum
regulatory informationAdditional regulatory information can be found in the HP Photo amp Imaging Help The information in this section supercedes information in the HP Photo amp Imaging Help
doc statement deacuteclaration de conformiteacute (Canada)Le preacutesent appareil numeacuterique neacutemet pas de bruit radioeacutelectrique deacutepassant les limites applicables aux appareils numeacuteriques de la classe B prescrites dans le Regraveglement sur le brouillage radioeacutelectrique eacutedicteacute par le ministegravere des Communications du CanadaThis digital apparatus does not exceed the Class B limits for radio noise emissions from digital apparatus set out in the Radio Interference Regulations of the Canadian Department of Communications
notice to users of the Canadian telephone networkThis equipment meets the applicable Industry Canada Terminal Equipment Technical Specifications This is confirmed by the registration number The abbreviation IC before the registration number signifies that registration was performed based on a Declaration of Conformity indicating that Industry Canada technical specifications were met It does not imply that Industry Canada approved the equipment
Note The Ringer Equivalence Number (REN) assigned to each terminal device provides an indication of the maximum number of terminals allowed to be connected to a telephone interface The termination on an interface may consist of any combination of devices subject only to the requirement that the sum of the Ringer Equivalence Numbers of all the devices does not exceed 5
The REN for this product is 03B based on FCC Part 68 test results
height width depth weight (without print cartridges)
with paper trays and ADF closed
718 in (1824 cm) 1676 in (4258 cm) 825 in (2096 cm) 75 lbs (34 kg)
with ADF and paper tray extended
1030 in (2615 cm) 1676 in (4258 cm) 1854 in (4709 cm) 75 lbs (34 kg)
hp officejet 4100 series
chapter 9
44
notice to all users of the European Economic Area (EEA)
This product is designed to interwork with the analogue telephone networks in the following countriesregions
Network compatibility depends on customer selected settings which must be reset to use the equipment on a telephone network in a countryregion other than where the product was purchased Contact the vendor or Hewlett-Packard Company if addition product support is necessaryThis equipment has been certified by the manufacturer in accordance with Directive 19995EC (annex II) for Pan-European single-terminal connection to the public switched telephone network (PSTN) However due to differences between the individual PSTNs provided in different countriesregions the approval does not of itself give an unconditional assurance of successful operation on every PSTN network termination pointIn the event of problems you should contact your equipment supplier in the first instance
geraumluschemissionLpA lt 70 dBam Arbeitsplatzim Normalbetriebnach DIN 45635 T 19
notice to Korean customers
Germany UK Netherlands
France Spain Italy
Belgium Luxembourg Sweden
Austria Denmark Ireland
Norway Finland Switzerland
Greece Portugal
10
45
hp support
This section explains the support services information provided by Hewlett-Packard If you are unable to find the answer you need in the printed or onscreen documentation supplied with your product you can contact one of the HP support services listed in the following pages Some support services are available only in the US and Canada while others are available in many countriesregions worldwide If a support service number is not listed for your countryregion contact your nearest authorized HP dealer for help
get support and other information from the internetIf you have Internet access you can get help from the following HP website
wwwhpcomsupportThe Web site offers technical support drivers supplies and ordering information
hp customer supportSoftware programs from other companies may be included with your HP Officejet If you experience problems with any of those programs you will receive the best technical assistance by calling the experts at that companyIf you need to contact HP Customer Support do the following before you call
1 Make sure thata Your unit is plugged in and turned onb The specified print cartridges are installed correctlyc The recommended paper is properly loaded in the input tray
2 Reset your unita Turn off the unit using the On button located on the unitrsquos front panelb Unplug the power cord from the back of the unitc Plug the power cord back into the unitd Turn on the unit using the On button
3 For more information check the HP website at wwwhpcomsupport
4 If you are still experiencing problems and need to speak with an HP Customer Support Representativendash Have your service ID and serial number ready To display your service ID and
serial number on the front panel do the following Press Enter and Start Color at the same time until the service ID appears in the front-panel display From this display press the right arrow until the serial number displays
ndash Print a Self-Test Report See print a self-test report on page 32 for information on printing this report
ndash Make a color copyndash Be prepared to describe your problem in detail
5 Call HP Customer Support Be near your unit when you call
call in the US during warrantyCall (208) 323-2551 This service is free during the warranty period however your standard long-distance phone charges still apply A fee may apply outside the warranty period
hp officejet 4100 series
chapter 10
46
US phone support is available in both English and Spanish languages 24 hours a day 7 days a week (days and hours of support may change without notice)
call elsewhere in the worldThe numbers listed below are current as of the printing date of this guide For a list of current international HP Support Service numbers visit this address and choose your own countryregion or language
wwwhpcomsupportFor Korea you can also visit this address
httpwwwhpcokrYou can call the HP support center in the following countriesregions If your countryregion is not listed contact your local dealer or nearest HP Sales and Support Office to find out how to obtain servicesSupport service is free during the warranty period however your standard long-distance phone charges will apply In some cases a flat fee per single incident will also applyFor phone support in Europe please check for the details and conditions of phone support in your countryregion by consulting the following Web site
wwwhpcomsupportAlternatively you can ask your dealer or call HP at the phone number indicated in this booklet As part of our constant efforts to improve our phone support service we advise you to check our website on a regular basis for new information regarding service features and delivery
countryregion hp technical support countryregion hp technical support
Algeria1 +213 (0) 61564 543 Malaysia 1-800-805405
Argentina 0810-555-5520 Mexico 01-800-472-6684
Australia +61 3 8877 80001902 910 910
Mexico (Mexico City) 5258-9922
Austria +43 (0) 810 00 6080 Morocco1 +212 22404 747
Bahrain (Dubai) 800 728 Netherlands +31 (0) 20 606 8751
Belgium (Dutch) +32 (0) 2 626 8806 New Zealand 0800 441 147
Belgium (French) +32 (0) 2 626 8807 Norway +47 22 11 6299
Brazil (Grande Sao Paulo) (11) 3747 7799 Oman +971 4 883 8454
Brazil (Demais Localidades) 0800 157751 Palestine +971 4 883 8454
Canada during warranty (905) 206 4663 Panama 001-800-7112884
Canada post-warranty(per-call charge)
1-877-621-4722 Peru 0-800-10111
Caribbean amp Central America
1-800-711-2884 Philippines 632-867-3551
Chile 800-360-999 Poland +48 22 865 98 00
China 86 10 6868 7980 Portugal +351 21 3176333
Colombia 9-800-114-726 Puerto Rico 1-877-2320-589
Costa Rica 0-800-011-0524 Qatar +971 4 883 8454
Czech Republic +420 (0) 261307310 Romania +40 1 315 44 42or local 01 3154442
reference guide
hp support
47
call in Australia post-warrantyIf your product is not under warranty you can call 03 8877 8000 A per-incident out-of-warranty support fee of $2750 (inc GST) will be charged to your credit card You can also call 1902 910 910 ($2750 charged to your phone account) from 900 AM to 500 PM Monday through Friday (Charges and support hours are subject to change without notice)
prepare your unit for shipmentIf after contacting HP Customer Support or returning to the point of purchase you are requested to send your unit in for service please follow the power off and rebox steps below to avoid further damage to the HP product
Denmark +45 39 29 4099 Russian Federation Moscow +7 095 797 3520
Ecuador 1800-711-2884 Russian Federation St Petersburg
+7 812 346 7997
Europe (English) +44 (0) 207 512 5202 Saudi Arabia +800 897 14440
Egypt 02 532 5222 Singapore 65 6272 5300
Finland +358 (0) 203 47 288 Slovakia +421 (0) 2 682 08080
France (034 Euromin) +0892 69 60 22 South Africa (inside RSA) 086 000 1030
Germany (012 Euromin) +49 (0) 180 52 58 143 South Africa (inside RSA) +27-11 258 9301
Greece +30 1060 73 603 Spain +34 902 321 123
Hong Kong (SAR) +85 (2) 3002 8555 Sweden +46 (0)8 619 2170
Guatemala 1800-995-5105 Switzerland 2 +41 (0) 84 880 1111
Hungary +36 (0) 1 382 1111 Taiwan +886-2-2717-00550800 010 055
India 1-600-11226791 11 682 6035
Thailand +66 (2) 661 4000
Indonesia 62-21-350-3408 Tunisia1 +216 1891 222
Ireland +353 (0) 1 662 5525 Turkey +90 216 579 7171
Israel +972 (0) 9 8304848 Ukraine +7 (380-44) 490-3520
Italy +39 (0) 226410350 United Arab Emirates +971 4 883 8454
Japan 0570 000 511+81 3 3335 9800
United Kingdom +44 (0) 207 512 52 02
Jordan +971 4 883 8454 Venezuela 0800-47468368 or800-477-7777
Korea (Seoul) +82 (2) 3270 0700 Venezuela (Caracas) (502) 207-8488
Korea (outside Seoul) 080 999 0700 Vietnam 84 (0) 8 823 4530
Kuwait +971 4 883 8454 Yemen +971 4 883 8454
Lebanon +971 4 883 8454
1 This Call Center supports French speaking customers from the following countriesregions Morocco Tunisia and Algeria
2 This Call Center supports German French and Italian speaking customers in Switzerland
countryregion hp technical support countryregion hp technical support
hp officejet 4100 series
chapter 10
48
Note When transporting your HP Officejet make sure that the pens have been removed the HP Officejet has been properly shut down by pressing the power button and you have allowed time for the carriage to return to the service station and for the scanner to return to its parked position
1 Turn on the unitDisregard steps 1 through 6 if your unit will not turn on and the print carriage is in the home position You will not be able to remove the print cartridges Proceed to step 7
2 Open the print cartridge access doorThe print carriage moves into view
3 See replace the print cartridges on page 33 for information on removing the print cartridges
Caution Remove both print cartridges Failure to do so may damage your unit
4 Place the print cartridges in an airtight bag so they will not dry out and put them aside (do not send them with the unit unless instructed to by the HP customer support call agent)
5 Turn off the unit
6 Close the print cartridge access door
7 Remove the front panel cover as followsa Grasp the front of the front panel cover with two hands as shownb Firmly lift the front panel cover to unsnap it from the unit
8 Retain the front panel cover Do not return the front panel cover with the unit
9 If available pack the unit for shipment using the original packing materials or the packaging materials that come with your exchange unit
If you do not have the original packaging materials please use other adequate packaging materials Shipping damage caused by improper packaging andor improper transportation is not covered under the warranty
reference guide
hp support
49
10 Place the return shipping label on the outside of the box
11 Include the following items in the boxndash A complete description of symptoms for service personnel (samples of print
quality problems are helpful)ndash A copy of the sales slip or other proof of purchase to establish the warranty
coverage periodndash Your name address and a phone number where you can be reached during
the day
hp distribution centerTo order HP Officejet software a copy of the printed Reference Guide a setup poster or other customer-replaceable parts do one of the following bull In the US or Canada call (208) 323 2551bull Visit this website
httpwwwhpcomcposupportsoftwarehtml
hp officejet 4100 series
chapter 10
50
11
51
warranty information
HP Officejet 4100 seriesDuration of Limited Warranty (hardware and labor) 1 YearDuration of Limited Warranty (CD media) 90 DaysDuration of Limited Warranty (print cartridges) Until the HP ink is depleted or the ldquoend of warrantyrdquo date printed on the cartridge has been reached whichever occurs first
warranty service
express serviceTo obtain HP express repair service the customer must contact an HP service office or an HP Customer Support Center for basic troubleshooting first See hp customer support on page 45 for steps to take before calling Customer SupportIf a customer unit needs a minor part replacement and these parts can normally be replaced by the customer the customer-replaceable components may be serviced through expedited part shipment In this event HP will prepay shipping charges duty and taxes provide telephone assistance on replacement of the component and pay shipping charges duty and taxes for any part that HP asks to be returnedThe HP Customer Support Center may direct customers to designated authorized service providers who are certified by HP to service the HP product
warranty upgradesUpgrade your standard factory warranty to a total of three years with the HP SUPPORTPACK Service coverage begins on product purchase date and the pack must be purchased within the first 180 days of product purchase This program offers phone support from 600 AM to 1000 PM Mountain Standard Time (MST) Monday through Friday and 900 AM to 400 PM (MST) on Saturdays If during your technical support call it is determined that you need a replacement product then HP will ship you this product next business day free of charge Available in US onlyFor more information please call 1-888-999-4747 or visit the following HP Web site
httpwwwhpcomgohpsupportpack
Outside the US please call your local HP Customer Support office See call elsewhere in the world on page 46 for a list of international Customer Support numbers
returning your hp officejet for serviceBefore returning your HP Officejet for service you must call HP Customer Support See hp customer support on page 45 for steps to take before calling Customer Support
hewlett-packard limited global warranty statement
extent of limited warrantyHewlett-Packard (ldquoHPrdquo) warrants to the end-user customer (ldquoCustomerrdquo) that each HP Officejet 4100 Series product (ldquoProductrdquo) including related software accessories media and supplies shall be free from defects in material and workmanship for the duration which begins on the date of purchase by the Customer
hp officejet 4100 series
chapter 11
52
For each software Product HPrsquos limited warranty applies only to a failure to execute programming instructions HP does not warrant that the operation of any Product shall be uninterrupted or error freeHPrsquos limited warranty covers only those defects which arise as a result of normal use of a Product and does not cover any other problems including those which arise as a result of (a) improper maintenance or modification (b) software accessories media or supplies not provided or supported by HP or (c) operation outside the Productrsquos specificationsFor any hardware Product the use of a non-HP print cartridge or a refilled print cartridge does not affect either the warranty to the Customer or any HP support contract with the Customer However if Product failure or damage is attributable to the use of a non-HP or refilled print cartridge HP shall charge its standard labor and materials charges to service the Product for the failure or damageIf HP receives during the applicable warranty period notice of a defect in any Product HP shall either repair or replace the defective Product at HPrsquos option Where labor charges are not covered by HPrsquos limited warranty repairs shall be at HPrsquos standard charges for laborIf HP is unable to repair or replace as applicable a defective Product which is covered by HPrsquos warranty HP shall within a reasonable time after being notified of the defect refund the purchase price for the ProductHP shall have no obligation to repair replace or refund until the Customer returns the defective Product to HPAny replacement product may be either new or like-new provided that it has functionality at least equal to that of the Product being replacedHP products including each Product may contain remanufactured parts components or materials equivalent to new in performanceHPs limited warranty for each Product is valid in any countryregion or locality where HP has a support presence for the Product and where HP has marketed the Product The level of warranty service may vary according to local standards HP shall have no obligation to alter the form fit or function of the Product in order to make it operate in a countryregion or locality for which the Product was never intended to operate
limitations of warrantyTO THE EXTENT ALLOWED BY LOCAL LAW NEITHER HP NOR ITS THIRD PARTY SUPPLIERS MAKE ANY OTHER WARRANTY OR CONDITION OF ANY KIND WHETHER EXPRESS OR IMPLIED WITH RESPECT TO THE COVERED HP PRODUCTS AND SPECIFICALLY DISCLAIM THE IMPLIED WARRANTIES OR CONDITIONS OF MERCHANTABILITY SATISFACTORY QUALITY AND FITNESS FOR A PARTICULAR PURPOSE
limitations of liabilityTo the extent allowed by local law the remedies provided in this Limited Warranty Statement are the Customerrsquos sole and exclusive remediesTO THE EXTENT ALLOWED BY LOCAL LAW EXCEPT FOR THE OBLIGATIONS SPECIFICALLY SET FORTH IN THIS LIMITED WARRANTY STATEMENT IN NO EVENT SHALL HP OR ITS THIRD PARTY SUPPLIERS BE LIABLE FOR DIRECT INDIRECT SPECIAL INCIDENTAL OR CONSEQUENTIAL DAMAGES WHETHER BASED ON CONTRACT TORT OR ANY OTHER LEGAL THEORY AND WHETHER ADVISED OF THE POSSIBILITY OF SUCH DAMAGES
local lawThis Limited Warranty Statement gives the Customer specific legal rights The Customer may also have other rights which vary from state to state in the United States from province to province in Canada and from countryregion to countryregion elsewhere in the world
reference guide
warranty information
53
To the extent this Limited Warranty Statement is inconsistent with local law this Statement shall be deemed modified to be consistent with such local law Under such local law certain disclaimers and limitations of this Statement may not apply to the Customer For example some states in the United States as well as some governments outside the United States (including provinces in Canada) mayPreclude the disclaimers and limitations in this Statement from limiting the statutory rights of a consumer (eg the United Kingdom)Otherwise restrict the ability of a manufacturer to enforce such disclaimers or limitations orGrant the Customer additional warranty rights specify the duration of implied warranties which the manufacturer cannot disclaim or not allow limitations on the duration of implied warrantiesFOR CONSUMER TRANSACTIONS IN AUSTRALIA AND NEW ZEALAND THE TERMS IN THIS LIMITED WARRANTY STATEMENT EXCEPT TO THE EXTENT LAWFULLY PERMITTED DO NOT EXCLUDE RESTRICT OR MODIFY AND ARE IN ADDITION TO THE MANDATORY STATUTORY RIGHTS APPLICABLE TO THE SALE OF THE COVERED HP PRODUCTS TO SUCH CUSTOMERS
hp officejet 4100 series
chapter 11
54
55
index
Numerics4-by-6 inch photo paper
load 10 12
AADF 7adjust
volume for fax 25align print cartridges 35Answer Ring Pattern 26automatic document feeder 7automatic reduction
fax 25
Bbest copy quality 13busy number
redial automatically 23
Ccancel
scan 18scheduled fax 21
cartridgesalign 35replace 33
cleanprint cartridges 35the exterior 32the glass 31white strip 32
colorenhance 14fax 20fax from front panel 20
contrastchange for fax 23photo color 14
copy 13 16change default settings 15enhance 14fit to page 16lighten or darken 14menu options 16number of copies 14photo 15quality 13reduce or enlarge 14settings 13 15
speed 13tutorial 4
Customer Support 45web site 45
Ddarken a copy 14date
setting 27default settings
restore 35director review 4distinctive ringing 26
Eenhance copies 14enlarge copy 14 16envelopes
load 9Error Correction Mode
(ECM) 25
Ffactory defaults
restore 35fast copy quality 13fax 28
adjust volume 25automated reports 22cancel fax forward 24cancel scheduled 21change Answer Ring
Pattern 26change contrast 23change resolution 22change settings 19control appearance 22create individual speed-dial
settings 26delete speed-dial
settings 27distinctive ringing 26Error Correction Mode
(ECM) 25forward faxes 24header 27in color 20in color from front panel 20manual reports 22
menu 29print reports 22receive 21receive manually 21redial busy or unanswered
number 23schedule 20send from front panel 19set automatic reduction 25set date and time 27set the number of rings 21settings 27 28setup menu options 29speed dials 19test 28
fit to page 16forward faxes 24
cancel 24front panel
display scroll speed 36enter text 28send a fax 19setting prompt delay 36tutorial 3
Gglass
cleaning 31greeting cards
load 11
Hhelp 1HP Customer Support 45
calling 45HP Director 4HP distribution center 49HP Officjet
preparing to ship 47HP papers
tips on loading 11
Iindividual speed-dial settings
create 26ink cartridges see print
cartridgesinkjet paper
load 11
index
hp officejet 4100 series56
Kkeypad
enter text 28
Llabels
load 12lighten copies 14load
change the paper type 12envelopes 9original in ADF 7paper 7photo paper 10 12postcards 10 12print cartridges 33set the paper size 12tips 11
Mmaintenance
align print cartridges 35clean print cartridges 35clean the exterior 32clean the glass 31clean the white strip 32normal sounds 36replace print cartridges 33restore factory defaults 35self-maintenance
sounds 36self-test report 32
menuscopy options 16fax 29fax setup 29maintenance 37print reports 37
Nnormal copy quality 13number of copies
set 14number of rings
set 21
Oorder print cartridges 60originals
load in ADF 7output tray 8
Ppaper
change default size for copy 12
change the type 12load 7recommended 7set the size 12tips on loading 11
paper size change for copy 12
paper trayload 7
phone numbers support services 45
photo paperload 10 12
photoscopy 15enhance copy 14
physical specifications 43postcards
load 10 12power
specifications 43print
envelopes 9fax reports 22self-test report 32
print cartridgesalign 35clean 35handling 32replace 33
prompt delaysetting 36
Qquick start
review the director 4use with a computer 4
Rreceive
fax 21redial
busy or unanswered number 23
reduce copy 14 16regulatory information 43reinstall software 40reports
generate automatically for fax 22
generate manually for fax 22
print 22self-test 32
resolution
change for fax 22restore factory settings 35returning your HP Officejet for
service 51
Sscan
from front panel 17stop 18
schedule a fax 20scroll speed
setting 36self-test report 32send
cancel forward faxes 24color fax 20color fax from front
panel 20forward faxes 24
settingscopy 13 15fax 27 28prompt delay 36scroll speed 36
setupadditional information 39menu 29
shippingyour HP Officejet 47
softwareremove and reinstall 40
soundsself-maintenance 36
specificationsphysical 43power 43
speed dials 19create individual
settings 26delete settings 27
stopscan 18scheduled fax 21
subscriber identification code 27
support services 45
Ttelephone line
multiple numbers 26telephone numbers 45text
enhance 14enter from front panel 28
time
index
reference guide 57
setting 27transparency film
recommended 7tips on loading 11
troubleshootingremove and reinstall
software 40T-shirt Transfer Iron-On
load 11tutorial
front panel 3make a copy 4
Uunanswered number
redial automatically 23
Vvolume
adjust 25
Wwarranty 45
service 51statement 51upgrades 51
white stripcleaning 32
hp officejet 4100 series
chapter 12
58
declaration of conformityAccording to ISOIEC Guide 22 and EN 45014
Manufacturerrsquos Name and Address
Hewlett-Packard Company 16399 West Bernardo Drive San Diego CA 92127-1899 USA
declares that the product
Product Name hp officejet 4100 series (Q1608A)
Model Number(s) officejet 4110 (Q1609A) officejet 4110xi (Q1610A) officejet 4110v (Q1611A) officejet 4105 (Q1612A) officejet 4105z (Q1613A) officejet 4115 (Q1614A)
Product Options All
conforms to the following Product Specifications
Safety EN609501992 +A1 A2 A3 A4 amp A11
IEC609501991 +A1 A2 A3 amp A4
UL1950CSA 222 No 950 3rd Edn 1995
NOM-019-SCFI-1993
EMC CISPR221993 +A1 amp A2 EN550221994 +A1 amp A2 -Class B
CISPR241997EN550241998
IEC 61000-3-21995 EN61000-3-21995
IEC 61000-3-31994 EN61000-3-31995
ASNZS 3548 1992
CNS13438 1997
FCC Part 15-Class B ICES-003 Issue 2 VCCI-2
GB 9254-1998
Telecom TBR21 1998
Supplementary Information
The Product herewith complies with the requirements of the Low Voltage Directive 7323EEC the EMC Directive 89336EEC and the RampTTE Directive 19995EC (ANNEX II) carries the CE marking accordingly
European Contact for regulatory topics only Your local Hewlett-Packard Sales and Service Office orHewlett-Packard GmbH
Department HQ-TRE Herrenberger Strasse 140 D-71034 Boumlblingen Germany (FAX + 49-7031-14-3143)
order mediaTo order media such as HP Premium Inkjet Paper HP Premium Inkjet Transparency Film HP Iron-On T-shirt Transfer paper or HP Greeting Cards go to
wwwhpshoppingcom
For orders in countries other than the US and Canada select other countries then click Yes to leave hpshoppingcom From this website you can access hpshoppingcom for your specific language or countryregion
order print cartridges
If you have Internet access you can get more information from the HP website at
wwwhpcomsupport
print cartridges hp reorder number
HP black print cartridge 56 19 ml black print cartridge
HP color print cartridgeHP tri-color print cartridge
57 17 ml color print cartridge28 8 ml color print cartridge
Visit the hp officejet information centerIt has everything you need to get the most value from your HP Officejet
bull Technical Supportbull Supplies and Ordering Informationbull Project Tipsbull Ways to Enhance Your Product
wwwhpcomsupport
copy 2003 Hewlett-Packard Company
Printed in the USA Mexico Germany Singapore or China
Q1608-90163Q1608-90163
Q1608-90163
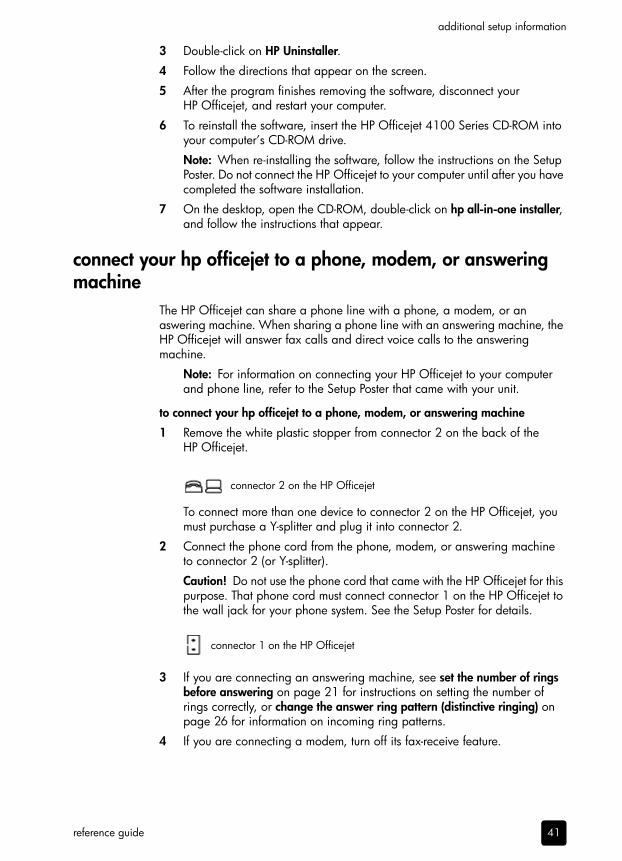
reference guide
additional setup information
41
3 Double-click on HP Uninstaller
4 Follow the directions that appear on the screen
5 After the program finishes removing the software disconnect your HP Officejet and restart your computer
6 To reinstall the software insert the HP Officejet 4100 Series CD-ROM into your computerrsquos CD-ROM drive
Note When re-installing the software follow the instructions on the Setup Poster Do not connect the HP Officejet to your computer until after you have completed the software installation
7 On the desktop open the CD-ROM double-click on hp all-in-one installer and follow the instructions that appear
connect your hp officejet to a phone modem or answering machine
The HP Officejet can share a phone line with a phone a modem or an aswering machine When sharing a phone line with an answering machine the HP Officejet will answer fax calls and direct voice calls to the answering machine
Note For information on connecting your HP Officejet to your computer and phone line refer to the Setup Poster that came with your unit
to connect your hp officejet to a phone modem or answering machine
1 Remove the white plastic stopper from connector 2 on the back of the HP Officejet
To connect more than one device to connector 2 on the HP Officejet you must purchase a Y-splitter and plug it into connector 2
2 Connect the phone cord from the phone modem or answering machine to connector 2 (or Y-splitter)
Caution Do not use the phone cord that came with the HP Officejet for this purpose That phone cord must connect connector 1 on the HP Officejet to the wall jack for your phone system See the Setup Poster for details
3 If you are connecting an answering machine see set the number of rings before answering on page 21 for instructions on setting the number of rings correctly or change the answer ring pattern (distinctive ringing) on page 26 for information on incoming ring patterns
4 If you are connecting a modem turn off its fax-receive feature
connector 2 on the HP Officejet
connector 1 on the HP Officejet
hp officejet 4100 series
chapter 8
42
additional troubleshooting helpYou may want to refer to the readme file for more information on possible installation problems On Windows you can access the readme file from the Start button on the taskbar select Programs Hewlett-Packard hp officejet 4100 series View the Readme File On Macintosh you can access the readme file by double-clicking on the icon located in the top-level folder of the HP Officejet software CD-ROM
The readme file provides more information including
bull Using the Re-install utility after a failed installation to return your PC to a state that will allow the HP Officejet to be re-installed
bull Using the Re-install utility on Windows 98 to recover from a Composite USB System Driver missing errorThis error may occur if the hardware is installed prior to installing the software After running the Re-install utility reboot your PC and install the HP Officejet software before connecting the HP Officejet to your computer
You can also find more information on this website
wwwhpcomsupport
9
43
technical information
Additional specifications information can be found in the HP Photo amp Imaging Help in the hp officejet 4100 series section
physical specifications
power specificationsbull Power consumption 75W maximumbull Source (Input Voltage) 100 to 240 VAC groundedbull Input Frequency 50 to 60 Hzbull Current 1A maximum
regulatory informationAdditional regulatory information can be found in the HP Photo amp Imaging Help The information in this section supercedes information in the HP Photo amp Imaging Help
doc statement deacuteclaration de conformiteacute (Canada)Le preacutesent appareil numeacuterique neacutemet pas de bruit radioeacutelectrique deacutepassant les limites applicables aux appareils numeacuteriques de la classe B prescrites dans le Regraveglement sur le brouillage radioeacutelectrique eacutedicteacute par le ministegravere des Communications du CanadaThis digital apparatus does not exceed the Class B limits for radio noise emissions from digital apparatus set out in the Radio Interference Regulations of the Canadian Department of Communications
notice to users of the Canadian telephone networkThis equipment meets the applicable Industry Canada Terminal Equipment Technical Specifications This is confirmed by the registration number The abbreviation IC before the registration number signifies that registration was performed based on a Declaration of Conformity indicating that Industry Canada technical specifications were met It does not imply that Industry Canada approved the equipment
Note The Ringer Equivalence Number (REN) assigned to each terminal device provides an indication of the maximum number of terminals allowed to be connected to a telephone interface The termination on an interface may consist of any combination of devices subject only to the requirement that the sum of the Ringer Equivalence Numbers of all the devices does not exceed 5
The REN for this product is 03B based on FCC Part 68 test results
height width depth weight (without print cartridges)
with paper trays and ADF closed
718 in (1824 cm) 1676 in (4258 cm) 825 in (2096 cm) 75 lbs (34 kg)
with ADF and paper tray extended
1030 in (2615 cm) 1676 in (4258 cm) 1854 in (4709 cm) 75 lbs (34 kg)
hp officejet 4100 series
chapter 9
44
notice to all users of the European Economic Area (EEA)
This product is designed to interwork with the analogue telephone networks in the following countriesregions
Network compatibility depends on customer selected settings which must be reset to use the equipment on a telephone network in a countryregion other than where the product was purchased Contact the vendor or Hewlett-Packard Company if addition product support is necessaryThis equipment has been certified by the manufacturer in accordance with Directive 19995EC (annex II) for Pan-European single-terminal connection to the public switched telephone network (PSTN) However due to differences between the individual PSTNs provided in different countriesregions the approval does not of itself give an unconditional assurance of successful operation on every PSTN network termination pointIn the event of problems you should contact your equipment supplier in the first instance
geraumluschemissionLpA lt 70 dBam Arbeitsplatzim Normalbetriebnach DIN 45635 T 19
notice to Korean customers
Germany UK Netherlands
France Spain Italy
Belgium Luxembourg Sweden
Austria Denmark Ireland
Norway Finland Switzerland
Greece Portugal
10
45
hp support
This section explains the support services information provided by Hewlett-Packard If you are unable to find the answer you need in the printed or onscreen documentation supplied with your product you can contact one of the HP support services listed in the following pages Some support services are available only in the US and Canada while others are available in many countriesregions worldwide If a support service number is not listed for your countryregion contact your nearest authorized HP dealer for help
get support and other information from the internetIf you have Internet access you can get help from the following HP website
wwwhpcomsupportThe Web site offers technical support drivers supplies and ordering information
hp customer supportSoftware programs from other companies may be included with your HP Officejet If you experience problems with any of those programs you will receive the best technical assistance by calling the experts at that companyIf you need to contact HP Customer Support do the following before you call
1 Make sure thata Your unit is plugged in and turned onb The specified print cartridges are installed correctlyc The recommended paper is properly loaded in the input tray
2 Reset your unita Turn off the unit using the On button located on the unitrsquos front panelb Unplug the power cord from the back of the unitc Plug the power cord back into the unitd Turn on the unit using the On button
3 For more information check the HP website at wwwhpcomsupport
4 If you are still experiencing problems and need to speak with an HP Customer Support Representativendash Have your service ID and serial number ready To display your service ID and
serial number on the front panel do the following Press Enter and Start Color at the same time until the service ID appears in the front-panel display From this display press the right arrow until the serial number displays
ndash Print a Self-Test Report See print a self-test report on page 32 for information on printing this report
ndash Make a color copyndash Be prepared to describe your problem in detail
5 Call HP Customer Support Be near your unit when you call
call in the US during warrantyCall (208) 323-2551 This service is free during the warranty period however your standard long-distance phone charges still apply A fee may apply outside the warranty period
hp officejet 4100 series
chapter 10
46
US phone support is available in both English and Spanish languages 24 hours a day 7 days a week (days and hours of support may change without notice)
call elsewhere in the worldThe numbers listed below are current as of the printing date of this guide For a list of current international HP Support Service numbers visit this address and choose your own countryregion or language
wwwhpcomsupportFor Korea you can also visit this address
httpwwwhpcokrYou can call the HP support center in the following countriesregions If your countryregion is not listed contact your local dealer or nearest HP Sales and Support Office to find out how to obtain servicesSupport service is free during the warranty period however your standard long-distance phone charges will apply In some cases a flat fee per single incident will also applyFor phone support in Europe please check for the details and conditions of phone support in your countryregion by consulting the following Web site
wwwhpcomsupportAlternatively you can ask your dealer or call HP at the phone number indicated in this booklet As part of our constant efforts to improve our phone support service we advise you to check our website on a regular basis for new information regarding service features and delivery
countryregion hp technical support countryregion hp technical support
Algeria1 +213 (0) 61564 543 Malaysia 1-800-805405
Argentina 0810-555-5520 Mexico 01-800-472-6684
Australia +61 3 8877 80001902 910 910
Mexico (Mexico City) 5258-9922
Austria +43 (0) 810 00 6080 Morocco1 +212 22404 747
Bahrain (Dubai) 800 728 Netherlands +31 (0) 20 606 8751
Belgium (Dutch) +32 (0) 2 626 8806 New Zealand 0800 441 147
Belgium (French) +32 (0) 2 626 8807 Norway +47 22 11 6299
Brazil (Grande Sao Paulo) (11) 3747 7799 Oman +971 4 883 8454
Brazil (Demais Localidades) 0800 157751 Palestine +971 4 883 8454
Canada during warranty (905) 206 4663 Panama 001-800-7112884
Canada post-warranty(per-call charge)
1-877-621-4722 Peru 0-800-10111
Caribbean amp Central America
1-800-711-2884 Philippines 632-867-3551
Chile 800-360-999 Poland +48 22 865 98 00
China 86 10 6868 7980 Portugal +351 21 3176333
Colombia 9-800-114-726 Puerto Rico 1-877-2320-589
Costa Rica 0-800-011-0524 Qatar +971 4 883 8454
Czech Republic +420 (0) 261307310 Romania +40 1 315 44 42or local 01 3154442
reference guide
hp support
47
call in Australia post-warrantyIf your product is not under warranty you can call 03 8877 8000 A per-incident out-of-warranty support fee of $2750 (inc GST) will be charged to your credit card You can also call 1902 910 910 ($2750 charged to your phone account) from 900 AM to 500 PM Monday through Friday (Charges and support hours are subject to change without notice)
prepare your unit for shipmentIf after contacting HP Customer Support or returning to the point of purchase you are requested to send your unit in for service please follow the power off and rebox steps below to avoid further damage to the HP product
Denmark +45 39 29 4099 Russian Federation Moscow +7 095 797 3520
Ecuador 1800-711-2884 Russian Federation St Petersburg
+7 812 346 7997
Europe (English) +44 (0) 207 512 5202 Saudi Arabia +800 897 14440
Egypt 02 532 5222 Singapore 65 6272 5300
Finland +358 (0) 203 47 288 Slovakia +421 (0) 2 682 08080
France (034 Euromin) +0892 69 60 22 South Africa (inside RSA) 086 000 1030
Germany (012 Euromin) +49 (0) 180 52 58 143 South Africa (inside RSA) +27-11 258 9301
Greece +30 1060 73 603 Spain +34 902 321 123
Hong Kong (SAR) +85 (2) 3002 8555 Sweden +46 (0)8 619 2170
Guatemala 1800-995-5105 Switzerland 2 +41 (0) 84 880 1111
Hungary +36 (0) 1 382 1111 Taiwan +886-2-2717-00550800 010 055
India 1-600-11226791 11 682 6035
Thailand +66 (2) 661 4000
Indonesia 62-21-350-3408 Tunisia1 +216 1891 222
Ireland +353 (0) 1 662 5525 Turkey +90 216 579 7171
Israel +972 (0) 9 8304848 Ukraine +7 (380-44) 490-3520
Italy +39 (0) 226410350 United Arab Emirates +971 4 883 8454
Japan 0570 000 511+81 3 3335 9800
United Kingdom +44 (0) 207 512 52 02
Jordan +971 4 883 8454 Venezuela 0800-47468368 or800-477-7777
Korea (Seoul) +82 (2) 3270 0700 Venezuela (Caracas) (502) 207-8488
Korea (outside Seoul) 080 999 0700 Vietnam 84 (0) 8 823 4530
Kuwait +971 4 883 8454 Yemen +971 4 883 8454
Lebanon +971 4 883 8454
1 This Call Center supports French speaking customers from the following countriesregions Morocco Tunisia and Algeria
2 This Call Center supports German French and Italian speaking customers in Switzerland
countryregion hp technical support countryregion hp technical support
hp officejet 4100 series
chapter 10
48
Note When transporting your HP Officejet make sure that the pens have been removed the HP Officejet has been properly shut down by pressing the power button and you have allowed time for the carriage to return to the service station and for the scanner to return to its parked position
1 Turn on the unitDisregard steps 1 through 6 if your unit will not turn on and the print carriage is in the home position You will not be able to remove the print cartridges Proceed to step 7
2 Open the print cartridge access doorThe print carriage moves into view
3 See replace the print cartridges on page 33 for information on removing the print cartridges
Caution Remove both print cartridges Failure to do so may damage your unit
4 Place the print cartridges in an airtight bag so they will not dry out and put them aside (do not send them with the unit unless instructed to by the HP customer support call agent)
5 Turn off the unit
6 Close the print cartridge access door
7 Remove the front panel cover as followsa Grasp the front of the front panel cover with two hands as shownb Firmly lift the front panel cover to unsnap it from the unit
8 Retain the front panel cover Do not return the front panel cover with the unit
9 If available pack the unit for shipment using the original packing materials or the packaging materials that come with your exchange unit
If you do not have the original packaging materials please use other adequate packaging materials Shipping damage caused by improper packaging andor improper transportation is not covered under the warranty
reference guide
hp support
49
10 Place the return shipping label on the outside of the box
11 Include the following items in the boxndash A complete description of symptoms for service personnel (samples of print
quality problems are helpful)ndash A copy of the sales slip or other proof of purchase to establish the warranty
coverage periodndash Your name address and a phone number where you can be reached during
the day
hp distribution centerTo order HP Officejet software a copy of the printed Reference Guide a setup poster or other customer-replaceable parts do one of the following bull In the US or Canada call (208) 323 2551bull Visit this website
httpwwwhpcomcposupportsoftwarehtml
hp officejet 4100 series
chapter 10
50
11
51
warranty information
HP Officejet 4100 seriesDuration of Limited Warranty (hardware and labor) 1 YearDuration of Limited Warranty (CD media) 90 DaysDuration of Limited Warranty (print cartridges) Until the HP ink is depleted or the ldquoend of warrantyrdquo date printed on the cartridge has been reached whichever occurs first
warranty service
express serviceTo obtain HP express repair service the customer must contact an HP service office or an HP Customer Support Center for basic troubleshooting first See hp customer support on page 45 for steps to take before calling Customer SupportIf a customer unit needs a minor part replacement and these parts can normally be replaced by the customer the customer-replaceable components may be serviced through expedited part shipment In this event HP will prepay shipping charges duty and taxes provide telephone assistance on replacement of the component and pay shipping charges duty and taxes for any part that HP asks to be returnedThe HP Customer Support Center may direct customers to designated authorized service providers who are certified by HP to service the HP product
warranty upgradesUpgrade your standard factory warranty to a total of three years with the HP SUPPORTPACK Service coverage begins on product purchase date and the pack must be purchased within the first 180 days of product purchase This program offers phone support from 600 AM to 1000 PM Mountain Standard Time (MST) Monday through Friday and 900 AM to 400 PM (MST) on Saturdays If during your technical support call it is determined that you need a replacement product then HP will ship you this product next business day free of charge Available in US onlyFor more information please call 1-888-999-4747 or visit the following HP Web site
httpwwwhpcomgohpsupportpack
Outside the US please call your local HP Customer Support office See call elsewhere in the world on page 46 for a list of international Customer Support numbers
returning your hp officejet for serviceBefore returning your HP Officejet for service you must call HP Customer Support See hp customer support on page 45 for steps to take before calling Customer Support
hewlett-packard limited global warranty statement
extent of limited warrantyHewlett-Packard (ldquoHPrdquo) warrants to the end-user customer (ldquoCustomerrdquo) that each HP Officejet 4100 Series product (ldquoProductrdquo) including related software accessories media and supplies shall be free from defects in material and workmanship for the duration which begins on the date of purchase by the Customer
hp officejet 4100 series
chapter 11
52
For each software Product HPrsquos limited warranty applies only to a failure to execute programming instructions HP does not warrant that the operation of any Product shall be uninterrupted or error freeHPrsquos limited warranty covers only those defects which arise as a result of normal use of a Product and does not cover any other problems including those which arise as a result of (a) improper maintenance or modification (b) software accessories media or supplies not provided or supported by HP or (c) operation outside the Productrsquos specificationsFor any hardware Product the use of a non-HP print cartridge or a refilled print cartridge does not affect either the warranty to the Customer or any HP support contract with the Customer However if Product failure or damage is attributable to the use of a non-HP or refilled print cartridge HP shall charge its standard labor and materials charges to service the Product for the failure or damageIf HP receives during the applicable warranty period notice of a defect in any Product HP shall either repair or replace the defective Product at HPrsquos option Where labor charges are not covered by HPrsquos limited warranty repairs shall be at HPrsquos standard charges for laborIf HP is unable to repair or replace as applicable a defective Product which is covered by HPrsquos warranty HP shall within a reasonable time after being notified of the defect refund the purchase price for the ProductHP shall have no obligation to repair replace or refund until the Customer returns the defective Product to HPAny replacement product may be either new or like-new provided that it has functionality at least equal to that of the Product being replacedHP products including each Product may contain remanufactured parts components or materials equivalent to new in performanceHPs limited warranty for each Product is valid in any countryregion or locality where HP has a support presence for the Product and where HP has marketed the Product The level of warranty service may vary according to local standards HP shall have no obligation to alter the form fit or function of the Product in order to make it operate in a countryregion or locality for which the Product was never intended to operate
limitations of warrantyTO THE EXTENT ALLOWED BY LOCAL LAW NEITHER HP NOR ITS THIRD PARTY SUPPLIERS MAKE ANY OTHER WARRANTY OR CONDITION OF ANY KIND WHETHER EXPRESS OR IMPLIED WITH RESPECT TO THE COVERED HP PRODUCTS AND SPECIFICALLY DISCLAIM THE IMPLIED WARRANTIES OR CONDITIONS OF MERCHANTABILITY SATISFACTORY QUALITY AND FITNESS FOR A PARTICULAR PURPOSE
limitations of liabilityTo the extent allowed by local law the remedies provided in this Limited Warranty Statement are the Customerrsquos sole and exclusive remediesTO THE EXTENT ALLOWED BY LOCAL LAW EXCEPT FOR THE OBLIGATIONS SPECIFICALLY SET FORTH IN THIS LIMITED WARRANTY STATEMENT IN NO EVENT SHALL HP OR ITS THIRD PARTY SUPPLIERS BE LIABLE FOR DIRECT INDIRECT SPECIAL INCIDENTAL OR CONSEQUENTIAL DAMAGES WHETHER BASED ON CONTRACT TORT OR ANY OTHER LEGAL THEORY AND WHETHER ADVISED OF THE POSSIBILITY OF SUCH DAMAGES
local lawThis Limited Warranty Statement gives the Customer specific legal rights The Customer may also have other rights which vary from state to state in the United States from province to province in Canada and from countryregion to countryregion elsewhere in the world
reference guide
warranty information
53
To the extent this Limited Warranty Statement is inconsistent with local law this Statement shall be deemed modified to be consistent with such local law Under such local law certain disclaimers and limitations of this Statement may not apply to the Customer For example some states in the United States as well as some governments outside the United States (including provinces in Canada) mayPreclude the disclaimers and limitations in this Statement from limiting the statutory rights of a consumer (eg the United Kingdom)Otherwise restrict the ability of a manufacturer to enforce such disclaimers or limitations orGrant the Customer additional warranty rights specify the duration of implied warranties which the manufacturer cannot disclaim or not allow limitations on the duration of implied warrantiesFOR CONSUMER TRANSACTIONS IN AUSTRALIA AND NEW ZEALAND THE TERMS IN THIS LIMITED WARRANTY STATEMENT EXCEPT TO THE EXTENT LAWFULLY PERMITTED DO NOT EXCLUDE RESTRICT OR MODIFY AND ARE IN ADDITION TO THE MANDATORY STATUTORY RIGHTS APPLICABLE TO THE SALE OF THE COVERED HP PRODUCTS TO SUCH CUSTOMERS
hp officejet 4100 series
chapter 11
54
55
index
Numerics4-by-6 inch photo paper
load 10 12
AADF 7adjust
volume for fax 25align print cartridges 35Answer Ring Pattern 26automatic document feeder 7automatic reduction
fax 25
Bbest copy quality 13busy number
redial automatically 23
Ccancel
scan 18scheduled fax 21
cartridgesalign 35replace 33
cleanprint cartridges 35the exterior 32the glass 31white strip 32
colorenhance 14fax 20fax from front panel 20
contrastchange for fax 23photo color 14
copy 13 16change default settings 15enhance 14fit to page 16lighten or darken 14menu options 16number of copies 14photo 15quality 13reduce or enlarge 14settings 13 15
speed 13tutorial 4
Customer Support 45web site 45
Ddarken a copy 14date
setting 27default settings
restore 35director review 4distinctive ringing 26
Eenhance copies 14enlarge copy 14 16envelopes
load 9Error Correction Mode
(ECM) 25
Ffactory defaults
restore 35fast copy quality 13fax 28
adjust volume 25automated reports 22cancel fax forward 24cancel scheduled 21change Answer Ring
Pattern 26change contrast 23change resolution 22change settings 19control appearance 22create individual speed-dial
settings 26delete speed-dial
settings 27distinctive ringing 26Error Correction Mode
(ECM) 25forward faxes 24header 27in color 20in color from front panel 20manual reports 22
menu 29print reports 22receive 21receive manually 21redial busy or unanswered
number 23schedule 20send from front panel 19set automatic reduction 25set date and time 27set the number of rings 21settings 27 28setup menu options 29speed dials 19test 28
fit to page 16forward faxes 24
cancel 24front panel
display scroll speed 36enter text 28send a fax 19setting prompt delay 36tutorial 3
Gglass
cleaning 31greeting cards
load 11
Hhelp 1HP Customer Support 45
calling 45HP Director 4HP distribution center 49HP Officjet
preparing to ship 47HP papers
tips on loading 11
Iindividual speed-dial settings
create 26ink cartridges see print
cartridgesinkjet paper
load 11
index
hp officejet 4100 series56
Kkeypad
enter text 28
Llabels
load 12lighten copies 14load
change the paper type 12envelopes 9original in ADF 7paper 7photo paper 10 12postcards 10 12print cartridges 33set the paper size 12tips 11
Mmaintenance
align print cartridges 35clean print cartridges 35clean the exterior 32clean the glass 31clean the white strip 32normal sounds 36replace print cartridges 33restore factory defaults 35self-maintenance
sounds 36self-test report 32
menuscopy options 16fax 29fax setup 29maintenance 37print reports 37
Nnormal copy quality 13number of copies
set 14number of rings
set 21
Oorder print cartridges 60originals
load in ADF 7output tray 8
Ppaper
change default size for copy 12
change the type 12load 7recommended 7set the size 12tips on loading 11
paper size change for copy 12
paper trayload 7
phone numbers support services 45
photo paperload 10 12
photoscopy 15enhance copy 14
physical specifications 43postcards
load 10 12power
specifications 43print
envelopes 9fax reports 22self-test report 32
print cartridgesalign 35clean 35handling 32replace 33
prompt delaysetting 36
Qquick start
review the director 4use with a computer 4
Rreceive
fax 21redial
busy or unanswered number 23
reduce copy 14 16regulatory information 43reinstall software 40reports
generate automatically for fax 22
generate manually for fax 22
print 22self-test 32
resolution
change for fax 22restore factory settings 35returning your HP Officejet for
service 51
Sscan
from front panel 17stop 18
schedule a fax 20scroll speed
setting 36self-test report 32send
cancel forward faxes 24color fax 20color fax from front
panel 20forward faxes 24
settingscopy 13 15fax 27 28prompt delay 36scroll speed 36
setupadditional information 39menu 29
shippingyour HP Officejet 47
softwareremove and reinstall 40
soundsself-maintenance 36
specificationsphysical 43power 43
speed dials 19create individual
settings 26delete settings 27
stopscan 18scheduled fax 21
subscriber identification code 27
support services 45
Ttelephone line
multiple numbers 26telephone numbers 45text
enhance 14enter from front panel 28
time
index
reference guide 57
setting 27transparency film
recommended 7tips on loading 11
troubleshootingremove and reinstall
software 40T-shirt Transfer Iron-On
load 11tutorial
front panel 3make a copy 4
Uunanswered number
redial automatically 23
Vvolume
adjust 25
Wwarranty 45
service 51statement 51upgrades 51
white stripcleaning 32
hp officejet 4100 series
chapter 12
58
declaration of conformityAccording to ISOIEC Guide 22 and EN 45014
Manufacturerrsquos Name and Address
Hewlett-Packard Company 16399 West Bernardo Drive San Diego CA 92127-1899 USA
declares that the product
Product Name hp officejet 4100 series (Q1608A)
Model Number(s) officejet 4110 (Q1609A) officejet 4110xi (Q1610A) officejet 4110v (Q1611A) officejet 4105 (Q1612A) officejet 4105z (Q1613A) officejet 4115 (Q1614A)
Product Options All
conforms to the following Product Specifications
Safety EN609501992 +A1 A2 A3 A4 amp A11
IEC609501991 +A1 A2 A3 amp A4
UL1950CSA 222 No 950 3rd Edn 1995
NOM-019-SCFI-1993
EMC CISPR221993 +A1 amp A2 EN550221994 +A1 amp A2 -Class B
CISPR241997EN550241998
IEC 61000-3-21995 EN61000-3-21995
IEC 61000-3-31994 EN61000-3-31995
ASNZS 3548 1992
CNS13438 1997
FCC Part 15-Class B ICES-003 Issue 2 VCCI-2
GB 9254-1998
Telecom TBR21 1998
Supplementary Information
The Product herewith complies with the requirements of the Low Voltage Directive 7323EEC the EMC Directive 89336EEC and the RampTTE Directive 19995EC (ANNEX II) carries the CE marking accordingly
European Contact for regulatory topics only Your local Hewlett-Packard Sales and Service Office orHewlett-Packard GmbH
Department HQ-TRE Herrenberger Strasse 140 D-71034 Boumlblingen Germany (FAX + 49-7031-14-3143)
order mediaTo order media such as HP Premium Inkjet Paper HP Premium Inkjet Transparency Film HP Iron-On T-shirt Transfer paper or HP Greeting Cards go to
wwwhpshoppingcom
For orders in countries other than the US and Canada select other countries then click Yes to leave hpshoppingcom From this website you can access hpshoppingcom for your specific language or countryregion
order print cartridges
If you have Internet access you can get more information from the HP website at
wwwhpcomsupport
print cartridges hp reorder number
HP black print cartridge 56 19 ml black print cartridge
HP color print cartridgeHP tri-color print cartridge
57 17 ml color print cartridge28 8 ml color print cartridge
Visit the hp officejet information centerIt has everything you need to get the most value from your HP Officejet
bull Technical Supportbull Supplies and Ordering Informationbull Project Tipsbull Ways to Enhance Your Product
wwwhpcomsupport
copy 2003 Hewlett-Packard Company
Printed in the USA Mexico Germany Singapore or China
Q1608-90163Q1608-90163
Q1608-90163

hp officejet 4100 series
chapter 8
42
additional troubleshooting helpYou may want to refer to the readme file for more information on possible installation problems On Windows you can access the readme file from the Start button on the taskbar select Programs Hewlett-Packard hp officejet 4100 series View the Readme File On Macintosh you can access the readme file by double-clicking on the icon located in the top-level folder of the HP Officejet software CD-ROM
The readme file provides more information including
bull Using the Re-install utility after a failed installation to return your PC to a state that will allow the HP Officejet to be re-installed
bull Using the Re-install utility on Windows 98 to recover from a Composite USB System Driver missing errorThis error may occur if the hardware is installed prior to installing the software After running the Re-install utility reboot your PC and install the HP Officejet software before connecting the HP Officejet to your computer
You can also find more information on this website
wwwhpcomsupport
9
43
technical information
Additional specifications information can be found in the HP Photo amp Imaging Help in the hp officejet 4100 series section
physical specifications
power specificationsbull Power consumption 75W maximumbull Source (Input Voltage) 100 to 240 VAC groundedbull Input Frequency 50 to 60 Hzbull Current 1A maximum
regulatory informationAdditional regulatory information can be found in the HP Photo amp Imaging Help The information in this section supercedes information in the HP Photo amp Imaging Help
doc statement deacuteclaration de conformiteacute (Canada)Le preacutesent appareil numeacuterique neacutemet pas de bruit radioeacutelectrique deacutepassant les limites applicables aux appareils numeacuteriques de la classe B prescrites dans le Regraveglement sur le brouillage radioeacutelectrique eacutedicteacute par le ministegravere des Communications du CanadaThis digital apparatus does not exceed the Class B limits for radio noise emissions from digital apparatus set out in the Radio Interference Regulations of the Canadian Department of Communications
notice to users of the Canadian telephone networkThis equipment meets the applicable Industry Canada Terminal Equipment Technical Specifications This is confirmed by the registration number The abbreviation IC before the registration number signifies that registration was performed based on a Declaration of Conformity indicating that Industry Canada technical specifications were met It does not imply that Industry Canada approved the equipment
Note The Ringer Equivalence Number (REN) assigned to each terminal device provides an indication of the maximum number of terminals allowed to be connected to a telephone interface The termination on an interface may consist of any combination of devices subject only to the requirement that the sum of the Ringer Equivalence Numbers of all the devices does not exceed 5
The REN for this product is 03B based on FCC Part 68 test results
height width depth weight (without print cartridges)
with paper trays and ADF closed
718 in (1824 cm) 1676 in (4258 cm) 825 in (2096 cm) 75 lbs (34 kg)
with ADF and paper tray extended
1030 in (2615 cm) 1676 in (4258 cm) 1854 in (4709 cm) 75 lbs (34 kg)
hp officejet 4100 series
chapter 9
44
notice to all users of the European Economic Area (EEA)
This product is designed to interwork with the analogue telephone networks in the following countriesregions
Network compatibility depends on customer selected settings which must be reset to use the equipment on a telephone network in a countryregion other than where the product was purchased Contact the vendor or Hewlett-Packard Company if addition product support is necessaryThis equipment has been certified by the manufacturer in accordance with Directive 19995EC (annex II) for Pan-European single-terminal connection to the public switched telephone network (PSTN) However due to differences between the individual PSTNs provided in different countriesregions the approval does not of itself give an unconditional assurance of successful operation on every PSTN network termination pointIn the event of problems you should contact your equipment supplier in the first instance
geraumluschemissionLpA lt 70 dBam Arbeitsplatzim Normalbetriebnach DIN 45635 T 19
notice to Korean customers
Germany UK Netherlands
France Spain Italy
Belgium Luxembourg Sweden
Austria Denmark Ireland
Norway Finland Switzerland
Greece Portugal
10
45
hp support
This section explains the support services information provided by Hewlett-Packard If you are unable to find the answer you need in the printed or onscreen documentation supplied with your product you can contact one of the HP support services listed in the following pages Some support services are available only in the US and Canada while others are available in many countriesregions worldwide If a support service number is not listed for your countryregion contact your nearest authorized HP dealer for help
get support and other information from the internetIf you have Internet access you can get help from the following HP website
wwwhpcomsupportThe Web site offers technical support drivers supplies and ordering information
hp customer supportSoftware programs from other companies may be included with your HP Officejet If you experience problems with any of those programs you will receive the best technical assistance by calling the experts at that companyIf you need to contact HP Customer Support do the following before you call
1 Make sure thata Your unit is plugged in and turned onb The specified print cartridges are installed correctlyc The recommended paper is properly loaded in the input tray
2 Reset your unita Turn off the unit using the On button located on the unitrsquos front panelb Unplug the power cord from the back of the unitc Plug the power cord back into the unitd Turn on the unit using the On button
3 For more information check the HP website at wwwhpcomsupport
4 If you are still experiencing problems and need to speak with an HP Customer Support Representativendash Have your service ID and serial number ready To display your service ID and
serial number on the front panel do the following Press Enter and Start Color at the same time until the service ID appears in the front-panel display From this display press the right arrow until the serial number displays
ndash Print a Self-Test Report See print a self-test report on page 32 for information on printing this report
ndash Make a color copyndash Be prepared to describe your problem in detail
5 Call HP Customer Support Be near your unit when you call
call in the US during warrantyCall (208) 323-2551 This service is free during the warranty period however your standard long-distance phone charges still apply A fee may apply outside the warranty period
hp officejet 4100 series
chapter 10
46
US phone support is available in both English and Spanish languages 24 hours a day 7 days a week (days and hours of support may change without notice)
call elsewhere in the worldThe numbers listed below are current as of the printing date of this guide For a list of current international HP Support Service numbers visit this address and choose your own countryregion or language
wwwhpcomsupportFor Korea you can also visit this address
httpwwwhpcokrYou can call the HP support center in the following countriesregions If your countryregion is not listed contact your local dealer or nearest HP Sales and Support Office to find out how to obtain servicesSupport service is free during the warranty period however your standard long-distance phone charges will apply In some cases a flat fee per single incident will also applyFor phone support in Europe please check for the details and conditions of phone support in your countryregion by consulting the following Web site
wwwhpcomsupportAlternatively you can ask your dealer or call HP at the phone number indicated in this booklet As part of our constant efforts to improve our phone support service we advise you to check our website on a regular basis for new information regarding service features and delivery
countryregion hp technical support countryregion hp technical support
Algeria1 +213 (0) 61564 543 Malaysia 1-800-805405
Argentina 0810-555-5520 Mexico 01-800-472-6684
Australia +61 3 8877 80001902 910 910
Mexico (Mexico City) 5258-9922
Austria +43 (0) 810 00 6080 Morocco1 +212 22404 747
Bahrain (Dubai) 800 728 Netherlands +31 (0) 20 606 8751
Belgium (Dutch) +32 (0) 2 626 8806 New Zealand 0800 441 147
Belgium (French) +32 (0) 2 626 8807 Norway +47 22 11 6299
Brazil (Grande Sao Paulo) (11) 3747 7799 Oman +971 4 883 8454
Brazil (Demais Localidades) 0800 157751 Palestine +971 4 883 8454
Canada during warranty (905) 206 4663 Panama 001-800-7112884
Canada post-warranty(per-call charge)
1-877-621-4722 Peru 0-800-10111
Caribbean amp Central America
1-800-711-2884 Philippines 632-867-3551
Chile 800-360-999 Poland +48 22 865 98 00
China 86 10 6868 7980 Portugal +351 21 3176333
Colombia 9-800-114-726 Puerto Rico 1-877-2320-589
Costa Rica 0-800-011-0524 Qatar +971 4 883 8454
Czech Republic +420 (0) 261307310 Romania +40 1 315 44 42or local 01 3154442
reference guide
hp support
47
call in Australia post-warrantyIf your product is not under warranty you can call 03 8877 8000 A per-incident out-of-warranty support fee of $2750 (inc GST) will be charged to your credit card You can also call 1902 910 910 ($2750 charged to your phone account) from 900 AM to 500 PM Monday through Friday (Charges and support hours are subject to change without notice)
prepare your unit for shipmentIf after contacting HP Customer Support or returning to the point of purchase you are requested to send your unit in for service please follow the power off and rebox steps below to avoid further damage to the HP product
Denmark +45 39 29 4099 Russian Federation Moscow +7 095 797 3520
Ecuador 1800-711-2884 Russian Federation St Petersburg
+7 812 346 7997
Europe (English) +44 (0) 207 512 5202 Saudi Arabia +800 897 14440
Egypt 02 532 5222 Singapore 65 6272 5300
Finland +358 (0) 203 47 288 Slovakia +421 (0) 2 682 08080
France (034 Euromin) +0892 69 60 22 South Africa (inside RSA) 086 000 1030
Germany (012 Euromin) +49 (0) 180 52 58 143 South Africa (inside RSA) +27-11 258 9301
Greece +30 1060 73 603 Spain +34 902 321 123
Hong Kong (SAR) +85 (2) 3002 8555 Sweden +46 (0)8 619 2170
Guatemala 1800-995-5105 Switzerland 2 +41 (0) 84 880 1111
Hungary +36 (0) 1 382 1111 Taiwan +886-2-2717-00550800 010 055
India 1-600-11226791 11 682 6035
Thailand +66 (2) 661 4000
Indonesia 62-21-350-3408 Tunisia1 +216 1891 222
Ireland +353 (0) 1 662 5525 Turkey +90 216 579 7171
Israel +972 (0) 9 8304848 Ukraine +7 (380-44) 490-3520
Italy +39 (0) 226410350 United Arab Emirates +971 4 883 8454
Japan 0570 000 511+81 3 3335 9800
United Kingdom +44 (0) 207 512 52 02
Jordan +971 4 883 8454 Venezuela 0800-47468368 or800-477-7777
Korea (Seoul) +82 (2) 3270 0700 Venezuela (Caracas) (502) 207-8488
Korea (outside Seoul) 080 999 0700 Vietnam 84 (0) 8 823 4530
Kuwait +971 4 883 8454 Yemen +971 4 883 8454
Lebanon +971 4 883 8454
1 This Call Center supports French speaking customers from the following countriesregions Morocco Tunisia and Algeria
2 This Call Center supports German French and Italian speaking customers in Switzerland
countryregion hp technical support countryregion hp technical support
hp officejet 4100 series
chapter 10
48
Note When transporting your HP Officejet make sure that the pens have been removed the HP Officejet has been properly shut down by pressing the power button and you have allowed time for the carriage to return to the service station and for the scanner to return to its parked position
1 Turn on the unitDisregard steps 1 through 6 if your unit will not turn on and the print carriage is in the home position You will not be able to remove the print cartridges Proceed to step 7
2 Open the print cartridge access doorThe print carriage moves into view
3 See replace the print cartridges on page 33 for information on removing the print cartridges
Caution Remove both print cartridges Failure to do so may damage your unit
4 Place the print cartridges in an airtight bag so they will not dry out and put them aside (do not send them with the unit unless instructed to by the HP customer support call agent)
5 Turn off the unit
6 Close the print cartridge access door
7 Remove the front panel cover as followsa Grasp the front of the front panel cover with two hands as shownb Firmly lift the front panel cover to unsnap it from the unit
8 Retain the front panel cover Do not return the front panel cover with the unit
9 If available pack the unit for shipment using the original packing materials or the packaging materials that come with your exchange unit
If you do not have the original packaging materials please use other adequate packaging materials Shipping damage caused by improper packaging andor improper transportation is not covered under the warranty
reference guide
hp support
49
10 Place the return shipping label on the outside of the box
11 Include the following items in the boxndash A complete description of symptoms for service personnel (samples of print
quality problems are helpful)ndash A copy of the sales slip or other proof of purchase to establish the warranty
coverage periodndash Your name address and a phone number where you can be reached during
the day
hp distribution centerTo order HP Officejet software a copy of the printed Reference Guide a setup poster or other customer-replaceable parts do one of the following bull In the US or Canada call (208) 323 2551bull Visit this website
httpwwwhpcomcposupportsoftwarehtml
hp officejet 4100 series
chapter 10
50
11
51
warranty information
HP Officejet 4100 seriesDuration of Limited Warranty (hardware and labor) 1 YearDuration of Limited Warranty (CD media) 90 DaysDuration of Limited Warranty (print cartridges) Until the HP ink is depleted or the ldquoend of warrantyrdquo date printed on the cartridge has been reached whichever occurs first
warranty service
express serviceTo obtain HP express repair service the customer must contact an HP service office or an HP Customer Support Center for basic troubleshooting first See hp customer support on page 45 for steps to take before calling Customer SupportIf a customer unit needs a minor part replacement and these parts can normally be replaced by the customer the customer-replaceable components may be serviced through expedited part shipment In this event HP will prepay shipping charges duty and taxes provide telephone assistance on replacement of the component and pay shipping charges duty and taxes for any part that HP asks to be returnedThe HP Customer Support Center may direct customers to designated authorized service providers who are certified by HP to service the HP product
warranty upgradesUpgrade your standard factory warranty to a total of three years with the HP SUPPORTPACK Service coverage begins on product purchase date and the pack must be purchased within the first 180 days of product purchase This program offers phone support from 600 AM to 1000 PM Mountain Standard Time (MST) Monday through Friday and 900 AM to 400 PM (MST) on Saturdays If during your technical support call it is determined that you need a replacement product then HP will ship you this product next business day free of charge Available in US onlyFor more information please call 1-888-999-4747 or visit the following HP Web site
httpwwwhpcomgohpsupportpack
Outside the US please call your local HP Customer Support office See call elsewhere in the world on page 46 for a list of international Customer Support numbers
returning your hp officejet for serviceBefore returning your HP Officejet for service you must call HP Customer Support See hp customer support on page 45 for steps to take before calling Customer Support
hewlett-packard limited global warranty statement
extent of limited warrantyHewlett-Packard (ldquoHPrdquo) warrants to the end-user customer (ldquoCustomerrdquo) that each HP Officejet 4100 Series product (ldquoProductrdquo) including related software accessories media and supplies shall be free from defects in material and workmanship for the duration which begins on the date of purchase by the Customer
hp officejet 4100 series
chapter 11
52
For each software Product HPrsquos limited warranty applies only to a failure to execute programming instructions HP does not warrant that the operation of any Product shall be uninterrupted or error freeHPrsquos limited warranty covers only those defects which arise as a result of normal use of a Product and does not cover any other problems including those which arise as a result of (a) improper maintenance or modification (b) software accessories media or supplies not provided or supported by HP or (c) operation outside the Productrsquos specificationsFor any hardware Product the use of a non-HP print cartridge or a refilled print cartridge does not affect either the warranty to the Customer or any HP support contract with the Customer However if Product failure or damage is attributable to the use of a non-HP or refilled print cartridge HP shall charge its standard labor and materials charges to service the Product for the failure or damageIf HP receives during the applicable warranty period notice of a defect in any Product HP shall either repair or replace the defective Product at HPrsquos option Where labor charges are not covered by HPrsquos limited warranty repairs shall be at HPrsquos standard charges for laborIf HP is unable to repair or replace as applicable a defective Product which is covered by HPrsquos warranty HP shall within a reasonable time after being notified of the defect refund the purchase price for the ProductHP shall have no obligation to repair replace or refund until the Customer returns the defective Product to HPAny replacement product may be either new or like-new provided that it has functionality at least equal to that of the Product being replacedHP products including each Product may contain remanufactured parts components or materials equivalent to new in performanceHPs limited warranty for each Product is valid in any countryregion or locality where HP has a support presence for the Product and where HP has marketed the Product The level of warranty service may vary according to local standards HP shall have no obligation to alter the form fit or function of the Product in order to make it operate in a countryregion or locality for which the Product was never intended to operate
limitations of warrantyTO THE EXTENT ALLOWED BY LOCAL LAW NEITHER HP NOR ITS THIRD PARTY SUPPLIERS MAKE ANY OTHER WARRANTY OR CONDITION OF ANY KIND WHETHER EXPRESS OR IMPLIED WITH RESPECT TO THE COVERED HP PRODUCTS AND SPECIFICALLY DISCLAIM THE IMPLIED WARRANTIES OR CONDITIONS OF MERCHANTABILITY SATISFACTORY QUALITY AND FITNESS FOR A PARTICULAR PURPOSE
limitations of liabilityTo the extent allowed by local law the remedies provided in this Limited Warranty Statement are the Customerrsquos sole and exclusive remediesTO THE EXTENT ALLOWED BY LOCAL LAW EXCEPT FOR THE OBLIGATIONS SPECIFICALLY SET FORTH IN THIS LIMITED WARRANTY STATEMENT IN NO EVENT SHALL HP OR ITS THIRD PARTY SUPPLIERS BE LIABLE FOR DIRECT INDIRECT SPECIAL INCIDENTAL OR CONSEQUENTIAL DAMAGES WHETHER BASED ON CONTRACT TORT OR ANY OTHER LEGAL THEORY AND WHETHER ADVISED OF THE POSSIBILITY OF SUCH DAMAGES
local lawThis Limited Warranty Statement gives the Customer specific legal rights The Customer may also have other rights which vary from state to state in the United States from province to province in Canada and from countryregion to countryregion elsewhere in the world
reference guide
warranty information
53
To the extent this Limited Warranty Statement is inconsistent with local law this Statement shall be deemed modified to be consistent with such local law Under such local law certain disclaimers and limitations of this Statement may not apply to the Customer For example some states in the United States as well as some governments outside the United States (including provinces in Canada) mayPreclude the disclaimers and limitations in this Statement from limiting the statutory rights of a consumer (eg the United Kingdom)Otherwise restrict the ability of a manufacturer to enforce such disclaimers or limitations orGrant the Customer additional warranty rights specify the duration of implied warranties which the manufacturer cannot disclaim or not allow limitations on the duration of implied warrantiesFOR CONSUMER TRANSACTIONS IN AUSTRALIA AND NEW ZEALAND THE TERMS IN THIS LIMITED WARRANTY STATEMENT EXCEPT TO THE EXTENT LAWFULLY PERMITTED DO NOT EXCLUDE RESTRICT OR MODIFY AND ARE IN ADDITION TO THE MANDATORY STATUTORY RIGHTS APPLICABLE TO THE SALE OF THE COVERED HP PRODUCTS TO SUCH CUSTOMERS
hp officejet 4100 series
chapter 11
54
55
index
Numerics4-by-6 inch photo paper
load 10 12
AADF 7adjust
volume for fax 25align print cartridges 35Answer Ring Pattern 26automatic document feeder 7automatic reduction
fax 25
Bbest copy quality 13busy number
redial automatically 23
Ccancel
scan 18scheduled fax 21
cartridgesalign 35replace 33
cleanprint cartridges 35the exterior 32the glass 31white strip 32
colorenhance 14fax 20fax from front panel 20
contrastchange for fax 23photo color 14
copy 13 16change default settings 15enhance 14fit to page 16lighten or darken 14menu options 16number of copies 14photo 15quality 13reduce or enlarge 14settings 13 15
speed 13tutorial 4
Customer Support 45web site 45
Ddarken a copy 14date
setting 27default settings
restore 35director review 4distinctive ringing 26
Eenhance copies 14enlarge copy 14 16envelopes
load 9Error Correction Mode
(ECM) 25
Ffactory defaults
restore 35fast copy quality 13fax 28
adjust volume 25automated reports 22cancel fax forward 24cancel scheduled 21change Answer Ring
Pattern 26change contrast 23change resolution 22change settings 19control appearance 22create individual speed-dial
settings 26delete speed-dial
settings 27distinctive ringing 26Error Correction Mode
(ECM) 25forward faxes 24header 27in color 20in color from front panel 20manual reports 22
menu 29print reports 22receive 21receive manually 21redial busy or unanswered
number 23schedule 20send from front panel 19set automatic reduction 25set date and time 27set the number of rings 21settings 27 28setup menu options 29speed dials 19test 28
fit to page 16forward faxes 24
cancel 24front panel
display scroll speed 36enter text 28send a fax 19setting prompt delay 36tutorial 3
Gglass
cleaning 31greeting cards
load 11
Hhelp 1HP Customer Support 45
calling 45HP Director 4HP distribution center 49HP Officjet
preparing to ship 47HP papers
tips on loading 11
Iindividual speed-dial settings
create 26ink cartridges see print
cartridgesinkjet paper
load 11
index
hp officejet 4100 series56
Kkeypad
enter text 28
Llabels
load 12lighten copies 14load
change the paper type 12envelopes 9original in ADF 7paper 7photo paper 10 12postcards 10 12print cartridges 33set the paper size 12tips 11
Mmaintenance
align print cartridges 35clean print cartridges 35clean the exterior 32clean the glass 31clean the white strip 32normal sounds 36replace print cartridges 33restore factory defaults 35self-maintenance
sounds 36self-test report 32
menuscopy options 16fax 29fax setup 29maintenance 37print reports 37
Nnormal copy quality 13number of copies
set 14number of rings
set 21
Oorder print cartridges 60originals
load in ADF 7output tray 8
Ppaper
change default size for copy 12
change the type 12load 7recommended 7set the size 12tips on loading 11
paper size change for copy 12
paper trayload 7
phone numbers support services 45
photo paperload 10 12
photoscopy 15enhance copy 14
physical specifications 43postcards
load 10 12power
specifications 43print
envelopes 9fax reports 22self-test report 32
print cartridgesalign 35clean 35handling 32replace 33
prompt delaysetting 36
Qquick start
review the director 4use with a computer 4
Rreceive
fax 21redial
busy or unanswered number 23
reduce copy 14 16regulatory information 43reinstall software 40reports
generate automatically for fax 22
generate manually for fax 22
print 22self-test 32
resolution
change for fax 22restore factory settings 35returning your HP Officejet for
service 51
Sscan
from front panel 17stop 18
schedule a fax 20scroll speed
setting 36self-test report 32send
cancel forward faxes 24color fax 20color fax from front
panel 20forward faxes 24
settingscopy 13 15fax 27 28prompt delay 36scroll speed 36
setupadditional information 39menu 29
shippingyour HP Officejet 47
softwareremove and reinstall 40
soundsself-maintenance 36
specificationsphysical 43power 43
speed dials 19create individual
settings 26delete settings 27
stopscan 18scheduled fax 21
subscriber identification code 27
support services 45
Ttelephone line
multiple numbers 26telephone numbers 45text
enhance 14enter from front panel 28
time
index
reference guide 57
setting 27transparency film
recommended 7tips on loading 11
troubleshootingremove and reinstall
software 40T-shirt Transfer Iron-On
load 11tutorial
front panel 3make a copy 4
Uunanswered number
redial automatically 23
Vvolume
adjust 25
Wwarranty 45
service 51statement 51upgrades 51
white stripcleaning 32
hp officejet 4100 series
chapter 12
58
declaration of conformityAccording to ISOIEC Guide 22 and EN 45014
Manufacturerrsquos Name and Address
Hewlett-Packard Company 16399 West Bernardo Drive San Diego CA 92127-1899 USA
declares that the product
Product Name hp officejet 4100 series (Q1608A)
Model Number(s) officejet 4110 (Q1609A) officejet 4110xi (Q1610A) officejet 4110v (Q1611A) officejet 4105 (Q1612A) officejet 4105z (Q1613A) officejet 4115 (Q1614A)
Product Options All
conforms to the following Product Specifications
Safety EN609501992 +A1 A2 A3 A4 amp A11
IEC609501991 +A1 A2 A3 amp A4
UL1950CSA 222 No 950 3rd Edn 1995
NOM-019-SCFI-1993
EMC CISPR221993 +A1 amp A2 EN550221994 +A1 amp A2 -Class B
CISPR241997EN550241998
IEC 61000-3-21995 EN61000-3-21995
IEC 61000-3-31994 EN61000-3-31995
ASNZS 3548 1992
CNS13438 1997
FCC Part 15-Class B ICES-003 Issue 2 VCCI-2
GB 9254-1998
Telecom TBR21 1998
Supplementary Information
The Product herewith complies with the requirements of the Low Voltage Directive 7323EEC the EMC Directive 89336EEC and the RampTTE Directive 19995EC (ANNEX II) carries the CE marking accordingly
European Contact for regulatory topics only Your local Hewlett-Packard Sales and Service Office orHewlett-Packard GmbH
Department HQ-TRE Herrenberger Strasse 140 D-71034 Boumlblingen Germany (FAX + 49-7031-14-3143)
order mediaTo order media such as HP Premium Inkjet Paper HP Premium Inkjet Transparency Film HP Iron-On T-shirt Transfer paper or HP Greeting Cards go to
wwwhpshoppingcom
For orders in countries other than the US and Canada select other countries then click Yes to leave hpshoppingcom From this website you can access hpshoppingcom for your specific language or countryregion
order print cartridges
If you have Internet access you can get more information from the HP website at
wwwhpcomsupport
print cartridges hp reorder number
HP black print cartridge 56 19 ml black print cartridge
HP color print cartridgeHP tri-color print cartridge
57 17 ml color print cartridge28 8 ml color print cartridge
Visit the hp officejet information centerIt has everything you need to get the most value from your HP Officejet
bull Technical Supportbull Supplies and Ordering Informationbull Project Tipsbull Ways to Enhance Your Product
wwwhpcomsupport
copy 2003 Hewlett-Packard Company
Printed in the USA Mexico Germany Singapore or China
Q1608-90163Q1608-90163
Q1608-90163

hp officejet 4100 series
chapter 9
44
notice to all users of the European Economic Area (EEA)
This product is designed to interwork with the analogue telephone networks in the following countriesregions
Network compatibility depends on customer selected settings which must be reset to use the equipment on a telephone network in a countryregion other than where the product was purchased Contact the vendor or Hewlett-Packard Company if addition product support is necessaryThis equipment has been certified by the manufacturer in accordance with Directive 19995EC (annex II) for Pan-European single-terminal connection to the public switched telephone network (PSTN) However due to differences between the individual PSTNs provided in different countriesregions the approval does not of itself give an unconditional assurance of successful operation on every PSTN network termination pointIn the event of problems you should contact your equipment supplier in the first instance
geraumluschemissionLpA lt 70 dBam Arbeitsplatzim Normalbetriebnach DIN 45635 T 19
notice to Korean customers
Germany UK Netherlands
France Spain Italy
Belgium Luxembourg Sweden
Austria Denmark Ireland
Norway Finland Switzerland
Greece Portugal
10
45
hp support
This section explains the support services information provided by Hewlett-Packard If you are unable to find the answer you need in the printed or onscreen documentation supplied with your product you can contact one of the HP support services listed in the following pages Some support services are available only in the US and Canada while others are available in many countriesregions worldwide If a support service number is not listed for your countryregion contact your nearest authorized HP dealer for help
get support and other information from the internetIf you have Internet access you can get help from the following HP website
wwwhpcomsupportThe Web site offers technical support drivers supplies and ordering information
hp customer supportSoftware programs from other companies may be included with your HP Officejet If you experience problems with any of those programs you will receive the best technical assistance by calling the experts at that companyIf you need to contact HP Customer Support do the following before you call
1 Make sure thata Your unit is plugged in and turned onb The specified print cartridges are installed correctlyc The recommended paper is properly loaded in the input tray
2 Reset your unita Turn off the unit using the On button located on the unitrsquos front panelb Unplug the power cord from the back of the unitc Plug the power cord back into the unitd Turn on the unit using the On button
3 For more information check the HP website at wwwhpcomsupport
4 If you are still experiencing problems and need to speak with an HP Customer Support Representativendash Have your service ID and serial number ready To display your service ID and
serial number on the front panel do the following Press Enter and Start Color at the same time until the service ID appears in the front-panel display From this display press the right arrow until the serial number displays
ndash Print a Self-Test Report See print a self-test report on page 32 for information on printing this report
ndash Make a color copyndash Be prepared to describe your problem in detail
5 Call HP Customer Support Be near your unit when you call
call in the US during warrantyCall (208) 323-2551 This service is free during the warranty period however your standard long-distance phone charges still apply A fee may apply outside the warranty period
hp officejet 4100 series
chapter 10
46
US phone support is available in both English and Spanish languages 24 hours a day 7 days a week (days and hours of support may change without notice)
call elsewhere in the worldThe numbers listed below are current as of the printing date of this guide For a list of current international HP Support Service numbers visit this address and choose your own countryregion or language
wwwhpcomsupportFor Korea you can also visit this address
httpwwwhpcokrYou can call the HP support center in the following countriesregions If your countryregion is not listed contact your local dealer or nearest HP Sales and Support Office to find out how to obtain servicesSupport service is free during the warranty period however your standard long-distance phone charges will apply In some cases a flat fee per single incident will also applyFor phone support in Europe please check for the details and conditions of phone support in your countryregion by consulting the following Web site
wwwhpcomsupportAlternatively you can ask your dealer or call HP at the phone number indicated in this booklet As part of our constant efforts to improve our phone support service we advise you to check our website on a regular basis for new information regarding service features and delivery
countryregion hp technical support countryregion hp technical support
Algeria1 +213 (0) 61564 543 Malaysia 1-800-805405
Argentina 0810-555-5520 Mexico 01-800-472-6684
Australia +61 3 8877 80001902 910 910
Mexico (Mexico City) 5258-9922
Austria +43 (0) 810 00 6080 Morocco1 +212 22404 747
Bahrain (Dubai) 800 728 Netherlands +31 (0) 20 606 8751
Belgium (Dutch) +32 (0) 2 626 8806 New Zealand 0800 441 147
Belgium (French) +32 (0) 2 626 8807 Norway +47 22 11 6299
Brazil (Grande Sao Paulo) (11) 3747 7799 Oman +971 4 883 8454
Brazil (Demais Localidades) 0800 157751 Palestine +971 4 883 8454
Canada during warranty (905) 206 4663 Panama 001-800-7112884
Canada post-warranty(per-call charge)
1-877-621-4722 Peru 0-800-10111
Caribbean amp Central America
1-800-711-2884 Philippines 632-867-3551
Chile 800-360-999 Poland +48 22 865 98 00
China 86 10 6868 7980 Portugal +351 21 3176333
Colombia 9-800-114-726 Puerto Rico 1-877-2320-589
Costa Rica 0-800-011-0524 Qatar +971 4 883 8454
Czech Republic +420 (0) 261307310 Romania +40 1 315 44 42or local 01 3154442
reference guide
hp support
47
call in Australia post-warrantyIf your product is not under warranty you can call 03 8877 8000 A per-incident out-of-warranty support fee of $2750 (inc GST) will be charged to your credit card You can also call 1902 910 910 ($2750 charged to your phone account) from 900 AM to 500 PM Monday through Friday (Charges and support hours are subject to change without notice)
prepare your unit for shipmentIf after contacting HP Customer Support or returning to the point of purchase you are requested to send your unit in for service please follow the power off and rebox steps below to avoid further damage to the HP product
Denmark +45 39 29 4099 Russian Federation Moscow +7 095 797 3520
Ecuador 1800-711-2884 Russian Federation St Petersburg
+7 812 346 7997
Europe (English) +44 (0) 207 512 5202 Saudi Arabia +800 897 14440
Egypt 02 532 5222 Singapore 65 6272 5300
Finland +358 (0) 203 47 288 Slovakia +421 (0) 2 682 08080
France (034 Euromin) +0892 69 60 22 South Africa (inside RSA) 086 000 1030
Germany (012 Euromin) +49 (0) 180 52 58 143 South Africa (inside RSA) +27-11 258 9301
Greece +30 1060 73 603 Spain +34 902 321 123
Hong Kong (SAR) +85 (2) 3002 8555 Sweden +46 (0)8 619 2170
Guatemala 1800-995-5105 Switzerland 2 +41 (0) 84 880 1111
Hungary +36 (0) 1 382 1111 Taiwan +886-2-2717-00550800 010 055
India 1-600-11226791 11 682 6035
Thailand +66 (2) 661 4000
Indonesia 62-21-350-3408 Tunisia1 +216 1891 222
Ireland +353 (0) 1 662 5525 Turkey +90 216 579 7171
Israel +972 (0) 9 8304848 Ukraine +7 (380-44) 490-3520
Italy +39 (0) 226410350 United Arab Emirates +971 4 883 8454
Japan 0570 000 511+81 3 3335 9800
United Kingdom +44 (0) 207 512 52 02
Jordan +971 4 883 8454 Venezuela 0800-47468368 or800-477-7777
Korea (Seoul) +82 (2) 3270 0700 Venezuela (Caracas) (502) 207-8488
Korea (outside Seoul) 080 999 0700 Vietnam 84 (0) 8 823 4530
Kuwait +971 4 883 8454 Yemen +971 4 883 8454
Lebanon +971 4 883 8454
1 This Call Center supports French speaking customers from the following countriesregions Morocco Tunisia and Algeria
2 This Call Center supports German French and Italian speaking customers in Switzerland
countryregion hp technical support countryregion hp technical support
hp officejet 4100 series
chapter 10
48
Note When transporting your HP Officejet make sure that the pens have been removed the HP Officejet has been properly shut down by pressing the power button and you have allowed time for the carriage to return to the service station and for the scanner to return to its parked position
1 Turn on the unitDisregard steps 1 through 6 if your unit will not turn on and the print carriage is in the home position You will not be able to remove the print cartridges Proceed to step 7
2 Open the print cartridge access doorThe print carriage moves into view
3 See replace the print cartridges on page 33 for information on removing the print cartridges
Caution Remove both print cartridges Failure to do so may damage your unit
4 Place the print cartridges in an airtight bag so they will not dry out and put them aside (do not send them with the unit unless instructed to by the HP customer support call agent)
5 Turn off the unit
6 Close the print cartridge access door
7 Remove the front panel cover as followsa Grasp the front of the front panel cover with two hands as shownb Firmly lift the front panel cover to unsnap it from the unit
8 Retain the front panel cover Do not return the front panel cover with the unit
9 If available pack the unit for shipment using the original packing materials or the packaging materials that come with your exchange unit
If you do not have the original packaging materials please use other adequate packaging materials Shipping damage caused by improper packaging andor improper transportation is not covered under the warranty
reference guide
hp support
49
10 Place the return shipping label on the outside of the box
11 Include the following items in the boxndash A complete description of symptoms for service personnel (samples of print
quality problems are helpful)ndash A copy of the sales slip or other proof of purchase to establish the warranty
coverage periodndash Your name address and a phone number where you can be reached during
the day
hp distribution centerTo order HP Officejet software a copy of the printed Reference Guide a setup poster or other customer-replaceable parts do one of the following bull In the US or Canada call (208) 323 2551bull Visit this website
httpwwwhpcomcposupportsoftwarehtml
hp officejet 4100 series
chapter 10
50
11
51
warranty information
HP Officejet 4100 seriesDuration of Limited Warranty (hardware and labor) 1 YearDuration of Limited Warranty (CD media) 90 DaysDuration of Limited Warranty (print cartridges) Until the HP ink is depleted or the ldquoend of warrantyrdquo date printed on the cartridge has been reached whichever occurs first
warranty service
express serviceTo obtain HP express repair service the customer must contact an HP service office or an HP Customer Support Center for basic troubleshooting first See hp customer support on page 45 for steps to take before calling Customer SupportIf a customer unit needs a minor part replacement and these parts can normally be replaced by the customer the customer-replaceable components may be serviced through expedited part shipment In this event HP will prepay shipping charges duty and taxes provide telephone assistance on replacement of the component and pay shipping charges duty and taxes for any part that HP asks to be returnedThe HP Customer Support Center may direct customers to designated authorized service providers who are certified by HP to service the HP product
warranty upgradesUpgrade your standard factory warranty to a total of three years with the HP SUPPORTPACK Service coverage begins on product purchase date and the pack must be purchased within the first 180 days of product purchase This program offers phone support from 600 AM to 1000 PM Mountain Standard Time (MST) Monday through Friday and 900 AM to 400 PM (MST) on Saturdays If during your technical support call it is determined that you need a replacement product then HP will ship you this product next business day free of charge Available in US onlyFor more information please call 1-888-999-4747 or visit the following HP Web site
httpwwwhpcomgohpsupportpack
Outside the US please call your local HP Customer Support office See call elsewhere in the world on page 46 for a list of international Customer Support numbers
returning your hp officejet for serviceBefore returning your HP Officejet for service you must call HP Customer Support See hp customer support on page 45 for steps to take before calling Customer Support
hewlett-packard limited global warranty statement
extent of limited warrantyHewlett-Packard (ldquoHPrdquo) warrants to the end-user customer (ldquoCustomerrdquo) that each HP Officejet 4100 Series product (ldquoProductrdquo) including related software accessories media and supplies shall be free from defects in material and workmanship for the duration which begins on the date of purchase by the Customer
hp officejet 4100 series
chapter 11
52
For each software Product HPrsquos limited warranty applies only to a failure to execute programming instructions HP does not warrant that the operation of any Product shall be uninterrupted or error freeHPrsquos limited warranty covers only those defects which arise as a result of normal use of a Product and does not cover any other problems including those which arise as a result of (a) improper maintenance or modification (b) software accessories media or supplies not provided or supported by HP or (c) operation outside the Productrsquos specificationsFor any hardware Product the use of a non-HP print cartridge or a refilled print cartridge does not affect either the warranty to the Customer or any HP support contract with the Customer However if Product failure or damage is attributable to the use of a non-HP or refilled print cartridge HP shall charge its standard labor and materials charges to service the Product for the failure or damageIf HP receives during the applicable warranty period notice of a defect in any Product HP shall either repair or replace the defective Product at HPrsquos option Where labor charges are not covered by HPrsquos limited warranty repairs shall be at HPrsquos standard charges for laborIf HP is unable to repair or replace as applicable a defective Product which is covered by HPrsquos warranty HP shall within a reasonable time after being notified of the defect refund the purchase price for the ProductHP shall have no obligation to repair replace or refund until the Customer returns the defective Product to HPAny replacement product may be either new or like-new provided that it has functionality at least equal to that of the Product being replacedHP products including each Product may contain remanufactured parts components or materials equivalent to new in performanceHPs limited warranty for each Product is valid in any countryregion or locality where HP has a support presence for the Product and where HP has marketed the Product The level of warranty service may vary according to local standards HP shall have no obligation to alter the form fit or function of the Product in order to make it operate in a countryregion or locality for which the Product was never intended to operate
limitations of warrantyTO THE EXTENT ALLOWED BY LOCAL LAW NEITHER HP NOR ITS THIRD PARTY SUPPLIERS MAKE ANY OTHER WARRANTY OR CONDITION OF ANY KIND WHETHER EXPRESS OR IMPLIED WITH RESPECT TO THE COVERED HP PRODUCTS AND SPECIFICALLY DISCLAIM THE IMPLIED WARRANTIES OR CONDITIONS OF MERCHANTABILITY SATISFACTORY QUALITY AND FITNESS FOR A PARTICULAR PURPOSE
limitations of liabilityTo the extent allowed by local law the remedies provided in this Limited Warranty Statement are the Customerrsquos sole and exclusive remediesTO THE EXTENT ALLOWED BY LOCAL LAW EXCEPT FOR THE OBLIGATIONS SPECIFICALLY SET FORTH IN THIS LIMITED WARRANTY STATEMENT IN NO EVENT SHALL HP OR ITS THIRD PARTY SUPPLIERS BE LIABLE FOR DIRECT INDIRECT SPECIAL INCIDENTAL OR CONSEQUENTIAL DAMAGES WHETHER BASED ON CONTRACT TORT OR ANY OTHER LEGAL THEORY AND WHETHER ADVISED OF THE POSSIBILITY OF SUCH DAMAGES
local lawThis Limited Warranty Statement gives the Customer specific legal rights The Customer may also have other rights which vary from state to state in the United States from province to province in Canada and from countryregion to countryregion elsewhere in the world
reference guide
warranty information
53
To the extent this Limited Warranty Statement is inconsistent with local law this Statement shall be deemed modified to be consistent with such local law Under such local law certain disclaimers and limitations of this Statement may not apply to the Customer For example some states in the United States as well as some governments outside the United States (including provinces in Canada) mayPreclude the disclaimers and limitations in this Statement from limiting the statutory rights of a consumer (eg the United Kingdom)Otherwise restrict the ability of a manufacturer to enforce such disclaimers or limitations orGrant the Customer additional warranty rights specify the duration of implied warranties which the manufacturer cannot disclaim or not allow limitations on the duration of implied warrantiesFOR CONSUMER TRANSACTIONS IN AUSTRALIA AND NEW ZEALAND THE TERMS IN THIS LIMITED WARRANTY STATEMENT EXCEPT TO THE EXTENT LAWFULLY PERMITTED DO NOT EXCLUDE RESTRICT OR MODIFY AND ARE IN ADDITION TO THE MANDATORY STATUTORY RIGHTS APPLICABLE TO THE SALE OF THE COVERED HP PRODUCTS TO SUCH CUSTOMERS
hp officejet 4100 series
chapter 11
54
55
index
Numerics4-by-6 inch photo paper
load 10 12
AADF 7adjust
volume for fax 25align print cartridges 35Answer Ring Pattern 26automatic document feeder 7automatic reduction
fax 25
Bbest copy quality 13busy number
redial automatically 23
Ccancel
scan 18scheduled fax 21
cartridgesalign 35replace 33
cleanprint cartridges 35the exterior 32the glass 31white strip 32
colorenhance 14fax 20fax from front panel 20
contrastchange for fax 23photo color 14
copy 13 16change default settings 15enhance 14fit to page 16lighten or darken 14menu options 16number of copies 14photo 15quality 13reduce or enlarge 14settings 13 15
speed 13tutorial 4
Customer Support 45web site 45
Ddarken a copy 14date
setting 27default settings
restore 35director review 4distinctive ringing 26
Eenhance copies 14enlarge copy 14 16envelopes
load 9Error Correction Mode
(ECM) 25
Ffactory defaults
restore 35fast copy quality 13fax 28
adjust volume 25automated reports 22cancel fax forward 24cancel scheduled 21change Answer Ring
Pattern 26change contrast 23change resolution 22change settings 19control appearance 22create individual speed-dial
settings 26delete speed-dial
settings 27distinctive ringing 26Error Correction Mode
(ECM) 25forward faxes 24header 27in color 20in color from front panel 20manual reports 22
menu 29print reports 22receive 21receive manually 21redial busy or unanswered
number 23schedule 20send from front panel 19set automatic reduction 25set date and time 27set the number of rings 21settings 27 28setup menu options 29speed dials 19test 28
fit to page 16forward faxes 24
cancel 24front panel
display scroll speed 36enter text 28send a fax 19setting prompt delay 36tutorial 3
Gglass
cleaning 31greeting cards
load 11
Hhelp 1HP Customer Support 45
calling 45HP Director 4HP distribution center 49HP Officjet
preparing to ship 47HP papers
tips on loading 11
Iindividual speed-dial settings
create 26ink cartridges see print
cartridgesinkjet paper
load 11
index
hp officejet 4100 series56
Kkeypad
enter text 28
Llabels
load 12lighten copies 14load
change the paper type 12envelopes 9original in ADF 7paper 7photo paper 10 12postcards 10 12print cartridges 33set the paper size 12tips 11
Mmaintenance
align print cartridges 35clean print cartridges 35clean the exterior 32clean the glass 31clean the white strip 32normal sounds 36replace print cartridges 33restore factory defaults 35self-maintenance
sounds 36self-test report 32
menuscopy options 16fax 29fax setup 29maintenance 37print reports 37
Nnormal copy quality 13number of copies
set 14number of rings
set 21
Oorder print cartridges 60originals
load in ADF 7output tray 8
Ppaper
change default size for copy 12
change the type 12load 7recommended 7set the size 12tips on loading 11
paper size change for copy 12
paper trayload 7
phone numbers support services 45
photo paperload 10 12
photoscopy 15enhance copy 14
physical specifications 43postcards
load 10 12power
specifications 43print
envelopes 9fax reports 22self-test report 32
print cartridgesalign 35clean 35handling 32replace 33
prompt delaysetting 36
Qquick start
review the director 4use with a computer 4
Rreceive
fax 21redial
busy or unanswered number 23
reduce copy 14 16regulatory information 43reinstall software 40reports
generate automatically for fax 22
generate manually for fax 22
print 22self-test 32
resolution
change for fax 22restore factory settings 35returning your HP Officejet for
service 51
Sscan
from front panel 17stop 18
schedule a fax 20scroll speed
setting 36self-test report 32send
cancel forward faxes 24color fax 20color fax from front
panel 20forward faxes 24
settingscopy 13 15fax 27 28prompt delay 36scroll speed 36
setupadditional information 39menu 29
shippingyour HP Officejet 47
softwareremove and reinstall 40
soundsself-maintenance 36
specificationsphysical 43power 43
speed dials 19create individual
settings 26delete settings 27
stopscan 18scheduled fax 21
subscriber identification code 27
support services 45
Ttelephone line
multiple numbers 26telephone numbers 45text
enhance 14enter from front panel 28
time
index
reference guide 57
setting 27transparency film
recommended 7tips on loading 11
troubleshootingremove and reinstall
software 40T-shirt Transfer Iron-On
load 11tutorial
front panel 3make a copy 4
Uunanswered number
redial automatically 23
Vvolume
adjust 25
Wwarranty 45
service 51statement 51upgrades 51
white stripcleaning 32
hp officejet 4100 series
chapter 12
58
declaration of conformityAccording to ISOIEC Guide 22 and EN 45014
Manufacturerrsquos Name and Address
Hewlett-Packard Company 16399 West Bernardo Drive San Diego CA 92127-1899 USA
declares that the product
Product Name hp officejet 4100 series (Q1608A)
Model Number(s) officejet 4110 (Q1609A) officejet 4110xi (Q1610A) officejet 4110v (Q1611A) officejet 4105 (Q1612A) officejet 4105z (Q1613A) officejet 4115 (Q1614A)
Product Options All
conforms to the following Product Specifications
Safety EN609501992 +A1 A2 A3 A4 amp A11
IEC609501991 +A1 A2 A3 amp A4
UL1950CSA 222 No 950 3rd Edn 1995
NOM-019-SCFI-1993
EMC CISPR221993 +A1 amp A2 EN550221994 +A1 amp A2 -Class B
CISPR241997EN550241998
IEC 61000-3-21995 EN61000-3-21995
IEC 61000-3-31994 EN61000-3-31995
ASNZS 3548 1992
CNS13438 1997
FCC Part 15-Class B ICES-003 Issue 2 VCCI-2
GB 9254-1998
Telecom TBR21 1998
Supplementary Information
The Product herewith complies with the requirements of the Low Voltage Directive 7323EEC the EMC Directive 89336EEC and the RampTTE Directive 19995EC (ANNEX II) carries the CE marking accordingly
European Contact for regulatory topics only Your local Hewlett-Packard Sales and Service Office orHewlett-Packard GmbH
Department HQ-TRE Herrenberger Strasse 140 D-71034 Boumlblingen Germany (FAX + 49-7031-14-3143)
order mediaTo order media such as HP Premium Inkjet Paper HP Premium Inkjet Transparency Film HP Iron-On T-shirt Transfer paper or HP Greeting Cards go to
wwwhpshoppingcom
For orders in countries other than the US and Canada select other countries then click Yes to leave hpshoppingcom From this website you can access hpshoppingcom for your specific language or countryregion
order print cartridges
If you have Internet access you can get more information from the HP website at
wwwhpcomsupport
print cartridges hp reorder number
HP black print cartridge 56 19 ml black print cartridge
HP color print cartridgeHP tri-color print cartridge
57 17 ml color print cartridge28 8 ml color print cartridge
Visit the hp officejet information centerIt has everything you need to get the most value from your HP Officejet
bull Technical Supportbull Supplies and Ordering Informationbull Project Tipsbull Ways to Enhance Your Product
wwwhpcomsupport
copy 2003 Hewlett-Packard Company
Printed in the USA Mexico Germany Singapore or China
Q1608-90163Q1608-90163
Q1608-90163

hp officejet 4100 series
chapter 10
46
US phone support is available in both English and Spanish languages 24 hours a day 7 days a week (days and hours of support may change without notice)
call elsewhere in the worldThe numbers listed below are current as of the printing date of this guide For a list of current international HP Support Service numbers visit this address and choose your own countryregion or language
wwwhpcomsupportFor Korea you can also visit this address
httpwwwhpcokrYou can call the HP support center in the following countriesregions If your countryregion is not listed contact your local dealer or nearest HP Sales and Support Office to find out how to obtain servicesSupport service is free during the warranty period however your standard long-distance phone charges will apply In some cases a flat fee per single incident will also applyFor phone support in Europe please check for the details and conditions of phone support in your countryregion by consulting the following Web site
wwwhpcomsupportAlternatively you can ask your dealer or call HP at the phone number indicated in this booklet As part of our constant efforts to improve our phone support service we advise you to check our website on a regular basis for new information regarding service features and delivery
countryregion hp technical support countryregion hp technical support
Algeria1 +213 (0) 61564 543 Malaysia 1-800-805405
Argentina 0810-555-5520 Mexico 01-800-472-6684
Australia +61 3 8877 80001902 910 910
Mexico (Mexico City) 5258-9922
Austria +43 (0) 810 00 6080 Morocco1 +212 22404 747
Bahrain (Dubai) 800 728 Netherlands +31 (0) 20 606 8751
Belgium (Dutch) +32 (0) 2 626 8806 New Zealand 0800 441 147
Belgium (French) +32 (0) 2 626 8807 Norway +47 22 11 6299
Brazil (Grande Sao Paulo) (11) 3747 7799 Oman +971 4 883 8454
Brazil (Demais Localidades) 0800 157751 Palestine +971 4 883 8454
Canada during warranty (905) 206 4663 Panama 001-800-7112884
Canada post-warranty(per-call charge)
1-877-621-4722 Peru 0-800-10111
Caribbean amp Central America
1-800-711-2884 Philippines 632-867-3551
Chile 800-360-999 Poland +48 22 865 98 00
China 86 10 6868 7980 Portugal +351 21 3176333
Colombia 9-800-114-726 Puerto Rico 1-877-2320-589
Costa Rica 0-800-011-0524 Qatar +971 4 883 8454
Czech Republic +420 (0) 261307310 Romania +40 1 315 44 42or local 01 3154442
reference guide
hp support
47
call in Australia post-warrantyIf your product is not under warranty you can call 03 8877 8000 A per-incident out-of-warranty support fee of $2750 (inc GST) will be charged to your credit card You can also call 1902 910 910 ($2750 charged to your phone account) from 900 AM to 500 PM Monday through Friday (Charges and support hours are subject to change without notice)
prepare your unit for shipmentIf after contacting HP Customer Support or returning to the point of purchase you are requested to send your unit in for service please follow the power off and rebox steps below to avoid further damage to the HP product
Denmark +45 39 29 4099 Russian Federation Moscow +7 095 797 3520
Ecuador 1800-711-2884 Russian Federation St Petersburg
+7 812 346 7997
Europe (English) +44 (0) 207 512 5202 Saudi Arabia +800 897 14440
Egypt 02 532 5222 Singapore 65 6272 5300
Finland +358 (0) 203 47 288 Slovakia +421 (0) 2 682 08080
France (034 Euromin) +0892 69 60 22 South Africa (inside RSA) 086 000 1030
Germany (012 Euromin) +49 (0) 180 52 58 143 South Africa (inside RSA) +27-11 258 9301
Greece +30 1060 73 603 Spain +34 902 321 123
Hong Kong (SAR) +85 (2) 3002 8555 Sweden +46 (0)8 619 2170
Guatemala 1800-995-5105 Switzerland 2 +41 (0) 84 880 1111
Hungary +36 (0) 1 382 1111 Taiwan +886-2-2717-00550800 010 055
India 1-600-11226791 11 682 6035
Thailand +66 (2) 661 4000
Indonesia 62-21-350-3408 Tunisia1 +216 1891 222
Ireland +353 (0) 1 662 5525 Turkey +90 216 579 7171
Israel +972 (0) 9 8304848 Ukraine +7 (380-44) 490-3520
Italy +39 (0) 226410350 United Arab Emirates +971 4 883 8454
Japan 0570 000 511+81 3 3335 9800
United Kingdom +44 (0) 207 512 52 02
Jordan +971 4 883 8454 Venezuela 0800-47468368 or800-477-7777
Korea (Seoul) +82 (2) 3270 0700 Venezuela (Caracas) (502) 207-8488
Korea (outside Seoul) 080 999 0700 Vietnam 84 (0) 8 823 4530
Kuwait +971 4 883 8454 Yemen +971 4 883 8454
Lebanon +971 4 883 8454
1 This Call Center supports French speaking customers from the following countriesregions Morocco Tunisia and Algeria
2 This Call Center supports German French and Italian speaking customers in Switzerland
countryregion hp technical support countryregion hp technical support
hp officejet 4100 series
chapter 10
48
Note When transporting your HP Officejet make sure that the pens have been removed the HP Officejet has been properly shut down by pressing the power button and you have allowed time for the carriage to return to the service station and for the scanner to return to its parked position
1 Turn on the unitDisregard steps 1 through 6 if your unit will not turn on and the print carriage is in the home position You will not be able to remove the print cartridges Proceed to step 7
2 Open the print cartridge access doorThe print carriage moves into view
3 See replace the print cartridges on page 33 for information on removing the print cartridges
Caution Remove both print cartridges Failure to do so may damage your unit
4 Place the print cartridges in an airtight bag so they will not dry out and put them aside (do not send them with the unit unless instructed to by the HP customer support call agent)
5 Turn off the unit
6 Close the print cartridge access door
7 Remove the front panel cover as followsa Grasp the front of the front panel cover with two hands as shownb Firmly lift the front panel cover to unsnap it from the unit
8 Retain the front panel cover Do not return the front panel cover with the unit
9 If available pack the unit for shipment using the original packing materials or the packaging materials that come with your exchange unit
If you do not have the original packaging materials please use other adequate packaging materials Shipping damage caused by improper packaging andor improper transportation is not covered under the warranty
reference guide
hp support
49
10 Place the return shipping label on the outside of the box
11 Include the following items in the boxndash A complete description of symptoms for service personnel (samples of print
quality problems are helpful)ndash A copy of the sales slip or other proof of purchase to establish the warranty
coverage periodndash Your name address and a phone number where you can be reached during
the day
hp distribution centerTo order HP Officejet software a copy of the printed Reference Guide a setup poster or other customer-replaceable parts do one of the following bull In the US or Canada call (208) 323 2551bull Visit this website
httpwwwhpcomcposupportsoftwarehtml
hp officejet 4100 series
chapter 10
50
11
51
warranty information
HP Officejet 4100 seriesDuration of Limited Warranty (hardware and labor) 1 YearDuration of Limited Warranty (CD media) 90 DaysDuration of Limited Warranty (print cartridges) Until the HP ink is depleted or the ldquoend of warrantyrdquo date printed on the cartridge has been reached whichever occurs first
warranty service
express serviceTo obtain HP express repair service the customer must contact an HP service office or an HP Customer Support Center for basic troubleshooting first See hp customer support on page 45 for steps to take before calling Customer SupportIf a customer unit needs a minor part replacement and these parts can normally be replaced by the customer the customer-replaceable components may be serviced through expedited part shipment In this event HP will prepay shipping charges duty and taxes provide telephone assistance on replacement of the component and pay shipping charges duty and taxes for any part that HP asks to be returnedThe HP Customer Support Center may direct customers to designated authorized service providers who are certified by HP to service the HP product
warranty upgradesUpgrade your standard factory warranty to a total of three years with the HP SUPPORTPACK Service coverage begins on product purchase date and the pack must be purchased within the first 180 days of product purchase This program offers phone support from 600 AM to 1000 PM Mountain Standard Time (MST) Monday through Friday and 900 AM to 400 PM (MST) on Saturdays If during your technical support call it is determined that you need a replacement product then HP will ship you this product next business day free of charge Available in US onlyFor more information please call 1-888-999-4747 or visit the following HP Web site
httpwwwhpcomgohpsupportpack
Outside the US please call your local HP Customer Support office See call elsewhere in the world on page 46 for a list of international Customer Support numbers
returning your hp officejet for serviceBefore returning your HP Officejet for service you must call HP Customer Support See hp customer support on page 45 for steps to take before calling Customer Support
hewlett-packard limited global warranty statement
extent of limited warrantyHewlett-Packard (ldquoHPrdquo) warrants to the end-user customer (ldquoCustomerrdquo) that each HP Officejet 4100 Series product (ldquoProductrdquo) including related software accessories media and supplies shall be free from defects in material and workmanship for the duration which begins on the date of purchase by the Customer
hp officejet 4100 series
chapter 11
52
For each software Product HPrsquos limited warranty applies only to a failure to execute programming instructions HP does not warrant that the operation of any Product shall be uninterrupted or error freeHPrsquos limited warranty covers only those defects which arise as a result of normal use of a Product and does not cover any other problems including those which arise as a result of (a) improper maintenance or modification (b) software accessories media or supplies not provided or supported by HP or (c) operation outside the Productrsquos specificationsFor any hardware Product the use of a non-HP print cartridge or a refilled print cartridge does not affect either the warranty to the Customer or any HP support contract with the Customer However if Product failure or damage is attributable to the use of a non-HP or refilled print cartridge HP shall charge its standard labor and materials charges to service the Product for the failure or damageIf HP receives during the applicable warranty period notice of a defect in any Product HP shall either repair or replace the defective Product at HPrsquos option Where labor charges are not covered by HPrsquos limited warranty repairs shall be at HPrsquos standard charges for laborIf HP is unable to repair or replace as applicable a defective Product which is covered by HPrsquos warranty HP shall within a reasonable time after being notified of the defect refund the purchase price for the ProductHP shall have no obligation to repair replace or refund until the Customer returns the defective Product to HPAny replacement product may be either new or like-new provided that it has functionality at least equal to that of the Product being replacedHP products including each Product may contain remanufactured parts components or materials equivalent to new in performanceHPs limited warranty for each Product is valid in any countryregion or locality where HP has a support presence for the Product and where HP has marketed the Product The level of warranty service may vary according to local standards HP shall have no obligation to alter the form fit or function of the Product in order to make it operate in a countryregion or locality for which the Product was never intended to operate
limitations of warrantyTO THE EXTENT ALLOWED BY LOCAL LAW NEITHER HP NOR ITS THIRD PARTY SUPPLIERS MAKE ANY OTHER WARRANTY OR CONDITION OF ANY KIND WHETHER EXPRESS OR IMPLIED WITH RESPECT TO THE COVERED HP PRODUCTS AND SPECIFICALLY DISCLAIM THE IMPLIED WARRANTIES OR CONDITIONS OF MERCHANTABILITY SATISFACTORY QUALITY AND FITNESS FOR A PARTICULAR PURPOSE
limitations of liabilityTo the extent allowed by local law the remedies provided in this Limited Warranty Statement are the Customerrsquos sole and exclusive remediesTO THE EXTENT ALLOWED BY LOCAL LAW EXCEPT FOR THE OBLIGATIONS SPECIFICALLY SET FORTH IN THIS LIMITED WARRANTY STATEMENT IN NO EVENT SHALL HP OR ITS THIRD PARTY SUPPLIERS BE LIABLE FOR DIRECT INDIRECT SPECIAL INCIDENTAL OR CONSEQUENTIAL DAMAGES WHETHER BASED ON CONTRACT TORT OR ANY OTHER LEGAL THEORY AND WHETHER ADVISED OF THE POSSIBILITY OF SUCH DAMAGES
local lawThis Limited Warranty Statement gives the Customer specific legal rights The Customer may also have other rights which vary from state to state in the United States from province to province in Canada and from countryregion to countryregion elsewhere in the world
reference guide
warranty information
53
To the extent this Limited Warranty Statement is inconsistent with local law this Statement shall be deemed modified to be consistent with such local law Under such local law certain disclaimers and limitations of this Statement may not apply to the Customer For example some states in the United States as well as some governments outside the United States (including provinces in Canada) mayPreclude the disclaimers and limitations in this Statement from limiting the statutory rights of a consumer (eg the United Kingdom)Otherwise restrict the ability of a manufacturer to enforce such disclaimers or limitations orGrant the Customer additional warranty rights specify the duration of implied warranties which the manufacturer cannot disclaim or not allow limitations on the duration of implied warrantiesFOR CONSUMER TRANSACTIONS IN AUSTRALIA AND NEW ZEALAND THE TERMS IN THIS LIMITED WARRANTY STATEMENT EXCEPT TO THE EXTENT LAWFULLY PERMITTED DO NOT EXCLUDE RESTRICT OR MODIFY AND ARE IN ADDITION TO THE MANDATORY STATUTORY RIGHTS APPLICABLE TO THE SALE OF THE COVERED HP PRODUCTS TO SUCH CUSTOMERS
hp officejet 4100 series
chapter 11
54
55
index
Numerics4-by-6 inch photo paper
load 10 12
AADF 7adjust
volume for fax 25align print cartridges 35Answer Ring Pattern 26automatic document feeder 7automatic reduction
fax 25
Bbest copy quality 13busy number
redial automatically 23
Ccancel
scan 18scheduled fax 21
cartridgesalign 35replace 33
cleanprint cartridges 35the exterior 32the glass 31white strip 32
colorenhance 14fax 20fax from front panel 20
contrastchange for fax 23photo color 14
copy 13 16change default settings 15enhance 14fit to page 16lighten or darken 14menu options 16number of copies 14photo 15quality 13reduce or enlarge 14settings 13 15
speed 13tutorial 4
Customer Support 45web site 45
Ddarken a copy 14date
setting 27default settings
restore 35director review 4distinctive ringing 26
Eenhance copies 14enlarge copy 14 16envelopes
load 9Error Correction Mode
(ECM) 25
Ffactory defaults
restore 35fast copy quality 13fax 28
adjust volume 25automated reports 22cancel fax forward 24cancel scheduled 21change Answer Ring
Pattern 26change contrast 23change resolution 22change settings 19control appearance 22create individual speed-dial
settings 26delete speed-dial
settings 27distinctive ringing 26Error Correction Mode
(ECM) 25forward faxes 24header 27in color 20in color from front panel 20manual reports 22
menu 29print reports 22receive 21receive manually 21redial busy or unanswered
number 23schedule 20send from front panel 19set automatic reduction 25set date and time 27set the number of rings 21settings 27 28setup menu options 29speed dials 19test 28
fit to page 16forward faxes 24
cancel 24front panel
display scroll speed 36enter text 28send a fax 19setting prompt delay 36tutorial 3
Gglass
cleaning 31greeting cards
load 11
Hhelp 1HP Customer Support 45
calling 45HP Director 4HP distribution center 49HP Officjet
preparing to ship 47HP papers
tips on loading 11
Iindividual speed-dial settings
create 26ink cartridges see print
cartridgesinkjet paper
load 11
index
hp officejet 4100 series56
Kkeypad
enter text 28
Llabels
load 12lighten copies 14load
change the paper type 12envelopes 9original in ADF 7paper 7photo paper 10 12postcards 10 12print cartridges 33set the paper size 12tips 11
Mmaintenance
align print cartridges 35clean print cartridges 35clean the exterior 32clean the glass 31clean the white strip 32normal sounds 36replace print cartridges 33restore factory defaults 35self-maintenance
sounds 36self-test report 32
menuscopy options 16fax 29fax setup 29maintenance 37print reports 37
Nnormal copy quality 13number of copies
set 14number of rings
set 21
Oorder print cartridges 60originals
load in ADF 7output tray 8
Ppaper
change default size for copy 12
change the type 12load 7recommended 7set the size 12tips on loading 11
paper size change for copy 12
paper trayload 7
phone numbers support services 45
photo paperload 10 12
photoscopy 15enhance copy 14
physical specifications 43postcards
load 10 12power
specifications 43print
envelopes 9fax reports 22self-test report 32
print cartridgesalign 35clean 35handling 32replace 33
prompt delaysetting 36
Qquick start
review the director 4use with a computer 4
Rreceive
fax 21redial
busy or unanswered number 23
reduce copy 14 16regulatory information 43reinstall software 40reports
generate automatically for fax 22
generate manually for fax 22
print 22self-test 32
resolution
change for fax 22restore factory settings 35returning your HP Officejet for
service 51
Sscan
from front panel 17stop 18
schedule a fax 20scroll speed
setting 36self-test report 32send
cancel forward faxes 24color fax 20color fax from front
panel 20forward faxes 24
settingscopy 13 15fax 27 28prompt delay 36scroll speed 36
setupadditional information 39menu 29
shippingyour HP Officejet 47
softwareremove and reinstall 40
soundsself-maintenance 36
specificationsphysical 43power 43
speed dials 19create individual
settings 26delete settings 27
stopscan 18scheduled fax 21
subscriber identification code 27
support services 45
Ttelephone line
multiple numbers 26telephone numbers 45text
enhance 14enter from front panel 28
time
index
reference guide 57
setting 27transparency film
recommended 7tips on loading 11
troubleshootingremove and reinstall
software 40T-shirt Transfer Iron-On
load 11tutorial
front panel 3make a copy 4
Uunanswered number
redial automatically 23
Vvolume
adjust 25
Wwarranty 45
service 51statement 51upgrades 51
white stripcleaning 32
hp officejet 4100 series
chapter 12
58
declaration of conformityAccording to ISOIEC Guide 22 and EN 45014
Manufacturerrsquos Name and Address
Hewlett-Packard Company 16399 West Bernardo Drive San Diego CA 92127-1899 USA
declares that the product
Product Name hp officejet 4100 series (Q1608A)
Model Number(s) officejet 4110 (Q1609A) officejet 4110xi (Q1610A) officejet 4110v (Q1611A) officejet 4105 (Q1612A) officejet 4105z (Q1613A) officejet 4115 (Q1614A)
Product Options All
conforms to the following Product Specifications
Safety EN609501992 +A1 A2 A3 A4 amp A11
IEC609501991 +A1 A2 A3 amp A4
UL1950CSA 222 No 950 3rd Edn 1995
NOM-019-SCFI-1993
EMC CISPR221993 +A1 amp A2 EN550221994 +A1 amp A2 -Class B
CISPR241997EN550241998
IEC 61000-3-21995 EN61000-3-21995
IEC 61000-3-31994 EN61000-3-31995
ASNZS 3548 1992
CNS13438 1997
FCC Part 15-Class B ICES-003 Issue 2 VCCI-2
GB 9254-1998
Telecom TBR21 1998
Supplementary Information
The Product herewith complies with the requirements of the Low Voltage Directive 7323EEC the EMC Directive 89336EEC and the RampTTE Directive 19995EC (ANNEX II) carries the CE marking accordingly
European Contact for regulatory topics only Your local Hewlett-Packard Sales and Service Office orHewlett-Packard GmbH
Department HQ-TRE Herrenberger Strasse 140 D-71034 Boumlblingen Germany (FAX + 49-7031-14-3143)
order mediaTo order media such as HP Premium Inkjet Paper HP Premium Inkjet Transparency Film HP Iron-On T-shirt Transfer paper or HP Greeting Cards go to
wwwhpshoppingcom
For orders in countries other than the US and Canada select other countries then click Yes to leave hpshoppingcom From this website you can access hpshoppingcom for your specific language or countryregion
order print cartridges
If you have Internet access you can get more information from the HP website at
wwwhpcomsupport
print cartridges hp reorder number
HP black print cartridge 56 19 ml black print cartridge
HP color print cartridgeHP tri-color print cartridge
57 17 ml color print cartridge28 8 ml color print cartridge
Visit the hp officejet information centerIt has everything you need to get the most value from your HP Officejet
bull Technical Supportbull Supplies and Ordering Informationbull Project Tipsbull Ways to Enhance Your Product
wwwhpcomsupport
copy 2003 Hewlett-Packard Company
Printed in the USA Mexico Germany Singapore or China
Q1608-90163Q1608-90163
Q1608-90163

reference guide
hp support
47
call in Australia post-warrantyIf your product is not under warranty you can call 03 8877 8000 A per-incident out-of-warranty support fee of $2750 (inc GST) will be charged to your credit card You can also call 1902 910 910 ($2750 charged to your phone account) from 900 AM to 500 PM Monday through Friday (Charges and support hours are subject to change without notice)
prepare your unit for shipmentIf after contacting HP Customer Support or returning to the point of purchase you are requested to send your unit in for service please follow the power off and rebox steps below to avoid further damage to the HP product
Denmark +45 39 29 4099 Russian Federation Moscow +7 095 797 3520
Ecuador 1800-711-2884 Russian Federation St Petersburg
+7 812 346 7997
Europe (English) +44 (0) 207 512 5202 Saudi Arabia +800 897 14440
Egypt 02 532 5222 Singapore 65 6272 5300
Finland +358 (0) 203 47 288 Slovakia +421 (0) 2 682 08080
France (034 Euromin) +0892 69 60 22 South Africa (inside RSA) 086 000 1030
Germany (012 Euromin) +49 (0) 180 52 58 143 South Africa (inside RSA) +27-11 258 9301
Greece +30 1060 73 603 Spain +34 902 321 123
Hong Kong (SAR) +85 (2) 3002 8555 Sweden +46 (0)8 619 2170
Guatemala 1800-995-5105 Switzerland 2 +41 (0) 84 880 1111
Hungary +36 (0) 1 382 1111 Taiwan +886-2-2717-00550800 010 055
India 1-600-11226791 11 682 6035
Thailand +66 (2) 661 4000
Indonesia 62-21-350-3408 Tunisia1 +216 1891 222
Ireland +353 (0) 1 662 5525 Turkey +90 216 579 7171
Israel +972 (0) 9 8304848 Ukraine +7 (380-44) 490-3520
Italy +39 (0) 226410350 United Arab Emirates +971 4 883 8454
Japan 0570 000 511+81 3 3335 9800
United Kingdom +44 (0) 207 512 52 02
Jordan +971 4 883 8454 Venezuela 0800-47468368 or800-477-7777
Korea (Seoul) +82 (2) 3270 0700 Venezuela (Caracas) (502) 207-8488
Korea (outside Seoul) 080 999 0700 Vietnam 84 (0) 8 823 4530
Kuwait +971 4 883 8454 Yemen +971 4 883 8454
Lebanon +971 4 883 8454
1 This Call Center supports French speaking customers from the following countriesregions Morocco Tunisia and Algeria
2 This Call Center supports German French and Italian speaking customers in Switzerland
countryregion hp technical support countryregion hp technical support
hp officejet 4100 series
chapter 10
48
Note When transporting your HP Officejet make sure that the pens have been removed the HP Officejet has been properly shut down by pressing the power button and you have allowed time for the carriage to return to the service station and for the scanner to return to its parked position
1 Turn on the unitDisregard steps 1 through 6 if your unit will not turn on and the print carriage is in the home position You will not be able to remove the print cartridges Proceed to step 7
2 Open the print cartridge access doorThe print carriage moves into view
3 See replace the print cartridges on page 33 for information on removing the print cartridges
Caution Remove both print cartridges Failure to do so may damage your unit
4 Place the print cartridges in an airtight bag so they will not dry out and put them aside (do not send them with the unit unless instructed to by the HP customer support call agent)
5 Turn off the unit
6 Close the print cartridge access door
7 Remove the front panel cover as followsa Grasp the front of the front panel cover with two hands as shownb Firmly lift the front panel cover to unsnap it from the unit
8 Retain the front panel cover Do not return the front panel cover with the unit
9 If available pack the unit for shipment using the original packing materials or the packaging materials that come with your exchange unit
If you do not have the original packaging materials please use other adequate packaging materials Shipping damage caused by improper packaging andor improper transportation is not covered under the warranty
reference guide
hp support
49
10 Place the return shipping label on the outside of the box
11 Include the following items in the boxndash A complete description of symptoms for service personnel (samples of print
quality problems are helpful)ndash A copy of the sales slip or other proof of purchase to establish the warranty
coverage periodndash Your name address and a phone number where you can be reached during
the day
hp distribution centerTo order HP Officejet software a copy of the printed Reference Guide a setup poster or other customer-replaceable parts do one of the following bull In the US or Canada call (208) 323 2551bull Visit this website
httpwwwhpcomcposupportsoftwarehtml
hp officejet 4100 series
chapter 10
50
11
51
warranty information
HP Officejet 4100 seriesDuration of Limited Warranty (hardware and labor) 1 YearDuration of Limited Warranty (CD media) 90 DaysDuration of Limited Warranty (print cartridges) Until the HP ink is depleted or the ldquoend of warrantyrdquo date printed on the cartridge has been reached whichever occurs first
warranty service
express serviceTo obtain HP express repair service the customer must contact an HP service office or an HP Customer Support Center for basic troubleshooting first See hp customer support on page 45 for steps to take before calling Customer SupportIf a customer unit needs a minor part replacement and these parts can normally be replaced by the customer the customer-replaceable components may be serviced through expedited part shipment In this event HP will prepay shipping charges duty and taxes provide telephone assistance on replacement of the component and pay shipping charges duty and taxes for any part that HP asks to be returnedThe HP Customer Support Center may direct customers to designated authorized service providers who are certified by HP to service the HP product
warranty upgradesUpgrade your standard factory warranty to a total of three years with the HP SUPPORTPACK Service coverage begins on product purchase date and the pack must be purchased within the first 180 days of product purchase This program offers phone support from 600 AM to 1000 PM Mountain Standard Time (MST) Monday through Friday and 900 AM to 400 PM (MST) on Saturdays If during your technical support call it is determined that you need a replacement product then HP will ship you this product next business day free of charge Available in US onlyFor more information please call 1-888-999-4747 or visit the following HP Web site
httpwwwhpcomgohpsupportpack
Outside the US please call your local HP Customer Support office See call elsewhere in the world on page 46 for a list of international Customer Support numbers
returning your hp officejet for serviceBefore returning your HP Officejet for service you must call HP Customer Support See hp customer support on page 45 for steps to take before calling Customer Support
hewlett-packard limited global warranty statement
extent of limited warrantyHewlett-Packard (ldquoHPrdquo) warrants to the end-user customer (ldquoCustomerrdquo) that each HP Officejet 4100 Series product (ldquoProductrdquo) including related software accessories media and supplies shall be free from defects in material and workmanship for the duration which begins on the date of purchase by the Customer
hp officejet 4100 series
chapter 11
52
For each software Product HPrsquos limited warranty applies only to a failure to execute programming instructions HP does not warrant that the operation of any Product shall be uninterrupted or error freeHPrsquos limited warranty covers only those defects which arise as a result of normal use of a Product and does not cover any other problems including those which arise as a result of (a) improper maintenance or modification (b) software accessories media or supplies not provided or supported by HP or (c) operation outside the Productrsquos specificationsFor any hardware Product the use of a non-HP print cartridge or a refilled print cartridge does not affect either the warranty to the Customer or any HP support contract with the Customer However if Product failure or damage is attributable to the use of a non-HP or refilled print cartridge HP shall charge its standard labor and materials charges to service the Product for the failure or damageIf HP receives during the applicable warranty period notice of a defect in any Product HP shall either repair or replace the defective Product at HPrsquos option Where labor charges are not covered by HPrsquos limited warranty repairs shall be at HPrsquos standard charges for laborIf HP is unable to repair or replace as applicable a defective Product which is covered by HPrsquos warranty HP shall within a reasonable time after being notified of the defect refund the purchase price for the ProductHP shall have no obligation to repair replace or refund until the Customer returns the defective Product to HPAny replacement product may be either new or like-new provided that it has functionality at least equal to that of the Product being replacedHP products including each Product may contain remanufactured parts components or materials equivalent to new in performanceHPs limited warranty for each Product is valid in any countryregion or locality where HP has a support presence for the Product and where HP has marketed the Product The level of warranty service may vary according to local standards HP shall have no obligation to alter the form fit or function of the Product in order to make it operate in a countryregion or locality for which the Product was never intended to operate
limitations of warrantyTO THE EXTENT ALLOWED BY LOCAL LAW NEITHER HP NOR ITS THIRD PARTY SUPPLIERS MAKE ANY OTHER WARRANTY OR CONDITION OF ANY KIND WHETHER EXPRESS OR IMPLIED WITH RESPECT TO THE COVERED HP PRODUCTS AND SPECIFICALLY DISCLAIM THE IMPLIED WARRANTIES OR CONDITIONS OF MERCHANTABILITY SATISFACTORY QUALITY AND FITNESS FOR A PARTICULAR PURPOSE
limitations of liabilityTo the extent allowed by local law the remedies provided in this Limited Warranty Statement are the Customerrsquos sole and exclusive remediesTO THE EXTENT ALLOWED BY LOCAL LAW EXCEPT FOR THE OBLIGATIONS SPECIFICALLY SET FORTH IN THIS LIMITED WARRANTY STATEMENT IN NO EVENT SHALL HP OR ITS THIRD PARTY SUPPLIERS BE LIABLE FOR DIRECT INDIRECT SPECIAL INCIDENTAL OR CONSEQUENTIAL DAMAGES WHETHER BASED ON CONTRACT TORT OR ANY OTHER LEGAL THEORY AND WHETHER ADVISED OF THE POSSIBILITY OF SUCH DAMAGES
local lawThis Limited Warranty Statement gives the Customer specific legal rights The Customer may also have other rights which vary from state to state in the United States from province to province in Canada and from countryregion to countryregion elsewhere in the world
reference guide
warranty information
53
To the extent this Limited Warranty Statement is inconsistent with local law this Statement shall be deemed modified to be consistent with such local law Under such local law certain disclaimers and limitations of this Statement may not apply to the Customer For example some states in the United States as well as some governments outside the United States (including provinces in Canada) mayPreclude the disclaimers and limitations in this Statement from limiting the statutory rights of a consumer (eg the United Kingdom)Otherwise restrict the ability of a manufacturer to enforce such disclaimers or limitations orGrant the Customer additional warranty rights specify the duration of implied warranties which the manufacturer cannot disclaim or not allow limitations on the duration of implied warrantiesFOR CONSUMER TRANSACTIONS IN AUSTRALIA AND NEW ZEALAND THE TERMS IN THIS LIMITED WARRANTY STATEMENT EXCEPT TO THE EXTENT LAWFULLY PERMITTED DO NOT EXCLUDE RESTRICT OR MODIFY AND ARE IN ADDITION TO THE MANDATORY STATUTORY RIGHTS APPLICABLE TO THE SALE OF THE COVERED HP PRODUCTS TO SUCH CUSTOMERS
hp officejet 4100 series
chapter 11
54
55
index
Numerics4-by-6 inch photo paper
load 10 12
AADF 7adjust
volume for fax 25align print cartridges 35Answer Ring Pattern 26automatic document feeder 7automatic reduction
fax 25
Bbest copy quality 13busy number
redial automatically 23
Ccancel
scan 18scheduled fax 21
cartridgesalign 35replace 33
cleanprint cartridges 35the exterior 32the glass 31white strip 32
colorenhance 14fax 20fax from front panel 20
contrastchange for fax 23photo color 14
copy 13 16change default settings 15enhance 14fit to page 16lighten or darken 14menu options 16number of copies 14photo 15quality 13reduce or enlarge 14settings 13 15
speed 13tutorial 4
Customer Support 45web site 45
Ddarken a copy 14date
setting 27default settings
restore 35director review 4distinctive ringing 26
Eenhance copies 14enlarge copy 14 16envelopes
load 9Error Correction Mode
(ECM) 25
Ffactory defaults
restore 35fast copy quality 13fax 28
adjust volume 25automated reports 22cancel fax forward 24cancel scheduled 21change Answer Ring
Pattern 26change contrast 23change resolution 22change settings 19control appearance 22create individual speed-dial
settings 26delete speed-dial
settings 27distinctive ringing 26Error Correction Mode
(ECM) 25forward faxes 24header 27in color 20in color from front panel 20manual reports 22
menu 29print reports 22receive 21receive manually 21redial busy or unanswered
number 23schedule 20send from front panel 19set automatic reduction 25set date and time 27set the number of rings 21settings 27 28setup menu options 29speed dials 19test 28
fit to page 16forward faxes 24
cancel 24front panel
display scroll speed 36enter text 28send a fax 19setting prompt delay 36tutorial 3
Gglass
cleaning 31greeting cards
load 11
Hhelp 1HP Customer Support 45
calling 45HP Director 4HP distribution center 49HP Officjet
preparing to ship 47HP papers
tips on loading 11
Iindividual speed-dial settings
create 26ink cartridges see print
cartridgesinkjet paper
load 11
index
hp officejet 4100 series56
Kkeypad
enter text 28
Llabels
load 12lighten copies 14load
change the paper type 12envelopes 9original in ADF 7paper 7photo paper 10 12postcards 10 12print cartridges 33set the paper size 12tips 11
Mmaintenance
align print cartridges 35clean print cartridges 35clean the exterior 32clean the glass 31clean the white strip 32normal sounds 36replace print cartridges 33restore factory defaults 35self-maintenance
sounds 36self-test report 32
menuscopy options 16fax 29fax setup 29maintenance 37print reports 37
Nnormal copy quality 13number of copies
set 14number of rings
set 21
Oorder print cartridges 60originals
load in ADF 7output tray 8
Ppaper
change default size for copy 12
change the type 12load 7recommended 7set the size 12tips on loading 11
paper size change for copy 12
paper trayload 7
phone numbers support services 45
photo paperload 10 12
photoscopy 15enhance copy 14
physical specifications 43postcards
load 10 12power
specifications 43print
envelopes 9fax reports 22self-test report 32
print cartridgesalign 35clean 35handling 32replace 33
prompt delaysetting 36
Qquick start
review the director 4use with a computer 4
Rreceive
fax 21redial
busy or unanswered number 23
reduce copy 14 16regulatory information 43reinstall software 40reports
generate automatically for fax 22
generate manually for fax 22
print 22self-test 32
resolution
change for fax 22restore factory settings 35returning your HP Officejet for
service 51
Sscan
from front panel 17stop 18
schedule a fax 20scroll speed
setting 36self-test report 32send
cancel forward faxes 24color fax 20color fax from front
panel 20forward faxes 24
settingscopy 13 15fax 27 28prompt delay 36scroll speed 36
setupadditional information 39menu 29
shippingyour HP Officejet 47
softwareremove and reinstall 40
soundsself-maintenance 36
specificationsphysical 43power 43
speed dials 19create individual
settings 26delete settings 27
stopscan 18scheduled fax 21
subscriber identification code 27
support services 45
Ttelephone line
multiple numbers 26telephone numbers 45text
enhance 14enter from front panel 28
time
index
reference guide 57
setting 27transparency film
recommended 7tips on loading 11
troubleshootingremove and reinstall
software 40T-shirt Transfer Iron-On
load 11tutorial
front panel 3make a copy 4
Uunanswered number
redial automatically 23
Vvolume
adjust 25
Wwarranty 45
service 51statement 51upgrades 51
white stripcleaning 32
hp officejet 4100 series
chapter 12
58
declaration of conformityAccording to ISOIEC Guide 22 and EN 45014
Manufacturerrsquos Name and Address
Hewlett-Packard Company 16399 West Bernardo Drive San Diego CA 92127-1899 USA
declares that the product
Product Name hp officejet 4100 series (Q1608A)
Model Number(s) officejet 4110 (Q1609A) officejet 4110xi (Q1610A) officejet 4110v (Q1611A) officejet 4105 (Q1612A) officejet 4105z (Q1613A) officejet 4115 (Q1614A)
Product Options All
conforms to the following Product Specifications
Safety EN609501992 +A1 A2 A3 A4 amp A11
IEC609501991 +A1 A2 A3 amp A4
UL1950CSA 222 No 950 3rd Edn 1995
NOM-019-SCFI-1993
EMC CISPR221993 +A1 amp A2 EN550221994 +A1 amp A2 -Class B
CISPR241997EN550241998
IEC 61000-3-21995 EN61000-3-21995
IEC 61000-3-31994 EN61000-3-31995
ASNZS 3548 1992
CNS13438 1997
FCC Part 15-Class B ICES-003 Issue 2 VCCI-2
GB 9254-1998
Telecom TBR21 1998
Supplementary Information
The Product herewith complies with the requirements of the Low Voltage Directive 7323EEC the EMC Directive 89336EEC and the RampTTE Directive 19995EC (ANNEX II) carries the CE marking accordingly
European Contact for regulatory topics only Your local Hewlett-Packard Sales and Service Office orHewlett-Packard GmbH
Department HQ-TRE Herrenberger Strasse 140 D-71034 Boumlblingen Germany (FAX + 49-7031-14-3143)
order mediaTo order media such as HP Premium Inkjet Paper HP Premium Inkjet Transparency Film HP Iron-On T-shirt Transfer paper or HP Greeting Cards go to
wwwhpshoppingcom
For orders in countries other than the US and Canada select other countries then click Yes to leave hpshoppingcom From this website you can access hpshoppingcom for your specific language or countryregion
order print cartridges
If you have Internet access you can get more information from the HP website at
wwwhpcomsupport
print cartridges hp reorder number
HP black print cartridge 56 19 ml black print cartridge
HP color print cartridgeHP tri-color print cartridge
57 17 ml color print cartridge28 8 ml color print cartridge
Visit the hp officejet information centerIt has everything you need to get the most value from your HP Officejet
bull Technical Supportbull Supplies and Ordering Informationbull Project Tipsbull Ways to Enhance Your Product
wwwhpcomsupport
copy 2003 Hewlett-Packard Company
Printed in the USA Mexico Germany Singapore or China
Q1608-90163Q1608-90163
Q1608-90163

hp officejet 4100 series
chapter 10
48
Note When transporting your HP Officejet make sure that the pens have been removed the HP Officejet has been properly shut down by pressing the power button and you have allowed time for the carriage to return to the service station and for the scanner to return to its parked position
1 Turn on the unitDisregard steps 1 through 6 if your unit will not turn on and the print carriage is in the home position You will not be able to remove the print cartridges Proceed to step 7
2 Open the print cartridge access doorThe print carriage moves into view
3 See replace the print cartridges on page 33 for information on removing the print cartridges
Caution Remove both print cartridges Failure to do so may damage your unit
4 Place the print cartridges in an airtight bag so they will not dry out and put them aside (do not send them with the unit unless instructed to by the HP customer support call agent)
5 Turn off the unit
6 Close the print cartridge access door
7 Remove the front panel cover as followsa Grasp the front of the front panel cover with two hands as shownb Firmly lift the front panel cover to unsnap it from the unit
8 Retain the front panel cover Do not return the front panel cover with the unit
9 If available pack the unit for shipment using the original packing materials or the packaging materials that come with your exchange unit
If you do not have the original packaging materials please use other adequate packaging materials Shipping damage caused by improper packaging andor improper transportation is not covered under the warranty
reference guide
hp support
49
10 Place the return shipping label on the outside of the box
11 Include the following items in the boxndash A complete description of symptoms for service personnel (samples of print
quality problems are helpful)ndash A copy of the sales slip or other proof of purchase to establish the warranty
coverage periodndash Your name address and a phone number where you can be reached during
the day
hp distribution centerTo order HP Officejet software a copy of the printed Reference Guide a setup poster or other customer-replaceable parts do one of the following bull In the US or Canada call (208) 323 2551bull Visit this website
httpwwwhpcomcposupportsoftwarehtml
hp officejet 4100 series
chapter 10
50
11
51
warranty information
HP Officejet 4100 seriesDuration of Limited Warranty (hardware and labor) 1 YearDuration of Limited Warranty (CD media) 90 DaysDuration of Limited Warranty (print cartridges) Until the HP ink is depleted or the ldquoend of warrantyrdquo date printed on the cartridge has been reached whichever occurs first
warranty service
express serviceTo obtain HP express repair service the customer must contact an HP service office or an HP Customer Support Center for basic troubleshooting first See hp customer support on page 45 for steps to take before calling Customer SupportIf a customer unit needs a minor part replacement and these parts can normally be replaced by the customer the customer-replaceable components may be serviced through expedited part shipment In this event HP will prepay shipping charges duty and taxes provide telephone assistance on replacement of the component and pay shipping charges duty and taxes for any part that HP asks to be returnedThe HP Customer Support Center may direct customers to designated authorized service providers who are certified by HP to service the HP product
warranty upgradesUpgrade your standard factory warranty to a total of three years with the HP SUPPORTPACK Service coverage begins on product purchase date and the pack must be purchased within the first 180 days of product purchase This program offers phone support from 600 AM to 1000 PM Mountain Standard Time (MST) Monday through Friday and 900 AM to 400 PM (MST) on Saturdays If during your technical support call it is determined that you need a replacement product then HP will ship you this product next business day free of charge Available in US onlyFor more information please call 1-888-999-4747 or visit the following HP Web site
httpwwwhpcomgohpsupportpack
Outside the US please call your local HP Customer Support office See call elsewhere in the world on page 46 for a list of international Customer Support numbers
returning your hp officejet for serviceBefore returning your HP Officejet for service you must call HP Customer Support See hp customer support on page 45 for steps to take before calling Customer Support
hewlett-packard limited global warranty statement
extent of limited warrantyHewlett-Packard (ldquoHPrdquo) warrants to the end-user customer (ldquoCustomerrdquo) that each HP Officejet 4100 Series product (ldquoProductrdquo) including related software accessories media and supplies shall be free from defects in material and workmanship for the duration which begins on the date of purchase by the Customer
hp officejet 4100 series
chapter 11
52
For each software Product HPrsquos limited warranty applies only to a failure to execute programming instructions HP does not warrant that the operation of any Product shall be uninterrupted or error freeHPrsquos limited warranty covers only those defects which arise as a result of normal use of a Product and does not cover any other problems including those which arise as a result of (a) improper maintenance or modification (b) software accessories media or supplies not provided or supported by HP or (c) operation outside the Productrsquos specificationsFor any hardware Product the use of a non-HP print cartridge or a refilled print cartridge does not affect either the warranty to the Customer or any HP support contract with the Customer However if Product failure or damage is attributable to the use of a non-HP or refilled print cartridge HP shall charge its standard labor and materials charges to service the Product for the failure or damageIf HP receives during the applicable warranty period notice of a defect in any Product HP shall either repair or replace the defective Product at HPrsquos option Where labor charges are not covered by HPrsquos limited warranty repairs shall be at HPrsquos standard charges for laborIf HP is unable to repair or replace as applicable a defective Product which is covered by HPrsquos warranty HP shall within a reasonable time after being notified of the defect refund the purchase price for the ProductHP shall have no obligation to repair replace or refund until the Customer returns the defective Product to HPAny replacement product may be either new or like-new provided that it has functionality at least equal to that of the Product being replacedHP products including each Product may contain remanufactured parts components or materials equivalent to new in performanceHPs limited warranty for each Product is valid in any countryregion or locality where HP has a support presence for the Product and where HP has marketed the Product The level of warranty service may vary according to local standards HP shall have no obligation to alter the form fit or function of the Product in order to make it operate in a countryregion or locality for which the Product was never intended to operate
limitations of warrantyTO THE EXTENT ALLOWED BY LOCAL LAW NEITHER HP NOR ITS THIRD PARTY SUPPLIERS MAKE ANY OTHER WARRANTY OR CONDITION OF ANY KIND WHETHER EXPRESS OR IMPLIED WITH RESPECT TO THE COVERED HP PRODUCTS AND SPECIFICALLY DISCLAIM THE IMPLIED WARRANTIES OR CONDITIONS OF MERCHANTABILITY SATISFACTORY QUALITY AND FITNESS FOR A PARTICULAR PURPOSE
limitations of liabilityTo the extent allowed by local law the remedies provided in this Limited Warranty Statement are the Customerrsquos sole and exclusive remediesTO THE EXTENT ALLOWED BY LOCAL LAW EXCEPT FOR THE OBLIGATIONS SPECIFICALLY SET FORTH IN THIS LIMITED WARRANTY STATEMENT IN NO EVENT SHALL HP OR ITS THIRD PARTY SUPPLIERS BE LIABLE FOR DIRECT INDIRECT SPECIAL INCIDENTAL OR CONSEQUENTIAL DAMAGES WHETHER BASED ON CONTRACT TORT OR ANY OTHER LEGAL THEORY AND WHETHER ADVISED OF THE POSSIBILITY OF SUCH DAMAGES
local lawThis Limited Warranty Statement gives the Customer specific legal rights The Customer may also have other rights which vary from state to state in the United States from province to province in Canada and from countryregion to countryregion elsewhere in the world
reference guide
warranty information
53
To the extent this Limited Warranty Statement is inconsistent with local law this Statement shall be deemed modified to be consistent with such local law Under such local law certain disclaimers and limitations of this Statement may not apply to the Customer For example some states in the United States as well as some governments outside the United States (including provinces in Canada) mayPreclude the disclaimers and limitations in this Statement from limiting the statutory rights of a consumer (eg the United Kingdom)Otherwise restrict the ability of a manufacturer to enforce such disclaimers or limitations orGrant the Customer additional warranty rights specify the duration of implied warranties which the manufacturer cannot disclaim or not allow limitations on the duration of implied warrantiesFOR CONSUMER TRANSACTIONS IN AUSTRALIA AND NEW ZEALAND THE TERMS IN THIS LIMITED WARRANTY STATEMENT EXCEPT TO THE EXTENT LAWFULLY PERMITTED DO NOT EXCLUDE RESTRICT OR MODIFY AND ARE IN ADDITION TO THE MANDATORY STATUTORY RIGHTS APPLICABLE TO THE SALE OF THE COVERED HP PRODUCTS TO SUCH CUSTOMERS
hp officejet 4100 series
chapter 11
54
55
index
Numerics4-by-6 inch photo paper
load 10 12
AADF 7adjust
volume for fax 25align print cartridges 35Answer Ring Pattern 26automatic document feeder 7automatic reduction
fax 25
Bbest copy quality 13busy number
redial automatically 23
Ccancel
scan 18scheduled fax 21
cartridgesalign 35replace 33
cleanprint cartridges 35the exterior 32the glass 31white strip 32
colorenhance 14fax 20fax from front panel 20
contrastchange for fax 23photo color 14
copy 13 16change default settings 15enhance 14fit to page 16lighten or darken 14menu options 16number of copies 14photo 15quality 13reduce or enlarge 14settings 13 15
speed 13tutorial 4
Customer Support 45web site 45
Ddarken a copy 14date
setting 27default settings
restore 35director review 4distinctive ringing 26
Eenhance copies 14enlarge copy 14 16envelopes
load 9Error Correction Mode
(ECM) 25
Ffactory defaults
restore 35fast copy quality 13fax 28
adjust volume 25automated reports 22cancel fax forward 24cancel scheduled 21change Answer Ring
Pattern 26change contrast 23change resolution 22change settings 19control appearance 22create individual speed-dial
settings 26delete speed-dial
settings 27distinctive ringing 26Error Correction Mode
(ECM) 25forward faxes 24header 27in color 20in color from front panel 20manual reports 22
menu 29print reports 22receive 21receive manually 21redial busy or unanswered
number 23schedule 20send from front panel 19set automatic reduction 25set date and time 27set the number of rings 21settings 27 28setup menu options 29speed dials 19test 28
fit to page 16forward faxes 24
cancel 24front panel
display scroll speed 36enter text 28send a fax 19setting prompt delay 36tutorial 3
Gglass
cleaning 31greeting cards
load 11
Hhelp 1HP Customer Support 45
calling 45HP Director 4HP distribution center 49HP Officjet
preparing to ship 47HP papers
tips on loading 11
Iindividual speed-dial settings
create 26ink cartridges see print
cartridgesinkjet paper
load 11
index
hp officejet 4100 series56
Kkeypad
enter text 28
Llabels
load 12lighten copies 14load
change the paper type 12envelopes 9original in ADF 7paper 7photo paper 10 12postcards 10 12print cartridges 33set the paper size 12tips 11
Mmaintenance
align print cartridges 35clean print cartridges 35clean the exterior 32clean the glass 31clean the white strip 32normal sounds 36replace print cartridges 33restore factory defaults 35self-maintenance
sounds 36self-test report 32
menuscopy options 16fax 29fax setup 29maintenance 37print reports 37
Nnormal copy quality 13number of copies
set 14number of rings
set 21
Oorder print cartridges 60originals
load in ADF 7output tray 8
Ppaper
change default size for copy 12
change the type 12load 7recommended 7set the size 12tips on loading 11
paper size change for copy 12
paper trayload 7
phone numbers support services 45
photo paperload 10 12
photoscopy 15enhance copy 14
physical specifications 43postcards
load 10 12power
specifications 43print
envelopes 9fax reports 22self-test report 32
print cartridgesalign 35clean 35handling 32replace 33
prompt delaysetting 36
Qquick start
review the director 4use with a computer 4
Rreceive
fax 21redial
busy or unanswered number 23
reduce copy 14 16regulatory information 43reinstall software 40reports
generate automatically for fax 22
generate manually for fax 22
print 22self-test 32
resolution
change for fax 22restore factory settings 35returning your HP Officejet for
service 51
Sscan
from front panel 17stop 18
schedule a fax 20scroll speed
setting 36self-test report 32send
cancel forward faxes 24color fax 20color fax from front
panel 20forward faxes 24
settingscopy 13 15fax 27 28prompt delay 36scroll speed 36
setupadditional information 39menu 29
shippingyour HP Officejet 47
softwareremove and reinstall 40
soundsself-maintenance 36
specificationsphysical 43power 43
speed dials 19create individual
settings 26delete settings 27
stopscan 18scheduled fax 21
subscriber identification code 27
support services 45
Ttelephone line
multiple numbers 26telephone numbers 45text
enhance 14enter from front panel 28
time
index
reference guide 57
setting 27transparency film
recommended 7tips on loading 11
troubleshootingremove and reinstall
software 40T-shirt Transfer Iron-On
load 11tutorial
front panel 3make a copy 4
Uunanswered number
redial automatically 23
Vvolume
adjust 25
Wwarranty 45
service 51statement 51upgrades 51
white stripcleaning 32
hp officejet 4100 series
chapter 12
58
declaration of conformityAccording to ISOIEC Guide 22 and EN 45014
Manufacturerrsquos Name and Address
Hewlett-Packard Company 16399 West Bernardo Drive San Diego CA 92127-1899 USA
declares that the product
Product Name hp officejet 4100 series (Q1608A)
Model Number(s) officejet 4110 (Q1609A) officejet 4110xi (Q1610A) officejet 4110v (Q1611A) officejet 4105 (Q1612A) officejet 4105z (Q1613A) officejet 4115 (Q1614A)
Product Options All
conforms to the following Product Specifications
Safety EN609501992 +A1 A2 A3 A4 amp A11
IEC609501991 +A1 A2 A3 amp A4
UL1950CSA 222 No 950 3rd Edn 1995
NOM-019-SCFI-1993
EMC CISPR221993 +A1 amp A2 EN550221994 +A1 amp A2 -Class B
CISPR241997EN550241998
IEC 61000-3-21995 EN61000-3-21995
IEC 61000-3-31994 EN61000-3-31995
ASNZS 3548 1992
CNS13438 1997
FCC Part 15-Class B ICES-003 Issue 2 VCCI-2
GB 9254-1998
Telecom TBR21 1998
Supplementary Information
The Product herewith complies with the requirements of the Low Voltage Directive 7323EEC the EMC Directive 89336EEC and the RampTTE Directive 19995EC (ANNEX II) carries the CE marking accordingly
European Contact for regulatory topics only Your local Hewlett-Packard Sales and Service Office orHewlett-Packard GmbH
Department HQ-TRE Herrenberger Strasse 140 D-71034 Boumlblingen Germany (FAX + 49-7031-14-3143)
order mediaTo order media such as HP Premium Inkjet Paper HP Premium Inkjet Transparency Film HP Iron-On T-shirt Transfer paper or HP Greeting Cards go to
wwwhpshoppingcom
For orders in countries other than the US and Canada select other countries then click Yes to leave hpshoppingcom From this website you can access hpshoppingcom for your specific language or countryregion
order print cartridges
If you have Internet access you can get more information from the HP website at
wwwhpcomsupport
print cartridges hp reorder number
HP black print cartridge 56 19 ml black print cartridge
HP color print cartridgeHP tri-color print cartridge
57 17 ml color print cartridge28 8 ml color print cartridge
Visit the hp officejet information centerIt has everything you need to get the most value from your HP Officejet
bull Technical Supportbull Supplies and Ordering Informationbull Project Tipsbull Ways to Enhance Your Product
wwwhpcomsupport
copy 2003 Hewlett-Packard Company
Printed in the USA Mexico Germany Singapore or China
Q1608-90163Q1608-90163
Q1608-90163

reference guide
hp support
49
10 Place the return shipping label on the outside of the box
11 Include the following items in the boxndash A complete description of symptoms for service personnel (samples of print
quality problems are helpful)ndash A copy of the sales slip or other proof of purchase to establish the warranty
coverage periodndash Your name address and a phone number where you can be reached during
the day
hp distribution centerTo order HP Officejet software a copy of the printed Reference Guide a setup poster or other customer-replaceable parts do one of the following bull In the US or Canada call (208) 323 2551bull Visit this website
httpwwwhpcomcposupportsoftwarehtml
hp officejet 4100 series
chapter 10
50
11
51
warranty information
HP Officejet 4100 seriesDuration of Limited Warranty (hardware and labor) 1 YearDuration of Limited Warranty (CD media) 90 DaysDuration of Limited Warranty (print cartridges) Until the HP ink is depleted or the ldquoend of warrantyrdquo date printed on the cartridge has been reached whichever occurs first
warranty service
express serviceTo obtain HP express repair service the customer must contact an HP service office or an HP Customer Support Center for basic troubleshooting first See hp customer support on page 45 for steps to take before calling Customer SupportIf a customer unit needs a minor part replacement and these parts can normally be replaced by the customer the customer-replaceable components may be serviced through expedited part shipment In this event HP will prepay shipping charges duty and taxes provide telephone assistance on replacement of the component and pay shipping charges duty and taxes for any part that HP asks to be returnedThe HP Customer Support Center may direct customers to designated authorized service providers who are certified by HP to service the HP product
warranty upgradesUpgrade your standard factory warranty to a total of three years with the HP SUPPORTPACK Service coverage begins on product purchase date and the pack must be purchased within the first 180 days of product purchase This program offers phone support from 600 AM to 1000 PM Mountain Standard Time (MST) Monday through Friday and 900 AM to 400 PM (MST) on Saturdays If during your technical support call it is determined that you need a replacement product then HP will ship you this product next business day free of charge Available in US onlyFor more information please call 1-888-999-4747 or visit the following HP Web site
httpwwwhpcomgohpsupportpack
Outside the US please call your local HP Customer Support office See call elsewhere in the world on page 46 for a list of international Customer Support numbers
returning your hp officejet for serviceBefore returning your HP Officejet for service you must call HP Customer Support See hp customer support on page 45 for steps to take before calling Customer Support
hewlett-packard limited global warranty statement
extent of limited warrantyHewlett-Packard (ldquoHPrdquo) warrants to the end-user customer (ldquoCustomerrdquo) that each HP Officejet 4100 Series product (ldquoProductrdquo) including related software accessories media and supplies shall be free from defects in material and workmanship for the duration which begins on the date of purchase by the Customer
hp officejet 4100 series
chapter 11
52
For each software Product HPrsquos limited warranty applies only to a failure to execute programming instructions HP does not warrant that the operation of any Product shall be uninterrupted or error freeHPrsquos limited warranty covers only those defects which arise as a result of normal use of a Product and does not cover any other problems including those which arise as a result of (a) improper maintenance or modification (b) software accessories media or supplies not provided or supported by HP or (c) operation outside the Productrsquos specificationsFor any hardware Product the use of a non-HP print cartridge or a refilled print cartridge does not affect either the warranty to the Customer or any HP support contract with the Customer However if Product failure or damage is attributable to the use of a non-HP or refilled print cartridge HP shall charge its standard labor and materials charges to service the Product for the failure or damageIf HP receives during the applicable warranty period notice of a defect in any Product HP shall either repair or replace the defective Product at HPrsquos option Where labor charges are not covered by HPrsquos limited warranty repairs shall be at HPrsquos standard charges for laborIf HP is unable to repair or replace as applicable a defective Product which is covered by HPrsquos warranty HP shall within a reasonable time after being notified of the defect refund the purchase price for the ProductHP shall have no obligation to repair replace or refund until the Customer returns the defective Product to HPAny replacement product may be either new or like-new provided that it has functionality at least equal to that of the Product being replacedHP products including each Product may contain remanufactured parts components or materials equivalent to new in performanceHPs limited warranty for each Product is valid in any countryregion or locality where HP has a support presence for the Product and where HP has marketed the Product The level of warranty service may vary according to local standards HP shall have no obligation to alter the form fit or function of the Product in order to make it operate in a countryregion or locality for which the Product was never intended to operate
limitations of warrantyTO THE EXTENT ALLOWED BY LOCAL LAW NEITHER HP NOR ITS THIRD PARTY SUPPLIERS MAKE ANY OTHER WARRANTY OR CONDITION OF ANY KIND WHETHER EXPRESS OR IMPLIED WITH RESPECT TO THE COVERED HP PRODUCTS AND SPECIFICALLY DISCLAIM THE IMPLIED WARRANTIES OR CONDITIONS OF MERCHANTABILITY SATISFACTORY QUALITY AND FITNESS FOR A PARTICULAR PURPOSE
limitations of liabilityTo the extent allowed by local law the remedies provided in this Limited Warranty Statement are the Customerrsquos sole and exclusive remediesTO THE EXTENT ALLOWED BY LOCAL LAW EXCEPT FOR THE OBLIGATIONS SPECIFICALLY SET FORTH IN THIS LIMITED WARRANTY STATEMENT IN NO EVENT SHALL HP OR ITS THIRD PARTY SUPPLIERS BE LIABLE FOR DIRECT INDIRECT SPECIAL INCIDENTAL OR CONSEQUENTIAL DAMAGES WHETHER BASED ON CONTRACT TORT OR ANY OTHER LEGAL THEORY AND WHETHER ADVISED OF THE POSSIBILITY OF SUCH DAMAGES
local lawThis Limited Warranty Statement gives the Customer specific legal rights The Customer may also have other rights which vary from state to state in the United States from province to province in Canada and from countryregion to countryregion elsewhere in the world
reference guide
warranty information
53
To the extent this Limited Warranty Statement is inconsistent with local law this Statement shall be deemed modified to be consistent with such local law Under such local law certain disclaimers and limitations of this Statement may not apply to the Customer For example some states in the United States as well as some governments outside the United States (including provinces in Canada) mayPreclude the disclaimers and limitations in this Statement from limiting the statutory rights of a consumer (eg the United Kingdom)Otherwise restrict the ability of a manufacturer to enforce such disclaimers or limitations orGrant the Customer additional warranty rights specify the duration of implied warranties which the manufacturer cannot disclaim or not allow limitations on the duration of implied warrantiesFOR CONSUMER TRANSACTIONS IN AUSTRALIA AND NEW ZEALAND THE TERMS IN THIS LIMITED WARRANTY STATEMENT EXCEPT TO THE EXTENT LAWFULLY PERMITTED DO NOT EXCLUDE RESTRICT OR MODIFY AND ARE IN ADDITION TO THE MANDATORY STATUTORY RIGHTS APPLICABLE TO THE SALE OF THE COVERED HP PRODUCTS TO SUCH CUSTOMERS
hp officejet 4100 series
chapter 11
54
55
index
Numerics4-by-6 inch photo paper
load 10 12
AADF 7adjust
volume for fax 25align print cartridges 35Answer Ring Pattern 26automatic document feeder 7automatic reduction
fax 25
Bbest copy quality 13busy number
redial automatically 23
Ccancel
scan 18scheduled fax 21
cartridgesalign 35replace 33
cleanprint cartridges 35the exterior 32the glass 31white strip 32
colorenhance 14fax 20fax from front panel 20
contrastchange for fax 23photo color 14
copy 13 16change default settings 15enhance 14fit to page 16lighten or darken 14menu options 16number of copies 14photo 15quality 13reduce or enlarge 14settings 13 15
speed 13tutorial 4
Customer Support 45web site 45
Ddarken a copy 14date
setting 27default settings
restore 35director review 4distinctive ringing 26
Eenhance copies 14enlarge copy 14 16envelopes
load 9Error Correction Mode
(ECM) 25
Ffactory defaults
restore 35fast copy quality 13fax 28
adjust volume 25automated reports 22cancel fax forward 24cancel scheduled 21change Answer Ring
Pattern 26change contrast 23change resolution 22change settings 19control appearance 22create individual speed-dial
settings 26delete speed-dial
settings 27distinctive ringing 26Error Correction Mode
(ECM) 25forward faxes 24header 27in color 20in color from front panel 20manual reports 22
menu 29print reports 22receive 21receive manually 21redial busy or unanswered
number 23schedule 20send from front panel 19set automatic reduction 25set date and time 27set the number of rings 21settings 27 28setup menu options 29speed dials 19test 28
fit to page 16forward faxes 24
cancel 24front panel
display scroll speed 36enter text 28send a fax 19setting prompt delay 36tutorial 3
Gglass
cleaning 31greeting cards
load 11
Hhelp 1HP Customer Support 45
calling 45HP Director 4HP distribution center 49HP Officjet
preparing to ship 47HP papers
tips on loading 11
Iindividual speed-dial settings
create 26ink cartridges see print
cartridgesinkjet paper
load 11
index
hp officejet 4100 series56
Kkeypad
enter text 28
Llabels
load 12lighten copies 14load
change the paper type 12envelopes 9original in ADF 7paper 7photo paper 10 12postcards 10 12print cartridges 33set the paper size 12tips 11
Mmaintenance
align print cartridges 35clean print cartridges 35clean the exterior 32clean the glass 31clean the white strip 32normal sounds 36replace print cartridges 33restore factory defaults 35self-maintenance
sounds 36self-test report 32
menuscopy options 16fax 29fax setup 29maintenance 37print reports 37
Nnormal copy quality 13number of copies
set 14number of rings
set 21
Oorder print cartridges 60originals
load in ADF 7output tray 8
Ppaper
change default size for copy 12
change the type 12load 7recommended 7set the size 12tips on loading 11
paper size change for copy 12
paper trayload 7
phone numbers support services 45
photo paperload 10 12
photoscopy 15enhance copy 14
physical specifications 43postcards
load 10 12power
specifications 43print
envelopes 9fax reports 22self-test report 32
print cartridgesalign 35clean 35handling 32replace 33
prompt delaysetting 36
Qquick start
review the director 4use with a computer 4
Rreceive
fax 21redial
busy or unanswered number 23
reduce copy 14 16regulatory information 43reinstall software 40reports
generate automatically for fax 22
generate manually for fax 22
print 22self-test 32
resolution
change for fax 22restore factory settings 35returning your HP Officejet for
service 51
Sscan
from front panel 17stop 18
schedule a fax 20scroll speed
setting 36self-test report 32send
cancel forward faxes 24color fax 20color fax from front
panel 20forward faxes 24
settingscopy 13 15fax 27 28prompt delay 36scroll speed 36
setupadditional information 39menu 29
shippingyour HP Officejet 47
softwareremove and reinstall 40
soundsself-maintenance 36
specificationsphysical 43power 43
speed dials 19create individual
settings 26delete settings 27
stopscan 18scheduled fax 21
subscriber identification code 27
support services 45
Ttelephone line
multiple numbers 26telephone numbers 45text
enhance 14enter from front panel 28
time
index
reference guide 57
setting 27transparency film
recommended 7tips on loading 11
troubleshootingremove and reinstall
software 40T-shirt Transfer Iron-On
load 11tutorial
front panel 3make a copy 4
Uunanswered number
redial automatically 23
Vvolume
adjust 25
Wwarranty 45
service 51statement 51upgrades 51
white stripcleaning 32
hp officejet 4100 series
chapter 12
58
declaration of conformityAccording to ISOIEC Guide 22 and EN 45014
Manufacturerrsquos Name and Address
Hewlett-Packard Company 16399 West Bernardo Drive San Diego CA 92127-1899 USA
declares that the product
Product Name hp officejet 4100 series (Q1608A)
Model Number(s) officejet 4110 (Q1609A) officejet 4110xi (Q1610A) officejet 4110v (Q1611A) officejet 4105 (Q1612A) officejet 4105z (Q1613A) officejet 4115 (Q1614A)
Product Options All
conforms to the following Product Specifications
Safety EN609501992 +A1 A2 A3 A4 amp A11
IEC609501991 +A1 A2 A3 amp A4
UL1950CSA 222 No 950 3rd Edn 1995
NOM-019-SCFI-1993
EMC CISPR221993 +A1 amp A2 EN550221994 +A1 amp A2 -Class B
CISPR241997EN550241998
IEC 61000-3-21995 EN61000-3-21995
IEC 61000-3-31994 EN61000-3-31995
ASNZS 3548 1992
CNS13438 1997
FCC Part 15-Class B ICES-003 Issue 2 VCCI-2
GB 9254-1998
Telecom TBR21 1998
Supplementary Information
The Product herewith complies with the requirements of the Low Voltage Directive 7323EEC the EMC Directive 89336EEC and the RampTTE Directive 19995EC (ANNEX II) carries the CE marking accordingly
European Contact for regulatory topics only Your local Hewlett-Packard Sales and Service Office orHewlett-Packard GmbH
Department HQ-TRE Herrenberger Strasse 140 D-71034 Boumlblingen Germany (FAX + 49-7031-14-3143)
order mediaTo order media such as HP Premium Inkjet Paper HP Premium Inkjet Transparency Film HP Iron-On T-shirt Transfer paper or HP Greeting Cards go to
wwwhpshoppingcom
For orders in countries other than the US and Canada select other countries then click Yes to leave hpshoppingcom From this website you can access hpshoppingcom for your specific language or countryregion
order print cartridges
If you have Internet access you can get more information from the HP website at
wwwhpcomsupport
print cartridges hp reorder number
HP black print cartridge 56 19 ml black print cartridge
HP color print cartridgeHP tri-color print cartridge
57 17 ml color print cartridge28 8 ml color print cartridge
Visit the hp officejet information centerIt has everything you need to get the most value from your HP Officejet
bull Technical Supportbull Supplies and Ordering Informationbull Project Tipsbull Ways to Enhance Your Product
wwwhpcomsupport
copy 2003 Hewlett-Packard Company
Printed in the USA Mexico Germany Singapore or China
Q1608-90163Q1608-90163
Q1608-90163

hp officejet 4100 series
chapter 10
50
11
51
warranty information
HP Officejet 4100 seriesDuration of Limited Warranty (hardware and labor) 1 YearDuration of Limited Warranty (CD media) 90 DaysDuration of Limited Warranty (print cartridges) Until the HP ink is depleted or the ldquoend of warrantyrdquo date printed on the cartridge has been reached whichever occurs first
warranty service
express serviceTo obtain HP express repair service the customer must contact an HP service office or an HP Customer Support Center for basic troubleshooting first See hp customer support on page 45 for steps to take before calling Customer SupportIf a customer unit needs a minor part replacement and these parts can normally be replaced by the customer the customer-replaceable components may be serviced through expedited part shipment In this event HP will prepay shipping charges duty and taxes provide telephone assistance on replacement of the component and pay shipping charges duty and taxes for any part that HP asks to be returnedThe HP Customer Support Center may direct customers to designated authorized service providers who are certified by HP to service the HP product
warranty upgradesUpgrade your standard factory warranty to a total of three years with the HP SUPPORTPACK Service coverage begins on product purchase date and the pack must be purchased within the first 180 days of product purchase This program offers phone support from 600 AM to 1000 PM Mountain Standard Time (MST) Monday through Friday and 900 AM to 400 PM (MST) on Saturdays If during your technical support call it is determined that you need a replacement product then HP will ship you this product next business day free of charge Available in US onlyFor more information please call 1-888-999-4747 or visit the following HP Web site
httpwwwhpcomgohpsupportpack
Outside the US please call your local HP Customer Support office See call elsewhere in the world on page 46 for a list of international Customer Support numbers
returning your hp officejet for serviceBefore returning your HP Officejet for service you must call HP Customer Support See hp customer support on page 45 for steps to take before calling Customer Support
hewlett-packard limited global warranty statement
extent of limited warrantyHewlett-Packard (ldquoHPrdquo) warrants to the end-user customer (ldquoCustomerrdquo) that each HP Officejet 4100 Series product (ldquoProductrdquo) including related software accessories media and supplies shall be free from defects in material and workmanship for the duration which begins on the date of purchase by the Customer
hp officejet 4100 series
chapter 11
52
For each software Product HPrsquos limited warranty applies only to a failure to execute programming instructions HP does not warrant that the operation of any Product shall be uninterrupted or error freeHPrsquos limited warranty covers only those defects which arise as a result of normal use of a Product and does not cover any other problems including those which arise as a result of (a) improper maintenance or modification (b) software accessories media or supplies not provided or supported by HP or (c) operation outside the Productrsquos specificationsFor any hardware Product the use of a non-HP print cartridge or a refilled print cartridge does not affect either the warranty to the Customer or any HP support contract with the Customer However if Product failure or damage is attributable to the use of a non-HP or refilled print cartridge HP shall charge its standard labor and materials charges to service the Product for the failure or damageIf HP receives during the applicable warranty period notice of a defect in any Product HP shall either repair or replace the defective Product at HPrsquos option Where labor charges are not covered by HPrsquos limited warranty repairs shall be at HPrsquos standard charges for laborIf HP is unable to repair or replace as applicable a defective Product which is covered by HPrsquos warranty HP shall within a reasonable time after being notified of the defect refund the purchase price for the ProductHP shall have no obligation to repair replace or refund until the Customer returns the defective Product to HPAny replacement product may be either new or like-new provided that it has functionality at least equal to that of the Product being replacedHP products including each Product may contain remanufactured parts components or materials equivalent to new in performanceHPs limited warranty for each Product is valid in any countryregion or locality where HP has a support presence for the Product and where HP has marketed the Product The level of warranty service may vary according to local standards HP shall have no obligation to alter the form fit or function of the Product in order to make it operate in a countryregion or locality for which the Product was never intended to operate
limitations of warrantyTO THE EXTENT ALLOWED BY LOCAL LAW NEITHER HP NOR ITS THIRD PARTY SUPPLIERS MAKE ANY OTHER WARRANTY OR CONDITION OF ANY KIND WHETHER EXPRESS OR IMPLIED WITH RESPECT TO THE COVERED HP PRODUCTS AND SPECIFICALLY DISCLAIM THE IMPLIED WARRANTIES OR CONDITIONS OF MERCHANTABILITY SATISFACTORY QUALITY AND FITNESS FOR A PARTICULAR PURPOSE
limitations of liabilityTo the extent allowed by local law the remedies provided in this Limited Warranty Statement are the Customerrsquos sole and exclusive remediesTO THE EXTENT ALLOWED BY LOCAL LAW EXCEPT FOR THE OBLIGATIONS SPECIFICALLY SET FORTH IN THIS LIMITED WARRANTY STATEMENT IN NO EVENT SHALL HP OR ITS THIRD PARTY SUPPLIERS BE LIABLE FOR DIRECT INDIRECT SPECIAL INCIDENTAL OR CONSEQUENTIAL DAMAGES WHETHER BASED ON CONTRACT TORT OR ANY OTHER LEGAL THEORY AND WHETHER ADVISED OF THE POSSIBILITY OF SUCH DAMAGES
local lawThis Limited Warranty Statement gives the Customer specific legal rights The Customer may also have other rights which vary from state to state in the United States from province to province in Canada and from countryregion to countryregion elsewhere in the world
reference guide
warranty information
53
To the extent this Limited Warranty Statement is inconsistent with local law this Statement shall be deemed modified to be consistent with such local law Under such local law certain disclaimers and limitations of this Statement may not apply to the Customer For example some states in the United States as well as some governments outside the United States (including provinces in Canada) mayPreclude the disclaimers and limitations in this Statement from limiting the statutory rights of a consumer (eg the United Kingdom)Otherwise restrict the ability of a manufacturer to enforce such disclaimers or limitations orGrant the Customer additional warranty rights specify the duration of implied warranties which the manufacturer cannot disclaim or not allow limitations on the duration of implied warrantiesFOR CONSUMER TRANSACTIONS IN AUSTRALIA AND NEW ZEALAND THE TERMS IN THIS LIMITED WARRANTY STATEMENT EXCEPT TO THE EXTENT LAWFULLY PERMITTED DO NOT EXCLUDE RESTRICT OR MODIFY AND ARE IN ADDITION TO THE MANDATORY STATUTORY RIGHTS APPLICABLE TO THE SALE OF THE COVERED HP PRODUCTS TO SUCH CUSTOMERS
hp officejet 4100 series
chapter 11
54
55
index
Numerics4-by-6 inch photo paper
load 10 12
AADF 7adjust
volume for fax 25align print cartridges 35Answer Ring Pattern 26automatic document feeder 7automatic reduction
fax 25
Bbest copy quality 13busy number
redial automatically 23
Ccancel
scan 18scheduled fax 21
cartridgesalign 35replace 33
cleanprint cartridges 35the exterior 32the glass 31white strip 32
colorenhance 14fax 20fax from front panel 20
contrastchange for fax 23photo color 14
copy 13 16change default settings 15enhance 14fit to page 16lighten or darken 14menu options 16number of copies 14photo 15quality 13reduce or enlarge 14settings 13 15
speed 13tutorial 4
Customer Support 45web site 45
Ddarken a copy 14date
setting 27default settings
restore 35director review 4distinctive ringing 26
Eenhance copies 14enlarge copy 14 16envelopes
load 9Error Correction Mode
(ECM) 25
Ffactory defaults
restore 35fast copy quality 13fax 28
adjust volume 25automated reports 22cancel fax forward 24cancel scheduled 21change Answer Ring
Pattern 26change contrast 23change resolution 22change settings 19control appearance 22create individual speed-dial
settings 26delete speed-dial
settings 27distinctive ringing 26Error Correction Mode
(ECM) 25forward faxes 24header 27in color 20in color from front panel 20manual reports 22
menu 29print reports 22receive 21receive manually 21redial busy or unanswered
number 23schedule 20send from front panel 19set automatic reduction 25set date and time 27set the number of rings 21settings 27 28setup menu options 29speed dials 19test 28
fit to page 16forward faxes 24
cancel 24front panel
display scroll speed 36enter text 28send a fax 19setting prompt delay 36tutorial 3
Gglass
cleaning 31greeting cards
load 11
Hhelp 1HP Customer Support 45
calling 45HP Director 4HP distribution center 49HP Officjet
preparing to ship 47HP papers
tips on loading 11
Iindividual speed-dial settings
create 26ink cartridges see print
cartridgesinkjet paper
load 11
index
hp officejet 4100 series56
Kkeypad
enter text 28
Llabels
load 12lighten copies 14load
change the paper type 12envelopes 9original in ADF 7paper 7photo paper 10 12postcards 10 12print cartridges 33set the paper size 12tips 11
Mmaintenance
align print cartridges 35clean print cartridges 35clean the exterior 32clean the glass 31clean the white strip 32normal sounds 36replace print cartridges 33restore factory defaults 35self-maintenance
sounds 36self-test report 32
menuscopy options 16fax 29fax setup 29maintenance 37print reports 37
Nnormal copy quality 13number of copies
set 14number of rings
set 21
Oorder print cartridges 60originals
load in ADF 7output tray 8
Ppaper
change default size for copy 12
change the type 12load 7recommended 7set the size 12tips on loading 11
paper size change for copy 12
paper trayload 7
phone numbers support services 45
photo paperload 10 12
photoscopy 15enhance copy 14
physical specifications 43postcards
load 10 12power
specifications 43print
envelopes 9fax reports 22self-test report 32
print cartridgesalign 35clean 35handling 32replace 33
prompt delaysetting 36
Qquick start
review the director 4use with a computer 4
Rreceive
fax 21redial
busy or unanswered number 23
reduce copy 14 16regulatory information 43reinstall software 40reports
generate automatically for fax 22
generate manually for fax 22
print 22self-test 32
resolution
change for fax 22restore factory settings 35returning your HP Officejet for
service 51
Sscan
from front panel 17stop 18
schedule a fax 20scroll speed
setting 36self-test report 32send
cancel forward faxes 24color fax 20color fax from front
panel 20forward faxes 24
settingscopy 13 15fax 27 28prompt delay 36scroll speed 36
setupadditional information 39menu 29
shippingyour HP Officejet 47
softwareremove and reinstall 40
soundsself-maintenance 36
specificationsphysical 43power 43
speed dials 19create individual
settings 26delete settings 27
stopscan 18scheduled fax 21
subscriber identification code 27
support services 45
Ttelephone line
multiple numbers 26telephone numbers 45text
enhance 14enter from front panel 28
time
index
reference guide 57
setting 27transparency film
recommended 7tips on loading 11
troubleshootingremove and reinstall
software 40T-shirt Transfer Iron-On
load 11tutorial
front panel 3make a copy 4
Uunanswered number
redial automatically 23
Vvolume
adjust 25
Wwarranty 45
service 51statement 51upgrades 51
white stripcleaning 32
hp officejet 4100 series
chapter 12
58
declaration of conformityAccording to ISOIEC Guide 22 and EN 45014
Manufacturerrsquos Name and Address
Hewlett-Packard Company 16399 West Bernardo Drive San Diego CA 92127-1899 USA
declares that the product
Product Name hp officejet 4100 series (Q1608A)
Model Number(s) officejet 4110 (Q1609A) officejet 4110xi (Q1610A) officejet 4110v (Q1611A) officejet 4105 (Q1612A) officejet 4105z (Q1613A) officejet 4115 (Q1614A)
Product Options All
conforms to the following Product Specifications
Safety EN609501992 +A1 A2 A3 A4 amp A11
IEC609501991 +A1 A2 A3 amp A4
UL1950CSA 222 No 950 3rd Edn 1995
NOM-019-SCFI-1993
EMC CISPR221993 +A1 amp A2 EN550221994 +A1 amp A2 -Class B
CISPR241997EN550241998
IEC 61000-3-21995 EN61000-3-21995
IEC 61000-3-31994 EN61000-3-31995
ASNZS 3548 1992
CNS13438 1997
FCC Part 15-Class B ICES-003 Issue 2 VCCI-2
GB 9254-1998
Telecom TBR21 1998
Supplementary Information
The Product herewith complies with the requirements of the Low Voltage Directive 7323EEC the EMC Directive 89336EEC and the RampTTE Directive 19995EC (ANNEX II) carries the CE marking accordingly
European Contact for regulatory topics only Your local Hewlett-Packard Sales and Service Office orHewlett-Packard GmbH
Department HQ-TRE Herrenberger Strasse 140 D-71034 Boumlblingen Germany (FAX + 49-7031-14-3143)
order mediaTo order media such as HP Premium Inkjet Paper HP Premium Inkjet Transparency Film HP Iron-On T-shirt Transfer paper or HP Greeting Cards go to
wwwhpshoppingcom
For orders in countries other than the US and Canada select other countries then click Yes to leave hpshoppingcom From this website you can access hpshoppingcom for your specific language or countryregion
order print cartridges
If you have Internet access you can get more information from the HP website at
wwwhpcomsupport
print cartridges hp reorder number
HP black print cartridge 56 19 ml black print cartridge
HP color print cartridgeHP tri-color print cartridge
57 17 ml color print cartridge28 8 ml color print cartridge
Visit the hp officejet information centerIt has everything you need to get the most value from your HP Officejet
bull Technical Supportbull Supplies and Ordering Informationbull Project Tipsbull Ways to Enhance Your Product
wwwhpcomsupport
copy 2003 Hewlett-Packard Company
Printed in the USA Mexico Germany Singapore or China
Q1608-90163Q1608-90163
Q1608-90163

hp officejet 4100 series
chapter 11
52
For each software Product HPrsquos limited warranty applies only to a failure to execute programming instructions HP does not warrant that the operation of any Product shall be uninterrupted or error freeHPrsquos limited warranty covers only those defects which arise as a result of normal use of a Product and does not cover any other problems including those which arise as a result of (a) improper maintenance or modification (b) software accessories media or supplies not provided or supported by HP or (c) operation outside the Productrsquos specificationsFor any hardware Product the use of a non-HP print cartridge or a refilled print cartridge does not affect either the warranty to the Customer or any HP support contract with the Customer However if Product failure or damage is attributable to the use of a non-HP or refilled print cartridge HP shall charge its standard labor and materials charges to service the Product for the failure or damageIf HP receives during the applicable warranty period notice of a defect in any Product HP shall either repair or replace the defective Product at HPrsquos option Where labor charges are not covered by HPrsquos limited warranty repairs shall be at HPrsquos standard charges for laborIf HP is unable to repair or replace as applicable a defective Product which is covered by HPrsquos warranty HP shall within a reasonable time after being notified of the defect refund the purchase price for the ProductHP shall have no obligation to repair replace or refund until the Customer returns the defective Product to HPAny replacement product may be either new or like-new provided that it has functionality at least equal to that of the Product being replacedHP products including each Product may contain remanufactured parts components or materials equivalent to new in performanceHPs limited warranty for each Product is valid in any countryregion or locality where HP has a support presence for the Product and where HP has marketed the Product The level of warranty service may vary according to local standards HP shall have no obligation to alter the form fit or function of the Product in order to make it operate in a countryregion or locality for which the Product was never intended to operate
limitations of warrantyTO THE EXTENT ALLOWED BY LOCAL LAW NEITHER HP NOR ITS THIRD PARTY SUPPLIERS MAKE ANY OTHER WARRANTY OR CONDITION OF ANY KIND WHETHER EXPRESS OR IMPLIED WITH RESPECT TO THE COVERED HP PRODUCTS AND SPECIFICALLY DISCLAIM THE IMPLIED WARRANTIES OR CONDITIONS OF MERCHANTABILITY SATISFACTORY QUALITY AND FITNESS FOR A PARTICULAR PURPOSE
limitations of liabilityTo the extent allowed by local law the remedies provided in this Limited Warranty Statement are the Customerrsquos sole and exclusive remediesTO THE EXTENT ALLOWED BY LOCAL LAW EXCEPT FOR THE OBLIGATIONS SPECIFICALLY SET FORTH IN THIS LIMITED WARRANTY STATEMENT IN NO EVENT SHALL HP OR ITS THIRD PARTY SUPPLIERS BE LIABLE FOR DIRECT INDIRECT SPECIAL INCIDENTAL OR CONSEQUENTIAL DAMAGES WHETHER BASED ON CONTRACT TORT OR ANY OTHER LEGAL THEORY AND WHETHER ADVISED OF THE POSSIBILITY OF SUCH DAMAGES
local lawThis Limited Warranty Statement gives the Customer specific legal rights The Customer may also have other rights which vary from state to state in the United States from province to province in Canada and from countryregion to countryregion elsewhere in the world
reference guide
warranty information
53
To the extent this Limited Warranty Statement is inconsistent with local law this Statement shall be deemed modified to be consistent with such local law Under such local law certain disclaimers and limitations of this Statement may not apply to the Customer For example some states in the United States as well as some governments outside the United States (including provinces in Canada) mayPreclude the disclaimers and limitations in this Statement from limiting the statutory rights of a consumer (eg the United Kingdom)Otherwise restrict the ability of a manufacturer to enforce such disclaimers or limitations orGrant the Customer additional warranty rights specify the duration of implied warranties which the manufacturer cannot disclaim or not allow limitations on the duration of implied warrantiesFOR CONSUMER TRANSACTIONS IN AUSTRALIA AND NEW ZEALAND THE TERMS IN THIS LIMITED WARRANTY STATEMENT EXCEPT TO THE EXTENT LAWFULLY PERMITTED DO NOT EXCLUDE RESTRICT OR MODIFY AND ARE IN ADDITION TO THE MANDATORY STATUTORY RIGHTS APPLICABLE TO THE SALE OF THE COVERED HP PRODUCTS TO SUCH CUSTOMERS
hp officejet 4100 series
chapter 11
54
55
index
Numerics4-by-6 inch photo paper
load 10 12
AADF 7adjust
volume for fax 25align print cartridges 35Answer Ring Pattern 26automatic document feeder 7automatic reduction
fax 25
Bbest copy quality 13busy number
redial automatically 23
Ccancel
scan 18scheduled fax 21
cartridgesalign 35replace 33
cleanprint cartridges 35the exterior 32the glass 31white strip 32
colorenhance 14fax 20fax from front panel 20
contrastchange for fax 23photo color 14
copy 13 16change default settings 15enhance 14fit to page 16lighten or darken 14menu options 16number of copies 14photo 15quality 13reduce or enlarge 14settings 13 15
speed 13tutorial 4
Customer Support 45web site 45
Ddarken a copy 14date
setting 27default settings
restore 35director review 4distinctive ringing 26
Eenhance copies 14enlarge copy 14 16envelopes
load 9Error Correction Mode
(ECM) 25
Ffactory defaults
restore 35fast copy quality 13fax 28
adjust volume 25automated reports 22cancel fax forward 24cancel scheduled 21change Answer Ring
Pattern 26change contrast 23change resolution 22change settings 19control appearance 22create individual speed-dial
settings 26delete speed-dial
settings 27distinctive ringing 26Error Correction Mode
(ECM) 25forward faxes 24header 27in color 20in color from front panel 20manual reports 22
menu 29print reports 22receive 21receive manually 21redial busy or unanswered
number 23schedule 20send from front panel 19set automatic reduction 25set date and time 27set the number of rings 21settings 27 28setup menu options 29speed dials 19test 28
fit to page 16forward faxes 24
cancel 24front panel
display scroll speed 36enter text 28send a fax 19setting prompt delay 36tutorial 3
Gglass
cleaning 31greeting cards
load 11
Hhelp 1HP Customer Support 45
calling 45HP Director 4HP distribution center 49HP Officjet
preparing to ship 47HP papers
tips on loading 11
Iindividual speed-dial settings
create 26ink cartridges see print
cartridgesinkjet paper
load 11
index
hp officejet 4100 series56
Kkeypad
enter text 28
Llabels
load 12lighten copies 14load
change the paper type 12envelopes 9original in ADF 7paper 7photo paper 10 12postcards 10 12print cartridges 33set the paper size 12tips 11
Mmaintenance
align print cartridges 35clean print cartridges 35clean the exterior 32clean the glass 31clean the white strip 32normal sounds 36replace print cartridges 33restore factory defaults 35self-maintenance
sounds 36self-test report 32
menuscopy options 16fax 29fax setup 29maintenance 37print reports 37
Nnormal copy quality 13number of copies
set 14number of rings
set 21
Oorder print cartridges 60originals
load in ADF 7output tray 8
Ppaper
change default size for copy 12
change the type 12load 7recommended 7set the size 12tips on loading 11
paper size change for copy 12
paper trayload 7
phone numbers support services 45
photo paperload 10 12
photoscopy 15enhance copy 14
physical specifications 43postcards
load 10 12power
specifications 43print
envelopes 9fax reports 22self-test report 32
print cartridgesalign 35clean 35handling 32replace 33
prompt delaysetting 36
Qquick start
review the director 4use with a computer 4
Rreceive
fax 21redial
busy or unanswered number 23
reduce copy 14 16regulatory information 43reinstall software 40reports
generate automatically for fax 22
generate manually for fax 22
print 22self-test 32
resolution
change for fax 22restore factory settings 35returning your HP Officejet for
service 51
Sscan
from front panel 17stop 18
schedule a fax 20scroll speed
setting 36self-test report 32send
cancel forward faxes 24color fax 20color fax from front
panel 20forward faxes 24
settingscopy 13 15fax 27 28prompt delay 36scroll speed 36
setupadditional information 39menu 29
shippingyour HP Officejet 47
softwareremove and reinstall 40
soundsself-maintenance 36
specificationsphysical 43power 43
speed dials 19create individual
settings 26delete settings 27
stopscan 18scheduled fax 21
subscriber identification code 27
support services 45
Ttelephone line
multiple numbers 26telephone numbers 45text
enhance 14enter from front panel 28
time
index
reference guide 57
setting 27transparency film
recommended 7tips on loading 11
troubleshootingremove and reinstall
software 40T-shirt Transfer Iron-On
load 11tutorial
front panel 3make a copy 4
Uunanswered number
redial automatically 23
Vvolume
adjust 25
Wwarranty 45
service 51statement 51upgrades 51
white stripcleaning 32
hp officejet 4100 series
chapter 12
58
declaration of conformityAccording to ISOIEC Guide 22 and EN 45014
Manufacturerrsquos Name and Address
Hewlett-Packard Company 16399 West Bernardo Drive San Diego CA 92127-1899 USA
declares that the product
Product Name hp officejet 4100 series (Q1608A)
Model Number(s) officejet 4110 (Q1609A) officejet 4110xi (Q1610A) officejet 4110v (Q1611A) officejet 4105 (Q1612A) officejet 4105z (Q1613A) officejet 4115 (Q1614A)
Product Options All
conforms to the following Product Specifications
Safety EN609501992 +A1 A2 A3 A4 amp A11
IEC609501991 +A1 A2 A3 amp A4
UL1950CSA 222 No 950 3rd Edn 1995
NOM-019-SCFI-1993
EMC CISPR221993 +A1 amp A2 EN550221994 +A1 amp A2 -Class B
CISPR241997EN550241998
IEC 61000-3-21995 EN61000-3-21995
IEC 61000-3-31994 EN61000-3-31995
ASNZS 3548 1992
CNS13438 1997
FCC Part 15-Class B ICES-003 Issue 2 VCCI-2
GB 9254-1998
Telecom TBR21 1998
Supplementary Information
The Product herewith complies with the requirements of the Low Voltage Directive 7323EEC the EMC Directive 89336EEC and the RampTTE Directive 19995EC (ANNEX II) carries the CE marking accordingly
European Contact for regulatory topics only Your local Hewlett-Packard Sales and Service Office orHewlett-Packard GmbH
Department HQ-TRE Herrenberger Strasse 140 D-71034 Boumlblingen Germany (FAX + 49-7031-14-3143)
order mediaTo order media such as HP Premium Inkjet Paper HP Premium Inkjet Transparency Film HP Iron-On T-shirt Transfer paper or HP Greeting Cards go to
wwwhpshoppingcom
For orders in countries other than the US and Canada select other countries then click Yes to leave hpshoppingcom From this website you can access hpshoppingcom for your specific language or countryregion
order print cartridges
If you have Internet access you can get more information from the HP website at
wwwhpcomsupport
print cartridges hp reorder number
HP black print cartridge 56 19 ml black print cartridge
HP color print cartridgeHP tri-color print cartridge
57 17 ml color print cartridge28 8 ml color print cartridge
Visit the hp officejet information centerIt has everything you need to get the most value from your HP Officejet
bull Technical Supportbull Supplies and Ordering Informationbull Project Tipsbull Ways to Enhance Your Product
wwwhpcomsupport
copy 2003 Hewlett-Packard Company
Printed in the USA Mexico Germany Singapore or China
Q1608-90163Q1608-90163
Q1608-90163

hp officejet 4100 series
chapter 11
54
55
index
Numerics4-by-6 inch photo paper
load 10 12
AADF 7adjust
volume for fax 25align print cartridges 35Answer Ring Pattern 26automatic document feeder 7automatic reduction
fax 25
Bbest copy quality 13busy number
redial automatically 23
Ccancel
scan 18scheduled fax 21
cartridgesalign 35replace 33
cleanprint cartridges 35the exterior 32the glass 31white strip 32
colorenhance 14fax 20fax from front panel 20
contrastchange for fax 23photo color 14
copy 13 16change default settings 15enhance 14fit to page 16lighten or darken 14menu options 16number of copies 14photo 15quality 13reduce or enlarge 14settings 13 15
speed 13tutorial 4
Customer Support 45web site 45
Ddarken a copy 14date
setting 27default settings
restore 35director review 4distinctive ringing 26
Eenhance copies 14enlarge copy 14 16envelopes
load 9Error Correction Mode
(ECM) 25
Ffactory defaults
restore 35fast copy quality 13fax 28
adjust volume 25automated reports 22cancel fax forward 24cancel scheduled 21change Answer Ring
Pattern 26change contrast 23change resolution 22change settings 19control appearance 22create individual speed-dial
settings 26delete speed-dial
settings 27distinctive ringing 26Error Correction Mode
(ECM) 25forward faxes 24header 27in color 20in color from front panel 20manual reports 22
menu 29print reports 22receive 21receive manually 21redial busy or unanswered
number 23schedule 20send from front panel 19set automatic reduction 25set date and time 27set the number of rings 21settings 27 28setup menu options 29speed dials 19test 28
fit to page 16forward faxes 24
cancel 24front panel
display scroll speed 36enter text 28send a fax 19setting prompt delay 36tutorial 3
Gglass
cleaning 31greeting cards
load 11
Hhelp 1HP Customer Support 45
calling 45HP Director 4HP distribution center 49HP Officjet
preparing to ship 47HP papers
tips on loading 11
Iindividual speed-dial settings
create 26ink cartridges see print
cartridgesinkjet paper
load 11
index
hp officejet 4100 series56
Kkeypad
enter text 28
Llabels
load 12lighten copies 14load
change the paper type 12envelopes 9original in ADF 7paper 7photo paper 10 12postcards 10 12print cartridges 33set the paper size 12tips 11
Mmaintenance
align print cartridges 35clean print cartridges 35clean the exterior 32clean the glass 31clean the white strip 32normal sounds 36replace print cartridges 33restore factory defaults 35self-maintenance
sounds 36self-test report 32
menuscopy options 16fax 29fax setup 29maintenance 37print reports 37
Nnormal copy quality 13number of copies
set 14number of rings
set 21
Oorder print cartridges 60originals
load in ADF 7output tray 8
Ppaper
change default size for copy 12
change the type 12load 7recommended 7set the size 12tips on loading 11
paper size change for copy 12
paper trayload 7
phone numbers support services 45
photo paperload 10 12
photoscopy 15enhance copy 14
physical specifications 43postcards
load 10 12power
specifications 43print
envelopes 9fax reports 22self-test report 32
print cartridgesalign 35clean 35handling 32replace 33
prompt delaysetting 36
Qquick start
review the director 4use with a computer 4
Rreceive
fax 21redial
busy or unanswered number 23
reduce copy 14 16regulatory information 43reinstall software 40reports
generate automatically for fax 22
generate manually for fax 22
print 22self-test 32
resolution
change for fax 22restore factory settings 35returning your HP Officejet for
service 51
Sscan
from front panel 17stop 18
schedule a fax 20scroll speed
setting 36self-test report 32send
cancel forward faxes 24color fax 20color fax from front
panel 20forward faxes 24
settingscopy 13 15fax 27 28prompt delay 36scroll speed 36
setupadditional information 39menu 29
shippingyour HP Officejet 47
softwareremove and reinstall 40
soundsself-maintenance 36
specificationsphysical 43power 43
speed dials 19create individual
settings 26delete settings 27
stopscan 18scheduled fax 21
subscriber identification code 27
support services 45
Ttelephone line
multiple numbers 26telephone numbers 45text
enhance 14enter from front panel 28
time
index
reference guide 57
setting 27transparency film
recommended 7tips on loading 11
troubleshootingremove and reinstall
software 40T-shirt Transfer Iron-On
load 11tutorial
front panel 3make a copy 4
Uunanswered number
redial automatically 23
Vvolume
adjust 25
Wwarranty 45
service 51statement 51upgrades 51
white stripcleaning 32
hp officejet 4100 series
chapter 12
58
declaration of conformityAccording to ISOIEC Guide 22 and EN 45014
Manufacturerrsquos Name and Address
Hewlett-Packard Company 16399 West Bernardo Drive San Diego CA 92127-1899 USA
declares that the product
Product Name hp officejet 4100 series (Q1608A)
Model Number(s) officejet 4110 (Q1609A) officejet 4110xi (Q1610A) officejet 4110v (Q1611A) officejet 4105 (Q1612A) officejet 4105z (Q1613A) officejet 4115 (Q1614A)
Product Options All
conforms to the following Product Specifications
Safety EN609501992 +A1 A2 A3 A4 amp A11
IEC609501991 +A1 A2 A3 amp A4
UL1950CSA 222 No 950 3rd Edn 1995
NOM-019-SCFI-1993
EMC CISPR221993 +A1 amp A2 EN550221994 +A1 amp A2 -Class B
CISPR241997EN550241998
IEC 61000-3-21995 EN61000-3-21995
IEC 61000-3-31994 EN61000-3-31995
ASNZS 3548 1992
CNS13438 1997
FCC Part 15-Class B ICES-003 Issue 2 VCCI-2
GB 9254-1998
Telecom TBR21 1998
Supplementary Information
The Product herewith complies with the requirements of the Low Voltage Directive 7323EEC the EMC Directive 89336EEC and the RampTTE Directive 19995EC (ANNEX II) carries the CE marking accordingly
European Contact for regulatory topics only Your local Hewlett-Packard Sales and Service Office orHewlett-Packard GmbH
Department HQ-TRE Herrenberger Strasse 140 D-71034 Boumlblingen Germany (FAX + 49-7031-14-3143)
order mediaTo order media such as HP Premium Inkjet Paper HP Premium Inkjet Transparency Film HP Iron-On T-shirt Transfer paper or HP Greeting Cards go to
wwwhpshoppingcom
For orders in countries other than the US and Canada select other countries then click Yes to leave hpshoppingcom From this website you can access hpshoppingcom for your specific language or countryregion
order print cartridges
If you have Internet access you can get more information from the HP website at
wwwhpcomsupport
print cartridges hp reorder number
HP black print cartridge 56 19 ml black print cartridge
HP color print cartridgeHP tri-color print cartridge
57 17 ml color print cartridge28 8 ml color print cartridge
Visit the hp officejet information centerIt has everything you need to get the most value from your HP Officejet
bull Technical Supportbull Supplies and Ordering Informationbull Project Tipsbull Ways to Enhance Your Product
wwwhpcomsupport
copy 2003 Hewlett-Packard Company
Printed in the USA Mexico Germany Singapore or China
Q1608-90163Q1608-90163
Q1608-90163

index
reference guide 57
setting 27transparency film
recommended 7tips on loading 11
troubleshootingremove and reinstall
software 40T-shirt Transfer Iron-On
load 11tutorial
front panel 3make a copy 4
Uunanswered number
redial automatically 23
Vvolume
adjust 25
Wwarranty 45
service 51statement 51upgrades 51
white stripcleaning 32
hp officejet 4100 series
chapter 12
58
declaration of conformityAccording to ISOIEC Guide 22 and EN 45014
Manufacturerrsquos Name and Address
Hewlett-Packard Company 16399 West Bernardo Drive San Diego CA 92127-1899 USA
declares that the product
Product Name hp officejet 4100 series (Q1608A)
Model Number(s) officejet 4110 (Q1609A) officejet 4110xi (Q1610A) officejet 4110v (Q1611A) officejet 4105 (Q1612A) officejet 4105z (Q1613A) officejet 4115 (Q1614A)
Product Options All
conforms to the following Product Specifications
Safety EN609501992 +A1 A2 A3 A4 amp A11
IEC609501991 +A1 A2 A3 amp A4
UL1950CSA 222 No 950 3rd Edn 1995
NOM-019-SCFI-1993
EMC CISPR221993 +A1 amp A2 EN550221994 +A1 amp A2 -Class B
CISPR241997EN550241998
IEC 61000-3-21995 EN61000-3-21995
IEC 61000-3-31994 EN61000-3-31995
ASNZS 3548 1992
CNS13438 1997
FCC Part 15-Class B ICES-003 Issue 2 VCCI-2
GB 9254-1998
Telecom TBR21 1998
Supplementary Information
The Product herewith complies with the requirements of the Low Voltage Directive 7323EEC the EMC Directive 89336EEC and the RampTTE Directive 19995EC (ANNEX II) carries the CE marking accordingly
European Contact for regulatory topics only Your local Hewlett-Packard Sales and Service Office orHewlett-Packard GmbH
Department HQ-TRE Herrenberger Strasse 140 D-71034 Boumlblingen Germany (FAX + 49-7031-14-3143)
order mediaTo order media such as HP Premium Inkjet Paper HP Premium Inkjet Transparency Film HP Iron-On T-shirt Transfer paper or HP Greeting Cards go to
wwwhpshoppingcom
For orders in countries other than the US and Canada select other countries then click Yes to leave hpshoppingcom From this website you can access hpshoppingcom for your specific language or countryregion
order print cartridges
If you have Internet access you can get more information from the HP website at
wwwhpcomsupport
print cartridges hp reorder number
HP black print cartridge 56 19 ml black print cartridge
HP color print cartridgeHP tri-color print cartridge
57 17 ml color print cartridge28 8 ml color print cartridge
Visit the hp officejet information centerIt has everything you need to get the most value from your HP Officejet
bull Technical Supportbull Supplies and Ordering Informationbull Project Tipsbull Ways to Enhance Your Product
wwwhpcomsupport
copy 2003 Hewlett-Packard Company
Printed in the USA Mexico Germany Singapore or China
Q1608-90163Q1608-90163
Q1608-90163