Embed Size (px)
Citation preview
Howto develop AVR programs using the Code:Blocks IDE.
Version 1.3 Written May 1. 2010 by ekhAdded more debug info + debug wire info
Version 1.2 Written July 2. 2008 by ekhVersion 1.1 Written July 2. 2008 by ekh
Added install instructions suggested by BingoNow variable readout is functional with GDB 6.8, install instructions added.
Version 1.0 Written Oct 2007 and May 2008 by ekh
Codeblocks is an integrated platform that works on Linux, OS X, and MS using the toolchain built by the script form Bingo. The screenshots are from a pre 8.02 C::B, but I think they are still valid.
It has been written to support User interface programming, write one program, and compile and run on one or more of the targets.
But it can be used for the AVR as well. The nice thing about this is, that you can do conditional compiling for the PC only or for the avr target.
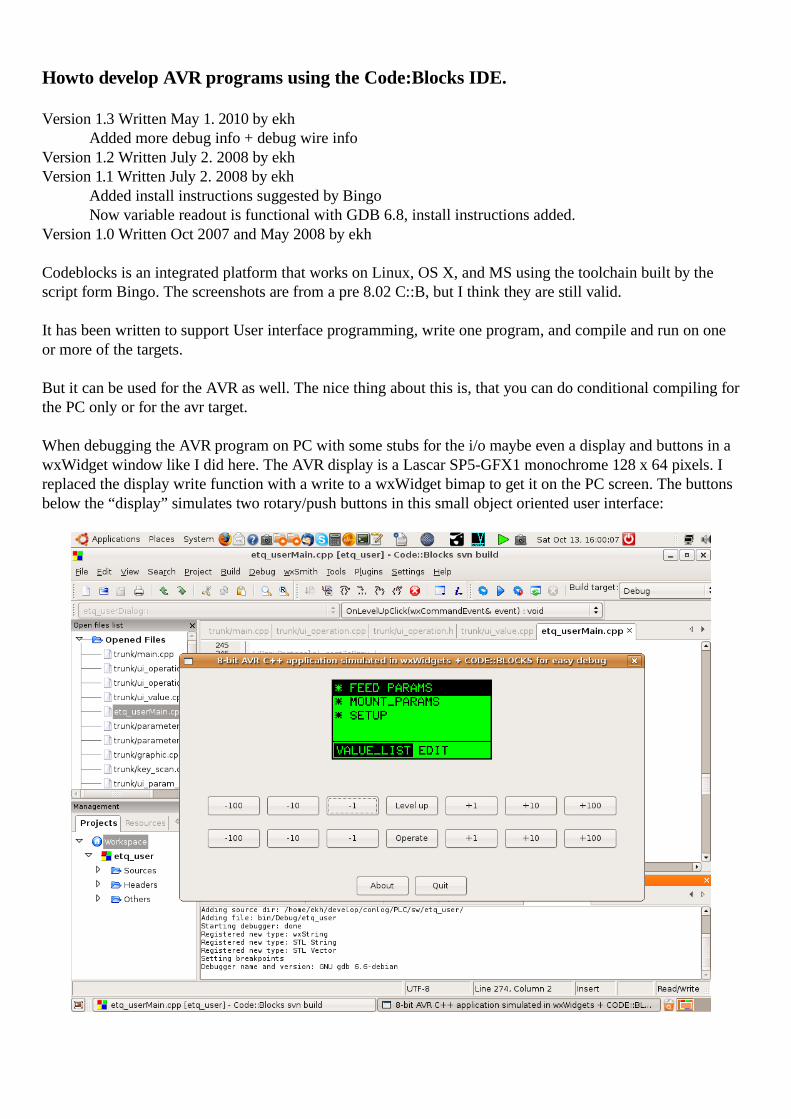
When debugging the AVR program on PC with some stubs for the i/o maybe even a display and buttons in a wxWidget window like I did here. The AVR display is a Lascar SP5-GFX1 monochrome 128 x 64 pixels. I replaced the display write function with a write to a wxWidget bimap to get it on the PC screen. The buttons below the “display” simulates two rotary/push buttons in this small object oriented user interface:

wxWidget is like MFC, but multi platform in addition.
The development is speeded up, and you do not wear out your flash while debugging on the PC target.
Install the AVR GCC compiler. I have used the instructions from Bingo600 ( Thanks a lot .-) ) to install the compiler on my Ubuntu 9.10.
install Code::BlocksSearch the web for install instructions for your operating system. For Ubuntu, just install from Synaptics.
Start Code::BlocksSelect menu Settings->Compiler and debugger...Click the Copy button and insert “GNU AVR GCC Compiler” in the combobox Selected compiler. select tab Toolchain executables and fill in values as seen below:

Also select “Debugger settings” and uncheck “Auto build project to ensure up-to-date”
Click OK
Be sure to have /usr/local/avr/bin in our path ( This is valid for my Linux setup )

Now select File->New->Project...or click “Create a new project” on the startup window of codeblocks
Double click the AVR Project icon and Click Next

Fill in the fields with your project info and Click Next.
Click Next
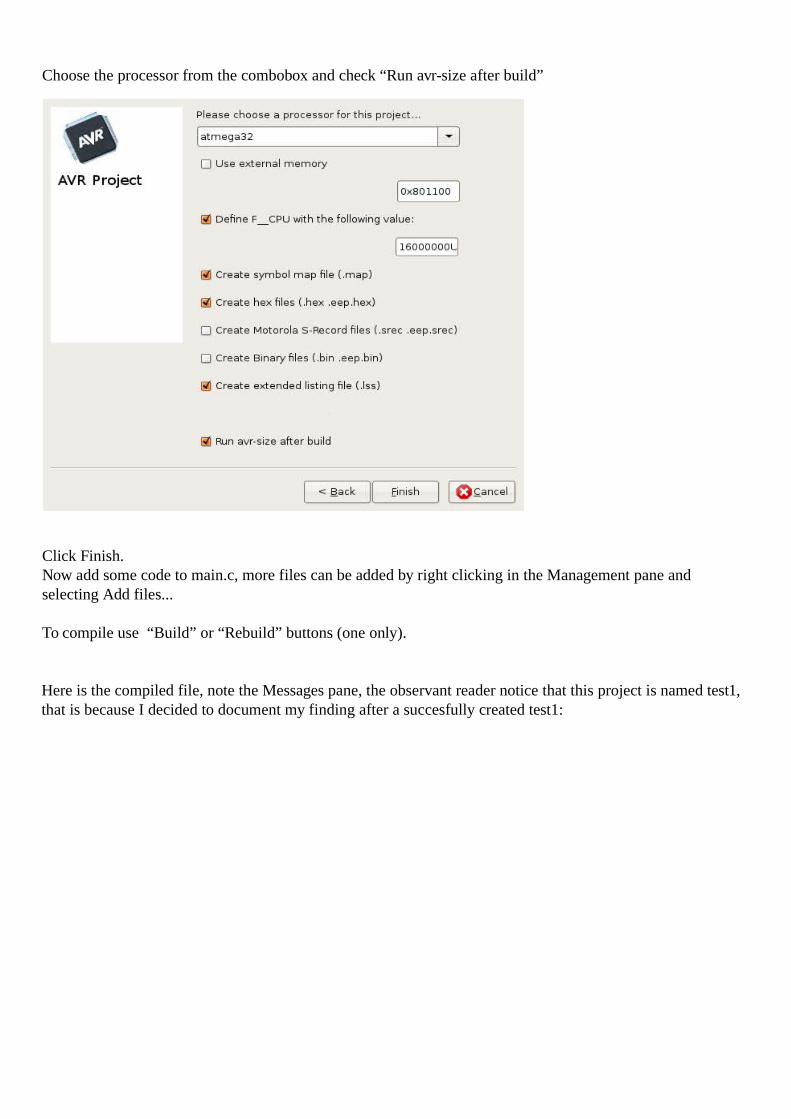
Choose the processor from the combobox and check “Run avr-size after build”
Click Finish. Now add some code to main.c, more files can be added by right clicking in the Management pane and selecting Add files...
To compile use “Build” or “Rebuild” buttons (one only).
Here is the compiled file, note the Messages pane, the observant reader notice that this project is named test1, that is because I decided to document my finding after a succesfully created test1:

The debugging has been tested with both the Dragon and the first version of JTAGICEII. It works nicely for both JTAG and debugWire
The setup of debugging follows below:

In Code::Blocks select Project->Properties...Select “Debugger” tabSelect target Debug and setup as shown in the following two screenshots.
Click OK
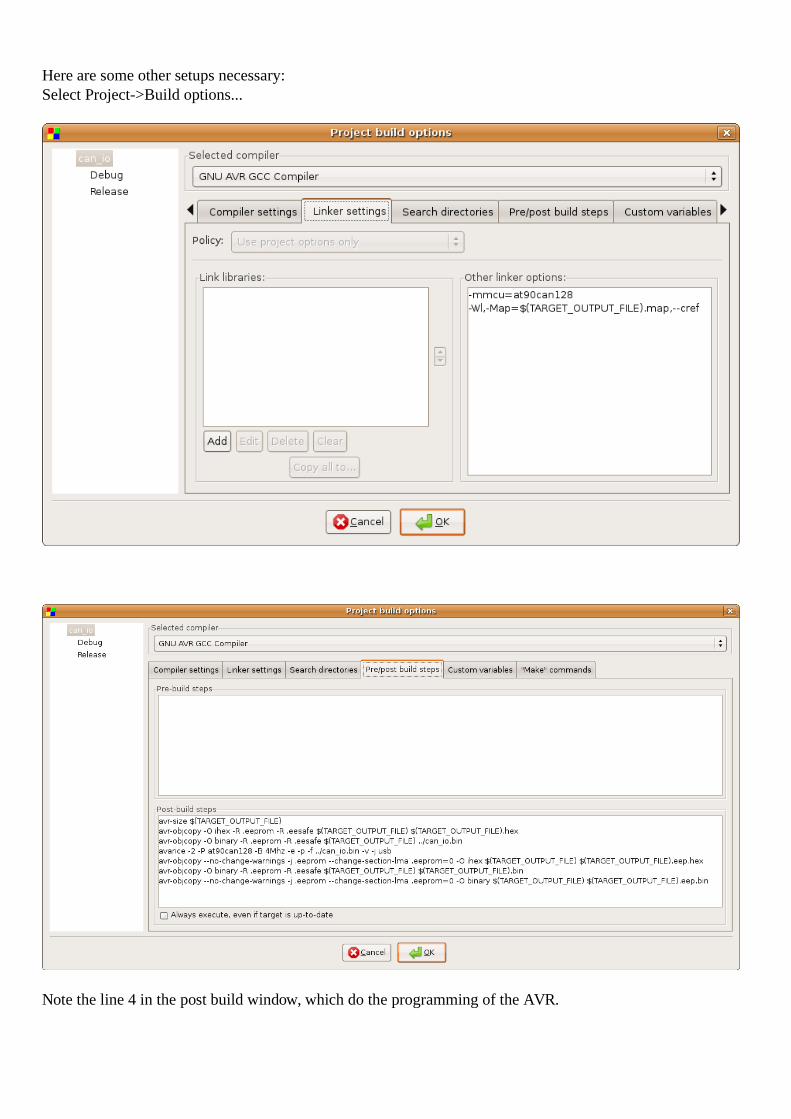
Here are some other setups necessary:Select Project->Build options...
Note the line 4 in the post build window, which do the programming of the AVR.

Finally the Settings->Compiler and debugger...
When you have built your program, and the AVR has been programmed and verified in the same step, then in
A terminal window enter the command:
/usr/local/avr/bin/avarice -g -P at90can128 --jtag usb localhost:4242
For using the Dragon as ICE. Or the JTAGICEII with debugwire for a tiny85:
/usr/local/avr/bin/avarice -2 -w -P attiny85 --jtag usb localhost:4242
Or this for the JTAGICEII, of cause I assume you have the JTAG powered up and connected to the target:
$ avarice -2 -P at90can128 -B 4Mhz -j usb localhost:4242
AVaRICE version 2.6, Jul 20 2007 11:53:13
JTAG config starting.
Found a device: JTAGICEmkII
Serial number: 00:a0:00:00:06:5d
Reported JTAG device ID: 0x9781
Configured for device ID: 0x9781 at90can128 -- Matched with at90can128
JTAG config complete.
Preparing the target device for On Chip Debugging.
Disabling lock bits:
LockBits -> 0xff
Enabling on-chip debugging:
Extended Fuse byte -> 0xfc
High Fuse byte -> 0x39
Low Fuse byte -> 0xce
Waiting for connection on port 4242.------
Having seen this message, then click the Debug/Continue button to start the program, or set some breakpoints. Remember you only have 3 HW breakpoints for your own use.
If you get the message:
gdb communications failure: Address already in use
use$ netstat -nap | grep 4242tcp 0 0 127.0.0.1:4242 0.0.0.0:* LISTEN 17426/avarice
and then as root$ kill -9 17426

Use of cause the actual PID (here 17426) you get from your netstat to kill the hanging process blocking port 4242.
If you need to terminate avarice ( normally terminated when stopping the debugger ) use <ctrl> c, not <ctrl>z.
Programming of the fuses:
avarice -2 -r -B 125Khz -W eehhll -j usb ( ee extended buse byte, hh high fuse byte, ll low fuse byte )
$ avarice -2 -P at90can128 -r -B 125Khz -W fd39ce -j usb
I have used some hours to reach so far, and as I have not been able to find other attempts on a howto, I made this one, and invite others to help solving the remaining issues. Maybe I have missed something.
I strongly feel this is worth the effort, as the code navigation features of Code::Blocks is very powerful. And this is a cross platform tool. It can be used for an ARM too :-)
Good luck with your Code::BlocksEkh
My system:
A PC running Ubuntu 9.10
An Atmel AVR JTAG MkII connected with USBA self developed AVR board with an AT90CAN128.
GCC installed as Bingo describes on AFRFreaks GCC forum sticky post.
gcc version 4.4.1 (Ubuntu 4.4.1-4ubuntu9)C:B in Ubuntu repository 8.02AVaRICE version 2.10, Mar 17 2010 23:05:15

![AVR - dl.melec.irdl.melec.ir/download/pdf/AVR/CodeVision-Fusebit[Melec.ir].pdf · AVR AVR AVR AVR 01 CodeVision CKSEL3..0 Device Clocking Option CKSEL3..0 External Crystal/Ceramic](https://img.dokumen.tips/doc/110x75/5cf6e10d88c99387248bfc0e/avr-dlmelecirdlmelecirdownloadpdfavrcodevision-fusebitmelecirpdf.jpg)