Embed Size (px)
Citation preview

www.rodexit.com
How to Rodent Proof
Sectional and Single Panel Garage Doors With STRAIGHT Proofing Strips
Installed by Means of Mounting Strips
July 2021
CONTENTS
1 IMPORTANT INTRODUCTION 2
1.1 The Gaps and the Garage Doors 2
1.2 Installation With or Without a Mounting Strip 2
1.3 Do Not Press the Proofing Strip Hard Against the Threshold or the Side Jambs 2
1.4 Bottom Weather Seals 3
1.5 Mounting Strips 3
1.6 Monitoring and Maintenance 4
2 PROOFING WOODEN GARAGE DOORS 4
2.1 Tools and Materials 4
2.2 Proofing the Threshold Gap 6
2.3 Proofing the Side Gaps 11
2.3.1 Installation of the STRAIGHT Proofing Strip 11
2.3.2 Single Panel Canopy Doors 12
2.3.3 Sectional Doors 12
2.3.4 Single Panel Retractable Doors 13
3 PROOFING METAL GARAGE DOORS 13
3.1 Tools and Materials 13
3.2 Proofing the Threshold Gap and the Side Gaps 14
4 TIPS & TRICKS 15
4.1 If a Very High Degree of Protection is Required 15
4.2 How to Handle Very Uneven Thresholds 16
4.3 Why Are Tin Snips with Long Blades Best? 16
4.4 A Very Useful Homemade Tool 17

2 / 17
1 IMPORTANT INTRODUCTION
1.1 The Gaps and the Garage Doors
This is a guide on the rodent proofing of up to 1.4 in (3½ cm) wide threshold gaps and side gaps of
sectional and single panel garage doors:
The proofing of wooden garage doors is described in section 2. The proofing of garage doors of metal is
described in section 3. In section 4 you will find some tips and tricks.
1.2 Installation With or Without a Mounting Strip
The STRAIGHT proofing strip can be secured to a garage door with or without the use of a mounting
strip. A mounting strip is used when an aesthetically pleasing installation is called for. This guide covers
installation with a mounting strip. A guide on how to install the STRAIGHT proofing strip without the
use of a mounting strip (i.e. with the use of screws and washers only) can be downloaded from www.ro-
dexit.com.
1.3 Do Not Press the Proofing Strip Hard Against the Threshold or the Side Jambs
The proofing strip should make featherlight contact only with the threshold and the side jambs.

3 / 17
1.4 Bottom Weather Seals
If there is a bottom weather seal under the garage door, and it is OK, leave it on.
If it isn’t OK, replace it and recalibrate the door opener if any before installing the STRAIGHT proofing
strip.
1.5 Mounting Strips
Numerous different strips can be used as mounting strips. RodeXit recommends aluminum carpet trims
of the angled flat bar type because they can cover the upper edge of the proofing strip:
The width and the gap height of an angled flat bar carpet trim are important:
This guide covers installation with the use of 1 3/8 to 2 in (35 to 51 mm) wide angled flat bar carpet trims
of aluminum with predrilled holes and
• a gap height of 0.16 to 0.25 in (4 to 6 mm) (hereinafter called Low Carpet Trims) or
• a gap height of 0.3 to 0.4 in (8 to 10 mm) (hereinafter called High Carpet Trims).

4 / 17
Low Carpet Trims can be used for single layer installations. High Carpet Trims can be used for double
layer installations:
Single layer installation with a 1 3/8 Double layer installation with a 2
in (35 mm) wide Low Carpet Trim in (51 mm) wide High Carpet Trim
Double layer installations are used when a very high degree of protection is required – for example when
the rodent pressure is very high.
Both Low Carpet Trims and High Carpet Trims are quite common and can be procured from well-assorted
hardware stores.
The height specifications if any on the websites of carpet trim producers and hardware stores are unfortu-
nately not always 100 % trustworthy. You should therefore always check the gap height when procuring
carpet trims, you haven’t used before.
You can download a list of recommended carpet trims from www.rodexit.com/mounting-guides. The list
will be periodically updated with further carpet trims.
1.6 Monitoring and Maintenance
All rodent proofed garage doors should at regular intervals be monitored
for maintenance needs. The proofing strips should be fixed or replaced
if they are seriously compromised – for example due to severe rodent
attacks.
2 PROOFING WOODEN GARAGE DOORS
2.1 Tools and Materials
You will need these tools and materials:
A. A roll of the rodent resistant STRAIGHT proofing strip.
B. Tin snips for trimming the proofing strip – preferably straight tin snips with long blades.
C. A staple gun with suitable staples for temporarily attaching the proofing strip to the door.

5 / 17
D. A sufficiently long Low Carpet Trim or High Carpet Trim (hereinafter called: “the mounting
strip”).
E. A hacksaw or another metal cutting device for trimming the mounting strip.
F. A metal file for deburring the cut end of the mounting strip.
G. Suitable flatheaded screws for example 1 inch (25 mm) long No. 10 (4.8 mm) hex head screws or
pan head screws.
H. A corresponding screw bit.
I. A cordless screwdriver.
J. A couple of around 2 pounds (1 kg) heavy objects for holding the mounting strip in place during
the installation.
K. Possibly: Washers by means of which you can reduce the risk of denting the mounting strip if too
much force is used when screwing the mounting strip onto the garage door.
L. Possibly: A drill bit for drilling pilot holes in the garage door.

6 / 17
2.2 Proofing the Threshold Gap
The STRAIGHT proofing strip shall be mounted on the exterior side of the garage door. It must be possible
to secure screws firmly in the lowermost 1½ in (4 cm) of the door.
Follow these steps:
1. If the door is equipped with side seals of the clip-on reverse angle jamb type (clipped onto the
garage door tracks),
a. dismount the side seals and
b. install ordinary stop molding side seals or brush seals as replacements after installing the
proofing strip.
2. Close the garage door completely.
3. If there is an automatic opener, unplug it.

7 / 17
4. If there is a left side seal, tuck the free end of the roll behind it (if necessary after loosening it):
If there isn’t sufficient room behind the side seal:
• loosen it or
• dismount it and remount it after installing the proofing strip.
NB: A sectional garage door will often move somewhat inwards when it starts opening, and that
reduces the need for space behind the side seal.
5. By means of a staple attach the free end of the roll to the left side of the door:
If the garage door is a retractable single panel door, the proofing strip shouldn’t extend beyond the
left edge of the door panel. Otherwise, it is OK to let it extend all the way to the left side jamb.
6. Unroll a little more of the proofing strip than you need for proofing the threshold gap:
8 / 17
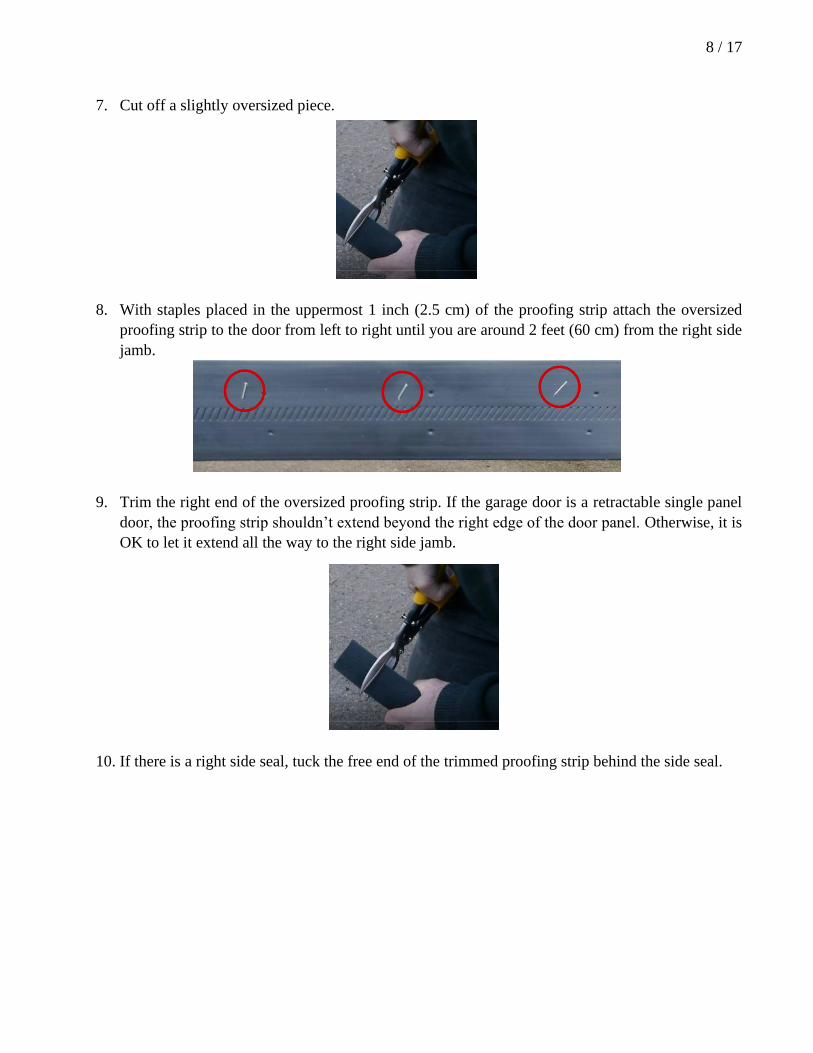
7. Cut off a slightly oversized piece.
8. With staples placed in the uppermost 1 inch (2.5 cm) of the proofing strip attach the oversized
proofing strip to the door from left to right until you are around 2 feet (60 cm) from the right side
jamb.
9. Trim the right end of the oversized proofing strip. If the garage door is a retractable single panel
door, the proofing strip shouldn’t extend beyond the right edge of the door panel. Otherwise, it is
OK to let it extend all the way to the right side jamb.
10. If there is a right side seal, tuck the free end of the trimmed proofing strip behind the side seal.

9 / 17
If there isn’t sufficient room behind the side seal:
• loosen it or
• dismount it and remount it after installing the proofing strip.
NB: A sectional garage door will often move somewhat inwards when it starts opening, and that
reduces the need for space behind the side seal.
11. With staples attach the last around 2 feet (60 cm) of the proofing strip to the door.
12. Trim the mounting strip to the width of the door panel, unless the door is a sectional door with a
door panel that is wider than the door opening. In that case trim the mounting strip to the width of
the door opening minus 0.4 in (1 cm) on each side. Use sturdy gloves to protect your hands.
13. Debur the cut end.

10 / 17
14. If there are any side seals, tuck the ends of the trimmed mounting strip behind the side seals:
If there isn’t sufficient room behind the side seals:
• loosen them or
• dismount them and remount them after installing the proofing strip.
NB: A sectional garage door will often move somewhat inwards when it starts opening, and that
reduces the need for space behind the side seal.
15. Screw the mounting strip onto the garage door.
Use a couple of around 2 pounds (1 kg) heavy objects for holding the mounting strip in place:
Don’t let the mounting strip extend below the bottom edge of the garage door.
Don’t use too much force. You risk denting the mounting strip. You can reduce the risk if you use
washers.
Use suitable screws – not necessarily the ones that come with the mounting strip if any.
It is no problem if the screws are slightly larger than the predrilled holes. The screws will auto-
matically widen the holes when driven in.

11 / 17
Place a screw in each of the predrilled holes of the mounting strip (if necessary, after drilling pilot
holes in the door):
16. Remember to
• retighten any loosened side seals,
• reinstall any dismounted side seals, and
• install any replacement side seals.
17. Open and close the garage door in order to secure that it operates satisfactorily.
If it doesn’t, you can probably solve the problem by doing one or more of the following:
• Adjust the opening and closing power of the opener – if any. Check the owner’s manual
and follow the instructions.
• Adjust the position of the side seals if any.
• If there are side seals of the stop molding type, replace them with brush seals.
• Adjust the garage door rails. Check the owner’s manual and follow the instructions.
2.3 Proofing the Side Gaps
2.3.1 Installation of the STRAIGHT Proofing Strip
The STRAIGHT proofing strip is secured to the door in much the same way as when you proof the thresh-
old gap. Use a top-down approach.
Don’t let the mounting strips extend beyond the sides of the door, and don’t install them closer to the
jambs than 0.4 in (1 cm).

12 / 17
Let the horizontal and vertical proofing strips adjoin in the corners. Don’t let them overlap.
The best-looking way to join the vertical and horizontal mounting strips is to install the vertical mounting
strips so A) they adjoin the upper edge of the horizontal mounting strip, and B) they align with the ends
of the horizontal mounting strip:
That should naturally be taken into consideration already when the horizontal mounting strip is trimmed.
If there is a brush side seal on the door, it may be used as mounting strip instead
of a carpet trim:
A 2½ in (6½ cm) or more wide brush strip will cover all of the vertical proofing
strip.
2.3.2 Single Panel Canopy Doors
The STRAIGHT proofing strip can be used for rodent proofing the lower part of the side gaps of a single
canopy door that corresponds to the exterior canopy part of the door.
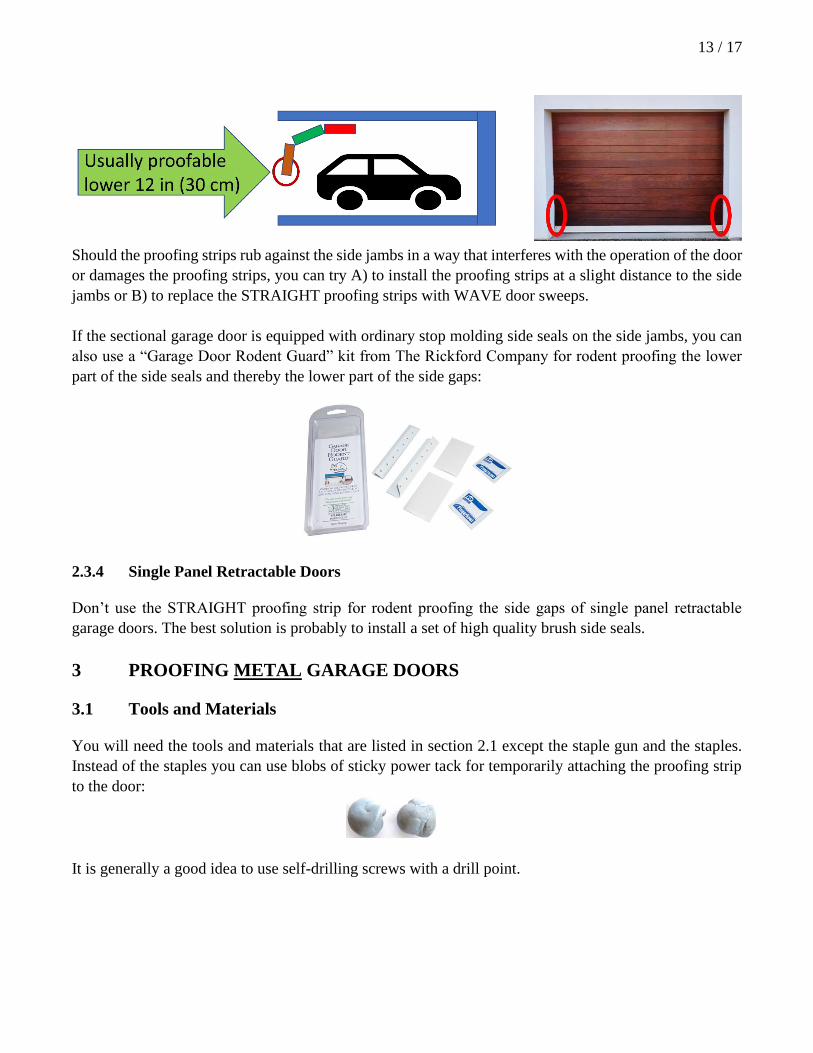
2.3.3 Sectional Doors
It is usually feasible to rodent proof the lowermost 12 in (30 cm) of the side gaps with STRAIGHT proof-
ing strips without impeding the opening and closing of the garage door.
13 / 17
Should the proofing strips rub against the side jambs in a way that interferes with the operation of the door
or damages the proofing strips, you can try A) to install the proofing strips at a slight distance to the side
jambs or B) to replace the STRAIGHT proofing strips with WAVE door sweeps.
If the sectional garage door is equipped with ordinary stop molding side seals on the side jambs, you can
also use a “Garage Door Rodent Guard” kit from The Rickford Company for rodent proofing the lower
part of the side seals and thereby the lower part of the side gaps:
2.3.4 Single Panel Retractable Doors
Don’t use the STRAIGHT proofing strip for rodent proofing the side gaps of single panel retractable
garage doors. The best solution is probably to install a set of high quality brush side seals.
3 PROOFING METAL GARAGE DOORS
3.1 Tools and Materials
You will need the tools and materials that are listed in section 2.1 except the staple gun and the staples.
Instead of the staples you can use blobs of sticky power tack for temporarily attaching the proofing strip
to the door:
It is generally a good idea to use self-drilling screws with a drill point.

14 / 17
You may also need:
• A Stanley knife for reducing the width of the proofing strip.
• A wood plank to be used as cutting board when using the Stanley knife.
3.2 Proofing the Threshold Gap and the Side Gaps
A garage door of metal is proofed in much the same way as a wooden door.
The screws must be secured firmly in solid structural parts. The screws are therefore usually secured in
the base of the door when the threshold gap is proofed.
When the screws are placed in the base of the door it is often a good idea to use a mounting strip that is
only 1 3/8 in (35 mm) or less wide. That is because a wider mounting strip is likely to extend below the
bottom edge of the garage door.
The predrilled holes of the proofing strip must naturally be aligned with the solid part of the door where
the screws are to be placed (usually in the base of the door). In order to achieve that it may be necessary
to reduce the width of the proofing strip.
If the width isn’t reduced, it may for example look like this:
The green dotted quadrangle marks the solid structural part of the metal garage door where it is possible
to secure the screws firmly.
The red dotted quadrangle marks the excess part of the proofing strip that must be cut off in order to reduce
the width of the proofing strip before installation.
This is how the example installation looks after
• a reduction of the width of the proofing strip and

15 / 17
• subsequent reinstallation of the proofing strip and the mounting strip:
The width of the proofing strip is easily reduced with a Stanley knife. When you place the knife between
2 of the parallel steel wires in the proofing strip, the wires will guide the knife, so you always will get a
fairly straight cut. Place the proofing strip on a wood plank when you cut it. Use sturdy gloves to protect
your hands.
Mount the proofing strip with the cut side hidden under the mounting strip.
4 TIPS & TRICKS
4.1 If a Very High Degree of Protection is Required
Under normal circumstances it is sufficient to install a single layer. If a particularly high degree of protec-
tion is required – for example because of a very high rodent pressure – you should consider installing a
double layer:
A double layer is installed in the same way as a single layer.

16 / 17
4.2 How to Handle Very Uneven Thresholds
If the garage door threshold is so uneven that there will be substantial gaps under the STRAIGHT proofing
strip, the threshold should be repaired before installing the proofing strip.
Though it is not the optimal solution, you can as an alternative cut the STRAIGHT proofing strip in several
pieces and mount them overlapping and at an angle as exaggeratedly illustrated here:
If you solve the problem in that way, you should use a mounting strip in the form of a High Carpet Trim
– i. e. one with a gap height of 0.3 to 0.4 in (8 to 10 mm).
Another way of dealing with uneven thresholds is to supplement the STRAIGHT proofing strip with a
brush strip that conforms better to uneven surfaces:
Installed with a 1 3/8 in (35 mm) wide Low Carpet
Trim and a 2 in (50 mm) wide brush strip
4.3 Why Are Tin Snips with Long Blades Best?
Straight tin snips with long blades are better than straight tin snips with ordinary blades first and foremost
because it is a lot easier to make straight cuts with the long blades.
Furthermore, it is possible to cut the STRAIGHT proofing strip in a single clip if you have strong hands.

17 / 17
4.4 A Very Useful Homemade Tool
If you on a regular basis use RodeXit seals, it is a good idea to make a simple and inexpensive “third
hand” tool that is capable of A) holding a RodeXit seal in place and at the same time B) elevating and
holding a mounting strip. It is often handy to have 2 of them.
The tool can be made from
• a 1 - 1¼ in (2½ - 3 cm) thick and around 2 pound (1 kg) heavy piece of wood (preferably of heavy
wood such as oak) and
• two around 2½ in (6½ cm) long screws.
You place a screw around 1 in (2½ cm) from each end of the piece of wood and around ½ in (13 mm)
from the edge. Drive in the screws around 1 in (2½ cm), so the distance between the screw heads and the
wood is around 1½ in (4 cm). The finished tool should look somewhat like this:
This is how it works: