Embed Size (px)
Citation preview
How To Model A Seamless Tiling Texture Using Blender + GIMP (Issue 1 – 22May12)
How To Model A Seamless Tiling Texture Using Blender + GIMPSince my tileable mail textures seem to have been well received, I've decided to share my secret recipe!
I'm fairly sure that I've sorted out the process of turning a simple 3D model of a single scale, mail link, etc, into a set of seamless tileable textures. All you need is Blender (and the ability to use it! This isn't a How-To-Use-Blender tutorial) and GIMP (or any graphics program that can tile images, adjust colour levels, create negatives). You can probably apply the same principles in other 3D modelling programs too.
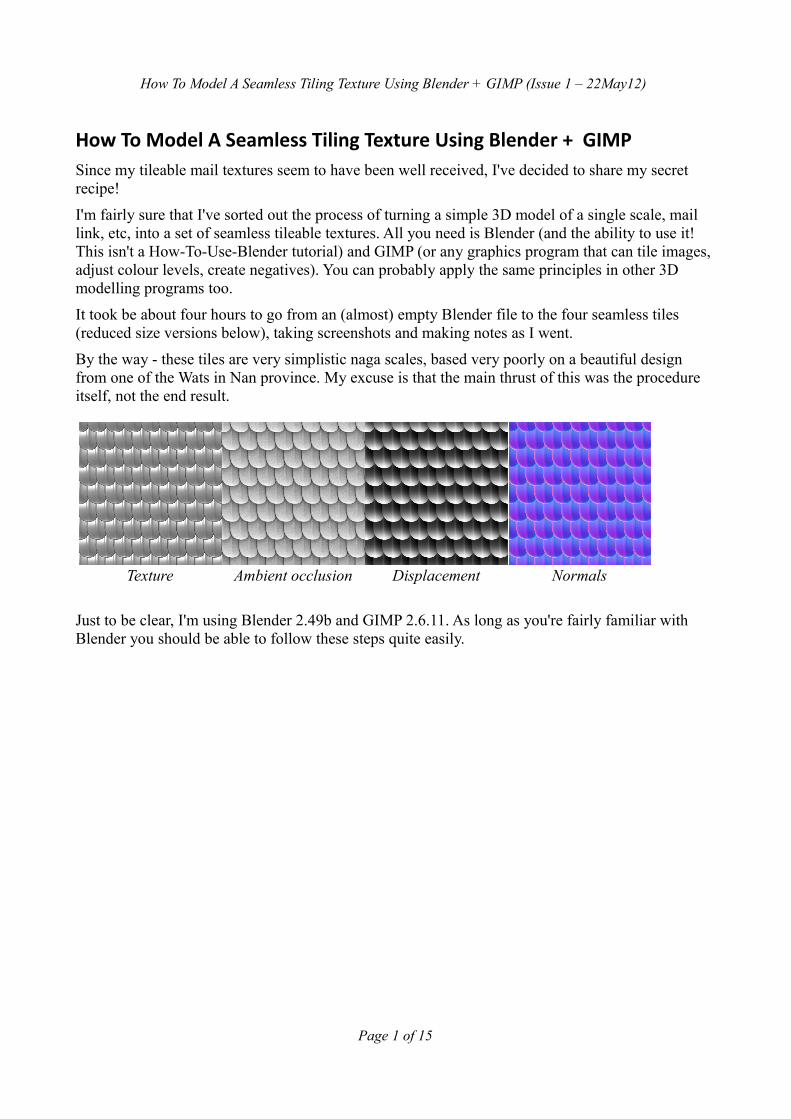
It took be about four hours to go from an (almost) empty Blender file to the four seamless tiles (reduced size versions below), taking screenshots and making notes as I went.
By the way - these tiles are very simplistic naga scales, based very poorly on a beautiful design from one of the Wats in Nan province. My excuse is that the main thrust of this was the procedure itself, not the end result.
Just to be clear, I'm using Blender 2.49b and GIMP 2.6.11. As long as you're fairly familiar with Blender you should be able to follow these steps quite easily.
Page 1 of 15
Texture Ambient occlusion Displacement Normals
How To Model A Seamless Tiling Texture Using Blender + GIMP (Issue 1 – 22May12)
Step 1: Set Up A Fixed Orthographic Camera, And Set The Render Output Format
The key thing is to make the image rendered from the camera match up perfectly with the baked image.
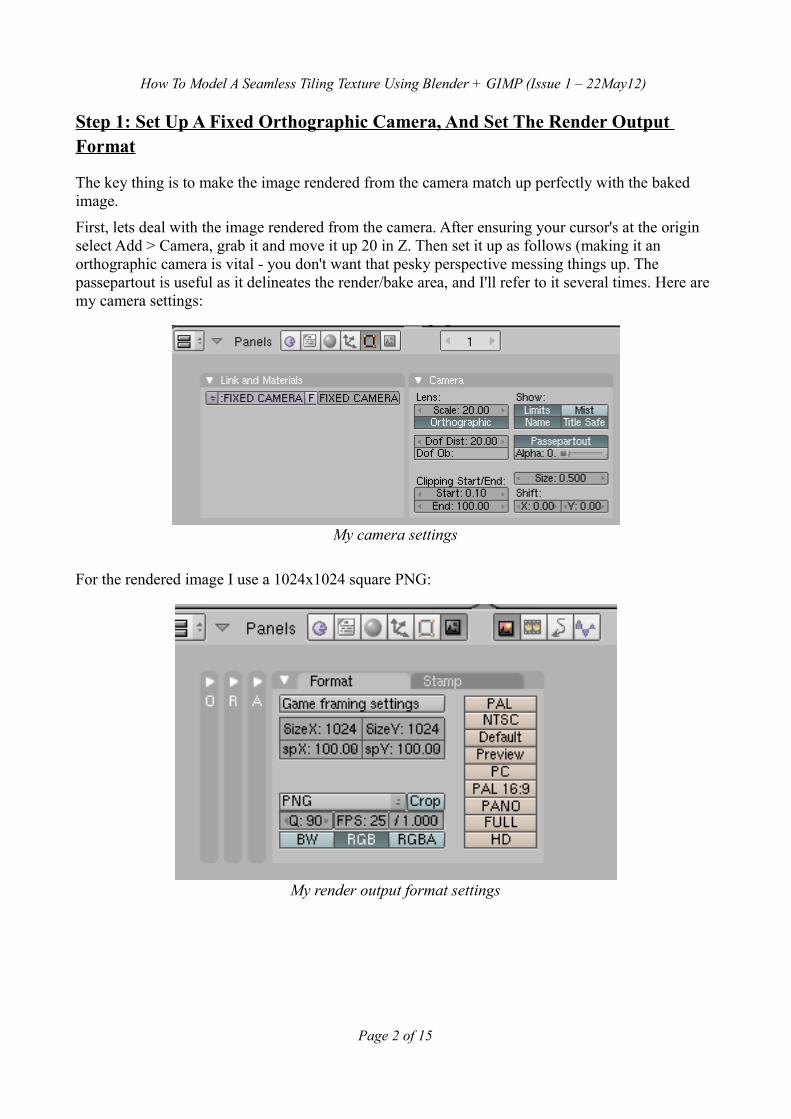
First, lets deal with the image rendered from the camera. After ensuring your cursor's at the origin select Add > Camera, grab it and move it up 20 in Z. Then set it up as follows (making it an orthographic camera is vital - you don't want that pesky perspective messing things up. The passepartout is useful as it delineates the render/bake area, and I'll refer to it several times. Here are my camera settings:
For the rendered image I use a 1024x1024 square PNG:
Page 2 of 15
My camera settings
My render output format settings
How To Model A Seamless Tiling Texture Using Blender + GIMP (Issue 1 – 22May12)
Step 2: Add A Light
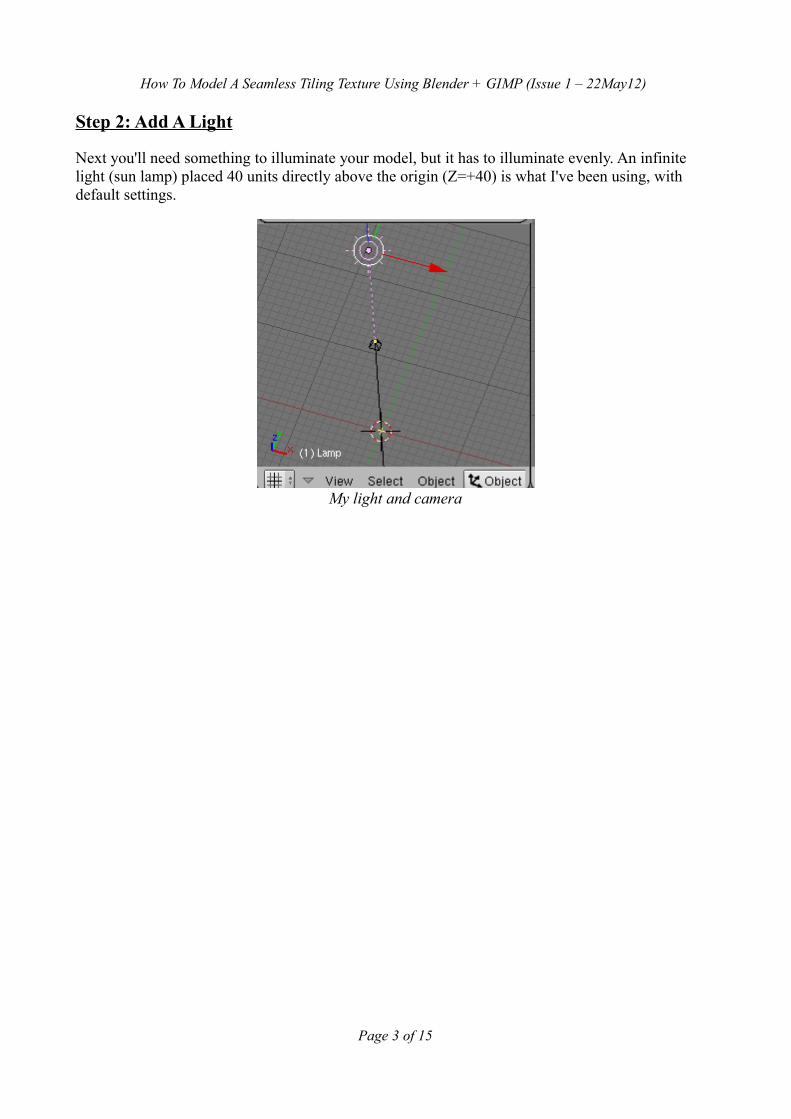
Next you'll need something to illuminate your model, but it has to illuminate evenly. An infinite light (sun lamp) placed 40 units directly above the origin (Z=+40) is what I've been using, with default settings.
Page 3 of 15
My light and camera
How To Model A Seamless Tiling Texture Using Blender + GIMP (Issue 1 – 22May12)
Step 3: Add A Baking Plane
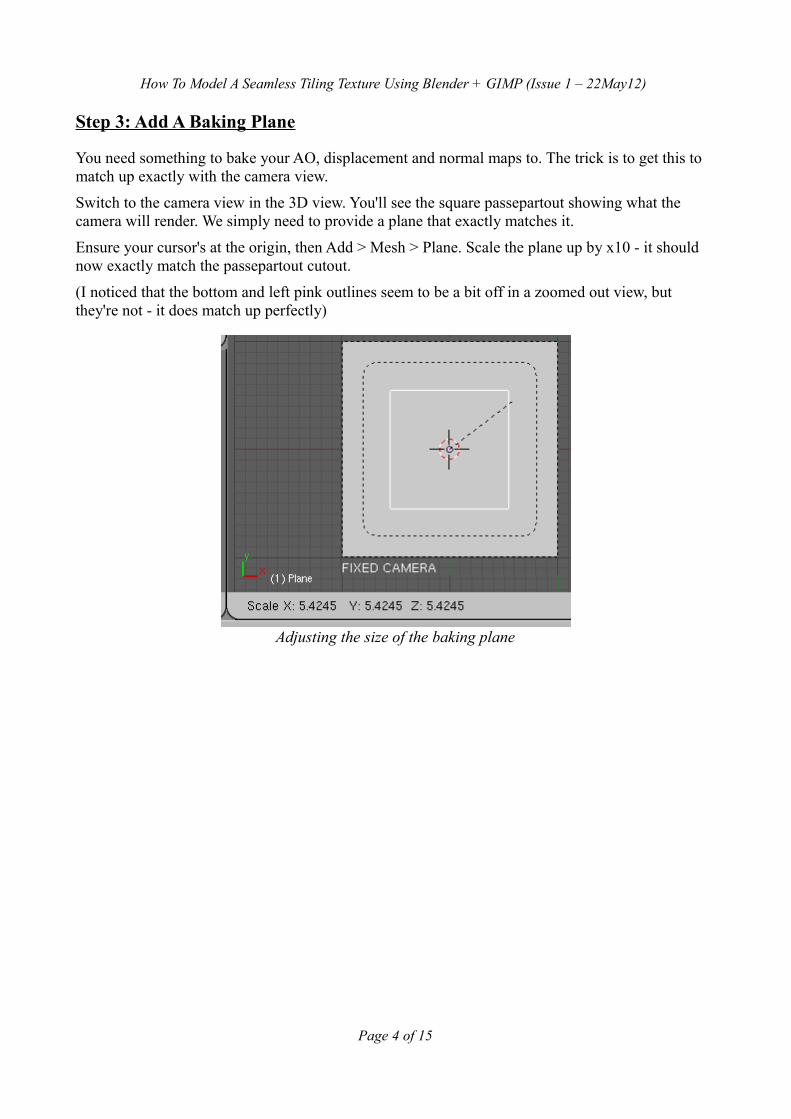
You need something to bake your AO, displacement and normal maps to. The trick is to get this to match up exactly with the camera view.
Switch to the camera view in the 3D view. You'll see the square passepartout showing what the camera will render. We simply need to provide a plane that exactly matches it.
Ensure your cursor's at the origin, then Add > Mesh > Plane. Scale the plane up by x10 - it should now exactly match the passepartout cutout.
(I noticed that the bottom and left pink outlines seem to be a bit off in a zoomed out view, but they're not - it does match up perfectly)
Page 4 of 15
Adjusting the size of the baking plane
How To Model A Seamless Tiling Texture Using Blender + GIMP (Issue 1 – 22May12)
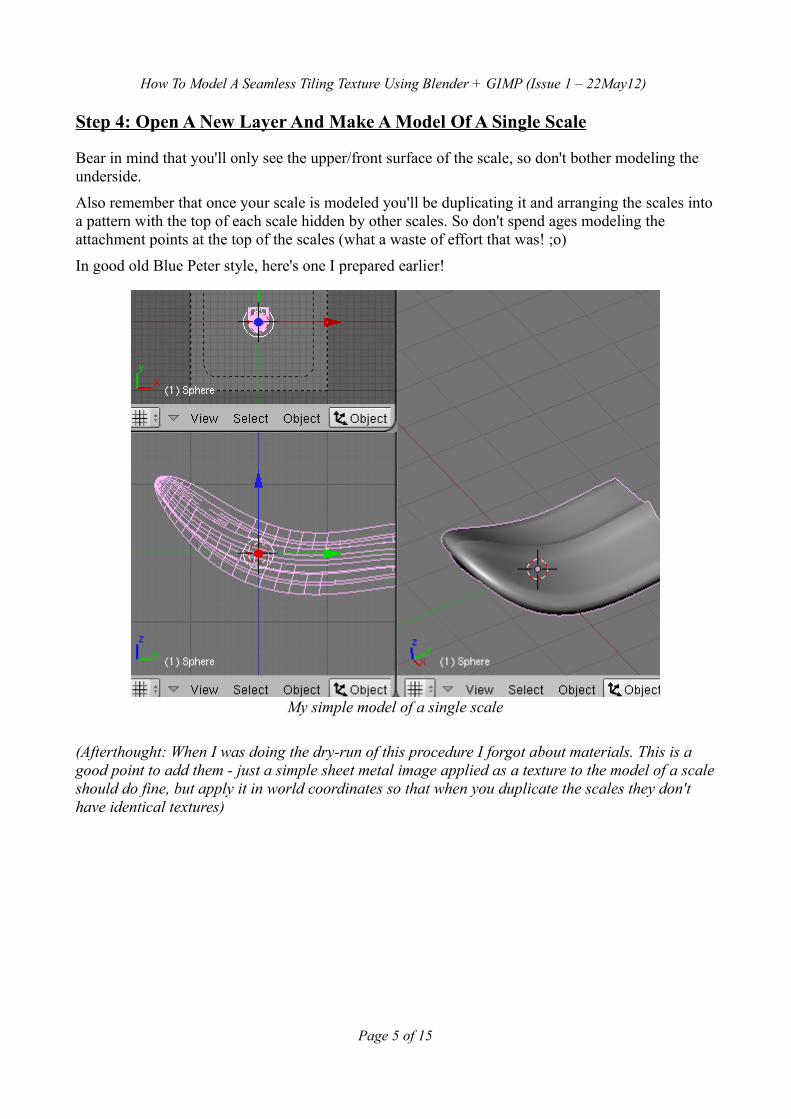
Step 4: Open A New Layer And Make A Model Of A Single Scale
Bear in mind that you'll only see the upper/front surface of the scale, so don't bother modeling the underside.
Also remember that once your scale is modeled you'll be duplicating it and arranging the scales into a pattern with the top of each scale hidden by other scales. So don't spend ages modeling the attachment points at the top of the scales (what a waste of effort that was! ;o)
In good old Blue Peter style, here's one I prepared earlier!
(Afterthought: When I was doing the dry-run of this procedure I forgot about materials. This is a good point to add them - just a simple sheet metal image applied as a texture to the model of a scale should do fine, but apply it in world coordinates so that when you duplicate the scales they don't have identical textures)
Page 5 of 15
My simple model of a single scale
How To Model A Seamless Tiling Texture Using Blender + GIMP (Issue 1 – 22May12)
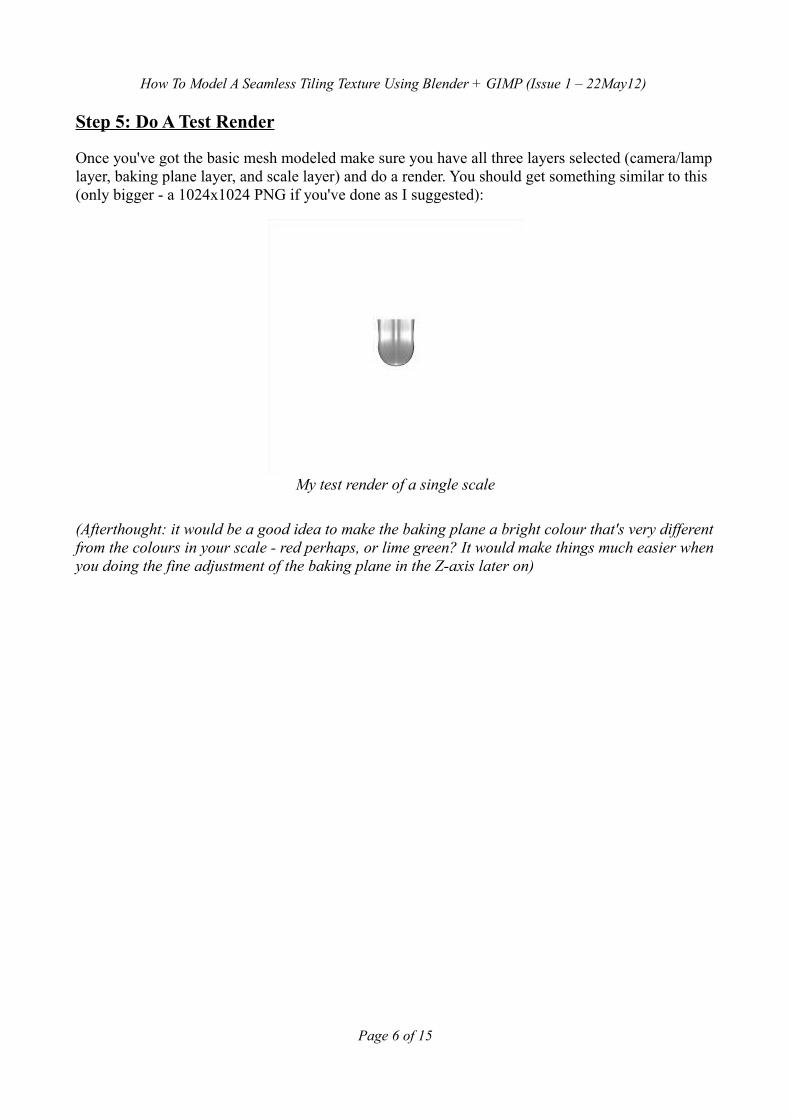
Step 5: Do A Test Render
Once you've got the basic mesh modeled make sure you have all three layers selected (camera/lamp layer, baking plane layer, and scale layer) and do a render. You should get something similar to this (only bigger - a 1024x1024 PNG if you've done as I suggested):
(Afterthought: it would be a good idea to make the baking plane a bright colour that's very different from the colours in your scale - red perhaps, or lime green? It would make things much easier when you doing the fine adjustment of the baking plane in the Z-axis later on)
Page 6 of 15
My test render of a single scale
How To Model A Seamless Tiling Texture Using Blender + GIMP (Issue 1 – 22May12)
Step 6: Bake The AO, Displacement And Normals
To bake your scales to the baking plane you must have
- all your scales 'selected' in object mode (purple outline)
- your baking plane 'active' in object mode (pink outline)
- your baking plane UV mapped
(I don't think it was necessary to UV map the scales - I was surprised by this as everything I'd read said they should be)
Here are the basic steps I follow:
a) In object mode deselect all objects.
b) In object mode select the baking plane only
c) Switch to editing mode, deselect all vertices (if any are selected) and then select all vertices.
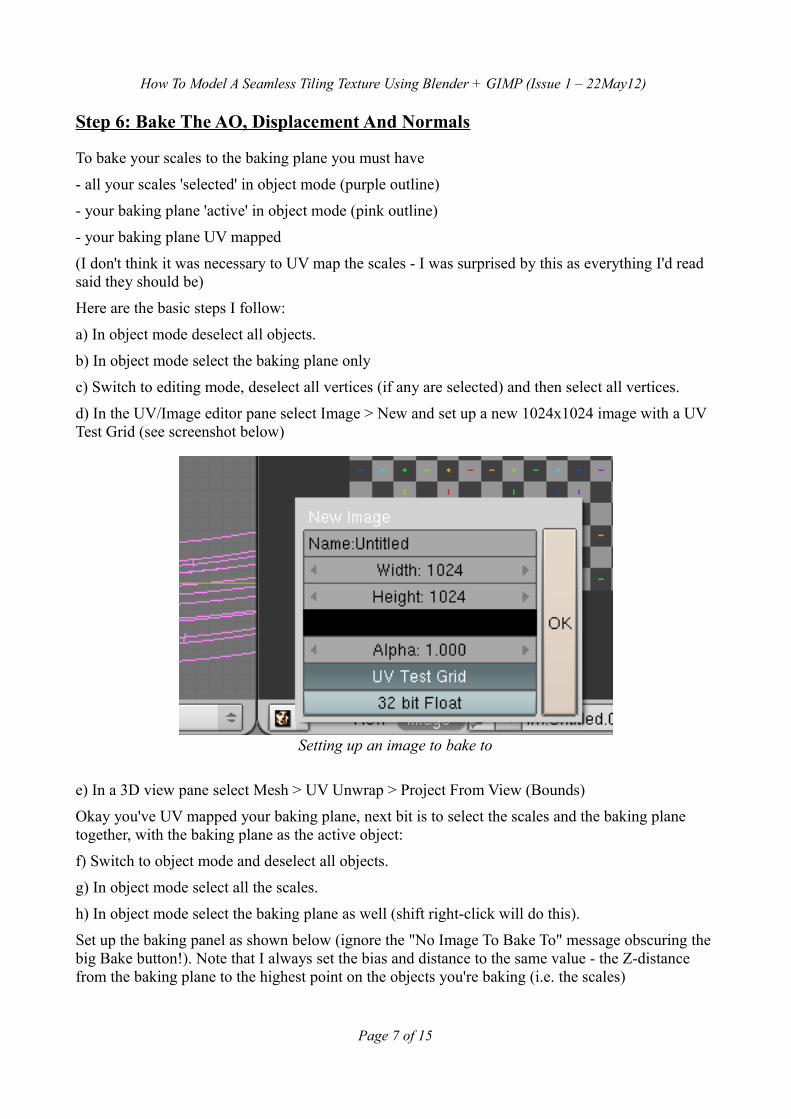
d) In the UV/Image editor pane select Image > New and set up a new 1024x1024 image with a UV Test Grid (see screenshot below)
e) In a 3D view pane select Mesh > UV Unwrap > Project From View (Bounds)
Okay you've UV mapped your baking plane, next bit is to select the scales and the baking plane together, with the baking plane as the active object:
f) Switch to object mode and deselect all objects.
g) In object mode select all the scales.
h) In object mode select the baking plane as well (shift right-click will do this).
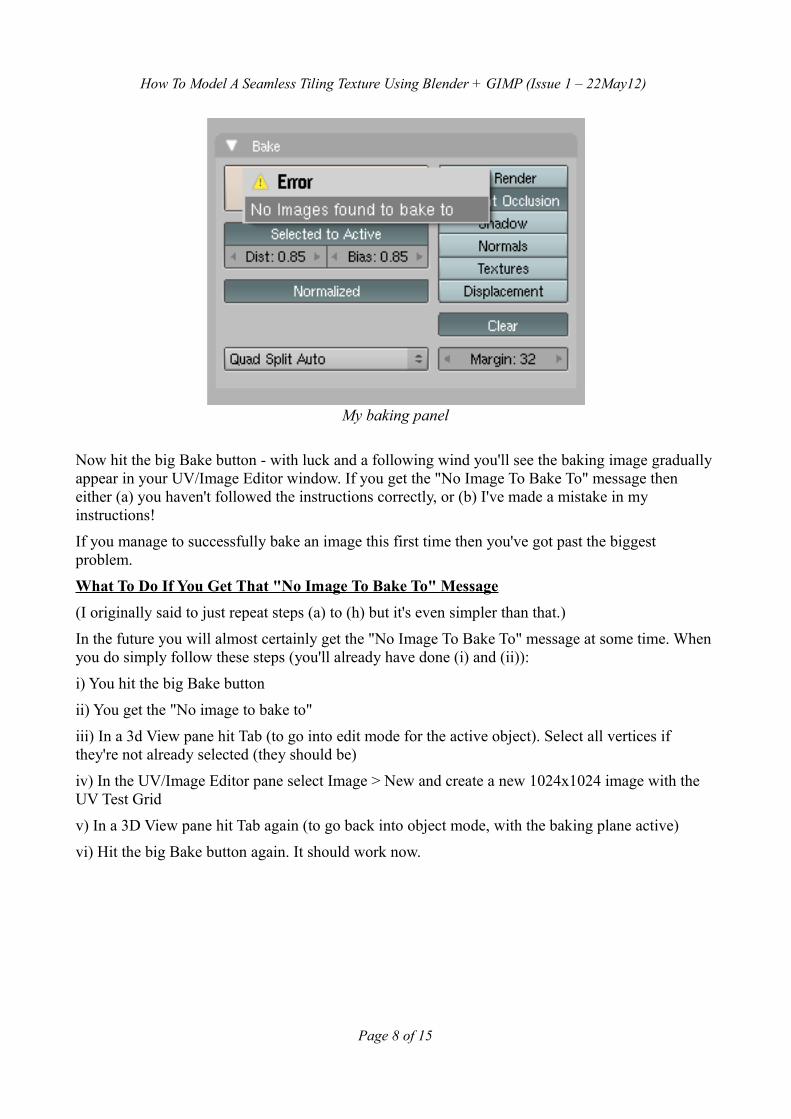
Set up the baking panel as shown below (ignore the "No Image To Bake To" message obscuring the big Bake button!). Note that I always set the bias and distance to the same value - the Z-distance from the baking plane to the highest point on the objects you're baking (i.e. the scales)
Page 7 of 15
Setting up an image to bake to
How To Model A Seamless Tiling Texture Using Blender + GIMP (Issue 1 – 22May12)
Now hit the big Bake button - with luck and a following wind you'll see the baking image gradually appear in your UV/Image Editor window. If you get the "No Image To Bake To" message then either (a) you haven't followed the instructions correctly, or (b) I've made a mistake in my instructions!
If you manage to successfully bake an image this first time then you've got past the biggest problem.
What To Do If You Get That "No Image To Bake To" Message
(I originally said to just repeat steps (a) to (h) but it's even simpler than that.)
In the future you will almost certainly get the "No Image To Bake To" message at some time. When you do simply follow these steps (you'll already have done (i) and (ii)):
i) You hit the big Bake button
ii) You get the "No image to bake to"
iii) In a 3d View pane hit Tab (to go into edit mode for the active object). Select all vertices if they're not already selected (they should be)
iv) In the UV/Image Editor pane select Image > New and create a new 1024x1024 image with the UV Test Grid
v) In a 3D View pane hit Tab again (to go back into object mode, with the baking plane active)
vi) Hit the big Bake button again. It should work now.
Page 8 of 15
My baking panel

How To Model A Seamless Tiling Texture Using Blender + GIMP (Issue 1 – 22May12)
(Afterthought: once you've baked your images it would be a good idea to load them into GIMP as separate layers over the original render. You can hide/show layers, make layers semi-transparent, or use different layer mixing options to confirm that all images do actually overlay each other. The baked layers will because they're all done the same way, but it's definitely worth double-checking the render against a bake)
Page 9 of 15
The layout of my baking viewport
How To Model A Seamless Tiling Texture Using Blender + GIMP (Issue 1 – 22May12)
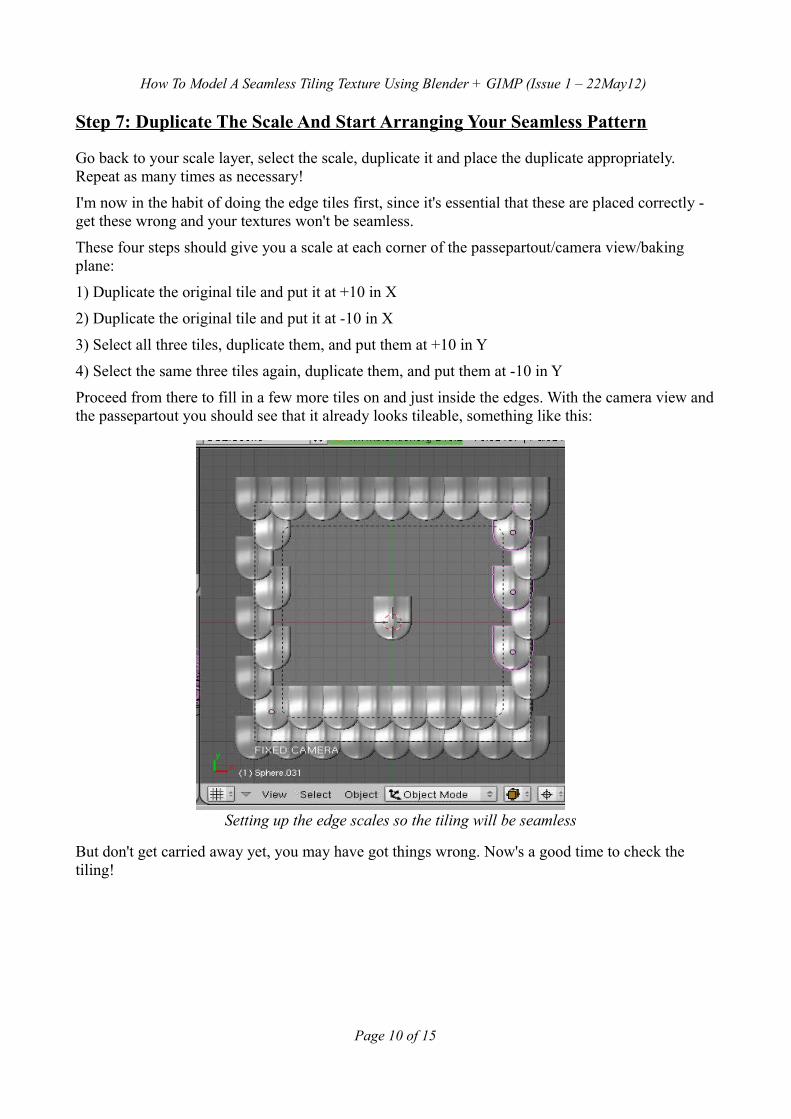
Step 7: Duplicate The Scale And Start Arranging Your Seamless Pattern
Go back to your scale layer, select the scale, duplicate it and place the duplicate appropriately. Repeat as many times as necessary!
I'm now in the habit of doing the edge tiles first, since it's essential that these are placed correctly - get these wrong and your textures won't be seamless.
These four steps should give you a scale at each corner of the passepartout/camera view/baking plane:
1) Duplicate the original tile and put it at +10 in X
2) Duplicate the original tile and put it at -10 in X
3) Select all three tiles, duplicate them, and put them at +10 in Y
4) Select the same three tiles again, duplicate them, and put them at -10 in Y
Proceed from there to fill in a few more tiles on and just inside the edges. With the camera view and the passepartout you should see that it already looks tileable, something like this:
But don't get carried away yet, you may have got things wrong. Now's a good time to check the tiling!
Page 10 of 15
Setting up the edge scales so the tiling will be seamless
How To Model A Seamless Tiling Texture Using Blender + GIMP (Issue 1 – 22May12)
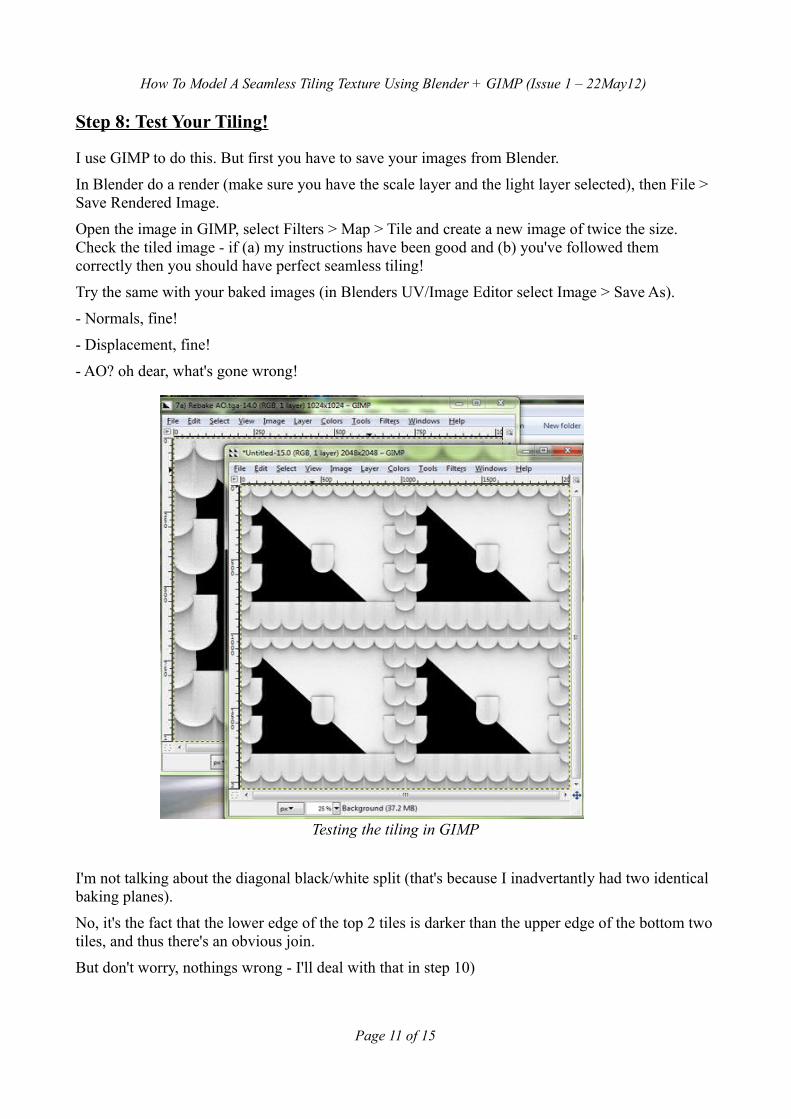
Step 8: Test Your Tiling!
I use GIMP to do this. But first you have to save your images from Blender.
In Blender do a render (make sure you have the scale layer and the light layer selected), then File > Save Rendered Image.
Open the image in GIMP, select Filters > Map > Tile and create a new image of twice the size. Check the tiled image - if (a) my instructions have been good and (b) you've followed them correctly then you should have perfect seamless tiling!
Try the same with your baked images (in Blenders UV/Image Editor select Image > Save As).
- Normals, fine!
- Displacement, fine!
- AO? oh dear, what's gone wrong!
I'm not talking about the diagonal black/white split (that's because I inadvertantly had two identical baking planes).
No, it's the fact that the lower edge of the top 2 tiles is darker than the upper edge of the bottom two tiles, and thus there's an obvious join.
But don't worry, nothings wrong - I'll deal with that in step 10)
Page 11 of 15
Testing the tiling in GIMP
How To Model A Seamless Tiling Texture Using Blender + GIMP (Issue 1 – 22May12)
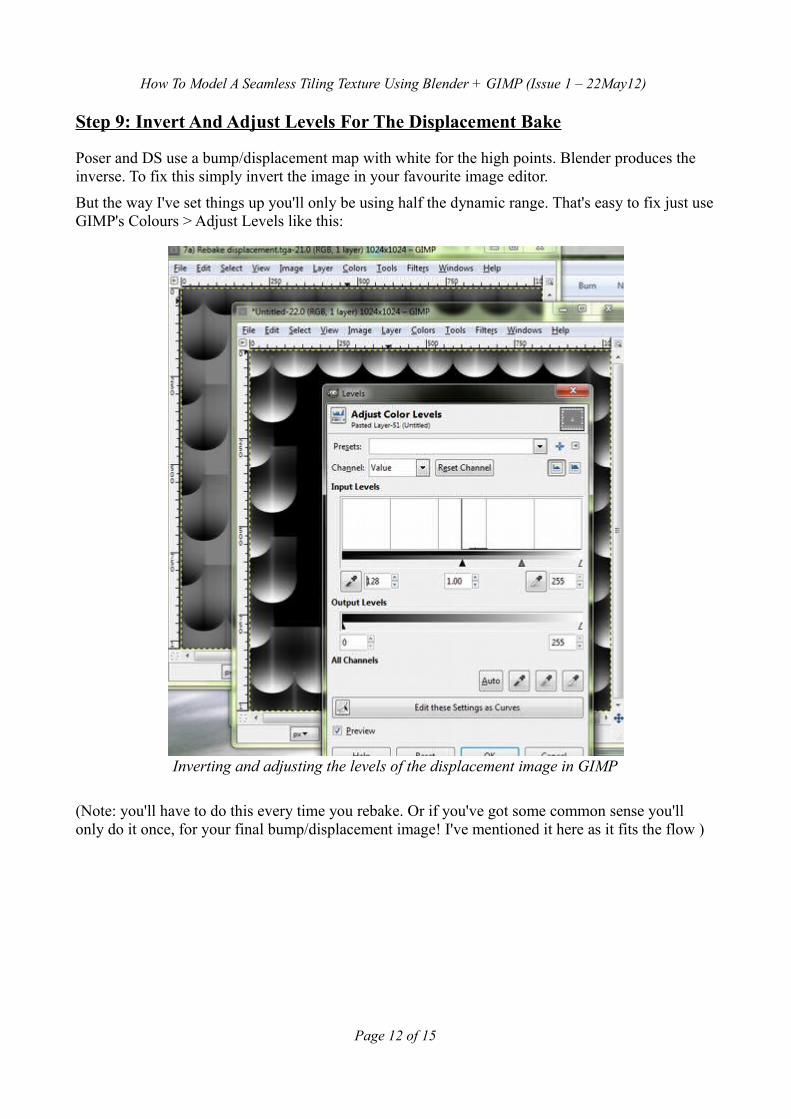
Step 9: Invert And Adjust Levels For The Displacement Bake
Poser and DS use a bump/displacement map with white for the high points. Blender produces the inverse. To fix this simply invert the image in your favourite image editor.
But the way I've set things up you'll only be using half the dynamic range. That's easy to fix just use GIMP's Colours > Adjust Levels like this:
(Note: you'll have to do this every time you rebake. Or if you've got some common sense you'll only do it once, for your final bump/displacement image! I've mentioned it here as it fits the flow )
Page 12 of 15
Inverting and adjusting the levels of the displacement image in GIMP
How To Model A Seamless Tiling Texture Using Blender + GIMP (Issue 1 – 22May12)
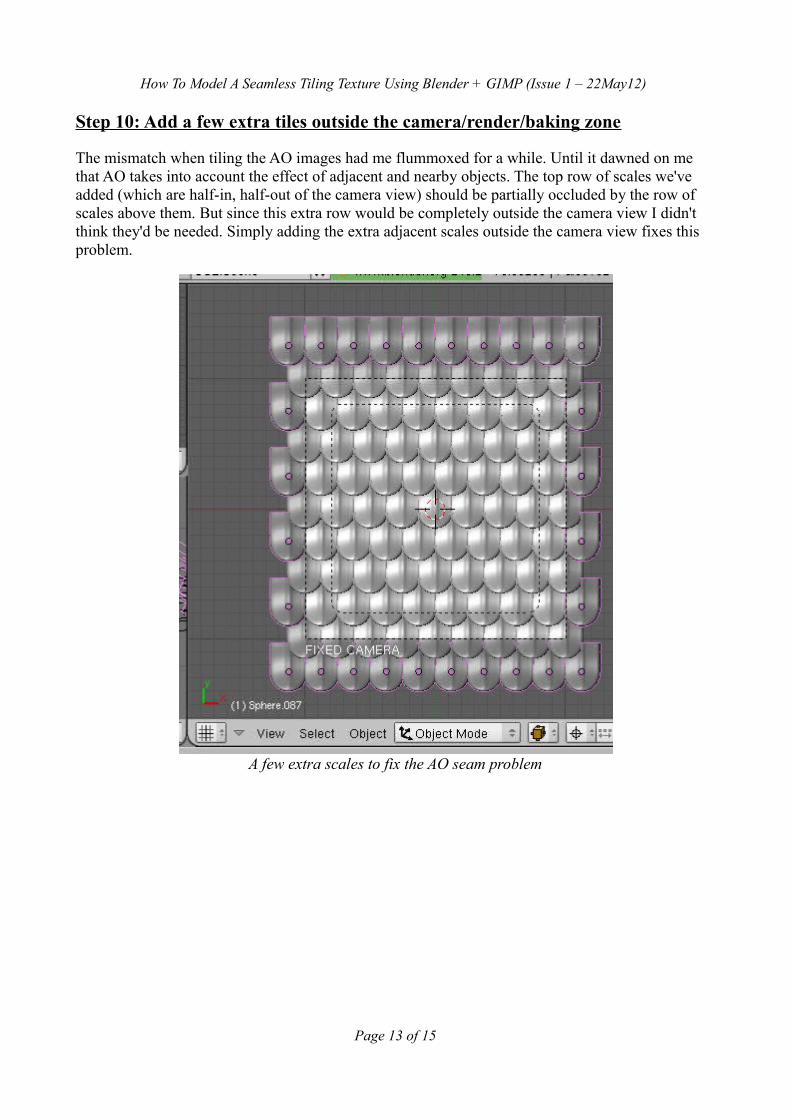
Step 10: Add a few extra tiles outside the camera/render/baking zone
The mismatch when tiling the AO images had me flummoxed for a while. Until it dawned on me that AO takes into account the effect of adjacent and nearby objects. The top row of scales we've added (which are half-in, half-out of the camera view) should be partially occluded by the row of scales above them. But since this extra row would be completely outside the camera view I didn't think they'd be needed. Simply adding the extra adjacent scales outside the camera view fixes this problem.
Page 13 of 15
A few extra scales to fix the AO seam problem
How To Model A Seamless Tiling Texture Using Blender + GIMP (Issue 1 – 22May12)
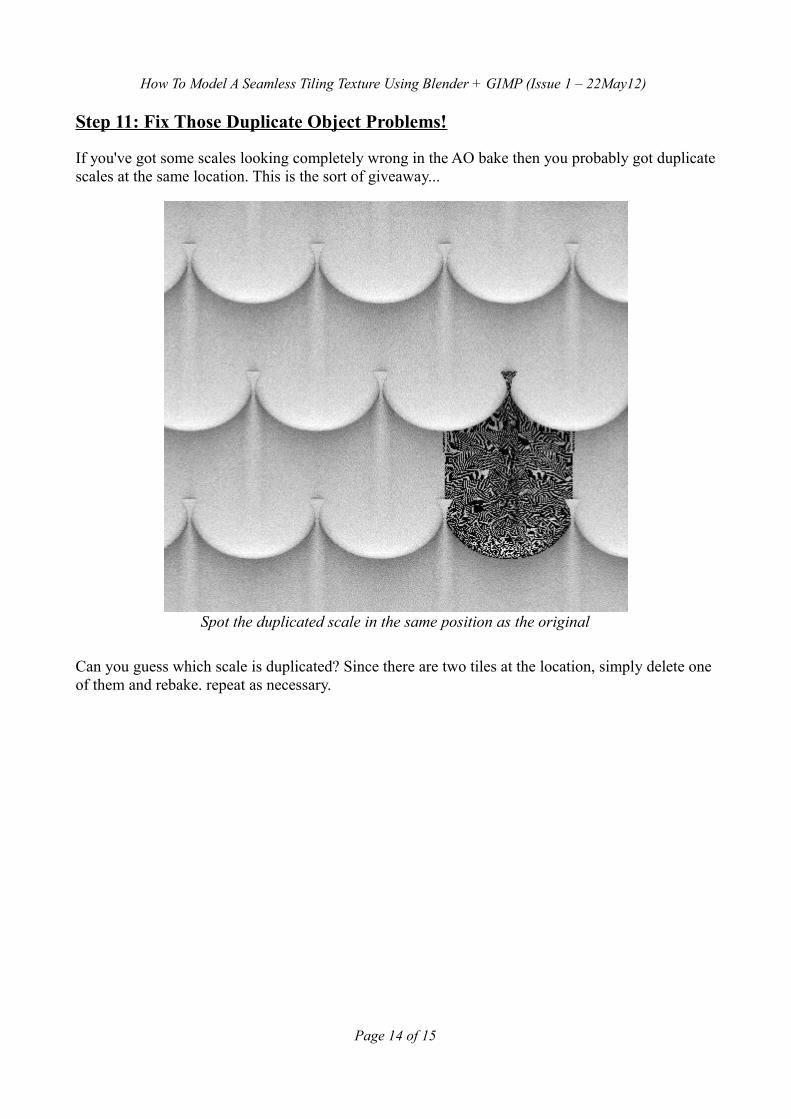
Step 11: Fix Those Duplicate Object Problems!
If you've got some scales looking completely wrong in the AO bake then you probably got duplicate scales at the same location. This is the sort of giveaway...
Can you guess which scale is duplicated? Since there are two tiles at the location, simply delete one of them and rebake. repeat as necessary.
Page 14 of 15
Spot the duplicated scale in the same position as the original
How To Model A Seamless Tiling Texture Using Blender + GIMP (Issue 1 – 22May12)
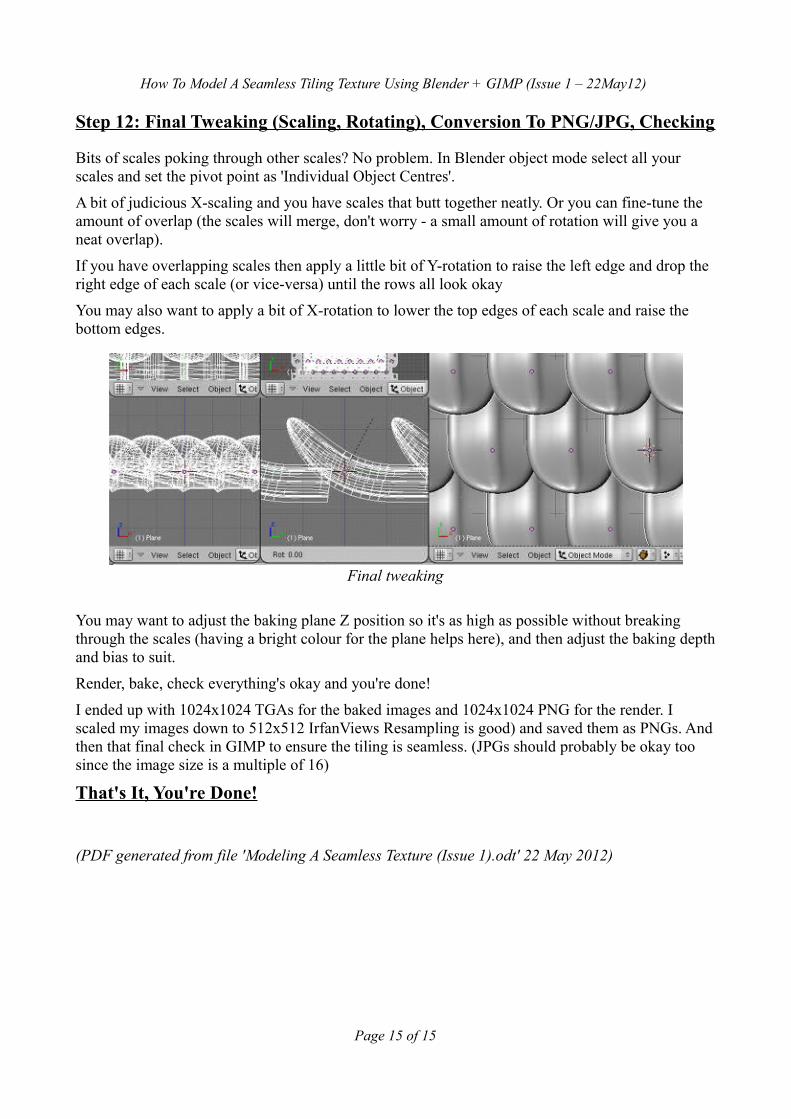
Step 12: Final Tweaking (Scaling, Rotating), Conversion To PNG/JPG, Checking
Bits of scales poking through other scales? No problem. In Blender object mode select all your scales and set the pivot point as 'Individual Object Centres'.
A bit of judicious X-scaling and you have scales that butt together neatly. Or you can fine-tune the amount of overlap (the scales will merge, don't worry - a small amount of rotation will give you a neat overlap).
If you have overlapping scales then apply a little bit of Y-rotation to raise the left edge and drop the right edge of each scale (or vice-versa) until the rows all look okay
You may also want to apply a bit of X-rotation to lower the top edges of each scale and raise the bottom edges.
You may want to adjust the baking plane Z position so it's as high as possible without breaking through the scales (having a bright colour for the plane helps here), and then adjust the baking depth and bias to suit.
Render, bake, check everything's okay and you're done!
I ended up with 1024x1024 TGAs for the baked images and 1024x1024 PNG for the render. I scaled my images down to 512x512 IrfanViews Resampling is good) and saved them as PNGs. And then that final check in GIMP to ensure the tiling is seamless. (JPGs should probably be okay too since the image size is a multiple of 16)
That's It, You're Done!
(PDF generated from file 'Modeling A Seamless Texture (Issue 1).odt' 22 May 2012)
Page 15 of 15
Final tweaking


