Embed Size (px)
Citation preview

How to Integrate SmartDeploy with Windows Deployment ServicesSmartDeployRevised: March 2017
Integrating custom Windows® Imaging Format (WIM) images into Windows® Deployment Services (WDS) lets you take advantage of the time and cost saving benefits of SmartDeploy® Enterprise while extending the functionality of WDS beyond its native capabilities. This step-by-step guide takes you through the process.

2
Contents
Introducing SmartDeploy Enterprise ..................................................................... 3How Does SmartDeploy Work? ................................................................................................ 3
SmartDeploy and WDS: Simple Integration ........................................................................... 3
How to Integrate SmartDeploy with WDS ............................................................ 4Before You Begin ........................................................................................................................ 4
Create a Custom SmartPE WIM ............................................................................................... 6
Import the Boot Image to WDS Server ................................................................................ 11
Install the Image ...................................................................................................................... 15
Boot to SmartPE and Deploy the Image ............................................................................... 20
Verify with the Device Manager ............................................................................................. 30
Summary ....................................................................................................................31
More Information .....................................................................................................31
3
Introducing SmartDeploy EnterpriseDeploying an operating system can frequently become a time-consuming and frustrating task, leading many companies to look for ways to streamline and simplify their operating system deployment strategies.
Operating system deployment usually involves a disk imaging technology that lets you make a copy of a master hard disk drive and transfer this copy to your computers. This works well as long as the target hardware is the same as the master computer. However, in reality, a company’s computers are often a mix of different makes and models. This means that the IT staff must create a separate master image for each hardware platform on the network, a time-consuming and labor-intensive endeavor.
SmartDeploy® Enterprise provides a real-world solution for this challenge by eliminating the need to create multiple master images for different computers. SmartDeploy helps make deployment of almost all versions of the Windows® operating system—including Windows 10—faster and easier.
How Does SmartDeploy Work?SmartDeploy uses virtual machines (VMs) to create and maintain the operating system and applications that you want to deploy. The process of creating the master image for the hardware platform is similar to that used with other disk imaging software; however with SmartDeploy, you need to create only one master image no matter how many different computer brands or models you have on your network. A separate file called the Platform Pack contains the device drivers and other hardware-specific files, customizing the standard master image for each computer’s unique properties. Platform Packs are available for many of the top computer manufacturers and models. You can also create custom Platform Packs with the Platform Manager. SmartDeploy merges these Platform Packs to the master image when deploying the operating system image.
SmartDeploy provides advantages over traditional disk imaging methods. Separating hardware and device drivers from the operating system and software means you have fewer images to maintain. Updates to any of the environments within the master image are transmitted as a small delta (or differencing) image file, which makes it possible for you to release updates frequently and easily at a low cost. You do not need a dedicated computer or dedicated infrastructure to run image management tasks. Additionally, SmartDeploy does not require a network to manage or deploy images; you can update remote users or offices without a network connection.
SmartDeploy and WDS: Simple IntegrationWindows Deployment Services (WDS), the Microsoft technology for network-based installation of Windows operating systems, can be used to reimage computers that are connected to the Local Area Network (LAN). WDS lets you inject drivers from a repository at image deployement time so you can keep one master image and still deploy to a variety of hardware; however, the driver injecting feature cannot be used for standalone (offline) DVD-based imaging.
SmartDeploy fits seamlessly into WDS environments. It lets you use customized Windows Imaging Format (WIM) images with WDS, extending the capabilities of your WDS implementation beyond basic installation images to help streamline, simplify, and accelerate Windows deployment. With SmartDeploy, you consolidate all client and server images onto a single DVD or USB, so you can deploy to any platform, even without a LAN.
4
How to Integrate SmartDeploy with WDSThe following sections step you through the process of integrating SmartDeploy with WDS. You are first guided through the process of creating a custom SmartDeploy Preinstallation Environment (SmartPE) ISO image, which can be used as a WDS boot image. The SmartDeploy Deploy Wizard supports the deployment of WDS install images. You can boot your target computer via Preboot Execution Environment (PXE) to the SmartPE environment, and then start the Deploy Wizard and map a drive to \\[wdsserver]\RemInst.
Before You BeginTo integrate SmartDeploy with WDS, you must have SmartDeploy installed on your computer. Reference the SmartDeploy Enterprise User’s Guide to confirm that your environment meets the hardware requirements and that you have a supported host operating system, supported guest operating systems, and supported virtual environment. You can download SmartDeploy from the SmartDeploy website. If you are evaluating SmartDeploy, your free 15-day trial will begin when you install the software. For customers, you can license your software using the License Wizard; see Licensing and Activation in the SmartDeploy Enterprise User’s Guide for more information.
Capture Master ImageYou must also capture the master image with the Capture Wizard. Detailed instructions can be found in the SmartDeploy Enterprise User’s Guide.
Note: If your image has multiple volumes, you must first enable your image for WDS. Also note that WDS requires that multicast images contain only valid Windows volumes.
1. Start the Capture Wizard by selecting 2. Capture from the Activities tab in the SmartDeploy Console.
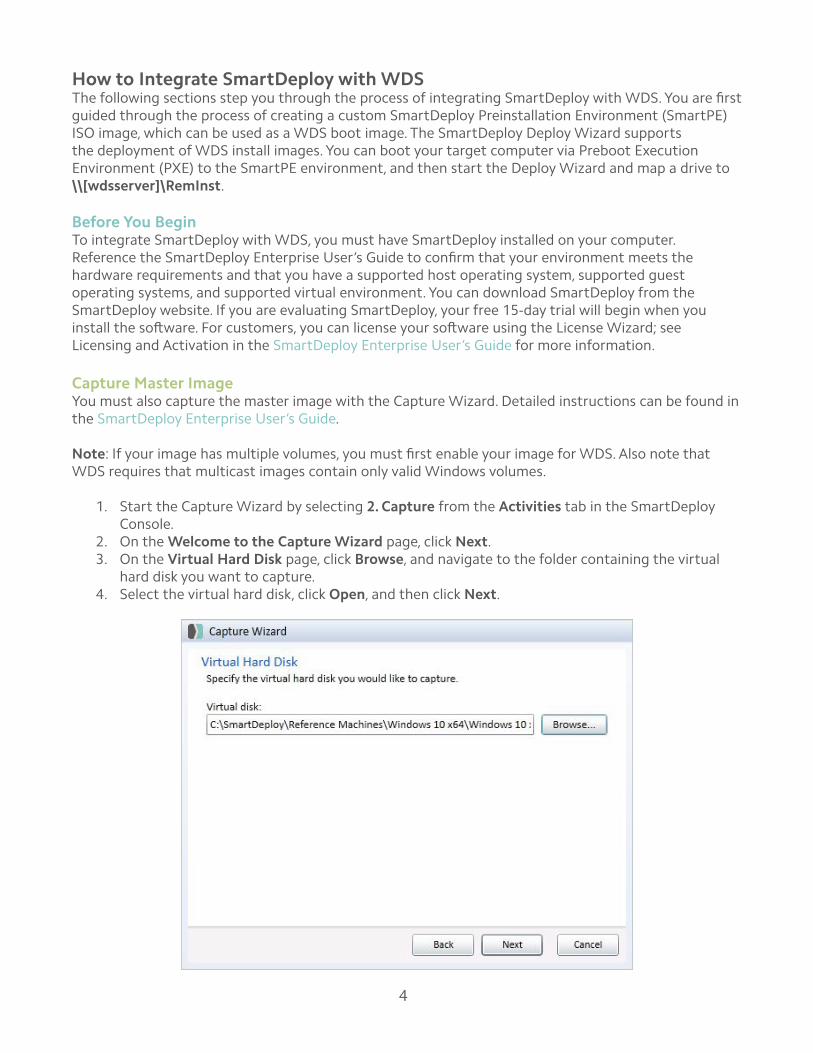
2. On the Welcome to the Capture Wizard page, click Next.3. On the Virtual Hard Disk page, click Browse, and navigate to the folder containing the virtual
hard disk you want to capture.4. Select the virtual hard disk, click Open, and then click Next.
5
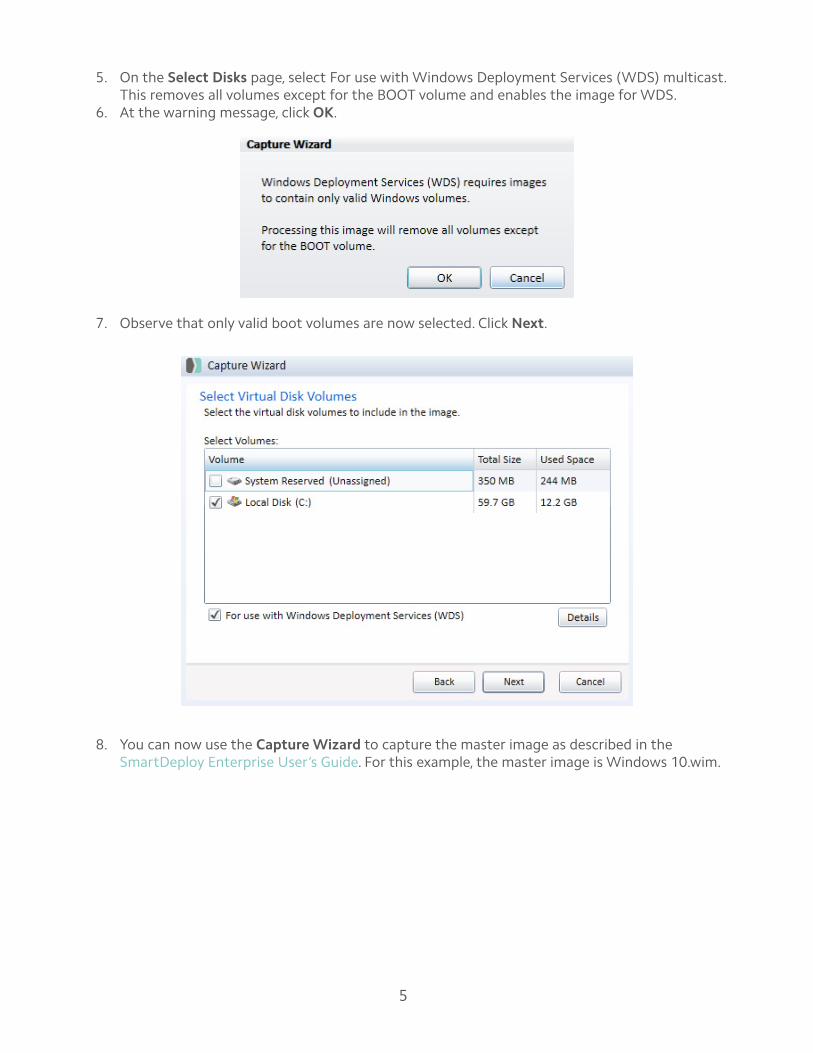
5. On the Select Disks page, select For use with Windows Deployment Services (WDS) multicast. This removes all volumes except for the BOOT volume and enables the image for WDS.
6. At the warning message, click OK.
7. Observe that only valid boot volumes are now selected. Click Next.
8. You can now use the Capture Wizard to capture the master image as described in the SmartDeploy Enterprise User’s Guide. For this example, the master image is Windows 10.wim.
6
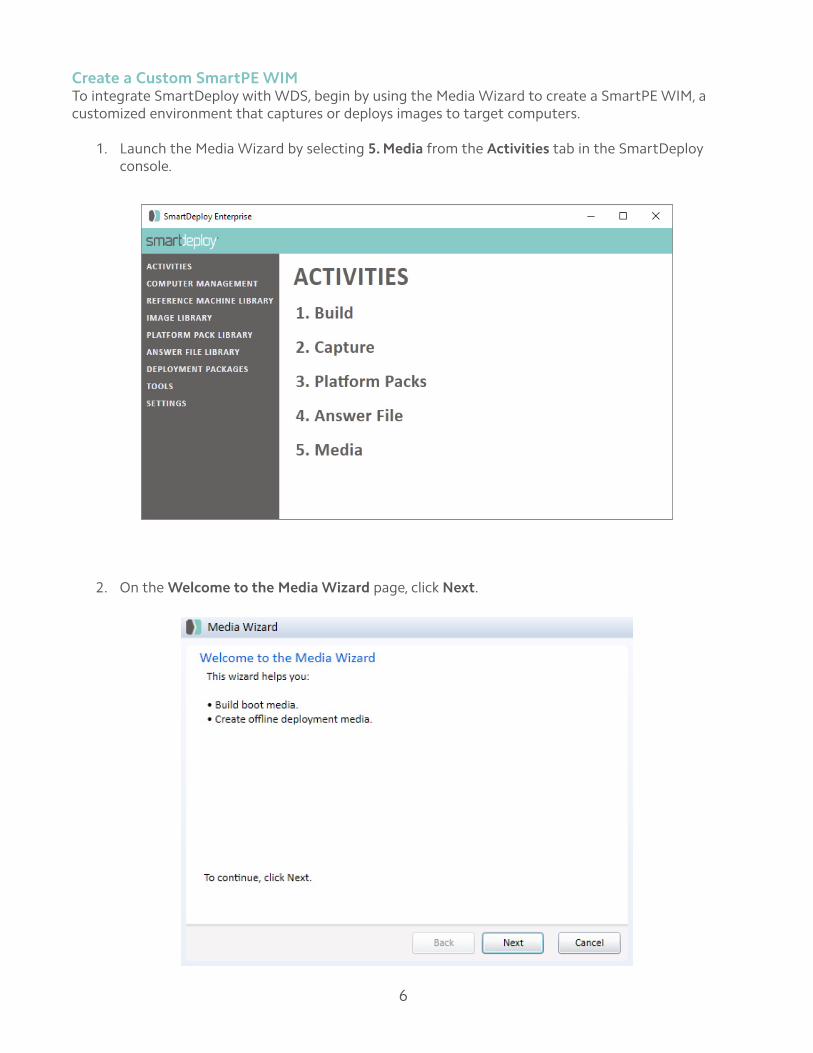
Create a Custom SmartPE WIMTo integrate SmartDeploy with WDS, begin by using the Media Wizard to create a SmartPE WIM, a customized environment that captures or deploys images to target computers.
1. Launch the Media Wizard by selecting 5. Media from the Activities tab in the SmartDeploy console.
2. On the Welcome to the Media Wizard page, click Next.
7
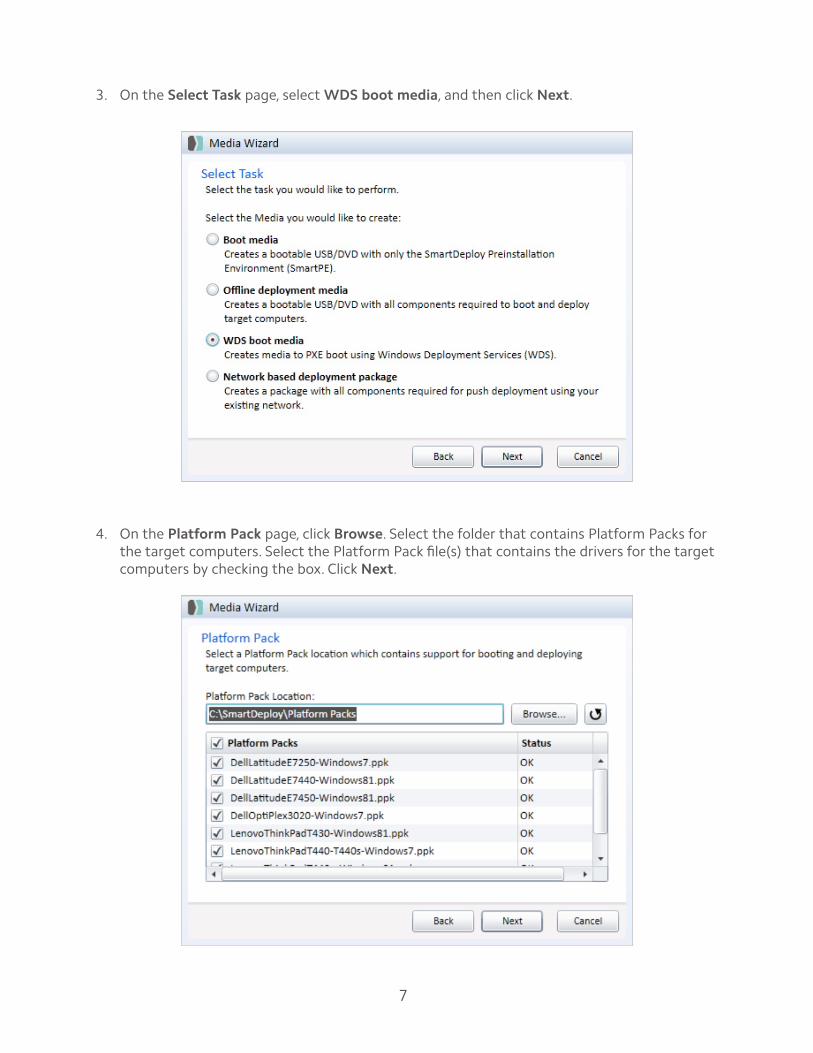
3. On the Select Task page, select WDS boot media, and then click Next.
4. On the Platform Pack page, click Browse. Select the folder that contains Platform Packs for the target computers. Select the Platform Pack file(s) that contains the drivers for the target computers by checking the box. Click Next.
8
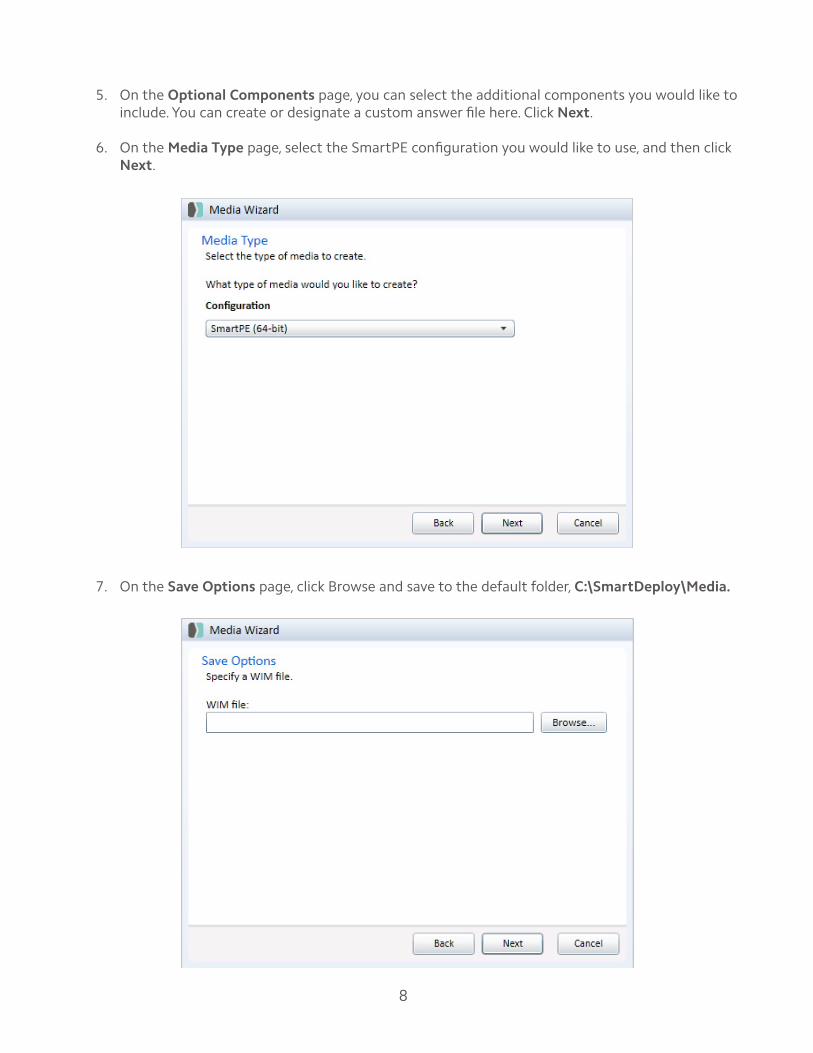
5. On the Optional Components page, you can select the additional components you would like to include. You can create or designate a custom answer file here. Click Next.
6. On the Media Type page, select the SmartPE configuration you would like to use, and then click Next.
7. On the Save Options page, click Browse and save to the default folder, C:\SmartDeploy\Media.

9
8. Click Save.
9. On the Save Options page, click Next.
10
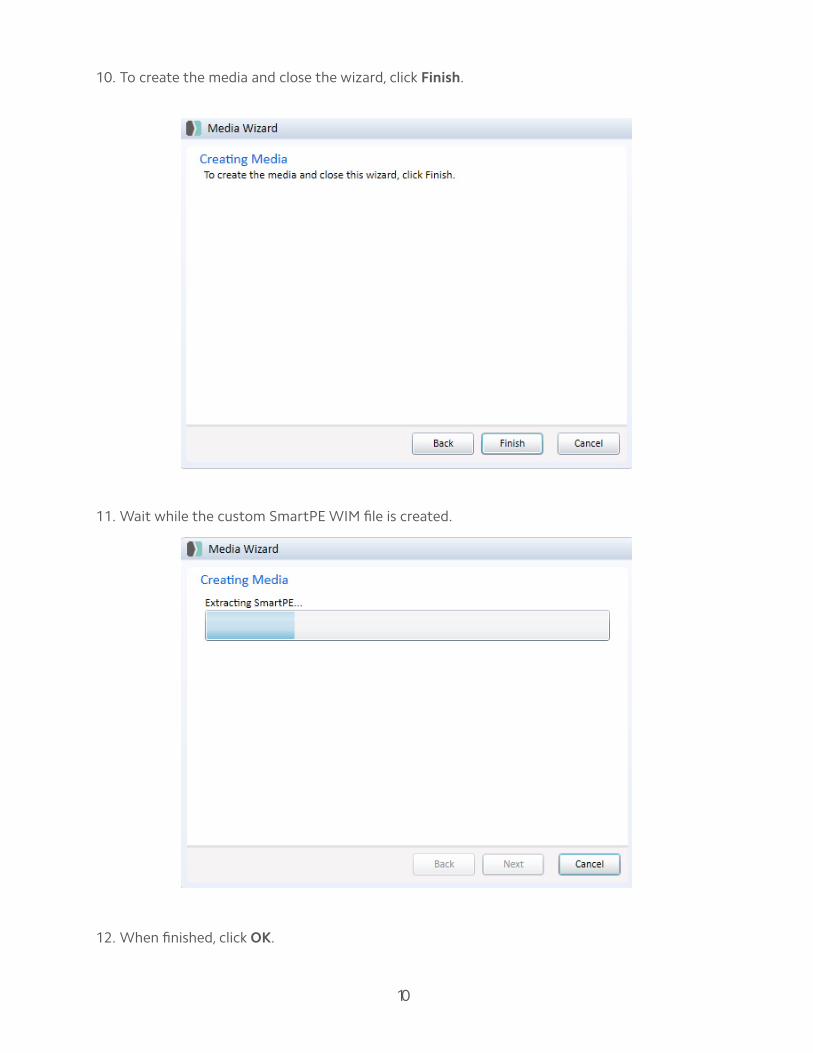
10. To create the media and close the wizard, click Finish.
11. Wait while the custom SmartPE WIM file is created.
12. When finished, click OK.

11
Import the Boot Image to WDS ServerCopy the SmartDeploy.wim file located in C:\SmartDeploy\Media, and import it to the WDS console so that SmartPE can be used as the WDS boot image.
1. Start the WDS Management Console by clicking Start > All Programs > Administrative Tools > Windows Deployment Services.
12
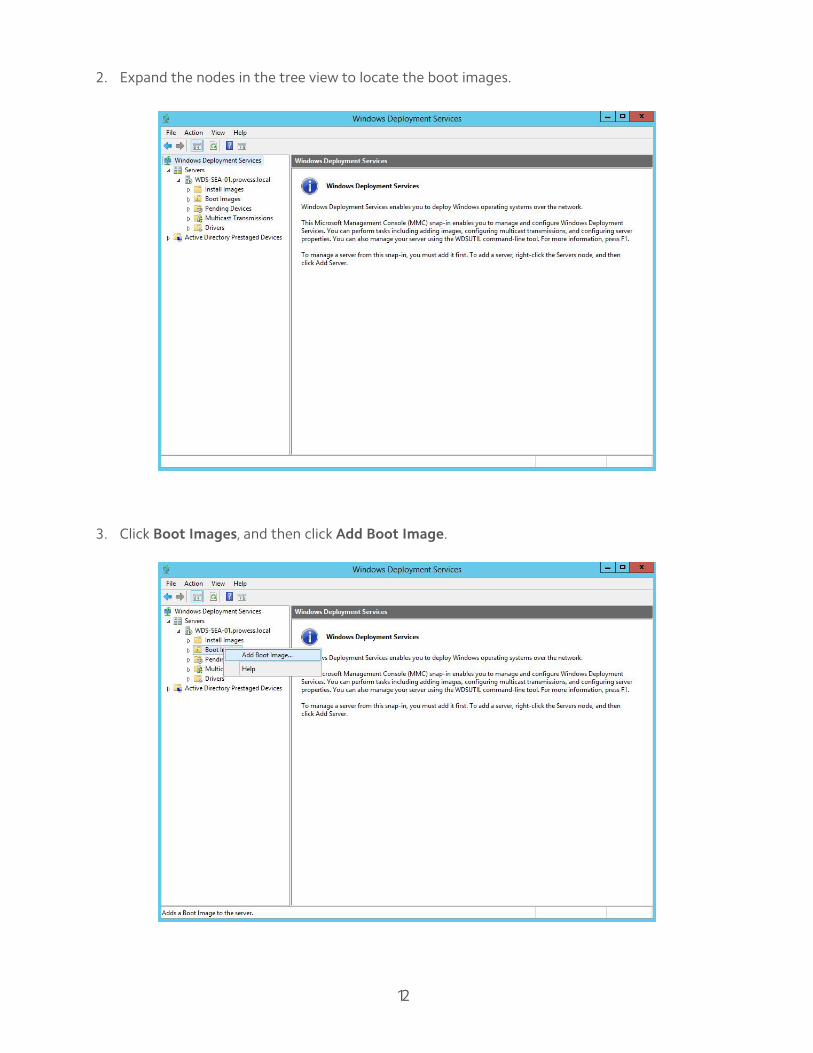
2. Expand the nodes in the tree view to locate the boot images.
3. Click Boot Images, and then click Add Boot Image.

13
4. Click Browse and browse to the location where you saved your boot WIM file you generated with the Media Wizard. Select that .WIM file and hit Next. Note: The default directory location of the boot WIM is C:\SmartDeploy\Media.
5. On the Image Metadata page, click Next.

14
6. On the Summary page, review the settings, and then click Next.
7. Wait while the image is added.
15
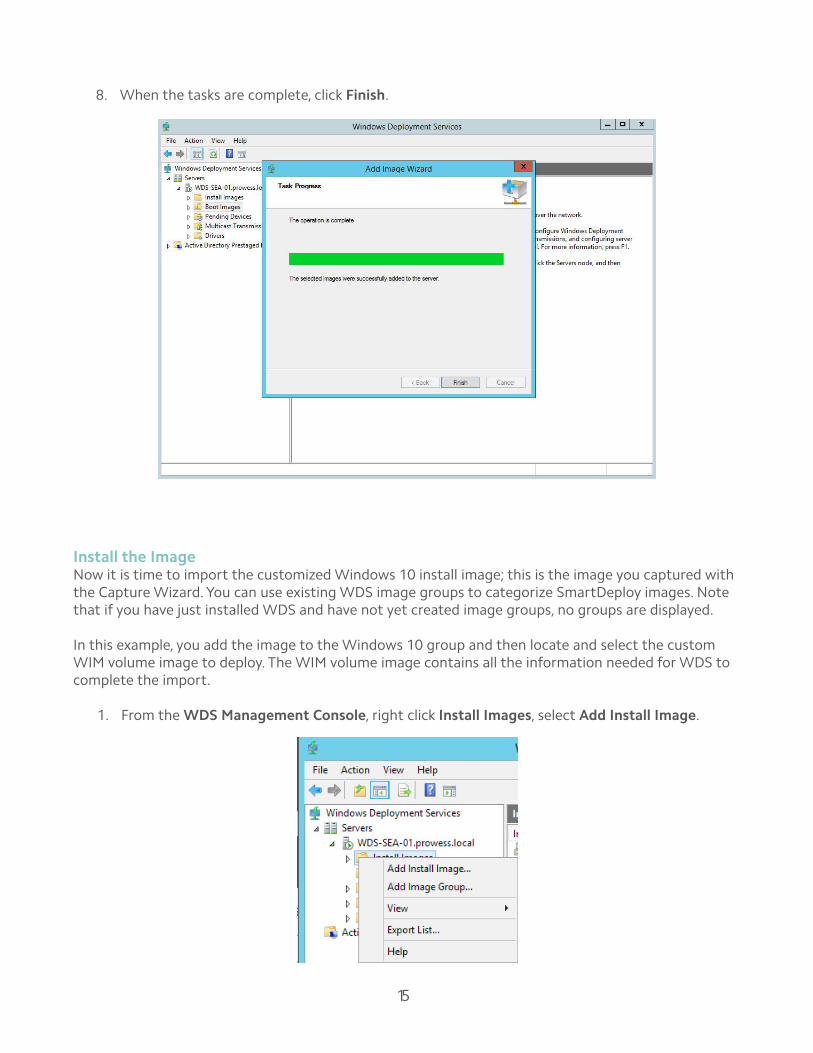
8. When the tasks are complete, click Finish.
Install the Image Now it is time to import the customized Windows 10 install image; this is the image you captured with the Capture Wizard. You can use existing WDS image groups to categorize SmartDeploy images. Note that if you have just installed WDS and have not yet created image groups, no groups are displayed.
In this example, you add the image to the Windows 10 group and then locate and select the custom WIM volume image to deploy. The WIM volume image contains all the information needed for WDS to complete the import.
1. From the WDS Management Console, right click Install Images, select Add Install Image.

16
2. Use existing WDS image groups to categorize the SmartDeploy image. Select the Select from existing image groups button, make sure Windows 10 is listed in the drop-down menu, and then click Next. If there are no existing groups, you can select Create a new image group and type the name of the new group.

17
3. Add the SmartDeploy images to the Windows 10 image group. Browse to your WIM location, C:\SmartDeploy\Images\Windows 10 x64.wim (the custom WIM volume image to deploy). Click Next. Note: Once you browse to your WIM and successfully import it into your WDS server, the WIM will be located in \\wds-server\reminst\Images\groupname\.

18
4. The Available Images page shows the images that are available in the file. Make sure that Windows10.wim is selected, and then click Next.
5. On the Summary page, review the settings, and then click Next. The selected image, Windows 10, is added to the server.
6. When the task is complete, click Finish.

19
Use Multicast TransmissionAs part of integration into WDS, you can choose to create a multicast transmission.
1. In the Windows Deployment Services Management Console, click on Windows 10, and then click on Create Multicast Transmission.
2. On the Transmission Name page, type the name of the transmission, and the click Next. In this example, type: Windows 10 Transmission

20
3. On the Multicast Type page, leave the Auto-Cast option selected, and then click Next.
4. When the task is complete, click Finish.
Boot to SmartPE and Deploy the ImageYou are now ready to boot your target computer to SmartPE. The target computer uses the boot WIM file to PXE boot.
1. Using the existing PXE environment, the target computer picks up the boot WIM file imported earlier and boots to SmartDeploy. Click on Deploy an image to start the Deploy Wizard. Note: you can also automate the deployment process using answer files.

21
2. On the Welcome to the Deploy Wizard page, click Next.
3. Locate the Windows 10 WIM. On the Select Image page, click Browse, and then click Network to browse to the network share where the image is located.

22
4. On the Map Network Drive page, provide the network location to the WDS remote install share (WDS repository \\sde-host\reminst), and then click OK.
5. On the Enter network credentials screen, type your credentials, and then click OK.

23
6. Locate and select the Windows 10 WIM on the mapped drive. Click Computer.
7. Scroll to the Network Location.

24
8. Browse to Z:\images\windows 10\windows 10.wim.
9. On the Select Image page, click Next.
25
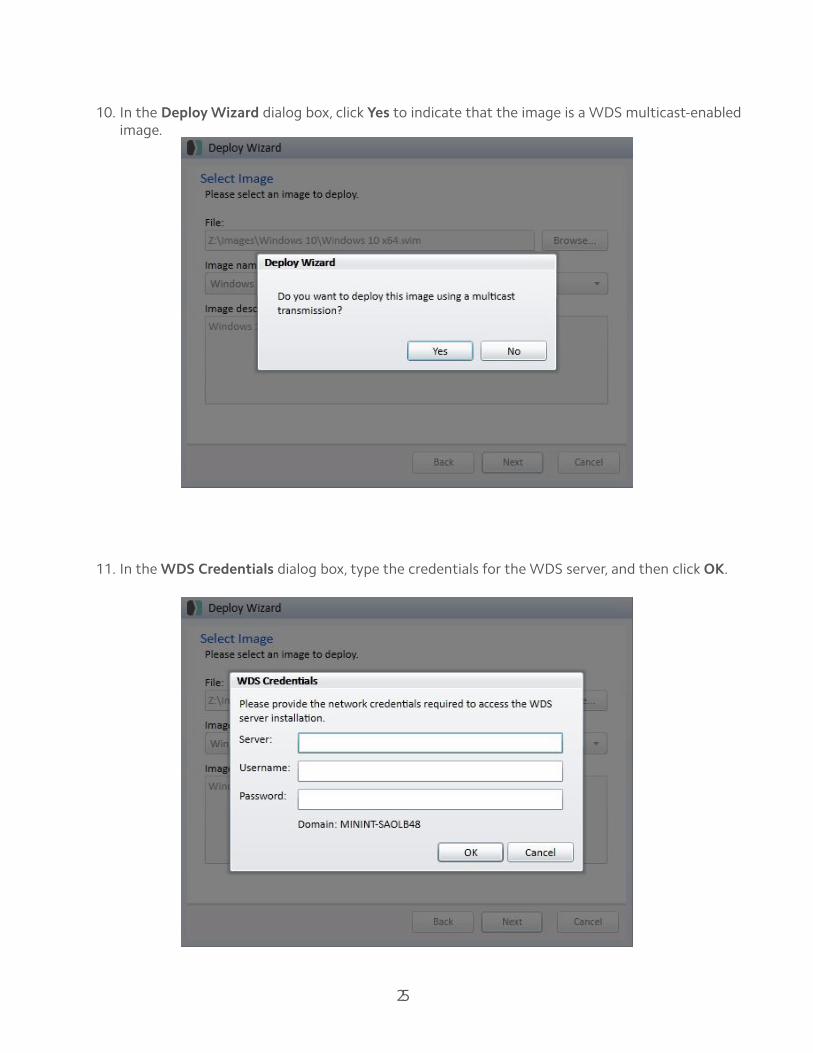
10. In the Deploy Wizard dialog box, click Yes to indicate that the image is a WDS multicast-enabled image.
11. In the WDS Credentials dialog box, type the credentials for the WDS server, and then click OK.
26
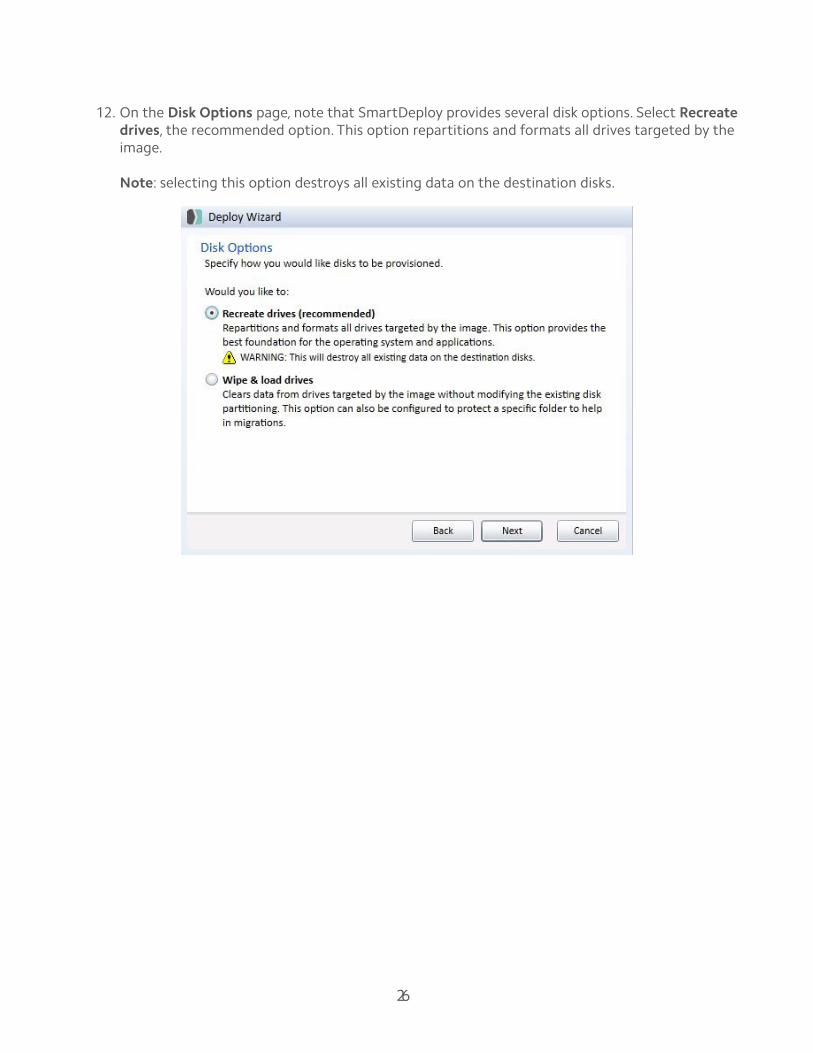
12. On the Disk Options page, note that SmartDeploy provides several disk options. Select Recreate drives, the recommended option. This option repartitions and formats all drives targeted by the image. Note: selecting this option destroys all existing data on the destination disks.

27
13. Next, you are prompted for standard Windows information.• The Product Key page appears. If you did not specify a product key when you captured an
image, you can enter the product key now. Click Next.• On the User Information page, enter the user name and organization. Click Next.• On the Regional Settings page, specify the time zone and language. Click Next.• On the Display Settings page, accept the default of Auto Detect. Click Next.
Note: if you are using an answer file, this can be automated.

28
14. In this example, the target computer is deployed to an existing domain. Enter the desired computer name and domain, and then click Next.
15. On the Join Domain Credentials page, type your user name, domain, and password, and confirm. Click Next.

29
16. Review your selections on the Summary page, and then click Next. The wizard is ready to provision the disks and apply the volume image. Note: you can save your selections to an answer file to automate the process by clicking Export.
17. To deploy the image and close the wizard, click Finish. The image will now be deployed.
30
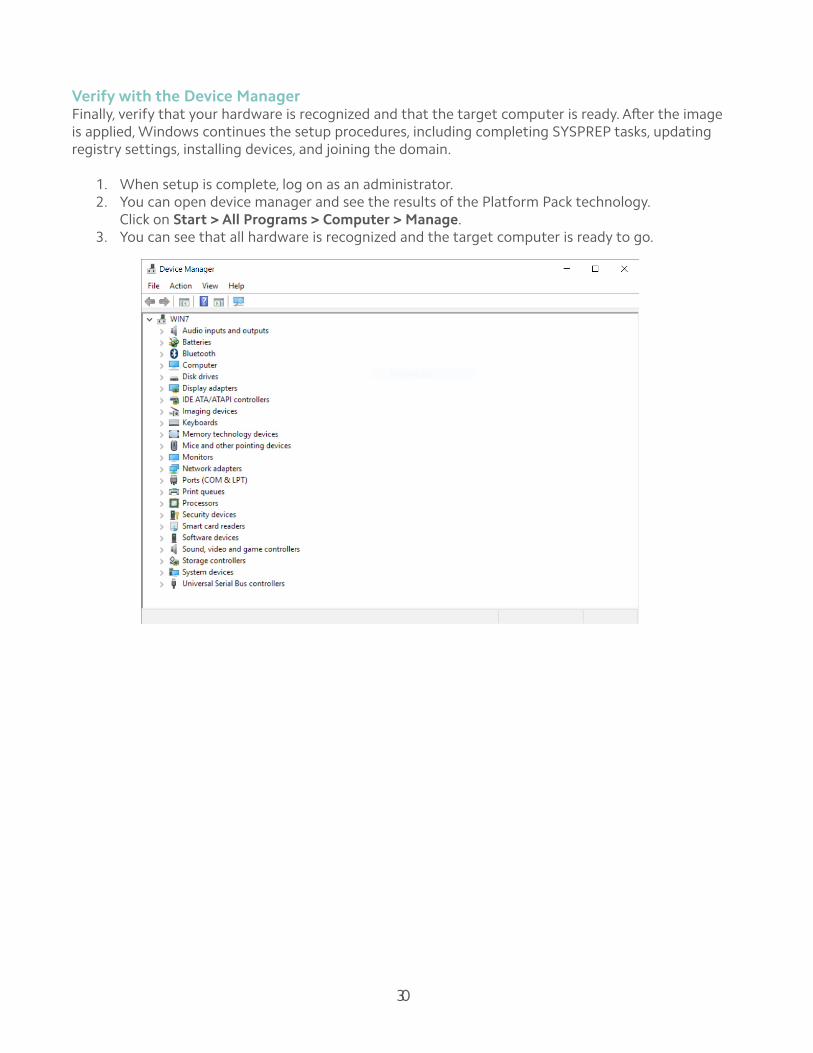
Verify with the Device ManagerFinally, verify that your hardware is recognized and that the target computer is ready. After the image is applied, Windows continues the setup procedures, including completing SYSPREP tasks, updating registry settings, installing devices, and joining the domain.
1. When setup is complete, log on as an administrator.2. You can open device manager and see the results of the Platform Pack technology.
Click on Start > All Programs > Computer > Manage.3. You can see that all hardware is recognized and the target computer is ready to go.
31
SummaryIt is easy to integrate custom WIM images created with SmartDeploy into Windows Deployment Services. Not only does this let you to take advantage of the time and cost saving benefits of SmartDeploy within WDS, but it also lets you extend the functionality of WDS beyond its native capabilities. Using SmartDeploy you only need to create and use a single image regardless of architecture or platform. You treat images created with SmartDeploy like you would any other install image in WDS. And the hardware-independent capabilities of SmartDeploy reduce the pain and frustration experienced by IT professionals who are responsible for supporting multiple computer models from multiple manufacturers.
More InformationThe following links provide further information:
• SmartDeploy Enterprise User’s Guide• SmartDeploy Home Page• DeployCentral Forum• Windows Deployment Services Getting Started Guide