Embed Size (px)
Citation preview

prajwaldesai.com http://prajwaldesai.com/how-to-deploy-microsoft-office-2013-using-sccm-2012-r2/
Prajwal Desai
How To Deploy Microsoft Office 2013 Using SCCM 2012 R2
In this post we will see how to deploy Microsoft Office 2013 using SCCM 2012 R2. If you are planning to deploy Microsoft Office 2010 using SCCM 2012 then you can click on this link. In this post we will be deploying Microsoft Office Professional Plus 2013 64 bit edition and the copy of office that I have is an MSDN copy. We know that the OCT (Office Customization Tool) is available only with volume licensed versions of Windows Installer-based Office 2013, Office 2010, and the 2007 Office system. To determine whether an Office 2013 installation is a volume licensed version, check the Office 2013 installation disk to see whether it contains a folder named Admin. If the Admin folder exists, the disk is a volume license edition. If the Admin folder does not exist, the disk is a retail edition. As there is no admin folder with MSDN copy we will first download Office Customization Tool 2013 from here. We are basically looking for an unattended setup of Microsoft Office 2013 and this can be achieved only when you customize the installation using office customization tool. You can refer to SCCM 2012 R2 step by step guide here.
Once you download the OCT 2013 setup file you need to install the software. Run the OCT 2013 executable file and extract the files to a folder inside Office installation files. In the below screenshot I have manually created the Admin folder and copied the OCT 2013 setup file inside it. The files are extracted to Admin folder, you can also skip creating a folder manually because the OCT 2013 setup file creates a folder named Admin by itself and extracts the files in it. The office 2013 setup files are stored on a drive in SCCM server in a folder named Office 2013.
On the SCCM server run the command prompt as administrator, change the path where office 2013 setup files are located. Run the command setup.exe /admin.

You will now see Microsoft Office Customization Tool, Choose Create a new setup customization file for following product, verify that correct product is selected. Click on OK.
Select Install location and organization name, in the text box provide the Organization Name.

Click on Licensing and user interface, choose the option Use KMS client key if you have KMS server in your organization for activating office 2013 suite, else choose Enter another product key and enter the office 2013 key. Click on I accept the terms in the license agreement. Select the Display level as Basic, check the box for Suppress modal and No cancel.
Now click on Modify Setup properties. Click Add, provide the Name as SETUP_REBOOT and Value as Never. Click OK.

Select Modify user settings, Microsoft Office 2013, Privacy, Trust Center. Double click the setting Disable Opt-in Wizard on first runand set the status as Enabled.
Now click on File -> Save As -> save the customization file inside Updates folder. Close the OCT tool.

Open the SCCM 2012 R2 console, under the Application Management, right click Applications and click Create Application.
Choose Automatically detect information and provide the path to file proplusrww.msi. Click Next.

The application information has been imported from .msi file. Click Next.

You can specify a little information about this application. We will change the Installation program command later. Choose the Installbehavior as Install for system. Click Next.

The Application has been created successfully. Click Close.
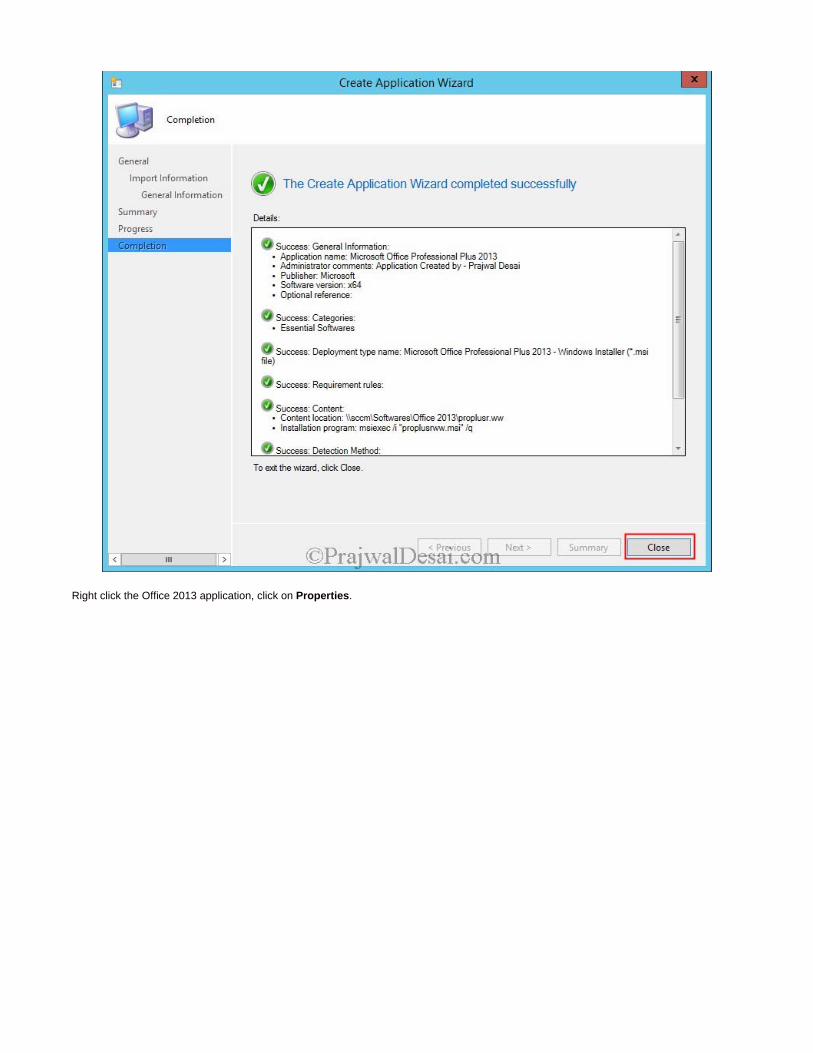
Right click the Office 2013 application, click on Properties.

Click on Deployment Types tab, click on the msi file and click Edit.

Click on Content tab, set the Content location to Office 2013 folder ( or a folder where Office 2013 installation files are present, remove proplusr.ww after Office 2013\ ). Click on Apply.
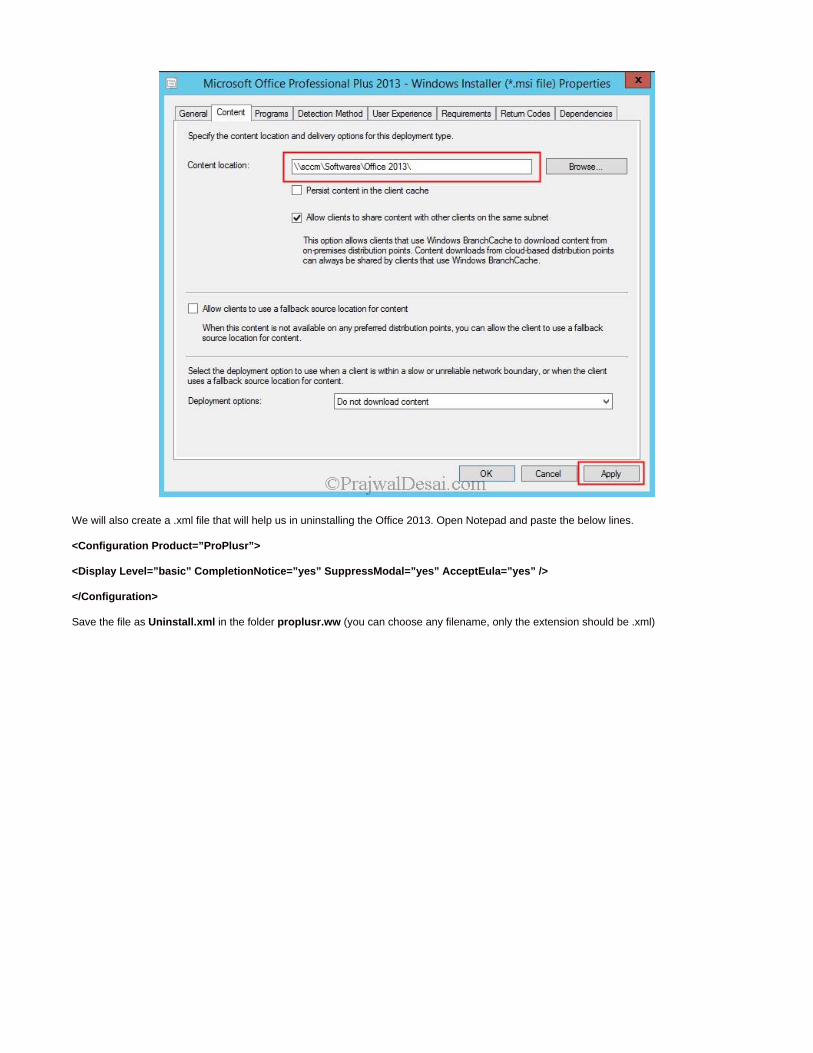
We will also create a .xml file that will help us in uninstalling the Office 2013. Open Notepad and paste the below lines.
<Configuration Product=”ProPlusr”>
<Display Level=”basic” CompletionNotice=”yes” SuppressModal=”yes” AcceptEula=”yes” />
</Configuration>
Save the file as Uninstall.xml in the folder proplusr.ww (you can choose any filename, only the extension should be .xml)

Click on Programs tab, change the Installation Program command to setup.exe, change the Uninstall program command to setup.exe /uninstall ProPlusr /config .\ProPlusr.WW\Uninstall.xml
Click on Apply and OK.

The next step is to make the application available to DP. Right click the Office 2013 application, click on Distribute Content, choose you DPand wait until the application is available with DP. You can verify this by checking the Content Status of the Office 2013 application under Distribution Status.
Deploy the Office 2013 application to the collection. Right click on the Office 2013 application and click on Deploy. Choose the Device Collection and choose the Action as Install and Purpose as Available. (I haven’t covered the screenshots of deploying application as it’s simple to deploy an application to collection).
After few minutes, on the client computer we see that the application is available. Select the software and click on Install Selected.

The application is first downloaded to the client computer and then installed. We now see that the application is installed successfully.

On the client machine we see Microsoft Office 2013 as installed program.

Lets try uninstalling the Office 2013 suite, to uninstall the app click on Uninstall. You will see the status as Removing. Since we had configured the uninstall command for this application, the uninstall process goes smoothly.

Finally we see that Microsoft Office Professional Plus 2013 has been successfully uninstalled. You can again install the application if you need it.