Embed Size (px)
Citation preview
How to create and modify Eudemons Online 3D models
1 - What do you need
what software tools do you need to modify the models:
– you need one program to convert C3 models to NIF format, and back to C3 format. That will be conversion tool Biturn.
– next you need 3D editor that can work well with NIF file format. I use Blender with NifTools. I have read that NifTools works well also with 3DS Max and Maya, but I don't have any experience with those. Blender is free and works on both windows and linux.
– texture editor and converter to DDS if you want to set up new textures on the model. I use „DDS Converter 2“ for conversion of DDS textures.
So if you don't have these, you can get them here:– download and install Blender from http://www.blender.org/download/get-blender/ . Its
free.– for Blender NIF scripts you need also Python and PyFFI( Python File Format Interface).
download Python from http://www.python.org/download/ and install it.– download PyFFI from http://sourceforge.net/project/platformdownload.php?
group_id=199269 and install it.– And finally, download the NIF scripts for Blender from
http://sourceforge.net/project/showfiles.php?group_id=149157&package_id=166219– if you have this document you probably also have Biturn with C3 support– „DDS Converter 2“ can be downloaded at
http://eliteforce2.filefront.com/file/DDS_Converter;29412
You should get these versions to make all work correctly:
– I use: Blender 2.49b on windows and 2.45 on linux. New Blender 2.5 changes its interface completely, so this document does not describe actions in Blender 2.5 or later.
– Nifscripts 2.5.1, which requires : Blender 2.49a or higher, Python 2.6 or higher, but not 3.0 or higher. PyFFI 2.1.0 or higher. On Linux I use NifScripts 2.5.0 on Blender 2.45 with Python 2.5.2 and PyFFI 2.0.5
– Biturn version 0.9a6 or later, special version with C3 support.
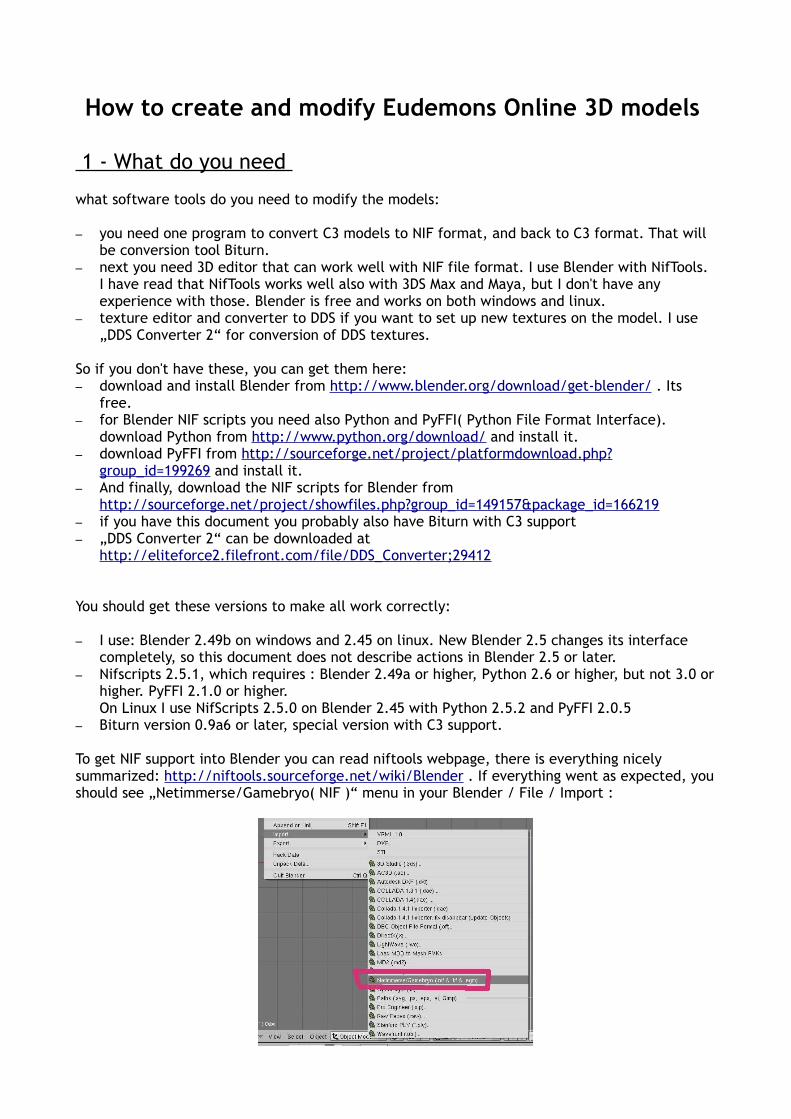
To get NIF support into Blender you can read niftools webpage, there is everything nicely summarized: http://niftools.sourceforge.net/wiki/Blender . If everything went as expected, you should see „Netimmerse/Gamebryo( NIF )“ menu in your Blender / File / Import :
2 - How to do it - working process
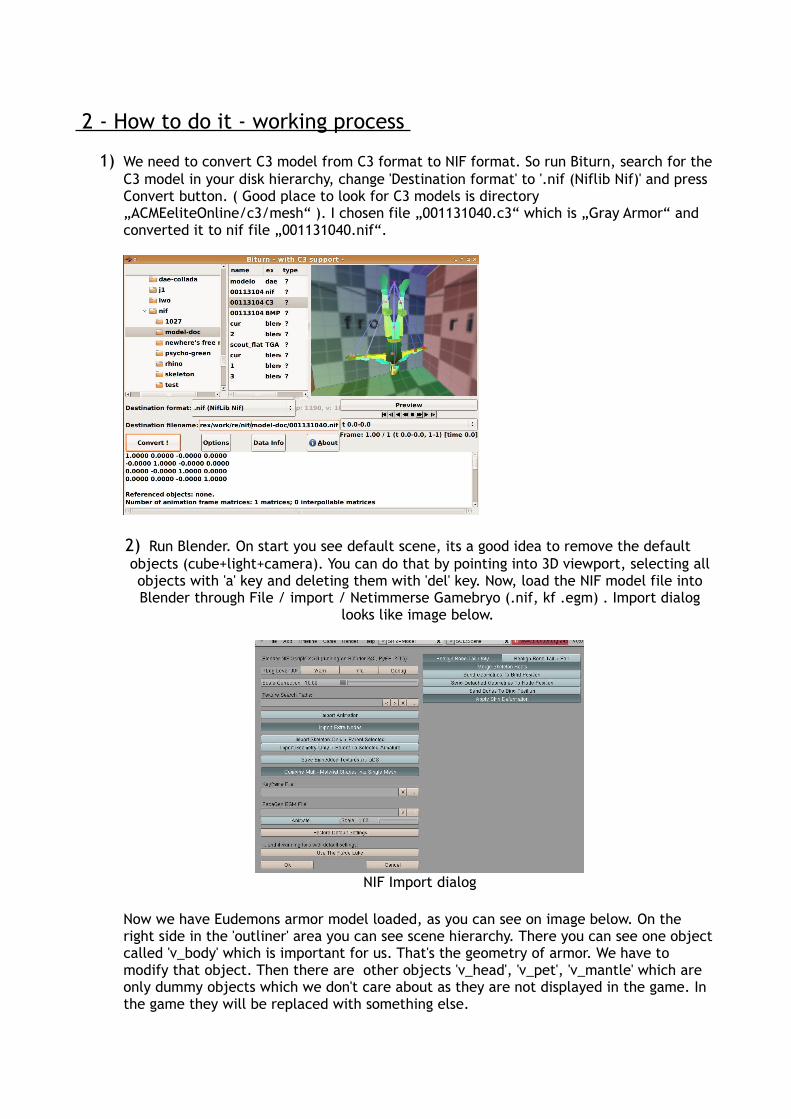
1) We need to convert C3 model from C3 format to NIF format. So run Biturn, search for the C3 model in your disk hierarchy, change 'Destination format' to '.nif (Niflib Nif)' and press Convert button. ( Good place to look for C3 models is directory „ACMEeliteOnline/c3/mesh“ ). I chosen file „001131040.c3“ which is „Gray Armor“ and converted it to nif file „001131040.nif“.
2) Run Blender. On start you see default scene, its a good idea to remove the default objects (cube+light+camera). You can do that by pointing into 3D viewport, selecting all objects with 'a' key and deleting them with 'del' key. Now, load the NIF model file into Blender through File / import / Netimmerse Gamebryo (.nif, kf .egm) . Import dialog
looks like image below.
NIF Import dialog
Now we have Eudemons armor model loaded, as you can see on image below. On the right side in the 'outliner' area you can see scene hierarchy. There you can see one object called 'v_body' which is important for us. That's the geometry of armor. We have to modify that object. Then there are other objects 'v_head', 'v_pet', 'v_mantle' which are only dummy objects which we don't care about as they are not displayed in the game. In the game they will be replaced with something else.

Also you can see that there are some armatures which symbolize model's animation skelet (black or pink lines in the 3d view). It is not formed into humanoid-skelet shape, as they're armature nodes which matrices are absolute-position baked matrices. We have to align our armor model with old armor model so the armor moves with game character correctly.
Armor imported into Blender, file 1.blend
3) Now let's modify the armor. I decided to replace armor with a different model. I have prepared a 'modelo.dae' 3D model, which is a model of normal guy with t-shirt and trousers. Its free, downloadable from Collada model library. So I use import menu again to import 'modelo.dae' through „Collada 1.4 dae“ plugin. It imports as very large object compared to armor model. So you have to right-click it to select it, and then scale it down with 's' key and mouse movement. Then I'll move it with 'g' key to proper location and rotate it with 'r' key.
File 'modelo.dae'
4) I only need the geometry mesh from 'modelo', I don't need its skelet. I'll move the 'scout' mesh into the armor's scene by right-click selecting it, then getting into object menu with 'space' key, choosing 'Object', 'Make links', 'To scene', 'Scene' (first one, that contains armor). Object is now 'copied' from 'modelo' scene into armor scene. So now I can remove the 'modelo' scene so it does not bother me anymore. Scene now looks like this:

file: 2.blend
5) Now, I want to place new scout model at place of old armor. Body positions should match as much as possible. First I'll scale and rotate the body, then I'll do minor position updates. So by right-click and keys 'g', 'r', 's', I'll move object to correct position, scale and rotation to match armor.
Scout moved and scaled to match armor. His arms are still at incorrect position.
Now I switch to edit mode, select arm vertices with 'b' key, rotate them and move them with 'r', 'g' keys, to get arms to correct position. Its also time to move other vertices, so the 'new body' matches 'old body'. I had to straighten arm's fingers so they're stretched. I have also delete all vertices above neck, because armor model does not have any head. Head will be replaced with avatar head model in the game.

edit mode
new 'scout' armor matching old armor as much as possible. File 3.blend
6) Now I'll join both objects so they are as single mesh. For this first I'll first change from 'Edit mode' back to 'Object mode', select and move 'scout' model aside, so it does not interfere with 'v_body' model (so it can be selected easily later). Then I'll select first 'scout' model with right-click, and then 'v_body' model with shift-right-click. 'v_body' has to be selected last, so the scout joins into 'v_body' object. Now with 'space' key pop-up the object menu, and select 'object', 'join objects...' . Objects are now a single mesh.
For easier work with the objects I'll mark vertices of 'scout' model into single vertex group, and original armor into other vertex group. I'll do that by changing into 'edit' mode (see image below), selecting vertices with 'b' key and selecting region by mouse.When vertices of one object are selected, I'll change panel to 'Editing' (see circled item on picture below, its not the same as 'Edit ), then create New Vertex group (by clicking on New button), name it(by clicking on the name area) and assign selected items to the group (by clicking on Assign button - see underlined items on image below).

Changing to edit mode, changing to 'edit' mode on Panel, and assigning vertices to vertex group.
7) Then I'll do the same with armor vertices. Deselect currently selected 'scout' vertices either by clicking 'Desel.' button on the Panels, or by pressing 'a' key. Select armor vertices by pressing 'b' key and mouse-drag selecting their area. Creating new vertrex group, assigning selected vertices to it and renaming it. Now you can test if vertices are correctly assigned to the vertex group by clicking 'select' or 'desel.' buttons on the 'Vertex Groups' panel.See file 4.blend
8) Now we have to bind new armor model to the skeleton. If it would not be bound to skeleton the model would not move at all. We have to assign all body parts to respective skeleton 'nodes', that way vertices will move with bone nodes. This process is also called 'assigning weights to vertices'.
First switch to 'Object mode', then select armor models with right-click. Now switch to 'Weight paint' mode, and now click on the 'vertex groups' button, which will show you existing groups of vertices. If you click on some vertex group the armor will change its color. Red marks vertices which belong to the group by 100%. Blue marks vertices that are not in the group. Other colors mean that vertex belongs to the group only partially (it is affected by the bone only a little). As you can see there are 59 groups named according the body parts. Now you have to draw vertex weights to new mesh according to the body parts. Because you see old armor mesh you can use it as your guide, you see which part of body should be drawn in each group.
On the 'Paint' panel there is option „x-mirror“. Keep that option turned off, as it would create copies of the vertex groups and that would confuse painting of the model.

9) When you weight-painting vertices you should specify amount of weight and your brush on the 'Paint' panel (see on image above). Draw vertices group after group. This is the hardest and most time-consuming work. Be sure to draw mesh from all directions, not only from front.
Top half of the model weight-painted – 5.blendWhole model weight-painted – 6.blend
I'm not painting anything into groups 'pelvis shield' and 'ass shield' as my model does not have anything like this.
10) One more important thing. Exported model has to use only single texture and material, otherwise it would get converted incorrectly. Currently in scene there are multiple materials, because old armor had one material, and 'scout' mesh had also some material. So I get to the 'UV Face select' mode (or Edit mode if there is no UV Face Select), click 'a' key to select all faces, and then change their texture with changing the texture combo selection in the 'UV/Image Editor' pane.

Each object has different texture used. File 7.blend
To erase object's references to more than one material first switch to 'Object mode'. Then select material you want to erase (see image below) and click 'delete'.
Buttons to delete multiple materials on object.
11) Now, I'll try to export the model for the first time back to the NIF format. I do this export only to check if the weights are allright. Because, if some vertex is missing weights ( to say other way, if some vertex is not assigned to any bone node ), it would not move with model, but more importantly – nif exporter will not export the model. So I go to Export menu and select „Netimmerse/Gamebryo( NIF )“. Because I do have some unweighted vertices in my model ( file 7.blend ) after a while of exporting I will get long error message that says „Cannot export mesh with unweighted vertices. The unweighted vertices have been selected in the mesh so they can be easily identified“. This is a good thing, you can see right away the vertices that need to get fixed. If you can't spot them on the model then use 'g' key to move selected vertices around and drag your mouse untill you see them. In case that there are no vertices selected even after this message, try to switch from 'Edit mode' to 'Object mode' and export again. Generally, its a good idea to export when in 'Object mode', because it seems that your mesh changes made in 'Edit mode' will be saved only if you move to 'Object mode' before exporting.

Export error.
Unweighted vertices are selected. Easy to spot them by dragging them with 'g'.
Now, fix those vertices and paint some weights on them and try to export again, untill you don't get the error message.File 8.blend.
12) We have new armor correctly weighted so its ready to be used and we don't need old armor anymore. We will now position new armor precisely to the position of old armor and delete the old armor. We can do that easily in 'Edit mode' because both old armor and new armor have their vertices assigned to vertex groups 'old armor' and 'scout'. When new 'scout' armor is in the correct position, select 'old armor' vertices, hit 'del' key and select to erase 'vertices'.
See files 9.blend , 001131040-out.nif
Afterwards export the armor into NIF format. When exporting it is important to check some of options:- Export Geometry Only (.nif) = ON- Stripify Geometries = OFF- Stitch Strips = OFF- Flatten Skin = OFF- Export Skin Partition = ON- Pad & Sort Bones = OFF
On the image below you can see export options that I am using:

13) Now we have to finish conversion from NIF format to C3 format through program Biturn. Run the program, click on the nif file, select 'C3 (TQ Digital C3)' and hit 'Convert' button.Now you can try to preview final C3 file. If you can't find converted C3 file in the list of files, try to change to some other directory and back, so the list of files is reloaded.
Preview of new armor model, at the moment without texture.
If you want to preview it with correct texture you have to convert model texture to DDS format, and name it according the model name ( in this case name would be 001131040-out.dds ). Although Biturn can convert images to DDS, they are in inproper format to be used in Eudemons. This should be improved in later versions of Biturn. For this moment you have to use different DDS converter, I use „DDS Converter 2“ which is freely downloadable from internet.
14) Final step – copy the new armor model to Eudemons directories and test it in the game. Before copying the files backup the original files so you can get back your original armor if you get bored with your new one. C3 model should be copied into directory „ACMEeliteOnline/c3/mesh“, DDS texture into directory „ACMEeliteOnline/c3/texture“.
Only you can see the armor, other people in the game see you in your old armor, unless you send them a patch with new armor.

On the left – new model with texture of original armor. On right – new model with correct texture, but normals are flipped and model looks like its inside-out.
Model is finished, trying if it animates correctly. Model also carries modified sword.
Troubleshooting FAQ:Q: What if I don't want to import new mesh for armor, and I want only to modify existing armor ?A: you can do that easily by draggin vertices, and adding new polygons to v_body mesh. Do not forgot to add vertex weights to new geometry.
Q: Model is moving in weird fashion. Legs and arms are stretched few meters when movingA: Make sure that your v_body mesh is not scaled or rotated. In Blender you can check on this by selecting object in Object mode and pressing 'n'. Rot and Scale parameters should be zero. If they're not, apply Ctrl+A so they are. Also check your NIF export options and the 'scale' parameter. It should be exactly the same as 'scale' parameter in NIF inport options (in my case that's 10.0 )
Q: When I export my armor from Blender to NIF format I get weird error - „Cannot export mesh with unweighted vertices“A: See instructions at point 11
Q: Is it possible to create new armor from scratch ?A: No, at the moment it is not possible to create new C3 models from scratch with all animations. If you want to have animated model you allways need to start from existing model as written in instructions above.
Q: Is it possible to modify other models too ? Weapons, NPC's, heads, hair, mounts ?
A: Weapons can be modified similair way, and even easier because they contain only single vertex group. I haven't tried NPC's, mounts and other models, but they should work in similair fashion.
Q: My model looks a little weird in game, it looks like it is turned inside-out.A: Try to flip model normals. Go to 'Edit mode', select all mesh vertices, click on 'mesh' menu which is next to 'Edit mode' there select 'normals' and 'flip'.
Q: Export of NIF model went very fast and nothing was exported, NIF file is too small.A: Try changing to 'Object mode'. Try selecting the body object, and export again. Or try to restart Blender.
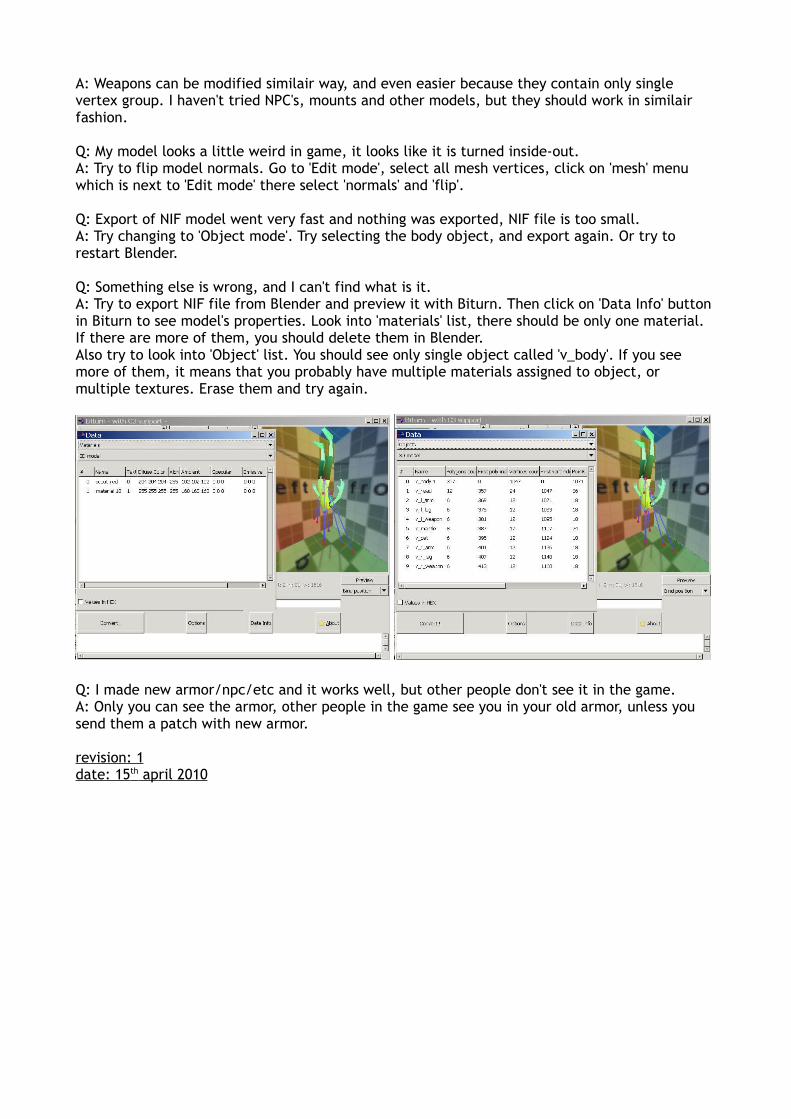
Q: Something else is wrong, and I can't find what is it.A: Try to export NIF file from Blender and preview it with Biturn. Then click on 'Data Info' button in Biturn to see model's properties. Look into 'materials' list, there should be only one material. If there are more of them, you should delete them in Blender.Also try to look into 'Object' list. You should see only single object called 'v_body'. If you see more of them, it means that you probably have multiple materials assigned to object, or multiple textures. Erase them and try again.
Q: I made new armor/npc/etc and it works well, but other people don't see it in the game.A: Only you can see the armor, other people in the game see you in your old armor, unless you send them a patch with new armor.
revision: 1date: 15 th april 2010