Embed Size (px)
Citation preview

How-to Guide SAP NetWeaver 2004s
How To… build BEx Analyzer Workbooks for Planning with Excel Design Objects Version 1.10 – September 2006 Applicable Releases: SAP NetWeaver 2004s (Business Information Management - Enterprise Reporting, Query, and Analysis)

© Copyright 2006 SAP AG. All rights reserved. No part of this publication may be reproduced or transmitted in any form or for any purpose without the express permission of SAP AG. The information contained herein may be changed without prior notice. Some software products marketed by SAP AG and its distributors contain proprietary software components of other software vendors. Microsoft, Windows, Outlook, and PowerPoint are registered trademarks of Microsoft Corporation. IBM, DB2, DB2 Universal Database, OS/2, Parallel Sysplex, MVS/ESA, AIX, S/390, AS/400, OS/390, OS/400, iSeries, pSeries, xSeries, zSeries, z/OS, AFP, Intelligent Miner, WebSphere, Netfinity, Tivoli, and Informix are trademarks or registered trademarks of IBM Corporation in the United States and/or other countries. Oracle is a registered trademark of Oracle Corporation. UNIX, X/Open, OSF/1, and Motif are registered trademarks of the Open Group. Citrix, ICA, Program Neighborhood, MetaFrame, WinFrame, VideoFrame, and MultiWin are trademarks or registered trademarks of Citrix Systems, Inc. HTML, XML, XHTML and W3C are trademarks or registered trademarks of W3C®, World Wide Web Consortium, Massachusetts Institute of Technology. Java is a registered trademark of Sun Microsystems, Inc. JavaScript is a registered trademark of Sun Microsystems, Inc., used under license for technology invented and implemented by Netscape. MaxDB is a trademark of MySQL AB, Sweden. SAP, R/3, mySAP, mySAP.com, xApps, xApp, and other SAP products and services mentioned herein as well as their respective logos are trademarks or registered trademarks of SAP AG in Germany and in several other countries all over the world. All other product and service names mentioned are the trademarks of their respective companies. Data
contained in this document serves informational purposes only. National product specifications may vary. These materials are subject to change without notice. These materials are provided by SAP AG and its affiliated companies ("SAP Group") for informational purposes only, without representation or warranty of any kind, and SAP Group shall not be liable for errors or omissions with respect to the materials. The only warranties for SAP Group products and services are those that are set forth in the express warranty statements accompanying such products and services, if any. Nothing herein should be construed as constituting an additional warranty. These materials are provided “as is” without a warranty of any kind, either express or implied, including but not limited to, the implied warranties of merchantability, fitness for a particular purpose, or non-infringement. SAP shall not be liable for damages of any kind including without limitation direct, special, indirect, or consequential damages that may result from the use of these materials. SAP does not warrant the accuracy or completeness of the information, text, graphics, links or other items contained within these materials. SAP has no control over the information that you may access through the use of hot links contained in these materials and does not endorse your use of third party web pages nor provide any warranty whatsoever relating to third party web pages. SAP NetWeaver “How-to” Guides are intended to simplify the product implementation. While specific product features and procedures typically are explained in a practical business context, it is not implied that those features and procedures are the only approach in solving a specific business problem using SAP NetWeaver. Should you wish to receive additional information, clarification or support, please refer to SAP Consulting. Any software coding and/or code lines / strings (“Code”) included in this documentation are only examples and are not intended to be used in a productive system environment. The Code is only intended better explain and visualize the syntax and phrasing rules of certain coding. SAP does not warrant the correctness and completeness of the Code given herein, and SAP shall not be liable for errors or damages caused by the usage of the Code, except if such damages were caused by SAP intentionally or grossly negligent.

- 1 -
1 (Business) Scenario In this guide, we will show you how you can use images and other Excel Design Objects for building Planning Applications within the BEx Analyzer framework.
2 Introduction Within SAP NetWeaver 2004s BI, planning applications can be created within the BEx Analyzer. These applications make extensive use of calling commands to send parameters or actions back to the server for interaction. This guide shows how to use Excel application constructs for enhancing your options available to you for planning within the BEx Analyzer.
3 Pre-requisites • You have a BI system on release SAP NetWeaver 2004s.
• You have constructed a BEx planning query.
• You have built a planning function or planning sequence in the planning modeler.
• You have launched the SAP NetWeaver 2004s version of BEx Analyzer.
• You have logged on to the BI system.

- 2 -
4 The Step By Step Solution
4.1 Using Embedded Images for executing Planning Commands In this scenario, we want to embed two additional images into the default BEx Analyzer Workbook. One image needs to say “Transfer Values” and the other needs to say “Save Data”. We will use the Web Application Designer to create these images for us.
1. Within the BEx Analyzer, choose “Open Query”.
2. Choose your planning enabled query and click OK.

- 3 -
3. You should now see your planning query embedded in the default workbook.
4. Launch the 2004s BEx Web Application Designer.
5. Create a new web application.

- 4 -
6. Drag and drop the “Button Group” web item into your web application.
7. Go to the web item parameters for this web item and choose the Help Selector for Button 1.
8. Type in “Transfer Values” in the caption and assign any command. Choose OK.

- 5 -
9. Choose the help selector for Button 2.
10. Type in “Save Data” in the caption
and assign any command. Choose OK.
11. Save and run your web application. You should see the two buttons you created.
- 6 -
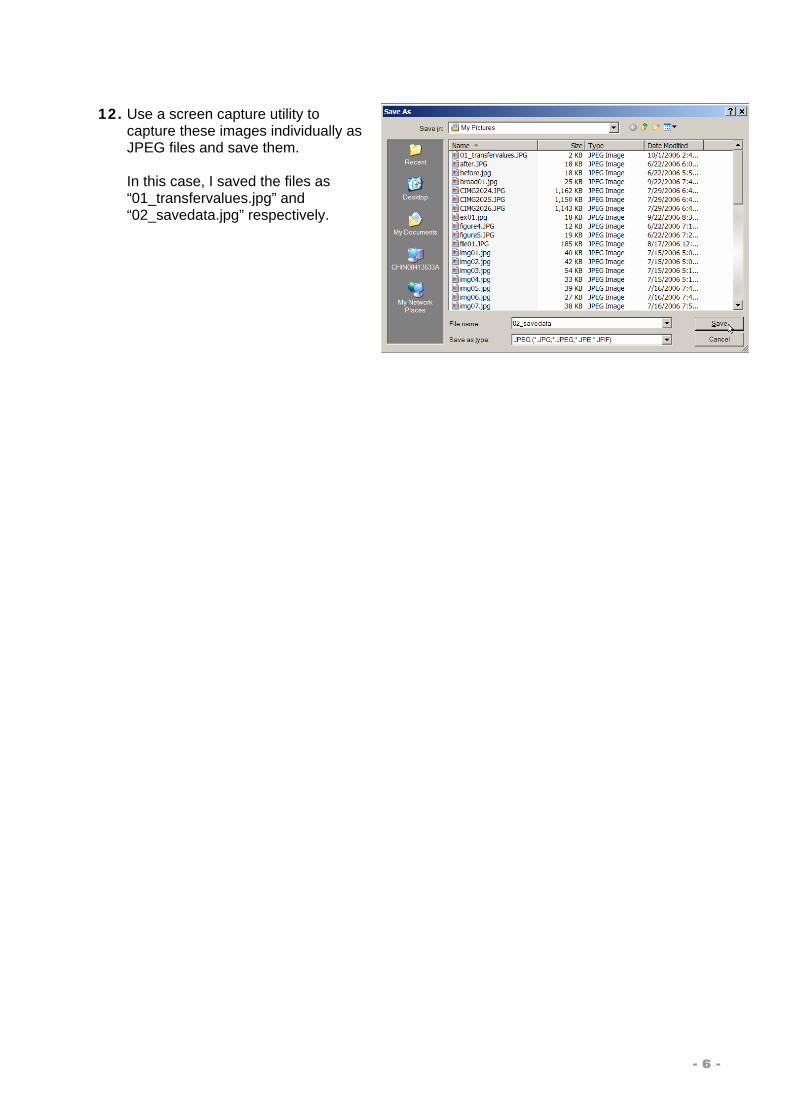
12. Use a screen capture utility to capture these images individually as JPEG files and save them. In this case, I saved the files as “01_transfervalues.jpg” and “02_savedata.jpg” respectively.

- 7 -
13. Go back to your BEx Analyzer application and insert a worksheet.
- 8 -
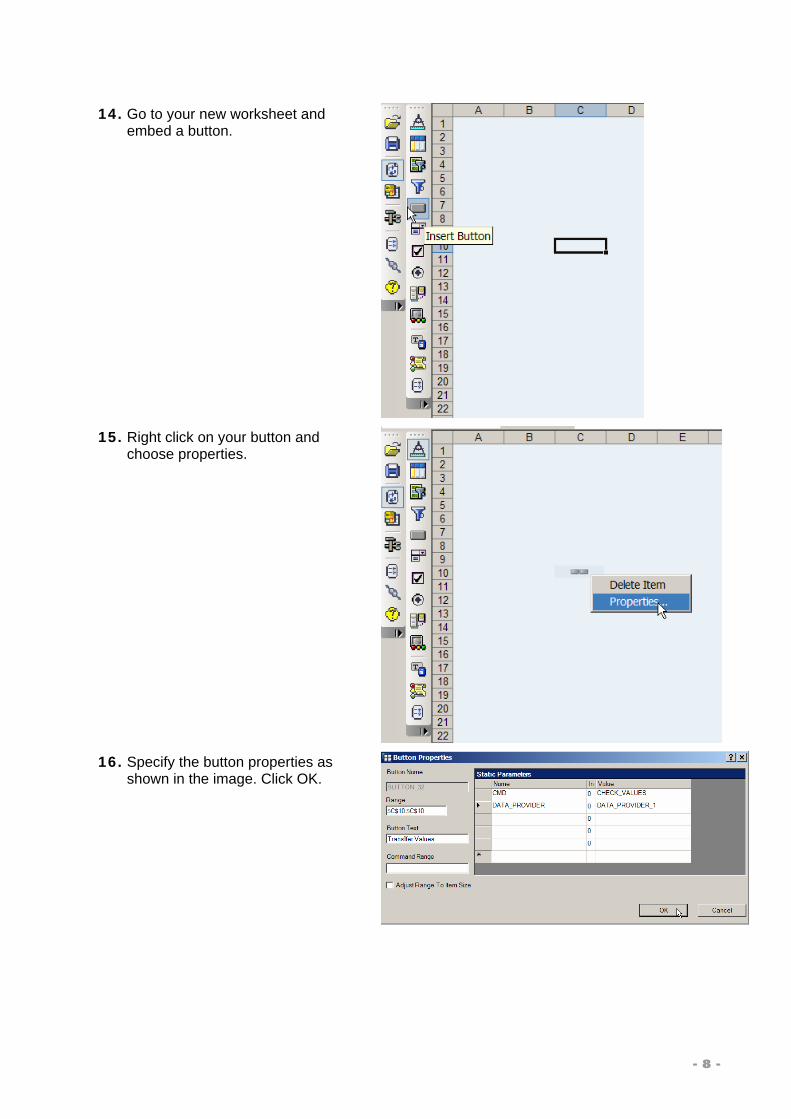
14. Go to your new worksheet and embed a button.
15. Right click on your button and
choose properties.
16. Specify the button properties as
shown in the image. Click OK.

- 9 -
17. Insert another button into your Excel Worksheet.
18. Right click on this worksheet an go
to properties.
19. Specify the properties as shown in this image and click OK.

- 10 -
20. Go back to your “Table” worksheet.
21. In Excel, choose “Insert -> Picture -> From File”.
22. Choose your “Transfer Values” jpeg picture and click Insert.

- 11 -
23. In Excel, choose “Insert -> Picture -> From File”.
24. Choose your “Save Data” jpeg picture and click Insert.
25. Now your workbook should look as follows:

- 12 -
26. Within Excel, go to “Tools -> Macro -> Visual Basic Editor”
27. Should click on the 4th Sheet with description (Sheet1) and you will find the 2 macros added for your buttons.
28. Copy the “BUTTON_32_Click” function to “TRANSFER_VALUES_Click” and copy the “BUTTON_33_Click” function to “SAVE_AREA_Click”.

- 13 -
29. Set the Visibility properties for this new “Sheet4” as “2-xlSheetVeryHidden”.
30. Close out of the Visual Basic Editor.
31. Right click on your “Transfer Values” image and choose “Assign Macro”.

- 14 -
32. Choose the macro “Sheet4.TRANSFER_VALUES_Click” and click OK.
33. Right click on your “Save Data” Image and choose “Assign Macro”.
34. Choose “Sheet4.SAVE_AREA_Click” and click OK.

- 15 -
35. Right click on the Transfer Values Image and choose “Format Picture”.
36. Make sure the property for object positioning is set as “Don’t move or size with cells”. Make sure this is set for your “Save Data” image as well.
37. Now you have 2 new buttons within your BEx Workbook application. Save this workbook.

- 16 -
4.2 Writing out popup messages on actions In this scenario, we want to have a popup message whenever we transfer or save data. This will continue from the application we built in section 4.1.
1. Now you have 2 new buttons within your BEx Workbook application. Save this workbook.
2. Launch the Visual Basic Editor by going to “Tools -> Macro -> Visual Basic Editor”
- 17 -
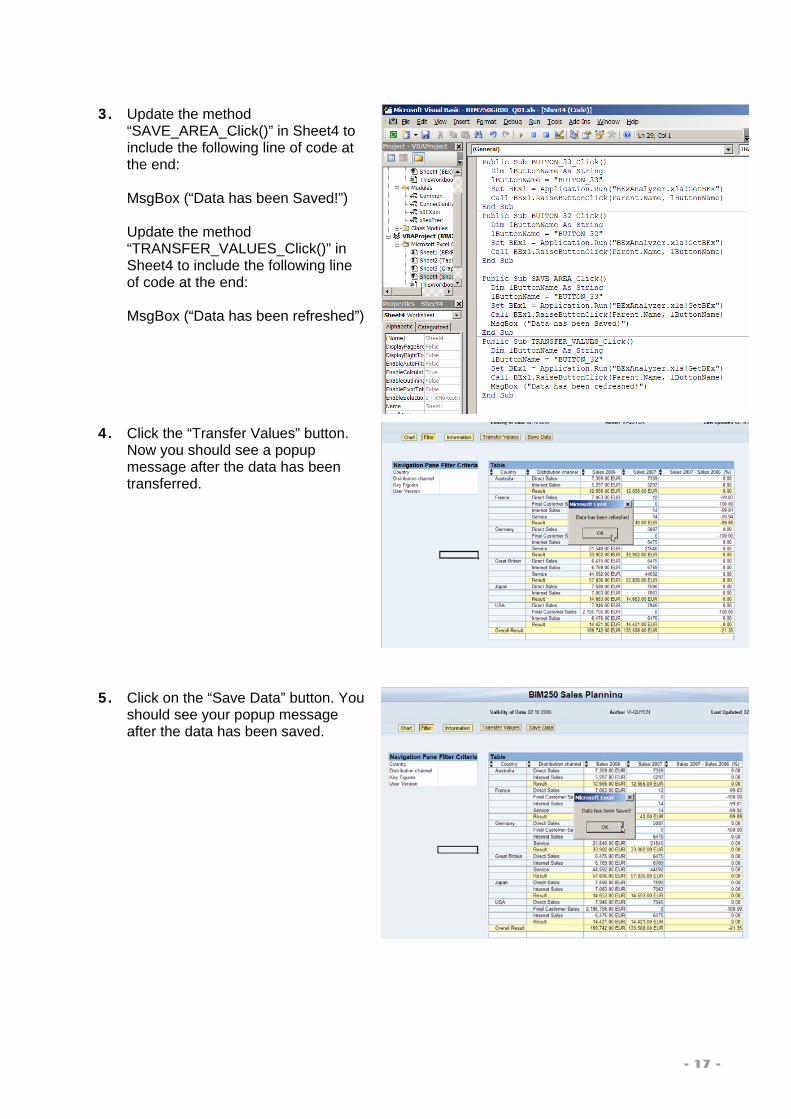
3. Update the method “SAVE_AREA_Click()” in Sheet4 to include the following line of code at the end: MsgBox (“Data has been Saved!”) Update the method “TRANSFER_VALUES_Click()” in Sheet4 to include the following line of code at the end: MsgBox (“Data has been refreshed”)
4. Click the “Transfer Values” button. Now you should see a popup message after the data has been transferred.
5. Click on the “Save Data” button. You should see your popup message after the data has been saved.

- 18 -
4.3 Creating a Dropdown box with Possible Commands and a Submit Button In this scenario, we want to create a dropdown list with a submit button for possible actions to perform within Integrated Planning.
1. Launch the BEx Analyzer and open a planning enabled query.
2. Add a new worksheet to your planning application.
3. Type in the values you want in a dropdown list. In this case, we typed in “Transfer Values” in cell B5 and “Save Data” in cell B6. Also, type in “Revaluation 5%”, Revaluation “10%”, and “Revaluation 15%” as well.

- 19 -
4. Insert a button into this worksheet.
5. Specify the following properties for
this button and choose OK.

- 20 -
6. Insert another button into your worksheet.
7. Specify the following properties for
the button and choose OK.
8. Insert another button with your planning function and variable values. Do this for all planning functions and variable values (in this case, we will run the same function for 10%, and 15% revaluations, so we will create 2 more buttons).

- 21 -
9. Go to View -> Toolbars -> Forms
10. Click “Label” and draw a label with text “Planning Action: “.
11. Choose the “Combo Box” option and draw a dropdown box in your application.

- 22 -
12. Right click on your dropdown list and choose “Format control”.
13. Go to the Control tab.
14. Specify the Input Range as the list of commands you have in your worksheet.
- 23 -
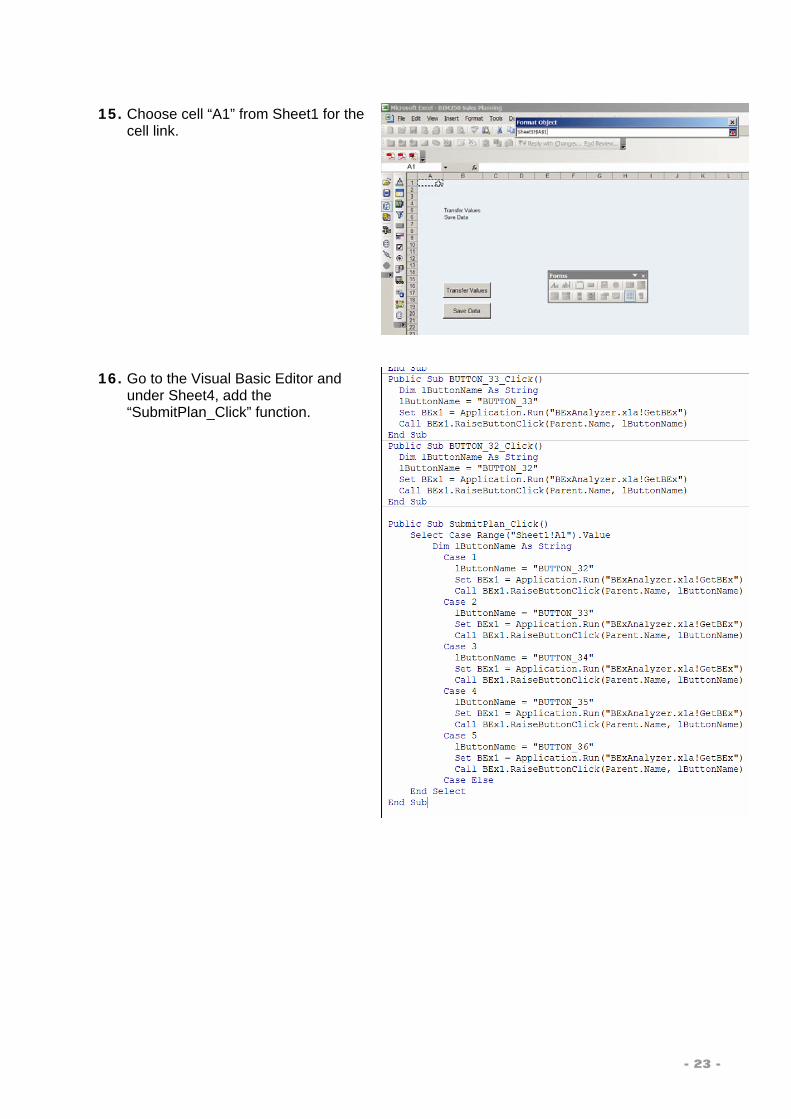
15. Choose cell “A1” from Sheet1 for the cell link.
16. Go to the Visual Basic Editor and under Sheet4, add the “SubmitPlan_Click” function.
- 24 -
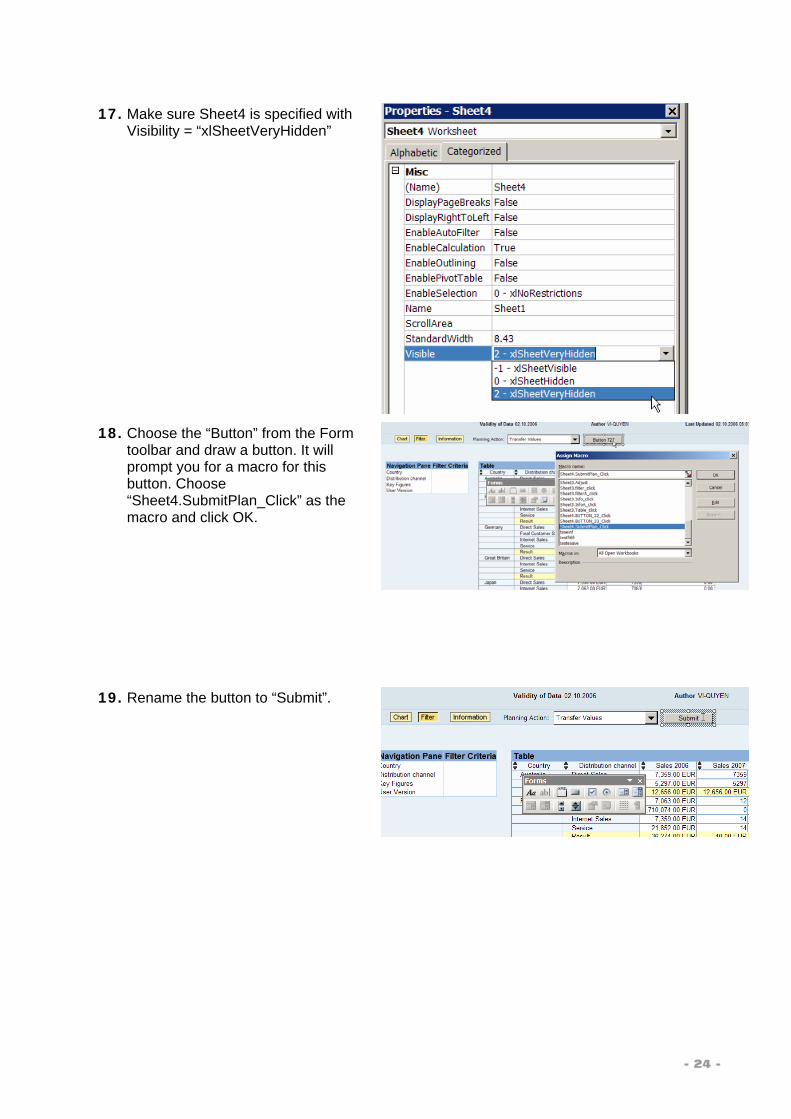
17. Make sure Sheet4 is specified with Visibility = “xlSheetVeryHidden”
18. Choose the “Button” from the Form
toolbar and draw a button. It will prompt you for a macro for this button. Choose “Sheet4.SubmitPlan_Click” as the macro and click OK.
19. Rename the button to “Submit”.

- 25 -
20. You will now have this dropdown with your planning actions. The submit button will execute your action you choose in the dropdown.

http://www.sdn.sap.com/irj/sdn/howtoguides