Embed Size (px)
Citation preview

How to build a wooden compost box
You will need
4 pressure treated timber posts (minimum 5cm by 5cm) all cut to
1m, or your required height
Pressure treated timber planks (cut to 1m lengths if 1m square
bin)
16m of roof tiling timber batten
Nails or screws (galvanised for longer life)
Hammer (if using nails) or drill with screwdriver attachment (if
using screws)
4m timber batten (2.5cm by 2.5cm) for lid
1m by 1m weld mesh
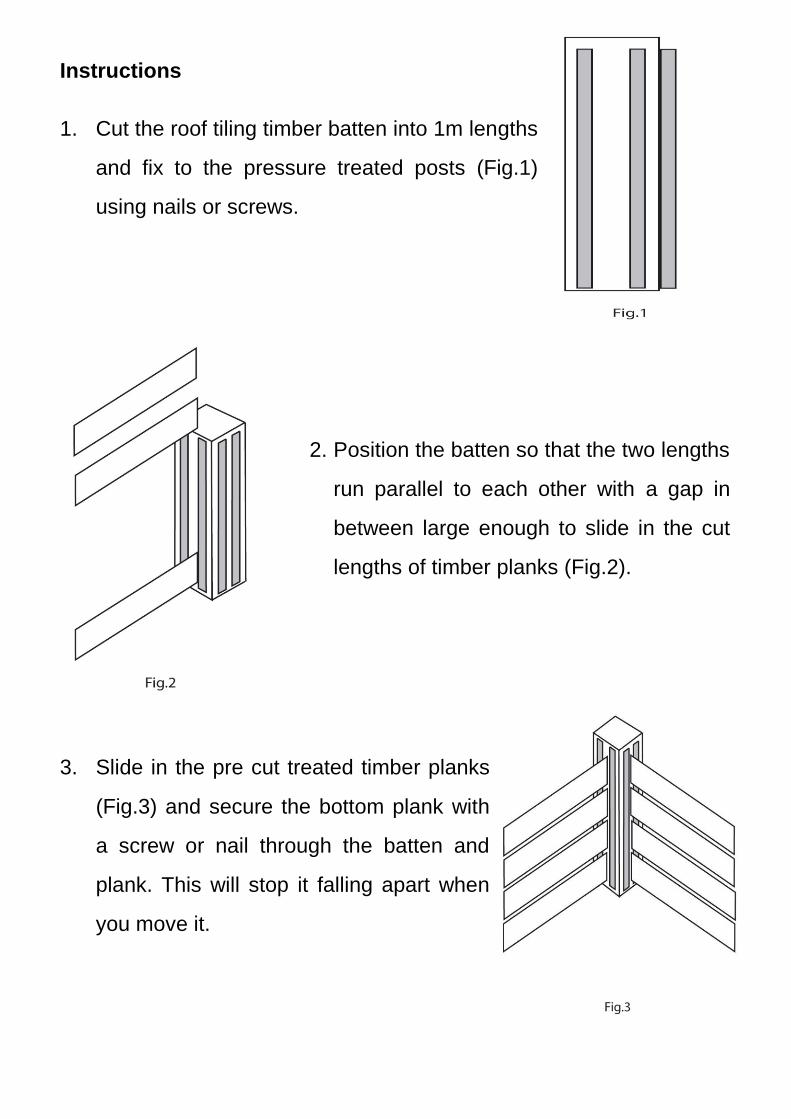
Instructions
1. Cut the roof tiling timber batten into 1m lengths
and fix to the pressure treated posts (Fig.1)
using nails or screws.
2. Position the batten so that the two lengths
run parallel to each other with a gap in
between large enough to slide in the cut
lengths of timber planks (Fig.2).
3. Slide in the pre cut treated timber planks
(Fig.3) and secure the bottom plank with
a screw or nail through the batten and
plank. This will stop it falling apart when
you move it.
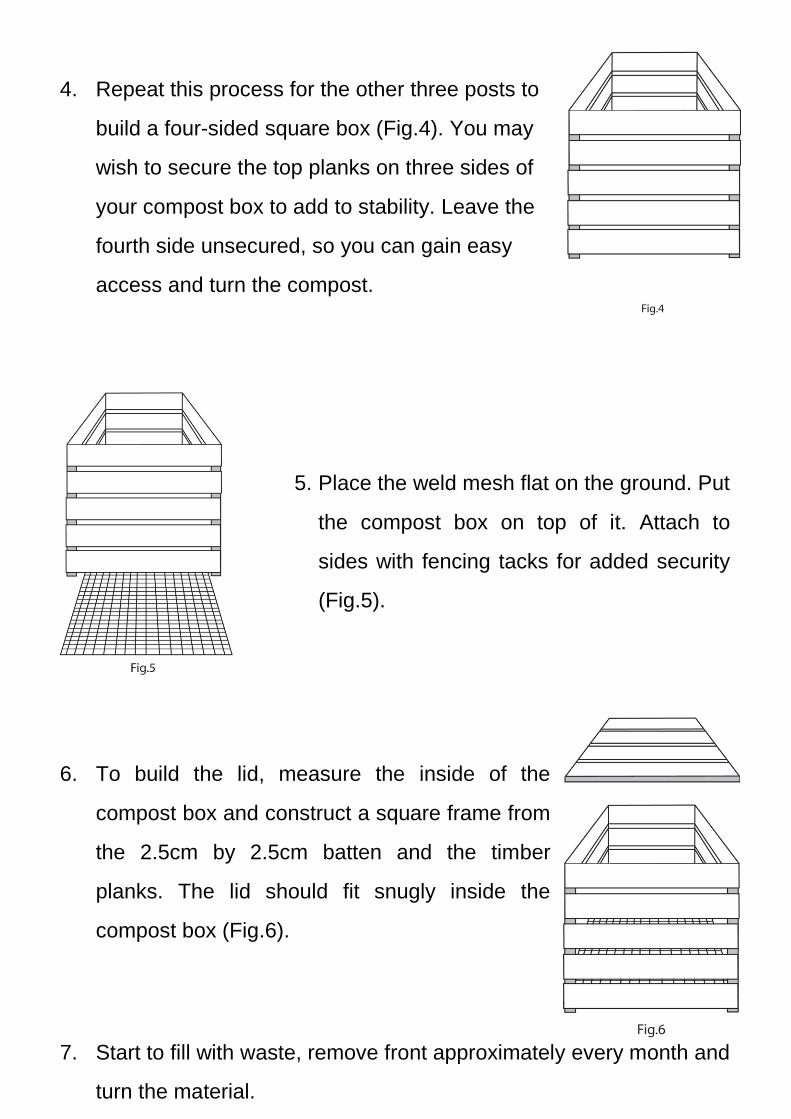
4. Repeat this process for the other three posts to
build a four-sided square box (Fig.4). You may
wish to secure the top planks on three sides of
your compost box to add to stability. Leave the
fourth side unsecured, so you can gain easy
access and turn the compost.
5. Place the weld mesh flat on the ground. Put
the compost box on top of it. Attach to
sides with fencing tacks for added security
(Fig.5).
6. To build the lid, measure the inside of the
compost box and construct a square frame from
the 2.5cm by 2.5cm batten and the timber
planks. The lid should fit snugly inside the
compost box (Fig.6).
7. Start to fill with waste, remove front approximately every month and
turn the material.

Suppliers of reclaimed wood
If you would prefer to build your compost box from recycled wood, the following organisations can supply all the necessary reclaimed timber. They can also make wooden compost bins to your required size on request.
Brighton & Hove Wood Recycling Project Municipal Market, Circus Street, Brighton BN2 9QF Tel 01273 570500 Hastings & Bexhill Wood Recycling Project Britannia Enterprise Centre, Waterworks Road, Hastings TN34 1RT Tel 01424 715566 Mid Sussex Wood Recycling Project The Dairy Barn, Rocky Lane, Haywards Heath RH16 4RR Tel 01273 565243
Tel 01273 482144 eastsussex.gov.uk/composting We cannot recommend or endorse any company listed January 2011

How to build a wormery using stacking boxes
You will need
Three stacking boxes (the type you can store kids toys in). You
will need to buy one with a lid or make your own from a piece of
hardboard or plywood (big enough to stop any rain from getting
in)
2m of weld mesh (smallest gauge is best)
A pair of wire cutters
Thin wire or garden ties
Drill with small drill bit or bevel
Hacksaw or sharp knife (such as a Stanley knife)
Plastic tap (from water butt or brewing barrel)
Small bag of stone chippings
A newspaper
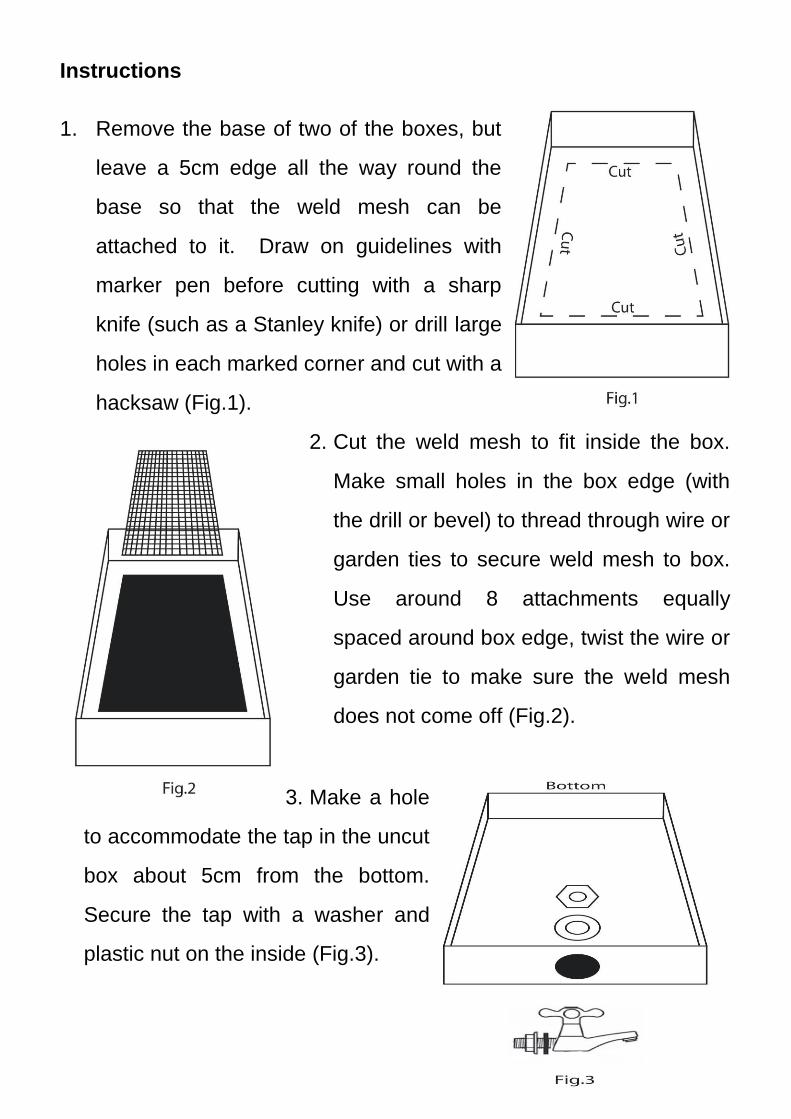
Instructions
1. Remove the base of two of the boxes, but
leave a 5cm edge all the way round the
base so that the weld mesh can be
attached to it. Draw on guidelines with
marker pen before cutting with a sharp
knife (such as a Stanley knife) or drill large
holes in each marked corner and cut with a
hacksaw (Fig.1).
2. Cut the weld mesh to fit inside the box.
Make small holes in the box edge (with
the drill or bevel) to thread through wire or
garden ties to secure weld mesh to box.
Use around 8 attachments equally
spaced around box edge, twist the wire or
garden tie to make sure the weld mesh
does not come off (Fig.2).
3. Make a hole
to accommodate the tap in the uncut
box about 5cm from the bottom.
Secure the tap with a washer and
plastic nut on the inside (Fig.3).

4. Add a layer of stone chippings (approximately 10cm deep) into the
box with tap, this will allow the wormery to drain but will prevent any
escaped worms from drowning.
5. To build the wormery, place the box with the tap the
bottom (place on some bricks or a wooden box to
allow access to the tap), then add one of the boxes
with the weld mesh. In this box add a layer of
newspaper (to prevent the worms falling through)
and then put in a 5cm layer of compost. Add worms
(tiger or brandling) into the compost. Place the box
with lid attached on top of the middle box and leave
to acclimatise for 2/3 days.
6. Start adding your kitchen waste into the top tier. This will attract the
worms up from the layer below.
7. Harvest the compost from the lower box when the top box becomes
full up. Remove the upper box, empty the compost out of the bottom
one and a place this one on the top of the stack. Then simply start
adding your waste to the empty box in the top tier.
8. Make sure you drain the lower box on a regular basis. This will
prevent the wormery from becoming waterlogged. If the waste looks
like it is becoming sludgy, add some shredded paper to absorb
excess moisture.

Worms for wormeries
‘Tiger’ or ‘Brandling’ worms (Eisenia fetida) are the best types to use in a wormery. There are also other types you can use such as Eisenia hortensis (formerly Dendrobaena). Earthworms from your garden are not suitable because they require different living conditions. You will need around 100 to 500 worms to start with depending on the amount of waste you intend to add. Where can I get hold of the worms:
Fishing shops usually stock the Eisenia hortensis worm for fishing bait which can be used in wormeries. Sold by the pot or by weight.
Mail order companies supply worms for womeries: Wiggly Wigglers Tel 01981 500391 wigglywigglers.co.uk Original Organics Tel 01884 841515 originalorganics.co.uk The Bin Company Tel 0845 602 3630 thebincompany.com
Tel 01273 482144 eastsussex.gov.uk/composting We cannot recommend or endorse any company listed January 2011

How to build a wormery using tyres
You will need
Three old tyres of the same size
A piece of plywood or hardwood (big enough to build a lid)
3m of weld mesh (smallest gauge is best)
A pair of wire cutters
Thin wire or garden ties
Drill with small drill bit or bevel
Sack of shredded paper
Old newspapers or cardboard

Instructions
1. The wormery will need to be positioned on a hard standing area.
Create a base from old bricks or paving slabs (must be flat and with
as few cracks as possible). Place a heavy/thick layer of newspaper
on top of the bricks.
2. Cut the weld mesh in a rough circle,
so that it fits into the tyre rim. Make
small holes in the tyre rim (with the drill
or bevel). Thread through wire or
garden ties to secure the weld mesh to
the tyre. Use around 8 attachments
equally spaced on the rim edge, twist
the wire or garden tie to make sure the
weld mesh does not come off. Fix the
weld mesh to the other two tyres as
above (Fig.1).
3. Stuff the three old tyre
rims with shredded paper.
Pile the tyres on top of
each other, with the first
tyre on the layer of
heavy/thick newspaper
(Fig.2).

4. Add some shredded paper or torn up cardboard in the bottom to
soak up any excess liquid.
5. Add about a 5cm layer of compost
into the bottom tyre of the wormery.
6. Add worms (tiger or brandling) and
leave to acclimatise for 2/3 days.
7. Start adding your kitchen waste
into the top tier. This will attract the
worms up from the layer below.
8. Use a piece of board, weighed down
with some bricks, as a lid. The lid
must be big enough to stop rain
getting in (Fig.4).
9. Harvest the bottom tyres worth of
fertilizer when the top tyre is full up,
remove the upper tiers of tyres,
empty the compost out of the bottom
one and a place this one on the top
of the stack. Then simply start
adding your waste to the tyre in the
top tier. You may need to replace the paper layer at the bottom at
this stage.

Worms for wormeries
‘Tiger’ or ‘Brandling’ worms (Eisenia fetida) are the best types to use in a wormery. There are also other types you can use such as Eisenia hortensis (formerly Dendrobaena). Earthworms from your garden are not suitable because they require different living conditions. You will need around 100 to 500 worms to start with depending on the amount of waste you intend to add. Where can I get hold of the worms:
Fishing shops usually stock the Eisenia hortensis worm for fishing bait which can be used in wormeries. Sold by the pot or by weight.
Mail order companies supply worms for womeries: Wiggly Wigglers Tel 01981 500391 wigglywigglers.co.uk Original Organics Tel 01884 841515 originalorganics.co.uk The Bin Company Tel 0845 602 3630 thebincompany.com
Tel 01273 482144 eastsussex.gov.uk/composting We cannot recommend or endorse any company listed January 2011