Embed Size (px)
Citation preview

How Schedule & Manage
a Point-to-Point Event
© OTN 2014

Table of Contents:
Definition…………………………………………………………....Slide 3
Off-Net IP Gateway Systems……………………………………..Slide 4
Scheduling a Point-to-Point Event……………………………….Slides 5 - 11
Managing Events …….……………………………………………Slides 12 - 15
Finding Events …...………………………………………………..Slide 16
Click-to Call …...……………………………………………………Slide 17
Terminology…………………………………………………………Slides 18 - 19
Schedule and Manage a Point-to-Point Event

Definition
• Point-to-point events take place between two
videoconference systems and do not require the
involvement of a bridge.
• Point-to-point calls can be scheduled at any time.
• Point-to-point events provide users with portal
calling features.
Slide 3

Off-Net IP Gateway Systems
• When scheduling a Point-to point event there are
some systems that require a Bridge - for instance
OTN members that have off net systems. Events
including these type of systems need to be
scheduled by 3 pm the day prior to the event
occurring. Furthermore, the event has to be
scheduled within OTN business hours. If you attempt
to schedule the day of the event, Ncompass will
display a message indicating that a Bridge is
required. In this case, please contact OTN
scheduling services for assistance.
Slide 4

Scheduling a Point-to-Point Event
[1] Once you have logged
into Ncompass you will be
brought to this main welcome
page. At the top left of the
screen, in the main toolbar,
there is a heading entitled
Non-Clinical Events.
[2] Point-to-point events are
events that are scheduled
with only two cameras
involved. Click on the Create
Point-to-Point link.
2
Schedule and Manage a Point-to-Point Event
Slide 5
1

3
Scheduling a Point-to-Point Event
[3] You are the organizer of
the event. You will need to
select your name from a
registry of organizers. This
will bring up a new window.
[4] Enter a few characters
from your first and last name
and click search. A list of
names will appear at the
bottom of the screen.
[5] Select yourself by clicking
on your name.
4
Schedule and Manage a Point-to-Point Event
5
Slide 6

Scheduling a Point-to-Point Event
7
Schedule and Manage a Point-to-Point Event
Slide 7
6
[6] Enter the Date of Event by
clicking on the calendar icon ()
and selecting a date from the
calendar. You may also type
the date, using the format dd-
mm-yyyy (e.g. ‘31-07-2009’ for
July 31, 2009).
[7] Include the Start and End
Times of the event in 2400
hour format.
[8] Indicate the Event
Category. If you select
Administrative the Event Type
will be auto filled as Other and
the Other field will be auto
filled as Administrative.
Manually type in the Event
Title.
Slide 7
8

9
Scheduling a Point-to-Point Event
[9] The Host system is
usually the system where the
Organizer is located. Click on
Select System button and a
new window appears.
[10] In the new window, type
the site number and click
search. Select the
appropriate address from the
list.
[11] The system participating
in your event needs to be
selected. Follow the same
process when finding the
host.
10
Schedule and Manage a Point-to-Point Event
11
Slide 8

Slide 4
Scheduling a Point-to-Point Event
[12] Notes for all Participants
will be visible to anyone
viewing your event. The
Private Notes are only visible
to you, those attached to your
system and to any member of
the OTN Scheduling Team.
[13] Click on “Schedule
Event” and review the
message at the top of the
screen for any errors. If there
are errors, or missing fields,
please enter and/or correct
them, then click on the
schedule button. Once you
receive the ‘Congratulations’
message, you will notice that
your meeting has been
scheduled on the calendar.
12
Schedule and Manage a Point-to-Point Event
13

Scheduling a Point-to-Point Event
[14] The status of the event
should have changed from
New (Unsaved) to a
Scheduled status.
[15] Ncompass also
generates an event number
that can be used to manage
the videoconference. If you
have any technical problems
during your video conference,
you can phone OTN’s
Service Desk and provide the
event number.
Schedule and Manage a Point-to-Point Event
14 15
Slide 10

Slide 4
Scheduling a Point-to-Point Event
[16] The top portion of the
screen will display all of the
event details - such as the
date, title, chairperson and
organizers contact details
[17] Once a point-to-point
event has been scheduled
the following options
appear. They include:
Notify Participants, Edit
Event, Copy Event and
Cancel Event. Each of
these functionalities will be
explained in the upcoming
pages.
Schedule and Manage a Point-to-Point Event
16
17
Slide 11

Managing Events – Notify Participants
[18] To notify participants
of the event, click on the
Notify Participants button.
This will launch MS
Outlook or any other type
of Email based application.
You will notice that the
“subject” line contains the
event number. Add the
participants email address
in the “To” field
[19] Within the body of the
email is a link that
Ncompass Users can click
to view the event in
Ncompass.
Schedule and Manage a Point-to-Point Event
18
19
Slide 12

Managing Events – Editing Events
[20] Once you click the
Edit Event button it is
important to realize that the
event has now moved to
an unscheduled status.
[21] Make the necessary
changes to the event. To
finalize the event , click on
the Schedule Event button.
It is worth noting that if you
do not click the Schedule
Event button; your event
will still be an unscheduled
event.
Schedule and Manage a Point-to-Point Event
20
21
Slide 13

Slide 4
Managing Events – Copying Events
[22] When you click the
Copy Event button, you will
notice that the event will
now have conflicts,
indicated by the red text
below each of the systems
names. If you click on the
red text, the system
calendar will appear
displaying the conflict.
[23] Make the necessary
changes to the event and
click the Schedule Button.
Please note that
Ncompass will generate a
new event number for your
copied event.
Schedule and Manage a Point-to-Point Event
22
23
Slide 14

Slide 4
Managing Events – Cancelling Events
[24] Click on the Cancel
Event button. This brings
up a page where you can
select the reason why you
are cancelling the event.
Find the most suitable
reason for cancellation
from the dropdown menu.
You can write additional
comments in the Log field.
[25] Now click on the Save
Changes button and
confirm that the status has
been changed to a
cancelled status.
Remember that it is
important to cancel events
to avoid security breaches.
Schedule and Manage a Point-to-Point Event
25
24
Slide 15

Finding Events
[26] Click on the View My
Events link, that is under
the Calendar heading. This
will list all events in which
one of your associated
systems has been
registered.
[27] To open the details
page, hover your mouse
over the event and click the
event.
Schedule and Manage a Point-to-Point Event
27
26
Slide 16

Slide 4
Portal Calling
[28] The click to call
feature enables Ncompass
users to connect and
disconnect scheduled
point-to-point events from
within Ncompass. In order
for the click to call feature
to appear for your point-to-
point events, the event
must be scheduled that
day, and include only
authorized systems *
[29] Click on the place call
button at the bottom right
of the screen to launch the
call. A green progress bar
will indicate the connection
status.
Schedule and Manage a Point-to-Point Event
28 29
Slide 17 * This feature is not available for Off-Net IP Gateway systems
Schedule and Manage a Point-to-Point Event
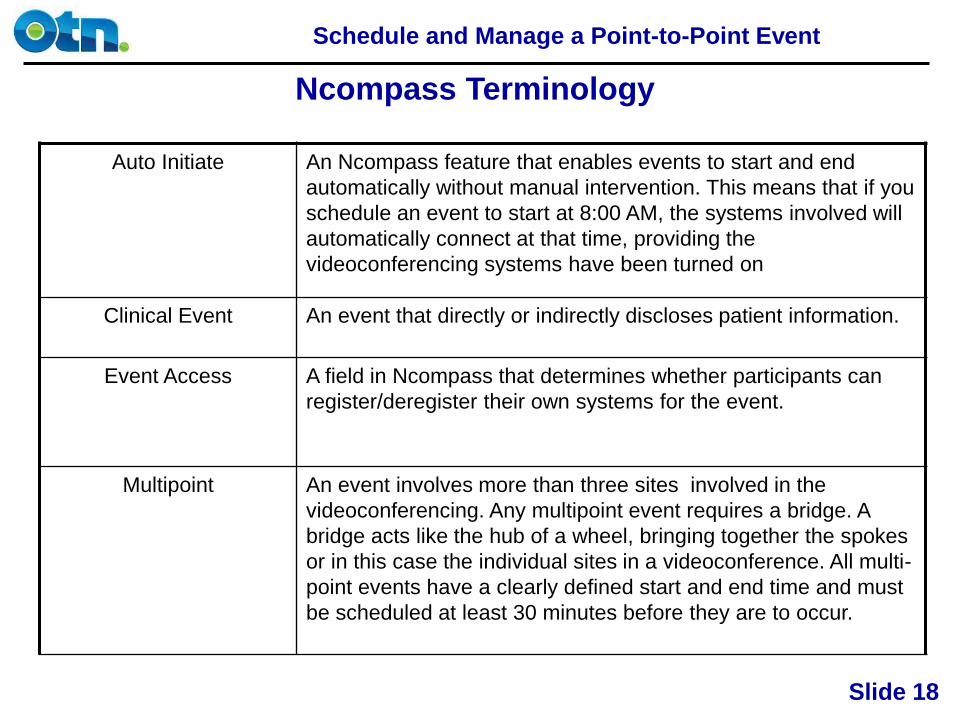
Ncompass Terminology
Auto Initiate An Ncompass feature that enables events to start and end
automatically without manual intervention. This means that if you
schedule an event to start at 8:00 AM, the systems involved will
automatically connect at that time, providing the
videoconferencing systems have been turned on
Clinical Event An event that directly or indirectly discloses patient information.
Event Access A field in Ncompass that determines whether participants can
register/deregister their own systems for the event.
Multipoint An event involves more than three sites involved in the
videoconferencing. Any multipoint event requires a bridge. A
bridge acts like the hub of a wheel, bringing together the spokes
or in this case the individual sites in a videoconference. All multi-
point events have a clearly defined start and end time and must
be scheduled at least 30 minutes before they are to occur.
Slide 18

Schedule and Manage a Point-to-Point Event
Ncompass Terminology
Ncompass Ncompass is an online scheduling tool designed for OTN
Members to schedule and manage videoconferencing events.
It’s simple to use, secure and gives OTN Members access to the
same scheduling information as OTN’s Scheduling Services.
Point-to-point An event that takes place between two videoconference
systems and do not require the involvement of a bridge.
Consequently, point-to-point calls can be scheduled at any time.
In addition, point-to-point events provide users with portal calling
features.
Private Event The host registers the sites that will attend the event. It is also
the host’s responsibility to contact all the participants that are
registered.
Public Event The event is published in Ncompass and participants can
register their own system to the event.
Slide 19