Embed Size (px)
Citation preview
How Do I Use Edmodo to:
1. Log in for the first time?
2. Create a teacher account?
3. Create a student account?
4. View my library?
5. Get apps?
6. Create a group?
7. Invite others to join my group?
8. Lock/Unlock or reset the code for my group?
9. Manage my group settings (moderate posting)?
10. Edit or Delete Posts?
11. Search through posts?
12. Change my notifications?
13. Set up folders in my library?
14. Use the planner?
15. Create an assignment?
16. Create a quiz?
17. View assignment / quiz results?
18. Find help?
How to Use Edmodo Screen Shot Example Instructions
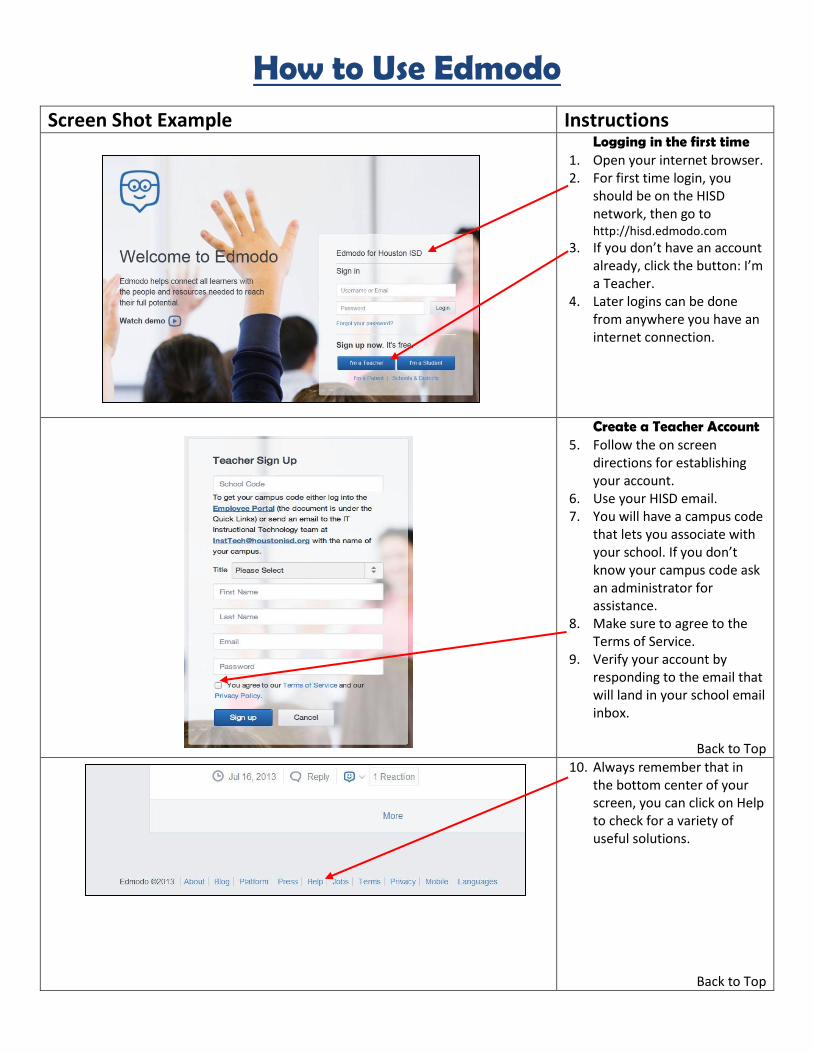
Logging in the first time 1. Open your internet browser.
2. For first time login, you should be on the HISD network, then go to http://hisd.edmodo.com
3. If you don’t have an account already, click the button: I’m a Teacher.
4. Later logins can be done from anywhere you have an internet connection.
Create a Teacher Account 5. Follow the on screen
directions for establishing your account.
6. Use your HISD email. 7. You will have a campus code
that lets you associate with your school. If you don’t know your campus code ask an administrator for assistance.
8. Make sure to agree to the Terms of Service.
9. Verify your account by responding to the email that will land in your school email inbox.
Back to Top
10. Always remember that in the bottom center of your screen, you can click on Help to check for a variety of useful solutions.
Back to Top

Create a Student Account 11. Invite students to create a
login. 12. Students will go through the
same steps to get to Edmodo, but select "I'm a Student" at the login screen.
13. Make sure your students use their HISD email as their login and select a password they are likely to remember.
14. Decisions about grouping students will be made on each campus. Please ask your department chairperson if you have questions.
15. Landing page: When you first log in, you will see all the latest posts in the center of your screen. If you’ve used Edmodo prior to July 2013, you’ll notice the look has changed! There are now different icons along the top of your page.
Back to Top
16. All the groups you’ve joined are displayed on the left side of your screen, in the middle.
17. At the top left of your screen notice the home icon. Clicking the home button will always bring you back to this first screen.
Back to Top

18. Now the 2nd icon, Progress,
gives details about each of your groups.
19. Assignments, Quizzes and Grades are visible from the Progress panel.
Back to Top
20. The third icon on the top left is Discover. Edmodo offers suggestions for: → Apps → Content Searched → Interesting Links → Possible Peers → Possible Communities
Back to Top
View Your Library 21. Your library icon is the final
icon at the top left. This will show you all the documents and links you have saved. You can share these by including them in posts, alerts or assignments. Organize them in folders to share different items with different groups.
Back to Top

Get Apps
22. On the right side of your screen, the shopping cart icon takes you to the Edmodo store. From here you can view a variety of apps. Some are free, but some must be purchased.
23. The rights to most of the educational apps usually last only for the school year. Note that many of the apps are free.
Back to Top
Create a Group 24. Creating Groups is done
using the controls in the center left part of your screen. Once you click
to create, follow the on screen prompts. To
invite students to your group, you will need the group code (6 digits) which appears at the center of your screen.
Back to Top
Invite others to Group 25. Invite students and other
teachers to join your group by giving them the six digit group code.
Back to Top
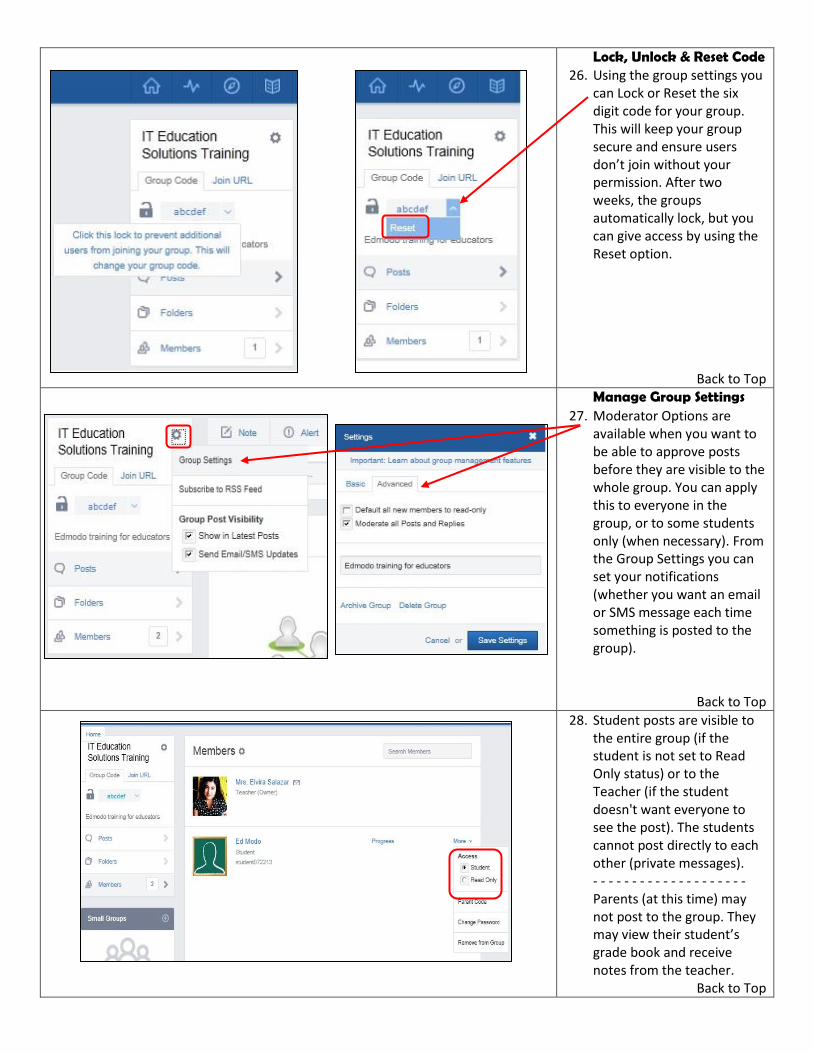
Lock, Unlock & Reset Code 26. Using the group settings you
can Lock or Reset the six digit code for your group. This will keep your group secure and ensure users don’t join without your permission. After two weeks, the groups automatically lock, but you can give access by using the Reset option.
Back to Top
Manage Group Settings 27. Moderator Options are
available when you want to be able to approve posts before they are visible to the whole group. You can apply this to everyone in the group, or to some students only (when necessary). From the Group Settings you can set your notifications (whether you want an email or SMS message each time something is posted to the group).
Back to Top
28. Student posts are visible to the entire group (if the student is not set to Read Only status) or to the Teacher (if the student doesn't want everyone to see the post). The students cannot post directly to each other (private messages). - - - - - - - - - - - - - - - - - - - - Parents (at this time) may not post to the group. They may view their student’s grade book and receive notes from the teacher.
Back to Top
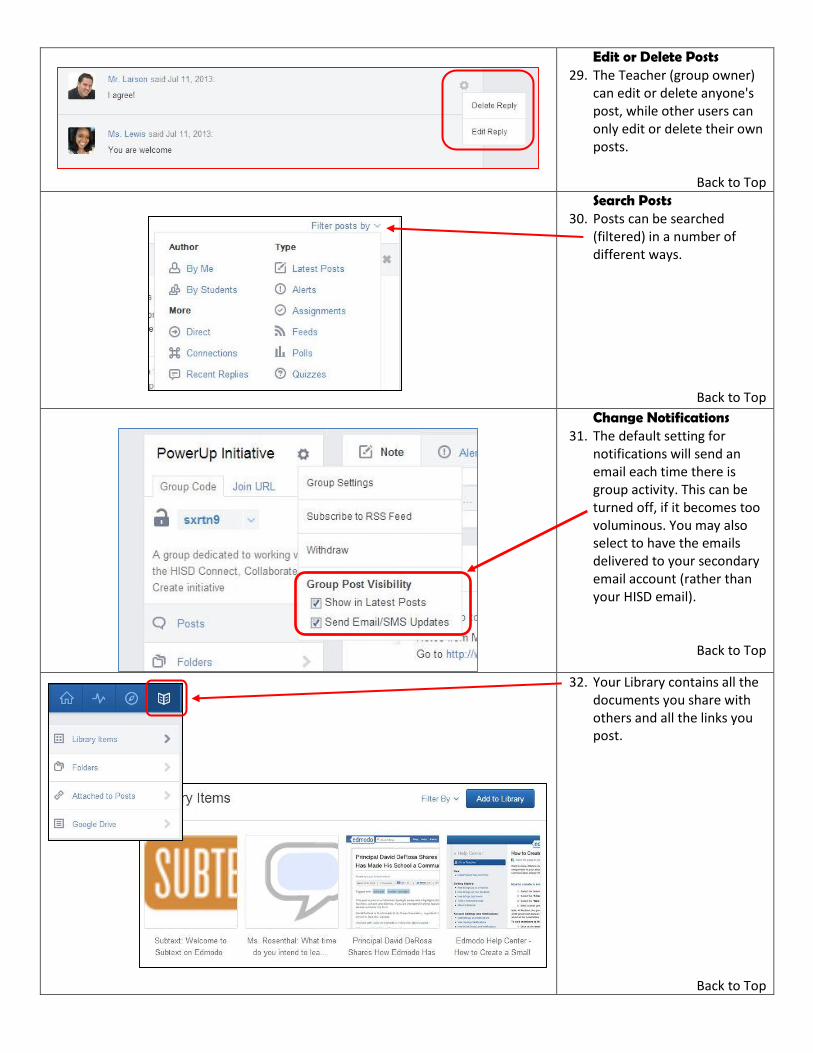
Edit or Delete Posts
29. The Teacher (group owner) can edit or delete anyone's post, while other users can only edit or delete their own posts.
Back to Top
Search Posts 30. Posts can be searched
(filtered) in a number of different ways.
Back to Top
Change Notifications
31. The default setting for notifications will send an email each time there is group activity. This can be turned off, if it becomes too voluminous. You may also select to have the emails delivered to your secondary email account (rather than your HISD email).
Back to Top
32. Your Library contains all the documents you share with others and all the links you post.
Back to Top

Create Library Folders
33. Setting up Folders will help you organize documents and links. You can make Folders available to various groups to help keep students focused and on track. Select “New Folder” and create a name for the folder or click on an existing folder to open it.
Back to Top
34. Files are added from the library view. Click Add to Library on the right upper corner of the screen. Indicate whether you are adding a Link (URL) or a File (.doc, .pdf). To add the file, you click Upload, indicate the file’s location, and click Open.
Back to Top
35. Add links by repeating the same steps listed above, instead of a file you may type (or paste) the web address (URL) you want to share. Note that you can control the text title that displays with the web address (if it is long and not very descriptive this is helpful).
Back to Top
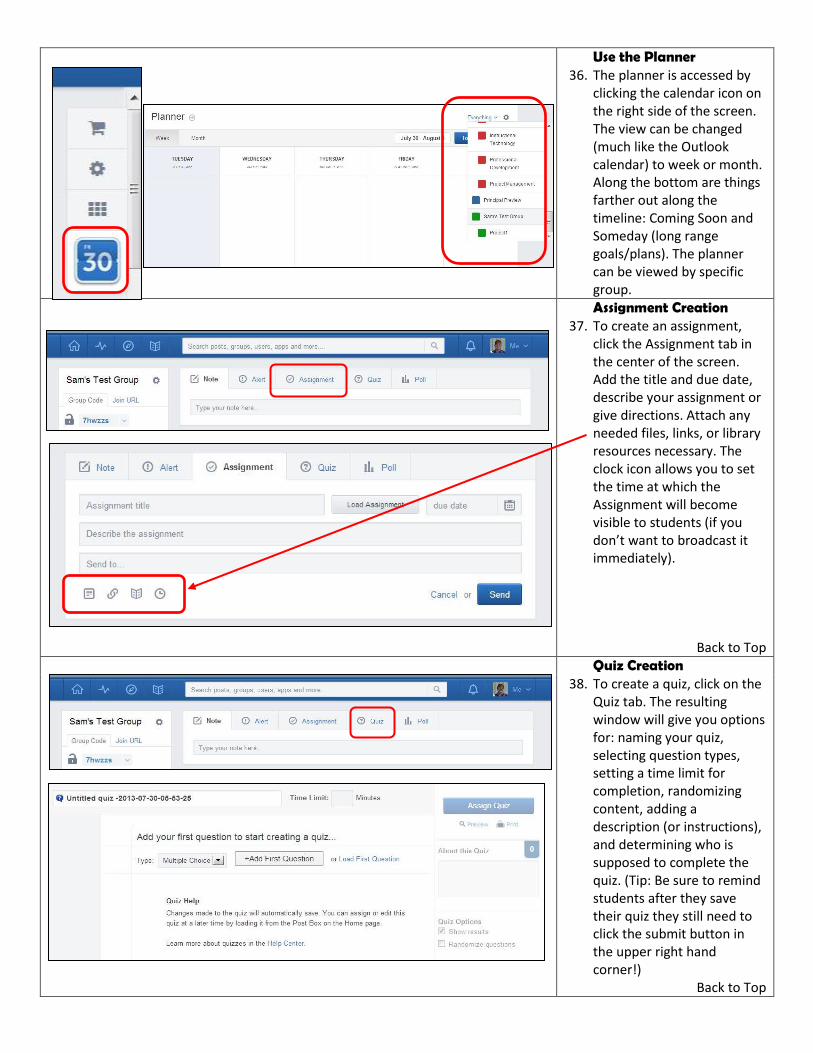
Use the Planner
36. The planner is accessed by
clicking the calendar icon on the right side of the screen. The view can be changed (much like the Outlook calendar) to week or month. Along the bottom are things farther out along the timeline: Coming Soon and Someday (long range goals/plans). The planner can be viewed by specific group.
Assignment Creation
37. To create an assignment, click the Assignment tab in the center of the screen. Add the title and due date, describe your assignment or give directions. Attach any needed files, links, or library resources necessary. The clock icon allows you to set the time at which the Assignment will become visible to students (if you don’t want to broadcast it immediately).
Back to Top
Quiz Creation
38. To create a quiz, click on the Quiz tab. The resulting window will give you options for: naming your quiz, selecting question types, setting a time limit for completion, randomizing content, adding a description (or instructions), and determining who is supposed to complete the quiz. (Tip: Be sure to remind students after they save their quiz they still need to click the submit button in the upper right hand corner!)
Back to Top

39. Set a time limit for your quiz to decrease potential time spent web browsing or in discussion. From this window teachers can choose questions types: Multiple Choice, Matching, Short Answer, True/False, Fill in the Blank.
Back to Top
View Results
40. Results are reported in the teacher’s latest posts. They can also be viewed in the grade book.
Back to Top

41. There are mobile apps for both Android, Chrome based and iPhone / Apple OS devices. Not all the Edmodo apps are usable on the mobile platform.
Back to Top
Find Help
42. Online Resources for Edmodo support include many documents and videos. There are also periodic webinars that are extremely helpful. Don't forget your best resource is always the teachers working with you! Sharing ideas and information improves us all.
Back to Top


