Embed Size (px)
Citation preview

hot-water-by-sunshine DocumentationRelease 0.1
Eric Pierce
April 05, 2015

Contents
1 Basic Principles 3
2 Solar Collector 5
3 Storage Tank 17
4 Pump Controller 25
5 Getting Results 31
6 Material Cost 376.1 Solar Collector . . . . . . . . . . . . . . . . . . . . . . . . . . . . . . . . . . . . . . . . . . . . . . 376.2 Storage Tank . . . . . . . . . . . . . . . . . . . . . . . . . . . . . . . . . . . . . . . . . . . . . . . 386.3 Pump Controller . . . . . . . . . . . . . . . . . . . . . . . . . . . . . . . . . . . . . . . . . . . . . 38
i

ii

hot-water-by-sunshine Documentation, Release 0.1
About six months ago, I started wondering if there was something useful I could do with all the sunshine we get herein Colorado. I knew that photovoltaic solar panels were expensive and could take a long time to pay for themselves;was there an alternative approach that would require a minimal initial investment, and had better potential for a returnon that investment?
I soon discovered the Build-It-Solar website, a fantastic resource for any DIYer looking to save some money whileconserving energy and reducing their environmental footprint. One of the most intriguing ideas I found there was asolar water heater, specifically Gary Reysa’s $1K water heating system. I spent several months thinking about buildingone, determining how big it would need to be, what materials I would need, and how much it would cost.
This summer, I finally got around to doing it. This project documents what I learned, including photos of the work inprogress as well as the final result.
Everything in this document is published under the Creative Commons Attribution license; basically, you are free todo whatever you like with this, as long as you credit me.
Contents:
Contents 1

hot-water-by-sunshine Documentation, Release 0.1
2 Contents

CHAPTER 1
Basic Principles
If you’ve ever left a garden hose out in the sun before turning it on, you know how easy it is for water to be heated bysunshine. Converting sunlight to electricity is a fairly complicated process, but converting it to heat is a no-brainer.
On the other hand, heating water (or anything else) using electricity or natural gas takes quite a bit of energy (andgenerates quite a lot of CO2 as a result). Replacing all this heat energy with the free heat we get from the sun makes alot of sense, not only in terms of cost but in its reduced impact on the environment.
The water heating system I built has two main components:
• Solar Collector: A large surface that is heated by the sun
• Storage Tank: A water tank that stores the accumulated heat
Of course, there’s a little more to it than this, but those account for 90% of the materials and effort. Here’s a diagramshowing how it all fits together:
3

hot-water-by-sunshine Documentation, Release 0.1
The water in the storage tank is only there for collecting and storing heat; it’s not for drinking! Our potable waterflows through a heat exchanger immersed in the tank, picking up some of that heat on its way to our regular electricwater heater.
This document will go over the construction of each component. First, the Solar Collector.
4 Chapter 1. Basic Principles

CHAPTER 2
Solar Collector
To capture a lot of heat from the sun, we need a large surface that can absorb and trap radiant energy. Black objectsabsorb more radiation than white objects, so we want it to be black. Air flowing around the object can cool it down, sowe want it to be enclosed in something that prevents air movement. Of course, since we’re trying to heat water, we’llwant the enclosed black object to have some plumbing to allow water to be pumped through it. Put it all together andyou have something like this:
It took about a week to assemble the collector with Dad’s help. Let’s take a look at the individual parts. First, there’s
5

hot-water-by-sunshine Documentation, Release 0.1
the box. I made mine using 2x4 lumber and 1/2” plywood. It’s 8 feet wide by 6 feet high:
We painted all of the pieces with 1-2-3 primer, and assembled it using a bunch of miscellaneous 2” screws I had lyingaround. To ensure an airtight seal, we put a bead of silicone along all edges to be joined. Inside the box, we puta 1” layer of foil-backed polyisocyanurate insulation; this should reduce the amount of heat lost out the back of thecollector.
Next up is the plumbing. We used 1/2” copper pipe for all of it; fifteen risers joining the top and bottom rails, withopenings in opposite corners. Cold water will go in one corner, and warm water will come out the other corner.
6 Chapter 2. Solar Collector

hot-water-by-sunshine Documentation, Release 0.1
Then we installed the copper grid into the insulated collector box. It’s tilted slightly, which is to allow the water todrain out.
7

hot-water-by-sunshine Documentation, Release 0.1
Now, copper is a really good conductor of heat, but with this arrangement, we’re only getting the sunlight that directlyhits the copper pipe. The reflective insulation might help a little, but we want to catch as much direct sunlight aspossible and transfer it to the copper pipes. Most of the designs I’ve seen use aluminum fins, wrapped around thecopper pipe, to transfer this heat, and I think it’s an excellent idea.
I got several big rolls of aluminum flashing (0.018” thick), and Dad helped me cut them to short manageable lengths.To accommodate the shape of the pipes, we used a wooden jig with a horizontal groove, a 3/4” steel rod, and asledgehammer to pound them into shape.
8 Chapter 2. Solar Collector

hot-water-by-sunshine Documentation, Release 0.1
Aluminum flashing is pretty springy, so they don’t keep the shape very well, but it’s a pretty good start at havingthe wrap-around profile I’m looking for. In order to mitigate possible galvanic corrosion between the aluminum andcopper, I painted the inside grooves black using high-temperature barbecue paint. It doesn’t need to be black, but Iwas planning to use this paint on the rest of the fins anyway.
9

hot-water-by-sunshine Documentation, Release 0.1
Once that was done, I attached a narrower piece of flashing to the back of each fin, using self-tapping sheet metalscrews down one side only, with silicone in between for slightly better heat transfer (yeah I know, silicone is not agreat conductor, but as Gary points out, it’s a lot more conductive than air, so it’s better than nothing). To attach themto the copper pipe, I can just slide it on and screw down the other side.
10 Chapter 2. Solar Collector

hot-water-by-sunshine Documentation, Release 0.1
To get the fins clamped on nice and tight, I made another wooden jig with metal jaws (salvaged from an old screendoor) that could pinch the fin under the pipe and hold it in place while we screwed it down. Again, more silicone tofill in the air gaps.
Once the fins were all attached, Dad added a few brackets to hold the whole mess in place:
11

hot-water-by-sunshine Documentation, Release 0.1
And then some corrugated polycarbonate glazing on the front, attached with short hex-head screws with rubber gaskets.I drilled the holes in the poly considerably larger than the screws, since it’ll want to expand and contract (and I don’twant it to crack). Of course, liberal use of silicone here too.
After it was all together, I put it out in the sun and stuck a kitchen thermometer in the copper pipe just to see how hotit was getting. Answer: Pretty hot.
12 Chapter 2. Solar Collector

hot-water-by-sunshine Documentation, Release 0.1
At this point in the narrative, I suppose I should mention the question of where to put a solar collector. Obviously, it’sbest to place it somewhere that gets a lot of sunshine, with relatively few obstacles between the sun and collector. If Ilived in the middle of the plains with no trees on the South side of my house, it’d be easy, but instead I live in suburbanColorado Springs, where there are trees, houses, and fences all around, and our house doesn’t even face directly South.Unless I keep track of which parts of the house are sunny at different times of day throughout the year, I’d have onlyan indistinct notion of which area gets the most solar exposure.
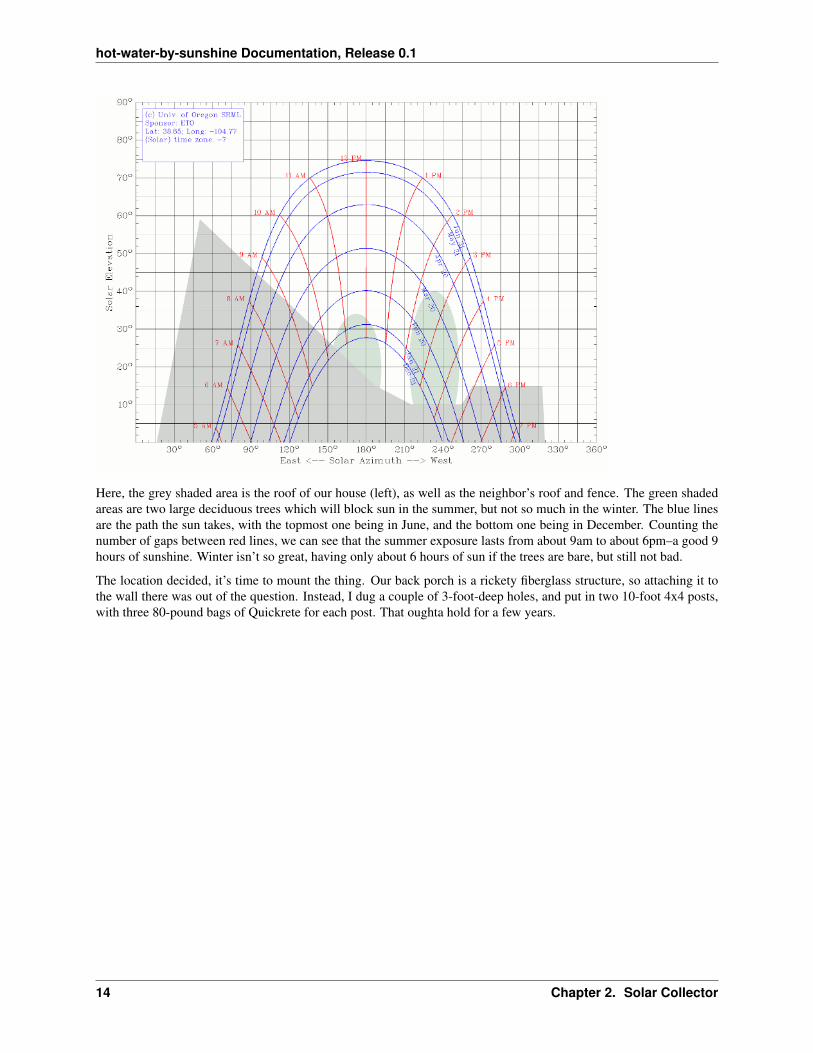
Luckily, someone else had already thought of this, and came up with a low-tech way to do a solar site survey. With asimple printed-out azimuth and elevation gauge, and a handy chart showing the path of the sun throughout the year atmy latitude, it was easy to sketch out the obstacles and find a good location for the collector. Here’s the survey fromthe location I chose:
13
hot-water-by-sunshine Documentation, Release 0.1
Here, the grey shaded area is the roof of our house (left), as well as the neighbor’s roof and fence. The green shadedareas are two large deciduous trees which will block sun in the summer, but not so much in the winter. The blue linesare the path the sun takes, with the topmost one being in June, and the bottom one being in December. Counting thenumber of gaps between red lines, we can see that the summer exposure lasts from about 9am to about 6pm–a good 9hours of sunshine. Winter isn’t so great, having only about 6 hours of sun if the trees are bare, but still not bad.
The location decided, it’s time to mount the thing. Our back porch is a rickety fiberglass structure, so attaching it tothe wall there was out of the question. Instead, I dug a couple of 3-foot-deep holes, and put in two 10-foot 4x4 posts,with three 80-pound bags of Quickrete for each post. That oughta hold for a few years.
14 Chapter 2. Solar Collector

hot-water-by-sunshine Documentation, Release 0.1
With a friend’s help (this thing is heavy!) I attached the collector to the top of the post using a couple of gate hinges.This allows easy tilt adjustment for better sun exposure:
The finished and mounted collector:
15

hot-water-by-sunshine Documentation, Release 0.1
Right! Now we can collect some heat. Where to put it? The Storage Tank of course.
16 Chapter 2. Solar Collector

CHAPTER 3
Storage Tank
One way to heat water by solar power is to simply run your cold water supply through the hot collector. There aresome drawbacks to doing it that way, though:
• No hot water when the sun isn’t shining. Without a way to store the heat for several hours or days, you’d onlybe getting hot water when the sun is directly heating the collector.
• No freeze protection. In the winter, the collector might get cold enough to freeze, which could be disastrous.
A storage tank can solve both of these problems. By accumulating the heated water in a large insulated tank, you cancontinue using the hot water even when it’s cold, cloudy, or dark outside. And by using an unpressurized tank, andunpressurized water supply to the collector, you have the possibility of draining all the water out of the collector toprevent freezing. This is a drainback system, and that’s what I went with.
The first big decision was how large to make the tank. My collector is 6 x 8 = 48 square feet, and I’ve read that eachsquare foot of collector can effectively heat about 2 gallons of water, so I began with a target of about 100 gallons inmind. Because I had a little extra plywood, I went ahead and increased it to around 150 gallons, figuring that it’s easierto take out some of the water than to make the tank larger later.
The tank is built from 2x4 lumber and 19/32” plywood sheathing. Inside that is 2 inches of polyiso insulation.
17

hot-water-by-sunshine Documentation, Release 0.1
I bought a 0.045” thick EPDM pond liner for the inside; it took some creative folding and arrangement to make it fitin the box without being stretched, but I made it work. I held it in place with some temporary clamps.
18 Chapter 3. Storage Tank

hot-water-by-sunshine Documentation, Release 0.1
It seemed to help to fill up the tank part of the way before the final attachment of the liner; this made sure that the linerwas pressed all the way down into the corners.
19

hot-water-by-sunshine Documentation, Release 0.1
The water that’s circulated between the tank and collector is separate from our potable water supply. You wouldn’twant to drink this water; it probably tastes like rubber anyway. So the heat from the tank needs to be transferred to ourpotable water supply via a heat exchanger. There are a few options for how to do this, but I went with a 300-foot coilof 3/4” PEX tubing:
20 Chapter 3. Storage Tank

hot-water-by-sunshine Documentation, Release 0.1
Pretty early on, I gave up on any hopes of making it all neatly coiled; some plastic zip ties keep it from getting toounruly, but for the most part I don’t really care if it spills all around the inside of the tank–better thermal circulationthat way anyhow. The blue tubes in this picture are the collector inlet (bottom) and outlet (top). The inlet obviouslyneeds to remain submerged so the pump will stay primed; the outlet cannot be submerged, because it needs to allowair in when the water drains out of the collector.
One end of the heat exchanger is connected to our residential cold water supply, and the other end is connecteddirectly to the cold-water inlet of our electric water heater, which becomes our “backup” heater when solar heating isinsufficient.
21

hot-water-by-sunshine Documentation, Release 0.1
This should be a no-maintenance arrangement:
• If the storage tank is nice and hot (120F to 140F), the incoming cold water should gain sufficient heat just bygoing through the 300-foot PEX coil. In this case, the backup electric water heater won’t turn on at all; it’ll justserve as a secondary storage tank for hot water we’re about to use for showers, dishes, etc.
• If the storage tank is warm, the incoming cold water at least gains some pre-heating before reaching the backupheater, meaning less work for the backup heater to do. Say the incoming cold water is 60F, and we want it to be120F: If the solar tank is 90F, that’s 50% less energy that the backup heater needs to use.
• If the storage tank is cold, meaning either that the collector is disconnected, or we’ve had several cold cloudydays in a row, the cold water comes out of the PEX coil still cold, and will be heated up by the electric waterheater, just as if there was no solar system at all.
I’ve acquired a thermostatic mixing valve, also known as a tempering valve. It’s not installed yet (it’s not clear whetherit’ll be needed yet), but this will temper the hot water coming out of the backup heater to prevent dangerously hot waterfrom reaching our faucet fixtures.
And just for fun, I give you: Thermal Accumulation Reservoir, Done In Style:
22 Chapter 3. Storage Tank

hot-water-by-sunshine Documentation, Release 0.1
Getting the hot water circulated between the tank and collector is just a matter of hooking up a water pump. Decidingwhen to turn on the pump is a somewhat hairier question, though. For that, I need a Pump Controller.
23

hot-water-by-sunshine Documentation, Release 0.1
24 Chapter 3. Storage Tank

CHAPTER 4
Pump Controller
Okay, so now that I have something to collect the heat from the sun, and a place to store the heat, how do I get theheat from one place to another? A pump, of course. Specifically, a 12 volt DC Sun-15 pump. This seems like a nicelittle pump, and it doesn’t use much electricity which is a definite plus. It doesn’t have a backflow check valve, whichis also a plus in this situation because I want water to be able to fully drain out of the collector and back into the tank.
The pump’s job is to circulate water from the storage tank through the collector and back into the tank. I had to takesome care to make sure the pump itself was well below the water inlet pipe; I initially tried mounting it about halfwaydown the side of the tank, but had some problems with the pump not staying primed. My initial attempt also had thewater inlet pipe sucking water from the bottom of the tank, but the pump just didn’t have enough juice to pull the waterall the way up and over the top edge of the tank that way. Moving the inlet to the top of the tank, and locating thepump all the way at the bottom seems to have solved these problems.
The pump didn’t come with a mounting bracket, so I just used a C-shaped plumbing clamp to hold it down on oneside:
25

hot-water-by-sunshine Documentation, Release 0.1
So you’ve got a pump, but when should you turn it on? You could put a thermometer in the collector, and manuallyswitch on the pump when it’s sunny. Or, just run the pump directly from a photovoltaic solar panel–it would automat-ically pump whenever the sun is out. I wanted something with a little more control, and room for optimization. I don’twant to run the pump if my storage tank is already hot enough, and in the winter I expect there will be times where it’ssunny enough to drive the pump, but not sunny enough to heat up the collector significantly. It’s all about temperature.
What’s needed, then, is a differential controller–a sort of thermostat that can turn something on when the differencebetween two temperatures (in this case, the collector and tank) is some predetermined amount. You can buy severalsuch devices off the shelf; the site where I got my pump has one such model. But I’m a computer programmer bytrade; I wanted something I could customize and extend entirely to my liking.
So, I did some Googling, and ended up buying an Arduino Uno, a couple of DS18B20 digital temperature sensors,and a pile of other components that I would need for building two circuits:
• Pump relay circuit: Allows controlling the 12V pump from the 5V Ardino
• Sensor circuit: Reads temperature of both sensors from a single pin to the Arduino
I assembled these circuits on a small prototyping board, and wired it up to the Arduino, then mounted both of them toa small piece of wood that I can hang on the wall.
26 Chapter 4. Pump Controller

hot-water-by-sunshine Documentation, Release 0.1
Here are the original schematics for the two circuits:
27

hot-water-by-sunshine Documentation, Release 0.1
Later, I re-built the controller on a Proto-Screwshield, with an RGB LCD Shield atop it. Instead of an LED to indicatewhen the pump is on, I made use of the LCD backlight color: Red when the pump is on, blue when it’s off. It onlytook a minor modification to my controller software to enable it to display the collector and tank temperature on theLCD.
Instead of a relay switch, I used a Power MOSFET to turn on the pump. I had hoped that this would eliminate the
28 Chapter 4. Pump Controller

hot-water-by-sunshine Documentation, Release 0.1
bad temperature readings, but no luck on that front–I’m still getting the bad readings. Not really a high priority at thispoint, since it works so well otherwise.
The Arduino can execute whatever code you want, so all I had to do was write up a short C program with the logic Iwanted to use for turning on the pump. This part is still a work in progress, but here’s basically how it works, with thedecision-making going in this order:
• Collector too cold? If the collector is cold (below 40F), the pump is off. This handles the freeze protection;under no circumstances do I want to pump water through a freezing (or near freezing) collector. This takes thehighest priority, since freezing could break my collector.
• Tank already hot? If the tank is already hot (above 140F), the pump is off. This is the safe upper limit I’vedecided to stick with in order to increase the life of the tank liner and PEX plumbing. Again, high prioritybecause of the possibility of damaging something.
• Collector hot enough? If the collector is over 20F hotter than the tank, turn on the pump. This is a configurablethreshold that is intended to prevent the collector temperature from dropping too rapidly when the colder waterbegins circulating. For example, if the tank is 70F and the collector is 90F, it makes sense to turn on the pump,but if the tank is 70F and the collector is only 80F, there’s not much to be gained by turning on the pump yet.
29

hot-water-by-sunshine Documentation, Release 0.1
• Collector not hot enough? If the collector is less than 10F hotter than the tank, turn off the pump. I found thatwith less than 10F of difference, the tank might actually lose heat, so this is kind of a “quit while you’re ahead”threshold. Also, having a different off-threshold helps prevent the pump from cycling on and off too much.
• Otherwise... If none of these conditions applies, don’t change state. This only takes effect during the rangebetween the two thresholds. For example, if the collector was hot (pump is already on), and is now coolingdown, it may be 11F to 19F warmer than the tank. As long as it stays in this range, the pump will stay on, butas soon as the difference drops to 10F, the shut-off condition will be reached. It won’t turn on again until it hitsthe 20-degree differential.
Because of some glitches with my temperature sensors, I added one more condition, with the highest priority:
• If either sensor reads below -50F, ignore it.
I’m getting pretty frequent readings of -196.6 degrees from the sensors; it only happens when the pump relay is on, soI think it has something to do with the 5V being drawn to hold the relay switch closed, and not enough voltage gettingto the sensors.
I’ve added my Arduino code, along with circuit diagrams and some other utilities as a Github project called ardiff,released under the MIT License, so feel free to use my code if you build something similar (and let me know how itgoes!) I should mention that I am not any kind of electrical engineer; this was the first time I’ve ever soldered anysignificant circuitry, and I am still learning, so if you fry your Arduino or pump, don’t say I didn’t warn you.
Does it work? Well, see for yourself at Getting Results.
30 Chapter 4. Pump Controller

CHAPTER 5
Getting Results
I started seeing some positive results after only a few days of using my new solar water heater. There were some partlycloudy days, and I had some minor glitches with the pump, but by logging the tank and collector temperature I couldsee it was definitely working.
• July 4: The storage tank started the day at 65F, and had climbed up to 80F by the evening. 15 degrees doesn’tseem like much, but when you consider there are 1200 pounds of water to heat up, that equates to about 18,000BTU, or about 5 KWH of electricity.
• July 5: The tank temperature was about 79.5F in the morning, so the tank didn’t lose more than 0.5 degreeovernight. It dropped by another 0.5 degree to supply water for two showers in the morning. By the end of theday, the tank temperature was back up to 96F, meaning we got about 20,000 BTU from the sun today.
• July 6: Overnight losses plus hot showers dropped the tank temperature to about 94F. Mostly cloudy today; thepump turned on for a while, but I manually shut it off because the tank was only getting cooler. It was at about92F in the early afternoon when I stopped logging. No significant heat gain.
• July 7: Tank was about 88F in the morning. Mostly cloudy again today, but a couple hours of sun brought it upto 93F by the evening. We’ll call it a 6,000 BTU gain.
• July 8: The tank was about 90F after our showers. Only a couple degrees rise today.
• July 9 and July 10: Cloudy and rainy; no significant gain.
• July 10: Mostly sunny today; tank went from 87F to 99F, about a 14,000 BTU gain. Finally got one good spreadof logged results, making for a pretty graph:
31

hot-water-by-sunshine Documentation, Release 0.1
• July 11: Mostly sunny again. The tank lost about 2F overnight, and another 2.5F in the morning (including twoshowers). The pump turned on at noon, with the tank at a little below 95F; there were a few fluctuations dueto scattered clouds, but after an hour the tank began steadily climbing, finally peaking at 104F at around 16:30.This is the first time the tank has gone over 100F. Total gain today was about 12,000 BTU:
32 Chapter 5. Getting Results

hot-water-by-sunshine Documentation, Release 0.1
• July 12: Another nice sunny day. 2F drop overnight, and about 3F more this morning; the tank was down to 99Fby the time the pump turned on at 11:20. Gained about 12F between 11:15 and 17:15, topping out at just over111F, a 14,400 BTU gain. The collector temperature reached nearly 180F, probably helped in part by the factthat I increased the tilt to around 40 degrees so it gets more direct sunlight. The storage tank is now approachingthe temperature of our electrically-heated water–once it reaches 120F, I’ll turn off the electric heater and seehow well we can do on solar-heated water alone!
33

hot-water-by-sunshine Documentation, Release 0.1
• July 14 - 17: The tank has been pretty consistently between 110F and 120F, so I turned off the backup electricwater heater for a few days to see if we could get by on solar-heated water alone. Verdict: Nearly. Showersweren’t quite as hot as I’d like, but it’s clear that we’re getting the vast majority of heat from solar.
• July 18: I’ve yet to see the tank go over 120F, despite seeing collector temperatures between 170F and 185F.It’s a little puzzling why this would be so; you’d think a temperature differential of 65F would give the incomingwater quite a boost, no matter how hot it already is. I may be losing the incoming heat through the circulationpipes (a little of which is still uninsulated), or through water vapor escaping through the tank lid (which, thoughinsulated, is not bolted down tightly).
• July 20: Only checking the tank temperature once a day now (until I get my LCD display from AdaFruit).Finally, the temperature is over 120F–got a reading of about 126F today.
• July 21: Tank went over 131F today. If it stays this hot, the backup water heater shouldn’t turn on at all. We’re100% solar, baby!
• July 23: The afternoon tank reading was 135F today, so any fears I had about inefficiencies preventing tempsover 120F were allayed. It took the better part of 3 weeks to get here, but I’m finally nearing my target temper-ature of 140F.
Since July 23, I haven’t kept detailed temperature records. Throughout August, the tank temperature usually variedbetween 100F and 115F. We had a lot of partly-cloudy days, and the collector only tends to get about 4 hours of fullsunshine. Unfortunately, the 130F+ temperatures I saw at the end of July have not reoccurred; in fact, I don’t think it
34 Chapter 5. Getting Results

hot-water-by-sunshine Documentation, Release 0.1
has gone over 120F since then.
Because we bought a couple of window air conditioners in July, so far it’s impossible to see what effect the solarheating is having on our electric bill. The AC usage more than made up for whatever we’ve been saving. However,now that the weather is cooling off, we haven’t needed the AC much during the last month; our next utility bill shouldtell the tale.
For a breakdown of how much I spent on all this, see Material Cost.
35

hot-water-by-sunshine Documentation, Release 0.1
36 Chapter 5. Getting Results

CHAPTER 6
Material Cost
The total cost of materials for this project was about $1,000 US, making it right in line with the $1K system on theBuild-It-Solar site.
6.1 Solar Collector
Item Cost Qty TotalInsulated box2x4 x 8’ stud $2 4 $2419/32” x 4’ x 8’ sheathing plywood $15 2 $3026” x 8’ clear polycarbonate $20 3 $601” x 4’ x 8’ polyisocyanurate insulation $15 2 $30Plumbing1/2” copper tee (10 pack) $8 3 $241/2” x 10’ copper pipe (type M) $11 10 $1101/2” GatorBite elbow $7 2 $14Fins8” x 50’ x 0.012” aluminum flashing $15 3 $453/4” x 3’ steel rod (for fin forming) $13 1 $13High-heat black spray paint $5 6 $30Mounting4x4 x 10’ treated lumber $12 2 $24Gate hinge $4 2 $8Quickcrete concrete mix (80 lb bag) $4 6 $24Miscellaneous1/2” sheet metal screws (300) $5 1 $51” screws with rubber gaskets (40) $6 2 $12Clear silicone 9.8 oz. $5 6 $30Total cost $483
37

hot-water-by-sunshine Documentation, Release 0.1
6.2 Storage Tank
Item Cost Qty TotalInsulated tank2x4 x 8’ stud $2 12 $2419/32” x 4’ x 8’ sheathing plywood $15 2 $302” x 4’ x 8’ polyisocyanurate insulation $26 2 $5210’ x 15’ x 0.045” EPDM pond liner $90 1 $90Heat exchanger3/4” x 300’ PEX $140 1 $1403/4” GatorBite elbow $9 2 $18MiscellaneousClear silicone 9.8 oz. $5 2 $10Total cost $364
6.3 Pump Controller
Item Cost Qty TotalSun-15 12V DC water pump $61 1 $61Arduino Uno starter pack $50 1 $50DS18B20 temperature sensors $4 2 $8Relay, diode, transistor, terminals $20 1 $20Total cost $139
38 Chapter 6. Material Cost