Embed Size (px)
Citation preview

Hoopmaster® Portable Backstop Models: 9405, 9407, & 9408
Installation, Operation and Maintenance Instructions
Please read all instructions before attempting installation or operation of these units
SAVE THESE INSTRUCTIONS FOR FUTURE USE
PUBLICATION NO. Revised 5 5 1 7 5 3 8 2 8 December 20, 2007

Hoopmaster® Portable Backstop
BASIC DIMENSIONS
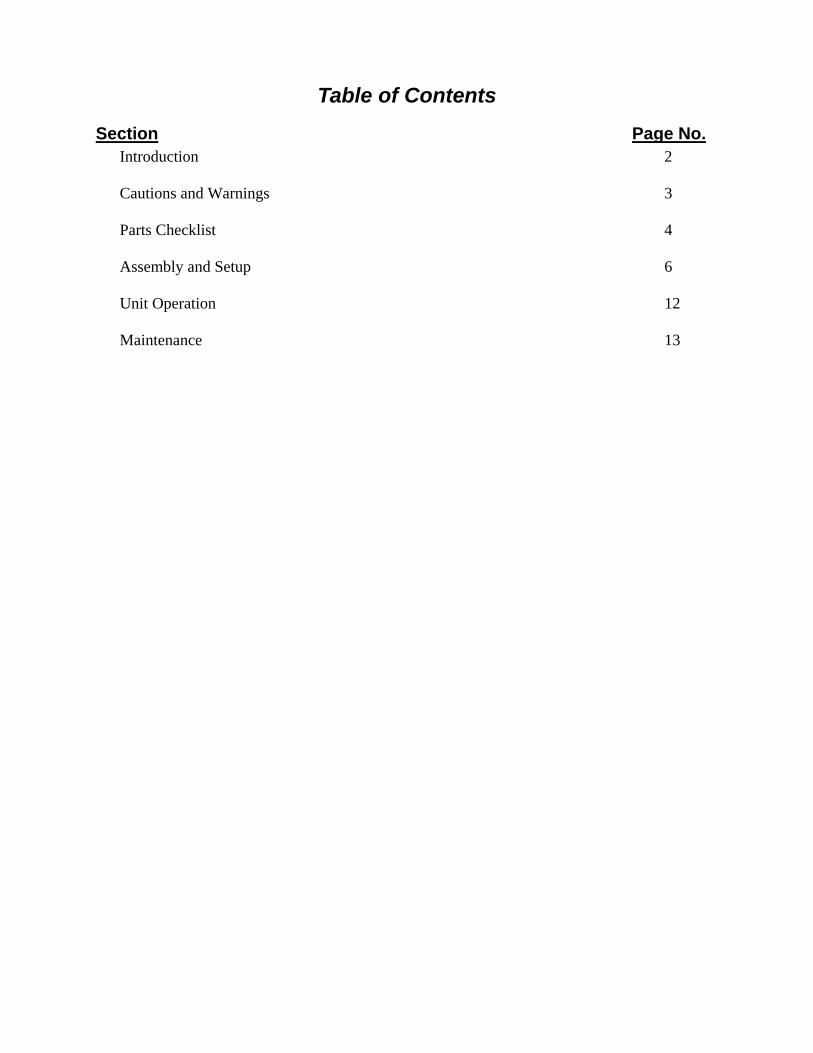
Table of Contents Section Page No.
Introduction 2
Cautions and Warnings 3
Parts Checklist 4
Assembly and Setup 6
Unit Operation 12
Maintenance 13

Hoopmaster® Portable Backstop
2
Introduction
Thank you for your purchase of a Gared Sports Hoopmaster® Portable backstop. To ensure that our equipment will provide years of use to you, we are including this installation, operation, and maintenance guide. This guide will provide information on the proper assembly and installation methods, operating procedures, and preventative maintenance of your portable backstop. Please note that a Bill of Materials is being included with this guide. Please check that all of the parts called out on the Bill of Materials are present prior to beginning assembly and setup. Please do not substitute for factory parts. Please contact the Gared Sports customer service department and allow them to determine if substitute parts are acceptable. It is recommended that an individual who has been properly trained perform assembly and set up of the backstop. No one under the age of 18 should attempt assembly or set up of the unit, unless properly supervised. To prevent normal wear and tear from shortening the life of the unit, preventative maintenance inspections and repairs should be performed at least once per year. If the units are subject to high or unusual usage, inspections should be scheduled to occur more frequently. If items are found to be nonconforming, replacements can be ordered from Gared Sports or one of our authorized dealers. When contacting Gared Sports, please have information regarding the dealer/installer who sold the unit, the name of the project, and any applicable warranty information.

Hoopmaster® Portable Backstop
3
Read and understand the following warnings to prevent possible personal injury and potential damage to the equipment during assembly, setup, and operation.
Before proceeding with assembly, read all instructions and assembly procedures. Make sure all parts have been received and are not damaged.


Hoopmaster® Portable Backstop
5
Item 4
Item 5
Item 7
Item 3
Item 6
Item 8
Down Latch Lever
Item 9 Item 11
Item 10
Item 12
Item 13
Item 14 Item 15 Item 16 Item 17 Item 18

Hoopmaster® Portable Backstop
6
INSTALLATION INSTRUCTIONS
Tools Required:
1-1/8” socket and wrench ½” wrench and socket 9/16” wrench and socket ¾” wrench #2 Phillips screw driver Flat blade screw driver Allen wrench set Two plumb bobs with string Bubble type level Tape measure Hand drill 1” spade bit ¾” drill bit Masking tape Pencil
See Installation Instruction for Rear Floor Insert (item 33) for additional tools. Item numbers noted throughout these instructions refer to the parts listed in the parts check list on page 4. Unpack all parts and check for damage or missing items.
1. Install a ¾” Shaft Collar (item 18) onto each Stabilizer screw (item 14). Slide the shaft collar up to the Nut at the top of the stabilizer screw and loosely tighten the set screw to keep the collar from sliding during assembly.
2. Install the Stabilizer screws (item 14) into the frame as shown in figure 1. Adjust the stabilizer screw with about 1” to 1-1/2” of the screw extended below the frame brackets.
Figure 1
3. Apply Loctite® to the threads of the leveling pads (item 15) and attach the leveling pads to the stabilizer screw rod. Turn the nut on the leveling pad with a 1-1/8” wrench until tight. Tighten the jam nut against the leveling pad.
4. Use the crank handle supplied and lower the leveling pads to lift the front casters about ¼” off the floor. Make sure the unit is raised evenly.
Frame
Item 18
Item 14
Item 15

Hoopmaster® Portable Backstop
7
IMPORTANT NOTE: Before proceeding to the next step, make sure enough individuals are available to assist with the mounting of the backboard to the unit. A minimum of two, preferably three, individuals is required for safe assembly of the backboard to the unit.
5. Position the backboard to the horizontal boom and install a 3/8-16 x 1” bolt with lock washer and flat washer in the lower two holes of the mounting plate and into the two tapped insert holes of the LXP backboard as shown in figure 2. Tighten these bolts securely.
Figure 2
Note: Do not fully tighten the bolts in steps 6 through 8. Snug tighten only. These bolts will not be tightened until after the backboard is leveled and plumbed later in the instructions.
6. Attach the backboard brace brackets (item 12) to the top corners of the backboard as shown in figure 3. Use the 3/8-16 x 1” carriage bolts with whizlock nuts for this assembly.
Figure 3
Item 12
LXP Backboard

Hoopmaster® Portable Backstop
8
7. Attach the Backboard brace yoke (item 11) to the brackets installed in step 6 using 3/8-16 x 1” hex head bolts with whizlock nuts.
8. Position the backboard brace clamp (item 10) over the yoke and yoke attachment plate on the boom as shown in figure 4. Secure the clamp with two 3/8-16 x 2-1/4” carriage bolts and whizlock nuts.
Figure 4
9. Using the hardware supplied with the goal, insert the two carriage bolts through the top goal mounting holes on the backboard and loosely install the nuts and washers on the back side of the board. Slide the goal over the carriage bolt heads and over the studs on the front of the board. Install the flat washer, lock washer and nuts on the studs and tighten securely. Tighten the two carriage bolts securely.
Item 11
Item 10

Hoopmaster® Portable Backstop
9
10. Remove the shipping bracket from the main boom and store the bracket, threaded rods, and hardware in a location for future use when replacing backboards or storing the unit.
11. Using the crank handle, raise the leveling pads so that the front caster wheels rest firmly on the floor.
12. Using masking tape and pencil, Mark the location of the center of the court 4’-0” from the inside of the court baseline (refer to figure 5). From this center mark, establish a mark 3’-0” to the left and another mark 3’-0” to the right. These marks will be used to align the face of bank to the court.
Figure 5 Figure 6
13. Push the unit to the playing location on the court. The unit should be 45-7/8” from the
inside of the court base line to the front of the frame and centered on the centerline of the court as shown in figure 6.
14. Lower the leveling pads and raise the front caster wheels about ¼” off the floor. Make sure the unit is raised evenly.
15. Release the down latch with your foot and raise the boom to the 10’ -0” playing position. Insert the safety pin into the sliding latch bar at the rear of the unit.
16. Check the 10’-0” goal height at the base of the goal. Adjust the leveling pads to obtain 10’-0” measurement, making sure each pad is raised or lowered evenly.
17. Slide the locking collar on the leveling screw down to contact the leveling screw plate and secure with the set screw. The locking collar is used to insure the leveling pads are always set at the correct height when the unit is moved or reinstalled.
18. To level the backboard in the horizontal plane, loosen the two goal carriage bolts and the two 3/8 bolts at the bottom of the board mounting bracket that attach the bracket to the backboard. Level the board and tighten all four bolts securely.
Note: Do not remove the goal bolts or the 3/8” board mounting bolts. It is only necessary to loosen these bolts. Once the board has been leveled, make sure these bolts are securely tightened.

Hoopmaster® Portable Backstop
10
19. To level the backboard in the vertical plane, loosen the two carriage bolts at the board brace clamp on top of the boom. Refer to Figure 7. Using a ¾” wrench, adjust the leveling bolt in the board mounting bracket until the backboard is plumb. Tighten the locking nuts on the leveling bolt. Tighten the two carriage bolts at the brace clamp securely.
Figure 7
20. Attach plumb bobs to the front corners of the backboard. Plumb bobs should hang down from the corners to where they are almost touching the floor.
21. Check plumb bobs with marks that were located in step 12. If the plumb bobs do not line up exactly with the marks on the floor, adjust the location of the unit accordingly.
22. Once the unit is relocated and the plumb bobs are exactly on the marks located in step 12, recheck all dimensions to make sure the 10’-0” playing height is correct and the face of the backboard is 4’-0” in front of the court baseline.
23. Insert the locator pins (item 16) into the sleeves located in the bottom rail of the unit near the front caster wheels. Find the center of these pins on the floor and mark this measurement on the floor.
24. Locate the center of the rear anchor on the floor and mark this measurement on the floor. 25. Remove the safety pin from the locking bar and lower the unit to the full down position. 26. Raise the leveling pads and make sure the unit is completely on the castor wheels. Push
the unit away from the playing location on the floor. 27. Refer to the installation instructions for the rear floor anchor found in the package of the
floor insert (item 33) and install the insert into the floor. This insert is to be installed at the rear anchor location marked on the floor in step 24.
28. Using a 1” spade bit and drill, drill a 1/8” deep counter-bore at the locations marked on the floor in step 23. Using a ¾” drill bit and drill, drill through the rest of the floor at the center of each of the counter-bores.
29. Insert the brass floor inserts (item 19) into the holes drilled in step 28.

Hoopmaster® Portable Backstop
11
30. Move the unit back into the playing position. Insert the locator pins into the floor inserts. Lower the leveling pads to the locking collar.
31. Install the rear anchor tie down bolt (item 17) on the rear of the unit and secure the anchor bolt to the floor anchor insert.
32. Attach the backboard padding to the backboard. Attach the horizontal boom pad (item 8) to the boom just behind the backboard.
33. Raise the unit to the playing position and insert the safety pin into the sliding locking bar. 34. Install the Upright pad (item 6) to the front upright using ¼”-20 pan head screws (item
21). 35. Install the remainder of the padding using the ¼” studs (item 20), flat washers (item 28),
and nuts (item 27). 36. Attach the hinge bracket (item 13) to the front base pad (item 3). Refer to figure 8.
Figure 8
37. Attach the base pad to the unit using ¼-20 hex bolts and nylon lock nuts to connect the hinge to the hinge bracket on the unit. Refer to figure 9.
Figure 9

Hoopmaster® Portable Backstop
12
Operation
1. Before operating the unit, read all caution, warning, and information labels. 2. To raise the unit from the stored position.
a. Make sure the unit is in the correct position on the court and the locator pins are inserted into the floor inserts
b. Make sure the rear floor anchor bolt is installed and secured to the floor anchor insert.
c. Remove the safety pin from the slide bar. d. Step on the down latch lever to release the latch. e. Using the handle on the left side of the rear upright, lift the upright and rotate to
the full up position. f. Install the safety pin into the slide tube locking bar.
3. To lower the unit from the playing position. a. Remove the safety pin from the slide tube locking bar. b. Using the handle on the left side of the rear upright, pull the upright back and
rotate it to the full down position. c. The arm should be lowered until the down latch engages the main portion of the
upright arm. d. Install the safety pin into the slide tube locking bar.
4. If the unit is to be moved to storage, make sure the shipping bracket and threaded rod are reinstalled on the unit to prevent accidental raising of the boom. Lower the leveling pads until the unit is fully on all four casters.
5. Raise the locating pins and release the rear anchor bolt. 6. Roll the unit to the storage facility.

Hoopmaster® Portable Backstop
13
Maintenance 1. General inspection of equipment when used should be performed to ensure no
catastrophic failures have occurred during the course of use between yearly inspections.
2. It is recommended that yearly inspections be conducted to determine if any bolts or other hardware has become worn or loosened.
3. During yearly inspections, check all joints to make sure they are tight and secure. Check all spring adjustment bolts to make sure they are tight and have not moved. Check the board and goal mounting bolts to make sure they are tight. Check the net for wear.
4. Apply a light coat of white lithium grease to the threads of the leveling pad screws. 5. Any loose bolts or nuts should be tightened. 6. Replace any components that are missing or worn.