Embed Size (px)
Citation preview
IMPORTANT INFORMATION• OPERATOR AND PASSENGER
This motorcycle is designed to carry the operator and one passenger. Never exceed the maximum weightcapacity as shown on the tire information label.
• ON-ROAD USEThis motorcycle is not equipped with a spark arrester and is designed to be used only on the road.Operation in forest, brush or grass covered areas may be illegal. Obey local laws and regulations.
• READ THIS OWNER'S MANUAL CAREFULLYPay special attention to the safety messages that appear throughout the manual. These messages arefully explained in the "Safety Messages" section which appears opposite the Contents page.
This manual should be considered a permanent part of the motorcycle and should remain with the motorcycle whenresold.
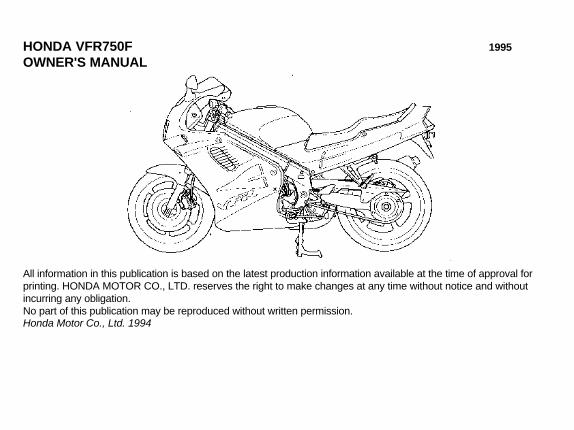
HONDA VFR750F 1995
OWNER'S MANUAL
All information in this publication is based on the latest production information available at the time of approval forprinting. HONDA MOTOR CO., LTD. reserves the right to make changes at any time without notice and withoutincurring any obligation.No part of this publication may be reproduced without written permission.Honda Motor Co., Ltd. 1994

WELCOME
Your new motorcycle presents you with an invitation to adventure and a challenge to master the machine. Yoursafety depends not only on your own alertness and familiarity with the motorcycle, but also the motorcycle'smechanical condition. A pre-ride inspection before every outing and regular maintenance are essential.
To help meet the challenges safely and enjoy the adventure fully, become thoroughly familiar with this Owner'sManual BEFORE YOU RIDE THE MOTORCYCLE.
Also for your own and your Honda's sake, please read all the written material which came with your new Honda.These items include (USA only):
• Honda Owner's Identification Card• Set-up and Pre-delivery Checklist• Honda Motorcycle Warranties Booklet• You And Your Motorcycle RIDING TIPS & PRACTICE GUIDE
When service is required, remember that your Honda dealer knows what it takes to keep your Honda going strong. Ifyou have the required mechanical "know-how" and tools, your dealer can supply you with Honda's Common ServiceManual and an official Model Specific Service Manual to help you perform many maintenance and repair tasks.
Pleasant riding, and thank you for choosing a Honda!

SAFETY MESSAGESYour safety, and the safety of others, is very important. We have provided important safety messages in this manualand on your motorcycle. Please read these messages carefully.
A safety message alerts you to potential hazards that can hurt you and others. Each safety message is preceded bya safety alert symbol and one of three words DANGER, WARNING, or CAUTION.
These mean:DANGER You WILL be KILLED or SERIOUSLY HURT if
you don't follow instructions.
WARNING You CAN be KILLED or SERIOUSLY HURT ifyou don't follow instructions.
CAUTION You CAN be HURT if you don't follow instructions.
Each message tells you what the hazard is, what can happen, and what you can do to avoid or reduce injury.
Damage Prevention MessagesYou will also see other important messages that are preceded by the word NOTICE.This word means:
The purpose of these messages is to help prevent damage to your Honda, other property, or the environment.
NOTICEYour motorcycle or other property can be damaged ifyou don't follow instructions.
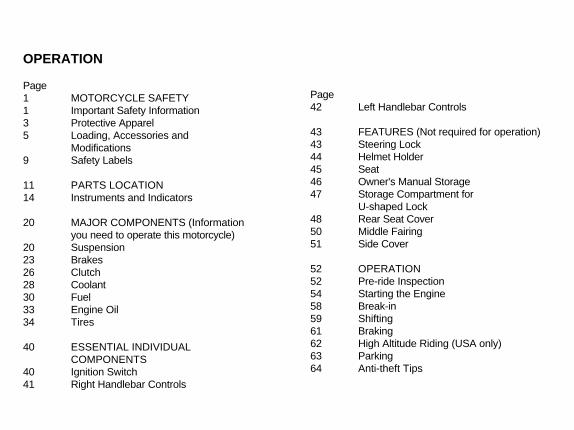
OPERATION
Page1 MOTORCYCLE SAFETY1 Important Safety Information3 Protective Apparel5 Loading, Accessories and
Modifications9 Safety Labels
11 PARTS LOCATION14 Instruments and Indicators
20 MAJOR COMPONENTS (Informationyou need to operate this motorcycle)
20 Suspension23 Brakes26 Clutch28 Coolant30 Fuel33 Engine Oil34 Tires
40 ESSENTIAL INDIVIDUALCOMPONENTS
40 Ignition Switch41 Right Handlebar Controls
Page42 Left Handlebar Controls
43 FEATURES (Not required for operation)43 Steering Lock44 Helmet Holder45 Seat46 Owner's Manual Storage47 Storage Compartment for
U-shaped Lock48 Rear Seat Cover50 Middle Fairing51 Side Cover
52 OPERATION52 Pre-ride Inspection54 Starting the Engine58 Break-in59 Shifting61 Braking62 High Altitude Riding (USA only)63 Parking64 Anti-theft Tips
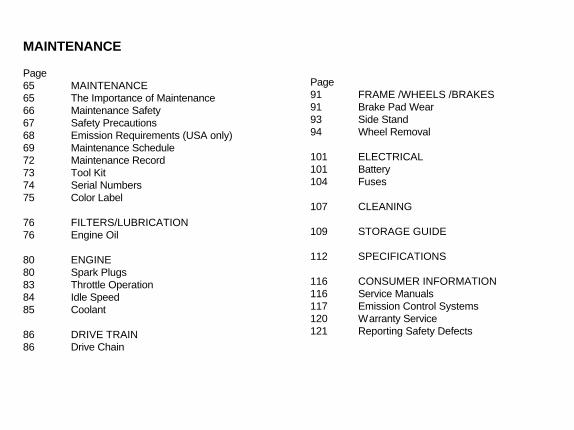
MAINTENANCE
Page65 MAINTENANCE65 The Importance of Maintenance66 Maintenance Safety67 Safety Precautions68 Emission Requirements (USA only)69 Maintenance Schedule72 Maintenance Record73 Tool Kit74 Serial Numbers75 Color Label
76 FILTERS/LUBRICATION76 Engine Oil
80 ENGINE80 Spark Plugs83 Throttle Operation84 Idle Speed85 Coolant
86 DRIVE TRAIN86 Drive Chain
Page91 FRAME /WHEELS /BRAKES91 Brake Pad Wear93 Side Stand94 Wheel Removal
101 ELECTRICAL101 Battery104 Fuses
107 CLEANING
109 STORAGE GUIDE
112 SPECIFICATIONS
116 CONSUMER INFORMATION116 Service Manuals117 Emission Control Systems120 Warranty Service121 Reporting Safety Defects
1MOTORCYCLE SAFETYIMPORTANT SAFETY INFORMATIONYour motorcycle can provide many years ofservice and pleasure - if you take responsibility foryour own safety and understand the challenges thatyou can meet on the road.
There is much that you can do to protect yourselfwhen you ride. You'll find many helpfulrecommendations throughout this manual Followingare a few that we consider most important.
Always Wear a HelmetIt's a proven fact: Helmets significantly reducethe number and severity of head injuries so alwayswear a helmet and make sure your passenger doesthe same. We also recommend that you wear eyeprotection, sturdy boots, gloves and other protectivegear (page 3).
Take a Rider Training CourseBecause many accidents involve inexperiencedor untrained riders, we urge all riders to take acertified course approved by the MotorcycleSafety Foundation (MSF).New riders should start with the basic course, andeven experienced riders will find the advancedcourse beneficial. For informationabout the MSF training course nearest you, callthe national toll-free number (800) 447-4700(USA only).
Ride DefensivelyThe most frequent motorcycle collisionhappens when a car turns left in front of amotorcycle. Another common situation is a carmoving suddenly into your lane. Always payattention to other vehicles around you, and donot assume that other drivers see you.
Be prepared to stop quickly or make an evasivemaneuver. For other riding tips, see the bookletYou and Your Motorcycle: Riding Tips andPractice Guide, which came with your newmotorcycle (USA only).

2Make Yourself Easy to SeeSome drivers do not see motorcycles because theyare not looking for them. To make yourself morevisible, wear bright reflective clothing, positionyourself so other drivers can see you, signal beforeturning or changing lanes, and use your horn when itwill help others notice you.
Ride Within Your LimitsPushing the limits is another major cause ofmotorcycle accidents. Never ride beyond yourpersonal abilities or faster than conditionswarrant. Remember that alcohol, drugs, fatigueand inattention can significantly reduce yourability to make good judgments and ridesafely.
Keep Your Bike in Safe ConditionFor safe riding, it's important to inspect yourmotorcycle before every ride and perform allrecommended maintenance. Never exceed loadlimits, and only use accessories that have beenapproved by Honda for this motorcycle. Seepage 5 for more details.

3PROTECTIVE APPARELFor your safety, we strongly recommend that youalways wear an approved motorcycle helmet, eyeprotection, boots, gloves, long pants, and a long-sleeved shirt or jacket whenever you ride Althoughcomplete protection is not possible, wearing propergear can reduce the chance of injury when you ride.Following are suggestions to help you chooseproper gear.
Helmets and Eye ProtectionYour helmet is your most important piece ofriding gear because it offers the best protectionagainst head injuries. A helmet should fit yourhead comfortably and securely. A bright-colored helmet can make you more noticeablein traffic, as can reflective strips.
An open-face helmet offers some protection,but a full-face helmet offers more. Regardlessof the style, look for a DOT (Department ofTransportation) sticker in any helmet you buy(USA only), and always wear a face shield orgoggles to protect your eyes and help yourvision.
WARNING
Not wearing a helmet increases thechance of serious injury or death in acrash.
Be sure you and your passengeralways wear a helmet, eye protectionand other protective apparel when youride.
4Additional Riding GearIn addition to a helmet and eye protection, we alsorecommend:• Sturdy boots with non-slip soles to help protect
your feet and ankles.• Leather gloves to keep your hands warm and
help prevent blisters, cuts, burns and bruises.• A motorcycle riding suit or jacket for comfort as
well as protection. Bright-colored and reflectiveclothing can help make you more noticeable intraffic. Be sure to avoid loose clothes that couldget caught on any part of your motorcycle.
5LOADING, ACCESSORIES ANDMODIFICATIONSYour motorcycle has been designed to carryyou and one passenger. When you carry apassenger. you may feel some differenceduring acceleration and braking. But so long asyou keep your motorcycle well-maintainedwith good tires and brakes, you can safelycarry loads within the given limits andguidelines.
However, exceeding the weight limit orcarrying an unbalanced load can seriouslyaffect your motorcycle's handling, braking andstability. Non Honda accessions, impropermodifications, and poor maintenance can alsoreduce your safety margin,
The following pages give more specificinformation on loading, accessories andmodifications.
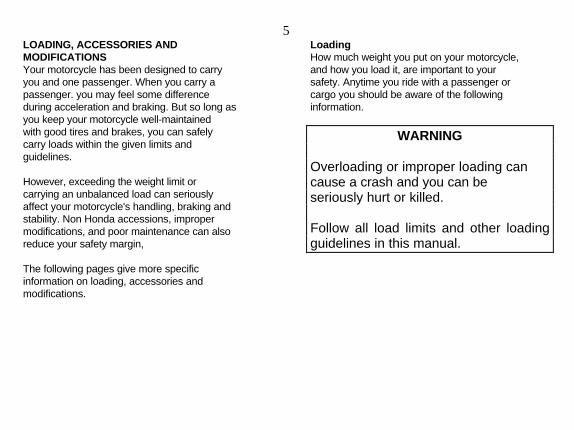
LoadingHow much weight you put on your motorcycle,and how you load it, are important to yoursafety. Anytime you ride with a passenger orcargo you should be aware of the followinginformation.
WARNING
Overloading or improper loading cancause a crash and you can beseriously hurt or killed.
Follow all load limits and other loadingguidelines in this manual.

6Load LimitsFollowing are the load limits for yourmotorcycle: Maximum weight capacity:
175 kg (386 lbs)Includes the weight of the rider,passenger, all cargo and all accessories
Maximum cargo weight:27 kg (60 lbs)
Loading GuidelinesYour motorcycle is primarily intended fortransporting you and a passenger. You maywish to secure a jacket or other small items tothe seat when you are not riding with apassenger.
If you wish to carry more cargo, check withyour Honda dealer for advice, and be sure toread the information regarding accessories onpage 7.
Improperly loading your motorcycle can affectits stability and handling. Even if your motorcycle isproperly loaded, you should ride at reduced speedsand never exceed 80 mph (130 km/h) when carryingcargo.
Follow these guidelines whenever you carry apassenger or cargo:• Check that both tires are properly inflated.• If you change your normal load, you may need
to adjust the front suspension (page 20) andthe rear suspension (page 21).
• To prevent loose items from creating a hazard,make sure that all cargo is securely tied downbefore you ride away.
• Place cargo weight as close to the center of themotorcycle as possible.
• Balance cargo weight evenly on both sides.
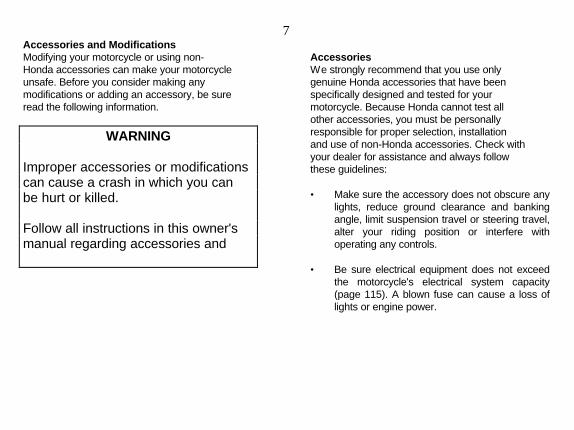
7Accessories and ModificationsModifying your motorcycle or using non-Honda accessories can make your motorcycleunsafe. Before you consider making anymodifications or adding an accessory, be sureread the following information.
AccessoriesWe strongly recommend that you use onlygenuine Honda accessories that have beenspecifically designed and tested for yourmotorcycle. Because Honda cannot test allother accessories, you must be personallyresponsible for proper selection, installationand use of non-Honda accessories. Check withyour dealer for assistance and always followthese guidelines:
• Make sure the accessory does not obscure anylights, reduce ground clearance and bankingangle, limit suspension travel or steering travel,alter your riding position or interfere withoperating any controls.
• Be sure electrical equipment does not exceedthe motorcycle's electrical system capacity(page 115). A blown fuse can cause a loss oflights or engine power.
WARNING
Improper accessories or modificationscan cause a crash in which you canbe hurt or killed.
Follow all instructions in this owner'smanual regarding accessories and

8
• Do not pull a trailer or sidecar with yourmotorcycle. This motorcycle was not designedfor these attachments, and their use canseriously impair your motorcycle's handling.
ModificationsWe strongly advise you not to remove anyoriginal equipment or modify your motorcyclein any way that would change its design oroperation. Such changes could seriously impairyour motorcycle's handling, stability andbraking, making it unsafe to ride.
Removing or modifying your lights, mufflers,emission control system or other equipmentcan also make your motorcycle illegal.
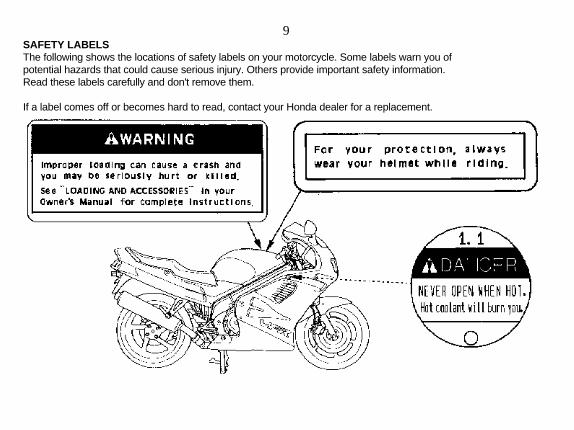
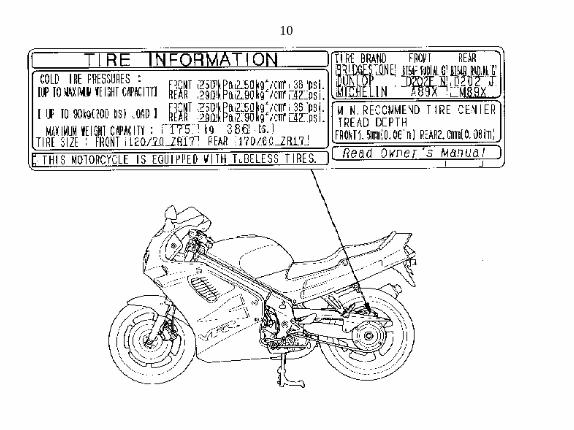
9SAFETY LABELSThe following shows the locations of safety labels on your motorcycle. Some labels warn you ofpotential hazards that could cause serious injury. Others provide important safety information.Read these labels carefully and don't remove them.
If a label comes off or becomes hard to read, contact your Honda dealer for a replacement.
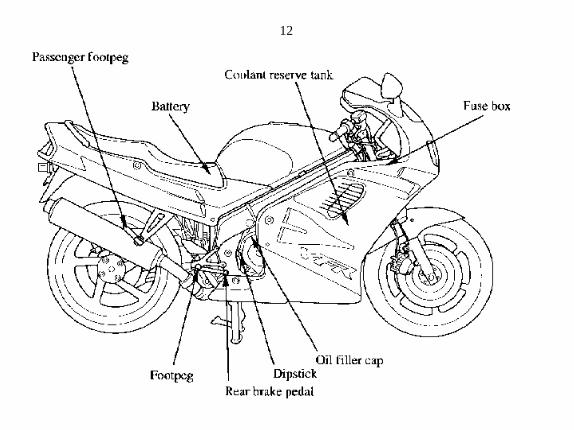
10

11
12
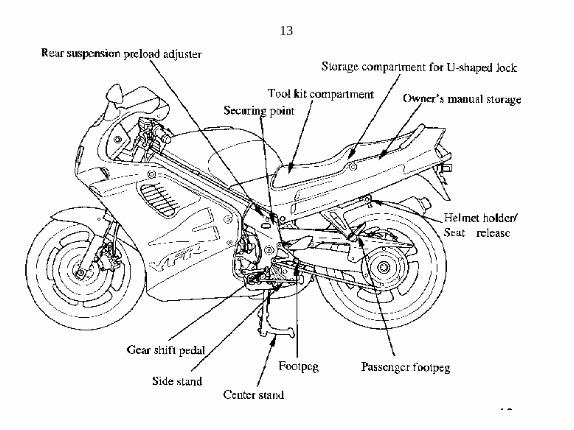
13

14INSTRUMENTS AND INDICATORSThe indicators are contained in the instrument panel. Their functions are described in the tables onthe following pages.
USA model:Odometer and tripmeter read in miles.
Canadian model:Odometer and tripmeter read in kilometers.
(1) Speedometer(2) Odometer(3) Left turn signal indicator(4) Side stand indicator(5) High beam indicator(6) Digital clock(7) Tachometer(8) Tachometer red zone(9) Neutral indicator(10) Right turn signal indicator(11) Fuel indicator(12) Fuel gauge(13) Coolant temperature gauge
(14) Low oil pressure indicator(15) Tripmeter(16) Tripmeter reset knob
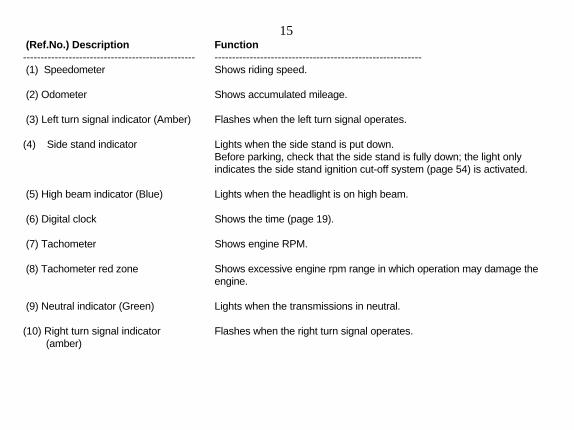
15 (Ref.No.) Description Function------------------------------------------------- -----------------------------------------------------------(1) Speedometer Shows riding speed.
(2) Odometer Shows accumulated mileage.
(3) Left turn signal indicator (Amber) Flashes when the left turn signal operates.
(4) Side stand indicator Lights when the side stand is put down.Before parking, check that the side stand is fully down; the light onlyindicates the side stand ignition cut-off system (page 54) is activated.
(5) High beam indicator (Blue) Lights when the headlight is on high beam.
(6) Digital clock Shows the time (page 19).
(7) Tachometer Shows engine RPM.
(8) Tachometer red zone Shows excessive engine rpm range in which operation may damage theengine.
(9) Neutral indicator (Green) Lights when the transmissions in neutral.
(10) Right turn signal indicator Flashes when the right turn signal operates. (amber)

16 (Ref.No.) Description Function-------------------------------------------------------------- -----------------------------------------------------------(11) Fuel indicator (Red) When this indicator comes on while riding, fuel reserved in the tank is
about: 3.3 L (0.87 US gal, 0.73 Imp gal) Should also light for a fewseconds and then go off when the ignition switch is turned ON. If itcomes on any other time, refill the fuel tank as soon as possible (page 30).
(12) Fuel gauge Shows approximate fuel supply available (page 18).
(13) Coolant temperature gauge Shows coolant temperature(page 17).
(14) Low oil pressure indicator (Red) Lights when the engine oil pressure is below the normal operating range.Should light when ignition switch is ON and engine is not running. Shouldgo out when the engine starts, except for occasional flickering at or nearidling speed when engine is warm.
(15) Tripmeter Shows mileage per trip.
(16) Tripmeter reset knob Resets tripmeter to zero (0) by turning the knob in direction shown.
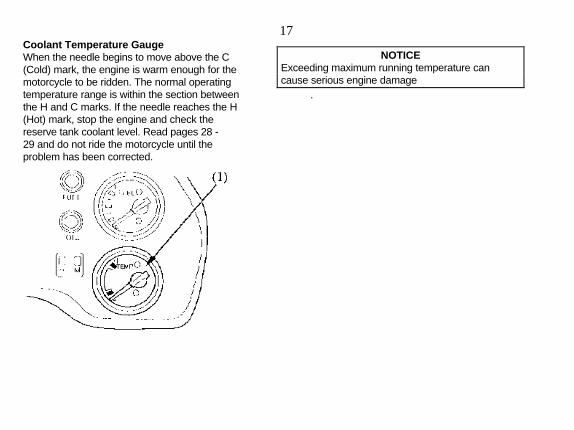
17Coolant Temperature GaugeWhen the needle begins to move above the C(Cold) mark, the engine is warm enough for themotorcycle to be ridden. The normal operatingtemperature range is within the section betweenthe H and C marks. If the needle reaches the H(Hot) mark, stop the engine and check thereserve tank coolant level. Read pages 28 -29 and do not ride the motorcycle until theproblem has been corrected.
.
NOTICEExceeding maximum running temperature cancause serious engine damage
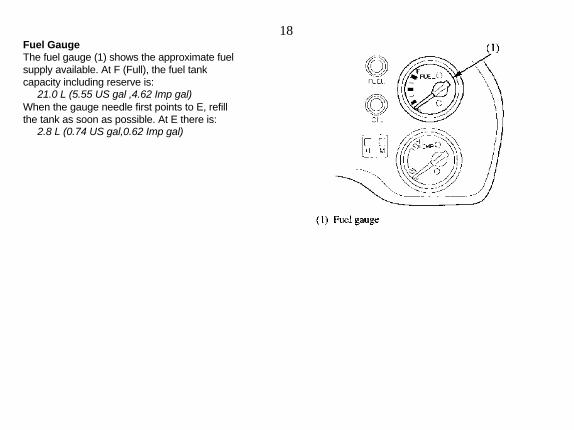
18Fuel GaugeThe fuel gauge (1) shows the approximate fuelsupply available. At F (Full), the fuel tankcapacity including reserve is: 21.0 L (5.55 US gal ,4.62 Imp gal)When the gauge needle first points to E, refillthe tank as soon as possible. At E there is: 2.8 L (0.74 US gal,0.62 Imp gal)
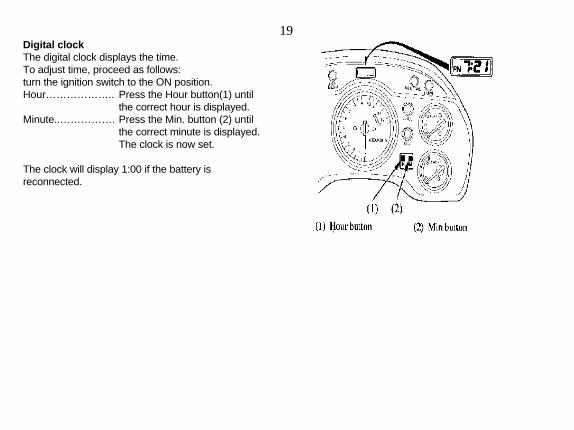
19Digital clockThe digital clock displays the time.To adjust time, proceed as follows:turn the ignition switch to the ON position.Hour……………….. Press the Hour button(1) until
the correct hour is displayed.Minute..……………. Press the Min. button (2) until
the correct minute is displayed.The clock is now set.
The clock will display 1:00 if the battery isreconnected.
20MAJOR COMPONENTSInformation you need to operate thisMotorcycle
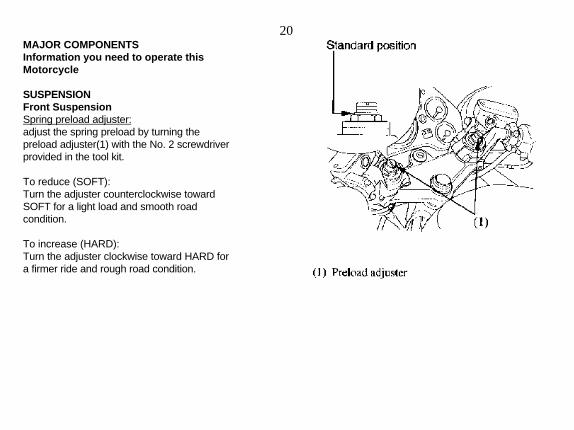
SUSPENSIONFront SuspensionSpring preload adjuster:adjust the spring preload by turning thepreload adjuster(1) with the No. 2 screwdriverprovided in the tool kit.
To reduce (SOFT):Turn the adjuster counterclockwise towardSOFT for a light load and smooth roadcondition.
To increase (HARD):Turn the adjuster clockwise toward HARD fora firmer ride and rough road condition.

21Rear SuspensionRebound damping adjuster.To adjust the adjuster to the standard position,proceed as follows:1. Turn the damping adjuster (1) clockwise
until it will no longer turn. This is the fullhard setting.
2. Turn the adjuster counterclockwiseapproximately 1 turn so that its punchmark (2) aligns with the reference punchmark (3).Then the adjuster is set in the standardposition.
To reduce (SOFT):Turn the adjuster counterclockwise towardSOFT for a light load and smooth roadconditions.
To increase (HARD):Turn the adjuster clockwise toward HARD fora firmer ride and rough road conditions.
The rear shock absorber assembly includes adamper unit that contains high pressurenitrogen gas. Do not attempt to disassemble orservice the damper; it cannot be rebuilt andmust be replaced when worn out. Disposalshould only be done by your authorized Hondadealer. The instructions found in this owner'smanual are limited to adjustment of the shockassembly only.
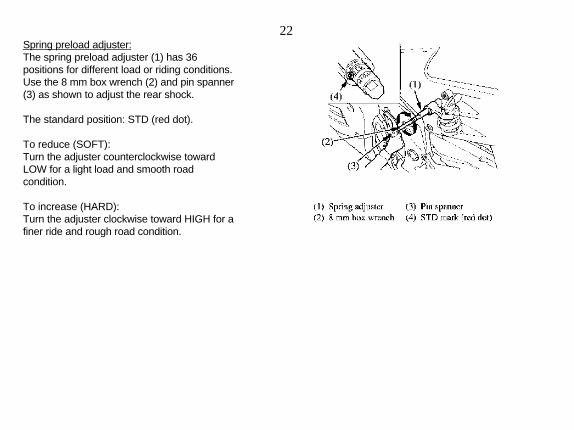
22Spring preload adjuster:The spring preload adjuster (1) has 36positions for different load or riding conditions.Use the 8 mm box wrench (2) and pin spanner(3) as shown to adjust the rear shock.
The standard position: STD (red dot).
To reduce (SOFT):Turn the adjuster counterclockwise towardLOW for a light load and smooth roadcondition.
To increase (HARD):Turn the adjuster clockwise toward HIGH for afiner ride and rough road condition.

23BRAKESBoth front and rear brakes are hydraulic disctypes.As the brake pads wear, the brake fluid levelwill drop. A leak in the system will also causethe level to drop. Therefore, the brake fluidlevel and pad wear must be inspectedperiodically. The system must be inspectedfrequently to ensure there are no fluid leaks. Ifthe control lever or pedal free travel becomesexcessive and the brake pads are not wornbeyond the recommended limit (page 91)there is probably air in the brake system and itmust be bled. See your authorized Hondadealer for this service.
Front Brake Fluid Level:With the motorcycle in an upright position,check the fluid level. It should be above theLOWER level mark (1). If the level is at orbelow the LOWER level mark(1), check thebrake pads for wear(page 91).
Worn pads should be replaced. If the pads arenot worn, have your brake system inspected forleaks.
The recommended brake fluid is Honda DOT 4brake fluid from a sealed container, or anequivalent.
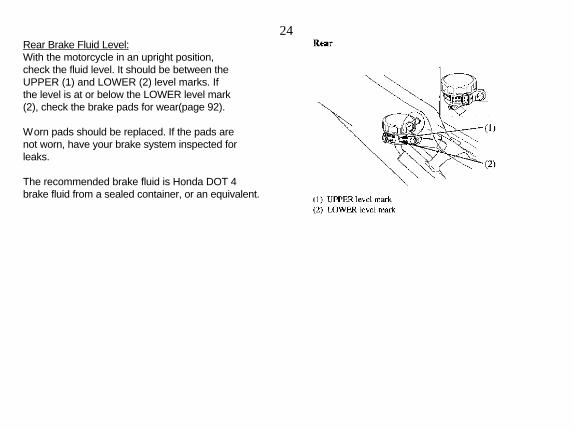
24Rear Brake Fluid Level:With the motorcycle in an upright position,check the fluid level. It should be between theUPPER (1) and LOWER (2) level marks. Ifthe level is at or below the LOWER level mark(2), check the brake pads for wear(page 92).
Worn pads should be replaced. If the pads arenot worn, have your brake system inspected forleaks.
The recommended brake fluid is Honda DOT 4brake fluid from a sealed container, or an equivalent.
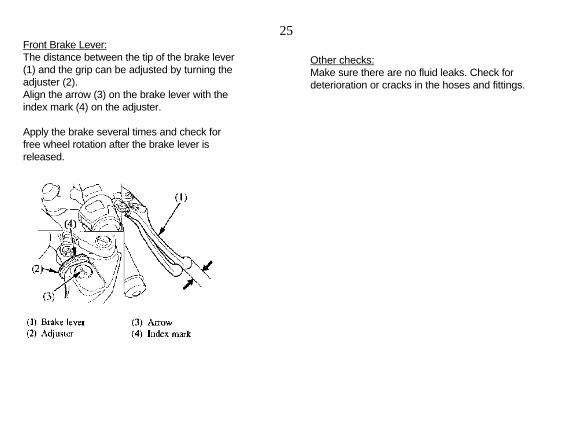
25Front Brake Lever:The distance between the tip of the brake lever(1) and the grip can be adjusted by turning theadjuster (2).Align the arrow (3) on the brake lever with theindex mark (4) on the adjuster.
Apply the brake several times and check forfree wheel rotation after the brake lever isreleased.
Other checks:Make sure there are no fluid leaks. Check fordeterioration or cracks in the hoses and fittings.
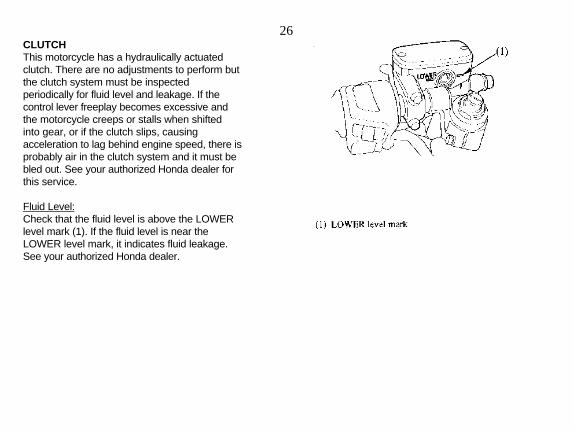
26CLUTCHThis motorcycle has a hydraulically actuatedclutch. There are no adjustments to perform butthe clutch system must be inspectedperiodically for fluid level and leakage. If thecontrol lever freeplay becomes excessive andthe motorcycle creeps or stalls when shiftedinto gear, or if the clutch slips, causingacceleration to lag behind engine speed, there isprobably air in the clutch system and it must bebled out. See your authorized Honda dealer forthis service.
Fluid Level:Check that the fluid level is above the LOWERlevel mark (1). If the fluid level is near theLOWER level mark, it indicates fluid leakage.See your authorized Honda dealer.
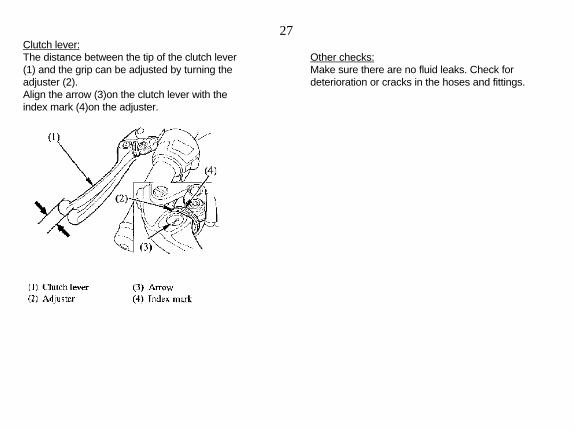
27Clutch lever:The distance between the tip of the clutch lever(1) and the grip can be adjusted by turning theadjuster (2).Align the arrow (3)on the clutch lever with theindex mark (4)on the adjuster.
Other checks:Make sure there are no fluid leaks. Check fordeterioration or cracks in the hoses and fittings.
28COOLANTCoolant RecommendationThe owner must properly maintain the coolantto prevent freezing, overheating and corrosion.Use only high quality ethylene glycolantifreeze containing corrosion protectioninhibitors specifically recommended for use inaluminum engines. (SEE ANTIFREEZECONTAINER LABEL).
Use only low-mineral drinking water ordistilled water as a part of the antifreezesolution. Water that is high in mineral contentor salt may be harmful to the aluminum engine.
The factory provides a 50/50 solution ofantifreeze and distilled water in this motorcycle.This coolant solution is recommended for mostoperating temperatures and provides goodcorrosion protection. A higher concentration ofantifreeze decreases the cooling systemperformance and is recommended only whenadditional protection against freezing is needed.A concentration of less than 40/60 (40%antifreeze) will not Provide proper corrosionprotection.
During freezing temperatures, check thecooling system frequently and add higherconcentrations of antifreeze (up to a maximumof 60% antifreeze) if required.
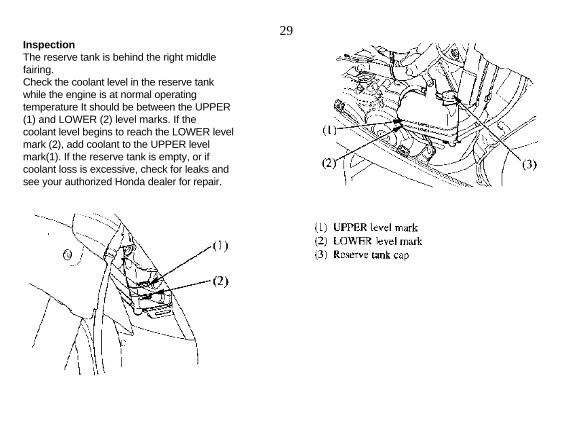
29InspectionThe reserve tank is behind the right middlefairing.Check the coolant level in the reserve tankwhile the engine is at normal operatingtemperature It should be between the UPPER(1) and LOWER (2) level marks. If thecoolant level begins to reach the LOWER levelmark (2), add coolant to the UPPER levelmark(1). If the reserve tank is empty, or ifcoolant loss is excessive, check for leaks andsee your authorized Honda dealer for repair.
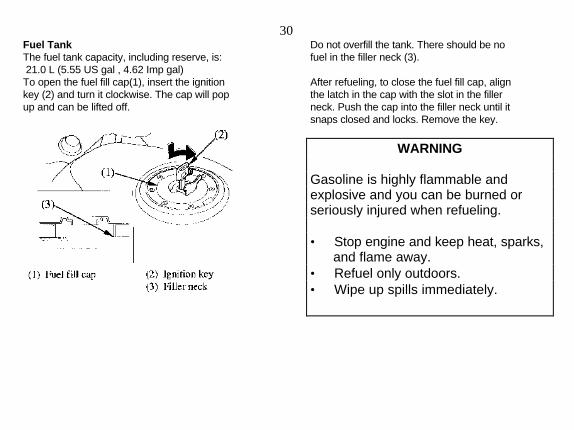
30Fuel TankThe fuel tank capacity, including reserve, is: 21.0 L (5.55 US gal , 4.62 Imp gal)To open the fuel fill cap(1), insert the ignitionkey (2) and turn it clockwise. The cap will popup and can be lifted off.
Do not overfill the tank. There should be nofuel in the filler neck (3).
After refueling, to close the fuel fill cap, alignthe latch in the cap with the slot in the fillerneck. Push the cap into the filler neck until itsnaps closed and locks. Remove the key.
WARNING
Gasoline is highly flammable andexplosive and you can be burned orseriously injured when refueling.
• Stop engine and keep heat, sparks, and flame away.• Refuel only outdoors.• Wipe up spills immediately.
31Your engine is designed to use any gasolinethat has a pump octane number of 86 or higher.Gasoline pumps at service stations normallydisplay the pump octane number.
We recommend that you use unleaded fuelbecause it produces fewer engine and sparkplug deposits and extends the life of exhaustsystem components.Never use stale or contaminated gasoline or anoil/gasoline mixture. Avoid getting dirt, dust orwater in the fuel tank. Use of a lower octanegasoline can cause persistent "pinging" orheavy "spark knock" (a metallic rappingnoise) which, if severe, can lead to enginedamage.
NOTICEIf "spark knock" or "pinging" occurs at asteady engine speed under normal load, changebrands of gasoline. If spark knock or pingingpersists, consult your authorized Honda dealer.Failure to do so is considered misuse, anddamage caused by misuse is not covered byHonda' s Limited Warranty.
Occasionally you may experience light sparkknock while operating under heavy loads. Thisis no cause for concern, it simply means yourengine is operating efficiently.

32Oxygenated FuelsSome conventional gasoline's are being blendedwith alcohol or an ether compound. Thesegasoline's are collectively referred to asoxygenated fuels. To meet clean IR standards,some areas of the United States and Canada useoxygenated fuels to help reduce emissions.
If you use an oxygenated fuel, be sure it isunleaded and meets the minimum octane ratingrequirement.
Before using an oxygenated fuel, try toconfirm the fuel's contents. Some states/provinces require this information to be postedon the pump. The following are the EPA (TheU.S. Environmental Protection Agency)approved percentages of oxygenates:
ETHANOL (ethyl or grain alcohol) 10% byVolumeYou may use gasoline containing up to 10%ethanol by volume. Gasoline containingethanol may be marketed under the name"Gasohol"
MTBE (Methyl Tertiary Butyl Ether) 15% byVolumeYou may use gasoline containing up to 15%MTBE by volume.
METHANOL (methyl or wood alcohol) 5% byVolumeYou may use gasoline containing up to 5%methanol by volume as long as it also containscosolvents and corrosion inhibitors to protectthe fuel system.Gasoline containing more than 5% methanol byvolume may cause starting and/or performanceproblems. It may also damage metal, rubber,and plastic parts of your fuel system.
If you notice any undesirable operatingsymptoms, try another service station or switchto another brand of gasoline.Fuel system damage or performance problemsresulting from the use of an oxygenated fuelcontaining more than the percentages ofoxygenates mentioned above are not coveredunder warranty.
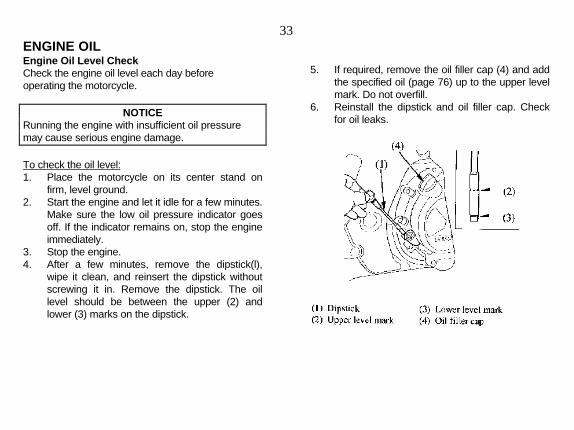
33ENGINE OILEngine Oil Level CheckCheck the engine oil level each day beforeoperating the motorcycle.
To check the oil level:1. Place the motorcycle on its center stand on
firm, level ground.2. Start the engine and let it idle for a few minutes.
Make sure the low oil pressure indicator goesoff. If the indicator remains on, stop the engineimmediately.
3. Stop the engine.4. After a few minutes, remove the dipstick(l),
wipe it clean, and reinsert the dipstick withoutscrewing it in. Remove the dipstick. The oillevel should be between the upper (2) andlower (3) marks on the dipstick.
5. If required, remove the oil filler cap (4) and add
the specified oil (page 76) up to the upper levelmark. Do not overfill.
6. Reinstall the dipstick and oil filler cap. Checkfor oil leaks.
NOTICERunning the engine with insufficient oil pressuremay cause serious engine damage.
34TIRESTo safely operate your motorcycle, your tiresmust be the proper type and size, in goodcondition with adequate tread, and correctlyinflated for the load you are carrying. Thefollowing pages give more detailed informationon how and when to check your air pressure, howto inspect your tires for damage, andwhat to do when your tires need to be repairedor replaced.
Air PressureKeeping your tires properly inflated providesthe best combination of handling, tread life andriding comfort. Under inflated tires wearunevenly, adversely affect handling, and aremore likely to fail from being overheated.Over inflated tires make your motorcycle ridemore harshly, are more prone to damage fromroad hazards, and wear unevenly.
We recommend that you visually check yourtires before every ride and use a gauge tomeasure air pressure at least once a month orany time you think the tires might be low.Tubeless tires have some self-sealing ability ifthey are punctured. However, because leakageis often very slow, you should look closely forpunctures whenever a tire is not fully inflated.
WARNING
Using tires that are excessively wornor improperly inflated can cause acrash in which you can be seriouslyhurt or killed.
Follow all instructions in this owner'smanual regarding tire inflation andmaintenance.

35Always check air pressure when your tires are"cold" -- when the motorcycle has beenparked for at least three hours. If you check airpressure when your tires are "warm" -- whenthe motorcycle has been ridden for even a fewmiles -- the readings will be higher than if thetires were "cold". This is normal, so do not letair out of the tires to match the recommendedcold air pressures given below. If you do, thetires will be under inflated.
The recommended ''cold'' tire pressures are: Front 250 kPa(2.50 kg/cm2 ,36psi) Rear 290 kPa(2.90 kg/cm2 .42psi)
InspectionWhenever you check the tire pressures, youshould also examine the tire treads andsidewalls for Wear, damage, and foreignobjects:
Look for:• Bumps or bulges in the side of the tire or the
tread. Replace the tire if you find any bumps orbulges.
• Cuts, splits or cracks in the tire. Replace thetire if you can see fabric or cord.
• Excessive tread wear.
Also, if you hit a pothole or hard object, pull tothe side of the road as soon as you safely canand carefully inspect the tires for damage.
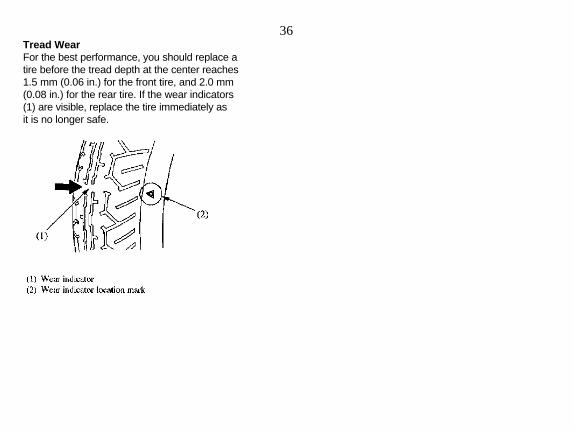
36Tread WearFor the best performance, you should replace atire before the tread depth at the center reaches1.5 mm (0.06 in.) for the front tire, and 2.0 mm(0.08 in.) for the rear tire. If the wear indicators(1) are visible, replace the tire immediately asit is no longer safe.
37Tire RepairIf a tire is punctured or damaged, you shouldreplace it, not repair it. As discussed below, atire that is repaired, either temporarily orpermanently, will have lower speed andperformance limits than a new tire.
A temporary repair, such as an externaltubeless tire plug, may not be safe for normalspeeds and riding conditions. If a temporary oremergency repair is made to a tire, you shouldride slowly and cautiously to a dealer and havethe tire replaced. If possible, you should notcarry a passenger or cargo until a new tire isinstalled.
Even if a tire is professionally repaired with apermanent internal patch plug, it will not be asgood as a new tire. You should not exceed 50mph (80 km/h) for the first 24 hours, or 80mph (130 km/h) at any time thereafter. Inaddition, you may not be able to safely carry asmuch weight as with a new tire. Therefore, westrongly recommend that you replace adamaged tire. If you choose to have a tirerepaired, be sure the wheel is balanced beforeyou ride.
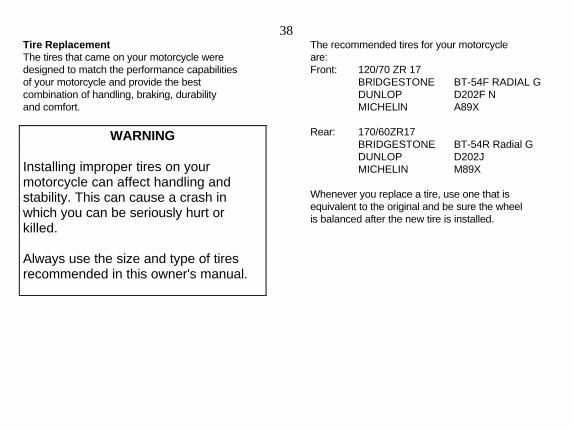
38Tire ReplacementThe tires that came on your motorcycle weredesigned to match the performance capabilitiesof your motorcycle and provide the bestcombination of handling, braking, durabilityand comfort.
The recommended tires for your motorcycleare:Front: 120/70 ZR 17
BRlDGESTONE BT-54F RADIAL GDUNLOP D202F NMICHELlN A89X
Rear: 170/60ZR17BRIDGESTONE BT-54R Radial GDUNLOP D202JMICHELIN M89X
Whenever you replace a tire, use one that isequivalent to the original and be sure the wheelis balanced after the new tire is installed.
WARNING
Installing improper tires on yourmotorcycle can affect handling andstability. This can cause a crash inwhich you can be seriously hurt orkilled.
Always use the size and type of tiresrecommended in this owner's manual.
39Important Safety Reminders• Do not install a tube inside a tubeless tire on
this motorcycle. Excessive heat build-up cancause the tube to burst.
• Use only tubeless tires on this motorcycle. Therims are designed for tubeless tires, and duringhard acceleration or braking, a tube type tirecould slip on the rim and cause the tire torapidly deflate.
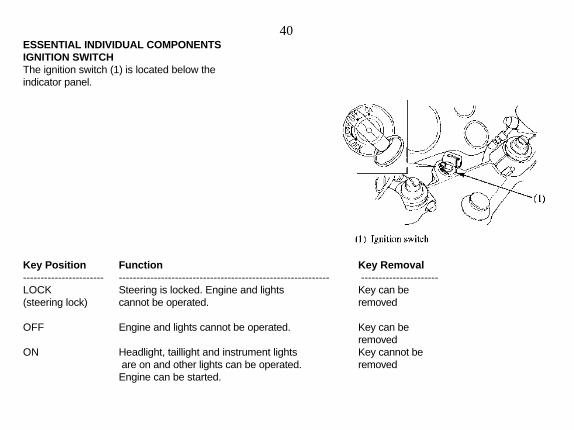
40ESSENTIAL INDIVIDUAL COMPONENTSIGNITION SWITCHThe ignition switch (1) is located below theindicator panel.
Key Position Function Key Removal----------------------- ------------------------------------------------------------ ----------------------LOCK Steering is locked. Engine and lights Key can be(steering lock) cannot be operated. removed
OFF Engine and lights cannot be operated. Key can be removedON Headlight, taillight and instrument lights Key cannot be
are on and other lights can be operated. removedEngine can be started.
41
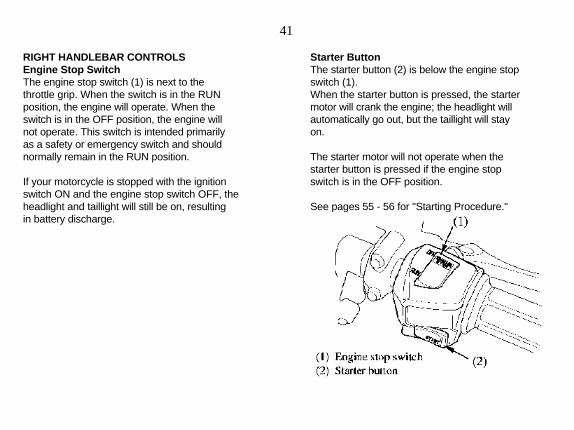
RIGHT HANDLEBAR CONTROLSEngine Stop SwitchThe engine stop switch (1) is next to thethrottle grip. When the switch is in the RUNposition, the engine will operate. When theswitch is in the OFF position, the engine willnot operate. This switch is intended primarilyas a safety or emergency switch and shouldnormally remain in the RUN position.
If your motorcycle is stopped with the ignitionswitch ON and the engine stop switch OFF, theheadlight and taillight will still be on, resultingin battery discharge.
Starter ButtonThe starter button (2) is below the engine stopswitch (1).When the starter button is pressed, the startermotor will crank the engine; the headlight willautomatically go out, but the taillight will stayon.
The starter motor will not operate when thestarter button is pressed if the engine stopswitch is in the OFF position.
See pages 55 - 56 for "Starting Procedure."
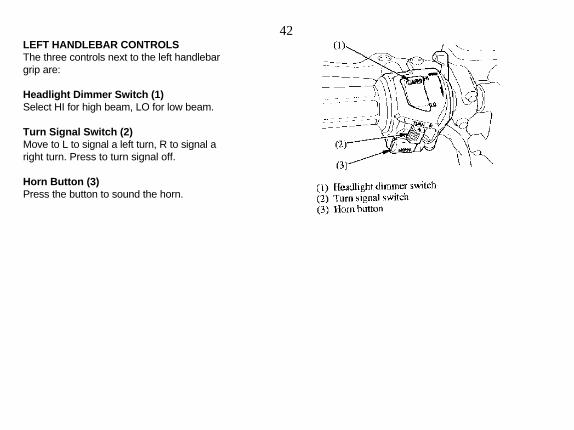
42LEFT HANDLEBAR CONTROLSThe three controls next to the left handlebargrip are:
Headlight Dimmer Switch (1)Select HI for high beam, LO for low beam.
Turn Signal Switch (2)Move to L to signal a left turn, R to signal aright turn. Press to turn signal off.
Horn Button (3)Press the button to sound the horn.
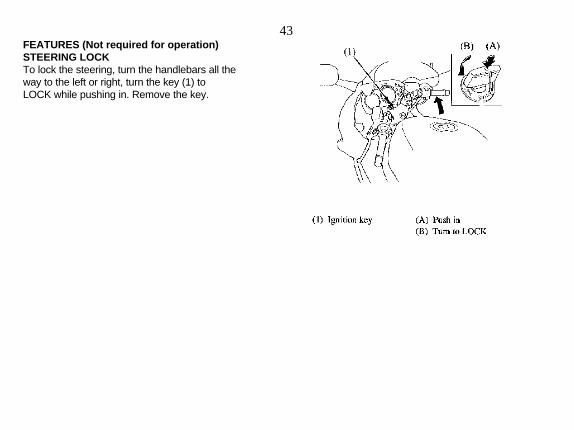
43FEATURES (Not required for operation)STEERING LOCKTo lock the steering, turn the handlebars all theway to the left or right, turn the key (1) toLOCK while pushing in. Remove the key.
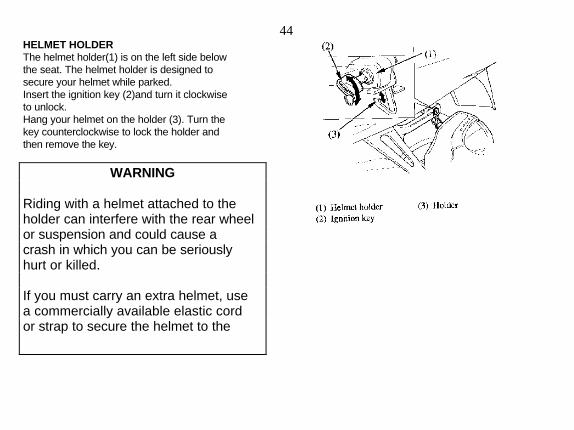
44HELMET HOLDERThe helmet holder(1) is on the left side belowthe seat. The helmet holder is designed tosecure your helmet while parked.Insert the ignition key (2)and turn it clockwiseto unlock.Hang your helmet on the holder (3). Turn thekey counterclockwise to lock the holder andthen remove the key.
WARNING
Riding with a helmet attached to theholder can interfere with the rear wheelor suspension and could cause acrash in which you can be seriouslyhurt or killed.
If you must carry an extra helmet, usea commercially available elastic cordor strap to secure the helmet to the

45SEATTo remove the seat( 1), insert the ignition key(2) into the helmet holder (3), turn itclockwise and pull the seat lock lever (4)downward. Pull the seat back and up.To install the seat, insert the prong into therecess under the frame cross member and thenpush down on the rear of the seat. Turn the keycounterclockwise to lock the seat, then removethe key.
Be sure to securely lock the seat afterreinstalling it.

46OWNER'S MANUAL STORAGEThe owner's manual (and other documents)should be stored in the plastic bag (1) in theowner's manual storage compartment (2)under the seat.When washing your motorcycle, be careful notto flood this area with water.
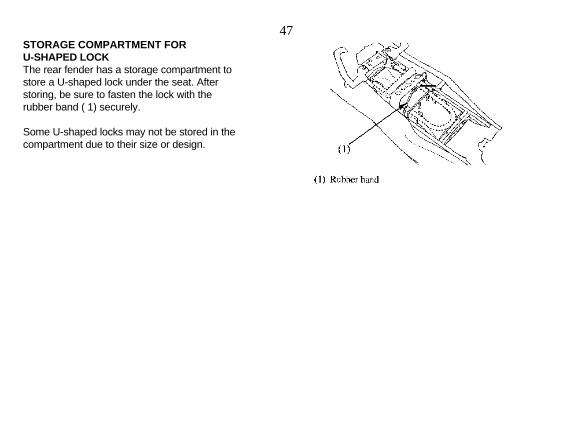
47STORAGE COMPARTMENT FORU-SHAPED LOCKThe rear fender has a storage compartment tostore a U-shaped lock under the seat. Afterstoring, be sure to fasten the lock with therubber band ( 1) securely.
Some U-shaped locks may not be stored in thecompartment due to their size or design.
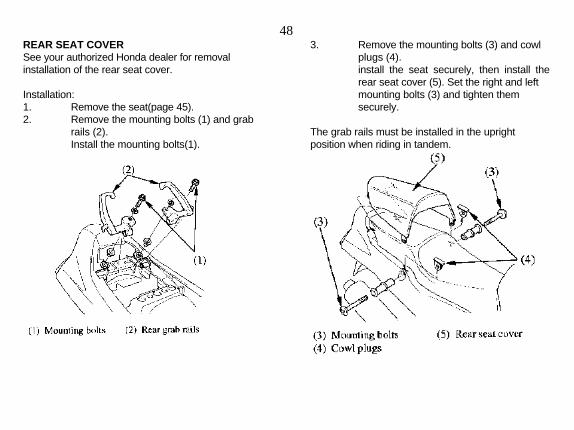
48REAR SEAT COVERSee your authorized Honda dealer for removalinstallation of the rear seat cover.
Installation:1. Remove the seat(page 45).2. Remove the mounting bolts (1) and grab
rails (2).Install the mounting bolts(1).
3. Remove the mounting bolts (3) and cowlplugs (4).install the seat securely, then install therear seat cover (5). Set the right and leftmounting bolts (3) and tighten themsecurely.
The grab rails must be installed in the uprightposition when riding in tandem.
49Removal:1. Removal can be done in the reverse order of
installation. Tighten the rear grab rail mountingbolts (1) securely.
TORQUE: 35 N-m(3.5 kg-m, 25 Ib-ft)
If a torque wrench was not used for installation,see your authorized Honda dealer as soon aspossible to verify proper assembly. The grabrail could come off easily and result in seriousinjury if the assembly is not made properly.
2. Install the seat properly (page 45).
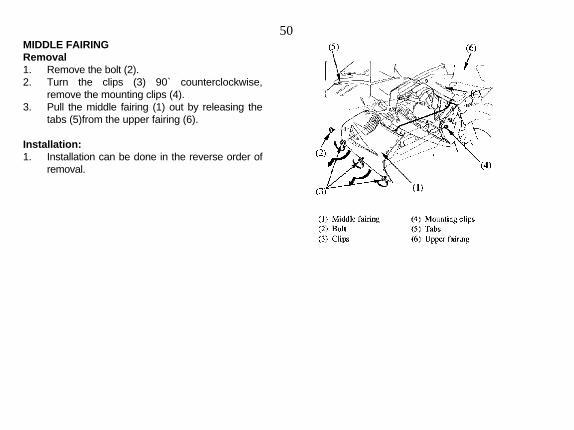
50MIDDLE FAIRINGRemoval1. Remove the bolt (2).2. Turn the clips (3) 90` counterclockwise,
remove the mounting clips (4).3. Pull the middle fairing (1) out by releasing the
tabs (5)from the upper fairing (6).
Installation:1. Installation can be done in the reverse order of
removal.
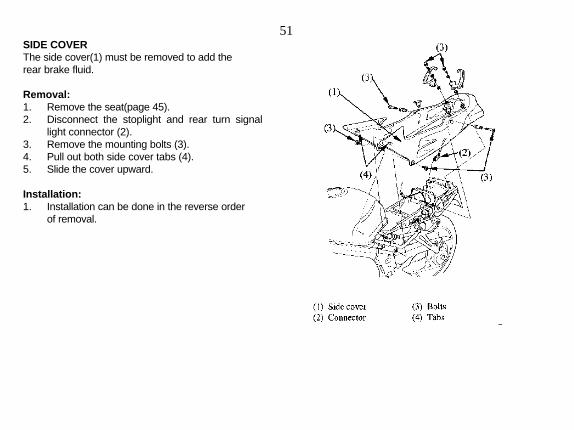
51SIDE COVERThe side cover(1) must be removed to add therear brake fluid.
Removal:1. Remove the seat(page 45).2. Disconnect the stoplight and rear turn signal
light connector (2).3. Remove the mounting bolts (3).4. Pull out both side cover tabs (4).5. Slide the cover upward.
Installation:1. Installation can be done in the reverse order
of removal.
52OPERATIONPRE-RIDE INSPECTIONFor your safety, it is very important to take afew moments before each ride to walk aroundyour motorcycle and check its condition. If youdetect any problem, be sure you take care of it,or have it corrected by your Honda dealer.
Check the following items before you get onthe motorcycle:
• Tires If a tire looks low, check the airpressure with a gauge. Also look for signs ofdamage or excessive wear(page 36).
• Leaks Look for signs of leaking fluidsunder the motorcycle.
• Chain Check condition and adjustslack and lubricate as needed (page 89).
• Cables Check for loose cables and otherparts, and anything that appears abnormal.
Check these items after you get on themotorcycle:• Throttle Rotate the throttle to check that
it moves smoothly without binding.• Brakes Pull the brake lever and press
on the brake pedal to check that they operatenormally.
WARNING
Improperly maintaining this motorcycleor failing to correct a problem beforeriding can cause a crash in which youcan be seriously hurt or killed.
Always perform a pre-ride inspectionbefore every ride and correct anyproblems.

53• Gauges Turn the ignition on and check
for normal operation of the gauges andindicators.
• Lights Make sure the brake light,taillight and other lights are working properly.
Remember, be sure to take care of any Problemyou find, or have your dealer correct it, beforeyou ride.
54STARTING THE ENGINEThis motorcycle is equipped with a side standignition cut-off system. The engine cannot bestarted if the side stand is down, unless thetransmission is in neutral. If the side stand is up,the engine can be started in neutral or in gearwith the clutch lever pulled in. After startingwith the side stand down, the engine will stopif the transmission is put in gear before raisingthe side stand.
Your motorcycle's exhaust contains poisonouscarbon monoxide gas. High levels of carbonmonoxide can collect rapidly in enclosed areassuch as a garage. Do not run the engine withthe garage door closed. Even with the dooropen, run the engine only long enough to moveyour motorcycle out of the garage.
Do not use the electric starter for more than 5seconds at a time. Release the starter button forapproximately 10 seconds before pressing itagain.
PreparationBefore starting, insert the key, turn the ignitionswitch ON and confirm the following:• The transmission is in NEUTRAL• (neutral indicator light ON).• The engine stop switch is at RUN.• The low oil pressure indicator is ON.• The fuel valve is ON.
The low oil pressure indicator should go off afew seconds after the engine starts. If the lightstays on, stop the engine immediately andcheck the engine oil level.
NOTICEOperating the engine with insufficient oil pressurecan cause serious engine damage.

55Starting ProcedureTo restart a warm engine, follow the procedurefor ''High Air Temperature".
Normal Air Temperature 10` - 35`C (50` - 95`F)
1. Pull the choke lever(1) back all the way to FullyON(A), if the engine is cold.
2. Start the engine, leaving the throttle closed.
Do not open the throttle when starting the enginewith the choke ON. This will lean the mixture,resulting in hard starting.
3. Immediately after the engine starts,operate the choke lever( 1) to keep fastidle at: 2,000-3,000 rpm
4. About a quarter minute after the enginestarts, push the choke lever (1) forwardall the way to Fully OFF (B).
5. If idling is unstable, open the throttleslightly.
NOTICEOperating the engine with insufficient oilpressure can cause serious engine damage.

56High Air Temperature
35 `C (95 `F) or above1. Do not use the choke.2. Open the throttle slightly.3. Start the engine.
Low Air Temperature10`C (50`F) or below
1. Follow steps 1-2 under "Normal AirTemperature''.
2. When engine rpm begins to pick up, operate
the choke lever to keep fast idle at : 2,000-3,000 rpm
3. Continue warming up the engine until it runs
smoothly and responds to the throttle when the choke lever(1) is at Fully OFF (B).
Snapping the throttle or fast idling for morethan about 5 minutes at normal air temperaturemay cause exhaust pipe discoloration.
NOTICEExtended use of the choke may impair pistonand cylinder wall lubrication.
57Flooded EngineIf the engine fails to start after repeatedattempts, it may be flooded with excess fuel.To clear a flooded engine, leave the engine stopon RUN and push the choke lever forward toFully OFF (B). Open the throttle fully andcrank the engine for 5 seconds. If the enginestarts, quickly close the throttle, then open itslightly if idling is unstable. If the engine doesnot start, wait 10 seconds, then follow the"High Air Temperature" Starting Procedure(page 56).

58BREAK-INDuring initial break-in, newly machinedsurfaces will be in contact with each other andthese surfaces will wear in quickly. Break-inmaintenance at 600 miles (1,000 km) isdesigned to compensate for this initial minorwear. Timely performance of the break-inmaintenance will ensure optimum service lifeand performance from the engine.The general rules are as follows:1 Never lug the engine with full throttle at low
engine speeds. This rule is applicable not onlyduring break-in but at all times.
2 Maximum continuous engine speed during thefirst 600 miles (1,000 km) must not exceed5,000 rpm.
3 3.Increase the maximum continuous enginespeed by 2,000 rpm between odometerreadings of 600 miles (1,000 km) and 1,000
miles (1,600 km). Drive briskly, varyspeeds frequently and use full throttle for shortbursts only. Do not exceed 7,000 rpm.
4 Upon reaching an odometer reading of 1,000
miles (1,600 km), you can subject themotorcycle to full throttle operation. However,do not exceed 11,500 RPM at any time(tachometer red zone limit).

59SHIFTINGReview Motorcycle Safety (pages 1 - 10)before you ride.
Proper shifting will provide better fueleconomy. When changing gears under normalconditions, use these recommended shiftpoints:
Shifting Up:From 1st to 2nd: 12 mph (20 km/h)From 2nd to 3rd: 19 mph (30 km/h)From 3rd to 4th: 25 mph (40 km/h)From 4th to 5th: 31 mph (50 km/h)From 5th to 6th: 37 mph (60 km/h)
Shifting Down:From 6th to 5th: 28 mph (45 km/h)From 5th to 4th: 22 mph (35 km/h)From 4th to 3rd: 16 mph (25 km/h)
Disengage the clutch when speed drops below11 mph (18 km/h), when engine roughness isevident, or when engine stalling is imminent;shift down to 1st gear for acceleration.
60To shift properly, pull the clutch lever andclose the throttle. Improper shifting maydamage the engine and drive train.
Downshifting allows you to use engine brakingand lower gearing to decelerate, butdownshifting when engine speed is near itsallowable maximum may over-rev the engineand cause possible damage.
The battery will not be charged while theengine speed is near idle speed. Avoid idlingfor prolonged periods.
Do not tow the motorcycle or coast for longdistances while the engine is off. Thetransmission will not be properly lubricatedand damage may result.
61BRAKINGFor normal braking, apply both the brake pedaland lever while down-shifting to match yourroad speed. For maximum braking, close thethrottle and firmly apply the pedal and lever;pull in the clutch lever before coming to acomplete stop to prevent stalling the engine.
Important Safety Reminders:• Independent operation of only the brake lever or
brake pedal reduces stopping performance.• Extreme application of the brake controls may
cause wheel lock, reducing control of themotorcycle.
• When possible, reduce speed or brake beforeentering a turn; closing the throttle or braking inmid-turn may cause wheel slip. Wheel slip willreduce control of the motorcycle.
• When riding in wet or rainy conditions, or onloose surfaces, the ability to maneuver and stopwill be reduced. All of your actions should besmooth under these conditions. Rapidacceleration, braking or turning may cause lossof control. For your safety, exercise extremecaution when braking, accelerating or turning.
• When descending a long, steep grade, useengine compression braking by down shifting,with intermittent use of both brakes.Continuous brake application can overheat thebrakes and reduce their effectiveness.
• Riding with your foot resting on the brake
pedal or your hand on the brake lever mayactuate the brakelight, giving a false indicationto other drivers. It may also overheat thebrakes, reducing effectiveness.

62HIGH ALTITUDE RUNNING(USA ONLY)When operating this motorcycle at high altitude,the air-fuel mixture becomes overly rich.Above 6,500 feet (2,000 m), driveability andperformance may be reduced and fuelconsumption increased. The carburetor can bemodified to compensate for this high altituderichness.
However, the carburetor must be returned tostandard factory specifications when loweraltitude riding is desired. See your authorizedHonda dealer for high altitude modification.
NOTICESustained operation at altitudes below 5,000feet (1,500 m) with high altitude carburetormodifications may cause engine overheatingand damage.
63PARKING1. After stopping the motorcycle, shift the
transmission into neutral, turn the ignitionswitch OFF, turn the handlebar all the way tothe left and remove the key.
2. Use the center stand to support the motorcyclewhile parked.
Park the motorcycle on firm, level ground toprevent it from falling over.If you must park on a slight incline, aim thefront of the motorcycle uphill to reduce thepossibility of rolling off the center stand oroverturning.
3. Lock the steering to help prevent theft (page 43).
64ANTI-THEFT TIPS1. 1.Always lock the steering and never leave the
key in the ignition switch. This sounds simplebut people do forget.
2. 2.Be sure the registration information for yourmotorcycle is accurate and current.
3. 3.Park your motorcycle in a locked garagewhenever possible.
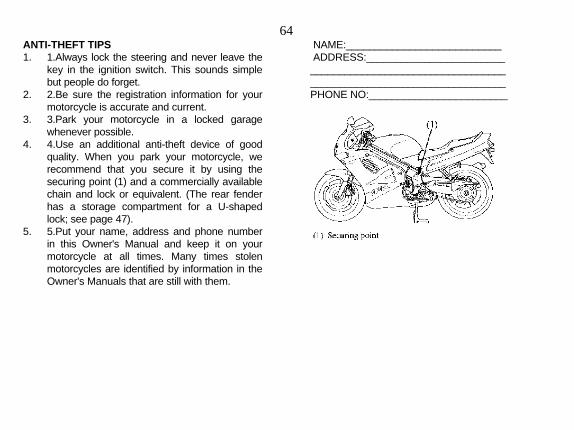
4. 4.Use an additional anti-theft device of goodquality. When you park your motorcycle, werecommend that you secure it by using thesecuring point (1) and a commercially availablechain and lock or equivalent. (The rear fenderhas a storage compartment for a U-shapedlock; see page 47).
5. 5.Put your name, address and phone numberin this Owner's Manual and keep it on yourmotorcycle at all times. Many times stolenmotorcycles are identified by information in theOwner's Manuals that are still with them.
NAME:___________________________ ADDRESS:____________________________________________________________________________________________PHONE NO:________________________
65MAINTENANCE
THE IMPORTANCE OF MAINTENANCEA well-maintained motorcycle is essential forsafe, economical and trouble-free riding. It willalso help reduce air pollution.
To help you properly care for your motorcycle,the following pages include a MaintenanceSchedule and a Maintenance Record forregularly scheduled maintenance.
These instructions are based on the assumptionthat the motorcycle will be used exclusively forits designed purpose. Sustained high speedoperation or operation in unusually wet ordusty conditions will require more frequentservice than specified in the MaintenanceSchedule. Consult your authorized Hondadealer for recommendations applicable to yourindividual needs and use.
If your motorcycle overturns or becomesinvolved in a crash, be sure your Honda dealerinspects all major parts, even if you are able tomake some repairs.
WARNING
Improperly maintaining this motorcycleor failing to correct a problem beforeriding can cause a crash in which youcan be seriously hurt or killed.
Always follow the inspection andmaintenance recommendations andschedules in this owner's manual.
66MAINTENANCE SAFETYThis section includes instructions on someimportant maintenance tasks. You can performsome of these tasks with the tools provided -if you have basic mechanical skills.
Other tasks that are more difficult and requirespecial tools are best performed byprofessionals. Removing the wheels shouldnormally be handled only by a Hondatechnician or other qualified mechanic;instructions are included in this manual only toassist in emergency service.
Some of the most important safety precautionsfollow. However, we cannot warn you of everyconceivable hazard that can arise in performingmaintenance. Only you can decide whether ornot you should perform a given task.
WARNING
Failure to properly follow maintenanceinstructions and precautions cancause you to be seriously hurt or killed.
Always follow the procedures andprecautions in this owner's manual.
67SAFETY PRECAUTIONS• Make sure the engine is off before you begin
any maintenance or repairs. This will helpeliminate several potential hazards:
• Carbon monoxide poisoning fromengine exhaust. Be sure there isadequate ventilation whenever youoperate the engine.
• Burns from hot parts. Let theengine and exhaust system coolbefore touching.
• Injury from moving parts. Do notrun the engine unless instructed todo so.
• Read the instructions before you begin, andmake sure you have the tools and skillsrequired.
• To help prevent the motorcycle from fallingover, park it on a firm, level surface, using thecenter stand to provide support.
• To reduce the possibility of a fire or explosion,be careful when working around gasoline orbatteries. Use only non-flammable solvent, notgasoline, to clean parts. Keep cigarettes,sparks and flames away from the battery andall fuel-related parts.
Remember that your authorized Honda dealerknows your motorcycle best and is fullyequipped to maintain and repair it.
To ensure the best quality and reliability, useonly new genuine Honda parts or theirequivalents for repair and replacement.
If you have the tools and skills required foradditional maintenance jobs, you can purchaseHonda's Common Service Manual and anofficial. Model Specific Service Manual fromyour Honda dealer (page 116).
68EMISSION REQUIREMENTS(USA ONLY)
The U.S. Environmental Protection Agencyand California Air Resources Board (CARB)require that your motorcycle comply withapplicable exhaust emissions standards duringits useful life, when operated and maintainedaccording to the instructions provided, and thatmotorcycles built after January 1, 1983 complywith applicable noise emission standards forone year or 6,000 km (3,730 miles) after thetime of sale to the ultimate purchaser, whenoperated and maintained according to theinstructions provided. Compliance with theterms of the Distributor's Warranties forHonda Motorcycle Emission Control Systemsis necessary in order to keep the emissionssystem warranty in effect.
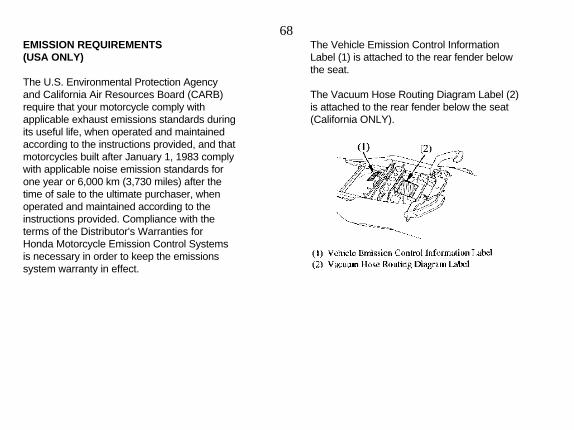
The Vehicle Emission Control InformationLabel (1) is attached to the rear fender belowthe seat.
The Vacuum Hose Routing Diagram Label (2)is attached to the rear fender below the seat(California ONLY).
69MAINTENANCE SCHEDULEPerform the Pre-ride Inspection (page 52) ateach scheduled maintenance period.
Each item on the maintenance schedulerequires some mechanical knowledge. Certainitems (particularly those marked * and **)may require more technical information andtools. Consult your authorized Honda Dealer.
• Should be serviced by your authorized Hondadealer, unless the owner has proper tools,service data and is mechanically qualified.Refer to Honda's Common Service Manual andan official Model Specific Service Manual.
• In the interest of safety, we recommend these
items be serviced only by your authorizedHonda dealer.
Summary of Maintenance Schedule Notes andProcedures:
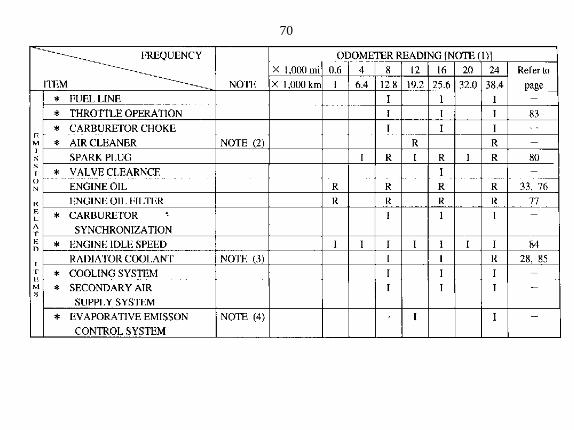
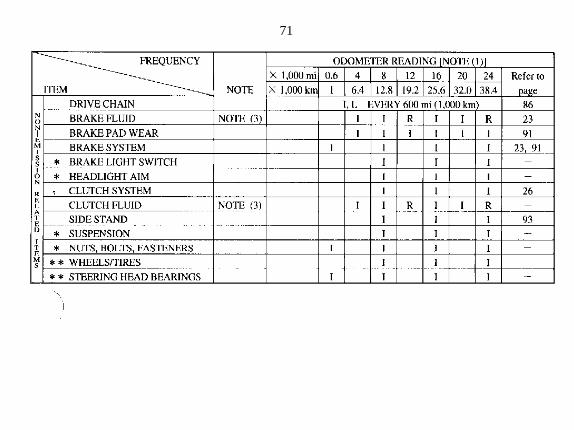
NOTE: (1) At higher odometer readings,repeat at the frequency intervalestablished here.
(2) Service more frequently whenriding in unusually wet or dustyareas.
(3) Replace every 2 years, or atindicated odometer interval,whichever comes first.Replacement requiresmechanical skill.
(4) California type only.
Maintenance Procedures:I: Inspect and Clean, Adjust, Lubricate or
Replace if necessaryC: CleanA: AdjustL: LubricateR: Replace
70
71
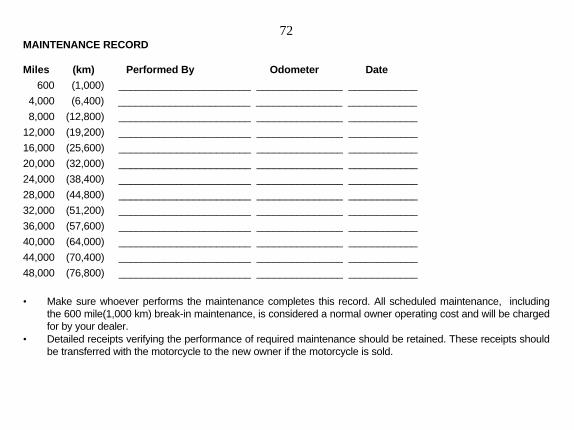
72MAINTENANCE RECORD
Miles (km) Performed By Odometer Date
600 (1,000) _______________________ _______________ ____________
4,000 (6,400) _______________________ _______________ ____________
8,000 (12,800) _______________________ _______________ ____________
12,000 (19,200) _______________________ _______________ ____________
16,000 (25,600) _______________________ _______________ ____________
20,000 (32,000) _______________________ _______________ ____________
24,000 (38,400) _______________________ _______________ ____________
28,000 (44,800) _______________________ _______________ ____________
32,000 (51,200) _______________________ _______________ ____________
36,000 (57,600) _______________________ _______________ ____________
40,000 (64,000) _______________________ _______________ ____________
44,000 (70,400) _______________________ _______________ ____________
48,000 (76,800) _______________________ _______________ ____________
• Make sure whoever performs the maintenance completes this record. All scheduled maintenance, includingthe 600 mile(1,000 km) break-in maintenance, is considered a normal owner operating cost and will be chargedfor by your dealer.
• Detailed receipts verifying the performance of required maintenance should be retained. These receipts shouldbe transferred with the motorcycle to the new owner if the motorcycle is sold.

73
TOOL KITThe tool kit (1) is in the tool kit compartment(2) under the seat (page 45).Some roadside repairs, minor adjustments andparts replacement can be performed with thetools contained in the kit.
• Pin spanner• 14 x 17 mm box end wrench• 10 x 12 mm box end wrench• 8 x 12 mm open end wrench• 10 x 14 mm open end wrench• Pliers• No.2 Phillips screwdriver• No.2 screwdriver• Screwdriver grip• 8 mm box wrench• 5 mm hex wrench• 22 mm box end wrench• 16 mm box end wrench• Feeler gauge 0.7 mm• Tool bag
The following tools are also provided withyour motorcycle.
• Wheel wrench• Extension bar
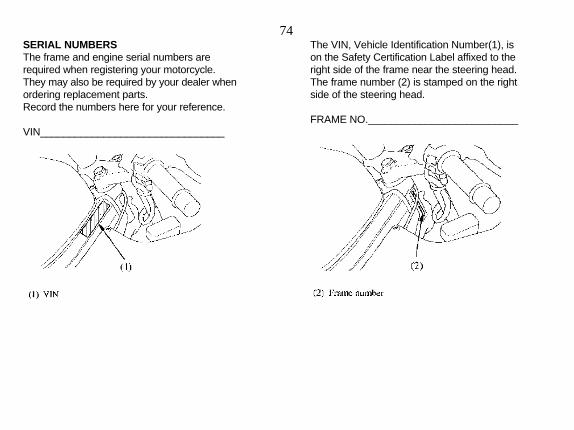
74SERIAL NUMBERSThe frame and engine serial numbers arerequired when registering your motorcycle.They may also be required by your dealer whenordering replacement parts.Record the numbers here for your reference.
VIN________________________________
The VIN, Vehicle Identification Number(1), ison the Safety Certification Label affixed to theright side of the frame near the steering head.The frame number (2) is stamped on the rightside of the steering head.
FRAME NO.__________________________
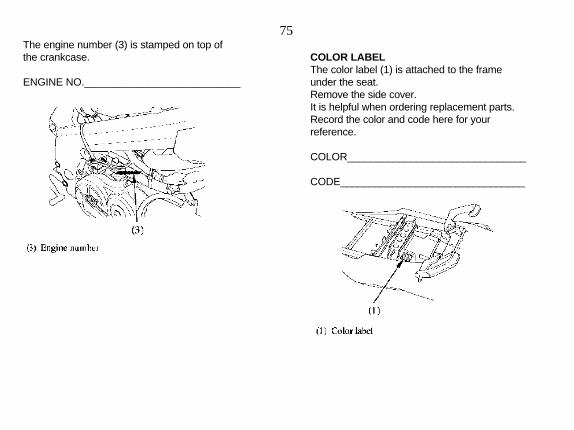
75The engine number (3) is stamped on top ofthe crankcase.
ENGINE NO.___________________________
COLOR LABELThe color label (1) is attached to the frameunder the seat.Remove the side cover.It is helpful when ordering replacement parts.Record the color and code here for yourreference.
COLOR_______________________________
CODE________________________________

76ENGINE OILRefer to the Safety Precautions on page 67
Engine Oil Recommendation:USE PRO HONDA GN44 STROKE OIL OR AN EQUIVALENT
Do not use oils with graphite or molybdenumadditives. They may adversely affect clutchoperation.
Use only high detergent, premium qualitymotor oil certified to meet API ServiceClassification SF or SG.Motor oils intended for Service SF or SG willshow this designation on the container. The useof special oil additives is unnecessary and willonly-increase operating expenses.
Engine oil is a major factor affecting theperformance and service life of the engine.Non-detergent, vegetable or castor-based racingoils are not recommended.
Recommended Oil ViscositySAE 10W-40Other viscosity's shown in the chart below maybe used when the average temperature in yourriding area is within the indicated range.
77Engine Oil and FilterEngine oil quality is the chief factor affectingengine service life. Change the engine oil asspecified in the maintenance schedule (page70).When running in very dusty conditions, oilchanges should be performed more frequentlythan specified in the maintenance schedule.
Please dispose of used engine oil in a mannerthat is compatible with the environment. Wesuggest you take it in a sealed container to yourlocal recycling center or service station forreclamation. Do not throw it in the trash orpour it on the ground or down a drain.
Changing the oil filter requires a special oilfilter tool and a torque wrench. If you do nothave these tools and the necessary skill, werecommend that you have your authorizedHonda dealer perform this service.
If a torque wrench is not used for thisinstallation, see your authorized Honda dealeras soon as possible to verify proper assembly.
Change the engine oil with the engine atnormal operating temperature and themotorcycle on its side stand to assure completeand rapid draining.
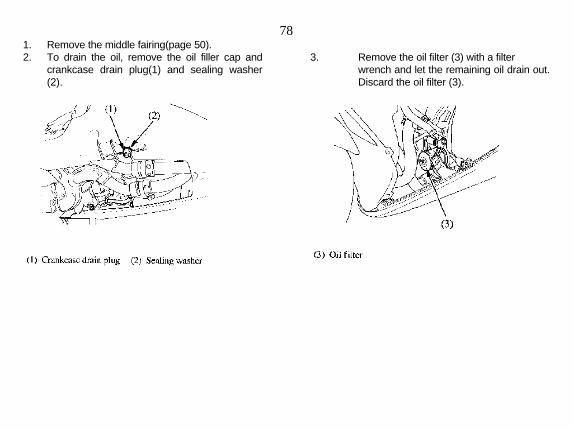
781. Remove the middle fairing(page 50).2. To drain the oil, remove the oil filler cap and
crankcase drain plug(1) and sealing washer(2).
3. Remove the oil filter (3) with a filterwrench and let the remaining oil drain out.Discard the oil filter (3).

794. Apply a thin coat of engine oil to the new
oil filter rubber seal (4).5. Using a special tool and a torque wrench,
install the new oil filter and tighten to atorque of: 10 N·m(1.0 kg-m, 7 Ib-ft)Use only the Honda genuine oil filter or afilter of equivalent quality specified foryour model. Using the wrong Honda filteror a non-Honda filter which is not ofequivalent quality may cause enginedamage.
6. Check that the sealing washer on thedrain plug is in good condition and installthe plug. Replace the sealing washerevery other time the oil is changed, oreach time if necessary.Oil Drain Plug Torque: 38 N·m(3.8 kg-m, 27 Ib-ft)
7. Fill the crankcase with the recommendedgrade oil; approximately: 3.1 Lt (3.3 USqt, 2.7 Imp qt)
8. Install the oil filler cap.9. Start the engine and let it idle for 2-3
minutes.10. Several minutes after stopping the
engine, check that the oil level is at theupper level mark on the dipstick with themotorcycle upright on firm, level ground.Make sure there are no oil leaks.
80SPARK PLUGSRefer to the Safety Precautions on page 67.
Recommended plugs:Standard:
CR9EH-9 (NGK) orU27FER 9 (NIPPONDENSO)
For cold climate: (Below 5`C, 41`F) CR8EH-9 (NGK) or U24FER 9 (NIPPONDENSO)
Access to rear cylinder spark plugs:1. Remove the side cover (page 51).
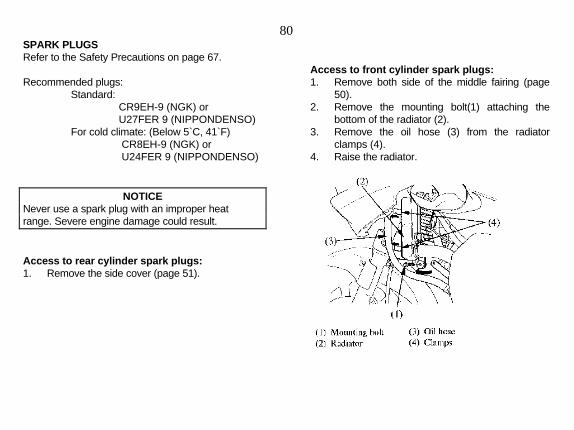
Access to front cylinder spark plugs:1. Remove both side of the middle fairing (page
50).2. Remove the mounting bolt(1) attaching the
bottom of the radiator (2).3. Remove the oil hose (3) from the radiator
clamps (4).4. Raise the radiator.
NOTICENever use a spark plug with an improper heatrange. Severe engine damage could result.
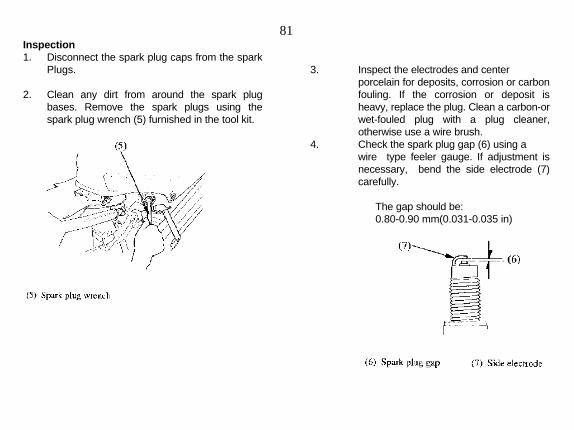
81Inspection1. Disconnect the spark plug caps from the spark
Plugs. 2. Clean any dirt from around the spark plug
bases. Remove the spark plugs using thespark plug wrench (5) furnished in the tool kit.
3. Inspect the electrodes and centerporcelain for deposits, corrosion or carbonfouling. If the corrosion or deposit isheavy, replace the plug. Clean a carbon-orwet-fouled plug with a plug cleaner,otherwise use a wire brush.
4. Check the spark plug gap (6) using awire type feeler gauge. If adjustment isnecessary, bend the side electrode (7)carefully.
The gap should be: 0.80-0.90 mm(0.031-0.035 in)

82
5. With the plug washer attached, thread the spark plug in by hand to prevent cross
threading.6. Tighten a new spark plug 1/2 turn with a spark
plug wrench to compress the washer. If you arereusing a plug, it should only take 1/8 - 1/4 turnafter the plug seats.
7. Reinstall the spark plug caps.8. Install the removed parts in reverse order of
removal.
NOTICEThe spark plug must be securely tightened. Animproperly tightened plug can become very hotand possibly damage the engine.
83THROTTLE OPERATIONRefer to the Safety Precautions on page 67.
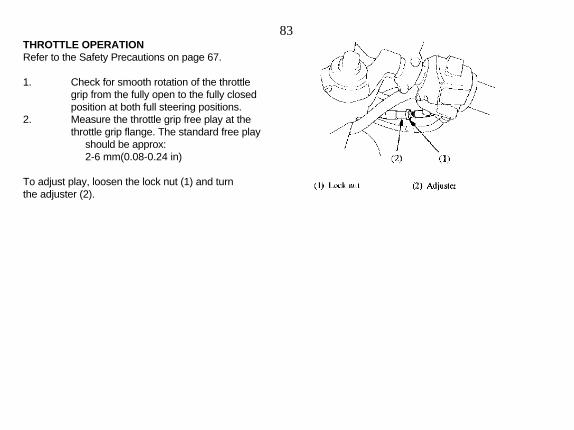
1. Check for smooth rotation of the throttlegrip from the fully open to the fully closedposition at both full steering positions.
2. Measure the throttle grip free play at thethrottle grip flange. The standard free play should be approx: 2-6 mm(0.08-0.24 in)
To adjust play, loosen the lock nut (1) and turnthe adjuster (2).
84IDLE SPEEDRefer to the Safety Precautions on page 67.
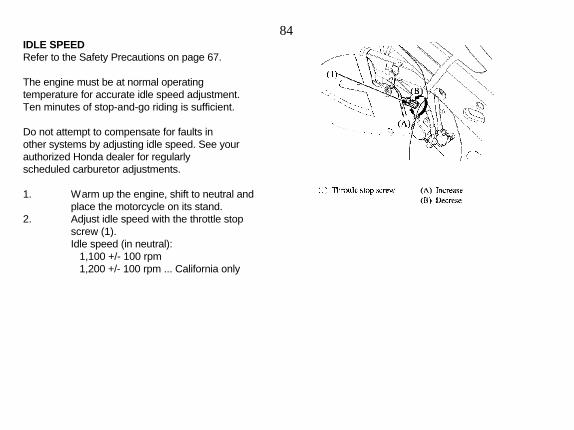
The engine must be at normal operatingtemperature for accurate idle speed adjustment.Ten minutes of stop-and-go riding is sufficient.
Do not attempt to compensate for faults inother systems by adjusting idle speed. See yourauthorized Honda dealer for regularlyscheduled carburetor adjustments.
1. Warm up the engine, shift to neutral andplace the motorcycle on its stand.
2. Adjust idle speed with the throttle stopscrew (1).Idle speed (in neutral): 1,100 +/- 100 rpm 1,200 +/- 100 rpm ... California only
85COOLANTRefer to the Safety Precautions on page 67.
Coolant ReplacementCoolant should be replaced by an authorizedHonda dealer, unless the owner has propertools and service data and is mechanicallyqualified. Refer to Honda's Common ServiceManual and an official Model Specific ServiceManual.
Always add coolant to the reserve tank. Do notattempt to add coolant by removing the radiatorcap.
WARNING
Removing the radiator cap while theengine is hot will allow the coolant tospray out, seriously scalding you.
Always let the engine and radiatorcool down before removing theradiator cap.
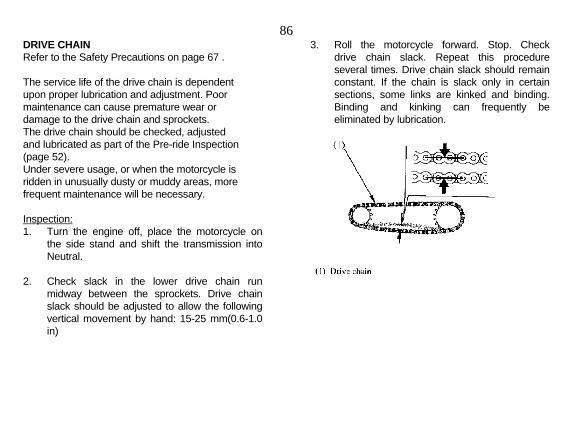
86DRIVE CHAINRefer to the Safety Precautions on page 67 .
The service life of the drive chain is dependentupon proper lubrication and adjustment. Poormaintenance can cause premature wear ordamage to the drive chain and sprockets.The drive chain should be checked, adjustedand lubricated as part of the Pre-ride Inspection(page 52).Under severe usage, or when the motorcycle isridden in unusually dusty or muddy areas, morefrequent maintenance will be necessary.
Inspection:1. Turn the engine off, place the motorcycle on
the side stand and shift the transmission intoNeutral.
2. Check slack in the lower drive chain run
midway between the sprockets. Drive chainslack should be adjusted to allow the followingvertical movement by hand: 15-25 mm(0.6-1.0in)
3. Roll the motorcycle forward. Stop. Checkdrive chain slack. Repeat this procedureseveral times. Drive chain slack should remainconstant. If the chain is slack only in certainsections, some links are kinked and binding.Binding and kinking can frequently beeliminated by lubrication.
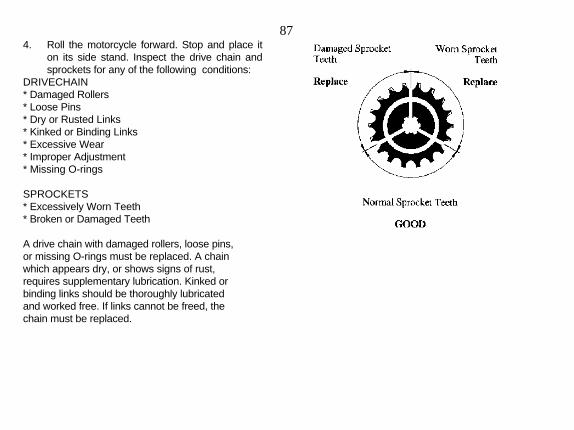
874. Roll the motorcycle forward. Stop and place it
on its side stand. Inspect the drive chain andsprockets for any of the following conditions:
DRIVECHAIN* Damaged Rollers* Loose Pins* Dry or Rusted Links* Kinked or Binding Links* Excessive Wear* Improper Adjustment* Missing O-rings
SPROCKETS* Excessively Worn Teeth* Broken or Damaged Teeth
A drive chain with damaged rollers, loose pins,or missing O-rings must be replaced. A chainwhich appears dry, or shows signs of rust,requires supplementary lubrication. Kinked orbinding links should be thoroughly lubricatedand worked free. If links cannot be freed, thechain must be replaced.
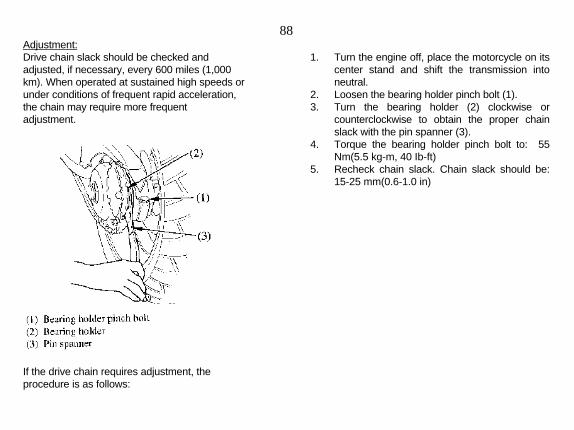
88Adjustment:Drive chain slack should be checked andadjusted, if necessary, every 600 miles (1,000km). When operated at sustained high speeds orunder conditions of frequent rapid acceleration,the chain may require more frequentadjustment.
If the drive chain requires adjustment, theprocedure is as follows:
1. Turn the engine off, place the motorcycle on itscenter stand and shift the transmission intoneutral.
2. Loosen the bearing holder pinch bolt (1).3. Turn the bearing holder (2) clockwise or
counterclockwise to obtain the proper chainslack with the pin spanner (3).
4. Torque the bearing holder pinch bolt to: 55Nm(5.5 kg-m, 40 Ib-ft)
5. Recheck chain slack. Chain slack should be:15-25 mm(0.6-1.0 in)

89Wear inspectionCheck the chain wear label when adjusting thechain. If the red zone (4) on the label alignswith the tip of driven sprocket teeth (5) afterthe chain has been adjusted to the proper slack,the chain is excessively worn and must bereplaced. The proper slack is:
15-25 mm(0.6-1.0 in)Damage to the bottom part of the frame may becaused by excessive drive chain slack of morethan:
40 mm(1.6in)
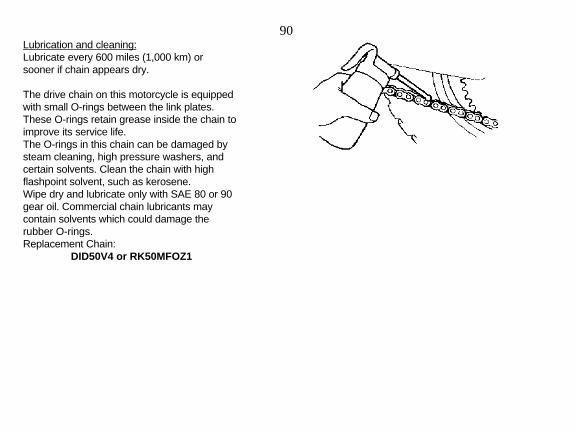
90Lubrication and cleaning:Lubricate every 600 miles (1,000 km) orsooner if chain appears dry.
The drive chain on this motorcycle is equippedwith small O-rings between the link plates.These O-rings retain grease inside the chain toimprove its service life.The O-rings in this chain can be damaged bysteam cleaning, high pressure washers, andcertain solvents. Clean the chain with highflashpoint solvent, such as kerosene.Wipe dry and lubricate only with SAE 80 or 90gear oil. Commercial chain lubricants maycontain solvents which could damage therubber O-rings.Replacement Chain:
DID50V4 or RK50MFOZ1
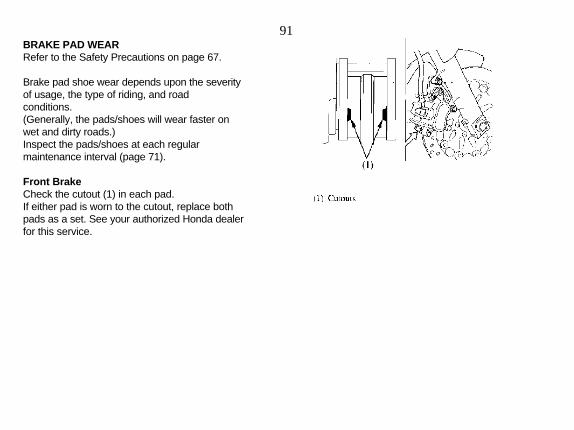
91BRAKE PAD WEARRefer to the Safety Precautions on page 67.
Brake pad shoe wear depends upon the severityof usage, the type of riding, and roadconditions.(Generally, the pads/shoes will wear faster onwet and dirty roads.)Inspect the pads/shoes at each regularmaintenance interval (page 71).
Front BrakeCheck the cutout (1) in each pad.If either pad is worn to the cutout, replace bothpads as a set. See your authorized Honda dealerfor this service.
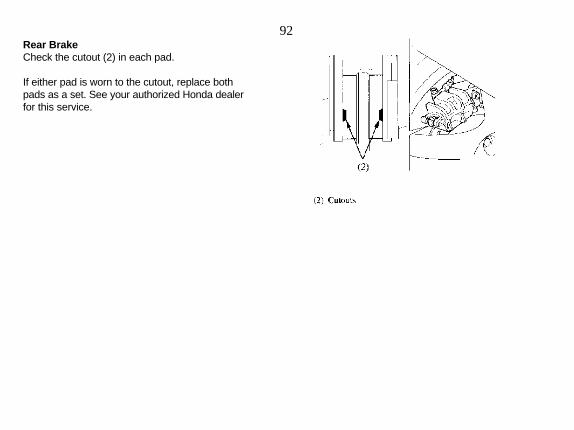
92Rear BrakeCheck the cutout (2) in each pad.
If either pad is worn to the cutout, replace bothpads as a set. See your authorized Honda dealerfor this service.
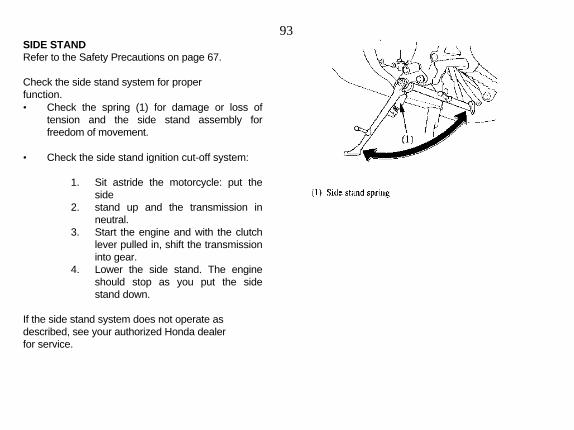
93SIDE STANDRefer to the Safety Precautions on page 67.
Check the side stand system for properfunction.• Check the spring (1) for damage or loss of
tension and the side stand assembly forfreedom of movement.
• Check the side stand ignition cut-off system:
1. Sit astride the motorcycle: put theside
2. stand up and the transmission inneutral.
3. Start the engine and with the clutchlever pulled in, shift the transmissioninto gear.
4. Lower the side stand. The engineshould stop as you put the sidestand down.
If the side stand system does not operate asdescribed, see your authorized Honda dealerfor service.
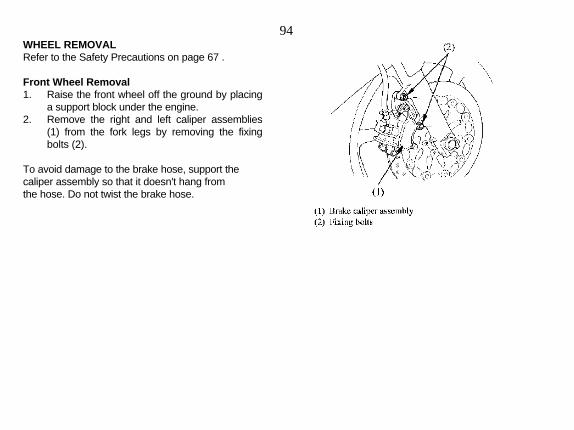
94WHEEL REMOVALRefer to the Safety Precautions on page 67 .
Front Wheel Removal1. Raise the front wheel off the ground by placing
a support block under the engine.2. Remove the right and left caliper assemblies
(1) from the fork legs by removing the fixingbolts (2).
To avoid damage to the brake hose, support thecaliper assembly so that it doesn't hang fromthe hose. Do not twist the brake hose.
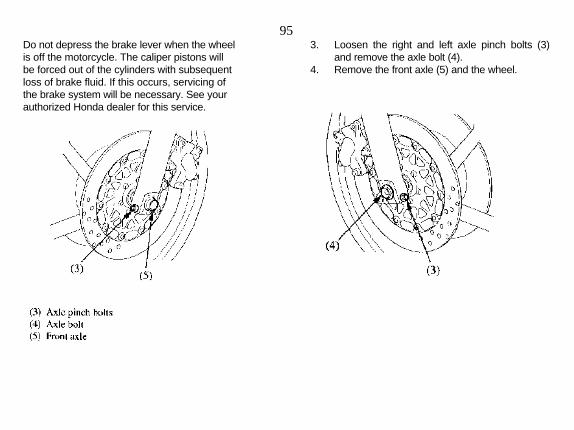
95Do not depress the brake lever when the wheelis off the motorcycle. The caliper pistons willbe forced out of the cylinders with subsequentloss of brake fluid. If this occurs, servicing ofthe brake system will be necessary. See yourauthorized Honda dealer for this service.
3. Loosen the right and left axle pinch bolts (3)and remove the axle bolt (4).
4. Remove the front axle (5) and the wheel.

96Installation Notes:Reverse the removal procedure to install thewheel.
If a torque wrench was not used for installation,see your authorized Honda dealer as soon aspossible to verify proper assembly. Improperassembly may lead to loss of braking capacity.
• Position the wheel between the fork legs andinsert the front axle shaft from the left side,through the left fork leg and wheel hub.
• When installing the wheel, fit the left brake disc
carefully between the brake pads to avoiddamaging the pads.
• Tighten the axle bolt to the specified torque.
Axle bolt torque: 59 Nm(5.9 kg-m, 43 Ib-ft) • Tighten all the axle pinch bolts to the specified
torque. Axle pinch bolts torque: 22 Nm(2.2 kg-m, 16 Ib-ft)
• Install the caliper fixing bolts, and tighten to atorque of: 27 Nm(2.7 kg-m, 20 Ib-ft)
Check the clearance (6) between the brake disc

97(7) and the caliper bracket (8) on each sidewith a 0.7 mm feeler gauge (9) after installation. Theclearance should be at least 0.7 mm (0.03 in).
If the clearance is not 0.7 mm (0.03 in) or more,loosen the left axle pinch bolt and pull the leftfork outward or push inward adjust theclearance. Then tighten the axle pinch bolt tothe specified torque.Axle pinch bolt torque:
22 N-m(2.2 kg-m, 16 Ib-ft)

98Apply the front brake several times, thenrecheck both discs for caliper bracket-to-discclearance. Do not operate the motorcyclewithout adequate clearance.
Failure to provide adequate disc-to-caliperbracket clearance may damage the brake discsand impair braking efficiency.
• Check for free wheel rotation after the brake isreleased. Recheck the wheel if the brake dragsor if the wheel does not rotate freely.
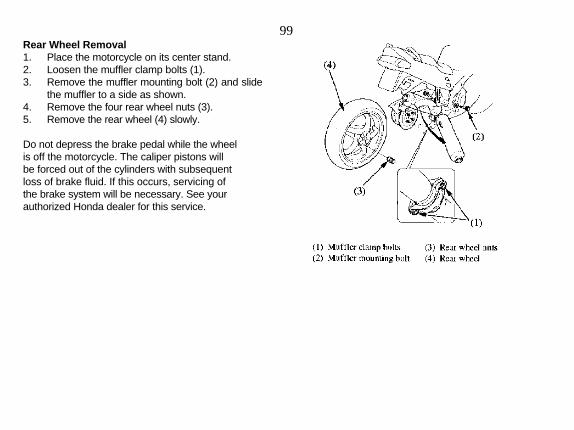
99Rear Wheel Removal1. Place the motorcycle on its center stand.2. Loosen the muffler clamp bolts (1).3. Remove the muffler mounting bolt (2) and slide
the muffler to a side as shown.4. Remove the four rear wheel nuts (3).5. Remove the rear wheel (4) slowly.
Do not depress the brake pedal while the wheelis off the motorcycle. The caliper pistons willbe forced out of the cylinders with subsequentloss of brake fluid. If this occurs, servicing ofthe brake system will be necessary. See yourauthorized Honda dealer for this service.
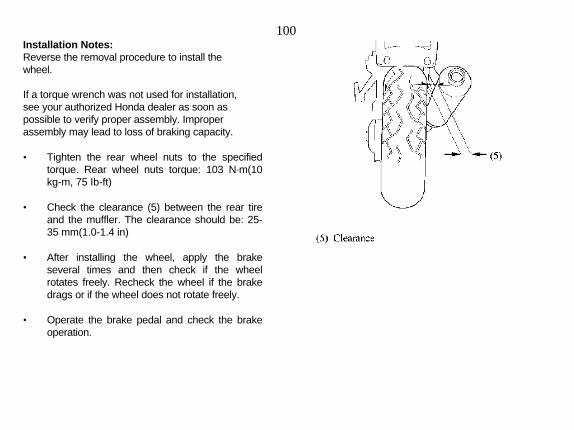
100Installation Notes:Reverse the removal procedure to install thewheel.
If a torque wrench was not used for installation,see your authorized Honda dealer as soon aspossible to verify proper assembly. Improperassembly may lead to loss of braking capacity.
• Tighten the rear wheel nuts to the specifiedtorque. Rear wheel nuts torque: 103 N·m(10kg-m, 75 Ib-ft)
• Check the clearance (5) between the rear tire
and the muffler. The clearance should be: 25-35 mm(1.0-1.4 in)
• After installing the wheel, apply the brake
several times and then check if the wheelrotates freely. Recheck the wheel if the brakedrags or if the wheel does not rotate freely.
• Operate the brake pedal and check the brake
operation.
101BATTERYRefer to the Safety Precautions on page 67.
It is not necessary to check the batteryelectrolyte level or add distilled water as thebattery is a maintenance-free (sealed) type. Ifyour battery seems weak and/or is leakingelectrolyte (causing hard starting or otherelectrical troubles), contact your authorizedHonda dealer.
NOTICEYour battery is a maintenance free type and canbe permanently damaged if the caps areremoved.
102
Emergency ProceduresEyes - Flush with water from a cup or othercontainer for at least fifteen minutes. (Waterunder pressure can damage the eye.)Immediately call 911 (U.S. only) or a physician.
Skin - Remove contaminated clothing. Flushthe skin with large quantities of water. Call aphysician immediately.
Swallowing - Drink water or milk. Call yourlocal Poison Control Center (U.S. only) or aphysician immediately.
WARNING
The battery contains sulfuric acid(electrolyte) which is highly corrosiveand poisonous.
Getting electrolyte in your eyes or onyour skin can cause serious burns.
Wear protective clothing and eyeprotection when working near thebattery.
KEEP CHILDREN AWAY FROM THEBATTERY.

103Battery RemovalThe battery is in the battery box below the seat.1. Remove the seat (page 45).2. Release the rings and remove the rubber
band(1).3. Disconnect the negative(--) terminal lead (2)
from the battery first, then disconnect thepositive(+) terminal lead (3).
4. Pull out the battery (4)from the battery box.

104FUSESRefer to the Safety Precautions on page 67.
All of the electrical circuits on your motorcyclehave fuses to protect them from a short circuitor overload.
Checking and Replacing Fuses
If something electrical on your motorcyclestops working, the first thing you should checkfor is a blown fuse. Determine from the charton the circuit fuse box cover which fuse orfuses control that component. Check thosefuses first, but check all the fuses beforedeciding that is not the cause. Replace anyblown fuses (1) and check the component'soperation.
If you cannot ride the motorcycle withoutfixing the problem, and you do not have aspare fuse, take a fuse of the same rating or atower rating from one of the other circuits.Make sure you can do without that circuittemporarily. If you replace a blown fuse with aspare fuse that has a lower rating, replace thefuse with the correct rating as soon as you can.
If the replacement fuse of the same ratingburns out in a short time, there is probably aserious electrical problem on your motorcycle.Leave the blown fuse in that circuit and haveyour motorcycle checked by a qualifiedtechnician.
NOTICEReplacing a fuse with one that has a higherrating greatly increases the chances ofdamaging the electrical system. If you do nothave a replacement fuse with the proper ratingfor the circuit, install one with a lower rating.

105Fuse box:The fuse box (1) is located near the right uppershroud (2).The specified fuses are:
10A, 20A
1. Turn the ignition switch OFF before checkingor replacing a fuse to prevent an accidentalshort circuit.
2. Remove the fuse box case cover (3) byremoving the screws (4).
3. Open the fuse box cover (5).4. Pull out the fuse. If the fuse is blown, install a
new fuse. Spare fuses (6) are located in thefuse box.
5. Install the fuse box case cover.
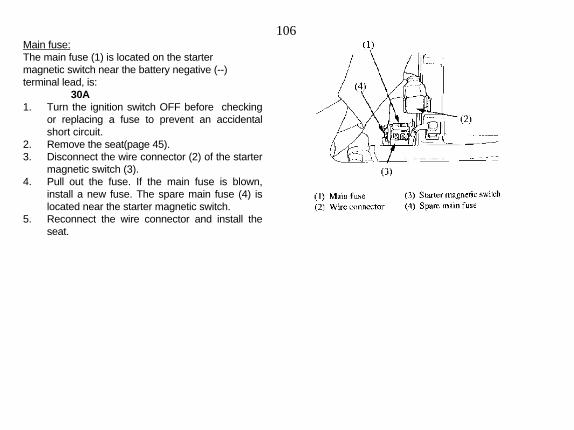
106Main fuse:The main fuse (1) is located on the startermagnetic switch near the battery negative (--)terminal lead, is:
30A1. Turn the ignition switch OFF before checking
or replacing a fuse to prevent an accidentalshort circuit.
2. Remove the seat(page 45).3. Disconnect the wire connector (2) of the starter
magnetic switch (3).4. Pull out the fuse. If the main fuse is blown,
install a new fuse. The spare main fuse (4) islocated near the starter magnetic switch.
5. Reconnect the wire connector and install theseat.
107CLEANINGClean your motorcycle regularly to protect thesurface finishes and inspect for damage, wear,and oil, coolant, or brake fluid leakage.
Avoid cleaning products that are notspecifically designed for motorcycle orautomobile surfaces.They may contain harsh detergents or chemicalsolvents that could damage the metal, paint,and plastic on your motorcycle.
If your motorcycle is still warm from recentoperation, give the engine and exhaust systemtime to cool off.
Park in a shady area. Washing your motorcyclein bright sunlight may cause the finish to fadebecause water droplets intensify the sun'sbrightness. Spotting is also more likely becausesurface water can dry before you have time towipe it off.
We recommend avoiding the use of highpressure water spray (typical in coin-operatedcar washes.)
1. Rinse the motorcycle thoroughly with cool waterto remove loose dirt.
2. Clean the motorcycle with a sponge or softcloth using cool water. Avoid directing water tomuffler outlets and electrical parts.
3. Clean the windshield with a soft cloth orsponge and plenty of water. Dry with a softclean cloth. Remove minor scratches withcommercially available plastic polishingcompound. Replace the windshield ifscratches cannot be removed and theyobstruct clear vision.
Take care to keep battery electrolyte, brakefluid or other acid chemicals off the fairing.They will damage the plastic.
NOTICEHigh pressure water (or air) can damage certainparts of the motorcycle

1084. After cleaning, rinse the motorcycle Aluminum Wheel Maintenance
thoroughly with plenty of clean water. Aluminum corrodes when it comes in contactDetergent residue can corrode alloy parts. with dust, mud, road salt, etc. After riding,
5. Dry the motorcycle and lubricate the clean the wheels with a wet sponge and milddrive chain. detergent, then rinse well with water and wipe
6. Start the engine and let it run for several dry with a clean cloth.minutes.
7. Test the brakes before riding the Do not use steel wool or a cleaner containingmotorcycle. Several applications may be abrasives or compounds to clean the wheels, asnecessary to restore normal braking they can cause damage.performance.
Braking efficiency may be temporarilyimpaired immediately after washing themotorcycle.Anticipate longer stopping distances to avoid apossible accident.
109STORAGE GUIDEExtended storage, such as for winter, requiresthat you take certain steps to reduce the effectsof deterioration from non-use of themotorcycle. In addition, necessary repairsshould be made BEFORE storing themotorcycle; otherwise, these repairs may beforgotten by the time the motorcycle isremoved from storage.
STORAGE1. Change the engine oil and filter.2. Make sure the cooling system is filled with a
50/50% antifreeze solution.3. Fill the fuel tank. Reinstall the fuel fill cap on
the tank.4. Drain the carburetors into an approved
gasoline container.
If storage will last more than one month,carburetor draining is very important, to assureproper Performance after storage.
WARNING
Gasoline is highly flammable andexplosive and you can be burned orseriously injured when handling fuel.
• Stop engine and keep heat, sparks,and flame away.
• Handle fuel only outdoors.• Wipe up spills immediately.
1105. To prevent rusting in the cylinders,
perform the following:• Remove the spark plug caps from the spark
plugs. Using tape or string, secure the caps toany convenient plastic body part so that theyare positioned away from the spark plugs.
• Remove the spark plugs from the engine andstore them in a safe place. Do not connect thespark plugs to the spark plug caps.
• Pour a tablespoon (15--20 cc) of clean engineoil into each cylinder and cover the spark plugholes with a piece of cloth.
• Crank the engine several times to distribute theoil.
• Reinstall the spark plugs and spark plug caps.
6. Remove the battery and charge it fully.Store it in an area protected from freezingtemperatures and direct sunlight.Slow charge the battery once a month.
7. Wash and dry the motorcycle. Wax allpainted surfaces. Coat chrome with rust-inhibiting oil.
8. Lubricate the drive chain.9. Inflate the tires to their recommended
pressures. Place the motorcycle onblocks to raise both tires off the ground.
10. Cover the motorcycle (don't use plastic orother coated materials) and store in anunheated area, free of dampness with aminimum of daily temperature variation.Do not store the motorcycle in directsunlight.
111 REMOVAL FROM STORAGE
1. Uncover and clean the motorcycle. Change theengine oil if more than 4 months have passedsince the start of storage.
2. Charge the battery as required. Install thebattery.
3. Perform all Preride Inspection checks (page52). Test ride the motorcycle at low speeds ina safe riding area away from traffic.
112SPECIFICATIONSDIMENSIONSOver all length 2,125 mm(83.7 in)Over all width 720 mm(28.3 in)Over all height 1,185 mm(46.7 in)Wheelbase 1,470 mm(57.9 in)Ground clearance 130 mm (5.1 in)
WEIGHTDry weight 211 kg (465 lbs)
212 kg (467 Ibs) ...California only
CAPACITIESEngine oil: After draining 2.9 L (3.1 USqt,2.6 Imp qt)
After draining and 3.1 L (3.3 USqt,2.7 Imp qt) oil filter changeAfter disassembly 3.8 L (4.0 US qt , 3.3 Imp qt)
Fuel tank 21.0 L (5.55 US gal ,4.62 Imp gal)Cooling system capacity 3.6 L (0.95 US gal , 0.79 Imp gal)Passenger capacity Operator and one passengerMaximum weight capacity 175 kg (386 Ibs)
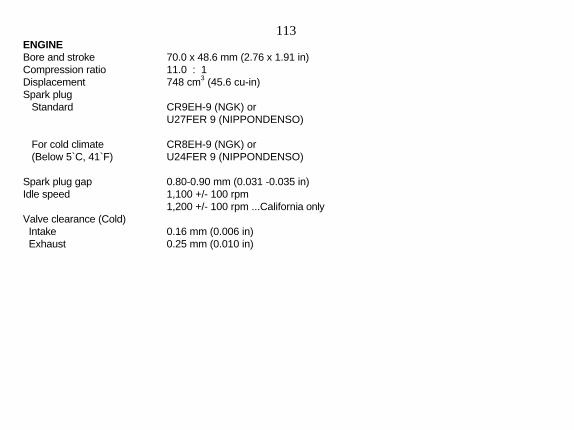
113ENGINEBore and stroke 70.0 x 48.6 mm (2.76 x 1.91 in)Compression ratio 11.0 : 1Displacement 748 cm3 (45.6 cu-in)Spark plug Standard CR9EH-9 (NGK) or
U27FER 9 (NIPPONDENSO)
For cold climate CR8EH-9 (NGK) or (Below 5`C, 41`F) U24FER 9 (NIPPONDENSO)
Spark plug gap 0.80-0.90 mm (0.031 -0.035 in)Idle speed 1,100 +/- 100 rpm
1,200 +/- 100 rpm ...California onlyValve clearance (Cold) Intake 0.16 mm (0.006 in) Exhaust 0.25 mm (0.010 in)
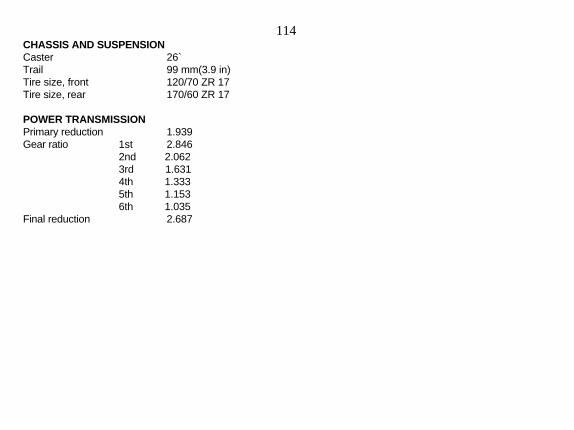
114CHASSIS AND SUSPENSIONCaster 26`Trail 99 mm(3.9 in)Tire size, front 120/70 ZR 17Tire size, rear 170/60 ZR 17
POWER TRANSMISSIONPrimary reduction 1.939Gear ratio 1st 2.846
2nd 2.0623rd 1.6314th 1.3335th 1.1536th 1.035
Final reduction 2.687
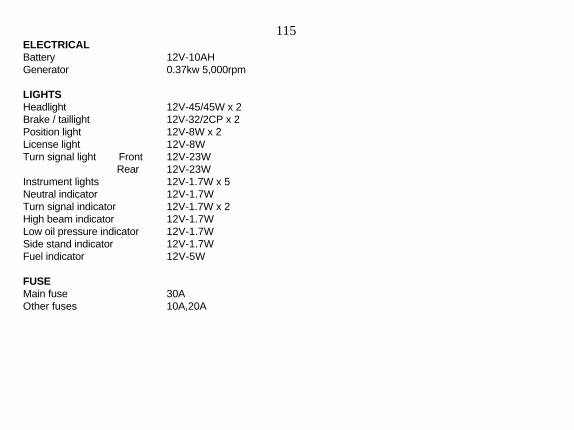
115ELECTRICALBattery 12V-10AHGenerator 0.37kw 5,000rpm
LIGHTSHeadlight 12V-45/45W x 2Brake / taillight 12V-32/2CP x 2Position light 12V-8W x 2License light 12V-8WTurn signal light Front 12V-23W
Rear 12V-23WInstrument lights 12V-1.7W x 5Neutral indicator 12V-1.7WTurn signal indicator 12V-1.7W x 2High beam indicator 12V-1.7WLow oil pressure indicator 12V-1.7WSide stand indicator 12V-1.7WFuel indicator 12V-5W
FUSEMain fuse 30AOther fuses 10A,20A

116CONSUMER INFORMATIONSERVICE MANUALS
• The Honda Common Service Manual (PartNumber: 61CM000) explains the theory ofperation and provides basic service informationfor various systems common to all Hondamotorcycles, scooters, ATVs and Pilots.
• The Model Specific Service Manual (Part
Number: 61MT405) contains serviceprocedures specific only to your model.
These Honda manuals are written for theprofessional technician, but most mechanically-capable owners should find them easy to use if theyhave the proper tools and observe proper safetyprocedures. Special Honda tools are necessary forsome procedures.
The Service Manuals used by your authorizedHonda dealer are available from your dealer's partsdepartment.
Some service procedures require reference toHonda's Common Service Manual as well as theModel Specific Service Manual. Consult yourauthorized dealer for details.
117EMISSION CONTROL SYSTEMSSource of EmissionsThe combustion process produces carbon monoxide and hydrocarbons. Control of hydrocarbons is very importantbecause under certain conditions, they react to form photochemical smog when subjected to sunlight. Carbonmonoxide does not react in the same way, but it is toxic. Honda Motor Co., Ltd. utilizes lean carburetor settings andother systems to reduce carbon monoxide and hydrocarbons.
Exhaust Emission Control SystemThe exhaust emission system consists of a secondary air supply system which introduces filtered air into theexhaust gases in the exhaust port. No adjustments to this system should be made although periodic inspection ofthe components is recommended. The secondary air supply system helps improve emission performance. Theexhaust emission control system is separate from the crankcase emission control system.

118Evaporative Emission Control System (California only)This motorcycle complies with the California Air Resources Board (CARB) requirements forevaporative emission regulations. Fuel vapor from the fuel tank and carburetor is directed into the charcoal canisterand air cleaner where it is adsorbed and stored while the engine is stopped. When the engine is running and thepurge control diaphragm valve is open, fuel vapor in the charcoal canister and air cleaner is drawn into the enginethrough the carburetor.
Crankcase Emission Control SystemThe engine is equipped with a closed crankcase system to prevent discharging crankcase emissions into theatmosphere. Blow-by gas is returned to the combustion chamber through the air cleaner and the carburetor.
Noise Emission Control SystemTAMPERING WITH THE NOISE CONTROL SYSTEM IS PROHIBITED: Federal law prohibits the following actsor the causing thereof: (1) The removal or rendering inoperative by any person, other than for purposes ofmaintenance, repair, or replacement, of any device or element of design incorporated into any new vehicle for thepurpose of noise control prior to its sale or delivery to the ultimate purchaser or while it is in use; or (2) the use of thevehicle after such device or element of design has been removed or rendered inoperative by any person.

119AMONG THOSE ACTS PRESUMED TO CONSTITUTE TAMPERING ARE THE ACTSLISTED BELOW:1. Removal of, or puncturing the muffler, baffles, header pipes or any other component which conducts exhaust
gases.2. Removal of, or puncturing any part of the intake system.3. Lack of proper maintenance.4. Replacing any moving parts of the vehicle, or parts of the exhaust or intake system, with parts other than those
specified by the manufacturer.
Problems that May Affect Motorcycle EmissionsIf you are aware of any of the following symptoms, have the vehicle inspected and repaired by your authorized HondaMotorcycle Dealer:1. Hard starting or stalling after starting2. Rough idle3. Misfiring or back firing during acceleration4. After-burning (backfiring)5. Poor performance (driveability) and poor fuel economy
120WARRANTY SERVICEOwner SatisfactionYour satisfaction and goodwill are important to your dealer and to us. The details of all Honda warranties areexplained in the Distributor's Limited Warranty. Normally, any problems with the product will be handled by yourdealer's service department. Sometimes, however, in spite of the best intentions of all concerned, is mis-understandings can occur. If your problem has not been handled to your satisfaction, we suggest you take thefollowing action:
• Discuss your problem with a member of dealership management. Often complaints can be quickly resolved atthat level. If the problem has already been reviewed with the Service Manager, contact the owner of thedealership or the General Manager.
• If your problem still has not been resolved to your satisfaction, contact the Motorcycle Customer Servicedepartment of American Honda Motor Co., Inc. The address is P.O. Box 2220, Torrance, CA90509-2220.Telephone: (310) 532-9811. We will need the following information in order to assist you:
-- Your name, address and telephone number-- Product model and serial number-- Date of purchase-- Dealer name and address-- Nature of the problem
After reviewing all the facts involved, you will be advised of what action can be taken.Please bear in mind that your problem will likely be resolved at the dealership, using the dealer's facilities,equipment, and personnel, so it is very important that your initial contact be with the dealer.Your purchase of a Honda product is greatly appreciated by both the dealer and American Honda Motor Co., Inc.We want to assist you in every way possible to assure your complete satisfaction with your purchase.
121REPORTING SAFETY DEFECTSIf you believe that your vehicle has a defect which could cause a crash or could cause injury or death, you shouldimmediately inform the National Highway Traffic Safety Administration (NHTSA) in addition to notifying AmericanHonda Motor Co., Inc.
If NHTSA receives similar complaints, it may open an investigation, and if it finds that a safety defect exists in agroup of vehicles, it may order a recall and remedy campaign. However, NHTSA cannot become involved inindividual problems between you, your dealer, or American Honda Motor Co., Inc.
To contact NHTSA, you may either call the Auto Safety Hot line toll-free at 1-800-424-9393 (or 366-0123 inWashington, D.C. area) or write to: NHTSA, U.S. Department of Transportation, Washington, D.C. 20590. You canalso obtain other information about motor vehicle safety from the Hot line.