Embed Size (px)
Citation preview

Home-Dzineonline
It’s all about caring for and improving your home
also in this issuemake a room divider - build a garden shed
replacing a ceiling - zen garden benchvertical walls - easy roman blind
January Issue 1
new year decorating resolutions
Finally!
DIY Divas heading to Cape Town

Home-Dzineonline 2
Home-Dzine Online is written and compiled by Janice Anderssen. All projects in this issue, or any other issue, remain the property of Home-Dzine and Janice Anderssen, and may not be copied or reproduced in any manner whatsoever without written permission.
Image and content credits:meredith publishing - wickes - boral - resene - popular mechanic - chicago home magazine - paint quality - channel 4 -
The year ahead...
By now I am sure that many of you will have seen the new look of the website. In the year ahead we will be concentrating our efforts on providing much more information, and doing more projects, so that the Home-Dzine website has even more to offer. Content will be updated on a weekly basis, and every time you visit there will be something new to see and do.
We will also be offering more DIY Diva and DesignTime classes for everyone who wants to get more involved in “Doing It Themselves!” With the price of labour and goods getting higher and higher, and the quality of services getting lower and lower, now is the time to empower yourself with the knowledge required to do it on your own. Please visit www.DIY-Divas.co.za for more information on our new courses. AND FINALLY, we are heading to Cape Town in May this year (see page 19 for more information).
Until next month
Janice
a word or two
CONTENTSAdd a touch of romance - spice up your love life with a new
bedroom.
Furniture makeover- here’s an easy way to update and
transform furniture.
Pamper yourself- give your bathroom a makeover.
Easy roman blind
Get organised- Tips for a practical kitchen.
Be creative- ideas for tabletops.
Empower yourself- today’s women are doing it for
themselves!
Add colour- invite colour into your home.
Vertical walls- zesty stripes for a family room.
Be eco-conscious- do your bit towards a greener future.
Spend more time outdoors
DIY divas head for cape town
Replacing a ceiling- It’s not as difficult as you think.
DIY room divider- Divide open spaces with this stylish
divider.
In the wash- Washing machine parts are given a
new life.
The art of zen- Build a zen bench for outdoors.
Build a garden shed- For the more experienced DIYer
Q-Zone- The diy diva answers your queries.
Directory
PAGE
3
5
6
8
10
11
13
15
16
17
18
19
20
21
23
24
25
28
29

Home-Dzineonline 3
1. add a touch of romance
It’s so easy to add romance to the bedroom and we’ve given you some tips to help you along the way.
Storage aplentyPiles of laundry and clutter do nothing for romance in the bedroom. If you are in the process of building a new home, or renovating an old one, incorporate plenty of storage. Even a small room has storage space above and down the sides of the headboard.
And while we are talking of headboards, today you can incorporate storage into the headboard, or under the bed, which is perfect for a small room with limited floor space.
So get organised and start romancing!
Dressing the bedReversible comforters are perfect for giving a bedroom a quick and easy makeover. A comforter also serves double duty as a decorative touch that coordinates with window
wallpaper blends accent colours.
large ceiling pendant adds a softness and draws the eye to the centre of the room.
blinds and pelmet draw their colours from the wallpaper and accessories
finish off the bedwith a padded headboard
the built-in window seat offers even more storage
Spice up your love life with a new bedroom. Decorate in your favourite colours and add a splash of contrast here and there with bold accessories, cushions, bedding, or even add wallpaper.
BELOW: No bedroom is complete with a headboard, whether solid wood, a luxurious padded headboard, or a homemade design that you have created.
Home-Dzineonline 4
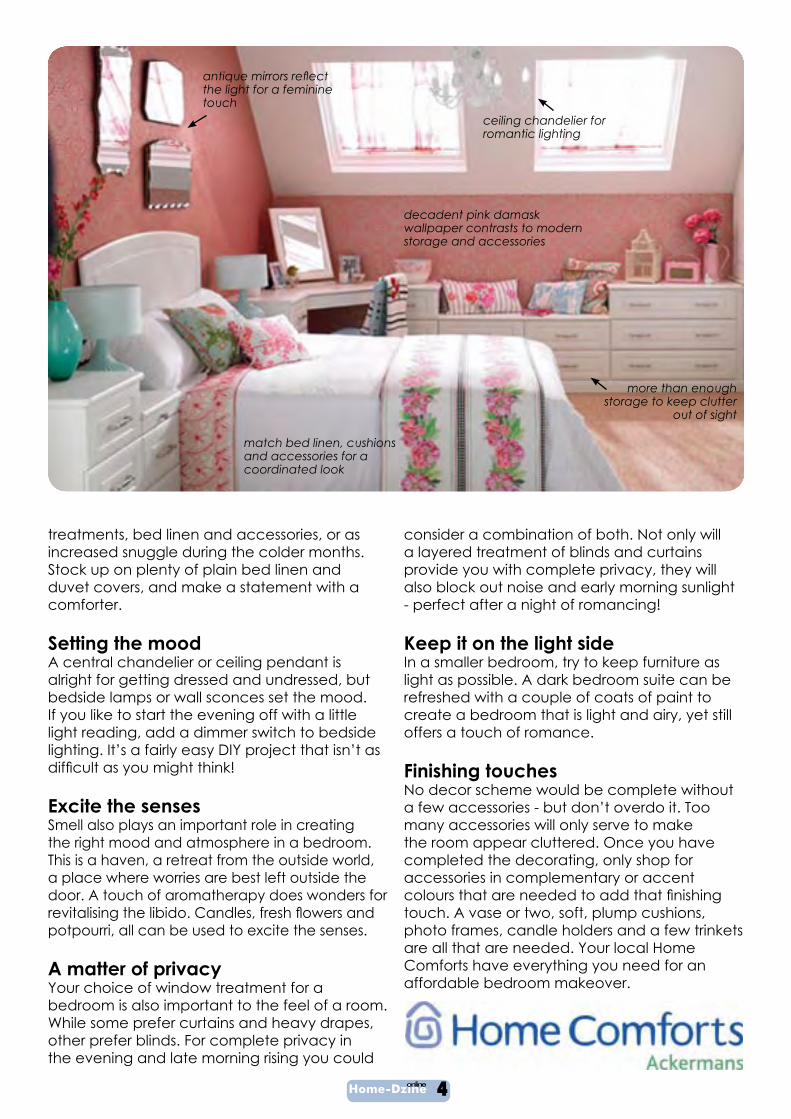
antique mirrors reflectthe light for a feminine touch
ceiling chandelier for romantic lighting
more than enough storage to keep clutter
out of sight
match bed linen, cushions and accessories for a coordinated look
decadent pink damask wallpaper contrasts to modern storage and accessories
treatments, bed linen and accessories, or as increased snuggle during the colder months. Stock up on plenty of plain bed linen and duvet covers, and make a statement with a comforter.
Setting the moodA central chandelier or ceiling pendant is alright for getting dressed and undressed, but bedside lamps or wall sconces set the mood. If you like to start the evening off with a little light reading, add a dimmer switch to bedside lighting. It’s a fairly easy DIY project that isn’t as difficult as you might think!
Excite the sensesSmell also plays an important role in creating the right mood and atmosphere in a bedroom. This is a haven, a retreat from the outside world, a place where worries are best left outside the door. A touch of aromatherapy does wonders for revitalising the libido. Candles, fresh flowers andpotpourri, all can be used to excite the senses.
A matter of privacyYour choice of window treatment for a bedroom is also important to the feel of a room. While some prefer curtains and heavy drapes, other prefer blinds. For complete privacy in the evening and late morning rising you could
consider a combination of both. Not only will a layered treatment of blinds and curtains provide you with complete privacy, they will also block out noise and early morning sunlight - perfect after a night of romancing!
Keep it on the light sideIn a smaller bedroom, try to keep furniture as light as possible. A dark bedroom suite can be refreshed with a couple of coats of paint to create a bedroom that is light and airy, yet still offers a touch of romance.
Finishing touchesNo decor scheme would be complete without a few accessories - but don’t overdo it. Too many accessories will only serve to make the room appear cluttered. Once you have completed the decorating, only shop for accessories in complementary or accent colours that are needed to add that finishingtouch. A vase or two, soft, plump cushions, photo frames, candle holders and a few trinkets are all that are needed. Your local Home Comforts have everything you need for an affordable bedroom makeover.

Home-Dzineonline 5
What is it made of?Before you attempt any makeover you will need to determine what the piece is made of. If it is solid wood that has previously been painted it is perfectly OK to sand down the piece to remove the layers of paint.
If it is a veneered board, which has a very thin layer or laminate on top of an engineered board product such as supawood, be careful not to sand away the veneer. Try to remove as much of the old paint as possible without damaging the veneer, or simply sand down the old layers of paint to a smooth surface.
UndercoatIt is not necessary to apply a primer to wood surfaces - simply water down the first coat slightly.
Applying paintUse a brush to apply a coat of water-based acrylic paint, working in the same direction as the grain of the wood. When dry, apply a second coat. If you want a smooth, brushstroke-free finish, use a foam roller to apply paint.
SandingIf the surface of the piece is damaged or chipped, start sanding with 120-grit and finish with 240-grit. Always work thesander or sandpaper in the direction of the grain and sand the entire surface, not only where there are faults, to avoid creating an irregular surface.
Always wipe the surface thoroughly after sanding to remove any dust that will affect the finish.
Clean upWater-based acrylic paints dry quicker and have less odour than solvent-based paints. Plus, all you have to do is wash your brushes and equipment in warm, soapy water to keep them clean.
furniture makeoverIf your bedroom furniture is looking a little tired and worn out, or perhaps you want a new look, here’s an easy way to update and transform furniture in a day.

Home-Dzineonline 6
2. pamper yourselfToday’s bathroom is practical yet stylish. It has gone from being a plain room offering basic functions, to a space designed for relaxation and self-indulgence.
plenty of storage space for storing bathroom essentials
skylights allow more natural light into a dark bathroom good lighting
is essential in a bathroom
there are now a wide range of bathroom flooring options
Give your bathroom a makeover - it’s time to pamper yourself! You don’t need a large budget to make small changes to your bathroom. Here are a few ideas to get you started in creating a relaxing bathroom.
Lighten upStart by taking a look at the existing lighting in the room. You probably have a ceiling fixturefor general lighting. Adding more lighting - and perhaps replacing your existing light fixtureswith something a little more trendy - will not only create a more practical bathroom, but will offer you the opportunity to control the amount of lighting in the room and create the right atmosphere for sensual bathing.
If you have a small, dark bathroom with very little natural light, skylights - even a small dome - are ideal for allowing natural light into the room. Even a small amount of natural light will make a big difference.
BELOW: A bathroom needs more than just a central light fixture. Accent and task lightingare just as important in the bathroom as any other room in the home.

Home-Dzineonline 7
Change the moodAlthough it can be expensive and time consuming to change wall and floor tiles, newflooring options, such as cork, bamboo and epoxy flooring, mean that you can easily apply these over the existing floor tiles that are still ingood condition.
Wall tiles can be painted or panelled over to transform your bathroom and give it a completely new look. If you do decide to remove the existing walls tiles, hire a professional plasterer to come in and fix up thewalls before painting.
Prominent Paints have a wide range of paint options from which to choose when decorating a bathroom. Research the various paint products to see which would be the best
Save on costsIf you are in the process of designing a new bathroom, look at the various options available to you. Some will save you time, and money.
Tiling from floorto ceiling is no longer considered a necessity unless you are planning to have a wet room. A backsplash over the basin and around the bath tub is sufficientto protect walls from excess moisture.
Plan for plenty of lighting. During the installation or renovation stage it is easy to add extra lighting. If the walls are already tiled, look at fitting additionallighting in the ceiling.
choice and most affordable buy for your bathroom makeover, or new bathroom.
The glitz factorToss out those old taps and splurge a little on new taps and fittings. Nothing says new likeshiny, modern taps and chrome accessories. Whilst you’re busy adding some glitz, don’t forget to hang a few mirrors on the walls to reflect light and create the illusion of space.
ceiling spots with a fitteddimmer allow light to be controlled
slimline venetian blinds allow in
plenty of natural light and provide
100% privacy
splurge on luxurious accessories such as a heated towel rail
white high-gloss tiles and sanitaryware create a clean,
uncluttered look in a bathroom
Home-Dzineonline 8
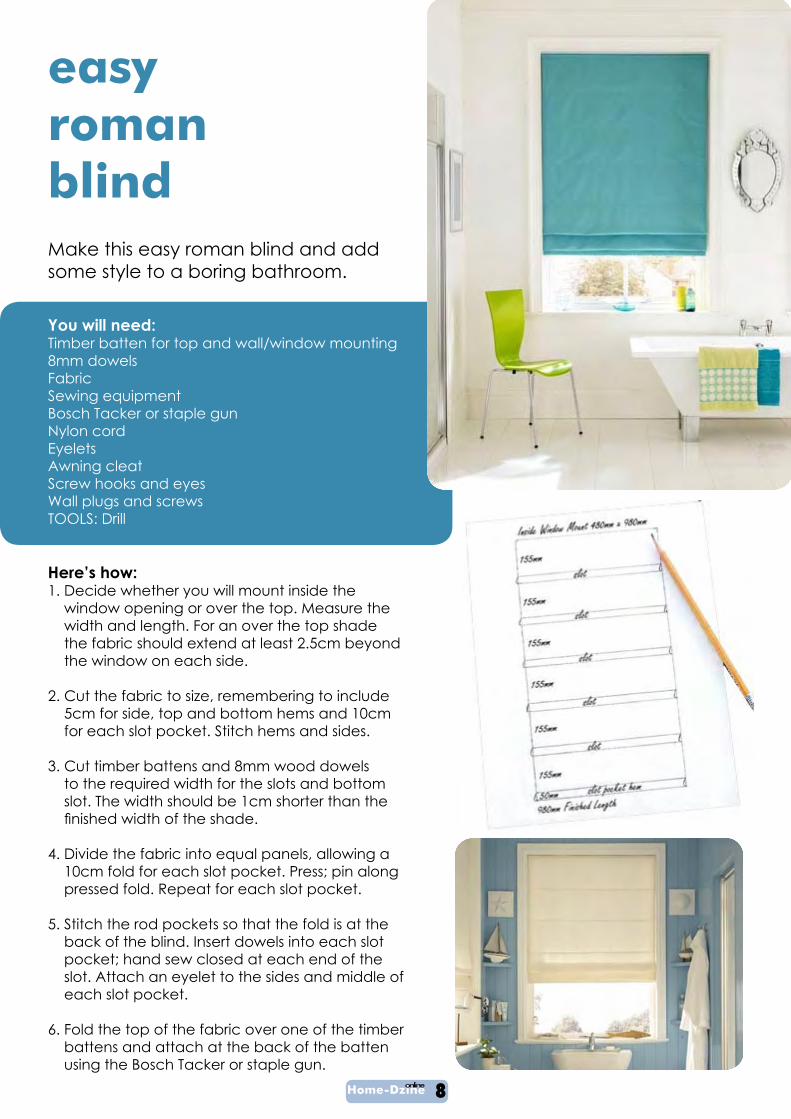
You will need:Timber batten for top and wall/window mounting8mm dowelsFabricSewing equipmentBosch Tacker or staple gunNylon cordEyeletsAwning cleatScrew hooks and eyesWall plugs and screwsTOOLS: Drill
Here’s how:1. Decide whether you will mount inside the
window opening or over the top. Measure the width and length. For an over the top shade the fabric should extend at least 2.5cm beyond the window on each side.
2. Cut the fabric to size, remembering to include 5cm for side, top and bottom hems and 10cm for each slot pocket. Stitch hems and sides.
3. Cut timber battens and 8mm wood dowels to the required width for the slots and bottom slot. The width should be 1cm shorter than the finished width of the shade.
4. Divide the fabric into equal panels, allowing a 10cm fold for each slot pocket. Press; pin along pressed fold. Repeat for each slot pocket.
5. Stitch the rod pockets so that the fold is at the back of the blind. Insert dowels into each slot pocket; hand sew closed at each end of the slot. Attach an eyelet to the sides and middle of each slot pocket.
6. Fold the top of the fabric over one of the timber battens and attach at the back of the batten using the Bosch Tacker or staple gun.
easyromanblindMake this easy roman blind and add some style to a boring bathroom.

Home-Dzineonline 9
7. Cut 3 lengths of nylon cord and tie each end to the bottom eyelet. Thread each cord up through the rings and through the eyes on the batten to one side. Knot to secure. Plait the three cords for a neat finish and knot securely at the end.
8. Install screw eyes at each end of the back of timber batten. To mount to the wall above window, drill holes for the wall plugs and screws, screw the top batten to the wall. If attaching to a wooden window frame, use wood screws to attach the timber batten to the outside of the frame.
9. Attach screw hooks to a batten and hang your blinds onto the fixed batten.
10. Position the awning cleat at a suitable height and fasten to the wall with wall plugs and screws.
DIY Tip:Instead of sewing you can also use ‘Iron-On Fusible Webbing” or Bostik ‘Sew Simple” fabric adhesive.
Add some colour to your bathroom with affordable accessories and Rust-Oleum American Accents Spray Paints.
You will need:American Accents White PrimerAmerican Accents Green Apple Here’s how:1. Give accessories a good clean
with soapy water and wipe dry.
2. Apply one coat of American Accents White Primer.
3. Apply one coat of American Accents Green Apple paint. Apply a second coat, if necessary, within 1 hour or after 24 hours.
Once dry, arrange items in your bathroom and accessorise with handy and colorrful items.
naturally bright
Home-Dzineonline10
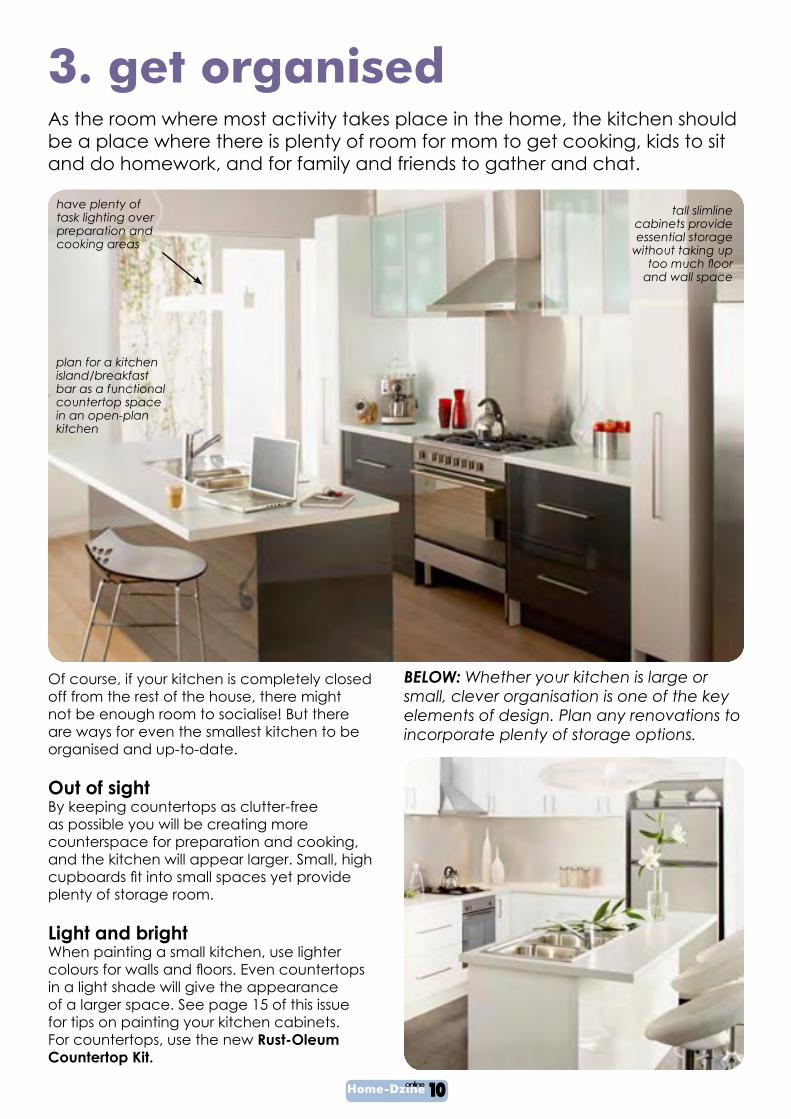
3. get organisedAs the room where most activity takes place in the home, the kitchen should be a place where there is plenty of room for mom to get cooking, kids to sit and do homework, and for family and friends to gather and chat.
have plenty of task lighting over preparation and cooking areas
Of course, if your kitchen is completely closed off from the rest of the house, there might not be enough room to socialise! But there are ways for even the smallest kitchen to be organised and up-to-date.
Out of sightBy keeping countertops as clutter-free as possible you will be creating more counterspace for preparation and cooking, and the kitchen will appear larger. Small, high cupboards fit into small spaces yet provideplenty of storage room.
Light and brightWhen painting a small kitchen, use lighter colours for walls and floors. Even countertopsin a light shade will give the appearance of a larger space. See page 15 of this issue for tips on painting your kitchen cabinets. For countertops, use the new Rust-Oleum Countertop Kit.
BELOW: Whether your kitchen is large or small, clever organisation is one of the key elements of design. Plan any renovations to incorporate plenty of storage options.
plan for a kitchen island/breakfast bar as a functional countertop space in an open-plan kitchen
tall slimline cabinets provide essential storage
without taking up too much floor
and wall space

Home-Dzineonline11
4. be creative
Is that table in front of your couch a flatland of remote controls, coasters,and magazines? After talking to homeowners and interior designers about what makes a coffee table look so good, the consensus seems to be that fresh flowers are a plus (though, as yousee in the following images, not required), unexpectedly large objects lend personality, and, generally speaking, it’s hard to go wrong with books (unless they are too small). Playing with heights and scale is encouraged. From there on out, it’s all about being true to yourself.
Are you a minimalist in the rest of your house? If so, keep the coffee table spare, too.
Love collections? Let’s see them front and centre.
And by all means, switch things up from time to time. All we ask is: Keep your remotes elsewhere.
TOP: When this interior designer arranges a coffee table, he keeps in mind the bird’s-eye view. That means tops of things - the cover of a book, the lid on a container, such as the Asian red-lacquered box shown here - should be beautiful. He also likes to play with scale; the water jug here might seem a little big, but that’s the point.

Home-Dzineonline12
TOP LEFT: These homeowners are avid collectors of ethnographic art, so the coffee table shows the goods. Yet if you look closely, you will see that there are actually only three major objects on the table - the flower-filled vase and two sculptural pieces - plus some very cool oldkeys. TOP RIGHT: In keeping with the bold, modern feeling of the room, stacked books make an effective pedestal for other things; a gentle arrangement of white flowers balances the hardedges. BOTTOM LEFT: A large-and-low square table allowed ample space for items simply and casually stacked. Instead of flowers, they used a big lime-green glass vase as a centrepiece.BOTTOM RIGHT: The table, its base adorned with small pots of moss, is meant to go in a garden. On top, an architectural element - a carved wood decoration from an Asian temple - sits next to an oversized vase and a grouping of candlesticks.

Home-Dzineonline13
5. empower yourself
In today’s modern society, women - just as much as men - are getting involved in “Doing It For Themselves.” With some basic DIY knowledge you are no longer reliant on fly-by-night contractors, overpriced repairs, andshoddy workmanship.
Power tool manufacturers have taken note of the fact that women are getting involved in DIY, whether they are doing their own home repairs, improvements, or tackling creative projects. One of the world’s leading power tool manufacturers, Bosch, have introduced a wide range of cordless tools that are lightweight and easy to use - with women in mind.
Empower yourself with the basics by attending one of our DIY Diva Power Tool and Basic Woodworking courses, and then move on up and start “Doing It For Yourself!”
You don’t need any previous experience or knowledge to attend our courses. Our courses are designed especially for women who don’t know and want to learn. We take you step-by-step through each power tool, and the tools and techniques you need to use power tools in your own home.
At your request we have recently added some very informative courses to our range:
DIY TILINGAn intensive, hands-on course that takes you step-by-step through the en-tire tiling process, whether walls or floors, ceramic ornatural stone.
In this course you will learn how to apply, finish, cut and drill tile. We introduce you tothe different tools used in tiling, as well as the various tricks and techniques used by the professionals.

Home-Dzineonline14
Kitchen Cabinets
This day course will explain the principles of designing and making your own kitchen cabinets:
• Planning and design elements • Materials and hardware • How to use the various power tools for kitchen installation
- hands-on and practical.
We show you how to...• Create cut outs for hob and sink• Fit new taps• Hang doors and drawers
DesignTime Furniture Projects - Storage Cubes on base
Individual cubes stacked on a base to create essential storage for any room.
Use the design to create storage units for the bathroom, stackable units for a lounge, TV or family room, and even for the bedroom.

Home-Dzineonline15
6. add colour
RIGHT: Transform woodwork with a high-impact, high-gloss finish, to real stunning effect with thisacid yellow. Use a high-quality acrylic gloss for best results. Most existing woodwork can be easily transformed - just remember to sand down before applying a water-based primer, followed by two coats of a good quality water-based gloss paint.
BELOW: Softer shades of muted lime green are used in a high-gloss finish on this dresser- and used to dramatic effect when combined with bitter chocolate walls. High gloss floorscomplete the modern style - use good quality water-based paints in a high gloss finish forfurniture and floors.
BOTTOM RIGHT: A large expanse of white wall is brightened with the addition of slim stripes of pink bronze and lime green for a more subtle look. Rather than paint a feature wall this would work well on all the walls of a living room or bedroom. Use masking tape to mark out the stripes and fill in with a paintbrush using goodquality water-based paints.
This year, invite some colour into your home and spice up your life!

Home-Dzineonline16
PrepareClean the wall with sugar soap, rinse well and allow to dry.
If the wall has previously been painted in a strong colour, firstpaint it white to prevent the dark colour showing through onto your new wall. Allow to dry.
PaintPaint the wall in the main colour (lime green) using a medium-width foam roller and leave to dry.
Mark out the stripes, using a tape measure and spirit level to divide the area into vertical bands of varying widths. Mark them with a pencil line, using the spirit level to check that they are straight. Apply the masking tape against the pencil lines.
Paint the contrast colour. Use the second colour (pink) and small roller to paint the stripes, working from top to bottom. Do not over-wet the roller or the colour may bleed under the masking tape.
When dry the second colour is completely dry, carefully peel off the masking tape.
Visit your local Prominent Paints or Decorating Centre and choose your colours.
vertical wallsgive a family room a completely new look - go tropical - with lime green and pink vertical stripes.
Follow the easy step-by-step instructions for a successful project.

Home-Dzineonline17
8. be eco conscious
Do you feel guilty every time you switch on the lights? A standard halogen bulb uses 50w, while energy-efficient bulbs use up to four timesless electricity to generate the same amount of light. So here’s a bright idea - switch to energy efficient bulbs!
Another lighting option to consider is LEDs. These small bulbs are long lasting, energy efficient and do not causeheat build up. However, these bulbs are more expensive that CFLs, but because they provide a focused light, they are perfect for flashlights, bedside lamps and spot lights.
And whilst we are on the subject of lighting. Every South African homeowner is concerned about the personal safety of their family and home, but that doesn’t mean you have to switch on the 500w spots to illuminate your garden! There is a sensible solution that won’t cost you a fortune and will be extremely eco-friendly - solar lights.
Most DIY and home centres now offer solar lighting. The latest technology means you can even have solar system with built-in PIR detectors that will switch on when movement is detected. Generally, these lights provide a dimmer light than mains or low voltage so it’s not a good solution if you want a strong directional light. However, your environmental conscience will be clearer - and solar is ideal for picking out low planting or lighting paths and decks.
Eco Tip:Do you know how much energy you could save just by turning off a light when you leave a room? It may not seem like much, but when you add it up in the space of a year - you are really making a difference.
Home-Dzineonline18
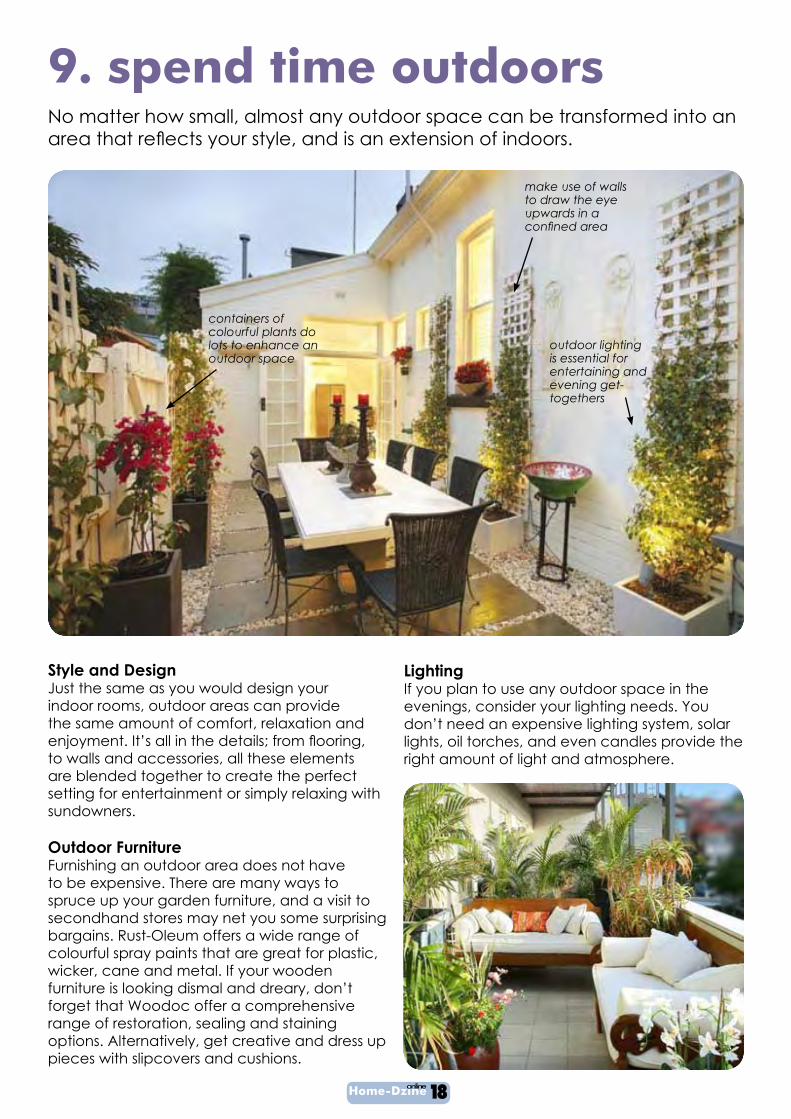
9. spend time outdoors
Style and DesignJust the same as you would design your indoor rooms, outdoor areas can provide the same amount of comfort, relaxation and enjoyment. It’s all in the details; from flooring,to walls and accessories, all these elements are blended together to create the perfect setting for entertainment or simply relaxing with sundowners.
Outdoor Furniture Furnishing an outdoor area does not have to be expensive. There are many ways to spruce up your garden furniture, and a visit to secondhand stores may net you some surprising bargains. Rust-Oleum offers a wide range of colourful spray paints that are great for plastic, wicker, cane and metal. If your wooden furniture is looking dismal and dreary, don’t forget that Woodoc offer a comprehensive range of restoration, sealing and staining options. Alternatively, get creative and dress up pieces with slipcovers and cushions.
containers of colourful plants do lots to enhance an outdoor space
No matter how small, almost any outdoor space can be transformed into an area that reflects your style, and is an extension of indoors.
LightingIf you plan to use any outdoor space in the evenings, consider your lighting needs. You don’t need an expensive lighting system, solar lights, oil torches, and even candles provide the right amount of light and atmosphere.
make use of walls to draw the eye upwards in a confined area
outdoor lighting is essential for entertaining and evening get-togethers

Home-Dzineonline19
Celebrate Women’s Day Weekend in true Diva style!
Join our 2-day DIY, Design and Decorating Courseat the Vineyard Hotel & Spa, Newlands
Discover your hidden potential!Courses are designed to inspire
and provide plenty of hands-on projects
Make and take home your own Designer Ottoman(Bring along your own fabric)
CLICK HERE FOR MORE DETAILS

Home-Dzineonline20
1. Carefully score along the bottom edge of the existing cornice with the trimming knife. Remove the cornice by levering it away from where the wall joins the ceiling with a flatinstrument such as a paint scraper, taking care not to damage the wall surface.
2. Locate the centre points of existing ceiling joists by probing with a small screwdriver. Prop up and re-nail or screw fasten any badly sagging parts of the ceiling (screw fastening creates less vibration).
3. Attach metal battens at right angles to existing ceiling joists. Fix battens to each joist with flathead nailsor appropriately sized nails to suit batten type and ceiling construction. Screws should also be considered in order to lessen vibration. Space battens at 450mm maximum centres if using 10mm plasterboard.
4. Position plasterboard sheets across battens. (It is highly recommended that you use full size sheets to avoid complex butt joints.) Two people will be needed to lift plasterboard ceiling sheets into position, or better still - hire a plasterboard lifter.
5. Fasten the plasterboard sheets to the metal battens with plasterboard screws spaced every 300mm maximum centres (approx. 5 screws per batten). For 1350mm wide sheets use 6 screws. Always screw from the centre of the plasterboard sheet towards the outside edge. Always drive screws with the shank at right angles to the sheet face (straight up). Press tip of screw firmly into plasterboardlinerboard face before commencing to drive the screw. The screw heads should be driven just below the plasterboard surface without breaking the paper face.
6. Finish joints with paper jointing tape and joint finish. After repairing the old ceiling, fix new lengths of cornicearound the perimeter of the room.
replacing a ceilingWater damage and mould can mean that you will have to replace a plasterboard ceiling.
Home-Dzineonline21
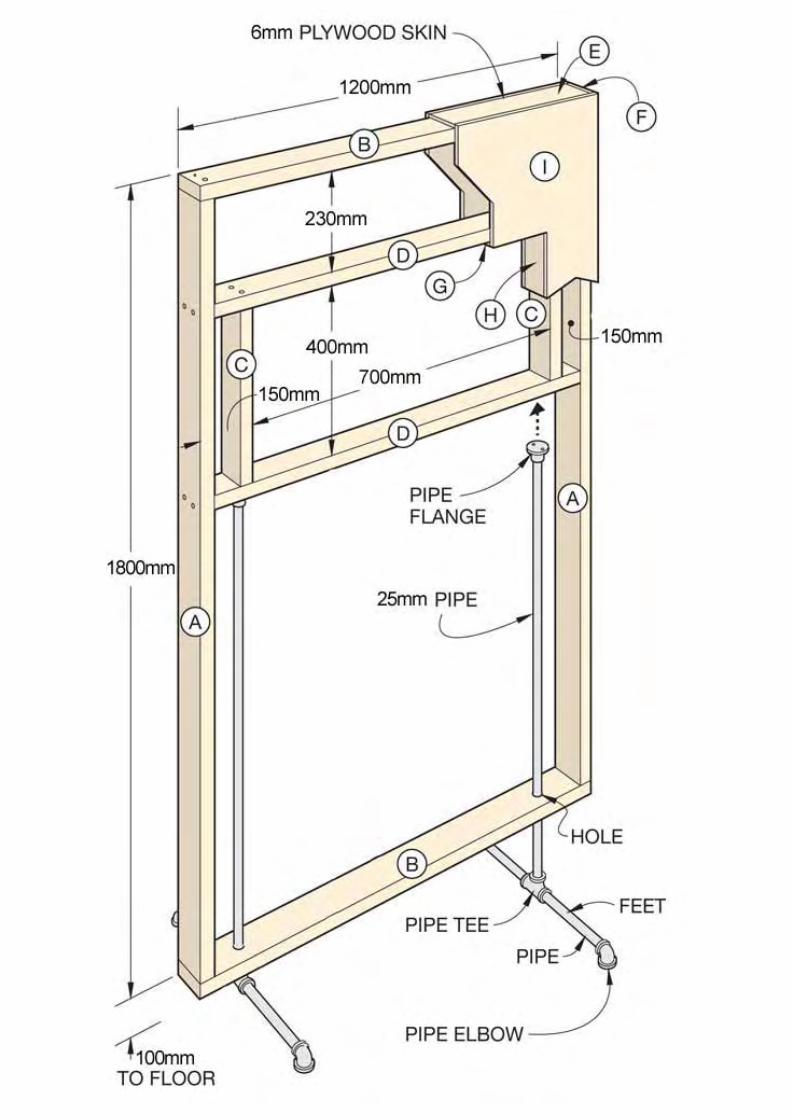
You will need:50-55mm wood screwsPipe for stand (see diagram)Alcolin wood glueAlcolin wood fillerPanel pinsProminent SheenPainting equipmentTIMBER:A [2] 50 x 100 x 1800mmB [2] 50 x 100 x 1200mm C [2] 50 x 100 x 400mm D [2] 50 x 100 x 1100mm E [1] 3 x 94 x 1194mm F [2] 3 x 94 x 1806mm G [2] 3 x 94 x 700mm H [2] 3 x 94 x 394mm I [2] 3 x 1206 x 1806mm
TOOLS: Measuring tape, Pencil, Circular saw, Drill, Pipe wrench, Jigsaw, Hammer, 10mm spade bit
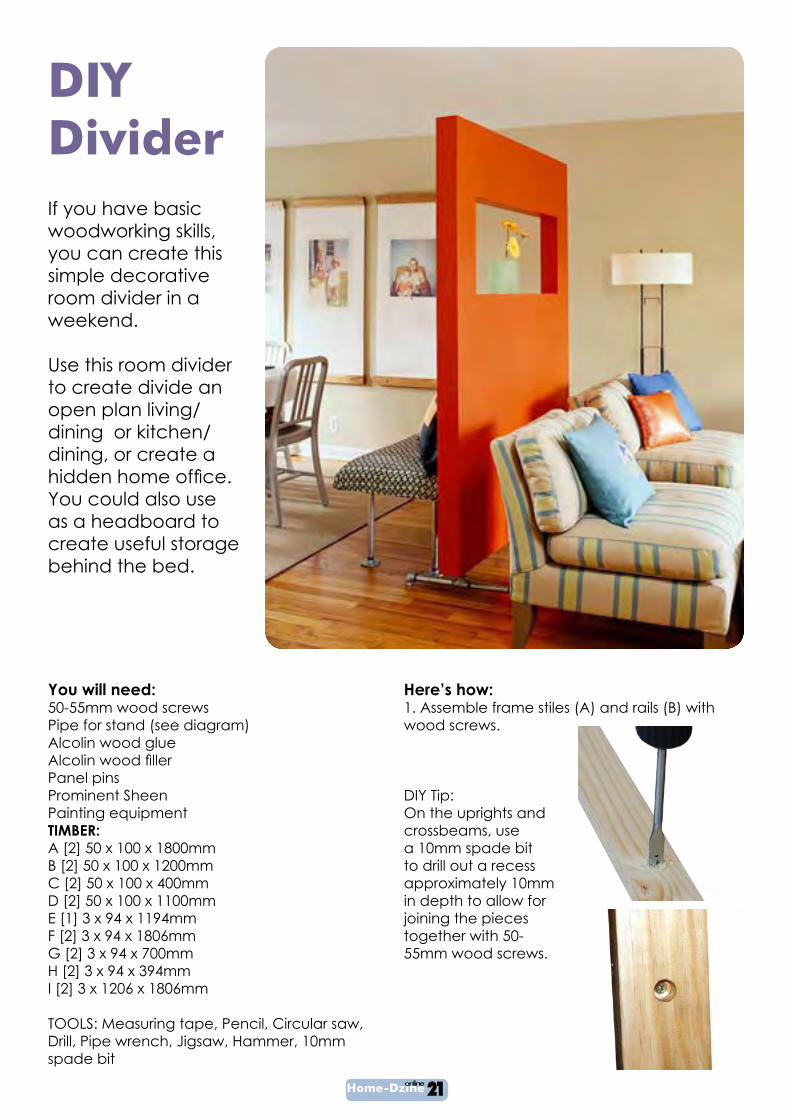
DIY Divider If you have basic woodworking skills, you can create this simple decorative room divider in a weekend.
Use this room divider to create divide an open plan living/dining or kitchen/dining, or create a hidden home office.You could also use as a headboard to create useful storage behind the bed.
Here’s how: 1. Assemble frame stiles (A) and rails (B) with wood screws.
DIY Tip:On the uprights and crossbeams, use a 10mm spade bit to drill out a recess approximately 10mm in depth to allow for joining the pieces together with 50-55mm wood screws.
Home-Dzineonline22
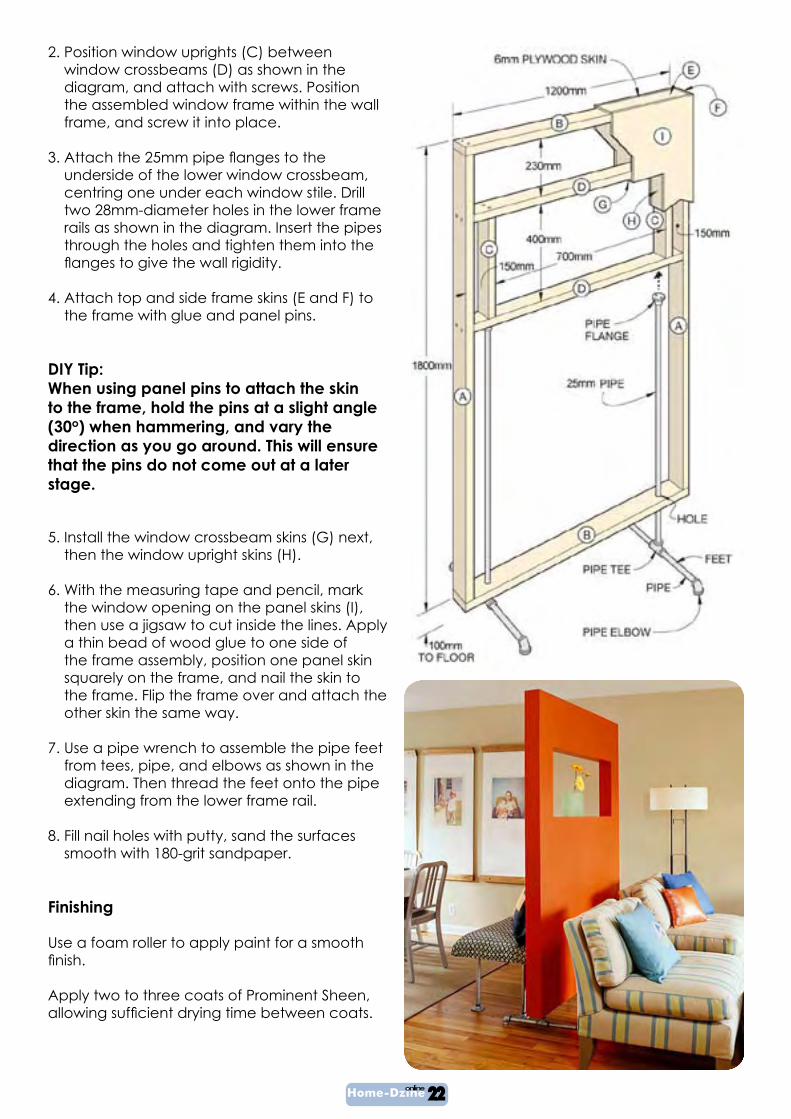
2. Position window uprights (C) between window crossbeams (D) as shown in the diagram, and attach with screws. Position the assembled window frame within the wall frame, and screw it into place.
3. Attach the 25mm pipe flanges to theunderside of the lower window crossbeam, centring one under each window stile. Drill two 28mm-diameter holes in the lower frame rails as shown in the diagram. Insert the pipes through the holes and tighten them into the flanges to give the wall rigidity.
4. Attach top and side frame skins (E and F) to the frame with glue and panel pins.
DIY Tip:When using panel pins to attach the skin to the frame, hold the pins at a slight angle (30o) when hammering, and vary the direction as you go around. This will ensure that the pins do not come out at a later stage.
5. Install the window crossbeam skins (G) next, then the window upright skins (H).
6. With the measuring tape and pencil, mark the window opening on the panel skins (I), then use a jigsaw to cut inside the lines. Apply a thin bead of wood glue to one side of the frame assembly, position one panel skin squarely on the frame, and nail the skin to the frame. Flip the frame over and attach the other skin the same way.
7. Use a pipe wrench to assemble the pipe feet from tees, pipe, and elbows as shown in the diagram. Then thread the feet onto the pipe extending from the lower frame rail.
8. Fill nail holes with putty, sand the surfaces smooth with 180-grit sandpaper.
Finishing
Use a foam roller to apply paint for a smooth finish.
Apply two to three coats of Prominent Sheen, allowing sufficient drying time between coats.
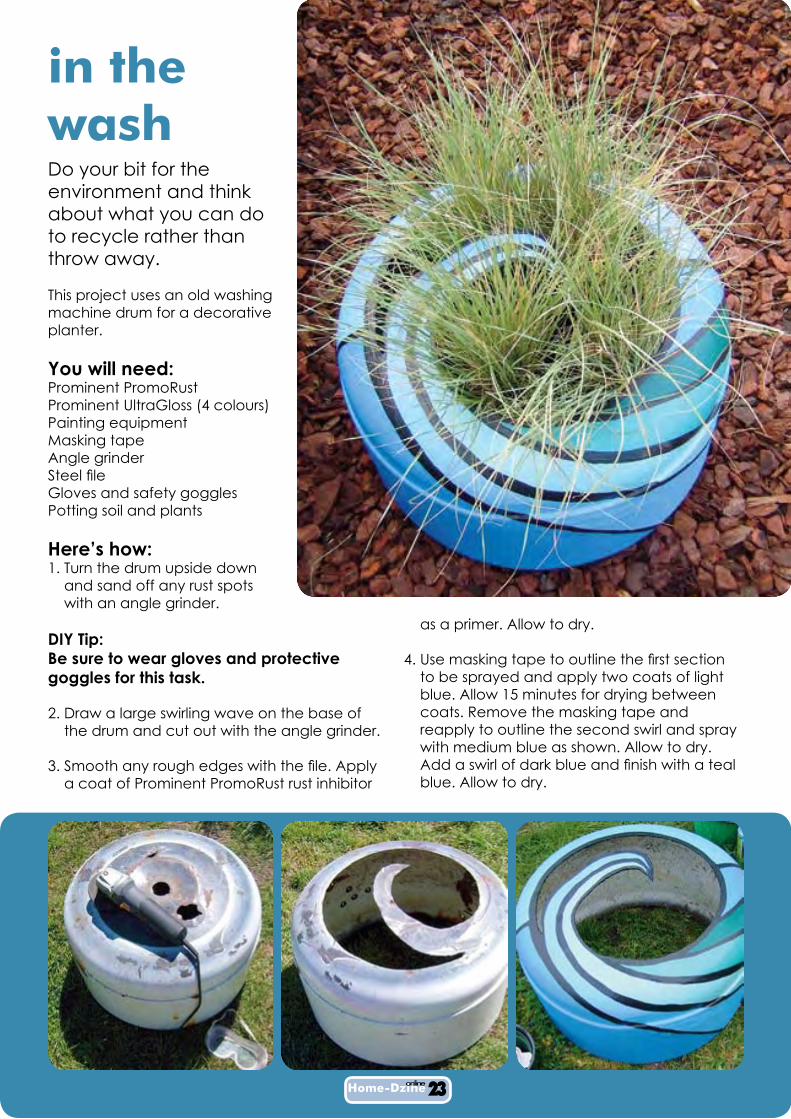
Do your bit for the environment and think about what you can do to recycle rather than throw away.
This project uses an old washing machine drum for a decorative planter.
You will need:Prominent PromoRustProminent UltraGloss (4 colours)Painting equipmentMasking tapeAngle grinderSteel fileGloves and safety gogglesPotting soil and plants
Here’s how:1. Turn the drum upside down
and sand off any rust spots with an angle grinder.
DIY Tip:Be sure to wear gloves and protective goggles for this task.
2. Draw a large swirling wave on the base of the drum and cut out with the angle grinder.
3. Smooth any rough edges with the file. Applya coat of Prominent PromoRust rust inhibitor
in the wash
as a primer. Allow to dry.
4. Use masking tape to outline the first sectionto be sprayed and apply two coats of light blue. Allow 15 minutes for drying between coats. Remove the masking tape and reapply to outline the second swirl and spray with medium blue as shown. Allow to dry. Add a swirl of dark blue and finish with a tealblue. Allow to dry.
Home-Dzineonline23
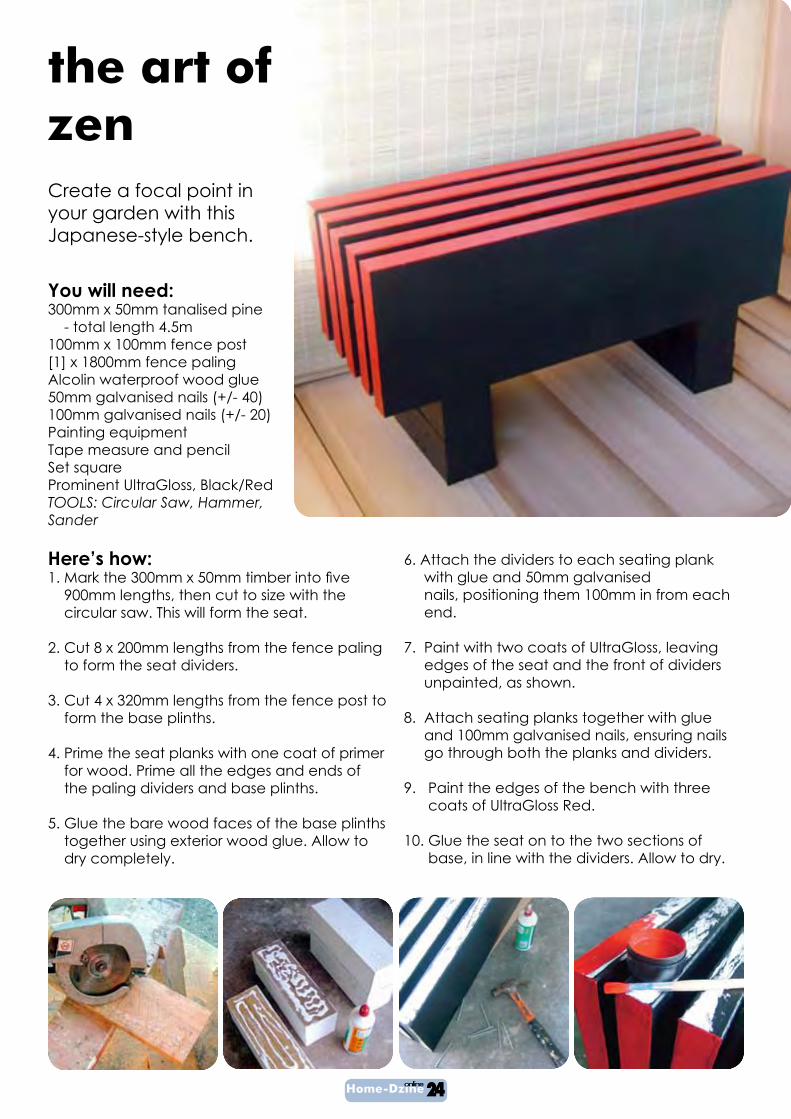
You will need:300mm x 50mm tanalised pine - total length 4.5m100mm x 100mm fence post[1] x 1800mm fence palingAlcolin waterproof wood glue50mm galvanised nails (+/- 40)100mm galvanised nails (+/- 20)Painting equipmentTape measure and pencilSet squareProminent UltraGloss, Black/RedTOOLS: Circular Saw, Hammer, Sander
Here’s how:1. Mark the 300mm x 50mm timber into five
900mm lengths, then cut to size with the circular saw. This will form the seat.
2. Cut 8 x 200mm lengths from the fence paling to form the seat dividers.
3. Cut 4 x 320mm lengths from the fence post to form the base plinths.
4. Prime the seat planks with one coat of primer for wood. Prime all the edges and ends of the paling dividers and base plinths.
5. Glue the bare wood faces of the base plinths together using exterior wood glue. Allow to dry completely.
6. Attach the dividers to each seating plank with glue and 50mm galvanised nails, positioning them 100mm in from each
end.
7. Paint with two coats of UltraGloss, leaving edges of the seat and the front of dividers unpainted, as shown.
8. Attach seating planks together with glue and 100mm galvanised nails, ensuring nails go through both the planks and dividers.
9. Paint the edges of the bench with three coats of UltraGloss Red.
10. Glue the seat on to the two sections of base, in line with the dividers. Allow to dry.
the art of zenCreate a focal point in your garden with this Japanese-style bench.
Home-Dzineonline24
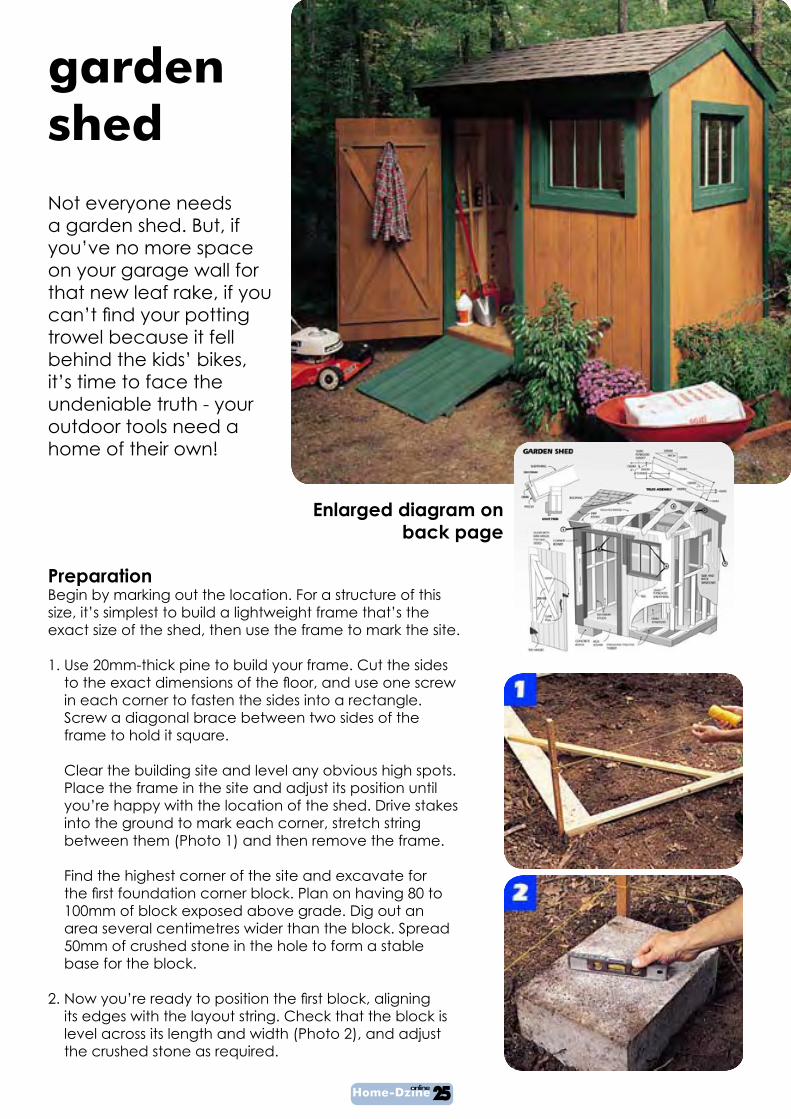
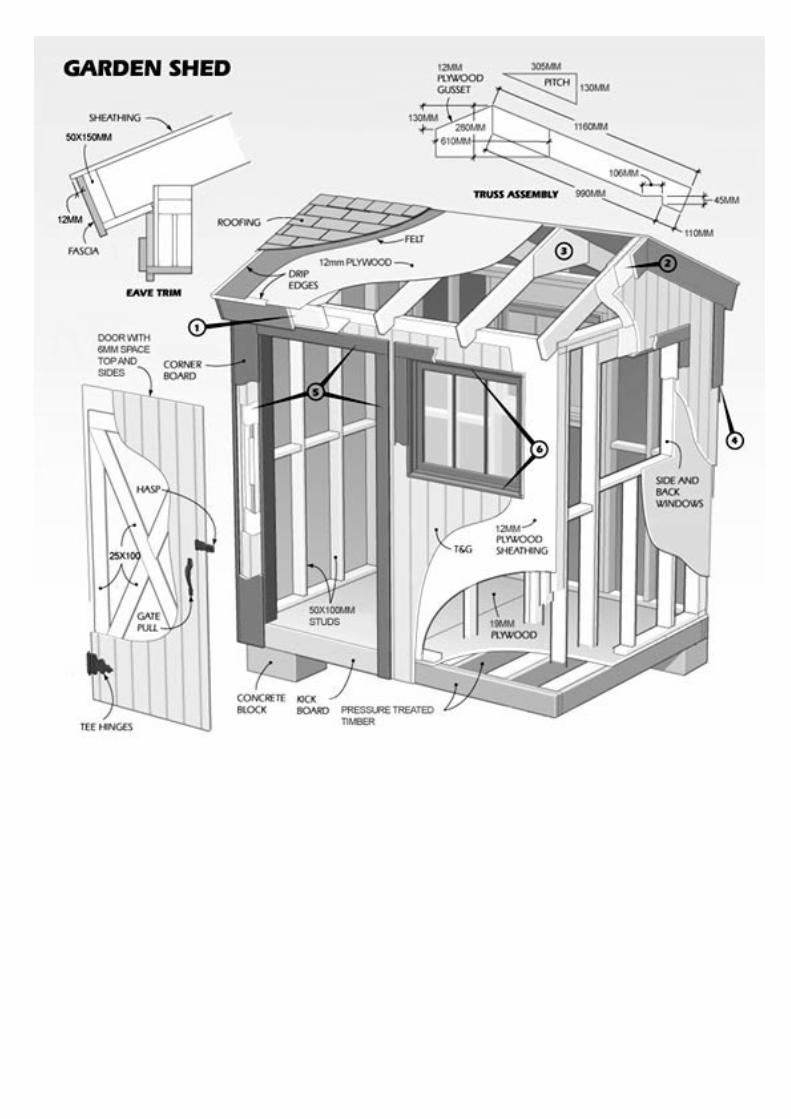
Not everyone needs a garden shed. But, if you’ve no more space on your garage wall for that new leaf rake, if you can’t find your pottingtrowel because it fell behind the kids’ bikes, it’s time to face the undeniable truth - your outdoor tools need a home of their own!
PreparationBegin by marking out the location. For a structure of this size, it’s simplest to build a lightweight frame that’s the exact size of the shed, then use the frame to mark the site.
1. Use 20mm-thick pine to build your frame. Cut the sides to the exact dimensions of the floor, and use one screwin each corner to fasten the sides into a rectangle. Screw a diagonal brace between two sides of the frame to hold it square.
Clear the building site and level any obvious high spots. Place the frame in the site and adjust its position until you’re happy with the location of the shed. Drive stakes into the ground to mark each corner, stretch string between them (Photo 1) and then remove the frame.
Find the highest corner of the site and excavate for the first foundation corner block. Plan on having 80 to100mm of block exposed above grade. Dig out an area several centimetres wider than the block. Spread 50mm of crushed stone in the hole to form a stable base for the block.
2. Now you’re ready to position the first block, aligningits edges with the layout string. Check that the block is level across its length and width (Photo 2), and adjust the crushed stone as required.
garden shed
Enlarged diagram on back page
Home-Dzineonline25
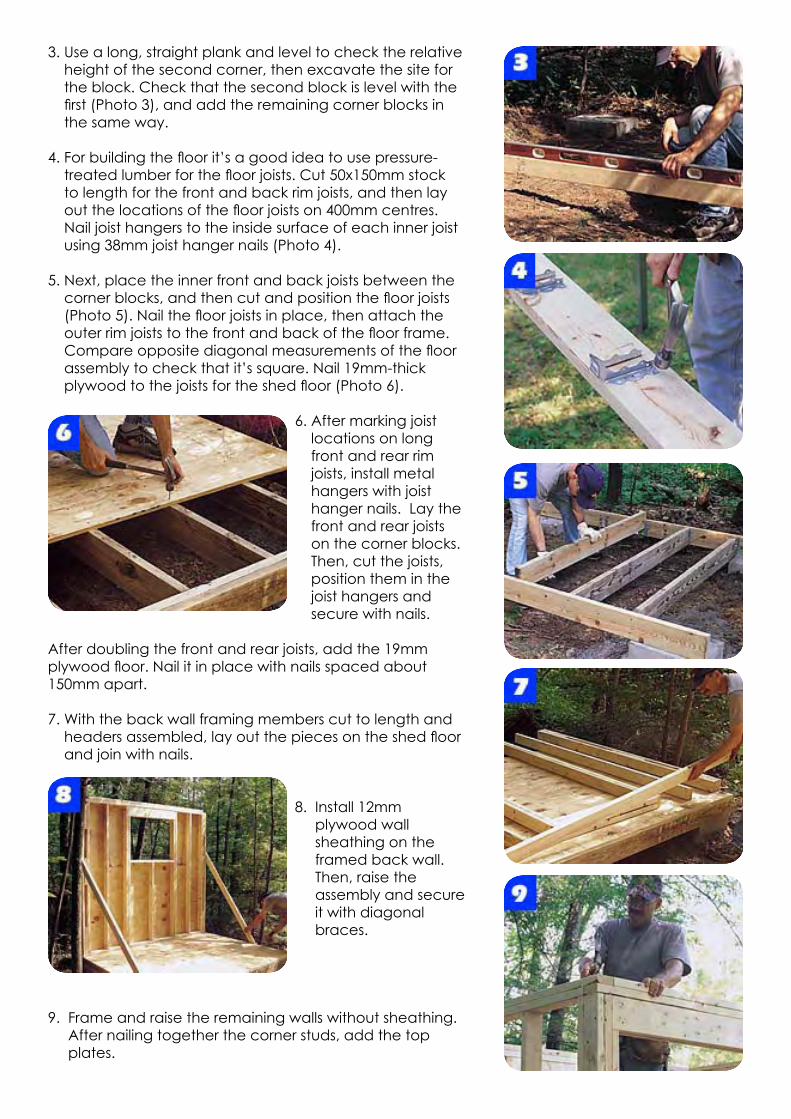
3. Use a long, straight plank and level to check the relative height of the second corner, then excavate the site for the block. Check that the second block is level with the first (Photo 3), and add the remaining corner blocks inthe same way.
4. For building the floor it’s a good idea to use pressure-treated lumber for the floor joists. Cut 50x150mm stockto length for the front and back rim joists, and then lay out the locations of the floor joists on 400mm centres.Nail joist hangers to the inside surface of each inner joist using 38mm joist hanger nails (Photo 4).
5. Next, place the inner front and back joists between the corner blocks, and then cut and position the floor joists(Photo 5). Nail the floor joists in place, then attach theouter rim joists to the front and back of the floor frame.Compare opposite diagonal measurements of the floorassembly to check that it’s square. Nail 19mm-thick plywood to the joists for the shed floor (Photo 6).
6. After marking joist locations on long front and rear rim joists, install metal hangers with joist hanger nails. Lay the front and rear joists on the corner blocks. Then, cut the joists, position them in the joist hangers and secure with nails.
After doubling the front and rear joists, add the 19mm plywood floor. Nail it in place with nails spaced about150mm apart.
7. With the back wall framing members cut to length and headers assembled, lay out the pieces on the shed floorand join with nails.
8. Install 12mm plywood wall sheathing on the framed back wall. Then, raise the assembly and secure it with diagonal braces.
9. Frame and raise the remaining walls without sheathing. After nailing together the corner studs, add the top plates.
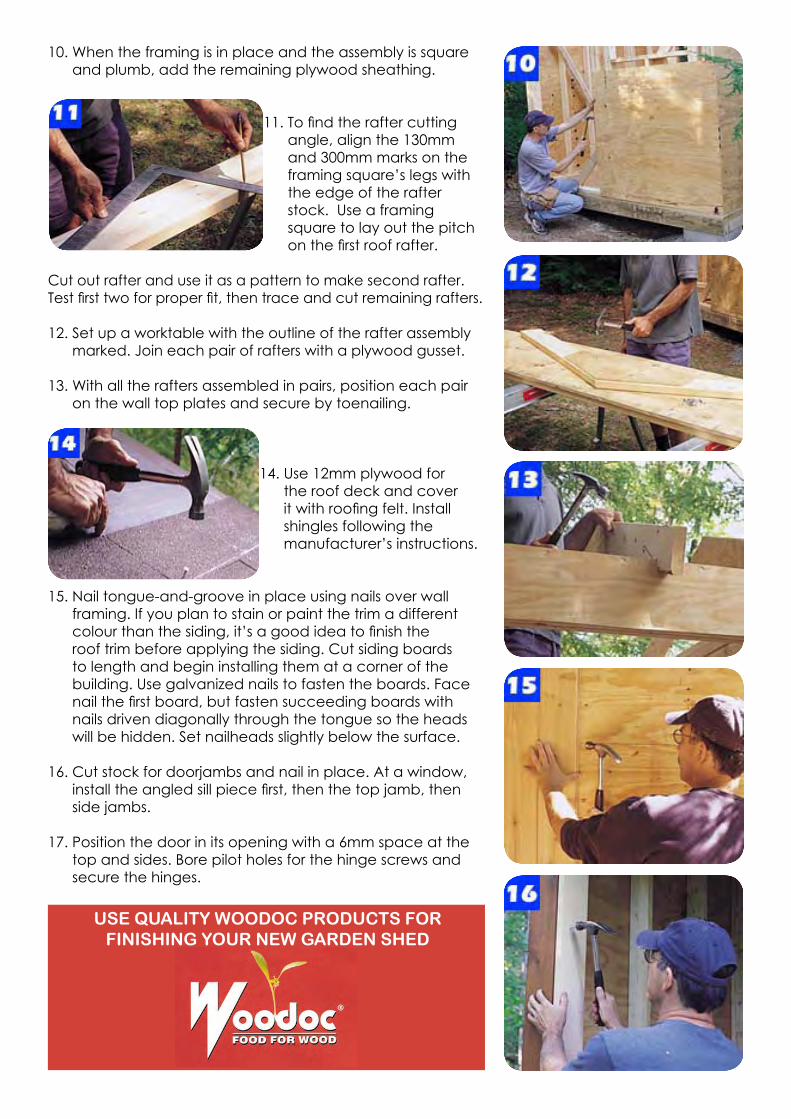
10. When the framing is in place and the assembly is square and plumb, add the remaining plywood sheathing.
11. To find the rafter cuttingangle, align the 130mm and 300mm marks on the framing square’s legs with the edge of the rafter stock. Use a framing square to lay out the pitch on the first roof rafter.
Cut out rafter and use it as a pattern to make second rafter. Test first two for proper fit, then trace and cut remaining rafters.
12. Set up a worktable with the outline of the rafter assembly marked. Join each pair of rafters with a plywood gusset.
13. With all the rafters assembled in pairs, position each pair on the wall top plates and secure by toenailing.
14. Use 12mm plywood for the roof deck and cover it with roofing felt. Installshingles following the manufacturer’s instructions.
15. Nail tongue-and-groove in place using nails over wall framing. If you plan to stain or paint the trim a different colour than the siding, it’s a good idea to finish theroof trim before applying the siding. Cut siding boards to length and begin installing them at a corner of the building. Use galvanized nails to fasten the boards. Face nail the first board, but fasten succeeding boards withnails driven diagonally through the tongue so the heads will be hidden. Set nailheads slightly below the surface.
16. Cut stock for doorjambs and nail in place. At a window, install the angled sill piece first, then the top jamb, thenside jambs.
17. Position the door in its opening with a 6mm space at the top and sides. Bore pilot holes for the hinge screws and secure the hinges.
USE QUALITY WOODOC PRODUCTS FOR FINISHING YOUR NEW GARDEN SHED
Home-Dzineonline28
Q zoneSend your Q & A for decor, decorating and DIY dilemmas to [email protected].
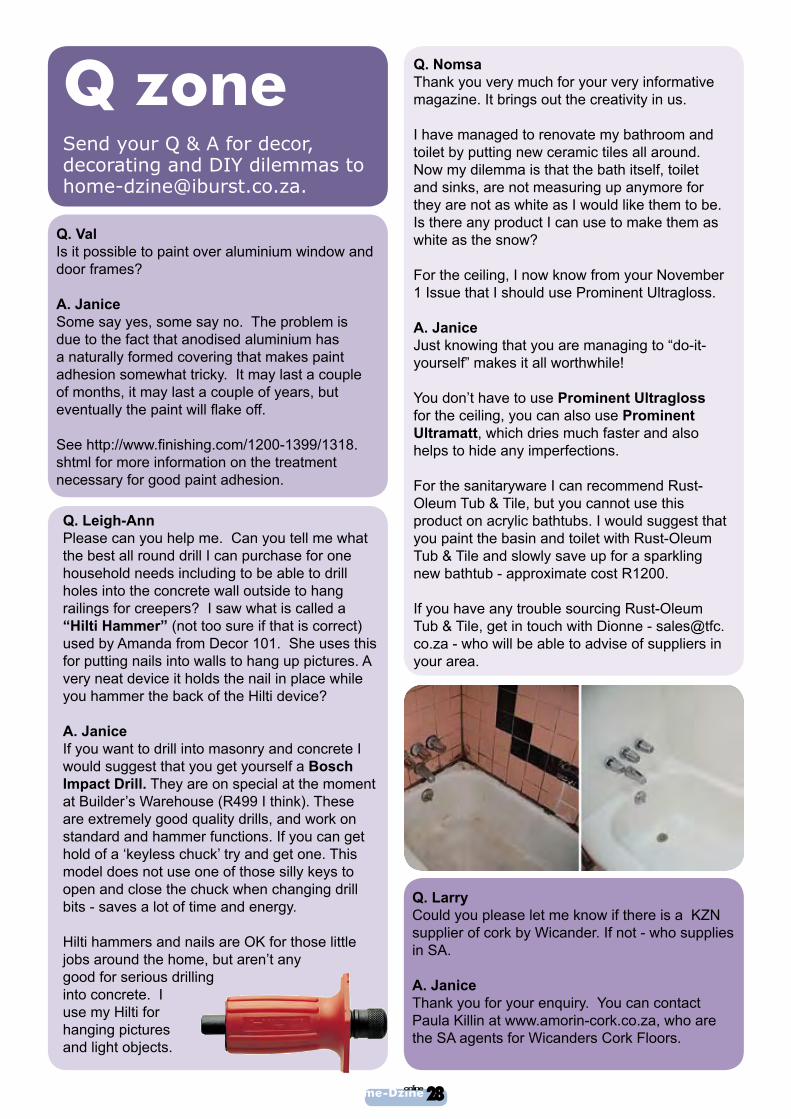
Q. Leigh-AnnPlease can you help me. Can you tell me what the best all round drill I can purchase for one household needs including to be able to drill holes into the concrete wall outside to hang railings for creepers? I saw what is called a “Hilti Hammer” (not too sure if that is correct) used by Amanda from Decor 101. She uses this for putting nails into walls to hang up pictures. A very neat device it holds the nail in place while you hammer the back of the Hilti device?
A. JaniceIf you want to drill into masonry and concrete I would suggest that you get yourself a Bosch Impact Drill. They are on special at the moment at Builder’s Warehouse (R499 I think). These are extremely good quality drills, and work on standard and hammer functions. If you can get hold of a ‘keyless chuck’ try and get one. This model does not use one of those silly keys to open and close the chuck when changing drill bits - saves a lot of time and energy. Hilti hammers and nails are OK for those little jobs around the home, but aren’t any good for serious drilling into concrete. I use my Hilti for hanging pictures and light objects.
Q. NomsaThank you very much for your very informative magazine. It brings out the creativity in us. I have managed to renovate my bathroom and toilet by putting new ceramic tiles all around. Now my dilemma is that the bath itself, toilet and sinks, are not measuring up anymore for they are not as white as I would like them to be. Is there any product I can use to make them as white as the snow?
For the ceiling, I now know from your November 1 Issue that I should use Prominent Ultragloss.
A. JaniceJust knowing that you are managing to “do-it-yourself” makes it all worthwhile! You don’t have to use Prominent Ultragloss for the ceiling, you can also use Prominent Ultramatt, which dries much faster and also helps to hide any imperfections. For the sanitaryware I can recommend Rust-Oleum Tub & Tile, but you cannot use this product on acrylic bathtubs. I would suggest that you paint the basin and toilet with Rust-Oleum Tub & Tile and slowly save up for a sparkling new bathtub - approximate cost R1200. If you have any trouble sourcing Rust-Oleum Tub & Tile, get in touch with Dionne - [email protected] - who will be able to advise of suppliers in your area.
Q. LarryCould you please let me know if there is a KZN supplier of cork by Wicander. If not - who supplies in SA.
A. JaniceThank you for your enquiry. You can contact Paula Killin at www.amorin-cork.co.za, who are the SA agents for Wicanders Cork Floors.
Q. ValIs it possible to paint over aluminium window and door frames?
A. JaniceSome say yes, some say no. The problem is due to the fact that anodised aluminium has a naturally formed covering that makes paint adhesion somewhat tricky. It may last a couple of months, it may last a couple of years, but eventually the paint will flake off. See http://www.finishing.com/1200-1399/1318.shtml for more information on the treatment necessary for good paint adhesion.

Links for this issue
Alcolin
Bosch Power Tools for DIY
Decorating Centre
Dremel MultiTools
Garden Shop
Home Comforts
PG Bison
Prominent Paints
Rust-Oleum
Timbercity
Woodoc
Need a back-issue of Home-Dzine Online?CLICK HERE
Need to send us an email?CLICK HERE
Home-Dzineonline29
directory
What’s new on Home-Dzine.co.za
Which paint for your project?
Fun Furniture for Kids
Tiling Course for Divas
How to screed a concrete floor
Easy ways to update a bedroom
Build a garden fence
Common design mistakes
Cottage kitchen makeover
Room ideas for little boys
Compact working spaces
Repair leather or upholstered furniture