Embed Size (px)
Citation preview
1
LCD Projector
LP-EU5002
User's Manual (detailed) Operating Guide
Thank you for purchasing this projector.
Safety GuideWARNING
NOTE
WARNING
CAUTION
NOTICE

2
Introduction . . . . . . . . . . . . . . . 3334
Setting up . . . . . . . . . . . . . . . . . 77
1015151616
Remote control . . . . . . . . . . . . 181819
1920
Power on/off . . . . . . . . . . . . . . 212122
Operating . . . . . . . . . . . . . . . . 2323232424252627272831323233
EASY MENU. . . . . . . . . . . . . . . 36PICTURE menu . . . . . . . . . . . . 38IMAGE menu . . . . . . . . . . . . . . 42INPUT menu . . . . . . . . . . . . . . 45SETUP menu . . . . . . . . . . . . . . 50AUDIO menu . . . . . . . . . . . . . . 57SCREEN menu . . . . . . . . . . . . . 58
OPTION menu . . . . . . . . . . . . . 63NETWORK menu . . . . . . . . . . . 76SECURITY menu . . . . . . . . . . . 77Presentation tools . . . . . . . . . 83
83Maintenance . . . . . . . . . . . . . . 92
92
95Troubleshooting . . . . . . . . . . . 97
9799
102
102 . . . . . . . . . . . . 108
3
Introduction
NOTE
Checking the contents of package
USB TYPE A
Contents of package User’s Manual (concise)
Features
WARNING

4
Introduction
Part namesProjector
23 5792
2619
95
5FOCUS 27
ZOOM 27AC 15
516162694
WARNING
CAUTION
5
Introduction
Part names (continued)
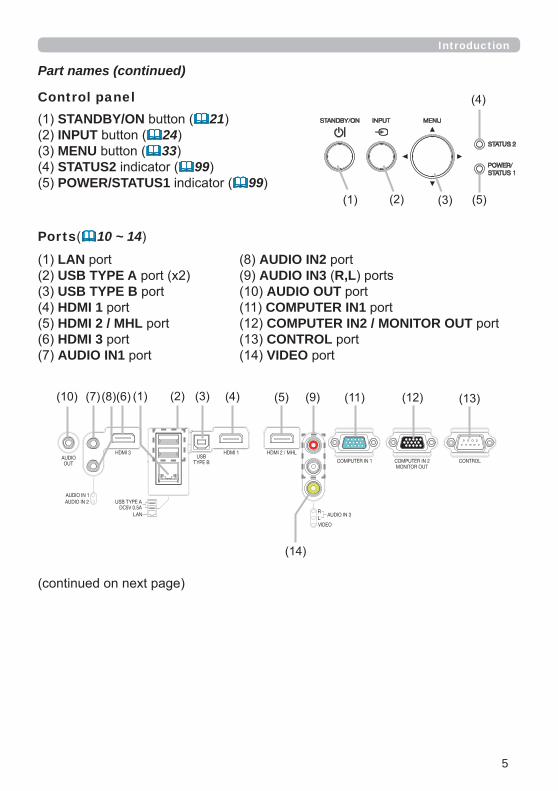
Control panelSTANDBY/ON 21INPUT 24MENU 33STATUS2 99POWER/STATUS1 99
Ports 10 ~ 14LANUSB TYPE AUSB TYPE BHDMI 1HDMI 2 / MHLHDMI 3AUDIO IN1
AUDIO IN2AUDIO IN3 R,LAUDIO OUT COMPUTER IN1COMPUTER IN2 / MONITOR OUTCONTROLVIDEO

6
Part names (continued)
98NOTE
INPUT 24MY BUTTON-1 66, 67MY BUTTON-2 66, 67STANDBY/ON 21ASPECT 24PbyPAUTO 27FREEZE 32MAGNIFY ON 31FOCUS +ZOOM +VOLUME + 23MAGNIFY OFF 31FOCUS -ZOOM -VOLUME - 23PAGE UP 20GEOMETRY 28PICTURE MUTE 23PAGE DOWN 20INTERACTIVE NETWORKBLANK 32ESC 19MENU 33ENTER 33OSD MSGRESET 33
3318
ASPECT
BLANK
ESC MENU
RESET
AUTO
PAGE
DOWN
ON
OFF
FREEZE
UP
ENTER
FOCUS ZOOM
INPUT
INTERACTIVE
MYBUTTON
PbyP
MAGNIFY VOLUME
GEOMETRY PICTURE MUTE
NETWORK
OSD MSG
Remote control
Introduction

7
ArrangementT-1 F-1 F-2
NOTE
Setting up
8
Setting up
Arrangement (continued)
WARNING Install the projector where you can access the power outlet easily.
Do not subject the projector to unstable conditions.
things.
Do not place the projector where any oils, such as cooking or machine oil, are used.
Do not place the projector in a place where it may get wet.

9
Setting up
Arrangement (continued)
ventilation.
Avoid placing the projector in smoky, humid or dusty place.
CAUTION
NOTICE
NOTE

10
Setting up
Connecting with your devices
Network Guide
Use only the appropriate accessories.WARNING
For a cable with a core at only one end, connect the end with the core to the projector.
CAUTION
COMPUTER IN 1
11 14
-
--
About Plug-and-Play capability
NOTE

11
Setting up
Connecting with your devices (continued)
27
NOTE
Computer
HDMIAUDIO
OUTUSB(A) DISPLAY RS-232C
SmartphoneTablet

12
Connecting with your devices (continued)
LANNOTE
LAN
86
CAUTION
Setting up
RS-232CUSB TYPE ALAN RS-232C
Computer External deviceAccess pointUSB wireless
adapter
USB storage device

13
Setting up
Connecting with your devices (continued)
-
-
-
-
- ®
NOTE
VCR/DVD/Blu-ray DiscTM player
COMPONENTCb/Pb YCr/PrRLVIDEO
AUDIOOUT
HDMI

14
Setting up
Connecting with your devices (continued)
MonitorSpeakers
RL RGB IN
15
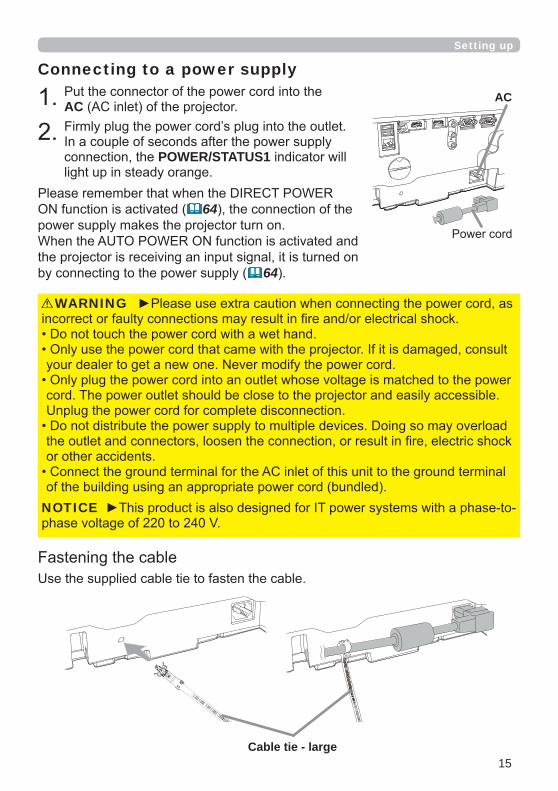
Connecting to a power supply
AC
POWER/STATUS1
WARNING
64
64
NOTICE
Setting up
AC
Cable tie - large
16
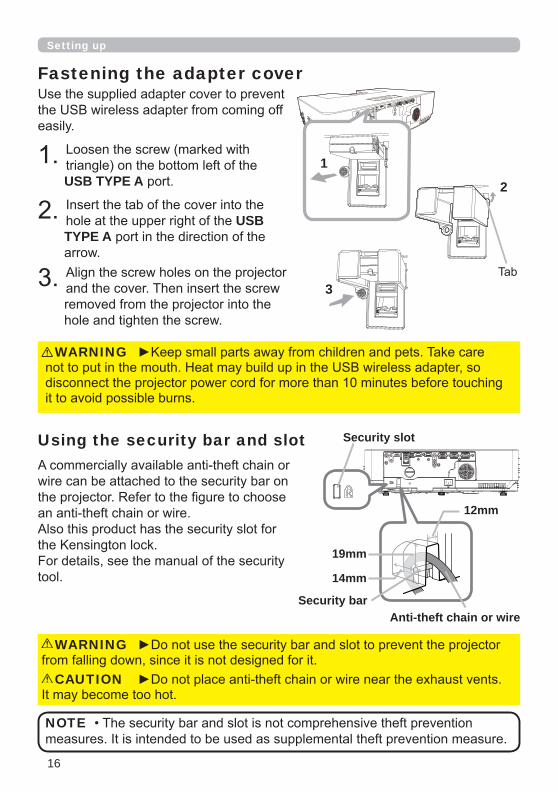
USB TYPE A
USB TYPE A
Using the security bar and slot
WARNING
CAUTION
NOTE
Fastening the adapter cover
WARNING
Setting up
2
1
3
Anti-theft chain or wireSecurity bar
19mm
12mm
14mm
Security slot

17
Setting up
・ ・

18
Installing the batteries
WARNING
Remote control

19
Remote control
About the remote control signal
NOTE
Changing the frequency of remote control signal
VOLUME - RESET
MAGNIFY OFF ESC
72
ASPECT
BLANK
ESC MENU
RESET
AUTO
PAGE
DOWN
ON
OFF
FREEZE
UP
ENTER
FOCUS ZOOM
INPUT
INTERACTIVE
MYBUTTON
PbyP
MAGNIFY VOLUME
GEOMETRY PICTURE MUTE
NETWORK
OSD MSG
RESET
VOLUME -MAGNIFY OFF
ESC

20
Remote control
®
POWER/STATUS1USB TYPE A
58 61
NOTE
Using as a simple PC mouse & keyboard
USB TYPE B
ASPECT
BLANK
ESC MENU
RESET
AUTO
PAGE
DOWN
ON
OFF
FREEZE
UP
ENTER
FOCUS ZOOM
INPUT
INTERACTIVE
MYBUTTON
PbyP
MAGNIFY VOLUME
GEOMETRY PICTURE MUTE
NETWORK
OSD MSG
PAGE UP key: PAGE UPPAGE DOWN key: PAGE DOWNMouse left button: ENTERMove pointer:ESC key: ESCMouse right button: RESET
NOTICE
USB TYPE B

21
Turning on the power
POWER/STATUS1
99STANDBY/ON
POWER/STATUS1
99
Selecting an input signal 24
Power on/off
ASPECT
BLANK
ESC MENU
RESET
AUTO
PAGE
DOWN
ON
OFF
FREEZE
UP
ENTER
FOCUS ZOOM
INPUT
INTERACTIVE
MYBUTTON
PbyP
MAGNIFY VOLUME
GEOMETRY PICTURE MUTE
NETWORK
OSD MSG
POWER/STATUS1STANDBY/ON
22
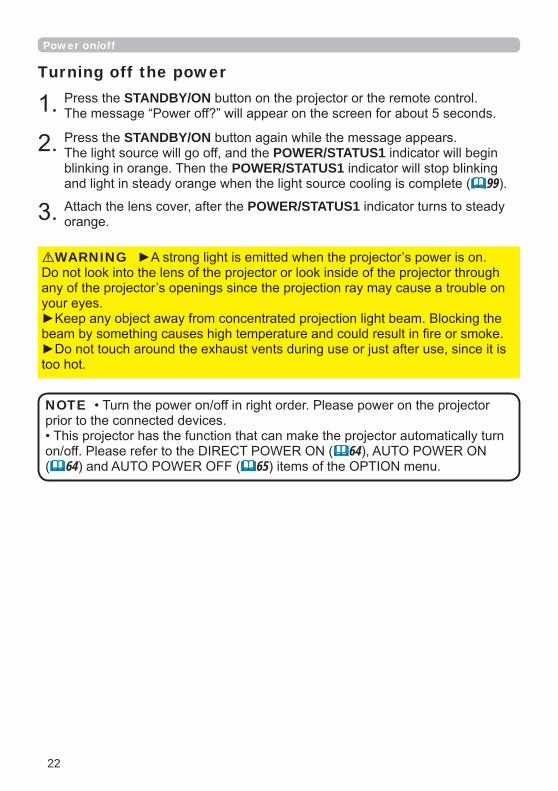
STANDBY/ON
Turning off the power
STANDBY/ONPOWER/STATUS1
POWER/STATUS199
POWER/STATUS1
Power on/off
WARNING
6464 65
NOTE

23
Operating
Adjusting the volumeVOLUME + -
57
56
54
MUTE
MUTE VOLUME +VOLUME -
ASPECT
BLANK
ESC MENU
RESET
AUTO
PAGE
DOWN
ON
OFF
FREEZE
UP
ENTER
FOCUS ZOOM
INPUT
INTERACTIVE
MYBUTTON
PbyP
MAGNIFY VOLUME
GEOMETRY PICTURE MUTE
NETWORK
OSD MSG
VOLUME
VOLUME + / -
NOTE
Temporarily muting the sound
ASPECT
BLANK
ESC MENU
RESET
AUTO
PAGE
DOWN
ON
OFF
FREEZE
UP
ENTER
FOCUS ZOOM
INPUT
INTERACTIVE
MYBUTTON
PbyP
MAGNIFY VOLUME
GEOMETRY PICTURE MUTE
NETWORK
OSD MSG
MUTEMUTE
NOTE
57
VIDEO COMPUTER IN1 COMPUTER IN2
62
24
Operating
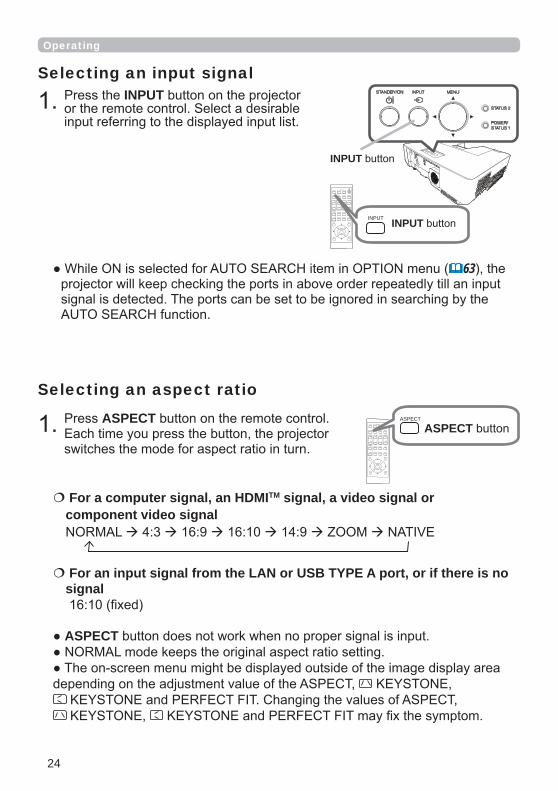
ASPECT
Selecting an aspect ratio
ASPECT
For an input signal from the LAN or USB TYPE A port, or if there is no signal
For a computer signal, an HDMITM signal, a video signal or component video signal
INPUTSelecting an input signal
63
INPUT
ASPECT
BLANK
ESC MENU
RESET
AUTO
PAGE
DOWN
ON
OFF
FREEZE
UP
ENTER
FOCUS ZOOM
INPUT
INTERACTIVE
MYBUTTON
PbyP
MAGNIFY VOLUME
GEOMETRY PICTURE MUTE
NETWORK
OSD MSG
INPUT INPUT
ASPECT
BLANK
ESC MENU
RESET
AUTO
PAGE
DOWN
ON
OFF
FREEZE
UP
ENTER
FOCUS ZOOM
INPUT
INTERACTIVE
MYBUTTON
PbyP
MAGNIFY VOLUME
GEOMETRY PICTURE MUTE
NETWORK
OSD MSG
ASPECT
ASPECT

25
Operating
OSD MSG
OSD MSG
Limiting OSD display
ASPECT
BLANK
ESC MENU
RESET
AUTO
PAGE
DOWN
ON
OFF
FREEZE
UP
ENTER
FOCUS ZOOM
INPUT
INTERACTIVE
MYBUTTON
PbyP
MAGNIFY VOLUME
GEOMETRY PICTURE MUTE
NETWORK
OSD MSG
OSD MSG
OSD MSG

26
Operating
WARNING
CAUTION
WARNING
5°
Adjusting the projector’s elevator
NOTE
27
Operating
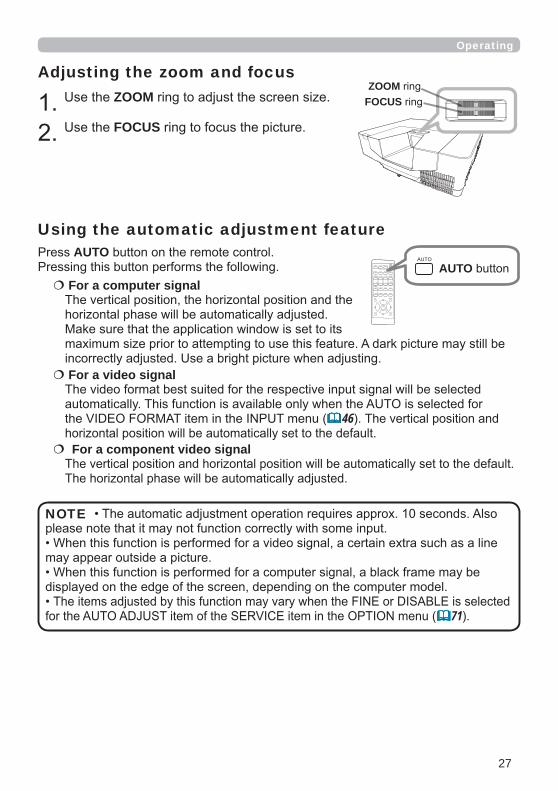
AUTOUsing the automatic adjustment feature
For a computer signal
For a video signal
46
For a component video signal
71
NOTE
ASPECT
BLANK
ESC MENU
RESET
AUTO
PAGE
DOWN
ON
OFF
FREEZE
UP
ENTER
FOCUS ZOOM
INPUT
INTERACTIVE
MYBUTTON
PbyP
MAGNIFY VOLUME
GEOMETRY PICTURE MUTE
NETWORK
OSD MSG
AUTO
AUTO
FOCUSZOOM
ZOOM
FOCUS
Adjusting the zoom and focus
28
Operating
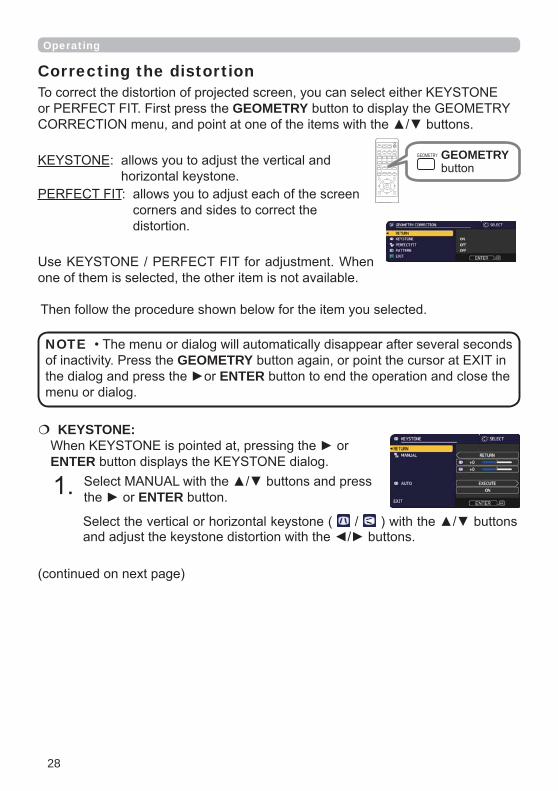
GEOMETRYENTER
NOTE
GEOMETRY
Correcting the distortion
KEYSTONE:
ENTER
ENTER
ASPECT
BLANK
ESC MENU
RESET
AUTO
PAGE
DOWN
ON
OFF
FREEZE
UP
ENTER
FOCUS ZOOM
INPUT
INTERACTIVE
MYBUTTON
PbyP
MAGNIFY VOLUME
GEOMETRY PICTURE MUTE
NETWORK
OSD MSG
GEOMETRY GEOMETRY
29
Operating
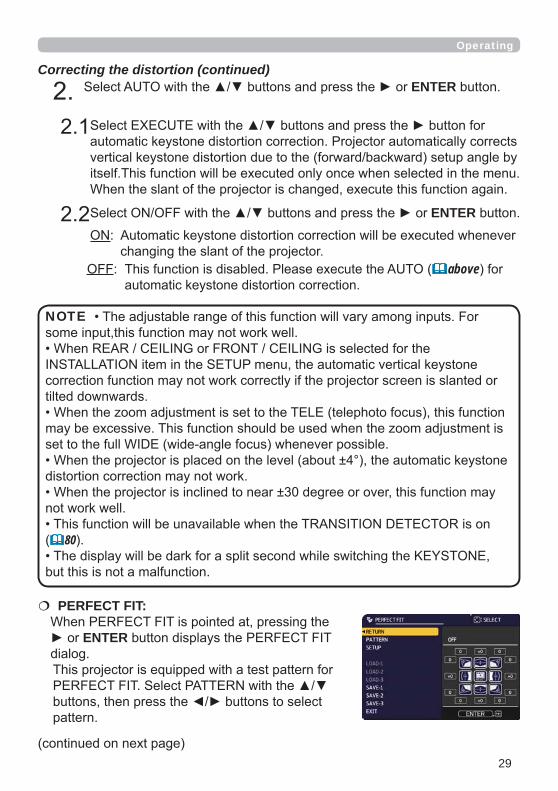
PERFECT FIT:
ENTER
Correcting the distortion (continued)
80
NOTE
ENTER
ENTER
above

30
Operating
Correcting the distortion (continued)
ENTER
ENTER
ENTER
SAVE:
ENTER
LOAD:
ENTER
NOTE
31
Operating
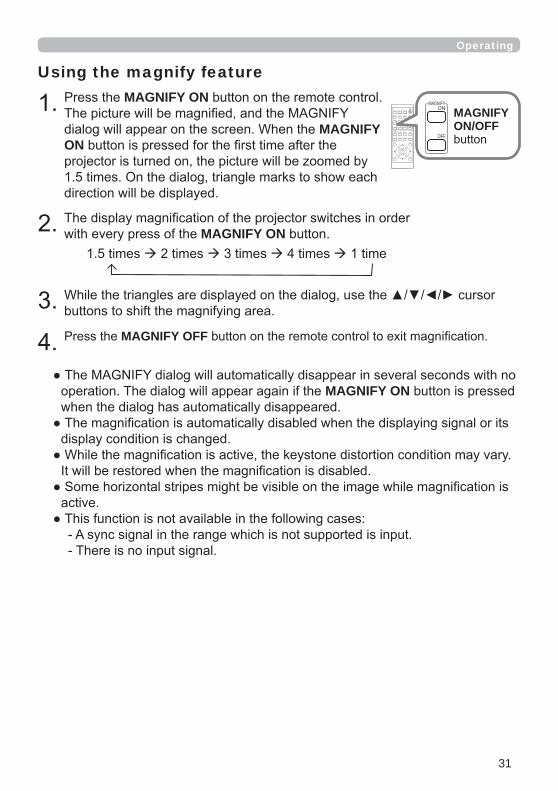
Using the magnify featureMAGNIFY ON
MAGNIFY ON
MAGNIFY ON
MAGNIFY OFF
MAGNIFY ON
ASPECT
BLANK
ESC MENU
RESET
AUTO
PAGE
DOWN
ON
OFF
FREEZE
UP
ENTER
FOCUS ZOOM
INPUT
INTERACTIVE
MYBUTTON
PbyP
MAGNIFY VOLUME
GEOMETRY PICTURE MUTE
NETWORK
OSD MSG
ON
OFF
MAGNIFY
MAGNIFYON/OFF

32
Operating
FREEZE
56
FREEZE
Temporarily freezing the screen
NOTE
ASPECT
BLANK
ESC MENU
RESET
AUTO
PAGE
DOWN
ON
OFF
FREEZE
UP
ENTER
FOCUS ZOOM
INPUT
INTERACTIVE
MYBUTTON
PbyP
MAGNIFY VOLUME
GEOMETRY PICTURE MUTE
NETWORK
OSD MSG
FREEZE FREEZE
BLANK
58
BLANK
Temporarily blanking the screen
NOTE
ASPECT
BLANK
ESC MENU
RESET
AUTO
PAGE
DOWN
ON
OFF
FREEZE
UP
ENTER
FOCUS ZOOM
INPUT
INTERACTIVE
MYBUTTON
PbyP
MAGNIFY VOLUME
GEOMETRY PICTURE MUTE
NETWORK
OSD MSG
BLANK BLANK
CAUTION
33
Operating
MENU
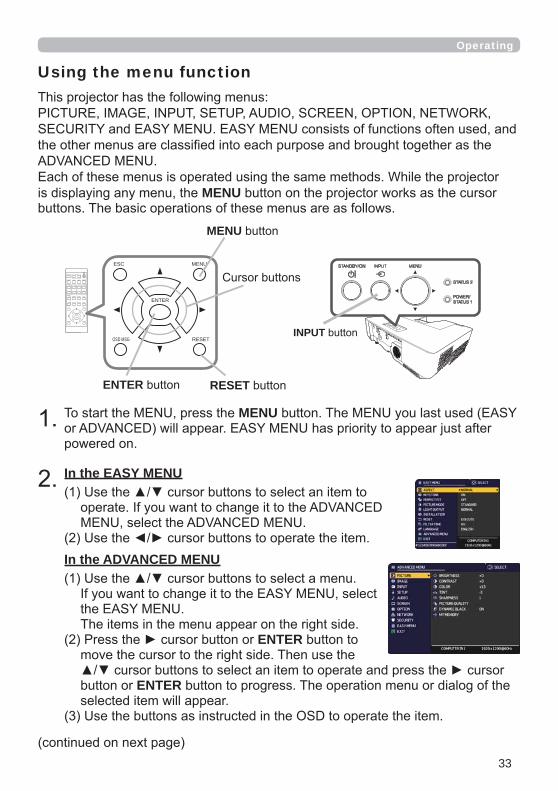
Using the menu function
MENU
In the EASY MENU
ENTER
ENTER
In the ADVANCED MENU
ENTER
ESC MENU
RESET
ENTER
OSD MSG
ASPECT
BLANK
ESC MENU
RESET
AUTO
PAGE
DOWN
ON
OFF
FREEZE
UP
ENTER
FOCUS ZOOM
INPUT
INTERACTIVE
MYBUTTON
PbyP
MAGNIFY VOLUME
GEOMETRY PICTURE MUTE
NETWORK
OSD MSG
MENU
RESET
INPUT

34
Operating
Using the menu function (continued)
MENUENTER
Indication in OSD (On Screen Display)
Indication Meaning
MENU
RESET
ESC
NOTE

35
Operating
Using the menu function (continued)
Containing items of each menu
Menu Items
EASY MENU 36
PICTURE 38
IMAGE 42
INPUT 45
SETUP 50
AUDIO 57
SCREEN 58
OPTION 63
NETWORK 76
SECURITY 77
36
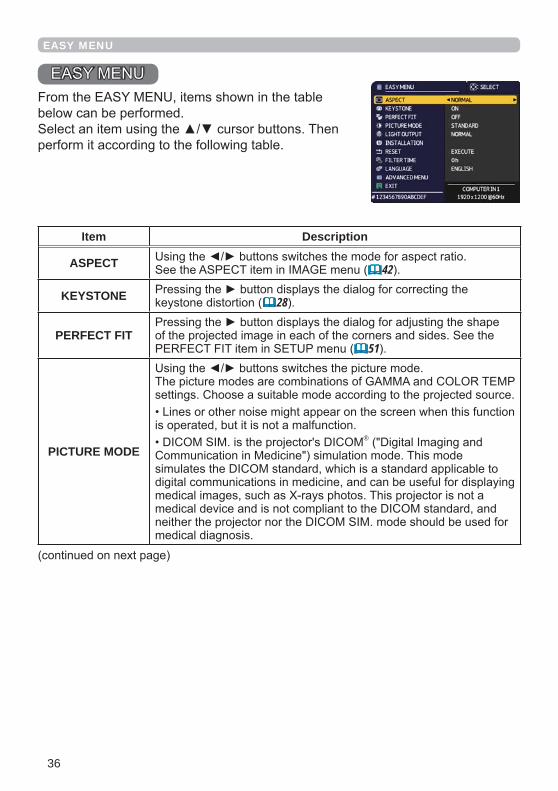
EASY MENU
Item Description
ASPECT 42
KEYSTONE 28
PERFECT FIT51
PICTURE MODE®

37
EASY MENU
Item Description
LIGHT OUTPUT
52
71
INSTALLATION 53
RESET
FILTER TIME
52
LANGUAGE 58
ADVANCED MENUENTER
EXIT ENTER

38
PICTURE menu
ENTER
Item Description
BRIGHTNESS
CONTRAST
COLOR
TINT
SHARPNESS
39
PICTURE menu
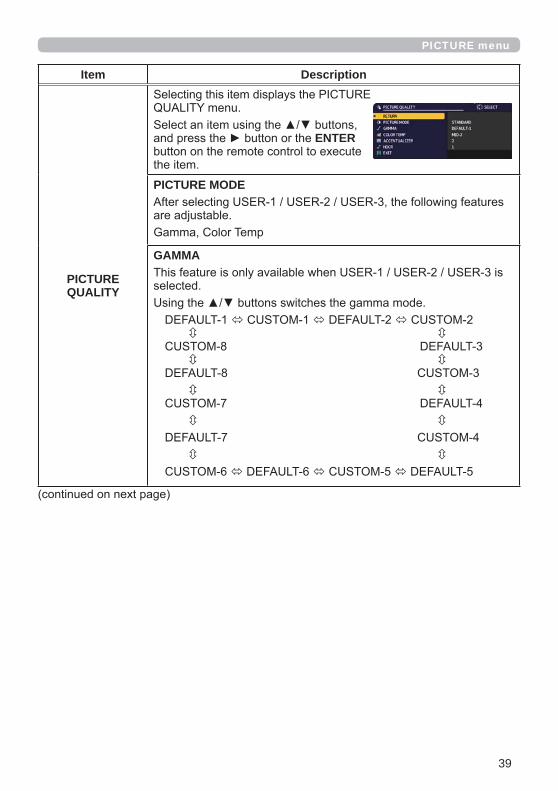
Item Description
PICTURE QUALITY
ENTER
PICTURE MODE
GAMMA

40
PICTURE menu
Item Description
PICTURE QUALITY
(continued)
GAMMA (continued)
ENTER
COLOR TEMP
ENTER
41
PICTURE menu
Item Description
PICTURE QUALITY
(continued)
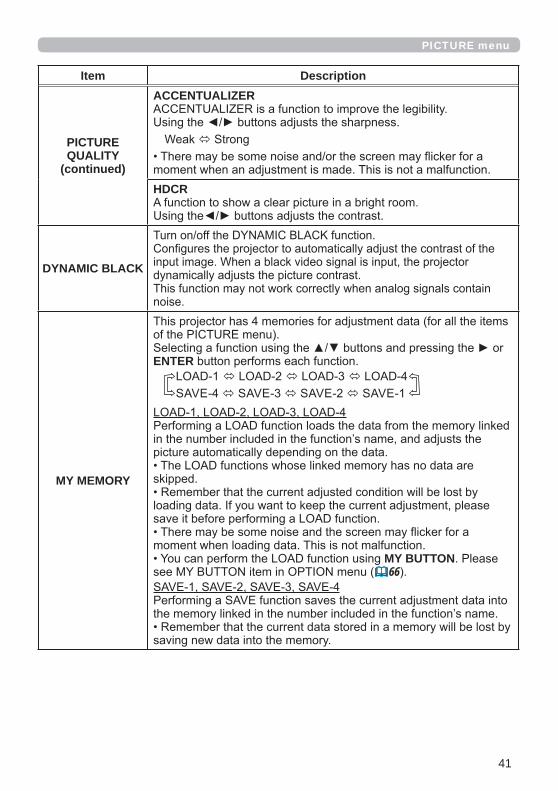
ACCENTUALIZER
HDCR
DYNAMIC BLACK
MY MEMORY
ENTER
MY BUTTON66
42
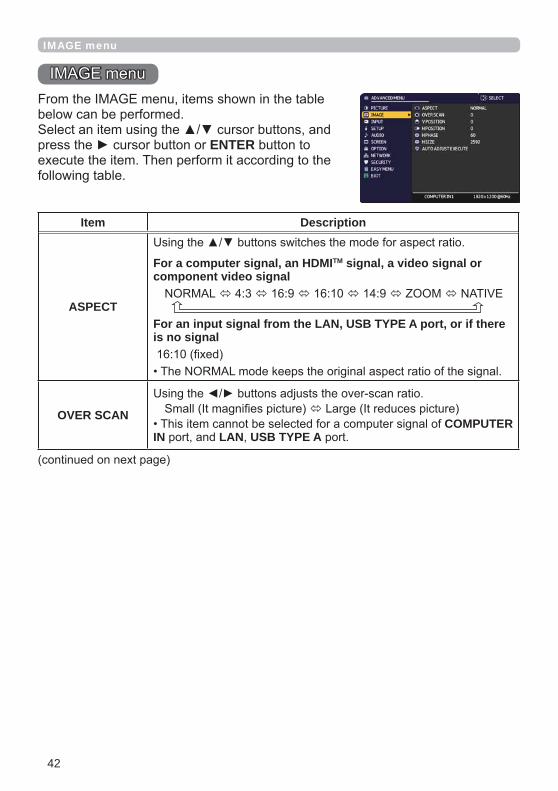
IMAGE menu
ENTER
Item Description
ASPECT
For a computer signal, an HDMITM signal, a video signal or component video signal
For an input signal from the LAN, USB TYPE A port, or if there is no signal
OVER SCANCOMPUTER
IN LAN USB TYPE A
43
IMAGE menu
Item Description
V POSITIONRESET
42
LAN USB TYPE AHDMI 1 HDMI 2 / MHL HDMI 3
H POSITIONRESET
42
LAN USB TYPE AHDMI 1 HDMI 2 / MHL HDMI 3
H PHASE
LANUSB TYPE A HDMI 1 HDMI 2 / MHL HDMI 3
44
IMAGE menu
Item Description
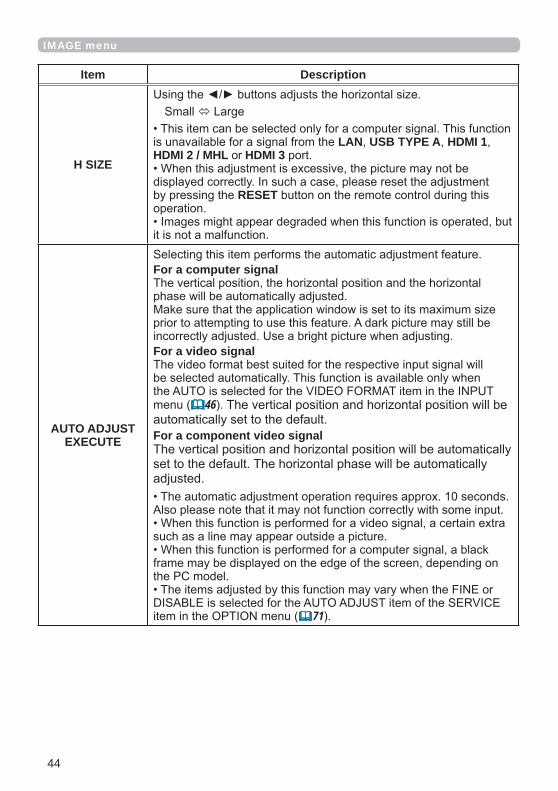
H SIZE
LAN USB TYPE A HDMI 1HDMI 2 / MHL HDMI 3
RESET
AUTO ADJUST EXECUTE
For a computer signal
For a video signal
46
For a component video signal
71

45
INPUT menu
ENTER
Item Description
PROGRESSIVE
VIDEO NR
COLOR SPACE LAN USB TYPE A
46
INPUT menu
Item Description
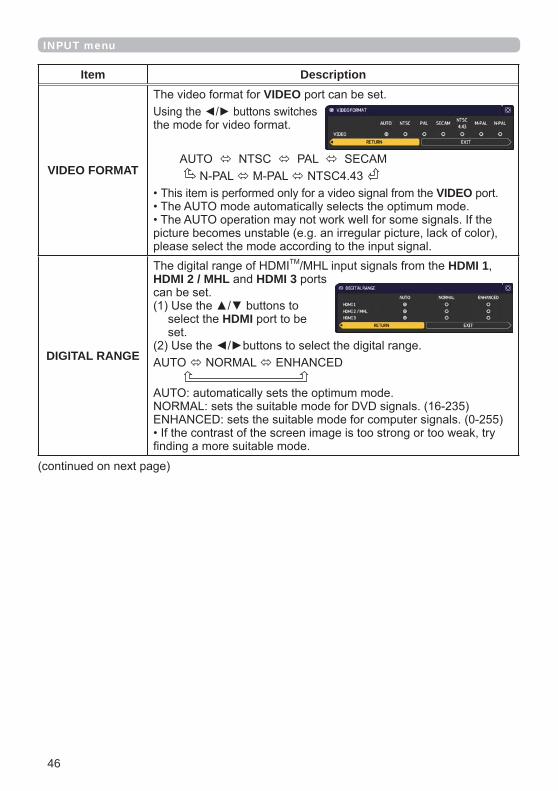
VIDEO FORMAT
VIDEO
VIDEO
DIGITAL RANGE
HDMI 1HDMI 2 / MHL HDMI 3
HDMI

47
INPUT menu
Item Description
COMPUTER IN
COMPUTER IN1 IN2
COMPUTER IN
11
FRAME LOCK

48
INPUT menu
Item Description
RESOLUTION
COMPUTER IN1 COMPUTER IN2
ENTER
ENTER
ENTER
49
INPUT menu
Item Description
MHL STANDBYPWR.
54
50
SETUP menu
ENTER
Item Description
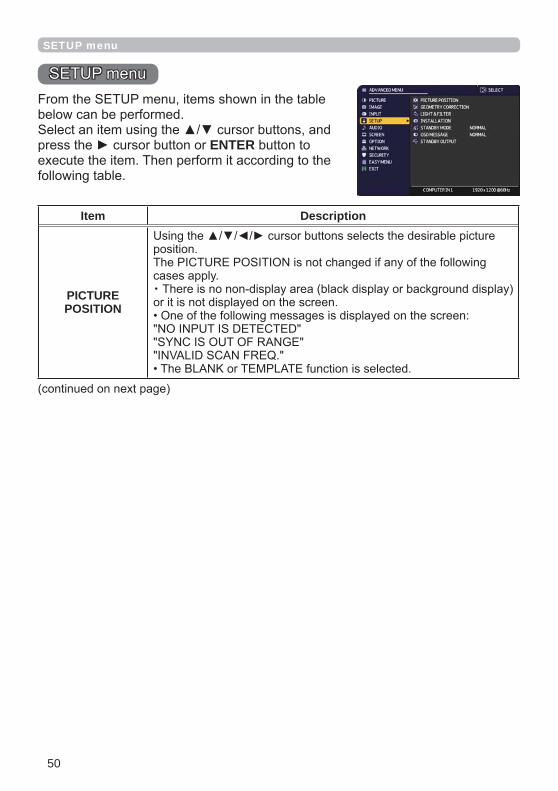
PICTURE POSITION
・
51
SETUP menu
Item Description
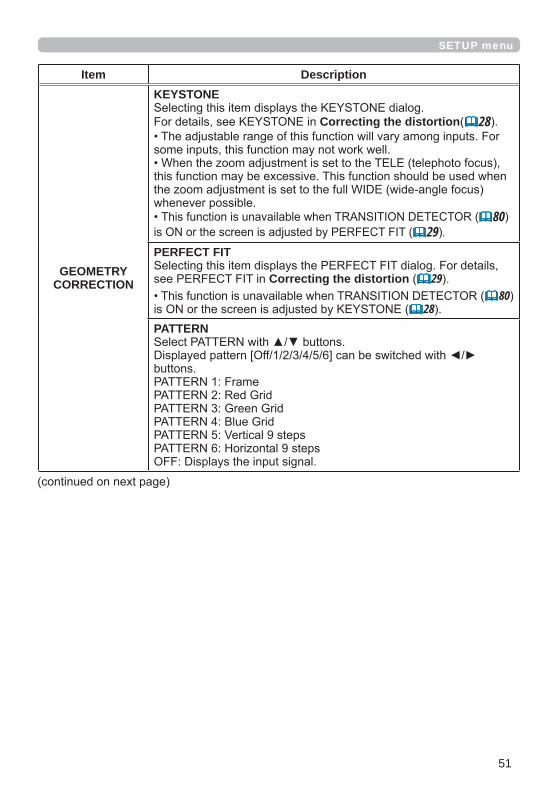
GEOMETRY CORRECTION
KEYSTONE
Correcting the distortion 28
8029 .
PERFECT FIT
Correcting the distortion 2980
28PATTERN
52
SETUP menu
Item Description
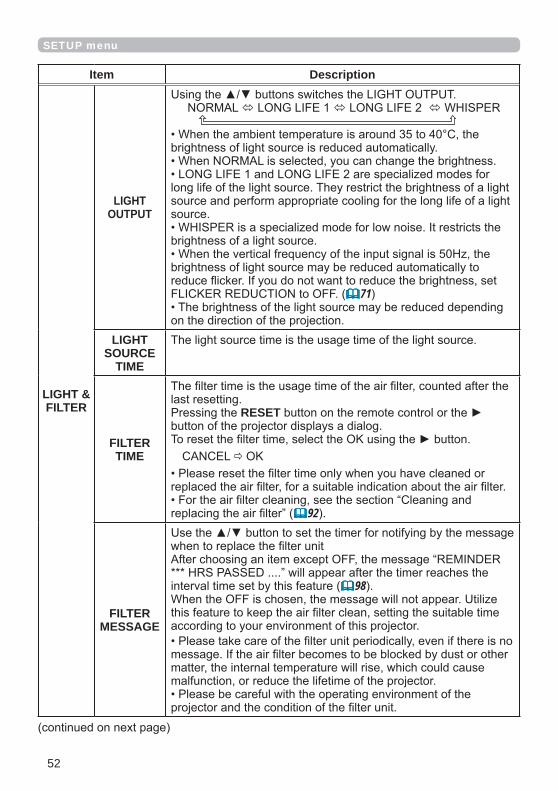
LIGHT & FILTER
LIGHT OUTPUT
71
LIGHT SOURCE
TIME
FILTER TIME
RESET
92
FILTER MESSAGE
98

53
SETUP menu
Item Description
INSTALLATION
80

54
SETUP menu
Item Description
STANDBY MODE
POWER/STATUS1
POWER/STATUS1
73
49

55
SETUP menu
Operation
Wake-On LAN (WOL) function
56
SETUP menu
Item Description
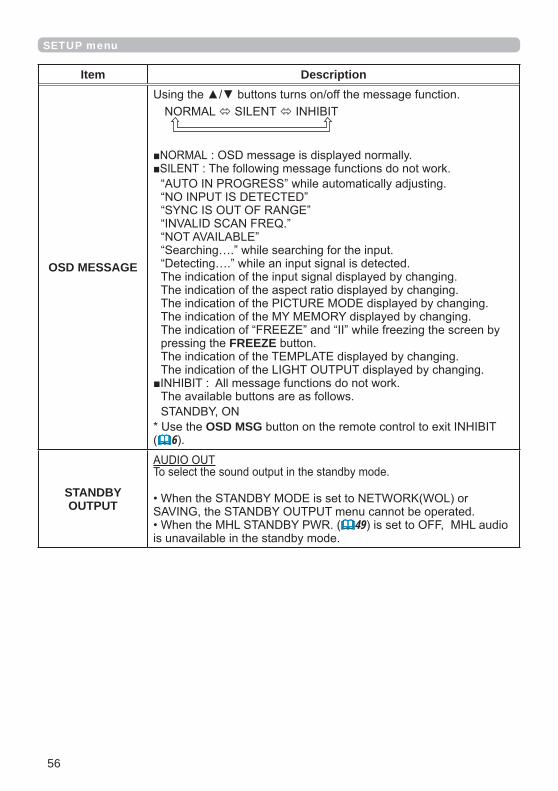
OSD MESSAGE
FREEZE
OSD MSG6
STANDBY OUTPUT
49
57
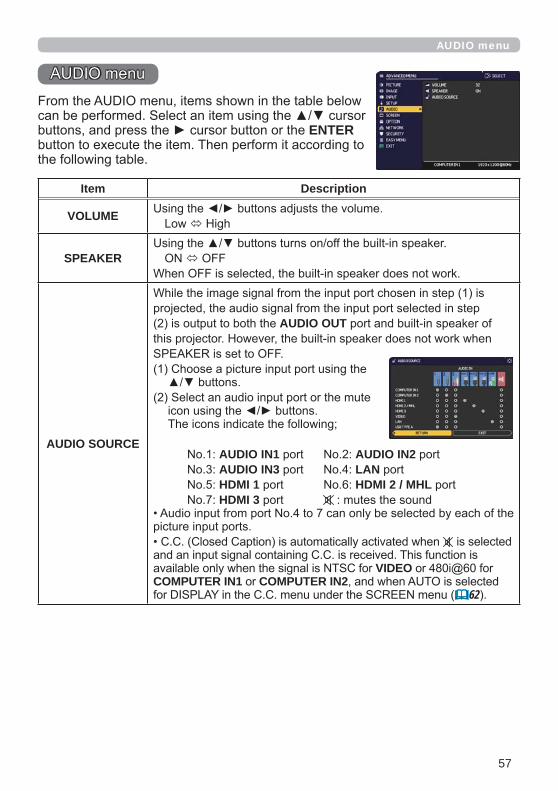
AUDIO menu
ENTER
Item Description
VOLUME
SPEAKER
AUDIO SOURCE
AUDIO OUT
AUDIO IN1 AUDIO IN2AUDIO IN3 LANHDMI 1 HDMI 2 / MHLHDMI 3
VIDEOCOMPUTER IN1 COMPUTER IN2
62
58
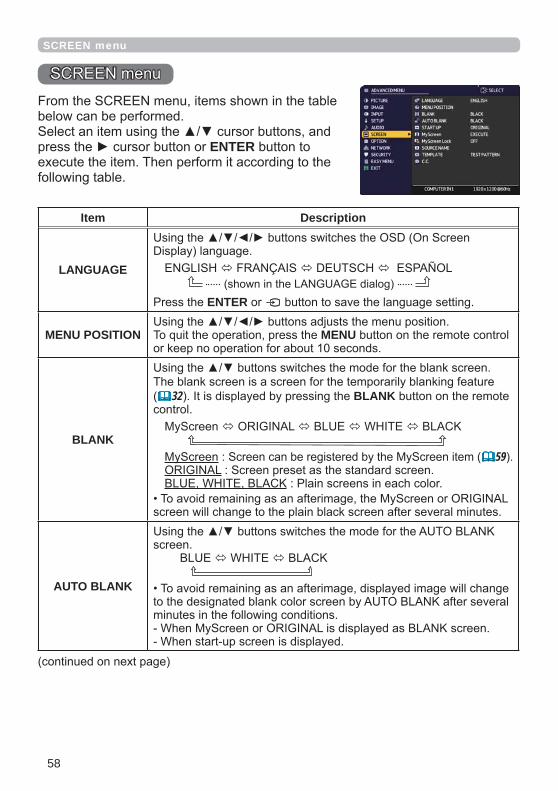
SCREEN menu
ENTER
Item Description
LANGUAGE
ENTER
MENU POSITION MENU
BLANK
32 BLANK
59
AUTO BLANK

59
SCREEN menu
Item Description
START UP59
58
78
MyScreen
ENTER
RESET
60
78LAN, USB TYPE A
HDMI 1 HDMI 2 / MHL HDMI 3

60
SCREEN menu
Item Description
MyScreen Lock
78
SOURCE NAME
ENTER
ENTER
ENTER
ENTER
61
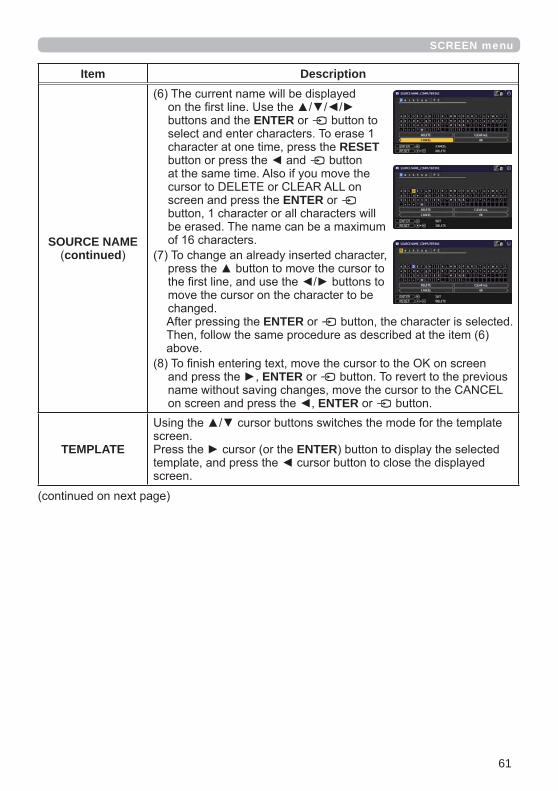
SCREEN menu
Item Description
SOURCE NAMEcontinued
ENTER
RESET
ENTER
ENTER
ENTER
ENTER
TEMPLATE ENTER
62
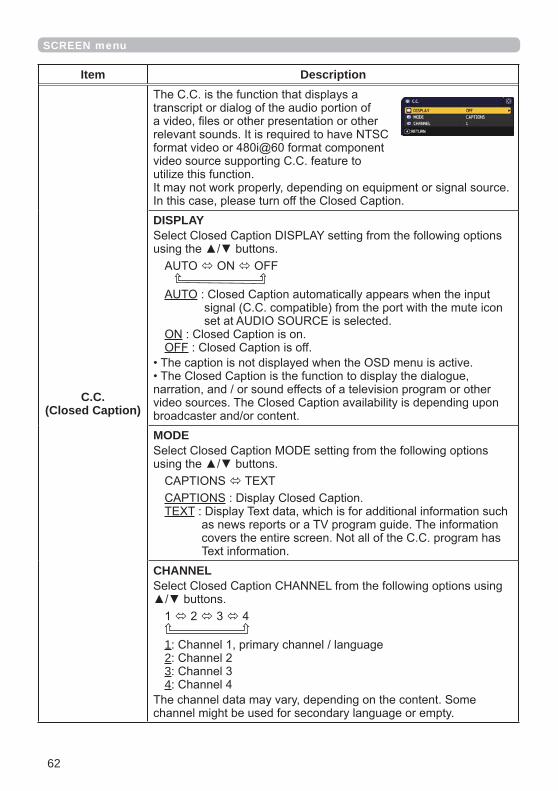
SCREEN menu
Item Description
C.C.(Closed Caption)
DISPLAY
MODE
CHANNEL
1234
63
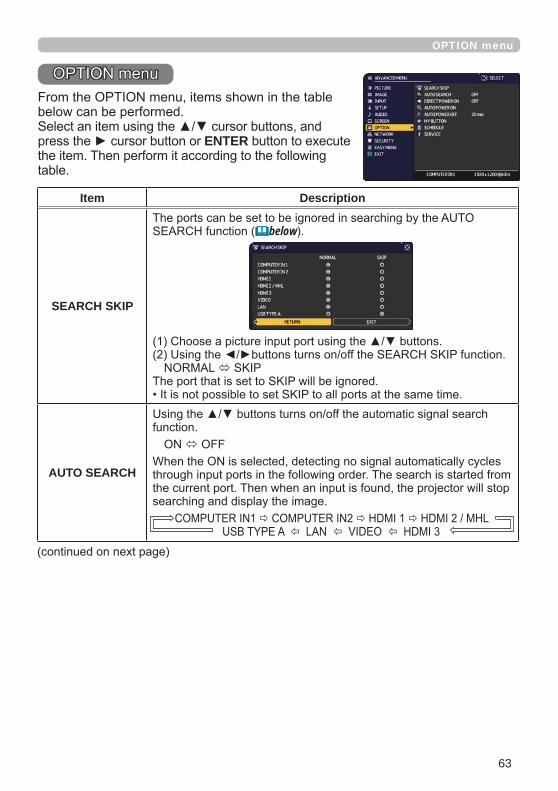
OPTION menu
ENTER
Item Description
SEARCH SKIP
below
AUTO SEARCH

64
OPTION menu
Item Description
DIRECT POWER ON
21
65WARNING
AUTO POWER ON
WARNING

65
OPTION menu
Item Description
AUTO POWER OFF
CONTROL
22

66
OPTION menu
Item Description
MY BUTTON
MY BUTTON 1/2 6
COMPUTER IN1 COMPUTER IN2
LANUSB TYPE A
HDMI 1HDMI 2 / MHL
HDMI 3VIDEO
USB TYPE A,
Messenger Function Network Guide
75
2841
MY BUTTON

67
OPTION menu
Item Description
MY BUTTONcontinued
3652
61
4852
4141
66
SCHEDULE
How to setup the item
NOTE
Item Description
DATE AND TIME
SPECIFIC DATE
PROGRAM EDIT

68
OPTION menu
Item Description
SCHEDULEcontinued
How to activate(DATE AND TIME / SPECIFIC DATE)
(

69
OPTION menu
Item Description
SCHEDULEcontinued
PROGRAM EDIT
RETURN
SELECT
COPY TO
APPLY
WARNING
70
OPTION menu
Item Description
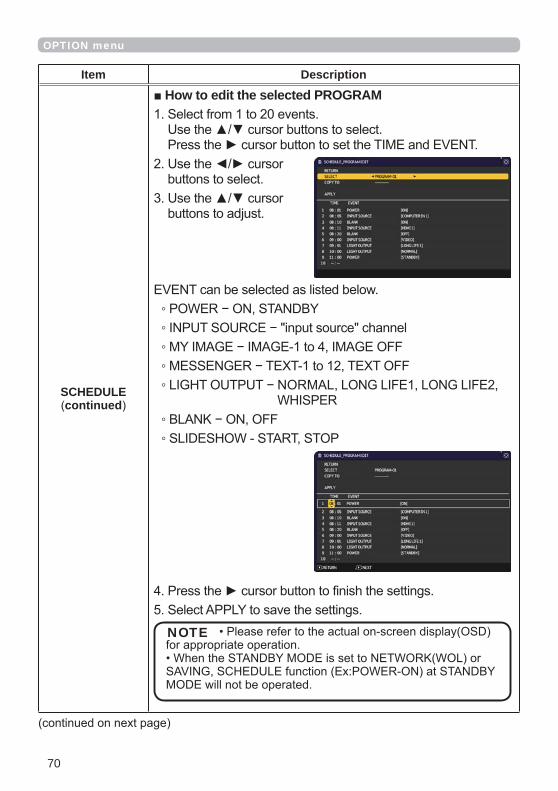
SCHEDULEcontinued
How to edit the selected PROGRAM
NOTE

71
OPTION menu
Item Description
SERVICE
ENTER
ALTITUDE
AUTO ADJUST
GHOST
FLICKER REDUCTION
72
OPTION menu
Item Description
SERVICE(continued)
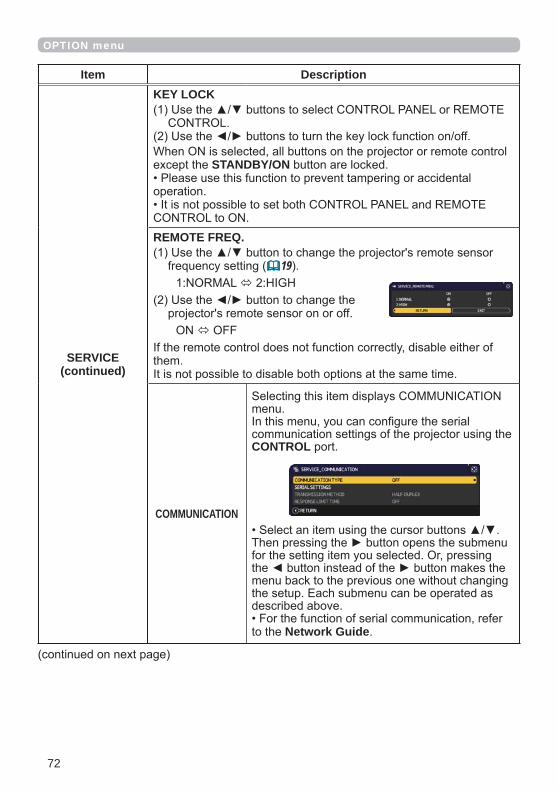
KEY LOCK
STANDBY/ON
REMOTE FREQ.
19
COMMUNICATION
CONTROL
Network Guide

73
OPTION menu
Item Description
SERVICE(continued)
COMMUNICATION(continued)
COMMUNICATION TYPE
CONTROL
CONTROLNetwork Bridge Function
Network Guide
CONTROL
below
SERIAL SETTINGS
CONTROLBAUD RATE
PARITY
TRANSMISSION METHOD
CONTROL
74

74
OPTION menu
Item Description
SERVICE(continued)
COMMUNICATION(continued)
RESPONSE LIMIT TIME
CONTROL
CONTROL
73
75
OPTION menu
Item Description
SERVICE(continued)
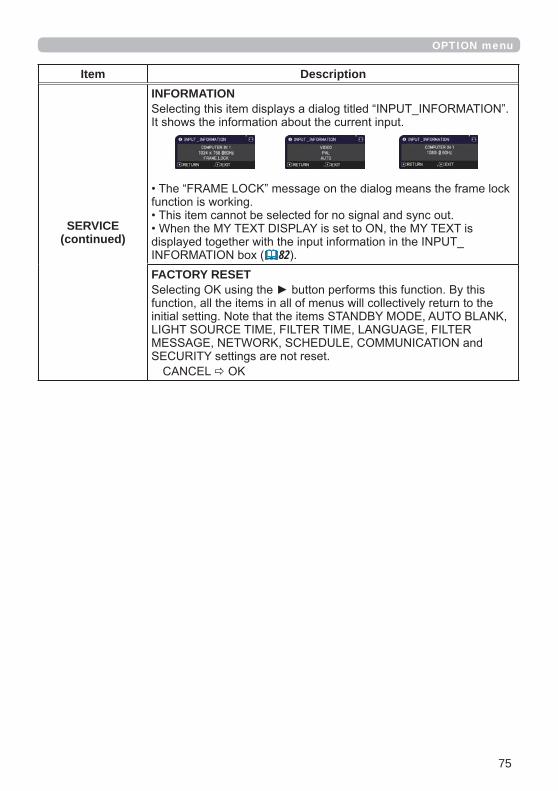
INFORMATION
82FACTORY RESET

76
NETWORK menu
Network Guide
77
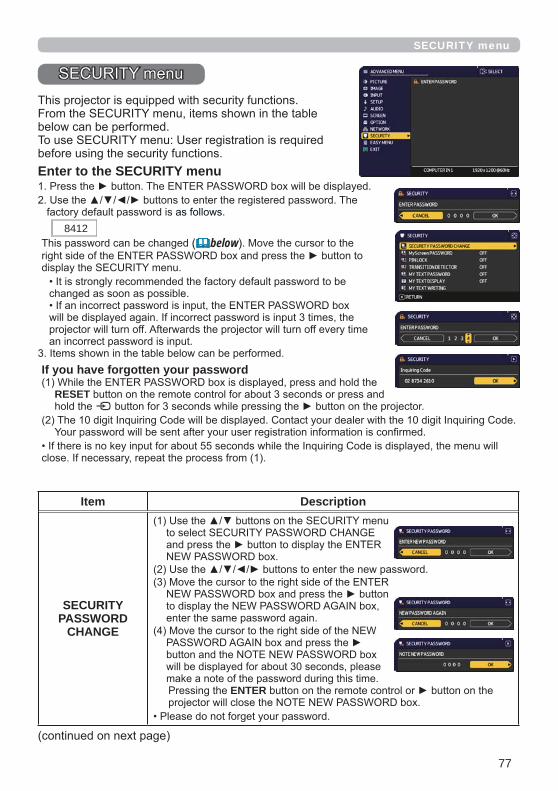
SECURITY menu
Item Description
SECURITY PASSWORD
CHANGE
ENTER
Enter to the SECURITY menu
8412below
If you have forgotten your password
RESET

78
SECURITY menu
Item Description
MyScreen PASSWORD
1 Turning on the MyScreen PASSWORD
ENTER
2 Turning off the MyScreen PASSWORD
3 If you have forgotten your password
79
SECURITY menu
Item Description
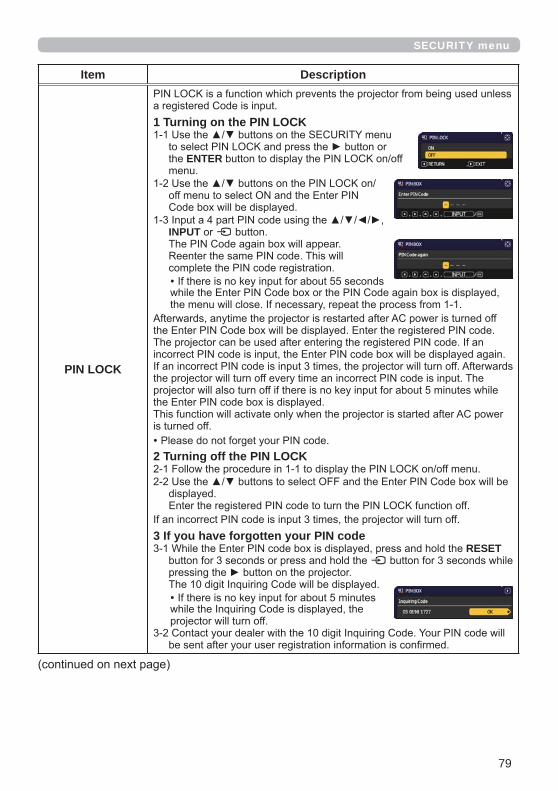
PIN LOCK
1 Turning on the PIN LOCK
ENTER
INPUT
2 Turning off the PIN LOCK
3 If you have forgotten your PIN codeRESET

80
SECURITY menu
Item Description
TRANSITION DETECTOR
1 Turning on the TRANSITION DETECTOR
ENTER
ENTER
2 Turning off the TRANSITION DETECTOR
3 If you have forgotten your password

81
SECURITY menu
Item Description
MY TEXT PASSWORD
1 Turning on the MY TEXT PASSWORD
ENTER
2 Turning off the MY TEXT PASSWORD
3 If you have forgotten your password
82
SECURITY menu
Item Description
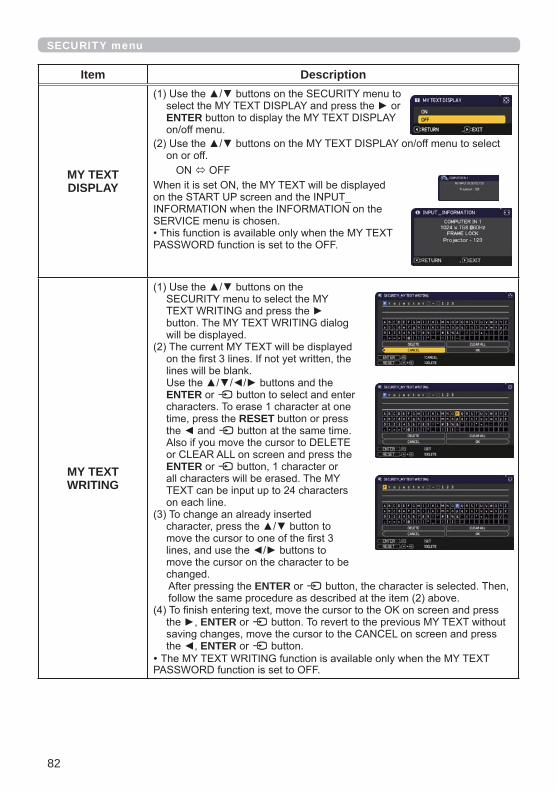
MY TEXT DISPLAY
ENTER
MY TEXT WRITING
ENTER
RESET
ENTER
ENTER
ENTER
ENTER
83
Presentation tools
USB TYPE AUSB TYPE A
PC-LESS Presentation
8488
89
[Supported storage media]
12, 86
NOTE
NOTE
[Supported format]
below
USB TYPE A

84
Presentation tools
NOTE
Thumbnail mode
PC-LESS Presentation (continued)
USB TYPE A

85
Presentation tools
PC-LESS Presentation (continued)
The setup menu for the selected image
Item Functions
ENTER
91
91
91ENTER
91ENTER
Operating by buttons or keys
Button operationFunctions
PAGE UPPAGE DOWN - PAGE UP
PAGE DOWN
ENTER INPUT ENTER below

86
Presentation tools
PC-LESS Presentation (continued)
Operating by the menu on the Thumbnail screen
Item Functions
ENTER
89ENTER
ENTER
USB TYPE A
87
Presentation tools
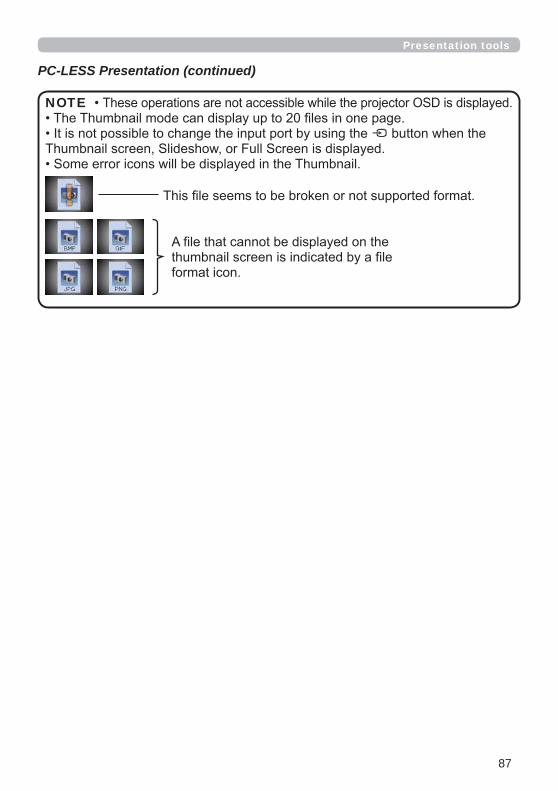
PC-LESS Presentation (continued)
NOTE

88
Presentation tools
PC-LESS Presentation (continued)
ENTERENTER]
Full Screen Mode
Button operationFunctions
PAGE DOWN PAGE DOWN
PAGE UP PAGE UPENTER INPUT ENTER
Operations for still images

89
Presentation tools
PC-LESS Presentation (continued)
Slideshow mode
ENTER
NOTE
ENTER[ENTER]
Button operationFunctions
ENTER INPUT ENTER
86

90
Presentation tools
PC-LESS Presentation (continued)
-
NOTE
91
Presentation tools
PC-LESS Presentation (continued)
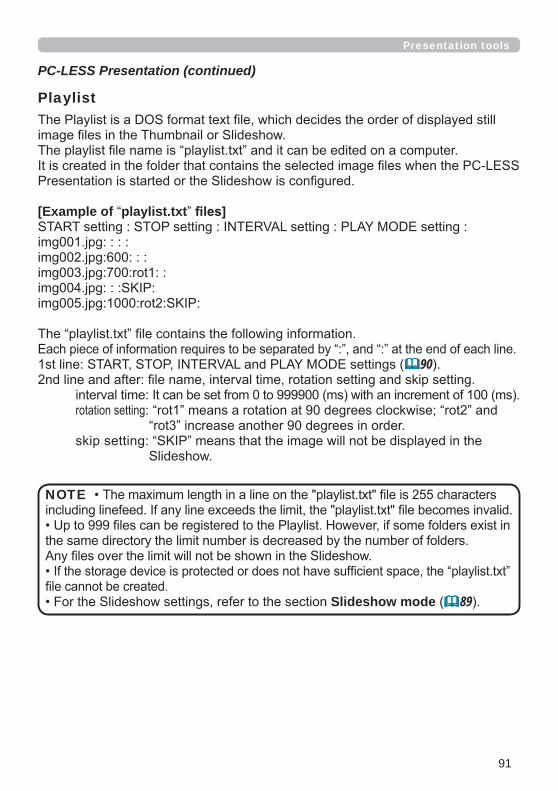
Playlist
[Example of playlist.txt
90
Slideshow mode 89
NOTE

92
Maintenance
Type number : UX43251
6
3

93
Maintenance
WARNING
NOTE
MENU
94
Maintenance
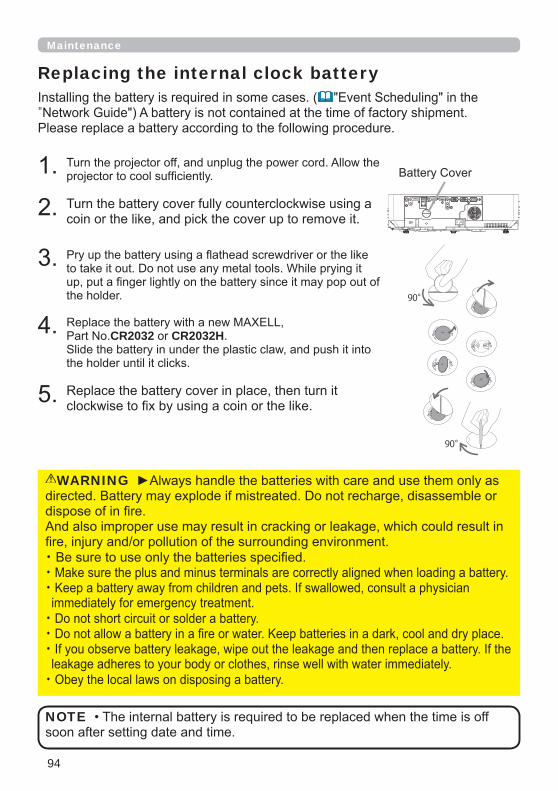
Replacing the internal clock battery
"
CR2032 CR2032H
WARNING
・・・
・・・
・
NOTE
90°
90°

95
Maintenance
Other careInside of the projector
Caring for the lens

96
Maintenance
WARNING
NOTICE
CAUTION
Caring for the cabinet and remote control

97
Troubleshooting
TroubleshootingWARNING
Related messages
Message DescriptionThere is no input signal.

98
Troubleshooting
Message DescriptionThe horizontal or vertical frequency of the input signal is
An improper signal is input.
The COMPUTER IN2/MONITOR OUT port is selectedas the picture input source even though MONITOR OUT is selected for COMPUTER IN2( 47).
COMPUTER IN2/MONITOR OUT
The internal temperature is rising.
52, 93
The button operation is not available.
Related messages (continued)
99
TroubleshootingTroubleshooting
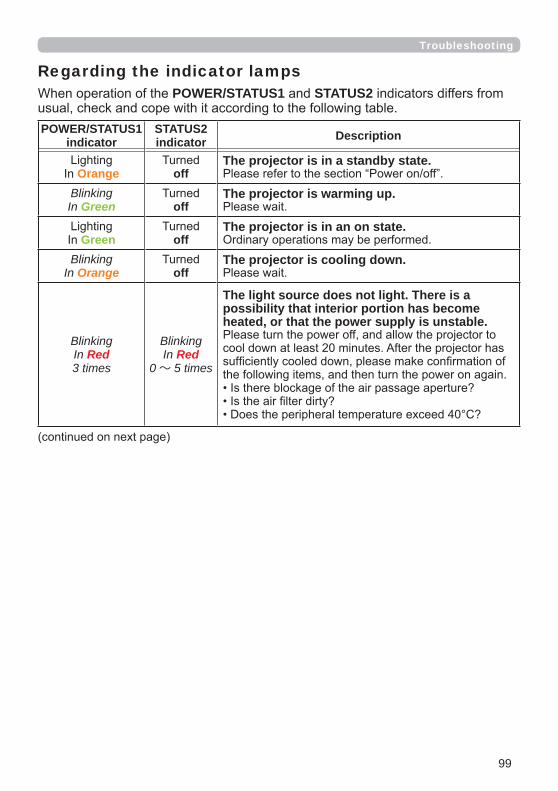
Regarding the indicator lampsPOWER/STATUS1 STATUS2
POWER/STATUS1 indicator
STATUS2 indicator Description
Orange offThe projector is in a standby state.
BlinkingIn Green off
The projector is warming up.
Green offThe projector is in an on state.
BlinkingIn Orange off
The projector is cooling down.
BlinkingIn Red3 times
BlinkingIn Red
0~ 5 times
The light source does not light. There is a possibility that interior portion has become heated, or that the power supply is unstable.

100
Troubleshooting
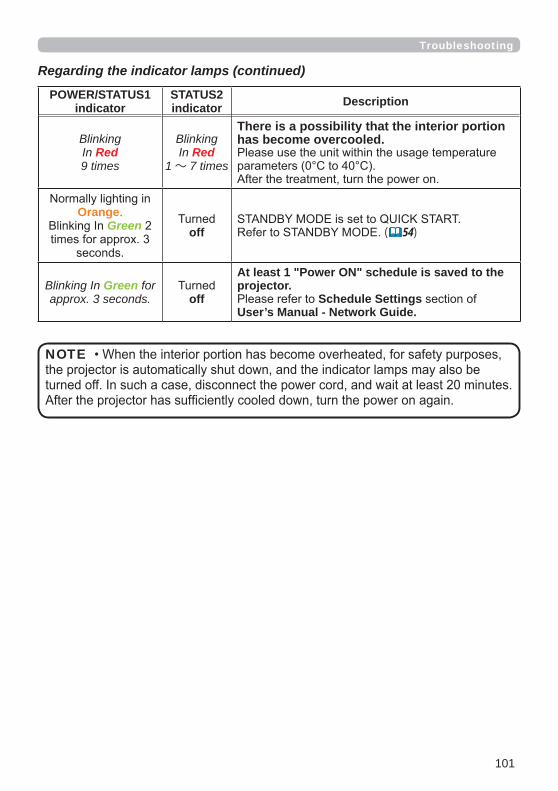
Regarding the indicator lamps (continued)
POWER/STATUS1 indicator
STATUS2 indicator Description
BlinkingIn Red7 times
BlinkingIn Red
1~ 6 times
The cooling fan is not operating.
BlinkingIn Red2 times off
The internal temperature is rising.
BlinkingIn Red1 time off
101
Troubleshooting
NOTE
POWER/STATUS1 indicator
STATUS2 indicator Description
BlinkingIn Red9 times
BlinkingIn Red
1~ 7 times
There is a possibility that the interior portion has become overcooled.
OrangeGreen
off ( 54)
Blinking In Green for approx. 3 seconds. off
At least 1 "Power ON" schedule is saved to the projector.
Schedule SettingsUser’s Manual - Network Guide.
Regarding the indicator lamps (continued)

102
Troubleshooting
Phenomena that may be easy to be mistaken for machine defects
Phenomenon Cases not involving a machine defect Reference page
The electrical power cord is not plugged in. 15
The main power source has been interrupted during operation such as by a power outage (blackout), etc.
OSD MESSAGE is set to INHIBIT.OSD MSG 25
The signal cables are not correctly connected. ~
Signal source does not correctly work.
The input changeover settings are mismatched. 24
The BLANK function for pictures and the MUTE function for sounds are working.
Resetting all settings
75

103
Troubleshooting
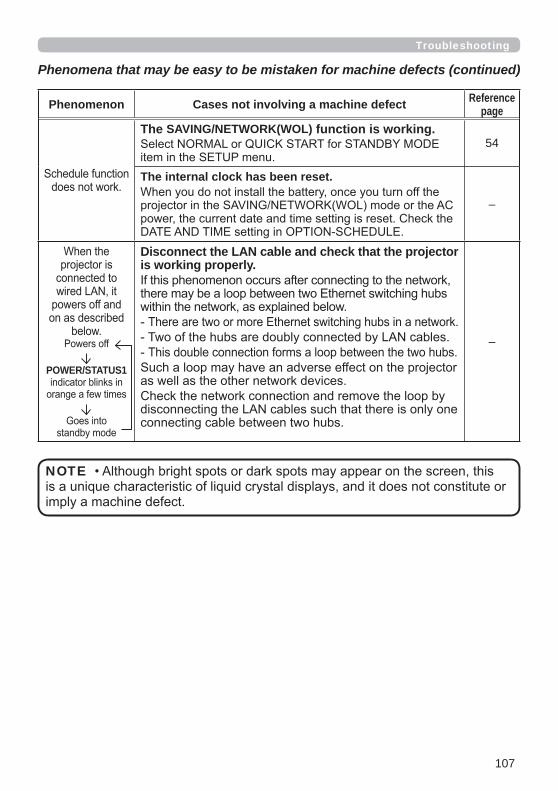
Phenomena that may be easy to be mistaken for machine defects (continued)
Phenomenon Cases not involving a machine defect Reference page
The signal cables are not correctly connected. ~
The MUTE function is working.VOLUME + - 23
The volume is adjusted to an extremely low level.
The AUDIO SOURCE/SPEAKER setting is not correct.57
The Sound checkbox is unchecked.LAN

104
Troubleshooting
Phenomena that may be easy to be mistaken for machine defects (continued)
Phenomenon Cases not involving a machine defect Reference page
The signal cables are not correctly connected. ~
The brightness is adjusted to an extremely low level. 38
The computer cannot detect the projector as a plug-and-play monitor. 10
The BLANK screen is displayed.BLANK 32
COMPUTER IN2 is set to MONITOR OUT.COMPUTER IN2 47
The projector does not recognize the USB storage device inserted into USB TYPE A port.
USB TYPE A12
The projector is not receiving a signal from the remote control. (frequency)
MHL STANDBY PWR. function is not working.

105
Troubleshooting
Phenomenon Cases not involving a machine defect Reference page
The FREEZE function is working.FREEZE 32
Color settings are not correctly adjusted.
45
COLOR SPACE setting is not suitable.45
The brightness and/or contrast are adjusted to an extremely low level. 38
The projector is operating in LONG LIFE mode or WHISPER mode. 52
The light source is approaching the end of its product lifetime.
When the internal temperature is high (even if the ambient temperature is lower than 35°C), the brightness of light source might be reduced automatically. 92
When the vertical frequency of the input signal is low,
37
Either the focus and/or horizontal phase settings are not properly adjusted.
FOCUS
The lens is dirty or misty.Caring for the lens 95
Phenomena that may be easy to be mistaken for machine defects (continued)

106
Troubleshooting
Phenomenon Cases not involving a machine defect Reference page
When the projector is operating in LONG LIFE mode or
52
The OVER SCAN ratio is too big. 42
Excessive VIDEO NR. 45
The FRAME LOCK function cannot work on the current input signal. 47
When LAN port is selected, some ports of the output may be missing due to signal processing delay.
USB TYPE B
The computer cannot start up in the current hardware
11
The SAVING/NETWORK(WOL) function is working.54
The COMMUNICATION TYPE for the CONTROL port is set to NETWORK BRIDGE. 73
The SAVING/NETWORK(WOL) function is working.54
The same network address is set for both wireless and wired LAN.
The NETWORK BRIDGE function is turned off.73
Phenomena that may be easy to be mistaken for machine defects (continued)
107
Phenomenon Cases not involving a machine defect Reference page
The SAVING/NETWORK(WOL) function is working.54
The internal clock has been reset.
POWER/STATUS1
Disconnect the LAN cable and check that the projector is working properly.
NOTE
Phenomena that may be easy to be mistaken for machine defects (continued)
Troubleshooting

108
End User License Agreement for the Product Software
User’s Manual (concise)
Trademark acknowledgment® ®
®
®


![Projector Digital X31/X36/X46 · 2012. 2. 9. · 3m™ digital projector x31/x36/x46 0 $oo 5ljkwv 5hvhuyhg apresentação $suhvhqwdomr 2 surmhfwru sursruflrqd okh xpd dpsod xwlol]domr](https://img.dokumen.tips/doc/110x75/5fdd7467f001f9350045f3d0/projector-digital-x31x36x46-2012-2-9-3ma-digital-projector-x31x36x46.jpg)