Embed Size (px)
Citation preview

High Flow Heated Respiratory Humidifier
Vincent Medical Manufacturing Co., Ltd
User Manual
Vincent Medical Manufacturing Co., Ltd.Flat/RM B2, 7/F., Hang Fung Industrial Building, Phase 2, 2G Hok Yuen Street, Hung Hom, Kowloon, Hong KongTel: +852 2365 5688Fax: +852 2765 8428
+852 2365 [email protected]
+852 2186 [email protected]

Thank you for purchasing the inspired™ O2FLO High Flow Heated Respiratory Humidi�er ( VUN-001).
The inspired™ O2FLO is a medical device. Please follow the instructions for use and intended use in this manual to ensure the device is used properly and in a safe manner.
Please keep this manual for future reference.
This manual and its corresponding intellectual property rights belong to Vincent Medical Manufacturing Co., Ltd. Without written consent, any individu-al or organization must not copy, modify, or translate any part of this manual.
P/N.: 10022560 Rev.E Release Date: 2020-12-03

1. Warnings and Cautions .................................................................................................. 1 1.1 Intended Use ........................................................................................................................................... 7
1.2 Product Features ................................................................................................................................ 7
2. inspired™ O2FLO Parts, Features and Speci�cation .... 82.1 inspired™ O2FLO Main Unit .............................................................................................. 8
2.2 Package Content ........................................................................................................................... 10
2.3 Optional Medical Accessories (Sold Separately) ............................. 10
2.4 Control Panel ...................................................................................................................................... 13
2.5 Speci�cation ........................................................................................................................................ 15
3. inspired™ O2FLO Operating Instruction ............................. 16
3.1 Preparation before Use ........................................................................................................ 16
3.2 Device Setup ....................................................................................................................................... 19
3.3 Humidi�cation Treatment ................................................................................................ 24
3.4 Settings Menu ................................................................................................................................... 24
3.5 Alarms ........................................................................................................................................................... 26
3.6 After Use .................................................................................................................................................... 30
3.7 Data Record Software ............................................................................................................ 31
4. Product Maintenance ...................................................................................................... 35
4.1 Filter Replacement ...................................................................................................................... 35
4.2 Main Unit Cleaning .................................................................................................................... 36
4.3 Temperature Probe Cleaning and Disinfection ................................. 36
4.4 Troubleshooting ............................................................................................................................. 37
4.5 Maintenance Statement ..................................................................................................... 38
4.6 Battery Information ................................................................................................................... 38
4.7 Main Unit Leakage Test ...................................................................................................... 39
5. EMC Information ........................................................................................................................ 40
5.1 Declaration - Electromagnetic Emissions .................................................. 40
5.2 Guidance & Declaration - Electromagnetic Immunity ............ 41
6. Use and Warranty Period ......................................................................................... 44
Contents
5.3 Guidance & Declaration -- Electromagnetic Immunity
Concerning Conducted RF & Radiated RF ................................................ 42
5.4 Recommended Separation Distances Between Portable
and Mobile RF Communications Equipment and the
Model VUN-001 ................................................................................................................................ 43

1. Warnings and Cautions
Read this manual before use. Keep this instruction manual available for future reference.
Please read the following carefully before use.The warning icons detailed below are intended to help the user to operate the device in a safe and correct manner and to prevent injuries to the user and others.The icons and their meanings are as follows.
Warning, Electricity
General Prohibition
General Mandatory
Warning; Flammable Material
Icon indicates caution (including warning and danger).
Icon indicates prohibited actions (what you cannot do).
Icon indicates something that is compulsory (must be observed at any time).
Icon indicates caution (including warning and danger).
Examples of Icons
21
Warnings
• The device is for use with spontaneously breathing patients and not for life support.• Continuous monitoring of blood oxygen concentration of the patient is required while using this device.• The device should only be operated by trained personnel under guidance of a physician.• The device should be located in a position where ventilation around the unit is not restricted. • This device can be used in desktop, pole-mounted and wall-mounted con�gurations. Please ensure that the device is not tilted at an angle greater than 10° from the horizontal plane. Failure to do so may cause the device to overbalance and/or may lead to water spilling out from the chamber.• This device must be installed with an air inlet �lter during use.• The air inlet �lter should be replaced at least once a month in single-patient use, and after every patient. Only approved �lters supplied by Vincent Medical should be used. • When the device is not in use, please place it in its original packaging to keep the air inlet and outlet clean.• The device should be maintained and serviced only by quali�ed or trained personnel.• When the device is used with a supply of oxygen, please pay attention to the following:—> Inspect the oxygen tube and ensure it is free of kinks.—> Keep device away from sources of ignition and/or open �ames. Do not smoke near the device.—> Oxygen concentration and �ow of delivered gas should only be determined by a physician or trained medical professional.—> Oxygen supply shall be standard dry and clean compressed oxygen for medical applications. The minimum oxygen concentration required is 99.5% . —> Adjust oxygen flow meter slowly.—> Do not turn up the oxygen supply until the device is running.—> Shut off the oxygen supply before turning off the device. • Oxygen leakage may cause serious accidents.—> If an oxygen leak is discovered, shut off the supply of oxygen and contact authorized personnel for repair.

• Do not apply excessive force to the device.• Do not drop or subject the device to strong impacts or shocks.• Avoid exposing the device to direct sunlight and/or high temperatures.• Do not allow children or infants to tamper with or operate the device.• Do not immerse the machine in liquid/water.• Do not use corrosive solvents to clean the surface of the device.• Do not use the device if it is not working properly. If an abnormality in device function is detected, stop using the device and have a quali�ed technician or engineer inspect the device before attempting to use it again.• Do not attempt to service the device while it is in use. Doing so may cause damage to the device or injury to patient and/or end user. • To prevent burns, do not touch the heater plate when the device is running and do not touch for 30min after running.• To prevent burns, do not continuously touch the bottom of the chamber for more than 1 minute when it is hot.• Do not use the device when room temperature is below 18°C or above 28°C.
• Do not use the power cord or the power plug if it is damaged, and do not plug the power cord into a loose electrical outlet/socket. Doing so may lead to electric shock.• Keep power cord away from heated or hot surfaces as this may damage the power cord. Use of a damaged power cord may lead to electric shock or serious device malfunction.• Do not plug the power plug into the electrical outlet with wet hands. Doing so may lead to electric shock.• Do not wash the machine with water, or splash water to the power source. Doing so may lead to electric shock or serious device malfunction.• If the machine is not being used for a long period of time, it is recommended that the device is unplugged/ disconnected from the electrical outlet. • To unplug the power plug from the electrical outlet, do not drag the power cord. Unplug by pulling the power plug. Dragging the power cord may lead to electric shock or serious device malfunction.• Be sure to turn o� the power and unplug the power plug from the electrical outlet before installing, moving, or servicing the device. Failure to do so may lead to electric shock or serious device malfunction. • Do not excessively stretch, bend or apply excessive force to cables and hoses.
NOTE: The device should be maintained and serviced only by quali�ed or trained personnel.
43
• The operator or responsible department should contact Vincent Medical or a Vincent Medical representative:—> for assistance, if needed, in setting up, using or maintaining the device, or;—> to report unexpected operation or events.• After using the device, store it away from pets and out of the reach of children. Keep the storage environment clean and free from dust.• Any liquid spilt or entering into the device may cause damage to the device or injury to patient and/or end user.• Ensure that the chamber is not tilted in any orientation to avoid water entering the breathing circuit.• Use sterile water bags for inhalation only. • The maximum surface temperature of the following parts (at ambient temperature of 28°C) are: Heated Breathing Circuit: 43°C; Applied Part (Nasal Cannula): 42.9°C; Stand-by Button: 59.8°C; Control Knob: 44.4°C; LCD Screen: 42.1°C.
• Do not use the device in the presence of a flammable anaesthetic mixture with air, oxygen or nitrous oxide. Doing so could lead to fire or explosion.• Do not use the device for any purpose other than what is specified in the manual. Doing so may cause damage to the device or injury to patient and/or end user.• Do not block or obstruct the air and oxygen inlets or the delivery gas outlet. Blockage or obstruction may lead to device malfunction and/or injury to patient and/or end user.• Do not use any parts or accessories other than those listed in this manual.• Do not place liquid containers on or near the top of the device.• Do not attempt to disassemble, repair or modify the unit. Doing so may cause damage to the device or injury to patient and/or end user.• To avoid contamination of the device, do not blow into the air inlet or outlet. • Do not fill water chamber beyond the maximum water level indicated on the chamber. Doing so may cause water to spill into the breathing circuit. If water level exceeds the maximum, please replace the chamber with a new one.• Do not fill the humidification chamber manually from the circuit port.• Do not pour water with a temperature of over 37°C or below 10°C into the chamber.• Do not kink or block the water supply tube.

Explanation of Symbols
Refer to instruction manual
Caution
Use by date
Fragile, handle with careThis way up
Keep away from sunlightKeep dry
Date of manufacture
Batch code
Serial No.
Safety Classification
• Type of protection against electric shocks: Class . • Degree of protection against electric shock: Type BF applied parts (Patients will come in direct contact with nasal cannula during treatment.)• Degree of protection against harmful ingress of particulate matter and water: . • Degree of safety of application in the presence of a flammable anaesthetic mixture with air or oxygen or nitrous oxide: Equipment is not suitable for use in the presence of a flammable anaesthetic mixture with air or oxygen or nitrous oxide.• Mode of operation: Continuous operation.
Environmental Conditions
This device should not be exposed to excessive vibration, dust, corrosive or explosive gases. During device operation it should be placed in a horizontal position. Suitable environmental conditions for operation are:—> Ambient temperature: 18 ~ 28°C;—> Relative humidity: 15% ~ 93% RH, non-condensing;—> Atmospheric pressure: 86 ~ 106kPa;—> Altitude: up to 2000m above sea level;—> Storage and transportation conditions: -20°C ~ 50°C, 15% ~ 93% RH, non-condensing, 86 ~ 106kPa.
Environmental Protection
At the end of service life, the device and its accessories should be disposed of and decom-missioned in accordance with local laws and regulations.Contact the appropriate local authorities to determine the proper method of disposal of potentially bio-hazardous parts and accessories.
II
Overview
The inspired™ O2FLO is a humidifier that delivers warmed and humidified respiratory gases to the patient via a flow generator with a flow rate from 2LPM to 60LPM. The gas delivered is composed of an air-oxygen mixture and is capable of delivering oxygen concentration from 21% to 95%.
Type BF Applied Part
Atmospheric pressure limitation
Class II equipment
Do not roll
Particulate matter and drip proof protection rating IP21 Alternating current
CE marking (EU only)Separate collection for EEE (EU only)
Humidity limitation Temperature limit
Caution, hot surfaces
5 6
Consult instructions for use
Non-sterile
Manufacturer
Do not re-use Do not use if package is damaged
Catalogue number
EU representative

2. inspired™ O2FLO Parts, Features and Speci�cationThe inspired™ O2FLO is intended to deliver warmed and humidified respiratory gases
to spontaneously breathing patients with a flow rate from 2LPM to 60LPM and is capable of providing high flow therapy. The device can be used in the emergency room, outpatient department, inpatient department and other diagnostic and treatment rooms. This device can also be used for homecare.
a. Dew Point Temperature ControlThis device allows the operator to set the dew point temperature from 31°C to 37°C and is equipped with highly sensitive temperature probes to monitor patient end tempera-ture. The device also has a number of temperature protection settings to ensure patient safety.
b. Oxygen Concentration Control This device can be used with an additional oxygen supply. The device accurately displays real-time oxygen concentration of gas mixture delivered. The user can control the oxygen concentration by adjusting the external oxygen valve. The upper and lower limits of oxygen concentration alarm is settable to ensure patient safety.
c. Flow Rate ControlThis device allows the operator to set the flow rate from 2LPM to 60LPM. The device monitors the flow rate with a built-in highly sensitive flow rate sensor.
d. Mode ControlThe device has two operating modes, namely Adult Mode and Paediatric Mode. The device will identify if the correct breathing circuit is being used (either Adult or Paediat-ric) to avoid misuse.
e. Display and Control Interface The device is equipped with a LCD display monitor and control knob to make the device easier to control, and to provide clear display of functions and data.
f. AlarmsThe device has an auditory alarm function to alert patient or end user when an alarm condition occurs. The auditory alarm is accompanied by indicator light and information displayed on the monitor.
1.1 Intended Use
2.1 inspired™ O2FLO Main Unit
1.2 Product Features
① ② ③
④⑤
⑥⑦
⑧
⑩
⑨
11
12 13 14
18
21
19
1516
17
20
7 8

10
①
②
③
④
⑤
⑥
⑦
⑧
⑩⑨
11
12
13
14
18
21
20
19
15
16
17
Stand-by Button
Name Function
Press and hold for 2 seconds to turn on or o� the inspired™ O2FLO.
Press Start/ Pause button to Start/ Pause the running.
Connect to mains power supply.
Couple with the Bracket Base, to mount the device onto the pole or wall.Heat the water in the chamber.
Fit the chamber to the right position.
Air-oxygen mixture outlet, connect to the chamber inlet.
Connect to Temperature Probe.
Connect to Heater Connection Cable.
Connect to SD card.
Connect to oxygen supply with oxygen tube.
Secure the �lter in place.
Filter the air taken in.
Control Knob
LCD Display
Status LED
Power Cord
Heater Plate
Chamber Lock
Annular Tube
SD Card Slot
Oxygen Inlet Port
Filter Cover
Filter
Temperature Probe
Heater Connection Cable
Temperature Probe Port (Blue)Heater Connection
Cable Port (Red)
Water Level Sensor and Chamber Sensor
Start/ Pause Button
No.
a. Rotate clockwise or counter-clockwise to highlight settings.b. Press the knob to select the highlighted settingsc. When alarm is active, press the knob to mute the alarm audio for 120 seconds. Press again to recover alarm audio.
a. Green (�ashing): Device is connected to mains power, but is not turned on. b. Green (continuous): Normal operation. c. Yellow (�ashing): Medium Priority Alarm. d. Red (�ashing): High Priority Alarm.
2.8-inch LCD display. Automatically enters the screen saver mode if there is no operation for 10 min.
Detect water level and presence of chamber, to provide water level alarm and chamber uninstalled alarm.
To detect the chamber outlet temperature, patient end temperature and ambient temperature when used 510-090/510-091 Heated Breathing Circuit.For connection between device and 510-049/510-050 Integrated Heated Breathing Circuit.To be screwed onto pole or wall where the inspired™ O2FLOis to be mounted.
For connection between device and 510-090/510-091 Heated Breathing Circuit.
Bracket Base
9
2.2 Package Content
2.3 Optional Medical Accessories (Sold Separately)
inspired™ O2FLO
Heater Connection Cable
Temperature Probe (VUN-200)
Bracket Base
Filter
Oxygen Tube
User Manual
Quick Guide
VUN-300 Connection Cable
Item Unit
1 PC
1 PC
1 PC
1 PC
5x5 PCS
1 PC
1 PC
1 PC
1 PC
VHC60 AutofeedHumidi�cation
Chamber
Heater Connection
Cable
Filter
Oxygen Tube
HC & HU
HC & HU
HC & HU
HC & HU
14 days
N/A
1 month
N/A
Yes
No
No
No
Product NameDrawing & Product Name P/N HC/HU
MaximumPeriod of Use
SingleUse
51006488 (JP)51006136
(US/EU/UK)
51007929 (JP)51006741
(US/EU/UK)
51006764
51006736
HC & HU
HC & HU
500 times
14 days
No
Yes
51006737
51006729
VUN-200 Temperature Probe(Used for 510-090 and 510-091)
510-090 Adult Heated Breathing Circuit
Bracket
Connection Cable

11 12
HC & HU
HC & HU
HC & HU
HC & HU
14 days
14 days
14 days
500 times
Yes
Yes
Yes
No
Drawing & Product Name P/N HC/HUMaximum
Period of Use
SingleUse
51006728
51006765
51006766
51006767
510-091 Paediatric Heated Breathing Circuit
Nasal Cannula (Adult)VANC-01(S)VANC-02 (M)VANC-03 (L)
51006704 (JP)51006705 (JP)51006706 (JP)51006177 (EU)51006178 (EU)51006179 (EU)
51005447 (EU)51005243 (EU)51005244 (EU)51005245 (EU)
HC & HU
14 daysfor HU
30 daysfor HC
Yes
Nasal Cannula (Infant)VINC-01 (S)VINC-02 (M)VINC-03 (L)VINC-04 (XL)
HU 7 days Yes
510-049 Adult Integrated Heated Breathing Circuit
510-050 Paediatric Integrated Heated Breathing Circuit
VUN-300 Connection Cable(Used for 510-049 and 510-050)
Remark: Home Care (HC), Hospital Use (HU).
HC & HU
HC & HU
HC & HU
HC & HU
14 days
14 days
14 days
14 days
Yes
Yes
Yes
Yes
Drawing & Product Name P/N HC/HUMaximum
Period of Use
SingleUse
51007895
51007896
51007893
51007894
Heated Breathing Circuit Kit (3PIN Adult)511-090-C60
Heated Breathing Circuit Kit (3PIN Pediatric)511-091-C60
Heated Breathing Circuit Kit (6PIN Adult)511-049-C60
Heated Breathing Circuit Kit (6PIN Pediatric)511-050-C60

13 14
2.4 Control Panel
Name FunctionIcon
Icons
a. Green (�ashing): Device is connected to mains power, but is not turned on. b. Green (continuous): Normal operation. c. Yellow (�ashing): Medium Priority alarm. d. Red (�ashing): High Priority alarm.
a. Rotate clockwise or counter-clockwise to highlight settings.b. Press the control knob to select highlighted setting.c. When alarm is active, press the control knob to mute the alarm audio for 120 seconds. Press again to recover alarm audio.
Status LED
Stand-by Button
Control Knob
LCD Display
Start/ PauseButton
Press and hold for 2 seconds to turn the device on or o�.
Press Start/ Pause button to start the device or to pause it while running.
Screen saver will be displayed after 10 minute if no user operation is detected.
Select to run in Adult Mode. Adult breathing circuit and adult high �ow nasal cannula must be used in Adult Mode.
Select to run in Paediatric Mode. Paediatric breathing circuit and paediatric high �ow nasal cannula must be used in Paediatric Mode.
Display oxygen concentration and select to set oxygen concentration alarm limits.
Select to set Dew Point Temperature at patient end.
When the alarm audio is muted, icon will be displayed as
Icon indicates SD card is inserted.When SD card is not inserted, icon will be displayed as
Select to set Flow Rate.
Select to set language, time, alarm volume and to display device information and alarm history.
Select to return to previous page.
Select to Lock/Unlock settings change.Lock/Unlock
Adult Mode
OxygenConcentration
Dew PointTemperature
Flow Rate
AlarmControl Knob
Paediatric Mode
SD Card
Setting
Back
Status LED
LCD Display
Start/PauseStand-by
9518
L/
Run time 00 00 00 00D H M S

3.1 Preparation before Use
3. inspired™ O2FLO Operating Instruction
15 16
2.5 Specification
Power Input
Power
Flow Rate Range (Adult Mode)
Flow Rate Range (Paediatric Mode)
Oxygen Concentration Accuracy
Working Pressure
Dew Point Temperature Range (Adult Mode)
Dew Point Temperature Range (Paediatric Mode)
Humidi�cation Output
Sound Pressure Level
Dimensions
Net Weight
Expected Service Life of the Unit
100-240V , 50/60Hz
300VA
10~60L/min
2~25L/min
±5%
30~80 psi (0.2Mpa~0.55Mpa)
31~37°C, ±2°C
31~34°C, ±2°C
>33mg/L @ 37°C ; >12mg/L @ 31~36°C
≤50 dB(A)
243mm x 220mm x 170mm
2.8±0.2kg
5 years
1) Install the autofeed humidification chamber by pressing down the chamber lock and sliding the chamber into position sitting on the heater plate. Once the chamber is in the correct position, the chamber lock will click into place with the chamber inlet connecting directly into the annular tube of the machine.
2) Connect water bagPush the spike at the end of water supply tube into the port at the bottom of the bag. Open the vent cap on the side of the spike. Hang the water bag above the unit. The chamber will be automatically filled to the required level and maintain at that level. Note: The unit will beep and the status LED will flash in yellow if there is insufficient water in the chamber. In this situation, check and make sure that the water supply tube is free of kinks and that there is sufficient water in the water bag. Replace as necessary if a kink is found or the water bag is empty.
L/min
hrs
2
340
5
136
10
68
15
46
20
34
25
27
30
22
35
19
40
17
45
15
50
14
55
12
60
11
VHC60: Flow setting vs Typical usage time (2 liter sterile water bag).

17 18
3) Connect Heated Breathing Circuit to the chamber.4) Connect the heater connection cable and Temperature probe as indicated. • Blue Port – Temperature Probe • Red Port – Heater connection cableNOTE:• Do not allow the heated breathing circuit to come into direct contact with the patient’s skin for prolonged periods of time. • Do not use any accessory which is not recommended by Vincent Medical in this manual.If an integrated heated circuit with integrated temperature probe is used, VUN-300 Connection Cable shall be used in place of Heater Connection Cable and VUN-200 Temperature Probe. The connection is shown as below:
5) Select patient interfaceThe following table shows the dew point temperature and flow settings associated with the relevant patient interfaces. Select the correct patient interfaces as per the guidance of physician or healthcare professional.
Patient Interface
Nasal Cannula(Infant)
VINC-01 (S)VINC-02 (M)VINC-03 (L)
VINC-04 (XL)
VANC-01 (S)VANC-02 (M)VANC-03 (L)
31~3431~3431~3431~34
2~82~8
2~102~10
31~3731~3731~37
10~5010~6010~60
Nasal Cannula(Adult)
Model Dew Point Temperature (°C) Flow Rate (L/min)
* In low ambient temperature conditions, the dew point temperature may not reach 37°C when the flow is high. User is advised to reduce the target flow setting to achieve the desired dew point temperature.
Warning: The patient interfaces are all single use products. Do not reuse or use in multiple patients as this may lead to cross-contamination. The patient interfaces must be changed frequently to avoid infection.
Warning: • Replace chamber if water fill exceeds maximun level.• Disconnect water supply when machine is not running.• Do not use tap water, saline water or glucose water. Use sterile water for inhalation only.• Do not fill water through chamber outlet.• Do not tilt machine.• Do not use chamber for more than 14 days.• The chamber are all single use products. Do not reuse or use in mutiple patients.
SD card slotOxygen inlet port
Oxygen tube
Flowmeter
Heaterconnectioncable port (red)
Heaterconnectioncable
Temperatureprobe port (blue)
Temperature probe
Autofeed humidi�cation chamber
STERILEWATER
Water Bag
STERILEWATER

19 20
9518
L/
Run time 00 00 00 18D H M S
3.2 Device Setup
3) The time setting page will appear when it is the first time the inspired™ O2FLO starts or after the replacement of internal battery. After setting the date and time, rotate the control knob to select “Save” and press control knob to continue.
4) The screen will show the main control interface. The default operating mode is Adult Mode.
During self-test, check that the following functions are working properly: - The status LED lights up in red, green and yellow sequentially.- The screen displays the Logo and device information.- The device generates a beep.
1) Plug in the power cord. 2) Press and hold the power button for 2 seconds to start the inspired™ O2FLO. The screen will display the Logo and device information (device name, model, software version, serial number, date and time), and the system will start self-test.
5) Parameter SettingStep 1: Rotate the control knob to highlight the lock icon . Press control knob to unlock .Step 2: Rotate the control knob to highlight the mode icon . Press the control knob. The icon will appear as yellow . Rotate the control knob to select Paediatric Mode , then press the control knob to confirm. The icon will then appear as green . If the control knob is not pressed within 10 seconds to confirm the change, the system will return to its previous settings.Step 3: Use the control knob in a similar manner to set the Dew Point Temperature (31- 37°C), the target Flow (2-60 L/min) and the Oxygen Concentration alarm upper limit O2 (default 95%) and lower limit O2 (default 18%).
Date: 2000-01-01Time: 00:00:00
Save
9518
L/
Run time 00 00 00 00D H M S
9518
9518
9518
L/
Run time 00 00 00 18D H M S
Stop running?
Yes No
9518
L/
Run time 00 00 00 00D H M S
High Flow HeatedRespiratory Humidifier
6) Press the Start/Pause Button to start running. The real-time dew point temperature, flow rate and oxygen concentration will be shown on the screen. The 4 icons of settings will become blue in running.
7) To stop running, press the Start/Pause Button. If oxygen concentration is lower than 25%, this window will appear, select “Yes” and press the control knob to stop, or rotate the control knob to select “No” and press the control knob to continue.
* When the unit stops running, the run time will stop and reset to zero.

21 22
2468
101520304050
60 4773
416080
37526884
3242526373
293745526180
27344046536884
26303742476174
2630343944556689
2529333741506080
252831353947567491
242730343745536884
24273032354350647893
24262931344147617487
Flow to Patient(L/min)
Flow-meter(L/min) O2%
4 6 8 10 15 20 25 30 35 40 45 50 55 60If oxygen supply has not been turned off and oxygen concentration is higher than 25%, a window will appear. User must discontinue oxygen supply before stopping the device from running.
WarningContinuous oxygen concentration monitoring is recommended for patients who require increased oxygen concentration to ensure that the correct oxygen supply is provided and suitable blood oxygen saturations are achieved as prescribed.This device is designed with a connector for pure oxygen. Use of any other gas or mixture of gases will prevent the device from functioning correctly.
. Keep device away from sources of ignition and/or open �ames. Do not smoke near the device.. Oxygen concentration and �ow of delivered gas should only be determined by a physician or trained medical professional.. Oxygen supply shall be standard dry and clean compressed oxygen for medical applications. . Shut o� the oxygen supply before turning o� the device. . Before turning on the oxygen supply, run the device to ensure target �ow rate can be reached. Only turn on the oxygen supply when the device is running.• Oxygen leakage may cause serious accidents.. If an oxygen leak is discovered, shut o� the supply of oxygen and contact authorized personnel for repair. Inspect the oxygen tube and ensure it is free of folds or kinks.
8) Adjusting oxygen concentration levels Connect the oxygen tube between the �owmeter (connected to oxygen supply) and the oxygen inlet port at the right side of the unit. Push the oxygen tube �rmly into this port to ensure a secure connection.
Adjust the oxygen flow while monitoring the oxygen concentration shown on the screen. Refer to the table next page to achieve the target O2%.
* The �owmeter shall be capable of delivering oxygen �ow up to 60LPM, otherwise the oxygen concentration under high �ow setting would be limited to low levels.
9518
L/
Run time 00 00 00 15D H M S
STERILEWATER
9518
L/
Run time 00 00 00 15D H M S
Ensure oxygen isnot flowing
FiO2: 54%OK
Attention: When oxygen supply is not connected to the device, please keep the cap of the oxygen inlet port closed.

23 24
Step 5: Follow the steps 1~3 to change dew point temperature or oxygen concentration alarm limits.If no action has been made for 10 minutes, the device will enter screen saver mode and show the real-time flow rate, dew point temperature and oxygen concetration.
Run time: 00 00 00 55D H M S
When the unit stops, rotate the control knob to highlight the settings icon .Press the control knob to bring up the settings menu.
If there is no operation for 10 seconds, the system will return to the main control interface.
3.4 Settings Menu
9518
L/
Info
Language
History
Time
3.3 Humidification TreatmentConnect the patient interface (nasal cannula) to the heated breathing circuit/integrated heated circuit. Read the separate user instructions for the exact patient interface that will be used, including all warnings. Warning: Do not bend the breathing circuit or block the patient interface. Warning: Note that oxygen concentration above 95% will be displayed as 100%. In this situation, the oxygen reading will flash in red and the device will alarm. Warning: Note that oxygen concentration below and equal 25% will be displayed as 21%.
2931
21
9518
L/
Run time 00 00 00 10D H M S
9) Adjusting settings during operation. When the unit is running, “Dew Point Temperature”, “Flow Rate”, “Oxygen Concentration Alarm Upper Limit”, and “Oxygen Concentration Alarm Lower Limit” can be adjusted. The mode (adult/ paediatric) cannot be changed.Step 1: Rotate the control knob to highlight the lock icon . Press control knob to unlock .Step 2: Rotate the control knob to highlight the parameter value (green).
9518
L/
Run time 00 00 00 15D H M S
9518
L/
Run time 00 00 00 25D H M S
Step 3: Press the control knob to enter adjustment mode (yellow).
Step 4: Rotate the control knob to adjust the parameter, then press the control knob to confirm (green). If the control knob is not pressed within 10 seconds after adjustment, the changes made will be discarded, and the system will continue to run with current settings.

25 26
• Time SettingSelect and highlight “Time”. Press the control knob to enter the time settings page. Set time Y-M-D-H-M-S.
• Choose LanguageSelect and highlight “Language”. Press the control knob to enter the language selection page, and select the desired language.
• HistorySelect and highlight “History”. Press the control knob to enter the history page.Select “Events” or “Alarm History” from this page. Press the control knob to view the corresponding item.
English
Date: 2000-01-01Time: 00:00:00
Time Setting
日本語 中文
Events
Alarm History
01. Circuit failure/data cable uninstalled 2019-08-09 16:0202. Lack of water 2019-08-08 15:0603. System Failure 2019-08-08 10:35
1/34
2019-08-09 16:02
2019-08-08 15:06
2019-08-08 10:26
37 ˚C 60L/min 18% 95%
37 ˚C 40L/min 18% 95%
34˚C 60L/min 18% 95%
01.
02.
03.
1/16
In Events page, up to 100 most recent records of change in settings or operating status can be retrieved.
In Alarm History page, up to 100 most recent alarm records can be retrieved.
3.5 Alarms
The inspired™ O2FLO is equipped with alarm indicator light, auditory alarm signal and on-screen information signal to warn about interruptions to patient treatment. When an alarm is triggered, the status LED flashes in red or yellow, and an audible alarm will sound. Information describing the alarm will appear on the LCD.
Warning: This alarm system provides the user with the option of adjusting the volume of alarms. If the alarm volume is set too low, the user may not hear it due to high ambient noise level.
• Device InformationSelect and highlight “Info”. Press the control knob to show device information including serial number, model number and software version.
• Volume ControlRotate the control knob to highlight the volume icon, press the control knob to select. Rotate the control knob to adjust the volume setting, then press control knob to confirm.
Warning: Do not set alarm volume too low when background noise is high!
9518
L/
Run time 00 00 00 25D H M S
Incompatible circuit type
Info
Language
History
Time
High Flow HeatedRespiratory Humidifier

27 28
• Alarm Alert List
No. AlarmPriority
AlarmInformation
1 <5sYes
Yes
Yes
NO
Yes
<10s
<5s
<25s
2
3
4
Delays ActionSilenceAbleMeaning
Overheat
Lack of water
Systemfailure (E#)
Checkchamber
High
Medium
Medium
Medium
The dew point temperature exceeds 43°C.
Press the pause button to stop the unit running. Wait for a few minutes before restarting the unit. Check the breathing circuit and patient interface for blockage. Do not change settings or pause too often, especially from high temp. to low temp. and from high �ow to low �ow.
5
6
<5s
Yes
Temp. probe
uninstalled/failure
MediumTemperature Probe is not installed properly or has failed.
<5sCheck heater
wireMedium
The heater connec-tion cable is not installed properly.
Replace a new temp. probe/heater wire/ heated breathing circuit.Turn o� the unit and then restart. If the error still exists, mark down the fault code and contact VM or your supplier.
Use the speci�ed chamber and install the chamber correctly into place.
Replace with new water bag with sterile water.
Install the temperature probe correctly or replace it with a new one. Replace a new Heated breathing circuit.
Check if the heater connection cable is connected correctly.Replace with a new Heated Breathing Circuit.Replace with a new Heater connection cable.
Yes7 <5sMediumCircuit Failure/data cable uninstalled
The VUN-300 connec-tion cable is not installed to circuit or the intergrated heated circuit has failed.
Check if the VUN-300 connec-tion cable is connected correctly.Replace with a new intergrated heated circuit.Replace with a new VUN-300 Connection cable.Restart the device. If the problem persists, please contact Vincent medical or your Vincent medical supplier.
Using wrong chamber or the chamber is not installed properly.
The chamber water level is lower than the center of prism.
E1 Oxygen concentra-tion transducer failure;E2 Flow sensor failure; E4 Heater plate temp. sensor failure; E5 Cooling fan failure; E6 Turbine fan failure; E8 Heater plate open circuit;E9 Memory failure.
Yes8 <15sMedium
Adult Mode selected when peadiatric integrated heated breathing circuit is connected, or vice versa.
Check if the breathing circuit matches with the selected mode.
9 <30sYesCheck for blockages
MediumThe �ow rate is lower than 50% of the target �ow.
Check the breathing circuit and the patient interface for blockage.Adjust the �ow of oxygen from the oxygen supply.Restart the device. If the problem persists, please contact Vincent Medical or your Vincent Medical supplier.
The real-time �ow is beyond �ow speci�ca-tion requirement.The oxygen �ow rate is higher than target �ow rate.
10 Adjust the �ow of oxygen from the oxygen supply.
The oxygen concentra-tion is higher than the upper alarm limit.
<20sYesOxygen too high
Medium
Check if the oxygen gas pathway is blocked or oxygen source is correctly connected.Adjust the �ow of oxygen from the oxygen supply.Oxygen gas path is blocked. Please repair device.
Oxygen too low or oxygen cannot reach 90%.
11 <20sYesOxygen too low
Medium
12 <30sYesFlow out of range
Medium
No.Alarm
PriorityAlarm
InformationDelays Action
SilenceAble
Meaning
Incompatible circuit type
Check the patient interface or breathing circuit if it is bent, kinked or blocked.If the inner gas pathway is blocked, contact the profes-sional maintenance personnel.Unspeci�ed cannula. Please replace with Vincent Medical speci�ed cannula listed on page 11 of this User Manual.Restart the device. If the problem persists, please contact Vincent medical or your Vincent medical supplier.

29 30
• Alarm muteWhen the device alarms, press the control knob to mute the alarm for maximum 120s. Press the control knob again to unmute the alarm.
* This device can record up to 10,000 alarm history records. If necessary, please contact Vincent Medical or your local supplier to obtain the data record software to read the alarm history.
* When the alarm occurs, please follow the action in Alarm Alert List and Troubleshooting to clear the alarm.
• Checking alarm system functionalityThe functionality of the alarm system can be checked during self-test when the device is starting up. Please refer to 3.2 Device Setup.
L/
Run time 00 00 00 05D H M S
9518
Incompatible circuit type
3.6 After UseAfter use, press Stand-by button to shutdown. Ensure that oxygen supply is shut off. If oxygen is flowing or if oxygen concentration is higher than 25%, the window below will appear.
If oxygen concentration is lower than 25%, the device will enter the cooling down mode for blowing and cooling down the heater plate. After cooling down, the device will shutdown; or press and hold standby button for 2 seconds to shutdown.
Disconnect the power plug from the mains power.
If the unit is unplugged when it is running, the “power out” auditory indication will be activated and will sound for more than 120 seconds. If the power cord is plugged back into the power supply within 2 minutes, the unit will resume running normally.
Ensure oxygen isnot flowing
FiO2: 54%
Insert the SD card properly.While in operation, the SD card is pulled out.
<5sYes15 SD card uninstalled
Medium
After warm up, temp. probe out from probe port for more than 30s.
<30sYes14 Temp. probeout
Medium
Insert the Temp. probe to the sensor hole properly.The ambient temperature is too low .Integrated circuit failure. Please replace with new integrated circuit.
No.Alarm
PriorityAlarm
InformationDelays Action
SilenceAble
Meaning
If the dew point temp. is 2°C below the target temp., decrease the target �ow rate. Adjust the ambient temp. by air condition if necessary. If the dew point temp. is 2°C above the target temp., allow a few minutes for the unit to cool down.Restart the device. If the problem persists, please contact Vincent Medical or your Vincent Medical supplier.
After warm up, the chamber outlet dew point temperature is 2°C higher or lower than the target temperature.
<30minYes13Temp. out of range Medium

31 32
Insert the SD card into a computer and install the inspired™ O2FLO Data Reader.exe software. Then run the Vincent Medical Data Record software .
The SD card in the SD card slot allows real time usage data of the machine to be recorded. The SD card can be removed by pressing the SD card in. It will then spring out.
Set
Time Setting
Patient Info
Name: N/A
N/A
N/A
N/A
Age:
Gender:
Phone No.:
Start DateEquipment Info
Time Period
Model No.: SN:
NA NA
Soft ver.:
End Date
Help
Patient Info.
Name: NA Height:
Age: NA
NA
NA
Gender: NA
Phone No.: NA
Address: NA
Weight:
Generate Report
Edit
Usage Time Alarm Info Work InfoDetail Charts
LanguageImport dataExport data
Select startdate or
end date
Edit patientinformation
2018-11-07
2018-11-07
Generate a PDF report
To begin, select “Set”-> “Import Data”, then a folder select dialog will pop up. Find the SD Card data folder “VM_VUN”. After importing data, the time setting function will be activated. The longest time span is 60 days.
Basic Info.
3.7 Data Record Software
After finishing editing, Patient Info entered will be shown.
Set
Time Setting
Patient Info
Name: N/A
N/A
N/A
N/A
Age:
Gender:
Phone No.:
Start DateEquipment Info
Time Period
Model No.: VUN-001 SN: 170000234
2018/11/01 2018/12/31
Soft ver.: X.X.X
End Date
Help
Patient Info
Name: NA Height:
Age: NA
NA
NA
Gender: NA
Phone No.: NA
Address: NA
Weight:
Generate Report
Edit
Usage Time Alarm Info Work InfoDetail Charts
2018-11-07
2018-11-07
ok
Height:
Gender: male female
Age:
Name:
CM
KGWeight:
Phone No.:
Address:
cancel
Patient Info
Name: Nancy
28
female
13200000000
Age:
Gender:
Phone No.:
Patient Info
Name: Nancy Height:
Age: 28
175
70
Gender: female
Phone No.: 13200000000
Address: China
Weight:
Generate Report
Edit
Basic Info.
Edit patient information. Name, age and gender are required.

33 34
For the alarm information and work information, user can export data to .csv file. After exporting data, you will get two .csv files: “SN_Alarm.csv” and “SN_WorkData.csv”, where “SN” is the 10-digit serial number of the device. To generate report, click “Generate Report” button.
Usage Time Alarm Info Work InfoDetail Charts
Patient Info
Name: Nancy
28
female
13200000000
Age:
Gender:
Phone No.:
Patient Info
Name: Nancy Height:
Age: 28
175
70
Gender: female
Phone No.: 13200000000
Address: China
Weight:
Generate Report
Edit
An example of Usage Time Chart is shown below.
Basic Info.
00:00
11-01 11-05 11-09 11-13 11-17 11-2111-03 11-07 11-11 11-15 11-19 11-23
03:0006:0009:0012:0015:0018:0021:0000:00
Usage Time
Detail Charts include: “Dewpoint Temperature”, “Flow” and “Oxygen Concentration”.
Usage Time Alarm Info Work InfoDetail ChartsBasic Info.Flow
Oxygen Concentration
20172018
01
02
01
0302
04050607
0908
10111213
1514
16171819
2120
22232425
2726
28293031
03040506
00:00
908070605040302010
0
01-16 01-16 01-16 01-16 01-16 01-1601:00 02:00 03:00 04:00 05:00
00:00
5040302010
0
01-16 01-16 01-16 01-16 01-16 01-1601:00 02:00 03:00 04:00 05:00
Dewpoint Temperature
00:00
8064483216
0
01-16 01-16 01-16 01-16 01-16 01-1601:00 02:00 03:00 04:00 05:00
Alarm Information and work informationNote: A warning will be displayed on the LCD screen when the log becomes full.
This will generate a report with a file name like “patient name_phone No.pdf”.
Set
Start Setting
Patient Info
Name: N/A
N/A
N/A
N/A
Age:
Gender:
Phone No.:
Start Date
End Date
Help
Edit
Usage Time Alarm Info Work InfoDetail Charts
2018-11-07
2018-11-07
Basic Info.
Top Page Prew Page Next Page End Page1/1788 Jump to:
No.
1
2
3
4
5
6
7
8
9
10
11
12
13
14
15
16
17
Set Adult or Paediatric
adult
adult
adult
adult
adult
adult
adult
adult
adult
adult
adult
adult
adult
adult
adult
adult
adult
Flow
60
60
60
60
60
61
60
60
60
60
60
60
61
60
60
60
60
Oxygen Concentration
34
31
33
30
30
34
32
31
32
34
33
31
33
30
33
30
31
Dewpoint Temperature
37
37
37
37
37
37
37
37
37
37
37
37
37
37
37
37
37
Date
2017-11-01 00:00:00
2017-11-01 00:01:00
2017-11-01 00:02:00
2017-11-01 00:03:00
2017-11-01 00:04:00
2017-11-01 00:05:00
2017-11-01 00:06:00
2017-11-01 00:07:00
2017-11-01 00:08:00
2017-11-01 00:09:00
2017-11-01 00:10:00
2017-11-01 00:11:00
2017-11-01 00:12:00
2017-11-01 00:13:00
2017-11-01 00:14:00
2017-11-01 00:15:00
2017-11-01 00:16:00

35 36
4.2 Main Unit Cleaning
4.3 Temperature Probe Cleaning and Disinfection
4.1 Filter Replacement
4. Product Maintenance
The device should be properly maintained throughout its expected service life. Visual inspection should be conducted on heater plate, temperature probe, power cord and all accessories in use, on a regular monthly basis, by trained technical personnel familiar with the technical performance of the inspired™ O2FLO. If necessary, damaged parts should be replaced. Check that the filter is clean before using the device.
Warning: Ensure that the device is powered off and disconnected from power supply before any cleaning or maintenance. Warning: When the device is not in use, please keep the inlets clean, and store the device in its original packaging.
The air inlet has a filter which needs to be replaced at least once a month. Once discoloration appears, we would recommend the filter to be changed immediately. The filter should be replaced every 30 days for single-patient use, or after every patient.The replacement steps are as follows:
a. Rotate counter-clockwise to open the filter cover.b. Remove the filter.c. Clean the filter cover with fresh water.d. Dry the filter cover and filter enclosure with a clean, dry cloth.e. Replace the old filter with a new filter. f. Rotate clockwise to close the filter cover.
* Before installing the filter, ensure that the filter is in good condition without defects.
Clean main unit, heater connection cable and VUN-300 connection cable with 75% ethanol solvent to wipe the surface of equipment. Warning: Do not immerse the main unit in liquid. Warning: Do not use corrosive solvents to clean the surface of the main unit.
This section only applies to VUN-200 Temperature Probe. Please refer to section 4.2 for the cleaning of Heater Connection Cable and VUN-300 Connection Cable.a. Rinse the temperature probe in clean water and a mild non-abrasive detergent, and remove any dirt with a soft brush.b. Flush the temperature probe with water.
Warning: Do not immerse the probe connector, which connects to the main unit, in any liquid when washing and soaking the temperature probe.
c. Dry the temperature probe with a clean, dry cloth. d. Soak for 3 minutes with 75% ethanol.e. Dry the temperature probe with a clean lint free cloth. f. Pack the temperature probe in clean plastic bag.* The 75% ethanol disinfection solution can be replaced by following disinfectants:1. Health Essence Disinfecting Effervescent Tablets2. CIDEX OPA* Follow the instructions supplied by the manufacturer of the disinfectant.
*

37 38
4.4 Troubleshooting
Possible Cause RemediationSymptom
Power plug is not plugged into the electrical outlet securely.
Plug the power plug into the electrical outlet correctly.
Equipment failure.
The gas path is blocked, the circuit is bent or patient interface is blocked.
Equipment failure, the blouer or the flow sensor is failure.
Contact professional maintenance personnel.
Check the patient interface and breathing circuit.
Contact professional maintenance personnel.
The check valves are damaged.
The breathing circuit and patient interface are not connected properly.
The oxygen flow from the oxygen flow meter is lower than the requirement (60LPM).
Contact professional maintenance personnel.
Check the patient interface and breathing circuit.
Equipment failure.Contact professional maintenance personnel.
Use an oxygen flow meter that can deliver oxygen flow up to 60LPM.
The LED does not illuminate
No gas is delivered when the device is running
Leakage sound
Oxygen concentration is limited to low levels
4.5 Maintenance Statement
For any repair or change of components, please contact Vincent Medical or your local authorized supplier. Vincent Medical will provide device related documents to assist service personnel in parts repair.Installers and operators must follow the instructions of installation, operation, inspec-tion and maintenance. They must be authorized by Vincent Medical. Inspections and maintenance must be performed in accordance with the recommend-ed schedule. In any of the following circumstances, Vincent Medical will not be respon-sible for the safety and reliability of the device performance:* Modifying, or repairing the machines without any authority from Vincent Medical* Unauthorized components are used* Electrical power source is not compatible with local regulations* Use of device is not in accordance with the instruction manual
It is recommended that users obtain the following information before performing maintenance or repairs:* Nature and scope of maintenance or repairs conducted* Changes in the scope of maintenance* Maintenance date* Name of staff or company providing the maintenance service* Signature from the Maintenance operator
4.6 Battery Information
One 3V Lithium/manganese dioxide battery is built into the device to power the clock. Only trained personnel should conduct battery replacement. Incorrect replacement would result in a hazard.
The temperature probe can withstand about 500 cycles of cleaning and disinfec-tion. If the temperature probe fails, the “Temp. probe uninstalled/failure” alarm will be activated when it is connected to the device. In this situation, the tempera-ture probe should be replaced.

5.1 Declaration - Electromagnetic Emissions
5. EMC Information
The electromagnetic compatibility (EMC) of the inspired™ O2FLO is designed according to Medical Electrical Equipment Part 1-2 General requirement on safety (IEC60601-1-2), Collateral Standard: Requirements and Tests for Electromagnetic Compatibility and the device complied with the requirements. In certain circumstances, the unit may affect or be affected by nearby equipment due to the effects of electromagnetic interference. If this should happen, move the unit or the location of the unit causing interference, or alternatively consult your homecare provider.
Guidance and Manufacturer’s Declaration - Electromagnetic Emissions
Emissions test Compliance Electromagnetic environment - guidance
The model VUN-001 is intended for use in the electromagnetic environment specified below. The customer or the user of the model VUN-001 should assure that it is used in such an environment.
RF emissions CISPR 11
Harmonic emissions IEC 61000-3-2
Voltage fluctuations/ flicker emissions IEC 61000-3-3
The model VUN-001 uses RF energy only for its internal function. Therefore, its RF emissions are very low and are not likely to cause any interference in nearby electronic equipment.
The model VUN-001 is suitable for used in domestic establishment and in establishment directly connected to a low voltage power supply network which supplies buildings used for domestic purposes.
Group 1
Class B
Class A
Complies
RF emissions CISPR 11
39 40
4.7 Main Unit Leakage TestInstall a VHC60 chamber to the device. Connect the spike to a water bag. Tightly cover the chamber outlet with cap. Run the machine ensuring no gas is escaping through the chamber outlet. The stable flow rate displayed on screen should be less than 1 L/min for at least 30s. If the flow rate is higher than 1 L/min your device may have a leak in the gas path. Please contact Vincent Medical, your Vincent Medical supplier or authorized personnel for repair.
STERILEWATER
5.2 Guidance & Declaration - Electromagnetic Immunity
Guidance & Declaration - Electromagnetic Immunity
Immunity test IEC 60601test level
Compliancelevel
Electromagnetic environment -guidance
The model VUN-001 is intended for use in the electromagnetic environment specified below. The customer or the user of the model VUN-001 should assure that it is used in such an environment.
Electrostatic discharge (ESD)lEC 61000-4-2
±8kV contact±2kV, ±4kV, ±8kV, ±15kV air
±8kV contact±2kV, ±4kV, ±8kV, ±15kV air
Floors should be wood, concrete or ceramic tile. If floors are covered with synthetic material, the relative humidity should be at least 30%.
±2kV for power supply lines±1kV for Input/output lines
±2kV for power supply lines
Mains power quality should be that of a typical commercial or hospital environment.
±0.5kV, ±1kV line to line±0.5kV, ±1kV, ±2kV line to earth
±0.5kV, ±1kV line to line
Mains power quality should be that of a typical commercial or hospital environment.
Power frequency magnetic fields should be at levels characteristic of a typical location in a typical commercial or hospital environ-ment.
<5% UT
(>95% dip in UT) for 0.5 cycle<5% UT
(>95% dip in UT) for 1 cycle70% UT (30% dip in UT) for 25/30 cycles<5% UT
(>95% dip in UT) for 5/6 sec
<5% UT
(>95% dip in UT) for 0.5 cycle<5% UT (>95% dip in UT) for 1 cycle70% UT (30% dip in UT) for 25/30 cycles<5% UT (>95% dip in UT) for 5/6 sec
Mains power quality should be that of a typical commercial or hospital environment. If the user of the model VUN-001 requires continued operation during power mains interruptions, it is recommended that the model VUN-001 be powered from an uninterruptible power supply or a battery.
Electrical fast transient/ burst IEC 61000-4-4
Surge lEC 61000-4-5
Voltage dips, short interruptions and voltage variations on power supply input lines IEC 61000-4-11.
Power frequency (50/60 Hz) magnetic field lEC 61000-4-8
NOTE: UT is the a.c. mains voltage prior to application of the test level.
30 A/m 30 A/m
41 42
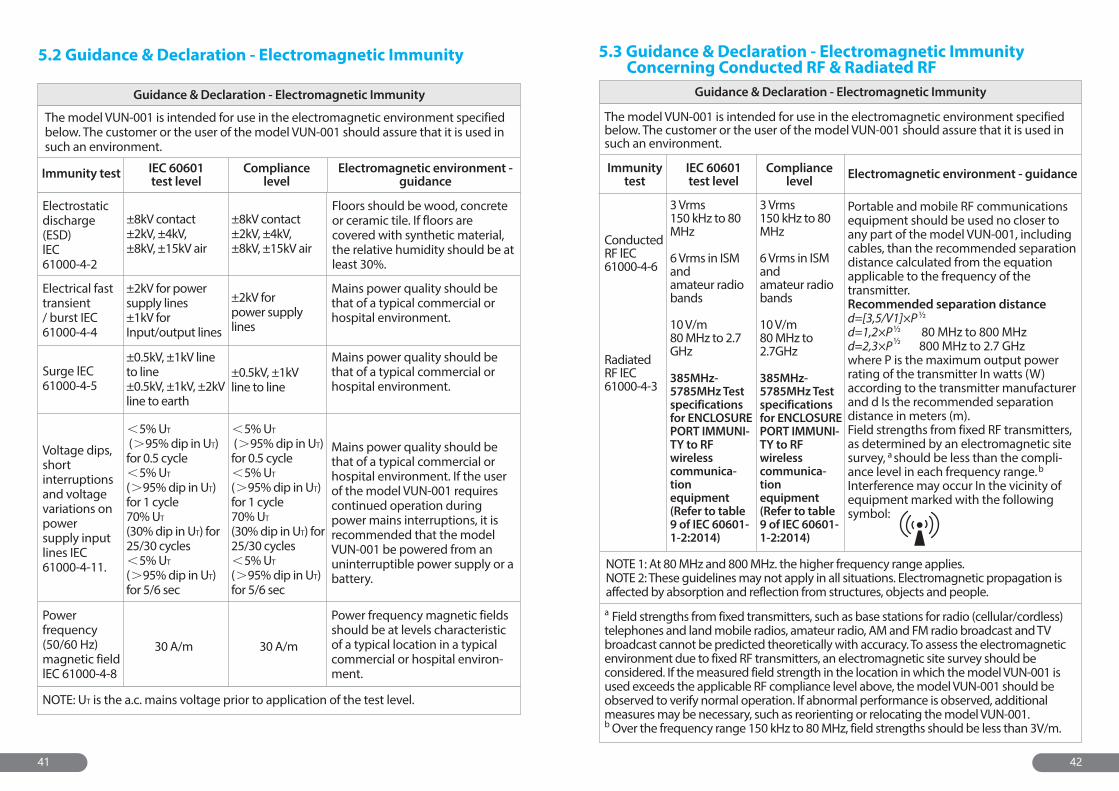
5.3 Guidance & Declaration - Electromagnetic Immunity Concerning Conducted RF & Radiated RF
Guidance & Declaration - Electromagnetic Immunity
Immunitytest
IEC 60601test level
Compliancelevel Electromagnetic environment - guidance
The model VUN-001 is intended for use in the electromagnetic environment specified below. The customer or the user of the model VUN-001 should assure that it is used in such an environment.
Conducted RF lEC 61000-4-6
Radiated RF lEC 61000-4-3
3 Vrms150 kHz to 80 MHz
6 Vrms in ISM andamateur radiobands
10 V/m80 MHz to 2.7 GHz
385MHz-5785MHz Testspecificationsfor ENCLOSUREPORT IMMUNI-TY to RF wirelesscommunica-tionequipment(Refer to table9 of IEC 60601-1-2:2014)
3 Vrms150 kHz to 80 MHz
6 Vrms in ISM andamateur radiobands
10 V/m80 MHz to 2.7GHz
385MHz-5785MHz Testspecificationsfor ENCLOSUREPORT IMMUNI-TY to RF wirelesscommunica-tionequipment(Refer to table9 of IEC 60601-1-2:2014)
Portable and mobile RF communications equipment should be used no closer to any part of the model VUN-001, including cables, than the recommended separation distance calculated from the equation applicable to the frequency of the transmitter.Recommended separation distanced=[3,5/V1]×Pd=1,2×P 80 MHz to 800 MHzd=2,3×P 800 MHz to 2.7 GHzwhere P is the maximum output power rating of the transmitter In watts (W) according to the transmitter manufacturer and d Is the recommended separation distance in meters (m).Field strengths from fixed RF transmitters, as determined by an electromagnetic site survey, should be less than the compli-ance level in each frequency range.Interference may occur In the vicinity of equipment marked with the following symbol:
NOTE 1: At 80 MHz and 800 MHz. the higher frequency range applies.NOTE 2: These guidelines may not apply in all situations. Electromagnetic propagation is affected by absorption and reflection from structures, objects and people.
Field strengths from fixed transmitters, such as base stations for radio (cellular/cordless) telephones and land mobile radios, amateur radio, AM and FM radio broadcast and TV broadcast cannot be predicted theoretically with accuracy. To assess the electromagnetic environment due to fixed RF transmitters, an electromagnetic site survey should be considered. If the measured field strength in the location in which the model VUN-001 is used exceeds the applicable RF compliance level above, the model VUN-001 should be observed to verify normal operation. If abnormal performance is observed, additional measures may be necessary, such as reorienting or relocating the model VUN-001. Over the frequency range 150 kHz to 80 MHz, field strengths should be less than 3V/m.
a
b
a
b
½
½½

6. Use and Warranty Period
Do not attempt to disassemble the device without authorization. The warranty period is 2 years from the date of purchase. For shelf-life of accessories please refer to the appropriate manual. During the warranty period, the warranty will be void under the following conditions:1) An error caused by operating the unit in any unprescribed conditions or applications.2) Damage caused by using an improper power supply, improper installation or operations not listed in this manual.3) Damage caused by installation, modification (the technical description is included in the user manual) or repair from unauthorized service engineers. 4) Damage caused by natural disasters such as fire, earthquake, power surge, lightning, flood, etc.
When the machine develops a fault, please contact your supplier or Vincent Medical for maintenance.
Customer Service Contact InformationVincent Medical Manufacturing Co., Ltd.Flat/RM B2, 7/F., Hang Fung Industrial Building, Phase 2, 2G Hok Yuen Street, Hung Hom, Kowloon, Hong KongTel: +852 2186 1010E-mail: [email protected]: www.inspired-medical.com
Obelis s.aBd Général Wahis, 53, 1030 Brussels, BelgiumTel: +32 2 732 59 54Fax: +32 2 732 60 03E-Mail: [email protected]
5.4 Recommended Separation Distances Between Portable and Mobile RF Communications Equipment and the Model VUN-001
Recommended Separation Distances Between Portable and Mobile RF Communications Equipment and the Model VUN-001
150kHz to 80MHzd=1,2×P
80MHz to 800MHzd=1,2×P
800MHz to 2,5GHzd=2,3×P
The model VUN-001 is intended for use in an electromagnetic environment in whichradiated RF disturbances is controlled. The customer or the user of the model VUN-001 can help to prevent electromagnetic interference by maintaining a minimum distance between portable and mobile RF communications equipment (transmitters) and the model VUN-001 is recommended below, according to the maximum output power of the communications equipment.
Rated maximum output power of transmitter w
0,01
0,1
1
10
100
0,12
0,38
1,2
3,8
12
0,12
0,38
1,2
3,8
12
0,23
0,73
2,3
7,3
23
Separation distance according to frequency of transmitter m
For transmitters rated at a maximum output power not listed above, the recommend-ed separation distance in meters (m) can be estimated using the equation applica-ble to the frequency of the transmitter, where is the maximum output power rating of the transmitter in watts (W) accordable to the transmitter manufacturer.NOTE 1 At 80 MHz and 800 MHz. the separation distance for the higher frequency range applies.NOTE 2 These guidelines may not apply in all situations. Electromagnetic propagation is affected by absorption and reflection from structures, objects and people.
½ ½ ½
dP
43 44


![[Gokigenyou] Flo Flo v.1 C.13](https://img.dokumen.tips/doc/110x75/577cdebd1a28ab9e78afba15/gokigenyou-flo-flo-v1-c13.jpg)

![[Gokigenyou] Flo Flo v.1 C.12](https://img.dokumen.tips/doc/110x75/577cdebd1a28ab9e78afba12/gokigenyou-flo-flo-v1-c12.jpg)


![[Gokigenyou] Flo Flo v.1 C.07](https://img.dokumen.tips/doc/110x75/577cdebd1a28ab9e78afba00/gokigenyou-flo-flo-v1-c07.jpg)
![[Gokigenyou] Flo Flo v.1 C.08](https://img.dokumen.tips/doc/110x75/577cdebd1a28ab9e78afba03/gokigenyou-flo-flo-v1-c08.jpg)


![[Gokigenyou] Flo Flo v.1 C.05](https://img.dokumen.tips/doc/110x75/577cdebd1a28ab9e78afb9f7/gokigenyou-flo-flo-v1-c05.jpg)
![[Gokigenyou] Flo Flo v.1 Omake](https://img.dokumen.tips/doc/110x75/577cdebd1a28ab9e78afba16/gokigenyou-flo-flo-v1-omake.jpg)

![[Gokigenyou] Flo Flo v.1 C.03](https://img.dokumen.tips/doc/110x75/577cdebd1a28ab9e78afb9f1/gokigenyou-flo-flo-v1-c03.jpg)
![[Gokigenyou] Flo Flo v.1 C.11](https://img.dokumen.tips/doc/110x75/577cdebd1a28ab9e78afba0e/gokigenyou-flo-flo-v1-c11.jpg)
![[Gokigenyou] Flo Flo v.1 C.01](https://img.dokumen.tips/doc/110x75/577cdebd1a28ab9e78afb9ef/gokigenyou-flo-flo-v1-c01.jpg)