Embed Size (px)
Citation preview

HI 1771-WSWEIGH SCALE MODULE
OPERATION AND INSTALLATIONMANUAL
Series B
Corporate Headquarters9440 Carroll Park Drive, Suite 150San Diego, CA 92121Phone: (858) 278-2900FAX: (858) 278-6700Web-Site: http://www.hardyinst.com
Hardy Instruments Document Number: 0596-0245-01 Rev CCopyright November 1999 Hardy Instruments, Inc. All Rights Reserved. Printed in the U.S.A. (941028)


Table of Contents
Table of Contents
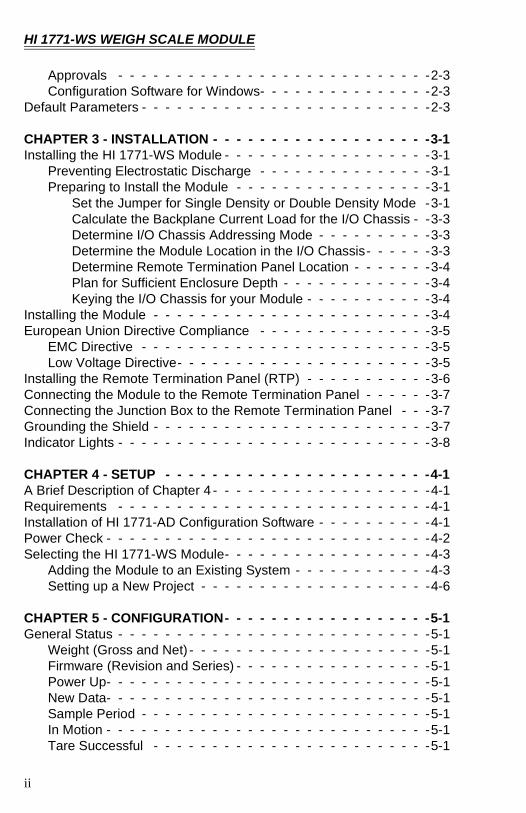
TABLE OF CONTENTS - - - - - - - - - - - - - - - - - - - - - - I
TABLE OF ILLUSTRATIONS- - - - - - - - - - - - - - - - - - - - I
CHAPTER 1 - OVERVIEW - - - - - - - - - - - - - - - - - - - - -1-1A Brief Description of the HI 1771 WS Weigh Scale Module - - - - -1-1About Hardy Manuals - - - - - - - - - - - - - - - - - - - - - - - -1-2Compatibility Issues - - - - - - - - - - - - - - - - - - - - - - - -1-3
Compatibility with Earlier Versions of the Module - - - - - - - -1-3Data Table Use- - - - - - - - - - - - - - - - - - - - - - - - -1-4I/O Chassis- - - - - - - - - - - - - - - - - - - - - - - - - - -1-5Remote Termination Panel - - - - - - - - - - - - - - - - - - -1-5Processor - - - - - - - - - - - - - - - - - - - - - - - - - - -1-5
Capabilities of the Weigh Scale Module - - - - - - - - - - - - - - -1-5
CHAPTER 2 - SPECIFICATIONS- - - - - - - - - - - - - - - - - -2-1A Brief Description of Chapter 2 - - - - - - - - - - - - - - - - - - -2-1Specifications for a Standard HI 1771-WS Weigh Scale Module - - -2-1
Modes of Operation- - - - - - - - - - - - - - - - - - - - - - -2-1Conversion Rate - - - - - - - - - - - - - - - - - - - - - - - -2-1Averages - - - - - - - - - - - - - - - - - - - - - - - - - - - -2-1Resolution - - - - - - - - - - - - - - - - - - - - - - - - - - -2-1Input - - - - - - - - - - - - - - - - - - - - - - - - - - - - - -2-1Non-Linearity - - - - - - - - - - - - - - - - - - - - - - - - - -2-1Maximum Zero Tolerance- - - - - - - - - - - - - - - - - - - -2-1WAVERSAVER® - - - - - - - - - - - - - - - - - - - - - - - -2-1Common-Mode Rejection - - - - - - - - - - - - - - - - - - - -2-1Common-Mode Voltage Range - - - - - - - - - - - - - - - - -2-2Backplane Input Voltage - - - - - - - - - - - - - - - - - - - -2-2Backplane Current Load - - - - - - - - - - - - - - - - - - - -2-2Power - - - - - - - - - - - - - - - - - - - - - - - - - - - - -2-2C2 Calibration Input - - - - - - - - - - - - - - - - - - - - - -2-2Cable lengths- - - - - - - - - - - - - - - - - - - - - - - - - -2-2Load Cell Excitation - - - - - - - - - - - - - - - - - - - - - -2-2C2 Calibration Output- - - - - - - - - - - - - - - - - - - - - -2-2
Software and Operating System Requirements - - - - - - - - - - -2-2Environmental Requirements - - - - - - - - - - - - - - - - - - - -2-2
Temperature Coefficient - - - - - - - - - - - - - - - - - - - -2-2Operating Temperature Range - - - - - - - - - - - - - - - - -2-2Storage Temperature Range - - - - - - - - - - - - - - - - - -2-2Humidity Range - - - - - - - - - - - - - - - - - - - - - - - -2-3
i
HI 1771-WS WEIGH SCALE MODULE
Approvals - - - - - - - - - - - - - - - - - - - - - - - - - - -2-3Configuration Software for Windows- - - - - - - - - - - - - - -2-3
Default Parameters - - - - - - - - - - - - - - - - - - - - - - - - -2-3
CHAPTER 3 - INSTALLATION - - - - - - - - - - - - - - - - - - -3-1Installing the HI 1771-WS Module - - - - - - - - - - - - - - - - - -3-1
Preventing Electrostatic Discharge - - - - - - - - - - - - - - -3-1Preparing to Install the Module - - - - - - - - - - - - - - - - -3-1
Set the Jumper for Single Density or Double Density Mode -3-1Calculate the Backplane Current Load for the I/O Chassis - -3-3Determine I/O Chassis Addressing Mode - - - - - - - - - -3-3Determine the Module Location in the I/O Chassis- - - - - -3-3Determine Remote Termination Panel Location - - - - - - -3-4Plan for Sufficient Enclosure Depth - - - - - - - - - - - - -3-4Keying the I/O Chassis for your Module - - - - - - - - - - -3-4
Installing the Module - - - - - - - - - - - - - - - - - - - - - - - -3-4European Union Directive Compliance - - - - - - - - - - - - - - -3-5
EMC Directive - - - - - - - - - - - - - - - - - - - - - - - - -3-5Low Voltage Directive- - - - - - - - - - - - - - - - - - - - - -3-5
Installing the Remote Termination Panel (RTP) - - - - - - - - - - -3-6Connecting the Module to the Remote Termination Panel - - - - - -3-7Connecting the Junction Box to the Remote Termination Panel - - -3-7Grounding the Shield - - - - - - - - - - - - - - - - - - - - - - - -3-7Indicator Lights - - - - - - - - - - - - - - - - - - - - - - - - - - -3-8
CHAPTER 4 - SETUP - - - - - - - - - - - - - - - - - - - - - - -4-1A Brief Description of Chapter 4 - - - - - - - - - - - - - - - - - - -4-1Requirements - - - - - - - - - - - - - - - - - - - - - - - - - - -4-1Installation of HI 1771-AD Configuration Software - - - - - - - - - -4-1Power Check - - - - - - - - - - - - - - - - - - - - - - - - - - - -4-2Selecting the HI 1771-WS Module- - - - - - - - - - - - - - - - - -4-3
Adding the Module to an Existing System - - - - - - - - - - - -4-3Setting up a New Project - - - - - - - - - - - - - - - - - - - -4-6
CHAPTER 5 - CONFIGURATION- - - - - - - - - - - - - - - - - -5-1General Status - - - - - - - - - - - - - - - - - - - - - - - - - - -5-1
Weight (Gross and Net) - - - - - - - - - - - - - - - - - - - - -5-1Firmware (Revision and Series) - - - - - - - - - - - - - - - - -5-1Power Up- - - - - - - - - - - - - - - - - - - - - - - - - - - -5-1New Data- - - - - - - - - - - - - - - - - - - - - - - - - - - -5-1Sample Period - - - - - - - - - - - - - - - - - - - - - - - - -5-1In Motion - - - - - - - - - - - - - - - - - - - - - - - - - - - -5-1Tare Successful - - - - - - - - - - - - - - - - - - - - - - - -5-1
ii
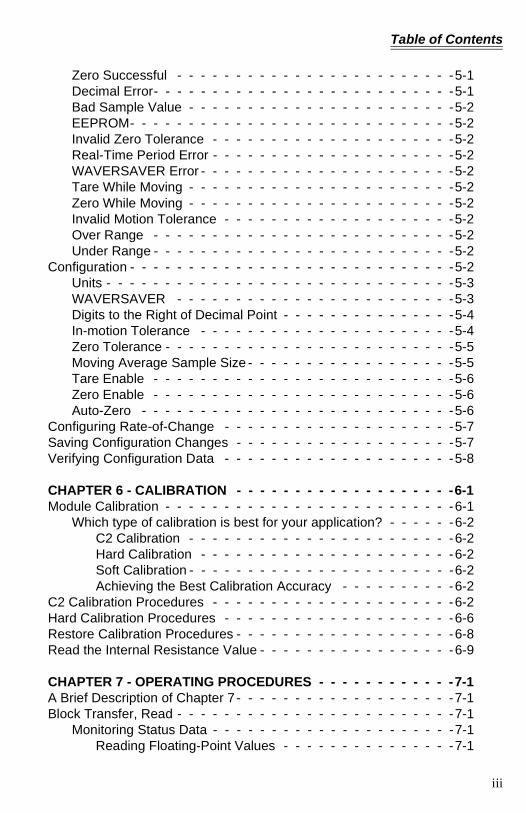
Table of Contents
Zero Successful - - - - - - - - - - - - - - - - - - - - - - - -5-1Decimal Error- - - - - - - - - - - - - - - - - - - - - - - - - -5-1Bad Sample Value - - - - - - - - - - - - - - - - - - - - - - -5-2EEPROM- - - - - - - - - - - - - - - - - - - - - - - - - - - -5-2Invalid Zero Tolerance - - - - - - - - - - - - - - - - - - - - -5-2Real-Time Period Error - - - - - - - - - - - - - - - - - - - - -5-2WAVERSAVER Error - - - - - - - - - - - - - - - - - - - - - -5-2Tare While Moving - - - - - - - - - - - - - - - - - - - - - - -5-2Zero While Moving - - - - - - - - - - - - - - - - - - - - - - -5-2Invalid Motion Tolerance - - - - - - - - - - - - - - - - - - - -5-2Over Range - - - - - - - - - - - - - - - - - - - - - - - - - -5-2Under Range - - - - - - - - - - - - - - - - - - - - - - - - - -5-2
Configuration - - - - - - - - - - - - - - - - - - - - - - - - - - - -5-2Units - - - - - - - - - - - - - - - - - - - - - - - - - - - - - -5-3WAVERSAVER - - - - - - - - - - - - - - - - - - - - - - - -5-3Digits to the Right of Decimal Point - - - - - - - - - - - - - - -5-4In-motion Tolerance - - - - - - - - - - - - - - - - - - - - - -5-4Zero Tolerance - - - - - - - - - - - - - - - - - - - - - - - - -5-5Moving Average Sample Size - - - - - - - - - - - - - - - - - -5-5Tare Enable - - - - - - - - - - - - - - - - - - - - - - - - - -5-6Zero Enable - - - - - - - - - - - - - - - - - - - - - - - - - -5-6Auto-Zero - - - - - - - - - - - - - - - - - - - - - - - - - - -5-6
Configuring Rate-of-Change - - - - - - - - - - - - - - - - - - - -5-7Saving Configuration Changes - - - - - - - - - - - - - - - - - - -5-7Verifying Configuration Data - - - - - - - - - - - - - - - - - - - -5-8
CHAPTER 6 - CALIBRATION - - - - - - - - - - - - - - - - - - -6-1Module Calibration - - - - - - - - - - - - - - - - - - - - - - - - -6-1
Which type of calibration is best for your application? - - - - - -6-2C2 Calibration - - - - - - - - - - - - - - - - - - - - - - -6-2Hard Calibration - - - - - - - - - - - - - - - - - - - - - -6-2Soft Calibration - - - - - - - - - - - - - - - - - - - - - - -6-2Achieving the Best Calibration Accuracy - - - - - - - - - -6-2
C2 Calibration Procedures - - - - - - - - - - - - - - - - - - - - -6-2Hard Calibration Procedures - - - - - - - - - - - - - - - - - - - -6-6Restore Calibration Procedures - - - - - - - - - - - - - - - - - - -6-8Read the Internal Resistance Value - - - - - - - - - - - - - - - - -6-9
CHAPTER 7 - OPERATING PROCEDURES - - - - - - - - - - - -7-1A Brief Description of Chapter 7 - - - - - - - - - - - - - - - - - - -7-1Block Transfer, Read - - - - - - - - - - - - - - - - - - - - - - - -7-1
Monitoring Status Data - - - - - - - - - - - - - - - - - - - - -7-1Reading Floating-Point Values - - - - - - - - - - - - - - -7-1
iii
HI 1771-WS WEIGH SCALE MODULE
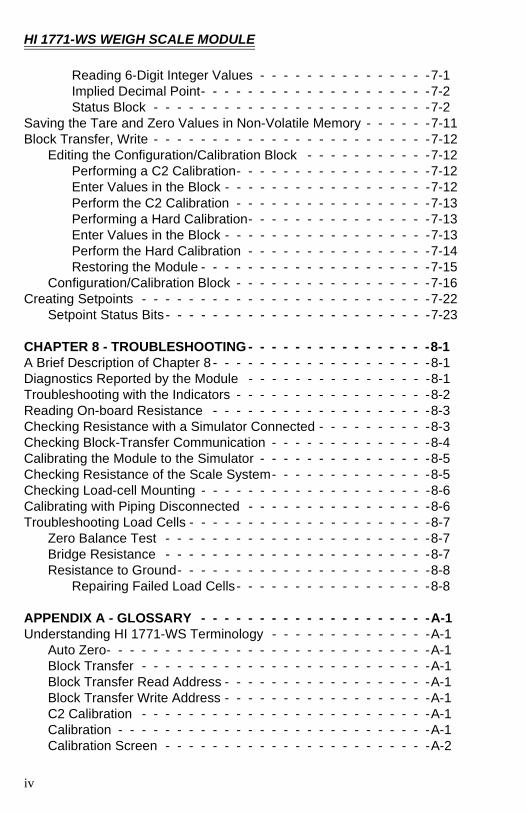
Reading 6-Digit Integer Values - - - - - - - - - - - - - - -7-1Implied Decimal Point- - - - - - - - - - - - - - - - - - - -7-2Status Block - - - - - - - - - - - - - - - - - - - - - - - -7-2
Saving the Tare and Zero Values in Non-Volatile Memory - - - - - -7-11Block Transfer, Write - - - - - - - - - - - - - - - - - - - - - - - -7-12
Editing the Configuration/Calibration Block - - - - - - - - - - -7-12Performing a C2 Calibration- - - - - - - - - - - - - - - - -7-12Enter Values in the Block - - - - - - - - - - - - - - - - - -7-12Perform the C2 Calibration - - - - - - - - - - - - - - - - -7-13Performing a Hard Calibration- - - - - - - - - - - - - - - -7-13Enter Values in the Block - - - - - - - - - - - - - - - - - -7-13Perform the Hard Calibration - - - - - - - - - - - - - - - -7-14Restoring the Module - - - - - - - - - - - - - - - - - - - -7-15
Configuration/Calibration Block - - - - - - - - - - - - - - - - -7-16Creating Setpoints - - - - - - - - - - - - - - - - - - - - - - - - -7-22
Setpoint Status Bits - - - - - - - - - - - - - - - - - - - - - - -7-23
CHAPTER 8 - TROUBLESHOOTING - - - - - - - - - - - - - - - -8-1A Brief Description of Chapter 8 - - - - - - - - - - - - - - - - - - -8-1Diagnostics Reported by the Module - - - - - - - - - - - - - - - -8-1Troubleshooting with the Indicators - - - - - - - - - - - - - - - - -8-2Reading On-board Resistance - - - - - - - - - - - - - - - - - - -8-3Checking Resistance with a Simulator Connected - - - - - - - - - -8-3Checking Block-Transfer Communication - - - - - - - - - - - - - -8-4Calibrating the Module to the Simulator - - - - - - - - - - - - - - -8-5Checking Resistance of the Scale System- - - - - - - - - - - - - -8-5Checking Load-cell Mounting - - - - - - - - - - - - - - - - - - - -8-6Calibrating with Piping Disconnected - - - - - - - - - - - - - - - -8-6Troubleshooting Load Cells - - - - - - - - - - - - - - - - - - - - -8-7
Zero Balance Test - - - - - - - - - - - - - - - - - - - - - - -8-7Bridge Resistance - - - - - - - - - - - - - - - - - - - - - - -8-7Resistance to Ground- - - - - - - - - - - - - - - - - - - - - -8-8
Repairing Failed Load Cells- - - - - - - - - - - - - - - - -8-8
APPENDIX A - GLOSSARY - - - - - - - - - - - - - - - - - - - -A-1Understanding HI 1771-WS Terminology - - - - - - - - - - - - - -A-1
Auto Zero- - - - - - - - - - - - - - - - - - - - - - - - - - - -A-1Block Transfer - - - - - - - - - - - - - - - - - - - - - - - - -A-1Block Transfer Read Address - - - - - - - - - - - - - - - - - -A-1Block Transfer Write Address - - - - - - - - - - - - - - - - - -A-1C2 Calibration - - - - - - - - - - - - - - - - - - - - - - - - -A-1Calibration - - - - - - - - - - - - - - - - - - - - - - - - - - -A-1Calibration Screen - - - - - - - - - - - - - - - - - - - - - - -A-2
iv
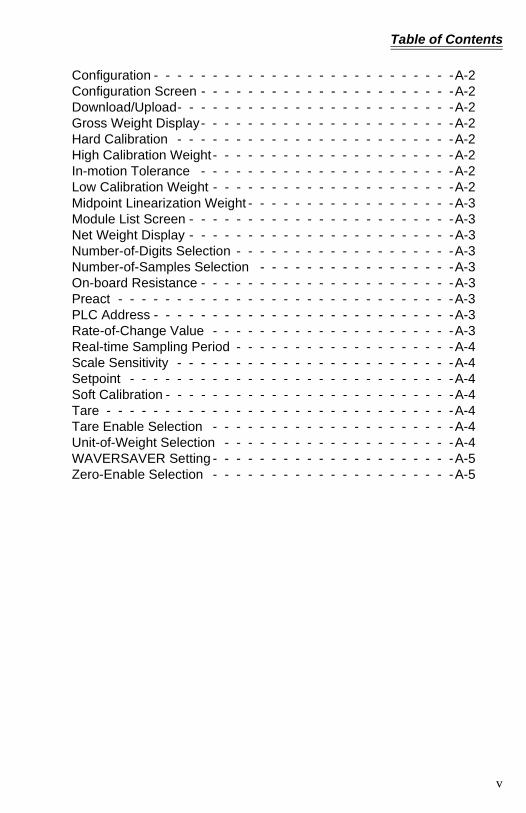
Table of Contents
Configuration - - - - - - - - - - - - - - - - - - - - - - - - - -A-2Configuration Screen - - - - - - - - - - - - - - - - - - - - - -A-2Download/Upload- - - - - - - - - - - - - - - - - - - - - - - -A-2Gross Weight Display- - - - - - - - - - - - - - - - - - - - - -A-2Hard Calibration - - - - - - - - - - - - - - - - - - - - - - - -A-2High Calibration Weight- - - - - - - - - - - - - - - - - - - - -A-2In-motion Tolerance - - - - - - - - - - - - - - - - - - - - - -A-2Low Calibration Weight - - - - - - - - - - - - - - - - - - - - -A-2Midpoint Linearization Weight - - - - - - - - - - - - - - - - - -A-3Module List Screen - - - - - - - - - - - - - - - - - - - - - - -A-3Net Weight Display - - - - - - - - - - - - - - - - - - - - - - -A-3Number-of-Digits Selection - - - - - - - - - - - - - - - - - - -A-3Number-of-Samples Selection - - - - - - - - - - - - - - - - -A-3On-board Resistance - - - - - - - - - - - - - - - - - - - - - -A-3Preact - - - - - - - - - - - - - - - - - - - - - - - - - - - - -A-3PLC Address - - - - - - - - - - - - - - - - - - - - - - - - - -A-3Rate-of-Change Value - - - - - - - - - - - - - - - - - - - - -A-3Real-time Sampling Period - - - - - - - - - - - - - - - - - - -A-4Scale Sensitivity - - - - - - - - - - - - - - - - - - - - - - - -A-4Setpoint - - - - - - - - - - - - - - - - - - - - - - - - - - - -A-4Soft Calibration - - - - - - - - - - - - - - - - - - - - - - - - -A-4Tare - - - - - - - - - - - - - - - - - - - - - - - - - - - - - -A-4Tare Enable Selection - - - - - - - - - - - - - - - - - - - - -A-4Unit-of-Weight Selection - - - - - - - - - - - - - - - - - - - -A-4WAVERSAVER Setting - - - - - - - - - - - - - - - - - - - - -A-5Zero-Enable Selection - - - - - - - - - - - - - - - - - - - - -A-5
v

HI 1771-WS WEIGH SCALE MODULE
vi

Table of Illustrations
Table of Illustrations
CHAPTER 3 - INSTALLATION - - - - - - - - - - - - - - - - - - -3-1
FIG. 3-1 J1 JUMPER LOCATION/SERIES B - - - - - - - - - - -3-2FIG. 3-2 SINGLE DENSITY & DOUBLE DENSITY
JUMPER SETTINGS - - - - - - - - - - - - - - - - - -3-2FIG. 3-3 MOUNTING DIMENSIONS FOR 1771-RT REMOTE
TERMINATION PANELS - - - - - - - - - - - - - - - -3-6FIG. 3-4 MOUNTING DIMENSIONS FOR 1771XX-RT
REMOTE TERMINATION PANELS - - - - - - - - - - -3-7FIG. 3-5 WIRING DIAGRAM FROM 1771 RT TO JUNCTION BOX-3-7FIG. 3-6 DIAGNOSTIC INDICATORS - - - - - - - - - - - - - - -3-8
CHAPTER 4 - SETUP - - - - - - - - - - - - - - - - - - - - - - -4-1
FIG. 4-1 LED’S - - - - - - - - - - - - - - - - - - - - - - - - - -4-3FIG. 4-2 OFFLINE PULL DOWN MENU/CLICK ON UPLOAD - - -4-3FIG. 4-3 UPLOAD DISPLAY/UPLOAD EXISTING LOGIC - - - - -4-4FIG. 4-4 UPLOADING PROCESSOR IMAGE - - - - - - - - - - -4-4FIG. 4-5 PROMPT TO GO ONLINE - - - - - - - - - - - - - - - -4-5FIG. 4-6 UPLOADED PROJECT - - - - - - - - - - - - - - - - -4-6FIG. 4-7 SELECTING A NEW PROJECT - - - - - - - - - - - - -4-7FIG. 4-8 SELECTING PROCESSING TYPE/NAME - - - - - - - -4-7FIG. 4-9 SELECTING I/O CONFIGURATION - - - - - - - - - - -4-8FIG. 4-10 I/O CONFIGURATION - CHASSIS TABLE - - - - - - - -4-8FIG. 4-11 SELECT DISPLAY CHASSIS - - - - - - - - - - - - - -4-9FIG. 4-12 CHASSIS DISPLAY - - - - - - - - - - - - - - - - - - -4-9FIG. 4-13 INSERT MODULE - - - - - - - - - - - - - - - - - - - -4-9FIG. 4-14 EDIT MODULE DISPLAY/ALL MODULES DISPLAYED- -4-10FIG. 4-15 CHASSIS_1/SELECTED MODULE TYPE DISPLAYED- -4-10FIG. 4-16 SELECT DISPLAY MODULE- - - - - - - - - - - - - - -4-11FIG. 4-17 MODULE ADDRESS DISPLAY/SELECT AUTO-PICK - -4-11FIG. 4-18 MODULE ADDRESS DISPLAY WITH ADDRESSES - - -4-12FIG. 4-19 HI 1771-WS MODULE MAIN MENU - - - - - - - - - - -4-13FIG. 4-20 SELECT PROGRAM FILE FOR RUNG INSERTION - - -4-13
CHAPTER 5 - CONFIGURATION5-1
FIG. 5-1 CONFIGURE DISPLAY - - - - - - - - - - - - - - - - -5-3
I
HI 1771-WS WEIGH SCALE MODULE
CHAPTER 6 - CALIBRATION - - - - - - - - - - - - - - - - - - -6-1
FIG. 6-1 HI 1771-WS MODULE DISPLAY/SELECTING CONFIGURE TAB - - - - - - - - - - - - - - - - - - -6-3
FIG. 6-1 SELECTING CALIBRATE BUTTON - - - - - - - - - - -6-3FIG. 6-1 CALIBRATION DISPLAY/SELECTING ENTER
CALIBRATE MODE - - - - - - - - - - - - - - - - - -6-4FIG. 6-1 C2 CALIBRATION DISPLAY - - - - - - - - - - - - - - -6-5FIG. 6-1 HARD CALIBRATION DISPLAY - - - - - - - - - - - - -6-7
II
Chapter 1 - Overview
CHAPTER 1 - OVERVIEW
A Brief Description of the HI 1771 WS Weigh Scale Module
This chapter provides an overview of the Weigh Scale module.The Weigh Scale module (1771-WS) is an intelligent I/O module that reads values from indus-try-standard strain-gage load cells. The module accepts analog weight values directly from a single load cell or the sum of the values from two, three, or four load cells connected through a junction box.
You can use as many as eight load cells with the mod-ule. You will need an external power supply for five or more load cells.
The module receives block-transferred configuration
and calibration values from the PLC-5® data table. The module block-transfers the weight values and
other status values to a PLC-5® processor.
NOTE: PLC-5® is a registered trademark of the Allen-Brad-ley Corporation Inc.
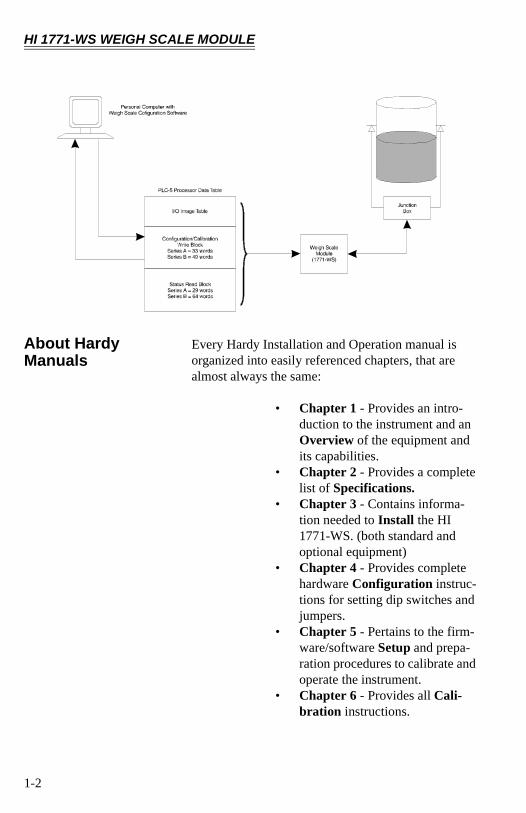
The Weigh Scale module can work without Weigh Scale Configuration software (interacting directly with the PLC processor). However, we recommend that you use the software to set up and maintain the module.
You install Weigh Scale software on a personal com-puter in a DH+ network with the PLC-5 processor. If you are using RSLinx software as a man-machine-interface (MMI), you can connect the personal com-puter to the PLC processor with an Ethernet link. You can then enter configuration and calibration values on easy-to-use screens.
1-1
HI 1771-WS WEIGH SCALE MODULE
About Hardy Manuals
Every Hardy Installation and Operation manual is organized into easily referenced chapters, that are almost always the same:
• Chapter 1 - Provides an intro-duction to the instrument and an Overview of the equipment and its capabilities.
• Chapter 2 - Provides a complete list of Specifications.
• Chapter 3 - Contains informa-tion needed to Install the HI 1771-WS. (both standard and optional equipment)
• Chapter 4 - Provides complete hardware Configuration instruc-tions for setting dip switches and jumpers.
• Chapter 5 - Pertains to the firm-ware/software Setup and prepa-ration procedures to calibrate and operate the instrument.
• Chapter 6 - Provides all Cali-bration instructions.
1-2

Chapter 1 - Overview
• Chapter 7 - Pertains to the Operating Procedures of the DI-803 TTS.
• Chapter 8 - Pertains to the Trou-bleshooting procedures for repair of the instrument.
Hardy Instruments hopes that this manual meets your needs for information and operation. All corrections or suggestions for improvements of this manual are welcome and can be sent to the Technical Publica-tions Department or Customer Support Department at Hardy Instruments Inc.
Compatibility Issues Compatibility involves previous releases of the mod-ule, data table use as well as compatibility with I/O chassis, remote termination panels, and processors.
Compatibility with Earlier Versions of the Module
A jumper setting (J1) you can change lets you config-ure the module for Series A (single density) or Series B (double density) operation. Functional modifica-tions made to the Weigh Scale Module for SeriesB do not affect how the module operates in Series A mode. You can complete any tasks you performed using earlier versions of the module.
To configure the jumper, see Chapter 3 of this manual.
If you set the jumper for Series B (double density) operation:
• You can now download setpoint, preact, and deadband values to the module .
• The module compares weight data to the setpoint and preact values. When the weight data reaches the preact value, the module sets a discrete bit in the PLC input image table without a block-trans-fer read.
• We now return rate-of-change data in the block-transfer-read data block.
• We also return all configuration data in the block-transfer-read data block.
1-3
HI 1771-WS WEIGH SCALE MODULE
A separate change to the real-time sampling period affects both new and old versions of the Weigh Scale Module:• When the PLC processor requests a block-trans-
fer read, the Weigh Scale Module responds only if the real-time sampling period value has elapsed since the last block-transfer read.
• When the data transfer occurs, the data in the PLC data table is the most recent information processed by the module.
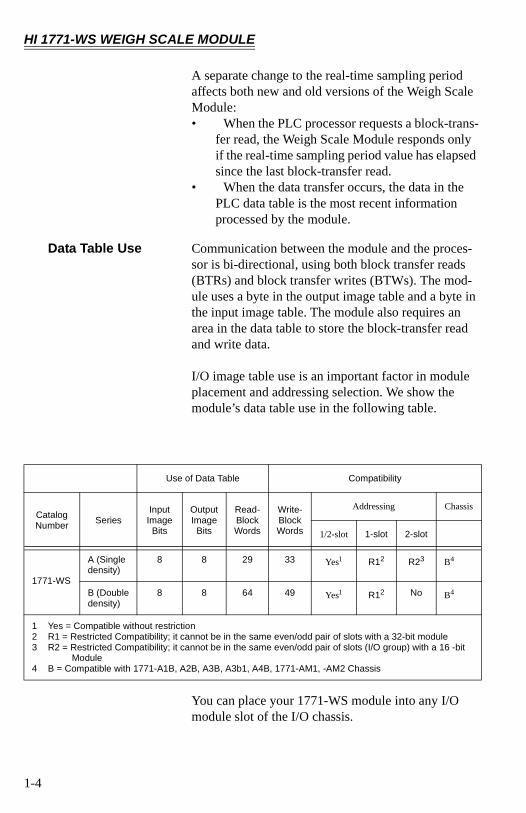
Data Table Use Communication between the module and the proces-sor is bi-directional, using both block transfer reads (BTRs) and block transfer writes (BTWs). The mod-ule uses a byte in the output image table and a byte in the input image table. The module also requires an area in the data table to store the block-transfer read and write data.
I/O image table use is an important factor in module placement and addressing selection. We show the module’s data table use in the following table.
You can place your 1771-WS module into any I/O module slot of the I/O chassis.
Use of Data Table Compatibility
CatalogNumber Series
InputImage
Bits
Output Image
Bits
Read- Block Words
Write- Block Words
Addressing Chassis
1/2-slot 1-slot 2-slot
1771-WS
A (Single density)
8 8 29 33 Yes1 R12 R23 B4
B (Doubledensity)
8 8 64 49 Yes1 R12 No B4
1 Yes = Compatible without restriction2 R1 = Restricted Compatibility; it cannot be in the same even/odd pair of slots with a 32-bit module3 R2 = Restricted Compatibility; it cannot be in the same even/odd pair of slots (I/O group) with a 16 -bit
Module4 B = Compatible with 1771-A1B, A2B, A3B, A3b1, A4B, 1771-AM1, -AM2 Chassis
1-4

Chapter 1 - Overview
I/O Chassis This module can only be used in 1771-A1B, A2B, A3B, A3B1, A4B, -AM1, and -AM2 chassis.
Remote Termination Panel
The 1771-WS module is compatible with the 1771-RT remote termination panel, which you must pur-chase separately.
Processor The HI 1771-WS module is compatible with 1785
PLC-5® processors.
Capabilities of the Weigh Scale Module
• Weight values in either pounds or kilograms• Weight values in both 16-bit integer and 32-bit
floating-point format• The ability to tare or zero the scale• Compatibility with 3mV/V and 2mV/V industry-
standard load cells and C2 Second-Generation-Calibration load points
• 20-bit A/D conversion — providing 985,000 counts of displayed resolution over the 0-30mV range
• 50ms A/D conversion period• A “weight-in-motion” status indication
• WAVERSAVER® technology to filter out mechanical vibrations and noise from the weight values
NOTE: WAVERSAVER® is a registered trademark of Hardy Instruments Inc.
• 3 ways to calibrate the module:
• Hard Calibration
• soft calibration — to minimize the need for test weights when used with load cells of known sensitivity and range
•C2® calibration — to minimize the need for test weights and elimi-nate the need for manual entry of values when used with C2 Sec-
1-5

HI 1771-WS WEIGH SCALE MODULE
ond-Generation-Calibration load points
NOTE: C2® is a registered trademark of Hardy Instruments Inc.
• Non-volatile on-board flash memory — to store calibration values
• Restoration of calibration values from PLC data table to non-volatile on-board memory — lets you to quickly switch the calibration values to those of another scale, or to restore them after replacing a module
• Windows®-based (NT, 95, 98, Millennium and 2000) Weigh Scale Configuration software — to provide configuration and calibration without ladder logic programming software
• On-board diagnostics• Setpoints, deadbands, and preacts — let you
download values to the module so that the mod-ule can compare the scale to the setpoints without waiting for the PLC processor to cycle through Ladder logic that depends on block transfers
• Rate-of-change in weight data — based on user-defined time units, evaluation period, and unit of measure
• Configuration data — lets you view configura-tion data in the block-transfer read data block
NOTE: Windows® is a registered trademark of the Microsoft Corporation.
1-6
Chapter 2 - Specifications
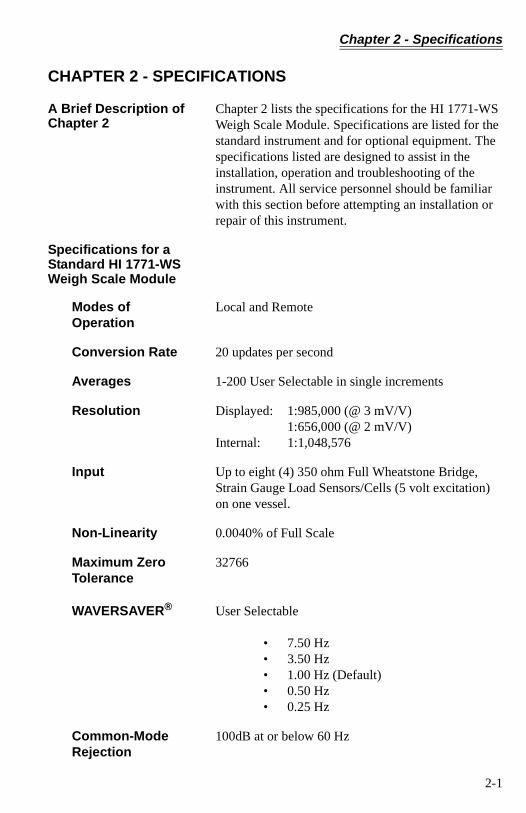
CHAPTER 2 - SPECIFICATIONS
A Brief Description of Chapter 2
Chapter 2 lists the specifications for the HI 1771-WS Weigh Scale Module. Specifications are listed for the standard instrument and for optional equipment. The specifications listed are designed to assist in the installation, operation and troubleshooting of the instrument. All service personnel should be familiar with this section before attempting an installation or repair of this instrument.
Specifications for a Standard HI 1771-WS Weigh Scale Module
Modes of Operation
Local and Remote
Conversion Rate 20 updates per second
Averages 1-200 User Selectable in single increments
Resolution Displayed: 1:985,000 (@ 3 mV/V)1:656,000 (@ 2 mV/V)
Internal: 1:1,048,576
Input Up to eight (4) 350 ohm Full Wheatstone Bridge, Strain Gauge Load Sensors/Cells (5 volt excitation) on one vessel.
Non-Linearity 0.0040% of Full Scale
Maximum Zero Tolerance
32766
WAVERSAVER® User Selectable
• 7.50 Hz• 3.50 Hz• 1.00 Hz (Default)• 0.50 Hz• 0.25 Hz
Common-Mode Rejection
100dB at or below 60 Hz
2-1

HI 1771-WS WEIGH SCALE MODULE
Common-Mode Voltage Range
2.5VDC maximum (with respect to earth ground)
Backplane Input Voltage
Continuous 40.0 VDC Maximum
Backplane Current Load
1.50 Amps at 5 VDC Maximum
Power +5 VDC +/- 5%
C2 Calibration Input
Isolation from digital section 1000 VDC minimum.
Cable lengths 1000 feet maximum of C2 authorized cable
Load Cell Excitation
10 VDC (+/- 5%) 1.5 W maximum.Isolation from digital section 1000 VDC minimum
C2 Calibration Output
Isolation from digital section 1000 VDC minimum
Software and Operating System Requirements
• Windows® 95/98/Millennium, NT/2000• RSLogix™• RSLinx™
NOTE: Windows® is a registered trademark of the Microsoft Corporation. RSLogix™ and RSLinx™ are trade-marks of Rockwell Automation.
Environmental Requirements
Temperature Coefficient
Less than 0.005% of full scale per degree C for Cal-LO and Cal-HI reference points
Operating Temperature Range
0o C to 60o C (32o F to 140o F)
Storage Temperature Range
-20o C to 85o C (-4o F to 185o F)
2-2

Chapter 2 - Specifications
Humidity Range 0-90% (non-condensing)
Approvals UL CertificationCSA CertificationCE Approval
Configuration Software for Windows
User selectable from RS Logix 5 Software.
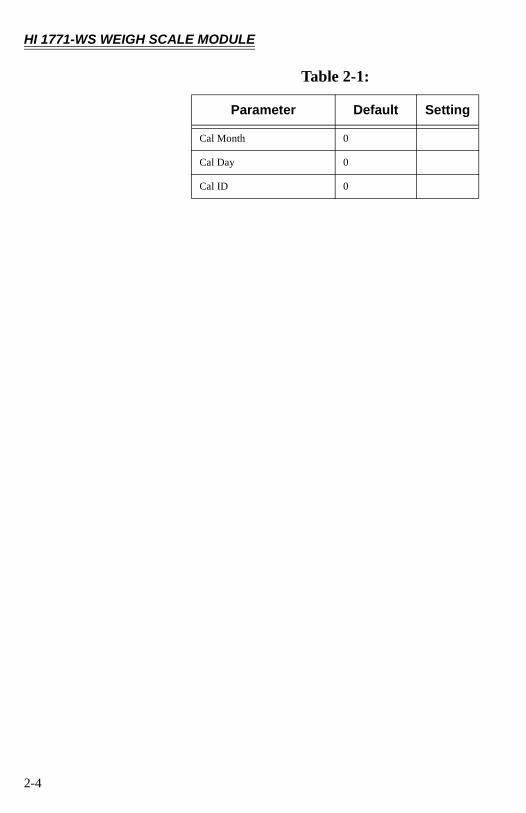
Default Parameters
Table 2-1:
Parameter Default Setting
Tare Weight 0.0 lbs
WAVERSAVER® .25 Hz 4
Weight Units lbs 0
Span Weight -1
Averages 100
Auto Zero Tracking Enabled NO 0
Tare Enabled YES 1
Auto Zero Disabled YES 1
Calibration Type HARD
Setpoint Mode 1&2 Net (fixed)
Setpoint Value 1&2 1.0 lbs
Setpoint Deadband 1&2 0.0 lbs
Setpoint Preact 1&2 0.5 lbs
Auto-zero Tolerance 10.0 lbs
Motion Tolerance 3.0 lbs
Zero Tolerance 1000 lbs
Rate of Change Time Base 10
Cal Year 0
2-3
HI 1771-WS WEIGH SCALE MODULE
Cal Month 0
Cal Day 0
Cal ID 0
Table 2-1:
Parameter Default Setting
2-4

Chapter 3 - Installation
CHAPTER 3 - INSTALLATION
Installing the HI 1771-WS Module
This chapter tells you how to install the Weigh Scale module.
Preventing Electrostatic Discharge
Electrostatic discharge can damage semiconductor devices inside this module if you touch backplane connector pins or jumper pins. Guard against electro-static damage by observing the followingwarning:
WARNING ELECTROSTATIC DISCHARGE CAN DEGRADE PERFORMANCE OR CAUSE PER-MANENT DAMAGE. HANDLE THE MODULE AS STATED BELOW:
• Wear an approved wrist-strap grounding device when handling the module
• Touch a grounded object to rid yourself of elec-trostatic charge before handling the module
• Handle the module from the front, away from the backplane connector. Do not touch the backplane connector pins
Preparing to Install the Module
Set the Jumper for Single Density or Double Density Mode
When you received the module, the J1 jumper was configured for Series B or double density mode. (The Series B modules have a label on their side.) You can set the jumper for single density (Series A) or double density (Series B) mode.
Step 1. Remove the four pan head screws that fas-ten the module cover and module printed circuit board to the module enclosure.
Step 2. Carefully lift the cover for the board. Step 3. Lift the printed circuit board out of the
enclosure. Step 4. Turn the printed circuit board over so that
the component side is facing up. Step 5. Locate the J1 Jumper. (See Fig. 3-1)
3-1
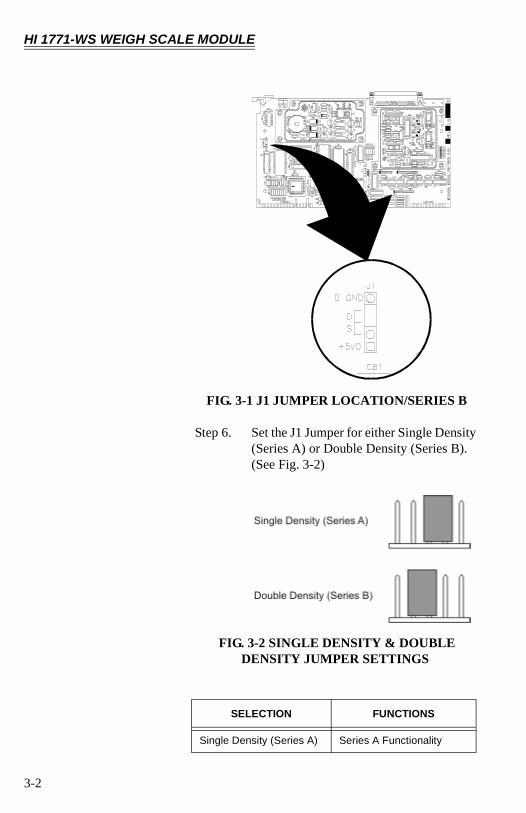
HI 1771-WS WEIGH SCALE MODULE
FIG. 3-1 J1 JUMPER LOCATION/SERIES B
Step 6. Set the J1 Jumper for either Single Density (Series A) or Double Density (Series B). (See Fig. 3-2)
FIG. 3-2 SINGLE DENSITY & DOUBLE DENSITY JUMPER SETTINGS
SELECTION FUNCTIONS
Single Density (Series A) Series A Functionality
3-2

Chapter 3 - Installation
Calculate the Backplane Current Load for the I/O Chassis
Your module receives its power through the 1771 I/O chassis backplane from the chassis power supply. The maximum backplane current load of the module is 1.5A.Add this load to the loads of all other modules in the I/O chassis. This total must not exceed the chassis backplane or backplane power supply load specifica-tion.
Determine I/O Chassis Addressing Mode
Your J1 jumper selection determines the addressing mode of the Weigh Scale Module:
When the J1 jumper is set for double density (Series B & C) operation, the module is not compatible with two-slot addressing.
Determine the Module Location in the I/O Chassis
The extreme left slot is not an I/O module slot; it is reserved for processors or adapter modules:• If you are using -slot addressing, you can place
your module into any I/O module slot of the I/O chassis.
• If you are using 1-slot addressing, do not place the 1771-WS module into the same even/odd
Double Density (Series B) Series A Functionality plus:• Use Setpoint Parameters• Retrieve Rate-of-
Change values• Verify Configuration
Data
SELECTION FUNCTIONS
If the jumper is set for those mode:*
The module is compatible with this addressing:
1/2-slot 1-slot 2-slot
Single Density Yes Rack 1 Yes
Double Density Yes Yes No
* If the jumper is not present, the module is compatible with 1/2-slot, and 2-slot addressing and defaults to Series A functionality
3-3
HI 1771-WS WEIGH SCALE MODULE
module-slot pair with a 32-bit-density module. This module uses the input image table and the output image table.
• To minimize electrical noise interference, group analog and low-voltage dc digital modules away from AC modules or high voltage DC digital modules.
NOTE: When using earlier versions of the module, if you are using a version of the module earlier than Series B (or a Series B module set for Series A mode) and are using 2-slot addressing, do not place the 1771-WS module into the same I/O group (even/odd module-slot pair) with a 16-bit density module. this module uses a byte in the input image table and a byte in the output image table.
Determine Remote Termination Panel Location
Place your 1771-RT remote termination panel in close proximity to the module so that the distance is within the length of the interconnect cables you choose:• The length of the 1771-C6 cable is 1.8m (6 feet)• The length of the 1771-C15 cable is 3.05m (10
feet)
Plan for Sufficient Enclosure Depth
The cable connector sticks out from the front of the module. The enclosure must provide room for a total of 254 mm (10.0 inches) from the back-panel to the connector.
Keying the I/O Chassis for your Module
For information about using the plastic keying clips see your PLC 5 Users Guide.
Installing the Module Step 1. Turn off the power to the I/O Chassis.
WARNING REMOVE POWER FROM THE HI 1771-WS I/O CHASSIS BACKPLANE AND DISCONNECT THE CABLE FROM THE MODULE BEFORE REMOVING OR INSTALLING AN I/O MODULE.FAILURE TO REMOVE POWER FROM THE BACKPLANE COULD CAUSE INJURY OR EQUIPMENT DAMAGE DUE TO POSSIBLEUNEXPECTED OPERATION.
3-4

Chapter 3 - Installation
FAILURE TO REMOVE POWER FROM THE BACKPLANE COULD CAUSE MODULE DAM-AGE, DEGRADATION OF PERFORMANCE,OR INJURY.
Step 2. Place the module in the plastic tracks on the top and bottom of the slot that guides the module into position.
Step 3. Do not force the module into its backplane connector. Apply firm, even pressure on the module to seat it properly.
Step 4. Snap the chassis latch over the top of the module to secure it.
European Union Directive Compliance
If this product is installed within the European Union or EEA regions and has the CE mark, the following regulations apply.
EMC Directive The Series B module is tested to meet Council Direc-tive 89/336Electromagnetic Compatibility (EMC) using a techni-cal construction file and the following standards, in whole or in part:
• EN 50081-2 EMC – Generic Emission Standard, Part 2 – Industrial Environment
• EN 50082-2 EMC – Generic Immunity Standard, Part 2 – Industrial Environment
The product described in this manual is intended for use in an industrial environment.
Low Voltage Directive
The Series B module is also designed to meet Council Directive 73/23 Low Voltage, by applying the safety requirements of EN 61131–2 Programmable Control-lers, Part 2 – Equipment Requirements and Tests.
For specific information that the above norm requires, see the appropriate sections in this manual, as well as the following Allen-Bradley publications:• Industrial Automation Wiring and Grounding
Guidelines, publication 1770-4.1• Guidelines for Handling Lithium Batteries, publi-
cation AG-5.4
3-5

HI 1771-WS WEIGH SCALE MODULE
• Automation Systems Catalog, publication B112
Installing the Remote Termination Panel (RTP)
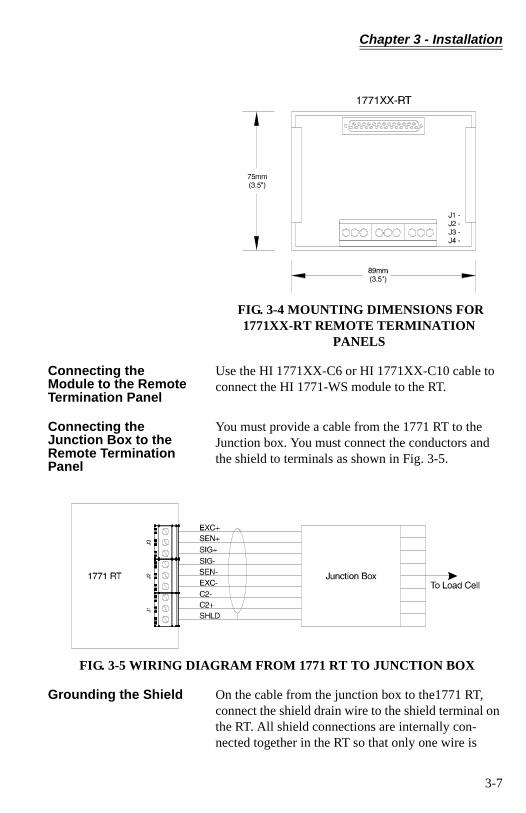
For the Weigh Scale Module, you must use the HI 1771-RT remote termination panel. The remote termi-nation panels are designed for mounting on standard DIN 1 or DIN 3 mounting rails. For mounting dimen-sions see Fig. 3-3 & 3-4.
FIG. 3-3 MOUNTING DIMENSIONS FOR 1771-RT REMOTE TERMINATION PANELS
3-6
Chapter 3 - Installation
FIG. 3-4 MOUNTING DIMENSIONS FOR 1771XX-RT REMOTE TERMINATION
PANELS
Connecting the Module to the Remote Termination Panel
Use the HI 1771XX-C6 or HI 1771XX-C10 cable to connect the HI 1771-WS module to the RT.
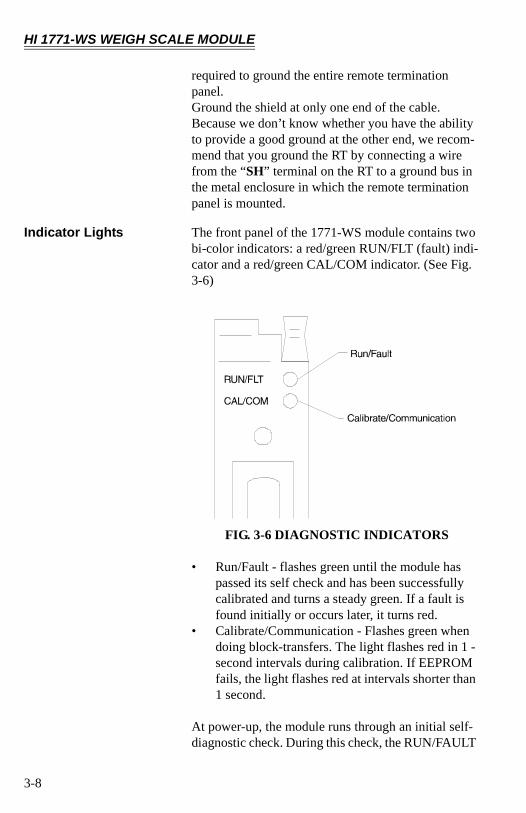
Connecting the Junction Box to the Remote Termination Panel
You must provide a cable from the 1771 RT to the Junction box. You must connect the conductors and the shield to terminals as shown in Fig. 3-5.
FIG. 3-5 WIRING DIAGRAM FROM 1771 RT TO JUNCTION BOX
Grounding the Shield On the cable from the junction box to the1771 RT, connect the shield drain wire to the shield terminal on the RT. All shield connections are internally con-nected together in the RT so that only one wire is
3-7
HI 1771-WS WEIGH SCALE MODULE
required to ground the entire remote termination panel.Ground the shield at only one end of the cable. Because we don’t know whether you have the ability to provide a good ground at the other end, we recom-mend that you ground the RT by connecting a wire from the “SH” terminal on the RT to a ground bus in the metal enclosure in which the remote termination panel is mounted.
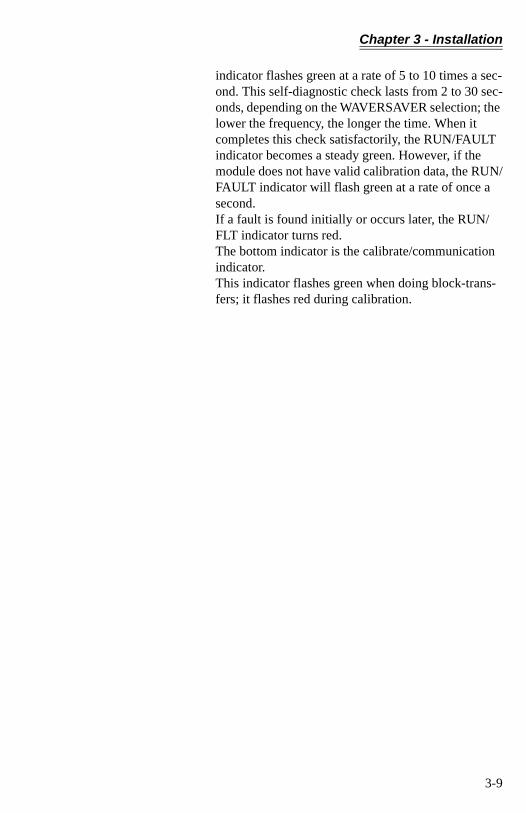
Indicator Lights The front panel of the 1771-WS module contains two bi-color indicators: a red/green RUN/FLT (fault) indi-cator and a red/green CAL/COM indicator. (See Fig. 3-6)
FIG. 3-6 DIAGNOSTIC INDICATORS
• Run/Fault - flashes green until the module has passed its self check and has been successfully calibrated and turns a steady green. If a fault is found initially or occurs later, it turns red.
• Calibrate/Communication - Flashes green when doing block-transfers. The light flashes red in 1 - second intervals during calibration. If EEPROM fails, the light flashes red at intervals shorter than 1 second.
At power-up, the module runs through an initial self-diagnostic check. During this check, the RUN/FAULT
3-8
Chapter 3 - Installation
indicator flashes green at a rate of 5 to 10 times a sec-ond. This self-diagnostic check lasts from 2 to 30 sec-onds, depending on the WAVERSAVER selection; the lower the frequency, the longer the time. When it completes this check satisfactorily, the RUN/FAULT indicator becomes a steady green. However, if the module does not have valid calibration data, the RUN/FAULT indicator will flash green at a rate of once a second.If a fault is found initially or occurs later, the RUN/FLT indicator turns red.The bottom indicator is the calibrate/communication indicator.This indicator flashes green when doing block-trans-fers; it flashes red during calibration.
3-9

HI 1771-WS WEIGH SCALE MODULE
3-10

Chapter 4 - Setup
CHAPTER 4 - SETUP
A Brief Description of Chapter 4
All information contained in Chapter 4 pertains to software settings (Local and Remote modes of opera-tion) to prepare the module controller for calibration and operation. Alternatives to these procedures explicit or implied, contained in this section are not recommended. It is very important that the user and service personnel be familiar with the procedures con-tained in this chapter, before going through the setup procedures. The Setup procedures require, Rockwell Automation RSLogix 5™ and Rockwell Automation RSLinx™ or RSLinx™ Lite. The Local Mode of Operation means the Module is installed in a PLC Chassis and Remote Mode of Operation means the Module is installed in a Remote Chassis.
NOTE: RSLogix 5™ and RSLinx™ are trademarks of Rock-well Automation.
Requirements Before installing the HI 1771-AD Configuration Soft-ware or doing any setup of the module the following requirements must be met:
• The module must be installed in the proper slot depending on the series selected (A or B). (See Chapter 3, “Determine the Module Location in the I/O Chassis”.)
• RS Logix & RSLinx must be installed on your PC.
• All cables and connectors are installed cor-rectly with the connectors tightly fastened.
• A steady green Run/Fault light on the HI 1771-WS Module.
NOTE: In the event you should encounter any problems with the operation of the PLC or problems installing or operating RSLogix or RSLinx, please consult your Allen Bradley manual or contact your Allen Bradley Customer Service representative for assistance.
Installation of HI 1771-AD Configuration Software
Step 1. The SETUP program copies the required files to your hard disk.
4-1
HI 1771-WS WEIGH SCALE MODULE
Step 2. Run Windows NT/95/98/2000 and insert the HI 1771-AD Configuration Software Disk into your 3.5” floppy drive.
Step 3. Click on START.Step 4. Click on Run.Step 5. In the Run field type the command:
a:setup. If your floppy drive is drive b enter: b:setup.
Step 6. Press the Enter key.Step 7. You can also use the Add/Remove Func-
tion in the Control Panel dialogue box. • Click on Start• Move the cursor to Settings. • Select Control Panel. • Double click on the Add/Remove
Programs icon.• Click on the Install button.
Step 8. The SETUP program will lead you through the installation process.
NOTE: You can download a copy of the HI 1771-AD Config-uration Software from our Web Site: http://www.har-dyinst.com. Follow the instructions furnished on the web site to install the software.
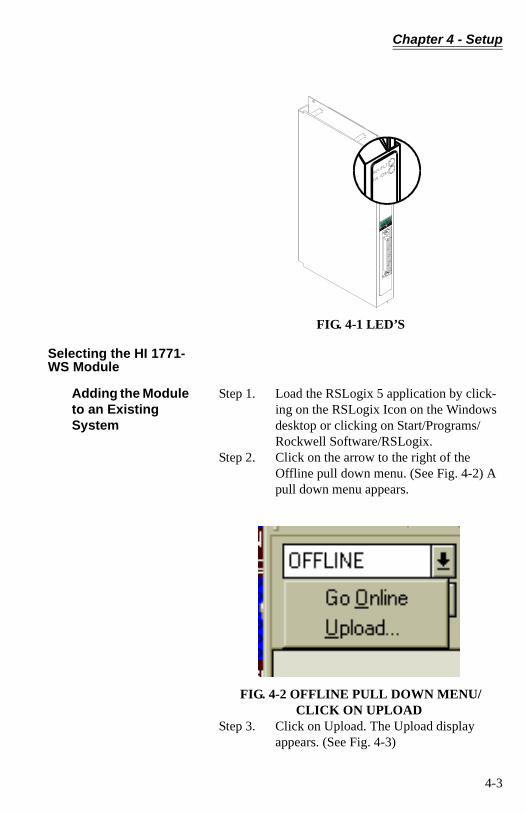
Power Check Step 1. Check to see that there is power to the PLC and the module.
Step 2. If there is power to the module, the Run/Fault LED should be lit. (See Fig. 4-1) The CAL/COM LED should be off.
4-2
Chapter 4 - Setup
FIG. 4-1 LED’S
Selecting the HI 1771-WS Module
Adding the Module to an Existing System
Step 1. Load the RSLogix 5 application by click-ing on the RSLogix Icon on the Windows desktop or clicking on Start/Programs/Rockwell Software/RSLogix.
Step 2. Click on the arrow to the right of the Offline pull down menu. (See Fig. 4-2) A pull down menu appears.
FIG. 4-2 OFFLINE PULL DOWN MENU/CLICK ON UPLOAD
Step 3. Click on Upload. The Upload display appears. (See Fig. 4-3)
4-3

HI 1771-WS WEIGH SCALE MODULE
FIG. 4-3 UPLOAD DISPLAY/UPLOAD EXISTING LOGIC
Step 4. Click on the “Upload Logic, Merge with Existing . . . . . .” button. The Uploading Processor Image display appears. (See Fig. 4-4) Then a prompt appears asking if you want to go online. (See Fig. 4-5)
FIG. 4-4 UPLOADING PROCESSOR IMAGE
4-4

Chapter 4 - Setup
FIG. 4-5 PROMPT TO GO ONLINE
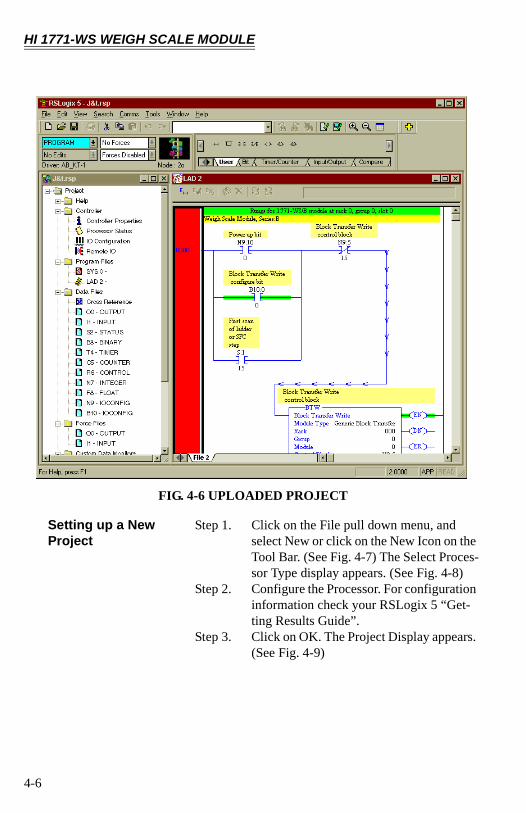
Step 5. Click on No if you do not want to go Online. Click on Yes if you want to go Online. After clicking Yes the project is loaded into RSLogix. (See Fig. 4-6)
Step 6. Click on I/O Configuration and continue to select the HI 1771-WS Module. Go to Step 2 in the Setting up a New Project.
4-5
HI 1771-WS WEIGH SCALE MODULE
FIG. 4-6 UPLOADED PROJECT
Setting up a New Project
Step 1. Click on the File pull down menu, and select New or click on the New Icon on the Tool Bar. (See Fig. 4-7) The Select Proces-sor Type display appears. (See Fig. 4-8)
Step 2. Configure the Processor. For configuration information check your RSLogix 5 “Get-ting Results Guide”.
Step 3. Click on OK. The Project Display appears. (See Fig. 4-9)
4-6

Chapter 4 - Setup
FIG. 4-7 SELECTING A NEW PROJECT
FIG. 4-8 SELECTING PROCESSING TYPE/NAME
4-7
HI 1771-WS WEIGH SCALE MODULE
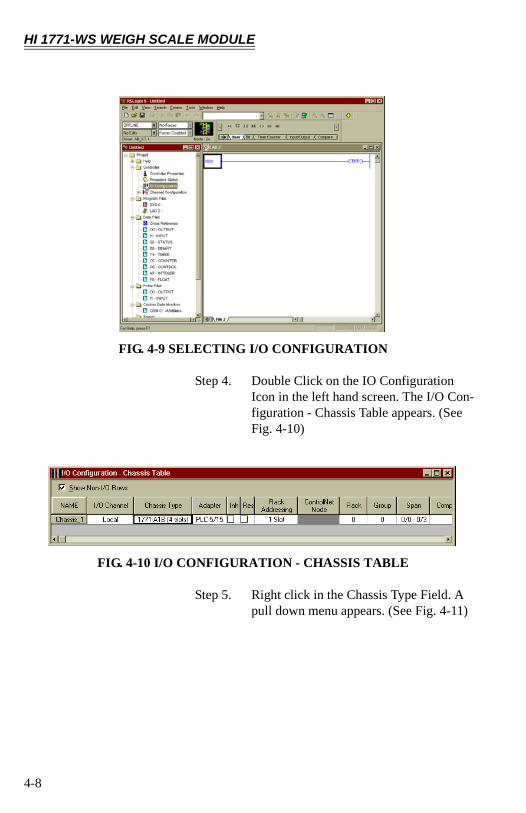
FIG. 4-9 SELECTING I/O CONFIGURATION
Step 4. Double Click on the IO Configuration Icon in the left hand screen. The I/O Con-figuration - Chassis Table appears. (See Fig. 4-10)
FIG. 4-10 I/O CONFIGURATION - CHASSIS TABLE
Step 5. Right click in the Chassis Type Field. A pull down menu appears. (See Fig. 4-11)
4-8

Chapter 4 - Setup
FIG. 4-11 SELECT DISPLAY CHASSIS
Step 6. Click on Display Chassis. The Chassis Chassis_1 display appears. (See Fig. 4-12)
FIG. 4-12 CHASSIS DISPLAY
Step 7. Right click in the Module Type cell for the slot containing the HI 1771-WS module. A menu appears. (See Fig. 4-13)
FIG. 4-13 INSERT MODULE
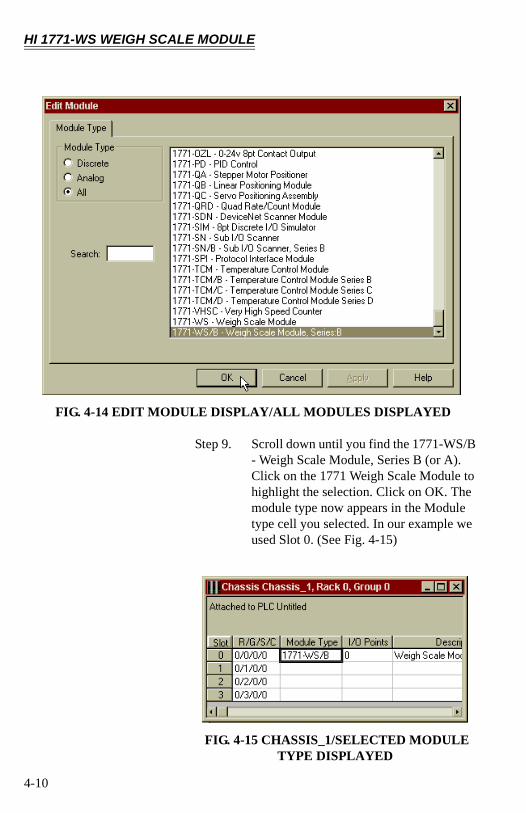
Step 8. Click on Insert Module. The Edit Module display appears. (See Fig. 4-14)
4-9
HI 1771-WS WEIGH SCALE MODULE
FIG. 4-14 EDIT MODULE DISPLAY/ALL MODULES DISPLAYED
Step 9. Scroll down until you find the 1771-WS/B - Weigh Scale Module, Series B (or A). Click on the 1771 Weigh Scale Module to highlight the selection. Click on OK. The module type now appears in the Module type cell you selected. In our example we used Slot 0. (See Fig. 4-15)
FIG. 4-15 CHASSIS_1/SELECTED MODULE TYPE DISPLAYED
4-10
Chapter 4 - Setup
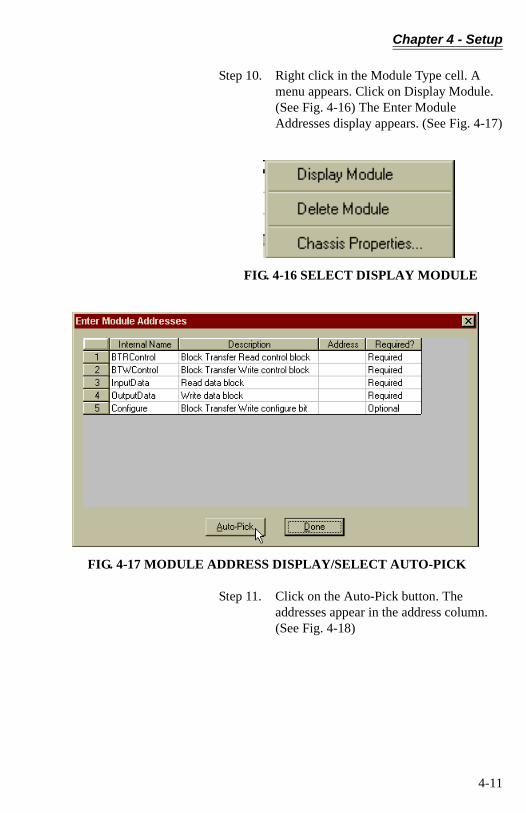
Step 10. Right click in the Module Type cell. A menu appears. Click on Display Module. (See Fig. 4-16) The Enter Module Addresses display appears. (See Fig. 4-17)
FIG. 4-16 SELECT DISPLAY MODULE
FIG. 4-17 MODULE ADDRESS DISPLAY/SELECT AUTO-PICK
Step 11. Click on the Auto-Pick button. The addresses appear in the address column. (See Fig. 4-18)
4-11

HI 1771-WS WEIGH SCALE MODULE
FIG. 4-18 MODULE ADDRESS DISPLAY WITH ADDRESSES
Step 12. Click on the Done button to accept the address entries. The HI 1771-WS Weigh Scale Module Main Menu appears. (See Fig. 4-19)
Step 13. Click on the Insert Ladder Rungs button. The Select Program File for Rung Inser-tion dialog box appears. (See Fig. 4-20)
Step 14. Select where you want the Rungs to go.
CAUTION: WHEN SELECTING WHICH FILE IN WHICH TO INSERT THE RUNGS, MAKE ABSOLUTELY SURE THAT IT IS A FILE THAT RUNS IN A NORMAL SCAN OF THE PROGRAM, OR THAT IN ADDITION TO INSERTING THE RUNGS, THE PROGRAM IS MODIFIED TO INSURE THE FILE WITH THE ADDED RUNGS IS INCLUDED IN THE PROGRAM SCAN. BLOCK TRANSFERS TO THE ASSOCIATED MODULE, ALREADY IN THE PROGRAM, SHOULD BE DISABLED WHILE RUNNING THE CONFIGURATION SOFTWARE. THIS WILL ELIMINATE ANY INTERFERENCE WHILE RUNNING THE CONFIGURATION SOFTWARE.
4-12

Chapter 4 - Setup
FIG. 4-19 HI 1771-WS MODULE MAIN MENU
FIG. 4-20 SELECT PROGRAM FILE FOR RUNG INSERTION
Step 15. Click on OK. The Main Menu reappears.
4-13

HI 1771-WS WEIGH SCALE MODULE
Step 16. The Module Setup is complete and the unit is ready to Configure.
4-14
Chapter 5 - Configuration
CHAPTER 5 - CONFIGURATION
General Status
Weight (Gross and Net)
The gross weight and net weight values are displayed from the last upload. They are not real-time values.
Firmware (Revision and Series)
The firmware revision and series (ASCII) are dis-played in these fields.
Power Up If this bit is set, it indicates that the module has gone thru a power-up or reset since it last received a block-transfer write.
New Data If this bit is set, it indicates that the status block data has been updated by the module since the last block-transfer read.
Sample Period This bit is set if an invalid value was entered for the real-time sample period.
In Motion If this bit is set, it indicates that the scale is in motion. This is based on the in-motion tolerance value which is set on the Configuration tabbed dialog.
Tare Successful This bit is set when the tare function was successfully completed. If it is not set, either the tare function is not active, the scale is in motion, or the tare function was not successfully completed.
Zero Successful This bit is set when the zero function was successfully completed. If this bit is not set, either the zero func-tion is not active, the scale is in motion, or the zero function was not successfully completed.
Decimal Error This bit is set if an invalid value was entered for the decimal point location.
5-1

HI 1771-WS WEIGH SCALE MODULE
Bad Sample Value This bit is set if an invalid value was entered for the number of samples.
EEPROM This bit is set if an unsuccessful write to EEPROM is detected.
Invalid Zero Tolerance
This bit is set if an invalid value was entered for zero tolerance on the Configuration tabbed dialog.
Real-Time Period Error
If this bit is set, a real-time sample period has passed without a block-transfer read.
WAVERSAVER Error
This bit is set if multiple WAVERSAVER selection bits are on.
Tare While Moving This bit is set if the tare function is active and the scale is in motion.
Zero While Moving This bit is set if the zero function is active and the scale is in motion.
Invalid Motion Tolerance
This bit is set when an invalid value was entered for in-motion tolerance, which is set on the Configuration tabbed dialog.
Over Range This bit is set if the input signal differential is greater than can be measured accurately.
Under Range This bit is set if the input signal differential is more negative than can be measured accurately.
Configuration On the configuration dialog, you are given several configuration selections to establish. However, the selections do not take effect until you download the selections to the PLC-5 data table. They do not con-
5-2

Chapter 5 - Configuration
trol the PLC-5 data table values in real-time. (See Fig. 5-1)
FIG. 5-1 CONFIGURE DISPLAY
NOTE: All values in the fields are for illustration only and do not reflect a real project. Your values will vary from this example.
Units Select either Lb. or Kg. to configure the unit of weight. This selection must match the units of the cal-ibration weight at the time of calibration.
WAVERSAVER The Weigh Scale module includes a proprietary tech-nology called WAVERSAVER that reduces the effect of noise or excess vibration in the weight signal. WAVERSAVER rejects all variations in the weight signal above the minimum (or cutoff) noise frequency you set for your application. Select the minimum
5-3
HI 1771-WS WEIGH SCALE MODULE
noise frequency (or frequency rejection level) for your application. Only changes of weight at frequen-cies below the level you select will be reflected in the value passed on in the status block as the weight value. This frequency rejection eliminates process noise and causes a more stable reading. However, a lower frequency rejection level causes a longer delay in updating the weight values.
Digits to the Right of Decimal Point
Select the number of digits to the right of the decimal point (0 thru 6). This value will apply to all weight integer values. When you enter calibration or setpoint weights, you can enter only as many digits to the right of the decimal point as this setting specifies.
CAUTION: WHEN YOU CHANGE THE DECIMAL POINT LOCATION, CALIBRATION WEIGHT VALUES ARE NOT AUTOMATICALLY ADJUSTED. YOU MUST RECALIBRATE THE SCALE. FAILURE TO RECALIBRATE THE SCALE WILL RESULT IN GROSS AND NET WEIGHT DIS-PLAYS BEING INCORRECT BY A FACTOR OF WHATEVER YOU CHANGED THE DECIMAL LOCATION TO.
In-motion Tolerance
Select the in-motion tolerance value (0 thru 999999). This value is weighted by your selections for unit of weight (Lb. or Kg.) and the number of digits to the right of the decimal place. The in-motion tolerance value defines the weight change that will trigger the in-motion flag to be set. As the module operates, it repeatedly reads the signals from the load cell(s) and calculates the weight value. When you change the weight on the scale, the scale requires a little time to stabilize at the new reading, since changing a weight can cause the scale to swing or vibrate slightly. If you tried to zero (or tare) the scale while it was still mov-ing, the zero or tare value would be inaccurate.
The module determines when the scale is in motion, and will not allow you to zero or tare the scale while
5-4

Chapter 5 - Configuration
the scale is moving. You can specify the amount of weight change the module uses to decide if the scale is moving. When the module senses scale motion, it disregards certain functions when scale motion exceeds the parameters you set.
Zero Tolerance Select the zero tolerance value (0 thru 999999). This value is weighted by your selections for weight (Lb. or Kg.) and the number of digits to the right of the decimal point. The zero tolerance value defines a range of weights over which a manual or auto-zero is permitted. The zero point of a scale may vary slightly from what it was when the scale was calibrated (the calibrated zero point) due to causes such as:
• ·Mechanical wear
• ·Material buildup
·Temperature variations
You can use auto-zero and manual zero to compensate for normal variations without recalibrating the scale.
CAUTION: IF THE VARIATION FROM THE CALIBRATION ZERO POINT GROWS TOO LARGE, IT MAY BE AN INDICATION OF A SERIOUS PROB-LEM WITH THE SCALE. UNLESS YOU IDEN-TIFY AND CORRECT THE PROBLEM, YOU MAY NOT BE ABLE TO OBTAIN ACCURATE WEIGHT MEASUREMENTS.
Moving Average Sample Size
Select the number of samples used in calculating the moving average of the current weight value (1 thru 200). Since the A/D conversion takes 50ms, the weight is sampled every 50ms. After each sample, the average is calculated based on the last number of sam-ples as you have specified. For example, if you set the moving average sample size to 10, each reading is added to the previous 9 readings and the sum divided by 10 to determine the current weight.
Moving Average Sample Size settingScale Response
5-5
HI 1771-WS WEIGH SCALE MODULE
Larger sample sizeSlower response to weight changes.More accurate reading (noise and variation may be reduced when more samples are averaged)Smaller sample sizeFaster response to weight changes.Less accurate reading (noise and variation may increase when less samples are averaged)Real-Time Sampling Period
Select the real-time sampling period for controlling the period at which the module places new weight values into the read block. Enter the period value in seconds, between 0.05 and 10.00 in increments of 0.05 seconds. If a block-transfer read is not executed within a real-time sampling period, the real-time sam-ple period BTR time-out bit in the status block is turned on. If a second BTR is executed within a real-time sample period, you will see that the new-data bit in the status block turned off. This tells you that the values you just read in that block transfer have not been updated since the previous block transfer read.
Tare Enable Use the tare-enable selection if you want to set the tare value equal to the gross weight, resulting in a zero value for the net weight. This can only happen when the scale is not in motion. If the scale is in motion while attempting to set tare, the “attempt to set tare while in motion” error bit in the status block is turned on.
Zero Enable Use the zero-enable selection if you want to set the gross weight value to zero. This can only happen when the scale is not in motion and the gross weight (the absolute value of the zero offset from the calibra-tion zero point) is within zero tolerance. If the scale is in motion while attempting to zero the gross weight, the “attempt to zero while in motion” error bit in the status block is turned on.
Auto-Zero Auto-zero tracking lets a scale automatically compen-sate for small variations at the zero point of the scale. These variations may be caused by slight material buildup on the scale platform or vessel, or by temper-
5-6
Chapter 5 - Configuration
ature fluctuations near the scale. If you select auto-zero “on”, whenever the weight on the scale (the absolute value of the zero offset from the calibration zero point) is within zero tolerance and the scale is not in motion, the gross weight will be set to zero.
For the scale to be considered not in motion, it must be motionless for:1s + (moving average sample size + 1)(0.05s)
For example, if:Zero tolerance = 5 lb.Moving average sample size = 10Auto-zero tracking = ONWeight is between –5 lb. and +5 lb.Scale is motionless for 1.55 secondsThen gross weight = zero
Configuring Rate-of-Change
The rate-of-change represents the rate-of-change in weight as measured by the module. This calculation is based on three parameters:• Weight Description—defines the unit of mea-
sure for weight in rate-of-change calculations. Valid values for weight descriptions are:
• – 0 = kilograms• – 1 = pounds
• Time units—unit of measure for time in rate-of-change calculations. Valid values for time units are:
• – 0 = seconds• – 1 = minutes• – 2 = hours
• Evaluation Period—the time over which a rate-of-change calculations are made. Valid val-ues for evaluation periods are 1 millisecond-32.767 seconds.
Saving Configuration Changes
Configuration changes that are made when the mod-ule is not in calibration mode are saved to non-volatile memory when the save flag in the block transfer is set. If this flag is not set, the values reside in volatile, run-time memory until you reset or power up the module. At this time, the values are initialized to their previ-
5-7

HI 1771-WS WEIGH SCALE MODULE
ously stored values. To set the save flag, you must edit your ladder logic code.
Verifying Configuration Data
If you have configured the module for double density mode, the module returns configuration parameters in the block transfer read data block. To configure the module for double density mode, see Chapter 3 of this manual. Words 48-63 store the configuration parame-ter values. For a complete list of the block-transfer read data block, see Chapter 7 of this manual.
5-8

Chapter 6 - Calibration
CHAPTER 6 - CALIBRATION
Module Calibration The Weigh Scale module uses three different types of calibration. Select the type of calibration that is best suited for your application.
Before you can calibrate the HI 1771-WS module, you must configure the module. You will also need the material and information as show in the table below:
Calibration Type
Method
Hard CAL Traditional Calibration physi-cally measuring low and high weights
Soft CAL Entering sensitivity and resis-tance values for each load cell
C2® CAL Automatically uploading sen-sitivity and resistance values from Hardy Instruments C2 Load sensors.
To perform this type of You will need
Hard CAL An accurate, known weight that is => 80% of the maximum scale capacity to use as the high weight.
Soft CAL The actual sensitivity and output resistance values for each load cell in your scale (from the manufacturer’s specifications or the load cell certificate) Note: Normalized or averaged data will result in an inaccurate calibration. Contact the load cell manufacturer for exact data.
C2 CAL Hardy Instruments’ C2 load sensors.
6-1

HI 1771-WS WEIGH SCALE MODULE
Which type of calibration is best for your application?
C2 Calibration C2 calibration is the easiest of the three calibration types, since only one test weight (which can be zero) is required. C2 calibration requires that you use Hardy Instruments’, certified load sensors.
Hard Calibration
Hard calibration requires two or three accurate, known test weights. You can use hard calibration on any manufacturer’s load cells. You do not need to know the sensitivity and output resistance for your load cells.
Soft Calibration
Soft calibration requires only one test weight. You can use soft calibration on some manufacturer’s load cells. You need to know the sensitivity and output resistance for all your load cells. Contact the Load Cell manufacturer for actual values.
WARNING IF ACTUAL TESTED VALUES ARE NOT USED THE CALIBRATION WILL BE INCORRECT.
Achieving the Best Calibration Accuracy
If you are using only a portion of your scale’s range, you can achieve the greatest calibration accuracy by:
• Performing a hard calibration• Choosing low, middle, and high test weights that
cover the operating portion of your scale’s range.
For example, if you are using a 10,000 lb. scale, but use it in the range of 2000 to 5000 lb., you could use test weights of 2000, 3500, and 5000 lb.
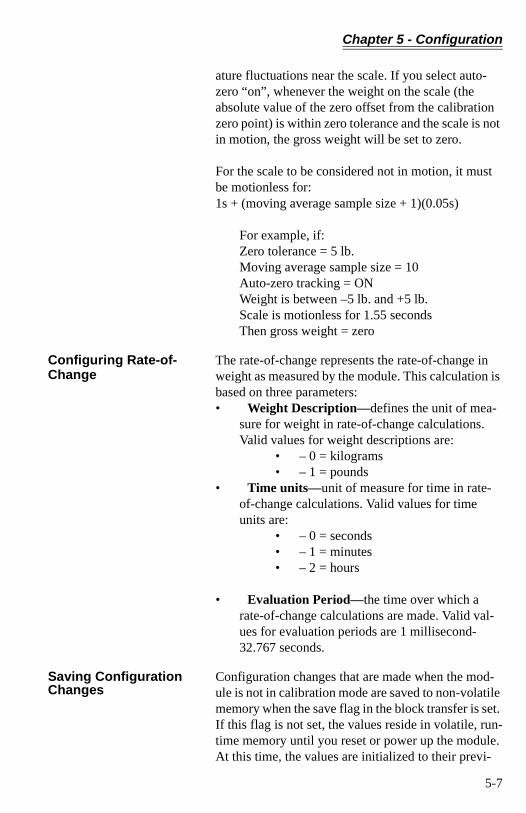
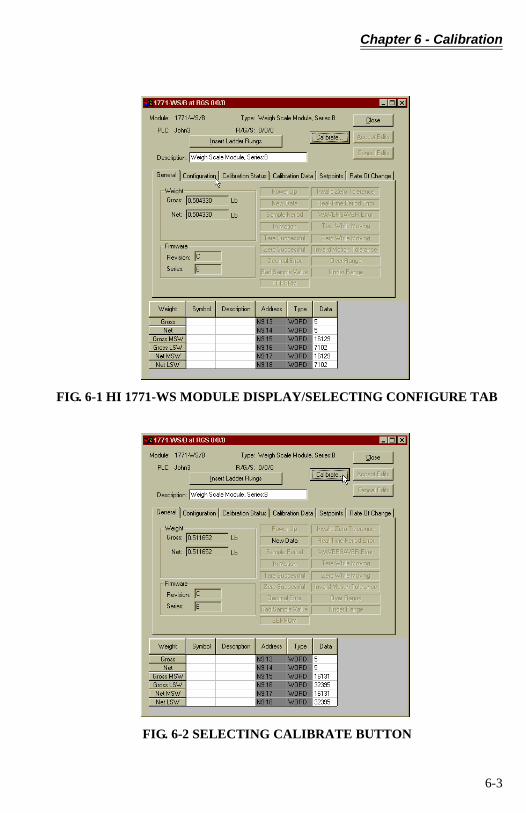
C2 Calibration Procedures
Step 1. On the HI 1771-WS Module display, click on the Configuration tab. (See Fig. 6-1) The configuration display appears. (See Fig. 6-2)
Step 2. Click on the Calibrate Button. The Cali-bration Display appears. (See Fig. 6-3)
6-2
Chapter 6 - Calibration
FIG. 6-1 HI 1771-WS MODULE DISPLAY/SELECTING CONFIGURE TAB
FIG. 6-2 SELECTING CALIBRATE BUTTON
6-3

HI 1771-WS WEIGH SCALE MODULE
FIG. 6-3 CALIBRATION DISPLAY/SELECTING ENTER CALIBRATE MODE
Step 3. Enter the calibration date (MM/DD/YY) in the Cal Date field.
Step 4. In the Calibration ID field, enter an ID that you have selected to indicate who per-formed the calibration. The ID can be as many as four alpha-numeric characters or spaces.
Step 5. In the Calibration Type field, use the pull-down list and select “C2”. The C2 Calibra-tion display appears. (See Fig. 6-5)
6-4

Chapter 6 - Calibration
FIG. 6-4 C2 CALIBRATION DISPLAY
Step 6. In the Number of Load Cells field, enter the number of load cells that you are using.
Step 7. Click the Enter Cal Mode button. This enables the parameter fields for C2 cali-bration and triggers the “Read load point data in C2 Cal Mode” command, which should be indicated in the information window.
Step 8. Place a calibration weight (the weight can be zero) on the scale. Enter the value of this calibration weight in the Reference weight field.
Step 9. This is the only calibration weight used. This weight could be any weight from 0 thru the maximum. If the exact weight on the scale is not known, you can enter an approximation. Even if the total weight is incorrect, net changes in weight should be within the tolerances of C2 calibration if the weighing system is installed properly. Entering an approximation can minimize downtime when a load cell must be
6-5

HI 1771-WS WEIGH SCALE MODULE
replaced and the scale tank is not empty. However, if you do enter an approxima-tion, you should recalibrate later when you have the opportunity to use a known weight.
Step 10. Click the Accept button for the Reference weight. After 12 to 15 seconds, you will see a message telling you the Reference weight has been accepted.
Step 11. Click the Accept Values button to store the values in the module’s non-volatile mem-ory.
Hard Calibration Procedures
Step 1. On the HI 1771-WS Module display, click on the Configuration tab. (See Fig. 6-1) The configuration display appears. (See Fig. 6-2)
Step 2. Click on the Calibrate Button. The Cali-bration Display appears. (See Fig. 6-3)
Step 3. Enter the calibration date (MM/DD/YY) in the Cal Date field.
Step 4. In the Calibration ID field, enter an ID that you have selected to indicate who per-formed the calibration. The ID can be as many as four alpha-numeric characters or spaces.
Step 5. In the Calibration Type field, use the pull-down list and select “Hard”.
Step 6. Click the Enter Cal Mode button. This enables the parameter fields for hard cali-bration. (See Fig. 6-3) The Hard Calibra-tion display appears. (See Fig. 6-4)
6-6

Chapter 6 - Calibration
FIG. 6-5 HARD CALIBRATION DISPLAY
Step 7. Place a low calibration weight (the weight can be zero) on the scale. Enter the value of this calibration weight in the Low cali-bration weight field.
Step 8. Click the Accept button for the Low cali-bration weight. After 12 to 15 seconds, you will see a message telling you the low calibration weight has been accepted.
Step 9. This step is optional since you are not required to enter a midpoint lineariza-tion weight. Place a midpoint linearization calibration weight on the scale, and enter its value in the appropriate field on the dia-log.
Step 10. Click Accept for the Midpoint lineariza-tion weight. You will see a message in 12 to 15 seconds telling you that this weight has been accepted.
Step 11. Place the high calibration weight on the scale. We recommend that you select a
6-7
HI 1771-WS WEIGH SCALE MODULE
high calibration weight value that is 80 to 100% of the scale capacity. Enter the value of the weight in the appropriate field on the dialog.
Step 12. Click Accept for the High calibration weight. You will see a message in 12 to 15 seconds telling you that this weight has been accepted.
Step 13. Click the Accept Values button to store the values in the module’s non-volatile mem-ory.
Restore Calibration Procedures
The WS module always saves the last successful cali-bration to its non-volatile memory. When you want to replace an existing WS module with a new one with-out calibrating the module, you can restore a previ-ously saved calibration. You can also restore a calibration when you want to use the previously saved calibration instead of one you are currently working on, or to replace calibration data from a failed mod-ule.
CAUTION: YOU SHOULD ONLY RESTORE A CALIBRA-TION AS A SHORT-TERM SOLUTION FOR REPLACING A FAILED MODULE. WEIGHT READINGS OBTAINED FROM A MODULE WHOSE CALIBRATION WAS RESTORED FROM ANOTHER MODULE MAY NOT BE AS ACCURATE AS READINGS FROM THE ORIG-INAL MODULE. AFTER YOU HAVE REPLACED THE FAILED MODULE, RECALI-BRATE IT AS SOON AS POSSIBLE.
Step 1. On the HI 1771-WS Module display, click on the Configuration tab. (See Fig. 6-1) The configuration display appears. (See Fig. 6-2)
Step 2. Click on the Calibrate Button. The Cali-bration Display appears. (See Fig. 6-3)
Step 3. Enter the calibration date (MM/DD/YY) in the Cal Date field.
Step 4. In the Calibration ID field, enter an ID that you have selected to indicate who per-
6-8
Chapter 6 - Calibration
formed the calibration. The ID can be as many as four alpha-numeric characters or spaces.
Step 5. In the Calibration Type field, use the pull-down list and select Restore.
Step 6. Click Accept and then Accept Values to restore the values of the last successful calibration to the module’s non-volatile memory.
Read the Internal Resistance Value
To isolate problems with the module, or with the external load cells or wiring, you can read the WS module’s internal resistance. During factory testing and calibration, the module is set to read the value of an internal resistor. This resistance is stored in the module’s non-volatile RAM.
Step 1. On the HI 1771-WS Module display, click on the Configuration tab. (See Fig. 6-1) The configuration display appears. (See Fig. 6-2)
Step 2. Click on the Calibrate Button. The Cali-bration Display appears. (See Fig. 6-3)
Step 3. Click the Calibrate button on the module configuration screen. The calibration dia-log will appear.
Step 4. Enter the calibration date (MM/DD/YY) in the Cal Date field.
Step 5. In the Calibration ID field, enter an ID that you have selected to indicate who per-formed the calibration. The ID can be as many as four alpha-numeric characters or spaces.
Step 6. Click the Stability Test button. As the internal resistor is read, the software dis-plays the ADC counts.
Step 7. Verify that the count stabilizes after 10-15 seconds.
Step 8. If the ADC counts is within acceptable tol-erance of the stored value (count stabilizes after 10-15 seconds), and a test resistance
6-9
HI 1771-WS WEIGH SCALE MODULE
failure does not occur (as indicated on the Calibration Status screen by the Stability Test Failure bit not set)The module is operating properly.
Step 9. If you still experience problems, the load cells or wiring may be bad, and may need to be replaced. A test resistance value fail-ure occurs (the Stability Test Failure bit is set on the Calibration Status screen)The value is out of tolerance. You see an error message in the status window on the screen. The module is not operating prop-erly. Contact your local Hardy Instruments Customer Support.
Step 10. When you are finished reading resistance, click Close to exit the calibration screen.
6-10

Chapter 7 - Operating Procedures
CHAPTER 7 - OPERATING PROCEDURES
A Brief Description of Chapter 7
All information contained in Chapter 7 pertains to the
operation of the HI 1771-WS Weigh Scale Module.
The Operating Procedures include Writing and Read-
ing data transferred between the PLC and the weigh
scale module. The data is defined as either Read Data
(including Module Status words indicating the current
state of the module) from the weigh scale module or
Write Data sent to the module. It is very important
that the user be familiar with this chapter before oper-
ating the weight scale module.
Block Transfer, Read
Monitoring Status Data
This section shows you how to monitor status data by reading information directly from the data table.
Reading Floating-Point Values
The gross weight and net weight values are available in 32-bit floating-point format in words 5 through 8. Since the status block must be in an integer file, each 32-bit floating-point value takes up two 16-bit integer words. To copy floating-point values into a floating-point file, use a COPY FILE instruction:
Reading 6-Digit Integer Values
The status block contains 6-digit integer values. How-ever, a 16-bit integer word has limits of –32,768 and +32,767. Therefore, 2 words are used for each 6-digit
For this Value: Enter the:
source Address of the first integer word (containing the 16 most-significant bits of the floating-point value).
Destination Address of the floating-point word.
Length Length of the destination block being written to in 32-bit floating-point words.
To copy the gross and net weight values together, enter a length of 2.
7-1
HI 1771-WS WEIGH SCALE MODULE
integer value. The 3 most-significant decimal digits are placed in natural binary format in one word, and the 3 least-significant decimal digits are placed in nat-ural binary format in the other word.For example, if the most-significant word has a value of 783 and the least-significant word has a value of 26, the total value is 783026. Unless the most-signifi-cant word has a value of zero, its sign must match that of the least-significant word or the value is invalid.
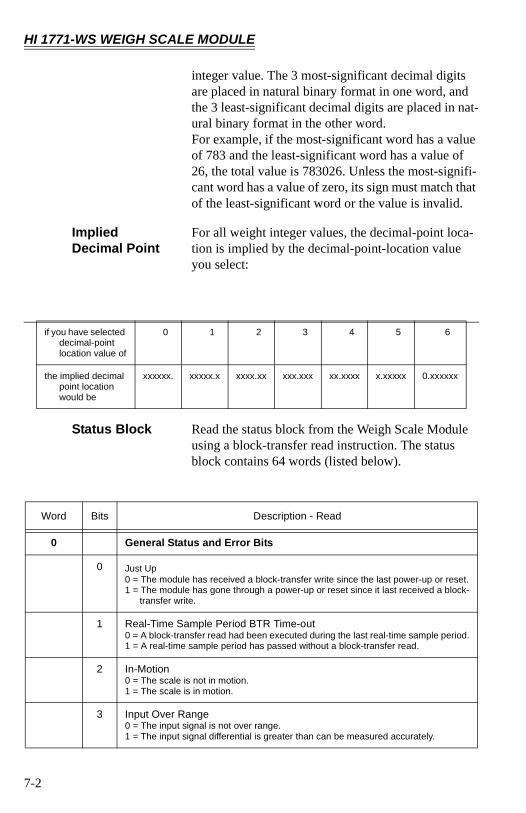
Implied Decimal Point
For all weight integer values, the decimal-point loca-tion is implied by the decimal-point-location value you select:
Status Block Read the status block from the Weigh Scale Module using a block-transfer read instruction. The status block contains 64 words (listed below).
if you have selected decimal-point location value of
0 1 2 3 4 5 6
the implied decimal point location would be
xxxxxx. xxxxx.x xxxx.xx xxx.xxx xx.xxxx x.xxxxx 0.xxxxxx
Word Bits Description - Read
0 General Status and Error Bits
0 Just Up0 = The module has received a block-transfer write since the last power-up or reset.1 = The module has gone through a power-up or reset since it last received a block-
transfer write.
1 Real-Time Sample Period BTR Time-out0 = A block-transfer read had been executed during the last real-time sample period.1 = A real-time sample period has passed without a block-transfer read.
2 In-Motion0 = The scale is not in motion.1 = The scale is in motion.
3 Input Over Range0 = The input signal is not over range.1 = The input signal differential is greater than can be measured accurately.
7-2

Chapter 7 - Operating Procedures
0 cont’d 4 Input Under Range0 = The input signal is not under range1 = The input signal differential is more negative than can be measured accurately.
5 Attempt to Set Tare While in Motion0 = Either the tare function is not active or the scale is not in motion.1 = The tare function is active and the scale is in motion.
6 Attempt to Zero While in Motion0 = Either the zero function is not active or the scale is not in motion.1 = The zero function is active and the scale is in motion.
7 Tare Successful0 = Either the tare function is not active, the scale is in motion, or the tare function
was not successfully completed.1 = The tare function was successfully completed.
8 Zero Successful0 = Either the zero function is not active, the scale is in motion, or the zero function
was not successfully completed.1 = The zero function was successfully completed.
9 New Data0 = The status-block data has not been updated by the module since the last block-
transfer read.1 = The status-block data has been updated by the module since the last block-
transfer read.
10 Decimal-Point Location Error0 = The decimal-point location value is valid.1 = An invalid value was entered for the decimal-point location.k-transfer read.
11 #Samples Entry Error0 = The #Samples value is valid.1 = An invalid value was entered for the number of samples.
12 Motion-Tolerance Entry Error0 = The motion-tolerance value is valid.1 = An invalid value was entered for motion tolerance.
13 Zero-Tolerance Entry Error0 = The zero-tolerance value is valid.1 = An invalid value was entered for zero tolerance.
14 Real-Time Sample Period Entry Error0 = The real-time sample period value is valid.1 = An invalid value was entered for the real-time sample period.
15 WAVERSAVER Selection Error0 = Only one WAVERSAVER selection bit is on.1 = Multiple WAVERSAVER selection bits are on.
Word Bits Description - Read
7-3

HI 1771-WS WEIGH SCALE MODULE
Word Bits Description - Read
1 General and Soft Calibration Bits
0 Not Calibrated0 = The current values in the non-volatile memory are valid calibration values.1 = The current values in the non-volatile memory are not valid calibration values —
the module is new (uncalibrated) or has bad non-volatile memory.
1 Calibration Mode0 = Not in a calibration mode.1 = In a calibration mode.
2 Last Calibration Mode0 = Module was last Cal’d in Hard-Cal Mode.1 = Module was last Cal’d in Soft-Cal Mode.
3 Last Soft-Cal/C2-Cal Mode — This bit is only valid if bit 2 is on.0 = The module was last calibrated in Hard-Cal mode.1 = The module was last calibrated in either Soft-Cal or C2-Cal mode.
4 4 Write Successful0 = Write not successful.1 = Write to non-volatile memory successful.
5 Current Calibration Mode0 = Set for Hard-Cal.1 = Set for Soft-Cal or C2-Cal.
6 Current Soft-Cal/C2-Cal Mode — This bit is only valid if bit 5 is on.0 = Set for Soft-Cal mode.1 = Set for C2-Cal mode.
7 Calibration Date or ID Error0 = No error1 = An invalid value was entered for the calibration year, month, day, or identifica-
tion.
8 Sensitivity Error0 = Sensitivity value is valid.1 = Sensitivity value entered is invalid.
9 Range Error0 = Range value is valid.1 = Range value entered is invalid.d is invalid.
10 Incorrect Load-Point Count in C2-Cal0 = The number of load points found during the read matched the number specified.1 = The number of load points found during the read did not match the number spec-
ified.
11 Load-Point Error in C2-Cal0 = No load-cell error.1 = Either no load points were found, or there was a communication error.
12 C2-Cal Read Complete0 = The load-point data has not yet been read, or errors were reported.1 = The load-point data was read successfully, and no errors were reported.
7-4

Chapter 7 - Operating Procedures
1 Cont’d 13 Test-Resistance Value Failure0 = Test-resistance value is within tolerance of the test-resistance value taken at the-
factory.1 = Test-resistance value is not within tolerance of the test-resistance value taken at
the factory.
14 Restore Data Complete0 = Processing of values block-transferred to the module for restoring calibration
data is not complete.1 = Processing of values block-transferred to the module for restoring calibration
data is complete. If no errors were found, the values have been loaded into the module’s non-volatile memory. If errors were found, they have been reported with the error bits.
15 EEPROM Failure0 = Successful write to EEPROM detected1 = Unsuccessful write to EEPROM detected
Available for Series B mode only
Word Bits Description - Read
2 Hardware Calibration Bits
0 Calibration Low-Weight Error0 = The CAL-LO reference weight value entered was OK.1 = The CAL-LO reference weight value entered was invalid.
1 Midpoint Linearization Weight Error0 = The MID-LIN reference weight value entered was OK.1 = The MID-LIN reference weight value entered was invalid.
2 Calibration High-Weight Error0 = The CAL-HI reference weight value entered was OK.1 = The CAL-HI reference weight value entered was invalid.lid.
3 Calibration Low Attempted with Scale in Motion0 = Scale not in motion during calibration low attempt.1 = The calibration control “Calibration-Low-Read” bit was set on, and the scale wa
emotion.
4 Midpoint Linearization Attempted with Scale in Motion0 = Scale not in motion during midpoint linearization attempt.1 = The calibration control “Midpoint-Linearization-Read” bit was set on, and the
scale was in motion.
5 Calibration High Attempted with Scale in Motion0 = Scale not in motion during calibration high attempt.1 = The calibration control “Calibration-High-Read” bit was set on, and the scale was
in motion.
Word Bits Description - Read
7-5
HI 1771-WS WEIGH SCALE MODULE
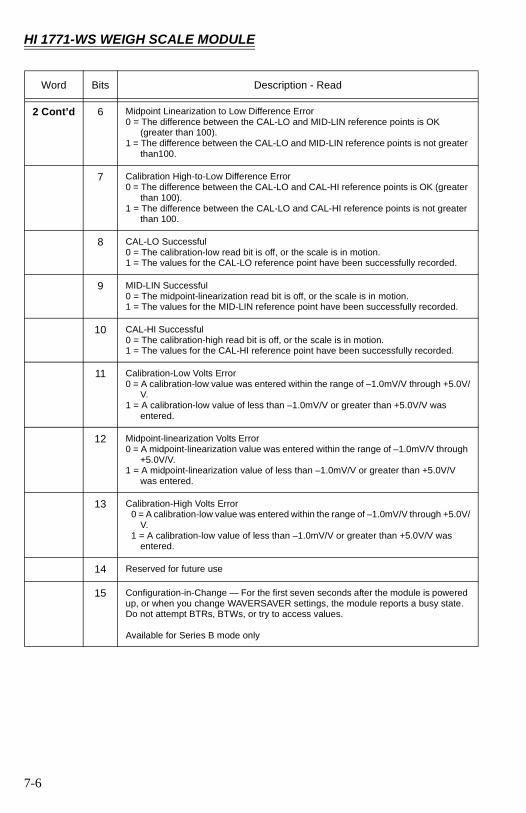
2 Cont’d 6 Midpoint Linearization to Low Difference Error0 = The difference between the CAL-LO and MID-LIN reference points is OK
(greater than 100).1 = The difference between the CAL-LO and MID-LIN reference points is not greater
than100.
7 Calibration High-to-Low Difference Error0 = The difference between the CAL-LO and CAL-HI reference points is OK (greater
than 100).1 = The difference between the CAL-LO and CAL-HI reference points is not greater
than 100.
8 CAL-LO Successful0 = The calibration-low read bit is off, or the scale is in motion.1 = The values for the CAL-LO reference point have been successfully recorded.
9 MID-LIN Successful0 = The midpoint-linearization read bit is off, or the scale is in motion.1 = The values for the MID-LIN reference point have been successfully recorded.
10 CAL-HI Successful0 = The calibration-high read bit is off, or the scale is in motion.1 = The values for the CAL-HI reference point have been successfully recorded.
11 Calibration-Low Volts Error0 = A calibration-low value was entered within the range of –1.0mV/V through +5.0V/
V.1 = A calibration-low value of less than –1.0mV/V or greater than +5.0V/V was
entered.
12 Midpoint-linearization Volts Error0 = A midpoint-linearization value was entered within the range of –1.0mV/V through
+5.0V/V.1 = A midpoint-linearization value of less than –1.0mV/V or greater than +5.0V/V
was entered.
13 Calibration-High Volts Error0 = A calibration-low value was entered within the range of –1.0mV/V through +5.0V/
V.1 = A calibration-low value of less than –1.0mV/V or greater than +5.0V/V was
entered.
14 Reserved for future use
15 Configuration-in-Change — For the first seven seconds after the module is powered up, or when you change WAVERSAVER settings, the module reports a busy state. Do not attempt BTRs, BTWs, or try to access values.
Available for Series B mode only
Word Bits Description - Read
7-6
Chapter 7 - Operating Procedures
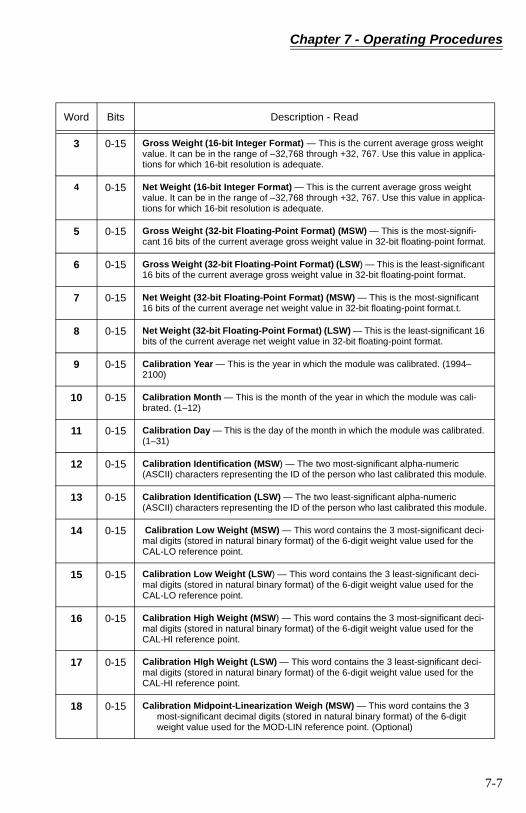
Word Bits Description - Read
3 0-15 Gross Weight (16-bit Integer Format) — This is the current average gross weight value. It can be in the range of –32,768 through +32, 767. Use this value in applica-tions for which 16-bit resolution is adequate.
4 0-15 Net Weight (16-bit Integer Format) — This is the current average gross weight value. It can be in the range of –32,768 through +32, 767. Use this value in applica-tions for which 16-bit resolution is adequate.
5 0-15 Gross Weight (32-bit Floating-Point Format) (MSW) — This is the most-signifi-cant 16 bits of the current average gross weight value in 32-bit floating-point format.
6 0-15 Gross Weight (32-bit Floating-Point Format) (LSW) — This is the least-significant 16 bits of the current average gross weight value in 32-bit floating-point format.
7 0-15 Net Weight (32-bit Floating-Point Format) (MSW) — This is the most-significant 16 bits of the current average net weight value in 32-bit floating-point format.t.
8 0-15 Net Weight (32-bit Floating-Point Format) (LSW) — This is the least-significant 16 bits of the current average net weight value in 32-bit floating-point format.
9 0-15 Calibration Year — This is the year in which the module was calibrated. (1994–2100)
10 0-15 Calibration Month — This is the month of the year in which the module was cali-brated. (1–12)
11 0-15 Calibration Day — This is the day of the month in which the module was calibrated. (1–31)
12 0-15 Calibration Identification (MSW) — The two most-significant alpha-numeric (ASCII) characters representing the ID of the person who last calibrated this module.
13 0-15 Calibration Identification (LSW) — The two least-significant alpha-numeric (ASCII) characters representing the ID of the person who last calibrated this module.
14 0-15 Calibration Low Weight (MSW) — This word contains the 3 most-significant deci-mal digits (stored in natural binary format) of the 6-digit weight value used for the CAL-LO reference point.
15 0-15 Calibration Low Weight (LSW) — This word contains the 3 least-significant deci-mal digits (stored in natural binary format) of the 6-digit weight value used for the CAL-LO reference point.
16 0-15 Calibration High Weight (MSW) — This word contains the 3 most-significant deci-mal digits (stored in natural binary format) of the 6-digit weight value used for the CAL-HI reference point.
17 0-15 Calibration HIgh Weight (LSW) — This word contains the 3 least-significant deci-mal digits (stored in natural binary format) of the 6-digit weight value used for the CAL-HI reference point.
18 0-15 Calibration Midpoint-Linearization Weigh (MSW) — This word contains the 3 most-significant decimal digits (stored in natural binary format) of the 6-digit weight value used for the MOD-LIN reference point. (Optional)
7-7
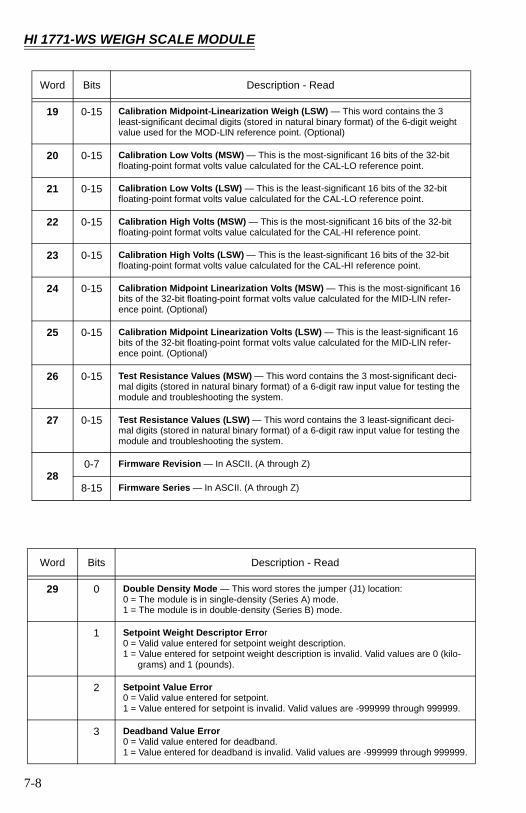
HI 1771-WS WEIGH SCALE MODULE
19 0-15 Calibration Midpoint-Linearization Weigh (LSW) — This word contains the 3 least-significant decimal digits (stored in natural binary format) of the 6-digit weight value used for the MOD-LIN reference point. (Optional)
20 0-15 Calibration Low Volts (MSW) — This is the most-significant 16 bits of the 32-bit floating-point format volts value calculated for the CAL-LO reference point.
21 0-15 Calibration Low Volts (LSW) — This is the least-significant 16 bits of the 32-bit floating-point format volts value calculated for the CAL-LO reference point.
22 0-15 Calibration High Volts (MSW) — This is the most-significant 16 bits of the 32-bit floating-point format volts value calculated for the CAL-HI reference point.
23 0-15 Calibration High Volts (LSW) — This is the least-significant 16 bits of the 32-bit floating-point format volts value calculated for the CAL-HI reference point.
24 0-15 Calibration Midpoint Linearization Volts (MSW) — This is the most-significant 16 bits of the 32-bit floating-point format volts value calculated for the MID-LIN refer-ence point. (Optional)
25 0-15 Calibration Midpoint Linearization Volts (LSW) — This is the least-significant 16 bits of the 32-bit floating-point format volts value calculated for the MID-LIN refer-ence point. (Optional)
26 0-15 Test Resistance Values (MSW) — This word contains the 3 most-significant deci-mal digits (stored in natural binary format) of a 6-digit raw input value for testing the module and troubleshooting the system.
27 0-15 Test Resistance Values (LSW) — This word contains the 3 least-significant deci-mal digits (stored in natural binary format) of a 6-digit raw input value for testing the module and troubleshooting the system.
280-7 Firmware Revision — In ASCII. (A through Z)
8-15 Firmware Series — In ASCII. (A through Z)
Word Bits Description - Read
29 0 Double Density Mode — This word stores the jumper (J1) location:0 = The module is in single-density (Series A) mode.1 = The module is in double-density (Series B) mode.
1 Setpoint Weight Descriptor Error0 = Valid value entered for setpoint weight description.1 = Value entered for setpoint weight description is invalid. Valid values are 0 (kilo-
grams) and 1 (pounds).
2 Setpoint Value Error0 = Valid value entered for setpoint.1 = Value entered for setpoint is invalid. Valid values are -999999 through 999999.
3 Deadband Value Error0 = Valid value entered for deadband.1 = Value entered for deadband is invalid. Valid values are -999999 through 999999.
Word Bits Description - Read
7-8
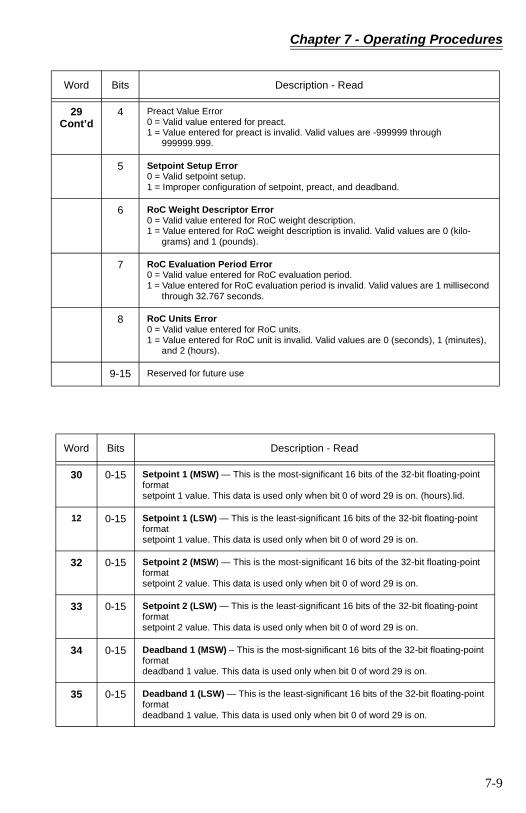
Chapter 7 - Operating Procedures
29Cont’d
4 Preact Value Error0 = Valid value entered for preact.1 = Value entered for preact is invalid. Valid values are -999999 through
999999.999.
5 Setpoint Setup Error0 = Valid setpoint setup.1 = Improper configuration of setpoint, preact, and deadband.
6 RoC Weight Descriptor Error0 = Valid value entered for RoC weight description.1 = Value entered for RoC weight description is invalid. Valid values are 0 (kilo-
grams) and 1 (pounds).
7 RoC Evaluation Period Error0 = Valid value entered for RoC evaluation period.1 = Value entered for RoC evaluation period is invalid. Valid values are 1 millisecond
through 32.767 seconds.
8 RoC Units Error0 = Valid value entered for RoC units.1 = Value entered for RoC unit is invalid. Valid values are 0 (seconds), 1 (minutes),
and 2 (hours).
9-15 Reserved for future use
Word Bits Description - Read
30 0-15 Setpoint 1 (MSW) — This is the most-significant 16 bits of the 32-bit floating-point formatsetpoint 1 value. This data is used only when bit 0 of word 29 is on. (hours).lid.
12 0-15 Setpoint 1 (LSW) — This is the least-significant 16 bits of the 32-bit floating-point formatsetpoint 1 value. This data is used only when bit 0 of word 29 is on.
32 0-15 Setpoint 2 (MSW) — This is the most-significant 16 bits of the 32-bit floating-point formatsetpoint 2 value. This data is used only when bit 0 of word 29 is on.
33 0-15 Setpoint 2 (LSW) — This is the least-significant 16 bits of the 32-bit floating-point formatsetpoint 2 value. This data is used only when bit 0 of word 29 is on.
34 0-15 Deadband 1 (MSW) – This is the most-significant 16 bits of the 32-bit floating-point formatdeadband 1 value. This data is used only when bit 0 of word 29 is on.
35 0-15 Deadband 1 (LSW) — This is the least-significant 16 bits of the 32-bit floating-point formatdeadband 1 value. This data is used only when bit 0 of word 29 is on.
Word Bits Description - Read
7-9

HI 1771-WS WEIGH SCALE MODULE
36 0-15 Deadband 2 (MSW) — This is the most-significant 16 bits of the 32-bit floating-point formatdeadband 2 value. This data is used only when bit 0 of word 29 is on.
37 0-15 Deadband 2 (LSW) — This is the least-significant 16 bits of the 32-bit floating-point formatdeadband 2 value. This data is used only when bit 0 of word 29 is on.
38 0-15 Preact 1 (MSW) – This is the most-significant 16 bits of the 32-bit floating-point for-mat preact1 value. This data is used only when bit 0 of word 29 is on.
39 0-15 Preact 1 (LSW) — This is the least-significant 16 bits of the 32-bit floating-point for-matpreact 1 value. This data is used only when bit 0 of word 29 is on.
40 0-15 Preact 2 (MSW) — This is the most-significant 16 bits of the 32-bit floating-point for-matpreact 2 value. This data is used only when bit 0 of word 29 is on.
41 0-15 Preact 2 (LSW) — This is the least-significant 16 bits of the 32-bit floating-point for-matpreact 2 value. This data is used only when bit 0 of word 29 is on.
42 0-15 SP Weight Description – This word stores the unit of measure for weight in setpointcalculations:0 = kilograms1 = pounds
43 0-15 RoC Time Units – This word stores the rate-of-change in time units:0 = seconds1 = minutes2 = hours
44 0-15 RoC Evaluation Period — This word stores the value for time over which a rate-of-changecalculation is made. (1 millisecond - 32.767 seconds)
45 0-15 RoC Weight Description – This word stores the unit of measure for weight in rate-of-change calculations:0 = kilograms1 = pounds
46 0-15 RoC Calculation (MSW) — This is the most-significant 16 bits of the 32-bit floating-point format RoC value. This data is used only when bit 0 of word 29 is on.
47 0-15 RoC Calibration (LSW) -This is the least-significant 16 bits of the 32-bit floating-point format RoC value. This data is used only when bit 0 of word 29 is on.
48 0-15 Calibration/Diagnostics Control — This word stores calibration and diagnostic information that you view on the active window for configuration verification.
49 0-15 Decimal Point Location - This word stores the number of digits to the right of the decimal point for all weight integer values.
50 0-15 Motion Tolerance (MSW) — This word stores the 3 most-significant decimal digits (stored in natural binary format) of the 6-digit value that defines the weight change that will trigger the in-motion flag to be set. You entered this value on the Configura-tion screen.
Word Bits Description - Read
7-10

Chapter 7 - Operating Procedures
Saving the Tare and Zero Values in Non-Volatile Memory
By default, the Weigh Scale module typically stores the tare and zero values in internal memory. These values are not included in read or write block transfer data, so they are not stored in the PLC processor data table. This means that any time the module loses power, the tare and zero values are reset. You must repeat the tare and zero functions to restore the tare and zero values in use before power to the module was lost.To avoid having to repeat the tare and zero functions, you can store the current tare and zero values in non-volatile memory. These values are restored automati-
51 0-15 Motion Tolerance (LSW) — This word stores the 3 least-significant decimal digits (stored in natural binary format) of the 6-digit value that defines the weight change that will trigger the in-motion flag to be set. You entered this value on the Configura-tion screen.
52 0-15 Number of Averages — This word stores the number of weight samples used to calculate the average current weight that you entered on the Configuration screen.
53 0-15 Number of Load Cells — This word stores the number of load cells that you entered on the Calibration screen.
54 0-15 Reserved for future use
55 0-15 Reserved for future use
56 0-15 Real-time Sample Period — This word stores the period at which the module puts a new average weight value into the read block and turns on the new-data bit. You entered this value on the Configuration screen.
57 0-15 Reserved for future use
58 0-15 Reserved for future use
59 0-15 WAVERSAVER Selection — This word stores the lowest frequency you want to reject. You entered this value on the Configuration screen.
60 0-15 Weight Functions — This word stores the tare-enable and zero-enable values you selected on the Configuration screen.
61 0-15 Weight Modes — This word stores the value (lb. or kg.) that you selected on the
Configuration screen.
62 0-15 Zero Tolerance (MSW) — This word stores the 3 most-significant decimal digits (stored in natural binary format) of the 6-digit value that defines the acceptable toler-ance for zero weight. You entered this value on the Configuration screen.
63 0-15 Zero Tolerance (LSW) — This word contains the 3 least-significant decimal digits (stored in natural binary format) of the 6-digit value that defines the acceptable toler-ance for zero weight. You entered this value on the Configuration screen.
Word Bits Description - Read
7-11
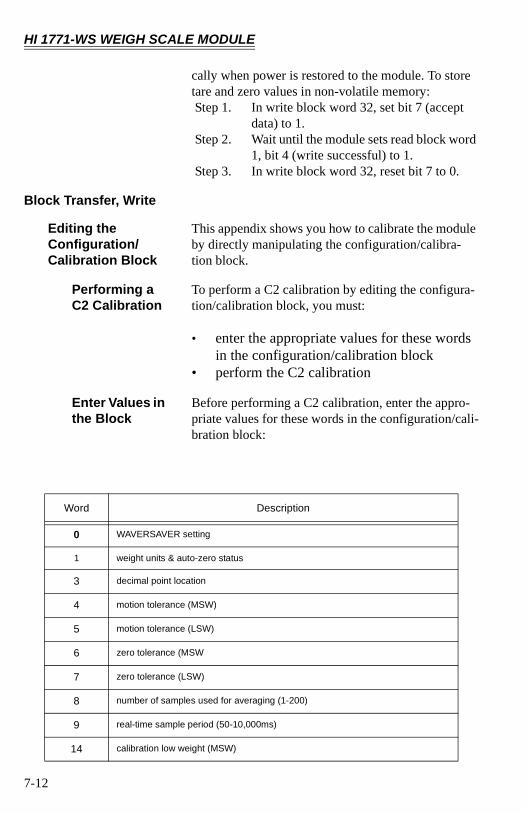
HI 1771-WS WEIGH SCALE MODULE
cally when power is restored to the module. To store tare and zero values in non-volatile memory: Step 1. In write block word 32, set bit 7 (accept
data) to 1. Step 2. Wait until the module sets read block word
1, bit 4 (write successful) to 1. Step 3. In write block word 32, reset bit 7 to 0.
Block Transfer, Write
Editing the Configuration/Calibration Block
This appendix shows you how to calibrate the module by directly manipulating the configuration/calibra-tion block.
Performing a C2 Calibration
To perform a C2 calibration by editing the configura-tion/calibration block, you must:
• enter the appropriate values for these words in the configuration/calibration block
• perform the C2 calibration
Enter Values in the Block
Before performing a C2 calibration, enter the appro-priate values for these words in the configuration/cali-bration block:
Word Description
0 WAVERSAVER setting
1 weight units & auto-zero status
3 decimal point location
4 motion tolerance (MSW)
5 motion tolerance (LSW)
6 zero tolerance (MSW
7 zero tolerance (LSW)
8 number of samples used for averaging (1-200)
9 real-time sample period (50-10,000ms)
14 calibration low weight (MSW)
7-12

Chapter 7 - Operating Procedures
Perform the C2 Calibration
Step 1. To place the module in calibration mode, in write-block word 32,set bit 0 and bits 2 & 3 to 1. In read-block word 1, bit 1 and bits 5 & 6 are set to 1. If the module has not previously been calibrated, in read-block word 1, bit 0 is set to 1.
NOTE: Bits 0, 2 and 3 are to remain on during the entire Cal-ibration process.
Step 2. Set word 32, bit 8 ON to read load point data in C2-Cal mode. If successful, this will turn on read block word 1, bit 12 (C2 read complete.)
Step 3. Perform a CAL-LO:• With the low calibration weight (or no
weight) on the scale, in write-block word 32, set bit 4 to 1. If no errors occur, in approximately 12 seconds, read-block word 2, bit 8 is set to 1. (CAL-LO successful)
• In write-block word 32, reset bit 4 to 0.
Step 4. Accept the calibration data:• In write-block word 32, set bit 7 to 1.
If no errors occur, in read-block word 1, bit 4 is set to 1. (write successful)
• In write-block word 32, reset bit 7 to 0.
Step 5. To exit calibration mode, in write-block word 32, reset bit 0 to 0. In read-block word 1, bit 1 and bit 5 & 6 are set to 0.
Performing a Hard Calibration
To perform a hard calibration by editing the configu-ration block, you must:• Enter the configuration values for the appropriate
words in the configuration/calibration block, then• perform the hard calibration
15 calibration low weight (LSW)
Word Description
7-13

HI 1771-WS WEIGH SCALE MODULE
Enter Values in the Block
Before performing a hard calibration, enter the appro-priate values for these words in the configuration/cali-bration block:
Perform the Hard Calibration
Step 1. To place the module in calibration mode, in write-block word 32, set bit 0 to 1. In read-block word 1, bit 1 is set to 1 to indi-cate the calibration mode. If the module has not previously been calibrated, in read-block word 1, bit 0 is set to 1.
Step 2. Perform a CAL-LO:
• Place the calibration low weight value in words 14 and 15. Be sure to observe the correct decimal point location. (CAL–LO weight)
Word Description - Write
0 WAVERSAVER setting
1 weight units & auto-zero status
3 decimal point location
4 motion tolerance (MSW)
5 motion tolerance (LSW)
6 zero tolerance (MSW
7 zero tolerance (LSW)
8 number of samples used for averaging (1-200)
9 real-time sample period (50-10,000ms)
14 calibration low weight (MSW)
15 calibration low weight (LSW)
16 calibration mid weight (MSW)
17 calibration mid weight (LSW)
18 calibration high weight (MSW)
19 calibration high weight (LSW)
7-14
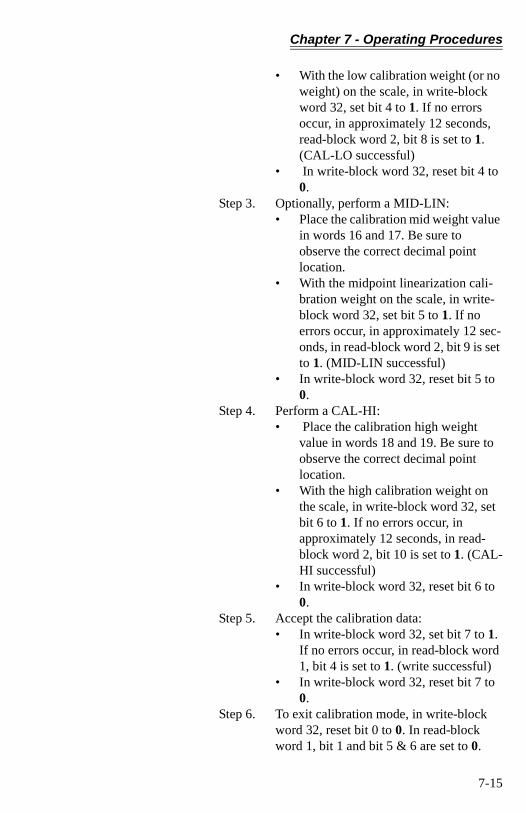
Chapter 7 - Operating Procedures
• With the low calibration weight (or no weight) on the scale, in write-block word 32, set bit 4 to 1. If no errors occur, in approximately 12 seconds, read-block word 2, bit 8 is set to 1. (CAL-LO successful)
• In write-block word 32, reset bit 4 to 0.
Step 3. Optionally, perform a MID-LIN:• Place the calibration mid weight value
in words 16 and 17. Be sure to observe the correct decimal point location.
• With the midpoint linearization cali-bration weight on the scale, in write-block word 32, set bit 5 to 1. If no errors occur, in approximately 12 sec-onds, in read-block word 2, bit 9 is set to 1. (MID-LIN successful)
• In write-block word 32, reset bit 5 to 0.
Step 4. Perform a CAL-HI:• Place the calibration high weight
value in words 18 and 19. Be sure to observe the correct decimal point location.
• With the high calibration weight on the scale, in write-block word 32, set bit 6 to 1. If no errors occur, in approximately 12 seconds, in read-block word 2, bit 10 is set to 1. (CAL-HI successful)
• In write-block word 32, reset bit 6 to 0.
Step 5. Accept the calibration data:• In write-block word 32, set bit 7 to 1.
If no errors occur, in read-block word 1, bit 4 is set to 1. (write successful)
• In write-block word 32, reset bit 7 to 0.
Step 6. To exit calibration mode, in write-block word 32, reset bit 0 to 0. In read-block word 1, bit 1 and bit 5 & 6 are set to 0.
7-15

HI 1771-WS WEIGH SCALE MODULE
Restoring the Module
After you have calibrated the module, you must copy the voltage values in the read block words 20, 21, 22, 23, 24, and 25 into the write block words 20, 21, 22, 23, 24, and 25.
NOTE: The values in the read block are not in the same order as those in the write block. If these values are not in the write block, the restore function does not work. All of these parameters must have valid values before the restore function can be completed.
• low weight• mid weight• high weight• low volts• mid volts• high volts
To restore the module:
Step 1. To place the module in calibration mode, in write-block word 32, set bit 0 to 1.
Step 2. Wait for the module to enter calibration mode (read block word 1, bit 1 is set to 1, if the module has not previously been cali-brated, in read-block word 1, bit 0 is set to 1 and the Cal/Com LED flashes red).
Step 3. Set word 32, bit 1 (the restore bit) to 1. When the restore is complete, in read-block word 1, bit 14 is set to 1 (restore data complete).
Step 4. In write block word 32, set bit 7 to 1. Step 5. Wait for read block word 1, bit 4 to be set
to 0. Step 6. To exit calibration mode, in write-block
word 32, reset bit 0, bit 1, and bit 7 to 0. In read-block word 1, bit 1 and bit 14 are set to 0.
Configuration/Calibration Block
7-16
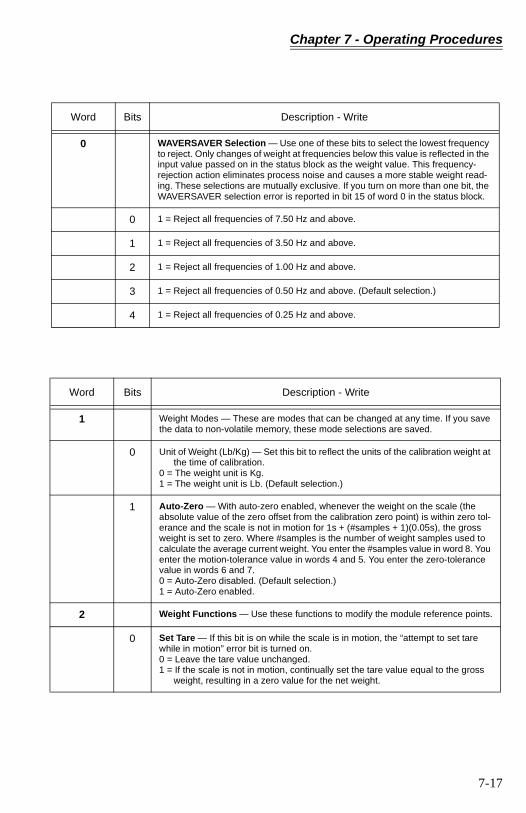
Chapter 7 - Operating Procedures
Word Bits Description - Write
0 WAVERSAVER Selection — Use one of these bits to select the lowest frequency to reject. Only changes of weight at frequencies below this value is reflected in the input value passed on in the status block as the weight value. This frequency-rejection action eliminates process noise and causes a more stable weight read-ing. These selections are mutually exclusive. If you turn on more than one bit, the WAVERSAVER selection error is reported in bit 15 of word 0 in the status block.
0 1 = Reject all frequencies of 7.50 Hz and above.
1 1 = Reject all frequencies of 3.50 Hz and above.
2 1 = Reject all frequencies of 1.00 Hz and above.
3 1 = Reject all frequencies of 0.50 Hz and above. (Default selection.)
4 1 = Reject all frequencies of 0.25 Hz and above.
Word Bits Description - Write
1 Weight Modes — These are modes that can be changed at any time. If you save the data to non-volatile memory, these mode selections are saved.
0 Unit of Weight (Lb/Kg) — Set this bit to reflect the units of the calibration weight at the time of calibration.
0 = The weight unit is Kg.1 = The weight unit is Lb. (Default selection.)
1 Auto-Zero — With auto-zero enabled, whenever the weight on the scale (the absolute value of the zero offset from the calibration zero point) is within zero tol-erance and the scale is not in motion for 1s + (#samples + 1)(0.05s), the gross weight is set to zero. Where #samples is the number of weight samples used to calculate the average current weight. You enter the #samples value in word 8. You enter the motion-tolerance value in words 4 and 5. You enter the zero-tolerance value in words 6 and 7.0 = Auto-Zero disabled. (Default selection.)1 = Auto-Zero enabled.
2 Weight Functions — Use these functions to modify the module reference points.
0 Set Tare — If this bit is on while the scale is in motion, the “attempt to set tare while in motion” error bit is turned on.0 = Leave the tare value unchanged.1 = If the scale is not in motion, continually set the tare value equal to the gross
weight, resulting in a zero value for the net weight.
7-17
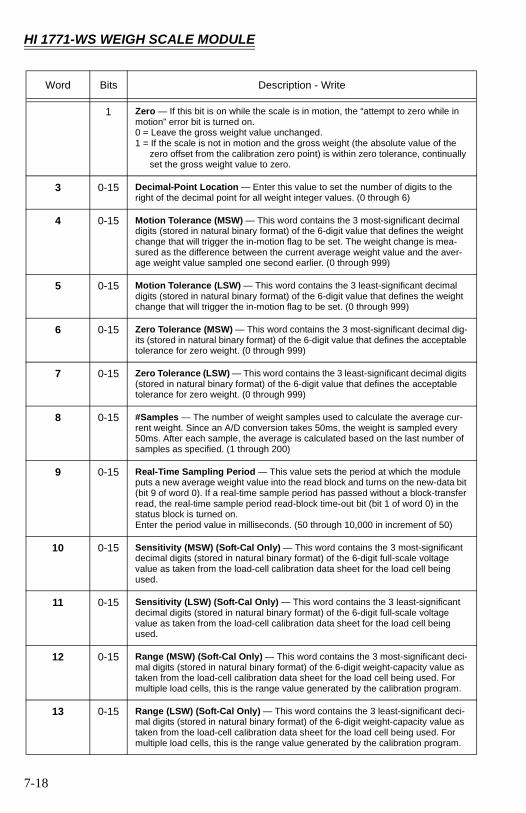
HI 1771-WS WEIGH SCALE MODULE
1 Zero — If this bit is on while the scale is in motion, the “attempt to zero while in motion” error bit is turned on.0 = Leave the gross weight value unchanged.1 = If the scale is not in motion and the gross weight (the absolute value of the
zero offset from the calibration zero point) is within zero tolerance, continually set the gross weight value to zero.
3 0-15 Decimal-Point Location — Enter this value to set the number of digits to the right of the decimal point for all weight integer values. (0 through 6)
4 0-15 Motion Tolerance (MSW) — This word contains the 3 most-significant decimal digits (stored in natural binary format) of the 6-digit value that defines the weight change that will trigger the in-motion flag to be set. The weight change is mea-sured as the difference between the current average weight value and the aver-age weight value sampled one second earlier. (0 through 999)
5 0-15 Motion Tolerance (LSW) — This word contains the 3 least-significant decimal digits (stored in natural binary format) of the 6-digit value that defines the weight change that will trigger the in-motion flag to be set. (0 through 999)
6 0-15 Zero Tolerance (MSW) — This word contains the 3 most-significant decimal dig-its (stored in natural binary format) of the 6-digit value that defines the acceptable tolerance for zero weight. (0 through 999)
7 0-15 Zero Tolerance (LSW) — This word contains the 3 least-significant decimal digits (stored in natural binary format) of the 6-digit value that defines the acceptable tolerance for zero weight. (0 through 999)
8 0-15 #Samples — The number of weight samples used to calculate the average cur-rent weight. Since an A/D conversion takes 50ms, the weight is sampled every 50ms. After each sample, the average is calculated based on the last number of samples as specified. (1 through 200)
9 0-15 Real-Time Sampling Period — This value sets the period at which the module puts a new average weight value into the read block and turns on the new-data bit (bit 9 of word 0). If a real-time sample period has passed without a block-transfer read, the real-time sample period read-block time-out bit (bit 1 of word 0) in the status block is turned on.Enter the period value in milliseconds. (50 through 10,000 in increment of 50)
10 0-15 Sensitivity (MSW) (Soft-Cal Only) — This word contains the 3 most-significant decimal digits (stored in natural binary format) of the 6-digit full-scale voltage value as taken from the load-cell calibration data sheet for the load cell being used.
11 0-15 Sensitivity (LSW) (Soft-Cal Only) — This word contains the 3 least-significant decimal digits (stored in natural binary format) of the 6-digit full-scale voltage value as taken from the load-cell calibration data sheet for the load cell being used.
12 0-15 Range (MSW) (Soft-Cal Only) — This word contains the 3 most-significant deci-mal digits (stored in natural binary format) of the 6-digit weight-capacity value as taken from the load-cell calibration data sheet for the load cell being used. For multiple load cells, this is the range value generated by the calibration program.
13 0-15 Range (LSW) (Soft-Cal Only) — This word contains the 3 least-significant deci-mal digits (stored in natural binary format) of the 6-digit weight-capacity value as taken from the load-cell calibration data sheet for the load cell being used. For multiple load cells, this is the range value generated by the calibration program.
Word Bits Description - Write
7-18
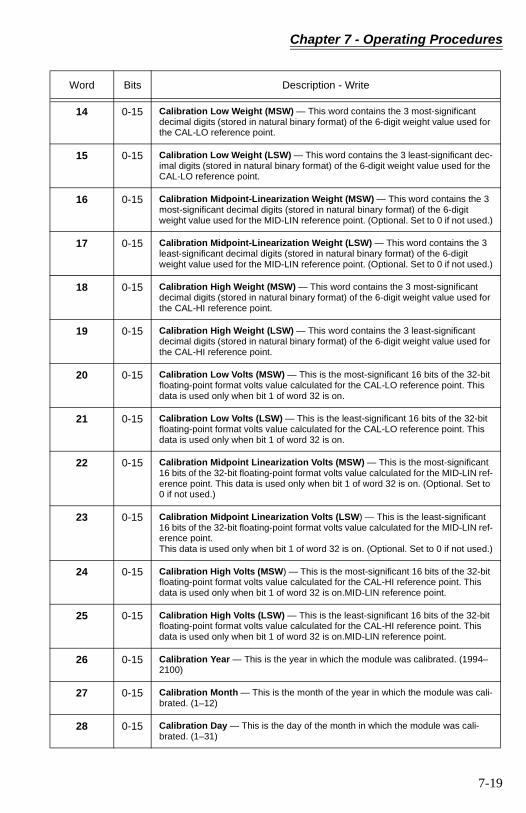
Chapter 7 - Operating Procedures
14 0-15 Calibration Low Weight (MSW) — This word contains the 3 most-significant decimal digits (stored in natural binary format) of the 6-digit weight value used for the CAL-LO reference point.
15 0-15 Calibration Low Weight (LSW) — This word contains the 3 least-significant dec-imal digits (stored in natural binary format) of the 6-digit weight value used for the CAL-LO reference point.
16 0-15 Calibration Midpoint-Linearization Weight (MSW) — This word contains the 3 most-significant decimal digits (stored in natural binary format) of the 6-digit weight value used for the MID-LIN reference point. (Optional. Set to 0 if not used.)
17 0-15 Calibration Midpoint-Linearization Weight (LSW) — This word contains the 3 least-significant decimal digits (stored in natural binary format) of the 6-digit weight value used for the MID-LIN reference point. (Optional. Set to 0 if not used.)
18 0-15 Calibration High Weight (MSW) — This word contains the 3 most-significant decimal digits (stored in natural binary format) of the 6-digit weight value used for the CAL-HI reference point.
19 0-15 Calibration High Weight (LSW) — This word contains the 3 least-significant decimal digits (stored in natural binary format) of the 6-digit weight value used for the CAL-HI reference point.
20 0-15 Calibration Low Volts (MSW) — This is the most-significant 16 bits of the 32-bit floating-point format volts value calculated for the CAL-LO reference point. This data is used only when bit 1 of word 32 is on.
21 0-15 Calibration Low Volts (LSW) — This is the least-significant 16 bits of the 32-bit floating-point format volts value calculated for the CAL-LO reference point. This data is used only when bit 1 of word 32 is on.
22 0-15 Calibration Midpoint Linearization Volts (MSW) — This is the most-significant 16 bits of the 32-bit floating-point format volts value calculated for the MID-LIN ref-erence point. This data is used only when bit 1 of word 32 is on. (Optional. Set to 0 if not used.)
23 0-15 Calibration Midpoint Linearization Volts (LSW) — This is the least-significant 16 bits of the 32-bit floating-point format volts value calculated for the MID-LIN ref-erence point.This data is used only when bit 1 of word 32 is on. (Optional. Set to 0 if not used.)
24 0-15 Calibration High Volts (MSW) — This is the most-significant 16 bits of the 32-bit floating-point format volts value calculated for the CAL-HI reference point. This data is used only when bit 1 of word 32 is on.MID-LIN reference point.
25 0-15 Calibration High Volts (LSW) — This is the least-significant 16 bits of the 32-bit floating-point format volts value calculated for the CAL-HI reference point. This data is used only when bit 1 of word 32 is on.MID-LIN reference point.
26 0-15 Calibration Year — This is the year in which the module was calibrated. (1994–2100)
27 0-15 Calibration Month — This is the month of the year in which the module was cali-brated. (1–12)
28 0-15 Calibration Day — This is the day of the month in which the module was cali-brated. (1–31)
Word Bits Description - Write
7-19

HI 1771-WS WEIGH SCALE MODULE
29 0-15 Calibration Identification (MSW) — The two most-significant upper-case alpha-numeric (ASCII) characters representing the ID of the person who last calibrated this module.
30 0-15 Calibration Identification (LSW) — The two least-significant upper-case alpha-numeric (ASCII) characters representing the ID of the person who last calibrated this module.
31 0-15 Number of Load points in C2-Cal — This is the number of load points con-nected. It is used to verify that all of the load points were found during the auto-matic search for calibration data. (0 through 8)
Word Bits Description - Write
32 Calibration/Diagnostic Control — Use these bits to calibrate the module, run diagnostics on the module, and control data storage in the non-volatile mem-ory on the module.
0 Calibration Mode — If you turn off this bit before you turn off the accept data bit (bit 7 of word 32) the new calibration is lost.
0 = Disable calibration mode.1 = Enable calibration mode.
1 Restore Calibration Data — This bit determines whether to use the calibration data in this block to restore calibration values regardless of the state of the accept data bit (bit 7 of word 32). Calibration data here refers to all calibration data including calibration-volts reference points. Using calibration data here refers to using old calibration data stored in the PLC data table to restore the calibration data on the module.
0 = Disable the writing of calibration restoration data into non-volatile memory.1 = Enable the writing of calibration restoration data into non-volatile memory.
2 Hard/Soft Calibration — This bit is relevant only if bit 1 is off.0 = Hard calibration mode.1 = Soft calibration or C2 calibration mode.n the module.
3 Soft-CalC2-Cal Mode — This bit is relevant only if bit 1 is off and bit 2 is on.0 = Set Soft-Cal mode.1 = Set C2-Cal mode. The module will ignore the configuration block values for
sensitivity and range.
4 Calibration-Low Read0 = Disable calibration-low read.1 = Enable calibration-low read. The module sets the averages to 200, waits 12
seconds, reads the value from the scale, stores it as the calibration-low value, and uses it in conjunction with the calibration-low weight for the CAL-LO refer-ence point. As long as this bit is on and the scale is not in motion, the module will read the calibration-low value continually.
Word Bits Description - Write
7-20
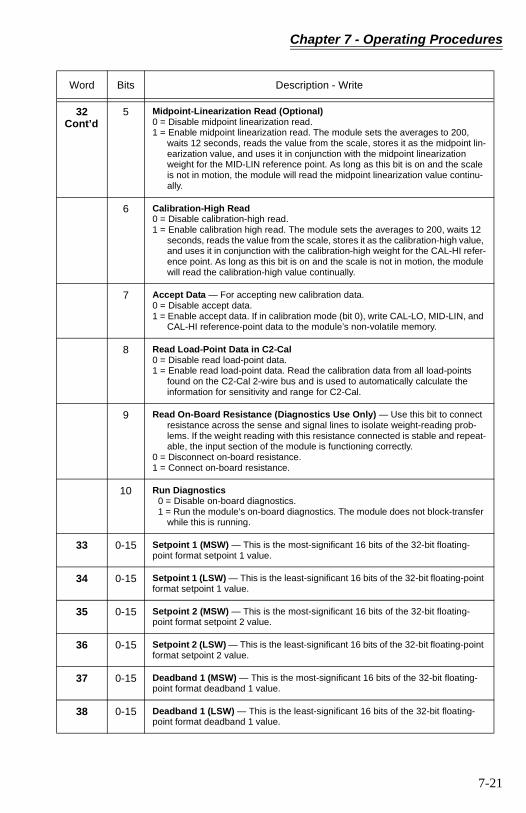
Chapter 7 - Operating Procedures
32Cont’d
5 Midpoint-Linearization Read (Optional)0 = Disable midpoint linearization read.1 = Enable midpoint linearization read. The module sets the averages to 200,
waits 12 seconds, reads the value from the scale, stores it as the midpoint lin-earization value, and uses it in conjunction with the midpoint linearization weight for the MID-LIN reference point. As long as this bit is on and the scale is not in motion, the module will read the midpoint linearization value continu-ally.
6 Calibration-High Read0 = Disable calibration-high read.1 = Enable calibration high read. The module sets the averages to 200, waits 12
seconds, reads the value from the scale, stores it as the calibration-high value, and uses it in conjunction with the calibration-high weight for the CAL-HI refer-ence point. As long as this bit is on and the scale is not in motion, the module will read the calibration-high value continually.
7 Accept Data — For accepting new calibration data.0 = Disable accept data.1 = Enable accept data. If in calibration mode (bit 0), write CAL-LO, MID-LIN, and
CAL-HI reference-point data to the module’s non-volatile memory.
8 Read Load-Point Data in C2-Cal0 = Disable read load-point data.1 = Enable read load-point data. Read the calibration data from all load-points
found on the C2-Cal 2-wire bus and is used to automatically calculate the information for sensitivity and range for C2-Cal.
9 Read On-Board Resistance (Diagnostics Use Only) — Use this bit to connect resistance across the sense and signal lines to isolate weight-reading prob-lems. If the weight reading with this resistance connected is stable and repeat-able, the input section of the module is functioning correctly.
0 = Disconnect on-board resistance.1 = Connect on-board resistance.
10 Run Diagnostics0 = Disable on-board diagnostics.1 = Run the module’s on-board diagnostics. The module does not block-transfer
while this is running.
33 0-15 Setpoint 1 (MSW) — This is the most-significant 16 bits of the 32-bit floating-point format setpoint 1 value.
34 0-15 Setpoint 1 (LSW) — This is the least-significant 16 bits of the 32-bit floating-point format setpoint 1 value.
35 0-15 Setpoint 2 (MSW) — This is the most-significant 16 bits of the 32-bit floating-point format setpoint 2 value.
36 0-15 Setpoint 2 (LSW) — This is the least-significant 16 bits of the 32-bit floating-point format setpoint 2 value.
37 0-15 Deadband 1 (MSW) — This is the most-significant 16 bits of the 32-bit floating-point format deadband 1 value.
38 0-15 Deadband 1 (LSW) — This is the least-significant 16 bits of the 32-bit floating-point format deadband 1 value.
Word Bits Description - Write
7-21
HI 1771-WS WEIGH SCALE MODULE
Creating Setpoints If you set the module for double density (Series B) mode, it supports two setpoints. Each setpoint is made up of:
• Weight Description — defines the unit of mea-sure for weight in setpoint calculations. Valid val-ues for weight descriptions are:
– 0 = kilograms– 1 = pounds
• Setpoint Value — target weight value. Valid values for setpoint values are -999999 through 999999
39 0-15 Deadband 2 (MSW) — This is the most-significant 16 bits of the 32-bit floating-point format deadband 2 value.
40 0-15 Deadband 2 (LSW) — This is the least-significant 16 bits of the 32-bit floating-point format deadband 2 value.
41 0-15 Preact 1 (MSW) — This is the most-significant 16 bits of the 32-bit floating-point format preact 1 value.
42 0-15 Preact 1 (LSW) — This is the least-significant 16 bits of the 32-bit floating-point format preact 1 value.
43 0-15 Preact 2 (MSW) — This is the most-significant 16 bits of the 32-bit floating-point format preact 2 value.
44 0-15 Preact 2 (LSW) — This is the least-significant 16 bits of the 32-bit floating-point format preact 2 value.
45 0-15 SP Weight Description — This word stores the unit of measure for weight in set-point calculations:0 = kilograms1 = pounds
46 0-15 RoC Time Units — This word stores the unit of measure for time in rate-of-change calculations:0 = seconds1 = minutes2 = hours
47 0-15 RoC Evaluation Period — This word stores the value for time over which a rate-of-change calculation is made. (1 millisecond - 32.767 seconds)
48 0-15 RoC Weight Description — This word stores the unit of measure for weight in rate-of-change calculations:0 = kilograms1 = pounds
Word Bits Description - Write
7-22
Chapter 7 - Operating Procedures
• Deadband — used to separate the “turn-off” weight. At the actual switching point, the dead-band prevents switching “chatter.” Valid values for deadband values are -999999 through 999999
• Preact Value — accounts for delay in the weighing system due to mechanical delays, mate-rial in flight, or other system delays. Valid values for deadband values are -999999 through 999999
Example values are shown below:
Weight Description = poundsSetpoint = 100 lb.Preact = -10 lb.Deadband = -15 lb.
The module sets the comparison result bit to ON when the weight value is _ (greater than or equal to) 90 lb., i.e.,
(100 lb. + (-10 lb.))_ 90 lb. (preact)
When the weight value is (less than or equal to) 85 lb., i.e.,
(100 lb. + (-15 lb.)) 85 lb. (deadband)
then the module sets the comparison result bit to OFF.In addition, taring the module, zeroing the module, emptying the vessel, or reducing the weight below the deadband value resets these bits to OFF
Setpoint Status Bits
The comparison result bits are single transferred to bits 10 and 11 (octal) to the input image word that cor-responds to the module’s physical location in the chassis. When the weight value is to the sum of (setpoint1 + preact1), then bit 10 is set to ON. Bit 11 is set to ON when the weight value _ to the sum of (setpoint2 + preact2). These bits are set to OFF when the weight value is (setpoint + deadband); for exam-ple, when we tare or zero the scale.
7-23

HI 1771-WS WEIGH SCALE MODULE
7-24

Chapter 8 - Troubleshooting
CHAPTER 8 - TROUBLESHOOTING
A Brief Description of Chapter 8
This chapter gives you information for troubleshoot-ing your system. We list these in order of ease of per-forming and likelihood of helping you isolate the problem.
Diagnostics Reported by the Module
At power-up, the module checks for:
• Correct RAM operation• EPROM operation• EEPROM operation
During this self-diagnostic check, the RUN/FLT (fault) indicator flashes green at a rate of 5 to 10 times a second. (We show the indicators in Figure 12.1.) This self-diagnostic check lasts from 2 to 30 seconds, depending on the WAVERSAVER selection; the lower the frequency, the longer the time.
When it completes this check satisfactorily, the RUN/FAULT indicator stops this rapid flashing. However, if the module does nothave valid calibration data, the RUN/FAULT indica-tor flashes green at a rate of once a second.
When it completes this check satisfactorily and the module has valid calibration data, the RUN/FAULT indicator becomes a steady green. If a fault is found initially or occurs later, the RUN/FAULT indicatorturns red.
The bottom indicator is the calibrate/communication indicator:
• This indicator flashes green when doing block-transfers
• It flashes red during calibration
8-1

HI 1771-WS WEIGH SCALE MODULE
Troubleshooting with the Indicators
This table shows indications, probable causes and rec-ommended actions to correct common faults which may occur.
Indicator When Green When Red
RUN/FAULT Flashes 5Hz - during self check at power-up.
Flashes 1HZ - after self check until valid calibration
Solid - after self check and valid cali-bration
solid - a fault is found
CAL/COM Flashes - during block-transfer
Flashes - during calibration
Indication Probable Cause Recommended Action
Both indicators are OFF
No power to module Check power to I/O chassis.Recycle as necessary.
Possible short on the moduleLED driver failure
Replace module.
RUN/FLT indica-tor ON red RUN/FLT indicator ON red
Microprocessor, oscillator or EPROM failure
Replace module.
If immediately after power-up, indicates RAM or EPROM failure.
Replace module.
If during operation, indicates possible microprocessor or backplane interface failure.
Replace module.
RUN/FLT indica-tor is flashing green at 5-10HZ
Power-up diagnostics in progress Normal operation for the first 2 to 30 seconds
8-2
Chapter 8 - Troubleshooting
Reading On-board Resistance
To read on-board resistance, using either Weigh Scale software, or bit 9 of word 32 in the write block, select to connect the on-board resistance across the sense and signal lines:
Checking Resistance with a Simulator Connected
To perform resistance checks with a simulator con-nected:
Step 1. Remove all power from the remote termi-nation panel by disconnecting the cable from the module.
Step 2. Disconnect the load cell cable or junction box cable from the remote termination panel.
Step 3. Connect a load-cell simulator to the remote termination panel. Follow the color code of the simulator, and if possible, con-
RUN/FLT indica-tor is flashing green at 1 HZ but CAL/COM indicator is off
Power-up diagnostics successfully com-pleted, but no valid calibration data.
Calibrate the Module
RUN/FLT indica-tor is solid green
Power-up diagnostics successfully com-pleted, and valid calibration data on board.
Normal Operation
CAL/COM indi-cator is flashing green
Block transfer in progress. Normal Operation
CAL/COM indi-cator is flashing red
Calibration in Progress. Normal Operation
Indication Probable Cause Recommended Action
If the weight reading with this resistance connected is
Then
Not stable and repeatable replace the module with a spare
Stable and repeatable The input section of the module is functioning correctly; try connecting a simulator
8-3
HI 1771-WS WEIGH SCALE MODULE
nect it in the same configuration you used for the load cell. If the simulator cannot be connected in the same configuration as the load cell, connect it in the configura-tion for which it is intended.
Step 4. With all power removed and the cable from the module disconnected, –signal.
Step 5. Compare these values with the resistance ratings of your simulator.
Step 6. If the resistance values you read don’t match the ratings of your simulator, re-check your wiring.
Step 7. If you are satisfied that your wiring is OK and the resistance values you read don’t match the ratings of your simulator, replace the simulator.
Step 8. If the resistance values you read match the ratings of your simulator, reconnect the cable from the module to the remote termi-nation panel and check the block-transfer communication with the PLC processor.
Checking Block-Transfer Communication
To check the block-transfer communication with the PLC processor:
Step 1. Check to see that the block-transfer addressing is consistent with the address-ing mode (-slot, 1-slot, or 2-slot) on the I/O chassis containing the Weigh Scale Module.
Step 2. Ensure that the words in the block-transfer control structures and read and write blocks in the data table are not being writ-ten over by some other ladder logic.
Step 3. Check for errors reported in the block-transfer control structures. If you are addressing the module correctly and are receiving block-transfer error indications, replace the Weigh Scale Module with a spare.
Step 4. Read the value in read-block words 26 and 27 as you change the output of the simula-tor. If this value does not change, check
8-4

Chapter 8 - Troubleshooting
the status of bits 3 and 4 in word 0 of the read block. If either of these bits is on (indicating over range of under range), recheck the wiring to the simulator. If the counts in words 26 and 27 changes as you change the output of the simulator, the block-transfer communication is OK:
Calibrating the Module to the Simulator
Once you have established communication between the PLC processor and the Weigh Scale Module, cali-brate the module to the simulator. If you use the Weigh Scale software to configure the module, check the status messages displayed on the calibration screen. If you use ladder logic to directly manipulate the write block to configure the module, check the sta-tus values in the read block. If you cannot calibrate the module at this point, replace the Weigh Scale Module with a spare. If you can calibrate the module,the module is probably OK; reconnect the load cell.
Checking Resistance of the Scale System
To perform resistance checks of the scale system:
Step 1. Remove all power from the remote termi-nation panel by disconnecting the cable from the module.
Step 2. Disconnect the simulator from the remote termination panel.
Step 3. Reconnect the load cell or junction box to the remote termination panel.
Step 4. With all power removed and the cable from the module disconnected, at the remote termination panel and the junction-box, check the resistance from +excitation to –excitation and from +signal to –signal.
Step 5. Compare these values with the resistance ratings of your load cells. Remember that
For this Simulator You will see a change of approximately
0-20mV/V 656,000 counts as you adjust the simulator from 0 to 100%
0-30mV/V 985,000 counts as you adjust the simulator from 0 to 100%
8-5

HI 1771-WS WEIGH SCALE MODULE
if you have multiple load cells connected through a junction box, they are connected in parallel; therefore the total resistance would be:
For example, if 4 load cells are each rated at 350.0, the total resistance would be 87.5 at the junction box. If the distance between the junction box and the remote termination panel is significant, the resistance measured at the remote termination panel because of resistance in the wiring. If the resistance doesn’t match the rating and the wiring is OK, replace load cells until you find the one that is faulty. If the resis-tance does match, check the load-cell mounting.
Checking Load-cell Mounting
Check to see that none of the load cells are mounted upside down. By load cell, we mean specifically the device in which the strain gage is mounted — not the mounting assembly. Also check to see that the load cells are free from any binding. If the mounting seemsto be OK, try disconnecting the piping.
Calibrating with Piping Disconnected
Try calibrating the module with piping disconnected:
Step 1. Disconnect all piping from your vessel. Step 2. Try to calibrate the module and test your
calibration with weights:• If you are still unable to calibrate your
module, recheck the load-cell mount-ing
• If you are able to calibrate the mod-ule, continue
Step 3. Reconnect one pipe. Step 4. Try to calibrate the module and test your
calibration with weights. Step 5. Continue reconnecting one pipe at a time
and trying to recalibrate each time until
8-6
Chapter 8 - Troubleshooting
you find any point that may be binding on your vessel.
Troubleshooting Load Cells
Inspect each load cell for physical damage. Look for distortion or cracks in all metal parts. Excessive rip-pling of the diaphragm on a canister may indicate damage. All welds should be free of cracks and deep pox marks. Cables should also be free of cuts, crimps, and excessive abrasion. Make note of anything that looks out of the ordinary.
The following three electrical tests can be useful in troubleshooting potential load-cell problems.
Zero Balance Test Changes in zero balance can be caused by overload-ing the load cell. Some changes may be tolerated in some applications.
With a milli-voltmeter, measure the load cell output under no-load conditions. It should be less than 1% (the typical tolerance for zero balance) of the full scale output. (Check the specification for zero balance tolerance and output sensitivity.) Cells can shift as much as approximately 10% of full scale and still be correctly functioning. Re-gaging may be recom-mended if the output has shifted more than 10%. A typical value for a 1% shift in zero balance is 0.3mV. This assumes 10V excitation on a load cell with 3mV/V output sensitivity. Full scale output with these con-ditions is 30mV. One percent of 30mV is 0.3mV.
Bridge Resistance Changes in bridge resistance are most often caused by a failure of a compensating element or by a broken or burned bridge wire, usually caused by an electrical transient such as lightning. Either type of failure must be repaired.
With an ohmmeter, measure the resistance across each pair of input and output leads. The values are the input and output resistance of the bridge. The resistance is normally approximately 350 for single-ended beams and canisters, 700 for double-ended beams and 1,000 for most Hardy Advantage load sensors. Refer to the load-cell drawing or data sheet for actual specified
8-7
HI 1771-WS WEIGH SCALE MODULE
values. Readings should be within 1.0% of specified values. Reading outside of this tolerance suggest dam-age; thoroughly inspect the load cell.ditions is 30mV.
Resistance to Ground
Electrical leakage is usually caused by water contami-nation within the load cell or cables. Whether the leakage can be tolerated depends on the application and the electronic instrumentation being used. An unstable output is most often caused by contamina-tion.
With a megohmmeter, measure the resistance between all 5 leads tied together (4 live leads plus the ground lead) and the metal body of the load cell. The reading should be 500 megohms or more. If the cell fails this test, remove the ground wire and test with only the 4 live leads. If it tests OK with the ground wire removed after failing with the ground wire included, the cable probably has an insulation problem.
Repairing Failed Load Cells
If the load cell needs to be returned to the factory for further examination or repair, be as detailed in the description of the failure as possible. As an example, if the load cell has drifted, mention the circumstances. Does it drift with load, without load, under tempera-ture variation, etc.? Only factory technicians should perform any additional tests and make repairs.
8-8
Appendix A - Glossary
APPENDIX A - GLOSSARY
Understanding HI 1771-WS Terminology
Auto Zero Tells the module to set the gross weight value equal to zero when the weight on the scale is within zero toler-ance and the scale is not in motion. This resets the zero weight of the scale.See also gross weight display, net weight display, zero tolerance.
Block Transfer The main means of communication between the PLC processor and the module. Transfers a block (64 words maximum) of data to and from an I/O module.
Block Transfer Read Address
Starting address of the data table file where status data is stored after being block transferred from the mod-ule. This address is assigned by the user and read by Weigh Scale Configuration software duringcalibration.
Block Transfer Write Address
Starting address of the data table file where configura-tion and calibration data is stored before being block transferred to the module. This address is assigned by the user and read by Weigh Scale Configuration soft-ware during calibration.
C2 Calibration A calibration technique that uploads calibration data from Hardy Instruments’ C2 second-generation load sensors. This calibration data lets the software auto-matically calibrate the module.See also calibration, hard calibration, soft calibration
Calibration Sets gain/range data in the module for a given load cell to convert input information to a weight. You must configure the module before you can calibrate or use it. The Weigh Scale module supports the three basic types of calibration:
• Hard – expects you to manually put weights on the scale to calibrate it.
• Soft – expects you to enter the actual scale sensi-tivity and output resistance for each load cell.
A-1
HI 1771-WS WEIGH SCALE MODULE
• C2 – uploads calibration data from Hardy Instruments’ C2 second-generation load cells.
See also C2 calibration, hard calibration, soft cali-bration.
Calibration Screen Use this Weigh Scale Configuration software screen to interact with the module to calibrate your scale.
Configuration Establishes basic module operation. You must config-ure the module before you can calibrate or use it. Your selections do not take effect until you download them to the PLC data table.See also download/upload.
Configuration Screen
Use this Weigh Scale Configuration software screen to interact with the module to configure your module.deadband Used to separate the “turn-off” weight from the setpoint, preventing switching “chatter.”
Download/Upload Refers to the reading and writing of blocks of data from one device to another. When data is transferred to a device, it’s considered an upload; when data is transferred from a device, it’s considered a download.
Gross Weight Display
Tells you the total weight of the vessel being mea-sured.See also net weight display.
Hard Calibration Expects you to manually put weights on the scale to calibrate it. Traditional way of calibration.See also C2 calibration soft calibration.
High Calibration Weight
High reference point for hard calibration. Equal to the high weight being placed on a scale. Should be equal to 80 – 90% of scale capacity.See also hard calibration.
In-motion Tolerance
Tells the module what amount of weight change will indicate that there has been a change in the weight value.
Low Calibration Weight
Low reference point for hard, soft, and C2 calibration. Equal to the low weight being placed on the scale.
A-2

Appendix A - Glossary
See also C2 calibration, hard calibration, soft cali-bration.
Midpoint Linearization Weight
Middle reference point for hard calibration, if the scale needs to be calibrated for linear operation.See also hard calibration.
Module List Screen
This Weigh Scale Configuration software screen dis-plays the modules in the project and lets you modify already existing modules or add new modules to the list.
Net Weight Display Tells you the difference between the gross weight and the tare value. See also gross weight display, tare value.
Number-of-Digits Selection
Number of digits displayed to the right of the decimal point.
Number-of-Samples Selection
Number of weight samples module uses to calculate the average current weight.
On-board Resistance
Disconnects the module input (i.e., stops the module from reading weight values from the scale) and forces the internal millivolt signal to 0 millivolts. This is used to detect drift in the module.
Preact Used to account for delay in shutting of feeders in the weighing system due to mechanical delays, material in flight, or other system delays.
PLC Address Node number on the DH+ link of the PLC-5 processor for the module.
Rate-of-Change Value
The rate-of-change represents the rate-of-change in weight as measured by the module over a defined time period. Can be used totrack material flow. This calculation is based on three parameters:
• Weight Description — defines the unit of mea-sure for weight in rate-of-change calculations
• Time Units — unit of measure for time in rate-of-change calculations
A-3
HI 1771-WS WEIGH SCALE MODULE
• Evaluation period — the time over which a rate-of-change calculations are made
Real-time Sampling Period
Tells the PLC processor how often to read the weight value from the module. Used to provide a consistent change over time ( /T) n the weight sample.
Scale Sensitivity Voltage value. You get this value from the load cell supplier (typically from the load cell certificate). This value is used to calibrate the module.
Setpoint The value or target value for turning feeders on and off. The Weigh Scale Module supports two setpoints. Each setpoint is made up of:
• Weight description — defines the unit of mea-sure for weight in setpoint calculations
• Setpoint value — target weight value• Deadband — used to separate the “turn-off”
weight. At the actual switching point, the dead-band also prevents switching “chatter”.
• Preact value — accounts for delay in the weighing system due to mechanical delays, mate-rial in flight, or other system delays.
Soft Calibration A method of calibration that eliminates the use of weights. This method expects you to enter the actual scale sensitivity and output resistance for each load cell. You get these values from the load cell supplier.For an accurate calibration, the scale sensitivity value must be to four digits to the right of the decimal point, and the output resistance value must be to digit to the right of the decimal point.See also calibration, C2 calibration, hard calibration.
Tare Equal to the gross weight when you tare the scale.See also gross weight display, tare enable selection.
Tare Enable Selection
Sets or resets the net weight equal to zero.See also net weight display.
Unit-of-Weight Selection
Tells you whether the weight is currently displayed in pounds or kilograms.
A-4

Appendix A - Glossary
WAVERSAVER Setting
Sets the input noise frequencies to reject. Only noise at frequencies below this value will be rejected. This helps minimize process noise and give you a more stable weight reading.
Zero-Enable Selection
Sets the gross and net weight values to zero.See also gross weight display, net weight display.zero-tolerance selection If the current weight is less than this value and the in-motion tolerance is turned off, you can set the gross weight and net weight to zero using the auto-zero function or the zero-enable function. See also auto-zero, gross weight display, net weight display, zero-enable selection.™
A-5