Embed Size (px)
Citation preview

APPLICATION NOTE
R12AN0067EU0100 Rev.1.0 Page 1 of 18 Jul 11, 2017
Healthcare Meters Kit Healthcare Meters Kit Quick Start Guide
Introduction This quick start guide describes the Renesas Healthcare Meters Kit set up. Highlighted components in this solution includes a Renesas RL78/G1D Bluetooth Smart, a programmable S3A7 board, and a Renesas USB charger IC. Contact your nearest Renesas sale offices to request a live demonstration or kit for development.
Target Device RL78/G1D and R7FS3A77C3A01CFP
Contents
1. Kit Contents .................................................................................................................... 2
2. Features .......................................................................................................................... 3 2.1 Activity Module ............................................................................................................................ 3 2.2 Blood Glucose Module ............................................................................................................... 3 2.3 Blood Pressure Module .............................................................................................................. 3 2.4 Heart Rate/Pulse Ox Module ...................................................................................................... 3
3. Images ............................................................................................................................. 4 3.1 Activity Module ............................................................................................................................ 4 3.2 Blood Glucose Module ............................................................................................................... 4 3.3 Blood Pressure Module .............................................................................................................. 4 3.4 Heart Rate/Pulse Ox Module ...................................................................................................... 5 3.5 Wireless Charging Unit ............................................................................................................... 5
4. Setting up iOS/Android App .......................................................................................... 6
5. Using the Activity Module .............................................................................................. 8
6. Using the Blood Glucose Module ................................................................................ 10
7. Using the Blood Pressure Module .............................................................................. 12
8. Using the Heart Rate/Pulse Ox Module ....................................................................... 14
9. Programming to the Synergy add-on board ............................................................... 16
Website and Support ........................................................................................................... 18
Revision History .................................................................................................................... 1
General Precautions in the Handling of Microprocessing Unit and Microcontroller Unit Products .......................................................................................................................... 2
R12AN0067EU0100 Rev.1.0
Jul 11, 2017

Healthcare Meters Kit Quick Start Guide
R12AN0067EU0100 Rev.1.0 Page 2 of 18 Jul 11, 2017
1. Kit Contents The following components are included in the kit:
• Activity Module • Blood Glucose Module with ONETOUCH® Measurement Strip • Blood Pressure Module with Arm Cuff • Heart Rate/Pulse Ox Module with Finger Clip • Micro USB cable • E1 to PMOD Adapter • Inductive Wireless Charger • 5 V AC-DC Adapter • Firmware • Mobile Apps – Download “Renesas HC Meters Kit” from iTunes or Google Play • Quick Start Guide • User Guide (r12an0068eu0100-rl78g1d-ble-healthcare-meters-kit-user-guide.pdf file can be downloaded from
below link) • https://www.renesas.com/en-us/solutions/home/healthcare/hckit.html • ONETOUCH® Control Solution (not included due to inconvenience of shipping liquid)

Healthcare Meters Kit Quick Start Guide
R12AN0067EU0100 Rev.1.0 Page 3 of 18 Jul 11, 2017
2. Features 2.1 Activity Module • Li-Ion battery with Wireless or USB charging • Fuel Gauge IC • Ambient light sensor • Pressure Sensor • Humidity Sensor • Temperature Sensor • Vibrate motor (optional) • 9-axis motion sensor (accel, gyro, compass) • BLE connectivity to the mobile app • USB output for wired data transfer • Mobile app displays Steps, Distance, Calories & Light, Temperature, Humidity, Pressure
2.2 Blood Glucose Module • 1 Coin cell or 5 V DC power operation • LCD displays blood glucose reading or status • Cap Touch buttons which can be enabled for additional functionality • BLE connectivity to the mobile app • USB output for wired data transfer • Mobile app displays Blood Glucose level
2.3 Blood Pressure Module • 3 AAA batteries or 5 V DC power operation • LCD displays systolic, diastolic, pulse rate readings or status • Cap Touch buttons which can be enabled for additional functionality • BLE connectivity to the mobile app • USB output for wired data transfer • Mobile app displays Systolic, Diastolic pressure and Pulse rate
2.4 Heart Rate/Pulse Ox Module • Li-Ion battery or 5 V DC power operation • LCD displays heart rate, pulse ox readings or status • Cap Touch buttons which can be enabled for additional functionality • BLE connectivity to the mobile app • USB output for wired data transfer • Mobile app displays Pulse Ox level and Heart rate
Healthcare Meters Kit Quick Start Guide
R12AN0067EU0100 Rev.1.0 Page 4 of 18 Jul 11, 2017
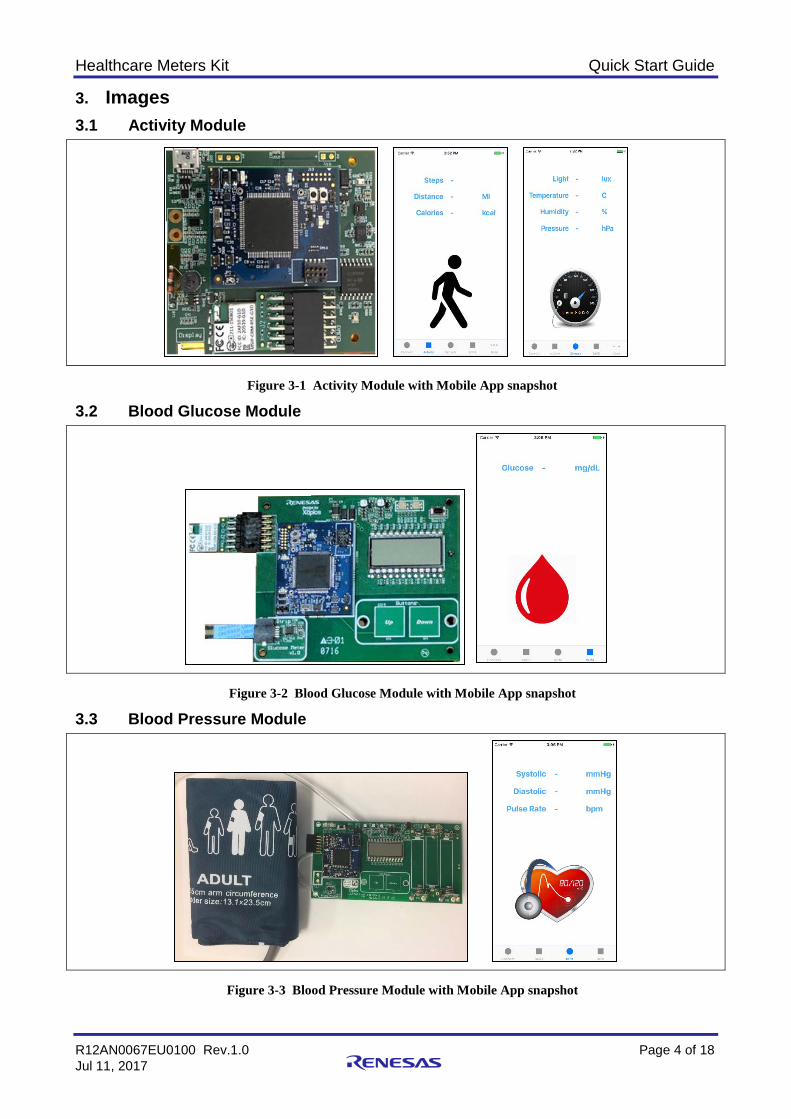
3. Images 3.1 Activity Module
Figure 3-1 Activity Module with Mobile App snapshot
3.2 Blood Glucose Module
Figure 3-2 Blood Glucose Module with Mobile App snapshot
3.3 Blood Pressure Module
Figure 3-3 Blood Pressure Module with Mobile App snapshot

Healthcare Meters Kit Quick Start Guide
R12AN0067EU0100 Rev.1.0 Page 5 of 18 Jul 11, 2017
3.4 Heart Rate/Pulse Ox Module
Figure 3-4 Heart Rate/Pulse Ox Module with Mobile App snapshot
3.5 Wireless Charging Unit
Figure 3-5 Micro USB charging cable with Qi Wireless Inductive Charger & 5V DC Adapter

Healthcare Meters Kit Quick Start Guide
R12AN0067EU0100 Rev.1.0 Page 6 of 18 Jul 11, 2017
4. Setting up iOS/Android App An application (Renesas HC Meters Kit) is available to demonstrate the connectivity portions of the development kit. The iOS version can be downloaded from the Apple iTunes Store, and the Android version from Google Play. Every effort has been made to ensure the apps work on a wide variety of phones but given the wide array of hardware and software it is possible the software may not work with your chosen device.
1. Before launching the application, ensure all apps trying to connect to Renesas HC Meters Kit device is closed. Then turn on Bluetooth for the mobile device. After that turn on any one of the HC Meters Kit module.
2. Launch Renesas HC Meters Kit application The following screen will appear:
3. Click on Connect to establish Bluetooth link and the message Ready will change to Connected. 4. Depending on which HC Meters Kit module you are working with select the appropriate tab at the bottom of the
app. This brings you to the following screen depending on which module you selected: A. Activity

Healthcare Meters Kit Quick Start Guide
R12AN0067EU0100 Rev.1.0 Page 7 of 18 Jul 11, 2017
B. BGM (Blood Glucose Meter)
C. BPM (Blood Pressure Meter)
D. HRM/SpO2
5. Mobile app displays the status of the module, action to be taken by the user or the reading for the vital measurement taken. It is a very intuitive user interface.
6. Once you are done taking the measurement go back to the main screen and click on Disconnect to release the Bluetooth link.
Healthcare Meters Kit Quick Start Guide
R12AN0067EU0100 Rev.1.0 Page 8 of 18 Jul 11, 2017
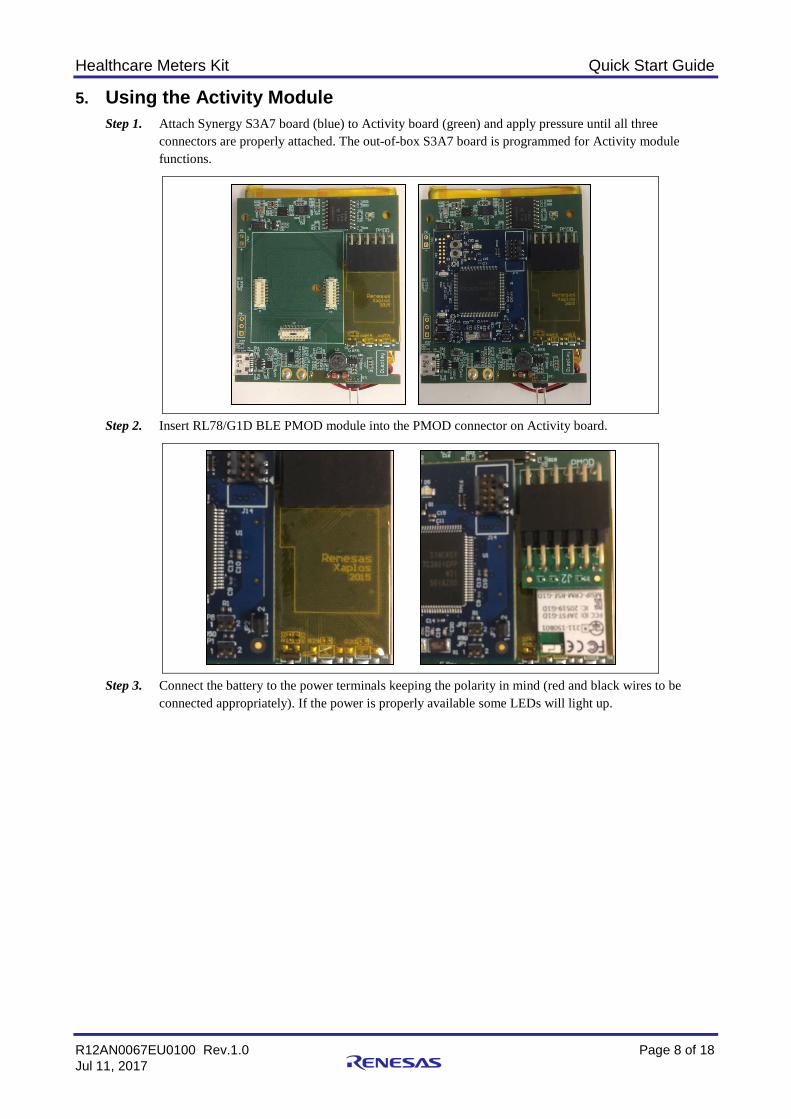
5. Using the Activity Module Step 1. Attach Synergy S3A7 board (blue) to Activity board (green) and apply pressure until all three
connectors are properly attached. The out-of-box S3A7 board is programmed for Activity module functions.
Step 2. Insert RL78/G1D BLE PMOD module into the PMOD connector on Activity board.
Step 3. Connect the battery to the power terminals keeping the polarity in mind (red and black wires to be connected appropriately). If the power is properly available some LEDs will light up.

Healthcare Meters Kit Quick Start Guide
R12AN0067EU0100 Rev.1.0 Page 9 of 18 Jul 11, 2017
Step 4. If battery power is diminished, connect to Qi wireless charging pad to charge the battery. Other option to charge the battery is to power the board using USB port.
Step 5. Launch Renesas HC Meters Kit smartphone app
1. Connect device to smartphone app and select activity or sensors tab 2. Generate movement with activity board to record steps 3. On the sensors screen raw data from the sensors is displayed
Step 6. Note: Since this kit is setup as a development platform not all the functions are enabled in the demo stage. End user can use the existing project base and add functions which leverage the various sensors preloaded on the activity module.

Healthcare Meters Kit Quick Start Guide
R12AN0067EU0100 Rev.1.0 Page 10 of 18 Jul 11, 2017
6. Using the Blood Glucose Module Step 1. Attach the Synergy S3A7 board (blue) to BGM board (green) and apply pressure until all three
connectors are properly attached. The out-of-box S3A7 board must be programmed for BGM function. Refer to the User Guide for further details.
Step 2. Insert RL78/G1D BLE PMOD module into the PMOD connector on BGM board.
Step 3. Insert coin cell battery or connect DC adapter to the power jack.
Step 4. Launch Renesas HC Meters Kit smartphone app
a. Connect device to smartphone app and select BGM tab b. Press Switch S4 to start reading operation c. Insert ONETOUCH® Ultra Test Strip into the connector
Healthcare Meters Kit Quick Start Guide
R12AN0067EU0100 Rev.1.0 Page 11 of 18 Jul 11, 2017
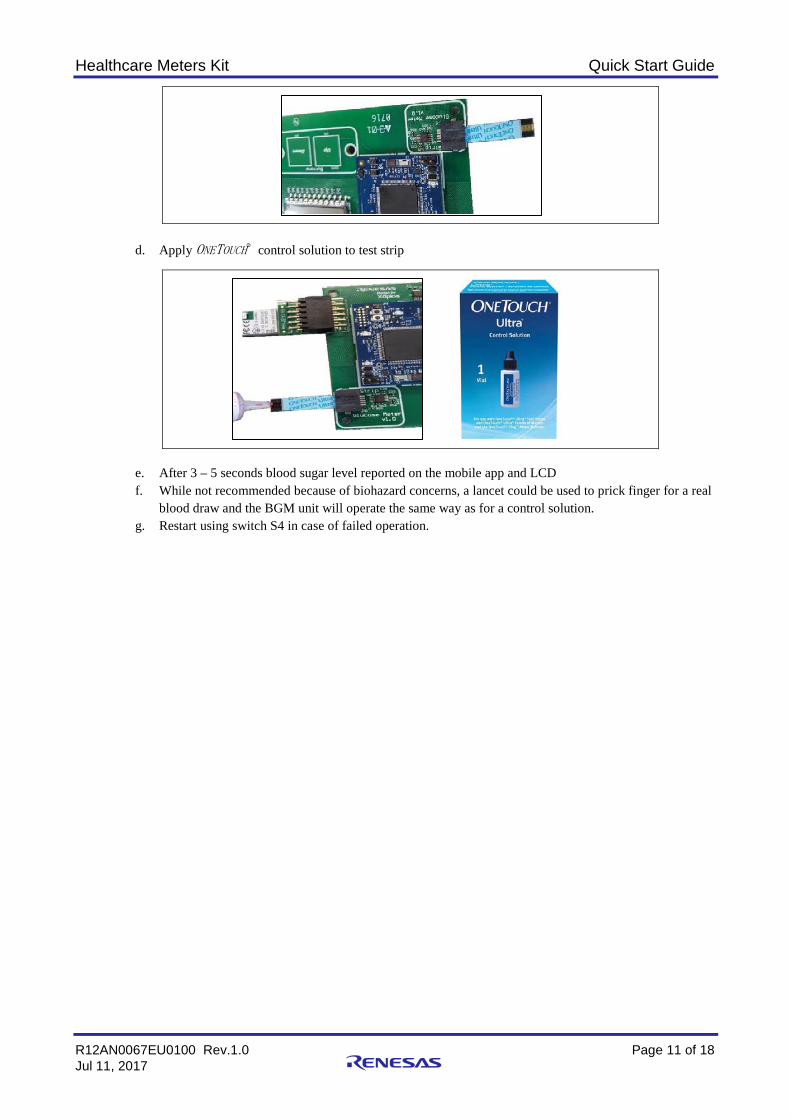
d. Apply ONETOUCH® control solution to test strip
e. After 3 – 5 seconds blood sugar level reported on the mobile app and LCD f. While not recommended because of biohazard concerns, a lancet could be used to prick finger for a real
blood draw and the BGM unit will operate the same way as for a control solution. g. Restart using switch S4 in case of failed operation.

Healthcare Meters Kit Quick Start Guide
R12AN0067EU0100 Rev.1.0 Page 12 of 18 Jul 11, 2017
7. Using the Blood Pressure Module
Step 1. Attach Synergy S3A7 board (blue) to BPM board (green) and apply pressure until all three connectors are properly attached. The out-of-box S3A7 board must be programmed for BPM function. Refer to the User Guide for further details.
Step 2. Insert RL78/G1D BLE PMOD module into the PMOD connector on BPM board.
Step 3. Insert 3 AAA batteries or connect DC adapter to the power jack.
Step 4. Fully assembled unit should look like below with tubes and arm cuff.

Healthcare Meters Kit Quick Start Guide
R12AN0067EU0100 Rev.1.0 Page 13 of 18 Jul 11, 2017
Step 5. Launch Renesas HC Meters Kit smartphone app
a. Connect device to smartphone app and select BPM tab b. Wrap the arm cuff around the arm
Note: need to tight enough the Bladder unit at arm to meet 90 seconds interval for building up the pressure. If not, get test result as fail, “FA”.
c. Press switch S4 to begin blood pressure reading Note: do not move while measuring. If not, the sensor measures wrongly because of the disturbance of human body movement and get test result as fail, “FA”.
d. After 45-60 seconds systolic pressure, diastolic pressure and pulse rate readings are displayed on the mobile app and LCD.
Step 6. Note: There can be variability from unit to unit due to differences in tube lengths and arm cuffs. There is a patch available in the software package to calibrate each unit.
Healthcare Meters Kit Quick Start Guide
R12AN0067EU0100 Rev.1.0 Page 14 of 18 Jul 11, 2017
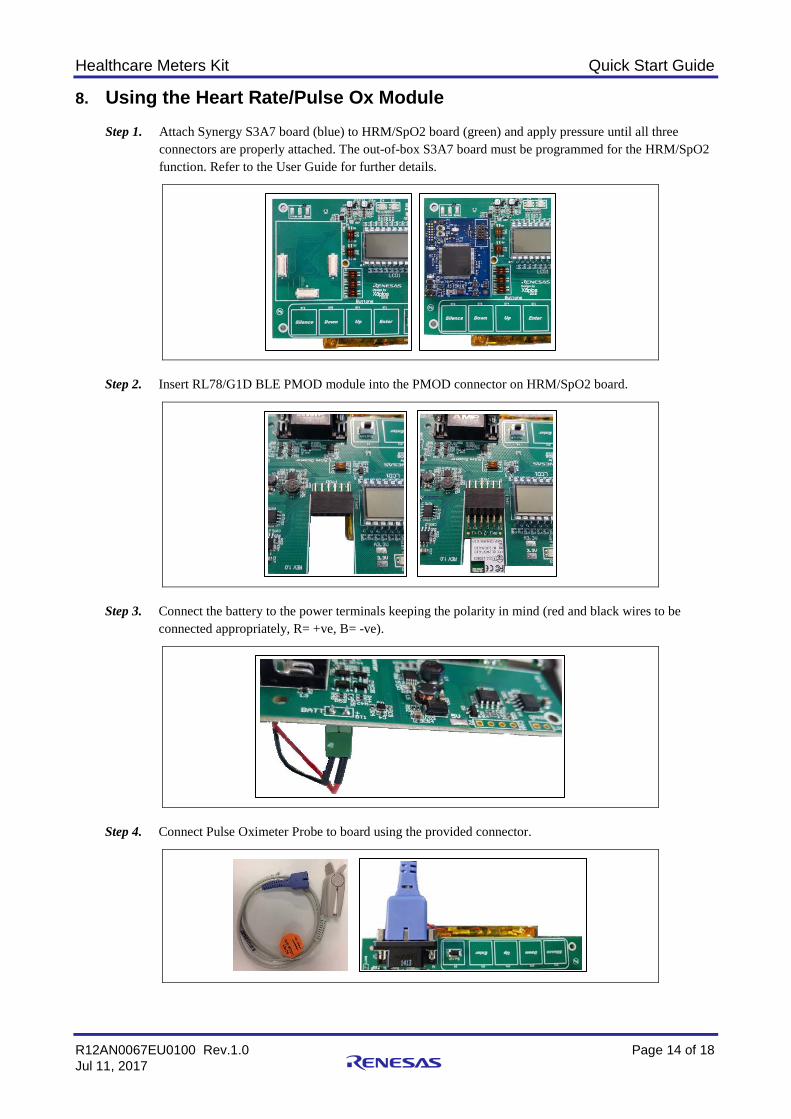
8. Using the Heart Rate/Pulse Ox Module
Step 1. Attach Synergy S3A7 board (blue) to HRM/SpO2 board (green) and apply pressure until all three connectors are properly attached. The out-of-box S3A7 board must be programmed for the HRM/SpO2 function. Refer to the User Guide for further details.
Step 2. Insert RL78/G1D BLE PMOD module into the PMOD connector on HRM/SpO2 board.
Step 3. Connect the battery to the power terminals keeping the polarity in mind (red and black wires to be connected appropriately, R= +ve, B= -ve).
Step 4. Connect Pulse Oximeter Probe to board using the provided connector.

Healthcare Meters Kit Quick Start Guide
R12AN0067EU0100 Rev.1.0 Page 15 of 18 Jul 11, 2017
Step 5. If power is diminished, connect to the DC adapter to the power jack.
Step 6. Launch Renesas HC Meters Kit smartphone app.
a. Connect device to smartphone app and select SpO2 tab b. Place finger probe on index finger with the wired side on top of your finger c. Press Switch S4 to start reading operation d. Remain still for 5 – 10 seconds e. Oxygen saturation and heart rate readings displayed on the mobile app and LCD.
Step 7. Restart using switch S4 in case of failed operation.

Healthcare Meters Kit Quick Start Guide
R12AN0067EU0100 Rev.1.0 Page 16 of 18 Jul 11, 2017
9. Programming to the Synergy add-on board
Step 1. Insert shunt jumper at JP2 to the S3A7 board (blue) and attach to PC USB connector via micro USB cable. Note: Set up the S3A7 board only (not mounted onto application Module known as application Base Board) for programming with on-board J-Link debugger/programmer
Step 2. Open J-Link Commander from Start menu in All Programs, SEGGER folder.
(Note: SEGGER J-Link download link: https://www.segger.com/downloads/jlink)
Step 3. Enter the below commands to program target device. 1. Device R7FS3A7 2. Speed 12000 3. loadbin C:\...\ROM_Synergy\file_name.hex, 0 4. s

Healthcare Meters Kit Quick Start Guide
R12AN0067EU0100 Rev.1.0 Page 17 of 18 Jul 11, 2017
Step 4. Note: This Healthcare Meters Kit includes following Hex files for respective modules a. The Activity Module: activity_monitor.hex b. The Blood Glucose Module: blood_glucose.hex c. The Blood Pressure Module: blood_pressure.hex d. The Heart Rate/Pulse Ox Module : pulse_oximeter.hex
Step 5. After programming, disconnect the board from the PC to evaluate.
① ②
③
④

Healthcare Meters Kit Quick Start Guide
R12AN0067EU0100 Rev.1.0 Page 18 of 18 Jul 11, 2017
Website and Support Renesas Electronics Website
http://www.renesas.com/ Inquiries
http://www.renesas.com/contact/ All trademarks and registered trademarks are the property of their respective owners.

Revision History
Rev. Date Description Page Summary
1.00 Jul 11, 2017 – Initial Release
General Precautions in the Handling of Microprocessing Unit and Microcontroller Unit Products The following usage notes are applicable to all Microprocessing unit and Microcontroller unit products from Renesas. For detailed usage notes on the products covered by this document, refer to the relevant sections of the document as well as any technical updates that have been issued for the products.
1. Handling of Unused Pins Handle unused pins in accordance with the directions given under Handling of Unused Pins in the manual. The input pins of CMOS products are generally in the high-impedance state. In operation with
an unused pin in the open-circuit state, extra electromagnetic noise is induced in the vicinity of LSI, an associated shoot-through current flows internally, and malfunctions occur due to the false recognition of the pin state as an input signal become possible. Unused pins should be handled as described under Handling of Unused Pins in the manual.
2. Processing at Power-on The state of the product is undefined at the moment when power is supplied. The states of internal circuits in the LSI are indeterminate and the states of register settings and
pins are undefined at the moment when power is supplied. In a finished product where the reset signal is applied to the external reset pin, the states of pins are not guaranteed from the moment when power is supplied until the reset process is completed. In a similar way, the states of pins in a product that is reset by an on-chip power-on reset function are not guaranteed from the moment when power is supplied until the power reaches the level at which resetting has been specified.
3. Prohibition of Access to Reserved Addresses Access to reserved addresses is prohibited. The reserved addresses are provided for the possible future expansion of functions. Do not
access these addresses; the correct operation of LSI is not guaranteed if they are accessed. 4. Clock Signals
After applying a reset, only release the reset line after the operating clock signal has become stable. When switching the clock signal during program execution, wait until the target clock signal has stabilized. When the clock signal is generated with an external resonator (or from an external oscillator)
during a reset, ensure that the reset line is only released after full stabilization of the clock signal. Moreover, when switching to a clock signal produced with an external resonator (or by an external oscillator) while program execution is in progress, wait until the target clock signal is stable.
5. Differences between Products Before changing from one product to another, i.e. to a product with a different part number, confirm that the change will not lead to problems. The characteristics of Microprocessing unit or Microcontroller unit products in the same group
but having a different part number may differ in terms of the internal memory capacity, layout pattern, and other factors, which can affect the ranges of electrical characteristics, such as characteristic values, operating margins, immunity to noise, and amount of radiated noise. When changing to a product with a different part number, implement a system-evaluation test for the given product.

Notice1. Descriptions of circuits, software and other related information in this document are provided only to illustrate the operation of semiconductor products and application examples. You are fully responsible for
the incorporation or any other use of the circuits, software, and information in the design of your product or system. Renesas Electronics disclaims any and all liability for any losses and damages incurred by
you or third parties arising from the use of these circuits, software, or information.
2. Renesas Electronics hereby expressly disclaims any warranties against and liability for infringement or any other disputes involving patents, copyrights, or other intellectual property rights of third parties, by or
arising from the use of Renesas Electronics products or technical information described in this document, including but not limited to, the product data, drawing, chart, program, algorithm, application
examples.
3. No license, express, implied or otherwise, is granted hereby under any patents, copyrights or other intellectual property rights of Renesas Electronics or others.
4. You shall not alter, modify, copy, or otherwise misappropriate any Renesas Electronics product, whether in whole or in part. Renesas Electronics disclaims any and all liability for any losses or damages
incurred by you or third parties arising from such alteration, modification, copy or otherwise misappropriation of Renesas Electronics products.
5. Renesas Electronics products are classified according to the following two quality grades: "Standard" and "High Quality". The intended applications for each Renesas Electronics product depends on the
product’s quality grade, as indicated below.
"Standard": Computers; office equipment; communications equipment; test and measurement equipment; audio and visual equipment; home electronic appliances; machine tools; personal electronic
equipment; and industrial robots etc.
"High Quality": Transportation equipment (automobiles, trains, ships, etc.); traffic control (traffic lights); large-scale communication equipment; key financial terminal systems; safety control equipment; etc.
Renesas Electronics products are neither intended nor authorized for use in products or systems that may pose a direct threat to human life or bodily injury (artificial life support devices or systems, surgical
implantations etc.), or may cause serious property damages (space and undersea repeaters; nuclear power control systems; aircraft control systems; key plant systems; military equipment; etc.). Renesas
Electronics disclaims any and all liability for any damages or losses incurred by you or third parties arising from the use of any Renesas Electronics product for which the product is not intended by Renesas
Electronics.
6. When using the Renesas Electronics products, refer to the latest product information (data sheets, user’s manuals, application notes, "General Notes for Handling and Using Semiconductor Devices" in the
reliability handbook, etc.), and ensure that usage conditions are within the ranges specified by Renesas Electronics with respect to maximum ratings, operating power supply voltage range, heat radiation
characteristics, installation, etc. Renesas Electronics disclaims any and all liability for any malfunctions or failure or accident arising out of the use of Renesas Electronics products beyond such specified
ranges.
7. Although Renesas Electronics endeavors to improve the quality and reliability of Renesas Electronics products, semiconductor products have specific characteristics such as the occurrence of failure at a
certain rate and malfunctions under certain use conditions. Further, Renesas Electronics products are not subject to radiation resistance design. Please ensure to implement safety measures to guard them
against the possibility of bodily injury, injury or damage caused by fire, and social damage in the event of failure or malfunction of Renesas Electronics products, such as safety design for hardware and
software including but not limited to redundancy, fire control and malfunction prevention, appropriate treatment for aging degradation or any other appropriate measures by your own responsibility as warranty
for your products/system. Because the evaluation of microcomputer software alone is very difficult and not practical, please evaluate the safety of the final products or systems manufactured by you.
8. Please contact a Renesas Electronics sales office for details as to environmental matters such as the environmental compatibility of each Renesas Electronics product. Please investigate applicable laws and
regulations that regulate the inclusion or use of controlled substances, including without limitation, the EU RoHS Directive carefully and sufficiently and use Renesas Electronics products in compliance with all
these applicable laws and regulations. Renesas Electronics disclaims any and all liability for damages or losses occurring as a result of your noncompliance with applicable laws and regulations.
9. Renesas Electronics products and technologies shall not be used for or incorporated into any products or systems whose manufacture, use, or sale is prohibited under any applicable domestic or foreign laws
or regulations. You shall not use Renesas Electronics products or technologies for (1) any purpose relating to the development, design, manufacture, use, stockpiling, etc., of weapons of mass destruction,
such as nuclear weapons, chemical weapons, or biological weapons, or missiles (including unmanned aerial vehicles (UAVs)) for delivering such weapons, (2) any purpose relating to the development,
design, manufacture, or use of conventional weapons, or (3) any other purpose of disturbing international peace and security, and you shall not sell, export, lease, transfer, or release Renesas Electronics
products or technologies to any third party whether directly or indirectly with knowledge or reason to know that the third party or any other party will engage in the activities described above. When exporting,
selling, transferring, etc., Renesas Electronics products or technologies, you shall comply with any applicable export control laws and regulations promulgated and administered by the governments of the
countries asserting jurisdiction over the parties or transactions.
10. Please acknowledge and agree that you shall bear all the losses and damages which are incurred from the misuse or violation of the terms and conditions described in this document, including this notice,
and hold Renesas Electronics harmless, if such misuse or violation results from your resale or making Renesas Electronics products available any third party.
11. This document shall not be reprinted, reproduced or duplicated in any form, in whole or in part, without prior written consent of Renesas Electronics.
12. Please contact a Renesas Electronics sales office if you have any questions regarding the information contained in this document or Renesas Electronics products.
(Note 1) "Renesas Electronics" as used in this document means Renesas Electronics Corporation and also includes its majority-owned subsidiaries.
(Note 2) "Renesas Electronics product(s)" means any product developed or manufactured by or for Renesas Electronics.
http://www.renesas.comRefer to "http://www.renesas.com/" for the latest and detailed information.
Renesas Electronics America Inc.2801 Scott Boulevard Santa Clara, CA 95050-2549, U.S.A.Tel: +1-408-588-6000, Fax: +1-408-588-6130Renesas Electronics Canada Limited9251 Yonge Street, Suite 8309 Richmond Hill, Ontario Canada L4C 9T3Tel: +1-905-237-2004Renesas Electronics Europe LimitedDukes Meadow, Millboard Road, Bourne End, Buckinghamshire, SL8 5FH, U.KTel: +44-1628-585-100, Fax: +44-1628-585-900Renesas Electronics Europe GmbHArcadiastrasse 10, 40472 Düsseldorf, GermanyTel: +49-211-6503-0, Fax: +49-211-6503-1327Renesas Electronics (China) Co., Ltd.Room 1709, Quantum Plaza, No.27 ZhiChunLu Haidian District, Beijing 100191, P.R.ChinaTel: +86-10-8235-1155, Fax: +86-10-8235-7679Renesas Electronics (Shanghai) Co., Ltd.Unit 301, Tower A, Central Towers, 555 Langao Road, Putuo District, Shanghai, P. R. China 200333Tel: +86-21-2226-0888, Fax: +86-21-2226-0999Renesas Electronics Hong Kong LimitedUnit 1601-1611, 16/F., Tower 2, Grand Century Place, 193 Prince Edward Road West, Mongkok, Kowloon, Hong KongTel: +852-2265-6688, Fax: +852 2886-9022Renesas Electronics Taiwan Co., Ltd.13F, No. 363, Fu Shing North Road, Taipei 10543, TaiwanTel: +886-2-8175-9600, Fax: +886 2-8175-9670Renesas Electronics Singapore Pte. Ltd.80 Bendemeer Road, Unit #06-02 Hyflux Innovation Centre, Singapore 339949Tel: +65-6213-0200, Fax: +65-6213-0300Renesas Electronics Malaysia Sdn.Bhd.Unit 1207, Block B, Menara Amcorp, Amcorp Trade Centre, No. 18, Jln Persiaran Barat, 46050 Petaling Jaya, Selangor Darul Ehsan, MalaysiaTel: +60-3-7955-9390, Fax: +60-3-7955-9510Renesas Electronics India Pvt. Ltd.No.777C, 100 Feet Road, HAL II Stage, Indiranagar, Bangalore, IndiaTel: +91-80-67208700, Fax: +91-80-67208777Renesas Electronics Korea Co., Ltd.12F., 234 Teheran-ro, Gangnam-Gu, Seoul, 135-080, KoreaTel: +82-2-558-3737, Fax: +82-2-558-5141
SALES OFFICES
© 2017 Renesas Electronics Corporation. All rights reserved.Colophon 6.0
(Rev.3.0-1 November 2016)


![アプリケーションノート - Renesas Electronics...2015 [9] Renesas Starter Kit+ for RX71M, ユーザーズマニュアル、Rev.1.00, Document No. R20UT3217JG0100, Jan 23,](https://img.dokumen.tips/doc/110x75/5f1001487e708231d446f82d/ffffffff-renesas-electronics-2015-9-renesas-starter.jpg)