Embed Size (px)
Citation preview

Operating Instructions
1
HDMIHDMIHDMIHDMI ExtenderExtenderExtenderExtender overoveroverover EthernetEthernetEthernetEthernet
OperatingOperatingOperatingOperating InstructionsInstructionsInstructionsInstructions
DearDearDearDear CustomerCustomerCustomerCustomerThank you for purchasing this product. For optimum performance and safety, please read theseinstructions carefully before connecting, operating or adjusting this product. Please keep this manual forfuture reference.
FEATURESFEATURESFEATURESFEATURES� Compliant HDCP� Uses off-the-shelf gigabit IP switches for extension and distribution� Extends 1080p HDMI signals up to 120m over a single UTP Cat5e/6 cable� Flexible and scalable HDMI 1080p Video Wall Broadcasting with Gigabit Ethernet LAN� Multicasting and broadcasting architecture, adding more displays without adding LAN bandwidth
loading� Support Point-to-Point, Point-to-Many and Many-to-Many network configuration� With IR Control function ,it allows you control back the source at the end of destination� Maximum 3 layers of ethernet switches could be passed through
NOTICENOTICENOTICENOTICEOur company reserve the right to make changes in the hardware, packaging and any accompanyingdocumentation without prior written notice.
Operating Instructions
2
TABLETABLETABLETABLE OFOFOFOF CONTENTSCONTENTSCONTENTSCONTENTSSpecificationsPackage ContentsPanel DescriptionsConnecting and OperatingTypical ApplicationMaintenanceProduct ServiceWarranty
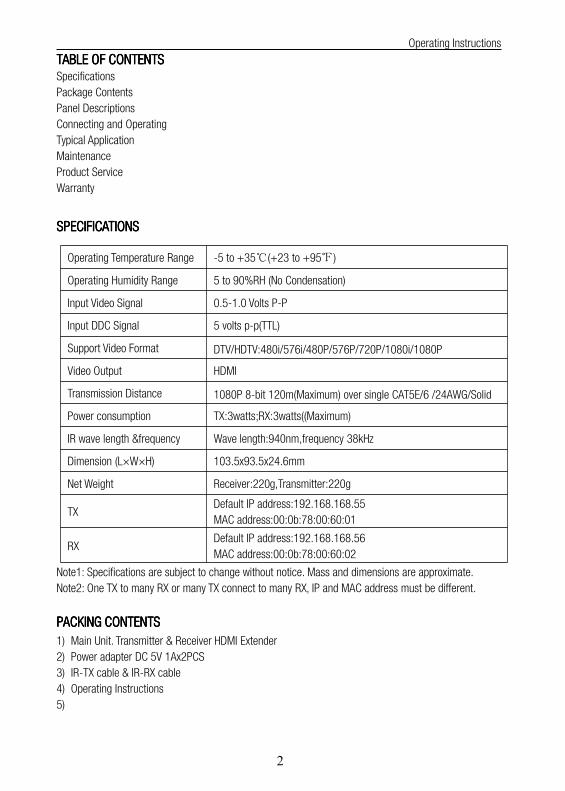
SPECIFICATIONSSPECIFICATIONSSPECIFICATIONSSPECIFICATIONS
Note1: Specifications are subject to change without notice. Mass and dimensions are approximate.Note2: One TX to many RX or many TX connect to many RX, IP and MAC address must be different.
PACKINGPACKINGPACKINGPACKING CONTENTSCONTENTSCONTENTSCONTENTS1) Main Unit. Transmitter & Receiver HDMI Extender2) Power adapter DC 5V 1Ax2PCS3) IR-TX cable & IR-RX cable4) Operating Instructions5)
Operating Temperature Range -5 to +35℃(+23 to +95℉)
Operating Humidity Range 5 to 90%RH (No Condensation)
Input Video Signal 0.5-1.0 Volts P-P
Input DDC Signal 5 volts p-p(TTL)
Support Video Format DTV/HDTV:480i/576i/480P/576P/720P/1080i/1080P
Video Output HDMI
Transmission Distance 1080P 8-bit 120m(Maximum) over single CAT5E/6 /24AWG/Solid
Power consumption TX:3watts;RX:3watts((Maximum)
IR wave length &frequency Wave length:940nm,frequency 38kHz
Dimension (L×W×H) 103.5x93.5x24.6mm
Net Weight Receiver:220g,Transmitter:220g
TXDefault IP address:192.168.168.55MAC address:00:0b:78:00:60:01
RXDefault IP address:192.168.168.56MAC address:00:0b:78:00:60:02

Operating Instructions
3
PANELPANELPANELPANEL DESCRIPTIONSDESCRIPTIONSDESCRIPTIONSDESCRIPTIONS
Transmitter Panel
1 Indicator of power input
2 Status of signal connection
3 HDMI input
4 Ethernet port
5 IR-TX port
6 Reset button
7 Power input port

Operating Instructions
4
Receiver Panel
1 Indicator of power input
2 Status of signal connection
3 HDMI output
4 Ethernet port
5 IR-RX port
6 Reset button
7 Power input port

Operating Instructions
5
TYPICALTYPICALTYPICALTYPICAL AAAAPPLICATIONPPLICATIONPPLICATIONPPLICATION
1)1)1)1) OneOneOneOne totototo OneOneOneOne
TransmitterTransmitterTransmitterTransmitter ReceiverReceiverReceiverReceiver
CONNECTCONNECTCONNECTCONNECTINGINGINGING ANDANDANDAND OPERATOPERATOPERATOPERATINGINGINGING1) Connect the HDMI signal sources (Such as DVD, STB etc) to HDMI Transmitter.2) Connect CAT5e or 6 cables to both the Ethernet of the transmitter and Ethernet port of the Receiver.
(The cables must follow the standard of EIA-TIA 568B).3) Connect the HDMI output (Such as HD-LCD, HD-DLP) into the Receiver.4) Connect the power supply into Power port.5) Connect the IR TX receiving cables into IR TX port on the back panel and affix the emitter onto thesource IR windows.6) Connect IR-RX cable into IR-RX port on the receiver and affix the IR receiver in direct line of site withthe handheld remote control.It is recommended to affix the receiver on the display frame /bezel or thedisplay stand.
Attention: Insert/Extract cables gently.

Operating Instructions
6
2).2).2).2). OneOneOneOne totototo moremoremoremore
CONNECTCONNECTCONNECTCONNECTINGINGINGING ANDANDANDAND OPERATOPERATOPERATOPERATINGINGINGING
1. You can use common IP switch to work with SX-EX22 for one to more connection.
2. when one TX connect to many RX or many TX connect to many RX, IP and MAC address must bedifferent.
IP:192.168.168.XX (XX:1-255) ;MAC:00:0b:78:XX:XX-XX (XX:01-FF)
3. A HTTP server is embedded in each TX and RX. You can setup the HDMI extender via web browser.
Please refer to "Setup HDMI TX and RX" inininin pagepagepagepage 7.7.7.7. but you only need to set HDMI RX for one to many
connection.

Operating Instructions
7
3).3).3).3). MoreMoreMoreMore totototo moremoremoremore
CONNECTING AND OPERATING1. For more to more connection , SX-EX22 has to work with HDMI smart matrix (SX-GES24).2. Connect HDMI TX ports with SX-GES24 ports, also connect HDMI RX ports with SX-GES24 ports.(for SX-GES24, any one of 24 ports can be set "input port"or "output port" by yourself. Please refer topage 9.10.

Operating Instructions
8
3.Setup HDMI TX and HDMI RXA HTTP server is embedded in each TX and RX. You can setup the HDMI extender via web browser. Thedefault IP address of the TX is 192.168.168.55 and the RX is 192.168.168.56. The default IP address willnot be changed no matter what you assign the device IP address (one TX to many RX or many TX connectto many RX, IP and MAC address must be different), IP:192.168.168.XX(XX:1-255) ;MAC:00:0b:78:XX:XX-XX (XX:01-FF)
Step 1: Assign the PC or laptop IP address through Control Panel, Network Connections, Local AreaConnections Status, Properties, Internet Protocol (TCP/IP), Use the following IP address. Type the IPaddress field with 192.168.168.11 (0-255)and Subnet mask with 255.255.255.0. After that press OKto save the configuration.
Step 2: turn on the device, the red light becomes lighting, waiting about 10 seconds, the green light
starts working, at this time to press the reset button about 5-10 seconds to turn off the green light.
Step 3: Use an Ethernet Cable to connect the PC or laptop and the device. The power LED is still red
and the status LED becomes green blink.
Step 4: Ping the connected device through the sequence, Start, Run, cmd, ping 192.168.168.55 or ping
192.168.168.56.You will receive the reply if the connection is established. Use IE browser to get access
the web server. You can setup IP address, subnet mask, gateway, and MAC address in this page.
Step 5: After click Apply button, the device shows Status LED green turn off . Turn off the device.

Operating Instructions
9
4:4:4:4: LoginLoginLoginLogin inininin
Default IP address for Switch : 192.168.168.254,Username:admin, Password:admin,connect
your PC with IP Switch, revise your PC's IP address to be in the same segment with IP Switch, Login
in IE :192.168.168.254
5:5:5:5: InputInputInputInput andandandand OutputOutputOutputOutput settingsettingsettingsetting ofofofof SwitchSwitchSwitchSwitch
Select "setting " in port tool as below picture, you can click "input "or "output " by your own choice.
When the port is set as "Input ", it should be connected to HDMI TX, when the port is set as "Output", it
should be connect to HDMI RX.

Operating Instructions
10
6:6:6:6: SettingSettingSettingSetting youryouryouryour SwitchSwitchSwitchSwitch
Select "Port Config "in Ports Tool, You can set every "Output" port to display and any "Input"port which
connected to HDMI Extender TX. For example, if you need all the output ports to display the same input
source which connected to port 1 , you can set it as below picture :
6.6.6.6. SetSetSetSet youryouryouryour UsernameUsernameUsernameUsername andandandand PasswordPasswordPasswordPassword inininin youryouryouryour devicedevicedevicedevice
Select "User Manage" in System tool, you can revise your Username and Password in your device。
7:7:7:7: SetSetSetSet youryouryouryour IIIIPPPP addressaddressaddressaddress inininin youryouryouryour devicedevicedevicedevice
Select "System config" in System tools, you can revise the device's IP address and name.

Operating Instructions
11
8.8.8.8. UpgradeUpgradeUpgradeUpgrade youryouryouryour devicedevicedevicedevice
Select "Upgrade Firmware" in System tools, you can upgrade the device's software .
RestoreRestoreRestoreRestore equipmentequipmentequipmentequipment defaultdefaultdefaultdefault SettingsSettingsSettingsSettings
Click "Restore Factory" in System tools, restore the device to it's factory default settings

Operating Instructions
12
MAINTENANCEMAINTENANCEMAINTENANCEMAINTENANCE
Clean this unit with a soft, dry cloth. Never use alcohol, paint thinner of benzine to clean this unit.
PRODUCTPRODUCTPRODUCTPRODUCT SERVICESERVICESERVICESERVICE
1) DamageDamageDamageDamage requiringrequiringrequiringrequiring service:service:service:service: The unit should be serviced by qualified service personnel if:(a)The DC power supply cord or AC adaptor has been damaged;(b)Objects or liquids have gotten into the unit;(c)The unit has been exposed to rain;(d)The unit does not operate normally or exhibits a marked change in performance;(e)The unit has been dropped or the cabinet damaged.2) ServicingServicingServicingServicing Personnel:Personnel:Personnel:Personnel: Do not attempt to service the unit beyond that described in these operatinginstructions. Refer all other servicing to authorized servicing personnel.3) ReplacementReplacementReplacementReplacement parts:parts:parts:parts: When parts need replacing ensure the servicer uses parts specified by themanufacturer or parts that have the same characteristics as the original parts. Unauthorized substitutesmay result in fire, electric shock, or other hazards.4) SafetySafetySafetySafety check:check:check:check: After repairs or service, ask the servicer to perform safety checks to confirm that the unitis in proper working condition.