Embed Size (px)
Citation preview

QEX – September/October 2014 31
Scotty Cowling, WA2DFI
PO Box 26843, Tempe, AZ 85285; [email protected]
Hands-On-SDRYou’ve been hearing about it, you’ve even read about DSP techniques, now it’s time
to actually put your hands on some hardware and install some software!
1Notes appear on page 37.
I often find that the fascination with something that works comes first, and the understanding of exactly how it works comes later. “I can actually pull music from out of the air with that little glass bead! How does that crystal set work, anyhow?”
In this new QEX column, I will show you how to combine off-the-shelf hardware and software components to make a working software defined radio (SDR). Our focus won’t be as much on how it works as how do I make it work. The digital signal processing (DSP) heavy lifting, complex mathematical functions and data transport (the Ethernet interface, for example) have already been implemented by others. We will hook up existing hardware and software blocks in order to build a working SDR. While I won’t delve into the internal workings of each block (at least not too much), I will show you how to get on the air with as little pain and confusion as possible.
The main focus will be on the software, or user interface (UI). The UI acts as a “virtual” front panel (in other words, generated by software) of our SDR. We will control the operation of the radio from this virtual front panel. The UI that we will be using is called HDSDR, short for High Definition Software Defined Radio. Even though we will focus on the software, we still need some hardware to pull signals from the ether.
In this first installment of the column, I will describe how to set up and use three different sets of commonly available hardware with the HDSDR software. You will want to select one of these radios to follow along.
The first option I will describe uses the SDRstickTM HF1 boards that I described in
the July/August 2014 issue of QEX.1, 2 The second option will be to set up an SDR-IQTM receiver from RFSpace.3 Last, we will install and configure a Softrock RX Ensemble II receiver, available from Five Dash Inc.4 The end result of each lash-up will be a working SDR receiver.
You might ask, “Why set up three different radios, when I only have two ears?” There are several reasons. Each of these receivers connects to the computer in a different way (Ethernet, USB, or PC sound card); each has its own capabilities (display bandwidth, frequency range); and the price range is wide (from a $67 kit to a $525 assembled unit). By showing different connection methods, you will be more prepared to hook up any SDR than if we just showed one example. Taken together, these three radios are representative of the majority of SDRs that you are likely to encounter in the amateur marketplace. By looking at different capabilities, you will become familiar with the features of more than one SDR and learn the relative importance of these features. Lastly, you are more likely to have access to the hardware if we show three examples; if SDR hardware is not in your budget right now, you might be able to borrow some from one of your buddies in the local club. Beware! This is a fun part of amateur radio. After playing with your SDR Elmer’s borrowed hardware, you might just have to go out and get your own!
Is this for me?With the limited space available within
each column, I must assume some technical knowledge on the reader’s part. In general, what do you, as the reader, need to know? What equipment do you need to have available? Keep in mind that many of the procedures are the same or similar for all SDRs. Even if you do not have the hardware, you may pick up some tricks by following along with the text. Note that things like programming knowledge, advanced math skills and RF design experience are conspicuously absent. We are assembling an SDR, not designing one.
A “Good” Windows PC
While the Marines need a few good men, we need one good PC. If you are a Linux or a MAC guy, you can still play with SDRs, but the experiments here require a Windows PC, running XP, 7, 8 or later. What is a “good” PC? I am not trying to be evasive, but the answer is, “it depends.” Generally any mid-grade PC built within the last few years will do, but here are some guidelines:
• At least two cores at 2.0 GHz or faster.• 8 GB of memory.• At least 10 GB of free disk space.• Gigabit Ethernet port (minimum 100
Mb Ethernet is required).• Minimum display resolution of 1024 ×
768 (the bigger the better).• One free USB 2.0 port.• Sound system with line input and
speakers.The ultimate test of a computer’s
suitability is simply to try it. Just be prepared to upgrade if you are using an old workhorse PC; it is likely not up to the task.
32 QEX – September/October 2014
Operating System KnowledgeI assume that you know your way around
the operating system, and can perform the following tasks, as a minimum. There are many on-line references to help you if you need to learn or just to brush up on the finer points of your particular operating system.
• Install applications.• Check system information and update
hardware drivers.• Enable/disable both wired and wireless
network ports.• Change PC IP address and network
mask.• Enable and disable PC DHCP client.• Use Windows Command Shell to check
IP addresses and ping network devices.• Check/set environment variables using
the system properties dialog box.• Navigate the PC file system to copy,
move and unzip files. You will need a signal source. This could
be a resonant amateur band antenna or non-resonant wire (to gather interesting signals) or a signal generator (not so interesting, but good for testing). Attenuators and high-pass filters are helpful too, especially if you live next door to a high-powered MW broadcast station. (More on this later.) We will list the specific hardware you need for each project before we show you how to put it all together to make an SDR.
Today’s Project: Let’s Make a Receiver!
The SDRs we will put together today are receivers that cover some or all of the medium wave band (300 kHz to 3 MHz) and all of the shortwave band (3 MHz to 30 MHz). We will use HDSDR software for our user interface for each receiver, and connect each SDR to the PC in a different way. In spite of the simplicity of some of the hardware, all of these receivers perform well.
What You Need: Hardware and Software
We will work with three different receiver
hardware configurations. We will show you how to set up the software for all three of these and become an expert at assembling different SDR systems. When you run the HDSDR software, you will select the hardware that you want to use. Note that the three configurations were not chosen at random; each setup connects to the PC in a different way. The three different connection methods are the three most commonly used by modern SDRs. If you can make these three different setups work, you can hook up just about any SDR! See table 1 for a quick comparison of the three receivers we will set up.
In addition to your Windows PC, here is the hardware you will need for the SDRstickTM receiver:
• BeMicroSDK development board and a UDPSDR-HF1 receiver board (Figure 1).
• 5 V DC, 500 mA power supply.• Short Cat5 Ethernet cable.• SMA adapter to your antenna feed. Here is the hardware you will need for the
SDR-IQTM receiver: • RFSpace SDR-IQTM receiver (Figure
2).• USB type A to type B cable (typical
USB printer cable).• BNC adapter to your antenna feed. Here is the hardware you will need for the
Softrock RX Ensemble II receiver: • Softrock RX Ensemble II receiver
(Figure 3).
• USB type A to type B cable (typical USB printer cable).
• Audio patch cord, 3.5 mm stereo male-to-male.
• 12 V DC, 500 mA power supply.• Enclosure (optional).• BNC adapter to your antenna feed. There are six pieces of software you need
to make these receivers operate with HDSDR. We will cover software downloading and installation in the next section.
• HDSDR application for all receivers.• FTDI USB driver for SDR-IQTM.• LibUSB driver for Softrock receiver.• ExtIO_SDRSTICK.dll file for
SDRstickTM receiver.• ExtIO_SDRIQ.dll file for SDR-IQTM
receiver.• ExtIO_Si570.dll file for Softrock
receiver.
Software Download and InstallationInstalling the software is by far the most
complicated and time-consuming task of the project. Here we will show you where to get each piece of the software and show you some tips for download and installation that will save you some time.
For all receivers, we need the HDSDR User Interface
Download the HDSDR installer by going to www.hdsdr.de and clicking the Download button at the bottom of the page.
Figure 1 — The BeMicroSDK data engine together with the HF1 RF front-end board.
Table 1Feature Comparison of the Three SDR Receivers
SDRstickTM HF1 SDR-IQTM Softrock RX Ensemble IIReceiver type DDC DDC QSD mixerPC Connectivity Ethernet USB Soundcard + USBFreq Coverage 100 kHz to 30 MHz 100 Hz to 30 MHz 1.8 MHz to 30 MHzDisplay Bandwidth 1.25 MHz 190 kHz 96 kHzA/D Converter 14 bit @ 80 Msps 14 bit @ 67 Msps soundcardCase no included $20 optionPower USB or external 5V USB only external 12VCost $243 assembled $525 assembled $67 kit/$92 assembled

QEX – September/October 2014 33
Save the software to a folder of your choice. Next, run the installer by using Windows Explorer to navigate to the folder where you saved the program, and double-click on HDSDR_install.exe. You will have to accept the license agreement (click on the “I accept the agreement” button). You will also have to select the Destination Location, the Start Menu Folder and the icons that you want. (I suggest that you accept the defaults on all of these choices.) You will then be shown a summary of all of the selections that you have made. At this step, write down the Destination Location, because you will need to know it later.
Finally, click the Install button to install
Figure 2 — The SDR-IQ receiver from RFSpace.
Figure 3 — The Softrock RX Ensemble II Receiver from Five Dash Inc.
the HDSDR user interface software. The final dialog box gives you the option to Launch HDSDR. Uncheck this box, since we have a few more things to do before we are ready to run the software. Click the Finish button to complete the installation. We will use this software to operate all three radios, but we are not quite there yet.
In order for HDSDR to recognize and “talk” to our receiver hardware, we need one more file. This file is generically called an ExtIO.dll file, and we need a different one for each kind of hardware that we want to use. This means that there are three of these ExtIO.dll files that we will need, one for each receiver. (Take a look at the list of
software, above, for the three file names.) Think of the ExtIO.dll files as “translators” that sit between the HDSDR software and our hardware. The “translators” convert the data from our hardware (in three different formats, a different one for each receiver) into the single native format that HDSDR understands.
For the SDRstickTM HF1 receiver, download the file ExtIO_SDRSTICK.dll from svn.sdrstick.com in the /sdrstick-release/software/extio section. Place this file in the HDSDR install directory. (You did write down the Destination Location during the install, didn’t you? Just in case you didn’t, the default destination location for Windows
34 QEX – September/October 2014
XP is C:\Program Files\HDSDR, and for Windows 7 it is C:\Program Files (x86)\HDSDR).
For the SDR-IQTM receiver, download the USB driver from rfspace.com/support_files/SDR14IQUSBdriver.zip and save it to a folder of your choice. Unzip the archive to either the same folder or a subfolder. Note the location of this folder, because we will need it to install the USB driver when we first plug in the SDR-IQTM receiver. Next, download the zip archive from www.hdsdr.de/download/ExtIO/ExtIO_SDRIQ14_Bonito.zip and save it to a folder of your choice. The archive contains two files; unzip it and copy the ExtIO_SDRIQ.dll file into the HDSDR install directory.
The Softrock procedure is a bit different. We need the LibUSB driver to talk to the Softrock USB port. Download the driver installer from pe0fko.nl/SR-V9-Si570/PE0FKO-USB-Driver-installer.exe. Save this installer to a folder of your choice and run it. The Driver Setup wizard will guide you through the steps necessary to install the LibUSB driver. Use the defaults for Destination Location and Start Menu Folder and click Next after each selection. If you are prompted to install the certificate, click Install Cert. Click Install to run the Device Driver wizard, then Next and Finish to
complete the LibUSB driver installation. Finally, click Finish to exit the Driver Setup wizard. If it seems like you are stepping through two installation wizards, it is because you are! The first (Driver Setup) wizard checks for the ROOT certificate and prompts you to install it if needed. This certificate is used to validate the driver. After the certificate is installed, the second (Device Driver) wizard installs the LibUSB driver itself.
The ExtIO_Si570.dll file that we need is part of an install package that includes the CFGSR.exe configuration utility (which we do not actually need). To get both of these, download the setup program from pe0fko.nl/CFGSR/setup.exe and save it to a folder of your choice. Run this program, and it will automatically download and run the correct Windows installer version for your operating system. You will need to click the Next button to get to the Select Installation Folder dialog box. Accept the defaults and click Next, then confirm that you want to install by clicking Next yet again before installation will commence. After installation is complete, click Close to complete the setup. Now navigate to the CFGSR installation folder and find the subfolder ExtIO_Si570. (If you didn’t make a note of it, the default installation folder for
Windows XP is C:\Program Files\CFGSR, and for Windows 7 it is C:\Program Files (x86)\CFGSR). Look in this subfolder to find the file ExtIO_Si570.dll; copy this file into the HDSDR install directory.
Now that the software and its three ExtIO.dll “translators” are installed, we are ready to hook up the hardware.
Hardware ProgrammingIf you purchased your SDRstickTM
BeMicroSDK and HF1 from iQuadLabs, the BeMicroSDK is already programmed, and no hardware programming is needed. If you purchased your boards from Arrow (www.arrownac.com/solutions/bemicro-sdk/), you must program the BeMicroSDK yourself before it will work. The procedure is outlined in the HF1 user’s manual, so we will not cover it here.5 No hardware programming is required for the SDR-IQTM or Softrock RX Ensemble II receivers.
Hardware setup
To set up the HF1 receiver, first plug the HF1 front-end board onto the BeMicroSDK, making sure to line up the pin 1 marks. See the HF1 users’ manual for details. Plug the 5 V DC power supply into the J3 connector on the HF1 board.6 Alternatively, you can plug the BeMicroSDK/HF1 combination into a
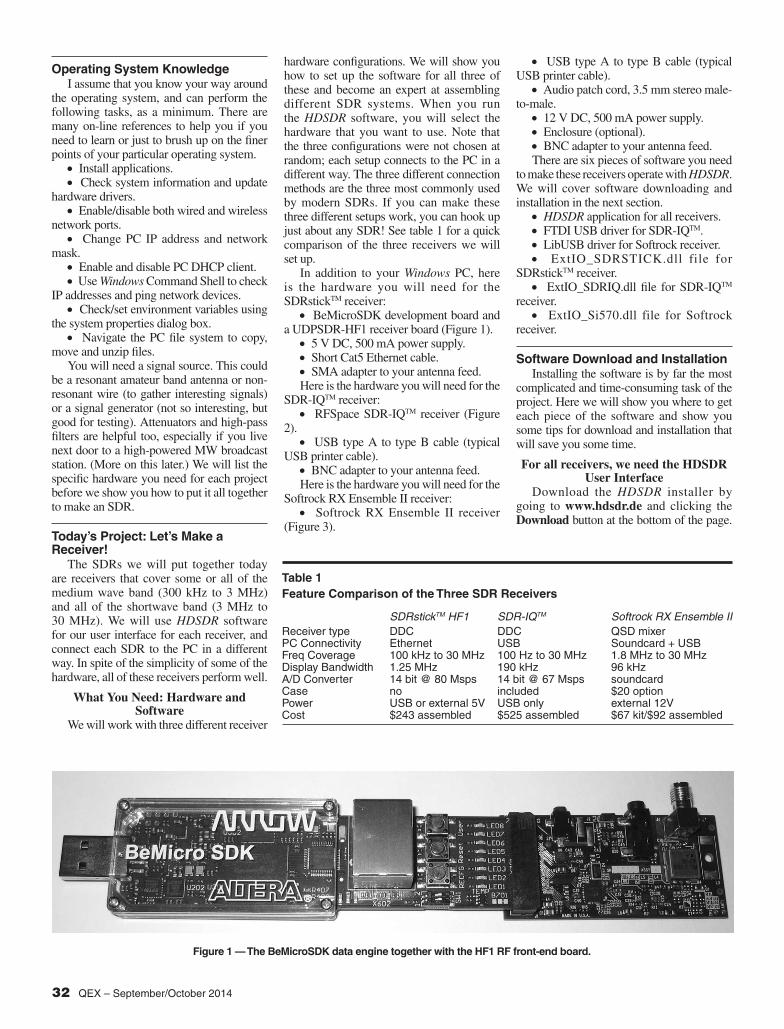
Figure 4 — Screen shot of the HDSDR user interface application.

QEX – September/October 2014 35
USB port on your PC. Windows will not be able to power the receiver without the Altera USB Blaster driver, however. Again refer to the HF1 users’ manual for instructions if you want to power your receiver this way. When the receiver is correctly powered up, LED V701 lights on the BeMicroSDK board and LED1 and LED2 flash at about 1 Hz. Connect the BeMicroSDK Ethernet port either directly to your PC or to a port on an Ethernet switch that is on the same subnet as your PC. (Most home networks have only one subnet, so a free port on your router’s internal Ethernet switch will work fine.) Connect your antenna or signal generator to the SMA antenna connector (J4) and your hardware setup is complete.
To set up the SDR-IQTM receiver, connect it to the PC with a USB type A to USB type B cable. These are commonly used to connect printers to your PC. The USB driver may install automatically (if a suitable FTDI driver is already on your system), but if it doesn’t, point the installer to the USB driver folder to where you unzipped the driver that you downloaded. As an alternative, you can go to the Device Manager and update the driver that way, again pointing to the unzipped driver folder. Connect your antenna or signal generator to the BNC antenna connector and your hardware setup is complete. When the receiver is correctly powered up, the green power light should be on, and the yellow LED next to the antenna icon should be slowly pulsing.
To set up the Softrock RX Ensemble II receiver, connect it to the PC with a USB type A to USB type B cable. The USB driver will install automatically, since you have already installed the LibUSB software. Connect the Line in connector of the Softrock to the Line in connector of your PC sound card using a 3.5 mm male-to-male audio patch cord. Note that you must use the Line in connection; typically the Microphone in connection will not work because it is a monaural input. Connect 12 V power to the front panel power connector (the pin is positive). Connect your
antenna or signal generator to the BNC antenna connector and your hardware setup is complete.
Operating and Troubleshooting
We are now ready to “fire” up our SDR receivers. Each receiver communicates with the PC differently. If this communication channel is not working, our SDR will not work either. Let’s tackle the most difficult interface first: the Ethernet interface on HF1.
HF1 OperationHDSDR operation with HF1 is normally
quite simple, but there are a few network hurdles that you might face the first time you start the software. If you have a DHCP server running on your network and use it to assign addresses to both your PC and SDR, you will have the least problems, since the PC and radio will be on the same subnet by design. If you use a fixed address for either the PC or the radio, you must make sure that the addresses are unique and that they are on the same subnet. The default IP address for HF1 is 192.168.1.25 on the 192.168.1.x subnet.
Go ahead and start the HDSDR application (see Figure 4). Since you have three ExtIO.dll files in the HDSDR working directory, you will have to choose the one to use. Select ExtIO_SDRSTICK.dll from the list and click OK. HDSDR will perform a network discovery and, with any luck, find your HF1 SDR (Figure 5A). The network discovery dialog box (see Figure 5B and 5C) will warn you if your HF1 cannot be found or if your HF1 and PC are on different subnets. If you get one of these warnings, you must fix the problem before your receiver will work properly.
If you start HDSDR and see no dialog box of any kind, check to make sure that you placed the three ExtIO.dll files in the correct HDSDR installation directory. Also check to make sure that your PC and radio IP addresses are on the same subnet. Open a Windows Command Shell and ping the BeMicroSDK IP address; it should respond.
If not, check your network addresses and connections. Another thing to be aware of is that multiple available networks on the PC confuse HDSDR network discovery. The most common occurrence of this problem is when you have your wireless network turned on. Disable your wireless network connection and it will work just fine. (You can even turn the wireless network back on after successful network discovery.) Speaking of wireless networks, the HF1 can operate over a wireless connection, but it uses a large chunk of bandwidth on the network at the higher bandwidth setting.
HF1 is capable of two display bandwidth settings, 384 kilo samples per second (Ksps) and 1.25 million samples per second (Msps). At 384 Ksps, it uses about 15 million bits per second (Mbps) of network bandwidth, and at 1.25 Msps it uses about 50 Mbps. Some wireless networks cannot handle the lower rate, and most wireless networks cannot handle the higher rate. Wired Ethernet is recommended.
Once HDSDR is running, click the Start button to turn the radio on. To select the display bandwidth, click on the Bandwidth (F6) button in the lower left of the display (or just press F6). At the bottom of the dialog box that pops up, there is a selection box; click on the down arrow to see the two sampling rate choices: 384 kHz or 1.25 MHz. Choose the higher sampling rate to see more of the band at once or the lower sampling rate if you have a slower PC.
SDR-IQTM OperationStart the HDSDR application. Again,
you will have to choose which ExtIO.dll to use. For SDR-IQTM, select ExtIO_SDRIQ.dll from the list and click OK. In this case, there is no network discovery since the SDR-IQTM is connected to a USB port. Just click the Start button to turn the radio on. To select the display bandwidth, click on the Bandwidth (F6) button or press F6. Click on the down arrow in the selection box to see the three sampling rate choices: 55.555 kHz,
Figure 5 — HDSDR Network Discovery Dialog Boxes. (A) indicates that everything is okay, (B) is seen when no SDRstickTM can be found and (C) tells you that the PC and radio are not on the same subnet.
(A) (B) (C)

36 QEX – September/October 2014
111.111 kHz or 196.078 kHz. Just like before, choose the higher sampling rate to see more of the band at once or the lower sampling rate if you have a slower PC.
Two other settings that you can choose are only found in the SDR-IQTM, but not in the HF1 or Softrock: the RF attenuator and IF gain settings. Click on the ExtIO button to see the controls and settings that are implemented within the ExtIO_SDRIQ.dll file. Note that you can set the IF gain, RF attenuation level and the sample rate within the ExtIO dialog box. While you can set the sample rate elsewhere (as we have shown), the other two settings can only be made from the ExtIO dialog box.
Softrock RX Ensemble II OperationStart the HDSDR application. As usual,
you will have to choose which ExtIO.dll to use. For the Softrock, select ExtIO_Si570.dll from the list and click OK. No network discovery is performed and you can click the Start button to turn the radio on. To select the display bandwidth, click on the Bandwidth (F6) button or press F6. This time there is no selection box, but you can choose from the sample rates in the Input column. The highest rates may not be supported by your sound card; try them to see how they work. Typical rates will be: 48 kHz, 96 kHz or 192 kHz. Just like before, choose the higher sampling rate to see more of the band at once or the lower sampling rate if you have a slower PC.
Click on the ExtIO button to see controls and settings that are implemented within the ExtIO_Si570.dll file. Wait, what is all this? There are dozens of settings here, and things are complicated! It is time for a more detailed explanation of the Softrock RX Ensemble II architecture so we know what we are doing (at least more than we know now). The Softrock uses what is called a Quadrature Sampling Detector or QSD. This detector is similar to two conventional mixers, one operating in-phase (the I channel) and one operating in quadrature, or shifted by 90º (the Q channel). The Softrock uses a Silicon Labs Si570 IC hardware frequency synthesizer for its local oscillator. The center frequency of the display bandwidth is determined by the frequency of this local oscillator that feeds the two mixers.
The Softrock uses the USB port to control the Si570 chip. The Si570 is very versatile, and many settings are needed to configure it. This is why you see so many tabs when you click on the ExtIO button. Note that the I and Q data from the mixer is sent to the PC soundcard line-in, and not over the USB connection. This is the analog receive data that the PC sound card processes to form the digital I/Q data stream that HDSDR demodulates and filters. The term analog
should give away the reason that the sound card is used to transport the data instead of the USB port. The Softrock uses separate control (USB) and data (soundcard) ports, while the HF1 and SDR-IQTM each use only one port for both control and data (Ethernet and USB, respectively). The HF1 and SDR-IQTM have on-board Analog-to-Digital converters, so their receiver data is digital and can be easily sent over the digital interfaces (USB and Ethernet).
It is beyond the scope of this column to cover all of the Softrock ExtIO options here, but there are a few settings that you need to make before you can use the receiver. These settings only need to be made once, the first time you run HDSDR with new hardware. In the USB tab, click on the USB device from the list in the bottom window (there will likely only be one device in the list) and then click the Open button at the bottom of the window. In the Init tab, click the button next to the radio type, in our case Ensemble RX II LF/HF(HF). You can now click on the Hide button to dismiss the ExtIO window and get back to using the radio. To open the ExtIO window again, just click on the ExtIO button on the main HDSDR screen at any time. There is a wealth of information on the Softrock RX Ensemble II on line, and you can research and dig into the finer nuances of Si570 settings to your heart’s content.7
HDSDR Operation for All ReceiversYou can adjust the frequency by mousing
over the fields in the Tune section and using your mouse wheel. If your mouse has no wheel, use the left mouse button for up and the right mouse button for down. As already described, use the Bandwidth (or F6) button to choose to see either more or less bandwidth on the panadapter and waterfall displays. Choose narrower bandwidths if you are running a less powerful PC and experience audio dropouts. The lower waterfall and panadapter windows are just zoomed-in versions of the pass band that is highlighted in the upper window. Slowing the screen update rates with the Speed sliders below each panadapter window can also ease the load on your creaky old PC if you experience audio problems.
Go ahead and play around with the settings in the user interface. You can grab either edge of the pass band in the lower panadapter window and drag it to perform low-cut or high-cut on the audio. You can click in the upper panadapter window to instantly change frequency. You can record and playback using the controls just below the Volume and AGC sliders. Keep in mind that when you record, you are recording the entire spectrum, not just your selected pass band. This uses a lot of disk space at the
wider bandwidth settings. HDSDR even has a scheduler for recording at predetermined times (it is under the Options menu). The advantage of recording the entire spectrum is that while playing back your recording, you can tune within the recorded spectrum, just as if you were listening to the airwaves “live.”
One other thing to be aware of is ADC overload. As we have already described, the SDR-IQTM has an internal 20 dB attenuator that you can use to prevent overload. The HF1 front-end uses a 20 dB preamp that provides sufficient sensitivity for reasonable size antennas, but has no way to adjust any gain settings, and can be overloaded when using a large antenna. The Softrock can also be overloaded with RF from a large antenna. If you have a Yagi at 150 feet or live next door to a 50 kW broadcast station, you may overload the receiver front-end. For HF1, LED8 on the BeMicroSDK indicates ADC overload. On the SDR-IQTM front panel, the red LED above the clipped sine wave icon is the ADC overload indicator. You should never see these light up for more than an occasional flicker. If they do, you must reduce the level of the offending signal. Remember, the front-end has a broadband frequency response.
The offending signal could be almost anywhere! You can just reduce all signals by adding an in-line attenuator (or using the SDR-IQTM built-in attenuator), or you can selectively remove the culprit with an external notch-, low-, or high-pass filter if you can identify it. The Softrock does have four internally switched low-pass filters, but unfortunately it has no overload indicator. Overload indications are distortion in the audio accompanied by a general rise in the noise floor (as seen on the panadapter display) and/or appearance of many spurious signals across the viewable spectrum.
If you get stuck and just can’t make your receiver work, there is help available. For the HF1 receiver, the SDRstick Yahoo group has about 250 members and is a friendly group.8 For the SDR-IQTM, the SDR-IQ group is your resource.9 The Softrock Yahoo group is named Softrock-40 after the first radio in the series.10 Just ask a question on any of these forums and you will very likely get help quickly.
Next Installment: Interesting SDR Applications
Now that we have a working SDR, what can we use it for? Get ready to do some broadcast-band DXing, where you can see the signals, listen to digital shortwave broadcasts or copy one of the new digital modes.

QEX – September/October 2014 37
Scotty Cowling, WA2DFI, was first licensed in 1967 as WN2DFI, and has been continuously active since that time. An Extra Class licensee and ARRL Life Member, Scotty is active while mobile on HF CW and on APRS. He is an advisor for Explorer Post 599, a BSA affiliated ham club for teens in the Phoenix, Arizona area. He also enjoys minimalist QRP operating. He has participated in every ARRL Field Day since 1968!
Scotty has been involved in the openHPSDR project for the last 8 years, and has served on the TAPR Board of Directors (2006-2012) and as TAPR Vice President (2011-2012). He is active in the production of openHPSDR components and with other TAPR projects. He is a co-founder of iQuadLabs, LLC, a supplier of openHPSDR systems and other Software Defined Radio components, and is President of Zephyr Engineering, Inc, an engineering consulting firm.
Scotty’s professional specialty is FPGA and embedded systems hardware design. He designed his first project with a microprocessor in 1975 and his first FPGA project was in 1987. He holds a BSEE from Rensselaer Polytechnic Institute and an MSEE from Arizona State University.
Notes1BeMicroSDK and UDPSDR-HF1 are avail-
able for $243 from either iQuadLabs (www.iQuadLabs.com) or Arrow Electronics (www.arrow.com).
2Scotty Cowling, WA2DFI, “Hardware Building Blocks for High Performance SDRs”, QEX, Jul/Aug 2014, pp 28-40.
3SDR-IQTM receivers are available for $525 from RFSPACE, Inc. www.rfspace.com/RFSPACE/SDR-IQ.
4Softrock RX Ensemble II kits are available for $67 from Five Dash Inc www.fivedash.com/index.php?main_page=product_info&cPath=1&products_id=7. Assembled boards are available for $92 and metal enclosures for $20.
5The HF1 User’s Manual can be downloaded at www.sdrstick.com/manuals/UDPSDR_HF1_users_manual_V1_1.pdf.
6The power connector for the HF1 is a 2.35 mm × 0.7 mm barrel, CUI part number PP-012, DigiKey CP-012-ND.
7Softrock RX Ensemble II information is available at these links: www.wb5rvz.org/ensemble_rx_ii/index?projectId=16.
www.wb5rvz.org/common/softwareinstal-lation.
8The SDRstick Yahoo group is at: www.groups.yahoo.com/groups/sdrstick.
9The SDR-IQ Yahoo group is at: www.groups.yahoo.com/groups/SDR-IQ.
10The Softrock Yahoo group is at: www.groups.yahoo.com/groups/softrock40.