Embed Size (px)
Citation preview

Intro to BricxCC Programming – Last updated 10/01/12
© Copyright Paul Oh
Hands-on Lab
Lego Programming – BricxCC Basics
This lab reviews the installation of BricxCC and introduces a C-like programming environment (called NXC) for the Lego NXT system. Specific concepts include: text display, button presses, looping (for and do-while), if conditionals and motor commands Preliminary: BricxCC Installation and Integrated Development Environment (IDE) setup The Bricx Command Center (BricxCC) is a single software program (called an IDE) that enables one to compose, compile and download/run C-like programs for all Lego-based bricks (e.g. NXT and the older RCX unit). Versions for Win95 to Vista exist and the IDE includes languages like C/C++, Pascal, and Java. This Hands-on Lab will focus exclusively on NxC (Not eXactly C). This has various advantages. First, C is a universally used programming language and most the common one in the embedded micro-controller community (e.g. robotics). Second, C is platform independent, meaning that code developed for one platform, should operate on other platforms (as long as ANSI standards are used). Third, unlike other C compilers for the NXT, NxC is freely available under the GNC public license. The net effect is that NxC will enable developers to quickly and painlessly develop code for their NXT-based systems. Step 0: Connect your NXT Brick to your PC’s USB port Windows may not be able to automatically find a suitable driver. As such, download and install the Fantom Driver from the Lego Mindstorms site: http://mindstorms.lego.com/en-us/support/files/Driver.aspx (Figure 0-A). Click download
A. Double-click PhantomDriver_Download1.zip and this should open the archive file (see Figure 0-B)
Figure 0-A: http://mindstorms.lego.com/en-us/support/files/Driver.aspx screenshot. Click download, select “PC” and then save the file PhantomDriver_Download1.zip a directory on your PC

Intro to BricxCC Programming – Last updated 10/01/12
© Copyright Paul Oh
B. The Lego Mindstorms dialog box should pop up (Figure 0-C). Clicking “Next” should prompt the installation of the related NXT driver
C. Congratulations! Now, each time your re-connect your NXT Brick on your PC, Windows should automatically detect it.
Step 1: Download
A. Visit http://sourceforge.net/projects/bricxcc/files/bricxcc/. B. We will use Version Build 3.3.8.9. Click bricxx 3.3.8.9 C. Download file “bricxcc_setup_3389.exe”
NB: As of 09/20/12, NXT Brick is installed with Firmware 1.28. Versions greater than 1.28 (e.g. 1.31) should also work. Step 2: Once downloaded, double-click the EXE file and install in a desired directory Step 3: Connect the USB cable between your PC and NXT. Turn on the NXT Step 4: Launch Program
A. “Start – Programs – Bricx Command Center – Bricx Command Center” B. You should see the following prompt
Figure 0-B: Click “setup” (left). When the resulting box pops up (right), click “Yes”.
Figure 0-C: Click “Next” (left) should pop up the box (right). Windows should detect the proper operating system (32- or 64-bit). If no driver was installed previously, then clicking “Next” should finalize installation of the driver.
Intro to BricxCC Programming – Last updated 10/01/12
© Copyright Paul Oh
C. Select “USB” and “NXT” respectively for the “Port” and “Brick Type” pull-down menus. Click OK.
Step 5: See the IDE
Figure: If installed properly, launching “Bricx Command Center” will result in this prompt
Figure: The IDE (Integrated Development Environment). The top bar reveals menus that enable one to compose, compile and download code to the NXT

Intro to BricxCC Programming – Last updated 10/01/12
© Copyright Paul Oh
Concept 1 – Hello World: Creating your first NxC Program to display text on the NXT Brick Step 1: Click File – New. Click File – Save As and save in a directory e.g. “myPrograms” with the name “helloWorld”. Step 2: Enter the following text Step 3: Click File – Save All. Step 4: Compile Step 5: Execute: Follow the left figure below. Your NXT should display your text (right figure)
Congratulations! You’ve composed, compiled and executed your first NxC program.
Code Example: helloWorld.nxc
Figure: Select Compile - Compile
Figure: Click Compile – Download and Run
Figure: The text is displayed on NXT brick
task main () { TextOut (10, LCD_LINE4, "Hello World"); Wait (SEC_2); }
Intro to BricxCC Programming – Last updated 10/01/12
© Copyright Paul Oh
Code Explanation: Like all C programs, code execution begins with a main function. NxC implements this with the syntax task main() and executes code between the parenthesis. In the program helloWorld.nxc, one sees the TextOut() function. According to the manual (online version is located at http://bricxcc.sourceforge.net/nbc/nxcdoc/nxcapi/index.html), searching for TextOut() reveals the following syntax:
char TextOut(int x, int y, string str, unsigned long options) In helloWorld.nxc, the statement:
TextOut(10, LCD_LINE4, “Hello World”); suggests that the characters between the quotations i.e. a string, will be displayed on the Brick at the location x = 10 and y = LCD_LINE4. Searching for LCD_LINE4 on the online manual reveals that LCD_LINE4 is a defined constant in NxC and is equal to 32. Thus, ultimately the message Hello World is displayed 10 pixels from the left and 32 pixels from the top. After displaying the message, a Wait statement is executed. Searching for Wait reveals
void Wait(unsigned long ms) and serves to wait a prescribed number of milliseconds. This statement essentially causes the program to “sleep” or delay for a specified amount of time. Searching for SEC_2 reveals that this is also a defined constant in NxC and is equal to 2000. Thus the statement
Wait(SEC_2) makes the task main go to sleep for 2000 milliseconds (or 2 seconds).
Exercise 1: In NxC create programs for the following: 1-1 Search for LCD_LINE and experiment displaying the message Hello World at various rows on
the LCD Brick
1-2 Introduce a string variable as follows and display it at position x=10, y=16 string strMessage; strMessage = “Bye Cruel World”;
1-3 Look up PlaySound. Execute a program that displays Hello World, waits 2 seconds, plays the error sound and then displays Bye Cruel World below the Hello World message
1-4 Look up ClearScreen. Rewrite 1-3 so that the LCD is cleared before the Bye Cruel World
message is displayed
Intro to BricxCC Programming – Last updated 10/01/12
© Copyright Paul Oh
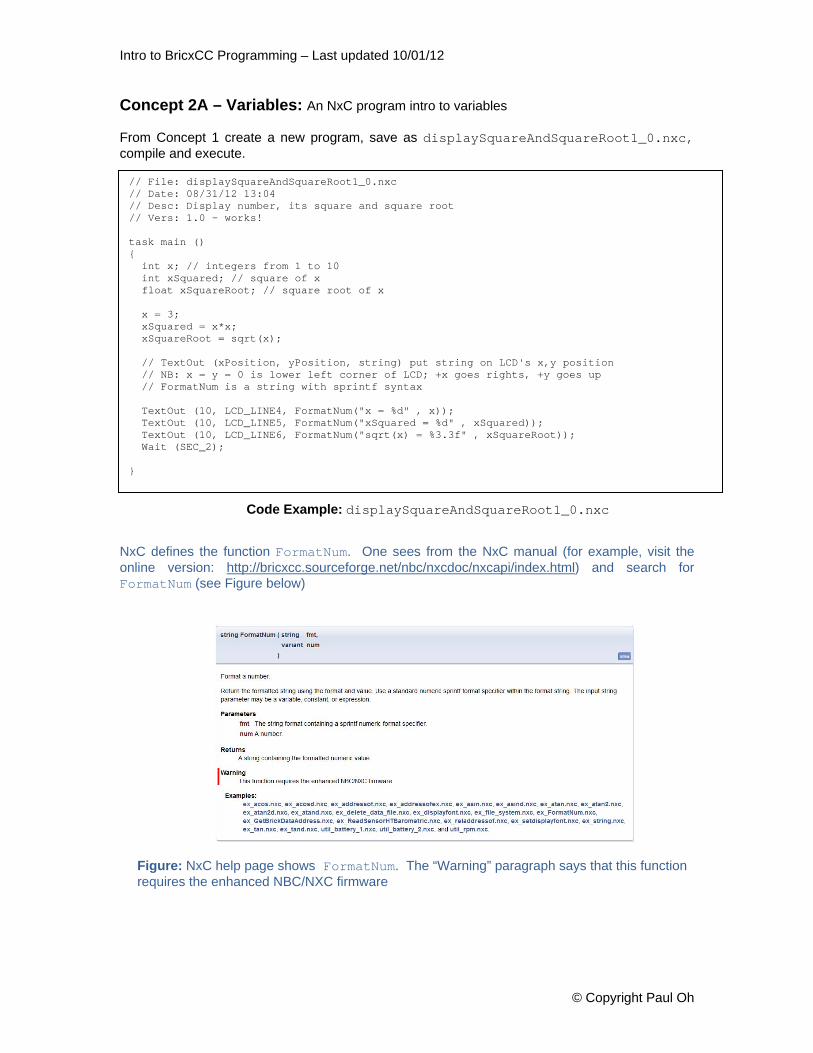
Concept 2A – Variables: An NxC program intro to variables From Concept 1 create a new program, save as displaySquareAndSquareRoot1_0.nxc, compile and execute. NxC defines the function FormatNum. One sees from the NxC manual (for example, visit the online version: http://bricxcc.sourceforge.net/nbc/nxcdoc/nxcapi/index.html) and search for FormatNum (see Figure below)
Code Example: displaySquareAndSquareRoot1_0.nxc
// File: displaySquareAndSquareRoot1_0.nxc // Date: 08/31/12 13:04 // Desc: Display number, its square and square root // Vers: 1.0 - works! task main () { int x; // integers from 1 to 10 int xSquared; // square of x float xSquareRoot; // square root of x x = 3; xSquared = x*x; xSquareRoot = sqrt(x); // TextOut (xPosition, yPosition, string) put string on LCD's x,y position // NB: x = y = 0 is lower left corner of LCD; +x goes rights, +y goes up // FormatNum is a string with sprintf syntax TextOut (10, LCD_LINE4, FormatNum("x = %d" , x)); TextOut (10, LCD_LINE5, FormatNum("xSquared = %d" , xSquared)); TextOut (10, LCD_LINE6, FormatNum("sqrt(x) = %3.3f" , xSquareRoot)); Wait (SEC_2); }
Figure: NxC help page shows FormatNum. The “Warning” paragraph says that this function requires the enhanced NBC/NXC firmware
Intro to BricxCC Programming – Last updated 10/01/12
© Copyright Paul Oh
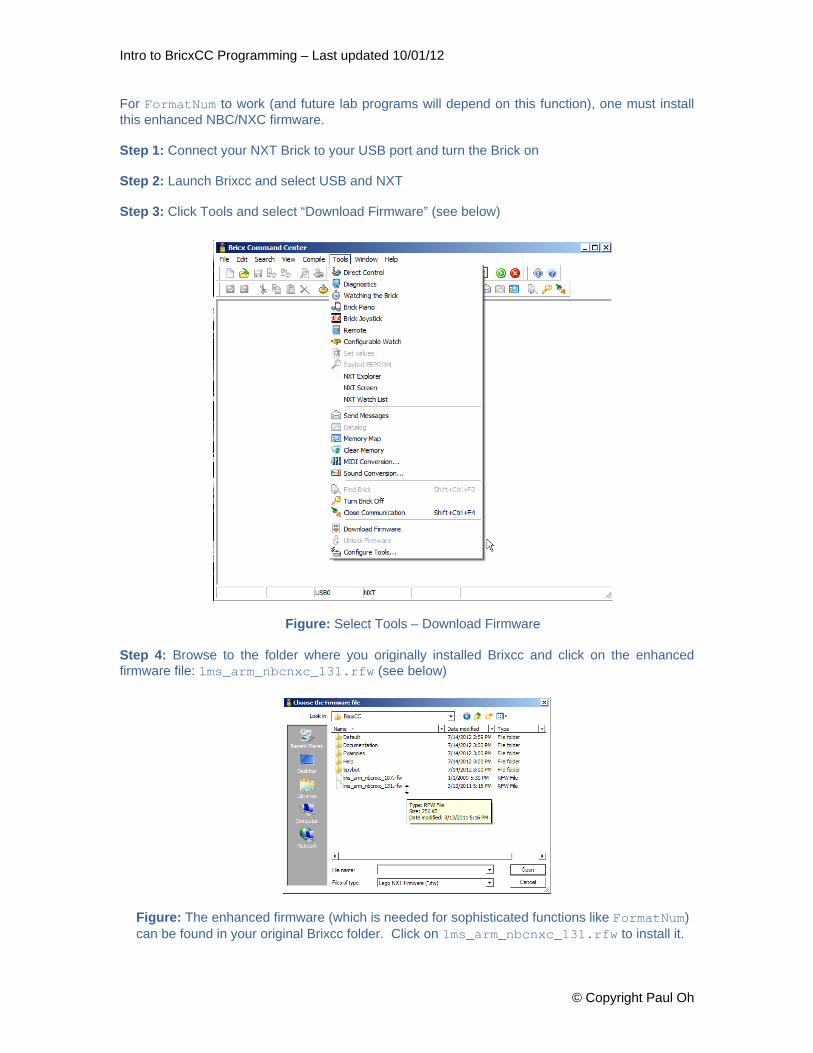
For FormatNum to work (and future lab programs will depend on this function), one must install this enhanced NBC/NXC firmware. Step 1: Connect your NXT Brick to your USB port and turn the Brick on Step 2: Launch Brixcc and select USB and NXT Step 3: Click Tools and select “Download Firmware” (see below) Step 4: Browse to the folder where you originally installed Brixcc and click on the enhanced firmware file: lms_arm_nbcnxc_131.rfw (see below)
Figure: Select Tools – Download Firmware
Figure: The enhanced firmware (which is needed for sophisticated functions like FormatNum) can be found in your original Brixcc folder. Click on lms_arm_nbcnxc_131.rfw to install it.

Intro to BricxCC Programming – Last updated 10/01/12
© Copyright Paul Oh
At this point, a periodic clicking sound may result from your NXT Brick. This is fine. After about 2-minutes, successful installation should result. Sometimes installation may not be successful. This is because Windows may be hung up trying to resolve permissions of external installations. Repeating Steps 3 and 4 should automatically override permission resolutions. With your NXT now installed with the enhanced NBC/NXC firmware, FormatNum should work. Compile and execute the program displaySquareAndSquareRoot1_0.nxc. The compiler should not complain (unless you mistyped syntax) and the Brick should display the number (i.e. 3), its square and square root. Code Explanation: Like C, NxC allows one to assign variables and uses ANSI-C standards like int and float to define 16-bit whole numbers ranging from -32768 to +32768 and 32-bit real numbers. The above program creates 2 integer variables x and xSquared. As their names suggest, they will store whole numbers. The float variable xSquareRoot will store real numbers (since square roots typically yield numbers with decimals). Concept 2B – for Statement: Repeat execution of code The for statement is part of the ANSI-C standard and is used to repeatedly execute a block of code. Modify the program in Concept 2 with the following for statement. Execution reveals that the variable x increments from 1 to 10, displaying the square and square root. Code Explanation: The variable x begins with 1 and executes the statements between its parentheses. These statements compute the square and square root and display their values using the TextOut statement at various rows of the LCD. The program waits 2 seconds, checks if x less than or equal to 10. If it is x increments and again goes through computation and display. If x is greater than 10, then the loop is bypassed – which ultimately leads the termination of main.
for (x = 1; x <=10; x++) { xSquared = x*x; xSquareRoot = sqrt(x); // TextOut (xPosition, yPosition, string) put string on LCD's x,y position // NB: x = y = 0 is lower left corner of LCD; +x goes rights, +y goes up // FormatNum is a string with sprintf syntax TextOut (10, LCD_LINE4, FormatNum("x = %d" , x)); TextOut (10, LCD_LINE5, FormatNum("xSquared = %d" , xSquared)); TextOut (10, LCD_LINE6, FormatNum("sqrt(x) = %3.3f" , xSquareRoot)); Wait (SEC_2); }
Intro to BricxCC Programming – Last updated 10/01/12
© Copyright Paul Oh
Concept 2C – do-while Statement: Repeat execution of code The Do-While statement is also a part of the ANSI-C standard for looping. Do-While is often used to execute code until some condition is met. Write the following program, save as displaySquareAndSquareRoot1_1.nxc, and execute. Code Explanation: The do-while statement polls the ButtonPressed statement. In the NxC manual, ButtonPressed is used to check if a specified button is pressed. Int his case, the defined constant BTNCENTER refers the Brick’s orange button. When pressed, the Boolean variable buttonPushed becomes TRUE. The exclamation mark (!) in ANSI-C refers to negation. In other words, the do-while keeps polling ButtonPressed while buttonPushed remains not-TRUE (i.e. FALSE).
Code Example: displaySquareAndSquareRoot1_1.nxc
// File: displaySquareAndSquareRoot1_1.nxc // Date: 08/31/12 13:04 // Desc: Display number, its square and square root // Vers: 1.0 - works! // 1.1: Push orange button to begin - works! task main () { int x; // integers from 1 to 10 int xSquared; // square of x float xSquareRoot; // square root of x bool buttonPushed; TextOut (0, LCD_LINE1, "Push Orange" ); TextOut (0, LCD_LINE2, "button to start" ); do { // nothing if Orange center button is not pushed buttonPushed = ButtonPressed(BTNCENTER, FALSE); } while(!buttonPushed); // exit loop when BTNCENTER = true i.e. pushed for (x = 1; x <=10; x++) { xSquared = x*x; xSquareRoot = sqrt(x); // TextOut (xPosition, yPosition, string) put string on LCD's x,y position // NB: x = y = 0 is lower left corner of LCD; +x goes rights, +y goes up // FormatNum is a string with sprintf syntax TextOut (10, LCD_LINE4, FormatNum("x = %d" , x)); TextOut (10, LCD_LINE5, FormatNum("xSquared = %d" , xSquared)); TextOut (10, LCD_LINE6, FormatNum("sqrt(x) = %3.3f" , xSquareRoot)); Wait (SEC_2); } } // end main

Intro to BricxCC Programming – Last updated 10/01/12
© Copyright Paul Oh
Concept 2D – if Statement: Conditional statement The if statement is the ANSI-C standard to conditionally execute a statement. To appreciate this, write the following program, save as displaySquareAndSquareRoot1_2.nxc and execute.
Code Example: displaySquareAndSquareRoot1_2.nxc
// File: displaySquareAndSquareRoot1_2.nxc // Date: 09/04/12 11:14 // Desc: Display number, its square and square root // Vers: 1.0 - works! // 1.1: Push orange button to begin - works! // 1.2: Arrows to increment, grey button to quit - works! task main () { int x; // integers from 1 to 10 int xSquared; // square of x float xSquareRoot; // square root of x bool orangeButtonPushed; bool greyButtonPushed; bool leftArrowButtonPushed; bool rightArrowButtonPushed; TextOut (0, LCD_LINE1, "Push Orange" ); TextOut (0, LCD_LINE2, "button to start" ); do { // nothing if Orange center button is not pushed orangeButtonPushed = ButtonPressed(BTNCENTER, FALSE); } while(!orangeButtonPushed); // exit loop when BTNCENTER = true i.e. pushed ClearScreen(); //clear screen TextOut (0, LCD_LINE1, "Arrows increment" ); TextOut (0, LCD_LINE2, "Grey quits" ); x = 1; // start with x = 1 do { // Stay in this loop until grey button pushed // Check which button pressed leftArrowButtonPushed = ButtonPressed(BTNLEFT, FALSE); rightArrowButtonPushed = ButtonPressed(BTNRIGHT, FALSE); greyButtonPushed = ButtonPressed(BTNEXIT, FALSE); if(leftArrowButtonPushed) x = x - 1; if(rightArrowButtonPushed) x = x + 1; if(x < 0) x = 0; // don't go below 0 xSquared = x*x; xSquareRoot = sqrt(x); // TextOut (xPosition, yPosition, string) put string on LCD's x,y position // NB: x = y = 0 is lower left corner of LCD; +x goes rights, +y goes up // FormatNum is a string with sprintf syntax TextOut (10, LCD_LINE4, FormatNum("x = %3d" , x)); TextOut (10, LCD_LINE5, FormatNum("xSquared = %3d" , xSquared)); TextOut (10, LCD_LINE6, FormatNum("sqrt(x) = %3.3f" , xSquareRoot)); Wait (500); // wait 500 msec } while(!greyButtonPushed); } // end main
Intro to BricxCC Programming – Last updated 10/01/12
© Copyright Paul Oh
Code Explanation: Like displaySquareAndSquareRoot1_1.nxc given in Concept 2C, this version (1.2) adds Boolean variables to the Brick’s 3 other buttons (left and right arrows and the grey center button). The if statement is used to increment or decrement the value of the variable x, and consequently compute and display the x’s square and square root. The do-while statement continues to monitor the status of the grey center button, and if pushed, exits the program. Concept 3 – Motors: An NxC program to command NXT motors to move Step 1: Open a new file and save as “helloMotor.nxc”. Type the following and save Step 2: Attached 2 NXT motors (to Ports A and C) on the Brick Step 3: Save All, Compile, then Download and Run Code Explanation: The NxC manual describes OnFwd and OnRev statements. These are specific to NxC and not part of the ANSI-C standard. Often, specific hardware (like NXT motors and sensors) dictate using non-ANSI standard statements. The OnFwd statement uses the defined constant OUT_AC to reference Brick ports A and C and commands motors connected to these ports to run at 75% of maximum power. Similarly, the OnRev statement commands the motors to rotate in the opposite direction at 25% of maximum power. Lastly, Off and StopAllTasks are additional non-ANSI statements, to stop the motors and exit the program gracefully.
Code Example: helloMotor.nxc – Rotate Motors A and C then Counter-rotate them
// FILE: helloMotor1_0.nxc // AUTH: P.Oh // DATE: 03/16/11 // DESC: Motors connected to Ports A and C. Command to rotate, // and counter-rotate fixed amount task main() { OnFwd(OUT_AC, 75); // NXC Guide P. 294 (6.36.2.27): OnFwd(byte outputs, char pwr) // outputs is OUT_X where X = [A, B, C, AB, AC, BC, ABC] // pwr is from [0, 100] Wait(5000); // continues for specified milliseconds OnRev(OUT_AC, 25); // NXC Guide P. 300 (6.36.2.37) Wait(2000); Off(OUT_AC); // stop and end program gracefully StopAllTasks(); }
Exercise 3: In NxC create programs for the following: 3-1 The repeat statement (page 25 Section 3.3.3.7) of the NXC_Guide.pdf document, describes
looping. Add a repeat(3) statement below the task main() and encase the code with a pair of French braces. This should make your helloMotor code operate 3 times.
3-2 Look up the RotateMotor statement (page 308 Section 6.36.2.255). Set Motor A to run at a
power level of 75 and rotate to -180 degrees.

Intro to BricxCC Programming – Last updated 10/01/12
© Copyright Paul Oh
Programming Exercises 1-1 Write a program that converts your age (in years) and displays your age in the number of
days. Don’t worry about fractional years and leap years. For example, if you are 10 years old, then the Brick should compute (365 days per year) and display 3650 days old. Hint: use int or long for variables
1-2 Write a program that increments a foot from 1 feet to 10 feet and displays the equivalent in meters (0.3048 meters per foot). NB: only display the 2 digits after the decimal. For example, for 1 foot, display (1 ft = 0.30 meters)
1-3 Define 3 string variables called firstName, middleInitial, and lastName that are
assigned with your own name. For example firstName = “Paul”, middleInitial = “Y” and lastName = “Oh”. Have the Brick display:
Paul Y Oh Paul Oh Paul Y. Oh
Look up and use the strcat function to display the 4th and 5th lines above
1-4 Look up strlen and write a program that displays the number of characters for each line in
program 1-3. For example, output should look like
Paul: 4 Yu: 2 Oh: 2 Paul Oh: 7 Paul Y. Oh: 10
NB: White spaces count as characters in ANSI-C
1-5 Write a program that uses the variable days to hold a value from 0 to 31. Use a for loop to display days and its equivalent in weeks and days. For example, 8 days would display 1 week and 1 day.
1-6 Write a program that computes and displays all the prime numbers smaller than or equal to 55. For example the display should read: 1, 5, 11, 55.
`


![#] +e A ) - 日本弁護士連合会│Japan Federation of … ý Â Â Ë Â Â Ä Â Â Â Å 1 ý Â Â Ë Â Â Ä Â Â Â Å 5U ÊKS 1 ý Â Â Ë Â Â Ä Â Â Â Å1 ý Â](https://img.dokumen.tips/doc/110x75/5ce9840888c993c0208d8cce/-e-a-japan-federation-of-y-a-a-e-a-a-ae.jpg)