Embed Size (px)
Citation preview

Page | 1
Hands-On Lab
3D Game Development with XNA Framework
Lab version: 1.0.0
Last updated: 2/2/2011

Page | 2
CONTENTS
OVERVIEW ................................................................................................................................................... 3
EXERCISE 1: BASIC XNA GAME STUDIO GAME WITH GAME STATE MANAGEMENT ...................... 5 Task 1 – Basic game project with game state management ................................................................. 7
Task 2 – 3D Drawing ............................................................................................................................ 19
Task 3 – 3D Movement and Camera ................................................................................................... 34
Task 4 – Physics and collision .............................................................................................................. 43
EXERCISE 2: GAME POLISH AND MENUS............................................................................................. 67 Task 1 –Sounds .................................................................................................................................... 67
Task 2 – Additional screens and menus .............................................................................................. 71
Task 3 – “3-2-1-Go!” countdown timer and game over screen .......................................................... 90
Task 4 - Calibration screen .................................................................................................................. 93
SUMMARY ................................................................................................................................................ 100

Page | 3
Overview
This lab introduces you to 3D game development on Windows Phone 7™, as well as to the basics of
game development using the XNA Game Studio.
During the course of this lab, you will build a simple, yet complete, 3D game using XNA Game Studio,
while getting familiar with the key concepts of XNA Game Studio 3D game development. You will also
learn how to use Microsoft Visual 2010 Express with the Windows Phone 7™ SDK to build and design
your XNA games for phones based on Windows Phone 7™.
Objectives
At the end of the lab you will know:
The basics of the XNA game engine model within Windows Phone 7™ games
How to import, process and use 3D game resources (3D models, textures, images, fonts, sound
files, etc.) in your XNA Game Studio game
The basic drawing mechanism of Windows Phone 7™ XNA games, including applying lighting
effects and camera movements
How to use the touch and accelerometer capabilities of the device for controlling the game, as
well as pc input handling for simulating control while using the Windows Phone 7™ emulator.
How to add basic game logic and basic 3D physics (movement, rotation, collision detection, etc.)
How to add sound effects to your game
How to create and manage multiple game screens and menus for your game
Prerequisites
The following is required in order to complete this hands-on lab:
Microsoft Visual Studio 2010 Express for Windows Phone or Microsoft Visual Studio 2010 with
Windows Phone 7™ Add-In for Visual Studio 2010 installed
Page | 4
Tasks
This hands-on lab includes two excercises built from the following tasks:
Exercise 1
1. Creating a new game project with game state management
2. Loading, positioning and drawing 3D models
3. Handling user input, rotating 3D objects, basic movements in 3D space and chase camera
4. Collision detection and game physics (Acceleration, Friction, Velocity, Angular Velocity, etc.)
Exercise 2
5. Adding screens and menus
6. Adding sound effects
7. Managing a High Scores table including commiting it to storage
8. Adding a calibration screen for the accelerometer
Estimated time to complete this lab: 120 minutes.

Page | 5
Exercise 1: Basic XNA Game Studio Game
With Game State Management
If you have ever wanted to program your own games, Microsoft® XNA™ Game Studio 4.0 (installed as a
part of the prerequisites) is for you.
Whether you are a student, hobbyist or an independent game developer — you can create and share
great games using the XNA Game Studio.
XNA Game Studio 4.0 is a game development product from Microsoft that is built on top of Microsoft
Visual Studio 2010 Express for Windows Phone 7™, allowing game developers to utilize the simplicity of
.NET based programming languages such as C# and the power and robustness of Visual Studio 2010 as
the IDE (Integrated Development Environment) for their games development.
XNA Game Studio 4.0 includes the XNA Framework and the XNA Framework Content Pipeline.
The XNA Framework is the runtime engine and class libraries (an extension to the .NET runtime and
class libraries) which provide a robust game-focused Application Programming Interface (API), which
simplifies the development of games for the Xbox 360™, Windows® based PCs and now for the
Windows Phone 7™ Series®.
The XNA Content Pipeline is a set of content importers and processors, integrated into the development
environment, which provides an easy and flexible way to import, load, process and use three-
dimensional (3D) models, textures, images, sounds, and other assets in your game. The XNA Content
Pipeline is extensible, allowing you to create custom content importers and/or processors to add
support for potentially any kind of resources and asset formats, or to add custom data to existing asset
types in loading time to be further utilized in runtime.
The XNA Game Studio is indeed an easy-to-use development environment and programming framework
developed by Microsoft to help developers make games faster and easier, however, it is not a "drag-
and-drop" visual game creation tool. It is a programming environment and you are required to know to
program in C# and to have object-oriented programming skills in order to use it.
The XNA Framework is not a game engine. It does not include camera management, state/screen/level
management, physics, collision monitoring, or other features often found in game engines. It is a game
development framework, meaning that the way your game works depends solely on your programming.
During this lab, you will build a full 3D game for the Windows Phone 7™. The game you will build,
“Marble Maze”, is a single player game in which the player guides a marble through a 3D maze, and
attempts to reach the end in the shortest time possible, while avoiding dropping the marbles into holes
in the ground (which will make the marble respawn in the last visited checkpoint). The player makes the
marble roll through the maze by tilting the device, which in turn affects the tilt of the maze game-board.

Page | 6
Once the user reaches the end of the maze, the result time is compared against the fastest times stored
on the device. If the time is in the top-ten high-scores, the player will be allowed to record their name
into the high-score table.
XNA Game Studio Game Basics
A game usually has three phases:
Initializing and Loading – In this phase, we load resources, initialize game-related variables, and
perform any other tasks that have to be performed before the game actually begins. This phase
occurs only once in the game’s life cycle.
Update – In this phase, we update the game-world state. Usually this means calculating the new
position/orientation of game objects according to the game’s physics, handling user input and
acting accordingly, triggering sound effects, updating health, ammo, and other statuses,
updating the score and performing other game-related logic. This phase occurs repeatedly
throughout the time that the game engine is active, as part of the game's main loop.
Draw – In this phase, we draw the current game scene to the output graphic device, as a single
frame, visually representing the current game state. This phase occurs repeatedly throughout
the time that the game engine is active, as part of the game's main loop.
In the XNA Framework, the Update and Draw phases are executed up to 60 times per second by default
on a PC or Xbox 360™ and up to 30 times per second on a Zune™, Zune HD™ or Windows Phone 7™
device.
General Architecture
The "Marble Maze" game uses the game screen management architecture from the Game State
Management sample (originally found at http://creators.xna.com/en-
US/sample/phonegamestatemanagement), which provides some of the assets for this lab. The game
includes the following screens:
Main Menu screen (MainMenuScreen class)
High Scores Table screen(HighScoreScreen class)
Gameplay screen (GameplayScreen class)
Paused (PauseScreen class)
Accelerometer calibration screen (CalibrationScreen class)
The Game performs game-specific content loading just before displaying the gameplay screen, so as to
avoid any noticeable delay before the game begins.

Page | 7
When launched, the game’s first action is to load and display the background screen and then the main
menu screen. Once the main menu screen is loaded, the user can access the game itself, or view the
high score.
The completed game will look as follows:
Figure 1
Finished Marble Maze Game
Task 1 – Basic game project with game state management
During this task, you will create an XNA Game Studio game project for the Windows Phone 7™ platform
and add game state management capabilities to it by incorporating code which is supplied with this lab.
1. Start Visual Studio 2010 Express for the Windows Phone or Visual Studio 2010.
Note: The steps in this hands-on lab illustrate procedures using Microsoft Visual Studio 2010
with the Windows Phone Developer Tools, but they are equally applicable to Microsoft Visual
Phone Developer 2010 Express. Instructions that refer generically to Visual Studio apply to
both products.
2. Open Microsoft Visual Phone Developer 2010 Express from Start | All Programs | Microsoft
Visual Studio 2010 Express.
Visual Studio 2010: Open Visual Studio 2010 from Start | All Programs | Microsoft Visual
Studio 2010.
3. In the File menu, choose New Project.
Visual Studio 2010: In the File menu, point to New and then select Project.

Page | 8
4. In the New Project dialog, select the XNA Game Studio 4.0 category and, from the list of
installed templates, select Windows Phone Game (4.0); then set the name to
MarbleMazeGame and click OK.
Figure 2
Creating a new Windows Phone Game application project in Microsoft Visual Studio 2010
5. In the Solution Explorer, review the structure of the solution generated by the Windows Phone
Application template. A Visual Studio solution is a container for related projects; in this case, it
contains an XNA Game Studio game for Windows Phone project named MarbleMazeGame and
a related game resource project named MarbleMazeGameContent.

Page | 9
Figure 3
Solution Explorer showing the MarbleMazeGame solution
Note: the Solution Explorer allows you to view items and perform item management tasks on
a solution or a project. To show the Solution Explorer, press CTRL + W, S or in the View menu,
select Other Windows | Solution Explorer.
6. The generated project includes a default game implementation that contains the basic XNA
Game Studio game loop. It is located in the Game1.cs file.
7. Open the Game1.cs file. We recommend that you change the file name to a name that reflects
your game.
8. Rename the main game class (default name "Game1") to "MarbleMazeGame". To rename it,
right click on the class name, select Refactor | Rename
Figure 4
Renaming the main game class
9. In the Rename dialog window's New name field, enter “MarbleMazeGame” and click OK.

Page | 10
Figure 5
Giving a new name to the main game class
10. Review changes suggested by Visual Studio and click Apply.
Figure 6

Page | 11
Applying changes to main game class
11. Rename the filename to match the new class name. Right-click on Game1.cs in Solution
Explorer and choose Rename. Give the class the new name “MarbleMazeGame.cs”
Figure 7
Renaming the main game class file
12. A XNA Game Studio game for Windows Phone application typically takes advantage of services
provided by the underlying platform or by other libraries. To use this functionality, the
application needs to reference the corresponding assemblies that implement these services.
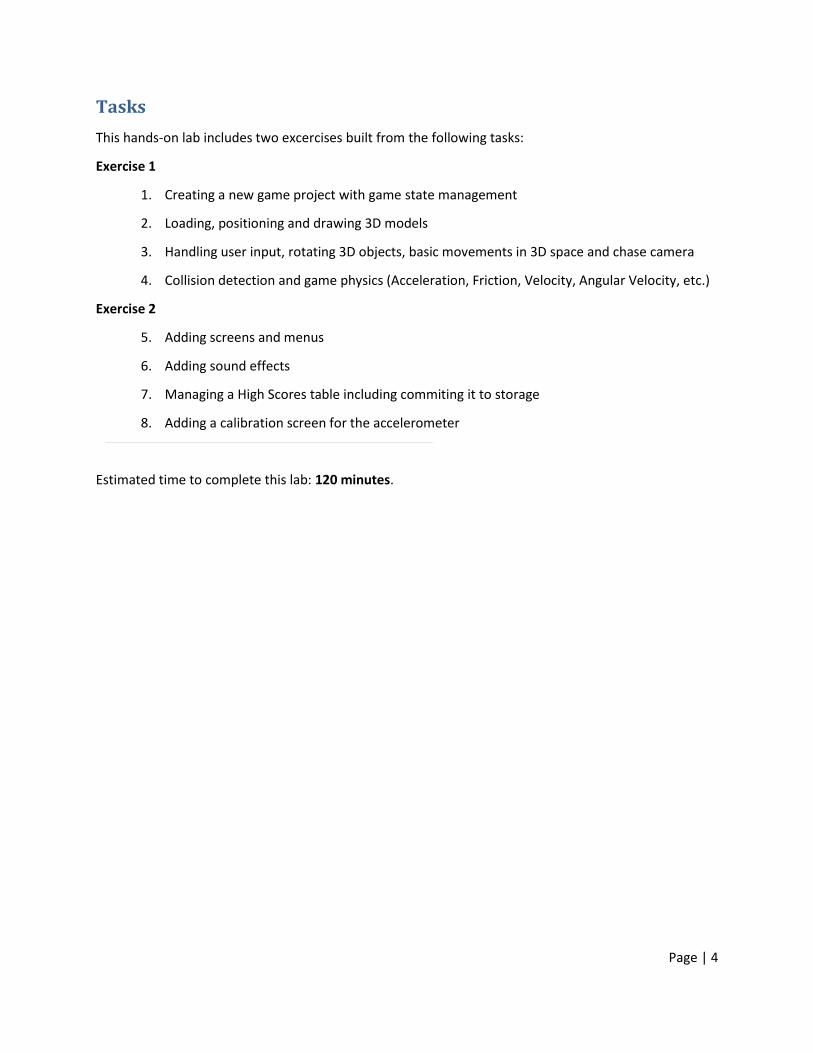
To display the assemblies referenced by the project, expand the References node in Solution
Explorer and examine the list. It contains regular XNA Framework assemblies as well as
assemblies specific to the Windows Phone platform.
Page | 12
Figure 8
Solution Explorer showing the assemblies referenced by the project
Currently, the application does not do much, but it is ready for its first test run. In this step, you
build the application, deploy it to the Windows Phone Emulator, and then execute it to
understand the typical development cycle.
13. In the View menu, select Output to open the Output window.
14. Select Build Solution in the Debug menu or press the SHIFT + F6 key combination to compile
the projects in the solution.
Visual Studio 2010: Select Build Solution in the Build menu or press CTRL + SHIFT + B to
compile the projects in the solution.

Page | 13
15. Observe the Output window and review the trace messages generated during the build process,
including a final message with its outcome.
Figure 9
Building the application in Visual Studio
You should not observe any errors at this stage but, if the project were to contain compilation
errors, these would appear in the Output window. To deal with these kinds of errors, you can
take advantage of the Error List window. This window displays errors, warnings, and messages
produced by the compiler in a list that you can sort and filter based on the severity of the error.
Moreover, you can double-click an item in the list to automatically open the relevant source
code file and navigate to the source of the error.
16. To open the Error List window, in the View menu, point to Other Windows and select Error List.
Visual Studio 2010: To open the Error List window, in the View menu select Error List.
Figure 10
Error List window shows errors during the build process
Note: Be aware that you should not encounter any errors at this stage. The above step simply
explains how to access the error list window.
17. Verify that the target of the deployment is the Windows Phone Emulator. To do this, ensure
that Windows Phone 7™ Emulator is selected in the Select Device drop down next to the Start
Debugging button on the toolbar.

Page | 14
Figure 11
Choosing the target device to deploy the application
Note: When you deploy your application from Visual Studio, you have the option to deploy it
to a real device or to the Windows Phone Emulator.
18. Press F5 to launch the application in the Windows Phone 7™ Emulator. Notice that a device
emulator window appears and there is a pause while Visual Studio sets up the emulator
environment and deploys the image. Once it is ready, the emulator shows the Start page and
shortly thereafter, your application appears in the emulator window.
The application will display a simple blue screen with nothing else shown. This is normal for an
application in such an early stage.

Page | 15
Figure 12
Running the application in the Windows Phone 7™ Emulator
Before you create the user interface and program the application logic, there is very little that
you can do with the application.

Page | 16
19. Press SHIFT + F5 or click the Stop button in the toolbar to detach the debugger and end the
debugging session. Do not close the emulator window.
Figure 13
Ending the debugging session
Tip: When you start a debugging session, it takes a considerable amount of time to set up the
emulator environment and launch the application. To streamline your debugging experience,
avoid closing the emulator while you work with the source code in Visual Studio. Once the
emulator is running, it takes very little time to stop the current session, edit the source code,
and then build and deploy a new image of your application to start a new debugging session.
Now that our initial game is capable of running, it is time to add game state management
capabilities to it. This will help us in the next tasks where we start adding screens and menus to
the game.
20. Add a new project folder to contain all game state management code. In the solution explorer,
right-click the MarbleMazeGame node and select Add | New folder from the context menu.
Figure 14
Adding a new project folder
21. Name the newly created folder ScreenManager.

Page | 17
22. Select the ScreenManager folder and add all existing files from the lab install folder under
Assets\Code\ScreenManager. To add existing items, right-click the ScreenManager folder in the
solution explorer and select Add | Existing items:
Figure 15
Adding existing items to the project
23. A file selection dialog will appear. Navigate to the path specified in the previous step, select all
source files, and click the Add button:
Figure 16
Page | 18
Adding the ScreenManager source files to the project
Note: All the game resources and sample code are provided in the lab install folder under the
following locations:
{LAB_PATH}\Assets\Code – all CSharp code files
{LAB_PATH}\Assets\Media – all graphics, fonts and sounds
Note: The code added in this step implements the standard approach for creating XNA Game
Studio menus and screens. It is recommended that you review the sample discussing this code,
in order to better understand it. The complete sample can be found at:
http://creators.xna.com/en-US/sample/phonegamestatemanagement
Note that the code has been slightly altered to better fit this lab.
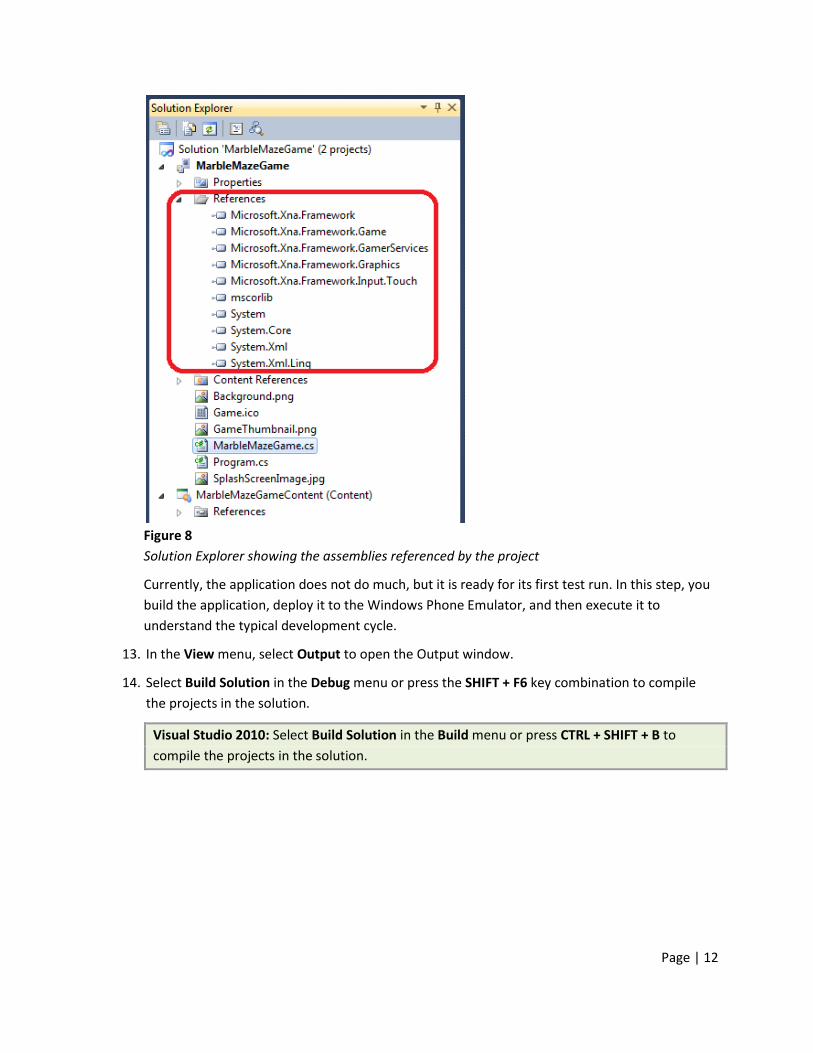
24. Review the solution explorer after performing the last few steps, it should now look like this:
Figure 17
The solution explorer after adding the ScreenManager folder and code
25. The ScreenManager code relies on the existence of resources, which define a background image
and a menu font. We will use this opportunity to add all font and texture resources to our
game. Navigate to the lab install folder and then to under Assets\Media, using Windows
Explorer.

Page | 19
26. In windows explorer, select the “Fonts” and “Textures” folders and then drag & drop them into
the MarbleMazeGameContent project node in Solution Explorer.
Figure 18. Adding the resource folders into the content project
Note: This drag & drop action is to be performed between applications. The drag operation
begins in Windows Explorer, and the concluding drop operation is to
MarbleMazeGameContent in Visual Studio.
27. Build the solution again, it should compile without any errors. There is no point in running the
application again as we have not yet altered it in any perceptible way.
Task 2 – 3D Drawing
During this task, you will enhance your MarbleMazeGame XNA game project and add 3D drawing
capabilities to it.
Before we can actually draw 3D models, we should fully understand the Windows Phone 7 3D axes
system.
The traditional three axes represent the Windows Phone 7 coordinate system: X, Y, and Z.
Moving along the X axis means progressing from left-to-right, thus the X value increases as we go further
to the right, and vice-versa.
The Y axis acts the same way, bottom-to-top, with the Y value increasing as we move upwards.
The Z axis represent the depth dimension. It increases as we move the virtual drawing point towards the
phone's screen, and vice-versa.

Page | 20
Figure 19
Axes- X, Y, Z in Portrait mode
The above figure illustrates the axes system when drawing in portrait mode. As you will see in the next
figure, which shows the axes system when drawing in landscape mode, the phone's current position
does not change the axes system as the Y axis always represents drawing from the ground up, the X axis
from left-to-right and the Z axis from the phone toward the user.

Page | 21
Figure 20
Axes- X, Y, Z in Landscape mode
The main implication of the above is that screen drawing is always performed so that it looks intuitive to
the phone user, no matter how the phone is being held (the picture is always correctly aligned).
A programmer rendering the 3D model to the screen will probably not be able to ignore the device’s
orientation, however, as the current orientation will probably change the proportions at which to draw.
1. Open the game project using Visual Studio 2010 if closed and review the solution - It now
includes the "MarbleMazeGame" project, holding the game application and logic, and the
"MarbleMazeGameContent" project, holding the complete set of content for the game.
We now want to add the game objects, which are elements that are able to display 3D models
and function in a 3D environment.
For that purpose, we should create classes that derive from the "DrawableComponent" class,

Page | 22
being a game component that is able to be drawn when required.
However, there are several aspects of 3D drawing which are not covered by the
"DrawableComponent" class, such as loading and rendering 3D models. Therefore, we must
create a deviced class, which we will call: "DrawableComponent3D". Before we do that,
however, we will define a “Camera” object. The camera is a non displayable game component,
responsible for defining the current view port.
2. Add a new project folder to contain all game 3D objects code. In the solution explorer, right-
click the “MarbleMazeGame” node and select Add | New folder from the context menu.
3. Name the newly created folder Objects.
4. Add a new class to the Objects folder and name it “Camera”. To do this, right click the “Objects”
folder created in the previous step and select Add | Class.
Figure 21
Adding a new class to a project folder
5. In the dialog that appears, give the class the name “Camera” and click Add:

Page | 23
Figure 22
Giving the new class a name
6. Open the new class file, which should now be located under the “Objects” folder, and see that it
only contains some basic "using" statements and the class definition. Add the following "using"
statements at the top of the file.
You can copy & paste directly from the following code:
C#
using Microsoft.Xna.Framework;
using Microsoft.Xna.Framework.Graphics;
7. Change the new class to derive from the GameComponent class (defined in the "Microsoft.Xna.Framework" namespace). We use this base class in order to inherit a certain set of methods, which logically fit the camera as a game component that is not drawn to the screen. Change the namespace under which the class is defined to "MarbleMazeGame", and make the class public: C#
namespace MarbleMazeGame
{
public class Camera : GameComponent
{
}
}
Page | 24
Note: This lab uses only one namespace – MarbleMazeGame. By default, when a new project
item added to the project, Visual Studio adds its relative folder(s) to the namespace. Remove
such automatically generated namespaces and replace them with default namespace –
MarbleMazeGame.
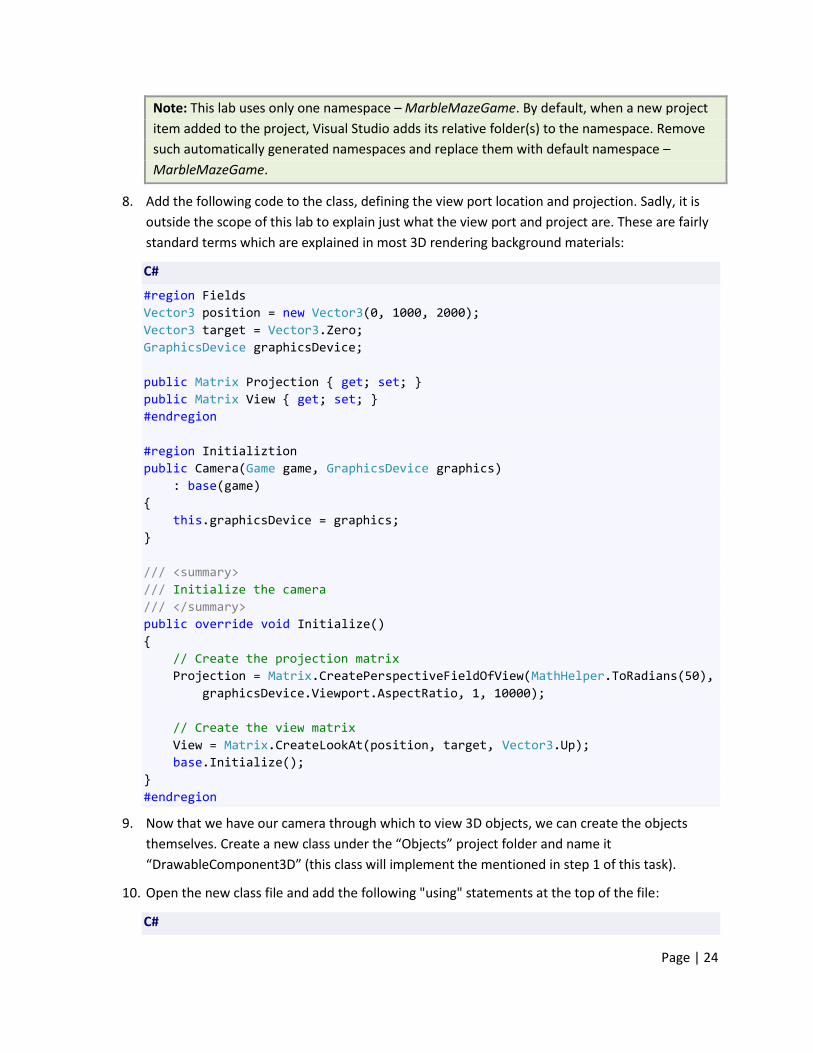
8. Add the following code to the class, defining the view port location and projection. Sadly, it is
outside the scope of this lab to explain just what the view port and project are. These are fairly
standard terms which are explained in most 3D rendering background materials:
C#
#region Fields
Vector3 position = new Vector3(0, 1000, 2000);
Vector3 target = Vector3.Zero;
GraphicsDevice graphicsDevice;
public Matrix Projection { get; set; }
public Matrix View { get; set; }
#endregion
#region Initializtion
public Camera(Game game, GraphicsDevice graphics)
: base(game)
{
this.graphicsDevice = graphics;
}
/// <summary>
/// Initialize the camera
/// </summary>
public override void Initialize()
{
// Create the projection matrix
Projection = Matrix.CreatePerspectiveFieldOfView(MathHelper.ToRadians(50),
graphicsDevice.Viewport.AspectRatio, 1, 10000);
// Create the view matrix
View = Matrix.CreateLookAt(position, target, Vector3.Up);
base.Initialize();
}
#endregion
9. Now that we have our camera through which to view 3D objects, we can create the objects
themselves. Create a new class under the “Objects” project folder and name it
“DrawableComponent3D” (this class will implement the mentioned in step 1 of this task).
10. Open the new class file and add the following "using" statements at the top of the file:
C#

Page | 25
using Microsoft.Xna.Framework;
using Microsoft.Xna.Framework.Graphics;
using System.Collections;
using System.Collections.Generic;
11. Change the DrawableComponent3D class to derive from the DrawableGameComponent class and change the namespace under which the class is defined to "MarbleMazeGame", as we have previously done. Also, change the class to be public and abstract: C#
namespace MarbleMazeGame
{
public abstract class DrawableComponent3D : DrawableGameComponent
{
}
}
Note: Remember to always change the namespace for new classes to “MarbleMazeGame”.
12. Add the following class variables to be used later for rendering a 3D image:
C#
string modelName;
protected bool preferPerPixelLighting = false;
public Model Model = null;
public Camera Camera;
public Vector3 Position = Vector3.Zero;
public Vector3 Rotation = Vector3.Zero;
public Matrix[] AbsoluteBoneTransforms;
public Matrix FinalWorldTransforms;
public Matrix OriginalWorldTransforms = Matrix.Identity;
13. Define a class constructor as follows:
C#
public DrawableComponent3D(Game game, string modelName)
: base(game)
{
this.modelName = modelName;
}
The above code simply sets a value the "modelName" field, to be used later.
14. Override the base class’s LoadContent functionality to load the actual 3D model resources:
C#
protected override void LoadContent()

Page | 26
{
// Load the model
Model = Game.Content.Load<Model>(@"Models\" + modelName);
// Copy the absolute transforms
AbsoluteBoneTransforms = new Matrix[Model.Bones.Count];
Model.CopyAbsoluteBoneTransformsTo(AbsoluteBoneTransforms);
base.LoadContent();
}
This code loads the object's model from the game content project (we will add these models to
the content project at a later stage) and transforms the model in order for it to be properly
positioned.
15. Add custom 3D drawing logic to the class by overriding the Draw method:
C#
public override void Draw(GameTime gameTime)
{
foreach (ModelMesh mesh in Model.Meshes)
{
foreach (BasicEffect effect in mesh.Effects)
{
// Set the effect for drawing the component
effect.EnableDefaultLighting();
effect.PreferPerPixelLighting = preferPerPixelLighting;
// Apply camera settings
effect.Projection = Camera.Projection;
effect.View = Camera.View;
// Apply necessary transformations
effect.World = FinalWorldTransforms;
}
// Draw the mesh by the effect that set
mesh.Draw();
}
base.Draw(gameTime);
}
This code goes through all the meshes in the model, applies mesh effects for each of them and
draws them.
16. Add update functionality to the class, by introducing the following methods:
C#
public override void Update(GameTime gameTime)

Page | 27
{
// Update the final transformation to properly place the component in the
// game world.
UpdateFinalWorldTransform();
base.Update(gameTime);
}
protected virtual void UpdateFinalWorldTransform()
{
FinalWorldTransforms = Matrix.Identity *
Matrix.CreateFromYawPitchRoll(Rotation.Y, Rotation.X, Rotation.Z) *
OriginalWorldTransforms *
Matrix.CreateTranslation(Position);
}
The above code updates the components transformation matrix according to its current state.
We will not update 3D object states until the next exercise.
17. Now that we have a "DrawableComponent3D" class, we will create the "Maze" and "Marble"
derivatives to manage and display the corresponding 3D objects. Add a new class to the
"Objects" folder, and name it "Marble".
18. Add the following "using" statements at the top of the new class file:
C#
using Microsoft.Xna.Framework;
using Microsoft.Xna.Framework.Audio;
using Microsoft.Xna.Framework.Graphics;
19. Change the new class to derive from the DrawableComponent3D class. Remember to change
the class’s namespace.
20. Add the following field and constructor to the class. The field will be used to store the marble’s
texture:
C#
private Texture2D m_marbleTexture;
public Marble(Game game)
: base(game, "marble")
{
preferPerPixelLighting = true;
}
21. As "DrawableComponent3D" already supports updating and rendering of a 3D model, we are
only required to expand upon that functionality in this newly derived object. Add the following
code to the LoadContent override, to load the marble’s texture in addition to the base
functionality:
Page | 28
C#
protected override void LoadContent()
{
base.LoadContent();
// Load the texture of the marble
m_marbleTexture = Game.Content.Load<Texture2D>(@"textures\Marble");
}
22. And a Draw override method, to replace the base implementation with one that properly
renders a marble:
C#
public override void Draw(GameTime gameTime)
{
var originalSamplerState = GraphicsDevice.SamplerStates[0];
// Cause the marble's textures to linearly clamp
GraphicsDevice.SamplerStates[0] = SamplerState.LinearClamp;
foreach (var mesh in Model.Meshes)
{
foreach (BasicEffect effect in mesh.Effects)
{
// Set the effect for drawing the marble
effect.EnableDefaultLighting();
effect.PreferPerPixelLighting = preferPerPixelLighting;
effect.TextureEnabled = true;
effect.Texture = m_marbleTexture;
// Apply camera settings
effect.Projection = Camera.Projection;
effect.View = Camera.View;
// Apply necessary transformations
effect.World = AbsoluteBoneTransforms[mesh.ParentBone.Index] *
FinalWorldTransforms;
}
mesh.Draw();
}
// Return to the original state
GraphicsDevice.SamplerStates[0] = originalSamplerState;
}
Note: we do not need to override the "Update" method as the implementation in the
"DrawableComponent3D" class suites our needs.

Page | 29
23. Next, add a "Maze" class to the "Objects" project folder.
24. Add the following using statements to the top of the new class file:
C#
using System.Collections.Generic;
using Microsoft.Xna.Framework;
using Microsoft.Xna.Framework.Graphics;
25. Replace the “Maze” class definition already present in “Maze.cs” with the following:
C#
class Maze : DrawableComponent3D
{
public Maze(Game game)
: base(game, "maze1")
{
preferPerPixelLighting = false;
}
public override void Draw(GameTime gameTime)
{
var originalSamplerState = GraphicsDevice.SamplerStates[0];
// Cause the maze's textures to linearly wrap
GraphicsDevice.SamplerStates[0] = SamplerState.LinearWrap;
foreach (var mesh in Model.Meshes)
{
foreach (BasicEffect effect in mesh.Effects)
{
// Set the effect for drawing the maze
effect.EnableDefaultLighting();
effect.PreferPerPixelLighting = preferPerPixelLighting;
// Apply camera settings
effect.Projection = Camera.Projection;
effect.View = Camera.View;
// Apply necessary transformations
effect.World = AbsoluteBoneTransforms[mesh.ParentBone.Index] *
FinalWorldTransforms;
}
mesh.Draw();
}
// Return to the original state
GraphicsDevice.SamplerStates[0] = originalSamplerState;
}

Page | 30
}
The above code is fairly similar to what we have done in the “Marble” class.
We are almost set. As we are about to use a Marble and Maze 3D objects, their respective 3D
models are required.
26. Add a new project folder under the “MarbleMazeGameContent” project and name it “Models”,
then add all existing files from the lab installation folder under Assets\Media\Models to this
new folder.
27. Finally, we need to create the gameplay screen which will actually contain and draw all the
objects which we have just created. Create a new project folder in the “MarbleMazeGame”
project and name it “Screens”.
28. Add a new class to the “Screens” project folder you have just created. Name the class
“GameplayScreen”.
29. Open the new class file and add the following using statements at its top:
C#
using Microsoft.Xna.Framework;
using Microsoft.Xna.Framework.Graphics;
using Microsoft.Xna.Framework.Input;
using GameStateManagement;
using Microsoft.Xna.Framework.GamerServices;
using Microsoft.Xna.Framework.Input.Touch;
using Microsoft.Xna.Framework.Audio;
30. Change the GameplayScreen class to inherit from the GameScreen class. The GameScreen class
is defined in the ScreenManager code, which we have previously added.
Note: Did you remember to revise the class’s namespace?
31. Add the following fields to the GameplayScreen class, which will hold instances of our game
objects:
C#
Maze maze;
Marble marble;
Camera camera;
32. Add the following constructor to the class:
C#
public GameplayScreen()
{
TransitionOnTime = TimeSpan.FromSeconds(0.0);
TransitionOffTime = TimeSpan.FromSeconds(0.0);
}

Page | 31
The above code simply controls the way that the screen transitions in and out of view, by setting
some properties inherited from the base class.
33. Add the following set of methods to the GameplayScreen class:
C#
public override void LoadContent()
{
LoadAssets();
base.LoadContent();
}
public void LoadAssets()
{
InitializeCamera();
InitializeMaze();
InitializeMarble();
}
private void InitializeCamera()
{
// Create the camera
camera = new Camera(ScreenManager.Game, ScreenManager.GraphicsDevice);
camera.Initialize();
}
private void InitializeMaze()
{
maze = new Maze(ScreenManager.Game)
{
Position = Vector3.Zero,
Camera = camera
};
maze.Initialize();
}
private void InitializeMarble()
{
marble = new Marble(ScreenManager.Game)
{
Position = Vector3.Zero,
Camera = camera
};
marble.Initialize();
}

Page | 32
These new methods simply initialize the various 3D objects during the screen’s loading phase.
34. Add custom update and drawing logic to the gameplay screen by introducing the following
overrides:
C#
public override void Update(GameTime gameTime, bool otherScreenHasFocus, bool
coveredByOtherScreen)
{
// Update all the component of the game
maze.Update(gameTime);
marble.Update(gameTime);
camera.Update(gameTime);
}
public override void Draw(GameTime gameTime)
{
ScreenManager.GraphicsDevice.Clear(Color.Black);
ScreenManager.SpriteBatch.Begin();
// Drawing sprites changes some render states around, which don't play
// nicely with 3d models.
// In particular, we need to enable the depth buffer.
DepthStencilState depthStensilState =
new DepthStencilState() { DepthBufferEnable = true };
ScreenManager.GraphicsDevice.DepthStencilState = depthStensilState;
// Draw all the game components
maze.Draw(gameTime);
marble.Draw(gameTime);
ScreenManager.SpriteBatch.End();
base.Draw(gameTime);
}
These overrides defer most of the works to the 3D objects themselves in order to render them
to the screen.
35. Finally, we must modify the main game class to introduce the gameplay screen using the
ScreenManager. Open the “MarbleMazeGame.cs” file and replace its entire contents with the
following:
C#
using System;
using Microsoft.Xna.Framework;
using GameStateManagement;
namespace MarbleMazeGame

Page | 33
{
/// <summary>
/// This is the main type for your game
/// </summary>
public class MarbleMazeGame : Microsoft.Xna.Framework.Game
{
GraphicsDeviceManager graphics;
ScreenManager screenManager;
public MarbleMazeGame()
{
graphics = new GraphicsDeviceManager(this);
Content.RootDirectory = "Content";
// Frame rate is 30 fps by default for Windows Phone.
TargetElapsedTime = TimeSpan.FromTicks(333333);
//Create a new instance of the Screen Manager
screenManager = new ScreenManager(this);
Components.Add(screenManager);
// Switch to full screen for best game experience
graphics.IsFullScreen = true;
graphics.SupportedOrientations = DisplayOrientation.LandscapeLeft;
screenManager.AddScreen(new GameplayScreen(),null);
}
}
}
This version of the game class simply uses the ScreenManager class to add a GameplayScreen
class to the game.
36. Build and deploy the project. Instead of a blank screen you should now see the game’s 3D
objects, the maze and the marble, on the display.
Page | 34
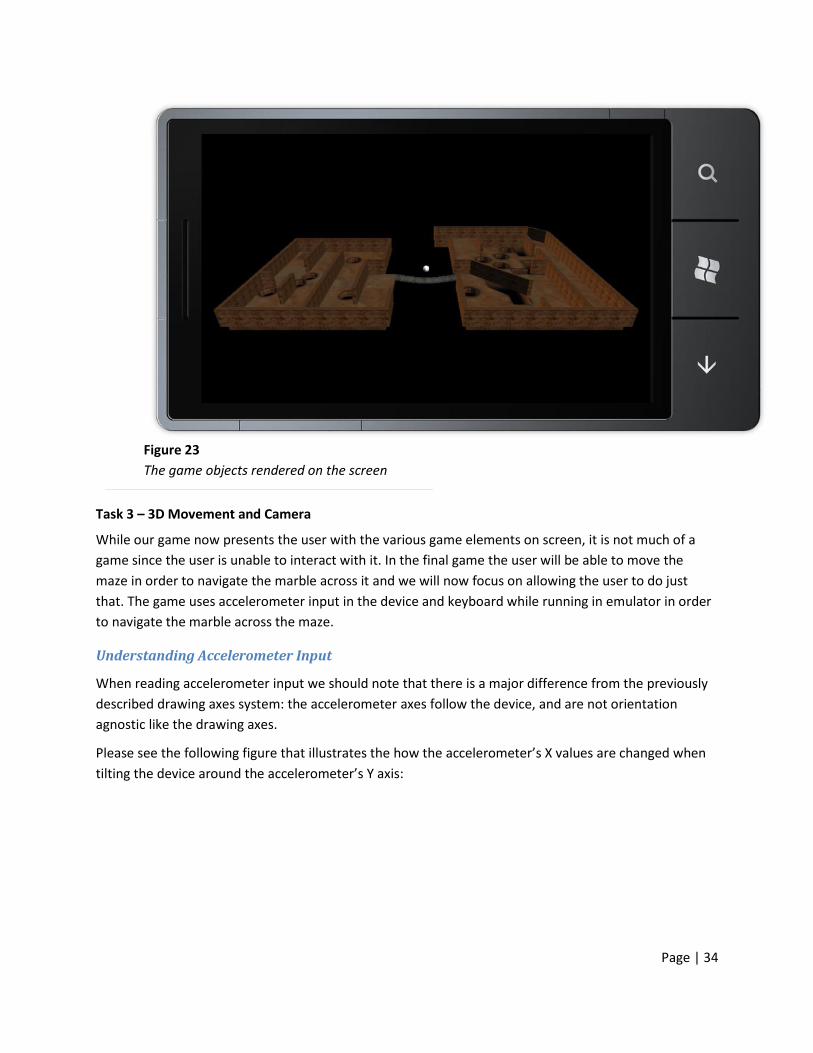
Figure 23
The game objects rendered on the screen
Task 3 – 3D Movement and Camera
While our game now presents the user with the various game elements on screen, it is not much of a
game since the user is unable to interact with it. In the final game the user will be able to move the
maze in order to navigate the marble across it and we will now focus on allowing the user to do just
that. The game uses accelerometer input in the device and keyboard while running in emulator in order
to navigate the marble across the maze.
Understanding Accelerometer Input
When reading accelerometer input we should note that there is a major difference from the previously
described drawing axes system: the accelerometer axes follow the device, and are not orientation
agnostic like the drawing axes.
Please see the following figure that illustrates the how the accelerometer’s X values are changed when
tilting the device around the accelerometer’s Y axis:

Page | 35
Figure 24
Changing the accelerometers X value by tilting the device sideways
As you can see in the figure, rotating the phone clockwise over the Y axis causes the accelerometer to
return larger X values. Tilting it counter-clockwise will return increasingly smaller values.
Again, note that the accelerometer’s Y axis remains the same axis, going across the phone from its
buttons and to the other side, regardless of the device’s orientation!
The next figure shows the changes in accelerometer input when tilting the phone over the X axis:

Page | 36
Figure 25
Changing the accelerometers X value by tilting the device up or down
The accelerometer’s Z values are a bit different, as the Z values do change by rotation over an axis, but
rather by movement along an axis.
The accelerometer will return negative Z values when the phone is being lifted upwards from the
ground, and positive values when the phone is being "dropped" downwards, as you can see in the
following figure:

Page | 37
Figure 26
Accelerometer returning positive Z values when the whole phone is lowered
The accelerometer’s X and Y values remain constant when tilting it at a specific angle (for example,
tilting the phone 45 degrees to the right will always return 0.5 as the accelerometer’s X value. Z values,
on the other hand, represent actual motion and not the current height of the phone! Positive/negative Z
values represent that the phone is being moved downwards/upwards respectively at a certain rate and
will return to 0 when the phone rests at a certain height.
1. Create a new project folder named Misc under the “MarbleMazeGame” project.
2. Navigate to the lab installation folder and then to Assets\Code\Misc. Add the file
“Accelerometer.cs” from that directory to the project folder created in the previous step. This
code asset supplies easy interaction with the device’s accelerometer. It also allows for keyboard
input to replace actual accelerometer input while running inside the emulator.

Page | 38
Note: This asset based on Creators Club “Accelerometer” sample. Full sample could be found
at http://creators.xna.com/en-US/sample/accelerometer
3. Open the “GameplayScreen.cs” file under the “Screens” project folder of the
“MarbleMazeGame” project and add the some additional fields to the GameplayScreen class:
C#
readonly float angularVelocity = MathHelper.ToRadians(1.5f);
Vector3? accelerometerState = Vector3.Zero;
We will use the above fields to interact with the device’s built-in accelerometer.
4. Navigate to the GameplayScreen’s LoadContent method and alter it to look like the following
(old code is colored gray):
C#
public override void LoadContent()
{
LoadAssets();
Accelerometer.Initialize();
base.LoadContent();
}
You may wonder why we initialize the accelerometer in the content loading phase, instead of
the initialization phase. The reason is that it is recommended to initialize the accelerometer, or
more precisely, call its “Start” method, as late as possible. The content loading phase is the last
phase before the update/draw cycles begin and so we perform the initialization there. We could
perform the initialization during the first update cycle, but that would mean needlessly adding a
conditional statement to the update loop.
5. Add a reference to the Microsoft.Phone assembly to the MarbleMazeGame project. You will
need this reference in the next steps.
6. In order to add a reference, in “Solution Explorer”, right click with a mouse on “References”
node in MarbleMazeGame and select “Add Reference” from context menu:

Page | 39
Figure 27
Adding a reference to the project
7. At opened “Add Reference” locate and select the “Microsoft.Phone” assembly and click “Ok”
Figure 28
Adding a reference to the project
8. Add another reference - to the Microsoft.Devices.Sensors assembly.
9. Add the following using statement to the top of the “GameplayScreen.cs” file:
C#
using Microsoft.Devices;
10. Next, override the HandleInput method in order to allow the gamesplay screen to react to user
input:
C#
public override void HandleInput(InputState input)
{
if (input == null)
throw new ArgumentNullException("input");
// Rotate the maze according to accelerometer data
Vector3 currentAccelerometerState = Accelerometer.GetState().Acceleration;
if (Microsoft.Devices.Environment.DeviceType == DeviceType.Device)

Page | 40
{
//Change the velocity according to acceleration reading
maze.Rotation.Z =
(float)Math.Round(MathHelper.ToRadians(currentAccelerometerState.Y * 30), 2);
maze.Rotation.X = -
(float)Math.Round(MathHelper.ToRadians(currentAccelerometerState.X * 30), 2);
}
else if (Microsoft.Devices.Environment.DeviceType == DeviceType.Emulator)
{
Vector3 Rotation = Vector3.Zero;
if (currentAccelerometerState.X != 0)
{
if (currentAccelerometerState.X > 0)
Rotation += new Vector3(0, 0, -angularVelocity);
else
Rotation += new Vector3(0, 0, angularVelocity);
}
if (currentAccelerometerState.Y != 0)
{
if (currentAccelerometerState.Y > 0)
Rotation += new Vector3(-angularVelocity, 0, 0);
else
Rotation += new Vector3(angularVelocity, 0, 0);
}
// Limit the rotation of the maze to 30 degrees
maze.Rotation.X =
MathHelper.Clamp(maze.Rotation.X + Rotation.X,
MathHelper.ToRadians(-30), MathHelper.ToRadians(30));
maze.Rotation.Z =
MathHelper.Clamp(maze.Rotation.Z + Rotation.Z,
MathHelper.ToRadians(-30), MathHelper.ToRadians(30));
}
}
While the above method is long, it is fairly simple. We check whether we are running on an
emulator or on an actual device and handle the Accelerometer class’s input differently in both
cases since when using an emulator accelerometer data is keyboard generated. We also make
sure to limit the maze’s rotation to 30 degrees in both cases.
11. Compile and deploy your game. You should now be able to rotate the rendered elements using
keyboard or accelerometer input.
Note: If the emulator is not responding to keyboard input, press the keyboard’s pause key
while focused on the emulator.

Page | 41
Figure 29
The gameplay screen, after performing some rotation
Now that we can rotate the maze, it is time to change the camera so that it will follow the
marble. This behavior will be useful once the ball actually rolls through the maze.
12. Open the Camera.cs file located in the Objects project folder and alter the Camera class’s fields.
Since we no longer want a fixed camera, we can modify the “position” and “target” fields and
add additional fields. Eventually, the class should contain the following fields (fields which were
previously present and were not changed are colored gray):
C#
private Vector3 position = Vector3.Zero;
private Vector3 target = Vector3.Zero;
private GraphicsDevice graphicsDevice;
public Vector3 ObjectToFollow { get; set; }
public Matrix Projection { get; set; }
public Matrix View { get; set; }
private readonly Vector3 cameraPositionOffset = new Vector3(0, 450, 100);
private readonly Vector3 cameraTargetOffset = new Vector3(0, 0, -50);
13. Alter the Camera class’s Initialize override, since we can no longer use it to set the camera’s
view as now the view has to constantly follow the marble (and “Initialize” only occurs once):
C#
public override void Initialize()
{
// Create the projection matrix
Projection = Matrix.CreatePerspectiveFieldOfView(MathHelper.ToRadians(50),

Page | 42
graphicsDevice.Viewport.AspectRatio, 1, 10000);
base.Initialize();
}
14. Add an override for the Update method. This is where we will make sure the camera follows the
marble:
C#
public override void Update(GameTime gameTime)
{
// Make the camera follow the object
position = ObjectToFollow + cameraPositionOffset;
target = ObjectToFollow + cameraTargetOffset;
// Create the view matrix
View = Matrix.CreateLookAt(position, target, Vector3.Up);
base.Update(gameTime);
}
The above code positions the camera at a position relative to the “ObjectToFollow”, and points
it at a target position, which is also relative to “ObjectToFollow”. To make sure that
“ObjectToFollow” is always properly set, we will need to modify the Marble class.
15. Open the Marble.cs file from the Objects project folder and add the following property to the
Marble class:
C#
public Maze Maze { get; set; }
16. Override for the Update method in the Marble class:
C#
public override void Update(GameTime gameTime)
{
base.Update(gameTime);
// Make the camera follow the marble
Camera.ObjectToFollow = Vector3.Transform(Position,
Matrix.CreateFromYawPitchRoll(Maze.Rotation.Y,
Maze.Rotation.X, Maze.Rotation.Z));
}
17. The final step will be to associate the maze with the marble. Open the GameplayScreen.cs file in
the Screens project folder and alter the GameplayScreen class’s InitializeMarble method to look
like the following:

Page | 43
C#
private void InitializeMarble()
{
marble = new Marble(ScreenManager.Game as MarbleMazeGame)
{
Position = new Vector3(100, 0, 0),
Camera = camera,
Maze = maze
};
marble.Initialize();
}
18. Compile and deploy your project. The camera should now follow the marble. Camera behavior
might seem a little strange but this is because the marble is currently stuck in space instead of
properly interacting with the maze. We will fix this in the next task.
Figure 30
The camera now follows the marble
Task 4 – Physics and collision
While we have made the game interactive in the previous task, it is not very fun to play as the only thing
with which a user can interact is the game’s camera. The focus of this task will be to make the game fully
playable by adding physics and collision detection so that the user will be able to navigate the marble
through the maze.

Page | 44
We will begin by creating a custom content processor which will enhance the maze model with
additional information that will help us when we implement collision detection between the marble and
the maze.
1. Add a new content pipeline extension project to the solution. Right click the solution in the
solution explorer and select Add | New Project.
Figure 31
Adding a new project to the solution
2. In the window that appears select a “Content Pipeline Extension Library” project and name it
MarbleMazePipeline.

Page | 45
Figure 32
Creating a new content pipeline extension project
3. The newly created project will contain a single code file named “ContentProcessor1.cs”. Change
the file name to “MarbleMazeProcessor.cs”.
4. Open the MarbleMazeProcessor.cs file and delete the entire file contents.
5. Add the following using statements to the top of the file:
C#
using System;
using System.Collections.Generic;
using Microsoft.Xna.Framework;
using Microsoft.Xna.Framework.Content.Pipeline;
using Microsoft.Xna.Framework.Content.Pipeline.Graphics;
using Microsoft.Xna.Framework.Content.Pipeline.Processors;
6. Add the following namespace and class definition to the “MarbleMazeProcessor.cs” file. The
class we add will serve as the content processor implementation:
C#
namespace MarbleMazePipeline
{
[ContentProcessor]
public class MarbleMazeProcessor : ModelProcessor
{

Page | 46
}
}
This content processor will attach a model’s “Tag” property a dictionary that maps the model’s
mesh names to a set of vertices, defined in the corresponding mesh. We will use this
information later on for collision calculations.
7. Add the following field to the new MarbleMazeProcessor class. This field will be used to store
the information we wish to attach to models passing through the processor:
C#
Dictionary<string, List<Vector3>> tagData =
new Dictionary<string, List<Vector3>>();
8. Add a helper method to the MableMazeProcessor class:
C#
void FindVertices(NodeContent node)
{
// Is this node a mesh?
MeshContent mesh = node as MeshContent;
if (mesh != null)
{
string meshName = mesh.Name;
List<Vector3> meshVertexs = new List<Vector3>();
// Look up the absolute transform of the mesh.
Matrix absoluteTransform = mesh.AbsoluteTransform;
// Loop over all the pieces of geometry in the mesh.
foreach (GeometryContent geometry in mesh.Geometry)
{
// Loop over all the indices in this piece of geometry.
// Every group of three indices represents one triangle.
foreach (int index in geometry.Indices)
{
// Look up the position of this vertex.
Vector3 vertex = geometry.Vertices.Positions[index];
// Transform from local into world space.
vertex = Vector3.Transform(vertex, absoluteTransform);
// Store this vertex.
meshVertexs.Add(vertex);
}
}
tagData.Add(meshName, meshVertexs);
}

Page | 47
// Recursively scan over the children of this node.
foreach (NodeContent child in node.Children)
{
FindVertices(child);
}
}
The above method simply scans a model recursively and builds the dictionary mentioned in step
7. Note that as one of the comments in the code specify, we are assured that each consecutive
set of three vertices defines a triangle which belongs to the mesh.
9. Finally, we will override the Process method in order to perform our custom content
processing, by using the helper method we have just defined:
C#
public override ModelContent Process(NodeContent input,
ContentProcessorContext context)
{
FindVertices(input);
ModelContent model = base.Process(input, context);
model.Tag = tagData;
return model;
}
10. We would like the maze’s model to use this new custom processor. Add a reference to the
“MarbleMazePipeline” project in the content project, “MarbleMazeGameContent”.
11. Build your project.
12. Right click the maze model file, “maze1.FBX”, under the content project’s “Models” folder and
select Properties.
13. In the properties window, select “MarbleMazePipeline” as the content processor:

Page | 48
Figure 33
The content processor property on the maze model
Figure 34
Selecting the “MarbleMazeProcessor” as the content processor
14. Now it is time to add physics to the game. The game’s physics will eventually comprise for most
of the game logic, controlling the way the marble rolls across the maze, collides with walls or
falls through openings in the maze’s floor. We will begin by adding a code asset which we will
later use for collision detection.
15. Navigate to the lab installation folder and then to Assets\Code\Misc. Add the file
“TriangleSphereCollisionDetection.cs” from that directory to the “Misc” project folder.

Page | 49
16. Add a new code file to the “Misc” project folder by right clicking it and selecting Add | New
Item:
Figure 35
Adding a new item to a project folder
17. In the dialog which appears, select Code File and name it IntersectDetails.cs:
Figure 36
Adding a new code file to the project
18. Open the newly created file, which should be empty, and fill it with the following block of code:
C#

Page | 50
using System;
using System.Collections.Generic;
namespace MarbleMazeGame
{
public struct IntersectDetails
{
public bool IntersectWithGround;
public bool IntersectWithFloorSides;
public bool IntersectWithWalls;
public Triangle IntersectedGroundTriangle;
public IEnumerable<Triangle> IntersectedFloorSidesTriangle;
public IEnumerable<Triangle> IntersectedWallTriangle;
}
}
The structure defined above will be used to store collision information, namely what sort of
collision occurred and which parts of the maze were involved in it.
19. We will move on to updating the DrawableComponent3D class, which serves as a base to all
entities that are affected by physics.
Open the “DrawableComponent3D.cs” file from the “Objects” project folder and add the
following enum definition above the DrawableComponent3D class definition:
C#
[Flags]
public enum Axis
{
X = 0x1,
Y = 0x2,
Z = 0x4
}
20. Change the DrawableComponent3D class’s field definitions by adding additional fields. The class
should now have the following fields (fields which were already defined are colored gray):
C#
public const float gravity = 100 * 9.81f;
public const float wallFriction = 100 * 0.8f;
string modelName;
protected bool preferPerPixelLighting = false;
public Model Model = null;
protected IntersectDetails intersectDetails = new IntersectDetails();
protected float staticGroundFriction = 0.1f;
public Vector3 Position = Vector3.Zero;
public Vector3 Rotation = Vector3.Zero;

Page | 51
public Vector3 Velocity = Vector3.Zero;
public Vector3 Acceleration = Vector3.Zero;
public Matrix[] AbsoluteBoneTransforms;
public Matrix FinalWorldTransforms;
public Matrix OriginalWorldTransforms = Matrix.Identity;
public Camera Camera;
Notice the “FinalWorldTransform” field, which has been highlighted. While it was previously
defined, we no longer set it to the identity matrix.
21. Change the DrawableComponent3D class’s Update override:
C#
public override void Update(GameTime gameTime)
{
// Perform physics calculations
CalcPhysics(gameTime);
// Update the final transformation to properly place the component in the
// game world.
UpdateFinalWorldTransform();
base.Update(gameTime);
}
As you can see, the only thing changed is that we now update the component’s physics as part
of the update phase.
22. Add the method which appears in the above step, CalcPhysics, to the class:
C#
protected virtual void CalcPhysics(GameTime gameTime)
{
CalculateCollisions();
CalculateAcceleration();
CalculateFriction();
CalculateVelocityAndPosition(gameTime);
}
The above method denotes a certain order of physics calculations. We will first calculate
collisions, acceleration and friction, and only then will we calculate the component’s actual
velocity and position in light of previous. We will now implement the four methods above,
which inheriting classes will be able to override in case they require calculations that differ from
the default.
23. Since a general component does not move in any particular way, we will simply add all the
above methods as abstract:
C#

Page | 52
protected abstract void CalculateFriction();
protected abstract void CalculateAcceleration();
protected abstract void CalculateVelocityAndPosition(GameTime gameTime);
protected abstract void CalculateCollisions();
This concludes our treatment of the DrawableComponent3D. We will move on to the Maze
class.
24. Open the “Maze.cs” file inside the “Objects” project folder. Add the following fields to the Maze
class:
C#
public List<Vector3> Ground = new List<Vector3>();
public List<Vector3> Walls = new List<Vector3>();
public List<Vector3> FloorSides = new List<Vector3>();
public LinkedList<Vector3> Checkpoints = new LinkedList<Vector3>();
public Vector3 StartPoistion;
public Vector3 End;
The first three fields will be used to store vertices belonging to the ground, walls and “floor
sides” (the pits’ inner walls) arranged into triangles as previously discussed while we were
adding a custom content processor. That custom content processor supplies the data that we
will use to populate these fields.
25. Override the LoadContent method in the Maze class:
C#
protected override void LoadContent()
{
base.LoadContent();
// Load the start & end positions of the maze from the bone
StartPoistion = Model.Bones["Start"].Transform.Translation;
End = Model.Bones["Finish"].Transform.Translation;
// Get the maze's triangles from its mesh
Dictionary<string, List<Vector3>> tagData =
(Dictionary<string, List<Vector3>>)Model.Tag;
Ground = tagData["Floor"];
FloorSides = tagData["floorSides"];
Walls = tagData["walls"];
// Add checkpoints to the maze

Page | 53
Checkpoints.AddFirst(StartPoistion);
foreach (var bone in Model.Bones)
{
if (bone.Name.Contains("spawn"))
{
Checkpoints.AddLast(bone.Transform.Translation);
}
}
}
The above method is rather straightforward and it simply populates the fields introduced in the
previous step with data added to the model by our custom content processor. The final section
of code defines checkpoints where the marble will respawn after falling into a pit, assuming the
checkpoint has been activated by having the marble roll over it.
26. As the maze itself is not affected by physics in any way, we will simply add the following empty
method implementations:
C#
protected override void CalculateCollisions()
{
// Nothing to do - Maze doesn't collide with itself
}
protected override void CalculateVelocityAndPosition(GameTime gameTime)
{
// Nothing to do - Maze doesn't move
}
protected override void CalculateFriction()
{
// Nothing to do - Maze is not affected by friction
}
protected override void CalculateAcceleration()
{
// Nothing to do - Maze doesn't move
}
27. Finally, we will add a helper method called GetCollisionDetails to the Maze class:
C#
public void GetCollisionDetails(BoundingSphere BoundingSphere,
ref IntersectDetails intersectDetailes, bool light)
{
intersectDetailes.IntersectWithGround =
TriangleSphereCollisionDetection.IsSphereCollideWithTringles(Ground,
BoundingSphere, out intersectDetailes.IntersectedGroundTriangle,
true);

Page | 54
intersectDetailes.IntersectWithWalls =
TriangleSphereCollisionDetection.IsSphereCollideWithTringles(Walls,
BoundingSphere, out intersectDetailes.IntersectedWallTriangle, light);
intersectDetailes.IntersectWithFloorSides =
TriangleSphereCollisionDetection.IsSphereCollideWithTringles(
FloorSides, BoundingSphere,
out intersectDetailes.IntersectedFloorSidesTriangle,
true);
}
This method will allow us to give the maze a bounding sphere and get back intersection details
that will tell us with which parts of the maze the sphere collides. The code itself uses the code
asset which we added during step 15.
We will now advance to the Marble class, which will require the most work when we come to
implement its physics.
28. Open the “Marble.cs” file under the “Objects” project folder and add the following using
statement to the file:
C#
using System.Collections.Generic;
29. Add the following field definitions to the Marble class:
C#
Matrix rollMatrix = Matrix.Identity;
Vector3 normal;
public float angleX;
public float angleZ;
30. Add the following property to the Marble class:
C#
public BoundingSphere BoundingSphereTransformed
{
get
{
BoundingSphere boundingSphere = Model.Meshes[0].BoundingSphere;
boundingSphere = boundingSphere.Transform(AbsoluteBoneTransforms[0]);
boundingSphere.Center += Position;
return boundingSphere;
}
}
This property will return the marble’s bounding sphere with the marble’s 3D transformations
taken into account, which is required for the bounding sphere to match the marble’s
representation in the game world.
31. Override the DrawableComponent3D class’s UpdateFinalWorldTransform in the Marble class:

Page | 55
C#
protected override void UpdateFinalWorldTransform()
{
// Calculate the appropriate rotation matrix to represent the marble
// rolling inside the maze
rollMatrix *= Matrix.CreateFromAxisAngle(Vector3.Right, Rotation.Z) *
Matrix.CreateFromAxisAngle(Vector3.Forward, Rotation.X);
// Multiply by two matrices which will place the marble in its proper
// position and align it to the maze (which tilts due to user input)
FinalWorldTransforms = rollMatrix *
Matrix.CreateTranslation(Position) *
Matrix.CreateFromYawPitchRoll(Maze.Rotation.Y,
Maze.Rotation.X, Maze.Rotation.Z);
}
This override will cause the marble model to rotate according to its “Rotation” value, which will
cause it to appear as if it is actually rolling while it moves.
32. Override the CalculateCollisions method. We will simply take the marble’s bounding sphere and
give it to the maze in order to perform collision calculations and store them in one of the
Marble class’s fields.
C#
protected override void CalculateCollisions()
{
Maze.GetCollisionDetails(BoundingSphereTransformed, ref intersectDetails,
false);
if (intersectDetails.IntersectWithWalls)
{
foreach (var triangle in intersectDetails.IntersectedWallTriangle)
{
Axis direction = CollideDirection(triangle);
if ((direction & Axis.X) == Axis.X &&
(direction & Axis.Z) == Axis.Z)
{
Maze.GetCollisionDetails(BoundingSphereTransformed,
ref intersectDetails, true);
}
}
}
}
33. Override the CalculateAcceleration method. This method will modify the marble’s acceleration
in light of the maze’s tilt:
C#
protected override void CalculateAcceleration()

Page | 56
{
if (intersectDetails.IntersectWithGround)
{
// We must take both the maze's tilt and the angle of the floor
// section beneath the marble into account
angleX = 0;
angleZ = 0;
if (intersectDetails.IntersectedGroundTriangle != null)
{
intersectDetails.IntersectedGroundTriangle.Normal(out normal);
angleX = (float)Math.Atan(normal.Y / normal.X);
angleZ = (float)Math.Atan(normal.Y / normal.Z);
if (angleX > 0)
{
angleX = MathHelper.PiOver2 - angleX;
}
else if (angleX < 0)
{
angleX = -(angleX + MathHelper.PiOver2);
}
if (angleZ > 0)
{
angleZ = MathHelper.PiOver2 - angleZ;
}
else if (angleZ < 0)
{
angleZ = -(angleZ + MathHelper.PiOver2);
}
}
// Set the final X, Y and Z axis acceleration for the marble
Acceleration.X = -gravity * (float)Math.Sin(Maze.Rotation.Z - angleX);
Acceleration.Z = gravity * (float)Math.Sin(Maze.Rotation.X - angleZ);
Acceleration.Y = 0;
}
else
{
// If the marble is not touching the floor, it is falling freely
Acceleration.Y = -gravity;
}
if (intersectDetails.IntersectWithWalls)
{
// Change the marble's acceleration due to a collision with a maze
// wall

Page | 57
UpdateWallCollisionAcceleration(
intersectDetails.IntersectedWallTriangle);
}
if (intersectDetails.IntersectWithFloorSides)
{
// Change the marble's acceleration due to collision with a pit wall
UpdateWallCollisionAcceleration(
intersectDetails.IntersectedFloorSidesTriangle);
}
}
The only non-trivial part of the method is the part directly below the first comment, which
simply calculates the floor’s own angle to have it affect the overall slope on which the marble is
currently placed. Near the end of the method, we use a helper function to update the
acceleration values in light of collisions. We will now implement this helper method, but first we
introduce another method.
34. Add the following method to the Marble class:
C#
protected Axis CollideDirection(Triangle collideTriangle)
{
if (collideTriangle.A.Z == collideTriangle.B.Z &&
collideTriangle.B.Z == collideTriangle.C.Z)
{
return Axis.Z;
}
else if (collideTriangle.A.X == collideTriangle.B.X &&
collideTriangle.B.X == collideTriangle.C.X)
{
return Axis.X;
}
else if (collideTriangle.A.Y == collideTriangle.B.Y &&
collideTriangle.B.Y == collideTriangle.C.Y)
{
return Axis.Y;
}
return Axis.X | Axis.Z;
}
This method simply inspects a triangle’s points in order to determine the plane it is on and
returns the axis that is perpendicular to it.
35. Now add the following method to the Marble class, which will alter acceleration in light of
collisions:
C#
protected void UpdateWallCollisionAcceleration(IEnumerable<Triangle>
wallTriangles)

Page | 58
{
foreach (var triangle in wallTriangles)
{
Axis direction = CollideDirection(triangle);
// Decrease the acceleration in x-axis of the component
if ((direction & Axis.X) == Axis.X)
{
if (Velocity.X > 0)
Acceleration.X -= wallFriction;
else if (Velocity.X < 0)
Acceleration.X += wallFriction;
}
// Decrease the acceleration in z-axis of the component
if ((direction & Axis.Z) == Axis.Z)
{
if (Velocity.Z > 0)
Acceleration.Z -= wallFriction;
else if (Velocity.Z < 0)
Acceleration.Z += wallFriction;
}
}
}
The method simply gives the marble an acceleration component which is inverse to the
direction it hit a wall.
36. Override the CalculateFriction method to introduce specific friction calculations to the Marble
class:
C#
protected override void CalculateFriction()
{
if (intersectDetails.IntersectWithGround)
{
if (Velocity.X > 0)
{
Acceleration.X -= staticGroundFriction * gravity *
(float)Math.Cos(Maze.Rotation.Z - angleX);
}
else if (Velocity.X < 0)
{
Acceleration.X += staticGroundFriction * gravity *
(float)Math.Cos(Maze.Rotation.Z - angleX);
}
if (Velocity.Z > 0)
{
Acceleration.Z -= staticGroundFriction * gravity *

Page | 59
(float)Math.Cos(Maze.Rotation.X - angleZ);
}
else if (Velocity.Z < 0)
{
Acceleration.Z += staticGroundFriction * gravity *
(float)Math.Cos(Maze.Rotation.X - angleZ);
}
}
}
The above method simply adds an acceleration component inverse to the marble’s current
velocity and proportional to the slope on which the marble is currently placed.
37. The last thing to do in order to fully support the marble’s physics is to update its velocity and
position by overriding CalculateVelocityAndPosition:
C#
protected override void CalculateVelocityAndPosition(GameTime gameTime)
{
// Calculate the current velocity
float elapsed = (float)gameTime.ElapsedGameTime.TotalSeconds;
Vector3 currentVelocity = Velocity;
Velocity = currentVelocity + (Acceleration * elapsed);
// Set a bound on the marble's velocity
Velocity.X = MathHelper.Clamp(Velocity.X, -250, 250);
Velocity.Z = MathHelper.Clamp(Velocity.Z, -250, 250);
if (intersectDetails.IntersectWithGround)
{
Velocity.Y = 0;
}
if (intersectDetails.IntersectWithWalls)
{
UpdateWallCollisionVelocity(
intersectDetails.IntersectedWallTriangle, ref currentVelocity);
}
if (intersectDetails.IntersectWithFloorSides)
{
UpdateWallCollisionVelocity(
intersectDetails.IntersectedFloorSidesTriangle,
ref currentVelocity);
}

Page | 60
// If the velocity is low, simply cause the marble to halt
if (-1 < Velocity.X && Velocity.X < 1)
{
Velocity.X = 0;
}
if (-1 < Velocity.Z && Velocity.Z < 1)
{
Velocity.Z = 0;
}
// Update the marble's position
UpdateMovement((Velocity + currentVelocity) / 2, elapsed);
}
The above method changes the marble’s velocity according to its calculated acceleration and the
time interval between to consecutive calls to the method. The method also alters the marble’s
velocity in case of a collision using a helper method we will soon implement and halts the
marble if its speed is sufficiently low. The marble’s position is also updated by a helper method,
which we will implement shortly.
38. Add the following method to the Marble class:
C#
protected void UpdateWallCollisionVelocity(IEnumerable<Triangle>
wallTriangles, ref Vector3 currentVelocity)
{
foreach (var triangle in wallTriangles)
{
Axis direction = CollideDirection(triangle);
// Swap the velocity between x & z if the wall is diagonal
if ((direction & Axis.X) == Axis.X && (direction & Axis.Z) == Axis.Z)
{
float tmp = Velocity.X;
Velocity.X = Velocity.Z;
Velocity.Z = tmp;
tmp = currentVelocity.X;
currentVelocity.X = currentVelocity.Z * 0.3f;
currentVelocity.Z = tmp * 0.3f;
}
// Change the direction of the velocity in the x-axis
else if ((direction & Axis.X) == Axis.X)
{
if ((Position.X > triangle.A.X && Velocity.X < 0) ||
(Position.X < triangle.A.X && Velocity.X > 0))
{
Velocity.X = -Velocity.X * 0.3f;
currentVelocity.X = -currentVelocity.X * 0.3f;
}

Page | 61
}
// Change the direction of the velocity in the z-axis
else if ((direction & Axis.Z) == Axis.Z)
{
if ((Position.Z > triangle.A.Z && Velocity.Z < 0) ||
(Position.Z < triangle.A.Z && Velocity.Z > 0))
{
Velocity.Z = -Velocity.Z * 0.3f;
currentVelocity.Z = -currentVelocity.Z * 0.3f;
}
}
}
}
The above method simply reverses the marble’s velocity upon hitting a straight wall while also
reducing it. If, however, the wall is diagonal then the marble’s velocity will be shifted between
the X and Z axes, assuming the maze only has diagonal walls the angle of which is 45 degrees.
39. Add the last physics-related method to the Marble class:
C#
private void UpdateMovement(Vector3 deltaVelocity, float deltaTime)
{
// Calculate the change in the marble's position
Vector3 deltaPosition = deltaVelocity * deltaTime;
// Before setting the new position, we must make sure it is legal
BoundingSphere nextPosition = this.BoundingSphereTransformed;
nextPosition.Center += deltaPosition;
IntersectDetails nextIntersectDetails = new IntersectDetails();
Maze.GetCollisionDetails(nextPosition, ref nextIntersectDetails, true);
nextPosition.Radius += 1.0f;
// Move the marble
Position += deltaPosition;
// If the floor not straight then we must reposition the marble vertically
Vector3 forwardVecX = Vector3.Transform(normal,
Matrix.CreateRotationZ(-MathHelper.PiOver2));
Vector3 forwardVecZ = Vector3.Transform(normal,
Matrix.CreateRotationX(-MathHelper.PiOver2));
bool isGroundStraight = true;
if (forwardVecX.X != -1 && forwardVecX.X != 0)
{
Position.Y += deltaPosition.X / forwardVecX.X * forwardVecX.Y;
isGroundStraight = false;
}

Page | 62
if (forwardVecZ.X != -1 && forwardVecZ.X != 0)
{
Position.Y += deltaPosition.Z / forwardVecZ.Z * forwardVecZ.Y;
isGroundStraight = false;
}
// If the marble is already inside the floor, we must reposition it
if (isGroundStraight && nextIntersectDetails.IntersectWithGround)
{
Position.Y = nextIntersectDetails.IntersectedGroundTriangle.A.Y +
BoundingSphereTransformed.Radius;
}
// Finally, we "roll" the marble in accordance to its movement
if (BoundingSphereTransformed.Radius != 0)
{
Rotation.Z = deltaPosition.Z / BoundingSphereTransformed.Radius;
Rotation.X = deltaPosition.X / BoundingSphereTransformed.Radius;
}
}
The above method simply repositions the marble according to its current velocity, but then
corrects its position to avoid having it go through a wall or a diagonal portion of the floor, as the
marble must move up and down to accommodate the slopes of the maze’s floor.
40. Add the following fields to the GameplayScreen class:
C#
bool gameOver = false;
LinkedListNode<Vector3> lastCheackpointNode;
SpriteFont timeFont;
TimeSpan gameTime;
We will use the above fields to keep track of the game’s flow. We will see how they come into
play later on.
41. Navigate to the LoadContent method and modify it to look like the following:
C#
public override void LoadContent()
{
LoadAssets();
timeFont = ScreenManager.Game.Content.Load<SpriteFont>(@"Fonts\MenuFont");
Accelerometer.Initialize();
base.LoadContent();
}
Page | 63
42. Navigate to the InitializeMaze method and add some code to initialize the first checkpoint,
which is actually the maze’s start location:
C#
private void InitializeMaze()
{
maze = new Maze(ScreenManager.Game as MarbleMazeGame)
{
Position = Vector3.Zero,
Camera = camera
};
maze.Initialize();
// Save the last checkpoint
lastCheackpointNode = maze.Checkpoints.First;
}
43. Modify the GameplayScreen class’s InitializeMarble method to set the marble’s initialize
position to the maze’s start location:
C#
private void InitializeMarble()
{
marble = new Marble(ScreenManager.Game as MarbleMazeGame)
{
Position = maze.StartPoistion,
Camera = camera,
Maze = maze
};
marble.Initialize();
}
44. Revise the HandleInput method, by changing it to the following implementation:
C#
public override void HandleInput(InputState input)
{
if (input == null)
throw new ArgumentNullException("input");
// Rotate the maze according to accelerometer data
Vector3 currentAccelerometerState = Accelerometer.GetState().Acceleration;
if (Microsoft.Devices.Environment.DeviceType == DeviceType.Device)
{
//Change the velocity according to acceleration reading

Page | 64
maze.Rotation.Z =
(float)Math.Round(MathHelper.ToRadians(currentAccelerometerState.Y * 30), 2);
maze.Rotation.X = -
(float)Math.Round(MathHelper.ToRadians(currentAccelerometerState.X * 30), 2);
}
else if (Microsoft.Devices.Environment.DeviceType == DeviceType.Emulator)
{
Vector3 Rotation = Vector3.Zero;
if (currentAccelerometerState.X != 0)
{
if (currentAccelerometerState.X > 0)
Rotation += new Vector3(0, 0, -angularVelocity);
else
Rotation += new Vector3(0, 0, angularVelocity);
}
if (currentAccelerometerState.Y != 0)
{
if (currentAccelerometerState.Y > 0)
Rotation += new Vector3(-angularVelocity, 0, 0);
else
Rotation += new Vector3(angularVelocity, 0, 0);
}
// Limit the rotation of the maze to 30 degrees
maze.Rotation.X =
MathHelper.Clamp(maze.Rotation.X + Rotation.X,
MathHelper.ToRadians(-30), MathHelper.ToRadians(30));
maze.Rotation.Z =
MathHelper.Clamp(maze.Rotation.Z + Rotation.Z,
MathHelper.ToRadians(-30), MathHelper.ToRadians(30));
}
}
The main changes are that input will no longer be handled if the game is not active, and that the
accelerometer input is affected by a calibration vector. We will introduce the purpose of the
calibration vector in the next exercise. Also, if the game is over then a tap method will initiate
the game ending sequence using a helper method we will soon implement.
45. Revise the Update method to perform the additional checks regarding the game’s state:
C#
public override void Update(GameTime gameTime, bool otherScreenHasFocus, bool
coveredByOtherScreen)
{
// Calculate the time from the start of the game

Page | 65
this.gameTime += gameTime.ElapsedGameTime;
CheckFallInPit();
UpdateLastCheackpoint();
// Update all the component of the game
maze.Update(gameTime);
marble.Update(gameTime);
camera.Update(gameTime);
CheckGameFinish();
base.Update(gameTime, otherScreenHasFocus, coveredByOtherScreen);
}
Other than keeping track of the total game time, we also use helper methods, which we will
soon implement, to check whether the ball has fallen into a pit, to update the last passed
checkpoint and to see whether the game has ended. An additional helper methods handle’s the
game’s end sequence.
46. Add the following method to the GameplayScreen class:
C#
private void UpdateLastCheackpoint()
{
BoundingSphere marblePosition = marble.BoundingSphereTransformed;
var tmp = lastCheackpointNode;
while (tmp.Next != null)
{
// If the marble is close to a checkpoint save the checkpoint
if (Math.Abs(Vector3.Distance(marblePosition.Center, tmp.Next.Value))
<= marblePosition.Radius * 3)
{
lastCheackpointNode = tmp.Next;
return;
}
tmp = tmp.Next;
}
}
The above code examines all checkpoints further away in the maze than the current one and
assuming the marble is close enough to one of them, it is set as the current checkpoint
47. Add a method to check whether the marble has fallen inside a pit:
C#
private void CheckFallInPit()
{

Page | 66
if (marble.Position.Y < -150)
{
marble.Position = lastCheackpointNode.Value;
maze.Rotation = Vector3.Zero;
marble.Acceleration = Vector3.Zero;
marble.Velocity = Vector3.Zero;
}
}
The code above resets the marble’s location to the last checkpoint in case it has indeed fallen
inside a pit.
48. Add a method that checks whether the game has ended. This only happens when the player
reaches the maze’s end:
C#
private void CheckGameFinish()
{
BoundingSphere marblePosition = marble.BoundingSphereTransformed;
if (Math.Abs(Vector3.Distance(marblePosition.Center, maze.End)) <=
marblePosition.Radius * 3)
{
gameOver = true;
return;
}
}
49. Finally, we will revise the Draw method to display the total elapsed time and to only work when
the game is active. The elapsed time serves as the player’s score in the eventual game, as the
aim of the game is to complete the maze in as short a time as possible:
C#
public override void Draw(GameTime gameTime)
{
ScreenManager.GraphicsDevice.Clear(Color.Black);
ScreenManager.SpriteBatch.Begin();
// Draw the elapsed time
ScreenManager.SpriteBatch.DrawString(timeFont,
String.Format("{0:00}:{1:00}", this.gameTime.Minutes,
this.gameTime.Seconds), new Vector2(20, 20), Color.YellowGreen);
// Drawing sprites changes some render states around, which don't play
// nicely with 3d models.
// In particular, we need to enable the depth buffer.
DepthStencilState depthStensilState =
new DepthStencilState() { DepthBufferEnable = true };
ScreenManager.GraphicsDevice.DepthStencilState = depthStensilState;

Page | 67
// Draw all the game components
maze.Draw(gameTime);
marble.Draw(gameTime);
ScreenManager.SpriteBatch.End();
base.Draw(gameTime);
}
50. Compile and deploy the game. The game should now be fully playable, though the game
experience will be lacking. Currently, the game begins very abruptly, ends suddenly when the
player reaches the end of the maze, and has no sounds. In the next exercise we will address
these issues by adding a menu system, a high-score table that will display once the game ends
and sound playback. We will also introduce a calibration screen, which will allow the
accelerometer to be calibrated once the game is deployed to an actual device.
Exercise 2: Game polish and menus
In the previous exercise, we implemented a fully playable game. However, as we have stated at the end
of the final task, the game severely lacks polish in its current state. Our first task in this exercise is to
improve the game’s presentation by incorporating sound.
Later in the exercise, we add additional elements that are part of the game but are not part of the actual
gameplay screen. We add a main menu and an instructions screen, and we give the user the ability to
pause the game and display a pause screen. Additionally, we add a highscore screen to keep track of the
best scores achieved in the game.
We will also add a calibration screen which will make it possible to set any orientation as the “idle” state
at which the maze is not tilted.
Task 1 –Sounds
1. Select the Misc folder and add the “AudioManager.cs” file from the lab installation folder, under
Assets\Code\Misc.
Note: A detailed explanation of the AudioManager can be found in the Catapult Wars lab at:
http://creators.xna.com/en-US/lab/catapultwars.
2. We now need to add sound resources to our content project. Add a new project folder under
the “MarbleMazeGameContent” project and name it “Sounds”, then add all existing files from
the lab installation folder under Assets\Media\Sounds to this new folder.
Page | 68
Now we will revisit the various classes created during the previous exercise in order to enhance
their functionality by adding sound playback.
3. Before we can play sounds we need to initialize the AudioManager and load the sounds. Open
the “MarbleMazeGame.cs” file and change the MarbleMazeGame class’s constructor to the
following (as before, old code is colored gray):
C#
AudioManager.Initialize(this);
4. Now the constructor look like
C#
public MarbleMazeGame()
{
graphics = new GraphicsDeviceManager(this);
Content.RootDirectory = "Content";
// Frame rate is 30 fps by default for Windows Phone.
TargetElapsedTime = TimeSpan.FromTicks(333333);
//Create a new instance of the Screen Manager
screenManager = new ScreenManager(this);
Components.Add(screenManager);
// Switch to full screen for best game experience
graphics.IsFullScreen = true;
graphics.SupportedOrientations =
DisplayOrientation.LandscapeLeft;
screenManager.AddScreen(new GameplayScreen(), null);
// Initialize sound system
AudioManager.Initialize(this);
}
5. Add the following function to the MarbleMazeGame class:
C#
protected override void LoadContent()
{
AudioManager.LoadSounds();
base.LoadContent();
}
This will cause the AudioManager to load all of its associated sounds so that they will be ready
for playback.

Page | 69
6. Open the “GameplayScreen.cs” under the “Screens” project folder and navigate to the
UpdateLastCheackpoint method. We will change the method so that each tune a checkpoint is
passed, a sound will play:
C#
private void UpdateLastCheackpoint()
{
BoundingSphere marblePosition =
marble.BoundingSphereTransformed;
var tmp = lastCheackpointNode;
while (tmp.Next != null)
{
// If the marble close to checkpoint save the checkpoint
if (Math.Abs(Vector3.Distance(marblePosition.Center,
tmp.Next.Value)) <= marblePosition.Radius * 3)
{
AudioManager.PlaySound("checkpoint");
lastCheackpointNode = tmp.Next;
return;
}
tmp = tmp.Next;
}
}
7. Open the “Marble.cs” file under the “Objects” project folder and navigate to the Update
method. Modify the method to look like the following:
C#
public override void Update(GameTime gameTime)
{
base.Update(gameTime);
// Make the camera follow the marble
Camera.ObjectToFollow = Vector3.Transform(Position,
Matrix.CreateFromYawPitchRoll(Maze.Rotation.Y,
Maze.Rotation.X, Maze.Rotation.Z));
PlaySounds();
}
The “PlaySounds” helper method will be responsible for playing sounds related to the marble’s
movement. We will implement it in the next step.
8. Add an implementation for the PlaySounds method:
C#
private void PlaySounds()

Page | 70
{
// Calculate the pitch by the velocity
float volumeX = MathHelper.Clamp(Math.Abs(Velocity.X) / 400,
0, 1);
float volumeZ = MathHelper.Clamp(Math.Abs(Velocity.Z) / 400,
0, 1);
float volume = Math.Max(volumeX, volumeZ);
float pitch = volume - 1.0f;
// Play the roll sound only if the marble roll on maze
if (intersectDetails.IntersectWithGround &&
(Velocity.X != 0 || Velocity.Z != 0))
{
if (AudioManager.Instance["rolling"].State !=
SoundState.Playing)
AudioManager.PlaySound("rolling", true);
// Update the volume & pitch by the velocity
AudioManager.Instance["rolling"].Volume =
Math.Max(volumeX, volumeZ);
AudioManager.Instance["rolling"].Pitch = pitch;
}
else
{
AudioManager.StopSound("rolling");
}
// Play fall sound when fall
if (Position.Y < -50)
{
AudioManager.PlaySound("pit");
}
// Play collision sound when collide with walls
if (intersectDetails.IntersectWithWalls)
{
AudioManager.PlaySound("collision");
AudioManager.Instance["collision"].Volume =
Math.Max(volumeX, volumeZ);
}
}
This method is responsible for playing several sounds. As the marble rolls, a rolling sound will be
played and will have its pitch and volume adjusted according to the marble’s current velocity.
The method plays additional sounds when the marble hits the wall or falls into a pit.
9. Compile the project and deploy it. The game should now include sounds.

Page | 71
Task 2 – Additional screens and menus
We may have drastically improved the game experience during the previous task, but the game is still
not complete, as it displays the gameplay screen abruptly when launched, and there is currently no way
to replay once the game is over (short of restarting the program). Additionally, the user cannot pause
the game.
In this task, we add additional screens and menus, and we connect them to each other.
1. Add a new project folder under the “MarbleMazeGameContent” project and name it “Images”,
then add all existing files from the lab installation folder under Assets\Media\Images to this
new folder.
2. Add a new class under the "Screens" project folder and name it “BackgroundScreen”.
3. Add the following using statements at the top of the new class file:
C#
using Microsoft.Xna.Framework.Graphics;
using Microsoft.Xna.Framework;
using GameStateManagement;
4. Change the new class to derive from the “GameScreen” class.
C#
class BackgroundScreen : GameScreen
{
}
Note: Do not forget to change the class’s namespace.
5. Add the following class variables to be used later for loading the background image:
C#
Texture2D background;
6. Define a class constructor as follows:
C#
public BackgroundScreen()
{
TransitionOnTime = TimeSpan.FromSeconds(0.0);
TransitionOffTime = TimeSpan.FromSeconds(0.5);
}
This code simply sets values for some of the properties derived from GameScreen, which control
how the screen is brought in and out of view.
7. Override the base class’s “LoadContent” method to load the background image:
C#
public override void LoadContent()

Page | 72
{
background = Load<Texture2D>(@"Images\titleScreen");
}
8. Add custom drawing logic to the class by overriding the Draw method:
C#
public override void Draw(GameTime gameTime)
{
SpriteBatch spriteBatch = ScreenManager.SpriteBatch;
spriteBatch.Begin();
spriteBatch.Draw(background, new Vector2(0, 0),
Color.White * TransitionAlpha);
spriteBatch.End();
}
9. Now that we have a background screen, it is time to add a menu that will be displayed over it.
Create a new class called “MainMenuScreen” in the “Screens” project folder.
10. Open the new class file and add the following using statements at the top of the file.
C#
using GameStateManagement;
using Microsoft.Xna.Framework;
11. Change the new class to derive from the “MenuScreen” class (this screen class is defined in the
code under the ScreenManager folder):
C#
class MainMenuScreen : MenuScreen
{
}
Note: Remember to change the class’s namespace.
12. Add the following constructor to the class. It defines the menu entries that this menu screen
displays, and it causes it not to hide the background screen by setting the IsPopup property to
true:
C#
public MainMenuScreen()
: base("")
{
IsPopup = true;
// Create our menu entries.
MenuEntry startGameMenuEntry = new MenuEntry("Play");

Page | 73
MenuEntry highScoreMenuEntry = new MenuEntry("High Score");
MenuEntry exitMenuEntry = new MenuEntry("Exit");
// Hook up menu event handlers.
startGameMenuEntry.Selected += StartGameMenuEntrySelected;
highScoreMenuEntry.Selected += HighScoreMenuEntrySelected;
exitMenuEntry.Selected += OnCancel;
// Add entries to the menu.
MenuEntries.Add(startGameMenuEntry);
MenuEntries.Add(highScoreMenuEntry);
MenuEntries.Add(exitMenuEntry);
}
A menu screen contains MenuEntry objects which depict the menu’s items. Each entry contains
an event handler, which fires when the user selects the entry from the menu. You can see how
the above code sets the handlers for all menu entries. In the next step, we add the methods that
are specified as event handlers.
13. Create the event handlers by implementing the following methods in the class:
C#
void HighScoreMenuEntrySelected(object sender, EventArgs e)
{
foreach (GameScreen screen in ScreenManager.GetScreens())
screen.ExitScreen();
ScreenManager.AddScreen(new BackgroundScreen(), null);
ScreenManager.AddScreen(new HighScoreScreen(), null);
}
void StartGameMenuEntrySelected(object sender, EventArgs e)
{
foreach (GameScreen screen in ScreenManager.GetScreens())
screen.ExitScreen();
ScreenManager.AddScreen(new LoadingAndInstructionScreen(), null);
}
protected override void OnCancel(PlayerIndex playerIndex)
{
HighScoreScreen.SaveHighscore();
ScreenManager.Game.Exit();
}
Notice the difference between the first two methods and last method. While the first two are
actual event handler, OnCancel is actually called from a different event handler, which is also

Page | 74
called OnCancel and is implemented in the base class. The various handlers refer to screens and
methods which do not exist yet. We will implement them during the course of this task.
14. Create a new class called “LoadingAndInstructionScreen” under the “Screen” project folder.
15. Open the new class file and add the following using statements at the top of the file.
C#
using Microsoft.Xna.Framework.Graphics;
using Microsoft.Xna.Framework;
using GameStateManagement;
using Microsoft.Xna.Framework.Input.Touch;
using System.Threading;
16. Change the new class to derive from the “GameScreen” class:
C#
class LoadingAndInstructionScreen : GameScreen
{
}
17. Add the following fields to the class:
C#
Texture2D background;
SpriteFont font;
bool isLoading;
GameplayScreen gameplayScreen;
Thread thread;
You may notice the field that contains a thread object. We use this field shortly.
18. Add the following constructor to the class. Since this screen responds to user taps on the
display, we need to enable tap gestures:
C#
public LoadingAndInstructionScreen()
{
EnabledGestures = GestureType.Tap;
TransitionOnTime = TimeSpan.FromSeconds(0);
TransitionOffTime = TimeSpan.FromSeconds(0.5);
}
19. Override the “LoadContent” method to load the instruction set image and a font which we will
later use:
C#
public override void LoadContent()
{

Page | 75
background = Load<Texture2D>(@"Textures\instructions");
font = Load<SpriteFont>(@"Fonts\MenuFont");
// Create a new instance of the gameplay screen
gameplayScreen = new GameplayScreen();
gameplayScreen.ScreenManager = ScreenManager;
}
20. Override the HandleInput method as shown in the following code segment:
C#
public override void HandleInput(InputState input)
{
if (!isLoading)
{
if (input.Gestures.Count > 0)
{
if (input.Gestures[0].GestureType == GestureType.Tap)
{
// Start loading the resources in additional thread
thread = new Thread(
new ThreadStart(gameplayScreen.LoadAssets));
isLoading = true;
thread.Start();
}
}
}
base.HandleInput(input);
}
The preceding method waits for a tap from the user in order to dismiss the instructions screen.
We would like to display the gameplay screen next, but waiting for it to load its assets will cause
a noticeable delay between the tap and the appearance of the gameplay screen. Therefore, we
will create an additional thread to perform the gameplay screen’s asset initialization. We will
display a loading prompt until the process finishes, and then display the gameplay screen. Let us
move on to the Update method where we will wait for all assets to load.
21. Override the “Update” method with the following code:
C#
public override void Update(GameTime gameTime,
bool otherScreenHasFocus, bool coveredByOtherScreen)
{
// If additional thread is running, skip
if (null != thread)
{
// If additional thread finished loading and the screen is
// not exiting

Page | 76
if (thread.ThreadState ==
ThreadState.Stopped && !IsExiting)
{
// Exit the screen and show the gameplay screen
// with pre-loaded assets
foreach (GameScreen screen in
ScreenManager.GetScreens())
screen.ExitScreen();
ScreenManager.AddScreen(gameplayScreen, null);
}
}
base.Update(gameTime, otherScreenHasFocus,
coveredByOtherScreen);
}
22. Override the Draw method to display the instructions image, and also the loading prompt while
the game’s assets are loading:
C#
public override void Draw(GameTime gameTime)
{
SpriteBatch spriteBatch = ScreenManager.SpriteBatch;
spriteBatch.Begin();
// Draw Background
spriteBatch.Draw(background, new Vector2(0, 0),
new Color(255, 255, 255, TransitionAlpha));
// If loading gameplay screen resource in the
// background show "Loading..." text
if (isLoading)
{
string text = "Loading...";
Vector2 size = font.MeasureString(text);
Vector2 position = new Vector2(
(ScreenManager.GraphicsDevice.Viewport.Width -
size.X) / 2,
(ScreenManager.GraphicsDevice.Viewport.Height -
size.Y) / 2);
spriteBatch.DrawString(font, text, position, Color.White);
}
spriteBatch.End();
}

Page | 77
23. Now that the instructions screen loads the gameplay screen’s assets, there is no longer a need
to perform that operation in the GameplayScreen class. Open the “GameplayScreen.cs” file and
navigate to the “LoadContent” method. Change the method to the following:
C#
public override void LoadContent()
{
timeFont =
ScreenManager.Game.Content.Load<SpriteFont>(@"Fonts\MenuFont");
Accelerometer.Initialize();
base.LoadContent();
}
24. So far, we have created three additional screens and now it is time to make them visible. To do
that, we will alter the game class “MarbleMazeGame”. Open the file, “MarbleMazeGame.cs”,
and navigate to the MarbleMazeGame class’s constructor and change it to the following:
C#
public MarbleMazeGame()
{
graphics = new GraphicsDeviceManager(this);
Content.RootDirectory = "Content";
// Frame rate is 30 fps by default for Windows Phone.
TargetElapsedTime = TimeSpan.FromTicks(333333);
//Create a new instance of the Screen Manager
screenManager = new ScreenManager(this);
Components.Add(screenManager);
// Switch to full screen for best game experience
graphics.IsFullScreen = true;
graphics.SupportedOrientations =
DisplayOrientation.LandscapeLeft;
// Add two new screens
screenManager.AddScreen(new BackgroundScreen(), null);
screenManager.AddScreen(new MainMenuScreen(), null);
// Initialize sound system
AudioManager.Initialize(this);
}
Notice that we have replaced the line which adds the gameplay screen, and instead now add the
background and main menu screens.

Page | 78
25. We need to implement one final screen which is referenced by the menu screen, the high score
screen. Under the "Screen" project folder create a new class called “HighScoreScreen".
26. Open the new class file and add the following using statements at the top of the file.
C#
using System.Collections.Generic;
using System.Linq;
using System.IO.IsolatedStorage;
using System.IO;
using Microsoft.Xna.Framework.Graphics;
using Microsoft.Xna.Framework;
using GameStateManagement;
using Microsoft.Xna.Framework.Input.Touch;
27. Change the new class to derive from the “GameScreen” class:
C#
class HighScoreScreen : GameScreen
{
}
28. Add the following fields to the class:
C#
const int highscorePlaces = 10;
public static KeyValuePair<string, TimeSpan>[] highScore = new
KeyValuePair<string, TimeSpan>[highscorePlaces]
{
new KeyValuePair<string,TimeSpan>
("Jasper",TimeSpan.FromSeconds(90)),
new KeyValuePair<string,TimeSpan>
("Ellen",TimeSpan.FromSeconds(110)),
new KeyValuePair<string,TimeSpan>
("Terry",TimeSpan.FromSeconds(130)),
new KeyValuePair<string,TimeSpan>
("Lori",TimeSpan.FromSeconds(150)),
new KeyValuePair<string,TimeSpan>
("Michael",TimeSpan.FromSeconds(170)),
new KeyValuePair<string,TimeSpan>
("Carol",TimeSpan.FromSeconds(190)),
new KeyValuePair<string,TimeSpan>
("Toni",TimeSpan.FromSeconds(210)),
new KeyValuePair<string,TimeSpan>
("Cassie",TimeSpan.FromSeconds(230)),
new KeyValuePair<string,TimeSpan>
("Luca",TimeSpan.FromSeconds(250)),
new KeyValuePair<string,TimeSpan>
("Brian",TimeSpan.FromSeconds(270))

Page | 79
};
SpriteFont highScoreFont;
These fields define the size of the high score table and provide a set of default entries.
29. Add the following constructor to the HighScoreScreen class:
C#
public HighScoreScreen()
{
EnabledGestures = GestureType.Tap;
}
30. Override the base class’s LoadContent with the following code:
C#
public override void LoadContent()
{
highScoreFont = Load<SpriteFont>(@"Fonts\MenuFont");
base.LoadContent();
}
31. Override HandleInput with the following code:
C#
public override void HandleInput(InputState input)
{
if (input == null)
throw new ArgumentNullException("input");
if (input.IsPauseGame(null))
{
Exit();
}
// Return to main menu when tap on the phone
if (input.Gestures.Count > 0)
{
GestureSample sample = input.Gestures[0];
if (sample.GestureType == GestureType.Tap)
{
Exit();
input.Gestures.Clear();
}
}
}

Page | 80
This will cause the screen to exit when the user taps the display or uses the device’s “back”
button. Exiting the screen is handled by the “Exit” method which we will implement next.
32. Add the following method to exit the high score screen:
C#
private void Exit()
{
this.ExitScreen();
ScreenManager.AddScreen(new BackgroundScreen(), null);
ScreenManager.AddScreen(new MainMenuScreen(), null);
}
33. Override the Draw method to show the highscores table on the screen:
C#
public override void Draw(Microsoft.Xna.Framework.GameTime gameTime)
{
ScreenManager.SpriteBatch.Begin();
// Draw the title
ScreenManager.SpriteBatch.DrawString(highScoreFont,
"High Scores", new Vector2(30, 30), Color.White);
// Draw the highscores table
for (int i = 0; i < highScore.Length; i++)
{
ScreenManager.SpriteBatch.DrawString(highScoreFont,
String.Format("{0}. {1}", i + 1, highScore[i].Key),
new Vector2(100, i * 40 + 70), Color.YellowGreen);
ScreenManager.SpriteBatch.DrawString(highScoreFont,
String.Format("{0:00}:{1:00}",
highScore[i].Value.Minutes,
highScore[i].Value.Seconds),
new Vector2(500, i * 40 + 70), Color.YellowGreen);
}
ScreenManager.SpriteBatch.End();
base.Draw(gameTime);
}
So far we have added very little logic to the screen that actually manages the high-score table.
We will now turn our attention to that matter.
34. Add the following method to the HighScoreScreen class. It will check if a score belongs in the
high-score table by comparing it with the worst score on the table:
C#
public static bool IsInHighscores(TimeSpan gameTime)

Page | 81
{
// If the score is less from the last place score
return gameTime < highScore[highscorePlaces - 1].Value;
}
35. Add an additional method which orders the scores in the high-score table:
C#
private static void OrderGameScore()
{
highScore = (highScore.OrderBy(e => e.Value.Ticks)).ToArray();
}
The high-score table is ordered by the amount of time that it took to get to the end of the maze.
36. Add a method to insert new scores into the high-score table:
C#
public static void PutHighScore(string playerName, TimeSpan gameTime)
{
if (IsInHighscores(gameTime))
{
highScore[highscorePlaces - 1] =
new KeyValuePair<string, TimeSpan>(playerName,
gameTime);
OrderGameScore();
}
}
A new score is inserted by removing the lowest score and then ordering the table.
37. Add the following method to store the high-score table on the device:
C#
public static void SaveHighscore()
{
// Get the place to store the data
using (IsolatedStorageFile isf =
IsolatedStorageFile.GetUserStoreForApplication())
{
// Create the file to save the data
using (IsolatedStorageFileStream isfs = new
IsolatedStorageFileStream("highscores.txt",
FileMode.Create, isf))
{
// Get the stream to write the file
using (StreamWriter writer = new StreamWriter(isfs))
{
for (int i = 0; i < highScore.Length; i++)
{
// Write the scores

Page | 82
writer.WriteLine(highScore[i].Key);
writer.WriteLine(highScore[i].Value.ToString());
}
// Save and close the file
writer.Flush();
writer.Close();
}
}
}
}
Note that we first access the game’s isolated storage, which is the only place where the game is
allowed to store data on the device.
38. Add the following method to load the high-score table:
C#
public static void LoadHighscore()
{
// Get the place the data stored
using (IsolatedStorageFile isf =
IsolatedStorageFile.GetUserStoreForApplication())
{
// Try to open the file
if (isf.FileExists("highscores.txt"))
{
using (IsolatedStorageFileStream isfs = new
IsolatedStorageFileStream("highscores.txt",
FileMode.Open, isf))
{
// Get the stream to read the data
using (StreamReader reader = new StreamReader(isfs))
{
// Read the highscores
int i = 0;
while (!reader.EndOfStream)
{
string[] line = new[] { reader.ReadLine(),
reader.ReadLine() };
highScore[i++] = new KeyValuePair<string,
TimeSpan>(line[0],
TimeSpan.Parse(line[1]));
}
}
}
}
}

Page | 83
OrderGameScore();
}
When loading the high-score table we attempt to find the file created by the save operation in
the game’s isolated storage. If the file does not exist the high-score table will revert to its
default values.
39. The high-score screen is ready, we just need to initialize it. Open the “MableMazeGame.cs” file
and navigate to the LoadContent method. Alter the method in the following manner:
C#
protected override void LoadContent()
{
AudioManager.LoadSounds();
HighScoreScreen.LoadHighscore();
base.LoadContent();
}
40. Compile and deploy the project. When the game launches you will now see the main menu.
Each entry should work as expected, though the game itself will still end abruptly. We will fix
this in the next task.
Figure 37
Main Menu

Page | 84
Figure 38
High-scores screen
41. The final part of this task is to add an additional screen, the pause screen. This screen will allow
the user to pause the game and is fairly similar to the main menu screen. Create a new class
under the “Screen” folder and call it “PauseScreen”.
42. Open the new class file and add the following using statements at the top of the file.
C#
using System.Linq;
using Microsoft.Xna.Framework;
using GameStateManagement;
43. Change the newly created class to inherit from the “MenuScreen” class:
C#
class PauseScreen : MenuScreen
{
}
44. Add the following constructor to the class:
C#
public PauseScreen()
: base("Game Paused")
{
// Create our menu entries.
MenuEntry returnGameMenuEntry = new MenuEntry("Return");
MenuEntry restartGameMenuEntry = new MenuEntry("Restart");
MenuEntry exitMenuEntry = new MenuEntry("Quit Game");

Page | 85
// Hook up menu event handlers.
returnGameMenuEntry.Selected += ReturnGameMenuEntrySelected;
restartGameMenuEntry.Selected += RestartGameMenuEntrySelected;
exitMenuEntry.Selected += OnCancel;
// Add entries to the menu.
MenuEntries.Add(returnGameMenuEntry);
MenuEntries.Add(restartGameMenuEntry);
MenuEntries.Add(exitMenuEntry);
}
The pause screen displays a menu with three entries. One allowing the user to return to the
game, another allowing the user to restart the game and a final one allowing the user to return
to the main menu.
45. Add the following event handlers to the class. These are be used by the pause screen’s menu
entries:
C#
void ReturnGameMenuEntrySelected(object sender, EventArgs e)
{
AudioManager.PauseResumeSounds(true);
var res = from screen in ScreenManager.GetScreens()
where screen.GetType() != typeof(GameplayScreen)
select screen;
foreach (GameScreen screen in res)
screen.ExitScreen();
(ScreenManager.GetScreens()[0] as GameplayScreen).IsActive =
true;
}
void RestartGameMenuEntrySelected(object sender, EventArgs e)
{
AudioManager.PauseResumeSounds(true);
var res = from screen in ScreenManager.GetScreens()
where screen.GetType() != typeof(GameplayScreen)
select screen;
foreach (GameScreen screen in res)
screen.ExitScreen();
(ScreenManager.GetScreens()[0] as GameplayScreen).IsActive =
true;
(ScreenManager.GetScreens()[0] as GameplayScreen).Restart();

Page | 86
}
protected override void OnCancel(PlayerIndex playerIndex)
{
foreach (GameScreen screen in ScreenManager.GetScreens())
screen.ExitScreen();
ScreenManager.AddScreen(new BackgroundScreen(), null);
ScreenManager.AddScreen(new MainMenuScreen(), null);
}
Notice how the first handler, which is fired when the user wishes to return to the game, restores
IsActive value and resumes all paused sounds. Also notice how the second handler uses a
method of the gameplay screen which we have yet to implement.
46. Open the “GameplayScreen.cs” file from the “Screens” project folder and navigate to the
GameplayScreen class. Add the following method:
C#
internal void Restart()
{
marble.Position = maze.StartPoistion;
marble.Velocity = Vector3.Zero;
marble.Acceleration = Vector3.Zero;
maze.Rotation = Vector3.Zero;
IsActive = true;
gameOver = false;
gameTime = TimeSpan.Zero;
lastCheackpointNode = maze.Checkpoints.First;
}
This method simply resets some variables which will in effect reset the game itself.
47. The final step is to revise the GameplayScreen class to utilize the new pause screen. Add the
following method:
C#
private void PauseCurrentGame()
{
IsActive = false;
// Pause the sounds
AudioManager.PauseResumeSounds(false);
ScreenManager.AddScreen(new BackgroundScreen(), null);
ScreenManager.AddScreen(new PauseScreen(), null);
}
This method will pause all currently playing sounds, make the game inactive and advance to the
pause screen.

Page | 87
48. Modify the GameplayScreen class's constructor:
C#
public GameplayScreen()
{
TransitionOnTime = TimeSpan.FromSeconds(0.0);
TransitionOffTime = TimeSpan.FromSeconds(0.0);
EnabledGestures = GestureType.Tap;
}
49. Modify the GameplayScreen class’s HandleInput method:
C#
public override void HandleInput(InputState input)
{
if (input == null)
throw new ArgumentNullException("input");
if (input.IsPauseGame(null))
{
if (!gameOver)
PauseCurrentGame();
else
FinishCurrentGame();
}
if (IsActive)
{
if (input.Gestures.Count > 0)
{
GestureSample sample = input.Gestures[0];
if (sample.GestureType == GestureType.Tap)
{
if (gameOver)
FinishCurrentGame();
}
}
if (!gameOver)
{
// Rotate the maze according to accelerometer data
Vector3 currentAccelerometerState =
Accelerometer.GetState().Acceleration;
if (Microsoft.Devices.Environment.DeviceType == DeviceType.Device)
{

Page | 88
//Change the velocity according to acceleration reading
maze.Rotation.Z = (float)Math.Round(MathHelper.ToRadians(
currentAccelerometerState.Y * 30), 2);
maze.Rotation.X = -(float)Math.Round(MathHelper.ToRadians(
currentAccelerometerState.X * 30), 2);
}
else if (Microsoft.Devices.Environment.DeviceType ==
DeviceType.Emulator)
{
Vector3 Rotation = Vector3.Zero;
if (currentAccelerometerState.X != 0)
{
if (currentAccelerometerState.X > 0)
Rotation += new Vector3(0, 0, -angularVelocity);
else
Rotation += new Vector3(0, 0, angularVelocity);
}
if (currentAccelerometerState.Y != 0)
{
if (currentAccelerometerState.Y > 0)
Rotation += new Vector3(-angularVelocity, 0, 0);
else
Rotation += new Vector3(angularVelocity, 0, 0);
}
// Limit the rotation of the maze to 30 degrees
maze.Rotation.X =
MathHelper.Clamp(maze.Rotation.X + Rotation.X,
MathHelper.ToRadians(-30), MathHelper.ToRadians(30));
maze.Rotation.Z =
MathHelper.Clamp(maze.Rotation.Z + Rotation.Z,
MathHelper.ToRadians(-30), MathHelper.ToRadians(30));
}
}
}
}
50. Add the FinishCurrentGame method
C#
private void FinishCurrentGame()
{
IsActive = false;
foreach (GameScreen screen in ScreenManager.GetScreens())

Page | 89
screen.ExitScreen();
if (HighScoreScreen.IsInHighscores(gameTime))
{
// Show the device's keyboard
Guide.BeginShowKeyboardInput(PlayerIndex.One,
"Player Name", "Enter your name (max 15 characters)", "Player",
(r) =>
{
string playerName = Guide.EndShowKeyboardInput(r);
if (playerName != null && playerName.Length > 15)
playerName = playerName.Substring(0, 15);
HighScoreScreen.PutHighScore(playerName, gameTime);
ScreenManager.AddScreen(new BackgroundScreen(), null);
ScreenManager.AddScreen(new HighScoreScreen(), null);
}, null);
return;
}
ScreenManager.AddScreen(new BackgroundScreen(), null);
ScreenManager.AddScreen(new HighScoreScreen(), null);
}
The updated method will allow the user to type in his name in case he has a achieved a high
score.
51. Compile and deploy the project. You should now be able to pause the game by pressing the
device’s “back” button while in the gameplay screen. Additionally, all of the pause screen’s
menu items should function properly.

Page | 90
Figure 1
Pause screen
Task 3 – “3-2-1-Go!” countdown timer and game over screen
In this task, we will focus on making the gameplay screen appear and exit more smoothly when the
game starts or ends.
1. Open the “GameplayScreen.cs” file under the “Screens” project folder and add the following
fields to the GameplayScreen class:
C#
bool startScreen = true;
TimeSpan startScreenTime = TimeSpan.FromSeconds(4);
2. Change the Update to contain the following code:
C#
public override void Update(GameTime gameTime, bool otherScreenHasFocus, bool
coveredByOtherScreen)
{
if (IsActive && !gameOver)
{
if (!startScreen)
{
// Calculate the time from the start of the game
this.gameTime += gameTime.ElapsedGameTime;
CheckFallInPit();
UpdateLastCheackpoint();
}

Page | 91
// Update all the component of the game
maze.Update(gameTime);
marble.Update(gameTime);
camera.Update(gameTime);
CheckGameFinish();
base.Update(gameTime, otherScreenHasFocus, coveredByOtherScreen);
}
if (startScreen)
{
if (startScreenTime.Ticks > 0)
{
startScreenTime -= gameTime.ElapsedGameTime;
}
else
{
startScreen = false;
}
}
}
The above code introduces a delay between the first moment the gameplay screen is display
and until the game actually begins. It is also responsible for adding a delay after the user reaches
the end of the maze before ending the game.
3. Update the Draw method to look like the following:
C#
public override void Draw(GameTime gameTime)
{
ScreenManager.GraphicsDevice.Clear(Color.Black);
ScreenManager.SpriteBatch.Begin();
if (startScreen)
{
DrawStartGame(gameTime);
}
if (IsActive)
{
// Draw the elapsed time
ScreenManager.SpriteBatch.DrawString(timeFont,
String.Format("{0:00}:{1:00}", this.gameTime.Minutes,
this.gameTime.Seconds), new Vector2(20, 20),
Color.YellowGreen);
// Drawing sprites changes some render states around, which don't
// play nicely with 3d models.
// In particular, we need to enable the depth buffer.

Page | 92
DepthStencilState depthStensilState =
new DepthStencilState() { DepthBufferEnable = true };
ScreenManager.GraphicsDevice.DepthStencilState = depthStensilState;
// Draw all the game components
maze.Draw(gameTime);
marble.Draw(gameTime);
}
if (gameOver)
{
AudioManager.StopSounds();
DrawEndGame(gameTime);
}
ScreenManager.SpriteBatch.End();
base.Draw(gameTime);
}
Here we call function that draw on screen prompts before the game begins and after it ends.
4. Add the following methods to the GameplayScreen class:
C#
private void DrawEndGame(GameTime gameTime)
{
string text = HighScoreScreen.IsInHighscores(this.gameTime) ?
" You got a High Score!" : " Game Over";
text += "\nTouch the screen to continue";
Vector2 size = timeFont.MeasureString(text);
Vector2 textPosition = (new
Vector2(ScreenManager.GraphicsDevice.Viewport.Width,
ScreenManager.GraphicsDevice.Viewport.Height) - size) / 2f;
ScreenManager.SpriteBatch.DrawString(timeFont, text,
textPosition, Color.White);
}
private void DrawStartGame(GameTime gameTime)
{
string text = (startScreenTime.Seconds == 0) ? "Go!" :
startScreenTime.Seconds.ToString();
Vector2 size = timeFont.MeasureString(text);
Vector2 textPosition = (new
Vector2(ScreenManager.GraphicsDevice.Viewport.Width,
ScreenManager.GraphicsDevice.Viewport.Height) - size) / 2f;
ScreenManager.SpriteBatch.DrawString(timeFont, text, textPosition,
Color.White);
}

Page | 93
5. Revise the HandleInput method by changing the initial conditional and Tap handling:
C#
public override void HandleInput(InputState input)
{
if (input == null)
throw new ArgumentNullException("input");
if (input.IsPauseGame(null))
{
if (!gameOver)
PauseCurrentGame();
else
FinishCurrentGame();
}
if (IsActive && !startScreen)
{
...
This will cause input to be ignored during the game’s initial countdown.
6. Modify the GameplayScreen class’s Restart method:
C#
internal void Restart()
{
marble.Position = maze.StartPoistion;
marble.Velocity = Vector3.Zero;
marble.Acceleration = Vector3.Zero;
maze.Rotation = Vector3.Zero;
IsActive = true;
gameOver = false;
gameTime = TimeSpan.Zero;
startScreen = true;
startScreenTime = TimeSpan.FromSeconds(4);
lastCheackpointNode = maze.Checkpoints.First;
}
7. Compile and deploy the project. The game should now be fully operational. The game will begin
and end smoothly and you will be able to save your high-scores. The only remaining task will be
to add the calibration screen.
Task 4 - Calibration screen
Our final task will be to add a calibration screen which will allow the user to calibrate the accelerometer
to eliminate “white noise”.

Page | 94
1. Create a new class under the “Screens” project folder and call it “CalibrationScreen”.
2. Open the new class file and add the following using statements at the top of the file.
C#
using Microsoft.Xna.Framework.Graphics;
using Microsoft.Xna.Framework;
using GameStateManagement;
using System.Threading;
3. Change the newly created class to inherit from the “MenuScreen” class:
C#
class CalibrationScreen : GameScreen
{
}
Note: Do not forget to alter the class’s namespace.
4. Add the following fields to the new class:
C#
Texture2D background;
SpriteFont font;
bool isCalibrating;
GameplayScreen gameplayScreen;
Thread thread;
// Calibration data
Microsoft.Devices.Sensors.Accelerometer accelerometer;
Vector3 accelerometerState = Vector3.Zero;
Vector3 accelerometerCalibrationData = Vector3.Zero;
DateTime startTime;
long samplesCount = 0;
5. Add the following constructor to the class:
C#
public CalibrationScreen(GameplayScreen gameplayScreen)
{
TransitionOnTime = TimeSpan.FromSeconds(0);
TransitionOffTime = TimeSpan.FromSeconds(0.5);
IsPopup = true;
this.gameplayScreen = gameplayScreen;
}
6. Override the LoadContent method
C#
public override void LoadContent()
Page | 95
{
background = Load<Texture2D>(@"Images\titleScreen");
font = Load<SpriteFont>(@"Fonts\MenuFont");
// Start calibrating in additional thread
thread = new Thread(
new ThreadStart(Calibrate));
isCalibrating = true;
startTime = DateTime.Now;
thread.Start();
}
7. Override the Update method
C#
public override void Update(GameTime gameTime, bool otherScreenHasFocus, bool
coveredByOtherScreen)
{
// If additional thread is running, skip
if (!isCalibrating)
{
gameplayScreen.AccelerometerCalibrationData =
accelerometerCalibrationData;
foreach (GameScreen screen in ScreenManager.GetScreens())
if (screen.GetType() == typeof(BackgroundScreen))
{
screen.ExitScreen();
break;
}
(ScreenManager.GetScreens()[0] as GameplayScreen).IsActive = true;
ExitScreen();
}
base.Update(gameTime, otherScreenHasFocus, coveredByOtherScreen);
}
All the above method does is wait for the calibration process to end, store the data in the
gameplay screen and reactivate it.
8. Override the Draw method to display a prompt while calibrating:
C#
public override void Draw(GameTime gameTime)
{
SpriteBatch spriteBatch = ScreenManager.SpriteBatch;
spriteBatch.Begin();

Page | 96
// Draw Background
spriteBatch.Draw(background, new Vector2(0, 0),
new Color(255, 255, 255, TransitionAlpha));
if (isCalibrating)
{
string text = "Calibrating...";
Vector2 size = font.MeasureString(text);
Vector2 position = new Vector2(
(ScreenManager.GraphicsDevice.Viewport.Width - size.X) / 2,
(ScreenManager.GraphicsDevice.Viewport.Height - size.Y) / 2);
spriteBatch.DrawString(font, text, position, Color.White);
}
spriteBatch.End();
}
9. Add the following method that calibrates the accelerometer:
C#
private void Calibrate()
{
//Initialize the accelerometer
accelerometer = new Microsoft.Devices.Sensors.Accelerometer();
if (accelerometer.State == SensorState.Initializing ||
accelerometer.State == SensorState.Ready)
{
accelerometer.ReadingChanged += (s, e) =>
{
accelerometerState = new Vector3((float)e.X, (float)e.Y,
(float)e.Z);
samplesCount++;
accelerometerCalibrationData += accelerometerState;
if (DateTime.Now >= startTime.AddSeconds(5))
{
accelerometer.Stop();
accelerometerCalibrationData.X /= samplesCount;
accelerometerCalibrationData.Y /= samplesCount;
accelerometerCalibrationData.Z /= samplesCount;
isCalibrating = false;
}
};
}
accelerometer.Start();

Page | 97
}
In this method the Calibration Screen accumulates the accelerometer readings for 5 seconds
and calculates average value of those readings. Those values will be used by the Gameplay
screen on order tweak accelerometer reading values received during gameplay.
10. All we need to do now is hook the calibration screen into the gameplay screen. Navigate to the
GameplayScreen class’s constructor and change it to the following:
C#
public GameplayScreen()
{
TransitionOnTime = TimeSpan.FromSeconds(0.0);
TransitionOffTime = TimeSpan.FromSeconds(0.0);
EnabledGestures = GestureType.Tap | GestureType.DoubleTap;
}
11. Open the “GameplayScreen.cs” file from the “Screens” project folder and add the following
method to the GameplayScreen class:
C#
private void CalibrateGame()
{
IsActive = false;
// Pause the sounds
AudioManager.PauseResumeSounds(false);
ScreenManager.AddScreen(new BackgroundScreen(), null);
ScreenManager.AddScreen(new CalibrationScreen(this), null);
}
This method simply activates the calibration screen.
12. Update the HandleInput method one last time to launch the calibration screen when the device
is double-tapped:
C#
public override void HandleInput(InputState input)
{
if (input == null)
throw new ArgumentNullException("input");
if (input.IsPauseGame(null))
{
if (!gameOver)
PauseCurrentGame();
else
FinishCurrentGame();
}
Page | 98
if (IsActive && !startScreen)
{
if (input.Gestures.Count > 0)
{
GestureSample sample = input.Gestures[0];
if (sample.GestureType == GestureType.Tap)
{
if (gameOver)
FinishCurrentGame();
}
}
if (!gameOver)
{
if (Microsoft.Devices.Environment.DeviceType == DeviceType.Device)
{
// Calibrate the accelerometer upon a double tap
if (input.Gestures.Count > 0)
{
GestureSample sample = input.Gestures[0];
if (sample.GestureType == GestureType.DoubleTap)
{
CalibrateGame();
input.Gestures.Clear();
}
}
}
// Rotate the maze according to accelerometer data
Vector3 currentAccelerometerState =
Accelerometer.GetState().Acceleration;
currentAccelerometerState.X -= AccelerometerCalibrationData.X;
currentAccelerometerState.Y -= AccelerometerCalibrationData.Y;
currentAccelerometerState.Z -= AccelerometerCalibrationData.Z;
if (Microsoft.Devices.Environment.DeviceType == DeviceType.Device)
{
//Change the velocity according to acceleration reading
maze.Rotation.Z = (float)Math.Round(MathHelper.ToRadians(
currentAccelerometerState.Y * 30), 2);
maze.Rotation.X = -(float)Math.Round(MathHelper.ToRadians(
currentAccelerometerState.X * 30), 2);
}
else if (Microsoft.Devices.Environment.DeviceType ==
DeviceType.Emulator)
{

Page | 99
Vector3 Rotation = Vector3.Zero;
if (currentAccelerometerState.X != 0)
{
if (currentAccelerometerState.X > 0)
Rotation += new Vector3(0, 0, -angularVelocity);
else
Rotation += new Vector3(0, 0, angularVelocity);
}
if (currentAccelerometerState.Y != 0)
{
if (currentAccelerometerState.Y > 0)
Rotation += new Vector3(-angularVelocity, 0, 0);
else
Rotation += new Vector3(angularVelocity, 0, 0);
}
// Limit the rotation of the maze to 30 degrees
maze.Rotation.X =
MathHelper.Clamp(maze.Rotation.X + Rotation.X,
MathHelper.ToRadians(-30), MathHelper.ToRadians(30));
maze.Rotation.Z =
MathHelper.Clamp(maze.Rotation.Z + Rotation.Z,
MathHelper.ToRadians(-30), MathHelper.ToRadians(30));
}
}
}
}
13. Compile and deploy the game. You should now be able to access the calibration screen while
playing by double-tapping the display.
Congratulations! The game is now fully operational.

Page | 100
Summary
This lab introduced you to 3D game development for the Windows Phone 7™ platform using the XNA
Framework. In the course of this lab you created an XNA Game Studio project for Windows Phone 7,
loaded the game’s resources, took care of the input, updated the game state, and added game specific
logic.
By completing this hands-on lab, you also became familiar with the tools required to create and test an
XNA Game Studio project for Windows Phone. In this lab, you created a new XNA Game Studio
application for Windows Phone 7 using Visual Studio 2010 and the Windows Phone Developer Tools,
and then created the application logic and the layout of the user interface.