Embed Size (px)
Citation preview

User Guide Software
Sontex916
Issue: Rev. 131113 Document: Sontex916 User Guide EN 13-11-2013 Manufacturer: Sontex SA
2605 Sonceboz, Switzerland Phone: +41 32 488 30 00 Fax: +41 32 488 30 01 Email: [email protected] Internet: www.sontex.ch
Technical modifications subject to change without notice

Revision
Issue Date Author Description 170609 17.06.09 JFS Document created 300609 30.06.09 JFS Add information for installation of NetCF messages 030709 03.07.09 JFS Change readout progression explanation and advice
to disable “turn off device if not use” feature. 200709 21.07.09 MS Completely reviewed 040909 04.09.09 SV Update basic image 170909 17.09.09 SV Update table of contents 080210 08.02.10 SV Modify address FTP server 300410 30.04.10 SV Add explanation XML file 010512 131113
04.04.12 13.11.13
JFS/RT RT
Add information about WMDC (Win7) Add information about NetCFv3.5 update for WM6.1/6.5 Add information about road size recommendation Add information about the Menu Tools in Chapter 4.1 New features in Page 15, 21 ,24 and 26
Sontex916 User Guide EN 13-11-2013 2

Table of Contents 1. Introduction ............................................................................................. 4 1.1 Main specifications ........................................................................................................ 4 1.2 System requirements .................................................................................................... 5 1.2.1 Readout the radio devices ........................................................................................................ 5 1.2.2 Transfer the data from the Pocket PC ....................................................................................... 5 2. Installation on the Pocket PC ................................................................. 6 2.1 Configuration requirements ........................................................................................... 6 2.2 Connection with WMDC ................................................................................................ 6 2.3 Connection with ActiveSync .......................................................................................... 7 2.4 Installation of Sontex916 and additional tools ............................................................... 7 2.4.1 Software Sontex916 ................................................................................................................. 7 2.4.2 .Net Compact Framework 3.5 ................................................................................................... 8 2.4.3 .Net Compact Framework 3.5 language files .......................................................................... 10 2.4.4 .Net Compact Framework 3.5 – Update for WM6.1 and WM6.5 ............................................. 11 2.5 Show the Sontex916 icon in the Start menu ............................................................... 12 2.6 Language settings ....................................................................................................... 13 3. Working with the Sontex916 ................................................................ 14 3.1 Configuration requirements ......................................................................................... 14 3.2 Bluetooth connection between Pocket PC and radio modem Supercom 636 ............. 14 3.3 Start the software Sontex916 ...................................................................................... 15 3.4 Create a new road ....................................................................................................... 16 3.5 Add a task ................................................................................................................... 17 3.6 Display properties of a task ......................................................................................... 18 3.7 Execute a task ............................................................................................................. 19 3.8 Options ........................................................................................................................ 21 3.8.1 Radio address ........................................................................................................................ 21 3.8.2 Warning .................................................................................................................................. 22 3.9 Close a road ................................................................................................................ 22 3.10 Open a road ................................................................................................................ 23 3.11 Quit the Sontex916 ...................................................................................................... 23 4. Menu Tools ............................................................................................ 24 4.1 Options ........................................................................................................................ 24 4.2 Serial port .................................................................................................................... 25 4.3 Agent options .............................................................................................................. 26 4.4 Warnings ..................................................................................................................... 26 4.4.1 Select or unselect warnings to be checked ............................................................................. 26 4.4.2 Show or hide warning in the road navigator ............................................................................ 28
Sontex916 User Guide EN 13-11-2013 3
1. Introduction The Sontex916 software is the software to remotely read the data of the Sontex Supercom radio products. This software also allows remotely changing of most of the parameters of the devices to easier carry out the installation and any maintenance. The list of the devices to read is saved in an *.xml “road” file that can be created from your data-base. Road files can also be created, modified or completed directly on your Pocket PC. The transfer of the road files between your computer and the Pocket PC is done by using a syn-chronization cable, a docking station, SD card or with the software supplied with your Pocket PC.
1.1 Main specifications The road file contains a list of tasks managed in groups and subgroups like an explorer bar. The Sontex916 software works with only one file at the time but you can save different road files on your Pocket PC and use it as often as you want. The data generated by the execution of the tasks will be inserted in the road file. The road file is saved after every modification. Moreover the Sontex916 software keeps copies of the two last ver-sions of every road file. Open road files can be quit without necessarily saving them. The tasks can be executed individually or by group. The road file – in XML Format – can be read and modified with simple text editor software. Most of the database have already export and import functions with XML format. A road can be created or modified from the Sontex916. A task or a group can also be added, modi-fied, removed or reinitialized. The transfer of files between your computer and the Pocket PC can be realized by different ways using the “Microsoft ActiveSync” software delivered with your Pocket PC. The easiest way is to use the “File Explorer” of your PC with your Pocket PC connected as a mo-bile device. An option of the ActiveSync will synchronize the date and time of your Pocket PC according to the PC value. The Sontex912 road files created to use with the former radio modem 545 can also be used with the Sontex916 software after a conversion with the “Road conversion” function available in the software Tools916. The software Sontex916 can be translated in other languages. For more information about any translation of translation tools please contact Sontex SA directly. The software Sontex916 is operated in combination with the radio modem Supercom 636. The communication between the two devices is using the Bluetooth interface.
The description of the XML files structure created by the software Tools916 can be requested from Sontex SA.
Sontex916 User Guide EN 13-11-2013 4

1.2 System requirements The software Sontex916 has been developed and tested with the latest handhelds (PDAs) avail-able. Ask for the latest application note of available, tested and supported PDAs by Sontex from Sontex directly or from your local Sontex representative: “Application Note PDA EN dd-mm-yyyy” Samples are for information only
PSION Workabout Pro G3
PSION EP10
IPAQ 114
Radio modem Supercom 636
1.2.1 Readout the radio devices
Pocket PC (PDA) with PPC2003 or Windows mobile 5.0, Windows mobile 6.x , Win-dows Embedded Handheld and Bluetooth interface.
.Net compact framework V3.5 or higher installed. Sontex916 software installed. Radio modem Supercom 636 with antenna
1.2.2 Transfer the data from the Pocket PC
PC with USB interface Operating system: Windows 2000 or higher Microsoft ActiveSync 4.2 or higher installed or Windows Mobile Device Center (for Win7
and Vista)
Sontex916 User Guide EN 13-11-2013 5

2. Installation on the Pocket PC This chapter explains how to install the software Sontex916 on the Pocket PC.
2.1 Configuration requirements
Pocket PC PC with USB interface Operating system Windows 2000 or
newer Microsoft ActiveSync 4.2 or higher (for
PC with Windows XP ) Windows Mobile Device Center (for
Windows Vista or 7)
For the file transfer from PC to the Pocket PC the same configuration is necessary.
2.2 Connection with WMDC PCs with Windows Vista or Windows 7 need “Windows Mobile Device Center” to to communicate with a connected PDA. WMDC is not a part of Windows7 and must be installed as an option available by download. See the Microsoft link: http://support.microsoft.com/kb/931937/en-us The installation files for WMDC are also available on the CD supplied or on our the FTP server. Start the installation and follow the on screen information. Connect then your PDA to your PC and wait until WMDC starts.
After detecting your PDA, WMDC will indicated that your PDA is connected. The first time you connect your PDA you will have to “Set up your device”. Programs installed on your PC/PDA could be viewed using “Programs and Services” “more” “Add/Remove programs”
Sontex916 User Guide EN 13-11-2013 6

2.3 Connection with ActiveSync
If the PC indicates a similar icon in the taskbar as shown in the picture the ActiveSync should already be installed on your PC. If this icon is missing you have to install Ac-tiveSync on your PC before installing the soft-ware Sontex916 on the Pocket PC. Follow the instructions of the manual of your Pocket PC how to install ActiveSync software before you continue installing the software Sontex916.
Place the Pocket PC on the docking station or connect it with a cable to your computer. The ActiveSync icon will change to green color to indicate that the connection with the Pocket PC is established. If this is the first connection between the Pocket PC and your computer, a “Partnership wizard” will be displayed, select the “Standard” and use the options as default.
2.4 Installation of Sontex916 and additional tools
2.4.1 Software Sontex916
The installation files are supplied with the CD Find the installation files (CD or email) and start the installation with the “Setup.exe” file from the CD, supplied with the radio module Supercom 636, or from the email that was sent automatically by Sontex with the last up-date.
Select or change the path and press the OK button. Remark The installation files are copied first on the hard disk of the PC. Then ActiveSync will be able to install the software on several Pocket PCs without restarting the installation process. If the directory doesn’t exist press Yes to cre-ate it.
Sontex916 User Guide EN 13-11-2013 7

Installation on the PC is in progress. Wait while the files are copied on the Pocket PC.
Press the OK button. Check your Pocket PC if any action is re-quired. Click “Yes” if necessary.
The files are installed on the Pocket PC. An installation confirmation must be accepted to correctly finish the installation on Pocket PCs running with Windows Mobile. Press “Yes” Remark: Depending on the type of Pocket PC the pic-ture to confirm the installation of the software can be different, but in any case always press “Yes” to go on with the installation.
2.4.2 .Net Compact Framework 3.5
The software Sontex916 also requires the .Net Compact Framework V3.5. This additional software must be installed on the Pocket PC to use the software Sontex916. The .Net Compact Framework 3.5 tool is available for download on the Microsoft website (NetCFSetupv35.msi; 35 MB!): http://www.microsoft.com/downloads/en/default.aspx The file is also available on the Sontex FTP server at: ftp://files.sontex.ch/ The username and password is as follows: sontex916 Once the file is downloaded on the computer run the file with a double click and follow the installa-tion instructions on the screen. It will be installed on the Pocket PC.
Sontex916 User Guide EN 13-11-2013 8

The file is also on the CD supplied with the radio module Supercom 636. Start the file from the CD and follow the instructions.
The installation on the PC is finished. Remark: The installation files are copied first on the hard disk of the PC. ActiveSync/WMDC is able to install the software on several Pocket PCs without restarting this installation process.
Sontex916 User Guide EN 13-11-2013 9

2.4.3 .Net Compact Framework 3.5 language files According to the Pocket PC language a special file must be installed that is able to properly display errors messages of errors generated by the .Net Compact Framework. Depending on the operating system of the Pocket PC (Pocket PC 2003 or Windows Mobile 5.x/6.x) the corresponding file must be installed: NETCFV35_Message_XX_PPC2003.zip for Pocket PC 2003 devices NETCFV35_Message_XX_WinMob.zip for Windows mobile 5.x or 6.x or Windows
Embedded Handheld devices XX represents the language. These files are available on the Sontex FTP server at: ftp://files.sontex.ch/ The username and password is as follows: sontex916 To install the files please unzip the file and double click the “setup.exe” file and follow the instruc-tions on the screen. The files are also on the CD supplied with the radio module Supercom 636. Start the file “Setup.exe” from the CD and follow the instructions.
Select or change the path and press the OK button Remark: The installation files are copied first on the hard disk of your computer. Then ActiveSync is able to install the software on several Pocket PCs without restarting this installation process. If the directory does not exist press Yes to create it.
Installation on the PC is in progress. Wait while the files are copied on the Pocket PC.
Sontex916 User Guide EN 13-11-2013 10

Press the OK button. Check your Pocket PC if any action is re-quired. Click “Yes” if necessary.
2.4.4 .Net Compact Framework 3.5 – Update for WM6.1 and WM6.5 PDAs working with Windows Mobile 6.1 or WM 6.5 need an update of the .NETCF3.5 to display correctly the information on the PDA (elsewhere the devices values window will look like being too small on the PDA and no scrollbar will be available). To avoid this problem, please install the “NETCFv35-Update WM6.1 or WM6.5” patch available on the CD supplied or on the ftp server (see information above). Start the Setup.exe file and follow the on screen information. To check if the update patch is already installed on a PDA, please start on the PDA the “File Ex-plorer” and launch the “cgacutil” file in the “Windows” folder. The first number for the version displayed must be [3.5.9198.0] if the patch is already installed.
Sontex916 User Guide EN 13-11-2013 11

2.5 Show the Sontex916 icon in the Start menu
After the installation if the Sontex916 software isn’t shown in the Start menu proceed as fol-lows : Click Settings in the Start menu Remark: The names and different menus, functions and icons are displayed according to the language settings of the operation system.
In the Personal tab, click Menus.
Remarks
The maximum number of items in the start menu is 7.
By default there’re already 7 items. Disable at least one item to enable the Sontex916 item. The disabled items of the Start menu are automatically shown in the folder Programs that can be opened by clicking Programs in the Start menu.
Disable the display of different items by un-checking (e.g.Tasks). Enable the Sontex916 item and click the OK button. Close the Settings window by clicking on the X in the upper right corner.
Now check the presence of Sontex916 in the Start menu.
Sontex916 User Guide EN 13-11-2013 12

2.6 Language settings The software Sontex916 is available in different languages. Contact Sontex about the status of availability of other languages. The installation file is the same and the language selection is done automatically at the start of the software Sontex916, according to the “Regional settings” set in your Pocket PC. If the language used in the Regional settings is not known by the Sontex916 it will start in English. To change the “regional settings” of your Pocket PC, please follow this sequence.
Click Settings in the Start menu.
In the System tab, click Regional settings. Select the language from the list.
Sontex916 User Guide EN 13-11-2013 13

3. Working with the Sontex916 This chapter is explaining the main features of the software Sontex916: How to create a road, add or edit a reading task, start a readout process, show the values and so on.
3.1 Configuration requirements The following material is required to readout the radio devices:
Pocket PC (PDA) with PPC2003 or Windows mobile 5.0 / Windows mobile 6.x or Win-dows Embedded Handheld and Bluetooth interface.
Net compact framework V3.5 or higher installed. Sontex916 software installed. Radio modem Supercom 636 with antenna
To avoid unattended errors during the readout we recommend disabling the “Turn off device if not used” feature on your Pocket PC. We refer to the manual of your Pocket PC for more informa-tion.
3.2 Bluetooth connection between Pocket PC and radio modem Supercom 636
The communication between the Pocket PC and the radio modem Supercom 636 is using a Blue-tooth interface. A Bluetooth connection must be established first. A Bluetooth connection must be established only once. The connection is done from the Pocket PC: 1. Switch on the radio modem Supercom 636. 2. Turn on the Bluetooth interface on your Pocket PC. 3. Create a New partnership and wait until the Pocket PC has detected the radio modem Su-
percom 636 with the correct serial number. 4. On the detected radio modem Supercom 636 use the service Serial Port. 5. Create a New Outgoing Port attached to the radio modem Supercom 636.
A COM port number is assigned. The serial port of the Sontex916 must then be set to this COM port number.
If during the creation of the partnership a password is required for the radio modem Supercom 636 use the code “0000”. Read the instructions of the manual of your Pocket PC about establishing a Bluetooth connection.
Sontex916 User Guide EN 13-11-2013 14

3.3 Start the software Sontex916
Click Sontex916 in the Start menu.
Wait a few seconds during the initialization of the software. The current date and time of your PDA displays. Confirm by pressing'' OK''. If the date and time are not correct, please up-date in the settings of your PDA.
Sontex916 User Guide EN 13-11-2013 15
3.4 Create a new road
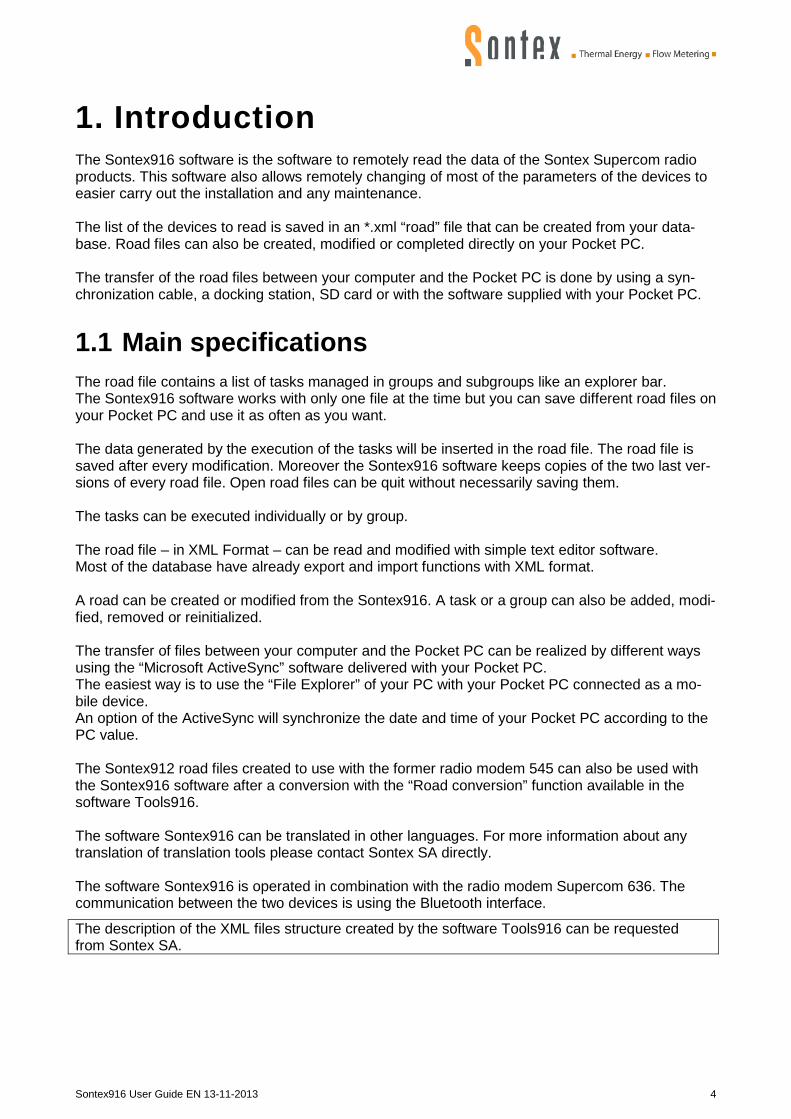
Press New to create a new road.
Remarks In this window existing roads can also be man-aged. (Open, rename, delete,..).
Name the new road and press Save to create and open it.
The new road will be shown in the road naviga-tor window. Remark By default the new created road is saved on the PDA into the “My Documents” folder. This information could be useful if you want to find the road when you are connected to your PC. Using the File Explorer of your Pc, browse into the “My Documents” folder on your “Mobile device”.
Remark As Pocket PCs are devices with limited internal memory, we recommend not to create road files containing more than 200 devices. The use of a road file with too many devices may cause problems while reading and may end with corrupted files and loss of data.
Sontex916 User Guide EN 13-11-2013 16

3.5 Add a task
Click Add Task in the Road menu.
Remarks:
In a selected group, the cursor is placed on a group; tasks are added at the bottom of a list of tasks, pressing Add Task.
If a task is selected, the cursor is placed on an existing task; new tasks are added above the selected task, pressing Add Task.
Select the respective agent to be added and click OK in the upper right corner. Wait a few seconds.
Remarks:
Each agent is a program that will do a speci-fied task. There’re two types of tasks: Read or Parameterize.
A prompt window will pop up. Enter the Radio address of the device that you want to read. Click OK and the software will return to the road navigator window.
Remarks:
The field Number of devices allows creating the same number of tasks according to the entered number with consecutive radio ad-dresses from the entered radio address.
Depending on the agent selected from the list different options are available for the readout.
Sontex916 User Guide EN 13-11-2013 17

3.6 Display properties of a task
Select a task and click the Properties icon
Remarks:
The uncompleted tasks are shown as a red square and the completed tasks as a green circle.
Groups containing at least one uncompleted task are shown as a red square and groups containing only completed tasks are shown as a green circle.
The details of a task are as shown in the pic-ture. The task is shown without any read data. Click OK to return to the road navigator.
Sontex916 User Guide EN 13-11-2013 18

3.7 Execute a task
Select the task and click the Execute icon.
Remarks: To execute all uncompleted tasks of a group select the required group and press the exe-cute icon.
A window will indicate the progression of the tasks. The window will disappear as soon as the exe-cution of the tasks is finished. The LEDs of the Supercom 636 are showing the status of progress and the status of pro-gress is also shown as a coloured bar with the following information: Error: X / Done: Y / Total: Z X : Failed tasks Y : Completed tasks Z : Executed tasks
Remarks: Stop the process with the Abort button
Sontex916 User Guide EN 13-11-2013 19

Tasks not executed correctly, due to an error, are shown as a red circle. Press the properties icon to show the error.
Remarks:: A task can be executed unlimited times. Only the latest error will be saved.
Sample of the details of an uncompleted task showing an error.
If a task is completed the task is shown with a green circle. Press the Properties icon to show the values read.
Remarks: A completed task can only be executed once.
To execute a completed task the task must be reinitialized first by clicking Reinitialize in the Road menu.
Reinitialize will delete in the xml road file the data previously read of the selected task.
Sontex916 User Guide EN 13-11-2013 20

Samples of the details of a completed read or parameterise task Remark: The data read or parameterise by a task are stored in the route file.
3.8 Options Different options are available to customize the view of the tasks in the road navigator.
3.8.1 Radio address
The radio addresses of the devices can be shown or hidden by enabling or disabling this feature in the View menu.
This feature will only add the radio address in the view but not physically in the task name.
Sontex916 User Guide EN 13-11-2013 21

3.8.2 Warning
Warnings can also be shown or hidden.
Warnings of a device, if enabled, will be shown on the respective task highlighted in yellow
The definition of warnings can be managed in the Tools Warning menu.
For more information please refer to chapter :
4.4 Warning
3.9 Close a road
Click OK in the upper right corner. The navigator window disappears and the main window will be displayed.
Remarks: The road file is saved after each modification of a road or the data of the same.
For safety reasons the two last versions of the road file are stored in the backup files "*_1.bak" et "*_2.bak".
To reactivate the backup files simply change the extension ".bak" to “xml”.
Sontex916 User Guide EN 13-11-2013 22

3.10 Open a road
Select in the list the road you want to work with.
The selected road will be opened and dis-played in the road navigator.
Remarks:
Only files with the ".xml" extension and present in the folder "\My Documents" or subfolder are shown.
3.11 Quit the Sontex916
Click Quit in the menu Tools or press OK.
Remarks: The menu Tools contains different features and options for the software
Sontex916 User Guide EN 13-11-2013 23

Press Yes to confirm to quit the software.
4. Menu Tools Different settings are available to configure the Sontex916 to fit your needs. These settings are available in the menu Tools.
4.1 Options
Checking this box enables the automatic up-date of date and time during the readout of a device. If this option is enabled each time the Pocket PC will read a device it will also update its date and time. This operation will send a command to the device to set its date and time according to the value of the Pocket PC.
Remarks:
The device must always be set with the stan-dard time (winter time). The option is activated by default
Selecting this box enables the duplicate check when creating a road or editing a task. If a du-plicate is detected than, a warning window will appear on your Pocket PC.
!!! If you enable the “update device clock during readout” make sure that the date and time of your Pocket PC is correct – always winter time in winter and summer time in summer. The software Tools916 detects the winter/summer time and automatically calculates the corresponding winter time to set the devices. Programming a wrong date and time in a ra-dio device will shift the radio time table, this means the period when the radio devices are awake and listening for radio commands to send their data !!!!
Sontex916 User Guide EN 13-11-2013 24

4.2 Serial port
This option allows selecting the correct COM port for the communication by Bluetooth be-tween the Pocket PC and the radio modem Suprcom 636.
Select the respective serial port for the Blue-tooth interface. This COM port must match with the “Outgoing port” set on your Pocket PC, the partnership that was established in the Bluetooth manager with the radio modem Supercom 636. Double check the communication with the ra-dio modem with the “Try to contact modem 636” button. Don’t forget to switch on your modem 636 before clicking the button. Following a successful connection, different information about the modem 636 will be dis-played.
Sontex916 User Guide EN 13-11-2013 25

4.3 Agent options Some products such the HCA 556, the radio-pulse converter 541 and radio module 581v2 require a password to be able to change additional settings. There are two types of passwords: - The password for the 556 that unlocks the edition of certain parameters - The password for the 541 and 581v2 which allows the writing of parameters in the device.
The screen to enter the password that opens the access to additional parameter options is located in the menu Tools -> Agent Options. Enter the password and press ok. The password to access the additional options is provided by Sontex depending on your user level.
4.4 Warnings A new feature has been added in the software Sontex916: Warnings Warnings will inform about any errors or problems with the radio devices directly in the road navi-gator after the readout. The warnings will be shown, if selected, in the road navigator or in the properties of the radio de-vice if anything occurred that matches the selected warnings.
4.4.1 Select or unselect warnings to be checked
Several different warnings can be enabled or disabled.
Sontex916 User Guide EN 13-11-2013 26

Go to Tools Warning Rules. “Rules” allows selecting different warnings depending on the radio device. Only selected warnings will be shown if they occur.
E.g. the integrator Supercal 531 is offering 5 different warnings as shown in the picture.
Warnings of all devices are checked after every read out or with the command Regenerate in the menu Tools Warning Regenerate
The command Regenerate allows checking the warnings after the readout of all devices. Warnings of all devices are checked after every read out. Press Clear to clear all the warnings in the menu Warning. In the road view all warnings will be cleared. Warnings can always be re-generated with Regenerate as explained above. Both commands will be applied on the selected tasks or on tasks of the selected groups and subgroups. Warnings are an interpretation of the “status of errors” data read in the devices.
Sontex916 User Guide EN 13-11-2013 27

Warnings will be shown in the Properties of the device as shown in the picture. Multiple warnings are all listed here.
4.4.2 Show or hide warning in the road navigator
It is possible to show the warnings in the road navigator if any of the selected warnings are present of a listed device. Present warnings are highlighted in yellow as shown in the picture. In the menu View Warning warnings can be shown or hidden in the road navigator.
Sontex916 User Guide EN 13-11-2013 28

Technical Support: For technical support contact your local Sontex agent or Sontex SA directly. Hotline Sontex: [email protected] +41 32 488 30 04 Sontex SA 2011
Sontex916 User Guide EN 13-11-2013 29


![52 STAT.] 75TH CONG., 3D SESS.-CHS. 555, 556-JUNE 21, …...52 STAT.] 75TH CONG., 3D SESS.-CH. 556-JUNE 21, 193S (d) Unless the Commission otherwise orders, no change shall be made](https://img.dokumen.tips/doc/110x75/60beb996de694340e65e4e71/52-stat-75th-cong-3d-sess-chs-555-556-june-21-52-stat-75th-cong.jpg)