Embed Size (px)
Citation preview

Hand Held Steam Cleaner User Manual
Model No.: JJB-301 Rev 4
READ AND SAVE THESE INSTRUCTIONS

Page 2 of 20

Page 3 of 20
1 Warnings ............................................................................ 4 2 Safety Direction ................................................................. 4 3 Recommendations ............................................................ 7 4 Safety: Protective Cut-Out and Pressure Relief ............. 8 5 Product Characteristics .................................................... 8
5.1 Suggested Uses ................................................................ 8 5.2 Higher Safety .................................................................... 8 5.3 Durable .............................................................................. 9 5.4 Energy Efficient ................................................................ 9 5.5 Easy to Use ....................................................................... 9
6 Specification ...................................................................... 9 7 Components .................................................................... 10 8 Operation Procedures .................................................... 11 9 Functions ......................................................................... 13
9.1 Disinfection and Sterilisation ........................................ 13 9.2 Steaming Clothes ........................................................... 13 9.3 Cleaning Windows .......................................................... 13 9.4 Upholstery Cleaning ....................................................... 14
10 Installation of Accessories ............................................. 14 10.1 Extension Nozzle & Flexible Extension Nozzle ............ 14 10.2 Brush Nozzle or Angled Nozzle ..................................... 14 10.3 Mop Head / Squeegee Plate for Cleaning Windows. .... 15 10.4 Mop .................................................................................. 16
11 Refill Water During Operation ........................................ 16 12 Completion and Storage ................................................. 16 13 Cleaning Your Steam Cleaner ........................................ 17 14 Troubleshooting .............................................................. 18 15 Warranty Against Defect ................................................ 19

Page 4 of 20
1 Warnings Before using this appliance, read and follow all warnings and instructions in this manual, even if you are familiar with this product. This appliance is not intended for use by persons (including children) with reduced physical, sensory or mental capabilities, or lack of experience and knowledge, unless they have been given supervision or instruction concerning use of the appliance by a person responsible for their safety. Children should be supervised to ensure that they do not play with the appliance. If the supply cord is damaged, it must be replaced by the manufacturer, its service agent or similarly qualified persons in order to avoid a hazard. The liquid or steam must not be directed towards equipment containing electrical components, such as the interior of ovens. The appliance has to be unplugged after use and before cleaning and carrying out user maintenance on the appliance.
2 Safety Direction Please read this instruction manual carefully before first use. It is advisable to keep this instruction manual for future reference. DO NOT leave the appliance unattended when in use, hot or pressurised. Take care that children cannot touch the appliance when the appliance is hot and/or pressurised and make sure they cannot pull the mains cord. DO NOT direct the steam towards persons, animals or other electrical products. To protect against the risk of electric shock, do not immerse the appliance, cord or plug in water or other liquids. The liquid or steam must not be directed towards equipment containing electrical components, such as the interior of ovens, etc The filling aperture (Water Fill Cap) must not be opened during use. Burns can occur from touching hot parts, hot water or steam. Be cautious when you turn this appliance upside down to empty any excess water as the water in the tank may be extremely hot.

Page 5 of 20
DO NOT use near sinks, baths or showers containing water or near running water. DO NOT use in swimming pools, etc. containing water. Always disconnect the plug from wall socket, let cool completely and release the pressure before removing the water fill cap. It is highly recommended to disconnect the plug from wall socket and let cool before changing the accessories. Do not use this appliance if it has been dropped or any part of the appliance (including cord or plug) has been damaged. Use only accessories recommended or supplied by an authorised service centre or qualified dealer. The use of accessories not intended for use with this appliance may cause injuries to the user or damage to the appliance. Do not place this unit on other appliances, on uneven surfaces or where it could be subject to heat sources (e.g. radiators or stoves), direct sunlight, excessive dust This Appliance should not be placed near a hot gas or electrical burner or placed in a heated oven. Do not operate this appliance underneath or near flammable or combustible materials (e.g. curtains, petrol, fuels, etc.). The appliance should always be switched off before connecting or disconnecting from the power supply. Never pull the cord to disconnect the plug from the wall socket. Any type of servicing, apart from ordinary cleaning, must be carried out by an authorised service centre or qualified dealer. There are no user serviceable parts in this appliance. If this appliance is to be used by a third party, please supply the instruction manual with it. Always disconnect the plug from wall socket, let cool and release all internal pressure before removing the Water Fill Cap when filling the appliance with water, or pouring the remaining water out. Note: Squeeze the steam trigger to release the pressure. Never open the cap to release pressure as Injury may result.
Page 6 of 20
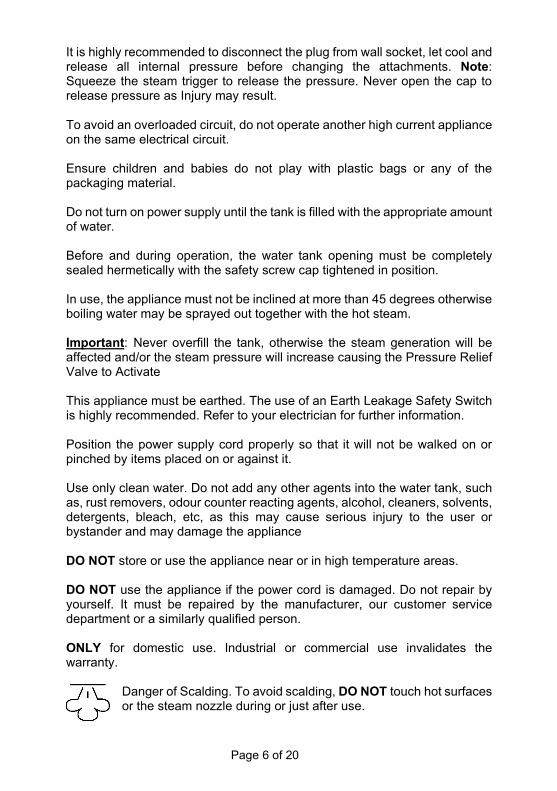
It is highly recommended to disconnect the plug from wall socket, let cool and release all internal pressure before changing the attachments. Note: Squeeze the steam trigger to release the pressure. Never open the cap to release pressure as Injury may result. To avoid an overloaded circuit, do not operate another high current appliance on the same electrical circuit. Ensure children and babies do not play with plastic bags or any of the packaging material. Do not turn on power supply until the tank is filled with the appropriate amount of water. Before and during operation, the water tank opening must be completely sealed hermetically with the safety screw cap tightened in position. In use, the appliance must not be inclined at more than 45 degrees otherwise boiling water may be sprayed out together with the hot steam. Important: Never overfill the tank, otherwise the steam generation will be affected and/or the steam pressure will increase causing the Pressure Relief Valve to Activate This appliance must be earthed. The use of an Earth Leakage Safety Switch is highly recommended. Refer to your electrician for further information. Position the power supply cord properly so that it will not be walked on or pinched by items placed on or against it. Use only clean water. Do not add any other agents into the water tank, such as, rust removers, odour counter reacting agents, alcohol, cleaners, solvents, detergents, bleach, etc, as this may cause serious injury to the user or bystander and may damage the appliance DO NOT store or use the appliance near or in high temperature areas. DO NOT use the appliance if the power cord is damaged. Do not repair by yourself. It must be repaired by the manufacturer, our customer service department or a similarly qualified person.
ONLY for domestic use. Industrial or commercial use invalidates the warranty.
Danger of Scalding. To avoid scalding, DO NOT touch hot surfaces or the steam nozzle during or just after use.

Page 7 of 20
No liability can be accepted for any damage caused by non-compliance with these instructions or any other improper use or mishandling of appliance. Additional Safety Instructions Relating to the Plug and Power Cord If using an extension cord:
• The technical specifications of the extension cord must match or exceed the technical specifications of this appliance.
• Do not allow the cord to hang over the edge of the work surface or
to come into contact with stoves or other hot surfaces.
• If the cord or plugs are worn or damaged, do not use.
• Unplug from the power socket by grasping the plug body - Do Not pull on the cord.
3 Recommendations It is highly recommended that you check the use and cleaning instructions of any surface from the manufacturer of the particular surface finish to ensure the suitability to steam cleaning. You may also choose to perform a test clean on the surface in an inconspicuous area.
• On surfaces that have been treated with wax, the wax may be removed by heat and steam action and may cause permanent damage.
• Do not use on unsealed wood surfaces or direct steam on any wood surface for an extended period of time. This may cause the wood grain to rise.
• On all fabric or upholstered surfaces, please check the care instructions accompanying the item. If no instructions are present, contact the manufacturer of the item for advice.
• In the case of using steam to smooth wrinkled fabric or clothing, do
not direct steam at the body.

Page 8 of 20
4 Safety: Protective Cut-Out and Pressure Relief This appliance is designed in such a way that when the water in the tank has been used up, the thermostat will activate and cut power off to the heating element thus preventing the appliance from continuing to heat with no water. The appliance should be immediately switched off and unplugged when there is no more steam generated. This appliance is also fitted with a safety pressure relief valve built into the screw cap. This valve will only release steam in the event that the pressure increases above the normal operating temperature. Never use the appliance unless the proper screw cap is fitted. Should the safety pressure relief valve operate every time the appliance is used, cease use and have the appliance checked by a qualified service agent or discard the product. These safety devices are incorporated for your personal safety.
5 Product Characteristics 5.1 Suggested Uses
The high temperature and high-pressure steam can be used for cleaning away dirt, grease, stains, kill bacteria and germs on most surfaces. With an automatic heating control and being able to generate steam continuously, will make cleaning easy. Cleaning with high temperature and high-pressure steam, with no added chemical agents, makes this appliance environmentally friendly.
5.2 Higher Safety This appliance is designed to prevent heating of the water tank after the water in the tank has been used up. The appliance will automatically disconnect the power supply to the heating element and thus prevent empty heating. With a highly sensitive thermostat, high steam temperature is available, ensuring disinfection and sterilisation. The pressure safety valve has an automatic pressure release function. If there is higher than normal steam pressure in the tank, the valve will automatically open and release the pressure.

Page 9 of 20
This appliance is supplied with a 3-pin power lead and plug with an earthing connection so that the tank and heating components can be grounded in order to ensure safety in operation. The extra long power cord with double insulation, can effectively insulate the cable from water spray and dust, and ensure safety under normal operating conditions.
5.3 Durable The appliance is designed with an aluminium alloy die cast boiler tank which can resist high pressures ensuring a long service life. The high strength plastic body is made from high quality material ensuring a long service life.
5.4 Energy Efficient With an integrated design of specially constructed heating tubes and boiler tank, an overall heating solution is provided creating high heating efficiency and energy saving. The body shell structure effectively prevents heat loss which aids in being environmentally friendly and energy efficient.
5.5 Easy to Use With the comprehensive cleaning accessory kit supplied, the components can be assembled and disassembled easily depending on your needs.
6 Specification • Rating of Power Supply: 220 - 240Va.c. 50Hz, with earthed connection. • Rated Power: 950W - 1100W • Allowed rated line load current is no greater than 10A. • Tank Capacity: 350ml – NOTE. Do not fill more than 250ml from empty • Steam Pressure: approximately 0.3Mpa • Steam Pressure Relief Valve: 0.4Mpa – 0.55Mpa • Over Temperature Fuse. 184°C • Heat Up Time: Approximately 3 minutes.
Page 10 of 20
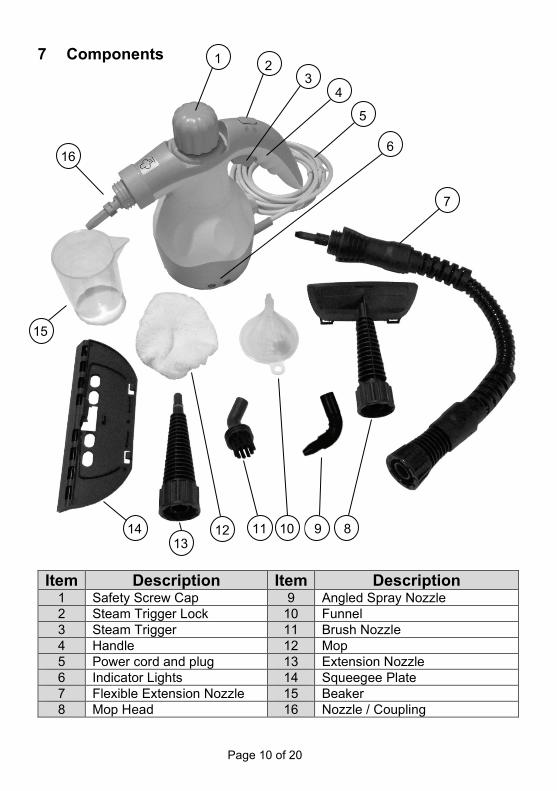
7 Components
Item Description Item Description 1 Safety Screw Cap 9 Angled Spray Nozzle 2 Steam Trigger Lock 10 Funnel 3 Steam Trigger 11 Brush Nozzle 4 Handle 12 Mop 5 Power cord and plug 13 Extension Nozzle 6 Indicator Lights 14 Squeegee Plate 7 Flexible Extension Nozzle 15 Beaker 8 Mop Head 16 Nozzle / Coupling
1 2 3
4
5
7
8 9 11 13
14 10 12
15
16 6

Page 11 of 20
8 Operation Procedures
• Before first use, please read the Instruction Manual carefully.
• Place the steam cleaner on a level flat surface.
• Push down on the safety screw cap and at the same time unscrew the safety screw cap Anti-clockwise then remove it. Note: Constant downward pressure is required when unscrewing the cap.
Place the funnel spout into the water tank opening.
• Fill the measuring cup up to the mark on the side (250ml) with clean water
and pour the water into the tank. Note: Do not overfill the tank as some air space must be left in the tank
for correct operation.

Page 12 of 20
• Remove the funnel and re-fit the safety screw cap.
Note: Screw the cap in clockwise as far as possible then push down hard on the cap top and turn to fully tighten the cap in position.
Constant downward pressure is required when screwing the Cap Closed
• Attach your required accessory to the main unit. Note: Refer to section “Functions” for the selection of accessory, and to section “Installation of Accessories” for method of assembly.
• Check the power supply and socket, and confirm they comply with the
requirements given in this Instruction Manual.
• Plug in to the power point and switch on.
• The Red Indicator Light will illuminate indicating Power is Supplied and the element will begin to heat.
• Allow at least 3 minutes after the power supply is turned on for the
appliance to heat up. When the correct temperature has been reached, the Green Indicator light will illuminate.
• With your thumb, slide the lock tab down to unlock the steam trigger.
• With the lock pulled down and help, gently squeeze the steam trigger and check whether steam jets out of the nozzle. (DO NOT aim the spray nozzle at other persons, animals or objects).
• If the steam jets out, the setup is complete.
• Release the steam trigger and lock tab.
• You can now proceed to carry out your cleaning / steaming.

Page 13 of 20
NOTE: It is highly recommended to disconnect the plug from the power point, let cool and release all internal pressure before changing the attachments as the nozzle will be extremely hot.
Slide the steam trigger lock down then squeeze the steam trigger to release the pressure. Never open the cap to release the pressure as serious injury may result.
Note: The Green indicator light will turn On and Off during use. This indicates that the temperature is being maintained. e.g. When green = heating
9 Functions 9.1 Disinfection and Sterilisation
With any of the “Nozzle” attachments fitted, aim the nozzle at the position that needs disinfection and squeeze the steam trigger. High-temperature steam will kill most bacteria.
9.2 Steaming Clothes Note: Read the garment care label before proceeding to ensure steaming is permissible. Allow clearance around the hung clothing to avoid steam coming in contact with surrounding objects.
• Install the Mop onto the Mop Head accessory, then attach onto the end of the Extension Nozzle or Flexible Extension Nozzle. Next, attach onto the Steam Unit.
• Place the Mop flat onto the hung clothes and squeeze the steam trigger.
• Move in a circular motion across the fabric to smooth out any wrinkles.
9.3 Cleaning Windows Note: Do not spray hot steam onto cold windows as the glass may crack.
• Install the Squeegee Plate onto the Mop Head accessory.
• Press the Squeegee Plate rubber strip onto the window and squeeze the steam trigger.
• Pull the Squeegee Plate down the glass to wipe off the dirty water as the steam loosens the dirt.
• Finish cleaning up with a clean cloth.

Page 14 of 20
9.4 Upholstery Cleaning
NOTE: Read the care labels for the upholstered surface before proceeding to ensure steaming is permissible. We suggest to perform a test clean in the surface in an inconspicuous area.
• Assemble the same components as under section “Steaming Clothes”.
• Place the Mop flat onto the fabric and squeeze the steam trigger whilst moving the mop in a circular motion across the fabric to remove stains.
• The Brush Nozzle or Angled Nozzle may be used for spot stain removing.
10 Installation of Accessories
10.1 Extension Nozzle & Flexible Extension Nozzle • Hold the outer section of the Extension Nozzle, push it onto the Cleaner
Nozzle all the way up and then screw on the collar.
• Installation of the Flexible Extension Nozzle and the Mop Head Accessory is carried out with the same procedure.
• To remove the Extension Nozzle, the Flexible Extension Nozzle or the Mop Head Accessory, reverse the procedure above.
10.2 Brush Nozzle or Angled Nozzle
• The Angled Nozzle and the Brush Nozzle must be connected to the end
of the Extension Nozzle for use. Do Not attach directly onto the Steam outlet nozzle.
• Fit the Extension Nozzle as described previously then fit either the Angled Nozzle or the Brush Nozzle over the tip of the Extension Nozzle, and push all the way on until it is in position.

Page 15 of 20
• The tip of the Extension Nozzle has six sides which means the Angled
Nozzle or the Brush Nozzle can be positioned at six different angles depending on the application.
• Installing the Angled Nozzle or the Brush Nozzle to the Flexible Extension Nozzle, is the same procedure.
10.3 Mop Head / Squeegee Plate for Cleaning Windows.
• First assemble the Squeegee Plate onto the Mop Head Accessory.
• Take the Squeegee Plate and locate the two small hooks into the two suspension lugs on the back of the Mop Head Accessory. Push hard until they clip together, and then swing the Squeegee Plate up and lock the hook over the front of Mop Head Accessory body.
• To remove the Squeegee Plate, pull the hook back to release the
squeegee plate then unhook from the lugs.
1 2
3 4

Page 16 of 20
10.4 Mop
• Take the Mop and stretch it over the bottom face of the Mop Head Accessory until it fits neatly.
• To remove the Mop, gently pull the side down and the pull off.
11 Refill Water During Operation
• Unplug the appliance from the power point.
• Slide the Steam Trigger Lock Tab back and squeeze the steam trigger to release the pressure until there is no more steam.
• Push down and slowly unscrew (anticlockwise) the safety screw cap, but be careful as there may be a short burst of residual steam escaping first.
• Completely remove the safety screw cap. Caution must be taken as the unit will still be very hot.
• Allow the appliance to cool it down for about 10 minutes before refilling.
• Use the funnel and measuring cup to refill as described in the Operation Procedure section of this manual.
• Re-fit the safety screw cap as described in the Operation Procedure section of this manual.
12 Completion and Storage • After you have finished using the appliance, unplug from the power point. • Push down and slowly unscrew (anticlockwise) the safety screw cap, but
be careful as there may be a short burst of residual steam escaping first.

Page 17 of 20
• Completely remove the safety screw cap. Caution must be taken as the unit will still be very hot.
• Allow the appliance to cool it down for about 10 minutes.
• Tip out the residual water in the tank and clean the external surface with a piece of dry cloth. Note: Burns can occur from touching hot parts, hot water or steam. Be cautious when you turn this appliance upside down to empty the water as the water in the tank may still be hot.
• Re-fit the safety screw cap as described in the Operation Procedure section of this manual.
• Store the appliance safely and in a dry place.
Do Not wind the power cord around the appliance body as this will damage the cord over time. Simply loop the cable and place next to the appliance
13 Cleaning Your Steam Cleaner • Turn off and unplug appliance prior to cleaning and let completely cool.
• Do Not immerse the appliance in water, or any other liquid.
• Rinse out the water chamber with clean fresh cold water.
• Do not allow detergents or solvents etc. to enter the boiler as this will
damage the appliance.
• Wipe the outer surface of the appliance with a soft damp cloth and dry with a dry towel.
• Do not use abrasive creams, solvents, steel wool or scouring pads as they
will damage the finish.
• All removable accessories should be detached and cleaned thoroughly in warm, soapy water at regular intervals.
• Do Not place appliance or components in the dishwasher.
CAUTION: DO NOT IMMERSE MAIN BODY IN WATER OR LIQUID.

Page 18 of 20
14 Troubleshooting
No Steam.
Power Not Switched On. Switch On at power point.
No water in the tank. Add water to the water tank.
Thermal Fuse Blown Product cannot be repaired. Call Customer service
No Power to Power Point Check to see if there is power supplied with another appliance, such as a lamp.
Cannot Squeeze Steam Trigger Steam Trigger lock not released Refer to page 11 for
instruction
Water is ejected instead of steam.
Too much water in the water tank.
Empty some water out. Maximum of 250ml to be used.
Unit tipped over more than 45° Hold Unit upright more
A small amount of water is ejected instead of steam
This is normal when the Steam Valve initially opens or as the pressure drops.
This is normal
Green Light turns On and Off during use.
This is the element turning on and off Indicating the temperature is being maintained.
This is normal
Red Light will not come on.
No Power being supplied to the Steam cleaner.
Check your power point is switched on.
Check to see if there is power supplied to the power point with another appliance, such as a lamp.
Thermal Fuse has Blown Product cannot be repaired. Call Customer service
Green Light will not come on even though Red light is on.
No more water in tank Refill with water as per these instructions.

Page 19 of 20
15 Warranty Against Defect
12 Month Warranty Thank you for your purchase from Kmart. Kmart Australia Ltd warrants your new product to be free from defects in materials and workmanship for the period stated above, from the date of purchase, provided that the product is used in accordance with accompanying recommendations or instructions where provided. This warranty is in addition to your rights under the Australian Consumer Law. Kmart will provide you with your choice of a refund, repair or exchange (where possible) for this product if it becomes defective within the warranty period. Kmart will bear the reasonable expense of claiming the warranty. This warranty will no longer apply where the defect is a result of alteration, accident, misuse, abuse or neglect. Please retain your receipt as proof of purchase and contact our Customer Service Centre 1800 124 125 (Australia) or 0800 945 995 (New Zealand) or alternatively, via Customer Help at Kmart.com.au for any difficulties with your product. Warranty claims and claims for expense incurred in returning this product can be addressed to our Customer Service Centre at 690 Springvale Rd, Mulgrave Vic 3170. Our goods come with guarantees that cannot be excluded under the Australian Consumer Law. You are entitled to a replacement or refund for a major failure and compensation for any other reasonably foreseeable loss or damage. You are also entitled to have the goods repaired or replaced if the goods fail to be of acceptable quality and the failure does not amount to a major failure. For New Zealand customers, this warranty is in addition to statutory rights observed under New Zealand legislation. IMPORTANT! For all technical queries or difficulties in operating the product and for spare parts, contact H.E. Group customer service 1300 105 888 (Australia) and 09 8870 447 (New Zealand).

Page 20 of 20