Embed Size (px)
Citation preview

Gwynnyd’s All Thumbs Guide to Sprang – Intermediate Class 1
Gwynnyd’s All Thumbs Guide to Sprang – Intermediate Class Baroness Gwynnyd of Roaring Wastes
http://www.ceilingpress.com
Right column left blank so you have a place to write notes.
Intermediate Sprang: In this class you will learn Continuous Loop Warping, for making longer pieces on the same size frame, and “Z” and “S” twist manipulation to make textures and designs.
New terms defined: Overplait row -‐ In my Basic Sprang docs, the first of the alternating rows was designated as “starts with one” or an “odd” row. The experts call this row the “overplait” row. Plait row -‐ A “starts with two” or “even” row is called the “plait” row. During this exercise, the terms “plait” and “overplait” will gradually be phased in to replace the other terms. “Z” twist: My Basic Sprang instructions were all in “Z” twist. This produces a fabric where the thread slants from right at the top to bottom at the left, just like the middle stroke of a “Z” does. “S” twist: is the opposite of “Z” twist. When you work “Z” twist in the top portion of the frame, the bottom half is automatically in “S” twist. “S” twist thread slants from left at the top to right at the bottom like an “S” does.

Gwynnyd’s All Thumbs Guide to Sprang – Intermediate Class 2
Materials: Sprang frame – you brought your own or got one like this from me.
#1 -‐ Sprang frame ready to be warped Since you are in the intermediate class, I assume you know how to assemble your frame to this point, but if you need help, please ask. Intermediate kit contents – One dowel for a third “heddle” to fit horizontally across the center of the frame. Sturdy cord, enough for four loops, to suspend the third dowel. Thread for the project, choose your color from the available balls on the table. You will need just one color. Please return the unused portion of the ball after you have warped up your frame, so I can use it in other classes. Short sticks in three colors – 20 of each color Tapestry needle for weaving in the ends Sandpaper for smoothing the sticks or dowels if necessary Any questions? Why do I have such short sticks in my kit and why are they different colors? I am not the kind of person who can just look at a mass of threads and instantly pick out the things I need to do next to keep a pattern. If I am working a whole piece at once, I can usually keep track of what I am doing, but if I put it down for some reason -‐ yikes! Where was I? The colored sticks will be used to keep track of the pattern, so you don’t have to do so much counting or figuring to find out where you are. They are short because, on a normal width frame, they need to be to work on a continuous loop warp. What do I need that extra dowel for? Have you ever wanted to make a longer piece of sprang, but ran into the limitations of your frame? Or have you ever, like me, cursed a lot while trying to work your hands into the increasingly smaller spaces in the center of your warp? Or given up and left a gap because it was just not possible to work it any narrower? Continuous loop warping makes longer pieces with perfect centers. It does have cut ends rather than looped ends, so it is not suitable for every application.

Gwynnyd’s All Thumbs Guide to Sprang – Intermediate Class 3
Continuous loop warping Quick and dirty attachment method. Using cord, make four loops long enough to run from the top and bottom heddles to the center of the frame. See the white loops in the following picture. Tie the cord into loops with an overhand knot.
#2 – White loops to suspend extra dowel. Set up the frame as usual – it should look like #1 above -‐ now add this step. After you have stabilized the top and bottom heddles with temporary cords lay the extra dowel centered between the top and bottom of the frame.
#3 – dowel centered between stabilized heddles Loop the extra cords over the top and bottom heddles and run them to the center and over the ends of the third heddle. Wrap loops around the center heddle to suspend it half way between the top and bottom heddles.
#4 – loops on the center dowel
Gwynnyd’s All Thumbs Guide to Sprang – Intermediate Class 4
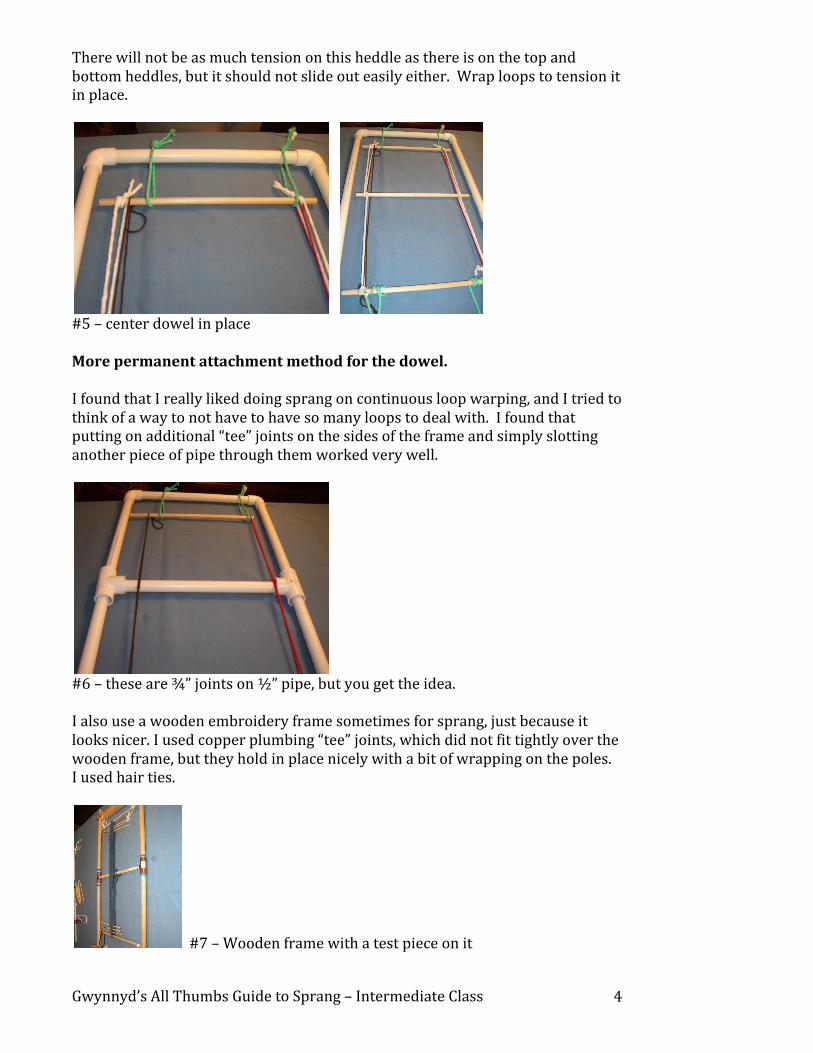
There will not be as much tension on this heddle as there is on the top and bottom heddles, but it should not slide out easily either. Wrap loops to tension it in place.
#5 – center dowel in place More permanent attachment method for the dowel. I found that I really liked doing sprang on continuous loop warping, and I tried to think of a way to not have to have so many loops to deal with. I found that putting on additional “tee” joints on the sides of the frame and simply slotting another piece of pipe through them worked very well.
#6 – these are ¾” joints on ½” pipe, but you get the idea. I also use a wooden embroidery frame sometimes for sprang, just because it looks nicer. I used copper plumbing “tee” joints, which did not fit tightly over the wooden frame, but they hold in place nicely with a bit of wrapping on the poles. I used hair ties.
#7 – Wooden frame with a test piece on it
Gwynnyd’s All Thumbs Guide to Sprang – Intermediate Class 5
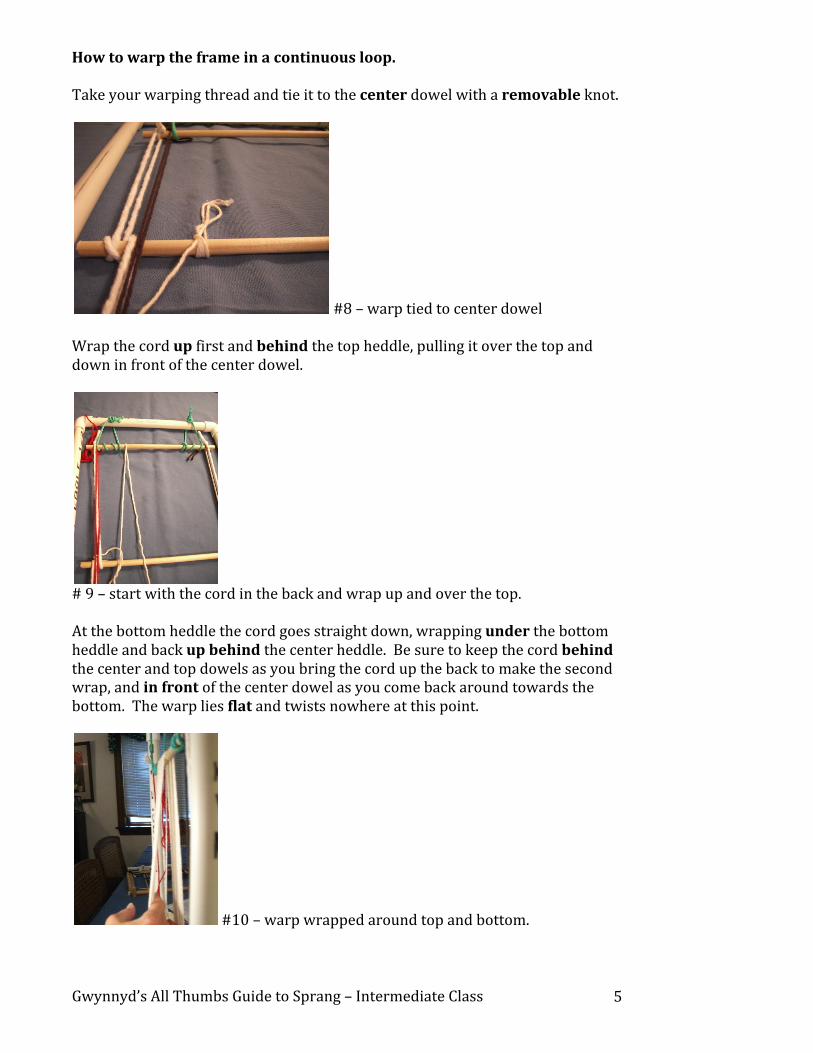
How to warp the frame in a continuous loop. Take your warping thread and tie it to the center dowel with a removable knot.
#8 – warp tied to center dowel Wrap the cord up first and behind the top heddle, pulling it over the top and down in front of the center dowel.
# 9 – start with the cord in the back and wrap up and over the top. At the bottom heddle the cord goes straight down, wrapping under the bottom heddle and back up behind the center heddle. Be sure to keep the cord behind the center and top dowels as you bring the cord up the back to make the second wrap, and in front of the center dowel as you come back around towards the bottom. The warp lies flat and twists nowhere at this point.
#10 – warp wrapped around top and bottom.

Gwynnyd’s All Thumbs Guide to Sprang – Intermediate Class 6
The only thing you do with the center dowel is tie the beginning and end of the cord to it. It also helps as a guide to keep the front and back threads separate.
#11 – warp tied at both ends to center If you are more clever and dexterous than me, you can tie the ends of the cords to the thread next to them in the center back and avoid having to use a third dowel. I have never managed to do this in any way that worked well or looked good on the finished piece, which is why I use a center dowel. For this project, make twenty (20) loops, being careful not to cross or twist the cord as you wrap it around. Count the cords where they go over the top and bottom heddles separately. Because you started the warp in the center, you will also have to end the warping on the center dowel. When you have twenty loops on the top and twenty loops on the bottom, the last wrap on the bottom heddle will come up the back and end at the center. This completes the first loop that started at the center back and went up over the top. Tension the warp so it is even and make sure the cords lay flat and straight with no twists. Leaving an end at least 6 – 12 inches long, tie the cord to the center heddle, again with a knot you will be able to remove later. See also #11 on this page.
#12 – 20 loops around the top and bottom, tensioned properly.

Gwynnyd’s All Thumbs Guide to Sprang – Intermediate Class 7
You now have a warp that goes around the top and bottom heddles, avoiding the center dowel while wrapping, but begins and ends on the center dowel at the back. Making sprang on continuous loop warping. Refresh your memory on how to do basic sprang. I’ll go quickly through it as we go along. With your left hand, pick up only the 20 threads that are in front of the center dowel. If you like, you may insert a piece of paper between the front and back to make the threads easier to see. The back threads will be hidden; this is fine as you won’t be picking any of them up. As you can see, the center dowel with the knots is not involved here.
#13 – 20 warp threads on the front, ready to go. Directions from this point on will assume right-‐handedness. Left-‐handers simply reverse the directions, substituting left for right, etc. They will be making the opposite twists, but as the work is symmetrical it works out the same in the end. Hold the warp flat and level in your left hand. Starting from the right hand side make a shed to work in by pulling the right-‐most thread to the front and pushing the next thread to the back, sliding the threads onto the fingers of the right hand, or onto a stick if you prefer to work that way, to keep them in place.
#14 – making the first shed.

Gwynnyd’s All Thumbs Guide to Sprang – Intermediate Class 8
Alternate pulling a thread to the front, then pushing a thread to the back all the way across. When you are done, take two sticks of one color – I’ll be using the undyed sticks in the pictures – and slide them in as usual, pushing the twists to near the top and bottom. Do not worry about not having a dowel to push them up against. You have made the first “starts with one” or “odd” or “overplait” row in “Z” twist.
#15 – shed open #16 – stick at top Next, make a “starts with two,” or “even” or “plait” row as usual, by picking up two back threads and pulling them to the front, then pushing one front thread to the back. For all the rest of the twists in this row, pull one thread up from the back and alternate with pushing one thread from the front to the back. At the end of the row, push the two remaining threads to the back. Insert two undyed sticks and push the twists up and down until they meet the previous row’s sticks. You have completed a “plait” row in “Z” twist.
#17 – two rows complete As doing basic “Z” twist sprang ought to be very familiar to you before you start this project, work two more sets of overplait (odd or starts with one thread) and plait (even or starts with two threads) rows now. Use undyed sticks to push the twists into position.
#18 – six rows complete. Warp spread to check for flaws

Gwynnyd’s All Thumbs Guide to Sprang – Intermediate Class 9
The magic of continuous loop warping After completing the sixth row, stop. Spread the warp to make sure the twists have interlinked properly. If they need fixing, do it now. When it is correct, go back to the first sticks you used. Take the first stick at the top and continue to push it up the warp, over the top dowel and down to the center dowel. Stop at the knot on the center dowel.
#19 – Pushing over the top
#20 – first stick at the center back. Go back to the front and take the first stick at the bottom and push the twists under the dowel and back up the warp to the center dowel, stopping at the knots, or when you run into the stick you previously pushed into place. The twists do not cancel each other out! Your piece now has a perfect center. And you didn’t have to cramp your hands working in a tiny space.
#21 – Two sticks at the back almost magically making a perfect center. On the right, shown with other rows worked. Do NOT remove the sticks now.

Gwynnyd’s All Thumbs Guide to Sprang – Intermediate Class 10
Push the next three sticks, one at a time, over the dowel and into place at the center at the back. Leave two sticks on the front side.
#22 – four rows to the back You could work the whole strap in plain “Z” twist sprang (the bottom half is, of course, in “S” twist). It would however have a tendency to curl. If you are stitching it down or using it under tension that might not matter, but there are ways of making it lie flatter … and look more interesting. We are going to start alternating “Z” twist rows with “S” twist rows. “S” twist sprang is simply the opposite of “Z” twist sprang. You’ve been doing it all along automatically on the bottom half of the piece. The REALLY easy way to make “S” twist The easiest way to incorporate “S” twist sprang, is to simply rotate the frame 180 degrees so the top front is the bottom front and work normally until you want to do “Z” twist and then turn the frame over again. This works, but it gets quite awkward when doing patterns that use both “Z” and “S” twists in the same row, as you can’t turn it over with your fingers in the warp. Here’s the regular way to do it. Making “S” twist rows the regular way Insert your left hand into the shed in the normal manner. Remember, in “Z” twist, a “starts with one” or “overplait” row would start by picking up the first back thread. In “S” twist: start by picking up the first thread in the front. Push it to the back on the right hand side of the first back thread. Now pull the first back thread to the front. Push the second front thread to the back and pull the second back thread to the front. Continue across the row.

Gwynnyd’s All Thumbs Guide to Sprang – Intermediate Class 11
#23 – “S” twist starts by pushing front thread to the back
#24 – notice how the last thread is at the front and the thread is starting to slant in the opposite direction. At the end of the row, take two dyed sticks and push them into position at the top and bottom. Do the same reversed movements with the front threads on the “even” or “plait” row. Pick up the first TWO front threads and push them to the back. Pick up the first back thread and pull it to the front. Continue across the row as usual, twisting only one thread at a time after the initial two. At the end, you will have two back threads to pull to the front to finish the row. Insert two dyed sticks, to indicate an “S” twist row has been done, and push the twists to the top and bottom.
#25 – only tips of the sticks are dyed here, but you can see the reverse direction of the warp Work another set or three of overplait and plait rows in “S” twist, holding the twists with dyed sticks, until you are comfortable with the finger movements. Spread the warp to check and make sure the twists have interlinked properly.
#26-‐ 3 sets of “S” and the same spread to show proper interlinking
Gwynnyd’s All Thumbs Guide to Sprang – Intermediate Class 12
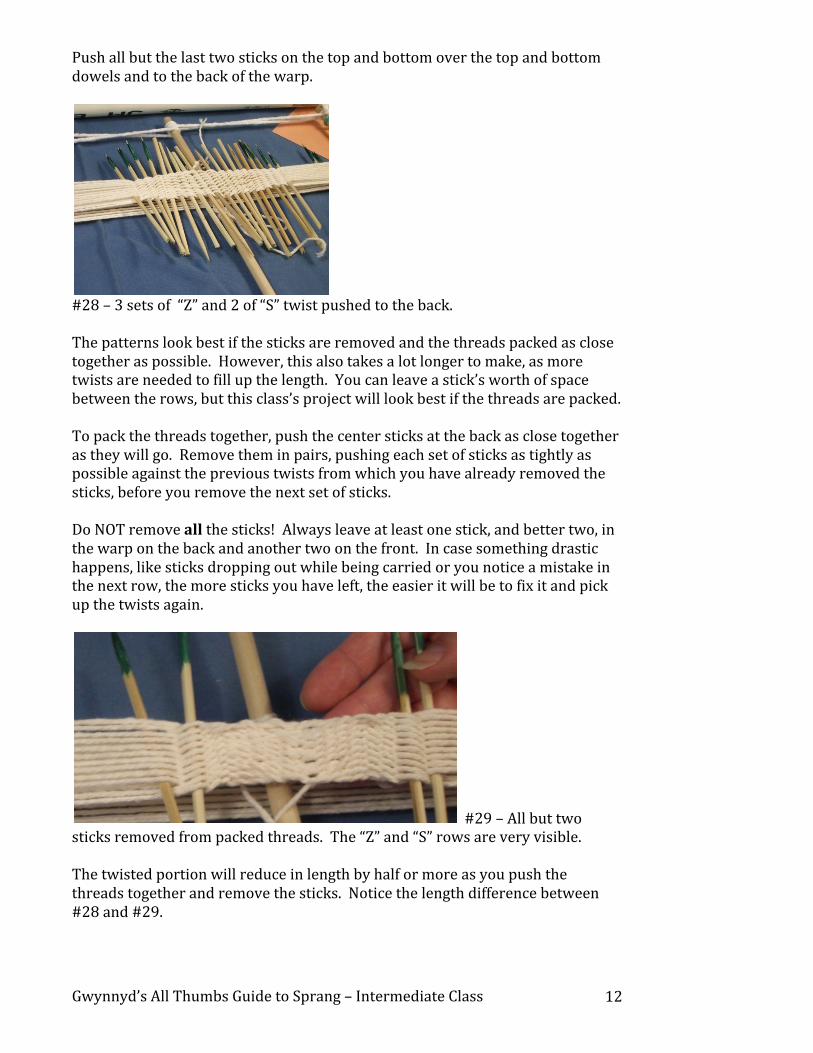
Push all but the last two sticks on the top and bottom over the top and bottom dowels and to the back of the warp.
#28 – 3 sets of “Z” and 2 of “S” twist pushed to the back. The patterns look best if the sticks are removed and the threads packed as close together as possible. However, this also takes a lot longer to make, as more twists are needed to fill up the length. You can leave a stick’s worth of space between the rows, but this class’s project will look best if the threads are packed. To pack the threads together, push the center sticks at the back as close together as they will go. Remove them in pairs, pushing each set of sticks as tightly as possible against the previous twists from which you have already removed the sticks, before you remove the next set of sticks. Do NOT remove all the sticks! Always leave at least one stick, and better two, in the warp on the back and another two on the front. In case something drastic happens, like sticks dropping out while being carried or you notice a mistake in the next row, the more sticks you have left, the easier it will be to fix it and pick up the twists again.
#29 – All but two sticks removed from packed threads. The “Z” and “S” rows are very visible. The twisted portion will reduce in length by half or more as you push the threads together and remove the sticks. Notice the length difference between #28 and #29.
Gwynnyd’s All Thumbs Guide to Sprang – Intermediate Class 13
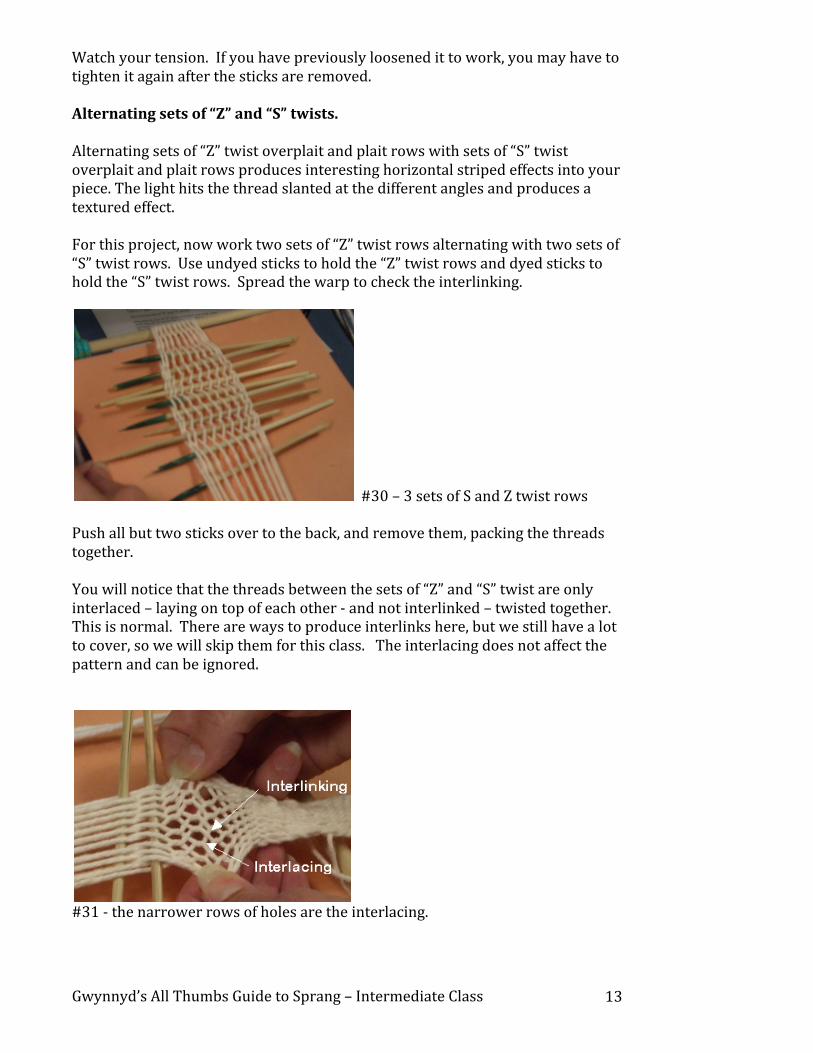
Watch your tension. If you have previously loosened it to work, you may have to tighten it again after the sticks are removed. Alternating sets of “Z” and “S” twists. Alternating sets of “Z” twist overplait and plait rows with sets of “S” twist overplait and plait rows produces interesting horizontal striped effects into your piece. The light hits the thread slanted at the different angles and produces a textured effect. For this project, now work two sets of “Z” twist rows alternating with two sets of “S” twist rows. Use undyed sticks to hold the “Z” twist rows and dyed sticks to hold the “S” twist rows. Spread the warp to check the interlinking.
#30 – 3 sets of S and Z twist rows Push all but two sticks over to the back, and remove them, packing the threads together. You will notice that the threads between the sets of “Z” and “S” twist are only interlaced – laying on top of each other -‐ and not interlinked – twisted together. This is normal. There are ways to produce interlinks here, but we still have a lot to cover, so we will skip them for this class. The interlacing does not affect the pattern and can be ignored.
#31 -‐ the narrower rows of holes are the interlacing.

Gwynnyd’s All Thumbs Guide to Sprang – Intermediate Class 14
The selvage, especially with elastic threads, like wool or the cotton we are using, will show curves. This can be a design feature. You will see this:
#32 – notice the selvage curls. Harder finished, less stretchy threads will show this tendency less. You can play with sets of “Z” and “S” twist rows to make interesting stripes, but remember to make at least one set of overplait and plait in one twist direction before you switch to the other. A piece made entirely of alternating sets of “Z” and “S” twist rows will still have a tendency to curl. If you are using the piece under tension, or sewing it as trim onto another piece, this curl does not matter.
#33 – close up of curling strap If you need, or want, a flat piece, you need to alternate “Z” and “S” twists in the same row, so that the tendency to twist one way is cancelled out by the reverse twists on the other parts of the same row. “Z” and “S” twists in the same row. This project has ten sets of threads across, so the transition point here will be done at the center. Later, we will work on other patterns. While doing these patterns, it helps to work close to the top stick, so you can see the twists happen. Starting with an overplait -‐ a “starts with one” row -‐ do “Z” twists on the first five threads by pulling one back thread forward, then pushing one front thread back, five times.

Gwynnyd’s All Thumbs Guide to Sprang – Intermediate Class 15
#34 – end of the 5 “Z” twists Starting with the sixth front thread, switch to “S” twist. Make the next five twists by pushing one front thread back, then pulling the next back thread forward. Hold the twists with undyed sticks and push them to the top and bottom. Look at the threads in the center of the top stick. You will see two threads lying next to each other, rather than alternating in front and behind the stick. If you continued to do five threads in “Z” twist followed by five threads in “S” twist, you would get a split down the center where the threads do not interlink.
#35 To make the interlinking between the “Z” and “S” twist sides in the same row: The next row is a plait row, so start with two threads from the back and work in “Z” twist until you get to the two threads lying next to each other – count of four twists for the plait row (five for the overplait rows), or work closer to the top where you can easily see the two threads laying together over the stick. Stop here. For the next twist, take the next two threads from the front only – these are the two that are next to each other in front of the stick.

Gwynnyd’s All Thumbs Guide to Sprang – Intermediate Class 16
#36 Reach under the right-‐hand front thread and pick up the second of the front threads. Pull the second thread behind the first thread and pull it to the front.
#37
#38 The first thread will drop into the bundle of back threads in your right hand.

Gwynnyd’s All Thumbs Guide to Sprang – Intermediate Class 17
Starting with the next top thread, work in “S” twist -‐ front thread to the back first -‐ to the end of the row. You will, seemingly by magic, have two threads in the back to pull to the front to end the plait row properly. Hold the twists with undyed sticks.
#39 This is actually a very simple twist to do. For all subsequent rows in this pattern, either overplait or plait, work “Z” twists to the transition point, twist the two front threads laying on top together in an “S” twist, finish the row in “S” twist. Work two more sets of overplait and plait rows of half “Z” and half “S” twist sprang. Spread the warp and check the interlinking.
#40 If all is well, push the twists up the warp to the back, remembering to leave two sticks in the front, and remove all but two of the sticks from the back. Admire your handiwork.
#41 – notice how flat it lies

Gwynnyd’s All Thumbs Guide to Sprang – Intermediate Class 18
You may also notice that the number of threads changes from 10 in the front and 10 in the back doing the plait row, to 9 in the back and 11 on the front in the overplait row, to 10 and 10 again, etc. This is a normal part of working this pattern. Work three sets of half “Z” and half “S” twist with an “S” twist transition in the center. Next, reverse the pattern. Each row will have five “S” twists first, a “Z” twist transition, and finish in “Z” twist. You must start the new pattern of twists on a plait (starts with two) row where the number of threads on the front and back is equal.
#42 – change to “S” twist on a plait row Make 4 “S” twists – start by pushing the front two threads to the back first, then pull a back thread to the front. You will be at the transition point where the two threads lie together on the front. However, you don’t want to use the front threads. On the backside of the shed, there are also two threads together. It is these threads you must interlink with a “Z” twist. Spread the warp wide with your hands and you will see the two threads lying together at the back.
#43 – finding the 2 threads together on the back

Gwynnyd’s All Thumbs Guide to Sprang – Intermediate Class 19
To make a “Z” twist transition: At the transition point, where the two threads lie next to each other on the back, reach under the left-‐most of the two threads, and grasp the thread on the right.
#44 – starting “Z” twist transition. Pull the right thread to the left under the left thread and bring it to the front. The left-‐most thread stays in the back.
#45 – pulling right thread forward It is a bit easier to do this twist if you use your left hand to reach under and grab the right thread, but after it is made, the twist should end up on your right hand with the other twisted threads in the row.
#46 –transfer the twist to the right hand

Gwynnyd’s All Thumbs Guide to Sprang – Intermediate Class 20
Finish the row in “Z” twist and hold the twists with dyed sticks.
#47 – end with “Z” twist You will notice that in the swap of threads, you will now see the 9 threads on the front at the overplait row with 11 in the back.
#48 – 9 threads on the top. This is correct at this point in the pattern. The next row is an overplait (starts with one) row. Work another set starting with “S” twist, with a “Z” twist transition in the back at the center, finishing in “Z” twist.
#49 – Z to S sets -‐ undyed sticks S to Z sets – dyed sticks
Gwynnyd’s All Thumbs Guide to Sprang – Intermediate Class 21
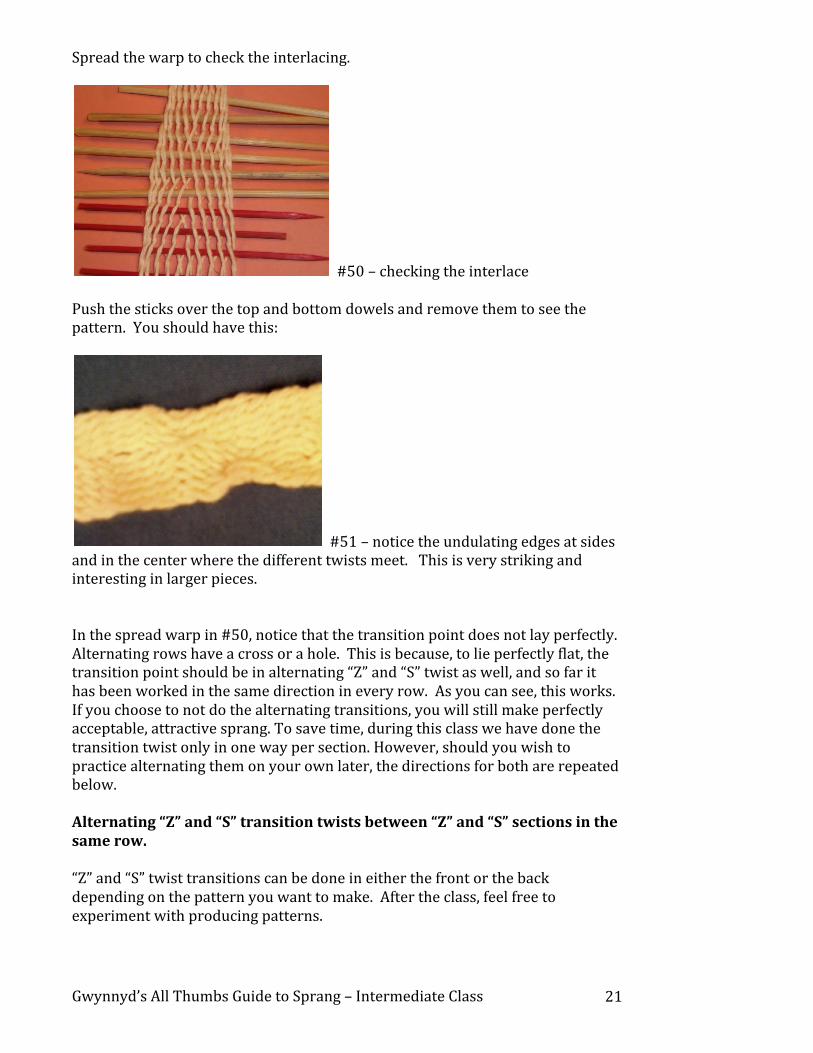
Spread the warp to check the interlacing.
#50 – checking the interlace Push the sticks over the top and bottom dowels and remove them to see the pattern. You should have this:
#51 – notice the undulating edges at sides and in the center where the different twists meet. This is very striking and interesting in larger pieces. In the spread warp in #50, notice that the transition point does not lay perfectly. Alternating rows have a cross or a hole. This is because, to lie perfectly flat, the transition point should be in alternating “Z” and “S” twist as well, and so far it has been worked in the same direction in every row. As you can see, this works. If you choose to not do the alternating transitions, you will still make perfectly acceptable, attractive sprang. To save time, during this class we have done the transition twist only in one way per section. However, should you wish to practice alternating them on your own later, the directions for both are repeated below. Alternating “Z” and “S” transition twists between “Z” and “S” sections in the same row. “Z” and “S” twist transitions can be done in either the front or the back depending on the pattern you want to make. After the class, feel free to experiment with producing patterns.

Gwynnyd’s All Thumbs Guide to Sprang – Intermediate Class 22
Since the direction of the transitions should alternate regularly, it is easiest to associate them with the plait and overplait rows. For example, you can decide that every plait row will be done with an “S” twist transition, and every overplait row will use a “Z” twist transition. It does not matter which twist you choose to use with which row, just use it consistently. Alternating dyed and undyed sticks helps a lot to keep track of what transition you do next. You have three colors to assist you here – undyed sticks can indicate plait rows while the blue dyed sticks can indicate the overplait rows in “Z” to “S” and the red sticks plait rows in the “S” to “Z” sections, or whatever scheme suits you.
#51 – section done with alternating “S” and “Z” transitions between halves of “Z” and “S” twists. Lays very flat and looks neat. To make an “S” twist transition: At the transition point, where the two threads lie next to each other, reach under the right thread and pull the left thread to the front. The right thread drops to the back in the right hand. To make a “Z” twist transition: At the transition point, where the two threads lie next to each other, reach under the left-‐most of the two threads, and grasp the thread on the right. Pull the right thread to the left under the left thread and bring it to the front. The left-‐most thread stays in the back and is given to the right hand. Can I stop now? Er, how? Anytime you wish to end a pattern: on a row that has the same number of threads in the front and back of the shed, simply work a set of plain “Z” twist plait and overplait rows. Do that now. Push all the twists to the back and remove all but eight sticks – two on each side, top and bottom. If your work has gotten long enough to come over the top and bottom dowels onto the front, you can leave just four sticks in the warp, two on the top and two on the bottom. Almost done. One more pattern type and then a set of suggestions for further experimentation.

Gwynnyd’s All Thumbs Guide to Sprang – Intermediate Class 23
Vertical stripes in multiples To help wider pieces lie flat, or just for a patterning effect, you can use several alternating rows of “S” and “Z” twists.
#52 – 3 rows of “Z” twist, 6 of “S”, 3 of “Z” done in a wool/acrylic blend with “Z” twist transitions. We only have ten rows to work with, so we will do something slightly different that makes an “arrowed” pattern.
#53 – another pattern made with alternating rows of “S” and “Z” twist To start the pattern, on an overplait row do three “Z” twists.
#54 – blue sticks above indicate the plain “Z” twist rows

Gwynnyd’s All Thumbs Guide to Sprang – Intermediate Class 24
Switch to “S” twist and do 4 twists.
#55 – held separate here so you can see the twists in place. Finish the row in “Z” twist. Hold the twists with a dyed stick. For the next plait row, start by doing 2 “Z” twists, you should be at the transition point where two threads lie next to each other on the top.
#55-‐ finding the transition point. Do the transition with the two top threads in an “S” twist transition, by reaching under the right thread and pulling the left thread to the front. The left of the threads drops into the back set of threads in the right hand.
#56 – making “S” twist transition on top Work in “S” twist until you reach the next transition point in the back.

Gwynnyd’s All Thumbs Guide to Sprang – Intermediate Class 25
#57 – spread the warp as you work so the transition point in the back is visible. Notice that you have two threads left on the bottom and three on the top to finish the plait row properly. Make an “S” twist transition in the back row of threads and finish the row in “Z” twist., pushing the last two top threads to the back. Hold the twists with dyed sticks. Spread the warp to check that the interlinking is done properly. Work more rows exactly like this. You should be approaching the center of the front at this point. Check the interlinking again. Push the sticks to the top and bottom and remove all but the last two.
#58 – vertical alternating rows of “Z” and “S” twist.

Gwynnyd’s All Thumbs Guide to Sprang – Intermediate Class 26
Finishing the piece This can be done in several ways, depending on the final use for the piece. One of the easiest ways to finish a strap or belt like this, is to place a length of thread into the twists along with the sticks. Be sure you do this on both the top and bottom of the warp.
#59 – thread is about 18” long Loop one end of the thread into the next two rows, weaving it back and forth. Keep working in the pattern of the previous rows.
#60 – weaving
#61 – Third weaving row, sticks removed Pack the threads together and remove the sticks. Pull the threads tight and knot them. Leave the ends long. Cut the piece in the center to remove it from the warp and let it hang loose.

Gwynnyd’s All Thumbs Guide to Sprang – Intermediate Class 27
The piece is still tied on to the center dowel.
#61 – removable knots on the center. Remove the knots now. Your piece will look like this:
#62 – removed from frame. Using the tapestry needle, weave the loose ends into the selvage.
#63 – the center will not unravel. Using the leftover thread from tying off the ends, make small tassels at either end. The finished piece.
#64 done!

Gwynnyd’s All Thumbs Guide to Sprang – Intermediate Class 28
What are some other sprang resources?
Techniques of Sprang, Plaiting on Stretched Threads; Peter Collingwood
This has a detailed history of sprang, including pictures of extant pieces. Good written instructions at the intermediate level. Shows lots of variations.
The material for this class is based on this book.
Sprang Language and Technique, Revised Third Edition; Jules Kliot
This is probably the worst set of instructions for any craft that I have ever tried to follow. If you already know what you are doing and if you are, unlike me, the kind of person who can easily visualize and extrapolate complex patterns from minimal and abstruse wordage, it does contain a lot of very interesting, very advanced, very out-‐of the-‐SCA-‐period techniques.
Sprang; thread twisting,: A creative textile technique; Hella Skowronski
I have not actually read this one, but include it for the sake of completeness.
Is this the best/only way to do this?
There are many different ways to do sprang. Collingwood spends a lot of his time describing finger placement that never worked for me or saying obscure things like, “There will be a misplaced thread.” Huh? What does that mean? And he’s still the clearest source out there.
This is one way that works. Feel free to experiment with other techniques or to go to other sources.
Hey – you promised me more patterns!
Right! The next step is to do the transitions between “Z” and “S” sections at an angle and make diamonds and triangles and slanted lines. After you make a transition point by switching from “Z” to “S” twist, you work the next row somewhat differently from the way described above. Collingwood says: “Work normal ‘Z’ twist interlinking, until the right hand of the two threads lying together (now behind the left-‐hand fingers…) has been included in the last interlinking, i.e. it has been picked up and a front layer dropped off.” The next step is to make an “S” twist transition in the two front threads, immediately followed by an “S” twist transition in the next two back threads.

Gwynnyd’s All Thumbs Guide to Sprang – Intermediate Class 29
Finish the row in “Z” twist. For each following row, add a regular “S” twist between the two transition points. So row three would have “Z” twist to the transition point, an “S” twist transition in the front, one regular “S” twist, another “S” twist transition in the back, and finish the row in “Z” twist. Row four would have “Z” twist to the transition point, an “S” twist transition in the front, two regular “S” twists, another “S” twist transition in the back, and finish the row in “Z” twist. Row five would have “Z” twist to the transition point, an “S” twist transition in the front, three regular “S” twists, another “S” twist transition in the back, and finish the row in “Z” twist. And so on, adding a regular “S” twist with every row until you’ve reached the width of the triangle you want Then decrease the “S” twists with every row to make it a diamond. I have done this. I can show you a picture of the test piece I did while getting this class ready.
#65 – diamond pattern sprang Unfortunately, I can’t do it consistently, and I mess it up more often than I get it right, so I can’t either teach it or show you step-‐by-‐step pictures of how it is done. Maybe by next year …. Gwynnyd – July, 2010