Embed Size (px)
Citation preview

1389
C H A P T E R 3 1
Troubleshooting computer problems can be a complex and arduous task. Microsoft® Windows® 2000 provides tools with which the user can resolve problems that might occur. This chapter details the most important troubleshooting tools, as well as troubleshooting strategies and procedures for some common problems.In This ChapterQuick Guide to Troubleshooting 1390General Troubleshooting Strategy 1394Startup and Recovery Tools 1398Maintenance and Update Tools 1419System File and Driver Tools 1429Applications Tools 1438Networking Tools 1452Troubleshooting Procedures 1467
Related Information in the Resource Kit· For more information about troubleshooting problems during Windows 2000
Setup and installation, see “Setup and Startup” in this book.· For more information about troubleshooting disk problems and recovering
from viruses, see “Disk Concepts and Troubleshooting” in this book.· For more information about troubleshooting Stop errors, see “Windows 2000
Stop Messages” in this book.
Quick Guide to TroubleshootingThis chapter provides information about troubleshooting some of the more commonly encountered problems with using Microsoft® Windows® 2000 Professional, as well as tools that you can use to diagnose and treat problems. In addition, many chapters in this book discuss troubleshooting specific types of problems. Use this guide to determine where to find the information you need to maintain and troubleshoot your system.
Troubleshooting Tools and Strategies
Part 7 Troubleshooting
You are having problems with your computer and don’t know the cause.Follow general troubleshooting procedures to isolate and repair the problem. Collect data along the way, in case you need to contact support personnel. · See “General Troubleshooting Strategy” in this chapter.
Your computer does not start.Startup problems can be caused by a variety of factors, such as viruses, disk corruption, or missing startup files. Some startup problems can be easily resolved; others might require that you perform emergency repair procedures or recovery operations. · See “Startup and Recovery Tools” in this chapter.· See “Troubleshooting Problems with System Startup and Shutdown” in this
chapter.· See “Disaster Recovery” in this chapter.· See “Setup and Startup” in this book.· See “Disk Concepts and Troubleshooting” in this book.
Your system experiences a failure and displays a “blue screen” error.Stop errors, also referred to as “blue screens,” are kernel-level errors. The Stop message provides information about the problem that caused the error and can be used by support personnel to fix the problem.· See “Windows 2000 Stop Messages” in this book.
Your computer has been infected with a virus.Viruses can infect the MBR or boot sector and cause problems such as preventing the system from starting up successfully. You can use tools to scan your computer for viruses and remove any that are found.· See “Maintenance and Update tools” in this chapter.· See “Disk Concepts and Troubleshooting” in this book.
You cannot connect to the Internet or local network.If you are connecting to the Internet through a modem, check your hardware and dial-up configuration. If you are connected to the Internet or an intranet through a local area network (LAN), check that the server and client are correctly configured and working properly. Make sure that you have permission or a user account to access the network.· See “Networking Tools” in this chapter.· See “Using the Hardware Compatibility List” in this chapter.· See “Telephony and Conferencing” in this book.· See “Local and Remote Network Connections” in this book.
Chapter 31 Troubleshooting Tools and Strategies 1391
Your network connection is slow or unreliable.Slow or unreliable connections can have a wide range of causes, such as problems on the remote server, with the line you are using to access the network, or with the connection hardware or software you are using.· See “Networking Tools” in this chapter.· See “Using the Hardware Compatibility List” in this chapter.· See “Telephony and Conferencing” in this book.· See “Local and Remote Network Connections” in this book.
You are having name resolution problems.The problem can be caused by a failure in host or NetBIOS name resolution. Check that parameters have been correctly configured.· See “Networking Tools” in this chapter.· See “TCP/IP in Windows 2000 Professional” in this book.
You are having IP addressing or routing problems.Incorrect configurations on the client computer can cause problems with IP addressing, routing, IP security, and filtering. Also, check that the remote host or resource is available.· See “Networking Tools” in this chapter.· See “TCP/IP in Windows 2000 Professional” in this book.
You are connected to a non-Windows-based server, and are experiencing connection or printing problems.Make sure that you have the correct software installed to connect to the network and that you have configured the client computers correctly.· See “Networking Tools” in this chapter.· See “Printing” in this book.· See “Interoperability with NetWare” in this book.· See “Interoperability with IBM Host Systems” in this book.· See “Interoperability with UNIX” in this book.
You cannot install a hardware device.Make sure that you have installed devices correctly. If a device is not Plug and Play you need to configure it manually. Incompatible hardware devices or device drivers can also cause problems.· See “System File and Driver Tools” in this chapter.· See “Using the Hardware Compatibility List” in this chapter.· See “Checking Hardware for Problems” in this chapter.· See “Printing” in this book.· See “Scanners and Cameras” in this book.
Part 7 Troubleshooting
· See “Device Management” in this book.
You cannot access a drive or other device attached to the computer.Several problems can prevent devices from working properly. The connecting cables can become loose. A resource conflict can prevent a device from working. Missing or corrupted drivers can prevent the computer from recognizing devices that are installed. Incompatible hardware devices or device drivers can also cause problems.· See “System File and Driver Tools” in this chapter.· See “Using the Hardware Compatibility List” in this chapter.· See “Checking Hardware for Problems” in this chapter.· See “Device Driver Problems” in this chapter.· See “Multimedia” in this book.· See “Printing” in this book.· See “Device Management” in this book.
You installed a second monitor, but there is no display, or the display is distorted.Make sure that you have configured the monitors correctly and that your display adapters are compatible with Windows 2000 Professional.· See “System File and Driver Tools” in this chapter.· See “Using the Hardware Compatibility List” in this chapter.· See “Device Management” in this book.
You cannot play audio, video, or multimedia files.Problems with playing multimedia files can have a variety of causes, including missing or incorrectly installed sound cards, hardware or drivers that are not properly installed, or volume settings that are muted or turned down.· See “System File and Driver Tools” in this chapter.· See “Applications Tools” in this chapter.· See “Multimedia” in this book.· See “Device Management” in this book.
Your computer will not wake up from standby or sleep mode.Make sure that you have configured the monitors correctly and that your display adapters are compatible with Windows 2000 Professional.· See “Power Management” in this book.
You cannot print.Printing problems can have a variety of causes, such as corrupted drivers or network problems (if you are printing to networked printer). Make sure that you have a driver installed for the printer that you are trying to access.· See “Using the Hardware Compatibility List” in this chapter.
Chapter 31 Troubleshooting Tools and Strategies 1393
· See “Checking Hardware for Problems” in this chapter.· See “Device Driver Problems” in this chapter.· See “Printing” in this book.· See “Device Management” in this book.
Your printed files are unreadable, or your print jobs take a long time.If text is unreadable, there might be a problem with corrupted fonts, or a problem with the application from which you are printing, or the page settings might be incorrect. If you are printing graphics, you might need to use a different printer. · See “Using the Hardware Compatibility List” in this chapter.· See “Printing” in this book.· See “Fonts” in this book.
The desktop does not behave as expected, or it does not appear correctly.Check that Group Policy has not been set so that you can customize your desktop. If you use a Web page as wallpaper, make sure that the Web page can be accessed. · See “Customizing the Desktop” in this book.
General Troubleshooting StrategyRecord-keeping is essential to troubleshooting any complex system. Keep all records of all installed peripherals, the network layout (if applicable), cabling, previous problems and their solutions, upgrades, and hardware and software installation dates.Many problems can be avoided with routine virus checks. Check for viruses before installing or upgrading to Windows 2000.To troubleshoot a problem, follow these general guidelines:· Analyze symptoms and factors.· Check to see whether the problem is a common issue.· Isolate the source of the problem.· Define an action plan.· Consult technical support resources.
Analyzing SymptomsStart troubleshooting by gathering information. Develop a clear understanding of the symptoms and collect pertinent system information to understand the environment in which they occur. Precisely what is not working correctly? Under what conditions does the problem occur? Which aspects of the operating system control those conditions? Is the problem specific to an application, or is it specific to a subsystem (networks, video, and so on)? Try to narrow down exactly what you expect to have happen versus what is happening.Consider the following:

Part 7 Troubleshooting
· What is the issue? What do you expect to happen when the problem is resolved?
· Has the system or configuration ever worked? If so, what changed? · Is the error condition reproducible or random?· Is the error specific to a particular system, configuration, or application?· What specific hardware and firmware are involved?· When the problem occurs, are there any programs running other than those
that automatically load when Windows 2000 is started?· Does the error still occur in Safe Mode?· Does it happen when another user is logged on to the computer?
Attempt to reproduce the symptom by using another application with similar functionality. If the problem is reproducible, it might be subsystem- or hardware-related. If the problem is not reproducible, investigate the application itself.Has your task ever worked on this computer before? If so, something might have changed that affects it. Have you changed hardware or installed new software? Might another user have made changes that you do not know about? If the task has never worked on this computer, compare the setup and configuration on this computer with another computer to identify differences.
Checking for Common IssuesCheck to see whether the problem is a common issue by reviewing Windows 2000 Professional Help and other files included on the Windows 2000 operating system CD. For example, check Read1st.txt and Readme.doc in the root folder and the additional text files in the Setuptxt folder of the Windows 2000 operating system CD.See the Windows 2000 Troubleshooters to diagnose and solve technical problems with the following system components and events:· Client Service for NetWare· Display· Hardware· Internet connections (ISP)· Modem· MS-DOS programs · Multimedia and games · Networking (TCP/IP) · Print · Remote access· Sound · System setup
Chapter 31 Troubleshooting Tools and Strategies 1395
· Windows 3.x programs
Isolating the Source of the ProblemTry to identify all variables that might affect the problem. Progressively eliminate these variables to isolate the cause of the issue. Record the effect of each action. If you eventually contact a support provider, your detailed notes are invaluable.Eliminating variables helps determine the cause of a problem. Do symptoms occur when you run the system in Safe Mode? If not, check the programs that run when the system is started normally. Look at the shortcuts stored in the Startup group located in the folder Documents and Settings\username\Start Menu\Programs\Startup. Shortcuts to other programs run at system startup are located in the registry subkey HKEY_LOCAL_MACHINE\SOFTWARE\Microsoft\Windows\CurrentVersion\Run.
Do not use a registry editor to edit the registry directly unless you have no alternative. The registry editors bypass the standard safeguards provided by administrative tools. These safeguards prevent you from entering conflicting settings or settings that are likely to degrade performance or damage your system. Editing the registry directly can have serious, unexpected consequences that can prevent the system from starting and require that you reinstall Windows 2000. To configure or customize Windows 2000, use the programs in Control Panel or Microsoft Management Console (MMC) whenever possible.
If programs are run at startup that are not listed in either of these locations, your computer might be using policies. For more information about policies, see Windows 2000 Professional Help and the Group Policy Reference on the Microsoft® Windows® 2000 Professional Resource Kit companion CD. If the computer is on a network, logon scripts or system management applications might also start programs on your computer. See your network administrator for assistance. If you have a local account on the system, log on to the local computer, to prevent network server – based policies and logon scripts from being carried out.Windows 2000 only loads the minimum number of device drivers required to start the computer when it is run in Safe Mode. If you determine that the problem is not with software loading at startup, you can attempt to isolate the problem by disabling suspect devices’ drivers. For more information about Safe Mode, see “Safe Mode” later in this chapter.
The Plug and Play specification allows an operating system to disable devices at the hardware level. For example, if you disable a COM port in Device Manager, you might be required to enter the CMOS or system setup to re-enable it.For more information about Plug and Play and using Device Manager, see “Device Management” in this book.
Caution Caution
Part 7 Troubleshooting
If the problem is the result of a recent change to the system, undo that change. System Information lists installed device drivers. If a device fails and its driver has been recently updated, replace it with the original and retest. If an update installed from the Windows Update Web site fails to meet your expectations, restore the original files by running Update Wizard Uninstall. If the problem did not exist before the system was last started, restart the computer and press F8 at the Starting Windows screen. Choose Last Known Good Configuration to restore the system configuration to the last known working version.
Restoring a previous system configuration results in the loss of any changes made in the interim.
Defining an Action Plan Try to identify all of the variables that might affect the problem. As you troubleshoot the problem, try to change only one of these variables at a time. Keep records of what you do and the effect of each action.Develop your plan on paper. Decide what steps you want to take and the expected results of each step. Then complete the steps in order, and follow your plan.If you see a result for which you have no plan:· Return to the isolation phase.· Identify what happens in similar situations.· Define another plan.
Checking Technical Support ResourcesTechnical newsgroups offer peer support for common computer problems. You can post persistent problems on the appropriate online forum. Other users might have already reported similar problems. Suggestions from others can save you time and give you direction for your troubleshooting. For more information about technical support resources, see the Microsoft TechNet link on the Web Resources page at http://windows.microsoft.com/windows2000/reskit/webresources.Windows 2000 Professional Help also contains information about online support.
Startup and Recovery ToolsWindows 2000 Professional offers tools to help you troubleshoot problems with starting your computer and recovering from disasters. Some of the most useful tools are detailed in this section, as shown in Table 31.1.For more information about troubleshooting techniques for setting up your computer, see “Setup and Startup” in this book.
Table 31.1 Startup and Recovery Troubleshooting Tools
Tool Description How to Start
Safe Mode A startup environment that limits the device drivers and system Windows 2000
Caution
Chapter 31 Troubleshooting Tools and Strategies 1397
services that load for troubleshooting problems with starting and running Windows 2000.
Advanced Options Menu at system startup
Recovery Console
A command-line startup environment that allows the system administrator access to the hard disk of computers running Windows 2000 for basic troubleshooting and system maintenance.
From Repair option of Setup or, if manually installed, from Operating System menu at startup
Emergency Repair Process
A process that can recover from problems such as damaged or deleted operating system files or a corrupted system volume boot sector.
From Repair option of Setup
Safe ModeSafe Mode is a diagnostic tool for troubleshooting problems with starting and running Windows 2000. Safe Mode allows the user to specifically control how the computer starts Windows 2000.If the computer fails to properly start up, restart Windows 2000 in Safe Mode to troubleshoot the problem. To do this, press F8 while the message “For troubleshooting and advanced startup options for Windows 2000, press F8” is displayed. Once the Windows 2000 Advanced Options Menu is displayed, you can start the computer in Safe Mode or press ESC to return to the normal startup menu. Table 31.2 describes the Windows 2000 Advanced Options Menu options. Table 31.2 Windows 2000 Advanced Options Menu Options
Start Menu Option Description
Safe Mode Loads the minimum required basic device drivers and system services to start the system. Programs located in the Startup Program group are not started.
Safe Mode with Networking
Similar to standard Safe Mode, but also adds essential services and drivers needed to start networking. Safe Mode with Networking allows Group Policy to be implemented, including those implemented by the server during the logon process and those configured on the local computer.
Safe Mode with Command Prompt
Similar to standard Safe Mode but loads the command interpreter instead of Explorer.exe as the user shell.
Enable Boot Logging Creates a log file, Ntbtlog.txt in the %SystemRoot% folder, during normal startup, which logs the name and status of all drivers loaded into memory.
Enable VGA Mode Starts the computer in basic VGA mode in cases of corruption or incompatibility of currently installed video driver.
Last Known Good Configuration
Reverts to the last successfully started system configuration.
Directory Services Restore Mode
Only applies to Windows 2000 domain controllers.Displays system information such as the number of processors,
Part 7 Troubleshooting
amount of main memory, Service Pack status, and build number during startup.
(continued)Table 31.2 Windows 2000 Advanced Options Menu Options (continued)
Start Menu Option Description
Debugging Mode Starts Windows 2000 in kernel debug mode, which allows a debugger to break into the kernel for troubleshooting and system analysis.
Boot Normally Starts Windows 2000, loading all normal startup files and registry values.
A boot log file, Ntbtlog.txt, is automatically created every time the computer is started in Safe Mode. If a boot log file using that name already exists, the new data is appended to the existing file.
Use Safe Mode in the following situations:· If Windows 2000 Professional stalls for an extended period of time.· If Windows 2000 Professional does not work correctly or has unexpected
results.· If your video display does not work correctly.· If your computer suddenly slows down.· If you need to test an intermittent error condition.· If you have recently installed a new device driver or software and your system
no longer starts.
Unlike Microsoft® Windows® 98, Windows 2000 does not automatically initiate Safe Mode after the system startup has failed. You need to manually access the Windows 2000 Advanced Options Menu to access Safe Mode.When starting Windows 2000 in Safe Mode, only essential drivers and system services are loaded, including the mouse, keyboard, CD-ROM, standard VGA device drivers, the Event Log, Plug and Play, Remote Procedure Call (RPC), and Logical Disk Manager system services. Safe Mode also bypasses programs referenced in Startup Program group folders (including the user’s profile, the All Users profile, and the Administrator profile), programs referenced in the registry to automatically run, and all local group policies (which might also enforce the automatic start of an application). This makes Safe Mode useful for isolating and resolving error conditions caused by faulty automatically started applications, system services, and device drivers. Safe Mode provides access to the Windows 2000 configuration files so you can make configuration changes, and then restart Windows 2000 Professional normally.
Note
Chapter 31 Troubleshooting Tools and Strategies 1399
Safe Mode with Command Prompt loads the basic VGA video driver and a graphical user interface with a command prompt.
After you are in Safe Mode, you can disable or delete a system service, a device driver, or automatically started application that is preventing the computer from starting normally.
Your computer can take substantially longer to start up and shut down when running in Safe Mode because all disk caching is disabled.
For more information about using Safe Mode, see “Troubleshooting Problems with System Startup and Shutdown” later in this chapter.
Recovery ConsoleThe Recovery Console is a startable text-mode command interpreter environment separate from the Windows 2000 command prompt that allows the system administrator access to the hard disk of computer running Windows 2000 Professional, regardless of the file format used, for basic troubleshooting and system maintenance tasks. Since Windows 2000 does not need to be running to use Recovery Console, it is most useful when a Windows 2000 – based computer does not start properly or cannot start at all. The Recovery Console allows you to obtain limited access to NTFS file system, file allocation table (FAT) 16, and FAT32 volumes without starting the graphical interface. The Recovery Console allows administrators to manage files and folders, start and stop services, and repair the system. It can also be used to repair the master boot record (MBR) and boot sectors and to format volumes. The Recovery Console also prevents unauthorized access to volumes by requiring the user to enter the system administrator password before using the console.
Starting the Recovery ConsoleTo start the Recovery Console, start the computer from the Windows 2000 operating system CD or the Windows 2000 Setup floppy disks. If you do not have Windows 2000 Setup floppy disks and your computer cannot start from the CD, use another Windows 2000 – based computer to create the setup disks. For information about creating the Windows 2000 Setup floppy disks, see Windows 2000 Professional Help.
The Recovery Console can also be installed to the local hard disk and accessed from the Windows 2000 startup menu. However, if the MBR or system volume boot sector have been damaged, you need to start the computer from either the Setup floppy disks or the Windows 2000 Professional operating system CD to access the Recovery Console.To add the Recovery Console to existing installations of Windows 2000, carry out the following command from the Windows 2000 operating system CD in the Run dialog box: d:\I386\Winnt32.exe /cmdcons
Note Note Note

Part 7 Troubleshooting
where d: represents the CD-ROM drive. This installation requires approximately 7 megabytes (MB) of disk space on your system volume.This only works correctly if your computer does not contain a mirrored volume. To install the Recovery Console on a computer that contains a mirrored volume, first break the mirror. After the Recovery Console is installed, you can re-establish the mirrored volume. For more information, see the Microsoft Knowledge Base link on the Web Resources page at http://windows.microsoft.com/windows2000/reskit/webresources.
Start the computer from either the Windows 2000 Setup disks or the operating system CD, and then enter Windows 2000 Setup. Press ENTER at the “Setup Notification” screen to go to the “Welcome to Setup” screen. Press R to repair a Windows 2000 installation, and then press C to use the Recovery Console.The Recovery Console displays valid Windows 2000 installations and prompts you select the installation to repair. To access the disk with the Recovery Console, press the number key for the Windows 2000 installation that you want to repair, and then press ENTER. If you press ENTER without typing a number, the Recovery Console quits and restarts the computer.
The Recovery Console might show installations of Microsoft® Windows NT®. However, the results of attempting to access a Windows NT installation from the Recovery Console can be unpredictable. Only use the Recovery Console to fix Windows 2000 installations.Mirrored volumes appear twice in the Recovery Console startup menu, but each entry uses the same drive letter, indicating a reference to the same disk.
The Recovery Console then prompts you for the local administrator account password. If you do not enter the correct password after three attempts, Recovery Console refuses access to the local disks and restarts the computer.
If the registry is corrupted or missing or no valid installations are found, the Recovery Console starts in the root of the startup volume without requiring a password. You cannot access any folders, but you can carry out commands such as chkdsk, fixboot, and fixmbr for limited disk repairs.
After the password is validated, you can access the following folders on your computer: · The root folder of any volume. · %SystemRoot% and subfolders of the Windows 2000 installation on which
you are currently logged on. · \Cmdcons and subfolders (if they exist).· Folders on removable media disks, such as CD-ROM and floppy disks.
Note Note

Chapter 31 Troubleshooting Tools and Strategies 1401
By default, the Recovery Console prevents access to other folders such as Program Files or Documents and Settings, and folders containing other installations of Windows 2000. This can be changed by using local Group Policy settings. For more information about using Group Policy to change the default behavior of the Recovery Console, see the procedure on setting the policy later in this section. For access to other Windows 2000 installation folders, restart the Recovery Console, and select that installation.
Using the Recovery ConsoleYou cannot copy a file from the local hard disk to a floppy disk. However, you can copy a file from a floppy disk or a CD-ROM to any hard disk, and from one hard disk to another. The Recovery Console displays an “Access is denied” error message when it detects invalid commands.You cannot run any programs or commands other than the supported commands listed later in this section. The Recovery Console contains no editing capabilities.
The set command makes use of Recovery Console environment variables to enable, among other options, disk write access to floppy disks. To enable the user to modify the restricted default Recovery Console environment variables, a Group Policy setting must be made. For more information about enabling the set command in Recovery Console, see the procedure at the end of this section.
The Recovery Console buffers previously entered commands and makes them available to the user by means of the UP ARROW and DOWN ARROW keys. To edit a previously entered command, use BACKSPACE to move the cursor to the point where you want to make the edit and rekey the remainder of the command. To quit and restart the computer, at the command prompt, type:exit
The Recovery Console might not map disk volumes with the same drive letters found in Windows 2000. If you are having trouble locating files to copy make sure that the drive mappings for both the source and the target locations are correct. If not, examine other drive letters for the file you are seeking. In addition, some volumes might not have drive letters assigned to them, such as volumes formatted with NTFS and grafted onto the folder structure of another volume by the use of volume mount points. Use the map command to confirm which drive letters and unnamed volumes correspond to which local volumes on the system. For more information about volume mount points, see “File Systems” in this book.Several of the Recovery Console commands are not fully functional to users who have converted to dynamic disk. For more information about dynamic disks, see “Disks Concepts and Troubleshooting” in this book.
Important Important
Part 7 Troubleshooting
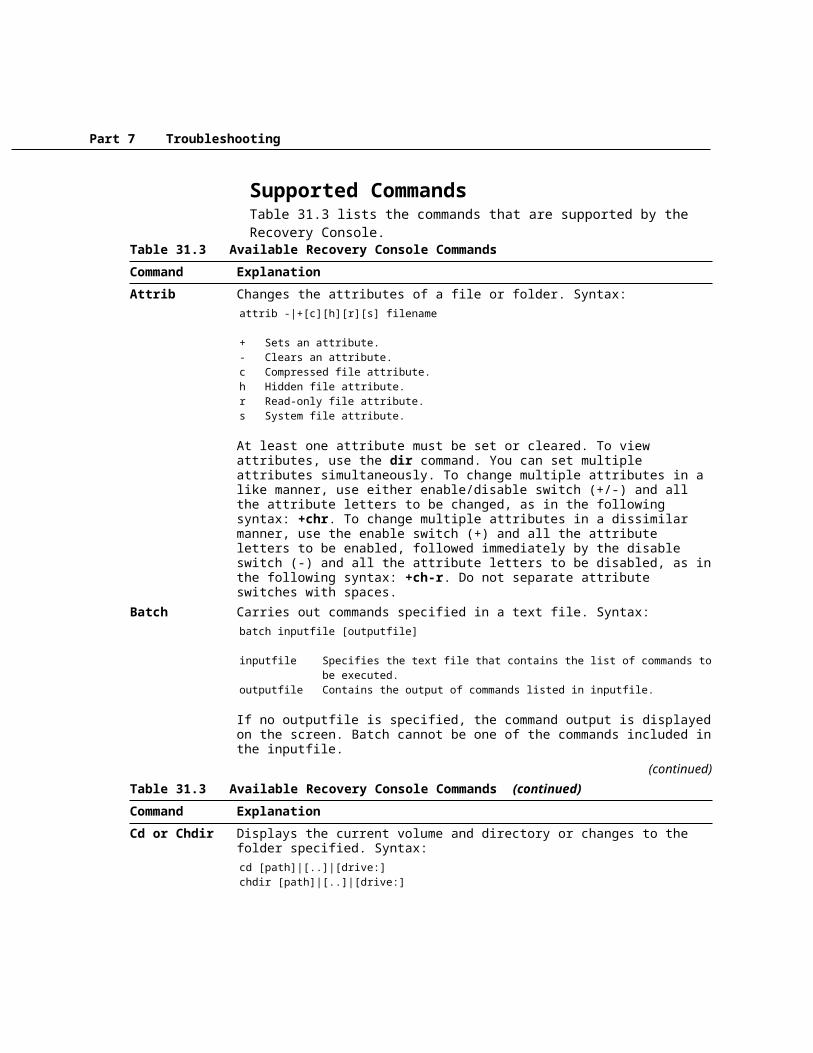
Supported CommandsTable 31.3 lists the commands that are supported by the Recovery Console.
Table 31.3 Available Recovery Console Commands
Command Explanation
Attrib Changes the attributes of a file or folder. Syntax:attrib -|+[c][h][r][s] filename
+ Sets an attribute.- Clears an attribute.c Compressed file attribute.h Hidden file attribute.r Read-only file attribute.s System file attribute.
At least one attribute must be set or cleared. To view attributes, use the dir command. You can set multiple attributes simultaneously. To change multiple attributes in a like manner, use either enable/disable switch (+/-) and all the attribute letters to be changed, as in the following syntax: +chr. To change multiple attributes in a dissimilar manner, use the enable switch (+) and all the attribute letters to be enabled, followed immediately by the disable switch (-) and all the attribute letters to be disabled, as in the following syntax: +ch-r. Do not separate attribute switches with spaces.
Batch Carries out commands specified in a text file. Syntax:batch inputfile [outputfile]
inputfile Specifies the text file that contains the list of commands to be executed.outputfile Contains the output of commands listed in inputfile.
If no outputfile is specified, the command output is displayed on the screen. Batch cannot be one of the commands included in the inputfile.
(continued)Table 31.3 Available Recovery Console Commands (continued)
Command Explanation
Cd or Chdir Displays the current volume and directory or changes to the folder specified. Syntax:cd [path]|[..]|[drive:]chdir [path]|[..]|[drive:]
path Changes to the specified folder on the same volume... Changes to the parent folder.drive: Displays the active folder of the volume specified.Using no switches displays the current volume and folder.
Cd treats spaces as delimiters, requiring that a space precede all arguments, including the use of double periods. Use quotation marks to enclose a path or file name that contains a

Chapter 31 Troubleshooting Tools and Strategies 1403
space.Chkdsk Checks a disk and, if needed, repairs or recovers the volume. Chkdsk also marks bad
sectors and recovers readable information. Syntax:chkdsk [drive:] [/p]|[/r]
drive: Specifies the volume to check./p Forces check if volume is not identified as bad./r Locates bad sectors and recovers readable information (/p is automatic).
Chkdsk can be used without switches, and when no disk is specified the current volume is implied. Chkdsk requires that Autochk.exe be installed in the System32 folder or be available from the Windows 2000 operating system CD.
Cls Clears the screen.(continued)
Table 31.3 Available Recovery Console Commands (continued)
Command Explanation
Copy Copies a single file to a specified location. Syntax:copy source [target]
source Specifies the file to be copied.target Specifies the destination folder and/or filename for the new file.
The use of wildcard characters (* and ?) is not permitted. If the target is not specified, it defaults to the current folder. If the file already exists, you are prompted to overwrite it. Compressed files from the Windows 2000 operating system CD are automatically decompressed as they are copied.
Del or Delete Deletes one file. Syntax:del [drive:][path]filenamedelete [drive:][path]filename
drive: Specifies the volume on which the file to be deletes resides.path Specifies the location within the folder structure of the file to be deleted.filename Specific file to be deleted.
The use of wildcard characters (* and ?) in file names is not permitted.Dir Displays a list of files and folders within a folder. Syntax:
dir [drive:][path][filename]
drive: Specifies the volume on which the files to be displayed reside.path Specifies the location within the folder structure of the files to be displayed.filename Specific file to be displayed.
Part 7 Troubleshooting
Dir lists all folders and files, including hidden and system files. Each listing can have any of the following attributes: a Archive h Hiddenc Compressed p Reparse pointd Directory r Read-onlye Encrypted s System file
The use of wildcard characters (* and ?) is permitted.(continued)
Table 31.3 Available Recovery Console Commands (continued)
Command Explanation
Disable Disables a Windows 2000 system service or driver. Syntax:disable servicename
servicename Name of the service or driver to be disabled.
Use the listsvc command to display all services or drivers that can be disabled. Disable prints the previous START_TYPE of the service before resetting it to SERVICE_DISABLED. Because of this, make sure that you record the previous START_TYPE, in case it is necessary to re-enable the service. The START_TYPE values that the disable command displays are: SERVICE_DISABLED SERVICE_BOOT_START SERVICE_SYSTEM_START SERVICE_AUTO_START SERVICE_DEMAND_START
Diskpart Manages the partitions on your hard disk. Syntax:diskpart[/add|/delete] [device-name|drive-name|partition-name] [size]
/add Create a new partition./delete Delete an existing partition.device-name Device name for creating a new partition (such as \Device\HardDisk0).drive-name Drive-letter based name for deleting an existing partition (such as D:).partition-name Partition-based name for deleting an existing partition and can be used in place of the drive-name argument (such as \Device\HardDisk0\Partition1).size Size of the new partition, in megabytes.
If no arguments are used, a user interface for managing your partitions appears.
WarningThis command can damage your partition table if the disk has been upgraded to dynamic
Chapter 31 Troubleshooting Tools and Strategies 1405
disk. Do not modify the structure of dynamic disks unless you are using the Disk Management tool.
(continued)Table 31.3 Available Recovery Console Commands (continued)
Command Explanation
Enable Enables a Windows 2000 system service or driver. Syntax:enable servicename [start_type]
servicename Name of the service or driver to be enabled.start_type How the service or driver is scheduled to be started. Valid values include: SERVICE_BOOT_START SERVICE_SYSTEM_START SERVICE_AUTO_START SERVICE_DEMAND_START
Use the listsvc command to display all eligible services or drivers to enable. The enable command prints the previous START_TYPE of the service before resetting it to the new value. Note the previous value, in case it is necessary to restore the START_TYPE of the service. If you do not specify a new START_TYPE, enable prints the previous START_TYPE.
Exit Quits the Recovery Console and restarts your computer. Expand Expands a compressed file stored on the Windows 2000 operating system CD or from
within a CAB file on the Windows 2000 operating system CD and copies it to a specified destination. Syntax:expand source [/f:filespec] [target] [/y]expand source [/f:filespec] /d
source Specifies the file to be expanded. May not include wildcard (* and ?) characters.target Specifies the destination folder and/or file name for the new file./y Do not prompt before overwriting existing file./f:filespec If source contains more than one file, this parameter is required to identify the specific file(s) to be expanded. May use wildcards./d Do not expand—only display a folder of the files which are contained in the source.
If target is not specified, the default is the current folder. If the file already exists, you are prompted to overwrite it unless the /y switch is used. The target file cannot be read-only. Use attrib to remove the read-only attribute.
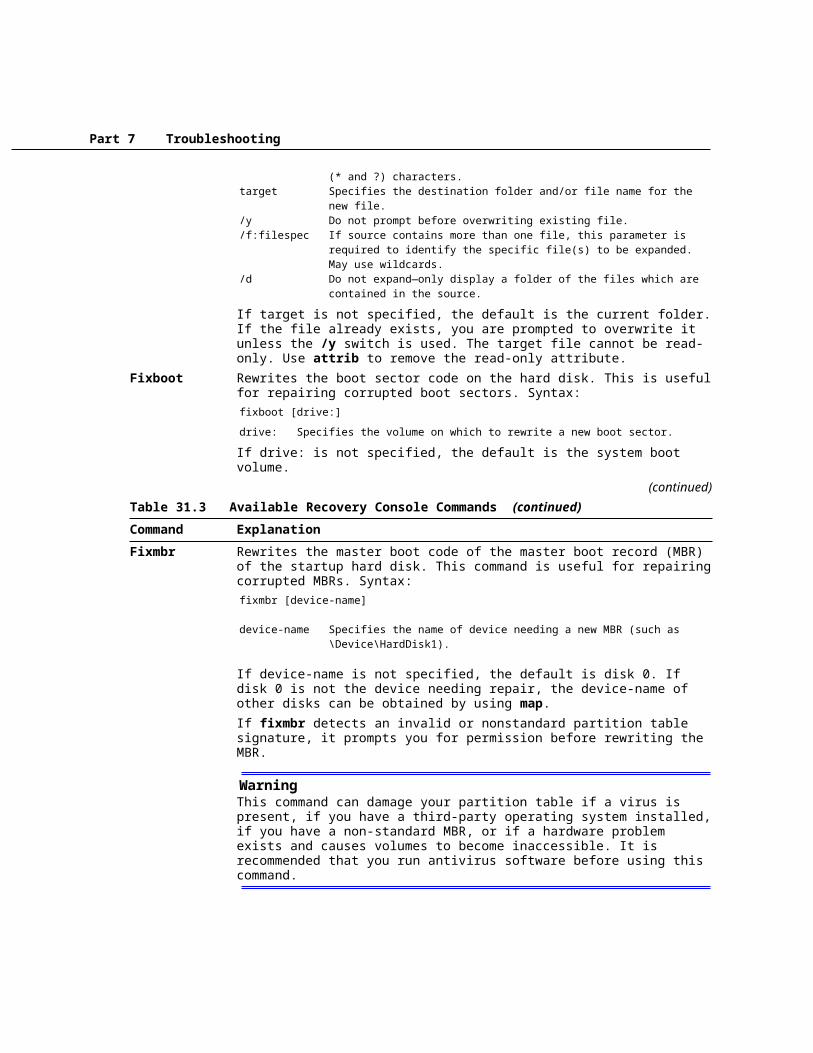
Fixboot Rewrites the boot sector code on the hard disk. This is useful for repairing corrupted boot sectors. Syntax:
Part 7 Troubleshooting
fixboot [drive:]
drive: Specifies the volume on which to rewrite a new boot sector.
If drive: is not specified, the default is the system boot volume. (continued)
Table 31.3 Available Recovery Console Commands (continued)
Command Explanation
Fixmbr Rewrites the master boot code of the master boot record (MBR) of the startup hard disk. This command is useful for repairing corrupted MBRs. Syntax:fixmbr [device-name]
device-name Specifies the name of device needing a new MBR (such as \Device\HardDisk1).
If device-name is not specified, the default is disk 0. If disk 0 is not the device needing repair, the device-name of other disks can be obtained by using map. If fixmbr detects an invalid or nonstandard partition table signature, it prompts you for permission before rewriting the MBR.
WarningThis command can damage your partition table if a virus is present, if you have a third-party operating system installed, if you have a non-standard MBR, or if a hardware problem exists and causes volumes to become inaccessible. It is recommended that you run antivirus software before using this command.
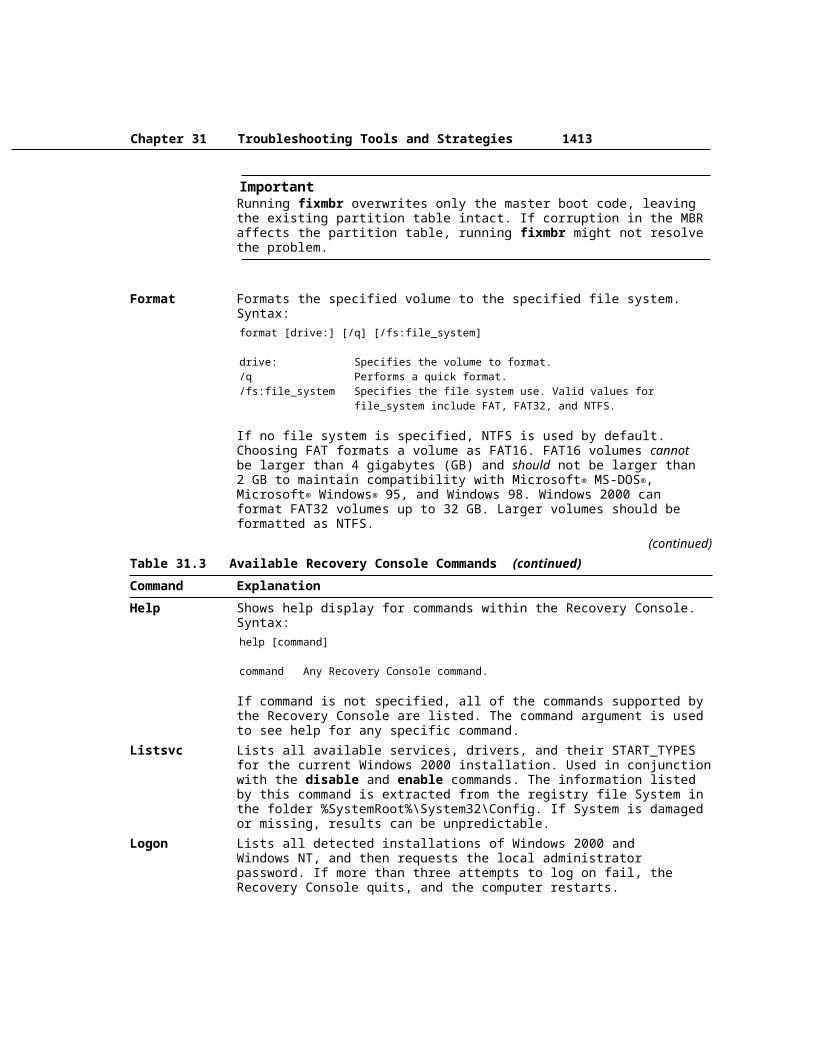
ImportantRunning fixmbr overwrites only the master boot code, leaving the existing partition table intact. If corruption in the MBR affects the partition table, running fixmbr might not resolve the problem.
Format Formats the specified volume to the specified file system. Syntax:format [drive:] [/q] [/fs:file_system]
drive: Specifies the volume to format./q Performs a quick format./fs:file_system Specifies the file system use. Valid values for file_system include FAT, FAT32, and NTFS.
If no file system is specified, NTFS is used by default. Choosing FAT formats a volume as FAT16. FAT16 volumes cannot be larger than 4 gigabytes (GB) and should not be larger than 2 GB to maintain compatibility with Microsoft® MS-DOS®, Microsoft® Windows® 95, and Windows 98. Windows 2000 can format FAT32 volumes up to 32 GB. Larger volumes should be formatted as NTFS.
(continued)
Chapter 31 Troubleshooting Tools and Strategies 1407
Table 31.3 Available Recovery Console Commands (continued)
Command Explanation
Help Shows help display for commands within the Recovery Console. Syntax:help [command]
command Any Recovery Console command.
If command is not specified, all of the commands supported by the Recovery Console are listed. The command argument is used to see help for any specific command.
Listsvc Lists all available services, drivers, and their START_TYPES for the current Windows 2000 installation. Used in conjunction with the disable and enable commands. The information listed by this command is extracted from the registry file System in the folder %SystemRoot%\System32\Config. If System is damaged or missing, results can be unpredictable.
Logon Lists all detected installations of Windows 2000 and Windows NT, and then requests the local administrator password. If more than three attempts to log on fail, the Recovery Console quits, and the computer restarts.
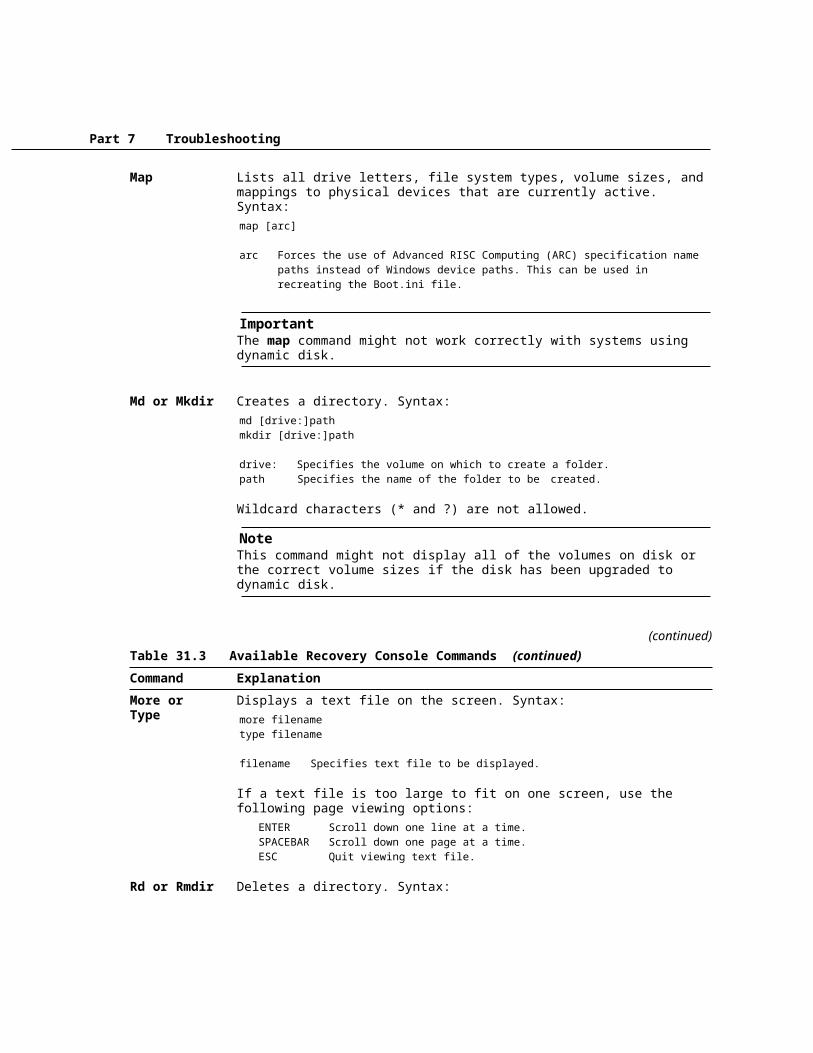
Map Lists all drive letters, file system types, volume sizes, and mappings to physical devices that are currently active. Syntax:map [arc]
arc Forces the use of Advanced RISC Computing (ARC) specification name paths instead of Windows device paths. This can be used in recreating the Boot.ini file.
ImportantThe map command might not work correctly with systems using dynamic disk.
Md or Mkdir Creates a directory. Syntax:md [drive:]pathmkdir [drive:]path
drive: Specifies the volume on which to create a folder.path Specifies the name of the folder to be created.
Wildcard characters (* and ?) are not allowed.
NoteThis command might not display all of the volumes on disk or the correct volume sizes if the disk has been upgraded to dynamic disk.
(continued)
Part 7 Troubleshooting
Table 31.3 Available Recovery Console Commands (continued)
Command Explanation
More or Type Displays a text file on the screen. Syntax:more filenametype filename
filename Specifies text file to be displayed.
If a text file is too large to fit on one screen, use the following page viewing options: ENTER Scroll down one line at a time. SPACEBAR Scroll down one page at a time. ESC Quit viewing text file.
Rd or Rmdir Deletes a directory. Syntax:rd [drive:]pathrmdir [drive:]path
drive: Specifies the volume on which to delete a folder.path Specifies the name of the folder to be deleted.
Wildcard characters (* and ?) are not supported.Ren or Rename Renames a file or directory. Syntax:
ren [drive:][path]filename1 filename2rename [drive:][path]filename1 filename2
drive: Specifies the volume on which the file to be renamed resides.path Specifies the location within the folder structure of the file to be renamed.filename1 Specific file to be renamed.filename2 New filename.
You cannot specify a new volume or path for your target file. Wildcard characters (* and ?) are not supported.
(continued)Table 31.3 Available Recovery Console Commands (continued)
Command Explanation
Set Displays and sets Recovery Console environment variables. Syntax:set [variable = value]
The following environment variables are supported:AllowWildCards Enable wildcard support for some commands, such as DEL, that do not otherwise support them.AllowAllPaths Allow access to all files and folders on the computer.AllowRemovableMedia Allow files to be copied to removable media, such as

Chapter 31 Troubleshooting Tools and Strategies 1409
floppy disks.NoCopyPrompt Do not prompt when overwriting file.
To display the list of current environment variable settings, use set without arguments.The set command is a Recovery Console configuration command that can only be enabled by using the Group Policy snap-in to MMC. Many users find it useful to enable the set command to extend the use of the Recovery Console. The procedure for enabling the set command follows.
Systemroot Sets the current directory to the %SystemRoot% directory of the Windows 2000 installation with which you are currently working.
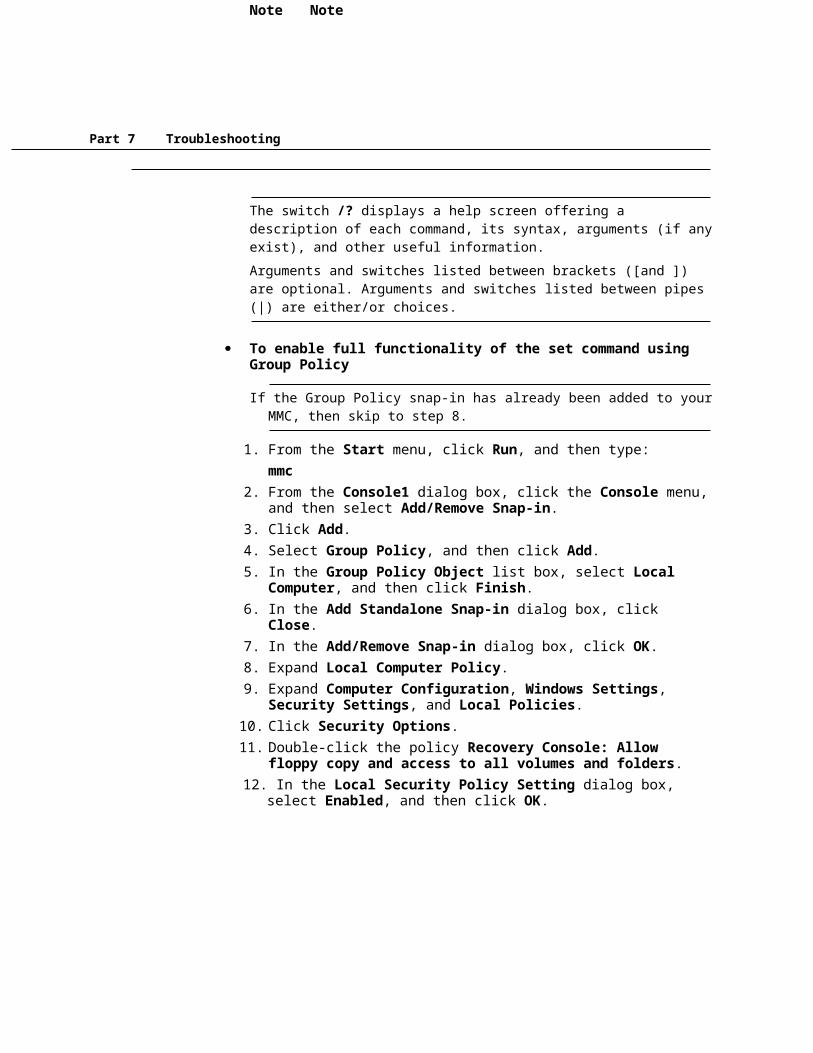
The switch /? displays a help screen offering a description of each command, its syntax, arguments (if any exist), and other useful information.Arguments and switches listed between brackets ([and ]) are optional. Arguments and switches listed between pipes (|) are either/or choices.
· To enable full functionality of the set command using Group Policy
If the Group Policy snap-in has already been added to your MMC, then skip to step 8.
1. From the Start menu, click Run, and then type:mmc
2. From the Console1 dialog box, click the Console menu, and then select Add/Remove Snap-in.
3. Click Add.4. Select Group Policy, and then click Add.5. In the Group Policy Object list box, select Local Computer, and then click
Finish.6. In the Add Standalone Snap-in dialog box, click Close.7. In the Add/Remove Snap-in dialog box, click OK.8. Expand Local Computer Policy.9. Expand Computer Configuration, Windows Settings, Security Settings,
and Local Policies.10. Click Security Options.11. Double-click the policy Recovery Console: Allow floppy copy and access to
all volumes and folders.12. In the Local Security Policy Setting dialog box, select Enabled, and then
click OK.
Note Note

Part 7 Troubleshooting
If you are using computers running Windows 2000 Professional on a Microsoft® Windows® 2000 Server – based network, use Group Policy from the server to control this functionality. It is more efficient to set this policy in one place and have the workstations automatically implement it when logging on to the network than to implement it on each workstation.
You can also use the Group Policy snap-in to enable the policy Recovery Console: Allow automatic administrative logon, allowing you to bypass the logon process when the Recovery Console is started. Activating this policy eliminates a security barrier used to protect your computer against intruders. You should only enable this policy on systems that have controlled access to the console, such as those in rooms that can be locked.Both of the settings available in the Group Policy snap-in can also be made through the Security Configuration and Analysis snap-in.
For more information about setting up, starting, and using Group Policy, see “Customizing the Desktop” in this book.
Using the Recovery Console to Restore the RegistryIf you know your registry is damaged, or some of your registry files are corrupted or have been deleted, you might be able to use the Recovery Console to restore your registry. However, this procedure can only work if you regularly create an Emergency Repair Disk (ERD) and you choose the option to back up your registry to the repair directory. For more information about backing up the registry when creating the ERD, see “Emergency Repair Process” later in this chapter. When you create an ERD and you choose this option, the current version of your registry files are copied from the %SystemRoot%\System32\Config folder to the %SystemRoot%\Repair\RegBack folder. Since both of these folders are accessible through the Recovery Console, you can use the copy command to restore the files.
· To restore the Registry by using the Recovery Console
Only use this procedure if you are certain which registry file needs to be restored, and you are certain that the restoration will not cause other damage to your computer. Restoring registry files improperly can prevent your system from starting and can cause you to lose data.
1. Start the Recovery Console and log on to the Windows 2000 installation containing the registry that you want to restore.
2. To copy the files you want from %SystemRoot%\Repair\RegBack to %SystemRoot%\System32\Config, type:cd repair\regback
Important Note Warning

Chapter 31 Troubleshooting Tools and Strategies 1411
and:copy file_name drive_letter:\system_root\system32\configwhere file_name is the registry file you want to restore, drive_letter is the drive letter where your system is installed (for example, C), and system_root is the system installation folder (for example, Winnt).
As a precaution, first rename the existing file in the Config folder that you intend to restore from backup. If a problem arises from the restoration attempt, you can restore the renamed file to return your system to its original condition.
To restore your entire registry, you need to copy the files Default, Sam, Security, Software, and System.
3. To exit the Recovery Console, type:exit
Emergency Repair ProcessThe Emergency Repair Process is a text-mode tool that you can use to repair or recover a system that cannot properly start. It helps you repair problems caused by damaged or deleted operating system files or a corrupted system volume boot sector. The Emergency Repair Process can repair system files and re-enable the system to start up—it does not back up any files or programs.The Emergency Repair Process can perform the following tasks: · Inspect and repair the startup environment. · Verify and replace system files.· Replace the system volume boot sector.· Replace the registry if it is missing or badly corrupted.
Using the Emergency Repair Process to repair registry problems is not recommended. The copy of the registry that the Emergency Repair Process restores is the original registry created during Setup. To back up the current registry in Windows 2000, you have one of two options using Backup: 1. Perform a backup of the System State data. This backs up the registry, the
Component Services class registration database, and all system startup files.2. Create a new ERD, and then back up the registry at the same time.
Note Important
Part 7 Troubleshooting
As a result of either action, the registry files are copied to the %SystemRoot%\Repair\RegBack folder. The registry files backed up with these processes are not the ones restored by the Emergency Repair Process. The Emergency Repair Process refers to the registry files stored in the %SystemRoot%\Repair folder. To use these backup registry files for system restoration, use the Recovery Console to copy the backed up registry files to the %SystemRoot%\System32\Config folder. For more information about restoring backed up registry files by using the Recovery Console, see “Recovery Console” earlier in this chapter.
To prepare for the Emergency Repair Process, create an Emergency Repair Disk (ERD).
· To create an ERD1. From the Start menu, click Programs, Accessories, System Tools, and
Backup.2. On the Welcome tab, click Emergency Repair Disk.3. Insert an empty, high-density 3.5-inch floppy disk into the floppy disk drive.4. When the process is complete, remove the disk, label it “Emergency Repair
Disk,” and then store it in a safe location.
Windows 2000 does not include the Rdisk.exe program that was used in Microsoft® Windows NT® version 4.0 and earlier versions to create an ERD.
When the ERD is created, the files listed in Table 31.4 are copied from the %SystemRoot%\Repair folder to a floppy disk. Table 31.4 Contents of the ERD
File Name Contents
Autoexec.nt A copy of %SystemRoot%\Repair\Autoexec.nt, which is used to initialize the MS-DOS environment.
Config.nt A copy of %SystemRoot%\Repair\Config.nt, which is used to initialize the MS-DOS environment.
Setup.log A copy of %SystemRoot%\Repair\Setup.log, which lists the files installed by Setup as well as their cyclic redundancy check (CRC) data for use during the Emergency Repair Process.
The Emergency Repair Process relies on data saved in the %SystemRoot%\Repair folder. Do not change or delete this folder.
The registry in Windows 2000 is too large to fit on a floppy disk, and the registry entries are no longer included on the ERD.
Note Note
Chapter 31 Troubleshooting Tools and Strategies 1413
To restore your system with the Emergency Repair Process, use the Windows 2000 operating system CD or the Windows 2000 Setup disks and the ERD. During the restore process, press F1 for more information about your options.
You must use the correct CD-ROM for repairs. You cannot use setup CDs for different languages or incorrect versions.
· To restore your system with the Emergency Repair Process1. Use the Windows 2000 Professional operating system CD to start your
computer. If you have a computer that cannot start up from a CD-ROM, use the Windows 2000 Setup disks instead.
2. At the Setup Notification screen, press ENTER to continue.3. At the Welcome to Setup screen, press R to select the option to repair a
Windows 2000 installation.4. When prompted to choose the type of repair or recovery option required, press
R to repair a Windows 2000 installation by using the Emergency Repair Process.
5. Choose the type of repair option you want to use: · Press M for Manual Repair. · Press F for Fast Repair.
6. Follow the instructions that appear and insert the ERD when prompted. If you have the original Windows 2000 operating system CD, you can have Setup check your disk for corruption.
Because missing or corrupted files are replaced with files from the Windows 2000 operating system CD, changes made after the original installation are lost. Any Service Pack or hotfix installations must be reapplied after using the Emergency Repair Process to restore system files.
If you choose Fast Repair, all repair options are automatically performed, including examination of the registry files. If the registry files are corrupted or missing, Fast Repair automatically replaces them with the copies stored in %SystemRoot%\Repair.Manual Repair allows you to select from the following three options:Inspect Startup Environment verifies that the Windows 2000 files in the system volume are the correct ones. If any of the files that are needed to start Windows 2000 are missing or corrupted, Repair replaces them from the Windows 2000 operating system CD. If Boot.ini is missing, it is recreated.
The replacement Boot.ini only contains information for the current installation. If your system was configured as a multiple-boot system, the nondefault entries in Boot.ini are not recreated.
Note Important Inspect Startup Environment. Note
Part 7 Troubleshooting
Verify Windows 2000 System Files uses a checksum to verify that each installed file is good and that it matches the file that was installed from the Windows 2000 operating system CD. If the recovery process determines that a file on the disk does not match what was installed, it displays a message that identifies the file and asks whether you want to replace it. The Emergency Repair Process also verifies that startup files, such as Ntldr, Ntdetect.com, and Ntoskrnl.exe, are present and valid. Inspect Boot Sector verifies that the boot sector on the system volume references Ntldr, and replaces it if it does not. The Emergency Repair Process can only replace the boot sector for the system volume on the first hard disk.
If the Emergency Repair Process was successful, your computer automatically restarts, and you likely have a working system.
Make a copy of the ERD and store it in a secure location, perhaps off-site.
There are a couple of points to consider about maintaining and using the ERD:· Be sure to maintain a copy of your current ERD. · The ERD is not a replacement for backups.
If any of the files that Windows 2000 installs on the system volume are missing or corrupted, you cannot start your computer. You can restore any of the files listed in Table 31.5 by using the ERD. Table 31.5 Additional Files Restored by the ERD
File Folder
Ntldr C:\Ntdetect.com C:\Boot.ini C:\Ntbootdd.sys (only applies to systems using SCSI disks) C:\Hal.dll %SystemRoot%\System32
For more information about creating and using the ERD, see Windows 2000 Professional Help.
Maintenance and Update ToolsWindows 2000 provides tools that you can use to maintain and update your system. Some of the most useful of these tools are detailed in this section, as shown in Table 31.6.
Table 31.6 Maintenance and Update Troubleshooting Tools
Tool Overview Location
Check Disk (Chkdsk.exe)
Scans for and repairs physical problems, such as bad blocks, as well as logical structure errors, such as lost clusters, cross-linked files, or directory errors, on volumes on the hard disk.
%SystemRoot%\System32
Verify Windows 2000 System Files. Inspect Boot Sector. Tip

Chapter 31 Troubleshooting Tools and Strategies 1415
Disk Defragmenter(Dfrg.msc)
Rearranges files, folders, programs, and unused space on the hard disk to optimize disk performance.
%SystemRoot%\System32
AVBoot (Makedisk.bat)
Scans for and removes MBR and boot sector viruses from the computer’s memory and disk.
\VALUEADD\3RDPARTY\CA_ANTIV on the Windows 2000 operating system CD
(continued)Table 31.6 Maintenance and Update Troubleshooting Tools (continued)
Tool Overview Location
Windows Update (Wupdmgr.exe)
Serves as an online extension of Windows 2000. It provides a central location to find customized files and product enhancements, including Service Packs, system files, device drivers, and new Windows 2000 features.
%SystemRoot%\System32
ChkdskChkdsk is a command-line tool that scans and repairs volumes on the hard disk for physical problems, such as bad blocks, and logical structure errors, such as lost clusters, cross-linked files, or directory errors. Run Chkdsk from a command prompt rather than from Windows Explorer to see the resulting display.
Chkdsk SyntaxThe command-line syntax for Chkdsk is as follows:chkdsk [volume[[path]filename]]] [/f] [/v] [/r] [/x] [/i] [/c] [/l[:size]]
Used without parameters, Chkdsk displays the status of the disk in the current volume.
Chkdsk SwitchesTable 31.7 lists all Chkdsk command-line switches.Table 31.7 Chkdsk Switches
Switch Effect
filename FAT only. Specifies the file or set of files to check for fragmentation. Wildcard characters (* and ?) are allowed.
path FAT only. Specifies the location of a file or set of files within the folder structure of the volume.
size NTFS only. Changes the log file size to the specified number of kilobytes. Must be used with the /l switch.
volume FAT only. Specifies the drive letter (followed by a colon), mount point, or volume name.
Part 7 Troubleshooting
/c NTFS only. Skips checking of cycles within the folder structure.(continued)
Table 31.7 Chkdsk Switches (continued)
Switch Effect
/f Fixes errors on the volume. The volume must be locked. If Chkdsk cannot lock the volume, it offers to check it the next time the computer starts.
/i NTFS only. Performs a less vigorous check of index entries./l NTFS only. Displays current size of the log file./r Locates bad sectors and recovers readable information (implies /f). If
Chkdsk cannot lock the volume, it offers to check it the next time the computer starts.
/v On FAT. Displays the full path and name of every file on the volume.On NTFS. Displays cleanup messages, if any.
/x NTFS only. Forces the volume to dismount first, if necessary. All opened handles to the volume are then invalid (implies /f).
/? Displays this list of Chkdsk switches.
FAT refers to volumes formatted with FAT12, FAT16, or FAT32.Using the /i or /c switch skips certain checks of the NTFS volume and reduces the amount of time required to run Chkdsk.
Use Chkdsk occasionally on each volume to check for errors. You must be logged on as a member of the Administrators group.
Chkdsk ReportsChkdsk creates and displays a status report for a volume, based on the file system used. Chkdsk also lists and corrects errors on the volume. The following are sample Chkdsk reports for volumes using each hard disk file system supported by Windows 2000. Each of these tests were run using the /f switch, although no errors were reported on any of the volumes.Following is an example Chkdsk report from an NTFS volume:The type of the file system is NTFS.
CHKDSK is verifying files (stage 1 of 3)...File verification completed.CHKDSK is verifying indexes (stage 2 of 3)...Index verification completed.CHKDSK is verifying security descriptors (stage 3 of 3)...Security descriptor verification completed.Windows has checked the file system and found no problem.
4096543 KB total disk space.
Note
Chapter 31 Troubleshooting Tools and Strategies 1417
639500 KB in 3206 files. 692 KB in 113 indexes. 0 KB in bad sectors. 26427 KB in use by the system. 22544 KB occupied by the log file. 3429924 KB available on disk.
4096 bytes in each allocation unit. 1024135 total allocation units on disk. 857481 allocation units available on disk.
An example of a Chkdsk report from a FAT32 volume:The type of the file system is FAT32.Volume FAT32 created 8/7/1999 11:19 AMVolume Serial Number is 1067-3B1CWindows is verifying files and folders...File and folder verification is complete.Windows has checked the file system and found no problem.
2,618,732,544 bytes total disk space. 286,720 bytes in 29 hidden files. 401,408 bytes in 86 folders. 307,101,696 bytes in 2,179 files.2,310,938,624 bytes available on disk.
4,096 bytes in each allocation unit. 639,339 total allocation units on disk. 564,194 allocation units available on disk.
An example of a Chkdsk report from a FAT16 volume:The type of the file system is FAT.Volume FAT16 created 8/7/1999 11:23 AMVolume Serial Number is 0CE5-DBB4Windows is verifying files and folders...File and folder verification is complete.Windows has checked the file system and found no problem.
1,340,538,880 bytes total disk space. 1,933,312 bytes in 50 hidden files. 3,407,872 bytes in 103 folders. 705,921,024 bytes in 3,158 files. 629,276,672 bytes available on disk.
32,768 bytes in each allocation unit. 40,910 total allocation units on disk. 19,204 allocation units available on disk.

Part 7 Troubleshooting
A sample Chkdsk report from FAT12 is not shown because it is only supported on floppy disks and volumes less than 16 MB in size.Chkdsk only runs on local floppy disks, hard disks, and removable, read/writable disks. It does not support CD-ROM and DVD-ROM disks.
If errors exist on the volume, Chkdsk alerts you by using a message and, if the /f switch was used, corrects the errors.
Correcting Problems by Using ChkdskChkdsk cannot correct found errors when there are open files on the volume because Chkdsk cannot lock the volume. In this case, Chkdsk offers to check the volume automatically the next time the computer is started. This is typical behavior for the boot volume. When the boot volume is checked, the computer is automatically restarted after the volume check is completed.Because some repairs, such as correcting lost clusters (also knows as allocation units) or cross-linked files, change a volume’s file allocation table and can cause data loss, Chkdsk first prompts you with a confirmation message similar to the following:10 lost allocation units found in 3 chains.Convert lost chains to files?
If you press N, Windows 2000 fixes the errors on the volume but does not save the contents of the lost clusters. If you press Y, Windows 2000 attempts to identify the folder to which they belong. If the folder is identified, the lost cluster chains are saved there as files. If the folder cannot be identified or if the folder does not exist, it saves each chain of lost clusters in a folder called Found.xxx, where xxx is a sequential number starting with 000. If no folder Found.000 exists, one is created at the root. If one or more sequential folders called Found.xxx (starting at 000) exists, one using the next number in the sequence is created. After the storage folder has been identified or created, one or more files with a name in the format Filennnn.chk (the first saved file is named File0000.chk, the second is named File0001.chk, and so on in sequence) are saved. When Chkdsk finishes, you can examine the contents of these files with a text editor to see whether they contain any needed data (if the converted chains came from corrupted binary files, they are of no value). You can delete the CHK files after you have saved any useful data.
Be careful to delete only files using the file name extension CHK from the Found.xxx folders. Other programs might create and use files with that extension.
If you do not use the /f switch, Chkdsk alerts you if it detects a file that needs to be fixed by indicating that it needs to be rerun with the /f switch to fix the errors. If you use the /f switch on an extremely large volume (for example, 70 GB) or a volume with a very large number of files (in the millions), Chkdsk can take a long time (perhaps days) to complete. The volume is not available during this time, since Chkdsk does not relinquish control until it is done. If the system volume is being
Note Note

Chapter 31 Troubleshooting Tools and Strategies 1419
checked during the startup process, the computer is not be available until the Chkdsk process is complete.Bad sectors reported by Chkdsk were marked when your volume was first prepared for operation. The fact that they are marked as bad means that the system prevents the disk from using them, so previously identified bad sectors pose no danger to your data.
Disk DefragmenterDisk Defragmenter is a Windows-based tool that rearranges files, folders, programs, and unused space on your computer’s hard disk. This is occasionally necessary because of the way files are stored on disk. When files are edited and outgrow their original space on the disk, the file is broken into fragments, with latter fragments stored in open spots elsewhere on disk. In addition, when files are deleted on FAT16 and FAT32 volumes, only the entries in the file allocation table itself are deleted. The formerly occupied space is marked as open and can be used by other files. When other files use the empty space, if it is not large enough to accommodate the remaining data of the file, the file is again broken up with the remainder stored in another open space on disk. This process occurs with every new and edited file that is stored to disk.While this process makes storage faster and more efficient when the file is saved, it takes much longer to read and write fragmented files than unfragmented files. Creating new files and folders also takes longer because the space available on the volume is scattered. Windows must then save new files and folders to various locations on the volume. When many files on disk become badly fragmented, performance notably suffers.
Running Disk DefragmenterDisk Defragmenter remedies this problem by rewriting the files on disk back into contiguous segments. To start Disk Defragmenter, from the Start menu, point to Programs, Accessories, and System Tools, and then click Disk Defragmenter.You can analyze the volume to see how many fragmented files and folders there are and then decide whether or not to defragment the volume.The amount of time that the defragmentation process takes to run depends on several factors, including the size of the volume, the number of files on the volume, the amount of fragmentation, and the available local system resources. Disk Defragmenter defragments volumes formatted with FAT16, FAT32, and NTFS.
Disk Defragmenter ResultsThe Disk Defragmenter tool display is split into two main areas, as shown in Figure 31.1. The upper portion lists the volumes on the local computer. The lower portion shows how fragmented the volume is. The colors indicate the condition of the volume:· Red areas show fragmented files. · Blue areas show contiguous (unfragmented) files. · White areas show free space on the volume.

Part 7 Troubleshooting
· Green areas show system files, which cannot be moved by Disk Defragmenter. These system files are not part of the Windows operating system but include files belonging to NTFS (when applicable) and the system paging file.
Figure 31.1 Disk Defragmenter
By comparing the Analysis Display band to the Defragmentation Display band, you can see the improvement in your volume after defragmenting. Always analyze volumes before defragmenting them. After the analysis is complete, a dialog box tells you if you need to defragment the volume. You can defragment local file system volumes only, and you can only run one Disk Defragmenter console at a time. In addition, you must be logged on as an administrator or a member of the Administrators group. If your computer is connected to a network, network policy settings might also prevent you from completing this procedure.
AVBootInoculateIT Antivirus AVBoot version 1.1 is a command-line tool that scans the computer’s memory and all locally-installed disk drives for MBR and boot sector viruses. If a virus is found, AVBoot can remove the virus. AVBoot is located in the \VALUEADD\3RDPARTY\CA_ANTIV folder of the Windows 2000 operating system CD.
· To create an AVBoot startup disk1. Insert the Windows 2000 operating system CD into the CD-ROM drive.2. Insert an empty, high-density 3.5 – inch floppy disk into the floppy disk drive.3. From the Start menu, click Run.4. Browse the CD-ROM drive in the Look in list box, and navigate to the \
VALUEADD\3RDPARTY\CA_ANTIV folder.5. Double-click Makedisk.bat, and then click OK.6. When the process is complete, remove the floppy disk, label it “AVBoot,” and
then store it in a safe location. Record the creation date in a log book.
Makedisk.bat is used to create a startup floppy disk that runs AVBoot.To run AVBoot, insert the AVBoot startup floppy disk and restart the computer. AVBoot automatically starts when the computer has completed the startup process from the floppy disk.
Chapter 31 Troubleshooting Tools and Strategies 1421
On many computers, an option in the CMOS setup program allows the user to set the sequence of installed disks that the system searches for the startup files. If drive C is set to be searched before drive A, the AVBoot disk is not loaded.
When the AVBoot menu appears, press 1. It displays a report showing the version number and the date of the installed virus-scanning engine and the data or antivirus signature files. The next line displays the results of a virus scan in memory. Below that, a Boot Sector Summary report is displayed, showing the results of the scan on the installed floppy disk drives and all hard disks. If a second floppy disk drive or hard disk is not installed, the report states “Not Installed”. Press any key to return to the AVBoot menu. Following is an example:InoculateIT AntiVirus Avboot V1.1Copyright 1997-99 Computer Associates International, Inc. and/or its subsidiaries. All Rights Reserved.
Engine version: 4.22 06/01/1999Data version: 4.22 06/14/1999
No Viruses Were Detected In Workstation Memory
Boot Sector Summary:
Floppy Drive A... No Boot Sector Viruses DetectedFloppy Drive B... Not InstalledHard Disk 1...... No Boot Sector Viruses DetectedHard Disk 2...... Not Installed
Whether you use a third-party antivirus program or AVBoot, be sure to regularly update the virus signature files. After you install an antivirus program, immediately update the signature files, usually through an Internet connection. Check with the software documentation for specific instructions. AVBoot includes update instructions in the installation folder and on the AVBoot floppy disk. When you update the virus signature files, record the date in your log book so you can determine how fresh the files are on the AVBoot disk.It is extremely important that you regularly update your antivirus program. In most cases, antivirus programs are unable to reliably detect and clean viruses of which they are unaware resulting in false negative reports. Most commercial antivirus software manufacturers offer monthly updates. Use the latest download to ensure that your system is protected with the latest virus defenses.
Windows UpdateWindows Update is an online extension of Windows 2000. It provides a central location to find customized files and product enhancements, such as Service Packs,
Note Important

Part 7 Troubleshooting
system files, device drivers, and new Windows 2000 features, that have been selected to work with your computer’s configuration.
Using Windows UpdateWindows 2000 creates a Start menu shortcut to the Windows Update Web page. Windows Update uses Active Setup and Microsoft® ActiveX® controls that are downloaded and installed on your system when you connect to the Windows Update Web page.
Windows Update requires browser software that supports ActiveX controls.
The controls scan your system, comparing system files and device drivers on your computer with a database of the files on the Windows Update server. Windows Update then generates a list of items that can be added and updated, and offers to install any files that are found to be newer than your current set.
All updates can be uninstalled using Update Wizard Uninstall in System Information on the Tools menu. Existing files and drivers are automatically backed up before new ones are installed by Windows Update.
Restricting Access to Windows UpdateTo closely control the programs that users download, you can prohibit user access the Windows Update Web page. By using Group Policy, you can remove the Windows Update icon both from the Start menu and from the Tools menu in Microsoft® Internet Explorer. Enabling the policy prevents users from accessing the Windows Update Web page from a computer running Windows 2000 Professional.
· To disable access to Windows Update by using Group Policy1. Start the Group Policy snap-in.
For more information about adding the Group Policy snap-in into MMC, see “Recovery Console” earlier in this chapter.
2. Expand Local Computer Policy.3. Expand User Configuration and Administrative Templates, and then click
Start Menu & Taskbar.4. Double-click Disable and remove links to Windows Update.5. In the Disable and remove links to Windows Update Properties dialog box,
on the Policy tab, select Enabled, and then click OK.
If you are using Windows 2000 Professional – based computers on a Windows 2000 Server – based network, use Group Policy from the Windows 2000 Server to control this functionality.
Note Note Note Important

Chapter 31 Troubleshooting Tools and Strategies 1423
System File and Driver ToolsWindows 2000 Professional provides tools to help you troubleshoot problems with devices and drivers. Many of the most helpful tools for troubleshooting these issues, are discussed in this section, as shown in Table 31.8.For more information about troubleshooting problems with Plug and Play and other devices, see “Device Management” in this book.
Table 31.8 Device and Driver Troubleshooting Tools
Tool Overview Location
System File Checker (Sfc.exe)
As part of Windows File Protection, scans protected system files and replaces files overwritten with correct versions provided by Microsoft.
%SystemRoot%\System32
Driver Verifier (Verifier.exe)
Runs a series of checks in the Windows 2000 kernel to help readily expose errors in kernel mode drivers.
%SystemRoot%\System32
Driver Signing (Sigverif.exe)
Verifies that device drivers have passed a series of rigorous tests administered by the Windows Hardware Quality Lab (WHQL).
%SystemRoot%\System32
System File CheckerSystem File Checker (SFC) is a command-line tool that scans protected system files and replaces files overwritten with the correct system files provided by Microsoft. It is part of the Windows File Protection feature of Windows 2000.
Windows File ProtectionThe Windows File Protection (WFP) feature protects your system files with two mechanisms. The first runs in the background: WFP is implemented when it is notified that a file in a protected folder is modified. After this notification is received, WFP determines which file was changed, and if it is protected, looks up the file signature in a catalog file to determine if the new file is the correct Microsoft version or if the file is digitally signed. If it is not, a replacement file is retrieved from either the %SystemRoot%\System32\Dllcache folder or the Windows 2000 operating system CD. By default, WFP displays the following message to an administrator and logs it to the System event log: A file replacement was attempted on the protected system file <file name>. To maintain system stability, the file has been restored to the correct Microsoft version. If problems occur with your application, please contact the application vendor for support.
The second WFP mechanism is SFC, which allows an administrator to scan all protected files to verify their versions. SFC also checks and repopulates the Dllcache folder. If the Dllcache folder becomes damaged or unusable, use SFC with the /purgecache switch to repair its contents. Most SYS, DLL, EXE, TTF, FON and OCX files on the Windows 2000 operating system CD are protected. However, for disk space considerations, maintaining cached versions of all of these files in the

Part 7 Troubleshooting
Dllcache folder is not always preferable on computers with limited available storage space. SFC also checks all catalog files used to track correct file versions. If any catalog files are missing or damaged, WFP renames the affected catalog file and retrieves a cached version of that file from the Dllcache folder. If a cached copy of the catalog file is not available, WFP requests that you insert the Windows 2000 operating system CD to retrieve a new copy of the catalog file.
SFC SyntaxThe command-line syntax for SFC is as follows:sfc [/scannow] [/scanonce] [/scanboot] [/cancel] [/enable] [/purgecache] [/cache size=x] [/quiet]
SFC SwitchesThe SFC switches are listed in Table 31.9. Table 31.9 SFC Switches
Switch Description
/scannow Scans all protected system files immediately./scanonce Scans all protected system files at the next system start./scanboot Scans all protected system files at every start./cancel Cancels all pending scans of protected system files./enable Enables WFP for normal operation./purgecache Purges the file cache and scans all protected system files immediately./cachesize=x Sets the file cache size, in megabytes./quiet Replaces incorrect file versions without prompting the user./? Displays this list.
Driver VerifierDriver Verifier is a Windows-based tool that runs a series of checks in the Windows 2000 kernel to expose errors in kernel-mode drivers. It can gather statistics from the kernel, which are displayed by the GUI or logged in a file.Driver Verifier can be run as a Windows 2000 application (called the “Driver Verifier Manager”), as a command-line tool, or as a debugger option in the system debugger WinDbg.
Driver Verifier SyntaxThe command-line syntax for Driver Verifier is as follows:verifier [/flags value [/iolevel level]] /allverifier [/flags value [/iolevel level]] /driver name [name ...]verifier /volatile /flags valueverifier /reset

Chapter 31 Troubleshooting Tools and Strategies 1425
verifier [/query]verifier /log log_file_name [/interval seconds]
Driver Verifier SwitchesThe Run dialog box switches of Driver Verifier are listed in Table 31.10. Table 31.10 Driver Verifier Command-Line Switches
Switch Description
/all Verifies all installed drivers./driver Verifies the driver specified in the name argument./flags Runs the checks specified in the /value argument./interval Records log file entries in x second increments. The default interval is
30 seconds./iolevel Specifies the level of I/O verification.level Specifies between a high-level scan and a full scan:
1 Only detects problems that will immediately cause the computer to fail.2 A superset of level 1, it also detects problems that will cause failures from which the system can likely recover. This is the recommended setting.
/log Creates a log file to hold memory, Interrupt Request Level (IRQL), and spin lock information.
/query Causes the current data to be displayed on the screen. Data includes a count of memory allocations, IRQL raises, spin locks, and other data relevant to Driver Verifier options.
/reset Erases all the current Driver Verifier settings./volatile Used to change the Driver Verifier settings without restarting the
system. Any new settings are lost when the system is restarted.log_file_name Name of the log file.name Name of the driver file. Multiple driver files can be listed in sequence,
separated by spaces, but wildcards (* and ?) are not supported.(continued)
Table 31.10 Driver Verifier Command-Line Switches (continued)
Switch Description
seconds Number of seconds in the interval.value A decimal combination of bits representing the available flags:
0x01 Special pool checking0x02 Force IRQL checking0x04 Low resources simulation0x08 Pool tracking0x10 I/O checkingBits can be freely combined. The default is 3.
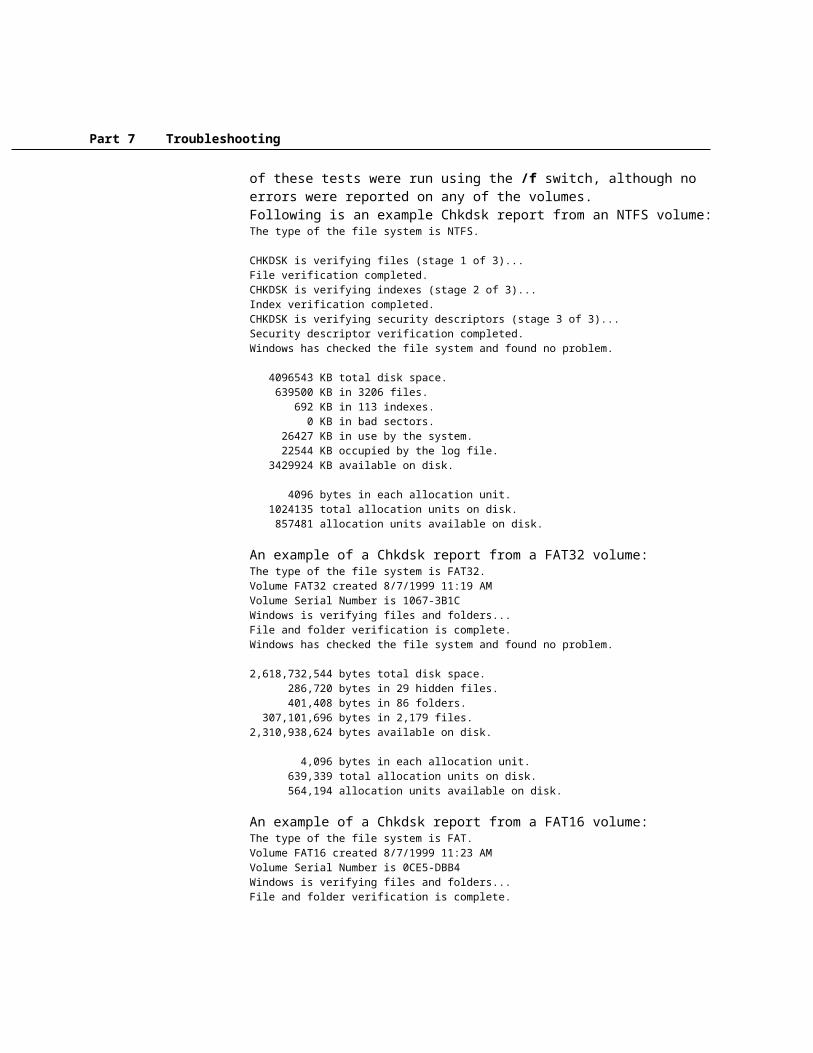
Part 7 Troubleshooting
/? Displays this list.
Running Driver Verifier with no command-line switches starts Driver Verifier Manager which uses a tabbed dialog box to separate the options it offers for testing device drivers, as shown in Figure 31.2.
Figure 31.2 Driver Verifier Manager

Chapter 31 Troubleshooting Tools and Strategies 1427
Driver Verifier ManagerThe following list shown in Table 31.11 contains a description of each tab in the Driver Verifier Manager dialog box: Table 31.11 Driver Verifier Manager Dialog Box Tabs
Tab Definition
Driver Status Displays which drivers are loaded and being verified, and which Driver Verifier options are active.
Global Counters Displays statistics that assist in monitoring Driver Verifier actions.Pool Tracking Displays information about paged and nonpaged pool allocations
(both current amounts and peak amounts).Settings Lists the drivers that are loaded and can be verified, as well as
Verification type options available for use.Volatile Settings Provides a list of verified drivers and a list of Verification type
options used for each driver.
· To set up a driver to be tested by Driver Verifier Manager1. Open Driver Verifier Manager.2. Click the Driver Status tab, and then select the driver that you want to verify.
You can verify multiple drivers at the same time, but to simplify the process, it is strongly recommended that you verify one driver at a time.
3. Check the verification techniques that you want to enable in Verification Type. It is recommended that you enable all techniques for general testing.
4. Click Apply and Exit, and then restart the computer for the changes to take effect.
5. Reopen Driver Verifier Manager and make sure that the driver you want to test is shown in the Driver Status tab.
6. Start an application that uses the device driver that you want to test.
Run a series of tests that use the full capability of the device driver in question.If the Windows 2000 kernel detects any driver errors during startup or during the user tests, it generates a Stop message and displays information useful to support personnel on the screen and the kernel debugger host (if one is connected). If no errors are found, reset the Driver Verifier Manager so it does not continue to test the drivers.
Note

Part 7 Troubleshooting
· To reset the Driver Verifier Manager1. Reopen Driver Verifier Manager.2. In the Additional Drivers text box, enter the driver’s full file name and file
name extension (without its path; if multiple drivers were tested, separate file names by using spaces).
3. Clear all options in Verification Type.4. Click Apply and Exit, and then restart the computer.
Driver SigningDriver signing is a multifaceted process in which device drivers are verified through a series of tests administered by the Windows Hardware Quality Lab (WHQL). Drivers that earn this certification are more robust and cause fewer problems with Windows 2000. Microsoft digitally signs drivers that pass the WHQL tests so they are recognized natively by Windows 2000 Professional. Devices covered include:· Keyboard· Hard disk controller· Multimedia device· Video display· Modem· Mouse· Network adapters· Printer· SCSI adapter· Smart card reader
The system files provided with Windows 2000 have a Microsoft digital signature, which indicates that the files are original, unaltered system files and that they have been approved by Microsoft for use with Windows 2000. Windows 2000 Professional can warn or prevent users from installing unsigned code. If a file has not been digitally signed and resides in one of the mentioned device driver classes, a message alerts the user, and asks if they want to continue. All drivers included with Windows 2000 are digitally signed by Microsoft. You can verify that third-party drivers have met the WHQL standards and that they have not been modified since they were tested. To ensure that device drivers are compatible with Windows 2000, look for vendors offering drivers signed by Microsoft.
Checking for Digital SignaturesWindows 2000 includes the File Signature Verification tool and Signature Checking to identify files that have been signed.

Chapter 31 Troubleshooting Tools and Strategies 1429
The File Signature Verification tool determines whether a file is signed and allows you to do the following:· View the certificates of signed files to ensure that the file has not been
tampered with after being certified.· Search for signed files in a specific location.· Search for unsigned files in a specific location.
To run the File Signature Verification tool, from the Start menu, click Run, and then type:sigverifTo customize the behavior of the File Signature Verification tool, in the File Signature Verification dialog box, click Advanced. The Advanced File Signature Verification Settings dialog box provides the following options:· The Search tab allows you to search all drivers or specify the name and
location of your driver search. · The Logging tab saves the program’s results as a log file, in which you can
specify the file name, whether to overwrite or append to an existing file, and view the existing log.
The log file, Sigverif.txt, is stored in the %SystemRoot% folder by default, and records the following information about the files it scans:· Name · Modification date · Version number · Signed status· Location
Signature CheckingSignature Checking can be enabled by system administrators to ensure that Windows 2000 inspects files for digital signatures whenever drivers are installed.Signature Checking has three levels:· Level 0 disables digital signature checking. The dialog box that identifies a
digitally signed driver does not appear, and all drivers are installed whether they are signed or not.
· Level 1 determines whether the driver has passed WHQL testing. A message appears whenever a user tries to install a driver that fails the signature check.
· Level 2 blocks installation of a driver that fails the signature check. The user is notified that the driver cannot be installed because it is not digitally signed.
You can start the Signature Checking feature by using the Hardware tab of the System Properties dialog box.

Part 7 Troubleshooting
DriversDrivers is a command-line tool that lists all of the drivers currently running on the computer from the %SystemRoot%\System32\Drivers folder. You can use this tool to identify a driver that might be causing problems due to corruption or because it is missing, not loaded, or outdated.Drivers is part of the Resource Kit Tools collection on the Windows 2000 Professional Resource Kit companion CD. For more information about Drivers, see Rktools.chm in the folder C:\Program Files\Resource Kit. Run Drivers from a command prompt, rather than from Windows Explorer, to see the resulting display. Drivers has no command-line switches.
Run Drivers when the system is working properly and save the output to a file. You can use these results as a comparison later if the system has problems with missing or corrupted drivers. To save the drivers list to a file, redirect the screen output to a file with the following command-line syntax:drivers > drivers_M-D-Y.txtwhere M is the numerical month, D is the day, and Y is the year that the report was run. Keep this file in a safe location or print it and record the date on the page.
Table 31.12 describes the output from the Drivers tool. The most important field is Module Name, which is the name of the component.Table 31.12 Column Names and Descriptions of the Drivers Tool Output
Column Definition
ModuleName The driver’s file name.Code The nonpaged code in the image.Data The initialized static data in the image.Bss The uninitialized static data in the image. This is data that is
initialized to 0.Paged The size of the data that is paged.Init Data not needed after initialization.LinkDate The date that the driver was linked.
The following is a sample portion of a Drivers output:ModuleName Code Data Bss Paged Init LinkDate------------------------------------------------------------------------------ntoskrnl.exe 423680 61952 0 730432 136448 Sun Aug 22 14:47:30 1999 hal.dll 33536 5536 0 31648 15488 Sat Aug 21 12:39:25 1999 BOOTVID.dll 6048 2464 0 0 448 Sat Aug 21 12:34:13 1999 pci.sys 12128 1536 0 30816 4576 Fri Aug 20 15:36:35 1999 isapnp.sys 14432 832 0 23200 2080 Wed Aug 18 18:29:07 1999intelide.sys 1760 32 0 0 128 Sun Aug 22 14:17:56 1999 PCIIDEX.SYS 4512 480 0 10848 1632 Sun Aug 22 14:17:56 1999MountMgr.sys 1088 0 0 22496 2176 Mon Aug 02 17:26:33 1999 ftdisk.sys 4640 32 0 95776 3392 Sun Aug 22 14:18:00 1999Diskperf.sys 1440 32 0 2016 992 Sun Aug 22 14:17:59 1999
Tip

Chapter 31 Troubleshooting Tools and Strategies 1431
WMILIB.SYS 480 0 0 1152 192 Sat Jul 31 11:29:42 1999 dmload.sys 2848 64 0 0 608 Fri Aug 20 14:29:47 1999... ntdll.dll 282624 16384 0 16384 0 Sun Aug 22 14:57:40 1999------------------------------------------------------------------------------ Total 3831648 306848 0 2966016 403552
Applications ToolsWindows 2000 offers tools to gather information about and manage application issues. Some of the most useful tools, which are shown in Table 31.13, are detailed in this section.
Table 31.13 Applications Troubleshooting Tools
Tool Overview Location
System Information (Msinfo32.exe)
Collects and displays system configuration information about hardware, system components, and the software environment.
Program Files\Common Files\Microsoft Shared\Msinfo
DirectX Diagnostics (Dxdiag.exe)
Presents information about installed components and drivers of the Microsoft® DirectX® API; tests sound, graphics output, and DirectPlay service providers; and disables some hardware acceleration features.
%SystemRoot%\System32
Registry Editor (Regedt32.exe)
An advanced editing tool for adding and changing settings and creating subkeys in the registry.
%SystemRoot%\System32
Registry Editor (Regedit.exe)
An advanced editing tool for searching, adding, and changing settings and creating subkeys in the registry.
%SystemRoot%
System InformationSystem Information is a Windows-based tool that collects and displays configuration information to help diagnose and correct problems. This tool can quickly find the required data to resolve problems, about the following categories:· System Summary displays basic information about the system, such as
version number of the operating system, the NetBIOS computer name, the manufacturer and model number, the installation folder of Windows 2000, locale and time zone information, as well as information about the amount of installed physical memory and virtual memory.
· Hardware Resources displays hardware resource settings such as direct memory access (DMA), interrupt requests (IRQs), I/O addresses, and memory addresses.
· Components displays information about the Windows 2000 configuration and determines the status of peripheral devices, ports, and universal serial bus (USB) connections.

Part 7 Troubleshooting
· Software Environment displays a snapshot of drivers, environment variables, tasks, and services loaded into computer memory. This information can be used to check whether a process is still running or to check version information.
· Internet Explorer 5 displays a list of configuration settings related to Internet Explorer, including install location, cipher strength, build number, a list of associated files and version numbers, and settings for connectivity, file caching, and security zones.
· Applications displays a list of installed Microsoft applications that support System Information. Microsoft® Office 2000 applications are currently supported. Additional Microsoft applications might be included in the future.
The Tools menu in System Information also provides links to several tools used for troubleshooting, including the following:· Disk Cleanup· Dr. Watson for Windows 2000· DirectX Diagnostic Tool· Add/Remove Hardware wizard· Network and Dial-up Connections · Backup· File Signature Verification Tool· Update Wizard Uninstall· Windows Report Tool
To use System Information, from the Start menu, click Run, and then type:msinfo32System Information categories are displayed in a tree structure, as shown in Figure 31.3.
Figure 31.3 System Information
You can print or save System Information to a text file to send to support personnel. These files are stored in the My Documents folder by default.
A full System Information report printout can total more than 80 pages depending on the hardware and software installed.
System SummarySystem Summary provides a general profile of the system, including the version of Windows, the installation folder, virtual memory, locale and local time zone, and
Note

Chapter 31 Troubleshooting Tools and Strategies 1433
system hardware, such as BIOS, CPU, memory, and other system resources. Use this information at the beginning of the troubleshooting process to develop a basic picture of the environment in which the problem occurs.
Hardware ResourcesHardware Resources, as shown in Table 31.14, displays hardware-specific settings, such as assigned or used IRQs, DMA channels, I/O addresses, and memory addresses.Table 31.14 Hardware Resources
Section Definition
Conflicts/Sharing
Identifies resource conflicts between multiple Industry Standard Architecture (ISA) devices or Peripheral Component Interconnect (PCI) devices. Use this information to identify hardware conflicts or troubleshoot a nonworking device.
DMA Reports the DMA channels in use, the devices using them, and those free for use.
Forced Hardware Lists hardware devices that have user-specified resources, as opposed to system-specified resources. This information is useful when troubleshooting Plug and Play resource conflicts.
I/O Lists all I/O port ranges in use and the devices using each range.IRQs Summarizes IRQ usage, by identifying the devices using the IRQs
and showing free IRQs.Memory Lists memory address ranges in use by devices.
ComponentsComponents displays information about your Windows 2000 system configuration, as shown in Table 31.15. The Components view includes information about the status of peripheral devices, ports, and USB connections. There is also a summary of problem devices.Table 31.15 Components
Section Definition
Multimedia Lists sound card information, audio and video codecs loaded, and the drive letter and model of the CD-ROM drive. With a data CD-ROM in the drive, System Information performs a data transfer test.
Display Lists video card information and current video configuration.Infrared Lists infrared device information.Input Lists keyboard and pointer device information.Modem Lists modem information.Network Lists network adapter, protocol, and Winsock information.Ports Lists serial and parallel port information.Storage Lists information about hard disks, floppy disk drives, removable

Part 7 Troubleshooting
storage, and controllers.Printing Lists installed printers and printer drivers.Problem Devices Lists devices with problems. Each device flagged in Device
Manager is displayed, with the corresponding status information.USB Lists USB controllers and drivers installed.
Software EnvironmentSoftware Environment, as shown in Table 31.16, displays the software loaded in computer memory.Table 31.16 Software Environment
Section Definition
Drivers Lists all installed drivers, whether they are currently running, and their status.
Environment Variables Lists all system environment variables and their values.Jobs Lists all open jobs, including print jobs.Network Connections Lists all mapped network connections.Running Tasks Lists all processes currently running on the system.Loaded Modules Lists loaded system-level DLLs and programs, along with their
version numbers, size, and file date and path. Useful for debugging software problems, such as application faults.
Services Lists all available system services, showing current run status and start mode.
Program Groups Lists all existing program groups for all known users of the system.
Startup Programs Lists programs started automatically either from the registry, the Startup program group, or the Win.ini file.
OLE Registration Lists OLE file associations controlled by the registry.
Internet Explorer 5Internet Explorer 5, as shown in Table 31.17, displays configuration information for Internet Explorer 5.Table 31.17 Internet Explorer 5
Section Definition
Summary Lists a summary of Internet Explorer 5 information, such as the version and build numbers, installation path, cipher strength, and so on.
File Versions Lists all files associated with Internet Explorer 5, as well as version numbers, file sizes, file dates, installation paths, and manufacturer.
Connectivity Lists all the connectivity settings used by Internet Explorer 5.Cache Lists a general summary of cache settings and of cached objects.

Chapter 31 Troubleshooting Tools and Strategies 1435
Content Identifies whether Content Advisor is enabled and lists all installed personal certificates, other people certificates, and their publishers.
Security Lists the settings for Internet security zones.
ApplicationsApplications, as shown in Table 31.18, displays configuration information about the installed applications that are compatible with System Information.Table 31.18 Applications
Section Definition
Microsoft® Word 2000 Lists information about the active document, the number of fields used, installed file converters, available fonts, headers and footers, number of hyperlinks, mail merge information, number of sections and page numbering schemes used, page setup data, styles used, Word settings, and number of tables.
Microsoft® Excel 2000 Lists information about the active workbook, installed add-ins, and charts in the active workbook.
Microsoft® PowerPoint® 2000 Lists information about the active presentation.Microsoft® Outlook® 2000 Lists summary information about Outlook 2000.Microsoft® Access 2000 Lists summary information about Access 2000.Microsoft® Publisher 2000 Lists summary information about Publisher 2000.Microsoft® FrontPage® 2000 Lists information about the active Web project, the
active Web page, installed Component Object Model (COM) add-ins, and installed themes.
Microsoft® Office Environment
Lists information about the last Web connection error, installed local Web server extensions, installed data transport technologies, installed open database connectivity (ODBC) drivers, and OLE DB providers.
The Applications module is installed into System Information whenever any version of Office 2000 is installed. By default, this module lists all of the applications included in the Microsoft® Office 2000 Premium Edition, regardless of whether any particular application listed is installed.
Other than the Summary pages, the data fields for the configuration information of the individual applications in Office 2000 are not populated unless the particular application is running at the time that System Information is active.
Note

Part 7 Troubleshooting
DirectX Diagnostic ToolThe DirectX Diagnostic Tool (DXDiag) is a Windows-based DirectX tool that presents information about the components and drivers of the DirectX application programming interface (API) installed on your system. Administrators or users can test sound and graphics output and DirectPlay service providers, and disable some hardware acceleration features. You can use DXDiag to gather information during a support call or to send an e-mail message.To start DXDiag, from the Start menu, click Run, and then type:dxdiag
Some information displayed in DXDiag, such as the amount of memory on a display card, might be approximate.
DXDiag uses a tabbed dialog box format to separate the sections of reports, as shown in Figure 31.4.
Figure 31.4 DXDiag Dialog Box
Table 31.19, describes each tab in the DirectX Diagnostic Tool dialog box.
If a DirectX problem is detected on a particular tab, a warning message is displayed in the Notes box.
Table 31.19 DXDiag Dialog Box Tabs
Tab Definition
System Provides system information about your computer and specifies the version of DirectX installed on your computer.
DirectX Files Lists the file name, version number, date, and size for each DirectX file installed on your computer.
DX Media Files Lists the file name, version number, date, and size for each DirectX media file installed on your computer.
DirectX Drivers Lists the file name, version number, date, and size for each DirectX driver file installed on your computer.
Display Lists your current display settings, and allows you to disable hardware acceleration and test DirectDraw® and Direct3D®.
Sound Displays current sound settings, and allows you to test DirectSound. Music Lists installed music ports, displays current Musical Instrument
Digital Interface (MIDI) settings, and allows you to test the DirectMusic component of DirectX.
Input Lists the input devices and drivers installed on your computer. Network Lists the registered DirectPlay service providers and the registered
lobbyable DirectPlay applications installed on your computer and
Note Note
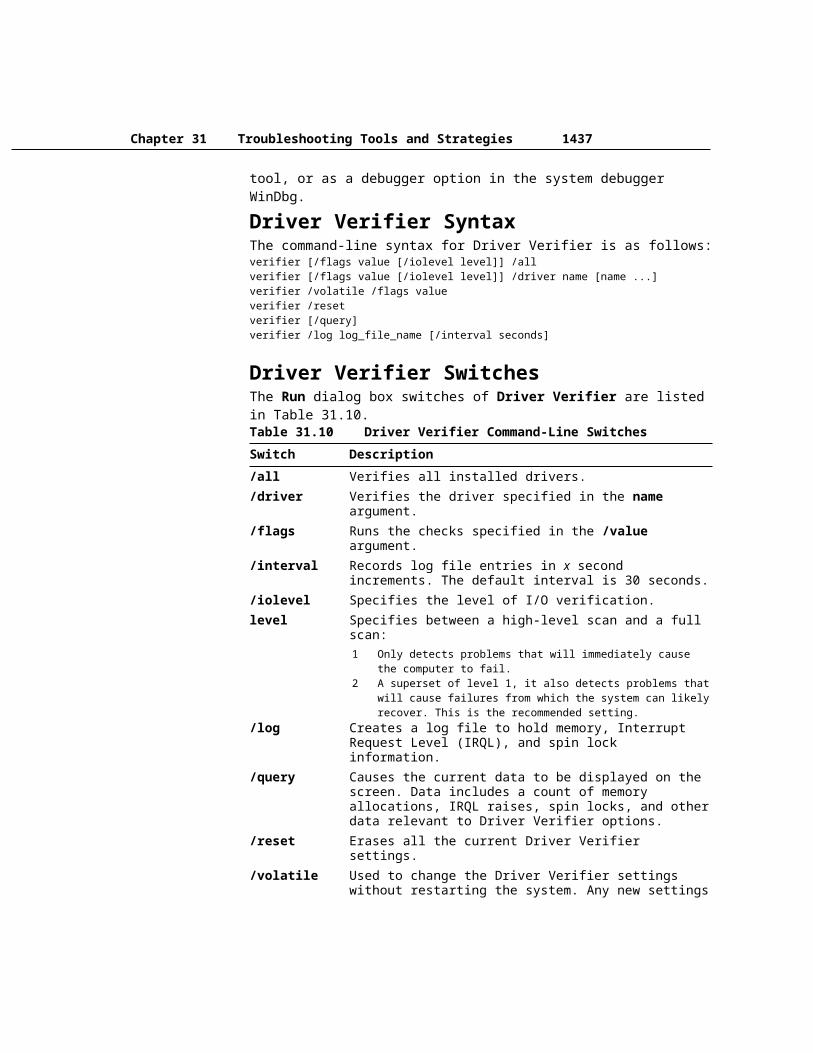
Chapter 31 Troubleshooting Tools and Strategies 1437
allows you to test the DirectPlay component of DirectX. More Help If you cannot resolve your DirectX by issue using the previous tabs,
you can use the More Help tab to continue troubleshooting the issue. Click MSInfo to start System Information. For more information about using System Information, see “System Information” earlier in this chapter.Click Override to change the DirectDraw refresh rate. This is not recommended as a general troubleshooting step.
What to Look ForIf you are experiencing problems when running DirectX applications, DXDiag can help you find the source of the trouble. The following are issues to look for: In the Notes section of the DirectX Files page, look for warnings about beta and debug files. In the file list on the DirectX Drivers page, look for drivers that are marked as uncertified. Other problems might be shown in the Notes section of the Display, Sound, and Input pages. Uncertified drivers have not been tested by Microsoft for full compatibility with the latest version of DirectX. Some programs run slowly or not at all unless DirectDraw or Direct3D hardware acceleration is available. On the Display page, under DirectX Features, check whether DirectDraw, Direct3D, or AGP Support is marked “Not available.” If so, consider upgrading your hardware. If a joystick or other input device fails to respond, it might not be properly set up. Make sure the device is accounted for on the Input page of DXDiag. If not, add the device by using the Game Controllers icon in Control Panel.
Testing DirectX ComponentsYou can test DirectDraw and Direct3D on each monitor attached to your system, DirectSound on each WAV output device, and DirectMusic on each music port. Click Test, read any messages that appear, and watch or listen to the tests. Let each test run until you see a message asking whether the test was successful. If you respond No, no more tests are run.There is a single test for DirectMusic. Click OK when you are satisfied that the music is or is not playing correctly.You can also test DirectPlay functionality on any available service provider.
· To test DirectPlay on two connected computers 1. On Computer A on the Network page, click Test DirectPlay. In the
DirectPlay Test dialog box, type a user name and choose a service provider. Select Create New Session, and then click OK. If you have chosen a modem connection, in the Modem Connection dialog box click Answer to put the modem in autoanswer mode.
Incorrect versions of DirectX components. Uncertified drivers. Lack of hardware acceleration. Device not connected.
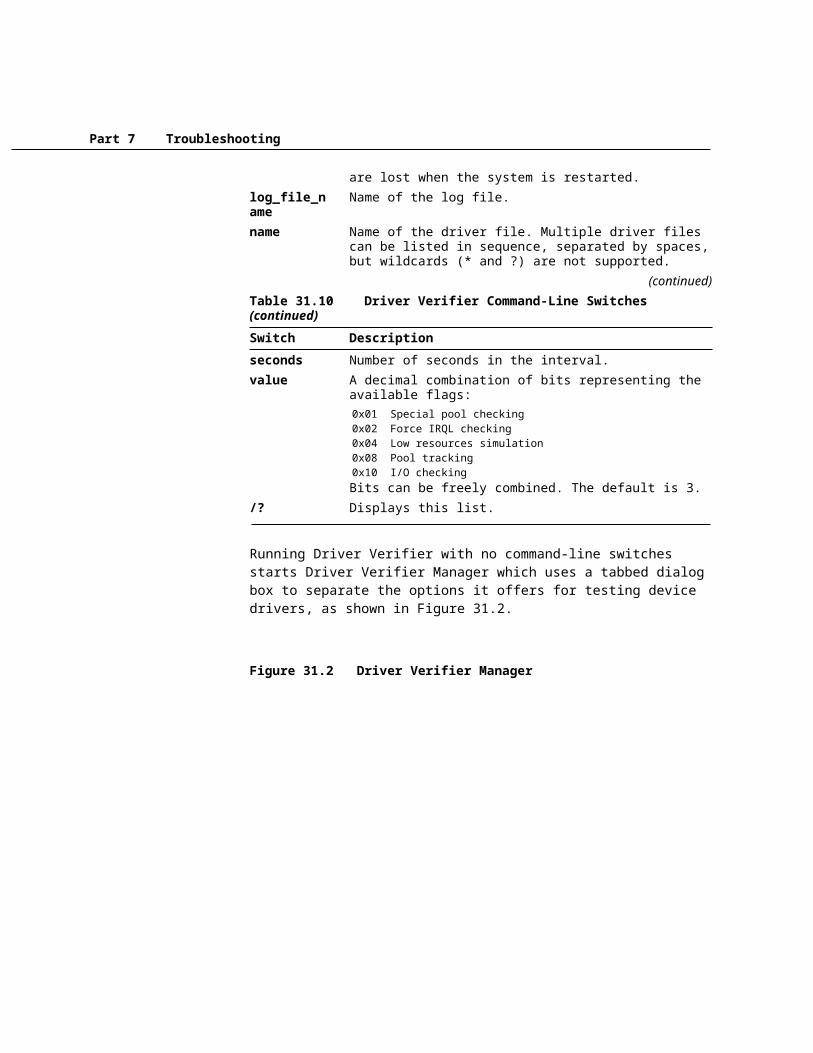
Part 7 Troubleshooting
2. Run DXDiag on Computer B to establish the selected connection with Computer A. Click Test DirectPlay, type in a different user name, choose the same service provider, select Join Existing Session, and then click OK. For some types of connections, you might be asked to provide more information, such as a telephone number. For a TCP/IP connection on a local network, you can leave the text box blank.
3. A session list is displayed on Computer B, containing the name of the session that you created on Computer A. Select the name of the session, and then click OK.
Both computers display a chat dialog box. Type a message in the input box on one computer, and then click Send. The message appears in the scrolling area of the chat dialog box on both computers.
Overriding Default SettingsOn the Sound page, you can set a different level of hardware acceleration by moving the slider. This level remains in effect after you have closed DXDiag.On the Display page for each installed display device, you can disable hardware acceleration for DirectDraw or Direct3D and AGP Support (if such options are available) by clicking Disable. These features remain disabled after you close DXDiag, and are not available to any applications. To re-enable a disabled feature, click Enable.
Disabling DirectDraw acceleration also disables acceleration for Direct3D.
You can also override the monitor refresh rate set by DirectDraw full-screen applications. Do this only if you are experiencing display problems with certain applications and have good reason to believe that the application is setting an invalid refresh rate.
· To set an override refresh rate 1. On the More Help page, click Override. 2. In the Override DirectDraw Refresh Behavior dialog box, select the
Override Value text box and type a valid refresh rate for your monitor. The Override Value option is automatically selected.
· To cancel the override refresh rate 1. On the More Help page, click Override. 2. In the Override DirectDraw Refresh Behavior dialog box, select Default.
Restoring DriversOn some configurations, DXDiag allows you to restore older audio and video drivers. This can be the best way of solving problems with incompatible drivers. If a Restore button appears on the More Help page, click it to run the DirectX Setup program.
Note

Chapter 31 Troubleshooting Tools and Strategies 1439
DirectX Setup has two buttons labeled Restore Audio Drivers and Restore Display Drivers. Clicking either of these buttons restores drivers that were replaced when DirectX was installed on your system. If a button is disabled, you do not have older drivers to which to revert. Contact the hardware manufacturer for the newest drivers.
Saving InformationTo save information gathered by DXDiag, click Save All Information. Information from all the pages is saved in a file under a name and in a location you choose.
Registry EditorsWindows 2000 contains two registry editors (Regedit and Regedt32) that you can use to change settings in your system registry, which stores information about how the hardware and software on your computer runs. Windows 2000 stores its configuration information in a set of database files, organized into subtrees, keys, and subkeys, and displayed in a tree format by the registry editors. Although the registry editors enable you to inspect and modify the registry, normally you do not need to do so, and making incorrect changes can damage your system. An advanced user who is prepared to edit and restore the registry can use a registry editor for tasks such as eliminating duplicate entries, deleting entries for programs that have been uninstalled or deleted, verifying options and settings, or configuring options that are not accessible through the normal user interface.If there is an error in your registry and your computer ceases to function properly, you can restore the registry to its state when you last successfully started your computer by starting the computer using the Last Known Good Configuration. For more information on the Last Known Good Configuration option, see “Safe Mode” earlier in this chapter.
Do not use a registry editor to edit the registry directly unless you have no alternative. The registry editors bypass the standard safeguards provided by administrative tools. These safeguards prevent you from entering conflicting settings or settings that are likely to degrade performance or damage your system. Editing the registry directly can have serious, unexpected consequences that can prevent the system from starting and require that you reinstall Windows 2000. To configure or customize Windows 2000, use the programs in Control Panel or Microsoft Management Console (MMC) whenever possible.
Before the registry is changed, it is highly recommended that you backup the registry files. For more information about backing up the registry, see “Emergency Repair Process” earlier in this chapter.The five subtrees, through which all registry keys, subkeys, and assigned values are accessed, are defined in Table 31.20. Table 31.20 Predefined Registry Subtrees
Key Definition
HKEY_CURRENT_USER Contains the root of the configuration information for the user who is currently logged on. The user's folders, screen colors, and Control Panel settings are stored here.
Warning

Part 7 Troubleshooting
This information is referred to as a user's profile.HKEY_USERS Contains the root of all user profiles on the computer.
HKEY_CURRENT_USER is an alias for a subkey in the HKEY_USERS subtree.
HKEY_LOCAL_MACHINE Contains configuration information particular to the computer (for any user).
HKEY_CLASSES_ROOT A subkey of HKEY_LOCAL_MACHINE\Software. The information stored here ensures that the correct program opens when you open a file by using Windows Explorer.
HKEY_CURRENT_CONFIG Contains information about the hardware profile used by the local computer at system startup.
Differences Between the Registry EditorsThe registry editors included with Windows 2000 include Regedt32 and Regedit. Each registry editor has advantages and disadvantages. You can perform most tasks with either registry editor, but certain tasks are easier with one registry editor.The following are advantages of Regedt32:· Using the Security menu, you can check for and apply access permissions to
subtrees, keys, and individual subkeys.· Each subtree is displayed in its own dedicated window, reducing clutter.· You can set an option to work in read-only mode.· You can edit values longer than 256 characters.· You can easily edit REG_MULTI_SZ entry values.· You can load multiple registry files at the same time.
From the Registry menu, select Load hive and open any registry file on disk. You can have more than one registry file open at one time. This feature is particularly useful when a computer with multiple installations of Windows 2000 cannot start from one of the installations due to a registry problem. If the cause of the problem is known, the user can start the computer from the secondary installation. Using Regedt32, the registry files from the primary installation can be loaded, edited, and saved, resolving the problem with the primary installation.
Figure 31.5 shows the Regedt32 interface.
Figure 31.5 Regedt32
The following are advantages of Regedit:· Regedit has more powerful search capabilities.
Note

Chapter 31 Troubleshooting Tools and Strategies 1441
· All the keys are visible in one Windows Explorer – like window.· You can bookmark favorite subkeys for fast access later on.· Regedit reopens to the subtree that was last edited.· You can export the registry to a text file.· You can import a registry file from the command line.
To import a registry file from the command line, type regedit /s regfilewhere regfile is the full path and file name of the registry file to be imported.
Figure 31.6 shows the Regedit interface.
Figure 31.6 Regedit
Regedit cannot display registry values larger then 256 characters. Values that contain a larger number of characters are ignored and not shown. These values can only be edited by Regedt32.
Using the Registry EditorsFolders represent subtrees, keys, and subkeys and are shown in the navigation pane. In the topic pane, the registry entries in a subkey are displayed. When you double-click a registry entry, it opens an editing dialog box.Within the registry editors, you can assign entries to new subkeys or alter the entries assigned to a currently selected subkey. Entries appear in the registry as strings that consist of three components separated by colons. For example, in the following registry entry:RefCount : REG_DWORD : 0x1
RefCount is the entry name, REG_WORD is the data type, and 0x1 is the value of the entry. For more information about using the registry editors for tasks such as saving a subtree, key, or subkey as a file, printing, importing, and exporting registry data, see Windows 2000 Professional Help and the Technical Reference to the Windows 2000 Registry (Regentry.chm) on the Windows 2000 Resource Kit companion CD.Regedt32 provides the following ways to update registry display:· Auto Refresh (on the Options menu) automatically updates the registry when
any change is made to registry data. · Refresh All (on the View menu) updates all of the information in all
windows. · Refresh Active (on the View menu) updates only the information in the
active window.
Note Important

Part 7 Troubleshooting
When Auto Refresh is in effect, a check mark appears next to the command and Refresh All and Refresh Active are unavailable. You cannot use Auto Refresh while viewing a remote registry. If you click Auto Refresh while displaying a remote registry, the manual refresh options (Refresh All and Refresh Active) are not available. Although Auto Refresh appears to work, the contents of the remote registry window are not automatically refreshed.
Networking ToolsWindows 2000 provides a large collection of networking client tools to optimize and troubleshoot network performance. Several of the most useful tools, shown in Table 31.21, are discussed in this section.
Table 31.21 Networking Troubleshooting Tools
Tool Overview Location
Network Diagnostics (Netdiag.exe)
Helps isolate networking and connectivity problems by performing a series of tests to determine the state of your network client and whether it is functional.
Support Tools on the Windows 2000 operating system CD
IP Configuration (Ipconfig.exe)
Displays the current configuration of the installed IP stack on a networked computer using TCP/IP.
%SystemRoot%\System32
NetBT Statistics (Nbtstat.exe)
Displays protocol statistics and current TCP/IP connections using NetBIOS over TCP/IP (NetBT), including NetBIOS name resolution to IP addresses.
%SystemRoot%\System32
Path Ping (Pathping.exe)
A route tracing tool that sends packets to each router, and then computes results based on the packets returned from each hop.
%SystemRoot%\System32
IP Security Monitor (Ipsecmon.exe)
Confirms whether your secured communications are successful by displaying the active security associations on local or remote computers.
%SystemRoot%\System32
NetDiagNetDiag is a command-line, diagnostic tool that helps isolate networking and connectivity problems by performing a series of tests to determine the state of your network client and whether it is functional. These tests and the network status information they expose help network administrators and support personnel identify and isolate network problems. Moreover, because this tool does not require parameters or switches, you can focus on analyzing the output, rather than training users on tool usage.NetDiag diagnoses network problems by checking all aspects of a client computer’s network configuration and connections. Beyond troubleshooting TCP/IP issues, it also examines a client computer’s Internet Packet Exchange (IPX) and NetWare configurations.
Note
Chapter 31 Troubleshooting Tools and Strategies 1443
NetDiag is part of the Support Tools collection on the Windows 2000 operating system CD. For information about NetDiag, see Windows 2000 Support Tools Help. For information about installing and using the Windows 2000 Support Tools and Support Tools Help, see the file Sreadme.doc in the Support\Tools folder of the Windows 2000 operating system CD. Run NetDiag from a command prompt rather than from Windows Explorer to see the results upon completion of the tests. Because the results fill more than one normal command prompt screen, use the /l switch to log the results to the text file NetDiag.log. The tests take a few minutes to complete.
NetDiag SyntaxThe command-line syntax for NetDiag is as follows:netdiag [[/q|/v|/debug][/l][/d:DomainName][/fix][/dcaccountenum] [/test:TestName|/skip:TestName]]
No switches or syntax need to be specified, but several are available, primarily to increase or decrease the level of detail in NetDiag reports. These switches are shown in the Table 31.22.Table 31.22 NetDiag Switches
Switch Name Function
/q Quiet output Lists only tests that return errors./v Verbose output Lists more detail from test data as
tests are performed./debug Most verbose output Lists the most detail from of test
data with reasons for success or failure.
(continued)Table 31.22 NetDiag Switches (continued)
Switch Name Function
/l Log output Stores output in NetDiag.log, in the current folder.
/d:DomainName Find DC Finds a domain controller in the specified domain.
/fix Fix DNS problems Only applies to domain controllers./DCAccountEnum Domain Controller Account
EnumerationEnumerates domain controller computer accounts.
/test: Perform single test Runs only the specified test./skip: Skip one test Skips the specified test. TestName Test name Test specified. For a complete list,
see Table 31.23./? Help Displays this list.

Part 7 Troubleshooting
NetDiag prints the string [FATAL] when it detects a condition that needs to be fixed immediately. The string [WARNING] signals a failure condition that does not require immediate attention.
NetDiag TestsRun NetDiag whenever a computer is having network problems. The tool tries to diagnose the problem and can even flag problem areas for closer inspection.NetDiag examines DLL files, output from other tools, and the system registry to find potential problem spots. It checks which network services or functions are enabled and then runs the network configuration tests listed in Table 31.23, in the order presented.
If the computer is not running one of the network troubleshooting tools listed in Table 31.23, that test is skipped and no results are displayed, not even an acknowledgement that the test was skipped.
Table 31.23 NetDiag Tests
Test Name Function Details
NDIS Network Adapter Status
Lists the network adapter configuration details, including the adapter name, configuration, media, globally unique identifier (GUID), and statistics. If this test shows an unresponsive network adapter, the remaining tests are aborted.
IPConfig IP Configuration Provides most of the TCP/IP information normally obtained from carrying out the ipconfig /all command, pings the DHCP and WINS servers, and checks that the default gateway is on the same subnet as the local computer’s IP address.
Member Domain Membership Confirms details of the primary domain, including computer role, domain name, domain GUID. Checks that NetLogon service is started, adds the primary domain to the domain list, and queries the primary domain security identifier (SID).
NetBTTransports Transports Test Lists NetBT transports managed by the redirector. Prints error information if no NetBT transports are found.
Autonet Autonet Address Checks whether any interface is using Automatic Private IP Addressing (APIPA).
IPLoopBk IP Loopback Ping Pings the IP loopback address of 127.0.0.1.DefGw Default Gateway Pings all the default gateways for each interface.NbtNm NetBT Name Test Similar to the nbtstat -n command. It checks that the workstation
service name <00> equals the computer name. It also checks that the messenger service name <03>, and server service name <20> are present on all interfaces and are not in conflict.
WINS WINS Service Test Sends NetBT name queries to all the configured WINS servers.Winsock Winsock Test Uses Windows Sockets WSAEnumProtocols() function to retrieve
available transport protocols.DNS DNS Test Checks whether DNS cache service is running, and whether the
Note

Chapter 31 Troubleshooting Tools and Strategies 1445
computer is correctly registered on the configured DNS servers. If the computer is a domain controller, DNS Test checks to see whether all the DNS entries in Netlogon.dns are registered on the DNS server. If the entries are incorrect and the /fix option is on, it tries to reregister the domain controller record on a DNS server.
(continued)Table 31.23 NetDiag Tests (continued)
Test Name Function Details
Browser Redirector and Browser Test
Checks whether the workstation service is running. Retrieves the transport lists from the redirector and the browser. Checks whether the NetBT transports are in the list from NetBT transports test. Checks whether the browser is bound to all the NetBT transports and whether the computer can send mailslot messages. Tests both via browser and redirector.
DsGetDc DC Discovery Test Finds a generic domain controller from directory service, finds the primary domain controller, and then finds a Windows 2000 domain controller. If the tested domain is the primary domain, checks whether the domain GUID stored in Local Security Authority (LSA) is the same as the domain GUID stored in the domain controller. If not, the test returns a fatal error; if the /fix option is used, DsGetDC tries to fix the GUID in LSA.
DcList DC List Test Gets a list of domain controllers in the domain from the directory service on an active domain controller. If there is no domain controller information for this domain, tries to get an active domain controller from the directory service (similar to DsGetDc test). Gets the domain controller list from the target domain controller and checks the status of each domain controller. Adds them all the to the list of the tested domain. If the preceding sequence fails, uses the browser to obtain the domain controllers, checks their status, and adds them to the list. If the DcAccountEnum registry entry option is enabled, NetDiag tries to get a domain controller list from Security Accounts Manager (SAM) on the discovered domain controller.
Trust Trust Relationship Test
Tests trust relationships to the primary domain only if the computer is a member workstation, member server, or domain controller. Checks that the primary domain SID is correct and contacts an active domain controller. Connects to the SAM server on the domain controller and uses the domain SID to open the domain to verify that the domain SID is correct. Queries information of the secure channel for the primary domain. If the computer is a backup domain controller, reconnects to the primary domain controller. If the computer is a member workstation or server, sets a secure channel to each domain controller listed for this domain.
(continued)

Part 7 Troubleshooting
Table 31.23 NetDiag Tests (continued)
Test Name Function Details
Kerberos Kerberos Test Tests Kerberos protocols only if the computer is a member computer or domain controller and the user is not logged on to a Windows 2000 domain account and not logged on to a local account. Connects to LSA and looks up the Kerberos package. Gets the ticket cache of the Kerberos package and checks whether the Kerberos package has a ticket for the primary domain and the local computer.
LDAP Lightweight Directory Access Protocol (LDAP) Test
Run only if the domain controller is running directory services and the computer is a member or domain controller. Tests LDAP on all the active domain controllers found in the domain and creates an LDAP connection block to the domain controller, then searches in the LDAP directory with three types of authentication: “unauthenticated,” NTLM, and “Negotiate.” If the /v (verbose) switch is on, prints the details of each entry retrieved.
Route Route test Prints the static and persistent entries in the routing table, including a Destination Address, Subnet Mask, Gateway Address, Interface, and Metric.
NetStat NetStat test Similar to NetStat tool. Displays statistics of protocols and current TCP/IP network connections.
Bindings Bindings test Lists all bindings, including interface name, lower module name, upper module name, whether the binding is currently enabled, and the owner of the binding.
WAN WAN test Displays the settings and status of current active remote access connections.
Modem Modem test Retrieves all available line devices. Displays the configuration of each line device.
NetWare NetWare test Determines whether NetWare is using the directory tree or bindery logon process, determines the default context if NetWare is using the directory tree logon process, and finds the server to which the host attaches itself at startup.
IPX IPX test Examines the network’s IPX configuration, including frame type, Network ID, RouterMTU, and whether packet burst or source routing are enabled.
IPSec IP Security test Checks the current status of the IP Security Policy Agent service. It also reports which IPSec policy (if any) is currently active for the computer.
IPConfigIPConfig is a command-line tool that displays the current configuration of the installed IP stack on a networked computer using TCP/IP.

Chapter 31 Troubleshooting Tools and Strategies 1447
Run IPConfig from a command prompt rather than from Windows Explorer to see the resulting display.
IPConfig SyntaxThe command-line syntax for IPConfig is as follows:ipconfig [/?|/all|/release [adapter]|/renew [adapter] |/flushdns|/registerdns|/showclassid adapter |/setclassid adapter [classidtoset]]
adapter Full name or pattern with '*' and '?' to 'match', * matches any character, ? matches one character.
The default is to display only the IP address, subnet mask and default gateway for each adapter bound to TCP/IP.
For /release and /renew, if no adapter name is specified, then the IP address leases for all adapters bound to TCP/IP will be released or renewed.
For SetClassID, if no class ID is specified, then the ClassID is removed.
IPConfig SwitchesTable 31.24 lists the IPConfig command-line switches.Table 31.24 IPConfig Switches
Switch Effect
/all Produces a detailed configuration report for all interfaces./release <adapter> Releases the IP address for a specified adapter. If no adapter
name is specified, releases the DHCP leases for all adapters bound to TCP/IP.
/renew <adapter> Renews the IP address for the specified adapter. If no adapter name is specified, renews the DHCP leases for all adapters bound to TCP/IP.
/flushdns Removes all entries from the DNS Resolver Cache./registerdns Refreshes all DHCP leases and reregisters DNS names./displaydns Displays the contents of the DNS Resolver Cache.
(continued)Table 31.24 IPConfig Switches (continued)
Switch Effect
/showclassid adapter Displays all the DHCP class IDs allowed for the specified adapter.
/setclassid adapter Modifies the DHCP class ID for the specified adapter./? Displays this list.

Part 7 Troubleshooting
It is recommended that only a network administrator or support personnel use many of the advanced features of IPConfig. Using these commands incorrectly can cause problems with the client system’s connection to the server.
\Run IPConfig to check the status of a computer’s TCP/IP configuration. When used with the /all switch, it displays a detailed configuration report for all interfaces, including any configured WAN miniports (typically used for remote access or virtual private network [VPN] connections). The following is a sample report:
Windows 2000 IP Configuration
Host Name . . . . . . . . . . . . : TESTPC1 Primary Domain Name . . . . . . . : reskit.com Node Type . . . . . . . . . . . . : Hybrid IP Routing Enabled. . . . . . . . : No WINS Proxy Enabled. . . . . . . . : No DNS Suffix Search List. . . . . . : ntcorpdc1.reskit.com dns.reskit.com reskit.com
Ethernet adapter Local Area Connection:
Connection-specific DNS Suffix . : dns.reskit.com Description . . . . . . . . . . . : Acme XL 10/100Mb Ethernet NIC Physical Address. . . . . . . . . : 00-CC-44-79-C3-AA DHCP Enabled. . . . . . . . . . . : Yes Autoconfiguration Enabled . . . . : Yes IP Address. . . . . . . . . . . . : 172.16.245.111 Subnet Mask . . . . . . . . . . . : 255.255.248.0 Default Gateway . . . . . . . . . : 172.16.240.1 DHCP Server . . . . . . . . . . . : 172.16.248.8 DNS Servers . . . . . . . . . . . : 172.16.55.85 172.16.55.134 172.16.55.54 Primary WINS Server . . . . . . . : 172.16.248.10 Secondary WINS Server . . . . . . : 172.16.248.9 Lease Obtained. . . . . . . . . . : Friday, March 05, 1999 2:21:40 PM Lease Expires . . . . . . . . . . : Sunday, March 07, 1999 2:21:40 PM
NBTStatNBTStat is a command-line tool for troubleshooting NetBIOS name over TCP/IP (NetBT) resolution problems. It displays protocol statistics and current TCP/IP connections using NetBT. When a network is functioning normally, NetBT resolves NetBIOS names to IP addresses. It uses several options for NetBIOS name resolution, including local cache lookup, WINS server query, broadcast, Lmhosts lookup, Hosts lookup, and DNS server query.
Caution

Chapter 31 Troubleshooting Tools and Strategies 1449
Run NBTStat from a command prompt rather than from Windows Explorer to see the resulting display.
NBTStat SyntaxThe command-line syntax for NBTStat is as follows:nbtstat [-a RemoteName] [-A IP address] [-c] [-n] [-r] [-R] [-RR] [-s] [-S] [interval]
RemoteName Remote host machine NetBIOS name.IP address Dotted decimal representation of the IP address.interval Redisplays selected statistics, pausing interval seconds between each display. Press Ctrl+C to stop redisplaying statistics.
NBTStat SwitchesNBTStat removes and corrects preloaded entries using case-sensitive switches as shown in Table 31.25.
Table 31.25 NBTStat Switches
Switch Name Function
-a <NetBIOS name>
Adapter status by NetBIOS name
Returns the NetBIOS name table and media access control (MAC) address of the address card for the specified computer name.
-A <IP address>
Adapter status by IP address
Lists the same information as -a when given the target’s IP address.
-c Cache Lists the contents of the NetBIOS name cache.-n Names Displays the names registered locally by NetBIOS applications such
as the server and redirector.-r Resolved Displays a count of all names resolved by broadcast or WINS server.-R Reload Purges the name cache and reloads all #PRE entries from LMHosts.
(continued)Table 31.25 NBTStat Switches (continued)
Switch Name Function
-RR Release Refresh Sends name release packets to the WINS server and starts a refresh, reregistering all names with the name server.
-s Sessions by NetBIOS names
Lists the NetBIOS sessions table converting destination IP addresses to computer NetBIOS names.
-S Sessions by IP address Lists the current NetBIOS sessions and their status, with the IP addresses.
[Number] Interval Redisplays selected statistics at intervals specified in seconds, pausing between each display. Press CTRL+C to stop redisplaying statistics.
-? Help Displays this list.

Part 7 Troubleshooting
NBTStat output is in the form of a table. For example, nbtstat -S lists the current NetBIOS sessions by IP address, including status, as in the following example:Local Area Connection:Node IpAddress: [172.16.0.142] Scope Id: []
NetBIOS Connection Table
Local Name State In/Out Remote Host Input Output------------------------------------------------------------------TESTPC1 <00> Connected Out 172.16.210.25 6MB 5MBTESTPC1 <00> Connected Out 172.16.3.1 108KB 116KBTESTPC1 <00> Connected Out 172.16.3.20 299KB 19KBTESTPC1 <00> Connected Out 172.16.3.4 324KB 19KBTESTPC1 <03> Listening
The following example shows a sample NetBIOS name table for a client running Windows 2000 Professional on a Windows 2000 Server – based network, using the nbtstat -n command. This example shows the sixteenth byte for special names, plus the type of NetBIOS name (unique or group).Local Area Connection:Node IpAddress: [192.168.17.41] Scope Id: []
NetBIOS Local Name Table
Name Type Status --------------------------------------------- WIN2KPROF <00> UNIQUE Registered NOAM <00> GROUP Registered WIN2KPROF <03> UNIQUE Registered WIN2KPROF <20> UNIQUE Registered NOAM <1E> GROUP Registered USER1 <03> UNIQUE Registered In this example, the following NetBIOS special names are identified:· computer\0x00 (shown as <00> in the example) indicates the computer name
associated with the Workstation service. · domain\0x00 indicates the domain to which this computer belongs. · computer\0x03 indicates the computer name associated with the Messenger
service.· computer\0x20 indicates the computer name associated with the Server
service.· domain\0x1E indicates that this computer can serve as a backup browser in
this domain.· username\0x03 displays the user name of the account currently logged on to
the computer.
Possible NetBIOS special names found in NBTStat are described in Table 31.26.

Chapter 31 Troubleshooting Tools and Strategies 1451
Table 31.26 Samples of NetBIOS Special Names
Special Name Description
Registered unique user name:<USERNAME><03> Registers the name of the user currently logged on
in the WINS database so net send commands can be sent to specified user names.
Registered unique computer names:<COMPUTER><00> Used by Microsoft networking workstations to
receive second-class mailslot requests. This is the computer name registered for workstation services by a WINS client and is needed to receive mailslot requests.
<COMPUTER><03> The computer name registered for the Messenger service on a WINS client.
<COMPUTER><20> The name registered for the Server service on a Windows 2000–based WINS client.
<COMPUTER><BE> The unique name registered when the Network Monitor agent is started on the computer.
<COMPUTER><BF> The group name registered when the Network Monitor agent is started on the computer. If this name is not 15 characters in length, it is padded with plus (+) symbols.
<COMPUTER><1F> The unique name registered for network dynamic data exchange (NetDDE) when the NetDDE service is started on the computer.
(continued)Table 31.26 Samples of NetBIOS Special Names (continued)
Special Name Description
Registered group names:<01><02>MSBROWSE<02><01>
Used by master browser servers to periodically announce their domain on a local subnet. This announcement contains the domain name and the name of the master browser server for the domain. In addition, master browser servers receive the domain announcements sent to this name and maintain them in their internal browse list with the announcer’s computer name.
<DOMAIN><00> Used by workstations and servers to process server announcements to support NTLM. Servers running Microsoft® Windows® for Workgroups, Windows 95, Windows 98, Windows NT, and Windows 2000 do not broadcast this name unless
Part 7 Troubleshooting
the LMAnnounce option is enabled in the server’s properties.
<DOMAIN><1B> Used to identify the domain master browser name, which is a unique name that only the domain controller can add. The domain controller processes GetBrowserServerList requests on this name. WINS assumes that the computer that registers a domain name with the <1B> character is the domain controller. The 1B entry is resolved when the NetGetDcName function is called.
<DOMAIN><1C> Used for the internet group name, which the domain controllers register. The internet group name is a dynamic list of up to 25 computers that have registered the name. This is the name used to find a Windows 2000 domain controller for pass-through authentication. The 1C entry is resolved when the NetGetAnyDcName function is called.
<DOMAIN><1D> Used to identify a segment master browser (not a domain master browser). The master browser adds this name as a unique NetBIOS name when it starts. Workstations announce their presence to this name so that master browsers can build their browse list.
<DOMAIN><1E> Used for all domain-wide announcements by browser servers in a Windows 2000–based server domain. This name is added by all browser servers and potential servers in the workgroup or domain. All browser election packets are sent to this name.
PathPingPathPing is a command-line route tracing tool that combines features of the tools Ping and TraceRt with additional information that neither provides. PathPing sends packets to each router on the way to a final destination over a period of time, and then computes results based on the packets returned from each hop. Since PathPing shows the degree of packet loss at any specified router or link, you can pinpoint which routers or links might be causing network problems. Run PathPing from a command prompt rather than from Windows Explorer to see the resulting display.
PathPing SyntaxThe command-line syntax for PathPing is as follows:pathping [-n] [-h maximum_hops] [-g host-list] [-p period] [-q num_queries] [-w timeout] [-T] [-R] target_name

Chapter 31 Troubleshooting Tools and Strategies 1453
PathPing SwitchesA number of switches are available, as shown in Table 31.27.Table 31.27 PathPing Switches
Switch Name Function
-n Host names Does not resolve addresses-to-host names.-h <max_hops> Maximum hops Maximum number of hops to search for
target. The default is 30.-g <host list> Host list A loose source route along host-list from
host to target system. Type in a series of router IP addresses separated by spaces for testing.
-p <milliseconds> Period Time, in milliseconds, to wait between pings. The default is 250 milliseconds.
-q <num_queries> Number of queries Number of queries per hop. The default is 100.
-w <milliseconds> Time out Time, in milliseconds, waited for each reply. The default is 3000 milliseconds.
-T Layer-2 Priority Test connectivity to each hop with Layer-2 priority tags.
-R RSVP Test whether each hop is RSVP-aware.-? Help Display this list.
PathPing ReportsThe following is a sample PathPing report. Note that the compiled statistics that follow the hop list indicate packet loss at each router.Tracing route to testpc1.dns.reskit.com [7.54.1.196]over a maximum of 30 hops: 0 172.16.87.35 1 172.16.87.218 2 192.168.52.1 3 192.168.80.1 4 7.54.247.14 5 7.54.1.196
Computing statistics for 125 seconds... Source to Here This Node/LinkHop RTT Lost/Sent = Pct Lost/Sent = Pct Address 0 172.16.87.35 0/ 100 = 0% | 1 41ms 0/ 100 = 0% 0/ 100 = 0% 172.16.87.218 13/ 100 = 13% | 2 22ms 16/ 100 = 16% 3/ 100 = 3% 192.168.52.1 0/ 100 = 0% |
Part 7 Troubleshooting
3 24ms 13/ 100 = 13% 0/ 100 = 0% 192.168.80.1 0/ 100 = 0% | 4 21ms 14/ 100 = 14% 1/ 100 = 1% 7.54.247.14 0/ 100 = 0% | 5 24ms 13/ 100 = 13% 0/ 100 = 0% 7.54.1.196
Trace complete.
When PathPing is run, the first results you see list the route as it is tested for problems. This is the same path shown by TraceRt. PathPing then displays a busy message while it gathers information from all the routers previously listed and the links between them. At the end of this period, it displays the test results. The columns “This Node/Link Lost/Sent = Pct” and “Address” contain the most useful information. In the preceding sample report, the link between 172.16.87.218 (hop 1), and 192.168.52.1 (hop 2) is dropping 13 percent of the packets. All other links are working normally. The routers at hops 2 and 4 also drop packets addressed to them, but this loss does not affect their forwarding path.The loss rates displayed for the links (marked as a “|” in the rightmost column) indicate losses of packets being forwarded along the path. This loss indicates link congestion. The loss rates displayed for routers (indicated by their IP addresses in the rightmost column) indicate that their CPUs or packet buffers might be overloaded. These congested routers might also be a factor in end-to-end problems, especially if packets are forwarded by software routers.
IP Security MonitorThe IP Security Monitor (IPSecMon) is a Windows-based tool used to confirm whether your secured, IP-based communications are successful by displaying the active security associations on local or remote computers. For example, you can use IPSecMon to determine whether there has been a pattern of authentication or security association failures, possibly indicating incompatible security policy settings. IPSecMon can be run locally or remotely if you have a network connection to the remote computer. From the Start menu, click Run, and then type:ipsecmon <computer name>An entry is displayed for each active security association, as shown in Figure 31.7. The information contained in each entry includes the name of the active IPSec policy, the active Filter Action and IP Filter List (including details of the active filter), and the tunnel endpoint (if one was specified in the active IPSec policy).
Figure 31.7 IP Security Monitor
Entry information can also provide statistics for tuning and troubleshooting, including the following:· The number and type of active security associations.

Chapter 31 Troubleshooting Tools and Strategies 1455
· The total number of master and session keys (Main and Quick modes). Successful IPSec security associations initially cause one master key and one session key. Subsequent key regenerations are shown as additional session keys.
· The total number of confidential (Encapsulating Security Payload or ESP) or authenticated (ESP or Authentication Header — AH) bytes sent or received.
Because ESP provides authenticity and confidentiality, both counters are incremented.
· The total number of soft associations.
The refresh rate is the only configurable option in IPSecMon. By default, the statistics update every 15 seconds and are accumulated with each communication that uses IPSec. A Bad SPI (Security Parameters Index) error might occur if a key lifetime value is set too low, or if the security agent has expired but the sender continues to transmit data. To determine and correct the problem, run IPSecMon, and then examine the number of rekeys.If the number of rekeys is very large compared to the amount of time the connections have been active, set the key lifetimes in the policy longer. Good values for high-traffic Ethernet connections are greater than 50 MB and longer than five minutes.This is likely to significantly reduce bad SPIs.For more information about IPSec, see “Internet Protocol Security” in the Microsoft®
Windows® 2000 Server Resource Kit TCP/IP Core Networking Guide.
Troubleshooting ProceduresThis section provides basic instructions for troubleshooting problems that might occur when running Windows 2000. For troubleshooting information related to topics not found in this chapter, see the related chapter in this book. Use the Quick Guide at the beginning of this chapter to determine which chapter contains the troubleshooting information you are looking for.
Using the Hardware Compatibility ListThe most common cause of hardware problems is using hardware that is not compatible with Windows 2000. The Hardware Compatibility List (HCL) outlines the hardware components that have been tested for use with Windows 2000. It is especially important to refer to the HCL if you plan to use modems, tape backup units, and SCSI adapters. If several different models of a device are available from one manufacturer, only those models included in the HCL are supported; a slightly different model might cause problems. Where special criteria are required for a model to be supported (for example, a particular version of driver), this information is described in the HCL.
Note

Part 7 Troubleshooting
The HCL is a Web-based searchable database which is updated as additional hardware is tested and approved. For more information about supported hardware devices, see the HCL link on the Web Resources page at http://windows.microsoft.com/windows2000/reskit/webresources.
Checking Hardware for ProblemsIf your hardware components are listed on the HCL, and you still have problems, try the following:1. Ensure that all physical connections are secure, that expansion cards are fully
inserted in their slots, and that cables are tight. You might also try using new cables or moving a card to a different slot.
2. Check that resources, such as IRQs, DMA channels, and I/O addresses, are properly assigned and configured. For instances of device conflicts, reassign a configurable device to use an available resource.
3. Check with the manufacturer for possible updated Windows 2000 drivers or for known issues and workarounds.
Even if you are sure that the termination is correct, open the computer case and check again. Use active rather than passive SCSI terminators whenever possible.
Terminators provide the correct impedance at the end of a cable. If the impedance is too high or too low, internal signal reflections can occur. These echoes represent noise on the cable and can corrupt subsequent signals, resulting in degraded performance or data loss. Passive terminators are resistors with the appropriate resistance value for the characteristic impedance of the cable. Active terminators can better maintain the correct impedance necessary to eliminate signal reflection.
If a two-foot cable is long enough to connect the device to the controller, do not use a three-foot cable just because one is available. The acceptable lengths vary depending on factors such as whether you are using basic SCSI, SCSI-2, wide SCSI, ultra-wide SCSI, or differential SCSI; the quality of the termination; and the quality of the devices being used. Consult your hardware documentation for more information.I/O and interrupt conflicts that went unnoticed with other operating systems must be resolved with Windows 2000. Likewise, pay close attention to CMOS and EISA BIOS configuration parameters when using Windows 2000, such as ensuring the Plug and Play OS BIOS parameter setting is set to No or Disabled, and enabling Advanced Configuration and Power Interface (ACPI) support on ACPI-compatible systems. For more information, see your motherboard or system manual documentation. There are several articles about memory problems, memory parity errors, SCSI problems, and other hardware information in the Knowledge Base. For information about these issues, see the Knowledge Base link on the Web Resources page at http://windows.microsoft.com/windows2000/reskit/webresources.
If you are using a SCSI device, check its termination. NoteVerify that the SCSI cables are not longer than necessary. Check your hardware configuration. Check the Knowledge Base for information about hardware problems.

Chapter 31 Troubleshooting Tools and Strategies 1457
Troubleshooting Problems with System Startup and Shutdown
Problems which prevent the computer from completing startup or shut down can be frustrating. However, there are several techniques that you can use to isolate and solve these problems.
Startup ProblemsIf a computer fails to complete the Windows 2000 startup process, note whether any new hardware or software has been added since the last startup. If so, remove the new component to see whether this resolves the problem.If nothing has been added or changed on the system, restart the computer in Safe Mode. If successful, you might be able to resolve the problem from within Safe Mode. Starting Windows 2000 in Safe Mode can help you resolve issues that occur when you start Windows 2000 normally, including (but not limited to):· Setup freezes during the first restart.· Error messages are displayed.· The system stops responding.· You lose functionality.
Starting Windows 2000 in Safe Mode bypasses the current configuration and loads a minimal configuration, enabling only basic Windows 2000 device drivers and system services. If the startup failure does not occur in Safe Mode, you might have a conflict with hardware settings or system resources; incompatibilities with Windows programs, services, or drivers; or registry damage.In Safe Mode, use the following tasks to find a startup problem. Many of these steps require changes to system configuration files. The changes are to isolate the conflict that is causing the problem and are not intended to be permanent. For more information about Safe Mode, see “Safe Mode” earlier in this chapter.
· To troubleshoot startup problems in Safe Mode1. To enter Safe Mode, restart the computer, and then press F8 when the screen
displays the prompt “For troubleshooting and advanced startup options for Windows 2000, press F8.”
2. On the Windows 2000 Advanced Options Menu, select Safe Mode, and then press ENTER. Determine whether the startup failure is resolved. If not, check for hardware problems such as defective devices, improper installation, cabling, or connector problems. Remove any newly added hardware to see whether the problem is resolved.If you cannot complete the startup process and you suspect your computer might have corruption in the registry, restart the computer, press F8, and on the Windows 2000 Advanced Options Menu, select Last Known Good Configuration. Press ENTER.

Part 7 Troubleshooting
3. If you can complete the startup process in Safe Mode, start System Information. Open the Run dialog box, and then type: msinfo32 For more information about System Information, see “System Information” earlier in this chapter.
4. Within System Information, check the Conflicts/Sharing section under Hardware Resources and the Problem Devices section under Components for known issues. Address any issues found by reconfiguring or disabling the devices in conflict, and then restart the computer. If you disabled a device to resolve the problem, check that the device is listed on the HCL and that it was installed correctly; or check it on another computer to see whether the device might be defective. Try using Windows Update to see whether any updated drivers are available. If not, try visiting the manufacturer’s Web site to see whether an updated driver is available.
5. If there were no conflicting devices reported in System Information, under Software Environment, check the Startup Programs section for programs that are automatically started when the computer is started. Disable these programs and restart the system.
Links to startup programs can be in a variety of places, including in the registry under the following subkeys:HKEY_LOCAL_MACHINE\SOFTWARE\Microsoft\Windows\CurrentVersion\RunHKEY_LOCAL_MACHINE\SOFTWARE\Microsoft\Windows\CurrentVersion\RunOnceHKEY_USERS\.DEFAULT\Software\Microsoft\Windows\CurrentVersion\RunOnceHKEY_CURRENT_USER\Software\Microsoft\Windows\CurrentVersion\RunOnceAlso look for startup programs in C:\Documents and Settings\logon_name\Start Menu\Programs\Startup and in C:\Documents and Settings\All Users\Start Menu\Programs\Startup. If the user is a member of the local administrators group, check C:\Documents and Settings\Administrator\Start Menu\Programs\Startup.
If the problem is resolved by disabling the startup programs, re-enable them one at a time, and restart the computer each time to determine which program causes the startup failure.
6. If disabling the Startup Programs does not resolve the problem, check the boot log file, %SystemRoot%\Ntbtlog.txt. Rename this file to indicate that it is a Safe Mode boot log file, and compare its contents to a recently saved boot log file from a normally started session. If a normal boot log does not exist, create one by restarting the computer, pressing F8 at the “Starting Windows” screen
Note

Chapter 31 Troubleshooting Tools and Strategies 1459
to display the Windows 2000 Advanced Options Menu, selecting Enable Boot Logging, and then pressing ENTER. The normal boot log file can indicate which driver file did not load properly.
Some startup problems occur so early in the startup process that they prevent the system from saving the boot log file to disk.
Examine the Safe Mode version of the boot log file to see which drivers were not loaded. This list of skipped drivers is a good starting place to look for the driver that is causing the startup process to fail.
If the problem is a Stop message (also known as a blue screen), see the troubleshooting tips in the chapter “Windows 2000 Stop Messages” in this book.
Shutdown ProblemsThe Windows 2000 shutdown process involves sending messages to the installed devices, system services, and applications to notify them that Windows is preparing to shut down. The system waits for responses from open applications to make sure that they shut down properly, and save unsaved data to disk. Each running device, system service, and application usually respond to the shutdown message, indicating that it can be closed.Typical causes for problems with Windows 2000 shutdown include:· Device drivers not responding correctly, if at all.· System services not responding or sending busy request messages to the
system.· Applications not responding, particularly 16-bit Windows programs.
To resolve problems with shutdown, try the following suggestions:· Check that the system properly shuts down in Safe Mode. If so, check the boot
log file. Note the services that were disabled under Safe Mode, stop them one at a time in normal mode, and then shut down to see whether the system works properly. After the problem driver or service is identified, if the file is corrupted, either reinstall it, search for an update, or uninstall it until the problem can be resolved.
· Press CTRL+SHIFT+ESC to start Task Manager and see which applications are currently running. Manually quit the applications before shutting down to see whether that resolves the problem.
· Check with your computer manufacturer to be sure that you have the latest BIOS update for the system.
If the problem occurs immediately after a change to the system, such as installing or upgrading applications, system services, or hardware with device drivers, undo the last change made to the system and test the system.
Note

Part 7 Troubleshooting
Using Windows File ProtectionEarlier operating systems did not prevent shared system files from being overwritten by program installations, causing unpredictable performance results, such as program errors or an unstable operating system. This problem affected files such as dynamic-link libraries (DLLs) and executable (EXE) files. Windows 2000 includes a feature called Windows File Protection (WFP) that prevents the replacement of certain protected system files and significantly minimizes file version mismatches. WFP uses the digital file signatures and catalog files generated by code signing to verify whether protected system files are the correct Microsoft versions. WFP does not generate signatures. WFP is notified when a file in a protected folder is modified. WFP determines which file was changed, and if the file is protected, WFP compares the digital file signature of the replacement file to those in the catalog files to determine whether the new file has been certified by Microsoft. If it has not, the original file is restored from the %SystemRoot%\System32\Dllcache folder (if it is located in the Dllcache folder) or from the Windows 2000 operating system CD.
Checking for Correct File VersionsYou can use the System File Checker (SFC) tool to scan for system files that have been changed by applications and alert you to discovered changes. If necessary, SFC prompts you to restore the original file from the Windows 2000 operating system CD.For more information about using SFC, see “System File Checker” earlier in this chapter.
Updating System Files and DriversWindows Update lets you update system files and device drivers specific to your computer. Any new system files downloaded by using Windows Update are automatically registered with WFP.For more information about updating your computer’s Windows 2000 installation, see “Windows Update” earlier in this chapter.
Checking Whether a Required File Is Missing or DamagedIf a particular hardware device or system service fails to work properly after starting the computer, especially after encountering problems with disk corruption, it is possible that the driver file did not properly load when the computer was started. To determine whether failures when loading driver files are the problem, restart the computer and enable boot logging. For information about how to enable boot logging, see “Safe Mode” earlier in this chapter.
· To check for driver files that did not load at system startup1. Restart the computer. 2. At the Starting Windows screen, at the prompt “For troubleshooting and
advanced startup options for Windows 2000, press F8” press F8 to display the Windows 2000 Advanced Options Menu.

Chapter 31 Troubleshooting Tools and Strategies 1461
3. Select Enable Boot Logging, and then press ENTER.4. After the computer has completed the startup process, start Windows Explorer
and navigate to the %SystemRoot% folder. Locate the file Ntbtlog.txt and double-click it to open it in Notepad.
The log file lists a long series of drivers that the computer loaded or attempted to load. Files that were loaded are preceded by the phrase “Loaded driver,” followed by the path and file name of the specific driver. Files that did not load are preceded by the phrase “Did not load driver.” A quick scan for these listings can help you identify the location and names of files that might be missing or corrupted. For more information about the choices in the Windows 2000 Advanced Options Menu, see “Safe Mode” earlier in this chapter.If a file that is needed to load or run Windows 2000 becomes corrupted or is deleted, the system typically displays an error message and might generate information in the event log. You can use this information to find the problem.On rare occasions an executable file or DLL does not report missing or corrupted files. If there is no indication of an error, but you think some component did not start correctly due to a required file that is missing or corrupted, you can run a few tests to attempt to resolve the problem.Check to see whether all of the Windows 2000 system files exist and appear to be uncorrupted. Symptoms of file corruption can be unpredictable, but include a file being an unusual size (for example, zero bytes or larger than its original size) or having a date or time that does not match the installation date. Compare files in %SystemRoot%\System32 and its subfolders with files in these folders on another computer running the same Windows 2000 version and Service Packs. Run SFC to inspect all installed system files. Also, run an antivirus program designed to work with Windows 2000 to scan for virus corruption.If you think that you might be having a problem with a missing Windows 2000 system file, you can run Windows 2000 Setup and repair the installation by running the Fast Repair process. For more information about the Fast Repair process, see “Emergency Repair Process” earlier in this chapter.
Device Driver ProblemsCorrupted or faulty device drivers and system services can cause problems such as hardware peripheral device or system feature failure and startup failures. To troubleshoot these problems, you need to isolate the cause.
Checking Device ConfigurationConflicts between devices that are trying to use the same system resources can cause errors. You can view your device configuration by using either System Information or Device Manager.System Information collects information such as devices installed or device drivers loaded, and displays the associated system topics. Device Manager provides a central place where you can verify that devices are configured correctly, and to change device resource settings.

Part 7 Troubleshooting
· To check for resource conflicts among devices1. Open System Information.2. Expand the Components category, and then select Problem Devices. Devices
with hardware conflicts are identified.3. To determine the resource in conflict, expand the Hardware Resources
category and select Conflicts/Sharing. If neither of the devices are listed under Problem Devices, they are probably sharing the resource.
Peripheral Component Interconnect (PCI) devices can share resources.
4. If necessary, change the devices’ resource settings by using Device Manager. To open Device Manager, in Control Panel click System, click the Hardware tab, and then click Device Manager.
If you use multiple hardware profiles, first select the appropriate configuration by using the list in the device’s Resource properties page.
For more information about using System Information to check for device conflicts, see “System Information” earlier in this chapter. For more information about Device Manager and troubleshooting problems with devices, see “Device Management” in this book. For more information about troubleshooting problems related to device detection, see “Setup and Startup” in this book.
Identifying a Problem DriverIf you can log on to your computer, use the Drivers tool on the Windows 2000 Professional Resource Kit companion CD to display information about the device drivers that are currently loaded. If you have previously printed the output from the Drivers tool (by redirecting the output to a printer or a file), you can compare it to your current output. You can also run the Drivers tool on a similar computer and compare the results.It might also be helpful to look at System Information’s display on Drivers and Problem Devices. For more information about System Information, see “System Information” earlier in this chapter.
Identifying a Service That Does Not Start Some services are configured to start automatically on Windows 2000. The specific services depend on your computer configuration, and which network services and protocols you are using. You can use the Services option in Administrative Tools to view which services are set to start automatically and which did not start, as seen in Figure 31.8.
Figure 31.8 System Services Window
Note Note
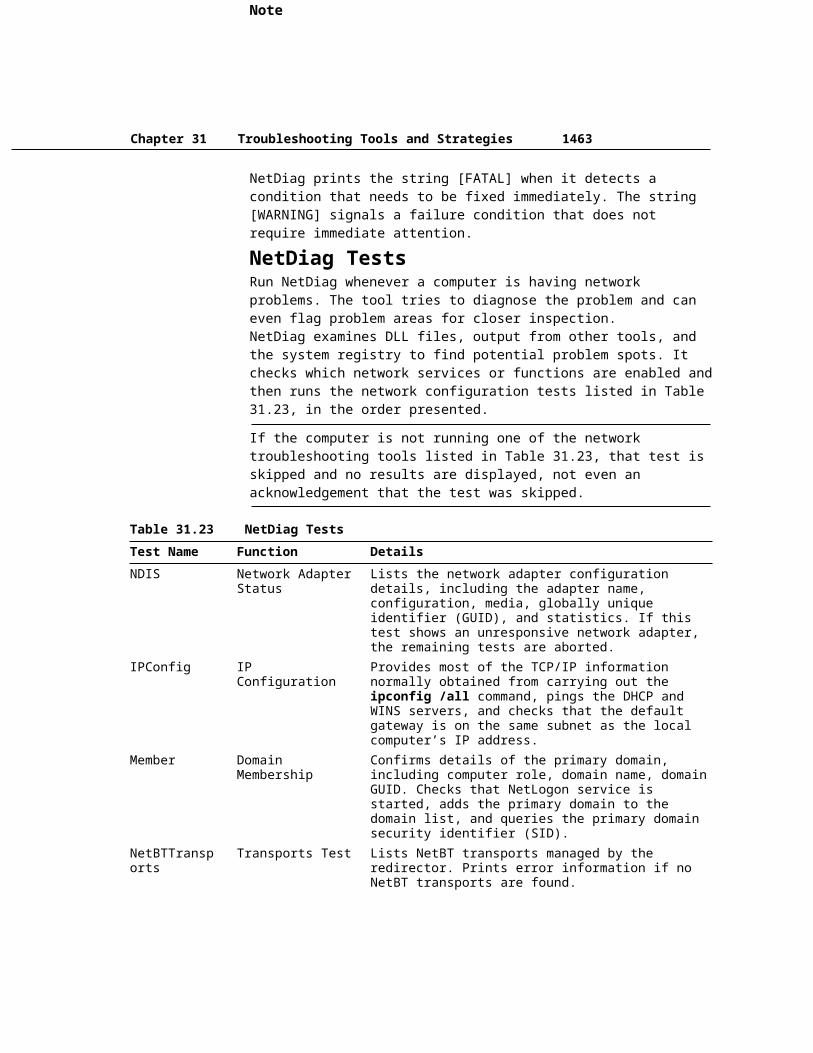
Chapter 31 Troubleshooting Tools and Strategies 1463
In Figure 31.8, TCP/IP NetBIOS Helper Service is configured to start automatically, but it did not start. Try to manually start the service or change the startup type status by double-clicking it to open the Service Properties dialog box, shown in Figure 31.9.
Figure 31.9 Service Properties Dialog Box
You must have administrator privileges to change the startup type of a service.
Saving Output from Troubleshooting ToolsMost of the command line – based troubleshooting tools produce useful information in the form of reports, but lack a command-line switch that offers to save their reports to disk.When using these tools, you can redirect the display output to a text file that can be viewed in Notepad. At the command prompt, type:Toolname /switch > Toolname.txtUse the standard command-line syntax to produce the report you want to save, including any optional command-line switches to produce the specific results you need. The redirector, the greater-than sign (>), transfers the screen output to the text file specified at the end of the command.
Unless directed otherwise, the output file is stored in the current folder by using the preceding syntax.
Disaster RecoveryDisaster recovery is primarily used to restore your system in the event that your hard disk fails and you have to replace or reformat it. You can also restore your system if critical system files have been accidentally erased or have become corrupted and you need to reformat your hard disk. Disaster recovery is for use only after you have attempted to repair your system using Safe Mode, Recovery Console, and the Emergency Repair Process, described earlier in this chapter.
Preparing for Disaster Recovery To perform a complete disaster recovery you need a recent backup of your entire system, including the system state data, the system files, and your data files. The system state data includes the registry, the Component Services class registration database, and the system files required to start your computer (also known as the boot files). The Backup tool provides two methods for backing up your entire system, including the system components mentioned earlier: the first method relies on the Backup Wizard to select files and folders and set backup options; the second method gives
Note Note
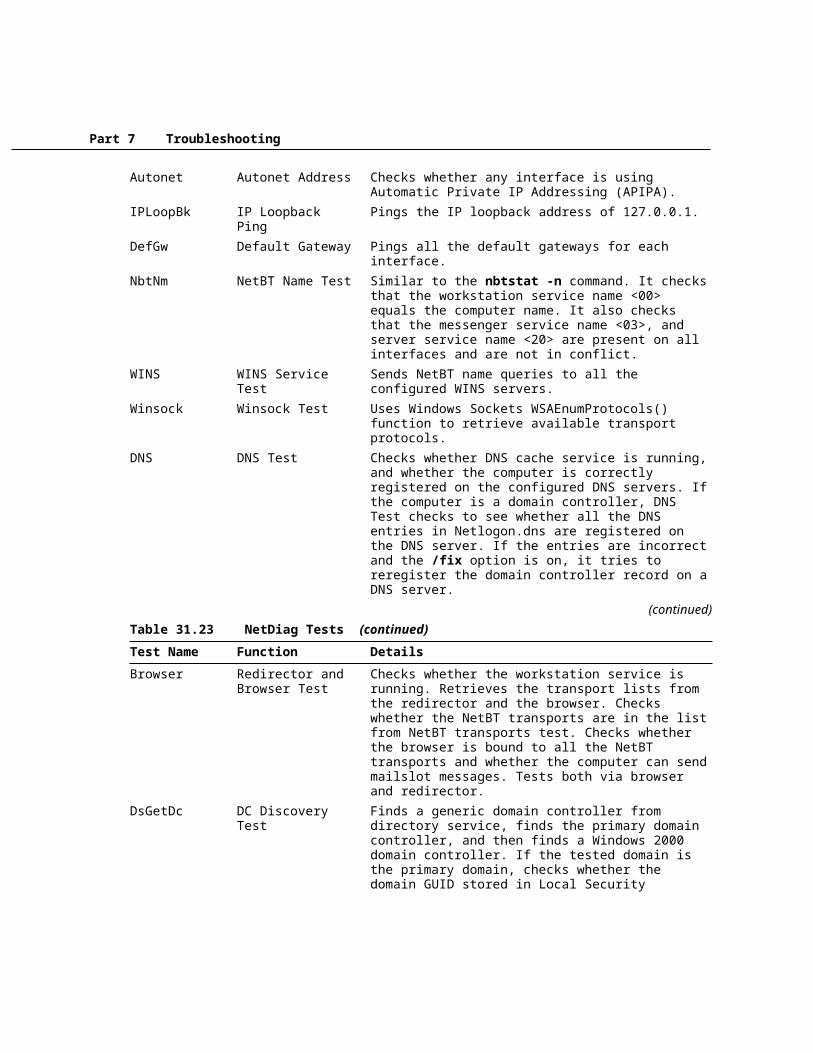
Part 7 Troubleshooting
you maximum control over the backup process because it relies on you to set backup options and select the files and folders to back up.
You must be a member of the Backup Operators group or a member of the Administrators group on the local computer to back up the system state.
· To prepare for disaster recovery by using the Backup Wizard1. Start Backup. From the Start menu, click Programs, Accessories, System
Tools, and Backup.2. On the Welcome tab, click Backup Wizard.3. At the “Welcome to the Windows 2000 Backup and Recovery Tools” screen,
click Next.4. Click Back up everything on my computer, and then click Next.5. Select a Backup media type, select Backup media or file name, and then
click Next. 6. Click Advanced to set advanced backup options, including backup type, data
verification, hardware compression, media labels and ownership, and scheduling. Otherwise, the Backup Wizard sets the following options by default:· Backup type: normal.· Migrated Remote Storage data: do not back up.· Data verification: none.· Hardware compression: on (if backing up to tape); off (if backing up to
file).· Ownership/permissions: not set.· Overwrite/append data to media: overwrite.· Backup and media labels: set to time and date that Backup is performed.· Schedule: Not set (runs Backup immediately).
7. Click Finish to start the backup operation.
The advanced backup options that appear when you run the Backup Wizard are a subset of the options you can set in the Backup tool. To prepare for disaster recovery and configure other options, use the following procedure.
· To manually prepare for disaster recovery1. Start Backup.2. On the Backup tab, select the volumes, files, and folders to back up. Select
System State or you cannot use the backup set for disaster recovery.3. In the Backup destination list box, choose the type of media to which to back
up, and then choose Backup media or file name.
Important

Chapter 31 Troubleshooting Tools and Strategies 1465
4. On the Tools menu, click Options to configure backup options, and then click OK.
5. Click Start Backup, and then make any changes you want to the Backup Job Information dialog box.
6. Click Advanced to set advanced backup options, and then click OK.7. Click Schedule to add the backup operation to the Task Scheduler so that it
runs automatically at some time in the future.8. Click Start Backup to start the backup operation.
Because can only back up the system state data on the computer that is running Backup, you cannot prepare remote computers for disaster recovery. However, you can indirectly automate a remote system backup of each computer on a network by scheduling regular file backups of the System State data on each computer and then backing up those backup files by making a regular network backup of each computer. The procedure is described below.
You can use third-party software to remotely back up the system state data.
· To perform a complete system backup on a remote computer1. Log on as an Administrator or a Backup Operator to the remote computer, and
then start the Backup Wizard.2. At the “Welcome to the Windows 2000 Backup and Recovery Tools” screen,
click Next.3. Select Only back up the System State data, and then click Next.4. Under Backup media type, select File. Under Backup media or file name,
enter the path and file name for the backup. The file must have the .bkf file name extension. Save it in a shared folder on the local computer or on a network share for which you have write permission. Click Next.
5. Click Advanced, and then follow the instructions to set advanced backup options and schedule the backup to run unattended. You do not need to back up migrated Remote Storage data and you do not need to set the backup type because the System State data is always treated as a Copy backup type. Also, schedule the backup to run on a regular basis (for example, weekly or monthly). Click Finish to add the backup job to the task scheduler and finish setting up the remote computer.
The remote computer must have the logon account used on the computer running the backups listed in either the Administrator or Backup Operator local groups to gain access to volumes on the remote computer. It is recommended that you use the administrative shares, such as C$, to back up the contents of the volumes.
6. Log on as an Administrator or a Backup Operator, and then start Backup.
Note Note

Part 7 Troubleshooting
7. On the Backup tab, select the shared folder containing the System State backup file you scheduled.
8. Select all of the shared volumes for the remote computer. 9. Click Start Backup, and on the Backup Job Information dialog box, click
Schedule to schedule the backup. Schedule the backup to run after the backup job you scheduled to run on the remote computer has completed.
10. Click Start Backup to add the backup job to the task scheduler.
There are several backup options that you can set. For more information about Backup, including backup and restore options, see “Removable Storage and Backup” in this book.
Performing Disaster RecoveryThe disaster recovery process typically begins after you have installed a new hard disk or reformat your existing disk. If you installed a new hard disk, you need at least as much storage capacity as the original hard disk. Also, it must have the same volumes as the original hard disk, including volume drive letter, volume size, and file system, or disaster recovery might not succeed.To start the disaster recovery process, install a new version of Windows 2000 and run Backup to restore (recover) your system and data files. The installation folder for the new system must be in the same location as the installation folder of your original system. This applies to the drive letter and the folder name. If your original system was installed to the default Setup location (C:\Winnt), you can simply install a fresh copy of Windows 2000, and then begin the disaster recovery process. However, if your original system was installed in a different location, for example at D:\Windows, your new system must be installed at D:\Windows.
Backup allows you to restore files to an alternate location, but does not restore the System State data in a form that recovers your system. When you restore or recover a system you need to restore all files, including the System State data, to the original location.
The Windows Setup program does not prompt you for the installation folder unless Winnt already exists on the volume that you intend to use for the installation. To perform disaster recovery on a computer that did not use the default Windows 2000 installation volume and folder name, create a Winnt folder on the installation volume before you run Setup. You can do this by using either the Recovery Console or a startup disk for MS-DOS, Windows 95 or Windows 98. Both methods are discussed in the following sections.
You can designate a different installation folder during an unattended installation by specifying the folder name in the "TargetPath=" parameter in the answer file. For more information about unattended installations, see “Customizing and Automating Installations” in this book.
Note Note
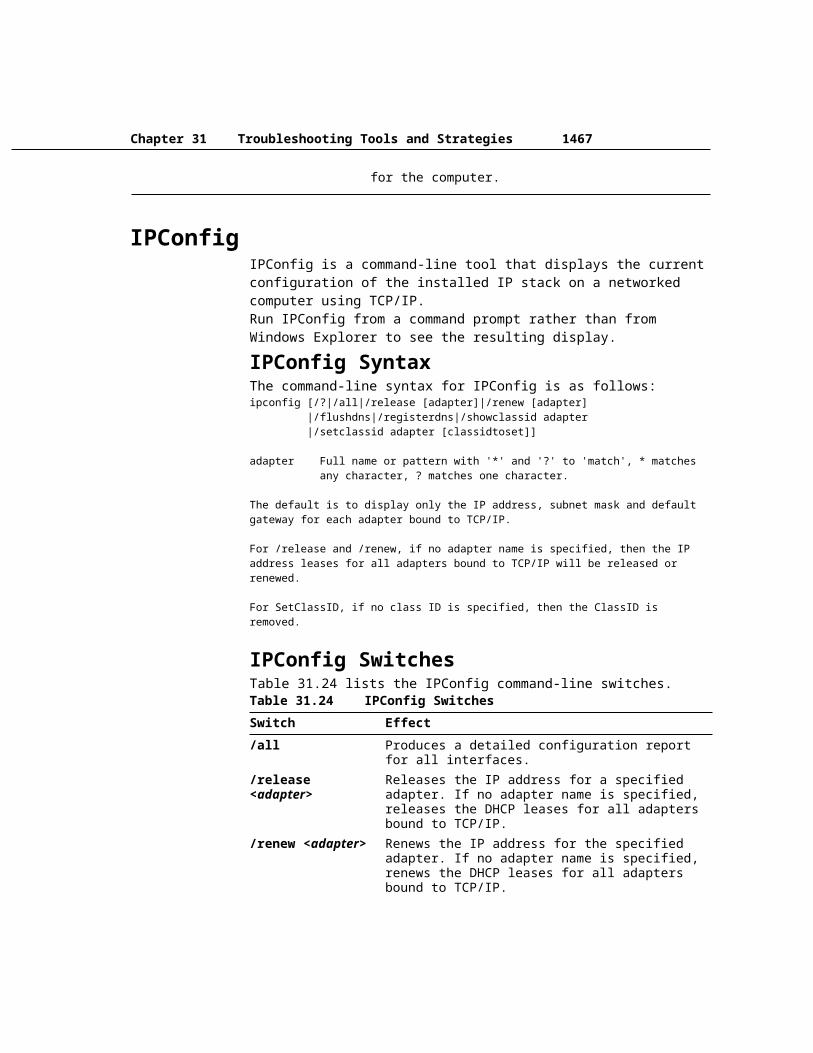
Chapter 31 Troubleshooting Tools and Strategies 1467
Using the Recovery Console to Create a Winnt Folder on a VolumeYou can use the Recovery Console to create a Winnt folder on an unformatted volume. If the disk has not been partitioned, you can also use the Recovery Console to create volumes. To perform this procedure you need access to a computer with a text editing program (for example, Notepad) and a floppy disk drive. If you do not have access to a computer with a text editor and a floppy drive, see the next section.
· To create a Winnt folder on an empty volume by using the Recovery Console1. Open the Recovery Console by using either the four Windows 2000 Setup
disks or the Windows 2000 operating system CD. Choose the repair option by pressing R when prompted, and then press C to choose the Recovery Console. You do not need to log on as the Recovery Console starts because there is no system installed.
2. If there are no volumes on your disk, use the diskpart command to create an installation volume on your hard disk (type diskpart with no switches to start a user interface for managing volumes). The volume must have the same drive letter and be at least as large as the installation volume that was on your hard disk when it was last backed up. You might need to create more than one volume to reach the appropriate drive letter. For example, if the original installation was on drive D, create drive C first, and then create drive D.
3. Use the format command to format the volumes you created in step 2. Format the new installation volume with the same file system the original installation volume or you can lose data and other file and folder features. For example, if your original installation volume was drive C and it was formatted with NTFS, type the following command:format c: /q /fs:ntfs
4. Use the map command to display the Advanced RISC Computing (ARC) path for the new installation volume. Write this information down. It is needed for step 6. On drive C, the ARC path typically looks similar to the following:\Device\Harddisk0\Partition1.
5. On another computer, use a text editor to create a file called Setup.log and save it to a floppy disk. Be sure the file ends with the file name extension .log and not .txt.
6. Add the following information to the Setup.log file and save it. After TargetDevice= and SystemPartition= you must type the ARC path you wrote down in step 4. The ARC path must be inside double quotes. For example:[Paths]TargetDirectory = "\WINNT"TargetDevice = "arc_path_information" SystemPartitionDirectory = "\"SystemPartition = "arc_path_information"[Signature]Version = "WinNt5.0"

Part 7 Troubleshooting
[Files.SystemPartition]NTDETECT.COM = "NTDETECT.COM","11f1b"ntldr = "ntldr","3aae6"arcsetup.exe = “arcsetup.exe”,”3036c”arcldr.exe = “arcldr.exe”,”33a86”[Files.WinNt]
7. Restart your computer from the Windows 2000 operating system CD or the four Windows 2000 Setup disks to run the Setup program. When you are prompted, press R, and then press R again to choose the Emergency Repair Process.
8. Select the Manual Repair option by pressing M. This displays a screen with three manual repair options. Clear all of the options except Verify Windows 2000 System files. When you are finished, select Continue (perform selected tasks), and then press ENTER.
9. When you are prompted for the Emergency Repair Disk, insert the disk you created in steps 5 and 6, and then press ENTER. This creates a Winnt folder on your installation volume.
The Recovery Console offers an md command, but by default, you cannot create a folder at the root folder. You can change the default behavior of Recovery Console to allow this type of action with local Group Policy settings, but because the hard disk does not yet have an installation of Windows 2000 on it, you cannot implement policies or change the default behavior for Recovery Console.
Using a Windows 98 Startup Disk to Create a Winnt Folder on a VolumeYou can create a Winnt folder on an unformatted volume by using a Windows 98 startup floppy disk.When you use a Windows 98 startup disk to create a Winnt folder, you can only format the volume with the FAT16 or FAT32 file systems. If your original installation volume was formatted with NTFS, and you want to restore your system to the same file system, you can use this procedure to create a Winnt folder on your volume. Use the Windows 98 disk partitioning tool Fdisk to create the volume to the original size, then format the volume with FAT32. If the original volume used NTFS, use the convert command to convert the FAT volume to NTFS after you create the Winnt folder and install a fresh copy of Windows 2000, but before you restore your system from backup.
The Windows 98 startup disk must contain the files Fdisk.exe and Format.exe from the C:\Windows\Command folder in Windows 98 to complete this procedure.
· To create a Winnt folder on a volume using a Windows 98 startup disk1. Start your computer by using a Windows 98 startup disk.
Note Note

Chapter 31 Troubleshooting Tools and Strategies 1469
2. If your disk does not have an installation volume, use the fdisk command to create a primary DOS partition with the same drive letter as the original installation volume. It must also be at least as large as the original installation volume. Make the partition active to be able to use it as an installation volume. You might need to create more than one volume to reach the drive letter your original installation used. Once fdisk is finished, the computer restarts. If your hard disk already has a formatted installation volume, skip to step 5.
3. Restart your computer by using the Windows 98 Startup disk.4. Use the format command to format the volumes created in step 2.
The Format tool cannot format FAT16 volumes made by Windows 98 that are larger than 2 GB. Format larger volumes using FAT32.
5. Use the md command to create a Winnt folder on the volume in which you want to install Windows 2000.
Installing a Fresh Version of Windows 2000Before you can recover your system and your data files, you must install a fresh copy of Windows 2000. If your original installation folder used the default volume and folder name (C:\Winnt) and no other volumes exist on the disk, simply restart your computer with the Windows 2000 operating system CD or the four Windows 2000 Setup disks, and follow the instructions on your screen. If you have more than one usable volume, Setup asks you to choose the volume on which to install Windows 2000. Choose the volume whose drive letter matches that of the original installation. If the original installation was on drive D but used the default folder name, Setup automatically begins the installation by using the default folder name (Winnt) unless you already created a Winnt folder on that volume. If there is a folder named Winnt on the volume, Setup prompts you for the name of the installation folder.
· To install a fresh version of Windows 2000 during disaster recovery1. Start your computer by using the Windows 2000 operating system CD or the
Windows 2000 Setup disks.2. If prompted, select a volume to use for the installation.3. When asked whether to format the volume or leave it as it is, choose Leave
the current file system intact (no changes). This preserves the Winnt folder on the installation volume. If you format the disk, the Winnt folder is erased.
4. If your original installation used the default installation folder name, proceed to Windows 2000 Setup and skip the remaining steps in this procedure.
5. If you manually created a Winnt folder on your installation volume, Setup prompts you to confirm whether or not you want to use the Winnt folder for this installation. Create the folder name you originally used.
Note

Part 7 Troubleshooting
6. When you are warned that there is a Winnt folder already on your computer, press ESC to choose a different installation folder. Enter a new installation folder, press ENTER, and then follow the instructions that appear.
If you installed Windows 2000 on a FAT16 or FAT32 volume, and your original installation volume was formatted to use NTFS, convert the new installation volume to NTFS before you restore the system. When the installation finishes, log on as the local administrator, and use the convert command. From the command prompt, typeconvert drive_letter: /fs:ntfs
where drive_letter is the installation volume.
Restoring the System and Data FilesTo finish the disaster recovery process, restore your system from the most recent backup. To fully recover your system, restore the following:· System files· Data files· System State data
Use the Restore function of Backup to restore these components to their original locations. This is especially critical when you restore the System State. After you finish restoring your files and system data, restart the computer. Your fully-restored system is in the same state it was in when you backed it up.

Chapter 31 Troubleshooting Tools and Strategies 1471
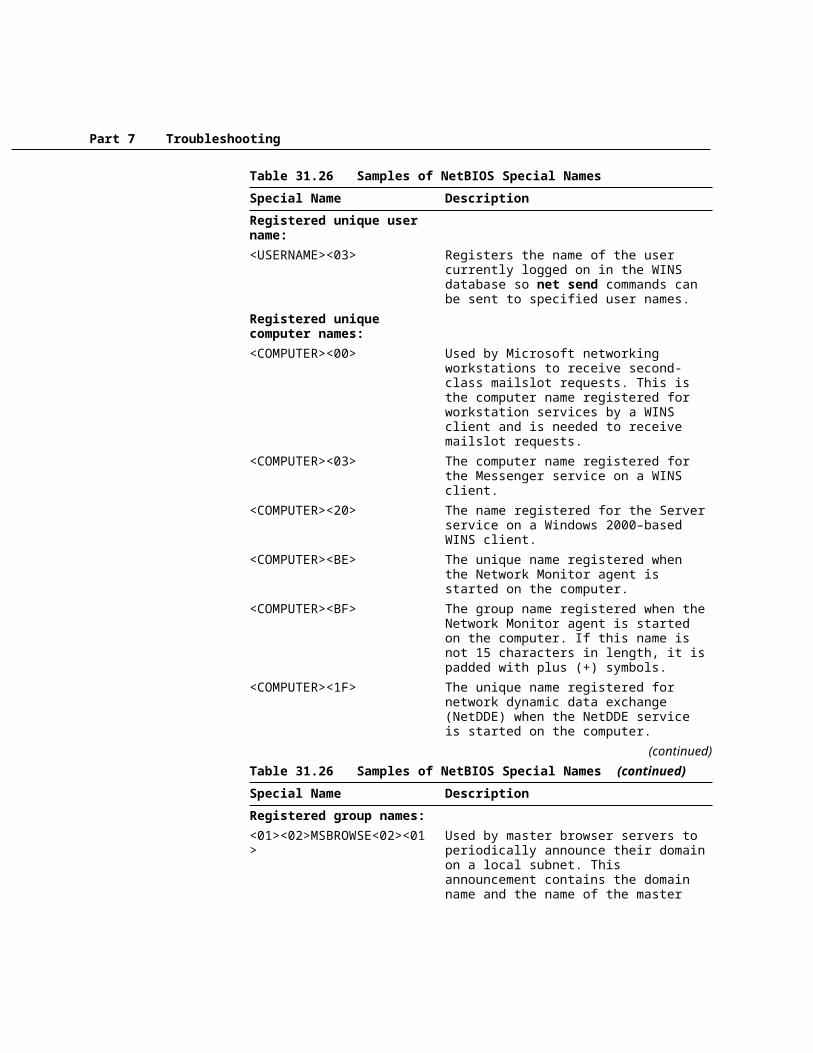
Part 7 Troubleshooting

Chapter 31 Troubleshooting Tools and Strategies 1473

Part 7 Troubleshooting


![[PPT]Troubleshooting and Problem Solving - Lane …media.lanecc.edu/.../media/TroubleshootingProblemSolving.ppt · Web viewTroubleshooting and Problem Solving Chapter 18 Troubleshooting](https://img.dokumen.tips/doc/110x75/5afee1d67f8b9a994d8f9a48/ppttroubleshooting-and-problem-solving-lane-media-viewtroubleshooting-and.jpg)