Embed Size (px)
Citation preview

Guide to Presenting the
Money Smart for Young Adults
Curriculum

Guide to Presenting the Money Smart for Young Adults Curriculum Page 2 of 23
Table of Contents
Introduction ................................................................................................................... 4
Program Objectives ...................................................................................................... 4
Target Audience ........................................................................................................... 5
Overview of Money Smart Modules.............................................................................. 5
Description of the Money Smart for Young Adults Program Training Materials ..... 6
Instructor Guide ............................................................................................................ 6
Why Keep Money in a Bank? ....................................................................................... 7
Participant Guide .......................................................................................................... 8
PowerPoint Slides ........................................................................................................ 8
Computer-Based Scenarios ......................................................................................... 8
Instructions for Starting the Scenarios....................................................................... 8
Instructor Preparation ................................................................................................. 10
Materials and Equipment Needed to Present a Module ............................................. 10
Things to Do Before Presenting a Module .................................................................. 10
Presentation Strategies .............................................................................................. 10
Classroom Set-Up ...................................................................................................... 11
Training Tips ................................................................................................................ 12
The Role of the Instructor ........................................................................................... 12
Delivering Effective Presentations .............................................................................. 12
Meeting the Needs of Your Target Audience ............................................................. 13
Assessments .............................................................................................................. 13
Matrix/Layering Table ................................................................................................. 13
Conducting Activities .................................................................................................. 13
Facilitating Discussions .............................................................................................. 14
Using Chart Paper ...................................................................................................... 14
Using Visual Aids ....................................................................................................... 15
Consider the Three Learning Styles While Teaching ................................................. 15
Visual ...................................................................................................................... 15
Auditory ................................................................................................................... 16
Tactile/Kinesthetic ................................................................................................... 16
Things to Avoid During a Presentation ....................................................................... 16
Questions for Self-Reflection ...................................................................................... 17
Accommodating Students with Disabilities .............................................................. 18

Guide to Presenting the Money Smart for Young Adults Curriculum Page 3 of 23
Americans with Disabilities Act (ADA) of 1990 ........................................................... 18
How to Make Classes Accessible to Students with Disabilities .................................. 18
Nondiscrimination .................................................................................................... 18
Physical Access ...................................................................................................... 18
Effective Communication ......................................................................................... 19
Guidelines for Talking About Disabilities .................................................................... 21
Ten Commandments of Etiquette for Interacting with People with Disabilities ........... 22

Guide to Presenting the Money Smart for Young Adults Curriculum Page 4 of 23
Introduction
The Federal Deposit Insurance Corporation (FDIC)
recognizes the importance of financial education for
everyone, including young adults who are about to
begin, or who have just begun, their independent
financial lives. The Money Smart for Young Adults
curriculum was created to help young adults learn the
basics of handling their money and finances,
including how to create positive relationships with
financial institutions. The curriculum consists of
materials, activities, and content geared towards the
high school audience.
Financial education fosters financial stability for individuals and for entire communities. The
more people know about credit and banking services, the more likely they are to make informed
decisions on money matters where a wrong decision could result in years of financial pain, save
money, and improve their financial health and well-being. The Money Smart for Young Adults
helps younger individuals build financial knowledge, develop financial confidence, become more
money savvy, and use banking services effectively.
Program Objectives
Upon completion of the eight Money Smart for Young Adults modules, students will have the
knowledge and resources they need to:
Use the services and products of financial institutions (e.g., banks, thrifts, and credit
unions) confidently.
Create and implement a spending plan.
Distinguish between ―wants‖ and ―needs.‖
Use credit and borrow money responsibly.
Protect their financial rights and safeguard their money.
Recognize available options for purchasing a car and paying for college.
Determine their readiness to invest and prepare for their future property purchases.

Guide to Presenting the Money Smart for Young Adults Curriculum Page 5 of 23
Target Audience
Targeted students for the Money Smart for Young Adults modules include those in grades 7–12
(i.e., middle school, junior high, and high school students) and those in the first two years of
college. The FDIC’s Money Smart Adult Financial Education Curriculum is more suitable for
other college students.
Overview of Money Smart Modules
The Money Smart for Young Adults curriculum consists of eight modules that focus on different
aspects of banking and money matters.
Module
Number Module Title Module Description
1 Bank On It Introduces students to the services banks offer and
how to open an account.
2 Check It Out Gives students the skills needed to correctly use a
checking account.
3 Setting Financial Goals Shows students how to prepare and follow a
personal spending plan.
4 Pay Yourself First Helps students understand the importance of saving
money. Describes savings and investment options.
5 Borrowing Basics Helps students decide when and how to use credit,
how to use credit appropriately, and what forms of
credit best suit their needs.
6 Charge It Right Teaches students how to shop for and use a credit
card responsibly.
7 Paying for College and
Cars
Describes the characteristics of consumer
installment loans, including car loans and student
loans, and how students can determine which loans
are best for their needs.
8 A Roof Over Your Head Helps students make informed choices about renting
their first apartment and determine their readiness to
have a space of their own.
Guide to Presenting the Money Smart for Young Adults Curriculum Page 6 of 23
Description of the Money Smart for Young Adults Program
Training Materials
All Money Smart training materials are free and available on CD-ROM. Obtain your copy by
visiting:
https://vcart.velocitypayment.com/fdic/index.php?cPath=121
Every module is formatted and structured the same. The components of each module consist of
an Instructor Guide, a Participant Guide, PowerPoint slides, and a computer-based scenario for
supplemental use.
Instructor Guide
The Instructor Guide is your roadmap for presenting each module. The detailed lesson plan
includes:
The purpose and objectives of the module
A layering table to help you modify the module to the audience’s needs
Answers to the pre-assessment and knowledge check questions, engaging questions
within the content, and practice exercises
A script with instructor notes and a thumbnail copy of the corresponding slide
Each lesson plan is laid out in a two-column format. The left-hand column contains notes (e.g.,
how and when to use content, tools, and resources during the training) and thumbnail images of
the PowerPoint slides for instructor reference. The right-hand column contains a script of the
module content, including italicized glossary terms and bolded answers to engaging questions
and practice exercises.
Four characters are used in the situational comic strips at the beginning and end of each module
and in the computer-based scenarios. These characters depict students in a real-world application
of the content. You can use the character introductions, comic strips, and computer-based
scenarios to facilitate student discussions about each module’s content.
Instructors are encouraged to modify each module according to their audience’s needs and
interests. Use the layering table to customize the training and select the topics that best meet the
audience’s needs and interests. If time permits you can also supplement the Instructor Guide by
Guide to Presenting the Money Smart for Young Adults Curriculum Page 7 of 23
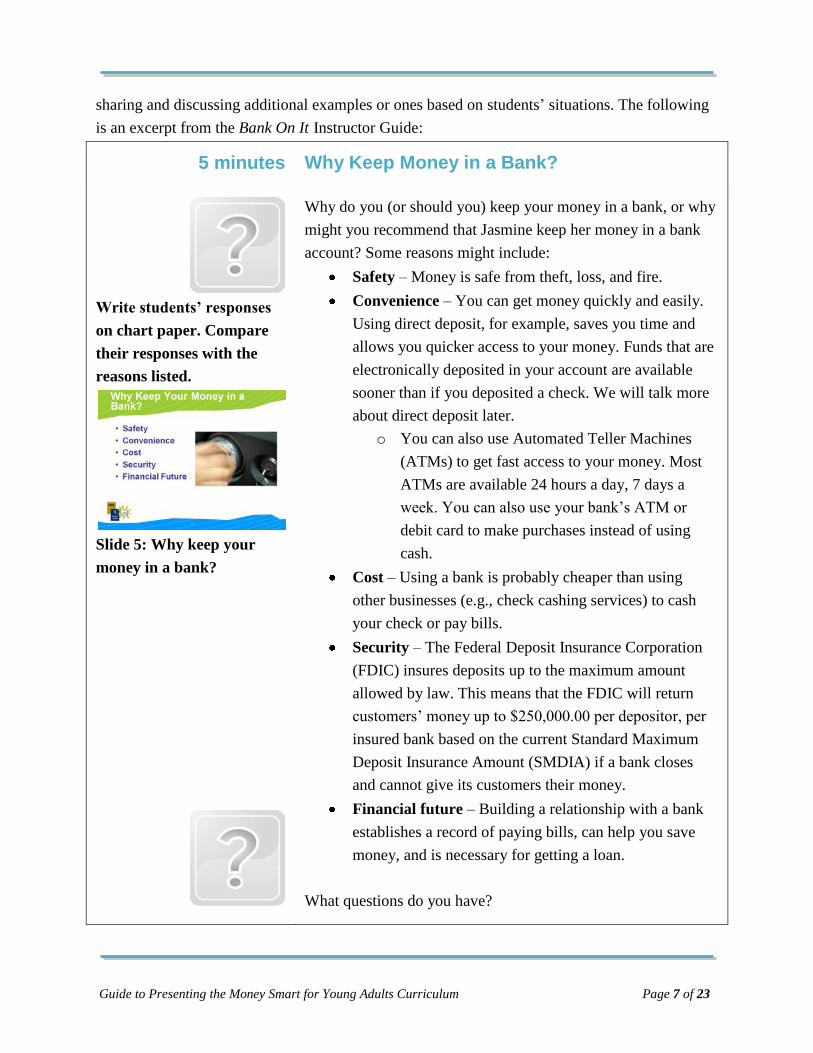
sharing and discussing additional examples or ones based on students’ situations. The following
is an excerpt from the Bank On It Instructor Guide:
5 minutes Why Keep Money in a Bank?
Write students’ responses
on chart paper. Compare
their responses with the
reasons listed.
Slide 5: Why keep your
money in a bank?
Why do you (or should you) keep your money in a bank, or why
might you recommend that Jasmine keep her money in a bank
account? Some reasons might include:
Safety – Money is safe from theft, loss, and fire.
Convenience – You can get money quickly and easily.
Using direct deposit, for example, saves you time and
allows you quicker access to your money. Funds that are
electronically deposited in your account are available
sooner than if you deposited a check. We will talk more
about direct deposit later.
o You can also use Automated Teller Machines
(ATMs) to get fast access to your money. Most
ATMs are available 24 hours a day, 7 days a
week. You can also use your bank’s ATM or
debit card to make purchases instead of using
cash.
Cost – Using a bank is probably cheaper than using
other businesses (e.g., check cashing services) to cash
your check or pay bills.
Security – The Federal Deposit Insurance Corporation
(FDIC) insures deposits up to the maximum amount
allowed by law. This means that the FDIC will return
customers’ money up to $250,000.00 per depositor, per
insured bank based on the current Standard Maximum
Deposit Insurance Amount (SMDIA) if a bank closes
and cannot give its customers their money.
Financial future – Building a relationship with a bank
establishes a record of paying bills, can help you save
money, and is necessary for getting a loan.
What questions do you have?

Guide to Presenting the Money Smart for Young Adults Curriculum Page 8 of 23
Participant Guide
Each student should receive a Participant Guide to use during training. The guide is a useful
reference for students during and after the class session because it contains:
Important concepts and facts presented in the module
Tools and activities to help you learn the material
Tips and checklists
A glossary of important terms
A list of resources
PowerPoint Slides
Each module includes a PowerPoint slide (in PowerPoint and PDF formats) to help you present
the module content. Some PowerPoint slides may contain animated text or images. The
Instructor Guide contains directions and indicates when you must click the space bar, right
arrow, or mouse to initiate the animation.
Computer-Based Scenarios
Short scenarios are included on the CD-ROM for students to review after completing each
module. The scenarios show the main characters—Jasmine, Todd, Ramon, and Grace—facing
different financial obstacles or decisions. Students must choose answers to help the characters
make the best decisions. You can use this as supplemental material, a homework assignment,
group activity, or assessment.
Note that the scenarios are not an essential part of the course materials and can be bypassed if
time or resources prohibit their use. All content contained in the scenarios is covered in the
module materials. If individual computers are unavailable, scenarios can be run from the
instructor’s computer and projected to the class or sent home with students to work on
independently for supplemental instruction.
Instructions for Starting the Scenarios
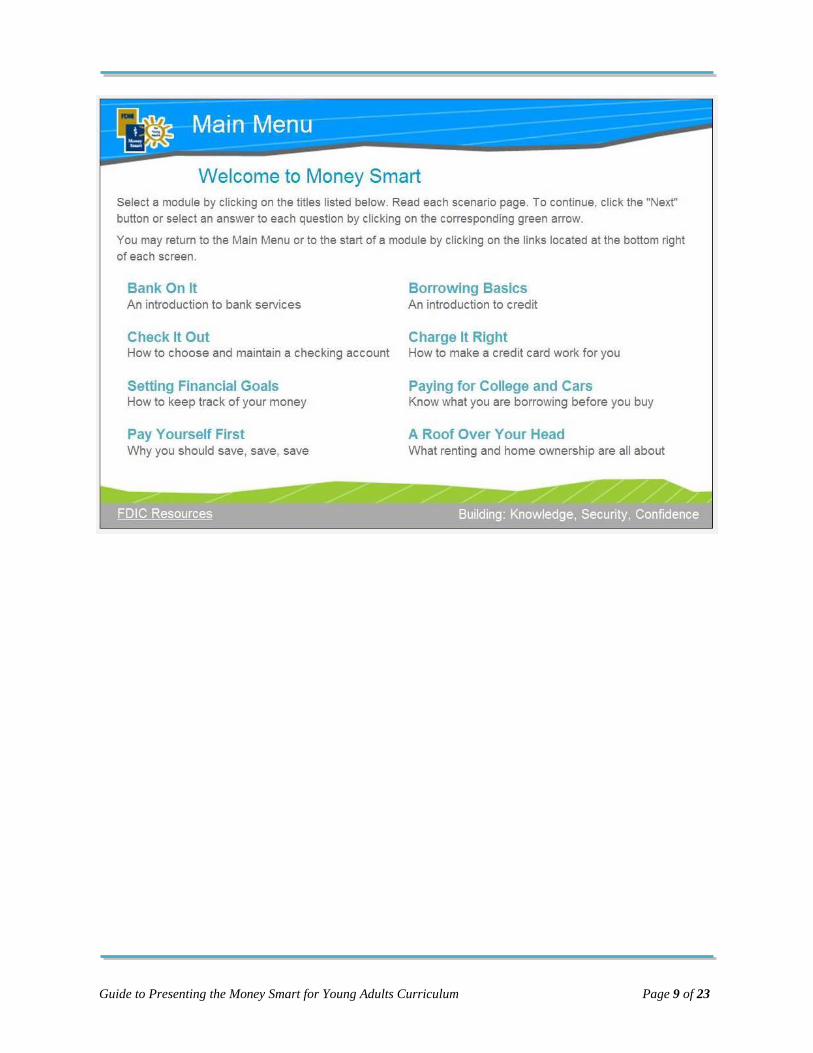
The CD-ROM will auto play after you insert it into your computer and the title screen will
appear. If the title screen does not automatically display after you insert the CD-ROM, open My
Computer and double-click on the CD-ROM drive. Select ―Click to Enter‖ and the Main Menu
(shown) will appear. Select and click on the module title you would like to play.
Guide to Presenting the Money Smart for Young Adults Curriculum Page 9 of 23

Guide to Presenting the Money Smart for Young Adults Curriculum Page 10 of 23
Instructor Preparation
Materials and Equipment Needed to Present a Module
You may need the following equipment and materials to present the Money Smart for Young
Adults modules:
Liquid Crystal Display (LCD) projector, computer, and module PowerPoint file (included
on the CD-ROM) or a printed copy of the slides (e.g., in Handouts or Notes Pages form)
for each student
Chart paper and easel
Markers in different colors
Tape or push pins
A Participant Guide for each student
Other materials or equipment needed to present the module (refer to the Getting Started
section in the Instructor Guide)
Things to Do Before Presenting a Module
Here are some tips to consider before presenting a Money Smart for Young Adults module:
Review all of the training materials thoroughly.
Make sufficient copies of the Participant Guide and slide handouts (if printing rather than
projecting them).
Make sure all computer and projection equipment is functioning and prepare a backup
copy of the PowerPoint slides for use during the training.
Prepare chart paper examples in advance when appropriate.
Identify potential trouble spots in the exercises and provide hints for assisting students.
Select and prepare anecdotes from real-world experiences that you can use to illustrate
special scenarios, generate discussion, and maintain student interest.
Give yourself ample time to set up the classroom and distribute student materials before
the training is scheduled to take place.
Presentation Strategies
Each module is designed to be presented as a separate course, generally taking 60 to 120 minutes
or longer to present. Longer modules can be divided into two class periods, or you can customize
the content to meet your class time.

Guide to Presenting the Money Smart for Young Adults Curriculum Page 11 of 23
Instructional strategies used to present module content include lecture, demonstrations, large and
small group discussions, and activities that reinforce learning and actively involve students in the
learning process. As you present the material:
Introduce each topic.
Emphasize key information and available resources, including online support, written
materials, and resources that students can use to help them in their day-to-day financial
activities.
Facilitate discussions.
Lead students through brief activities.
Provide feedback and answer questions.
Summarize what students learned.
Throughout the training, you should emphasize available resources, including online supports,
written materials, and resources that students can use to help them in their day-to-day financial
activities.
Classroom Set-Up
Consider the best layout for the room and how you plan to present the module and activities
(e.g., together as a class, individually, or in small groups with one or two people seated next to
them). For instance, you may want all desks or chairs facing towards you and the screen, or you
may want desks or tables and chairs spread out so students can sit and work together in small
groups.
Guide to Presenting the Money Smart for Young Adults Curriculum Page 12 of 23
Training Tips
The following training tips are designed to help you present the Money Smart for Young Adults
curriculum.
The Role of the Instructor
As an instructor, you are responsible for:
Identifying the learning and communication needs of students
Focusing and directing students
Aiming discussions toward course objectives
Making sure every student has the opportunity to contribute to the discussion
You can accomplish these things by listening, asking questions, observing students’ reactions,
and leading by example.
Delivering Effective Presentations
A first step to delivering an effective presentation is to know your audience. You must
understand the goals of the course and why the students need this information.
The following are some tips for delivering effective presentations:
Study the material to familiarize yourself with the technical content. Feel free to look up
anything you can’t easily explain. Practice your presentation out loud in front of a mirror
before your present to the students
Use language familiar to the students, avoiding jargon or unfamiliar terms when possible.
Speak clearly.
Be aware of the tone and pace of your speech.
Avoid tangents and getting off track during a presentation.
Minimize the use of filler words (such as ―uh‖ and ―um‖).
Make eye contact with students.
Encourage student participation.
Use natural and positive body language and facial expressions.
Avoid fidgeting, pacing, and other nervous habits.
Be yourself.
Guide to Presenting the Money Smart for Young Adults Curriculum Page 13 of 23
Meeting the Needs of Your Target Audience
If you have teaching experience you know that one size does not fit all. A best practice of
financial education is to tailor the training to the needs of the audience by taking into account
their previous training, experience, skills, goals, and needs. You can tailor the module as you
prepare to instruct it. However, in many instances, you may have to further tailor the training as
you engage with students and learn more about their level of understanding and needs.
Assessments
Each module includes a pre-assessment for the students to complete at the beginning of the
module. You can use the pre-assessment to make an informed decision about focal topics. If you
determine that the class is already adept at budgeting, for example, you can spend more time on
sections providing advice on decreasing spending, and what to do in response to financial
problems rather than how to establish a spending plan. It is strongly recommended that all
information in the module be covered to some degree, as time permits, to accommodate groups
with varied needs and interests. Even students knowledgeable in a particular subject matter have
indicated that they learned something new when the information was covered in a Money Smart
module.
You may choose to administer the knowledge check at the end of each module to assess what the
audience has learned and determine if you have presented the material effectively. This
information may also help you tailor the content for future trainings.
Matrix/Layering Table
Each module includes a matrix of the material to help you tailor the modules. This matrix, or
Layering Table, is located at the beginning of each Instructor Guide and delineates the module’s
topics. The matrix will assist you in presenting material responsive to the needs of your target
audience within the suggested timeframes.
Conducting Activities
Instructions for all module activities are included in the Instructor Guides. Speak clearly and
slowly when presenting the objectives of an activity and giving instructions. Make sure to define
important terms and concepts and, when possible, demonstrate activities or provide examples for
the students. Also, periodically ask if there are any questions.

Guide to Presenting the Money Smart for Young Adults Curriculum Page 14 of 23
Interaction among students contributes to a successful learning experience, so provide
opportunities for students to exchange information and encounter different perspectives. Ask
questions about how the students reached their conclusions. Avoid becoming redundant or
repetitive by asking the next group to report findings that are different from the previous group’s
findings, or by asking groups to respond to different questions. Call on different individuals or
groups to provide responses. Encourage students with different experience levels and
perspectives to contribute their observations. Acknowledge correct responses and provide
alternative approaches if incomplete or inaccurate responses are given.
Facilitating Discussions
Informative discussions and the exchange of information among instructors and students are key
to the success of this course. Your role as an instructor is to elicit comments from the students
while maintaining the focus of the discussion.
The following tips may be useful when you are leading group discussions:
Paraphrase what someone has said so the student will know he or she has been
understood, and to ensure the rest of the class hears the comment.
Compliment student s on interesting or insightful comments.
Use open-ended questions that require more than one-word answers (e.g., ―Why did you
decide to get a credit card?‖).
Mediate differences of opinions, and pull ideas together showing their relationship to one
another.
Summarize (and record on chart paper if appropriate) the major views of the group.
Using Chart Paper
Chart paper lets you capture meaningful information generated by discussion and display it for
all students to see. When using chart paper:
Prepare chart paper in advance.
Write with large, clear, bold letters. Avoid light colors (e.g., yellow).
Write only key ideas.
Check your spelling.
Use post-its, tape, or dog ear pages so you can easily refer to them again.
Write, turn to the audience, and then talk; do not talk while writing.
Do not obstruct students’ view of the chart; be sure to ask if everyone can see the chart
paper.

Guide to Presenting the Money Smart for Young Adults Curriculum Page 15 of 23
Leave the bottom quarter blank so the entire chart can be seen by those in the back of the
room.
Tear off and post chart paper you want the group to be able to refer to throughout the
course.
Practice!
Using Visual Aids
These tips for using visual aids will help you be an effective presenter:
Keep visual aids out of sight until you are ready to use them.
Stand to the side of your visual aid.
Talk to and face the audience, not the visual aid.
Do not block your face with the visual aid.
Maintain eye contact with your audience.
Make sure your audience has the time to fully read and understand the visual aid before
removing it and moving on.
Switch the projector off when not in use; the noise and light can be distracting.
It is helpful to practice using visual aids before delivering the actual presentation. All visual aids
should be free of grammatical errors and clutter. When presenting visual aids, describe the
content and add a few anecdotes or meaningful details. Visual aids should not be read verbatim.
Remember that visual aids enhance learning.
Consider the Three Learning Styles While Teaching
Experts find that each person likes to approach new information using one of three styles. Some
people may actually have more than one style and/or use a combination of styles. Knowing your
own style as an instructor can help you realize that other people may approach the same situation
in a different way. As a result, be flexible in the way you teach a concept and vary your methods
accordingly.
Visual
Visual learners are those who learn best by seeing how things are done. They typically:
Like to see the instructor’s body language and facial expression to fully understand the
content presented.
Prefer to sit toward the front of the room to avoid visual obstructions (e.g., people’s
heads)

Guide to Presenting the Money Smart for Young Adults Curriculum Page 16 of 23
Think visually (e.g., pictures) and learn best from diagrams, illustrations, PowerPoint
slides, videos, flipcharts, and handouts.
Prefer to take detailed notes to absorb the information.
Auditory
Auditory learners are those who learn best by listening or hearing instructions. They typically:
Are affective learners; that is, they tend to be more intuitive than rational
Have to feel the learning experience
Like to get involved with others and share ideas and information
Like thinking out loud about what they are learning
Learn best from exercises that allow them to share the experiences with each other; and
from lectures and audio tapes
Tactile/Kinesthetic
Tactile/kinesthetic learners are those who learn best by doing. They typically:
Like to experiment, handle materials, manipulate or assemble parts, and complete writing
or drawing activities
Dislike conventional educational approaches
Become bored with lectures, presentations, or anything that does not allow them to be
physically active
Learn best from hands-on training and physically active exercises
Prefer role plays, physical games, and activities
Things to Avoid During a Presentation
You can lose the interest of students by doing the following:
Failing to prepare
Reading verbatim from notes or script
Teaching without student involvement
Diverging from course objectives
Avoiding eye contact
Using confusing visual aids
Behaving in a condescending or superior manner
Using jargon or language that is either too simple or too complex for students
Lacking empathy for students needs
Using offensive or critical humor

Guide to Presenting the Money Smart for Young Adults Curriculum Page 17 of 23
Making promises you cannot deliver
Questions for Self-Reflection
Here are some potential challenges you may face. How would you deal with them?
You have made promises you cannot deliver.
You are asked a question and you do not know the answer.
A student is sleeping or a student is rude and uncooperative.
No one responds to your questions.
One person monopolizes the discussion.

Guide to Presenting the Money Smart for Young Adults Curriculum Page 18 of 23
Accommodating Students with Disabilities
Americans with Disabilities Act (ADA) of 1990
The Americans with Disabilities Act (ADA) is designed to protect the civil rights of people with
disabilities. The ADA prohibits discrimination on the basis of disability by guaranteeing equal
opportunity for individuals with disabilities in public accommodations, commercial facilities,
employment, transportation, state and local government services, and telecommunications. The
ADA is built on the principles of equal opportunity, full participation, independent living, and
economic self-sufficiency.
For people with disabilities, discrimination often also takes the form of inaccessible facilities that
make it impossible for them to gain access to or participate in ―standard‖ activities. For example,
stairs leading to the only entrance into a building prohibit entry by a person who uses a
wheelchair.
How to Make Classes Accessible to Students with Disabilities
There are many things that both you and the sponsoring agency can do to make the modules
accessible to people with a wide range of disabilities. An overview of actions that can be taken to
ensure accessibility is presented below.
Nondiscrimination
Qualified individuals with disabilities cannot be denied participation simply because of their
disability. You can limit participation in your course to individuals who meet some general
criteria (e.g., being over the age of 62 or unemployed), but if an individual qualifies on those
grounds he or she may not be denied participation because of a disability.
Physical Access
When deciding where to hold the Money Smart for Young Adults class, look for a location that is
accessible for people who use wheelchairs or scooters, or who have other difficulties walking or
climbing stairs. People with mobility limitations need to be able to access the building without
using steps or crossing over a high object. A sign should be posted indicating the location of the
closest accessible entrance if the main entrance is not accessible. Classes should be held on the
upper floors of a building only if they can be reached by an elevator. The building should also
have at least one accessible restroom.

Guide to Presenting the Money Smart for Young Adults Curriculum Page 19 of 23
Other physical access issues to consider in determining the location of the Money Smart for
Young Adults classrooms are: clearly marked accessible parking spaces located close to the
accessible entrance, Braille signage on the elevator call buttons and on the buttons inside the cab,
and raised letters and Braille signage identifying the restrooms. The elevators should also have
chimes or a recorded voice indicating the different floors.
In the classroom itself, check to be sure that there is at least 32 inches of clear space in the aisles
and along the edges of the seating area. This is how much space a person using a wheelchair
needs to move freely around the room. If you are using individual desks and chairs and a person
who uses a wheelchair enters the room, ask that person if you should move one of the desks, or if
he or she prefers to transfer from the wheelchair to the desk chair. Always ask; never assume.
People with a disability know what works best for them.
Similarly, if the room is arranged like a classroom with long tables and individual chairs, ask the
person in the wheelchair if he or she wants to transfer to a chair or if you should remove one of
the chairs. With classroom-style seating, it is always a good idea to remove one or two of the
chairs from the ends of rows in different areas of the room before the class starts. This allows
persons using wheelchairs or scooters a choice of seating arrangements—the same way that
others in the class have a choice of where they want to sit.
Effective Communication
Some individuals have disabilities that affect their ability to communicate. For example, people
who are blind or have low vision, or people who are deaf or hearing impaired. Other disabilities
that affect communication include cognitive or learning disabilities that impact the ability to
read. People who have cognitive disabilities or learning disabilities may have difficulty reading
written material.
The ADA requires private and public entities to communicate effectively with individuals with
disabilities. The obligation to communicate effectively applies to the presentation and exchange
of information in all forms, including: sound, print, graphics, and speech.
The law states that people with communication disabilities are entitled to appropriate ―aids and
services where necessary to ensure effective communications.‖ With respect to the Money Smart
for Young Adults courses, these aids and services could include:
Obtaining a version of Money Smart for Young Adults for individuals who are visually
impaired from your FDIC Community Affairs Officer

Guide to Presenting the Money Smart for Young Adults Curriculum Page 20 of 23
Assisting someone with cognitive or learning disabilities by reading aloud the pre- and
post-tests
Helping someone with a disability write their answers to the assessments and activities
Making sure not to turn your back on someone who is lip reading
Wearing a lapel microphone, or using a handheld microphone to amplify what is being
said for persons who use hearing aids or auxiliary listening devices
Making sure that any videos used in class are captioned for persons who are deaf and
ensuring that written material presented on screen is read aloud, either by the narrator on
the video or by the course instructor
Sometimes communication assistance can include providing a sign language interpreter, on
request, if doing so does not result in an undue burden. Undue burden is defined in the ADA as
―significant difficulty or expense.‖ Even if providing a sign language interpreter or some other
type of communication assistance is an undue burden, you still are expected, if at all feasible, to
provide some other type of assistance (e.g., a copy of the Instructor Guide so that a person who is
deaf or hard of hearing can follow along as the class is taught).
Some people with visual disabilities have difficulty reading standard-size text or viewing
materials projected on a screen. Copies of the slides for each module can be printed out and
given to these individuals to use as you present the course content. Similarly, handouts used
during the course can sometimes be difficult for people who have difficulty using their hands and
fingers (e.g., due to cerebral palsy, severe arthritis, or spinal cord injury). If the pages are
enclosed in clear plastic file folders, people with small motor impairments can handle them more
easily.
Other people may have difficulty hearing what you are saying. Allow individuals who read lips
to sit in the front where they can have an unobstructed view of your face. Make sure that you
continue to face these individuals throughout the presentation. Keep your Instructor Guide open
to the individual slides; or better still, print out a copy of the PowerPoint slides so that you can
read the text on the slides without turning your head away from the person who has the hearing
impairment. When there is class discussion or when someone asks a question, repeat what has
been said so that the person lip reading can be part of the discussion.
Some individuals with significant speech disabilities use an augmentative communication device
that produces synthesized speech. They must use a keyboard to key in what they want to say
(e.g., when they want to ask a question or contribute to the class discussion). This may take a few

Guide to Presenting the Money Smart for Young Adults Curriculum Page 21 of 23
moments; therefore, you should acknowledge their intention to speak by saying something like,
―Mr. Jones, we will come back to you (or please let us know) when you are ready to share.‖
Then be certain that you go back to the individual as soon as they have finished keying in their
comment or question. (Note: Most keyboards make a small beep as each word or phrase is keyed
in.) However, during an interaction between the person with the disability and another
individual, etiquette demands that you wait respectfully until the comments are keyed in and
played, just as you would wait for someone who stutters or stammers, or for whom English is a
second language to choose and utter the appropriate words.
Guidelines for Talking About Disabilities
Here are some guidelines that will help you communicate with your students who have
disabilities in ways that will not offend them:
Do not refer to a person’s disability unless it is relevant.
Use ―disability‖ rather than ―handicap‖ to refer to a person’s disability. Never use
―cripple/crippled‖ in any reference to disability.
When referring to a person’s disability, use ―people first‖ language. In other words, it is
better to say ―person with a disability‖ rather than ―disabled person.‖ Since ―disabled‖ is
an adjective, it is important to avoid ridiculous and improper constructions (e.g.,
―disabled group‖ or ―disabled transportation‖). Instead, build phrases using the word
―disability.‖ For example, ―disability activist‖ or ―disability community‖ are correct and
not contradictions to the ―people first‖ ideas.
Avoid referring to people with disabilities as ―the disabled, the blind, the epileptics, the
retarded, a quadriplegic,‖ etc. Descriptive terms should be used as adjectives, not as
nouns.
Avoid negative or sensational descriptions of a person’s disability. Do not say ―suffers
from,‖ ―a victim of,‖ or ―afflicted with.‖ Do not refer to people with disabilities as
―patients‖ unless they are receiving treatment in a medical facility. Never say ―invalid.‖
These portrayals elicit unwanted sympathy or pity toward individuals with disabilities.
Respect and acceptance is what people with disabilities prefer.
Do not portray people with disabilities as overly courageous, brave, special, or
superhuman. This implies that it is unusual for people with disabilities to have talents or
skills.
Do not use ―normal‖ to describe people who do not have disabilities. It is better to say
―people without disabilities‖ or ―typical,‖ if necessary to make comparisons.

Guide to Presenting the Money Smart for Young Adults Curriculum Page 22 of 23
Never say ―wheelchair-bound‖ or ―confined to a wheelchair.‖ People who use mobility or
adaptive equipment are, if anything, afforded freedom and access that otherwise would be
denied them.
Never assume that a person with a communication disorder (e.g., speech impediment,
hearing loss, or motor impairment) also has a cognitive disability (e.g., mental
retardation).
Ten Commandments of Etiquette for Interacting with People with
Disabilities
1. Speak directly to the person with the disability rather than their companion or sign
language interpreter.
2. Offer to shake hands with people who have a disability. It is appropriate. People with
limited hand use or who wear an artificial limb can usually shake hands. Shaking hands
with the left hand is an acceptable greeting.
3. Identify yourself and others who may be with you when meeting a person who is visually
impaired. Also, identify the person to whom you are speaking when conversing in a
group.
4. Do not be afraid to ask questions when you are unsure of what to do. If you offer
assistance, wait until the offer is accepted. Then listen to or ask for instructions.
5. Treat people humanely. Address people who have disabilities by their first names only
when extending the same familiarity to all others. Never patronize people who use
wheelchairs by patting them on the head or shoulder.
6. Never lean or hang on to a person’s wheelchair. This is similar to leaning or hanging on
to a person. The chair is part of the personal body space of the person who uses it.
7. Listen attentively when you are talking to a person who has difficulty speaking. Be
patient and wait for the person to finish, rather than correcting or speaking for the person.
If necessary, ask short questions that require short answers, a nod, or a shake of the head.
Never pretend to understand if you are having difficulty doing so. Instead, repeat what
you have understood and allow the person to respond. The response will clue you in and

Guide to Presenting the Money Smart for Young Adults Curriculum Page 23 of 23
guide your understanding.
8. Place yourself at eye level in front of the person to facilitate the conversation when
speaking with a person who uses a wheelchair or a person who uses crutches.
9. Tap a person with a hearing impairment on the shoulder or wave your hand to get their
attention. Look directly at the person and speak clearly, slowly, and expressively to
determine if the person can read your lips. Not all people who are deaf can read lips. For
those who read lips, be sensitive to their needs by placing yourself so that you face the
light source, and keep hands, cigarettes, and food away from your mouth when speaking.
10. Relax. Do not be embarrassed if you happen to use accepted, common expressions (e.g.,
―See you later,‖ or ―Did you hear about that?‖) that may relate to a person’s disability.