Embed Size (px)
Citation preview

© 2016 Cisco and/or its affiliates. All rights reserved. This document is Cisco Public Information. Page 1 of 23
Your New Service Request Process: Technical Support
Reference Guide for Cisco Meeting Server and
Legacy Acano X-Series Servers November 2016
Support Guide
© 2016 Cisco and/or its affiliates. All rights reserved. This document is Cisco Public Information. Page 2 of 23
Contents
Introduction .............................................................................................................................................................. 3
Registration for a Cisco.com User ID ..................................................................................................................... 4
Opening a Support Case by Web ......................................................................................................................... 10 Identify Type of Support Case and Verify Contact Information ........................................................................... 11 Specify Associated Service Contract .................................................................................................................. 13 Describe the Problem ......................................................................................................................................... 14 Submit Your Support Case ................................................................................................................................. 16 Save as Draft ...................................................................................................................................................... 17
Opening a Support Case by Phone ...................................................................................................................... 18 Support Numbers ................................................................................................................................................ 18 Defining the Severity of a Support Case ............................................................................................................. 18
Opening a Support Case by Email ....................................................................................................................... 19
Managing Your Support Case ............................................................................................................................... 20

© 2016 Cisco and/or its affiliates. All rights reserved. This document is Cisco Public Information. Page 3 of 23
Introduction
This document describes the procedure for obtaining Technical Support through your newly adopted case
management system through the Cisco® Technical Assistance Center (TAC). This document covers the Cisco.com
user ID registration process, how to contact technical support, as well as how to manage your support case online.
We want you to know that this is only a change in the process through which you receive technical support. We at
Cisco are committed to delivering the same high level of quality service that you are accustomed to receiving.
The Cisco TAC will allow you to:
● Open support cases by phone, web, or email 24 hours a day, 365 days a year
● Download software updates (maintenance and minor releases) for your covered software
● Access Cisco’s online support, including database of product and service information, support case
tracking, and a robust set of tools that help facilitate knowledge transfer to your staff and help answer
questions more quickly
© 2016 Cisco and/or its affiliates. All rights reserved. This document is Cisco Public Information. Page 4 of 23
Registration for a Cisco.com User ID
To contact Cisco Technical Support for questions or issues with your Cisco Meeting Server or Legacy Acano
X-Series products, you first need to register for a Cisco.com user ID. If you already have a Cisco.com user ID,
go to step 5, as you do not need to reregister.
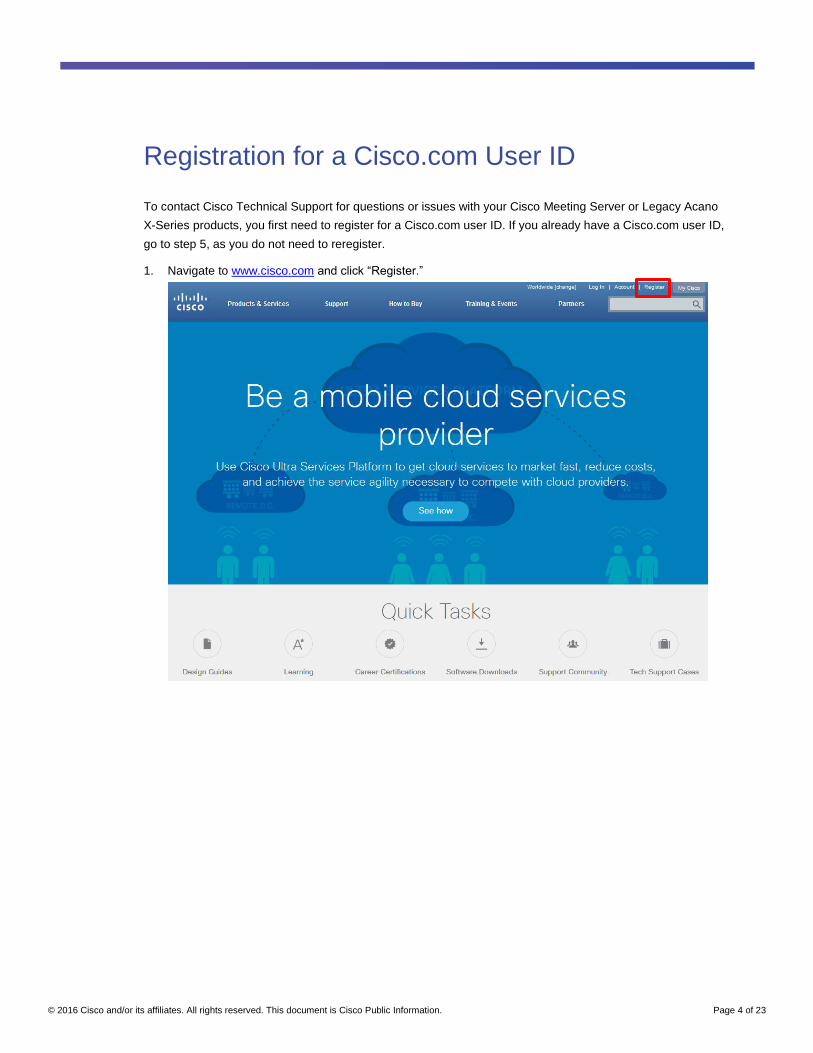
1. Navigate to www.cisco.com and click “Register.”

© 2016 Cisco and/or its affiliates. All rights reserved. This document is Cisco Public Information. Page 5 of 23
2. Fill out the information on the Cisco.com Registration form.
© 2016 Cisco and/or its affiliates. All rights reserved. This document is Cisco Public Information. Page 6 of 23
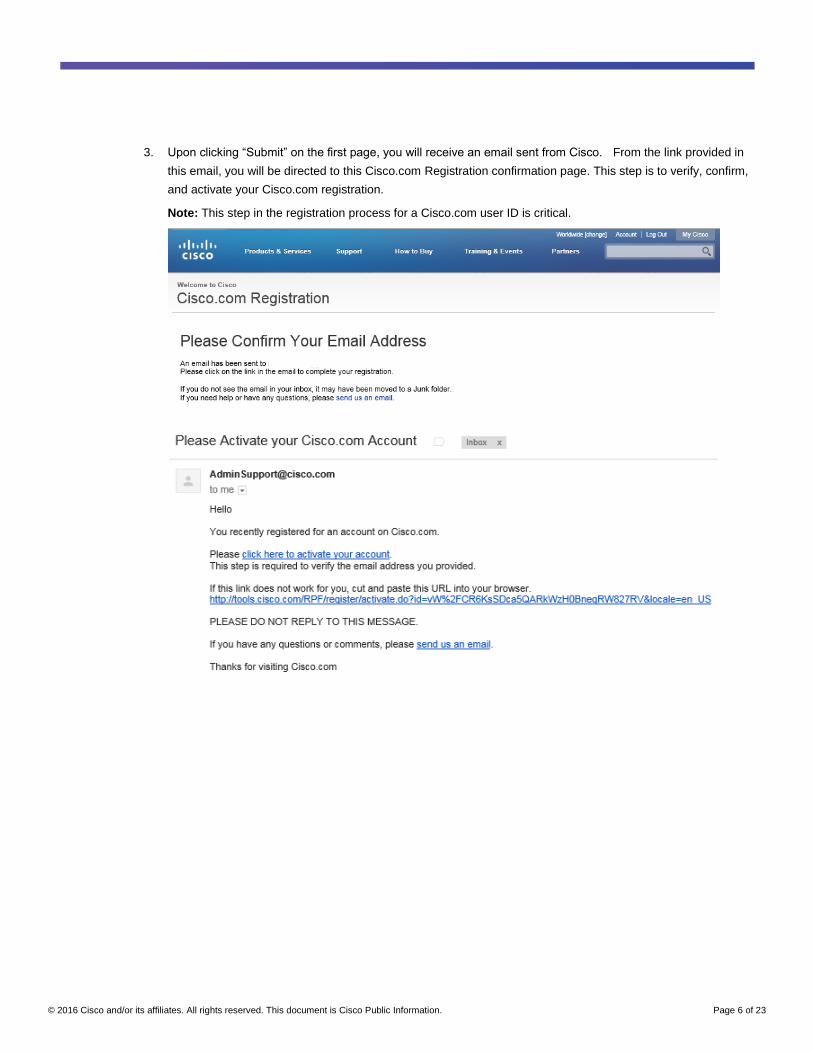
3. Upon clicking “Submit” on the first page, you will receive an email sent from Cisco. From the link provided in
this email, you will be directed to this Cisco.com Registration confirmation page. This step is to verify, confirm,
and activate your Cisco.com registration.
Note: This step in the registration process for a Cisco.com user ID is critical.

© 2016 Cisco and/or its affiliates. All rights reserved. This document is Cisco Public Information. Page 7 of 23
4. You will need to select “Associate your user ID” to update your Cisco Account Profile.

© 2016 Cisco and/or its affiliates. All rights reserved. This document is Cisco Public Information. Page 8 of 23
5. You will be directed to the Cisco Account Profile. Click the “Add Access” button, then select the “Full Access”
radio button on the pop-up screen, and then click “Go” to manage your Service Contract online.
© 2016 Cisco and/or its affiliates. All rights reserved. This document is Cisco Public Information. Page 9 of 23
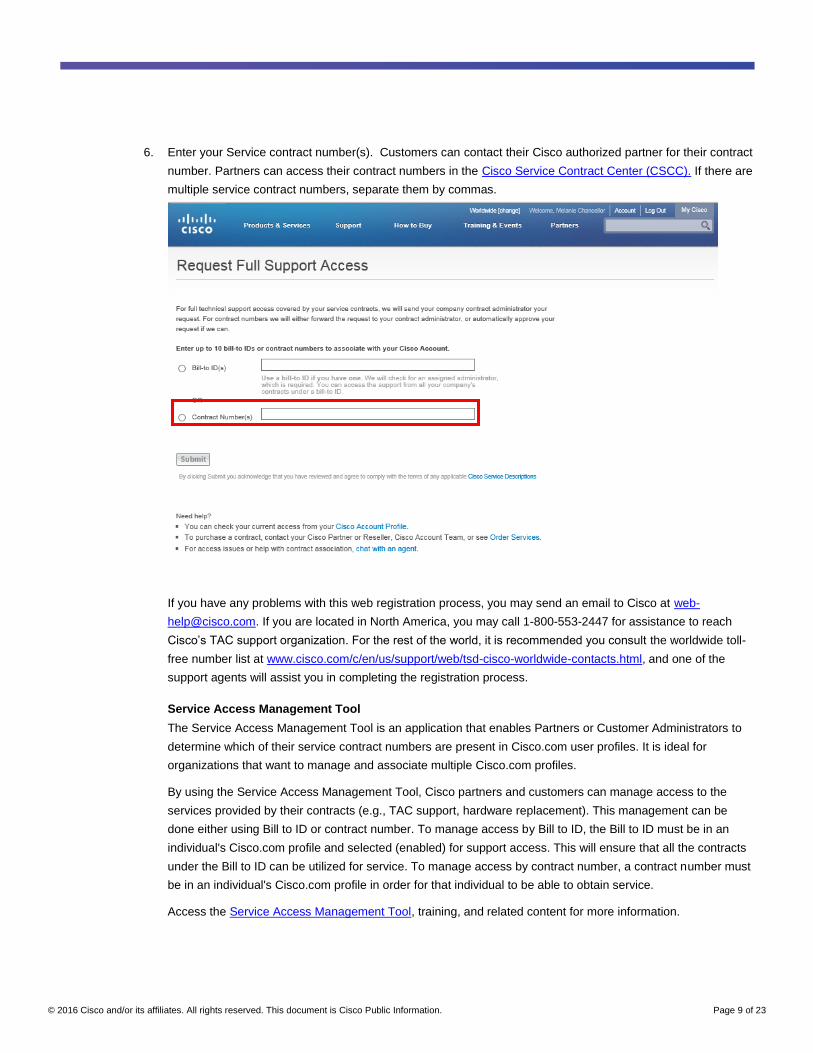
6. Enter your Service contract number(s). Customers can contact their Cisco authorized partner for their contract
number. Partners can access their contract numbers in the Cisco Service Contract Center (CSCC). If there are
multiple service contract numbers, separate them by commas.
If you have any problems with this web registration process, you may send an email to Cisco at web-
[email protected]. If you are located in North America, you may call 1-800-553-2447 for assistance to reach
Cisco’s TAC support organization. For the rest of the world, it is recommended you consult the worldwide toll-
free number list at www.cisco.com/c/en/us/support/web/tsd-cisco-worldwide-contacts.html, and one of the
support agents will assist you in completing the registration process.
Service Access Management Tool
The Service Access Management Tool is an application that enables Partners or Customer Administrators to
determine which of their service contract numbers are present in Cisco.com user profiles. It is ideal for
organizations that want to manage and associate multiple Cisco.com profiles.
By using the Service Access Management Tool, Cisco partners and customers can manage access to the
services provided by their contracts (e.g., TAC support, hardware replacement). This management can be
done either using Bill to ID or contract number. To manage access by Bill to ID, the Bill to ID must be in an
individual's Cisco.com profile and selected (enabled) for support access. This will ensure that all the contracts
under the Bill to ID can be utilized for service. To manage access by contract number, a contract number must
be in an individual's Cisco.com profile in order for that individual to be able to obtain service.
Access the Service Access Management Tool, training, and related content for more information.
© 2016 Cisco and/or its affiliates. All rights reserved. This document is Cisco Public Information. Page 10 of 23
Opening a Support Case by Web
The online support case management tool, called Support Case Manager (SCM), allows users to open a support
case, assign a severity (level 3 or 4), receive information through the web or email, maintain and track support
cases online, and upload files.
SCM allows you to create Cisco TAC support cases for issues covered under the terms of your Cisco support
contract(s). At this time, SCM can assist you only with products currently covered by a Cisco service contract. If
you would like assistance with a product that is not covered by a contract or is covered under warranty, contact the
Cisco TAC by phone.
Before you use SCM, you must be logged in with your Cisco.com user ID and password, and your Cisco.com ID
must contain all of your appropriate Cisco support contracts in order for you to access the services covered by
those contracts. You can use the Cisco Profile Manager to associate all of your Cisco service contracts to your
profile.
Note: If you have a Service Access Management Administrator, you can ask them to make sure that all of your
service contracts are associated with your Cisco.com user ID. If you are unsure of your contract number(s), your
Cisco Partner, Reseller, or Service Account Manager can provide you with a complete list of your service contracts.
The main steps for opening a support case using SCM include:
1. Identify Type of Support Case and Verify Contact Information – enter Cisco.com user ID, assign severity, and
so on
2. Specify Associated Service Contract – verify the product is covered by a service contract
3. Describe the Problem – enter details about the product
4. Submit Your Support Case – confirm information and edit accordingly
You can access the online support case tool using this link: mycase.cloudapps.cisco.com/case
You will be required to log in with your Cisco.com ID and Password. Please make sure that you have your service
contract number available with your Cisco.com ID.

© 2016 Cisco and/or its affiliates. All rights reserved. This document is Cisco Public Information. Page 11 of 23
To open a new support case, click on Open New Case and then follow the instructions below.
Identify Type of Support Case and Verify Contact Information
Identify the type of support case, severity of the problem, extended loss of service (if applicable), and whether you
would like the engineer to contact you. In addition, you can review and change your contact information.
Note: At any time during the process, you can click the Save a Draft button (shown in the image above) in order to
save a draft of your support case. See the Save a Draft section in this document for the steps required to delete or
continue submitting a saved support case.
Complete these steps in order to identify the type of support case and verify your contact information:
1. Choose one of the following options from the Support Case Type drop-down list.
Diagnose and Fix my Problem
Request an RMA
Answer my Question

© 2016 Cisco and/or its affiliates. All rights reserved. This document is Cisco Public Information. Page 12 of 23
2. Choose the severity from the Severity of Problem drop-down list. The Severity of Problem drop-down list is
automatically populated based on the type of support case:
Diagnose and Fix my Problem = Severity 3 – Network Impaired
Request an RMA = Severity 3 – Network Impaired
Answer my Question = Severity 4 – Normal Response Time
If you need to open a severity 1 or 2 network-down emergency support case, please call the Technical
Assistance Center (TAC) nearest you.
3. Choose one of the following values from the Extended Loss of Service drop-down list:
No: There is no extended loss of service. (Default)
Yes: Users are experiencing a loss of service for more than 15 seconds.
The Extended Loss of Service drop-down list does not appear if you selected Answer my Question from the
Support Case Type drop-down list.
4. Review your contact information in the Contact Information section. Your contact information is automatically
provided based on the Cisco.com username you used to log in to the tool. You can click the links located to
the side of the Contact Information heading in order to make changes:
Click Change for this support case in order to change your contact information for this specific support
case.
5. Click Next to continue.
© 2016 Cisco and/or its affiliates. All rights reserved. This document is Cisco Public Information. Page 13 of 23
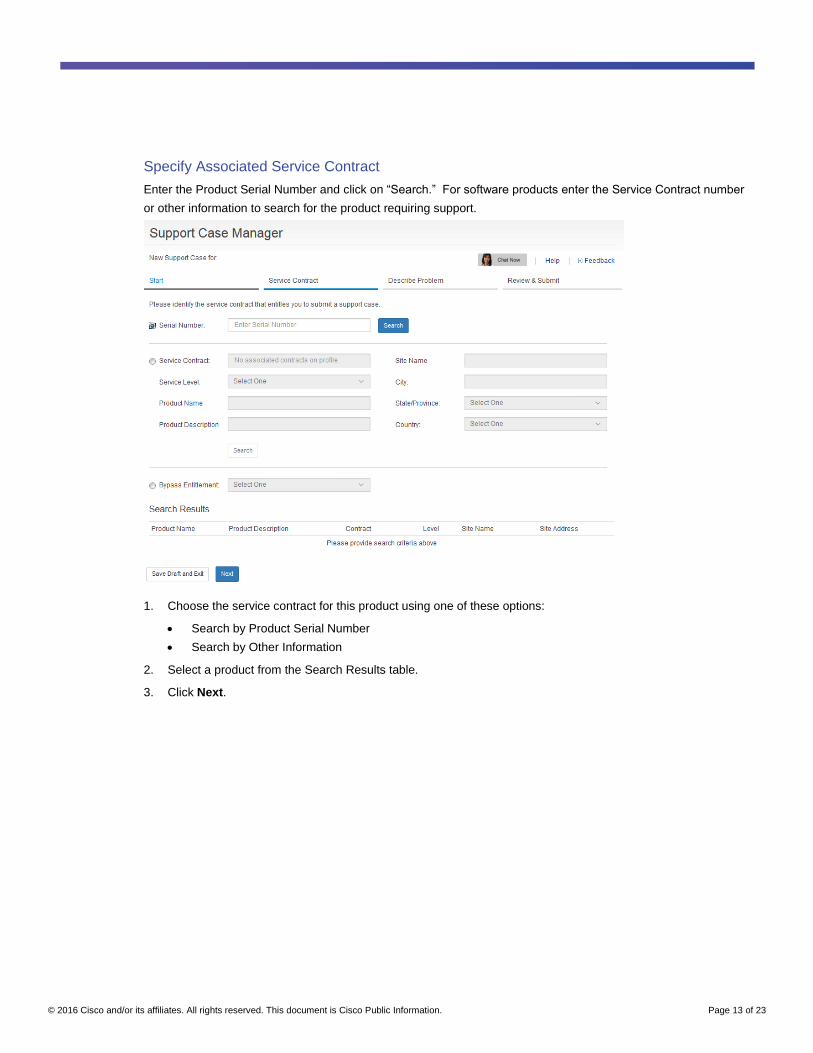
Specify Associated Service Contract
Enter the Product Serial Number and click on “Search.” For software products enter the Service Contract number
or other information to search for the product requiring support.
1. Choose the service contract for this product using one of these options:
Search by Product Serial Number
Search by Other Information
2. Select a product from the Search Results table.
3. Click Next.

© 2016 Cisco and/or its affiliates. All rights reserved. This document is Cisco Public Information. Page 14 of 23
Describe the Problem
Keep these guidelines in mind when describing your problem:
Include a meaningful case title that states the problem accurately. A meaningful title permits assignment
of the case to the appropriate technical resources.
Describe the problem and symptoms (only one per support case).
Include a history of the problem and any troubleshooting steps you completed.
Describe your network topology.
Include any recent changes to your network or data center environment.
Include output from the show tech command (if applicable) and all other relevant output.
Include software versions and types of equipment.
© 2016 Cisco and/or its affiliates. All rights reserved. This document is Cisco Public Information. Page 15 of 23
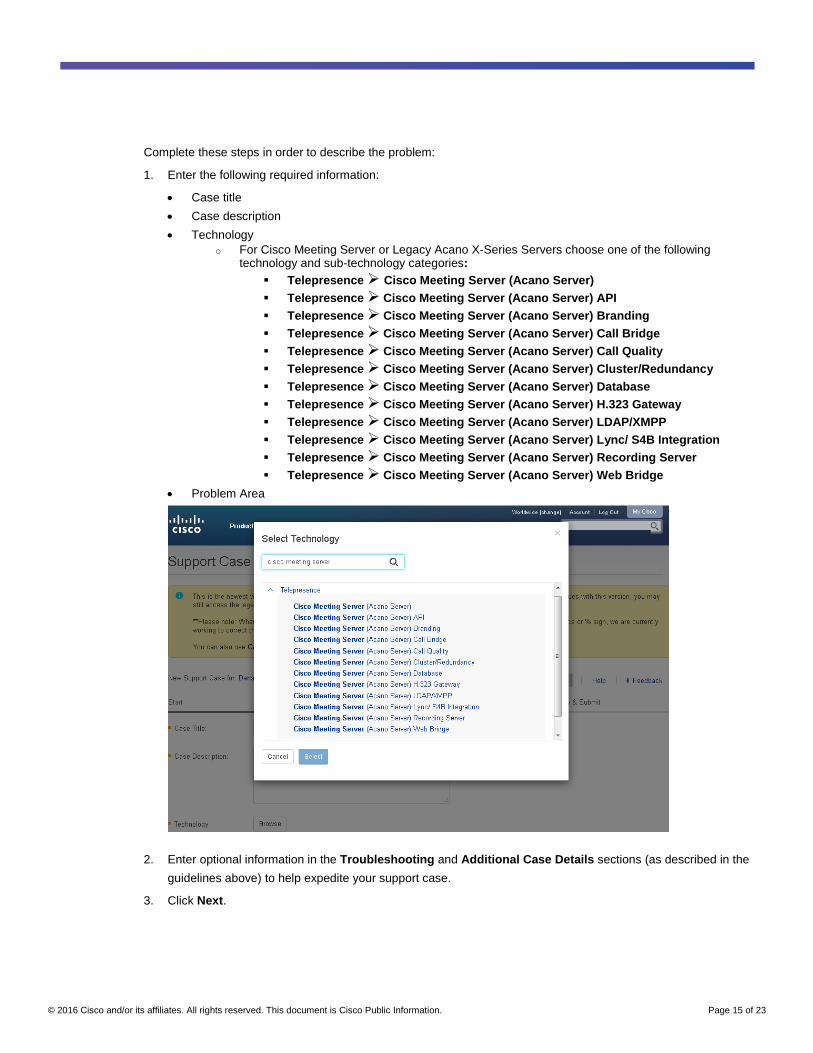
Complete these steps in order to describe the problem:
1. Enter the following required information:
Case title
Case description
Technology
o For Cisco Meeting Server or Legacy Acano X-Series Servers choose one of the following technology and sub-technology categories:
Telepresence Cisco Meeting Server (Acano Server)
Telepresence Cisco Meeting Server (Acano Server) API
Telepresence Cisco Meeting Server (Acano Server) Branding
Telepresence Cisco Meeting Server (Acano Server) Call Bridge
Telepresence Cisco Meeting Server (Acano Server) Call Quality
Telepresence Cisco Meeting Server (Acano Server) Cluster/Redundancy
Telepresence Cisco Meeting Server (Acano Server) Database
Telepresence Cisco Meeting Server (Acano Server) H.323 Gateway
Telepresence Cisco Meeting Server (Acano Server) LDAP/XMPP
Telepresence Cisco Meeting Server (Acano Server) Lync/ S4B Integration
Telepresence Cisco Meeting Server (Acano Server) Recording Server
Telepresence Cisco Meeting Server (Acano Server) Web Bridge
Problem Area
2. Enter optional information in the Troubleshooting and Additional Case Details sections (as described in the
guidelines above) to help expedite your support case.
3. Click Next.

© 2016 Cisco and/or its affiliates. All rights reserved. This document is Cisco Public Information. Page 16 of 23
Submit Your Support Case
Review your information and submit your support case.
1. Review the summary of your support case. If you need to update a section, click the Edit link located next to
the section heading.
2. Click Submit in order to submit your support case.
Your support case number will appear at the top of the page.
© 2016 Cisco and/or its affiliates. All rights reserved. This document is Cisco Public Information. Page 17 of 23
Save as Draft
During your process to open a support case, you can click the Save as Draft button located at the bottom of the
page in order to complete the process at a later time. When you click the Save as Draft button, all information you
entered is saved, and you are redirected to your open support cases page. Each saved draft has an expiration
date, after which it will be automatically deleted.
To continue submitting a saved draft, click the title of the support case.
To delete a saved draft, click the checkbox located next to the support case, and click the Delete button.

© 2016 Cisco and/or its affiliates. All rights reserved. This document is Cisco Public Information. Page 18 of 23
Opening a Support Case by Phone
Support Numbers
1-800-553-2447 U.S.
For worldwide support numbers, refer to Cisco worldwide contacts:
www.cisco.com/c/en/us/support/web/tsd-cisco-worldwide-contacts.html
When you want to report a case, make sure you have the following information available:
● Cisco.com user ID that has been associated to the service contract
● Service contract number
● Business effect (case severity)
Cisco entitles customers by contract number and Cisco.com ID. You must know your Cisco.com user name and
have the contract number of the product when you are calling for support.
Once the agent has all the appropriate information he/she will open a case, provide you with a case tracking
number and route your case to a support engineer. They will contact you to provide technical assistance.
Defining the Severity of a Support Case
Severity 1 and 2 Support Cases must be opened by phone.
Severity 3 and 4 Support Cases should be opened online or by email, but may be opened by phone.
● Severity 1 (S1) – shall mean reported Error(s) in Covered Software that causes all or substantially all of a
system to be functionally inoperative severely affecting delivery to Customers and requiring immediate
corrective action, regardless of time of day or day of the week.
◦ Product and/or covered software are in operable for 100% of Customers
◦ Loss of service>0.5% of Customers
● Severity 2 (S2) – shall mean reported Error(s) in covered products causing the loss of one or more major
functions of the system, causing perceptible degradation or interruption of services delivery to Customers or
seriously affecting Customer’s ability to operate, administer, or maintain their system and requiring
immediate attention. Urgency is less than Severity 1 situation because of a lesser immediate or impending
effect on system performance, Customer’s operation and revenue.
◦ Management system failure
◦ No backup is available
● Severity 3 (S3) – shall mean reported Error(s) in covered products disabling specific noncritical functions of
the system that do not significantly affect delivery services to Customers. The lost or degraded functionality
impairs Customer’s ability to operate, administer, or maintain the system, but does not significantly affect
services delivery to Customers.
◦ System functionality or performance is reduced

© 2016 Cisco and/or its affiliates. All rights reserved. This document is Cisco Public Information. Page 19 of 23
◦ System is working on backup
◦ Loss of service <0.5 % of Subscribers
● Severity 4 (S4) – shall mean reported Error(s) in covered products which is an irritant only and has no
significant effect on the functionality or operation of the system and requests for informational support
assistance, including product information requests and configuration assistance.
◦ Conditions that do not significantly impair the function of the system
◦ Documentation
◦ System enhancement/functionality request
Opening a Support Case by Email
Open new support cases by email using the Cisco support email address: [email protected]. If you are opening a
new support case, include the product type as the subject line of your email; for example, “Cisco Meeting Server.”
This will help the agent processing the incoming email to determine the correct support case queue to route your
support request.
Include the following information in your email:
● Company name
● Contact name
● Contact phone number
● Cisco.com User ID
● Contact email address
● Contract number
● Product type (e.g. Cisco Meeting Server, etc.)
● Business effect (support case severity – as defined above)
● Brief problem description
● Equipment location (e.g., address)
● Alternate contact name
● Alternate contact phone number
Providing this information will help expedite the processing of the support case through the Cisco TAC agent.
Once the agent has processed the email, he/she will open a support case and you will receive a support case
number by email. A support engineer will contact you shortly regarding your support case.

© 2016 Cisco and/or its affiliates. All rights reserved. This document is Cisco Public Information. Page 20 of 23
Managing Your Support Case
After you have created your support case, you can view the status, update the notes, upload files, turn automatic
updates on or off, and request case closure.
Navigate to www.cisco.com/c/en/us/support/index.html and then select “View Open Cases” from the “My Support”
menu.
Or you may go directly to: mycase.cloudapps.cisco.com/case

© 2016 Cisco and/or its affiliates. All rights reserved. This document is Cisco Public Information. Page 21 of 23
The Support Case Manager home page provides two top-level filtered views of the case list:
My Cases: This view shows the cases that were opened by the current user.
All Cases: This view shows the cases that were opened for the contract number(s) associated with the
current user profile.
Note: The case search results are limited to 500 contracts per user. If more than 500 contracts are associated with
your Cisco account, the All Cases view displays a message that instructs you to enter specific contract numbers
(up to 30) in order to narrow the search filter.
When you log in, the home page displays the My Cases view by default. Click the All Cases tab in order to change
to that filtered view.
Note: When you switch to a different tab, all of the filter options reset to their default values.
At the top of each tabbed page, there are basic filter options:
Select the check box beside each case status that you want to include in the list: Open Cases, Draft
Cases, and/or Closed Cases.
Click inside of the Updated In box and choose a date-based filter from the drop-down menu if you want to
show only the cases that were updated within the last 30, 60, or 90 days.
After you select the filters, click Apply Filters in order to update the case list.
© 2016 Cisco and/or its affiliates. All rights reserved. This document is Cisco Public Information. Page 22 of 23
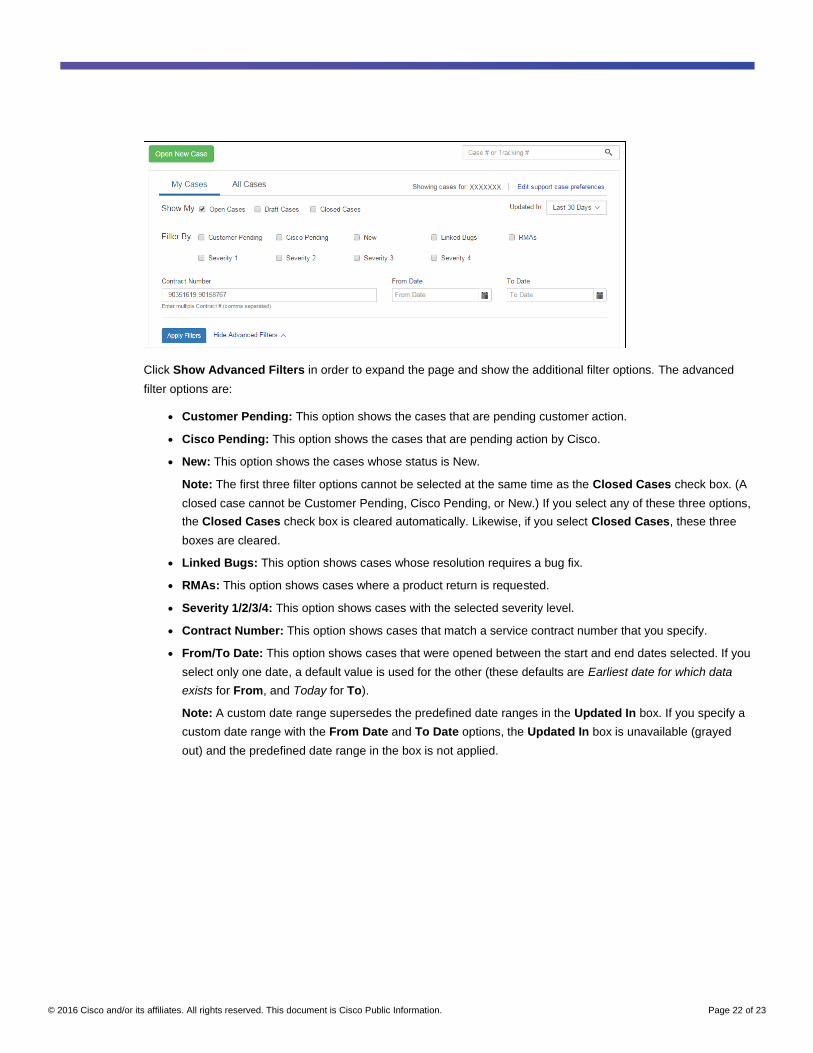
Click Show Advanced Filters in order to expand the page and show the additional filter options. The advanced
filter options are:
● Customer Pending: This option shows the cases that are pending customer action.
● Cisco Pending: This option shows the cases that are pending action by Cisco.
● New: This option shows the cases whose status is New.
Note: The first three filter options cannot be selected at the same time as the Closed Cases check box. (A
closed case cannot be Customer Pending, Cisco Pending, or New.) If you select any of these three options,
the Closed Cases check box is cleared automatically. Likewise, if you select Closed Cases, these three
boxes are cleared.
● Linked Bugs: This option shows cases whose resolution requires a bug fix.
● RMAs: This option shows cases where a product return is requested.
● Severity 1/2/3/4: This option shows cases with the selected severity level.
● Contract Number: This option shows cases that match a service contract number that you specify.
● From/To Date: This option shows cases that were opened between the start and end dates selected. If you
select only one date, a default value is used for the other (these defaults are Earliest date for which data
exists for From, and Today for To).
Note: A custom date range supersedes the predefined date ranges in the Updated In box. If you specify a
custom date range with the From Date and To Date options, the Updated In box is unavailable (grayed
out) and the predefined date range in the box is not applied.
© 2016 Cisco and/or its affiliates. All rights reserved. This document is Cisco Public Information. Page 23 of 23
Printed in USA 11/16