Embed Size (px)
Citation preview

Guide for REX Dynamics Real Estate App
Microsoft Dynamics 365
Solution version 2.0.2.6

REX – Guide for Dynamics 365 Page | 2
Index
Index ..................................................................................................................................................................... 2
1.1 REX Versioning .......................................................................................................................................... 3
1.2 REX - Introduction .................................................................................................................................... 4
Setup REX for first use ..................................................................................................................................... 6
2.1 Deactivate default sales processes ...................................................................................................... 6
2.2 Assigning Security roles to users.......................................................................................................... 7
2.3 System Settings ......................................................................................................................................... 9
2.4 Personal Options ..................................................................................................................................... 11
2.5 Data in REX .............................................................................................................................................. 14
2.6 Filling the Property Type entity........................................................................................................... 17
Navigation ......................................................................................................................................................... 18
3.1 REX – Navigation .................................................................................................................................... 18
3.2 Dashboards .............................................................................................................................................. 21
Accounts and Contacts ................................................................................................................................. 23
4.1 General ...................................................................................................................................................... 23
4.2 Accounts ................................................................................................................................................... 23
4.3 Contacts .................................................................................................................................................... 25
Objects, Units and Contracts ....................................................................................................................... 27
5.1 General ...................................................................................................................................................... 27
5.2 Objects ...................................................................................................................................................... 27
5.3 Units ........................................................................................................................................................... 29
5.4 Contracts ................................................................................................................................................... 30
Case Management ......................................................................................................................................... 32
6.1 General ...................................................................................................................................................... 32
6.2 Cases .......................................................................................................................................................... 32
Leads and Deals .............................................................................................................................................. 35
7.1 General ...................................................................................................................................................... 35
7.2 Leads .......................................................................................................................................................... 35
7.3 Deals .......................................................................................................................................................... 38

REX – Guide for Dynamics 365 Page | 3
1.1 REX Versioning
Verion Date Description
2.0.2.5 December 11, 2017 Updated version

REX – Guide for Dynamics 365 Page | 4
1.2 REX - Introduction
REX is the complete and cloud based solution for real estate investors and managers. REX is
based upon Microsoft Dynamics 365. This quide describes the main functionality of REX and is not
intended to describe the complete functionality of Microsoft Dynamics 365.
1.2.1 Access REX
REX can be accessed on these ways:
1. Using a browser (Internet Explorer, Edge, Chrome, Safari etc.)
2. Using the Outlook Client (with the full Dynamics 365 for Outlook client)
3. Using the Outlook Client and Outlook Online (with the CRM lightweight app)
4. Using Mobile Clients like Tablets and Smartphones (via the Dynamics 365 App or Mobile
browser)
To access REX for Dynamics 365 from a browser, the URL of the Dynamics 365 instance needs to
be filled. REX will be opened on the page determined in the user’s Personal options.
To use the complete REX functionality in the familiar Outook (client) interface, the Microsoft
Dynamics 365 for Outlook client needs to be installed. See https://technet.microsoft.com/en-
us/library/mt826557.aspx for more information.
The Microsoft Dynamics 365 App for Outlook can be used to view Microsoft Dynamics 365
information and track emails from within Outlook on your desktop and phone. See
https://technet.microsoft.com/library/mt812179.aspx for more information.
The Dynamics 365 Apps for Phones and Tablets can be downloaded using the appstore for the
(mobile) device.
More information can be found in the User Settings – Apps for Dyanmics 365.

REX – Guide for Dynamics 365 Page | 5
* Before users can access REX for Dynamics 365 they need to have a Dynamics 365 license
associated to their useraccount in Office 365. After that, the user needs to have an security role in
Dynamics 365.
1.2.2 Modules
REX consists of the following main Modules
• Real Estate Deals : Module used for aquireing property or assocate contracts
• Property Management : Module used for maintaining property
• REX Settings : Base entities and users

REX – Guide for Dynamics 365 Page | 6
Setup REX for first use
Before using REX a couple of settings needs to be done, these are:
1. Deactivate default sales processes
2. Assigning Security roles to users
3. Systemsettings
4. Personal options
5. Data in REX
6. Filling the Property Type entity
2.1 Deactivate default sales processes
Go to Settings>Customizations
Select Customize the System
Select Processes
Select the Opportunity Sales Process and select Deactivate
Select Deactivate

REX – Guide for Dynamics 365 Page | 7
Deactivate the Lead to Opportunity Sales Process in the same way as above.
Now that the default processes are deactivated, the REX process can be used.
2.2 Assigning Security roles to users
Security in REX Dynamics is done with security roles. Before users can login to REX, one or more
securityroles needs to be associated to these users. A minimum of one user must be of type
systemadminstrator. This users has all the rights in REX.
REX Dynamics comes with several out-of-the-box security roles and some specific REX security
roles. The Security Roles and Users entities are accessed in the module REX Settings – Security.

REX – Guide for Dynamics 365 Page | 8
The person with system adminstator access can assign roles by selecting entity Users.
Select the appropriate user or users and click on button MANAGE ROLES.
Select the appropriate role(s) and press on OK.

REX – Guide for Dynamics 365 Page | 9
Now the users are able to login to REX by selecting the URL REX is installed upon.
2.3 System Settings
In REX Settings – Administration – System Settings
Before using REX it is recommded to check the System Settings.

REX – Guide for Dynamics 365 Page | 10
Tabpage General
Name format determines how names of contacts and users are saved in REX. This can be changed
if needed. Keep in mind that the change will only be applied on new records. Existing records will
not be updated if the format is change. Best practice is to change the format before data
entry/import.
Tabpage General
With button Select.. in set up Search section the entities which are searched upon in Global search
can be selected.
Show Bing Maps on forms will show a Bing map on base entities accounts, contacts and leads.
Enable country/region code prefixing if enabled, which is the default, Dynamics REX will prefix the
country/region code to numbers that users are trying to call.
Select provider for Click to call. Choose which provider to enable outbound calls from within
Dynamics 365. This setting doesn’t apply to Dynamics 365 for tablets or Microsoft Dynamics 365
for phones.

REX – Guide for Dynamics 365 Page | 11
Tabpage Formats
Select the Current Format for the localized settings.
Tabpage Email
Selecy the default Server Profile to use and processing method between REX and Exchange.
The Help ? functionality will give more information regarding these and other systemsettings.
2.4 Personal Options
The first (and one-time-only) thing to do when opening Dynamics 365 is to access the personal
options. This can be achieved from the upper right side with the settings icon and then Options.

REX – Guide for Dynamics 365 Page | 12
On tab page General The first setting that can be adjusted is the Homepage that is opened when
REX is accessed. Default this will be determined based upon the security role, but users can
change this to for example Default Pane Real Estate Deals and Default Tab Dashboards. Users
can also select other options if applicable
The second setting is the Records Per Page setting. We recommend setting this to 250. Now the
maximum of 250 records will be shown for each list view in CRM for example the My Active
Companies view.
Another setting to adjust is the default mode in Advanced Find. Set this option to Detailed.
On Tab Page Formats the Current Format can be set to the user’s local country format. This will
ensure that the appropriate format for certain fields (like numbers, currencies and date/time fields)
is shown to the current user.
REX – Guide for Dynamics 365 Page | 13
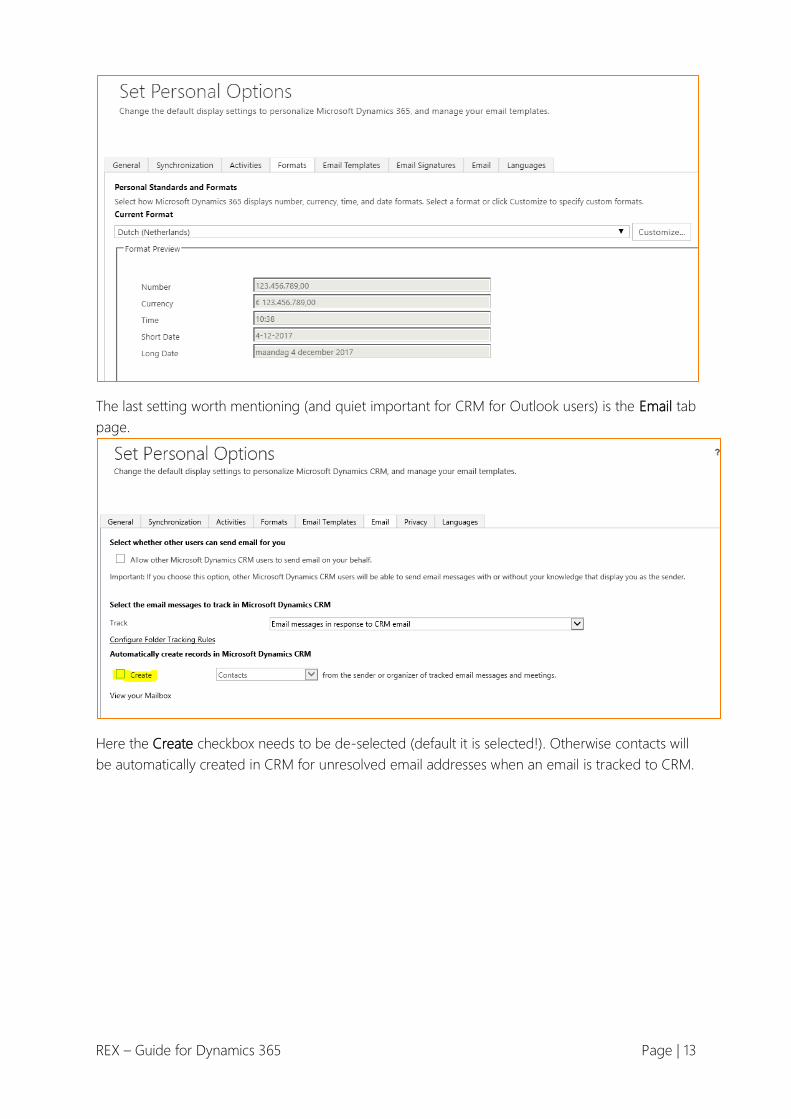
The last setting worth mentioning (and quiet important for CRM for Outlook users) is the Email tab
page.
Here the Create checkbox needs to be de-selected (default it is selected!). Otherwise contacts will
be automatically created in CRM for unresolved email addresses when an email is tracked to CRM.

REX – Guide for Dynamics 365 Page | 14
This is undesired behavior.
After the personal options are changed, they can be saved by pressing button OK.
2.5 Data in REX
Data can be filled in REX in several manners:
1. Manually in REX
2. Using Import Templates
3. Using 3rd party middle ware tools (Scribe etc.) or by using custom API’s.
The first two options are explained in this guide.
2.5.1 Filling data manually
If there is no data needed for import, then data can be filled manually in the corresponding
entities. Best practice is to first fill the data in the base entities Accounts, Contacts and Leads.
After the data in the base entities is available, data in dependent entities like Deals, Cases,
Contracts, Objects and Units can be filled.
2.5.2 Using import templates
If there is data available in the current system, data import templates can be used to fill in the
data. The dataimport templates can be downloaded in module REX Settings – Templates for Data
Import.

REX – Guide for Dynamics 365 Page | 15
For each entity a Template for Data import can be downloaded.
With button Download an import Excel sheet is downloaded.
After the data is inserted in the importstheet, the data can be uploaded in REX from within the
Imports entity.

REX – Guide for Dynamics 365 Page | 16
The Excel file can be selected and by following the import wizard, the data can be imported.

REX – Guide for Dynamics 365 Page | 17
2.6 Filling the Property Type entity
A base entity which needs to be filled in order to work with leads and deals is the Property type
entity.
With button NEW the records can be created.

REX – Guide for Dynamics 365 Page | 18
Navigation
3.1 REX – Navigation
When using CRM in a browser (Internet explorer, chrome, safari etc), the first thing to see is the
Explore Dynamics 365 wizard. Here a quick overview is given in the Home page options in
Dynamics 365. With the close window button X this window can be closed. Now the default
Dynamics 365 homepage is shown.
Navigating in REX is done by using the menu options on the top of the screen. This menu bar
contains a couple of options:
• Navigate to other office apps / office 365
• Select other Dynamics CRM apps
• Select the REX Module
• Select the recently viewed items
• The magnifying glass is used to do a quick blobal
search on accounts, contacts, deals, activities, etc (see
Systemsettings to select the datatypes which can be

REX – Guide for Dynamics 365 Page | 19
searched upon).
• The Shortcut to recent work can be used to quickly go to a
previous opened view or record.
• With the add or Plus button an account, contact or activity
can be created quickly.
• With Advanced search options more advanced
searching can be done. For example, a search string can be
show me all Objects located in The Netherlands
When working in Dyanamics 365 the first thing to determine is in which module will be worked.
For REX applies that almost all relevant menu options can be found under modules Real Estate
Deals and Property Managemen. The CRM modules are accessed by selecting the symbol
and then the module, see the example below.
TIP: It is possible to use
wildcards like * as parts of
the name in searches.
Example search *estate
results in all active records
in which estate is in the
name.

REX – Guide for Dynamics 365 Page | 20
Main Modules
• Dashboards : Overview of different records from different menu options
• Activities : Overview of planned / completed operations (tasks, appointments
etc.)
• Accounts : Here you can find all accounts / companies
• Contacts : Persons working for a company
• Competitors : Competitive companies.
• Leads : Potential deals/customers or suspects
• Deals : Deals with a better close ratio then leads
• Visits : Visit Report associated at deals etc.
• Objects : Property (buildings etc) wich are in use in the company
• Units : Rooms, spaces etc inside an object
• Contracts : Contractual agreements associated at objects/units
• Invoices : Generated invoices (EMLinked connection)
• Property Types : Different types of property
• Stages History : This is used for keeping track of the duration of the sales cycle
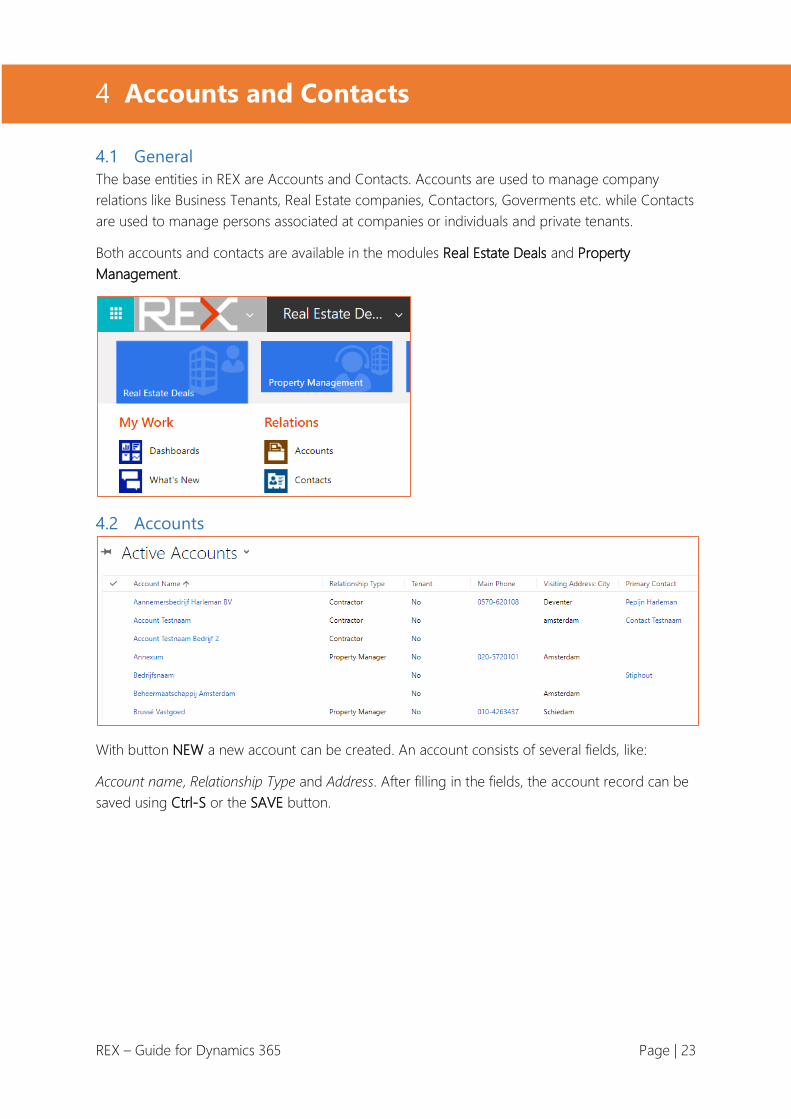
By selecting a menu-option (f.e. Accounts), the records are shown in a list view. In the figure
below the Active Accounts are shown.

REX – Guide for Dynamics 365 Page | 21
Views filter the information on predefined fields. By clicking on the symbol, located right of
the view "Active Accounts", a different view can be selected.
3.2 Dashboards
Dashboard can be accessed both the Real Estate Deals and Property Management modules.
Next to the many Dynamics 365 dashboards REX is equipped with 3 custom dashboards:
• REX Property Dashboard
• REX Sales Dashboard
• REX Tenant Dashboard
REMARK: Each user can display its own preferred
view by using the pushpin. This will then be
displayed by default.
TIP: It is possible to use
wildcards like * as parts of
the name in searches.
Example search *Cap
results in all active records
in which Cap is in the
name.

REX – Guide for Dynamics 365 Page | 22
Example REX Property Dashboard
Example REX Sales Dashboard
Example REX Tenant Dashboard
REX – Guide for Dynamics 365 Page | 23
Accounts and Contacts
4.1 General
The base entities in REX are Accounts and Contacts. Accounts are used to manage company
relations like Business Tenants, Real Estate companies, Contactors, Goverments etc. while Contacts
are used to manage persons associated at companies or individuals and private tenants.
Both accounts and contacts are available in the modules Real Estate Deals and Property
Management.
4.2 Accounts
With button NEW a new account can be created. An account consists of several fields, like:
Account name, Relationship Type and Address. After filling in the fields, the account record can be
saved using Ctrl-S or the SAVE button.
REX – Guide for Dynamics 365 Page | 24
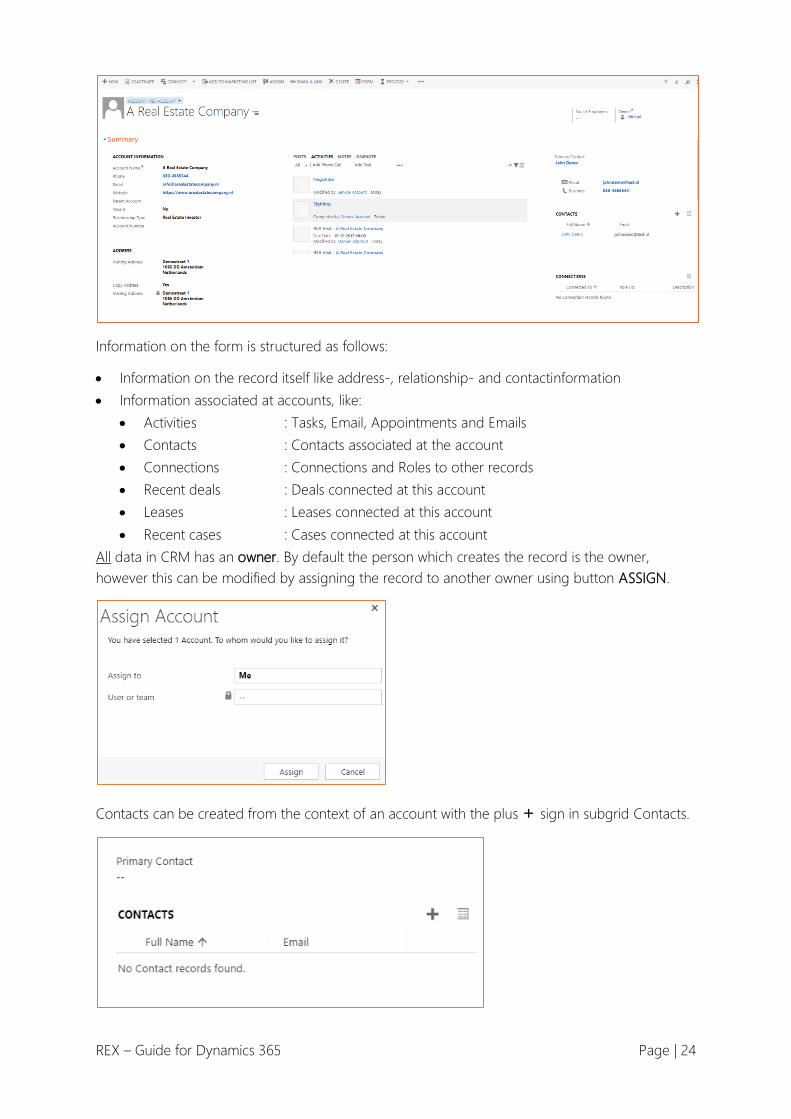
Information on the form is structured as follows:
• Information on the record itself like address-, relationship- and contactinformation
• Information associated at accounts, like:
• Activities : Tasks, Email, Appointments and Emails
• Contacts : Contacts associated at the account
• Connections : Connections and Roles to other records
• Recent deals : Deals connected at this account
• Leases : Leases connected at this account
• Recent cases : Cases connected at this account
All data in CRM has an owner. By default the person which creates the record is the owner,
however this can be modified by assigning the record to another owner using button ASSIGN.
Contacts can be created from the context of an account with the plus + sign in subgrid Contacts.

REX – Guide for Dynamics 365 Page | 25
A new quick create form opens where the data can be inserted. Automatically the contact will
inherit information like address from the account.
With button SAVE the contact is created.
Also a Primary contact can be selected on the account form. Now the contactdetails are show
instantly on the account form.
4.3 Contacts

REX – Guide for Dynamics 365 Page | 26
With button NEW a new contact can be created. An contact consists of several fields, like:
Fullname, Email and Address. After filling in the fields, the contact record can be saved using Ctrl-S
or the SAVE button.
Information on the form is structured as follows:
• Information on the record itself like address- and contactinformation
• Information associated at contacts, like:
• Activities : Tasks, Email, Appointments and Emails
• Recent cases : Cases connected at this contact
• Recent deals : Deals connected at this contact
• Leases : Leases connected at this contact
All data in CRM has an owner. By default the person which creates the record is the owner,
however this can be modified by assigning the record to another owner using button ASSIGN.

REX – Guide for Dynamics 365 Page | 27
Objects, Units and Contracts
5.1 General
Objects, Units and Contracts are maintained in the corresponding entities. During the Sales
process, Objects and Units can be associated at leads and Deals using the Match entity. The final
step in this process is the Contract phase. Now the preverred Match record is
maintained/contracted.
5.2 Objects
Objects are used for storing property specific information.
With button NEW a new object can be created. An object consists of several fields, like:
Object Number, Property Type, Name, Address and Cadastral details. After filling in the fields, the
object record can be saved using Ctrl-S or the SAVE button.

REX – Guide for Dynamics 365 Page | 28
Note, locked fields like Total Units are automatically filled based upon other records/criteria.
A picture can be saved upon the record by clicking on the icon, select the appropriate picture
ans press OK.
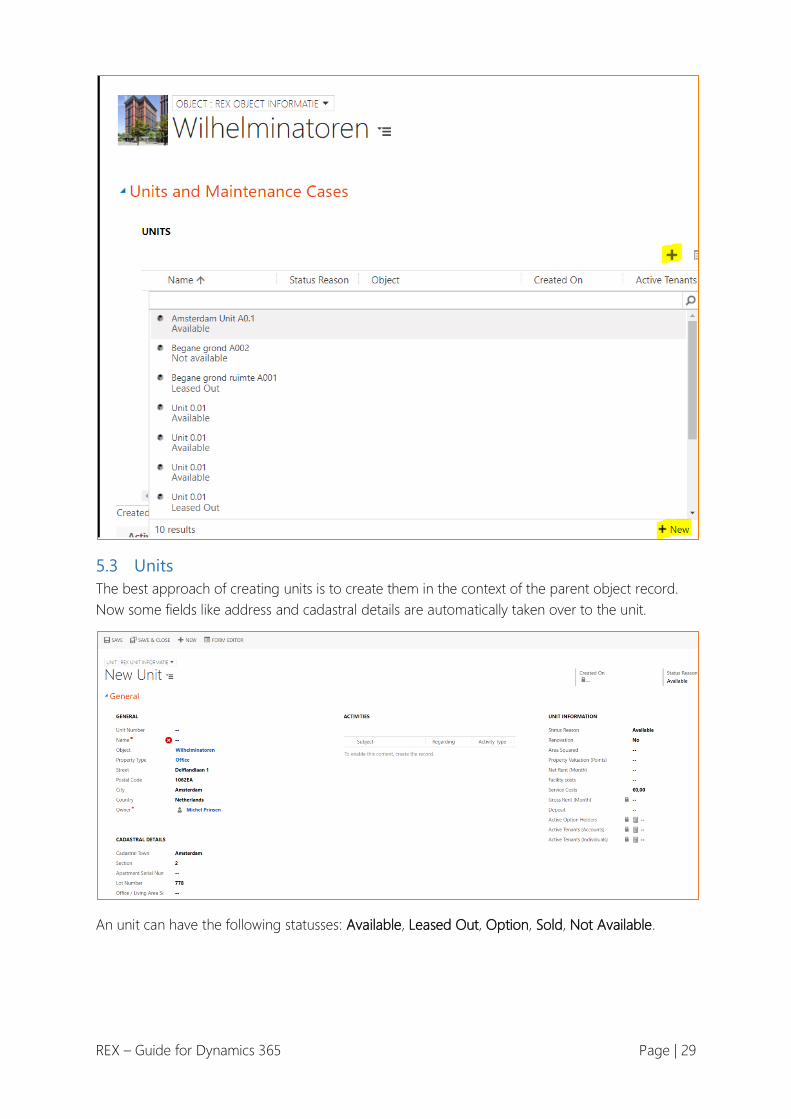
In the below part of the record in tabpage Units and Maintenance Cases subgrid Units, units can
be associated at the object by pressing button +. If the Unit was created previously, this can now
be selected. Otherwise press button + New
REX – Guide for Dynamics 365 Page | 29
5.3 Units
The best approach of creating units is to create them in the context of the parent object record.
Now some fields like address and cadastral details are automatically taken over to the unit.
An unit can have the following statusses: Available, Leased Out, Option, Sold, Not Available.

REX – Guide for Dynamics 365 Page | 30
When creating an Unit the default status is Available. If the Active Tenants is >= 1, then the status
will be set to Leased Out. If Active Option Holder is >= 1, then the status will be set to Option.
Statusses Sold and Not Available are set Manually.
The following information can be associated at Units:
• Stakeholders
• Contracts/Leases
• Cases
• Invoices
Best practice for dealing with Invoices is to use the EMLinked connection.
5.4 Contracts
Contracts can be created from the Contract entity or can be the result of the Lead – Deal Sales
Process.
Contracts containing information like start- and enddate, customer data and financial data.

REX – Guide for Dynamics 365 Page | 31
A contract can have the following statuses:
• Concept
• Offered – REX Linked
• Signed – REXLinked
The status of the Contract determines the status of the Unit/Object.

REX – Guide for Dynamics 365 Page | 32
Case Management
6.1 General
Depending on the support level companies uses for their customers, cases are to be used. Cases
can be used to file a “simple” complaint, or for registering a complete object renewal process.
Cases are available in the module Property Management.
6.2 Cases
Case creation can be done from within the Service Module. Also cases can be created from within
the context of objects, units or accounts. The below picture shows a case creation from the Unit
record.
When a case is created from within the context of a parent record plus icon and button New, then
the quick create case form is shown.

REX – Guide for Dynamics 365 Page | 33
The quick create form shows an extract of the total case field. After the appropriate fields are
filled, the case can be created with button Save. A casenumber is automatically generated.
Opening te case shows the case form. On this form additional case information can be added or
assocated at. Activities can be created and used for follow up of the case. Also similar cases can
be searched upon in order to streamline the casemanagement process and have a consistent
quality in case resolving.
By using the Business Process Flow the case representative is guided through the nessecary steps
of closing the case. With the Next Stage button, the status of the case can be transferred from
Identify, Research to Resolve.

REX – Guide for Dynamics 365 Page | 34
When the case is Resolved, this option can be selected in the corresponding phase.
The case close form is shown. After filling in the required and wanted information, the case can be
closed with button Resolve.
Example of a closed case

REX – Guide for Dynamics 365 Page | 35
Leads and Deals
7.1 General
The REX “Sales” process is maintained in Leads and Deals. Generally speaking, a Lead is a cold
“Deal” for new accounts or contacts, while a Deal is a better chance of closing / registering a
Contract for existing relations. The following Sales types are available:
• Investment deal
• Sales deal
• Lease inquiry
• Property management
• Maintenance deal
• Tenant rep
• Valuation
• Consultancy
• Other
The next paragraphs further describes the Lead and Deal process.
7.2 Leads
Leads are maintained in the Leads entity which is available in the Real Estate Deals module.
With button NEW a new lead record is created.

REX – Guide for Dynamics 365 Page | 36
A Business Process Flow is used to guide the repronsible user throught the Lead – Deal – Contract
process.
The deal type determines the phases and steps which are used in the sales process. Leads are in
the Registration phase. When a lead becomes more likely to become a contract, a Deal is created.
In general the following phases are distinguished:
• Registration : General information needed in the registration phase.
• Intake : Activities done in the intake phase
• Sighting : When the sighting is planned/done
• Negotiate : Negotiating of the contract
• Contract : Contract phase
The following information can be associated at leads.
• Activities like phonecall’s, tasks, appointments etc.
• Details and interests
• Match(es) of the lead by registration of Propertie(s)
Properties are records associated at a lead, deal or contract. From within each of those records
Property or Match records can be created with the plus + sign.

REX – Guide for Dynamics 365 Page | 37
In the Match record the Object and Unit need to be filled. The match can have one of the
following statuses:
• Interest (default)
• Sighted
• Option
• Contracted
• Denied
With button SAVE & CLOSE the match record is saved and the previous form will be shown again.
When going from the Registration to the Intake stage a Deal needs to be created. This is done
using button Qualify.

REX – Guide for Dynamics 365 Page | 38
7.3 Deals
Deals can be manually from the Real Estate Deals module or automatically by qualifying a lead.
When a deal is created from a lead, all (related) information is also taken over to the Deal. This
ensures a proper customer view.
The following phases are available in the Deal.
• Intake
• Sighting
• Negotiate

REX – Guide for Dynamics 365 Page | 39
In the Intake phase more detilas of the deal can be maintained. For example more properties of
interests can be registered with the Plus + icon in subgrid Related Properties. See paragraph
Properties/Matches for more information.
In the Sighting phase the visit van be planned and a visit report can be created. See paragraph
Visit Reports for more information.
In the Negotiate phase the financial details can be further detailed.
Closing the deal - Lost
A Deal can be won or lost. When a deal is lost, it is closed with button CLOSE AS LOST.
Now a dialog window is opened where the Competitor (if known) can be filled, before closing the
deal with button OK.

REX – Guide for Dynamics 365 Page | 40
Closing the deal – Won
When the Deal is won, a contract is to be created. A contract is created by selecting Yes in option
Create Contract.
Before a contract can be created, the contracted Property to be selected. If there is no Property
selected, an error will be shown that the Property needs to be filled.
Now with button Next Stage the Contract can be selected and the record will be opened.

REX – Guide for Dynamics 365 Page | 41
See for more information Contracts.
7.3.1 Properties/Matches
Properties or match records determine which properties (Object/Units) are applicable in the sales
phase.
When creating a matschrecord the Object and Unit need to be filled in. If a Deal is a combination
of more Objects/Units, then multiple matchrecords needs to be created,.
From within the Match record also a visit report can be created. See paragraph Visit Reports.

REX – Guide for Dynamics 365 Page | 42
7.3.2 Visit Reports
Creation of visit reports is done from the related properties records. First the appropriate
property/match record needs to be opened.
A visit report can be created manually with the plus + icon or automatically if option Create New
Visit is set to Yes.
By creating a visit reports manually, a new window opens. Some fields like subject, reason for
meeting and startdate are (pre)-filled.
Note: fields regarding and account will be filled when the visit report record is saved.

REX – Guide for Dynamics 365 Page | 43
When a visit report is automatically created, the fields are pre-filled.
When opening the created visit report it can be updated with a description and follow-up
activities.
After the visit is done, the record can be completed with button Mark Complete.