Embed Size (px)
Citation preview

Groshong® Catheter Care
1
Table of Contents
Learning About the Groshong® Catheter .................................................................................. 2
Benefits ....................................................................................................................................... 2
Placement .................................................................................................................................... 2
After Placement .......................................................................................................................... 3
Caring for Your Groshong® Catheter ........................................................................................ 3
Preventing Infection .................................................................................................................... 3
Site Care for First 2 – 4 weeks .................................................................................................... 5
Dressing Changes ........................................................................................................................ 6
Once Your Catheter Has Healed ................................................................................................. 6
Sensitive Skin Care ..................................................................................................................... 7
Flushing the Catheter .................................................................................................................. 9
Changing the needleless connector ........................................................................................... 10
Groshong® Catheter Supply Checklist ..................................................................................... 11
Problem Solving .......................................................................................................................... 12

2
Learning About the Groshong® Catheter
The Groshong® catheter is a narrow plastic-like hollow tube. It is tunneled under the skin and
placed in one of the veins just under the collarbone. The catheter is placed just above the heart
(see picture). The Groshong® catheter has many uses.
Drawing blood
Chemotherapy
IV fluids
Blood transfusions
IV nutrition
Benefits
1. Comfort – Fewer needle sticks are required.
2. Safety – Secure access into your bloodstream that can be maintained as long as it is needed.
3. Independence – Many treatments can be done on an outpatient basis.
Placement
Your Groshong® catheter will be placed in the operating room or Interventional Radiology.
Placement often takes about 30 minutes. There is some waiting and observation time.
Therefore, the entire process may take 2 – 4 hours.
Medicines may be given to help you relax and a local anesthetic is used to numb the area where
the incisions are made. The first incision is made just below the collarbone. This is where the
catheter enters the large blood vessel that leads to the heart. This place is called the “entrance
site.”
The entrance site will have paper “stitches” called steri-strips holding it closed. These will fall
off as the site heals.
The rest of the Groshong® catheter is tunneled under the skin where the second small incision is
made. This is the “exit site”, where the catheter exits the body. At the exit site, a few stitches
will be placed to hold it in place until the tissue can heal. These stitches may be removed by
your nurse or doctor in 2 – 3 weeks.

3
The Groshong® catheter does not need a clamp. It has a two-way valve which prevents blood
from backing up into the catheter.
After Placement
A chest x-ray will be taken to confirm proper placement.
You may feel some neck and/or shoulder pain and stiffness for a couple of days. Pain medicine
may be ordered for you.
It is normal to have a small amount of bleeding around the exit site for 1 – 2 days. If the
bleeding increases or does not stop, contact your nurse or doctor.
Check with your doctor before you resume any strenuous activity.
Bathing
You will be able to shower in 24 – 48 hours. Cover the Groshong® and the hub with
occlusive plastic and tape. Other options are: Ziplock
bag or AquaGuard
(800-426-1042).
The catheter should never be below the level of water in the tub when you are bathing.
Swimming may not be allowed. Consult with your doctor.
Caring for Your Groshong® Catheter
Preventing Infection
To prevent infection, you will need to keep the exit site and the opening to the Groshong® sterile.
Your nurse will show you how to do this.
Wash your hands well. Be sure to clean under your nails. You may want to use a nail brush.
Scrub your hands with soap and water for 15 – 30 seconds. Rinse well. Dry your hands with
a clean towel.
Use only tubing, IV bags, or other supplies that are sterile.
Never let anything touch the connection end of the catheter or the end of the needleless
connector that attaches to the catheter.
Never touch the hub of the syringe.

4
Always clean the top of the needleless connector with an alcohol swab using a ‘juicing’
method for 15 seconds; then allow to air dry for 10 seconds before accessing. (Note: do not
allow the end of the needleless connector to touch anything after you’ve cleaned it with a
alcohol swab and before accessing with a syringe or IV line.)
Always clean your work area with soap and water. Let it dry before setting up supplies.
Handle gauze pads or transparent dressings only at the edges.
Watch for expiration dates on your medicines and supplies.
Always store your supplies in a dry place.
Other Helpful Points
Never use scissors, pins, or sharp objects near your catheter.
Carry a rubber band and sterile gauze in case your cap leaks or your catheter is accidentally
broken. In the event of a break, pinch off the catheter in between the break and your skin.
Cover the end with sterile gauze and secure with a rubber band. Call the doctor immediately.
If your skin becomes irritated from tape or the dressing, ask your nurse for other options,
which may include skin prep.
Keep the catheter coiled or looped and taped to the chest at all times to prevent it from being
pulled out or damaged.
A Biopatch® may be recommended for new catheters with sutures in place, your nurse will
instruct you how to apply the Biopatch
around the exit side. The Biopatch
goes on with
the blue side up.

5
Site Care for First 2 – 4 weeks (Note: Pre-packaged dressing kits may also be provided.)
Supplies:
1 ChloraPrep
1 roll of tape
1 gauze dressing or 1 transparent adhesive dressing
exam gloves
skin prep (optional)
Steps:
1. Set up a clean work surface.
2. Gather supplies.
3. Wash hands well for 30 seconds.
4. Put on clean gloves and carefully remove the old dressing.
5. Inspect the exit site for the signs of infection: redness, swelling, drainage, tenderness,
and/or warmth. Call your nurse or doctor if any of these signs are present. Also report
dry skin, rash, or irritation from the dressing.
6. Put on sterile exam gloves.
7. Clean the area with alcohol swabsticks (pre-wash), only if needed for extra cleaning
around stitches, etc, starting at the exit site. At first you will not be able to pick up the
catheter because of the stitches. Once the stitches are removed, it will be easier to clean
around the catheter.
8. Pinch the wings on the ChloraPrep
to release the
liquid into the sponge pad. Do not touch the pad.
Gently press the sponge against the skin near the
exit site until you can see the liquid on your skin.
Use a back-and-forth friction rub for 60 seconds to
all skin areas being covered by the dressing. Let air
dry. Do not blot, wave at, or blow-dry the area.
6
Dressing Changes
Gauze Dressing
If just a gauze dressing is used, it needs to be changed daily, and when it is loose, wet, soiled, or
if any drainage is present.
Open the sterile gauze package.
Pick up the gauze. Be careful to touch only the very edges or the outside part that will not
come in contact with your Groshong® exit site.
Place the gauze over the exit site.
Tape the edges of the gauze.
Transparent Adhesive Dressing with Gauze
If gauze is used with a transparent dressing, it needs to be changed every 3 days or more often if
it is loose, wet, soiled, or if any drainage is present.
Follow the steps above for gauze dressing. Instead of tape, place the transparent dressing over
the gauze.
Transparent Adhesive Dressing without Gauze
Change at least every three days or sooner if it is loose, wet, soiled, or if any drainage is present.
Peel the backing from the transparent dressing and apply to site. Be careful not to touch the
adhesive side to anything but the exit site. Place the dressing over the catheter tube first, and
then gently smooth out the rest of the dressing.
Once Your Catheter Has Healed
In about four weeks, your exit site should be well healed. The stitches will be removed. Your
doctor or nurse may change your cleaning routine. Instead of the Chloraprep®, the site can be
cleaned with a washcloth and antimicrobial soap. Soap with a chlorhexidine base is preferred.
At this point you may not have to wear a dressing. If you do not use a dressing, you must clean
your site daily. If you continue to use a dressing, you will need to follow the cleaning/dressing
routine as outlined above.
Always cover your hub (see page 3) before cleaning to protect it from any water contamination.
Please follow these steps:
1. Use a liquid antimicrobial soap and a clean washcloth. Do not use a bar of soap.
2. Place the washcloth at the exit site and clean in ever larger circles moving away from the
site until you are 2 inches from it. Use a clean, fresh washcloth each day.

7
3. Gently pat the exit site dry with a clean towel so that you don’t pull at the catheter.
4. Then apply your dressing – either a transparent or gauze dressing or adhesive dressing
(Band-Aid
.) Some people prefer no dressing at all.
5. Loop and secure the catheter at all times to prevent pulling, even if you are not using a
dressing.
Sensitive Skin Care
Follow these steps if your skin becomes red, irritated, or has open sores.
Supplies:
1 Bottle of water-based chlorhexidine solution (Stearis 32oz CS# 1254444 or Hibiclens single
use packets CS#1215001)
4 x 4 sterile gauze
1 roll of paper tape or hytape (pink) tape
2 x 2 sterile gauze
1small transparent adhesive dressing (optional)
Clean and sterile gloves (if sutures are still in place)
No-sting skin prep
Adhesive tape remover
1. Follow steps 1 – 5 above on skin care for the first 2 – 4 weeks.
2. Open 4 x 4 gauze packages. Pour chlorhexidine onto one of the sterile 4 x 4 gauze squares.
3. Put on exam gloves. Gently scrub the exit site with the soaked gauze squares for 30 seconds.
Gently blot dry with dry sterile gauze.
4. Let air dry completely. Do not wave at or blow-dry the area.
Your nurse will help you decide which dressing is best for you.
Gauze
If your skin is very irritated with open sores, it should be covered with gauze, not left open to the
air. When placing the gauze, make sure to either use a no-tape method which your nurse can
show you or make sure the tape is not over the sore. Try to place your gauze and tape in a
different area each time you change your dressing and use the least amount of tape that you can.
This will give your skin a chance to heal.
8
Transparent Adhesive Dressing
If using a transparent dressing on sensitive skin, place it over gauze as outlined above. Each time
you change your dressing, rotate where you place the transparent dressing on your skin.
Sorbaview window dressings are also available for sensitive skin (Small sorbaview
CS# 2203484).
Personalized Dressing Plan (if different from above)

9
Flushing the Catheter
Use pre-filled saline syringes from the pharmacy. If you need to draw up your flushes, your
nurse will teach you how to do this.
You will need to flush your catheter once a week, or after each use.
Supplies:
A syringe with 10 mL normal saline.
Alcohol swabs
needleless connector every 3-7 days.
Clean gloves.
1. Wash hands for 30 seconds.
2. Put on clean gloves.
3. Clean the top of the needleless connector with an alcohol swab for 15 seconds using a
‘juicing’ method and allow to air dry for 10 seconds before accessing. (Note: do not allow
the end of the needleless connector to touch anything after you’ve cleaned it with alcohol
and before accessing with a syringe or IV line.)
4. Remove the plastic cover from the syringe. Insert the syringe filled with normal saline into
the valve. If the tip of the syringe touches anything other than the cleansed catheter, stop,
and replace the syringe.
5. Push gently and steadily on the plunger until the syringe is empty. The Groshong® catheter
should flush easily. If you feel resistance, check to see if the tubing is kinked. If there is
resistance, do not force.
6. Remove the syringe and dispose of it.
(If you have a Groshong® catheter with multiple ports, repeat steps to flush each port).

10
Changing the needleless connector
1. The needleless connector is a two-way neutral pressure connector that needs to be changed
once or twice a week.
2. Wash hands for 30 seconds.
3. Put on clean gloves.
4. Always make sure the clamp is closed before removing the needleless connector.
5. Remove the old needleless connector from the catheter.
6. Remove the blue protective cap and screw the new needleless connector onto the end of the
catheter.
11
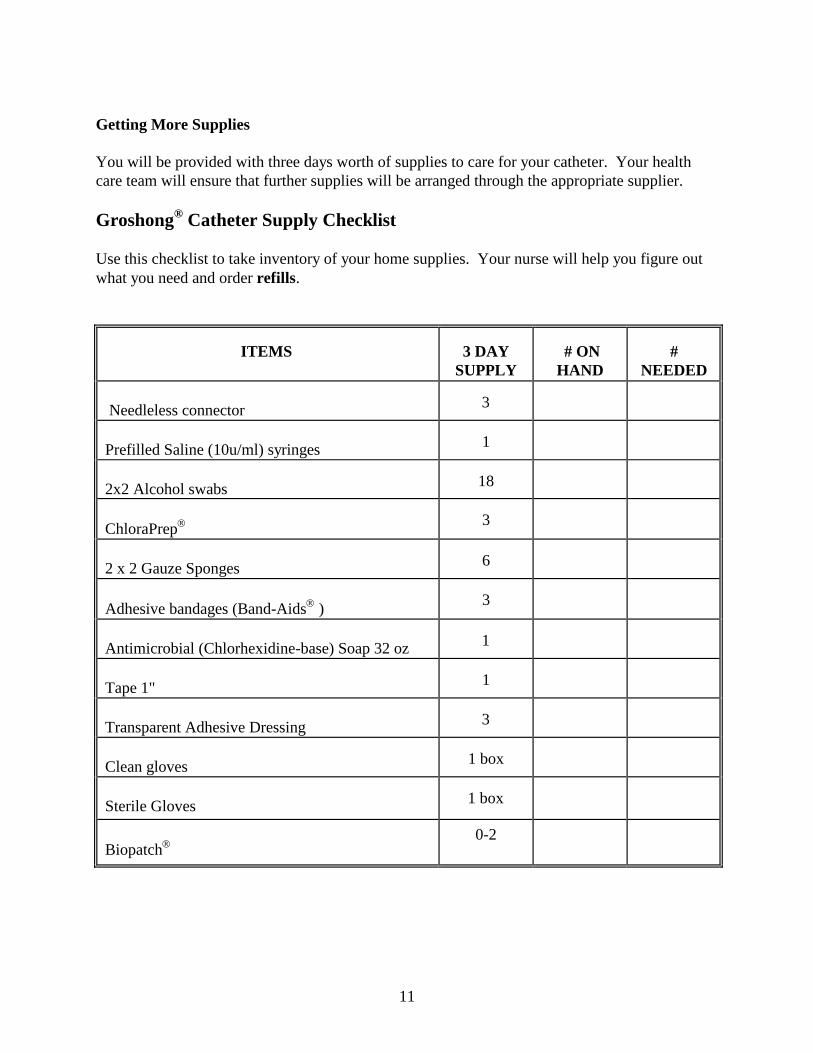
Getting More Supplies
You will be provided with three days worth of supplies to care for your catheter. Your health
care team will ensure that further supplies will be arranged through the appropriate supplier.
Groshong® Catheter Supply Checklist
Use this checklist to take inventory of your home supplies. Your nurse will help you figure out
what you need and order refills.
ITEMS
3 DAY
SUPPLY
# ON
HAND
#
NEEDED
Needleless connector
3
Prefilled Saline (10u/ml) syringes
1
2x2 Alcohol swabs
18
ChloraPrep
3
2 x 2 Gauze Sponges
6
Adhesive bandages (Band-Aids
)
3
Antimicrobial (Chlorhexidine-base) Soap 32 oz
1
Tape 1"
1
Transparent Adhesive Dressing
3
Clean gloves
1 box
Sterile Gloves
1 box
Biopatch
0-2

12
Problem Solving
Call your doctor immediately with any of the problems listed below.
Persistent blood in catheter tubing.
Swelling of face, neck, chest, or arm.
Drainage, redness, swelling, severe pain, or bleeding at the exit site.
Fever and/or chills.
Shaking chills right after you flush the catheter.
Difficulty flushing the catheter. When you try to push on the plunger, you meet resistance.
Damage to the catheter such as a leak, hole, cut, or crack in the tubing. See Helpful Points on
page 4 for details.
The Groshong® catheter is accidentally pulled out. Apply pressure with gauze to the exit and
entrance sites and shown in picture on page 2.
Who to call for questions or problems
8:00 a.m. -4:30 p.m. on weekdays call ____________________@_______________________
After 4:30 p.m. or weekends/holidays call resident/attending on call
____________________________@ _______________________________________________ Your health care team may have given you this information as part of your care. If so, please use it and call if you have any questions. If this information was not given to you as part of your care, please check with your doctor. This is not medical advice. This is not to be used for diagnosis or treatment of any medical condition. Because each person’s health needs are different, you should talk with your doctor or others on your health care team when using this information. If you have an emergency, please call 911. Copyright © 4/2015. University of Wisconsin Hospitals and Clinics Authority. All rights reserved. Produced by the Department of Nursing. HF4558.


