Embed Size (px)
Citation preview

www.popwood.com 1
SHAKER
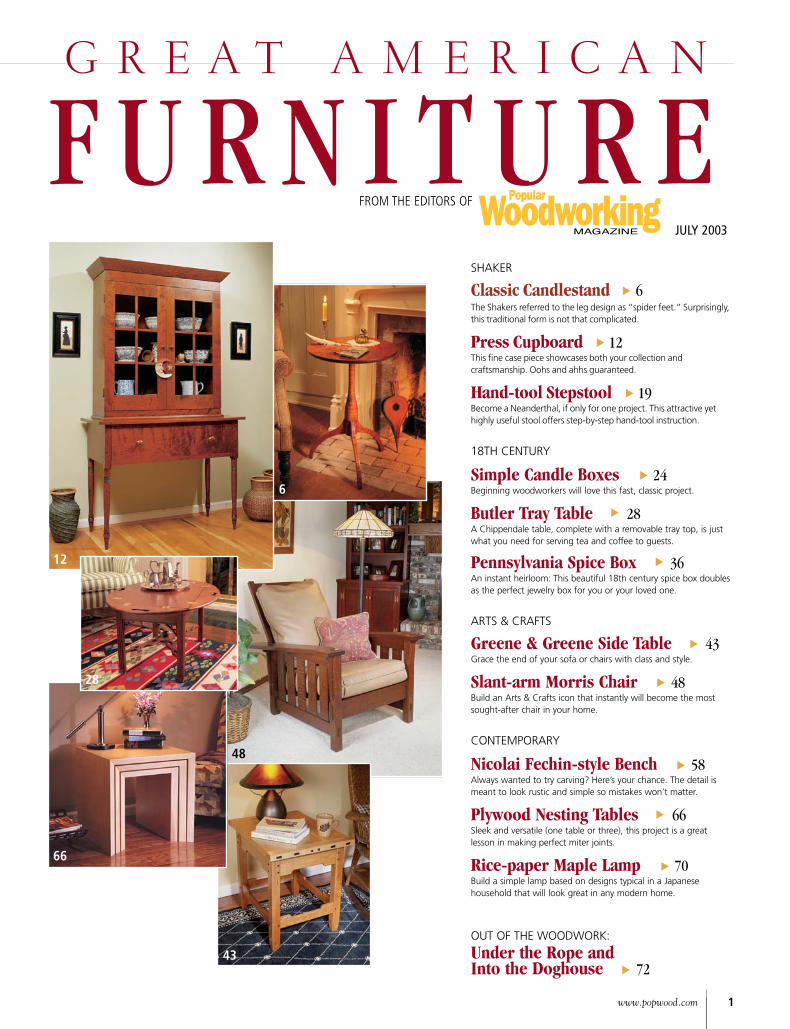
Classic Candlestand 6The Shakers referred to the leg design as “spider feet.” Surprisingly, this traditional form is not that complicated.
Press Cupboard 12This fine case piece showcases both your collection and craftsmanship. Oohs and ahhs guaranteed.
Hand-tool Stepstool 19Become a Neanderthal, if only for one project. This attractive yet highly useful stool offers step-by-step hand-tool instruction.
18TH CENTURY
Simple Candle Boxes 24Beginning woodworkers will love this fast, classic project.
Butler Tray Table 28A Chippendale table, complete with a removable tray top, is just what you need for serving tea and coffee to guests.
Pennsylvania Spice Box 36An instant heirloom: This beautiful 18th century spice box doubles as the perfect jewelry box for you or your loved one.
ARTS & CRAFTS
Greene & Greene Side Table 43Grace the end of your sofa or chairs with class and style.
Slant-arm Morris Chair 48Build an Arts & Crafts icon that instantly will become the most sought-after chair in your home.
CONTEMPORARY
Nicolai Fechin-style Bench 58Always wanted to try carving? Here’s your chance. The detail is meant to look rustic and simple so mistakes won’t matter.
Plywood Nesting Tables 66Sleek and versatile (one table or three), this project is a great lesson in making perfect miter joints.
Rice-paper Maple Lamp 70Build a simple lamp based on designs typical in a Japanese household that will look great in any modern home.
OUT OF THE WOODWORK:
Under the Rope and Into the Doghouse 72
G r e a t a m e r i c a n
F u r n i t u r eFrom the editors oF
JULY 2003
62
▼
▼
▼
▼
▼
▼
▼
▼
▼
▼▼
▼
6
48
43
12
66
28
MAGAZINE

PoPular WoodWorking March 20032
▼
PoPular WoodWorking July 20032
▼
From the editor
American Classics, Colonial to Modern In so many elements of the United States’
history, the concept of freedom is central. The love of liberty not only forged the
Declaration of Independence and spawned the Revolutionary War, it permeated Colonial life, giving rise to new ways of doing just about anything. It could be said the seeds of American inventiveness flourished on the fertile soil of freedom.
Woodworking and furniture design are but one of those inven-tive seeds. Colonial furniture makers didn’t just copy fashion-able English and European fur-niture styles of the time, they re-interpreted them and made them uniquely their own. As a r e s u l t , C h i p p e n d a l e , Hepplewhite and Queen Anne styles as developed across the Atlantic have their U.S. counterparts as built in the Colonial culture centers of Boston, Newport, New York and Philadelphia.
Other American styles following the 18th century are rooted in freedom as well. For example, the Shakers, whose social and cul-tural foundations were born in their religious beliefs, left England to find religious freedom on the United States’ shores.
Arts & Crafts furniture is but one mani-festation of a broader philosophy, which re-jected the dehumanization of the machine age and embraced the freedom expressed in good design with objects made by hand.
Modern or contemporary furniture styles are one byproduct of the so-called American Century when economic, social and political freedom in the United States gave birth to such uniquely American art forms such as jazz, the Broadway musical, movies, even rock ’n’ roll. In furniture we have the classic work of Charles and Ray Eames, Isamu Noguchi, Sam
Steve Shanesy
P.S. For more great American furniture projects (or just great woodworking projects and technique articles) visit our web site at popularwoodworking.com.
Maloof, George Nakashima and the entire studio furniture movement.
With this issue, we once again celebrate great American furniture, now our second published edition, further broadening the col-lections of woodworking projects in each of
these cherished American styles. The previous edition can be ordered at popwood.com.
And no matter where your woodworking skill level stands, you’ll find detailed projects right for you. For those just starting, the simple 18th century candle box or contemporary lamp will be of interest. Intermediate skilled woodworkers will find the Greene & Greene table and Pennsylvania spice box well within grasp. More advanced
woodworkers will find the Shaker press cup-board and Chippendale-style butler tray table a good exercise of their experience.
Woodworkers whose interests run toward the use of hand tools will enjoy the Shaker three-step stool or Nicolai Fechin-style bench. Those who like to work at the lathe couldn’t find a more quintessential Shaker form than the beautiful maple candlestand.
So no matter what your skill level or style preference, you’ll find something in this issue for you. Isn’t it wonderful – great American furniture with all the freedom to choose!


PoPular WoodWorking March 20034
Precision balanced cast iron wheels with ground-
rubber tires
Rack and pinion blade guide height adjustment
Heavy duty, European tri-bearing blade guides
Exclusive, double box-beam frame design for
extra rigidity
Cast iron rip fence
Blade tension indicator
Magnetic switch with thermal overload
protection
Dust collection hookup
Foot brake with micro switch
Optional HTC®
Mobile Base available
PBS-44018” Bandsaw
12” Resaw capacityTable: 16-1/2” x 22-3/4”Motor: 3hp 1ph or 3ph
$1795.00
PBS-54022” Bandsaw
14” Resaw capacityTable: 19-1/2” x 28”
Motor: 5hp 1ph or 3ph$2195.00
Exceptional, full-featured woodcutting bandsaws made in Italy to exacting
BRIDGEWOOD®specifications
FOB, York, PA Price subject to change without
July 2003 popularwoodworking.com
Editorial Offices 513-531-2690
Editor & Publisher Steve Shanesy ext. 1238 • [email protected]
Art Director Linda Watts ext. 1396 • [email protected]
Senior Editor David Thiel ext. 1255 • [email protected]
Senior Editor Christopher Schwarz ext. 1407 • [email protected]
Assistant Editor Kara Gebhart ext. 1348 • [email protected]
Project Illustrator John Hutchinson
Photographer Al Parrish
Contributing Editors Nick Engler Bob Flexner Glen Huey
Troy Sexton
President-Magazines Roger Case
Executive Vice President Jim Gleim
CiRCuLATioN
Lynn Kruetzkamp, Group Circulation Manager Jennifer Shaffer, Circulation Manager
PRoDuCTioN
Barbara Schmitz, Vice President Vicki Whitford, Production Supervisor
ADVERTiSiNG
Advertising Director Don Schroder
331 N. Arch St., Allentown, PA 18104 Tel. 610-821-4425; Fax 610-821-7884
Classified Advertising Sales Joan Wright, Tel. 800-388-1820
Advertising Production Coordinator Debbie Thomas, Tel. 513-531-2690 ext. 1219
SuBSCRiPTioN SERViCES Subscription inquiries, orders and address changes can be made at popwood.com (click on Subscriber Services).
or by mail: Popular Woodworking, P.o. Box 5369, Harlan, iA 51593 or call 800-888-6880.
include your address with all inquiries. Allow 6 to 8 weeks for delivery.
NEWSSTAND DiSTRiBuTioN Curtis Circulation Co., 730 River Rd., New Milford, NJ 07646
ATTENTioN RETAiLERS: Attention Retailers: To carry Popular Woodworking in your store, call Steve Hudziak at 800-894-4656 or write Magazine
Retail Sales, Steve Hudziak, P.O. Box 5014, Iola, WI 54945-5014.
Back issues are available for $7 ($9 Canada; $11 other for-eign). Send check or money order to: Popular Woodworking/
F&W Publications Products, P.O. Box 2031, Harlan IA, 51593; or call 888-419-0421. Please specify
publication, month and year.
®�®
VISI
T O
UR
WEB
SIT
E AT
po
pularw
oodw
orking
.com

www.popwood.com 5
Made in the USA by the Adjustable Clamp Co., 425 N. Ashland Ave., Chicago, IL 60622, www.adjustableclamp.com
Whether you are a do-it-yourselfer, a professional woodworker or somewhere in between, you have a world full of projects in the home or in the shop that will be easier and more enjoyable to complete when you use quality clamps, bench vises and miter boxes/saws from the Adjustable Clamp Company. Look for them under the Jorgensen, Adjustable and Pony brand names wherever fine tools are sold.
Visit our website and register for our 100TH Anniversary 100-piece clamp, miter saw and vise set giveaway.
PoPular WoodWorking July 200366
C l a s s i c
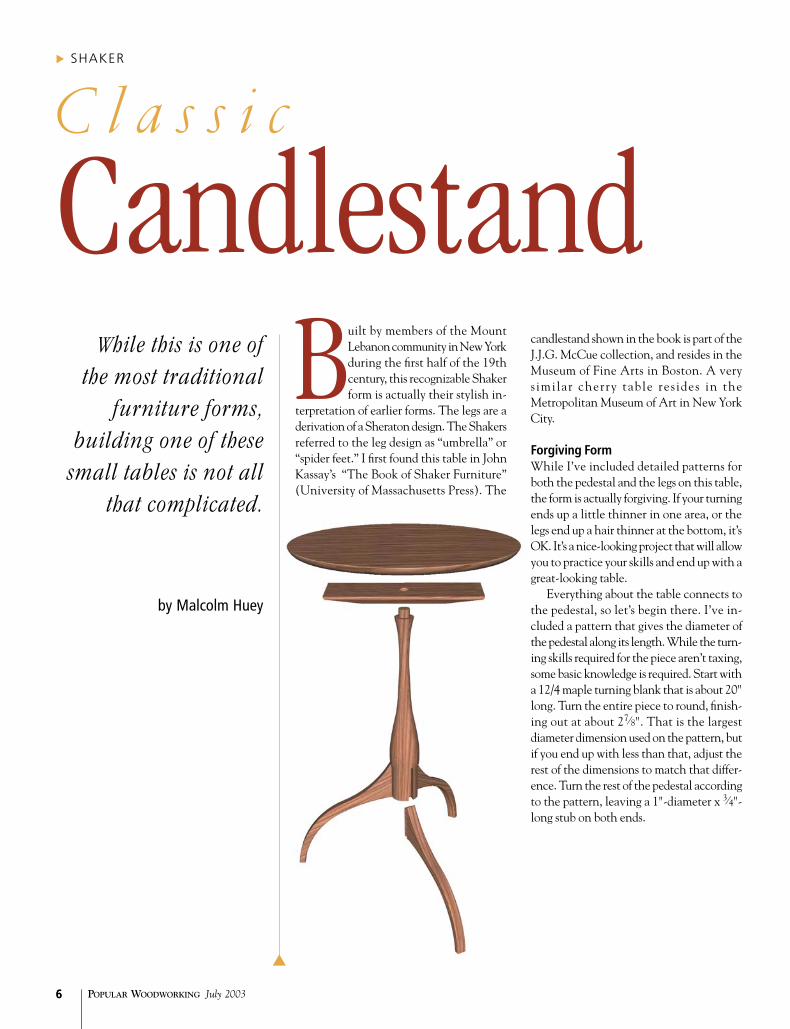
CandlestandBuilt by members of the Mount
Lebanon community in New York during the first half of the 19th century, this recognizable Shaker form is actually their stylish in-
terpretation of earlier forms. The legs are a derivation of a Sheraton design. The Shakers referred to the leg design as “umbrella” or “spider feet.” I first found this table in John Kassay’s “The Book of Shaker Furniture” (University of Massachusetts Press). The
candlestand shown in the book is part of the J.J.G. McCue collection, and resides in the Museum of Fine Arts in Boston. A very s imilar cherry table res ides in the Metropolitan Museum of Art in New York City.
Forgiving FormWhile I’ve included detailed patterns for both the pedestal and the legs on this table, the form is actually forgiving. If your turning ends up a little thinner in one area, or the legs end up a hair thinner at the bottom, it’s OK. It’s a nice-looking project that will allow you to practice your skills and end up with a great-looking table.
Everything about the table connects to the pedestal, so let’s begin there. I’ve in-cluded a pattern that gives the diameter of the pedestal along its length. While the turn-ing skills required for the piece aren’t taxing, some basic knowledge is required. Start with a 12/4 maple turning blank that is about 20" long. Turn the entire piece to round, finish-ing out at about 27⁄8". That is the largest diameter dimension used on the pattern, but if you end up with less than that, adjust the rest of the dimensions to match that differ-ence. Turn the rest of the pedestal according to the pattern, leaving a 1"-diameter x 3⁄4"-long stub on both ends.
▼
While this is one of the most traditional
furniture forms, building one of these
small tables is not all that complicated.
by Malcolm Huey
SHAKER▼

popwood.com 7
Photo by Al Parrish. Special thanks to Sharon Woods for use of location.

PoPular WoodWorking July 20038
▼
When you’re done with the pedestal, the next step is to cut the three sliding dovetail grooves for the legs on the base of the ped-estal. The legs are oriented at 120° around the base of the pedestal. You need to mark the locations accurately, but to cut the grooves themselves I have borrowed from a few different books to make a router jig that makes it nearly foolproof.
The jig is made from shop scraps and holds the two stubs of the pedestal in place and uses a screw to hold the pedestal ori-ented correctly to cut each groove. You need to use two different bits to cut the grooves. Start with a 1⁄2" straight bit to remove most of the wood, then follow up with an 8° dovetail bit. Stop the groove at the shoulder, 31⁄2" up from the base of the pedestal.
8
▼
Turning the pedestal is a great way to practice your lathe skills. While there is a pattern to follow, the lines are fluid enough to allow for personalization, slight miscalculations or both.
The dovetailing jig makes it fairly simple to place the leg, run the groove, then rotate the leg to the next position. Note the screw in the diagram and photo that’s used to hold the pedestal in the appropriate position.
1"
12
34
56
78
910
1112
1314
1516
1718
1920
1"
1"
1 2 3 4
3/4"
193/8"
143/8"
31/2"
3/4"
21/2"
13/4"
11/4"
11/8"
11/16"
15/16"
29/32"
7/8"
11/4"
17/16"
17/8"
25/16"
25/8"
27/8"
213/16"
23/4"
Pedestal turning & dovetail mortise
Illus
trat
ions
by
John
Hut
chin
son
Indexing screw

popwood.com 9
Spider FeetRough out the legs by milling three pieces to 7⁄8" x 4" x 15". Use the scaled pattern to lay out the shape of the legs in pencil on the pieces. Make sure the grain runs the length of the leg, or your legs
could snap. Determine the loca-tion of the dovetail pin on each leg and cut the corner from the leg blank at that point. Before shaping the rest of the leg, cut the dovetail pin first.
Set up your dovetail bit in a
To cut the mating pins for the sliding dovetails, a router table works best. By using an auxiliary fence clamped above the table, first one side of the leg is run (left), then the leg is turned around and the opposite side is run (right).
4"3/4"
3/4"
3/4"
4"
1/2"
111/2"
3/4"
3/4"3/4"
4"
14"273/4"
8"
4"
1" dia. hole
RemovableL-bracket
Varies -measure router base plate
1" dia.holeIndexingscrew
Stop block
Base plateradius
1x2 routerguides
RemovableL-bracket
1x2 routerguides
Stop block
Bit slot
Classic Shaker Candlestand No. Item DImeNsIoNs (INches) materIal
t W l
❏ 1 Top 3⁄4 197⁄8 dia. Maple ❏ 1 Mounting plate 3⁄4 5 133⁄4 Maple ❏ 3 Legs 7⁄8 39⁄16 145⁄8 Maple ❏ 1 Pedestal 3 dia. 20 Maple ❏ 4 Wood screws #9 11⁄4 FH Steel
FH = flathead
▼
End elevation
Section
Plan
Router jig for leg
120º
1/2"
5/8"
7/8"
8º x 11/16" large diameterdovetail mortise
Leg to pedestal dovetails

PoPular WoodWorking July 200310
▼
10
▼
A spindle sander makes what could be a daunting task reasonably painless. By using double-sided tape to hold the legs together, all three can be sanded at the same time, reducing work and ensuring uniform shapes.
router table. Attach an auxiliary fence to allow you to hold the leg upright against the fence. Run a test piece on some scrap to see if your offset is correct. You want the fit to be tight at this point. You’ll hand-fit each joint later. When the test piece fits to your satisfaction, run each side of the leg past the bit, shaping the pins.
With this important joint complete on all three leg pieces, head for the band saw and rough cut the legs to shape. Then use a spindle sander (or spokeshave) and finish shaping the legs to fin-ished size. On the original Shaker piece, the legs are also tapered slightly in thickness down to the feet. You can achieve this authen-tic look with a bench plane and some care.
The next step is to fit each leg to the pedestal. I re-use part of my router jig as a stop on my bench to hold the pedestal in place while I carefully pare away material with a chisel until each leg slides in place with a snug fit.
Once satisfied, trim the lower stub off the pedestal, finish sand the legs and post, and glue the legs in place. If your joint is well-made, you shouldn’t need any clamping pressure. The Shakers used metal
The leg shape is created by making a full-size template from the scaled pattern below, then transferring that to the leg blanks. A band saw makes quick work of the roughed-out shapes.
10"
1 2 3 4 5 6 7 8 9 10 11
12
34
56
78
910
11
15"135º
2"
Dashed lines -final shape
2"
5/8"3/8"
Leg pattern
133/4"
33/8"
33/8"
7"
5"
Taper both ends3/4" to 1/4"
45º chamferboth sides
1" dia. hole
Mounting plate

popwood.com 1111
It’s a good idea to drill clearance holes in the mounting plate before gluing the mounting plate to the base. It screws on much easier the second time.
A circle-cutting jig attached to my router lets me make a true circle. Take increas-ingly deeper passes around the perimeter of the top to complete the cut.
No matter how accurate your machin-ing, there needs to be some hand-fitting to make the legs just right. A sharp chisel can make a big difference here. Don’t make the joint too tight, but not too loose, either.
plate over the top of the stub, then add glue and drive a wedge into the saw kerf to lock the plate in place. When the glue is dry, cut the tenon and stub flush to the top of the mounting plate.
All that’s left is to attach the top and add the finish. I use a water-based aniline dye made by Moser that’s available from Woodworker’s Supply (800- 645-9292 or woodworker.com). Traditionally, in my shop we dilute the dye more than the manufac-turer recommends. Be sure to make some sample boards to find a color that you like. Next, I fol-low that with a couple coats of orange shellac. I level that with 360-grit sandpaper and then apply a brown glazing stain over the shellac. After I allow that to dry overnight, a few coats of lacquer finish the job. PW
plates across the base of the ped-estal to hold the legs in place, but our glues are more reliable. Allow the glue to cure and move on to the top.
Circle TopYou now have a table base. The last two parts actually are the easiest. If you can find a piece of maple that is 20" wide, use it for the top. That’s what the Shakers did, and it looks great. If you can’t find a board that wide, look for a thicker piece, cut it in half along the width on your band saw and make the top bookmatched. While you’re scrounging for wood, grab a piece that’s 5" x 133⁄4" to use as the mounting plate.
To shape the top, I use a simple circle-cutting jig that mounts to my router. With the center of the jig attached to the underside of the top, cut the 197⁄8"-diameter shape using a spiral bit, taking the cut in three or four passes. When the top is round, chuck a 1⁄2" roun-dover bit in your router and round over the bottom edge of the top. Then do the same to the top edge with a 1⁄16" roundover bit (or break the edge with sandpaper).
The mounting plate is simple, except that to keep it like the original, both ends of the plate taper to 1⁄4" thick within the first 33⁄8" of each end. There are a couple of ways to do this, but I still think the safest way is to use a band saw to cut the taper, then use a sander or handplane to clean up the surface.
Cut a 3⁄16" roundover on all four edges and drill a 1"-diameter hole in the center of the plate. Then drill a few more mounting holes for attaching the top. You’re now ready to finish sand the piece.
To attach the base to the mounting plate, cut a saw kerf across the width of the top stub on the pede stal, running the kerf with the grain. Slip the mounting
PoPular WoodWorking July 200312
Photos by Al Parrish

popwood.com 13
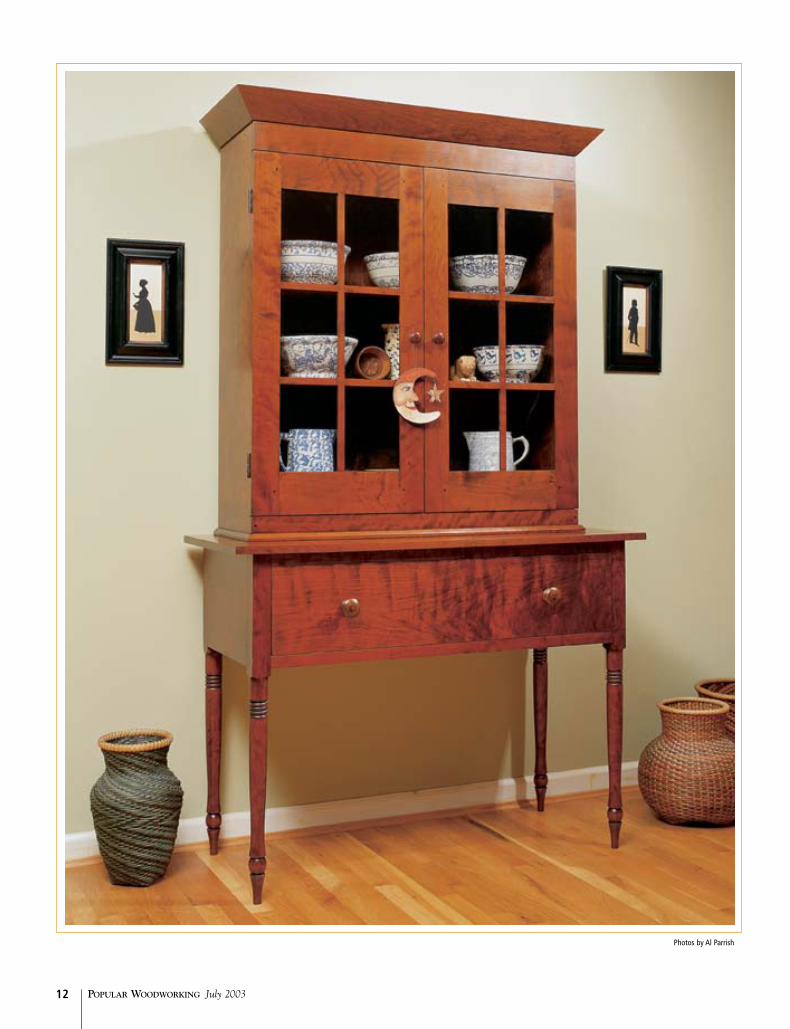
P r e s s
CupboardOnce used to help press
linens, this beautiful Shaker reproduction serves as a showcase
for any collection of china or pottery.
by Glen HueyExcerpted from “Fine Furniture for a Lifetime”
copyright 2002 by Glen Huey. Used with permission of Popular Woodworking Books, an imprint of
F&W Publications Inc. Visit your local bookseller or call 800-289-0963 to obtain your copy.
W hen I first discovered this cupboard in John Kassay’s “The Book of Shaker Furniture” (University of Massachusetts Press), it
jumped from the pages and begged me to build it. The original version that I built featured a blind-door cupboard, but a friend at a furniture show suggested I build it with glass doors. I followed her advice, and what a difference it made.
This cupboard originated in the Pleasant Hill, Ky., Shaker community in the late 1800s. It’s called a press cupboard because its flat, sturdy construction helped to press the clean linens stacked neatly inside. With the addition of the glass doors, this piece becomes a showcase for any treasured collection.
Lower Section FirstTo begin, mill the parts for the lower case according to the cutting list. Then mark the layout of the mortises on the legs. Because the sides and back are wide pieces of solid wood, you should use a double tenon to accommodate seasonal wood movement. Next cut the 1⁄4"-thick mortises on the legs.
Don’t forget to cut the mortises in the top and lower rails and back piece. These mortises will receive the two rail supports and the two drawer runners.
If you’re using a hollow-chisel mortiser, use the step method of cutting mortises – skip every other cut and return to clean out
▼SHAKER▼
PoPular WoodWorking July 200314
▼
14
▼
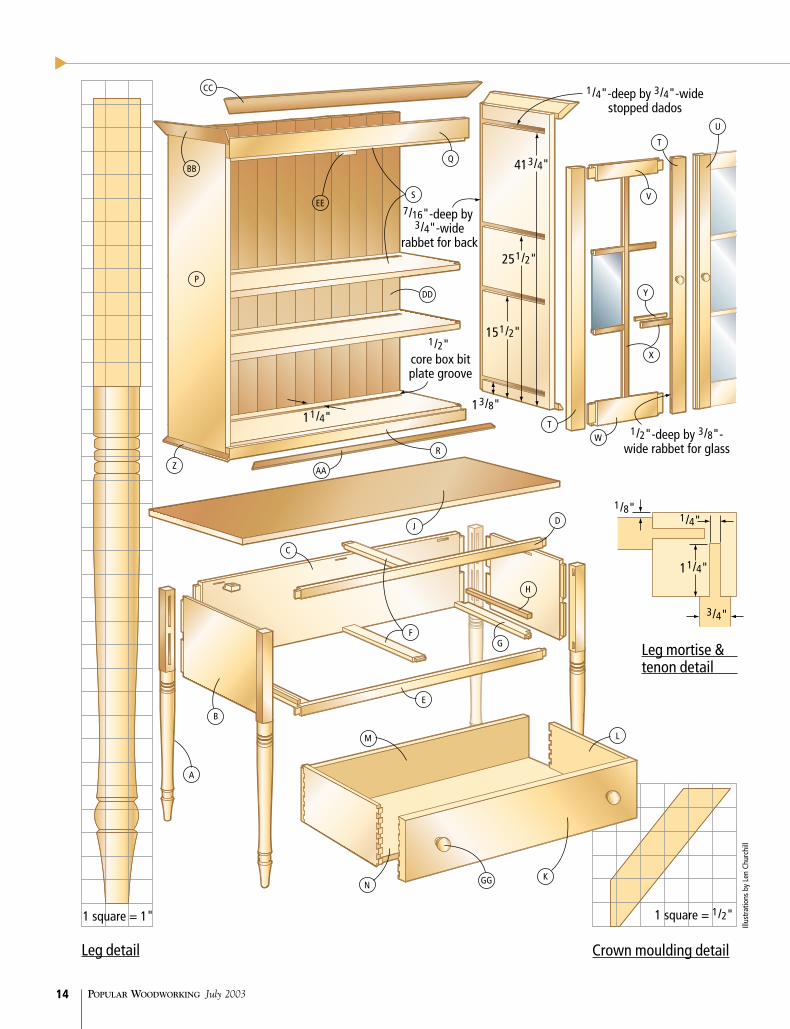
1 square = 1/2"1 square = 1"
1/8"
3/4"
1/4"
CC
BB
EE
Q
U
S
DD
T
V
Y
X
TW
R
P
Z AA
C
J
F
H
G
E
A
B
M
N GG K
L
D
251/2"
413/4"
151/2"
13/8"
1/2" core box bitplate groove
7/16"-deep by 3/4"-wide
rabbet for back
1/4"-deep by 3/4"-widestopped dados
1/2"-deep by 3/8"-wide rabbet for glass
11/4"
11/4"
Leg mortise &tenon detail
Leg detail Crown moulding detail
Illus
trat
ions
by
Len
Chur
chill

popwood.com 1515
the sections between after reach-ing the end of each mortise. This will prevent excessive wear on your mortising chisel.
Now turn the legs using the diagram provided. If you’re not a turner, I recommend you taper the legs on the two inside edges instead. The taper should begin 1" below the lower front rail and sides, and the legs should taper to 15⁄16" square at the floor.
Now cut your tenons on the table saw. I use a shop-made tenon jig, but a commercial jig will do fine. Test the fit of the pieces of the lower case. If every-thing works, proceed to finish
sand your parts, and glue and as-semble the lower section. First glue the front and back sub-as-semblies, then finish by assem-bling the side pieces. Remember to install the rail support pieces at this stage.
Next, notch the drawer run-ners so they fit around the legs. Glue them into the mortises you cut in the lower front rail and nail them to the rear of the back leg. Nail the drawer guides to the runners, flush to the leg blocks.
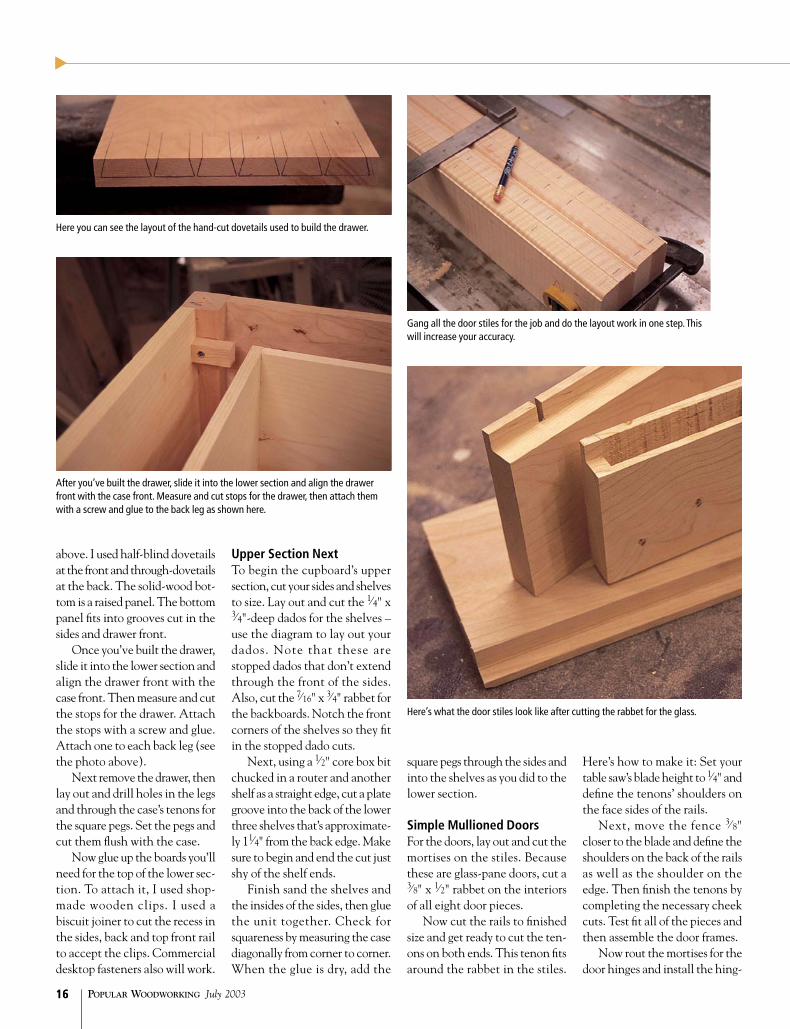
Next build the drawer. The drawer front is flush with the face of the cupboard. You can see the layout of the hand-cut dovetails
Step
pho
tos
by th
e au
thor
Press Cupboard No. Let. Item DImeNsIoNs (INches) materIaL commeNts
t W L
Lower Section Case Pieces ❏ 4 A Legs 17⁄8 17⁄8 341⁄4 Primary wood ❏ 2 B Sides 3⁄4 11 171⁄4 Primary wood 11⁄4" TBE ❏ 1 C Back 3⁄4 11 421⁄4 Secondary wood 11⁄4" TBE ❏ 1 D Top front rail 3⁄4 11⁄4 421⁄4 Primary wood 11⁄4" TBE ❏ 1 E Lower front rail 3⁄4 11⁄4 421⁄4 Primary wood 11⁄4" TBE ❏ 2 F Rail supports 3⁄4 2 181⁄8 Secondary wood 1⁄2" TBE ❏ 2 G Drawer runners 3⁄4 21⁄8 173⁄8 Secondary wood 1⁄2" TOE ❏ 2 H Drawer guides 1⁄2 13⁄16 145⁄8 Secondary wood ❏ 1 J Top 3⁄4 20 471⁄2 Primary wood ❏ 1 K Drawer front 7⁄8 83⁄8 395⁄8 Primary wood ❏ 2 L Drawer sides 1⁄2 81⁄4 151⁄2 Secondary wood ❏ 1 M Drawer back 1⁄2 81⁄4 395⁄8 Secondary wood ❏ 1 N Drawer bottom 5⁄8 151⁄2 39 Secondary wood ❏ 2 GG Wooden knobs 2 Primary wood
Upper Section Case Pieces ❏ 2 P Sides 3⁄4 12 45 Primary wood ❏ 1 Q Top front case rail 3⁄4 51⁄2 39 Primary wood ❏ 1 R Bottom front case rail 3⁄4 13⁄4 39 Primary wood ❏ 4 S Top, bottom & shelves 3⁄4 111⁄4 373⁄4 Primary wood ❏ 3 T Door stiles 3⁄4 3 371⁄2 Primary wood ❏ 1 U Door stiles 3⁄4 31⁄4 371⁄2 Primary wood ❏ 2 V Upper door rails 3⁄4 33⁄4 16 Primary wood 11⁄4" TBE ❏ 2 W Lower door rails 3⁄4 41⁄2 16 Primary wood 11⁄4" TBE ❏ 4 X Exterior door grills 1⁄4 3⁄4 30 Primary wood ❏ 4 Y Interior door pieces 1⁄4 1⁄2 30 Primary wood ❏ 2 Z Bottom moulding 5⁄8 11⁄2 16 Primary wood ❏ 1 AA Bottom moulding 5⁄8 11⁄2 42 Primary wood ❏ 2 BB Crown moulding 3⁄4 4 16 Primary wood ❏ 1 CC Crown moulding 3⁄4 4 42 Primary wood ❏ 1 DD Back boards 5⁄8 383⁄8 421⁄2 Primary wood Made in many pieces ❏ 1 EE Fixed door catch 3⁄4 1 31⁄4 Secondary wood ❏ 2 FF Wooden knobs 11⁄4 Primary woodTBE=tenon both ends; TOE=tenon one end; Primary wood=maple; secondary wood=poplar
▼
Before I glued the drawer parts together, I ran the bottom edge of my drawer front over the jointer with the fence set at a 5° angle and the machine set to make a 1⁄16"-deep cut. This creates a slight bevel that allows the drawer to close without the bottom edge catching on the lower front rail.
PoPular WoodWorking July 200316
▼
above. I used half-blind dovetails at the front and through-dovetails at the back. The solid-wood bot-tom is a raised panel. The bottom panel fits into grooves cut in the sides and drawer front.
Once you’ve built the drawer, slide it into the lower section and align the drawer front with the case front. Then measure and cut the stops for the drawer. Attach the stops with a screw and glue. Attach one to each back leg (see the photo above).
Next remove the drawer, then lay out and drill holes in the legs and through the case’s tenons for the square pegs. Set the pegs and cut them flush with the case.
Now glue up the boards you’ll need for the top of the lower sec-tion. To attach it, I used shop-made wooden clips. I used a biscuit joiner to cut the recess in the sides, back and top front rail to accept the clips. Commercial desktop fasteners also will work.
Upper Section NextTo begin the cupboard’s upper section, cut your sides and shelves to size. Lay out and cut the 1⁄4" x 3⁄4"-deep dados for the shelves – use the diagram to lay out your dados. Note that these are stopped dados that don’t extend through the front of the sides. Also, cut the 7⁄16" x 3⁄4" rabbet for the backboards. Notch the front corners of the shelves so they fit in the stopped dado cuts.
Next, using a 1⁄2" core box bit chucked in a router and another shelf as a straight edge, cut a plate groove into the back of the lower three shelves that’s approximate-ly 11⁄4" from the back edge. Make sure to begin and end the cut just shy of the shelf ends.
Finish sand the shelves and the insides of the sides, then glue the unit together. Check for squareness by measuring the case diagonally from corner to corner. When the glue is dry, add the
square pegs through the sides and into the shelves as you did to the lower section.
Simple Mullioned DoorsFor the doors, lay out and cut the mortises on the stiles. Because these are glass-pane doors, cut a 3⁄8" x 1⁄2" rabbet on the interiors of all eight door pieces.
Now cut the rails to finished size and get ready to cut the ten-ons on both ends. This tenon fits around the rabbet in the stiles.
Here’s how to make it: Set your table saw’s blade height to 1⁄4" and define the tenons’ shoulders on the face sides of the rails.
Next, move the fence 3⁄ 8" closer to the blade and define the shoulders on the back of the rails as well as the shoulder on the edge. Then finish the tenons by completing the necessary cheek cuts. Test fit all of the pieces and then assemble the door frames.
Now rout the mortises for the door hinges and install the hing-
16
▼
Gang all the door stiles for the job and do the layout work in one step. This will increase your accuracy.
After you’ve built the drawer, slide it into the lower section and align the drawer front with the case front. Measure and cut stops for the drawer, then attach them with a screw and glue to the back leg as shown here.
Here’s what the door stiles look like after cutting the rabbet for the glass.
Here you can see the layout of the hand-cut dovetails used to build the drawer.

popwood.com 17
es. Hang the doors. Now cut down the door stiles so they over-lap 5⁄16" in the center. Remember to keep the stiles the same width.
One of these doors will open with a latching knob, and the other one will open using a re-lease inside the cupboard. First, remove the door that will have the latching knob and cut a 3⁄8" x 3⁄8" rabbet on the back side of its interior stile. Reinstall this door and allow the rabbet to overlap onto the opposite door’s
stile.Mark the overlap on the op-
posite door and cut a matching rabbet to produce the shiplap joint shown below.
Next, with the doors installed, mark the location of the top and bottom of each shelf on the door stiles. This will properly place the glass dividers on the door so they conceal the shelves when the doors are shut. Also mark for a 3⁄4"-wide vertical divider on the edge of the two rails of each door.
17
The exterior glass dividers form the basis of the door’s glass grid. The interior horizontal pieces rest
on the lip created by the rabbet cut on the door pieces. The exterior vertical piece is fitted into the
center of the opening and glued to the two horizontal pieces.
This is how the tenoned ends look after you complete all the cuts. Create a shiplap joint by marking the location on the latched door and creating a matching rabbet on the other door.
Now cut the long strips of 1⁄4" x 1⁄2" material for the interior dividers and the 1⁄4" x 3⁄4" strips for the exterior glass dividers. With the door face down, fit and glue the interior horizontal piec-es, allowing them to rest on the lip created by the rabbet cut on the inside of the door.
Flip the door so it’s face up, and fit the long vertical exterior piece into the center of the open-ing. Glue this to the two previ-ously installed pieces. These
three pieces form the basis of the opening for the glass.
Cut, fit and install the remain-ing pieces necessary to complete the door. Then repeat the proce-dure on the other door.
Finishing TouchesWhen the glue in the upper unit is dry, mill the top and bottom front case rails a bit longer than required, sand the insides and glue them to the sides of the upper unit. After the glue dries,
Hardware & supplies2 pairs • 21⁄2"-long door hinges
No. 8 x 11⁄4" slot-head wood screws
11⁄2" shingle nails for backboards
11⁄2" fine finish nails for mouldings

PoPular WoodWorking July 200318
▼
drill and install square pegs through these rails. (By allowing the glue to dry, you reduce the risk of the wood splitting at the joint.) Cut the extra length flush to the case.
Now make the crown mould-ing according to the illustration. Set the blade of your table saw to 40° and make the first cut with the board face against the fence. The fence is set on the left side of the blade. Then set the fence to the right side of the blade; lay the face flat on the table saw in order to cut the complementary angle on the opposite edge of the board, achieving 90°.
Keep your table saw settings the same and cut the angle on the bottom moulding that skirts the bottom of the upper section. Sand both mouldings, progress-ing to 180-grit sandpaper.
Sand the outside of the case to 180 grit, then fit the crown moulding to the case and attach it with reproduction finish nails for an authentic look. Dowel the top edge of the crown moulding from the side into the front piece and sand it smooth.
Align the bottom moulding with the inside of the front and sides of the case. Make the 45° cuts at the front corners, square cut the back corners and attach with No. 8 x 11⁄4" slot-head wood screws into the sides. Glue and screw the moulding to the front. Then dowel the front corners as you did on the crown moulding.
Cut the shiplap joints on the long edges of the backboards. Then finish sand the pieces.
On the door without a knob, install the catch. Using a biscuit joiner, cut a 1⁄4" slot in the bottom of the second shelf to accept the catch shown at right. After fin-ishing, align the catch with the slot and install with a No. 8 x 11⁄4" slot-head wood screw. Then make a latch (also called a turn)
for the other door. It will latch against its neighbor’s stile.
I used a reddish aniline dye to finish this piece. After the dye-job is complete, attach the top to the lower case using wooden clips and apply your protective top coat. I selected lacquer as the cupboard’s finish.
Nail the backboards into place using reproduction nails, then install the glass in the doors. On th i s cupboard , I u sed Bendheim’s light restoration glass (for more information, visit the company’s web site at bendheim.com). PW
18
▼
This is what the latching knob looks like.
Use water putty for installing glass panes into the doors. Water putty gives a yellowed look that simulates age. I use Durham’s Rock Hard Water Putty.
This is the catch for the door without a knob. It turns into a 1⁄4" slot in the bottom of the second shelf that you cut using a biscuit joiner.
This case is unusual in that you install the top and bottom case rails after assem-bling the case. They are applied to the front edge of the sides. Cut them long, glue them in place and trim them to fit.

popwood.com 19
▼
H a n d - t o o l
StepstoolDiscover what it was
like to work wood 200 years ago when
all you had was a few well-tuned saws, a
couple chisels and a steady hand.
by Jim Stuard
Back when the Shakers started making furniture in the late 18th century, the only tools available to them were powered by people. There were no table saws, no elec-
tric jointers or planers. Instead, your tool kit consisted largely of hand saws, chisels and planes. Your planer, jointer and table saw
were usually a young apprentice who prepared stock by hand while the skilled woodworkers handled most joinery tasks.
As time passed, Shakers eagerly sought out power tools and technology to help them do their work. But during the heyday of most Shaker communities, hand tools handled most of the woodworking tasks.
Photo by Al Parrish
SHAKER▼

PoPular WoodWorking July 200320
▼
for that precision plunge router on your bench.
These stepstools were used in Shaker housing to get to the upper drawers in the enormous chests built for communal use. The stool was placed against the lower part of a chest for support. If you want to use this as a freestanding step-stool, add a hand rail.
The tools needed are as fol-lows: clamps, a block plane, jack plane, a couple Japanese saws, two sharp chisels, a coping saw and a hand drill. For marking dovetails. I use a sharp knife, a square and a sliding T-bevel.
Begin construction by laying out the panels for the sides. Use a cardboard template to lay out the best yield from your panels. Because you aren’t going to make these cuts with a table saw, you will have to make stopped cross-cuts and rips in the middle of the
Today there is a group of wood-workers who still pride themselves on building furniture this way. They call themselves “Nean-derthals.” And the way they com-municate is, ironically, usually through the internet. We thought it would be interesting to build a project using only hand tools to get a feel for how early Shakers and electronic-age Neanderthals work. Admittedly, we copped out on one aspect of this project: We didn’t surface the lumber from rough stock using hand tools. We rationalized this by figuring an apprentice would have done what would have been hard work.
I think you’ll enjoy unplugging your router for a few days to tack-le this modest but satisfying proj-ect. And if you cannot give up your power tools, you can rest easy knowing that the early Shakers would have paid almost any price
20
▼
See detail for dovetail layout
51/4" 51/4" 51/4"
33/4"3/4" 3/4"
3/4"
3/4"
3/4"
3/4"
3/4"
41/2" 41/2"3/4"
1/4"
1/4"
1/4"
1/4"
1/4"
1/4"
51/2"
51/2"
51/2"
13/4"
61/4"
14"
9"33/8" 33/8"153/4"
41/2" radius
2"
2"
2"
81/2"
81/2"
81/2"
251/2"
2"
Clamp a straightedge to the back line of the stool, gently press the saw against it and rip the back edge (left). Use the ripping teeth on the back of the Ryoba.
After cutting the bottom, lay out the radius (below).
Illus
trat
ions
by
the
auth
or
Cutting guide
Profile

popwood.com 21
panels to cut out the steps using hand saws. I’ve found the best way to cut out the steps is with Japanese saws.
Courtesy of JapanThere is a style of saw called an Azebiki-Nokogiri. In short, it’s a saw with a curved blade for doing a “plunge” cut in the middle of a panel. The other saw I used was a Ryoba style. It’s a two-edged blade with rip teeth on one edge and crosscut teeth on the other. There are other Japanese saws designed
21
After laying out the steps, start making the plunge cuts in the panel for each rise and run on the steps. Remember to use the larger ripping teeth for the long grain and the shorter cross-cutting teeth for the cross grain. Start each cut by gently pressing the saw against the straightedge and use a rocking motion to use the entire length of the blade to make the cut.
When you’ve penetrated the other side of the panel, cut a slot large enough for the Ryoba. Finish the cuts into the inside and outside corners, but be sure to use the correct teeth for the direction you are cutting.
The results speak for themselves. With a kerf less than 1⁄16", it’s possible to do some fine cutting. Notice the radiused cuts that resemble cuts from a table saw. These marks are from the Azebiki-Nokogiri saw.
C
BA
Back bracegets two-sided tail
Shaker Stepstool No. Let. Item DImeNsIoNs (INches) materIaL
t W L
❏ 2 A Sides 3⁄4 153⁄4 251⁄2 Hardwood ❏ 3 B Treads 3⁄4 51⁄4 16 Hardwood ❏ 5 C Braces 3⁄4 21⁄4 16 Hardwood
▼
Exploded view
for dovetailing, but I appreciate the utility of the Ryoba’s two-sided blade.
Begin by laying out your cut-ting lines in pencil on the sides. The object is to first cut the back edge of the side, then cut the bot-tom edge square to that. Then lay out the steps from these two per-pendicular lines.
Cutting a straight line isn’t difficult, especially if you clamp a piece of wood to your work to serve as a guide. Simply clamp the guide to the work and begin mak-ing the cut with your Ryoba. Use your fingers to gently hold the blade against your guide. Take it slowly and your cut will be true.
Set up another straightedge and, using the finer crosscut teeth of the Ryoba, cut in about 4" from the front and back edges of the stool. Now you need to mark the center of the bottom and lay out a 9"-diameter semi-circle. Now cut the half circle on the sides using a compass saw. Clean up your cuts with sandpaper.
Hand Tool Web SiTeSThe Electronic Neanderthal cs.cmu.edu/~alf/en/en.html
Shavings.net www.shavings.net
Museum of Woodworking Tools antiquetools.com
Ralph Brendler’s Old Tools Page brendlers.net/oldtools

PoPular WoodWorking July 200322
▼
The best way to cut the steps is to make a plunge cut with the Azebiki saw and finish with the Ryoba, crosscutting against the grain and ripping with the grain. Again, clamping a piece of straight wood to your work will ensure your cuts are straight.
There’s nothing fast about this process. Working slowly and de-liberately will do the trick. Once the sides are complete, cut the treads and risers to size. Clean them up with a plane and make sure everything’s square.
DovetailsStart cutting the dovetail joints by laying out the tails on the treads and braces according to the diagram. On hardwood joints, the dovetail angles should be at a 1:8 ratio (7°). On softwoods the ratio is 1:6 (9°). Cut the tails, then num-ber each joint for reference.
22
▼
After cleaning up the edges of the side panels, begin laying out the tails on the treads. Use the diagram to help. If you’re going to use the training-wheels jig mentioned below, don’t lay out the sides of the tails on the top and bottom of the tread. Simply lay out the 1⁄8" spaces between the tails on the ends.Use the jig to define the tail shape. Braver souls will start with a marking gauge and then, using a sliding T-bevel set to 7°, make knife cuts into the wood to mark the tails. If you can’t see the cut lines, use a pencil to put a little “make-up” on them.
I built a couple little jigs to make cutting my tails easier. See the story “The 10 Cent Dovetail Jig” below for details.
Now use the tails to lay out the pins on the side pieces. Cut the tails by making the first cuts with the Ryoba and clean out the waste with a coping saw. Now try to fit the joints. If they are too tight, use a chisel to clean up the joint. If they are too loose, you can glue thin shavings into the joint to fill it out. Most people will never no-tice.
When cut correctly, the joints should tap together and be snug without beating on the stool. When you’re satisfied with the fit, glue all the joints and mating edges together. Sand and apply three coats of your favorite finish. I used Watco, an oil and varnish blend. PW
In the midst of laying out the dovetails for these stools, I decided I wanted a way to make the cuts for my tails as clean, accurate and quick as possible. There are 44 angled cuts for the dovetails alone. So I made this jig, and I think it will help the first-timers out there. Look at this jig as training wheels for cutting tails.
Basically, the jig is an “H” that fits over your work and guides your saw at the perfect angle. Flip the jig over, and it cuts the other way. Tails have never been easier to do. Begin by cutting two sides pieces 1⁄2" x 3" x 4" from plywood. Then cut the spacer that goes between the two using falloff from your stool. This will ensure your jig sleeves tightly over your work. The spacer should be 3⁄4" x 3⁄8" x 4". I glued and nailed the spacer between the two sides and then cut one end at a 7° or 9° angle. I cheated and used a chop saw for this cut.
Then cut out a face piece (1⁄2" x 3" x 5") out of plywood. Glue and nail the face on the angled ends of the “H.” Now use a Ryoba and a coping saw to cut the notches out of the face and fit the jig to your dove-tailing stock with a rasp. When you’ve got a snug fit, try a couple of test cuts. Gently hold the Ryoba against the jig as you begin to make your cut. The guide will do the rest.
It’s pretty easy to hold the blade in position and cut down to the gauge marks. As an added bonus, you can use the other end of the jig to make square cuts. With practice, you won't even have to trim the tails when fitting.
THe 10 CenT doveTail jig
Sides
Spacer
Face

popwood.com 2323
Those of you using the training-wheels jig can now cut all of the tails on the treads and braces. You’ll have to figure out which way the jig works best on each cut. If you’re not sure, mark the tails with a pencil so there’s no confu-sion. I like to use the rip side of the Ryoba to cut dovetails. Some people use a crosscut saw for this cut, but the rip teeth are the correct choice.
After defining the tails, remove the little triangle of wood between them with a coping saw. The 1⁄8" gap is big enough for a small chisel to fit into for trimming.
Clamp a panel into a vise and use the tails on the tread ends and braces to mark the locations for the pins and brace notches. Use a knife to get a more accurate layout. Because they’re easier to fit, I don’t use a jig for the pins. Just lay them out from the tail marks, using a knife and sliding T-bevel set to 7°. Fit the pins to the tails with a four-in-hand rasp, remov-ing material from the pins until the tread can be lightly tapped onto the side. Use a backer block to do this so you don’t split the tread.
Tread
17/16" 17/16" 1"1"
3/4"
1/8" 1/8"1/8"51/4"
1/4"
1/4"
13/4" 2"
1/4"
3/4"3/4"
Backbrace
Treadbrace
7º angle on tails for hardwood (shown)
9º angle for softwoods
Dovetail layout detail
Dovetail layout detail

PoPular WoodWorking July 200324
▼
24
S i m p l e
Candle BoxesThese simply made
boxes once were used to store candles. Today
they can be used for decoration or your
spare change.
by Troy Sexton
has a one-piece bottom. But if you choose to build an even larger box then you should consider a two-board bottom that’s simply shiplapped together. The shiplap joint takes care of any shrinking or swelling that might occur with seasonal humidity changes.
The sliding lid on your candle box also will differ depending on the size candle box you choose to build. My large candle box has a beveled top, while my smaller candle box has a rabbeted top. I cut my bevels using my table saw, so when building smaller candle boxes that require a smaller top, a rabbet cut is the safer cut to make.
Once you’ve determined the size of your candle box, the construction part is easy. The back of the box slips into two rabbets cut into each of the side pieces. The front is butt-jointed into place between the sides. The bottom is glued and nailed into place. Once cut to size, the sliding lid is either bev-eled or rabbeted to slide in and out of three grooves, which are cut in the candle box’s two sides and back. Cut a thumb notch on the top and you’re done.
Every time my wife, Terri, and I go antique shopping, she invariably buys a candle box. She loves them, which is why we have them all over the house. Look in any of
our cabinets or on any of our tabletops and you’ll likely find one of these simple boxes being used for storage or decoration.
As our collection of candle boxes from antique shows grew, it dawned on me: I should be building them. And so, I did. You can build several of these classic boxes in a day and they’re a great idea for last-minute, homemade gifts. They look really nice on a shelf and they’re a great way to hide all the things you don’t want lying about, such as spa re change. And here’s the best part: They’re very simple to build.
Some Thoughts on SizeBefore you begin, you need to choose the size of your candle box. The illustration, cut-ting list and the instructions that follow offer the details you need to build the large box that’s shown in the picture. This large box
18th CENTURY▼

popwood.com 25
Photos by Al Parrish
25
Photo by Al Parrish

PoPular WoodWorking July 200326
▼
tom into place, as shown in the photo on the next page.
Lid LastNow turn your attention to the lid. Measure and cut the lid to size. Cut a 14° bevel on the lid’s back and two sides using your table saw as shown on the next page. Check the fit.
Now cut the thumb notch on the front end of the lid. The notch is perfectly sized for your thumb to pull the sliding lid in and out.
If you’re building a few of these boxes at one time, drill out the notch using a 35mm bit in your drill press. You’ll need to make a jig, as shown on the next page. The thumb notch is drilled at a 15° angle, 1 ⁄4" deep, with a 3⁄8" offset from the back.
If you’re building only one box, cut away the notch using a gouge and some sandpaper, as shown on the next page. Using a gouge also is a way to make your box look more authentic.
Simple Candle Box No. Item DImeNsIoNs (INches) materIal t W l
❏ 1 Front 1⁄2 43⁄8 5 Maple
❏ 1 Back 1⁄2 5 51⁄2 Maple
❏ 2 Sides 1⁄2 5 131⁄2 Maple
❏ 1 Bottom 1⁄2 5 121⁄2 Maple
❏ 1 Lid 1⁄2 51⁄2 131⁄4 Maple
▼Box FirstThe sizes and dimensions are based on my large box. If you’d like to build the small box, check out “Building the Small Box” at right.
First, cut all your stock to size. Next, cut a 1 ⁄4" x 1 ⁄2" rabbet at one end of each of the two side pieces, as shown below. Then cut a 1 ⁄4" x 1 ⁄4" groove 3⁄8" from the
top on the back and two sides, as shown below. Next, cut the bot-tom to size. If you’d like to make a two-board bottom for the large box, feel free. Simply cut a shiplap joint to join the two bottom pieces.
Before assembly, finish sand the interiors of all your parts. It’s easier now than later. Now glue and nail the back, front and bot-
26
▼
Use your table saw to cut the rabbets on one end of the two sides. The rabbets hold the back in place.
Use your table saw to cut the grooves at the top of the two sides and at the top of the back. These grooves must be right on for the sliding lid to work properly.
131/4"
14ϒ
3"
5"51/2"
1/4"1" 1"
1/4"
5" 1/2"1/2"
131/2" 121/2"
1/2"
1/2"1/4" 51/2" 5"1/4"
3/8" 1/4"43/8"
C
B
D
1/4" x 1/4" groove
Construction Notes:
A 1/4" d. x 1/2" w. rabbet
Fit bottom to openingand butt join
C
Thumb notchD
B
A
Elevation-open end
Plan Side section-lid removed
Illus
trat
ion
by Jo
hn H
utch
inso
n

popwood.com 2727
Building the Small BoxFollowing are some sizes and dimensions that will be helpful when building the small candle box.
• Overall dimensions: 3" high x 8" wide x 33⁄8" deep
• Built using 3⁄8" stock
• Rabbets on side pieces: 1⁄4" x 3⁄8"
• Grooves on side pieces and back: 3⁄16" deep x 1⁄4"
• Rabbets on lid: 1⁄8" x 1⁄4"
You can use a gouge to cut your thumb notch. Or, cut the notch using your drill press, then clean up any
burn marks with a gouge. Leave the tooling marks
for an authentic look.
Use the bottom piece as a place
holder when nailing the front and back to the
sides – it’s easier to line everything
up this way.
Tilt your blade 14° when cutting the bevel on the lid. If your lid is too small for this operation, simply cut rabbets to slide into the box’s grooves.
When building multiple boxes at one time (which I suggest), use your drill press and a 35mm bit to cut the thumb notch on the lid. Make a jig to cut the notch at a 15° angle, 1⁄4" deep. I suggest doing a few practice runs first.
Before finishing, sand the ex-terior of the box and the lid. I fill in my tiny nail holes with wood putty. You can finish these boxes any way you like. I simply apply a couple coats of lacquer, sanding between each coat.
Now that I build all of our candle boxes, we really don’t have an excuse to buy the boxes when scouting out antique shows. But that’s OK. Not buying candle boxes simply has led to bigger and better finds. PW

PoPular WoodWorking July 200328
Photos by Al Parrish
28

popwood.com 29
▼
B u t l e r
Tray TableNothing says “classy”
like bringing out a full tea service on a
tray table. Here’s all you need to know to build a proper tray
table that lifts off its base. Butler not in-
cluded.
by Jim Stuard
When we set out to build a tray table, we thought we’d come across plenty of ex-amples in the historical record. Truth be told, there
weren’t many. This form probably origi-nated about 100 years ago, in the Victorian era. A time when showing all of the trap-pings of wealth included having the butler
bring out the good tea service for afternoon tea. Having the head servant emerge with everything in its place and setting it on the table base would appear most impressive.
Ellipses and SquaresThe top is a rectangle set inside of an ellipse. The wings actually touch at the four corners of the rectangle. With the aid of our com-
If you are going to change the size of the top, you’ll need to use an ellipse-marking jig (top). If not, cut out the wing patterns on the next page. Make copies of the wing pattern halves and tape them together. Glue the patterns on the appro-priate wings and cut out the oval-shaped wings. Next, clean up the edges of the wings with a block plane and prepare for mortising the hinges (right).
18th CENTURY▼
PoPular WoodWorking July 200330
▼
Mounting the WingsMark the hinge locations 4" in from each corner and transfer the location to each wing with a knife. The barrels of the hinges don’t align exactly with the wing joint, so use the template in the illustrations at right to locate the hinge recesses. Rout the recesses on the table side first; then, with a spacer, rout the wing side. There is some chisel work in-volved in fitting the hinge’s spring mechanism to the top and wings. After this is done, attach all of the wings and test the fit.
You will notice that after mounting the wings, all four can’t fold up at the same time. Routing a roundover profile on the edges of the top and wings will fix this.
30
▼
puter drafting software, I deter-mined the perfect size of a rect-angle that yields equal widths on all four wings. If you want to modify the top and base sizes, you’ll need an ellipse-layout jig. We built a simple ellipse-layout jig, which first appeared in our September 1997 issue. Although this issue is no longer for sale, we’ve posted plans for the layout jig online at popularwoodwork-ing.com/projects/oval_layout_jig.
Begin by cutting out all the parts according to the cutting list. Next, cut the wings to shape as shown in the photos. Then put the wing parts in place against the rectangle and, using masking tape, attach the wings to the top so they pull up tight.
Use 1/4" spacer for routing wings
13/8" 3/4" radius
11/2"
Stop nailed to edge of template
Use 3/4" material for jig
For full-size enlarge 200%
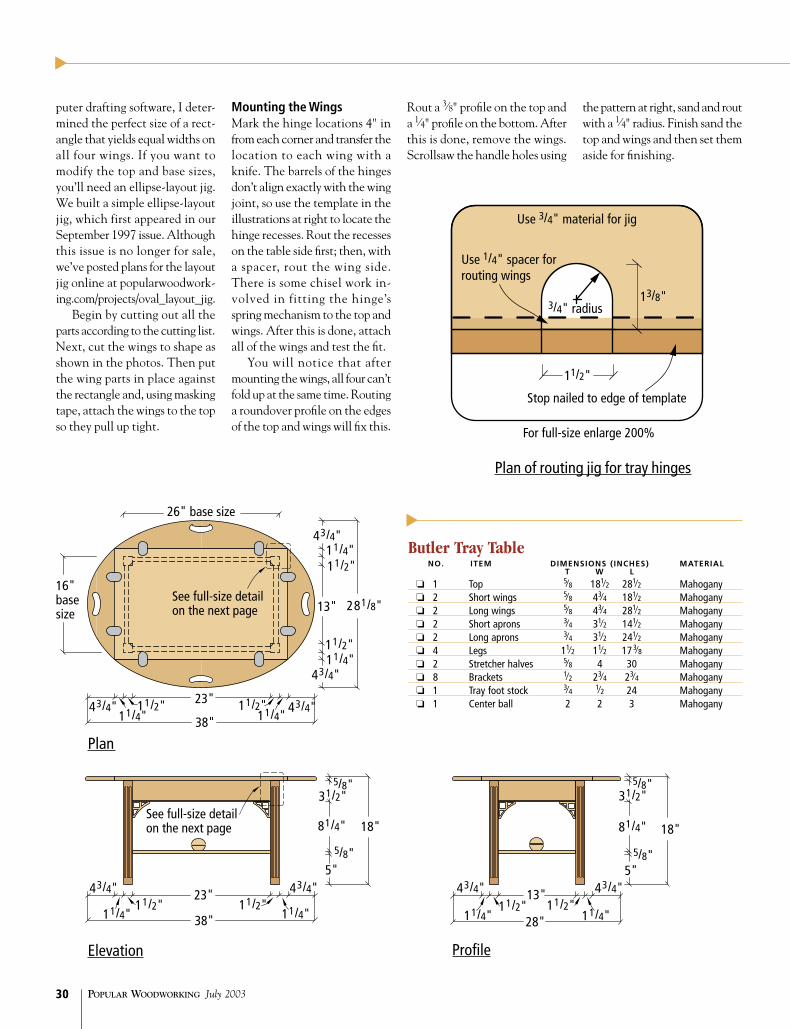
Plan of routing jig for tray hinges
5/8"
5"
23"
38"
13"
26" base size
18"
5"
18"
13"
28"
See full-size detail on the next page
See full-size detail on the next page
43/4"11/4"11/2"
11/2"11/4"
43/4"
43/4"11/4"
11/2"11/2"11/4"
43/4"
16"basesize
281/8"
31/2"
81/4"
5/8"
23"
38"
43/4" 43/4"
11/4" 11/4"11/2" 11/2"
43/4" 43/4"
11/4" 11/4"11/2" 11/2"
5/8"
5/8"
31/2"
81/4"
▼
Butler Tray Table No. Item DImeNsIoNs (INches) materIal
t W l
❏ 1 Top 5⁄8 181⁄2 281⁄2 Mahogany ❏ 2 Short wings 5⁄8 43⁄4 181⁄2 Mahogany ❏ 2 Long wings 5⁄8 43⁄4 281⁄2 Mahogany ❏ 2 Short aprons 3⁄4 31⁄2 141⁄2 Mahogany ❏ 2 Long aprons 3⁄4 31⁄2 241⁄2 Mahogany ❏ 4 Legs 11⁄2 11⁄2 173⁄8 Mahogany ❏ 2 Stretcher halves 5⁄8 4 30 Mahogany ❏ 8 Brackets 1⁄2 23⁄4 23⁄4 Mahogany ❏ 1 Tray foot stock 3⁄4 1⁄2 24 Mahogany ❏ 1 Center ball 2 2 3 Mahogany
Rout a 3⁄8" profile on the top and a 1⁄4" profile on the bottom. After this is done, remove the wings. Scrollsaw the handle holes using
the pattern at right, sand and rout with a 1⁄4" radius. Finish sand the top and wings and then set them aside for finishing.
Plan
Elevation Profile

popwood.com 3131
Make a jig to rout the hinge mortises. If you use the supplier that we named, use the pattern on this page to make a jig for routing the mortises. If you use a bearing-on-top bit, make sure that you use material thick enough to accommodate the bit and bearing when you make the jig.
Handle cutout
For full-size enlarge 165%
CL
Hingelocation
Short wing
Short wing
Illus
trat
ions
by
the
auth
or
Handle cutout
For full-size enlarge 165%
CL
Hingelocation

PoPular WoodWorking July 200332
▼
32
▼
CL
CL
For full-size enlarge 165%
For full-size enlarge 165%
CL
CL
Base stretcher
Base stretcher
60ϒ
Layout of patterns on half-lapped stretcher
The Pierced StretcherThe stretcher on this table is strictly for show, and the turned ball centerpiece discourages people from putting anything on the stretcher, including their feet. Rough cut the stretchers to size, then use the pattern on this page to lay out the angled half-lap joints on the pieces. I cut the half laps with a hand saw and a rabbet plane, but a straight edge and a router would work fine. After cutting the half laps, temporar-
ily attach the stretcher pieces together with a screw.
Next, make two copies of each stretcher pattern shown here. This gives a left and right, and the crosshairs in the center give a good indexing point. Tape the pattern pieces together and affix them to the stretcher blank. Remove the screw and cut the stretchers out using a scrollsaw.
Precision is important here because there is little room for error when fitting the stretcher

popwood.com 3333
to the legs later on in construc-tion. Take your time and do it right. Once the stretchers are cut and sanded, glue them together. Lastly, turn a small ball for the center of the stretcher. Drill a 1⁄2" x 3⁄8"-deep hole in the center of the stretcher and a deeper hole in the ball. Attach the ball with a dowel after finishing.
Fluting the LegsUse a router in a table to flute the legs. Set stops at each end of the fence and measure (include the bit width) from the mounted bit to the stop. The distance should be 1" less than the length of the leg. This gives a 1" space at the top and bottom where there is no fluting. Using a 1⁄4" round nose bit, the first setup is 3⁄16" from the
3/4"
1"
Apron
Apron
Leg
Leg
11/2"3/4"
1/8"
3/4"
3/16"
3/8"
7/8"
31/2"Apron
Leave a square corner 4" down from the top of the leg to index the top
3/4"
21/2"Tenon
3/16" 3/16"
1/4" 1/4"1/4"
Tenonsize
Full-size
Full-size
Begin the stretcher layout by mark-ing the centers of each stretcher piece along the length and across the middle. Drill a small hole through each center and place a small finish nail through both pieces. Place this assembly on the 60° angle and mark both pieces at the edges where they touch (right). Once you get the angle right, cut the half lap. First I used a hand saw to define the edges, then I used a rabbet plane to hog out the waste (above).
Full-size elevation of table base cornerFull-size plan of table base corner
PoPular WoodWorking July 200334
▼
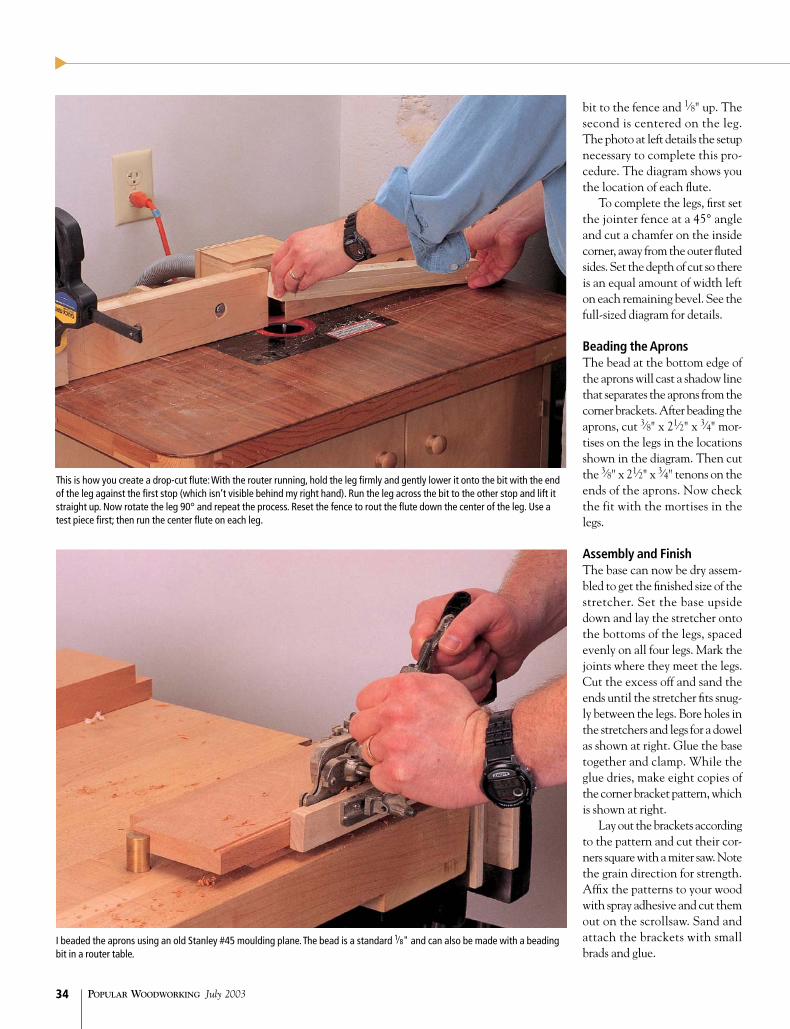
bit to the fence and 1⁄8" up. The second is centered on the leg. The photo at left details the setup necessary to complete this pro-cedure. The diagram shows you the location of each flute.
To complete the legs, first set the jointer fence at a 45° angle and cut a chamfer on the inside corner, away from the outer fluted sides. Set the depth of cut so there is an equal amount of width left on each remaining bevel. See the full-sized diagram for details.
Beading the ApronsThe bead at the bottom edge of the aprons will cast a shadow line that separates the aprons from the corner brackets. After beading the aprons, cut 3⁄8" x 21⁄2" x 3⁄4" mor-tises on the legs in the locations shown in the diagram. Then cut the 3⁄8" x 21⁄2" x 3⁄4" tenons on the ends of the aprons. Now check the fit with the mortises in the legs.
Assembly and FinishThe base can now be dry assem-bled to get the finished size of the stretcher. Set the base upside down and lay the stretcher onto the bottoms of the legs, spaced evenly on all four legs. Mark the joints where they meet the legs. Cut the excess off and sand the ends until the stretcher fits snug-ly between the legs. Bore holes in the stretchers and legs for a dowel as shown at right. Glue the base together and clamp. While the glue dries, make eight copies of the corner bracket pattern, which is shown at right.
Lay out the brackets according to the pattern and cut their cor-ners square with a miter saw. Note the grain direction for strength. Affix the patterns to your wood with spray adhesive and cut them out on the scrollsaw. Sand and attach the brackets with small brads and glue.
34
▼
I beaded the aprons using an old Stanley #45 moulding plane. The bead is a standard 1⁄8" and can also be made with a beading bit in a router table.
This is how you create a drop-cut flute: With the router running, hold the leg firmly and gently lower it onto the bit with the end of the leg against the first stop (which isn’t visible behind my right hand). Run the leg across the bit to the other stop and lift it straight up. Now rotate the leg 90° and repeat the process. Reset the fence to rout the flute down the center of the leg. Use a test piece first; then run the center flute on each leg.

popwood.com 3535
Now build the tray’s feet, which keep the tray centered per-fectly on the base. First cut 45° miters on the ends of some 3⁄4" x 1⁄2" stock (called “tray foot stock” in the cutting list) and cut them to 2" lengths. Using the foot pat-tern below, scrollsaw left and right mitered pieces for each foot. Place the top and base upside down on a blanket. Center the inverted base on the top. Nail two of these corner pieces together and attach them to the top at the inside cor-ner where the long apron meets the leg. Leave a little clearance so the top won’t get stuck.
Start the three-step finishing process with a thinned-down red aniline dye. Why red? This will accentuate the red that is already in the mahogany. Your goal is a bright reddish or pink color when dry. So don’t be shocked if your table suddenly looks like it belongs in the circus. Rag it on, preferably with cheese cloth (it doesn’t leave lint on the surface). Wipe any blotches down with a clean rag lightly soaked with the thinner used for your dye. Next, reduce some neutral grain filler with oil-based mahogany stain to the con-sistency of heavy cream. Rub the stain/filler mixture across the grain leaving a fairly heavy coat. Let it stand for a few minutes until the thinnest part of the application starts to dry. Rub the excess stain/filler out across the grain and fin-ish rubbing lightly with the grain. Apply three coats of clear lacquer, sanding between coats. And now it’s tea time. PW
After fitting the stretcher, lay out and drill dowel centers so that the stretcher will attach 5" up from the bottom of the legs.
Grain direction
Full-size
Full-size
Full-size
Full-size
Full-size Full-size diagram of corner bracket
Full-size diagram of foot for top
Plan
Profile
SupplieSLee Valley Tools 800-871-8158 or leevalley.com8 • butler tray table hinges #00W21.02, $6.70/pair • screws #91Z05.04, $3.20/100
Prices correct at time of publication.
PoPular WoodWorking July 200336
▼
36
P e n n s y l v a n i a
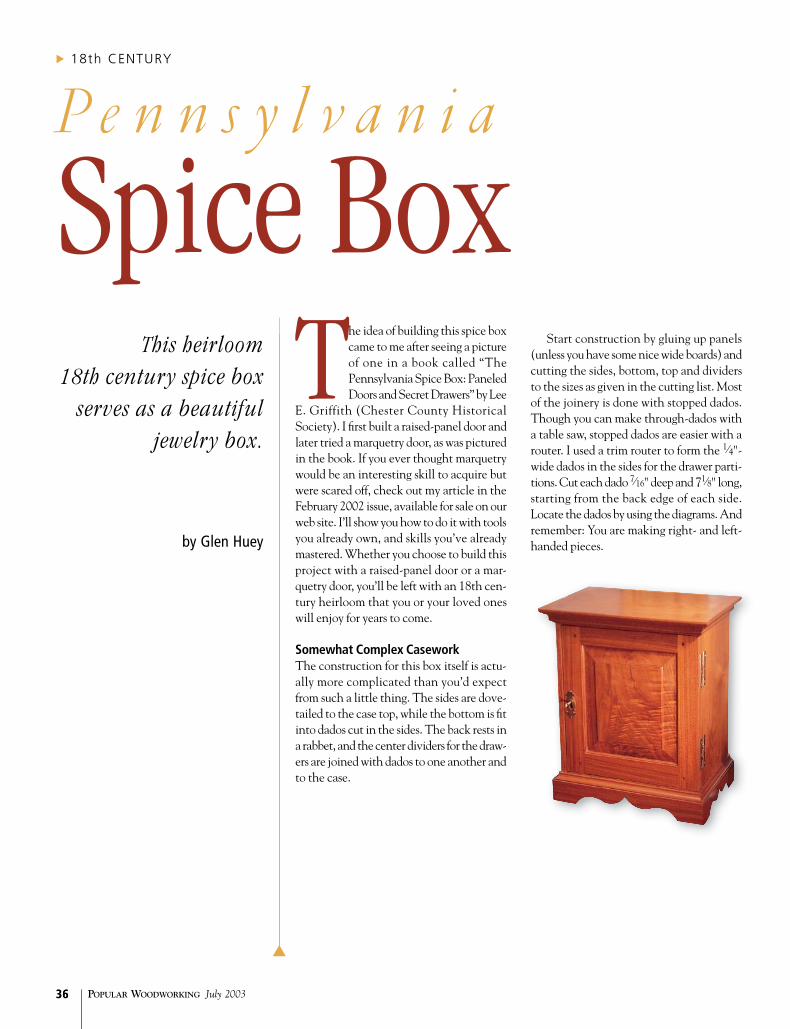
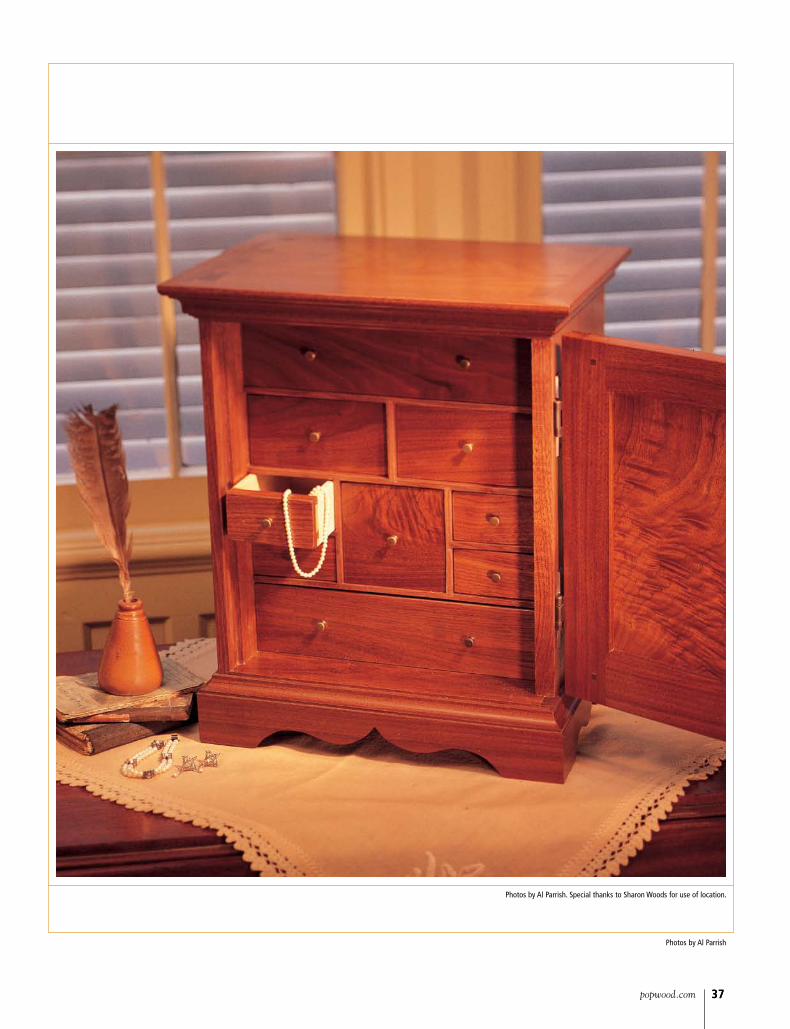
Spice BoxThis heirloom
18th century spice box serves as a beautiful
jewelry box.
by Glen Huey
The idea of building this spice box came to me after seeing a picture of one in a book called “The Pennsylvania Spice Box: Paneled Doors and Secret Drawers” by Lee
E. Griffith (Chester County Historical Society). I first built a raised-panel door and later tried a marquetry door, as was pictured in the book. If you ever thought marquetry would be an interesting skill to acquire but were scared off, check out my article in the February 2002 issue, available for sale on our web site. I’ll show you how to do it with tools you already own, and skills you’ve already mastered. Whether you choose to build this project with a raised-panel door or a mar-quetry door, you’ll be left with an 18th cen-tury heirloom that you or your loved ones will enjoy for years to come.
Somewhat Complex CaseworkThe construction for this box itself is actu-ally more complicated than you’d expect from such a little thing. The sides are dove-tailed to the case top, while the bottom is fit into dados cut in the sides. The back rests in a rabbet, and the center dividers for the draw-ers are joined with dados to one another and to the case.
Start construction by gluing up panels (unless you have some nice wide boards) and cutting the sides, bottom, top and dividers to the sizes as given in the cutting list. Most of the joinery is done with stopped dados. Though you can make through-dados with a table saw, stopped dados are easier with a router. I used a trim router to form the 1⁄4"-wide dados in the sides for the drawer parti-tions. Cut each dado 7⁄16" deep and 71⁄8" long, starting from the back edge of each side. Locate the dados by using the diagrams. And remember: You are making right- and left-handed pieces.
18th CENTURY▼
popwood.com 37
Photos by Al Parrish
37
Photos by Al Parrish. Special thanks to Sharon Woods for use of location.
PoPular WoodWorking July 200338
▼
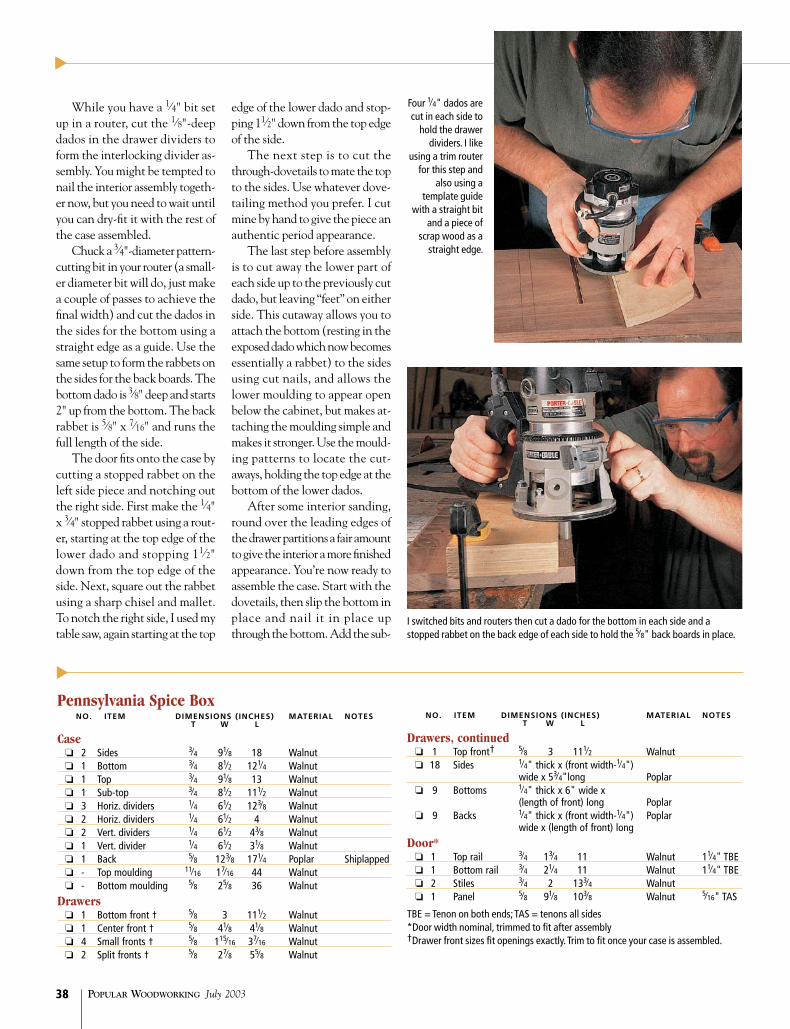
While you have a 1⁄4" bit set up in a router, cut the 1⁄8"-deep dados in the drawer dividers to form the interlocking divider as-sembly. You might be tempted to nail the interior assembly togeth-er now, but you need to wait until you can dry-fit it with the rest of the case assembled.
Chuck a 3⁄4"-diameter pattern-cutting bit in your router (a small-er diameter bit will do, just make a couple of passes to achieve the final width) and cut the dados in the sides for the bottom using a straight edge as a guide. Use the same setup to form the rabbets on the sides for the back boards. The bottom dado is 3⁄8" deep and starts 2" up from the bottom. The back rabbet is 5⁄8" x 7⁄16" and runs the full length of the side.
The door fits onto the case by cutting a stopped rabbet on the left side piece and notching out the right side. First make the 1⁄4" x 3⁄4" stopped rabbet using a rout-er, starting at the top edge of the lower dado and stopping 11⁄2" down from the top edge of the side. Next, square out the rabbet using a sharp chisel and mallet. To notch the right side, I used my table saw, again starting at the top
edge of the lower dado and stop-ping 11⁄2" down from the top edge of the side.
The next step is to cut the through-dovetails to mate the top to the sides. Use whatever dove-tailing method you prefer. I cut mine by hand to give the piece an authentic period appearance.
The last step before assembly is to cut away the lower part of each side up to the previously cut dado, but leaving “feet” on either side. This cutaway allows you to attach the bottom (resting in the exposed dado which now becomes essentially a rabbet) to the sides using cut nails, and allows the lower moulding to appear open below the cabinet, but makes at-taching the moulding simple and makes it stronger. Use the mould-ing patterns to locate the cut-aways, holding the top edge at the bottom of the lower dados.
After some interior sanding, round over the leading edges of the drawer partitions a fair amount to give the interior a more finished appearance. You’re now ready to assemble the case. Start with the dovetails, then slip the bottom in place and nail it in place up through the bottom. Add the sub-
38
▼
I switched bits and routers then cut a dado for the bottom in each side and a stopped rabbet on the back edge of each side to hold the 5⁄8" back boards in place.
Four 1⁄4" dados are cut in each side to
hold the drawer dividers. I like
using a trim router for this step and
also using a template guide
with a straight bit and a piece of
scrap wood as a straight edge.
Pennsylvania Spice Box No. Item DImeNsIoNs (INches) materIal Notes
t W l
Case ❏ 2 Sides 3⁄4 91⁄8 18 Walnut ❏ 1 Bottom 3⁄4 81⁄2 121⁄4 Walnut ❏ 1 Top 3⁄4 91⁄8 13 Walnut ❏ 1 Sub-top 3⁄4 81⁄2 111⁄2 Walnut ❏ 3 Horiz. dividers 1⁄4 61⁄2 123⁄8 Walnut ❏ 2 Horiz. dividers 1⁄4 61⁄2 4 Walnut ❏ 2 Vert. dividers 1⁄4 61⁄2 43⁄8 Walnut ❏ 1 Vert. divider 1⁄4 61⁄2 31⁄8 Walnut ❏ 1 Back 5⁄8 123⁄8 171⁄4 Poplar Shiplapped ❏ - Top moulding 11⁄16 17⁄16 44 Walnut ❏ - Bottom moulding 5⁄8 25⁄8 36 Walnut
Drawers ❏ 1 Bottom front † 5⁄8 3 111⁄2 Walnut ❏ 1 Center front † 5⁄8 41⁄8 41⁄8 Walnut ❏ 4 Small fronts † 5⁄8 115⁄16 37⁄16 Walnut ❏ 2 Split fronts † 5⁄8 27⁄8 55⁄8 Walnut
No. Item DImeNsIoNs (INches) materIal Notest W l
Drawers, continued ❏ 1 Top front† 5⁄8 3 111⁄2 Walnut ❏ 18 Sides 1⁄4" thick x (front width-1⁄4") wide x 53⁄4"long Poplar ❏ 9 Bottoms 1⁄4" thick x 6" wide x (length of front) long Poplar ❏ 9 Backs 1⁄4" thick x (front width-1⁄4") Poplar wide x (length of front) long
Door* ❏ 1 Top rail 3⁄4 13⁄4 11 Walnut 11⁄4" TBE ❏ 1 Bottom rail 3⁄4 21⁄4 11 Walnut 11⁄4" TBE ❏ 2 Stiles 3⁄4 2 133⁄4 Walnut ❏ 1 Panel 5⁄8 91⁄8 103⁄8 Walnut 5⁄16" TAS
TBE = Tenon on both ends; TAS = tenons all sides*Door width nominal, trimmed to fit after assembly†Drawer front sizes fit openings exactly. Trim to fit once your case is assembled.
▼
popwood.com 39
▼
39
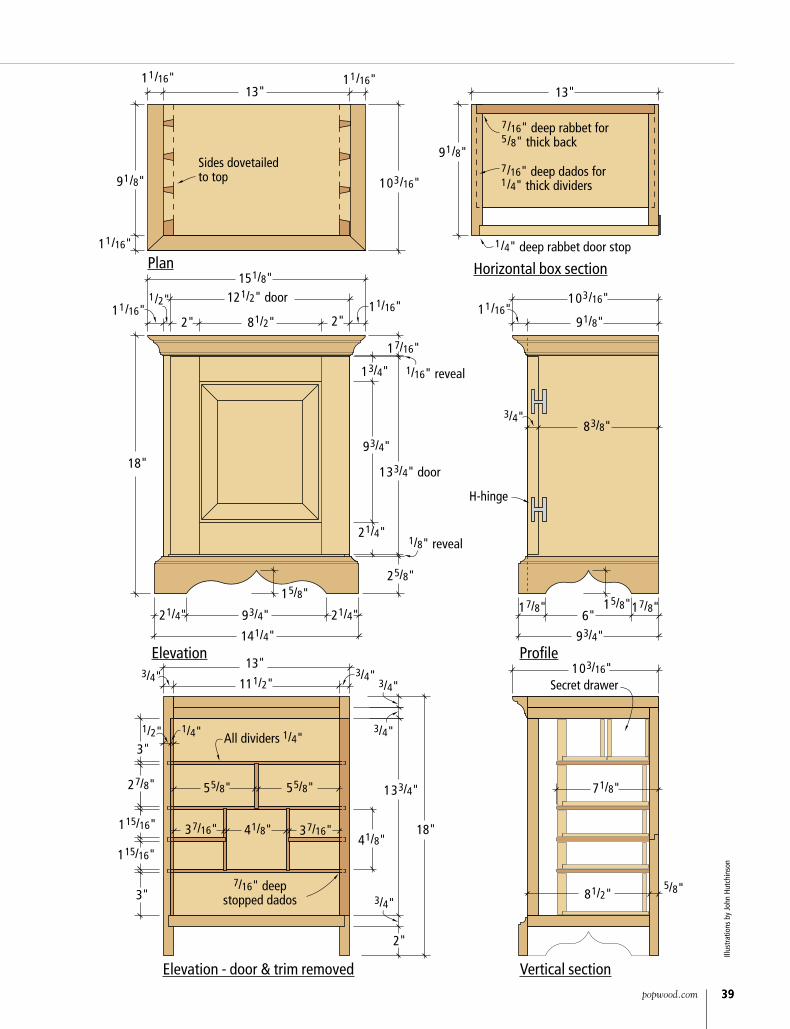
13"
7/16" deep rabbet for 5/8" thick back
7/16" deep dados for 1/4" thick dividers
Sides dovetailedto top
Secret drawer
H-hinge
151/8"121/2" door
91/8"
11/16"13"
11/16"
11/16"
103/16"
91/8"
1/4" deep rabbet door stop
11/16"1/2"
81/2"2" 2"11/16"
13/4"
93/4"
133/4" door
21/4"
1/16" reveal
17/16"
25/8"
1/8" reveal
21/4"
15/8"
93/4"
141/4"
21/4"
18"
111/2"
13"3/4" 3/4"
1/2" 1/4" All dividers 1/4"3/4"
3/4"
55/8" 55/8"
37/16"37/16" 41/8"41/8"
133/4"
18"
3"
115/16"
115/16"
27/8"
3"
7/16" deepstopped dados 3/4"
2"
103/16"11/16"
91/8"
83/8"3/4"
17/8"17/8"
93/4"
103/16"
71/8"
6"
5/8"81/2"
15/8"
Illus
trat
ions
by
John
Hut
chin
son
Plan Horizontal box section
ProfileElevation
Vertical sectionElevation - door & trim removed
PoPular WoodWorking July 200340
▼
top that is slipped into place inside the case (under the top) and at-tach it to the top using screws. This sub-top builds up the front edge of the case to support the top moulding.
After a dry test-fit, assemble the drawer dividers using glue and one or two strategically placed brads. Then slide the drawer as-sembly into place in the case, using only glue.
While letting the case sit clamped-up for about an hour, mill the material for the top and bot-tom mouldings. Using the pro-vided patterns, mark and then cut out the bracket feet patterns on the lower mouldings. The lower mouldings also have a decorative
detail routed onto the top edge. Cut this next. The upper mould-ing uses a double-ogee design to form a miniature crown. See the diagrams to help match these pat-terns on your case. With the moulding shaped, miter the cor-ners and attach them to the case using small brads. Nail directly through the moulding into the case. Cut the front mouldings to fit first, then work back from the corners to get the side mouldings the proper length. Set the brad nails below the wood surface, then use a matching wood putty to fill in the holes.
The back for the case is made from two interlocking shiplapped poplar boards. The grain is run
horizontally, and the shiplapped joint is horizontal and falls some-where near the center of the back. Cut the pieces and mill the rab-bets to form the shiplapping, but leave the back loose till after fin-ishing the piece. It’s hard enough to finish the small drawer divider spaces without a back.
The drawers use straightfor-ward, traditional half-blind dove-tails. Use poplar for all the parts except the fronts, which are wal-nut. See the story “Traditional Dovetailed Drawers” for details.
Door is LastThe first door I built for this cab-inet was a frame-and-panel design built with haunched mortise-and-
tenon joinery. While I don’t want to set you up for failure if trying my inlaid door (February 2002 issue), I’d make sure I had enough walnut for this frame-and-panel door if things didn’t work out as planned.
To make the door, cut your rails, stiles and panel to rough size. Select stock for the panel with some nice figure to make the door really special. Start by running a 3⁄16" beading profile on the inside front edge of each piece. The in-side edge of the bead should roll into the panel once it’s in place. Next cut a 1⁄4"-wide x 3⁄8"-deep groove down the center of the inside edge of each door stile and rail. Then make a 1⁄4" x 1" mortise,
40
▼
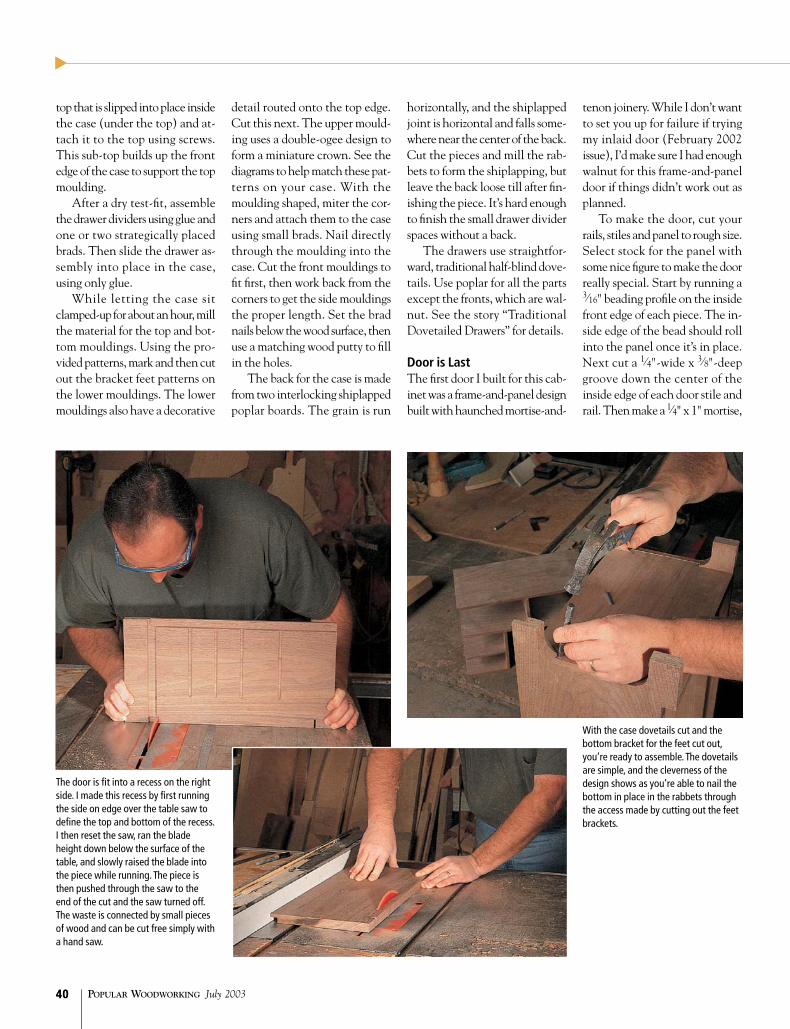
With the case dovetails cut and the bottom bracket for the feet cut out, you’re ready to assemble. The dovetails are simple, and the cleverness of the design shows as you’re able to nail the bottom in place in the rabbets through the access made by cutting out the feet brackets.
The door is fit into a recess on the right side. I made this recess by first running the side on edge over the table saw to define the top and bottom of the recess. I then reset the saw, ran the blade height down below the surface of the table, and slowly raised the blade into the piece while running. The piece is then pushed through the saw to the end of the cut and the saw turned off. The waste is connected by small pieces of wood and can be cut free simply with a hand saw.

popwood.com 41
▼
11⁄4" deep at the top and bottom of each stile, 1⁄4" in from each end. The 1⁄4" width should center on the previously made groove, and the depth of the mortise should include the depth of the groove itself.
Next, set up your table saw to make the 1⁄4"-thick x 11⁄4"-long tenons on both ends of the door rails. The tenon is again centered
on the piece. Now miter the beaded profile. Tip your table saw’s blade to 45°, and with the rail resting on the inside edge, use your miter gauge to notch the inside corners, 11⁄4" in from each end, and at a height of 3⁄16". While the blade is set to 45°, make a similar cut on the two stiles, set at 3⁄16" high, and starting 13⁄4" in from the top end of each stile, and 21⁄4" in
from the bottom end.Reset the blade to 90°, and by
running each stile on end with the outside edge against the rip fence, trim 3⁄16" from the inside edge of each stile, up to the height of the previously cut 45° miter.
With the tenon formed, it’s time to make it a haunched tenon. Using your miter gauge, notch the outside edge of each door rail
41
With the drawer dividers assembled and installed, the moulding is ready to go on. The top moulding was made using a roman ogee bit in two steps, then nailed in place. The lower mould-ing is cut to provide the bracket base design using the scaled pat-terns provided, then an attractive profile is run on the top edge. The rest is simply mitering and nailing in place.
TraDiTional DoveTaileD DrawerSNot only is the construction of the drawers traditional, the secret hiding spaces are as well. The spices kept in these boxes were already considered valuable, but the original builders wanted to make it possible to store even more valuable items undetected. Behind both second-tier, shortened drawers are secret drawers. It’s a nice touch, but it’s your choice. The sizes given in the materials list are for full-depth drawers in those spaces. You can change the dimensions as you like to add your own secret.
Construction of the drawers uses half-blind dovetails to mate the fronts and sides, and through-dovetails to mate the backs and sides. The bottoms simply are tacked on to the sides and back using brads. This method of attaching the bottoms will prove sufficient to carry the amount of weight in these small drawers.
Each drawer uses three dovetail pins per joint and all that I made were hand-cut. Start by cutting the drawer fronts to fit in each of the spaces with about 1⁄16" clearance on all sides. With all the fronts cut, set up a router to cut a 1⁄4" high x 3⁄8" rabbet on the inside bottom edge of each front. The sides should align with the top of the rabbet, so go ahead and lay out your dove-tails on the fronts, sides and backs.
With all the dovetails cut and fit, cut the bottoms to width for each drawer, but leave them a little long. The length of the drawer bottom will serve as a stop against the case back to keep the drawer fronts aligned properly. The exception to this is with any secret drawers. Leave a longer bottom on the secret drawer and make the front
drawer bottom flush to the back. Assemble the drawers with glue, then tack the bottoms in place using a few small brads.
Trim the drawer bottoms so that everything aligns in front nicely, then add the simple screw-on knobs to the drawers. Follow the same finishing technique for the drawers as for the main case and you’re ready to start filling up your spice box.
tenon 1" in (including the blade thickness) and 1⁄4" high. Then use your rip fence again to cut away the tenon waste on either side of the rail tenons, leaving the appro-priate-width tenon to fit in the mortises in the stiles. Now dry-fit the door together to check your joints.
I used a panel-raising bit in my router table to shape the door
Door construction detail
Mitered 3⁄16" bead
Haunch
1⁄4" x 3⁄8" groove

PoPular WoodWorking July 200342
▼
panel. Allow the appropriate thickness at the edge of the panel for it to fit into the grooves in the stiles and rails. The flat of the panel will extend 1⁄8" beyond the front surface of the door, while the back surface of the panel will fit exactly into the groove and form a 1⁄4" recess. Assem ble the
door using glue in the mortise-and-tenon joints, but allow the panel to float loose in the grooves. I added squared pegs to the joints, drilling all the way through the door at the center of each tenon, sanding the pegs flush to the sur-face of the door.
The door is hung on the case
using an “H”-shaped hinge that’s screwed into the right-hand edge of the door and the right side of the case. The lock set requires a recess routed into the back of the door. Because each of the locks is fairly individual, use the actual lock to accurately determine the appropriate sized recess. The same goes for the recess required in the left-side piece to accept the bolt from the lock.
To finish the piece, I filled the grain with a paste filler then ap-plied a couple of coats of blonde shellac to bring out the beauty of the walnut. Though there are lots of little pieces, this is a very pleas-
ing piece when finished. All the basics of a larger piece, but it fits on your table. PW
42
▼
Base scroll patterns
The drawers are built to match the traditional style of the original piece, with the backs captured in through-dovetails to the sides, and the fronts attached to the sides with half-blind dovetails. The bottoms simply are nailed onto the sides, which would be a poor idea in anything larger than these drawers. Though the materials list doesn’t call out the pieces for it, I added a very typical secret drawer behind one of the drawers.
Take your time fitting and attaching the door to the case. Because it’s inset on three sides, and the traditional hinges don’t allow for much slop, you need to get it right the first time.
SupplieSHorton Brasses 800-754-9127 or horton-brasses.com 1 • lock
#LK-11, $9.251 • escutcheon
#H-121, $311 • 1⁄2" knobs
#H-42, $1.802 • 21⁄2" hinges
#HH2, $14/pairPrices correct at time of publication
One square = 1⁄2"
Secret drawer

popwood.com 43
▼
G r e e n e & G r e e n e
Side TableSimple joinery makes a table in the classic
style of the Greene brothers a rewarding
and easy project for woodworkers
of any skill.
by Steve Shanesy
Photo by Tim Grondin
ARTS & CRAFTS▼

PoPular WoodWorking July 200344
▼
44
▼
If you don’t mind a little cheating, you can make this table quite simply. You see, the “pegged” mortise-and-tenon joints aren’t
really pegged at all. They are simple dowel joints, and the “pegs” are merely inlaid and ap-plied pieces of ebony. But even if you feel the slightest twinge of guilt about taking such short cuts – please don’t. The brothers Greene and Greene, renowned architects and designers of the late Arts & Crafts period, didn’t hesitate a moment to use screws in their classic furniture. So a little liberty on this project fol-lows right along in the tradition.
I built this table from cherry. The legs require 2"-thick mate-rial and the top requires 11⁄2"-thick stock. The aprons and stretchers finish out at 7⁄8" thick. If you use thinner material, you could reduce both the top and legs by 1⁄2", and the aprons and stretchers could go to 3⁄4" stock. That will keep the proportions just about right.
Prepare all your stock to the final sizes as given in the cutting list. Next prepare the template for routing the so-called “cloud lift” patterns on the aprons and stretchers. These are a Greene and Greene signature design and were borrowed from the Japanese.
Cloud Lift TemplateThe two-sided template is made from 1⁄4" Baltic birch plywood with the two patterns (one is slightly longer than the other) cut on the long edges of the same piece. Plan on using the template along with a straight router bit with a bearing of the same dimen-sion as the bit diameter. Draw the design on the plywood following the dimensions in the diagram. The “lift” is 3⁄4". Before band saw-ing to the line, drill 1⁄2" holes in the inside corners of the pattern. Drilling these holes is much
easier than band sawing such a tight radius. After carefully band sawing to the line, sand the band-sawn edges so that they are smooth and straight. Next, on the template, mark each pattern edge with a line that represents the ends of the two different lengths of aprons and stretchers used in the project.
Before using the templates to rout the design, first band saw away most of the waste on the parts. Using the template, draw a pencil line of the design on each apron or stretcher, then band saw
Here I’m rounding over the edges with a 1⁄4”-radius router bit. Almost every edge on the project gets this treatment. The exception is where parts join together, such as the apron and stretcher ends, and apron top edge.
When routing the cloud lifts, the top-mounted bear-ing on the straight router bit follows and duplicates the pattern shape onto the table apron. Before rout-ing, most of the waste material is removed with a band saw. Note the aprons ends are aligned with pencil marks on the template and the part is held to the template with brad nails.
to about 1⁄16" from the line. The router will clean up the rest.
To prepare for routing, set up a router table with a router and the 1⁄2" straight bit as mentioned earlier. No fence is required for this type of pattern cutting. To begin routing, align the part so that the ends match up with the lines previously drawn and so that the leading edge of the pat-tern aligns with the edge of the part. Attach the part to the tem-plate using two small brad nails. You can putty the nail holes later, but even so, select the “b” side of
the part that will go to the inside of the table base as the side to nail to. Run each part this way. If you use cherry, do your best not to hesitate in the corners of the cut to minimize burning.
Shape the LegsNext, turn to the legs. First shape the bottom to the gradual taper-ing curve as seen in the diagram. Start the detail 3" up from the bottom. The slight curved taper removes only 1⁄4" per side at the end of the leg. Now make a tem-plate of the pattern so you can

popwood.com 4545
3"
30ϒ typ.
5"
20"2"
163/4"
2"
1/4"typ.
1"
13"
17/8"161/4"
20"
20"
19"183/4"
13"
19"
1 7/8"
17/8"
17/8"
11/8" 11/4"
2"
3"
43/4"
9
21/2"
17/8" 17/8"161/4" 17/8"
213/4" 4"
2" 2"
Breadboard end - see details
1/2" typ.
21/8"35/8"
61/4"
1/4"squareappliedebony pegs
13/8"
typ. curvedleg taper
1"11/4" 1"25/8"
1/2"1"
1/2" 1"25/8"25/8" 25/8"
1" 11/4"
19"
11/4" 3/8"
7/16"
7/16"
Ebony plug with 1/16"x 80ϒ chamfer
Mortise
Elongatedscrew hole
Breadboard
Tabletop
Greene & Greene Side Table No. Item DImeNsIoNs (INches) materIal t W l
❏ 4 Legs 17⁄8 17⁄8 213⁄4 Cherry ❏ 2 Aprons 7⁄8 43⁄4 161⁄4 Cherry ❏ 2 Aprons 7⁄8 43⁄4 13 Cherry ❏ 2 Stretchers 7⁄8 21⁄2 161⁄4 Cherry ❏ 2 Stretchers 7⁄8 21⁄2 13 Cherry ❏ 1 Top 11⁄8 183⁄4 20 Cherry ❏ 2 Breadboards 11⁄4 2 19 Cherry
▼
Breadboard mortise layout
Breadboard plan detail
Plan - top removed Tabletop plan
ProfileElevation
Illus
trat
ion
by Jo
ohn
Hutc
hins
on

PoPular WoodWorking July 200346
▼
46
▼
gated screw slots in the bread-board to anticipate wood move-ment in the top. To make the square grooves in the breadboard ends, use a mortising machine or chain drill the holes and then square them up with a chisel. The depth of the hole is 1". The size of the small holes is 3⁄8" wide by 1⁄2" long. The longer holes are 1" long.
Before attaching the bread-boards to the top, go back to the router table and round over the long edges of the top and the outside edges of the breadboards.
draw a pencil line for each side of the leg. Then band saw and sand to the line.
With the parts of the table base shaped, go back to the rout-er table and insert a 1⁄4" roundo-ver bit in the router. Run the profile on all the long edges of the legs, stretchers and aprons, except for the top edge of the apron, which remains square.
Dowel Joints for BaseTo assemble the legs, aprons and stretchers, drill the holes for the 3⁄8" dowels and sand the parts to 150 grit. Use two, 2"-long dowels for each joint and position them so that when assembled, the apron sets back 1⁄4" from the out-side face of the leg.
When all the dowel holes are drilled, dry-fit the assembly be-fore actually gluing it together. When I assembled my base, I glued and clamped it in two stages. First assemble one set of legs, aprons and stretchers. Then complete the assembly after the first assembly is dry. Take care not to apply too much glue because squeeze-out in the joint is diffi-cult to clean up and can lead to finishing problems later.
Make the TopNow turn your attention to the tabletop. The breadboard ends with ebony plugs are another Greene and Greene signature detail. I made the breadboard ends 1⁄8" thicker than the top, leaving them 1⁄16" proud of the thickness of the rest of the top. They also are slightly longer. This additional length anticipates eventual expansion of the top.
Prepare your top’s main boards and glue them up. When dry, square up the top and cut it to its final size. The breadboards are attached easily with a 21⁄2"-long screw in each of the plugged holes. Be sure and make elon-
Simple joinery makes this project quite easy. A pair of dowels join each apron and stretcher end to the leg. This vintage Stanley #59 doweling jig makes this process especially easy due to its adjustability (see the story at right), particularly when drilling the holes in the legs to provide the 1⁄4” setback of the aprons.
The edges of the top and bread-boards that join together remain square. As with the table base, pre-sand the top before assem-bling the top and breadboard ends. When done, clamp the ends to the top so they remain in perfect position while screwing the ends in place.
Ebony Plugs and PegsThe ebony plugs used on the table all stand about 1⁄8" proud of the surface. The top of each plug is shaped so that it looks faceted, or slightly beveled on the top.
RiGhT-SizinG DowelSA dowel that’s even slightly oversized in diameter can cause all sorts of problems – the worst of which is actually splitting the part to be doweled. This not only happens because the dowel is a snug fit, but also because the glue in the hole has nowhere to go once you insert the dowel. If the glue can’t escape, it can prevent the dowel from insert-ing completely and can actually prevent the parts to be joined from closing completely.
If your dowels are too snug, there’s an easy fix called a dowel skinner. In this project, I found my 3⁄8" dowels were too tight for my 3⁄8" hole. The solu-tion was to drill a hole in 1⁄8" or thicker mild steel, that’s 1⁄64" smaller than the dowel. Then just drive your dowels through the hole with a hammer and you’ll get a perfect fit.
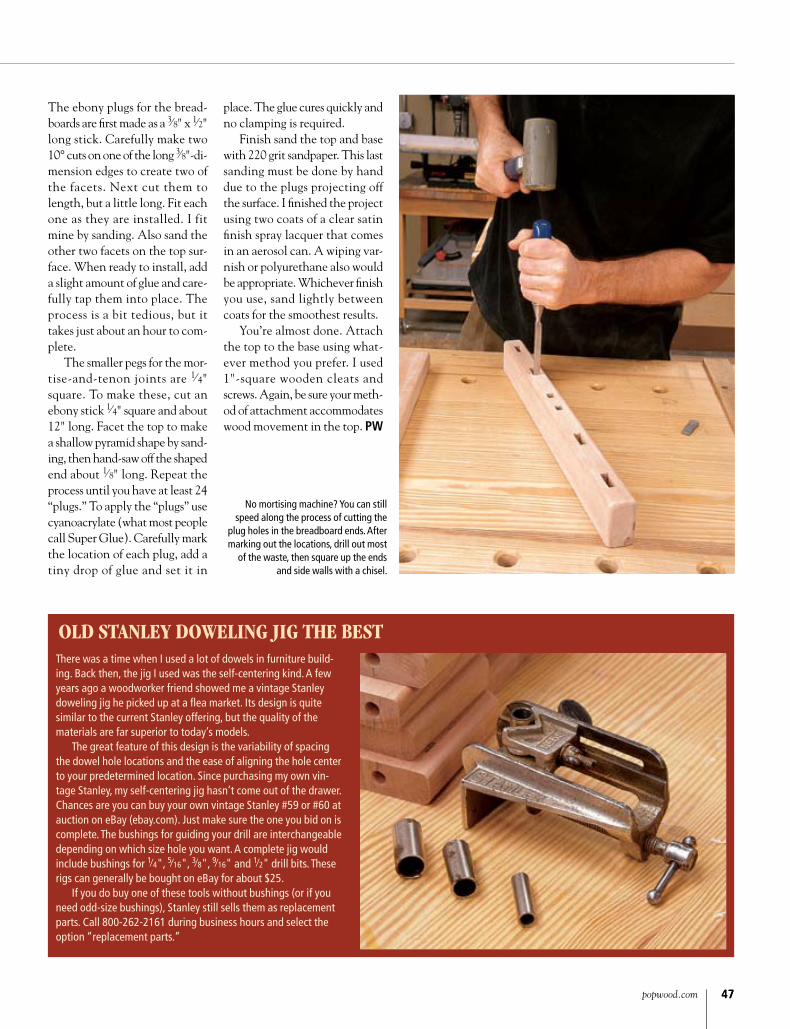
popwood.com 4747
The ebony plugs for the bread-boards are first made as a 3⁄8" x 1⁄2" long stick. Carefully make two 10° cuts on one of the long 3⁄8"-di-mension edges to create two of the facets. Next cut them to length, but a little long. Fit each one as they are installed. I fit mine by sanding. Also sand the other two facets on the top sur-face. When ready to install, add a slight amount of glue and care-fully tap them into place. The process is a bit tedious, but it takes just about an hour to com-plete.
The smaller pegs for the mor-tise-and-tenon joints are 1⁄4" square. To make these, cut an ebony stick 1⁄4" square and about 12" long. Facet the top to make a shallow pyramid shape by sand-ing, then hand-saw off the shaped end about 1⁄8" long. Repeat the process until you have at least 24 “plugs.” To apply the “plugs” use cyanoacrylate (what most people call Super Glue). Carefully mark the location of each plug, add a tiny drop of glue and set it in
place. The glue cures quickly and no clamping is required.
Finish sand the top and base with 220 grit sandpaper. This last sanding must be done by hand due to the plugs projecting off the surface. I finished the project using two coats of a clear satin finish spray lacquer that comes in an aerosol can. A wiping var-nish or polyurethane also would be appropriate. Whichever finish you use, sand lightly between coats for the smoothest results.
You’re almost done. Attach the top to the base using what-ever method you prefer. I used 1"-square wooden cleats and screws. Again, be sure your meth-od of attachment accommodates wood movement in the top. PW
olD STanley DowelinG JiG The BeSTThere was a time when I used a lot of dowels in furniture build-ing. Back then, the jig I used was the self-centering kind. A few years ago a woodworker friend showed me a vintage Stanley doweling jig he picked up at a flea market. Its design is quite similar to the current Stanley offering, but the quality of the materials are far superior to today’s models.
The great feature of this design is the variability of spacing the dowel hole locations and the ease of aligning the hole center to your predetermined location. Since purchasing my own vin-tage Stanley, my self-centering jig hasn’t come out of the drawer. Chances are you can buy your own vintage Stanley #59 or #60 at auction on eBay (ebay.com). Just make sure the one you bid on is complete. The bushings for guiding your drill are interchangeable depending on which size hole you want. A complete jig would include bushings for 1⁄4", 5⁄16", 3⁄8", 9⁄16" and 1⁄2" drill bits. These rigs can generally be bought on eBay for about $25.
If you do buy one of these tools without bushings (or if you need odd-size bushings), Stanley still sells them as replacement parts. Call 800-262-2161 during business hours and select the option “replacement parts.”
No mortising machine? You can still speed along the process of cutting the
plug holes in the breadboard ends. After marking out the locations, drill out most
of the waste, then square up the ends and side walls with a chisel.
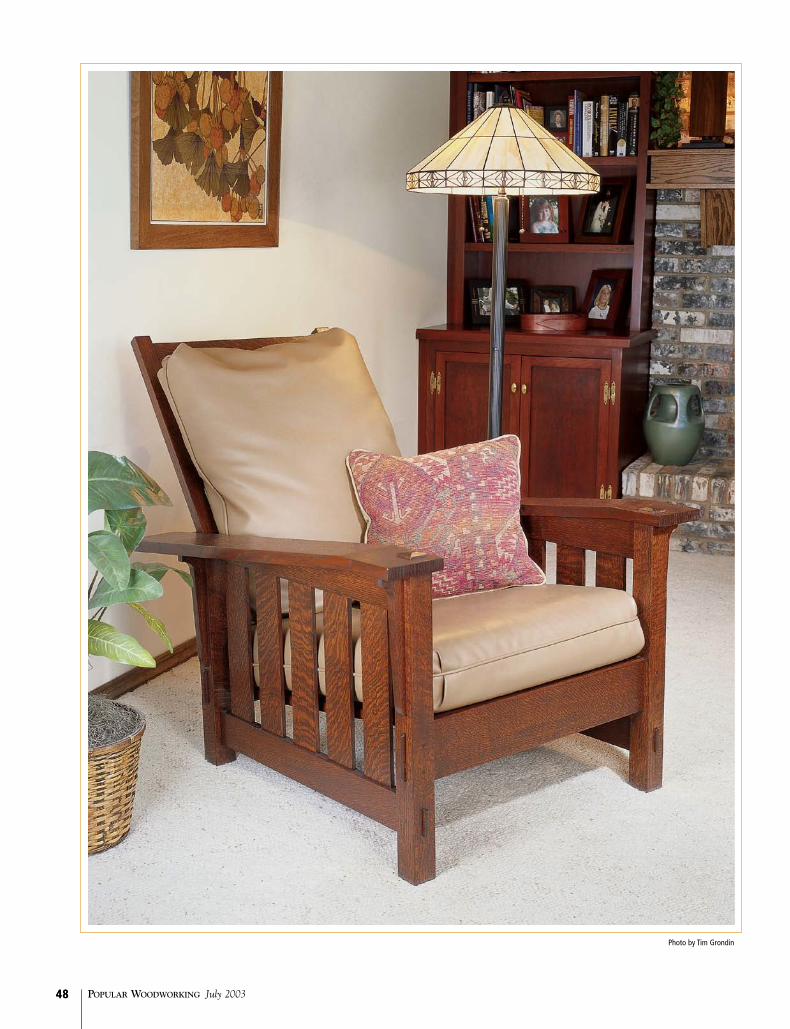
PoPular WoodWorking July 200348
Photo by Tim Grondin
48

popwood.com 49
Photos by Al Parrish
49
S l a n t - a r m
Morris ChairThe one piece
of furniture most identified with the
Arts & Crafts movement is more
than an icon … it’s a very comfortable
reading chair!
by David Thiel
Call me lazy, but I’m a sucker for a comfortable chair. Growing up, it was my Dad’s La-Z-Boy. When he wasn’t in it, I was pulling on the handle to recline the back and
relax with a book. It’s quite possible that my affinity for Arts & Crafts furniture stems from that love of a comfortable chair.
About 1900, a number of manufacturers offered reclining-back chairs called the Morris chair (the predecessor of the La-Z-Boy!) in a variety of designs. The first Morris chair was produced by British Arts & Crafts designer William Morris’s company, Morris Co. But furniture maker and marketing ge-nius Gustav Stickley brought these chairs into homes throughout the United States.
Stickley’s first design was patented in 1901. It underwent changes through the years. Square spindles were added about 1905, and those spindles turned into broad, flat slats about 1909.
Stickley’s chairs included pegged through-tenons, steam-bent back rails, a variety of seat designs, and a fumed-oak finish. While I can appreciate all the hard work that went into those original chairs, I felt that with the technology we have today, I could build a chair somewhat more simply, but still just as attractive and comfortable.
The chair built here includes pegged
through-tenons, but I’ll also show you a clever way to get the same (likely even bet-ter) look without all the fuss and without sacrificing strength. I also left some of the back comfort to the cushion and opted for straight back rails, taking out hours of work. The cushions are loose, with the seat cushion supported by a drop-in frame that’s criss-crossed with jute webbing.
As for the finish, fuming can give a great-looking finish to white oak pieces. But it can be dangerous (toxic fumes), very time con-suming and still cause irregular coloring of the wood. Instead, I used a staining method we’ve perfected throughout the years, which gives a very good finished look and durabil-ity to the piece.
▼ARTS & CRAFTS▼

PoPular WoodWorking July 200350
▼
Start with the Best WoodOne of the secrets to good-looking versus average-looking Arts & Crafts furniture is wood selection. The best pieces use quartersawn white oak that offers amazing cross-grain ray flakes – adding drama and flair to what is essen-tially a plain furniture design. Quartersawn white oak is more expensive, but I think you’ll agree that the results speak for them-selves. Also, while this is a pretty large chair, a great amount of wood isn’t needed to make the frame. I used about 60 board feet for this chair. That gave me plen-ty of room to pick the pieces with the best grain and still have lots of scrap for some smaller Arts & Crafts pieces for the future.
When you have your lumber, decide which boards will offer the best grain pattern and mark those for the arms, front and lower side rails, and side slats. Having good grain pattern on the legs is nice too, but I’ll show you a trick to make that happen in a second.
If you’re working with lumber in the rough and you’re having difficulties determining the grain patterns, it may be beneficial to
run the boards through your planer to knock the rough surface off to see the grain more clearly.
Love Those LegsLegs on Morris chairs have been made dozens of ways throughout the years. Because the ray flake only will appear on the quarter-sawn sides of the board, a square
leg will only give two opposing striking sides. To improve this, some people have glued-up the legs from four mitered pieces and joined them with what we would recognize as a lock-miter joint today. This does a nice job of pro-viding dramatic grain, but if you’re planning a true through-tenon in the arms, the mitered version leaves a hollow center.
I chose Stickley’s method – veneer. By cutting the legs and the veneer to cover the non-quartersawn sides of the legs from the same section of board, the legs look like they’re quartersawn on all four sides – a nice trick.
Start by ripping the two leg-halves slightly over width and length, and glue them together. When the glue has cured, run one glued edge over the jointer, then plane the opposite edge to form, not a square leg, but one that is 17⁄8" on the non-glue seam face and 2" (or 21⁄8") on the glue seam face. Then plane the veneer pieces to 1⁄8" (or thicker if you’re more comfortable that way) and glue those pieces to the seamed
50
▼
By first gluing two pieces (cut from the same board) together to form the majority of the leg blank, you get two quartersawn faces. By then adding thick quartersawn veneer (also cut from the same board) to the two plain faces, you’ve achieved a leg with four quartersawn faces. After carefully planing the legs down to 2" x 2" size, the veneer face will be about 1⁄16" thick, making it almost invisible.
Slant-arm Morris Chair No. Item DImeNsIoNs (INches) commeNts t W L
❏ 2 Front legs 2 2 231⁄2 11⁄4 x 11⁄4 x 5⁄8 tenon, top ❏ 2 Back legs 2 2 20 11⁄4 x 2 x 5⁄8 tenon, top ❏ 1 Front rail 7⁄8 41⁄2 273⁄4 3⁄8 x 31⁄2 x 21⁄4 TTBE ❏ 1 Back rail 7⁄8 4 273⁄4 3⁄8 x 31⁄2 x 21⁄4 TTBE ❏ 2 Lower side rails 7⁄8 3 291⁄4 3⁄8 x 2 x 21⁄4 TTBE ❏ 2 Arms 1 5 37 See diagram for fitting ❏ 2 Upper side rails 7⁄8 31⁄4 261⁄4 See diagram for fitting, 3⁄4 TBE ❏ 10 Side slats 3⁄8 31⁄8 14 1⁄4 x 21⁄2 x 1⁄4 TBE ❏ 4 Corbels 1 2 10 ❏ 2 Back posts 11⁄8 15⁄8 291⁄4 ❏ 1 Top back slat 3⁄4 37⁄8 201⁄2 1⁄2 x 3 x 3⁄4 long TBE ❏ 4 Back slats 1⁄2 21⁄2 20 1⁄4 x 2 x 1⁄2 long TBE ❏ 2 Seat sides 3⁄4 23⁄4 26 ❏ 2 Seat front & back 3⁄4 21⁄4 201⁄8 3⁄8 x 11⁄2 x 11⁄4 long TBE ❏ 2 Seat cleats 3⁄4 11⁄4 23 10° bevel on one length ❏ 2 Pivot pins 5⁄8 31⁄4 Trim to fit after installation ❏ 2 Back stops 5⁄8 3 ❏ 2 Back stops 1 21⁄4 One end rounded ❏ 2 Arm caps 11⁄2 11⁄2 1⁄2 See diagram for fitting ❏ Dowel/pins 1⁄4 48 Cut to fit
TBE=tenon both ends; TTBE=through-tenon both ends; TOE=tenon one end
▼
faces.Once again, with the glue
cured, head back to the planer and run the leg down to 2" square. Make sure you take evenly from the veneer sides to leave equal amounts of veneer on each side. Then cut the legs to length. Now it’s time to do some measuring.
Laying out the MortisesAs I mentioned earlier, you can make this chair with true through-tenons or cheat a little – your choice. I did both, making the leg tenons true through-mortises, while the leg/arm tenons are fake. Use the article, “Through-tenon Caps” on the following page to help decide which method you want to use.
Regardless of which method you choose, the locations of the mortises are the same. Use the diagrams to locate the mortises and mark them on the appropriate faces of the legs. While you’re at it, mark the locations of the ten-ons at the tops of the legs as well. The diagrams will help here. Note that the front leg tenon is a com-

popwood.com 5151
2"
7"
1"5"
21/2" typ.
3" typ.
1"
2" 2"
2
3"
31/8"
131/2"
31/4"7/8"
51/2" 361/2"
typ.31/8"
typ.11/2"
7/8"
243/4"
291/4"
3"
131/2"
21/8"
37/8"
291/4"
231/4"2"
1/4"
11/2" 23/8"227/8"
113/8"
41/2"
51/2"
7/8"
3/4"
29/16"
1/4" shoulders
31/4"
243/4"3/4"
361/2"
11/4" typ.11/2"
7/8"
5"11/4"
5/8"5/8"
2"
11/4"
B
See arm & top raildetails below
CD
1/2" 1/2" 1/2"
14ϒ
11/4" 1/8"1/8"1/8" F
11/8"
15/8" 19" 15/8"G
G
GJ
K
4"
91/8"111/2"
41/2"
L
11/4"
11/4"
H
A
E
131/4"
Construction notes:
L 1/4" x 21/2" x 1/4"l. tenon
H 3/8" x 31/2" x 21/4"l. through-tenon
11/4" x 11/4" x 5/8"l. tenonA11/4" x 2" x 5/8"l. tenonB
C 3/8" x 23/4" x 3/4"l. tenon
D 3/8" x 7/8" x 3/4"l. tenon
E 1/2" x 3" x 3/4"l. tenon
F 1/4" x 2" x 1/2"l. tenon
G 1/8" chamfer, four sides
J 3/8" x 2" x 21/4"l. through-tenon
K Back stop dowel holes
9/16"
7/16"
ElevationProfile
Section
Arm plan
Arm section Illus
trat
ions
by
John
Hut
chin
son

PoPular WoodWorking July 200352
▼
plete, four-shouldered tenon, while the back leg tenon is shoul-dered only on the inside and out-side. You could put a shoulder on all four sides, but nobody will see them, and it’s a lot of extra work. With everything marked, check them again. This isn’t a place you want to make a mistake.
Note that the upper side rails don’t have through-tenons, only blind tenons. The mortise needs to be only 1⁄16" deeper than the tenon length to allow for glue space and to make sure the tenon doesn’t bottom out before the shoulder is tight against the leg.
I used a 3⁄8" hollow-chisel mor-tiser to make my mortises. If you don’t have a hollow-chisel mor-tiser you can use a drill press to bore out most of the waste mate-rial. Simply clean up the edges with a sharp chisel.
Through-tenonsNext, grab one of the legs and head to the table saw. To cut the tenons on the rails I used a dado stack, a miter sled and a rip fence.
By cutting the cheeks of the tenon oversized to start, I was able to edge up to the appropriate thick-ness, checking the tenon in the actual mortise as I went.
When your first tenon is the correct thickness, go ahead and cut the rest of them, then reset the saw to trim the tenons to width, again checking the fit as you go. Use the same technique to form the tenons on the tops of the front and rear legs.
If you don’t have a dado stack, you also can use a standard com-bination blade in your saw and make repeated passes to remove the material. It’s slower, but still works. I actually have found the ribbed face left on the tenon by a single blade can make fitting the tenon very easy. Cut the tenon over-size then simply plane the high points off the ridges with a shoulder plane to fine-fit the tenon.
Putting a Slant on ThingsYou’re almost done with the rails, but before you can actually fit the
52
▼
Making the through-tenons is simple, repetitive table-saw work. Using a dado stack and a miter sled, use the rip fence on your first pass to define the tenon shoulder. Then back the piece away from the fence to nibble off the rest of the cheek cut. Flip the piece and repeat for the opposite side. Check the tenon’s fit in your already-cut mortise to make sure it’s a snug fit. It’s easier to take a little wood off the tenon than to put it back on. Then do the same on the other end of the rail. To make the shoulder cuts, repeat the process, adjusting the dado height to fit the tenons in the mortises.
Though you can mark the taper on the upper side rails using the information in the diagrams, it’s a good idea to check it against the actual chair. This will ensure that the taper ends at the shoulder of the tenon on the back leg.
A hollow-chisel mortiser makes quick work of the through-mortises. A backing board underneath the legs reduces the tear-out on the exit side of the mortise. While you can use a router to create mortises, a through-mortise of this size will tax a router motor and will require routing from both sides, adding concerns about alignment. A better alternative would be to use a drill press to drill a connected series of holes, then square out the mortise with a sharp chisel.

popwood.com 53
thick, that leaves room for only a thin (1⁄4") tenon. These tenons don’t need to be very long. I used my router table to make the mor-tise in the upper and lower side rails, marking the stop and start locations on both the pieces and the fence of the router table.
With the mortises complete, it’s time to head back to the saw for a few minutes to cut the tenons on the side slats. To do this, use the same technique you did for the upper side rails.
To make the back, use the diagrams to mark the mortise lo-
cations, then go ahead and cut the mortises and tenons.
Caps or the Real Thing?If you’ve opted for real through-tenons, mark the tenons where they exit the mortises, then mark and file the bevels to finish off the through-tenons. Otherwise, look at the story “Through-tenon Caps” at right to make the tenon caps and dry-fit them in the legs.
Slick Slant ArmsStickley used three types of arms on his Morris chairs: a flat arm, a
53
With the blade set to the 1⁄8" height, define the very bottom of the cap on all four sides.
Shift the rip fence 1⁄8" to the left to “lengthen” the tenon of the cap.
Next, with the rip fence and sled out of the way, set the blade to a 14° bevel and bevel the top of the cap to leave an 1⁄8" side.
Finally part the cap from the blank. Watch your fall-off so it falls clear of the blade!
Rather than fuss with actual through-tenons, a slightly over sized (1⁄8”) through-tenon cap will give the same look but save time and effort. By using a wood blank and making the cuts shown below on both ends of the blank, caps are made very quickly. This works not only for the leg through-tenons, but also the rail through-tenons in the legs.
Through-Tenon CapS
While you could use a mortiser to create the 1⁄4”-wide mortises in the
upper and lower rails for the side slats, a router works well and leaves
a clean hole. By making indexing marks (indicating the infeed and
outfeed sides of the bit) on the router table fence and on the back
side of the rails, I’m able to stop and start my plunge cuts accurately. Make your mortises in multiple
passes. A 1⁄4" bit is pretty small and any unnecessary stress will send you
to the store for a new bit.
I used a combination blade in my table saw to make the relatively
short tenons on the back rails. This required three or four passes over
the tenon and left a “ridged” appearance on the tenon. I took advantage of this and made the
tenons slightly over-thickness, then used a shoulder plane to hand-fit the tenons to the mortises. I guess that’s what they call making lemonade out
of lemons.
Indexing marks
upper side rails, you need to cut a taper on each upper side rail. First dry-fit the chair except for the upper side rails, clamping the chair frame to pull the joints tight. Then slip the upper side rail into the front mortise (if possible) and use the diagrams on page 51 and a straight edge to lay out the taper. Then cut the taper on the band saw and you can go ahead and fit the rear tenons.
You’re still not done with the frame. The next step is to mark and make the mortises for the side slats. Because the side slats are 3⁄8"
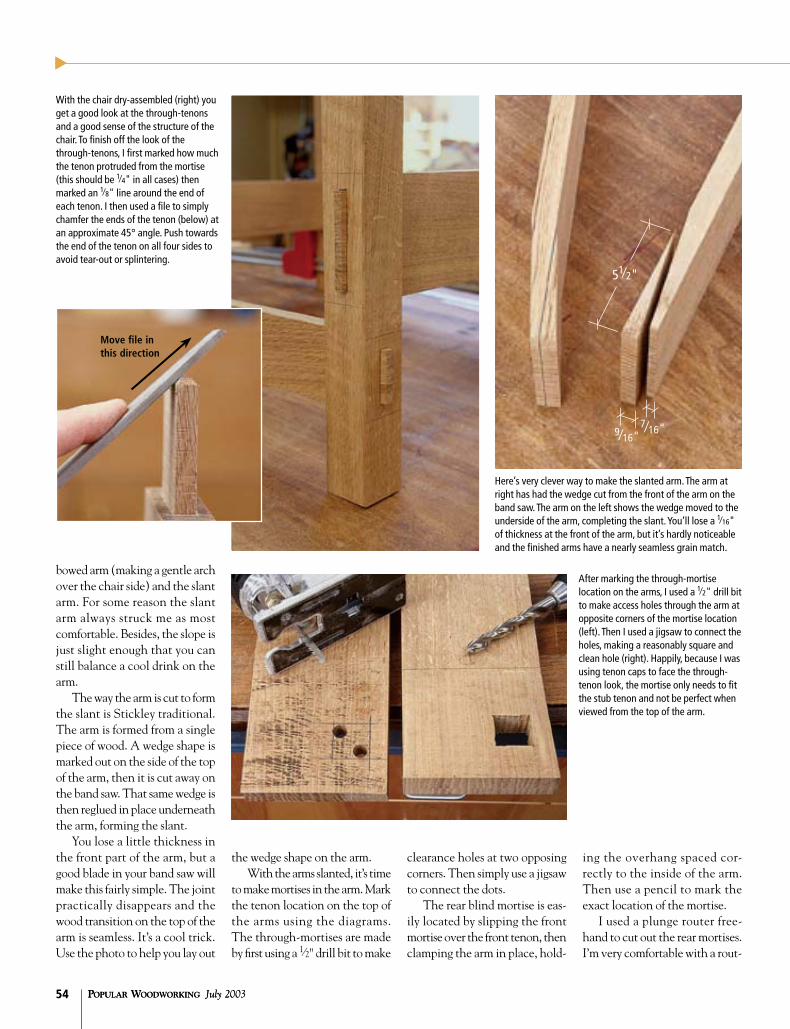
PoPular WoodWorking July 200354
▼
bowed arm (making a gentle arch over the chair side) and the slant arm. For some reason the slant arm always struck me as most comfortable. Besides, the slope is just slight enough that you can still balance a cool drink on the arm.
The way the arm is cut to form the slant is Stickley traditional. The arm is formed from a single piece of wood. A wedge shape is marked out on the side of the top of the arm, then it is cut away on the band saw. That same wedge is then reglued in place underneath the arm, forming the slant.
You lose a little thickness in the front part of the arm, but a good blade in your band saw will make this fairly simple. The joint practically disappears and the wood transition on the top of the arm is seamless. It’s a cool trick. Use the photo to help you lay out
the wedge shape on the arm.With the arms slanted, it’s time
to make mortises in the arm. Mark the tenon location on the top of the arms using the diagrams. The through-mortises are made by first using a 1⁄2" drill bit to make
clearance holes at two opposing corners. Then simply use a jigsaw to connect the dots.
The rear blind mortise is eas-ily located by slipping the front mortise over the front tenon, then clamping the arm in place, hold-
ing the overhang spaced cor-rectly to the inside of the arm. Then use a pencil to mark the exact location of the mortise.
I used a plunge router free-hand to cut out the rear mortises. I’m very comfortable with a rout-
PoPular WoodWorking July 200354
▼
After marking the through-mortise location on the arms, I used a 1⁄2" drill bit to make access holes through the arm at opposite corners of the mortise location (left). Then I used a jigsaw to connect the holes, making a reasonably square and clean hole (right). Happily, because I was using tenon caps to face the through-tenon look, the mortise only needs to fit the stub tenon and not be perfect when viewed from the top of the arm.
Here’s very clever way to make the slanted arm. The arm at right has had the wedge cut from the front of the arm on the band saw. The arm on the left shows the wedge moved to the underside of the arm, completing the slant. You’ll lose a 1⁄16" of thickness at the front of the arm, but it’s hardly noticeable and the finished arms have a nearly seamless grain match.
With the chair dry-assembled (right) you get a good look at the through-tenons and a good sense of the structure of the chair. To finish off the look of the through-tenons, I first marked how much the tenon protruded from the mortise (this should be 1⁄4" in all cases) then marked an 1⁄8" line around the end of each tenon. I then used a file to simply chamfer the ends of the tenon (below) at an approximate 45° angle. Push towards the end of the tenon on all four sides to avoid tear-out or splintering.
51⁄2"
9⁄16"7⁄16"
Move file in this direction

popwood.com 55
With the arm slipped in place over the front leg tenon, I clamped the arm in
position with the appropriate interior overhang and marked the actual location
of the rear tenon. I then routed the oversized mortise (using multiple depth-settings to achieve final depth) just short
of the pencil lines and used a chisel to clean up the edges (below right).
er and this freehand operation wasn’t difficult, but you can also use an edge guide to ensure an ac-curate cut.
No Glue Yet!While I know you’re antsy to glue something together, you’re not ready yet. You need to disassemble the frame and mark the locations on the two rear legs for the pivot holes for the back. Also mark the pivot location on the back posts, then head to the drill press and use a Forstner bit to drill the holes. While you’re at the drill press, use the diagrams to mark the locations on the arms for the back stop holes and drill them, too. You should be able to dry-assemble the chair and slip a couple of dowels into the back now and get a good look at how everything’s fitting together.
Putting on the GlueIf everything seems to be fitting fine, you’re almost ready to glue things up. But first, before you disassemble the chair, mark the angle on each of the leg bottoms that is keeping the chair from sit-ting flat. It should be no more that an 1⁄8" offset and should only re-quire a 2° trim on the table saw.
Disassemble the chair, then head to the saw and trim the leg bottoms. Pay attention to the length of the front legs (which should be the same) and the back legs (which should be the same).
With the legs trimmed you’re in for some sanding. But do it now, because it’s a lot more difficult once everything is assembled. I worked up through 150-grit sand-paper, then got things organized for gluing up the chair.
Start with the two sides, first gluing the slats between the upper and lower side rails. Clamp across the rails, then go ahead and insert the rail assembly into the leg mor-tises. As you clamp up each side, align the upper side rail with the tenon shoulders on the front and rear legs. This will allow gluing contact along the full length of the underside of the arm. Glue both sides, then set them aside.
While the glue is curing, cut the frame pieces for the seat, and cut mortises and tenons to as-semble the frame. You could make the frame with a more simple joint, but honestly this is where a lot of your weight will be focused so making a strong frame is a good idea.
Take the side assemblies out of the clamps, but keep them
handy. Glue the front and rear rails between the two sides. Measure between the legs at the top and bottom of the legs to make sure everything is square. If you’ve got a couple extra clamps, go ahead and glue up the back frame at this time as well.
While the glue is curing, slip the arms in place on the leg tenons and then go ahead and make the arm caps, fitting them in place in the arms. After sanding the arms, glue the caps in place, too.
You’re now ready to fit the seat into the frame. The seat rests on two cleats mounted to the inside of the front and back rails. Both cleats are cut longways at a 10° angle, then screwed in place on the rails. The rear cleat is mount-ed flush to the bottom of the back rail, while the front cleat is held
popwood.com 55
Angle of shoulder = 6ϒbut follows rail's slant
Rear leg joinery
Rout oversize to accommodate tenon angle

PoPular WoodWorking July 200356
▼
to get the pegs all the way into the holes, I used an electric pencil sharpener to chamfer the leading end of each dowel. Add some glue, then pound the pegs home. Use a flush-set trim saw to cut the pegs flush to the legs. Sanding finishes the job.
Ready for Finishing
PoPular WoodWorking July 200356
▼
21/4"
1"
1"3"
5/8"
Here you can see the essence of the “reclining” chair. The four evenly spaced holes in the rear of the arm allow you to move the back stop to whatever location is most comfortable for your sitting needs. It can’t get much simpler than that.
Back stop Front leg joinery
stay loose, again to make finishing easier.
As a last step, drill and cut lengths of 1⁄4" dowel rod to peg the through-tenons on the frame. I used two pegs on the front and rear of the legs for each joint, and a single peg in each of the side joints. Make sure you drill through past the tenon, but not all the way through the leg. To make it easier
down 7⁄8" from the top of the rail to allow space for the seat frame, and a little extra room.
With the seat frame free of the clamps and sanded, the front and rear edges also should be trimmed at a 10° angle and fit onto the cleat to produce an easy fit.
Final DetailsYou’re almost down to the wire. There are a couple final details to finish, including the corbels (the arm supports) and the back sup-port pegs. Use the diagram at right to cut and shape the corbels from some 3⁄4"-thick stock. A band saw and oscillating spindle sander make quick work of these pieces.
With the arms clamped in place on the chair, fit the corbels to the legs (the rear corbels need to be beveled to match the slope of the arm), then glue the corbels to the leg, making sure their top edge is flush to the leg tenon shoul-der and the underside of the arm.
You might be tempted to glue the arms on at this point, but the chair is much easier to finish with the arms loose.
Turn to the back stops and use the diagrams to cut and drill the 1"- and 5⁄8"-diameter dowels to form the stops. Round over the end using a sander or by hand sanding. While you’re working with the 5⁄8" dowel stock, mark and cut the two dowels that will make the pivots for the back. The dowels should finish flush, or slightly recessed in the holes in the back, with 1⁄4" of space on either side of the back, between the arms. The back also should
21/4"
1"
1"3"
5/8"
1" r.
2"
10"
1" r.
1 grid square = 1"
Corbel layout
With everything finish-sanded, it’s time to stain. As I mentioned earlier, Stickley used ammonia to fume his furniture. We’ve come very close to his finish using ani-line dye, brown glaze and a top-coat of lacquer.
I used a water-based amber maple dye from J.E. Moser to put the first layer of color on the chair.
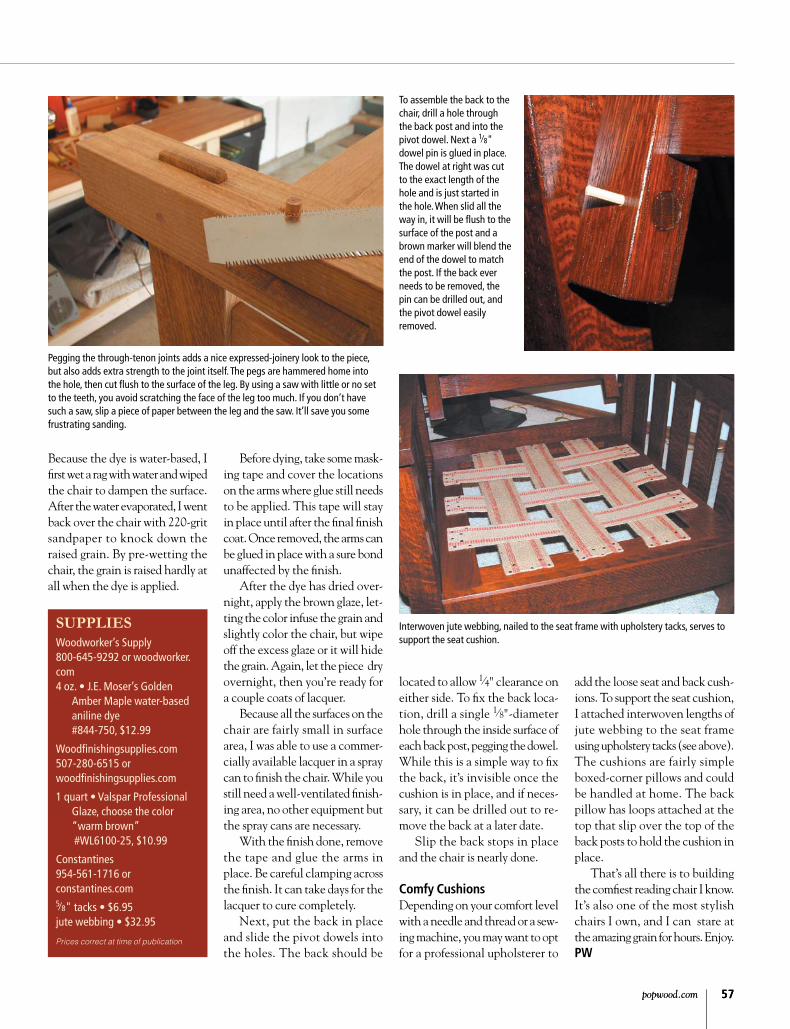
popwood.com 57
To assemble the back to the chair, drill a hole through the back post and into the pivot dowel. Next a 1⁄8" dowel pin is glued in place. The dowel at right was cut to the exact length of the hole and is just started in the hole. When slid all the way in, it will be flush to the surface of the post and a brown marker will blend the end of the dowel to match the post. If the back ever needs to be removed, the pin can be drilled out, and the pivot dowel easily removed.
Interwoven jute webbing, nailed to the seat frame with upholstery tacks, serves to support the seat cushion.
Before dying, take some mask-ing tape and cover the locations on the arms where glue still needs to be applied. This tape will stay in place until after the final finish coat. Once removed, the arms can be glued in place with a sure bond unaffected by the finish.
After the dye has dried over-night, apply the brown glaze, let-ting the color infuse the grain and slightly color the chair, but wipe off the excess glaze or it will hide the grain. Again, let the piece dry overnight, then you’re ready for a couple coats of lacquer.
Because all the surfaces on the chair are fairly small in surface area, I was able to use a commer-cially available lacquer in a spray can to finish the chair. While you still need a well-ventilated finish-ing area, no other equipment but the spray cans are necessary.
With the finish done, remove the tape and glue the arms in place. Be careful clamping across the finish. It can take days for the lacquer to cure completely.
Next, put the back in place and slide the pivot dowels into the holes. The back should be
located to allow 1⁄4" clearance on either side. To fix the back loca-tion, drill a single 1⁄8"-diameter hole through the inside surface of each back post, pegging the dowel. While this is a simple way to fix the back, it’s invisible once the cushion is in place, and if neces-sary, it can be drilled out to re-move the back at a later date.
Slip the back stops in place and the chair is nearly done.
Comfy CushionsDepending on your comfort level with a needle and thread or a sew-ing machine, you may want to opt for a professional upholsterer to
popwood.com 57
Because the dye is water-based, I first wet a rag with water and wiped the chair to dampen the surface. After the water evaporated, I went back over the chair with 220-grit sandpaper to knock down the raised grain. By pre-wetting the chair, the grain is raised hardly at all when the dye is applied.
Pegging the through-tenon joints adds a nice expressed-joinery look to the piece, but also adds extra strength to the joint itself. The pegs are hammered home into the hole, then cut flush to the surface of the leg. By using a saw with little or no set to the teeth, you avoid scratching the face of the leg too much. If you don’t have such a saw, slip a piece of paper between the leg and the saw. It’ll save you some frustrating sanding.
SupplieSWoodworker’s Supply800-645-9292 or woodworker.com4 oz. • J.E. Moser’s Golden
Amber Maple water-based aniline dye #844-750, $12.99
Woodfinishingsupplies.com507-280-6515 or woodfinishingsupplies.com
1 quart • Valspar ProfessionalGlaze, choose the color “warm brown” #WL6100-25, $10.99
Constantines954-561-1716 or constantines.com5⁄8" tacks • $6.95 jute webbing • $32.95
Prices correct at time of publication
add the loose seat and back cush-ions. To support the seat cushion, I attached interwoven lengths of jute webbing to the seat frame using upholstery tacks (see above). The cushions are fairly simple boxed-corner pillows and could be handled at home. The back pillow has loops attached at the top that slip over the top of the back posts to hold the cushion in place.
That’s all there is to building the comfiest reading chair I know. It’s also one of the most stylish chairs I own, and I can stare at the amazing grain for hours. Enjoy. PW

PoPular WoodWorking July 200358
Photo by Tim Grondin
58
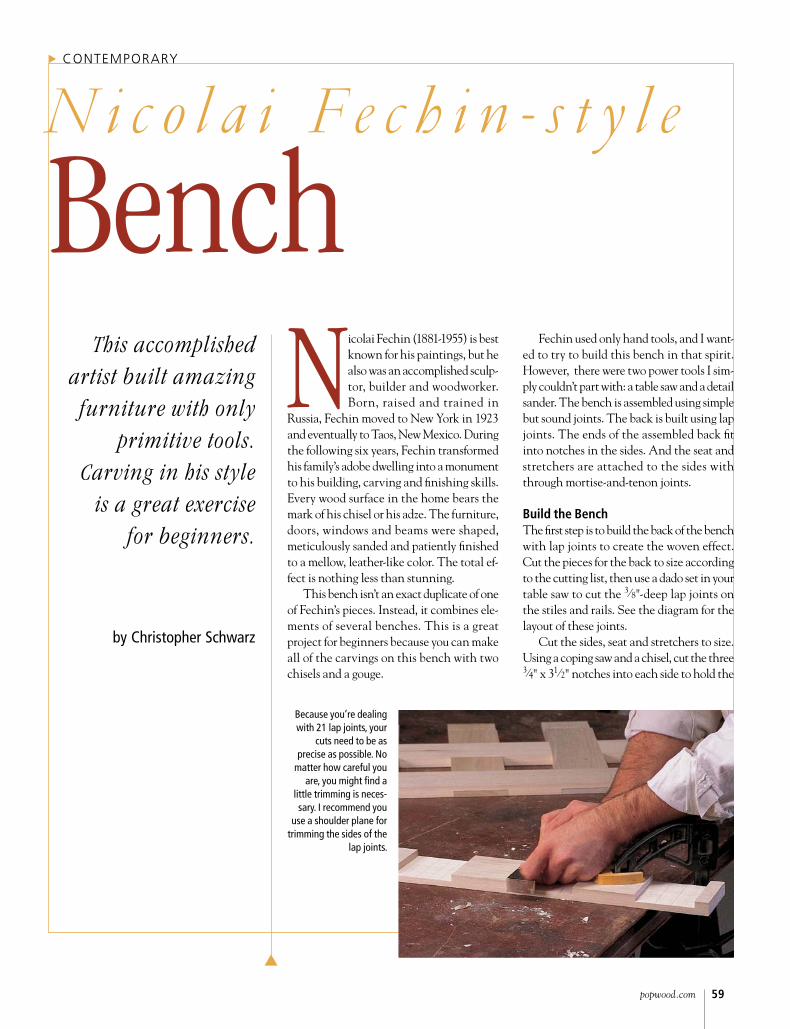
popwood.com 59
▼
N i c o l a i F e c h i n - s t y l e
BenchThis accomplished
artist built amazing furniture with only
primitive tools. Carving in his style
is a great exercise for beginners.
by Christopher Schwarz
Nicolai Fechin (1881-1955) is best known for his paintings, but he also was an accomplished sculp-tor, builder and woodworker. Born, raised and trained in
Russia, Fechin moved to New York in 1923 and eventually to Taos, New Mexico. During the following six years, Fechin transformed his family’s adobe dwelling into a monument to his building, carving and finishing skills. Every wood surface in the home bears the mark of his chisel or his adze. The furniture, doors, windows and beams were shaped, meticulously sanded and patiently finished to a mellow, leather-like color. The total ef-fect is nothing less than stunning.
This bench isn’t an exact duplicate of one of Fechin’s pieces. Instead, it combines ele-ments of several benches. This is a great project for beginners because you can make all of the carvings on this bench with two chisels and a gouge.
Fechin used only hand tools, and I want-ed to try to build this bench in that spirit. However, there were two power tools I sim-ply couldn’t part with: a table saw and a detail sander. The bench is assembled using simple but sound joints. The back is built using lap joints. The ends of the assembled back fit into notches in the sides. And the seat and stretchers are attached to the sides with through mortise-and-tenon joints.
Build the BenchThe first step is to build the back of the bench with lap joints to create the woven effect. Cut the pieces for the back to size according to the cutting list, then use a dado set in your table saw to cut the 3⁄8"-deep lap joints on the stiles and rails. See the diagram for the layout of these joints.
Cut the sides, seat and stretchers to size. Using a coping saw and a chisel, cut the three 3⁄4" x 31⁄2" notches into each side to hold the
Because you’re dealing with 21 lap joints, your
cuts need to be as precise as possible. No
matter how careful you are, you might find a
little trimming is neces-sary. I recommend you
use a shoulder plane for trimming the sides of the
lap joints.
CONTEMPORARY▼
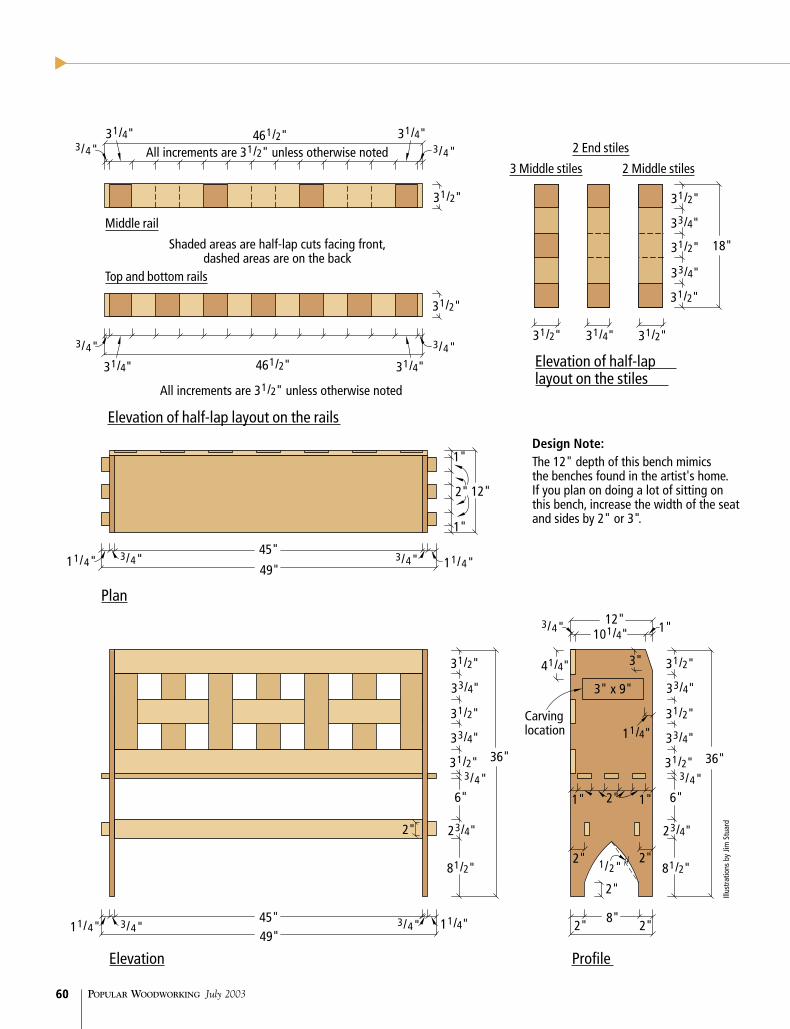
PoPular WoodWorking July 200360
▼
60
▼
45"49"
2"
36"
1"
3" x 9"
1"
1"
12"
18"
All increments are 31/2" unless otherwise noted
461/2"
31/2"
31/2"
31/2"
33/4"
33/4"
31/2" 31/2"31/4"
12"101/4"
3/4"
41/4" 3"
Carvinglocation 11/4"
1" 1"
2" 2"
2"
2"2"8"
1/2"
31/2"
31/2"
31/2"
33/4"
33/4"
3/4"6"
23/4"
81/2"
36"
31/2"
31/2"
31/2"
33/4"
33/4"
3/4"6"
23/4"
81/2"
11/4"3/4"
2"
3/4"11/4"
11/4" 3/4" 3/4" 11/4"45"
49"
2"
3/4"
31/4" 31/4"
3/4"
31/2"
All increments are 31/2" unless otherwise noted
31/2"
3/4"31/4" 461/2" 31/4"
3/4"
Shaded areas are half-lap cuts facing front,dashed areas are on the back
Design Note:The 12" depth of this bench mimicsthe benches found in the artist's home. If you plan on doing a lot of sitting on this bench, increase the width of the seat and sides by 2" or 3".
Illus
trat
ions
by
Jim S
tuar
d
Elevation of half-lap layout on the rails
Elevation of half-laplayout on the stiles
Elevation Profile
Plan
Middle rail
3 Middle stiles 2 Middle stiles
2 End stiles
Top and bottom rails
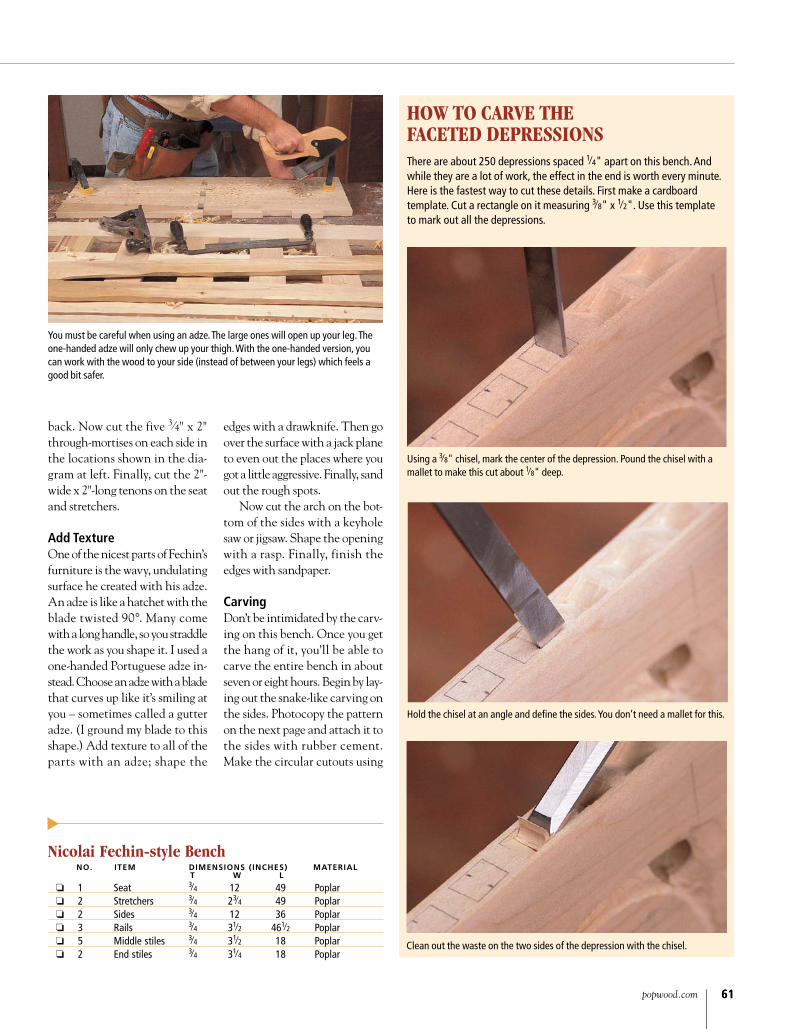
popwood.com 6161
back. Now cut the five 3⁄4" x 2" through-mortises on each side in the locations shown in the dia-gram at left. Finally, cut the 2"-wide x 2"-long tenons on the seat and stretchers.
Add TextureOne of the nicest parts of Fechin’s furniture is the wavy, undulating surface he created with his adze. An adze is like a hatchet with the blade twisted 90°. Many come with a long handle, so you straddle the work as you shape it. I used a one-handed Portuguese adze in-stead. Choose an adze with a blade that curves up like it’s smiling at you – sometimes called a gutter adze. (I ground my blade to this shape.) Add texture to all of the parts with an adze; shape the
You must be careful when using an adze. The large ones will open up your leg. The one-handed adze will only chew up your thigh. With the one-handed version, you can work with the wood to your side (instead of between your legs) which feels a good bit safer.
Nicolai Fechin-style Bench No. Item DImeNsIoNs (INches) materIal
t W l
❏ 1 Seat 3⁄4 12 49 Poplar ❏ 2 Stretchers 3⁄4 23⁄4 49 Poplar ❏ 2 Sides 3⁄4 12 36 Poplar ❏ 3 Rails 3⁄4 31⁄2 461⁄2 Poplar ❏ 5 Middle stiles 3⁄4 31⁄2 18 Poplar ❏ 2 End stiles 3⁄4 31⁄4 18 Poplar
▼
edges with a drawknife. Then go over the surface with a jack plane to even out the places where you got a little aggressive. Finally, sand out the rough spots.
Now cut the arch on the bot-tom of the sides with a keyhole saw or jigsaw. Shape the opening with a rasp. Finally, finish the edges with sandpaper.
CarvingDon’t be intimidated by the carv-ing on this bench. Once you get the hang of it, you’ll be able to carve the entire bench in about seven or eight hours. Begin by lay-ing out the snake-like carving on the sides. Photocopy the pattern on the next page and attach it to the sides with rubber cement. Make the circular cutouts using
How to Carve tHe FaCeted depressioNsThere are about 250 depressions spaced 1⁄4" apart on this bench. And while they are a lot of work, the effect in the end is worth every minute. Here is the fastest way to cut these details. First make a cardboard template. Cut a rectangle on it measuring 3⁄8" x 1⁄2". Use this template to mark out all the depressions.
Using a 3⁄8" chisel, mark the center of the depression. Pound the chisel with a mallet to make this cut about 1⁄8" deep.
Clean out the waste on the two sides of the depression with the chisel.
Hold the chisel at an angle and define the sides. You don’t need a mallet for this.

▼
PoPular WoodWorking July 200362
▼
62
▼
11⁄2" and 1⁄2" Forstner bits. Then define all of the edges with a 1⁄4" chisel. Make your cut about 3⁄16" deep. Then go back and remove the waste up to that line. Now lay out the 24 spiral patterns on the bench’s back. These are each 13⁄8" in diameter and carved the same way you carved the sides. Carve the square and faceted depressions on the back, seat and sides. See the story on the previous page for details on how to do this quickly and cleanly.
Now comes a difficult decision. Eya Fechin, who is Nicolai Fechin’s daughter, said in an in-terview in 1999 that her father hand sanded all of the carvings. He started with the coarse grits and ended with the extremely fine grits. The result, she says, is that every carving is perfectly smooth to the touch. I wish I had the time to do this. I used Fein Power Tool’s fantastic detail sander (called the MultiMaster) and progressively finer grits to get the carvings smooth.
It’s now time to assemble the bench. Glue the back together. You can glue the seat’s tenons into the mortises, as I did. Or make small wedges for the tenons,
waste
waste
waste
Dashed circleindicates scooped out area.
End panel carving
Spiral
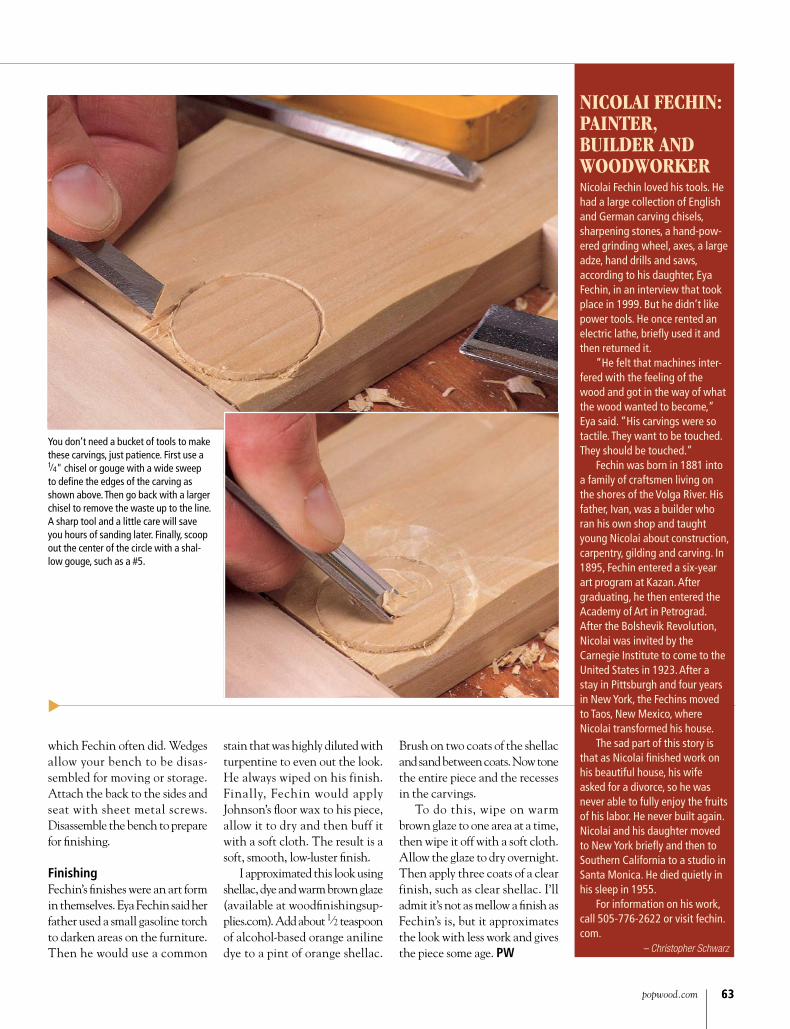
popwood.com 63
▼
63
which Fechin often did. Wedges allow your bench to be disas-sembled for moving or storage. Attach the back to the sides and seat with sheet metal screws. Disassemble the bench to prepare for finishing.
FinishingFechin’s finishes were an art form in themselves. Eya Fechin said her father used a small gasoline torch to darken areas on the furniture. Then he would use a common
NiColai FeCHiN: paiNter, Builder aNd woodworkerNicolai Fechin loved his tools. He had a large collection of English and German carving chisels, sharpening stones, a hand-pow-ered grinding wheel, axes, a large adze, hand drills and saws, according to his daughter, Eya Fechin, in an interview that took place in 1999. But he didn’t like power tools. He once rented an electric lathe, briefly used it and then returned it.
“He felt that machines inter-fered with the feeling of the wood and got in the way of what the wood wanted to become,” Eya said. “His carvings were so tactile. They want to be touched. They should be touched.”
Fechin was born in 1881 into a family of craftsmen living on the shores of the Volga River. His father, Ivan, was a builder who ran his own shop and taught young Nicolai about construction, carpentry, gilding and carving. In 1895, Fechin entered a six-year art program at Kazan. After graduating, he then entered the Academy of Art in Petrograd. After the Bolshevik Revolution, Nicolai was invited by the Carnegie Institute to come to the United States in 1923. After a stay in Pittsburgh and four years in New York, the Fechins moved to Taos, New Mexico, where Nicolai transformed his house.
The sad part of this story is that as Nicolai finished work on his beautiful house, his wife asked for a divorce, so he was never able to fully enjoy the fruits of his labor. He never built again. Nicolai and his daughter moved to New York briefly and then to Southern California to a studio in Santa Monica. He died quietly in his sleep in 1955.
For information on his work, call 505-776-2622 or visit fechin.com.
– Christopher Schwarz
stain that was highly diluted with turpentine to even out the look. He always wiped on his finish. Finally, Fechin would apply Johnson’s floor wax to his piece, allow it to dry and then buff it with a soft cloth. The result is a soft, smooth, low-luster finish.
I approximated this look using shellac, dye and warm brown glaze (available at woodfinishingsup-plies.com). Add about 1⁄2 teaspoon of alcohol-based orange aniline dye to a pint of orange shellac.
Brush on two coats of the shellac and sand between coats. Now tone the entire piece and the recesses in the carvings.
To do this, wipe on warm brown glaze to one area at a time, then wipe it off with a soft cloth. Allow the glaze to dry overnight. Then apply three coats of a clear finish, such as clear shellac. I’ll admit it’s not as mellow a finish as Fechin’s is, but it approximates the look with less work and gives the piece some age. PW
You don’t need a bucket of tools to make these carvings, just patience. First use a 1⁄4" chisel or gouge with a wide sweep to define the edges of the carving as shown above. Then go back with a larger chisel to remove the waste up to the line. A sharp tool and a little care will save you hours of sanding later. Finally, scoop out the center of the circle with a shal-low gouge, such as a #5.

PoPular WoodWorking July 20036666
Photos by Al Parrish

popwood.com 67
▼
67
P l y w o o d
Nesting TablesOne table or three –
how you use these sleek tables is up to
you.
by David Thiel
CONTEMPORARY▼
If you’ve been looking for an excuse to buy a nice table saw blade – or at least get your old one sharpened – this is the project. While these tables are simple to build, precision and a sharp saw
blade will make the difference between a relaxing weekend project or a frustrating exercise in gluing up miters.
I made these tables using three sheets of plywood. Essentially I ripped each sheet down the middle and glued the two pieces from each sheet together to make a 11⁄2"-thick slab. Then I beveled the front edge and glued thin solid-wood pieces to cover the slab’s plywood edges. Finally, I cut the legs and top for each table from the slab and biscuited the pieces together. This method allows the grain on the top to continue uninterrupted down the legs.
Make a Slab Start the nesting tables by ripping three sheets of plywood in half. Rip them just under 24" in width. You won’t need all that width, but it will come in handy later. As for the lengths, using the full 96" is a little wasteful, but it does make gluing the two halves to-gether easier.
After ripping the sheets, determine which three faces are most attractive and mark these as the outsides of the tables. Next glue the pairs together. To keep the sheets from slid-ing around during glue-up, pound a nail into each slab about 1" from the ends. These ends will be cut off anyway, and it makes glue-up much easier. Stack the three pairs together, then clamp across the stack using stout wood cauls to spread the pressure.
After the glue is dry, square off one end of each slab. Then cut the slabs to 68", 621⁄2" and 55" in length. Don’t pitch the fall-off pieces, they’ll be useful later. Next, rip each slab to 23" wide to give you one flat edge. You could run one edge over a jointer, but the adhesive in plywood is murder on high-speed steel knives. When you have one square edge, set the table saw’s blade to bevel at 33˚ and rip the three slabs to 215⁄8", 205⁄8" and 195⁄8" wide respectively. Again, be sure to save the fall-off.

PoPular WoodWorking July 200368
▼
Homemade VeneerYou’re now ready to run some solid lumber to cover the plywood edges. I used soft maple edging on my birch ply tables.
Run out six lengths of 3⁄16"-thick solid wood for the edges. To plane wood that thin, you prob-ably will have to put an auxiliary bed board over the bed of your planer – most planers aren’t de-signed for wood that thin.
With the strips ready, it’s time to glue them to the slabs. Find the fall-off from the bevel cuts and grab a couple other sturdy solid strips. Use the fall-off as a clamp-ing caul. By gluing the edges on the slabs with the bevel facing up, gravity is on your side. I also cheat-ed a little by tacking the edge strips in place with a few small brads at either end. Once again, the extra inch in length will be cut off, so the nail holes won’t show.
Glue the edging to the three slabs, then trim the edging flush to the plywood. I used a router
with a flush-cutting bit for the back edges, and I used a jack plane to get the beveled edges nearly flush. Then I used a random orbit sander to flush the edges perfect-ly. To soften the edges, I used some 120-grit paper wrapped around a block of wood.
Make Your MitersThe tables slip inside one an-other with a 1⁄4" gap between each, so accurate cutting and spacing is very important. To make the mi-tered corners and still maintain the grain pattern on the tabletops, first crosscut the three slabs into three parts. Use the table saw with the blade set to 90˚. Start by mark-ing the middle of each slab and cut the top section from the middle of each slab, allowing the excess length to remain on the leg sections.
You’re now ready to do the precision cutting, and you’ll see quickly why a sharp blade is im-portant. Start with the largest top
68
Most of us have used biscuits at some time. If you haven’t, they’re a great way to align a piece for glue-up, and more importantly provide improved strength to what may be a less-than-perfect glue joint. Many biscuit joints occur with two right-angled pieces mating, but biscuits work just as effectively on mitered joints. In our nesting table case we have multiple 45˚ joints that need critical alignment and could use extra strength. How to cut the biscuits on the mitered edge is a question best answered by the type of biscuit jointer you own. At right are four options that will take into account even the most basic jointers.
GettinG the AnGle on Biscuits
... or if you’re feeling inside out, flip the pieces so that the miters face out, clamp the pieces together, and make your cuts from the outside. This is the preferred method of the two.
The Porter-Cable model 557 jointer offers a 135˚ variable fence, allowing you to set the fence for just the right angle and hold the machine firmly against the piece for a very accurate cut.
If your jointer is designed for only 90˚ biscuiting, don’t fret. We’ve got not one, but two ways to simplify your cuts. The first method is to clamp two beveled pieces together, miters in, to form a 90˚ pocket, then place the jointer into the groove formed and make your cuts.
If your jointer’s fence is restricted to 90˚ of variation, you’ll need to make your cut from the inside of the piece and carefully align the face of the leg with the face of the machine.
▼
(22" x 22") and set the blade bevel to exactly 45˚ and the rip fence to cut the miter exactly to the width of the top. If you have a left-beveling table saw you’re in luck as the inside of the table is on the tear-out side. If you have a right tilt, that sharp blade is im-portant. Make the first bevel cut on one end, then spin the top and make the cut on the opposite end. Again, with a right-tilt saw you
have the extra difficulty of the first miter trying to slide under the rip fence. Adjust your cut for any vari-ance and consider adding an aux-iliary fence that fits tight to the table surface. Repeat this with all three tops.
You’re now ready to make the miter cuts on the legs. Start with the 22"-high legs and work through the 201⁄4"- and 181⁄2"-high legs, then trim the extra 1" off the
Spacers underneath the slab allow the solid-wood edging to hang over to evenly cover the edges. It doesn’t take a lot of pressure to clamp the edges, and too much pressure will force the front edge caul to slide.
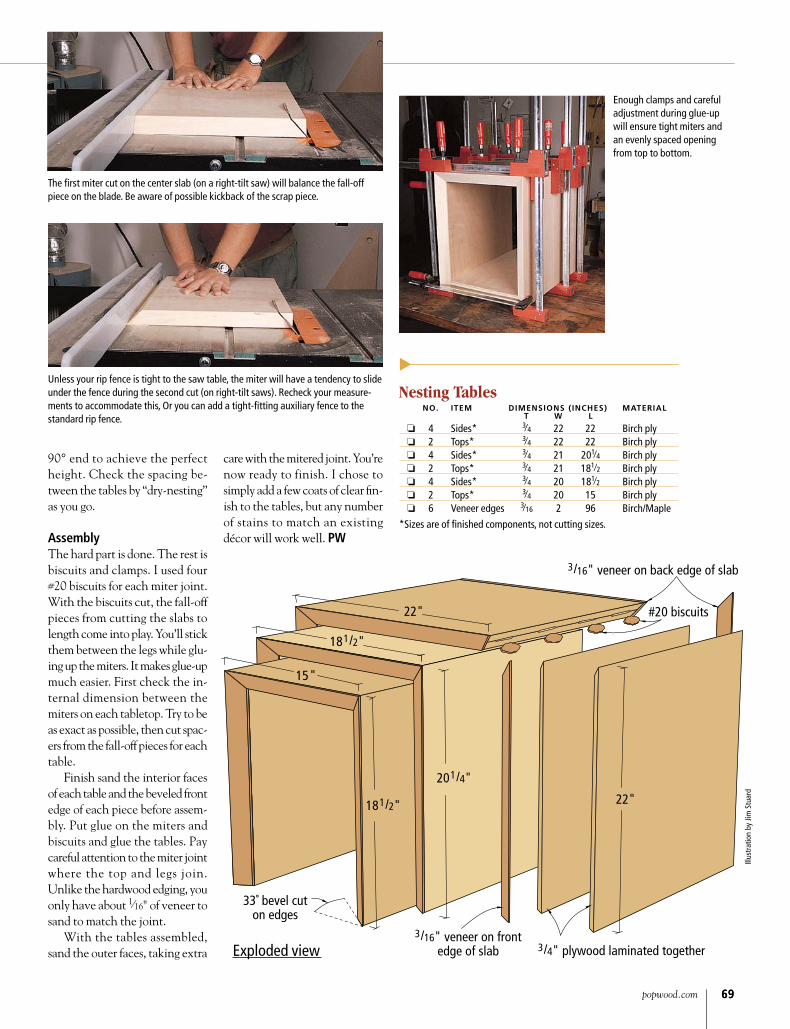
popwood.com 6969
Enough clamps and careful adjustment during glue-up will ensure tight miters and an evenly spaced opening from top to bottom.
Unless your rip fence is tight to the saw table, the miter will have a tendency to slide under the fence during the second cut (on right-tilt saws). Recheck your measure-ments to accommodate this, Or you can add a tight-fitting auxiliary fence to the standard rip fence.
181/2"
15"
22"
33˚ bevel cuton edges
3/16" veneer on frontedge of slab 3/4" plywood laminated together
22"181/2"
201/4"
#20 biscuits
3/16" veneer on back edge of slab
nesting tables No. Item DImeNsIoNs (INches) materIal t W l
❏ 4 Sides* 3⁄4 22 22 Birch ply ❏ 2 Tops* 3⁄4 22 22 Birch ply ❏ 4 Sides* 3⁄4 21 201⁄4 Birch ply ❏ 2 Tops* 3⁄4 21 181⁄2 Birch ply ❏ 4 Sides* 3⁄4 20 181⁄2 Birch ply ❏ 2 Tops* 3⁄4 20 15 Birch ply ❏ 6 Veneer edges 3⁄16 2 96 Birch/Maple
*Sizes are of finished components, not cutting sizes.
▼
Illus
trat
ion
by Ji
m S
tuar
d
90° end to achieve the perfect height. Check the spacing be-tween the tables by “dry-nesting” as you go.
AssemblyThe hard part is done. The rest is biscuits and clamps. I used four #20 biscuits for each miter joint. With the biscuits cut, the fall-off pieces from cutting the slabs to length come into play. You’ll stick them between the legs while glu-ing up the miters. It makes glue-up much easier. First check the in-ternal dimension between the miters on each tabletop. Try to be as exact as possible, then cut spac-ers from the fall-off pieces for each table.
Finish sand the interior faces of each table and the beveled front edge of each piece before assem-bly. Put glue on the miters and biscuits and glue the tables. Pay careful attention to the miter joint where the top and legs join. Unlike the hardwood edging, you only have about 1⁄16" of veneer to sand to match the joint.
With the tables assembled, sand the outer faces, taking extra
The first miter cut on the center slab (on a right-tilt saw) will balance the fall-off piece on the blade. Be aware of possible kickback of the scrap piece.
care with the mitered joint. You’re now ready to finish. I chose to simply add a few coats of clear fin-ish to the tables, but any number of stains to match an existing décor will work well. PW
Exploded view

PoPular WoodWorking July 200370
▼
70
R i c e - p a p e r
Maple LampThis Japanese-inspired
maple lamp provides subtle light for any
modern home.
by Christopher Schwarz
CONTEMPORARY▼
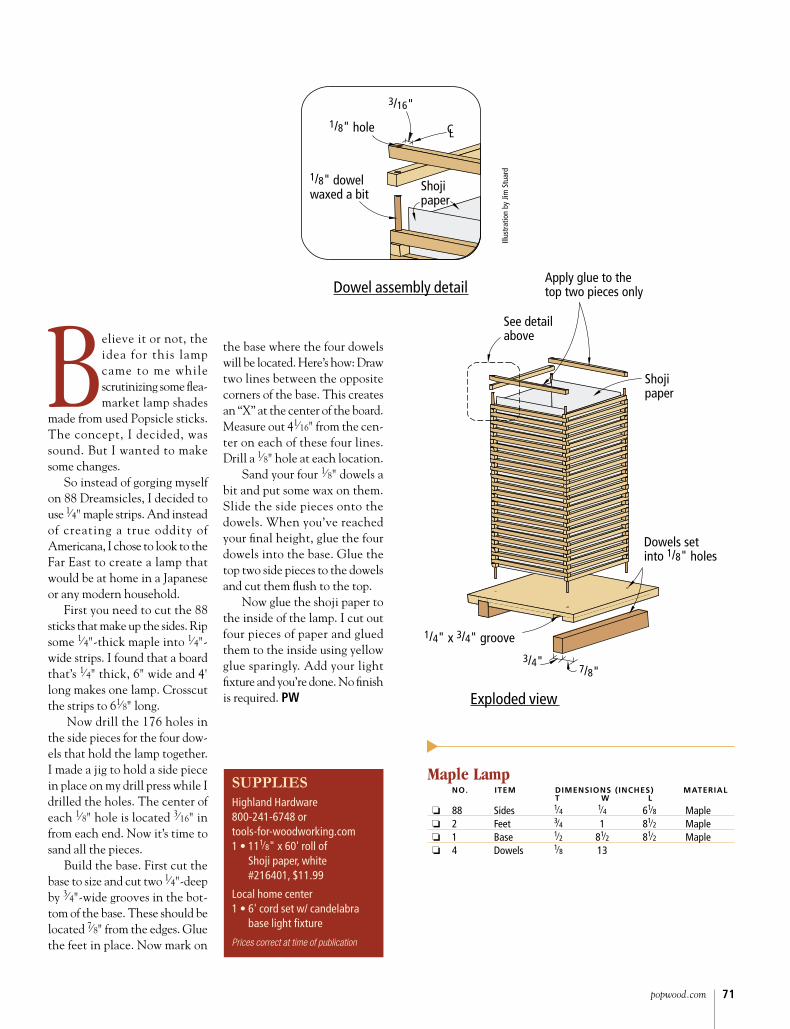
popwood.com 71
Believe it or not, the idea for this lamp came to me while scrutinizing some flea-market lamp shades
made from used Popsicle sticks. The concept, I decided, was sound. But I wanted to make some changes.
So instead of gorging myself on 88 Dreamsicles, I decided to use 1⁄4" maple strips. And instead of creating a true oddity of Americana, I chose to look to the Far East to create a lamp that would be at home in a Japanese or any modern household.
First you need to cut the 88 sticks that make up the sides. Rip some 1⁄4"-thick maple into 1⁄4"-wide strips. I found that a board that’s 1⁄4" thick, 6" wide and 4' long makes one lamp. Crosscut the strips to 61⁄8" long.
Now drill the 176 holes in the side pieces for the four dow-els that hold the lamp together. I made a jig to hold a side piece in place on my drill press while I drilled the holes. The center of each 1⁄8" hole is located 3⁄16" in from each end. Now it’s time to sand all the pieces.
Build the base. First cut the base to size and cut two 1⁄4"-deep by 3⁄4"-wide grooves in the bot-tom of the base. These should be located 7⁄8" from the edges. Glue the feet in place. Now mark on
the base where the four dowels will be located. Here’s how: Draw two lines between the opposite corners of the base. This creates an “X” at the center of the board. Measure out 41⁄16" from the cen-ter on each of these four lines. Drill a 1⁄8" hole at each location.
Sand your four 1⁄8" dowels a bit and put some wax on them. Slide the side pieces onto the dowels. When you’ve reached your final height, glue the four dowels into the base. Glue the top two side pieces to the dowels and cut them flush to the top.
Now glue the shoji paper to the inside of the lamp. I cut out four pieces of paper and glued them to the inside using yellow glue sparingly. Add your light fixture and you’re done. No finish is required. PW
Maple Lamp No. Item DImeNsIoNs (INches) materIal
t W l
❏ 88 Sides 1⁄4 1⁄4 61⁄8 Maple ❏ 2 Feet 3⁄4 1 81⁄2 Maple ❏ 1 Base 1⁄2 81⁄2 81⁄2 Maple ❏ 4 Dowels 1⁄8 13
▼
SUPPLIESHighland Hardware 800-241-6748 or tools-for-woodworking.com 1 • 111⁄8" x 60' roll of
Shoji paper, white #216401, $11.99
Local home center 1 • 6' cord set w/ candelabra
base light fixture
Prices correct at time of publication
CL
3/16"
1/8" dowelwaxed a bit
Shojipaper
1/8" hole
Dowel assembly detail
Exploded view
Illus
trat
ion
by Ji
m S
tuar
d
See detailabove
Dowels setinto 1/8" holes
3/4" 7/8"
1/4" x 3/4" groove
Apply glue to the top two pieces only
Shojipaper
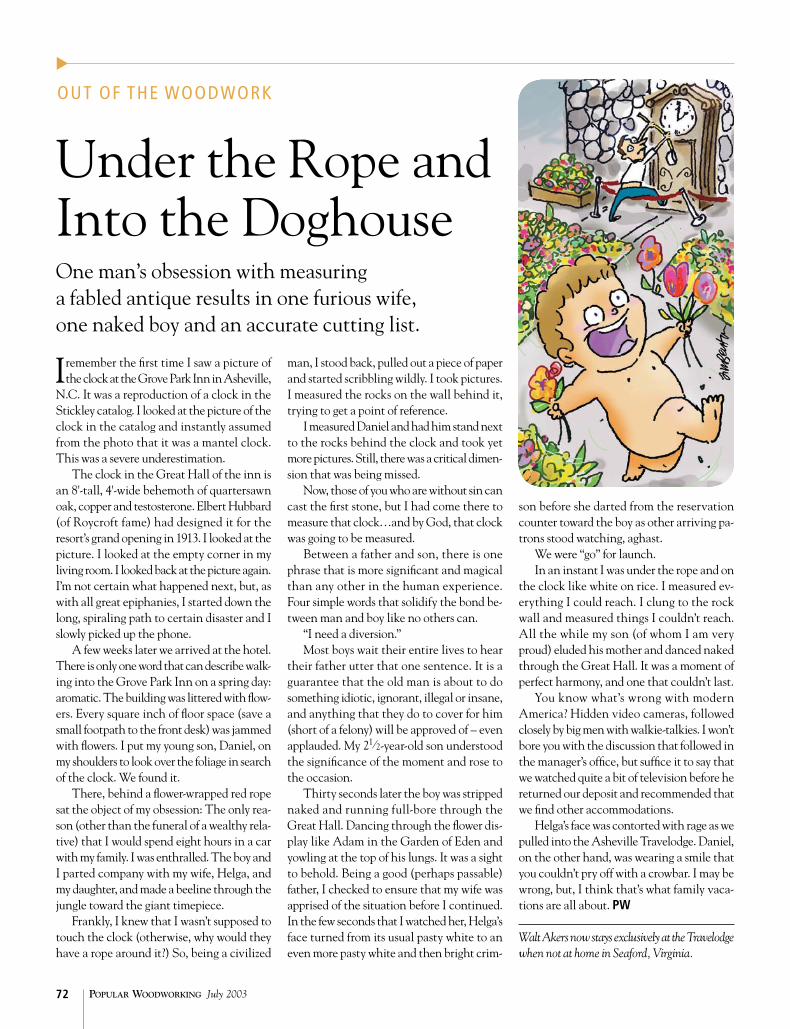
PoPular WoodWorking July 200372
I remember the first time I saw a picture of the clock at the Grove Park Inn in Asheville,
N.C. It was a reproduction of a clock in the Stickley catalog. I looked at the picture of the clock in the catalog and instantly assumed from the photo that it was a mantel clock. This was a severe underestimation.
The clock in the Great Hall of the inn is an 8'-tall, 4'-wide behemoth of quartersawn oak, copper and testosterone. Elbert Hubbard (of Roycroft fame) had designed it for the resort’s grand opening in 1913. I looked at the picture. I looked at the empty corner in my living room. I looked back at the picture again. I’m not certain what happened next, but, as with all great epiphanies, I started down the long, spiraling path to certain disaster and I slowly picked up the phone.
A few weeks later we arrived at the hotel. There is only one word that can describe walk-ing into the Grove Park Inn on a spring day: aromatic. The building was littered with flow-ers. Every square inch of floor space (save a small footpath to the front desk) was jammed with flowers. I put my young son, Daniel, on my shoulders to look over the foliage in search of the clock. We found it.
There, behind a flower-wrapped red rope sat the object of my obsession: The only rea-son (other than the funeral of a wealthy rela-tive) that I would spend eight hours in a car with my family. I was enthralled. The boy and I parted company with my wife, Helga, and my daughter, and made a beeline through the jungle toward the giant timepiece.
Frankly, I knew that I wasn’t supposed to touch the clock (otherwise, why would they have a rope around it?) So, being a civilized
Under the Rope and Into the DoghouseOne man’s obsession with measuring a fabled antique results in one furious wife, one naked boy and an accurate cutting list.
man, I stood back, pulled out a piece of paper and started scribbling wildly. I took pictures. I measured the rocks on the wall behind it, trying to get a point of reference.
I measured Daniel and had him stand next to the rocks behind the clock and took yet more pictures. Still, there was a critical dimen-sion that was being missed.
Now, those of you who are without sin can cast the first stone, but I had come there to measure that clock…and by God, that clock was going to be measured.
Between a father and son, there is one phrase that is more significant and magical than any other in the human experience. Four simple words that solidify the bond be-tween man and boy like no others can.
“I need a diversion.”Most boys wait their entire lives to hear
their father utter that one sentence. It is a guarantee that the old man is about to do something idiotic, ignorant, illegal or insane, and anything that they do to cover for him (short of a felony) will be approved of – even applauded. My 21⁄2-year-old son understood the significance of the moment and rose to the occasion.
Thirty seconds later the boy was stripped naked and running full-bore through the Great Hall. Dancing through the flower dis-play like Adam in the Garden of Eden and yowling at the top of his lungs. It was a sight to behold. Being a good (perhaps passable) father, I checked to ensure that my wife was apprised of the situation before I continued. In the few seconds that I watched her, Helga’s face turned from its usual pasty white to an even more pasty white and then bright crim-
son before she darted from the reservation counter toward the boy as other arriving pa-trons stood watching, aghast.
We were “go” for launch.In an instant I was under the rope and on
the clock like white on rice. I measured ev-erything I could reach. I clung to the rock wall and measured things I couldn’t reach. All the while my son (of whom I am very proud) eluded his mother and danced naked through the Great Hall. It was a moment of perfect harmony, and one that couldn’t last.
You know what’s wrong with modern America? Hidden video cameras, followed closely by big men with walkie-talkies. I won’t bore you with the discussion that followed in the manager’s office, but suffice it to say that we watched quite a bit of television before he returned our deposit and recommended that we find other accommodations.
Helga’s face was contorted with rage as we pulled into the Asheville Travelodge. Daniel, on the other hand, was wearing a smile that you couldn’t pry off with a crowbar. I may be wrong, but, I think that’s what family vaca-tions are all about. PW
Walt Akers now stays exclusively at the Travelodge when not at home in Seaford, Virginia.
▼
out of the woodwork

Job# W216108BAd Code# C3039
Sears/Craftsman/Contractor Table Saw
This Advertisement Prepared By:OGILVY & MATHER, CHICAGO
To Appear In:Fine Woodworking – July/Aug. 2003
This Old House – Sept. 2003Popular Woodworking – Sept./Oct. 2003
Extreme How-To – Sept. 2003
Page 4/CBleed: 9-1/4"w x 11-1/8"h
Trim: 8"w x 10-1/2"h Live: 7-1/2"w x 10"h
Art Director: M. Wiegard / M. GordonCopywriter: B. Raczka
Traffic: L. BrownProduction: L. McDonald
Account Service: R. Mackey
Ours is an age of mobility, so it was only a matter
of time before somebody came up with a table saw
you can take with you—probably somebody who got
sick and tired of trying to rip huge pieces of stock
in his cramped basement workshop.
Introducing the Craftsman®
Professional 10" Job Site Table
Saw. When you’re planning on
working in one place for a while,
its sturdy yet amazingly light-
weight aluminum legs provide
a solid base for cutting. But
when you need to take your
act on the road, all you have to
do is fold the legs up, tip it up on
its two wheels, and pull it
behind you like a suitcase—
it’s that easy. And because this saw only weighs
about half as much as Craftsman’s stationary table
saws, it’s no big deal to throw it in the back of your
car or pickup. Other professional features include a
24-inch right extension wing, which gives you the
flexibility to rip bigger stock. And its 8-foot-long
cord not only
makes it easy
to reach your power source, it’s
retractable so it won’t trip you up. In fact,
if there is any downside to
this saw’s portability at all,
it would be this: the words,
“Hey neighbor, can I borrow
your table saw?” just became
a reasonable request. Finally,
in case you were wondering,
the Craftsman Professional 10"
Job Site Table Saw is quite a
value at just $399.99. So hop in your
mobile home, or whatever else you’re driving these
days, and head for a Sears or Sears Hardware
Store near you. You can also order it by phone
(mobile, if you prefer) at 1-800-437-9686. Or get it
online (say, from your laptop?) at craftsman.com.
© 2003 Sears Brands, LLC
MOBILE HOMES. MOBILE PHONES.AND NOW, MOBILE TABLE SAWS.
MOBILE HOMES. MOBILE PHONES.AND NOW, MOBILE TABLE SAWS.
When you can’t bring the
work to the saw, just bring
the saw to the work.
AB
CD
EF
G§
™
225 W
. Sup
erior
St.
Chica
go, IL
6061
0Te
l 312
943 0
400
CM
YK
Job:
Cust
:
2817
1.00
Ogilv
y&M
athe
r`

800.234.1976w w w . l a g u n a t o o l s . c o m
Simply the best!