Embed Size (px)
Citation preview

GP1+ USER GUIDE
TM

CON T EN T S Technical Background
Introduction
Getting Started Handling Methods
Applications Support & Service
Technical Background
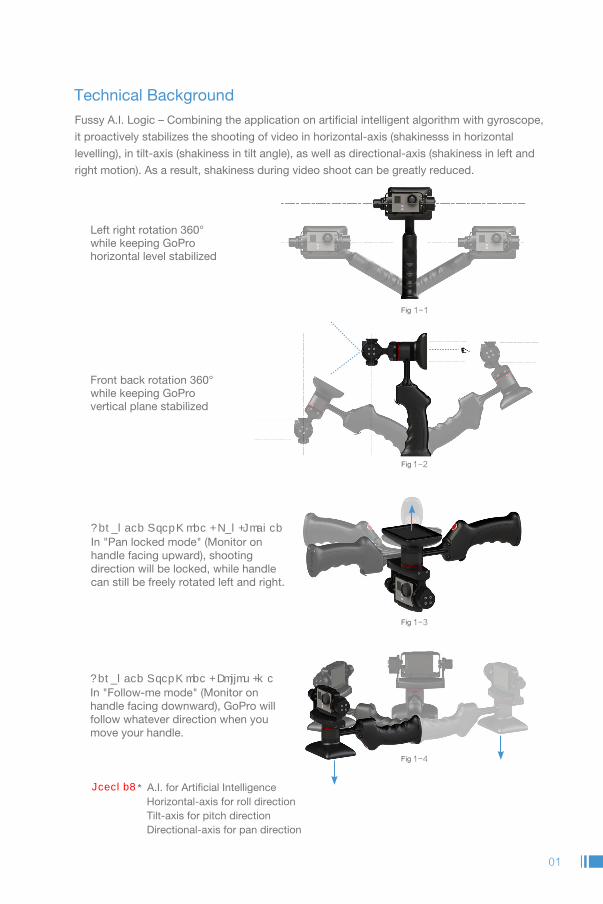
Fig 1-2
Fig 1-1
Fig 1-3
Fig 1-4
01
Technical BackgroundFussy A.I. Logic – Combining the application on artificial intelligent algorithm with gyroscope,
it proactively stabilizes the shooting of video in horizontal-axis (shakinesss in horizontal
levelling), in tilt-axis (shakiness in tilt angle), as well as directional-axis (shakiness in left and
right motion). As a result, shakiness during video shoot can be greatly reduced.
Left right rotation 360°while keeping GoPro horizontal level stabilized
Front back rotation 360°while keeping GoPro vertical plane stabilized
In "Pan locked mode" (Monitor on handle facing upward), shooting direction will be locked, while handle can still be freely rotated left and right.
In "Follow-me mode" (Monitor on handle facing downward), GoPro will follow whatever direction when you move your handle.
* A.I. for Artificial Intelligence Horizontal-axis for roll direction Tilt-axis for pitch direction Directional-axis for pan direction

Screen specificationsScreen size
Brightness
Rotatable angle
- 3.5 inch
- 400-800 cd/m2 (auto brightness adaptation)
- manually rotated 3 x 90° =270°
GP1+
产品保修卡
稳拍
02
Introduction
WENPOD GP1+ is the state of the art digital gyroscopic stabilizer. It empowers stability and
horizontal leveling when shooting video footage using GoPro action camera. With GP1 Plus, in
combination with a few simple techniques, it empowers ordinary people to produce extraordinary
video footages on the move. The built-in 3.5 inch rotatable monitor directly streaming recording
image as well as for playback purposes for your convenience.. When GP1+ is turned on, it also acts
as the supplementary battery source, which extends your GoPro power upto 2 hours (Under normal
condition).
Supports GoPro Hero 1/2/3/3+/4 Black/Silver Edition action camera.
Backup power source for your GoPro: Actively supply battery power to your GoPro camera,
when GP1+ is being powered on. It can extend your GoPro operating time upto 2 hours.
Product Specifications
What's in the boxPlease check your contents carefully. If any items are missing, please contact your retailer.
Battery Adaptor Adaptor plug User guide Warranty card
Fig. 2-1
Model no.: Dimension:
Weight:
Battery type:
Battery capacity: Operating time:
Charging time:
Operating temperature:
Operating humidity:
Operating angle:
W 75mm
H 242mm
405g(including battery)
LiPo battery with protective circuit board
800mAh, 11.1V
about 120min in normal room temperature
about 30min ("Lightning Charg-in" patent pending technology)
-10 to 40 degree celcius
10% - 90%
360°All directions (Horizontal / Veritical axis)
WENPOD GP1+ L 135mm

11
①
②
⑤
④
③
⑥
⑦
⑧
⑨
⑩
①
②
③
④
⑤
⑥
⑦
⑧
⑨
⑩ 11
This USB port is for manufacturer maintenance purpose. Special USB cable is required. Connecting any cable or charging via that port is NOT permitted, and will cause damages to your SP1 Plus. Doing such will void your warranty.
Fig 2-3
Fig 2-4
03
GoPro REC button
GoPro mounting frame
USB Port
Tilt axis motor
3.5-inch rotatable LCD screen
Tilt angle controller joystick
Manufacturer USB port
Power ON/OFF button
Charging port
Battery compartment
door
Roll axis motor

Features
Horizontal-axis remain stabilized while handle
can be freely rotated in 360 degrees.1 Horizontal-axis remain stabilized while handle
can be freely rotated in 360 degrees.2
360°
Fig 2-4
360°
Fig 2-5
Follow-me modeWhen handle is flipped down as in the following diagram (roll-axis motor is located below the GoPro camera), the motor that controls the horizontal leveling will seamlessly change to the pan-axis. This allows the lock on the pan direction, while other axis is still being stabilized.
4
Fig 2-7
360°
Pan Lock Mode
When handle is lifted up as in the following diagram (roll-axis motor is located above the GoPro
camera), the motor that controls the horizontal leveling will seamlessly change to the pan-axis.
This allows the lock on the pan direction, while other axis is still being stabilized.
3
Fig 2-6
360°
04
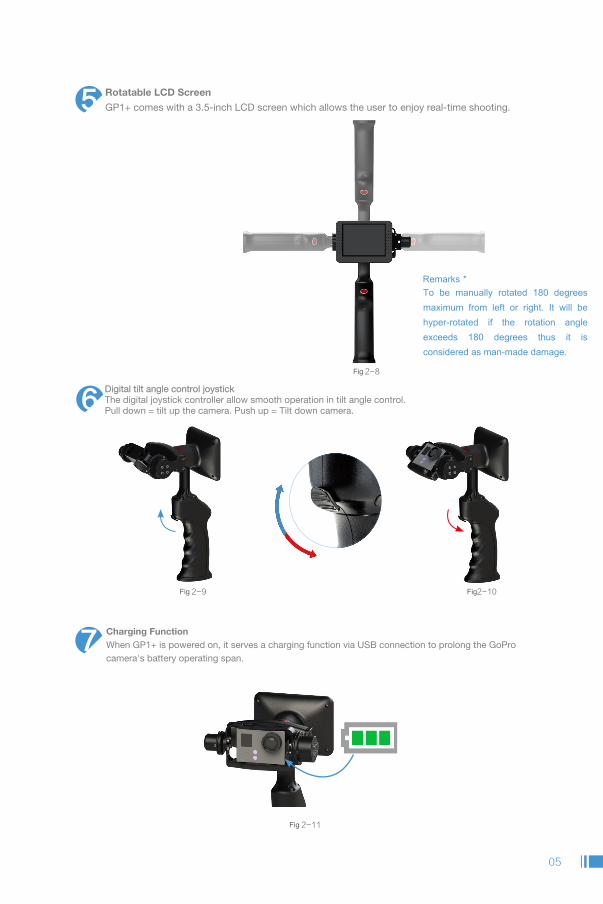
Fig 2-9 Fig2-10
Fig 2-11
Rotatable LCD Screen
GP1+ comes with a 3.5-inch LCD screen which allows the user to enjoy real-time shooting.
Remarks * To be manually rotated 180 degrees maximum from left or right. It will be hyper-rotated if the rotation angle exceeds 180 degrees thus it is considered as man-made damage.
5
Digital tilt angle control joystickThe digital joystick controller allow smooth operation in tilt angle control. Pull down = tilt up the camera. Push up = Tilt down camera.
Charging FunctionWhen GP1+ is powered on, it serves a charging function via USB connection to prolong the GoPro camera's battery operating span.
6
7
Fig 2-8
05

Installing batteryAs in the following diagrams, open the battery compartment door by sliding the switch to "open". Insert the battery in the direction of the triangle mark toward the battery compartment. Close the compartment door, and slide the switch to "lock" position.
This section introduces some basic yet important prepration steps as well as some basic operations.
Fig 3-1
Fig 3-3
Fig 3-2
Fig 3-4
GettingStarted
06
Charging the battery
◆ Plug in the adaptor into the wall plug outlet. Flip up the protective cover on handle, and insert the charging plug into the
charging port.
◆ When the indicator LED on handle turns RED, the charging process has started。
◆ When the battery is fully charged, the LED indicating light will go off。
◆ After your battery is fully charged, please remove the charging plug as soon as possible, and cover the port with the
protective cover. In addition, please remove the adaptor from
the wall outlet.
◆ If you intend not to use your GP1 for long period of time, please remove the battery, and place it in a clean and cool area.
Remark: In normal room temperature, it requires about 30 minutes for completely discharged battery to be fully charged.
The charging time may vary according to the temperature and power remained in the battery.

Installing the GoPro Camera
As shown in Fig 3-5, the GoPro lens is facing outward, a slight push to slide the camera towards the USB port (Fig 3-6 and Fig 3-7).Remarks * Before installation, ensure the GoPro camera functions normally and ensure there is adequate space in the memory card.
Fig 3-5
Fig 3-7
Fig 3-9
Fig图 3-6
Fig 3-8
Camera frame/mountfacing downward
GoPro lens facing outward
REC button
Power onHold the handle vertically upright with one hand, while the other hand holds the frame vertically upright as well
as leveling it horizontally. Press power button, ensure your hands are stationary. After 2 seconds, the LED
indicator light turns into slow flashing status, you may now release the hand that is holding the camera/frame,
and GP1+ is ready to use in Landscape mode.
Remarks:As soon as GP1+ is powered on, do not attempt to use the device immediately. Allow it to turn from still LED light mode to flashing mode. During this process, it automatically records the balancing status of GoPro and GP1 and sets it as default status.
Horizontal line
Vertical line
Push backward to attach camera to GP1+
Slide towards the USB port
07

Your wrist must be lockedand steady in order to recorda stable footage
Landscape Mode
In this mode, your footage will be recorded in landscape position. It is best suited for making a VIDEO
SELFIE.
Hold handle invertedly ① (For advance
users)This position can be reached by holding your handle in upright position and lower your arm naturally toward your legs. This position is best suited for low-angle shots for babies standing or crawling, pets and simulate shots as used in studio arm.
Hold handle invertedly ②Flip the device over and hold it as shown in Fig 4-3. It allows GP1+ to shoot horizontally in slow skate-boarding/scootering motion.
Fig 4-2
Fig 4-1
HandlingMethod
Fig 4-3
08

Hold handle horizontallyThis position is best suited for shots as you move, also applicable to moving your camera shots. In this
ergonomic position, your wrist movment will be actively cancelled by both the horizontal-axis and tilt-axis
motors. This will enhance the stability of shots when you move.
Hold handle in Pan-Locked Mode(single hand, for advance users)
When holding the handle as the follow picture, flipping the horizontal-axis motor facing upward, the horizontal-axis will seamlessly change to pan-axis, and the Pan-Lock Mode will be activated using this gesture. In this mode, the direction of camera will remain locked, however, it is up to the operator to maintain the horizontal
leveling manually. This position is best suitable for slow motion straight line shots.
Hold handle in Follow-me Mode (single hand, for advance users)
When holding the handle as the following picture, with the monitor screen facing downward, the horizontal-
axis will seamlessly change to pan-axis, and the Follow-me Mode will be activated using this gesture. In this mode, the direction of camera will follow you wherever you turn your handle, however, it is up to the operator
to maintain the horizontal leveling manually. This position is best suitable for slow motion non-directional shots.
StronglySuggested
Fig 4-4
Fig 4-8
Fig图 4-7
09
StronglySuggested
Hold handle horizontally with both hands - Normal Mode① (for advance users)
Flipping the handle as the following picture shown, at the same time hold the screen gently with the other hand. This position is best suitable for long shots, as well as shots in normal pacing speed.
Hold handle horizontally with both hands - Pan-Locked Mode② (for advance users)
Flipping the handle as the following picture shown (the monitor screen facing upward), at the same time hold the monitor gently with the other hand. This enable the directional lock in your camera, while
handle can still be freely moved. However, due to the change of axis, it requires the operator to maintain the horizontal leveling manually. This position is best suitable for long shots, as well as shots in normal pacing speed at a fixed shooting direction.
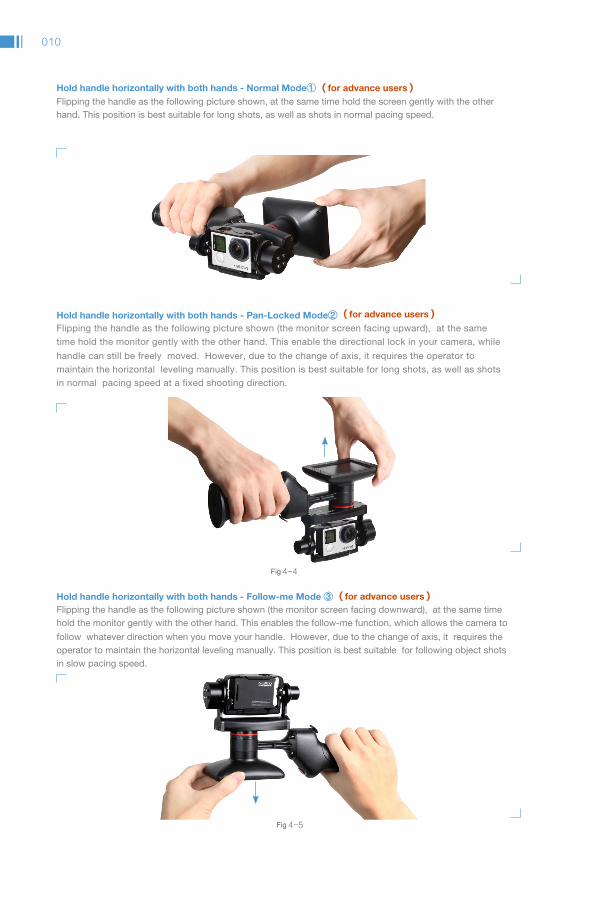
Hold handle horizontally with both hands - Follow-me Mode ③ (for advance users)Flipping the handle as the following picture shown (the monitor screen facing downward), at the same time hold the monitor gently with the other hand. This enables the follow-me function, which allows the camera to
follow whatever direction when you move your handle. However, due to the change of axis, it requires the operator to maintain the horizontal leveling manually. This position is best suitable for following object shots in slow pacing speed.
Fig 4-4
Fig 4-5
010

Applications
Sporting
Mini movie productions
Fig 5-1
Fig 5-2
011

Romantic moments
At the scene
Fig 5-5
Fig 5-6
012

Baby vlog
Fig 5-7
013

Initialization
When there is change of camera, extreme changes in temperature, or instability during operation, you me need to reset your SP1 and carry out the initialization process. Initialization is NOT require during the day to day use except the above cases is encountered.
Procedures for Initialization / Reset1.Follow the step in page 7 to install and Pre-balance properly.2.Place GP1+ on a flat and stationary surface, and expose the power button as in Fig. 6-1. Remarks: GoPro lens facing upwards.
3.Press the power button (Fig. 6-2), and the LED light will start to flash. At this moment, GP1 Plus will
automatically detect the environmental data such as temperature, magnetic field and humidity.
4.After the flashing stage, LED will remain long lit for 2 seconds. As soon as the LED turns to a flashing stage,
immediately hold the handle upright on the flat surface, at the same time holding the camera upright using the
other hand. Then release the hand that holds the camera after 1 second (Fig. 6-3).
5.At this stage, the LED will turn to long lit mode, and the angle adjustment process will begin. 6.After the
adjustment process, the LED will change to slow flashing mode (standby mode).
7.You may power off and then power on the device to begin normal operation.
Fig 6-1
Fig 6-3Fig 6-2
014

Incorrect Handlings
X X XIncorreect screen position
Fig 6-1
Fig 6-2
X X X
015
Attentions :◆ GP1 Plus is delicate digital electronic equipment. Please stay away from strong magnetic field, fire,
water or any high temperature, high humidity or high corrosive environment to avoid causing damage to this equipment.◆ GP1+ is battery operated and controlled by our proprietary CPU and chipset. During the
operation, please do not counteract the motors. If you found your SP1 behave abnormally, please check the battery. If LED remains long lit in operation, that means battery is low. Please replace a battery or charge it as soon as possible. If there is still power in battery, please go through the reset / initialization process.◆ For best performance, please do not shake or touch SP1 during video recording.
Handle with care
Away from Water
Away from heat source
Use force upon GP1+

Common Errors
Incorrect Pitch-axis
motor direction
Fig 6-3
Use force pressing the LCD screen
Fig 6-4
Incorrect Pitch-axis
motor direction
Fig 6-5
X X X
016
◆ During video shooting, why there are lost in frames?
Possible cause:Solution:
CMOS sensor in GoPro does not support high speed recording.
Try to move slowly during recording.
Possible cause:Solution:
Not enough power to operate the electronic device, or battery is dead.
Charge or replace the battery.
◆ After GP1 Plus is Powered on, the LED light start flash, but the device is not operating.
◆ Why footages taken by GP1 Plus is not horizontally leveled?
Possible cause:
Solution:
1. The gyroscopic sensor needs reset due to temperature changes.
2. When powering on the GP1+, you have not hold the camera upright and
1. Follow the steps in page 14 to perform the device auto initialization.
2. Power off. Hold the camera upright the first 2 second when you power on.

017
Copyrights - All rights reserved to Gazercam Limited
No part of this publication may be reproduced, distributed, or transmitted in any form or by any means, including photocopying, recording, or other electronic or mechanical methods, without the prior written permission of Gazercam Limited
Trademark declarationWENPOD is registered trademark of Gazercam Limited
All trademarks, trade names and products mentioned herein belong to their respective owners.
Limitation of LiabilityThe contents of this manual are in accordance with the status quo, unless applicable the laws required, Gazercam Limited does not
provide any kind of explicit or implied guarantee a particular purpose.Within the scope permitted by applicable laws, Gazercam Limited, under any circumstances, is NOT liable for the product resulting
from the application of this manual and related content described in this manual and any incidental, indirect, consequential DAMAGES, nor for any loss of profits, data, goodwill or anticipated savings compensation. And under any circumstances, the maximum liability of Gazercam Limited is limited to the purchase price paid for the product. (except in cases involving personal injury
in accordance with applicable laws)
Import and export controlsFor the products described in this manual, (including but not limited to product technical data) all export, re-import or import should be complied with the applicable laws and regulations.
* We reserve the right to make changes without further notice to any products herein.Please refers to our official website www.gazercam.com for any update.
Legal Notices
Accessory requirement
Use of unauthorized or incompatible power supplies, chargers or batteries may cause fire, explosion or other hazard.
Use only equipment approved by the manufacturer and model of the device with the matching accessories. If you use other types of
accessories may invalidate any warranty of the device as well as the relevant provisions of the country and may cause accidents. To
get approved accessories, please contact our authorized service center.
Safety informationBefore using and operating the device, please read and pay attention the following
precautions to ensure optimum equipment performance and to avoid dangerous or illegal
situations.
Operating environment
Do not use the device in dusty, wet, dirty environment or close to magnetic fields, in order to avoid causing internal circuit failure.
Do not use the device during thunderstorm. It may lead to equipment failure or cause hazards. Please use or store this equipment
and accessories in the temperature range from -10 ℃ ~ 40 ℃. When the ambient temperature is too high or too low, it may cause
malfunction to the device.
Do not place the device under direct sunlight, such as car dashboard or windowsill place.Keep the equipment and accessories away from rain or moisture. It will cause fire or electric shock hazard. Do not place the device
near heat sources or naked fire sources, such as electric heating, microwave, oven, water heater, fireplace, candles or other places
that may generate high temperatures.

018
Electronic equipment
This equipment should not be used in any premises that electronic equipment is prohibited. It will interfere with other electronic
equipment or cause other hazards.
Children precautions
This device and its accessories may contain small parts. Keep the device and its accessories out of the reach of children. Children
could damage the device and its accessories inadvertently, or swallow small parts and may cause choking or other hazard. This
equipment is not toys, children may operate only under adult supervision.
Care and MaintenancePlease keep equipment and accessories dry. Do not use microwave oven, hair dryer or any other external heating device to dry your
equipment.
Do not store the equipment and accessoriesis in extreme temperature environment. It may lead to device failure, fire or explosion.
Avoid strong impact or vibration to your equipment and accessories. It will result in failure.
Before cleaning and maintenance, please power off the device and discount all cable attached.
Do not use harsh chemicals, cleaning solvents, or strong detergents to clean the device or its accessories. Use clean, dry, soft cloth to
wipe the device or its accessories.
Do not attempt to modify or repair the equipment and accessories. It will void your warranty. For any problems, please contact an
authorized service center.
Adaptor Charger SafetyWhen the device is being charged, the equipment should be placed near the power outlet and should be easily accessible. When fully
charged or not being charged, disconnect the charger from the device and unplug the charger from the power outlet. Do not drop or
bump the charger. Please contact an authorized service center for replacement when housing of charger is damaged.
If the charger plug or power cord is damaged, please do not use to avoid electric shock or fire.
Do not touch the device or charger with wet hands. Do not unplug the charger by way of pulling the power cable. If charger is
exposed to rain, liquid, or excessive moisture, discontinue to use and contact an authorized service center for replacement. Chargers
must meet the saftey requirement of "GB4943.1 IT equipment standard - 2.5 Restricted Power".
Battery SafetyDo not connect or touch battery poles with metal objects conductor, in order to avoid battery short circuit, and burns due to battery
overheating and causing any injury.
Do not expose the battery to high temperature environment, such as under sunlight, heaters, microwave, oven or water heater. Battery
overheating may cause explosion.
Do not disassemble or modify the battery, insert foreign objects, or immerge into the water or other liquids to avoid battery leakage,
overheating, fire or explosion. If battery leaks, do not come into contact with skin or eyes with leaking liquid. If you come into contact
with the skin or eyes, flush with water immediately, and go to the hospital for medical treatment.
If the battery is in use, saving in the process of charging or discoloration, deformation, abnormal heat and other anomalies, please stop
using it and replace with new batteries. Do not throw batteries into the fire, otherwise it will cause the battery to fire and explosion.
Dispose of batteries according to local regulations, not dispose as household waste. If the battery is disposed of improperly can cause
the battery to explode. Do not allow children or pets to swallow the bite batteries to avoid inflicting harm or cause the device to
malfunction or explode.
Do not drop, crush, or puncture the battery. Avoid letting the battery from external pressure, causing the battery internal short circuit
and overheating. Do not use a damaged battery. When the standby time of the device is significantly shorter than normal, replace the
battery.

019
www.wenpod.com