Embed Size (px)
Citation preview

GiodisUser Manual
Version 1.0Last Revised January 28, 2009
All contents in this manual are copyrighted by JAVAD GNSS.All rights reserved.The information contained herein may not be used, accessed, copied,
stored, displayed, sold, modified, published, or distributed, or otherwise reproduced without express written consent from JAVAD GNSS.

www.javad.com

Chapter 1. Introduction . . . . . . . . . . . . . . . . . . . . . . . . . . . . . . . . . . . . . . . . . . . . . . . . . . . . 91.1. Welcome . . . . . . . . . . . . . . . . . . . . . . . . . . . . . . . . . . . . . . . . . . . . . . . . . . . . . . . . . . . . . . 91.2. System Requirements . . . . . . . . . . . . . . . . . . . . . . . . . . . . . . . . . . . . . . . . . . . . . . . . . . . . 9
Chapter 2. Giodis User Interface . . . . . . . . . . . . . . . . . . . . . . . . . . . . . . . . . . . . . . . . . . . 112.1. Main Window . . . . . . . . . . . . . . . . . . . . . . . . . . . . . . . . . . . . . . . . . . . . . . . . . . . . . . . . . 112.2. Javad Button . . . . . . . . . . . . . . . . . . . . . . . . . . . . . . . . . . . . . . . . . . . . . . . . . . . . . . . . . . 122.3. Ribbon . . . . . . . . . . . . . . . . . . . . . . . . . . . . . . . . . . . . . . . . . . . . . . . . . . . . . . . . . . . . . . 132.4. Quick Access Toolbar . . . . . . . . . . . . . . . . . . . . . . . . . . . . . . . . . . . . . . . . . . . . . . . . . . . 132.5. Map and Tab Collection . . . . . . . . . . . . . . . . . . . . . . . . . . . . . . . . . . . . . . . . . . . . . . . . . 142.6. Status Bar . . . . . . . . . . . . . . . . . . . . . . . . . . . . . . . . . . . . . . . . . . . . . . . . . . . . . . . . . . . 15
Chapter 3. Managing Projects. . . . . . . . . . . . . . . . . . . . . . . . . . . . . . . . . . . . . . . . . . . . . . 173.1. Creating a New Project . . . . . . . . . . . . . . . . . . . . . . . . . . . . . . . . . . . . . . . . . . . . . . . . . . 173.2. Creating a New Encrypted Project . . . . . . . . . . . . . . . . . . . . . . . . . . . . . . . . . . . . . . . . . 193.3. Opening an Existing Project . . . . . . . . . . . . . . . . . . . . . . . . . . . . . . . . . . . . . . . . . . . . . . 213.4. Saving a Project . . . . . . . . . . . . . . . . . . . . . . . . . . . . . . . . . . . . . . . . . . . . . . . . . . . . . . . . 233.5. How to Use the Configuration Settings . . . . . . . . . . . . . . . . . . . . . . . . . . . . . . . . . . . . . . 243.6. Closing a Project . . . . . . . . . . . . . . . . . . . . . . . . . . . . . . . . . . . . . . . . . . . . . . . . . . . . . . . 26
Chapter 4. Working with Project . . . . . . . . . . . . . . . . . . . . . . . . . . . . . . . . . . . . . . . . . . . 274.1. Importing Data Files . . . . . . . . . . . . . . . . . . . . . . . . . . . . . . . . . . . . . . . . . . . . . . . . . . . . 27
4.1.1. Importing a Folder. . . . . . . . . . . . . . . . . . . . . . . . . . . . . . . . . . . . . . . . . . . . . . . . . 284.1.2. Importing a File . . . . . . . . . . . . . . . . . . . . . . . . . . . . . . . . . . . . . . . . . . . . . . . . . . 314.1.3. Downloading Measurement Data from a Remote Server . . . . . . . . . . . . . . . . . . 314.1.4. Downloading IGS/CORS Stations Positions. . . . . . . . . . . . . . . . . . . . . . . . . . . . . 33
4.2. Processing Static Observations . . . . . . . . . . . . . . . . . . . . . . . . . . . . . . . . . . . . . . . . . . . . 344.2.1. The JavadGeo Engine Main Features . . . . . . . . . . . . . . . . . . . . . . . . . . . . . . . . . . 344.2.2. Running the JavadGeo Engine . . . . . . . . . . . . . . . . . . . . . . . . . . . . . . . . . . . . . . . 35
Setting ECEF Control . . . . . . . . . . . . . . . . . . . . . . . . . . . . . . . . . . . . . . . . . . . . . . . 364.3. Performing Network Adjustment . . . . . . . . . . . . . . . . . . . . . . . . . . . . . . . . . . . . . . . . . . 38
4.3.1. The Order of Adjustment . . . . . . . . . . . . . . . . . . . . . . . . . . . . . . . . . . . . . . . . . . . 38Checking the quality of control positions. . . . . . . . . . . . . . . . . . . . . . . . . . . . . . . . . 39
4.3.2. Running the JavadGeo Network Adjustment . . . . . . . . . . . . . . . . . . . . . . . . . . . . 414.4. Generating a Report. . . . . . . . . . . . . . . . . . . . . . . . . . . . . . . . . . . . . . . . . . . . . . . . . . . . . 42
3www.javad.com
Chapter 5. Map Options . . . . . . . . . . . . . . . . . . . . . . . . . . . . . . . . . . . . . . . . . . . . . . . . . . 435.1. Displaying a Map . . . . . . . . . . . . . . . . . . . . . . . . . . . . . . . . . . . . . . . . . . . . . . . . . . . . . . 435.2. Moving Around a Map . . . . . . . . . . . . . . . . . . . . . . . . . . . . . . . . . . . . . . . . . . . . . . . . . 455.3. Displaying a Layer . . . . . . . . . . . . . . . . . . . . . . . . . . . . . . . . . . . . . . . . . . . . . . . . . . . . . 465.4. Getting Point Coordinates. . . . . . . . . . . . . . . . . . . . . . . . . . . . . . . . . . . . . . . . . . . . . . . . 46
Chapter 6. Tools . . . . . . . . . . . . . . . . . . . . . . . . . . . . . . . . . . . . . . . . . . . . . . . . . . . . . . . . 496.1. Coordinate Calculator . . . . . . . . . . . . . . . . . . . . . . . . . . . . . . . . . . . . . . . . . . . . . . . . . . . 49
6.1.1. Running Calculator. . . . . . . . . . . . . . . . . . . . . . . . . . . . . . . . . . . . . . . . . . . . . . . . 496.1.2. Using Calculator. . . . . . . . . . . . . . . . . . . . . . . . . . . . . . . . . . . . . . . . . . . . . . . . . . 50
6.2. Coordinate System Editor. . . . . . . . . . . . . . . . . . . . . . . . . . . . . . . . . . . . . . . . . . . . . . . . 566.2.1. Understanding Main Window Elements . . . . . . . . . . . . . . . . . . . . . . . . . . . . . . . 56
Coordinate Systems. . . . . . . . . . . . . . . . . . . . . . . . . . . . . . . . . . . . . . . . . . . . . . . . . 57Transformations . . . . . . . . . . . . . . . . . . . . . . . . . . . . . . . . . . . . . . . . . . . . . . . . . . . 57Properties. . . . . . . . . . . . . . . . . . . . . . . . . . . . . . . . . . . . . . . . . . . . . . . . . . . . . . . . . 57
6.2.2. Viewing Properties . . . . . . . . . . . . . . . . . . . . . . . . . . . . . . . . . . . . . . . . . . . . . . . . 58Viewing Coordinate System Properties . . . . . . . . . . . . . . . . . . . . . . . . . . . . . . . . . 58 Viewing Transformations and Geoids Properties . . . . . . . . . . . . . . . . . . . . . . . . . 59
6.2.3. Creating a New Coordinate System, Transformation Parameters and Geoids. . . 60Creating a New Geodetic Datum Ellipsoidal System . . . . . . . . . . . . . . . . . . . . . . . 60Creating a New Grid - Projected Coordinate System . . . . . . . . . . . . . . . . . . . . . . . 61Creating a New Local - Engineering Coordinate System . . . . . . . . . . . . . . . . . . . . 62Creating a New Vertical Coordinate System . . . . . . . . . . . . . . . . . . . . . . . . . . . . . 62Creating Transformation Parameters . . . . . . . . . . . . . . . . . . . . . . . . . . . . . . . . . . . 63Creating a New Geoid Model . . . . . . . . . . . . . . . . . . . . . . . . . . . . . . . . . . . . . . . . . 64
Appendix 1. Glossary . . . . . . . . . . . . . . . . . . . . . . . . . . . . . . . . . . . . . . . . . . . . . . . . . . . . 67
4 www.javad.com
PREFACE
Thank you for purchasing this JAVAD GNSS product. The materials available in this UserManual (the “Manual”) have been prepared by JAVAD GNSS for owners of JAVAD GNSSproducts. It is designed to assist owners with the operating of the Giodis Software and its use issubject to these terms and conditions (the “Terms and Conditions”).
Note: Please read these Terms and Conditions carefully.
Terms and ConditionsUSE – JAVAD GNSS products are designed to be used by a professional. The user is expected tohave a good knowledge and understanding of the user and safety instructions before operating,inspecting or adjusting. Always wear the required protectors (safety shoes, helmet, etc.) whenoperating the receiver.
COPYRIGHT – All information contained in this Manual is the intellectual property of, andcopyrighted material of JAVAD GNSS. All rights are reserved. You may not use, access, copy,store, display, create derivative works of, sell, modify, publish, distribute, or allow any third partyaccess to, any graphics, content, information or data in this Manual without JAVAD GNSS’express written consent and may only use such information for the operation of your software.The information and data in this Manual are a valuable asset of JAVAD GNSS and are developedby the expenditure of considerable work, time and money, and are the result of original selection,coordination and arrangement by JAVAD GNSS.
TRADEMARKS – Giodis™, JAVAD GNSS® are trademarks or registered trademarks of JAVADGNSS. Windows® is a registered trademark of Microsoft Corporation, Bluetooth® word mark isowned by the Bluetooth SIG, Inc. Product and company names mentioned herein may betrademarks of their respective owners.
DISCLAIMER OF WARRANTY – EXCEPT FOR ANY WARRANTIES IN THIS MANUALOR A WARRANTY CARD ACCOMPANYING THE PRODUCT, THIS MANUAL ANDSOFTWARE ARE PROVIDED “AS-IS.” THERE ARE NO OTHER WARRANTIES. JAVADGNSS DISCLAIMS ANY IMPLIED WARRANTY OF MERCHANTABILITY OR FITNESSFOR ANY PARTICULAR USE OR PURPOSE. JAVAD GNSS AND ITS DISTRIBUTORSSHALL NOT BE LIABLE FOR TECHNICAL OR EDITORIAL ERRORS OR OMISSIONS
5www.javad.com

PrefaceTerms and Conditions
CONTAINED HEREIN; NOR FOR INCIDENTAL OR CONSEQUENTIAL DAMAGESRESULTING FROM THE FURNISHING, PERFORMANCE OR USE OF THIS MATERIAL.SUCH DISCLAIMED DAMAGES INCLUDE BUT ARE NOT LIMITED TO LOSS OF TIME,LOSS OR DESTRUCTION OF DATA, LOSS OF PROFIT, SAVINGS OR REVENUE, ORLOSS OF THE PRODUCT'S USE. IN ADDITION, JAVAD GNSS IS NOT RESPONSIBLE ORLIABLE FOR DAMAGES OR COSTS INCURRED IN CONNECTION WITH OBTAININGSUBSTITUTE PRODUCTS OR SOFTWARE, CLAIMS BY OTHERS, INCONVENIENCE, ORANY OTHER COSTS. IN ANY EVENT, JAVAD GNSS SHALL HAVE NO LIABILITY FORDAMAGES OR OTHERWISE TO YOU OR ANY OTHER PERSON OR ENTITY IN EXCESSOF THE PURCHASE PRICE FOR THE TRACY SOFTWARE.
LICENSE AGREEMENT – Use of any computer programs or software supplied by JAVADGNSS or downloaded from a JAVAD GNSS website (the “Software”) in connection with theJAVAD GNSS receivers constitutes acceptance of these Terms and Conditions in this Manual andan agreement to abide by these Terms and Conditions. The user is granted a personal, non-exclusive, non-transferable license to use such Software under the terms stated herein and in anycase only with a single computer. You may not assign or transfer the Software or this licensewithout the express written consent of JAVAD GNSS. This license is effective until terminated.You may terminate the license at any time by destroying the Software and Manual. JAVAD GNSSmay terminate the license if you fail to comply with any of the Terms or Conditions. You agree todestroy the Software and manual pon termination of your use of software. All ownership,copyright and other intellectual property rights in and to the Software belong to JAVAD GNSS. Ifthese license terms are not acceptable, return any unused software and manual.
CONFIDENTIALITY – This Manual, its contents and the Software (collectively, the“Confidential Information”) are the confidential and proprietary information of JAVAD GNSS.You agree to treat JAVAD GNSS' Confidential Information with a degree of care no less stringentthat the degree of care you would use in safeguarding your own most valuable trade secrets.Nothing in this paragraph shall restrict you from disclosing Confidential Information to youremployees as may be necessary or appropriate to operate Giodis Software. Such employees mustalso keep the Confidentiality Information confidential. In the event you become legally compelledto disclose any of the Confidential Information, you shall give JAVAD GNSS immediate notice sothat it may seek a protective order or other appropriate remedy.
WEBSITE; OTHER STATEMENTS – No statement contained at the JAVAD GNSS website (orany other website) or in any other advertisements or JAVAD GNSS literature or made by anemployee or independent contractor of JAVAD GNSS modifies these Terms and Conditions(including the Software license, warranty and limitation of liability).
MISCELLANEOUS – The above Terms and Conditions may be amended, modified, superseded,or canceled, at any time by JAVAD GNSS. The above Terms and Conditions will be governed by,
6 www.javad.com

PrefaceAbout this Manual
Symbols and Typographic Conventions
and construed in accordance with, the laws of the State of California, without reference to conflictof laws.
About this ManualThis User Manual is designed to help you get familiar with the Giodis User Interface andintroduce you to the Giodis main features. The Manual includes Glossary with terms explanationfor better understanding unfamiliar or complicated terms.
Symbols and Typographic Conventions
This Manual uses the following text conventions:
Example Description.Port Titles of dialog windows/boxes, names of menu options.
Screen Captures
This Manual includes sample screen captures. Your actual screen can look slightly different fromthe sample screen due to the receiver you have connected, operating system used and settings youhave specified. This is normal and not a cause for concern.
Technical SupportOccasionally, Giodis users encounter problems during installation or use of the program. Shouldyou have any problems with Giodis Software, please contact JAVAD GNSS Support([email protected]).
7www.javad.com

PrefaceTechnical SupportScreen Captures
8 www.javad.com

Chapter 1
INTRODUCTION
1.1. WelcomeWelcome to Giodis™, the full-featured office post-processing software. The Giodis softwarecombines the modern fluent user interface with the established functionality. Geodis solves widerange of practical surveying tasks using advanced scientific approach. Geodis includes thefollowing key features:
• tools for data files importing• high-precision post-processing engine• network adjustment of vectors and multi-site subnets• extended coordinate systems database.
1.2. System RequirementsBefore installing and running Giodis, be sure, that your computer satisfies the followingrequirements:
• Pentium III-compatible processor or higher• Microsoft Windows XP, Vista• RAM: 1GB (minimum) or 2GB or more (recommended)• 150MB free disk space and 7GB additional free disk space (for World Map)
9www.javad.com

IntroductionSystem Requirements
10 www.javad.com
Chapter 2
GIODIS USER INTERFACE This chapter describes elements of the Giodis user interface. In general the Giodis user interface isclear and intuitive understandable. But getting acquainted with the main components of the userinterface and its design concept is the best way to start job in Giodis. In future it helps users toavoid complexities on finding needed tools or options and to focus on making their jobs.
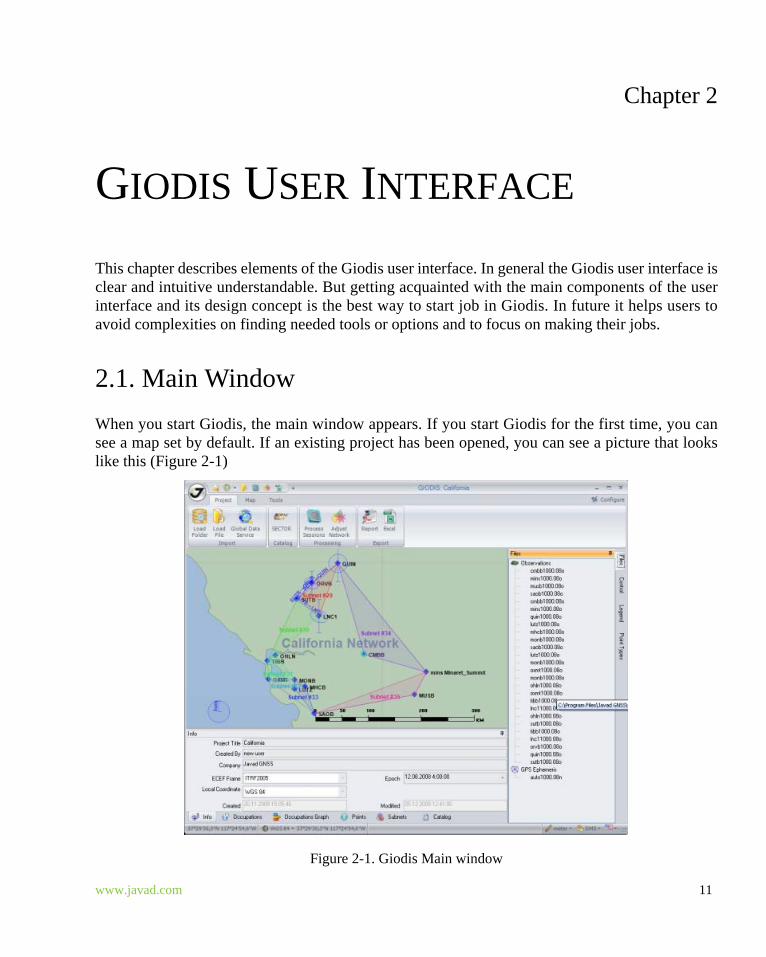
2.1. Main WindowWhen you start Giodis, the main window appears. If you start Giodis for the first time, you cansee a map set by default. If an existing project has been opened, you can see a picture that lookslike this (Figure 2-1)
Figure 2-1. Giodis Main window
11www.javad.com

Giodis User InterfaceJavad Button
This window includes the following areas:
• Javad button• Ribbon• Quick Access Toolbar• Map with Tab Collection• Status bar and Language switch.
2.2. Javad ButtonThe Javad button enables you to access the program functions and capabilities from one point.Clicking the Javad button you open the Projects menu, displaying commands that operate on theproject as a whole. The Figure 2-2 shows the such commands, these are: New, New Encrypted,Open, Save, Save as, Close, Exit.
Figure 2-2. Javad button and Projects menu
12 www.javad.com
Giodis User InterfaceRibbon
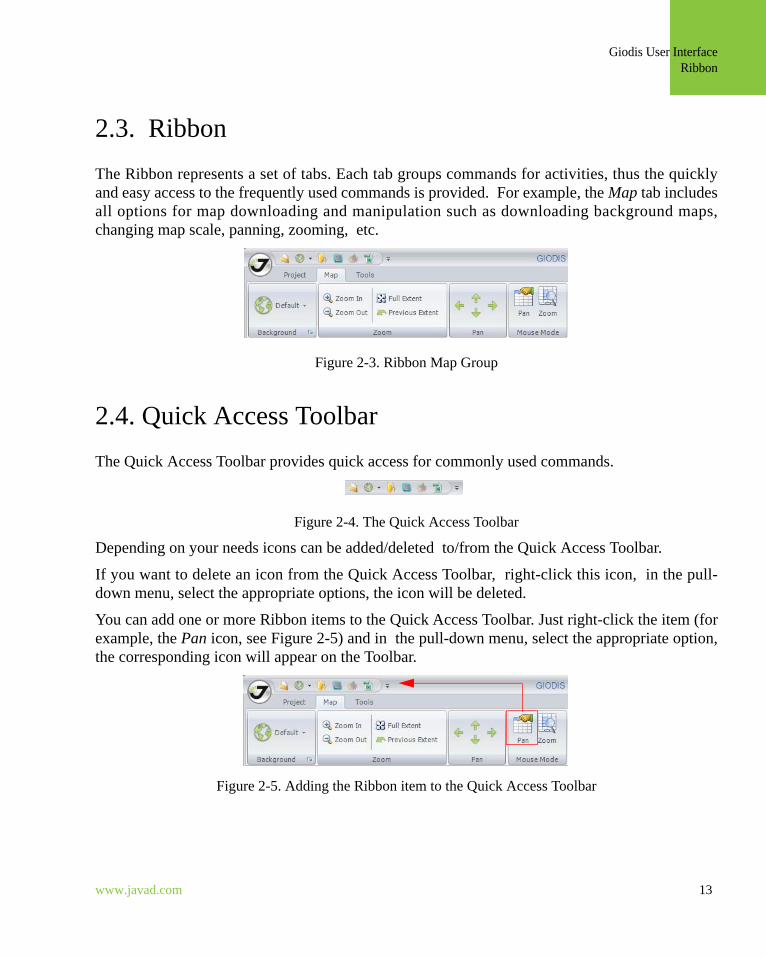
2.3. Ribbon The Ribbon represents a set of tabs. Each tab groups commands for activities, thus the quicklyand easy access to the frequently used commands is provided. For example, the Map tab includesall options for map downloading and manipulation such as downloading background maps,changing map scale, panning, zooming, etc.
Figure 2-3. Ribbon Map Group
2.4. Quick Access ToolbarThe Quick Access Toolbar provides quick access for commonly used commands.
Figure 2-4. The Quick Access Toolbar
Depending on your needs icons can be added/deleted to/from the Quick Access Toolbar.
If you want to delete an icon from the Quick Access Toolbar, right-click this icon, in the pull-down menu, select the appropriate options, the icon will be deleted.
You can add one or more Ribbon items to the Quick Access Toolbar. Just right-click the item (forexample, the Pan icon, see Figure 2-5) and in the pull-down menu, select the appropriate option,the corresponding icon will appear on the Toolbar.
Figure 2-5. Adding the Ribbon item to the Quick Access Toolbar
13www.javad.com
Giodis User InterfaceMap and Tab Collection
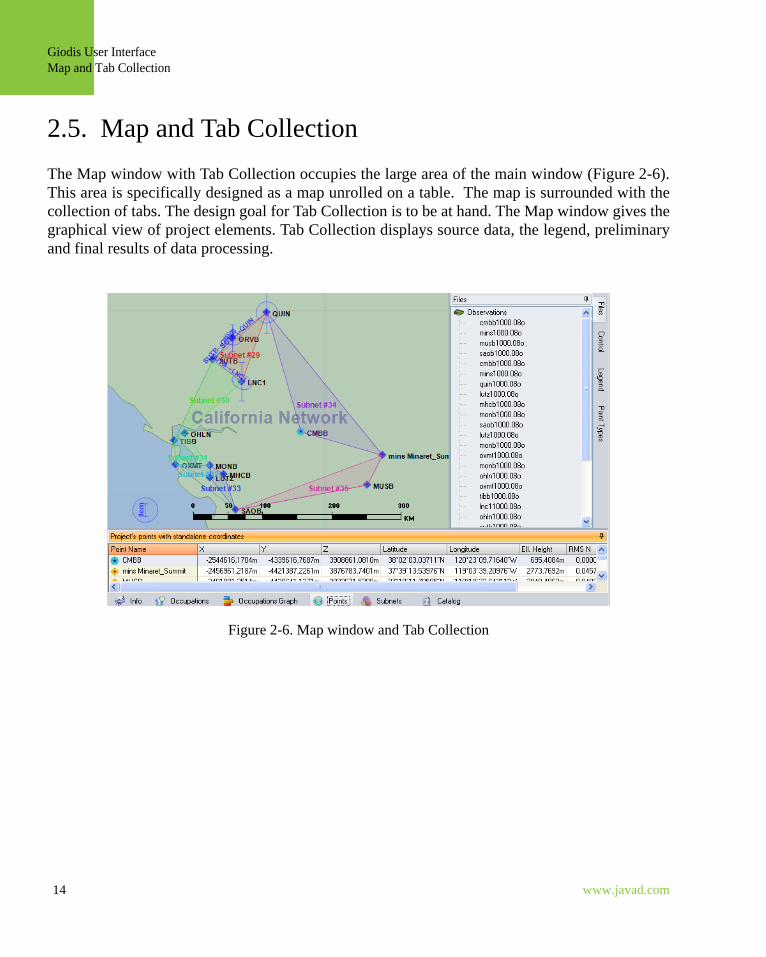
2.5. Map and Tab CollectionThe Map window with Tab Collection occupies the large area of the main window (Figure 2-6).This area is specifically designed as a map unrolled on a table. The map is surrounded with thecollection of tabs. The design goal for Tab Collection is to be at hand. The Map window gives thegraphical view of project elements. Tab Collection displays source data, the legend, preliminaryand final results of data processing.
Figure 2-6. Map window and Tab Collection
14 www.javad.com

Giodis User InterfaceStatus Bar
2.6. Status Bar The Status bar provides current information while using Giodis (Figure 2-7) and ability to changesome settings. The Status bar includes the following elements:
The coordinates of the current mouse cursor position in WGS 84.
The Coordinate Systems split button allowing you to set a coordinate system for displayingcoordinates of the current cursor mouse position.
The coordinates of the current mouse cursor position in the selected coordinate system.
The Linear Measurement Unit split button allowing you to select a unit for linear values. Thedefault unit is meter.
The Angular Measurement Unit split button allowing you to select a unit for angular values.The default unit is degree, minute, second.
The Language switch allowing you to select the language for the user interface.
Figure 2-7. Status bar
1
2
3
4
5
6
1 2 3 4 5 6
15www.javad.com
Giodis User InterfaceStatus Bar
16 www.javad.com

Chapter 3
MANAGING PROJECTS
Giodis Project is intended to display (in graphical and tabular view) imported data, dataprocessing and represent processing results. Only one project can be active. A project is savedautomatically while closing the project. This chapter learns how to:
• create a new project• create a new encrypted project• open an existing project• save a project• set the configuration settings and use them for future projects• close a project.
3.1. Creating a New ProjectTo create a new project, do the following steps:
17www.javad.com

Managing ProjectsCreating a New Project
1. Click on the Quick Access toolbar (Figure 3-1). Or click the Javad button, then theNew button (Figure 3-1).
Figure 3-1. The New button
2. It opens the Save as dialog window (Figure 3-2). In this dialog window, navigate to thedesired folder, enter a project name, and click Save.
Note: Notice that the file extension *.giodis is added automatically to all projects created with Giodis.
Figure 3-2. Save as dialog window
18 www.javad.com

Managing ProjectsCreating a New Encrypted Project
3. The new project saves on the computer and information on the new project appears in theInfo tab (Figure 3-3).
Figure 3-3. New project created
4. Enter the following information:• your name in the Created By field• your company name in the Company field• select the ECEF frame for IGS/CORS points, if they are planned to be used in the project• select an epoch at which the ITRF coordinates will be transformed from a specified epoch
(e. g., 2000 or 2005). (To get information on ITRF general concepts, go to http://itrf.ensg.ign.fr/general.php).
Note: It is important to know, when you have selected the epoch, you should click (the SECTORbutton on the Ribbon) to download the coordinates of the ECEF frame selected in the ECEFFrame field at the epoch in the Epoch field.
• select the local coordinate system, which control positions in the project are referred to.
Note: Notice that the Created and Modified field displaying the date and time when the project wascreated and modified are filled in and updated automatically (they are not editable).
5. View and edit, if needed, the configuration settings. To open the Configuration dialogwindow, click in the upper right corner of the main window. (See the “How toUse the Configuration Settings” on page 24 for detailed information on the projectconfiguration).
3.2. Creating a New Encrypted ProjectYou might want to protect your control and measurement data imported into a project from third-party access. In this case you should create an encrypted project with a password. Every timewhen opening the encrypted project, Giodis requests the password.
To create a new encrypted project, do the following steps:
19www.javad.com

Managing ProjectsCreating a New Encrypted Project
1. Click the Javad button, to open the Project menu and then, click the New Encryptedbutton (Figure 3-4).
Figure 3-4. Projects menu. New Encrypted button
2. It opens the Save as dialog window (Figure 3-5). In this dialog window, navigate to thedesired folder, enter the project name, and click Save.
Figure 3-5. Save as dialog window
20 www.javad.com

Managing ProjectsOpening an Existing Project
3. It opens the Please Enter a Password dialog window.
Figure 3-6. Please Enter a Password dialog window
4. Type a password. While you are typing the password, you can read the comments at thebottom of the dialog window regarding the secure degree of the password.
5. To confirm the password, type a password once more in the Confirm field.6. Click OK. This dialog window closes. The new encrypted project saves on the computer
and the main window changes displaying information on the new project in the Info tab.7. Enter the following information:
• your name in the Created By field• your company name in the Company field• select the ECEF frame for IGS/CORS points, if they are planned to be used in the project. • select an epoch at which the ITRF coordinates will be transformed from a specified epoch
(e. g., 2000 or 2005). (To get information on ITRF general concepts, go to http://itrf.ensg.ign.fr/general.php).
Note: It is important to know, when you have selected the epoch, you should click (the SECTORbutton on the Ribbon) to download the coordinates of the ECEF frame selected in the ECEFFrame field at the epoch in the Epoch field.
• select the local coordinate system, which control positions in the project are referred to.
Note: Notice that the Created and Modified field displaying the date and time when the project wascreated and modified are filled in and updated automatically (they are not editable).
8. View and edit, if needed, the configuration settings. To open the Configuration dialogwindow, click in the upper right corner of the main window. (See the “How toUse the Configuration Settings” on page 24 for detailed information on the projectconfiguration).
3.3. Opening an Existing ProjectTo open an existing project, do the following steps:
21www.javad.com

Managing ProjectsOpening an Existing Project
1. Click the Javad button, to open the Projects menu.2. Click the project you want to open in the Recent Project & Catalogs list (Figure 3-7).
Figure 3-7. The Recent Projects & Catalogs list
Or click the Open button (Figure 3-8). It opens the standard Open dialog window allowing you to select the project you want to open.
Figure 3-8. Projects menu. The Open button
22 www.javad.com

Managing ProjectsSaving a Project
3. If the project you want to open is encrypted, the Please Enter a Password dialog boxappears (Figure 3-9). Enter a password and click OK.
Figure 3-9. Please Enter a Password dialog box
4. The project opens in the main window.
3.4. Saving a ProjectThere are two ways to save an active project: using the current project's name and specifying adifferent name and location.
To save the current project with the same name, do the following steps:
1. Click the Javad button, to open the Projects menu.2. Click the Save button (Figure 3-10). The project will be saved without changing its name and location.
Figure 3-10. Projects menu. Save button
23www.javad.com

Managing ProjectsHow to Use the Configuration Settings
Note: The current project is saved automatically while closing the project or exiting the program. If youwant to accept any changes without closing the project, use the Save option as described above.
To save the current project with a different name and in a different location, do the followingsteps:
1. Click the Javad button, to open the Projects menu.2. Click the Save as button (Figure 3-11). It opens the Save as dialog window.
Figure 3-11. Projects menu. Save as button
3. In the Save as dialog window, select a folder, if you want to change the project location. 4. In the Save as dialog window, enter a new project name, if you want to change the project
name.5. Click the Save button, the project is saved with the name and location you defined.
3.5. How to Use the Configuration SettingsGiodis applies the configuration settings to any project. The configuration settings includemeasurement units and processing parameters. You can view and change the default configurationsettings. The newly entered settings can be saved in the configuration file (*.giocfg) and used forother projects.
To change and save the configuration settings, do the following steps:
24 www.javad.com
Managing ProjectsHow to Use the Configuration Settings
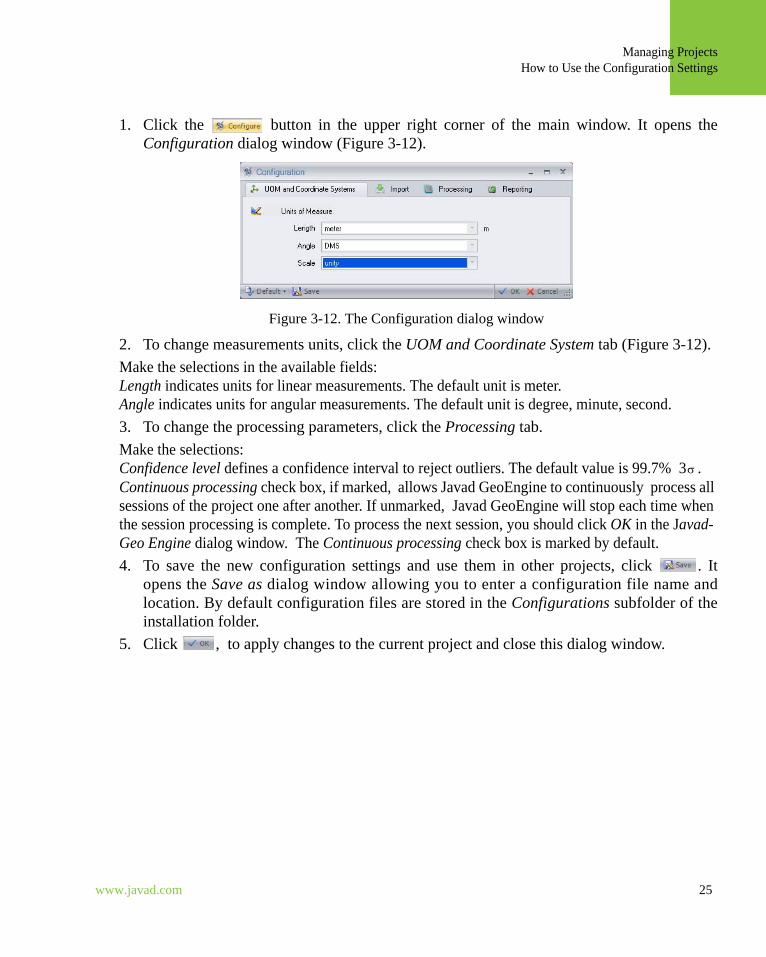
1. Click the button in the upper right corner of the main window. It opens theConfiguration dialog window (Figure 3-12).
Figure 3-12. The Configuration dialog window
2. To change measurements units, click the UOM and Coordinate System tab (Figure 3-12). Make the selections in the available fields:Length indicates units for linear measurements. The default unit is meter.Angle indicates units for angular measurements. The default unit is degree, minute, second.3. To change the processing parameters, click the Processing tab.Make the selections: Confidence level defines a confidence interval to reject outliers. The default value is 99.7% 3 .Continuous processing check box, if marked, allows Javad GeoEngine to continuously process all sessions of the project one after another. If unmarked, Javad GeoEngine will stop each time when the session processing is complete. To process the next session, you should click OK in the Javad-Geo Engine dialog window. The Continuous processing check box is marked by default.4. To save the new configuration settings and use them in other projects, click . It
opens the Save as dialog window allowing you to enter a configuration file name andlocation. By default configuration files are stored in the Configurations subfolder of theinstallation folder.
5. Click , to apply changes to the current project and close this dialog window.
σ
25www.javad.com

Managing ProjectsClosing a Project
3.6. Closing a ProjectTo close a project, do the following steps:1. Click the Javad button, to open the Project menu and then, click the Close button.
Figure 3-13. Close button
2. The active project will be closed.
26 www.javad.com

Chapter 4
WORKING WITH PROJECT
If the project is open, you can do the following tasks:
1. importing data files2. processing data (static observations)3. performing network adjustment4. generating a report.
All these tasks are available to perform by using the Project tab of the Ribbon.
4.1. Importing Data FilesGiodis allows you to import data files to a project from a computer and from a remote serverusing the Internet.
This version of Giodis supports importing the JPS and RINEX files from a computer andcoordinates of CORS/IGS reference stations as well as RINEX files via the Internet.
If you want to import files from your computer to the project, you can use one of the ways:importing a whole folder or a single file. The former allows importing all files and subfoldersunder the folder. The latter allows importing only a selected file (or multiple files). The ways aredescribed in “Importing a Folder” on page 28 and in “Importing a File” on page 31correspondingly.
Giodis allows you to download measurement data from web services that collect and archive thisdata. “Downloading Measurement Data from a Remote Server” on page 31 gives instructions onhow to do it.
If you want to use the IGS/CORS reference points in your project, Giodis provides you the abilityto download the IGS/CORS reference points positions from a web service to the project.“Downloading IGS/CORS Stations Positions” on page 33 gives instructions on how to do it.
27www.javad.com
Working with ProjectImporting Data FilesImporting a Folder
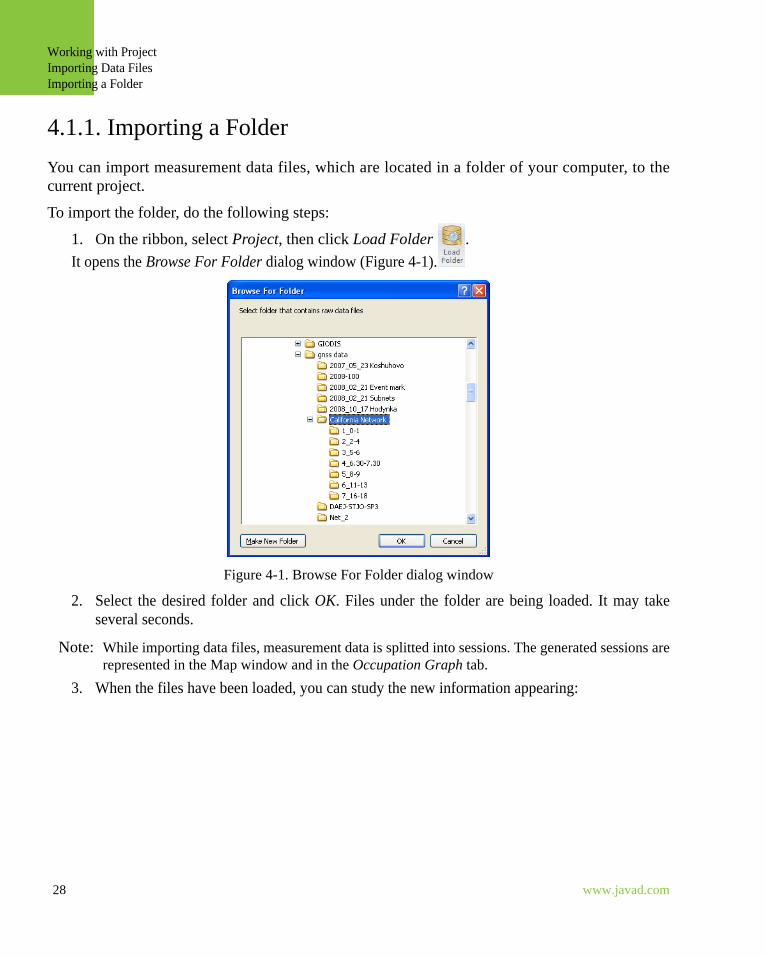
4.1.1. Importing a FolderYou can import measurement data files, which are located in a folder of your computer, to thecurrent project.
To import the folder, do the following steps:
1. On the ribbon, select Project, then click Load Folder .It opens the Browse For Folder dialog window (Figure 4-1).
Figure 4-1. Browse For Folder dialog window
2. Select the desired folder and click OK. Files under the folder are being loaded. It may takeseveral seconds.
Note: While importing data files, measurement data is splitted into sessions. The generated sessions arerepresented in the Map window and in the Occupation Graph tab.
3. When the files have been loaded, you can study the new information appearing:
28 www.javad.com

Working with ProjectImporting Data Files
Importing a Folder
• The imported files are arranged and listed in the Files tab.
Figure 4-2. Files tab, data files have been imported
• Network view appears in the Map window. • The detailed information on each point occupation is given in the Occupation tab
(Figure 4-3).
Figure 4-3. Occupations tab. Measurements data files imported
The Occupation tab displays the following information: the point’s name, mode, observation period, antenna height and type, navigational coordinates and deviations.The Mode column is editable. Check that all points in this example have the Enable mode. It means that all occupations will be accepted for further processing.
29www.javad.com
Working with ProjectImporting Data FilesImporting a Folder
The Deviation column is shown for checking points that have the same name but referred to differ-ent locations. For a point that was occupied only once (and therefore no check data for its position is available), the zero deviation is shown. If a point was occupied more than one time, the devia-tions between navigation positions for its occupations are given, referred to the occupation position that has minimal RMS value (for this reference position, zero deviation is assigned).
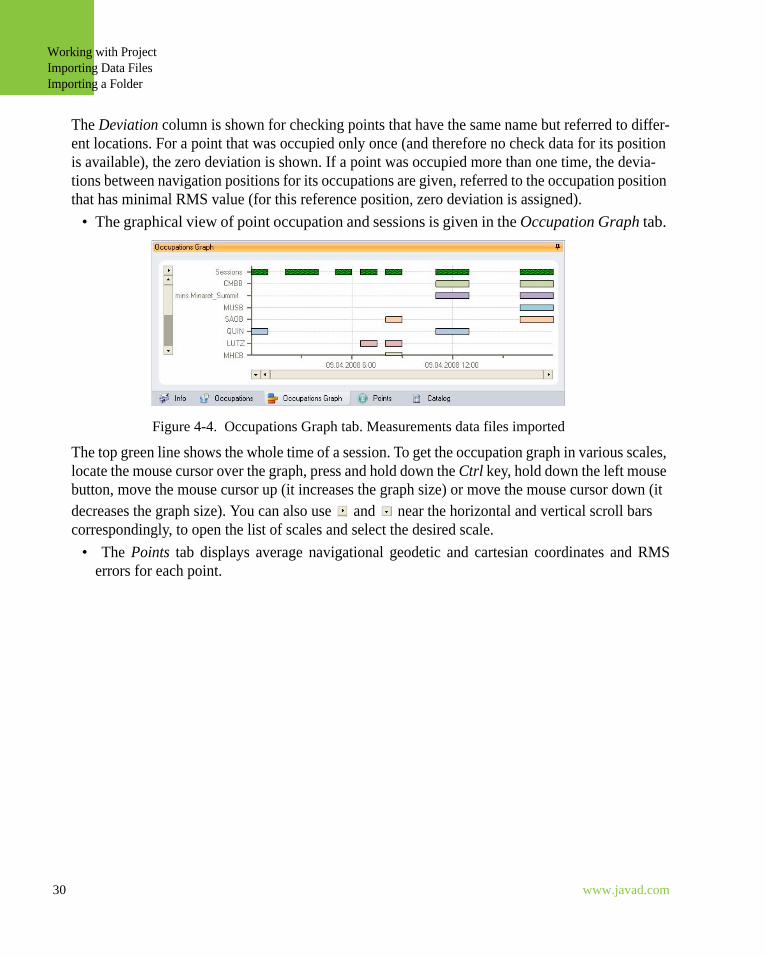
• The graphical view of point occupation and sessions is given in the Occupation Graph tab.
Figure 4-4. Occupations Graph tab. Measurements data files imported
The top green line shows the whole time of a session. To get the occupation graph in various scales, locate the mouse cursor over the graph, press and hold down the Ctrl key, hold down the left mouse button, move the mouse cursor up (it increases the graph size) or move the mouse cursor down (it decreases the graph size). You can also use and near the horizontal and vertical scroll bars correspondingly, to open the list of scales and select the desired scale.
• The Points tab displays average navigational geodetic and cartesian coordinates and RMSerrors for each point.
30 www.javad.com

Working with ProjectImporting Data Files
Importing a File
4.1.2. Importing a FileYou can import a measurement data file (or multiple files, not a whole folder), located on yourcomputer, to the current project.
To import a file, do the following steps:
1. On the Ribbon, select Project, then click Load File .It opens the Open dialog window.2. Navigate to the folder in which the file is located, select the file and click Open.
Note: To select multiple sequential files, press Shift and then use the Up and Down keys. To selectnonsequential files press Ctrl and click the desired files.
3. When the file has been loaded, you can study the new information appearing:• The imported files are arranged and listed in the Files tab.• Network view appears in the Map window. • The detailed information on each point occupation is given in the Occupation tab
(Figure 4-3).• The graphical view of point occupations and sessions is given in the Occupation Graph
tab (Figure 4-4).• The Points tab displays average navigational geodetic and cartesian coordinates and RMS
errors for each point.
4.1.3. Downloading Measurement Data from a Remote ServerNote: Before doing actions described below, be sure your computer is connected to the Internet and
internet connection is not failed, otherwise it disables to retrieve data from web services.
To download measurement data from a remote server, do the following steps:
1. On the Map, draw a rectangle by using the drag and drop technique. The rectangle boundsa region for which measurement data will be downloaded.
31www.javad.com

Working with ProjectImporting Data FilesDownloading Measurement Data from a Remote Server
2. Click on the Ribbon, the Project tab. It opens the Global Data Service dialogwindow (Figure 4-5).
Figure 4-5. Global Data Service dialog window
3. In Timespan and Time of Search, select the needed observation date, it should be earlier thanthe current date. By default, the current date is set.
4. In Spatial Bounding Box, verify that the needed region is selected. 5. Click , the Search button. Giodis looks for CORS/IGS stations for the selected
region and lists them in a table.
Note: If no stations appear in the table, increase a value in the Timeout, ms field or reduce the region inSpatial Bounding Box and click the Search button again.
6. Select stations for downloading. By default, all stations are specified as Selected. 7. Click , the Download button. Giodis downloads the data files to the project. 8. When the data files have been downloaded, click the Occupations tab, to see the imported
data in the table. Also you can click the Occupation Graph tab, to view the observationsessions.
9. In the Occupations tab, select the data to be processed. In the Mode column, verify thatEnable is selected for the points to be processed.
32 www.javad.com

Working with ProjectImporting Data Files
Downloading IGS/CORS Stations Positions
4.1.4. Downloading IGS/CORS Stations PositionsIf you want to use the IGS/CORS reference points in your project, you can download theirpositions from the web service, that provides this data. Before doing actions described below,make sure that:
1. Your computer is connected to the Internet and internet connection is not failed.2. The IGS/CORS points, included o your project, have the same four-character names as in
the IGS/CORS data archive. If this is not so, you must correct them. To change the point’sname, select the Occupation tab, double-click the point’s name and type in the appropriatefour-character name.
To download the IGS/CORS reference station positions to the current project, do the followingsteps:
1. On the Ribbon, click . Giodis connects to the SOPAC web server and requests
positions for the IGS/CORS points of the project according to their four-character code names. 2. Select the Catalog tab, to view the downloaded the IGS/CORS reference points positions.
33www.javad.com

Working with ProjectProcessing Static ObservationsThe JavadGeo Engine Main Features
4.2. Processing Static ObservationsAfter the measurement data has been imported and splitted into sessions, you are ready to startprocessing.
In Giodis the JavadGeo engine makes static observation processing. “The JavadGeo Engine MainFeatures” on page 34 describes main features of the JavadGeo engine. “Running the JavadGeoEngine” on page 35 learns you how to run the engine and keep track of preliminary results.
4.2.1. The JavadGeo Engine Main FeaturesThe main features of the JavadGeo engine are as follows:
• multi-baseline (session) processing, that allows accounting for correlations betweensimultaneously observed vectors and removing the problem of trivial vectors. If a sessionincludes two-points observation, the engine fulfills traditional baseline processing.
• Un-differenced (zero-differenced) phase and code data are processed.• Lambda method of phase ambiguity resolution is used.• The meteodata library is used for a priori troposphere delay calculating. The library contains
the global spread meteodata. Meteodata for a surveyed point is interpolated based on the pointgeographical location and height, as well as the observation date and time.
• Direct impact and behavior of ionosphere and troposhere, satellite and receiver clocks onGNSS observations are estimated.
• Orbit relaxation parameters are determined.• The IGS/CORS reference points data and the user collected observation data are
processed jointly. This allows better estimating satellite clocks and orbit relaxationparameters thus improving the accuracy of surveyed points. This, in turn, enables to betterdetermine long baselines even without precise ephemeris.
• The effects of solid Earth tide on point positions are accounted for. • The result of the JavadGeo engine is:
• a multi-vector subnet, if the IGS/CORS reference points data is not used for processing or
• a multi-points subnet, if the IGS/CORS reference points data is used for processing.
34 www.javad.com

Working with ProjectProcessing Static ObservationsRunning the JavadGeo Engine
4.2.2. Running the JavadGeo Engine To run the JavadGeo Engine, do the following steps:
1. Create a project or open an existing project. (See Chapter 1 “Managing Projects”).2. Import measurement data files (See “Importing Data Files” on page 27).
Note: While importing data files, measurements data is splitted into sessions. The generated sessionsare represented in the Map window and in the Occupation Graph tab.
3. If you are working with IGS or CORS reference points, include the IGS/CORS pointpositions into the project. For this, you can use the following options:
• manually specify a point as ECEF control (See “Setting ECEF Control” on page 36).
Note: If the point has been specified as ECEF Control, it changes from to in the Points tab and on theMap.
• enable control data contained in the Control points catalog. Go to the Catalog tab, find theneeded control point, mark one or several check boxes in the Selected column.
Note: If the control point has been selected in the Control points catalog and included to the project, itchanges to in the Catalog tab and on the Map.
4. Process the sessions. Click Process Sessions on the Ribbon.
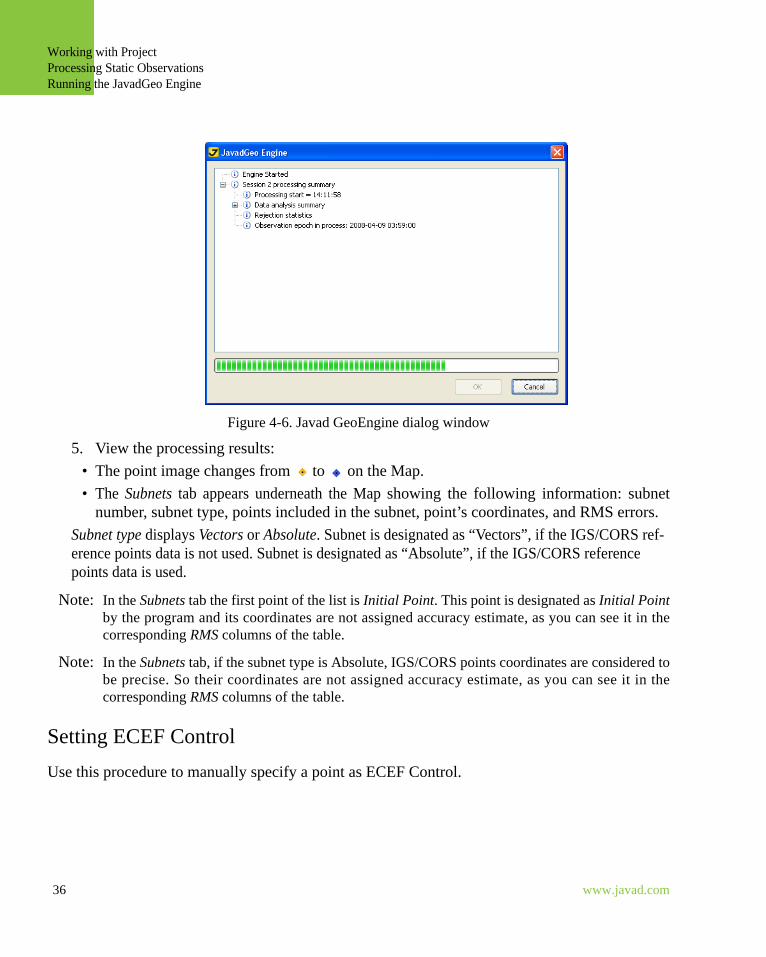
It opens the JavadGeo Engine dialog window displaying the processing progress bar and summary (Figure 4-6). Sessions of the project are processed one after another without stopping. When all sessions of the project have been processed, the Javad GeoEngine dialog window closes.
Note: If you want to see the results after finishing each session processing, clear the Continuousprocessing check box in the Configuration dialog window, the Processing tab. In this case youmust click OK (Figure 4-6) to begin processing of the next session.
35www.javad.com
Working with ProjectProcessing Static ObservationsRunning the JavadGeo Engine
Figure 4-6. Javad GeoEngine dialog window
5. View the processing results:• The point image changes from to on the Map.• The Subnets tab appears underneath the Map showing the following information: subnet
number, subnet type, points included in the subnet, point’s coordinates, and RMS errors. Subnet type displays Vectors or Absolute. Subnet is designated as “Vectors”, if the IGS/CORS ref-erence points data is not used. Subnet is designated as “Absolute”, if the IGS/CORS reference points data is used.
Note: In the Subnets tab the first point of the list is Initial Point. This point is designated as Initial Pointby the program and its coordinates are not assigned accuracy estimate, as you can see it in thecorresponding RMS columns of the table.
Note: In the Subnets tab, if the subnet type is Absolute, IGS/CORS points coordinates are considered tobe precise. So their coordinates are not assigned accuracy estimate, as you can see it in thecorresponding RMS columns of the table.
Setting ECEF ControlUse this procedure to manually specify a point as ECEF Control.
36 www.javad.com

Working with ProjectProcessing Static ObservationsRunning the JavadGeo Engine
1. In the Points tab, right click the Point Type cell next to the point you want to make a ECEFControl. It displays the ECEF Control option.
Figure 4-7. ECEF Control option
2. Click the ECEF Control option, it opens the ECEF Control dialog winow.
Figure 4-8. Set ECEF Control dialog window
3. Enter the point’s coordinates.4. Mark the ECEF Control check box. 5. Click OK. The ECEF Control dialog window closes. The point changes from to in the
table and on the Map. The point appears in the Catalog tab underneath the Map and in theControl tab on the right of the Map.
37www.javad.com

Working with ProjectPerforming Network AdjustmentThe Order of Adjustment
4.3. Performing Network AdjustmentThe adjustment has two main goals:
1. Detecting blunders in adjusted data.
2. Calculating the most reliable and accurate results (in our case -final local coordinates ofsurveyed points and their realistic error estimates).
The network adjustment is done in two steps:
First, the minimally constrained network adjustment (or, free adjustment) is performed in whichonly one station is held fixed. This allows to detect possible blunders in adjusted GNSS data (e.g.,missed antenna heights), and in control positions (say, misprint errors in control data catalogs).For this, different statistical tests are applied like global (Chi square) test or Tau test.
If there are no blunders in the adjusted data, the second step can be done - the fully constrainedadjustment in which all the known (published) coordinates of control points (horizontal and/orvertical) are held fixed. This allows to fit the GNSS network into the local control.
4.3.1. The Order of Adjustment1. All the processed subnets are assembled into a common network. The integrity of the networkis checked; it should not have any breaks.
2. The system of equations for the minimally constrained adjustment is formed. Depending on theapproach that was chosen to processing, the following types of subnets can be adjusted:
• Single baseline solutions, i.e., vectors and associated 3x3 covariance matrices. • Session processing solutions, i.e., a set of non-trivial vectors and the covariances between
them.• In case if field GNSS observations have been processed along with data from IGS/CORS
reference stations, the adjusted subnet consists of absolute ECEF coordinates and thecovariance matrix of the subnet.
All these types of processing subnets can be adjusted together.
3. Minimally constrained 3D adjustment of the GNSS subnets is performed; its results areanalyzed based on the Tau and Chi square (VPV) statistical tests. Tau test allows to detect andreject blunders in adjusted observations. VPV, or global test, is used to check whether the
38 www.javad.com

Working with ProjectPerforming Network Adjustment
The Order of Adjustment
observation error estimates made by the processing engine, are close to the expected. If this is so,the standard error of unit weight output by adjustment, is close to 1.
4. After finishing the minimally constrained adjustment a fully constrained adjustment is run. Theconstraints are horizontal and/or vertical coordinates of local control points.
The Giodis software allows three types of constrained adjustment:
• Horizontal adjustment in which only horizontal control coordinates (geodetic or grid) areknown. In this case the output results are adjusted horizontal positions of GNSS network.
• Vertical adjustment in which only elevations are used as control data. In this case the maingoal is to calculate point elevations referred to a local vertical datum.
• Three dimensional adjustment with both horizontal and vertical control. In this case,horizontal coordinates and heights of surveyed points are adjusted.
5. Because GNSS subnets and local control refer to different datums, the constrained adjustmentprocedure estimates the datum transformation parameters. Depending on the type of constrainedadjustment, Giodis estimates the following sets of transformation parameters:
• Horizontal transformation parameters - a shift (two parameters), azimuth rotation angleand scale - that describe the differences between horizontal positions given in global (e.g.,WGS84) and local datum.
Note: If the subnets not referred to ITRF are adjusted (i.e., the subnets were not tied to CORS/IGSstations), only rotation angle and scale parameters are estimated.
• Three parameters - the values for a slope (two parameters) and vertical shift - that describethe difference between heights referred to global WGS84 ellipsoid and to local verticaldatum.
Note: If the adjusted subnets were not tied to CORS/IGS stations, only slope parameters are estimated.• Seven parameters for both horizontal (four above mentioned parameters) and vertical
(three above mentioned parameters) transformation.
Note: If the adjusted subnets were not tied to CORS/IGS stations, only four parameters are estimated -three rotation angles and scale.
Checking the quality of control positions.To check the quality of your local control, do the next steps:
1. Perform minimally constrained (free) adjustment of the GPS network.
39www.javad.com
Working with ProjectPerforming Network AdjustmentThe Order of Adjustment
2. After the free adjustment is successfully finished (i.e., all blunder vectors have been detectedand removed from the network), do the constrained adjustment with minimal control. At this step,constrain the adjustment solution by only one horizontal control position (in case of horizontaladjustment) or by one fixed height (when you are interested in adjusting vertical positions), or byboth horizontal and vertical coordinates when doing three dimensional adjustment. Note that inthe latter case you may use fixed horizontal coordinates and height that refer to different controlpoints.
3. In this adjustment, for all points of your network (including control points) the localcoordinates are calculated. Compare the calculated coordinates of the control points (other thanthe point that was used as fixed) with their published (true) values. If the differences are morethan expected the corresponding coordinates may be incorrect. Check the suspect coordinates; atworst, do not use the corresponding control point positions in the final adjustment. It also may beso that the calculated position differences for all points are big but very close to each other. Thismay indicate that an error occurs in the position of the point that was chosen as fixed. In this case,select another control point and try Step 3 again.
4. After all your control coordinates have been successfully checked, you may do the final step,i.e., perform the fully constrained adjustment.
40 www.javad.com
Working with ProjectPerforming Network Adjustment
Running the JavadGeo Network Adjustment
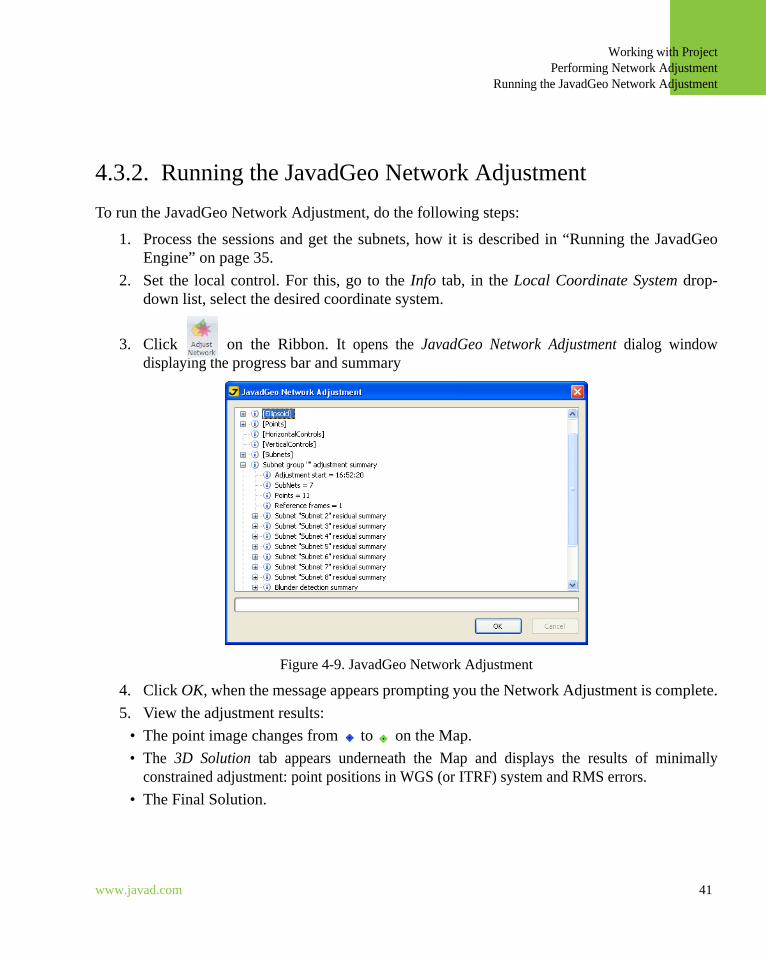
4.3.2. Running the JavadGeo Network AdjustmentTo run the JavadGeo Network Adjustment, do the following steps:
1. Process the sessions and get the subnets, how it is described in “Running the JavadGeoEngine” on page 35.
2. Set the local control. For this, go to the Info tab, in the Local Coordinate System drop-down list, select the desired coordinate system.
3. Click on the Ribbon. It opens the JavadGeo Network Adjustment dialog windowdisplaying the progress bar and summary
Figure 4-9. JavadGeo Network Adjustment
4. Click OK, when the message appears prompting you the Network Adjustment is complete.5. View the adjustment results:
• The point image changes from to on the Map.• The 3D Solution tab appears underneath the Map and displays the results of minimally
constrained adjustment: point positions in WGS (or ITRF) system and RMS errors.• The Final Solution.
41www.javad.com

Working with ProjectGenerating a ReportRunning the JavadGeo Network Adjustment
4.4. Generating a ReportYou can export data (such as tables, charts, and maps) from the current project to the XLS fileformat. Creating a report allows you to output data in the same manner as it is organized in theproject and then view, manipulate and print this data taking advantages of the standard MicrosoftExcel application. The report contains several spreadsheets, including:
• Standalone_Points to represent point’s coordinates similarly the Points tab• Occupation_Charts to represent the graphical view of occupations and sessions similarly
the Occupations Graph tab• Map to represent the network view on a map.
You can generate a report on each stage of your work with the project.
To generate a report, do the following steps:
1. Click on the Quick Access Toolbar or on the Ribbon. The Save as dialog windowopens.
2. Navigate to the location you want to save the file and type in the file name.
Note: By default, the file is saved in the Reports folder and the file name consists of the subnet’s nameand file creation date and time.
3. Click Save button, to export data to the file. It runs Microsoft Excel and opens this file.See, for example, Figure 4-10.
Figure 4-10. Report in XLS file format
42 www.javad.com
Chapter 5
MAP OPTIONS
Giodis displays maps as a background to show location of surveyed points and control data.Giodis uses maps developed by Map SuiteTM from ThinkGeo. There are three types of mapsavailable:
• Global includes major road level maps of the World• USA includes scalable street level maps of USA• Canada includes scalable street level maps of Canada.
This chapter learns how to:
• display a map• move around a map • display a layer• get point coordinates.
5.1. Displaying a MapYou can select one of the several available maps for displaying in the Map window.
Giodis uses the Default map unless you select another from the list. The Default map is a non-detailed scalable map covering the globe.
43www.javad.com
Map OptionsDisplaying a Map
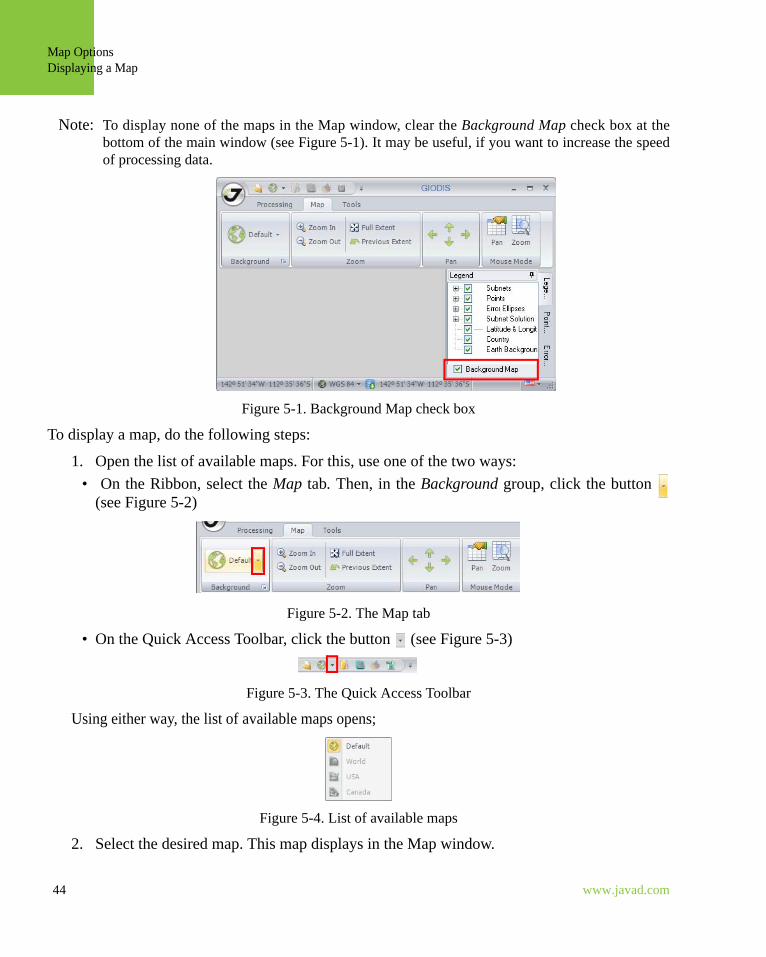
Note: To display none of the maps in the Map window, clear the Background Map check box at thebottom of the main window (see Figure 5-1). It may be useful, if you want to increase the speedof processing data.
Figure 5-1. Background Map check box
To display a map, do the following steps:
1. Open the list of available maps. For this, use one of the two ways:• On the Ribbon, select the Map tab. Then, in the Background group, click the button
(see Figure 5-2)
Figure 5-2. The Map tab
• On the Quick Access Toolbar, click the button (see Figure 5-3)
Figure 5-3. The Quick Access Toolbar
Using either way, the list of available maps opens;
Figure 5-4. List of available maps
2. Select the desired map. This map displays in the Map window.
44 www.javad.com

Map OptionsMoving Around a Map
5.2. Moving Around a MapYou can zoom and pan your map in the Map window. Use the options of the Map tab on theRibbon depending on your needs and explanations below.
The Zoom group includes the following options:
Figure 5-5. Zoom group
Zoom in increases the scale of the map.
Zoom out decreases the scale of the map.
Full Extent extents the map to its default maximum size.
Previous Extent saves all previous map extents and goes back any times you want.
The Pan group moves the map up, down, right and left (see Figure 5-6). Click the appropriatearrow to move the map in the direction indicated by the arrow.
Figure 5-6. Pan group
The Mouse Mode group includes the following options (see Figure 5-7):
Figure 5-7. Mouse Mode group. The Pan mode is on
Pan changes the mouse cursor to a hand and moves the map. Hold the mouse button down whiledragging the map in the desired direction, then release the button.
Zoom allows to use the mouse wheel for zooming the map. Move the mouse wheel forward/backward to zoom in/out the map.
45www.javad.com

Map OptionsDisplaying a Layer
5.3. Displaying a LayerYou can view layers that form the current map as well as display/hide a layer. The Legend taballows you to view the list of layers and control layers appearing.
All layers are visible by default. To display/hide the layer, mark/clear the check box next to layer(see Figure 5-8).
Figure 5-8. Legend tab
5.4. Getting Point CoordinatesYou can get coordinates of the current mouse cursor position. Status bar displays thesecoordinates in two coordinate systems. One is WGS 84, the other can be selected.
To get point coordinates, do the following steps:
1. Locate the mouse cursor over the point, whose coordinates you want to know. 2. View the point coordinates in WGS 84 on the left (see Figure 5-9)
Figure 5-9. Point coordinates in WGS 84
3. If you want to get coordinates in another coordinate system, select it from the list of theFavorite coordinate systems (see Figure 5-10).
Figure 5-10. Favorite Coordinate System list
46 www.javad.com

Map OptionsGetting Point Coordinates
4. View the point coordinates in this coordinate system on the right (see Figure 5-11).
Figure 5-11. Point coordinates in the selected coordinate system
Note: If you want to change measurement units, use the corresponding split buttons on the Status bar.Both linear and angular measurement units are available for changing.
47www.javad.com

Map OptionsGetting Point Coordinates
48 www.javad.com
Chapter 6
TOOLS
6.1. Coordinate CalculatorGiodis Calculator is intended to transform point’s coordinates from one coordinate system toanother, as well as to convert an orthometric height to an ellipsoidal one and vice versa.Calculator allows you to perform transformation between any two coordinate systems if atransformation model between them is known.
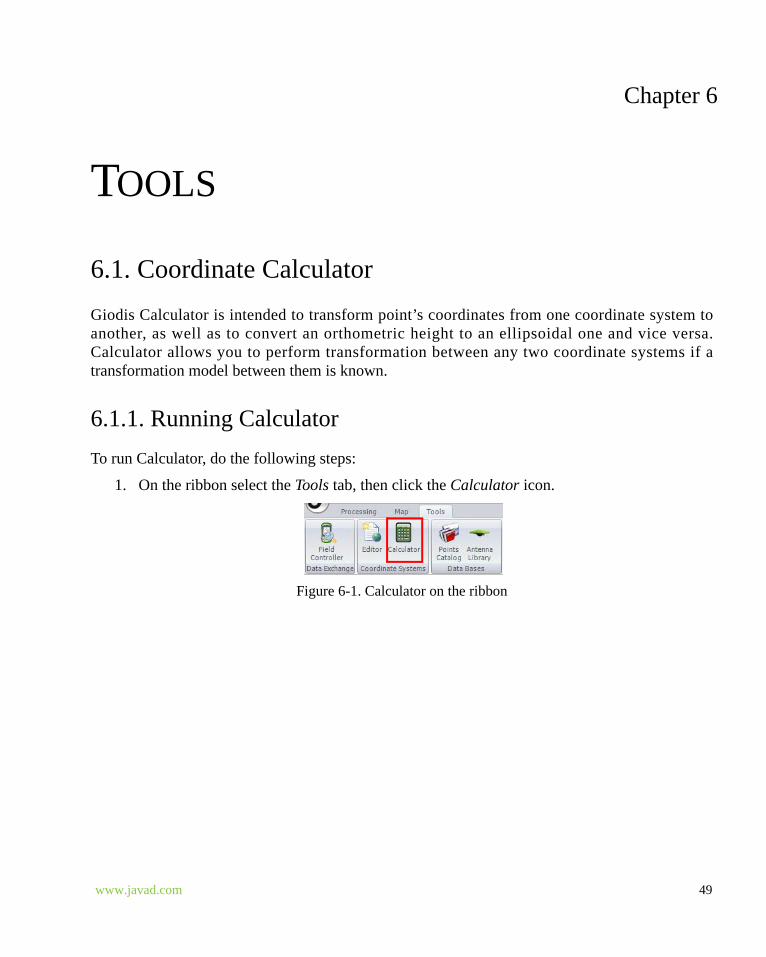
6.1.1. Running CalculatorTo run Calculator, do the following steps:
1. On the ribbon select the Tools tab, then click the Calculator icon.
Figure 6-1. Calculator on the ribbon
49www.javad.com
ToolsCoordinate CalculatorUsing Calculator
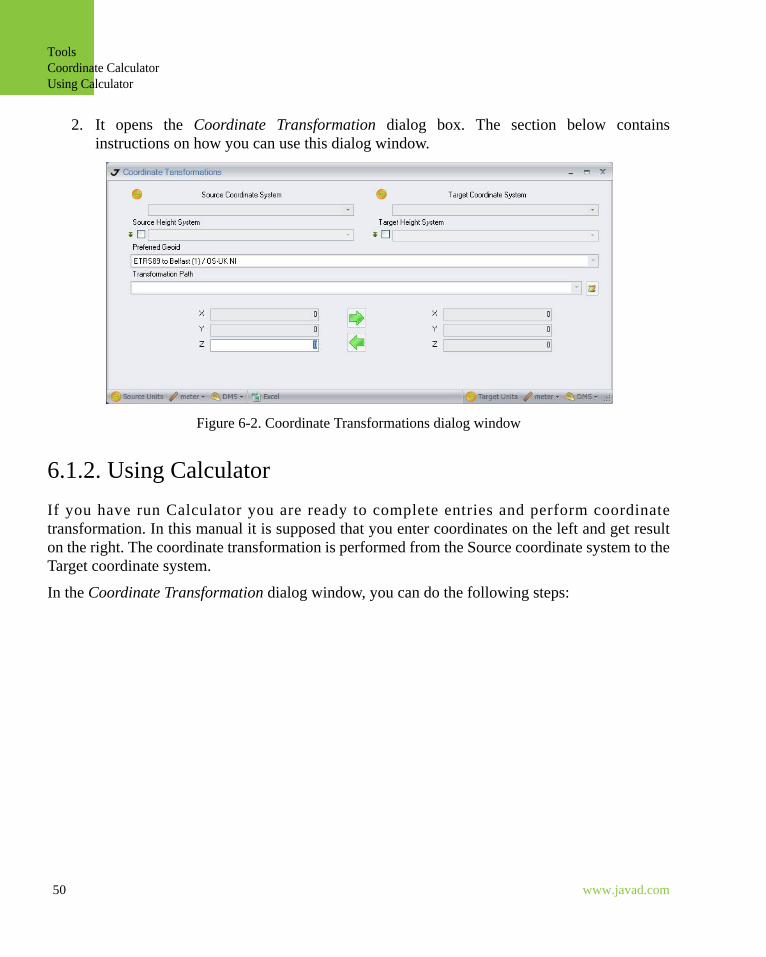
2. It opens the Coordinate Transformation dialog box. The section below containsinstructions on how you can use this dialog window.
Figure 6-2. Coordinate Transformations dialog window
6.1.2. Using CalculatorIf you have run Calculator you are ready to complete entries and perform coordinatetransformation. In this manual it is supposed that you enter coordinates on the left and get resulton the right. The coordinate transformation is performed from the Source coordinate system to theTarget coordinate system.
In the Coordinate Transformation dialog window, you can do the following steps:
50 www.javad.com
ToolsCoordinate Calculator
Using Calculator
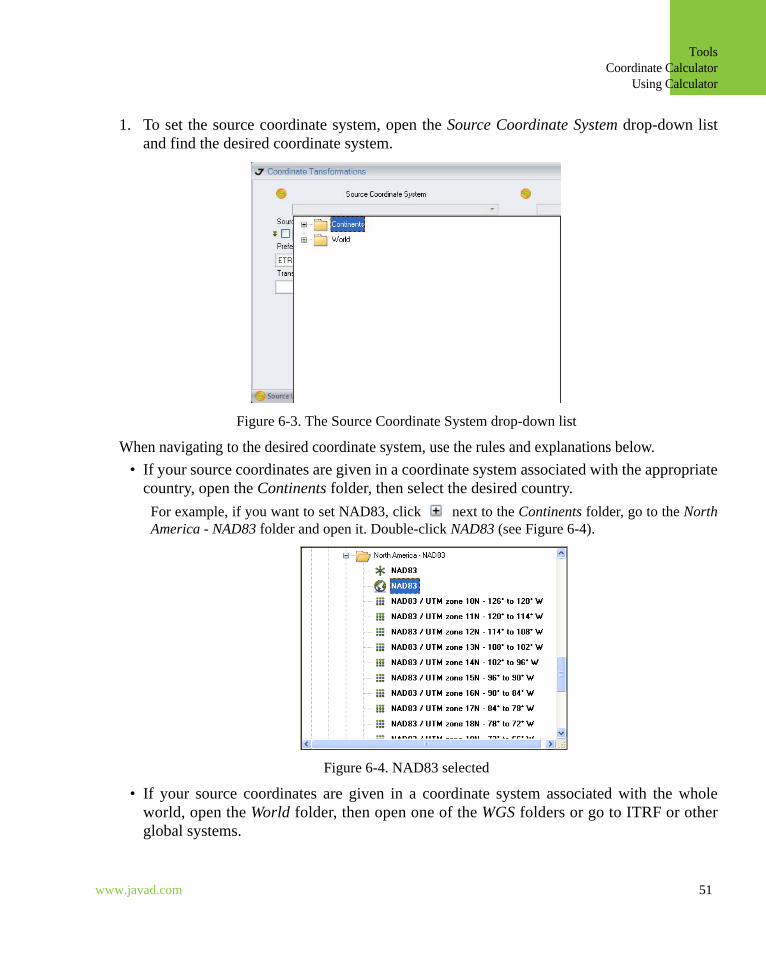
1. To set the source coordinate system, open the Source Coordinate System drop-down listand find the desired coordinate system.
Figure 6-3. The Source Coordinate System drop-down list
When navigating to the desired coordinate system, use the rules and explanations below.• If your source coordinates are given in a coordinate system associated with the appropriate
country, open the Continents folder, then select the desired country. For example, if you want to set NAD83, click next to the Continents folder, go to the NorthAmerica - NAD83 folder and open it. Double-click NAD83 (see Figure 6-4).
Figure 6-4. NAD83 selected
• If your source coordinates are given in a coordinate system associated with the wholeworld, open the World folder, then open one of the WGS folders or go to ITRF or otherglobal systems.
51www.javad.com

ToolsCoordinate CalculatorUsing Calculator
• The icon next to each coordinate system indicates the coordinate system type. The four typesare available:
- 3D Cartesian
- Geodetic
- Grid
- Local
- Height System.
Note: If there is no needed coordinate system in the list, you should exit from Calculator, create one inCoordinate System Editor and then run Calculator again.
2. If you have found the coordinate system, double-click on it. It is designated as source andappears in the Source Coordinate System field (see Figure 6-5).
Figure 6-5. NAD83 is the source coordinate system
3. To set the target coordinate system, in the Target Coordinate System drop-down list, findthe desired coordinate system and double click it. It appears in the Target CoordinateSystem field (Figure 6-6).
52 www.javad.com

ToolsCoordinate Calculator
Using Calculator
The Target Coordinate System list is organized the same way as Source Coordinate System. Use the rule described above, to find the desired target system.
Figure 6-6. NAD27 selected
4. If you want to use orthometric heights for the source/target coordinates, mark the checkbox under Source/Target Height System (Figure 6-7), open the Source Height System/
53www.javad.com

ToolsCoordinate CalculatorUsing Calculator
Target Height System list and select the desired height system by double-clicking on it(Figure 6-8) .
Figure 6-7. Setting orthometric heights.
Figure 6-8. Source Height System drop-down list
Note: Leave the check box clear and the field empty, in the case of ellipsoidal heights, as Calculatoruses ellipsoidal heights by default.
54 www.javad.com

ToolsCoordinate Calculator
Using Calculator
5. To set the desired geoid model, open the Preferred Geoid drop-down list and select ageoid. For example, see Figure 6-9
Figure 6-9. Preferred Geoid drop-down list
6. After the Height and Coordinate systems have been defined, select a transformationmethod from the Transformation Path drop-down list. The list of transformation methodsis generated by Giodis. It can be different depending on a Coordinate and Height systemdefined by the user (Figure 6-10).
The button (Figure 6-10) opens the Transformation XML dialog window allowing you to get detailed information on the appropriate transformation methods and copy this information into the Clipboard by clicking the Copy button.
Figure 6-10. Transformation Path drop-down list
Note: If the “No transformation” message displays in this field, there may be two reasons:1. there is some insufficient data for the coordinate transformation. To resolve this problem, try toinput new parameters for the transformation model using Coordinate System Editor.2. it is impossible to implement transformation between ellipsoidal and orthometric heights. Toresolve this problem, try to define the geoid model in the Preferred Geoid list.
7. Enter the coordinate values in the corresponding fields (Figure 6-11.
Figure 6-11. Entering the coordinates
8. Click to get the resulting coordinates in the corresponding fields.
55www.javad.com

ToolsCoordinate System EditorUnderstanding Main Window Elements
6.2. Coordinate System EditorCoordinate System Editor is intended to view, create, and edit
• coordinate systems• vertical datums• coordinate transformations• geoid models.
6.2.1. Understanding Main Window Elements
To run Coordinate System Editor, select Tools on the Ribbon and click .
The main window of Coordinate System Editor includes the Ribbon and area divided into threeparts: Coordinate Systems, Transformations, and Properties (Figure 6-12).
Figure 6-12. Coordinate System Editor main window
56 www.javad.com
ToolsCoordinate System Editor
Understanding Main Window Elements
Coordinate SystemsCoordinate Systems part represents available coordinate systems, which are organized into fivegroups:
• Earth-Centered Earth-Fixed Cartesian Coordinate System• Geodetic Datum Ellipsoidal System• Grid-Projected Coordinate System• Local Engineering Coordinate System• Vertical Datum
Each group reveals the list of available coordinate systems and allows to select on of them. If thecoordinate system has been selected, the Transformations and Properties parts displaytransformations associated with the coordinate system and its properties.
TransformationsTransformations part shows Transformations and Geoids groups if any coordinate systemselected in the Coordinate Systems part. When Transformations or Geoids indicates a number 1(or more) next to its title, the group can be opened to display the list of available transformationsor geoids. If the transformation or geoid has been selected, the Properties parts changes to displaythe transformation or geoid properties.
PropertiesProperties part displays either coordinate system properties or transformation properties,depending on where the currently selected item is located - in Coordinate Systems or inTransformation.
Each group of the coordinate systems is characterized by its own set of the properties. Propertiesdisplays:
• Name for the Earth-Centered Earth-Fixed Cartesian Coordinate System• Name, Related ECEF system, Ellipsoid for the Geodetic Datum Ellipsoidal System• Name, Geodetic Datum Ellipsoidal System, Projection for the Grid-Projected Coordinate
System• Name for the Local Engineering Coordinate System• Name for Vertical Datum
57www.javad.com
ToolsCoordinate System EditorViewing Properties
6.2.2. Viewing Properties
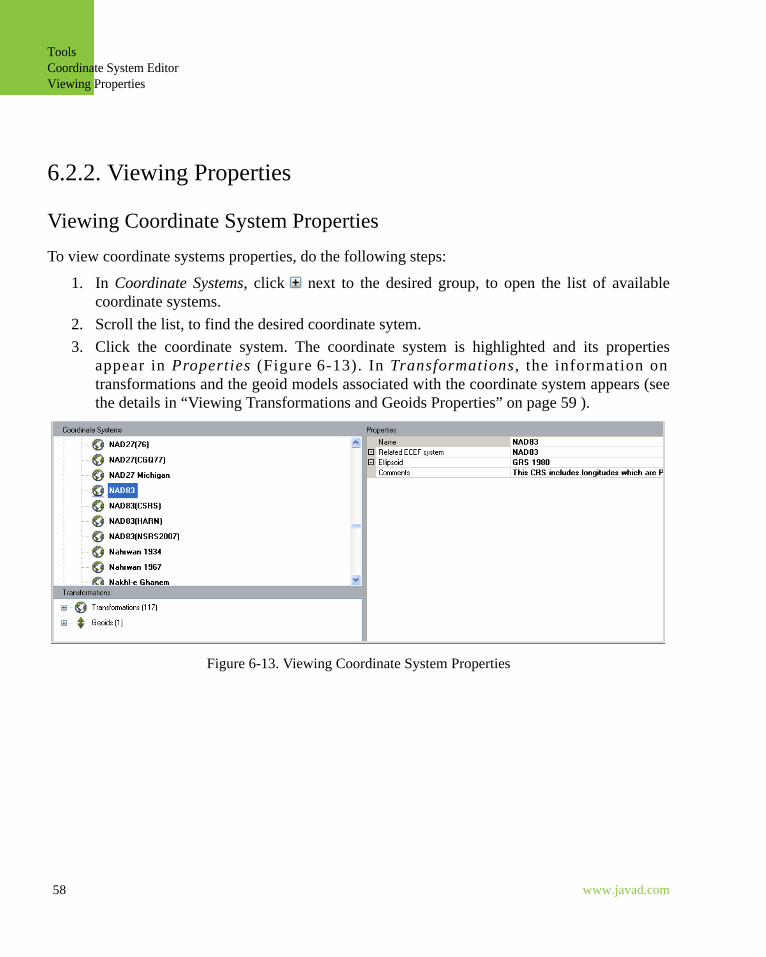
Viewing Coordinate System PropertiesTo view coordinate systems properties, do the following steps:
1. In Coordinate Systems, click next to the desired group, to open the list of availablecoordinate systems.
2. Scroll the list, to find the desired coordinate sytem.3. Click the coordinate system. The coordinate system is highlighted and its properties
appear in Properties (Figure 6-13). In Transformations , the information ontransformations and the geoid models associated with the coordinate system appears (seethe details in “Viewing Transformations and Geoids Properties” on page 59 ).
Figure 6-13. Viewing Coordinate System Properties
58 www.javad.com

ToolsCoordinate System Editor
Viewing Properties
Viewing Transformations and Geoids PropertiesTo view transformations and geoids properties, do the following steps:
1. In Coordinate Systems, click next to the desired group, to open the list of availablecoordinate systems.
2. Scroll the list, to find the desired coordinate sytem.3. Click the coordinate system. It enables the Transformation part contents:
• Transformations group• Geoids group • Projection group (if Projected Coordinate System has been selected)
4. In Transformations, click next to the desired group and select the desired item(Figure 6-14).
Figure 6-14. Viewing Transformations and Geoids Properties
5. View the item’s properties in the Properties part.
59www.javad.com

ToolsCoordinate System EditorCreating a New Coordinate System, Transformation Parameters and Geoids
6.2.3. Creating a New Coordinate System, Transformation Parameters and Geoids
Creating a New Geodetic Datum Ellipsoidal SystemTo create a new geodetic datum ellipsoidal system, do the following steps:
1. Click on the Ribbon, in the pull-down menu, select Geodetic. In CoordinateSystems the Geodetic Datum Ellipsoidal System group opens displaying a new item Newgeodetic coordinate system at the top (Figure 6-15).
Figure 6-15. New geodetic coordinate system
2. In Properties, select and fill the following fields:• Name. Type in the new coordinate system name.
Note: Pay attention that the new coordinate system name must not be identical with the existingcoordinate system name.
• Related ECEF System. Select the one of the available ECEF systems from the pull-downlist. Here you can also create a new ECEF system. For this, select Create new related EcefCS from the pull-down list and enter a name in the Name field.
• Ellipsoid. Select one of the available ellipsoids from the pull-down list.
3. Click the Save button on the Ribbon. The new geodetic datum ellipsoidal systemappears in the list.
60 www.javad.com

ToolsCoordinate System Editor
Creating a New Coordinate System, Transformation Parameters and Geoids
Creating a New Grid - Projected Coordinate SystemTo create a new grid - projected coordinate system, do the following steps:
1. Click on the Ribbon, in the pull-down menu, select Grid. In Coordinate Systemsthe Grid - Projected Coordinate System group opens displaying a new item New gridcoordinate system at the top (Figure 6-16).
Figure 6-16. New grid coordinate system
2. In Properties, select and fill the following fields:• Name. Type in the new coordinate system name.
Note: Pay attention that the new coordinate system name must not be identical with the existingcoordinate system name.
• Zone. Type in the zone name.• Related geodetic system. Select one of the available systems from the pull-down list
(Figure 6-16). • Projection. Click next to Projection.
• Select the Type field. Click , to open the pull-down list of the available projection types. Select the desired projection.
• Click next to the Params field. It opens the list of available parameters. Select the desired parameter and edit it.
3. Click the Save button on the Ribbon. The new grid - projected coordinate systemappears in the list.
61www.javad.com

ToolsCoordinate System EditorCreating a New Coordinate System, Transformation Parameters and Geoids
Creating a New Local - Engineering Coordinate SystemTo create a new local engineering coordinate system, do the following steps:
1. Click on the Ribbon, in the pull-down menu, select Local. In Coordinate Systemsthe Local Engineering Coordinate System group opens displaying a new item New localcoordinate system (Figure 6-17).
Figure 6-17. New local - engineering coordinate system
2. In Properties, select and fill the following fields:• Name. Type in the new coordinate system name.
3. Click the Save button on the Ribbon. The new local - engineering coordinate systemappears in the list.
Creating a New Vertical Coordinate SystemTo create a new vertical coordinate system, do the following steps:
1. Click on the Ribbon, in the pull-down menu, select Vertical. In CoordinateSystems the Vertical Datum group opens displaying a new item New vertical coordinatesystem at the top.
2. In Properties, select and fill the following fields:• Name. Type in the new coordinate system name.
62 www.javad.com

ToolsCoordinate System Editor
Creating a New Coordinate System, Transformation Parameters and Geoids
3. Click the Save button on the Ribbon. The new vertical coordinate system appears inthe list.
Creating Transformation ParametersTransformation parameters allow transforming positions from one coordinate system to another.
In this version of Giodis, seven parameter transformation can be specified between two ECEF(Earth Centered Earth Fixed) cartesian coordinate systems. One system is considered as sourceand the other as a target.
To define new seven transformation parameters set, do the following steps:
1. In the Coordinate Systems part, select the source coordinate system.
2. Click on the Ribbon, then select Transformation. The New transformation itemappears in the Transformation part. The sample to be filled appears in the Properties part(Figure 6-18).
Figure 6-18. The sample in the Properties part
3. In Properties, select and fill the following fields:• Name. The name for the new transformation parameters used to be formed of the names of
the two systems they are referred to. By default, the new transformation name contains thesource coordinate system name. You can edit the final name as you wish.
• Source CS. Select one of the available systems from the pull-down list.• Target CS. Select one of the available systems from the pull-down list• Params. Click next to Params. It opens the list of available parameters. Select the
desired parameter and edit it. By default, transformation parameter values are equal tozero. Fill in the fields, taking into account the units of measure.
4. Click the Save button on the Ribbon. The new transformation appears in bothTransformation groups for the source and target coordinate systems.
63www.javad.com

ToolsCoordinate System EditorCreating a New Coordinate System, Transformation Parameters and Geoids
Creating a New Geoid ModelGeod heights interrelate ellipsoidal and orthometric heights. Therefore geoid model can bespecified for Geodetic Datum Ellipsoidal Coordinate System or Grid - Projected CoordinateSystem.
To create a new geoid model, do the following steps:
1. In Coordinate Systems, select the desired coordinate system in the Geodetic DatumEllipsoidal Coordinate System or the Grid - Projected Coordinate System group.
2. Click on the Ribbon, then select Geoid.3. In Properties, select and fill the following fields:
• Name. The geoid name is generated automatically. You can edit it as you wish.• Vertical system. Select one of the available systems from the pull-down list.• Geoid File. Click next to Geoid File. In the Geoid model file field click , to open the
dialog window that allows you to select the needed geoid file.
4. Click the Save button on the Ribbon. The new geoid appears in the list of geoids forthe selected coordinate system.
64 www.javad.com

ToolsCoordinate System Editor
Creating a New Coordinate System, Transformation Parameters and Geoids
65www.javad.com

ToolsCoordinate System EditorCreating a New Coordinate System, Transformation Parameters and Geoids
66 www.javad.com

APPENDIX 1. GLOSSARY
Terms DefinitionAAccuracy Closeness of measured or computed value to the correct or standard value.Adjustment (Least Squares)
A method of determining a best-fit solution by minimizing the sum of the squares of the measurement residuals.
Adjustment, minimally constrained
The type of network adjustment where only one point is held fixed. The minimally constrained adjustment is used to detect blunders and obtain realistic observation error estimates.
Adjustment, fully constrained
The adjustment performed to best fit the survey observations to the local control. For the fully constrained adjustment, the horizontal and/or vertical coordinates of all control stations are held fixed to their published values.
Algorithm A special method or instruction for solving a certain type of mathematical problem. Almanac A set of parameters broadcast by a GNSS satellite to predict the approximate satellite
positions and the clock offset. Each satellite contains and transmits the almanac data for all the satellites of a system (GPS or GLONASS).
Ambiguity The unknown number of integer cycles contained in an unbroken set of phase observations of a satellite. It must be computed (resolved) when the carrier-phase data are processed.
Antenna Height The height of a GPS antenna phase center above the surveyed point.Antenna Phase Center
The electronic center of an antenna at which the radio signal is measured. The location of the phase center is defined by its offset from a specified physical point on the antenna called Antenna Reference Point (ARP). The phase center of a typical antenna can change by as much as many centimeters as the position of the satellites change. The "phase center stability" is the main characteristics of an antenna for precision applications.
Anti Spoofing Encryption of the P-code signal by changing its characteristics resulting in the Y-code which is not available to civilian users.
Atmosphere The 500 km thick layer of air that surrounds the Earth.Attribute A characteristic of a mapped feature (point, line, or area) in a Geographic Information
System (GIS).Autonomous position
The absolute position estimated using data from a single GNSS receiver without using any differential correction.
Azimuth The horizontal angle, from 0° to 360°, measured clockwise from the North. Azimuth, grid The azimuth measured from grid North.
67www.javad.com

Appendix 1. Glossary
BBase Station A GNSS receiver that is set up on a known location to collect data for differentially
correcting rover files. See also Differential GPS (DGPS).Baseline The measured vector between a pair of stations which simultaneously collect GNSS
data. Benchmark A survey mark that is used for elevation reference. Bias Constant or variable systematic deviation of a measurement from true value. Blunder A serious mistake typically caused by ignorance, carelessness, or confusion.C C/A-Code The standard (coarse acquisition or clear acquisition) code modulated onto the GPS L1
signal. Also known as the "civilian code" or S-code. The C/A-Code allows a receiver to quickly lock on to a satellite.
Calibration Process of determining systematic errors in an instrument by comparing its measurements with a standard.
Carrier frequency
The basic frequency of an unmodulated radio signal. In GNSS, satellite signals are broadcast on two L-band frequencies, L1 and L2.
Carrier phase The cumulative phase of either the L1 or L2 carrier of a satellite signal, measured by a receiver since locking onto the signal.
Catalog Catalog (geodetic): A database that contains positions and other geodetic data for control and surveyed points.
Central meridian
A line of constant longitude that passes through the center of a zone. The central meridian is defined by the angle it forms east or west of the Greenwich meridian. In a map projection, it is used as one of constants defining the projection.
Channel In a receiver, a hardware to receive the signal from a single GNSS satellite.Chi square test (Also referred to as global or VPV test). The global statistical test of the network
adjustment. It is used to reject or to accept the hypothesis that the variances for the adjusted observation are close to expected.
Clock bias The difference between the satellite or receiver clock's indicated time and a time scale reference such as UTC (Coordinated Universal Time), TAI (International Atomic Time) or GPS Time.
Clock correction
The quantity added to the time shown by a clock to obtain the correct time.
Clock rate The rate of change of a clock correction.Constraint A restriction to the behavior of a variable. In network adjustment, the coordinates of
control points are constrained or fixed to their known values.Contour A line on a map joining points of equal elevation.Control 1) Points which are used as reference for other surveys.
2) The reference coordinates of control points (horizontal or vertical).Control segment
Ground-based component of a GNSS system that controls the satellites for proper function.
Coordinate System
A reference frame used to define the location of points in three or two dimensional space.
68 www.javad.com

Appendix 1. Glossary
Coordinate system, geocentric
Any coordinate system with origin at the center of the Earth. See also ECEF (Earth Centered, Earth Fixed).
Coordinate system, grid
A plane rectangular coordinate system based on a map projection.
Coordinate system, height
A system, or datum, adopted as the fixed vertical reference.
Coordinates Angular and/or linear quantities used to specify the position of an object in a given reference system.
Coordinates, geodetic
A set of coordinates (latitude, longitude, and height) referred to a reference ellipsoid:Geodetic latitude: an angle between the equatorial plane of the ellipsoid, and the line normal to the ellipsoid.Geodetic longitude: an angle between the plane of local geodetic meridian, and the plane of the initial (prime) geodetic meridian.Geodetic height: see Ellipsoid height.
Coordinates, grid
Coordinates in a plane rectangular coordinate system based on a map projection. Grid coordinates are normally referred to as Easting and Northing.
Correlation Standardized covariance between two variables varying from -1 (negative correlation) through 0 (no correlation) to +1 (positive correlation).
CORS Continuously Operating Reference Stations. GPS base stations on the U.S. territory that provide carrier phase and code range measurements for real-time and post-processing applications.
Covariance A measure of the stochastic dependence between two observed or derived quantities. Covariance also refers to an off-diagonal term in a covariance matrix.
Covariance matrix
(Also referred to as variance- covariance matrix). A measure of the correlation of errors between observations or derived quantities. The elements along the main diagonal of covariance matrix are the variances of the corresponding variables; those off the main diagonal are the covariances.
Cycle slip A discontinuity in carrier-phase observations, usually of an integer number of cycles, resulting from temporary loss of lock in the receiver's carrier tracking loops.
DDatum A set of parameters defining the coordinate system used for horizontal or vertical
control.Deflection of the vertical
The angle between the vertical (plumb line) at a point and the line normal to the reference ellipsoid.
Degrees of freedom
Number of observations minus the number of estimated parameters.
Differential GPS (DGPS)
A technique of correcting GPS-positions recorded at an unknown location using additional data collected simultaneously by a reference receiver at a known position (GPS Base Station).
69www.javad.com

Appendix 1. Glossary
Dilution of precision (DOP)
A dimensionless number that represents the contribution of the satellite configuration geometry to the positioning and time accuracy. A low DOP value indicates a higher probability of accuracy. Standard GNSS applications are: PDOP - position (three coordinates)HDOP - horizontal (two coordinates)VDOP -vertical (height only)TDOP - time (for clock offset only)GDOP - geometric (three coordinates and clock offset).
Double Difference
The difference between two single differences for two simultaneously observed satellites.
EEarth tide The periodic sub-meter motion of the solid earth due to the attraction of the Moon, the
Sun and loading of the adjacent seabed by ocean tides.Easting The distance of a point east of the reference meridian for a grid system.Easting, false A constant value added to all Eastings so that only positive values of Easting are
recorded.Eccentricity A Keplerian element describing the geometric shape of a satellite orbit. The eccentricity
is a measure of the departure from a circle.ECEF (Earth Centered, Earth Fixed)
A geocentric coordinate system where the X-axis is coincident with the zero meridian, the Z-axis is coincident with the earth's mean rotation axis, and the Y axis lies on the equatorial plane thus completing a right-handed coordinate system.
EGNOS European Geostationary Navigation Overlay Service. A European system of satellite navigation that provides satellite navigation correction and validation throughout Europe. It consists of three geostationary satellites and a network of ground stations. EGNOS will augment the two satellite navigation systems now operating, GPS and GLONASS.
Elevation The distance from a point to a reference surface (most often the geoid) measured along a plumb line.
Elevation angle The angle above the horizon, measured from the horizontal plane.Elevation mask (Also referred to as mask angle, and cut-off angle) The elevation angle below which
satellite signals are no longer tracked or processed.Ellipsoid In geodesy, a mathematical model of the earth formed by rotating an ellipse around its
minor axis. The ellipsoid is described by dimensions for the semi-major axis (a) together with the semi-minor axis (b) or by the semi-major axis and flattening f = (a - b)/a .
Ellipsoid height The distance from a point to the reference ellipsoid measured along a line normal to the ellipsoid.
Ellipsoid, reference
An ellipsoid associated with a specified geodetic datum or reference system.
Ephemeris A set of parameters that describes the position of a celestial object as a function of time. Ephemeris, broadcast
The ephemeris transmitted in the Navigation Message of a GNSS satellite. The broadcast ephemeris is used to calculate the positions of a GNSS satellite and its clock behavior.
Ephemeris, precise
Post-processed positions of a GNSS satellite. Precise ephemeris is computed by various global agencies from data collected at worldly distributed reference stations.
70 www.javad.com

Appendix 1. Glossary
Epoch 1. A specific instant in time for which GNSS observation data are given.2. The date, usually expressed in decimal years, for which published coordinates are valid.
Epoch interval (Also referred to as measurement interval, epoch rate).Time interval between two consecutive observation epochs.
Error The difference between a measured or computed value of a quantity and its standard or true value.
Error ellipse A graphical representation of the magnitude and direction of the positional error. Error ellipse is centered at the estimated position and shows the region where the least squares estimate falls with 39.4%. (one sigma), 95% (two sigma) or other confidence.
FFast static (Also referred to as rapid-static or quick-static). A method of GPS surveying similar to
static GPS, but with a shorter observation period (from 5 to 30 minutes) and usually with a faster epoch interval (5 seconds or less). To achieve a centimeter level of accuracy (10 mm + 1 ppm), Fast static technique is used on baselines up to 20 kilometers in length.
Feature A representation of a real-world object in a layer on a map as a distinct set of characteristic.
Firmware A software embedded into hardware of a GNSS receiver that controls its operation.Fixed solution A vector solution where the integer ambiguities have been correctly resolved and held
fixed.Float solution A vector solution where the ambiguities could not be fixed to their integer values so they
were left to float as a real numbers.Frequency The number of oscillations per second existing in any form of periodic motion.GGalileo The European Union's satellite navigation system. Galileo is expected to be completed
after 2012 and be interoperable with the GPS and GLONASS systems. The system will use 30 satellites (27 operational + 3 spares) in three uniformly spaced circular orbits at a height of 23,000 kilometers, with inclination of 56 degrees.
Geodesy Science of measuring the size and shape of the earth and its gravitational field.GIS Geographic Information System. A computer-based system for the input, storage,
retrieval, analysis, and display of geographically referenced data.Geoid The equipotential surface which is everywhere normal to the direction of gravity and
best fits, in a least squares sense, with mean sea level in the oceans. The geoid is main reference surface for elevations.
Geoid model A mathematical representation of the geoid for a specific area (regional geoid model), or for the whole earth (global geoid model).
Geoid height The height of geoid above a reference ellipsoid. Also referred to as the geoid separation or geoid undulation. Geoid height is equal to the difference between ellipsoidal and orthometric height (i.e., elevation).
Global Navigation Satellite System (GLONASS)
Russian Global Navigation Satellite System designed to use 24 satellites in three uniformly spaced circular orbits at height 19,140 kilometers, at an inclination of 64.8 degrees.
71www.javad.com
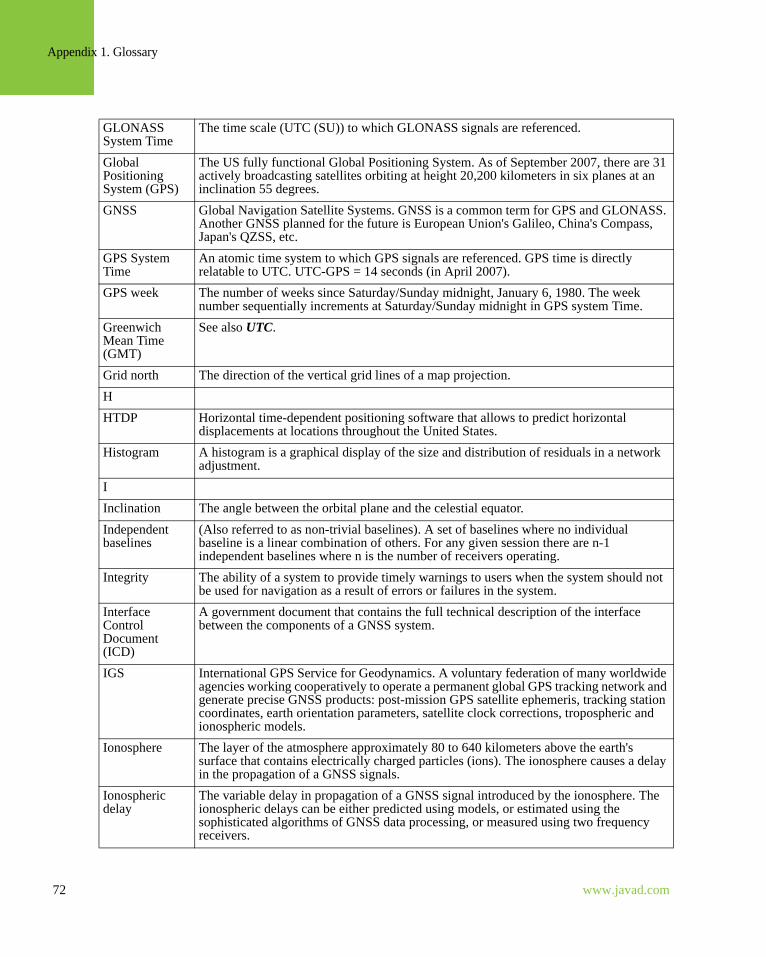
Appendix 1. Glossary
GLONASS System Time
The time scale (UTC (SU)) to which GLONASS signals are referenced.
Global Positioning System (GPS)
The US fully functional Global Positioning System. As of September 2007, there are 31 actively broadcasting satellites orbiting at height 20,200 kilometers in six planes at an inclination 55 degrees.
GNSS Global Navigation Satellite Systems. GNSS is a common term for GPS and GLONASS. Another GNSS planned for the future is European Union's Galileo, China's Compass, Japan's QZSS, etc.
GPS System Time
An atomic time system to which GPS signals are referenced. GPS time is directly relatable to UTC. UTC-GPS = 14 seconds (in April 2007).
GPS week The number of weeks since Saturday/Sunday midnight, January 6, 1980. The week number sequentially increments at Saturday/Sunday midnight in GPS system Time.
Greenwich Mean Time (GMT)
See also UTC.
Grid north The direction of the vertical grid lines of a map projection.HHTDP Horizontal time-dependent positioning software that allows to predict horizontal
displacements at locations throughout the United States. Histogram A histogram is a graphical display of the size and distribution of residuals in a network
adjustment.IInclination The angle between the orbital plane and the celestial equator.Independent baselines
(Also referred to as non-trivial baselines). A set of baselines where no individual baseline is a linear combination of others. For any given session there are n-1 independent baselines where n is the number of receivers operating.
Integrity The ability of a system to provide timely warnings to users when the system should not be used for navigation as a result of errors or failures in the system.
Interface Control Document (ICD)
A government document that contains the full technical description of the interface between the components of a GNSS system.
IGS International GPS Service for Geodynamics. A voluntary federation of many worldwide agencies working cooperatively to operate a permanent global GPS tracking network and generate precise GNSS products: post-mission GPS satellite ephemeris, tracking station coordinates, earth orientation parameters, satellite clock corrections, tropospheric and ionospheric models.
Ionosphere The layer of the atmosphere approximately 80 to 640 kilometers above the earth's surface that contains electrically charged particles (ions). The ionosphere causes a delay in the propagation of a GNSS signals.
Ionospheric delay
The variable delay in propagation of a GNSS signal introduced by the ionosphere. The ionospheric delays can be either predicted using models, or estimated using the sophisticated algorithms of GNSS data processing, or measured using two frequency receivers.
72 www.javad.com

Appendix 1. Glossary
ITRF International Terrestrial Reference Frame. A set of more than 350 globally distributed points with their ECEF coordinates which realize the global International Terrestrial Reference System (ITRS). New ITRF solutions for coordinates and velocities of the points (e.g. ITRF-2005) are produced every few years.
ITRS International Terrestrial Reference System. The most precise, geocentric, globally-defined coordinate system. The various "frames" (such as ITRF2005, etc.) are the realizations of the ITRS for a particular epoch in time.
J Job file A file that contains survey data gathered with the data collection software embedded in a
field controller. KKeplerian Elements
A set of six parameters that define elliptical (Keplerian) orbit. These are: the semimajor axis and eccentricity of the orbital ellipse, the inclination of the orbital plane to the equatorial plane, the right ascension (or longitude) of the ascending node of the orbit, the argument of perigee, and the time the satellite passes through the perigee.
Kinematic GPS A method of GPS surveying in which at least one receiver is set up over a known (base) point and remains stationary, while another (rover) receiver is moved from point to point. The base receiver and rovers are initialized as in stop and go. Lock on the satellites must be maintained at all times or a new initialization must be performed. Data sampling shall have an epoch interval of 2 seconds or less. Typical achieved accuracy is few centimeters. Kinematic GPS surveys can be either Continuous or Stop-and-Go. See also Stop-and-Go.
LL1 & L2 The designations of the two basic carrier frequencies transmitted by GPS satellites that
contain the navigation signals. L1 is 1,575.42 Mhz and L2 is 1,227.60 Mhz.Layer A thematic set of spatial data described and stored in a database. Each layer has its own
set of parameters defining the graphical representation on a map document for each object from the given collection. So modifying the style parameters (e.g.visibility) user can modify such parameters for all objects of the layer.
L-band The radio frequency range extending from 390 MHz to 1550 MHz.Length of Session
The maximum time interval at which data is collected simultaneously from all the receivers in a session.
Local grid system
A local plane coordinate system usually arbitrary defined for use on a small survey area.
Localization (Also, referred to as site calibration). The process of determining transformation parameters between GPS-surveyed coordinates and the coordinates of known points given in a local coordinate system.
MMap projection A set of functions relating latitudes and longitudes at ellipsoid into map grid
coordinates. Map scale The relationship between a distance on a map and the corresponding distance on the
ground.Meridian, geodetic
The curve in which a plane through the minor axis of a reference ellipsoid intersects the ellipsoid. All points at this curve have the same geodetic longitude.
73www.javad.com
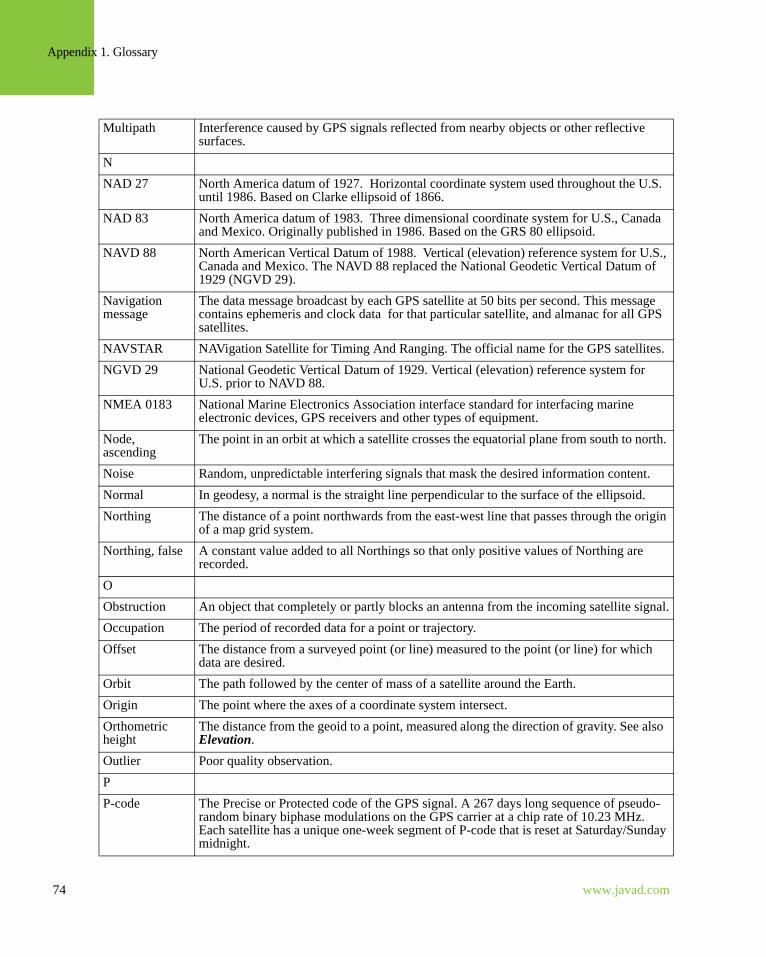
Appendix 1. Glossary
Multipath Interference caused by GPS signals reflected from nearby objects or other reflective surfaces.
NNAD 27 North America datum of 1927. Horizontal coordinate system used throughout the U.S.
until 1986. Based on Clarke ellipsoid of 1866.NAD 83 North America datum of 1983. Three dimensional coordinate system for U.S., Canada
and Mexico. Originally published in 1986. Based on the GRS 80 ellipsoid.NAVD 88 North American Vertical Datum of 1988. Vertical (elevation) reference system for U.S.,
Canada and Mexico. The NAVD 88 replaced the National Geodetic Vertical Datum of 1929 (NGVD 29).
Navigation message
The data message broadcast by each GPS satellite at 50 bits per second. This message contains ephemeris and clock data for that particular satellite, and almanac for all GPS satellites.
NAVSTAR NAVigation Satellite for Timing And Ranging. The official name for the GPS satellites. NGVD 29 National Geodetic Vertical Datum of 1929. Vertical (elevation) reference system for
U.S. prior to NAVD 88.NMEA 0183 National Marine Electronics Association interface standard for interfacing marine
electronic devices, GPS receivers and other types of equipment.Node, ascending
The point in an orbit at which a satellite crosses the equatorial plane from south to north.
Noise Random, unpredictable interfering signals that mask the desired information content.Normal In geodesy, a normal is the straight line perpendicular to the surface of the ellipsoid.Northing The distance of a point northwards from the east-west line that passes through the origin
of a map grid system.Northing, false A constant value added to all Northings so that only positive values of Northing are
recorded.OObstruction An object that completely or partly blocks an antenna from the incoming satellite signal.Occupation The period of recorded data for a point or trajectory.Offset The distance from a surveyed point (or line) measured to the point (or line) for which
data are desired.Orbit The path followed by the center of mass of a satellite around the Earth.Origin The point where the axes of a coordinate system intersect.Orthometric height
The distance from the geoid to a point, measured along the direction of gravity. See also Elevation.
Outlier Poor quality observation.PP-code The Precise or Protected code of the GPS signal. A 267 days long sequence of pseudo-
random binary biphase modulations on the GPS carrier at a chip rate of 10.23 MHz. Each satellite has a unique one-week segment of P-code that is reset at Saturday/Sunday midnight.
74 www.javad.com

Appendix 1. Glossary
PDOP Mask The highest PDOP value at which a GPS data is collected.Perigee The point in an orbit at which the satellite is closest to the Earth's center of mass. Phase center The electronic center of an antenna at which the radio signal is measured.Point Positioning
(Also, Absolute Positioning). GNSS positioning with use of a single receiver in a standalone mode.
PPM Parts per million.Post-processing The differential processing GNSS data after it has been collected in the field and stored
on a computer.Precise Positioning Service (PPS)
The most accurate single-receiver GPS positioning based on the dual frequency P-code.
Precision A degree of agreement of an estimate with its mean value in repeated sampling. Precision estimates reflect random error and are not affected by bias.
Prime meridian The reference line for measurements of longitude. The meridian passing through Greenwich, England, is almost universally accepted as the prime meridian.
Pseudorange The range between the GPS receiver antenna and the GPS satellite, measured by the receiver using either the C/A- or P-code.
PZ-90 A global ECEF coordinate system established as the reference frame for GLONASS. GLONASS broadcast Ephemeris is given in PZ-90.
QRRandom Errors The unpredictable, typically small, deviations of a random variable from its expected
value. It is not possible to correct for random error.Raw data GNSS observation data which has not been processed or differentially corrected.Real Time Kinematic (RTK)
The GPS relative positioning technique whereby carrier-phase data (or corrections) are transmitted in real time from a reference receiver (base station) to a rover receiver enabling the rover to compute it's position and check the quality of measurements in real time.
Refraction The bending of sonic or electromagnetic rays by the medium through which the rays pass. The amount and direction of bending are determined by the refractive index of the medium.
Relative positioning
The determination of relative positions of GNSS receivers simultaneously tracking the same satellites.
Residual Difference between the observed and the computed quantity.RINEX The Receiver-INdependent EXchange format. A standard GNSS raw data file format
used to exchange files from multiple receiver manufacturers.RMS Root Mean Square. The square root of the arithmetic mean of the squared errors. In one
dimension RMS is equivalent to Standard deviation.Rover A mobile GPS receiver and data logger collecting data in the field. The rover position is
computed relative to another, stationary (base) GPS receiver.
75www.javad.com
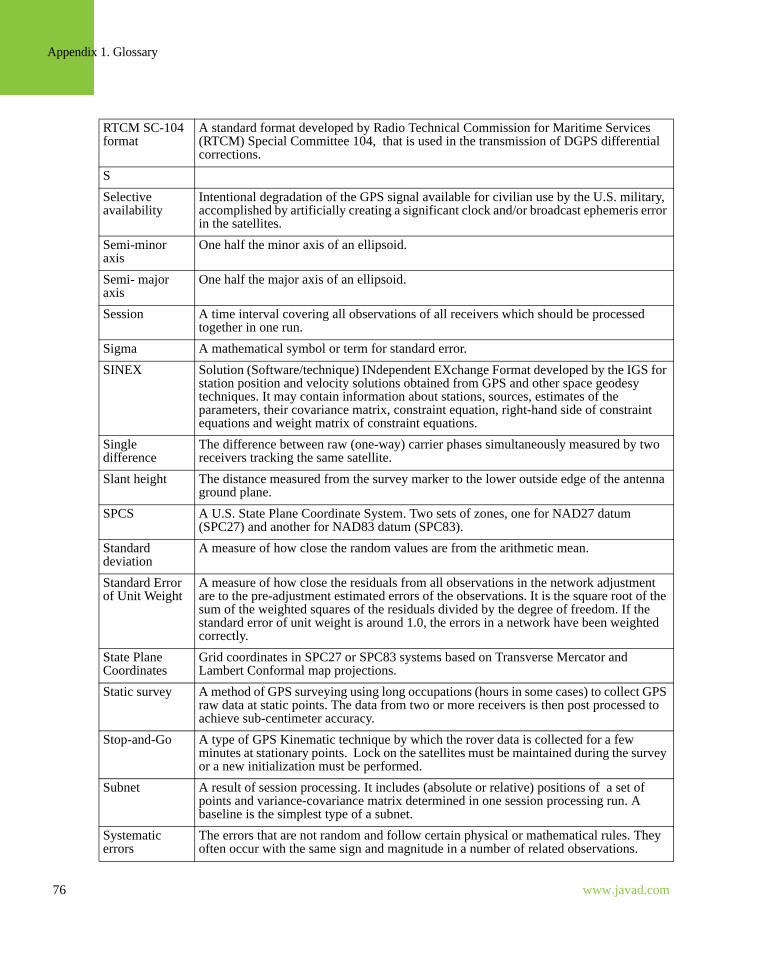
Appendix 1. Glossary
RTCM SC-104 format
A standard format developed by Radio Technical Commission for Maritime Services (RTCM) Special Committee 104, that is used in the transmission of DGPS differential corrections.
SSelective availability
Intentional degradation of the GPS signal available for civilian use by the U.S. military, accomplished by artificially creating a significant clock and/or broadcast ephemeris error in the satellites.
Semi-minor axis
One half the minor axis of an ellipsoid.
Semi- major axis
One half the major axis of an ellipsoid.
Session A time interval covering all observations of all receivers which should be processed together in one run.
Sigma A mathematical symbol or term for standard error.SINEX Solution (Software/technique) INdependent EXchange Format developed by the IGS for
station position and velocity solutions obtained from GPS and other space geodesy techniques. It may contain information about stations, sources, estimates of the parameters, their covariance matrix, constraint equation, right-hand side of constraint equations and weight matrix of constraint equations.
Single difference
The difference between raw (one-way) carrier phases simultaneously measured by two receivers tracking the same satellite.
Slant height The distance measured from the survey marker to the lower outside edge of the antenna ground plane.
SPCS A U.S. State Plane Coordinate System. Two sets of zones, one for NAD27 datum (SPC27) and another for NAD83 datum (SPC83).
Standard deviation
A measure of how close the random values are from the arithmetic mean.
Standard Error of Unit Weight
A measure of how close the residuals from all observations in the network adjustment are to the pre-adjustment estimated errors of the observations. It is the square root of the sum of the weighted squares of the residuals divided by the degree of freedom. If the standard error of unit weight is around 1.0, the errors in a network have been weighted correctly.
State Plane Coordinates
Grid coordinates in SPC27 or SPC83 systems based on Transverse Mercator and Lambert Conformal map projections.
Static survey A method of GPS surveying using long occupations (hours in some cases) to collect GPS raw data at static points. The data from two or more receivers is then post processed to achieve sub-centimeter accuracy.
Stop-and-Go A type of GPS Kinematic technique by which the rover data is collected for a few minutes at stationary points. Lock on the satellites must be maintained during the survey or a new initialization must be performed.
Subnet A result of session processing. It includes (absolute or relative) positions of a set of points and variance-covariance matrix determined in one session processing run. A baseline is the simplest type of a subnet.
Systematic errors
The errors that are not random and follow certain physical or mathematical rules. They often occur with the same sign and magnitude in a number of related observations.
76 www.javad.com
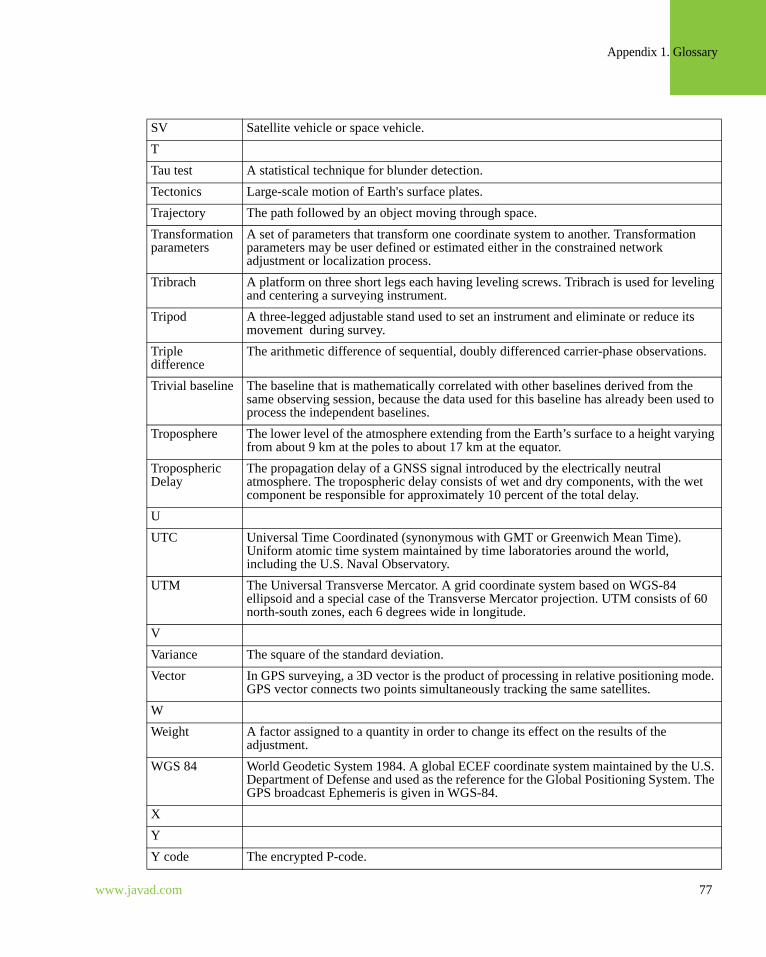
Appendix 1. Glossary
SV Satellite vehicle or space vehicle.TTau test A statistical technique for blunder detection.Tectonics Large-scale motion of Earth's surface plates. Trajectory The path followed by an object moving through space.Transformation parameters
A set of parameters that transform one coordinate system to another. Transformation parameters may be user defined or estimated either in the constrained network adjustment or localization process.
Tribrach A platform on three short legs each having leveling screws. Tribrach is used for leveling and centering a surveying instrument.
Tripod A three-legged adjustable stand used to set an instrument and eliminate or reduce its movement during survey.
Triple difference
The arithmetic difference of sequential, doubly differenced carrier-phase observations.
Trivial baseline The baseline that is mathematically correlated with other baselines derived from the same observing session, because the data used for this baseline has already been used to process the independent baselines.
Troposphere The lower level of the atmosphere extending from the Earth’s surface to a height varying from about 9 km at the poles to about 17 km at the equator.
Tropospheric Delay
The propagation delay of a GNSS signal introduced by the electrically neutral atmosphere. The tropospheric delay consists of wet and dry components, with the wet component be responsible for approximately 10 percent of the total delay.
UUTC Universal Time Coordinated (synonymous with GMT or Greenwich Mean Time).
Uniform atomic time system maintained by time laboratories around the world, including the U.S. Naval Observatory.
UTM The Universal Transverse Mercator. A grid coordinate system based on WGS-84 ellipsoid and a special case of the Transverse Mercator projection. UTM consists of 60 north-south zones, each 6 degrees wide in longitude.
VVariance The square of the standard deviation.Vector In GPS surveying, a 3D vector is the product of processing in relative positioning mode.
GPS vector connects two points simultaneously tracking the same satellites. WWeight A factor assigned to a quantity in order to change its effect on the results of the
adjustment.WGS 84 World Geodetic System 1984. A global ECEF coordinate system maintained by the U.S.
Department of Defense and used as the reference for the Global Positioning System. The GPS broadcast Ephemeris is given in WGS-84.
XYY code The encrypted P-code.
77www.javad.com
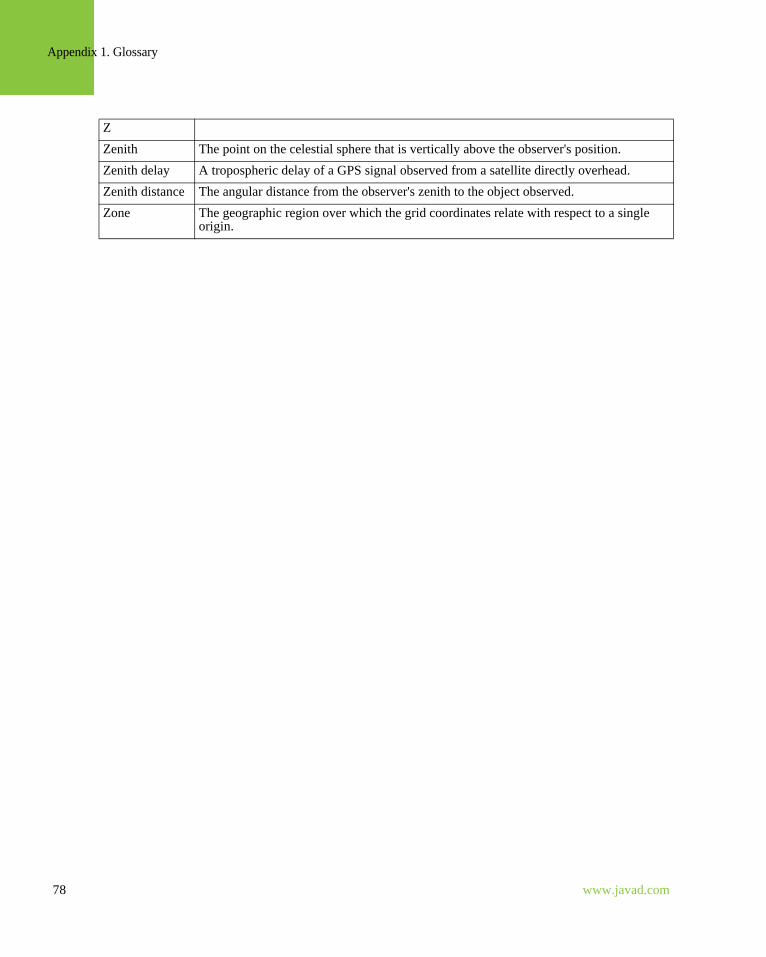
Appendix 1. Glossary
ZZenith The point on the celestial sphere that is vertically above the observer's position. Zenith delay A tropospheric delay of a GPS signal observed from a satellite directly overhead. Zenith distance The angular distance from the observer's zenith to the object observed. Zone The geographic region over which the grid coordinates relate with respect to a single
origin.
78 www.javad.com

Appendix 1. Glossary
79www.javad.com
1731 Technology Drive, San Jose, CA 95110 USA Phone: +1(408)573-8100
Fax: +1(408)573-9100
www.javad.com
Copyright © JAVAD GNSS, Inc., 2008
All rights reserved. No unauthorized duplication.