Embed Size (px)
Citation preview


Specify Projection
Customizing Projection
Changing Projection

Click the Projection button
FYI: To select zone pls. see in next slide

From the View Menu, Choose Properties
If a projection has already been set, the name of the projection will
appear. If no projection is currently specified for the view, set the Map
Units to decimal degree for the projection to work correctly.


From the View Menu, Choose Properties
Select Custom
Projection: Transverse MercatorSpheroid: GRS 80 Central Meridian: 105Reference Latitude: 0Scale Factor: 0.9996False Northing: 500000False Easting: 0
Click the Projection

From the File Menu, Extension
The ArcView Projection Utility -- Project shapefile from one coordinate system to another
and save it as a new Shape file
Click Projection Utility Wizard

From the File View Window,
Add theme “district.shp”
From File Menu, Select ArcView Projection Utility

Browse “shape file” you
want to change the projection
(district.shp)
Click Next
The File has been selected will appear

Specify current coordinate system
WGS_1984
Unit as Degree
Click Next
Specify New Coordinate system
WGS_1984_Zone48
Unit as Meter
Click Next

Browse directory where you want to
save your file
(d:\training\district_prj.shp)

Click Save
Then Next
ArcView Projection Utility Summary
Page will appear
Finish

Add theme (district_proj.shp)


Geometric Correction
Raster to Vector conversion

Extension: Image to Map World File Creator uses to register the coordinate system with
Ground Control Point
I. Scanned Map --------- Image to be rectified
II. Landsat Image --------- Based Map
III. GCP from map to be rectified as “gcpmap.txt”
IV. GCP from Based Map as “gcpsatimg.txt”
Assume you have Satellite image as a base and you need to create data from scanned map, now
you have to set geocorrection for your scanned map in order to work with other data layers.
FYI: You can also get GCP from GPS Surveying data

FYI: Read the coordinate on View Window and save in notepad as txt file
The marks will be the same point on both map need to be rectified and based map
FYI: Nothing to do with this slide, gcpmap.txt and gcpsatimg.txt are in d:\training_july2004

From the File Menu, Extension
Click Image to Map World File Creator

Make Project Window Active
Select Table Icon
Click Add Button to Add
“gcpsatimg.txt” (based map)
Select File Type from List Files of
Type as Text
Go to Directory that you stored file
Click gcpsatimg.txt)

Make Project Window Active
Select New View
Go to View Menu, Click Add Event Theme

Select
Table as gcpsatimg.txt
X field: X_tic
Y field: Y_tic
Point correspond to X, Y
Coordinate will appear in View

Go to Theme Menu, Click Convert
to shapefile
Note: Check Point with Coordinate System on the View whether it is correct
Save as gcpsatimg.shp
Click OK
Close all

Open New Project
Go to File, Extension check
Image to Map World File Creator
TIFF
Click

Dialog will appear, Select the
map that you want to change
the coordinate (river.tif)
Select Point shapefile (gcpsatimg.shp)
Image to be Rectified
Registration Map

Save as xyz.dbf
Click OK
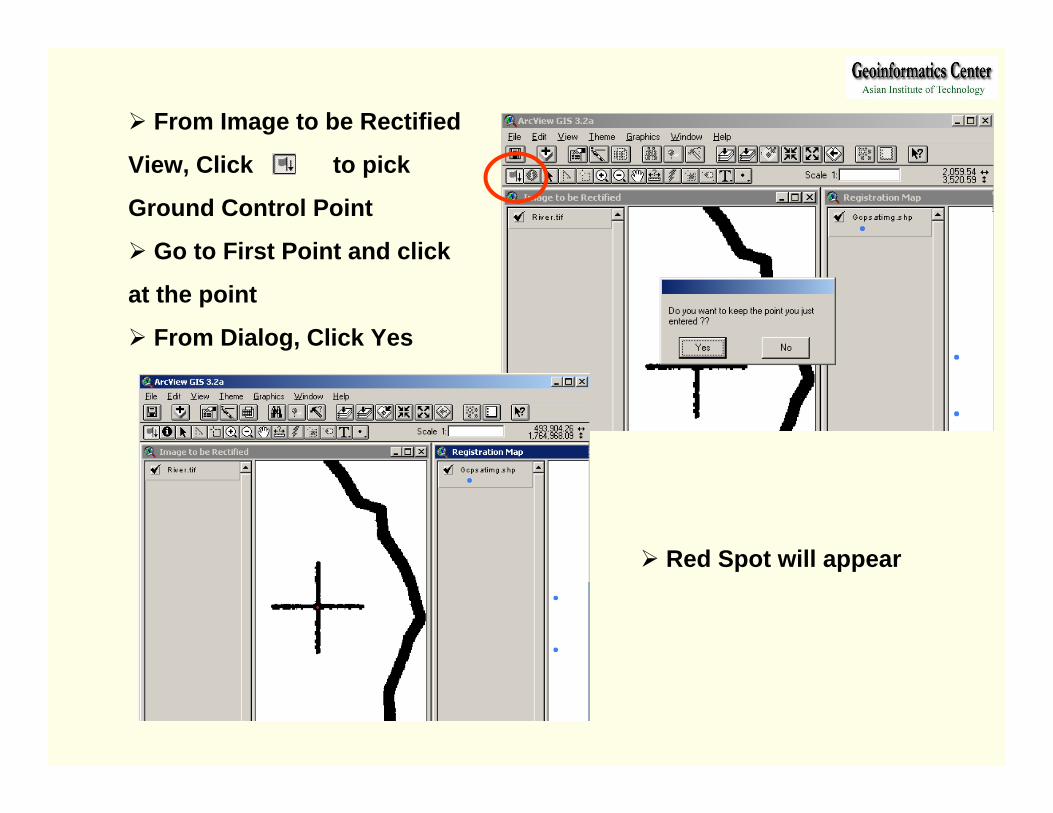
From Image to be Rectified
View, Click to pick
Ground Control Point
Go to First Point and click
at the point
From Dialog, Click Yes
Red Spot will appear

Go to Registration View,
Click to pick Ground
Control Point
Go to First Point and click
at the point
From Dialog, Click Yes
Red Spot will appear

finish 6 points on
both Views
Then Minimize views and Open
Ground Control Points table

Ground Control Points table appear,
Click to calculate RMS value
Total RMS value will appear, Click Ok
You can also edit the
point to less the error

IF you satisfy the error, Click
to write the file to disk
Dialog appear, Click Yes
Specify File name “river.TFW”
Click OK

The Dialog appear, confirmed --- Click OK
Your “tif file” will be ready to open as the coordinate system that you specified
Open New View
Add theme
Select Data Source type “Image Data Source”
Select “river.tif”
FYI: Accuracy depends on RMS error you accepted at the beginning

Projected Image

This process we will use the projected scanned image fromprevious steps as input file to be covert to vector file.
-Open new view,Add image “river.tiff”-Check box in Spatial AnalysistAt Extensions in File menu

-Activate “River.tiff”, selectCovert to Grid in Theme menu-Save new grid file name “river-g”at your working directory
-Click OK
-Open attribute tableof “river-g” and click Select at “0” value

-Select Convert to ShapefileIn Theme menu
-Define a new shape file’s nameIn the working directory-Add the new theme and display