Embed Size (px)
Citation preview
Copyright © Shenzhen Rakwireless Technology Co., LtdETDX170224
Getting Started With the
RAK811 LoRa Node V1.0
Shenzhen Rakwireless Technology Co., Ltd
© 2016 Rakwireless all rights reserved.
Mentioned in this document , the actual company and product names,
trademarks are their respective owners.
After update the new version, this document without prior notice.

Copyright © Shenzhen Rakwireless Technology Co., LtdETDX170224
1. Introduction
This tutorial is a step-by-step guide to get started with the RAK811 lora node module by
RAK wireless. This tutorial assumes that we already have a LoRA Gateway setup as shown here:
https://www.hackster.io/naresh-krish/getting-started-with-the-rak-831-lora-gateway-a
nd-rpi3-e3351d

Copyright © Shenzhen Rakwireless Technology Co., LtdETDX170224
2. The RAK811: Affordable Lora Node
The RAKWireless rak811 is low-cost awesome lora node board based off the sx1276 semtech
module and a STM32 host. Te node supports both 868 and 915. In this turial I will be focusing on
867.5 mhz channel with Spread factor 7.
RAK811 module with some important pins mark

Copyright © Shenzhen Rakwireless Technology Co., LtdETDX170224
3. Some jargons: Frequency and Data Rates
It is good to know some lora terminology before we delve into how to use nodes.
Frequency bands:
LoRa Wireless system uses different frequency bands in different regions of the world such
as US, EU, China. Following table lists out frequency bands along with LoRa channel frequencies.
Please note that both Gateway and End device can use the same frequency for transmission but
at different time slots. This concept is known as TDD.
ETSI has defined 433 to 434 MHz frequency band for LoRa application. It uses 433.175 MHz,
433.375 MHz and 433.575 MHz frequency channels.
Class B end device uses 869.525 MHz frequency channel in EU band.
Note: Information provided on this page is derived from LoRaWAN Specification V1.0
released on Jan.2015 by LoRa™ Alliance. Refer latest specifications published by LoRa Alliance
( https://www.lora-alliance.org ).
LoRaWAN data rate and application packet sizes:
The data rate and maximum packet size roughly depend on the distance to the nearest
gateway and the type of data to be sent, and are also defined in the specification for each region.
Like for the European 863-870MHz band, the application packet size varies between 51 bytes for
the slowest data rate, and 222 bytes for faster rates. Beware that the LoRaWAN protocol adds at
least 13 bytes to the application payload.
Devices with fixed hardcoded data rates of SF12 or SF11 are not allowed to join the network.

Copyright © Shenzhen Rakwireless Technology Co., LtdETDX170224
4. LoRaWAN transmit duty cycles and dwell time
To avoid network congestion, LoRaWAN defines some maximum transmit duty cycles158
and maximum transmit times (dwell times). These depend on many factors including the region
and the type of operation (like sending data, or broadcasting a request to join a network).
For the European EU 863-870MHz ISM Band the specification137 limits the duty cycle to 1%
for data:
The LoRaWAN enforces a per sub-band duty-cycle limitation. Each time a frame is
transmitted in a given sub-band, the time of emission and the on-air duration of the frame are
recorded for this sub-band. The same sub-band cannot be used again during the next Toff
seconds where:
Toffsubband = (TimeOnAir / DutyCyclesubbband) - TimeOnAir
During the unavailable time of a given sub-band, the device may still be able to transmit on
another sub-band. If all sub-bands are unavailable, the device has to wait before any further
transmission. The device adapts its channel hopping sequence according to the sub-band
availability.
Example: A device just transmitted a 0.5 s long frame on one default channel. This channel is
in a sub-band allowing 1% duty-cycle. Therefore this whole sub-band (868 – 868.6) will be
unavailable for 49.5 s.
For other regions, quite similar limitations apply.
Here is an awesome spreadsheet to help you do all the math as explained above:
https://docs.google.com/spreadsheets/d/1QvcKsGeTTPpr9icj4XkKXq4r2zTc2j0gsHLrnplzM3
I/edit#gid=0
An even more detailed description of the lora tech and hardware abstraction here:
https://www.digikey.com/en/articles/techzone/2016/nov/lorawan-part-1-15-km-wireless-10-ye
ar-battery-life-iot

Copyright © Shenzhen Rakwireless Technology Co., LtdETDX170224
5. Board layout
Here is the board with some of the important pins marked
RAK811 module
When using with the PC have the jumper between CRX - TXD and CTX - RXD as in the pic
above. If your using with an arduino have the jumper between TXD - RX and RXD - TX
Function Name Description
Module U3 RAK811 Lora Module
External Interface Micro USBPower Supply;DC 5V Input,USB to TTL
communication Interface
Key Reset Module Reset Key
Loading Foot
P1Boot Switch Pin,When Boot Pin Switch to 3.3V,
Module will into the Boot Mode
P4 Debug Pin
P5 Uart Switch Pin
Power Test J1 Module Power Test Pin
LED IndicatorLED1
(Power)Power Indicator Light
Copyright © Shenzhen Rakwireless Technology Co., LtdETDX170224
6. Using the board as a standalone LoRa node
The RAK 811 already has an AT command based firmware running on it out of the box that
supports a wide variety of operations. The board can be used along with an Arduino UNO as well
via the serial port which I will cover in another article. The board can also be programmed using
the STM32 coIDE. This will also be covered in a different tutorial.
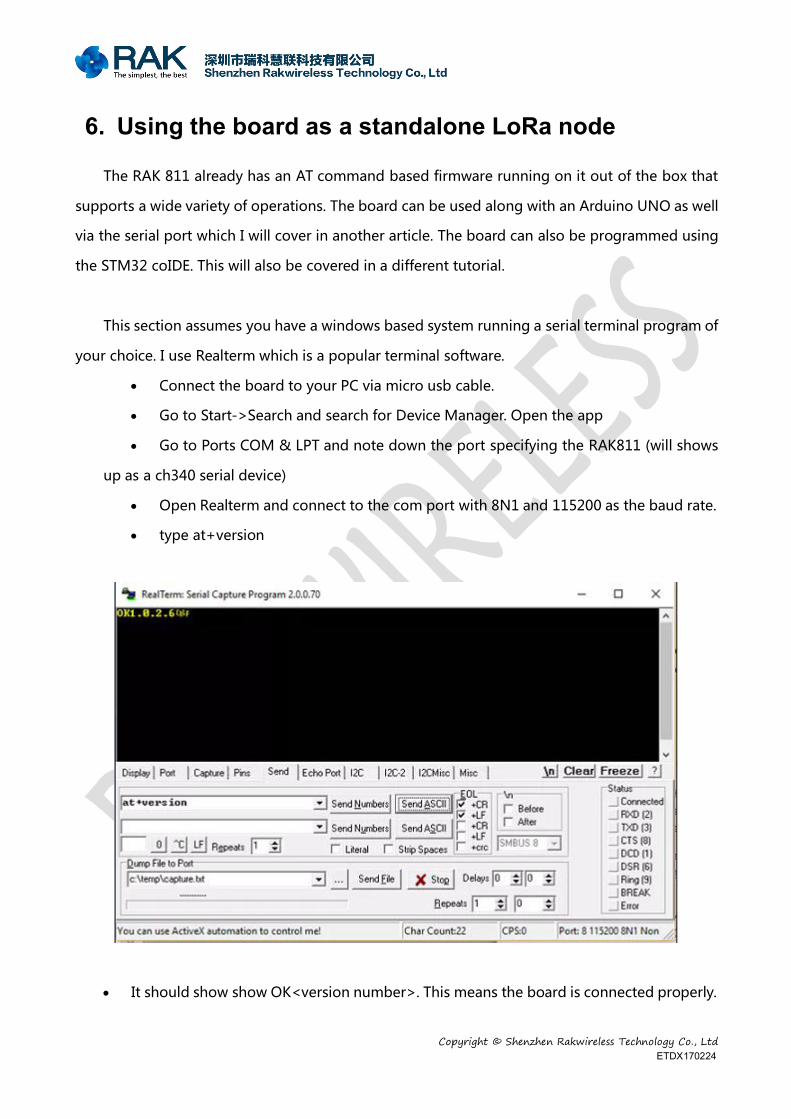
This section assumes you have a windows based system running a serial terminal program of
your choice. I use Realterm which is a popular terminal software.
Connect the board to your PC via micro usb cable.
Go to Start->Search and search for Device Manager. Open the app
Go to Ports COM & LPT and note down the port specifying the RAK811 (will shows
up as a ch340 serial device)
Open Realterm and connect to the com port with 8N1 and 115200 as the baud rate.
type at+version
It should show show OK<version number>. This means the board is connected properly.

Copyright © Shenzhen Rakwireless Technology Co., LtdETDX170224
TroubleShoot Notes:
Make sure the baud rate is 115200 for the serial connection
And the comm setting is 8 data bits, no parity and 1 stop bit
The CR and LF combo at the end is essential. Else you will not get the response from the
board

Copyright © Shenzhen Rakwireless Technology Co., LtdETDX170224
7. Lora WAN connection: ABP and OTAA
When you connect a node to a lora gateway, we need some amount of security and
trust to be established amongst them. There are two connection modes, and we distinguish
between them using the criteria of security and ease of implementation.
ABP: Activation By Personalization
OTAA: Over-The-Air-Activation
ABP
Advantage: Easy to connect to the network; the device can be made operational
in little time.
Disadvantage: The encryption keys enabling communication with the network
are preconfigured in the device; this weakens security.
NB: Easy connection to the network comes at the cost of security; in the event of a
physical intrusion occurring on the device, the keys can be stolen, the device’s identity
retrieved and the collected data corrupted.
Example: a water meter could return incorrect meter data leading to inconveniences
(flooding, overbilling, etc.).
In order to properly set up the connection to the network and identify the object, we
need some information:
AppEUI: This is a unique application identifier used to group objects. This
address, 64 bits, is used to classify the peripheral devices by application. This setting can
be adjusted.
DevEUI: This identifier, factory set, makes each object unique. In principle, this
setting cannot be adjusted.
AppKey: This is a secret key shared between the peripheral device and the
network. It is used to determine the session keys. This setting can be adjusted.
The Encryption Keys are preprogrammed in the peripheral device:
DevAddr: This is a logical address used to identify the object on the network.

Copyright © Shenzhen Rakwireless Technology Co., LtdETDX170224
NetSKey (Network Session Key): Encryption key between the object and the
operator used for transmissions and to validate the integrity of messages.
AppSKey (Application Session Key): Encryption key between the object and
the user (via the application) used for transmissions and to validate the integrity of
messages.
OTAA
Advantage: The network generates and sends the encryption keys; this makes
for more security.
Owing to the greater level of security, OTAA is the most frequently used method in
IoT/LoRaWAN.
Disadvantage: The object must implement this connection mechanism which
adds an additional layer of complexity.
In order to establish the connection to the network and identify the object, we need
some information.
AppEUI: This is a unique application identifier used to group objects. This
address, 64 bits, is used to classify the peripheral devices by application. This setting can
be adjusted.
DevEUI: This identifier, factory set, makes each object unique. In principle, this
setting cannot be adjusted.
AppKey: This is a secret key shared between the peripheral device and the
network. It is used to determine the session keys. This setting can be adjusted.
Focus on OTAA
The Network Server is the software component in charge of establishing a connection
with the objects and managing the network core.
During the OTAA connection, and assuming the device is authorized to connect to the
network, the network exchanges session-specific encryption keys with the network core. The
Network Server then allocates information specific to the session and sends them to the
peripheral device:

Copyright © Shenzhen Rakwireless Technology Co., LtdETDX170224
DevAddr: Logical address (equivalent of an IP address) which will be used for all
subsequent communication.
NetSKey (Network Session Key): Encryption key between the object and the
operator used for transmissions and to validate the integrity of messages.
AppSKey (Application Session Key): Encryption key between the object and
the operator (via the application) used for transmissions and to validate the integrity of
messages.

Copyright © Shenzhen Rakwireless Technology Co., LtdETDX170224
8. Configuring you node on TTN
I will briefly introduce the concept of device resgistration on the TTN website (steps
courtesy TheThingNetwork.org). Before a device can communicate via The Things Network
you need to register it with an application.
To use the default Over The Air Activation you will need to register your device with its
Device EUI. See the documentation of your device for instructions, as for example that of The
Things Uno.
1. In the Console, from the Application or an application’s Devices screen, click
register device.
For Device ID, choose a - for this application - unique ID of lower case,
alphanumeric characters and nonconsecutive - and _ .
o For Device EUI, copy-paste the one you retrieved from your device.
If you plan to switch to ABP anyway, click the button have one generated for you.
Leave the App Key to be generated.
For App EUI, select the generated EUI from the list.

Copyright © Shenzhen Rakwireless Technology Co., LtdETDX170224
2. Click Register to finish.
You will be redirected to the newly registered device where you can find the generated
App Keyneeded to activate the device.

Copyright © Shenzhen Rakwireless Technology Co., LtdETDX170224
9. Personalize device for ABP
It is advised to use Over The Air Activation (OTAA) to negotiate session keys for further
communication. You have the option to personalize a device, which means you will generate
or assign session keys manually and use hard code them on the device.
In production, you’ll want to use OTAA. This is more reliable because the activation will
be confirmed and more secure because the session keys will be negotiated with every
activation. ABP is useful for workshops because you don’t have to wait for a downlink
window to become available to confirm the activation.
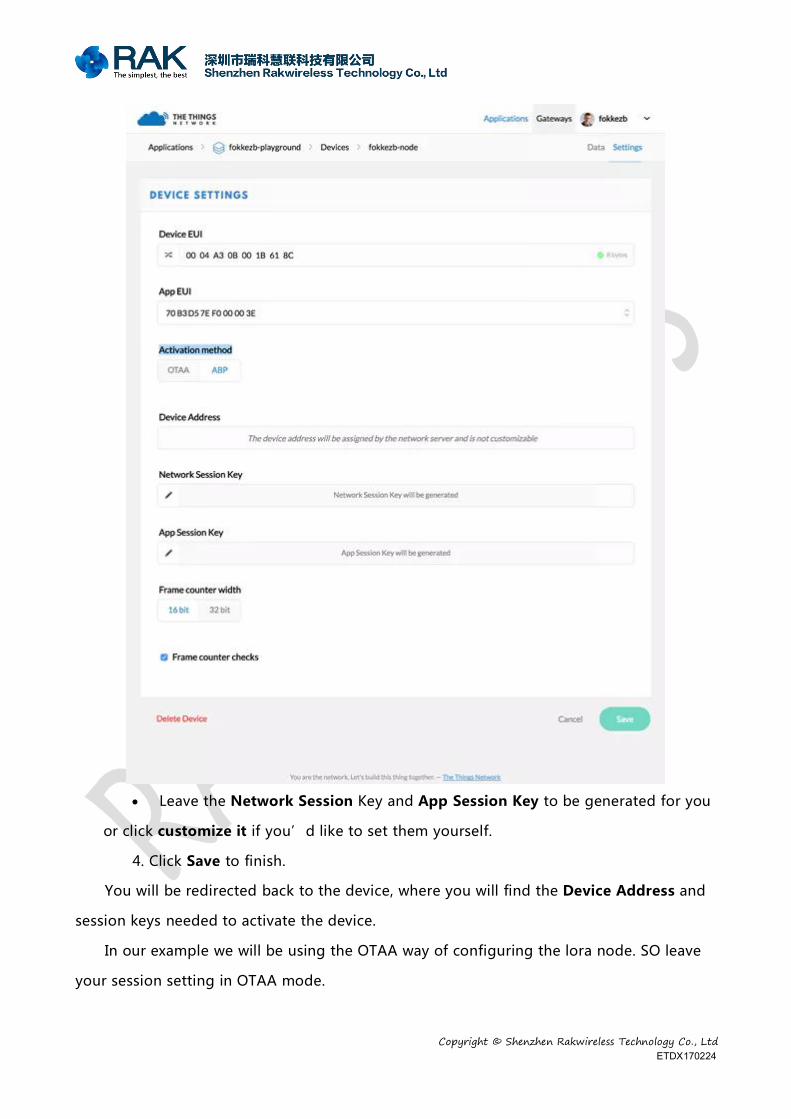
In the Console, go to the device you’d like to personalize.
From the top right menu, select Settings.
3. For Activation method, click ABP.
Copyright © Shenzhen Rakwireless Technology Co., LtdETDX170224
Leave the Network Session Key and App Session Key to be generated for you
or click customize it if you’d like to set them yourself.
4. Click Save to finish.
You will be redirected back to the device, where you will find the Device Address and
session keys needed to activate the device.
In our example we will be using the OTAA way of configuring the lora node. SO leave
your session setting in OTAA mode.

Copyright © Shenzhen Rakwireless Technology Co., LtdETDX170224
10. Configuring you RAK811 LoRA Node
Now that you node is provisioned in the cloud. Its time to configure the node to talk to
the gateway. You need to have three details in hand by now
dev – eui
app-eui from the device console page
app_key: also from the device console page. App session key
Where ever you see an at+<command> below, you need to type that in the terminal
program. Any lines below that are just responses from the board.
TO join as OTAA:
TO Join as ABP:

Copyright © Shenzhen Rakwireless Technology Co., LtdETDX170224
11. Send and Receive messages via LoRAWan
Now once its connected, you can send and receive messages via the LoraWAN method: To
send a message, here is an example:
Copyright © Shenzhen Rakwireless Technology Co., LtdETDX170224
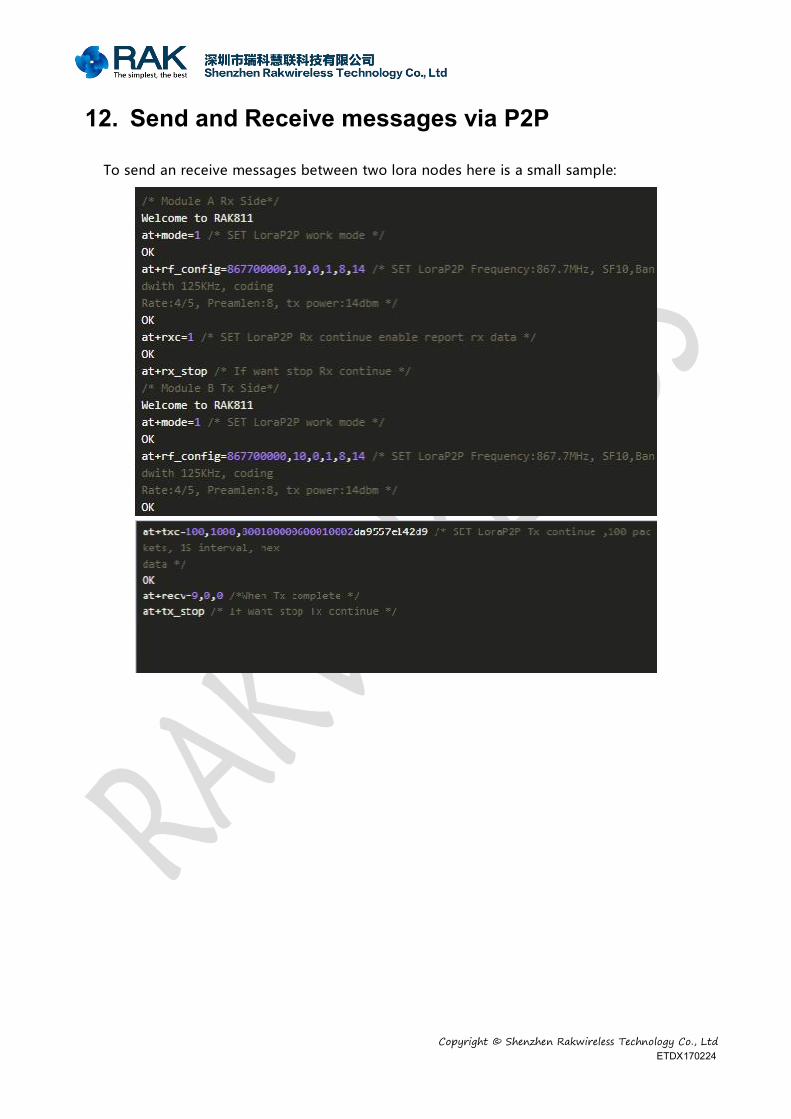
12. Send and Receive messages via P2P
To send an receive messages between two lora nodes here is a small sample:

Copyright © Shenzhen Rakwireless Technology Co., LtdETDX170224
13. Check the TTN console for incoming messages
The TTN device console provides a tab to view the incoming data from a registered lora
node as a list. For en extensive list of ways to work with the data bytes reeived, please have a
look at the tutorials on the TTN APIs here:
https://www.thethingsnetwork.org/docs/devices/bytes.html
This concludes the setup of the RAK811 usage with a LoRa gateway.

Copyright © Shenzhen Rakwireless Technology Co., LtdETDX170224
14. SCHEMATICS and CODEthe official repo for the wisnode lora node : https://github.com/RAKWireless/WisNode-LoRa

Copyright © Shenzhen Rakwireless Technology Co., LtdETDX170224
15. Modify Record
Version Author Data Modify content
V1.0 chace 2017/08/14 Create Document