Embed Size (px)
Citation preview
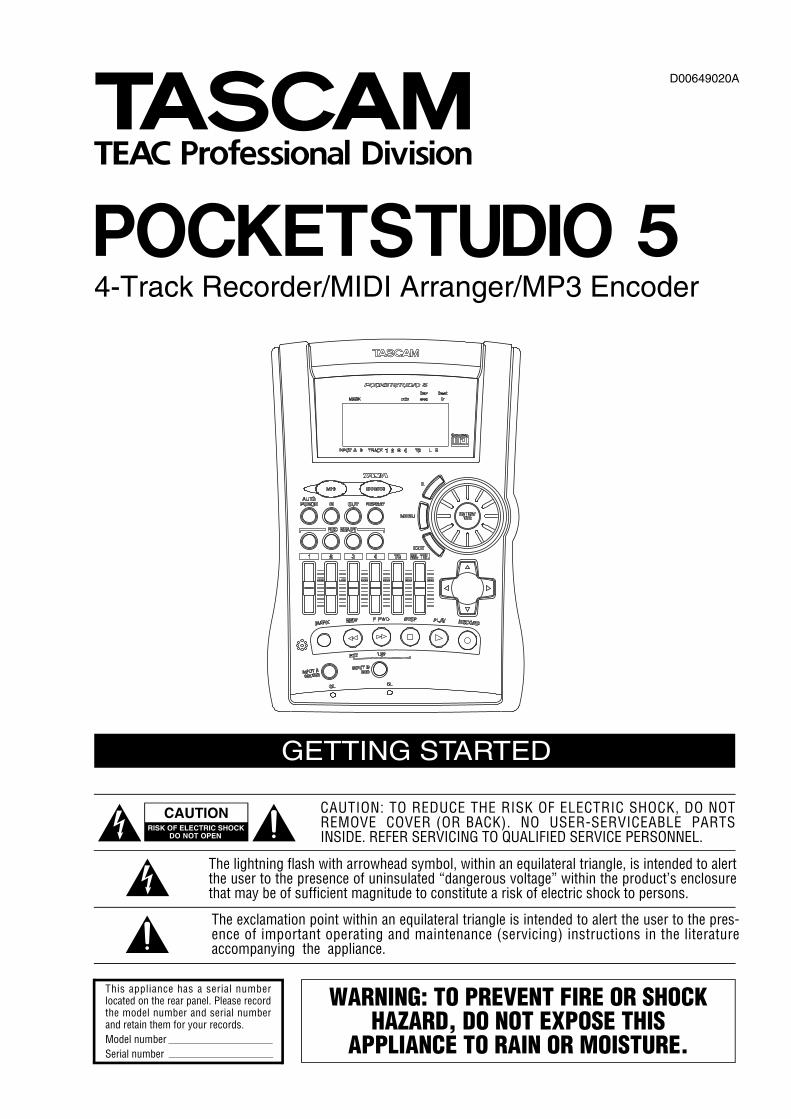
POCKETSTUDIO 54-Track Recorder/MIDI Arranger/MP3 Encoder
GETTING STARTED
CAUTION: TO REDUCE THE RISK OF ELECTRIC SHOCK, DO NOTREMOVE COVER (OR BACK). NO USER-SERVICEABLE PARTSINSIDE. REFER SERVICING TO QUALIFIED SERVICE PERSONNEL.
The exclamation point within an equilateral triangle is intended to alert the user to the pres-ence of important operating and maintenance (servicing) instructions in the literatureaccompanying the appliance.
The lightning flash with arrowhead symbol, within an equilateral triangle, is intended to alertthe user to the presence of uninsulated “dangerous voltage” within the product’s enclosurethat may be of sufficient magnitude to constitute a risk of electric shock to persons.
This appliance has a serial numberlocated on the rear panel. Please recordthe model number and serial numberand retain them for your records.Model numberSerial number
Ü
ÿ
Ÿ
WARNING: TO PREVENT FIRE OR SHOCKHAZARD, DO NOT EXPOSE THIS
APPLIANCE TO RAIN OR MOISTURE.
D00649020A
Table of Contents
2 TASCAM Pocketstudio 5 Getting Started
1 – WelcomeAbout this manual.......................................3What’s in the box? ......................................3Powering up the Pocketstudio 5................4
The AC adaptor............................................... 4Using batteries ............................................... 4
2 – About multitrack recordingCards and memory ......................................... 5
Multi-track recording ..................................5Tone generator rhythm ............................. 5Tone generator MIDI files .......................... 5Punching ..................................................... 5Mixdown ..................................................... 5Effects ......................................................... 6
3 – Parts of the Pocketstudio 5Rear panel....................................................7Front panel...................................................7Right panel...................................................8Top panel .....................................................9Navigating around the Pocketstudio 5......10
The “home” screen......................................... 10The menus....................................................... 11The wheel ....................................................... 11Enter and exit (“Yes” and “no”) .................... 11MENU .............................................................. 11Function key ................................................... 11The cursor pad ................................................ 12Naming songs, etc. ......................................... 12
4 – Basic use of the Pocketstudio 5Playback ...................................................... 13Stopping ..................................................... 13Recording .................................................... 13Fast forward and rewind ........................... 13Special location (RTZ) ................................. 13Special location (LRP) ................................. 13
Patching and routing on the Pocketstudio 5 ..........................................13Routing an input to a track ........................... 14Track bouncing ............................................... 14Routing on mixdown ..................................... 14
Marks ...............................................................14Punch recording ..............................................14Editing data .....................................................14
5 – Your first song using the Pocketstudio 5
Before you start recording .............................15Setting up a new song to record into ...........15Setting up the rhythm....................................16
Selecting the pattern ..................................16Adding the rhythm guitar ..............................16Tuning the guitar ............................................17Adding a guitar effect ....................................17Adding EQ .......................................................18Saving the song ..............................................18Making the recording .....................................19Adding vocals..................................................19Adding the lead guitar ...................................20Mixdown .........................................................20Transfer to computer......................................22
6 – Managing songs and data on your Pocketstudio 5Managing songs ......................................... 23
Naming songs .............................................23Deleting a song from the card ...................23
Using CF cards ............................................. 24Before you start using a new CF card ...........24Checking how full the card has become .......24Optimizing a card............................................25
Connecting the Pocketstudio 5 to a computer .................................................. 25
Disconnecting the Pocketstudio 5 ............. 25Windows 98(SE) ..........................................25Windows Me/Windows 2000
/Windows XP ...........................................25Macintosh ....................................................25Exiting USB mode (any system) .................25
Pocketstudio files........................................ 26How to share your Pocketstudio 5 files .... 26
Some notes on keeping files..........................26
1 – Welcome
Welcome to the TASCAM Pocketstudio 5. This exciting device allows you to record yourself and friends, and to build up a multitrack recording and mix down to a stereo mix, adding effects such as reverb and delay, just like a professional recording studio.
All of the recording and mixing is done digitally, in memory, so the Pocketstudio 5 has no tapes or discs to wear out or replace. It uses easily-obtainable, reus-able CompactFlash™ cards, which hold a large amount of data.
If the card becomes full, you can connect the Pocket-studio 5 to your computer, and store the data from the Pocketstudio 5 on your computer’s hard disk.
The Pocketstudio 5 uses the MP3 format to record and store the finished mix files, allowing you to share your finished files with a whole world of other musi-cians using the Internet.
In addition to being able to record your voice and instruments, the Pocketstudio 5 also contains a full MIDI (GM standard) tone generator. You can use this tone generator to produce backing tracks for your music using a wide variety of patterns supplied with the Pocketstudio 5, or you can import standard MIDI files and play over the top of them.
About this manual
This manual is intended to get you started and work-ing easily with your Pocketstudio 5.
It does not contain all the information about the Pocketstudio 5. You can find more detailed explana-tions of many of the functions, as well as lists of effects in the Reference Manual contained on the CD-ROM which comes with your Pocketstudio 5.
To read this manual, which is in PDF format, you will need a copy of Adobe Acrobat Reader 5.0 (or the full Adobe Acrobat 5.0 program). Your computer may already have this software installed. If it does not, there is a copy of the Acrobat Reader 5.0 installer provided on the CD-ROM.
You should refer to the “electronic” manual (which of course, you can print out, should you wish to do so), for detailed explanations of some of the func-tions which are described in this quick manual.
Read through this manual for an overview of the Pocketstudio 5.
1, “Welcome” This section.
2, “About multitrack recording” With spe-cial reference to the Pocketstudio 5
3, “Parts of the Pocketstudio 5” And some notes on menu, etc. operations. READ THIS SEC-TION, otherwise the rest of the manual, and the Pocketstudio 5 itself will not make sense!
4, “Basic use of the Pocketstudio 5” Some basic functions explained. READ THIS to learn what the Pocketstudio 5 can do for you.
5, “Your first song using the Pocketstudio 5” An example song. We strongly suggest that you work through this example to learn the way of work-ing with the Pocketstudio 5 to create music.
6, “Managing songs and data on your Pocketstudio 5” Songs, memory cards and con-nection to your computer.
What’s in the box?
When you open the Pocketstudio 5 package, you should also find in the box:
• The Pocketstudio 5 itself, with a CompactFlash card installed.
• An AC adaptor• A stereo headphone/microphone headset
• This guide (Getting Started)• A CD-ROM containing the Reference Manual,
reader software, and various utilities and data to help you with the Pocketstudio 5
If any of these items are missing, or appear damaged, contact your TASCAM dealer.
TASCAM Pocketstudio 5 Getting Started 3
1 – Welcome
Powering up the Pocketstudio 5
The Pocketstudio 5 has two methods of receiving power: from six dry-cell batteries, or from the sup-plied AC adaptor.
The on/off switch is located on the “rear panel”, together with the AC adaptor input, the USB jack and the MIDI IN jack.
Slide the switch towards the AC adaptor jack (ON is towards the center) to turn on the Pocketstudio 5. The
display lights and a welcome message appears briefly before the home screen is shown.
NOTE
In this manual, we use the term “top panel” to refer to the main colored control surface with the display and the control keys, “front panel” to refer to the surface with the input jacks and level controls, and “rear panel” to refer to the surface with the MIDI, USB and power connector and switches.
The AC adaptorWhen using the Pocketstudio 5 with the AC adaptor:
Make sure that you only use the Pocketstudio 5 with the AC adaptor supplied with it. If you use any other AC adaptor, there is a serious risk of damage to the Pocketstudio 5.
Make sure that the voltage of your AC supply matches the voltage requirements printed on the Pocketstudio 5 AC adaptor. If you are in any doubt, consult a qualified expert.
Disconnect the AC adaptor from the power supply when you are not using it, but note the following:
Even when the Pocketstudio 5 is plugged into the AC adapter, there is a slight drain on the batteries.
If the Pocketstudio 5 becomes unplugged from the AC power supply, the batteries will be used unless the power is turned off.
In order to avoid draining the batteries by mistake, always turn off the power on the Pocketstudio 5 before disconnecting the adaptor.
NOTE
There is a hook on the bottom of the unit. You should loop the power cord round this hook to prevent the Pocketstudio 5 from becoming accidentally discon-nected from the power when you are using it.
Using batteriesWhen using batteries with the Pocketstudio 5, note the following:
• The Pocketstudio 5 requires six AA-type batteries.• Always remove and replace batteries with the
power to the Pocketstudio 5 turned off.• Always use the same type of batteries in the Pock-
etstudio 5 at one time. We strongly recommend the use of alkaline batteries. Standard manganese bat-teries are not suitable for use with the Pocketstudio 5, as they will not provide sufficient battery life for use of the unit.
• Although you can use Ni-MH rechargeable batter-ies (Ni-Cad batteries will not give sufficient life), you must make sure that all such batteries are charged together when replacing the batteries.
Always follow the maker’s instructions when charging these batteries. You cannot use the Pock-etstudio 5 as a charger for these batteries.
• Do not mix different types of batteries, and do not mix old and new batteries together.
• Always make sure that the batteries are the right way round (+ and –) as shown by the markings in the battery compartment.
If the batteries drop below a usable voltage, the Pock-etstudio 5 shows Low Battery! on the dis-play. If you see this message, do not attempt to use the Pocketstudio 5 (there is a risk of losing your work) replace the batteries as soon as possible and/or connect the Pocketstudio 5 to the power supply, using the AC adaptor.
4 TASCAM Pocketstudio 5 Getting Started
2 – About multitrack recording
Even if you already know something about multi-track recording, you may find it useful to read this section in order to refresh your memory regarding the basic concepts involved in producing a recording.
This explanation has been written specially with the Pocketstudio 5 in mind, and some of the ways in which you work with a Pocketstudio 5 are slightly different to the way in which you would work with a tape recorder, for example.
Cards and memoryThe Pocketstudio 5 stores all information on standard CompactFlash™ (CF) cards. Using a USB connec-tion to a computer, the Pocketstudio 5 containing the CF card can be used as a hard disk and files trans-ferred to and from a personal computer.
A 32 MB card is supplied with the unit. Any other cards must be formatted before use and some files copied onto it before it can be used by the Pocketstu-dio 5. See “Managing songs and data on your Pocket-studio 5” on page 23 for further details.
Multi-track recording
You are already familiar with stereo, the standard for the overwhelming majority of music produced today, which produces a realistic 3D audio image from two speakers. Each sound source in the stereo image is precisely placed (panned) and at the correct volume relative to the rest.
In order to produce this effect of a sound which is similar to the one you would hear in real life, there are two different ways of working: live recording and multitracking. In live recording, microphones are set up around the artistes and the performance is recorded directly to a stereo recorder, as it actually takes place.
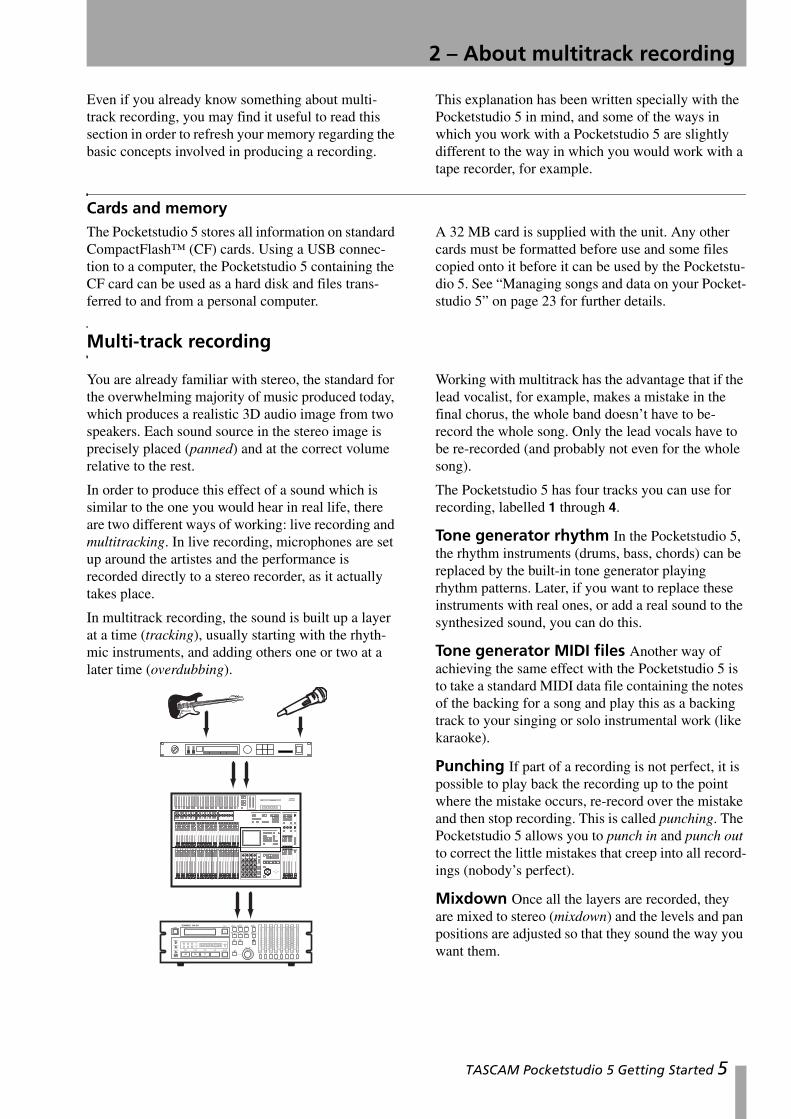
In multitrack recording, the sound is built up a layer at a time (tracking), usually starting with the rhyth-mic instruments, and adding others one or two at a later time (overdubbing).
Working with multitrack has the advantage that if the lead vocalist, for example, makes a mistake in the final chorus, the whole band doesn’t have to be-record the whole song. Only the lead vocals have to be re-recorded (and probably not even for the whole song).
The Pocketstudio 5 has four tracks you can use for recording, labelled 1 through 4.
Tone generator rhythm In the Pocketstudio 5, the rhythm instruments (drums, bass, chords) can be replaced by the built-in tone generator playing rhythm patterns. Later, if you want to replace these instruments with real ones, or add a real sound to the synthesized sound, you can do this.
Tone generator MIDI files Another way of achieving the same effect with the Pocketstudio 5 is to take a standard MIDI data file containing the notes of the backing for a song and play this as a backing track to your singing or solo instrumental work (like karaoke).
Punching If part of a recording is not perfect, it is possible to play back the recording up to the point where the mistake occurs, re-record over the mistake and then stop recording. This is called punching. The Pocketstudio 5 allows you to punch in and punch out to correct the little mistakes that creep into all record-ings (nobody’s perfect).
Mixdown Once all the layers are recorded, they are mixed to stereo (mixdown) and the levels and pan positions are adjusted so that they sound the way you want them.
TASCAM Pocketstudio 5 Getting Started 5
2 – About multitrack recording
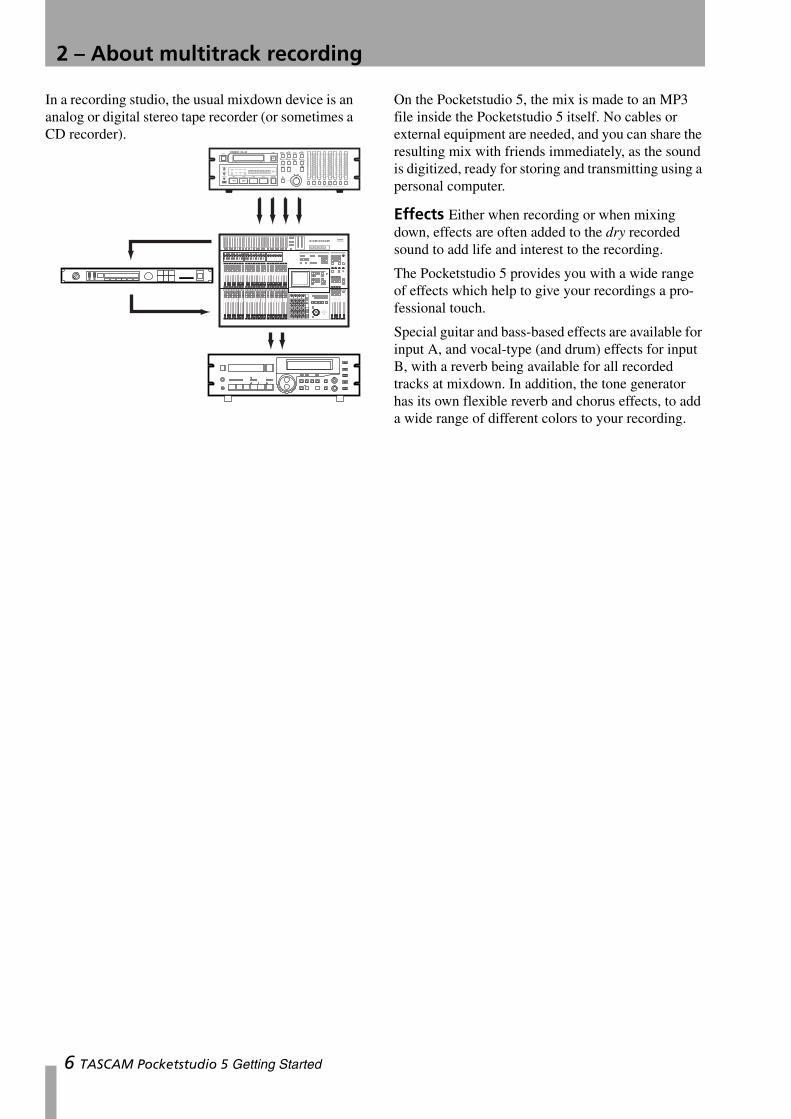
In a recording studio, the usual mixdown device is an analog or digital stereo tape recorder (or sometimes a CD recorder).
On the Pocketstudio 5, the mix is made to an MP3 file inside the Pocketstudio 5 itself. No cables or external equipment are needed, and you can share the resulting mix with friends immediately, as the sound is digitized, ready for storing and transmitting using a personal computer.
Effects Either when recording or when mixing down, effects are often added to the dry recorded sound to add life and interest to the recording.
The Pocketstudio 5 provides you with a wide range of effects which help to give your recordings a pro-fessional touch.
Special guitar and bass-based effects are available for input A, and vocal-type (and drum) effects for input B, with a reverb being available for all recorded tracks at mixdown. In addition, the tone generator has its own flexible reverb and chorus effects, to add a wide range of different colors to your recording.
6 TASCAM Pocketstudio 5 Getting Started
3 – Parts of the Pocketstudio 5
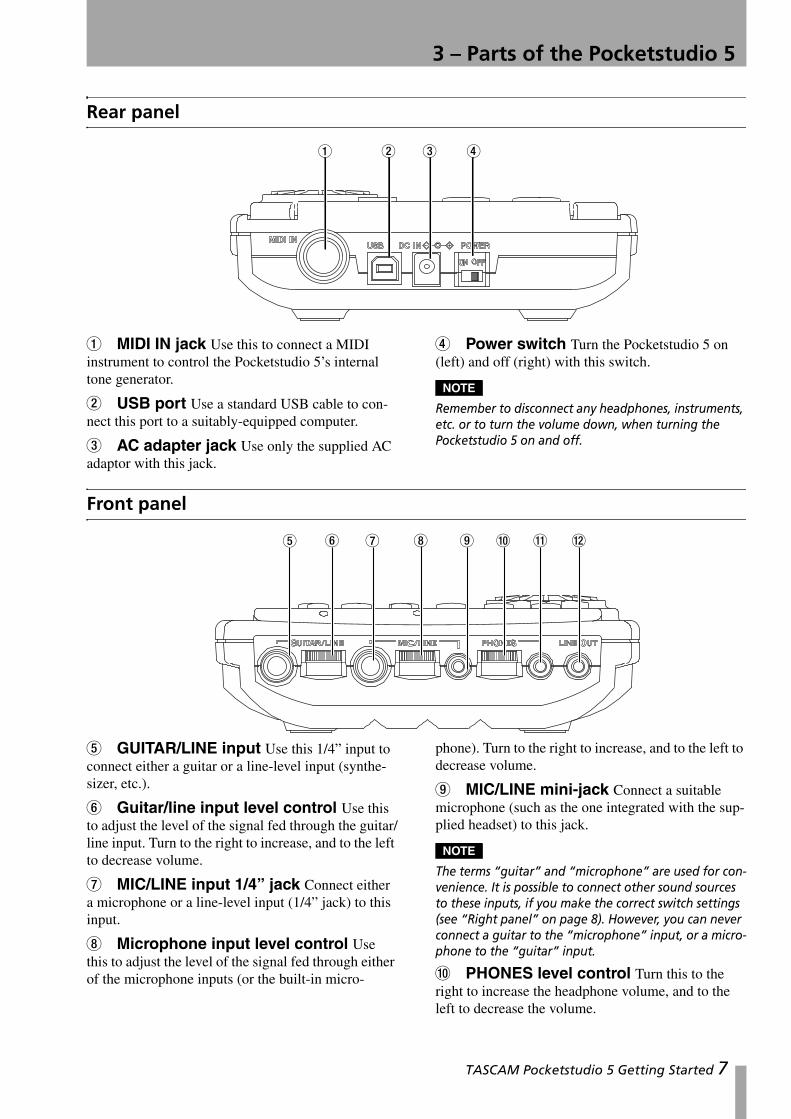
Rear panel
1 MIDI IN jack Use this to connect a MIDI instrument to control the Pocketstudio 5’s internal tone generator.
2 USB port Use a standard USB cable to con-nect this port to a suitably-equipped computer.
3 AC adapter jack Use only the supplied AC adaptor with this jack.
4 Power switch Turn the Pocketstudio 5 on (left) and off (right) with this switch.
NOTE
Remember to disconnect any headphones, instruments, etc. or to turn the volume down, when turning the Pocketstudio 5 on and off.
Front panel
5 GUITAR/LINE input Use this 1/4” input to connect either a guitar or a line-level input (synthe-sizer, etc.).
6 Guitar/line input level control Use this to adjust the level of the signal fed through the guitar/line input. Turn to the right to increase, and to the left to decrease volume.
7 MIC/LINE input 1/4” jack Connect either a microphone or a line-level input (1/4” jack) to this input.
8 Microphone input level control Use this to adjust the level of the signal fed through either of the microphone inputs (or the built-in micro-
phone). Turn to the right to increase, and to the left to decrease volume.
9 MIC/LINE mini-jack Connect a suitable microphone (such as the one integrated with the sup-plied headset) to this jack.
NOTE
The terms “guitar” and “microphone” are used for con-venience. It is possible to connect other sound sources to these inputs, if you make the correct switch settings (see “Right panel” on page 8). However, you can never connect a guitar to the “microphone” input, or a micro-phone to the “guitar” input.
A PHONES level control Turn this to the right to increase the headphone volume, and to the left to decrease the volume.
1 2 3 4
6 7 8 9 A B C5
TASCAM Pocketstudio 5 Getting Started 7
3 – Parts of the Pocketstudio 5
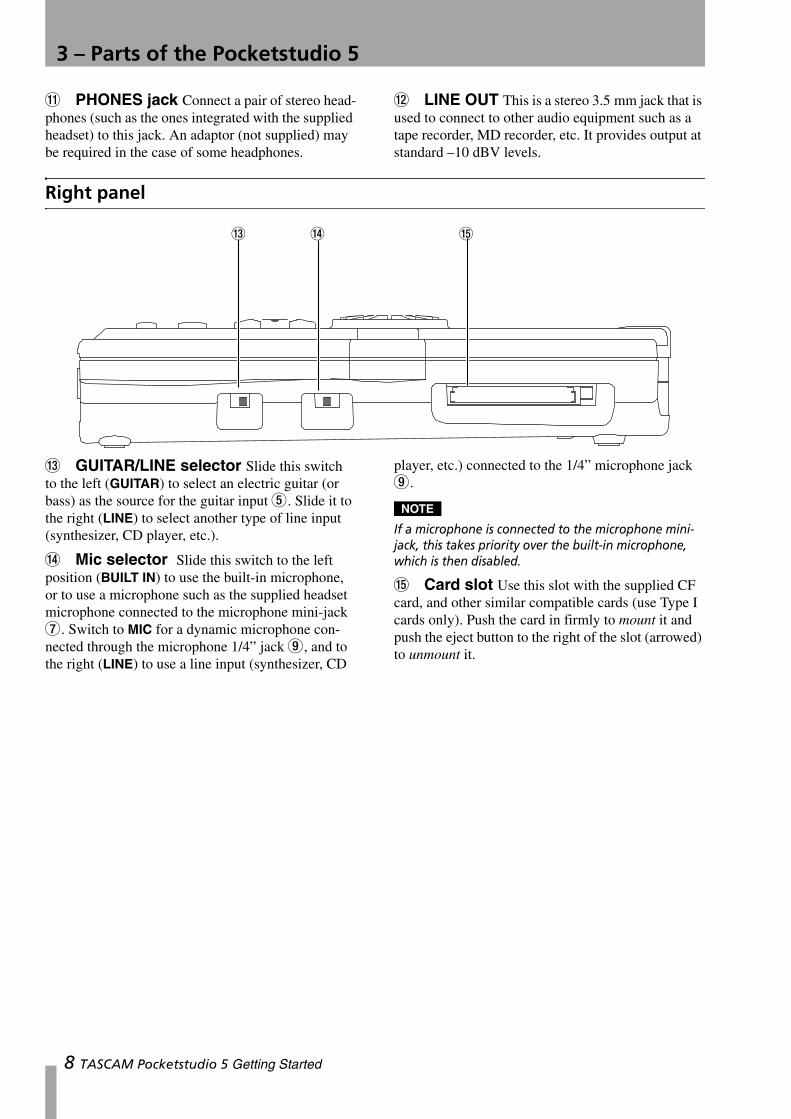
B PHONES jack Connect a pair of stereo head-phones (such as the ones integrated with the supplied headset) to this jack. An adaptor (not supplied) may be required in the case of some headphones.
C LINE OUT This is a stereo 3.5 mm jack that is used to connect to other audio equipment such as a tape recorder, MD recorder, etc. It provides output at standard –10 dBV levels.
Right panel
D GUITAR/LINE selector Slide this switch to the left (GUITAR) to select an electric guitar (or bass) as the source for the guitar input 5. Slide it to the right (LINE) to select another type of line input (synthesizer, CD player, etc.).
E Mic selector Slide this switch to the left position (BUILT IN) to use the built-in microphone, or to use a microphone such as the supplied headset microphone connected to the microphone mini-jack 7. Switch to MIC for a dynamic microphone con-nected through the microphone 1/4” jack 9, and to the right (LINE) to use a line input (synthesizer, CD
player, etc.) connected to the 1/4” microphone jack 9.
NOTE
If a microphone is connected to the microphone mini-jack, this takes priority over the built-in microphone, which is then disabled.
F Card slot Use this slot with the supplied CF card, and other similar compatible cards (use Type I cards only). Push the card in firmly to mount it and push the eject button to the right of the slot (arrowed) to unmount it.
D E F
8 TASCAM Pocketstudio 5 Getting Started

3 – Parts of the Pocketstudio 5
Top panel
G Display The display shows you the current status of the song, etc. as well as the menu choices to set up and use your Pocketstudio 5.
H MP3 key Use this key when mixing down to a stereo MP3 file (lights red) or playing back an MP3 file (lights green). When unlit, the Pocketstudio 5 is recording tracks or bouncing.
I EFFECTS key Use this key to set up and use the Pocketstudio 5’s built-in effects units.
J Advanced transport keys Use these keys to set repeat points, and automated punch operations.
K REC READY keys Used with the four audio tracks of the Pocketstudio 5 to assign the sources to the tracks, to check these assignments, and so on.
L Faders The four track faders (1 through 4) are used to adjust the playback volume of the four audio tracks. The TG fader adjusts the overall volume of the built-in MIDI tone generator (that’s what “TG” stands for!), and the MASTER fader adjusts the over-all level of the overall signal. Pull the faders away to you to reduce the volume, and push them away from you to increase the volume. The nominal position, with no cut or boost, is marked about two-thirds of the way up.
M Built-in microphone If you do not have an external microphone available, you can use this microphone to record “guide” tracks, etc. The quality will be improved, though, if you use an external microphone, such as the one included as part of the supplied headset.
G
H
I
J
K
L
M
N
O
P
Q
R
S
TASCAM Pocketstudio 5 Getting Started 9
3 – Parts of the Pocketstudio 5
N Transport keys These keys act in much the same way as an ordinary tape recorder’s keys. There is no pause key (none is necessary with a device like the Pocketstudio 5). There is, however, an extra key which you will not find on a tape recorder, the MARK key, which allows you to set and return to preset points throughout your song. See “Marks” on page 14.
O Source keys These keys are used to select and confirm the assignment of the source to the recording tracks.
P OL indicators If you are recording and these indicators light, the signal you are recording is too loud (the inputs are OverLoaded = OL). Turn down the volume on the source, if possible, or adjust the
input level with the Pocketstudio 5’s own controls (6 and 8).
Q Menu navigation keys These keys allow you to jump to a pre-defined menu (F.), to switch between the menu and the “home” screens (MENU) and to move up a level from a menu setting (EXIT).
R Wheel and ENTER/YES This forms a key part of the operation of the Pocketstudio 5. Turn the wheel to change a value, and the ENTER/YES key to confirm the setting of that value.
TIP
Press and hold the ENTER key for a few seconds to turn on the display backlight if it is off, or turn it off if it is on.
S Cursor Pad This is actually four keys in one. Use this control to navigate around the screens.
Navigating around the Pocketstudio 5
The way in which you use the Pocketstudio 5 is straightforward and easy.
You should learn the basic principles of operating described here. Very soon you will find that using the
Pocketstudio 5 becomes second nature, and you can carry out complex operations without having to think about them.
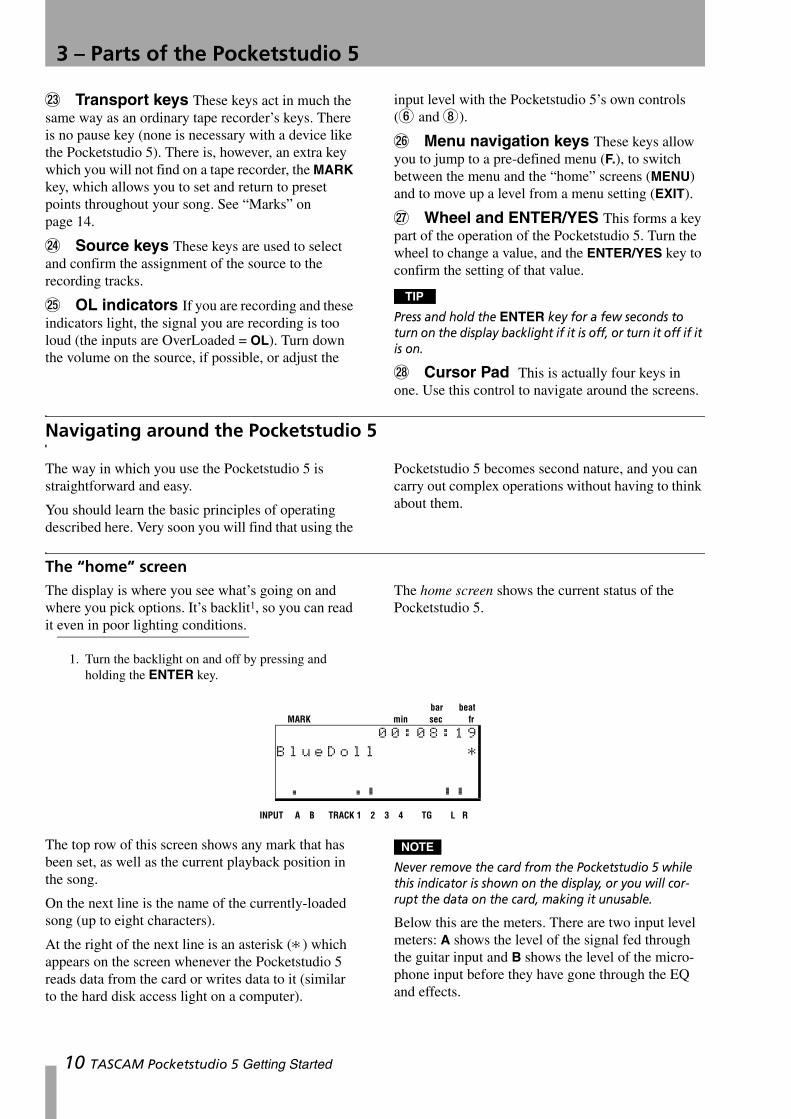
The “home” screenThe display is where you see what’s going on and where you pick options. It’s backlit1, so you can read it even in poor lighting conditions.
The home screen shows the current status of the Pocketstudio 5.
The top row of this screen shows any mark that has been set, as well as the current playback position in the song.
On the next line is the name of the currently-loaded song (up to eight characters).
At the right of the next line is an asterisk (*) which appears on the screen whenever the Pocketstudio 5 reads data from the card or writes data to it (similar to the hard disk access light on a computer).
NOTE
Never remove the card from the Pocketstudio 5 while this indicator is shown on the display, or you will cor-rupt the data on the card, making it unusable.
Below this are the meters. There are two input level meters: A shows the level of the signal fed through the guitar input and B shows the level of the micro-phone input before they have gone through the EQ and effects.
1. Turn the backlight on and off by pressing and holding the ENTER key.
00:08:19
BlueDoll *
C C B B B
MARK min sec frbar beat
INPUT A B TRACK 1 2 3 4 TG L R
10 TASCAM Pocketstudio 5 Getting Started
3 – Parts of the Pocketstudio 5
NOTE
Since the EQ and effects can add a significant amount of volume to the signals, you should not rely on these meters for the final level being sent to the track.
The levels of the four audio tracks being played back are shown on the four track meters before they have been through the EQ and the faders, as well as for the tone generator (TG). Finally, the L and R master out-put levels are shown at the right of the screen.
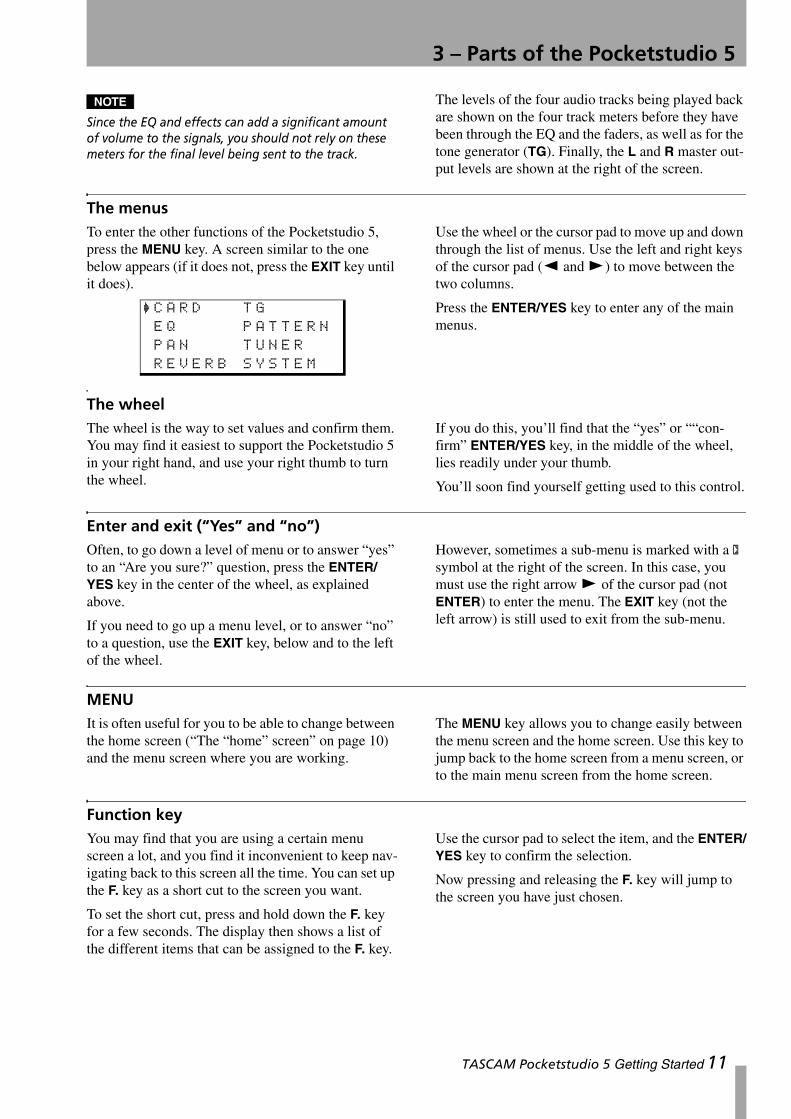
The menusTo enter the other functions of the Pocketstudio 5, press the MENU key. A screen similar to the one below appears (if it does not, press the EXIT key until it does).
Use the wheel or the cursor pad to move up and down through the list of menus. Use the left and right keys of the cursor pad (Ó and Á) to move between the two columns.
Press the ENTER/YES key to enter any of the main menus.
The wheelThe wheel is the way to set values and confirm them. You may find it easiest to support the Pocketstudio 5 in your right hand, and use your right thumb to turn the wheel.
If you do this, you’ll find that the “yes” or ““con-firm” ENTER/YES key, in the middle of the wheel, lies readily under your thumb.
You’ll soon find yourself getting used to this control.
Enter and exit (“Yes” and “no”)Often, to go down a level of menu or to answer “yes” to an “Are you sure?” question, press the ENTER/YES key in the center of the wheel, as explained above.
If you need to go up a menu level, or to answer “no” to a question, use the EXIT key, below and to the left of the wheel.
However, sometimes a sub-menu is marked with a . symbol at the right of the screen. In this case, you must use the right arrow Á of the cursor pad (not ENTER) to enter the menu. The EXIT key (not the left arrow) is still used to exit from the sub-menu.
MENUIt is often useful for you to be able to change between the home screen (“The “home” screen” on page 10) and the menu screen where you are working.
The MENU key allows you to change easily between the menu screen and the home screen. Use this key to jump back to the home screen from a menu screen, or to the main menu screen from the home screen.
Function keyYou may find that you are using a certain menu screen a lot, and you find it inconvenient to keep nav-igating back to this screen all the time. You can set up the F. key as a short cut to the screen you want.
To set the short cut, press and hold down the F. key for a few seconds. The display then shows a list of the different items that can be assigned to the F. key.
Use the cursor pad to select the item, and the ENTER/YES key to confirm the selection.
Now pressing and releasing the F. key will jump to the screen you have just chosen.
/ CARD TG
EQ PATTERN
PAN TUNER
REVERB SYSTEM
TASCAM Pocketstudio 5 Getting Started 11
3 – Parts of the Pocketstudio 5
The cursor padThe cursor pad is used to navigate around the screens—left and right and up and down.
Sometimes a screen will show an up (l) or a down (;) mark or both (') at the bottom right of the display which indicates that more options are available before the current screen, or after the current screen, or both before and after the current screen. Use the
cursor keys to scroll through to these “invisible” options.
Note that although it seems as though the center of the cursor pad can be pressed, you are not really pressing the center—the Pocketstudio 5 thinks that you have always pressed one of the arrow keys first.
Naming songs, etc.You can store songs, effect settings, etc. and you can name them for future reference.
To do this, use the Ó and Á keys as cursor keys to move the (underline) cursor left and right along the space for the name.
Use the wheel to select the characters for the name.
Select the letters, numbers and punctuation to use in the name from the following list:
After a name has been written, you usually move the cursor to the screen position where you select the memory area to store your song or settings, etc., use the wheel to select the memory area, and then press ENTER to store the song or settings for later.
NOTE
Some characters may not be supported or may produce strange results when you use them in names for files which are later to be read on a computer.
space ( ) + , -
0 1 2 3 4 5 6 7 8 9 : ; < = > ? @
A B C D E F G H I J K L M N O P Q R S T U V W X Y Z
[ \ ] ^ _
a b c d e f g h i j k l m n o p q r s t u v w x y z
| ≥ ≤
Patch :MyBass1
Write to UA-35
Write>>[ENTER]
12 TASCAM Pocketstudio 5 Getting Started
4 – Basic use of the Pocketstudio 5
Playback When you press the PLAY key, playback starts from the point shown in the top right of the home screen. The PLAY key lights when playback is taking place.
Stopping Pressing STOP stops playback or recording (note that there is no pause function). It also stops fast “winding” (see below).
Recording To record, make sure that at least one REC READY indicator is flashing (see “Patching and routing on the Pocketstudio 5” on page 13), press and hold down the RECORD key and press the PLAY key. Recording then starts on the track(s) with flashing REC READY indicators. The RECORD key lights while recording is taking place. When you press the STOP key to stop the recording, the RECORD key flashes for a short time while the recorded data is stored.
NOTE
Never turn off the power to the Pocketstudio 5 while the RECORD key is flashing after a recording opera-tion. If you do, the recorded data will be corrupted, and you may lose not just the music you have just recorded, but also the rest of the song.
TIP
You can also “drop into” record mode while playing back, as long as at least one REC READY indicator is flashing. While the PLAY key is lit, press the RECORD key, which lights, and recording starts on the tracks with flashing REC READY indicators.
“Drop out” of recording while pressing the PLAY key alone while recording is taking place (the RECORD key is lit).
Fast forward and rewind The fast forward (F FWD) and rewind (REW) keys take you back-wards and forwards through the songs in a very simi-lar way to a tape recorder, but note the following:
• Pressing and holding one of these keys while play-back is stopped or playing back (but not recording) takes you backwards or forwards (depending on the key pressed) with playback muted, and you can read the current playback position on the display of the top right of the home screen. When you release the key, the “winding” continues (to the end of the song for forward, or to the zero point for rewind). Press STOP to stop the wind operation or PLAY to start playback from the current location.
• Pressing and releasing either of these keys briefly while playback is stopped or playing back (but not recording) will move to the previous or next mark position (including the IN and OUT points). If no mark positions have been set behind the current playback position, the playback position will be set to the start (REW) of the song. See below for details of how to set and use the marks.
Special location (RTZ) If you press and hold the STOP key and then press the REW key, the playback position returns to the zero point.
Special location (LRP) If you press and hold the STOP key and then press the F FWD key, the play-back position moves to the point at which recording last started (“LRP” stands for “Last Recording Position”).
Patching and routing on the Pocketstudio 5
These are very important concepts in the multitrack world. Basically, they refer to the same thing—the way in which signals reach their destination.
In a large recording studio, signals are often patched (that is, passed through a patchbay, looking like an old-fashioned telephone switchboard) and connected using patch cords. Even in the case of modern all-in-one units like the Pocketstudio 5 which have no physical patchbay, we still use the term “patching” to
describe the joining of signals inside an audio system.
In the case of the Pocketstudio 5, since there are four tracks that can be used for recording, and only two inputs, there must be a way of routing or assigning (other words for patching) the signals at the two inputs to reach the tracks where you will actually be recording.
TASCAM Pocketstudio 5 Getting Started 13
4 – Basic use of the Pocketstudio 5
Routing an input to a trackWhen you want to route one of the two inputs to a track, press and hold either the GUITAR IN key or the MIC IN key.
Any track REC READY keys which are assigned to this input flash rapidly while you are holding down the input key (slow flashing means that the track is armed ready for recording).
Initially, tracks 1 and 2 are assigned to the guitar input, and tracks 3 and 4 are assigned to the micro-phone input (since the microphone and guitar effec-tors both have a stereo output, it makes sense to record on more than one track at a time).
Press a track key again to unpatch the input from the track (the key does not light).
Note that the tracks are initially assigned in pairs, so that if you press one REC READY of an unused pair, both indicators of that pair start to flash. To record on just one track, press one of the list tracks of a pair.
You can see that you can assign an input to more than one track at the same time, but you cannot assign both inputs to one track at the same time. Neither can you assign an input to all four tracks at once.
If you have selected a line input on both the micro-phone and guitar inputs so that you can record the left and right channels of a stereo instrument, you can assign these to the 1+2 and 3+4 track pairs (not to 1+3 or 1+4 or 2+3, etc.).
Track bouncingThe Pocketstudio 5 allows track bouncing (setting the playback of two or more tracks as inputs to another track or tracks.
See“Track bouncing” on page 26 of the reference manual for details.
Routing on mixdownWhen mixing down a multitrack recording, all four tracks, as well as the stereo outputs of the internal MIDI tone generator, are routed to the stereo outputs, and the four tracks may also use the internal reverb unit.
The MIDI tone generator can use its own reverb and chorus units, which cannot be used by the audio tracks.
MarksThe “extra” MARK key is used to set and clear marks which you can use to find your way quickly round the song.
You can set up to eight marks, plus the special IN and OUT marks.
See “Marks” on page 23 of the reference manual for details of how to use these functions.
Punch recordingOne of the most useful features of recording with a unit such as the Pocketstudio 5 is the ability to per-form punch recording. This allows you to correct only a small part of your recording without having to re-record the whole of the song.
See “Punch recording” on page 24 of the reference manual for details of how to carry out such punch operations.
Editing dataYou can copy and paste, as well as delete, audio data from your songs. See “Editing data” on page 31 of the reference manual for details.
14 TASCAM Pocketstudio 5 Getting Started
5 – Your first song using the Pocketstudio 5
This does not pretend to explain every possible func-tion of the Pocketstudio 5, but it will guide you through the first steps in making a recording.
We’ll assume that you are going to use the built-in tone generator to give your song a backing track of at least drums and bass and that you will be playing rhythm and lead guitar and singing.
Before you start recordingFind yourself a quiet area where you won’t be dis-turbed while you’re recording.
We will assume that you are using the headset (stereo headphones and microphone) that came with the Pocketstudio 5. Plug the red plug (microphone) into
the smaller (3.5 mm) microphone jack, and the black plug into the headphone jack.
Turn the headphone level control A to about half-way.
Setting up a new song to record intoThe Pocketstudio 5 card comes with a song already recorded out of the box. However, you will probably want to make your own song. Here’s how you do it:
1 From the home screen, which you see after turning on the Pocketstudio 5, press MENU.
2 The cursor should be at CARD. Press ENTER.
3 With the cursor at SONG LOAD, press ENTER again:
4 With the cursor at New Song, press ENTER. An asterisk (*) flashes briefly at the right of the screen to show that the card is accessed, and the display then shows the home screen, with SONG2 (your new song) ready for recording.
5 You can now rename the song. Press MENU, and select the CARD menu (press ENTER again). Use the cursor keys to move down to SONG EDIT and press ENTER.
6 With the cursor at SONG NAME, press ENTER again.
7 Use the cursor pad and wheel to edit the song name (see “Naming songs, etc.” on page 12) and then press ENTER, followed by MENU. The home screen now shows your song title.
NOTE
When you connect the Pocketstudio 5 to a computer (see “Managing songs and data on your Pocketstudio 5” on page 23), the song folder will still appear as SONGx where x is the original song number. However, the name of the song will be included in the folder. You should also see the Reference Manual for further details.
/ CARD TG
EQ PATTERN
PAN TUNER
REVERB SYSTEM
/ SONG LOAD
SONG SAVE
SONG EDIT
SMF LOAD ;
/ New Song
LHL
Load>>[ENTER]
00:00:00
SONG2
/ SONG NAME
SONG DELETE
UNDO
REDO ;
Song Name
Name :SONG2
Sure?>>[ENTER]
00:00:00
SlowBlue
TASCAM Pocketstudio 5 Getting Started 15
5 – Your first song using the Pocketstudio 5
Setting up the rhythmThe first thing to do is to set the tone generator to the “pattern” setting.
1 From the “home” screen, press MENU and then enter the SYSTEM menu.
2 Use the cursor to move to TgMode, and the wheel to select PATTERN.
TIP
While you are in the SYSTEM menu, you may decide that you want to think in terms of bars and beats, not minutes and seconds. Set the Time parameter to Bars/Beats if you want to work this way (see “Choosing the time type” on page 22 of the reference manual).
Selecting the pattern From the home screen, press the MENU key, and enter the PATTERN menu.
Select a category and style to use as a backing.
You can also adjust the structure of the song, arrang-ing fills, intro, verses, etc. into the order that fits your song, and you can also adjust the chord changes throughout the song, as well as adjusting the relative levels, pan positions, etc. of the instruments.
See the reference manual describing the use of pat-terns (“Patterns on the Pocketstudio 5” on page 7) for full details of how to do these operations.
Start playback using the PLAY y key.
Bring up the TG and MASTER faders to their nomi-nal positions so that the meters show some life, and adjust the headphone volume using the headphone level control A until it is comfortable. Do not use the TG or the MASTER faders to adjust the monitoring level in the headphones.
Adding the rhythm guitarThe first thing to do is to make sure your guitar is in tune. Happily, the Pocketstudio 5 contains a tuner—you don’t need other equipment.
1 Connect the guitar to the Pocketstudio 5.
Make sure the switch on the right of the Pocketstudio 5 D is set to the GUITAR posi-tion. Plug your guitar into the Pocketstudio 5’s GUITAR IN jack.
NOTE
NEVER plug your guitar amplifier speaker output into the Pocketstudio 5. If you do, will almost certainly dam-age the Pocketstudio 5 and your guitar amplifier. You may have an output marked LINE OUT on your ampli-fier. If such a jack exists, you may use that, but you must make sure that the selector switch on the Pocketstudio 5 is set to LINE and not GUITAR (even though the instrument you are playing is a guitar!).
2 Assign the GUITAR IN to track 1.
Press and hold the INPUT A GUITAR key and make sure the REC READY lights for tracks 1 and 2 flash rapidly (you will be recording on tracks 1 and 2 in stereo).
3 Adjust the levels. Make sure that your gui-tar’s pickup volume and tone controls are set to the level you want.
NOTEN
If you have exceptionally powerful pickups on your gui-tar, you may find that the red OL indicator by the INPUT A key flashes on loud passages. This means that you are overloading the input stages of the Pocketstu-dio 5, and you should reduce the input level using the GUITAR/LINE control.
Make sure the Pocketstudio 5 is showing its home screen (“The “home” screen” on page 10). You’ve already adjusted the MASTER fader, haven’t you?
Record:Tracking
TgMode / Pattern
Tempo :-------
Time :ABS ;
Ctgry / Rock1
Style:60sHrock
Tempo: d =100
Arnge:Preset . ;
16 TASCAM Pocketstudio 5 Getting Started
5 – Your first song using the Pocketstudio 5
NOTE
Bringing up track 1 fader here does not affect the level of the signal being recorded—it sets the relative level of the sound from track 1 that you hear through the head-phones (or LINE OUT).
Adjust the guitar input level 6 so that when you play the guitar in the way you will be playing when you are recording, the meter (INPUT A) is in the top part of the bottom line of the display.
Tuning the guitar
1 Tune the guitar. Since you’re playing along with the tone generator, you should be in tune with your “backing band”!
From the home screen, press MENU. Use the cursor pad to navigate to the TUNER menu and press ENTER/YES again.
2 The top line of the screen indicates the refer-ence tuning (the frequency of the A below middle C). Leave this at 440 when playing along with the Pocketstudio 5’s tone genera-tor. If you are recording with an instrument which does not follow this standard, you may want to adjust this value, otherwise leave it alone.
3 Play any single string on the guitar. The Pocketstudio 5 makes its best guess of the note that the string is tuned to, and displays this note, and a graphical display showing whether the string is sharp or flat. This
screen shows an E string which is slightly sharp.
In this case, you should flatten the note (loosen the string) slightly until only the cen-ter box is filled when you play the string.
4 Repeat the process one string at a time until all strings are tuned.
NOTE
If you do not see any indication on the screen when you play the guitar, check that (i) the guitar pickup is switched on and the guitar volume is correctly set, and (ii) that the GUITAR/LINE LEVEL control 5 is also correctly set.
If the string pitch is midway between two notes (for instance, between E and Eb, both note names are shown alternately in the second line of the display.
5 Exit the tuner function by pressing EXIT.
Adding a guitar effect
1 Press the EFFECTS key so a screen similar to the one below is displayed:
2 If the top line shows FX2 rather than FX1, press the EFFECTS key once more to change it.
3 Use the cursor pad to move to the program setting and select a guitar effect (a full list of these patches can be found in the reference manual).
Note that there are four categories of effects available for input A: electric guitar
(EGTR), acoustic guitar (AGTR), bass effects (BASS) and other miscellaneous set-tings (ELSE)1. Use the wheel to choose the appropriate category.
4 Each setting has one parameter (Param) that may be adjusted, which is the most “meaningful” parameter for each setting. The exact way in which the sound is affected by this parameter depends on the selected effect.
5 As well as the preset (Preset) bank of effects, you can also store your own effect set-tings (User). The Bank parameter allows
Cal:440
---
|_____ o _____|
Cal:440
E
|_____ J H ____|
FX1 :TraDist
Ctgry / EGTR
Param :83
Bank :Preset ;
1. Currently, the only “else” setting is a thru set-ting. This may change with future releases of the Pocketstudio 5 software.
TASCAM Pocketstudio 5 Getting Started 17

5 – Your first song using the Pocketstudio 5
you to choose which bank you will select the effect from.
6 Set the input and output levels (In Lev and Out Lev) for the effect (from 0 to 127).
7 Switch the effect on or off (make sure the effect is turned on, otherwise you won’t
hear any effect). Also note that you will hear no effect
8 The last setting allows you to store your parameter settings to a user area which you can then name for easy recall. See the refer-ence manual for details.
NOTE
If you push and hold the EFFECTS key for a couple of seconds, you change between the key being lit and unlit. When the key is unlit, both effects (FX1 and FX2) are disabled, even if the Switch setting is set to on for either effect. The EFFECTS key status does not affect the third reverb effects unit (see “Mixdown” on page 20) or the tone generator’s internal effector.
Adding EQ
1 Press the MENU key so that you see the main menu, and then use the cursor pad and ENTER key to enter the EQ menu.
You can apply EQ to the recorded tracks, or to the tone generator (left and right separately) or to the inputs. Here, of course, we’ll be making EQ settings on the guitar input (A).
TIP
Some people prefer to record with no EQ and to add it at the mixdown stage. There are no rules about this—it’s your choice!
2 Move the cursor to the second line of the dis-play, and turn the wheel until the Source field shows InputA.
3 Adjust the bass. Move the cursor down to the third line to change the amount of bass boost or cut (from -12dB (full cut) to 12dB (full boost) in decibel steps, and to the fourth line to change the frequency of the bass EQ band (from 30Hz to 1.6kHz in 31 steps).
4 Adjust the treble. Move the cursor down to the bottom of the screen (the fifth line) to change the amount of treble boost or cut (from -12dB (full cut) to 12dB (full boost) in decibel steps, and to the sixth line to change the frequency of the treble EQ band (between 1.7kHz and 18kHz in 31 steps).
NOTE
If you add too much gain to the low and/or high EQ bands, the input may overload, but this will not be visi-ble on the meters or on the OL indicators. You must use your ears to judge if the sound is distorted or not.
Saving the songYou may wonder why you need to save the song at this stage—after all, nothing’s been recorded yet.
Even so, all the settings you have made to the tone generator, to the effects and to the EQ, etc. can still be stored for later recall. If you were to turn off the Pocketstudio 5 now, you would lose all of these set-tings! To avoid such a catastrophe:
1 Press the MENU key, and select the CARD menu.
2 Select the SONG SAVE menu item and press ENTER:
The display shows:
In Lev:100
OutLev:100
Switch:on
Write : .
Func :EQ , .
Source / TR1
LowGain: 0dB
LowFreq:100Hz ;
Save Current?
Sure?>>[ENTER]
Song Save
Are you sure ?
Sure?>>[ENTER]
18 TASCAM Pocketstudio 5 Getting Started

5 – Your first song using the Pocketstudio 5
3 Press ENTER once again to save the data before you start recording.
NOTE
Audio data is saved every time you stop recording. This is shown by the RECORD key flashing after recording has stopped, and the display showing a flashing aster-isk. However, when the audio data is written to the
card, any changes you have made to the tone genera-tor, EQ or effect settings, etc. are not stored to the card along with the audio data.
For this reason, you should use the song save procedure described here on a regular basis to make sure that none of your work gets lost if you are making changes to the song settings.
Making the recordingAt last, we can start the recording!
1 Practice your playing. Press the REW m key to locate to the start of the song, and then the PLAY y key to start the rhythm. Play along to get the feel of the piece. Adjust the tempo and the level, etc. of the backing tracks as necessary.
2 Make your first recording. Rewind the song to the start (m) and press the REC READY key of track 1 so that it starts to flash. Press and hold down the RECORD key (>) and then press the PLAY key (y). The track’s REC READY key lights steadily. Press STOP when you’ve finished recording and wait
until the RECORD key stops flashing before doing anything else.
Repeat this recording process as often as you want—unlike a tape recorder, there is no delay when you rewind to the start. Don’t worry about getting it perfect just yet, but make sure that you have the chords you want in at least roughly the right places!
NOTE
Turn off the track’s REC READY light when you want to listen to what you’ve recorded, and turn it on again when you want to record. Remember to turn it off before you record the next track, or you’ll undo all your hard work so far!
Adding vocals
1 Now we’ll move onto the vocals. If you haven’t plugged it in already, your headset microphone (red plug) should be plugged into the microphone input jack 9 and the mic/line selection switch E should be set to the BUILT IN position (this works both for the built-in microphone or any microphone con-nected to the mini-jack). Use the MIC position if you have a dynamic microphone connected to the 1/4” jack.
TIP
You can use the built-in microphone M, and switch the selection switch to the BUILT IN position, but the sound quality will not be so good as using the head-phone microphone. You can also use your favorite microphone instead of the headset microphone, but it may be simpler to use the headset here.
Unplug your guitar, and turn down the input level of INPUT A, so that you won’t record any unwanted noise from that input while you are singing.
2 Assign the microphone to track 3. Press and hold down the INPUT B MIC key, and press the REC READY for track 4 to turn it off so that track 3’s REC READY light is the only one flashing rapidly.
Speak into the microphone and adjust the level as required using the microphone level control 8. Use the INPUT B meter to adjust the input level.
3 Assign a vocal effect to the microphone sig-nal, using the EFFECTS key as you did ear-lier for the guitar (“Adding a guitar effect” on page 17). Remember that the input here is input B, not A. A different set of effects is available for this input (as it’s unlikely that you’ll want a vintage tube stack sound on your vocals!).
4 Adjust the EQ for your voice as you did for the guitar.
5 Start playback from the start of the song and adjust the level of the recorded guitar on track 1 and 2.
TASCAM Pocketstudio 5 Getting Started 19
5 – Your first song using the Pocketstudio 5
6 Rewind to the start and record your vocals. It’s unlikely that you’ll get them completely right first time, so you will probably want to use the Pocketstudio 5’s auto punch facility
to make them perfect! See “Punch record-ing” on page 14 for details of how to correct your mistakes.
Adding the lead guitarWhen you’ve done recorded the vocals, you can add the lead guitar line.
We only have one track left, track 4, so we’ll have to use that for the guitar line.
To start with, turn down the input volume for the microphone, and turn off the routing for the B input to track 3 (press the INPUT B key and press the REC READY key for track 3).
1 Assign the guitar input (A) to track 4 (press and hold down INPUT A and make sure that REC READY 4 is the only REC READY key that is flashing rapidly.
2 Adjust the input volume and the volume of your guitar. Add an effect for the lead sound (see “Adding a guitar effect” on page 17) for how to do this.
3 Add EQ as necessary (see “Adding EQ” on page 18).
4 Press the PLAY key to start playing back the song from the start, and use the track faders to adjust the relative levels of the two previ-ous recordings (the rhythm guitar on tracks 1 and 2, and the vocals on track 3).
5 Play the guitar lead line along with the tracks you recorded earlier.
TIP
Most people find it useful to use the mark features (“Marks” on page 14) as well as the automated punch facilities (“Punch recording” on page 14) when record-ing overdubs like guitar solos.
Also, if you want to add extra parts, you may want to do some track bouncing. See “Track bouncing” on page 14 and “Track bouncing” on page 26 of the Refer-ence Manual for some details regarding this.
MixdownThe final stage in recording a song is the mixdown.
1 Disconnect the guitar and microphone and set the input volume controls to the mini-mum.
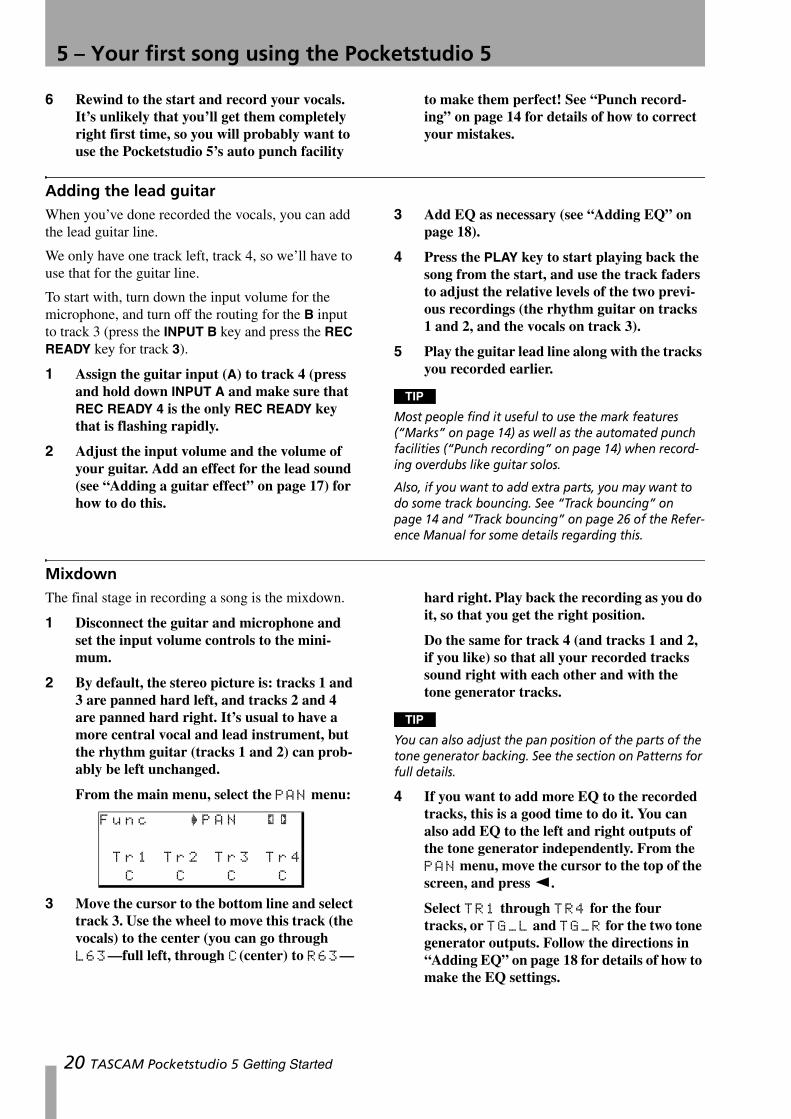
2 By default, the stereo picture is: tracks 1 and 3 are panned hard left, and tracks 2 and 4 are panned hard right. It’s usual to have a more central vocal and lead instrument, but the rhythm guitar (tracks 1 and 2) can prob-ably be left unchanged.
From the main menu, select the PAN menu:
3 Move the cursor to the bottom line and select track 3. Use the wheel to move this track (the vocals) to the center (you can go through L63—full left, through C(center) to R63—
hard right. Play back the recording as you do it, so that you get the right position.
Do the same for track 4 (and tracks 1 and 2, if you like) so that all your recorded tracks sound right with each other and with the tone generator tracks.
TIP
You can also adjust the pan position of the parts of the tone generator backing. See the section on Patterns for full details.
4 If you want to add more EQ to the recorded tracks, this is a good time to do it. You can also add EQ to the left and right outputs of the tone generator independently. From the PAN menu, move the cursor to the top of the screen, and press Ó.
Select TR1 through TR4 for the four tracks, or TG_L and TG_R for the two tone generator outputs. Follow the directions in “Adding EQ” on page 18 for details of how to make the EQ settings.
Func / PAN , .
Tr1 Tr2 Tr3 Tr4
C C C C
20 TASCAM Pocketstudio 5 Getting Started
5 – Your first song using the Pocketstudio 5
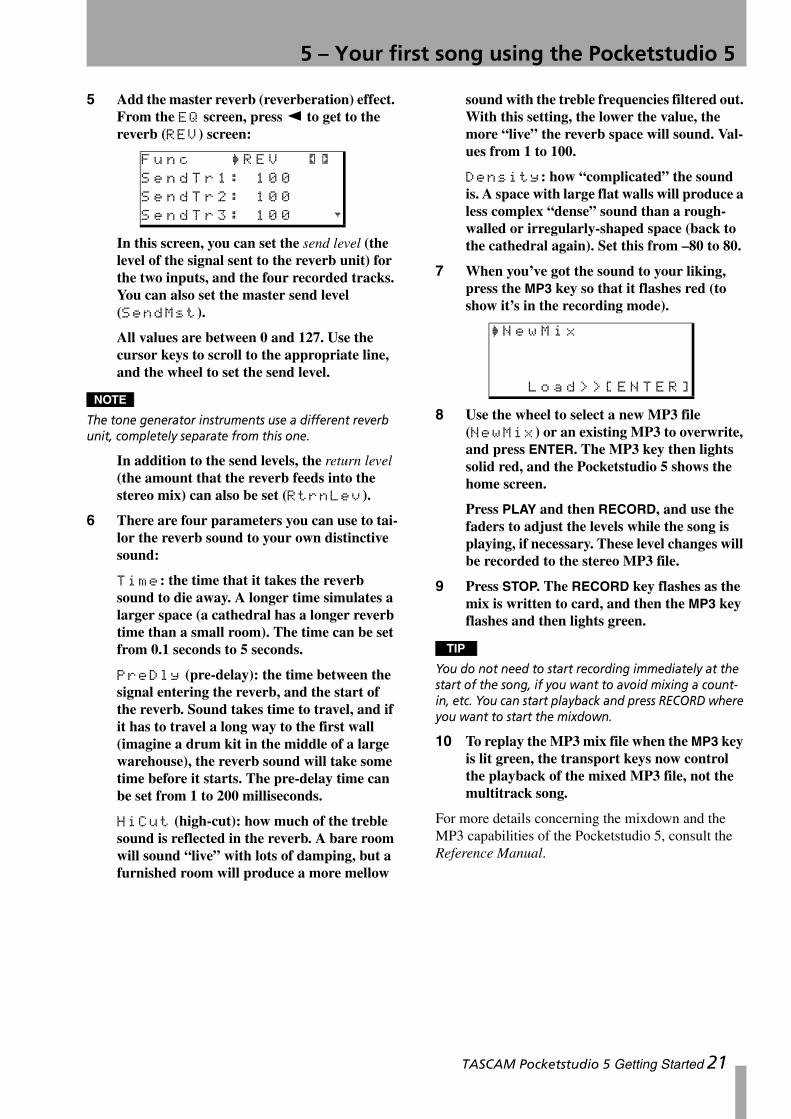
5 Add the master reverb (reverberation) effect. From the EQ screen, press Ó to get to the reverb (REV) screen:
In this screen, you can set the send level (the level of the signal sent to the reverb unit) for the two inputs, and the four recorded tracks. You can also set the master send level (SendMst).
All values are between 0 and 127. Use the cursor keys to scroll to the appropriate line, and the wheel to set the send level.
NOTE
The tone generator instruments use a different reverb unit, completely separate from this one.
In addition to the send levels, the return level (the amount that the reverb feeds into the stereo mix) can also be set (RtrnLev).
6 There are four parameters you can use to tai-lor the reverb sound to your own distinctive sound:
Time: the time that it takes the reverb sound to die away. A longer time simulates a larger space (a cathedral has a longer reverb time than a small room). The time can be set from 0.1 seconds to 5 seconds.
PreDly (pre-delay): the time between the signal entering the reverb, and the start of the reverb. Sound takes time to travel, and if it has to travel a long way to the first wall (imagine a drum kit in the middle of a large warehouse), the reverb sound will take some time before it starts. The pre-delay time can be set from 1 to 200 milliseconds.
HiCut (high-cut): how much of the treble sound is reflected in the reverb. A bare room will sound “live” with lots of damping, but a furnished room will produce a more mellow
sound with the treble frequencies filtered out. With this setting, the lower the value, the more “live” the reverb space will sound. Val-ues from 1 to 100.
Density: how “complicated” the sound is. A space with large flat walls will produce a less complex “dense” sound than a rough-walled or irregularly-shaped space (back to the cathedral again). Set this from –80 to 80.
7 When you’ve got the sound to your liking, press the MP3 key so that it flashes red (to show it’s in the recording mode).
8 Use the wheel to select a new MP3 file (NewMix) or an existing MP3 to overwrite, and press ENTER. The MP3 key then lights solid red, and the Pocketstudio 5 shows the home screen.
Press PLAY and then RECORD, and use the faders to adjust the levels while the song is playing, if necessary. These level changes will be recorded to the stereo MP3 file.
9 Press STOP. The RECORD key flashes as the mix is written to card, and then the MP3 key flashes and then lights green.
TIP
You do not need to start recording immediately at the start of the song, if you want to avoid mixing a count-in, etc. You can start playback and press RECORD where you want to start the mixdown.
10 To replay the MP3 mix file when the MP3 key is lit green, the transport keys now control the playback of the mixed MP3 file, not the multitrack song.
For more details concerning the mixdown and the MP3 capabilities of the Pocketstudio 5, consult the Reference Manual.
Func / REV , .
SendTr1: 100
SendTr2: 100
SendTr3: 100 ;
/ NewMix
Load>>[ENTER]
TASCAM Pocketstudio 5 Getting Started 21
5 – Your first song using the Pocketstudio 5
Transfer to computerOf course, you want to be able to share your work with others, and the best way to do that is using a computer.
Read the section on “Managing songs and data on your Pocketstudio 5” on page 23 for details of how to connect the Pocketstudio 5 to a computer and transfer files.
When you have an MP3 file on the computer, you can transfer it to any digital audio player capable of accepting 128kbps MP3 files, or put it on an Internet Web site, so that the results of your hard work are ready for the world to listen to!
22 TASCAM Pocketstudio 5 Getting Started

6 – Managing songs and data on your Pocketstudio 5
When you connect the Pocketstudio 5 to a computer, you can transfer data such as the following between the Pocketstudio 5 and your computer.
• Song data (audio, effect settings, MIDI backing settings, etc.)
• Stereo MP3 files: the files that you have mixed yourself on the Pocketstudio 5 as well as other MP3 stereo files from other sources.
• Standard MIDI files which you can use as backing data for “karaoke” playing and singing.
• Additional MIDI backing patterns and effect set-tings as these become available through the TASCAM Web site, or from other sources.
Also note that if you are using a new CF card with the Pocketstudio 5, you will need to format the card (see “Before you start using a new CF card” on page 24.
The computer must have one compatible USB port available for use with the Pocketstudio 5 (if all ports are being used by a mouse, keyboard, etc., you can add a USB hub to expand the number of ports avail-able to you).
NOTE
The majority of modern computers have USB ports which are compatible with the USB interface fitted to the Pocketstudio 5. A very few older computers may have older versions of USB hardware (host controllers) which are not compatible with the hardware on the Pocketstudio 5.
Your Pocketstudio 5 can be used with any of the fol-lowing computer operating systems.
• Microsoft Windows 98 SE (Second Edition)• Microsoft Windows Me• Microsoft Windows 2000 (Workstation and Profes-
sional)• Microsoft Windows XP (Home and Professional)• Mac OS 8.5 and greater (up to Mac OS 9.0)
The Pocketstudio 5 cannot be used with Microsoft Windows 95, Microsoft Windows 98 (first edition), or Microsoft Windows NT (any version).
It will not currently work with Mac OS 9 or above (including Mac OS X).
Managing songs
All song management and editing operations are accessed through the CARD menu.
Naming songs To name the current song loaded into memory, from the main menu, enter the CARD menu, and scroll down to SONG EDIT. Press ENTER.
Scroll the cursor to Song Name and press ENTER to edit the name of the current song loaded into memory.
Edit the song name (see “Naming songs, etc.” on page 12) and press ENTER when you have finished.
NOTE
This does not rename the song folder on the card, but renames the “zero-length” file inside the song folder. See the Reference Manual for details.
Take care that you only always use letters, numbers and dash (-) in filenames. If you use any other characters, you may not be able to read the card on a computer.
Deleting a song from the card To delete a song from the card, enter the CARD menu and scroll down to Song Delete. Press ENTER:
Scroll to the song you want to delete and press ENTER. The song (tracks, settings, and mix) is deleted from the card.
NOTE
There is no undo operation available here. If you delete a song from the card, there is no “escape hatch”. Always be sure that you have backed up your song to PC (or that you really do not want that song any more) before you delete it from the card.
/ SONG NAME
SONG DELETE
UNDO
REDO ;
Song Name
Name :KotoJazz
Sure?>>[ENTER]
SONG NAME
/ SONG DELETE
UNDO
REDO ;
/ KotoRock
RedGrass
Sure?>>[ENTER]
TASCAM Pocketstudio 5 Getting Started 23
6 – Managing songs and data on your Pocketstudio 5
Using CF cards
The 32 MB card which is supplied with your Pocket-studio 5 allows you to record up to 10 minutes of 4-track material (as well as allowing you to produce the stereo mix for these tracks).
Although you can back up cards to the computer quickly and easily using the USB connection, as described below (and then reuse the cards), you may
sometimes want to expand the capabilities of your Pocketstudio 5 by purchasing another CF card with more capacity. You can use CF cards up to 128 MB in size.
Note that it is currently not possible to use the CF-size hard disk drives which are available.
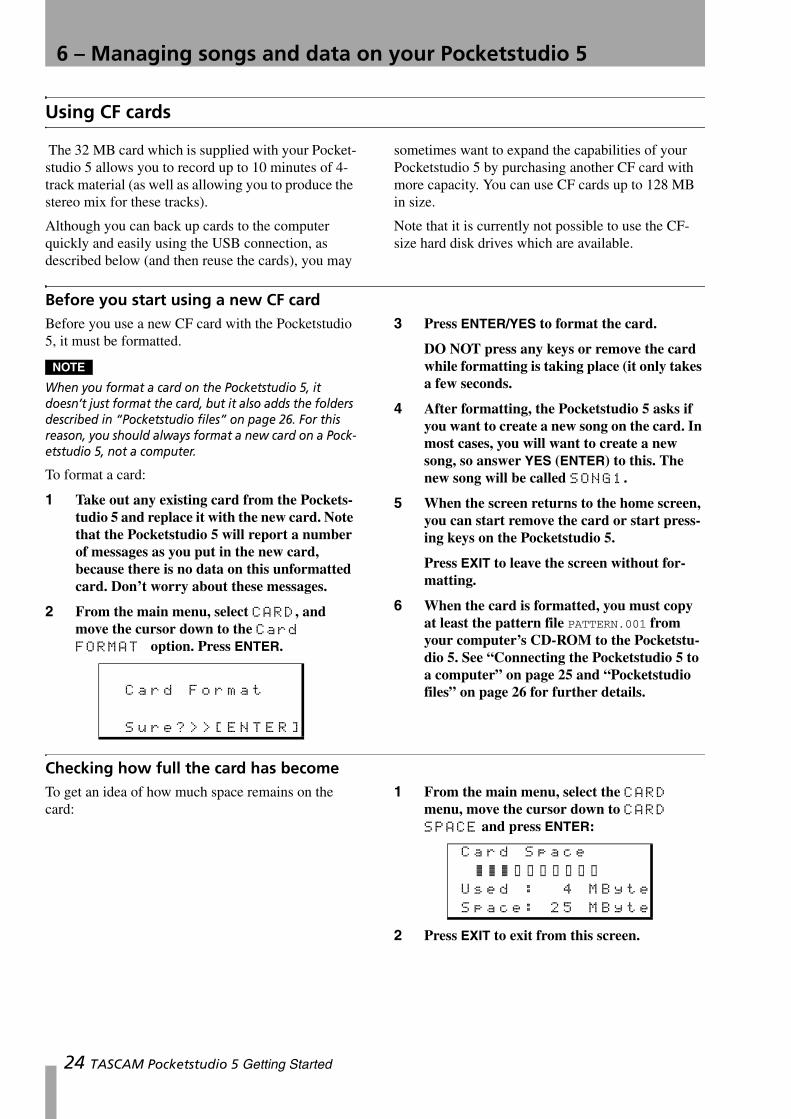
Before you start using a new CF card Before you use a new CF card with the Pocketstudio 5, it must be formatted.
NOTE
When you format a card on the Pocketstudio 5, it doesn’t just format the card, but it also adds the folders described in “Pocketstudio files” on page 26. For this reason, you should always format a new card on a Pock-etstudio 5, not a computer.
To format a card:
1 Take out any existing card from the Pockets-tudio 5 and replace it with the new card. Note that the Pocketstudio 5 will report a number of messages as you put in the new card, because there is no data on this unformatted card. Don’t worry about these messages.
2 From the main menu, select CARD, and move the cursor down to the Card FORMAT option. Press ENTER.
3 Press ENTER/YES to format the card.
DO NOT press any keys or remove the card while formatting is taking place (it only takes a few seconds.
4 After formatting, the Pocketstudio 5 asks if you want to create a new song on the card. In most cases, you will want to create a new song, so answer YES (ENTER) to this. The new song will be called SONG1.
5 When the screen returns to the home screen, you can start remove the card or start press-ing keys on the Pocketstudio 5.
Press EXIT to leave the screen without for-matting.
6 When the card is formatted, you must copy at least the pattern file PATTERN.001 from your computer’s CD-ROM to the Pocketstu-dio 5. See “Connecting the Pocketstudio 5 to a computer” on page 25 and “Pocketstudio files” on page 26 for further details.
Checking how full the card has becomeTo get an idea of how much space remains on the card:
1 From the main menu, select the CARD menu, move the cursor down to CARD SPACE and press ENTER:
2 Press EXIT to exit from this screen.
Card Format
Sure?>>[ENTER]
Card Space
K K K o o o o o o o
Used : 4 MByte
Space: 25 MByte
24 TASCAM Pocketstudio 5 Getting Started
6 – Managing songs and data on your Pocketstudio 5
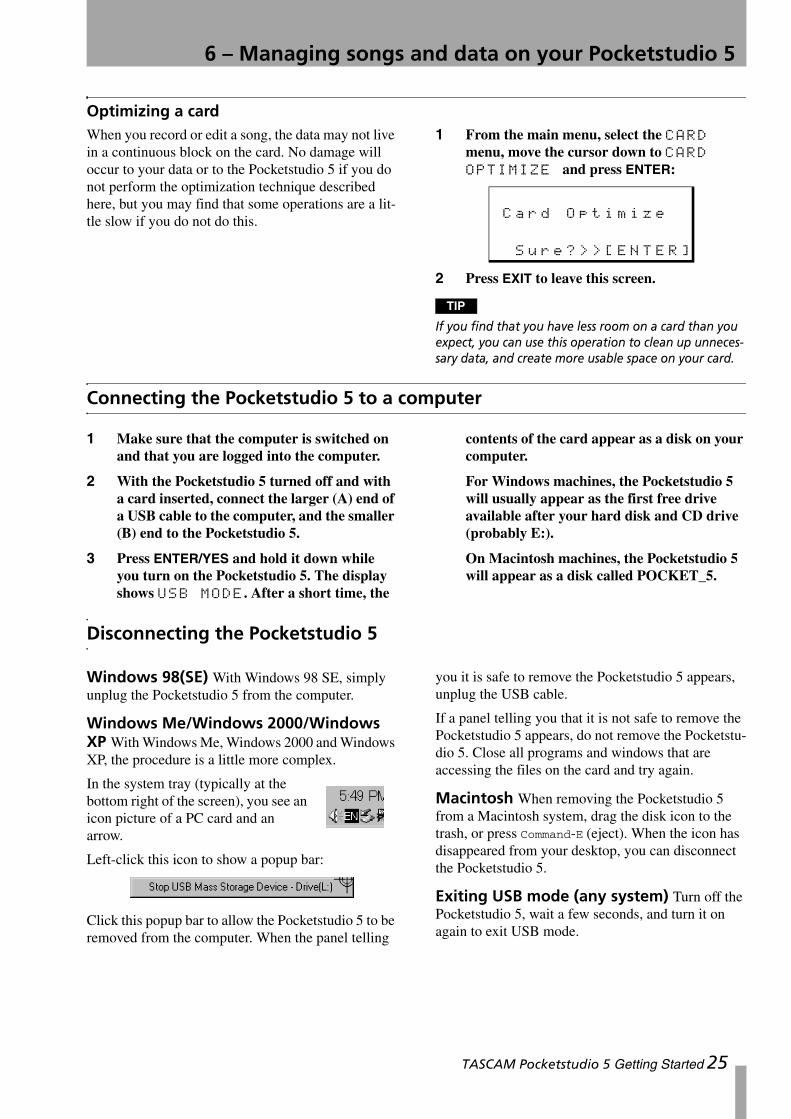
Optimizing a cardWhen you record or edit a song, the data may not live in a continuous block on the card. No damage will occur to your data or to the Pocketstudio 5 if you do not perform the optimization technique described here, but you may find that some operations are a lit-tle slow if you do not do this.
1 From the main menu, select the CARD menu, move the cursor down to CARD OPTIMIZE and press ENTER:
2 Press EXIT to leave this screen.
TIP
If you find that you have less room on a card than you expect, you can use this operation to clean up unneces-sary data, and create more usable space on your card.
Connecting the Pocketstudio 5 to a computer
1 Make sure that the computer is switched on and that you are logged into the computer.
2 With the Pocketstudio 5 turned off and with a card inserted, connect the larger (A) end of a USB cable to the computer, and the smaller (B) end to the Pocketstudio 5.
3 Press ENTER/YES and hold it down while you turn on the Pocketstudio 5. The display shows USB MODE. After a short time, the
contents of the card appear as a disk on your computer.
For Windows machines, the Pocketstudio 5 will usually appear as the first free drive available after your hard disk and CD drive (probably E:).
On Macintosh machines, the Pocketstudio 5 will appear as a disk called POCKET_5.
Disconnecting the Pocketstudio 5
Windows 98(SE) With Windows 98 SE, simply unplug the Pocketstudio 5 from the computer.
Windows Me/Windows 2000/Windows XP With Windows Me, Windows 2000 and Windows XP, the procedure is a little more complex.
In the system tray (typically at the bottom right of the screen), you see an icon picture of a PC card and an arrow.
Left-click this icon to show a popup bar:
Click this popup bar to allow the Pocketstudio 5 to be removed from the computer. When the panel telling
you it is safe to remove the Pocketstudio 5 appears, unplug the USB cable.
If a panel telling you that it is not safe to remove the Pocketstudio 5 appears, do not remove the Pocketstu-dio 5. Close all programs and windows that are accessing the files on the card and try again.
Macintosh When removing the Pocketstudio 5 from a Macintosh system, drag the disk icon to the trash, or press Command-E (eject). When the icon has disappeared from your desktop, you can disconnect the Pocketstudio 5.
Exiting USB mode (any system) Turn off the Pocketstudio 5, wait a few seconds, and turn it on again to exit USB mode.
Card Optimize
Sure?>>[ENTER]
TASCAM Pocketstudio 5 Getting Started 25

6 – Managing songs and data on your Pocketstudio 5
Pocketstudio files
The Pocketstudio 5 keeps its files in special loca-tions, which must not be changed.
See the Reference Manual for details of these loca-tions and settings.
How to share your Pocketstudio 5 files
Thanks to the Pocketstudio 5 and the Internet, you can now share your files round the world.
Not only can you share your finished mixes, but you can send your projects in progress round the world and make recordings together with musicians you’ve never even met!
For example, if you feel that your latest song would really be enhanced by some Latin American percus-sion, you could find, through the Internet, a fellow Pocketstudio 5 owner playing such instruments and living in Brazil, for example.
Sending the tracks (and MIDI backing) of the song to the percussion player allows him to overdub the per-cussion parts and return them to you. All you need is the Pocketstudio 5, your computer, an Internet con-nection and a mail and browser program.
To help you and all the other Pocketstudio 5 owners around the world, TASCAM has set up a Web page on the main TASCAM Web site (www.tascam.com) where you can register your details (name, contact details, the region where you live, the instrument(s) that you play, the type of music you enjoy, etc.) and search for like-minded musicians to work with you on your projects.
Some notes on keeping filesAlways back up your songs as often as you can to your computer by copying them from the card to your computer’s hard disk drive. You stand less risk of losing important data (and maybe hours of hard work) that way.
You may also want to keep different versions of your songs. Perhaps you feel that one player’s interpreta-tion of a part on your song is better than another’s,
and you want to keep the two versions for compari-son before you make the final mix.
Although the filenames you use on the Pocketstudio 5 are restricted to eight characters, you can use longer names on your computer. Remember to change them back to eight characters when you put them back on the Pocketstudio 5.
26 TASCAM Pocketstudio 5 Getting Started


TEAC CORPORATION Phone: (0422) 52-5082 3-7-3, Nakacho, Musashino-shi, Tokyo 180-8550, Japan
TEAC AMERICA, INC.Phone: (323) 726-0303 7733 Telegraph Road, Montebello, California 90640
TEAC CANADA LTD.Phone: 905-890-8008 Facsimile: 905-890-9888 5939 Wallace Street, Mississauga, Ontario L4Z 1Z8, Canada
TEAC MEXICO, S.A. De C.VPhone: 5-851-5500 Campesinos No. 184, Colonia Granjes Esmeralda, Delegaacion Iztapalapa CP 09810, Mexico DF
TEAC UK LIMITEDPhone: 01923-819699 5 Marlin House, Croxley Business Park, Watford, Hertfordshire. WD1 8TE, U.K.
TEAC DEUTSCHLAND GmbHPhone: 0611-71580 Bahnstrasse 12, 65205 Wiesbaden-Erbenheim, Germany
TEAC FRANCE S. A.Phone: 01.42.37.01.02 17 Rue Alexis-de-Tocqueville, CE 005 92182 Antony Cedex, France
TEAC BELGIUM NV/SAPhone: 0031-162-510210 Oeverkruid 15, NL-4941 VV Raamsdonksveer, Netherlands
TEAC NEDERLAND BVPhone: 0162-510210 Oeverkruid 15, NL-4941 VV Raamsdonksveer, Netherlands
TEAC AUSTRALIA PTY.,LTD. A.B.N. 80 005 408 462 Phone: (03) 9672-2400 Facsimile: (03)9672-2249 280 William Street, Port Melbourne, Victoria 3000, Australia
TEAC ITALIANA S.p.A.Phone: 02-66010500 Via C. Cantù 11, 20092 Cinisello Balsamo, Milano, Italy
Printed in China MA-0652
POCKETSTUDIO 5