Embed Size (px)
Citation preview

1


3
Copyright
Copyright © 1998-2011 Questionmark Computing Ltd. All rights reserved.
Questionmark and Perception are either registered trademarks or trademarks of Questionmark Computing Ltd in the United States of America and the United Kingdom and other countries.
Microsoft, Microsoft Excel, Microsoft Word, Windows, Windows 2008, Windows 2003, Windows XP, Windows Vista and Windows 7 are either registered trademarks or trademarks of Microsoft Corporation in the United States and/or other countries.
Adobe, Adobe Flash and Adobe Captivate are registered trademarks of Adobe.
Other product and company names mentioned herein might be trademarks of their respective owners.
Revision # 2.1


5
Table of Contents
Welcome .......................................................................................................................7
What's new in this release? ........................................................................................................ 7
Finding more information ..........................................................................................................10
Contact us .................................................................................................................................11
Authoring .................................................................................................................... 13
Choosing an authoring tool ........................................................................................................13
Creating repositories .................................................................................................................13
Creating questions .....................................................................................................................18
Creating assessments ................................................................................................................30
Scheduling .................................................................................................................. 37
Accessing Enterprise Manager ...................................................................................................37
Creating groups .........................................................................................................................39
Creating participants .................................................................................................................40
Creating schedules ....................................................................................................................42
Delivering ................................................................................................................... 47
Web delivery .............................................................................................................................47
Paper delivery ...........................................................................................................................52
Offline delivery ..........................................................................................................................53
Third-party LMS delivery............................................................................................................54
Reporting .................................................................................................................... 55
Accessing Enterprise Reporter ...................................................................................................55
Choosing a report ......................................................................................................................56
Creating a report .......................................................................................................................63
Managing results .......................................................................................................................65
Questionmark Analytics............................................................................................... 67
Accessing Questionmark Analytics .............................................................................................67
Creating a report .......................................................................................................................68


7
Welcome
Questionmark Perception is a complete assessment management system that enables you to create questions and organize them into exams, quizzes, tests or surveys. You can schedule people to take your assessments, deliver them in a variety of ways and then view the results in twelve different report types.
Perception offers a cost-effective, easy way to utilize computerized assessments that not only measure knowledge, skills and attitudes but also enhance the learning process. Perception can be integrated with other systems and supports major standards including IMS QTI, AICC, SCORM, PENS and HR-XML.
The way in which assessments are created and made available for participants to take is explained in the
following diagram.
With Perception, you can:
Author questions and organize them into exams,
quizzes, tests or surveys
Schedule assessments for participants and groups
Deliver via standard web browser, secure browser, PDA, CD or paper
Report on and analyze results using 12 standard reports
This guide provides first-time users of Questionmark Perception with the information they need to start authoring, scheduling, delivering and reporting on assessments. It is divided into:
See "Authoring" on page 13
See "Scheduling" on page 37
See "Delivering" on page 47
See "Reporting" on page 55
See "Questionmark Analytics" on page 67
To follow the instructions given in this guide, you will need to have installed both Authoring Manager and Perception Server, and verified that they are functioning correctly. Both applications can be obtained free-of-charge from the Download area of the Questionmark Web site.
What's new in this release?
Questionmark Perception Version 5 is major new release of Perception, and contains many powerful new
features. The following table explains the new features that have been added to each of the Perception Version 5 releases.
Feature Description

8
Feature Description
Questionmark Perception 5.1
New
templates Perception Version 5 template files now use industry-standard XML to control the appearance of every screen presented to participants when logging in to Perception and taking assessments.
Many example template files have been included with Perception
Version 5, each using a different cutting-edge design. Authors can choose to use any one of these templates to deliver their assessments, or instead create new ones of their own - Perception Version 5 templates provide the flexibility authors need to completely customize the look and feel of assessments. For example, authors can use templates to:
Replace the English text presented to participants when they log in to Perception and take an assessment with the text of
another language
Display a company logo and reflect a corporate style
Make assessments more accessible to participants with disabilities
Translation Manager
Translation Manager is a powerful new feature of Enterprise Manager that enables Perception administrators to easily and quickly manage the deployment of assessments in different languages
New architecture for scalability
Perception Version 5 has been designed to offer maximum scalability, reliability, and security. This is delivered through a multi-
tiered architecture that can be scaled to support the needs of all organizations - from the smallest to the largest.
The multi-tiered architecture of Perception Version 5 is composed of three tiers:
Presentation tier - presents assessments to participants in a suitable format
Perception Server tier - delivers assessment data from the database server to the presentation tier
Database Server tier - the Perception repository containing all assessment data
The new presentation tier uses industry-standard PHP technology to
massively increase the scalability, reliability and security of Perception deployments
Blended delivery Blended delivery is a powerful new feature of Perception Version 5
that enables assessments to be delivered to participants in the most suitable format. For example, an assessment maybe made available to a group of participants. Using blended delivery, one participant might take the assessment on a PDA, another might take the same
assessment with a browser, while others might take the assessment

9
Feature Description
as an email or a PDF.
For the initial release of Perception Version 5, only browser delivery
is supported. Other delivery types will be made available in later releases
Other
improvements In addition to the major new features listed above, many other improvements have been included in Perception Version 5. These include:
More powerful technology
Improved assessment tryout
Improved installer for Perception Server
Improvements to delivering assessments from multiple repositories
Improvements to participant authentication
Improvements to Perception screens displayed to participant
Improved resume and restart of assessments
Improvements to Save As You Go
New participant tools
Questionmark Perception 5.2
New language
options In addition to the languages available for the delivery of assessments. In Questionmark Perception 5.2 and above Enterprise Manager has also been translated. Enterprise Manager is available in the following languages:
English
Spanish
French
Dutch
German
Norwegian
Questionmark Perception 5.3
Questionmark Analytics
Questionmark Analytics is a new reporting system. The application pulls information from your shared repository and stores it in a specially constructed Results Warehouse. Reports can then be run on these results. Analytics launches with several new course evaluation reports, while others will be added over time.
Updated user interface An updated user interface has been created to fit in Questionmark
Analytics. The new portal styled user interface allows users to share
certain parts of the software with other by allowing them to be embedded in other sites or by providing a direct URL link to that part of the application.

10
Finding more information
Once you have completed this Getting Started Guide, you may find the resources available on the Questionmark Product Support site of particular interest.
www.questionmark.com/perception/help
The following resources are provided:
Knowledge Base - hundreds of articles on every area of Perception, constantly updated with new material
Product Manuals - the definitive source of information on using Perception
Best Practice Guides - detailed guidance on a particular aspect of Perception, including load-
balancing, scalability, accessibility, legal defensibility and many more
Questionmark has also created a Community Spaces Wiki to enable simple cooperation and collaboration by our customers to document tips, best practices and lessons learned. Access to the Community Spaces Wiki is a benefit available to all Questionmark customers subscribing to Questionmark's Software Support
Plan (SSP).
http://communityspaces.questionmark.com/
In addition to the above, you may also be interested in the following resources on the Questionmark web
site. Each of these can be found on the Questionmark Learning page:
www.questionmark.com/events/index.aspx
Resource Description
Questionmark Live Questionmark Live lets you easily write questions and then export them for use in
Questionmark Perception. Subject matter experts (SMEs) can access this powerful authoring tool anytime, anywhere. This Web-based application is available free of charge
to all Questionmark Software Support Plan customers. For more information about Questionmark Live, please refer to:
www.questionmark.com/live/index.aspx
Learning Cafe Guided tours, presentations, and other key documentation that provide an introduction to Questionmark Perception and will help you get the most out of the software. Plus, guides, presentations, and white papers designed to help you create effective assessments and understand best practices for developing and deploying surveys,
quizzes, tests and exams.
Web Seminars Connect with us via by telephone and web browser for a quick climb up the learning curve during an introductory web seminar.
Breakfast Briefings
Attendees learn about the latest developments in assessment software technology, hear customer case studies, and have the opportunity to network with fellow learning professionals. Briefings are held in several cities each fall.
Perception
Training
Product training is offered in various locations throughout the year and can be provided
onsite. Questionmark experts give attendees valuable tips about how to implement computer aided learning programs and/or run online surveys.
User Conference
Perception users gather each year for technical training, case study presentations, sessions on best practices, lively discussions and enthusiastic networking.

11
Resource Description
White Papers Many Questionmark White Papers explain best practices in assessment authoring and delivery. Some offer technical advice about the use of Questionmark products. All are provided free of charge.
Glossary Testing and assessment glossary of terms.
Contact us
If you have a technical problem with Perception that you cannot resolve, please contact Questionmark Technical Support. Contact details are provided in the table below.
Area Technical Support phone Technical Support Email
US 800-597-3950 [email protected]
UK +44 (0)800 731 5895
Europe +32 (0)2 398 02 05
Rest of World +44 (0)800 731 5895
If you have a licensing query, please email the Questionmark Customer Service team. Please refer to the full list of Questionmark Sales Offices for the contact details of your nearest office.


13
Authoring
This chapter explains how assessments are created in Perception, and demonstrates how easy it is to start creating Perception assessments. It is divided into:
See "Choosing an authoring tool" on page 13
See "Creating repositories" on page 13
See "Creating questions" on page 18
See "Creating assessments" on page 30
Choosing an authoring tool
There are four authoring tools available in Perception:
Questionmark Live - Is free to customers that have an SSP membership. It is an advanced Web Application for SMEs to create questions. Questions can be created or imported and shared between different users. The questions can be edited and then imported in to Perception using QPacks
Authoring Manager - A powerful Windows application for creating every type of question and assessment
Browser-Based Authoring - A Web application for creating many types of question and assessment
Most questions and assessments in Perception are created with Questionmark Live as it is easy to use and quick to access. However, the most powerful and feature-rich of the above authoring tools is Authoring Manager. With Authoring Manager, authors can create every type of question, and can perform every task required to produce sophisticated assessments ready for scheduling and delivery to participants. In this chapter we will show how you can use Authoring Manager to create questions and
include them in assessments ready to be scheduled and delivered.
For information on the other authoring tools available in Perception, please refer to See "Finding more information" on page 10.
Creating repositories
A repository is a Microsoft Access, Oracle or SQL Server database containing question and assessment
data. All the information needed to author, schedule, deliver and report on assessments is contained within a repository. Before questions and assessments can be created, an author must first create the repository (or open an existing repository) in which question and assessment data will be stored.
A repository can be located:

14
On an author's computer, in which case the author is said to be working from a local repository
On another computer, that authors can access over a network. In this case, the author is said to be working from a shared repository
If you are using the Questionmark OnDemand service your shared repository has already been created
by Questionmark and you can find details about connecting to it in your Welcome email.
More information on these repository types is provided in the following table.
Repository Description
Local A Microsoft Access database with no security features. Because of this, local repositories should only be used for tryout and demonstration purposes. Local repositories should not be used in production environments, and must never be used to deliver high-stakes assessments. In these situations, a shared repository should always be used.
Authors can create local repositories with Authoring Manager, and use them to create questions and assessments. For testing and tryout purposes, you can create local repositories in which to store example questions and assessments.
Shared An Oracle or SQL Server database with advanced security features suitable for production use.
Authors can create shared repositories with Shared Repository Manager. This tool is installed with Perception Server, and to use it you will need access to the Perception Server.
Assessments in local repositories cannot be scheduled, delivered and reported on. Therefore to follow the instructions given in the Scheduling, Delivering and Reporting chapters of this guide we recommend that you use a shared repository to store your assessments. (If you are only interested in the Authoring chapter of this guide, you can use a local repository if you wish. Any question or assessment content you
create in a local repository can be easily imported into a shared repository at a later date.)
If you have already created a shared repository, or if one has already been created for you, rather than creating a local repository you can connect to your shared repository and use it to follow the instructions given in this guide.
Creating shared repositories
Shared repositories cannot be created with Authoring Manager - they must be created with the
Shared Repository Manager tool. This tool is installed with Perception Server. Refer to the Shared Repository Manager User Guide for more information on shared repositories. This guide is available to members of Questionmark Communities and can be accessed on the Questionmark Support web site:
www.questionmark.com/perception/help/v4/manuals
This section contains information on:
Creating a local repository
Connecting to a shared repository

15
Creating a local repository
A local repository is a Microsoft Access database with the file extension .qmr. To create a local repository:
1. Open Authoring Manager
2. If this is the first time you have opened Authoring Manager, or if you have not yet disabled the Welcome to Authoring Manager box, you will see the following dialog box
If this dialog box is displayed, check Create new repository and click OK
Alternatively, if the dialog box is not displayed, select File > New Repository… from the File
menu
3. The Repository Creation Wizard will open, enabling you to create a local repository. Click Next to begin
4. Enter the location on your computer in which you want to create your local repository and click Next
Note that repository names cannot include spaces or quote (") marks
5. Enter the initial topic and assessment folder names, and click Next

16
Topics are folders used to contain questions. For example, you may have one topic called 'Maths' containing questions on mathematics, and another called 'Science' containing questions on science. The initial topic is the first (root) topic that will be created in your repository.
Assessment folders contain assessments, and like topics are used to group together related
content.
Additional topic and assessment folders can be created from within Authoring Manager once you have accessed your repository.
If you do not want to specify an initial topic name or assessment folder name, you can skip this stage by clicking Next without entering any values
6. Specify whether you want to import existing data from an earlier version of Perception and click Next
In this example, we will create an empty local repository, so we will not tick this box
If you would like to learn more about how to import data into Perception, please refer to See "Finding more information" on page 10
7. Confirm that the details of the repository you are about to create are correct and click Next
If the details are not correct, use the Back button to modify earlier screens in the Repository Creation Wizard
8. The new local repository will be created.
9. Once the repository has been created, the final screen in the Repository Creation Wizard will be displayed. Click Finish to close the Wizard
Once the repository has been created, it will be opened in Authoring Manager, and you can begin
creating questions.

17
Refer to Creating topics & questions for instructions on how to start creating question content.
Example repository
An example local repository is included with Authoring Manager. This local repository is named
ExampleLocal and includes several example questions, as well as an example assessment. When learning how to use Authoring Manager, you may find it useful to open this repository and work with the existing content.
The ExampleLocal repository can be found in the Authoring Manager application folder. By default, this is:
C:\Perception5\Repositories\local\Examplelocal.qmr
Connecting to a shared repository
If a shared repository has been created for you, and you have been given the shared repository name and server address, you can connect to it in Authoring Manager. Once you have connected to a shared repository, you can create questions and assessments in the same way that you can with local repositories.
To connect to a shared repository:
1. Open Authoring Manager
2. Select Open > Open Shared Repository... from the File menu
3. Enter the address of your shared repository server and click Connect

18
4. Select the repository you want to connect to from the drop-down list and click OK
5. Enter your username and password to log in to the shared repository and click OK
6. The shared repository will be opened in Authoring Manager, and you can begin creating questions.
Creating questions
Before you start creating questions, you will need to create the topic structure that will store your
questions.
A topic contains a group of questions that relate to a particular subject, level of difficulty, or some other common trait. A topic can contain other topics (called subtopics) and are used for structuring questions into logical groups. For example, you may have a topic called 'Mathematics' containing two subtopics, one
called 'Calculus' containing questions on calculus, and one called 'Algebra' containing algebra questions.
Importing existing questions
If you have questions in another format outside of your Perception repository, you can bring the content into Perception in several ways. The method you can use will depend on the format of the content you want to import. For example, you can import questions from earlier versions of Perception, Word-processor files, QTI XML files, Blackboard 6 and higher zip files or ASCII files.
For detailed information on how to import existing content into your Perception repository, please refer to the Importing Content chapter of the Perception Version 5 Authoring Guide.
This section is divided into:
Creating a topic
Choosing a question type
Creating a question
Trying out a question
Creating a topic
To create a topic:
1. Open Authoring Manager and connect to your local or shared repository
2. To create a root topic, right-click Topics in the navigation pane and select Add Topic...

19
3. To create a subtopic of an existing topic, right-click the existing topic in the navigation pane and select Add Topic...
4. Enter a name and a description for the topic and click OK.
Topic names must be unique, and should follow a clear and consistent naming strategy.
5. The new topic will appear under the 'Topics' folder
You can create as many root topics and subtopics as you require. For example, if you have created a root topic named 'Geography', you might want to create two subtopics named 'Africa' and 'Europe'.
Working with topics
Once a topic has been created, it can be copied, relocated, renamed or deleted from the repository. To perform these operations, simply right-click the topic and select the appropriate option. You can also relocate a topic by dragging and dropping it.
Also, access by authors to different root topics can be controlled. For example, you may wish to enable one author to edit questions in the 'Geography' topic, but be unable to edit or even view questions in the 'Science' topic. For more information on topic security, please refer to the Perception Version 5 Authoring Guide
Choosing a question type
There are 21 different types of question that can be included in Perception assessments, and all can be created with Authoring Manager. Each question type is unique, and before you create your question, you should consider which type is the most appropriate.

20
The following table provides a description of each question type.
Question type
Participants answer the question by...
Adobe Captivate
Performing a user interaction with Adobe Captivate content
Adobe Flash
Performing a user interaction with Adobe Flash content

21
Question type
Participants answer the question by...
Drag and Drop
Placing any number of graphical markers on a background graphic

22
Question type
Participants answer the question by...
Essay
Entering a long, free-range text response into a text box
Explanation
Information is given to participants at the beginning of a topic. There is no opportunity for answering
File Upload
Uploading a file to Perception
Fill in Blanks
Entering text into a number of blank spaces

23
Question type
Participants answer the question by...
Hotspot
Placing a single graphical marker on a single image to indicate their answer
Knowledge Matrix
Selecting one choice for each multiple choice question presented
Likert Scale
Selecting a response according to whether they agree or disagree with a statement

24
Question type
Participants answer the question by...
Matching
Selecting an answer from a drop-down list
Multiple
Choice
Selecting an answer from two or more choices
Multiple Response
Selecting one or more answers from two or more choices

25
Question type
Participants answer the question by...
Numeric
Entering a number into a box
Pull-down List
Selecting an answer from a drop-down list. One or more choices may be presented
Ranking
Arranging a list of options in a particular order
Select a Blank
Choosing the correct word or phrase from a drop-down list corresponding to a blank area of text
Selecting a response for each in a series of Agree/Disagree or other Likert Scale style questions

26
Question type
Participants answer the question by...
Survey Matrix
Text Match
Entering a single word or a few words
True/False
Selecting True or False
Yes/No
Selecting Yes or No
Creating a question
In this section, we will create a True/False question. The procedure for creating other question types is very similar.
To create a True/False question:
1. Open Authoring Manager and connect to your repository.
2. In the navigation pane, right-click the topic in which you want to create your question and select
Add Question... to open the Question Wizard

27
3. Click Next to start creating your question
4. Select True/False from the list of question types and click Next
5. Enter the question stimulus and click Next
You can include picture files, video files or sound files in the question stimulus. To do so, simply
click the Insert Picture button, Insert Video button or Insert Sound button and select the file you wish to include.

28
You can format the question stimulus by using the buttons on the toolbar, or, if your question requires more detailed formatting, you can launch the Advanced Editor by clicking the Launch Advanced Editor button. This enables you to edit the HTML code used to display the question stimulus
6. Define the score and specify any required feedback for the True and False choices. To do so, select a choice and click Edit...
In the above example, the correct answer score has been defined as 1, and the incorrect answer score has been defined as 0. Appropriate feedback has also been specified
Once you have defined scores and feedback for your choices, click Next
7. Enter a description for the question and click Next.
Question descriptions are used to identify individual questions within topic folders. By default the question description will be the same as the stimulus
8. Click Finish to create the question in the repository. The question will appear in the topic in which it was created.

29
Once a question has been created, it can be copied, relocated, renamed or deleted from the repository.
To perform these operations, simply right-click the question and select the appropriate option. You can also relocate a question by dragging and dropping it.
Trying out a question
Once a question has been created, you can try it out. To do so, right-click the question you want to try out and select Tryout
The question will open in a new window, and can be tried out as many times as you wish.

30
Editing questions
If you would like to edit your question once it has been created, right-click the question and select either Edit with Wizard... or Edit with Editor... This opens either the Question Editor, from
where you can edit any aspect of the question, or the Question Wizard. For more information on editing question settings in Authoring Manager, please refer to the Authoring Manager Help
Creating assessments
Once questions have been created in the repository, assessments that include them can be created. Before you start creating assessments, however, you will need to create the assessment folder structure in which they will be stored.
This section is divided into:
Creating an assessment folder
Choosing an assessment type
Creating an assessment
Trying out an assessment
Creating an assessment folder
Just as questions are organized into topics, so assessments are organized into assessment folders. And like roots topics, access by authors to different root assessment folders can be controlled.
To create an assessment folder:
1. Open Authoring Manager and connect to your repository
2. Right-click Assessments in the navigation pane and select Add Assessment Folder...
3. Enter the assessment folder name and a description and click OK
Choosing an assessment type
There are four different types of assessment, and before you create an assessment you should consider which type is the most appropriate.

31
The following types of assessment can be created.
Assessment type
Description
Exam Summative assessment that does not give feedback, and is secured against unauthorized access
Typical use might be for a formal exam delivered by an awarding body
Test Formative assessment that is mid-way between a quiz and an exam, and feedback may be given
Typical use might be for a post-course test of the participant's learning
Quiz Diagnostic assessment used for self-assessment, usually gives feedback, and is open to all
Typical use might be for a pre-course quiz that provides a measure of participant knowledge
Survey Reaction assessment that asks the participant questions, does not give feedback, and
has no right or wrong answers
Typical use might be for a course evaluation or employee attitude survey
Creating an assessment
Once you have decided what type of assessment is most appropriate, you can create your assessment. To do so:
1. Open Authoring Manager and connect to your repository
2. In the navigation pane, right-click the assessment folder in which you want to create your assessment and select Add Assessment... to open the Assessment Wizard. Click Next to begin
3. Enter a name and a description for the assessment, and then specify the assessment type
Note that some Assessment Wizard screens vary depending on the type of assessment you create. In the following procedure, we will create a quiz.
Once you have specified the assessment details, click Next to continue

32
4. Specify the control features for the assessment and click Next
The control features are described in the following table.
Note that, depending on the type of assessment you are creating, certain control features may be unavailable.
For more information on setting the control features for assessments, please refer to the
Perception Version 5 Authoring Guide
5. Enter the message that will be displayed at the beginning of the assessment and click Next
6. Specify the questions you wish to include in the assessment. Click Add to open the Select Questions window, where you can insert all the questions in particular topics, individual questions within topics, or randomly select questions from topics. Once you have inserted all the questions required, click OK
7. Check that all the topics and questions you want to include in your assessment are listed. If they
are, click Next

33
8. Specify a pass mark and enter any Pass or Fail feedback you would like to display. Pass feedback will be displayed if they achieve the Pass mark, and Fail feedback will be displayed if they do not.
You can also enter a URL into the Go to URL when done box. This will direct participants to the
specified URL at the end of the assessment
If you would like to have an email sent to participants at the end of the assessment, for example to confirm that the assessment has been successfully completed or to inform the participant of their score, click Set outcome email. This opens the Outcome email settings window, where
you can specify the details of the email you want to send.

34
To include information on participants and their performance in the assessment, click Insert Field on the toolbar and select the field you wish to add from the drop-down list. For example, in the above screenshot we have included the %SESSION.USER% field and the %SESSION.PERCENT%
field. When the assessment is completed and the email is sent, these fields will be replaced with the participant's name and assessment percentage score.
9. Click Next to create the assessment, and Finish to close the Assessment Wizard. The assessment will appear in the assessment folder in which it was created.
Once an assessment has been created, it can be copied, relocated, renamed or deleted from the repository. To perform these operations, right-click the assessment and select the appropriate option. You can also relocate an assessment by dragging and dropping it.

35
Trying out an assessment
Once an assessment has been created, you can try it out. To do so, right-click the assessment you want to try out and select Tryout. The assessment will open in a new window, and can be tried out as may times as you wish.
Editing assessments
If you would like to edit your assessment once it has been created, right-click the assessment and
select Edit assessment... This open the Assessment Editor, from where you can edit any aspect of the assessment. For more detailed information on editing assessment settings, please refer to the Perception Version 5 Authoring Guide


37
Scheduling
A schedule enables Perception administrators to determine how an assessment can be taken. For example, a schedule can determine:
Which participants can take an assessment
Where participants can take an assessment
When participants can take an assessment
How long participants have to take an assessment
How many times participants can take an assessment
If an assessment is defined as open access (meaning that it can be taken by anyone, at any time), a schedule does not need to be created for it. However, if the assessment is not defined as open access, a schedule must be created for the assessment. (An assessment can be defined as open access when it is created in Authoring Manager. Refer to See "Authoring" on page 13 for more information.)
Before an assessment can be scheduled to participants, the participants being scheduled must exist in the Perception repository. Therefore, before creating schedules, you will need to create the participants you want to schedule. This can be done with Enterprise Manager, a web application that enables Perception administrators to manage a Perception deployment.
Participants are often defined as belonging to particular groups. This makes it easy for Perception administrators to organize, schedule and report on members of particular groups. For example, a group might represent a particular department, company, geographical area, or some other common trait. Therefore, although it is not essential to do so, it is recommended that participants are organized into groups.
This chapter demonstrates how to create groups and participants in Enterprise Manager, and also how to schedule an assessment for delivery to these participants and groups. It is divided into:
See "Accessing Enterprise Manager" on page 37
See "Creating groups" on page 39
See "Creating participants" on page 40
See "Creating schedules" on page 42
Accessing Enterprise Manager
Enterprise Manager is part of Perception Server. To access Enterprise Manager, you will need to know the web address of your Perception Server deployment. You will also need to have been given the username and password of a Perception administrator with permission to access Enterprise Manager. If you do not know the web address of your Perception Server deployment, or you have not been given the username

38
and password of a Perception administrator, please contact the person responsible for your Perception Server deployment.
To access Enterprise Manager:
1. Open a web browser and navigate to the following URL:
http://<domain name>/em5/login.aspx
Where <domain name> is the name of your Perception Server. A typical URL might be:
If you are using the Questionmark OnDemand service you will need to navigate to:
https://ondemand.questionmark.com/<customerid>
Where <customerid> is your unique it for your OnDemand service
2. Enter your username and password and click Login
The main Enterprise Manager screen is displayed.
If you are using Questionmark Perception 5.1 or 5.2 this will look like:
If you are using Questionmark Perception 5.3 this will look like:

39
Note that the features available to you once you have logged in to Enterprise Manager will depend on the permissions you have been given. If a feature you require, such as Browser-Based Authoring, System Administration or Enterprise Reporter, is not available, please contact the person responsible for your
Perception Server deployment.
Creating groups
Groups can be used to organize participants into well-defined groupings, such as age range or geographical area. To create a group in which to organize participants:
1. Log in to Enterprise Manager
2. Select Administration | Groups
A list of any groups already created in the repository will be displayed

40
3. From the Group folder, select New Group
4. Enter a name and description for the new group and click Create
The group will be added to the repository and participants can now be added to this group
Creating participants
Before an assessment can be scheduled to participants, the participants must exist in the Perception
repository. This section will explain how to use Enterprise Manager to:
Create an individual participant
Create multiple participants
View and edit participant details once they have been created
Creating an individual participant
To create an individual participant:
1. Log in to Enterprise Manager
2. Click Administration | Participants
3. From the Participant folder, select Create individual
4. In the five different tabs, enter the details for the new participant and click Finish to create the participant
To assign a group membership to the participant, click the button in the Participant tab and select the group from the list of available groups
Creating multiple participants
Rather than creating each participant individually, it is also possible to create more than one participant at a time. This is important if you have a large number of participants that you need to add to the repository.
Importing participants

41
As well as manually creating participants, you can import them from a file. This is useful if you already have a list of participants in another program or database, and want to bring them into the shared repository that Perception Server uses.
For more information, please refer to 'Importing participants' in the Enterprise Manager User Guide. This guide is available to members of Questionmark Communities and can be accessed on the Questionmark Support web site:
www.questionmark.com/perception/help/v5/product_guides/
To create multiple participants:
1. Click Administration | Participants
2. From the Participant folder, select Create multiple
3. Enter the multiple participant data into the form and click Finish
You can assign every participant to a particular by clicking the button and selecting the group from the list of available groups
Viewing and editing participant details
To view and edit the details of a participant you have already created:
1. In the Administration menu, select Participants. A list of every participant in the repository will be displayed

42
2. Select the participant whose details you wish to view or edit and select Edit from the Participants window.
If the relevant participant is not displayed, you can search for it by using the Participant filter and Group filter boxes. Use the drop-down boxes to customize your search and click search to filter the list of participants
3. In the five different tabs, view and edit the details for the participant. Click Finish to update the participant details
Creating schedules
To create a schedule:
1. Click Administration :
If you wish to create a schedule for a participant, select Participants
If you wish to create a schedule for a group of participants, select Groups
2. Highlight the participant or group you wish to create a schedule for and either from the Participants or Group folder, select Schedule
3. In the Options tab, specify the assessment delivery method from the choices available
43
These delivery methods are described in the following table
Delivery method The assessment can be taken...
Web delivery With an Internet browser
Questionmark to Go In an offline environment with Questionmark to Go
Questionmark to Go or Web Delivery
Either with a Internet browser, or in an offline environment with Questionmark to Go (the participant can choose which)
Delivery at Test Center At an assessment Test Center
For more information on these delivery options, please refer to See "Delivering" on page 47
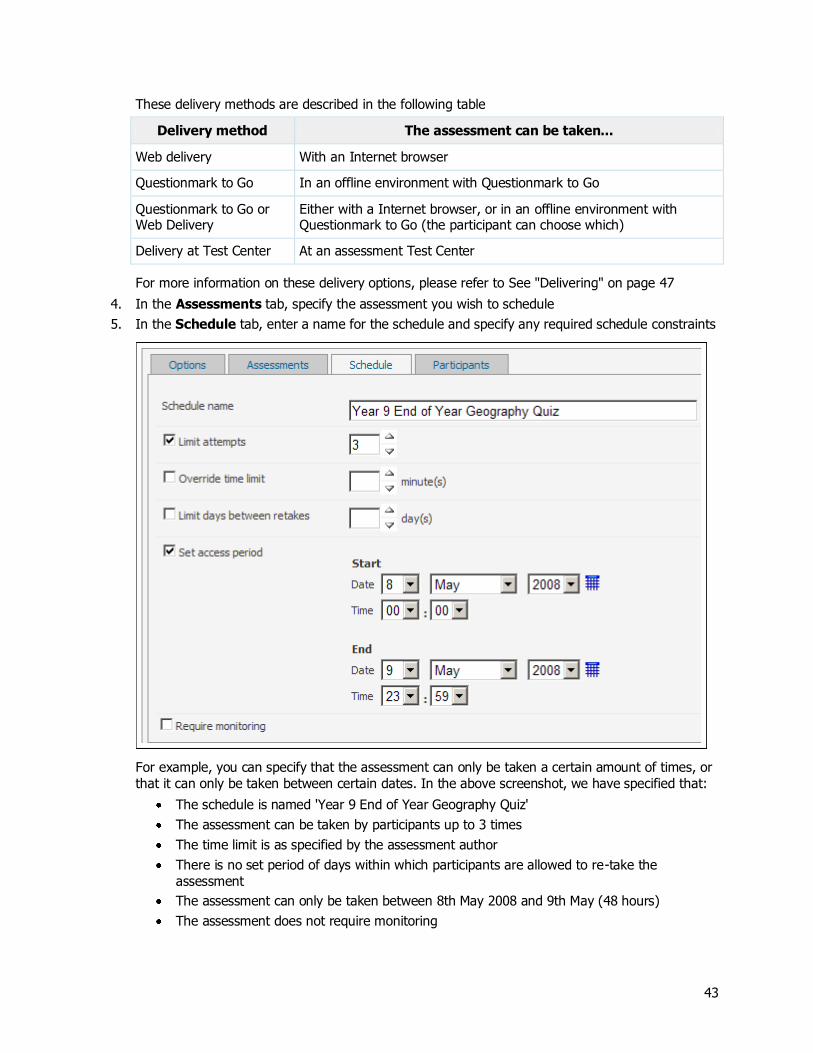
4. In the Assessments tab, specify the assessment you wish to schedule
5. In the Schedule tab, enter a name for the schedule and specify any required schedule constraints
For example, you can specify that the assessment can only be taken a certain amount of times, or that it can only be taken between certain dates. In the above screenshot, we have specified that:
The schedule is named 'Year 9 End of Year Geography Quiz'
The assessment can be taken by participants up to 3 times
The time limit is as specified by the assessment author
There is no set period of days within which participants are allowed to re-take the
assessment
The assessment can only be taken between 8th May 2008 and 9th May (48 hours)
The assessment does not require monitoring

44
6. In the Participants tab, check the Email broadcast box if you wish to send an email to scheduled participants, either individually or by group. This can be used, for example, to inform participants of their login instructions, notify them of the assessments they are scheduled to take, or provide other, more general information. For instructions, refer to Using Email Broadcast
7. Click Finish to create the schedule
Viewing and editing schedules
To view and edit the details of a schedule you have already created:
1. Click Administration | Schedules. A list of every schedule in the repository will be displayed
2. Select the schedule you wish to view or edit and select Edit from the Schedules window
If the relevant schedule is not displayed, you can search for it by using the Participant filter and Group filter boxes. Use the drop-down boxes to customize your search and click search to filer the list of schedules
3. View and edit the schedule as appropriate. Click Finish to update the schedule
Using Email Broadcast
There are three types of email broadcast:
Participant Announcements - Sends an email to participants, selected either individually or by
group
New Schedule - Sends an email to all participants assigned to a particular schedule
Schedule Reminder - Sends an email to all participants assigned to a particular schedule who have one or more assessment attempts remaining
To send an email broadcast to participants:
1. Open the Email Broadcast feature
If you are creating a schedule and tick the Email broadcast box, the Email Broadcast feature will be displayed when you click Finish. Alternatively, if you have already created a schedule and want to send an email broadcast, you can select Email Broadcast from the Administration screen to display the Email Broadcast feature.
2. Select the type of email broadcast you require

45
3. In the To... tab, enter the email address you wish the email broadcast to be sent from, and specify the participants you want to send the email broadcast to
4. In the Email body... tab, enter the email title and the content of the email you wish to send
You can construct the email content by typing directly into the text box and also by inserting Merge fields. These are place-holders that will be converted to meaningful text when the email is sent or previewed. Some merge fields will be replaced by exactly the same text for every recipient of a particular email broadcast, whilst other merge fields will be replaced by text that is different for each participant to whom the email is sent. Merge fields are a very useful way of including important participant information, such as the participant name, their password, and the Perception Server URL.
To insert a Merge field, simply select it from the Merge fields: drop-down box.

46
5. Click Preview to ensure the email is addressed and formatted correctly
6. If you are happy with the email, click Send. Emails to the appropriate participants will be sent immediately

47
Delivering
Once an assessment has been authored and scheduled, it can be delivered in the following ways:
See "Web delivery" on page 47
See "Paper delivery" on page 52
See "Offline delivery" on page 53
See "Third-party LMS delivery" on page 54
Web delivery
An assessment scheduled for web delivery can be taken by participants with any modern Internet browser. In most cases, this is all that is required to take the assessment. However, in some situations additional software may be required, such as if the assessment includes Adobe Flash or PDF content. For the complete system requirements for participants to take web-delivered assessments, please refer to Delivering assessments in the Enterprise Manager User Guide.
Browser Checker
The Browser Checker is an application for Perception that can check the configuration of a
participant's browser before the assessment is delivered. This can ensure that the browser on which the assessment is being taken meets certain minimum requirements - the assessment will only be delivered if it meets these requirements.
For more information on the Browser Checker, please refer to Delivering assessments in the
Enterprise Manager User Guide.
There are several different methods of taking assessments with web delivery:
Open access - no security provided, suitable for low-stakes assessments such as quizzes and
surveys
Secure access - medium security provided, suitable for low and medium stakes assessments
Certified access at a test center - Only a Monitor assigned to a test center can authorize the assessment to be taken
Questionmark Secure - high security provided, recommended for medium and high-stakes assessments such as exams and tests
These methods are described below.

48
The user interface presented to participants is also available in various languages if you are delivering assessments via open, secure and certified test center access. The different user interface languages can also be used with Questionmark Secure. For details about the default languages available, please refer to:
User Interface language options
Open access
If an assessment allows open access, participants do not need to supply a valid username and password when logging in to Perception. On the Log-in page, they can enter any name and group to log-in.
Once logged-in, participants will be able to view a list of all assessments that allow open access. From this list they will be able to take of any open access assessment.
Assessment authors can specify whether an assessment will allow open access when the assessment is created in Authoring Manager. For more information, refer to Creating an assessment.

49
Secure access
Assessments that have been scheduled to participants can only be taken by the scheduled participants, at the scheduled time and in the scheduled manner.
To log in, participants must enter a valid username and password. Once logged in, they will be able to view a list of all assessments scheduled to them. From this list they will be able to take assessments.

50
Certified access at a test center
Test Centers are locations where Perception administrators can schedule participants to take assessments.
Monitors are proctors or invigilators assigned to a Test Center who can authorize
assessments to be taken by participants at the Test Center.
When an assessment is scheduled for delivery at a test center, the monitor must first log in to Perception to authorize the assessment. The Test Center ID must be specified, as well as the monitor's own name and password.
If the monitor is successfully authorized, the participant can then log-in to Perception and take the scheduled assessment.
Questionmark Secure
Most browsers are designed to be as open and flexible as possible. Because of this, when delivering
secure assessments such as tests and exams online far more security is required than most browsers can provide. Questionmark Secure provides a secure environment in which to deliver high-stakes assessments. It is easy to install and run, requires no special configuration and will work with most browsers. Simply install Questionmark Secure on your PC and start taking high-stakes tests in confidence.
When Questionmark Secure is started, it will go to the defined starting URL and display the secure content in the following way:
The display is always full screen - it’s not possible to maximize or minimize it
There are no menu bars
Questionmark Secure displays its own toolbar
There is no Windows caption bar
A vertical scroll bar is always displayed
A horizontal scroll bar will appear if needed

51
The contents of the screen displayed is exactly the same as in Internet Explorer
None of the pages visited are stored in Internet Explorer’s history listing
Once installed, Questionmark Secure will open automatically whenever the participant clicks a link to an assessment that requires Questionmark Secure. When the assessment is completed, Questionmark
Secure will close and the participant will be returned to the browser from which the assessment was called.
Before participants can begin using Questionmark Secure they will need to install Questionmark Secure
on their machines. If Questionmark Secure is not installed, secure assessments won't start- when participants attempt to take a secure assessment without Questionmark Secure installed, they will be directed to the Questionmark Secure download page, where they can obtain Questionmark Secure.
When creating an assessment, authors can specify whether the assessment must be taken with Questionmark Secure. Refer to Creating an assessment for information on how to do so.
For more information on Questionmark Secure, please refer to the Questionmark Secure area of the
Questionmark web site.
www.questionmark.com/secure
User Interface Language options
The User Interface presented to participants has been translated into various languages by Questionmark. It is possible to add further languages if required, but the default languages that are available are listed below:
Afrikaans
Arabic
Bengali
Deutsch - German
English
Spanish
French
Hindi
Italiano - Italian
Japanese
Norsk - Norwegian
Nederlands - Dutch
Punjabi
Portuguese

52
Russian
Svenska - Swedish
Urdu
Xhosa
Chinese
Zulu
The language displayed can be chosen by the participant when they log in to take an assessment using the available drop-down box:
Paper delivery
Assessments can be printed in Word or HTML form for participants to take on paper rather than online. In this way, assessments can be printed and taken on paper, the answers also printed out, and the
scoring then performed manually. A more sophisticated means of delivering assessments on paper, however, is to use Questionmark's Printing and Scanning solution. Using Printing and Scanning, assessments created in Perception can be printed and delivered on paper. The assessment results can then be scanned and uploaded to the Perception database for reporting.
Printing and Scanning works as follows:

53
1. An assessment can be printed out from Authoring Manager onto paper using one of the Microsoft Word template files supplied with Perception
2. Participants then take the assessment and submit their responses by marking OMR (Optical Mark Recognition) bubble sheets. An example OMR bubble sheet is displayed below.
3. The bubble sheets are scanned, and the response data is read by the third-party scanning software
4. The scanning software produces an Assessment Data File in CSV (Comma Separated Value) ASCII text format suitable for uploading to Perception
5. Data from this file is uploaded to the Perception database, and the responses can be analyzed
using Enterprise Reporter in Enterprise Manager
For more information on Questionmark's Printing and Scanning solution, please refer to the Printing and Scanning area of the Questionmark web site.
www.questionmark.com/perception/print_and_scan.aspx
Offline delivery
Questionmark To Go enables participants to take Perception assessments in an offline environment.
An assessment that will be taken with Questionmark To Go can be distributed to participants in three ways:
1. With Perception - The assessment is scheduled for delivery with Questionmark To Go, and the participant logs in to Perception and downloads the assessment
2. With a Learning Management System (LMS) - The assessment is published to an LMS, and the participant logs in to the LMS and downloads the assessment
3. On a CD, memory stick, via email, FTP or any other method of transferring data to the participant
Note that the first two methods of distributing assessments require the participant to establish an Internet connection for long enough to log in and download the assessment. Once the assessment has been obtained, however, the Internet connection is not required to take the assessment.
If the assessment has been scheduled in Perception, once the assessment has been taken the results can be automatically returned to the Perception Server as soon as an Internet connection is established.
Refer to See "Finding more information" on page 10 for more information on Questionmark to Go.

54
Third-party LMS delivery
Perception assessments can be delivered by third-party Learning Management Systems (LMSs) such as Blackboard, SAP Enterprise Learning and Moodle. To do so, an author must use the Publish to LMS
feature of Authoring Manager or Browser-Based Authoring to create a Content Package that can be read and imported by the LMS. A Content Package is a zip file containing information about one or more assessments, with links to the URL on the Perception Server where the assessment can be taken.
Standards support
Publish to LMS supports the PENS and SCORM 2004 standards, as well as several others. In addition, Perception is fully compliant with the AICC and IMS QTI XML specifications. For more
information on Perception's support of these standards, please refer to the Questionmark website

55
Reporting
Perception administrators with reporting permissions can run reports by using the Enterprise Reporter feature of Enterprise Manager.
This chapter explains how assessment results for participants can be analyzed using Enterprise Reporter. It is divided into:
See "Accessing Enterprise Reporter" on page 55
See "Choosing a report" on page 56
See "Creating a report" on page 63
See "Managing results" on page 65
Once a report has been created, it can be viewed, saved or distributed in several different formats - you can select the desired format when creating
the report.
To be able to run reports, you must have been granted reporting permissions - if you do not have these permissions, please contact the person responsible for your Perception Server deployment.
Accessing Enterprise Reporter
To access Enterprise Reporter:
1. Log in to Enterprise Manager as a Perception administrator with reporting permissions. Refer to Accessing Enterprise Manager for details on how to access Enterprise Manager
2. Select Reporter (in Version 5.3) or Enterprise Reporter (in Version 5.1 and 5.2)
If you cannot see the Enterprise Reporter link, you do not have reporting permissions and will
need to request reporting permissions from your system administrator
3. Select the type of report you want to run.
There are twelve report types available, and depending on the permissions you have been given, you may see some or all of these reports.

56
Below the list of reports is a link to Report Manager. This feature of Enterprise Reporter enable you to create, edit, delete and set permissions for report templates.
The interface for each type of report varies in appearance, although the general process for running the report is the same.
Choosing a report
There are twelve different reports provided by Perception. Each report has been built to analyze assessment result data in a different way.
The following table can help you to decide which report is most appropriate for your requirements.
To report on... Use the... Can analyze...
Assessment statistics Assessment Overview Report
Single or multiple assessments
Test Analysis Report Single assessment
Results for a single assessment Score List Report Single assessment
Export for Excel Report Single assessment
Results for participants Coaching Report Single assessment or multiple participants
Grade Book Report Multiple assessments or multiple participants
Transcript Report Single participant
A comparison of two groups of participants
Gap Report Single assessment / two groups
Results for questions Question Statistics Report
Single assessment or single topic
Item Analysis Report Single assessment
Results for surveys Survey Report Single assessment
Assessment and question results to be exported
Export to ASCII Report Single or multiple assessments
Export for Excel Report Single assessment
This section provides an overview of each report type.
Assessment Overview Report
Provides an overview of results for one or more assessments. This can be a convenient overall summary of assessment results that can help flag potential problems and provide direction for drilling down into a more detailed analysis using other reports.
This report provides the following information:
Number of participants who have started and finished the assessment
Minimum, maximum and average scores and time taken of participants who have finished

57
Minimum, maximum and average scores for each topic in the assessment
The report can also include histograms on:
The numbers reaching each assessment outcome (score band), for example those who passed and failed.
This shows you at a glance the range
of distributions of each assessment outcome
Assessment scores showing the
numbers in each 10%, 20% or other band scores.
This tells you the distribution of
participants with different scores, and can be used as a guide to setting cut or pass scores
Each topic in the assessment showing the numbers in each band. This can highlight score distributions in each topic
Coaching Report
Provides detailed results for one participant taking one assessment. Can be used for coaching participants and providing feedback on their performance. It can also be used for reference purposes, for example to produce a print-out that is permanently filed as a record of the assessment results for a participant. The
Coaching Report is divided into three parts, called reportlets. These are:
Question reportlet - provides information on each question in an assessment and how the participant performed when answering them

58
Topic reportlet - provides a comparison of the participant's performance in each topic with a benchmark score. Also includes a comparison of the participant's overall performance in the assessment when compared to a benchmark score
Comparison reportlet - provides a comparison of the participant's performance with other
participants. You can have zero, one or more comparisons in a Coaching Report. Each of these compares the individual participant's result against a set of results.
The following example shows how a participant's performance in a particular topic as well as overall assessment performance can be compared with the minimum, maximum and average of other
participants who have taken the assessment.
Export for Excel Report
Provides a list of results for a single assessment exported directly into a Microsoft Excel document.
Depending on the report template used, the report can display summary results or answers or scores to each question in the assessment
Export to ASCII Report
Provides the ability to export data from the answer database in a comma-separated format suitable for import into SPSS, Microsoft Access, Microsoft Excel and other systems. The content of the data file produced can be determined by the options selected when the export template is created.
Gap Report
Provides a comparison of two sets of results to reveal the difference between them. The report allows the
investigation of differences achieved at a question, topic, or assessment level.

59
Grade Book Report
Provides a table of participants and assessments showing the scores achieved. Can calculate a weighted total or average score on all the assessments. If you have a series of assessments that each contribute to an overall course grade, the Grade Book Report can enable you to see all results in one report.
This figure shows a simple Grade Book Report.
In the example, there are three participants who have
taken two assessments, and a total score is calculated by averaging the results.
Item Analysis Report
Provides Item (question) analysis calculated according to classical test theory, for use by professional test analysts. Has a fixed format and does not use report templates. The minimum number of results necessary to compile an Item Analysis Report is 25.
This report provides:
Item Difficulty Level Histograms and Discrimination Indices Histograms
Detailed statistical information on the questions in an assessment
Statistical information useful for understanding the difficulty of questions
Question Statistics Report
Provides an analysis of scores and outcomes from an assessment and displays statistics on the results, enabling you to evaluate the quality of your questions, and find poor or ambiguous ones. You can report on all questions in an assessment, or all questions in a topic.
The following table from a Question Statistics Report displays summary information on questions.

60
The Question Statistics Report can also show detailed information on the statistics for each outcome of
the question. The figure below shows an extract from the report, giving the outcome analysis for the Alabama question.
Score List Report
Provides a list of participant results for a single assessment.
Survey Report
Provides analysis of survey results including question analyses and frequency graphs of answers. The generated reports typically use the bar chart or pie chart reporting formats, although an extensive range of reporting options is provided.

61
The following screenshot displays an Outcome Bar Chart that illustrates frequency analysis of question outcomes, encompassing basic analysis of the question.
Test Analysis Report
Provides analysis of the statistical performance of an assessment including the internal consistency reliability (Cronbach's Alpha). This report is highly useful when verifying the psychometric quality of high-stakes assessments, such as those used for University entrance exams.

62
Transcript Report
Provides a list of results for a single participant across assessments. This can be useful if an administrator wants to see all assessment results for a single participant.

63
Creating a report
This section will describe how to create an Assessment Overview Report that will provide an overview of results for an assessment. The procedure for creating other types of report is very similar and just as easy: simply select a report type, specify any filters display the report. For more detailed information on how to create reports, please refer to the Perception Version 5 Enterprise Reporter Guide.
To create an Assessment Overview report:
1. Access Reporter and select Assessment Overview Report
2. Select a report template from the drop-down list

64
Report templates define the content of the report and the format in which it will be presented. All public report templates are displayed in the drop-down list, and also non-public report templates that you have permission to view. If you have permission to edit the report template, you can do so by clicking Edit... This opens the Report Manager.
With Report Manager, you can create, edit and delete templates and filters to use with your reports. You can also set the permissions required to view templates, which ensures that only certain people can use specific report templates. Each type of report has its own template, except for the Item Analysis Report, which is fixed. For more information on report templates, including how to edit them, refer to the Perception Version 5 Enterprise Reporter Guide
3. Select the assessment or assessments you wish to report on - you can report on all the assessments or define a custom list by using the Add and Remove buttons
4. Select a filter from the drop-down list, or manually specify your filters in the available tabs
You can use filters to specify exactly what results data your report will analyze. For example, you may wish to create a report that analyzes only certain participants, or participants in a particular group, or assessments taken on certain dates
The filter tabs visible to you will depend on the type of report you are creating. For example, in the Assessment Overview Report the following filter tabs are available: Groups, Participants, Special Fields and Dates. Filters can be saved in the repository by clicking the Filter button once you have specified a filter. If you have already saved a filter, you can select it from the Select filter drop-down list
For more information on using filters in reports, please refer to the Perception Version 5 Enterprise Reporter Guide
5. Click View Report
The report will be generated and displayed in the browser. In the following screenshot we have created a Printable report on a single assessment.

65
To return to the selection page, click Back. To return to the main Enterprise Reporter screen, click Home
Managing results
Scoring schemes for questions that require written responses or include uploading a file do not have a strict answer key in the same way that questions that require multiple choice or Yes/No responses do. For teachers and educators, scoring will inevitably involve making some subjective judgments about the quality of students’ responses.
Scoring Tool is a feature of Enterprise Manager that enables educators and trainers to annotate and grade essay questions within assessments by using customized rubrics. Scoring Tool helps both individual and multiple graders maintain consistency in marking constructed answers. This is achieved by using the Scoring Tool to define rubrics, or scoring rules, for each question. For example, the rubric for a history essay might assign points to grammar, spelling, persuasiveness and quality of research.
For more information on Scoring Tool, please refer to the Enterprise Manager User Guide.
Results Management System
The Results Management System (RMS) is an application that enables users of Perception to analyze and modify results stored in a Perception repository. It is designed to help organizations modify the results that they have administered because one or more questions are identified as

66
performing poorly. The following diagram illustrates how the RMS works.
For more information on the RMS, please refer to the RMS User Guide.

67
Questionmark Analytics
Questionmark Analytics is Questionmark's new reporting system. It is only available for user of Questionmark Perception 5.3. The application pulls information from a database designed for reporting via reporting web services. The database that the reporting web services draw from (using an ETL - Extract, Transform, and Load process) is the Results Warehouse (a data warehouse). In turn, the Results
Warehouse may draw data from several different Perception data sources.
Accessing Questionmark Analytics
To access Questionmark Analytics you must have a Perception administrator account set up and have created a Reporting Administrator user within Enterprise Manager with access to all results.
To access Analytics:
1. Log into Enterprise Manager
2. Select Analytics
See below for information about creating a user with the correct permissions to access Questionmark Analytics.

68
Creating a Reporting Administrator user
You will need to set the required permissions in Enterprise Manager for a Reporting Administrator user in order to access Questionmark Analytics successfully.
To create a Reporting Administrator user:
1. Log into Enterprise Manager
2. Select Administration | Administrators
3. Click New administrator
4. Fill in the required information for the Reporting Administrator user on the Administrator tab. But leave the Profile blank.
5. On the Reporting tab ensure all report type permissions and Access results for all groups are selected:
6. Click Create
Creating a report
Creating a report is a case of selecting the result data you would like to report on and then filtering out the unnecessary information.
To create a report:
1. From the Questionmark portal homepage select Analytics | Report type
The Report type selection page opens. It will display a list of the available report types.
2. Click View to create the report type you want.
You can preview a report by hovering over View
3. Depending on the type of report, you will be able to apply one or more of the following filters:

69
Assessment filter
The assessments available to you will depend on what assessments you have stored in your shared repository.
Topics filter
If you have demographics questions in the assessment, they must be in a separate topic from questions that get reported on such as Likert questions.
Group filter
The group filter allows users to optionally filter their report results by groups. Users can select one or more groups to filter the report data on.
Date filter
From the date filter you can specify the dates you want the results to be filtered from (when questions were created in the repository).
Special fields filter
Certain reports may be filtered by Special fields; for example the Class detail report compares Course evaluation information across courses and instructors. Therefore information about what course a participant took and what instructor participants had must be specified as part of the reporting process; which can be captured in special fields.
4. Once you have selected the data, applied the necessary filters you can distribute the report via PDF, HTML or CSV.