Embed Size (px)
Citation preview

0
Getting Started with
Microsoft Word 2010
Created by the HUSD Information Services Department
Version 1 – 3/30/12

1
Table of Contents A New Look ............................................................................................................................................. 2
The W Button .......................................................................................................................................... 3
The Minimize Ribbon Button ................................................................................................................... 4
The File Tab ............................................................................................................................................. 5
The Quick Access Toolbar ........................................................................................................................ 6
The Ribbon .............................................................................................................................................. 7
The Help Button ...................................................................................................................................... 8
Create a Document ................................................................................................................................. 9
Spelling and Grammar Mistakes ............................................................................................................ 10
Paragraph and Text Formatting ............................................................................................................. 11
Open an Existing File ............................................................................................................................. 13
Saving Files Part I ................................................................................................................................... 14
Saving Files Part II .................................................................................................................................. 15
File Tab with Recent Option ................................................................................................................... 16
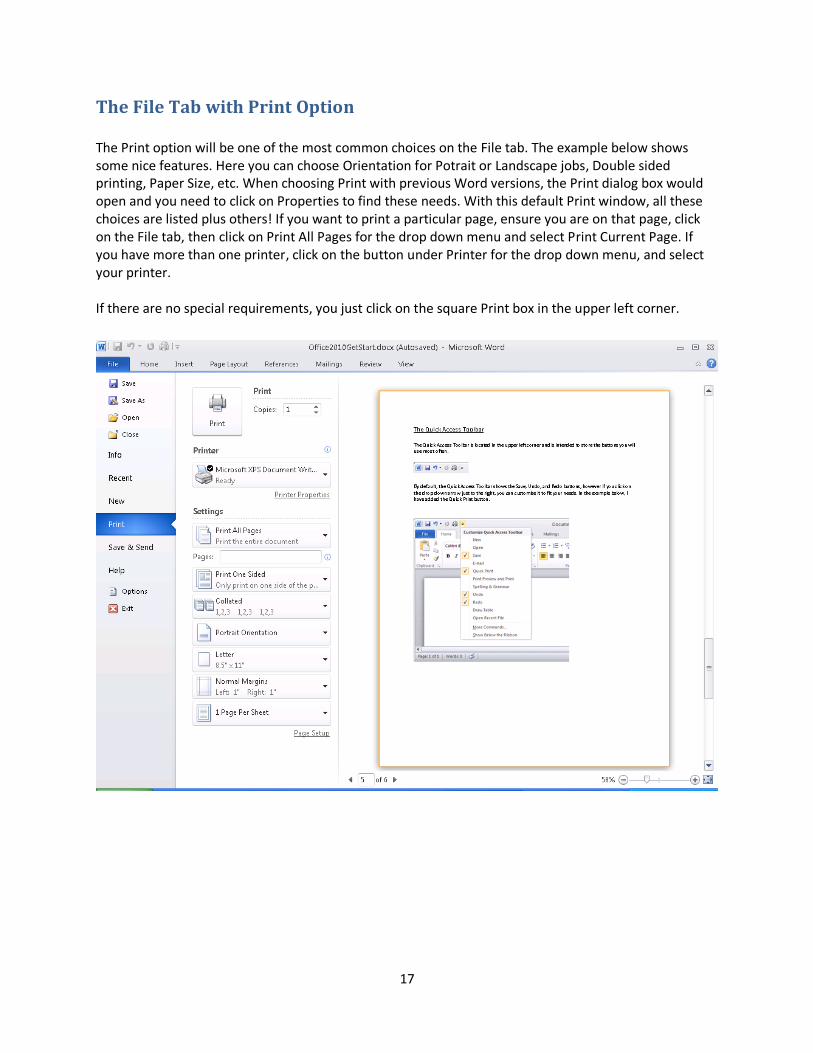
The File Tab with Print Option ............................................................................................................... 17
File Tab Save & Send Option .................................................................................................................. 18
File Tab Help Option .............................................................................................................................. 19
File Tab Options Option ......................................................................................................................... 20
The Insert Tab ....................................................................................................................................... 21
Page Layout Tab .................................................................................................................................... 22
References Tab ...................................................................................................................................... 23
Mailings Tab .......................................................................................................................................... 24
Review and View Tabs ........................................................................................................................... 25
Creating a document to be used by previous versions of Word .............................................................. 26
The CutePDF Writer Addition ................................................................................................................ 27

2
A New Look In Word 2010, there have been some features that are new or have been re-added and some features that have been removed from past versions of Word. The biggest visual change has been the replacement of the Office 2003 Command Line (File Edit View Insert…) for The Ribbon. The Office Button in Office 2007 has gone away and replaced by the File Tab. These features will be described in the following pages.
The ‘W’ Button The Ribbon The Help Button The Quick Access Toolbar The File Tab The Minimize Ribbon Button

3
The W Button This button was removed in Office 2007 and makes its return in 2010. This button is convenient in that you can Minimize, Maximize or Close Word without having to traverse your mouse across the entire screen to the right corner to perform these same actions. With our monitors getting larger, this is a nice feature.

4
The Minimize Ribbon Button While reading over a document, it may be convenient at times to minimize the Ribbon. To minimize, just click on the ‘up arrow’ symbol.
To maximize the Ribbon, click on the ‘down arrow’ symbol.

5
The File Tab The File tab is basically the same look as the File command for Office 2003 users. You will still see the same commands such as, Save, Save As, New, Print, etc. For Office 2007 users, the Office Button has gone away and has been replaced by the File tab. Here, you will still find the basic file commands. The screen below is the default with Info being highlighted in the left column and the right side giving you more information about your document like file size, number of words and pages.

6
The Quick Access Toolbar
The Quick Access Toolbar is located in the upper left corner and is intended to store the buttons you will use most often.
By default, the Quick Access Toolbar shows the Save, Undo, and Redo buttons, however if you click on the drop down arrow just to the right, you can customize it to fit your needs. In the example below, I have added the Quick Print button. The Save icon (which appears as a floppy diskette symbol) is convenient to click on when wanting to save your work instead of clicking on the Save icon from the File tab.

7
The Ribbon The Ribbon is designed to replace the menus and toolbars of Office 2003. The goal of the Ribbon is to keep commands visually up front so that they are easy to access as you work.
The Ribbon is divided into what are called Groups (Clipboard, Font, Paragraph and Styles, etc.). Each Group has a triangular icon in the lower right hand corner. Clicking this will bring up an additional menu window. For example, clicking the triangle in the Font group brings up the classic Font options window.
You will find that most
of your needs can be
found right on the
Ribbon Group itself.

8
The Help Button
There is so much that Word can do in the latest version that it’s hard to know everything. If you want
information on a topic, click on the ‘?’ symbol in the upper right hand corner and the Help window will
appear like below. You will see common topics to click on or you can type in a word or question in the
search field to find further information.

9
Create a Document
Getting started with a basic document in Microsoft Word 2010 is as easy as opening Word and beginning to type. Or, if you want to create an additional document besides the one you already have opened, click on the File tab, click on New in the left column, then double click on Blank document and a new document window will appear.
You can also start a document from a template from the New view as well. There are many to download and choose from if you are on the Internet from Office.com like Letters, Flyers and Forms. If there is no Internet connection, you may choose from the Sample templates under Available Templates.

10
Spelling and Grammar Mistakes As you type, Word will warn you if make spelling or grammar mistakes by inserting a wavy red, green, or blue underline beneath the text that it thinks is an error. Red underline: This indicates either a possible spelling error or that Word doesn’t recognize a word, such as a proper name or place. Green underline: Word thinks that grammar should be revised. Blue underline: A word is spelled correctly but does not seem to be the correct word for the sentence. For example, you type “too,” but the word should be “to.” You right click an underlined word to see the suggested revisions. Click a revision to replace the word in the document and get rid of the underlines.
A note of caution about green and blue underlines: Word is really good at spelling, which is pretty straightforward most of the time. But grammar and correct word usage take some judgment. If you think that you are right, and Word is wrong, then you can right-click the word and ignore the suggested revisions and get rid of the underlines.

11
Paragraph and Text Formatting Word 2010 assumes some defaults when you start a new document. For instance, there is no indentation on paragraphs and the line or sentence spacing is set by the default Style called Normal.
Line Spacing (the space between each sentence) can be tightened up by choosing the No Spacing option on the Styles group. If Indentation is needed, click the triangle on the Paragraph group. Under Indentation, Special, choose First Line. Paragraphs can have Bullets or Numbering added. Hover the cursor over any button produces a description. Clicking the button will execute the feature.

12
Text alignment is also available on the Paragraph group. The default is Align Text Left which is highlighted. The other options are Center, Align Text Right and Justify which is a clean look with text aligned on both margins.
Text can easily be color highlighted or colored. Highlight the text first with your cursor then click on the Font Color button and the text will change to the default of red. To change the font color, click on the down arrow for the color palette and choose your color. To color highlight your text, highlight the text with your cursor, click on the Text Highlight Color button and it changes to the default of yellow. To change the highlight color, click on the down arrow for the color palette and choose your color.

13
Open an Existing File To open an existing file you’ve created, click on the File tab, click the Open button and the familiar Open dialog box appears as seen in the next screen shot below.
Click on the file you want, then click Open at the bottom right.

14
Saving Files Part I While editing an existing file, it’s a good habit to often save your work. There are two different ways to save files. Click the File tab, then just click the Save button. The faster option as described earlier, is to click the Save button in the Quick Access Toolbar.

15
Saving Files Part II When editing an existing document, you may want to save the file under a different name. Click on the File tab, click the Save As button and the Save As dialog box opens as seen below. In the File name field,
type in the new name without changing the .docx extension. Click the Save button.

16
File Tab with Recent Option
The Recent option on the File tab allows you to quickly go to your other documents and open them. If you accidently deleted a document or closed Word by mistake, you can recover your documents by clicking on the Recover Unsaved Documents button at the bottom of the page.
17
The File Tab with Print Option The Print option will be one of the most common choices on the File tab. The example below shows some nice features. Here you can choose Orientation for Potrait or Landscape jobs, Double sided printing, Paper Size, etc. When choosing Print with previous Word versions, the Print dialog box would open and you need to click on Properties to find these needs. With this default Print window, all these choices are listed plus others! If you want to print a particular page, ensure you are on that page, click on the File tab, then click on Print All Pages for the drop down menu and select Print Current Page. If you have more than one printer, click on the button under Printer for the drop down menu, and select your printer. If there are no special requirements, you just click on the square Print box in the upper left corner.

18
File Tab Save & Send Option There is a nice email feature on the Save & Send option under the File tab. You can choose to send your document as an email attachment. Clicking the Send as Attachment button causes a new Outlook email box to open with your Word file attached! You can also choose to send it as a PDF file by clicking the Send as PDF button. You may also choose to save your document as a PDF file by clicking the Create PDF/XPS Document button.

19
File Tab Help Option You may also find Help with Word 2010 under the File tab. Clicking the Getting Started button offers nice videos on basics for all the Office suite programs from Microsoft.com. The Microsoft Office Help button offers the same useful help information as the question mark symbol in the upper right corner. You can also see which version of Word is loaded on this view.

20
File Tab Options Option You can customize many tools and features in Word by clicking on the Options button. For example, you can change the color scheme under the General button on the dialog box that opens in the screen shot seen below. Changes can also be made for Display, Proofing and how files can be saved.

21
The Insert Tab The Insert Tab offers many tools that can add nice features to a document.
Pictures or drawings can be added by clicking on the Picture button. A The Insert Picture box will open prompting you to browse to the picture on your PC. Click the picture you want then click Insert. It will appear on your document. Clipart are pictures or illustrations that can be added through the Internet from Office.com. Simply click the Clipart button and a dialog box will appear. Type in the subject in the ‘Search for:’ field, click the box for ‘Include Office.com content’ and then click the Go button. Click the picture you want from the results that appeared and it will be inserted into your document. Shapes like lines, arrows, basic geometric shapes, equation shapes, flowchart shapes, stars, and banners can be added. Clicking the Shapes button will cause a large dropdown of multiple shapes to appear. Click your choice, and then click your cursor on the document where you want, and the shape will appear. Charts can also be added to a document. There are many to choose from such as column charts, line graphs, pie charts, bar charts, area graphs, and stock charts. Click on the Chart button and the Insert Chart box will appear. Select the type of chart on the left, select the chart on the right, click OK and the chart will appear and it then can be manipulated. Headers, Footers and Page Numbers can also be added to a document from the Header & Footer group on the Insert Ribbon. For a multi-page document, the content of the Header will be seen at the top of each printed page and the Footer will be seen at the bottom as well as the page number when added. These are just a few common examples on the Insert tab. The size of your object can also be changed. After you add the object, a box appears around it with circles in each corner. Hover your cursor over the bottom right circle until the arrow appears, hold the left mouse button and just move your mouse!
22
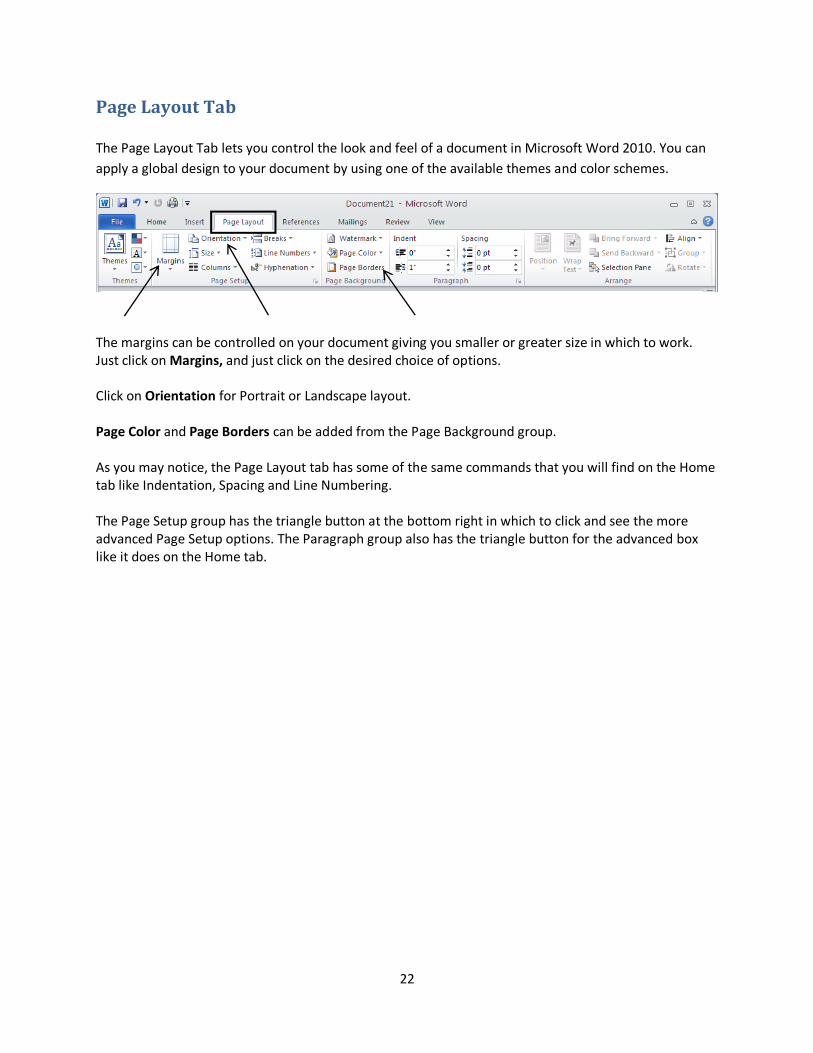
Page Layout Tab The Page Layout Tab lets you control the look and feel of a document in Microsoft Word 2010. You can
apply a global design to your document by using one of the available themes and color schemes.
The margins can be controlled on your document giving you smaller or greater size in which to work. Just click on Margins, and just click on the desired choice of options. Click on Orientation for Portrait or Landscape layout. Page Color and Page Borders can be added from the Page Background group. As you may notice, the Page Layout tab has some of the same commands that you will find on the Home tab like Indentation, Spacing and Line Numbering. The Page Setup group has the triangle button at the bottom right in which to click and see the more advanced Page Setup options. The Paragraph group also has the triangle button for the advanced box like it does on the Home tab.

23
References Tab
The References Tab on Microsoft Word 2010's ribbon offers a quick way to enter your document sources, citations etc. On the References tab you will find groups like Table of Contents, Footnotes, Citations & Bibliography, and Captions.
One of the nicest features on the References tab is adding the Table of Contents for a document. One thing you need to make sure is that you type your document using one of the heading styles for the items that need to be included in the Table of Contents. Click the Table of Contents button and the table below appears. Automatic Table 2 is a good choice. Click this option and your table is created!

24
Mailings Tab One of the most common features on the Mailings tab is the Envelopes and Labels for printing.
Clicking the Envelopes button produces the box below which allows you to enter in the Delivery address and Return address. Clicking the Options button gives the choices for the envelope size. On the Labels tab, the Options button is also available for the needed label size.

25
Review and View Tabs The Proofing group is one of the most popular groups on the Review tab.
Once you have finished your document, you can perform one last spell check by choosing the Spelling & Grammar button. This is an automated process going through the entire document. The Research button will allow you to access different dictionary lookups of any word you have highlighted. The Thesaurus button will suggest other words with a similar meaning for the word you have highlighted. The Word Count button will give you statistics for the number of pages, words, paragraphs, lines, etc.
View Tab The View Tab is the last of the tabs on the Microsoft Word 2010 Ribbon.
By the buttons available on the Document Views group, you can view your document in different ways. You can see the Print Layout, Full Screen Reading, Web Layout, Outline, and Draft views. On the Show group, you can measure and line up objects by clicking the Ruler button and the ruler will appear at the top and left margin of the document. The Gridlines button also allows you to line up objects by splashing a grid paper view on top of the document.

26
Creating a document to be used by previous versions of Word If you create a document to send to people who are working in earlier versions of Word and you know that they have installed the Microsoft Office Compatibility Pack for Word, Excel, and PowerPoint 2007 File Formats, you can work in Microsoft Word 2010 mode. If you aren't sure whether the people you send your document to have installed the Microsoft Office Compatibility Pack for Word, Excel and PowerPoint Open XML File Formats, you can work in Compatibility Mode. Compatibility Mode makes sure that no new or enhanced features in Word 2010 are available while you work in a document, so that people who are using previous versions of Word will have full editing capabilities. Note: If you already created a document, and you want to find out what content won't be available for editing in earlier versions, see Features that behave differently in earlier versions. Turn on Compatibility Mode When you create a new document that will be used in an earlier version, you can turn on Compatibility Mode by saving the file in Word 97-2003 format. 1. Open a new document. 2. Click the File tab. 3. Click Save As. 4. In the Save as type list, click Word 97-2003 Document. This changes the file format to .doc. 5. In the File name box, type a name for the document. 6. Click Save.

27
The CutePDF Writer Addition With the deployment of all new staff computers, there will be a program loaded called CutePDF Writer. The purpose of this program is to allow you to create PDF files from any Windows program that is able to print. If you needed to send a document to someone who doesn’t have Word or a compatible version, this is the answer for everyone has access to Adobe Reader. To create the PDF document from Word, click on the Print button from the File tab. From the drop down menu under Printer, choose CutePDF Writer, then click the Print button. The Save As box below appears. You can save the converted PDF to your PC!