Embed Size (px)
DESCRIPTION
C# & ASP.NET MVC Tutorial
Citation preview

EF Database First with ASP.NET MVC
1
Getting Started with Entity Framework 6
Database First using MVC 5
Using MVC, Entity Framework, and ASP.NET Scaffolding, you can create a web application
that provides an interface to an existing database. This tutorial series shows you how to
automatically generate code that enables users to display, edit, create, and delete data that resides
in a database table. The generated code corresponds to the columns in the database table.
This part of the series focuses on creating a database and populating it with data.
This series was written with contributions from Tom Dykstra and Rick Anderson. It was
improved based on feedback from users in the comments section.
1. Introduction
This topic shows how to start with an existing database and quickly create a web application that
enables users to interact with the data. It uses the Entity Framework 6 and MVC 5 to build the
web application. The ASP.NET Scaffolding feature enables you to automatically generate code
for displaying, updating, creating and deleting data.
This topic addresses the situation where you have a database and want to generate code for a web
application based on the fields of that database. This approach is called Database First
development. If you do not already have an existing database, you can instead use an approach
called Code First development which involves defining data classes and generating the database
from the class properties.
Set up the database
To mimic the environment of having an existing database, you will first create a database with
some pre-filled data, and then create your web application that connects to the database.
This tutorial was developed using LocalDB with either Visual Studio 2013 or Visual Studio
Express 2013 for Web. You can use an existing database server instead of LocalDB, but
depending on your version of Visual Studio and your type of database, all of the data tools in
Visual Studio might not be supported. If the tools are not available for your database, you may
need to perform some of the database-specific steps within the management suite for your
database.
If you have a problem with the database tools in your version of Visual Studio, make sure you
have installed the latest version of the database tools

EF Database First with ASP.NET MVC
2
Launch Visual Studio and open the Server Explorer pane. To add a new database, right-click
Data Connections and select Add Connection.
If this is the first data connection you have added, you will be prompted to choose a Data
source. Select Microsoft SQL Server. If you have added a data connection in the past, you
might not see this dialog window.
If you have a server that you prefer to use, you can specify the name of that server; otherwise,
use the local database that comes with Visual Studio by specifying (localdb)\v11.0 for the server
name. Name the database ContosoUniversity.

EF Database First with ASP.NET MVC
3
Click OK. When prompted to create a new database, select Yes.
Your new database appears under the Data Connections node. The database name may be
prefixed with some additional identifiers. Right-click the database, and select New Query.

EF Database First with ASP.NET MVC
4
In the query window, you will add T-SQL commands to create 3 tables (Course, Student, and
Enrollment), and add some example data to those tables. Add the following code to the query
window:
CREATE TABLE [dbo].[Course] (
[CourseID] INT IDENTITY (1, 1) NOT NULL,
[Title] NVARCHAR (50) NULL,
[Credits] INT NULL,
PRIMARY KEY CLUSTERED ([CourseID] ASC)
);
CREATE TABLE [dbo].[Student] (
[StudentID] INT IDENTITY (1, 1) NOT NULL,
[LastName] NVARCHAR (50) NULL,
[FirstName] NVARCHAR (50) NULL,
[EnrollmentDate] DATETIME NULL,
PRIMARY KEY CLUSTERED ([StudentID] ASC)
);
CREATE TABLE [dbo].[Enrollment] (
[EnrollmentID] INT IDENTITY (1, 1) NOT NULL,
[Grade] DECIMAL(3, 2) NULL,
[CourseID] INT NOT NULL,
[StudentID] INT NOT NULL,
PRIMARY KEY CLUSTERED ([EnrollmentID] ASC),
CONSTRAINT [FK_dbo.Enrollment_dbo.Course_CourseID] FOREIGN KEY
([CourseID])
REFERENCES [dbo].[Course] ([CourseID]) ON DELETE CASCADE,
CONSTRAINT [FK_dbo.Enrollment_dbo.Student_StudentID] FOREIGN KEY
([StudentID])
REFERENCES [dbo].[Student] ([StudentID]) ON DELETE CASCADE
);
INSERT INTO Course
(Title, Credits)
Values ('Economics', 3), ('Literature', 3), ('Chemistry', 4);
INSERT INTO Student
(LastName, FirstName, EnrollmentDate)

EF Database First with ASP.NET MVC
5
VALUES
('Tibbetts', 'Donnie', '2013-09-01'),
('Guzman', 'Liza', '2012-01-13'),
('Catlett', 'Phil', '2011-09-03');
INSERT INTO Enrollment
(Grade, CourseID, StudentID)
VALUES
(2.00, 1, 1),
(3.50, 1, 2),
(4.00, 2, 3),
(1.80, 2, 1),
(3.20, 3, 1),
(4.00, 3, 2);
Execute the query (Ctrl + Shift + E). The tables now exist in the database.
After executing the query, you can close the query window without saving the file.
To see that the tables are populated with data, right-click a table, and select Show Table Data.
An editable view of the table data is displayed.

EF Database First with ASP.NET MVC
6
Your database is now set up and populated with data. In the next tutorial, you will create a web
application for the database.

EF Database First with ASP.NET MVC
7
2. Create a new ASP.NET Web Application
Create a new project in Visual Studio, and select the ASP.NET Web Application template.
Name the project ContosoSite.
Click OK.
In the New ASP.NET Project window, select the MVC template. Click OK to create the
application.

EF Database First with ASP.NET MVC
8
The project is created with the default files and folders.
In this tutorial, you will use Entity Framework 6. You can double-check the version of Entity
Framework in your project through the Manage NuGet Packages window. If necessary, update
your version of Entity Framework.

EF Database First with ASP.NET MVC
9
Generate the models
You will now create Entity Framework models from the database tables. These models are
classes that you will use to work with the data. Each model mirrors a table in the database and
contains properties that correspond to the columns in the table.
Right-click the Models folder, and select Add and New Item.
In the Add New Item window, select Data in the left pane and ADO.NET Entity Data Model
from the options in the center pane. Name the new model file ContosoModel.

EF Database First with ASP.NET MVC
10
Click Add.
In the Entity Data Model Wizard, select EF Designer from database.

EF Database First with ASP.NET MVC
11
Click Next.
Select the data connection you added earlier.

EF Database First with ASP.NET MVC
12
Click Next.
Select Tables to generate models for all three tables.

EF Database First with ASP.NET MVC
13
Click Finish.
If you receive a security warning, select OK to continue running the template.
The models are generated from the database tables, and a diagram is displayed that shows the
properties and relationships between the tables.

EF Database First with ASP.NET MVC
14
The Models folder now includes many new files related to the models that were generated from
the database.
The ContosoModel.Context.cs file contains a class that derives from the DbContext class, and
provides a property for each model class that corresponds to a database table. The Course.cs,
Enrollment.cs, and Student.cs files contain the model classes that represent the databases
tables. You will use both the context class and the model classes when working with scaffolding.
Before proceeding with this tutorial, build the project. In the next section, you will generate code
based on the data models, but that section will not work if the project has not been built.

EF Database First with ASP.NET MVC
15
3. Add scaffold
You are ready to generate code that will provide standard data operations for the model classes.
You add the code by adding a scaffold item. There are many options for the type of scaffolding
you can add; in this tutorial, the scaffold will include a controller and views that correspond to
the Student and Enrollment models you created in the previous section.
To maintain consistency in your project, you will add the new controller to the existing
Controllers folder. Right-click the Controllers folder, and select Add – New Scaffolded Item.
Select the MVC 5 Controller with views, using Entity Framework option. This option will
generate the controller and views for updating, deleting, creating and displaying the data in your
model.
EF Database First with ASP.NET MVC
16
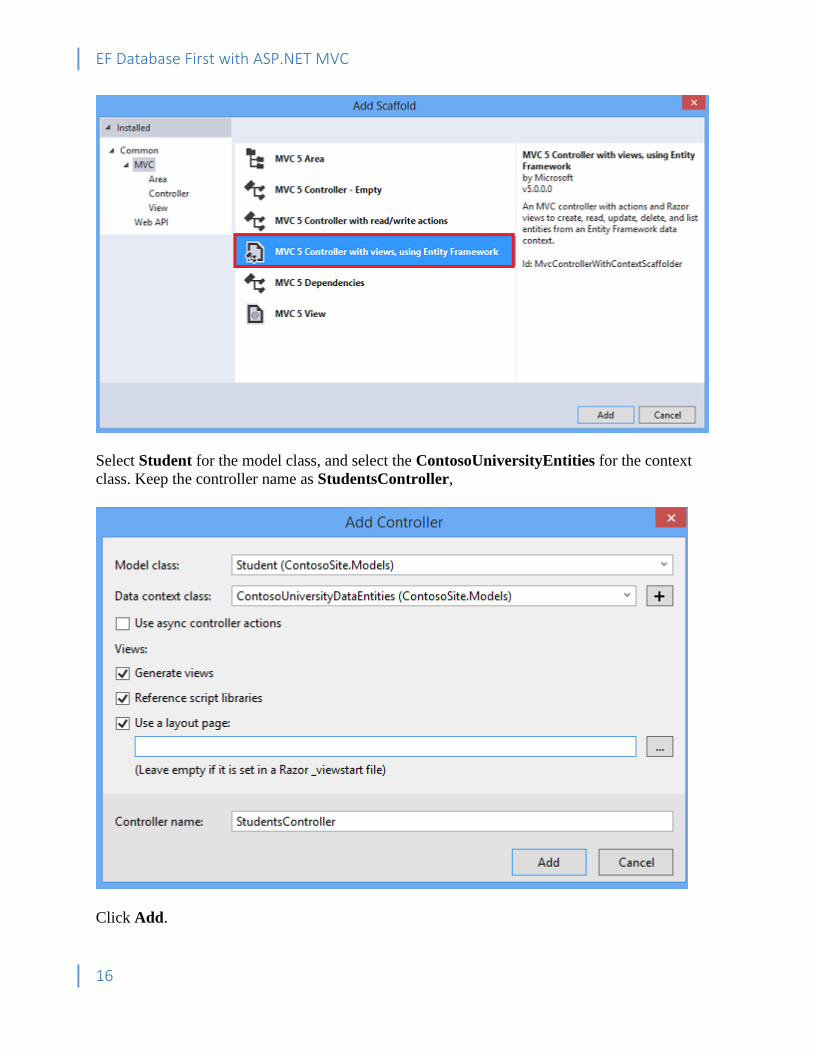
Select Student for the model class, and select the ContosoUniversityEntities for the context
class. Keep the controller name as StudentsController,
Click Add.

EF Database First with ASP.NET MVC
17
If you receive an error, it may be because you did not build the project in the previous section. If
so, try building the project, and then add the scaffolded item again.
After the code generation process is complete, you will see a new controller and views in your
project.
Perform the same steps again, but add a scaffold for the Enrollment class. When finished, you
should have an EnrollmentsController.cs file, and a folder under Views named Enrollments
with the Create, Delete, Details, Edit and Index views.

EF Database First with ASP.NET MVC
18
Display student views
You will verify that the code added to your project correctly displays a list of the students, and
enables users to edit, create, or delete the student records in the database.
Right-click the Views/Students/Index.cshtml file, and select View in Browser. Notice that it
displays a list of the students.

EF Database First with ASP.NET MVC
19
Click the Create New link and provide some values for a new student.
Click Create, and notice the new student is added to your list.

EF Database First with ASP.NET MVC
20
Select the Edit link, and change some of the values for a student.
Click Save, and notice the student record has been changed.
Finally, select the Delete link and confirm that you want to delete the record by clicking the
Delete button.

EF Database First with ASP.NET MVC
21
Close the browser.
Without writing any code, you have added views that perform common operations on the data in
the Student table.
Display enrollment views
Your database includes a one-to-many relationship between the Student and Enrollment tables,
and a one-to-many relationship between the Course and Enrollment tables. The views for
Enrollment correctly handle these relationships. Right-click Views/Enrollments/Create.cshtml
and select View in Browser. The view displays a form for creating a new enrollment record. In
particular, notice that the form contains two drop-down lists that are populated with values from
the related tables.

EF Database First with ASP.NET MVC
22
Furthermore, validation of the provided values is automatically applied based on the data type of
the field. Grade requires a number, so an error message is displayed if you try to provide an
incompatible value.

EF Database First with ASP.NET MVC
23
4. Add a column
If you update the structure of a table in your database, you need to ensure that your change is
propagated to the data model, views, and controller.
For this tutorial, you will add a new column to the Student table to record the middle name of the
student. To add this column, open a new query window and execute the following command.
ALTER TABLE [dbo].[Student]
ADD [MiddleName] NVARCHAR (50) NULL;
The new field has been added to the table. If you do not see it in the Server Explorer, click the
Refresh button in the pane.
The new column exists in the database table, but it does not currently exist in the data model
class. You must update the model to include your new column. In the Models folder, open the
ContosoModel.edmx file to display the model diagram. Notice that the Student model does not
contain the MiddleName property. Right-click anywhere on the design surface, and select
Update Model from Database.

EF Database First with ASP.NET MVC
24
In the Update Wizard, select the Refresh tab and the Student table.

EF Database First with ASP.NET MVC
25
Click Finish.
After the update process is finished, the database diagram includes the new MiddleName
property. Save the ContosoModel.edmx file. You must save this file for the new property to be
propagated to the Student.cs class. You have now updated the database and the model.
Build the solution.
Unfortunately, the views still do not contain the new property. To update the views you have two
options - you can either re-generate the views by once again adding scaffolding for the Student
class, or you can manually add the new property to your existing views. In this tutorial, you will
add the scaffolding again because you have not made any customized changes to the
automatically-generated views. You might consider manually adding the property when you
have made changes to the views and do not want to lose those changes.

EF Database First with ASP.NET MVC
26
To ensure the views are re-created, delete the Students folder under Views, and delete the
StudentsController. Then, right-click the Controllers folder and add scaffolding for the
Student model. Again, name the controller StudentsController. Select OK.
The views now contain the MiddleName property.
In the next section, you will add code to customize the view for showing details about a student
record.

EF Database First with ASP.NET MVC
27
5. Customizing a View
Add enrolled courses to student details
The generated code provides a good starting point for your application but it does not necessarily
provide all of the functionality that you need in your application. You can customize the code to
meet the particular requirements of your application. Currently, your application does not display
the enrolled courses for the selected student. In this section, you will add the enrolled courses for
each student to the Details view for the student.
Open Students/Details.cshtml, and below the last </dl> tab, but before the closing </div> tag,
add the following code.
<table class="table">
<tr>
<th>
Course Title
</th>
<th>
Grade
</th>
<th>
Credits
</th>
</tr>
@foreach (var item in Model.Enrollments)
{
<tr>
<td>
@Html.DisplayFor(modelItem => item.Course.Title)
</td>
<td>
@Html.DisplayFor(modelItem => item.Grade)
</td>
<td>
@Html.DisplayFor(modelItem => item.Course.Credits)
</td>
</tr>
}
</table>
This code creates a table that displays a row for each record in the Enrollment table for the
selected student. Browse to the Students/Index view again and select Details for one of the
students. You will see the enrolled courses have been included in the view.

EF Database First with ASP.NET MVC
28
6. Enhancing Data Validation
Add data annotations
As you saw in an earlier topic, some data validation rules are automatically applied to the user
input. For example, you can only provide a number for the Grade property. To specify more data
validation rules, you can add data annotations to your model class. These annotations are applied
throughout your web application for the specified property.
In this tutorial, you will add data annotations to restrict the length of the values provided for the
FirstName, LastName, and MiddleName properties. In the database, these values are limited to
50 characters; however, in your web application that character limit is currently not enforced. If a
user provides more than 50 characters for one of those values, the page will crash when
attempting to save the value to the database. You will also restrict Grade to values between 0 and
4.
Open the Student.cs file in the Models folder. Add the following highlighted code to the class.
namespace ContosoSite.Models
{

EF Database First with ASP.NET MVC
29
using System;
using System.Collections.Generic;
using System.ComponentModel.DataAnnotations;
public partial class Student
{
public Student()
{
this.Enrollments = new HashSet<Enrollment>();
}
public int StudentID { get; set; }
[StringLength(50)]
public string LastName { get; set; }
[StringLength(50)]
public string FirstName { get; set; }
public Nullable<System.DateTime> EnrollmentDate { get; set; }
[StringLength(50)]
public string MiddleName { get; set; }
public virtual ICollection<Enrollment> Enrollments { get; set; }
}
}
In Enrollment.cs, add the following highlighted code.
namespace ContosoSite.Models
{
using System;
using System.Collections.Generic;
using System.ComponentModel.DataAnnotations;
public partial class Enrollment
{
public int EnrollmentID { get; set; }
[Range(0, 4)]
public Nullable<decimal> Grade { get; set; }
public int CourseID { get; set; }
public int StudentID { get; set; }
public virtual Course Course { get; set; }
public virtual Student Student { get; set; }
}
}
Build the solution.
Browse to a page for editing or creating a student. If you attempt to enter more than 50
characters, an error message is displayed.

EF Database First with ASP.NET MVC
30
Browse to the page for editing enrollments, and attempt to provide a grade above 4.
For a full list of data validation annotations you can apply to properties and classes, see
System.ComponentModel.DataAnnotations.
Add metadata classes
Adding the validation attributes directly to the model class works when you do not expect the
database to change; however, if your database changes and you need to regenerate the model
class, you will lose all of the attributes you had applied to the model class. This approach can be
very inefficient and prone to losing important validation rules.
To avoid this problem, you can add a metadata class that contains the attributes. When you
associate the model class to the metadata class, those attributes are applied to the model. In this
approach, the model class can be regenerated without losing all of the attributes that have been
applied to the metadata class.
In the Models folder, add a class named Metadata.cs.

EF Database First with ASP.NET MVC
31
Replace the code in Metadata.cs with the following code.
using System;
using System.ComponentModel.DataAnnotations;
namespace ContosoSite.Models
{
public class StudentMetadata
{
[StringLength(50)]
public string LastName;
[StringLength(50)]
public string FirstName;
[StringLength(50)]
public string MiddleName;
}
public class EnrollmentMetadata
{
[Range(0, 4)]
public Nullable<decimal> Grade;
}
}

EF Database First with ASP.NET MVC
32
These metadata classes contain all of the validation attributes that you had previously applied to
the model classes. Now, you must associate the model classes with the metadata classes.
In the Models folder, add a class named PartialClasses.cs.
Replace the contents of the file with the following code.
using System;
using System.ComponentModel.DataAnnotations;
namespace ContosoSite.Models
{
[MetadataType(typeof(StudentMetadata))]
public partial class Student
{
}
[MetadataType(typeof(EnrollmentMetadata))]
public partial class Enrollment
{
}
}

EF Database First with ASP.NET MVC
33
Notice that each class is marked as a partial class, and each matches the name and namespace
as the class that is automatically generated. By applying the metadata attribute to the partial
class, you ensure that the data validation attributes will be applied to the automatically-generated
class. These attributes will not be lost when you regenerate the model classes because the
metadata attribute is applied in partial classes that are not regenerated.
To regenerate the automatically-generated classes, open the ContosoModel.edmx file. Once
again, right-click on the design surface and select Update Model from Database. Even though
you have not changed the database, this process will regenerate the classes. In the Refresh tab,
select Tables and Finish.
Save the ContosoModel.edmx file to apply the changes.
Open the Student.cs file or the Enrollment.cs file, and notice that the data validation attributes
you applied earlier are no longer in the file. However, run the application, and notice that the
validation rules are still applied when you enter data.