Embed Size (px)
Citation preview

Version 3.0.4 Last printed 3/31/2004 3:57 PM
The Standard in Industrial Automation and Scientific Components for Real-Time Applications
Instrumentation Pack Standard Instrumentation Pack Pro
ActiveX, VCL, and CLX Components
Getting Started Manual

Table of Contents
Page ii Iocomp Components – Getting Started Manual
Acknowledgements Author Patrick Carroll Technical Reviewers Joe Castoro Cyrus Edson Todd Oster Copyright Copyright © 1998-2003 Iocomp Software Incorporated. All rights reserved. Portions of the software described in this document copyright Microsoft Corporation, Borland Corporation, and Linus Torvalds, All Rights Reserved. No part of this publication may be reproduced, stored in a retrieval system or transmitted by any means, electronic, mechanical, photocopying, recording, or otherwise, without written permission from the publisher. Except for the limited warranty as described in the End User License Agreement, the information and material contained in this book are provided "As Is" without warranty of any kind, express or implied, including without limitation any warranty concerning the accuracy, adequacy, or completeness of such information or material or the results to be obtained from using such information or material contained within this manual or documentation. Neither Iocomp Software nor the author shall be responsible for any claims attributable to errors, omissions, or other inaccuracies in the information or material contained in this book, and in no event shall Iocomp Software nor shall the author be liable for direct, indirect, special, incidental, or consequential damages arising out of the use of such information or material. Some states do not allow limitations of duration of any implied warranty, so the above limitations may not apply to you. Trademarks Iocomp and the Iocomp Logo are registered trademarks of Iocomp Software Incorporated. Microsoft, Visual Basic, Visual C++, Visual FoxPro, Windows, Microsoft Office, Visual Basic.NET, C#.NET, C++.NET, Visual Studio.NET, and ActiveX are trademarks or registered trademarks of Microsoft Corporation. Borland, Delphi, C++ Builder, Kylix, VCL, and CLX are trademarks or registered trademarks of Borland Corporation. All other names, products, or marks are trademarks or registered trademarks of their respective companies. Printing Initial Printing 08/2000 Second Printing 02/2001 Third Printing 12/2001 Fourth Printing 08/2003 Manufactured in the United States of America

Table of Contents
Iocomp Components – Getting Started Manual Page iii
Table of Contents
Table of Contents...........................................................................................................................................................................................iii Chapter 1 – Introduction.............................................................................................................................................................................. 1 Chapter 2 – Installation................................................................................................................................................................................ 3 Chapter 3 – Getting Started with Visual Basic 6 ..................................................................................................................................... 6 Chapter 4 – Getting Started with Visual C++ 6 (Disp Interface).......................................................................................................11 Chapter 5 – Getting Started with Visual C++ 6 (iDispatch Interface)..............................................................................................21 Chapter 6 – Getting Started with Visual Studio.NET (VB.NET) .......................................................................................................32 Chapter 7 – Getting Started with Visual Studio.NET (C#.NET)........................................................................................................38 Chapter 8 – Getting Started with Delphi (Windows/Linux)................................................................................................................44 Chapter 9 – Getting Started with C++ Builder (Windows/Linux)......................................................................................................50 Chapter 10 – Obtaining Additional Assistance......................................................................................................................................56 Appendix A – ActiveX Component Libraries..........................................................................................................................................57 Appendix B – Color Codes and Constants..............................................................................................................................................59 Appendix C – Visual C++ Fonts................................................................................................................................................................60 Appendix D – VCL/CLX Manual Installation.......................................................................................................................................62 Glossary ..........................................................................................................................................................................................................68

Table of Contents
Page iv Iocomp Components – Getting Started Manual
This page left intentionally blank.

Chapter 1 – Introduction
Iocomp Components – Getting Started Manual Page 1 of 68
Chapter 1 – Introduction Welcome to Iocomp Instrumentation Components Version 3.0, including high-speed, easy to use components not found in many other ActiveX, VCL, and CLX component packages. Iocomp Software is committed to providing reliable, feature rich components that will enhance your automation, scientific, and instrumentation programming projects. They're ideally suited for real-time applications where speed is of the utmost importance while maintaining an easy-to-use, professional, polished user interface. Should I Use the ActiveX, VCL, or CLX Components? Iocomp components are distributed as three different component architectures. All three architectures are included with your product distribution…
ActiveX Our ActiveX version is compatible with all 32-bit ActiveX compatible design environments such as Microsoft Visual Basic, Microsoft Visual C++, Microsoft Visual Studio.NET, HP VEE, Clarion, Microsoft Office, Internet Explorer, Power Builder, and many other ActiveX compatible programming environments. VCL Our VCL version is compatible with all 32-bit Borland Delphi and C++ Builder development environments. Full source code is included with our VCL components. VCL components are not compatible with Microsoft Visual C++ or any other non-Borland development environment. Although our ActiveX controls are compatible, it is recommended that you use our VCL controls so that you can take advantage of additional features. CLX Our CLX version is compatible with all 32-bit Borland CLX development environments for Windows and Linux, such as Delphi 6-7, C++ Builder 6, Kylix 1-3 Delphi Edition, and Kylix 3 C++ Builder Edition. Full source code is included with our CLX versions. If you only plan on distributing your application to the Windows platform and plan on never distributing to Linux, we highly recommend that you use the VCL version of our controls so you can avoid needing to distribute the QT interface libraries.
Key Features Iocomp Components have been designed to provide a rich, stable, and robust set of features to simplify your program designs. Here is a list of our key features…
? High Speed for Real-Time Applications ? Vector-based graphics for greater design flexibility ? Easy to use Theme Support ? Custom Property Editors ? And Much More…
System Requirements
? Windows: 32-Bit Microsoft Windows System (Windows 95, 98, ME, NT4SP3, 2000, XP, or higher versions) ? Linux: Linux Kernel Version 2.2.x or higher, Lib QT 2.3.x or higher, i386 Processor.
Getting Help There are several ways for you to obtain help on using Iocomp Components in your programming task.
Getting Started Guide This guide is intended to provide basic information about using the Iocomp components for beginning developers, bringing them up-to-speed quickly.
Chapter 1 – Introduction
Page 2 of 68 Iocomp Components – Getting Started Manual
Help Files These files are intended to provide immediate assistance during your programming task. Many development environments support and context -sensitive help simply by highlighting a component, code property, or code method and pressing the key, which will result in opening our Help Files which provide complete documentation concerning all properties, methods, and events of our components including syntax examples. Plot Pack Manual Since the Plot Pack components are more feature-rich than our Instrumentation Components, there is a separate manual dedicated to understanding and using the Plot Pack components. Please refer to your CD-ROM or to our website at http://www.iocomp.com/documentation for more information about obtaining the PDF or printed version of our Plot Pack manual. Example Source Code Projects Our website and software CD distributions contain many different examples of using our components in popular programming environments such as Microsoft Visual Basic, Microsoft Visual C++, Internet Explorer, Borland Delphi, Borland C++ Builder, Borland Kylix (Delphi and C++ Builder Editions), and more. Each example covers aspects of a particular component, covers in-depth usage of a particular component feature, or covers a wide range of features and components.
Contacting Iocomp Software You can always contact Iocomp Software support staff directly for assistance with our software products at the following telephone numbers and Internet addresses…
? USA & Canada Toll Free Telephone: 888-599-2929 ? International Telephone: +1-407-226-3456 ? Customer Support Email: [email protected] ? Public Newsgroup: news://news.iocomp.com ? Other Iocomp Products and Upgrades: http://www.iocomp.com/products ? Customer Support Website: http://www.iocomp.com/support

Chapter 2 – Installation
Iocomp Components – Getting Started Manual Page 3 of 68
Chapter 2 – Installation CD-ROM Installation [Windows]
? Insert the CD-ROM into your CD-ROM drive. The installation should start automatically if you have the AutoRun option turned ON, otherwise you may need to manually run the SETUP.EXE program located in the root of the CD-ROM.
? Select a directory to install the Iocomp Component products. ? When prompted for your registration information, fill in the appropriate information. ? Full Product Only: If you are installing our fully purchased product, enter the keycode or keycodes that were
provided with your Software. Keycodes will unlock the software contained in the installer. Please keep this number in a safe place as you will need it for future installations/updates and when contacting us for Technical Support. If you are installing a product upgrade, you will need to enter your upgraded product keycode (the old keycode) first before you can enter the upgrade keycode.
? Full Product Only: If you are installing VCL or CLX components, the installer will prompt you for Borland IDEs where you want the installer to automatically compile and install our components. No further installation is necessary for our VCL or CLX components unless the automatic install fails.
CD-ROM Installation [Linux] ? Insert the CD-ROM into your CD-ROM drive. ? Full Product Only: Navigate to the root of the CD-ROM using Nautilus, Konqueror, your favorite file browser,
or a shell prompt and execute the "setup.sh" script. ? Evaluation Only : Navigate to the "~/EVAL/Linux" directory of the CD-ROM and then the appropriate Kylix
version folder (Kylix 3 for example would be located in "~/EVAL/Linux/kylix3") on the CD-ROM using Nautilus, Konqueror, your favorite file browser, or a shell prompt and execute the "setup.sh" script.
? Select a directory to install the Iocomp Component products. ? When prompted for your registration information, fill in the appropriate information. ? Full Product Only: If you are installing our fully purchased product, enter the keycode or keycodes that were
provided with your software. Keycodes will unlock the software contained in the installer. Please keep this number in a safe place as you will need it for future installations/updates and when contacting us for Technical Support. If you are installing a product upgrade, you will need to enter your upgraded product keycode (the old keycode) first before you can enter the upgrade keycode.
? The installer will prompt you for Borland Kylix IDEs where you want the installer to automatically install our components. No further installation is necessary for our CLX components unless the automatic install fails.
Electronic Delivery Installation [Windows]
? Run the single-file setup program that you downloaded from your online merchant. If prompted to overwrite files, always say yes. This will overwrite any older installation files from previous versions of Iocomp Components and ensure that your files are up-to-date.
? Select a directory to install the Iocomp Component products. ? When prompted for your registration information, fill in the appropriate information. ? Full Product Only: If you are installing our fully purchased product, enter the keycode or keycodes that were
provided with your Software. Keycodes will unlock the software contained in the installer. Please keep this number in a safe place as you will need it for future installations/updates and when contacting us for Technical Support. If you are installing a product upgrade, you will need to enter your upgraded product keycode (the old keycode) first before you can enter the upgrade keycode.
? Full Product Only: If you are installing VCL or CLX components, the installer will prompt you for Borland IDEs where you want the installer to automatically compile and install our components. No further installation is necessary for our VCL or CLX components unless the automatic install fails.

Chapter 2 – Installation
Page 4 of 68 Iocomp Components – Getting Started Manual
Electronic Delivery Installation [Linux] ? Download the installation tarball from your online merchant, and extract it with your favorite
compression/decompression program. ? Using Nautilus, Konqueror, your favorite file browser, or a shell prompt, execute the "setup.sh" script found in the
root of the archive. ? Select a directory to install the Iocomp Component products. ? When prompted for your registration information, fill in the appropriate information. ? Full Product Only: If you are installing our fully purchased product, enter the keycode or keycodes that were
provided with your software. Keycodes will unlock the software contained in the installer. Please keep this number in a safe place as you will need it for future installations/updates and when contacting us for Technical Support. If you are installing a product upgrade, you will need to enter your upgraded product keycode (the old keycode) first before you can enter the upgrade keycode.
? The installer will prompt you for Borland Kylix IDEs where you want the installer to automatically install our components. No further installation is necessary for our CLX components unless the automatic install fails.
Service Pack Updates Iocomp will periodically release Service Pack releases of our products to provide you with the latest feature enhancements and bug fixes that we may include with our software. Service Packs are provided free of charge. ou can always find a list of Service Packs available at our website:
http://www.iocomp.com/download
EvaluationNote : if you are using our evaluation version, you can simply uninstall our evaluation, download the latest evaluation from our website, and then re-install the evaluation to upgrade to the latest service pack version.
Product Upgrades and New Products Iocomp will periodically release Major Upgrades (approximately every 1.5 years) to our existing lines of products as well as New Products. You can always find a list of Upgrades and New Products available at our website:
http://www.iocomp.com/ products http://www.iocomp.com/ upgrades
EvaluationNote : if you are using our evaluation version, you can simply uninstall our evaluation, download the latest evaluation from our website, and then re-install the evaluation to upgrade to the latest service pack version.
Beta Versions In-between Service Packs, we may identify an important bug fix or may just want to make a new feature of our component available to our customers as quickly as possible. These types of updates are generally not 100% tested as our Service Packs, so you should consider these types of updates as "beta" quality updates. After a Service Pack is released, all of the Beta Versions are removed from our servers as the updates in these Beta Versions are always rolled into the latest Service Pack release. You can find a list of Beta versions for our full product and evaluation versions available at our website:
http://www.iocomp.com/beta
Chapter 2 – Installation
Iocomp Components – Getting Started Manual Page 5 of 68
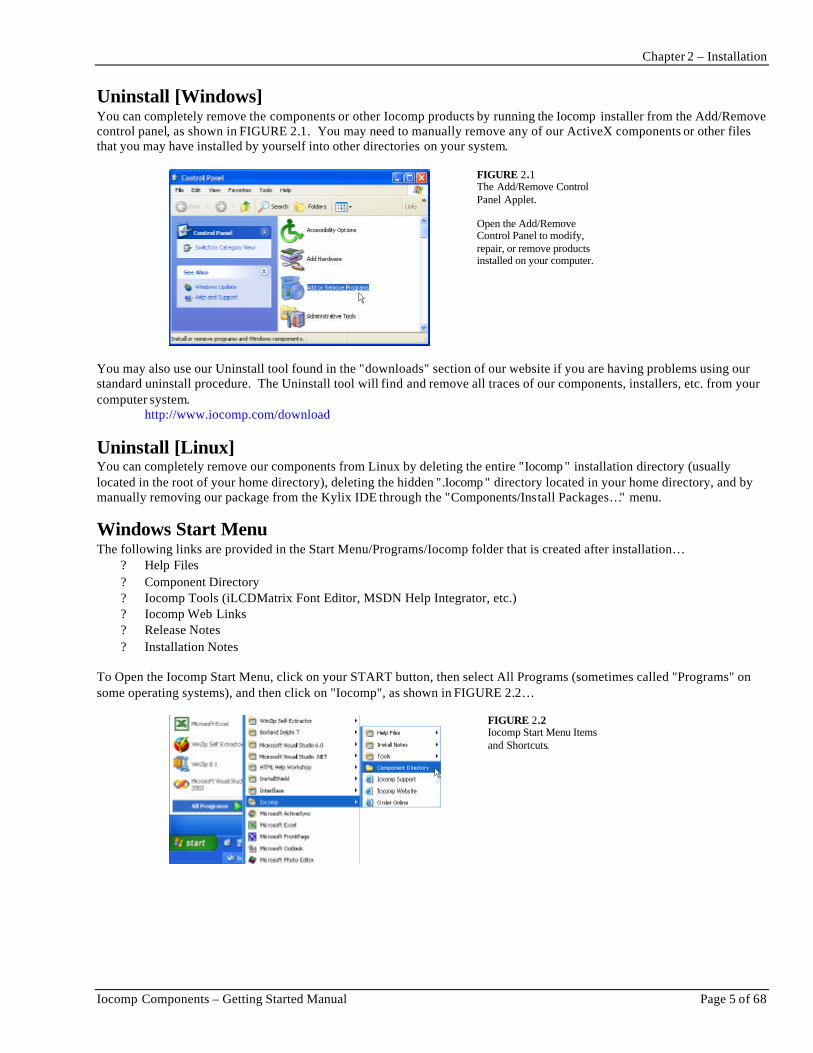
Uninstall [Windows] You can completely remove the components or other Iocomp products by running the Iocomp installer from the Add/Remove control panel, as shown in FIGURE 2.1. You may need to manually remove any of our ActiveX components or other files that you may have installed by yourself into other directories on your system.
FIGURE 2.1 The Add/Remove Control Panel Applet. Open the Add/Remove Control Panel to modify, repair, or remove products installed on your computer.
You may also use our Uninstall tool found in the "downloads" section of our website if you are having problems using our standard uninstall procedure. The Uninstall tool will find and remove all traces of our components, installers, etc. from your computer system.
http://www.iocomp.com/download
Uninstall [Linux] You can completely remove our components from Linux by deleting the entire "Iocomp " installation directory (usually located in the root of your home directory), deleting the hidden ".Iocomp " directory located in your home directory, and by manually removing our package from the Kylix IDE through the "Components/Install Packages…" menu. Windows Start Menu The following links are provided in the Start Menu/Programs/Iocomp folder that is created after installation…
? Help Files ? Component Directory ? Iocomp Tools (iLCDMatrix Font Editor, MSDN Help Integrator, etc.) ? Iocomp Web Links ? Release Notes ? Installation Notes
To Open the Iocomp Start Menu, click on your START button, then select All Programs (sometimes called "Programs" on some operating systems), and then click on "Iocomp", as shown in FIGURE 2.2…
FIGURE 2.2 Iocomp Start Menu Items and Shortcuts.

Chapter 3 – Getting Started with Visual Basic 6
Page 6 of 68 Iocomp Components – Getting Started Manual
Chapter 3 – Getting Started with Visual Basic 6
Tutorial Open Visual Basic and select "Standard EXE" from the New Project wizard or select the "File/New Project" menu and then create a "Standard EXE project" as shown in FIGURE 3.1.
FIGURE 3.1 To create a new project, select "New Project" from the File menu, select "Standard EXE", and then press OK.
Right-click on the component pallet and select "Components…" as shown in FIGURE 3.2 or select "Components…" from the Project menu.
FIGURE 3.2 To make an ActiveX component available for use with your application, right-click on your component pallet and select "Components…".
Scroll down the list and place a check mark next to "Iocomp Analog Pack", as seen in FIGURE 3.3 and click OK.
FIGURE 3.3 View of the available ActiveX components on your computer system. Select "Iocomp Analog Pack" to make our Analog Components available to your application.

Chapter 3 – Getting Started with Visual Basic 6
Iocomp Components – Getting Started Manual Page 7 of 68
Click once on the iAngularGaugeX icon shown in FIGURE 3.4.
FIGURE 3.4 To add a component to the form, click on the component icon in the Visual Basic component pallet.
Click and drag-out the component on your form to the size shown in FIGURE 3.5 and FIGURE 3.6. You can also drop a component on the form at the default size by double-clicking on the component icon in the toolbox.
FIGURE 3.5 Click and drag out the component to the desired size.
FIGURE 3.6 View of an iAngularGaugeX component on a Visual Basic form.

Chapter 3 – Getting Started with Visual Basic 6
Page 8 of 68 Iocomp Components – Getting Started Manual
Right-click on the component and select "Properties" as shown in FIGURE 3.7
FIGURE 3.7 To open the iAngularGaugeX Component’s Custom Property Editor, right-click on the component and select "Properties".
Click on the "Theme" tab as shown in FIGURE 3.8. Select the "Speedometer MPH" theme from the "Overall Scheme" combo-box and then clock the "Accept Preview" button. Click the Apply button to apply the new settings to the component on the form.
FIGURE 3.8 View of the Theme Property Editor Tab.
Click on the "Control" tab. Change the Position property to "50". Press the OK button as shown in FIGURE 3.9. Notice that the pointer of the gauge moves to 50 on the scale.
FIGURE 3.9 View of the Control Property Editor Tab.

Chapter 3 – Getting Started with Visual Basic 6
Iocomp Components – Getting Started Manual Page 9 of 68
Insert a standard Button onto your dialog, as shown in FIGURE 3.10. Double-click the button to generate the OnClick event handler for the button.
FIGURE 3.10 Add a button to your form.
Type the name of the component "iAngularGaugeX1" and then enter a ".". A list of valid properties and methods will appear, as shown in FIGURE 3.11.
FIGURE 3.11 To bring up an Intellisense list of properties and methods for a component, press CTRL -SPACEBAR.
Select Position property and then complete the line as follows… Example Command1_Click code as shown in FIGURE 3.11 Private Sub Command1_Click() iAngularGaugeX1.Position = Rnd(1) * 100 End Sub

Chapter 3 – Getting Started with Visual Basic 6
Page 10 of 68 Iocomp Components – Getting Started Manual
Select the iAngularGaugeX component "iAngularGaugeX1" from the upper left-hand combo-box. Select the OnPositionChange event from the combo box on the upper right-hand as shown in FIGURE 3.12.
FIGURE 3.12 View of the Visual Basic code window and the list of events for the iAngularGaugeX1 component.
Enter the code as shown below and in FIGURE 3.13… Example OnPositionChange code as shown in FIGURE 3.13 Private Sub iAngularGaugeX1_OnPositionChange() Caption = iAngularGaugeX1.Position End Sub
FIGURE 3.13 View of the Visual Basic code window and the iAngularGaugeX OnPositionChange event.
Press the F5 button to execute the program. When the button on the dialog is clicked, the Position property of the iAngularGaugeX component is set to a random value between 0 and 100. When the Position property is changed, the OnPositionChange event fires. That event then sets the caption of the form to the Position property of the iAngularGaugeX component. Accessing Help Place your mouse cursor over the Position property and then press . This will open the Iocomp help on the Position property of the iAngularGaugeX component. Select the iAngularGaugeX1 component on the form and then press to open the overall help topic for the iAngularGaugeX component. Select a property in the Visual basic properties window and press for help on the specific property.

Chapter 4 – Getting Started with Visual C++ 6 (Disp Interface)
Iocomp Components – Getting Started Manual Page 11 of 68
Chapter 4 – Getting Started with Visual C++ 6 (Disp Interface)
Tutorial Create a new Dialog-based MFC project that supports ActiveX controls as follow…
1. Close any currently open workspace by selecting "Close Workspace" form the File menu 2. Select "New…" from the File Menu, as shown in FIGURE 4.1. 3. Select "MFC AppWizard (exe)", and enter the “Project name” as "IocompDispExample". 4. Click the OK button to continue.
FIGURE 4.1 To create a new MFC Application, Select "New…" from the File menu, click on "MFC AppWizard (exe), and then enter a unique Project Name in the edit box.
5. Select a "Dialog based" type of application, as shown in FIGURE 4.2. 6. Click the FINISH button to create the application.
FIGURE 4.2 MFC AppWizard, showing the creation of a Dialog based application.
Chapter 4 – Getting Started with Visual C++ 6 (Disp Interface)
Page 12 of 68 Iocomp Components – Getting Started Manual
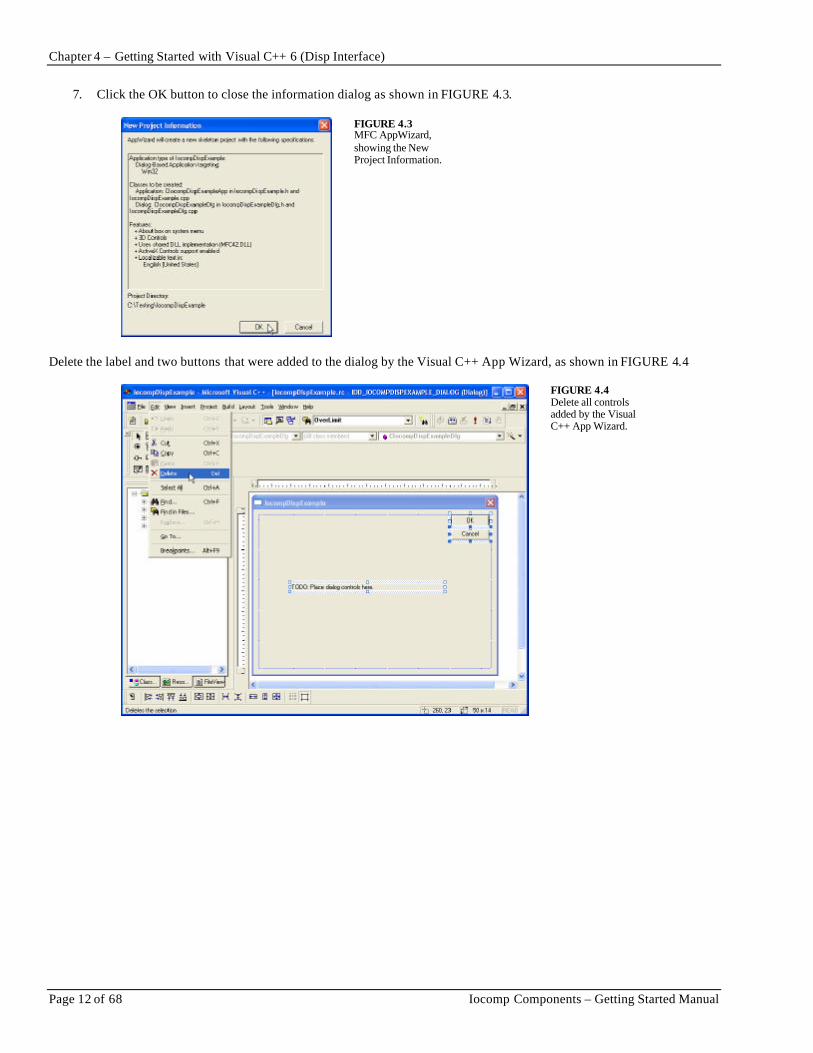
7. Click the OK button to close the information dialog as shown in FIGURE 4.3.
FIGURE 4.3 MFC AppWizard, showing the New Project Information.
Delete the label and two buttons that were added to the dialog by the Visual C++ App Wizard, as shown in FIGURE 4.4
FIGURE 4.4 Delete all controls added by the Visual C++ App Wizard.
Chapter 4 – Getting Started with Visual C++ 6 (Disp Interface)
Iocomp Components – Getting Started Manual Page 13 of 68
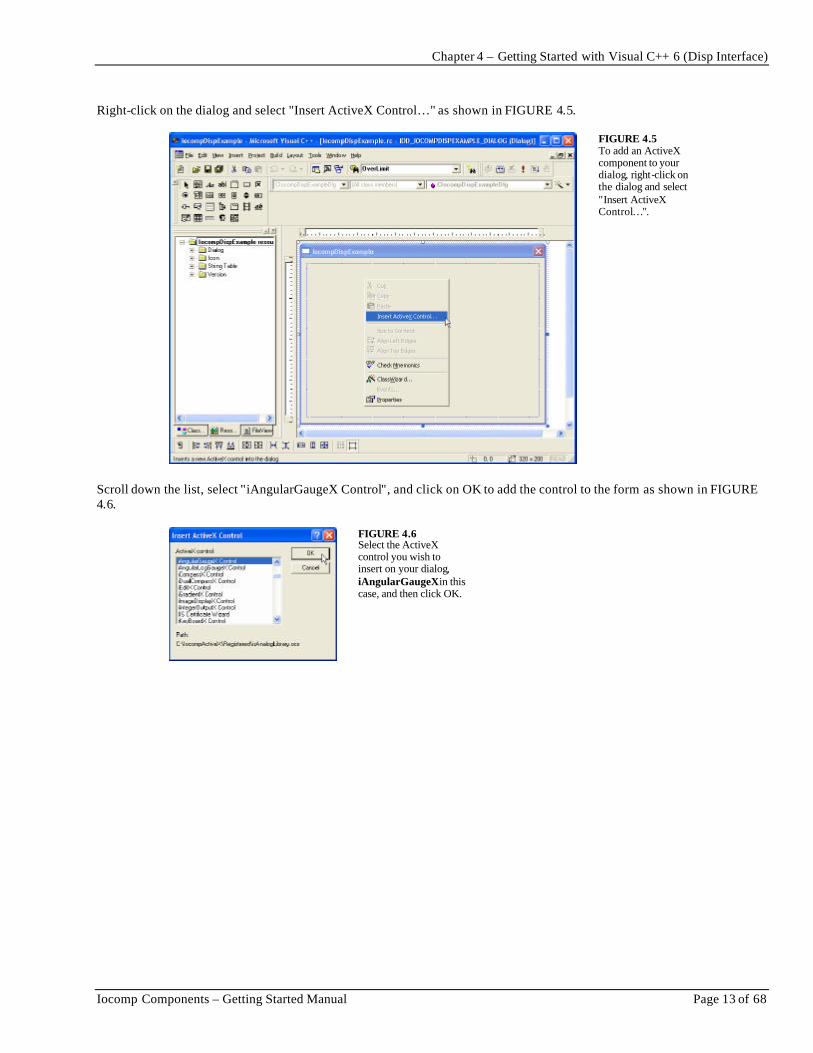
Right-click on the dialog and select "Insert ActiveX Control…" as shown in FIGURE 4.5.
FIGURE 4.5 To add an ActiveX component to your dialog, right-click on the dialog and select "Insert ActiveX Control…".
Scroll down the list, select "iAngularGaugeX Control", and click on OK to add the control to the form as shown in FIGURE 4.6.
FIGURE 4.6 Select the ActiveX control you wish to insert on your dialog, iAngularGaugeX in this case, and then click OK.

Chapter 4 – Getting Started with Visual C++ 6 (Disp Interface)
Page 14 of 68 Iocomp Components – Getting Started Manual
The component will now be displayed on the form as shown in FIGURE 4.7
FIGURE 4.7 Drag-out the component to the desired size on your dialog or simply click on the dialog for the default component size.
Note: Sometimes Visual C++ doesn't update the metafile representation used during the design of your dialog, so you may need to resize or move the component after you first insert it to force Visual C++ to update. This is only an issue at design-time, never at run-time. Right-click on the component and select "Properties iAngularGaugeX Control Object" as shown in FIGURE 4.8…
FIGURE 4.8 To open the iAngularGaugeX Component’s Custom Property Editor, right-click on the component and select "Properties iAngularGaugeX Control Object".

Chapter 4 – Getting Started with Visual C++ 6 (Disp Interface)
Iocomp Components – Getting Started Manual Page 15 of 68
Select the "Control" tab and then the second-row "Theme" tab as shown in FIGURE 4.9. Select the "Speedometer MPH" theme from the "Overall Scheme" combo-box and then click the “Accept Preview” button.
FIGURE 4.9 View of the Theme Property Edit or Tab.
Select the second-row "Control" tab as shown in FIGURE 4.10. Change the Position property to "50" and then click to another edit box to record the change. Notice that the pointer of the gauge moves to 50 on the scale. Close the property editor by clicking on the X in the upper-right-hand corner of the property editor dialog.
FIGURE 4.10 View of the Control Component Property Editor Tab.
Right-click anywhere on your dialog or your C++ code window, and select "Class Wizard …" as shown in FIGURE 4.11, or press the CTRL-W key to open the Visual C++ Class Wizard …
FIGURE 4.11 Right-click on the dialog or in your source code window and select "ClassWizard…"
Chapter 4 – Getting Started with Visual C++ 6 (Disp Interface)
Page 16 of 68 Iocomp Components – Getting Started Manual
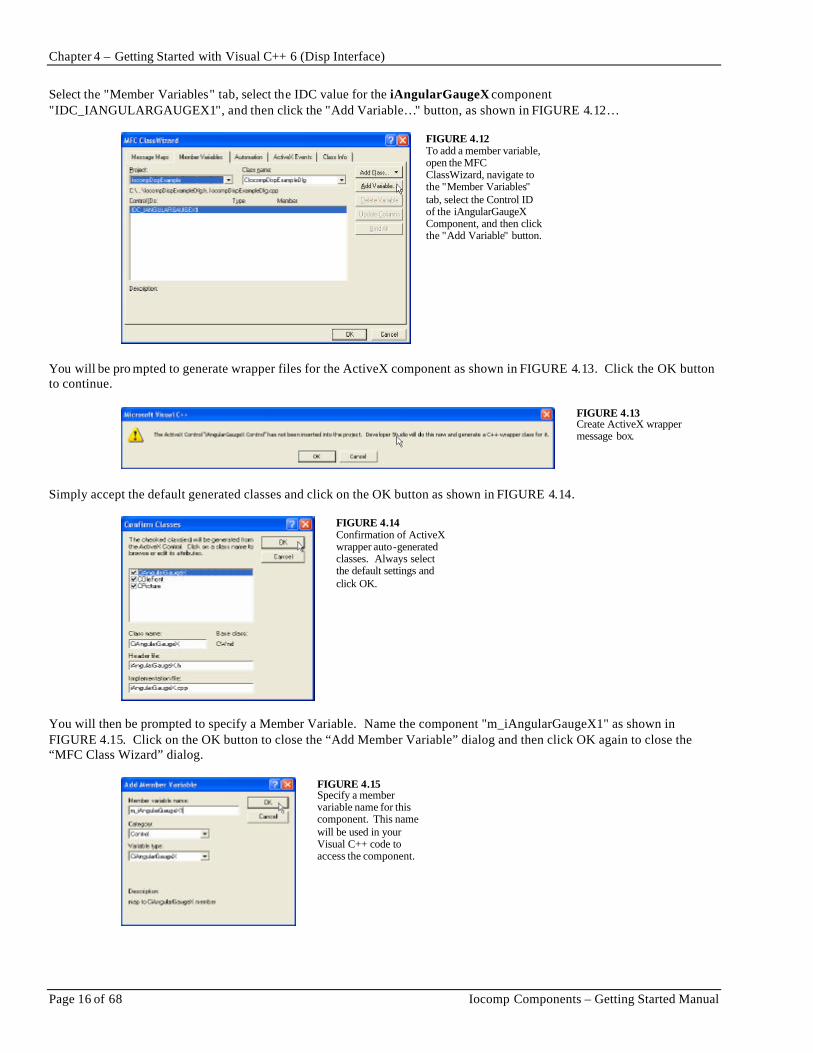
Select the "Member Variables" tab, select the IDC value for the iAngularGaugeX component "IDC_IANGULARGAUGEX1", and then click the "Add Variable…" button, as shown in FIGURE 4.12…
FIGURE 4.12 To add a member variable, open the MFC ClassWizard, navigate to the "Member Variables" tab, select the Control ID of the iAngularGaugeX Component, and then click the "Add Variable" button.
You will be pro mpted to generate wrapper files for the ActiveX component as shown in FIGURE 4.13. Click the OK button to continue.
FIGURE 4.13 Create ActiveX wrapper message box.
Simply accept the default generated classes and click on the OK button as shown in FIGURE 4.14.
FIGURE 4.14 Confirmation of ActiveX wrapper auto-generated classes. Always select the default settings and click OK.
You will then be prompted to specify a Member Variable. Name the component "m_iAngularGaugeX1" as shown in FIGURE 4.15. Click on the OK button to close the “Add Member Variable” dialog and then click OK again to close the “MFC Class Wizard” dialog.
FIGURE 4.15 Specify a member variable name for this component. This name will be used in your Visual C++ code to access the component.

Chapter 4 – Getting Started with Visual C++ 6 (Disp Interface)
Iocomp Components – Getting Started Manual Page 17 of 68
Insert a standard button and edit box to your dialog from the Visual C++ control palette as shown in FIGURE 4.16.
FIGURE 4.16 Add a standard Edit Box and Button to your dialog.
Right-click anywhere on your dialog or your C++ code window, and select "Class Wizard …" or press the CTRL-W key to open the Visual C++ Class Wizard. Select the “Member Variables” tab, click on the IDC value of the Edit Box “IDC_ EDIT1”, and then click on the “Add Variable...” button. Create a member variable for the Edit Box, naming it "m_Edit1" and as Variable type "double", as shown in FIGURE 4.17. Click on the OK button to close the dialog and then click the OK button to close the MFC Class Wizard dialog.
FIGURE 4.17 Add a member variable for the Edit Control, naming it "m_Edit1" and of Variable type "double".
Double-click the button and the code window will open up to allow you to add the event handler code. Select the OK button when prompted as shown in FIGURE 4.18.
FIGURE 4.18 Add Member Function Dialog for Button OnClick event. Accept default name by clicking on the OK button.

Chapter 4 – Getting Started with Visual C++ 6 (Disp Interface)
Page 18 of 68 Iocomp Components – Getting Started Manual
Type in the member variable of the ActiveX component "m_iAngularGaugeX1", and then type a ".". A list of properties and methods will appear, as shown in FIGURE 4.19.
FIGURE 4.19 To bring up an Intellisense listing of methods for a component member variable, press CTRL-SPACEBAR.
Select the SetPosition method and then complete the line as follows … Example OnButton1 code as shown in FIGURE 4.19 void CIocompDispExampleDlg::OnButton1() { m_iAngularGaugeX1.SetPosition((rand()/(double)RAND_MAX)*100); } Right-click anywhere on your dialog or your C++ code window, and select "Class Wizard …" or press the CTRL-W key to open the Visual C++ Class Wizard. Select the "Message Maps" tab, select the Object ID for the iAngularGaugeX Component from the list of "Object IDs". In the list box to the right, select the OnPositionChange event and then press the Add Function button as shown in FIGURE 4.20.
FIGURE 4.20 To map an event message to a member function (a.k.a. Event Handler), select the Object ID, then select the Message to map, then click the "Add Function…" button.
Accept the default Member function name and press the OK button as shown in FIGURE 4.21…
FIGURE 4.21 Specify a name for the Event Handler member function.
Chapter 4 – Getting Started with Visual C++ 6 (Disp Interface)
Iocomp Components – Getting Started Manual Page 19 of 68
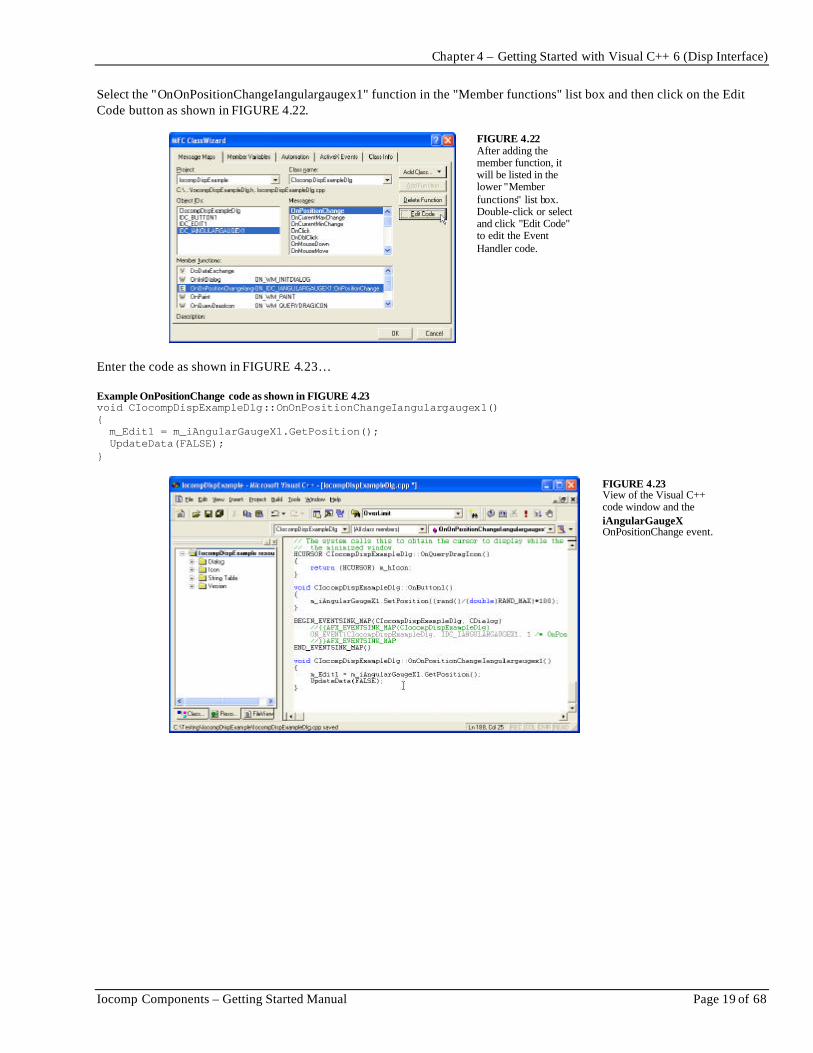
Select the "OnOnPositionChangeIangulargaugex1" function in the "Member functions" list box and then click on the Edit Code button as shown in FIGURE 4.22.
FIGURE 4.22 After adding the member function, it will be listed in the lower "Member functions" list box. Double-click or select and click "Edit Code" to edit the Event Handler code.
Enter the code as shown in FIGURE 4.23… Example OnPositionChange code as shown in FIGURE 4.23 void CIocompDispExampleDlg::OnOnPositionChangeIangulargaugex1() { m_Edit1 = m_iAngularGaugeX1.GetPosition(); UpdateData(FALSE); }
FIGURE 4.23 View of the Visual C++ code window and the iAngularGaugeX OnPositionChange event.

Chapter 4 – Getting Started with Visual C++ 6 (Disp Interface)
Page 20 of 68 Iocomp Components – Getting Started Manual
Press the F5 button to execute the program as shown in FIGURE 4.24. Answer “Yes” if you are prompted to build the IocompDispExample.exe file. When the button on the dialog is clicked, the Position property of the iAngularGaugeX component is set to a random value between 0 and 100. When the Position property is changed, the OnPositionChange event fires. That event then sets the value of the edit box to the Position property of the iAngularGaugeX component.
FIGURE 4.24 View of running program.
Accessing Help If you chose to integrate our HTML help files with your MSDN Help collection, you will be able to open our help file directly from the Visual C++ code editor window as follows… Place your mouse cursor over the SetPosition method and then press . This will open the Iocomp help on the Position property of the iAngularGaugeX component. If you chose not to integrate our HTML help files, you can manually open our ActiveX help files from the “Start/All Programs/Iocomp/Help Files” as shown in FIGURE 4.25…
FIGURE 4.25 Iocomp Start Menu Items and Shortcuts.

Chapter 5 – Getting Started with Visual C++ 6 (iDispatch Interface)
Iocomp Components – Getting Started Manual Page 21 of 68
Chapter 5 – Getting Started with Visual C++ 6 (iDispatch Interface)
Tutorial Create a new Dialog-based MFC project that supports ActiveX controls by following these steps…
1. Close any currently open workspace by selecting "Close Workspace" form the File menu 2. Select "New…" from the File Menu, as shown in FIGURE 5.1. 3. Select "MFC AppWizard (exe)", and enter the “Project name” as "Iocomp iDispatchExample". 4. Click the OK button to continue.
FIGURE 5.1 To create a new MFC Application, Select "New…" from the File menu, click on "MFC AppWizard (exe), and then enter a unique Project Name in the edit box.
5. Select "Dialog based", as shown in FIGURE 5.2. 6. Click the FINISH button to create the application.
FIGURE 5.2 MFC AppWizard, showing the creation of a Dialog based application.

Chapter 5 – Getting Started with Visual C++ 6 (iDispatch Interface)
Page 22 of 68 Iocomp Components – Getting Started Manual
7. Click the OK button to close the information dialog as shown in FIGURE 5.3.
FIGURE 5.3 MFC AppWizard, showing the New Project Information.
Delete the label and two buttons that were added to the dialog by the Visual C++ App Wizard, as shown in FIGURE 5.4
FIGURE 5.4 Delete all controls added by the Visual C++ App Wizard.
Chapter 5 – Getting Started with Visual C++ 6 (iDispatch Interface)
Iocomp Components – Getting Started Manual Page 23 of 68
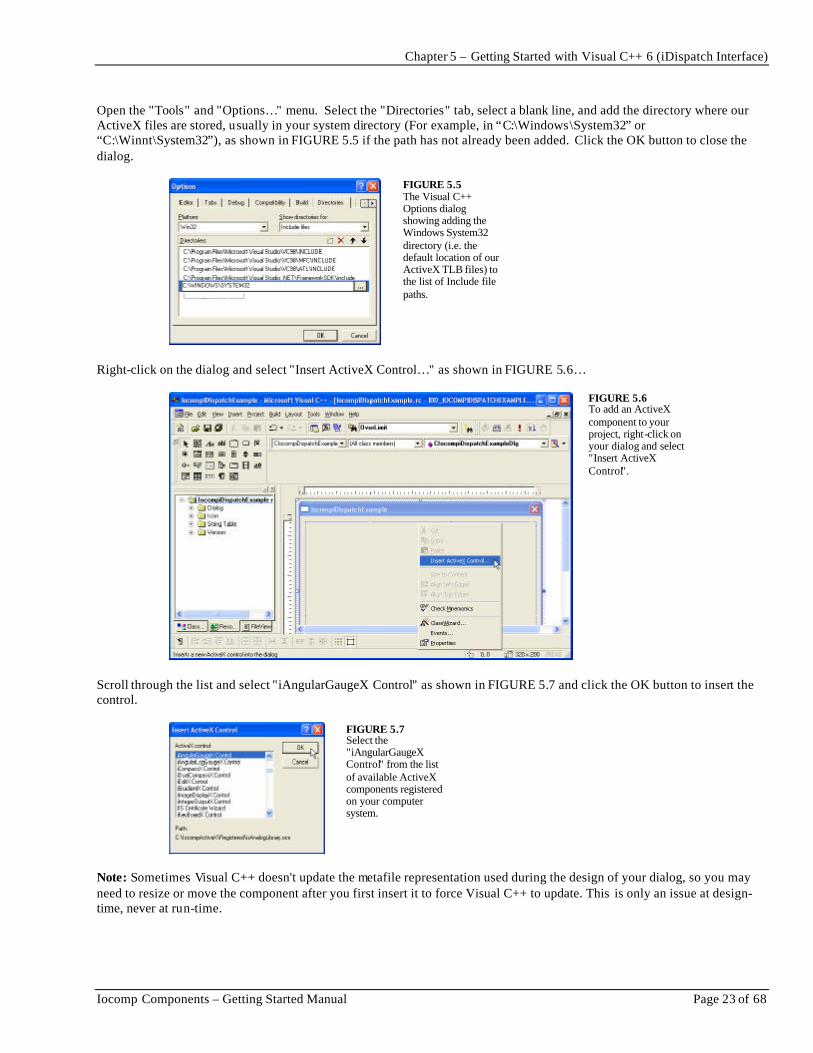
Open the "Tools" and "Options…" menu. Select the "Directories" tab, select a blank line, and add the directory where our ActiveX files are stored, usually in your system directory (For example, in “C:\Windows\System32” or “C:\Winnt\System32”), as shown in FIGURE 5.5 if the path has not already been added. Click the OK button to close the dialog.
FIGURE 5.5 The Visual C++ Options dialog showing adding the Windows System32 directory (i.e. the default location of our ActiveX TLB files) to the list of Include file paths.
Right-click on the dialog and select "Insert ActiveX Control…" as shown in FIGURE 5.6…
FIGURE 5.6 To add an ActiveX component to your project, right-click on your dialog and select "Insert ActiveX Control".
Scroll through the list and select "iAngularGaugeX Control" as shown in FIGURE 5.7 and click the OK button to insert the control.
FIGURE 5.7 Select the "iAngularGaugeX Control" from the list of available ActiveX components registered on your computer system.
Note: Sometimes Visual C++ doesn't update the metafile representation used during the design of your dialog, so you may need to resize or move the component after you first insert it to force Visual C++ to update. This is only an issue at design-time, never at run-time.

Chapter 5 – Getting Started with Visual C++ 6 (iDispatch Interface)
Page 24 of 68 Iocomp Components – Getting Started Manual
Notice the second combo box in FIGURE 5.8 inside the Visual C++ toolbar; this is the IDC name of the component, by default "IDC_IANGULARGAUGEX1". You will generally not use this name in your code, but will create a CCOM pointer variable in your project so that you can access the control through code.
FIGURE 5.8 The component will automatically be dropped into your dialog.
Right-click on the component and select "Properties iAngularGaugeX Control Object", as shown in FIGURE 5.9.
FIGURE 5.9 To open the iAngularGaugeX Component’s Custom Property Editor, right-click on the component and select "Properties iAngularGaugeX Control Object".

Chapter 5 – Getting Started with Visual C++ 6 (iDispatch Interface)
Iocomp Components – Getting Started Manual Page 25 of 68
Select the "Control" tab and then the second-row "Theme" tab as shown in FIGURE 5.10. Select the "Speedometer MPH" theme from the "Overall Scheme" combo-box and then click the "Accept Preview" button.
FIGURE 5.10 View of the Theme Property Editor Tab.
Select the second-row "Control" tab as shown in FIGURE 5.11. Change the Position property to "50" and then click to another edit box to record the change. Notice that the pointer of the gauge moves to 50 on the scale. Close the property editor by clicking on the X in the upper-right-hand corner of the property editor dialog.
FIGURE 5.11 View of the Control Component Property Editor Tab.
Chapter 5 – Getting Started with Visual C++ 6 (iDispatch Interface)
Page 26 of 68 Iocomp Components – Getting Started Manual
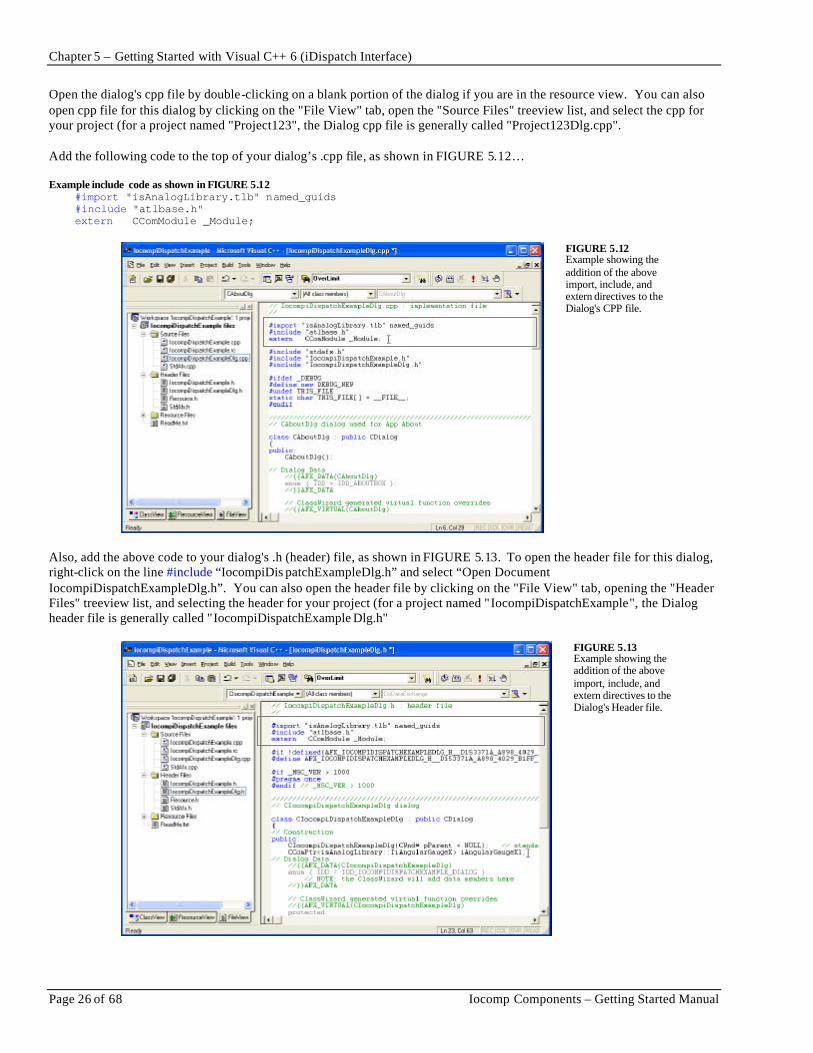
Open the dialog's cpp file by double-clicking on a blank portion of the dialog if you are in the resource view. You can also open cpp file for this dialog by clicking on the "File View" tab, open the "Source Files" treeview list, and select the cpp for your project (for a project named "Project123", the Dialog cpp file is generally called "Project123Dlg.cpp". Add the following code to the top of your dialog’s .cpp file, as shown in FIGURE 5.12… Example include code as shown in FIGURE 5.12 #import "isAnalogLibrary.tlb" named_guids #include "atlbase.h" extern CComModule _Module;
FIGURE 5.12 Example showing the addition of the above import, include, and extern directives to the Dialog's CPP file.
Also, add the above code to your dialog's .h (header) file, as shown in FIGURE 5.13. To open the header file for this dialog, right-click on the line #include “IocompiDis patchExampleDlg.h” and select “Open Document IocompiDispatchExampleDlg.h”. You can also open the header file by clicking on the "File View" tab, opening the "Header Files" treeview list, and selecting the header for your project (for a project named "IocompiDispatchExample", the Dialog header file is generally called "IocompiDispatchExample Dlg.h"
FIGURE 5.13 Example showing the addition of the above import, include, and extern directives to the Dialog's Header file.
Chapter 5 – Getting Started with Visual C++ 6 (iDispatch Interface)
Iocomp Components – Getting Started Manual Page 27 of 68
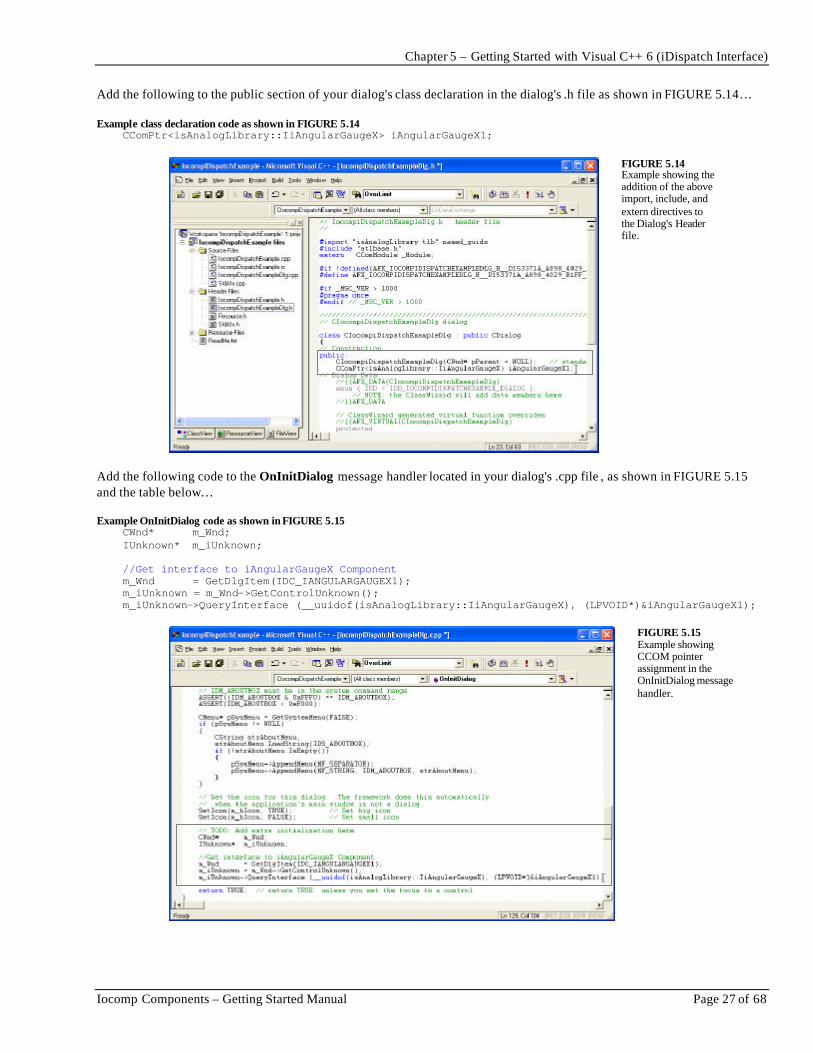
Add the following to the public section of your dialog's class declaration in the dialog's .h file as shown in FIGURE 5.14… Example class declaration code as shown in FIGURE 5.14 CComPtr<isAnalogLibrary::IiAngularGaugeX> iAngularGaugeX1;
FIGURE 5.14 Example showing the addition of the above import, include, and extern directives to the Dialog's Header file.
Add the following code to the OnInitDialog message handler located in your dialog's .cpp file , as shown in FIGURE 5.15 and the table below… Example OnInitDialog code as shown in FIGURE 5.15 CWnd* m_Wnd; IUnknown* m_iUnknown; //Get interface to iAngularGaugeX Component m_Wnd = GetDlgItem(IDC_IANGULARGAUGEX1); m_iUnknown = m_Wnd->GetControlUnknown(); m_iUnknown->QueryInterface (__uuidof(isAnalogLibrary::IiAngularGaugeX), (LPVOID*)&iAngularGaugeX1);
FIGURE 5.15 Example showing CCOM pointer assignment in the OnInitDialog message handler.
Chapter 5 – Getting Started with Visual C++ 6 (iDispatch Interface)
Page 28 of 68 Iocomp Components – Getting Started Manual
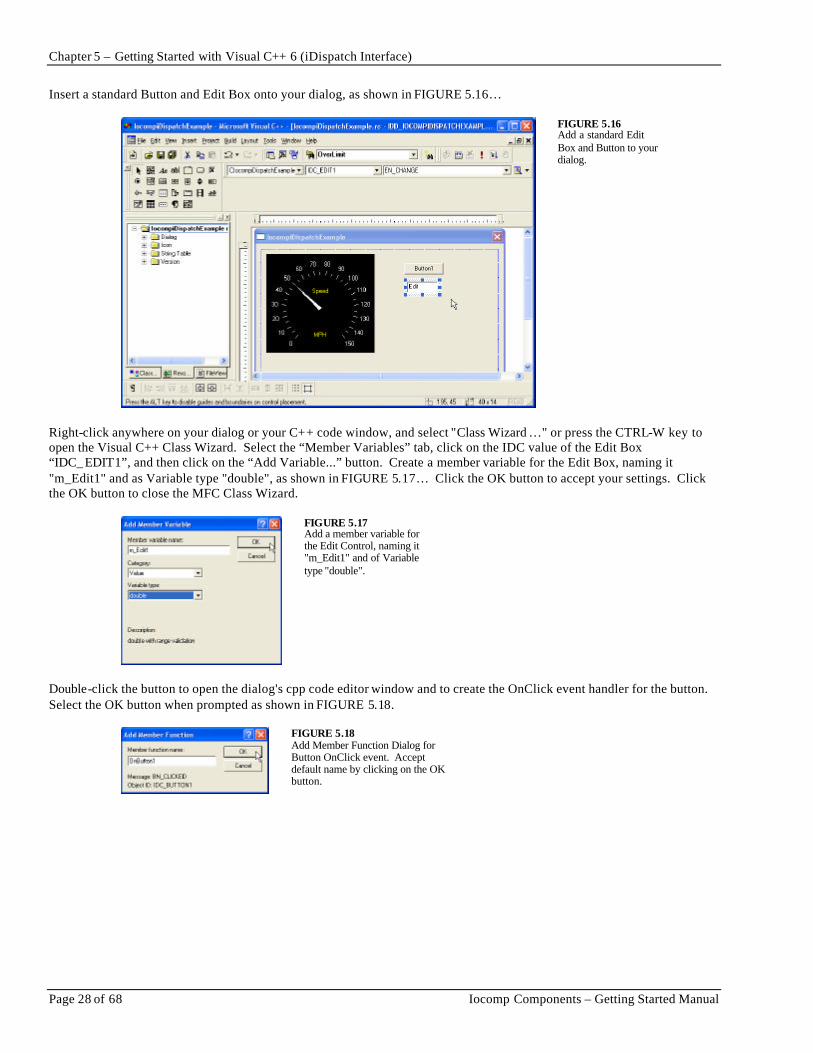
Insert a standard Button and Edit Box onto your dialog, as shown in FIGURE 5.16…
FIGURE 5.16 Add a standard Edit Box and Button to your dialog.
Right-click anywhere on your dialog or your C++ code window, and select "Class Wizard …" or press the CTRL-W key to open the Visual C++ Class Wizard. Select the “Member Variables” tab, click on the IDC value of the Edit Box “IDC_ EDIT1”, and then click on the “Add Variable...” button. Create a member variable for the Edit Box, naming it "m_Edit1" and as Variable type "double", as shown in FIGURE 5.17… Click the OK button to accept your settings. Click the OK button to close the MFC Class Wizard.
FIGURE 5.17 Add a member variable for the Edit Control, naming it "m_Edit1" and of Variable type "double".
Double-click the button to open the dialog's cpp code editor window and to create the OnClick event handler for the button. Select the OK button when prompted as shown in FIGURE 5.18.
FIGURE 5.18 Add Member Function Dialog for Button OnClick event. Accept default name by clicking on the OK button.

Chapter 5 – Getting Started with Visual C++ 6 (iDispatch Interface)
Iocomp Components – Getting Started Manual Page 29 of 68
Type in the name of the CCOM pointer to the component "iAngularGaugeX1" and then type "->". A list of valid properties and methods will appear, as shown in FIGURE 5.19…
FIGURE 5.19 To bring up an Intellisense listing of methods for a component member variable, press CTRL-SPACEBAR.
Select the Position property and complete the line as follows… Example OnButton1 code as shown in FIGURE 5.19 void CIocompiDispatchExampleDlg::OnButton1() { iAngularGaugeX1->Position = (rand()/(double)RAND_MAX)*100; } Right-click anywhere on your dialog or your C++ code window, and select "Class Wizard …" or press the CTRL-W key to open the Visual C++ Class Wizard. In the "Message Maps" tab, select the Object ID for the iAngularGaugeX Component "IDC_IANGULARGAUGEX1" from the list of "Object IDs". Select the OnPositionChange event and then click the Add Function button as shown in FIGURE 5.20…
FIGURE 5.20 To map an event message to a member function (a.k.a. Event Handler), select the Object ID, then select the Message to map, and then click the "Add Function…" button.
Accept the default Member function name by pressing the OK button as shown in FIGURE 5.21…
FIGURE 5.21 Specify a name for the Event Handler member function. Pick any unique name.

Chapter 5 – Getting Started with Visual C++ 6 (iDispatch Interface)
Page 30 of 68 Iocomp Components – Getting Started Manual
Select the "OnOnPositionChangeIangulargaugex1" function in the "Member functions" list box and then click on the Edit Code button as shown in FIGURE 5.22.
FIGURE 5.22 After adding the member function, it will be listed in the lower "Member functions" list box. Double-click or select and click "Edit Code" to edit the Event Handler code.
Enter the code as shown in FIGURE 5.23… Example OnPositionChange code as shown in FIGURE 5.23 void CIocompiDispatchExampleDlg::OnPositionChangeiAngularGaugeX1() { m_Edit1 = iAngularGaugeX1->Position; UpdateData(FALSE); }
FIGURE 5.23 View of the Visual C++ code window and the iAngularGaugeX OnPositionChange event. This event fires every time the Position property of iAngularGaugeX1 changes.
Chapter 5 – Getting Started with Visual C++ 6 (iDispatch Interface)
Iocomp Components – Getting Started Manual Page 31 of 68
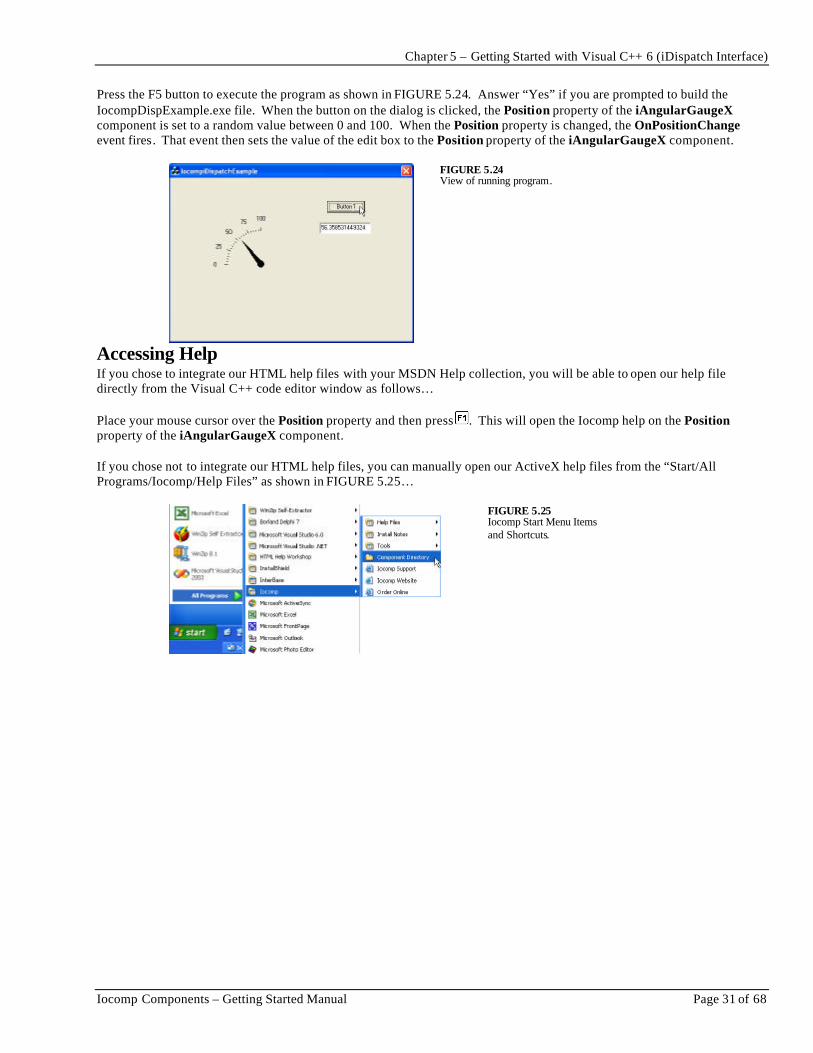
Press the F5 button to execute the program as shown in FIGURE 5.24. Answer “Yes” if you are prompted to build the IocompDispExample.exe file. When the button on the dialog is clicked, the Position property of the iAngularGaugeX component is set to a random value between 0 and 100. When the Position property is changed, the OnPositionChange event fires. That event then sets the value of the edit box to the Position property of the iAngularGaugeX component.
FIGURE 5.24 View of running program.
Accessing Help If you chose to integrate our HTML help files with your MSDN Help collection, you will be able to open our help file directly from the Visual C++ code editor window as follows… Place your mouse cursor over the Position property and then press . This will open the Iocomp help on the Position property of the iAngularGaugeX component. If you chose not to integrate our HTML help files, you can manually open our ActiveX help files from the “Start/All Programs/Iocomp/Help Files” as shown in FIGURE 5.25…
FIGURE 5.25 Iocomp Start Menu Items and Shortcuts.
Chapter 6 – Getting Started with Visual Studio.NET (VB.NET)
Page 32 of 68 Iocomp Components – Getting Started Manual
Chapter 6 – Getting Started with Visual Studio.NET (VB.NET)
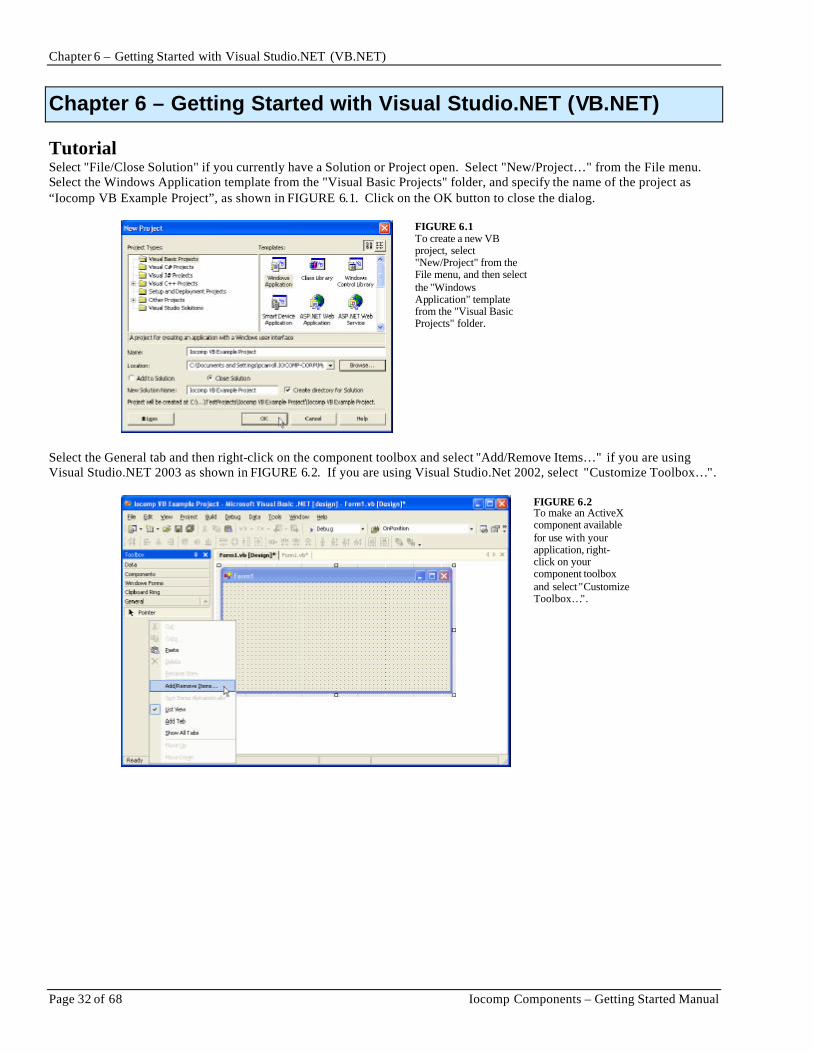
Tutorial Select "File/Close Solution" if you currently have a Solution or Project open. Select "New/Project…" from the File menu. Select the Windows Application template from the "Visual Basic Projects" folder, and specify the name of the project as “Iocomp VB Example Project”, as shown in FIGURE 6.1. Click on the OK button to close the dialog.
FIGURE 6.1 To create a new VB project, select "New/Project" from the File menu, and then select the "Windows Application" template from the "Visual Basic Projects" folder.
Select the General tab and then right-click on the component toolbox and select "Add/Remove Items…" if you are using Visual Studio.NET 2003 as shown in FIGURE 6.2. If you are using Visual Studio.Net 2002, select "Customize Toolbox…".
FIGURE 6.2 To make an ActiveX component available for use with your application, right-click on your component toolbox and select "Customize Toolbox…".
Chapter 6 – Getting Started with Visual Studio.NET (VB.NET)
Iocomp Components – Getting Started Manual Page 33 of 68
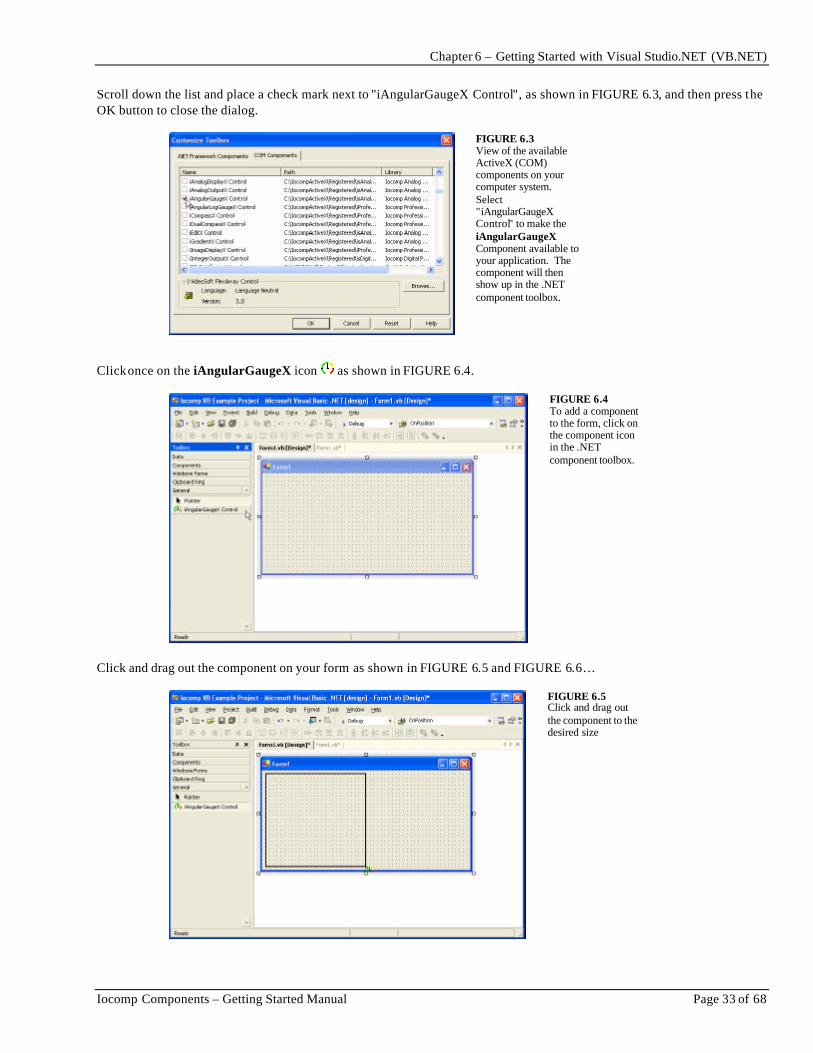
Scroll down the list and place a check mark next to "iAngularGaugeX Control", as shown in FIGURE 6.3, and then press the OK button to close the dialog.
FIGURE 6.3 View of the available ActiveX (COM) components on your computer system. Select "iAngularGaugeX Control" to make the iAngularGaugeX Component available to your application. The component will then show up in the .NET component toolbox.
Click once on the iAngularGaugeX icon as shown in FIGURE 6.4.
FIGURE 6.4 To add a component to the form, click on the component icon in the .NET component toolbox.
Click and drag out the component on your form as shown in FIGURE 6.5 and FIGURE 6.6…
FIGURE 6.5 Click and drag out the component to the desired size

Chapter 6 – Getting Started with Visual Studio.NET (VB.NET)
Page 34 of 68 Iocomp Components – Getting Started Manual
FIGURE 6.6 View of an iAngularGaugeX1 component on a .NET form. The component is named "AxiAngularGaugeX1" as show in the .NET property editor.
Right-click on the component and select "Properties" as shown in FIGURE 6.7.
FIGURE 6.7 To open the iAngularGaugeX Component’s Custom Property Editor, right-click on the component and select "Properties".
Select the "Theme" tab as shown in FIGURE 6.8. Select the "Speedometer MPH" theme from the "Overall Scheme" combo-box and press the "Accept Preview" button. Click the Apply button to see the changes on the form.
FIGURE 6.8 View of the Theme Property Editor Tab.
Chapter 6 – Getting Started with Visual Studio.NET (VB.NET)
Iocomp Components – Getting Started Manual Page 35 of 68
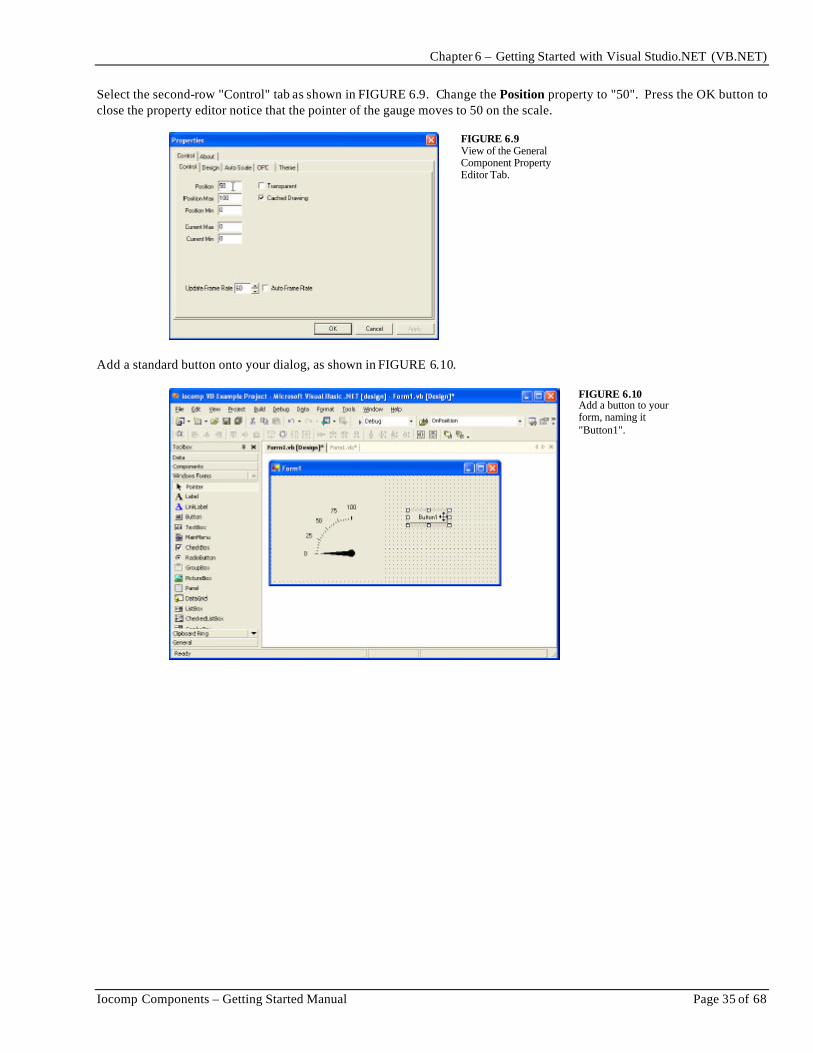
Select the second-row "Control" tab as shown in FIGURE 6.9. Change the Position property to "50". Press the OK button to close the property editor notice that the pointer of the gauge moves to 50 on the scale.
FIGURE 6.9 View of the General Component Property Editor Tab.
Add a standard button onto your dialog, as shown in FIGURE 6.10.
FIGURE 6.10 Add a button to your form, naming it "Button1".

Chapter 6 – Getting Started with Visual Studio.NET (VB.NET)
Page 36 of 68 Iocomp Components – Getting Started Manual
Double-click the button on the form to bring up the OnClick event handler for the button. Enter " Dim r As New Random" on a line and press ENTER. On a new line, type the name of the component "AxiAngularGaugeX1" and then type a ".". A list of valid properties and methods will appear, as shown in FIGURE 6.11…
FIGURE 6.11 To bring up an Intellisense listing of properties and methods for a component, press CTRL -SPACEBAR.
Select the Position property and complete the line as follows… VB.NET Example Button1_Click code as shown in FIGURE 6.11 Private Sub Button1_Click(ByVal sender As System.Object, ByVal e As System.EventArgs) Handles Button1.Click Dim r As New Random AxiAngularGaugeX1.Position = r.NextDouble * 100 End Sub Select AxiAngularGaugeX1 from the left-hand combo box just below the “Form1.vb” tab. Select the "OnPositionChange" event from the combo-box on the right, as shown in FIGURE 6.12, to generate the event handler…
FIGURE 6.12 View of the VB.NET code window and the list of iAngularGaugeX events.

Chapter 6 – Getting Started with Visual Studio.NET (VB.NET)
Iocomp Components – Getting Started Manual Page 37 of 68
Enter the code as shown in FIGURE 6.13 … VB.NET Example OnPositionChange code as shown in FIGURE 6.13 Private Sub AxiAngularGaugeX1_OnPositionChange(ByVal sender As Object, ByVal e As System.EventArgs) Handles AxiAngularGaugeX1.OnPositionChange Text = AxiAngularGaugeX1.Position.ToString End Sub
FIGURE 6.13 View of the VB.NET code window and the iAngularGaugeX OnPositionChange event. This event fires every time the Position property of gauge changes.
Press the F5 button to execute the program as shown in FIGURE 6.14. When the button is clicked, the Position property of the iAngularGaugeX component is set to a random value between 0 and 100. When the Position property is changed, the OnPositionChange event fires and sets the caption of the form to the Position property of the iAngularGaugeX component.
FIGURE 6.14 View of the running program.
Accessing Help Visual Studio.NET does not support the older WinHelp or HTML Help files that were supported by Visual Studio 6 for ActiveX components. You can manually open our ActiveX help files from the “Start/All Programs/Iocomp/Help Files” as shown in FIGURE 6.15…
FIGURE 6.15 Iocomp Start Menu Items and Shortcuts.
Chapter 7 – Getting Started with Visual Studio.NET (C#.NET)
Page 38 of 68 Iocomp Components – Getting Started Manual
Chapter 7 – Getting Started with Visual Studio.NET (C#.NET)
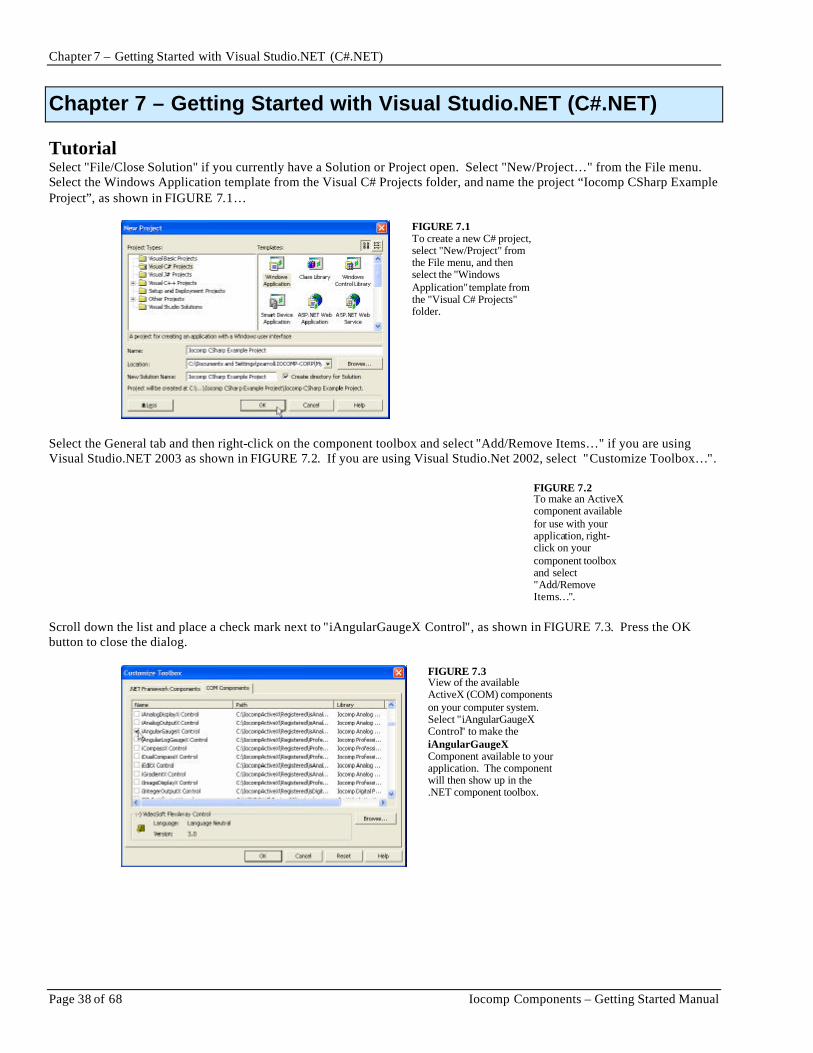
Tutorial Select "File/Close Solution" if you currently have a Solution or Project open. Select "New/Project…" from the File menu. Select the Windows Application template from the Visual C# Projects folder, and name the project “Iocomp CSharp Example Project”, as shown in FIGURE 7.1…
FIGURE 7.1 To create a new C# project, select "New/Project" from the File menu, and then select the "Windows Application" template from the "Visual C# Projects" folder.
Select the General tab and then right-click on the component toolbox and select "Add/Remove Items…" if you are using Visual Studio.NET 2003 as shown in FIGURE 7.2. If you are using Visual Studio.Net 2002, select "Customize Toolbox…".
FIGURE 7.2 To make an ActiveX component available for use with your application, right-click on your component toolbox and select "Add/Remove Items…".
Scroll down the list and place a check mark next to "iAngularGaugeX Control", as shown in FIGURE 7.3. Press the OK button to close the dialog.
FIGURE 7.3 View of the available ActiveX (COM) components on your computer system. Select "iAngularGaugeX Control" to make the iAngularGaugeX Component available to your application. The component will then show up in the .NET component toolbox.

Chapter 7 – Getting Started with Visual Studio.NET (C#.NET)
Iocomp Components – Getting Started Manual Page 39 of 68
Click once on the iAngularGaugeX icon as shown in FIGURE 7.4.
FIGURE 7.4 To add a component to the form, click on the component icon in the .NET component toolbox.
Click and drag out the component on your form as shown in FIGURE 7.5 and FIGURE 7.6…
FIGURE 7.5 Click and drag out the component to the desired size.
FIGURE 7.6 View of an iAngularGaugeX1 component on a .NET form. The component is named "AxiAngularGaugeX1" as show in the .NET property editor.

Chapter 7 – Getting Started with Visual Studio.NET (C#.NET)
Page 40 of 68 Iocomp Components – Getting Started Manual
Right-click on the component and select "Properties" as shown in FIGURE 7.7.
FIGURE 7.7 To open the iAngularGaugeX Component’s Custom Property Editor, right-click on the component and select "Properties".
Open the "Theme" tab as shown in FIGURE 7.8. Select the "Speedometer MPH" theme from the "Overall Scheme" combo-box and press "Accept Preview" button. Click the Apply button to apply the new settings to the component on the form.
FIGURE 7.8 View of the Theme Property Editor Tab.
Select the second-row "Control" tab as shown in FIGURE 7.9. Change the Position property to "50". Press the OK button. Notice that the pointer of the gauge moves to 50 on the scale.
FIGURE 7.9 View of the General Component Property Editor Tab.
Chapter 7 – Getting Started with Visual Studio.NET (C#.NET)
Iocomp Components – Getting Started Manual Page 41 of 68
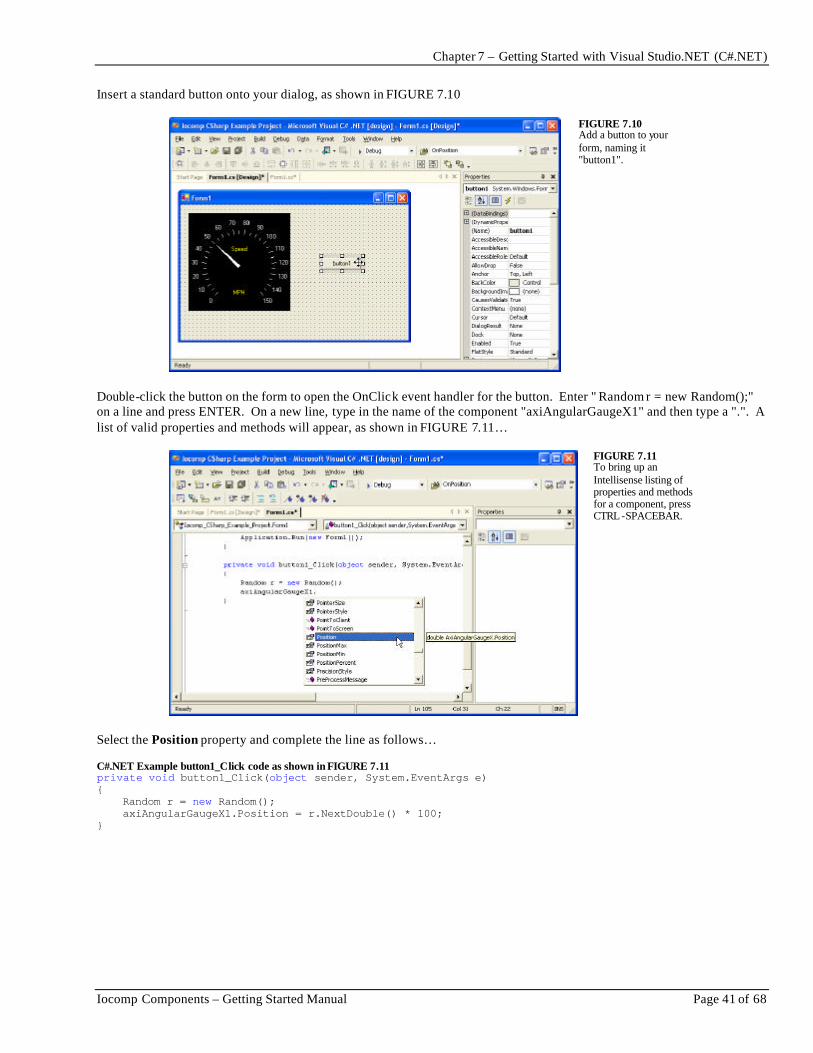
Insert a standard button onto your dialog, as shown in FIGURE 7.10
FIGURE 7.10 Add a button to your form, naming it "button1".
Double-click the button on the form to open the OnClick event handler for the button. Enter " Random r = new Random();" on a line and press ENTER. On a new line, type in the name of the component "axiAngularGaugeX1" and then type a ".". A list of valid properties and methods will appear, as shown in FIGURE 7.11…
FIGURE 7.11 To bring up an Intellisense listing of properties and methods for a component, press CTRL -SPACEBAR.
Select the Position property and complete the line as follows… C#.NET Example button1_Click code as shown in FIGURE 7.11 private void button1_Click(object sender, System.EventArgs e) { Random r = new Random(); axiAngularGaugeX1.Position = r.NextDouble() * 100; }

Chapter 7 – Getting Started with Visual Studio.NET (C#.NET)
Page 42 of 68 Iocomp Components – Getting Started Manual
To create an event handler for the iAngularGaugeX Component, select the “Form1.cs [Design]” tab, and click on the button in the Properties window, as shown in FIGURE 7.12. Double-click in the combo box next to the OnPositionChange event and the .NET IDE will automatically create the event handler for you.
FIGURE 7.12 View of the C#.NET code window and the iAngularGaugeX OnPositionChange event. This event fires every time the Position property of gauge changes.
Enter the code as shown in FIGURE 7.13… C#.NET Example OnPositionChange code as shown in FIGURE 7.13 private void axiAngularGaugeX1_OnPositionChange(object sender, System.EventArgs e) { this.Text = axiAngularGaugeX1.Position.ToString(); }
FIGURE 7.13 View of the C#.NET code window and the iAngularGaugeX OnPositionChange event. This event fires every time the Position property of gauge changes.

Chapter 7 – Getting Started with Visual Studio.NET (C#.NET)
Iocomp Components – Getting Started Manual Page 43 of 68
Press the F5 button to execute the program as shown in FIGURE 7.14. When the button is clicked, the Position property of the iAngularGaugeX component is set to a random value between 0 and 100. When the Position property is changed, the OnPositionChange event fires. That event then sets the caption of the form to the Position property of the iAngularGaugeX component.
FIGURE 7.14 View of the running program.
Accessing Help Visual Studio.NET does not support the older WinHelp or HTML Help files that were supported by Visual Studio 6 for ActiveX components. You can manually open our ActiveX help files from the “Start/All Programs/Iocomp/Help Files” as shown in FIGURE 7.15…
FIGURE 7.15 Iocomp Start Menu Items and Shortcuts.

Chapter 8 – Getting Started with Delphi (Windows/Linux)
Page 44 of 68 Iocomp Components – Getting Started Manual
Chapter 8 – Getting Started with Delphi (Windows/Linux)
Tutorial First close any project that you may have open. Select the New/Application menu as shown in FIGURE 8.1.
FIGURE 8.1 To create a new project, Select "New/Application" from the File Menu.
Scroll through the tabs in the component palette and look for "Iocomp Std". Click once on the iAngularGauge icon as shown in FIGURE 8.2.
FIGURE 8.2 Example of the Iocomp Std tab showing the iAngularGauge component.

Chapter 8 – Getting Started with Delphi (Windows/Linux)
Iocomp Components – Getting Started Manual Page 45 of 68
Click and drag out the component on your form as Shown in FIGURE 8.3 and FIGURE 8.4 or double-click the component.
FIGURE 8.3 Click and drag out the component to the desired size.
FIGURE 8.4 View of a iAngularGauge component on a Delphi Form.

Chapter 8 – Getting Started with Delphi (Windows/Linux)
Page 46 of 68 Iocomp Components – Getting Started Manual
If you are using the evaluation version of our components, you will need to configure your project to use "Packages". If you are using the Full Version of our product, skip ahead to the next section referring to FIGURE 8.6. To configure your project to use packages , open your "Project/Options…" menu, select the "Packages" tab, and then make sure the "Build with runtime packages" checkbox is checked. Also, ensure that our package is listed in the edit box below the "Build with runtime packages" checkbox as shown in FIGURE 8.5. If not, please add the appropriate package for your compiler language and version as shown in Table 8.1 and Table 8.2…
Windows Linux Compiler/IDE Package Name Compiler/IDE Package Name Delphi 4 iocomp40 Kylix 1 iocomp10clx Delphi 5 iocomp50 Kylix 2 iocomp20clx Delphi 6 VCL iocomp60 Kylix 3 Delphi Edition iocomp30clx Delphi 6 CLX iocomp60clx Delphi 7 VCL iocomp70
Delphi 7 CLX iocomp70clx Table 8.1 Table 8.2
FIGURE 8.5 View of the Delphi 7 Project’s Package options tab. Check the “Build with runtime packages” option and be sure the appropriate Iocomp package is in the edit box below..
Right-click on the component and select "Edit…" as shown in FIGURE 8.6 or double-click on the component to bring up the component’s custom property editor.
FIGURE 8.6 To open the iAngularGauge Component’s Custom Property Editor, right-click on the component and select "Edit…".
Chapter 8 – Getting Started with Delphi (Windows/Linux)
Iocomp Components – Getting Started Manual Page 47 of 68
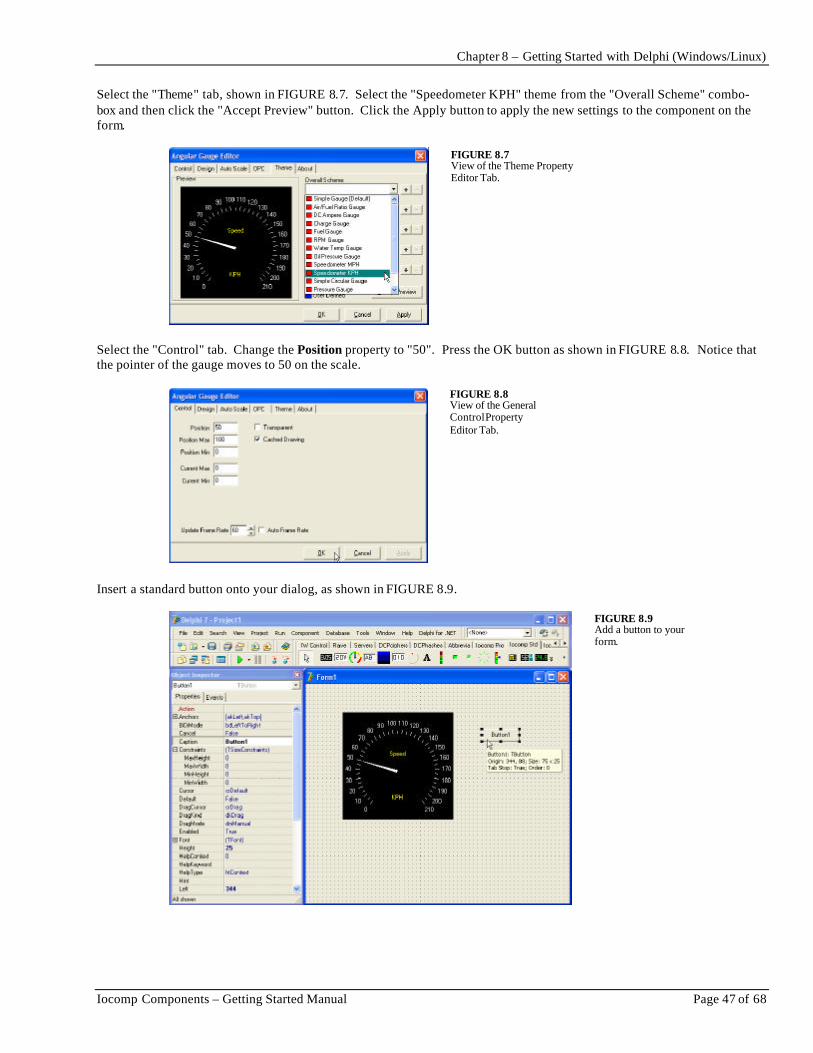
Select the "Theme" tab, shown in FIGURE 8.7. Select the "Speedometer KPH" theme from the "Overall Scheme" combo-box and then click the "Accept Preview" button. Click the Apply button to apply the new settings to the component on the form.
FIGURE 8.7 View of the Theme Property Editor Tab.
Select the "Control" tab. Change the Position property to "50". Press the OK button as shown in FIGURE 8.8. Notice that the pointer of the gauge moves to 50 on the scale.
FIGURE 8.8 View of the General Control Property Editor Tab.
Insert a standard button onto your dialog, as shown in FIGURE 8.9.
FIGURE 8.9 Add a button to your form.

Chapter 8 – Getting Started with Delphi (Windows/Linux)
Page 48 of 68 Iocomp Components – Getting Started Manual
Double-click the button on the form to generate the OnClick event handler for the button. Type in the name of the component "iAngularGauge1" and then type a ".". A list of valid properties, methods, and events will appear, as shown in FIGURE 8.10…
FIGURE 8.10 To bring up a listing of properties and methods for a component, press CTRL -SPACEBAR.
Select the Position property and complete the line as follows… Example Button1Click code as shown in FIGURE 8.10 procedure TForm1.Button1Click(Sender: TObject); begin iAngularGauge1.Position := Random(100000)/1000; end; Open the Object Inspector window, select the iAngularGauge component from the combo box, and click on the "Events" tab. Find the OnPositionChange event and double-click in the blank combo box area to the right to generate the event handler, as shown in FIGURE 8.11.
FIGURE 8.11 To create an event handler, double-click in the blank combo-box area next to the event.
Chapter 8 – Getting Started with Delphi (Windows/Linux)
Iocomp Components – Getting Started Manual Page 49 of 68
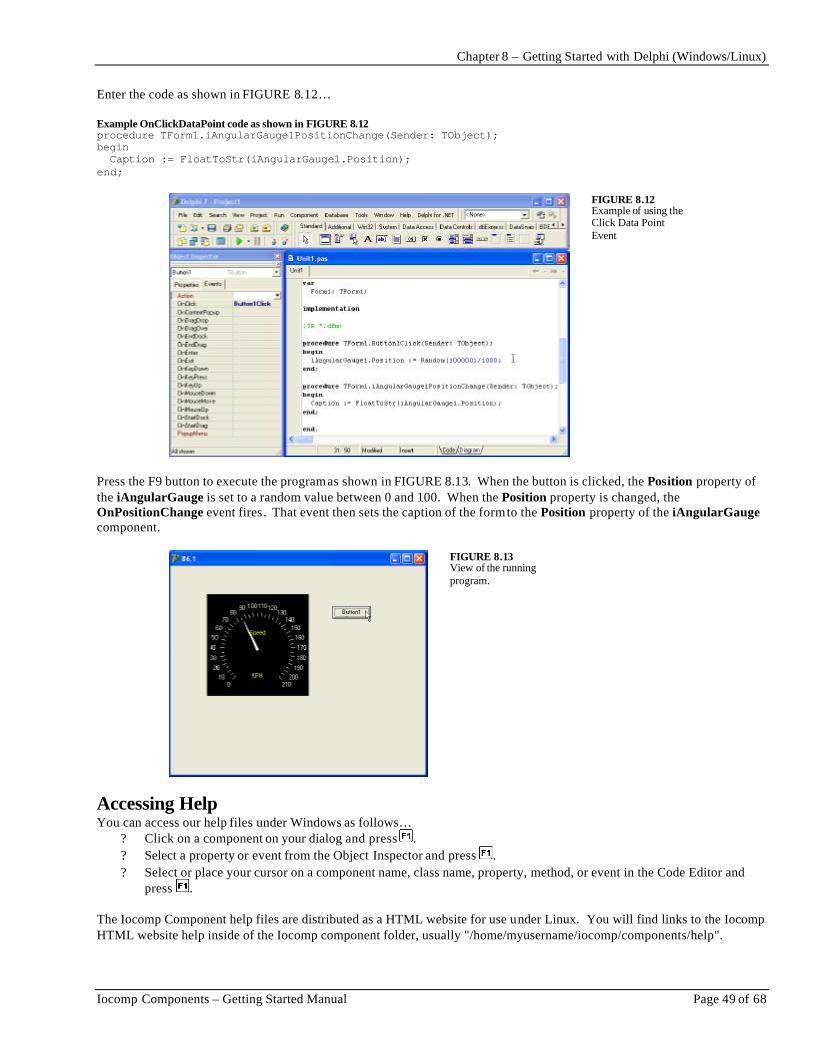
Enter the code as shown in FIGURE 8.12… Example OnClickDataPoint code as shown in FIGURE 8.12 procedure TForm1.iAngularGauge1PositionChange(Sender: TObject); begin Caption := FloatToStr(iAngularGauge1.Position); end;
FIGURE 8.12 Example of using the Click Data Point Event
Press the F9 button to execute the program as shown in FIGURE 8.13. When the button is clicked, the Position property of the iAngularGauge is set to a random value between 0 and 100. When the Position property is changed, the OnPositionChange event fires. That event then sets the caption of the form to the Position property of the iAngularGauge component.
FIGURE 8.13 View of the running program.
Accessing Help You can access our help files under Windows as follows…
? Click on a component on your dialog and press . ? Select a property or event from the Object Inspector and press . ? Select or place your cursor on a component name, class name, property, method, or event in the Code Editor and
press . The Iocomp Component help files are distributed as a HTML website for use under Linux. You will find links to the Iocomp HTML website help inside of the Iocomp component folder, usually "/home/myusername/iocomp/components/help".
Chapter 9 – Getting Started with C++ Builder (Windows/Linux)
Page 50 of 68 Iocomp Components – Getting Started Manual
Chapter 9 – Getting Started with C++ Builder (Windows/Linux)
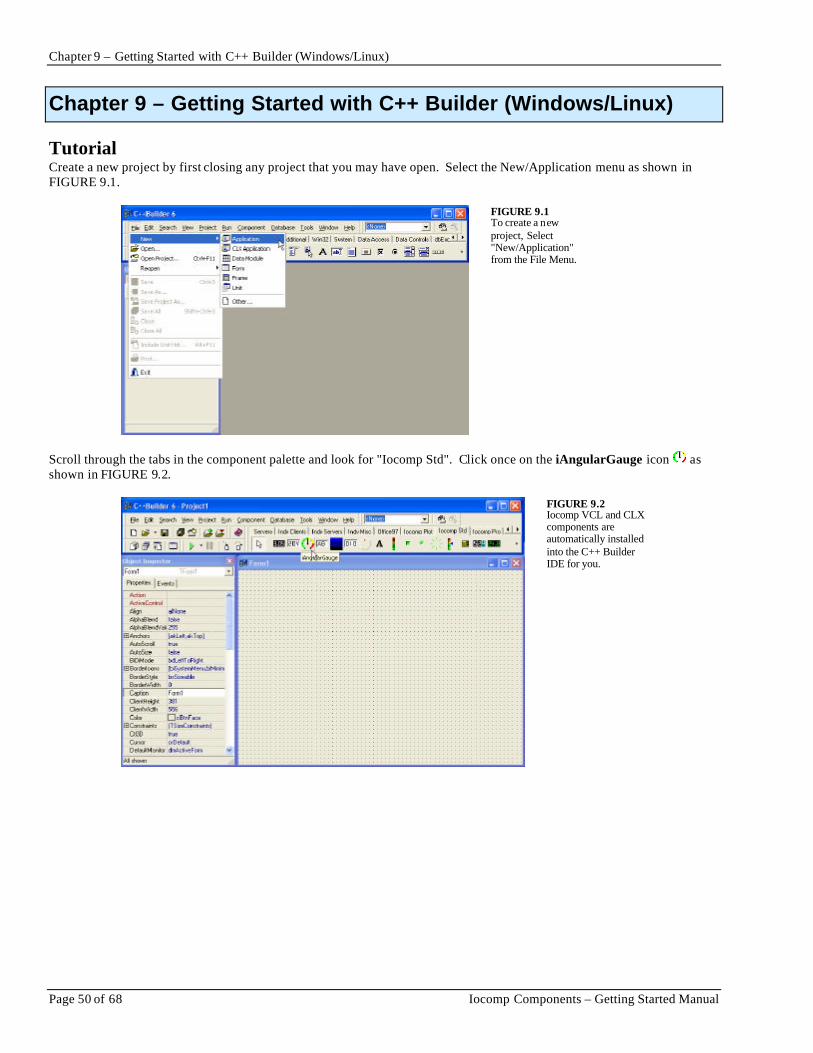
Tutorial Create a new project by first closing any project that you may have open. Select the New/Application menu as shown in FIGURE 9.1.
FIGURE 9.1 To create a new project, Select "New/Application" from the File Menu.
Scroll through the tabs in the component palette and look for "Iocomp Std". Click once on the iAngularGauge icon as shown in FIGURE 9.2.
FIGURE 9.2 Iocomp VCL and CLX components are automatically installed into the C++ Builder IDE for you.

Chapter 9 – Getting Started with C++ Builder (Windows/Linux)
Iocomp Components – Getting Started Manual Page 51 of 68
Click and drag out the component on your form to the size you desire as shown in FIGURE 9.3 and FIGURE 9.4.
FIGURE 9.3 Click and drag out the component to the desired size.
FIGURE 9.4 View of a iAngularGauge component on a C++ Builder Form.
Chapter 9 – Getting Started with C++ Builder (Windows/Linux)
Page 52 of 68 Iocomp Components – Getting Started Manual
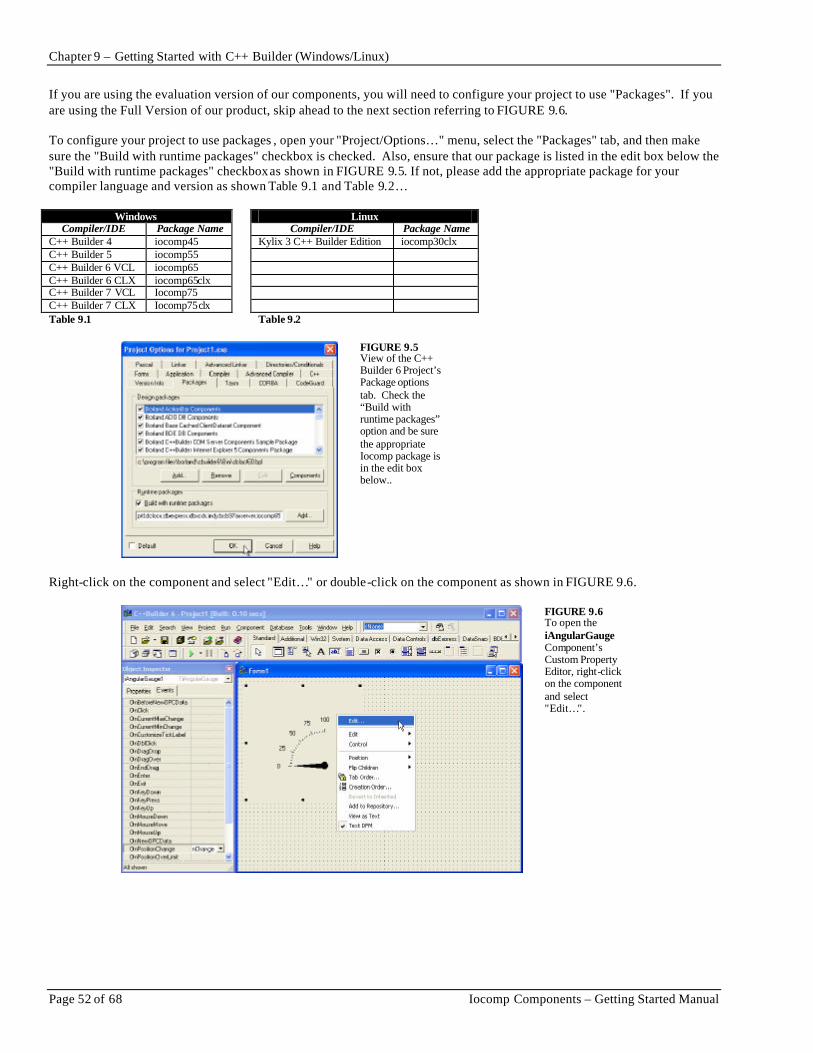
If you are using the evaluation version of our components, you will need to configure your project to use "Packages". If you are using the Full Version of our product, skip ahead to the next section referring to FIGURE 9.6. To configure your project to use packages , open your "Project/Options…" menu, select the "Packages" tab, and then make sure the "Build with runtime packages" checkbox is checked. Also, ensure that our package is listed in the edit box below the "Build with runtime packages" checkbox as shown in FIGURE 9.5. If not, please add the appropriate package for your compiler language and version as shown Table 9.1 and Table 9.2…
Windows Linux Compiler/IDE Package Name Compiler/IDE Package Name
C++ Builder 4 iocomp45 Kylix 3 C++ Builder Edition iocomp30clx C++ Builder 5 iocomp55 C++ Builder 6 VCL iocomp65 C++ Builder 6 CLX iocomp65clx C++ Builder 7 VCL Iocomp75 C++ Builder 7 CLX Iocomp75clx Table 9.1 Table 9.2
FIGURE 9.5 View of the C++ Builder 6 Project’s Package options tab. Check the “Build with runtime packages” option and be sure the appropriate Iocomp package is in the edit box below..
Right-click on the component and select "Edit…" or double-click on the component as shown in FIGURE 9.6.
FIGURE 9.6 To open the iAngularGauge Component’s Custom Property Editor, right-click on the component and select "Edit…".
Chapter 9 – Getting Started with C++ Builder (Windows/Linux)
Iocomp Components – Getting Started Manual Page 53 of 68
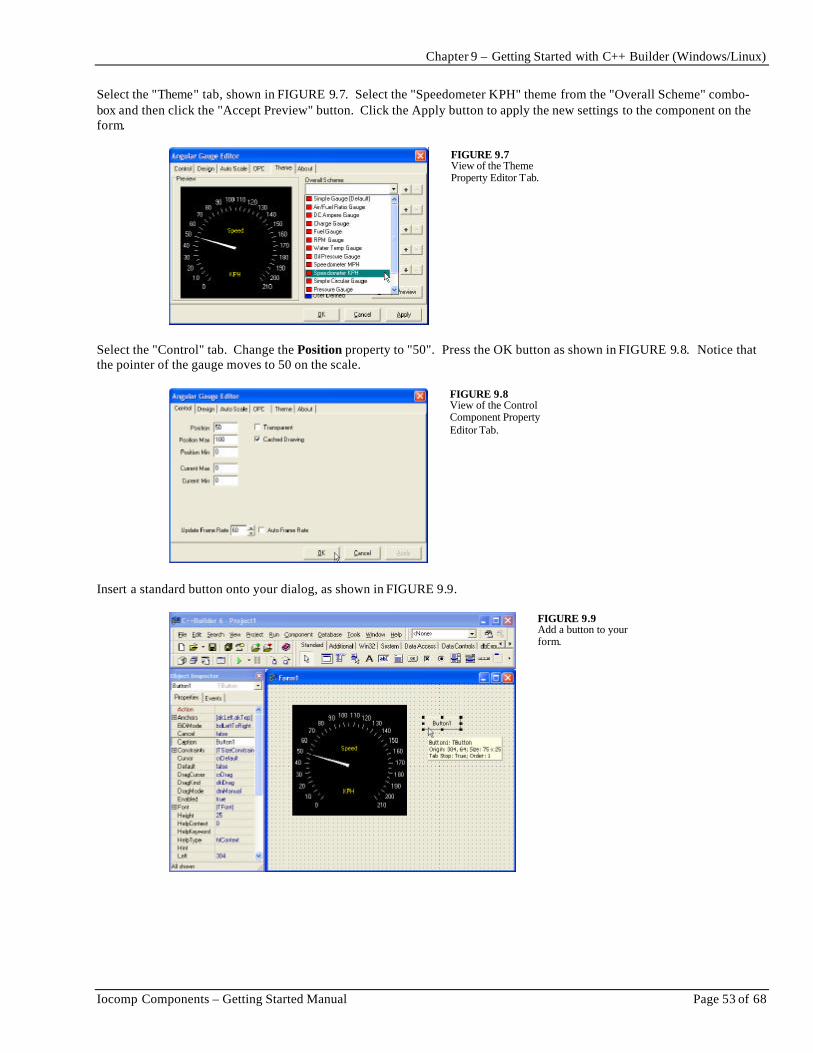
Select the "Theme" tab, shown in FIGURE 9.7. Select the "Speedometer KPH" theme from the "Overall Scheme" combo-box and then click the "Accept Preview" button. Click the Apply button to apply the new settings to the component on the form.
FIGURE 9.7 View of the Theme Property Editor Tab.
Select the "Control" tab. Change the Position property to "50". Press the OK button as shown in FIGURE 9.8. Notice that the pointer of the gauge moves to 50 on the scale.
FIGURE 9.8 View of the Control Component Property Editor Tab.
Insert a standard button onto your dialog, as shown in FIGURE 9.9.
FIGURE 9.9 Add a button to your form.
Chapter 9 – Getting Started with C++ Builder (Windows/Linux)
Page 54 of 68 Iocomp Components – Getting Started Manual
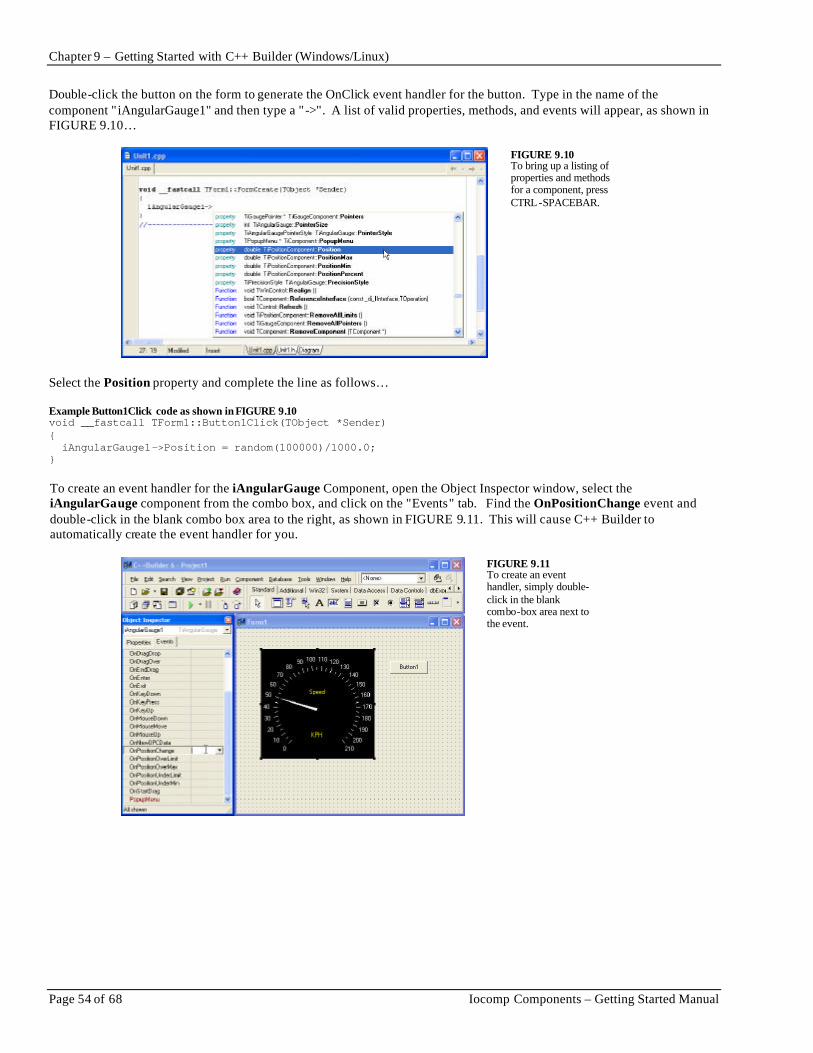
Double-click the button on the form to generate the OnClick event handler for the button. Type in the name of the component "iAngularGauge1" and then type a "->". A list of valid properties, methods, and events will appear, as shown in FIGURE 9.10…
FIGURE 9.10 To bring up a listing of properties and methods for a component, press CTRL -SPACEBAR.
Select the Position property and complete the line as follows… Example Button1Click code as shown in FIGURE 9.10 void __fastcall TForm1::Button1Click(TObject *Sender) { iAngularGauge1->Position = random(100000)/1000.0; } To create an event handler for the iAngularGauge Component, open the Object Inspector window, select the iAngularGauge component from the combo box, and click on the "Events" tab. Find the OnPositionChange event and double-click in the blank combo box area to the right, as shown in FIGURE 9.11. This will cause C++ Builder to automatically create the event handler for you.
FIGURE 9.11 To create an event handler, simply double-click in the blank combo-box area next to the event.

Chapter 9 – Getting Started with C++ Builder (Windows/Linux)
Iocomp Components – Getting Started Manual Page 55 of 68
Enter the code as shown in FIGURE 9.12… Example OnClickDataPoint code as shown in FIGURE 9.12 void __fastcall TForm1::iAngularGauge1PositionChange(TObject *Sender) { Caption = FloatToStr(iAngularGauge1->Position); }
FIGURE 9.12 View of the C++ Builder code window with the OnPositionChange event handler.
Press F9 to execute the program as shown in FIGURE 9.13. When the button is clicked, the Position property of the iAngularGauge is set to a random value between 0 and 100. When the Position property is changed, the OnPositionChange event fires. That event then sets the caption of the form to the Position property of the iAngularGauge.
FIGURE 9.13 View of the running program.
Accessing Help You can access our help files under Windows as follows…
? Click on a component on your dialog and press . ? Select a property or event from the Object Inspector and press . ? Select or place your cursor on a component name, class name, property, method, or event in the Code Editor and
press . The Iocomp Component help files are distributed as a HTML website for use under Linux. You will find links to the Iocomp HTML website help inside of the Iocomp component folder, usually "/home/myusername/iocomp/components/help".
Chapter 10 – Obtaining Additional Assistance
Page 56 of 68 Iocomp Components – Getting Started Manual
Chapter 10 – Obtaining Additional Assistance
Source Code Examples May example programs, including source code for many popular development environments, are available for download from our website and on select CDs. Just open your browser and navigate to…
http://www.iocomp.com/examples FAQ You may find the answer to your question in our listing of Frequently Asked Questions (or FAQ) listed on our website. This section contains questions and answers to questions that we frequently receive through our technical support email and telephone conversations with customers. Open your web browser and navigate to…
http://www.iocomp.com/faq Other Internet Support You can always find listings of our current support options on our website at…
http://www.iocomp.com/support
Product Updates Bug fixes and feature enhancements are always free to registered customers. You can always find a listing of our current downloads available, including special libraries here…
http://www.iocomp.com/download Email Support Drop us an email with a question, concern, or suggestion anytime. You may also include attachments with code samples if you need assistance with our controls. Send all support emails, bug reports, feature requests to…
[email protected] Telephone Please feel free to give us a telephone call if you have any questions, need any assistance, or need technical support with our component products.
888-599-2929 9am-6pm EST USA & Canada Toll Free +1-407-226-3456 9am-6pm EST (GMT -5) International +1-407-226-3454 International & Domestic Fax
Appendix A – ActiveX Component Libraries
Iocomp Components – Getting Started Manual Page 57 of 68
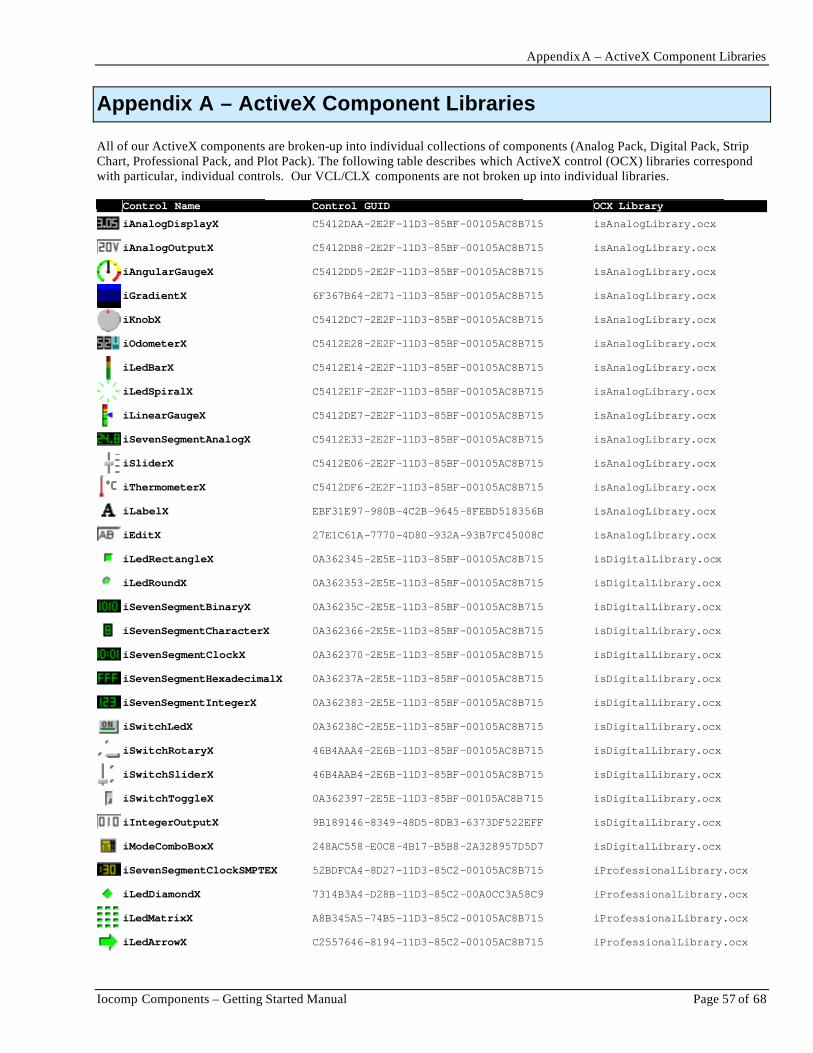
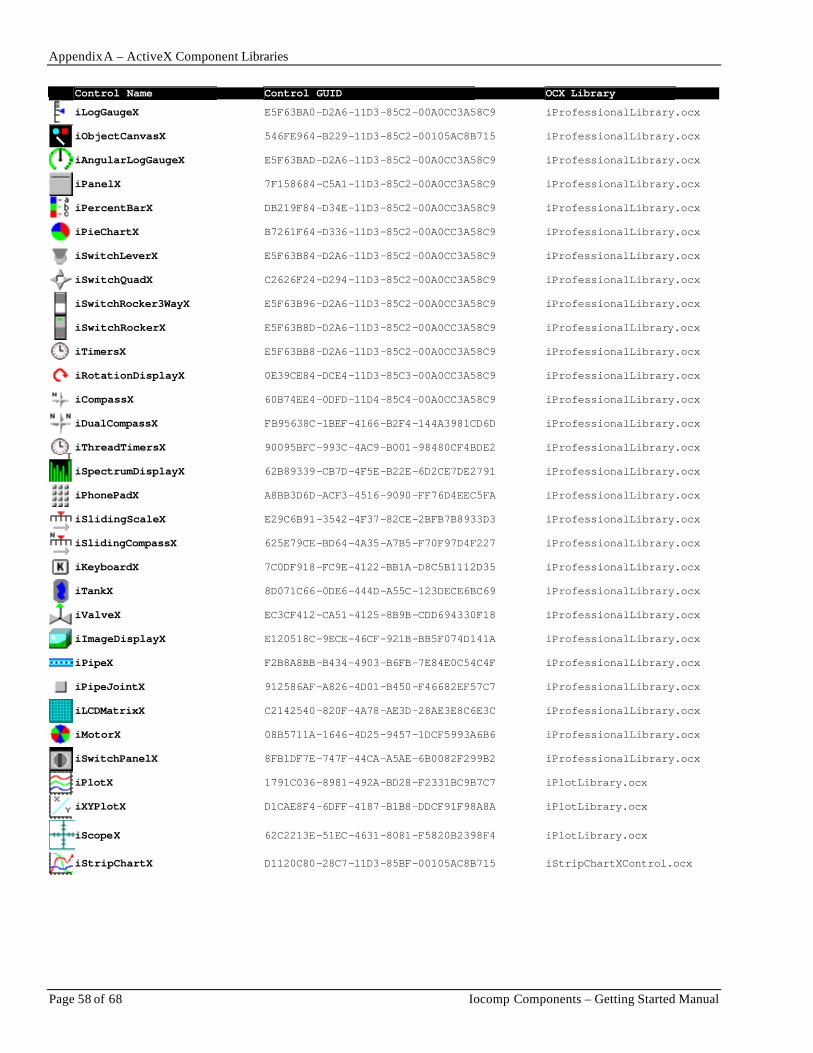
Appendix A – ActiveX Component Libraries All of our ActiveX components are broken-up into individual collections of components (Analog Pack, Digital Pack, Strip Chart, Professional Pack, and Plot Pack). The following table describes which ActiveX control (OCX) libraries correspond with particular, individual controls. Our VCL/CLX components are not broken up into individual libraries. Control Name Control GUID OCX Library
iAnalogDisplayX C5412DAA-2E2F-11D3-85BF-00105AC8B715 isAnalogLibrary.ocx
iAnalogOutputX C5412DB8-2E2F-11D3-85BF-00105AC8B715 isAnalogLibrary.ocx
iAngularGaugeX C5412DD5-2E2F-11D3-85BF-00105AC8B715 isAnalogLibrary.ocx
iGradientX 6F367B64-2E71-11D3-85BF-00105AC8B715 isAnalogLibrary.ocx
iKnobX C5412DC7-2E2F-11D3-85BF-00105AC8B715 isAnalogLibrary.ocx
iOdometerX C5412E28-2E2F-11D3-85BF-00105AC8B715 isAnalogLibrary.ocx
iLedBarX C5412E14-2E2F-11D3-85BF-00105AC8B715 isAnalogLibrary.ocx
iLedSpiralX C5412E1F-2E2F-11D3-85BF-00105AC8B715 isAnalogLibrary.ocx
iLinearGaugeX C5412DE7-2E2F-11D3-85BF-00105AC8B715 isAnalogLibrary.ocx
iSevenSegmentAnalogX C5412E33-2E2F-11D3-85BF-00105AC8B715 isAnalogLibrary.ocx
iSliderX C5412E06-2E2F-11D3-85BF-00105AC8B715 isAnalogLibrary.ocx
iThermometerX C5412DF6-2E2F-11D3-85BF-00105AC8B715 isAnalogLibrary.ocx
iLabelX EBF31E97-980B-4C2B-9645-8FEBD518356B isAnalogLibrary.ocx
iEditX 27E1C61A-7770-4D80-932A-93B7FC45008C isAnalogLibrary.ocx
iLedRectangleX 0A362345-2E5E-11D3-85BF-00105AC8B715 isDigitalLibrary.ocx
iLedRoundX 0A362353-2E5E-11D3-85BF-00105AC8B715 isDigitalLibrary.ocx
iSevenSegmentBinaryX 0A36235C-2E5E-11D3-85BF-00105AC8B715 isDigitalLibrary.ocx
iSevenSegmentCharacterX 0A362366-2E5E-11D3-85BF-00105AC8B715 isDigitalLibrary.ocx
iSevenSegmentClockX 0A362370-2E5E-11D3-85BF-00105AC8B715 isDigitalLibrary.ocx
iSevenSegmentHexadecimalX 0A36237A-2E5E-11D3-85BF-00105AC8B715 isDigitalLibrary.ocx
iSevenSegmentIntegerX 0A362383-2E5E-11D3-85BF-00105AC8B715 isDigitalLibrary.ocx
iSwitchLedX 0A36238C-2E5E-11D3-85BF-00105AC8B715 isDigitalLibrary.ocx
iSwitchRotaryX 46B4AAA4-2E6B-11D3-85BF-00105AC8B715 isDigitalLibrary.ocx
iSwitchSliderX 46B4AAB4-2E6B-11D3-85BF-00105AC8B715 isDigitalLibrary.ocx
iSwitchToggleX 0A362397-2E5E-11D3-85BF-00105AC8B715 isDigitalLibrary.ocx
iIntegerOutputX 9B189146-8349-48D5-8DB3-6373DF522EFF isDigitalLibrary.ocx
iModeComboBoxX 248AC558-E0C8-4B17-B5B8-2A328957D5D7 isDigitalLibrary.ocx
iSevenSegmentClockSMPTEX 52BDFCA4-8D27-11D3-85C2-00105AC8B715 iProfessionalLibrary.ocx
iLedDiamondX 7314B3A4-D28B-11D3-85C2-00A0CC3A58C9 iProfessionalLibrary.ocx
iLedMatrixX A8B345A5-74B5-11D3-85C2-00105AC8B715 iProfessionalLibrary.ocx
iLedArrowX C2557646-8194-11D3-85C2-00105AC8B715 iProfessionalLibrary.ocx
Appendix A – ActiveX Component Libraries
Page 58 of 68 Iocomp Components – Getting Started Manual
Control Name Control GUID OCX Library
iLogGaugeX E5F63BA0-D2A6-11D3-85C2-00A0CC3A58C9 iProfessionalLibrary.ocx
iObjectCanvasX 546FE964-B229-11D3-85C2-00105AC8B715 iProfessionalLibrary.ocx
iAngularLogGaugeX E5F63BAD-D2A6-11D3-85C2-00A0CC3A58C9 iProfessionalLibrary.ocx
iPanelX 7F158684-C5A1-11D3-85C2-00A0CC3A58C9 iProfessionalLibrary.ocx
iPercentBarX DB219F84-D34E-11D3-85C2-00A0CC3A58C9 iProfessionalLibrary.ocx
iPieChartX B7261F64-D336-11D3-85C2-00A0CC3A58C9 iProfessionalLibrary.ocx
iSwitchLeverX E5F63B84-D2A6-11D3-85C2-00A0CC3A58C9 iProfessionalLibrary.ocx
iSwitchQuadX C2626F24-D294-11D3-85C2-00A0CC3A58C9 iProfessionalLibrary.ocx
iSwitchRocker3WayX E5F63B96-D2A6-11D3-85C2-00A0CC3A58C9 iProfessionalLibrary.ocx
iSwitchRockerX E5F63B8D-D2A6-11D3-85C2-00A0CC3A58C9 iProfessionalLibrary.ocx
iTimersX E5F63BB8-D2A6-11D3-85C2-00A0CC3A58C9 iProfessionalLibrary.ocx
iRotationDisplayX 0E39CE84-DCE4-11D3-85C3-00A0CC3A58C9 iProfessionalLibrary.ocx
iCompassX 60B74EE4-0DFD-11D4-85C4-00A0CC3A58C9 iProfessionalLibrary.ocx
iDualCompassX FB95638C-1BEF-4166-B2F4-144A3981CD6D iProfessionalLibrary.ocx
iThreadTimersX 90095BFC-993C-4AC9-B001-98480CF4BDE2 iProfessionalLibrary.ocx
iSpectrumDisplayX 62B89339-CB7D-4F5E-B22E-6D2CE7DE2791 iProfessionalLibrary.ocx
iPhonePadX A8BB3D6D-ACF3-4516-9090-FF76D4EEC5FA iProfessionalLibrary.ocx
iSlidingScaleX E29C6B91-3542-4F37-82CE-2BFB7B8933D3 iProfessionalLibrary.ocx
iSlidingCompassX 625E79CE-BD64-4A35-A7B5-F70F97D4F227 iProfessionalLibrary.ocx
iKeyboardX 7C0DF918-FC9E-4122-BB1A-D8C5B1112D35 iProfessionalLibrary.ocx
iTankX 8D071C66-0DE6-444D-A55C-123DECE6BC69 iProfessionalLibrary.ocx
iValveX EC3CF412-CA51-4125-8B9B-CDD694330F18 iProfessionalLibrary.ocx
iImageDisplayX E120518C-9ECE-46CF-921B-BB5F074D141A iProfessionalLibrary.ocx
iPipeX F2B8A8BB-B434-4903-B6FB-7E84E0C54C4F iProfessionalLibrary.ocx
iPipeJointX 912586AF-A826-4D01-B450-F46682EF57C7 iProfessionalLibrary.ocx
iLCDMatrixX C2142540-820F-4A78-AE3D-28AE3E8C6E3C iProfessionalLibrary.ocx
iMotorX 08B5711A-1646-4D25-9457-1DCF5993A6B6 iProfessionalLibrary.ocx
iSwitchPanelX 8FB1DF7E-747F-44CA-A5AE-6B0082F299B2 iProfessionalLibrary.ocx
iPlotX 1791C036-8981-492A-BD28-F2331BC9B7C7 iPlotLibrary.ocx
iXYPlotX D1CAE8F4-6DFF-4187-B1B8-DDCF91F98A8A iPlotLibrary.ocx
iScopeX 62C2213E-51EC-4631-8081-F5820B2398F4 iPlotLibrary.ocx
iStripChartX D1120C80-28C7-11D3-85BF-00105AC8B715 iStripChartXControl.ocx
Appendix B – Color Codes and Constants
Iocomp Components – Getting Started Manual Page 59 of 68
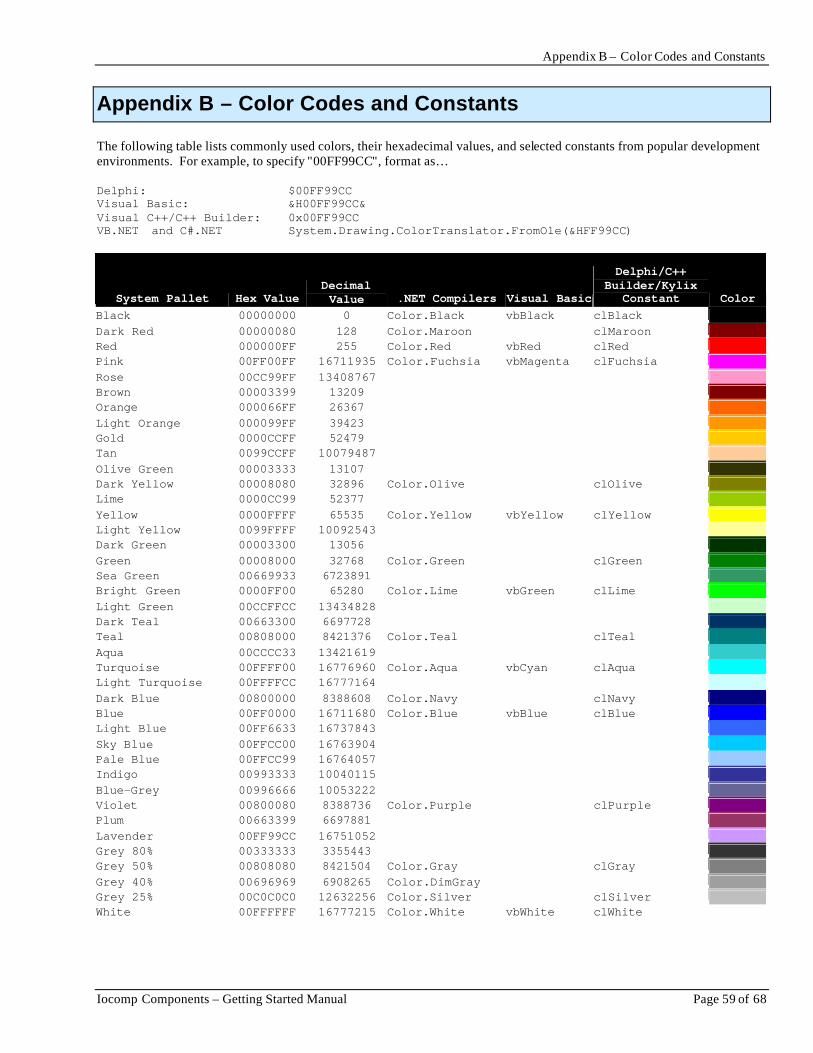
Appendix B – Color Codes and Constants The following table lists commonly used colors, their hexadecimal values, and selected constants from popular development environments. For example, to specify "00FF99CC", format as… Delphi: $00FF99CC Visual Basic: &H00FF99CC& Visual C++/C++ Builder: 0x00FF99CC VB.NET and C#.NET System.Drawing.ColorTranslator.FromOle(&HFF99CC)
System Pallet Hex Value Decimal Value .NET Compilers Visual Basic
Delphi/C++ Builder/Kylix
Constant Color Black 00000000 0 Color.Black vbBlack clBlack Dark Red 00000080 128 Color.Maroon clMaroon Red 000000FF 255 Color.Red vbRed clRed Pink 00FF00FF 16711935 Color.Fuchsia vbMagenta clFuchsia Rose 00CC99FF 13408767 Brown 00003399 13209 Orange 000066FF 26367 Light Orange 000099FF 39423 Gold 0000CCFF 52479 Tan 0099CCFF 10079487 Olive Green 00003333 13107 Dark Yellow 00008080 32896 Color.Olive clOlive Lime 0000CC99 52377 Yellow 0000FFFF 65535 Color.Yellow vbYellow clYellow Light Yellow 0099FFFF 10092543 Dark Green 00003300 13056 Green 00008000 32768 Color.Green clGreen Sea Green 00669933 6723891 Bright Green 0000FF00 65280 Color.Lime vbGreen clLime Light Green 00CCFFCC 13434828 Dark Teal 00663300 6697728 Teal 00808000 8421376 Color.Teal clTeal Aqua 00CCCC33 13421619 Turquoise 00FFFF00 16776960 Color.Aqua vbCyan clAqua Light Turquoise 00FFFFCC 16777164 Dark Blue 00800000 8388608 Color.Navy clNavy Blue 00FF0000 16711680 Color.Blue vbBlue clBlue Light Blue 00FF6633 16737843 Sky Blue 00FFCC00 16763904 Pale Blue 00FFCC99 16764057 Indigo 00993333 10040115 Blue-Grey 00996666 10053222 Violet 00800080 8388736 Color.Purple clPurple Plum 00663399 6697881 Lavender 00FF99CC 16751052 Grey 80% 00333333 3355443 Grey 50% 00808080 8421504 Color.Gray clGray Grey 40% 00696969 6908265 Color.DimGray Grey 25% 00C0C0C0 12632256 Color.Silver clSilver White 00FFFFFF 16777215 Color.White vbWhite clWhite

Appendix C – Visual C++ Fonts
Page 60 of 68 Iocomp Components – Getting Started Manual
Appendix C – Visual C++ Fonts
Fonts: Using the Disp (Late Binding, Slow-Speed, Member Variable) Interface All of our components that have font properties have two methods that make it easy to deal with fonts in our components when developing under Microsoft Visual C++. To set the Font's Color property, there is a special, single property to do this …
m_iAngularGaugeX1.SetFontColor(0x0000FFFF); //Yellow Font Color To set other Font Properties, do the following…
//Add this include statement to the top of your file #include "font.h";
…and then add the following in the body of your code where you want to make changes to the font property…
//Setup Local Variables in your code COleFont MyFont; CY FontSize; //Get a copy of the font from the component MyFont = m_iAngularGaugeX1.GetLabel1Font(); //Set the Font Size FontSize.int64 = 240000; //Point Size 24 (24 * 10000 = 240000) MyFont.SetSize(FontSize); //Set the Font Name MyFont.SetName("Times New Roman"); //Set Various Font Styles MyFont.SetBold(TRUE); MyFont.SetItalic(FALSE); MyFont.SetUnderline(FALSE); MyFont.SetStrikethrough(FALSE); //Set the font back on the component m_iAngularGaugeX1.SetLabel1Font(MyFont);
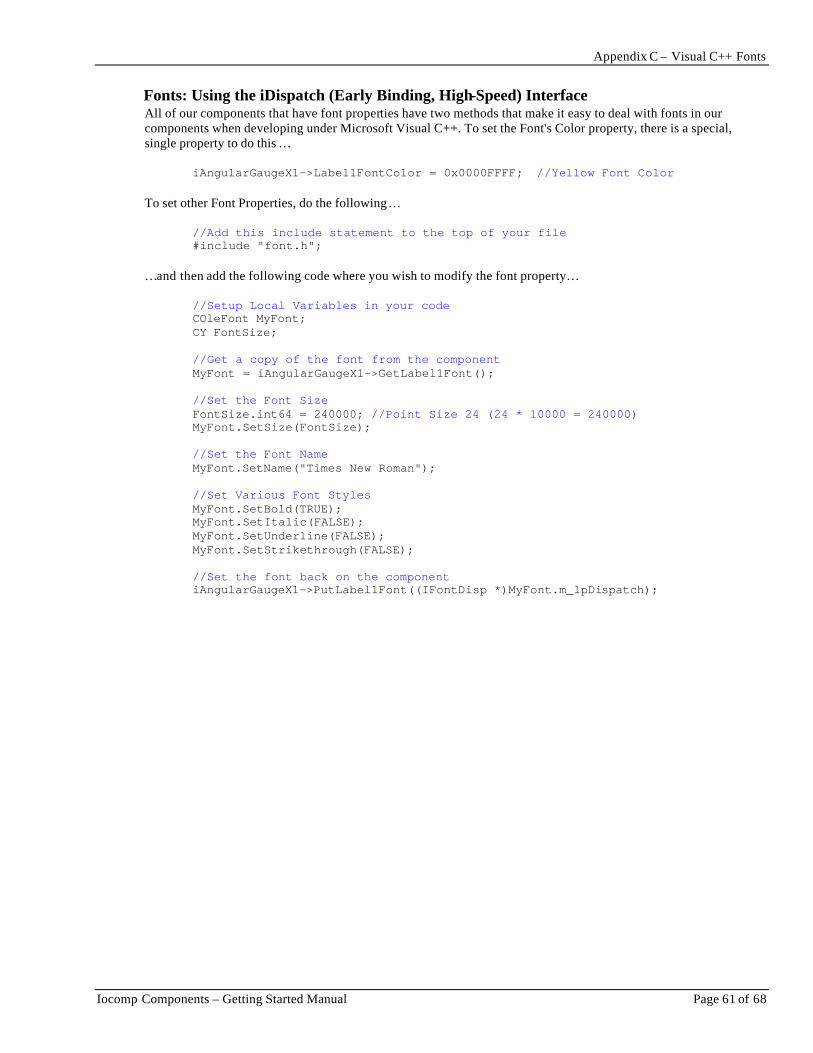
Appendix C – Visual C++ Fonts
Iocomp Components – Getting Started Manual Page 61 of 68
Fonts: Using the iDispatch (Early Binding, High-Speed) Interface All of our components that have font properties have two methods that make it easy to deal with fonts in our components when developing under Microsoft Visual C++. To set the Font's Color property, there is a special, single property to do this …
iAngularGaugeX1->Label1FontColor = 0x0000FFFF; //Yellow Font Color To set other Font Properties, do the following…
//Add this include statement to the top of your file #include "font.h";
…and then add the following code where you wish to modify the font property…
//Setup Local Variables in your code COleFont MyFont; CY FontSize; //Get a copy of the font from the component MyFont = iAngularGaugeX1->GetLabel1Font(); //Set the Font Size FontSize.int64 = 240000; //Point Size 24 (24 * 10000 = 240000) MyFont.SetSize(FontSize); //Set the Font Name MyFont.SetName("Times New Roman"); //Set Various Font Styles MyFont.SetBold(TRUE); MyFont.SetItalic(FALSE); MyFont.SetUnderline(FALSE); MyFont.SetStrikethrough(FALSE); //Set the font back on the component iAngularGaugeX1->PutLabel1Font((IFontDisp *)MyFont.m_lpDispatch);
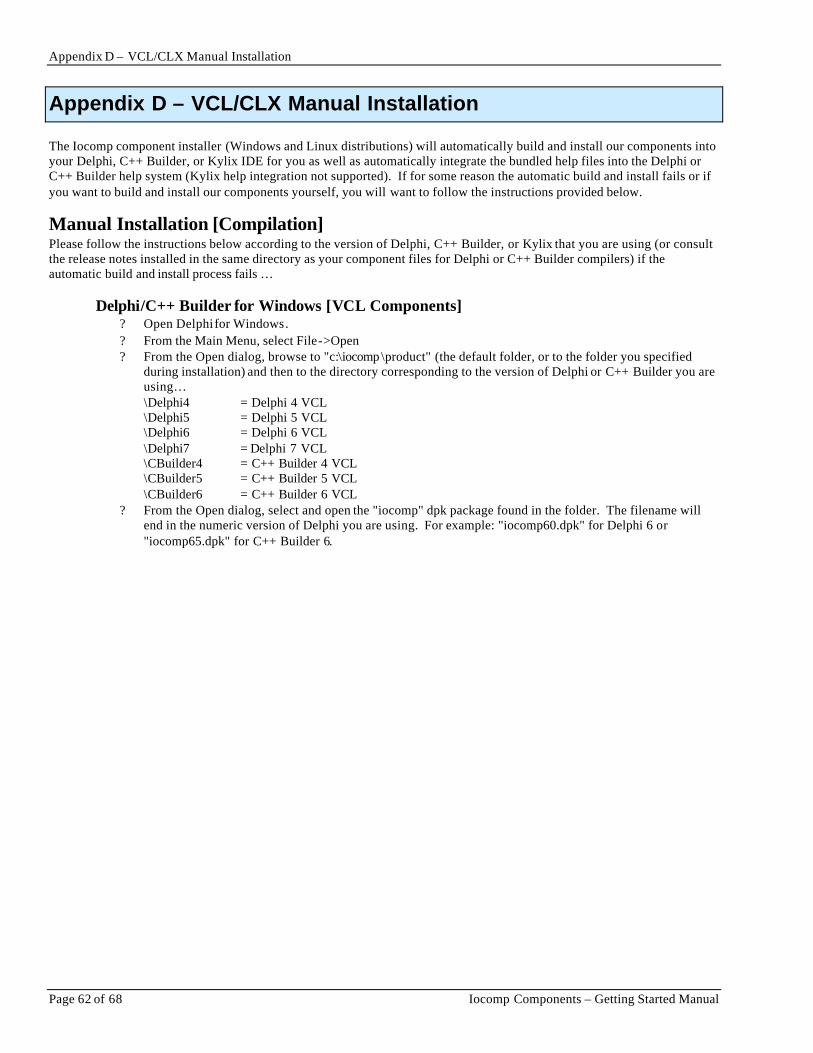
Appendix D – VCL/CLX Manual Installation
Page 62 of 68 Iocomp Components – Getting Started Manual
Appendix D – VCL/CLX Manual Installation The Iocomp component installer (Windows and Linux distributions) will automatically build and install our components into your Delphi, C++ Builder, or Kylix IDE for you as well as automatically integrate the bundled help files into the Delphi or C++ Builder help system (Kylix help integration not supported). If for some reason the automatic build and install fails or if you want to build and install our components yourself, you will want to follow the instructions provided below. Manual Installation [Compilation] Please follow the instructions below according to the version of Delphi, C++ Builder, or Kylix that you are using (or consult the release notes installed in the same directory as your component files for Delphi or C++ Builder compilers) if the automatic build and install process fails …
Delphi/C++ Builder for Windows [VCL Components] ? Open Delphi for Windows. ? From the Main Menu, select File->Open ? From the Open dialog, browse to "c:\iocomp \product" (the default folder, or to the folder you specified
during installation) and then to the directory corresponding to the version of Delphi or C++ Builder you are using… \Delphi4 = Delphi 4 VCL \Delphi5 = Delphi 5 VCL \Delphi6 = Delphi 6 VCL \Delphi7 = Delphi 7 VCL \CBuilder4 = C++ Builder 4 VCL \CBuilder5 = C++ Builder 5 VCL \CBuilder6 = C++ Builder 6 VCL
? From the Open dialog, select and open the "iocomp" dpk package found in the folder. The filename will end in the numeric version of Delphi you are using. For example: "iocomp60.dpk" for Delphi 6 or "iocomp65.dpk" for C++ Builder 6.
Appendix D – VCL/CLX Manual Installation
Iocomp Components – Getting Started Manual Page 63 of 68
? The Package Project Manager dialog for the iocomp package should now be open. The project is set up for both the Instrumentation Pack Professional and Plot Pack products (a.k.a. Ultra Pack). If you did not purchase both the Instrumentation Pack Professional and Plot Pack products then this file will need to be modified. as follows: Instrumentation Pack Standard Remove iPlotPackPropertyEditorsReg.pas Remove iPlotPackReg.dcr Remove iPlotPackReg.pas Remove iProfessionalPropertyEditorsReg.pas Remove iProfessionalReg.dcr Remove iProfessionalReg.pas Instrumentation Pack Professional Remove iPlotPackPropertyEditorsReg.pas Remove iPlotPackReg.dcr Remove iPlotPackReg.pas Plot Pack Remove iInstrumentPropertyEditorsReg.pas Remove iInstrumentReg.dcr Remove iInstrumentReg.pas Remove iProfessionalPropertyEditorsReg.pas Remove iProfessionalReg.dcr Remove iProfessionalReg.pas Ultra Pack Do Not Remove Any Files
? Click the INSTALL button to compile and install the components into the IDE. ? Click OK on the Information Dialog showing the installed components. ? Close the Project Manager and close the project, saving changes if prompted. ? You are now ready to start using Iocomp VCL Components. You should see new tabs starting with
"Iocomp ", corresponding to the different Iocomp Component Sets in the Delphi/C++ Builder component pallet.
Delphi/C++ Builder for Windows [CLX Components]
? Open Delphi or C++ Builder for Windows. ? From the Main Menu, select File->Open ? From the Open dialog, browse to "c:\iocomp \product" (the default folder, or to the folder you specified
during installation) and then to the directory corresponding to the version of Delphi or C++ Builder you are using… \Delphi6clx = Delphi 6 CLX \Delphi7clx = Delphi 7 CLX \CBuilder6clx = C++ Builder 6 CLX
? From the Open dialog, select and open the "iocomp" dpk package found in the folder. For example: "iocomp60clx.dpk" for Delphi 6 or "iocomp65clx.dpk" for C++ Builder 6.
? The Package Project Manager dialog for the iocomp package should now be open. The project is set up for both the Instrumentation Pack Professional and Plot Pack products (a.k.a. Ultra Pack). If you did not purchase both the Instrumentation Pack Professional and Plot Pack products then this file will need to be modified. as follows: Instrumentation Pack Standard Only Remove QiPlotPackPropertyEditorsReg.pas Remove QiPlotPackReg.dcr Remove QiPlotPackReg.pas
Appendix D – VCL/CLX Manual Installation
Page 64 of 68 Iocomp Components – Getting Started Manual
Remove QiProfessionalPropertyEditorsReg.pas Remove QiProfessionalReg.dcr Remove QiProfessionalReg.pas Instrumentation Pack Professional Only Remove QiPlotPackPropertyEditorsReg.pas Remove QiPlotPackReg.dcr Remove QiPlotPackReg.pas Plot Pack Only Remove QiInstrumentPropertyEditorsReg.pas Remove QiInstrumentReg.dcr Remove QiInstrumentReg.pas Remove QiProfessionalPropertyEditorsReg.pas Remove QiProfessionalReg.dcr Remove QiProfessionalReg.pas Ultra Pack Do Not Remove Any Files
? Click the INSTALL button to compile and install the components into the IDE. ? Click OK on the Information Dialog showing the installed components. ? Close the Project Manager and close the project, saving changes if prompted. ? You are now ready to start using Iocomp CLX Components. You should see new tabs starting with
"Iocomp ", corresponding to the different Iocomp Component Sets in the Delphi/C++ Builder component pallet.
Kylix (Delphi Edition) for Linux [CLX Components]
? Open Kylix (Delphi Edition) for Linux ? From the Main Menu, select File->Open ? From the Open dialog, browse to "/home/myusername/iocomp/components " (the default folder, or to the
folder you specified during installation) and then to the folder corresponding to the version of Kylix you are using… /kylix1 = Kylix 1 (Delphi Edition) CLX /kylix2 = Kylix 2 (Delphi Edition) CLX /kylix3delphi = Kylix 3 (Delphi Edition) CLX
? From the Open dialog, select and open the "iocomp" dpk package found in the folder. For example: "iocomp10clx.dpk" for Kylix 1, "iocomp20clx.dpk" for Kylix 2, or "iocomp30clx.dpk" for Kylix 3 Delphi Edition.
Appendix D – VCL/CLX Manual Installation
Iocomp Components – Getting Started Manual Page 65 of 68
? The Package Project Manager dialog for the iocomp package should now be open. The project is set up for both the Instrumentation Pack Professional and Plot Pack products (a.k.a. Ultra Pack). If you did not purchase both the Instrumentation Pack Professional and Plot Pack products , then this file will need to be modified as follows: Instrumentation Pack Standard Only Remove QiPlotPackPropertyEditorsReg.pas Remove QiPlotPackReg.dcr Remove QiPlotPackReg.pas Remove QiProfessionalPropertyEditorsReg.pas Remove QiProfessionalReg.dcr Remove QiProfessionalReg.pas Instrumentation Pack Professional Only Remove QiPlotPackPropertyEditorsReg.pas Remove QiPlotPackReg.dcr Remove QiPlotPackReg.pas Plot Pack Only Remove QiInstrumentPropertyEditorsReg.pas Remove QiInstrumentReg.dcr Remove QiInstrumentReg.pas Remove QiProfessionalPropertyEditorsReg.pas Remove QiProfessionalReg.dcr Remove QiProfessionalReg.pas Ultra Pack Do Not Remove Any Files
? Click the INSTALL button to compile and install the components into the IDE. ? Click OK on the Information Dialog showing the installed components. ? Close the Project Manager and close the project, saving changes if prompted. ? You are now ready to start using Iocomp CLX Components. You should see new tabs starting with
"Iocomp ", corresponding to the different Iocomp Component Sets in the Delphi component pallet.
Kylix (C++ Builder Edition) for Linux [CLX Components] ? Open Kylix (C++ Builder Edition) for Linux ? From the Main Menu, select File->Open ? From the Open dialog, browse to "/home/myusername/iocomp/components " (the default folder, or to the
folder you specified during installation) and then to the folder corresponding to the version of Kylix you are using… /kylix3cbuilder = Kylix 3 (C++ Builder Edition) CLX
? From the Open dialog, select and open the "iocomp" dpk package found in the folder. For example: "iocomp30clx.dpk" for Kylix 3.
Appendix D – VCL/CLX Manual Installation
Page 66 of 68 Iocomp Components – Getting Started Manual
? The Package Project Manager dialog for the iocomp package should now be open. The project is set up for both the Instrumentation Pack Professional and Plot Pack products (a.k.a. Ultra Pack). If you did not purchase both the Instrumentation Pack Professional and Plot Pack products then this file will need to be modified as follows: Instrumentation Pack Standard Only Remove QiPlotPackPropertyEditorsReg.pas Remove QiPlotPackReg.dcr Remove QiPlotPackReg.pas Remove QiProfessionalPropertyEditorsReg.pas Remove QiProfessionalReg.dcr Remove QiProfessionalReg.pas Instrumentation Pack Professional Only Remove QiPlotPackPropertyEditorsReg.pas Remove QiPlotPackReg.dcr Remove QiPlotPackReg.pas Plot Pack Only Remove QiInstrumentPropertyEditorsReg.pas Remove QiInstrumentReg.dcr Remove QiInstrumentReg.pas Remove QiProfessionalPropertyEditorsReg.pas Remove QiProfessionalReg.dcr Remove QiProfessionalReg.pas Ultra Pack Do Not Remove Any Files
? DO NOT CLICK INSTALL OR COMPILE!!!! ? Close the Project Manager and close the project, saving changes if prompted. ? Close Kylix (C++ Builder Edition) ? Open a terminal. ? Run the kylixpath shell script found in your "~/kylix3/bin" directory. ? Navigate to the "/home/yourusername/iocomp/components/kylix3cpp" or to the installed directory if
different than the default directory. ? In the next few steps, the "dcc" compiler must be in your path or you must access the dcc compiler directly.
The location of the "dcc" compiler is usually in your "~/kylix3/bin" directory. ? Execute the following command: dcc -jphnv iocomp30clx.dpk ? Execute the following command: dcc -p iocomp30clx.dpk ? Execute the following command: ar rcs iocomp30clx.a iocomp30clx.lsp ? Open Kylix (C++ Builder Edition). ? From the Main Menu, select "Component/Install Packages…". ? From the Packages Tab, click the "Add…" button and browse to
"/home/yourusername/iocomp/components/kylix3cpp" or to the installed directory if different than the default directory.
? From the "Add Design Package" dialog, select and open the "bpliocomp 30clx.so" design-time package. ? Click Open and then OK. ? Open the Environment Options from the Tools ->Environment Options menu item. ? Select the "Library" Tab. ? Click on the "Library Path" browse button ("…") to modify. ? From the "Browse For Folder" dialog, browse to "/home/yourusername/iocomp/components/kylix3cpp" or
to the installed directory if different than the default directory. Click the OK button. ? From the Environment Options dialog clic k OK. ? You are now ready to start using Iocomp CLX Components. You should see new tabs starting with
"Iocomp ", corresponding to the different Iocomp Component Sets in the Delphi component pallet.

Appendix D – VCL/CLX Manual Installation
Iocomp Components – Getting Started Manual Page 67 of 68
Setting Default Search/Include Path For each new program that you develop in Delphi, Kylix or C++ builder, you will need to set the project’s Search Path (Delphi/Kylix) or Include Path and Library Path (C++ Builder) to the location where you installed your copy of Iocomp Components. This is important so that the Delphi/Kylix and C++ Builder compilers know where to find your installation of Iocomp Components. You can setup the default search/include & library path to include Iocomp Components as follows…
? Select "Options…" from the Projects menu. ? Click on the "Directories/Conditionals tab and click on the ellipse button next to "Search Path" (Delphi) or "Include
Path" (C++ Builder) ? Click on the ellipse button in the Directories dialog and select the location where your Iocomp components are
stored. Examples… C:\iocomp \product\delphi4 Delphi 4 VCL for Windows C:\iocomp \product\cbuilder6 C++ Builder 6 VCL for Windows c:\iocomp \product\delphi6clx Delphi 6 CLX for Windows /home/myusername/iocomp/components/kylix3delphi Kylix 3 (Delphi Edition) for Linux
? Click on the Add button to add this path to the list of directories that are searched during the compilation process. ? Select the OK button. ? The Project Options dialog should reappear. Check the "Default" checkbox if you wish these project settings to be
the default for all new projects created from now on. ? If using C++ Builder, repeat the same steps for the Library Search Path. ? Click on OK to accept all changes.
Glossary
Page 68 of 68 Iocomp Components – Getting Started Manual
Glossary ActiveX: Microsoft stripped-down implementation of OLE. Supported component architecture used in many modern 32-bit Windows-based development environments Code Editor : Window where you can edit source code for your program Component: An ActiveX, VCL, or CLX program that can be added to and referenced by your application as if it was part of your program. Components can be visual (displayed on a form/dialog) or non-visual (not displayed on a form/dialog). Container: Form or dialog that "contains" ActiveX, VCL, or CLX components. Container Property : property that is managed by the container, and not the control. Control: See component. Control Pallet: A listing of all components available for use by your program. Components are usually represented by their small icon graphical representations (e.g. ). Design-Time: editing and working with a program at the time of development. The program does not execute at this point, but is in current development. Event: a notification that occurs in a response to an action from the user or change in state of a component. Events are generally "fired" when a user clicks on a component, but can be from a long list of actions initiated by the use, the operating system, or some other program. FAQ: Frequently Asked Question. A document that attempts to answer questions often asked by new users. IDE: Integrated Development Environment. Method: A routine of a component or object that can be executed to perform some task. Object Inspector : The dialog that lists the properties and events of an object in Borland Delphi or Borland C++ Builder. Property: Attributes of a component or class that can be set, stored, and retrieved through programming code. Property editors built into our components or into the development environment can access and modify properties. Run-Time: The point at which the program is executing instructions. Property Editor: A dialog or configurable listing of a control’s properties. Our built-in property editors organize and list all available properties that a control posses and can be set at design-time. The built -in property editors do not show properties that are provided by the container. Property Window: a dialog with a column listing of properties for a control (both container properties and control properties) VCL: Visual Component Library. Component library architecture for Borland software development environments CLX: Cross-Platform Component Library. Component library architecture for Borland software development environments running under Windows and Linux (GNU Linux)


![Skaffold - storage.googleapis.com · [getting-started getting-started] Hello world! [getting-started getting-started] Hello world! [getting-started getting-started] Hello world! 5](https://img.dokumen.tips/doc/110x75/5ec939f2a76a033f091c5ac7/skaffold-getting-started-getting-started-hello-world-getting-started-getting-started.jpg)


