Embed Size (px)
Citation preview

Cr
Evisions, Inc. • 14522 My ford R
Getting Started Guide eating Your First DataBlocks
Version 2.0
LAST UPDATED 06/13/2006
d • Irvine, CA 92606 • Phone: 949.833.1384 • Fax714.730.2524 • http://www.evisions.com/support

Page 2 Evisions, Inc. • 14522 Myford Rd • Irvine, CA 92606 • Phone: 949.833.1384 • Fax714.730.2524 • http://www.evisions.com/support
Getting Started Guide Last Updated 06/13/2006
Table of Contents
DOCUMENT OVERVIEW.....................................................................................................................4
Intended Audience ................................................................................................................................................ 4
Sample Database ................................................................................................................................................... 4
1 - GENERAL OVERVIEW...................................................................................................................5
Argos Architectural Overview............................................................................................................................. 5
Logging-in and Argos Desktop ............................................................................................................................ 5 Desktop ............................................................................................................................................................... 7 Folder Options .................................................................................................................................................. 10 DataBlock Options............................................................................................................................................ 11
2 – CREATING FIRST DATABLOCK ........................................................................................................... 12
Adding a QuickView DataBlock........................................................................................................................ 12
Adding Parameters ............................................................................................................................................. 14 Parameter Form - Images and Text................................................................................................................... 19 Parameter Form - Drop Down Box................................................................................................................... 24 Parameter Form - List Box ............................................................................................................................... 29 Parameter Form - Multi-Column Box .............................................................................................................. 35 Parameter Form - Variables.............................................................................................................................. 43
3 – REPORT DATABLOCK ............................................................................................................................. 50 Adding a Report DataBlock.............................................................................................................................. 50 Adding Query ................................................................................................................................................... 53 Defining Joins ................................................................................................................................................... 56 Adding Fields.................................................................................................................................................... 60 Conditional Statement...................................................................................................................................... 65 Order By ........................................................................................................................................................... 67 Security - Field Level ....................................................................................................................................... 67
4 – Advanced Report DataBlock ....................................................................................................................... 69 Unions............................................................................................................................................................... 69 Create a Sub-Query........................................................................................................................................... 71 Advance Query ................................................................................................................................................. 75
5 – Reports ........................................................................................................................................................... 77 QuickView Reports........................................................................................................................................... 77 CSV Reports ..................................................................................................................................................... 81 Banded Report .................................................................................................................................................. 85
Conclusion ........................................................................................................................................................... 90
Appendix A – Parameter Form Objects ........................................................................................................... 91

Page 3 Evisions, Inc. • 14522 Myford Rd • Irvine, CA 92606 • Phone: 949.833.1384 • Fax714.730.2524 • http://www.evisions.com/support
Getting Started Guide Last Updated 06/13/2006 Background....................................................................................................................................................... 91
Memo Box ........................................................................................................................................................ 92 Check Box......................................................................................................................................................... 94 OK Button......................................................................................................................................................... 96
Table of Figures................................................................................................................................................... 98

Page 4 Evisions, Inc. • 14522 Myford Rd • Irvine, CA 92606 • Phone: 949.833.1384 • Fax714.730.2524 • http://www.evisions.com/support
Getting Started Guide Last Updated 06/13/2006 Getting Started Guide for Banner Users
We encourage you to inform us of any errors you may find in this guide, and we ask that you please forward suggestions that will make this document more relevant/understandable to those that will follow. We listen to our users to always try to improve our literature and products. Welcome to Argos! Enjoy! Document Overview This document is NOT intended to be a complete user guide, but rather to provide the Argos developer or designer the skills required to create their first DataBlocks in Argos. This DataBlock can then be used by end-users of Argos to “access information” and generate reports in varying ways. For the purposes of this guide, it is assumed that the software has been fully installed and configured – i.e. ADO connections and users have been added. If any problems arise in following the examples in this guide, please contact our support staff for assistance. This can be done by submitting a support request to http://helpdesk.evisions.com, or you may choose to first visit our knowledgebase at http://www.evisions.com/suport . In addition to this manual, there are additional manuals and multimedia tutorials for the Administrators and End Users. Intended Audience This guide is intended for the Argos developer and assumes that the reader is familiar with writing SQL (Structure Query Language) statements. The samples in this document are written using SQL designed for Oracle. Every attempt is made to keep the queries generic enough so they can be transported across platforms. Although ANSI standards do exist, these standards remain theoretical and differ significantly from implementation to implementation. This is NOT a SQL tutorial. Sample Database All samples used in this guide (unless otherwise indicated) are based on the Sungard SCT Banner administrative suite of student, financial aid, finance, HR, and advancement systems. Most of the samples will be based on the finance or student modules.

Page 5 Evisions, Inc. • 14522 Myford Rd • Irvine, CA 92606 • Phone: 949.833.1384 • Fax714.730.2524 • http://www.evisions.com/support
Getting Started Guide Last Updated 06/13/2006 1 - General Overview
Argos Architectural Overview Argos is an MAPS application. MAPS stands for Multiple Application Platform Server. Evisions undertook this aggressive project nearly two years ago and what has come of it is nothing short of spectacular. By creating a web-based application server Evisions is now able to deploy all of its products via the web. By using this common MAP Server for all our products we have incorporated our various applications into an integrated suite of products. This allows a single point of administration for the various products, via a web-based interface. The MAP Server software can be installed on Win-32 platforms such as Windows 2000/XP/2003. You may install it on a non-server platform, but this should only be done for evaluation purposes. In a production environment, other systems may access this software, so it is recommended that MAP Server software be installed on a Windows server-level platform and that the system is constantly on and accessible via your network. The Argos client is launched from a web browser. However, a shortcut to Argos can be created on the user’s PC desktop. To create the shortcut, right-click on a blank spot of the desktop and select New/Shortcut. When prompted, enter the full URL for the Argos web server. Click Next and assign a name to the newly created shortcut. The user can now click on this shortcut to quickly launch Argos. Logging-in and Argos Desktop
Fig. 1.1 - Argos Launched from Web
Open up a web browser (IE. Internet Explorer) and go to http://localhost:8080. It should then display this screen. Click on the link that points to “Argos Reporting Tool.” NOTE: If you have another application that uses port 8080, and Argos does not launch, see your MAPS administrator to see which port to use.
Click Here

Getting Started Guide
Last Updated 06/13/2006
Fig. 1.2 - Security Warning for Client Download
If this is the first time you have launched Argos from this machine, you will receive a security alert asking if you wish to install the user client. To avoid having this message being displayed every time the application is launched, check the ‘Always trust content …’ box. Click “Yes” to continue
Fig. 1.3 - Login Icon
This will result in the Argos application being launched. The Login form will be displayed. You will use the login username and password provided by your administrator. You can instruct Argos to remember the password. The first time you log onto the system, there will be no defined server. To change the server, click on the Edit Servers link.
Click Here
Page 6 Evisions, Inc. • 14522 Myford Rd • Irvine, CA 92606 • Phone: 949.833.1384 • Fax714.730.2524 • http://www.evisions.com/support

Getting Started Guide
Last Updated 06/13/2006
Fig. 1.4 - Login Screen
Click on the Green Plus to add a new server. Type in the name of the server. If you are logging into MAP Server from the system where the MAP Server is installed you will need to use “localhost” as the system to connect to. If you are logging into MAP Server from a remote system you will need to put the system name or IP address of the system running the MAP Server. Click OK to continue. You will also need to add the entry to the Server Address line.
Desktop
Fig. 1.5 – Explorer Tree and Detail
The initial screen is referred to as the Argos Desktop and is comprised of the ‘Explorer Tree’ (on the left) and ‘Explorer Detail’ (on the right). In addition to the Explore tab there is a Quick Launch tab where end users can store shortcuts to the reports they most frequently run. Use of this tab is discussed in the End User Manual.
The tree is divided into Folders ,
DataBlocks , and Reports .
Folders are used to organize your work. When you are logged-in, you can see the folders for which you have been given permission. Security can be set to limit who has access to which folders. This is discussed in more detail in the MAPS Installation and Administrator Guide. Folders can be named anything. A ‘+’ next to an item indicates this object contains other items.
Page 7 Evisions, Inc. • 14522 Myford Rd • Irvine, CA 92606 • Phone: 949.833.1384 • Fax714.730.2524 • http://www.evisions.com/support

Getting Started Guide
Last Updated 06/13/2006
Fig. 1.6 - Sample Explorer Tree Expanded
In the expanded view, note that Folders can contain other Folders
as well as DataBlocks . DataBlocks hold the definitions from which the reports will pull their data. A DataBlock can either be in the form of a ‘Report’ or a ‘QuickView’. DataBlocks in turn may contain reports. Any report identified with
the icon is a report created from a QuickView DataBlock. A or icon indicates that the report was created from a Report DataBlock.
The Datablock is the foundation from which all reports are created. The datablock consists of two parts - the Parameter form and the query design. The parameter form has two functions. First it is used to have the user executing the report a chance to enter or choose from a list, certain parameters that will be used to filter the data displayed in the report. Secondly, the parameter form can be used to display the final results of the report. The parameter form can be a complete report in and of itself. For example if all I want to see is what advisor is assigned to a certain student, you would prompt for the student ID and then in another object on the parameter form display the advisor for that ID. In this case the parameter form is a complete report. Nothing more is needed. We refer to this type of report as a QuickView or QV report. The intent of a QV report is to "quickly" get and display information. The report does not need to be printed or saved, (although the results can be saved if needed.) IF this is all that is required, the datablock is complete. A QuickView DataBlock is the easiest to build. This type of DataBlock gives end users the ability to look at information on their screen with drill down capabilities. It is very useful for combining different screen shots from the database application into one. Users have the ability within a Quick View report to right click on the information being displayed and dump it into an excel spreadsheet for further manipulation. Comma delimited and Banded reports are not options for QuickView DataBlocks. In the DataBlock design, only the Parameter Design form is used. The Query Design form is not used at all in this type of DataBlock. An example of a QuickView report can be seen in Fig. 2.7.
Page 8 Evisions, Inc. • 14522 Myford Rd • Irvine, CA 92606 • Phone: 949.833.1384 • Fax714.730.2524 • http://www.evisions.com/support

Getting Started Guide
Last Updated 06/13/2006
Key to the above - A QuickView report ONLY displays what is on the parameter form. The second part of building a datablock is the Query Design. This is where the developer creates the main sql statement for pulling back data from the datasource based on the choices the end user has made on the parameter form. From an end user point of view, they only see the Parameter form as designed, and the results from the query on the query design, if present. For the end user to see the results, the developer needs to create a report - either a CSV report or a banded report. A CSV report (comma separator value) is good for sharing the results between applications or third parties. A banded report is good for printing and distributing. Even though a QV report can be created from a datablock that contains a query in the query design tab, the QV report will still ONLY show what is on the parameter form - period. The key to the query design is that the results of the query are only displayed on reports created by the developer. This type of datablock is often referred to as a Report DataBlock. This type of DataBlock uses both the Parameter Design and Query Design forms. The Parameter Design is used to allow users any easy way to select criteria in order to limit the information retrieved . Their selections are then used as Conditional Fields in the Query Design. With this type of DataBlock, and appropriate security access, users can customize the Comma delimited and Banded report types. They can pick and choose which fields they want to include in their report (all fields are based on security access), how they want the columns to be ordered and add calculated fields. When a Banded (Fully Formatted) report is chosen for the output method, the designer of the report has the ability to setup report titles, headers, footers, colors, fonts and the report style. The key to the query design is that the results of the query are only displayed on reports created by the developer. And these reports are either a CSV or banded report. Summary - if there is NO query in the query design form, then the ONLY type of report that can be created is a QuickView report. Only when you add a query to the query design tab, will the other two types of reports be available to build.
Page 9 Evisions, Inc. • 14522 Myford Rd • Irvine, CA 92606 • Phone: 949.833.1384 • Fax714.730.2524 • http://www.evisions.com/support

Getting Started Guide
Last Updated 06/13/2006
Folder Options
Fig. 1.7 – Folder Options
When a user right-clicks on a folder, the available options are listed. A folder can be renamed. (In naming a folder, do not use spaces). Under an existing folder, a new folder or DataBlock can be added. In addition to the normal cut, copy, paste, delete functions, a user can also export a folder.
To export an object, select Export from the option menu. When prompted, enter a file name. By default, the file will be named the Object name followed by the current date in YYYYMMDD format. An extension of “argosexport” is automatically added. Security can be set at the folder-level. The security set at folder level will default to the objects inside the folder. This topic is beyond the scope of this document.
Page 10 Evisions, Inc. • 14522 Myford Rd • Irvine, CA 92606 • Phone: 949.833.1384 • Fax714.730.2524 • http://www.evisions.com/support

Getting Started Guide
Last Updated 06/13/2006
DataBlock Options
Fig. 1.8 – DataBlock Options
DataBlock options are similar to those for the folder, except the only object that can be added below a DataBlock is a report. Default security for a DataBlock is inherited from the folder-level. If changed, the security will be inherited for any new object (i.e. reports) under the DataBlock.
Page 11 Evisions, Inc. • 14522 Myford Rd • Irvine, CA 92606 • Phone: 949.833.1384 • Fax714.730.2524 • http://www.evisions.com/support

Page 12 Evisions, Inc. • 14522 Myford Rd • Irvine, CA 92606 • Phone: 949.833.1384 • Fax714.730.2524 • http://www.evisions.com/support
Getting Started Guide Last Updated 06/13/2006
2 – CREATING FIRST DATABLOCK Adding a QuickView DataBlock
Fig. 2.1 - Adding a QuickView DataBlock
To create a DataBlock, highlight the Folder you wish to contain the DataBlock, right-click, and select NEW/DATABLOCK. When Prompted, enter a valid name. In this example we have called the DataBlock ‘CRNRoster(QV)’. When naming a DataBlock, it is useful to the end user to somehow indicate if this is a QuickView or a Report DataBlock. We are using the convention of appending a (QV) to the name to indicate this is a QuickView. For this example, the QV DataBlock is going to allow the end user to select the term and CRN and then list the students enrolled in that CRN and their majors.
When creating a DataBlock, the developer can associated the block to a connection pool or a specific database connection. By associating a DataBlock with a connection pool, the block can be executed against any database in that pool. When the user runs a report based on the DataBlock, they will be prompted for the database to which they wish to connect. Please refer to the MAPS Installation and Administration Guide for more information on connection pools.

Getting Started Guide
Last Updated 06/13/2006
Fig. 2.2 – Associate Connection Pool
A Connection Pool is a ‘group’ or ‘collection’ of databases that the administrator has selected to be grouped together. The databases are similar in that they should have all the same attributes – i.e. tables, views, users, etc. By selecting a specific connection or database, the query is restricted to just this connection It is recommended that during development that a single connection be used. When the DataBlock is fully tested, then the developer can associate it to a connection pool.
Fig. 2.3 - Adding a Description to DataBlock
Adding a description to a DataBlock allows the developer to provide more information to the end user. To assign a description to this DataBlock, click on the ‘Click here to set the description’ and enter desired text.
Page 13 Evisions, Inc. • 14522 Myford Rd • Irvine, CA 92606 • Phone: 949.833.1384 • Fax714.730.2524 • http://www.evisions.com/support

Getting Started Guide
Last Updated 06/13/2006
Fig. 2.4 - Adding Notes to DataBlock
You can further document your DataBlock by creating notes. Click on the Notes button. To add a new note, press the green ‘+’. Enter a brief note in the small box and more complete text below. Notes are useful in keeping track of why you are in creating a DataBlock or for documenting what tables are being used. If you are going to be publishing or sharing this DataBlock with others, this is an ideal place to document what tables and functions are being used. You could also include the specific function definition in the notes area.
Adding Parameters
Fig. 2.5 - Sample QuickView/Parameter DataBlock
Some reports or DataBlocks can be entirely created from the Parameter Design window. All QuickView DataBlocks are created using the Parameter Design form only. The end user will make selections until the data they want is displayed. This example demonstrates how you can pull up available sections for a subject by first selecting the Term Code, then the Subj.
Page 14 Evisions, Inc. • 14522 Myford Rd • Irvine, CA 92606 • Phone: 949.833.1384 • Fax714.730.2524 • http://www.evisions.com/support

Getting Started Guide
Last Updated 06/13/2006
The above is an example of a QuickView report. This DataBlock answers the question “What courses are offered for the selected term and department.” In the DataBlock we will be creating, we are asking the question “For a selected term, what CRNS are offered and for that CRN what students are registered for that CRN.” We will first need to provide a user a list of all the terms. After the user selects a term, then display the CRNs that are offered for the selected term. The following should only be used as a training sample. We will be creating several variations of the same parameter to show the difference between the available Parameter Entry and selection tools. On a real Parameter form, you would not be doing this!!!
Fig. 2.6 – Edit DataBlock
In the previous exercise you successfully added a DataBlock. Now we need to create the parts that make up a DataBlock. To begin ‘EDITing’ the DataBlock, press the EDIT key or double click on the DataBlock itself.
Page 15 Evisions, Inc. • 14522 Myford Rd • Irvine, CA 92606 • Phone: 949.833.1384 • Fax714.730.2524 • http://www.evisions.com/support

Getting Started Guide
Last Updated 06/13/2006
Fig. 2.7
2
1Page 16 Evisions, Inc. • 14522 Myford Rd • Irvine, CA 92606 • Phone: 949.833.1384 • Fax714.730.2524 • http://www.evisions.com/support
– Blank Form Design
The Edit button takes you to the Argos Builder. The Builder consists of two windows. The Query Design (1) window is used only when creating a Report DataBlock and will be discussed in Chapter 3 of this manual. The Form Design (2) window is used to define the parameters that the end user will use to enter or select the selection criteria when the final report is executed. It consits of the Parameter tab and the Variable tab. To access the Parameter form, from the Argos Builder window click on the ‘Parameter Tab’ on the ‘Form Design’ tab.

Getting Started Guide
Last Updated 06/13/2006
Fig. 2.8 - Parameter Tool Bar
What you are creating at this time will be visible by all users who have the proper permission to run the report. Along the top of the grid on the right half are the tools available for creating the controls and/or parameters.
Connection Preview or Test
Controls Save Changes
Properties Alignment Tools
Workspace
Page 17 Evisions, Inc. • 14522 Myford Rd • Irvine, CA 92606 • Phone: 949.833.1384 • Fax714.730.2524 • http://www.evisions.com/support

Getting Started Guide
Last Updated 06/13/2006
Parameter Tools Argos has several tools that allow the user to enter data directly or select the data from values returned from a SQL query or that have been manually entered. The developer can also add different controls, images, or design elements. Following is a very brief description of what is available.
and are used to select or delete the object.
are tools that the developer can use to ensure objects are properly aligned.
and allow the user to add a background to the parameter window. If the parameters will not fit on one screen, the second icon will add scroll bars.
will be used to add static text to the parameter form. In addition, it can be used to display variables such as the user-id of who is executing the report.
allows the designer to add shapes to the parameter form.
Edit Box and Memo Box allows the user to manually enter a value. An example might be to prompt the user to enter the ID of the customer.
Allows the developer to add an image to the parameter form.
The drop down icon is used to add an object that will display one column of values. From the items displayed, the user will be able to select one value.
The Boolean button is a True/False button. The developer can assign distinct values depending on if the box is checked or not.
Is similar to the drop down box in that only one value is displayed to the user. However, the end user will be able to select multiple values. (The drop down icon limits the user to only one selection.)
icon is used to add an object that will display multiple columns of data to the end user. The user will be able to select one or multiple values.
Icon will allow the designer to add a date field.
Using the OK button on a background, allows items on the background to be refreshed.
Page 18 Evisions, Inc. • 14522 Myford Rd • Irvine, CA 92606 • Phone: 949.833.1384 • Fax714.730.2524 • http://www.evisions.com/support

Getting Started Guide
Last Updated 06/13/2006
Parameter Form - Images and Text A parameter form is used to ask the end user for input as well as display data to the user. As discussed, a QuickView report is run completely from the Parameter form. In our example, the user will be asked to select a term from a displayed list of terms. Once the term is selected, a list of CRNs taught that term will be displayed. Any value that is returned from a query or is manually entered will be stored in variables that can be used in subsequent queries. Argos is ‘smart’ enough to NOT execute a query until it has values for any variable that might be used in the SQL statement. The following will show how to add the object that will allow the user executing the report to select the term and subsequently, CRNS for that term.
Page 19 Evisions, Inc. • 14522 Myford Rd • Irvine, CA 92606 • Phone: 949.833.1384 • Fax714.730.2524 • http://www.evisions.com/support

Getting Started Guide
Last Updated 06/13/2006
Fig. 2.9 – Add an Image
To start, let’s add a nice graphics or image to spruce up the Parameter
form. Select the image ( ) icon and indicate on the form where you want to place the image. The File open window will be displayed. Drill down and select the object you wish to add and select open. Normal image files are supported – including animated graphics.
Page 20 Evisions, Inc. • 14522 Myford Rd • Irvine, CA 92606 • Phone: 949.833.1384 • Fax714.730.2524 • http://www.evisions.com/support

Getting Started Guide
Last Updated 06/13/2006
Fig. 2.9a – Image properties
Once an object or control has been added, the attributes or properties of that control are shown in the property pane. Setting AutoSize to YES will ensure that the entire image will be seen. Set it to NO to if you want to control what is visible to the end user. You can manually move or reposition the image or use the property tab to change the image location. We recommend the JPG or GIF images be used in place of BMPs due to size of the image.
Page 21 Evisions, Inc. • 14522 Myford Rd • Irvine, CA 92606 • Phone: 949.833.1384 • Fax714.730.2524 • http://www.evisions.com/support

Getting Started Guide
Last Updated 06/13/2006
Fig. 2.10 - Adding Text to Parameter Form
We need to be able to instruct or inform the end user of what they should be entering or selecting. We can do this by adding text to describe the parameter. To add a
text objext, select the and position the cusor on the blank form.. This will open a box with the words ‘Type Text Here’. On the right-hand side are the properties for this object. To enter text, go to the Label Text(1) and enter the desired comment. In this example type: Select Term To change the font(2), click on the Font box. You can select the style, color, and other attributes. In our example, we have set the color to ‘clMenuHighlight’; the font to Tahoma, and th font size to 12.
2
1
Page 22 Evisions, Inc. • 14522 Myford Rd • Irvine, CA 92606 • Phone: 949.833.1384 • Fax714.730.2524 • http://www.evisions.com/support

Getting Started Guide
Last Updated 06/13/2006
Using the attributes the developer can:
Align: This will move the text object to various spots on the form. Alignment: The user can left, right or center the text within the defined text box Auto Size: If set to YES, the text box will automatically resize if the size of the text
within the box changes. For example, if you change the font to a larger font size, the box will grow accordingly so the text is not truncated. If set to NO, the box will not grow. Data Aware: Allows a text box to display the value of a variable. This will be
discussed in more detail. Font: Allows the user to alter the attributes of the font being used. Height and Width: Set the size of the text box. Left and Top: Set the position of the text box. Word Wrap: If entering a large amount of text, if word wrap is set to YES, the text
will automatically be broken into set lines so to ensure everything fits within the selected width.
Page 23 Evisions, Inc. • 14522 Myford Rd • Irvine, CA 92606 • Phone: 949.833.1384 • Fax714.730.2524 • http://www.evisions.com/support

Getting Started Guide
Last Updated 06/13/2006
Parameter Form - Drop Down Box
A Drop Down Box is used to display a list of values from which the user can select ONE. Even though the underlying query or manual entries might return multiple columns, only one column of values will be displayed to the end user.
Fig. 2.11 - Drop Down Box
To create a Drop Down Box, click
on the Drop Down icon and position your cursor on the form. To determine what will be in the parameter, select the attribute ‘Choices’ on the left side of the form. The Choice Entry form will then open. Entries can be of two types: ‘Manual entries’ where the designer manually adds entries to the Drop Down Box, or a ‘SQL statement’ where the data is retrieved via a SQL query.
Fig. 2.12 - Manually Enter Values
Editing a manual entry parameter is straightforward. By clicking on the green ‘+’ on the horizontal top bar, you can add columns. The ‘+’ on the Vertical side bar will add rows. The designer will place the values that they want to be displayed to the user. In this simple example, the user would be shown the ‘Month’. Once selected, the the ‘OrdinalValue’ will be available for use in subsequent queries.
Page 24 Evisions, Inc. • 14522 Myford Rd • Irvine, CA 92606 • Phone: 949.833.1384 • Fax714.730.2524 • http://www.evisions.com/support

Getting Started Guide
Last Updated 06/13/2006
Fig. 2.13 - Sample SQL Statement for Drop Down Box
If you choose a SQL statement, then it is merely a case of writing the correct statement to retrieve the necessary values. Note the use of the AS clause to assign aliases or user-friendly names to the data being returned. These names will also be the names of the variables that can be used in subsequent queries. Once the SQL statement has been entered, press the Next button. This will perform a syntax check.
Page 25 Evisions, Inc. • 14522 Myford Rd • Irvine, CA 92606 • Phone: 949.833.1384 • Fax714.730.2524 • http://www.evisions.com/support

Getting Started Guide
Last Updated 06/13/2006
Fig. 2.14 – Data Returned from Test
If the query is correct, the first five records will be displayed. If the coulmn widths are too narrow or too wide, the developer can make necessary adjustments by dragging the column bars. You can also click on the EDIT Column button to change the caption and/or description. Hit the Next button one more time.
Fig. 2.15- Associate Data Field with Variable
Since the Drop Down Box is only capable of displaying one column of data to the end user, but our query returns two columns, we need to tell Argos what value will be displayed. From the Drop Down Box of variables, select the variable ‘TERM’. The CODE variable can still be used in subsequent queries, but the end user will only see the term description. Click Finish to save the drop down choices.
Page 26 Evisions, Inc. • 14522 Myford Rd • Irvine, CA 92606 • Phone: 949.833.1384 • Fax714.730.2524 • http://www.evisions.com/support

Getting Started Guide
Last Updated 06/13/2006
Fig. 2.16 - Drop Down Attributes
All the objects created on a parameter form have attributes. To complete the Drop Down definition, you should provide a brief ‘Description’ (1) of the Drop Down Box. In addition, you should name the variable (2). The name used here should be unique, as it is used as the qualifier for the values returned. In our example, the values CODE and TERM are retuned in the SQL statement. To use these variables in subsequent queries, they should be prefaced or qualified with the value entered in the Variable Name field; i.e. SelTerm.CODE or SelTerm.TERM.
1
2
Page 27 Evisions, Inc. • 14522 Myford Rd • Irvine, CA 92606 • Phone: 949.833.1384 • Fax714.730.2524 • http://www.evisions.com/support

Getting Started Guide
Last Updated 06/13/2006
We will refer to CODE and TERM as sub-variables. The complete variable is qualified by the name given to the variable defined in the Attribute window. In the above example the select statement was written with the AS clause. Note that this will rename or assign an alias to the column. It is this alias that the end user will see as the column or field name. Using a Drop Down limits the user to the selection of only one value. i.e., in the above example, the user will only be able to select one Term. When displayed to the end user, the selection box will be a list of the values that satisfy the query. One column of data will be displayed. Even though only one column is displayed, the query can be written to return multiple columns of data. The data returned in these columns can be used as variables in subsequent queries. One attribute that is useful to apply on a Drop Down Box is the ‘Free Type’. By setting this to “YES”, the user can manually enter a value. The value entered will be assigned to the sub-variable that was named as the field that will represent the value of the variable. In this case, that would be the variable SelTerm.TERM. If that value is valid, all other sub-variables will automatically be set to the returned value, i.e. the CODE will be automatically set to the correct term code if the user ‘types’ a value in the Drop Down Boxes. This is useful when it is likely that the end user knows the value to manually enter; i.e. the user can manually enter a value or select from the returned values. At any time you are working on your parameter, make sure you save or commit your work.
To do so, click on the icon on top right of the parameter window. This will save all work on the MAPS Server database.
Page 28 Evisions, Inc. • 14522 Myford Rd • Irvine, CA 92606 • Phone: 949.833.1384 • Fax714.730.2524 • http://www.evisions.com/support

Getting Started Guide
Last Updated 06/13/2006
Fig. 2.17 – Test Parameter Form
In addition to saving your work, you can also check your progress and ‘see’ what the end user will see by clicking on the test icon. The Test Run window will be displayed. For the end user to actually see any values in a Drop Down Box they will need to click on the ‘expand’ arrow on the object. Another option in displaying the data to the end user would be to use a ‘List’ box.
Parameter Form - List Box
The List Box is similar to the Drop Down Box in that only one column of values of the underlying query or entries is displayed to the user. However, with a list box a user can select more than one value. Using the ctrl or shift button, the user can select multiple values that can be used in subsequent queries.
Fig. 2.18 – Adding List Box
Add a List Box by clicking on the
List Box icon ( ), place the object on the Parameter Form and select choices (1). As this will be another SQL statement, set the apporpriate mode to SQL (2).
1
2
Page 29 Evisions, Inc. • 14522 Myford Rd • Irvine, CA 92606 • Phone: 949.833.1384 • Fax714.730.2524 • http://www.evisions.com/support

Fig. 2.19 - Select Statement for List Box
This time we are going to create a query that will return the SUBJECT CODES. This will allow us to narrow the listed courses to not only those offered for the term selected, but by subject as well. Several things to note in the above SQL statement. First, the second variable (Description) is using an Oracle Function (concatenation) as well as a Banner Function (f_student_get_desc). Argos allows the developer or designer to use any database specific function that they have Oracle permission to use. Also note in the where clause the variable :SelTerm.CODE. This is the variable from the drop down box. Argos is smart enough to not execute this query until it has a value for the SelTerm.Code. When creating a query, to see what variables are available, aquickly add the variable to the query, click on the abc icon (
nd to )
l v lect ery
and al ariables that have been defined will be listed. Sethe desired variable and note that it will be added to the quwith the colon preceeding it. Using the AS clause allows the developer to create alias’ for the data returned. Remember, it is this value used in the AS clause, or the alias, that the end user will see when the results are displayed.
Fig. 2.20 – List of defined variables.
Page 30 Evisions, Inc. • 14522 Myford Rd • Irvine, CA 92606 • Phone: 949.833.1384 • Fax714.730.2524 • http://www.evisions.com/support
Getting Started Guide Last Updated 06/13/2006

Fig. 2.21– test query; populate variable.
Fig. 2.22- Associate Retuned Data with Variable
Once the query has been created, click Next -> to continue. Because we are using a variable in the where clause it will prompt you for a value to populate that variable with. Fill in a valid term code and click ok to continue. The first five records returned will be displayed. Click Next again to select which field to display to the user. A List box like a drop down box ONLY displays one column to the end user. Here we are using the Description field to display.
Page 31 Evisions, Inc. • 14522 Myford Rd • Irvine, CA 92606 • Phone: 949.833.1384 • Fax714.730.2524 • http://www.evisions.com/support
Getting Started Guide Last Updated 06/13/2006

Fig. 2.23 - Attributes for List Box
To complete the List Box definition, provide a brief ‘Description’ (1). Also name the variable (2). The name used here should be unique. This name is used as the qualifier for all the values returned. In our example, the values Subject and Description are retuned in the SQL statement. To use these variables in subsequent queries, they should be prefaced or qualified with the value entered in the Variable Name field; i.e. SelSubject.Subject or SelSubject.Description. .
In addition, you can allow the end user to select more then one value from the list displayed. Notice the attribute that allows a multi-selection (3) to be made. If set to YES, Argos will ‘re-write’ any subsequent SQL statements that use these variables. That means, you as the developer will not need to be concern if the where clause should be an ‘equal’ (=) or an in. In addition to the description and variable name, the other attributes the designer should take note of are ‘Auto Select’ and ‘Required’. The ‘Required’ parameter allows the user to NOT select a value, if set to ‘No’. To force the user to make a selection, set the Required to ‘Yes’. Finally, if you want a default value to be selected, set Auto Select to ‘Yes’. If set to ‘Yes’, then by default, the variables defined in the query will be set to the FIRST row or value returned. By setting Required to ‘Yes’ and Auto Select to ‘No’, the designer will force the user to make a selection(s) from the values displayed.
Page 32 Evisions, Inc. • 14522 Myford Rd • Irvine, CA 92606 • Phone: 949.833.1384 • Fax714.730.2524 • http://www.evisions.com/support
Getting Started Guide Last Updated 06/13/2006
3
2
1

Page 33 Evisions, Inc. • 14522 Myford Rd • Irvine, CA 92606 • Phone: 949.833.1384 • Fax714.730.2524 • http://www.evisions.com/support
Getting Started Guide Last Updated 06/13/2006
Fig. 2.24 – Test Showing Drop Down vs. List Box
Lets review what we have so far.
Click on the Test Icon ( ). Because we are using the selection for the Select Term box to display the Subjects, nothing will be displayed in the Subject box until we select a term. Note because of the number of values displayed, a scroll bar was automatically added to the List box. Note that the user must select from the returned values. Several things to note here, the List Box is not wide enough to display all the data, and the boxes are not aligned. We also need to add a text box to prompt the user to Select the subject. Press Close to return to the parameter form.
Drop Down Box
List Box

Page 34 Evisions, Inc. • 14522 Myford Rd • Irvine, CA 92606 • Phone: 949.833.1384 • Fax714.730.2524 • http://www.evisions.com/support
Getting Started Guide Last Updated 06/13/2006 We will add the text box similar to how the Select Term was added.
We can fix the size of the list box several ways:
Manually edit the width attribute of the object. Drag the side of the box to desired width.
For the Alignment, we will use the alignment tools. First select the Drop Down box and the List box by holding down the shift key and selecting both objects. Then using the alignment tools, make the proper alignment. When aligning objects, the first object selected will be the guide. For example, if we want to align on the left edge of the Drop Down Box, select that object before selecting the List box
and then select the left alignment tool ( ). The form should look similar to the following.
Fig. 2.25 – Parameter form to date.

Getting Started Guide
Last Updated 06/13/2006
Parameter Form - Multi-Column Box
There are times that the developer needs to make more information available to the end user for either selecting or for a final report. A Multi-Column Box is used to display multiple columns of information. In our next object we want to offer the user a list of all the courses that are taught for the select term and subject.
Fig. 2.26 - Select Statement for Multi-Column Box
Add a Multi-Column Box by selecting the Multi-Column icon
( ), position where you want, select CHOICES and create the SQL statement. In this case we are going to create a query based on what is being selected by the end user from the DropDown list. That is, the values returned in the query will be filtered by what the term code selected by the user. We are also going to use the query builder to build the query. Click on the little
hard hat icon ( ) to move onto the query builder form.
Page 35 Evisions, Inc. • 14522 Myford Rd • Irvine, CA 92606 • Phone: 949.833.1384 • Fax714.730.2524 • http://www.evisions.com/support

Fig. 2.27 - Select Statement for Multi-Column Box
We will go into more detail on how to use this form in the next chapter. For our purposes we just want to create the query that will display the courses taught for the selected Term and subject. First click on the Add Table Button
( )on the top tool bar, and add the table SSBSECT. Click OK to continue.
Page 36 Evisions, Inc. • 14522 Myford Rd • Irvine, CA 92606 • Phone: 949.833.1384 • Fax714.730.2524 • http://www.evisions.com/support
Getting Started Guide Last Updated 06/13/2006

Page 37 Evisions, Inc. • 14522 Myford Rd • Irvine, CA 92606 • Phone: 949.833.1384 • Fax714.730.2524 • http://www.evisions.com/support
Getting Started Guide Last Updated 06/13/2006
Fig. 2.28 - Select Statement for Multi-Column Box
The next form ask if you want to pull in the Table definition or the Synonym. There are a few times that the synonym is not pointing to the table with the same name, so if you use the synonym, make sure that it indeed is pointing to the correct table or object. We will select the synoym. Press OK to continue.

Fig. 2.29- Add SSBSECT_CRSE_NUMB
The following form displays the columns for the selected table. To add a column to the query, double click on the column name you want to add. Here we have added the column SSBSECT_CRSE_NUMB. Note the column appears in the GRID on the bottom of the form. In addition to the column, you can add an Alias by typing a value in the alias field of the grid. Here we asign the alias of COURSE.
Page 38 Evisions, Inc. • 14522 Myford Rd • Irvine, CA 92606 • Phone: 949.833.1384 • Fax714.730.2524 • http://www.evisions.com/support
Getting Started Guide Last Updated 06/13/2006

Page 39 Evisions, Inc. • 14522 Myford Rd • Irvine, CA 92606 • Phone: 949.833.1384 • Fax714.730.2524 • http://www.evisions.com/support
Getting Started Guide Last Updated 06/13/2006 Continue to add the following columns:
SSBSECT_SEQ_NUMB as SECTION SSBSECT_CRN as CRN
Once the fields are added, we want to filter the values by the term and subject that the end user selected. Click on the Conditional Field tab to add the conditions in the WHERE clause. Double Click on the SSBSECT_TERM_CODE to add to the grid.
Fig. 2.30 – adding conditions
Click on the condition field to open up another SQL editor window to add the condition. To
list all the variables defined to date, click on the ABC icon ( ) and select the variable SelTerm.CODE. Repeat to filter on the Subject field. Finally, you can change the order by moving over to the Order By tab and selecting the field you want to order the returned rows by. We will order by the CRN. Click OK to continue.

Page 40 Evisions, Inc. • 14522 Myford Rd • Irvine, CA 92606 • Phone: 949.833.1384 • Fax714.730.2524 • http://www.evisions.com/support
Getting Started Guide Last Updated 06/13/2006 When complete the query should look like the following.
Fig. 2.31 – completed query
Click Next to review the results. Again you will be prompted for values for the term and subject. On the data review form there is new button that allows you to modify the properties of the column. To modify the column, click in the column and press the edit button ( )
Fig. 2.32 – edit column properties

Fig. 2.33 - Select Statement for Multi-Column Box
Click Finish to move on. Note that the Alias’s by defaut will be set as the Column name. If no alias is given to a returned value the Column name from the table will be displayed.
Page 41 Evisions, Inc. • 14522 Myford Rd • Irvine, CA 92606 • Phone: 949.833.1384 • Fax714.730.2524 • http://www.evisions.com/support
Getting Started Guide Last Updated 06/13/2006

Page 42 Evisions, Inc. • 14522 Myford Rd • Irvine, CA 92606 • Phone: 949.833.1384 • Fax714.730.2524 • http://www.evisions.com/support
Getting Started Guide Last Updated 06/13/2006
Fig. 2.34 - Set Column Attributes for Multi-Column Box
Multi-Column Boxes are used to create queries or manual entries that will display multiple columns of data. One of the attributes the Developer should consider modifying is the Columns attribute (1). Here you can assign a Display Caption (2), i.e. the caption that will be displayed when the data is displayed. The Column Description will appear when the user creates a report. Finally, the developer can set the column to be Visible(3) or not. If Visible is checked, you can also set the display width for the column (shaded, right).
Fig. 2.35 – Test run with MultiColumn
Lets review what we have so far. Note in the Multi-Column Box, the Titles are being picked up either from the Alias in the SQL statement or from the Column definition. Note that the Subject List box will not populate until we select a term. Likewise the multicolumn box displaying the Course information will not display until we select the Subject.
2 1
3

Getting Started Guide
Last Updated 06/13/2006
Parameter Form - Variables
In the three examples created, the columns have been assigned variable names by using the AS clause of the Select Statement. If no AS clause is used, the variable will be assigned the name of the field or column title.
Fig. 2.36 - List of Variables
When creating the query or manual entries for the different boxes, the values returned will be stored in variables. To see all the variables that have been defined, click on the Variables tab from the Parameter form window. The list of variable objects will be displayed. To see the full list of variables click on the plus sign to expand. In addition to the variables that are being returned via the parameters, there are other Argos system variables that can be used. $USER.name will automatically be set to the user id who is running the query. This could be useful for keeping an audit trail or for determining is this user has the proper access to the underlying tables. These are referred to as System Variables.
Page 43 Evisions, Inc. • 14522 Myford Rd • Irvine, CA 92606 • Phone: 949.833.1384 • Fax714.730.2524 • http://www.evisions.com/support

Page 44 Evisions, Inc. • 14522 Myford Rd • Irvine, CA 92606 • Phone: 949.833.1384 • Fax714.730.2524 • http://www.evisions.com/support
Getting Started Guide Last Updated 06/13/2006 At this point, we still have not answered the question “What
students are enrolled for selected CRN?” Go back to the Parameter form. Since the next element we add will also be the finished report, we can divide the data by adding a line between the selection criteria and the final data. Adding a shape can help in dividing your form or giving the form
more presence. Click on the shape Icon ( ) and position the shape. Click on the Shape property to select the type of shape. We want to add a rectangle. We will also need to change the fill color to Black and change the height to 2 and width to 534. This wproduce a long black line.
ill
Finally, add another Multicolumn box to display the roster for the selected course.
Fig. 2.37 – adding a shape
This is the complete query. We are pulling back the student name as well as additional information:
SELECT SPRIDEN_PIDM as "PIDM", SPRIDEN_LAST_NAME ||' '|| SPRIDEN_FIRST_NAME as "FullName", SPRIDEN_ID as "StudentID", SGBSTDN_MAJR_CODE_1 as "Major", SGBSTDN_LEVL_CODE as "Level", SFRSTCR_RSTS_CODE as "RSTS", SFRSTCR_CREDIT_HR as "CreditHR", SPBPERS_ETHN_CODE as "EthnicCode", STVETHN_DESC as "EthnicDesc", SPBPERS_SEX as "Gender" FROM SGBSTDN, SPRIDEN, SFRSTCR,SPBPERS,STVETHN WHERE SGBSTDN_PIDM = SFRSTCR_PIDM AND SGBSTDN_TERM_CODE_EFF = (SELECT MAX(SGBSTDN_TERM_CODE_EFF) FROM SGBSTDN WHERE SGBSTDN_PIDM = SFRSTCR_PIDM AND SGBSTDN_TERM_CODE_EFF <= :SelTerm.CODE) AND SPRIDEN_PIDM = SFRSTCR_PIDM AND SPRIDEN_CHANGE_IND IS NULL AND SFRSTCR_TERM_CODE = :SelTerm.CODE AND SFRSTCR_CRN = :SelCRN.CRN AND (SFRSTCR_ERROR_FLAG NOT IN ('F','D') OR SFRSTCR_ERROR_FLAG IS NULL OR SFRSTCR_RSTS_CODE IN (SELECT STVRSTS_CODE FROM STVRSTS WHERE STVRSTS_CODE = SFRSTCR_RSTS_CODE AND STVRSTS_GRADABLE_IND = 'Y')) AND SPBPERS_PIDM = SFRSTCR_PIDM AND STVETHN_CODE = SPBPERS_ETHN_CODE
ORDER BY SPRIDEN_LAST_NAME, SPRIDEN_FIRST_NAME

Page 45 Evisions, Inc. • 14522 Myford Rd • Irvine, CA 92606 • Phone: 949.833.1384 • Fax714.730.2524 • http://www.evisions.com/support
Getting Started Guide Last Updated 06/13/2006
Let’s review what we have so far:
Fig. 2.38 – Completed roster

Page 46 Evisions, Inc. • 14522 Myford Rd • Irvine, CA 92606 • Phone: 949.833.1384 • Fax714.730.2524 • http://www.evisions.com/support
Getting Started Guide Last Updated 06/13/2006 At this point we have produced a roster for a selected CRN. Lets go one step more. The
person you wrote this report is satisfied, but would like to display additional information about the course. For example, they would like to know where and when the course meets. We could create another multi-column field, but in the interest of learning something new, we are going to use a unique feature of Argos that allows a Text field to be used to display static text (i.e. labels) as well as variable text. Using a data-aware text field, you can have a text box display any defined variable.
Fig. 2.39 – Adding a New SQL Variable
Lets first add a new SQL query that will retreive information about the selected CRN. Click on the Variables tab. To add a new SQL variable, on the Variable
Form click on the plus icon ( ). The SQL editor window will immediately be displayed. We want to pick up some information from the SSRMEET table. The end query will read as follows:

Fig. 2.40 – renaming variable
When complete, we will want to rename the SQLVariable. We do this by right clicking on the new SQL Variable and selecting Rename Variable. We will call the Variable ‘GetCrseInfo’. Expand the variable to list all the sub-variables available.
Fig. 2.41 – list sub-variables
Page 47 Evisions, Inc. • 14522 Myford Rd • Irvine, CA 92606 • Phone: 949.833.1384 • Fax714.730.2524 • http://www.evisions.com/support
Getting Started Guide Last Updated 06/13/2006

Page 48 Evisions, Inc. • 14522 Myford Rd • Irvine, CA 92606 • Phone: 949.833.1384 • Fax714.730.2524 • http://www.evisions.com/support
Getting Started Guide Last Updated 06/13/2006 Full SQL Statement:
select SUBSTR(NVL(SSBSECT_CRSE_TITLE,SCBCRSE_TITLE),1,40) as "CourseTitle", SSRMEET.SSRMEET_BLDG_CODE as "Bldg", SSRMEET.SSRMEET_ROOM_CODE as "Room", DECODE(TO_CHAR(TO_DATE(SSRMEET_BEGIN_TIME,'HH24:MI'),'HH:MI pm')||'-'||TO_CHAR(TO_DATE(SSRMEET_END_TIME,'HH24:MI'),'HH:MI pm'),'-','TBA', TO_CHAR(TO_DATE(SSRMEET_BEGIN_TIME,'HH24:MI'),'HH:MI pm')||'-'||TO_CHAR(TO_DATE(SSRMEET_END_TIME,'HH24:MI'),'HH:MI pm')) as "MeetingTime", NVL(SSRMEET_SUN_DAY||SSRMEET_MON_DAY||SSRMEET_TUE_DAY||SSRMEET_WED_DAY||SSRMEET_THU_DAY||SSRMEET_FRI_DAY||SSRMEET_SAT_DAY,'TBA') as "MeetingDays", NVL(TO_CHAR(SSRMEET_START_DATE,'MM/DD'),'TBA') as "StartDate", NVL(TO_CHAR(SSRMEET_END_DATE,'MM/DD'),'TBA') as "EndDate", nvl(f_format_name(sirasgn_pidm,'LF30'),'Staff') as "Instructor" from SATURN.SIRASGN SIRASGN, SATURN.SSRMEET SSRMEET, SATURN.SCBCRSE SCBCRSE, SATURN.SSBSECT SSBSECT where ( SSRMEET.SSRMEET_TERM_CODE (+) = SSBSECT.SSBSECT_TERM_CODE and SSRMEET.SSRMEET_CRN (+) = SSBSECT.SSBSECT_CRN and SCBCRSE.SCBCRSE_SUBJ_CODE = SSBSECT.SSBSECT_SUBJ_CODE and SCBCRSE.SCBCRSE_CRSE_NUMB = SSBSECT.SSBSECT_CRSE_NUMB and SIRASGN.SIRASGN_TERM_CODE (+) = SSRMEET.SSRMEET_TERM_CODE and SIRASGN.SIRASGN_CRN (+) = SSRMEET.SSRMEET_CRN and SIRASGN.SIRASGN_CATEGORY (+) = SSRMEET.SSRMEET_CATAGORY ) and (nvl(sirasgn_primary_ind,'Y') = 'Y' and SSBSECT.SSBSECT_TERM_CODE = :SelTerm.CODE and SSBSECT.SSBSECT_SUBJ_CODE = :SelSubject.Subject and SSBSECT.SSBSECT_CRSE_NUMB = :SelCRN.COURSE and SSBSECT.SSBSECT_SEQ_NUMB = :SelCRN.SECTION and SSBSECT.SSBSECT_CRN = :SelCRN.CRN and SCBCRSE.SCBCRSE_EFF_TERM = ( select Max( A.SCBCRSE_EFF_TERM ) from SATURN.SCBCRSE A where A.scbcrse_subj_code = ssbsect_subj_code and A.scbcrse_crse_numb = ssbsect_crse_numb and A.scbcrse_eff_term <= ssbsect_term_code ) )

Fig. 2.42 – Setting Data Aware Attribute
On the parameter form, we are going to add a ‘Static’ text field, however we need to make it Data Aware. On the attribute form, note the label Data Aware. Set this to YES. (1) Next go to the TEXT attribute (2). Typically you would type the text you want to be displayed. This time however, note the Expansion arrow. When expanded, a list of all variables that have currently been defined will be listed. Select the variable we just added on the Variables form (GetCrseInfo.Bldg). Change the font of the Data Aware Variable by select the Font attribute (3). Repeat to add other fields from the GetCrseInfo Query.
Hit the Test Icon ( ) and review the output. Note that the Course information is displayed for the selected course. Fig. 2.43 – Final Test
Page 49 Evisions, Inc. • 14522 Myford Rd • Irvine, CA 92606 • Phone: 949.833.1384 • Fax714.730.2524 • http://www.evisions.com/support
Getting Started Guide Last Updated 06/13/2006
3
2
1

Page 50 Evisions, Inc. • 14522 Myford Rd • Irvine, CA 92606 • Phone: 949.833.1384 • Fax714.730.2524 • http://www.evisions.com/support
Getting Started Guide Last Updated 06/13/2006 3 – REPORT DATABLOCK
Adding a Report DataBlock A complete report can be written by just using the Parameter Form. However, to give more flexibility or create more complex reports, you can also create a Report DataBlock. By using the Report DataBlock the developer has more control over what the end user will see. This Report DataBlock can be used to answer a multitude of questions. When the end user creates a report from a Report DataBlock, they will also have more control over what is displayed. They can generate a report containing only the columns they want to be displayed. In addition, the data can be extracted for further manipulation into programs such as Excel, or the finalized report can be printed. Argos includes a Band Editor that allows the output to be fully formatted. Add the DataBlock the same way as CRNRoster (QV)” was created. Review the steps as outlined in Fig. 2.1 to 2.4. In our sample we will call the DataBlock “PurchaseOrders”. We want to be able to run reports that will show any orders placed for selected vendor. We want the item, product number, product description, order status, payment terms, etc. In other words, any information about a placed order should be available. In addition, we want to be able to print off mailing for our vendors. From this one Report DataBlock, many different reports will be run. We will discuss creating these reports in Chapter 5.

Page 51 Evisions, Inc. • 14522 Myford Rd • Irvine, CA 92606 • Phone: 949.833.1384 • Fax714.730.2524 • http://www.evisions.com/support
Getting Started Guide Last Updated 06/13/2006
Fig. 3.1 – Customer Query for OrderReport
After adding the new DataBlock, click the Edit button. This will take you immediately to the Query Design screen. First we will need to create a parameter that will pull back the Vendor IDs. To do this, go to the Parameter Design form and add a List Box as outlined in the previous chapter. We want this to be a Multi Select so the end user can select one or all vendors. Therefore, make sure to set Multi Select to YES. We also want to narrow the Purchase orders for selected date range. We wil add two date objects to define this date range.

Fig. 3.2a – adding date fields – StartDate
Fig. 3.2b– adding date fields – EndtDate
To add a date object, click on the Date icon ( ) and place on the form. By default the date is blank. You can set a default date by setting the Date attribute to the desired date. Optionaly you can have the date automaticatically default to the current system date. Remember to assign an appropriate variable name. Add a date for both a starting and ending date as we want to narrow the PO’s by a date range. By setting the ending date to defalut to Today’s date, we do not need to have the user enter current date.
Page 52 Evisions, Inc. • 14522 Myford Rd • Irvine, CA 92606 • Phone: 949.833.1384 • Fax714.730.2524 • http://www.evisions.com/support
Getting Started Guide Last Updated 06/13/2006

Getting Started Guide
Last Updated 06/13/2006
Adding Query
Fig. 3.3 – access Query design form to write main query
We have added the parameters we need to filter the data. Now we need to pull back from Banner the information about the PO’s for selected vendor(s). Eventually we want to create reports that our end users can quickly print off, or save as a PDF file, or even schedule to be run in the evening. To do this, we need to use the Query Design form, which is accessible by clicking on the Query Design Tab. A blank form on which we will create our query will be displayed.
Fig. 3.3 – access Query design form to write main query
Page 53 Evisions, Inc. • 14522 Myford Rd • Irvine, CA 92606 • Phone: 949.833.1384 • Fax714.730.2524 • http://www.evisions.com/support

Page 54 Evisions, Inc. • 14522 Myford Rd • Irvine, CA 92606 • Phone: 949.833.1384 • Fax714.730.2524 • http://www.evisions.com/support
Getting Started Guide Last Updated 06/13/2006
Fig. 3.4 - Adding Tables via List
We want To display all the tables in the scheme that you have access to, click the Show Tables
( ) button. A list of all the tables the developer has access to will be displayed. Tables by default will be shown by Schema. All the tables we are working with are owned by the user FIMSMGR. By expanding the schema FIMSMGR you will see the objects sorted by type. This display can be changed. Play around with the Object Organizer bar (
) to see how the objects can be sorted and grouped. For example, for organizing a large amount of objects, you can group by the first letter.
Fig. 3.5– Adding Table Definition
To add a table, locate the table in the list and double-click. This will pull the table definition to the right-hand side of the screen. You can either scroll or start typing the name of the table, entering enough unique characters to identify. We want to add the table FPBPOHD, which is the ‘header’ table for Purchase Orders. Every purchase order created in Banner will have at least one record in the FPBPOHD table. n The Columns can be displayed in alphabetical order by clicking on
the icon.

Page 55 Evisions, Inc. • 14522 Myford Rd • Irvine, CA 92606 • Phone: 949.833.1384 • Fax714.730.2524 • http://www.evisions.com/support
Getting Started Guide Last Updated 06/13/2006 If you are editing an existing DataBlock, the icon can be used to ‘refresh’ the table
definition. Use this if you feel the table definition is not current, eg. the table itself has been modified - fields have been added.
If the table is no longer needed in the query, remove the table definition by using the button.
Fig. 3.6 - Adding Tables Manually
If you know the name of a table, you can add it directly without searching through the list. Click on the Add Table button and fill in the name of the table you wish to add. We need to add the ‘detail’ table for the Purchase orders – FPRPODT.
Fig. 3.7 – Choose table or synonym
You will be asked if you wish to bring in the table definition or the Synonym definition. Typically in Banner the synonym points to the table. There are rare instances, however, that the synonym points to something else. There is no hard and fast rule as to what should be used. The synonym might be the safest.

Getting Started Guide
Last Updated 06/13/2006
Defining Joins
Fig. 3.8 – Generated Join
When the table is brough in, Argos is looking at the Meta Layer to determine if any joins exist. If one exist, it will be added immediately. However, manually adding a join is staight forward. To create a Join, merely select the field from one table and while holding down the mouse key, draw a line to the field in the second table that you wish to join. Here we want to connect our two tables based on the Purchase order number which is held in the fpbpohd_code column for the fpbpohd table and fprpodt_pohd_code field in the detail table.
Page 56 Evisions, Inc. • 14522 Myford Rd • Irvine, CA 92606 • Phone: 949.833.1384 • Fax714.730.2524 • http://www.evisions.com/support

Page 57 Evisions, Inc. • 14522 Myford Rd • Irvine, CA 92606 • Phone: 949.833.1384 • Fax714.730.2524 • http://www.evisions.com/support
Getting Started Guide Last Updated 06/13/2006
Fig. 3.9 - Edit Joins
By default an Inner Join will be created. To edit the properties of the join, right click or double-click on the join line. Argos supports Outer right and Outer left joins.

Page 58 Evisions, Inc. • 14522 Myford Rd • Irvine, CA 92606 • Phone: 949.833.1384 • Fax714.730.2524 • http://www.evisions.com/support
Getting Started Guide Last Updated 06/13/2006 To generate all the data we want, we will need to add additional tables:
SPRIDEN – Person ID table FTVBUYR - Validation table for all buyers FTVCOMM – Validation table for commodities The header (fpbohd) table needs to connect to the SPRIDEN table based on the fobpohd_vend_pidm equal to spriden_pidm (inner join). The commodity table needs to be joined to the detail (fprpodt) table based on the fprpodt_comm_code matching ftvcomm_comm_code. However, it is possible that there is not a match, therefore we want to do an Outer join, pulling in all records from the detail table and only those in the commodity table where there is a match. We do this by creating the join first and then editing the join to be an ‘outer left join’ if you drew the connection from FPRPODT to FTVCOMM or ‘outer right join’ if connected from FTVCOMM to FPRPODT.
Fig. 3.7 – creating outer join
Similarly, we need to join the buyer table using an outer join to the header (fpbpohd) table based on the fpbpohd_buyr_code matching the ftvbury_code. We want to include all the records from the header table and only records from the buyer table where there is a match.

Page 59 Evisions, Inc. • 14522 Myford Rd • Irvine, CA 92606 • Phone: 949.833.1384 • Fax714.730.2524 • http://www.evisions.com/support
Getting Started Guide Last Updated 06/13/2006
Fig. 3.7 - Review SQL Statement
At any point you can review the SQL statement that is being built by clicking on the Review
SQL button Notice that the joins are automatically built into the WHERE clause of the SQL statement that has been built thus far.
Fig. 3.8 - Commit Modifications
It is also important to save your work while working. To save what has been built to date, push the Commit Changes button on the form.

Getting Started Guide
Last Updated 06/13/2006
Adding Fields
Fig. 3.9 - Adding Fields by 'clicking'
Now that all the tables have been added, the developer will need to add the fields that we want to pull data from. There are several ways of adding a field to a query. The easiest is by double-clicking on the field name displayed in the Table description. In this example, the developer double clicked on the fpbpohd_code field and it droped down to the “Visible Fields (SELECT)” section. At this point, the developer should assign an Alias to the field. This will be the name that is displayed to the end user. Make the name meaningful, as again, this is how the end user will refer to the field. In addition to a short description the developer can (and should!) assign a Long Desc[ription]. The long description will be used to give more information to the end user.
Page 60 Evisions, Inc. • 14522 Myford Rd • Irvine, CA 92606 • Phone: 949.833.1384 • Fax714.730.2524 • http://www.evisions.com/support

Fig. 3.10 - Adding Field Manually, Selecting Table
Fig. 3.11 - Select Field Manually, Selecting Column
There also is a second method of adding a data field to a query. First, position your cursor on the Table row on the ‘Visible Fields (SELECT)’ grid. Note that a drop down arrow now appears. Click on the arrow and all the tables selected will be displayed. Select the table containing the field you want to include in the query. Here we selected the table FPBPOHD. Next repeat on the Field row of the grid. Note that the columns or fields for the selected table are displayed. Select the field. The field FPBPOHD_ACTIVITY_DATE was selected in this case.
Fig. 3.12 - Adding 'Calculated' Field
In addition to selecting a column from an existing table, there are times that you might want to reformat the data or use other SQL functions (concatenate, substr, DECODE …) or a PL/SQL function provided by Banner. Argos allows the user to create such fields. From the Table row of the ‘Visible Fields (SELECT)’ grid, choose <calculated> from the drop down list.
Fig. 3.13 - SQL Statement for Sample 'Calculated' Field
Next, click on the Field row on the grid and a ‘SQL Editor’ box is displayed. Here, the developer can create a field using SQL functions. In this example, we want to pick up the first three characters of the Product description. We will use the Banner function to return the Chart of Accounts description.
Page 61 Evisions, Inc. • 14522 Myford Rd • Irvine, CA 92606 • Phone: 949.833.1384 • Fax714.730.2524 • http://www.evisions.com/support
Getting Started Guide Last Updated 06/13/2006

Page 62 Evisions, Inc. • 14522 Myford Rd • Irvine, CA 92606 • Phone: 949.833.1384 • Fax714.730.2524 • http://www.evisions.com/support
Getting Started Guide Last Updated 06/13/2006
Fig. 3.14 - Adding Description for Calculated Field
Finally, because this is a calculated field, it is important that we create both an alias and a long description. This will allow the end user to quickly identify the values in this field. Using a long description, the developer can clearly explain what is contained in the column. Note that by default Argos will automatically add an alias for calculated fields, starting with CALC1.
Fig. 3.15 – Adding Calc Field using Built-in Argos Functions.
When adding a caculated field, there are several tools on the SQL Editor form that make it easier to create the function. The developer can quickly add arithmetic and logical functions. Here we are calculating a discount on 10 percent.
Fig. 3.16 – Display Variables
When creating the above statements, you can display a complete list of fields from the
selected tables, click on the icon. A list of the qualified columns (table and column name) will be displayed.

Fig. 3.17 – Display Variables
There are times you need to add values that were entered in on the parameter form. For example, in our report, we might want to display the date range selected by the user. Thus we need the values for StartDate and EndDate. First add a Calculated field and expand the field property button.
By clicking on the ‘abc’ icon, a list of any variable created on the parameter form will be displayed. To add any listed variable that were created on the Parameter Design form, click the ‘abc’ icon and select the desired variable.
Page 63 Evisions, Inc. • 14522 Myford Rd • Irvine, CA 92606 • Phone: 949.833.1384 • Fax714.730.2524 • http://www.evisions.com/support
Getting Started Guide Last Updated 06/13/2006

Page 64 Evisions, Inc. • 14522 Myford Rd • Irvine, CA 92606 • Phone: 949.833.1384 • Fax714.730.2524 • http://www.evisions.com/support
Getting Started Guide Last Updated 06/13/2006 We continue adding columns and defining fields until all desired data is added.
Remembering the end user, make sure to also add descriptions! The final select part of our statement should be something like the following:
select FPBPOHD.FPBPOHD_CODE "PO_Number", FPBPOHD.FPBPOHD_ACTIVITY_DATE "ActivityDate", FPRPODT.FPRPODT_UNIT_PRICE * FPRPODT.FPRPODT_QTY * .10 "CalcDiscount", :StartDate "StartDate", :EndDate "EndDate", FPBPOHD.FPBPOHD_PO_DATE "PO_Date", FPBPOHD.FPBPOHD_TRANS_DATE "Transaction_Date", NVL(FPBPOHD_CLOSED_IND,'N') "Closed", NVL(FPBPOHD_COMPLETE_IND,'N') "Complete", FPBPOHD.FPBPOHD_PO_PRINTED_DATE "Print_Date", FPBPOHD.FPBPOHD_BUYR_CODE "BuyerCode", FTVBUYR.FTVBUYR_NAME "BuyerName", FPBPOHD.FPBPOHD_COAS_CODE "COAS", f_get_finance_desc('FTVCOAS',FPBPOHD_COAS_CODE,NULL,30) "COASDesc", SUBSTR(f_get_finance_status('FTVCOAS',FPBPOHD_COAS_CODE,NULL),1,1) "COAS_Status", FPBPOHD.FPBPOHD_SHIP_CODE "Shipping_Code", FPRPODT.FPRPODT_ITEM "ItemNumber", FPRPODT.FPRPODT_COMM_CODE "CommCode", NVL(FPRPODT_COMM_DESC,FTVCOMM_DESC) "CommodityDescription", FPRPODT.FPRPODT_UOMS_CODE "UOMS", FPRPODT.FPRPODT_UNIT_PRICE "UnitPrice", FPRPODT.FPRPODT_QTY "QTY", FIMSMGR.FPRPODT.FPRPODT_UNIT_PRICE * FIMSMGR.FPRPODT.FPRPODT_QTY "Amount", FPRPODT.FPRPODT_DISC_AMT "Discount", FPRPODT.FPRPODT_TAX_AMT "Tax", FPRPODT.FPRPODT_ADDL_CHRG_AMT "AdditionalCharge", SPRIDEN.SPRIDEN_LAST_NAME "VendorLastName", SPRIDEN.SPRIDEN_FIRST_NAME "VendorFirstName", SPRIDEN.SPRIDEN_ID "VendorID"

Getting Started Guide
Last Updated 06/13/2006
Conditional Statement At this time, we have created the first part of the SQL statement – i.e. what fields or columns to include and how tables are related. However, there is normally a need to limit the query by some criteria. In our sample here we want to limit what is being shown by the vendor id’s and the date range selected on the parameter form. This requires us to add a criteria or parameter via the Parameter Design form.
Fig. 3.18 - Adding Conditional Fields
Fig. 3.19 - Adding Table to Conditional
From the Query Design window, click
Alternatively you can double clic
Evisions, Inc. • 14522 Myford Rd • Irvine
1
on the Conditional Fields (WHERE) tab (1). Fields (columns) are defined or selected the same way as described when creating the select statement. We need to add the conditions to only select the PO for the selected Vendors, between the selected dates.
2
3
First, select ‘AND’ or ‘OR’ as the condition. (2). Then select the table CUSTOMER from the list of tables. (3) Next add the field (4).
Fig. 3.20 - Adding Fields to Condition
k on the column you wish to add.
Page 65 , CA 92606 • Phone: 949.833.1384 • Fax714.730.2524 • http://www.evisions.com/support
4
al

Fig. 3.21 - Adding Variables to Conditional
To add the actual condition, click on the ellipsis “…” on the Condition line and enter the condition that needs to be met. To display all available
variables, click on the icon on the bottom of the editor. Then double-click on the varable. In this example, we manually typed the equal (=) sign and select the variable CUSTOMER.ID from the drop down list. CUSTOMER.ID is the variable we created on the parameter form. Note that by default the equal sign is assumed and we really did not need to enter. However, any other relationship then equal would need to be typed.
Fig. 3.22 – Expert Mode Icon
For those of you who do not need the GUI aid for adding a WHERE clause, Argos provides ‘expert’ mode. At the bottom left-hand corner of the WHERE clause, there is an icon that
looks like this . Clicking it opens an edit form.
Fig. 3.23 – Manually Entering WHERE Clause
On the edit form the developer can manually type the complete WHERE clause. Note that you can use either the point-and- click method or manually enter the statement. Use either method--but not a combination! Note that we have added all the conditions desired.
Page 66 Evisions, Inc. • 14522 Myford Rd • Irvine, CA 92606 • Phone: 949.833.1384 • Fax714.730.2524 • http://www.evisions.com/support
Getting Started Guide Last Updated 06/13/2006
Getting Started Guide
Last Updated 06/13/2006
Order By
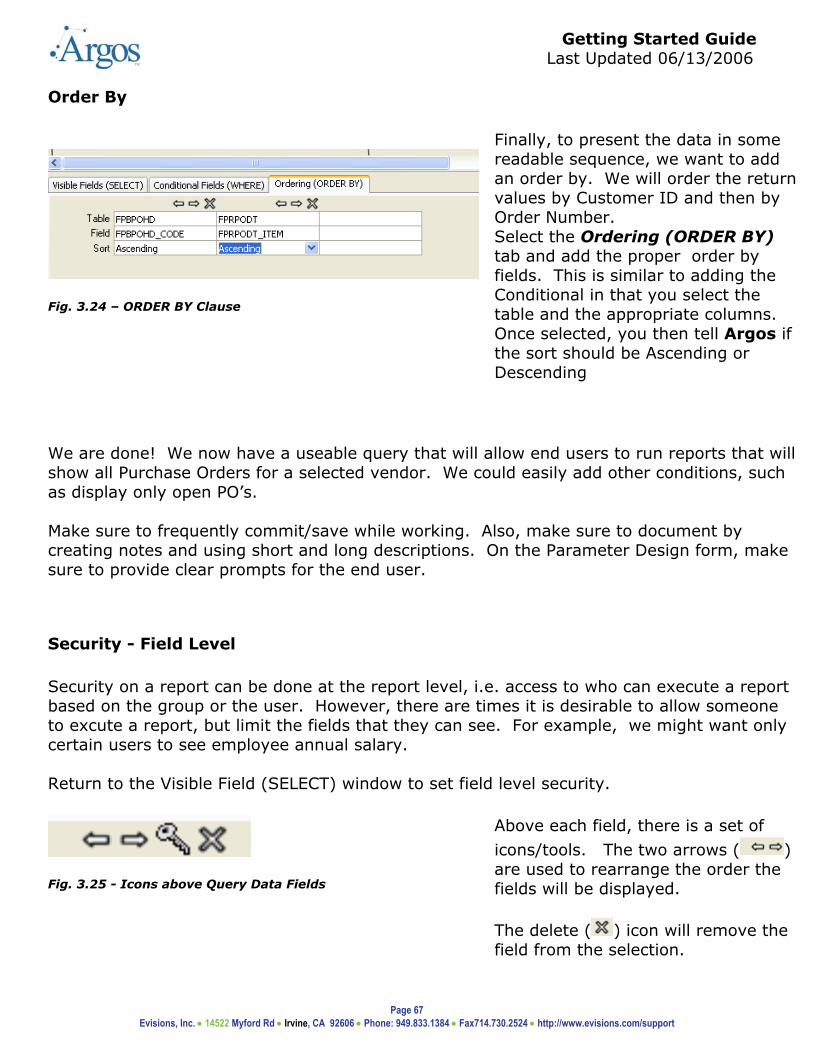
Fig. 3.24 – ORDER BY Clause
Finally, to present the data in some readable sequence, we want to add an order by. We will order the return values by Customer ID and then by Order Number. Select the Ordering (ORDER BY) tab and add the proper order by fields. This is similar to adding the Conditional in that you select the table and the appropriate columns. Once selected, you then tell Argos if the sort should be Ascending or Descending
We are done! We now have a useable query that will allow end users to run reports that will show all Purchase Orders for a selected vendor. We could easily add other conditions, such as display only open PO’s. Make sure to frequently commit/save while working. Also, make sure to document by creating notes and using short and long descriptions. On the Parameter Design form, make sure to provide clear prompts for the end user.
Security - Field Level Security on a report can be done at the report level, i.e. access to who can execute a report based on the group or the user. However, there are times it is desirable to allow someone to excute a report, but limit the fields that they can see. For example, we might want only certain users to see employee annual salary. Return to the Visible Field (SELECT) window to set field level security.
Fig. 3.25 - Icons above Query Data Fields
Above each field, there is a set of
icons/tools. The two arrows ( ) are used to rearrange the order the fields will be displayed. The delete ( ) icon will remove the field from the selection.
Page 67 Evisions, Inc. • 14522 Myford Rd • Irvine, CA 92606 • Phone: 949.833.1384 • Fax714.730.2524 • http://www.evisions.com/support

Fig. 3.26 - Adding Field (Column) Level Security
To limit access to a particular field, click on the ‘key’ ( ) icon above the field or column. Then press the Add button. A list of all users and groups will be displayed. Select the user or group and select the Allow or Deny radio button. Here, we are denying the user ‘joe’ the access to see a particular field.
Fig. 3.27 – Adding User to Field Level Security
Fig. 3.28 – Review Field Level security
Security can also be added by
clicking on the set of keys ( ) to the left of the visible field list.. By using these, the developer can review what field level security has been set and add, delete or modify security on multiple fields.
Page 68 Evisions, Inc. • 14522 Myford Rd • Irvine, CA 92606 • Phone: 949.833.1384 • Fax714.730.2524 • http://www.evisions.com/support
Getting Started Guide Last Updated 06/13/2006

Page 69 Evisions, Inc. • 14522 Myford Rd • Irvine, CA 92606 • Phone: 949.833.1384 • Fax714.730.2524 • http://www.evisions.com/support
Getting Started Guide Last Updated 06/13/2006 4 – Advanced Report DataBlock
The DataBlock defined in the previous example was pretty straightforward. By first selecting the tables and creating the relationship, the majority of the WHERE clause was created for us. For example, in to operating accounting ledger table (FGBOPAL) all the data for each FOAPAL is strung out in one row; i.e. one row contains the budget information for multiple periods. If you wanted to return one row per period for selected FOAPAL, you would need to do a UNION. In addition there are times that a WHERE clause is more complex and requires a ‘sub-query’. Argos provides a method of creating a sub-query and using this in the WHERE clause. In this chapter we will discuss adding a UNION and a subquery. The final topic will show you how to create a query without using the wizard.
Unions The one caveate with UNIONS is that each select statement must have an equal number of expressions in their list. In addition, these expressions (column names, literals, dates, results from functions, etc.) must be of compatibile data types. For example, if the expression evaluates to a date in one query, it must evaluate as a date in the second. Argos will not check the syntax of the UNION until execution, so it is up to the developer to make sure these conditions are met.
Fig. 4.1 – Show Unions
Fig. 4.2 – Type of Unions
To add a UNION, go to the Query Design window and click on the
icon along the top. The next form allows you to select the type of UNION you want to add.

This is the standard union that combines the results of the two queries into one result. Duplicate records are excluded.
Use this for a UNION ALL which combines the results of two queries into one. Duplicate records are not removed.
This is for an INTERSECT union which returns only those records that exisit in both queries.
Use this icon for a MINUS union. This removes records that exisit in both queries.
Fig. 4.3 – Adding a Union
We are going to use a UNION ALL so
we will click on the icon. You create the underlying query as before – adding the tables and columns. Argos does not check to make sure you have added the correct number of columns or that the datatypes of the columns added are the same. That is the responsibility of the developer. Therefore, make sure to test!
Note that when adding columns in the UNION window, there is no spot for the “AS” or “Description” fields (1). These will default to the values set in the Main query.
Page 70 Evisions, Inc. • 14522 Myford Rd • Irvine, CA 92606 • Phone: 949.833.1384 • Fax714.730.2524 • http://www.evisions.com/support
Getting Started Guide Last Updated 06/13/2006
2 1

Getting Started Guide
Last Updated 06/13/2006
Create a Sub-Query A sub-query is frequently used in the where clause to limit the number of records returned in the main query. For example, in Banner, a student can have multiple records in the Student general information table (SGBSTDN). Every time the student changes a major or level, a new record will be entered. When pulling back data from this table you want to make sure you get the correct data based on the term being queried. In the example below, we have already created a query where we are getting the major for the selected student from the SGBSTDN table. The sub-query is added to make sure the major is for the selected term.
Fig. 4.4 - Create a Sub-Query
First a sub-query needs to be created. From the Query Form, press the Sub-Query button (1). A new Query Form is displayed. Here you can add tables as shown earlier. We’ll add the table SGBSTDN. Another feature of Argos is the ability to add an alias for the table as well as columns. To add a table alias, click on the Edit Properties Icon (2) and fill in an alias. In this example we are ‘re-naming the table ‘A’ (3).
1
2
3
Page 71 Evisions, Inc. • 14522 Myford Rd • Irvine, CA 92606 • Phone: 949.833.1384 • Fax714.730.2524 • http://www.evisions.com/support

Fig. 4.5a – Add Condition to Sub-Query
Using what you have learned earlier, we will need to create the following query: select Max( A.SGBSTDN_TERM_CODE_EFF ) from SATURN.SGBSTDN A where A.SGBSTDN_PIDM = SGBSTDN.SGBSTDN_PIDM and A.SGBSTDN_TERM_CODE_EFF <= :TERM.TERM To add the MAX, select the column as normal (SGBSTDN_TERM_CODE_EFF) and then click on the summation sign
( ). A new row is displayed in the Visable Fields labeld Summing. Here select MAX to choose the Maximum term effective term code.
Page 72 Evisions, Inc. • 14522 Myford Rd • Irvine, CA 92606 • Phone: 949.833.1384 • Fax714.730.2524 • http://www.evisions.com/support
Getting Started Guide Last Updated 06/13/2006
2
1

Page 73 Evisions, Inc. • 14522 Myford Rd • Irvine, CA 92606 • Phone: 949.833.1384 • Fax714.730.2524 • http://www.evisions.com/support
Getting Started Guide Last Updated 06/13/2006
Fig. 4.5b – Add Condition to Sub-Query
Add the conditions to make sure the PIDM (internal ID) from the sub-query SGBSTDN matches the pidm from the SGBSTDN in the main query. To do this, on the conditional field, select the A.SGBSTDN_PIDM as the field. Then open up the condition tabl. To display all the tables in the query, press the Display Table icon ( ). This displays all the tables – including the ones from the main query. Select the SGBSTDN_PIDM field. We also want to add the condition where A.SGBSTDN_TERM_CODE_EFF <= :TERM.TERM. Which is coming from the parameter form.
Fig. 4.6 – Sub-Query Added to Conditional
The final step is to add the results of the sub-query into the conditional. Click on the Add SubQuery to Condition icon ( ) (1). Select the Condition – here we are selecting <= (2) and fill in table and column. Here we are indicating the table SGBSTDN, field SGBSTDN_TERM_CODE_EFF should be <= to the MAXIMUM sgbstdn_term_code_eff for the selected student.
1
2

Page 74 Evisions, Inc. • 14522 Myford Rd • Irvine, CA 92606 • Phone: 949.833.1384 • Fax714.730.2524 • http://www.evisions.com/support
Getting Started Guide Last Updated 06/13/2006
In the final query the WHERE clause would read: and SGBSTDN.SGBSTDN_TERM_CODE_EFF = ( select Max( A.SGBSTDN_TERM_CODE_EFF ) from SATURN.SGBSTDN A where A.SGBSTDN_PIDM = SGBSTDN.SGBSTDN_PIDM and A.SGBSTDN_TERM_CODE_EFF <= :TERM.TERM )

Getting Started Guide
Last Updated 06/13/2006
Advance Query In Chapter 3 we spent a great deal of time showing you how to create a query using a point and click method to add tables and fields. There are times you already have a SQL statement created in some other tool and you really just want to drop that query into Argos without having to manually re-do the query. This is possible by using the ‘Advance Mode’ Query button. On the top of Argos datablock
form you will see three icons. ( ) The first one (green arrow) we have used to review the datablock we have created to date. The spyglass allows the developer to look at what Argos will actually save in the database. This is all XML and typically is used only to debug problems. The last icon (the pacifier) is used to go into the Advance Query Builder mode. Clicking on the Icon will take you to a blank form.
Fig. 4.7 – Advance Query Builder Form
Page 75 Evisions, Inc. • 14522 Myford Rd • Irvine, CA 92606 • Phone: 949.833.1384 • Fax714.730.2524 • http://www.evisions.com/support

Page 76 Evisions, Inc. • 14522 Myford Rd • Irvine, CA 92606 • Phone: 949.833.1384 • Fax714.730.2524 • http://www.evisions.com/support
Getting Started Guide Last Updated 06/13/2006 On the right hand side you can paste in an existing SQL statement or create a new SQL
statement from scratch. Once the Query is pasted or created, click on the ‘Refresh Field’
icon ( ) located at the top of the left side of the form. This will execute the query and when done, the fields in the query will be listed on the left side of the form.
Fig. 4.8 – Advance Query Builder Form completed
Security on fields can be set on the Free Type form in the same manner as on the Query Design form. The main thing to note is that when building a query, it is either/or. You can either use the Free Type or the Query Design.

Page 77 Evisions, Inc. • 14522 Myford Rd • Irvine, CA 92606 • Phone: 949.833.1384 • Fax714.730.2524 • http://www.evisions.com/support
Getting Started Guide Last Updated 06/13/2006
5 – Reports The developer or users who have been given the proper Argos permissions can create reports. Please review the Argos Administration and Argos Security White Paper for further information on adding users and modifying security. There are three general types of reports. A Quick View Report is based off of a QuickView DataBlock. Although the user can save the returned data, the power of a QuickView Report is that the user can quickly and easily retrieve/view the data with a minimum of trouble. This really is “Information Access.” The second type, a CSV Report is based on a Report DataBlock. Here, the report creator has more control over what fields will be displayed (and how), and may add fields. The selected data will be extracted in a form usable by other applications. The final type is a Banded Report. This also is based on a Report DataBlock. The report creator has control over what fields will be displayed, as well as how they are displayed. Using the Banded Report, the end user can organize the data into logical banded areas. The final output can be printed or saved in some other format.
QuickView Reports We begin with a different sample than the one created earlier in the document. We will be accessing a roster based on Term and selected CRN. After the complete roster is accessed, the user can pull up the schedule for a selected student, and obtain their GPA.

Fig. 5.1 – Adding New Report to a QuickView DataBlock
Select the QuickView Datablock for which you want to add a new report, right-click, then select New > Report from the menu. An optional method is to again select the DataBlock and press the New Report button
Fig. 5.2 – Select Type of Report
The next form gives you an opportunity to select the type of report to generate. At this time, since this is a QuickView datablock, the the only option available is to create a ‘QuickView’ report. If you were to edit the DataBlock, you would see that there is no query and that all the data is being retrived by the options or paramters selected by the end user.
Page 78 Evisions, Inc. • 14522 Myford Rd • Irvine, CA 92606 • Phone: 949.833.1384 • Fax714.730.2524 • http://www.evisions.com/support
Getting Started Guide Last Updated 06/13/2006

Fig. 5.3 – Edit/Describe Report
The next form allows the report creator to name the report as well as provide a description. In addition, you can mark the report Public or Private. A Public report is accessible to anyone with access to the DataBlock. A Private report will be seen by only the creator of the report. Give the report a meaningful name as well as good description. Click the Finsh button to save the report.
Fig. 5.4 – Adding Notes to a Report
After the report is added, you can also add Notes. This is useful for noting characteristics of the report, when to run the report, etc. To add a note, highlight the report just added (1) and from the menu
select Notes ( ) (2).
Page 79 Evisions, Inc. • 14522 Myford Rd • Irvine, CA 92606 • Phone: 949.833.1384 • Fax714.730.2524 • http://www.evisions.com/support
Getting Started Guide Last Updated 06/13/2006
2
1

Fig. 5.5– Choosing a Connection
Under the DataBlock, a new icon will now be displayed. To run the
report, click on the icon or from the menu select execute (
). If no default database has been selected the user will be forced to select the connection. A list of available connections will be displayed.
Fig. 5.6 – Run and Save Quick View Report
The end-user will need to make the proper selections until the complete roster for the selected term/course is displayed. If the user wants to save the data, they can right-click on the displayed data, then choose Save Results. By default, the columns in the last parameter executed will be checked. The end-user can select other columns as required. To save as a comma delimited file, press the Save button. Press the Launch button to save the data and then have the data displayed in an Excel spreadsheet.
Page 80 Evisions, Inc. • 14522 Myford Rd • Irvine, CA 92606 • Phone: 949.833.1384 • Fax714.730.2524 • http://www.evisions.com/support
Getting Started Guide Last Updated 06/13/2006

Getting Started Guide
Last Updated 06/13/2006
CSV Reports A report based on a Report DataBlock provides the user with the ability to not only select what fields they wish to include in the query, but also they can manipulate existing columns – for example, reformat distinct columns into one field. A CSV report will extract the data from the report and allow the user to save the data in CSV format. The saved data can then be reviewed in Excel for further manipulation.
Fig. 5.7 – Types of Report DataBlock Reports
A CSV report can only be created on a Report DataBlock. To create a CSV report, select the DataBlock, right click and select NEW/Report from the list. Optionally select the Datablock and select New Report (
) from the menu. From the list of options select the Comma Delimited (CSV) option
( ) Note that even though this is a Report datablock, you can still create a QV report. However, the main query will not execute. Click Next to continue.
Page 81 Evisions, Inc. • 14522 Myford Rd • Irvine, CA 92606 • Phone: 949.833.1384 • Fax714.730.2524 • http://www.evisions.com/support

Page 82 Evisions, Inc. • 14522 Myford Rd • Irvine, CA 92606 • Phone: 949.833.1384 • Fax714.730.2524 • http://www.evisions.com/support
Getting Started Guide Last Updated 06/13/2006
Fig. 5.8 – Select Columns to Appear in Report
The next form gives the option of selecting which fields or columns to include in the report. Initially, all the columns are listed on the left side. Note that the alias that were assigned by the Developer are the names that are listed. Also note, that if any descriptions were given for a column, they would be displayed when the column is selected(1). To add the column to the report select the column and press the single arrow (2). Using the shift or ctrl key, the user can select more than one column. To add all the columns, select the double arrows . We will not be adding all the fields, as we want to format some of the fields. To add a new field select
the Equation Builder icon ( ).
1
2

Page 83 Evisions, Inc. • 14522 Myford Rd • Irvine, CA 92606 • Phone: 949.833.1384 • Fax714.730.2524 • http://www.evisions.com/support
Getting Started Guide Last Updated 06/13/2006
Fig. 5.9 - Available Built-in Functions
When the Equation Builder icon is clicked, the expression buillder window will be displayed. The user can manually type the expression. Or, you can use the point-and- click method. Click on
the to get a complete list of built-in Argos functions. The Function Builder is point-and-click. The user will be guided through creating new fields. We will be formatting the last line of the address and will not need any of these functions. Click cancel to return to the Expression Builder form.
Fig. 5.10 – Adding Formatted Fields
Click on the icon to get a complete list of all the fields from the query. As is other forms, this icon will pull up all the available fileds. Click on the desired column. Note that when added the variable will be surrounded by brackets; i.e. {}. To join two fields, use the plus (+) sign. Here we are concatanting the City and state fields, seperating by a comma and space. The complete string will look like: {VendorLastName} + “, “ + {VendorFirstName}

Page 84 Evisions, Inc. • 14522 Myford Rd • Irvine, CA 92606 • Phone: 949.833.1384 • Fax714.730.2524 • http://www.evisions.com/support
Getting Started Guide Last Updated 06/13/2006
Fig. 5.11 – Finished Field Definition
Click close to save the Expression Builder. You will then be prompted to assign a name to this new field. When complete, the new field will be listed. Note that it is identified with the Equation Builder Icon. To edit this field, use the Edit
Equation Builder icon ( ).
Fig. 5.12 – Re-arranging Fields
Continue to add the fields you want in the report. Note the order of the fields can be changed by selecting the field and right clicking.
When all the fields have been added, click Finish. As with the QuickView report, you can make this a puplic (all users, with proper permissions, can execute) or private. Make sure to give the report a name and a description. To run, the user will click Execute. After making choices on the parameter form, they will then be given an opportunity to save the data to a file or save and launch. If they choose the later, the data will be displayed in Excel.

Getting Started Guide
Last Updated 06/13/2006
Banded Report The last type of report the developer can add is referred to as a Banded Report. A Banded Report can only be added to a Report DataBlock. Using the Band Editor, the developer can product fully formatted reports that can be saved as a PDF file or previewed and printed. The formatted report can also be saved as a Rich Text Format (.rtf) or Excel format (xls). Using the Band Editor, you can also produce mailing labels. For complete instructions on using the Band Editor, see the Argos Band Editor User Guide.
Fig. 5.13 – Banded Report Definitions
Add the report using the steps outlined above, but select the
Banded Editor icon ( ). On the next screen you can select the type of report you wish to create. Using the first option (New Blank Report) you will be taken to a completely blank page where you design the report from scratch. For more information on using this option, check the Argos Band Editor User Guide. The other options will assist you in creating a report. We will be creating a ‘List Style Report’ where all the records will be listed in columns. Click Next to continue.
Page 85 Evisions, Inc. • 14522 Myford Rd • Irvine, CA 92606 • Phone: 949.833.1384 • Fax714.730.2524 • http://www.evisions.com/support

Fig. 5.14 – Select Dataset for Banded Report
On the next form, you will select the dataset which contains the data on which the report will be based. Select the ArgosData option and click Next to continue.
Fig. 5.15 – Select Fields
The next window will display all the available fields. You can add one at a time, add all the fields, or using the shift or control button, select a range of fields to add. Click Next to continue.
Page 86 Evisions, Inc. • 14522 Myford Rd • Irvine, CA 92606 • Phone: 949.833.1384 • Fax714.730.2524 • http://www.evisions.com/support
Getting Started Guide Last Updated 06/13/2006

Fig. 5.16 – Select Bands
On the next screen, you select what ‘bands’ you want to appear on the report. By default the Page Header and Title are selected. Check/uncheck the options you want. Here we have selected to also print the Summary and page Footer. Click Next to continue.
Fig. 5.17 – Report Options
On the next form you set up the characteristic of the report itself. Here you assign a Title to the Report. This is the title that will print in the Title Band. The Columns indicator allows you to split the page into multiple columns. These columns are distinct from the data columns that were selected. For example, if you changed the number of columns from 1 to 2, there would be two columns of all the fields selected – similar to how a news letter is formatted. You can also indicate if this is for a protrait or landscape output. Click Next to continue.
Page 87 Evisions, Inc. • 14522 Myford Rd • Irvine, CA 92606 • Phone: 949.833.1384 • Fax714.730.2524 • http://www.evisions.com/support
Getting Started Guide Last Updated 06/13/2006

Fig. 5.18 – Report Characteristics
On the next form, you can set the default Font for the header, labels and detail section. In addition you can tell Argos to draw lines around the data fields and/or report. Click Next to continue.
Fig. 5.19 – Preview Report
After you have made all you selections, the final screen gives you an opportunity to Preview or, if you want to make some modifications, click Finish. Click Finish to review the report definitions.
Page 88 Evisions, Inc. • 14522 Myford Rd • Irvine, CA 92606 • Phone: 949.833.1384 • Fax714.730.2524 • http://www.evisions.com/support
Getting Started Guide Last Updated 06/13/2006

Fig. 5.20 – Modify Report
On this screen you can add and modify the appearance of the report itself. Complete instructions on using the Band Editor can be found in the Argos Band Editor User Guide. You can test the report by cllick on
the Preview icon ( ). This allows you to review the output before saving. To save the report created, click Next. You will be taken to the normal form where you fill in the name of the report itself, indicate if this is a public or private report, and give the report a description.
Fig. 5.21 – Preview Report
This is what the end-users will see when the report is executed. They will first be presented with the list of parameters. After making the selection, they then will be asked if they want to preview or save to a PDF. Here we have selected Preview. From the Preview screen the user
can search for a value ( ), print
the report directly ( ) or save the report ( ).
Page 89 Evisions, Inc. • 14522 Myford Rd • Irvine, CA 92606 • Phone: 949.833.1384 • Fax714.730.2524 • http://www.evisions.com/support
Getting Started Guide Last Updated 06/13/2006

Fig. 5.22 – Saved as a Excel Spreadsheet
If the Save button is pressed, the user can select how to save it – as a PDF, CSV, or Excel Export. Here the output was saved as an Excel output. Note that the formatting of the report is carried over into Excel.
That is all – you have created simple datablocks and reports. The next step is to continue to experiment with the product and have fun! Conclusion The intent of this manual was to provide the developer with a quick overview of how to create a simple datablock and generate a report. In addition to this manual, there are training materials at the Evisions web site. Tutorials in the form of ‘screen cams’ can be downloaded and reviewed. They range from simpe – ‘How to Launch Argos’ ; to in depth discussions – ‘Creating a Quick View Report’. In addition to the screen cams there are the documents referred to in this manual
Page 90 Evisions, Inc. • 14522 Myford Rd • Irvine, CA 92606 • Phone: 949.833.1384 • Fax714.730.2524 • http://www.evisions.com/support
Getting Started Guide Last Updated 06/13/2006

Evisions, Inc. • 14522 Myford Rd • Irvine, CA 92606 • Phone: 949.833.1384 • Fax714.730.2524 • http://www.evisions.com/support
Gettin
Page 91
g Started Guide Last Updated 06/13/2006 Appendix A – Parameter Form Objects
Since the original creation of this document, new objects have been added to the Parameter form. This appendix was added to discuss some of these objects and how to use them affectively. A list of all the objects that can be added to a parameter form can be found in Chapter 2, Parameter Tools. In this appendix we would like to discuss the use of some of the objects that we have not used in our previous datablocks.
Background
and allow the user to add a background to the parameter window. If the parameters will not fit on one screen, the second icon will add scroll bars. Using a background, other objects on the background can be treated as a group. The background becomes the parent and the objects placed on the background will be considered the child.
For example, in the following sample, a background was added. Like other objects certain attributes can be set. For example, in the following we set the color of the background object and set the ‘parent’ font to be used for any text object we will add. Note that the ‘Parent’ of this background is the main parameter form. Any object any to this background will be a child of this background.
g
Background Color
Fig. A.1 – Setting properties for background
Font Settin

Page 92 Evisions, Inc. • 14522 Myford Rd • Irvine, CA 92606 • Phone: 949.833.1384 • Fax714.730.2524 • http://www.evisions.com/support
Getting Started Guide Last Updated 06/13/2006 Now if we go ahead and add a text object, the font by default will inherit the properties of
the font set for the parent.
Fig. A.2 – Sample using property of parent
Memo Box
Adding a memo box ( ) allows developer to add an object where massive amount of text can be added. Using a Memo box is one way of adding information to the end user as to how to run this report. If added to a background it can be set to use the default font set for the background.
Since Parent Font is set to YES, the text field just added will use the default font set for the parent or background.

Fig. A.3 – Use of Memo Field
Other attributes for Memo Field:
Data Aware: This is similar to the text object. If Data Aware is set to YES, then any previously defined variable can be displayed in a memo field. For example, using a Memo object, the developer can display a long wChar field in SqlServer.
Read Only: Set to YES the end user cannot update the text in the memo field.
Set to NO, the end user has write access to the data. The data in the memo field can then be used in subsequent queries.
Page 93 Evisions, Inc. • 14522 Myford Rd • Irvine, CA 92606 • Phone: 949.833.1384 • Fax714.730.2524 • http://www.evisions.com/support
Getting Started Guide Last Updated 06/13/2006

Getting Started Guide
Last Updated 06/13/2006
Check Box
The Boolean button is a True/False button. The developer can assign distinct values depending on if the box is checked or not. By default the check value is set to 1 and the uncheck value is set to NULL. However, the developer can set these values to be anything. In the following example the check box is being used to limit the addresses that are returned in a subsequent query.
Fig
So
Check Box
. A.4 – Check Box
me of the attributes of a check box to note:
Checked: By default this value is set to N. The developer can change this to Yes and the check box will be initially checked when the user runs the report.
Checked value: By default it is set to 1. In the above example the checked value is set it ‘Y’. The value entered here can be more then one character long.
Unchecked Value: By default this is set to NULL. In the above example, the unchecked value is set to ‘N’.
Page 94 Evisions, Inc. • 14522 Myford Rd • Irvine, CA 92606 • Phone: 949.833.1384 • Fax714.730.2524 • http://www.evisions.com/support

Page 95 Evisions, Inc. • 14522 Myford Rd • Irvine, CA 92606 • Phone: 949.833.1384 • Fax714.730.2524 • http://www.evisions.com/support
Getting Started Guide Last Updated 06/13/2006 A sample of a query using the results from a Checked Box variable:
(The following query is based on the above example. The variable name for the checked box is ‘selectActiveOnly’.) select SPRIDEN.SPRIDEN_LAST_NAME, SPRIDEN.SPRIDEN_FIRST_NAME, … from SATURN.SPRADDR SPRADDR, SATURN.SPRIDEN SPRIDEN where ( SPRIDEN.SPRIDEN_PIDM = SPRADDR.SPRADDR_PIDM ) and … and ( SPRADDR.SPRADDR_STATUS_IND is null or :selectActiveOnly = 'N' ) )

Getting Started Guide
Last Updated 06/13/2006
OK Button
Using the OK button on a background, allows items on the background to be refreshed. In addition, it can be used to force an event to occur. One place a ‘button’ is useful, is to delay an execution of a query until the user has all the parameters filled in and is ready to run the query. Since many datablocks can be created to show results in a QuickView report as well as a banded report, maybe the end user does not want the QuickView report to be executed. Likewise, some queries are complex and take a long time to execute. Using the ‘button’ the user can populate the parameters but the main query will only execute when the button is pressed. Following is an example of how this might be used:
Fig. A.5 – Button
By default, when pressed, the button will have a value of 1. When not pressed it is NULL. A sample query using the Button:
Button
Page 96 Evisions, Inc. • 14522 Myford Rd • Irvine, CA 92606 • Phone: 949.833.1384 • Fax714.730.2524 • http://www.evisions.com/support

Page 97 Evisions, Inc. • 14522 Myford Rd • Irvine, CA 92606 • Phone: 949.833.1384 • Fax714.730.2524 • http://www.evisions.com/support
Getting Started Guide Last Updated 06/13/2006 select SPRIDEN.SPRIDEN_LAST_NAME,
SPRIDEN.SPRIDEN_FIRST_NAME, … from SATURN.SPRADDR SPRADDR, SATURN.SPRIDEN SPRIDEN where ( SPRIDEN.SPRIDEN_PIDM = SPRADDR.SPRADDR_PIDM ) and … and ( SPRADDR.SPRADDR_STATUS_IND is null … and :runQuery is not null ) ) The query will not be executed until the runQuery button is pressed.

Page 98 Evisions, Inc. • 14522 Myford Rd • Irvine, CA 92606 • Phone: 949.833.1384 • Fax714.730.2524 • http://www.evisions.com/support
Getting Started Guide Last Updated 06/13/2006 Table of Figures
Fig. 1.1 - Argos Launched from Web ........................................................................................................... 5 Fig. 1.2 - Security Warning for Client Download.......................................................................................... 6 Fig. 1.3 - Login Icon .................................................................................................................................... 6 Fig. 1.4 - Login Screen ................................................................................................................................ 7 Fig. 1.5 – Explorer Tree and Detail .............................................................................................................. 7 Fig. 1.6 - Sample Explorer Tree Expanded................................................................................................... 8 Fig. 1.7 – Folder Options ........................................................................................................................... 10 Fig. 1.8 – DataBlock Options ..................................................................................................................... 11 Fig. 2.1 - Adding a QuickView DataBlock................................................................................................... 12 Fig. 2.2 – Associate Connection Pool ......................................................................................................... 13 Fig. 2.3 - Adding a Description to DataBlock ............................................................................................. 13 Fig. 2.4 - Adding Notes to DataBlock......................................................................................................... 14 Fig. 2.5 - Sample QuickView/Parameter DataBlock................................................................................... 14 Fig. 2.6 – Edit DataBlock ........................................................................................................................... 15 Fig. 2.7 – Blank Form Design..................................................................................................................... 16 Fig. 2.8 - Parameter Tool Bar .................................................................................................................... 17 Fig. 2.9 – Add an Image ............................................................................................................................ 20 Fig. 2.9a – Image properties ..................................................................................................................... 21 Fig. 2.10 - Adding Text to Parameter Form ............................................................................................... 22 Fig. 2.11 - Drop Down Box ........................................................................................................................ 24 Fig. 2.12 - Manually Enter Values.............................................................................................................. 24 Fig. 2.13 - Sample SQL Statement for Drop Down Box .............................................................................. 25 Fig. 2.14 – Data Returned from Test ......................................................................................................... 26 Fig. 2.15- Associate Data Field with Variable ............................................................................................ 26 Fig. 2.16 - Drop Down Attributes.............................................................................................................. 27 Fig. 2.17 – Test Parameter Form............................................................................................................... 29 Fig. 2.18 – Adding List Box........................................................................................................................ 29 Fig. 2.19 - Select Statement for List Box ................................................................................................... 30 Fig. 2.20 – List of defined variables. ......................................................................................................... 30 Fig. 2.21– test query; populate variable.................................................................................................... 31 Fig. 2.22- Associate Retuned Data with Variable....................................................................................... 31 Fig. 2.23 - Attributes for List Box .............................................................................................................. 32 Fig. 2.24 – Test Showing Drop Down vs. List Box...................................................................................... 33 Fig. 2.25 – Parameter form to date. .......................................................................................................... 34 Fig. 2.26 - Select Statement for Multi-Column Box.................................................................................... 35 Fig. 2.27 - Select Statement for Multi-Column Box.................................................................................... 36 Fig. 2.28 - Select Statement for Multi-Column Box.................................................................................... 37 Fig. 2.29- Add SSBSECT_CRSE_NUMB ....................................................................................................... 38 Fig. 2.30 – adding conditions .................................................................................................................... 39 Fig. 2.31 – completed query...................................................................................................................... 40 Fig. 2.32 – edit column properties............................................................................................................. 40 Fig. 2.33 - Select Statement for Multi-Column Box.................................................................................... 41 Fig. 2.34 - Set Column Attributes for Multi-Column Box ............................................................................ 42 Fig. 2.35 – Test run with MultiColumn....................................................................................................... 42 Fig. 2.36 - List of Variables ....................................................................................................................... 43 Fig. 2.37 – adding a shape ........................................................................................................................ 44 Fig. 2.38 – Completed roster ..................................................................................................................... 45 Fig. 2.39 – Adding a New SQL Variable ..................................................................................................... 46 Fig. 2.40 – renaming variable.................................................................................................................... 47 Fig. 2.41 – list sub-variables ..................................................................................................................... 47 Fig. 2.42 – Setting Data Aware Attribute................................................................................................... 49 Fig. 2.43 – Final Test................................................................................................................................. 49 Fig. 3.1 – Customer Query for OrderReport............................................................................................... 51 Fig. 3.2a – adding date fields – StartDate ................................................................................................. 52 Fig. 3.2b– adding date fields – EndtDate................................................................................................... 52 Fig. 3.3 – access Query design form to write main query.......................................................................... 53 Fig. 3.3 – access Query design form to write main query.......................................................................... 53 Fig. 3.4 - Adding Tables via List ................................................................................................................ 54 Fig. 3.5– Adding Table Definition .............................................................................................................. 54 Fig. 3.6 - Adding Tables Manually.............................................................................................................. 55 Fig. 3.7 – Choose table or synonym........................................................................................................... 55

Page 99 Evisions, Inc. • 14522 Myford Rd • Irvine, CA 92606 • Phone: 949.833.1384 • Fax714.730.2524 • http://www.evisions.com/support
Getting Started Guide Last Updated 06/13/2006 Fig. 3.8 – Generated Join .......................................................................................................................... 56
Fig. 3.9 - Edit Joins.................................................................................................................................... 57 Fig. 3.7 – creating outer join..................................................................................................................... 58 Fig. 3.7 - Review SQL Statement ............................................................................................................... 59 Fig. 3.8 - Commit Modifications................................................................................................................. 59 Fig. 3.9 - Adding Fields by 'clicking' .......................................................................................................... 60 Fig. 3.10 - Adding Field Manually, Selecting Table..................................................................................... 61 Fig. 3.11 - Select Field Manually, Selecting Column................................................................................... 61 Fig. 3.12 - Adding 'Calculated' Field .......................................................................................................... 61 Fig. 3.13 - SQL Statement for Sample 'Calculated' Field ............................................................................ 61 Fig. 3.14 - Adding Description for Calculated Field.................................................................................... 62 Fig. 3.15 – Adding Calc Field using Built-in Argos Functions. .................................................................... 62 Fig. 3.16 – Display Variables ..................................................................................................................... 62 Fig. 3.17 – Display Variables ..................................................................................................................... 63 Fig. 3.18 - Adding Conditional Fields ......................................................................................................... 65 Fig. 3.19 - Adding Table to Conditional ..................................................................................................... 65 Fig. 3.20 - Adding Fields to Conditional..................................................................................................... 65 Fig. 3.21 - Adding Variables to Conditional ............................................................................................... 66 Fig. 3.22 – Expert Mode Icon..................................................................................................................... 66 Fig. 3.23 – Manually Entering WHERE Clause ............................................................................................ 66 Fig. 3.24 – ORDER BY Clause..................................................................................................................... 67 Fig. 3.25 - Icons above Query Data Fields ................................................................................................. 67 Fig. 3.26 - Adding Field (Column) Level Security....................................................................................... 68 Fig. 3.27 – Adding User to Field Level Security ......................................................................................... 68 Fig. 3.28 – Review Field Level security...................................................................................................... 68 Fig. 4.1 – Show Unions.............................................................................................................................. 69 Fig. 4.2 – Type of Unions........................................................................................................................... 69 Fig. 4.3 – Adding a Union .......................................................................................................................... 70 Fig. 4.4 - Create a Sub-Query .................................................................................................................... 71 Fig. 4.5a – Add Condition to Sub-Query..................................................................................................... 72 Fig. 4.5b – Add Condition to Sub-Query .................................................................................................... 73 Fig. 4.6 – Sub-Query Added to Conditional................................................................................................ 73 Fig. 4.7 – Advance Query Builder Form ..................................................................................................... 75 Fig. 4.8 – Advance Query Builder Form completed .................................................................................... 76 Fig. 5.1 – Adding New Report to a QuickView DataBlock........................................................................... 78 Fig. 5.2 – Select Type of Report ................................................................................................................ 78 Fig. 5.3 – Edit/Describe Report ................................................................................................................. 79 Fig. 5.4 – Adding Notes to a Report........................................................................................................... 79 Fig. 5.5– Choosing a Connection ............................................................................................................... 80 Fig. 5.6 – Run and Save Quick View Report............................................................................................... 80 Fig. 5.7 – Types of Report DataBlock Reports ........................................................................................... 81 Fig. 5.8 – Select Columns to Appear in Report........................................................................................... 82 Fig. 5.9 - Available Built-in Functions........................................................................................................ 83 Fig. 5.10 – Adding Formatted Fields.......................................................................................................... 83 Fig. 5.11 – Finished Field Definition .......................................................................................................... 84 Fig. 5.12 – Re-arranging Fields ................................................................................................................. 84 Fig. 5.13 – Banded Report Definitions ....................................................................................................... 85 Fig. 5.14 – Select Dataset for Banded Report ............................................................................................ 86 Fig. 5.15 – Select Fields ............................................................................................................................ 86 Fig. 5.16 – Select Bands ............................................................................................................................ 87 Fig. 5.17 – Report Options ........................................................................................................................ 87 Fig. 5.18 – Report Characteristics ............................................................................................................. 88 Fig. 5.19 – Preview Report ........................................................................................................................ 88 Fig. 5.20 – Modify Report .......................................................................................................................... 89 Fig. 5.21 – Preview Report ........................................................................................................................ 89 Fig. 5.22 – Saved as a Excel Spreadsheet.................................................................................................. 90 Fig. A.1 – Setting properties for background............................................................................................. 91 Fig. A.2 – Sample using property of parent ............................................................................................... 92 Fig. A.3 – Use of Memo Field ..................................................................................................................... 93 Fig. A.4 – Check Box.................................................................................................................................. 94 Fig. A.5 – Button ....................................................................................................................................... 96


![Skaffold - storage.googleapis.com · [getting-started getting-started] Hello world! [getting-started getting-started] Hello world! [getting-started getting-started] Hello world! 5](https://img.dokumen.tips/doc/110x75/5ec939f2a76a033f091c5ac7/skaffold-getting-started-getting-started-hello-world-getting-started-getting-started.jpg)


