Embed Size (px)
Citation preview

General Safety General Safety


EyesEyes
Safety glasses must be worn at all timesSafety glasses must be worn at all times Welding goggles (shade 5) when using Welding goggles (shade 5) when using
Oxy-acetylene equipment, (shade 12) Oxy-acetylene equipment, (shade 12) when welding or using plasmawhen welding or using plasma
Never watch the arc with the naked eyeNever watch the arc with the naked eye

EarsEars
Plugs are cheapest form of protectionPlugs are cheapest form of protection Ear muffs block out more noise and Ear muffs block out more noise and
protect betterprotect better

HeadHead
Caps made from non-flammable material to Caps made from non-flammable material to protect from hot sparksprotect from hot sparks
Helmets to protect face from exposure to arc.Helmets to protect face from exposure to arc. Long hair must be tied backLong hair must be tied back No dangling earringsNo dangling earrings No necklacesNo necklaces Jewelry may become entangled in spinning or Jewelry may become entangled in spinning or
rotating machineryrotating machinery

Arms and HandsArms and Hands
No exposed skinNo exposed skin Arc is like the sun, severe sunburn can result Arc is like the sun, severe sunburn can result
from exposure.from exposure. No loose sleeves or cuffsNo loose sleeves or cuffs
May become entangled or trap hot sparksMay become entangled or trap hot sparks Gloves must be worn while weldingGloves must be worn while welding
Non-flammable materialNon-flammable material Protect from exposureProtect from exposure
Remove gloves when grinding. Remove gloves when grinding. May become entangled in spinning machineryMay become entangled in spinning machinery

TorsoTorso
Welding jacket or coverallsWelding jacket or coveralls Protect from exposureProtect from exposure Non-flammable material, leather is best, Non-flammable material, leather is best,
cotton is finecotton is fine No synthetics, melt to your skinNo synthetics, melt to your skin Must be buttoned or zipped to the topMust be buttoned or zipped to the top No open pocketsNo open pockets
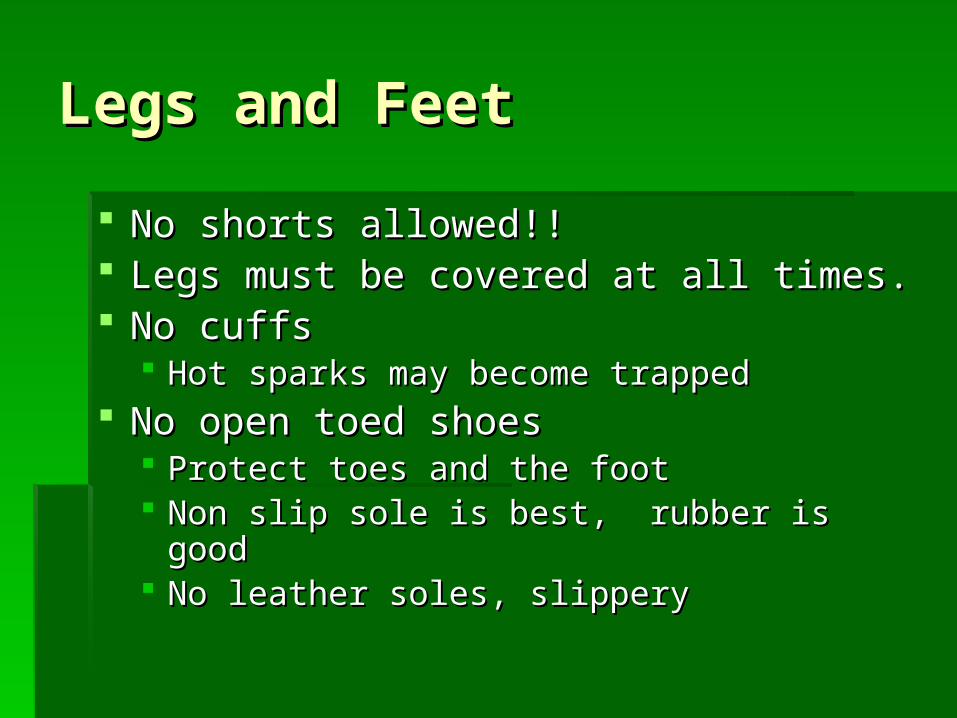
Legs and FeetLegs and Feet
No shorts allowed!!No shorts allowed!! Legs must be covered at all times.Legs must be covered at all times. No cuffsNo cuffs
Hot sparks may become trappedHot sparks may become trapped No open toed shoesNo open toed shoes
Protect toes and the footProtect toes and the foot Non slip sole is best, rubber is goodNon slip sole is best, rubber is good No leather soles, slipperyNo leather soles, slippery

HousekeepingHousekeeping
Floors and workbenches should be kept Floors and workbenches should be kept clean of dirt, scrap metals, excess tools, clean of dirt, scrap metals, excess tools, and anything flammable.and anything flammable.
Aisles must be kept clear of hoses and Aisles must be kept clear of hoses and cables, which can cause tripping hazardscables, which can cause tripping hazards
Everyone has a responsibility to keep the Everyone has a responsibility to keep the shop clean and clear and report any shop clean and clear and report any hazardshazards

Fire hazardsFire hazards
Paint, oil, cleaning chemicals, other Paint, oil, cleaning chemicals, other combustibles must be kept in metal combustibles must be kept in metal container away from sparks.container away from sparks.
Fire exits, fire blankets, and extinguishers Fire exits, fire blankets, and extinguishers must be clearly marked.must be clearly marked.
Equipment must be shut down before Equipment must be shut down before evacuatingevacuating

Electrical HazardsElectrical Hazards
All electrical devices are hazardous, but All electrical devices are hazardous, but some use extremely high and dangerous some use extremely high and dangerous voltages.voltages.
All equipment and areas where 220 volts All equipment and areas where 220 volts or more are used must be well-marked.or more are used must be well-marked.

LiftingLifting
Always lift with your legsAlways lift with your legs Keep back straightKeep back straight Ask for help with heavy loadsAsk for help with heavy loads

Machinery general safetyMachinery general safety
Never operate until properly trainedNever operate until properly trained Ask for help if you are unsureAsk for help if you are unsure All safety guards must be installedAll safety guards must be installed Turn power off and unplug it before making Turn power off and unplug it before making
adjustments adjustments Check for loose parts before operatingCheck for loose parts before operating Check cords for frays or crackingCheck cords for frays or cracking Report any defective equipment to teacher Report any defective equipment to teacher
immediatelyimmediately

Pedestal grinderPedestal grinder
Probably one of the most dangerous pieces of Probably one of the most dangerous pieces of equipment in the shopequipment in the shop
Adjust tool rests as close as possible to wheelAdjust tool rests as close as possible to wheel Never grind on the side of the wheelNever grind on the side of the wheel Don’t push against the wheel or attempt to grind Don’t push against the wheel or attempt to grind
downward.downward. If the wheel slows down stop pushing against itIf the wheel slows down stop pushing against it Your thumb may become caught resulting in severe injury.Your thumb may become caught resulting in severe injury.
Never operate at speeds exceeding those marked on Never operate at speeds exceeding those marked on the wheel itself.the wheel itself. May result in wheel explodingMay result in wheel exploding

Handheld angle grinderHandheld angle grinder
Always operate with guard in placeAlways operate with guard in place always operate with handle in place.always operate with handle in place. Check cord for fraying or crackingCheck cord for fraying or cracking Inspect grinding wheel to ensure it is securely Inspect grinding wheel to ensure it is securely
tightenedtightened Always grind in the 12 to 3 area of the wheelAlways grind in the 12 to 3 area of the wheel Ensure sparks are away from others.Ensure sparks are away from others. Always place grinder upside down when not in use.Always place grinder upside down when not in use. Exercise caution so as not to grind through cable.Exercise caution so as not to grind through cable.

Drill PressDrill Press
Secure work to work bench with clampsSecure work to work bench with clamps Use cutting oil to help remove metal burrs and Use cutting oil to help remove metal burrs and
reduce heat from frictionreduce heat from friction Always center punch the hole to be drilledAlways center punch the hole to be drilled
This helps keep the bit from wanderingThis helps keep the bit from wandering Always tighten the bit in all three key holes with Always tighten the bit in all three key holes with
the chuckthe chuck Never force the bitNever force the bit
This will result in the bit shatteringThis will result in the bit shattering

Iron workerIron worker
Make sure all guards are in place while Make sure all guards are in place while operatingoperating
Only the operator may be around the Only the operator may be around the ironworker while it is onironworker while it is on
Keep fingers away from all sharp edges.Keep fingers away from all sharp edges. Only cut metal of the recommended thickness.Only cut metal of the recommended thickness. Tighten all clamps on work before operating Tighten all clamps on work before operating
the shear.the shear.

Bench brake and shearBench brake and shear
Only bend or cut metal of the recommended Only bend or cut metal of the recommended thicknessthickness
Always operate with all guards and shields in Always operate with all guards and shields in place.place.
Only the operator activates the foot treadle.Only the operator activates the foot treadle. Keep feet from under the treadle as they may Keep feet from under the treadle as they may
become trappedbecome trapped
Beware of freshly cut metal. Edges are razor Beware of freshly cut metal. Edges are razor sharp.sharp.

Power sawsPower saws
Keep all guards in place.Keep all guards in place. Secure work to saw or bench before Secure work to saw or bench before
beginning your cut.beginning your cut. Inspect saw blade for damageInspect saw blade for damage Aim sparks away from others.Aim sparks away from others.

Hand toolsHand tools
Always pull wrenches towards your bodyAlways pull wrenches towards your body If wrench slips you will fall away from the If wrench slips you will fall away from the
machinemachine
Use tools for their intended useUse tools for their intended use Always clean and return tools when Always clean and return tools when
finished.finished.

Safety in Welding Safety in Welding shopsshops

Designated areasDesignated areas
All welding and cutting should be done in All welding and cutting should be done in designated areas.designated areas.
Areas kept clear of any flammable Areas kept clear of any flammable materials.materials.
Welding screens must be closed before Welding screens must be closed before striking an arcstriking an arc

ventilationventilation
Exhaust fans must be turned on to Exhaust fans must be turned on to remove toxic fumes produced by welding.remove toxic fumes produced by welding.
High ceilings and opening doors ensures High ceilings and opening doors ensures a movement of air in the shopa movement of air in the shop
Respirators must be used when welding Respirators must be used when welding aluminum or galvanized steelaluminum or galvanized steel

Hot and Sharp MetalHot and Sharp Metal
All metal in a welding shop is hot until All metal in a welding shop is hot until you yourself make it cool.you yourself make it cool. Chip off all slag before cooling your metal in Chip off all slag before cooling your metal in
the quench tankthe quench tank Use tongs to pick up hot metal Use tongs to pick up hot metal Do not drop the metal into the tankDo not drop the metal into the tank The tank water is above boiling use cautionThe tank water is above boiling use caution Do not get the leather gloves wet. This ruins Do not get the leather gloves wet. This ruins
themthem

Freshly cut metal has a razors edge.Freshly cut metal has a razors edge. Metal that has been cut by a torch has a Metal that has been cut by a torch has a
temperature above 6000 F.temperature above 6000 F. Always wear gloves in the welding shopAlways wear gloves in the welding shop

Oxy-Acetylene OutfitsOxy-Acetylene Outfits
All cylinders must be chained to the wall or cart All cylinders must be chained to the wall or cart to prevent them from tipping over.to prevent them from tipping over.
When not in use all cylinders must have a When not in use all cylinders must have a protective cap in place.protective cap in place. This helps prevent the “rocket effect”This helps prevent the “rocket effect” An unprotected tank has the capability of smashing An unprotected tank has the capability of smashing
through a concrete wall. through a concrete wall. All hoses must be inspected for leaks using All hoses must be inspected for leaks using
soapy water.soapy water. Flash back arrestors are in place to prevent Flash back arrestors are in place to prevent
fire from reaching the tanks.fire from reaching the tanks.

Tanks that are green are non-flammableTanks that are green are non-flammable Therefore they are safe and have normal Therefore they are safe and have normal
threadsthreads Righty tighty, lefty loosey.Righty tighty, lefty loosey.
Tanks that are red or black are highly Tanks that are red or black are highly flammable!!flammable!! Therefore they have Therefore they have left-handedleft-handed threads to threads to
prevent any untrained person for properly prevent any untrained person for properly attaching them.attaching them.

Tank RegulatorsTank Regulators
Inspect the butterfly valves to make sure they Inspect the butterfly valves to make sure they are not under pressure before opening the are not under pressure before opening the tank.tank. Upon opening the cylinders the valve may be under Upon opening the cylinders the valve may be under
such tremendous pressure that the valve will shoot such tremendous pressure that the valve will shoot off.off.
Always crack the cylinder to clear it of any Always crack the cylinder to clear it of any debrisdebris
Never oil the connections.Never oil the connections. This may cause a dangerous chemical reaction This may cause a dangerous chemical reaction
resulting in explosionresulting in explosion

Opening the tanksOpening the tanks
OxygenOxygen Open the main valve on the tank completely.Open the main valve on the tank completely.
AcetyleneAcetylene Only open the main valve on the tank ¼ to Only open the main valve on the tank ¼ to
½ a turn.½ a turn. This is referred to as “cracking” the cylinder.This is referred to as “cracking” the cylinder. In case of emergency you want to be able to In case of emergency you want to be able to
close this tank quickly.close this tank quickly.

Set Working pressuresSet Working pressures Slowly turn in butter fly valve on both regulatorsSlowly turn in butter fly valve on both regulators
10 psi max for Oxygen10 psi max for Oxygen 5 psi max for Acetylene5 psi max for Acetylene
Never exceed 15 psi with Acetylene.Never exceed 15 psi with Acetylene. The tank becomes unstable at this point and may The tank becomes unstable at this point and may
spontaneously combust.spontaneously combust.

Lighting the torchLighting the torch
Ignite the torch away from yourself, others, and Ignite the torch away from yourself, others, and anything flammable.anything flammable.
Always use a flint igniter never matches or a Always use a flint igniter never matches or a butane lighter.butane lighter.
Always crack the valves until a flame is Always crack the valves until a flame is established then open them to obtain a neutral established then open them to obtain a neutral flame.flame.

1. Open the Oxygen torch valve 1. Open the Oxygen torch valve completely. No gas will flow through the completely. No gas will flow through the torch yet because the mixing valve is torch yet because the mixing valve is closed.closed.
2. Open the Acetylene torch valve ¼ of a 2. Open the Acetylene torch valve ¼ of a turn and light the torch.turn and light the torch.
3. Slowly open the Acetylene torch valve 3. Slowly open the Acetylene torch valve more until the black smoke disappears more until the black smoke disappears from your flame.from your flame.

4. Slowly turn the mixing valve located at 4. Slowly turn the mixing valve located at the top of the torch away from you.the top of the torch away from you. The flame will change from orange to a The flame will change from orange to a
bright blue.bright blue. Continue opening the mixing valve until the Continue opening the mixing valve until the
bright blue color of the flame forms a tight bright blue color of the flame forms a tight cone near the torch tip. cone near the torch tip.
5. This is the neutral flame.5. This is the neutral flame.

Acetylene SafetyAcetylene Safety
Never exceed 15 Never exceed 15 psi with psi with
Acetylene!!!!Acetylene!!!! The tank becomes unstable at this point and may The tank becomes unstable at this point and may
spontaneously combust.spontaneously combust.

Bleeding offBleeding off
Pressure in the lines must be released safelyPressure in the lines must be released safely Begin by shutting off the torch itself.Begin by shutting off the torch itself.
1. Mixing valve1. Mixing valve 2. Acetylene2. Acetylene 3. Oxygen3. Oxygen
Close both cylinder tank valvesClose both cylinder tank valves First Acetylene then OxygenFirst Acetylene then Oxygen
Open torch valvesOpen torch valves Wait until all gauges read zeroWait until all gauges read zero Close torch valvesClose torch valves