Embed Size (px)
Citation preview

Enrouleurs de génois / Headsail reefing-furling systems
M A N U E L D E M O N T A G EI N S T A L L A T I O N M A N U A L
B29SB29LB35SB35MB35L
GAMMEBASIC
BASICMODELS
MULTITOPWRAPSTOP
VIS AUTO-TARAUDEUSESELF-TAPING SCREW
ECLISSE SUPÉRIEUREUPPER BEARING HOLDER
1/2 LUNEC-SHAPED WASHEREMERILLON
HALYARD SWIVEL
2 DEMI PALIERS2 HALF BEARINGS
ECLISSE DE RACCORDEMENTJOINING BEARING HOLDER
VIS DE JONCTIONSET SCREWS
GAINE INTERMÉDIAIREINTERMEDIATE LUFF EXTRUSION
GAINE INFÉRIEURELOWER EXTRUSION
ECLISSE INFÉRIEURELOWER BEARING HOLDER
VIS D'ARRÊTSTOP SCREW
VIS TÉTONNIPPLED SCREW
BRAS ARCEAUDRUM CAGE
MÉCANISME DE TAMBOURDRUM MECHANISM
AXE DE FIXATIONCLEVIS PIN
VERROUS BLOQUEURS D'AXELOCKING DEVICES
COULISSEAU DE POINT D'AMURE RÉGLABLEADJUSTABLE TACK RING
OPTION LATTES LONGUESOPTIONAL LONG LINK PLATES
AXE FILETÉTHREADED CLEVIS PIN
CANON DE PERÇAGEDRILLING GUIDE
Pages
34-55
6-7
89-10-11
1213
14151516161717181819
20-2122
23-24
TABLE DES MATIERESCONTENTS
PréparationIdentification de vos terminaisons d’étaisVerrous bloqueursTypes de terminaisons inférieures d’étai etpossibilités de montages correspondantesMise à longueur des gainesMontages des gaines sur le câbleMontage de l’émerillonMontage du mécanisme de tambour sur les gainesPose du MultitopInstallation à bordRéglage du ridoirMise en place du cordage de manœuvreHisser la voileRéglage de la hauteur de l’émerillonPoint d’amure réglableConseils d’utilisationEntretienTableau de pannesPièces détachéesDimensions des enrouleursGarantie
PreparationIdentification of your forestay terminalsLocking devicesType of lower terminal and correspondingfitting of the ProfurlCutting extrusions to lengthFitting the extrusions onto the stayFitting the halyard swivelFitting the drum mechanism ontothe extrusionsFitting the WrapstopFitting on boardAdjust the turnbuckleFitting the furling lineHoisting the sailHalyard swivel position adjustmentAdjustable tack fittingRecommandations to operate the systemMaintenanceTroubleshootingSpare partsDimensions of Profurl unitsWarranty
RÉCEPTION DU MATÉRIELLe matériel voyage toujours aux risques et périls du destinataire. Il y a donc lieu d'effectuer une vérificationdès réception et émettre toutes réserves ou exercer tous recours à l'encontre du transporteur dans lesdélais réglementaires.
RECEIPT OF GOODSAll goods must be checked on delivery and the purchaser should claim from the carrier within seven daysin the event of loss or damage.
2
Sur toutes les vues, le haut de l'étai est représenté du côté droit, et le bas du côté gauche.Every picture shows the top end of the stay on the RIGHT side, and the bottom end of the stay on the LEFT side.
PRÉPARATIONPREPARATION
Les enrouleurs Basic ont été conçus pour être installés facilement. Pour le montage quelques outils sont nécessaires: un scie à métaux - un décamètre - une lime douce -une clé à molette ouverture 30mm - une perceuse - un jeu de forets.
Il est conseillé de démonter l'étai en totalité et de réaliser le montage à plat sur le sol, sur une surfacepropre.
The Basic PROFURL reefing-furling systems are designed to be easily fitted.The following tools are required for the installation: a measuring-tape, an adjustable spanner with 30mm(1 3/16”) opening, an electric drill, a set of drills, a metal saw, a smooth file.
For easier installation remove the forestay from the boat and assemble the system on a clean and level surface.Protect the system from any damage.
ATTENTION: Sur un étai existant : noter le réglage du ridoir (si ridoir), ou la position de l'œil inférieur de l'étai
entre les lattes-ridoir AVANT de démonter l'étai.Sur un nouvel étai : installer en préalable le nouvel étai en place, régler le ridoir (si ridoir) et noter
son réglage, ou la position de l'œil inférieur de l'étai entre les lattes-ridoir.
CAUTION: Existing Forestay : before attempting to remove the forestay and if a turnbuckle – or adjustment plates-
are fitted, mark the position of adjustment of the turnbuckle – or adjustment plates.New Forestay : Fit the new stay to the boat first and mark the position of adjustment of the turnbuckle
– or adjustment plates.This will ensure the original length of the forestay is maintained.
3

TERMINAISON SUPERIEURE DE L’ÉTAIFORESTAY UPPER TERMINAL
IDENTIFICATION DE VOS TERMINAISONS D'ÉTAIIDENTIFICATION OF YOUR FORESTAY TERMINALS
Certaines terminaisons supérieures d'étai ne sont pas adaptées à la pose d'un enrouleur, et imposentune modification de l'étai:Terminaisons à boule ( principalement mâts Isomat et Z-Spars). Solution: placer une terminaison boule-œil dans la tête de mât (réf ACMO réf EBO ou équivalent), raccourcir le câble d'étai en tenant comptede la longueur de la nouvelle pièce, et sertir sur le câble une terminaison à chape articulée.Terminaisons à Té. Solution: modifier l'ancrage de l'étai sur le mât pour pouvoir employer un câblecomportant une chape articulée.
Some terminals require special attention when assembling a reefing system:Ball terminals (mainly found on Isomat and Z Spars masts). Solution is to fit a ball-eye terminal (Ref: stemballeye 639 from Norseman-Gibb or similar) into the mast head, to shorten the wire by a few inches, and tohave a new swage terminal pressed onto the wire.T terminals (mainly found on Kemp and Selden masts with fractional rig). Solution is to fit a new stayattachment onto the mast, and have a toggle swage terminal pressed onto the wire.
PRÉCAUTIONS PRÉLIMINAIRES :Vérifiez ou faites vérifier par une personne compétente que l’étai est en bon état. La durée de vie
moyenne d’un étai est d’environ 10 ans.
PRELIMINARY CAUTION:Please ensure your forestay is checked by a skilled person. Recommended forestay life is about 10 years.
4

En fonction :• de vos terminaisons d’étai,• du type d’installation choisi :
- tambour près du pont, sans lattes longuesou- tambour surélevé avec lattes longues,
vous devrez :• vérifier que votre étai corresponde aux spécifications requises,• suivre les séq. 2 à 14 pour raccorder la partie basse de l’enrouleur sur la terminaison inférieure de l’étai.
According to :• type of forestay terminals,• type of installation selected :
- drum low to the deck, without Long Link Platesor- drum raised from deck, with Long Link Plates,
you should :• check that your forestay matches the required specifications,• follow seq. 2 to 14 to connect the drum mechanism onto the lower end of the forestay.
VERROUS BLOQUEURSLOCKING DEVICES
ATTENTION: Le verrouillage des verrous plastique est obtenu en les tournant d’1/2 tour pour que les flèches
soient orientées vers le haut de l’étai. CAUTION:Locking the plastic locking devices is achieved by turning them by 1/2 turn so that the arrows point towardsthe upper end of the stay.
Les verrous bloqueurs ont pour fonction de centrer la terminaisoninférieure de l’étai dans l’enrouleur. Si la cote “C ” ( voir dessins 4, 9et 11 page 6-7) est supérieure à :Basic 29 : 18 mmBasic 35 : 14 mm,il y a lieu de raccourcir la longueur des verrous en les coupant auniveau des cannelures, prévues pour guider la lame de scie. Laisserun jeu de 1 mm de chaque côté de la terminaison d’étai.
The black Nylon locking devices are used to keep the forestay lower terminal in the center of the drummechanism. If dimensions “ C ” (see drawings 4, 9 & 11 page 6-7) is larger than :Basic 29 : 18 mmBasic 35 : 14 mm,the locking devices must be shortened : cut off the same amount off each locking device. Grooves in thelocking devices can be used to guide the saw blade. Please leave a space of 1 mm (1/16”) on each sideof the toggle / stay attachement.
TERMINAISON INFÉRIEURE DE L’ÉTAIFORESTAY LOWER TERMINAL
1
5
Seq. 1
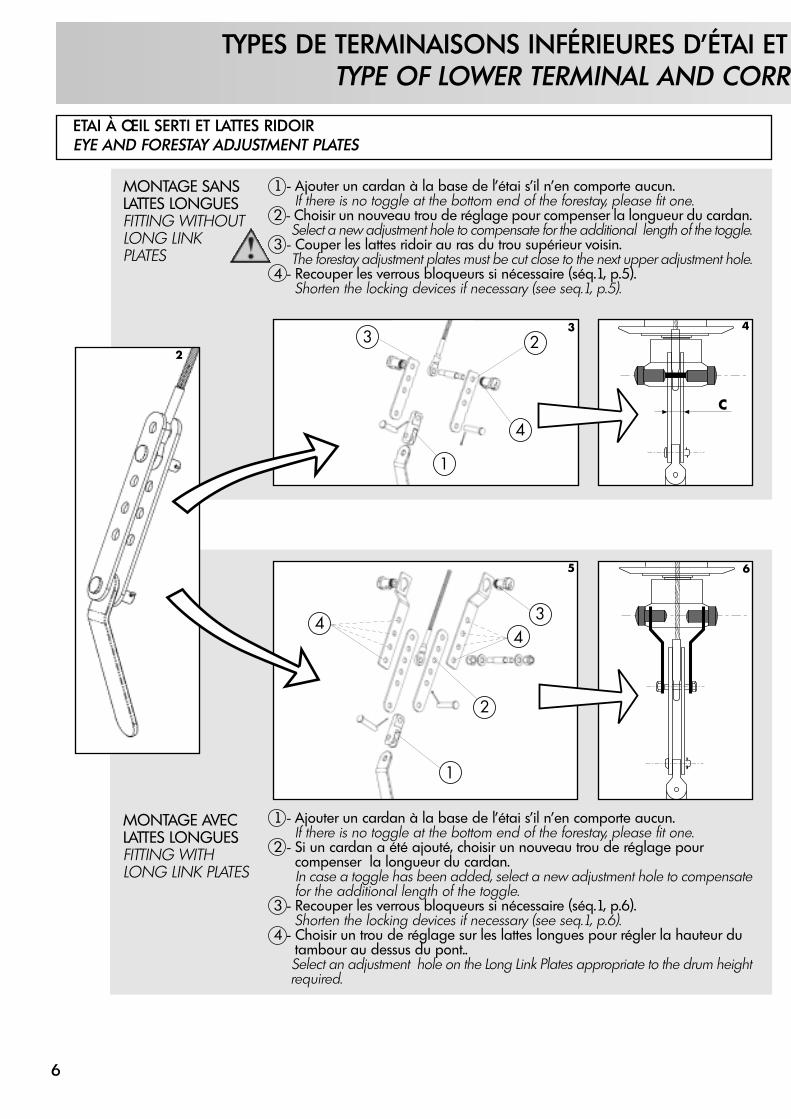
ETAI À ŒIL SERTI ET LATTES RIDOIREYE AND FORESTAY ADJUSTMENT PLATES
TYPES DE TERMINAISONS INFÉRIEURES D’ÉTAI ET TYPE OF LOWER TERMINAL AND CORRE
1 - Ajouter un cardan à la base de l’étai s’il n’en comporte aucun.If there is no toggle at the bottom end of the forestay, please fit one.
2 - Si un cardan a été ajouté, choisir un nouveau trou de réglage pour compenser la longueur du cardan.In case a toggle has been added, select a new adjustment hole to compensatefor the additional length of the toggle.
3 - Recouper les verrous bloqueurs si nécessaire (séq.1, p.6).Shorten the locking devices if necessary (see seq.1, p.6).
4 - Choisir un trou de réglage sur les lattes longues pour régler la hauteur dutambour au dessus du pont..Select an adjustment hole on the Long Link Plates appropriate to the drum heightrequired.
1 - Ajouter un cardan à la base de l’étai s’il n’en comporte aucun.If there is no toggle at the bottom end of the forestay, please fit one.
2 - Choisir un nouveau trou de réglage pour compenser la longueur du cardan.Select a new adjustment hole to compensate for the additional length of the toggle.
3 - Couper les lattes ridoir au ras du trou supérieur voisin.The forestay adjustment plates must be cut close to the next upper adjustment hole.
4 - Recouper les verrous bloqueurs si nécessaire (séq.1, p.5).Shorten the locking devices if necessary (see seq.1, p.5).
MONTAGE SANSLATTES LONGUESFITTING WITHOUTLONG LINK PLATES
MONTAGE AVECLATTES LONGUESFITTING WITHLONG LINK PLATES
2
3 4
C
5 6
4
44
1
1
3
3
2
2
6

RIDOIR SERTI A CHAPE ARTICULEE, OU CHAPE ARTICULEE SERTIESWAGE TURNBUCKLE WITH DOUBLE JAW TOGGLE, OR DOUBLE JAW TOGGLE SWAGE TERMINAL
RIDOIR CHAPE – CHAPEFORK - FORK TURNBUCKLE
montage BASIC 9
montage BASIC 11
montage BASIC 14
Ce type de ridoir impose obligatoirement un montage avec des Lattes LonguesThis style of turnbuckle requires compulsory fitting with Long Link Plates
POSSIBILITÉS DE MONTAGE CORRESPONDANTESESPONDING FITTING OF THE PROFURL
1 - Chasser l’axe prisonnier.Remove the captive pin.
2 - Recouper les verrous bloqueurs si nécessaire (séq.1, p.5).Shorten the locking devices if necessary (see seq.1, p.5).
1 - Ajouter un cardan à la base du ridoir s’il n’en comporte aucun.If there is no toggle at the bottom end of the turnbuckle please add one.
2 - Si un cardan a été ajouté, régler le ridoir pour compenser la longueurdu cardan.In case a toggle has been added, please adjust the turnbuckle to compensate for the length of the toggle.
3 - Recouper les verrous bloqueurs si nécessaire (séq.1, p.5).Cut the locking devices if necessary (see seq.1, p.5).
1 - Chasser l’axe prisonnier.Remove the captive pin.
2 - Recouper les verrous bloqueurs si nécessaire (séq.1, p.5).Shorten the locking devices if necessary (see seq.1, p.5).
3 - Choisir un trou de réglage sur les lattes longues pour régler la hauteurde tambour au dessus du pont.Select an adjustment hole on the Long Link Plates appropriate to the drum height required.
MONTAGE SANSLATTES LONGUESFITTING WITHOUTLONG LINK PLATES
MONTAGE AVECLATTES LONGUESFITTING WITHLONG LINK PLATES
ouor
78 9
10 11
12 13 14
C
1
1
2
2
2
1 3
3
7
C
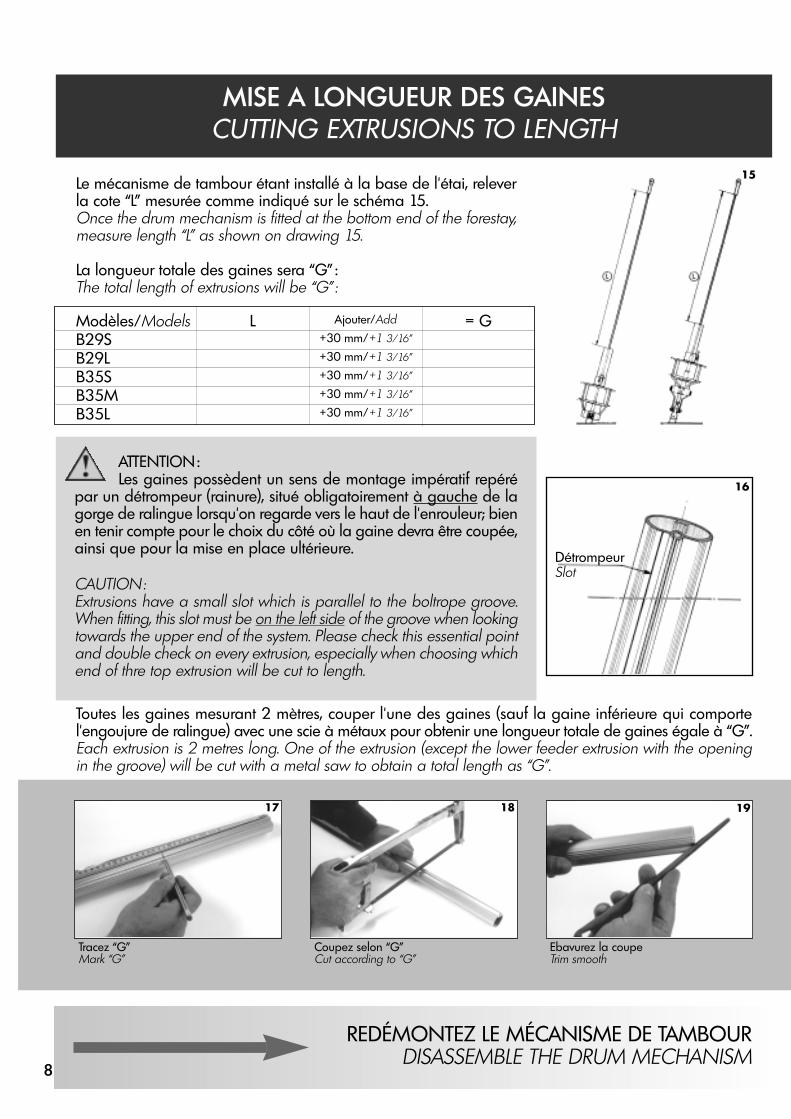
MISE A LONGUEUR DES GAINESCUTTING EXTRUSIONS TO LENGTH
Le mécanisme de tambour étant installé à la base de l'étai, releverla cote “L” mesurée comme indiqué sur le schéma 15. Once the drum mechanism is fitted at the bottom end of the forestay,measure length “L” as shown on drawing 15.
La longueur totale des gaines sera “G” :The total length of extrusions will be “G” :
ATTENTION: Les gaines possèdent un sens de montage impératif repéré
par un détrompeur (rainure), situé obligatoirement à gauche de lagorge de ralingue lorsqu'on regarde vers le haut de l'enrouleur; bienen tenir compte pour le choix du côté où la gaine devra être coupée,ainsi que pour la mise en place ultérieure.
CAUTION:Extrusions have a small slot which is parallel to the boltrope groove.When fitting, this slot must be on the left side of the groove when lookingtowards the upper end of the system. Please check this essential pointand double check on every extrusion, especially when choosing whichend of thre top extrusion will be cut to length.
Modèles/ModelsB29SB29LB35SB35MB35L
L = GAjouter/Add
+30 mm/+1 3/16”
+30 mm/+1 3/16”
+30 mm/+1 3/16”
+30 mm/+1 3/16”
+30 mm/+1 3/16”
Toutes les gaines mesurant 2 mètres, couper l'une des gaines (sauf la gaine inférieure qui comportel'engoujure de ralingue) avec une scie à métaux pour obtenir une longueur totale de gaines égale à “G”.Each extrusion is 2 metres long. One of the extrusion (except the lower feeder extrusion with the openingin the groove) will be cut with a metal saw to obtain a total length as “G”.
Tracez “G”Mark “G”
Coupez selon “G”Cut according to “G”
Ebavurez la coupeTrim smooth
REDÉMONTEZ LE MÉCANISME DE TAMBOURDISASSEMBLE THE DRUM MECHANISM
17 18 19
16
DétrompeurSlot
15
8

Mesurez le Ø du câbleMeasure the diameter Ø of your stay
Percez le Multitop à Ø -1mmDrill the Wrapstop in the center at Ø minus 1mm
MONTAGE DES GAINES SUR LE CÂBLEFITTING THE EXTRUSIONS ONTO THE STAY
L'éclisse supérieure est identifiable par la rainure proche de son extrémité.The upper bearing holder is one piece with a slot located close to its upper end.
Prenez l'éclisse supérieureTake the upper bearing holder
Montez 1/2 palier dans l'éclisseFit one 1/2 bearing into the bearingholder
Placez le câble dans cet ensembleFit the wire into this assembly
MISE EN PLACE DE L’ÉCLISEE SUPÉRIEUREFITTING THE UPPER BEARING HOLDER
Mesurez le Ø du câbleMeasure the diameter Ø of your stay
Percez le Multitop à Ø -1mmDrill the Wrapstop in the center at Ø minus 1mm
Glissez le 2ème demi palier dansl'éclisseSlide the second 1/2 bearing into thebearing holder
Tournez le palier de 1/4 de tour Turn the bearing by 1/4 turn
Enfilez le câble dans la gaine coupéeSlide the top extrusion up the forestay
Mesurez le Ø du câbleMeasure the diameter Ø of your stay
Percez le Multitop à Ø -1mmDrill the Wrapstop in the center at Ø minus 1mm
Poussez l'éclisse supérieure dans lagaine jusqu'à la rainurePush the upper bearing holder into theextrusion up to the slot
Engagez la butée latéralement dans larainureFit the stop into the slot in the bearingholder
Engagez la vis de butée dans la gorgeet serrez la vis de butéeFit the stop screw into the groove andtighten the top screw
20 21 22
2524
27 2826
23
9
Mesurez le Ø du câbleMeasure the diameter Ø of your stay
Percez le Multitop à Ø -1mmDrill the Wrapstop in the center at Ø minus 1mm
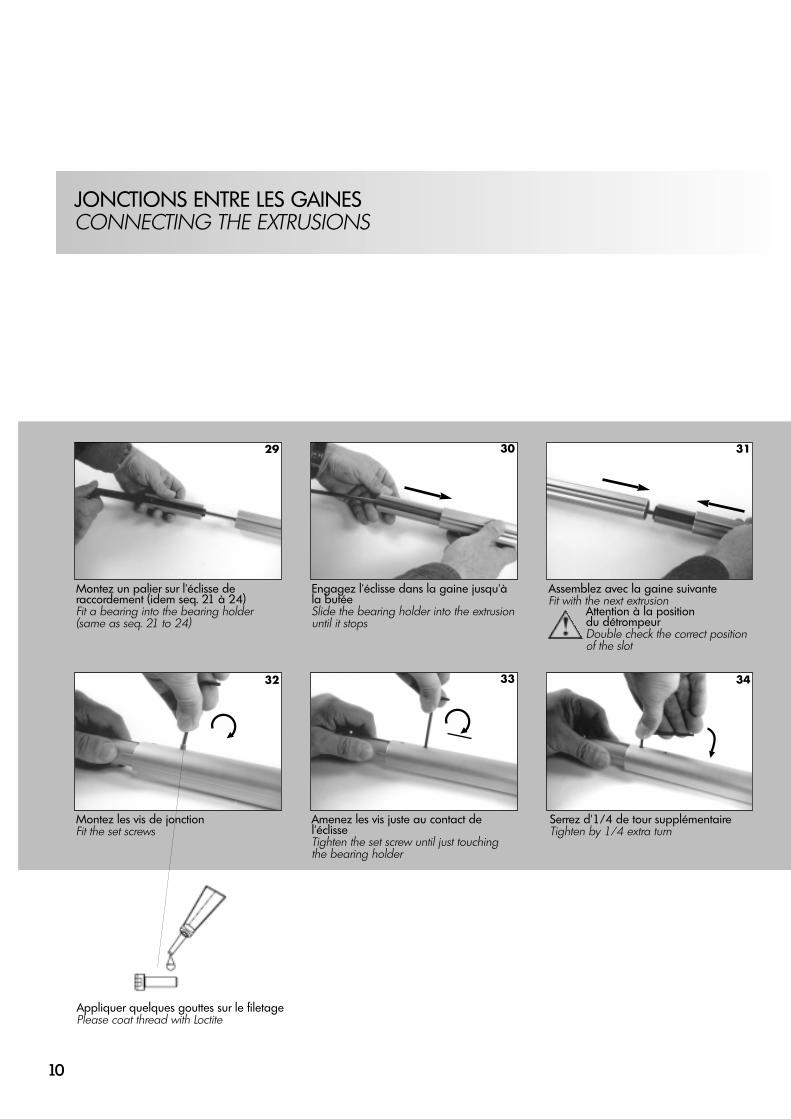
Montez un palier sur l'éclisse deraccordement (idem seq. 21 à 24)Fit a bearing into the bearing holder(same as seq. 21 to 24)
Engagez l'éclisse dans la gaine jusqu'àla butéeSlide the bearing holder into the extrusionuntil it stops
Assemblez avec la gaine suivanteFit with the next extrusion
Attention à la position du détrompeurDouble check the correct position of the slot
Percez le Multitop à Ø -1mmDrill the Wrapstop in the center at Ø minus 1mm
Montez les vis de jonctionFit the set screws
Amenez les vis juste au contact del'éclisseTighten the set screw until just touchingthe bearing holder
Serrez d'1/4 de tour supplémentaireTighten by 1/4 extra turn
JONCTIONS ENTRE LES GAINESCONNECTING THE EXTRUSIONS
29 30
32 33
31
34
10
Appliquer quelques gouttes sur le filetagePlease coat thread with Loctite

Engagez 1/2 palier et 1/2 éclisse inférieuredans l'extrémité la gaine inférieureFit 1/2 bearing and 1/2 lower bearingholder into the end of the lower extrusion
Poussez jusqu'en butéeSlide inside until it stops
Poussez le câble de côtéPosition the forestay wire in the 1/2 bearing
Engagez le 2ème demi palier et la2ème demi éclisse Fit the second 1/2 bearing and 1/2bearing holder
Le câble est centréThe forestay wire is now centered
Montez les 2 vis téton pour immobiliserl'éclisseFit both nippled screws to hold thebearing holder
MONTAGE DE LA GAINE ET DE L’ÉCLISSE INFÉRIEUREFITTING THE LOWER EXTRUSION AND LOWER BEARING HOLDER
Attention à la position du détrompeur sur les gaines (séq. 16).Double check the correct position of the slot (seq. 16).
L'éclisse inférieure est constituée de 2 moitiés : 1 gauche et 1 droite.The lower bearing holder has 2 halves : one right and one left.
35 36 37
38 39 40
11
Appliquer quelques gouttes sur le filetagePlease coat thread with Loctite

Mesurez le Ø du câbleMeasure the diameter Ø of your stay
Percez le Multitop à Ø -1mmDrill the Wrapstop in the center at Ø minus 1mm
MONTAGE DE L’ÉMERILLONFITTING THE HALYARD SWIVEL
Enfilez l'émerillon sur les gaines dans lesens indiquéFit the halyard swivel onto the extrusionsas shown
Montez les 2 manilles fourniesFit the 2 shackles onto the halyard swivel
41 42
12

Percez le Multitop à Ø -1mmDrill the Wrapstop in the center at Ø minus 1mm
MONTAGE DU MÉCANISME DE TAMBOUR SUR LES GAINESFITTING THE DRUM MECHANISM ONTO THE EXTRUSIONS
Démontez le canon de perçage et reprendre à la séq. 44.Remove the drilling guide and start again at seq. 44.
Remontez le mécanisme de tambour à la base de l'étai tel que vous l'aviez défini (dessins 2à 14).Permanently fit the drum mechanism onto the lower end of the stay, as you did previously (drawings 2 to 14).
Montez le mécanisme de tambour sur lagaine inférieure jusqu'au traitFit the drum mechanism onto the lowerextrusion up to the black mark.
Le trou “T” doit être aligné avec le troucorrespondant dans la gaineHole “T” must be on line with thecorresponding hole in the lower extrusion
Montez et serrez la vis d'arrêt “U”Fit and tighten the stop screw “U”
NOTE :En cas d'erreur de mise à longueur des gaines, mais seulement sila gaine supérieure a été coupée trop longue, un dispositif permetde rectifier cette erreur.La gaine inférieure pourra pénétrer plus profondément à l'intérieurdu mécanisme de tambour. Dans ce cas visser le canon de perçagedans le trou “T”, faire coulisser les gaines dans le cylindre à la positionvoulue, et percer la gaine à Ø 6 mm à travers le canon de perçage.
Attention à la profondeur de perçage pour ne pasendommager l'étai.
NOTE :In case you made a mistake in cutting extrusions to length, but only ifthey have been cut too long you can correct the problem.You can generally allow the lower extrusion to be inserted deeperthan standard (black mark) into the cylinder of the drum mechanism.Should this adjustment be necessary fit the drilling guide into the “T”hole, slide the extrusions down into the cylinder of the drum mechanism,and drill the lower extrusion with a 6 mm (15/64”) drill through thedrilling guide. Do not allow the lower bearing to press against thelower swage terminal.
Caution : when drilling make sure you don't drill too deep toavoid damage to the stay.
43 44T U 45
46
47
Vérifiez que l'intérieur du cylindre est parfaitement propre (pas de sable, poussière, etc..)Please check that the inside of the cylinder is perfectly clean (no sand, no dust, etc..)
Canon de perçageDrilling guide
13
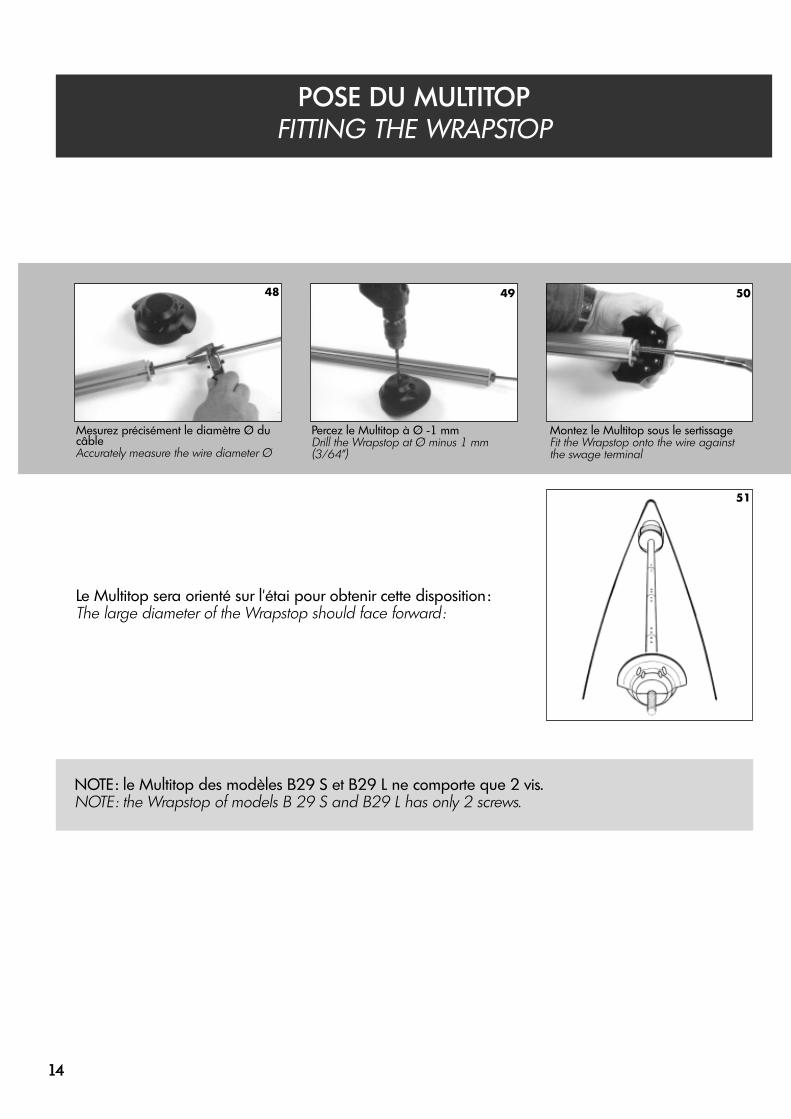
POSE DU MULTITOPFITTING THE WRAPSTOP
Mesurez précisément le diamètre Ø ducâbleAccurately measure the wire diameter Ø
Percez le Multitop à Ø -1 mmDrill the Wrapstop at Ø minus 1 mm(3/64”)
Montez le Multitop sous le sertissageFit the Wrapstop onto the wire againstthe swage terminal
Le Multitop sera orienté sur l'étai pour obtenir cette disposition :The large diameter of the Wrapstop should face forward :
NOTE : le Multitop des modèles B29 S et B29 L ne comporte que 2 vis.NOTE : the Wrapstop of models B 29 S and B29 L has only 2 screws.
51
49 5048
14
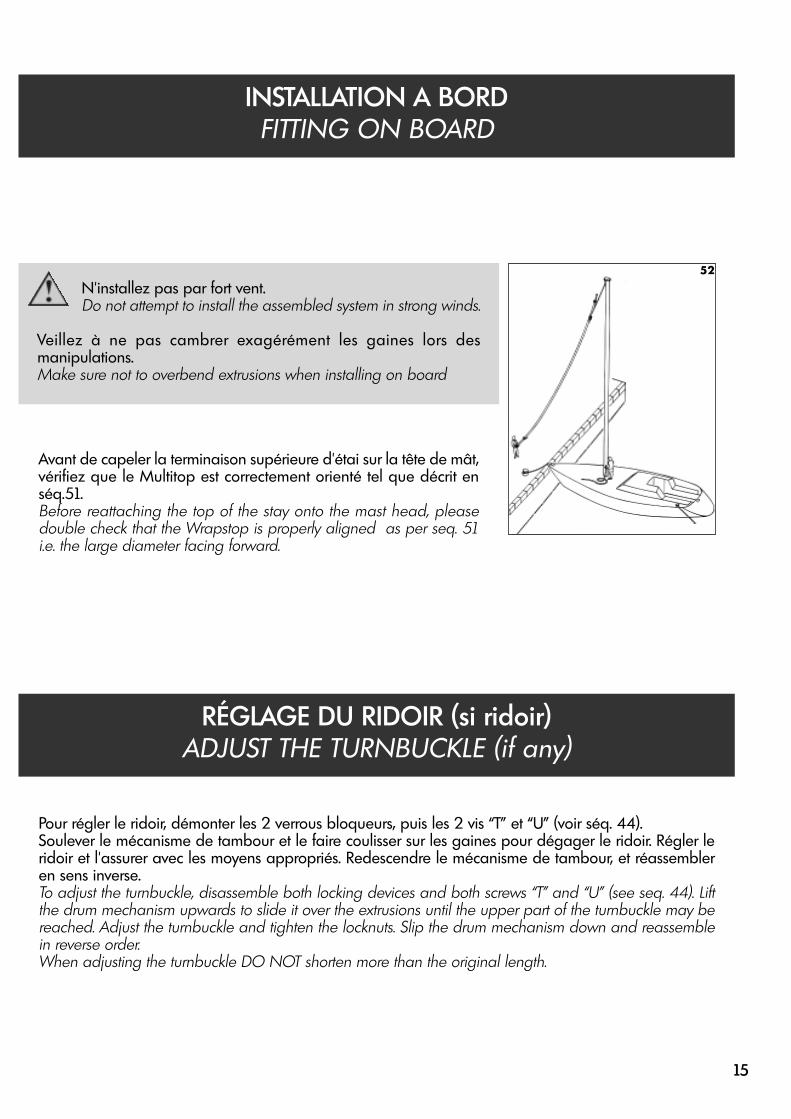
N'installez pas par fort vent.Do not attempt to install the assembled system in strong winds.
Veillez à ne pas cambrer exagérément les gaines lors desmanipulations.Make sure not to overbend extrusions when installing on board
Avant de capeler la terminaison supérieure d'étai sur la tête de mât,vérifiez que le Multitop est correctement orienté tel que décrit enséq.51.Before reattaching the top of the stay onto the mast head, pleasedouble check that the Wrapstop is properly aligned as per seq. 51i.e. the large diameter facing forward.
Pour régler le ridoir, démonter les 2 verrous bloqueurs, puis les 2 vis “T” et “U” (voir séq. 44).Soulever le mécanisme de tambour et le faire coulisser sur les gaines pour dégager le ridoir. Régler leridoir et l'assurer avec les moyens appropriés. Redescendre le mécanisme de tambour, et réassembleren sens inverse.To adjust the turnbuckle, disassemble both locking devices and both screws “T” and “U” (see seq. 44). Liftthe drum mechanism upwards to slide it over the extrusions until the upper part of the turnbuckle may bereached. Adjust the turnbuckle and tighten the locknuts. Slip the drum mechanism down and reassemblein reverse order.When adjusting the turnbuckle DO NOT shorten more than the original length.
INSTALLATION A BORDFITTING ON BOARD
RÉGLAGE DU RIDOIR (si ridoir)ADJUST THE TURNBUCKLE (if any)
52
15
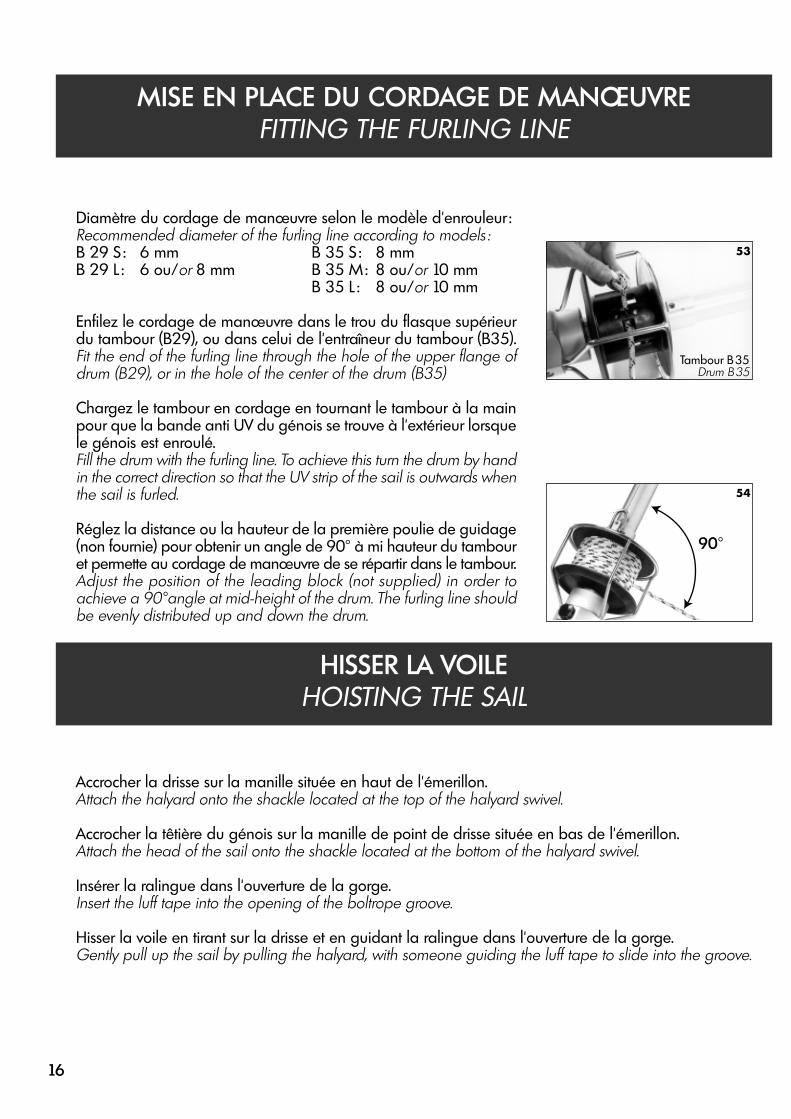
Diamètre du cordage de manœuvre selon le modèle d'enrouleur :Recommended diameter of the furling line according to models :B 29 S : 6 mmB 29 L : 6 ou/or 8 mm
Enfilez le cordage de manœuvre dans le trou du flasque supérieurdu tambour (B29), ou dans celui de l'entraîneur du tambour (B35).Fit the end of the furling line through the hole of the upper flange ofdrum (B29), or in the hole of the center of the drum (B35)
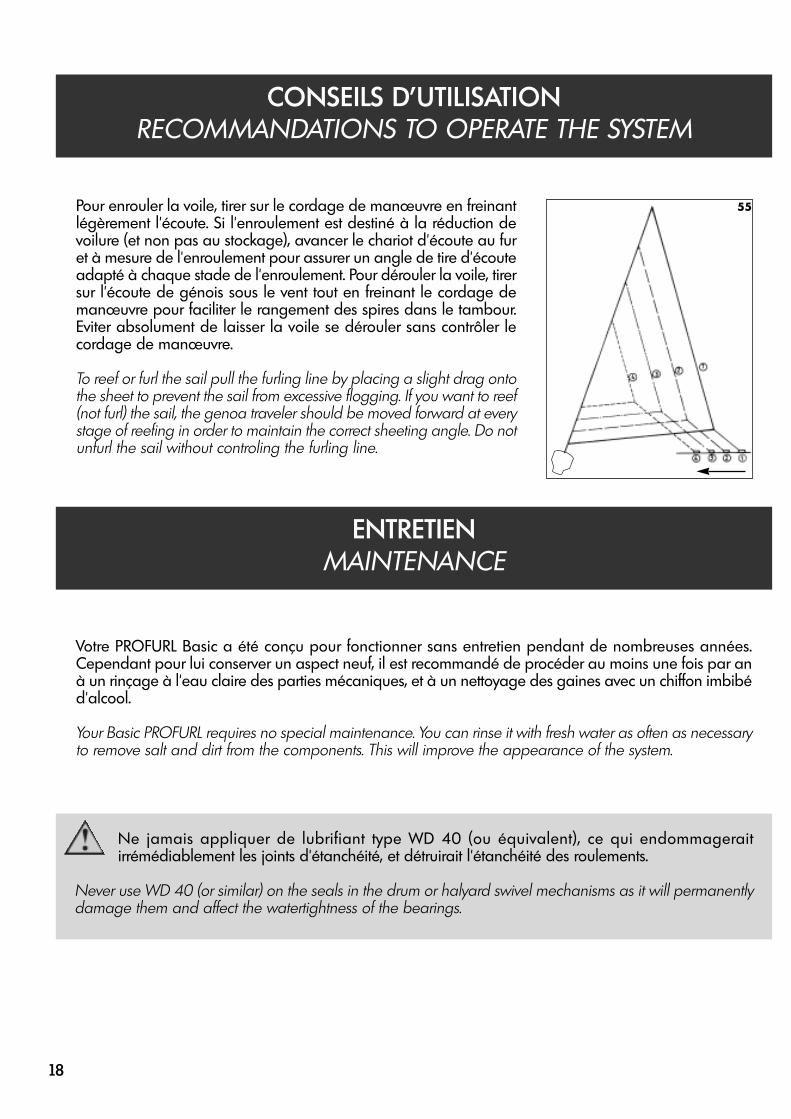
Chargez le tambour en cordage en tournant le tambour à la mainpour que la bande anti UV du génois se trouve à l'extérieur lorsquele génois est enroulé.Fill the drum with the furling line. To achieve this turn the drum by handin the correct direction so that the UV strip of the sail is outwards whenthe sail is furled.
Réglez la distance ou la hauteur de la première poulie de guidage(non fournie) pour obtenir un angle de 90° à mi hauteur du tambouret permette au cordage de manœuvre de se répartir dans le tambour.Adjust the position of the leading block (not supplied) in order toachieve a 90°angle at mid-height of the drum. The furling line shouldbe evenly distributed up and down the drum.
MISE EN PLACE DU CORDAGE DE MANŒUVREFITTING THE FURLING LINE
Accrocher la drisse sur la manille située en haut de l'émerillon.Attach the halyard onto the shackle located at the top of the halyard swivel.
Accrocher la têtière du génois sur la manille de point de drisse située en bas de l'émerillon.Attach the head of the sail onto the shackle located at the bottom of the halyard swivel.
Insérer la ralingue dans l'ouverture de la gorge.Insert the luff tape into the opening of the boltrope groove.
Hisser la voile en tirant sur la drisse et en guidant la ralingue dans l'ouverture de la gorge.Gently pull up the sail by pulling the halyard, with someone guiding the luff tape to slide into the groove.
HISSER LA VOILEHOISTING THE SAIL
53
54
B 35 S : 8 mmB 35 M: 8 ou/or 10 mmB 35 L : 8 ou/or 10 mm
16
Tambour B35Drum B35
90°

La position de l'émerillon est déterminée par la longueur du guindant de la voile étarquée. Vérifiez quela longueur de guindant est correcte : le bord supérieur de l'émerillon devra être situé à 5 à 10 cm dela tête de l'enrouleur lorsque la voile est étarquée.
The position of the halyard swivel is determined by the luff after the halyard has been tensioned. You shouldthen have a distance of 5 to 10 cm (2 to 4”) between the top edge of the halyard swivel ant the top endof the extrusions.
Les enrouleurs PROFURL Basic comportent un dispositif permettant de régler la hauteur du point d'amure,indépendamment de la hauteur du tambour. Le réglage est utilisé dans les cas suivants :
• tambour monté sous le pont , dans la soute à mouillage,• souhait de l'utilisateur de dégager la bordure du génois des filières, pour éviter l'usure de la bordure ou améliorer la visibilité sous la voile,
• rattrapage partiel ou total de la longueur du guindant de la voile si celui ci a été coupé trop court, de façon à obtenir un émerillon de drisse bien placé en tête de l'enrouleur.
La position du point d'amure peut être modifiée en desserrant la vis placée dans le tenon, en plaçantle coulisseau à la hauteur voulue, et en reserrant fermement la vis.
The Basic PROFURL has a device allowing adjustment of the position of the tack of the sail. This feature isused in the following cases :
• drum mechanism fitted under deck, in the chain locker,• if the user wishes to raise the foot of the sail from the life lines, in order to avoid chafe on the foot ofthe sail, or to allow for better visibility under the sail,
• correction to the luff length in case the sail being cut too short, so that the halyard swivel is properlypositioned at the top of the system.
The position of the tack slide may be changed by loosening the screw located in the tack slide rib, slidingthe tack slide in position, and firmly re-tigntening the screw.
RÉGLAGE DE LA HAUTEUR DE L’ÉMERILLONHALYARD SWIVEL POSITION ADJUSTMENT
POINT D’AMURE RÉGLABLEADJUSTABLE TACK FITTING
17
ATTENTION: La plupart des voiles s'allongent de manière permanente à l'utilisation, et le voilier devra prendre
en compte cet allongement permanent lors de la détermination de la longueur du guindant.Veillez à ce que l'émerillon ne puisse en aucun cas s'engager au dessus des gaines. CAUTION:Most sails stretch permanently after being used. Sailmakers should compensate for this permanent stretchwhen designing the luff length.DO NOT over tension the halyard swivel above the top end of the luff extrusions.the upper end of the stay.
CONSEILS D’UTILISATIONRECOMMANDATIONS TO OPERATE THE SYSTEM
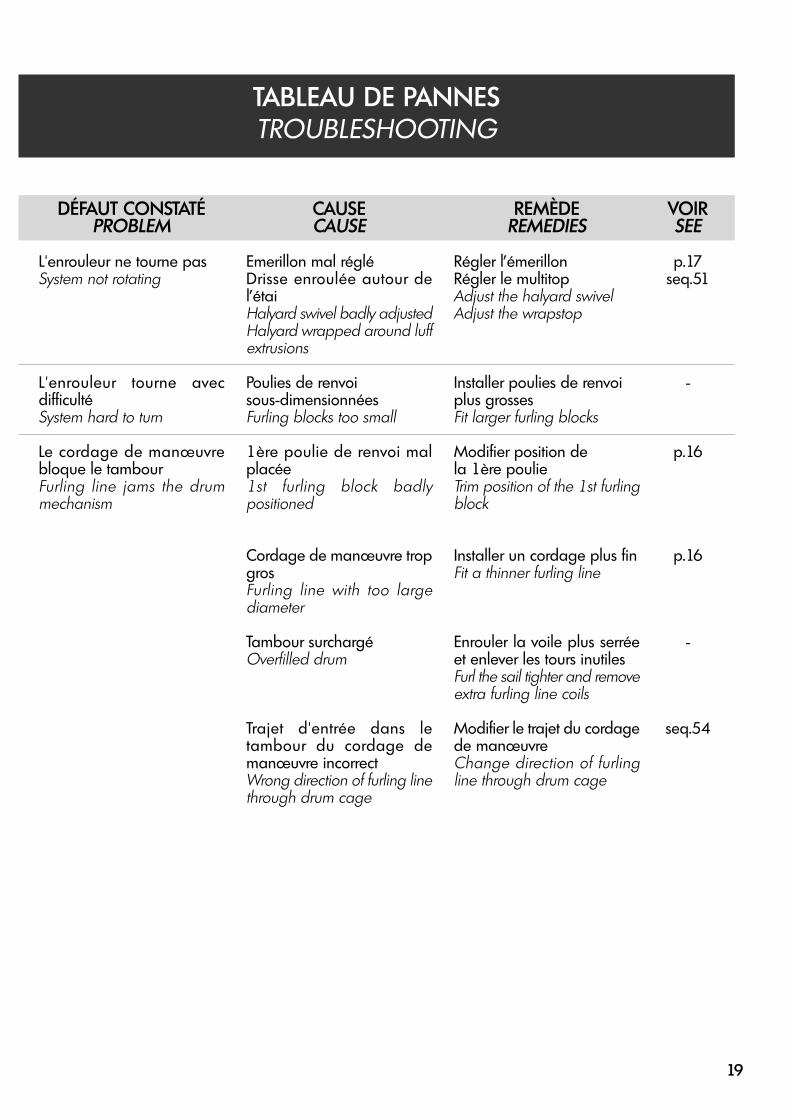
Pour enrouler la voile, tirer sur le cordage de manœuvre en freinantlégèrement l'écoute. Si l'enroulement est destiné à la réduction devoilure (et non pas au stockage), avancer le chariot d'écoute au furet à mesure de l'enroulement pour assurer un angle de tire d'écouteadapté à chaque stade de l'enroulement. Pour dérouler la voile, tirersur l'écoute de génois sous le vent tout en freinant le cordage demanœuvre pour faciliter le rangement des spires dans le tambour.Eviter absolument de laisser la voile se dérouler sans contrôler lecordage de manœuvre.
To reef or furl the sail pull the furling line by placing a slight drag ontothe sheet to prevent the sail from excessive flogging. If you want to reef(not furl) the sail, the genoa traveler should be moved forward at everystage of reefing in order to maintain the correct sheeting angle. Do notunfurl the sail without controling the furling line.
ENTRETIENMAINTENANCE
Votre PROFURL Basic a été conçu pour fonctionner sans entretien pendant de nombreuses années.Cependant pour lui conserver un aspect neuf, il est recommandé de procéder au moins une fois par anà un rinçage à l'eau claire des parties mécaniques, et à un nettoyage des gaines avec un chiffon imbibéd'alcool.
Your Basic PROFURL requires no special maintenance. You can rinse it with fresh water as often as necessaryto remove salt and dirt from the components. This will improve the appearance of the system.
Ne jamais appliquer de lubrifiant type WD 40 (ou équivalent), ce qui endommageraitirrémédiablement les joints d'étanchéité, et détruirait l'étanchéité des roulements.
Never use WD 40 (or similar) on the seals in the drum or halyard swivel mechanisms as it will permanentlydamage them and affect the watertightness of the bearings.
55
18
DÉFAUT CONSTATÉPROBLEM
L'enrouleur ne tourne pasSystem not rotating
L'enrouleur tourne avecdifficultéSystem hard to turn
Le cordage de manœuvrebloque le tambourFurling line jams the drummechanism
TABLEAU DE PANNESTROUBLESHOOTING
CAUSECAUSE
Emerillon mal régléDrisse enroulée autour del’étaiHalyard swivel badly adjustedHalyard wrapped around luffextrusions
Poulies de renvoi sous-dimensionnéesFurling blocks too small
1ère poulie de renvoi malplacée1st furling block badlypositioned
Cordage de manœuvre tropgrosFurling line with too largediameter
Tambour surchargéOverfilled drum
Trajet d'entrée dans letambour du cordage demanœuvre incorrectWrong direction of furling linethrough drum cage
REMÈDEREMEDIES
Régler l’émerillonRégler le multitopAdjust the halyard swivelAdjust the wrapstop
Installer poulies de renvoi plus grossesFit larger furling blocks
Modifier position de la 1ère poulieTrim position of the 1st furlingblock
Installer un cordage plus finFit a thinner furling line
Enrouler la voile plus serréeet enlever les tours inutilesFurl the sail tighter and removeextra furling line coils
Modifier le trajet du cordagede manœuvreChange direction of furlingline through drum cage
VOIRSEE
p.17seq.51
-
p.16
p.16
-
seq.54
19
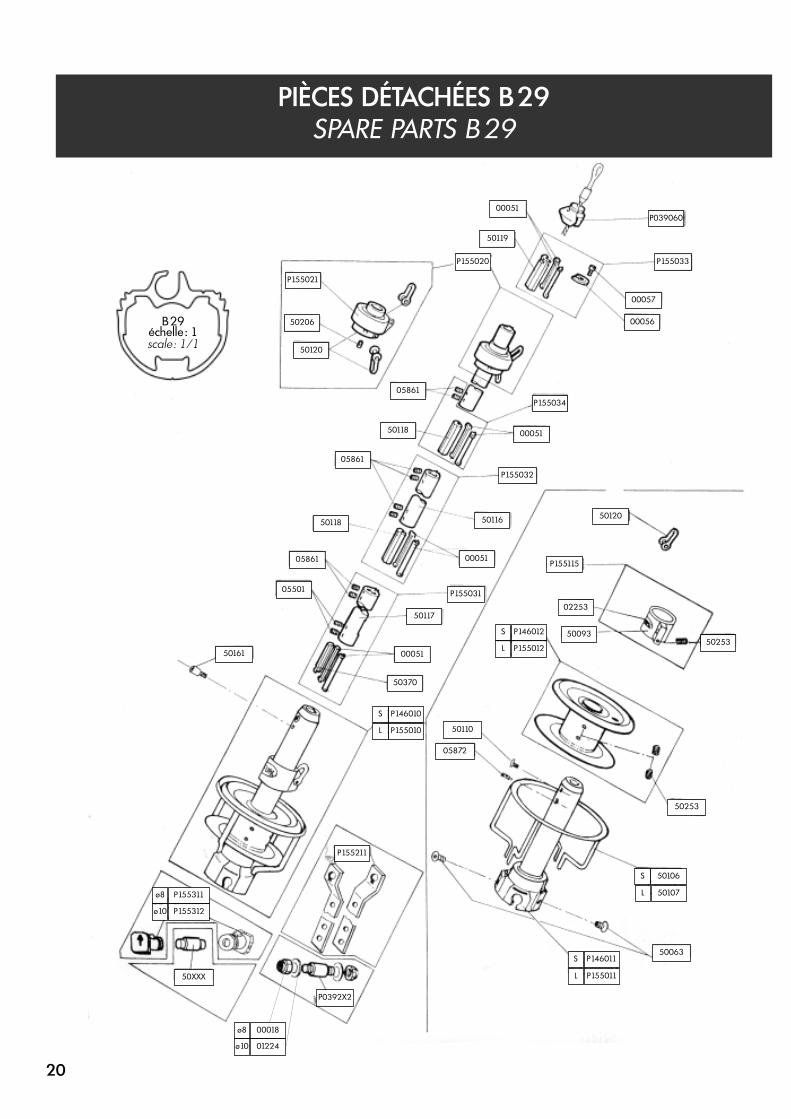
PIÈCES DÉTACHÉES B29SPARE PARTS B29
B29échelle : 1scale : 1/1
00051
50119
00057
P155020
00056
50117
50118
P155021
50206
50120
P039060
P155033
P155031
05861
50370
50118
00051
05861
P155115
05501
P146010S
50120
05861
50093
P155034
02253
50161
P155010
05872
P155032
P0392X2
50063
50110
00051
50253
00051
P155211
50253
50116
50XXX
L
P146011S
P155011L
P155311ø8
P155312ø10
00018ø8
01224ø10
50106S
50107L
P146012S
P155012L
20

PIÈCES DÉTACHÉES B35SPARE PARTS B35
B35échelle : 1scale : 1/1
50172
50066
00057
P153020
02103
50068
50067
P153021
02178
50111
P035060
P153033
P153031
00052
50065
50067
50172
00052
P153115
05501
P153010S
50111
00052
50057
P153034
02253
50161
P151010
05872
P153032
P0352X2
50063
50110
50172
50064
50172
P153211
50064
50069
020XXX
M
P153011S/M
P151011L
P153311ø10
P153312ø12
01224ø10
00094ø12
P147010L
50112S
50073M
50014L
P153012S
P147012M
P151012L
21
45
10
20
120
70
365
90
320
105
100
105
400
75
25
45
150
99
80
160
28
210
66
97
46
29
175
145
115
85
4
15
35
1 49/64"
25/64"
25/32"
4 47/64"
2 3/4"
1' 2 3/8"
3 35/64"
1 19/32"
4 1/8"
3 15/16"
4 1/8"
1' 3 3/4"
2 61/64"
1"
1 49/64"
5 29/32"
3 57/64"
3 5/32"
6 19/64"
1 7/64"
8 17/64"
2 19/32"
3 13/16"
1 13/16"
1 5/32"
6 57/64"
5 45/64"
4 17/32"
3 11/32"
5/32"
19/32"
13/8"
45
10
20
150
70
475
90
430
105
100
105
510
75
25
45
150
99
80
255
28
210
66
97
46
29
175
145
115
85
4
15
35
1 49/64"
25/64"
25/32"
5 29/32"
2 3/4"
1' 6 11/16"
3 35/64"
1' 4 15/16"
4 1/8"
3 15/16"
4 1/8"
1' 8 5/64"
2 61/64"
1"
1 49/64"
5 29/32"
3 57/64"
3 5/32"
10"
1 7/64"
8 17/64"
2 19/32"
3 13/16"
1 13/16"
1 5/32"
6 57/64"
5 45/64"
4 17/32"
3 11/32"
5/32"
19/32"
1 3/8"
70
10
28
170
98
680
128
460
130
150
270
540
80
32
50
190
115
95
240
32
265
115
115
56
35
203
168
133
98
4
17
45
2 3/4"
25/64"
1 7/64"
6 11/16"
3 55/64"
2' 2 23/32"
5 3/64"
1' 6 3/32"
5 1/8"
5 29/32"
10 5/8"
1' 9 1/4"
3 5/32"
1 1/4"
1 31/32"
7 15/32"
4 17/32"
3 3/4"
9 29/64"
1 1/4"
10 7/16"
4 17/32"
4 17/32"
2 13/64"
1 3/8"
7 63/64"
6 39/94"
5 15/64"
3 55/64"
5/32"
43/64"
1 25/32"
70
10
28
200
98
680
128
460
130
150
270
540
80
32
50
190
115
95
240
32
265
115
115
56
35
203
168
133
98
4
17
45
2 3/4"
25/64"
1 7/64"
7 7/8"
3 55/64"
2' 2 23/32"
5 3/64"
1' 6 3/32"
5 1/8"
5 29/32"
10 5/8"
1' 9 1/4"
3 5/32"
1 1/4"
1 31/32"
7 15/32"
4 17/32"
3 3/4"
9 29/64"
1 1/4"
10 7/16"
4 17/32"
4 17/32"
2 13/64"
1 3/8"
7 63/64"
6 39/94"
5 15/64"
3 55/64"
5/32"
43/64"
1 25/32"
70
10
28
220
98
760
128
530
130
150
270
610
80
32
50
190
115
95
310
37
265
115
115
56
35
203
168
133
98
4
17
45
2 3/4"
25/64"
1 7/64"
8 43/64"
3 55/64"
2' 5 7/8"
5 3/64"
1' 8 7/8"
5 1/8"
5 29/32"
10 5/8"
2' 1/64"
3 5/32"
1 1/4"
1 31/32"
7 15/32"
4 17/32"
3 3/4"
12 13/64"
1 29/64"
10 7/16"
4 17/32"
4 17/32"
2 13/64"
1 3/8"
7 63/64"
6 39/94"
5 15/64"
3 55/64"
5/32"
43/64"
1 25/32"
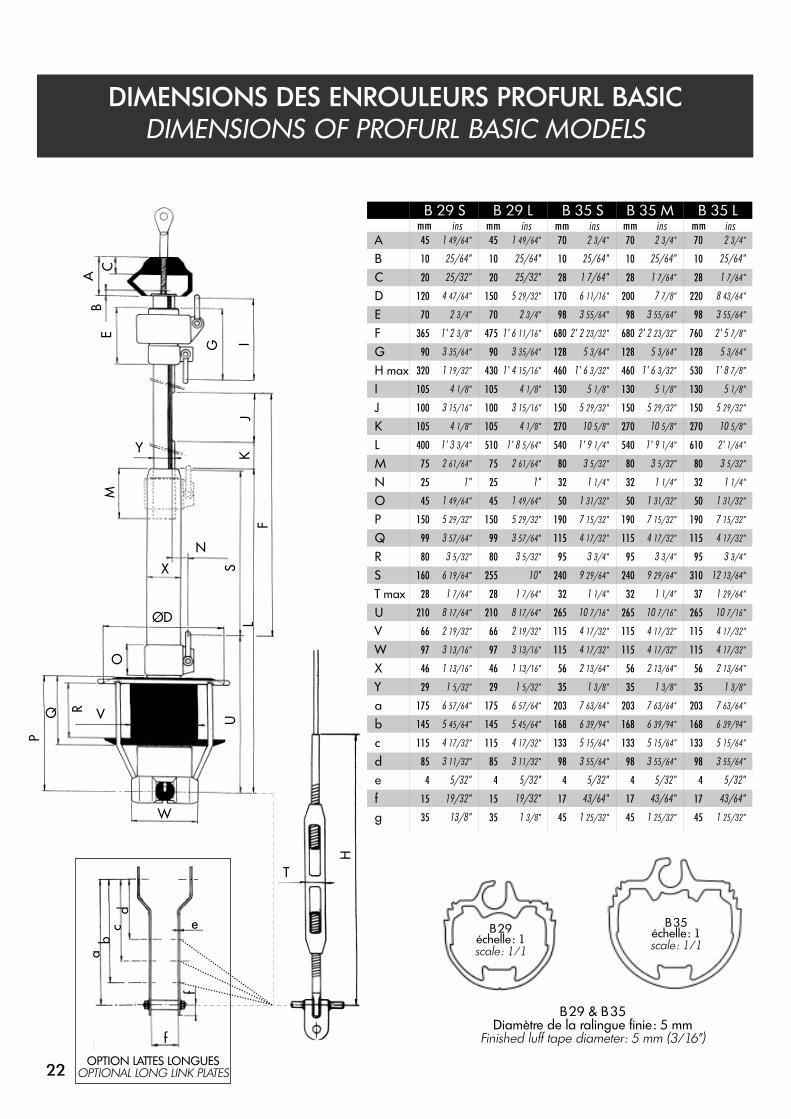
ABCDEFGH max
IJKLMNOPQRST max
UVWXYabcdefg
B 29 S B 29 L B 35 S B 35 M B 35 Lmm ins mm ins mm ins mm ins mm ins
DIMENSIONS DES ENROULEURS PROFURL BASICDIMENSIONS OF PROFURL BASIC MODELS
OPTION LATTES LONGUESOPTIONAL LONG LINK PLATES
B29échelle : 1scale : 1/1
B35échelle : 1scale : 1/1
B29 & B35Diamètre de la ralingue finie : 5 mm
Finished luff tape diameter : 5 mm (3/16”)
AC
BE
G IJ
K
M
S
F
O
LU
R
X
N
Y
W
T
V
ØD
QP
a
H
cd
f
f
e
b
22

WICHARD, Inc148a Bryce Blvd
Fairfax - VT05454 USA
Tel : +1 401 683 5055Fax :+1 802 655 4689
Free toll number: + 1 800 852-7084Email : [email protected]
WICHARD PACIFIC Pty LtdUnit 13, 2 Bishop StreetSt Peters NSW 2044,
AustraliaTel : + 61 2 9516 0677Fax : + 61 2 9516 0688
Freecall from Australia: 1800 639 767Email : [email protected]
WICHARD FranceHotline / Support technique / SAV
33 rue de l’Etoile du matin44600 Saint Nazaire,
FranceTel +33 (0)2 51 76 00 35Fax +33 (0)2 40 01 40 43
Email : [email protected]
www.profurl.com