Embed Size (px)
Citation preview

Rev. 021521 1-888-651-3431 Page 1
General Guidelines
• It is the user’s responsibility to read and follow all instructions.
• Keep these instructions with the product at all times and review before each use.
• It is the responsibility of this product’s owner to furnish the instructions to any person
that borrows or purchases the product.
• Inspect the product before use to ensure it is assembled properly and all parts are in safe
working order and free of defects.
• Never modify this product in any way.
• All circumstances cannot be addressed in these instructions. Please use common
sense and practice general safety measures when using this product.
• Parts and/or instructions are subject to change without notice.
• Do not exceed the 1000 lbs weight capacity.
Technical Specifications Property Specification
Length 131.4in.
Width 71.9in.
Height 39.6in.
Maximum Weight Capacity 1000lbs.
Full size Steel Truck Rack
Instructions for Part # UPUT-RACK-V3

Rev. 021521 1-888-651-3431 Page 2
PARTS LIST
Prior to assembly and installation, make sure all parts are present, intact and undamaged. If you discover
missing and/or damaged parts, contact our customer service using the information on page 1.
Hardware kit
Item# Description Quantity Item# Description Quantity
1 Front Upright 2 10 Connecting Post 2
2 Driver Side Rear
Upright 1 11 Anchor Plate 2
3 Passenger Side Rear
Upright 1 12 Side Rail Bracket 4
4
Driver Side
Front/Passenger
Side Rear Mounting
Bracket
2
13 Handle 2
5
Passenger Side
Front/Driver Side
Rear Mounting
Bracket
2
14 M12 Knob
2
6 Crossbar 3 15 End Cap 10
7 Front Side Rail
Section 2 16 Handle End Cap 2
8 Rear Side Rail
Section 2 17 using L-Clamps 8
9 Connecting Bracket 8
NO Description Picture Quantity
A M12x70 Carriage bolt(18),M12 Outer hex nut(19) 2
B M12x75 Carriage bolt(20), M12 Locking nut(21) 4
C M12x45 Carriage bolt(22), M12 Locking nut(21) 2
D M10x70 Carriage bolt(23),M10 locking nut(24) 4
E M10x45 Carriage bolt(25),10 flat washer(26),M10 locking nut(24) 2
F M12x100 outer hex bolt(27),12 Flat washer(28),12 spring washer(29) 8
G M12x55 outer hex bolt(30),12 Flat washer(28),12 spring washer(29) 8

Rev. 021521 1-888-651-3431 Page 3
Tools Required
19mm Wrench (1 pc.) 17mm Wrench (1 pc.) Tape Measure (1 pc)
ASSEMBLY/PARTS DIAGRAM
ATTENTION!
Before beginning the assembly process, we recommend that you confirm the standard Mounting
Bracket and L-Clamp rack installation will work on your vehicle. Per the directions in Step 4, check the fit
of one Mounting Bracket (4 or 5), and one L-Clamp (17), on the truck bed rail of your vehicle. In the
unlikely event the standard L-Clamp installation does not work on your truck, you can consult your
truck’s maker to determine the proper installation method before assembling your rack.
Rev. 021521 1-888-651-3431 Page 4
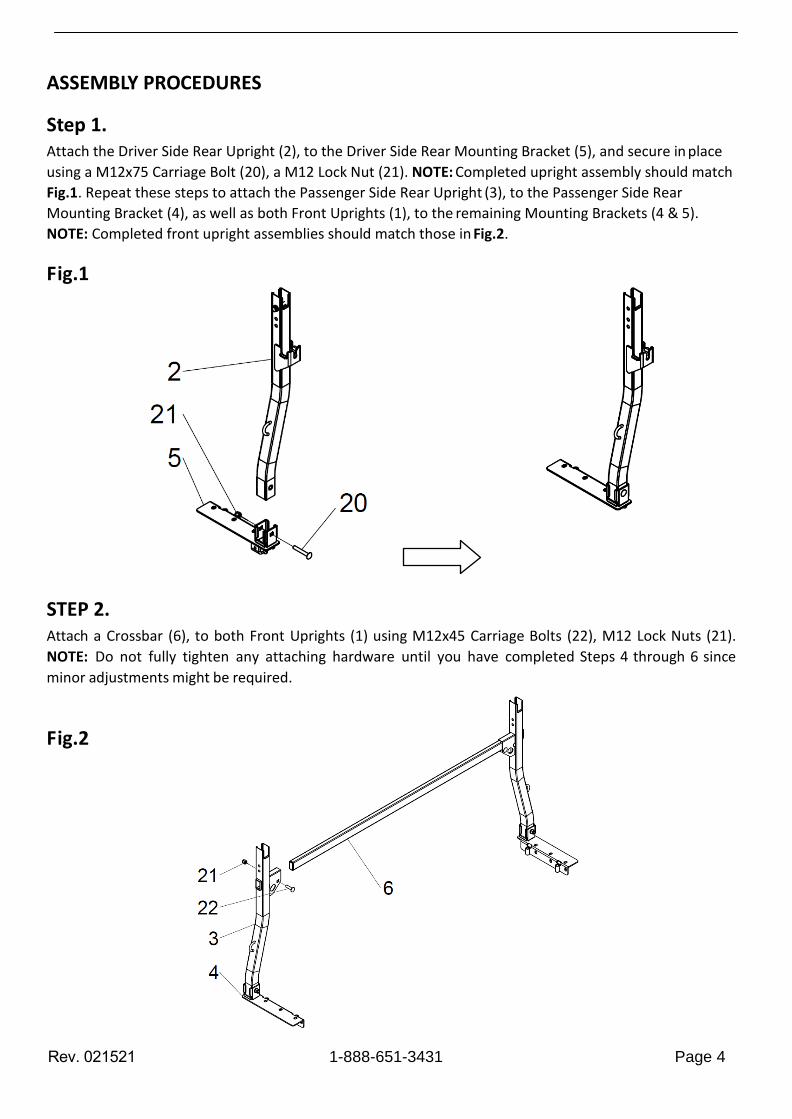
ASSEMBLY PROCEDURES
Step 1. Attach the Driver Side Rear Upright (2), to the Driver Side Rear Mounting Bracket (5), and secure in place
using a M12x75 Carriage Bolt (20), a M12 Lock Nut (21). NOTE: Completed upright assembly should match
Fig.1. Repeat these steps to attach the Passenger Side Rear Upright (3), to the Passenger Side Rear
Mounting Bracket (4), as well as both Front Uprights (1), to the remaining Mounting Brackets (4 & 5).
NOTE: Completed front upright assemblies should match those in Fig.2.
Fig.1
STEP 2. Attach a Crossbar (6), to both Front Uprights (1) using M12x45 Carriage Bolts (22), M12 Lock Nuts (21).
NOTE: Do not fully tighten any attaching hardware until you have completed Steps 4 through 6 since
minor adjustments might be required.
Fig.2

Rev. 062118 DiscountRamps.com • 1-888-651-3431 Page 5
STEP 3. Attach Anchor Plates (11), to each end of the second Crossbar (6), using M12x70 Carriage Bolts (18),
M12 Hex Nuts (19), and M12 Knobs (14). Only finger tighten for now. After hardware is installed, attach
the Crossbar (6), to the Rear Uprights (2 & 3), as shown in Fig.3. NOTE: Do not fully tighten crossbar
attaching hardware until you have completed Steps 4 through 6 since minor adjustments might be
required. Install the bolt and nut first, and screw on the hand wheel.
Fig.3
STEP 4. Secure the mounting brackets of the completed upright/crossbar assemblies from steps 2 and 3 to the
rails of your truck bed using L-Clamps (17), M12x100 Hex Head Bolts (27), Spring Washers (29), and M12
Washers (28). ATTENTION! TWO L-Clamps MUST be installed on each bracket to properly secure the
rack to the truck. If the provided L-Clamps (17) are not a suitable fit for your truck bed rails an alternate
mounting method may be possible using the other holes in the mounting plates. Please consult the truck
manufacturer regarding suitable mounting options for your truck.
Fig.4

Rev. 021521 1-888-651-3431 Page 6
STEP 5. Join Front and Rear Side Rail Sections (7) & (8), and secure with two Side Rail Brackets (12), two M10x70
Carriage Bolt (23), and two M10 Lock Nuts (21), as shown. Slide a Handle (26), on the end of the Rear
Side Rail Section (8), and secure it in place with an M10x45 Carriage Bolt (25), a M10 Washer (26), and a
M10 Lock Nut (24). Install End Caps (15), on the both ends of the Side Rail. Install a Handle End Cap (16),
on the end of the handle. Repeat this process to complete the second side rail assembly.
Fig.5
STEP 6.
Attach the completed side rail assemblies to each of the four uprights using a Connecting Bracket (9),
M12x55 Hex Head Bolt (30), Spring Washer (29), and M12 Washer (28), as shown in Fig.6. Do not fully
tighten yet. ATTENTION! Side rail assemblies cannot be attached to the uprights at the point where
the side rail sections are joined together. If necessary, slide the side rail fore or aft to ensure the joint
is NOT directly over the attachment point of the front upright.
Fig.6

Rev. 021521 1-888-651-3431 Page 7
STEP 7.
Attach a Connecting Post (10), to the each end of the third Crossbar (6), using a Connecting Bracket (9),
M12x55 Hex Head Bolt (30), Spring Washer (29), and M12 Washer (28), as shown in Fig.7. Do not
fully tighten hardware yet.
Fig.7
STEP 8.
Attach the third crossbar assembly to the fronts of the side rails over the cab of the truck by
repeating the attachment method described in Step 6. ATTENTION! Once you are satisfied with the
position of all rack components, ALL crossbar and side rail attachment hardware should be securely
tightened. Your installed rack should resemble Fig.8
Fig.8
STEP 9.
Perform a final check to ensure ALL hardware has been properly tightened to ensure your rack is
securely assembled and attached to your truck. Congratulations! Your rack is now ready for use.
Please remember to haul your loads safely.

Rev. 021521 1-888-651-3431 Page 8
Product Warranty and Liability
GENERAL PRODUCT WARRANTY: Products purchased from the Authorized Dealer (original place
of purchase) or Merchant (“Dealer”) will be free of defects in material and workmanship at the
time of receipt, and will meet the specifications stated at the place of purchase transaction or
online at the Dealer’s website, under normal use and service when correctly installed, operated
and maintained. This product warranty is effective for the period of time stated below, unless
otherwise stated in the product instructions or depicted in the product advertisement. All
Authorized Dealer warranties are NON-TRANSFERABLE and cover only the original end
purchaser. This limited warranty does not cover products purchased through non-authorized
dealers. Non-authorized dealer receipts are not accepted for warranty verification.
***Warranty claims must be made directly to the original place of purchase.***
WARRANTY PERIOD: This warranty remains in force for one year from the date of the product’s
accepted delivery. The Authorized Dealer offers a one year manufacturer’s warranty for most products
unless otherwise specified on the product advertisement.
WARRANTY SERVICE: The Authorized Dealer will replace any defective or malfunctioning part
at no charge, including payment of the shipping costs of parts or replacement product to and
from the
manufacturer. The purchaser is responsible for labor charges. If the product does not meet
specifica- tions as depicted in the advertisement, the Authorized Dealer will refund the full
purchase price of the product.
Questions regarding the warranty on a specific product and warranty claims should be directed to the
Authorized Dealer with whom the purchase transaction was made.
WARRANTY LIMITATIONS: The above warranty does not apply to products that are repaired, modi-
fied or altered by any party other than the Authorized Dealer; are subjected to unusual physical
stress or conditions (such as overloaded ramps or corrosion), natural disaster, governmental
actions, wars, strikes, labor disputes, riots, theft, vandalism, terrorism or any reason beyond
reasonable control; are damaged due to improper installation, misuse, abuse, accident or
negligence in use, storage, trans- portation or handling, or tampering; or to products that are
considered consumable items or items requiring repair or replacement due to normal wear and
tear.
Product should be inspected prior to signing for delivery. Product damage incurred during
shipping, unless noted on the Bill of Lading at the time of delivery, renders this warranty void.
LIMITED LIABILITY: In no event shall THE AUTHORIZED DEALER be liable to the purchaser or any
third party for any indirect, incidental, consequential, special, exemplary or punitive damages
arising out of the use of the product, including, without limitation, property damage, loss of value
of the prod- uct or any third party products that are used in or with the product, or loss of use of
the product or any third party products that are used in or with the product.