Embed Size (px)
Citation preview

7ft -------------------------
Section N - Cooling System N.B. Cooling System part numbers begin with (K)
)
Hosted and optimised by www.TheTVRSite.com

- ----. ----
contents
·· ·········· ··· ·······················11······································
Radiator
······················ ················IJ································· ·····
Temp. Sensor
······································&······································
Oil Cooler
······································m······································
Water cooling piping
............................. .. ....... g ..................................... . Bleeding Coolant System )
........................... .. ......... g ..................................... . Coolant Replacement
Hosted and optimised by www.TheTVRSite.com

7ft ------------------------
Service I Workshop Manual
Radiator
)
Hosted and optimised by www.TheTVRSite.com

4
Service/Workshop Manual - Radiator
Radiator -Removal/Replacement Procedure
. Remove the air flow sensor plug HTh;roh
':situated on theN/S of the ~ar . .
Next remove the split pins on the twose~J:}Iirlg ,; clips on the front of the box and undq the clips:. ·
The filter housing should now come free.
)
Hosted and optimised by www.TheTVRSite.com

)
CERBERA SERVICEI'WORKSHOP NIANUAL
Service/Workshop Manual - Radiator
8
To gain access to the radiator ·paneL · ··
Remove ·the top and bottom radiator l}oses::···· ,,,;. . .Starting with the bottom - to allow fluid to:' drain out
·If A/ Con· disconnect both fan wires. N.B. Noti]1g which.wires went to whis:h
. connector. · · ' If standard .disconnect single fan wiring.
If A/Con remove the largest fan by unbolting the 4 x M6 nyloc nuts.
Hosted and optimised by www.TheTVRSite.com

. .
Locate 'the radiator ,Mtgi pins m ·. the two ~ocationaLhol;s c,;nd·.then repla"ce nuts.. 0 Ensure th~t the intg.,pins have1Jh~;Iubber spafers in·place. .. · ·· Coola~t Specification 3 parts water tS 1 c:
·anti'.:.freeze: CapacitYlS'Jities.
)
Hosted and optimised by www.TheTVRSite.com

CERBERA SERVICE/WORKSHOP NIANUAL
Notes
)
i i i i i ! ! .
l
Hosted and optimised by www.TheTVRSite.com

7W ---------------------- -- -
)
Service I Workshop Manual
ECU Temperature Sensor
)
)
Hosted and optimised by www.TheTVRSite.com

- --
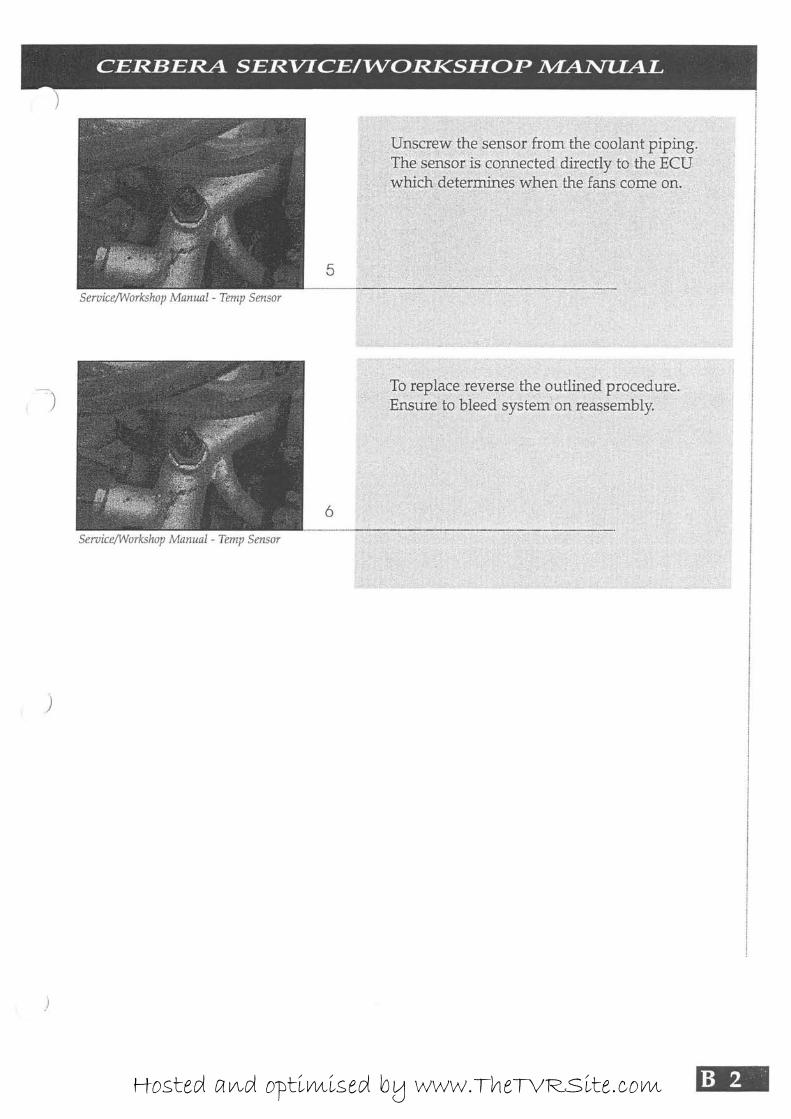
Service/Workshop Manual - Temp Sensor
3
Service/Workshop Manual - Temp Sensor
4
Service/Workshop Manual - Temp Sensor
Temp. Sensor -Removal/Replacement Procedure
The temperature sepsor for th~ cooling sx.~l~~§s located in the eng~ne bay under the Flg~~~t:~·
Remov~ . the 6 xM8allen bolts whiCh secures . the .Flpanel. ·
The sensor is located on the top of the outlet cooling pipes - as shown.
To remove unclip the sensor connector.
)
Hosted and optimised by www.TheTVRSite.com
)
)
)
CERBERA SERVICE/WORKSHOP .MANUAL
,, ;T() . r~HlBc~ •• r~yen;;e tn~ 9~tl~ne~ procedure_ 'En~lir~:.!o hleed .srsfemon'reasse!Tibly. ·
Hosted and optimised by www.TheTVRSite.com

7R ------------------------
-)
Service I Workshop Manual
Oil Cooler
)
)
Hosted and optimised by www.TheTVRSite.com
Service/Workshop Manual - Oil Cooler
3
Service/Workshop Manual - Oil Cooler
4
Service/Workshop Manual - Oil Cooler
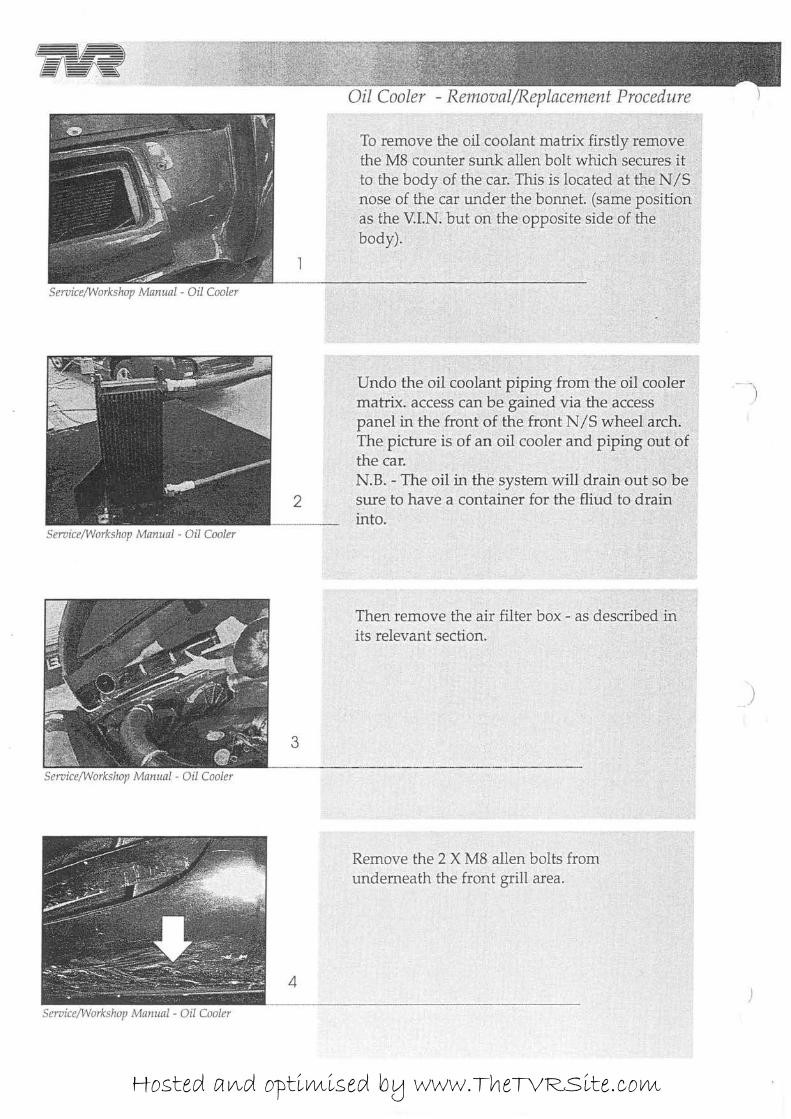
Oil Cooler -Removal/Replacement Procedure
To remove the oil :coolant matri~ firstly remov~ . the M8 counter s~k allen bolt which secures .. rt ,_ to the body ofthe car. This is locate_~ .. at tl;l~, NZ;~ .; nose of the car. unde. r the bonnet ·(same po.· ~it~qn q astl}e V:J.N;J?ut on_ . !hi::i opposi!?·· sid~, oftll.~ .. body). ' · · · · · · .·· .,it>
Undo the oil coolant piping froii1 the Oil ·~oq~J~ <;
matrix. access can be· gained via the access. ., · · ·panel in the front of the front N IS wheel'arc!}: The, pi~e is of ari oil cooler a'nd piping.ouf?f · .. the car. .,. '"''"' N.R- The oil in the system will drairt ou~ sog~ sure to have a container for the fliud to drain •.: · ·into.
Then remove the air filter box- as described-in'' its relevant section.
Remove the 2 X M8 allen bolts from underneath the front grill area.
)
Hosted and optimised by www.TheTVRSite.com

')
')
)
CERBERA SERVICE/WORKSHOP JVIANUAL
,-·:;Remove the oil cooiantmatrix from the car ,.v:c->~ . ;;_-= ':?t1<;:-~,-. ;~?i: . ' -~-;::,.,\<:=_''' . > ·\tt . ==~ :·-' -· r-t ~ ~ -P: -.< ,
throt1ghthe-air,.filter box hsle . . _, · ·• ~- r.ro"re,_piac~ _ reyerse· ~he ohtlifl.edprocedure · ,;p,;~rne,.pip~{ip~to ~~fHl ~,~d -b~~e,d .tpe s1'st~I+l· '
:.:_~ r~f~-~~g:tb the ;elevant sections for . " / .
>.:?~8-tr~c,ttpp:s . o~' tl;le,8.~ - PfQC~~pres,;/j : ~:- ··,; . ' ,.;.; . , __ ,_,_
Hosted and optimised by www.TheTVRSite.com

'i\R ------------------ ------
Service I Workshop Manual
Water Cooling Piping
)
)
Hosted and optimised by www.TheTVRSite.com

Service/Workshop Manual - Coolant Piping
4
Service/Workshop Manual - Coolant Piping
Coolant Piping- Removal/Replacement Procedure
To replac€t a secti6ii oftn~;rubbe!' piping even a section of tl}e metal piping; drain the system - as describ~d inJhe:"bleedingthe coolant sys!em"
Then, simply disconnect the relevant section of hose or metal tubing by undoing the re!eval}t jubliee clips. ··.. · " ·
Remembering to disconnect the temperatur~ sensor or the temperature gauge when the section of tubing which houses them has to be removed.
)
Hosted and optimised by www.TheTVRSite.com

CERBERA SERVICE/WORKSHOP 1\IIANUAL
Notes
)
)
Hosted and optimised by www.TheTVRSite.com

-;
fiN ------------------------
Service I Workshop Manual
Bleeding the Coolant System
)
Hosted and optimised by www.TheTVRSite.com

- ---
Service/Workshop Manual - Coolant Bleeding
3
Coolant Bleeding
Replace the bleed plug and then bleed any:a'ir from the system using the bleed valves on the coolant rails. Once no more air is being expelled;' tighten the valve, check the level of coolant in the reservoir and r~place the cap. Run the car and then re-check for air.
)
Hosted and optimised by www.TheTVRSite.com

CERBERA SERVICEI"WORKSHOP JVLANUAL
Notes
)
)
Hosted and optimised by www.TheTVRSite.com
1\W ---------------------- -- -
-~)
Service I Workshop Manual
Replacing the Coolant
)
)
Hosted and optimised by www.TheTVRSite.com
3
Seroice/Workshop Manual - Coolant replacement
4
Seroice/Workshop Manual - Coolant replacement
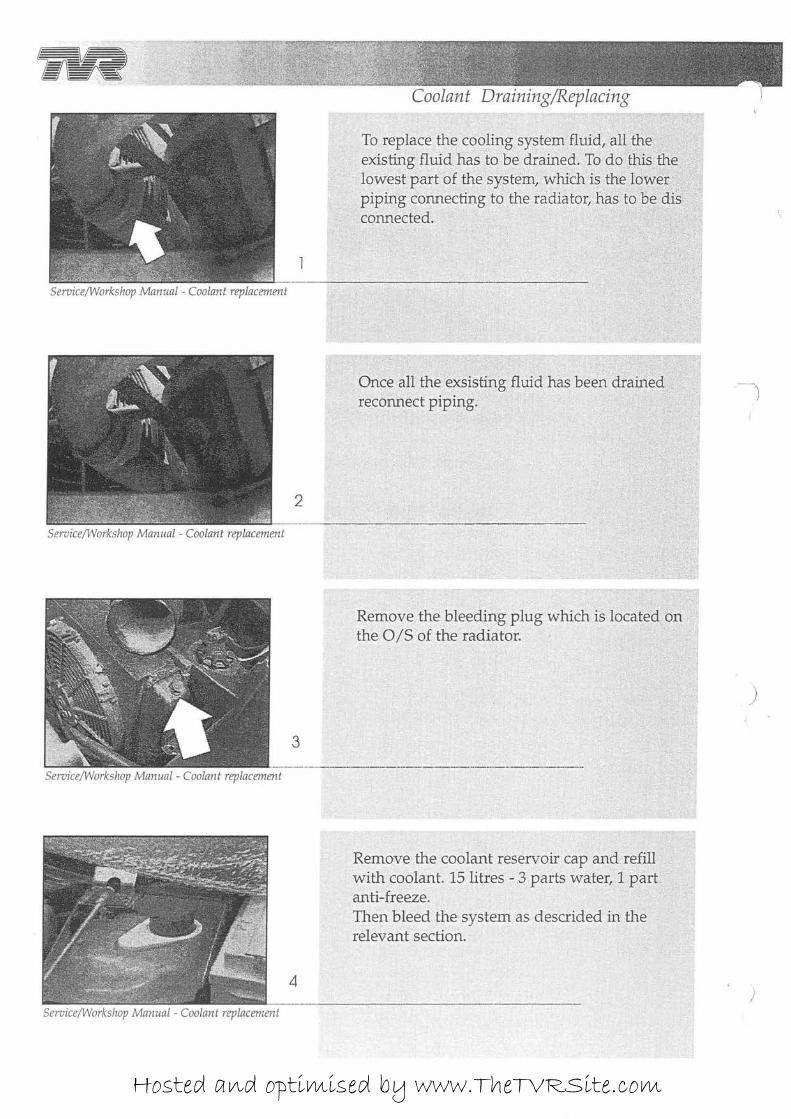
Coolant Draining/Replacing
To replace the cooling system fluid1 al(th~,-t*: existingfluid;has to be_drained.To dq}lAs :~~ lowest P.art Q(the,syste:rn,vyhich ist~~)<?;r~E:{i.cs ,,~ pip~g ~connecting to theradiator,has:.t~·. 9e dis · connected. . ·· · · · "·
Remove the bleeding plug which is ldcat~d h~' the 0 /S of the radiator. ·
Remove the coolant reservoir cap and refill with coolant. 15 litres - 3 parts water, 1 part .· anti-freeze. · Then bleed the system as descrided in the relevant section. ·,j
-)
)
)
Hosted and optimised by www.TheTVRSite.com