Embed Size (px)
Citation preview

Front Office Procedures

2
Table of Contents Opening Check List 3 Cash Office Policy 4 Cash Office Daily Activity 5 Cash Office Weekly Activity 6 Monday Morning Packet 7 Reports and Where to Send 10 Cash Office Activity 11 Front End Procedures 12 Employee Purchase Policy 13 Store Keys 14 Building Security 15 Closing Check List 16-17 Office Closing Procedures 18-21 Cash Till Accountability 22 DSD Receiving 23 Personnel Files 24 I.C.L Reference 25-48 Price Verification Procedure 49-54
3
Store Opening Checklist Turn off the alarm. Walk the store and make sure everything was done
right the night before. If it was done right the store should be standing tall when you open the doors.
Check the temperature on the cases and walk in coolers.
Count the safe. Have your deposit done by 12p.m. Get the tills ready to put out, have enough coins and
ones in them. Put down the rugs on the floor and sweep them if
needed. Clean the parking lot and sidewalk. Go check your departments and make sure they are
being pulled to get rid of distressed product before it starts getting busy.
Make a list of what needs to be done and tell everyone what their part in the plan is.
Be a cheerleader and encourage your coworkers, thank them for what they do right. Everybody wants to feel needed and that they make a difference.
All bags filled and neatly arranged. Make sure product is not over fill zone. Camera system is working properly. Make sure there is someone on the registers closes to
the door. Check grinding logs in the meat department. Check sanitation and cleaning log on the Perishable
Departments. Control where you are on payroll and make cuts if
needed.
Additional Things to be Done:

4
Cash Office Policy The only team members allowed in the Cash Office is
Management, Crew Leaders, Department Heads, and Cashiers cashing out.
No Purses or Personal Items allowed in the Cash Office. See Store Manager for designated area for Personal Items and where those items are to be stored.
The door to the Cash Office must be closed and locked at all times.
The Safe Door must be secured at all times. No day lock.
The Safe Money is counted three times daily and recorded in the Safe Log Book:
Morning Shift Change Closing
All funds not in use at the register must be secure in the safe at all times.
Any discrepancies in the safe count are to be corrected at the end of the day by adjusting the cash deposit. In the event there is an overage those funds need to be dropped in the bank deposit that same night.
Do not leave cash on counters unattended.
Cash pickups are to be made when required (by limit on registers) and placed in the safe with pick up slip. (Do not over ride).
Never allow anyone to use your keys or pass codes.
Deposits are to be at the bank no later than 12 noon the following day.

5
Cash Office Daily Activity Make out current day deposit for the bank.
Verify beginning cash count, record total on Safe Log.
Order store change from bank as needed.
Retail invoices, then Record current day invoices on Vendor and/or SAL invoice Access sheet on Desktop.
Record all markdowns and supplies on ID Loss.
Verify office till at shift change and record on Safe Log.
Email any SAL credits to [email protected] after calling into SAL Distribution Center in your Division.
Check Emails, print and give to appropriate department.
Tax Exempt Sales. Enter on ICL screen 2, 1, and 2 for the Control Report.
Error correct and void report. Enter on ICL screen 10, 5, and 3, report #50 (Subtract and Cancel Report).
Daily To Do List (Cleaning Schedule).
Record all Out of Dates, reductions, and discarded product into Known Loss for all Departments.

6
Cash Office Weekly Activity Copy all Invoices; send Originals into Central Office
in UPS envelope and file copies for your records.
Email completed Vendor Invoice list to [email protected], print 2 copies, one attached to the vendor invoices and placed in the UPS envelope for the Central Office, the other for store records.
Email completed SAL Invoice list to [email protected], print 2 copies, one attached to the SAL invoices and placed in the UPS envelope for the Central Office, the other for store records.
Total timecards, and record on the Weekly Payroll Report, email to [email protected].
Print the Expanded Department Report, ICL Screen 10, 1, 4, and the Weekly Business Report, ICL Screen 2, 1, 3 then enter the date of the week, place in the UPS envelope for the Central Office.
Put all vendor coupons in the UPS envelope for the Central Office.
Send UPS envelope to the Central Office. Include all new employee forms.
Monday morning Checklist (See Page 7).
Vendor and Visitor check-in sheets placed in UPS envelope to Central Office.
Cashier Accuracy Reports reviewed.
Activate price change batches in ICL. ICL Screen 1, 2, 2; then choose file and press execute. Done every Monday.
Price changes. Print & change signs & labels every Monday Morning.

7
MONDAY PAPERWORK FOR PACKET Sunday or Monday print reports form SAL computer. All reports are printed twice 1 for the central office and 1 for the store. Store report-F-11 Print 2 reports Weekly business report- from ICL menu 2-Enter report menu 1-Enter dept report 3-Weekly business report In date box put wk start date - wk end date. Print. Expanded dept. Report: 10-Supervisors menu 1-Dept. Report 4-Expanded dept. Report 3- Previous week Print 2 copies Total store sales for the week must match on the store report with weekly business report. Sal invoices and vendor invoices: When completed and entered in the computer print 2-copies They are to be put in order with the invoice list.
8
Monday paperwork for packet If correct e-mail to home office. (Export e-mail you will send each one twice) Sal truck invoices---SAL invoices Vendor invoices -------Vendor invoices. All invoices needs to have the retailed extended out and that it is legible so the office and supervisors can read it. Coupons---Should be counted and placed in an envelope with wk end date and your stores name. Total should match store report total for coupons. Weekly non-controllable markdowns: you print off your price tags for the following week’s batch and items going in the ad, count the quantity you have on hand and record the new price and the old price on form. Send this weekly to Brandi Gulley and Operations Supervisor. Need to separate all dept markdowns: Meat dept - Sales to purchases then e-mail to Meat Merchandiser and Operations Supervisor. Produce - Sales to purchases then e-mail to-Produce Merchandiser and Operations Supervisor. .

9
Monday Paperwork for Packet Time sheet- Needs filled out and e-mailed on Sunday or Monday mornings. Print a copy and place with the store schedule and time cards this must be kept for 4-years. Keep in store storage. Keep organized. Also send any- incident reports, Employee Dr. Excuse, and any shipping statements your store may have received that week. Any employee paper work (new hires, change of status, change of address, or par’s). Office inventory—monthly email only this sheet. Check register from safe must also be sent in to the office (only when we have office inventory). Petty cash needs to be settled at this time. (Contact your operation supervisor to write the check. Only operation supervisor can write and sign checks from ledger). Store Verification- Once a month you must file a complete store verification this includes: grocery, frozen food, dairy, ice-cream, bakery, meat, produce, and all DSD vendor items (don’t forget registers) send this in to robin pike and your operation supervisor. Once a month you must file a case cleaning calendar for your perishable departments. Send to your Operation Supervisor and Robin Pike.

10
Email Addresses and Reports Description E-mail Address
Save A Lot Truck Listing [email protected]
Vendor Listing [email protected]
Save A Lot Credits [email protected]
Office Inventory [email protected]
Sales and Markdown Sheet [email protected]
Personnel Action Request [email protected]
I-9 forms & ID's
Time Sheets
Close Outs
[email protected] Store Verfications
Employee Schedules
Case Cleaning Dates [email protected]
Employees Incident Reports
Insurance & 401k [email protected]
Customer Incident Reports Maintenance Requests [email protected]
11
Cash Office Daily Activity
Verify safe by making sure your cash on hand matches what is on your safe count sheet.
In the event of a discrepancy that results in a cash shortage contact your Operation Supervisor and Loss Prevention Agent for that area and follow proper procedure for balancing the safe.
Separate all bill bundles and verify they are correct. (Don’t initial or sign for something you did not verify).
When filling out a deposit slip make sure to verify total amount going to the bank versus what you have. If money is over deposit the overage your safe is to stay at the amount approved by Saver Group.
When picking up deposit slips make sure to match the date and attach them to the same day’s paperwork.
Monthly Activity Send special account check register in the UPS
envelope to the Central Office.(Copy ledger and receipts and keep copies in Store Office).
Send out Accounts Receivable statements.
Complete Office Inventory using the Office Inventory Form, email to [email protected], print 2 copies, one for store records, and one goes to the Central Office in the UPS envelope.
Assemble new hire packets as needed.
Have Operation Supervisor write a check to balance petty cash at this time.

12
Front End Procedures Cashier sales privileges (ICL Screen 1, 4, 1) are to be
set at 1 to 4 only. Management and Crew Leader sales privileges are to be set to 1 to 8.
No one is to have training privileges.
Only Management and Crew Leaders are authorized to handle Voids and Refunds.
Any void or refund over $5 must have the manager on duty and cashiers initial, then stapled to their cashier report for the Store Manager’s approval.
Each Cashier is to have a secret 4 digit password.
No one is allowed to check on any other cashier’s till.
Each register is to be put in secure mode when it is unattended.
Any cashier shortage over $5 daily or $10 weekly is to be repaid by the responsible person. This is to be listed on the store report as employee reimbursement and the cashier counseled.
The Cashier Accuracy Report is to be completed weekly and verified by the Store Manager. This will be verified by the Operations Supervisor.
Management and Crew Leaders are not to share register keys or their passwords with each other.
All vendors must be checked in by the manager on duty or department manager. (Verify All Products).
All registers are to have counterfeit pens and they are to be used with no exception.

13
Employee Purchase Policy
No employee may purchase product from Save A Lot unless you are off the clock (break, before or after work). If you want to make a purchase during your break or before work, you must have a manager check you out, and the merchandise must have a signed receipt attached.
For example: a bottle of soda must have the receipt taped to it. Plus the manager shall sign the receipt.
If the product is intended to go home with the employee, the product must be in a Save A Lot bag with the receipt stapled by a member of management (Store Manager, Assistant Manager, and Front End Manager). And, the bag(s) must be secured by management until the employee is off the clock. All bags are subject to a manager viewing the contents. No product is permitted to be consumed on the front end, the sales floor or in the back room. It is only to be consumed in the designated break room area after purchase has been made. No product from the shelves such as coffee, plastic ware, filters, creamer, napkins, plates or other product intended for personnel use is to be “store use”. These things need to be officially purchased with a receipt. All “Store Use” items must be approved by the store manager and used for the operation of the store and documented in Known Loss.

14
Store Keys
The only associates in the store that can have keys to the building are the Store Manager, the Assistant Store Manager, Front End Managers and Crew Leaders.
Each key holder must have their own code for the security system.
No one is to share codes for the security system.
In the event a key holder quits you must notify your Operation Supervisor and Loss Prevention Agent.
At no time should a key holder give their keys to someone else or set their keys down and leave them unattended.

15
Building Security The back room door must be closed and locked at all times
unless it is being used for trash removal or receiving product.
The manager on duty is to be at the back door for all trash removal and deliveries.
Always have a minimum of 2 people on duty while closing the store. One must be a key holder.
All fire extinguishers must be inspected monthly with the manager’s initials acknowledging the inspection on the extinguisher.
Detex locks checked weekly manager initials placed on log. (Follow proper protocol and change the batteries as required).
All electrical panels are free and clear of debris.
All doors secured and locked before exiting the parking lot.
If at any time the alarm will not arm you must contact your Operations Supervisor and Loss Prevention Agent.(See Closing Checklist).
16
Closing Checklist Shopping Carts Removed from Parking Lot.
Restrooms Cleaned.
Floors swept and mopped.
Floors are buffed.
Cardboard Pulled.
Front End Candy Filled.
Pop Coolers Filled.
Front End Cleaned.
Registers Cleaned.
Belts Cleaned.
Outside Garbage Cans Emptied.
Bale made if needed.
Refrigeration check completed.
Frozen doors fronted.
Milk filled.
Put backs completed.
Check grinding logs in the meat department.
Check sanitation and cleaning log on the Perishable Departments.
Frozen walked for out of place product.
All cases running correct temperature.
Back stock DSD filled up and ready for next day business.
Dairy, milk, and eggs filled up and fronted.
Lights turned off on all cases and night shades pulled.
Store has been thoroughly walked and checked for security, janitor's closet, coolers etc.
Pallet wall pulled up.
DSD and bread racks pulled up.
Back doors locked and barred.
All cooler and restroom lights turned off.
Check restrooms and coolers to make sure no customers are left in store.
Check to make sure all employees are at the front door ready to leave.
Store lights turned off.
Alarm set.

17
Doors locked.
Parking lot lights in working order.
All bags filled and neatly arranged.
Make sure product is not over filled zone.
Camera system is working properly.
Make sure there is someone at the last register by the door.
Additional Things to be Done:

18
Closing procedures for the office
1. Update Reports:
Log onto ICL Screen (the blue screen)
#2 Reports menu (enter)
#6 Update Save-a-lot reports (enter) o When you are done updating you will be back on the #2 reports
menu. 2. Cashier Report;
#2 Reports menu (enter)
#3 Cashier reports (enter)
#1 Cashier report-Required (enter)
Enter the cashier number.
Press F2 to print.
Once you have printed out the cashier report you then need the cashier to count their till back down to $100. When they are finished, verify the till is at $100 and deposit amount (The amount is found under Cash in Drawer Summary on the cash line of the report).
Repeat steps 1 and 2 for every cashier. If you do not update in between
the different cashiers the cash due will be wrong.
Closing paperwork: Once you have updated for the final cashier: 3. Department Report:
#2 Reports menu (enter).
#1 Department reports (enter).
#1 Department report
F2 to print.
Verify Funds: 5. Verify the safe.
Fill out the Safe Count Log. Count and verify everything in the safe, then sign off at bottom of the Safe Count Log.
6. Verify the Deposit.
Trade out all the 1’s & 5’s out of the deposit till and put them into the cash drawer.
Swap out any loose change.
Match your cash, WIC & Check totals to your media report (Step 9).
Place all cash, WIC & Checks on the same deposit ticket and total it out and then sign off on the deposit ticket. o WIC Vouchers need the following:

19
Store WIC Stamp in the box. (This must be clear with no smears).
Signature of the customer who used the check.
Total Dollar amount wrote in amount box. (For WIC CVV it can not exceed Voucher amount).
Verify dates to ensure participant used a Voucher that was valid.
SAL Computer.
If your computer is on the ICL screen press F11 to get to the SAL screen. 7. Store Reports
o Click on and Store Reports and Sign On. o Click on cashier recap. o Verify the correct Week Ending Date is checked. o Click on summary. o Click the day of the week. o Click on the cashier name box and select the cashier you are
entering. o Click the edit button in the left hand column. o Click on the penny line under coins. Put total cash from that till for
deposit. o Click Approve at bottom of screen. o Verify everything in the right hand column has been balanced. If a
total has a negative value you will verify the amount against your Media Payment Report (Step 9).
o Verify the amount at the bottom is at 0. (If cashier does not balance verify each payment line if it’s in cash refer to Cashier Policy.
o Click on approve at the bottom. You will then see your name and the time appear in the balanced by: (username) box (i.e. Melissa05-06-201018:24). Repeat step #7 for all Cashiers as they cash out. Once all cashiers are completed you will notice the dollar
amount has disappeared beside their names under cashier recap. 8. Cash Worksheet.
o Click Store Reports. o Click on cash worksheet. (This is for your safe count). o Verify the correct Week Ending Date is checked. o Click on summary. o Click the day of the week. o On screen #1 put in Safe Total from Safe Count Log. o Then hit enter click on screen #2. (This will save the information).

20
9. Micro Trax.
SAL screen click on Micro Trax.
Username:sal and your store number. (i.e.: sal24675).
Company:100309
Password will be: Savealot4. (The S in Savealot needs to be capitalized the rest is lower case check with management to find out what number to follow Savealot in the password this will vary from store to store).
Once logged in click on Reports at top of the page.
Choose Store Sales Summary By Store SSR04.
Under Store Selection Click Specify Stores to Search.
Select your store and click done.
Click Generate Report under Report Configuration.
Click Print on the top of the report.
Once report is printed Click Logout in the top right corner.
Click Close browser and Yes and you will return to the home page.
10. Store Report.
o Click Store Reports. o Click Store Report. o Verify the correct Week Ending Date is checked. o Click Summary. o Click the day of the week. o Click on screen #4 you will need your Media report (Step 9).
o Enter amount of cash that you are depositing into the cash deposit line.
o If you have any checks then put this amount into the check deposit line.
o M/C Visa/Discover - look at your Sales Summary Report (Step 9) and get this total from the purchase column under amount, you then enter that amount into the MC Visa deposit line and Discover under the Discover deposit line..
o WIC deposit - enter your daily total for your WIC checks. (Add all the checks together to make sure that this total is correct).
o Click on screen #5 you will then need to hit the signoff/approve. Once you have done this it will bring you back to the original store report screen for the week. You then need to hit the red box that says print report. (At this point if an error has been made only corrections can be made as an error correction and done by a member of Management).
o Once the report has printed you then take this report along with the Media & Department reports and staple them together with the store report on top along with all of your pick-up slips and the top of your deposit bag to the top left corner of the reports.(Make sure to attach the deposit slip to the packet when you get it back from the bank to the corresponding packet).

21
Take the deposit to the bank. (Only Key carriers who are classified as Insured Drivers with Saver Group can make a bank run).
11. Close Store
Check all doors and make sure they are locked.
Check Bathrooms.
Clear Carts from lot.
Make sure all cooler lights and case lights are out.
Floors swept, mopped, and buffed.
Turn out the lights for the store.
Clock out.
Set the alarm.
Lock the doors.
Check lights on store and parking lot for any outages.
22
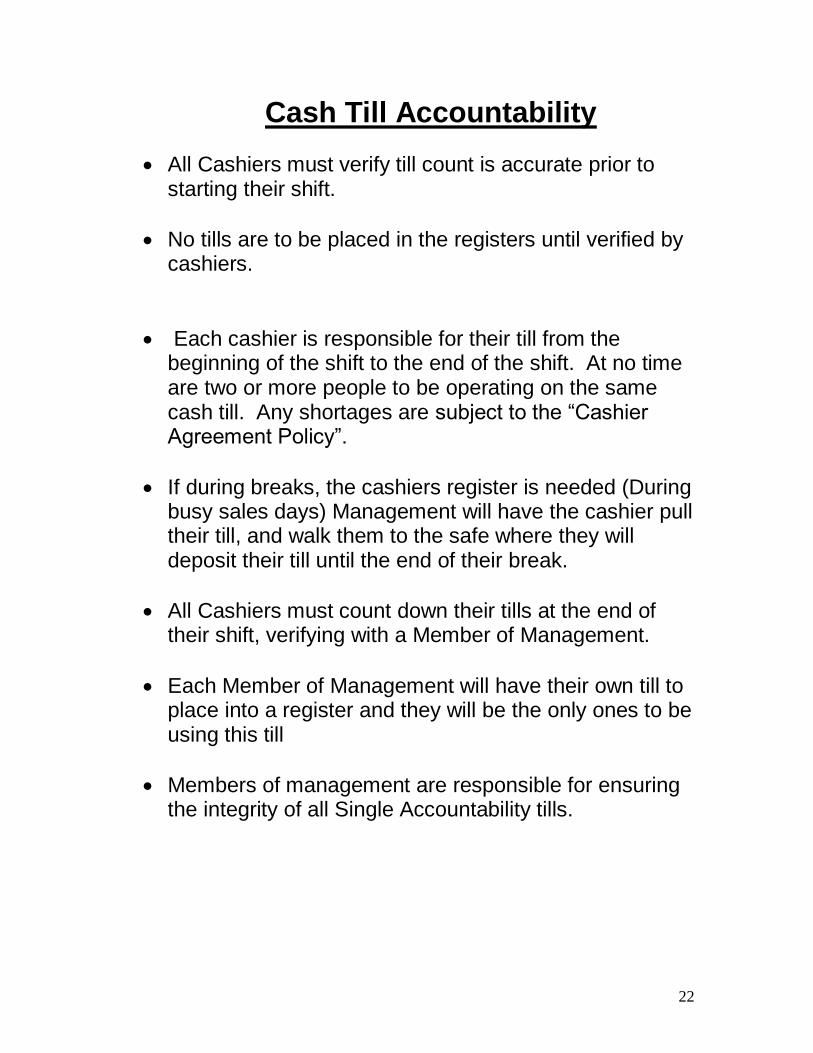
Cash Till Accountability
All Cashiers must verify till count is accurate prior to starting their shift.
No tills are to be placed in the registers until verified by cashiers.
Each cashier is responsible for their till from the beginning of the shift to the end of the shift. At no time are two or more people to be operating on the same cash till. Any shortages are subject to the “Cashier Agreement Policy”.
If during breaks, the cashiers register is needed (During busy sales days) Management will have the cashier pull their till, and walk them to the safe where they will deposit their till until the end of their break.
All Cashiers must count down their tills at the end of their shift, verifying with a Member of Management.
Each Member of Management will have their own till to place into a register and they will be the only ones to be using this till
Members of management are responsible for ensuring the integrity of all Single Accountability tills.

23
DSD Receiving
All DSD vendors must be checked in by the Store Manager, Assistant Sore Manager or person in charge of store only, there are to be no exceptions.
The person that is checking in the vendor is to count every package to ensure that the product that the store is billed for is all being delivered.
All boxes are to be opened and every piece is to be counted, sealed boxes are to be opened and all items are to be accounted for.
All bread trays are to be down stacked so that every piece can be counted and verified.
DSD vendors are to be received, all products are to be counted and invoices verified before shelves are stocked.
Credits must be kept separate and must remain in the store until vendor is ready to leave.

24
Personnel Files
All information in employee’s personnel file must be sent to the office. The only items that should be in an employee’s file at store level are:
1) A copy of the Personnel Action Request form. 2) A copy of any disciplinary documentation and
Constructive Advisement Memos. 3) Each employee’s performance evaluation. 4) Attendance Record. (Unless you keep these
separate.) Note: All original Documents must be sent to corporate. MEDICAL RECORDS HAVE TO BE KEPT IN A SEPARATE FILE.( ALL EMPLOYEE AND MEDICAL INFORMATION SENT TO OFFICE SHOULD BE IN A SEPARATE ENVELOPE TO THE ATTENTION OF HR DEPT.)
Once a team member’s status becomes inactive, send the personnel file and Medical File into the Central Office with Monday morning packet. (Note the only files you should have at store level are current and active team members.) If you have any questions, call Human Resources at 270-465-8675.

25
I.C.L
Reference
Guide

26
Username- 9
Password- 99999
#1 File Maintenance Menu
Item Look UP:
#1 File Maintenance Menu
#1 PLU File Maintenance
#1 PLU Maintenance – from this screen you can
perform the following tasks:
Inquiry: Allows you to look up items but no
changes can be made in this function
Update: This function allows you to change
information on products already in the ICL.
Insert: Allows you to insert new items that are
not in the ICL, Make sure to check Food Stamps,
WIC if the item is WIC approved, and Tax flag
should read YNNNNNN ( otherwise the
customer will not be charged tax on purchase)-
do this by hitting F8 using space bar check tax
rate 1, and make sure the department is listed
correctly.
Delete: Allows you to delete an item out of the
ICL system.
Price: Allows you to change the price of item
scanned. Note: if no information is found refer
back to Insert.
Index: Allows user to see the index of the ICL as
far as categories.
Cancel: Will exit screen.

27
PLU Groups:
#1 File Maintenance Menu
#1 PLU File Maintenance
#2 PLU Groups – Lists Groups found in PLU-
You will hardly use this function
DEA Groups:
#1 File Maintenance Menu
#1 PLU File Maintenance
#3 DEA Group Maintenance- Function will not
be used.
To Execute Price Changes:
#1 File Maintenance Menu
#2 Batch File Maintenance
#1 Local Batch Files – NO ACCESS
#1 File Maintenance Menu
#2 Batch File Maintenance
#2 Host Batch Files – Screen will show Batches
(prices) that need to be Executed. Choose file, Click
Execute, Click Yes you are sure, Screen will read Batch
Execution is over click continue, you can print this report
as proof batch was executed then press Esc. Key one time.
Repeat this process if there are multiple batches.

28
Bad Checks:
#1 File Maintenance Menu
#3 Negative Check File
#1 Insert/Update Bad Accounts –
Update allows you to change information
on an existing account.
Insert allows you to enter a new account.
Print will print report of bad account.
Delete Bad Check Accounts:
#1 File Maintenance Menu
#3 Negative Check File
#2 Delete Bad Accounts- Allows you to Delete
accounts from system
Cashier Maintenance:
#1 File Maintenance Menu
#4 Cashier Maintenance
#1 Cashier Maintenance – Allows you to do the
following:
Update: Select Cashier and you can update their
information. Remember to click update to save
changes.
Insert: Allows you to insert a new cashier into
the system. IMPORTANT: Only managers are
assigned 1-8 hourly cashiers are assigned 1-4
under privileges. (No One is to be assigned
training privileges).
Delete: Allows you to delete cashier.
Print: Will print cashier list and cashier number.
Cancel: Will exit from screen.

29
Password Look Up: No Access
#1 File Maintenance Menu
#4 Cashier Maintenance
#2 Password Inquiry- Enter cashier number and
will show cashiers password for sign on and sign off.
Force Sign Off:
#1 File Maintenance Menu
#4 Cashier Maintenance
#3 Remote/ Force Log Off- Enter cashier number
and will allow you to sign cashier off and open
the till from office.
Tax Exempt Accounts:
#1 File Maintenance Menu
#5 Tax Exempt Accounts Maintenance- NO ACCESS.
30
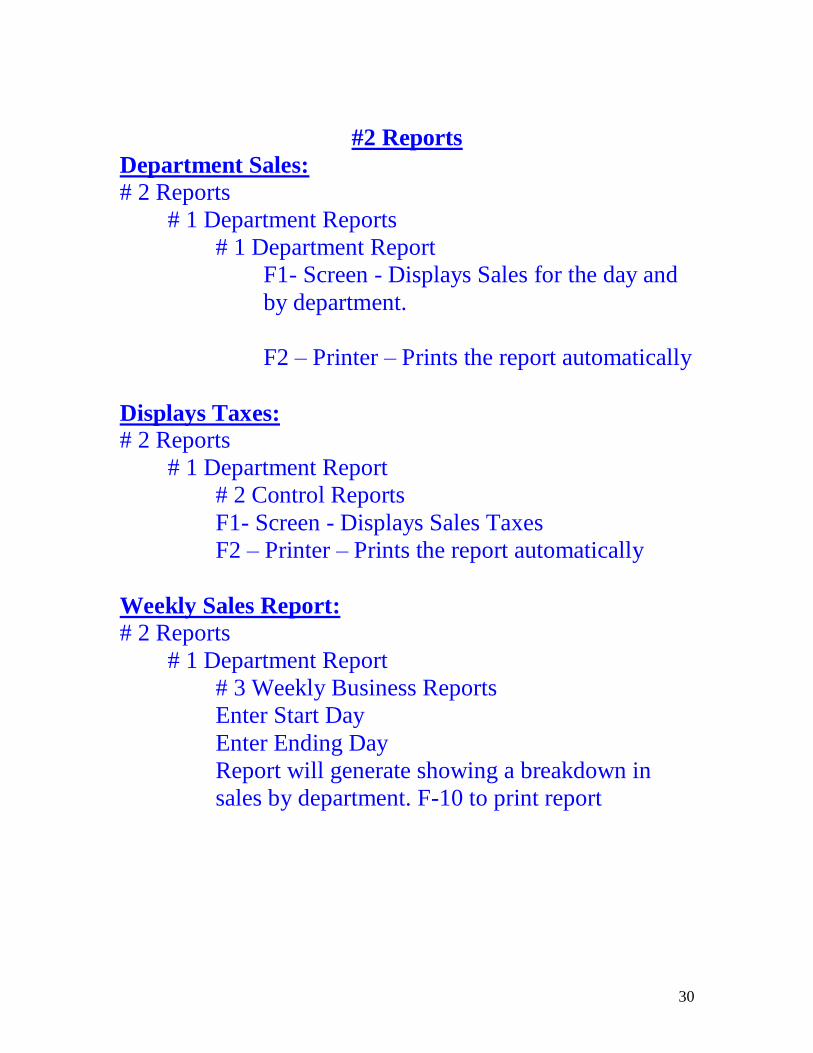
#2 Reports
Department Sales:
# 2 Reports
# 1 Department Reports
# 1 Department Report
F1- Screen - Displays Sales for the day and
by department.
F2 – Printer – Prints the report automatically
Displays Taxes:
# 2 Reports
# 1 Department Report
# 2 Control Reports
F1- Screen - Displays Sales Taxes
F2 – Printer – Prints the report automatically
Weekly Sales Report:
# 2 Reports
# 1 Department Report
# 3 Weekly Business Reports
Enter Start Day
Enter Ending Day
Report will generate showing a breakdown in
sales by department. F-10 to print report
31
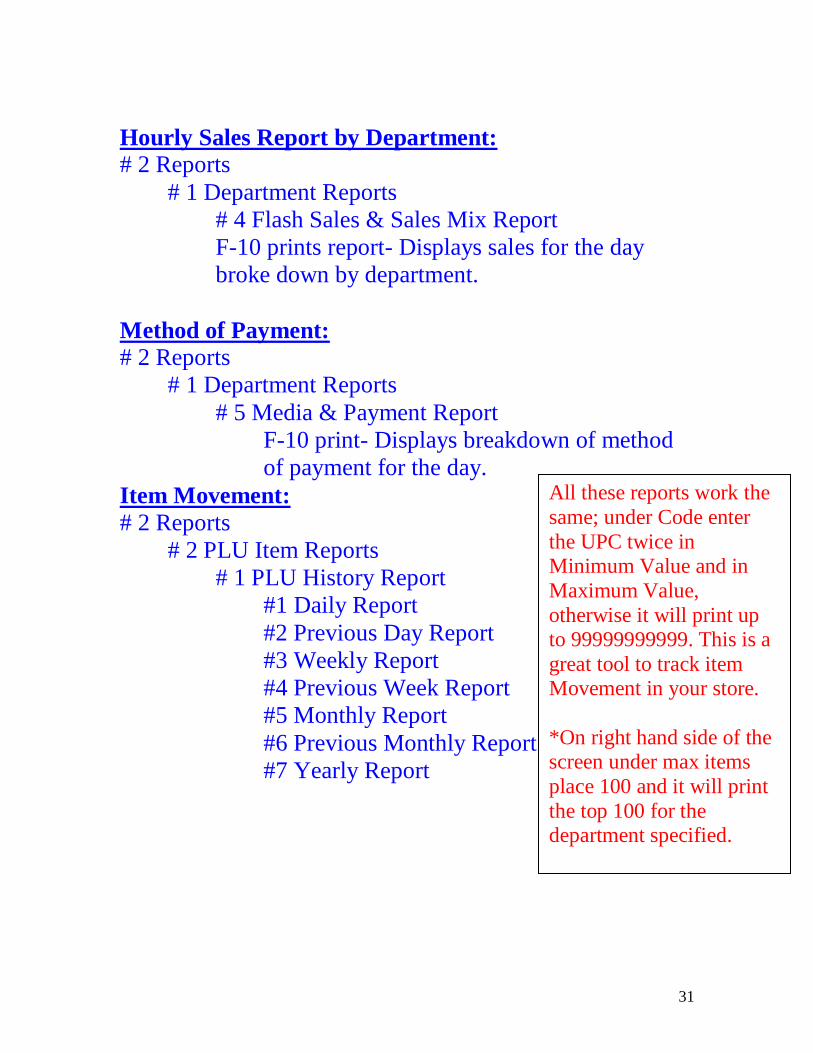
Hourly Sales Report by Department:
# 2 Reports
# 1 Department Reports
# 4 Flash Sales & Sales Mix Report
F-10 prints report- Displays sales for the day
broke down by department.
Method of Payment:
# 2 Reports
# 1 Department Reports
# 5 Media & Payment Report
F-10 print- Displays breakdown of method
of payment for the day.
Item Movement:
# 2 Reports
# 2 PLU Item Reports
# 1 PLU History Report
#1 Daily Report
#2 Previous Day Report
#3 Weekly Report
#4 Previous Week Report
#5 Monthly Report
#6 Previous Monthly Report
#7 Yearly Report
All these reports work the
same; under Code enter
the UPC twice in Minimum Value and in
Maximum Value,
otherwise it will print up to 99999999999. This is a
great tool to track item Movement in your store.
*On right hand side of the screen under max items
place 100 and it will print
the top 100 for the department specified.
32
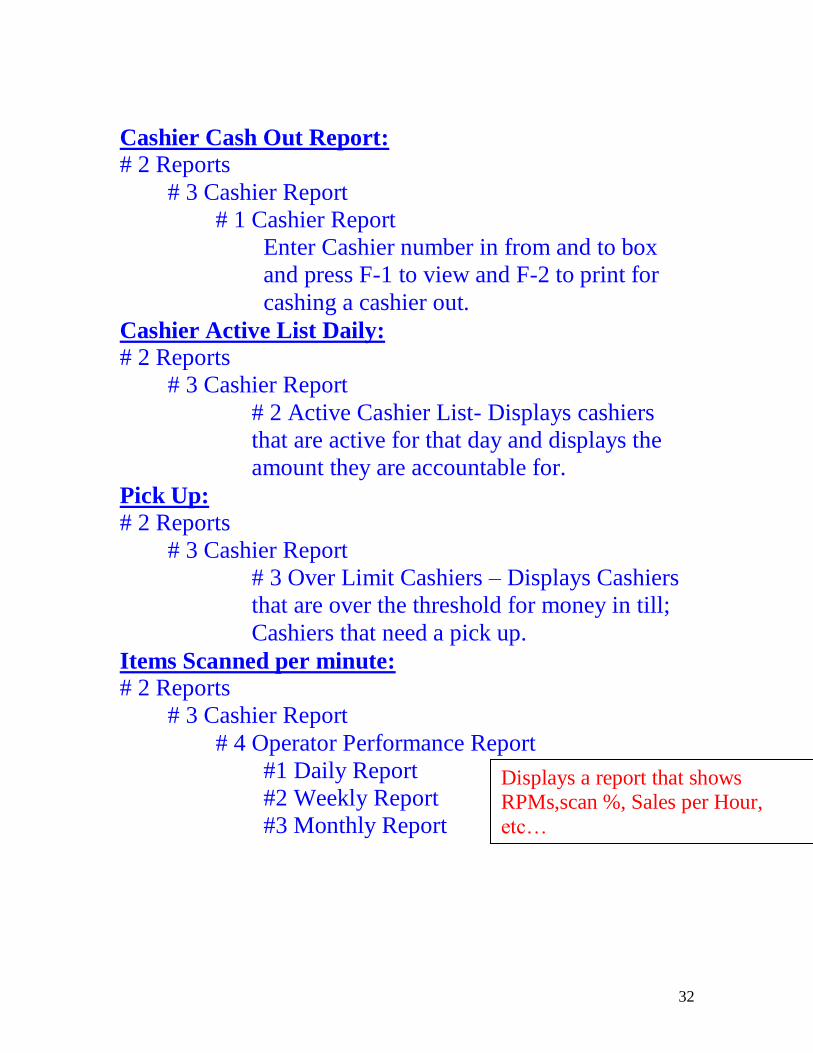
Cashier Cash Out Report:
# 2 Reports
# 3 Cashier Report
# 1 Cashier Report
Enter Cashier number in from and to box
and press F-1 to view and F-2 to print for
cashing a cashier out.
Cashier Active List Daily:
# 2 Reports
# 3 Cashier Report
# 2 Active Cashier List- Displays cashiers
that are active for that day and displays the
amount they are accountable for.
Pick Up:
# 2 Reports
# 3 Cashier Report
# 3 Over Limit Cashiers – Displays Cashiers
that are over the threshold for money in till;
Cashiers that need a pick up.
Items Scanned per minute:
# 2 Reports
# 3 Cashier Report
# 4 Operator Performance Report
#1 Daily Report
#2 Weekly Report
#3 Monthly Report
Displays a report that shows RPMs,scan %, Sales per Hour,
etc…

33
Check Received Daily:
# 2 Reports
# 3 Cashier Report
# 5 Itemized Check Report – Displays Checks
that have been received for orders for the day,
breaking it down by cashier and amount.
Hourly Sales:
# 2 Reports
# 4 Store Productivity Report
# 1 On-Line Hourly Sales
F-1- Displays on Screen
F-2 – Print
Displays incremental sales per hour.
Productivity Report:
# 2 Reports
# 4 Store Productivity Report
# 2 Hourly Sales Report
#1 Last Day Report
#2 Weekly Report
#3 Last Week Report
#4 Monthly Report
#5 Last Month Report
#6 Yearly Report
#7 Last Year Report
Saved Transaction:
# 2 Reports
# 5 Miscellaneous Report
# 1 Saved Transaction Report – Displays any
saved orders for the day.
Displays incremental sales
by hour with sale, customer
%, and Customer count for
the selected report.

34
Refunds:
# 2 Reports
# 5 Miscellaneous Report
# 2 Refunds Report – Displays Refunds for the
day.
Pick Ups For Shift:
# 2 Reports
# 5 Miscellaneous Report
# 3 Cashier Pick Up Report – Enter Cahier
number. Will display pickups for the shift.
Transaction Report:
# 2 Reports
# 5 Miscellaneous Report
# 4 Cashier Daily Transact Report – Displays
Transaction done on the register such as pick
ups.
Current Week Transaction Report:
# 2 Reports
# 5 Miscellaneous Report
# 5 Cashier Weekly Transact Report – Displays
Same as Daily (4); only for the week.
Payment report:
# 2 Reports
# 5 Miscellaneous Report
# 6 Media Income Report – Enter the date range.
Displays Tender Class (credit, EBT, Debit,
etc...) and Tender Amount.

35
NO ACCESS:
# 2 Reports
# 5 Miscellaneous Report
# 7 Basket Analysis Reports- No Access!!!!
Update ICL Reports:
# 2 Reports
# 6 Update Save-A-Lot Reports- Runs a update in ICL
for Sales and Tenders to update the ICL system
making it current.
SEE APENDIX FOR BREAKDOWN OF REPORTS:
# 2 Reports
# 7 Cashier by Dept History Report – Displays 54
reports to choose from. These reports are
explained in the Appendix.
36
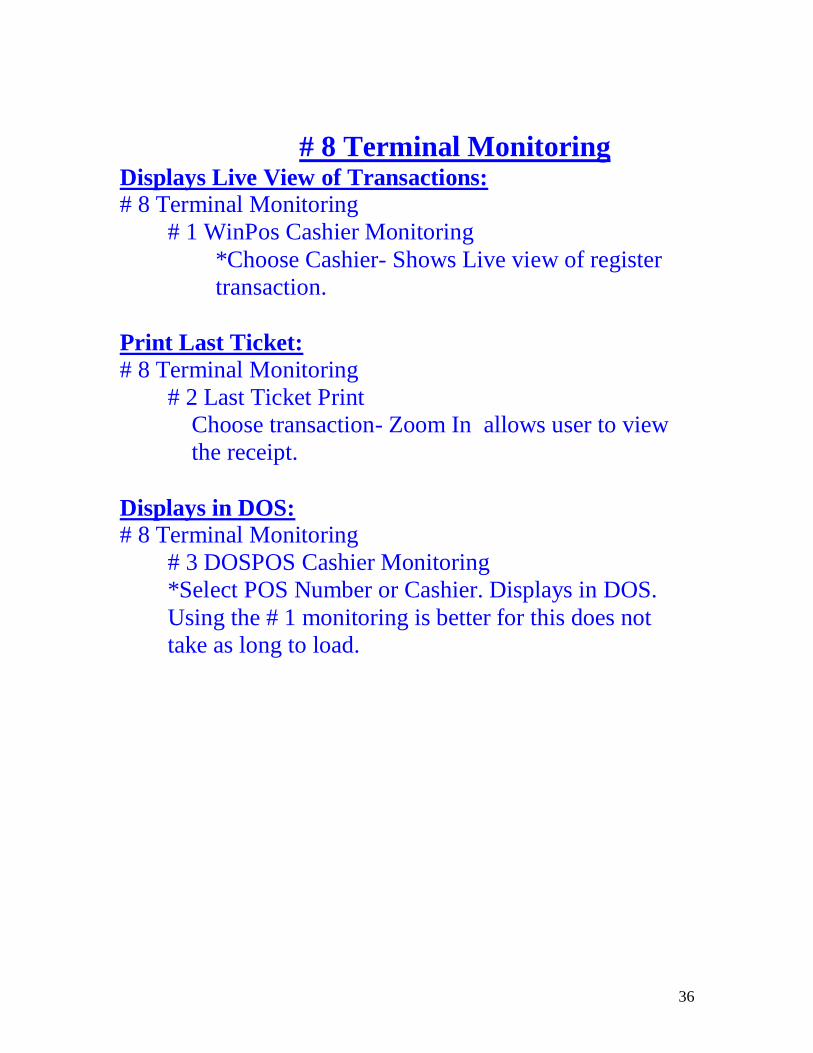
# 8 Terminal Monitoring Displays Live View of Transactions:
# 8 Terminal Monitoring
# 1 WinPos Cashier Monitoring
*Choose Cashier- Shows Live view of register
transaction.
Print Last Ticket:
# 8 Terminal Monitoring
# 2 Last Ticket Print
Choose transaction- Zoom In allows user to view
the receipt.
Displays in DOS:
# 8 Terminal Monitoring
# 3 DOSPOS Cashier Monitoring
*Select POS Number or Cashier. Displays in DOS.
Using the # 1 monitoring is better for this does not
take as long to load.

37
# 9 Miscellaneous Functions Electronic Journal:
# 9 Miscellaneous Functions
# 1 Electronic Journal
*Select the date you wish to view
* Select the type of report to view:
#1 All Transactions
#2 Text Search
#3 Cashier Number
#4 POS Number
#5 Transaction Number
#6 Transaction Amount
#7 Tender Type
#8 Tender + Amount
#9 Authorization Number
#10 Transaction Time
#11 Items
#12 Departments
#13 Account Number
#14 Multiple Choice
#15 Events
#16 Not Balanced
#17 Freq. Shopper Number
#18 Last Tickets
#19 Supervisors
#20 Total Departments

38
NO ACCESS:
# 9 Miscellaneous Functions
# 2 Message Center – NO ACCESS!!!!
NO ACCESS:
# 9 Miscellaneous Functions
# 3 Set Date and Time – NO ACCESS!!!!
Password Maintenance:
# 9 Miscellaneous Functions
# 4 Back Office Password Maintenance
Select Name and Click Update. Once
Information is entered press F2 key to update.
Reboot Lane:
# 9 Miscellaneous Functions
# 5 Reboot a Lane- Enter POS and system will reboot
lane.
Shutdown Lane:
# 9 Miscellaneous Functions
# 6 Shutdown A Lane – Enter POS number and ICL
will shut down that lane.
Promotion Menu:
# 9 Miscellaneous Functions
# 7 Promotion Maintenance – We do not use this
function.

39
Pick 5:
# 9 Miscellaneous Functions
# 8 Member Promotions
# 3 Group Promotions – This is the only function
we use in this group.
Click Update
Click List Attachment – F10 prints pick 5 list
Click Set Attatchment-
Set UPC on Promotion
Enter PLU number – press enter twice
Click Set – Enter number 1 click continue- item
is now linked to pick 5. To remove item follow
these steps except after hitting enter twice click
reset. ONLY SUPERVISORS AND
MERCHANDISERS USE THIS FUNCTION.
# 10 Supervisor Menu Department Reports:
# 10 Supervisor Menu
# 1 Department Reports
# 1 Department Report
F1- Screen - Displays Sales for the day and
by department.
F2 – Printer – Prints the report automatically
Control Reports- Taxes:
# 10 Supervisor Menu
# 1 Department Reports
# 2 Control Reports –Sales and Taxes for day.
F1- Screen - Displays Sales Taxes
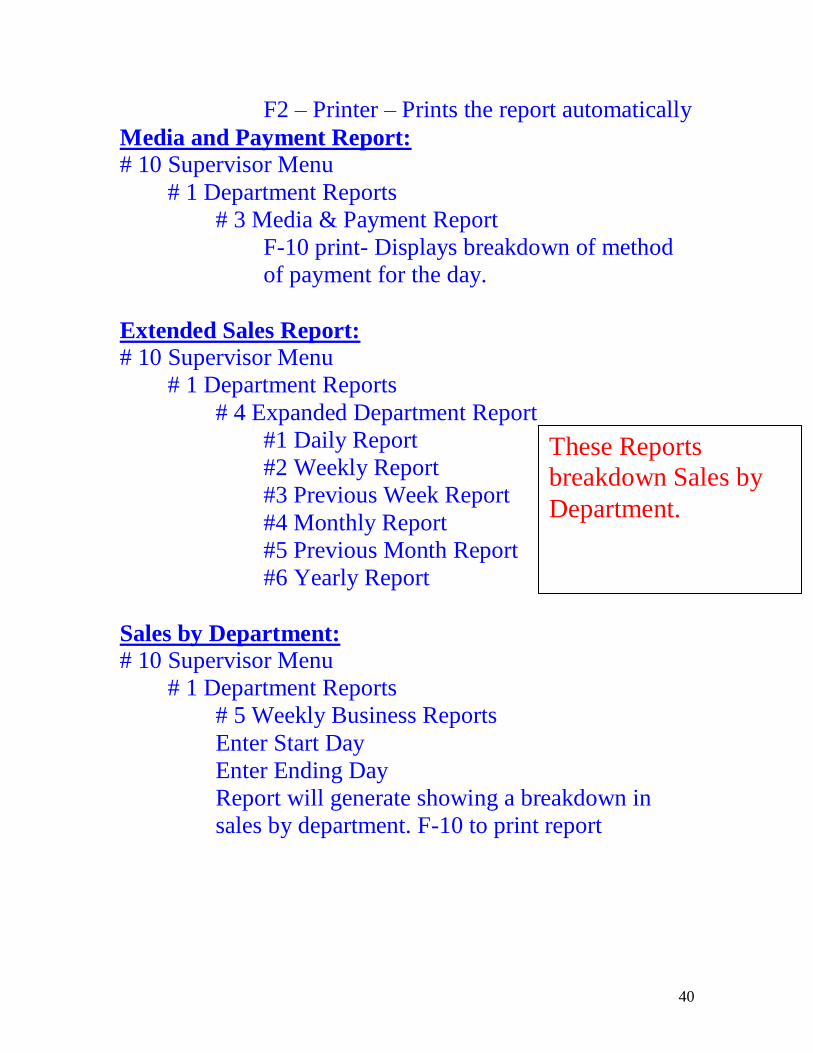
40
F2 – Printer – Prints the report automatically
Media and Payment Report:
# 10 Supervisor Menu
# 1 Department Reports
# 3 Media & Payment Report
F-10 print- Displays breakdown of method
of payment for the day.
Extended Sales Report:
# 10 Supervisor Menu
# 1 Department Reports
# 4 Expanded Department Report
#1 Daily Report
#2 Weekly Report
#3 Previous Week Report
#4 Monthly Report
#5 Previous Month Report
#6 Yearly Report
Sales by Department:
# 10 Supervisor Menu
# 1 Department Reports
# 5 Weekly Business Reports
Enter Start Day
Enter Ending Day
Report will generate showing a breakdown in
sales by department. F-10 to print report
These Reports
breakdown Sales by
Department.
41
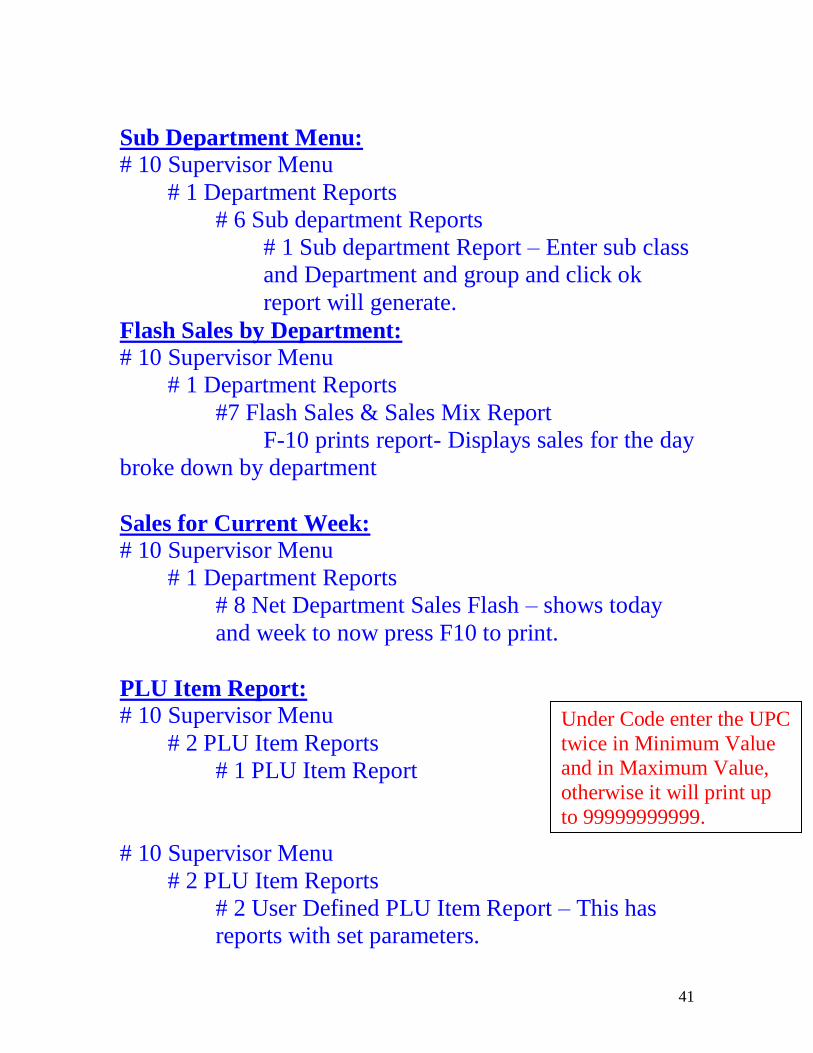
Sub Department Menu:
# 10 Supervisor Menu
# 1 Department Reports
# 6 Sub department Reports
# 1 Sub department Report – Enter sub class
and Department and group and click ok
report will generate.
Flash Sales by Department:
# 10 Supervisor Menu
# 1 Department Reports
#7 Flash Sales & Sales Mix Report
F-10 prints report- Displays sales for the day
broke down by department
Sales for Current Week:
# 10 Supervisor Menu
# 1 Department Reports
# 8 Net Department Sales Flash – shows today
and week to now press F10 to print.
PLU Item Report:
# 10 Supervisor Menu
# 2 PLU Item Reports
# 1 PLU Item Report
# 10 Supervisor Menu
# 2 PLU Item Reports
# 2 User Defined PLU Item Report – This has
reports with set parameters.
Under Code enter the UPC
twice in Minimum Value and in Maximum Value,
otherwise it will print up
to 99999999999.

42
Item Movement Reports:
# 10 Supervisor Menu
# 2 PLU Item Reports
# 3 PLU History Reports
#1 Daily Report
#2 Previous Day Report
#3 Weekly Report
#4 Previous Week Report
#5 Monthly Report
#6 Previous Monthly Report
#7 Yearly Report
# 10 Supervisor Menu
# 2 PLU Item Reports
# 4 Define User PLU Item Report- Report with
set parameters.
# 10 Supervisor Menu
# 2 PLU Item Reports
# 5 Not Found PLU Report – Enter Information
and report will generate.
# 10 Supervisor Menu
# 2 PLU Item Reports
# 6 Selective Item Sales Report – select report,
name report and follow steps.
All these reports work the same; under Code enter
the UPC twice in
Minimum Value and in Maximum Value,
otherwise it will print up
to 99999999999. This is a great tool to track item
Movement in your store.
43
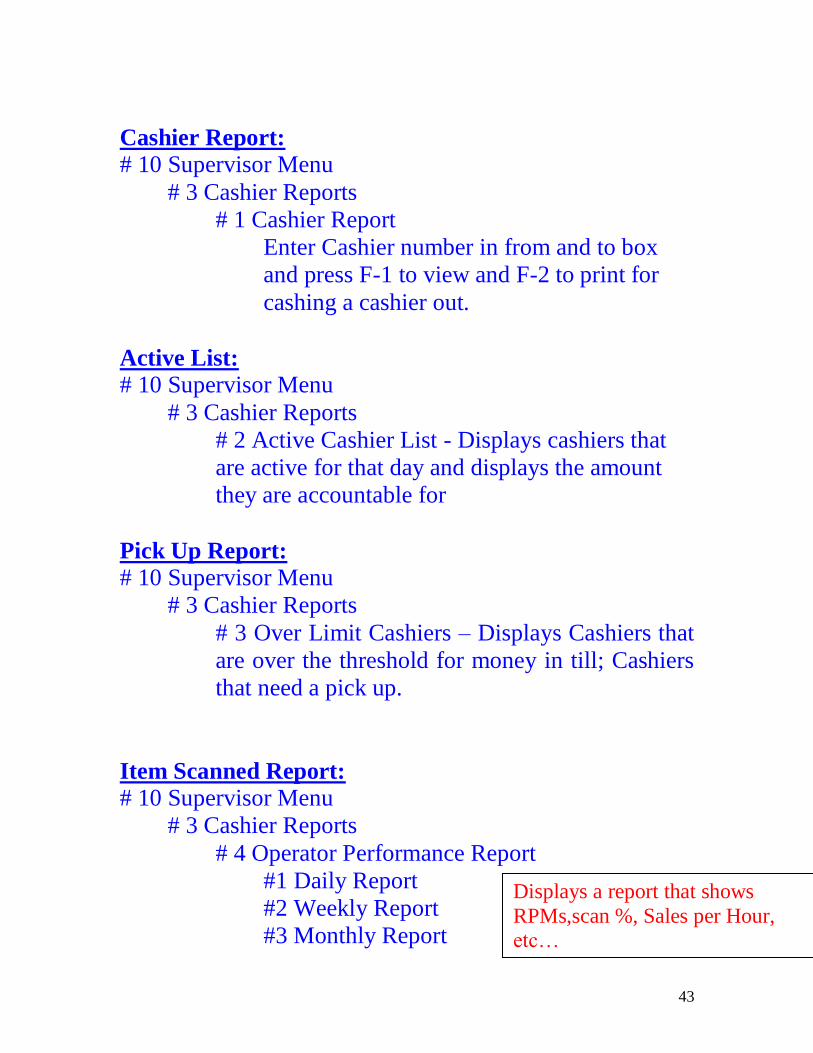
Cashier Report:
# 10 Supervisor Menu
# 3 Cashier Reports
# 1 Cashier Report
Enter Cashier number in from and to box
and press F-1 to view and F-2 to print for
cashing a cashier out.
Active List:
# 10 Supervisor Menu
# 3 Cashier Reports
# 2 Active Cashier List - Displays cashiers that
are active for that day and displays the amount
they are accountable for
Pick Up Report:
# 10 Supervisor Menu
# 3 Cashier Reports
# 3 Over Limit Cashiers – Displays Cashiers that
are over the threshold for money in till; Cashiers
that need a pick up.
Item Scanned Report:
# 10 Supervisor Menu
# 3 Cashier Reports
# 4 Operator Performance Report
#1 Daily Report
#2 Weekly Report
#3 Monthly Report
Displays a report that shows
RPMs,scan %, Sales per Hour, etc…

44
Checks Received by Cashier:
# 10 Supervisor Menu
# 3 Cashier Reports
# 5 Itemized Check Report – Displays Checks
that have been received for orders for the day,
breaking it down by cashier and amount.
Training Report for Cashiers:
# 10 Supervisor Menu
# 3 Cashier Reports
# 6 Training Mode Reports – Shows how a
cashier is performing in training mode.
Location Report:
# 10 Supervisor Menu
# 3 Cashier Reports
# 7 Location Report – Displays the location of
Cashier on POS
History of POS:
# 10 Supervisor Menu
# 3 Cashier Reports
# 8 Cashier History Reports – Enter cashier
number and start day and end day click ok and
report will generate.
POS # and Sales of POS:
# 10 Supervisor Menu
# 4 Point of Sale Terminal Reports

45
# 1 Net Sales – Shows sales press F10 to print
POS Sales Report:
# 10 Supervisor Menu
# 4 Point of Sale Terminal Reports
# 2 POS Sales Report – Enter POS and click
continue.
Active Cashier Report:
# 10 Supervisor Menu
# 4 Point of Sale Terminal Reports
# 3 Active Cashier/POS Report – F10 and report
will print.
Over Pick Up Limit:
# 10 Supervisor Menu
# 4 Point of Sale Terminal Reports
# 4 Over Limit Cashiers / POSTs – Generate
report of cashiers over limit for pick up F10 print.
Itemized Check Report:
# 10 Supervisor Menu
# 4 Point of Sale Terminal Reports
# 5 Itemized Check Report by POST – Displays
checks received at POS and by cashier.

46
End-Of-Day History Reports:
# 10 Supervisor Menu
# 5 End of Day History Reports
# 1 Print Yesterday’s E-O-D Reports-prints
report automatically
# 2 Print History E-O-D Reports-prints report
automatically
# 3 End of Day Reports – These are the 54
reports outlined in the Appendix.
# 4 Print Yesterday’s Selected E-O-D-prints
report automatically
# 5 Print History Selected E-O-D – Then Select
Date. - Prints report automatically.
47
Appendix
1. Department Report
2. Media Report
3. Control Report
4. Hourly Productivity
5. Fifteen Minutes Productivity
6. POST Report ( Grand Total)
7. Daily Expanded Department Report
8. Weekly Expanded Department Report
9. Monthly Expanded Department Report
10. Yearly Expanded Department Report
11. Department by Cashier Report
12. Department by Terminal Report
13. Department by Hour Report
14. Customer by Department Report
15.Department Information Report
16. Itemized Check Report by Cashier
17. Statement of Trade Receivables Report
18. Vendor Coupon Totals Report
19. Promotion Add/Loss Report
20. Daily Payouts Report
21. Weekly Payouts Report
22. Daily ROA Report
23. Weekly ROA Report
24. Traders Sales Report
25. Department VAT Report
26. Groups Sales Report
27. Cashier Productivity by Hour
28. Training Report

48
29. Branch Performance Report
30. Daily Refunds Report
31. Flash Sales & Sales Mix Report
32. Net Department Sales Flash Report
33. Cashier History Report
34. POS Accountability Report
35. Saved Transactions Report
36. Location Report
37. Queue Length Weekly Summary
38. Daily Operator Performance Report
39. Weekly Operator Performance Report
40. Monthly Operator Performance Report
41. Itemized Check Report by POST
42. Sale Items Add/Loss Report
43. Trading Stamps Distribution Report
44. POSTs Signed-On At Store Close Report
45. Audit Report PLU Changes
46. EOD Error Status Report
47. Member Promotion Sales Report
48. Daily POS/Cashier Transactions Report
49. Weekly POS/Cashier Transactions Report
50. Subtract and Cancel Report
51. Daily Reward Checks Report
52. Not- Found PLU
53. Post Checkout Banks Report
54. Cashier Performance Report

49
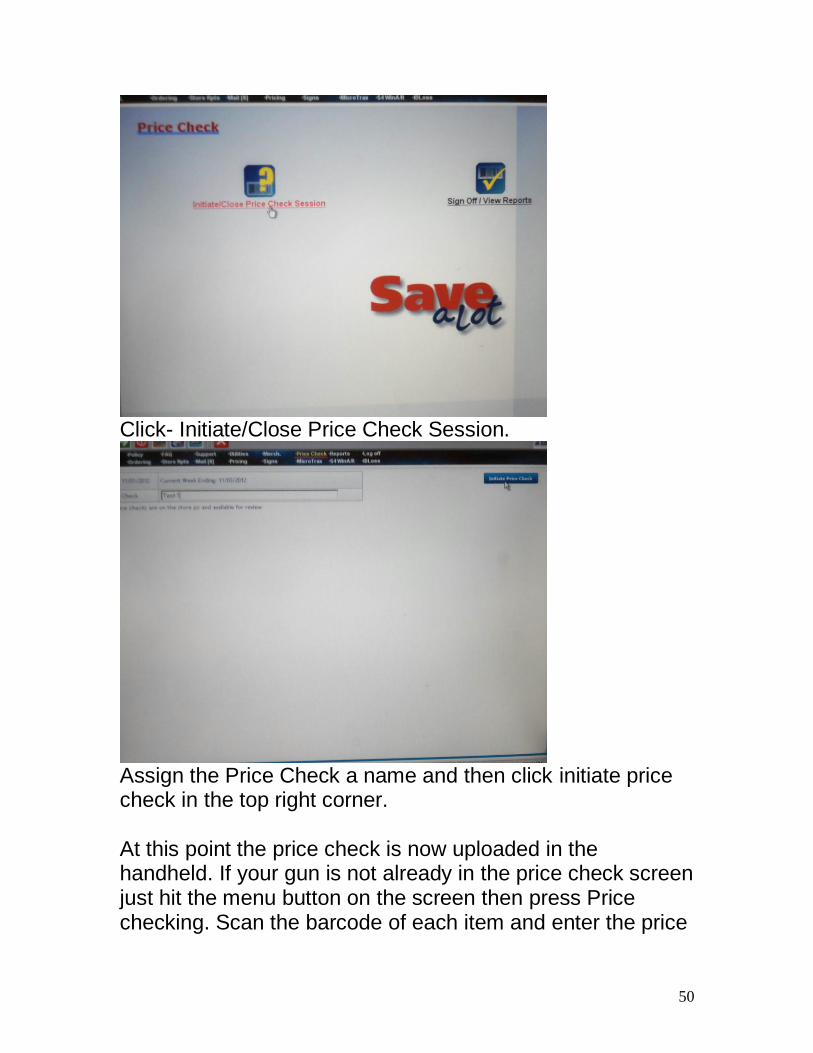
Price Verification
On SAL main screen click on Price Check.
Enter your User ID and Password.
50
Click- Initiate/Close Price Check Session.
Assign the Price Check a name and then click initiate price check in the top right corner. At this point the price check is now uploaded in the handheld. If your gun is not already in the price check screen just hit the menu button on the screen then press Price checking. Scan the barcode of each item and enter the price
51
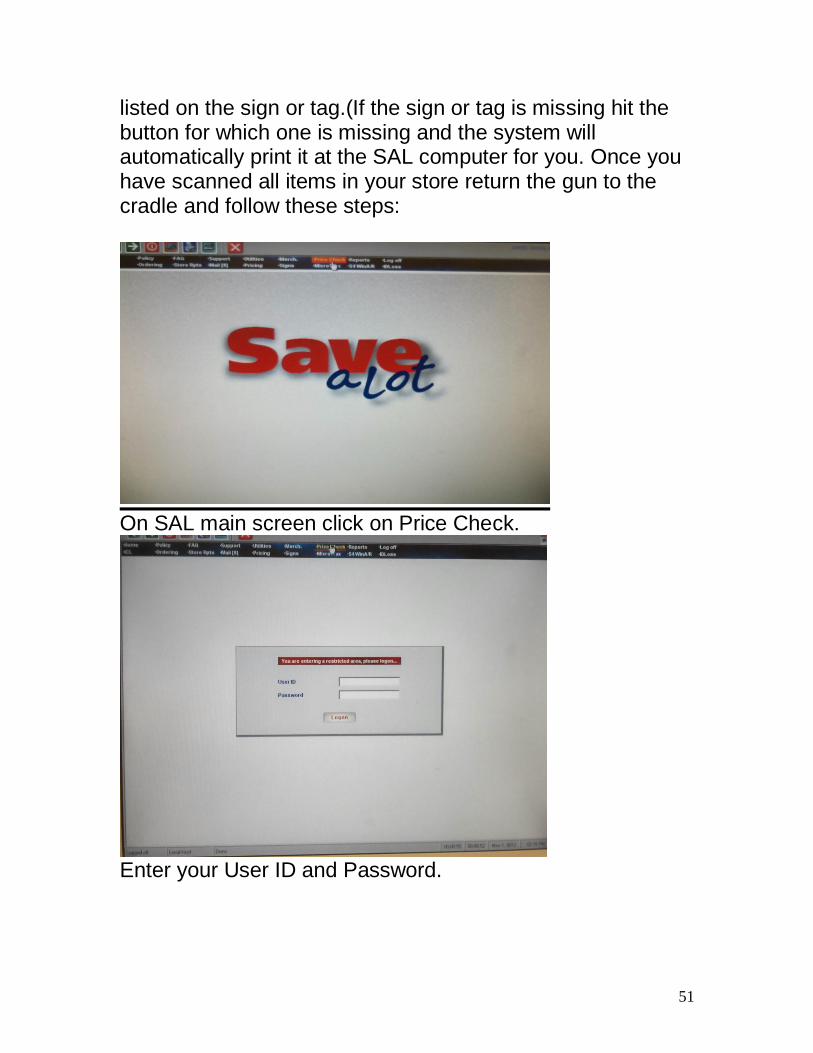
listed on the sign or tag.(If the sign or tag is missing hit the button for which one is missing and the system will automatically print it at the SAL computer for you. Once you have scanned all items in your store return the gun to the cradle and follow these steps:
On SAL main screen click on Price Check.
Enter your User ID and Password.

52
Click- Initiate/Close Price Check Session.
Click- Download Price Check- after clicking this you will return to the Price Check main screen.

53
Click- Sign Off/ View Reports.
Select the Week Ending Date you are working with and then click Continue at the top of the page.

54
Select the file you wish to view then on the top right corner click view discrepancies.
Print this screen and be sure to fix all discrepancies, after the discrepancies have been fixed in the ICL then you return to this screen and click Sign Off in top right corner.

55
To fix the discrepancies you must make sure our items price matches the Qty/ Corp $. The only time you won’t match the POS price to Corp. Price is if it’s a price change sent down from Grocery Director, Director of Operations, or Perishable Director. In the event of a question contact your Operations Supervisor.