Embed Size (px)
Citation preview

From the author
The information on this disk is completely free. No registration is required.
Everything you need to know in order to properly tune your own piano or to tune professionally is presented in alogical format. If you need additional help, you will find I offer all you need if you request enrollment as one of mystudents.
This disk contains the complete updated text (except for the graphics) of my published book ‘‘Strictly tuning’’.
Since this Disk Book must be presented so all computers can read the information, certain graphics files cannot beincluded. These can be obtained directly from me (explained later). Although these illustrations are not necessary tounderstand the text, they do make it a little easier.
It is suggested that you read through all files on this disk before making a decision to continue your education byregistering as a ‘‘Student’’.
As an enrolled student you will receive:
• Tw o 60 minute audio tapes of me playing the illustrations in the text—complete with verbal instructions.
• A copy of the illustrations to better understand the printed text.
• A ‘‘Business disk’’ full of information on how to set up and maintain a Piano Service Business, how to advertise,income tax and license requirements, how to keep track of everything on your computer or by manual means,and much more.
This disk also contains extensive instructions on how to make minor repairs to your customer’s pianos in thehome. This knowledge can easily double your income. After all, a piano can’t be tuned if the keys don’t work.
• The opportunity to correspond with me via audio tapes.
You may also request:
• A Basic Tuning Tool Kit containing everything you need to tune a piano
• When you feel you are ready (up to five years), you will have the opportunity to apply for the course examina-tion. After you successfully complete this exam, you will receive a beautiful Certificate suitable for framing anddisplay in your shop.
• After receipt of your certificate—FREE Telephone Support for One FULL year! You are not charged for thesupport. Your only cost is for your phone bill.
This unique way to learn piano tuning and set up a business has worked for hundreds of my students over the pastfew years. Now, with this ‘‘Disk Book’’ approach, you have the opportunity to read the entire text without cost andthen decide if you really want to join the ranks of professional tuners.
If you are serious about learning to tune, setting up your own business and enjoying a comfortable, respectable, wellpaying profession, I am certain I can show you how.
Now, begin your education. I look forward to welcoming you as a student and future professional tuner.
Please join us—we need you!
Ron Van Hoose, B.A.Tuner/Technician/Author4291 Holland Road, Suite 534Virginia Beach, VA 23452

Editor’s noteI found this document on the web at http://www.mirror.ac.uk/collections/hensa-micros/collections/aeres/edsw/d-geninf.htm. The contents indicate that it is freely redistributable. My involvement in the matter has been restrictedto markup for typesetting.
The text refers to a course and registration. It’s not clear whether this course is still offered; at the time of writing,the document is over ten years old, and there is neither a phone number nor (not surprisingly) a web URI. The regis-tration form is available at http://www.lemis.com/grog/Documentation/regoform.txt.

1Musical knowledge required for
piano tuners
In order to properly tune a piano, I recommend you learn a ‘‘little’’ about music terminology, acoustics, how a stringvibrates, how the musical scale is organized, a little about the mathematics of the musical scale, and the theory sur-rounding the art of tuning. Although I can teach you to tune a piano without requiring much knowledge in these ar-eas, the more you know, the more confidence you will have. I believe the more you can learn about the completesubject of ‘‘TUNING’’, the better tuner you will become.
This sounds like I am going to ask you to become a music major rather than a tuner. Nothing could be farther fromthe truth. You will find the musical knowledge required to tune a piano can be learned in a very short time.
A piano is tuned by listening for beats (explained later) and adjusting the tension of the strings to either eliminate orset the speed of these beats. A good ear is necessary, but a good musical ear is not.
Noise and musicWebster’s dictionary defines noise as ‘‘something that lacks agreeable musical quality or is noticeably unpleasant.’’A musical tone is defined as a ‘‘sound of definite pitch and vibration.’’
When a piano string is struck, a musical tone is heard, and when you hear the sound of a jack-hammer, you are hear-ing noise. You probably have learned elsewhere that in order for a sound to exist, it must be heard. If a sound vi-brates at a certain rate and causes your ear to vibrate at the same rate, you are hearing a musical sound. Conversely,if a sound vibrates in an unorganized fashion causing your ear to vibrate the same way, you are hearing noise.
The vibrating piano stringIf you secure a length of piano wire on both ends and pluck it with your fingernail, you will hear a musical sound.The sound (pitch) you hear is determined by 1) the thickness of the wire; 2) the length of the wire; 3) the tension puton the wire; and 4) how stiff the wire is. It is not necessary to try this experiment at this point—just remember thecharacteristics of a vibrating string.
Note: If you are not familiar with basic musical notation, please refer to appendix D.
When a string is struck, it vibrates in many different ways. First, and foremost, the sound you hear will be the fun-damental. Secondly, the string produces a series of partials by dividing itself into halves, thirds, quarters etc. Thisphenomenon occurs simultaneously.
The first eight partials produced by striking an individual string are shown in illus. 1-2 built on the fundamental noteC-28 (explained later).
The partials shown above (over the fundamental C-28) are C-40, G-47, C-52, E-56, G-59, A# (or Bb—explained lat-er) and C-64. A little later, after I have explained these numbers attached to the notes (pitches), I will ask you to

play them on the piano.
Producing beatsIf one piano wire is adjusted to sound exactly the same as another wire, they are ‘‘in tune’’ with each other. On theother hand, If one wire is just a little ‘‘flat’’ or ‘‘sharp’’ to the other, they will produce a softer tone when sounded to-gether and you will hear a vibration. This vibration will either be fast or slow, depending on how far sharp or flatone wire is to the other.
For example, if one wire is tuned to sound at 440 Hz (cycles or beats per second) and the other wire is tuned tosound at 441 Hz you will hear one beat per second. You will hear this because the faster vibrating string will over-take the slower vibrating string once per second. Every time you hear the sound getting louder and then softer, youare hearing one beat (cycle). Therefore one string (or partial) vibrating at a specific frequency will cause you to hearbeats if it is sounded with another string vibrating an a different frequency.
Please don’t giv e up yet. This subject will be presented in more detail later on. I am just filling your head with factsthat will magically make sense as you progress. I promise!
The piano keyboardNow, I am going to introduce you to your piano in a way you may not have experienced before.
First: sit down in front of the piano—say ‘‘Hi! I am going to tickle your ivories and make you feel and soundgreat’’.
If you are sitting in front of a full size piano, you will be looking at 88 individual keys. The key at the far left of thekeyboard will be a white key and it will be given the name of A-1. The key at the far right of the keyboard is also awhite key and will be given the name of C-88.
Second: observe that there are 52 white keys, and 36 black keys (which we will call sharps). If you do not know thenames of all the keys you will now learn them very easily.
I will take you up the keyboard as you are sitting in front of the piano.
The keys (for identification) are numbered from left to right 1 thru 88.
Learn this sequence: A-B-C-D-E-F-G-A. This is the way the scale progresses from A-1 up to C-88 on the whitekeys.
Try it. Start on A-1 and play every white key all the way up to the top. You just played 52 keys, not 88. The other36 keys are the black ones.
As you progress up the keyboard on the white keys, and come to a black key between two white keys, give it thename of the key you just left and add the name sharp. In other words, the first black key you come to will be calledA-sharp (written usually as A#). The second black key you come to will be called C#. The third black key will becalled D#.
So now, you have the ability to name all the keys from A-1 to C88.
I’m sure you are familiar with the word ‘‘FLAT’’ as pertains to musical sound. When most people hear this term, Iimagine they think of a tone (note or pitch) that sounds a little ‘‘off’’. This is correct, but another way tuners and mu-sicians use the term flat is to identify musical pitches.
If you start at the top of the piano on pitch C-88 and come down, you will find that the black keys are in exactly thesame place. Brilliant? I thought you would think so.
As you come down the keyboard the first black key you come to is just below B-87. Since it is BELOW the note weare going to call it B-flat (normally written Bb).
Simply put, when you are going up the keyboard, the black key takes the name of the white key below it and adds

the term sharp (or #). When your are coming down the keyboard the black key takes the name of the white keyabove it and adds the term flat or (b).
At this point, make sure you understand that C# is the same as Db; D# is the same as Eb; etc...
One other point to make—Please note that between the notes E and F; and B and C, there are no black keys. Thismerely means that E# can also be called F and B# can be called C. Also Fb is the same as E, and Cb is the same asB. Please do not let this confuse you. Just accept it for now .
Important: tuners, for the most part, call all black keys sharps. Musicians use both sharp and flat. For the purposesof this course we will use the term sharp exclusively in the printed text and illustrations. I just wanted you to under-stand why you may hear C# called Db—A# being called Bb etc...
On the audio tapes you will hear me occasionally refer to both Sharps and Flats. This is so you will be able to betterunderstand the terms and feel comfortable with either one.
Take a break—have a cup or glass of your favorite beverage, think about it until just before you get a headache andthen proceed reading. Believe me, it will ev entually make sense.
Earlier, when you learned the sequence of notes as you go up and down the keyboard, you saw that the notes start re-peating after 12 have been hit. Start on A-1 the first note on the left side of the keyboard and go up note by note andthe 13th note you hit will be A-13.
Remember this: The distance between one note and another one with the same letter name (higher or lower) is calledan octave.
Now, start with A-1 and go up counting the A’s and determine that there are 7 more—plus 3 more notes. This tellsyou that the complete piano scale contains 7 OCTAVES plus three notes.
When you start at the bottom of the piano and ascend by playing each note (white and black) one after the other, youwill be going up the keyboard CHROMATICALLY. Practice going up and down the keyboard in this manner andsaying aloud the notes as you play them.
INTERVALSAn interval is a unit of harmony, resulting from sounding two tones (notes) simultaneously. For our purposes wewill think of an interval as the distance between two notes measured by their differences in pitch. If the two notesare played one after the other, it is referred to as a melodic interval. If they are played together, it is referred to as aharmonic interval.
The distance from any note to the next note, higher (to the right) or lower (to the left) is defined as a half-tone orhalf-step. This is the smallest interval. Recall now that the letter names of the notes are A-B-C-D-E-F-G-... Now ifyou want to find out the general name of any interval, you simply start counting on the first note of the interval andcontinue up or down to the second note of the interval.
Examples: If the first note of the interval is C-28 (the 28th note from the bottom of the piano) and the second note ofthe interval is D-30, you would count 1-2. The interval would be called a second; C-28 up to E-32 is a third; C-28up to F-33 is a fourth and so on until you reach the 8th which is called the octave (C-28 to C-40).
Since sharps (#) and flats (b) take their letter names from the adjacent white keys, they are not considered when youare determining the size of an interval. A to C is a third and A to C# is also a third.
This brings us to another term called the unison. Look at the strings on the piano and you will find that when youstrike them by pressing the keys, the higher notes will have three strings per note. The notes to the immediate ofthese will have two strings per note and the bottom 10 or so will have only one string per note. When the stringsstruck by one hammer are tuned to each other the are said to be in unison. This is also referred to as the interval of aperfect prime.
We must now learn to identify the intervals by counting half-steps. A half step is the distance from on note up ordown to an adjacent note (black or white). The chart below will show you how to construct the intervals. You then

need to be able to start on any note and play any interval necessary.
From To Half steps Interval name
C-28 E-32 4 major third
C-28 D#-31 3 minor third
C-28 F-33 5 perfect fourth
C-28 G-35 7 perfect fifthC-28 A-37 9 major sixth
C-28 G#-36 8 minor sixth
C-28 C-40 12 perfect octave
Some new terms were introduced in the chart—major, minor and perfect. As you have probably have figured out bynow, if C-E is a third and C-D# (Eb) is also a third, we need some way to label the difference since they will notsound the same when played together. So, a third will be major if there are 4 half steps between the two notes and itwill be minor if there are only 3 half-steps.
Practice identifying intervals starting on various notes until you are able to start on any note and play the intervals ofthe MAJOR & minor thirds and sixths and the perfect fourths and fifths.
You will use these intervals over and over while learning to tune and in every tuning you perform in the future. Theimportance of learning the keyboard cannot be overemphasized. You certainly do not have to know how to play apiano to tune it and an auto mechanic does not have to know how to drive, but you wouldn’t take your car to a me-chanic if he/she didn’t know a spark plug from a carburetor.
A little mathThere are numerous books you can find that will delve deeply into the mathematics or mechanics of the musicalscale. My purpose in this book is to present just enough (hopefully) but not too much of the technical aspect of tun-ing. Once you grasp the information herein you may find your appetite has been whetted sufficiently and you canexpand your knowledge. As in all professions, there is always more to learn.
The rest of this chapter is fairly technical, but no course on tuning would be complete without at least including thisinformation.
I recommend you at least read the rest of the chapter because there are many non-technical bits of information youshould know. Don’t worry that you will not be able to tune without knowing everything I will present. I tuned pi-anos professionally for a few years without knowing most of the information on the next few pages. If you are reallyserious about entering this profession, you will refer to and learn the theory of tuning eventually.
So, speed read the following info and proceed to chapter two. If you understand it all—great, if not — don’t worry.
Equal temperamentAs you sit in front of your piano and play the notes up and down, it is apparent that they all sound at a different pitchor frequency. You learned that a string, when struck, vibrates at a certain rate causing your ear to vibrate at the samerate. Since there are 88 different pitches on most pianos, there has to be a way to space these pitches one to anotherso that the piano will be in tune.
For instance, we know that within any octave there are 13 separate sounds. These sounds must be arranged so thereis exactly the same distance between each note as we go up or down. There are 13 separate sounds, but only 12 half-steps.
In order to obtain the frequency of a tone one half- step higher than another and have 12 equal half-steps from thelower note of an octave to the upper note it is necessary to multiply the frequency of the tone by the 12th root of the

octave ratio, which is 1:2. The 12th root of 2 is 1.0594631 for those of you who understand this terminology.
More simply, the note A-49 vibrates at 440 cycles per second (Hz). If you multiply 440 by 1.0594631 you will get466.163764 which is the number of Hz of A#-50. If you multiply 466.163764 by the 12th root of 2, you will get thefrequency of B-51. You could do this from the bottom of the piano all the way to the top and you would go fromA-1 with a frequency of 27.5 to C-88 with a frequency of 4186.009. Or you could just refer to appendix B from thetable of contents (main menu) and find that I have provided this information for you.
When 12 successive half-steps (comprising one octave) are equalized by the method explained above, the result iscalled and equal tempered octave.
A smaller unit of measurement was introduced by A.J. Ellis called the cent. Ellis divided the equal tempered octaveinto 1200 units called ‘‘cents’’ with each half-step being exactly 100 cents distance from the next, regardless whatoctave you are in. The cent is too short a distance to be heard by the ear, but a trained ear will hear a distance of 2cents and the average person can hear a distance of 3-4 cents.
Now that we know how the equal tempered octave was created, it is a simple matter to ‘‘equally temper the entirekeyboard.’’
For Example, the lowest note on the piano is A-1 which beats at 27.5 Hz. To obtain the beats of A-13 an octavehigher) we multiply 27.5 by two and get 55.00 Hz. We then could multiply 55.00 by two and get the frequency ofA-25 (110.00). If we proceed by multiplying each frequency by successive of 2 we will reach A-85 at a frequencyof 3520. Again, please refer to Appendix B for clarification.
At the beginning of this section, I told you that a tuner tunes a piano by listening for beats. You are surely wonder-ing how you are supposed to hear 440 or whatever cycles per second. You don’t hav e to. Since it is impossible tohear those frequencies, we will use a system of tuning based on coincident partials. Don’t let this new term frustrateyou. You will understand soon enough.
Recall that we learned when a string vibrates it produces a series of partials. When two strings are sounded togetherforming an interval, you will find (explained later) that there is a common partial sounding at close to the same fre-quency. So instead of comparing the extremely high frequencies of the fundamentals, we will be comparing theclosely related frequencies of the coincident partials.
Series of partialsIn order to follow the discussion of partials, it will help to have the chart on pitch frequencies (Appendix B) in frontof you Just return to the Table of Contents and highlight the topic ‘‘Theoretical Fundamental Pitches of All Notes.Press ENTER, and when Appendix appears, turn on you printer and press P. It is only two pages long. Chart (1)gives you the cycles per second that every note on the piano sounds when struck. Chart (2) starts on C-28 (the 3rd Cfrom the bottom of the piano). Locate C-28 on the piano. Beneath The word NOTE on Chart 2, the notes from C-28up to C-40 are listed and the first column to the right will give you the frequency of these pitches.
When you play C-28 on the piano the fundamental will be sounding at 130.81 Hz. Since the string produces par-tials, I will give you the first eight partials that will be produced. Remember, the fundamental is actually the firstpartial.

Partial Note frequency Interval
1st C-28 130.81 fundamental2nd C-40 261.63 octave up from C-283rd G-47 392.44 fifth up from C-404th C-52 523.25 fourth up from G-475th E-56 654.07 major third up from C-526th G-59 784.88 minor third up from E-567th A#-62 915.69 minor third up from G-598th C-64 1046.50 one octave up from C-52 and
two octaves up from C-28
Now, start on C-28 and while holding the right pedal on the piano down, play the partials one after the other fromC-28 up to C-64. As you play each note try to learn the intervals listed above. Listen to the sounds of the intervals.
Since our goal is to tune the piano by listening for beats or vibrations as one note is sounded against another, I willnow show you how we get these beats down from the hundreds of cycles per second to the range in which we candistinguish them.
For this exercise, we are going to assume that the note C-28 is perfectly in tune. How to do this will be explained lat-er, but for now we already have it in tune. We are going to tune E-32 to C-28 so we will have two notes on the pianoin tune.
Look at chart TWO in Appendix B which lists the frequencies of the first eight partials of each note in the tempera-ment octave. By the way, the TEMPERAMENT octave is the octave we will use later when we begin tuning the pi-ano.
Locate C-28 under the column labeled Note. Follow this to the right until you come to the 5th partial. The 5th par-tial of C-28 produces 654.07 Hz. NOW, E-32 in the same column. Follow this to the right until you come to the 4thpartial. You will find the 4th partial of E-32 produces 659.26 Hz. We subtract 654.07 from 659.26 and find thatwhen C-28 and E-32 are tuned we will hear approximately 5 Hz. You will be able to hear 5 Hz easily once your earis trained (later). For now just try to follow the mathematics all well as you can. It will gradually (believe it or not)become easy.
The simple fact is, that when we sound any note with another, somewhere in the series of partials of each note wecan find a partial of one series that beats very close to the other. Above, we found that the 5th partial of C-28 beatsvery close to the 4th partial of E-32. Therefore, we can conclude that the RATIO of C-28 to E-32 (which is the in-terval of a MAJOR third) is 5:4.
I will now giv e you the ratios of the intervals we will be using later so you will be able to find the coincident partialsby using the chart. If you didn’t hav e the chart, you could find the frequency of any partial by finding the multiple ofthe fundamental. For example, if you wanted to know what the frequency of the sixth partial of C-28 is, you merelymultiply the fundamental (130.81) by six. You will find it to be 784.86, which you can find under the column la-beled 6th in the chart. The cycles have been rounded off to two decimal places. You can find the frequency of anypartial of any fundamental by the same method. Simple — Right?

Ratios
Interval Ratio
Unison 1:1Octave 2:1Perfect Fifth 3:2Perfect Fourth 4:3Major Third 5:4minor third 6:5Major Sixth 5:3minor sixth 8:5
Remember to multiply the lower note in the interval by the larger number in the ratio and the upper note by thesmaller.
One more example and then you must spend some time working on this procedure until you feel comfortable with it.
We just tuned E-32 to C-28. Now we will tune G#-36 to E-32. We will then have three notes in tune— C-28, E-32and G#-36.
First, determine that the interval from E-32 up to G#- 36 is a MAJOR third. Then find the ratio of a MAJOR thirdfrom the above chart. Since the ratio is 5:4 we know that the 5th partial of E-32 will sound very close to the 4th par-tial of G#-36.
Locate the frequency of the two notes. E-32 beats at 164.81 Hz and G#-36 beats at 207.65. Multiply 164.81 by 5 toobtain the Hz of the 5th partial and get 824.05. Then multiply 207.65 by 4 and get 830.56. Subtract and come upwith approximately 6.5 (6 1/2) Hz. So we would then tune G#-36 to E-32 until we hear 6.5 Hz.
You could also just have looked up the notes on the chart and saved the hassle of multiplying.
In this chapter you learned
1. The difference between noise and musical sound.
2. How a piano wire vibrates.
3. What partials are and how they are used in tuning.
4. Identification of keys on the piano keyboard.
5. What intervals are and how to identify/construct them.
6. What ‘‘equal temperament’’ means.
7. What coincident partials are.
8. The ratios of intervals and how they are applied.
2Tuning technique
The first step in learning the mechanics of tuning is procuring the necessary tools. A list of supply houses is provid-ed to enrolled students. It is quite an education in itself just to browse through these catalogs.
I can provide you with a basic tuning kit which is all you really need to learn tuning (see order form). Later on youmay want to upgrade to a more professional Tuning Hammer, but this kit will suffice through your learning stage.Tuning can be learned with the least expensive tuning hammer.
I will tell you what you absolutely must obtain, and you will decide in time what else you may want.
You will need:
1. A tuning lever (usually called a tuning hammer)
2. A tuning fork or tuning bar
3. A felt temperament strip
4. A few felt or rubber mutes (I use rubber)
The tuning kit I can provide for you includes these items.
If you already have the necessary tools, we will begin by preparing the piano for tuning. The first thing to do is tolift the lid and then remove the top front panel. This can normally be removed by releasing the catches on the leftand right sides. Some panels are attached with screws and others are a hinge type. In any case, it will be apparentonce you look inside.
If you are learning on a grand piano, you will need to remove the music shelf which is directly above the tuning pinsin front of the piano. This usually just slides out, but some grands have a notch in the shelf requiring you to lift itout.
This discussion will, for the most part be referring to vertical pianos, but the grand is tuned in the same manner, andthe few differences in technique will either be apparent or I will point them out as we go along.
In front of you will be the action, the strings, the metal plate and approximately 220 tuning pins. Recall from chap-ter one that the strings to your right (treble strings) will be three to a note. The strings (bass) to the left of the middlewill be two to a note and the bottom 10 or so will be single string.
The tuning pins are approximately 2¼ to 2½ inches long and are made of steel which has been ‘‘blued’’ and in somecases nickel plated for appearance. They are driven into a block of laminated hard wood (usually maple) until thereis approximately one inch showing. You can see that the music wire is put through or ‘‘eye’’ of the pin and thenwrapped to form at least three coils.
Now, take off the very bottom panel so you can observe the strings from below. This panel usually can be removedby lifting up on the hinges on the top and pulling forward.
The treble wire is put into the eye of one tuning pin, wrapped around the hitch pin at the bottom and then putthrough the eye of the next tuning pin. Note that one length of wire makes up two of the three strings for each treblenote. Carefully follow the wire from pin to pin and familiarize yourself with the way a piano is strung. The copperwound lower strings are all just one string to one hitch pin as you can see.

Before you leave your examination of the strings, observe how the string is placed between the metal pins on theblock of wood directly above the hitch pins. These pins are the bridge pins and the block of wood in which they aredriven is called the bridge.
There are two bridges, one for the treble strings and one for the bass strings. The bridge pins give the strings what isreferred to as side bearing which helps to keep them steady on the bridge, while the purpose of the bridge is to trans-mit the vibrations of the string to the soundboard on which it is mounted.
One more piece of knowledge you should know at this point. Follow the string from just above the bridge to just be-low it. The string should rise up to the bridge on the top side and come down from the bridge on the down side.This is called down bearing.
To review briefly the above discussion: The string is put through the eye of one tuning pin, stretched down over thebridge between the bridge pins, wrapped around the hitch pin, and then brought up and through the eye of the nexttuning pin and secured. A complete discussion on the procedure of putting on a string is given in a later chapter.For now, an overview is all that is necessary.
In order to proceed with the actual tuning process, you must have a piano that is relatively free of any major prob-lems. The action must work adequately and the moving parts must not make excessive noise that will hamper yourhearing of the vibrating string. Assuming the piano is satisfactory, we will move on.
Locate the note C-40. It will be a white key approximately in the center of the keyboard. Press the key and watchthe hammer go toward the strings and hit all three strings causing them to vibrate. Now look at the chart of pitchfrequencies (Appendix B) and find that C-40 vibrates at approximately 262 cycles per second. Since there are threestrings on this note, each one should be vibrating at the same rate. This is hypothetical of course because unless thepiano was just tuned, the strings will not be perfectly in tune with each other. Let us just say that if they were in tunethey would each be beating at approximately 262 Hz (actually 261.626).
As was explained in chapter one, it is impossible to hear beat rates that fast. We are now going to go through as ex-ercise that will explain how we listen for beats.
Take two rubber mutes and insert one on the left side of the strings of C-40 and insert the other one on the right side.They will be held in place by being wedged between the note we are on and the one just below and just above.
Now when you strike the string by pressing the key, just the center string of C-40 will vibrate. Listen to the sound.You should hear a pure sound with no vibrations at all. Now, take the left mute out and again strike the two strings.If the note is not perfectly in tune, you will hear a different sound than before. You are probably hearing vibrationscaused by the left string beating at slightly more or less than 262 Hz.
Place your tuning hammer on the tuning pin that holds the left string of the note. It will be the one at the top of thebank of three pins. The hammer should be placed on the pin with the handle as close to straight up as possible. If itwon’t go on in the straight up position, go toward the left rather than the right and put it on the pin securely.
Now wrap your hand around the handle so it feels comfortable, and place your elbow (if you can) on the top of thepiano. The point to be made here is that is very difficult to tune ‘‘free handed’’. Find some way to steady your armby using some part of the piano. Make sure the hammer is as far on the pin as it can go and then very slightly turnthe hammer toward the left. Now strike the note again and it should sound very out of tune.
When you turn the pin toward the left it loosens the string and when you turn it to the right it will tighten it.
The left string should now be ‘‘flat’’ to the middle string. Now start very slowly bringing the left string up to thepitch of the middle string by turning it to the right. Each time you make an adjustment, strike the note and listen tothe difference. The goal here is to adjust the tension of the left string so that when the two strings are struck, theywill sound as one.
Mute off the left string again and listen to the sound of just the center string sounding alone. This is the sound youare after.
It is very easy to bring the string up too far and go over the pitch of the center string. Be careful, it is possible to puttoo much tension on a string causing it to break. Go slowly, and strike the note constantly until both strings are vi-brating at the same rate.

After you have the two strings ‘‘in tune’’ with each other you can start learning how to listen for beats. Let’s assumethat the two strings are sounding at 262 Hz. If we lower (turn to the left) the left hand string until we can hear beats,we can count how many beats we can hear in one second.
It is recommended that you practice with a stop watch or metronome until you can accurately determine how long asecond is. A very good exercise for this is to start the stop watch and count to 60. See how close you are to 60 sec-onds. When you can get it to where you are counting 59,60 or 61, you are ready.
Hint: I learned to recognize the length of a second by thinking over and over ‘‘I am going to tune’’ in a normal fairlyquick pace. This phrase should take a second to think. Test your pace with a second hand until you can say thephrase as close to 60 times a minute as you can.
Tune the two strings once more so they are sounding the same (in unison). Now adjust the left string by turning it tothe left until you hear beats. You just ease it to the left—it doesn’t take much. At this point don’t concern yourselfas to how many beats per second you are hearing. Stop as soon as you can hear what could be described as a pulsebeating at regular intervals. Listen until you can count these beats/pulses/vibrations. Once you can count them, seeif you can determine how many you hear in one second. Adjust the left string until you can hear 1,2,3,4,5,6,7 and 8beats per second. This could take many hours of practice.
The audio tapes provided to students will save you a great deal of time, but if you do not yet have these, don’t giv eup. All of a sudden, if you are persistent, you will realize that you are hearing the beats. This may take hours, or afew days, but until you can hear and count the beats, no progress can be made.
Remember, always strike the note after each adjustment. A very, very small movement of the tuning hammer willgreatly change the pitch.
When you are adjusting the tension on the strings, it is important to turn the tuning hammer left and right NOT inand out. It is possible to bend or even break the tuning pins if the hammer is not used properly.
Setting the pinAfter you have learned to manipulate the tuning hammer and set the pitch properly, the next technique to master isthe ‘‘setting of the pin’’.
Recall the previous discussions of the tuning pin, pin block, path of the string and characteristics of a piano wire.All these factors have to be taken into consideration when we ‘‘turn’’ the tuning pin to adjust the pitch. First, the pi-ano you are called upon to tune perhaps has not been tuned for at least six months and more likely a lot longer. Myexperience with new customers is that their piano has not been tuned for up to fifteen years or more. This meansthat the pins have ‘‘settled into their little niche and will become very stubborn when moved to a new location.
The string (wire) also has formed a comfortable position around the hitch pin, the bridge pins and all other points offriction. In other words, changing the position of the pin or wire will be met with a great deal of resistance.
If you merely pull the string up to pitch (if it is flat) or lower it down to pitch (if it is sharp) and then leave it, it willsurely try to go back to its natural habitat very quickly.
The recommended way to compensate for this natural tendency is to pull the string a little over the pitch (if it is flat)or a little under pitch (if it is sharp) and then ease it back up or down until it is in tune. This technique (setting thepin) is one that will only come with time and practice, but you must understand that a quality tuning will not resultuntil it is mastered.
One more important element in the setting of the pin is giving the string a solid blow just before and after you feelthe pin has been ‘‘set’’. This hard blow will settle the strings and result in a solid tuning. If, after you give the stringa solid blow, it goes sharp or flat, then you must repeat the process of setting the pin until a solid blow will notchange the pitch of the string. The more out of tune a piano is, the more important this procedure becomes.
A solid blow means pressing the key down hard (not hitting the string with something). I’m sure you assumed that(but you never know). I was teaching a class at a local music store a couple of years ago, and after explaining thisprocedure, a student asked what tool was needed to hit the strings with. I immediately made a mental note to add

this paragraph in the next revision of the manual.
The tuning forkUp to now, you have not been introduced to a way to get a reference note to begin your practice. A tuning fork is a‘U’ shaped bar of steel that gives out a pure tone (without partials) when you strike it against a solid substance.
The tuning forks used by most tuners are tuned to sound the frequencies of C-52 (523.252 Hz), A-49 (440), or F-33(349.228). The tuning fork used for this course is the C-52.
If you have this fork , hold it by the stem—strike it against your knee—place the stem inside your ear—close yourear lobe with your finger and listen. You will be hearing a pure tone sounding at the pitch at which you will nowtune C-52 on your piano.
Mute off the two outside strings of C-52 as previously explained. Place the tuning hammer on the center tuning ofC-52. Sound the tuning fork by the procedure described above and then adjust the tension of the string to match thesound of the fork.
After you have the center string of C-52 sounding with the tuning fork, remove the left mute. Put the tuning hammeron the upper tuning pin of C-52 and tune it as described a couple of pages back.
Now that you have the center and left strings of C-52 sounding the same, take the right mute out. Place the tuninghammer on the lower tuning pin and tune the right string to the two others. You now hav e the note C-52 perfectly intune. You just tuned a unison.
Mute off the two outer strings of C-52 once more so that only the ‘‘tuned’’ center string sounds when struck. LocateC-40 on the piano and mute off the other strings the same way. Place your tuning hammer on the center string ofC-40 and then strike C-52 and C-40 together. Chances are that the two notes C-40 and C-52 (comprising an octave)do not sound in tune.
Listen very closely to the two strings vibrating together. Try and hear the beats. If you cannot hear beats, turn thepin to the left and see if the sound becomes worse. If so, C-40 is flat to C-52. Now, gradually turn the pin to theright. Remember to strike the key after each adjustment. Keep this up until you can hear an identifiable beat. Listenas you adjust for the beats to get slower and slower. When they stop, you have just tuned an octave. If the beats getslower and slower and then begin to get faster, you have gone over the pitch. Turn the hammer to the left and onceagain get below the pitch. Then begin again until you completely stop the beats. Now set the pin as previously de-scribed.
Pull out the left mute—tune the string to the center string—pull out the right mute and tune the right string to theother two strings and you now hav e all the strings of C-52 and C-40 in tune. Strike the two notes together and onceagain listen for beats. If there are any, you must retrace your steps and adjust until you have a beatless octave.
SummaryIn this chapter you learned:
1. Tools needed
2. Nomenclature of parts affecting the tuning process
3. Muting of strings
4. Tuning hammer technique
5. How to listen for beats
6. How to set the pin

7. How to use the tuning fork
8. How to tune unisons and octaves
We hav e now laid the foundation for the most important part this course—Setting the temperament octave (chapterthree). If you have learned (and practiced) the procedures presented up to now, you should be able to get throughthis phase with your sanity intact. If the following chapter blows your mind completely, please don’t cut this disk inhalf, kick the dog and go off to the nearest tavern.
Back up—take a break—then review the first two chapters. If you are like me, you may have jumped ahead thinkingyou can learn how to tune without all this grief. Sorry! I tried it many years ago and wasted a lot of valuable timeby thinking I could do it the ‘‘easy way’’.
There is really no ‘‘easy way’’ to learn tuning. However, I believe you will find that this course will show you the‘‘easiest’’ way.
Now, lets either ‘‘back up’’ if necessary, or proceed on to chapter three. Many ‘‘mysteries’’ await!

3Setting the temperament octave
There are many systems a beginning tuner can follow in order to set a good temperament. Most of them are verygood and if followed accurately will produce the same results as the system I prefer; However, I believe the system Iteach is easier to learn and a higher degree of accuracy is more probable.
The system outlined in this course is the one I have used for a number of years. I recommend it because I learned bya different method and after experimenting over the years, I found that I could set a better temperament in much lesstime than with any other method. I hope you find it as acceptable as I have.
If you have my tapes, you will see (hear) how easy it is to set a good temperament AND be sure that is a GOODtemperament before you move on the tuning the remainder of the piano.
3
1. You must be familiar with everything in this text up to this point before attempting to set a temperament.Some of the more technical information is not required, but everything else is essential.
2. You must practice daily, especially in the beginning stages. The learning process is very demanding of yourtime. You will not become a good tuner without a lot of hard work. I will provide the system and personal as-sistance (via audio tapes)—you provide the time.
I recommend you obtain, or have access to a piano that does not need too much (or any) repair. You can’t getstarted if the hammers won’t hit the strings or if strings are missing etc. If you have the luxury of practicingon a new large grand so much the better, but I also advise you to spend a good deal of time on a lesser qualitypiano. Most of the pianos you will be tuning as a professional will not be ‘‘quality’’ pianos.
3. You must understand that you will not become a tuner overnight. Some may be proficient in a few weeks—others will take much longer—and some simply do not have the ability to become a professional tuner. Thelatter category comprises a very small percentage of those who really put out the effort required.
Very little musical knowledge is necessary. Pianos are tuned by listening to and adjusting the vibrations of onestring to another—NOT listening for pitch. A musical background will help in understanding the theory, keyboardand interval recognition, but a tuner relies on simple mathematics rather than musical ability.
Once you have mastered this chapter, you will be well on your way to calling yourself a ‘‘tuner’’.
There are numerous illustrations included in this chapter and will be very helpful to you when your receive them.Also the audio tapes provided to enrolled students will allow you to HEAR the beats referred to below. You do notneed these illustrations or the tapes, but I sure wish I would have had them when I was first learning. They will saveyou many hours of trial and error.

Step OneNote: When you are asked to tune an interval, you are to play the two notes of the interval together (harmonically)while listening for the beats.
Before you begin to set the temperament octave, you must do the following:
• Mute the entire octave from C-28 to C-40
1. Insert your muting strip so all but one string are muted off. In the case of a three string unison, you willinsert the strip on the left and right sides of the unison. In the case of a two string unison, it will be neces-sary to insert between unisons so only one of the two strings sound when the hammer strikes. Whateverthe situation, just remember that only ONE string from each unison sounds when the hammer strikes.
2. Mute the two outer of C-52 with rubber mutes and tune the center string to the C tuning fork. To soundthe tuning fork, hold it by the handle and strike it against your knee. Place the handle (stem) inside yourear. Close the earlobe and listen for the pitch.
3. Tune C-40 to C-52 so there are no audible beats.
4. Tune C-28 to C-40 the same way.
Step Two
• Tune E-32 to C-28 so that E-32 is on the sharp side on beatless by approximately 5 Hz—(Actual 5.19)
• Tune G#-36 to E-32 so that G#-36 is on the sharp side of beatless by 6½ Hz (Actual 6.54)
• Tune C#-29 to G#-36 so that c#-29 is on the sharp side of beatless by approximately½ Hz or 2½ per 5 seconds.
• Test—Play the minor third from C#-29 up to E-32 followed by the major third E-32 up to G#-36. You will findthat the minor third beats slightly faster than the major third.
• Test—Play the interval from Ab-36 (same as G#-36) up to C-40. You should hear approximately 8 Hz.
Step Three
• Tune F-33 to C#-29 so that F-33 is on the sharp side of beatless by 5½ Hz.
• Tune A-37 to F-33 so that A-37 is on the sharp side of beatless by approximately 7 Hz.
• Tests:
1. Play the interval C-28 up to F-33 (a perfect fourth) followed by the interval F-33 up to C-40 (a perfectfifth). These two intervals will have the same beat rate.
2. Play the interval F-33 up to G#-36 (a minor third) followed by the interval G#-36 up to C-40 (a majorthird). The minor third beats slightly faster than the major third.
3. Play the interval C-28 up to G#-36 (a minor sixth) followed by the interval G#-36 up to C-40 (a majorthird). The minor 6th & the MAJOR 3rd will have the same beat rate.
• Tune D-30 to A-37 so that D-30 is on the sharp side of beatless of beatless by approximately ½ beat per secondOR 2½ beats per 5 seconds.
• Tests:

1. Play the interval D-30 up to F-33. It should beat at approximately 8 Hz.
2. Play a series of four major thirds beginning with C-28 up to E-32 followed by C#-29 up to F-33 followedby E-32 up to G#-36 and ending with F-33 up to A-37. These major 3rds will increase from 5 to 7 Hz.
3. Play the interval from D-30 up to F-33 (a minor 3rd) followed by the interval of F-33 up to A-37 (a major3rd). Again the minor 3rd will beat slightly faster than the major 3rd.
Step four
• Tune F#-34 to D-30 so that F#-34 is on the sharp side of beatless by approximately 6 Hz.
• Tests
1. The major 3rd D-30 up to F#-34 and the major 6th C-28 up to A-37 will beat the same.
2. The series of Major 3rds starting with C-28 up to E-32 and ending with F-33 up to A-37 will increasefrom 5 to 7 Hz.
3. Play the major chord D-30, F#-34 A-37. It should sound pleasing to the ear.
• Tune A#-38 to F#-34 so that A#-38 is on the sharp side of beatless by approximately 7½ Hz.
• Tune D#-31 to A#-38 so that D#-31 is on the sharp side of beatless by approximately½ Hz OR 2½ beats in 5seconds.
• Tests
1. The major 3rd F#-A# will beat approximately the same as the minor 3rd C#-E.
2. The major 3rds beginning on D-F# and ending on F#-A# will increase from 6 to 7½ Hz.
3. The minor 3rd D#-F# will beat slightly faster than the major 3rd F#-A#.
4. Ascending fourths starting on C-F and ending on F-A# and the ascending fifths starting on C#-G# andending on F-C will gradually increase in frequency.
Step five
• Tune G-35 to D#-31 so that G-35 is on the sharp side of beatless by approximately 6 Hz.
• Tests
1. The major 3rd D#-G will beat approximately the same as the minor 6th C#-A#.
2. The major 3rds beginning with C-E and continuing up to F#-A# will increase from 5 to 7½ Hz.
• Tune B-39 to G-35 so that B-39 is on the sharp side of beatless by approximately 8 Hz.
Final TestsPlay all major 3rds starting with C-28/E-32 all the way up to G#-36/C-40. They should gradually increase from 5 to8 Hz.
All ascending 4ths and 5ths should gradually increase in speed.
In this chapter, you learned:

1. How to mute off the temperament octave
2. How to set the pitches in the temperament octave
3. All ‘‘tests’’ needed to check your work as you go
Take advantage of all tests available. Check and recheck your temperament. Make adjustments as necessary untilall intervals sound pleasing and as close to the actual beat rate as possible. Never proceed on to tuning the remain-der of the piano until you are positive your temperament is as good as you can get it.

4Tuning the remaining 75
The temperament has been set and we must now proceed to tune the rest of the piano by tuning beatless octaves.
On the surface, it seems that octave tuning will be relatively simple compared to setting the temperament, since ourgoal is to just tune all octaves up and down beatless.
This is true up to a point, and that point begins for most of us when we get above D-54 or below C-28. There arenumerous reasons for this problem, and the situation varies from one piano to another.
When you reach the point in the treble or bass where you are hearing harsh or false sounds, you must rely on certaintests to ensure the octave is properly tuned. There are many tests available and tuners must understand and use themon every tuning. Do not rely solely on the octave interval. You will find this insufficient.
Please read this entire chapter before beginning practice.
Mute entire pianoI recommend you mute the entire piano as a first step for all tunings. This is simply to use your muting strips and in-dividual mutes to mute off all but one string of a note. The previous explanations on how to use the mutes should besufficient except for possibly a couple of points. The top note (C-88) usually cannot be muted off in the same wayas the other three string notes. You will have to place a mute between the left and center string or the right and cen-ter string. Also, on the other ends of the middle and treble sections (on some pianos) you may have to do the same.
Pianos are strung differently, so there is no one way to mute a piano that will work for all. The important thing to re-member is that only one string per note should sound when a key is struck. When you are tuning a note that is mut-ed off differently, be aware of which tuning pin you are turning. It is easy to place your hammer on a muted offstring out of habit and turn it until the string breaks. If you ever turn a tuning pin and hear no difference in thesound, always check to see if you are on the right pin.
I usually use two muting strips to mute off the treble and tenor sections (three string sections) and individual mutesfor the ends of these sections and the bass. The correct way to insert the muting strip is to use either the end of awire rubber mute or a screwdriver to push the felt between the strings. Make sure you make the fold high enough sothe middle string is not muted.
The only problem you may have is in using the muting strip on the lower part of the extreme upper section. Thedampers must be pulled back and the strip inserted between them and the strings. Push on the right (sustain) pedaland also help with your hands to accomplish this. Care must be taken to not tear off any damper felt.
After you have muted the entire piano, play each note and ensure that only one string is sounding and you have notsomehow muted off all strings of a unison by not making the loops in the muting strip high enough.
Now, you can proceed to tune the remainder of the piano by tuning beatless octaves. The first octave to tune isC#-41 to C#-29. Then tune all octaves up until you reach C-52. Then tune all the notes from B-27 to the bottom ofthe piano. Return to C#-53 and tune up the entire scale.
Keep in mind that since the temperament was set from C-28 to C-40, When you tune octaves up and down the pianoyou are automatically adjusting the temperament by tuning beatless octaves—C# to C#, D to D, D# to D# and so

forth up and down. If this still sounds confusing, review the beginning chapters once again.
I will now present numerous octave tests and you will have the opportunity to decide which ones appeal to you andserve you best.
One word of caution! Don’t bog yourself down by using more tests than necessary. You may find a normal 90minute tuning turning into over two hours very quickly. Tests are necessary and must be used, but try to find a hap-py medium between too few and too many. It will come with time.
Tests within the octave being tunedRefer to Appendix A while studying the following examples.
• When tuning B-27 from B-39, you can compare the beat rates of the major third G-35 to B-39 and the minorsixth B-27 to G-35. They should be the same.
• The minor third B-27 to D-30 will beat the same as the major sixth D-30 to B-39.
Also, the fourth/fifth test explained previously is very helpful between F-33 and C-52. This test requires that in anyoctave, a perfect fifth above a perfect fourth will beat the same as the fourth. Example: C-28 to F-33 (a perfectfourth) will beat the same as F-33 to C-40 (a perfect fifth).
The tests described so far can be used in any octave, but unfortunately they become increasingly less useful whenreaching the high treble and the low bass.
The fourth/fifth test is usually effective above F-33 and below C-52. This will vary from piano to piano.
The minor third/major sixth test described above is useful between C-16 and C-64. When tuning downward, if theminor third beats faster than the major 6th, the lower note of the octave is sharp. If the minor third beats slower thanthe major 6th, the lower note is flat. Conversely, when tuning upwards, if the major 6th beats faster than the minor3rd, the upper tone of the octave is sharp. If it beats slower, the upper tone will be flat. In other words, the two in-tervals should have the same beat rate.
Tests extending beyond the octave being tuned
Major third/tenth testA very good test in tuning up to C-64 is the major third/tenth test. For example, if you are tuning G-35 from G-47,the interval from D#-31 up to G-35 will beat the same as the interval (tenth) D#-31 up to G-47. IF the tenth beatsfaster than the major third, the upper note of the octave is sharp. On the other hand, if the tenth beats slower than themajor third, the upper note of the octave is flat. This test is similar to the minor third/major sixth test in that thebeats of the intervals are alike.
This test is useful when tuning downwards by ensuring that the beats of the descending tenths become slower as youproceed towards the bottom of the piano.
Using double octavesWhen tuning in the upper treble it is useful to check your upper note by comparing it with the note two octaves be-low.
Octave tenth testWhen tuning the high treble, another useful test interval is the octave/tenth. This is simply the tenth extended by anoctave. This test is applied in exactly the same way as the major third/tenth test. Example: When tuning C-64 toC-52 you would compare the beat rates of G#-36 and C-40 with the beat rates of G#-36 and C-64. They should beatthe same, in this case, approximately 8 C.P.S.

This test is also useful in tuning the low bass in the same way as the major third/tenth test—by listening for gradual-ly decreasing beat rates as you descend.
Octave/minor seventh testOne more test to use in the extreme low bass is the octave/minor seventh test.
Examples:
C#-29 down to d#-7 5 beats per secondA-25 down to B-3 4 beats per secondG-23 down to A-1 3 1/2 beats per second
Tips
Tr eble tuningWhen tuning the upper treble, you must be aware of the fact that the tone will fade rapidly after the string is struck.It is sometimes necessary to strike the string repeatedly and loudly to overcome this problem.
False beats are prevalent in the treble beginning as low as D-54 and continuing upwards. Some pianos will havemany, others very few. Refer to the section on false beats (below).
The extreme upper treble can be tested by running two octave arpeggios up to the note being tuned in addition tothe double or triple octave tests.
Bass tuningElsewhere in this course we discussed the fact that the upper partials of a fundamental are not necessarily equallytempered, but the tuned piano IS. Therefore, since the upper partials of the low bass notes are low enough, they willclash with higher notes on the keyboard and WIll be heard.
It is for this reason that we tune the low bass notes to the tempered intervals of the tenth (octave and a third) and theseventeenth (two octaves and a third). Also, the interval of a twelfth (octave and a fifth) can be used in the sameway, although the twelfth will beat so slowly as to almost seen beatless. This makes it a good test to ensure you arenot way off course.
False beatsYou hav e been taught to tune unisons and octaves beatless and of course this is the goal. However, you will find thatev en though you have muted off all but one string of a unison, that one string will sometimes produce beats whenstruck. It may be the center string, or either of the two outer strings.
If you have ten piano technicians discussing the problem of false beats, you will probably have ten different so-lutions to the problem. Solving this problem is beyond the scope of this course, but coping with the problem issomething you will have to do.
False beats usually occur anywhere above C-52. When you are tuning a unison and one string of the unison beatswhen sounded alone, your only recourse is to tune the other strings of the unison so the least amount of beats are au-dible when the note is struck
The higher the quality of the piano, usually the fewer false beats are present. However, I must say that as of now(1991) I have been tuning pianos for over 30 years and in can recall very few pianos that were completely free offalse beats. One was a concert grand and the other surprisingly was a medium priced console.
Causes for false beats are many, so I will only list a few of the most common.

1. A twist or kink put in the wire on stringing.
2. Faulty bridges and/or bridge pins.
3. Wire of uneven thickness.
4. Rust on the strings.
5. Poor scaling.
This is a problem you will live with throughout your tuning career. You now know how to detect false beats so youmust learn to compensate as best you can.
Just remember, if you are trying to tune a beatless unison, and you simply cannot stop the beats, check each string ofthe unison and see if a false beat is there.
Bass strings buzzingOccasionally, you will find a definite buzz when tuning a bass string. This buzz is usually a result of improper in-stallation or a break in the copper winding.
Rather than immediately replacing the string, loosen the tension enough to slip the bottom of it off the hitch pin.Then twist the loop a full turn in the direction in which the winding points. Replace the string on the hitch pin andtune. If the buzz is still there and you can determine that it is not coming from another source, you should replacethe string.
Follow the instructions in chapter six and remember to twist the bottom of the string as described above before tun-ing. It will save having to do it a year or two later.
SummaryIn this chapter, you learned:
1. How to mute the entire piano.
2. Tuning tests to use within the octave being tuned.
3. Major third/tenth test.
4. Double octave test.
5. Octave tenth test.
6. Octave/minor seventh test.
7. Important tips on treble tuning.
8. Definition of ‘‘False Beats’’.
9. Why bass strings sometimes ‘‘buzz’’ and how to stop it.

5Pitch raising and lowering
All pianos are now manufactured to be tuned to the standard pitch of A-440. This simply means that the note A-49will sound at 440 cycles per second when properly tuned.
Pianos that are much lower in pitch than the standard will sound lifeless or dull. The strings do not have the tensionnecessary to produce the correct piano sound. You hav e heard people say that the piano is too old and the sound is‘‘tinny’’ or other descriptive words. The fact of the matter is that an old piano can sound just as good and sometimesbetter than many new ones when tuned correctly. If the piano is ½ step or more below the standard pitch and theunisons are also out of tune, it will obviously produce the ‘‘BARROOM’’ sound associated with old pianos. If thereis no mechanical problem which prevents the piano from being brought up to pitch and tuned, you should have noproblem in having a satisfied customer when you are through.
As a matter of fact, many older pianos, when tuned to pitch will produce a better sound than newer pianos.
CAUTION: Always tighten the plate bolts and look over the entire piano for defects that may prohibit a pitch rais-ing. Test a few tuning pins to see if they hav e the necessary torque to hold the extra tension you will be applying.
Pianos that are sharp to the standard pitch are putting more stress on the plate than it was built to withstand. Al-though there is less probability of breaking strings when lowering the pitch, it nevertheless is just as time consumingas raising the pitch.
Why pianos go out of tuneIf I’ve heard it once I have heard it hundreds of times —‘‘I didn’t know pianos had to be tuned that often’’! Most ofyour new customers have no idea how often or even IF pianos need tuning. You should spend at least five minutestrying to educate your customer. It will pay off in obtaining more regular tunings.
A number of factors are involved in causing a piano to go out of tune. You will hear many times that the reason thecustomer waited so long to have the piano tuned is that no one ever played it. They think that playing the piano isthe only reason it will go out of tune. Although this is one cause, it certainly is not the main one.
Changes in temperature or humidity have a drastic affect on the stability of the pitch. Pianos have a tendency to gosharp in high humidity and flat in low humidity. You will find that a late summer tuning in a high humidity area will(IF the piano is tuned regularly) occasionally require a pitch lowering, whereas a late winter tuning may require apitch raising. If the piano is of good quality and is serviced regularly, the pitch should not be terribly off, but youwill see that this will be rule rather than the exception to some degree.
If a piano is let stand from year to year without being tuned, it will go through numerous rises and falls. The resultusually is a lowering of pitch. It will normally fall more than it will rise from season to season.
Obviously, the same piano will react differently depending on the atmospheric conditions in which it is placed. In amodern house, with modern controls for temperature and humidity, a piano will stay in tune much longer than itwould in a house with little or no insulation and poor temperature controls.
Years ago, little could be done to alleviate this problem. Some piano owners kept pots of water in the bottom of thepiano and a number of potted plants in the area during the dry months. During the high humidity months, light bulbs
were put in the bottom of the piano to draw out the humidity.
Today, there are humidity control systems sold by the supply houses that greatly reduce this problem. Pianos withthese systems still require regular tunings, but they will not go out nearly as fast or nearly as far in a normal tuninginterval of six months.
I nev er fail to recommend these systems to my customers. Not only will you make a profit on the installation (up to$150.00), you will have easier tunings from then on. The customer benefits because the piano will always be veryclose in tune if it is serviced regularly. Everybody wins.
One major problem that you encounter while tuning that is caused by fluctuations in humidity is tuning pins that aretoo tight or too loose. Pins that are too tight are very difficult to set and pins that are too loose are impossible to set.
Regardless of the reasons for pianos going out of tune, our job is to put them in tune.
Pitch raisingI will begin with the recommended procedure to raise the pitch since this will occur more frequently than a pitchlowering.
A number of factors must be weighed before you attempt to raise the pitch of a piano. These include:
1. The age of piano,
2. The condition of the piano,
3. How far down in pitch the piano is.
A new piano should be tuned at least four times the first year. It has been my experience that hardly anyone otherthan manufacturers and technicians are aware of this fact. Some sales personnel understand this, but are reluctant totell their customers. I can only assume that since this fact will add the cost of the tunings to the price of the piano,they are afraid of losing the sale. A sad situation, but I’m afraid it is too often true.
My hat is off to those respectable merchants who not only tell their customers of the importance of those first fourtunings, but also provide at least one or two of them without cost. I personally believe they would sell more pianosthis way.
A new piano that has only been tuned once and then let stand for a few years is much harder to tune than an older pi-ano that has been tuned regularly over the years. This is usually very difficult to explain to a customer.
You will find the newer piano that has not been tuned will require more frequent tunings for the first couple of yearsthan you would normally recommend. You possibly will not have string breakage or structure problems as you mayon an older instrument, but the tuning stability will take some time to establish.
An older piano presents a number of interesting problems. Let’s take a hypothetical situation and work it out.
A tuner just received a call from a potential customer and it goes something like this.
Customer: How much do you charge for a tun-ing?
Technician: Let me ask you a few questions andsee if I can answer that without in-specting your piano. What kind of pi-ano do you own?
Customer: An old one that has been in the fami-ly for years.
Technician: Is it an upright or a grand?Customer: What is the difference?Technician: Explains...Customer: I guess it is an upright

Technician: How long has it been since it has beentuned?
Customer: (long pause) It doesn’t seem to be toofar out but I guess it has been eight ornine years. (At this point, you shouldassume that it has been much longer).
Technician: Explain that it is possible the pianohas gone so far out of tune that it maytake more than one tuning to get it upto pitch. Outline charges.
Customer: They either say O.K. or that they willcall back. We will assume they sayO.K.
An appointment is set and upon arrival we find:
A piano that obviously has not seen a technician for many, many moons, if ever. We also find that every picture andornament imaginable is piled on top of the piano. She/He says, ‘‘I didn’t know you had to lift up the top???’’
Eventually, you get the lid up and the top panel off. You see strange things inside. Paper clips, hair pins, traces ofvarmint residue, some rust on the strings and tuning pins, some moth eaten hammers...
At this point it is hard not to deliver a lecture on the merits of regular service—DON’T! That is the quickest way Iknow of to lose a customer. They do not want to hear how delinquent they hav e been. They only want to know ifyou can fix it for nothing.
Now, it is recommended that you inform the customer of all the problems you see and explain that tuning the pianowill not necessarily take care of them. This is sometimes hard to do, because the average owner cannot understandthat tuning and repair/regulation are separate operations. However, do the best you can because if you tune the pianowithout any other work being done and they start playing it, the other problems will surely surface.
The customer says to ‘‘just tune it’’ and we will worry about the repair work later. This is fine if all the hammers hitthe strings, the tuning pins are tight enough and the strings are all there. Also, you will check the bridges to ensurethey are not cracked and will withstand a tuning.
We will now assume the piano CAN be tuned in spite of any other mechanical problems.
You must now (if you haven’t already) determine just how far down in pitch the piano is. Once you determine this,you will be able to tell the customer the procedure necessary and approximately the charge required. Explain that itis always possible that some strings may break and this would require an extra charge.
There are a number of ways to accurately determine the pitch of the piano and I will briefly describe them. After ex-perimentation, you will decide which method you prefer.
Electronic methodBy far, the easiest and fastest method to determine the frequency of the notes on the piano is by using an electronicdevice. I occasionally use the ‘‘Sight o tuner’’ which can be purchased directly from the inventor, or from at leastone supply house. Many other brands are available, so if you are interested in this method, you will have a decisionto make.
I must emphasize that you should not purchase an electronic tuner until you are capable of tuning a piano with just atuning fork, mutes and your ear.
A discussion on electronic tuning and why I sometimes rely on this method is provided to enrolled students on theaudio tapes.
Three reasons for learning the correct way of tuning:
1. What happens when your electronic device fails? Do you turn to the customer and say ‘‘I’m sorry, but mytuner is not working’’? You are supposed to be the tuner.
2. A tuning fork is provided with the basic tuning kit—The best electronic tuner costs at least $1000. The besttuning device available is your ear, which I believe was provided at no cost.
3. Complete satisfaction and confidence in your abilities. You are in charge—you can handle any situation with-out an electronic aid.
Aural methodIf you do not have access to an electronic tuning device, you will be able to determine the pitch of the piano by sim-ply using your ear and applying the expertise you learned earlier in this course.
Let’s assume that you have only a ‘‘C’’ tuning fork which sounds at 523.251 Hz. When you sound this fork andthen sound C-52 on the piano, you will obviously hear something other than a tuned unison. Remember to mute offthe outer strings of C-52.
Let’s further assume that when you sound the fork with the string that C-52 sounds ‘‘lower’’ than the fork, and youcan hear beats.
Recall from previous discussions you learned that there are 100 ‘‘cents’’ between each ½ step. This is true through-out the piano scale, but Hz and cents do not coincide in the same way.
For example, when you were practicing tuning unisons and then adjusting the left string to beat at 1,2,3,4, etc. Hz,each cycle per second equated to a specific number of cents.
If the center string of A-49 is set at 440 Hz and the left string is set at 438 Hz, you will hear two beats per second.This also is a distance of 7.88 cents. If you hear eight beats, the distance would be approximately 32 cents.
For those of you who would like a formula to figure out this relationship between Hz and cents here it is!
On a Texas Instrument (TI-55): 440/438 = log/2 log x 1200 = 7.887
For a more complete illustration, lets assume that you sound A-49 on the piano with an A-440 tuning fork and findthat the piano is beating 6 Hz flat.
1. enter 440 in the calculator and divide by 434
2. press the = sign
3. press the log button
4. divide this result by 2
5. press the log button (do not press = first)
6. multiply by 1200 and you should get 23.77 This tells you the piano is approximately 24 cents flat.
Believe me, you do not have to know the above procedure to determine the approximate pitch of the piano, but thereare some people who like to know exactly how these pitches are calculated. More power to them—I didn’t learn thisprocedure until I had been tuning over 10 years.
NOW, for the procedure I have always used.
Let’s say that you know the piano is pretty far flat, but the beats are so fast in the C-52 region that you cannot countthem.
Sound C#-53 and the C-52 fork together. If the C# is close to the pitch of the fork, the piano would have to be
Close ½ step or 100 cents flat. If the C# is lower than the fork, the piano would be over ½ step and if the C3 is high-er than the fork, the piano is less than ½ step flat.
The point is, you must determine approximately how far flat the piano is so the proper pitch raising procedure can be

applied.
If your tests show that the piano is very close to the standard pitch, you will merely set a temperament and tune it thenormal way. Howev er, if the piano is close to a quarter step flat, you must first bring it up to slightly over standardpitch and THEN set a temperament and tune.
¼ step (50 cents) flat
It has been my experience that a piano will fall about 25% of the distance it is raised in one tuning rather quickly.Since we are attempting to raise the pitch 50 cents, we will raise it over pitch approximately 12 cents (50/4).
To do this, mute off the two outer strings of C-52 and tune the center string to the fork so you hear NO beats. Nowpull out the right mute and raise the right string OVER the middle string until you hear 4 Hz. In this area of the pi-ano, 4 Hz = approximately 12 cents. Then tune the middle and left strings to the right one. You now hav e C-52tuned about 12 cents sharp.
If the piano is less than ¼ step flat, just decrease the distance you pull the string over pitch.
Now, mute the entire piano—set a temperament and quickly pull the strings close to pitch. At this point you are not‘‘fine tuning’’. You just want to stretch the strings, so don’t worry if your temperament or octaves are not perfect.
After you finish this very ‘‘rough’’ tuning, check C-52 against the fork and see how far down the piano has fallen.You may have to repeat this procedure more than once before the final tuning.
A word of caution: If there is rust on the strings, always turn the pin down first before raising it up to or over pitch.This will tend to break loose the rust bond and string breakage is less likely. If the strings are extremely rusty, youmay be better off telling the customer that the piano should be tuned at a lower pitch due to the high probability ofstring breakage.
over ¼ step flat
If the piano is between ¼ and ½ step flat, the above procedure will work on some pianos and not on others. Thecondition of the pin block, strings and so forth will determine this. An extra ‘‘rough’’ tuning may be necessary, butessentially you follow the same procedure.
If the piano is over ½ step flat, I recommend you give it a minimum of two rough tunings and return in a few daysfor one more rough tuning followed by the final ‘‘fine’’ tuning. The space of a few days is usually necessary to letthe piano ‘‘settle’’. When you return you will have a pretty good idea of how well the piano will hold its pitch.
Your first rough tuning on a piano that is ½ step flat can be easily accomplished by simply starting at the bottom ofthe piano on A-1 and tuning it to A#-2, then tune A#-2 to B-3, and so on all the way up to C-88. Just one string perunison first and then pull up the others. Your second rough tuning will include setting a temperament.
Pianos that are a full step or more flat will require the above procedure and a return visit one, three and six monthslater before you can be reasonably sure that the pitch is stabilized.
When a piano is over a full step down, care must be takes so the tension is applied evenly throughout the piano. Ifthe piano is old and in generally poor shape, it is a good idea to bring it up ¼ step or so at a time. It is rare that aplate will crack, but why take chances?
I know I hav e said this a few times before, but it is worth repeating—mute the entire piano and apply tension to onestring per unison throughout the scale. This method will stabilize the pitch in a shorter time and the possibility ofdamage to the instrument is much less.
Please understand that the above procedures are based on my experiences over the years. I have discussed this sub-ject with many technicians and found that many of them will pull up the pitch of a piano (regardless of how far downit is) and immediately set a temperament and fine tune it.
I hav e done this many times in the past, and am convinced that the procedures I outlined above work best for me.After you have tuned for a while, you will decide what works best for you.

Pitch loweringTo lower the pitch, simply reverse the procedure you use in raising the pitch. You will go below the standard pitchby 25% of the distance the piano is sharp. Depending on how far sharp the piano is, you will rough tune until it be-gins to hold and then fine tune.
It is rare that a piano will go as far over pitch as it will go under. Only in climates with consistently high humiditywould you find this situation. We are so used to tuning flat pianos that it feels awkward to tune one that is sharp.Once you get used to ‘‘setting the pin’’ in rev erse, you will have no problem.
In this chapter, you learned:
1. Precautions to take when raising the pitch of a piano
2. Why pianos go out of tune
3. Importance of humidity control
4. Brief explanation of electronic tuning (more on tapes)
5. How to determine the pitch of the piano your are going to tune eith just your ear and a tuning fork
6. ‘‘technical’’ info on how to find pitches without using the charts
7. Raising the pitch less than ¼ step
8. Raising the pitch more than ¼ step
9. Pitch lowering
6Replacing a string
Although this course ‘‘strictly tuning’’ does not offer instruction on piano repair per se, there is one procedure that isnecessary to include in any discussion on tuning. That is the replacement of a piano string.
No matter how careful you are, and no matter how new a piano may be, it is possible that a string will break during anormal tuning. It is more likely to happen on an older instrument, but just be aware that it can happen any time toanyone. You should know how to make a number of other minor on the spot repairs before you take on your firstcustomer, but for sure, a piano will not make a sound without a string.
Numerous other minor repairs are explained on the ‘‘business’’ disk which you will receive when you enroll as a stu-dent.
It is possible that in the beginning stage of your Piano Service Business, you may want to concentrate on tuning andfarm out repair work to other technicians in your area. This is not a bad idea for a number of reasons:
1. You will be able to begin advertising and tuning immediately upon completing this course. This means $ willbe coming in right away.
2. You will be making contacts with other people in this business and as a result will learn a great deal about theprospects in your area.
3. You will not be ‘‘pressured’’ into learning everything about piano servicing before you start tuning. You cantake your time with the repair phase take on more and more of this type of work as you are learning.
Of course, if you currently are making a living in some other pursuit, I would recommend learning all I haveto offer before you start. This way, when you open your business your can advertise ‘‘tuning/repair’’ ratherthan just restricting yourself to tuning alone.
It is beyond the scope of ‘‘strictly tuning’’ to go into a complete restringing project. We will concentrate ourefforts here on single string replacement.
First, just as in tuning, you need the necessary tools. When you look through supply house catalogs, you willsee there are a great many different shape tools to accomplish the same result. Most of these are excellent so Iwill not tell you exactly which one you need, just the type of tool necessary.
You Will Need:
A wire gaugeTuning hammer ( you should already have)Chain nose or long nose pliersWire cuttersStandard type pliersString lifterString spacerStringing hookWire sizes:12—22. Unless you do a great deal of stringing, ¼lb. of sizes 12-15 and 1 lb. of the larger sizes will do.

Bass Strings—see info later in this chapter
Tr eble string replacementLet’s assume you are tuning an upright piano and you are just getting into the upper treble—a string breaks!Do you break out into a sweat? No—you just calmly recall what I am now going to present.
Recall that in the treble, one length of wire actually makes up two strings of a unison.
Remove the action by removing the four (or sometimes three) action bracket bolt nuts, removing the woodenrods that are attached to the pedals (trapwork), and lifting the action up and out. Be careful not to damage anydampers on the action bracket bolts. Stand the action in a safe place by leaning it carefully against a solidwall or piece of furniture. Some actions will stand on the action brackets and some won’t. Be careful, or youwill wish you had already studied the repair section on the Business Disk.
See spinet action removal at end of chapter!
Now you have all the working room you need to replace the string. Follow the broken string to the two tuningpins attached to it. Loosen the pins slightly and pry the coil out of the eye with a screw driver, then lift thecoil out with your needle nose pliers. Find a clean part of the string and measure it with your wire gauge.Now, discard the old wire before you get cut. I speak from experience!
With a tape measure, determine the distance from the upper tuning pin to the hitch pin. Double it for the dis-tance of the return trip to the other tuning pin. Now, add 8 inches for the extra needed for the coils on the pin.Cut this amount of wire from the new coil of the same size as the old string.
Turn the tuning pins out three full turns with the tuning hammer to allow for the coil and put one end of thewire under the pressure bar and guide it through the eye of the right hand pin with the stringing hook. If youare working on a grand piano put the string on the left hand pin to keep the new coil out of the way of the sec-ond coil. Make sure the wire is all the way through the eye and flush with the other side. Then, while holdingthe wire firmly with the stringing hook, turn the tuning pin clockwise with the tuning hammer until you havetwo and a half turns of wire on the pin. Draw the wire down over the bridge and wrap it around the hitch pin.When you bend it around the hitch pin, pull it as tight as you can and put a good bend in it. Now, bring it upand above the next tuning pin.
You now hav e to cut off all of the excess wire except for the amount necessary to allow for the three coils onthe tuning pin. The easiest way to measure this is by using the width of your hand. Hold the wire above thepin between your thumb and fingers with your hand extended and cut the wire just above your hand so therewill be at least three inches of wire above the pin.
Guide the string under the pressure bar and through the eye of the tuning pin. Put two coils on the pin, but nomore. You now hav e to put the string around the pins on the bridge and you have to hav e enough slack in thestring to do this.
With the string lifter holding the wire steady, turn the pin about one half turn taking care to make the coils neatand the string not overlapping. Now, return to the other pin and finish putting the three neat coils on it withthe help of a screwdriver or the string lifter. Put the final half turn on the other pin and you should have astring that has three neat coils on each pin, is threaded around the correct bridge pins and is ready to be tuned.
If the coils are not neat enough, loosen the pin slightly and make adjustments. Use your long nose pliers topush the wire firmly into the eye of the pins. Ensure that the string is firmly against the plate just below thehitch pin. If not, use a screwdriver and a small hammer to tap it flush. Use regular pliers and squeeze the wirejust above the hitch pin to help with the stretching process.
Bring the new string up over pitch about four Hz. Since it will fall down quickly, a return trip will be neces-sary in a few days to bring it back up to pitch.
If a return trip is not possible from some reason, and the wire you replaced happens to be one that provides astring for two different pitches, here is what I sometimes do. Bring the new string up over the pitch about sixHz (on both notes) and then place a mute firmly between the two new strings. You will now hav e only two

strings of the left and right note sounding, but they will be in tune because the muted off strings will not beheard. When you return for your next regular appointment, you merely pull out the mute and tune the string inthe usual manner. It will have stretched out by then and you should have no problem with it going belowpitch.
If the wire is two strings of the same unison, you can still mute off the new wire, but be careful that the mutedoes not cut off the sound of the one remaining string. Explain to the customer that the sound will be a bit‘‘thin’’ until you return to remove the mute and tune the string. Also, be sure to explain the extra charge nec-essary for the return trip. If you are lucky, he/she may understand...
Single treble stringsOccasionally, you will find a treble string that is not wrapped around a hitch pin. It will have a loop on thebottom and will be placed on the hitch pin in the same manner as the bass strings. If this is the case, you willhave to wind a loop on the bottom of the string either by hand or with a looping machine available from thesupply house of your choice.
If you have a looping machine, the directions that come with it are sufficient. If you have to do it by hand, itgets a little more complicated.
Put a medium size nail in a vice with the head up better than ¼". Wrap about two inches (if the wire size is12-15 or three inches if the wire is thicker) around the nail. Then starting about 3/8" from the nail, wrap thewire around itself with pliers. Make the wrapping as close and as tight as possible. Cut off any wire you areunable to wrap and leave only a ¼" stub.
If this sounds confusing, just look at one of the bass strings on the piano and this procedure should becomeclear. After doing this by hand two times, I purchased a looping machine. I’m not saying it is impossible todo by hand, but since you will only have to do this occasionally, you will have to practice the procedure inyour shop every so often or it will be awkward to do in the customers home. The looping machine works per-fectly every time with very little practice. The choice is yours.
Bass string replacementIf a bass string breaks, you have two choices. 1) You can send the broken string to the supply house for an ex-act duplicate, or 2) You can match the string as closely as possible from a supply of ‘‘universal bass strings’’you can obtain from a supply house.
Sending broken bass strings back for duplicates is the choice if there is no time constraint and the customeragrees. However, usually it is preferable to use one of the universal strings. You just purchase a packet ofthese strings and carry them to all tunings. The instructions included are easy to follow and if you learned theprocedure for putting on a treble string, you will have no trouble in putting on a bass string.
Loose tuning pinsIt is possible that due to the age of the piano, the tuning pin, after being turned out three turns and then backin, will be too loose to hold the tension of the new string. If the pin is on the verge of being too loose beforeyou begin to replace the broken string, you have two choices.
The recommended procedure is to replace the pin with an oversized one. You would need a tuning pin gaugeto determine the correct size of the old pin. Usually new pianos are pinned with size 2/0. You can purchasepins up to 7/0 by the dozen from any supply house. It is a good idea to carry pin sizes 3/0, 4/0 and 5/0 withyou at all times.
The other choice is to take out the old tuning pin and insert a metal tuning pin bushing in the hole. Replacethe old pin and you effectively have increased the old tuning pin by two sizes. These bushings are very inex-
pensive and are an acceptable repair. If you have to go up more than two sizes, you of course would have touse a larger tuning pin.
The procedure is to turn out the old pins, determine the size and select new pins at least two sizes larger.Then, using a tuning pin punch (available from the supply house) and a hammer, pound in the new pins untilthey are level with the other old pins. Now, turn out the new pins three full turns and proceed with the string-ing process.
Caution: If you are working on a grand piano, never pound in the tuning pins without using a jack under thepin block. The jack to use is available from any supply house and an explanation on its use is included. In anupright piano, the pin block is part of the structure of the piano but in the grand, it is an entity all its own andwill crack under hard pounding. If you are only replacing a few pins, it is permissible to turn in the pins withthe tuning hammer on a grand. However, when completely restringing the grand piano it is better to poundthem in.
Removing the spinet actionIn the 1930’s a new type of piano action was introduced called the ‘‘Drop Action’’. It is identical to the othertypical upright actions except for:
The drop action or indirect blow action is mostly placed below the key height. A lifter of some sort (usually awire) is attached to the back of the key and extends down toward to the bottom of the whippen. When the keyis struck, the lifter wire lifts the whippen and from then on, everything works just as in the ‘‘direct blow’’ ac-tion.
When removing this type action you must first disengage the lifter wires from the back of the key—attachthem to the action rail (with string or tape)—remove the action bolts or screws—remove the screws that holdthe bottom of the action to the piano—detach the pedal rods from the action and lift it straight up and out.
That is an over simplification of the removal of the spinet action, but it is essentially correct.
The important thing to remember is that you must get the lifter wires out of the way before removal of the ac-tion or you will surely break them when lifting it out.
It is possible that there will not be enough room to safely lift out the action without removing the keys fromthe key bed. If you need to remove the keys, be sure to number them from 1 -88 with a pencil before removal.Most manufacturers number the keys on the top, but the numbers may be hard to read.
Also, be very careful when lifting out the action so you do not damage the dampers on the tuning pins or rodsthat the action brackets are attached to.
Removing the Spinet Action is more or less a common sense procedure, but since there are so many differenttypes of drop actions out there, I have included a more complete discussion of this procedure in the Repairsection on the Business disk.
You can also request service manuals directly from the manufacturer when in doubt.
The information presented in this chapter should be sufficient for the occasional single string replacement.
SummaryIn this chapter, you learned:
• Tools necessary to replace piano strings
• Treble string replacement
• ‘‘Single’’ treble string replacement (how to make a loop in the string)

• Bass string replacement
• What to do in case of loose tuning pins
• Cautions on pounding in grand tuning pins

ATable of equivalent beat rates
This table uses capital letters for key names. b means flat; # means sharp. Numbers are key numbers. Thefirst named is the lower note of the interval.
Reading from left to right, all intervals on a line will beat at approximately the same rate.
Major thirds Major sixths Minor thirds Minor sixths
C-28/E-32 Bb-26/G-35 G-23/Bb26 E-20/C-28Db-29/F-33 B-27/G#-36 G#-24/B-27 F-21/Db-29D-30/F#-34 C-28/A-37 A-25/C-28 F#-22/D-30Eb-31/G-35 Db-29/Bb-38 Bb-26/Db-29 G-23/Eb-31E-32/G#-36 D-30/B-39 B-27/D-30 G#-24/E-32F-33/A-37 Eb-31/C-40 C-28/Eb-31 A-25/F-33F#-34/A#-38 E-32/C#-41 C#-29/E-32 Bb-26/F#-34G-35/B-39 F-33/D-42 D-30/F-33 B-27/G-35Ab-36/C-40 F#-34/D#-43 Eb-31/Gb-34 C-28/Ab-36A-37/C#-41 G-35/E-44 E-32/G-35 C#-29/A-37Bb-38/D-42 Ab-36/F-45 F-33/Ab-36 D-30/Bb-38B-39/D#-43 A-37/F#-46 F#-34/A-37 D#-31/B-39C-40/E-44 Bb-38/G-47 G-35/Bb-38 E-32/C-40

BCharts
Theoretical fundamental pitches of all 88 notes
Octave 1 2 3 4 5PitchA 27.50 55.00 110.00 220.00 440.00A# 29.14 58.27 116.54 233.08 466.16B 30.87 61.74 123.47 246.94 493.88C 32.70 65.41 130.81 261.63 523.25C# 34.65 69.30 138.59 277.18 554.37D 36.71 73.42 146.83 293.66 587.33D# 38.89 77.78 155.56 311.13 622.25E 41.20 82.41 164.81 329.63 659.26F 43.65 87.31 174.61 349.23 698.46F# 46.25 92.50 185.00 369.99 739.99G 49.00 98.00 196.00 392.00 783.99G# 51.91 103.83 207.65 415.30 830.61
Octave 6 7 8PitchA 880.00 1760.00 3520.00A# 932.33 1864.66 3729.31B 987.77 1975.53 3951.07C 1046.50 2093.00 4186.01C# 1108.73 2217.46D 1174.66 2349.32D# 1244.51 2489.02E 1318.51 2637.02F 1396.91 2793.83F# 1479.98 2959.96G 1567.98 3135.96G# 1661.22 3322.44
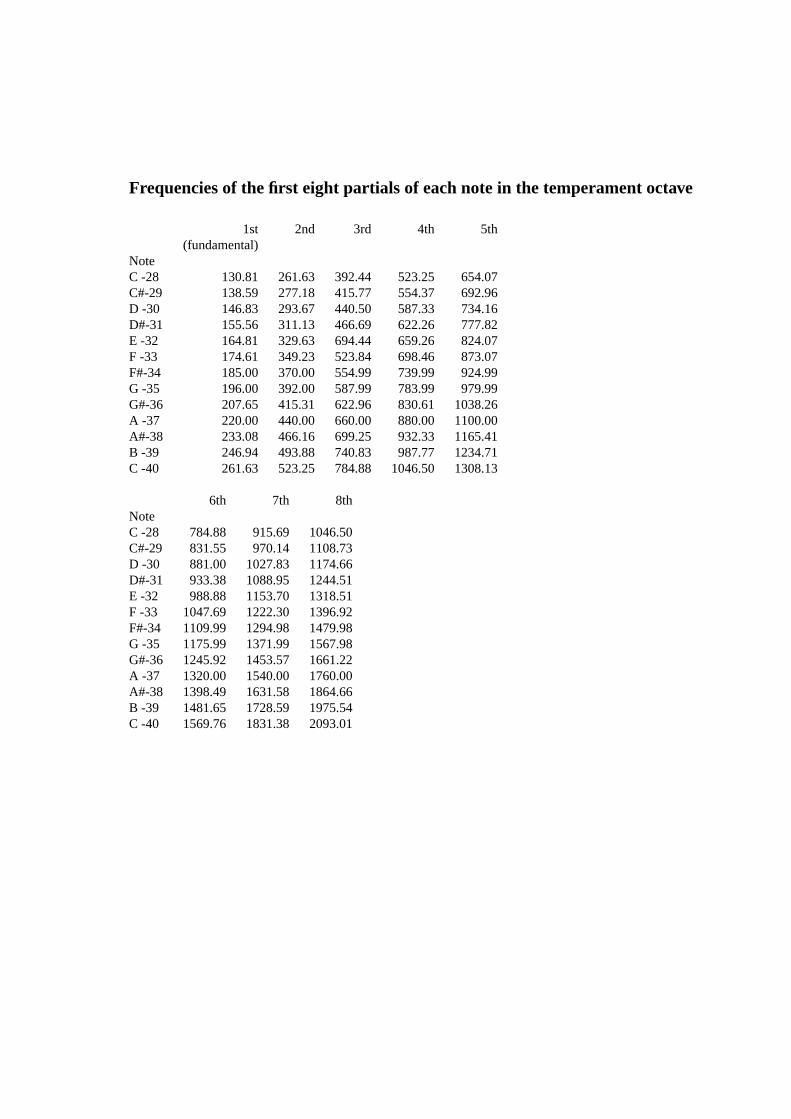
Frequencies of the first eight partials of each note in the temperament octave
1st 2nd 3rd 4th 5th(fundamental)
NoteC -28 130.81 261.63 392.44 523.25 654.07C#-29 138.59 277.18 415.77 554.37 692.96D -30 146.83 293.67 440.50 587.33 734.16D#-31 155.56 311.13 466.69 622.26 777.82E -32 164.81 329.63 694.44 659.26 824.07F -33 174.61 349.23 523.84 698.46 873.07F#-34 185.00 370.00 554.99 739.99 924.99G -35 196.00 392.00 587.99 783.99 979.99G#-36 207.65 415.31 622.96 830.61 1038.26A -37 220.00 440.00 660.00 880.00 1100.00A#-38 233.08 466.16 699.25 932.33 1165.41B -39 246.94 493.88 740.83 987.77 1234.71C -40 261.63 523.25 784.88 1046.50 1308.13
6th 7th 8thNoteC -28 784.88 915.69 1046.50C#-29 831.55 970.14 1108.73D -30 881.00 1027.83 1174.66D#-31 933.38 1088.95 1244.51E -32 988.88 1153.70 1318.51F -33 1047.69 1222.30 1396.92F#-34 1109.99 1294.98 1479.98G -35 1175.99 1371.99 1567.98G#-36 1245.92 1453.57 1661.22A -37 1320.00 1540.00 1760.00A#-38 1398.49 1631.58 1864.66B -39 1481.65 1728.59 1975.54C -40 1569.76 1831.38 2093.01