Embed Size (px)
Citation preview
7/30/2019 Frigidaire Refrigerator Manual
http://slidepdf.com/reader/full/frigidaire-refrigerator-manual 1/9
COMMERCIAL FREEZER/REFRIGERATOR GLASS DOOR REFRIGERATOR
TABLE OF CONTENTS
Product Registration………………………............………….…..... 2Important Safety Instructions…………..........…………….…..... 2Electrical Information…………………………........………........ 2-3Caster Installation and Setup ............................................ 3-4
Appliance Start-up…………………………………..........................4Features……………………………………………….............……..... 5Routine Maintenance……………………………............………..… 6Energy Conservation Measures……………………….................. 6Troubleshooting Guide…………………………….........……...... 7-8Wiring Diagram……………………………………..............………....9
READ AND SAVE THESE INSTRUCTIONS Electrolux Major Appliances297429400 (June 2012)
7/30/2019 Frigidaire Refrigerator Manual
http://slidepdf.com/reader/full/frigidaire-refrigerator-manual 2/9
2
Product Registration
Read and Save These InstructionsThis Use & Care Guide provides specic operating instructionsfor your model. Use your freezer only as instructed in thisguide. These instructions are not meant to cover every possiblecondition and situation that may occur. Common sense andcaution must be practiced when installing, operating, andmaintaining any appliance.
Record Your Model and Serial NumbersRecord the model and serial numbers in the space providedbelow. The serial plates are located on the left exterior wall(chest models).
Model No.
Serial No.
Register Your ProductThe self-addressed PRODUCT REGISTRATION CARD (shownabove) should be lled in completely, signed and returned tothe address provided.
Important Safety InstructionsRead all instructions before using this appliance
For Your SafetyDo not store or use gasoline or other ammable vapors andliquids in the vicinity of this unit or any other appliance.Read product labels for ammability and other warnings.
Child Safety• Destroy carton, plastic bags, and any exterior
wrapping material immediately after theappliance is unpacked. Children should never usethese items for play. Cartons covered with rugs,bedspreads, plastic sheets or stretch wrap maybecome airtight chambers and can quickly causesuffocation.
• Remove all staples from the carton. Staples
can cause severe cuts, and destroy nishes if they come in contact with other appliances orfurniture.
• An empty, discarded ice box, refrigerator, orfreezer is a very dangerous attraction to children.
• Remove and discard any spacers used to securethe shelves during shipping. Small objects are achoke hazard to children.
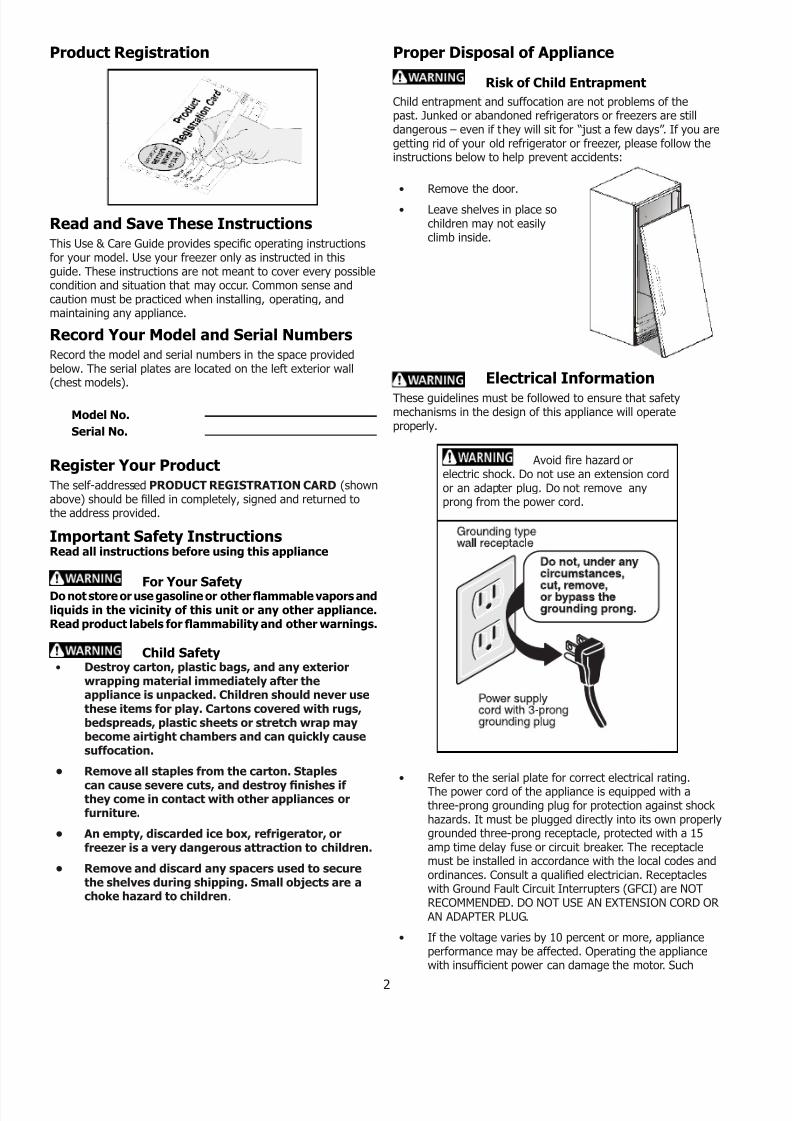
Electrical InformationThese guidelines must be followed to ensure that safetymechanisms in the design of this appliance will operateproperly.
• Refer to the serial plate for correct electrical rating.The power cord of the appliance is equipped with athree-prong grounding plug for protection against shock hazards. It must be plugged directly into its own properlygrounded three-prong receptacle, protected with a 15amp time delay fuse or circuit breaker. The receptaclemust be installed in accordance with the local codes andordinances. Consult a qualied electrician. Receptacleswith Ground Fault Circuit Interrupters (GFCI) are NOTRECOMMENDED. DO NOT USE AN EXTENSION CORD OR
AN ADAPTER PLUG.
• If the voltage varies by 10 percent or more, applianceperformance may be affected. Operating the appliancewith insufcient power can damage the motor. Such
Avoid re hazard orelectric shock. Do not use an extension cordor an adapter plug. Do not remove anyprong from the power cord.
Proper Disposal of Appliance
Risk of Child Entrapment
Child entrapment and suffocation are not problems of thepast. Junked or abandoned refrigerators or freezers are stilldangerous – even if they will sit for “just a few days”. If you aregetting rid of your old refrigerator or freezer, please follow theinstructions below to help prevent accidents:
• Remove the door.
• Leave shelves in place sochildren may not easilyclimb inside.
7/30/2019 Frigidaire Refrigerator Manual
http://slidepdf.com/reader/full/frigidaire-refrigerator-manual 3/9
3
Caster Installation and Set-up
damage is not covered under the warranty. If yoususpect your voltage is high or low, consult your powercompany for testing.
• To prevent the appliance from being turned off accidentally, do not plug the unit into an outlet controlledby a wall switch or pull cord.
• DO NOT pinch, knot, or bend the power cord in anymanner.
Other Precautions• NEVER unplug the appliance by pulling on the power
cord. Always grip the plug rmly and pull straight outfrom the receptacle.
• To avoid electrical shock, unplug the appliance beforecleaning.
NOTE: Turning the control to “OFF” turns off the compressorbut does not disconnect power to other electrical components.
Inspection for DamageInspect the underside of the cabinet and packaging for
damage, similar to what can be caused with a forklift. If hiddendamage is found after uncrating, immediately call the deliverycarrier and request an inspection. Retain all packaging andcrating materials until the inspection is complete.
Parts and Accessories
Check to make sure that you have received the box containingall of the components listed below.
Tools Needed
The following tools are required to assemble and install the
casters to the unit:
A Carriage Bolt (4) D Fixed Caster (2)
B Lock Nut (4) E Hex Screw (10)
C Swivel Caster (2)
5/16”, 3/8” and 9/16” Socket or Open EndWrench
Adjustable Wrenchor Pliers
A B C D E
Phillips®
Screwdriver
Uncrating and Set-up1. Remove carton and all loose parts from inside the unit.
2. Remove the rear access guard and place it and thescrews in a safe place for reassembly later.
3. Using an assistant, carefully tip the unit onto its back andrest on blocks to avoid damaging the condensate drainhose and the plastic raceway that covers the evaporator
tubing on the back of the cabinet.
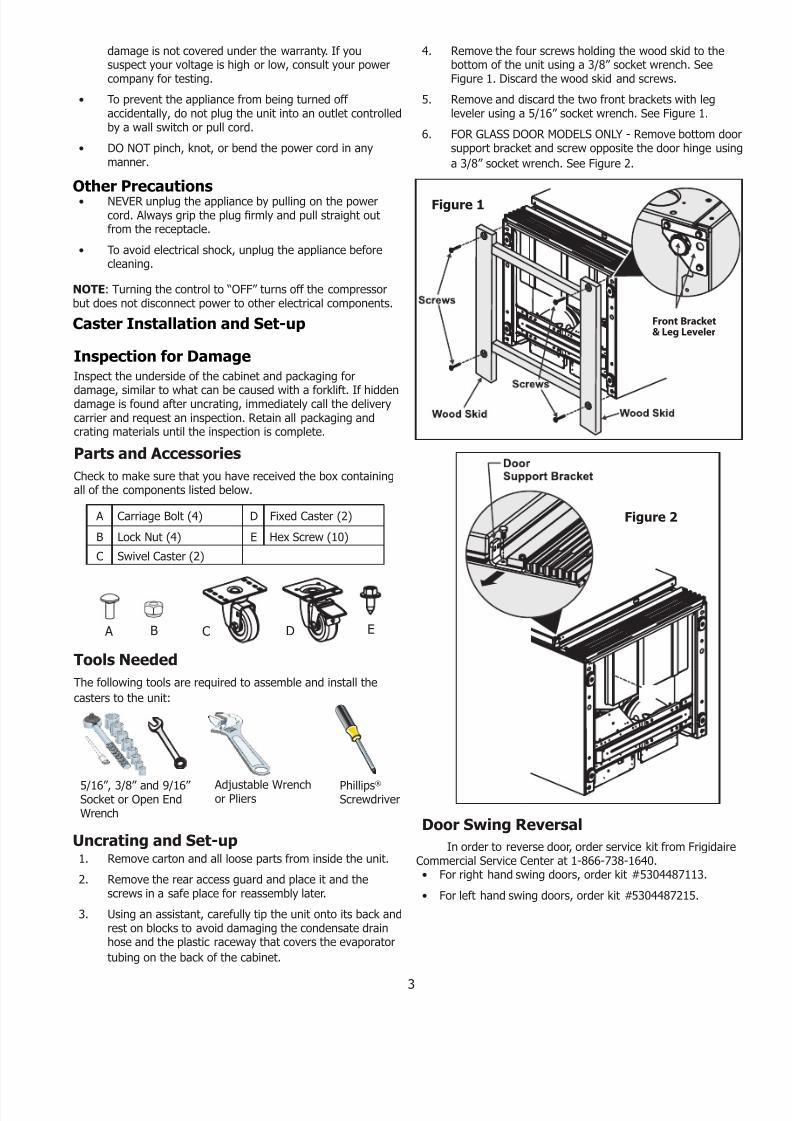
Front Bracket& Leg Leveler
Figure 1
Figure 2
4. Remove the four screws holding the wood skid to thebottom of the unit using a 3/8” socket wrench. SeeFigure 1. Discard the wood skid and screws.
5. Remove and discard the two front brackets with legleveler using a 5/16” socket wrench. See Figure 1.
6. FOR GLASS DOOR MODELS ONLY - Remove bottom doorsupport bracket and screw opposite the door hinge using
a 3/8” socket wrench. See Figure 2.
Door Swing Reversal
In order to reverse door, order service kit from FrigidaireCommercial Service Center at 1-866-738-1640.• For right hand swing doors, order kit #5304487113.
• For left hand swing doors, order kit #5304487215.
7/30/2019 Frigidaire Refrigerator Manual
http://slidepdf.com/reader/full/frigidaire-refrigerator-manual 4/9
4
Appliance PlacementLeave a one (1) inch space on all sides and the back of thecabinet for ease of installation, proper air circulation andelectrical connections. DO NOT block the front grill on the lowerfront of your appliance. Sufcient air circulation is essentialfor the proper operation of your appliance. Choose a placethat is near a grounded electrical outlet. For the most efcientoperation, the appliance should be located where surroundingtemperatures will not drop below 40ºF (5ºC) or exceed 110ºF(43ºC). Additional compressor heaters are not recommended.
InsulationThe insulated space of this cabinet is sealed to maintain peak efciency. Holes drilled in the cabinet may destroy that seal anddamage electrical wiring located in the insulated space.
DAMAGED ELECTRICAL WIRING OR WET INSULATIONCAUSED BY DRILLING WILL VOID THE WARRANTY.
Appliance Start-up
Once the appliance has been located in its permanent locationand the proper power and grounding has been provided, thefollowing items must be checked or completed:
Cool Down Period
For safe food storage, allow 24 hours for the appliance to cooldown completely before loading with food. The appliance willrun continuously for the rst several hours. Do not place anyfood in the appliance until after the rst 24 hours of operation.
Thermostat Setting
The appliance is shipped from the factory with the thermostatset at about the mid-point of the operating range. Adjustments
colder or warmer can be made after the appliance hasbeen running for at least 8 hours. Allow at least 8 hours fortemperature stabilization before re-adjusting the thermostat.
Defrost Setting
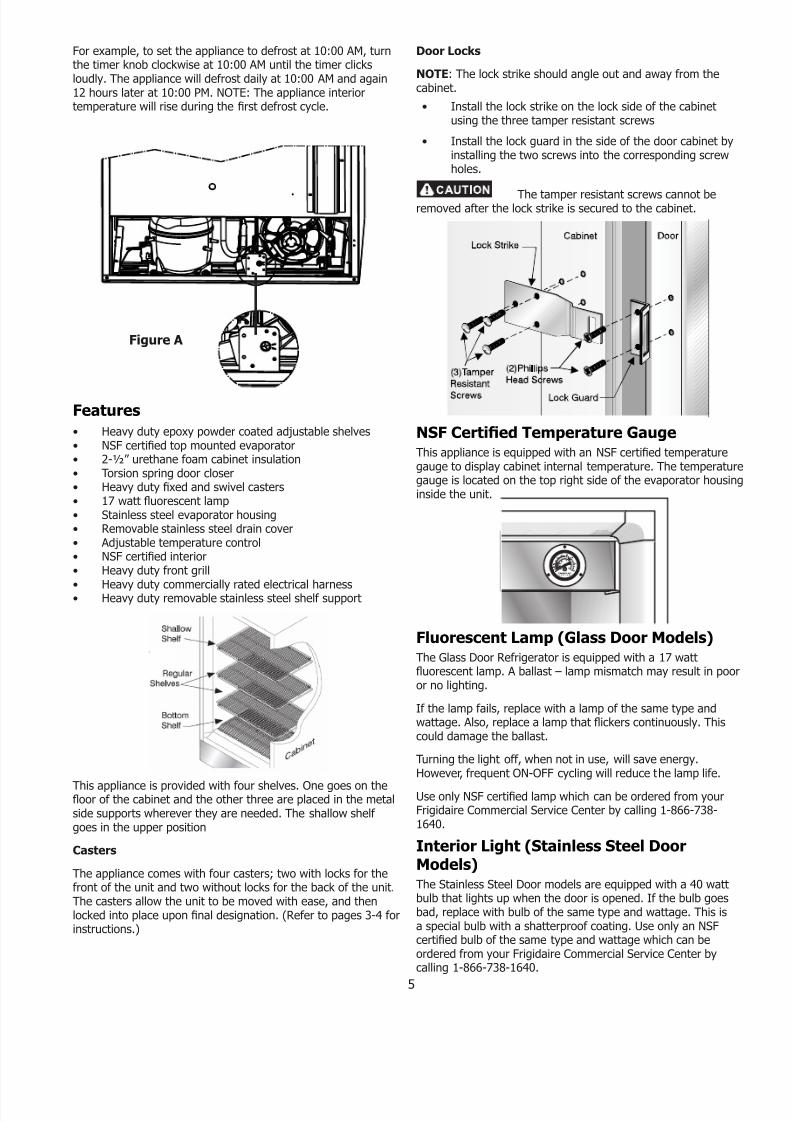
The appliance is designed to defrost automatically every 12hours. To set the time of defrost, wait until the desired time todefrost. With the notch on the timer knob aligned with the lineon the bracket (Fig. A), turn the defrost timer knob clockwiseslowly. The timer will click several times, then once loudly,at which point the defrost cycle begins. The timer knob willadvance through the defrost cycle, then click loudly at the endof the cycle. The appliance will defrost automatically every 12hours after the rst defrost cycle.
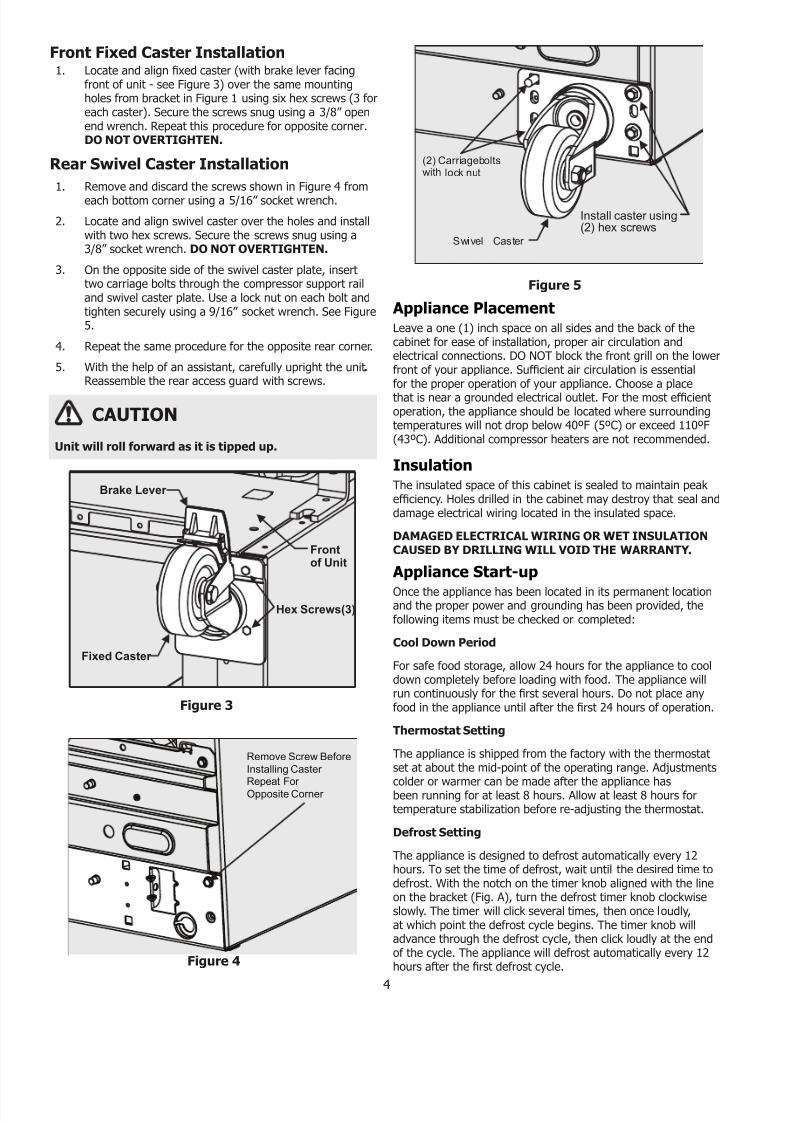
Front Fixed Caster Installation1. Locate and align xed caster (with brake lever facing
front of unit - see Figure 3) over the same mountingholes from bracket in Figure 1 using six hex screws (3 foreach caster). Secure the screws snug using a 3/8” openend wrench. Repeat this procedure for opposite corner.DO NOT OVERTIGHTEN.
Rear Swivel Caster Installation
1. Remove and discard the screws shown in Figure 4 from
each bottom corner using a 5/16” socket wrench.
2. Locate and align swivel caster over the holes and installwith two hex screws. Secure the screws snug using a3/8” socket wrench. DO NOT OVERTIGHTEN.
3. On the opposite side of the swivel caster plate, inserttwo carriage bolts through the compressor support railand swivel caster plate. Use a lock nut on each bolt andtighten securely using a 9/16” socket wrench. See Figure5.
4. Repeat the same procedure for the opposite rear corner.
5. With the help of an assistant, carefully upright the unit.Reassemble the rear access guard with screws.
CAUTION
Unit will roll forward as it is tipped up.
Brake Lever
Fixed Caster
Hex Screws(3)
Frontof Unit
Figure 3
(2) Carriageboltswith lock nut
Swivel Caster
Install caster using(2) hex screws
Figure 5
Figure 4
Remove Screw Before
Installing Caster
Repeat For Opposite Corner
7/30/2019 Frigidaire Refrigerator Manual
http://slidepdf.com/reader/full/frigidaire-refrigerator-manual 5/9
5
Figure A
For example, to set the appliance to defrost at 10:00 AM, turnthe timer knob clockwise at 10:00 AM until the timer clicksloudly. The appliance will defrost daily at 10:00 AM and again12 hours later at 10:00 PM. NOTE: The appliance interiortemperature will rise during the rst defrost cycle.
Features
• Heavy duty epoxy powder coated adjustable shelves• NSF certied top mounted evaporator• 2-½” urethane foam cabinet insulation• Torsion spring door closer• Heavy duty xed and swivel casters• 17 watt uorescent lamp• Stainless steel evaporator housing• Removable stainless steel drain cover• Adjustable temperature control• NSF certied interior• Heavy duty front grill
• Heavy duty commercially rated electrical harness• Heavy duty removable stainless steel shelf support
This appliance is provided with four shelves. One goes on theoor of the cabinet and the other three are placed in the metalside supports wherever they are needed. The shallow shelf goes in the upper position
Casters
The appliance comes with four casters; two with locks for thefront of the unit and two without locks for the back of the unit.The casters allow the unit to be moved with ease, and thenlocked into place upon nal designation. (Refer to pages 3-4 forinstructions.)
Door Locks
NOTE: The lock strike should angle out and away from thecabinet.
• Install the lock strike on the lock side of the cabinetusing the three tamper resistant screws
• Install the lock guard in the side of the door cabinet byinstalling the two screws into the corresponding screwholes.
The tamper resistant screws cannot beremoved after the lock strike is secured to the cabinet.
NSF Certied Temperature GaugeThis appliance is equipped with an NSF certied temperaturegauge to display cabinet internal temperature. The temperaturegauge is located on the top right side of the evaporator housinginside the unit.
Fluorescent Lamp (Glass Door Models)The Glass Door Refrigerator is equipped with a 17 wattuorescent lamp. A ballast – lamp mismatch may result in pooror no lighting.
If the lamp fails, replace with a lamp of the same type andwattage. Also, replace a lamp that ickers continuously. Thiscould damage the ballast.
Turning the light off, when not in use, will save energy.However, frequent ON-OFF cycling will reduce the lamp life.
Use only NSF certied lamp which can be ordered from yourFrigidaire Commercial Service Center by calling 1-866-738-1640.
Interior Light (Stainless Steel DoorModels)The Stainless Steel Door models are equipped with a 40 wattbulb that lights up when the door is opened. If the bulb goesbad, replace with bulb of the same type and wattage. This isa special bulb with a shatterproof coating. Use only an NSFcertied bulb of the same type and wattage which can beordered from your Frigidaire Commercial Service Center bycalling 1-866-738-1640.
7/30/2019 Frigidaire Refrigerator Manual
http://slidepdf.com/reader/full/frigidaire-refrigerator-manual 6/9
6
Routine Maintenance
Cleaning the Interior
Be sure to turn the temperature control to “OFF” and unplugthe electrical cord. Wash the inside surface of the storagearea with warm water and baking soda solution (about onetablespoon of baking soda per quart of warm water). Rinsethoroughly with clean, warm water and wipe dry.
Cleaning the Exterior
Wipe the cabinet exterior occasionally with a cloth dampened inmild detergent and water. Rinse and wipe dry with a soft cloth.Do not use razor blades or other sharp instruments that canscratch the appliance surface when removing adhesive labels.
Any glue left from the tape can be removed with a mixture of warm water and mild detergent or touch the residue with thesticky side of tape already removed. DO NOT REMOVE THESERIAL PLATE.
Condensate Pan
Some models have a condensate pan in a xed position locatedbehind the toe grill. This must not be removed from under thecabinet. If the pan is removed, condensate will drop onto theoor.
Power FailureDO NOT open the appliance lid unnecessarily if the appliance isoff for several hours.
If a power failure occurs, pack seven or eight pounds of dryice into the appliance every 24 hours. Look in the Yellow Pagesunder “Dry Ice”, “Dairies”, or “Ice Cream Manufacturers” forlocal dry ice suppliers. Always wear gloves and use cautionwhen handling dry ice.
Energy Conservation MeasuresThis appliance is designed for efciency with heavy foaminsulation. However, there are things that the user can do to
maintain the appliance in operating condition.
• Do not operate the appliance any colder than necessaryto maintain safe, product storage temperatures.
• Make sure the appliance is located to prevent directexposure to sunlight, air ducts, etc.
• Keep the door closed except for normal use. Inspect thedoor often to see that it self-closes and the gaskets arein good condition.
• Do not overstock the product in the cabinet because itwill block the normal air ow.
• Have at least annual inspections by a qualied servicecompany to see that the refrigerant charge is correct.
• This appliance operates more efciently in a coolerambient than in a hot ambient. Try to maintain anambient below 80ºF (27ºC) and 65% RH (RelativeHumidity) for maximum efciency.
Periods of Non-use and Moving Tips
Leave the appliance operating during periods of non-use of lessthan three (3) weeks.
Long Periods of Non-use
If the appliance will not be used for several months:
• Remove all food and unplug the power cord.
• Clean and dry the interior thoroughly.
• Leave the appliance door open slightly, blocking it open if necessary, to prevent odor and mold growth.
Moving
When moving the appliance , follow these guidelines to preventdamage:
• Disconnect the power cord plug from the wall outlet.
• Remove foods, then defrost, and clean the appliance .
• Secure all loose items such as base panel, baskets, andshelves by taping them securely in place to preventdamage.
• In the moving vehicle, secure appliance in an upright
position to prevent movement. Also, protect outside of appliance with a blanket or similar item.
7/30/2019 Frigidaire Refrigerator Manual
http://slidepdf.com/reader/full/frigidaire-refrigerator-manual 7/9
7
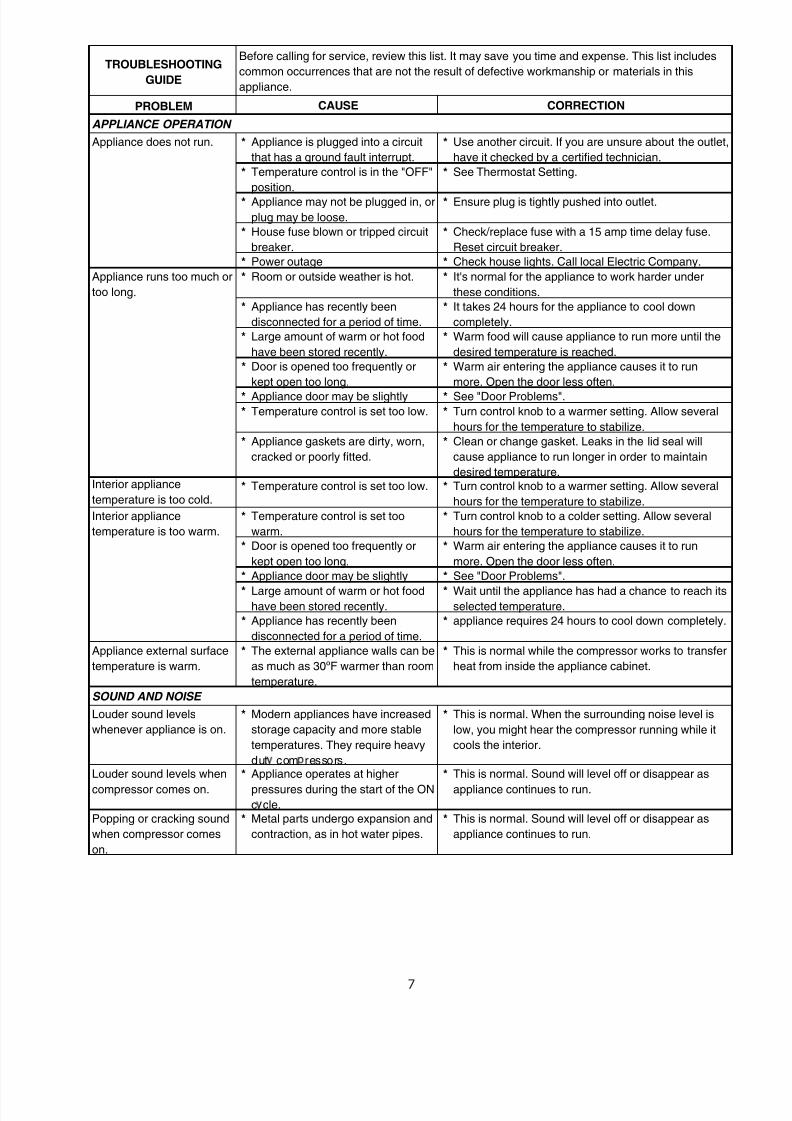
TROUBLESHOOTING
GUIDE
Before calling for service, review this list. It may save you time and expense. This list includes
common occurrences that are not the result of defective workmanship or materials in this
appliance.
PROBLEM CAUSE CORRECTION
APPLIANCE OPERATION
Appliance does not run. * Appliance is plugged into a circuit
that has a ground fault interrupt.
* Use another circuit. If you are unsure about the outlet,
have it checked by a certified technician.
* Temperature control is in the "OFF"
position.
* See Thermostat Setting.
* Appliance may not be plugged in, or
plug may be loose.
* Ensure plug is tightly pushed into outlet.
* House fuse blown or tripped circuit
breaker.
* Check/replace fuse with a 15 amp time delay fuse.
Reset circuit breaker.
* Power outage * Check house lights. Call local Electric Company.
Appliance runs too much or
too long.
* Room or outside weather is hot. * It's normal for the appliance to work harder under
these conditions.
* Appliance has recently been
disconnected for a period of time.
* It takes 24 hours for the appliance to cool down
completely.
* Large amount of warm or hot food
have been stored recently.
* Warm food will cause appliance to run more until the
desired temperature is reached.
* Door is opened too frequently or
kept open too long.
* Warm air entering the appliance causes it to run
more. Open the door less often.
* Appliance door may be slightly * See "Door Problems".
* Temperature control is set too low. * Turn control knob to a warmer setting. Allow several
hours for the temperature to stabilize.
* Appliance gaskets are dirty, worn,
cracked or poorly fitted.
* Clean or change gasket. Leaks in the lid seal will
cause appliance to run longer in order to maintain
desired temperature.Interior appliance
temperature is too cold.* Temperature control is set too low. * Turn control knob to a warmer setting. Allow several
hours for the temperature to stabilize.
Interior appliance
temperature is too warm.
* Temperature control is set too
warm.
* Turn control knob to a colder setting. Allow several
hours for the temperature to stabilize.
* Door is opened too frequently or
kept open too long.
* Warm air entering the appliance causes it to run
more. Open the door less often.
* Appliance door may be slightly * See "Door Problems".
* Large amount of warm or hot foodhave been stored recently.
* Wait until the appliance has had a chance to reach itsselected temperature.
* Appliance has recently been
disconnected for a period of time.
* appliance requires 24 hours to cool down completely.
Appliance external surface
temperature is warm.
* The external appliance walls can be
as much as 30ºF warmer than room
temperature.
* This is normal while the compressor works to transfer
heat from inside the appliance cabinet.
SOUND AND NOISE
Louder sound levels
whenever appliance is on.
* Modern appliances have increased
storage capacity and more stable
temperatures. They require heavy
dut com ressors.
* This is normal. When the surrounding noise level is
low, you might hear the compressor running while it
cools the interior.
Louder sound levels when
compressor comes on.
* Appliance operates at higher
pressures during the start of the ON
c cle.
* This is normal. Sound will level off or disappear as
appliance continues to run.
Popping or cracking sound
when compressor comes
on.
* Metal parts undergo expansion and
contraction, as in hot water pipes.
* This is normal. Sound will level off or disappear as
appliance continues to run.
7/30/2019 Frigidaire Refrigerator Manual
http://slidepdf.com/reader/full/frigidaire-refrigerator-manual 8/9
8
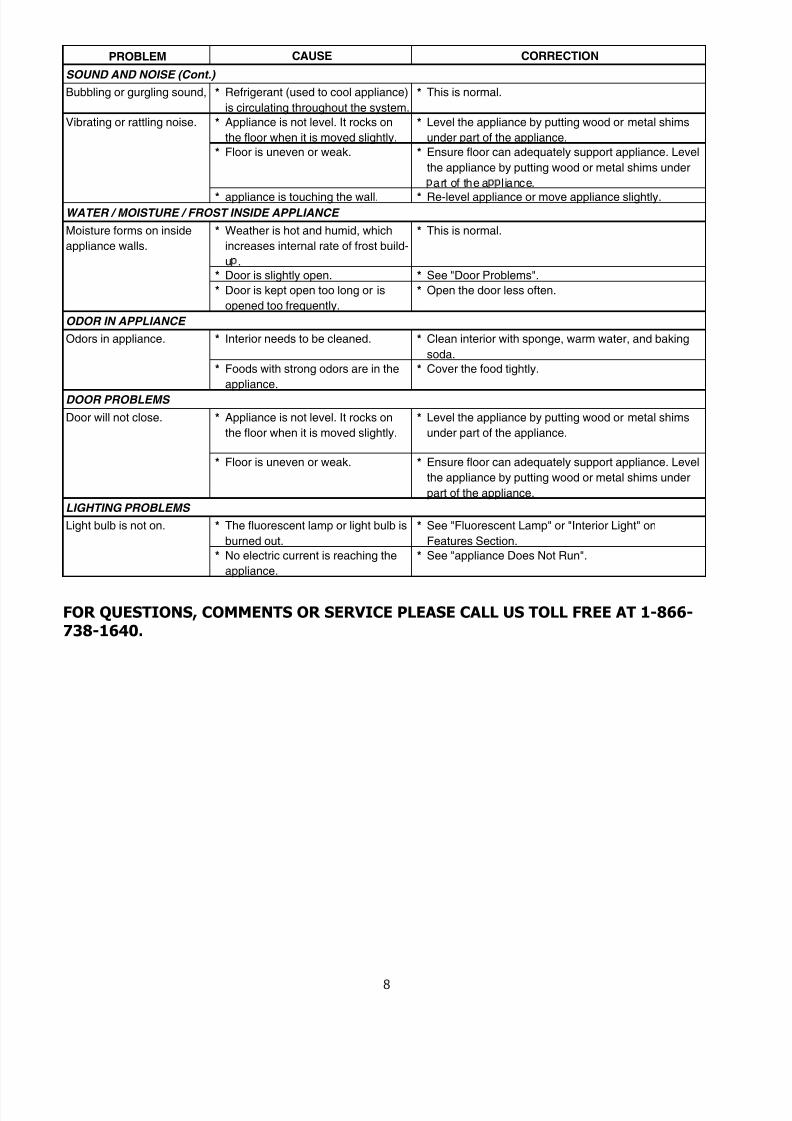
FOR QUESTIONS, COMMENTS OR SERVICE PLEASE CALL US TOLL FREE AT 1-866-738-1640.
PROBLEM CAUSE CORRECTION
SOUND AND NOISE (Cont.)
Bubbling or gurgling sound, * Refrigerant (used to cool appliance)
is circulating throughout the system.
* This is normal.
Vibrating or rattling noise. * Appliance is not level. It rocks on
the floor when it is moved slightly.
* Level the appliance by putting wood or metal shims
under part of the appliance.
* Floor is uneven or weak. * Ensure floor can adequately support appliance. Level
the appliance by putting wood or metal shims under
art of the a liance.
* appliance is touching the wall. * Re-level appliance or move appliance slightly.WATER / MOISTURE / FROST INSIDE APPLIANCE
Moisture forms on inside
appliance walls.
* Weather is hot and humid, which
increases internal rate of frost build-
u .
* This is normal.
* Door is slightly open. * See "Door Problems".
* Door is kept open too long or is
opened too frequently.
* Open the door less often.
ODOR IN APPLIANCE
Odors in appliance. * Interior needs to be cleaned. * Clean interior with sponge, warm water, and baking
soda.
* Foods with strong odors are in the
appliance.
* Cover the food tightly.
DOOR PROBLEMS
Door will not close. * Appliance is not level. It rocks on
the floor when it is moved slightly.
* Level the appliance by putting wood or metal shims
under part of the appliance.
* Floor is uneven or weak. * Ensure floor can adequately support appliance. Level
the appliance by putting wood or metal shims under
part of the appliance.
LIGHTING PROBLEMS
Light bulb is not on. * The fluorescent lamp or light bulb is
burned out.
* See "Fluorescent Lamp" or "Interior Light" on
Features Section.
* No electric current is reaching the
appliance.
* See "appliance Does Not Run".
7/30/2019 Frigidaire Refrigerator Manual
http://slidepdf.com/reader/full/frigidaire-refrigerator-manual 9/9
9
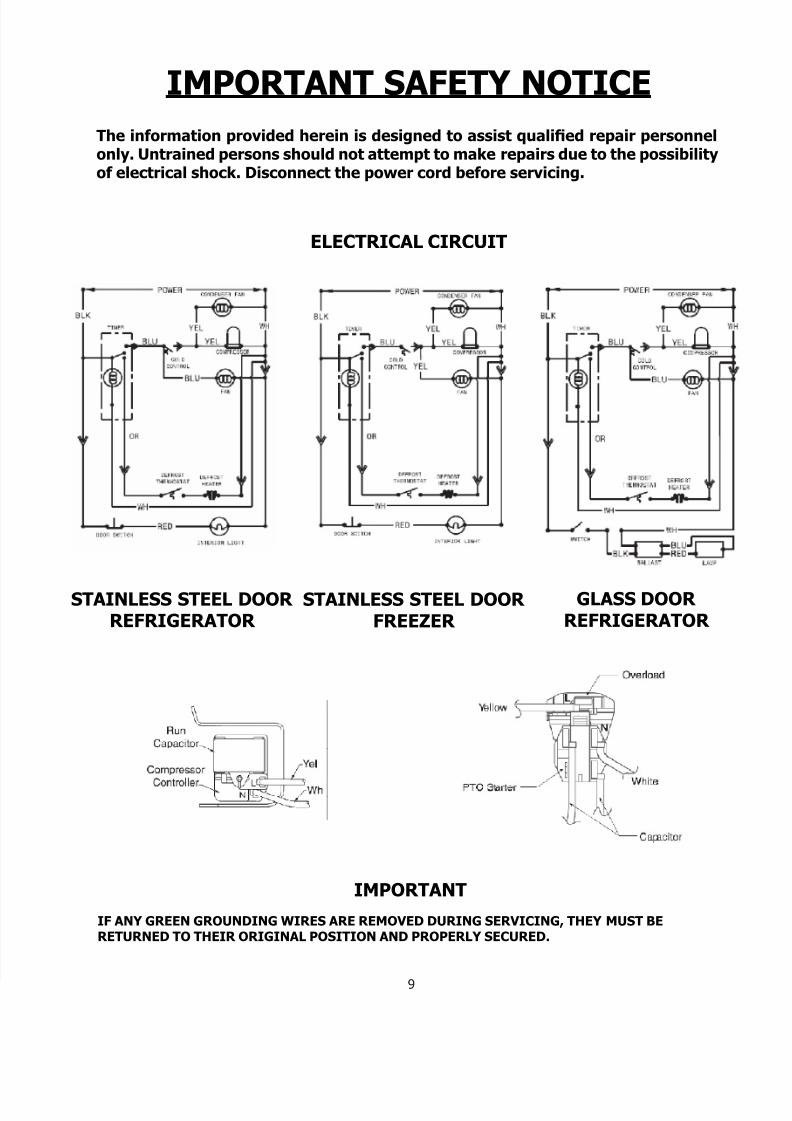
IMPORTANT SAFETY NOTICE
The information provided herein is designed to assist qualied repair personnelonly. Untrained persons should not attempt to make repairs due to the possibilityof electrical shock. Disconnect the power cord before servicing.
IMPORTANT
IF ANY GREEN GROUNDING WIRES ARE REMOVED DURING SERVICING, THEY MUST BERETURNED TO THEIR ORIGINAL POSITION AND PROPERLY SECURED.
ELECTRICAL CIRCUIT
STAINLESS STEEL DOOR REFRIGERATOR
STAINLESS STEEL DOOR FREEZER
GLASS DOOR REFRIGERATOR